

Page 1

návod k použití
user manual
benutzerinformation
istruzioni per l’uso
Chladnička s mrazničkou
Fridge-Freezer
Kühl-/Gefrierschrank
Frigorifero-Congelatore
ERN29801
Page 2
2 electrolux
Electrolux. Thinking of you.
Více o nás naleznete na adrese www.electrolux.com
OBSAH
Bezpečnostní informace 2
Ovládací panel 4
Při prvním použití 6
Denní používání 6
Užitečné rady a tipy 8
BEZPEČNOSTNÍ INFORMACE
V zájmu své bezpečnosti a správného chodu spotřebiče si před jeho instalací a prvním
použitím pozorně Přečtěte návod k použití
včetně rad a upozornění. K ochraně před
nežádoucími omyly a nehodami je důležité,
aby se všechny osoby, které budou používat tento spotřebič, seznámily s jeho provozem a bezpečnostními funkcemi. Tyto pokyny uschovejte a zajistěte, aby zůstaly u
spotřebiče i v případě jeho přestěhování na
jiné místo nebo prodeje dalším osobám,
aby se tak všichni uživatelé po celou dobu
životnosti spotřebiče mohli řádně informovat o jeho používání a bezpečnosti.
Dodržujte pokyny uvedené v tomto návodu
k použití, abyste neohrozili své zdraví a majetek, a uvědomte si, že výrobce neručí za
úrazy a poškození způsobené jejich nedodržením.
Bezpečnost dětí a hendikepovaných
osob
•Tento spotřebič nesmějí používat osoby
etně dětí) se sníženými fyzickými,
(vč
smyslovými nebo duševními schopnostmi, nebo bez patřičných zkušeností a
znalostí, pokud je nesledují osoby odpovědné za jejich bezpečnost, nebo jim nedávají příslušné pokyny k použití
spotřebiče.
Na děti je třeba dohlédnout, aby si se
spotřebičem nehrály.
• Všechny obaly uschovejte z dosahu dětí.
Hrozí nebezpečí udušení.
• Jestliže likvidujete starý spotřebič, vytáh-
něte zástrčku ze zásuvky, odřízněte napájecí kabel (co nejblíže u spotřebiče) a
odstraňte dveře, aby nedošlo k úrazu dětí
elektrickým proudem, nebo se děti nemohly zavřít uvnitř.
Čištění a údržba 9
Co dělat, když... 10
Technické údaje 12
Instalace 13
Poznámky k životnímu prostředí 17
Zmĕny vyhrazeny
• Jestliže je tento spotřebič vybaven magnetickým těsněním dveří a nahrazuje starší spotřebič s pružinovým zámkem (západkou) na dveřích nebo víku, nezapomeňte před likvidací pružinový zámek
znehodnotit. Děti se pak nemohou ve
spotřebiči zavřít jako ve smrtelně nebezpečné pasti.
Všeobecné bezpečnostní informace
Pozor Udržujte větrací otvory volně
průchodné.
•Tento spotřebič je určen k uchovávání
potravin nebo nápojů v běžné domácnosti, jak je uvedeno v návodu k použití.
• K urychlení odmrazování nepoužívejte
mechanické nebo jiné pomocné
prostředky.
• V prostoru chladicích spotřebičů nepoužívejte jiné elektrické přístroje (např.
zmrzlinové strojky) než typy schválené k
tomuto účelu výrobcem.
• Nepoškozujte okruh chladicí kapaliny.
• Chladivo isobutan (R600a), které je obsaženo v chladicím okruhu spotřebiče, je
přírodní plyn, který je dobře snášen životním prostředím, ale je hořlavý.
Během přepravy a instalace spotřebiče
dbejte na to, aby nedošlo k poškození
žádné části chladicího okruhu.
Pokud dojde k poškození chladicího
okruhu,
– nepoužívejte v blízkosti spotřebiče
otevřený oheň a jiné zápalné zdroje;
–důkladně vyvětrejte místnost, ve které
je spotřebič umístěný.
•Změna technických parametrů nebo ja-
kákoli jiná úprava spot
pečná. Jakékoli poškození kabelu může
řebiče je nebez-
Page 3

electrolux 3
způsobit zkrat, požár nebo úraz elektrickým proudem.
Upozornění Elektrické díly (napájecí
kabel, zástrčka, kompresor) smí vymě-
nit pouze autorizovaný zástupce nebo
kvalifikovaný pracovník servisu.
1. Napájecí kabel se nesmí nastavovat.
2. Zkontrolujte, zda není zástrčka stlače-
ná nebo poškozená zadní stranou
spotřebiče. Stlačená nebo poškozená
zástrčka se může přehřát a způsobit
požár.
3. Dbejte na to, aby byla zástrčka
spotřebiče dobře přístupná.
4. Netahejte za napájecí kabel.
5. Pokud je síťová zásuvka uvolněná,
nezasunujte do ní zástrčku. Hrozí nebezpečí úrazu elektrickým proudem
nebo požáru.
6. Spotřebič nesmí být spuštěn bez kry-
1)
tu žárovky
vnitřního osvětlení.
•Tento spotřebič je těžký. Při přemísťování
spotřebiče buďte proto opatrní.
• Nevytahujte věci z mrazničky, ani se jich
nedotýkejte, máte-li vlhké nebo mokré ruce, protože byste si mohli způsobit
odřeniny nebo omrzliny.
•Spotřebič nesmí být dlouhodobě vysta-
ven přímému slunečnímu záření.
•
Žárovky
2)
použité v tomto spotřebiči jsou
určené pouze pro použití v domácích
spotřebičích. Tyto žárovky nejsou vhodné
pro osvětlení místností.
Denní používání
•Ve spotřebiči nestavte horké nádoby na
plastové části spotřebiče.
•Neskladujte v něm hořlavý plyn nebo te-
kutiny, protože by mohly vybuchnout.
• Potraviny neukládejte přímo na větrací otvory v zadní stěně.
3)
• Zmrazené potraviny se nesmí po rozmrznutí znovu zmrazovat.
•Zakoupené zmrazené potraviny skladujte
podle pokynů daného výrobce.
• Pokyny výrobce spotřebiče týkající se
uchování potravin je nutné přísně dodržovat. Řiďte se příslušnými pokyny.
• Do mrazicího oddílu nevkládejte nápoje s
vysokým obsahem kysličníku uhličitého
nebo nápoje s bublinkami, protože vytvářejí tlak na nádobu, a mohou dokonce
vybuchnout a poškodit spotřebič.
• Nejezte zmrzlinu ihned po vyjmutí z mrazničky, hrozí nebezpečí popálení.
Čištění a údržba
•Před čištěním nebo údržbou vždy
spotřebič vypněte a vytáhněte síťovou
zástrčku ze sítě. Jestliže nemůžete vytáhnout zástrčku, přerušte přívod proudu.
•Nečistěte spotřebič kovovými předměty.
•K odstranění námrazy nepoužívejte ostré
ěty. Použijte plastovou škrabku.
předm
•Pravidelně kontrolujte a čistěte odtokový
otvor na rozmrazenou vodu. Je-li zanesený, uvolněte ho. Jestliže je otvor ucpaný,
rozlije se voda na dno chladničky.
Instalace
Důležité U elektrického připojení se pečlivě
řiďte pokyny uvedenými v příslušných
odstavcích.
•Vybalte spotřebič a zkontrolujte, zda není
poškozený. Je-li spotřebič poškozený,
nezapojujte ho do sítě. Případné poškození okamžitě nahlaste prodejci, u kterého jste spotřebič koupili. V tomto případě
si uschovejte obal.
•Doporučujeme vám, abyste se zapojením
spotřebiče počkali nejméně čtyři hodiny,
aby olej mohl natéct zpět do kompresoru.
•Okolo spotřebiče musí být dostatečná
cirkulace vzduchu, jinak by se přehříval. K
dosažení dostatečného větrání se řiďte
pokyny k instalaci.
•Pokud je to možné, měl by spotřebič stát
zadní stranou ke stěně, aby byly jeho
horké části nepřístupné (kompresor, kondenzátor), a nemohli jste o ně zachytit
nebo se spálit.
•Spotřebič nesmí být umístěn v blízkosti
radiátorů nebo sporáků.
• Zkontrolujte, zda je zástrčka po instalaci
spotřebiče přístupná.
1) Pokud je spotřebič vybaven krytem žárovky.
2) Pokud je spotřebič vybaven osvětlením.
3) Pokud je spotřebič beznámrazový.
Page 4
4 electrolux
•Spotřebič připojte výhradně k přívodu pit-
né vody.
4)
Servis
• Jakékoliv elektrikářské práce, nutné pro
zapojení tohoto spotřebiče, smí provádět
pouze kvalifikovaný elektrikář nebo osoba
s příslušným oprávněním.
• Pokud je spotřebič nutné opravit, obraťte
se na autorizované servisní středisko,
které smí použít výhradně originální náhradní díly.
chladicím okruhu, ani v izolačních materiálech. Spotřebič nelikvidujte společ-
ně s domácím odpadem a smetím. Izolační pěna obsahuje hořlavé plyny:
spotřebič je nutné zlikvidovat podle
příslušných předpisů, které získáte na
obecním úřadě. Zabraňte poškození
chladicí jednotky, hlavně vzadu v blízkosti výměníku tepla. Materiály použité
u tohoto spotřebiče označené symbo-
jsou recyklovatelné.
lem
Ochrana životního prostředí
Tento přístroj neobsahuje plyny, které
mohou poškodit ozónovou vrstvu, ani v
OVLÁDACÍ PANEL
MODE˚C
123 4 5 6
1 Vypínač ZAP/VYP
2 Regulátor teploty mrazničky
3 Tlačítko ukazatele teploty chladničky s
mrazničkou
4 Displej
5 Tlačítko Funkce
Spínač resetu poplachu
6 Regulátor teploty chladničky
Displej
1 2 3 4 5 8 7 6
1 Ukazatel chladicího oddílu
2 Ukazatel mrazicího oddílu
3 Ukazatel kladné nebo záporné teploty
4 Kontrolka teploty
5 Funkce Action Freeze
6 Funkce Shopping
7 Funkce Minidac
8 Funkce Performance Optimization
4) Pokud je spotřebič vybaven vodovodní přípojkou.
Zapnutí
Jestliže se po zasunutí zástrčky do zásuvky
displej nerozsvítí, stiskněte vypínač ZAP/
VYP.
Jakmile je spotřebič zapnutý, na ovládacím
panelu se objeví následující signály:
• Ukazatel pozitivní nebo negativní teploty
bude pozitivní a označuje tedy teplotu
nad nulou.
• Teplota bliká, pozadí displeje je červené a
uslyšíte zvukový signál.
Page 5

electrolux 5
Stiskněte tlačítko Funkce a zvukový signál
se vypne (viz také část "Poplach nadměrné
teploty") .
Nastavte požadovanou teplotu (viz "Regulace teploty").
Vypnutí
Spotřebič se vypíná stisknutím vypínače
ZAP/VYP na více než 1 vteřinu.
Poté se zobrazí odpočítávání teploty -3 -2
-1.
Jestliže je spotřebič vypnutý, displej se také
vypne.
Ukazatel teploty
Po každém stisknutí tlačítka ukazatele teploty chladničky s mrazničkou se na displeji
zobrazí v následujícím pořadí:
1. – Ukazatel chladicího oddílu je zapnutý.
– Na displeji je teplota chladničky.
2. – Ukazatel mrazicího oddílu je zapnutý.
5)
– Na displeji je teplota mrazničky.
V každém případě se za 10 vteřin obnoví
normální stav displeje.
Nabídka funkcí
Po každém stisknutí tlačítka Funkce se postupně směrem doprava aktivují následující
funkce:
• Funkce Action Freeze
• Funkce Shopping
• Funkce Minidac
• Funkce Performance Optimization
• Žádný symbol: běžný provoz.
Důležité Můžete ZAPNOUT vždy pouze
jednu funkci.
Chcete-li funkce VYPNOUT, stiskněte ně-
kolikrát tlačítko Funkce, až všechny ikony
zmizí.
Regulace teploty
Teplota ve spotřebiči se reguluje ovladačem
teploty umístěným nahoře ve spotřebiči.
Teplotu chladicího oddílu lze regulovat otáčením regulátoru teploty chladničky a může se lišit v rozmezí od +2°C do +8°C.
Teplotu mrazicího oddílu lze regulovat otáčením regulátoru teploty mrazničky a může se lišit v rozmezí od -15°C do -24°C.
Při otáčení regulátoru teploty displej bliká a
ukazuje požadovanou teplotu.
5) V normálních podmínkách.
Pro správné uložení potravin nastavte následující teploty:
+5°C v chladničce
-18°C v mrazničce.
Pokud po nastavení požadované teploty
neotočíte regulátorem teploty do 5 vteřin,
zobrazí se teplota mrazicího oddílu.
Chcete-li spotřebič nastavit, postupujte takto:
te regulátorem teploty směrem do-
•otoč
prava, chcete-li dosáhnout maximálního
chladu
•otočte regulátorem teploty směrem dole-
va, chcete-li dosáhnout minimálního chladu.
Obvykle je nejvhodnější střední poloha.
Při hledání přesného nastavení mějte na paměti, že teplota uvnitř spotřebiče závisí na:
•teplotě místnosti
• četnosti otevření dveří
• množství vložených potravin
•umístění spotřebiče.
Funkce Action Freeze
Funkce Performance optimization se zapíná
stisknutím tlačítka Funkce (popřípadě něko-
likrát), až se objeví příslušná ikona
.
Nyní se automaticky nastaví zvolené teploty
pro nejlepší uchování potravin, a dokud je
tato funkce zapnutá, není možné provést
tlačítky žádnou změnu.
Funkci můžete kdykoli vypnout stisknutím
tlačítka Funkce (viz "Zapnutí funkcí") .
Funkce Shopping
Potřebujete-li uložit do velké množství teplých potravin, například po nákupu, doporučujeme zapnout funkci Shopping, aby se
potraviny rychleji zchladily a nezahřály další
potraviny, které jsou už v chladničce.
Funkce Shopping se zapíná stisknutím tlačítka Funkce (popřípadě několikrát), až se
objeví příslušná ikona
.
Funkce Shopping se automaticky vypne asi
za 6 hodin.
Během funkce Shopping se uvnitř chladicího oddílu automaticky aktivuje i ventilátor.
Důležité Ventilátor uvnitř chladicího oddílu
se také automaticky zapne, jestliže je
teplota místnosti příliš vysoká (nad 38°C), i
když není zapnutá funkce Shopping.
Page 6

6 electrolux
Funkci je možné kdykoli vypnout stisknutím
tlačítka Funkce (viz "Nabídka funkcí").
Funkce Action Freeze
Chcete-li zmrazovat čerstvé potraviny, je
nutné zapnout funkci Action Freeze. Stiskněte tlačítko Funkce (popřípadě několikrát), až se objeví příslušná ikona.
Funkce se automaticky vypne za 52 hodin.
Funkci je možné kdykoli vypnout stisknutím
tlačítka Funkce (viz "Nabídka funkcí").
Poplach vysoké teploty
Zvýšení teploty v oddílu mrazničky
(například z důvodu výpadku proudu) je signalizováno:
• blikající teplotou
• blikáním mrazicího oddílu (ukazatele mrazicího oddílu )
PŘI PRVNÍM POUŽITÍ
Čistění vnitřku spotřebiče
Před prvním použitím spotřebiče vymyjte
vnitřek a všechno vnitřní příslušenství vlažnou vodou s trochou neutrálního mycího
prostředku, abyste odstranili typický pach
nového výrobku, a pak vše důkladně utřete
do sucha.
• červeným osvětlením displeje
• zvukovým signálem
• symbolem poplachu.
Po obnovení normálních podmínek:
• zvukový signál se vypne
• hodnota teploty bude dále blikat
•osvětlení displeje bude stále červené.
Po stisknutí tlačítka Funkce/ spínače resetu
poplachu se na displeji
objeví nejvyšší dosažená teplota v oddílu.
V tomto okamžiku blikání přestane a osvě-
tlení displeje se změní z červené na bílou.
Během fáze poplachu je možné vypnout
zvukový signál stisknutím tlačítka Funkce/
spínače resetu poplachu
Osvětlení displeje zůstane červené, dokud
se neobnoví normální podmínky pro uskladnění potravin.
Důležité Nepoužívejte čisticí prostředky ne-
bo abrazivní prášky, které mohou poškodit
povrch spotřebiče.
na několik vteřin
DENNÍ POUŽÍVÁNÍ
Zmrazování čerstvých potravin
Mrazicí oddíl se hodí pro zmrazování čer-
stvých potravin a dlouhodobé uložení zmrazených a hlubokozmrazených potravin.
Chcete-li zmrazit čerstvé potraviny, zapněte
funkci Action Freeze minimálně 24 hodiny
před uložením zmrazovaných potravin do
mrazicího oddílu.
Potraviny, které chcete zmrazovat, vložte
do horní části mrazničky, kde je její nejchladnější místo.
Maximální množství čerstvých potravin, které je možné zmrazit za 24 hodin, je uvedeno na typovém štítku uvnitř spotřebiče.
Zmrazovací postup trvá 24 hodin: v této
době nevkládejte do spotřebiče žádné další
potraviny ke zmrazení.
Skladování zmrazených potravin
Po prvním spuštění spotřebiče nebo po jeho dlouhodobé odstávce nechte spotřebič
před vložením potravin běžet nejméně 12 h
s nastavením Action Freeze.
Jestliže chcete vložit velké množství potravin, vyjměte ze spotřebiče všechny zásuvky
a koše a položte potraviny na chladicí polici;
potraviny se tak lépe zmrazí.
Upozornění Zkontrolujte, zda
nepřekračujete maximální množství
uvedené na boku horní části (je-li to
uvedeno).
Důležité V případě náhodného rozmrazení,
například z důvodu výpadku proudu, a
pokud výpadek proudu trval delší dobu, než
je uvedeno v tabulce technických údajů, je
nutné rozmrazené potraviny rychle
spotřebovat nebo ihned uvařit či upéct a
potom opět zmrazit (po ochlazení).
Rozmrazování
Hlubokozmrazené nebo zmrazené potraviny
je možné před použitím rozmrazit v chladničce nebo při pokojové teplotě, podle toho, kolik máte času.
Page 7

Malé kousky lze dokonce připravit ještě
zmrazené, přímo z mrazničky: čas přípravy
bude ale v tomto případě delší.
Akumulátory chladu
Mraznička obsahuje nejméně jeden akumulátor chladu, který prodlužuje dobu uchování potravin v případě výpadku proudu nebo
poruchy.
Výroba ledových kostek
Spotřebič je vybaven jednou nebo více nádobkami pro výrobu ledových kostek. Naplňte je vodou, a pak je vložte do mraznič-
ky.
Důležité K vyjmutí nádobek z mrazničky
nepoužívejte kovové nástroje.
Přemístitelné police
Na stěnách chladničky jsou kolejničky, do
kterých se podle přání zasunují police.
K lepšímu využití prostoru mohou přední
poloviční police ležet na zadních policích.
electrolux 7
Regulace vlhkosti
Ve skleněné polici jsou štěrbiny (nastavitelné posuvnou páčkou), které umožňují regulaci teploty v zásuvce nebo zásuvkách na
zeleninu.
Se zavřenými větracími otvory:
se přirozená vlhkost potravin v zásuvkách
na ovoce a zeleninu uchová po delší dobu.
S otevřenými větracími otvory:
dochází k větší cirkulaci vzduchu a tedy snížení vlhkosti vzduchu v potravinách v zásuvkách na ovoce a zeleninu.
Umístění dveřních poliček
Dveřní poličky můžete umístit do různé výšky a vkládat tak do nich různě velká balení
potravin.
Postupujte následovně:
pomalu posunujte polici ve směru šipek, až
se uvolní, a pak ji zasuňte do zvolené polohy.
Recyklace vzduchu
Chladicí oddíl je vybaven speciálním ventilátorem DAC (Dynamické chlazení vzduchem).
Tento systém umožňuje rychlé zchlazení
potravin a udržení rovnoměrnější teploty
uvnitř oddílu.
Page 8
8 electrolux
Zapněte ventilátor stisknutím tlačítka Funkce (popřípadě několikrát), dokud se neobje-
ví příslušná ikona
Pokud je teplota prostředí nad 25 °C, zapněte ventilátor.
Jestliže je teplota místnosti vyšší než 38 °C,
nebo je zapnutá funkce Shopping, ventilátor
je automaticky zapnutý.
Ventilátor je možné kdykoli vypnout stisknutím tlačítka Funkce, dokud příslušná ikona
nezmizí.
.
UŽITEČNÉ RADY A TIPY
Tipy pro úsporu energie
•Neotvírejte často dveře, ani je nenechá-
vejte otevřené déle, než je nezbytně nutné.
• Jestliže je okolní teplota vysoká, regulátor
teploty je na vyšším nastavení a spotřebič
je zcela zaplněný, může kompresor běžet
nepřetržitě a na výparníku se pak tvoří
námraza nebo led. V tomto případě je
nutné nastavit regulátor teploty na nižší
nastavení, aby se spotřebič automaticky
odmrazil, a tím snížil spotřebu energie.
Tipy pro chlazení čerstvých potravin
K dosažení nejlepšího výkonu:
•do chladničky nevkládejte teplé potraviny
nebo tekutiny, které se odpařují;
• potraviny zakrývejte nebo je zabalujte, zejména mají-li silnou vůni;
• potraviny položte tak, aby okolo nich mohl proudit volně vzduch.
Tipy pro chlazení
Užitečné rady:
Maso (všechny druhy): zabalte do polyetylénového sáčku a položte na skleněnou polici
nad zásuvku se zeleninou.
Z hlediska bezpečné konzumace takto skladujte maso pouze jeden nebo dva dny.
Vařená jídla, studená jídla apod.: můžete
zakrýt a položit na jakoukoli polici.
Ovoce a zelenina: musí být důkladně oči-
štěné, vložte je do speciální zásuvky (nebo
zásuvek), které jsou součástí vybavení.
Máslo a sýr: musí být ve speciální vzducho-
ěsné nádobě nebo zabalené do hliníkové
t
fólie či do polyetylénového sáčku, aby k nim
měl vzduch co nejméně přístup.
Láhve s mlékem: musí být uzavřeny víčkem
a uloženy v držáku na láhve ve dveřích.
Banány, brambory, cibule a česnek smí být
v chladničce pouze tehdy, jsou-li zabalené.
Tipy pro zmrazování potravin
K dosažení dokonalého zmrazovacího procesu dodržujte následující důležité rady:
• maximální množství potravin, které je možné zmrazit za 24 hodin je uvedeno na typovém štítku;
• zmrazovací postup trvá 24 hodin. V této
době nepřidávejte žádné další potraviny
ke zmrazení;
• zmrazujte pouze potraviny prvotřídní kvality, čerstvé a dokonale čisté;
•připravte potraviny v malých porcích, aby
se mohly rychle a zcela zmrazit, a bylo
pak možné rozmrazit pouze požadované
množství;
• zabalte potraviny do alobalu nebo polyetylénu a přesvědčte se, že jsou balíčky
vzduchotěsné;
• čerstvé, nezmrazené potraviny se nesmí
dotýkat již zmrazených potravin, protože
by zvýšily jejich teplotu;
• libové potraviny vydrží uložené déle a v
lepším stavu, než tučné; sůl zkracuje délku bezpečného skladování potravin;
• vodové zmrzliny mohou při konzumaci
okamžitě po vyjmutí z mrazicího oddílu
způsobit popáleniny v ústech;
•doporu
čujeme napsat na každý balíček
viditelně datum uskladnění, abyste mohli
správně dodržet dobu uchování potravin.
Page 9
electrolux 9
Tipy pro skladování zmrazených
potravin
K dosažení nejlepšího výkonu zakoupeného
spotřebiče dodržujte následující podmínky:
•vždy si při nákupu ověřte, že zakoupené
zmrazené potraviny byly prodejcem
správně skladované;
• zajistěte, aby zmrazené potraviny byly z
obchodu přineseny v co nejkratším možném čase;
ČIŠTĚNÍ A ÚDRŽBA
Pozor Před každou údržbou vytáhněte
zástrčku spotřebiče ze zdroje
elektrického napájení.
Tento spotřebič obsahuje uhlovodíky v
chladicí jednotce; údržbu a doplňování
smí proto provádět pouze autorizovaný
pracovník.
Pravidelné čištění
Spotřebič je nutné pravidelně čistit:
•vnitřek a všechno vnitřní příslušenství
omyjte vlažnou vodou s trochou neutrálního mycího prostředku;
•pravidelně kontrolujte těsnění dvířek a ot-
írejte je, aby bylo čisté, bez usazených
nečistot;
•důkladně vše opláchněte a osušte.
Důležité Nehýbejte s žádnými trubkami
nebo kabely uvnitř spotřebiče, netahejte za
ně a nepoškozujte je.
Nikdy nepoužívejte k čištění vnitřku
spotřebiče abrazivní prášky, vysoce parfémované čisticí prostředky nebo vosková le-
štidla, protože mohou poškodit povrch a
zanechat silný pach.
Kondenzátor (černá mřížka) a kompresor na
zadní straně spotřebi
nebo vysavačem. Tím se zlepší výkon
spotřebiče a sníží spotřeba energie.
Důležité Dbejte na to, abyste nepoškodili
chladicí systém.
Řada prostředků na čistění povrchů v kuchyni obsahuje chemikálie, které mohou
poškodit umělou hmotu použitou v tomto
spotřebiči. Doporučujeme proto čistit po-
vrch spotřebiče pouze teplou vodou s tro-
če čistěte kartáčem
• neotvírejte často dveře, ani je nenechá-
vejte otevřené déle, než je nezbytně nutné;
• již rozmrazené potraviny se rychle kazí a
nesmí se znovu zmrazovat;
•nepřekračujte dobu skladování uvedenou
výrobcem na obalu.
chou tekutého mycího prostředku na nádobí.
Po čištění znovu připojte spotřebič k elektrické síti.
Odmrazování chladničky
Během normálního používání se námraza
automaticky odstraňuje z výparníku chladicího oddílu při každém zastavení motoru
kompresoru. Rozmrazená voda vytéká
žlábkem do speciální nádoby na zadní straně spotřebiče nad motorem kompresoru,
kde se odpařuje.
Odtokový otvor pro rozmrazenou vodu, který se nachází uprostřed žlábku v chladicím
oddíle, se musí pravidelně čistit, aby voda
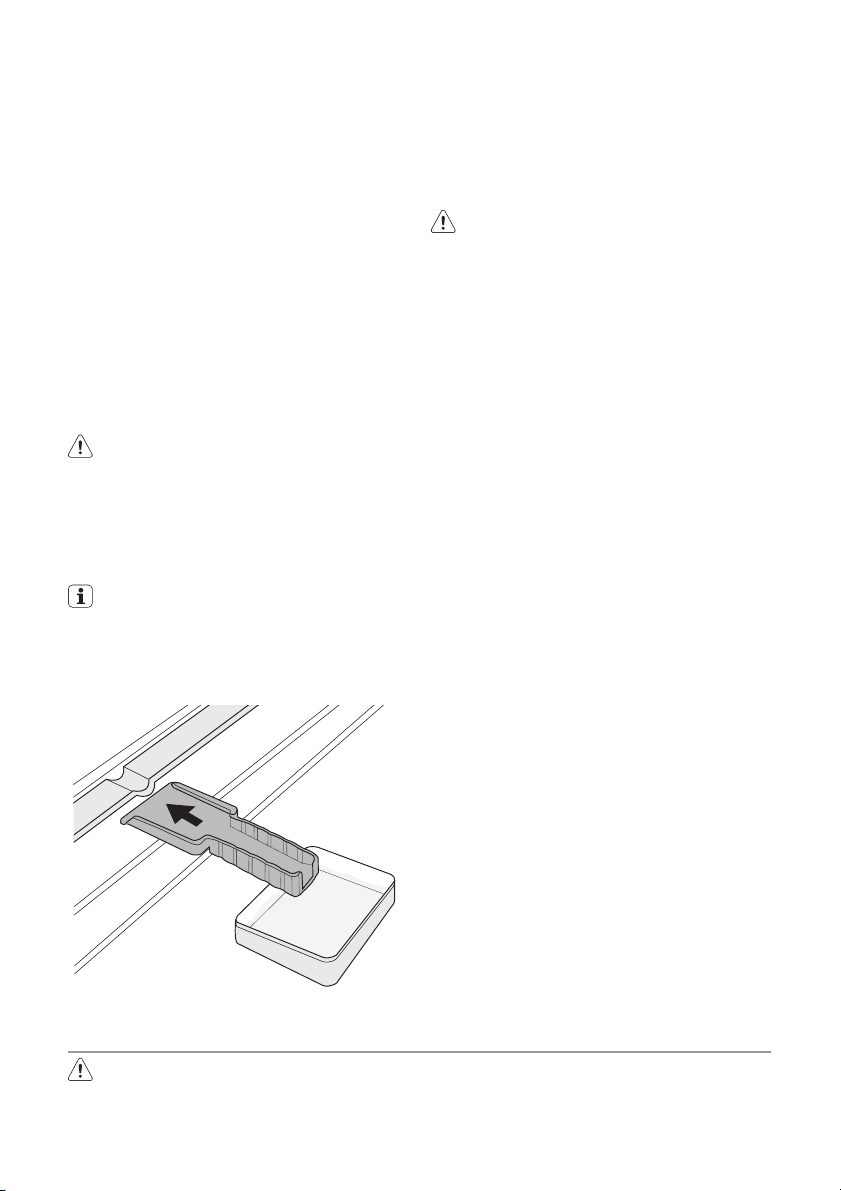
nemohla přetéct na uložené potraviny. Používejte speciální čisticí nástroj, který najdete
již zasunutý do odtokového otvoru.
Page 10
10 electrolux
Odmrazování mrazničky
Na policích mrazničky a okolo horního oddí-
lu se vždy bude tvořit určité množství ná-
mrazy.
Mrazničku odmrazujte, když vrstva námrazy
dosáhne tloušťky kolem 3-5 mm.
Důležité Asi 12 h před rozmrazováním
nastavte regulátor teploty na vyšší
nastavení, aby se vytvořila dostatečná
zásoba chladu pro případ přerušení
postupu.
Námrazu odstraňte takto:
1. Vypněte spotřebič.
2. Vyjměte všechny zmrazené potraviny,
zabalte je do několika vrstev novin a dejte je na chladné místo.
Pozor Nedotýkejte se zmrazených
potravin vlhkýma rukama. Ruce by vám
mohly k potravinám přimrznout.
3. Nechte dveře otevřené, plastovou
škrabku vložte do určeného místa dole
uprostřed a pod ní dejte misku na rozmrazenou vodu.
Chcete-li urychlit odmrazování, postavte do mrazicího oddílu hrnek s teplou
vodou. Odstraňujte také kusy ledu, které odpadnou ještě před dokončením
odmrazení.
4. Po skončení odmrazování vysušte dů-
kladně vnitřní prostor a škrabku uschovejte pro další použití.
5. Zapněte spotřebič.
6. Po dvou nebo třech hodinách uložte vyjmuté potraviny zpět do oddělení.
Upozornění Nikdy při odstraňování
námrazy z výparníku nepoužívejte ostré
kovové nástroje, mohli byste ho
poškodit.
K urychlení odmrazování nepoužívejte
mechanické nebo jiné pomocné
prostředky, které nejsou výrobcem doporučeny.
Zvýšení teploty během odmrazování
může u zmrazených potravin zkrátit dobu jejich skladování.
Vyřazení spotřebiče z provozu
Jestliže spotřebič nebudete po dlouhou dobu používat, proveďte následná opatření:
• odpojte spotřebič od sítě
•vyjměte všechny potraviny
•
odmrazte
6)
a vyčistěte spotřebič a vše-
chno příslušenství
• nechte dveře pootevřené, abyste zabránili
vzniku nepříjemných pachů.
Pokud necháte spotřebič zapnutý, požádejte někoho, aby ho občas zkontroloval, zda
se potraviny nekazí, např. z důvodu výpadku proudu.
CO DĚLAT, KDYŽ...
Upozornění Při hledání a odstraňování
závady vytáhněte zástrčku z nástěnné
zásuvky.
6) Pokud je to zapotřebí.
Odstraňování závady, které není uvedeno v tomto návodu, smí provádět
pouze kvalifikovaný elektrikář nebo
osoba s příslušným oprávněním.
Page 11

electrolux 11
Důležité Během normálního používání
vydává spotřebič různé zvuky (kompresor,
chladicí okruh).
Problém Možná příčina Řešení
Spotřebič nefunguje.
Osvětlení nefunguje.
Zástrčka není zasunutá správně
Spotřebič je bez proudu. Zásuv-
Zazní zvukový signál. Příliš vysoká teplota v mraznič-
Osvětlení nefunguje. Osvětlení je v klidovém stavu. Zavřete a otevřete dveře.
Vadná žárovka. Viz "Výměna žárovky".
Kompresor funguje
nepřetržitě.
Dveře nejsou správně zavřené. Viz "Zavření dveří".
Otvírali jste příliš často dveře. Nenechávejte dveře otevřené dé-
Teplota jídla je příliš vysoká. Nechte jídlo vychladnout na poko-
Teplota místnosti je příliš vysoká. Snižte teplotu místnosti.
Po vnitřní zadní stěně
chladničky stéká voda.
V chladničce teče voda.
Vložené potraviny brání odtoku
Na podlahu teče voda. Vývod rozmrazené vody neústí
Teplota spotřebiče je
příliš nízká.
Teplota ve spotřebiči je
příliš vysoká.
Dveře nejsou správně zavřené. Viz "Zavření dveří".
Teplota jídla je příliš vysoká. Nechte jídlo vychladnout na poko-
Vložili jste příliš velké množství
Teplota v chladničce je
příliš vysoká.
Příliš vysoká teplota v
mrazničce.
Spotřebič je vypnutý. Zapněte spotřebič.
do zásuvky.
ka není pod proudem.
ce.
Není správně nastavená teplota. Nastavte vyšší teplotu.
Během automatického odmrazování se na zadní stěně rozmrazuje námraza.
Odtokový otvor je ucpaný. Vyčistěte odtokový otvor.
vody do odtokového otvoru.
do misky nad kompresorem.
Regulátor teploty není správně
nastavený.
Regulátor teploty není správně
nastavený.
potravin najednou.
Ve spotřebiči neobíhá chladný
vzduch.
Potraviny jsou položeny příliš
těsně u sebe.
Zástrčku zasuňte správně do zásuvky.
Zasuňte do zásuvky zástrčku jiného elektrického spotřebiče.
Obraťte se na kvalifikovaného
elektrikáře.
Řiďte se pokyny v části "Poplach
nadměrné teploty"
le, než je nezbytně nutné.
jovou teplotu, a teprve pak ho
vložte do spotřebiče.
Nejde o závadu.
Přemístěte potraviny tak, aby se
nedotýkaly zadní stěny.
Vložte vývod rozmrazené vody do
vypařovací misky.
Nastavte vyšší teplotu.
Nastavte nižší teplotu.
jovou teplotu, a teprve pak ho
vložte do spotřebiče.
Dávejte do spotřebiče raději méně
potravin.
Vždy zkontrolujte, zda ve
spotřebiči může dobře obíhat
chladný vzduch.
Uložte potraviny tak, aby mohl
dobře obíhat chladný vzduch.
Page 12
12 electrolux
Problém Možná příčina Řešení
Příliš mnoho námrazy. Potraviny nejsou správně zaba-
Dveře nejsou správně zavřené. Viz "Zavření dveří".
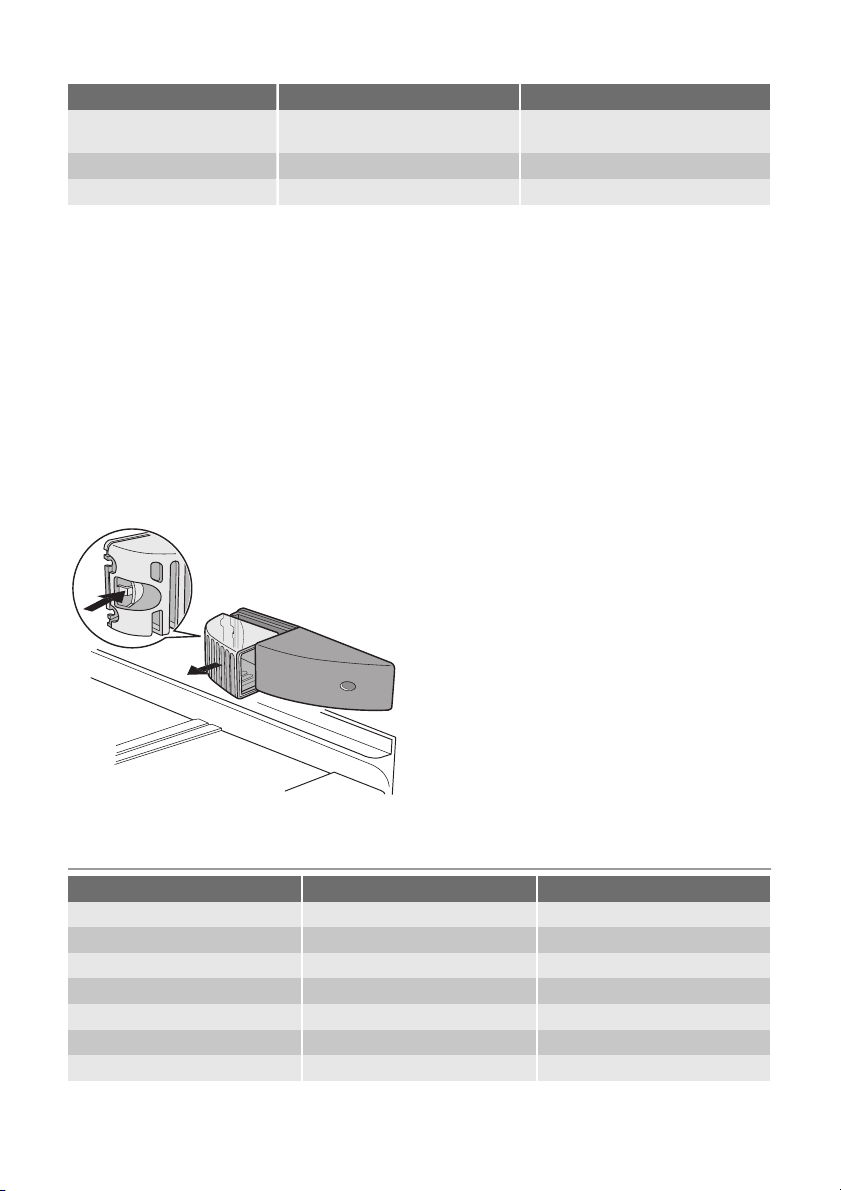
Výměna žárovky
Jestliže chcete výměnit žárovku, postupujte
takto:
1. Vypněte napájení spotřebiče.
2. Stiskněte zadní háček a současně posuňte kryt ve směru označeném šipkou.
3. Vyměňte žárovku za novou o stejném
leny.
Zavření dveří
1. Vyčistěte těsnění dveří.
2. Pokud je to nutné, dveře seřiďte. Řiďte
se pokyny v části "Instalace".
3. V případě potřeby vadné těsnění dveří
vyměňte. Obraťte se na servisní středi-
sko.
Zabalte je správně.
výkonu a určenou pouze pro použití v
domácích spotřebičích. (maximální výkon je zobrazen na krytu žárovky)
4. Kryt žárovky posuňte zpět do původní
polohy.
5. Spotřebič opět připojte k síti.
6. Otevřete dveře a zkontrolujte, zda se žárovka rozsvítí.
TECHNICKÉ ÚDAJE
Rozměry výklenku
Výška 1780 mm
Šířka 560 mm
Hloubka 550 mm
Skladovací čas při poruše 24 h
Napětí 230—240 V
Frekvence 50 Hz
Technické údaje jsou uvedeny na typovém
štítku umístěném na vnitřní levé straně
spotřebiče a na energetickém štítku.
Page 13
INSTALACE
Přečtěte si pečlivě "Bezpečnostní
informace" ještě před instalací k
zajištění bezpečnosti a správného
provozu spotřebiče.
Umístění
Tento spotřebič můžete umístit v suché,
dobře větrané místnosti (garáži nebo ve
sklepě), chcete-li ale dosahovat optimálního
výkonu, instalujte jej tam, kde teplota
prostředí odpovídá klimatické třídě uvedené
na typovém štítku spotřebiče:
Klima-
tická
třída
SN +10°C až + 32°C
N +16°C až + 32°C
ST +16°C až + 38°C
T +16°C až + 43°C
Připojení k elektrické síti
Spotřebič smí být připojen k síti až po
ověření, že napětí a frekvence uvedené na
typovém štítku odpovídají napětí v domácí
síti.
Spotřebič musí být podle zákona uzemněn.
Zástrčka napájecího kabelu je k tomuto
účelu vybavena příslušným kontaktem. Pokud není domácí zásuvka uzemněná, poraďte se s odborníkem a připojte spotřebič
k samostatnému uzemnění v souladu s
platnými předpisy .
Výrobce odmítá veškerou odpovědnost v
případě nedodržení výše uvedených pokynů.
Tento spotřebič je v souladu se směrnicemi
EHS.
Změna směru otvírání dveří
Dveře spotřebiče se otvírají doprava. Chce-
te-li, aby se dveře otvíraly doleva, postupujte takto:
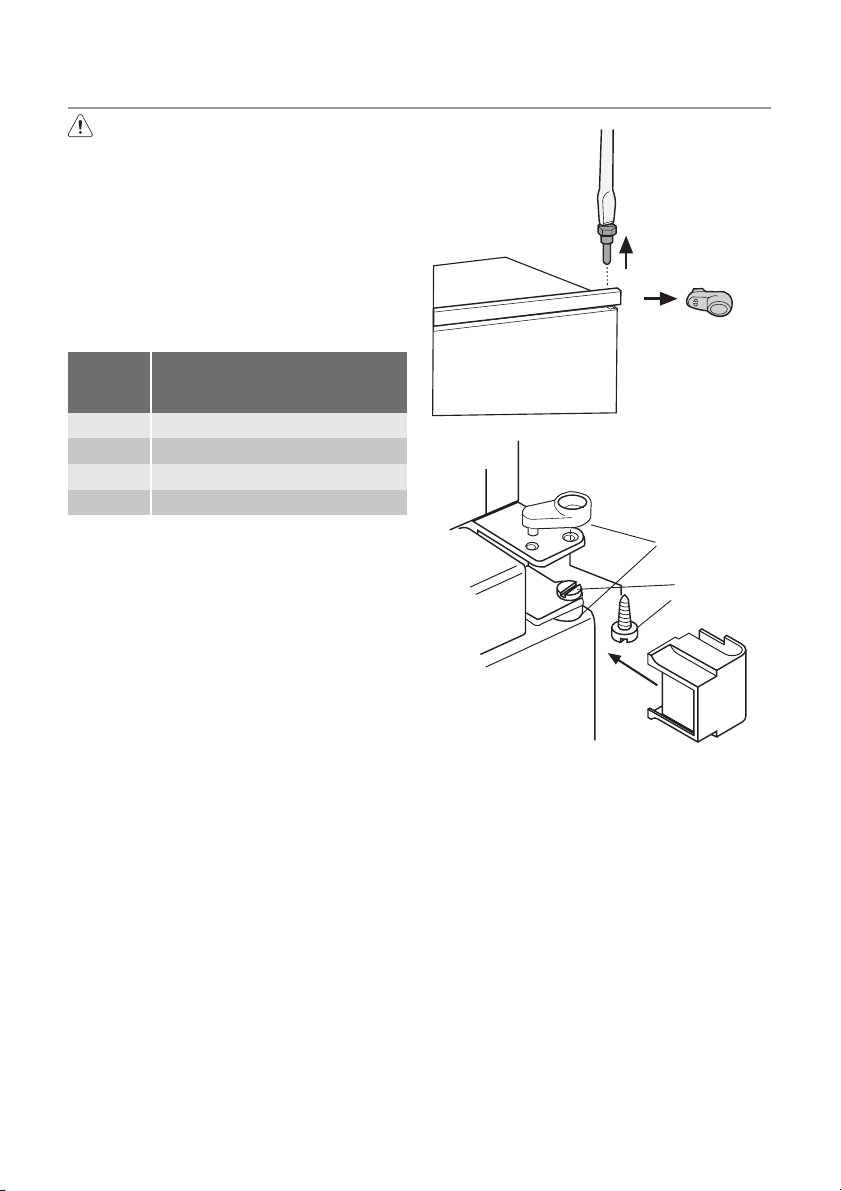
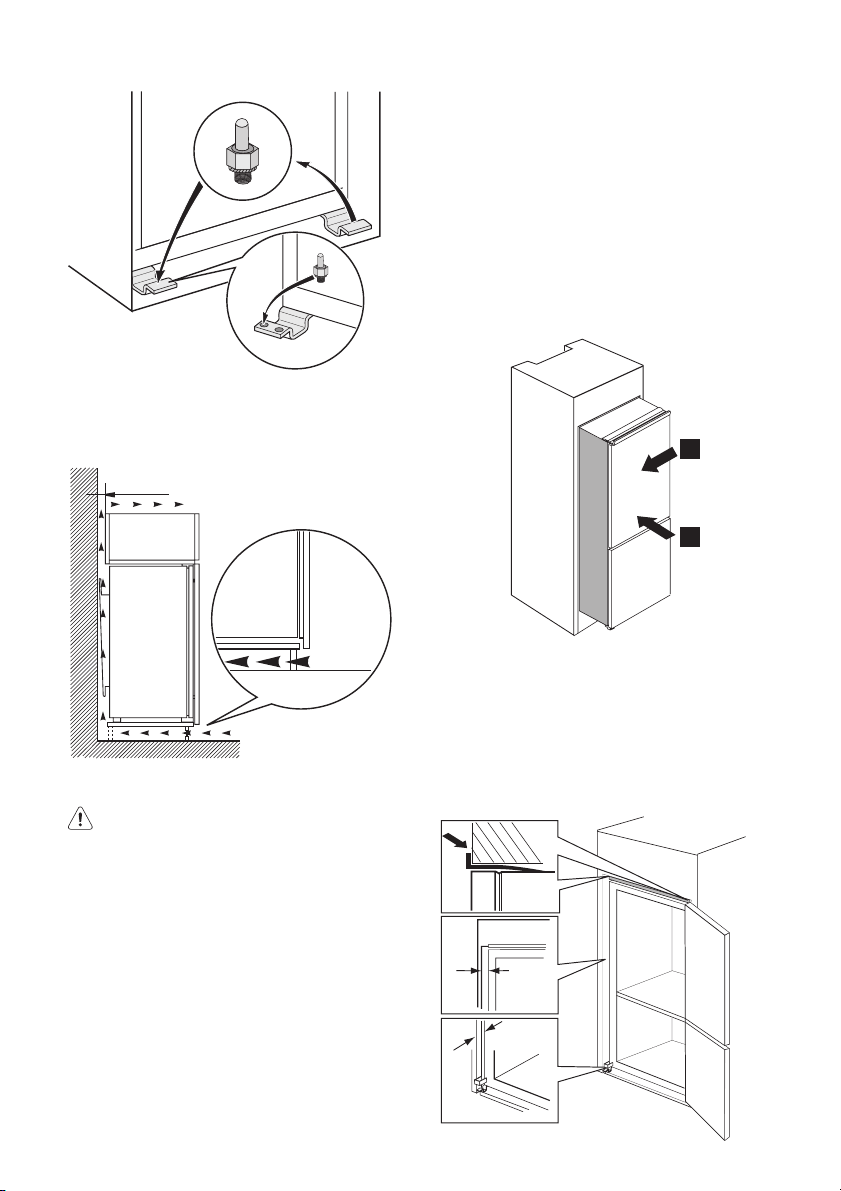
1. Uvolněte horní čep a vyjměte rozpěrku.
2. Odstraňte horní čep a sejm
dveře.
3. Sejměte kryt závěsu (A). Odšroubujte
čepy (B) a rozpěrky (C). Nasaďte kryt
závěsu (A).
4. Vysaďte dolní dveře.
5. Uvolněte dolní čep.
Okolní teplota
ěte horní
electrolux 13
C
B
A
Na opačné straně:
1. Nasaďte dolní čep.
2. Nasaďte dolní dveře.
3. Opět nasaďte čepy (B) a rozpěrky (C) do
prostředního závěsu na opačné straně.
4. Nasaďte horní dveře.
5. Utáhněte rozpěrku a utáhněte horní čep.
Page 14
14 electrolux
Požadavky na větrání
Prostor za spotřebičem musí umožňovat
dostatečné proudění vzduchu.
min.
2
200 cm
1. Zasuňte spotřebič do výklenku.
Pomalu ho posunujte ve směru šipek
(1), až se horní kryt mezery zastaví o
kuchyňskou skříňku. Ověřte si, že je
dodržena vzdálenost 44 mm mezi
spotřebičem a předním okrajem skříň-
ky.
Posuňte spotřebič ve směru šipek (2)
na kuchyňskou skříňku na opačné straně závěsu. Ověřte si, že je dodržena
vzdálenost 4 mm mezi spotřebičem a
skříňkou.
2
1
min.
200 cm
Instalace spotřebiče
Pozor Zkontrolujte, zda můžete s
napájecím kabelem volně pohybovat.
Postupujte následujícím způsobem.
2
2. Vyrovnejte spotřebič ve výklenku.
Kryt dolního závěsu (v sáčku s příslu-
šenstvím) je zárukou správné vzdálenosti mezi spotřebičem a kuchyňskou
skříňkou.
Otevřete dveře. Nasaďte kryt dolního
závěsu.
4mm
44mm
Page 15

electrolux 15
3. Připevněte spotřebič k výklenku 4 šrouby.
I
4. Mezi spotřebič a přilehlou skříňku vtlač-
te těsnicí pásek.
5. Odstraňte správnou část krytu závěsu
(E). Dbejte na to, abyste odstranili část
označenou DX v případě pravého závě-
su, a část SX v případě levého závěsu.
6. Připevněte kryty (C, D) k příchytkám a
otvorům závěsu.
Instalujte větrací mřížku (B).
Připevněte kryty závěsu (E) k závěsu.
C
D
E
E
B
Page 16

16 electrolux
7. Pokud se spotřebič připojuje ke dveřím
kuchyňské skříňky bočně:
a) Uvolněte šrouby v držácích (H).
b) Posuňte držáky (H).
c) Znovu utáhněte šrouby.
8. Oddělte díly Ha, Hb, Hc, Hd
Ha
Hb
9. Instalujte Ha na vnitřní stranu kuchyň-
ské skříňky.
ca. 50 mm
90°
21 mm
90°
ca. 50 mm
10. Nasuňte díl Hc na díl Ha.
21 mm
Ha
Hc
Hc
Hd
Page 17
electrolux 17
11. Otevřete dveře spotřebiče a dveře kuchyňské skříňky na 90°.
Do vodicí lišty (Ha) vložte malý čtvere-
ček (Hb).
Přiložte k sobě dveře spotřebiče a
skříňky a vyznačte otvory.
8 mm
Ha
Hb
12. Odstraňte držáky a vyznačte vzdálenost 8 mm od vnějšího okraje dveří,
kam se připevní hřebík (K).
8 mm
13. Opět umístěte na vodicí lištu malý čtvereček a připevněte ho přiloženými šrouby.
Vyrovnejte dveře spotřebiče a dveře kuchyňské skříňky seřízením dílu Hb.
Hb
14. Přitiskněte díl Hd na díl Hb.
Hb
K
Ha
Na závěr zkontrolujte, zda:
• Jsou všechny šrouby utažené.
• Magnetický těsnicí pásek je připevněný
těsně ke skříni.
POZNÁMKY K ŽIVOTNÍMU PROSTŘEDÍ
Symbol na výrobku nebo jeho balení
udává, že tento výrobek nepatří do
domácího odpadu. Je nutné odvézt ho do
sběrného místa pro recyklaci elektrického a
elektronického zařízení. Zajištěním správné
likvidace tohoto výrobku pomůžete zabránit
negativním důsledkům pro životní prostředí
a lidské zdraví, které by jinak byly
způsobeny nevhodnou likvidací tohoto
výrobku. Podrobnější informace o recyklaci
tohoto výrobku zjistíte u příslušného
místního úřadu, služby pro likvidaci
domovního odpadu nebo v obchodě, kde
jste výrobek zakoupili.
Hd
Page 18
18 electrolux
Electrolux. Thinking of you.
Share more of our thinking at www.electrolux.com
CONTENTS
Safety information 18
Control panel 20
First use 22
Daily use 22
Helpful hints and tips 24
SAFETY INFORMATION
In the interest of your safety and to ensure
the correct use, before installing and first
using the appliance, read this user manual
carefully, including its hints and warnings.
To avoid unnecessary mistakes and accidents, it is important to ensure that all people using the appliance are thoroughly familiar with its operation and safety features.
Save these instructions and make sure that
they remain with the appliance if it is moved
or sold, so that everyone using it through its
life will be properly informed on appliance
use and safety.
For the safety of life and property keep the
precautions of these user's instructions as
the manufacturer is not responsible for
damages caused by omission.
Children and vulnerable people safety
• This appliance is not intended for use by
persons (including children) with reduced
physical, sensory or mental capabilities,
or lack of experience and knowledge, unless they have been given supervision or
instruction concerning use of the appliance by a person responsible for their
safety.
Children should be supervised to ensure
that they do not play with the appliance.
• Keep all packaging well away from children. There is risk of suffocation.
• If you are discarding the appliance pull
the plug out of the socket, cut the connection cable (as close to the appliance
as you can) and remove the door to prevent playing children to suffer electric
shock or to close themselves into it.
• If this appliance featuring magnetic door
seals is to replace an older appliance
having a spring lock (latch) on the door or
Care and cleaning 25
What to do if… 27
Technical data 28
Installation 29
Environmental concerns 33
Subject to change without notice
lid, be sure to make that spring lock unusable before you discard the old appliance. This will prevent it from becoming a
death trap for a child.
General safety
Caution! Keep ventilation openings
clear of obstruction.
• The appliance is intended for keeping
foodstuff and/or beverages in a normal
household as explained in this instruction
booklet.
• Do not use a mechanical device or any
artificial means to speed up the thawing
process.
• Do not use other electrical appliances
(such as ice cream makers) inside of refrigerating appliances, unless they are approved for this purpose by the manufacturer.
• Do not damage the refrigerant circuit.
• The refrigerant isobutane (R600a) is contained within the refrigerant circuit of the
appliance, a natural gas with a high level
of environmental compatibility, which is
nevertheless flammable.
During transportation and installation of
the appliance, be certain that none of the
components of the refrigerant circuit become damaged.
If the refrigerant circuit should become
damaged:
– avoid open flames and sources of igni-
tion
– thoroughly ventilate the room in which
the appliance is situated
• It is dangerous to alter the specifications
or modify this product in any way. Any
Page 19

electrolux 19
damage to the cord may cause a shortcircuit, fire and/or electric shock.
Warning! Any electrical component
(power cord, plug, compressor) must
be replaced by a certified service agent
or qualified service personnel to avoid
hazard.
1. Power cord must not be lengthened.
2. Make sure that the power plug is not
squashed or damaged by the back of
the appliance. A squashed or damaged power plug may overheat and
cause a fire.
3. Make sure that you can come to the
mains plug of the appliance.
4. Do not pull the mains cable.
5. If the power plug socket is loose, do
not insert the power plug. There is a
risk of electric shock or fire.
6. You must not operate the appliance
7)
without the lamp cover
of interior
lighting.
• This appliance is heavy. Care should be
taken when moving it.
• Do not remove nor touch items from the
freezer compartment if your hands are
damp/wet, as this could cause skin abrasions or frost/freezer burns.
• Avoid prolonged exposure of the appliance to direct sunlight.
•
Bulb lamps
8)
used in this appliance are
special purpose lamps selected for
household appliances use only. They are
not suitable for household room illumination.
Daily Use
• Do not put hot pot on the plastic parts in
the appliance.
• Do not store flammable gas and liquid in
the appliance, because they may explode.
• Do not place food products directly
against the air outlet on the rear wall.
9)
• Frozen food must not be re-frozen once
it has been thawed out.
• Store pre-packed frozen food in accordance with the frozen food manufacturer's
instructions.
7) If the lamp cover is foreseen.
8) If the lamp is foreseen.
9) If the appliance is Frost Free.
• Appliance's manufacturers storage recommendations should be strictly adhered
to. Refer to relevant instructions.
• Do not place carbonated or fizzy drinks in
the freezer compartment as it creates
pressure on the container, which may
cause it to explode, resulting in damage
to the appliance.
• Ice lollies can cause frost burns if consumed straight from the appliance.
Care and cleaning
• Before maintenance, switch off the appliance and disconnect the mains plug from
the mains socket.
• Do not clean the appliance with metal
objects.
• Do not use sharp objects to remove frost
from the appliance. Use a plastic scraper.
• Regularly examine the drain in the refrigerator for defrosted water. If necessary,
clean the drain. If the drain is blocked,
water will collect in the bottom of the appliance.
Installation
Important! For electrical connection
carefully follow the instructions given in
specific paragraphs.
• Unpack the appliance and check if there
are damages on it. Do not connect the
appliance if it is damaged. Report possible damages immediately to the place
you bought it. In that case retain packing.
• It is advisable to wait at least four hours
before connecting the appliance to allow
the oil to flow back in the compressor.
• Adequate air circulation should be
around the appliance, lacking this leads
to overheating. To achieve sufficient ventilation follow the instructions relevant to
installation.
• Wherever possible the back of the product should be against a wall to avoid
touching or catching warm parts (compressor, condenser) to prevent possible
burn.
• The appliance must not be located close
to radiators or cookers.
Page 20

20 electrolux
• Make sure that the mains plug is accessible after the installation of the appliance.
•
Connect to potable water supply only.
10)
Service
• Any electrical work required to do the
servicing of the appliance should be carried out by a qualified electrician or competent person.
• This product must be serviced by an authorized Service Centre, and only genuine spare parts must be used.
in either its refrigerant circuit or insulation materials. The appliance shall not
be discarded together with the urban
refuse and rubbish. The insulation foam
contains flammable gases: the appliance shall be disposed according to
the applicable regulations to obtain
from your local authorities. Avoid damaging the cooling unit, especially at the
rear near the heat exchanger. The materials used on this appliance marked
by the symbol
are recyclable.
Environment Protection
This appliance does not contain gasses
which could damage the ozone layer,
CONTROL PANEL
MODE˚C
123 4 5 6
1 ON/OFF switch
2 Freezer temperature regulator
3 Fridge-Freezer temperature indication
button
4 Display
5 Function button
Alarm reset switch
6 Fridge temperature regulator
Display
1 2 3 4 5 8 7 6
1 Fridge compartment indicator
2 Freezer compartment indicator
3 Positive or negative temperature indica-
tor
4 Temperature indicator
5 Action Freeze function
6 Shopping function
7 Minidac function
8 Performance Optimization function
10) If a water connection is foreseen.
Switching on
After plugging the plug into the power outlet, if the display is not illuminated, press
ON/OFF switch.
As soon as the appliance is turned on, the
following signals will appear on the control
panel:
• Positive or negative temperature indicator
will be positive, indicating that the temperature is positive
• the temperature flashes, the background
of the display is red and you will hear a
buzzer.
Page 21

electrolux 21
Press Function button and the buzzer will
go off (also refer to "Excessive temperature
alarm" ) .
Set the desired temperature (refer to "Temperature regulation").
Switching off
The appliance is shut off by pressing ON/
OFF switch for more than 1 second.
After this, a countdown of the temperature
from -3 -2 -1 will be shown.
When the appliance is switched off, Display
also goes off.
Temperature Indication
Each time the Fridge-Freezer temperature
indication button is pressed, the display indicates in sequence:
1. – The Fridge compartment indicator is
on.
– The display indicates the fridge tem-
perature.
2. – The Freezer compartment indicator is
11)
on.
– The display indicates the freezer tem-
perature.
In any case, after 10 seconds normal display conditions are restored.
Functions menu
Each time Function button is pressed, the
following functions are activated in a clockwise direction:
• Action Freeze function
• Shopping function
• Minidac function
• Performance Optimization function
• no symbol: normal operation.
Important! You can set one function ON at
a time.
To set the functions OFF, press the Function button several times until no icon appears.
Temperature regulation
The temperature within the appliance is
controlled by the Temperature regulator situated at the top of the appliance.
The temperature of the fridge compartment
may be regulated by rotating the Fridge
temperature regulator, and may vary between more or less +2°C and +8°C.
11) In normal conditions.
The temperature of the freezer compartment may be regulated by rotating the
Freezer temperature regulator, and may
vary between more or less -15°C and
-24°C.
By turning the Temperature regulator, the
display flashes and shows the desired temperature.
For a correct storage of the food the following temperatures should be set:
+5°C in the fridge
-18°C in the freezer.
After having set the desired temperature, if
the Temperature regulator is not rotated
within 5 seconds, the temperature of the
freezer compartment will be indicated.
To operate the appliance, proceed as follows:
• turn the Temperature regulator clockwise
to obtain the maximum coldness
• turn the Temperature regulator counterclockwise to obtain the minimum coldness.
The intermediate position is usually the
most suitable.
However, the exact setting should be chosen keeping in mind that the temperature inside the appliance depends on:
• room temperature
• how often the door is opened
• the quantity of food stored
• the location of the appliance.
Performance optimization Function
The Performance optimization function is
activated by pressing Function button (several times if necessary) until the corresponding icon appears
.
In this condition the chosen temperatures
are automatically set, in the best conditions
for storing food and therefore any possible
operation through the keys does not cause
any change as long as this function is activated.
It is possible to de-activate the function at
any time by pressing Function button (see
"Activation of functions" ) .
Shopping Function
If you need to insert a large amount of
warm food, for example after doing the grocery shopping, we suggest activating the
Page 22
22 electrolux
Shopping function to chill the products
more rapidly and to avoid warming the other food which is already in the refrigerator.
The Shopping function is activated by
pressing Function button (several times if
necessary) until the corresponding icon ap-
pears
The Shopping function shuts off automatically after approximately 6 hours.
During the Shopping function also the fan
inside the refrigerator compartment is automatically activated.
Important! The fan inside the refrigerator
compartment is automatically activated also
when the room temperature is high (over
38°C), even though the Shopping function
is not activated.
It is possible to de-activate the function at
any time by pressing Function button (refer
to "Functions Menu").
Action Freeze Function
To freeze fresh foods, you will need to activate the Action Freeze function. Press
Function button (several times if necessary)
until the corresponding icon appears.
This function stops automatically after 52
hours.
It is possible to deactivate the function at
any time by pressing Function button (refer
to "Functions Menu").
.
Excessive temperature alarm
An increase in the temperature in the freezer compartment (for example due to a power failure) is indicated by:
• flashing temperature
• freezer compartment flashing (Freezer
compartment indicator )
• red illumination of display
• sounding of buzzer
•alarm symbol.
When normal conditions are restored:
• the acoustic signal shuts off
• the temperature value continues to flash
• the display illumination remains red.
When you press Function button / Alarm reset switch to deactivate the alarm, the highest temperature reached in the compartment appears on indicator
seconds.
At this point the flashing stops and the display illumination changes over from red to
white.
During the alarm phase, the buzzer can be
switched off by pressing Function button /
Alarm reset switch.
The illumination of the display remains red
until normal storage conditions are restored.
for some
FIRST USE
Cleaning the interior
Before using the appliance for the first time,
wash the interior and all internal accessories with lukewarm water and some neutral
soap so as to remove the typical smell of a
brand-new product, then dry thoroughly.
DAILY USE
Freezing fresh food
The freezer compartment is suitable for
freezing fresh food and storing frozen and
deep-frozen food for a long time.
To freeze fresh food activate the Action
Freeze function at least 24 hours before
placing the food to be frozen in the freezer
compartment.
Important! Do not use detergents or abrasive powders, as these will damage the finish.
Place the fresh food to be frozen in the in
the upper part of the freezer, as this is the
coldest point.
The maximum amount of food that can be
frozen in 24 hours is specified on the rating
plate, a label located on the inside of the
appliance.
The freezing process lasts 24 hours: during
this period do not add other food to be frozen.
Page 23

Storage of frozen food
When first starting-up or after a period out
of use, before putting the products in the
compartment let the appliance run at least
12 hours on the Action Freeze setting.
If large quantities of food are to be stored,
remove all drawers and baskets from appliance and place food on cooling shelves to
obtain the best performance.
Warning! Make sure that foods do not
exceed the load limit stated on the side
of the upper section (where applicable)
Important! In the event of accidental
defrosting, for example due to a power
failure, if the power has been off for longer
that the value shown in the technical
characteristics chart under "rising time", the
defrosted food must be consumed quickly
or cooked immediately and then re-frozen
(after cooling).
Thawing
Deep-frozen or frozen food, prior to being
used, can be thawed in the refrigerator
compartment or at room temperature, depending on the time available for this operation.
Small pieces may even be cooked still frozen, directly from the freezer: in this case,
cooking will take longer.
Cold accumulators
The freezer contains at least one cold accumulator which increases storage time in the
event of a power cut or breakdown.
Ice-cube production
This appliance is equipped with one or
more trays for the production of ice-cubes.
Fill these trays with water, then put them in
the freezer compartment.
Important! Do not use metallic instruments
to remove the trays from the freezer.
Movable shelves
The walls of the refrigerator are equipped
with a series of runners so that the shelves
can be positioned as desired.
For better use of space, the front halfshelves can lie over the rear ones.
electrolux 23
Positioning the door shelves
To permit storage of food packages of various sizes, the door shelves can be placed
at different heights.
To make these adjustments proceed as follows:
gradually pull the shelf in the direction of the
arrows until it comes free, then reposition
as required.
Humidity control
The glass shelf incorporates a device with
slits (adjustable by means of a sliding lever),
which makes it possible to regulate the
temperature in the vegetable drawer(s).
When the ventilation slots are closed:
the natural moisture content of the food in
the fruit and vegetable compartments is
preserved for longer.
When the ventilation slots are opened:
Page 24

24 electrolux
more air circulation results in a lower air
moisture content in the fruit and vegetable
compartments.
Air recycling
The refrigerator compartment is equipped
with a special D.A.C. (Dynamic Air Cooling)
fan.
This device allows rapid cooling of foods
and a more uniform temperature in the
compartment.
HELPFUL HINTS AND TIPS
Hints for energy saving
• Do not open the door frequently or leave
it open longer than absolutely necessary.
• If the ambient temperature is high and
the Temperature Regulator is set to low
temperature and the appliance is fully
loaded, the compressor may run continuously, causing frost or ice on the evaporator. If this happens, set the Temperature Regulator toward warmer settings to
allow automatic defrosting and so a saving in electricity consumption.
Hints for fresh food refrigeration
To obtain the best performance:
• do not store warm food or evaporating
liquids in the refrigerator
• do cover or wrap the food, particularly if it
has a strong flavour
•position food so that air can circulate
freely around it
Hints for refrigeration
Useful hints:
Set the fan to ON by pressing the Function
button (several times if necessary) until the
corresponding icon appears
When the ambient temperature exceeds
25°C, set the fan to ON.
When the room temperature is higher than
38°C or when the Shopping function is ON,
the fan is automatically ON.
It is possible to set the fan OFF at any time
by pressing the Function button until the
goes out of view.
icon
Meat (all types) : wrap in polythene bags
and place on the glass shelf above the vegetable drawer.
For safety, store in this way only one or two
days at the most.
Cooked foods, cold dishes, etc..: these
should be covered and may be placed on
any shelf.
Fruit and vegetables: these should be thoroughly cleaned and placed in the special
drawer(s) provided.
Butter and cheese: these should be placed
in special airtight containers or wrapped in
aluminium foil or polythene bags to exclude
as much air as possible.
Milk bottles: these should have a cap and
should be stored in the bottle rack on the
door.
Bananas, potatoes, onions and garlic, if not
packed, must not be kept in the refrigerator.
Hints for freezing
To help you make the most of the freezing
process, here are some important hints:
.
Page 25

electrolux 25
• the maximum quantity of food which can
be frozen in 24 hrs. is shown on the rating plate;
• the freezing process takes 24 hours. No
further food to be frozen should be added during this period;
• only freeze top quality, fresh and thoroughly cleaned, foodstuffs;
• prepare food in small portions to enable it
to be rapidly and completely frozen and
to make it possible subsequently to thaw
only the quantity required;
• wrap up the food in aluminium foil or polythene and make sure that the packages
are airtight;
• do not allow fresh, unfrozen food to
touch food which is already frozen, thus
avoiding a rise in temperature of the latter;
• lean foods store better and longer than
fatty ones; salt reduces the storage life of
food;
• water ices, if consumed immediately after
removal from the freezer compartment,
CARE AND CLEANING
Caution! Unplug the appliance before
carrying out any maintenance
operation.
This appliance contains hydrocarbons
in its cooling unit; maintenance and recharging must therefore only be carried
out by authorized technicians.
Periodic cleaning
The equipment has to be cleaned regularly:
• clean the inside and accessories with
lukewarm water and some neutral soap.
• regularly check the door seals and wipe
clean to ensure they are clean and free
from debris.
• rinse and dry thoroughly.
Important! Do not pull, move or damage
any pipes and/or cables inside the cabinet.
Never use detergents, abrasive powders,
highly perfumed cleaning products or wax
polishes to clean the interior as this will
damage the surface and leave a strong
odour.
Clean the condenser (black grill) and the
compressor at the back of the appliance
can possibly cause the skin to be freeze
burnt;
• it is advisable to show the freezing in date
on each individual pack to enable you to
keep tab of the storage time.
Hints for storage of frozen food
To obtain the best performance from this
appliance, you should:
• make sure that the commercially frozen
foodstuffs were adequately stored by the
retailer;
• be sure that frozen foodstuffs are transferred from the foodstore to the freezer in
the shortest possible time;
• not open the door frequently or leave it
open longer than absolutely necessary.
• Once defrosted, food deteriorates rapidly
and cannot be refrozen.
• Do not exceed the storage period indicated by the food manufacturer.
with a brush or a vacuum cleaner. This operation will improve the performance of the
appliance and save electricity consumption.
Important! Take care of not to damage the
cooling system.
Many proprietary kitchen surface cleaners
contain chemicals that can attack/damage
the plastics used in this appliance. For this
reason it is recommended that the outer
casing of this appliance is only cleaned with
warm water with a little washing-up liquid
added.
After cleaning, reconnect the equipment to
the mains supply.
Defrosting of the refrigerator
Frost is automatically eliminated from the
evaporator of the refrigerator compartment
every time the motor compressor stops,
during normal use. The defrost water drains
out through a trough into a special container at the back of the appliance, over the
motor compressor, where it evaporates.
It is important to periodically clean the defrost water drain hole in the middle of the
Page 26

26 electrolux
refrigerator compartment channel to prevent the water overflowing and dripping onto the food inside. Use the special cleaner
provided, which you will find already inserted into the drain hole.
Defrosting the freezer
A certain amount of frost will always form
on the freezer shelves and around the top
compartment.
Defrost the freezer when the frost layer reaches a thickness of about 3-5 mm.
Important! About 12 hours prior to
defrosting, set the Temperature regulator
toward higher settings , in order to build up
sufficient chill reserve for the interruption in
operation.
To remove the frost, follow the instructions
below:
1. Switch off the appliance.
2. Remove any stored food, wrap it in several layers of newspaper and put it in a
cool place.
Caution! Do not touch frozen goods
with wet hands. Hands can freeze to
the goods.
3. Leave the door open and insert the
plastic scraper in the appropriate seating at the bottom centre, placing a basin
underneath to collect the defrost water
In order to speed up the defrosting
process, place a pot of warm water in
the freezer compartment. In addition,
remove pieces of ice that break away
before defrosting is complete.
4. When defrosting is completed, dry the
interior thoroughly and keep the scraper
for future use.
5. Switch on the appliance.
6. After two or three hours, reload the previously removed food into the compartment.
Warning! Never use sharp metal tools
to scrape off frost from the evaporator
as you could damage it.
Do not use a mechanical device or any
artificial means to speed up the thawing process other than those recommended by the manufacturer.
A temperature rise of the frozen food
packs, during defrosting, may shorten
their safe storage life.
Periods of non-operation
When the appliance is not in use for long
periods, take the following precautions:
disconnect the appliance from elec-
•
tricity supply
• remove all food
defrost
12)
and clean the appliance and all
•
accessories
12) If foreseen.
Page 27

electrolux 27
• leave the door/doors ajar to prevent unpleasant smells.
If the cabinet will be kept on, ask somebody to check it once in a while to prevent
the food inside from spoiling in case of a
power failure.
WHAT TO DO IF…
Warning! Before troubleshooting,
disconnect the mains plug from the
mains socket.
Only a qualified electrician or competent person must do the troubleshooting that is not in this manual.
Problem Possible cause Solution
The appliance does not
operate. The lamp does
not operate.
The mains plug is not connected
The appliance has no power.
The buzzer sounds.
The lamp does not work.
The lamp is defective. Refer to "Replacing the lamp".
The compressor operates continually.
The door is not closed correctly. Refer to "Closing the door".
The door has been opened too
The product temperature is too
The room temperature is too
Water flows on the rear
plate of the refrigerator.
Water flows into the refrigerator.
Products prevent that water
Water flows on the
ground.
The temperature in the
appliance is too low.
The appliance is switched off. Switch on the appliance.
to the mains socket correctly.
There is no voltage in the mains
socket.
The temperature in the freezer is
too high.
The lamp is in stand-by. Close and open the door.
The temperature is not set correctly.
frequently.
high.
high.
During the automatic defrosting
process, frost defrosts on the
rear plate.
The water outlet is clogged. Clean the water outlet.
flows into the water collector.
The melting water outlet does
not flow in the evaporative tray
above the compressor.
The temperature regulator is not
set correctly.
Important! There are some sounds during
normal use (compressor, refrigerant
circulation).
Connect the mains plug to the
mains socket correctly.
Connect a different electrical appliance to the mains socket.
Contact a qualified electrician.
Refer to "Excessive Temperature
Alarm"
Set a higher temperature.
Do not keep the door open longer
than necessary.
Let the product temperature decrease to room temperature before storage.
Decrease the room temperature.
This is correct.
Make sure that products do not
touch the rear plate.
Attach the melting water outlet to
the evaporative tray.
Set a higher temperature.
Page 28

28 electrolux
Problem Possible cause Solution
The temperature in the
appliance is too high.
The door is not closed correctly. Refer to "Closing the door".
The product temperature is too
Many products are stored at the
The temperature in the
refrigerator is too high.
The temperature in the
freezer is too high.
There is too much frost. Food is not wrapped correctly. Wrap the food correctly.
The door is not closed correctly. Refer to "Closing the door".
The temperature regulator is not
set correctly.
high.
same time.
There is no cold air circulation in
the appliance.
Products are too near to each
other.
Set a lower temperature.
Let the product temperature decrease to room temperature before storage.
Store less products at the same
time.
Make sure that there is cold air
circulation in the appliance.
Store products so that there is
cold air circulation.
Replacing the bulb
If you want to replace the bulb, do these
steps:
1. Break the circuit of the appliance.
2. Press on the rear hook and at the same
time slide the cover in the direction of
the arrow.
3. Replace the bulb with one of the same
power and specifically designed for
household appliances. the maximum
power is shown on the light bulb cover)
4. Replace the light cover by sliding it into
its original position.
5. Reconnect the appliance.
6. Open the door and check if the light
comes on.
Closing the door
1. Clean the door gaskets.
2. If necessary, adjust the door. Refer to
"Installation".
3. If necessary, replace the defective door
gaskets. Contact the Service Center.
TECHNICAL DATA
Dimension of the recess
Height 1780 mm
Width 560 mm
Depth 550 mm
Rising Time 24 h
Voltage 230-240 V
Frequency 50 Hz
Page 29

The technical information are situated in the
rating plate on the internal left side of the
appliance and in the energy label.
INSTALLATION
Read the "Safety Information" carefully
for your safety and correct operation of
the appliance before installing the
appliance.
Positioning
Install this appliance at a location where the
ambient temperature corresponds to the
climate class indicated on the rating plate of
the appliance:
Climate
class
SN +10°C to + 32°C
N +16°C to + 32°C
ST +16°C to + 38°C
T +16°C to + 43°C
Electrical connection
Before plugging in, ensure that the voltage
and frequency shown on the rating plate
correspond to your domestic power supply.
The appliance must be earthed. The power
supply cable plug is provided with a contact
for this purpose. If the domestic power supply socket is not earthed, connect the appliance to a separate earth in compliance with
current regulations, consulting a qualified
electrician.
The manufacturer declines all responsibility
if the above safety precautions are not observed.
This appliance complies with the E.E.C. Directives.
Door reversibility
The door of the appliance opens to the
right. If you want to open the door to the
left, do these steps before you install the
appliance:
1. Loosen the upper pin and remove the
spacer.
2. Remove the upper pin and the upper
door.
3. Remove the hinge cover (A). Unscrew
the pins (B) and spacers (C). Fit the
hinge cover (A).
Ambient temperature
electrolux 29
4. Remove the lower door.
5. Loosen the lower pin.
C
B
A
On the opposite side:
1. Install the lower pin.
2. Install the lower door.
3. Refit the pins (B) and the spacers (C) on
the middle hinge on the opposite side.
4. Install the upper door.
5. Tighten the spacer and tighten the upper pin.
Page 30

30 electrolux
Ventilation requirements
The airflow behind the appliance must be
sufficient.
min.
2
200 cm
1. Install the appliance in the niche.
Push the appliance in the direction of
the arrows (1) until the upper gap cover
stops against the kitchen furniture.
Make sure that the distance between
the appliance and the cupboard frontedge is 44 mm.
Push the appliance in the direction of
the arrows (2) against the cupboard on
the opposite side of the hinge. Make
sure that the clearance between the
appliance and the cupboard is 4 mm.
2
1
Installing the appliance
Caution! Make sure that the mains
cable can move freely.
Do these steps.
min.
200 cm
2
2. Adjust the appliance in the niche.
The lower hinge cover (in the accessories bag) makes sure that the distance
between the appliance and the kitchen
furniture is correct.
Open the door. Put the lower hinge
cover in position.
4mm
44mm
Page 31

electrolux 31
3. Attach the appliance to the niche with 4
screws.
I
4. Push the sealing strip between the appliance and the adjacent cabinet.
5. Remove the correct part from the hinge
cover (E). Make sure to remove the part
DX, in the case of right hinge, SX in opposite case.
6. Attach the covers (C, D) to the lugs and
the hinge holes.
Install the vent grille (B).
Attach the hinge covers (E) to the
hinge.
C
D
E
E
B
Page 32

32 electrolux
7. If the appliance must connect laterally
to the kitchen furniture door:
a) Slacken the screws in fixing brack-
ets (H).
b) Move the brackets (H).
c) Retighten the screws.
8. Disconnect the parts Ha, Hb, Hc and
Hd
Ha
Hb
9. Install the part Ha on the inner side of
the kitchen furniture.
ca. 50 mm
90°
21 mm
90°
ca. 50 mm
10. Push the part Hc on the part Ha.
21 mm
Ha
Hc
Hc
Hd
Page 33

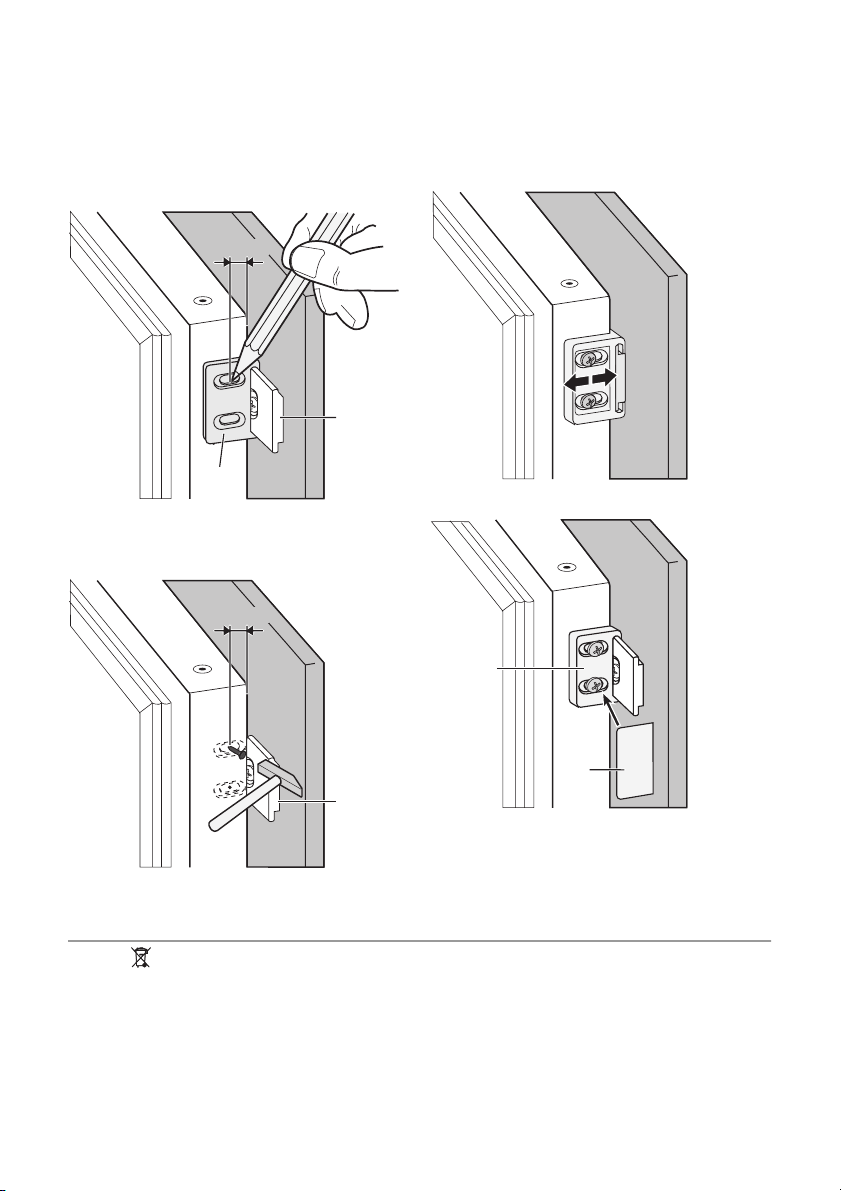
electrolux 33
11. Open the appliance door and the kitchen furniture door at an angle of 90°.
Insert the small square (Hb) into guide
(Ha).
Put together the appliance door and
the furniture door and mark the holes.
8 mm
Ha
Hb
12. Remove the brackets and mark a distance of 8 mm from the outer edge of
the door where the nail must be fitted
(K).
8 mm
13. Place the small square on the guide
again and fix it with the screws supplied.
Align the kitchen furniture door and the
appliance door by adjusting the part
Hb.
Hb
14. Press the part Hd on the part Hb.
K
Ha
ENVIRONMENTAL CONCERNS
The symbol on the product or on its
packaging indicates that this product may
not be treated as household waste. Instead
it should be taken to the appropriate
collection point for the recycling of electrical
and electronic equipment. By ensuring this
product is disposed of correctly, you will
Hb
Hd
Do a final check to make sure that:
• All screws are tightened.
• The magnetic sealing strip is attached
tightly to the cabinet.
help prevent potential negative
consequences for the environment and
human health, which could otherwise be
caused by inappropriate waste handling of
this product. For more detailed information
about recycling of this product, please
contact your local council, your household
Page 34

34 electrolux
waste disposal service or the shop where
you purchased the product.
Page 35

Electrolux. Thinking of you.
Mehr zu unserem Denken finden Sie unter
www.electrolux.com
INHALT
Sicherheitshinweise 35
Bedienfeld 37
Erste Inbetriebnahme 40
Täglicher Gebrauch 40
Praktische Tipps und Hinweise 42
SICHERHEITSHINWEISE
Lesen Sie zu Ihrer Sicherheit und für die optimale Geräteanwendung vor der Installation
und dem Gebrauch des Gerätes die vorliegende Benutzerinformation aufmerksam
durch, einschließlich der Ratschläge und
Warnungen. Es ist wichtig, dass zur Vermeidung von Fehlern und Unfällen alle Personen, die das Gerät benutzen, mit der Bedienung und den Sicherheitsvorschriften
vertraut sind. Heben Sie die Benutzerinformation gut auf und übergeben Sie sie bei
einem Weiterverkauf des Gerätes dem neuen Besitzer, so dass jeder während der gesamten Lebensdauer des Gerätes über Gebrauch und Sicherheit informiert ist.
Halten Sie sich zu Ihrer Sicherheit und zum
Schutz Ihres Eigentums strikt an die Vorsichtsmaßnahmen der vorliegenden Benutzerinformation, da der Hersteller bei Missachtung derselben von jeder Haftung freigestellt ist.
Sicherheit von Kindern und
hilfsbedürftigen Personen
• Das Gerät darf von Personen (einschließlich Kindern), deren physische, sensorische Fähigkeiten und deren Mangel an
Erfahrung und Kenntnissen einen sicheren Gebrauch des Gerätes ausschließen
nur unter Aufsicht oder nach ausreichender Einweisung durch eine verantwortungsbewusste Person benutzt werden,
die sicherstellt, dass sie sich der Gefahren des Gebrauchs bewusst sind.
Kinder müssen beaufsichtigt werden, damit sie nicht am Gerät herumspielen können.
electrolux 35
Reinigung und Pflege 43
Was tun, wenn … 45
Technische Daten 47
Montage 47
Hinweise zum Umweltschutz 52
Änderungen vorbehalten
• Halten Sie das Verpackungsmaterial unbedingt von Kindern fern. Erstickungsgefahr!
• Ziehen Sie vor der Entsorgung des Gerätes den Netzstecker, schneiden Sie das
Netzkabel (so nah wie möglich am Gerät)
ab und entfernen Sie die Tür, so dass
spielende Kinder vor elektrischem Schlag
geschützt sind und sich nicht in dem Gerät einschließen können.
• Wenn dieses Gerät mit magnetischer
Türdichtung ein älteres Modell mit
Schnappverschluss (Türlasche) an der
Tür oder auf dem Deckel ersetzt, machen
Sie den Schnappverschluss vor dem Entsorgen des Altgerätes unbrauchbar. So
verhindern Sie, dass das Gerät nicht zu
einer Todesfalle für Kinder wird.
Allgemeine Sicherheitshinweise
Vorsicht! Die Belüftungsöffnungen
müssen immer frei zugänglich sein.
• Das Gerät ist für die Aufbewahrung von
Lebensmitteln und/oder Getränken in einem normalen Haushalt bestimmt, wie in
der vorliegenden Gebrauchsanweisung
beschrieben wird.
• Benutzen Sie keine mechanischen oder
sonstigen Hilfsmittel, um den Abtauprozess zu beschleunigen.
• Verwenden Sie keine anderen Elektrogeräte (wie Speiseeisbereiter) in Kühlgeräten, wenn solche Geräte nicht ausdrücklich vom Hersteller für diesen Zweck zugelassen sind.
Page 36

36 electrolux
• Achten Sie darauf, den Kältekreislauf
nicht zu beschädigen.
• Das Kältemittel Isobutan (R600a) im Kältekreislauf des Gerätes ist ein natürliches
und sehr umweltfreundliches Gas, das jedoch leicht entflammbar ist.
Achten Sie beim Transport und bei der
Aufstellung des Gerätes darauf, nicht die
Komponenten des Kältekreislaufs zu beschädigen.
Bei einer eventuellen Beschädigung des
Kältekreislaufs:
– Offene Flammen und Zündfunken ver-
meiden
– Den Raum, in dem das Gerät installiert
ist, gut lüften
• Änderungen der technischen Eigenschaften oder am Gerät sind gefährlich. Ein
defektes Netzkabel kann Kurzschlüsse
und einen Brand verursachen und/oder
zu Stromschlägen führen.
Warnung! Elektrische Bauteile (Netzkabel, Stecker, Kompressor) dürfen nur
vom Kundendienst oder einer Fachkraft
ausgewechselt werden.
1. Das Netzkabel darf nicht verlängert
werden.
2. Vergewissern Sie sich, dass der Netz-
stecker nicht von der Geräterückseite
gequetscht oder beschädigt wird. Ein
gequetschter oder beschädigter
Netzstecker überhitzt und kann einen
Brand verursachen.
3. Vergewissern Sie sich, dass der Netz-
stecker des Gerätes frei zugänglich
ist.
4. Ziehen Sie nicht am Netzkabel.
5. Stecken Sie den Netzstecker nie in ei-
ne lockere Steckdose. Es besteht
Brand- und Stromschlaggefahr.
6. Betreiben Sie das Gerät nicht ohne
13)
Lampenabdeckung
, der Innenbe-
leuchtung.
• Dieses Gerät ist schwer. Vorsicht beim
Transport.
• Entnehmen oder berühren Sie nie mit
nassen/feuchten Händen Tiefkühlgut, da
dies zu Hautverletzungen oder Kälteverbrennungen führen kann.
• Das Gerät nicht direkter Sonneneinstrahlung aussetzen.
•
Die Leuchtmittel
14)
in diesem Gerät sind
Speziallampen, die nur für Haushaltsgeräte geeignet sind. Sie eignen sich nicht
zur Raumbeleuchtung.
Täglicher Gebrauch
• Stellen Sie keine heißen Töpfe auf die
Kunststoffteile des Gerätes.
• Lagern Sie keine feuergefährlichen Gase
oder Flüssigkeiten in dem Gerät. Explosionsgefahr.
• Legen Sie Lebensmittel nicht direkt vor
den Luftauslass auf der Rückwand.
15)
• Ein aufgetautes Produkt darf nicht wieder
eingefroren werden.
• Abgepackte Tiefkühlkost immer entsprechend den Herstellerangaben aufbewahren.
• Die Lagerempfehlungen des Geräteherstellers sollten strikt eingehalten werden.
Halten Sie sich an die betreffenden Anweisungen.
• Keine kohlensäurehaltigen Getränke oder
Sprudel in den Tiefkühlschrank stellen, da
der Druckanstieg in den Behältern zur
Explosion führen und das Gerät beschädigen kann.
• Eis am Stiel kann Kälteverbrennungen
verursachen, wenn es direkt nach der
Entnahme aus dem Gefrierschrank gegessen wird.
Reinigung und Pflege
• Schalten Sie vor Wartungsarbeiten immer
das Gerät ab und ziehen Sie den Netzstecker aus der Steckdose.
• Reinigen Sie das Gerät nicht mit Metallgegenständen.
• Keine scharfen Gegenstände zum Entfernen von Reif und Eis im Gerät verwenden. Verwenden Sie einen Kunststoffschaber.
• Kontrollieren Sie den Tauwasserabfluss
im Kühlraum in regelmäßigen Abständen.
Reinigen Sie den Ablauf, falls nötig. Bei
verstopftem Wasserabfluss sammelt sich
das Wasser auf dem Boden des Geräts
an.
13) Falls Lampenabdeckung vorhanden.
14) Falls Lampe vorhanden.
15) Wenn das Gerät mit dem Frost-Free-System ausgestattet ist.
Page 37

electrolux 37
Montage
Wichtig! Halten Sie sich für den
elektrischen Anschluss strikt an die
Anweisungen der betreffenden Abschnitte.
• Kontrollieren Sie nach dem Auspacken
das Gerät auf eventuelle Beschädigungen. Nehmen Sie das Gerät nicht in Betrieb, wenn es beschädigt ist. Melden Sie
die Schäden umgehend dem Händler,
bei dem Sie es erworben haben. Bewahren Sie in diesem Fall die Verpackung
auf.
• Lassen Sie das Gerät mindestens vier
Stunden stehen, bevor Sie es elektrisch
anschließen, damit das Öl in den Kompressor zurückfließen kann.
• Ausreichenden Freiraum zur Luftzirkulation um das Gerät lassen; anderenfalls besteht Überhitzungsgefahr. Halten Sie sich
für die Belüftung an die Installationsanweisungen.
• Das Gerät sollte zur Vermeidung von Verbrennungen durch Berührung von heißen
Bauteilen (Kompressor, Kondensator)
möglichst mit der Rückseite gegen eine
Wand aufgestellt werden.
• Das Gerät darf nicht in der Nähe von
Heizkörpern oder Kochern installiert werden.
• Vergewissern Sie sich, dass der Netzstecker des Gerätes nach der Installation frei
zugänglich ist.
• Verbinden Sie das Gerät ausschließlich
mit einer Trinkwasserzuleitung.
16)
Kundendienst
• Sollte die Wartung des Gerätes elektrische Arbeiten verlangen, so dürfen diese
nur von einem qualifizierten Elektriker
oder einem Elektro-Fachmann durchgeführt werden.
• Wenden Sie sich für Reparaturen und
Wartung nur an Fachkräfte der autorisierten Kundendienststellen und verlangen
Sie stets Original-Ersatzteile.
Umweltschutz
Das Gerät enthält im Kältekreis oder in
dem Isoliermaterial keine ozonschädigenden Gase. Das Gerät darf nicht wie
normaler Hausmüll entsorgt werden.
Die Isolierung enthält entzündliche Gase: das Gerät muss gemäß den geltenden Vorschriften entsorgt werden; sie
erhalten diese bei Ihrer Gemeindeverwaltung. Nicht das Kälteaggregat beschädigen, insbesondere nicht in der
Nähe des Wärmetauschers. Die Materialien, die bei der Herstellung dieses
Geräts verwendet wurden und mit dem
Symbol
markiert sind, können recy-
celt werden.
BEDIENFELD
MODE˚C
123 4 5 6
1 EIN/AUS-Taste
2 Temperaturregler Gefriergerät
3 Kühl-/Gefrierschrank-Taste für Tempe-
raturanzeige
16) Falls ein Wasseranschluss erforderlich ist.
4 Display
5 Funktionstaste
Lösch-Schalter für den Alarmton
6 Temperaturregler Kühlgerät
Page 38

38 electrolux
Display
1 2 3 4 5 8 7 6
1 Anzeige Kühlraum
2 Anzeige Gefrierraum
3 Temperaturvorzeichen
4 Temperaturanzeige
5 Action Freeze-Funktion
6 Shopping-Funktion
7 Minidac-Funktion
8 Performance Optimization-Funktion
Einschalten des Geräts
Stecken Sie den Netzstecker in die Netzsteckdose. Falls das Display nicht leuchtet,
drücken Sie die Taste ON/OFF (EIN/AUS).
Nach dem Einschalten des Geräts wird auf
dem Bedienfeld Folgendes angezeigt:
• Die Temperaturvorzeichenanzeige zeigt
ein Pluszeichen an
• Die Temperaturanzeige blinkt, der Hintergrund des Displays leuchtet rot und es
ertönt ein Signalton.
Drücken Sie die Funktionstaste, um den
Signalton abzuschalten (siehe auch "Temperaturwarnung (Temperatur zu hoch).
Stellen Sie die gewünschte Temperatur ein
(siehe "Temperaturregulierung").
Ausschalten
Das Gerät wird ausgeschaltet, wenn Sie die
EIN/AUS-Taste länger als 1 Sekunde lang
betätigen.
Danach wird ein Temperatur-Countdown
(-3 -2 -1) angezeigt.
Nach dem Abschalten des Gerätes erlischt
auch das Display.
Temperaturanzeige
Wenn die Taste für die Temperaturanzeige
des Kühl-/Gefrierschranks gedrückt wird,
zeigt das Display nacheinander Folgendes
an:
1. – Die Anzeige des Kühlschranks leuchtet.
– Das Display zeigt die Kühlschrank-
temperatur an.
2. – Die Anzeige des Gefrierschranks
leuchtet.
17)
– Das Display zeigt die Temperatur im
Gefrierschrank an.
Nach 10 Sekunden werden stets die normalen Anzeigebedingungen wiederhergestellt.
Funktionsmenü
Bei jedem Betätigen der Funktionstaste
werden abwechselnd die folgenden Funktionen aktiviert:
• Action Freeze-Funktion
• Shopping-Funktion
• Minidac-Funktion
• Performance Optimization-Funktion
• Kein Symbol: Normalbetrieb.
Wichtig! Sie können jeweils eine Funktion
einschalten.
Zum Ausschalten der Funktionen drücken
Sie die Funktionstaste mehrmals, bis kein
Symbol mehr erscheint.
Temperaturregelung
Die Temperatur im Gerät wird vom Temperaturregler geregelt, der sich oben am Gerät
befindet.
Die Temperatur des Kühlschranks kann
durch Drehen des Temperaturreglers für
den Kühlschrank mehr oder weniger zwischen +2°C und +8°C geregelt werden.
Die Temperatur des Gefrierfachs kann
durch Drehen des Temperaturreglers für
das Gefrierfach mehr oder weniger zwischen -15°C und -24°C geregelt werden.
Beim Drehen des Temperaturreglers blinkt
das Display und zeigt dabei die gewünschte
Temperatur an.
17) Unter normalen Bedingungen.
Page 39

electrolux 39
Für eine ordnungsgemäße Lagerung von
Lebensmitteln sollten Sie folgende Temperatur einstellen:
+5 °C im Kühlschrank
-18 °C im Gefriergerät.
Wenn die gewünschte Temperatur eingestellt und der Temperaturregler innerhalb
der nächsten 5 Sekunden nicht mehr gedreht wurde, wird die Temperatur des Gefrierfachs angezeigt.
Bedienen Sie das Gerät wie folgt:
• drehen Sie den Temperaturregler im Uhrzeigersinn, um die maximal mögliche
Kühlung zu erreichen
• drehen Sie den Temperaturregler gegen
den Uhrzeigersinn, um die minimal mögliche Kühlung zu erreichen
Eine mittlere Stellung ist im Allgemeinen am
besten geeignet.
Allerdings muss für eine exakte Einstellung
berücksichtigt werden, dass die Temperatur im Innern des Gerätes von verschiedenen Faktoren abhängt:
• Raumtemperatur
• von der Häufigkeit der Türöffnung
• von der Menge der eingelagerten Lebensmittel
• und vom Standort des Geräts.
Performance optimization -Funktion
Die Performance optimization -Funktion
wird aktiviert, indem Sie die Funktionstaste
(gegebenenfalls mehrmals) drücken, bis das
gewünschte Symbol erscheint
.
Ist diese Funktion aktiviert, werden die ausgewählten Temperaturen automatisch auf
die optimalen Lagerbedingungen für Ihre
Lebensmittel eingestellt. Aus diesem Grund
ändert auch eine beliebige Betätigung der
Tasten nichts an dieser Einstellung, solange
diese Funktion aktiviert ist.
Die Funktion kann jederzeit durch Drücken
der Funktionstaste (siehe "Funktionen aktivieren") ausgeschaltet werden.
Shopping-Funktion
Wenn Sie zum Beispiel nach einem Einkauf
größere Mengen warmer Lebensmittel einlegen möchten, empfehlen wir die Aktivierung der Shopping-Funktion, um die Produkte schneller zu kühlen und um zu vermeiden, dass die bereits im Kühlschrank
befindlichen Lebensmittel erwärmt werden.
Die Funktion Shopping wird aktiviert, indem
Sie die Funktionstaste (gegebenenfalls
mehrmals) drücken, bis das gewünschte
Symbol erscheint
.
Die Funktion Shopping wird nach ca. 6
Stunden automatisch abgeschaltet.
Bei aktivierter Shopping-Funktion wird auch
der Ventilator im Inneren des Kühlraums automatisch aktiviert.
Wichtig! Der Ventilator im Inneren des
Kühlraums wird auch dann automatisch
aktiviert, wenn die Raumtemperatur hoch
ist (über 38°C), selbst wenn die ShoppingFunktion nicht aktiviert ist.
Sie kann jederzeit durch Drücken der Funktionstaste (siehe "Funktionsmenü") ausgeschaltet werden.
Action Freeze Funktion
Zum Einfrieren frischer Lebensmittel müssen Sie die Funktion Action Freeze einschalten. Drücken Sie die Funktionstaste
gegebenenfalls mehrmals, bis das gewünschte Symbol erscheint.
Diese Funktion endet automatisch nach 52
Stunden.
Sie kann jederzeit durch Drücken der Funktionstaste (siehe "Funktionsmenü") ausgeschaltet werden.
Temperaturwarnung (Temperatur zu
hoch)
Ein Anstieg der Temperatur im Gefrierfach
(zum Beispiel aufgrund eines Stromausfalls)
wird wie folgt angezeigt:
• blinkende Temperaturanzeige
• blinkende Anzeige (Gefrierfach-Anzeige)
• Display leuchtet rot
• durch das Ertönen eines Summers
•Alarmsymbol.
Sobald die normalen Bedingungen wieder
hergestellt sind:
• wird das akustische Signal ausgeschaltet
• blinkt der Temperaturwert weiterhin
• das Display leuchtet weiter rot.
Wenn Sie die Funktionstaste/den AlarmRückstellschalter zum Ausschalten des
Alarms betätigen, wird in der Anzeige
einige Sekunden lang die wärmste Temperatur im Fach angezeigt.
Page 40

40 electrolux
Die Temperaturanzeige hört zu diesem Zeitpunkt auf zu blinken, und das Display
leuchtet nicht mehr rot, sondern weiß.
In der Alarmphase kann das Signal durch
Drücken der Funktionstaste/des AlarmRückstellschalters ausgeschaltet werden.
ERSTE INBETRIEBNAHME
Reinigung des Innenraums
Bevor Sie das Gerät in Betrieb nehmen, beseitigen Sie den typischen "Neugeruch" am
besten durch Auswaschen der Innenteile
mit lauwarmem Wasser und einem neutralen Reinigungsmittel. Sorgfältig nachtrocknen.
TÄGLICHER GEBRAUCH
Einfrieren frischer Lebensmittel
Der Gefrierraum eignet sich zum Einfrieren
von frischen Lebensmitteln und zum Lagern
von gefrorenen und tiefgefrorenen Lebensmitteln für einen längeren Zeitraum.
Um frische Lebensmittel einzufrieren, aktivieren Sie bitte die Action Freeze-Funktion
mindestens 24 Stunden, bevor Sie die Lebensmittel in das Gefrierfach legen.
Legen Sie bitte die zu gefrierenden frischen
Lebensmittel in den oberen Teil des Gerätes, da dies die kälteste Stelle ist.
Die maximale Menge an Lebensmitteln, die
in 24 Stunden eingefroren werden kann, ist
auf dem Typenschild angegeben; eine
Plakette befindet sich im Innern des Geräts.
Der Gefriervorgang dauert 24 Stunden. Legen Sie während dieses Zeitraums keine
weiteren einzufrierenden Lebensmittel in
den Gefrierraum.
Lagerung gefrorener Produkte
Lassen Sie das Gerät vor der ersten Inbetriebnahme oder nach einer Zeit, in der
das Gerät nicht benutzt wurde, mindestens
12 Stunden lang auf der Einstellung Action
Freeze laufen.
Sollen große Mengen an Lebensmitteln aufbewahrt werden, entfernen Sie alle Körbe
und Schubladen aus dem Gerät und setzen
Sie die Lebensmittel auf Kühlablagen, um
die optimale Leistung zu erhalten.
Warnung! Bitte achten Sie unbedingt
darauf, die Beladungsgrenze nicht zu
Das Display leuchtet weiterhin rot, bis die
normalen Lagerbedingungen wiederhergestellt sind.
Wichtig! Verwenden Sie keine Reinigungsmittel oder Scheuerpulver, da hierdurch die
Oberfläche beschädigt wird.
überschreiten, die seitlich im oberen
Teil angegeben ist (wo zutreffend)
Wichtig! Kam es zum Beispiel durch einen
Stromausfall, der länger dauerte als der in
der Tabelle mit den technischen Daten
angegebene Wert (siehe "Ausfalldauer") zu
einem ungewollten Abtauen, dann müssen
die aufgetauten Lebensmittel sehr rasch
verbraucht oder sofort gekocht und nach
dem Abkühlen erneut eingefroren werden.
Auftauen
Tiefgefrorene oder gefrorene Lebensmittel
können vor der Verwendung je nach der zur
Verfügung stehenden Zeit im Kühlschrank
oder bei Raumtemperatur aufgetaut werden.
Kleinere Gefriergutteile können unter Umständen sogar direkt aus dem Gefrierschrank entnommen und anschließend sofort gekocht oder gegart werden: in diesem
Fall dauert der Garvorgang allerdings etwas
länger.
Kälteakkumulatoren
Der Gefrierschrank wird mit einem oder
mehreren Gefrierakkumulatoren geliefert.
Diese verlängern die Zeitdauer, in der die
Lebensmittel bei einem Stromausfall oder
einem Ausfall des Gerätes gekühlt werden.
Eiswürfelbereitung
Dieses Gerät ist mit einer oder mehreren
Schalen für die Herstellung von Eiswürfeln
ausgestattet. Füllen Sie die Schalen mit
Page 41

Wasser und stellen Sie diese in das Gefrierfach.
Wichtig! Bitte verwenden Sie zum
Herausholen der Schalen aus dem
Gefrierschrank keine Utensilien aus Metall.
Verstellbare Ablagen/Einsätze
Die Wände des Kühlschranks sind mit einer
Anzahl von Führungsschienen ausgestattet,
die verschiedene Möglichkeiten für das Einsetzen der Ablagen bieten.
Zur besseren Raumnutzung können die
vorderen Halbteile der Ablagen auf die
rückwärtigen hinaufgelegt werden.
electrolux 41
Feuchtigkeitsregulierung
In die Glasablage ist eine Vorrichtung mit
(über einen Schieber verstellbaren) Schlitzen integriert, die die Temperaturregelung in
den Gemüsefächern ermöglicht.
Bei geschlossenen Lüftungsschlitzen:
bleibt der natürliche Feuchtegehalt der Lebensmittel in den Obst- und Gemüsefächern für längere Zeit erhalten.
Bei geöffneten Lüftungsschlitzen:
führt die höhere Luftzirkulation zu einem
niedrigeren Feuchtegehalt der Luft in den
Obst- und Gemüsefächer.
Positionierung der Türeinsätze
Die Türeinsätze können in verschiedener
Höhe positioniert werden; damit ermöglichen Sie das Lagern verschieden großer
Lebensmittelpackungen.
Bitte nehmen Sie die Einstellungen wie folgt
vor:
Ziehen Sie das Türabstellfach nach und
nach in Pfeilrichtung, bis es sich herausheben lässt. Dann setzen Sie es in die neue
Position ein.
Dynamische Luftkühlung
Der Kühlraum ist mit einem speziellen DACVentilator (Dynamic Air Cooling) ausgestattet.
Der Ventilator sorgt für eine rasche Kühlung
der Lebensmittel und für eine gleichmäßigere Temperatur im Innenraum.
Page 42

42 electrolux
Drücken Sie zum Einschalten des Ventilators (wenn notwendig mehrmals) die Funktionstaste, bis das entsprechende Symbol
aufleuchtet.
Der Ventilator sollte eingeschaltet werden,
wenn die Umgebungstemperatur 25 °C
übersteigt.
Ist die Raumtemperatur höher als 38 °C
oder ist die Funktion Shopping eingeschaltet, schaltet sich der Ventilator automatisch
ein.
Sie können den Ventilator jederzeit durch
Drücken der Funktionstaste ausschalten,
bis das Symbol
erlischt.
PRAKTISCHE TIPPS UND HINWEISE
Energiespartipps
• Öffnen Sie die Tür nicht zu häufig, und
lassen Sie diese nicht länger offen als unbedingt notwendig.
• Wenn die Umgebungstemperatur hoch
ist und der Temperaturregler auf eine
niedrige Temperatur eingestellt und das
Gerät voll beladen ist, kann es zu andauerndem Betrieb des Kompressors und
damit zu Reif- oder Eisbildung am Verdampfer kommen. Stellen Sie in diesem
Fall den Temperaturregler auf eine höhere
Einstellung ein, die ein automatisches Abtauen und damit auch einen niedrigeren
Energieverbrauch ermöglicht.
Hinweise für die Kühlung frischer
Lebensmittel
So erzielen Sie beste Ergebnisse:
• Legen Sie bitte keine warmen Lebensmit-
tel oder dampfende Flüssigkeiten in den
Kühlschrank.
• Decken Sie die Lebensmittel ab oder ver-
packen Sie diese entsprechend, besonders wenn diese stark riechen.
• Legen Sie die Lebensmittel so hinein,
dass um sie Luft frei zirkulieren kann.
Hinweise für die Kühlung
Tipps:
Fleisch (alle Sorten): wickeln Sie Fleisch in
lebensmittelechte Tüten und legen Sie diese auf die Glasablage über der Gemüseschublade.
Bitte lagern Sie Fleisch aus Sicherheitsgründen nur einen oder maximal zwei Tage auf
diese Weise.
Gekochte Lebensmittel, kalte Gerichte
usw.: diese können abgedeckt auf eine Ablage gelegt werden.
Obst und Gemüse: bitte waschen Sie Obst
und Gemüse gründlich und legen Sie es in
die speziell dafür vorgesehene(n) Schublade(n).
Butter und Käse: diese sollten stets in speziellen luftdichten Behältern verpackt sein
oder in Aluminiumfolie bzw. in lebensmittelechte Tüten eingepackt werden, um so
wenig Luft wie möglich in der Verpackung
zu haben.
Milchflaschen: bitte bewahren Sie Milchflaschen stets mit Deckel im Flaschenregal in
der Tür auf.
Bananen, Kartoffeln, Zwiebeln und Knoblauch sollten nicht im Kühlschrank aufbewahrt werden, außer diese sind dafür speziell verpackt.
Hinweise zum Einfrieren
Im Folgenden finden Sie einige wertvolle
Tipps für einen optimalen Gefriervorgang:
• die maximale Menge an Lebensmitteln,
• der Gefriervorgang dauert 24 Stunden.
• frieren Sie ausschließlich frische und
• teilen Sie die Lebensmittel in kleinere Por-
die innerhalb von 24 Stunden eingefroren
werden kann. ist auf dem Typschild angegeben;
Legen Sie während dieses Zeitraums keine weiteren einzufrierenden Lebensmittel
in das Gefrierfach;
gründlich gewaschene Lebensmittel von
sehr guter Qualität ein;
tionen ein, damit diese schnell und voll-
Page 43

electrolux 43
ständig gefrieren und Sie später nur die
Menge auftauen müssen, die Sie gerade
benötigen;
• die einzufrierenden Lebensmittelportio-
nen sollten stets luftdicht in Aluminiumfolie oder in lebensmittelechte Gefrierbeutel
verpackt werden, um so wenig Luft wie
möglich in der Verpackung zu haben;
• achten Sie beim Hineinlegen von fri-
schen, noch ungefrorenen Lebensmitteln
darauf, dass diese keinen Kontakt mit
Gefriergut bekommen, da dieses sonst
antauen kann;
• weniger fetthaltige Lebensmittel lassen
sich besser lagern als fetthaltigere; Salz
verkürzt die Lagerzeit von Lebensmitteln
im Gefrierfach;
• werden Gefrierwürfel direkt nach der Ent-
nahme aus dem Gefrierfach verwendet,
können Sie zu Frostbrand auf der Haut
führen;
• es empfiehlt sich, das Einfrierdatum auf
jeder einzelnen Packung zu notieren, um
REINIGUNG UND PFLEGE
Vorsicht! Ziehen Sie bitte vor jeder
Reinigungsarbeit immer den
Netzstecker aus der Steckdose.
Der Kältekreis des Gerätes enthält
Kohlenwasserstoffe; Wartungsarbeiten
und Nachfüllen von Kältemittel dürfen
daher nur durch vom Hersteller autorisiertes Fachpersonal ausgeführt werden.
Regelmäßige Reinigung
Der gesamte Kühlschrank muss regelmäßig
gereinigt werden:
• Reinigen Sie die Innenseiten und die Zu-
behörteile mit lauwarmem Wasser und
etwas Neutralseife.
• Prüfen und säubern Sie die Türdichtun-
gen in regelmäßigen Abständen und kontrollieren Sie, dass diese sauber und frei
von Verunreinigungen sind.
• Spülen und trocknen Sie diese sorgfältig
ab.
Wichtig! Ziehen Sie nicht an Leitungen
und/oder Kabeln im Innern des
Kühlschranks und achten Sie darauf, diese
nicht zu verschieben oder zu beschädigen.
einen genauen Überblick über die Lagerzeit zu haben.
Hinweise zur Lagerung gefrorener
Produkte
So erzielen Sie die besten Ergebnisse mit
Ihrem Gerät:
• Prüfen Sie sorgfältig, dass die im Handel
erworbenen gefrorenen Lebensmittel
sachgerecht gelagert wurden.
• Achten Sie unbedingt darauf, die eingekauften gefrorenen Lebensmittel in der
kürzest möglichen Zeit in Ihren Gefrierschrank zu bringen.
• Öffnen Sie die Tür nicht zu häufig, und
lassen Sie diese nicht länger offen als unbedingt notwendig.
• Abgetaute Lebensmittel verderben sehr
schnell und eignen sich nicht für ein erneutes Einfrieren.
• Das Haltbarkeitsdatum auf der Tiefkühlkostverpackung sollte nicht überschritten
werden.
Benutzen Sie zur Reinigung des Innenraums keinesfalls Putzmittel, Scheuerpulver,
stark parfümierte Reinigungsmittel oder
Wachspolituren, da diese die Oberfläche
des Innenraums beschädigen und einen
starken Eigengeruch hinterlassen können.
Reinigen Sie den Kondensator (schwarzes
Gitter) und den Motorkompressor auf der
Geräterückseite mit einer Bürste oder einem Staubsauger. Dadurch verbessert sich
die Leistung des Geräts und es verbraucht
weniger Strom.
Wichtig! Bitte achten Sie darauf, das
Kühlsystem nicht zu beschädigen.
Viele Haushaltsreiniger für Küchen enthalten
Chemikalien, die den im Gerät verwendeten
Kunststoff angreifen können. Aus diesem
Grund ist es empfehlenswert, das Gerät außen nur mit warmem Wasser und etwas
flüssigem Tellerspülmittel zu reinigen.
Schließen Sie das Gerät nach der Reinigung wieder an die Netzversorgung an.
Abtauen des Kühlschranks
Bei normalem Betrieb wird Frost bei jedem
Anhalten des Motorkompressors automa-
Page 44

44 electrolux
tisch aus dem Verdampfer des Kühlschranks entfernt. Das Tauwasser läuft
durch eine Rinne in einen speziellen Behälter an der Rückseite des Geräts über dem
Motorkompressor, wo es verdampft.
Reinigen Sie deshalb regelmäßig die Abflussöffnung des Tauwassers in der Mitte
des Kühlschrankkanals, damit das Wasser
nicht überfließt und auf die gelagerten Lebensmittel tropft. Benutzen Sie dazu bitte
das mitgelieferte Reinigungswerkzeug, das
sich bereits in der Ablauföffnung befindet.
2. Nehmen Sie das gesamte Gefriergut he-
raus, verpacken Sie es in mehrere
Schichten Zeitungspapier und lagern Sie
es an einem kühlen Ort.
Vorsicht! Fassen Sie eingefrorene
Lebensmittel nicht mit nassen Händen
an. Ihre Hände könnten an den
Lebensmitteln festfrieren.
3. Lassen Sie die Tür des Geräts offen ste-
hen und setzen Sie den Kunststoffschaber in den entsprechenden Sitz unten in
der Mitte; stellen Sie eine Schale zum
Auffangen des Tauwassers darunter
Stellen Sie eine Schale mit warmem
Wasser in das Gefrierfach, um den Abtauprozess zu beschleunigen. Entfernen Sie vorsichtig Eisstücke von den
Wänden, bevor alles abgetaut ist.
Abtauen des Gefrierschranks
Auf den Ablagen des Gefrierschranks und
im Innern des oberen Fachs wird sich stets
etwas Reif bilden.
Tauen Sie den Gefrierschrank ab, wenn die
Reifschicht eine Stärke von etwa 3 bis 5
mm erreicht hat.
Wichtig! Stellen Sie den Temperaturregler
bitte 12 Stunden vor dem Abtauen auf eine
kühlere Einstellung, damit eine
ausreichende Kälte als Reserve für die
Unterbrechung im Betrieb entstehen kann.
Entfernen Sie den Reif wie nachstehend erläutert:
1. Gerät ausstecken.
4. Ist alles vollständig abgetaut, trocken
Sie die nassen Oberflächen gründlich ab
und bewahren Sie den Schaber für eine
spätere Verwendung auf.
5. Schalten Sie das Gerät ein.
6. Nachdem das Gerät zwei bis drei Stun-
den in Betrieb ist, können Sie die ausgelagerten Lebensmittel wieder in den Gefrierschrank hinein legen.
Page 45

electrolux 45
Warnung! Verwenden Sie niemals
scharfe Gegenstände zum Entfernen
von Reif und Eis vom Verdampfer, da
dieser dadurch beschädigt werden
könnte.
Benutzen Sie keine mechanischen oder
sonstigen Hilfsmittel, um den Abtauprozess zu beschleunigen; halten Sie
sich dazu ausschließlich an die Angaben des Geräteherstellers.
Ein Temperaturanstieg des Gefrierguts
während des Abtauens des Gerätes
kann die Lagerzeit dieser Lebensmittel
verkürzen.
• trennen Sie das Gerät von der Netz-
versorgung
• entnehmen Sie alle Lebensmittel
•
tauen Sie das Gerät ab
18)
, Reinigen Sie
das Gerät und alle Zubehörteile
• lassen Sie die Türen offen/angelehnt, um
das Entstehen unangenehmer Gerüche
zu vermeiden.
Möchten Sie bei einer längeren Abwesenheit den Gefrierschrank weiter laufen lassen, bitten Sie jemanden, gelegentlich die
Temperatur zu prüfen, damit das Gefriergut
bei einem möglichen Stromausfall nicht im
Innern des Gerätes verdirbt.
Stillstandzeiten
Bei längerem Stillstand des Gerätes müssen Sie folgendermaßen vorgehen:
WAS TUN, WENN …
Warnung! Ziehen Sie vor der
Fehlersuche immer den Netzstecker
aus der Steckdose.
Maßnahmen zur Störungsbehebung,
die in der vorliegenden Gebrauchsanweisung nicht beschrieben sind, dürfen
nur von einem qualifizierten Elektriker
Störung Mögliche Ursache Abhilfe
Das Gerät funktioniert
nicht. Die Lampe funktioniert nicht.
Der Netzstecker steckt nicht
Das Gerät bekommt keinen
Es wird ein Warnton ausgegeben.
Die Lampe funktioniert
nicht.
Die Lampe ist defekt. Siehe hierzu "Austauschen der
Der Kompressor arbeitet
ständig.
Die Tür ist nicht richtig geschlos-
Das Gerät ist abgeschaltet. Schalten Sie das Gerät ein.
richtig in der Steckdose.
Strom. Es liegt keine Spannung
an der Netzsteckdose an.
Die Temperatur im Gefrierraum
ist zu hoch.
Die Lampe ist im Standby-Modus.
Die Temperatur ist nicht richtig
eingestellt.
sen.
oder einer kompetenten Person durchgeführt werden.
Wichtig! Während das Gerät in Betrieb ist,
entstehen bestimmte Geräusche
(Kompressor und Kühlkreislauf).
Stecken Sie den Netzstecker richtig in die Steckdose.
Testen Sie bitte, ob ein anderes
Gerät an dieser Steckdose funktioniert.
Kontaktieren Sie gegebenenfalls
einen qualifizierten Elektriker.
Siehe hierzu den Abschnitt "Temperaturwarnung (Temperatur zu
hoch)".
Schließen und öffnen und Sie die
Tür.
Lampe".
Stellen Sie eine höhere Tempera-
tur ein.
Siehe hierzu "Schließen der Tür".
18) Falls dies vorgesehen ist.
Page 46

46 electrolux
Störung Mögliche Ursache Abhilfe
Die Tür wurde zu häufig geöff-
Die Temperatur der zu kühlen-
Die Raumtemperatur ist zu
Wasser fließt an der
Rückwand des Kühlschranks hinunter.
Wasser fließt in den
Kühlschrank.
Die eingelagerten Lebensmittel
Wasser fließt auf den Boden.
Die Temperatur im Gerät
ist zu niedrig.
Die Temperatur im Gerät
ist zu hoch.
Die Tür ist nicht richtig geschlos-
Die Temperatur der zu kühlen-
Es wurden zu viele Lebensmittel
Die Temperatur im Kühlschrank ist zu hoch.
Die Temperatur im Gefrierraum ist zu hoch.
Es bildet sich zu viel Reif
oder Eis.
Die Tür ist nicht richtig geschlos-
Ersetzen der Lampe
Bitte ersetzen Sie die Lampe wie folgt:
1. Trennen Sie das Gerät vom Stromkreis.
2. Drücken Sie auf den Haken hinten und
schieben Sie die Abdeckung der Lampe
gleichzeitig in Pfeilrichtung.
net.
den Lebensmittel ist zu hoch.
hoch.
Beim automatischen Abtauen
fließt das abgetaute Wasser an
der Rückwand des Kühlschranks hinunter.
Der Wasserabflusskanal ist verstopft.
verhindern, dass das Wasser
zum Kollektor fließt.
Der Tauwasserablauf läuft nicht
in die Verdampferschale über
dem Kompressor.
Die Temperatur ist nicht richtig
eingestellt.
Die Temperatur ist nicht richtig
eingestellt.
sen.
den Lebensmittel ist zu hoch.
auf einmal eingelegt.
Die Kaltluft kann nicht im Gerät
zirkulieren.
Die einzufrierenden Packungen
liegen zu dicht aneinander.
Die Lebensmittel sind nicht richtig verpackt.
sen.
3. Ersetzen Sie die Lampe durch eine mit
der gleichen Leistung, die für Haushaltsgeräte geeignet sein muss. (die maximal
erlaubte Leistung steht auf der Abdeckung der Lampe).
4. Bringen Sie die Abdeckung der Lampe
wieder an, indem Sie sie an ihre ursprüngliche Position zurückschieben.
5. Schließen Sie das Gerät wieder an.
Lassen Sie die Tür nicht länger als
unbedingt erforderlich offen.
Lassen Sie Lebensmittel auf
Raumtemperatur abkühlen, bevor
Sie sie ins Gerät legen.
Senken Sie die Raumtemperatur.
Das ist normal.
Reinigen Sie den Ablauf.
Stellen Sie sicher, dass die Lebensmittel nicht die Rückwand
berühren.
Befestigen Sie den Tauwasserablauf an der Verdampferschale.
Stellen Sie eine höhere Temperatur ein.
Stellen Sie eine niedrigere Temperatur ein.
Siehe hierzu "Schließen der Tür".
Lassen Sie die Lebensmittel auf
Raumtemperatur abkühlen, bevor
Sie sie ins Gerät legen.
Legen Sie weniger Lebensmittel
auf einmal ein.
Stellen Sie sicher, dass die Kaltluft
im Gerät zirkulieren kann.
Stellen Sie sicher, dass die Kaltluft
im Gerät zirkuliert und die Lebensmittel dies nicht verhindern.
Verpacken Sie die Lebensmittel
richtig.
Siehe hierzu "Schließen der Tür".
Page 47

electrolux 47
6. Öffnen Sie die Tür und prüfen Sie, ob
die Beleuchtung funktioniert.
Schließen der Tür
1. Reinigen Sie die Türdichtungen.
2. Stellen Sie die Tür nach Bedarf ein. Siehe hierzu "Montage".
3. Ersetzen Sie die defekten Türdichtungen, falls erforderlich. Kontaktieren Sie
den Kundendienst.
TECHNISCHE DATEN
Abmessungen der Aussparung
Höhe 1780 mm
Breite 560 mm
Tiefe 550 mm
Lagerzeit bei Störung 24 Std.
Spannung 230-240 V
Frequenz 50 Hz
Die technischen Informationen befinden
sich auf dem Typenschild innen links im Gerät sowie auf der Energieplakette.
MONTAGE
Lesen Sie bitte die
"Sicherheitshinweise" sorgfältig vor der
Aufstellung des Geräts durch, um
Gefahren für Sie selbst zu vermeiden
und einen korrekten Betrieb des Geräts
zu gewährleisten.
Aufstellung
Installieren Sie dieses Gerät an einem Ort,
an dem die Umgebungstemperatur mit der
Klimaklasse übereinstimmt, die auf dem
Typschild des Geräts angegeben ist:
Klimaklasse
SN +10°C bis + 32°C
N +16°C bis + 32°C
ST +16°C bis + 38°C
T +16°C bis + 43°C
Umgebungstemperatur
Elektrischer Anschluss
Kontrollieren Sie vor der ersten Benutzung
des Gerätes, ob die Netzspannung und frequenz Ihres Hausanschlusses mit den
auf dem Typenschild angegebenen Anschlusswerten übereinstimmen.
Das Gerät muss geerdet sein. Zu diesem
Zweck ist die Netzkabelsteckdose mit ei-
Page 48

48 electrolux
nem Schutzkontakt ausgestattet. Falls die
Steckdose Ihres Hausanschlusses nicht geerdet sein sollte, lassen Sie das Gerät bitte
gemäß den geltenden Vorschriften erden
und fragen Sie dafür einen qualifizierten
Elektriker.
Der Hersteller übernimmt keinerlei Haftung
für Schäden oder Verletzungen, die durch
Missachtung der oben genannten Sicherheitshinweise entstehen.
Das Gerät entspricht den EU- Richtlinien.
Wechsel des Türanschlags
Die Tür des Geräts öffnet sich nach rechts.
Wenn Sie möchten, dass sich die Tür nach
links öffnet, gehen Sie vor dem Einbau des
Geräts bitte nach den folgenden Anweisungen vor:
1. Lösen Sie den oberen Scharnierstift und
entfernen Sie das Distanzstück.
2. Lösen Sie den oberen Bolzen und die
obere Tür.
3. Entfernen Sie die Scharnierabdeckung
(A). Lösen Sie die Stifte (B) und die Distanzstücke (C). Bringen Sie die Scharnierabdeckung (A) an.
4. Entfernen Sie die untere Tür.
5. Lösen Sie den unteren Scharnierstift.
C
B
A
Auf der gegenüberliegenden Seite:
1. Bringen Sie den unteren Scharnierstift
an.
2. Installieren Sie die untere Tür.
3. Bringen Sie die Stifte (B) und die Distanzstücke (C) am mittleren Scharnier
an der gegenüber liegenden Seite an.
4. Installieren Sie die obere Tür.
5. Legen Sie das Distanzstück ein und ziehen Sie den oberen Scharnierstift fest.
Anforderungen an die Belüftung
Die Luftzirkulation hinter dem Gerät muss
ausreichend groß sein.
Page 49

electrolux 49
min.
2
200 cm
Aufstellung des Geräts
Vorsicht! Vergewissern Sie sich, dass
sich das Netzkabel des Geräts frei
bewegen lässt.
Führen Sie diese Schritte durch.
min.
200 cm
1. Installieren Sie das Gerät in der Einbau-
nische.
Schieben Sie das Gerät in Pfeilrichtung
(1), bis der obere Anschlag am Küchenmöbel anliegt. Vergewissern Sie
sich, dass der Abstand zwischen dem
Gerät und der Schrankvorderkante 44
mm beträgt.
Schieben Sie das Gerät auf der den
2
Scharnieren gegenüberliegenden Seite
in Pfeilrichtung (2) soweit wie möglich
gegen die Seitenwand des Küchenmöbels. Vergewissern Sie sich, dass der
Abstand zwischen dem Gerät und dem
Schrank 4 mm beträgt.
2
1
Page 50

50 electrolux
2. Richten Sie das Gerät in der Nische
aus.
Mit der unteren Scharnierabdeckung
(im Beipack) können Sie sicherstellen,
dass der Abstand zwischen Gerät und
Küchenmöbel passt.
Öffnen Sie die Tür. Stecken Sie die untere Scharnierabdeckung auf.
4mm
44mm
3. Befestigen Sie das Gerät mit 4 Schrauben in der Nische.
4. Drücken Sie den Dichtungsstreifen zwischen das Gerät und das angrenzende
Küchenmöbel.
5. Brechen Sie das gekennzeichnete Teil
aus der Scharnierabdeckung (E) heraus. Achten Sie darauf, beim rechten
Scharnier Teil DX bzw. beim anderen
Scharnier Teil SX abzunehmen.
I
Page 51

electrolux 51
6. Setzen Sie die beiliegenden Abdeckkappen (C, D) in die Befestigungs- und
Scharnierlöcher ein.
Bauen Sie das Entlüftungsgitter (B) ein.
Stecken Sie die Scharnierabdeckungen
(E) auf das Scharnier auf.
C
D
E
E
7. Das Gerät muss seitlich wie folgt an
das Küchenmöbel angeschlossen werden:
a) Lockern Sie die Schrauben in den
Haltewinkeln (H).
b) Verschieben Sie die Haltewinkel (H).
c) Ziehen Sie die Schrauben wieder
an.
B
8. Die Teile Ha, Hb, Hc und Hd abtrennen
Ha
Hb
Hc
Hd
9. Montieren Sie Teil Ha an der Innenseite
des Küchenmöbels.
ca. 50 mm
90°
21 mm
90°
ca. 50 mm
10. Drücken Sie Teil Hc auf Teil Ha.
21 mm
Ha
Hc
Page 52

52 electrolux
11. Öffnen Sie die Gerätetür und die Tür
des Küchenmöbels in einem Winkel
von 90°.
Setzen Sie das Führungsstück (Hb) in
die Führungsschiene (Ha) ein.
Bringen Sie die Gerätetür und die Küchenmöbeltür zusammen und markieren Sie die Bohrungen.
8 mm
Ha
Hb
12. Nehmen Sie das Führungsstück (Hb)
wieder ab. Schlagen Sie 8 mm von der
Außenkante mit dem Nagel (K) und einem Hammer je ein kleines Loch in das
Türblech.
13. Setzen Sie das Führungsstück (Hb) erneut auf die Führungsschiene (Ha) und
schrauben Sie es mit den mitgelieferten
Schrauben fest.
Richten Sie die Küchenmöbeltür und
die Gerätetür mittels Führungsstück
(Hb) aus.
Hb
14. Drücken Sie Teil Hd auf Teil Hb.
8 mm
K
Ha
HINWEISE ZUM UMWELTSCHUTZ
Das Symbol auf dem Produkt oder
seiner Verpackung weist darauf hin, dass
dieses Produkt nicht als normaler
Haushaltsabfall zu behandeln ist, sondern
an einem Sammelpunkt für das Recycling
von elektrischen und elektronischen
Hb
Hd
Prüfen Sie alles erneut, um sicherzustellen,
dass:
• Alle Schrauben fest angezogen sind.
• Der magnetische Dichtungsstreifen sicher
am Gerät befestigt ist.
Geräten abgegeben werden muss. Durch
Ihren Beitrag zum korrekten Entsorgen
dieses Produkts schützen Sie die Umwelt
und die Gesundheit Ihrer Mitmenschen.
Umwelt und Gesundheit werden durch
falsches Entsorgen gefährdet. Weitere
Informationen über das Recycling dieses
Page 53

Produkts erhalten Sie von Ihrem Rathaus,
Ihrer Müllabfuhr oder dem Geschäft, in dem
Sie das Produkt gekauft haben.
electrolux 53
Page 54

54 electrolux
Electrolux. Thinking of you.
Per conoscere meglio il nostro modo di pensare, visitate il
sito www.electrolux.com
INDICE
Informazioni per la sicurezza 54
Pannello dei comandi 56
Primo utilizzo 58
Utilizzo quotidiano 59
Consigli e suggerimenti utili 61
INFORMAZIONI PER LA SICUREZZA
Per garantire un impiego corretto e sicuro
dell'apparecchio, prima dell'installazione e
del primo utilizzo leggere con attenzione il libretto istruzioni, inclusi i suggerimenti e le
avvertenze. Per evitare errori e incidenti, è
importante garantire che tutte le persone
che utilizzano l'apparecchio ne conoscano il
funzionamento e le caratteristiche di sicurezza. Conservare queste istruzioni e accertarsi che rimangano unite all'apparecchio in
caso di vendita o trasloco, in modo che
chiunque lo utilizzi sia correttamente informato sull'uso e sulle norme di sicurezza.
Per la sicurezza delle persone e delle cose
osservare le precauzioni indicate nelle presenti istruzioni per l'utente, il produttore non
è responsabile dei danni provocati da eventuali omissioni.
Sicurezza dei bambini e delle persone
fragili
• Questo apparecchio non deve essere
usato da persone, bambini inclusi, con ridotte capacità fisiche, sensoriali o psichiche, oppure prive di conoscenza e esperienza, a meno che non siano state istruite all'uso dell'apparecchio da parte dei
responsabili della loro sicurezza, oppure
sotto vigilanza di questi.
I bambini devono essere sorvegliati per
assicurarsi che non giochino con l'apparecchio.
• Tenere i materiali di imballaggio al di fuori
della portata dei bambini. Alcuni materiali
possono creare rischi di soffocamento.
• Qualora l'apparecchio venga demolito,
estrarre la spina dalla presa, tagliare il cavo di collegamento (il più vicino possibile
all'apparecchio) e smontare lo sportello
Pulizia e cura 62
Cosa fare se… 63
Dati tecnici 65
Installazione 66
Considerazioni ambientali 70
Con riserva di modifiche
per evitare che i bambini giocando possano subire scosse elettriche o chiudersi
dentro l'apparecchio.
• Se questo nuovo apparecchio, che è dotato di guarnizioni magnetiche nello sportello, va a sostituirne uno più vecchio
avente sportello o coperchio con chiusure a molla, si deve rendere inutilizzabili tali
chiusure prima di eliminare l'apparecchio
sostituito, per evitare che diventi una
trappola mortale per i bambini.
Norme di sicurezza generali
Attenzione Accertarsi che le aperture
di ventilazione non siano ostruite.
• L'apparecchiatura è progettata per la
conservazione domestica di alimenti e/o
bevande nelle modalità descritte nelle
presenti istruzioni.
• Non utilizzare dispositivi meccanici o altri
mezzi artificiali per accelerare lo sbrinamento.
• Non utilizzare altre apparecchiature elettriche (per esempio gelatiere) all'interno
del frigorifero, salvo quelle approvate per
tale scopo dal produttore.
• Non danneggiare il circuito refrigerante.
• Il circuito refrigerante dell'apparecchiatura contiene isobutano (R600a), un gas
naturale con un elevato livello di compatibilità ambientale che, tuttavia, è infiammabile.
Durante il trasporto e l'installazione dell'apparecchiatura, assicurarsi che nessuno dei componenti del circuito refrigerante venga danneggiato.
In caso di danneggiamento del circuito
refrigerante:
Page 55

electrolux 55
– Evitare fiamme libere e scintille
– Aerare bene il locale in cui si trova l'ap-
parecchiatura
• È pericoloso cambiare le specifiche o
modificare il prodotto in qualunque modo. Un danneggiamento del cavo potrebbe provocare cortocircuiti, incendi e/o
scosse elettriche.
Avvertenza Tutti i componenti elettrici
(cavo di alimentazione, spina, compressore) devono essere sostituiti da
un tecnico certificato o da personale
d'assistenza qualificato.
1. Non collegare prolunghe al cavo di
alimentazione.
2. Evitare che il lato posteriore dell'appa-
recchiatura possa schiacciare o danneggiare la spina, causandone il surriscaldamento con un conseguente rischio di incendio.
3. La spina dell'apparecchiatura deve
trovarsi in una posizione accessibile.
4. Evitare di tirare il cavo di alimentazio-
ne.
5. Se la presa elettrica non è perfetta-
mente stabile, non inserire la spina. Il
collegamento potrebbe provocare
scosse elettriche o creare un rischio
di incendio.
6. L'apparecchiatura non deve essere
messo in funzione senza il coprilam-
19)
pada interno
della luce interna.
• Questa apparecchiatura è pesante. Prestare attenzione quando occorre spostarla.
• Evitare di estrarre o di toccare gli alimenti
riposti nel vano congelatore con le mani
bagnate o umide; il contatto potrebbe
provocare abrasioni o ustioni da freddo.
• Evitare un'esposizione prolungata dell'apparecchiatura alla luce solare diretta.
•
Lampadine
20)
utilizzate in questa apparecchiatura sono lampadine speciali selezionate per essere usate unicamente negli elettrodomestici. Non sono adatte per
l'illuminazione degli ambienti.
19) Per le apparecchiature che prevedono il coprilampada.
20) Nel caso in cui la lampadina sia prevista.
21) Se l'apparecchio è di tipo No-Frost.
Uso quotidiano
• Non collocare pentole calde sulle parti in
plastica dell'apparecchio.
• Non collocare gas e liquidi infiammabili
nell'apparecchio, perché potrebbero
esplodere.
• Non collocare gli alimenti direttamente
contro l'uscita dell'aria nella parete po-
steriore.
21)
• Gli alimenti congelati non devono essere
ricongelati una volta scongelati.
• Riporre gli alimenti surgelati preconfezionati secondo le istruzioni del produttore
dell'alimento surgelato.
• Osservare rigorosamente i consigli per la
conservazione degli alimenti del produttore dell'apparecchio. Vedere le relative
istruzioni.
• Non collocare bevande gassate o frizzanti nello scomparto congelatore perché
creano pressione sul recipiente che può
esplodere danneggiando l'apparecchio.
• I ghiaccioli possono provocare bruciature
da gelo se consumati immediatamente
dopo averli tolti dall'apparecchio.
Pulizia e cura
• Prima della manutenzione, spegnere l'apparecchio e staccare la spina dalla presa.
• Non pulire l'apparecchio con oggetti metallici.
• Non usare oggetti appuntiti per rimuovere
la brina dall'apparecchio. Usare un raschietto di plastica.
• Esaminare regolarmente il foro di scarico
dell'acqua di sbrinamento nel frigorifero.
Se necessario, pulirlo. Se il foro è otturato, l'acqua si raccoglie sul fondo dell'apparecchio.
Installazione
Importante Per il collegamento elettrico,
seguire attentamente le istruzioni dei
paragrafi corrispondenti.
• Disimballare l'apparecchio e assicurarsi
che non presenti danni. Non collegare
l'apparecchio se è danneggiato. Segnalare immediatamente gli eventuali danni al
negozio in cui è stato acquistato. In questo caso conservare l'imballaggio.
Page 56

56 electrolux
• Si consiglia di attendere almeno due ore
prima di collegare l'apparecchio per consentire all'olio di arrivare nel compressore.
• Attorno all'apparecchio vi deve essere
un'adeguata circolazione dell'aria, altrimenti si può surriscaldare. Per ottenere
una ventilazione sufficiente seguire le
istruzioni di installazione.
• Se possibile il retro dell'apparecchio dovrebbe essere posizionato contro una
parete per evitare di toccare le parti calde
o di rimanervi impigliati (compressore,
condensatore), evitando così possibili
scottature.
• L'apparecchio non deve essere posto vicino a radiatori o piani di cottura a gas.
• Installare l'apparecchio in modo che la
presa rimanga accessibile.
• Per il collegamento idrico, usare solo sorgenti d'acqua potabile.
22)
Assistenza tecnica
• Gli interventi elettrici sull'apparecchiatura
devono essere eseguiti esclusivamente
PANNELLO DEI COMANDI
da elettricisti qualificati o da personale
competente.
• Gli interventi di assistenza devono essere
eseguiti esclusivamente da tecnici autorizzati e utilizzando solo ricambi originali.
Tutela ambientale
Questo apparecchio non contiene gas
che potrebbero danneggiare lo strato
di ozono nel circuito refrigerante o nei
materiali isolanti. L'apparecchio non
deve essere smaltito assieme ai rifiuti
urbani e alla spazzatura. La schiuma
dell'isolamento contiene gas infiammabili: lo smaltimento dell'apparecchio va
eseguito secondo le prescrizioni vigenti
da richiedere alle autorità locali. Evitare
di danneggiare il gruppo refrigerante,
specialmente nella parte posteriore vicino allo scambiatore di calore. I materiali
usati su questo apparecchio contras-
segnati dal simbolo
MODE˚C
sono riciclabili.
123 4 5 6
1 Tasto ON/OFF
2 Regolatore di temperatura del congela-
tore
3 Tasto indicatore della temperatura del
4 Display
5 Tasto funzione
Tasto di reset allarme
6 Regolatore di temperatura del frigorifero
frigorifero-congelatore
Display
1 2 3 4 5 8 7 6
1 Indicatore vano frigorifero
2 Indicatore vano congelatore
3 Indicatore di temperatura positiva o ne-
gativa
4 Display della temperatura
22) Per gli apparecchi che prevedono un collegamento alla rete idrica.
Page 57

electrolux 57
5 Action Freeze Funzione
6 Funzione Shopping
7 Funzione Minidac
8 Funzione Performance Optimization
Accensione
Dopo aver inserito la spina nella presa, se il
display non si illumina premere il tasto ON/
OFF.
All'accensione dell'apparecchiatura, sul
pannello comandi compaiono le indicazioni
seguenti:
• L'indicatore di temperatura positiva o negativa è positivo per indicare che la temperatura è positiva
• La temperatura lampeggia, lo sfondo del
display è rosso e si attiva un segnale
acustico.
Premendo il tasto funzione si disattiva il segnale acustico (vedere anche "Allarme di
temperatura eccessiva" ).
Impostare la temperatura desiderata (vedere "Regolazione della temperatura").
Spegnimento
L'apparecchiatura si spegne premendo il
tasto ON/OFF per più di 1 secondo,
dopodiché viene visualizzato un conto alla
rovescia (-3 -2 -1) della temperatura.
Quando si spegne l'apparecchiatura, si
spegne anche il display.
Indicatore della temperatura
A ogni pressione del tasto indicatore di
temperatura del frigorifero-congelatore, il display indica in sequenza:
1. – L'indicatore del vano frigorifero è ac-
ceso.
– Il display indica la temperatura del fri-
gorifero.
2. – L'indicatore del vano congelatore è
acceso.
23)
– Il display indica la temperatura del
congelatore.
In ogni caso, dopo 10 secondi sono ripristinate le normali condizioni del display.
Menu Funzioni
Ad ogni pressione del tasto Funzione, si attivano le seguenti funzioni in senso orario:
• Action Freeze Funzione
• Funzione Shopping
23) In condizioni normali.
• Funzione Minidac
• Funzione Performance Optimization
• Nessun simbolo: funzionamento normale.
Importante È possibile impostare una sola
funzione per volta.
Per disattivare una funzione, premere più
volte il tasto funzione finché non compare
più alcun simbolo.
Regolazione della temperatura
La temperatura all'interno dell'apparecchiatura è controllata dalla manopola di regolazione della temperatura che si trova nella
parte alta dell'apparecchiatura.
La temperatura del vano frigorifero può essere regolata tra +2°C e +8°C circa ruotando il regolatore di temperatura del frigorifero.
La temperatura del vano congelatore può
essere regolata tra più o meno -15°C e
-24°C ruotando il regolatore di temperatura
del congelatore.
Quando si ruota il regolatore di temperatura, il display lampeggia e indica la temperatura desiderata.
Per una corretta conservazione degli alimenti si dovrebbero impostare le temperature seguenti:
+5°C nel frigorifero
-18°C nel congelatore.
Una volta impostata la temperatura desiderata, se non si ruota il regolatore di temperatura entro 5 secondi, sul display è indicata la temperatura del vano congelatore.
Per regolare il livello di raffreddamento, procedere come segue:
• ruotare il regolatore di temperatura in
senso orario per aumentare al massimo
l'intensità del raffreddamento
• ruotare il regolatore di temperatura in
senso antiorario per ridurre al minimo l'intensità del raffreddamento.
La posizione centrale è generalmente la più
adatta.
Tuttavia, è importante ricordare che la temperatura all'interno dell'apparecchiatura è
condizionata dai seguenti fattori:
• temperatura ambiente
• frequenza di apertura della porta
• quantità di alimenti conservati
• posizione dell'apparecchiatura.
Page 58

58 electrolux
Funzione Performance optimization
La funzione Performance optimization si attiva premendo il tasto Funzione (se necessario più volte) finché appare il simbolo
Con questa funzione attiva, sono impostate
automaticamente le temperature e le condizioni ottimali per la conservazione degli alimenti e l'azionamento di qualunque tasto
non produce alcun effetto.
È possibile disattivare la funzione in qualsiasi momento premendo il tasto (vedere "Attivazione delle funzioni").
Funzione Shopping
Se occorre inserire una grande quantità di
alimenti nel frigorifero, per esempio al ritorno dalla spesa, è consigliabile attivare la
funzione Shopping per raffreddare più rapidamente gli alimenti introdotti nel frigorifero
e non intiepidire i cibi già presenti al suo interno.
La funzione Shopping si attiva premendo il
tasto funzione (se necessario più volte) fin-
ché appare il simbolo
La funzione Shopping si disattiva automaticamente dopo circa 6 ore.
Quando è attiva la funzione Shopping, si attiva automaticamente anche la ventola presente all'interno del vano frigorifero.
Importante La ventola all'interno del vano
frigorifero si attiva automaticamente quando
la temperatura ambiente è superiore a
38°C, anche quando la funzione Shopping
non è attivata.
È possibile disattivare la funzione in qualsiasi momento premendo il tasto Funzione (vedere "Menu Funzioni").
Funzione Action Freeze
Per il congelamento di alimenti freschi, è
necessario attivare la funzione Action Free-
.
ze. Premere il tasto Funzione (se necessario
più volte) finché appare il simbolo corrispondente.
Questa funzione si arresta automaticamen-
.
te dopo 52 ore.
È possibile disattivare la funzione in qualsiasi momento premendo il tasto (vedere "Menu Funzioni").
Allarme temperatura eccessiva
Un aumento di temperatura nel vano congelatore (per esempio a causa di un'interruzione dell'alimentazione elettrica) è indicato
da:
• Temperatura lampeggiante
• Vano congelatore lampeggiante (indicatore vano congelatore)
• Illuminazione rossa del display
• Emissione di un segnale acustico
• Simbolo di allarme.
Al ripristino delle condizioni normali:
• l'allarme acustico si interrompe
• il valore della temperatura continua a
lampeggiare
• l'illuminazione del display rimane rossa.
Quando si preme il tasto funzione / interruttore di reset dell'allarme per disattivare l'al-
larme, l'indicatore
condi la temperatura massima raggiunta nel
vano.
A questo punto il lampeggiamento si interrompe e l'illuminazione del display si trasforma da rossa a bianca.
Durante la fase di allarme, il segnale acustico può essere disattivato premendo l'interruttore di reset dell'allarme.
L'illuminazione del display rimane rossa fino
al ripristino delle condizioni normali di conservazione.
mostra per alcuni se-
PRIMO UTILIZZO
Pulizia dell'interno
Prima di utilizzare l'apparecchio per la prima volta, lavare l'interno e gli accessori interni con acqua tiepida e un po' di sapone
neutro in modo a togliere il tipico odore dei
prodotti nuovi, quindi asciugare accuratamente.
Importante Non usare detergenti corrosivi
o polveri abrasive che danneggiano le finiture.
Page 59

UTILIZZO QUOTIDIANO
Congelazione dei cibi freschi
Il vano congelatore è adatto alla congelazione di cibi freschi e alla conservazione a lungo termine di alimenti congelati e surgelati.
Per congelare alimenti freschi, attivare la
funzione Action Freeze almeno 24 ore prima di introdurli nel vano congelatore.
Introdurre gli alimenti da congelare nella
parte superiore del vano congelatore, che
rappresenta il punto più freddo.
La quantità massima di alimenti congelabile
in 24 ore è riportata sulla targhetta, un'etichetta presente sulle pareti interne dell'apparecchiatura.
Il processo di congelamento dura 24 ore:
finché non è concluso, non aggiungere altro
cibo da congelare.
Conservazione dei surgelati
Al primo avvio o dopo un periodo di non
utilizzo, lasciare in funzione l'apparecchiatura per almeno 12 ore con la regolazione Action Freeze prima di introdurre gli alimenti.
Per conservare grandi quantità di cibo, togliere dall'apparecchiatura tutti i cassetti e i
cestelli e sistemare il cibo sui ripiani di raffreddamento per ottenere i migliori risultati.
Avvertenza Accertare che il cibo non
superi il limite di carico riportato a lato
della sezione superiore (quando
electrolux 59
congelatore: in questo caso la cottura durerà più a lungo.
Accumulatori di freddo
Il congelatore contiene almeno un accumulatore di freddo che prolunga il tempo di
conservazione degli alimenti in caso di interruzione della corrente elettrica.
Produzione di cubetti di ghiaccio
Questo apparecchio è equipaggiato con
una o più vaschette per la produzione di
cubetti di ghiaccio. Riempire d'acqua le vaschette quindi inserirle nel vano congelatore.
Importante Non usare strumenti metallici
per rimuovere le vaschette dal congelatore.
Ripiani mobili
Le pareti del frigorifero sono equipaggiate
con una serie di guide che permettono di
collocare i ripiani nella posizione desiderata.
Per un migliore sfruttamento dello spazio, i
semiripiani anteriori possono essere collocati sopra a quelli posteriori.
applicabile)
Importante In caso di sbrinamento
accidentale, per esempio a causa di
un'interruzione dell'alimentazione elettrica,
se l'alimentazione manca per un periodo
superiore al valore indicato nella tabella dei
dati tecnici sotto "Tempo di risalita", il cibo
scongelato deve essere consumato
rapidamente o cucinato immediatamente
quindi ricongelato (dopo il raffreddamento).
Scongelamento
Prima dell'utilizzo, i cibi surgelati o congelati
possono essere scongelati nel vano frigorifero o a temperatura ambiente, in funzione
del tempo disponibile per questa operazione.
I pezzi piccoli possono addirittura essere
cucinati ancora congelati, direttamente dal
Posizionamento dei ripiani della porta
Per consentire di riporre pacchetti di cibo di
varie dimensioni, i ripiani della porta possono essere collocati ad altezze diverse.
Per tali regolazioni, procedere come segue:
tirare gradualmente il ripiano nella direzione
delle frecce fino a liberarlo, quindi riposizionarlo come desiderato.
Page 60

60 electrolux
Controllo dell'umidità
Il ripiano di vetro incorpora un dispositivo a
fessure, regolabili per mezzo di una leva
scorrevole, che consente di regolare la temperatura del cassetto o dei cassetti delle
verdure.
Quando le fessure di ventilazione sono
chiuse,
l'umidità naturale del cibo conservato negli
scomparti della frutta e della verdura viene
preservata più a lungo.
Quando le fessure di ventilazione sono
aperte,
la maggiore circolazione di aria riduce l'umidità presente negli scomparti della frutta e
della verdura.
Riciclo dell'aria
Il vano frigo è dotato di una speciale ventola
D.A.C. (Raffreddamento Dinamico dell'Aria).
Questo dispositivo consente un rapido raffreddamento degli alimenti e mantiene più
uniforme la temperatura nello scomparto.
ACCENDERE la ventola premendo il tasto
Funzione (se necessario più volte) finché
appare l'icona corrispondente
.
Accendere la ventola quando la temperatura ambiente supera i 25 °C.
Quando la temperatura ambiente è superiore ai 38°C o quando la funzione Shopping è
su ON, la ventola si ACCENDE in modo automatico.
La funzione può essere DISATTIVATA in
qualunque momento premendo di nuovo il
tasto Funzione finché l'icona
scompare.
Page 61

CONSIGLI E SUGGERIMENTI UTILI
Consigli per il risparmio energetico
• Non aprire frequentemente la porta e non
lasciarla aperta più di quanto assolutamente necessario.
• Se la temperatura ambiente è elevata, il
termostato è impostato su una regolazione alta e l'apparecchio è a pieno carico, il
compressore può funzionare in continuo
causando la formazione di brina o ghiaccio sull'evaporatore. In questo caso, ruotare il termostato su una regolazione più
bassa per consentire lo scongelamento
automatico risparmiando così energia.
Consigli per la refrigerazione di cibi
freschi
Per ottenere i migliori risultati:
• non riporre nel frigorifero cibi caldi o liquidi in fase di evaporazione
• coprire o avvolgere il cibo, in particolare
se emana un odore forte
• posizionare il cibo in modo che l'aria possa circolare liberamente attorno ad esso
Consigli per la refrigerazione
Consigli utili:
Carne (tutti i tipi): avvolgerla in sacchetti di
politene e collocarla sul ripiano di vetro sopra il cassetto delle verdure.
Per motivi di sicurezza, conservarla in queste condizioni solo per uno o due giorni al
massimo.
Cibi cucinati, piatti freddi ecc..: dovrebbero
essere coperti e possono essere collocati
su qualsiasi ripiano.
Frutta e verdura: dovrebbero essere pulite
accuratamente e collocate nell'apposito/i
cassetto/i speciale/i.
Burro e formaggio: dovrebbero essere posti
in contenitori ermetici speciali o avvolti in
pellicole di alluminio o sacchetti di politene
per escludere per quanto possibile l'aria.
Bottiglie di latte: dovrebbero essere tappate
e conservate nell'apposito ripiano sulla porta.
Non conservare nel frigorifero banane, patate, cipolle o aglio se non sono confezionati.
Consigli per il congelamento
Per un processo di congelamento ottimale,
ecco alcuni consigli importanti:
electrolux 61
• la quantità massima di cibo che può essere congelata in 24 h è riportata sulla
targhetta;
• il processo di congelamento dura 24 ore.
In questo periodo non aggiungere altro
cibo da congelare;
• congelare solo alimenti freschi, di ottima
qualità e accuratamente puliti;
• preparare il cibo in piccole porzioni per
consentire un congelamento rapido e
completo e per scongelare in seguito solo la quantità necessaria;
• avvolgere il cibo in pellicole di alluminio o
in politene e verificare che i pacchetti siano ermetici;
• non lasciare che cibo fresco non congelato entri in contatto con quello già congelato, per evitare un aumento della temperatura in quest'ultimo;
• i cibi magri si conservano meglio e più a
lungo di quelli grassi; il sale riduce il periodo di conservazione del cibo;
• i ghiaccioli, se consumati immediatamente dopo la rimozione dal vano congelatore, possono causare ustioni da congelamento della pelle;
• si consiglia di riportare la data di congelamento su ogni singolo pacchetto per riuscire a tenere traccia del tempo di conservazione;
Consigli per la conservazione dei
surgelati
Per ottenere i migliori risultati con questo
apparecchio:
• accertare che i cibi congelati commercialmente siano adeguatamente conservati
dal rivenditore;
• fare in modo che i cibi congelati siano
trasferiti dal negozio al congelatore nel
più breve tempo possibile;
• non aprire la porta frequentemente o lasciarla aperta più del tempo strettamente
necessario.
• Una volta scongelato, il cibo si deteriora
rapidamente e non può essere ricongelato.
• Non superare il periodo di conservazione
indicato dal produttore.
Page 62

62 electrolux
PULIZIA E CURA
Attenzione Staccare la spina
dell'apparecchio prima di eseguire
lavori di manutenzione.
Questo apparecchio contiene idrocarburi nell'unità di raffreddamento; la manutenzione e la ricarica devono pertanto essere effettuate esclusivamente da
tecnici autorizzati.
Pulizia periodica
L'apparecchio deve essere pulito regolarmente:
• Pulire l'interno e gli accessori con acqua
tiepida e un po' di sapone neutro.
• Controllare regolarmente le guarnizioni
della porta e verificare che siano pulite e
prive di residui.
• Risciacquare e asciugare accuratamente.
Importante Non tirare, spostare o
danneggiare tubi e/o cavi all'interno
dell'apparecchio.
Non usare mai detergenti, polveri abrasive,
prodotti per la pulizia con una forte profumazione o cere lucidanti per pulire l'interno,
in quanto danneggiano la superficie e lasciano un odore forte.
Pulire il condensatore (griglia nera) e il compressore sul retro con una spazzola o un
aspirapolvere. Questa operazione migliorerà
le prestazioni dell'apparecchio riducendo i
consumi elettrici.
Importante Non danneggiare il sistema di
raffreddamento.
Molti detergenti per cucine di marca contengono sostanze chimiche in grado di attaccare/danneggiare la plastica impiegata in
questo apparecchio. Per questo motivo si
raccomanda di pulire l'involucro esterno
dell'apparecchio solo con acqua calda con
un po' di liquido detergente.
Dopo la pulizia, ricollegare l'apparecchio alla rete di alimentazione.
Sbrinamento del frigorifero
Durante l'uso normale la brina è eliminata
automaticamente dall'evaporatore del vano
frigorifero ogni volta che il motocompressore si arresta. L'acqua di sbrinamento è scaricata attraverso un condotto in un conteni-
tore speciale sul retro dell'apparecchio, sopra il motocompressore, dove evapora.
È importante pulire periodicamente il foro di
scarico dell'acqua di sbrinamento al centro
del canale nel vano frigorifero per evitare
che l'acqua fuoriesca gocciolando sul cibo
all'interno. Usare lo speciale detergente in
dotazione, già inserito nel foro di scarico.
Sbrinamento del congelatore
Una certa quantità di brina si formerà sempre sui ripiani del congelatore e attorno allo
scomparto superiore.
Sbrinare il congelatore quando lo strato di
brina raggiunge uno spessore di ca. 3-5
mm.
Importante Circa 12 ore prima dello
sbrinamento, impostare il termostato su
una regolazione più alta per accumulare
una riserva di freddo sufficiente per
l'interruzione del funzionamento.
Per rimuovere la brina, seguire le istruzioni
sottostanti:
1. Spegnere l'apparecchio.
2. Rimuovere il cibo eventualmente conservato, avvolgendolo in diversi strati di
carta di giornale e collocandolo in un
luogo fresco.
Attenzione Non toccare il cibo
congelato con le mani bagnate. Le
mani potrebbero aderire all'alimento
congelato.
Page 63

electrolux 63
3. Lasciare aperta la porta e inserire il raschietto in plastica nella sede appropriata al centro sul fondo, collocando una
bacinella al di sotto per raccogliere l'acqua di sbrinamento.
Per accelerare il processo di sbrinamento, collocare un recipiente di acqua
calda nel vano congelatore. Inoltre rimuovere i pezzi di ghiaccio che si distaccano prima che lo sbrinamento sia
completo.
4. Una volta completato lo sbrinamento,
asciugare accuratamente l'interno conservando il raschietto per l'uso futuro.
5. Accendere l'apparecchio.
6. Dopo due o tre ore, reintrodurre nel vano il cibo precedentemente rimosso.
Avvertenza Per rimuovere la brina
dall'evaporatore, non usare utensili
metallici appuntiti che possano
danneggiarlo.
Non usare dispositivi elettrici o altri
mezzi artificiali non raccomandati dal
produttore allo scopo di accelerare il
processo di sbrinamento.
Un innalzamento della temperatura dei
surgelati durante lo sbrinamento può ridurre la loro durata di conservazione.
Periodi di inutilizzo
Quando l'apparecchio non è utilizzato per
lunghi periodi, adottare le seguenti precauzioni:
• scollegare l'apparecchio dalla rete
elettrica
• rimuovere tutto il cibo
•
sbrinare
24)
e pulire l'apparecchio e tutti gli
accessori
• lasciare la/e porta/e socchiusa/e per evi-
tare odori sgradevoli.
Se l'apparecchio rimane acceso, chiedere a
qualcuno di controllare ogni tanto per evitare che il cibo contenuto marcisca in caso di
interruzione dell'alimentazione elettrica.
COSA FARE SE…
Avvertenza Prima della ricerca guasti,
estrarre la spina dalla presa.
Le operazioni di ricerca guasti non descritte nel presente manuale devono
essere eseguite esclusivamente da
elettricisti qualificati o da personale
competente.
Problema Possibile causa Soluzione
L'apparecchiatura non
funziona. La lampadina
non si accende.
La spina non è inserita corretta-
24) Se previsto.
L'apparecchiatura è spenta. Accendere l’apparecchio.
mente nella presa di alimentazione.
Importante Durante l'uso, alcuni rumori di
funzionamento (come quelli del
compressore o del circuito refrigerante)
sono da considerarsi normali.
Inserire correttamente la spina
nella presa di alimentazione.
Page 64

64 electrolux
Problema Possibile causa Soluzione
L'apparecchio non riceve cor-
rente. Assenza di tensione nella
presa di alimentazione.
Collegare alla presa di alimentazione un'altra apparecchiatura
elettrica.
Rivolgersi ad un elettricista qualificato.
Viene emesso un segnale
acustico.
La lampadina non si accende.
La temperatura nel vano congelatore è troppo alta.
La lampadina è in modalità
stand-by.
Fare riferimento alla sezione "Allarme temperatura eccessiva"
Chiudere e riaprire lo sportello.
La lampadina è difettosa. Fare riferimento alla sezione "So-
stituzione della lampadina".
Il compressore rimane
sempre in funzione.
Lo sportello non è chiuso corret-
Lo sportello viene aperto troppo
La temperatura degli alimenti è
La temperatura non è impostata
correttamente.
tamente.
frequentemente.
troppo alta.
Impostare una temperatura superiore.
Fare riferimento alla sezione
"Chiusura dello sportello".
Limitare il più possibile il tempo di
apertura dello sportello.
Prima di conservare gli alimenti,
lasciarli raffreddare a temperatura
ambiente.
La temperatura ambiente è trop-
po alta.
Sul pannello posteriore
del frigorifero scorre acqua.
All'interno del frigorifero
Durante lo sbrinamento automatico, la brina che si forma sul
pannello posteriore si scioglie.
Lo scarico dell'acqua è ostruito. Pulire lo scarico dell'acqua.
Abbassare la temperatura ambiente.
Non si tratta di un'anomalia.
scorre acqua.
Gli alimenti impediscono all'ac-
qua di scorrere nell'apposito collettore.
Sul pavimento scorre acqua.
L'acqua di sbrinamento non viene scaricata nella bacinella di
evaporazione posta sopra il
Evitare di disporre gli alimenti a diretto contatto con il pannello posteriore.
Collegare lo scarico dell'acqua di
sbrinamento alla bacinella di evaporazione.
compressore.
La temperatura all'interno dell'apparecchiatura è
Il regolatore della temperatura
non è impostato correttamente.
Impostare una temperatura superiore.
troppo bassa.
La temperatura all'interno dell'apparecchio è
Il regolatore della temperatura
non è impostato correttamente.
Impostare una temperatura inferiore.
troppo alta.
Lo sportello non è chiuso corret-
tamente.
La temperatura degli alimenti è
troppo alta.
Fare riferimento alla sezione
"Chiusura dello sportello".
Prima di conservare gli alimenti,
lasciarli raffreddare a temperatura
ambiente.
Sono stati introdotti molti ali-
menti contemporaneamente.
La temperatura nel vano
frigorifero è troppo alta.
L'aria fredda non circola correttamente all'interno dell'apparecchio.
Introdurre gli alimenti poco alla
volta.
Adottare le misure necessarie per
garantire una corretta circolazione
dell'aria fredda.
Page 65

Problema Possibile causa Soluzione
La temperatura nel vano
congelatore è troppo alta.
Si forma troppa brina.
Lo sportello non è chiuso corret-
I prodotti sono troppo vicini tra
loro.
Gli alimenti non sono avvolti correttamente.
tamente.
Sostituzione della lampadina
Per sostituire la lampadina, procedere come segue:
1. Spegnere l'apparecchiatura e staccare
la spina dalla presa.
2. Premere sul gancio posteriore e contemporaneamente fare scorrere il coprilampada nella direzione della freccia.
3. Sostituire la lampadina con una di uguale potenza (la potenza massima è indicata sul coprilampada) concepita in modo specifico per elettrodomestici.
4. Rimontare il coprilampada facendolo
scorrere nella posizione originale.
5. Reinserire la spina nella presa e accendere l'apparecchiatura.
6. Aprire la porta e verificare che la luce si
accenda.
Chiusura della porta
1. Pulire le guarnizioni della porta.
2. Se necessario, regolare la porta. Vedere
"Installazione".
3. Se necessario, sostituire le guarnizioni
della porta difettose. Contattare il Centro di assistenza locale.
electrolux 65
Disporre i prodotti in modo da
consentire una corretta circolazione dell'aria fredda.
Avvolgere correttamente gli alimenti.
Fare riferimento alla sezione
"Chiusura dello sportello".
DATI TECNICI
Nicchia di incasso
Altezza 1780 mm
Larghezza 560 mm
Profondità 550 mm
Tempo di risalita 24 h
Tensione 230-240 V
Frequenza 50 Hz
I dati tecnici sono riportati sulla targhetta
del modello, applicata sul lato sinistro inter-
no dell'apparecchio, e sull'etichetta dei valori energetici.
Page 66

66 electrolux
INSTALLAZIONE
Leggere con attenzione le "Informazioni
per la sicurezza" per la vostra sicurezza
e per il corretto funzionamento
dell'apparecchio prima di procedere
all'installazione.
Posizionamento
Installare questo apparecchio in un punto in
cui la temperatura ambiente corrisponda alla classe climatica indicata sulla sua targhetta:
Classe
climati-
ca
SN da + 10°C a + 32°C
N da + 16°C a + 32°C
ST da + 16°C a + 38°C
T da + 16°C a + 43°C
Collegamento elettrico
Prima di inserire la spina, verificare che la
tensione e la frequenza riportate sulla targhetta corrispondano ai valori della rete
elettrica domestica.
L'apparecchio deve essere collegato a
massa. La spina del cavo di alimentazione è
dotata di un contatto a tale scopo. Se la
presa della rete elettrica domestica non è
collegata a massa, collegare l'apparecchio
ad una massa separata in conformità alle
norme relative alla corrente, consultando un
elettricista qualificato.
Il fabbricante declina qualsiasi responsabilità se le precauzioni suddette non sono rispettate.
Il presente apparecchio è conforme alle direttive CEE.
Reversibilità della porta
La porta dell'apparecchiatura si apre verso
destra. Se si desidera che la porta si apra
verso sinistra, prima di installare l'apparecchiatura eseguire queste operazioni:
1. Allentare il perno superiore e rimuovere il
distanziatore.
2. Rimuovere il perno superiore e lo sportello superiore.
3. Togliere la copertura della cerniera (A).
Svitare i perni (B) e i distanziatori (C).
Montare la copertura della cerniera (A).
4. Rimuovere lo sportello inferiore.
Temperatura ambiente
5. Allentare il perno inferiore.
C
B
A
Sul lato opposto:
1. Installare il perno inferiore.
2. Installare lo sportello inferiore.
3. Reinserire i perni (B) e i distanziatori (C)
nella cerniera centrale sul lato opposto.
4. Installare lo sportello superiore.
5. Serrare il distanziatore e il perno superiore.
Page 67

Requisiti di ventilazione
Il flusso d'aria dietro l'apparecchio deve essere sufficiente.
min.
2
200 cm
electrolux 67
1. Installare l'apparecchiatura nella nic-
chia.
Spingere l'apparecchiatura in direzione
delle frecce (1) finché la copertura dello
spazio superiore si arresta contro il mobile da cucina. Accertarsi che la distanza fra l'apparecchiatura e il bordo anteriore del mobile sia di 44 mm.
Spingere l'apparecchiatura in direzione
delle frecce (2) contro il mobile sul lato
opposto della cerniera. Accertarsi che
lo spazio fra l'apparecchiatura e il mobile sia di 4 mm.
2
1
min.
200 cm
Installazione dell'apparecchiatura
Attenzione Accertarsi che il cavo di
rete possa muoversi liberamente.
Procedere come segue.
2
Page 68

68 electrolux
2. Regolare l'apparecchiatura nella nicchia.
Il copricerniera inferiore (incluso nel
sacchetto degli accessori) permette di
controllare che la distanza fra l'apparecchiatura e il mobile della cucina sia
corretta.
Aprire le porte. Applicare il copricerniera inferiore.
4mm
44mm
3. Fissare l'apparecchiatura nella nicchia
con 4 viti.
4. Spingere la striscia sigillante fra l'apparecchiatura e il mobile adiacente.
5. Rimuovere la parte appropriata del copricerniera (E). Rimuovere la parte DX
per la cerniera di destra, o la parte SX
per quella di sinistra.
I
Page 69

electrolux 69
6. Applicare i cappucci (C, D) sui coprigiunti e nei fori delle cerniere.
Installare la griglia di sfiato (B).
Applicare i copricerniera (E).
C
D
E
E
7. Se l'apparecchiatura deve essere collegata lateralmente alla porta del mobile
da cucina:
a) Allentare le viti nelle staffe di fissag-
gio (H).
b) Togliere le staffe (H).
c) Serrare nuovamente le viti.
B
8. Staccare le parti Ha, Hb, Hc e Hd
Ha
Hb
Hc
Hd
9. Installare la parte Ha sul lato interno del
mobile da cucina.
ca. 50 mm
90°
21 mm
90°
ca. 50 mm
10. Spingere la parte Hc sulla parte Ha.
21 mm
Ha
Hc
Page 70

70 electrolux
11. Aprire la porta dell'apparecchiatura e la
porta del mobile da cucina con un'angolazione di 90°.
Inserire la squadretta (Hb) nella guida
(Ha).
Unire la porta dell'apparecchiatura alla
porta del mobile e marcare i fori.
8 mm
Ha
Hb
12. Togliere le staffe e segnare la posizione
in cui deve essere inserito il chiodo (K)
a una distanza di 8 mm dal bordo
esterno della porta.
8 mm
13. Riapplicare la squadretta sulla guida e
fissarla con le viti in dotazione.
Allineare la porta del mobile con quella
dell'apparecchiatura regolando la parte
(Hb).
Hb
14. Premere la parte Hd sulla parte Hb.
Hb
K
Ha
CONSIDERAZIONI AMBIENTALI
Il simbolo sul prodotto o sulla confezione
indica che il prodotto non deve essere
considerato come un normale rifiuto
domestico, ma deve essere portato nel
punto di raccolta appropriato per il
riciclaggio di apparecchiature elettriche ed
elettroniche. Provvedendo a smaltire questo
prodotto in modo appropriato, si
Hd
Effettuare un controllo finale per verificare
che:
• Tutte le viti siano serrate.
• La striscia sigillante magnetica sia fissata
saldamente al mobile.
contribuisce a evitare potenziali
conseguenze negative per l’ambiente e per
la salute, che potrebbero derivare da uno
smaltimento inadeguato del prodotto. Per
informazioni più dettagliate sul riciclaggio di
questo prodotto, contattare l’ufficio
comunale, il servizio locale di smaltimento
rifiuti o il negozio in cui è stato acquistato il
prodotto.
Page 71

electrolux 71
Page 72

www.electrolux.com/shop
222336619-A-432010
 Loading...