

Page 1
user manual
Fridge-Freezer
ERN29780
Page 2
2 electrolux
Electrolux. Thinking of you.
Share more of our thinking at www.electrolux.com
CONTENTS
Safety information 2
Control panel 5
First use 7
Daily use 7
Helpful hints and tips 9
SAFETY INFORMATION
In the interest of your safety and to ensure
the correct use, before installing and first using the appliance, read this user manual
carefully, including its hints and warnings.
To avoid unnecessary mistakes and accidents, it is important to ensure that all people using the appliance are thoroughly familiar with its operation and safety features.
Save these instructions and make sure that
they remain with the appliance if it is moved
or sold, so that everyone using it through its
life will be properly informed on appliance
use and safety.
For the safety of life and property keep the
precautions of these user's instructions as
the manufacturer is not responsible for damages caused by omission.
During manufacture, this appliance has
been built in accordance with the standards, directives and/or regulations applying
to its use on French territory.
For the safety of person and property,
as well as out of respect for the environment, you should first read carefully
the following recommendations before
making any use of your appliance.
Caution! To avoid any risk of damage
to the appliance, transport it in its
operating position and with its packing
blocks in place (depending on the
model). While unpacking the appliance,
and to avoid the risk of suffocation or
physical injury, keep the packaging
materials out of the reach of children.
Caution! To avoid any risk to fixtures
and fittings, risk of structural damage
or of physical injury etc., any installation
work, connections (to water, gas,
Care and cleaning 10
What to do if… 12
Technical data 14
Installation 14
Environmental concerns 19
Subject to change without notice
electricity and air extraction depending
on the model), setting up and
maintenance of your appliance must be
carried out by a qualified service
technician.
Caution! Your appliance has been
designed for use by adults. It is
intended for normal domestic use. Do
not use it for commercial or industrial
purposes or for any purpose other than
that for which it was designed. This
way, you will avoid risks of harming
persons or damaging property.
Caution! Before carrying out any
manual cleaning operation, disconnect
the power supply. Use only products
that are non-corrosive or nonflammable. To avoid a risk of
electrocution, never spray water or
steam onto the appliance.
Caution! If your appliance is fitted with
lighting, disconnect the appliance from
the mains supply before changing the
light fitting bulb (or neon tube, etc.) to
avoid electrocution.
Caution! To avoid risks of explosion or
fire, do not put inflammable products
or items wetted with inflammable
products inside, near or on the
appliance.
Page 3
electrolux 3
Caution! When disposing of your
appliance, to eliminate any risk of
physical harm or damage, disable
anything which might cause a hazard:
cut off the mains cable close to the
appliance. Find out about your local
authority's authorised facilities for
disposing of your appliance.
Caution! Pay attention to the “cold
chain” from the point where an item of
food is acquired up to its consumption,
to avoid this risk of food poisoning.
Please now read these instructions
carefully to ensure the best use of
your appliance.
Children and vulnerable people safety
• This appliance is not intended for use by
persons (including children) with reduced
physical, sensory or mental capabilities,
or lack of experience and knowledge, unless they have been given supervision or
instruction concerning use of the appliance by a person responsible for their
safety.
Children should be supervised to ensure
that they do not play with the appliance.
• Keep all packaging well away from children. There is risk of suffocation.
• If you are discarding the appliance pull
the plug out of the socket, cut the connection cable (as close to the appliance
as you can) and remove the door to prevent playing children to suffer electric
shock or to close themselves into it.
• If this appliance featuring magnetic door
seals is to replace an older appliance having a spring lock (latch) on the door or lid,
be sure to make that spring lock unusable before you discard the old appliance.
This will prevent it from becoming a
death trap for a child.
General safety
Caution! Keep ventilation openings
clear of obstruction.
• The appliance is intended for keeping
foodstuff and/or beverages in a normal
household as explained in this instruction
booklet.
1) If the lamp cover is foreseen
• Do not use a mechanical device or any artificial means to speed up the thawing
process.
• Do not use other electrical appliances
(such as ice cream makers) inside of refrigerating appliances, unless they are approved for this purpose by the manufacturer.
• Do not damage the refrigerant circuit.
• The refrigerant isobutane (R600a) is contained within the refrigerant circuit of the
appliance, a natural gas with a high level
of environmental compatibility, which is
nevertheless flammable.
During transportation and installation of
the appliance, be certain that none of the
components of the refrigerant circuit become damaged.
If the refrigerant circuit should become
damaged:
– avoid open flames and sources of igni-
tion
– thoroughly ventilate the room in which
the appliance is situated
• It is dangerous to alter the specifications
or modify this product in any way. Any
damage to the cord may cause a shortcircuit, fire and/or electric shock.
Warning! Any electrical component
(power cord, plug, compressor) must
be replaced by a certified service agent
or qualified service personnel.
1. Power cord must not be lengthened.
2. Make sure that the power plug is not
squashed or damaged by the back of
the appliance. A squashed or damaged power plug may overheat and
cause a fire.
3. Make sure that you can come to the
mains plug of the appliance.
4. Do not pull the mains cable.
5. If the power plug socket is loose, do
not insert the power plug. There is a
risk of electric shock or fire.
6. You must not operate the appliance
without the lamp cover
1)
of interior
lighting.
• This appliance is heavy. Care should be
taken when moving it.
• Do not remove nor touch items from the
freezer compartment if your hands are
Page 4
4 electrolux
damp/wet, as this could cause skin abrasions or frost/freezer burns.
• Avoid prolonged exposure of the appliance to direct sunlight.
•
Bulb lamps
2)
used in this appliance are
special purpose lamps selected for household appliances use only. They are not
suitable for household room illumination.
Daily Use
• Do not put hot pot on the plastic parts in
the appliance.
• Do not store flammable gas and liquid in
the appliance, because they may explode.
• Do not place food products directly
against the air outlet on the rear wall.
3)
• Frozen food must not be re-frozen once
it has been thawed out.
• Store pre-packed frozen food in accordance with the frozen food manufacturer's
instructions.
• Appliance's manufacturers storage recommendations should be strictly adhered
to. Refer to relevant instructions.
• Do not place carbonated or fizzy drinks in
the freezer compartment as it creates
pressure on the container, which may
cause it to explode, resulting in damage
to the appliance.
• Ice lollies can cause frost burns if consumed straight from the appliance.
Care and cleaning
• Before maintenance, switch off the appliance and disconnect the mains plug from
the mains socket.
• Do not clean the appliance with metal objects.
• Do not use sharp objects to remove frost
from the appliance. Use a plastic scraper.
• Regularly examine the drain in the refrigerator for defrosted water. If necessary,
clean the drain. If the drain is blocked, water will collect in the bottom of the appliance.
Installation
Important! For electrical connection
carefully follow the instructions given in
specific paragraphs.
• Unpack the appliance and check if there
are damages on it. Do not connect the appliance if it is damaged. Report possible
damages immediately to the place you
bought it. In that case retain packing.
• It is advisable to wait at least four hours
before connecting the appliance to allow
the oil to flow back in the compressor.
• Adequate air circulation should be
around the appliance, lacking this leads
to overheating. To achieve sufficient ventilation follow the instructions relevant to
installation.
• Wherever possible the back of the product should be against a wall to avoid
touching or catching warm parts (compressor, condenser) to prevent possible
burn.
• The appliance must not be located close
to radiators or cookers.
• Make sure that the mains plug is accessible after the installation of the appliance.
•
Connect to potable water supply only.
4)
Service
• Any electrical work required to do the servicing of the appliance should be carried
out by a qualified electrician or competent person.
• This product must be serviced by an authorized Service Centre, and only genuine spare parts must be used.
Environment Protection
This appliance does not contain gasses
which could damage the ozone layer,
in either its refrigerant circuit or insulation materials. The appliance shall not
be discarded together with the urban refuse and rubbish. The insulation foam
contains flammable gases: the appliance shall be disposed according to
the applicable regulations to obtain
from your local authorities. Avoid damaging the cooling unit, especially at the
rear near the heat exchanger. The materials used on this appliance marked
by the symbol
are recyclable.
2) If the lamp is foreseen
3) If the appliance is Frost Free
4) If a water connection is foreseen
Page 5
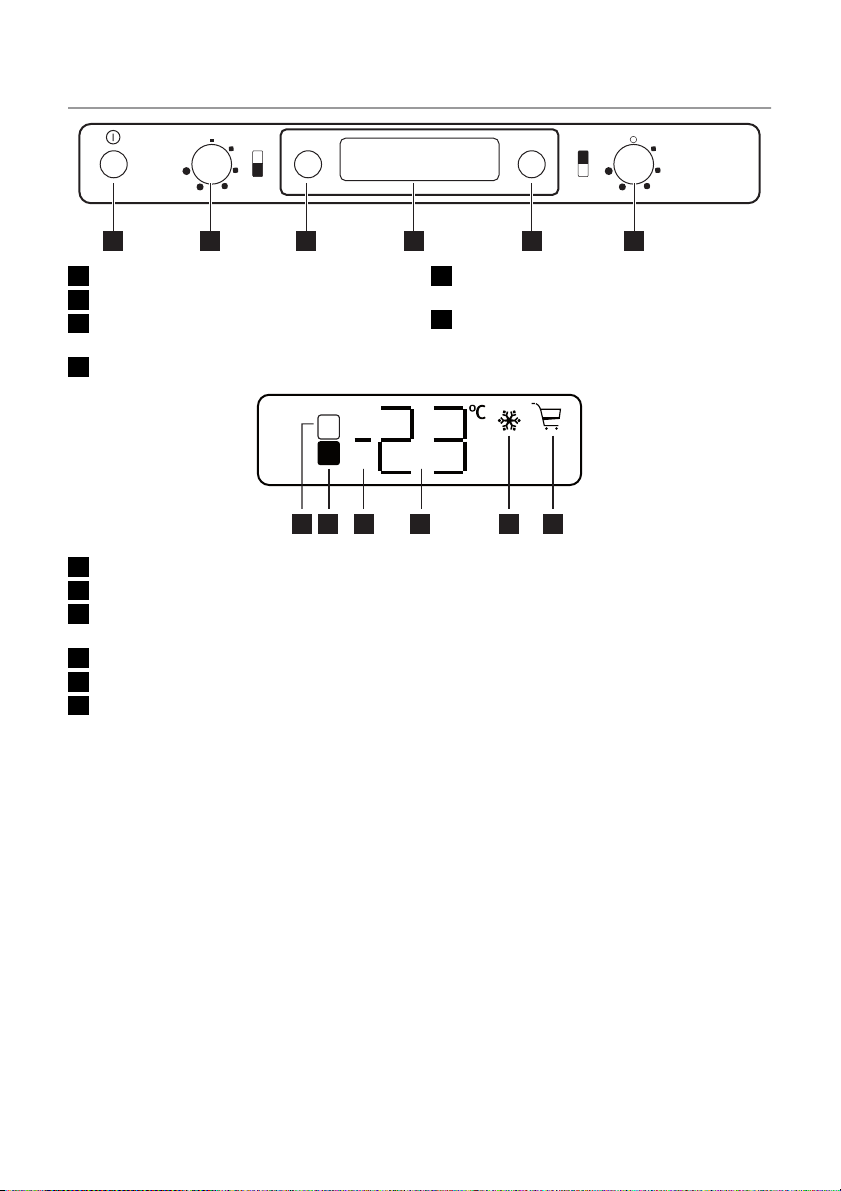
CONTROL PANEL
MODE˚C
123 4 5 6
electrolux 5
1 ON/OFF switch
2 Freezer temperature regulator
3 Fridge-Freezer temperature indication
button
4 Display
1 2 3 4 5 6
1 Fridge compartment indicator
2 Freezer compartment indicator
3 Positive or negative temperature indica-
tor
4 Temperature indicator
5 Action Freeze function
6 Shopping function
Switching on
After plugging the plug into the power outlet, if the display is not illuminated, press ON/
OFF switch.
As soon as the appliance is turned on, the
following signals will appear on the control
panel:
• Positive or negative temperature indicator
will be positive, indicating that the temperature is positive
• the temperature flashes, the background
of the display is red and you will hear a
buzzer.
Press Function button and the buzzer will
go off (also refer to "Excessive temperature
alarm" ) .
Set the desired temperature (refer to "Temperature regulation").
5) In normal conditions.
5 Function button
Alarm reset switch
6 Fridge temperature regulator
Display
Switching off
The appliance is shut off by pressing ON/
OFF switch for more than 1 second.
After this, a countdown of the temperature
from -3 -2 -1 will be shown.
When the appliance is switched off, Display
also goes off.
Temperature Indication
Each time the Fridge-Freezer temperature indication button is pressed, the display indicates in sequence:
1. – The Fridge compartment indicator is
on.
– The display indicates the fridge tem-
perature.
2. – The Freezer compartment indicator is
5)
on.
– The display indicates the freezer tem-
perature.
In any case, after 10 seconds normal display conditions are restored.
Functions menu
Each time Function button is pressed, the
following functions are activated in a clockwise direction:
• Action Freeze function
Page 6

6 electrolux
• Shopping function
• no symbol: normal operation.
Important! You can set one function ON at
a time.
To set the functions OFF, press the Function button several times until no icon appears.
Temperature regulation
The temperature within the appliance is controlled by the Temperature regulator situated at the top of the appliance.
The temperature of the fridge compartment
may be regulated by rotating the Fridge temperature regulator, and may vary between
more or less +2°C and +8°C.
The temperature of the freezer compartment may be regulated by rotating the Freezer temperature regulator, and may vary between more or less -15°C and -24°C.
By turning the Temperature regulator, the
display flashes and shows the desired temperature.
For a correct storage of the food the following temperatures should be set:
+5°C in the fridge
-18°C in the freezer.
After having set the desired temperature, if
the Temperature regulator is not rotated
within 5 seconds, the temperature of the
freezer compartment will be indicated.
To operate the appliance, proceed as follows:
• turn the Temperature regulator clockwise
to obtain the maximum coldness
• turn the Temperature regulator counterclockwise to obtain the minimum coldness.
The intermediate position is usually the
most suitable.
However, the exact setting should be chosen keeping in mind that the temperature inside the appliance depends on:
• room temperature
• how often the door is opened
• the quantity of food stored
• the location of the appliance.
Shopping Function
If you need to insert a large amount of
warm food, for example after doing the gro-
cery shopping, we suggest activating the
Shopping function to chill the products
more rapidly and to avoid warming the other food which is already in the refrigerator.
The Shopping function is activated by pressing Function button (several times if necessary) until the corresponding icon appears
.
The Shopping function shuts off automatically after approximately 6 hours.
It is possible to de-activate the function at
any time by pressing Function button (see
"Activation of functions" ) .
Action Freeze Function
To freeze fresh foods, you will need to activate the Action Freeze function. Press Function button (several times if necessary) until
the corresponding icon appears.
This function stops automatically after 52
hours.
It is possible to deactivate the function at
any time by pressing Function button (refer
to "Functions Menu").
Excessive temperature alarm
An increase in the temperature in the freezer compartment (for example due to a power failure) is indicated by:
• flashing temperature
• freezer compartment flashing (Freezer
compartment indicator )
• red illumination of display
• sounding of buzzer
•alarm symbol.
When normal conditions are restored:
• the acoustic signal shuts off
• the temperature value continues to flash
• the display illumination remains red.
When you press Function button / Alarm reset switch to deactivate the alarm, the highest temperature reached in the compartment appears on indicator
for some seconds.
At this point the flashing stops and the display illumination changes over from red to
white.
During the alarm phase, the buzzer can be
switched off by pressing Function button /
Alarm reset switch.
The illumination of the display remains red
until normal storage conditions are restored.
Page 7
FIRST USE
Cleaning the interior
Before using the appliance for the first time,
wash the interior and all internal accessories with lukewarm water and some neutral
soap so as to remove the typical smell of a
brand-new product, then dry thoroughly.
DAILY USE
Freezing fresh food
The freezer compartment is suitable for
freezing fresh food and storing frozen and
deep-frozen food for a long time.
To freeze fresh food activate the Action
Freeze function at least 24 hours before placing the food to be frozen in the freezer compartment.
Place the fresh food to be frozen in the in
the upper part of the freezer, as this is the
coldest point.
The maximum amount of food that can be
frozen in 24 hours is specified on the rating
plate , a label located on the inside of the
appliance.
The freezing process lasts 24 hours: during
this period do not add other food to be frozen.
Storage of frozen food
When first starting-up or after a period out
of use, before putting the products in the
compartment let the appliance run at least
12 hours on the Action Freeze setting.
If large quantities of food are to be stored,
remove all drawers and baskets from appliance and place food on cooling shelves to
obtain the best performance.
Warning! Make sure that foods do not
exceed the load limit stated on the side
of the upper section (where applicable)
Important! In the event of accidental
defrosting, for example due to a power
failure, if the power has been off for longer
that the value shown in the technical
characteristics chart under "rising time", the
defrosted food must be consumed quickly
or cooked immediately and then re-frozen
(after cooling).
electrolux 7
Important! Do not use detergents or abrasive powders, as these will damage the finish.
Thawing
Deep-frozen or frozen food, prior to being
used, can be thawed in the refrigerator compartment or at room temperature, depending on the time available for this operation.
Small pieces may even be cooked still frozen, directly from the freezer: in this case,
cooking will take longer.
Cold accumulators
The freezer contains at least one cold accumulator which increases storage time in the
event of a power cut or breakdown.
Ice-cube production
This appliance is equipped with one or
more trays for the production of ice-cubes.
Fill these trays with water, then put them in
the freezer compartment.
Important! Do not use metallic instruments
to remove the trays from the freezer.
Temperature indicator
To assist you in controlling your appliance
correctly we have fitted a temperature indicator to your refrigerator, placed in the coldest area.
The coldest area of the refrigerator compartment is at the level of the lower
glass shelf.
The symbol opposite shows the location of
the coldest area of your refrigerator.
The space directly above the glass shelf of
the fruit and vegetable drawer is the coldest
region of the refrigerator compartment as
shown by the shelf or the sticker on the wall
of your appliance.
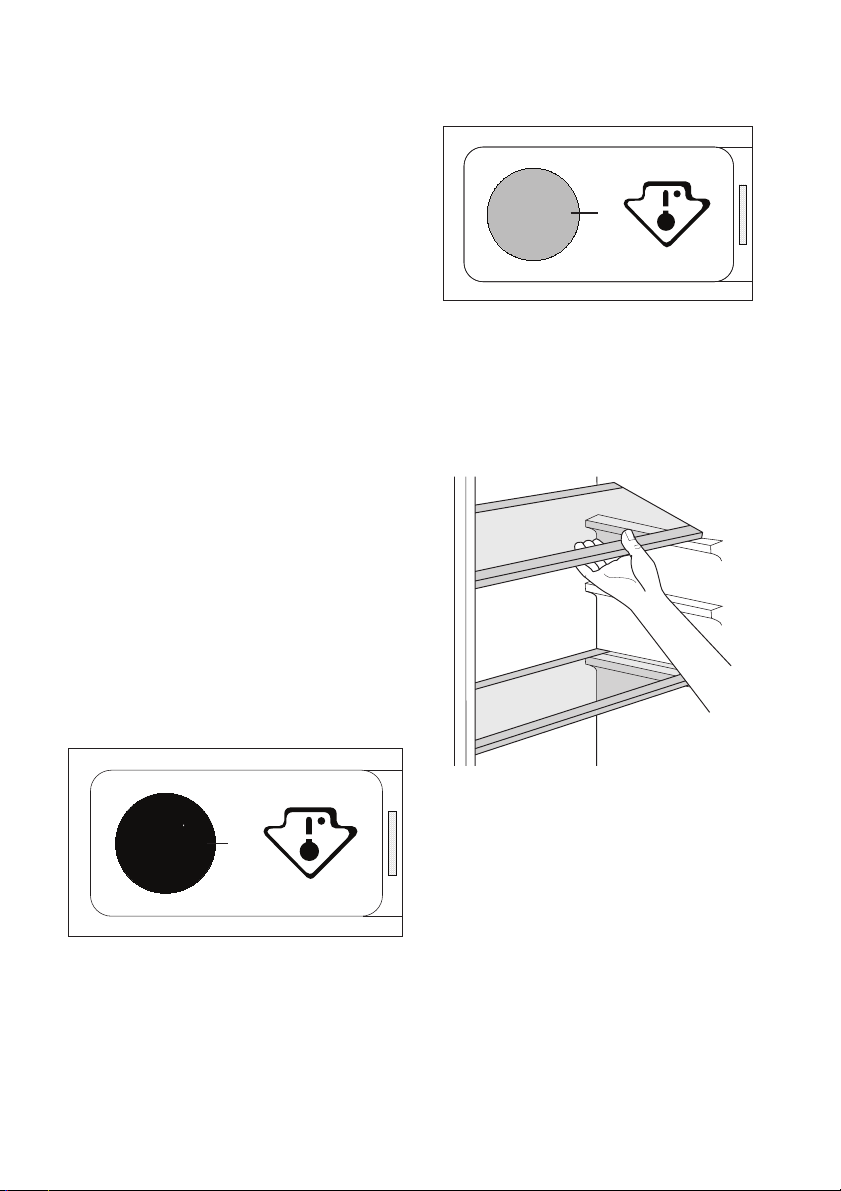
For proper storage of the food in your refrigerator and particularly in the coldest area,
ensure that the temperature indicator is displaying “OK”.
Page 8
8 electrolux
If “OK” is not displayed, the average temperature in the area is too high. Adjust the temperature controller to a colder setting. Since
the “OK” display is in black, it is difficult to
see if the temperature indicator is poorly illuminated. Correct illumination makes it easy
to read.
Each time the temperature controller is adjusted, wait for the temperature inside the
appliance to stabilise before checking
whether another adjustment is required. Only adjust the controller gradually and wait at
least 12 hours before checking and perhaps adjusting it again.
Important! After putting fresh food into the
appliance or after opening the door
repeatedly or for a long period, it is normal
for the indicator not to show “OK”; wait at
least 12 hours before readjusting the
temperature controller.
If the evaporator of the refrigeration compartment (wall at the bottom of the appliance)
has an abnormal covering of ice (appliance
too full, high ambient temperature, thermostat too high, frequent door opening), gradually move the thermostat control to a lower
setting until there are once more periods
when the compressor stops. The automatic
defrosting of the refrigerator compartment
will not work correctly unless the compressor stops from time to time.
Thermostat requires adjustment
Correct temperature
OK
Movable shelves
The walls of the refrigerator are equipped
with a series of runners so that the shelves
can be positioned as desired.
For better use of space, the front halfshelves can lie over the rear ones.
Positioning the door shelves
To permit storage of food packages of various sizes, the door shelves can be placed
at different heights.
To make these adjustments proceed as follows:
gradually pull the shelf in the direction of the
arrows until it comes free, then reposition
as required.
Page 9
Humidity control
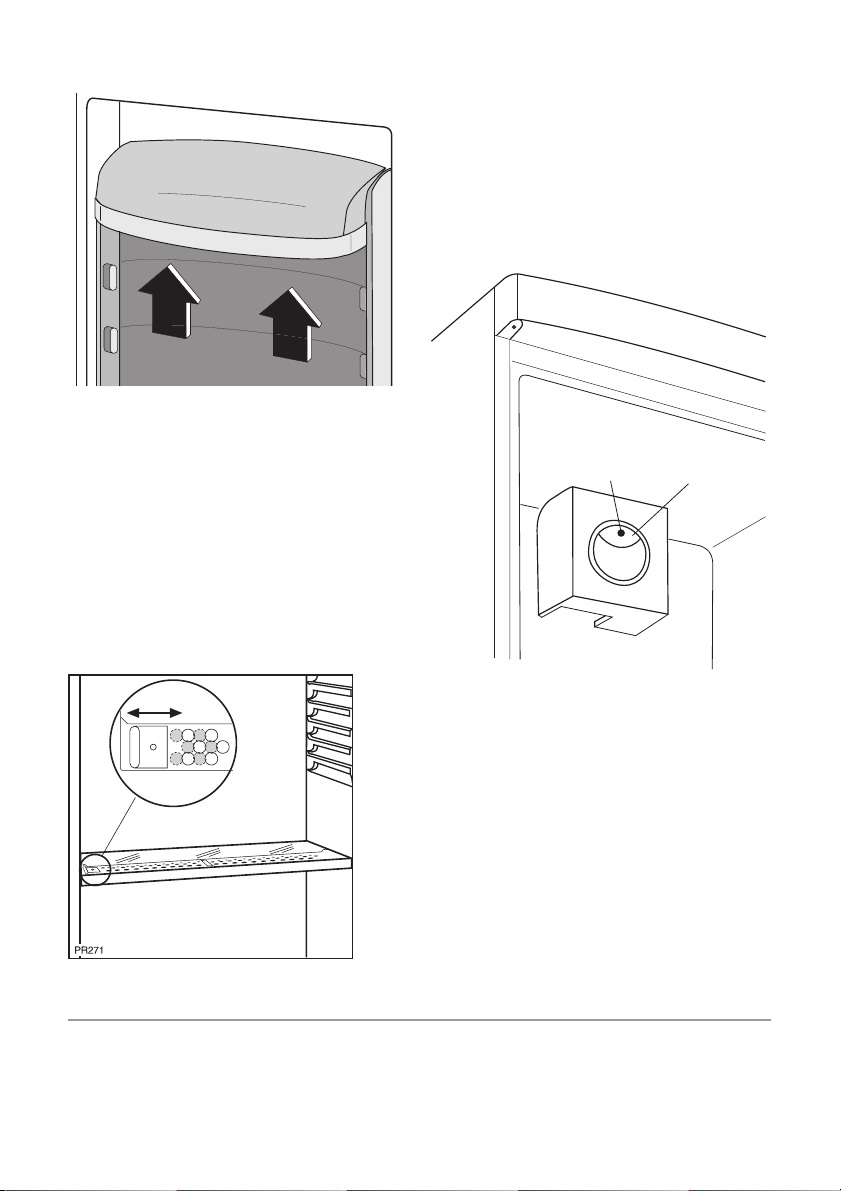
The glass shelf incorporates a device with
slits (adjustable by means of a sliding lever),
which makes it possible to regulate the temperature in the vegetable drawer(s).
When the ventilation slots are closed:
the natural moisture content of the food in
the fruit and vegetable compartments is preserved for longer.
When the ventilation slots are opened:
more air circulation results in a lower air moisture content in the fruit and vegetable compartments.
electrolux 9
Air cooling
The Dynamic Air Cooling (DAC) fan let food
cool quickly and a more uniform temperature in the compartment.
1. You can switch on the fan by pressing
the switch (1). The green light (2) comes
on.
2. Adjust the Temperature regulator to the
FAN position.
2
1
HELPFUL HINTS AND TIPS
Hints for energy saving
• Do not open the door frequently or leave
it open longer than absolutely necessary.
• If the ambient temperature is high and
the Temperature Regulator is set to low
This device allows for rapid cooling of foods
and a more uniform temperature in the compartment.
Important! Switch on the fan when the
ambient temperature exceeds 25°C.
temperature and the appliance is fully loaded, the compressor may run continuously, causing frost or ice on the evaporator.
If this happens, set the Temperature Regulator toward warmer settings to allow au-
Page 10

10 electrolux
tomatic defrosting and so a saving in electricity consumption.
Hints for fresh food refrigeration
To obtain the best performance:
• do not store warm food or evaporating liquids in the refrigerator
• do cover or wrap the food, particularly if it
has a strong flavour
• position food so that air can circulate freely around it
Hints for refrigeration
Useful hints:
Meat (all types) : wrap in polythene bags
and place on the glass shelf above the vegetable drawer.
For safety, store in this way only one or two
days at the most.
Cooked foods, cold dishes, etc..: these
should be covered and may be placed on
any shelf.
Fruit and vegetables: these should be thoroughly cleaned and placed in the special
drawer(s) provided.
Butter and cheese: these should be placed
in special airtight containers or wrapped in
aluminium foil or polythene bags to exclude
as much air as possible.
Milk bottles: these should have a cap and
should be stored in the bottle rack on the
door.
Bananas, potatoes, onions and garlic, if not
packed, must not be kept in the refrigerator.
Hints for freezing
To help you make the most of the freezing
process, here are some important hints:
• the maximum quantity of food which can
be frozen in 24 hrs. is shown on the rating plate;
• the freezing process takes 24 hours. No
further food to be frozen should be added during this period;
• only freeze top quality, fresh and thoroughly cleaned, foodstuffs;
• prepare food in small portions to enable it
to be rapidly and completely frozen and
to make it possible subsequently to thaw
only the quantity required;
• wrap up the food in aluminium foil or polythene and make sure that the packages
are airtight;
• do not allow fresh, unfrozen food to
touch food which is already frozen, thus
avoiding a rise in temperature of the latter;
• lean foods store better and longer than
fatty ones; salt reduces the storage life of
food;
• water ices, if consumed immediately after
removal from the freezer compartment,
can possibly cause the skin to be freeze
burnt;
• it is advisable to show the freezing in date
on each individual pack to enable you to
keep tab of the storage time.
Hints for storage of frozen food
To obtain the best performance from this appliance, you should:
• make sure that the commercially frozen
foodstuffs were adequately stored by the
retailer;
• be sure that frozen foodstuffs are transferred from the foodstore to the freezer in
the shortest possible time;
• not open the door frequently or leave it
open longer than absolutely necessary.
• Once defrosted, food deteriorates rapidly
and cannot be refrozen.
• Do not exceed the storage period indicated by the food manufacturer.
CARE AND CLEANING
Caution! Unplug the appliance before
carrying out any maintenance operation.
This appliance contains hydrocarbons
in its cooling unit; maintenance and recharging must therefore only be carried
out by authorized technicians.
Periodic cleaning
The equipment has to be cleaned regularly:
• clean the inside and accessories with lukewarm water and some neutral soap.
• regularly check the door seals and wipe
clean to ensure they are clean and free
from debris.
• rinse and dry thoroughly.
Page 11
Important! Do not pull, move or damage
any pipes and/or cables inside the cabinet.
Never use detergents, abrasive powders,
highly perfumed cleaning products or wax
polishes to clean the interior as this will damage the surface and leave a strong odour.
Clean the condenser (black grill) and the
compressor at the back of the appliance
with a brush or a vacuum cleaner. This operation will improve the performance of the
appliance and save electricity consumption.
Important! Take care of not to damage the
cooling system.
Many proprietary kitchen surface cleaners
contain chemicals that can attack/damage
the plastics used in this appliance. For this
reason it is recommended that the outer casing of this appliance is only cleaned with
warm water with a little washing-up liquid
added.
After cleaning, reconnect the equipment to
the mains supply.
Defrosting of the refrigerator
Frost is automatically eliminated from the
evaporator of the refrigerator compartment
every time the motor compressor stops, during normal use. The defrost water drains
out through a trough into a special container at the back of the appliance, over the motor compressor, where it evaporates.
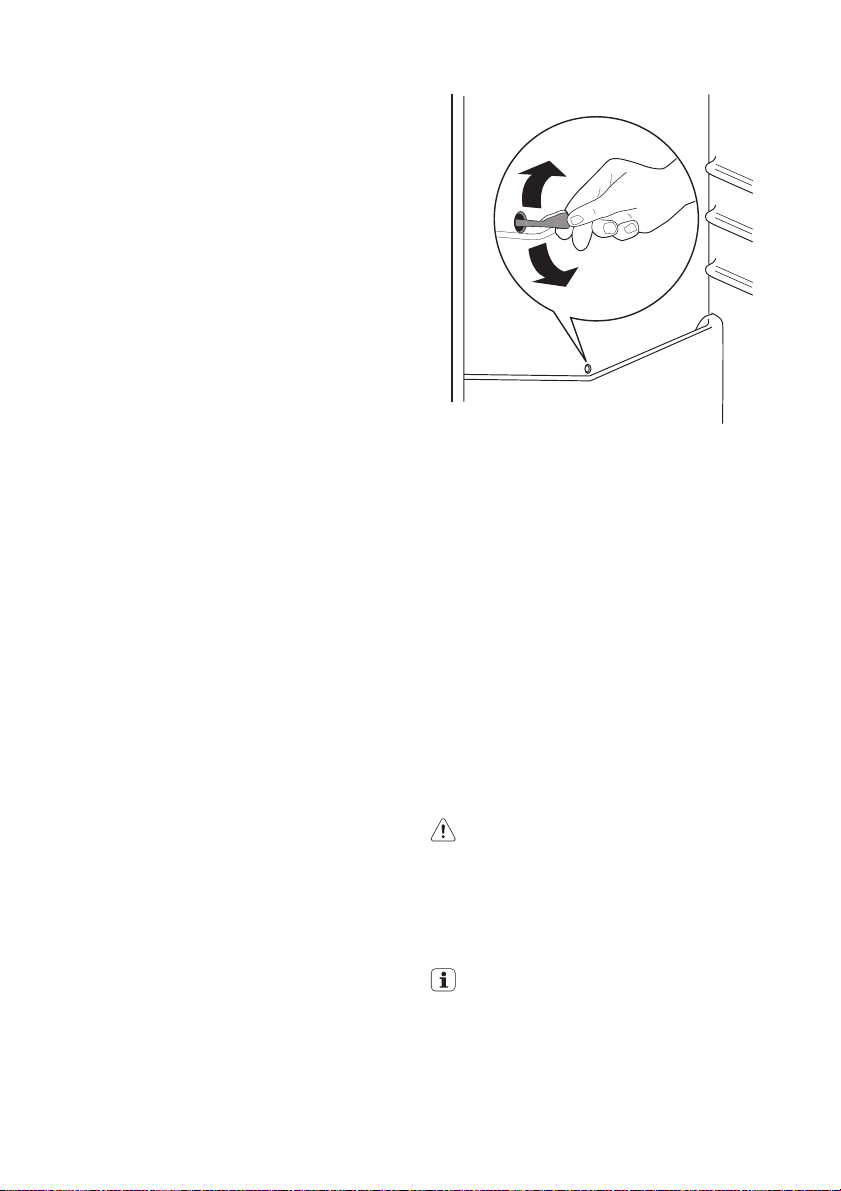
It is important to periodically clean the defrost water drain hole in the middle of the refrigerator compartment channel to prevent
the water overflowing and dripping onto the
food inside. Use the special cleaner provided, which you will find already inserted into the drain hole.
electrolux 11
Defrosting the freezer
A certain amount of frost will always form
on the freezer shelves and around the top
compartment.
Defrost the freezer when the frost layer reaches a thickness of about 3-5 mm.
Important! About 12 hours prior to
defrosting, set the Temperature regulator
toward higher settings , in order to build up
sufficient chill reserve for the interruption in
operation.
To remove the frost, follow the instructions
below:
1. Switch off the appliance.
2. Remove any stored food, wrap it in sev-
eral layers of newspaper and put it in a
cool place.
Caution! Do not touch frozen goods
with wet hands. Hands can freeze to
the goods.
3. Leave the door open and insert the plas-
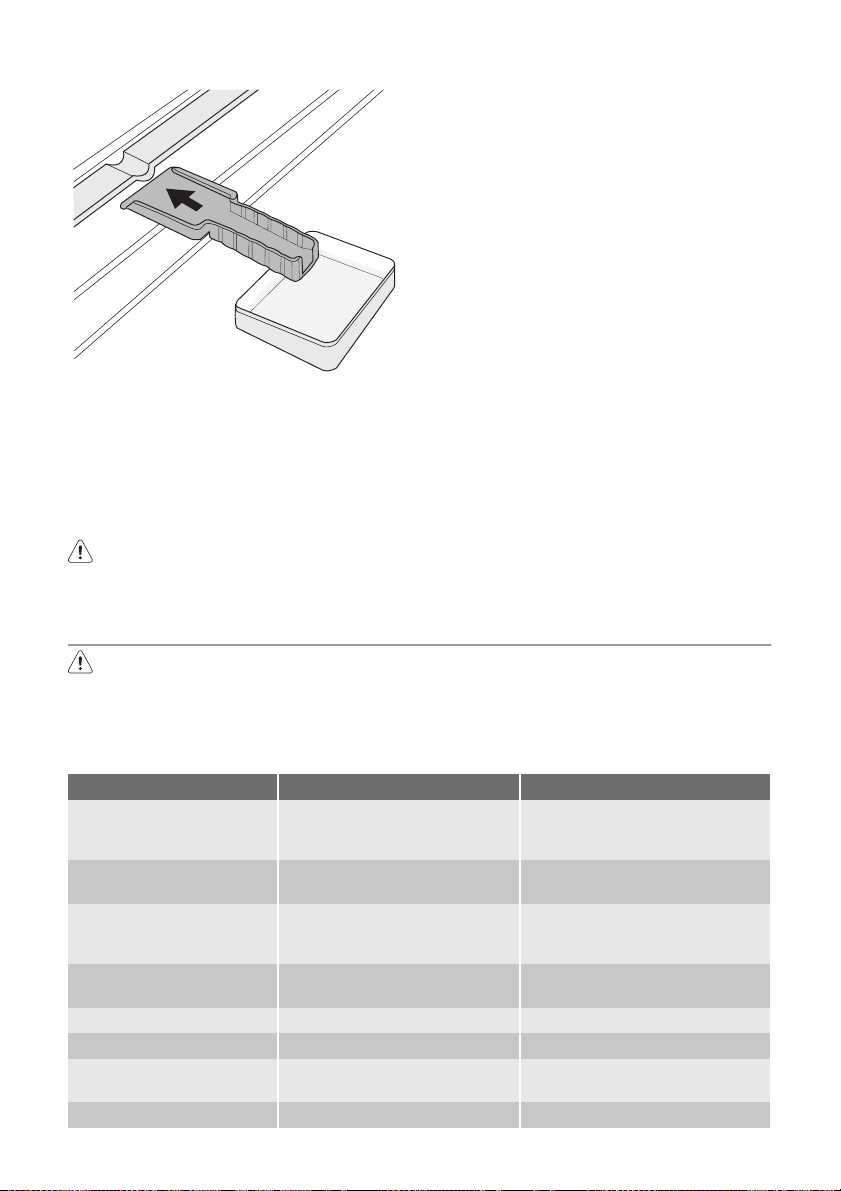
tic scraper in the appropriate seating at
the bottom centre, placing a basin underneath to collect the defrost water
In order to speed up the defrosting process, place a pot of warm water in the
freezer compartment. In addition, remove pieces of ice that break away before defrosting is complete.
Page 12
12 electrolux
4. When defrosting is completed, dry the interior thoroughly and keep the scraper
for future use.
5. Switch on the appliance.
6. After two or three hours, reload the previously removed food into the compartment.
Warning! Never use sharp metal tools
to scrape off frost from the evaporator
as you could damage it.
Do not use a mechanical device or any
artificial means to speed up the thawing process other than those recommended by the manufacturer.
A temperature rise of the frozen food
packs, during defrosting, may shorten
their safe storage life.
Periods of non-operation
When the appliance is not in use for long periods, take the following precautions:
•
disconnect the appliance from electricity supply
• remove all food
defrost
6)
and clean the appliance and all
•
accessories
• leave the door/doors ajar to prevent unpleasant smells.
If the cabinet will be kept on, ask somebody to check it once in a while to prevent
the food inside from spoiling in case of a
power failure.
WHAT TO DO IF…
Warning! Before troubleshooting,
disconnect the mains plug from the
mains socket.
Only a qualified electrician or competent person must do the troubleshooting that is not in this manual.
Problem Possible cause Solution
The appliance does not
operate. The lamp does
not operate.
The mains plug is not connected
The appliance has no power.
The buzzer sounds.
The lamp does not work.
The lamp is defective. Refer to "Replacing the lamp".
The compressor operates continually.
The door is not closed correctly. Refer to "Closing the door".
6) If foreseen.
The appliance is switched off. Switch on the appliance.
to the mains socket correctly.
There is no voltage in the mains
socket.
The temperature in the freezer is
too high.
The lamp is in stand-by. Close and open the door.
The temperature is not set correctly.
Important! There are some sounds during
normal use (compressor, refrigerant
circulation).
Connect the mains plug to the
mains socket correctly.
Connect a different electrical appliance to the mains socket.
Contact a qualified electrician.
Refer to "Excessive Temperature
Alarm"
Set a higher temperature.
Page 13
electrolux 13
Problem Possible cause Solution
The door has been opened too
The product temperature is too
The room temperature is too
Water flows on the rear
plate of the refrigerator.
Water flows into the refrigerator.
Products prevent that water
Water flows on the
ground.
The temperature in the
appliance is too low.
The temperature in the
appliance is too high.
The door is not closed correctly. Refer to "Closing the door".
The product temperature is too
Many products are stored at the
The temperature in the refrigerator is too high.
The temperature in the
freezer is too high.
There is too much frost.
The door is not closed correctly. Refer to "Closing the door".
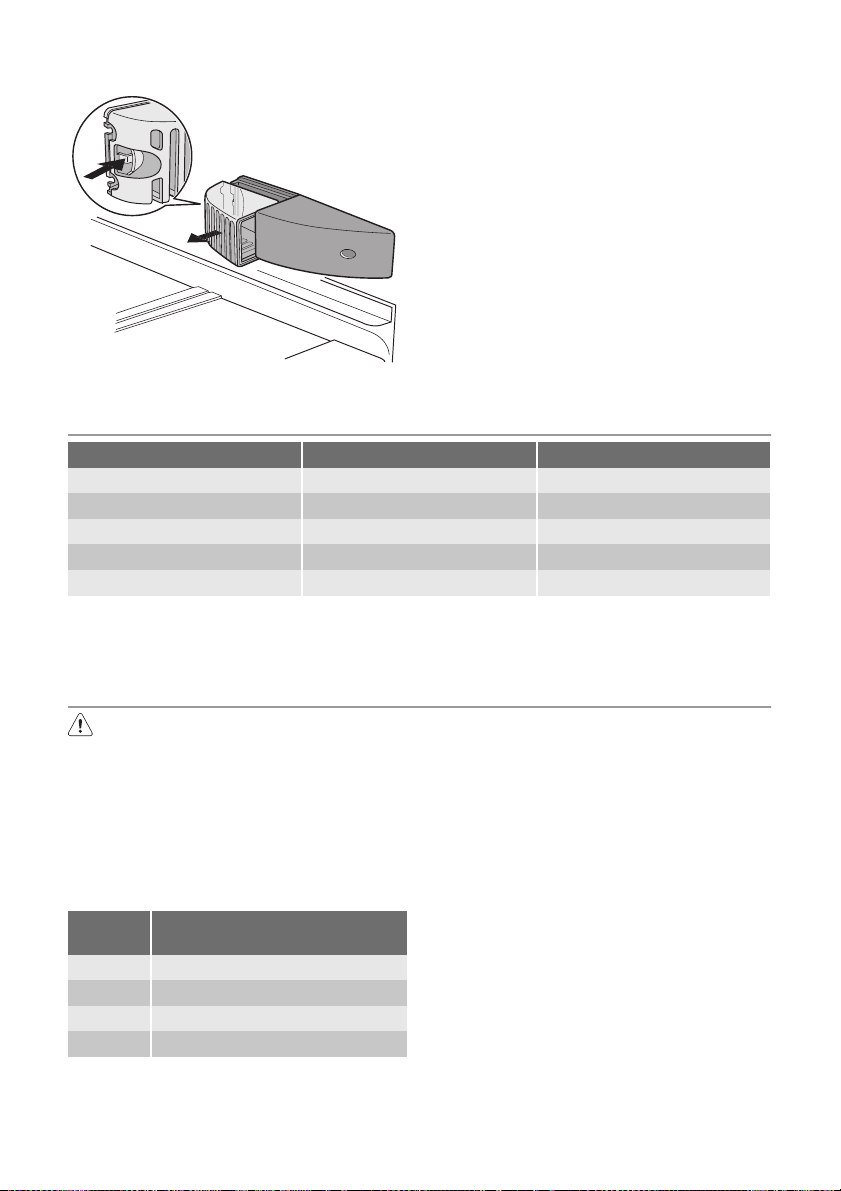
Replacing the bulb
If you want to replace the bulb, do these
frequently.
high.
high.
During the automatic defrosting
process, frost defrosts on the
rear plate.
The water outlet is clogged. Clean the water outlet.
flows into the water collector.
The melting water outlet does
not flow in the evaporative tray
above the compressor.
The temperature regulator is not
set correctly.
The temperature regulator is not
set correctly.
high.
same time.
There is no cold air circulation in
the appliance.
Products are too near to each
other.
Food is not wrapped correctly. Wrap the food correctly.
6. Open the door and check if the light
comes on.
Do not keep the door open longer
than necessary.
Let the product temperature decrease to room temperature before storage.
Decrease the room temperature.
This is correct.
Make sure that products do not
touch the rear plate.
Attach the melting water outlet to
the evaporative tray.
Set a higher temperature.
Set a lower temperature.
Let the product temperature decrease to room temperature before storage.
Store less products at the same
time.
Make sure that there is cold air circulation in the appliance.
Store products so that there is
cold air circulation.
steps:
1. Break the circuit of the appliance.
2. Press on the rear hook and at the same
time slide the cover in the direction of
the arrow.
3. Replace the bulb with one of the same
power and specifically designed for
household appliances. the maximum
power is shown on the light bulb cover)
4. Replace the light cover by sliding it into
its original position.
5. Reconnect the appliance.
Page 14
14 electrolux
Closing the door
1. Clean the door gaskets.
2. If necessary, adjust the door. Refer to "Installation".
3. If necessary, replace the defective door
gaskets. Contact the Service Center.
TECHNICAL DATA
Dimension of the recess
Height 1780 mm
Width 560 mm
Depth 550 mm
Rising Time 24 h
The technical information are situated in the
rating plate on the internal left side of the appliance and in the energy label.
INSTALLATION
Read the "Safety Information" carefully
for your safety and correct operation of
the appliance before installing the
appliance.
Positioning
Install this appliance at a location where the
ambient temperature corresponds to the climate class indicated on the rating plate of
the appliance:
Climate
class
SN +10°C to + 32°C
N +16°C to + 32°C
ST +16°C to + 38°C
T +16°C to + 43°C
Electrical connection
Your appliance must be connected to a single-phase supply of 230 V. Check that the
electricity meter is suitable for the power con-
Ambient temperature
sumed by your appliance, allowing for the
other connected appliances. Rating of the inline fuses (one per phase): 10 A at 230 V.
Important! Installation must be done in
conformance with the applicable codes, the
requirements of the standard NF.C.15100
and the requirements of the electrical
energy supplier.
Use a power supply socket that has an
earth connection and this must be connected in conformance with the standard
15100 and the requirements of the supplier
of electrical energy. this power supply socket must be accessible. If the mains supply
cable is damaged, it must be replaced by a
certified supply cable. This must be done only by a skilled person, the seller or the manufacturer. The appliance must not be connected via an extension cable, a multiple
socket or a multiple connector (risk of fire).
Page 15
Make sure the earthing connection complies with the regulations in force.
We will accept no responsibility in the event
of accidents or incidents caused by non-existent or defective electrical earthing connections.
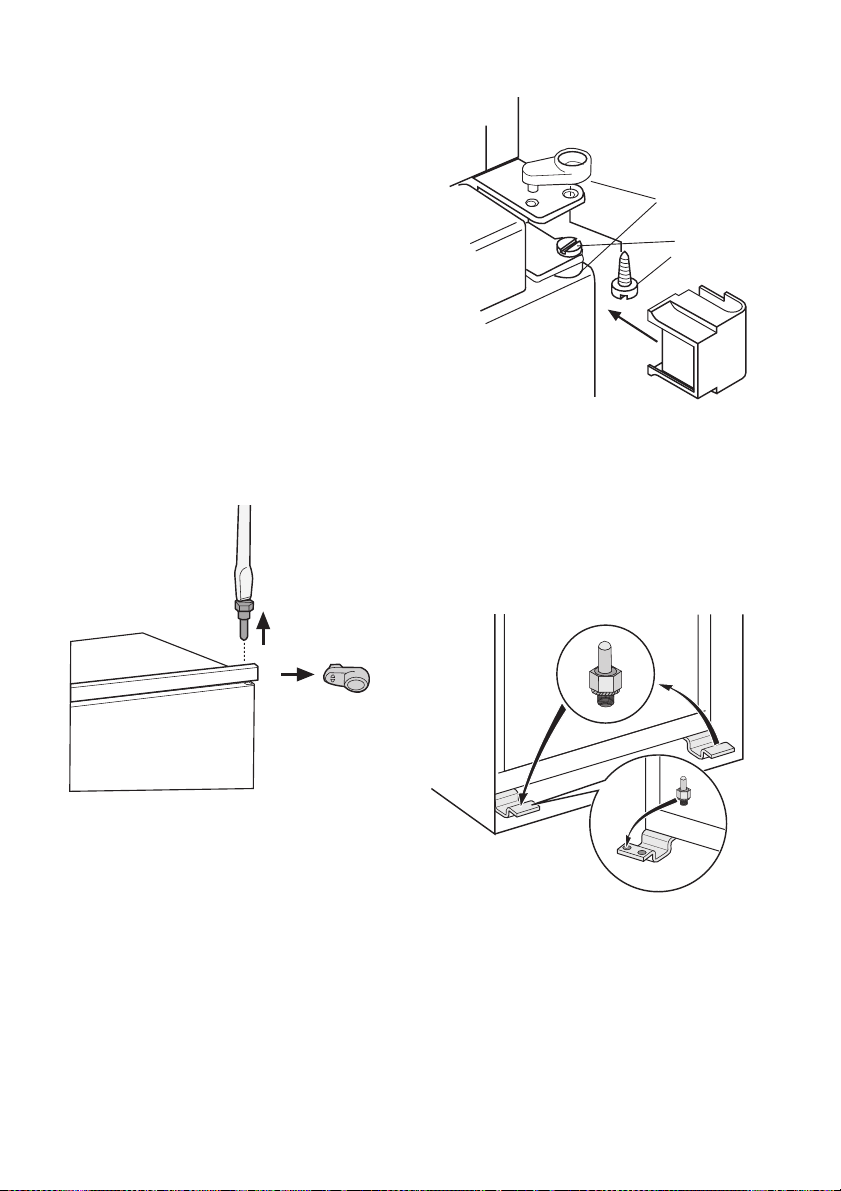
Door reversibility
The door of the appliance opens to the
right. If you want to open the door to the
left, do these steps before you install the appliance:
1. Loosen the upper pin and remove the
spacer.
2. Remove the upper pin and the upper
door.
3. Remove the hinge cover (A). Unscrew
the pins (B) and spacers (C). Fit the
hinge cover (A).
4. Remove the lower door.
5. Loosen the lower pin.
electrolux 15
C
B
A
On the opposite side:
1. Install the lower pin.
2. Install the lower door.
3. Refit the pins (B) and the spacers (C) on
the middle hinge on the opposite side.
4. Install the upper door.
5. Tighten the spacer and tighten the upper pin.
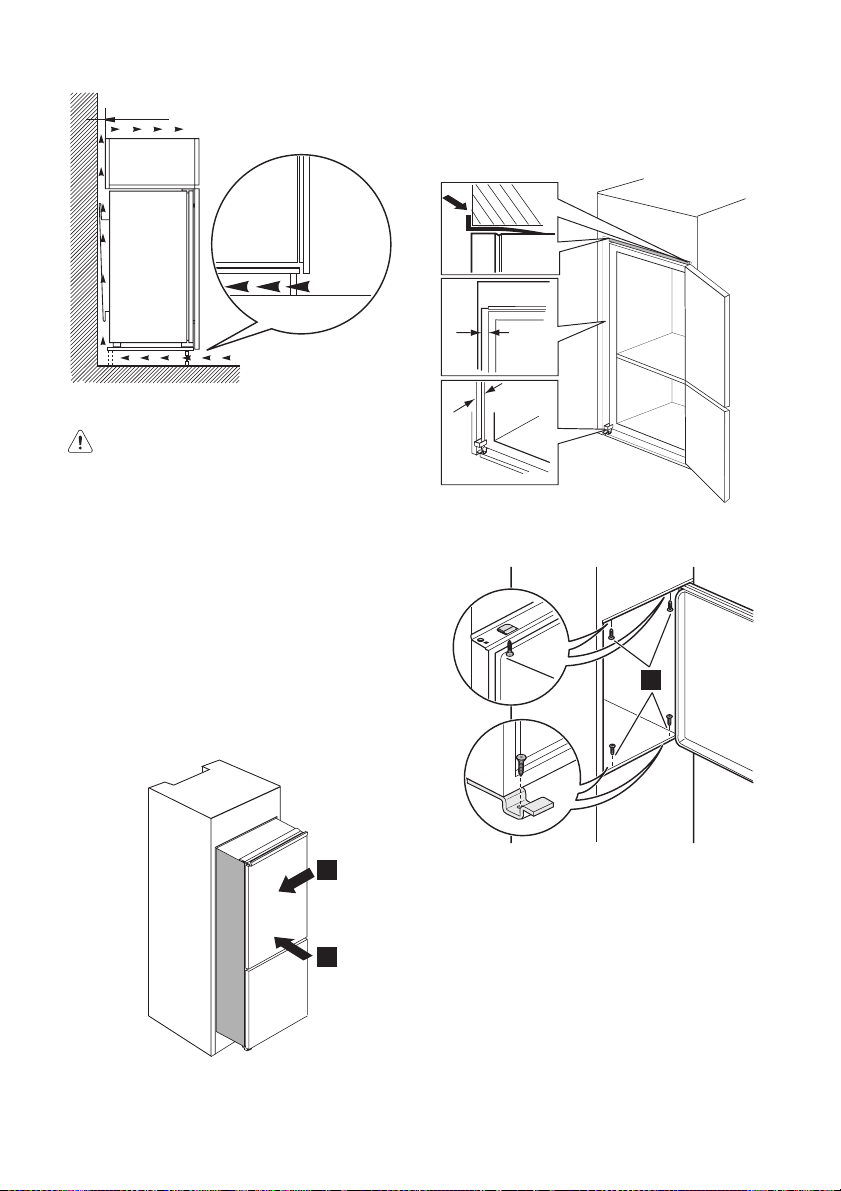
Ventilation requirements
The airflow behind the appliance must be
sufficient.
Page 16
16 electrolux
min.
2
200 cm
min.
200 cm
Installing the appliance
Caution! Make sure that the mains
cable can move freely.
Do these steps.
1. Install the appliance in the niche.
Push the appliance in the direction of
the arrows (1) until the upper gap cover
stops against the kitchen furniture.
Make sure that the distance between
the appliance and the cupboard frontedge is 44 mm.
Push the appliance in the direction of
the arrows (2) against the cupboard on
the opposite side of the hinge. Make
sure that the clearance between the appliance and the cupboard is 4 mm.
between the appliance and the kitchen
furniture is correct.
Open the door. Put the lower hinge cover in position.
2
4mm
44mm
3. Attach the appliance to the niche with 4
screws.
I
2
1
2. Adjust the appliance in the niche.
The lower hinge cover (in the accessories bag) makes sure that the distance
4. Push the sealing strip between the appliance and the adjacent cabinet.
Page 17
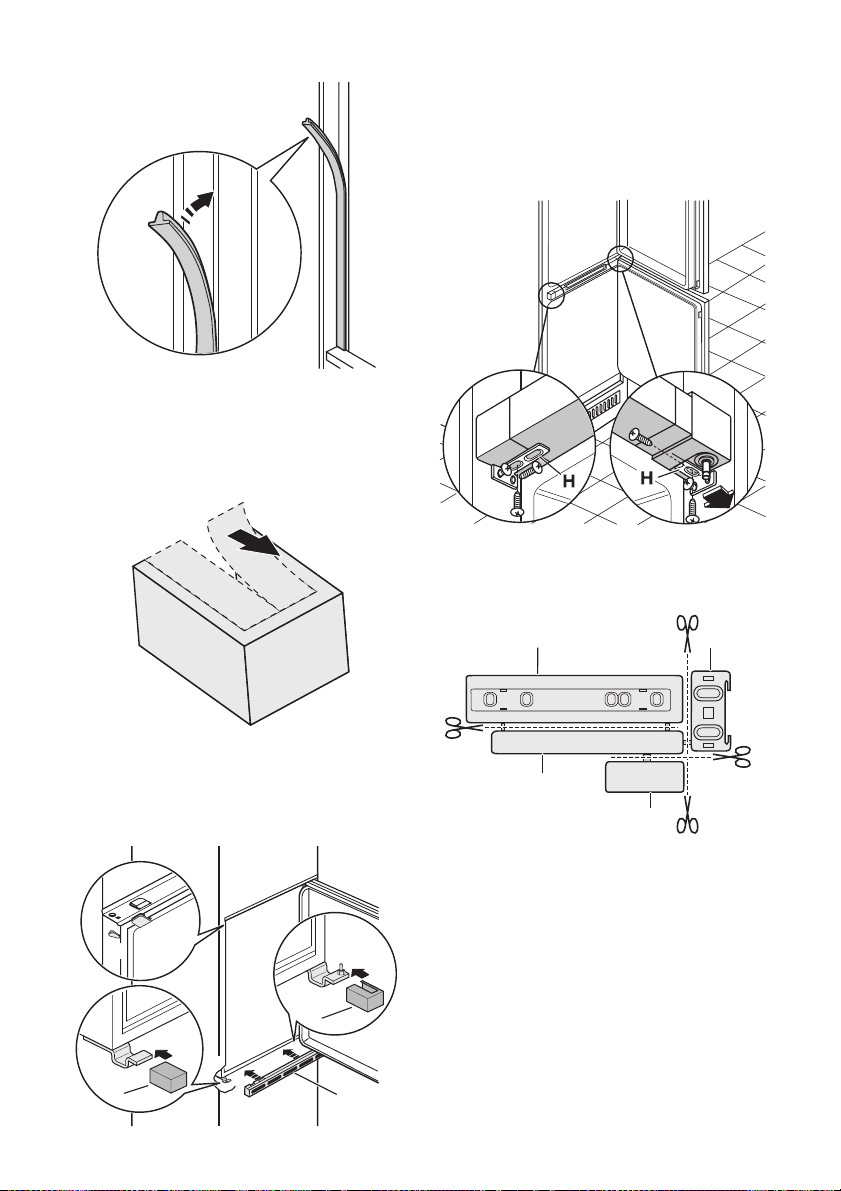
5. Remove the correct part from the hinge
cover (E). Make sure to remove the part
DX, in the case of right hinge, SX in opposite case.
electrolux 17
7. If the appliance must connect laterally
to the kitchen furniture door:
a) Slacken the screws in fixing brack-
ets (H).
b) Move the brackets (H).
c) Retighten the screws.
8. Disconnect the parts Ha, Hb, Hc and Hd
6. Attach the covers (C, D) to the lugs and
the hinge holes.
Install the vent grille (B).
Attach the hinge covers (E) to the hinge.
C
D
E
E
B
Ha
Hb
Hc
Hd
9. Install the part Ha on the inner side of
the kitchen furniture.
Page 18
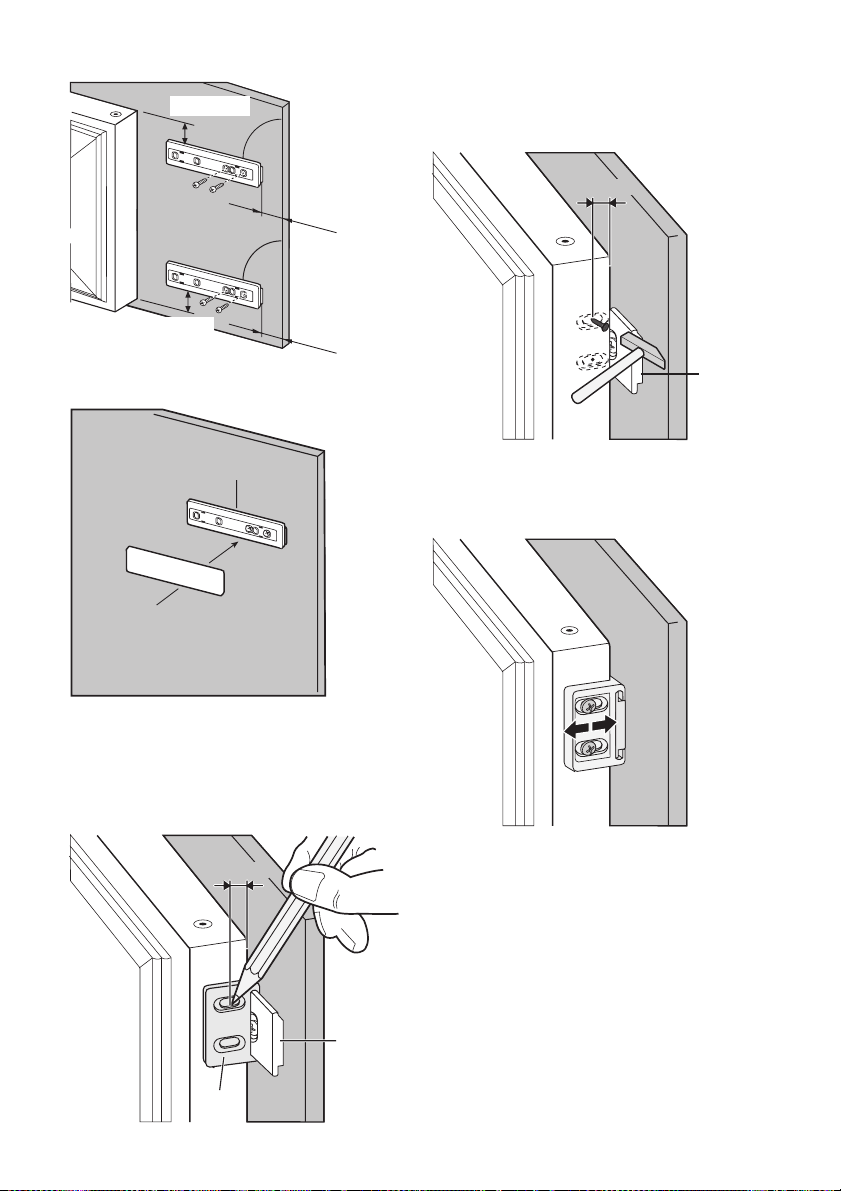
18 electrolux
ca. 50 mm
90°
21 mm
90°
ca. 50 mm
21 mm
10. Push the part Hc on the part Ha.
Ha
Hc
12. Remove the brackets and mark a distance of 8 mm from the outer edge of
the door where the nail must be fitted (K).
8 mm
K
Ha
13. Place the small square on the guide
again and fix it with the screws supplied.
Align the kitchen furniture door and the
appliance door by adjusting the part Hb.
11. Open the appliance door and the kitchen furniture door at an angle of 90°.
Insert the small square (Hb) into guide
(Ha).
Put together the appliance door and
the furniture door and mark the holes.
8 mm
Ha
Hb
Hb
14. Press the part Hd on the part Hb.
Page 19
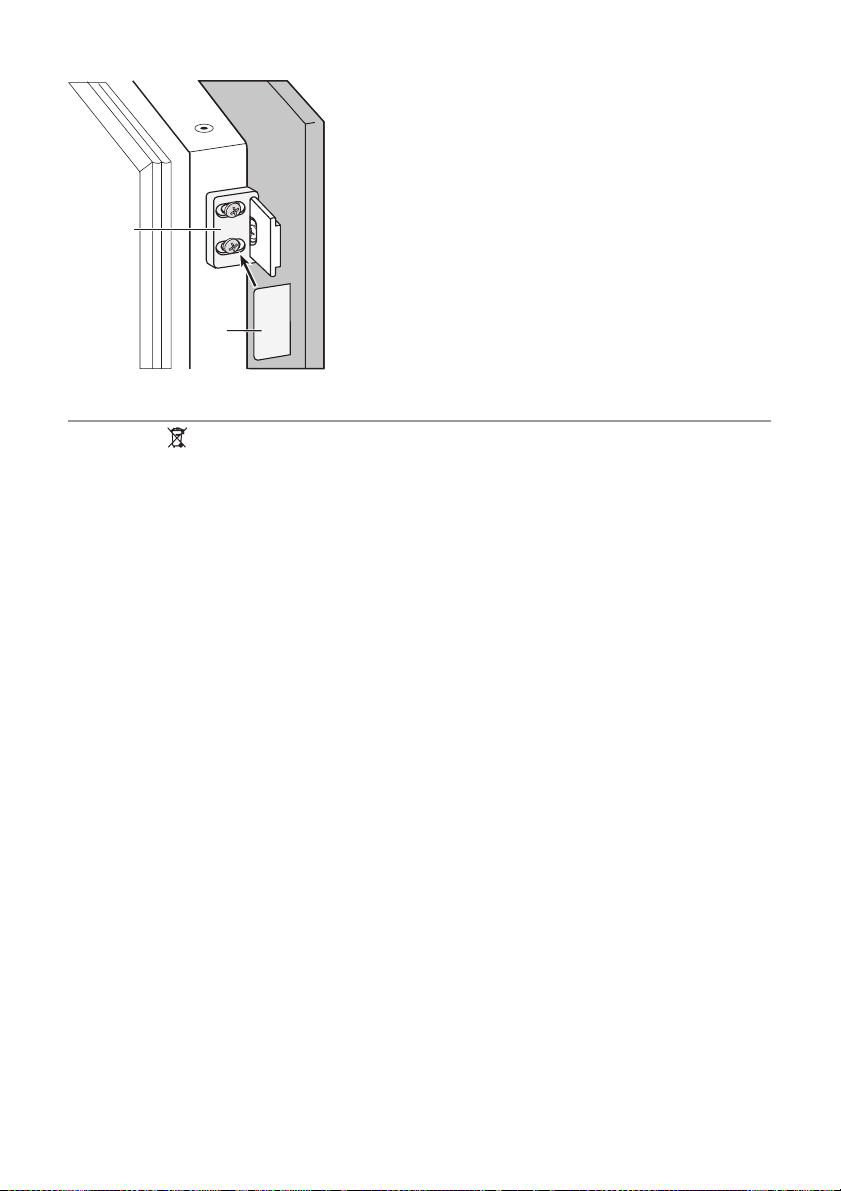
Hb
Hd
ENVIRONMENTAL CONCERNS
The symbol on the product or on its
packaging indicates that this product may
not be treated as household waste. Instead
it should be taken to the appropriate
collection point for the recycling of electrical
and electronic equipment. By ensuring this
product is disposed of correctly, you will
help prevent potential negative
electrolux 19
Do a final check to make sure that:
• All screws are tightened.
• The magnetic sealing strip is attached
tightly to the cabinet.
consequences for the environment and
human health, which could otherwise be
caused by inappropriate waste handling of
this product. For more detailed information
about recycling of this product, please
contact your local council, your household
waste disposal service or the shop where
you purchased the product.
Page 20
www.electrolux.com/shop
212717161-00-15072010
 Loading...