

Page 1

ERF4112AOX
ERF4112AOW
................................................ .............................................
EN REFRIGERATOR USER MANUAL
Page 2
www.electrolux.com
2
CONTENTS
1. SAFETY INSTRUCTIONS . . . . . . . . . . . . . . . . . . . . . . . . . . . . . . . . . . . . . . . . . . . . . . . . . . 3
2. PRODUCT DESCRIPTION . . . . . . . . . . . . . . . . . . . . . . . . . . . . . . . . . . . . . . . . . . . . . . . . . 5
3. CONTROL PANEL . . . . . . . . . . . . . . . . . . . . . . . . . . . . . . . . . . . . . . . . . . . . . . . . . . . . . . . 5
4. DAILY USE . . . . . . . . . . . . . . . . . . . . . . . . . . . . . . . . . . . . . . . . . . . . . . . . . . . . . . . . . . . . . 8
5. HELPFUL HINTS AND TIPS . . . . . . . . . . . . . . . . . . . . . . . . . . . . . . . . . . . . . . . . . . . . . . . 11
6. CARE AND CLEANING . . . . . . . . . . . . . . . . . . . . . . . . . . . . . . . . . . . . . . . . . . . . . . . . . . . 11
7. TROUBLESHOOTING . . . . . . . . . . . . . . . . . . . . . . . . . . . . . . . . . . . . . . . . . . . . . . . . . . . . 12
8.
INSTALLATION . . . . . . . . . . . . . . . . . . . . . . . . . . . . . . . . . . . . . . . . . . . . . . . . . . . . . . . . . 14
9. TECHNICAL DATA . . . . . . . . . . . . . . . . . . . . . . . . . . . . . . . . . . . . . . . . . . . . . . . . . . . . . . 18
10.
NOISES . . . . . . . . . . . . . . . . . . . . . . . . . . . . . . . . . . . . . . . . . . . . . . . . . . . . . . . . . . . . . . 19
WE’RE THINKING OF YOU
Thank you for purchasing an Electrolux appliance. You’ve chosen a product that brings with it
decades of professional experience and innovation. Ingenious and stylish, it has been designed
with you in mind. So whenever you use it, you can be safe in the knowledge that you’ll get great
results every time.
Welcome to Electrolux.
Visit our website for:
Get usage advice, brochures, trouble shooter, service information:
www.electrolux.com
Register your product for better service:
www.electrolux.com/productregistration
Buy Accessories, Consumables and Original spare parts for your appliance:
www.electrolux.com/shop
CUSTOMER CARE AND SERVICE
We recommend the use of original spare parts.
When contacting Service, ensure that you have the following data available.
The information can be found on the rating plate. Model, PNC, Serial Number.
Warning / Caution-Safety information
General information and tips
Environmental information
Subject to change without notice.
Page 3
ENGLISH 3
1.
SAFETY INSTRUCTIONS
In the interest of your safety and to ensure
the correct use, before installing and first
using the appliance, read this user manual
carefully, including its hints and warnings.
To avoid unnecessary mistakes and accidents, it is important to ensure that all
people using the appliance are thoroughly
familiar with its operation and safety features. Save these instructions and make
sure that they remain with the appliance if
it is moved or sold, so that everyone using
it through its life will be properly informed
on appliance use and safety.
For the safety of life and property keep
the precautions of these user's instructions as the manufacturer is not responsible for damages caused by omission.
1.1 Children and vulnerable
people safety
• This appliance is not intended for use
by persons (including children) with reduced physical, sensory or mental capabilities, or lack of experience and
knowledge, unless they have been given supervision or instruction concerning
use of the appliance by a person responsible for their safety.
Children should be supervised to ensure that they do not play with the appliance.
• Keep all packaging well away from children. There is risk of suffocation.
• If you are discarding the appliance pull
the plug out of the socket, cut the connection cable (as close to the appliance
as you can) and remove the door to
prevent playing children to suffer electric shock or to close themselves into it.
• If this appliance featuring magnetic
door seals is to replace an older appliance having a spring lock (latch) on the
door or lid, be sure to make that spring
lock unusable before you discard the
old appliance. This will prevent it from
becoming a death trap for a child.
1.2 General safety
WARNING!
Keep ventilation openings, in the appliance enclosure or in the built-in structure,
clear of obstruction.
• The appliance is intended for keeping
foodstuff and/or beverages in a normal
household and similar applications such
as:
– staff kitchen areas in shops, offices
and other working environments;
– farm houses and by clients in hotels,
motels and other residential type environments;
– bed and breakfast type environ-
ments;
– catering and similar non-retail appli-
cations.
• Do not use a mechanical device or any
artificial means to speed up the thawing
process.
• Do not use other electrical appliances
(such as ice cream makers) inside of refrigerating appliances, unless they are
approved for this purpose by the manufacturer.
• Do not damage the refrigerant circuit.
• The refrigerant isobutane (R600a) is
contained within the refrigerant circuit of
the appliance, a natural gas with a high
level of environmental compatibility,
which is nevertheless flammable.
During transportation and installation of
the appliance, be certain that none of
the components of the refrigerant circuit become damaged.
If the refrigerant circuit should become
damaged:
– avoid open flames and sources of ig-
nition
– thoroughly ventilate the room in
which the appliance is situated
• It is dangerous to alter the specifications or modify this product in any way.
Any damage to the cord may cause a
short-circuit, fire and/or electric shock.
WARNING!
Any electrical component (power
cord, plug, compressor) must be
replaced by a certified service
agent or qualified service personnel to avoid hazard.
Page 4
www.electrolux.com
4
• This appliance is heavy. Care should be
• Do not remove nor touch items from
• Avoid prolonged exposure of the appli-
• Bulb lamps (if foreseen) used in this ap-
1.3 Daily use
• Do not put hot pot on the plastic parts
• Do not store flammable gas and liquid
• Appliance's manufacturers storage rec-
1.4 Care and cleaning
• Before maintenance, switch off the ap-
• Do not clean the appliance with metal
• Regularly examine the drain in the re-
1.
Power cord must not be lengthened.
2.
Make sure that the power plug is
not squashed or damaged by the
back of the appliance. A squashed
or damaged power plug may overheat and cause a fire.
3.
Make sure that you can come to
the mains plug of the appliance.
4.
Do not pull the mains cable.
5.
If the power plug socket is loose,
do not insert the power plug. There
is a risk of electric shock or fire.
6.
You must not operate the appliance without the lamp cover (if
foreseen) of interior lighting.
taken when moving it.
the freezer compartment if your hands
are damp/wet, as this could cause skin
abrasions or frost/freezer burns.
ance to direct sunlight.
pliance are special purpose lamps selected for household appliances use
only. They are not suitable for household room illumination.
in the appliance.
in the appliance, because they may explode.
ommendations should be strictly adhered to. Refer to relevant instructions.
pliance and disconnect the mains plug
from the mains socket.
objects.
frigerator for defrosted water. If necessary, clean the drain. If the drain is
blocked, water will collect in the bottom
of the appliance.
1.5 Installation
For electrical connection carefully
follow the instructions given in
specific paragraphs.
• Unpack the appliance and check if
there are damages on it. Do not connect the appliance if it is damaged. Report possible damages immediately to
the place you bought it. In that case retain packing.
• It is advisable to wait at least four hours
before connecting the appliance to allow the oil to flow back in the compressor.
• Adequate air circulation should be
around the appliance, lacking this leads
to overheating. To achieve sufficient
ventilation follow the instructions relevant to installation.
• Wherever possible the back of the
product should be against a wall to
avoid touching or catching warm parts
(compressor, condenser) to prevent
possible burn.
• The appliance must not be located
close to radiators or cookers.
• Make sure that the mains plug is accessible after the installation of the appliance.
• Connect to potable water supply only (If
a water connection is foreseen).
1.6 Service
• Any electrical work required to do the
servicing of the appliance should be
carried out by a qualified electrician or
competent person.
• This product must be serviced by an
authorized Service Centre, and only
genuine spare parts must be used.
1.7 Environment Protection
This appliance does not contain
gasses which could damage the
ozone layer, in either its refrigerant
circuit or insulation materials. The
appliance shall not be discarded
together with the urban refuse and
rubbish. The insulation foam contains flammable gases: the appliance shall be disposed according
to the applicable regulations to
Page 5
obtain from your local authorities.
Avoid damaging the cooling unit,
especially at the rear near the heat
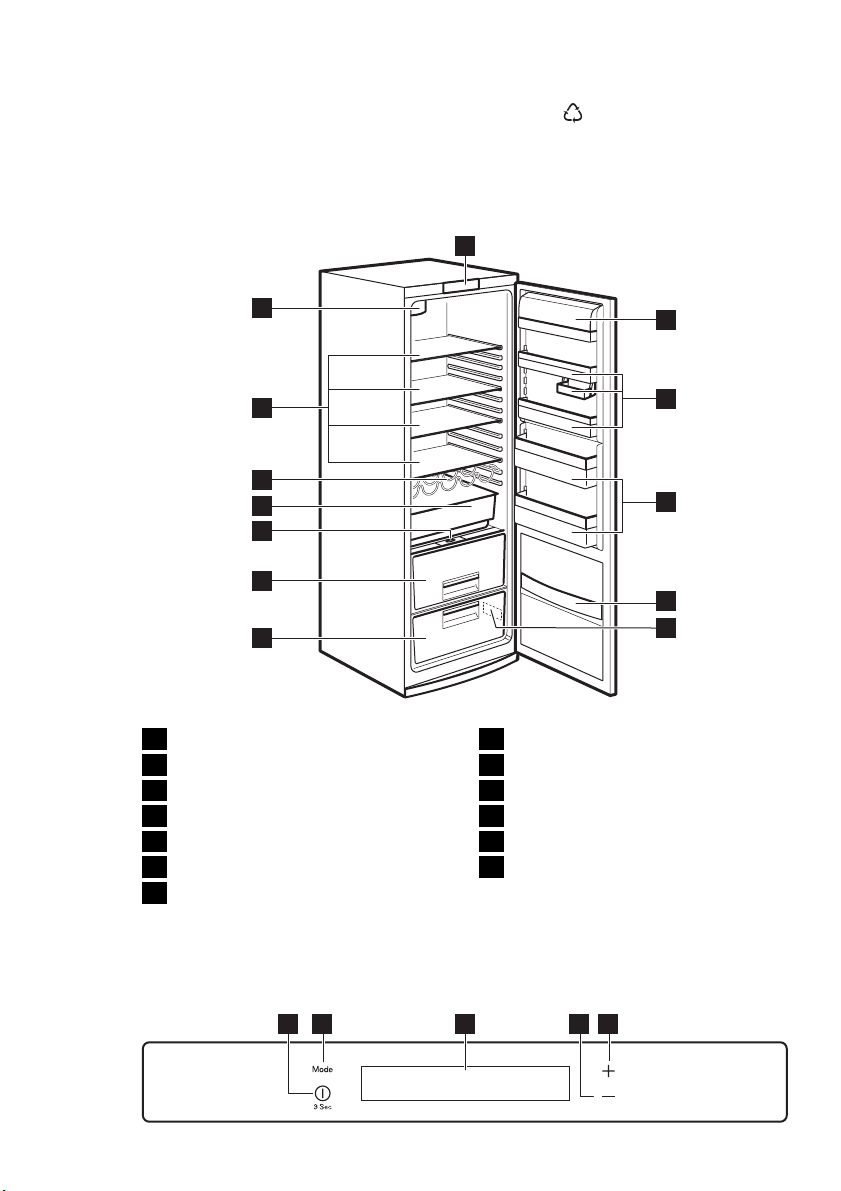
2. PRODUCT DESCRIPTION
ENGLISH 5
exchanger. The materials used on
this appliance marked by the sym-
are recyclable.
bol
1
Control panel
1
Butter shelf
2
Dairy shelves
3
Bottle shelves
4
Snack shelf
5
Rating plate
6
Crispfresh drawer
7
13
12
11
10
2
3
4
9
8
7
Crispfresh drawer
8
Humidity control
9
Freshzone drawer
10
Bottle rack
11
Glass shelves
12
Cleanair control
13
5
6
3. CONTROL PANEL
1 2 3 4 5
Page 6
www.electrolux.com
6
1
2
3
4
5
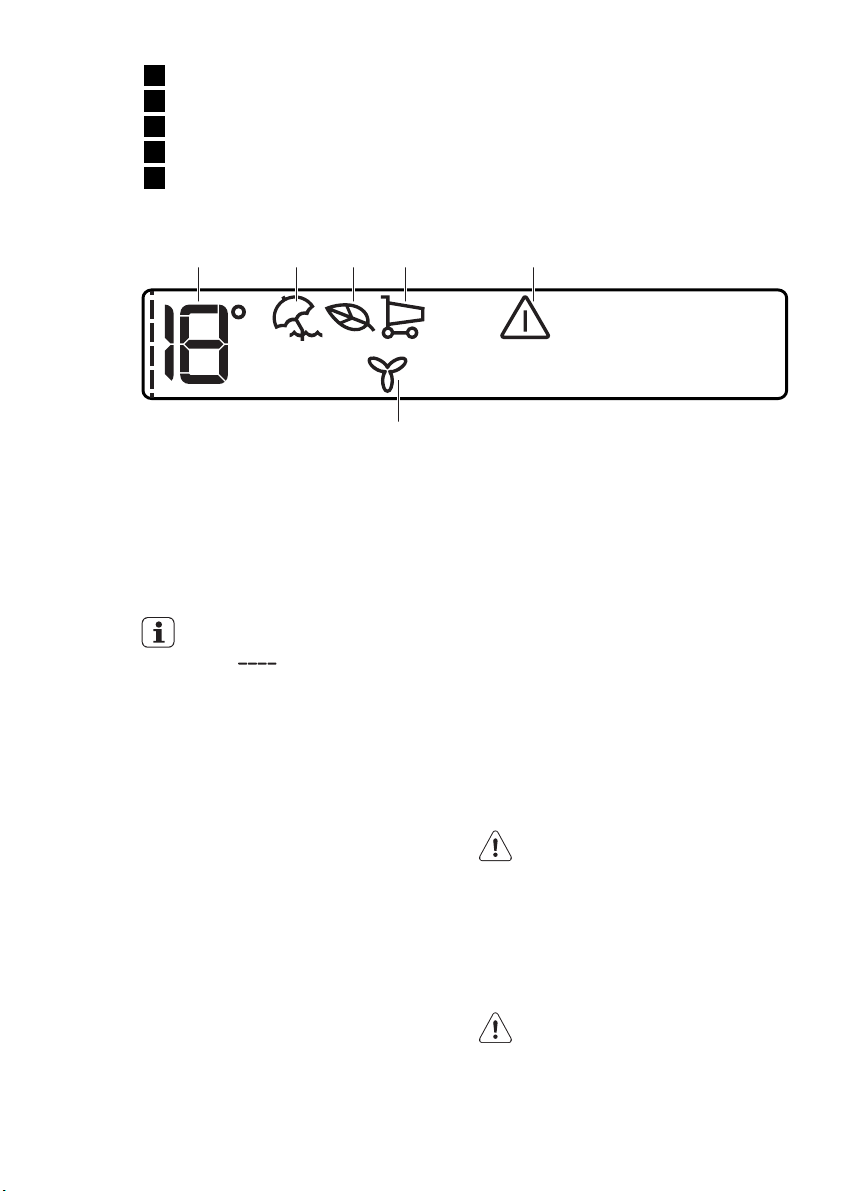
3.1 Display
ON/OFF button
Mode button
Display
Temperature colder button
Temperature warmer button
It is possible to change predefined sound
of buttons to a loudly one by pressing together Mode button and Temperature
colder button for some seconds. Change
is reversible.
A B C D E
F
A)
Temperature indicator
B)
HolidayMode
C)
EcoMode
D)
ShoppingMode
E)
Door open alarm indicator
F)
FreeStore mode
After selection of the Mode or the
Temperature button the anima-
tions
After selection of the temperature
the animation flashes for a few minutes.
starts.
3.2 Switching on
To switch on the appliance do these
steps:
1.
Connect the mains plug to the power
socket.
2.
Press the ON/OFF button if the display is off.
3.
If DEMO appears on the display, the
appliance is in demonstration mode.
Refer to "What to do if..." paragraph.
4.
The temperature indicators show the
set default temperature.
To select a different set temperature refer
to "Temperature regulation".
1.
Press the ON/OFF button for 3 seconds.
2.
The display switches off.
3.
To disconnect the appliance from the
power disconnect the mains plug
from the power socket.
3.4 Temperature regulation
The set temperature of the fridge may be
adjusted by pressing the temperature button.
Set default temperature: +5°C for the
fridge.
The temperature indicator shows the set
temperature.
The set temperature will be reached within 24 hours.
After a power failure the set temperature remains stored.
3.5 HolidayMode
This function allows you to keep the refrigerator closed and empty during a long
holiday period without the formation of a
bad smell.
The fridge compartment must be
empty with holiday function on.
3.3 Switching off
To switch off the appliance do these
steps:
To switch on the function:
1.
Press the Mode button until the corresponding icon appears.
Page 7
The Holiday indicator flashes for few
seconds.
The fridge temperature indicator
shows the set temperature.
To switch off the function:
1.
Press the Mode button until the Holi-
day indicator flashes.
2.
The Holiday indicator goes off.
The function switches off by selecting a different fridge set temperature.
3.6 EcoMode
For optimal food storage select the EcoMode.
To switch on the function:
1.
Press the Mode button until the cor-
responding icon appears.
The EcoMode indicator flashes for
few seconds.
The temperature indicator shows the
set temperature:
– for the fridge: +4°C
2.
The EcoMode indicator is shown.
To switch off the function:
1.
Press the Mode button until the Eco-
Mode indicator flashes.
2.
The EcoMode indicator goes off.
The function switches off by selecting a different set temperature.
3.7 ShoppingMode
If you need to insert a large amount of
warm food, for example after doing the
grocery shopping, we suggest activating
the ShoppingMode to chill the products
more rapidly and to avoid warming the
other food which is already in the refrigerator.
To switch on the function:
1.
Press the Mode button until the cor-
responding icon appears.
ENGLISH 7
The ShoppingMode indicator flashes
for few seconds.
The ShoppingMode shuts off automatically after approximately 6 hours.
To switch off the function before its automatic end:
1.
Press the Mode button until the
ShoppingMode indicator flashes.
2.
The ShoppingMode indicator goes
off.
The function switches off by selecting a different fridge set temperature.
3.8 Door open alarm
An acoustic alarm will sound if the door is
left open for a few minutes. The door
open alarm conditions are indicated by:
• flashing Alarm indicator
• acoustic buzzer
When normal conditions are restored
(door closed), the alarm will stop.
During the alarm, the buzzer can be
switched off by pressing any button.
3.9 FreeStore mode
To switch on the function:
1.
Press the Mode button until the cor-
responding icon appears.
The FreeStore indicator flashes for
few seconds.
2.
The FreeStore indicator is shown.
To switch off the function:
1.
Press the Mode button until the Free-
Store indicator flashes.
2.
The FreeStore indicator goes off.
If the function is activated automatically the FreeStore indicator is
not shown (refer to "Daily use").
The activation of the FreeStore
mode increases the energy consumption.
Page 8
www.electrolux.com
8
4. DAILY USE
4.1 Movable shelves
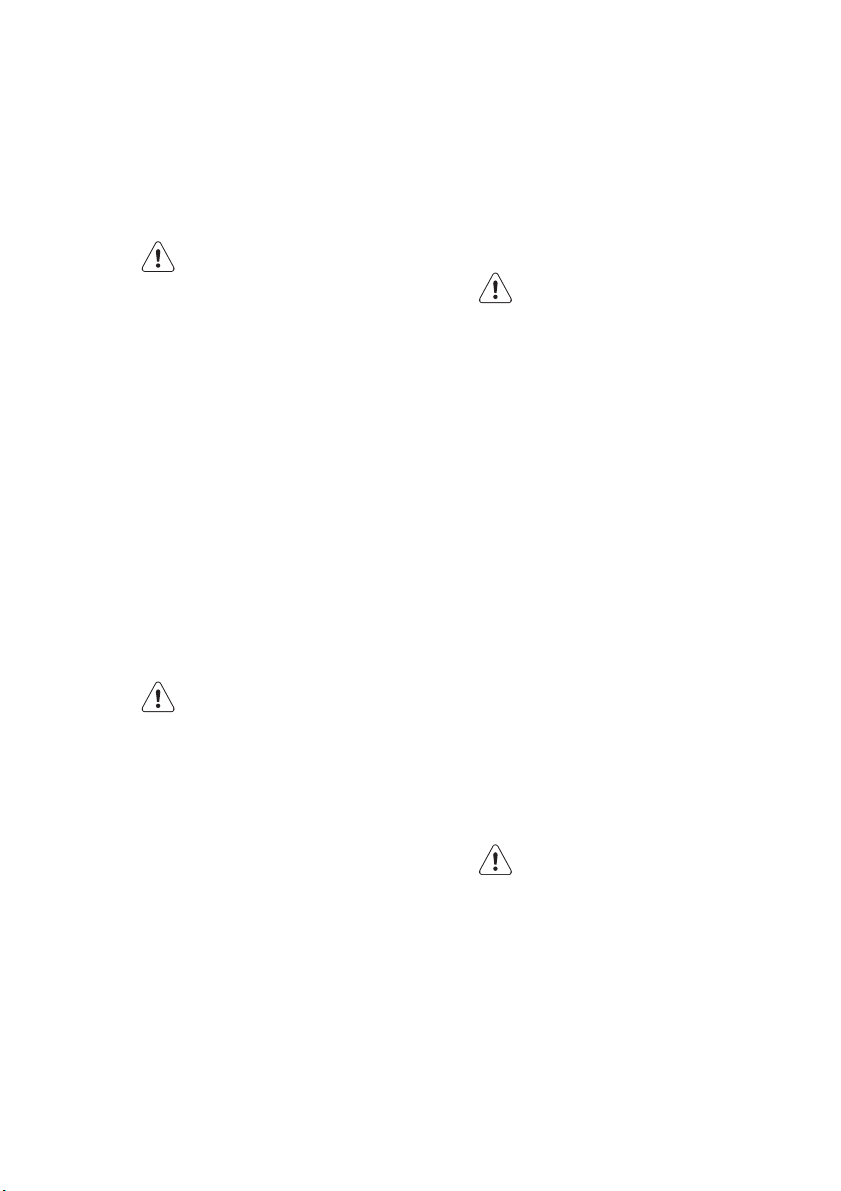
4.2 Positioning the door shelves
The walls of the refrigerator are equipped
with a series of runners so that the
shelves can be positioned as desired.
To permit storage of food packages of
various sizes, the door shelves can be
placed at different heights.
To make these adjustments proceed as
follow: gradually pull the shelf in the direction of the arrows until it comes free, then
reposition as required.
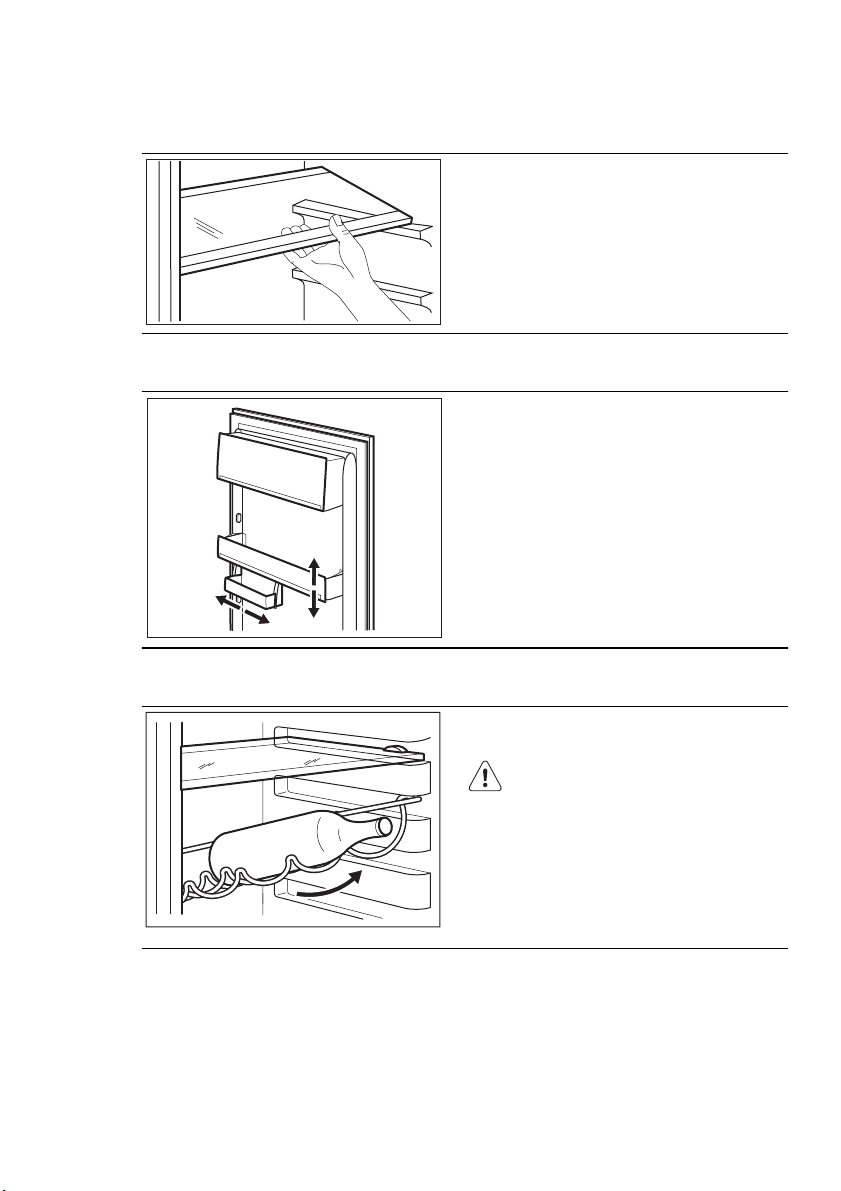
4.3 Bottle rack
Place the bottles (with the opening facing
front) in the pre-positioned shelf.
If the shelf is positioned horizontally, place
only closed bottles.
This bottle holder shelf can be tilted in order to store previously opened bottles. To
obtain this result, pull the shelf up so it
can rotate upwards and be placed on the
next higher level.
Page 9

4.4 CrispFresh drawer
4.5 Freshzone drawer
ENGLISH 9
The drawer is suitable for storing fruit and
vegetables.
There is a separator inside the drawer that
can be placed in different positions to allow for the subdivision best suited to personal needs.
There is a grille (if foreseen) on the bottom
of the drawer to separate the fruit and
vegetables from any humidity that may
form on the bottom surface.
All parts inside the drawer can be removed for cleaning purposes.
The FreshZone drawer is suitable for storing fresh food like fish, meat, seafood, because the temperature is lower here than
in the rest of the fridge.
Page 10

www.electrolux.com
10
4.6 Humidity Control
When storing vegetables and fruits in the
refrigerator it is good practise to place the
produce in the drawer. The refrigerator
makes sure that the temperature is kept
low, thus slowing down the aging. In normal conditions, when the vegetable drawer is not fully loaded, and contains a mix
of vegetables and fruits, the humidity control should be placed in the high humidity
position illustrated by the large drop. This
means that the top grill is closed high humidity is maintained inside the drawer.
This should be the standard setting.
Sometimes when the drawer is tightly
packed there is a risk that the produce is
cooled less effectively it is then good
practise to open the vents of the grill towards the small droplet. Vegetables normally cool themselves by evaporating water, and in the case of closed vents, there
is risk of a build up of drops and pools of
water inside. Produce that may drive large
quantities include lettuces, mushrooms,
broccoli and carrots. In cases where the
mix contains apples and fruits, it may be a
good idea to keep the vents a little open
in case there is a risk of ethylene accumulation inside. Ethylene is a growth hormone released by some fruits and vegetables, that may harm some, and speed up
aging of others.
4.7 DYNAMICAIR
The refrigerator compartment is equipped
with a device that allows for rapid cooling
of foods and more uniform temperature in
the compartment.
This device activates by itself when needed, for example for a quick temperature
recovering after door opening or when the
ambient temperature is high.
Allows you to switch on the device manually when needed (refer to "DYNAMICAIR
Function").
The DYNAMICAIR device stops when the
door is open and restarts immediately after the door closing.
Page 11

5. HELPFUL HINTS AND TIPS
ENGLISH 11
5.1 Hints for energy saving
• Do not open the door frequently or
leave it open longer than absolutely
necessary.
• If the ambient temperature is high and
the Temperature Regulator is set to low
temperature and the appliance is fully
loaded, the compressor may run continuously, causing frost or ice on the
evaporator. If this happens, set the
Temperature Regulator toward warmer
settings to allow automatic defrosting
and so a saving in electricity consumption.
5.2 Hints for fresh food
refrigeration
To obtain the best performance:
• do not store warm food or evaporating
liquids in the refrigerator
• do cover or wrap the food, particularly if
it has a strong flavour
• position food so that air can circulate
freely around it
6. CARE AND CLEANING
5.3 Hints for refrigeration
Useful hints:
Meat (all types) : wrap in polythene bags
and place on the glass shelf above the
vegetable drawer.
For safety, store in this way only one or
two days at the most.
Cooked foods, cold dishes, etc..: these
should be covered and may be placed on
any shelf.
Fruit and vegetables: these should be
thoroughly cleaned and placed in the special drawer(s) provided.
Butter and cheese: these should be
placed in special airtight containers or
wrapped in aluminium foil or polythene
bags to exclude as much air as possible.
Milk bottles: these should have a cap and
should be stored in the bottle rack on the
door.
Bananas, potatoes, onions and garlic, if
not packed, must not be kept in the refrigerator.
6.1 Cleaning the interior
Before using the appliance for the first
time, wash the interior and all internal accessories with lukewarm water and some
neutral soap so as to remove the typical
smell of a brand-new product, then dry
thoroughly.
Do not use detergents or abrasive
powders, as these will damage
the finish.
CAUTION!
Unplug the appliance before carrying out any maintenance operation.
This appliance contains hydrocarbons in its cooling unit; maintenance and recharging must therefore only be carried out by authorized technicians.
6.2 Periodic cleaning
The equipment has to be cleaned regularly:
• clean the inside and accessories with
lukewarm water and some neutral
soap.
• regularly check the door seals and wipe
clean to ensure they are clean and free
from debris.
• rinse and dry thoroughly.
Do not pull, move or damage any
pipes and/or cables inside the
cabinet.
Never use detergents, abrasive
powders, highly perfumed cleaning products or wax polishes to
clean the interior as this will damage the surface and leave a
strong odour.
Page 12

www.electrolux.com
12
Clean the condenser (black grill) and the
compressor at the back of the appliance
with a brush. This operation will improve
the performance of the appliance and
save electricity consumption.
6.3 Defrosting the refrigerator
Take care of not to damage the
cooling system.
Many proprietary kitchen surface cleaners
contain chemicals that can attack/damage the plastics used in this appliance.
For this reason it is recommended that
the outer casing of this appliance is only
cleaned with warm water with a little
washing-up liquid added.
Frost is automatically eliminated from the
evaporator of the refrigerator compartment every time the motor compressor
stops, during normal use. The defrost water drains out through a drain hole into a
special container at the back of the appliance, over the motor compressor, where
it evaporates.
It is important to periodically clean the defrost water drain hole in the middle of the
refrigerator compartment channel to prevent the water overflowing and dripping
onto the food inside.
Use the special cleaner provided, which
you will find already inserted into the drain
hole.
7. TROUBLESHOOTING
During operation of the appliance some
smaller but annoying trouble can often occur, which does not require calling a technician out. In the following chart information is given about them to avoid unnecessary charges on service.
The operation of the appliance
goes with certain sounds (compressor and circulating sound).
This not means a trouble, but a
normal operation.
Problem Possible cause Solution
The appliance is
noisy.
The buzzer sounds.
The Alarm icon
flashing.
The appliance is not supported properly.
The door is not closed
correctly.
The appliance operates discontinuously, so the stopping of compressor does not mean being no
current. That is why you must not
touch the electrical parts of the
appliance before breaking the circuit.
Check if the appliance
stands stable (all feet and
wheels should be on the
floor). Refer to "Levelling".
Refer to "Door open alarm".
Page 13

Problem Possible cause Solution
upper or lower
square is shown in
the temperature display.
An error has occurred in
measuring the temperature
Call your service representative (the cooling system
will continue to keep food
products cold, but temperature adjustment will not be
possible)
“dEMo” appears on
the display.
The appliance is in demonstration mode.
Keep pressed approximately 10 sec the OK button
since a long sound of buzzer is heard and the display
shut off for a short while:
appliance start works regularly.
The compressor
runs continuously.
The door is not closed
The Temperature regulator
may be set incorrectly.
Set a warmer temperature.
Refer to "Closing the door".
correctly.
The door has been
opened too frequently.
The food temperature is
too high.
Do not keep the door open
longer than necessary.
Let the food temperature
decrease to room temperature before storage.
The room temperature is
too high.
Water flows inside
the refrigerator.
The water outlet is clogged.
Food prevent that water
flows into the water collec-
Decrease the room temperature.
Clean the water outlet.
Make sure that food do not
touch the rear plate.
tor.
Water flows on the
ground.
The melting water outlet
does not flow in the evaporative tray above the
Attach the melting water
outlet to the evaporative
tray.
compressor.
The temperature in
the appliance is too
The Temperature regulator
may be set incorrectly.
Set a warmer temperature.
cold.
The temperature in
the appliance is too
The Temperature regulator
may be set incorrectly.
Set a lower temperature.
warm.
The door is not closed
Refer to "Closing the door".
correctly.
The food temperature is
too high.
Let the food temperature
decrease to room temperature before storage.
ENGLISH 13
Page 14

www.electrolux.com
14
Problem Possible cause Solution
The temperature in
the refrigerator is
too warm.
Large quantities of food to
The appliance does
not operate.
The mains plug is not con-
The appliance has no
The lamp does not
work.
The door has been open
Door interferes with
ventilation grill.
Misaligned door. The appliance is not level-
As much as the advice does not lead to result, call the nearest brand-mark service.
7.1 Replacing the lamp
The appliance is equipped with a longlife
LED interior light.
Only service is allowed to replace the
lighting device. Contact your Service Center .
There is no cold air circulation in the appliance.
Make sure that there is cold
air circulation in the appliance.
Insert smaller quantities of
be cooled were put in at
the same time.
The appliance is switched
food to be cooled at the
same time.
Switch on the appliance.
off.
Connect the mains plug to
nected to the mains sock-
the mains socket correctly.
et correctly.
Connect a another electrical
power. There is no voltage
in the mains socket.
appliance to the mains
socket. Check fuse. Con-
tact a qualified electrician.
The lamp is defective. Refer to "Replacing the
lamp".
Close the door.
to long.
The appliance is not level-
Refer to "Levelling".
led.
Refer to "Levelling".
led.
2.
If necessary, adjust the door. Refer to
"Installation".
3.
If necessary, replace the defective
door gaskets. Contact the Service
Center.
7.2 Closing the door
1.
Clean the door gaskets.
8. INSTALLATION
WARNING!
Read the "Safety Information"
carefully for your safety and correct operation of the appliance
before installing the appliance.
8.1 Positioning
Install this appliance at a location where
the ambient temperature corresponds to
the climate class indicated on the rating
plate of the appliance:
Page 15

ENGLISH 15
Cli-
Ambient temperature
mate
class
SN +10°C to + 32°C
N +16°C to + 32°C
ST +16°C to + 38°C
T +16°C to + 43°C
8.2 Location
100 mm
min
A
20 mm
B
The appliance should be installed well
away from sources of heat such as radiators, boilers, direct sunlight etc. Ensure
that air can circulate freely around the
back of the cabinet. To ensure best performance, if the appliance is positioned
below an overhanging wall unit, the minimum distance between the top of the
cabinet and the wall unit must be at least
100 mm . Ideally, however, the appliance
should not be positioned below overhanging wall units. Accurate levelling is ensured by one or more adjustable feet at the
base of the cabinet.
WARNING!
It must be possible to disconnect
the appliance from the mains
power supply; the plug must
therefore be easily accessible after
installation.
Page 16

www.electrolux.com
16
8.3 Electrical Connection
AB
C
E
D
A-Green and Yellow: Earth
C- Brown: Live
E- Blue: Neutral
As the colours of the wires in the mains
lead of this appliance may not correspond
with the coloured markings identifying the
terminals in your plug, proceed as follows:
1.
Connect the wire coloured green and
yellow to the terminal marked either
with the letter “E“ or by the earth
symbol
low.
2.
Connect the wire coloured blue to the
terminal either marked with the letter
“N“ or coloured black.
3.
Connect the wire coloured brown to
the terminal either marked with the
“L“ or coloured red.
4.
Check that no cut, or stray strands of
wire is present and the cord clamp D
is secure over the outer sheath.
5.
Make sure the electricity supply voltage is the same as that indicated on
the appliance rating plate.
6.
Switch on the appliance.
The appliance is supplied with a 13 amp
plug fitted B. In the event of having to
change the fuse in the plug supplied, a 13
amp ASTA approved (BS 1362) fuse must
be used.
CAUTION!
Any electrical work required to install this appliance should be carried out by a qualified electrician
or competent person.
WARNING!
This appliance must be earthed.
The manufacturer declines any liability should these safety measures not be observed.
The wires in the mains lead are
coloured in accordance with the
following code:
or coloured green and yel-
WARNING!
A cut off plug inserted into a 13
amp socket is a serious safety
(shock) hazard. Ensure that it is
disposed of safely.
Page 17

8.4 Rear spacers
ENGLISH 17
4
8.5 Levelling
8.6 Door reversibility
2
1
3
You can find the two spacers in the bag
with documentation.
Do these steps to install the spacers:
1.
Release the screw.
2.
Engage the spacer below the screw.
3.
Turn the spacer to the right position.
4.
Tighten again the screws.
Accurate levelling prevents the vibration
and noise of the appliance during operation. To adjust the height of the appliance
loosen or tighten the two adjustable front
feet.
To carry out the following operations, we suggest that this be
made with another person that will
keep a firm hold on the doors of
the appliance during the operations.
To change the opening direction of the
door, do these steps:
• Remove the plug from the power sock-
et.
• Unscrew the upper pin and screw it on
the opposite side.
• Remove the door.
Page 18

www.electrolux.com
18
• Remove the plinth .
A
B
• Remove the cap (A) and position it on
the opposite side.
• Unscrew the lower hinge (C) and the
washers (B)
• Position the pin and the washers on the
opposite side .
C
• Re-screw the upper hinge.
C
B
• Refit the door.
• Remove the covers. (B) Remove the
cover pins. (A)
• Unscrew the handles and fix them on
A
the opposite side. (C)
• Re-insert the cover pins (A) on the op-
posite side
• Do a final check to make sure that:
– All screws are tightened.
– The door opens and closes correctly.
If the ambient temperature is cold (i.e. in
Winter), the gasket may not fit perfectly to
the cabinet. In that case, wait for the natural fitting of the gasket.
In case you do not want to carry out the
above mentioned operations, contact the
nearest After Sales Service Force. The After Sales Service specialist will carry out
the reversibility of the doors at your cost.
9. TECHNICAL DATA
Dimension
Height 1850 mm
Width 595 mm
Depth 658 mm
Voltage 230-240 V
Frequency 50 Hz
The technical information are situated in
the rating plate on the internal left side of
the appliance and in the energy label.
Page 19

10. NOISES
There are some sounds during normal
running (compressor, refrigerant circulation).
SSSRRR!
HISSS!
ENGLISH 19
CLICK!
BRRR!
OK
CLICK!
BRRR!
CRACK!
BLUBB!
CLICK!
BRRR!
BLUBB!
BLUBB!
Page 20

www.electrolux.com
20
HISSS!
HISSS!
SSSRRR!
CRACK!
11. ENVIRONMENT CONCERNS
Recycle the materials with the symbol
. Put the packaging in applicable
containers to recycle it.
Help protect the environment and human
health and to recycle waste of electrical
SSSRRR!
CRACK!
and electronic appliances. Do not dispose
appliances marked with the symbol
with the household waste. Return the
product to your local recycling facility or
contact your municipal office.
Page 21

ENGLISH 21
Page 22

www.electrolux.com
22
Page 23

ENGLISH 23
Page 24

www.electrolux.com/shop
280150992-A-442012
 Loading...