

Page 1

Instruction book
Instrucciones de uso
Instruçõnes de uso
fridge
congelador
congelador
ERC37300
Page 2

We were thinking of you
when we made this product
Page 3

Welcome to the world of Electrolux
Thank you for choosing a first class product from Electrolux, which hopefully will
provide you with lots of pleasure in the future. The Electrolux ambition is to offer
a wide variety of quality products that make your life more comfortable. You find
some examples on the cover in this manua l. Please take a few minutes to study
this manual so that you can take advantage of the benefits of your new machine.
We promise that it will provide a superior User Experience delivering
Ease-of-Mind. Good luck!
3
Page 4
The following symbols are used in this manu al:
T
Important information concerning your personal safety and
information on how to avoid damaging the appliance
General information and tips
Environmental information
Scrapping old appliances
he symbol on the product or on its packaging indicates that this product
may not be treated as household waste. Instead it should be taken to the
appropriate collection point for the recycling of electrical and electronic
equipment. By ensuring this product is disposed of correctly, you will help
prevent potential negative consequences for the environment and human
health, which could otherwise be caused by inappropriate waste handling of
this product. For more detailed i n formation about recycling of this product,
please contact your local council, your household waste disposal service or the
shop where you purchased the product.
4
Page 5
Safety instructions
Your new fridge may have other
functions compared to your previous
one.
This appliance is not intended for use
by persons (including ch ildren) with
reduced physical, sensory or men tal
capabilities, or lack of experience and
knowledge, unless they have been
given supervision or instruction
concerning use of the appliance by a
person responsible for their safety.
Carefully read these instructions
learn how the appliance works
how to care for it. Keep the
booklet. It will come in handy if
later sell the cabinet or give it
somebody else.
These warnings are provided in the
interests of your safety. En sure that
you understand them all before
installing or using the appliance. Your
safety is of paramount importance. If
you are unsure about any of the
meanings or war nings contact the
Customer Care Department.
to
and
instruction
you
to
For the User
· The cabinet is intended for keeping
foodstuff in a normal household as
explained in this instruction booklet.
· Do not keep explosive gases or
liquids in the refrigerator or freezer
compartment. They may e xplode and
cause injury and material damage.
· Do not let sharp objects come in to
contact with the refrigerating system
on the back of and inside the cabinet.
If the refrigerating system is punctured,
the cabinet will be damaged and
foodstuff inside may spoil.
· Do not keep carbonised drinks or
bottles in the freezer compartment.
The glass bottles may break.
· The cabinet is heavy. The edges
and projecting parts of the cabinet
may be sharp. Be careful when moving
the cabinet and always use gloves.
Child Safety
· Pay attention so that small children
do not gain access to the operating
controls or the inside of the cabinet.
WARNING
Keep ventilation openings, in the
appliance enclosure or in the built-in
structure, clear of obstruction.
WARNING
Do not use mechanical devices or
other means to accelerate the
defrosting process, other than those
recommended by the man u facturer.
WARNING
Do not damage the refrigerant circuit.
WARNING
Do not u se electrical appliance in side
the food storage compartments of the
appliance, unless they are of the type
recommended by the man u facturer.
5
Page 6

Contents
Welcome to the world of Electrolux 3.
Scrapping old cabinets 4...........
Safety instructions 5............
USE 7..........................
Control Panel 7...................
DISPLAY 8.......................
Functions Menu 8.................
Select /Switch off /Switch on 8......
Temperature selection 8............
Switching off 8....................
Ambient Temperature Function 9.....
Child lock Function 9..............
Shopping Function 9...............
Eco mode Function 9..............
Use of the fridge compartment 9.....
Temperature selection 9............
Holiday Function "H" 10............
Door open acoustic alarm 10........
Cabinet interior 10.................
HINT and TIPS 11.................
Saving energy 11..................
Food Storage 11..................
Protect the environment 11.........
MAINTENANCE and CLEANING 11..
Removing the ventilation grille 11....
Cleaning 11......................
Defrosting the fridge 12.............
To change the lamp 12.............
Whentheapplianceis
not in use 13..................
SOMETHING NOT WORKING 13....
TECHNICAL SPECIFICATION 15....
INSTALLATION 15.................
Unpacking 15.....................
Remove the transport supports 15...
Cleaning 15......................
Electrical cord 16..................
Installing the cabinet 16............
Door Reversal 17..................
Electrical connection 18............
6
Page 7
USE
Position and clean the cabinet as
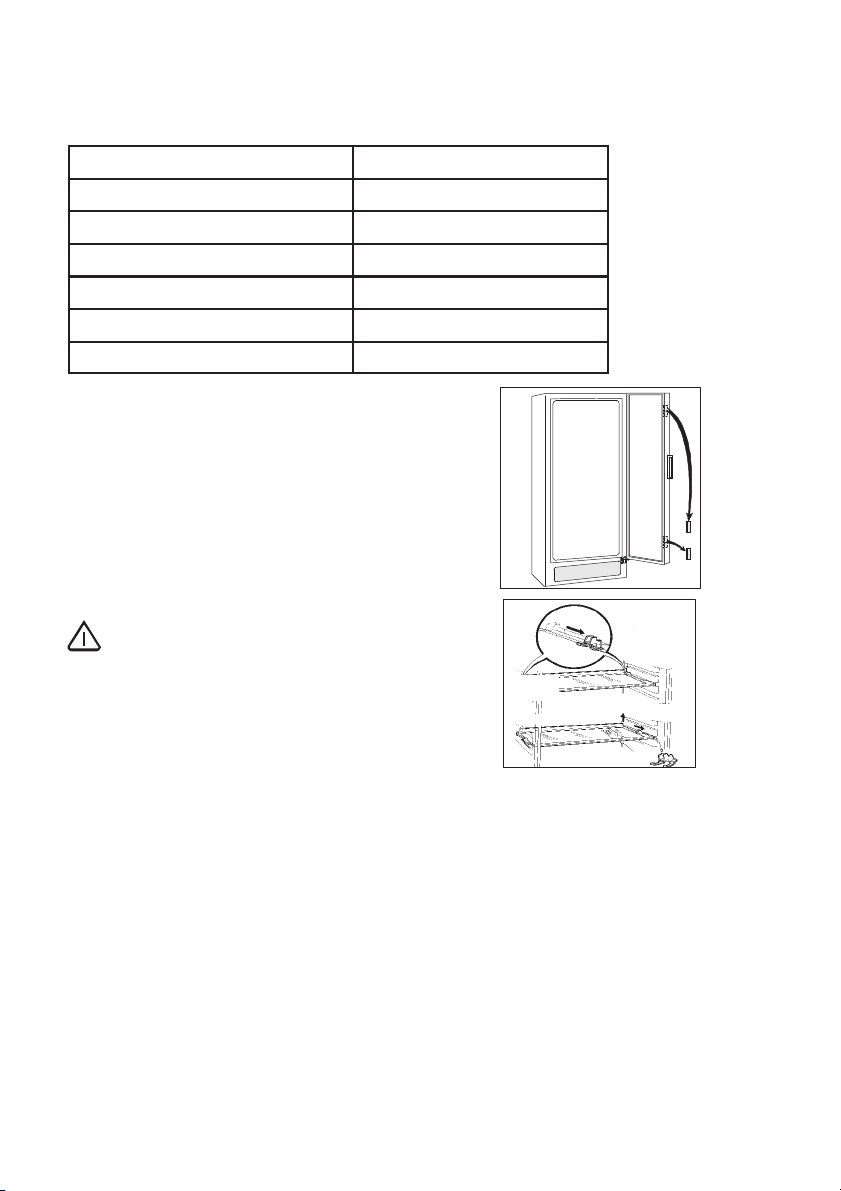
explained in the section "Installation".
Check that the drain h ose at the rear
of the cabinet discharges into the drip
tray.
Before inserting the power plug into the outlet and switching on the cabinet for
the first time, leave it standing upright for about 2 hours. Otherwise the
compressor may sustain damage. This time will allow the oil sufficient time to
return to the compressor.
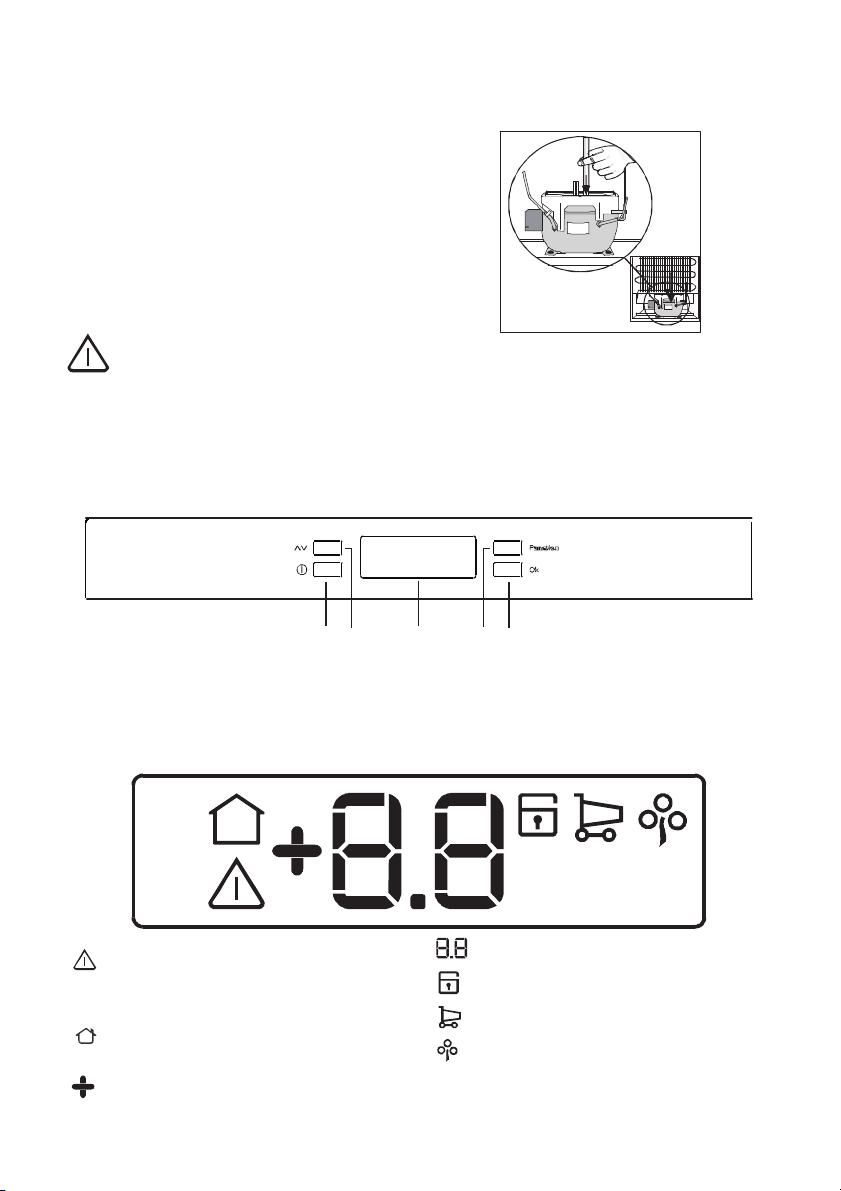
Control Panel
AE
B
A - Appliance button ON/OFF
B - Temperature regulation button
C - Temperature and function indicator
DISPLAY
Excessive temperature alarm and
Door open acoustic alarm
Indicator (if foreseen)
If on the temperature indicated is
the ambient temperature
PositiveTemperature indicator
7
C
D
D - Function button
E - Confirmation button
Temperature indicator
If on the Child Lock function is on
If on the Shopping function is on
If on the Eco Mode function is on
Page 8
First switch on
After plugging the plug into the power
outlet, if the display is not illuminated,
press key (A), appliance on.
For a correct storage of the food select
the Eco mode function that guarantee
the following temperature is set:
+5°C in the fridge
· To select a different temperature
see "Temperature regulation".
Important
If the door remains ajar for some
minutes, the internal lighting will turn
off electronically; after this, the lighting
function will be reset by closing an d
opening the door itself.
Functions Menu
By activating the key D the functions
menu is operating. Each fu n ction
could be confirmed by pressing button
E. If there is no confirmation after
some seconds the display will go out
from the menu and return in normal
condi-tion.
The following functions are indicated:
Ambient Temperature
By pressing the key B the current temperature setting flashes on the indicator and by pressing the key B again it
is possible to change it.
Youconfirmthechoiceofthetemperature either by pressing the key E,
(you will hear the buzzer) or by waiting
for some seconds (you will not h ear
the buzzer).
Then the indicator shows the inside
compartment temperature again.
The newly selected-temperature must
be reached after 24 hours.
It is n ot necessary to set the temperature again after long periods of non
use as the temperature remains
stored.
Attention!
During the stability period by the first
starting the temperature displayed can
not correspond to the setting temperature. During this time it is possible
that the temperature displayed is
different than the setting temperature.
Switching off
The appliance is shut off by pressing
key (A) for more than 1 second. After
this, a countdown of the temperature
from -3 -2 -1 will be shown.
Child Lock function
Shopping function
Eco Mode function
Select /Switch off /Switch on
Temperature regulation
The temperature may be regulated by
pressing the key (B) to set the desired
temperature.
Ambient Temperature Function
The ambient temperature function is
activated by pressing key D (several
times if necessary) until the corresponding icon appears
In this condition the selected temperature is the ambient temperature.
You must confirm the choice by
pressing key E within few seconds.
You will hear the buzzer and the icon
remains lighted.
.
8
Page 9
It is possible to de-activate the function
atanytimebypressingkeyDuntilthe
corres po nding icon will flash and then
key E.
Child Lock Function
The child lock function is activated by
pressing key D (several times if
necessar y) until the cor responding icon
appears
You must confir m the choice by pressing key E within few seconds. You will
hear the buzzer and the icon remains
lighted.
In this condition any possible operation
through the keys does not cause any
change as long as this function is
activated.
It is possible to de-activate the function
atanytimebypressingkeyDuntilthe
corresponding icon flashes and then
key E.
.
Shopping Function
If you need to insert a large amount of
warm food, for example after doing the
grocery shopping, we suggest you
activate the Shopping function to chill
the products more rapidly and to avoid
warming the other food which is
already in the refrigerator.
The shopping function is activated by
pressing key D (several times if n ecessary) until the corresponding icon
appears
choice by pressing key E within few
seconds. You will hear the buzzer and
the icon remains lighted.
The Shopping function shuts off automatically after approximately 6 hours.
It is possible to de-activate the function
atanytimebypressingkeyDuntilthe
You mu st con firm th e
corresponding icon will flashes and
then key E.
Eco mode Function
The Eco mode function is activated by
pressing key D (several times if necessary) until the corresponding icon
appears
choice by pressing key E within few
seconds. You will hear the buzzer and
the icon remains lighted.
In this condition the chosen temperatures are automatically set (+ 5°C and
- 18°C), in the best conditions for
storing food.
It is possible to de-activate the function
at any time by changing the selected
temperature in one of the compartments.
It is possible to de-activate the function
atanytimebypressingkeyDuntilthe
corresponding icon will flash and then
key E.
. You must confirm the
Use of the fridge compartment
Temperature regulation
The temperature of this compartment
may be regulated between +2°C and
+8°C.
During normal functioning the indicator
shows the temperature inside the
fridge.
Attention!
Difference between the temperature
displayed and temperature setting is
normal. Especially when:
- a new setting has recently been
selected
- the door has been left open for a
long time
- warm food has been placed in the
compartment.
9
Page 10

Holiday Function "H"
The holiday function sets the temperature at + 15°C.
This function allows you to keep the
refrigerator shut and empty during a
long holiday period ( e. g. the summer
holidays) without the formation of a
bad smell.
The Holiday Function H may be regulated by pressing the key B. By pressing the key B the current temperature
setting flashes on the indicator. Press
the key B again. When the letter H
appears on the display, confirm the
choice of the temperature or by
pressing the key E, (you will hear the
buzzer) or by waiting for some
seconds (you will not hear the buzzer).
Now the refrigerator is in the Holiday
function in the energy saving mode
and the indicator shows the letter H .
It is possible to de-activate the function
at any time by changing the selected
temperature in the compartment.
Attention!
The fridge compartment must be
empty with holiday fun ction on.
Door open acoustic alarm
An acoustic alarm will sound when the
door is left open for around 5 minutes.
The door open alarm conditions are
indicated by:
- flashing of the icon
- sound ing of buzzer.
Press the key (E) to stop the acoustic
alarm.
When normal conditions are resto red
(door closed):
- the acoustic alarm will stop.
;
Cabinet interior
The shelves and door compartments
are removable and can easily be
re-arranged.
Certain shelves must be lifted up by
the rear edge to enable them to be
removed.
The lower door compartment and the
glass shelf above the vegetable drawer
must not be moved. They are fitted to
ensure air circulation inside the
cabinet.
Shelves with a raised edge should be
placed with the raised edge facing the
rear wall of the cabinet, an d thus
prevent food products from touching
the cooling plate.
The vegetable drawer has a ventilation
edging to increase the circulation of air
and reduce the risk of condensation.
10
Page 11

HINT and TIPS
Saving energy
· Pay careful attention to where the
cabinet is placed. See the section
"Installation". When installed correctly,
the cabinet will consume less energy.
· Try to avoid keeping the door open
for long periods, or opening the door
too frequently as warm air will enter the
cabinet, and cause the compressor to
switch on u n necessarily often.
· Ensure there are no obstructions
preventing the door from closing
properly.
· Thaw frozen food in the fridge. This
will ensure safer defrosting of foods
and reduce the work of the
refrigeration u n it
· It is advisable to periodically clean the
refrigeration system at the back of the
appliance with a duster or vacuum
cleaner.
· Always leave warm food to cool
down to room temperature before
placing in the fridge.
· Make sure the door gasket is
complete and always clean.
Food Storage
· To obtain the best results from your
appliance, neither hot foods nor liquids
which may evaporate, should be
placed in the larder compartment.
Remove suspect food from you
refrigerator and clean, refer to cleaning
and maintenance.
council or Environmental Health office
for more information.
· Keep foodstuff in re-usable
containers. Cut down on disposable
material as much as possible.
· When cleaning the cabinet, use a
mild washing-up detergent.
· Follow the advice in the section
"Saving energy"
· The door gasket and coolant used in
this cabinet will not harm the ozone
layer.
· All parts in the packaging can be
recycled.
· The cabinet has been designed for
easy dismantling and subsequent
recycling.
MAINTENANCE and
CLEANING
Removing the ventilation grille
The ventilation grille can be removed,
e.g. to wash the grille.
Make sure the door is open when
removing the ventilation grille. Unsnap
the upper edge of the grille by pulling
outward/downward. Then pull the grille
straight out to completely remove it.
Cleaning
Clean the cabinet at regular intervals.
Protect the environment
· Hand over the cabinet packaging
and discarded fridges and freezers to a
recycling station. Contact your local
11
Page 12
Internal Cleaning
Disconnect the appliance from
electricity supply.
Clean the inside and accessories with
warm water and bicarbonate of soda
(5ml to 0,5 litre water) Rinse and dry
thoroughly.
Regularly check the door seals and
wipe clean to ensure they are clean
and free from debris.
Clean out the drip channel inside the
fridge at regular intervals and ensure
that the drip channel is clear at all
times. If blocked carefully clear using
a piece of flexible curtain wire inserted
into the drain outlet to remove the
blockage.
External Cleaning
Use water/neutral soap emulsion for
cleaning the surface of stainless steel,
anti-finger-print coated. Do NOT use
abrasive paste.
Remove the ventilation grille (see the
section "Removing the ventilation
grille") and vacuum-clean under the
cabinet. Once or twice a year dust the
condenser (black grille) and the
compressor at the back of the
appliance, with a brush or vacuum
cleaner, as an accumulation of dust
will affect the performance of the
appliance and cause excessive
electricity consumption.
When moving the cabinet, lift it by the
front edge to avoid scratching the floor.
Defrosting the fridge
The fridge is defrosted automatically
every time the compressor stops. Frost
formation can be prevented by:
· not putting warm foodstuff inside
the cabinet.
· avoiding frequently opening the
door or keeping it open too long.
To change the lamp
The light is switched on au tomatically
when the door is opened. Before
replacing the light bulb, disconnect the
power plug from the outlet.
Disassemble the lamp by using a
screwdriver in the recess on the lamp
insert. To prise it out of its location.
Assemble a new lamp by guiding it
into a centred position and press until
it snaps in to place.
Use a halogen bulb of the same type,
maximum rating of 20 W.
12
Page 13
When the appliance is not in use
Disconnect the appliance from
electricity supply.
Empty all foods and clean the
appliance, leaving the doors ajar to
prevent unpleasant smells.
If the cabinet is to be kept on, ask
somebody to check it once in a while
to prevent the food in side from spoiling
in case of a power failure.
SOMETHING NOT WORKING
Before contacting your local Service Force Centre check the following point:
Problem Possible cause / Remedy
”” is displayed in the
temperature display.
It is too cold inside the
refrigerator.
There is water on the cooling
plate inside the refrigerator.
Water is running inside the
refrigerator.
It is too warm inside the
refrigerator.
An error has occurred in measuring the
temperature. Call your service representative.
(The cooling system will continue to keep
food products cold, but temperature
adjustment will not be possible.)
Set a warmer temperature.
Vegetables and other products that are easily
frozen have been placed on a "too cold"
shelf. See the chapter "Temperature inside
the refrigerator".
This is normal. During automatic defrosting,
frost thaws on the cooling plate.
Clean the water drain and drain hole inside
the refrigerator using e.g. cotton swabs or a
bottle cleaner brush.
Some food products could have been placed
near the rear of the appliance prevetung the
water from running into the drain.
Set a lower temperature.
Put food products in the right place inside the
refrigerator. See the chapter "Temperature
inside the refrigerator".
Distribute the food products to allow cold air
to circulate around them.
Make sure that the door is completely closed
and that the insulating strip is complete and
clean.
13
Page 14
Water comes out on the floor.
The compressor operates
continuously.
The cabinet does not operate
at all. Cooling or interior light
does not operate. No indicator
lamps light.
Sound level in cabinet is too
high.
Place the drain hose at the back of the
cabinet above the drain bowl. See the
chapter "Before using the cabinet the first
time".
Set a warmer temperature.
Make sure that the door is completely closed
and that the insulating strip is complete and
clean.
Power does not reach the cabinet. (Try
connecting another electrical device to the
power outlet.)
The cabinet is not switched on.
Thefusehasblown.
The power plug is not properly connected.
The refrigerating system will always produce
some sounds. A pulsing sound is heard when
coolant is pumped inside the cooling pipes.
A ticking sound from the thermostat can be
heard when the compressor switches on and
off. The sound level varies depending on the
operation of the cabinet.
If you feel the sound level is incorrect:
Make sure the pipes at the back of the
cabinet do n ot touch each other. Carefully
bend them if they do.
If the cushion spacers (between the cabinet
wall and pipes) come loose, put them back in
place again.
Carefully follow the instructions in the chapter
"Installing the cabinet".
If after above checks there is still a fault call your local Service Force Centre.
In-guarantee customers should ensure that the above checks have been made
as the engineer will make a charge if the fault is not a mechan ical or electrical
breakdown.
Please note that proof of purchase is required for in-guarantee service calls.
14
Page 15
TECHNICAL SPECIFICATION
Model ERC37300W8/X8/S8
Net capacity Refrigerator l 361
Energy consumption kWh/y 179
Dimension mm
Height 1800
Width 595
Depth 623
INSTALLATION
Unpacking
Unpack the cabinet and ch eck that it
is in good condition and free of any
transport damage. Notify the dealer
immediately of any damage. Hand the
packaging over for recycling. For more
information, contact your local council
or the dealer.
Do not allow children to play with the
packaging. The plastic film can cause
suffocation.
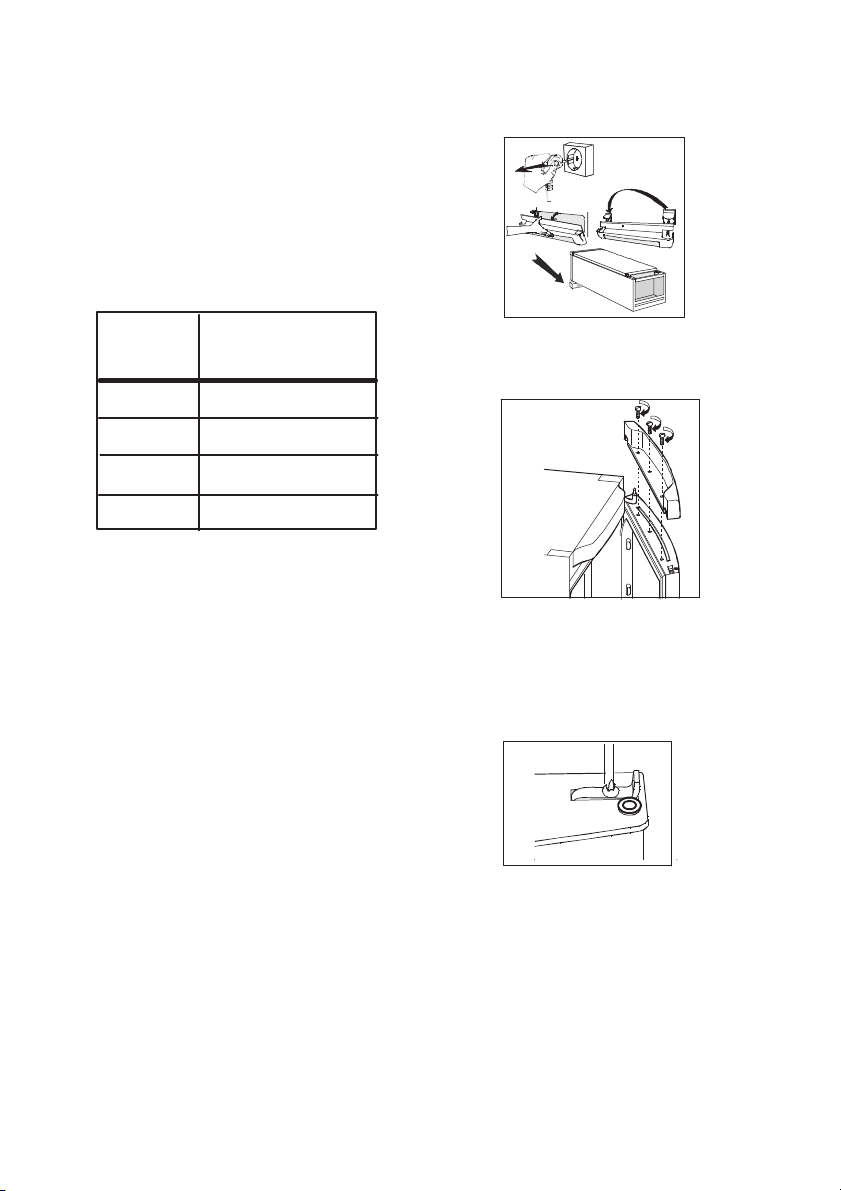
Remove the transport supports
Removethetapeandthetransport
supports from
· the door sides
·theshelves
Remove the transport support on the
glass shelf by pushing the support
forwardalongtheedgeoftheshelf
until it stops. Take hold of the rear
edge of the glass shelf and pull the
shelf and transport support forward
until the shelf tilts and the transport
support can be removed. Some
models are fitted with a silencing pad
under the cabinet. Do n ot remove this
pad.
Cleaning
Wash the inside of the cabinet using
lukewarm water, a mild washing-up
detergentandasoftcloth.
15
Page 16

Electrical cord
Do not remove the power cord by
pulling on its lead, particulary when the
product is being pulled out of its niche.
· Damage to the cord may cause a
short-circuit, fire and/or electric shock.
· In the event of damage to the
appliance's main cable, only an
authorised service company
recommended by the man u facturer or
a similarly qualified person may adjust
it in order to avoid shock hazard for the
user.
Installing the cabinet
When two appliances are placed
beside each other, the spacers
enclosed in the plastic wrapping
should be glued between the
appliances. As shown in the
illustration.
Make sure that the power plug is not
squashed or damaged by the back of
the product.
· A damaged power plug may
overheat and cause a fire.
Do not place h eavy articles or the
product itself on the power cord.
· there is a risk of a short circuit and
fire.
If the power plug socket is loose, do not
insert the power plug.
· there is a risk of electric shock or fire.
To obtain the best performance from the
cabinet, ensure:
· the cabinet is placed in a dry, cool
place and is not exposed to direct
sunlight.
· the cabinet is not placed close to a
source of heat, e.g. a cooker or
dishwasher.
· the cabinet is level. The cabinet
should not lean against any wall. If
necessary adjust the feet using the
adjustment spanner supplied.
· there is good air circulation around
the cabinet and that the air channels
below and behind the cabinet are n ot
blocked. The ventilation space above
the cabinet must be at least 4 cm.
The ventilation space can either be
a) directly above the cabinet, or
b) behind and above the top cupboard.
In this case, the space behind the
cupboard must be at least 50 mm deep.
a)
b)
50mm
16
Page 17
Cabinet is placed at a location where
the ambient temperature corresponds
to the climate classification*, for which
the appliance is designed.
* See on the rating plate on the inside
of the appliance.
The following table shows which
ambient temperature is correct for
each climate classification.
Climate
classification
SN
N
for an ambient
temperature of
+10°C to +32°C
+16°C to +32°C
grip under the cabinet thanks to the
board.
1
2
3
Remove the front cover
4. Unscrew the three screws on the
backside of the front cover
4
ST
T
If the cabinet is placed in a corner and
the side with the hinges facing the
wall, the distance between the wall
and the cabinet must be at least 230
mm to allow the door to open enough
so that the shelves can be removed.
Check that the drain h ose at the rear
of the cabinet discharges into the drip
tray.
The power plug must be accessible
after installation of the cabinet.
Door Reversal
1. Close the cabinet and remove the
plug from the electrical socket.
2. Remove the ventilation grille. There
is a part on the grille that can be
removed. Remove and reposition it on
the other side.
3. Put the cabinet on a wooden board
when it is laid down. Later, when
raising the cabinet, it will be easier to
+18°C to +38°C
+18°C to +43°C
Unscrew the hinge pin
Remove the door
5. Unscrew the door stopper screw
Remove the door stopper
5
17
Page 18

6. Remove the two cover lids on the
roof
7. Unscrew the two screws on the
hinge
7
6
8. Remove the cover on the front
8
Reassembly in reverse order on the
opposite side.
Raise the cabinet and replace the
ventilation grille.
Electrical connection
Connect the cabinet to a grounded
electrical outlet.
Voltage: 230 V.
Fuse: 10 A.
Refer to the rating plate on the left
inside the cabinet.
9. To transfer the handle.
Unscrew the screws. Fit the handle
onto the opposite side by turning it
one half circle. Press the supplied
plastic plugs into the holes to which
the handle was previously fitted.
9
Put the cabinet in position. Check that
the appliance is level. See the section
"Positioning the cabinet".
18
Page 19

Bienvenido al mundo E lectrolux
Gracias por elegir un producto Electrolux de primera clase, el cual esperamos le
proporcione una gran satisfacción en el futuro. Electrolux ambiciona ofrecerle
una amplia variedad de productos de calidad que haga su vida más cómoda.
Usted encontrará algunos ejemplos en la portada de este manual. Por favor,
tómese unos minutos para estudiar este manual de modo que pueda
aprovecharse de los beneficios de su nu eva máquina. N osotros prometemos
proporcionarle una experiencia superior como usuario y mucha tranquilidad.
¡Buena suerte!
19
Page 20

Algunos párrafos de este libro de instrucciones han sido identificados con
símbolos que tienen el siguiente significado:
El triángulo de advertencia subraya instrucciones muy importantes
para Su seguridad o para el buen funcionamiento del aparato.
Les informaciones precididas por este símbolo completan las
instrucciones de uso y de u tilización práctica del aparato
Este símbolo indica consejos e in strucciones para un empleo
económico del aparatore que respete el ambiente.
Eliminación de aparato viejos
El símbolo en el producto o en su embalaje indica que este producto no
se puede tratar como desperdicios normales del hogar. Este producto se
debe entregar al punto de recolección de equipos eléctricos y electrónicos
para reciclaje. Al asegurarse de que este producto se deseche
correctamente, usted ayudará a evitar posibles consecuencias negativas para
el ambiente y la salud pública, lo cual podría ocurrir si este producto no se
manipula de forma adecuada. Para obtener información más detallada sobre
el reciclaje de este producto, póngase en contacto con la administración de
su ciudad, con su servicio de desechos del hogar o con la tienda donde
compró el producto.
20
Page 21

Información sobre la seguridad
El nue vo frigorífico puede que tenga
otras funciones en comparación con el
aparato que usted haya tenido antes.
Este electrodoméstico n o está
destinado a personas (incluidos niños)
con reducción de las funciones físicas
o sensoriales o con experiencia y
conocimiento insuficientes, a menos
que una persona responsable de su
seguridad les supervise o les instruya
en el uso del electrodoméstico
Lea atentamente estas instrucciones
para conocer el funcionamiento del
aparato y su cuidado. Guarde este
manual de instrucciones. Será de
utilidad si con posterioridad es vendido
osedejaaotrapersona.
Utilización
· El aparato está diseñado para
guardar los alimentos de un hogar
normal, tal como se explica en este
manual de instrucciones.
· No se deben guardar gases o
líquidos explosivos en el
compartimiento del frigorífico o del
congelador. Podrían explotar y
ocasionar lesiones y daños materiales.
· No se debe permitir que objetos
punzantes entren en contacto con el
sistema de refrigeración de la parte
trasera e interior del aparato. Si se
rompiera el sistema de refrigeración,
resultaría dañado y los alimentos en su
interior podrían echarse a perder.
· No guardar botellas o bebidas
carbonatadas en el compartimiento
congelador. Las botellas de vidrio
podrían romperse.
· El aparato es pesado. L os bordes y
partes salientes del mismo pueden ser
punzantes por lo que hay que tener
cuidado al moverle y utilizar siempre
guantes.
Niños
· Prestar atención para que los niños
pequeños no tengan acceso a los
mandos de funcionamiento o al interior
del aparato.
ADVERTENCIA!
Mantenga libres de obstrucciones las
aberturas de ventilación del
alojamiento del aparato o de la
estructura empotrada.
ADVERTENCIA!
No utilice dispositivos mecánicos ni
otros medios para acelerar el proceso
de descongelación, excepto los
recomendados por el fabricante.
ADVERTENCIA!
No dañe el circuito refrigerante.
ADVERTENCIA!
No utilice dispositivos eléctricos dentro
de los compartimientos para alimentos
del aparato, salvo si son del tipo
recomendado por el fabricante.
21
Page 22

Indice
Eliminación de aparato viejos 20.....
Información sobre la seguridad 21...
CÓMO USAR EL FRIGORÍFICO 23...
Antes de utilizar el aparato por
primera vez 23................
El panel de control 23..............
DISPLAY 23......................
Funcionamiento 24................
Menú de Funciones 24.............
Selección de Desconexión/
Conexión 24..................
Regulación de Temperatura 24......
Desconexión 24...................
Función Temperature Ambiente 25...
Función Eco Mode 25..............
Función Child Lock 25.............
Uso del compartimento frigorífico 25.
Regulación de Temperatura 25......
Función Holiday " H" 26............
Alarma acústica con puerta abierta 26
Interior del armario 26..............
CONSEJOS ÚTILES 27............
Ahorro de energía 27...............
El aparato y el medio ambiente 27...
Protección del medio ambiente 27...
CUIDADOS 27....................
Extracción de la rejilla de ventilación 27
Limpieza 27......................
Cambio de la bombilla de luz 28.....
Descongelación del frigorífico 29.....
Cuando no se vaya a utilizar
el aparato 29..................
SI EL ARTÍCULO NO FUNCIONA
SATISFACTORIAMENTE 29.....
CARACTERISTICAS TÉCNICAS 31..
INSTALACIÓN 31.................
Desembalaje 31...................
Extracción de los soportes
de transporte 31...............
Limpieza 31......................
Cable 32.........................
Instalación del aparato 32...........
Conexión eléctrica 33..............
Cambio de sentido de apertura de la
puerta 33.....................
22
Page 23

CÓMO USAR EL FRIGORÍFICO
A
/
y
Antes de utilizar el aparato por
primera vez
Colocar y limpiar el aparato como se
explica en la sección "Instalación".
Comprobar que la manguera de
drenaje de la parte posterior del
armario descarga en la bandeja de
goteo.
Antes de introducir el enchufe en la toma de red y poner en marcha el aparato
por primera vez unos 4 horas. De lo contrario el compresor podría resultar
dañado. Este tiempo de reposo permitirá que el aceite vuelva al compresor.
El panel de control
AE
B
A - Tecla de encendido / apagado del
aparato
B - Tecla de regulación de la
temperatura
C
D
C - Display de visualización de las
temperaturas y funciones
D - Tecla de activación de las
funciones
DISPLAY
larma por sobretemperatura
indicador de alarma puerta abierta
Si está encen dido, indica que la
temperatura mostrada en el displa
es la temperatura ambiente.
Indicador de temperatura positiva
Indicador de la temperatura
23
Si está encen dido, indica que
está activa la función Child Lock
Si está encen dido, indica que
está activa la función Shopping
Si está encen dido, indica que
está activa la función Eco Mode
Page 24

Funcionamiento
e
Después de haber introducido el
enchufeenlatomadecorriente,siel
display no se ilumina apretar la tecla
(A), encendido del aparato. Una vez
conectado, el aparato estará en
condición de alarma, la temperatura
parpadea y se oye una señal acústica
(timbre).
Para la correcta conservación de los
alimentos, es recomendable definir la
función Eco Mode y las siguientes
temperaturas:
+5°C en el frigorífico
· Para modificar la temperatura,
consulte la sección "Regulación de la
temperatura".
Importante
Si la puerta permanece abierta durant
mas de 7 minutos la luz interior será
desconectada automáticamente la luz
se reactivará al volver a cerrar y abrir
la puerta.
Menú de Funciones
Pulsando la tecla D se activa el menú
de funciones. La activación de cada
función puede confirmarse pulsando la
tecla. Si después de unos segundo no
se confirma ninguna función el display
saldrá del menú de funciones y
regresará su estado normal.
En el display se in dican las siguientes
funciones:
Función Temperatura Ambiente
Función Bloqueo para Niños
Función Shopping
Función Eco Mode
Selección de
Desconexión/Conexión
Regulación de Temp eratura
Se puede regular la temperatura
pulsando primero el botón (B).
Apretando el botón (B), en el indicador
parpadea la temperatura programada.
Confirme la temperatura elegida
pulsando el botón E (se oye un sonido)
o esperando unos segundos (no se
oye el sonido).
El indicador indica de nuevo la
temperatura actual dentro del
compartimiento.
La temperatura programada es
alcanzada dentro de 24 h.
Después de periodos largos sin usar el
aparato no será necesario regular de
nuevo la temperatura, ya que esta
permanece almacenada en memoria.
¡Atención!
Durante el periodo de estabilización,
despuésdelaprimerapuestaen
marcha, la temperatura mostrada
puede no corresponderse con la
temperatura programada. Durante este
periodo es posible que la temperatura
mostradaseadifferentealatemperatura programada.
Desconexión
Cuando se apaga el aparato, en el
display aparecerá la temperatura
ambiente con su icono
correspondiente activado.
24
Page 25

Función Temperature Ambiente
La función Temperatura ambiente se
activa pulsando la tecla D (si es
necesario, varias veces) hasta que
aparezca el icono correspondiente
Entre las temperaturas seleccionables
está la temperatura ambiente. Debe
confirmar la selección pulsando en
pocos segundos el botón E . Se oirá
una señal acústica y el icono
permanecerá activado.
Se puede desactivar la función en
cualquier momento pulsando la tecla
D hasta que el icono correspondiente
comience a parpadear y seguidamente
pulsar el botón E.
Función Child Lock
La función Child Lock se activa
pulsando la tecla D (si es necesario,
varias veces) hasta que aparezca el
icono correspondiente
Debe confirmar la selección pulsando
en pocos segundos el botón E . Se
oirá una señal acústica y el icono
permanecerá activado.
En este estado, ninguna acción sobre
los botones implicará variación alguna
mientras la función esté activa.
Se puede desactivar la función en
cualquier momento pulsando la tecla
D hasta que el icono correspondiente
comience a parpadear y seguidamente
pulsar el botón E.
.
Función Eco Mode
La función Eco Mode se activa
pulsando la tecla D (si es necesario,
varias veces) hasta que aparezca el
icono correspondiente
temperatura en + 5°C).
Debe confirmar la selección pulsando
(o fijando l a
en pocos segundos el botón E . Se
oirá una señal acústica y el icono
permanecerá activado.
En este estado, las temperaturas se
fijan de modo automático (+ 5°C ),
.
para obtener las mejores condiciones
de conservación de los alimentos.
Se puede desactivar la función en
cualquier momento modificando la
temperaturadecualquieradelos
compartimentos.
Se puede desactivar la función en
cualquier momento pulsando la tecla
D hasta que el icono correspondiente
comience a parpadear y seguidamente
pulsar el botón E.
Uso del compartimento
frigorífico
Regulación de Temp eratura
Es posible programar la temperatura
de este compartimento entre +2°C y
+8°C.
Durante el funcionamiento normal se
indica la temperatura dentro del
compartimiento frigorífico.
¡Atención!
Es normal que exista una diferencia
entre la temperatura mostrada y la
programada. En particular cuando:
- recientemente se ha modificado la
temperatura programada.
-lapuertahaquedadoabiertapor
mucho tiempo.
- se han introducido en el frigorífico
alimentos calientes.
25
Page 26

Función Holiday " H"
Al activar la función Holiday se regula
la temperatura del frigorífico a +15 ºC.
Esta función le permite man tener
frigorífico vacío y con la puerta cerrada
durante periodos largos como las
vacaciones, evitándose la formación
de malos olores.
La función Holiday H puede regularse
pulsando la tecla B. Al pulsar la tecla
B, en el indicador parpadea el ajuste
de temperatura actual. Vuelva a pulsar
la tecla B. Cuando aparezca en
pantalla la letra H, confirme la
temperatura elegida apretando el
botónE(oiráunsonido)oesperando
unos segundos (no oirá el sonido).
Ahora el re f r igerador se encuent r a en
función Holiday del modo de ahorro de
energía y el indicador muestra la letra H.
Se puede desactivar la función en
cualquier momento modificando la
temperatura seleccionada en el
compartimiento.
¡Atención!
El frigorífico de estar totalmente vacío
de alimentos cu an do se active la
función Holiday.
Alarma acústica con puerta
abierta
Unaalarmaacústicaleavisarácuando
la puerta se ha quedado abierta
durante más de 5 minutos
La condición de alarma de puerta
abiertaseindicamedianteel:
- parpadeo del icono
- sonido de la señal acústica.
Para detener la señal acústica, pulse
el botón (E). Cuando se restablecen
las condiciones normales (puerta
cerrada):
- se apaga la señal acústica.
;
Interior del armario
Losestantesyloscompartimientosde
puerta son extraíbles y pueden
ordenarse a voluntad con facilidad.
Ciertos estantes deben ser levantados
por el borde posterior para que se
puedan quitar.
El compartimiento de la puerta inferior
y el estante de cristal situado encima
del cajón de las verduras no deben
moverse. Son necesarios para la
adecuada circulación de aire dentro
del frigorífico.
Losestantesdelacubaconunborde
levantado deben ser colocados con tal
borde mirando a la pared posterior del
frigorifico, y así evitar que los
productos alimenticios toquen la pared
de enfriamiento.
El cajón de las verduras tiene un ribete
de ventilación para aumentar la
circulación de aire y disminuir el riesgo
de condensación.
26
Page 27

CONSEJOS ÚTILES
Ahorro de energía
· Prestar especial atención al sitio
donde se ha de colocar el aparato.
Véase el apartado "Instalación". Si el
aparato se instala correctamente
consumirá menos energía.
· Evitar abrir el aparato con mucha
frecuencia y por períodos demasiado
prolongados.
· Comprobar de vez en cuando que el
aparato está correctamente cerrado.
· Descongelar los productos
alimenticios dentro del frigorífico; el frío
de los productos congelados serán de
utilidad dentro del frigorífico.
· Limpiar el compresor y el sistema de
refrigeración situados en la parte
posterior del aparato con aspiradora
una vez al año más o menos.
· Dejar que los productos calientes se
enfríen antes de meterlos en el
frigorífico.
· Asegurarsedequelamoldurade
juntadelapuertaestéenteray
siempre limpia.
detergente suave.
· Deben seguirse los consejos
indicados en el apartado "Ahorro de
energía".
El aparato y el medio
ambiente
· El matrerial aislante y el liquido
refrigeraante utilizados en este aparati
no dañan la capa de ozono.
· Todas las piezas del embalaje
pueden ser recicladas.
· El aparato ha sido diseñado para un
sencillo desmontaje y consiguiente
reciclado de sus piezas.
CUIDADOS
Extracción de la rejilla de
ventilación
La rejilla de ventilación puede quitarse,
v.gr. para lavar la rejilla.
Asegurarsedequelapuertaqueda
abierta al quitar la rejilla de ventilación.
Desenganchar el borde superior de la
rejilla tirando hacia afuera/hacia abajo.
A continuación tirar de la rejilla recto
hacia afuera para sacarla del todo.
Protección del medio
ambiente
· Entregar el embalaje, los frigoríficos y
congeladores desechados a un
establecimiento de reciclaje. Ponerse
en contacto con las autoridades
municipales o con el establecimiento
de venta más próximo para solicitar
información
· Los alimentos deben guardarse en
recipientes re-utilizables. Evitar en lo
posible la utilización de material
desechable de un solo uso.
· Al limpiar el aparato, utilizar u n
27
Limpieza
Limpiar el aparato a intervalos
regulares.
Desconectar el aparato y desenchufar
de la toma de red o.
Page 28

Limpieza interior
Quitar cualquier pieza floja y lavarla a
mano. Limpiar el extrerior, el interior y
la moldura de junta. Utilizar u n paño
suave y un detergente también suave
diluído en agua templada. No cerrar la
puerta hasta que el interior del armario
esté totalmente seco.
Limpiar el canal de drenaje dentro del
frigorífico con bastoncillos de algodón
o un limpiador de tubos. Si se hubiera
atascado la manguera de drenaje
puede utilizarse una espiral de cortina
protegida de plástico.
Limpieza externo
Utilice sólo agua y detergente neutro
para limpiar la superficie de acero
inoxidable de la puerta, que se ha
sometido a un tratamiento especial
antihuellas. No utilice sustancias
abrasivas.
Quitar la rejilla de ventilación (véase la
sección "Extracción de la rejilla de
ventilación") y limpiar con aspiradora
por debajo del armario. Separar el
aparato de la pared y limpiar con
aspiradora la parte posterior del
aparato, el sistema de refrigeración y el
compresor.
Al cambiar de sitio el aparato, debe
levantarse por el borde frontal para
evitar rayar el suelo.
Cambio de la bombilla de luz
La luz se enciende automáticamente
cadavezqueseabrelapuerta.Antes
de cambiar la bombilla, desconectar el
enchufedelatomadered.
Desmonte la lámpara utilizando el
destornillador en la entalladura del
inserto de lámpara.
Monte una nueva lámpara colocándola
en un a posición centrada y presione
hasta que encaje.
Utilizar una bombilla halógena del
mismo tipo; potencia máxima de 20
vatios.
Descongelación del frigorífico
El frigorífico se descongela
automáticamente cada vez que se
detiene el compresor. La formación de
escarcha puede evitarse:
· no poniendo alimentos calien tes
dentro del armario.
· evitando aperturas frecuentes de la
puerta o dejándola abierta demasiado
tiempo.
28
Page 29

Cuando no se vaya a utilizar el
aparato
Desconectar el aparato y desenchufar
de la toma de red o.
Limpiar el aparato tal como se ha
explicado en la sección "L impieza". No
cerrar el aparato: esta acción
producirá mal olor en el interior del
mismo.
Si se va a dejar el armario conectado,
pedir a alguien que lo compruebe de
vez en cuando para evitar que los
alimentos guardados en su interior no
se echen a perder en caso de una
interrupción del fluido eléctrico.
SI EL ARTÍCULO NO FUNCIONA
SATISF ACTORIAMENTE
Si el aparato no funciona de la forma esperada, a menudo podrá corregir esta
situación usted mismo. Para evitar solicitar servicio innecesariamente, lea y siga
las instrucciones que se dan a continuación.
Problema Posible causa / Solución
El indicador de temperatura
indica ““.
La temperatura e s demasiado
alta dentro del refrigerador.
La temperatura e s demasiado
alta dentro del congelador.
Hayaguaenlaplacade
refrigeración dentro del
refrigerador.
Ha ocurrido u n error durante la medición de
la temperatura. Llame al servicio técnico. (El
sistema de refrigeración seguirá manteniendo
los alimentos fríos, pero el ajuste de
temperatura no funcionará.)
Seleccione una temperatura más baja.
Ponga los alimentos en los lugares
apropiados dentro del refrigerador. Consulte
el capítulo "Temperatura dentro del
refrigerador".
Distribuya los alimentos para permitir que el
aire frío circule alrededor de ellos.
Asegúrese de que la puerta esté
completamente cerrada y que la guarnición
magnéticaestécompletaylimpia.
Seleccione una temperatura más baja.
Se han puesto vegetales y otros productos
que se congelan fácilmente en una bandeja
"demasiado fría". Consulte el capítulo
"Temperatura dentro del refrigerador".
Esto es normal. Durante la operación de
descongelación automática, la escarcha se
descongela en la placa de refrigeración.
29
Page 30

Hay agua escurriendo dentro
del refrigerador.
El agua se escurre al piso. Coloque la manguera de vaciado, situada en
El compresor funciona
continuamente.
El aparato no funciona en
absoluto. No hay refrigeración
o la luz interior no se enciende.
Ninguna lámpara indicadora se
enciende.
El nivel de ruido del aparato es
demasiado alto.
Limpie el drenaje de agua y el orificio de
desagüe dentro del refrigerador usando, por
ejemplo, bastoncillos de algodón o un pincel
limpiador de botella.
Posiblemente se han guardado alimentos
que hacen escurrir agua al drenaje.
la parte posterior del frigorifico, encima del
recipiente de vaciado. Consulte el capítulo
"Antes de en cen der el gabinete por primera
vez".
Seleccione una temperatura más baja.
Asegúrese de que la puerta esté
completamente cerrada y que la guarnición
magnéticaestécompletaylimpia.
El aparato no está encendido.
El suministro de energía no llega al aparato.
(Pruebe conectar otro aparato eléctrico a la
toma de corriente.)
Elfusiblesehaquemado.
La clavija de alimentación no está
debidamente conectada.
El sistema de refrigeración siempre produce
algunos ruidos. Un ruido impulsivo se
escucha cuando el gas refrigerante es
bombeado dentro de los tubos de
refrigeración. Asimismo, el termostato
produce un ruido de "tictac" cuan do el
compresor se enciende y se apaga. El nivel
de ruido varía dependiendo trabajo del
aparato.
Si le parece el que el nivel de ruido es
excesivo:
Doble cuidadosamente los tubos en la parte
posterior del aparato, asegurándose de que
no se toquen entre sí.
Si las almohadillas espaciadoras (situadas
entre la pared del gabinete y los tubos) se
sueltan, vuelva a colocarlas en posición.
Siga cuidadosamente las instrucciones del
capítulo "Instalación del aparato".
30
Page 31

CARACTERISTICAS TÉCNICAS
modelo ERC37300W8/X8/S8
volumen neto congelador l 361
consumo de energia kWh/Ano 179
dimension mm
altura 1800
ancho 595
profundidad 623
INSTALACIÓN
Desembalaje
Desembalar el aparato y comprobar
que esté en perfectas condiciones y
no haya sufrido daños durante el
transporte. Los daños producidos
durante el transporte deberán
comunicarse inmediatamente al
proveedor. Depositar el embalaje en
los contenedores apropiados para que
sea reciclado. Para más información
dirigirse a las autoridades municipales
o al distribuidor.
!Nosedebepermitirquelosniños
jueguen con el embalaje. La película
plástica puede provocar asfixia.
Extracción de los soportes de
transporte
Quitar la cinta y los soportes de
transporte de
·losladosdelapuerta
· los estantes
Quitar el soporte de transporte situado
en el estante de cristal empujando el
mismohaciaadelantealolargodel
borde del estante hasta que se
detenga en el saliente del mismo.
Coger el borde posterior del estante
de cristal y tirar del estante y del
soportedetransportehastaqueel
estanteseinclineysepuedaquitarel
soporte. Algunos modelos están
equipados con una almohadilla
insonorizante situada debajo del
aparato. No se debe quitar esta
almohadilla.
Limpieza
Limpiar el interior del aparato con agua
templada, detergente suave de lavado
a mano y con un paño suave.
31
Page 32

Cable
No cambie o quite el cable de
corriente tirando de él, particularmente
cuando mueva su aparto de su sitio.
· El cable dañado puede causar un
cortocircuito, fuego y/o un shock
eléctrico.
· Si el cable de alimentación del
producto está dañado, evite riesgos y
deje que sea una empresa de servicio
técnico autorizado recomendada por
el proveedor o una persona cualificada
quien lo cambie.
Instalación del aparato
Cuando se colocan dos cámaras la
una junto a la otra, los dos
separadores que se adjuntan en la
bolsa de plástico deben ser pegados
entre las cámaras, como se muestra
en el dibujo
corriente.
· hay un riesgo de shock eléctrico o
fuego.
Para garantizar un funcionamiento
óptimo del armario, asegurarse de
que:
· el aparato es colocado en u n sitio
seco, fresco y no está expuesto a la
luz directa del sol.
· el apatato n o ha sido colocado
cerca de un a fuente de calor, v.gr. una
cocina, hornillo o un lavavajillas.
· el aparato debe quedar recto y bien
asentado por sus cu atro esquinas. El
armario no debe ser apoyado contra la
pared. Si fuera necesario, ajustar las
patas con la llave de ajuste.
Aseqúrese que el cable y/o toma de
corriente no está atrapado, aplastado
o dañado por la parte trasera del
aparato.
· puede producirse un calentamiento
del cable y/o toma y causar fuego.
No ponga artículos pesados o el
aparato mismo sobre el cable.
· hay un riesgo de cortocircuito y
fuego.
Si el cable de corriente está suelto, no
lo introduzca en el enchu fe o toma de
· there is good air circulation around
the cabinet and that the air channels
below and behind the cabinet are n ot
blocked. The ventilation space above
the cabinet must be at least 4 cm.
The ventilation space can either be
a) directly above the cabinet, or
b) behind and above the top cupboard.
In this case, the space behind the
cupboard must be at least 50 mm deep.
32
Page 33

a)
b)
50mm
· hay una buena circulación de aire
alrededor del aparato y los can ales de
aire situados debajo y detrás del
mismo no están bloqueados. El
espacio de ventilación por encima del
armario y de cualquier compartimiento
o armario de la parte superior debe ser
de al menos 4 cm. El espacio de
ventilación puede estar
a) directamente encima del aparato, o
b) detrás y encima del módulo
superior. En este caso, el espacio libre
detrás del armario debe tener un
mínimo de 50 mm de profundidad.
· el aparato esté colocado solamente
en un lugar cuya temperatura
ambientalcorrespondaalaclase
climática* para el cual fue diseñado.
*La clase climática está indicada en la
placa del lada izquierdo del interior del
aparato.
Clase
climática
SN
N
ST
T
para temperatura
ambiental de
+10°C hasta +32°C
+16°C hasta +32°C
+18°C hasta +38°C
+18°C hasta +43°C
Comprobar que la manguera de
drenaje de la parte posterior del
armario descarga en la bandeja de
goteo.
Si se coloca el aparato en un rincón y
el costado que tiene las bisagras da a
la pared, la distancia entre la pared y el
armario debe ser de al menos 230 mm
parapermitirquelapuertaseabralo
suficiente como para que los estantes
puedan quitarse.
El enchu fe debe mantenerse accesible
una vez que el producto haya sido
instalado.
Conexión eléctrica
Conecte el armario a un a toma de red
eléctrica con toma de tierra.
Tensión: 230 V.
Fusible: 10 A.
Remitirse a la placa de características
situada en la parte interior izquierda
del aparato.
Cambiodesentidodeaperturadela
puerta
1. Cerrar el armario y desenchufar de
la toma de red eléctrica.
2. Quitar la rejilla de ventilación. Existe
una parte de la rejilla que puede
quitarse. Quitar y ponerla en el otro
lado.
3. Coloque el armario sobre taco de
madera al tumbarlo. Más tarde, al
levantarlo, resultará más fácil cogerlo
por debajo gracias a esta placa.
1
2
3
33
Page 34

Desenrosque los tres tornillos en la
parte posterior de la cubierta delantera
4. Retire la cubierta delantera
4
Desenrosque el pasador de bisagra
Retire la puerta
4. Desenrosque el tornillo del tope de
la puerta
Retire el tope de la puerta
5
8. Retire la cubierta en la parte
delantera
8
Realice el montaje en el orden inverso
en el lado opuesto.
Levantar el aparato y volver a colocar
la rejilla de ventilación.
9. Mueva la manilla. Desenrosque los
tornillos. Ensamble la manilla por el
lado contrario haciéndola girar media
vuelta. Monte los tapones plásticos
provistos en los agujeros en los que
estaba montada la manilla
anteriormente.
9
6. Retire las dos tapas de la cubierta
en el techo
7. Desenrosque los dos tornillos de la
bisagra
7
6
Colocar el aparato en su posición.
Comprobar que queda recto. Véase la
sección "Situación del armario".
34
Page 35

Bem-vindoaomundoElectrolux
Obrigado por ter escolhido adquirir um produto de primeira classe da Electrolux,
que esperamos lhe traga muito prazer no futuro. A ambição da Electrolux é
oferecer uma vasta variedade de produtos de qualidade que tornem a sua vida
ainda mais confortável. Pode encontrar alguns exemplos n a capa deste manual.
Tire alguns minutos para estudar este manual para que possa começar a tirar
partido dos benefícios do seu novo aparelho. Nós prometemos que lhe irá
proporcionar uma experiência superior e confortante como utilizador.
Boa sorte!
35
Page 36

A
lguns parágrafos deste manual de instruções foram marcados com alguns
símbolos que têm o seguinte significado:
Com o triângulo de aviso e/ou através de palavras de sinalização
(Atenção!, Advertência!), são evidenciadas instruções
particularmente importantes para a Sua segurança ou para o bom
funcionamento do aparelho. Por favor, cumpra-as.
As informações precedidas por este símbolo servem para completar as
instruções de uso e utilização prática da máquina
Este símbolo indica conselhos e instruções para um emprego económico
da máquina, respeitando o ambiente.
Quando deixar de ser utilizado definitivamente
O símbolo no produto ou na embalagem indica que este produto não
pode ser tratado como lixo doméstico. Em vez disso, deve ser entregue
ao centro de recolha selective para a reciclagem de equipamento eléctrico e
electrónico. Ao garantir uma eliminação adequada deste produto, irá ajudar a
evitar eventuais consequências negativas para o meio ambiente e para a
saúde pública, que, de outra forma, poderiam ser provocadas por um
tratamento incorrecto do produto. Para obter informações mais
pormenorizadas sobre a reciclagem deste produto, contacte os services
municipalizados locais, o centro de recolha selectiva da sua área de residência
ou o estabelecimento onde adquiriu o produto.
36
Page 37

Informações sobre segurança
O seu novo frigorífico poderá possuir
outras funções quando comparado
com o que possuía anteriormente.
Este aparelho não deve ser utilizado
por pessoas (incluindo crianças) com
deficiências físicas, sensoriais ou sem
experiência e conhecimentos, salvo se
tiverem recebido supervisão ou
instruções relativas à utilização do
aparelho por uma pessoa responsável
pela sua segurança
Leia atentamente estas instruções
para aprender o funcionamento e
como cuidar do aparelho. Conserve o
livro de instruções. Mostrar-se-á útil
se, mais tarde, vender ou oferecer o
aparelho a alguém.
Ao utilizar o aparelho
· O aparelho foi concebido para
conservar géneros alimen tícios numa
casacomum,comoseexplicaneste
livro de instruções de uso.
· Nunca guarde gases ou líquidos
explosivos no compartimento frigorífico
ou de refrigeração. H á riscos de
explosão com consequentes danos
pessoais e materiais.
· Não deixe que objectos aguçados
entrem em contacto com o sistema de
refrigeração na parte de trás e no
interior do aparelho. Se o sistema de
refrigeração for perfurado, o aparelho
ficará danificado e os géneros
alimentícios, no seu interior, ficarão
arruinados.
· Nunca guarde bebidas
gaseificadas no compartimento do
congelador. As garrafas de vidro
poder-se-ão quebrar.
· O aparelho é pesado. Há arestas e
partes salientes do aparelho que
apresentam gumes afiados. Tenha
cuidado quando tiver que deslocar o
aparelho e use sempre luvas.
Segurança com as crianças
· Preste atenção de modo a que
crianças pequenas não tenham
acesso à regulação e controlo do
funcionamento ou ao interior do
aparelho.
AVISO!
Mantenha as aberturas de ventilação,
na caixa do aparelho ou na estrutura
integrada, sem obstruções.
AVISO!
Não utilize dispositivos mecânicos ou
outros meios para acelerar o processo
de descongelação, além dos
recomendados pelo fabricante.
AVISO!
Não danifique o circuito refrigerante.
AVISO!
Não utilize aparelhos eléctricos dentro
dos compartimentos de
armazenamento de alimen tos, a não
ser que sejam do tipo recomendado
pelo fabricante
37
Page 38

Indice
Quando deixar de ser utilizado
definitivamente 36..............
Informações sobre segurança 37....
USO 39..........................
Antesdeusarpelaprimeiravezo
armario 39....................
Painel de comandos 39............
DISPLAY 39......................
Função Temperatura Ambiente 40...
Funções do Menu 40..............
Seleccionar /Desligar /Ligar 40......
Regulação da Temperatura 40.......
Desligar o Aparelho 40.............
Função Temperatura Ambiente 41...
Função Child Lock 41..............
Função Shopping 41...............
Função Eco Mode 41..............
Utilização do compartimento
frigorífico 42...................
Regulação da Temperatura 42.......
Função Holiday "H" 42.............
Alarme sonoro com porta aberta 42..
Interior do aparelho 43.............
CONSELHOS ÚTEIS 43............
Conservação de energia 43.........
Oaparelhoeoambiente 43.........
Protecção ambiental 44............
MANUTENÇÃO 44................
Remoção da grade de ventilação 44.
Limpeza 44.......................
Substituição da lâmpada 45.........
Troca do filtro de carvão 45.........
Descongelamento, frigorífico 45.....
Se o aparelho ficar desligado 45.....
SE O APARELHO NÃO FUNCIONAR
SATISFATORIAMENTE 45......
CARACTERÍSTICAS TÉCNICAS 47..
INSTALAÇÃO 48..................
Desembalagem 48................
Retirar os suportes de transporte 48..
Limpeza 48.......................
Cabo 48.........................
Instalação do aparelho 58..........
Transposição das portas 50.........
Ligação à corrente eléctrica 51......
38
Page 39

USO
Antesdeusarpelaprimeiravezo
armario
Coloque e limpe o aparelho da forma
que se explica na secção "Instalação".
Verifiqueseotubosituadodoladode
trás do aparelho desemboca no
recipiente de recolha de água.
Antes de inserir a ficha na tomada de corrent e e de ligar o apar elho pela
primeira vez durante cerca 4 horas. De contrário , o compr ess or corre o risco de se
avariar. Este período de tempo permitirá ao óleo o tempo suficiente para retornar ao
compressor .
Painel de comandos
AE
B
A - Tecla para ligar/desligar o aparelho
B - Tecla de regulação de temperatura
C - Display de exibição temperaturas e
DISPLAY
Alarme de
Superaquecimento/ Indicador
alarme porta aberta
idicaqueatemperatura
visível no display é a
temperatura ambiente da
divisão
39
C
D
funções
D - Tecla de activação das funções
E - Tecla de confirmação
Indicador de temperatura
positiva
Indicador da temperatura
(dígitos)
Se ligado, indica que está activa
a função Child Lock
Page 40

Se ligado, indica que está activa
a função Shopping
Se ligado, indica que está activa
a função Eco Mode
Função Temperatura Ambiente
Após ter introduzido a ficha na tomada
de corrente, se o écrã não se iluminar
carregue na tecla (A).
Para um correcto armazenamento dos
alimentos seleccione a Função Modo
Económico (Eco Mode) que garante a
seguinte temperatura:
cerca de +5°C no frigorífico.
· Para seleccionar u ma temperatura
diferente veja a secção "Regulação da
Temperatura".
Importante
Se a porta permanecer entreaberta por
mais de 7minutos, a luz interna
desligar-se-á au tomaticamente.
A função de luz interna será
restaurada abrindo e fechando a porta
do frigorífico.
Funções do Menu
Pressionando a tecla (D) acciona as
funções do Menu Cada função pode
ser confirmada pressionando a tecla
(E)
Se não carregar na tecla (E), após
alguns segundos, o display volta ao
ecrã/informação anterior
As seguintes funções são indicadas:
Temperatura Ambiente
Função Child Lock
Função Shopping
Função Eco Mode
Seleccionar /Desligar /Ligar
Regulação da Temperatura
A temperatura pode ser regulada
pressionando a tecla (B) para escolher
a temperatura pretendida.
Pressionando a tecla (B), a
temperatura configurada aparece a
piscar no display. Para confirmar a
temperatura pretendida carregue na
tecla (E).
Durante alguns segundos, irá ouvir um
sinal sonoro e no display aparecerá a
tempreratura que foi seleccionada.
Depois o display volta a indicar a
temperatura interna do
compartimento.
A temperatura programada será
atingida em 24h.
Após um longo período sem utilização
não será necessário aju star
novamente a temperatura pois esta
fica em memória.
Atenção!
Durante o período de estabilização na
primeira colocação em função, a
temperatura visualizada pode não
corresponder à temperatura
configurada. Durante este período é
possível que a temperatura visualizada
sejadiferentedatemperatura
configurada.
Desligar o Aparelho
Para desligar o aparelho prima a tecla
(A) durante mais de 1 segundo.
Será iniciada uma contagem
decrescente da temperatura
de -3 -2 -1 .
40
Page 41

Função Temperatura Ambiente
A função Temperatura Ambiente é
activada carregando n a tecla (D) até
aparecer o símbolo correspondente
.
Nesta função, a temperatura
seleccionadaéaTemperatura
Ambiente. Deverá confirmar a sua
escolha pressionando a tecla (E) por
alguns segundos. Irá ouvir um sinal
sonoro e o símbolo
ligado.
É possível desactivar a função a
qualquer momentocarregando a tecla
(D) até o símbolo
e depois pressionando a tecla (E).
permanece
começar a piscar
Função Child Lock
A função Child Lock é activada
carregando na tecla (D) até aparecer o
símbolo correspondente
confirmar a sua escolha pressionando
a tecla (E) por alguns segundos.
Irá ouvir um sinal sonoro e o símbolo
permanece ligado. breve suono e
l'icona rimane accesa.
Com esta fu n ção activada não será
possível fazer alterações nas
definições programadas anteriormente
É possível desactivar a função a
qualquer momento carregando a tecla
(D) até o símbolo
e depois pressionando a tecla (E).
. Deverá
começar a piscar
Função Shopping
Se necessitar de colocar uma grande
quantidade de alimentos quentes/
mornos, por exemplo, depois de estes
terem sido comprados, sugerimos que
active a função Shopping para
refrigerar mais rapidamente evitando
assim que os alimentos que acabou
de colocar dentro do seu aparelho
aqueçam os que já lá estavam
anteriormente frescos.
A função Compras é activada
carregando na tecla (D) até aparecer o
símbolo correspondente
Deverá confirmar a sua escolha
pressionando a tecla (E) por alguns
segundos. Irá ouvir um sinal sonoro e
o símbolo
Esta função desliga-se
automaticamente após 6 horas.
É possível desactivar a função a
qualquer momento carregando a tecla
(D) até o símbolo
e depois pressionando a tecla (E).
permanece ligado.
começar a piscar
.
Função Eco Mode
A função Modo Económico é activada
carregando na tecla (D) até aparecer o
símbolo correspondente
Deverá confirmar a sua escolha
pressionando a tecla (E) por alguns
segundos. Irá ouvir um sinal sonoro e
o símbolo
Nesta função as temperatures são
definidas automaticamente (+ 5°C e 18°C), mantendo as melhores
condições de conservação dos
alimentos.
É possível desactivar a função a
qualquer momento alterando a
temperatura seleccionada no
compartimento.
permanece ligado.
.
41
Page 42

Utilização do
compartimento frigorífico
Regulação da Temperatura
A temperatura do frigorífico pode ser
configurada entre +2°C e +8°C.
Durante o funcionamento normal é
visualizada a temperatura do
compartimento frigorífico.
Atenção!
É normal ter uma diferença entre a
temperatura visualizada e aquela
configurada. Sobretudo quando:
- foi recentemente alterada a
temperatura configurada
-aportafoimantidaabertapormuito
tempo
- foram introduzidos alimentos
quentes.
Função Holiday "H"
No regime de férias, a temperatura
TEÓRICA dofrigorífico é regulada para
+ 15 °C. Este regime permite- lhe
deixar o frigorífico vazio fechado, em
vezdeaberto,-semqueseverifique
uma formação de cheiros ou de bolor
- durante uma ausência mais
prolongada ( p. ex. férias) . Vantagem:
aportanão
poderá, assim, fechar- se
acidentalmente ou ser fechada, por
descuido, por pessoas que tenham
eventualmente acesso à casa, durante
a sua ausência. Sem o regime de
férias, isso daria origem à formação de
cheiros e de bolor.
A função Holiday H pode ser ajustada
premindo a tecla B. Ao premir a tecla
B, a actual definição de temperatura
pisca no indicador. Prima novamente a
tecla B. Quando no visor for
apresentada a letra H, confirme a
escolha da temperatura premindo a
tecla E (ouvirá o aviso sonoro) ou
aguarde alguns segundos (não ouvirá
o aviso sonoro).
O frigorífico está agora na função
Holiday no modo de poupança de
energia e o indicador apresenta a letra
H.
É possível desactivar a função a
qualquer altura mudando a
temperatura seleccionada no
compartimento.
Atenção!
Não coloque produtos no frigorífico
enquanto ele estiver a funcionar no
regime de férias.
Alarme sonoro com porta aberta
Um alarme sonoro sinaliza quando a
portaficaabertadurantemaisde5
minutos.
A condição de alarme de porta aberta
éindicadapor:
- piscaro do símbolo
-sinalsonoro.
Para parar o alarme sonoro, carregue
atecla(E).
Quando as condições normais forem
restauradas (porta fechada):
- o sinal sonoro desliga
42
Page 43

Interior do aparelho
As prateleiras e as prateleiras da porta
são removíveis e poderão ser
fácilmente re-organizadas.
Certas prateleiras deverão ser
levantadas pela orla de trás para as
permitir retirar.
A prateleira da porta de baixo e a
prateleira de vidro acima da gaveta
dos legumes não deverão ser
deslocadas. Elas são uma exigência
para a circulação adequada do ar no
interior do frigorífico.
As prateleiras com uma orla elevada
deverão ser colocadas voltadas para a
parede de trás do frigorífico, e, por
isso, evitar que os géneros alimentícios
toquem a placa de refrigeração.
A gaveta de verduras e legumes tem
uma ranhura de ventilação para
aumentar a circulação de ar e reduzir
o risco de condensação.
CONSELHOS ÚTEIS
Conservação de energia
· Preste cuidadosa atenção onde o
aparelho for colocado. Veja a secção
"Instalação". Quando instalado
correctamente, o aparelho consumirá
menos energia.
· Evite abrir frequentemente e por
demasiadotempooaparelho.
· Verifique de vez em quando se o
aparelho se encontra devidamente
encerrado.
· Descongele os alimentos congelados
no frigorífico; o frio dos géneros
congelados será de boa utilidade no
interior do frigorífico.
· Aspire o compressor e o sistema de
refrigeração atrás, no aparelho, cerca
de uma vez por ano.
· Permita que géneros manos frios
arrefeçam antes de os colocar no
frigorífico.
· Assegure-se de que o isolamento
se encontra completo e sempre limpo.
Oaparelhoeoambiente
· O isolamento e o agente de
refrigeração usados neste aparelho
são totalmente inofensivos em relação
à camada de ozono.
· Todas as peças da embalagem
podem ser recicladas.
· O aparelho está fabricado de modo
a permitir o seu desmantelamento
para reciclagem.
43
Page 44

Protecção ambiental
· Entregue a embalagem e o
aparelho ou congelador em desuso a
um centro de reciclagem. Contacte
com o seu município ou o seu
fornecedor mais próximo para mais
informações.
· Mantenha os géneros alimentícios
em recipientes re-utilizáveis. Não use
desnecessáriamente materiais que só
possam ser utilizados uma vez.
· Quando estiver a limpar o aparelho,
use um detergente suave para a
lavagem.
· Siga o conselho na secção
"Conservação de energia".
MANUTENÇÃO
Remoção da grade de
ventilação
A grade de ventilação pode ser
retirada, por exº., para lavar a grade.
Assegure-sedequeaportase
encontra aberta quando retirar a grade
de ventilação. Solte a orla superior da
grade puxando-a para for a/baixo.
Depois puxe a grade a direito para a
retirar c ompletamente.
Limpeza
Limpe o aparelho em intervalos
regulares.
Desligue o aparelho e puxe a ficha de
corrente para fora da tomada ou.
Limpeza interior
Retire quaisquer peças soltas e
lave-as à mão. Limpe o aparelho, o
interior e o isolamento. Use um tecido
macio e um detergente suave para
lavagem diluido em água tépida. Não
feche a porta até que esteja
completamente seco o interior do
aparelho.
Limpe a calha de escoamento no
interior do frigorífico usando cotonetes
ou algo para limpar tubos. Se o tubo
de drenagem estiver entupido, poderá
ser usado um enrolamento de cabide
de cortina plástica.
Limpeza externa
Useáguaesabãoneutroparalimpara
superfície externa de aço inoxidável da
porta, que possui revestimento
especial contra marcas de mão. Não
use substâncias abrasivas.
Retire a grade de ventilação (veja a
secção "Remoção da grade de
ventilação") e aspire por debaixo do
aparelho. Puxe o aparelho da parede e
aspire o lado de baixo do aparelho, o
sistema de refrigeração e o
compressor.
44
Page 45

Descongelamento, frigorífico
Quando deslocar o frigorífico/ congelador, eleve-o pelo bordo dianteiro
para evitar riscar o soalho.
Substituição da lâmpada
A luz ilumina-se automáticamente
quando a porta estiver aberta. Antes
de substituir a lâmpada, desligue a
fichadecorrentedatomada.
Desmonte a lâmpada usando uma
chave de fendas na reentrância do
encaixe da lâmpada.
Monte uma lâmpada nova,
colocando-a numa posição central e
pressione-a até ouvir um estalido.
Useumalâmpadadehalogéniodo
mesmo tipo; potência máxima 20 W.
O frigorífico descongela-se
automáticamente de cada vez que o
compressor parar. A formação de gelo
pode ser evitada através de:
· não colocação de géneros
alimentícios menos frios no interior do
compartimento.
· evite abrir frequentemente a porta
ou mantê-la aberta por demasiado
tempo.
· não coloque géneros alimentícios
directamente de encontro à placa de
refrigeração fria.
Se o aparelho ficar desligado
Desligue o aparelho e puxe a ficha de
corrente para fora da tomada ou.
Limpe o aparelho como se explicou na
secção "Limpeza". Não feche o
aparelho: isto provocará um odor a
estragado no interior do aparelho.
Se o aparelho for mantido ligado, peça
a alguém para verificar de vez em
quando para evitar que os alimentos
no interior se deteriorem caso haja
uma falta de corrente eléctrica.
SEOAPARELHONÃO FUNCIONAR
SA T ISFATO RIAMENT E
Se o armário não funcionar como se espera, é frequentemente possível
rectificar-se isto. Para evitar chamadas desnecessárias de manutenção, leia
todas e siga as instruções embaixo.
Problema Causa possível / Remédio
É apresentado ““ no
mostrador da temperatura.
45
Ocorreu um erro na medição da temperatura.
Chame o seu agente de reparação. (O
sistema de arrefecimento continuará a
manterfriososprodutosalimentares,mas
será possível o ajustamento da temperatura
não.)
Page 46

Estádemasiadofrionointerior
do congelador.
Há água na placa de
arrefecimento no interior do
frigorífico.
Estáacorreráguanointerior
do frigorífico.
Está demasiado quente no
interior do frigorífico.
Corre água para o chão. Coloque o tubo de drenagem por cima da
O compressor funciona
contínuamente.
Ajuste a uma temperatura mais elevada.
Legumes e outros produtos que são
fácilmente congelados foram colocados
numa prateleira "demasiado fria". Veja o
capítulo "A temperatura no interior do
frigorífico".
Isto é normal. Durante o descongelamento
automático, o gelo derrete-se na placa de
arrefecimento.
Limpeadrenagemdaáguaeoorifíciode
drenagem no interior do frigorífico, usando,
por exemplo, cotonetes ou uma escova de
limpeza de garrafas.
Alguns produtos alimentares podem ter sido
colocados impedidndo a água de correr para
adrenagem.
Ajuste a uma temperatura mais baixa.
Coloque produtos alimen tares no lugar certo,
no interior do frigorífico. Veja o capítulo "A
temperatura no interior do frigorífico".
Distribua os produtos alimentares para
permitir a circulação do ar frio em seu redor.
Assegure-sedequeaportaseencontra
completamente fechada e que a faixa
isoladora se encontra completa e limpa.
taça de drenagem, atrás, no armário. Veja o
capítulo "Antes de ligar o armário pela
primeira vez".
Ajuste a uma temperatura mais elevada.
Assegure-sedequeaportaseencontra
completamente fechada e que a faixa
isoladora se encontra completa e limpa.
46
Page 47

O armário não funciona de
todo. O arrefecimento ou a
iluminação interior não
funcionam. Nenhuma lâmpada
indicadora se ilumina.
O nível de som no armário é
demasiado elevado.
O armário não está ligado.
A energia não chega ao armário. (Tente ligar
um outro dispositivo eléctrico à tomada de
energia.)
O fusível fundiu-se.
Atomadadeenergianãoseencontraligada
adequadamente.
O sistema de refrigeração produzirá sempre
alguns sons. É escutado um som palpitante
quando o produto de arrefecimento é
bombeado no interior dos tubos de
arrefecimento. Pode ser escutado um som
de tique-taque do termóstato quando o
compressor liga e desliga. O nível de som
varia dependendo do funcionamento do
armário.
Sesentirqueoníveldesoméincorrecto:
Curve cuidadosamente os tubos atrás, no
armário,eassegure-sedequenãosetocam
um ao outro.
Se os espaçadores de amortecimento (entre
a parede do armário e os tubos) ficarem
soltos, coloque-os, de novo, de volta no
lugar.
Siga cuidadosamente as instruções no
capítulo "Instalação do aparelho".
CARACTERÍSTICAS TÉCNICAS
modelo ERC37300W8/X8/S8
volume líquido frigorifico 361
consumo de energia kWh/Anno 179
dimension
altura 1800
largura 595
profundidade 623
47
Page 48

INSTALAÇÃO
Desembalagem
Desembale o aparelho e verifique se
se encontra em boas condições e livre
de qualquer dano proveniente do
transporte. Notifique imediatamente o
fornecedor de qualquer dano que
possa notar. Entregue a embalagem a
um centro de reciclagem. Para mais
informações, contacte com o seu
município ou o fornecedor.
Não deixe que as crianças brinquem
com aembalagem. O plástico de
protecção pode originar risco de
asfixia.
Retirar os suportes de
transporte
Retireafitaeossuportesde
transporte de
· osladosdasportas
· as prateleiras
Retire o suporte de transporte da
prateleira de vidro empurrando-o para
afrenteaolongodaarestada
prateleira até parar na saliência da
prateleira. Segure a aresta de trás da
prateleira de vidro e puxe a prateleira e
o suporte de transporte para a frente
até a prateleira se poder inclinar e o
suporte de transporte poder ser
retirado. Em determinados modelos há
uma almofada silenciadora debaixo do
compartimento. Deixe ficar esta
almofada.
Limpeza
Lave o interior do compartimento
usando água tépida, um detergente
suave para a lavagem e um tecido
macio.
Cabo
Não desligar a ficha puxando pelo
cabo. Não permitir que isso ocorro ao
retirar o aparelho do seu local de
instalção habitual.
· Um cabo eléctrico danificado pode
resultar num choque e/ou
curto-circuito e/ou incêndio.
· Se o cabo de alimen tação se
encontrar danificado, a sua
substituição só deverá ser feita, por
razões de segurança, pelos serviços
técnicos recomendados pelo
fornecedor ou por um técnico
qualificado.
48
Page 49

Instalação do aparelho
Se dois armários forem montados
juntos, cola-se os espaçadores
(inclusos na bolsa de plástico) entre os
armários, tal como a figura mostra.
Assegurar-se que a ficha não está
esmagada.
· uma ficha danificada pode originar
um curto-circuito e/ou u m incêndio.
Evite colocar objectos pesados, ou o
próprio aparelho, sobre o cabo
eléctrico.
· podería originar um curto-circuito
e/ou um incêndio.
Se a ficha e/ou a tomada tiverem a
aparência de danificadas, não deve
procederse à ligação eléctrica.
· podería resultar num ch oque
elécrico e/ou um incêndio.
Para garantir um desempenho de
opção do aparelho, assegure-se de
que:
· o aparelho seja colocado num
local seco, fresco e que não esteja
exposto directamente à luz solar.
· o aparelho não fique colocado
pertodeumafontedecalor,p.exº.
um fogão ou uma máquina de lavar
louça.
· o aparelho permaneça vertical
direito e sobre os quatro ângulos da
base. O aparelho não deverá ficar
inclinado contra qualquer parede. Se
necessário ajuste os pés usando a
chave ajustadora que acompanha a
embalagem.
· haja boa circulação de ar em redor
do aparelho e que os canais de ar
embaixo e por detrás do
compartimento não estejam
bloqueados. O espaço de ventilação
acima do aparelho e qualquer armário
de mercearias/de parede deverá ficar,
pelo menos, a 4 cm. O espaço de
ventilação poderá ficar, quer
a) directamente acima do aparelho,
ou
b) por detrás e acima do armário de
parede. Neste caso, o espaço livre por
detrás do aparelho deverá ser de, pelo
menos, 50 mm de profundidade.
a)
b)
50mm
49
Page 50

· o aparelho seja colocado num
local com uma temperatura ambiente
corrospondente à classe climática*
para a qual o aparelho foi concebido.
*A classe climática é indicada na placa
de características, interior do aparelho.
A tabela sequinte mostra a
temperatura ambiente corrospondente
a cada classe climática.
Classe
climática
SN
N
ST
para uma temperatura ambiente de
+10°C a +32°C
+16°C a +32°C
+18°C a +38°C
aparelho, será mais fácil agarrar por
debaixo do aparelho, graças à placa.
1
2
3
Desenrosque os três parafusos na
traseira da cobertura frontal
4. Retire a cobertura frontal
4
T
Verifiqueseotubosituadodoladode
trás do aparelho desemboca no
recipiente de recolha de água.
A tomada deve estar acessível depois
da instalação do produto.
Se o aparelho for colocado num canto
e o lado com as dobradiças voltado
para a parede, a distância entre a
parede e o aparelho deverá ser, pelo
menos, de 230 mm para permitir abrir
aporta,obastantedemaneiraaque
as prateleiras possam ser retiradas.
Transposição das portas
1. Feche o aparelho e puxe a bucha
para fora da tomada eléctrica.
2. Retire a grade de ventilação. Há
uma parte na grade que pode ser
retirada. Retire-a e coloque-a do outro
lado.
3. Coloque o aparelho sobre uma
placa de madeira quando estiver
deitado. Mais tarde, quando erguer o
+18°C a +43°C
Desenrosque o pino da dobradiça
Retire a porta
5. Desenrosque o parafuso do batente
da porta
Retire o batente da porta
5
50
Page 51

6. Retire as duas tampas existentes no
topo
7. Desenrosque os dois parafusos da
dobradiça
7
6
8.Retireacoberturanapartedafrente
8
Volteamontarpelaordeminversano
lado oposto.
Eleve o aparelho e reponha a grade de
ventilação.
Ligação à corrente eléctrica
Ligue o aparelho a uma tomada
eléctrica com ligação à terra.
Corrente de: 230 V.
Fusível de: 10 A.
Ver a placa de especificações à
esquerda, no interior do aparelho.
9. Mude o puxador de sítio
Desaperte os parafusos. Monte o
puxador no lado oposto virando-o meia
volta. Introduza nos furos onde
anteriormente estava preso o puxador,
as buchas que vêm na embalagem.
9
Coloque o aparelho n a posição
definitiva. Verifique se se mantém
vertical. Veja a secção "Colocação do
aparelho".
51
Page 52

525354
Page 53

Page 54

Page 55

55
Page 56

www.electrolux.com
www.electrolux.co.uk
www.electrolux.es
www.electrolux.pt
8184183-00/5 012008
 Loading...