

Page 1
UUsseerr MMaannuuaall
ERC 25292 W
Fridge
Page 2

Page 3

electrolux
3
Welcome to the world of Electrolux
You’ve chosen a first class product from Electrolux, which hopefully will provide
you with lots of pleasure in the future. Electrolux ambition is to offer a wide variety
of quality products that would make your life even more comfortable. You can look
at some examples on the cover in this manual. But now it’s time to study this
manual and start using and enjoying the benefits from your new machine. We
promise that it’ll make your life a little easier. Good luck!
Page 4
4
electrolux
The following symbols are used in this manual:
Important information concerning your personal safety and information on
how to avoid damaging the appliance.
General information and tips
Environmental information
The symbol on the product or on its packaging indicates that this product
may not be treated as household waste. Instead it shall be handed over to the
applicable collection point for the recycling of electrical and electronic equipment.
By ensuring this product is disposed of correctly, you will help prevent potential
negative consequences for the environment and human health, which could
otherwise be caused by inappropriate waste handling of this product. For more
detailed information about recycling of this product, please contact your local city
office, your household waste disposal service or the shop where you purchased
the product.
Page 5

electrolux
5
CONTENTS
Safety IInformation 6
Use 99
Cleaning the interior 9
Control panel 9
Operation 9
Temperature regulation 9
Fresh food refrigeration 10
Movable shelves 10
Positioning the door shelves 10
Bottle rack 11
Health aand ssafety gguidelines 12
Maintenance 113
Internal cleaning 13
External cleaning 13
When the appliance is not in use 13
Defrosting 14
Interior light 14
Something nnot wworking 15
Technical sspecifications 116
Installation 17
Positioning 17
Rear spacers 18
Electrical connection 18
Shelf holders 20
Door reversibility 20
Guarantee/Customer SService 22
Service aand SSpare PParts 22
Customer CCare 23
European GGuarantee 24
www.electrolux.com 25
Page 6

6
electrolux
SAFETY INFORMATION
It is most important that this
instruction book should be retained
with the appliance for future reference.
Should the appliance be sold or
transferred to another owner, or
should you move house and leave the
appliance, always ensure that the
book is supplied with the appliance in
order that the new owner can be
acquainted with the functioning of the
appliance and the relevant warnings.
If this appliance featuring magnetic
door seals is to replace an older
appliance having a spring lock (latch)
on the door or lid, be sure to make
that spring lock unusable before you
discard the old appliance. This will
prevent it from becoming a death-trap
for a child.
These warnings are provided in the
interest of safety. You must read them
carefully before installing or using the
appliance.
General Safety
• This appliance is designed to be
operated by adults. Children
should not be allowed to tamper
with the controls or play with the
product.
• It is dangerous to alter the
specifications or modify this
product in any way.
• Before any cleaning or
maintenance work is carried out,
be sure to switch off and unplug
the appliance.
• This appliance is heavy. Care
should be taken when moving it
• Ice lollies can cause frost burns if
consumed straight from the
appliance.
•• Take uutmost ccare wwhen hhandling
your aappliance sso aas nnot tto ccause
any ddamages tto tthe ccooling uunit
with cconsequent ppossible ffluid
leakages.
• The aappliance mmust nnot bbe llocated
close tto rradiators oor ggas ccookers.
• Avoid pprolonged eexposure oof tthe
appliance tto ddirect ssunlight.
• There mmust bbe aadequate vventilation
round tthe bback oof tthe aappliance
and aany ddamage tto tthe rrefrigerant
circuit mmust bbe aavoided.
• For ffreezers oonly ((except bbuilt-iin
models): aan iideal llocation iis tthe
cellar oor bbasement.
• Do nnot uuse oother eelectrical
appliances ((such aas iice ccream
makers) iinside oof rrefrigerating
appliances.
Service/Repair
• Any electrical work required to
install this appliance should be
carried out by a qualified electrician
or competent person
• This product should be serviced by
an authorized Service Centre, and
only genuine spare parts should be
used.
• Under no circumstances should
you attempt to repair the appliance
yourself. Repairs carried out by
inexperienced persons may cause
injury or more serious
malfunctioning. Refer to your local
Page 7

electrolux
7
Service Centre, and always insist
on genuine spare parts.
• This appliance contains
hydrocarbons in its cooling unit;
maintenance and recharging must
therefore only be carried out by
authorized technicians.
Use
• The domestic refrigerators and
freezers are designed to be used
specifically for the storage of edible
foodstuffs only.
• Best performance is obtained with
ambient temperature between
+18°C and +43°C (class T); +18°C
and +38°C (class ST); +16°C and
+32°C (class N); +10°C and +32°C
(class SN). The class of your
appliance is shown on its rating
plate.
Warning:
when the ambient
temperature is not included within
the range indicated for the class of
this appliance, the following
instructions must be observed:
when the ambient temperature
drops below the minimum level, the
storage temperature in the freezer
compartment cannot be
guaranteed; therefore it is advisable
to use the food stored as soon as
possible.
• Frozen food must not be re-frozen
once it has been thawed out.
• Manufacturers’ storage
recommendations should be strictly
adhered to. Refer to relevant
instructions.
• The inner lining of the appliance
consists of channels through which
the refrigerant passes. If these
should be punctured this would
damage the appliance beyond
repair and cause food loss. DO
NOT USE SHARP INSTRUMENTS
to scrape off frost or ice. Frost may
be removed by using the scraper
provided. Under no circumstances
should solid ice be forced off the
liner. Solid ice should be allowed to
thaw when defrosting the
appliance.
• Do not place carbonated or fizzy
drinks in the freezer as it creates
pressure on the container, which
may cause it to explode, resulting
in damage to the appliance.Do not
use a mechanical device or any
artificial means to speed up the
thawing process other than those
recommended by the
manufacturer. Never use metal
objects for cleaning your appliance
as it may get damaged.
Installation
• During normal operation, the
condenser and compressor at the
back of the appliance heat up
considerably. For safety reasons,
minimum ventilation must be as
shown in the instructions.
Attention: kkeep vventilation oopenings
clear oof oobstruction.
• Care must be taken to ensure that
the appliance does not stand on
the electrical supply cable.
Page 8

8
electrolux
Important:
if the supply cord is
damaged, it must be replaced by a
special cord or assembly availa-ble
from the manufacturer or its service
agent.
• If the appliance is transported
horizontally, it is possible that the
oil contained in the compressor
flows in the refrigerant circuit. It is
advisable to wait at least two hours
before connecting the appliance to
allow the oil to flow back in the
compressor.
• There are working parts in this
product which heat up. Always
ensure that there is adequate
ventilation as a failure to do this will
result in component failure and
possible food loss. See installation
instructions.
• Parts which heat up should not be
exposed. Wherever possible the
back of the product should be
against a wall.
Environment
Protection
This aappliance ddoes nnot ccontain
gasses wwhich ccould ddamage tthe oozone
layer, iin eeither iits rrefrigerant ccircuit oor
insulation mmaterials. TThe aappliance
shall nnot bbe ddiscarded ttogether wwith
the uurban rrefuse aand rrubbish. AAvoid
damaging tthe ccooling uunit, eespecially
at tthe rrear nnear tthe hheat eexchanger.
Information oon yyour llocal ddisposal ssites
may bbe oobtained ffrom mmunicipal
authorities. TThe mmaterials uused oon tthis
appliance mmarked bby tthe ssymbol
are rrecyclable.
Page 9
electrolux
9
USE
Cleaning the interior
Before using the appliance for the first
time, wash the interior and all internal
accessories with luke-warm water and
some neutral soap so as to remove
the typical smell of a brand-new
product, then dry thoroughly.
Do nnot uuse ddetergents oor
abrasive ppowders, aas tthese wwill
damage tthe ffinish.
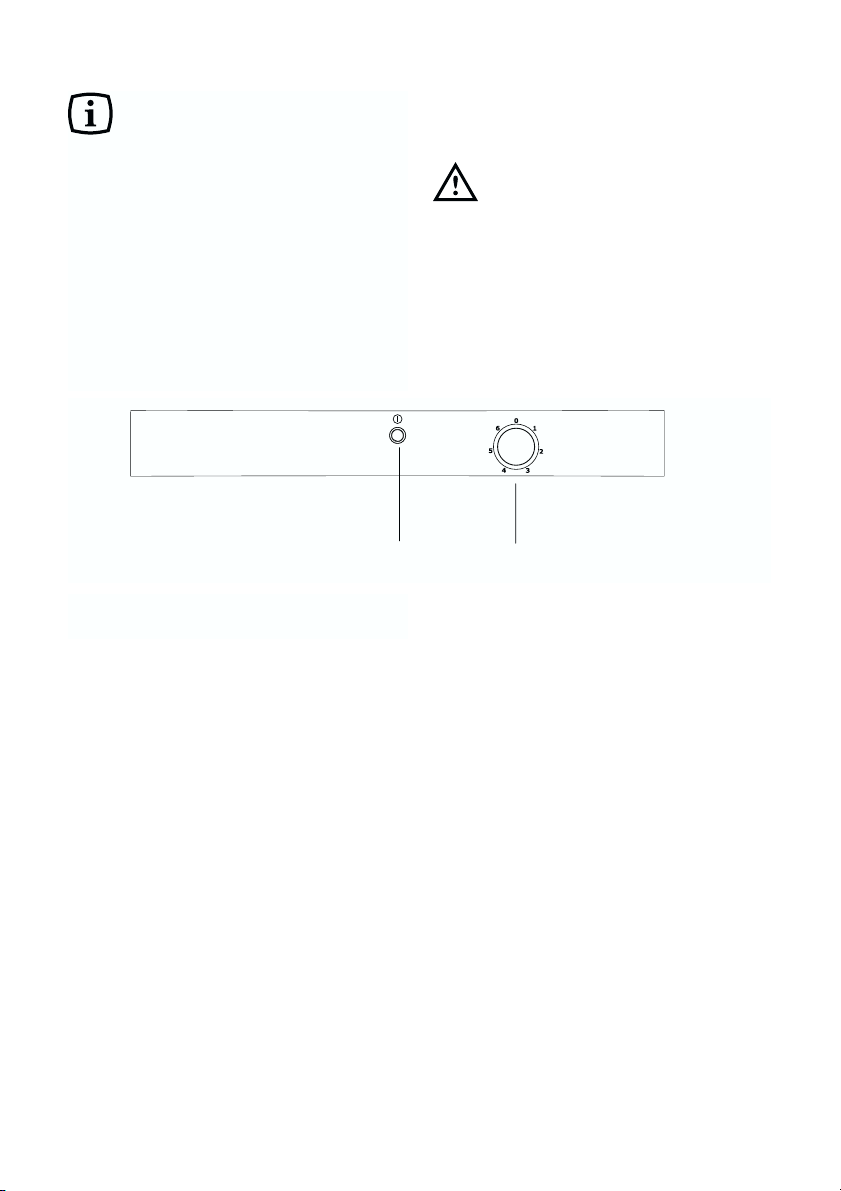
Control panel
A.
Pilot light
B.
Thermostat knob
Operation
Insert the plug into the wall socket.
Turn the thermostat knob (B) to the
right to a medium setting.The pilot light
(A) will light up, indicating that the
appliance is powered. To stop
operation, simply turn the thermostat
knob to position «O».
The pilot light remains lit up.
Temperature regulation
The temperature is automatically
regulated and can be increased to
achieve a higher temperature (warmer)
by rotating the thermostat knob toward
lower settings or reduced (colder)
rotating the knob towards higher settings.
However, the exact setting should be
chosen keeping in mind that the
temperature inside the refrigerator
depends on:
• room temperature;
• how often the door is opened;
• the quantity of food stored;
• location of appliance.
A
B
Page 10

10
electrolux
Important
If tthe aambient ttemperature iis hhigh oor
the aappliance iis ffully lloaded, aand tthe
appliance iis sset tto tthe llowest
temperatures, iit mmay rrun ccontinuously
causing ffrost tto fform oon tthe rrear wwall.
In tthis ccase tthe ddial mmust bbe sset tto aa
higher ttemperature tto aallow aautomatic
defrosting aand ttherefore rreduced
energy cconsumption.
Fresh food refrigeration
To obtain the best performance:
• do not store warm food or
evaporating liquids in the
refrigerator;
• do cover or wrap the food,
particularly if it has a strong flavour.
• Position food so that air can
circulate freely round it.
Movable shelves
The walls of the refrigerator are
equipped with a series of runners so
that the shelves can be positioned as
desired.
Positioning the door
shelves
To permit storage of food packages of
various sizes, the door shelves can be
placed at different heights.
To make these adjustments proceed
as follows: Gradually pull the shelf in
the direction of the arrows until it
comes free, then reposition as
required.
D338
Page 11

electrolux
11
Bottle rack
Place bottles in the rack with the
bottleneck to the front.
Important: Only store unopened bottles
horizontally.
The bottle rack can be tilted for storing
opened bottles.
To do this pull the bottle rack forward
until it can be tilted upwards, then slide
the front support into the next level up.
Page 12

12
electrolux
HEALTH AND SAFETY GUIDELINES
Because oof cconsumer ddemand, ppreservatives hhave bbeen rremoved ffrom mmany
pre-pprepared ffoods. TThis ttogether wwith tthe cchanges iin sshopping hhabits tto aa
once-aa-wweek sshop, mmean tthat ssafe hhandling aand sstorage oof ffood iis eeven mmore
important tthan eever.
The ffollowing ttips sshould hhelp yyou tto eensure tthat tthe ffood iin yyour hhome iis iin aas
perfect ccondition aas ppossible.
• Keep the time between buying
chilled food and placing it in your
fridge as short as possible. Tests
showed that the temperature of 1
litre of orange juice rose to 22°C in
an hour between the supermarket
and home. It then took 11 hours to
get down to 7°C in the refrigerator.
• Keep the refrigerator door closed
as much as possible.
• Do not push food together too
much, try to allow air to circulate
around each item.
• Cool cooked food as quickly as
possible but do NOT place in the
refrigerator until cool. (Leave food
in a place as cool as possible in
order that it can then be placed in
the refrigerator as soon as
possible).
• Do NOT mix raw and cooked
meat, they must be in separate
containers. Take care not to let the
meat juices drip onto other food. If
the meat does drip, remove
everything and clean thoroughly.
• Do not store food uncovered.
• Remove suspect food from your
refrigerator and clean (refer to
“Maintenance and Cleaning).
• Never allow spillages to dry and
harden.
• Store eggs in the egg rack provided
in the refrigerator door. Discard any
broken or chipped eggs.
• Regularly check the refrigerator
door seal to ensure that it is clean
and free from debris.
• Always wash your hands with
soapy water and dry them with a
clean towel before handling food.
• Keep work surfaces clean and
avoid cross contamination by not
using the same work surface or
knife, without washing them
thoroughly in between.
Page 13

electrolux
13
NEVER UUSE DDETERGENTS,
ABRASIVE PPOWDERS, HHIGHLY
PERFUMED CCLEANING
PRODUCTS OOR WWAX
POLISHES, TTO CCLEAN TTHE
INTERIOR AAS TTHESE WWILL
DAMAGE TTHE SSURFACE AAND
LEAVE AA SSTRONG OODOUR.
When the appliance is
not in use
When the appliance is not in use for
long periods, disconnect from the
electricity supply, empty all foods and
clean the appliance, leaving the doors
ajar to prevent unpleasant smells.
MAINTENANCE
Before any maintenance or
cleaning work is carried out,
DISCONNECT the appliance
from the ELECTRICITY supply.
Warning
This aappliance ccontains
hydrocarbons iin iits ccooling uunit;
maintenance aand rrecharging
must ttherefore oonly bbe ccarried
out bby aauthorized ttechnicians.
Internal cleaning
Clean the inside with warm water and
bicarbonate of soda.(5ml to 0.5 litre of
water). Rinse and dry thoroughly.
Do nnot ppull, mmove oor ddamage aany
pipes aand //or ccables iinside tthe ccabinet
External cleaning
Many pproprietary kkitchen ssurface
cleaners ccontain cchemicals tthat ccan
attack/damage tthe pplastics uused iin
this aappliance. FFor tthis rreason iit iis
recommended tthat tthe oouter ccasing oof
this aappliance iis oonly ccleaned wwith
warm wwater wwith aa llittle wwashing-uup
liquid aadded.
An accumulation of dust will affect the
performance of the appliance and
cause excessive electricity
consumption.
You MUST ensure that the appliance
is switched OFF.
Once or twice a year dust the
condenser (black grill) and the
compressor at the back of the
appliance, with a brush or vacuum
cleaner, see diagram.
PR259
Page 14
14
electrolux
Interior light
If it becomes necessary to replace the
lamp, press on the rear hook and at
the same time slide the cover in the
direction indicated by the arrow.
Attention
Replace tthe llamp wwith oone oof tthe
same ppower ((the mmaximum ppower iis
shown oon tthe llight ddiffuser).
Defrosting
Frost is automatically eliminated from
the evaporator of the refrigerator
compartment every time the motor
compressor stops, during normal use.
The defrost water drains out through a
trough into a special container at the
back of the appliance, over the motor
compressor, where it evaporates.
It iis iimportant tto pperiodically cclean tthe
defrost wwater ddrain hhole iin tthe mmiddle
of tthe rrefrigerator ccompartment
channel tto pprevent tthe wwater
overflowing aand ddripping oonto tthe ffood
inside. UUse tthe sspecial ccleaner
provided, wwhich yyou wwill ffind aalready
inserted iinto tthe ddrain hhole.
D037
Page 15

electrolux
15
SOMETHING NOT WORKING
Important:
If you call out an engineer to a fault listed below, or to repair a fault
caused by incorrect use or installation a charge will be made, even if the
appliance is under guarantee.
Before
contacting your local Service Force Centre, check the following points:
If, after the above checks, there is still a fault, call your local Service Force
Centre. In guarantee customers should ensure that the above checks have been
made as the engineer will make a charge if the fault is not a mechanical or
electrical breakdown. Please note that proof of purchase is required for any inguarantee service calls.
Symptom
No power to the appliance
The light does not come on
The temperature in the fridge
The compressor runs
continously
Noise
Water under the salad crispers
Solution
Check there is power at the socket.
Check there is not a power cut by checking
the household lights.
Check the fuse has not blown.
Ensure that the bulb is correctly fitted.
Replace the bulb if it has blown.
Check the door light switch is not jammed.
Check the thermostat control knob in the fridge
is turned to the correct setting relative to
ambient conditions.
Check the ambient temperature is within the
appliance’s operating limits, please refer to the
installation section in this instruction book.
Relocate the appliance if necessary.
Adjust the thermostat control knob to give
correct temperature control. See “Setting the
temperature”.
Check that the door is closed.
Large quantities of food have recently been placed
in the cabinet and/or door is frequently opened.
Check that air ventilation is not obstructed.
Refer to normal operating sounds.
Check the drain hole is not blocked. (see
Maintenance and Cleaning).
Page 16

16
electrolux
TECHNICAL SPECIFICATIONS
DIMENSIONS
Height 140 cm
Width 60 cm
Depth 62,5 cm
POWER SUPPLY VOLTAGE AND FREQUENCY 230-240 V / 50 Hz
TOTAL POWER ABSORBED 110 W
AVERAGE DAILY UNITS ELECTRICITY * 0.430 kWh
GROSS CAPACITY
Fridge 248 l
NET CAPACITY
Fridge 243 l
* This figure is based on standard test results in accordance with European
Standard EN 153.
Actual consumption will depend on how the appliance is used and where it is
located.
Page 17

electrolux
17
INSTALLATION
Warning
IF YOU ARE DISCARDING AN OLD
APPLIANCE THAT HAS A LOCK OR
CATCH ON THE DOOR, YOU MUST
ENSURE THAT IT IS MADE
UNUSABLE TO PREVENT YOUNG
CHILDREN BEING TRAPPED INSIDE.
Depending upon the position which
you choose for your appliance, you
may wish to reverse the way in which
the door opens. To do this, refer to
instructions on “Door reversal
directions” paragraph.
Positioning
This appliance should only be installed
at a location where the ambient
temperature corresponds to the
climate classification indicated on the
rating plate, which is located at the left
on the inside of the appliance.
The following table shows which
ambient temperature is correct for
each climate classification:
SN +10°C to + 32°C
N +16°C to + 32°C
ST +18°C to + 38°C
T +18°C to + 43°C
It should be located in a dry
atmosphere, out of direct sunlight and
away from extreme temperature e.g.
not next to a boiler or radiator, or in a
very cold room e.g. an outhouse,
where the temperatures may fall below
10°C (50°F). If these temperatures are
exceeded i.e. colder or warmer, then
the appliance may not operate
correctly.
You should also ensure that air can
circulate freely around the back and
the top of the cabinet. There must also
be at least 100 mm (4”) distance
between the top of the cabinet and
any overhanging kitchen furniture (A).
Ideally, the appliance should not be
positioned beneath overhanging
furniture (B).
There should also be a gap of 25 mm
either side of the appliance. Do not
obstruct the space underneath. The
back of the cabinet may be placed
close to the wall but must not touch it.
DO NOT install in places with restricted
ventilation.
100 mm10 mm
A
NP006
B
10 mm
Page 18

18
electrolux
Adjust the level of the appliance by
screwing out the adjustable foot, or
feet, at the bottom of the cabinet using
your fingers.
Important
It must be possible to disconnect the
appliance from the mains power
supply; the plug must therefore be
easily accessible after installation.
Rear spacers
In tthe bbag wwith tthe ddocumentation,
there aare ttwo sspacers wwhich mmust bbe
fitted aas sshown iin tthe ffigure ..
Slacken the screws and insert the
spacer under the screw head, then retighten the screws.
Electrical
connections
Any electrical work required to install
this appliance should be carried out by
a qualified electrician or competent
person.
WARNING: TTHIS AAPPLIANCE MMUST
BE EEARTHED.
The mmanufacturer ddeclines aany lliability
should tthis ssafety mmeasure nnot bbe
observed.
If the plug that is fitted to your
appliance is not suitable for your
socket outlet, it must be cut off and
the appropriate plug fitted.
Remove the fuse from the cut off plug.
The cut off plug should then be
disposed of to prevent the hazard of
shocks in case it should be plugged
into a 13amp socket in another part of
your home.
Important
The wires in the mains lead are
coloured in accordance with the
following code:
Green aand YYellow - EEarth
Blue - NNeutral
Brown - LLive
If you fit your own plug, the colours of
the wires in the mains lead of your
appliance may not correspond with
the markings identifying the terminals
in your plug, proceed as follows:
D200
PR153
Page 19

electrolux
19
Connect the Green and Yellow (earth)
wire to the terminal in the plug which is
marked with the letter «E» or the earth
symbol or coloured green and
yellow.
Connect the blue (neutral) wire to the
terminal in the plug which is marked
with the letter «N» or coloured black.
Connect the brown (live) wire to the
terminal in the plug which is marked
with the letter «L» or coloured red.
The plug moulded onto the lead
incorporates a fuse. For replacement,
use a 13amp BSI362 fuse. Only ASTA
or BSI approved fuses should be used.
The plug must not be used if the fuse
cover/carrier is lost. The cover/carrier
is indicated by the coloured insert at
the base of the plug.
A replacement cover/carrier must be
obtained from your local Electrolux
Service Force Centre.
This aappliance ccomplies wwith tthe
E.E.C. DDirective NNo. 887/308 oof 22.6.87
relative tto rradio iinterference
suppression.
GREEN & YELLOW
This appliance complies with the
following E.E.C. Directives:
-
73/23 EEEC oof 119.2.73
(Low Voltage
Directive) and subsequent
modifications;
-
89/336 EEEC oof 33.5.89
(Electromagnetic Compatibility
Directive) and subsequent
modifications.
Please eensure tthat wwhen tthe aappliance
is iinstalled iit iis eeasily aaccessible ffor tthe
engineer iin tthe eevent oof aa bbreakdown.
BLUE
D207
13 AMP. FUSE
13 AMP
BROWN
CORD CLAMP
Page 20

20
electrolux
Shelf holders
Your appliance is equipped with shelf
retainers that make it possible to
secure the shelves during transportation.
To remove them proceed as follows:
Move the shelf holders in the direction
of the arrow, raise the shelf from the
rear and push it forward until it is freed
and remove the retainers.
Door reversibility
Before carrying out any operations,
remove the plug from the power socket.
To change the opening direction of the
door, proceed as follows:
• To carry out the following
operations, we suggest that this be
made with another person that will
keep a firm hold on the doors of
the appliance during the operations.
• Open the door with the appliance in
the upright position. Unscrew the
screws and remove the door plastic
trim.
• Remove the little plastic cover from
the door plastic trim and refit on the
opposite side (d).
• Lay down the appliance back side
down.
• Remove the plastic hinge covers dx
and sx (3).
• Unscrew the upper hinge and remove it
(1-2)
• Unscrew the screw and remove the
door stopper (4).
• Remove the door
A
B
C
Page 21

electrolux
21
• Remove the ventilation grill (D).
• Using a 10 mm spanner, unscrew
the hinge pin (E) and reassemble it
on the opposite side of the hinge;
• Screw down the bottom hinge (E)
on the opposite side by using the
screws previously removed.
• Remove the plug (F) from the
ventilation grill (D) and replace it on
the opposite side.
• Re-assemble the ventilation grill (D).
• Reinsert the door .
• Pay attention that the front board of
the doors are parallel to the front
board of the top.
• Fix the door stopper on the
opposite side (4).
• Position and fix the upper hinge on
the opposite side (1-2)
1
4
3
2
F
F
D
F
F
E
E
• Reinsert the 2 plastic hinge covers (3).
• Lift up the appliance to vertical
position.
• Open the door and reposition the
upper door plastic trim with screws.
• Fix the handles on the opposite
side, insert the plastic plugs into
the holes left open that can be
found in the instruction for use bag.
Reposition, level the appliance,
wait for at least two hours and
then connect it to the power socket.
In any case you do not want to carry
out the above mentioned operations,
contact the nearest After Sales Service
Force. The After Sales Service
specialist will carry out the reversibility
of the doors at your cost.
Warning
After hhaving rreversed tthe oopening
direction oof tthe ddoors ccheck tthat aall tthe
screws aare pproperly ttightened aand tthat
the mmagnetic sseal aadheres tto tthe ccabinet.
If tthe aambient ttemperature iis ccold ((i.e.
in WWinter), tthe ggasket mmay nnot ffit
perfectly tto tthe ccabinet. IIn tthat ccase,
wait ffor tthe nnatural ffitting oof tthe ggasket
or aaccelerate tthis pprocess bby hheating
up tthe ppart iinvolved wwith aa nnormal
hairdrier.
Page 22

22
electrolux
Guarantee/Customer
Service
Standard guarantee conditions
We, Electrolux, undertake that if within
12 months of the date of the purchase
this Electrolux appliance or any part
the-reof is proved to be defective by
reason only of faulty workmanship or
materials, we will, at our option repair or
replace the same FREE OF CHARGE
for labour, materials or carriage on
condition that:
• The appliance has been correctly installed and used only on the electricity
supply stated on the rating plate.
• The appliance has been used for
normal domestic purposes only, and
in accordance with the manufacturer’s instructions.
• The appliance has not been ser-viced,
maintained, repaired, taken apart or
tampered with by any per-son not
authorised by us.
• Electrolux Service Force Centre must
undertake all service work under this
guarantee
• Any appliance or defective part replaced shall become the Company’s
property.
• This guarantee is in addition to your
statutory and other legal rights.
Exclusions
• Damage or calls resulting from transportation, improper use or neglect, the
replacement of any light bulbs or
removable parts of glass or plastic.
• Costs incurred for calls to put right an
appliance which is improperly installed or
calls to appliances outside the United
Kingdom.
• Appliances found to be in use within a
commercial environment, plus those
which are subject to rental agreements.
• Products of Electrolux manufacturer that
are not marketed by Electrolux
Service and Spare Parts
In the event of your appliance requiring
service, or if you wish to purchase spare
parts, please contact your local Service
Force Centre by telephoning
0870 5 929 929
Your telephone call will be automatically
routed to the Service Force Centre covering your postcode area.
For the address of your local Service
Force Centre and further information
about Service Force, please visit the
website at
www.serviceforce.co.uk
Before calling out an engineer, please
ensure you have read the details under the
heading “Something not working” When
you contact the Service Force Centre you
will need to give the follo-wing details:
1.Your name, address and postcode.
2.Your telephone number.
3. Clear concise details of the fault.
4. The model and Serial number of the
appliance (found on the rating plate).
5.The purchase date.
Please note a valid purchase receipt or
guarantee documentation is required for in
guarantee service calls.
Page 23

electrolux
23
Customer Care
For general enquiries concerning your
Electrolux appliance, or for further
information on Electrolux products
please contact our Customer Care
Department by letter or telephone at the
address below or visit our website at
www.electrolux.co.uk
Customer Care Department
Electrolux Major Appliances
Addington Way
Luton
Bedfordshire, LU4 9QQ
Tel: 08705 950 950 (*)
(*) Calls may be recorded for training
purposes
Page 24

24
electrolux
EUROPEAN GUARANTEE
This appliance is guaranteed by Electrolux in each of the countries listed at the
back of this user manual, for the period specified in the appliance guarantee or
otherwise by law. If you move from one of these countries to another of the
countries listed, the appliance guarantee will move with you subject to the
following qualifications:
• The appliance guarantee starts from the date you first purchased the appliance
which will be evidenced by production of a valid purchase document issued by
the seller of the appliance.
• The appliance guarantee is for the same period and to the same extent for
labour and parts as exists in your new country of residence for this particular
model or range of appliances.
• The appliance guarantee is personal to the original purchaser of the appliance
and cannot be transferred to another user.
• The appliance is installed and used in accordance with instructions issued by
Electrolux and is only used within the home, i.e. is not used for commercial
purposes.
• The appliance is installed in accordance with all relevant regulations in force
within your new country of residence.
The provisions of this European Guarantee do not affect any of the rights granted
to you by law.
Page 25

electrolux
25
Suomi
www.electrolux.fi
Sverige
+46 (0)771 76 76 76
Electrolux Service, S:t Göransgatan 143, S-105 45 Stockholm
Türkiye
+90 21 22 93 10 25
Tarlaba caddesi no : 35 Taksim stanbul
+7 095 937 7837
Albania
+35 5 4 261 450
Rr. Pjeter Bogdani Nr. 7 Tirane
Belgique/België/Belgien
+32 2 363 04 44
Bergensesteenweg 719, 1502 Lembeek
Danmark
+45 70 11 74 00
Sjællandsgade 2, 7000 Fredericia
eská republika
+420 2 61 12 61 12
Bud jovická 3, Praha 4, 140 21
Deutschland
+49 180 32 26 622
Muggenhofer Str. 135, 90429 Nürnberg
Eesti
+37 2 66 50 030
Mustamäe tee 24, 10621 Tallinn
España
+34 902 11 63 88
Carretera M-300,Km.29,900 Alcalá de Henares Madrid
France
Great Britain
+44 8705 929 929
Addington Way, Luton, Bedfordshire LU4 9QQ
Hellas
+30 23 10 56 19 70
4, Limnou Str., 54627 Thessaloniki
Hrvatska
+385 1 63 23 338
Slavonska avenija 3, 10000 Zagreb
Ireland
+353 1 40 90 753
Long Mile Road Dublin 12
Italia
+39 (0) 434 558500
C.so Lino Zanussi, 26 - 33080 Porcia (PN)
Latvija
+37 17 84 59 34
Kr. Barona iela 130/2, LV-1012, Riga
Lietuva
+370 5 2780609
Verki 29, LT-09108 Vilnius
Luxembourg
+35 2 42 43 13 01
Rue de Bitbourg, 7, L-1273 Hamm
Magyarország
+36 1 252 1773
H-1142 Budapest XIV, Erzsébet királyné útja 87
Nederland
+31 17 24 68 300
Vennootsweg 1, 2404 CG - Alphen aan den Rijn
Norge
+47 81 5 30 222
Risløkkvn. 2 , 0508 Oslo
Österreich
+43 18 66 400
Herziggasse 9, 1230 Wien
Polska
+48 22 43 47 300
ul. Kolejowa 5/7, Warsaw
Portugal
+35 12 14 40 39 39
Quinta da Fonte-Edificio Gonçalves Zarco-Q 35-2774-518 Paço de Arcos
Romania
+40 21 451 20 30
Str. Garii Progresului 2, S4, 040671 RO
Schweiz-Suisse-Svizzera
+41 62 88 99 111
Industriestrasse 10, CH-5506 Mägenwil
Slovenija
+38 61 24 25 731
Electrolux Ljubljana d.o.o., Gerbi eva 98, 1000 Ljubljana
Slovensko
+421 2 43 33 43 22
Electrolux Slovakia s.r.o., Electrolux Domáce spotrebi e SK, Seberíniho 1, 821 03 Bratislava
www.electrolux.com
ě
á
ŏ
ŝ
www.electrolux.fr
È
129090 Москва, Олимпийский проспект, 16, БЦ "Олимпик"
ģ
ě
Россия
Page 26

Page 27

Page 28

2223 387-61-00 26012007
wwwwww..eelleeccttrroolluuxx..ccoomm
www.electrolux.co.uk
 Loading...