

Page 1
21
Warnings for your safety. Carefully read these
instructions before installing and using the
machine.
m This freezer is designed to be operated by adults
only. Children should not be allowed to tamper
with the controls or play with the product.
m Make sure that the power plug is not squashed or
damaged by the back of the fridge/freezer. Do not
place heavy articles or the fridge/freezer itself on
the power cord. Do not remove the power cord by
pulling on its lead, particularly when the fridge/freezer is being pulled out of its niche. If the power
plug socket is loose, do not insert the power plug.
If the power cord is damaged, it must be replaced
by a certified service agent or qualified service
personnel. Damage to the cord may cause a
shortcircuit,fire and/or electric shock.
m This appliance is heavy. Care should be taken
when moving it.
m Repairs carried out by inexperienced persons
may cause injuries or serious malfunctioning.
Refer to the nearest Authorized Dealer.
m Make sure the rear part of the appliance stands
against a wall as there are working parts which
heat up and should not be of easy access.
m Make sure that there is a continous and adequate
ventilation as a failure to do so may result in
damage to the appliance or deterioration of the
food.
m The appliance should be left for at least 4 hours
after installation before it is turned on ill order to
allow the refrigerant to settle.
m This product must be serviced only by an AUT-
HORIZED DEALER, and only GENUINE SPARE
PARTS must be employed.
m Before cleaning or reparing the appliance, make
sure it is unplugged.
m It is dangerous to alter the specifications or modify
this product in any way.
m These domestic refrigerators are designed to be
used specifically for the storage and conservation
of food.
m DO NOT USE SHARP INSTRUMENTS to scrap
off frost or ice. Frost may be removed by using a
plastic scraper. (See defrosting instructions).
m Frozen food must not be re-frozen once it has
been thawed out.
Manufacturer’s storage recommendations should
be strictly complied with.
m Lollies can cause frost burns if consumed right
away from the freezer.
m Do not place carbonate or fizzy drinks in the free-
zer as these may explode.
m When an old freezer is to be discarded make sure
to:
m Dismount the doors in order to prevent children
from getting trapped inside.
m The symbol on the product or on its packaging indicates that this product may not be
treated as household waste. Instead it shall be
handed over to the applicable collection point
for the recycling of electrical and electronic
equipment. By ensuring this product is disposed of correctly, you will help prevent potential
negative consequences for the environment
and human health, which could otherwise be
caused by inappropriate waste handling of this
product. For more detailed information about
recycling of this product, please contact your
local city office, your household waste disposal
service or the shop where you purchased the
product.
m Warnings for your Safety
Index
Warnings for your safety. . . . . . . . . . . . . . . . . . . . . . . . . . . . . . . . . . . . . . . . . . . . . . . . . . . . . . . . . . . 21
Installation Positioning/Cleaning the interior/Electrical connection/Starting up. . . . . . . . . . . . . . . . . . . . . . 22
Changing the opening directions of the doors. . . . . . . . . . . . . . . . . . . . . . . . . . . . . . . . . . . . . . 23
Control and Use Control panel/Interior Light/Dynamic Refrigeration ASP/ Inner Door/ Shelves Position .. 24
Control and Use Freezer Compartment/Refrigerator Compartment . . . . . . . . . . . . . . . . . . . . . . . . . . . . 25
Maintenance Defrosting of the freezer/Defrosting of the fridge . . . . . . . . . . . . . . . . . . . . . . . . . . . . . . . . . 26
Something not working . . . . . . . . . . . . . . . . . . . . . . . . . . . . . . . . . . . . . . . . . . . . . . . . . . . . . . . . . 27-28
Normal noises when functioning. . . . . . . . . . . . . . . . . . . . . . . . . . . . . . . . . . . . . . . . . . . . . . . . . . . 28
Guarantee, Service and spare Parts . . . . . . . . . . . . . . . . . . . . . . . . . . . . . . . . . . . . . . . . . . . . . . . . 29
Tecnical Features . . . . . . . . . . . . . . . . . . . . . . . . . . . . . . . . . . . . . . . . . . . . . . . . . . . . . . . . . . . . . . . . . 29
Page 2
22
Installation
Positioning
• Place the refrigerator away from direct sunlight
and heat sources.
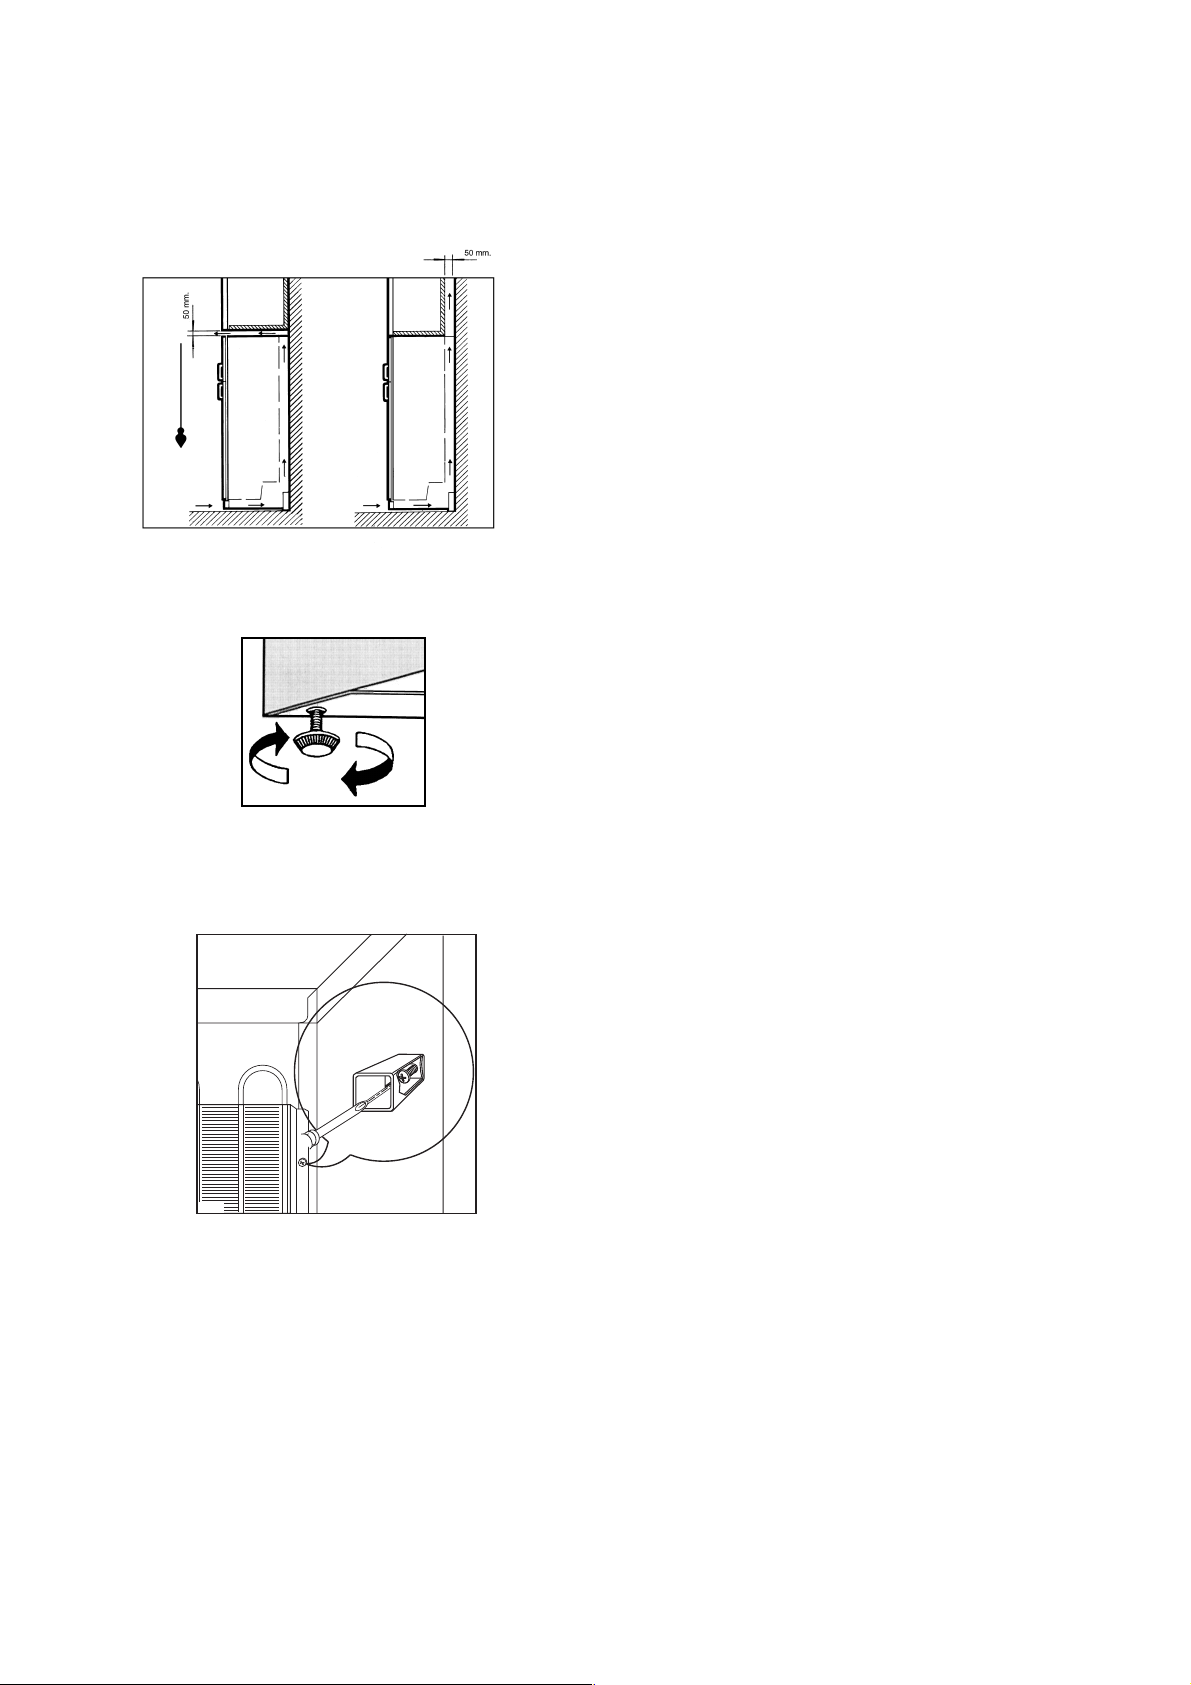
• Maintain recommended ventilation - see Fig. 1.
• Make sure the refrigerator is accurately levelled
turning the adjustable feet in order to avoid vibrations and noises, Fig. 2.
• In the documentation bag you will find two spacers that must be mounted as shown in the figure
in the back of your appliance. Please loosen the
screw under its head and then unloosen again.
• This is a built in design to be aligned with other
furniture
• The appliance must be located in places of maximum temperature as follows:
SN +10 hasta +32ºC
N +16 hasta +32ºC
ST +18 hasta +38ºC
T +18 hasta +43ºC
If the temperature are higher than these both
above mentioned, the functions of appliance coudl
result reduced.
Cleaning the interior
• Do not use alcohol or any cleanig product containing alcohol because it can damage the cabinet.
• Before using the appliance for the first time wash
the interior whith luke warm water and some neutral soap so as to remove the typical smell of a
brand-new product arid then dry thoroughly.
• Do not use detergents or abrasive powders as
these will damage the finish.
• Remove security used for transportation.
Electrical connection
mBefore plugging the appliance make sure that the
voltage and frequency shown on the «Technical
Features» correspond to your home supply.
It is essential that the appliance be efficiently
earthed.
mFor this purpose the supply cable plug incorpora-
tes a special earth contact. If the sockets of your
domestic wiring system are not grounded, have
the appliance connected to a separate ground wire
in accordance with existing safety regulations.
«THE MANUFACTURER DECLINES TO ACCEPT
ANY LIABILITY IF THIS SAFETY RULE IS NOT
OBSERVED».
Starting – up
• Plug the appliance into the mains.
• Make sure the inner light turns on when opening
the door.
• Turn to intermediate position the knobs of the
«temperature regulator» «A» (See Control And
Use paragraph).
Fig. 1
Fig. 2
D
Page 3
23
Changing the opening direction of the doors
Before carrying out any operations, remove the plug
from the power socket.
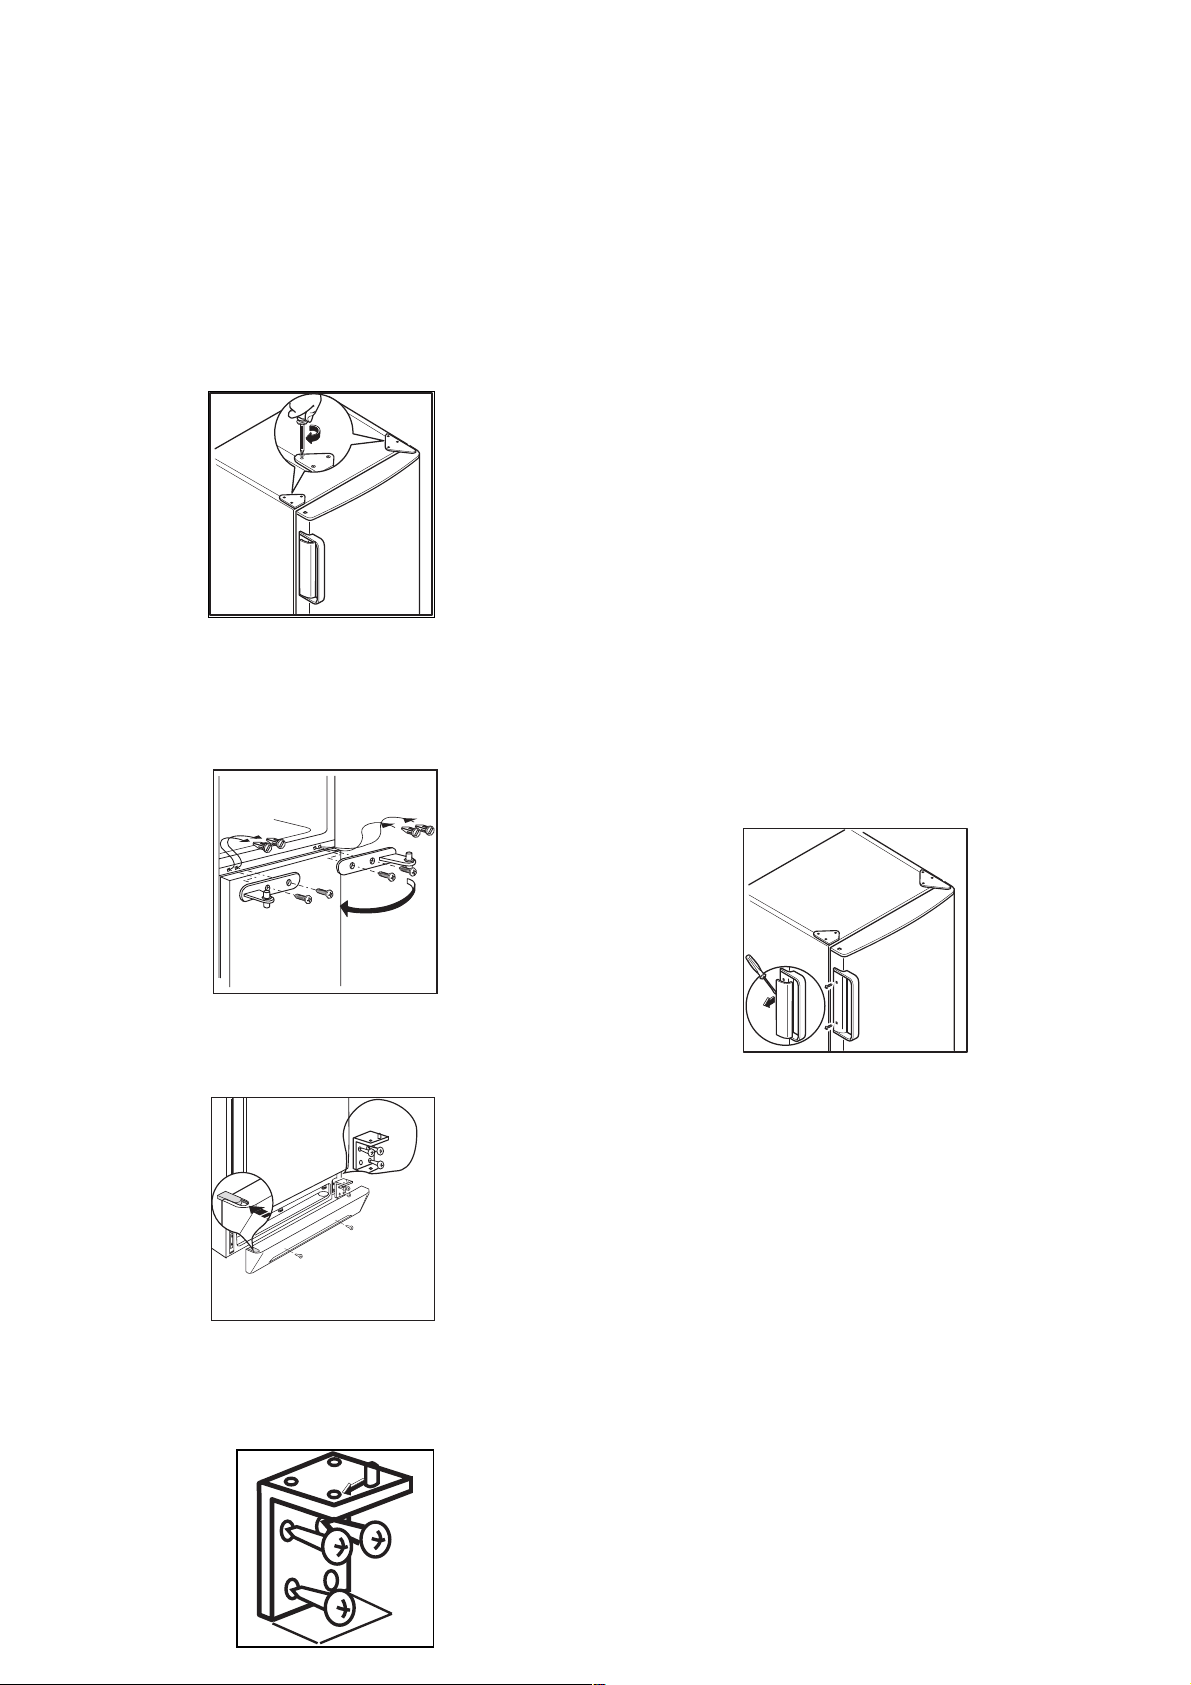
To change the opening direction of the door, proceed as follows:
1. Remove the upper hinge taking care for the
upper door not to fall off and keep it for future
actions;
Remove the upper support and mount it in the
opposite side
2. remove the upper door;
3. unscrew the middle hinge. Unscrew the plastic
plugs located on the opposite side of the central
hinge and introduce them in the holes occupied
before by the hinge;
4. remove the lower door;
5. pull off the ventilation grille which is fixed by two
screws;
6. remove the bottom hinge by unscrewing its fixing
screws;
7. using a 12 mm spanner, unscrew the hinge pin
and reassemble it on the opposite side of the
hinge;
8. adjust the level of the appliance by screwing out
the adjustable foot, or feet, at the bottom of the
cabinet using your fingers or a tool;
9. reassemble the lower hinge on the opposite side,
using the screws previously removed. Slide the
hole cover out of the ventilation grille by pushing
it in the direction of the arrow and reassemble it
on the opposite side;
10. refit the ventilation grille, fixing the screws;
11. reassemble the lower door;
12.reassemble the middle hinge on the opposite
side;
13.replace the upper door.
14.In your documentation bag you will find the upper
hinge necessary to make the reversibility. Please
mount it in their relevant place.
15.Dismount the handle cover making pressure and
using a screwdriver. Dismantle the handles and
reassemble them on the opposite side. Cover the
holes with the plastic lids that were situated
where the handles are presently. Place the handle cover.
mm
Warning:
After having reversed the opening direction of
the doors check that all the screws are properly
tightened and that the magnetic seal adheres to
the cabinet. If the ambient temperature is cold
(i.e. in Winter), the gasket may not fit perfectly to
the cabinet. In that case, wait for the natural fitting of the gasket or accelerate this process by
heating up the part involved with a normal hairdrier.
PR1
Page 4
24
Control and Use
Control
Temperature Regulator for
Refrigerator:
«A»
Allows to adjust the temperature inside the refrigerator according to use and external conditions.
• Pos. 1 = Minimum cold.
• Pos. 6 = Maximum cold.
• Pos. 0 = Motor disconnected.
Interior light:
Comes on when opening the door of the refrigerating compartment.
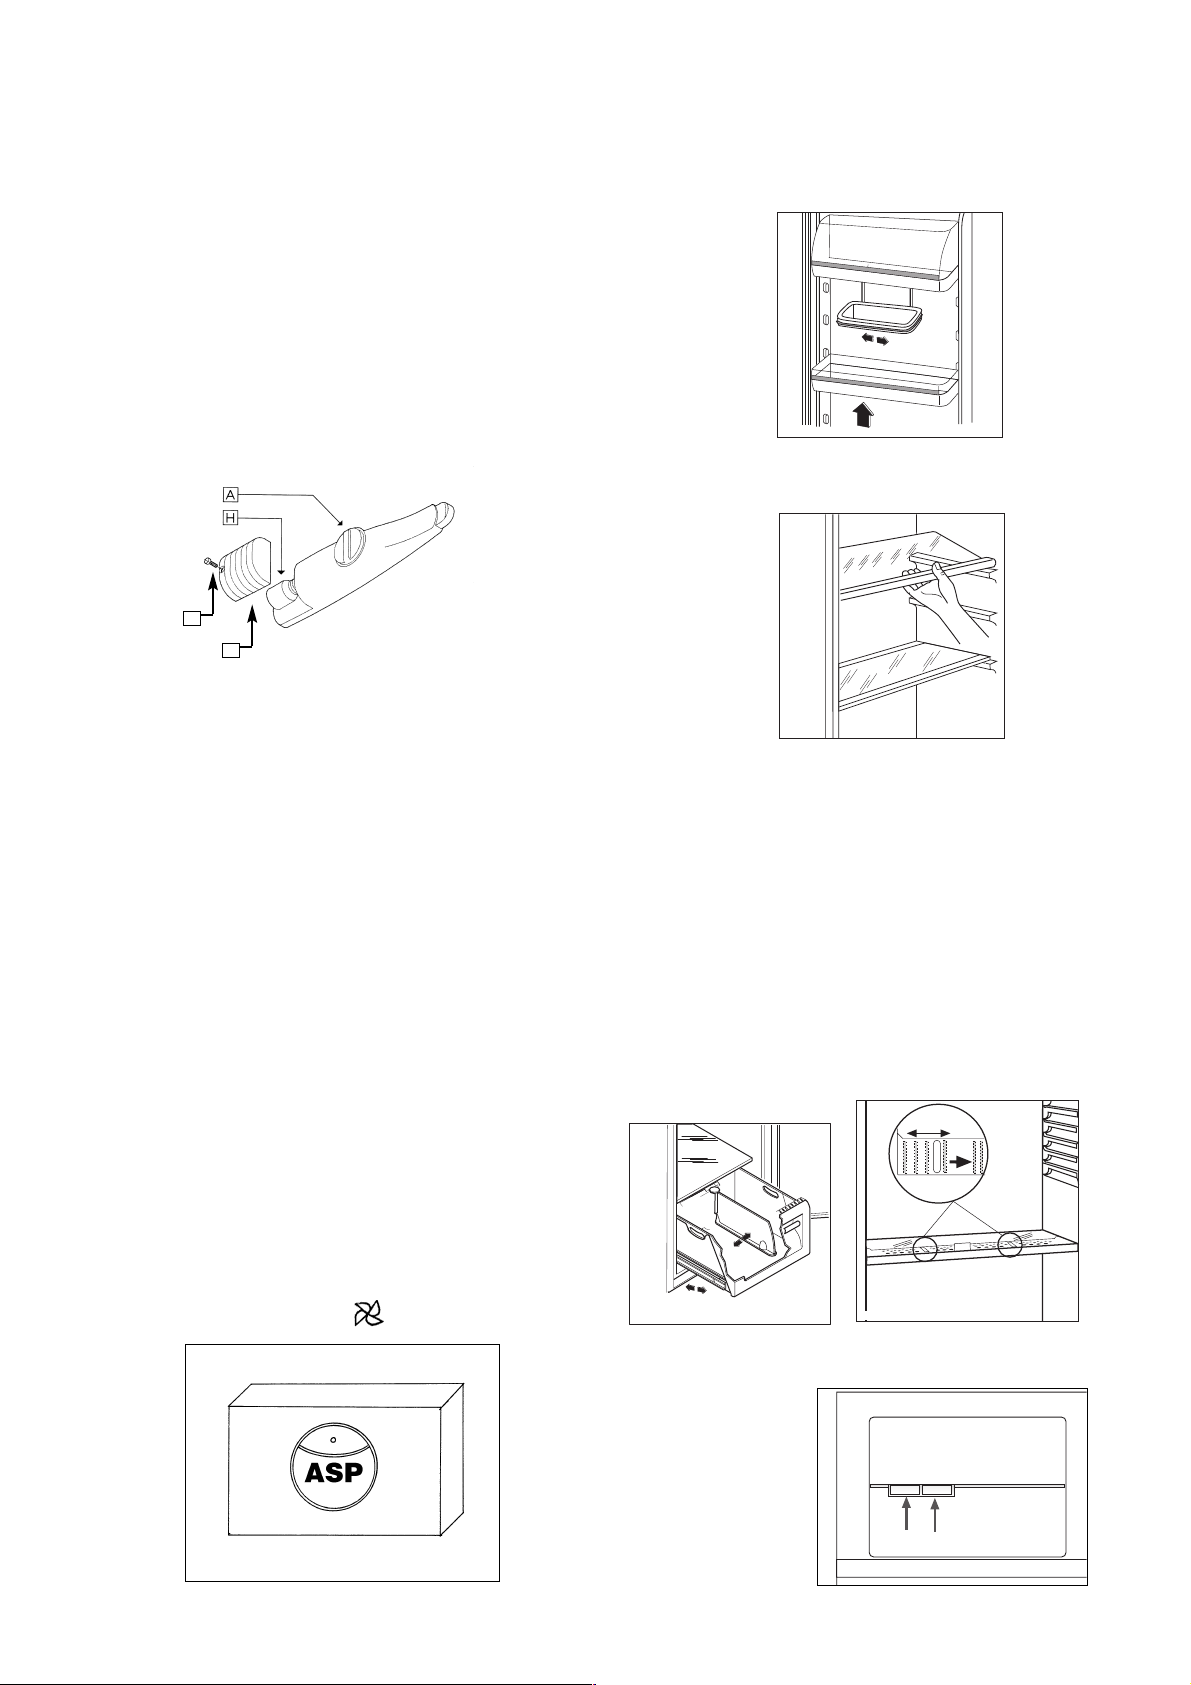
When changing the light bulb, first remove the protective cover «X» after pull out the screw “Y” .
Dinamic Refrigeration (ASP):
Its use is particularly suitable:
• In hot weather (ambient temperature of over 25º)
and when a lot of foodstuffs have just been stored.
• In damp atmospheres (if a lot of frost forms on the
back wall of the refrigerator cabinet or droplets of
water appear on the shelves).
To operate, press the switch.
The ASP Dynamic Refrigeration system improves the
performance of the fridge compartment as can be
seen by:
· Faster cooling
· A more uniform temperature distribution
NOTE: When the ASP is operating on, cold production is heightened, so the refrigerator temperature
control must be set to to avoid excessive
cold.
Inner Door Compartments Position
The door compartments can be pulled up and removed , and inserted at other positions as needed.
Shelves Position
The storage shelves can be adjusted to various
heights.
Vegetable Drawer
The drawer is suitable for storing fruit and
vegetables.
There is a separator inside the drawer that can be
placed in different positions to allow for the
subdivision best suited to personal needs.
The drawer incorporates a device with slits
(adjustable by means of a sliding lever), which
makes it possible to regulate the temperature in the
vegetable drawer(s).
Close the slots to obtain a warmer temperature and
greater humidity.
Open the slots (Pos. ON) to obtain a cooler temperature and less humidity.
Ice Cube trays
Your freezer is equipped with a specific holder in
order to place the ice
cube tray you will find
inside your appliance.
X
Y
PR270
D338
ON
PR271
Page 5
25
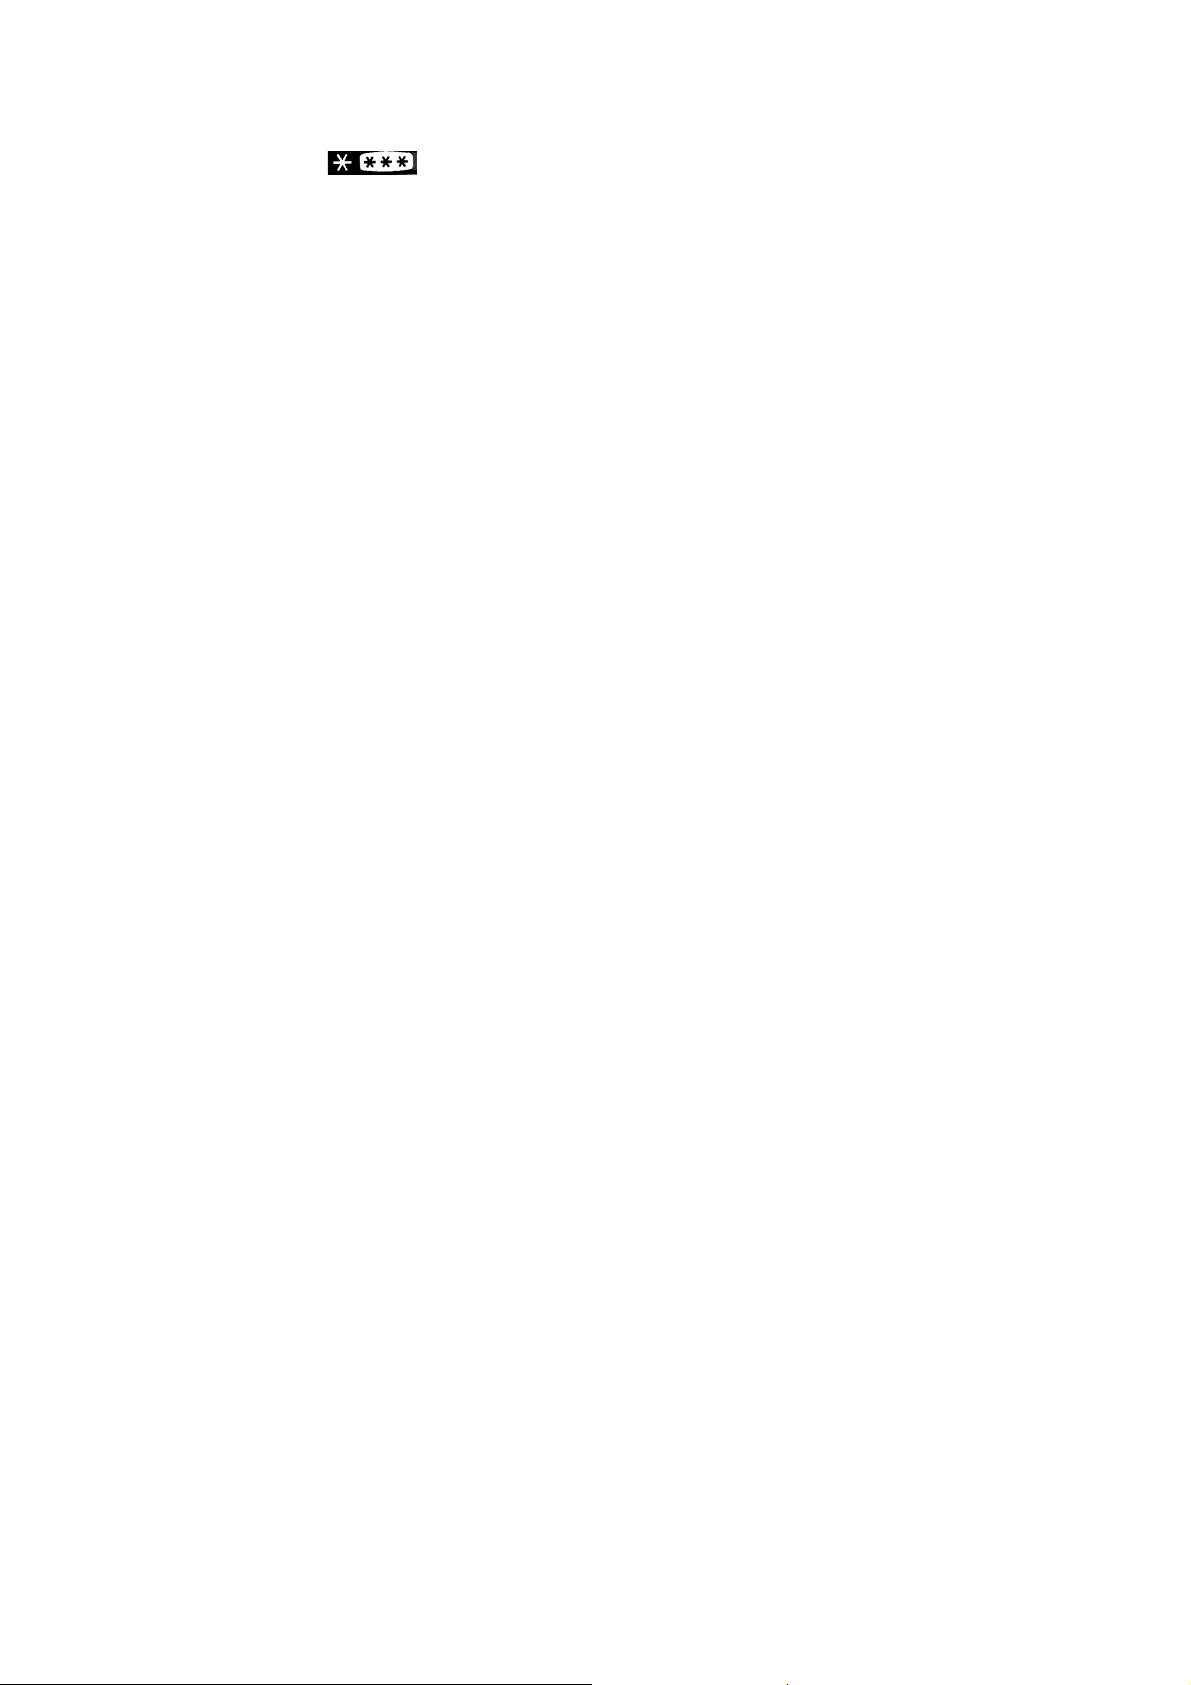
This freezer, is marked , and is suitable
for freezing fresh foodstuffs and keeping food for
long periods.
Freezing of food
1... Place food on the upper grill.
2... Maintain food for at least 24 hours in that posi-
tion.
3... The maximum quantity to be frozen within 24
hours is shown on the «Rating Plate», depending
on the model.
Keeping frozen food
For optimum consevation, the temperature inside the
freezer compartment must be at least -18°C.
This temperature is adjusted automatically.
Check that the «Temperature Control» is in a middle position. Sometimes it may be necessary (insufficient ventilation, high roon temperature, frequent
opening and closing of the door…) to change the
position of the «Temperature Control».
If the appliance should be accidentally switched off by
a fault or power cut, take the following precautions:
• Keep the doors closed at all times.
• Find out how long the stoppage is expected to last.
Once normal power is restored:
A) If the freezer is full and the stoppage has been
less than «Time for temperature Rise» indicated
for each model in the «Technical Features» section, then no damage will have been caused to the
food.
B) If the freezer is not full, the cold will be lost more
quickly. If the food has not started to thaw, then
follow the instructions in «A».
C) If the food has begun to thaw, use them up as
quickly as possible, or cook them and refreeze
them.
Useful Hints
™ Do not introduce any new food during a freezing
period.
™ Do not put any newly introduced food for freezing
near to already frozen food.
™ Wrap the food up properly or place it in hermethic
recipies before introducing it into the freezer.
™ Do not introduce any hot food into the freezer.
™ Food and drinks of a strong flavour may pass this
on to others and affect their flavour. Wrap them up
adequately or put them into tight closing bags.
™ Follow the instructions given in the cook books,
freezing books and wrapping utensiles for better
conservation of food.
Freezer Compartment
This compartment is for storing drinks and fresh food products.
The temperature inside is very evenly distributed. Make sure food does not touch the back wall, since
behind this surface is where the cold is generated and food could bee partially frozen. Also, this can impede the
circulation of cold air.
This appliance is provided with an automatic defrosting system. Consequently you will sometimes notice a thin
layer of ice or drops of water on the rear wall.
Refrigerator Compartment:
Page 6
26
Prior to undertaking any maintenance operation,
be sure to unplug the appliance.
Defrosting of the freezer
The inner walls of the freezer become gradually
covered with a layer of frost keeping in mind not to
open the door frequently and keeping the food wrapped up in closed bags.
Whenever the thickness of ice reaches 5 mm. the
frost should be removed. Here to proceed as follows:
1... Remove all food staffand place it in the coolest
possible place.
2... Never pull up the sticked ice, you must wait untill
it is melted, when the ice is soft you can remove
it by helping yourself with a plastic ice-scraper,
never use sharp objects, or heating households
because the appliance could be seriusly damaged.
3... Once removed the ice clean and dry the inside
with a soft piece of cloth.
4... You can plug it in again.
Defrosting of the refrigerator
Frost is automatically eliminated in the refrigerator.
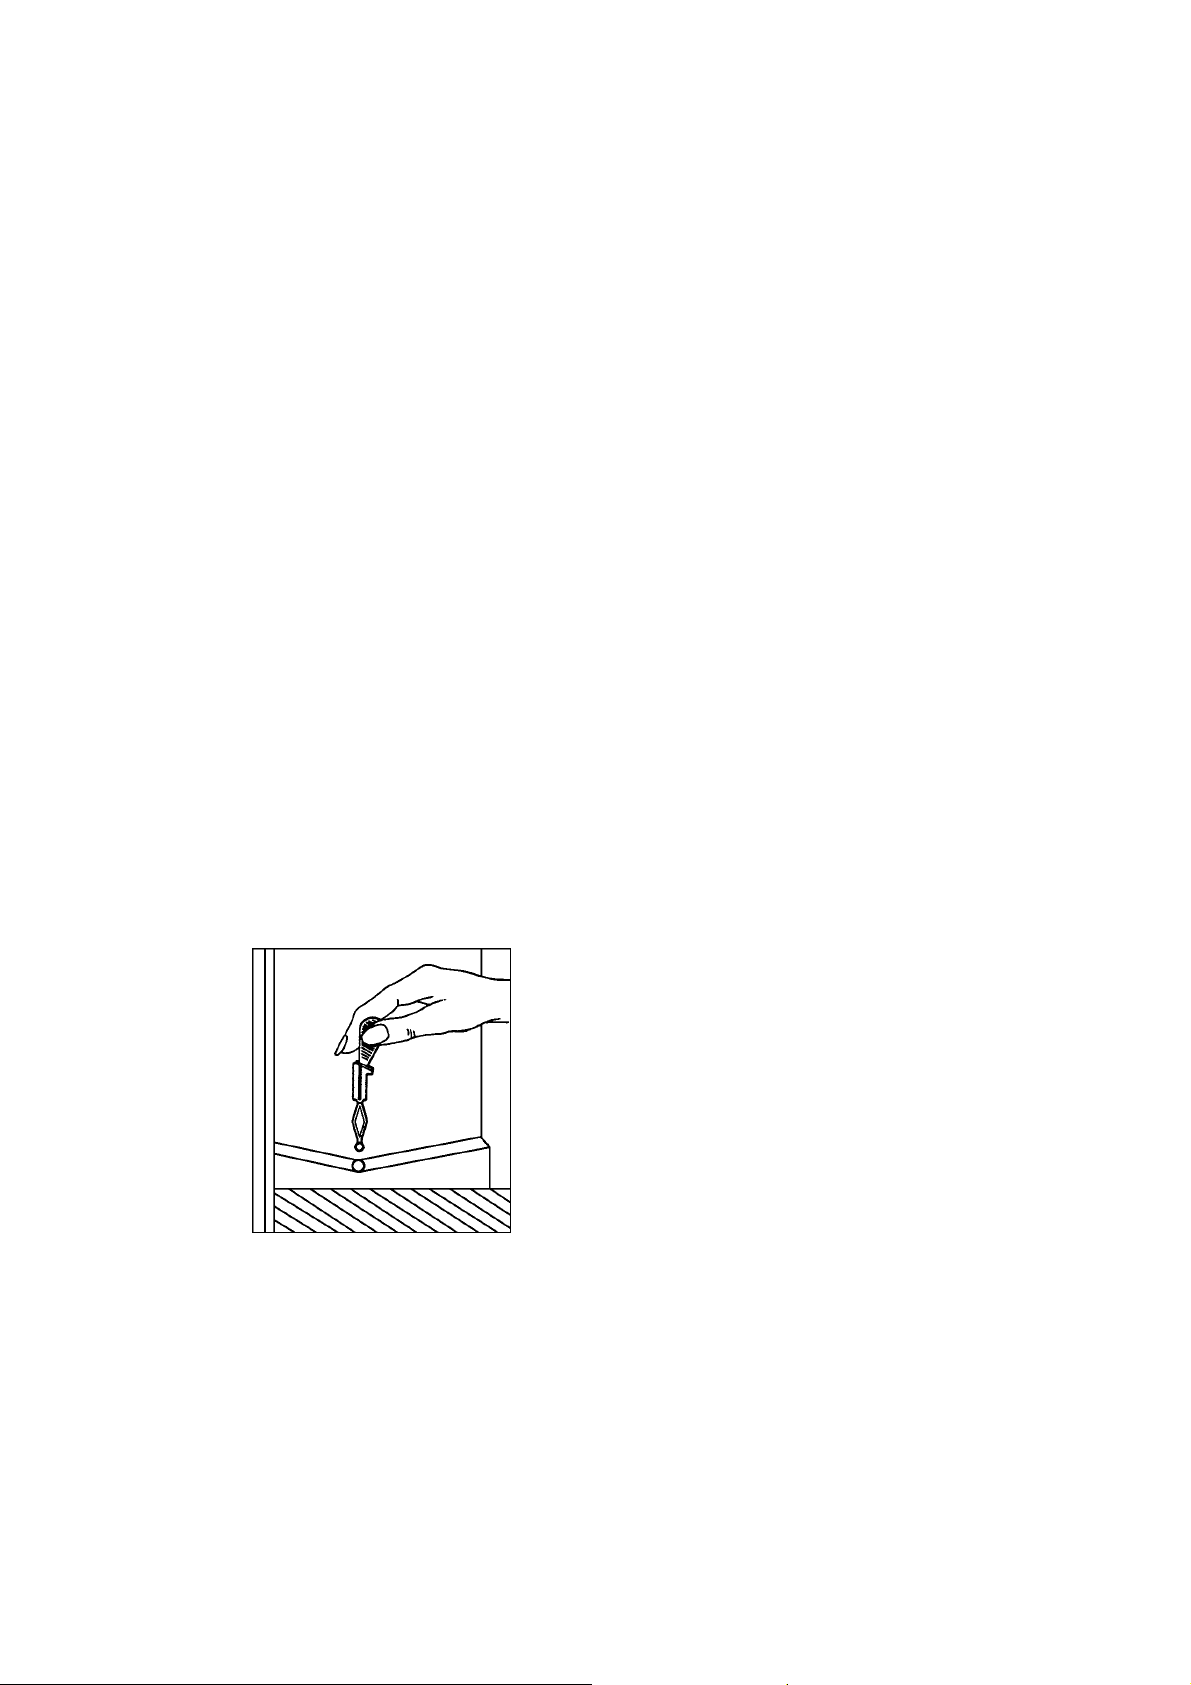
Clean regularly the water drain opening «G».
Cleaning
• Do not use alcohol or any cleanig product containing alcohol because it can damage the cabinet.
• Use lukewarm water and neutral soap or bicarbonate of soda for cleaning the interior and the exterior of the appliance. Never use detergents nor
abrasive powders.
• Clean the black grill on the read of the appliance
(condeser), motor and the upper and downer ventilation slots with a brush or vacuum cleaner. This
way the performance of the appliance will improve
and energy consumption reduced.
• Clean the water container above the motor.
• Extract the base pulling it outwards in order to permit its cleaning.
Idle periods
During periods when the appliance is not in use take
the following precautions:
• Unplug the appliance.
• Remove all the food.
• Defrost and clean the interior and all accessories.
• Leave the door ajar to permit the air to circulate in
the interior and thus avoid unpleasant smells.
Maintenance
Page 7
27
Something not working
Some functioning problems may be due to causes which can easily be solved before calling the Network
Service. Follow theses instructions:
Problem Cause Solution
A) INTERNAL LIGHT
1. Inner light (Refrigerator • Appliance unplugged. • Plug the appliance into mains.
compartment) does not • No power at mains socket. • Chek the domestic
come on «H». instalación doméstica. automatic cutout.
• Bulb loose or burnt out. • Tighteen or substitute it fo
another of same rating.
• The temperature regulator is on • Change the regulator to another
“0” position position
B) PERFORMANCE
1. The freezer or the refrigerator • The appropiate «Temperature • Change to another position.
do not cool. Regulator» is in position «0».
2. The freezer or the refrigerator • Door not properly closed. • Close well.
do not cool enough. • The door has been opened • Avoid frecuent opening.
frecuently.
• Inadequate position of • Change position to a cooler one.
«Temperature Regulator».
• Food has been introduced • The appliance will get back
recently in large quantities. to normal, wait.
3. Food gets frozen in the • «Temperature Regulator» • Change position to less cold.
refrigerator. on inadequate position.
• Food touches the back walls • Bring food forwards.
4. The motor does not stop • Temperature regulator • Change position to less cold.
running: on inadequate position.
• Door not properly closed. • Close the door correctly.
• Door opened frequently. • Avoid frequent opening.
• Food has been put in • Wait for the appliance to come
recently in large quantity. back to normal.
C) WATER/ICE
1. Makes too much ice. • «Temperature Regulator» • Change position to less cold.
in inadequate position.
• Door not properly closed. • Close correctly.
• Escessive door opening. • Avoid frequent opening.
Page 8
28
2. Water in the lower part • Drain blocked • Clean duct «G».
of the Refrigerator.
3. Water in the vegetable box. • Wet vegetables have been • This is normal.
introduced.
4. The outside of the cabinet • High humidity level . • This is normal. It does not
steams up. in the room affect the performance.
of the appliance
D) DOORS
1. Door does not close. • The appliance is not • Level smooth.
properly levelled.
• Door has benn banged • Never bang the door.
too hard and bounces back.
• Food protudes. • Place food properly.
E) NOISES
• Appliance not properly levelled. • Level properly.
• Friction from back pipes. • Space well.
• Some fixing screw is loose. • Tihten the screw.
• Something inside is vibrating • Place correctly.
• Others. • See next page.
Normal noises when functioning
1. Temperature Regulator.
May cause cracking sounds when the system connects or disconnects.
2. Refrigerating system.
The injected cooling gas may produce a burbling sound while running through the tubes.
3. Compressor.
May cause zumbing noises and/or slight bumping.
4. Insulation.
The material used has a tendency to increase noises, but it does insulate perfectly and is of low energy
consumption.
Page 9
29
Guarantee, Service and Spare Parts
Together with the appliance you should receive an
instruction booklet like this together with:
• A guarantee card «Certificado de Garantia»
, with
the conditions of the guarantee printed on the back.
This documentation should always be at hand for
consulting. Should this appliance be sold or transfered to another user, make sure that this documentation stays with the appliance so the new owner can
be acquainted with the functioning of the appliance
and relevant warnigns.
Before calling the repairman
Read the user instruction and follow the advice and
directives given. In many cases, you will be able to
clarify any doubts yourself and thus avoid unnecessary service calls.
The preceding section entitled «If the appliance does
not perform correctly» includes suggestions for what
should be checked before a serviceman is called.
If, after the above check, there is still a fault call your
nearest Service Centre «Asistencia Tecnica».
Please make sure you give the model and serial
number of the appliance. This information can be
found on the data plate inside the cabinet.
Guarantee
According to the enclosed Guarantee registration
card.
Service and spare parts
Can be obtained from our service organization
«Asistencia tecnica».
Necessary Data to Our Spare Parts Service (see
rating plate)
Model: . . . . . . . . . . . . . . . . . . . . . . . . . . . . . . . . . . . . . . .
Product Number: . . . . . . . . . . . . . . . . . . . . . . . . . .
Serial Number: . . . . . . . . . . . . . . . . . . . . . . . . . . . . . . .
mm
Safey
Read the safety and warning texts at the begining of
the user instructions. The manufacturer is not reponsible for faults caused by the product being used
incorrectly or for purposes other than those specified
in the user instructions.
mm
Warning
Don’t use the fridge/freezer unit for storing explosive
gases or liquids, e.g. cigarette lighter gas, petrol
(gasoline), ether, acetone.
Tecnical Features
This appliance complies with the following CEE Directives:
– 73/23 CEE of 19/02/73 (low voltage directive) and subsequent modifications.
– 89/336 CEE del 03/05/89 (electromagnetic compatibility directive) and subsequent modifications.
DATA IN AGREEMENT WITH «UNE» REQUIREMENTS
Rising Time (h) 25 25
Dimensions in mm
height 1800 1800
width 695 695
depth 670 670
The reamaining data can be obtained from the rating plate located inside the fridge part.
 Loading...