

Page 1

ERA 39350 W
Fridge
Frigorifico
UUsseerr MMaannuuaall
MMaannuuaall ddee iinnssttrruuççõõeess
Page 2

2
electrolux
Welcome to the world of Electrolux
You’ve chosen a first class product from Electrolux, which hopefully will provide
you with lots of pleasure in the future. Electrolux ambition is to offer a wide variety
of quality products that would make your life even more comfortable. You can look
at some examples on the cover in this manual. But now it’s time to study this
manual and start using and enjoying the benefits from your new machine. We
promise that it’ll make your life a little easier. Good luck!
Page 3
electrolux
3
The following symbols are used in this manual:
Important information concerning your personal safety and information on
how to avoid damaging the appliance.
General information and tips
Environmental information
The symbol on the product or on its packaging indicates that this product
may not be treated as household waste. Instead it shall be handed over to the
applicable collection point for the recycling of electrical and electronic equipment.
By ensuring this product is disposed of correctly, you will help prevent potential
negative consequences for the environment and human health, which could
otherwise be caused by inappropriate waste handling of this product. For more
detailed information about recycling of this product, please contact your local city
office, your household waste disposal service or the shop where you purchased
the product.
Page 4

4
electrolux
CONTENTS
Safety IInformation 5
Use 88
Cleaning the interior 8
Control panel 8
Display 9
First switch on 9
Switching off 9
Temperature regulation 9
Functions Menu 10
Use of the fridge compartment 11
Holiday Function 11
Fresh food refrigeration 11
Movable shelves 12
Bottle rack 12
Positioning the door shelves 12
Air recycling 13
Hints 13
Hints for refrigeration 13
Maintenance 113
Periodic cleaning 14
Periods of non-operation 14
Interior light 14
Defrosting 14
Technical iinformation 15
Customer sservice aand sspare pparts 115
Installation 16
Location 16
Electrical connection 16
Shelf holders 17
Rear spacers 17
Door reversibility 17
Page 5

electrolux
5
SAFETY INFORMATION
It iis mmost iimportant tthat tthis
instruction bbook sshould bbe rretained
with tthe aappliance ffor ffuture rreference.
Should tthe aappliance bbe ssold oor
transferred tto aanother oowner, oor
should yyou mmove hhouse aand lleave tthe
appliance, aalways eensure tthat tthe
book iis ssupplied wwith tthe aappliance iin
order tthat tthe nnew oowner ccan bbe
acquainted wwith tthe ffunctioning oof tthe
appliance aand tthe rrelevant wwarnings.
If tthis aappliance ffeaturing mmagnetic
door sseals iis tto rreplace aan oolder
appliance hhaving aa sspring llock ((latch)
on tthe ddoor oor llid, bbe ssure tto mmake
that sspring llock uunusable bbefore yyou
discard tthe oold aappliance. TThis wwill
prevent iit ffrom bbecoming aa ddeath-ttrap
for aa cchild.
These wwarnings aare pprovided iin tthe
interest oof ssafety. YYou mmust rread tthem
carefully bbefore iinstalling oor uusing tthe
appliance.
General Safety
• This appliance is not intended for
use by persons (including children)
with reduced physical, sensory or
mental capabilities, or lack of
experience and knowledge, unless
they have been given supervision
or instruction concerning use of the
appliance by a person responsible
for their safety.
Children should be supervised to
ensure that they do not play with
the appliance.
• It is dangerous to alter the
specifications or modify this
product in any way.
• Before any cleaning or
maintenance work is carried out,
be sure to switch off and unplug
the appliance.
• This appliance is heavy. Care
should be taken when moving it
• Ice lollies can cause frost burns if
consumed straight from the
appliance.
•• Take uutmost ccare wwhen hhandling
your aappliance sso aas nnot tto ccause
any ddamages tto tthe ccooling uunit
with cconsequent ppossible ffluid
leakages.
• The aappliance mmust nnot bbe llocated
close tto rradiators oor ggas ccookers.
• Avoid pprolonged eexposure oof tthe
appliance tto ddirect ssunlight.
• There mmust bbe aadequate vventilation
round tthe bback oof tthe aappliance
and aany ddamage tto tthe rrefrigerant
circuit mmust bbe aavoided.
• For ffreezers oonly ((except bbuilt-iin
models): aan iideal llocation iis tthe
cellar oor bbasement.
• Do nnot uuse oother eelectrical
appliances ((such aas iice ccream
makers) iinside oof rrefrigerating
appliances.
Service/Repair
• Any electrical work required to
install this appliance should be
carried out by a qualified electrician
or competent person
• This product should be serviced by
an authorized Service Centre, and
only genuine spare parts should be
used.
Page 6

6
electrolux
• Under no circumstances should
you attempt to repair the appliance
yourself. Repairs carried out by
inexperienced persons may cause
injury or more serious
malfunctioning. Refer to your local
Service Centre, and always insist
on genuine spare parts.
• This appliance contains
hydrocarbons in its cooling unit;
maintenance and recharging must
therefore only be carried out by
authorized technicians.
Use
• The domestic refrigerators and
freezers are designed to be used
specifically for the storage of edible
foodstuffs only.
• Best performance is obtained with
ambient temperature between
+18°C and +43°C (class T); +18°C
and +38°C (class ST); +16°C and
+32°C (class N); +10°C and +32°C
(class SN). The class of your
appliance is shown on its rating
plate.
Warning:
when the ambient
temperature is not included within
the range indicated for the class of
this appliance, the following
instructions must be observed:
when the ambient temperature
drops below the minimum level, the
storage temperature in the freezer
compartment cannot be
guaranteed; therefore it is advisable
to use the food stored as soon as
possible.
• Frozen food must not be re-frozen
once it has been thawed out.
• Manufacturers’ storage
recommendations should be strictly
adhered to. Refer to relevant
instructions.
• The inner lining of the appliance
consists of channels through which
the refrigerant passes. If these
should be punctured this would
damage the appliance beyond
repair and cause food loss. DO
NOT USE SHARP INSTRUMENTS
to scrape off frost or ice. Frost may
be removed by using the scraper
provided. Under no circumstances
should solid ice be forced off the
liner. Solid ice should be allowed to
thaw when defrosting the
appliance.
• Do not place carbonated or fizzy
drinks in the freezer as it creates
pressure on the container, which
may cause it to explode, resulting
in damage to the appliance.Do not
use a mechanical device or any
artificial means to speed up the
thawing process other than those
recommended by the
manufacturer. Never use metal
objects for cleaning your appliance
as it may get damaged.
Installation
• During normal operation, the
condenser and compressor at the
back of the appliance heat up
considerably. For safety reasons,
minimum ventilation must be as
shown in the instructions.
Attention: kkeep vventilation oopenings
clear oof oobstruction.
Page 7

electrolux
7
• Care must be taken to ensure that
the appliance does not stand on
the electrical supply cable.
Important:
if the supply cord is
damaged, it must be replaced by a
special cord or assembly availa-ble
from the manufacturer or its service
agent.
• If the appliance is transported
horizontally, it is possible that the
oil contained in the compressor
flows in the refrigerant circuit. It is
advisable to wait at least two hours
before connecting the appliance to
allow the oil to flow back in the
compressor.
• There are working parts in this
product which heat up. Always
ensure that there is adequate
ventilation as a failure to do this will
result in component failure and
possible food loss. See installation
instructions.
• Parts which heat up should not be
exposed. Wherever possible the
back of the product should be
against a wall.
Environment
Protection
This aappliance ddoes nnot ccontain
gasses wwhich ccould ddamage tthe oozone
layer, iin eeither iits rrefrigerant ccircuit oor
insulation mmaterials. TThe aappliance
shall nnot bbe ddiscarded ttogether wwith
the uurban rrefuse aand rrubbish. AAvoid
damaging tthe ccooling uunit, eespecially
at tthe rrear nnear tthe hheat eexchanger.
Information oon yyour llocal ddisposal ssites
may bbe oobtained ffrom mmunicipal
authorities. TThe mmaterials uused oon tthis
appliance mmarked bby tthe ssymbol
are rrecyclable.
Page 8
8
electrolux
USE
Cleaning the interior
Before using the appliance for the first
time, wash the interior and all internal
accessories with luke-warm water and
some neutral soap so as to remove
the typical smell of a brand-new
product, then dry thoroughly.
Do nnot uuse ddetergents oor
abrasive ppowders, aas tthese wwill
damage tthe ffinish.
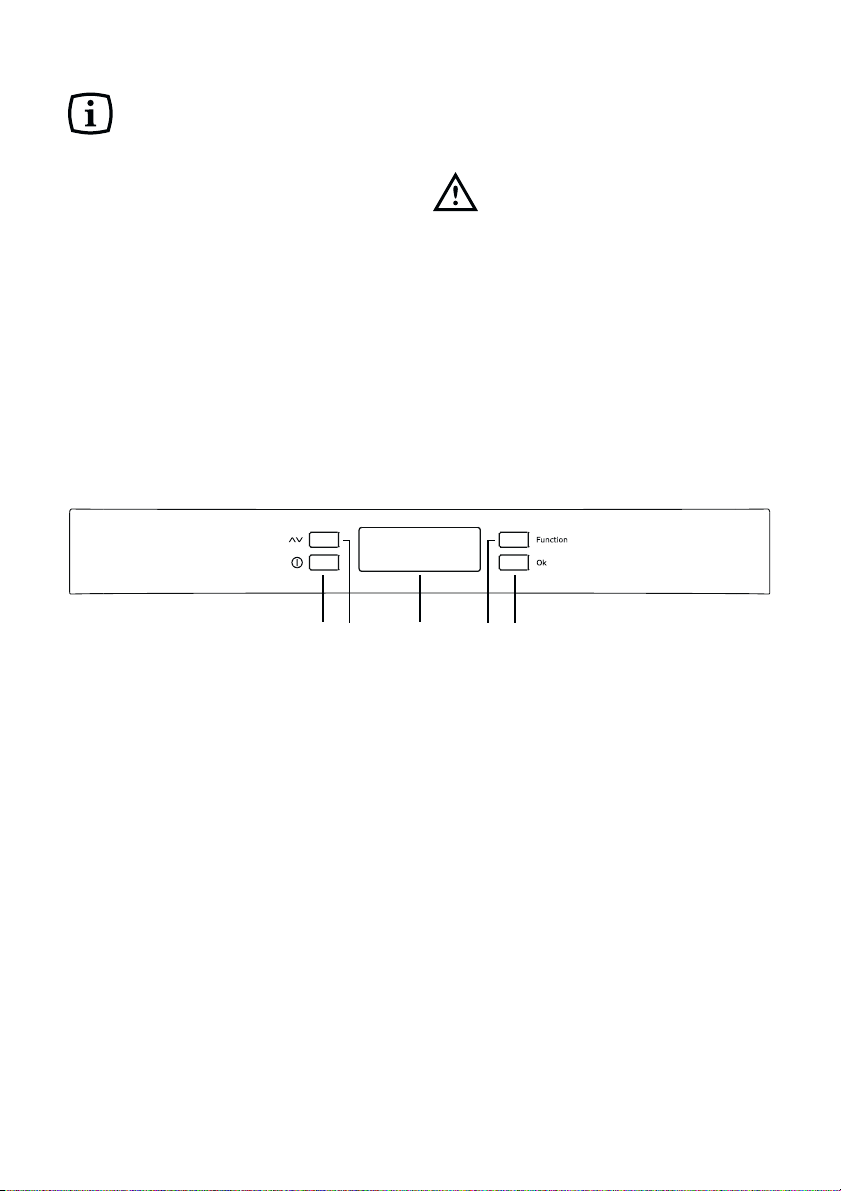
Control panel
A - Appliance button ON/OFF
B - Temperature regulation button
C - Temperature and function indicator
D - Function button
E - Confirmation button
A
B
C
D
E
Page 9
electrolux
9
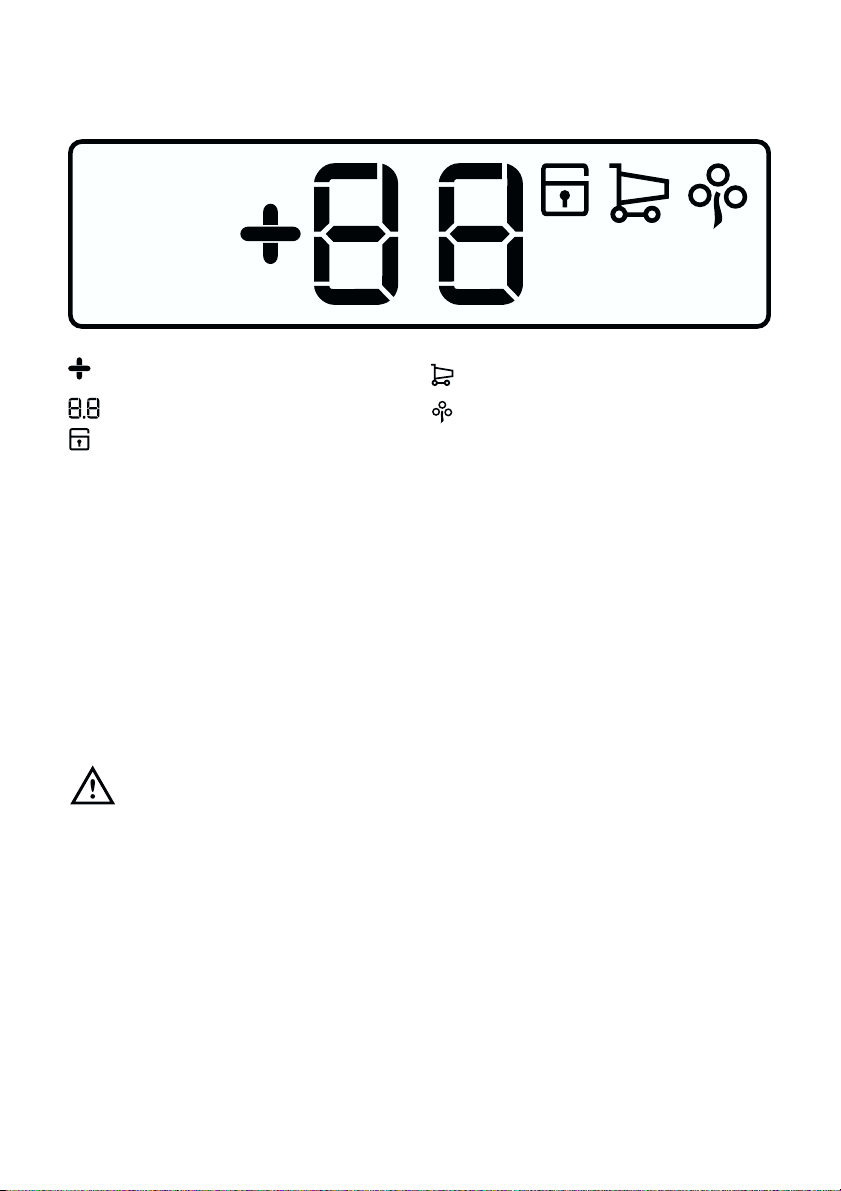
Display
Positive Temperature indicator
Temperature indicator
If on the Child Lock function is on
If on the Shopping function is on
If on the Eco Mode function is on
First switch on
After plugging the plug into the power
outlet, if the display is not illuminated,
press key (A), appliance on.
For a correct storage of the food select
the Eco Mode function that guarantee
the following temperature is set:
+5°C in the fridge
• To select a different temperature
see "Temperature regulation".
Important
If the door remains ajar for some
minutes, the internal
lighting will turn off electronically; after
this, the lighting function will be reset
by closing and opening the door itself.
Switching off
The appliance is shut off by pressing
key (A) for more than 1 second. During
this, a countdown of the temperature
from -3 -2 -1 will be shown.
Temperature regulation
The temperature may be regulated by
pressing the key B.
By pressing the key B the current
temperature setting flashes on the
indicator and by pressing the key B
again it is possible to change it.
You confirm the choice of the
temperature either by pressing the key
E, (you will hear the buzzer) or by
waiting for some seconds (you will not
hear the buzzer).
Then the indicator shows again the
inside compartment temperature.
The newly selected-temperature must
be reached after 24 hours.
After a long period out of use it is not
necessary to set again the temperature
because it remains stored.
Page 10
10
electrolux
Attention!
During the stability period by the first
starting the temperature displayed can
not correspond to the setting
temperature. During this time it is
possible that the temperature
displayed is different than the setting
temperature.
Functions Menu
By activating the key D the functions
menu is operating.
Each function could be confirmed by
pressing button E. If there is no
confirmation after some seconds the
display will go out from the menu and
return in normal condition.
The following functions are indicated:
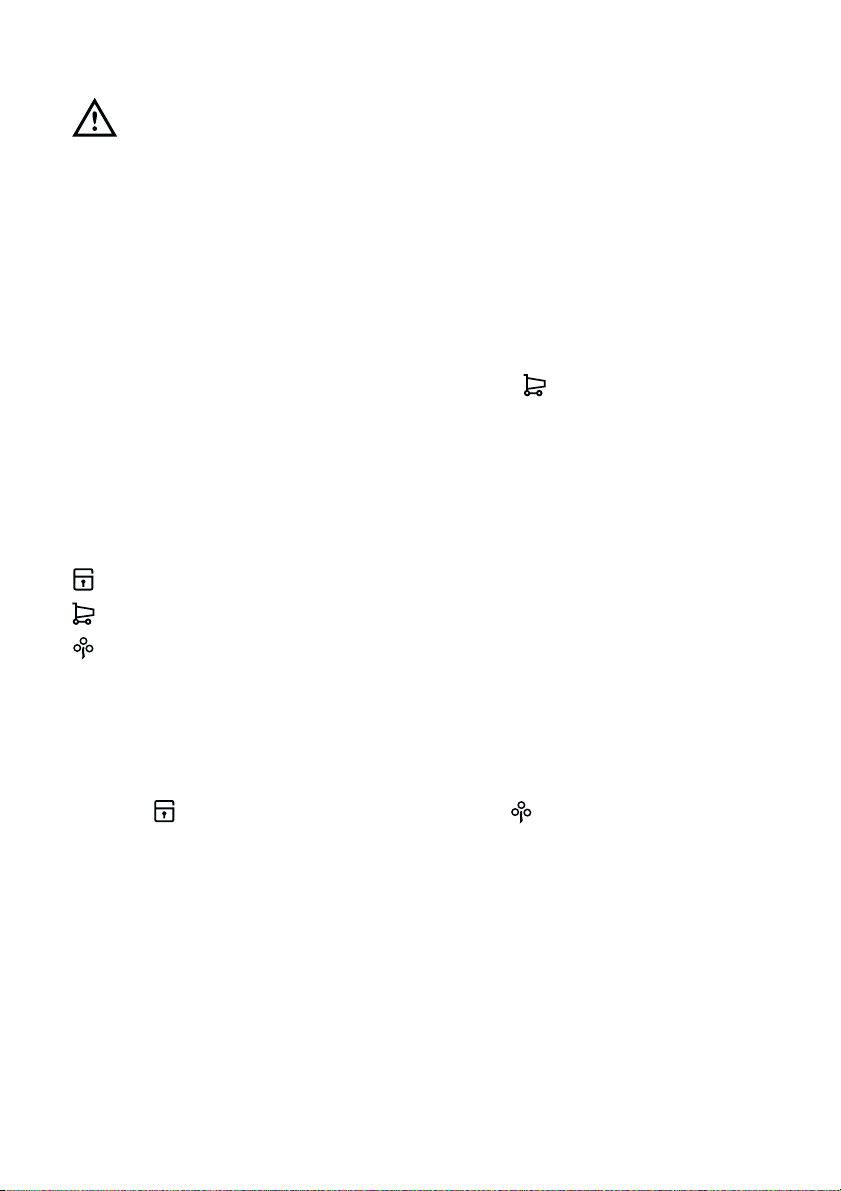
Child Lock function
Shopping function
Eco Mode function
Child Lock Function
The Child Lock function is activated by
pressing key D (several times if
necessary) until the corresponding icon
appears .
You must confirm the choice by
pressing key E within few seconds.
You will hear the buzzer and the icon
remains lighted.
In this condition any possible operation
through the keys does not cause any
change as long as this function is
activated.
It is possible to de-activate the
function at any time by pressing key D
until the corresponding icon will flash
and then key E.
Shopping Function
If you need to insert a large amount of
warm food, for example after doing the
grocery shopping, we suggest
activating the Shopping function to
chill the products more rapidly and to
avoid warming the other food which is
already in the refrigerator.
The Shopping function is activated by
pressing key D (several times if
necessary) until the corresponding icon
appears .
You must confirm the choise by
pressing key E within few seconds.
You will hear the buzzer and the icon
remains lighted.
The Shopping function shuts off
automatically after approximately 6
hours.
It is possible to de-activate the
function at any time by pressing key D
until the corresponding icon will flash
and then key E.
Eco Mode Function
The Eco Mode function is activated by
pressing key D (several times if
necessary) until the corresponding icon
appears (or setting the temperature
at +5°C).
You must confirm the choice by
pressing key E within few seconds.
You will hear the buzzer and the icon
remains lighted.
In this condition the chosen
temperatures are automatically set (+
5°C), in the best conditions for storing
food.
It is possible to de-activate the
function at any time by changing the
selected temperature in the
compartment.
Page 11
electrolux
11
Now the refrigerator is in the Holiday
function in the energy- saving mode
and the indicator shows the letter H.
It is possible to de-activate the function
at any time by changing the selected
temperature in the compartment.
Attention!
The fridge compartment must be
empty with Holiday function on.
Fresh food refrigeration
To obtain the best performance:
• do not store warm food or
evaporating liquids in the
refrigerator;
• do cover or wrap the food,
particularly if it has a strong flavour.
• Position food so that air can
circulate freely round it.
Use of the fridge
compartment
The temperature of this compartment
may be regulated between +2°C and
+8°C.
During normal functioning the indicator
shows the temperature inside the
fridge.
Attention!
Difference between the temperature
displayed and temperature setting is
normal. Especially when:
• a new setting has recently been
selected
• the door has been left open for a
long time
• warm food has been placed in the
compartment.
Holiday Function “H”
The Holiday function sets the
temperature at + 15°C.
This function allows you to keep the
refrigerator shut and empty during a
long holiday period ( e. g. the summer
holidays) without the formation of a
bad smell.
The Holiday Function H may be
regulated by pressing the key B. By
pressing the key B the current
temperature setting flashes on the
indicator. Press the key B again. When
on the display appears the letter H
confirm the choice of the temperature
or by pressing the key E, (you will hear
the buzzer) or by waiting for some
seconds (you will not hear the buzzer).
Page 12

12
electrolux
Movable shelves
The walls of the refrigerator are
equipped with a series of runners so
that the shelves can be positioned as
desired.
Bottle rack
Place bottles in the rack with the
bottleneck to the front.
Important: Only store unopened
bottles horizontally.
The bottle rack can be tilted for storing
opened bottles.
To do this pull the bottle rack forward
until it can be tilted upwards, then
slide the front support into the next
level up.
Positioning the door
shelves
To permit storage of food packages of
various sizes, the door shelves can be
placed at different heights.
To make these adjustments proceed
as follows: Gradually pull the shelf in
the direction of the arrows until it
comes free, then reposition as
required.
D338
Page 13

electrolux
13
Air recycling
The refrigerator compartment is
equipped with a device which can be
turned on with the switch ( A- see fig.).
The green light, when on, means that
the fan is working.
It is suggested that the device be
used when the ambient temperature
exceeds 25°C .
This device allows for rapid cooling of
foods and a more uniform temperature
in the compartment.
HINTS
Hints for refrigeration
Useful hints:
Meat ((all ttypes):
wrap in polythene
bags and place on the glass shelf
above the vegetable drawer.
For ssafety, sstore iin tthis wway oonly oone
or ttwo ddays aat tthe mmost.
Cooked ffoods, ccold ddishes, eetc..:
these should be covered and may be
placed on any shelf.
Fruit aand vvegetables:
these should be
thoroughly cleaned and placed in the
special drawer(s) provided.
Butter aand ccheese:
these should be
placed in special airtight containers or
wrapped in aluminium foil or polythene
bags to exclude as much air as
possible.
Milk bbottles:
these should have a cap
and should be stored in the bottle rack
on the door.
Bananas, ppotatoes, oonions aand ggarlic,
if nnot ppacked, mmust nnot bbe kkept iin tthe
refrigerator.
MAINTENANCE
Unplug tthe aappliance bbefore
carrying oout aany mmaintenance
operation.
Warning
This aappliance ccontains
hydrocarbons iin iits ccooling uunit;
maintenance aand rrecharging mmust
therefore oonly bbe ccarried oout bby
authorized ttechnicians.
A
Page 14

14
electrolux
Periodic cleaning
Many pproprietary kkitchen ssurface
cleaners ccontain cchemicals tthat ccan
attack/damage tthe pplastics uused iin
this aappliance. FFor tthis rreason iit iis
recommended tthat tthe oouter ccasing oof
this aappliance iis oonly ccleaned wwith
warm wwater wwith aa llittle wwashing-uup
liquid aadded.
Clean the inside with warm water and
bicarbonate of soda.
Rinse and dry thoroughly.
Clean the condenser (black grill) and
the compressor at the back of the
appliance with a brush or a vacuum
cleaner. This operation will improve the
performance of the appliance and
save electricity consumption.
Periods of non-operation
When the appliance is not in use for
long periods, take the following
precautions:
• remove the plug from the wall socket;
• remove all food;
• defrost and clean the interior and
all accessories;
• leave the door ajar to allow air to
circulate to prevent unpleasant smells.
Interior light
If it becomes necessary to replace the
lamp, press on the rear hook and at the
same time slide the cover in the
direction indicated by the arrow.
Attention
Replace the lamp with one of the
same power (the maximum power is
shown on the light diffuser).
Defrosting
Frost is automatically eliminated from
the evaporator of the refrigerator
compartment every time the motor
compressor stops, during normal use.
The defrost water drains out through a
trough into a special container at the
back of the appliance, over the motor
compressor, where it evaporates.
It iis iimportant tto pperiodically cclean tthe
defrost wwater ddrain hhole iin tthe mmiddle
of tthe rrefrigerator ccompartment
channel tto pprevent tthe wwater
overflowing aand ddripping oonto tthe ffood
inside. UUse tthe sspecial ccleaner
provided, wwhich yyou wwill ffind aalready
inserted iinto tthe ddrain hhole.
D037
Page 15

electrolux
15
CUSTOMER SERVICE
AND SPARE PARTS
If the appliance is not functioning
properly, check that:
• the plug is firmly in the wall socket
and the mains power switch is on;
• there is an electricity supply (find
out by plugging in another
appliance);
• If there are water drops on the
bottom of the cabinet, check that
the defrost water drain opening is
not obstructed (see “Defrosting”
section).
• If your appliance is still not working
properly after making the above
checks, contact the nearest service
centre.
To oobtain ffast sservice, iit iis eessential
that wwhen yyou aapply ffor iit yyou sspecify
the mmodel aand sserial nnumber oof yyour
appliance wwhich ccan bbe ffound oon tthe
guarantee ccertificate oor oon tthe rrating
plate llocated iinside tthe aappliance, oon
the bbottom lleft-hhand sside.
TECHNICAL INFORMATION
378
0,403
147
1800
600
650
Net Fridge Capacity lt.
Energy Consumption kWh/year
Dimensions mm
High
Energy Consumption kWh/24h
Width
Depth
The technical infomation are situated in the rating plate on the internal left side of
the appliance.
Page 16

16
electrolux
INSTALLATION
Location
The appliance should be installed well
away from sources of heat such as
radiators, boilers, direct sunlight etc.
Ensure that air can circulate freely
around the back of the cabinet. To
ensure best performance, if the
appliance is positioned below an
overhanging wall unit, the minimum
distance between the top of the
cabinet and the wall unit must be at
least 100 mm . Ideally, however, the
appliance should not be positioned
below overhanging wall units. Accurate
levelling is ensured by one or more
adjustable feet at the base of the
cabinet.
Attention
It must be possible to disconnect the
appliance from the mains power
supply; the plug must therefore be
easily accessible after installation.
Electrical connection
Before plugging in, ensure that the
voltage and frequency shown on the
serial number plate correspond to your
domestic power supply. Voltage can
vary by ±6% of the rated voltage.
For operation with different voltages, a
suitably sized auto-transformer must
be used.
The aappliance mmust bbe eearthed.
The power supply cable plug is provided
with a contact for this purpose.
If the domestic power supply socket is
not earthed, connect the appliance to
a separate earth in compliance with
current regulations, consulting a
specialist technician.
The MManufacturer ddeclines aall
responsibility iif tthe aabove ssafety
precautions aare nnot oobserved.
This appliance complies with
the following E.E.C. Directives:
•
87/308 EEEC
of 2/6/87 relative to
radio interference suppression.
•
73/23 EEEC
of 19.2.73 (Low Voltage
Directive) and subsequent
modifications;
•
89/336 EEEC
of 3.5.89
(Electromagnetic Compatibility
Directive) and subsequent
modifications.
100 mm10 mm
10 mm
NP00
Page 17

electrolux
17
Shelf holders
Your appliance is equipped with shelf
retainers that make it possible to
secure the shelves during
transportation.
To remove them proceed as follows:
Move the shelf holders in the direction
of the arrow, raise the shelf from the
rear and push it forward until it is freed
and remove the retainers.
Rear spacers
In tthe aappliance, tthere aare ttwo sspacers
which mmust bbe ffitted aas sshown iin tthe
figure ..
Slacken the screws and insert the
spacer under the screw head, then retighten the screws.
Door reversibility
Before carrying out any operations,
remove the plug from the power socket.
To change the opening direction of the
door, proceed as follows:
• To carry out the following operations,
we suggest that this be made with
another person that will keep a firm
hold on the door of the appliance
during the operations.
• Open the door with the appliance in
the upright position. Unscrew the
screws and remove the upper door
plastic trim.
• Remove the little plastic cover from
the door plastic trim and refit on the
opposite side (d).
• Lay down the appliance back side
down.
• Remove the screw of the hinge cover
plug (a).
• Unscrew the upper hinge and remove
it (b).
• Unscrew the screw and remove the
door stopper (c).
• Remove the door.
A
B
C
Page 18

18
electrolux
• Remove using a tool the cover (e)
unscrew the lower hinge pivot (f)
and place it on the opposite side.
• Reinsert the cover (e) on the
opposite side.
• Reinsert the door .
• Pay attention that the front board of
the door is parallel to the front
board of the top.
• Fix the door stopper on the
opposite side.
• Position and fix the upper hinge (that
can be found in the instruction for use
bag) on the opposite side .
• Fix the screw of the new cover hinge
(that can be found in the instruction for
use bag).
a
b
c
• Lift up the appliance to vertical position.
• Open the door and reposition the
upper door plastic trim with screws.
• Fix the handle on the opposite side.
Reposition, level the appliance,
wait for at least two hours and
then connect it to the power socket.
In case you do not want to carry out
the above mentioned operations,
contact the nearest After Sales Service
Force. The After Sales Service
specialist will carry out the reversibility
of the doors at your cost.
Warning
After hhaving rreversed tthe
opening ddirection oof tthe ddoor check
that aall tthe sscrews aare pproperly
tightened aand tthat tthe mmagnetic sseal
adheres tto tthe ccabinet.
If tthe aambient ttemperature iis ccold ((i.e.
in WWinter), tthe ggasket mmay nnot ffit
perfectly tto tthe ccabinet. IIn tthat ccase,
wait ffor tthe nnatural ffitting oof tthe ggasket
or aaccelerate tthis pprocess bby hheating
up tthe ppart iinvolved wwith aa nnormal
hairdrier. LLay ddown tthe aappliance bback
side ddown
.
Page 19

electrolux
19
Bem-vindo ao mundo Electrolux
Obrigado por ter escolhido adquirir um produto de primeira classe da Electrolux,
que esperamos lhe traga muito prazer no futuro. A ambição da Electrolux é
oferecer uma vasta variedade de produtos de qualidade que tornem a sua vida
ainda mais confortável. Pode encontrar alguns exemplos na capa deste manual.
Tire alguns minutos para estudar este manual para que possa começar a tirar
partido dos benefícios do seu novo aparelho. Nós prometemos que lhe irá
proporcionar uma experiência superior e confortante como utilizador. Boa sorte!
Page 20

20
electrolux
Os símbolos que se seguem são utilizados neste manual
Informações importantes relativas à segurança pessoal e como evitar
danos no aparelho
Informações gerais e sugestões
Informações ambientais
O símbolo no produto ou na embalagem indica que este produto não pode
ser tratado como lixo doméstico. Em vez disso, deve ser entregue ao centro de
recolha selectiva para a reciclagem de equipamento eléctrico e electrónico.
Ao garantir uma eliminação adequada deste produto, irá ajudar a evitar eventuais
consequências negativas para o meio ambiente e para a saúde pública, que, de
outra forma, poderiam ser provocadas por um tratamento incorrecto do produto.
Para obter informações mais pormenorizadas sobre a reciclagem deste produto,
contacte os serviços municipalizados locais, o centro de recolha selectiva da sua
área de residência ou o estabelecimento onde adquiriu o produto.
Page 21

electrolux
21
ÍNDICES
Advertências ee cconselhos
importantes 22
Uso ee ffuncionamiento 25
Limpeza das partes internas 25
Painel de comandos 25
Display 25
Primeira Utilização do Aparelho 26
Desligar o Aparelho 26
Regulação de Temperatura 26
Funções do Menu 26
Utilização do compartimento
frigorífico 27
Função Holiday 28
Refrigeração dos alimentos 28
Prateleiras amovíveis 29
Prateleira para garrafas 29
Colocação das preteleiras da porta 29
Recirculação de ar 30
Conselhos 30
Conselhos para a refrigeração 30
Manutenção 30
Limpeza periódica 30
Paragem prolongada 31
Lâmpada de iluminação 31
Descongelação 31
Dados TTécnicos 32
Assistência ttécnica ee ppeças dde
substsuição 32
Instalação 33
Colocação 33
Ligação eléctrica 33
Fixadores para prateleiras 34
Espaçadores posteriores 34
Reversibilidade da porta 34
Page 22

22
electrolux
ADVERTÊNCIAS E
CONSELHOS
IMPORTANTES
É mmuito iimportante qque eeste mmanual
de uutilização aacompanhe oo aaparelho
para ggarantir uuma ffutura uutilização
correcta. SSe oo aaparelho ffor vvendido oou
emprestado aa uuma ooutra ppessoa, oo
manual dde uutilização ddeve, ccomo
acima sse ffaz nnotar, aacompanhá-llo, dde
maneira qque oo uutilizador ppossa sser
informado ddo sseu ffuncionamento, ddas
advertências ee cconselhos. SSe eeste
aparelho, mmunido dde ffecho mmagnético,
veio ssubstituir uum ooutro qque ttinha
portas ccom ffecho dde mmola,
aconselhamos aa iinutilizar eeste ffecho,
antes ddo aaparelho sser pposto
definitivamente dde llado. EEsta
precaução pprocura eevitar qque
crianças, bbrincando, sse ppossam ffechar
no aaparelho oo qque sseria aaltamente
perigoso.
Essas aadvertências ttêm ppor ffim
garantir aa ssegurança ddos uutilizadores.
Agradecemos, pportanto, qque lleia oo
manual aatentamente, aantes dde iinstalar
e uutilizar oo aaparelho.
Segurança
• Este aparelho não se destina a ser
utilizado por pessoas (incluindo
crianças) com capacidades mentais,
sensoriais e físicas reduzidas, ou com
falta de experiência e conhecimento, a
não ser que sejam supervisionadas ou
recebam instruções relativamente à
utilização do aparelho, por parte de
uma pessoa responsável pela sua
segurança.
As crianças devem ser
supervisionadas para garantir que não
brincam com o electrodoméstico.
• É perigoso modificar ou tentar
modificar as características deste
aparelho.
• Este aparelho é pesado. Tenha o
maior cuidado quando o deslocar
• Não consuma certos produtos, tais
como gelados, imediatamente
após terem saído do aparelho; a
temperatura muito baixa a que se
encontram pode provocar
queimaduras.
• Este aaparelho ccontém
hidrocarbonetos nno ccircuito
refrigerante; pportanto, aa
manutenção ee aa rrecarga ddevem
ser eefectuadas eexclusivamente ppor
pessoal aautorizado ppelo pprodutor.
• Preste aa mmáxima aatenção aao
deslocar oo aaparelho, ppara nnão
danificar aas ppartes ddo ccircuito
refrigerante, eevitando aassim
possíveis ssaídas dde ffluido.
• O aaparelho nnão ddeve sser iinstalado
perto dde eelementos dde
aquecimento oou ffogões dde ggás.
• Evite aa eexposição pprolongada ddo
aparelho aaos rraios ddo ssol.
• A pparte dde ttrás ddo aaparelho ddeve
receber uuma ssuficiente vventilação ee
deve sser eevitado qqualquer ddano aao
circuito rrefrigerante.
• Somente ppara oos ccongeladores
(excepto oos dde eencaixe): aa mmelhor
colocação éé nna ccave.
Assistência
• Se uma eventual modificação da
instalação eléctrica, na casa do
utilizador, tiver de ser feita para tornar
Page 23

electrolux
23
possível a instalação do aparelho,
deve, esta, ser efectuada por pessoal
qualificado.
• Este aparelho deve ser assistido
por um Centro de Assistência
autorizado, sendo apenas
aplicadas peças de origem.
• Em caso de avaria, não tente você
mesmo, reparar o aparelho. As
reparações executadas por
pessoas inexperientes, podem
causar danos físicos e mate-riais
(aumentando as avarias a serem
reparadas). Faça apelo ao seu
Centro de Assistência mais
próximo e insista em peças
genuínas.
Utilização
• Os frigoríficos e/ou congeladores
domésticos destinam-se,
unicamente, à conservação e/ou
congelação de alimentos.
• Os melhores rendimentos são
conseguidos com temperaturas
ambiente incluídas entre +18°C e
+43°C (Classe T); +18°C e +38°C
(Classe ST); +16°C e +32°C
(Classe N); +10°C e +32°C (Classe
SN); a classe a que pertence o
aparelho é indicada na placa de
matrícula (posta na cela ao lado do
compartimento dos legumes).
Atenção: com temperaturas
ambiente não incluídas nas
indicadas para a classe climática a
que pertence o produto, é preciso
cumprir as indicações seguintes:
quando a temperatura ambiente
descer abaixo do valor mínimo,
pode não ser garantida a
temperatura de conservação no
compartimento congelador;
portanto, aconselha-se a
consumar rapidamente os
alimentos nele contidos.
• Um produto descongelado não
deve, em nenhum caso, voltar a
ser congelado.
• Siga as indicações do fabricante
para a conservação e/ou
congelação dos alimentos.
• O revestimento interior do aparelho
em composto de pequenos tubos
por onde passa o refrigerante. Se
estes tubos forem danificados o
aparelho ficará irremediavelmente
avariado, provocando a perda dos
alimentos no seu interior. NÃO
UTILIZE OBJECTOS
PONTEAGUDOS para raspar o gelo
acumulado. Esse gelo pode ser
raspado utilizando a espátula que é
fornecida com o aparelho. Para
eliminar grandes quantidades de gelo
acumulado, é aconselhável deixá-lo
derreter. Veja as instruções para a
descongelação.
• Não coloque no
compartimento/congelador a baixa
temperatura, garrafas ou latas com
bebidas gaseificadas dado que se
cria uma pressão elevada no interior
da garrafa e/ou lata havendo o perigo
de este explodir. Desta explosão
resultariam danos graves para o
aparelho.
Page 24

24
electrolux
Instalação
• Durante o normal funcionamento o
condensador e o compressor,
colocados na parte de trás do
aparelho, aquecem sensivelmente.
Por razões de segurança a
ventilação deve ser como indicado
na respectiva Figura.
Atenção: mmantenha aas aaberturas
para aa vventilação llivres dde qqualquer
obstrução.
• O aparelho aquece, sensivelmente,
ao nível do con-densador e do
compressor. Certifique-se que o ar
circula, livremente, à volta do
aparelho. Uma ventila-ção
insuficiente ocasionaria um mau
funcionamen-to, danos para o
aparelho e perda dos alimentos no
seu interior. Siga as instruções
para a correcta instalação do
aparelho.
• Assegure-se, quando instalar o
aparelho, que este não repousa
sobre o cabo de alimentação
eléctrica.
Importante:
se o cabo de
alimentação se danificar, deverá ser
substituído por um cabo especial ou
por um conjunto, disponíveis junto do
construtor ou do serviço de
assistência técnica.
• Os componentes do aparelho que
aquecem devido ao seu
funcionamento não devem estar
expostos. Sempre que possível as
costas do aparelho devem ficar
encostadas a uma parede
• Desligue sempre a tomada de
corrente antes de proceder à limpeza
ou qualquer operação de
manutenção do aparelho.
• Ao transportar o aparelho na
horizontal, pode acontecer que o óleo
contido no compressor escorra para
o circuito refrigerante. É portanto
aconselhável esperar pelo menos
duas horas antes de ligar o aparelho
à corrente.
Protecão do
ambiente
Este aaparelho nnão ccontem, nno sseu
circuito rrefrigerante ee nnas ssuas
matérias iisolantes, ggases nnocivos àà
camada dde oozono.Mesmo aassim eeste
aparelho ddeve, qquando ffor
destruido,receber oos ccuidados
convenientes, dde aacordo ccom aas
disposições eem vvigor ppara aa pprotecção
do mmelo aambiente. OOs mmateriais
utilizados nneste aaparelho, mmarcados
com oo ssimbolo ssão rreciclàveis.
Page 25

electrolux
25
USO E
FUNCIONAMIENTO
Limpeza das partes
internas
Estando o aparelho convenientemente
instalado, antes de o utilizar,
aconselhamos a sua limpeza
cuidadosa com água tépida e sabão
neutro para retirar o cheiro
característico do “novo”.
Não uutilize ddetergentes oou ppós
abrasivos, qque ppodem ddanificar
os aacabamentos. EEnxague ee
seque ccuidadosamente.
Painel de comandos
A
B
C
D
E
Display
Indicador de temperatura positiva
Indicador da temperatura (dígitos)
Se ligado, indica que está activa
a função Child Lock
Se ligado, indica que está activa a
função Shopping
Se ligado, indica que está activa a
função Eco Mode
A - Tecla para ligar/desligar o aparelho
B - Tecla de regulação de temperatura
C - Display de exibição temperaturas
e funções
D - Tecla de activação das funções
E - Tecla de confirmação
Page 26

26
electrolux
Primeira Utilização
do Aparelho
Após ter introduzido a ficha na tomada
de corrente, se o écrã não se iluminar
carregue na tecla (A).
Para um correcto armazenamento dos
alimentos seleccione a Função Eco
Mode que garante a seguinte
temperatura:
cerca de +5°C no frigorífico.
• Para seleccionar uma temperatura
diferente veja a secção "Regulação
de Temperatura".
Importante
Se a porta permanecer entreaberta por
mais de 7 minutos, a luz interna
desligar-se-á utomaticamente.
A função de luz interna será restaurada
abrindo e fechando a porta do frigorífico.
Desligar o Aparelho
Para desligar o aparelho prima a tecla
(A) durante mais de 1 segundo.
Será iniciada uma contagem decrescente
da temperatura de -3 -2 -1 .
Regulação de
Temperatura
A temperatura pode ser regulada
pressionando a tecla (B).
Pressionando a tecla (B), a
temperatura configurada aparece a
piscar no display.
Para confirmar a temperatura
pretendida, pressione a tecla (E),
(ouvirá o sinal sonoro) ou aguarde
durante alguns segundos (não ouvirá o
sinal sonoro).
Depois o display volta a indicar a
temperatura interna do compartimento.
A temperatura programada será
atingida em 24h.
Após um longo período sem utilização
não será necessário ajustar novamente
a temperatura pois esta fica em
memória.
Atenção!
Durante o período de estabilização na
primeira colocação em função, a
temperatura visualizada pode não
corresponder à temperatura
configurada. Durante este período é
possível que a temperatura visualizada
seja diferente da temperatura
configurada.
Funções do Menu
Pressionando a tecla (D) acciona as
funções do Menu. Cada função pode
ser confirmada pressionando a tecla (E).
Se não carregar na tecla (E), após
alguns segundos, o display volta ao
ecrã/informação anterior
As seguintes funções são indicadas:
Função Child Lock
Função Shopping
Função Eco Mode
Page 27

electrolux
27
Função Child Lock
A função Child Lock é activada
carregando na tecla (D) até aparecer o
símbolo correspondente .
Deverá confirmar a sua escolha
pressionando a tecla (E) por alguns
segundos.
Irá ouvir um sinal sonoro e o símbolo
permanece ligado.
Com esta função activada não será
possível fazer alterações nas
definições programadas anteriormente.
É possível desactivar a função a
qualquer momento carregando a tecla
(D) até o símbolo começar a piscar
e depois pressionando a tecla (E).
Função Shopping
Se necessitar de colocar uma grande
quantidade de alimentos
quentes/mornos, por exemplo, depois
de estes terem sido comprados,
sugerimos que active a função
Shopping para refrigerar mais
rapidamente evitando assim que os
alimentos que acabou de colocar
dentro do seu aparelho aqueçam os
que já lá estavam anteriormente frescos.
A função Shopping é activada
carregando na tecla (D) até aparecer o
símbolo correspondente .
Deverá confirmar a sua escolha
pressionando a tecla (E) por alguns
segundos.
Irá ouvir um sinal sonoro e o símbolo
permanece ligado.
Esta função desliga-se
automaticamente após 6 horas.
É possível desactivar a função a
qualquer momento carregando a tecla
(D) até o símbolo começar a piscar
e depois pressionando a tecla (E).
Função Eco Mode
A função Eco Mode é activada
carregando na tecla (D) até aparecer o
símbolo correspondente (or
ajustando a temperatura para +5°C).
Deverá confirmar a sua escolha
pressionando a tecla (E) por alguns
segundos.
Irá ouvir um sinal sonoro e o símbolo
permanece ligado.
Nesta função as temperatures são
definidas automaticamente (+ 5°C),
mantendo as melhores condições de
conservação dos alimentos.
É possível desactivar a função a qualquer
momento alterando a temperatura
seleccionada no compartimento.
Utilização do
compartimento frigorífico
A temperatura do frigorífico pode ser
configurada entre +2°C e +8°C.
Durante o funcionamento normal é
visualizada a temperatura do
compartimento frigorífico.
Atenção!
É normal ter uma diferença entre a
temperatura visualizada e aquela
configurada. Sobretudo quando:
• foi recentemente alterada a
temperatura configurada
• a porta foi mantida aberta por
muito tempo
• foram introduzidos alimentos
quentes.
Page 28

28
electrolux
Refrigeração dos
alimentos
Para obter um melhor rendimento do
seu aparelho:
• reparta as provisões de maneira a
que o ar possa circular, facilmente,
à volta delas;
• não introduza, na caixa, alimentos
ainda quentes ou líquidos em
evaporação;
• cubra os alimentos, de especial
modo se são aromáticos.
Função Holiday “H”
No regime de férias, a temperatura
TEÓRICA do frigorífico é regulada para
+ 15 °C. Este regime
permite- lhe deixar o frigorífico vazio
fechado, em vez de aberto, - sem que
se verifique uma formação de cheiros
ou de bolor - durante uma ausência
mais prolongada ( p. ex. férias) .
Vantagem: a porta não poderá, assim,
fechar- se acidentalmente ou ser
fechada, por descuido, por pessoas
que tenham eventualmente acesso à
casa, durante a sua ausência. Sem o
regime de férias, isso daria origem à
formação de cheiros e de bolor.
A função Holiday H pode ser ajustada
premindo a tecla B. Ao premir a tecla
B, a actual definição de temperatura
pisca no indicador. Prima novamente a
tecla B. Quando no visor for
apresentada a letra H, confirme a
escolha da temperatura premindo a
tecla E (ouvirá o aviso sonoro) ou
aguarde alguns segundos (não ouvirá
o aviso sonoro).
O frigorífico está agora na função
Holiday no modo de poupança de
energia e o indicador apresenta a letra
H.
É possível desactivar a função a
qualquer altura mudando a
temperatura seleccionada no
compartimento.
Atenção!
Não coloque produtos no frigorífico
enquanto ele estiver a funcionar no
regime de férias.
Page 29

electrolux
29
Prateleiras amovíveis
Nas paredes do compartimento há
calhas que permitem colocar as
prateleiras a diferentes alturas.
Prateleira para garrafas
Colocar as garrafas da prateleira com
a boca para frente.
Atenção: Só guardar deitadas garrafas
que ainda não tenham sido abertas.
Para guardar garrafas já abertas, a
prateleira para garrafas pode ser
colocada na posição inclinada.
Para tal, puxe a prateleira para
garrafas para frente, até que seja
possível levantá-la. Em seguida,
colocar a prateleira da frente em um
nível mais alto.
Colocação das
prateleiras da porta
Pode modificar a posição das
prateleiras da porta. Para isso
proceda da seguinte forma:
Empurre gradualmente a prateleira no
sentido que indica a seta até
desencaixa-la. Depois monte-a no
lugar desejado fazendo a operação
inversa.
D338
Page 30

30
electrolux
Frutas ee llegumes:
nas caixas de
legumes depois de lavados.
Bananas, bbatatas, ccebola ee aalho, sse
não fforem ppreparados, nnão sse
conservam nno rrefrigerador.
MANUTENÇÃO
Antes dde qqualquer iintervenção
no aaparelho, aaconselhamos qque
se ddesligue aa ttomada dde ccorrente.
Aviso
Este eelectrodoméstico ccontém
hidrocarbonetos nno ssistema dde
refrigeração; aa mmanutenção ee aa
recarga ddeve sser, pportanto,
executada aapenas ppor ttécnicos
autorizados.
Limpeza periódica
Muitos ddetergentes eespecíficos ppara
as ssuperfícies dda ccozinha ccontêm
agentes qquímicos qque ppodem
corromper/danificar aas ppartes eem
plástico ppresentes nneste aaparelho.
Aconselha-sse, ppor iisso, dde llimpar oo
revestimento eexterno ddeste aaparelho
só ccom áágua qquente jjuntamente ccom
uma ppequena qquantidade dde
detergente llíquido ppara aa llouça.
Lave as paredes e acessórios com
água tépida e bicarbonato de soda.
Enxague e seque cuidadosamente;
limpe o condensador e o
motocompressor com uma escova ou
um aspirador. Esta operação vai
melhorar o funcionamento com
conseguinte poupança de energia.
Recirculação de ar
O compartimento geladeira é dotado
de uma ventoinha especial que é
ativada agindo no interruptor (A-ver
fig.), o sinal luminoso aceso significa
que a ventoinha está funcionando.
Aconselha-se o uso da ventoinha
quando a temperatura ambiente
ultrapassa os 25°C.
Este dispositivo permite um
arrefecimento rápido dos alimentos e
uma uniformidade melhor da
temperatura dentro do
compartimento.
CONSELHOS
Conselhos para a
refrigeração
Carne ((de qqualquer ttipo):
envolva
esses alimentos em sacos plásticos e
coloque-as na divisão imediatamente
acima das caixas para legumes.
O pperíodo dde cconservação éé dde 11 aa 22
dias, nno mmáximo.
Alimentos ccozidos, ppratos ffrios, eetc:
coloque-os, bem cobertos, numa
prateleira qualquer.
A
Page 31

electrolux
31
Paragem prolongada
No caso de se ausentar por um
período prolongado, desligue a
tomada de corrente, esvazie, degele e
limpe o aparelho.
Mantenha as portas entre-abertas
durante toda a não utilização, para
facilitar a circulação do ar no interior e
evitar a formação de cheiros
desagradáveis.
Lâmpada de iluminação
Para a eventual substituição da
lâmpada apertar o engate traseiro e
simultaneamente desenfiar a tampa no
sentido das setas.
Atenção
Substituir a lâmpada com uma
de potência igual (a potência
máxima está contida no difusor
de luz).
Descongelação
A descongelação do refrigerador dáse automaticamente durante cada
período de paragem do compressor.
A água proveniente do descongelação
é evacuada para um recipiente situado
na parte detrás do aparelho, por cima
do compressor, e onde ela se
evapora.
Não sse eesqueça dde llimpar
periodicamente oo oorifício dde
escoamento dde áágua ddo
descongelação qque sse eencontra nno
centro dda ggoteira ddo ccompartimento
refrigerador ppara eevitar qque aa áágua
possa ttransbordar ee ccair ssobre oos
alimentos. UUtilize ppara eesse eefeito aa
pequena bbarra qque sse eencontra nno
orifício.
D037
Page 32

32
electrolux
ASSISTÊNCIA
TÉCNICA E PEÇAS
DE SUBSTITUIÇÃO
Se o aparelho não funcionar verifique:
• Se a ficha está bem introduzida na
tomada e se há corrente na rede.
• No caso de haver vibrações ou
ruídos verifique se o aparelho está
em contacto com moveis que
podem transmitir ou ampliar ruídos
e vibrações.
• Verifique também se as tubagens
do sistema refrigerante não vibram.
Se houver restos de água no interior
do frigorifico verifique se o orifício de
descarga não está obstruído.
Se depois de todas estas verificações
o problema persistir dirija-se ao seu
vendedor ou o serviço de assistência
mais perto da sua residência.
Para oobter uuma aassistência mmais
rápida iindique oos ddados dda pplace dde
identificac,ão ddo aaparelho qque sse
encontra nno iinterior ddo
electrodoméstico nna pparede ddo ffundo
no llado eesquerdo, ee ttambém oo mmodelo
número dde sserie ee ccertificado dde
garantia.
DADOS TECNICOS
378
0,403
147
1800
600
650
Capacidade lìquida em litros do frigorìfico
Consumo energético en kWh/ano
Consumo energético en kWh/24h
Dimensões em mm
Altura
Largura
Profundidade
Os dados técnicos são indicados na placa de matrícula que se encontra no lado
esquerdo interno do apareho.
Page 33

electrolux
33
INSTALAÇÃO
Colocação
Coloque o aparelho longe de qualquer
fonte de calor (aquecimento, fogões,
ou raios solares demasiado
intensos).Verifique que nas parses
posterior, superior e inferior o ar pode
circular livremente. Para um melhor
funcionamento verifique que a parse
superior têm pelo menos 100 mm de
distancia de algum móvel suspenso
por cima do aparelho . A solução
preferível é indicada na (sem móvel).
Um ou vários pés niveladores situados
na base têm a função de nivelar o
aparelho correctamente.
Importante
O aparelho deve
poder ser desligado
da rede; uma vez realizada a
instalação, portanto, é necessário que
a ficha fique acessível.
100 mm10 mm
10 mm
NP00
Ligação eléctrica
Verifique, antes de ligar o aparelho, se
a voltagem e a frequência indicadas na
placa sinalética correspondem às da
sua rede. Tolerância admitida na
voltagem nominal: ±6%. Para a
adaptação do aparelho a voltagens
diferentes, é indispensável a adjunção
de um auto-transformador de uma
potência adequada.
Verifique sse aa ttomada dde ccorrente dda
parede eestá eem bbom eestado ee aapta aa
receber aa fficha ddo ffio dde aalimentação
do aaparelho.
Esta última está conforme às normas
em vigor e possui uma entrada para a
ligação à terra. Essa ficha pode ser
ligada a qualquer tomada de corrente
desde que esta tenha uma ponta de
ligação à terra. No caso em que a
tomada não tenha a ligação à terra,
ligar o aparelho a uma instalação de
ligação à terra separada, conforme as
normas em vigor, consultando para
isso um técnico especializado.
A CCasa CConstrutora ddeclina ttoda ee
qualquer rresponsabilidade nno ccaso dde
esta nnorma ccontra oos aacidentes nnão
ser ccumprida ee sse vverificarem
acidentes ooriginados ppor ddeficiente
ligação àà tterra, oou ffalta ddela.
Este aparelho está conforme as
seguintes Directrizes
Comunitárias:
•
87/308
de 2/6/87 respeitante à
supressão das interferências radioeléctricas.
•
73/23 CCEE
19/02/73 (Baixa Tensão)
e sucessivas modificações;
•
89/336 CCEE
03/05/89
(Compatibilidade Electromagnética)
e sucessivas modificações.
Page 34

34
electrolux
Fixadores para prateleiras
O seu aparelho é equipado com
fixadores para prateleiras que
permitem de bloquear as prateleiras
durante o transporte.
Para removê-los executar quanto segue:
mexer os fixadores de prateleiras no
sentido da seta, levantar o vidro na
parte traseira e empurrá-lo para a
frente até liberá-lo e remover os
fixadores.
Espaçadores posteriores
No interior do aparelho encontram se
dois espaçadores que hão de ser
montados nos figuras.
Desapertar oos pparafusos, iinserir oo
espaçador ddebaixo dda ccabeça ddo
parafuso ee vvoltar aa aapertar.
Reversibilidade da porta
Antes de levar a cabo qualquer
operação, remova a ficha da tomada.
Para mudar a direcção de abertura da
porta proceda do seguinte modo:
• Para levar a cabo as seguintes
operações, nós sugerimos que o
faça com outra pessoa que possa
segurar firmemente a porta do
aparelho durante as operações.
• Abra a porta com o aparelho na
posição vertical. Desaperte os
parafusose e remova a parte
superior de plástico da porta.
• Remova a bucha e reposicione no
lado contrário (d).
• Deite o aparelho com a parte
traseira para baixo.
• Remova o parafuso da cobertura
da dobradiça (a)
• Desaparafuse a dobradiça superior
e remova-a (b)
• Desaparafuse e retire o travão da
porta (c)
• Remova a porta.
• Remova usando uma ferramenta a
capa (e) , desaparafuse o pino no
eixo da dobradiça inferior (f) e
reaparafuse no lado oposto.
A
B
C
Page 35

electrolux
35
• Reinsira a cobertura (e) no lado
oposto.
• Reinsira a porta.
• Preste atenção à parte da frente da
porta, que é paralela à parte
superior.
• Coloque o travão da porta no lado
oposto.
• Posicione e fixe a dobradiça
superior (que pode ser encontrada
no saco das instruções de
utilização) no lado oposto.
• Fixe o parafuso da nova cobertura
da dobradiça (que pode ser
encontrada no saco das instruções
de utilização).
• Eleve o aparelho para a posição
vertical.
a
b
c
• Abra a porta e reposicione a parte
superior de plástico da porta com
parafusos.
• Fixe a pega no lado oposto.
Reposicione, eleve o aparelho,
espere pelo menos duas horas
antes de ligue na ficha de alimentação.
Em qualquer caso, se não desejar
levar a cabo as operações acima
descritas, contacte o Concessionário
de Assitência Técnica mais próximo. O
Concessionário, especialista no
serviço pós venda levará a cabo a
reversibilidade das portas.
Aviso
Depois dde rreverter aa ddirecção dde
abertura dda pporta, vverifique qque ttodos
os pparafusos eestão ccorrectamente
apertados ee qque oo sselo mmagnético
adere aao aaparelho.
Se aa ttemperatura aambiente éé ffria, ((ex.
no IInverno), aa bborracha ppode nnão
aderir pperfeitamenteao aaparelho. EEm
qualquer ccaso, eespere ppelo nnatural
ajustamento dda bborracha, oou aacelere
este pprocesso aaquecendo aa pparte nnão
aderente ccom uum ssecador dde ccabelo.
Page 36

2223 437-05-00 20102008
wwwwww..eelleeccttrroolluuxx..ccoomm
www.electrolux.pt
 Loading...