

Page 1
Fridge-Freezer / Kühl-Gefrierkombinat ion / Chladnička-Mraznička
INSTRUCTION BOOK
GEBRAUCHSANWEISUNG
NÁVOD K OBSLUZE
818 19 21--01/9
GB
ER8998B
DE
CZ
Page 2
Safety instructions
Your new fridge/freezer may have other functions compared to your previous one.
Carefully read these instructions to learn how the appliance works and how to care for it. Keep the
booklet. It will come in handy if you later sell the cabinet or give it to somebody else.
These warnings are provided in the interests of your safety. Ensure that you understand them all before
installing or using the appliance. Your safety is of paramount importance. If you are unsure about any of the
meanings or warnings contact the Customer Care Department.
For the User
· The cabinet is intended for keeping foodstuff in a
normal household as explained in this instruction
booklet.
· Do not keep explosive gases or liquids in the
refrigerator or freezer compartment. They may
explode and cause injury and material damage.
· Do not let sharp objects come into contact with
the refrigerating system on the back of and i nside
the cabinet. If the refrigerating system is
punctured, the cabinet will be damaged and
foodstuff inside may spoil.
· Do not keep carbonised drinks or bottles in the
freezer compartment. The glass bottles may
break.
· The cabinet is heavy. The edges and projecting
parts of the cabinet may be sharp. Be careful
when moving the cabinet and always use gloves.
Child Safety
· Pay attention so that small children do not gain
access to the operating controls or the inside of
the cabinet.
Scrapping old cabinets
When discarding the cabinet, hand it over to a
recycling station. For more information, call your
local city office or your dealer.
GB
instruction
Contents
Safety instructions 2.................
Scrapping old cabinets 2.......................
Contents 2..........................
Description of the Appliance 3........
Control Panel 3..............................
Before use 4.........................
Using the fridge 4....................
To start the fridge and set the correct temperature 4.
Temperature inside the fridge 4.................
Measuring the temperature 5...................
Switching off 5..............................
Alarms and other features 5....................
Cabinet interior 5............................
Using the freezer 6...................
To start the freezer and set the correct temperature 6
Temperature inside the freezer 6................
Alarms and other features 7....................
Switching off 7..............................
Freezing 8..................................
Suitable storage periods 8......................
Thawing 8..................................
Cabinet interior 9............................
GB
Hints and Tips 9.....................
Saving energy 9.............................
Food Storage 10..............................
Protect the environment 10......................
Maintenance and Cleaning 10..........
Removing the ventilation grille 10................
Cleaning 10..................................
Defrosting the fridge 11........................
Defrosting the freezer 11.......................
To Change the Light Bulb 11....................
When the appliance is not in use 11...............
Something Not Working 12............
Guarantee Conditions 13.......................
Customer Care Depart ment 13...................
Service and Spare Parts 13......................
Technical specification 14.............
Installation 14........................
Mains Cable 14...............................
Unpacking 14................................
Cleaning 14..................................
Remove the transport supports 14................
Installing the cabinet 15........................
Electrical connection 15........................
Door Reversal 16.............................
2
Electrolux 818 19 21-01/9
Page 3
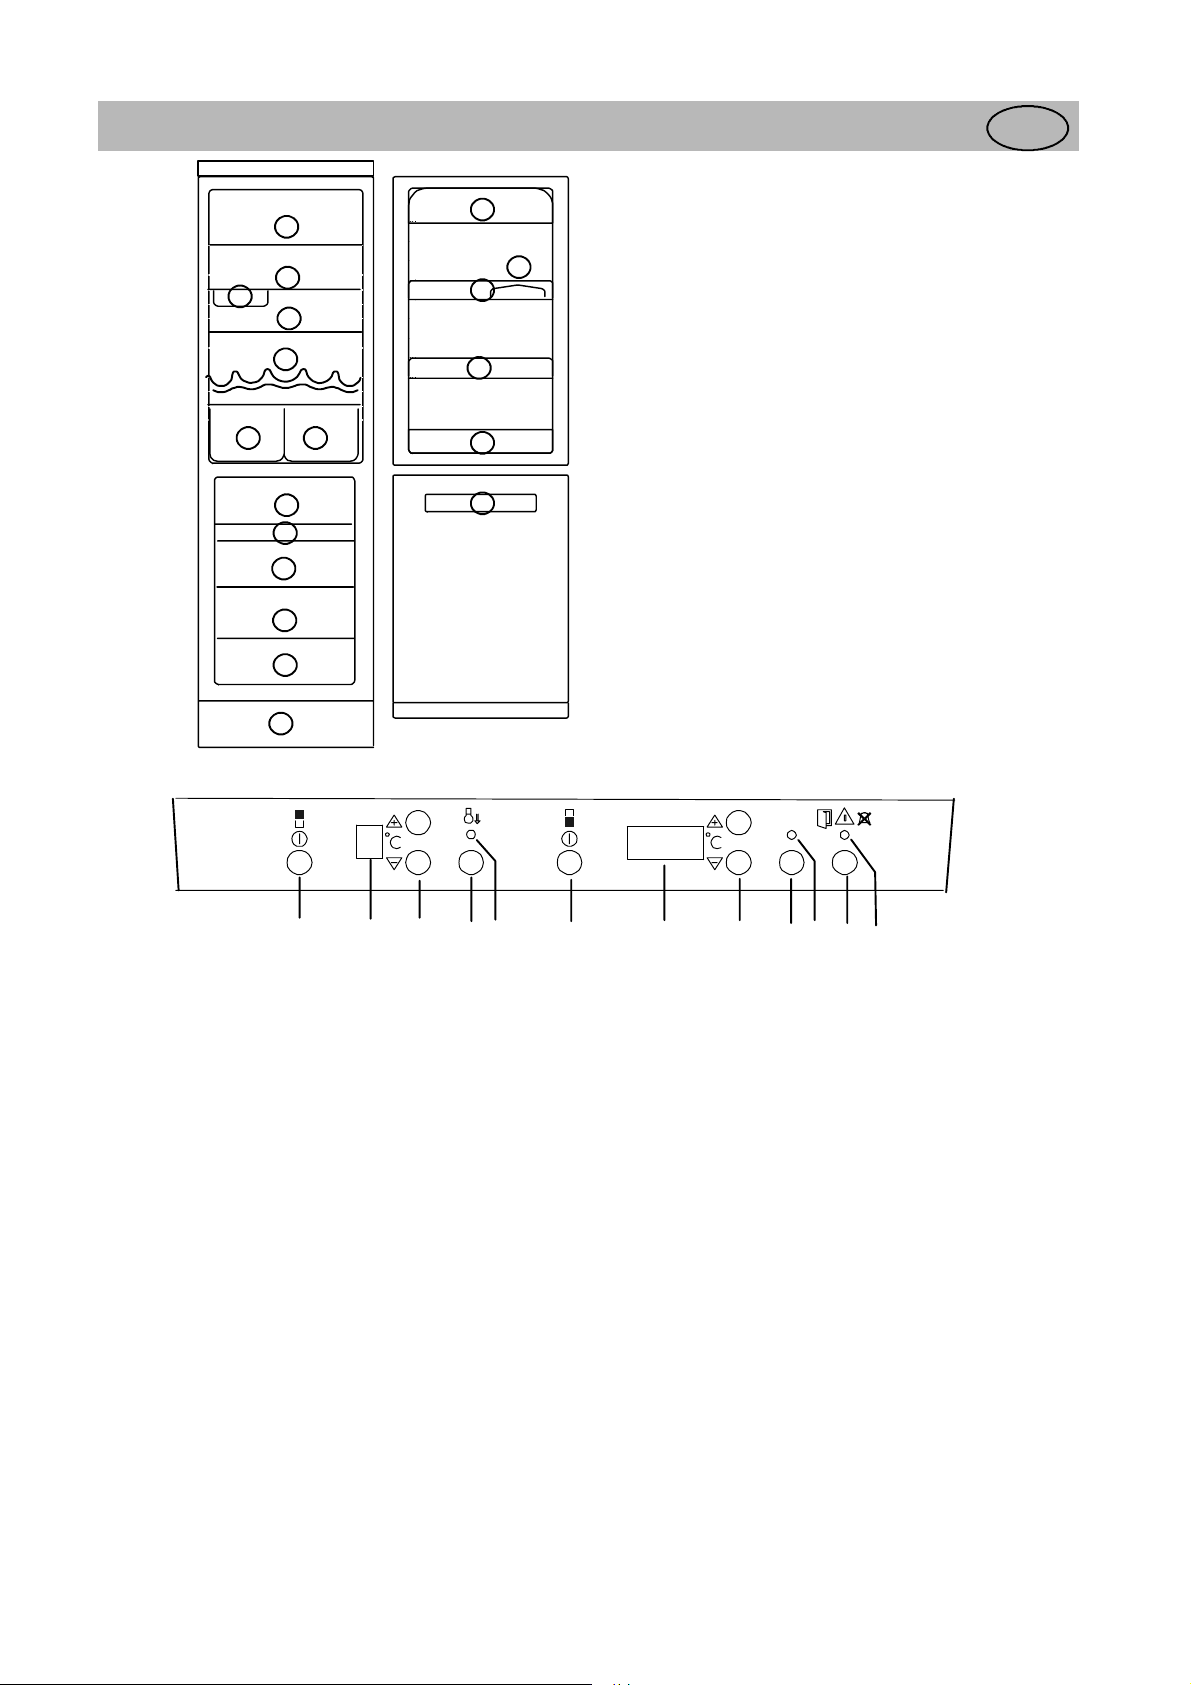
Description of the Appliance
GB
12
3
Control Panel
10
1
1
1
2
3
9
8
9
9
9
4
6
5
5
7
11
Model ER8998B
1. Glass shelf
2. Cooling rack
3. Vegetable drawer
4. Butter compartment
5. Door shelf
6. Egg holder
7. Bottle shelf
8. Freezer plate + accumulator
9. Freezer drawer
10. Ventilation grille
11. Freezer calendar
12. Quick store
ACTION COOL
ABCDEF GHIJKL
A. Refrigerator power switch
Switches the refrigerator on and off.
B. Temperature display
Shows the average temperature inside the
refrigerator.
C. Temperature adjustment button/thermostat
Used to set the temperature in the refrigerator.
D. ACTION COOL button
Used to switch the Action Cool feature on and off.
E. Yellow indicator lamp
Lights when Action Cool is operating.
F. Freezer power switch
Switches the freezer on and off.
*
-- 1 85
ACTIONFREEZE
G. Temperature display
Shows the highest temperature inside the freezer.
H. Temperature adjustment button/thermostat
Used to set the temperature in the freezer.
I. FAST FREEZE button
Used to switch the Fast Freeze feature on and off.
J. Yellow indicator lamp
Lights when Fast Freeze is operating.
K. Alarm shut-off button
Used to turn the audible alarm off.
L. Red warning lamp
Flashes when one of the alarms in the cabinet has
been triggered.
3
Electrolux 818 19 21-01/9
Page 4
Before use
Position and clean the cabinet as explained in the
section "Installation".
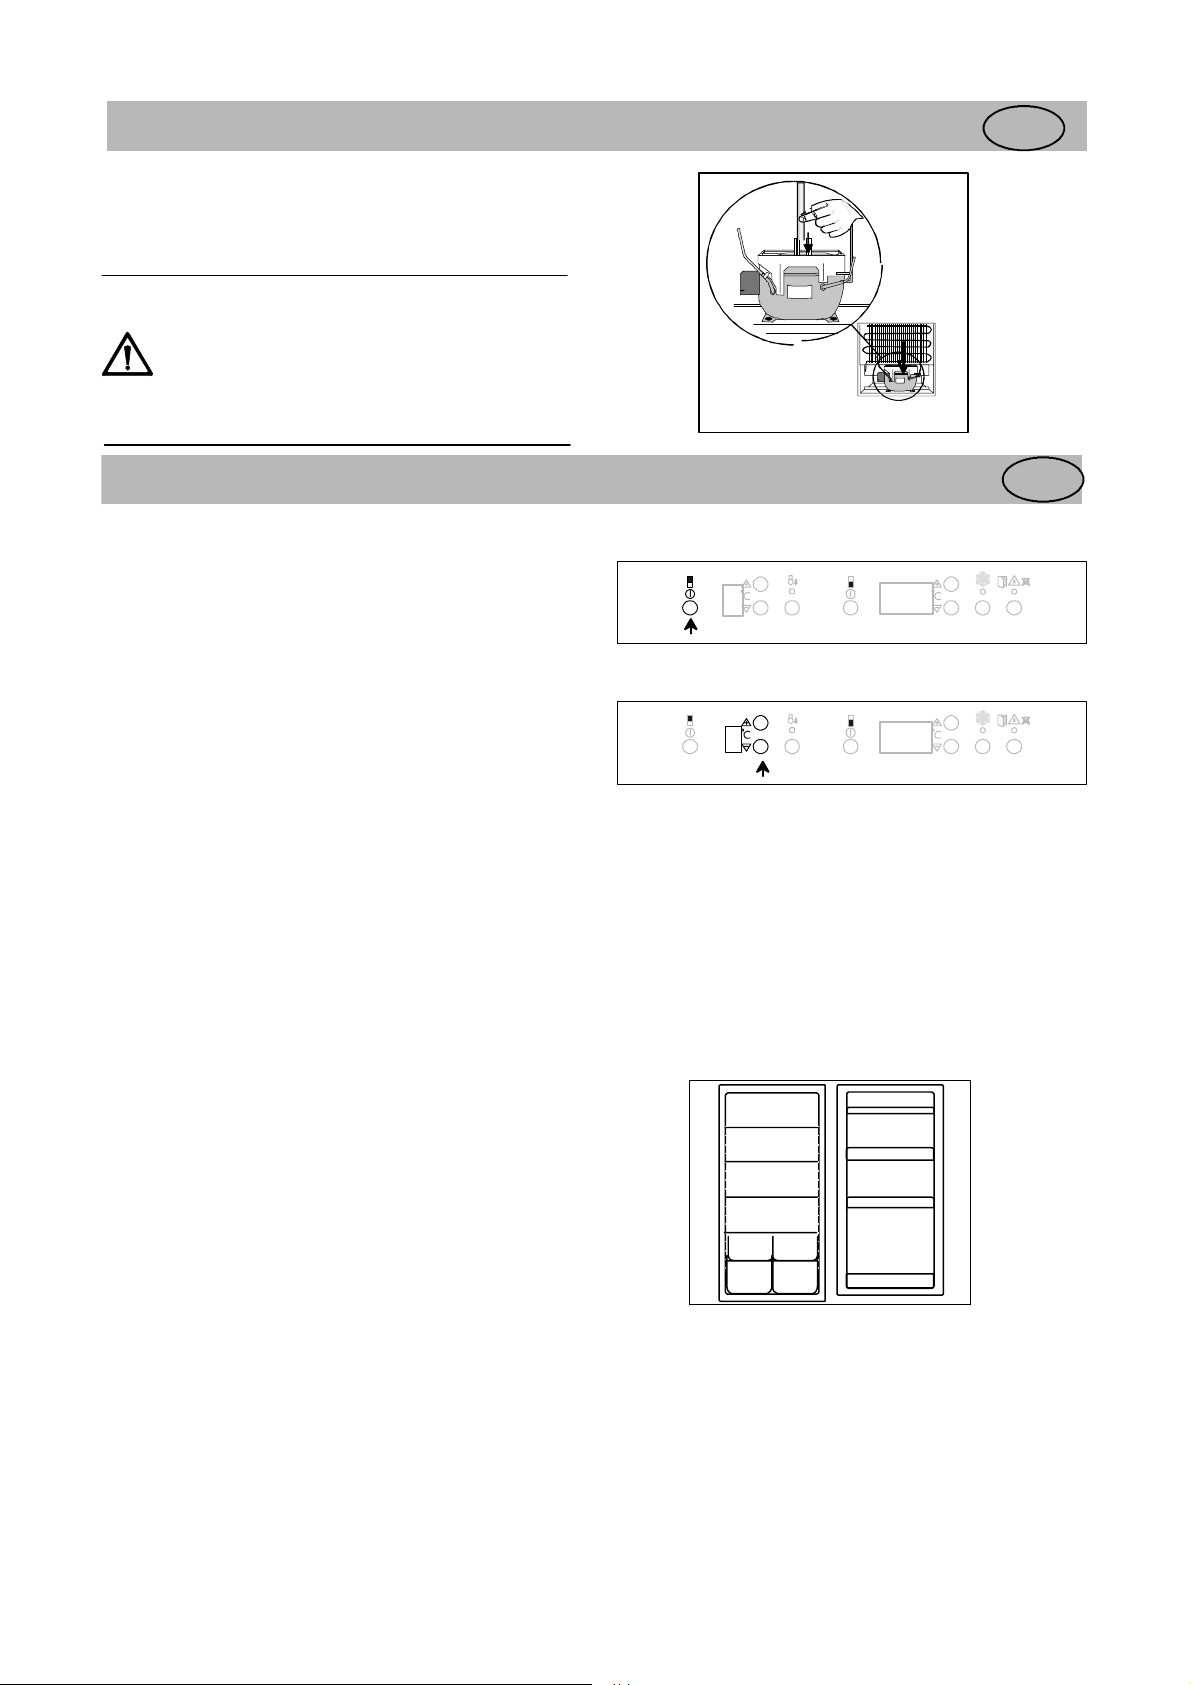
Check that the drain hose at the rear of the cabinet
discharges into the drip tray.
Before inserting the power plug into the
outlet and switching on the cabinet for
the first time, leave it standing upright
for about 4 hours. Otherwise the
compressor may sustain damage. This
time will allow the oil sufficient time to
return to the compressor.
GB
Using the fridge
To start the fridge and set the
correct temperature
Switching on:
Switch on the fridge by pressing the power switch.
Setting the temperature
Press the buttons until the desired temperature
flashes in the temperature display (The temperature
can be set between +1°C and +9°C.)
"+" raises the temperature.
"-" lowers the temperature.
Once set, the temperature display shows "-" until the
temperature inside the fridge reaches +9°C or below.
Allow the cabinet to run for a period of 24 hours
whenever the temperature setting is changed. This
will allow the temperature to stabilise inside the
cabinet.
It is not necessary to reset the temperature when the
cabinet is switched on after it has been out of use.
The thermostat recalls the previously set
temperature.
GB
5
5
-18
-18
Temperature inside the fridge
A s uitable temperature inside the fridge is approx.
+5°C. If the thermostat control is set to a too cold
temperature, food with a high water content may
start to freeze if it has been placed in the coldest
places in the fridge. The picture shows the coldest
and warmest places inside the fridge.
(+ warm, - cold)
Meat, fish and milk should be put in the coldest part
of the cabinet.
The temperature will be affected by:
· How often the door is opened
· How much food is stored
· Position of the appliance (See chapter
Installation)
+
+
--
--
--
--
+
+
4
+
Electrolux 818 19 21-01/9
Page 5
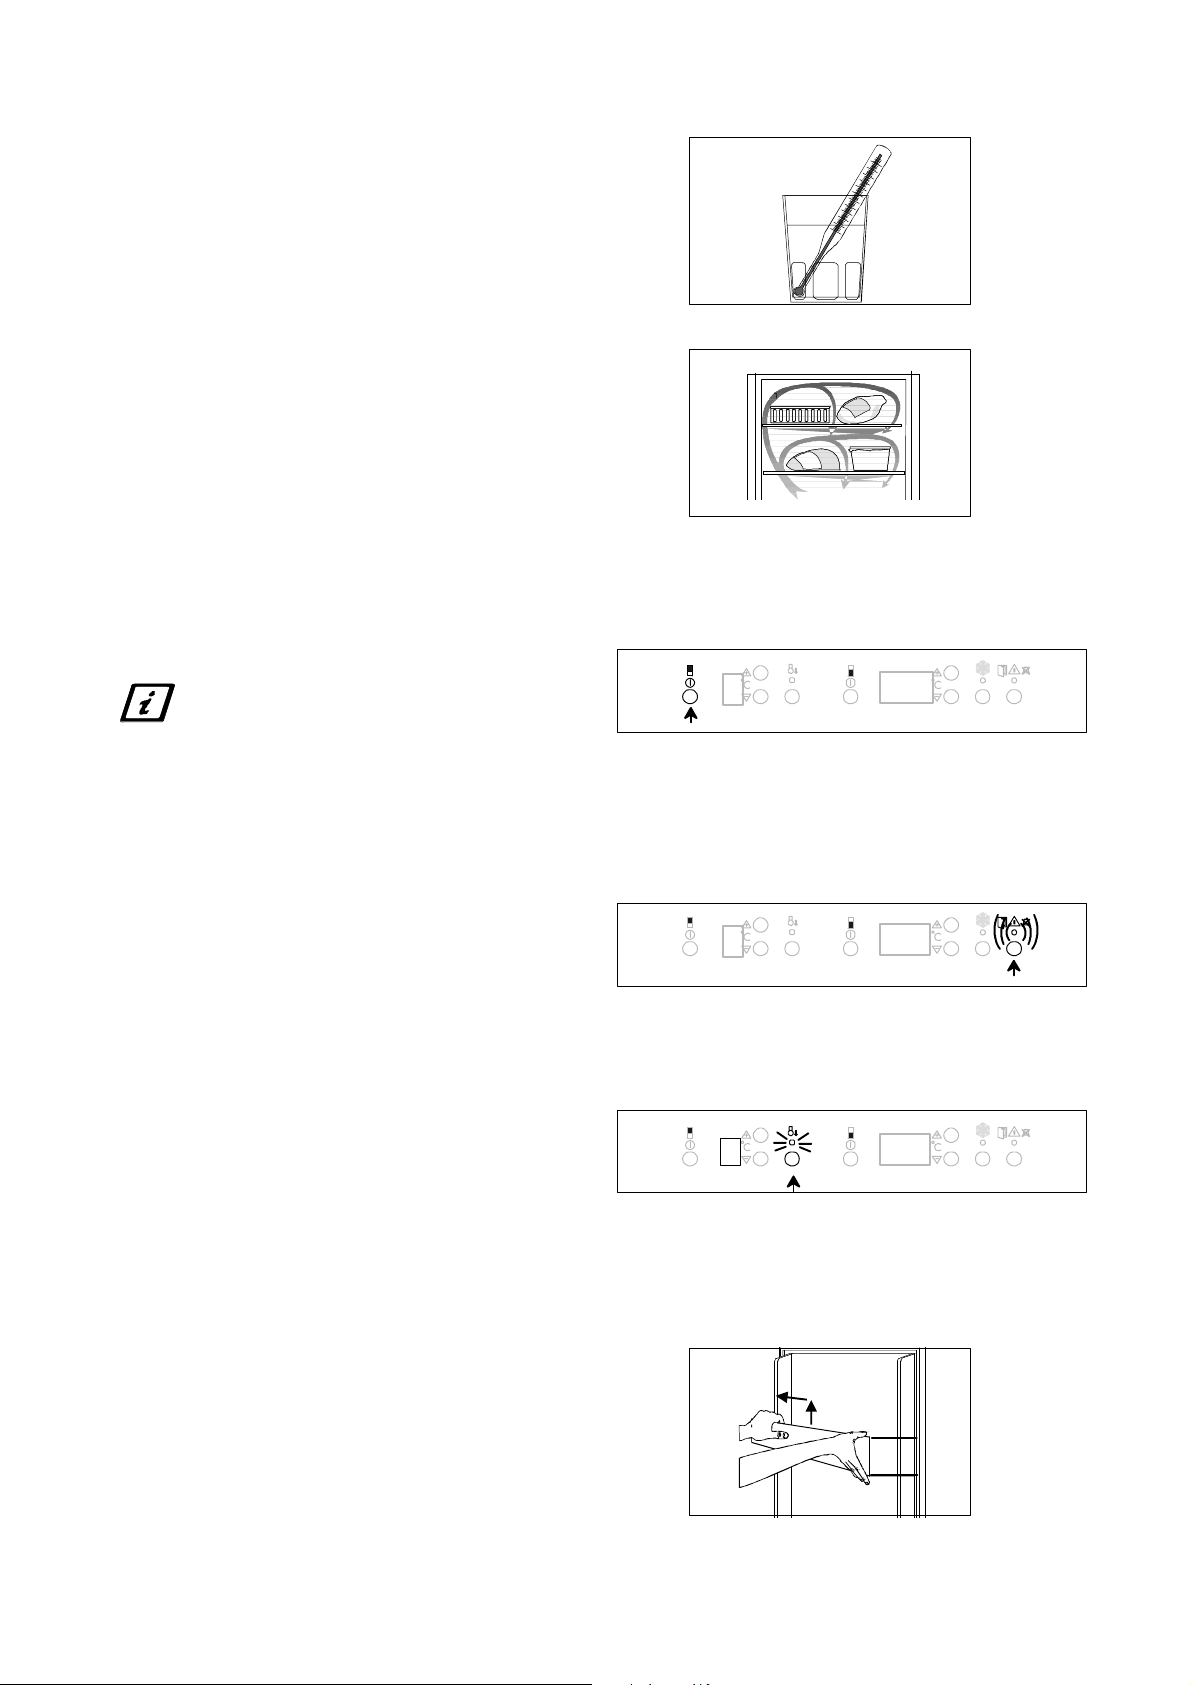
Measuring the temperature
If the temperature is measured using a standard,
single thermometer, this should be put in a glass of
water centrally placed inside the cabinet. This will
reflect the temperature inside the food products. Do
not place the thermometer hanging or lying directly
on the shelf.
Hints:
· Distribute foodstuffs to allow cold air to
circulate freely between the products.
· Do not place food products directly against the
cooling plate on the rear wall since they may
freeze in this case.
· Also never put warm products into the cabinet.
Wait until they have cooled down.
· Cover all foods properly to avoid odours and
flavours from tainting other food.
Switching off
Switch off the cabinet by pressing the power switch.
Keep the button pressed for approx. 1 second.
Power to the cabinet is completely
interrupted only when the power plug is
disconnected.
5
-18
Alarms and other features
Door open alarm
If the fridge door remains open for more than 5
minutes, the red warning lamp starts flashing and an
audible alarm sounds.
To switch off the alarm:
Press the "alarm shut-off button". The red warning
lamp goes out when the door is closed.
Action cool
Use Action Cool to refrigerate a large quantity of
products. When Action Cool is switched on, the
temperature is automatically set to +2°C.
"A" is then displayed in the temperature display and
the yellow indicator lamp lights. After about 6
hours, Action Cool is switched off and the
temperature gradually returns to the previously set
temperature. It is possible to switch off Action Cool
manually by pressing the Action C ool button once
more.
Cabinet interior
The shelves and door compartments are removable
and can easily be re-arranged.
Certain shelves must be lifted up by the rear edge to
enable them to be removed.
The lower door compartment and the glass shelf
above the vegetable drawer must not be moved.
They are required for proper air circulation inside the
cabinet.
A
5
-18
-18
5
Electrolux 818 19 21-01/9
Page 6
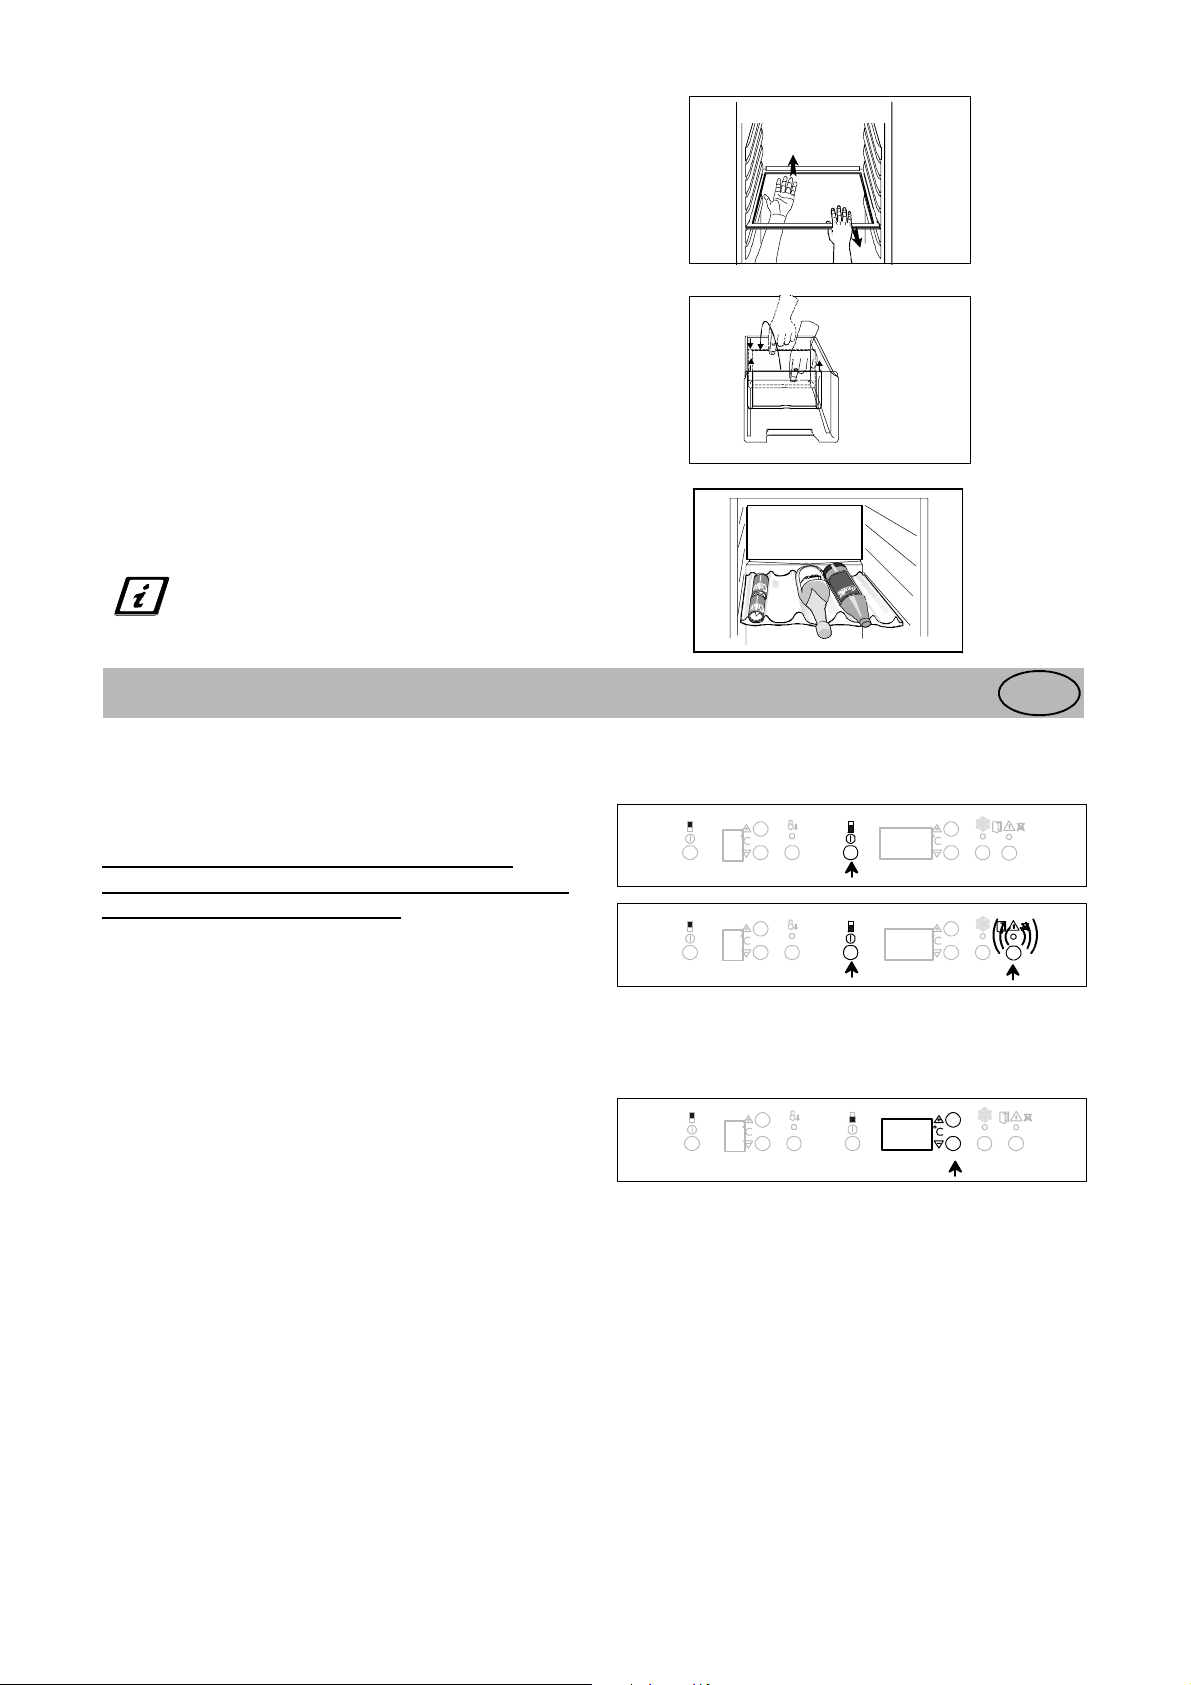
Shelves with a raised edge should be placed with the
r
raised edge facing the rear wall of the cabinet, and
thus prevent food products from touching the
cooling plate.
The vegetable drawer has a removable plate to
separate different vegetables.
Cooling Rack for Beverages
To achieve maximum cooling in the cooling rack,
heed the following:
· Place the rack immediately under the drip
channel.
· Be sure the rack is cold before placing bottles
and cans, that you want to cool, on it.
· Place large cans and bottles in the big
recesses in the middle of the rack.
· Place small cans and bottles in the small
recesses close to the cabinet wall.
Do notput the coolingrackin a freeze
to achieve quicker cooling.
Do not put loads heavier than 6.5kg
onto the shelf
.
Using the freezer
To start the freezer and set the
correct temperature
Switching on:
Switch on the freezer by pressing the power switch.
The alarm sounds if the temperature inside
freezer reaches room temperature. Turn off the
by pressing the switch-off
Setting the temperature
Press the buttons until the desired temperature blinks
on the temperature display. (The temperature can be
set between -15°C and -24°C.)
"+" increases the temperature.
"-" decreases the temperature.
Once set, the temperature display shows the current
temperature inside the freezer.
Allow the cabinet to run for a period of 24 hours
whenever the temperature setting is changed. This
will allow the temperature to stabilise inside the
cabinet.
It is not necessary to reset the temperature when the
cabinet is switched on after it has been out of use.
The thermostat recalls the previously set
temperature.
button.
the
alarm
GB
5
5
5
-18
20
-18
Temperature inside the freezer
To ensure that foodstuff will keep for a long time, be
sure that the temperature inside the freezer is -18°C
or below. Please note, however, that the energy
consumption increases as the temperature decreases.
The built-in temperature display shows the warmest
temperature inside the freezer. If the temperature is
measured using a thermometer, put it between the
products since this will reflect the real temperature
in the frozen products. It is normal that the built-in
temperature display shows a temperature slightly
above that measured in other ways.
Electrolux 818 19 21-01/9
6
Page 7
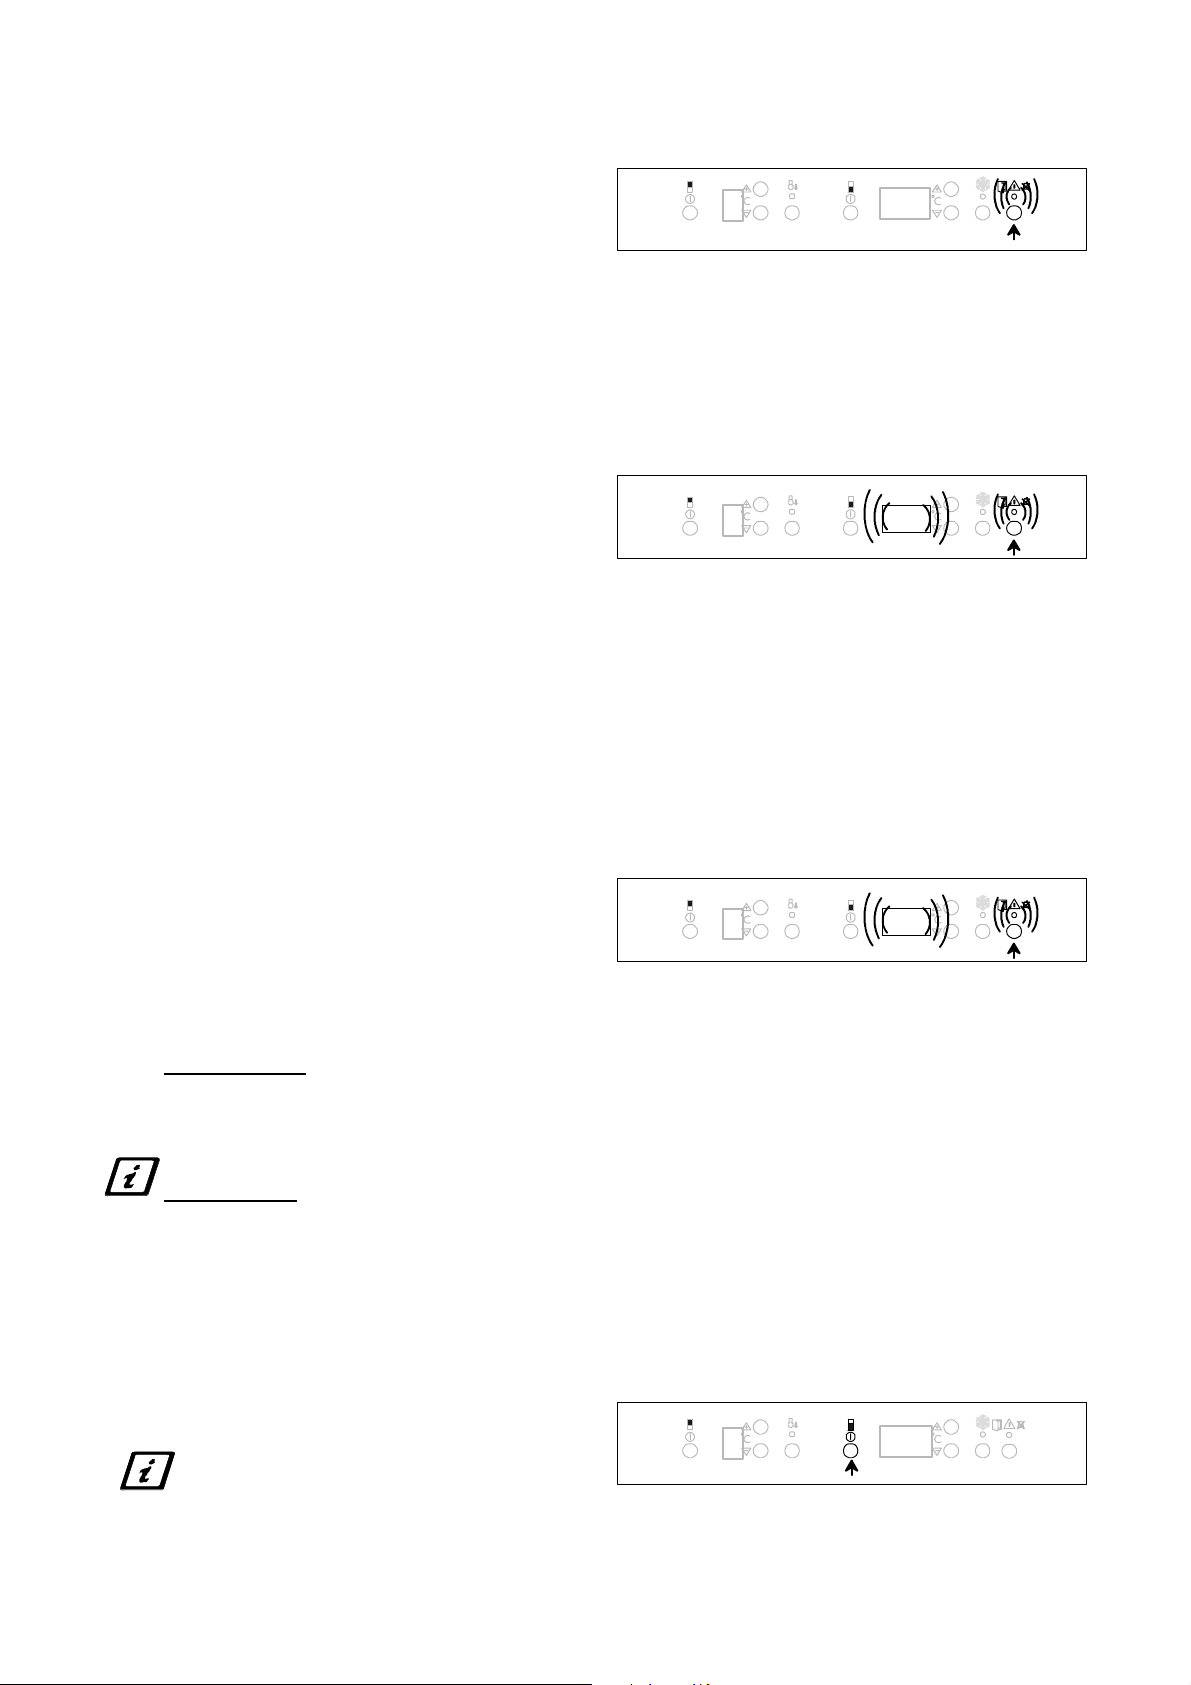
Alarms and other features
Door open alarm
If the door remains open for more than about 1,5
minute, the red indicator lamp starts flashing and an
audible alarm sounds.
To switch off the alarm:
Press the alarm shut-off button. As long as the door
remains open, the audible alarm will sound anew at
1-minute intervals. The red indicator lamp goes out
when the door is closed.
Temperature alarm
If the temperature rises above -12°C, the red warning
lamp flashes and an audible alarm sounds. The
temperature display will then start to flash.
To switch off the alarm:
Press the alarm shut-off button to switch off the
audible alarm. The temperature display will stop
flashing.
The red warning lamp goes out when the
temperature inside the freezer again falls below
-11°C.
Find out what caused the alarm. See the chapter
"Something not working".
Temperature memory
The temperature memory shows when an alarm has
been triggered in the cabinet.
The temperature memory operates as follows:
When the temperature inside the freezer again falls
below -11°C the audible alarm stops. The
temperature display and the red warning lamp will
flash t o indicate than an alarm was triggered. When
the alarm shut-off button is pressed, the display then
displays the warmest temperature inside the cabinet
during t he alarm phase and t he display stops
flashing. By referring to the temperature display
indication, it is possible to decide whether or not to
discard the products inside the freezer.
At about -12°C:
Most food products can be immediately
re-frozen. Ice cream is especially sensitive to
temperature changes and should be consumed
as soon as possible.
-- -2°C:
At -9°
Food products should be prepared (cooked)
prior to eating or re-freezing them.
5
5
5
-18
-11
-18
However, always check the quality of the food
yourself to determine if it can be frozen or if it must
be discarded.
Switching off
Switch off the cabinet by pressing the power switch.
Keep the button pressed for approx. 1 second.
Power to the cabinet is completely
interrupted only when the power plug is
disconnected.
5
7
-18
Electrolux 818 19 21-01/9
Page 8
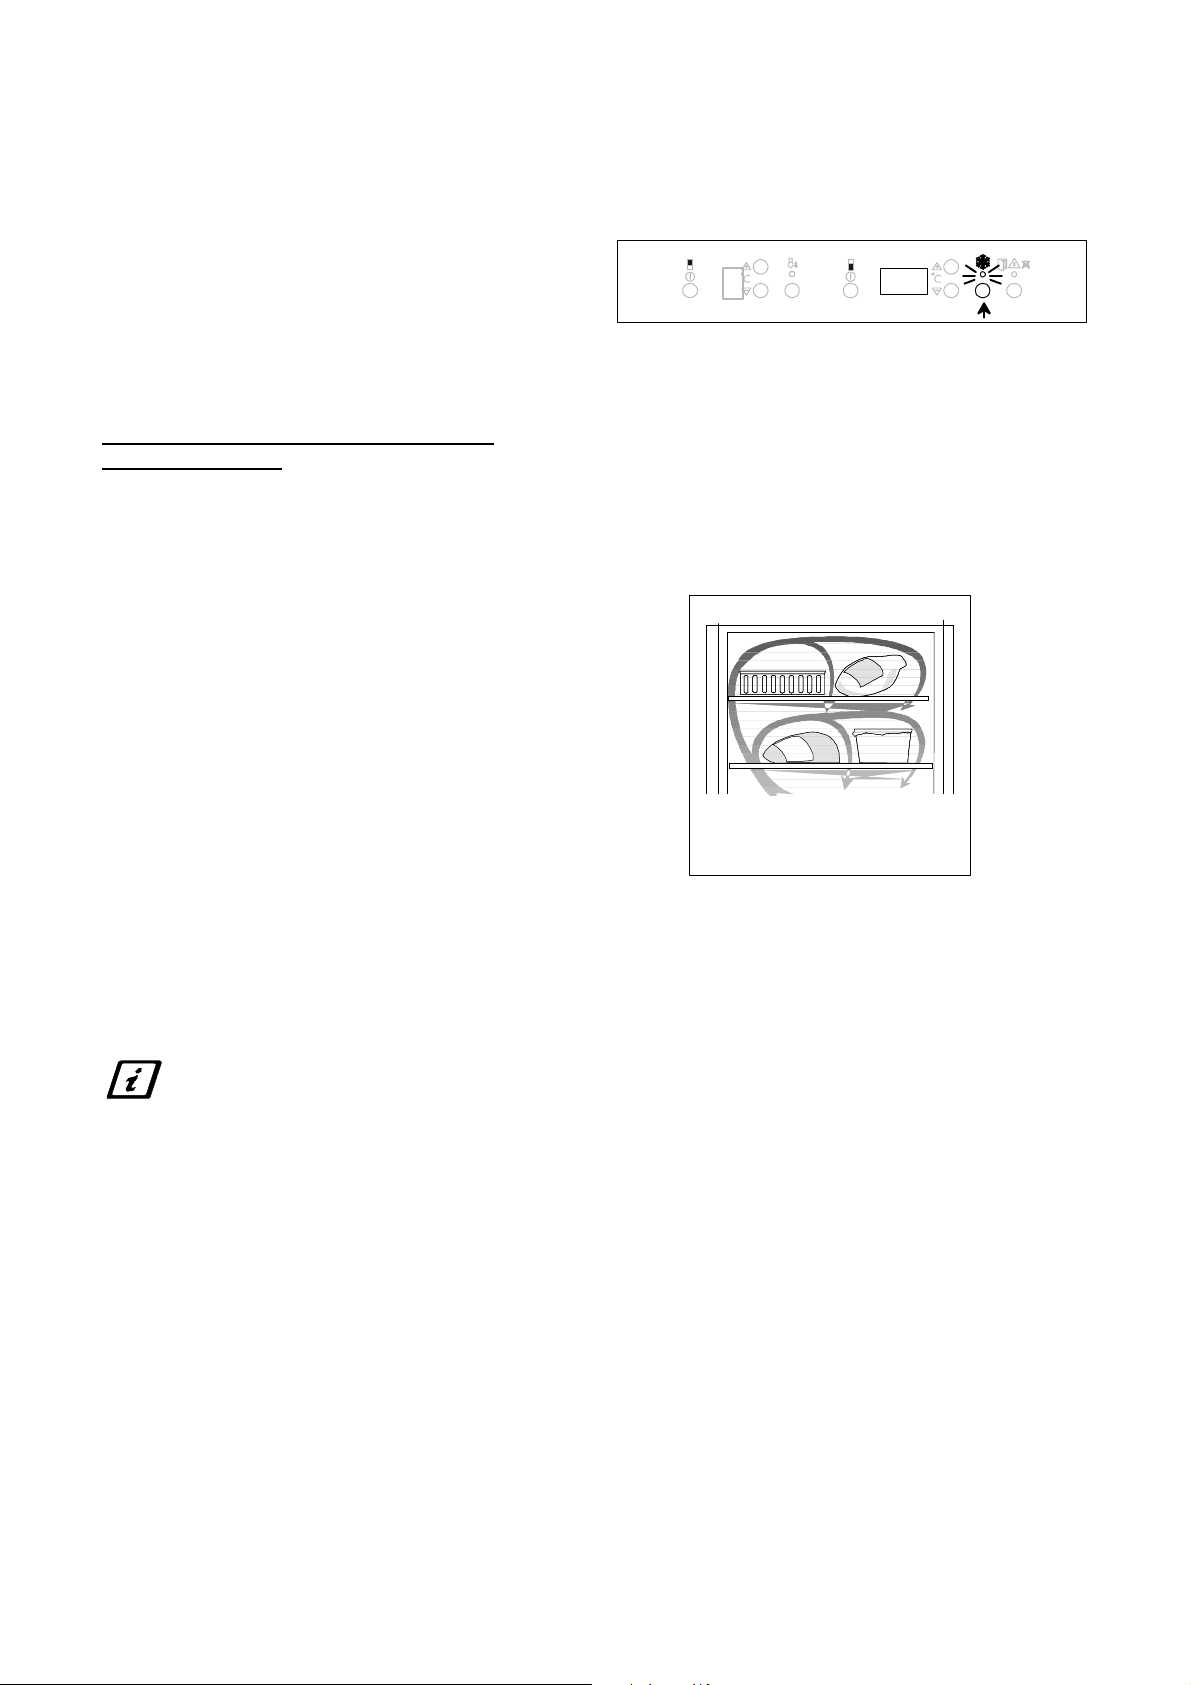
Freezing
Press the fast-freezing button approx. 24 hours prior
to placing the food in the freezer.
You need not press the fast-freezing button when
freezing smaller quantities of food during any
24-hour period.
Fast-freezing is automatically switched of apporox
50 hours after the button has been pressed.
Fast-freezing can be discontinued by pressing the
fast-freezing button once again.
The yellow fast-freezing lamp remains lit as long as
the fast-freezing button is engaged.
"A" (ACTION FREEZE) is displayed in
temperature display
Practical advice on freezing
· When freezing products, use the top shelf, and if
necessary the shelf beneath as this is the coldest
part.
· When freezing large amounts of food/provisions,
the accumulator moves to the tray/space nearest
to the lower freezing shelf.
- Place the foods directly on the freezer shelves.
· Spread out the products as much as possible to
allow air to circulate between them.
· Do not place food products which are to be
frozen directly against other frozen food.
The heat from the unfrozen food may cause
the frozen food to thaw on the surface.
· Once frozen, re-arrange the products and put
them as close as possible to each other.
The food will then stay cold longer i n t he
event of a power failure.
· Do not freeze too much food at the same time.
The freezing capacity of the unit is indicated in
the specifications section.
Check that the cabinet is operating and
keeps the set temperature one day after
switching it on for the first time. Only
after then should the freezer be used to
freeze fresh foodstuff.
.
the
5
A
Suitable storage periods
Food purchased in frozen condition: Follow the
advice on the maximum storage period indicated on
the packaging.
Fresh food frozen at home:
Fatty and salty food should not be kept frozen for
more than three months. Cooked food and low-fat
food may be kept up to about six months. Lean food
and berries can be kept for approximately one year.
Thawing
It is best to use the fridge to thaw food. P l ace the
foodstuff on a plate with a raised edge to prevent
liquids from running out. To quickly thaw food, put
it in room temperature or in cold water. When using
a microwave oven to thaw foodstuff, follow the
manufacturer's instructions.
Electrolux 818 19 21-01/9
8
Page 9
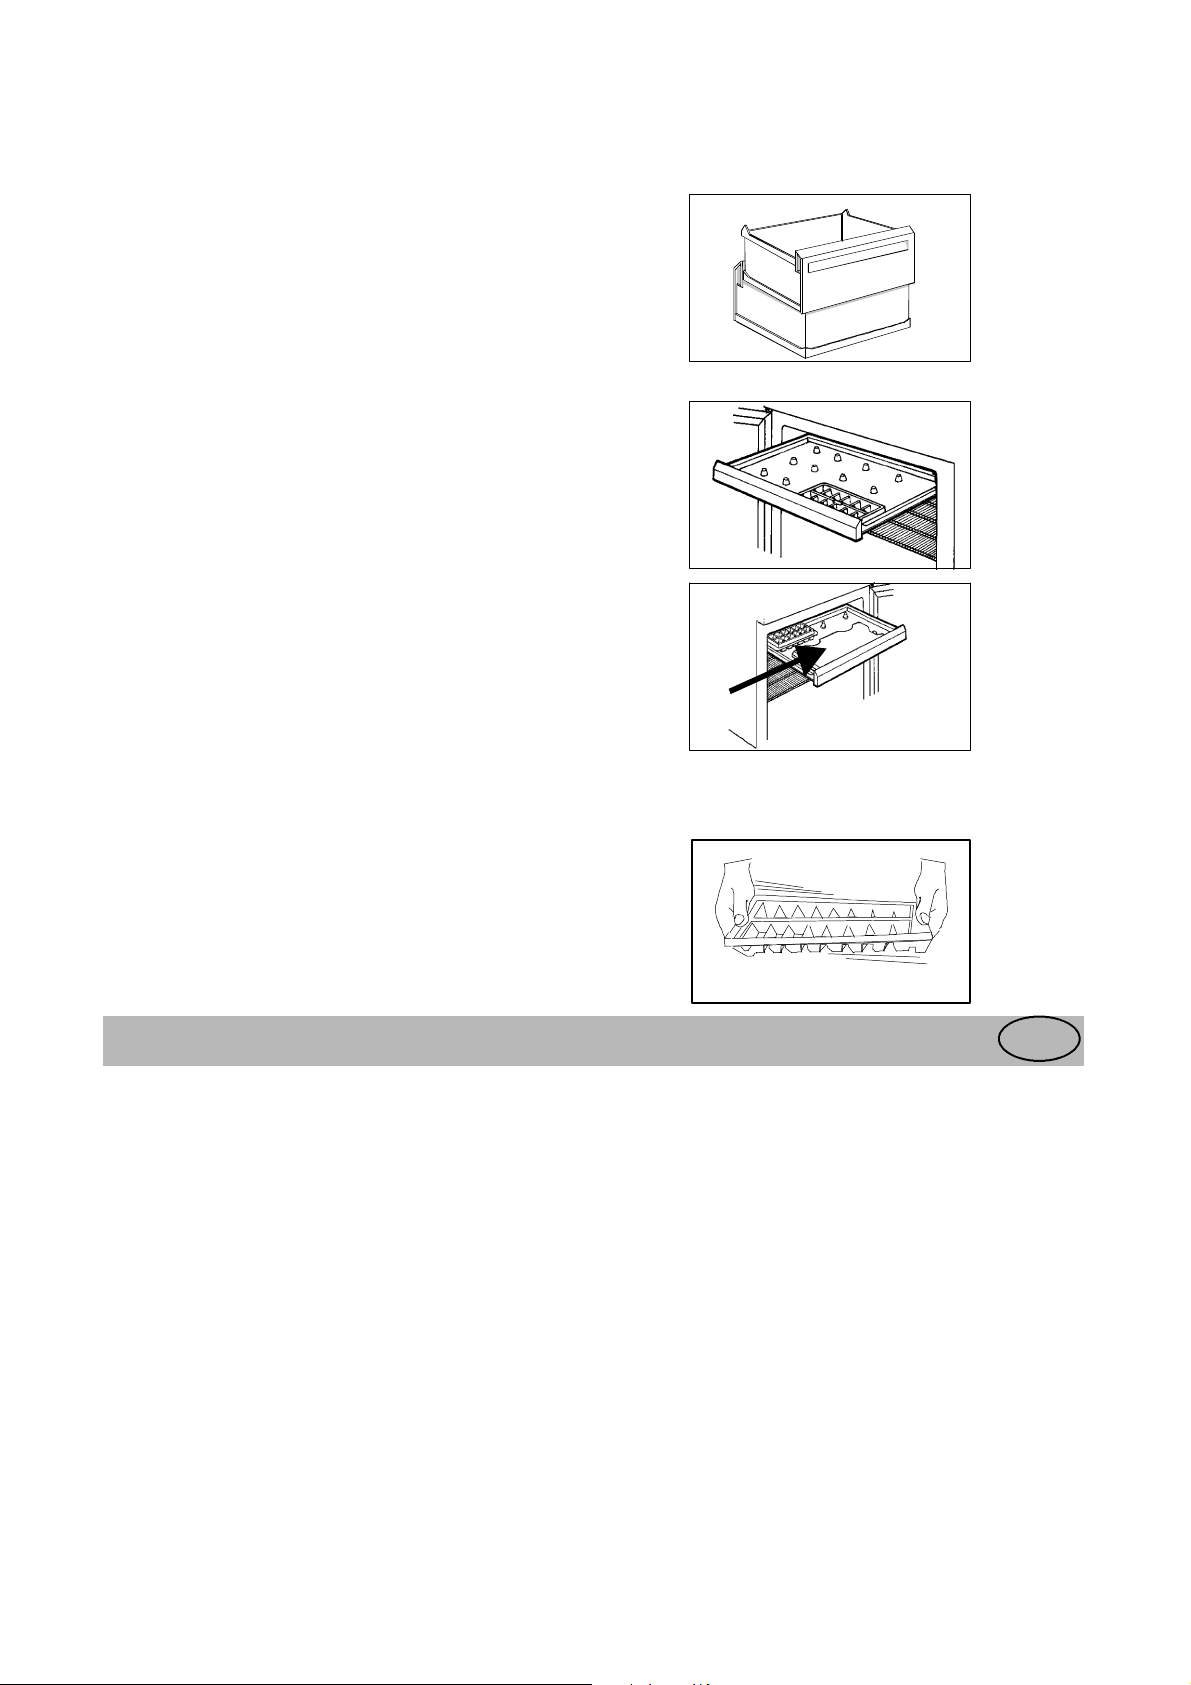
Cabinet interior
Freezer drawers
The freezer drawers make it easy to quickly and
easily find the food package you want. To gain
space, the drawers can be removed and the products
can be put directly on the shelves. On all shelves,
except the top shelf, it is possible to place products
that protrude 20 mm from the front edge. This
allows maximum use of the available space.
Do not remove the bottom drawer. It is required to
assure proper air circulation.
Freezer tray
Use the freezer tray to freeze berries and vegetables.
After about 4 hours the food will be thoroughly
frozen and can then be packaged normally. Food
that is frozen in this way will not stick together,
enabling you to use only the amount required.
Cold accumulator
The cold accumulator will keep the food cold for
longer after a power failure. The cold accumulator
will be most effective when placed at the front of the
fast-freezing tray. When freezing large amounts of
food/provisions, the accumulator moves to the
tray/space nearest to the lower freezing shelf.
When defrosting:
Place the cold accumulator on top of the frozen food
to keep it cold.
Ice cubes
Fill the ice tray to max. 3/4 since water expands as it
freezes. Release the ice cubes by twisting the ice
tray.
If ice cubes are kept for a long time, they will dry
out and t he taste is affected. Thus, throw away old
ice cubes and prepare new ones when needed.
Hints and Tips
Saving energy
· Pay careful attention to where the cabinet is
placed. See the section "Installation". When
installed correctly, the cabinet will consume less
energy.
· Try to avoid keeping the door open for long
periods, or opening the door too frequently as
warm air will enter the cabinet, and cause the
compressor to switch on unnecessarily often.
· Ensure there are no obstructions preventing the
door from closing properly.
· Thaw frozen food in the fridge. This will ensure
safer defrosting of foods and reduce the work of
the refrigeration unit
· It is advisable to periodically clean the
refrigeration system at the back of the appliance
with a duster or vacuum cleaner .
· Always leave warm food to cool down to room
temperature before placing in the fridge.
GB
· Food which is to be frozen (when cool) should
be placed in the fridge before being transfered to
the freezer.
· Avoid unnecessary frosting in the cabinet by
packing all foodstuffs into airtight packages
before placing them in the freezer.
· Carefully follow the advice on freezing products
in the section "Using the freezer". This will
prevent wasting energy.
· Do not set the temperature too low in the freezer .
A suitable temperature is in the range of -18°C
to -20°C .
· Defrost the freezer when the frost layer reaches a
thickness of 3-5 mm.
· Make sure the door gasket is complete and
always clean.
Electrolux 818 19 21-01/9
9
Page 10
Food Storage
· To obtain the best results from your appliance,
neither hot foods nor liquids which may
evaporate, should be placed in the larder
compartment.
· Avoid buying frozen food if you can not store it
straight away. The use of an insulated container is
advisable. When you arrive home place the
frozen food in the freezer immediately.
· Ensure that food placed in the freezer is dated and
labelled and used in date order to ensure that food
is consumed at its best.
Remove suspect food from you refrigerator and
clean, refer to cleaning and maintenance.
Protect the environment
· Hand over the cabinet packaging and discarded
fridges and freezers to a recycling station.
Contact your local council or Environmental
Health office for more information.
· Keep foodstuff in re-usable containers. Cut down
on disposable material as much as possible.
· When cleaning the cabinet, use a mild
washing-up detergent.
· Follow the advice in the section "S aving energy"
· The door gasket and coolant used in this
cabinet will not harm the ozone layer.
· All parts in the packaging can be recycled.
· The cabinet has been designed for easy
dismantling and subsequent recycling.
Maintenance and Cleaning
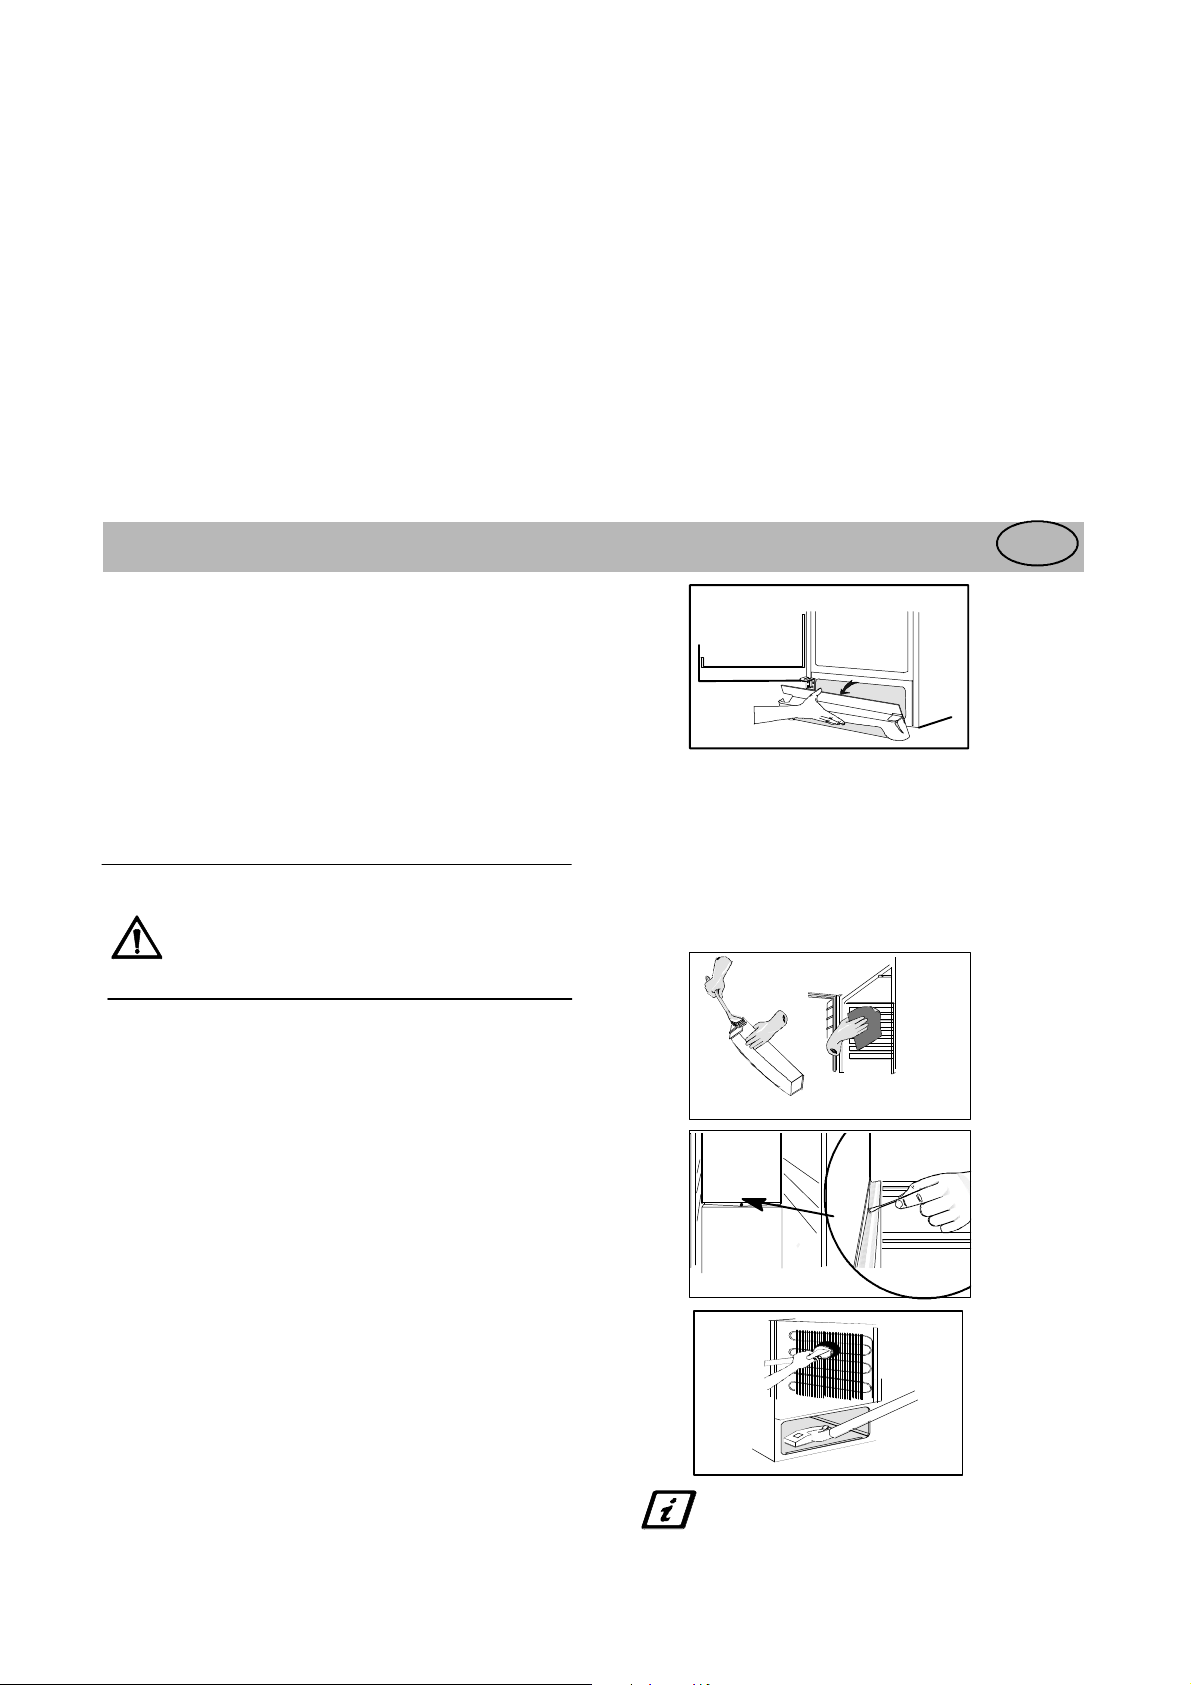
Removing the ventilation grille
The ventilation grille can be removed, e.g. to wash
the grille.
Make sure the door is open when removing the
ventilation grille. Unsnap the upper edge of the grille
by pulling outward/downward. Then pull the grille
straight out to completely remove it.
Cleaning
Clean the cabinet at regular intervals.
Don't use detergents, abrasive powders,
high perfumed cleaning products, wax
polishes or cleaning products
containing bleach or alcohol when
cleaning the product
Disconnect the appliance from electricity supply.
Internal Cleaning
Clean the inside and accessories with warm water
and bicarbonate of soda (5ml to 0,5 litre water)
Rinse and dry thoroughly.
Regularly check the door seals and wipe clean to
ensure they are clean and free from debris.
Clean out the drip channel inside the fridge at
regular intervals and ensure that the drip channel is
clear at all times. If blocked carefully clear using a
piece of flexible curtain wire inserted into the drain
outlet to remove the blockage.
External Cleaning
Wash the outer cabinet with warm soapy water.
Remove the ventilation grille (see the section
"Removing the ventilation grille") and vacuum-clean
under the cabinet. Once or twice a year dust the
condenser (black grille) and the compressor at the
back of the appliance, with a brush or vacuum
cleaner, as an accumulation of dust will af fect the
performance of the appliance and cause excessive
electricity consumption.
GB
When moving the cabinet, lift it by
the front edge to avoid scratching the
floor.
10
Electrolux 818 19 21-01/9
Page 11
Defrosting the fridge
The fridge is defrosted automatically every time the
compressor stops. Frost formation can be prevented
by:
· not putting warm foodstuff inside the cabinet.
· avoiding frequently opening the door or keeping
it open t oo long.
· do not place foodstuffs directly against the cold
cooling plate.
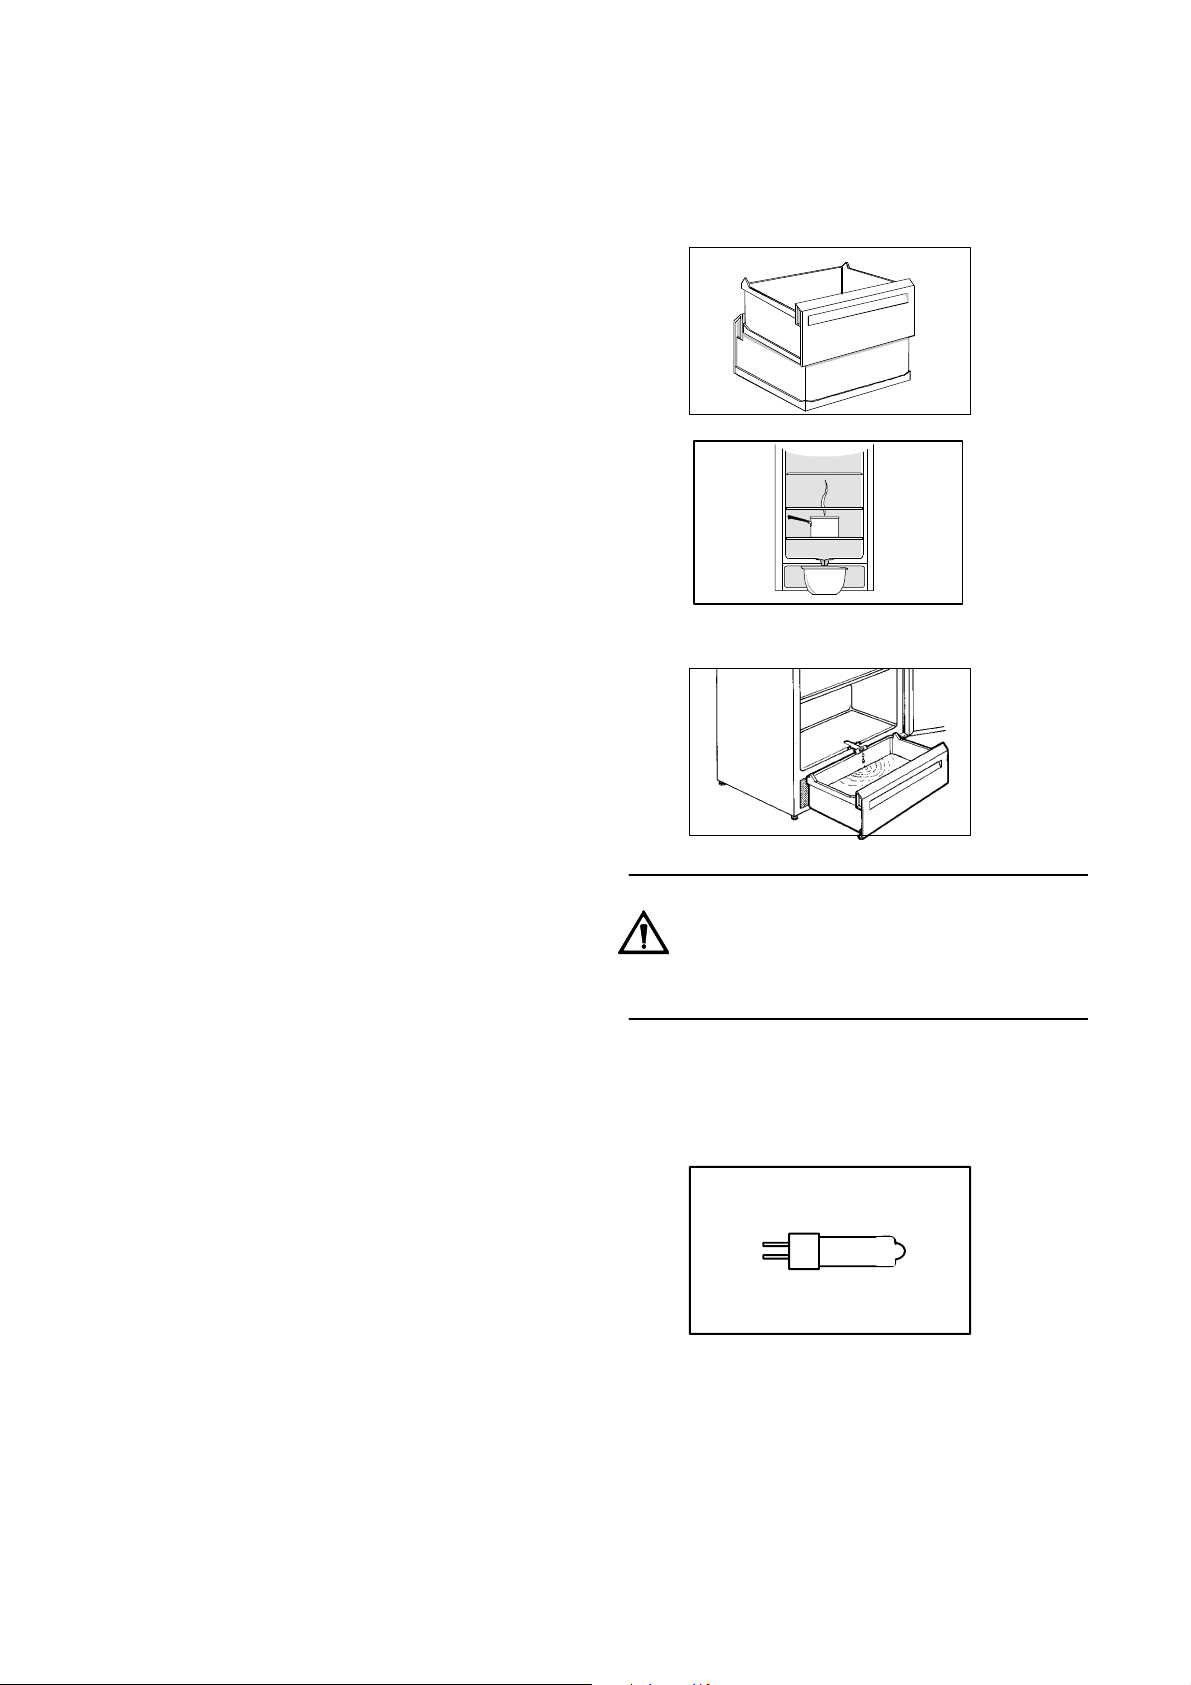
Defrosting the freezer
A certain amount of frost will always form on the
freezer shelves and around the top compartment.
Defrost the freezer when the frost layer reaches a
thickness of about 3-5 mm.
Remove the freezer drawers and place them on top
of each other by turning every other drawer one half
turn. Put insulating material around the drawers, e.g.
blankets or newspapers.
The frozen products can also be packed closely
together and be kept in a cold location, e.g. in the
fridge.
Defrosting can be accelerated by placing bowls with
hot water (not boiling) inside the freezer.
Take out the drain spout and place it in the bottom
freezer drawer where water can collect.
Loosen the ventilation grille to enable the bowl to fit
under the drain spout.
Carefully scrape off the ice when it starts to thaw.
Use a wood or plastic scraper. Do not use sharp
objects as these may damage the interior.
When all the ice has melted, clean and wipe the
cabinet dry, then push the drain spout back in place.
Switch on the cabinet and replace the frozen
foodstuff.
Never use a hair drier or other heating
appliances to speed up defrosting. Excessive
heat may damage the plastic interior, and
humidity could enter the electric appliance
making it live.
To Change the Light Bulb
The light is switched on automatically when the
door is opened. Before replacing the light bulb,
disconnect the power plug from t he outlet.
Cut the packaging around the bulb socket.
Keep the packaging on to hold the bulb when setting
it into the socket. Do not touch the bulb with your
bare fingers. Halogen light bulbs are sensitive to
grease from the skin.
Use a clear halogen light bulb.
When the appliance is not in use
Disconnect the appliance from electricity supply.
Empty all foods and clean the appliance, leaving the
doors ajar to prevent unpleasant smells.
If the cabinet will be kept on, ask somebody to
check it once in a while to prevent the food inside
from spoiling in case of a power failure.
11
G4
UV-blocked
Low pressure20W/12V
Electrolux 818 19 21-01/9
Page 12
Something Not Working
Before contacting your local Service Force Centre check the following point:
Problem Possible cause / Remedy
GB
"" is displayed in the temperature
display.
Or
The yellow Action Freeze and red
warning lamp both flash.
Audible alarm + flashing red warning
lamp. (It is too warm inside the freezer .)
It is too warm inside the refrigerator. Set a lower temperature.
It is too cold inside the refrigerator. Set a warmer temperature.
An error has occurred in measuring the temperature. Call your
service representative. (The cooling system will continue to
keep food products cold, but temperature adjustment will not
be possible.)
Switch off the audible alarm by pressing the alarm shut-off
button.
The audible alarm could have been triggered by:
The cabinet having been recently switched on and the
temperature still being too high. See the chapter "Switching on
and setting the temperature".
The door may have been open for so long that the `door open'
alarm was triggered.
Put food products in the right place inside the refrigerator. See
the chapter "Temperature inside the refrigerator".
Distribute the food products to allow cold air to circulate
around them.
Make sure that the door is completely closed and that the
insulating strip is complete and clean.
Vegetables and other products that are easily frozen have been
placed on a "too cold" shelf. See the chapter "Temperature
inside the refrigerator".
There is water on the cooling plate inside
the refrigerator.
Water is running inside the refrigerator. Clean the water drain and drain hole inside the refrigerator
Water comes out on the floor. Place the drain hose at the back of the cabinet above the drain
It is too warm inside the freezer. Set a lower temperature.
It is too cold inside the freezer. Set a warmer temperature.
This is normal. During automatic defrosting, frost thaws on the
cooling plate.
using e.g. cotton swabs or a bottle cleaner brush.
Some food products could have been placed near the rear of the
appliance prevetung the water from running into the drain.
bowl. See the chapter "Before using t he cabinet the first time".
Make sure that the door is completely closed and that the
insulating strip is complete and clean.
If warm food products have been put inside the freezer, wait for
a couple of hours and then check the temperature again.
Distribute the food products to allow cold air to circulate
around them.
Action Freeze could have been switched on.
The temperature display s hows the highest temperature inside
the cabinet. Thus a difference between the temperature
indicated on the display and the (average) t emperature
measured in another way is normal.
12
Electrolux 818 19 21-01/9
Page 13
Too much frost and ice are produced. Make sure that the door is completely closed and that the
insulating strip is complete and clean.
The compressor operates continuously. Set a warmer temperature.
Make sure that the door is completely closed and that the
insulating strip is complete and clean.
The cabinet does not operate at all.
Cooling or interior light does not
operate. No indicator lamps light.
Sound level in cabinet is too high. The refrigerating system will always produce some sounds. A
Power failure Do not unnecessarily open the cabinet, except when the power
The cabinet is not switched on.
Power does not reach the cabinet. (Try connecting another
electrical device to the power outlet.)
The fuse has blown.
The power plug is not properly connected.
pulsing sound is heard when coolant is pumped inside the
cooling pipes. A ticking sound from the thermostat can be
heard when the compressor switches on and off. The sound
level varies depending on the operation of the cabinet.
If you feel the sound level is incorrect:
Make sure the pipes at the back of the cabinet not touch each
other. Carefully bend them if they do.
If the cushion spacers (between the cabinet wall and pipes)
come loose, put them back in place again.
Carefully follow the instructions in the chapter "Installing the
cabinet".
cut seems to be long, in which case the food products should be
moved to another cabinet that works. If the frozen products are
still hard following the power cut, they may be immediately
refrozen. If the food products have thawed but are still fresh,
they may be used, however they should be prepared before
re-freezing or eating them.
Guarantee Conditions
See Guarantee Conditions on the Registration Card.
Customer Care Department
For general enquiries concerning your Electrolux
appliance or futher information on Electrolux
products, you are invited to contact our Customer
Care Department by letter or phone as follows:
Customer Care Department
Electrolux
55-77 High Street
Slough
Berkshire
SL1 1DZ
Phone: 08705 950950 *
* calls to this number may be recorded for training
purposes
ServiceandSpareParts
In the event of your appliance requiring service, or
if you wish to purchase spare parts please contact
your local Electrolux Service Force Centre by
telephoning:
XXXXXXXXXXX
Your call be routed the Service Force Centre
covering your post code area. The address of your
local Service F orce Centre ids detailed in the
accompanying Customer Care Book.
Before calling out an engineer, please ensure you
have read the details under the heading "Something
Not Working"
When you contact the Service Centre you will need
to give the following details.They will be found
inside your appliance.
MOD (modell):.....................................................
PROD.NO (model number):..................................
SER:NO (serial number):.......................................
Purchase date............................................................
13
Electrolux 818 19 21-01/9
Page 14
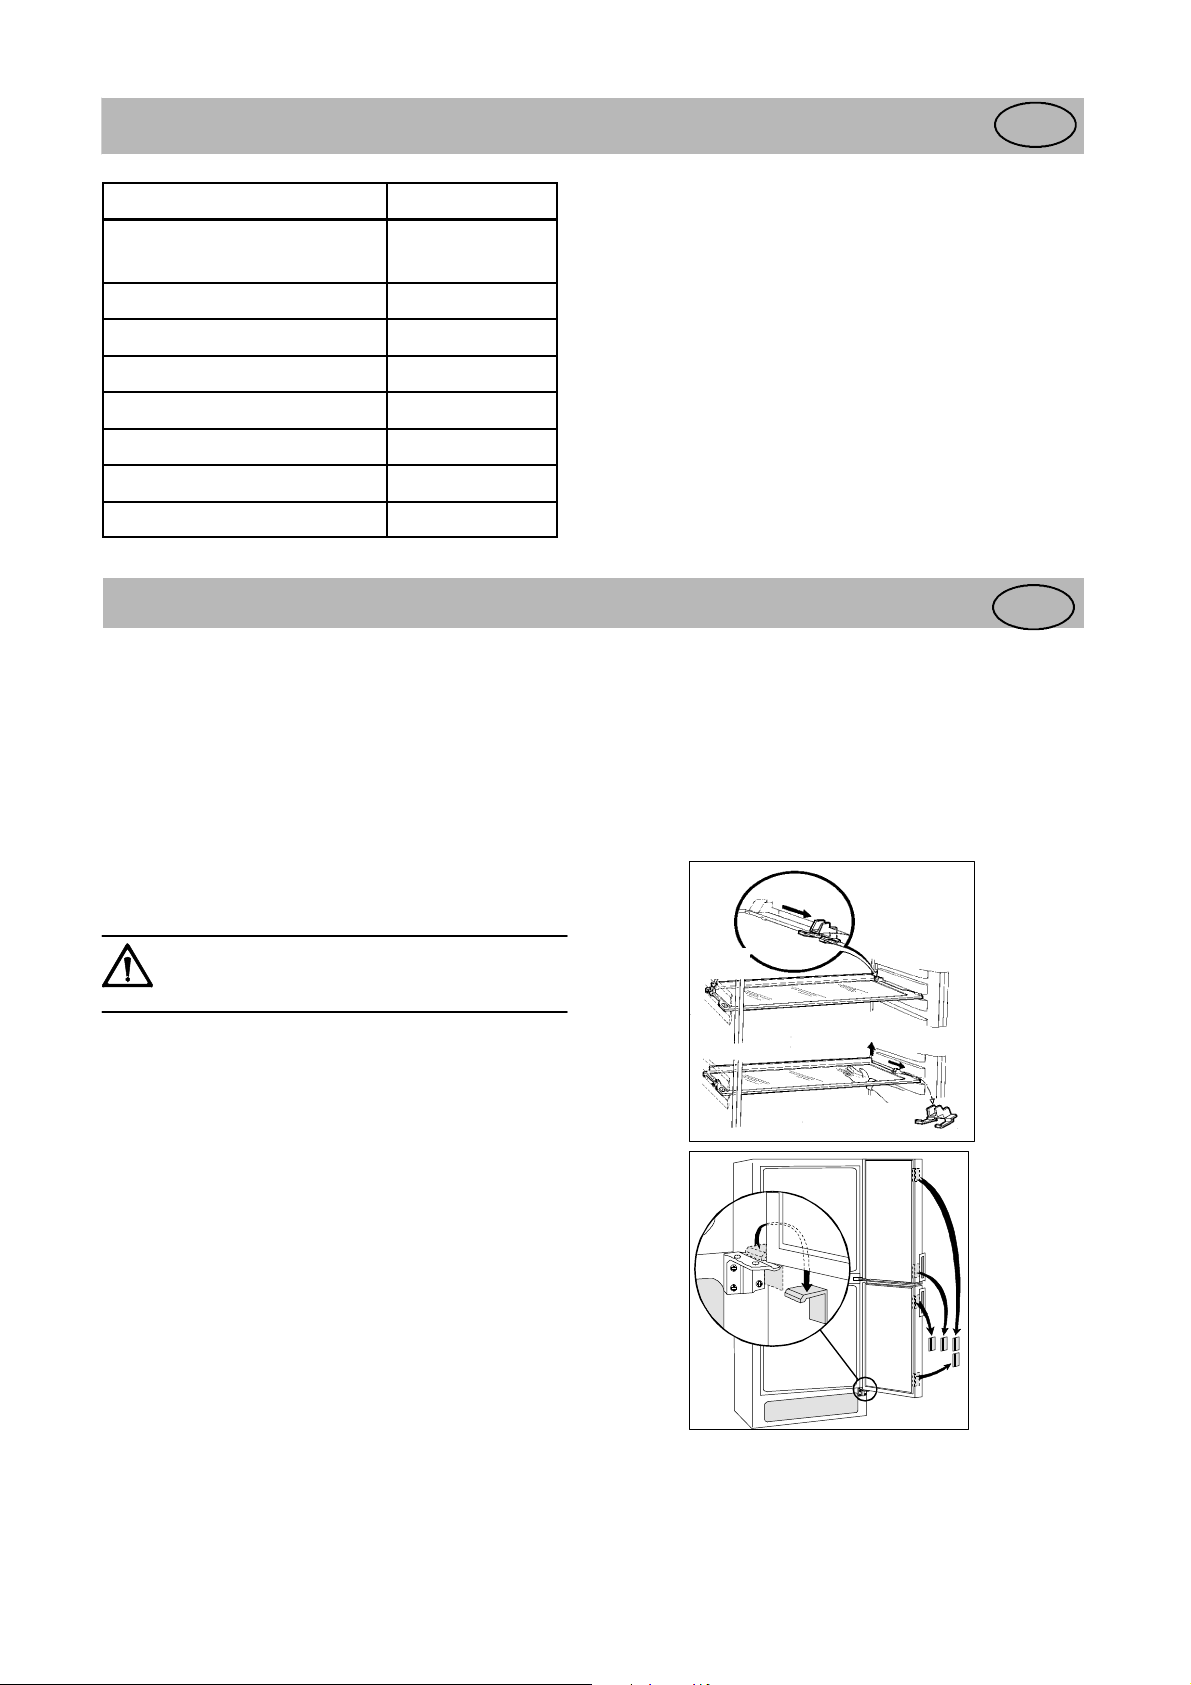
Technical specification
Model ER8998B
GB
Volume fridge
Volume freezer
Width 595 mm
Height 2000 mm
Depth 600 mm
Energy consumption 372 kWh/y
Energy class A
Rated power 160W
Freezing capacity 12 kg/24 h
228 l
124 l
Installation
Mains Cable
Installation of distance
Assemble the attached distance on the back side of
the panel according to the illustration.
Unpacking
Unpack the cabinet and check that it is in good
condition and free of any transport damage. Notify
the dealer immediately of any damage. Hand the
packaging over for recycling. For more information,
contact your local city office or the dealer.
GB
Do not allow children to play with the
packaging. The plastic film can cause
suffocation.
Cleaning
Wash the inside of the cabinet using lukewarm
water, a mild washing-up detergent and a soft cloth.
Remove the transport supports
Remove the tape and the transport supports from
· the door sides
· inside the door hinges
· the shelves
Remove the transport support on the glass shelf by
pushing the support forward along the edge of the
shelf until it stops. Take hold of the rear edge of the
glass shelf and pull the shelf and transport support
forward until the shelf tilts and the transport support
can be removed.
14
Electrolux 818 19 21-01/9
Page 15
Installing the cabinet
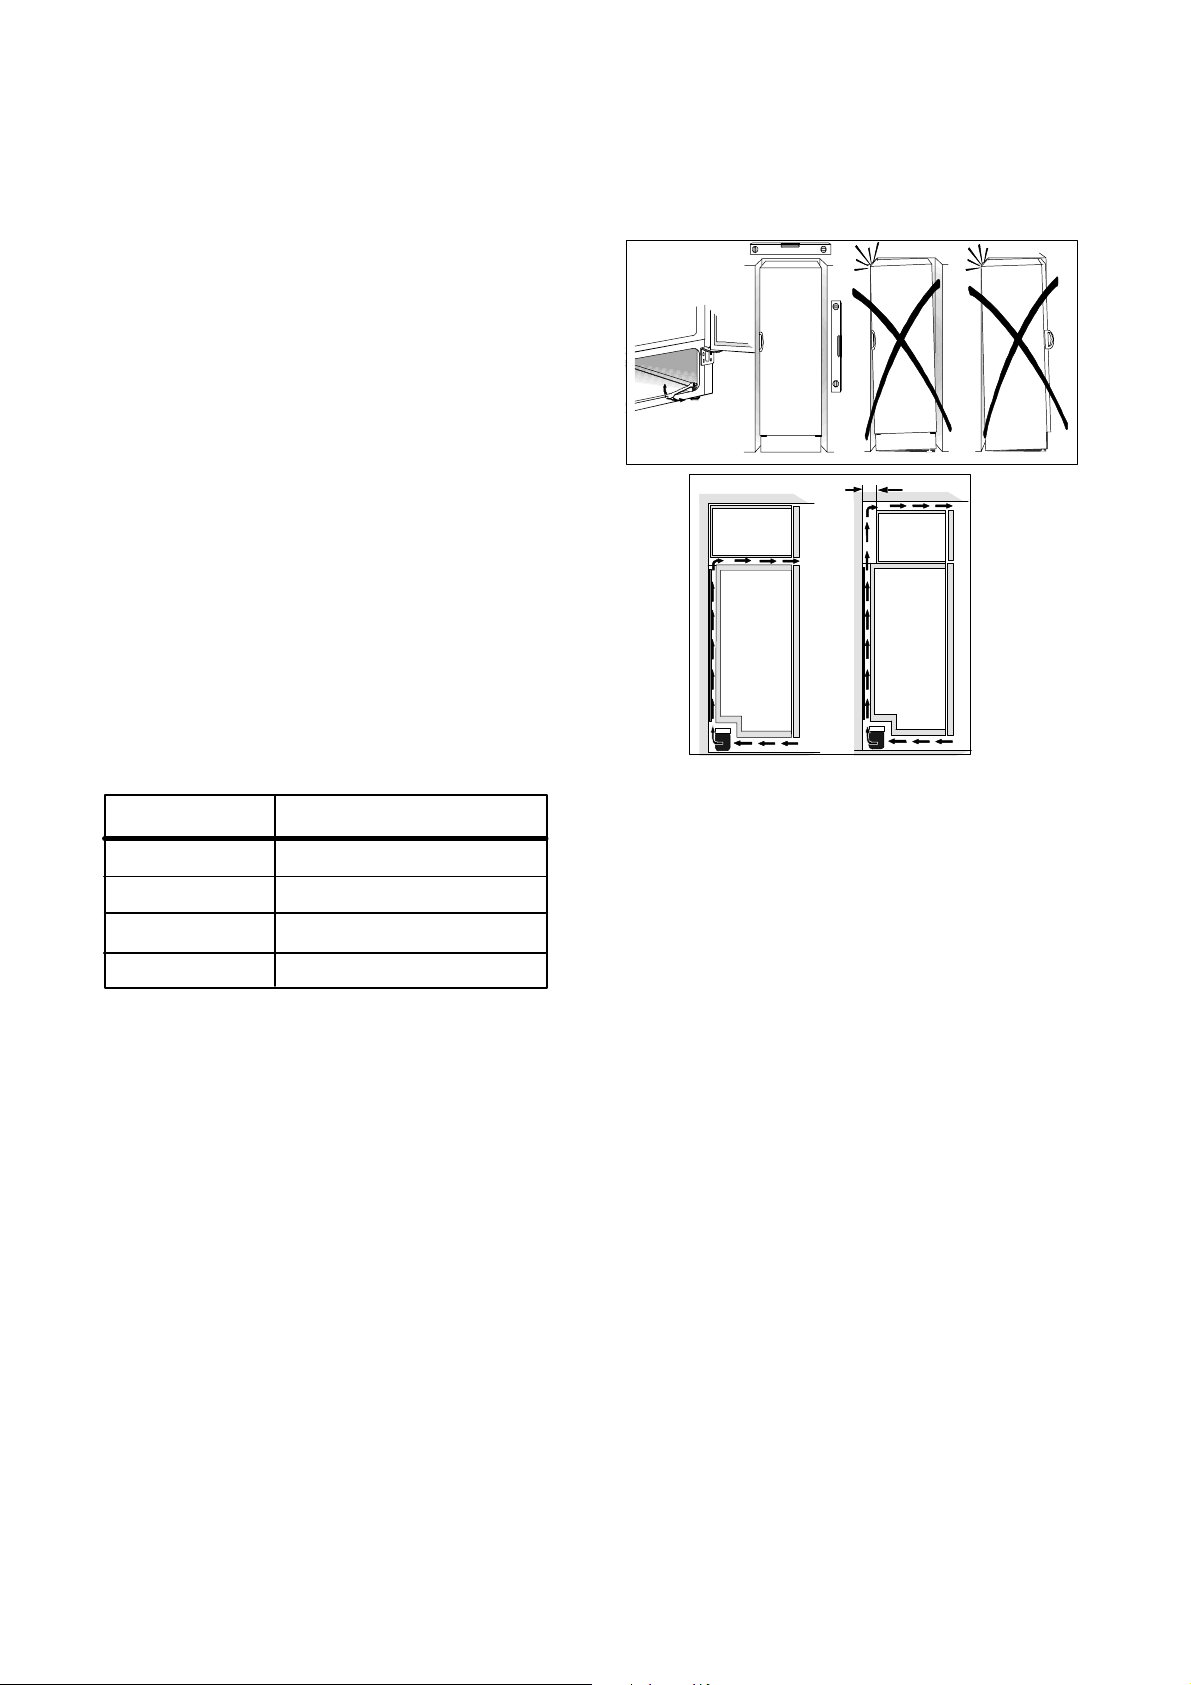
To obtain the best performance from the cabinet,
ensure :
· the cabinet is placed in a dry, cool place and
is not exposed to direct sunlight.
· the cabinet is not placed close to a source of
heat, e.g. a cooker or dishwasher.
· the cabinet is level. The cabinet should not lean
against any wall. If necessary adjust the
feet using the adjustment spanner supplied.
· there is good air circulation around the cabinet
and that the air channels below and behind
the cabinet are not blocked. The ventilation
space above the cabinet must be at least 4 cm.
The ventilation space can either be
a) directly above the cabinet, or
b) behind and above the top cupboard. In this case,
the space behind the cupboard must be at least
50 mm deep.
Cabinet is placed at a location whose ambient
temperature corresponds to the climate
classification*, for which the appliance is designed.
* See on the rating plate on the inside of the
appliance.
The following table shows which ambient
temperature is correct for each climate classification.
Climate
classification
SN
for an ambient temperature of
+10°C to +32°C
a)
b)
50mm
N
ST
T
+16°C to +32°C
+18°C to +38°C
+18°C to +43°C
Check that the drain hose at the rear of the cabinet
discharges into the drip tray.
If the cabinet is placed in a corner and the side with
the hinges facing the wall, the distance between the
wall and the cabinet must be at least 220 mm to
allow the door to open enough so that the shelves
can be removed.
The power plug must be accessible after installation
of the cabinet.
Electrical connection
Connect the cabinet to a grounded electrical outlet.
Voltage: 230 V.
Fuse: 10 A.
Refer to the rating plate on the left inside the
cabinet.
15
Electrolux 818 19 21-01/9
Page 16
Door Reversal
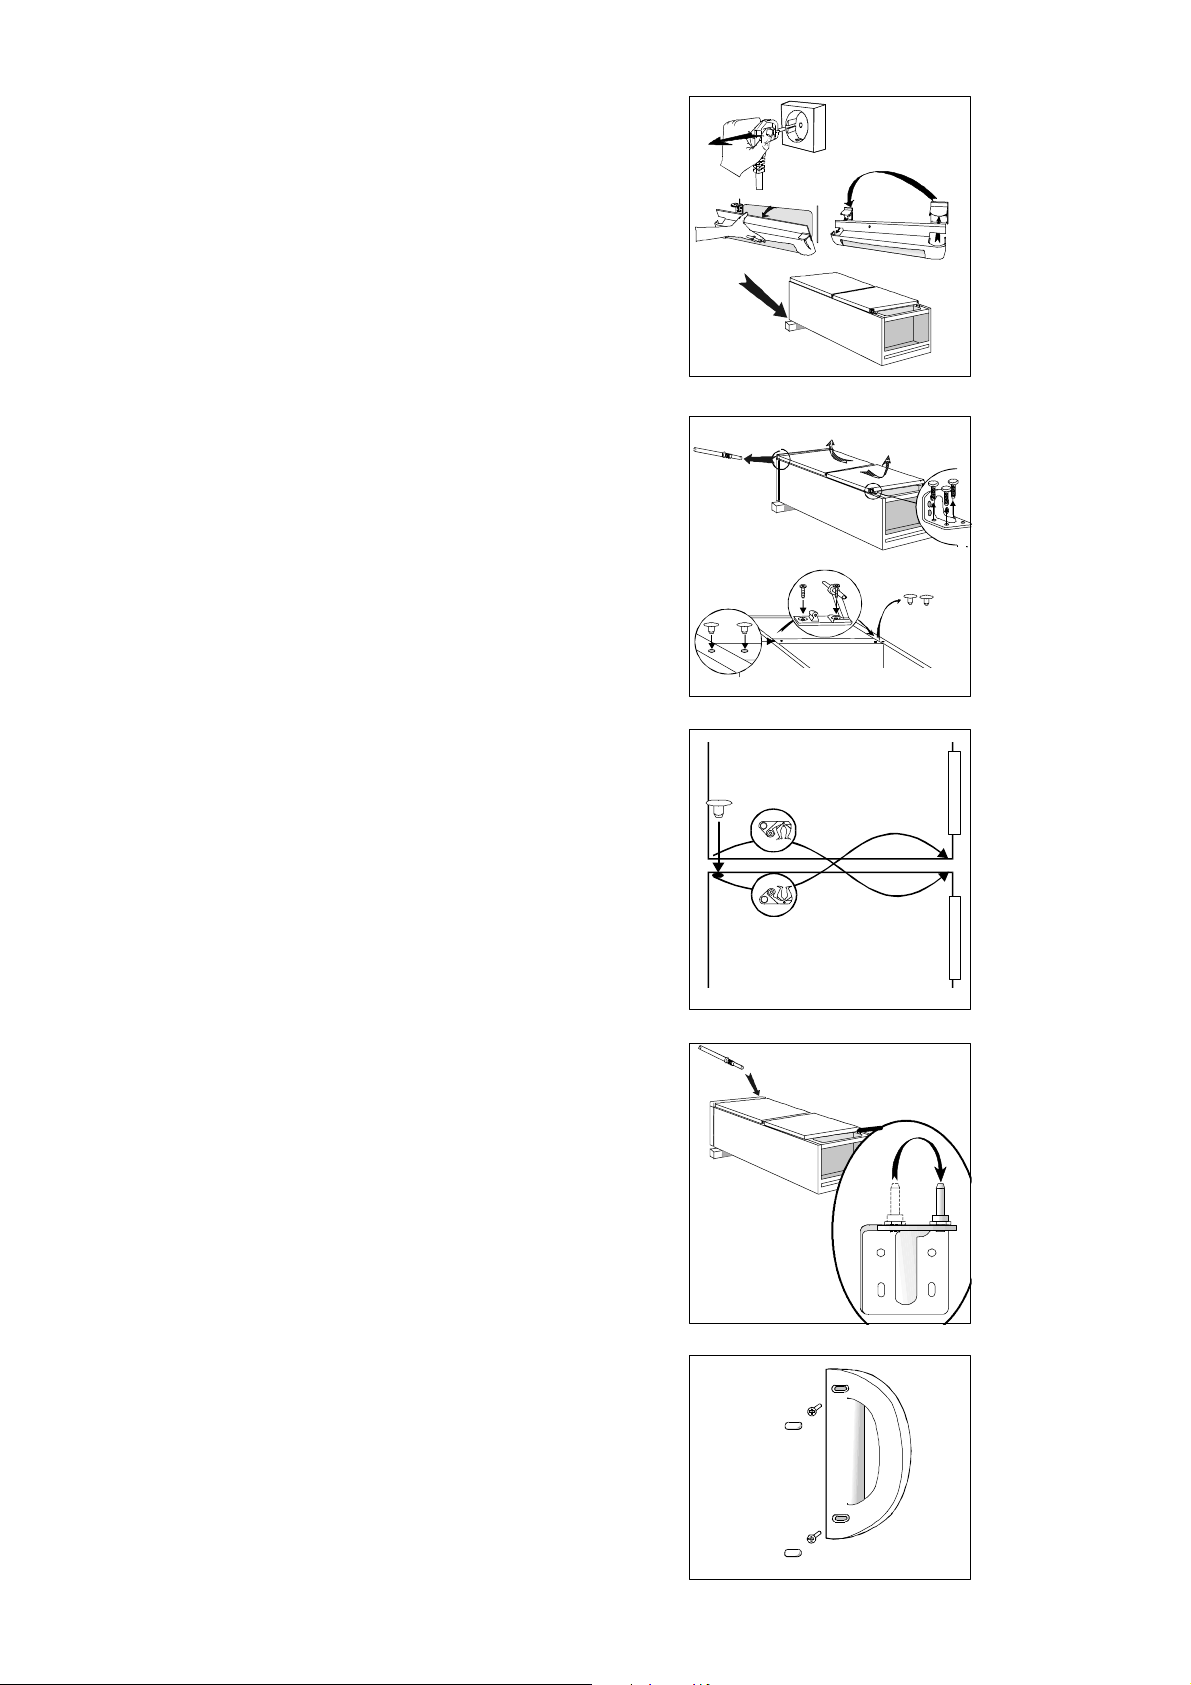
1. Close the cabinet and remove the plug from the
electrical socket.
2. Remove the ventilation grille. There is a part on
the grille that can be removed. Reposition it and put
it on the other side.
3. Put the cabinet on a wooden board when it is laid
down. Later, when raising the cabinet, it will be
easier to grip under the cabinet thanks to the board.
1
2
3
4. Unscrew the lower hinge and remove the lower
door. Unscrew the upper hinge pin and remove the
upper door.
5. On the centre beam:
Remove the plastic plugs by driving a drift into them
and rocking them loose.
Move the centre hinge unit to t he other side. Flatten
the threads in the holes remaining from the hinges
and insert new plastic plugs.
6. On the doors: Change the positions of the door
fittings. Put a new plug in the hole on the lower
door.
7. Replace the upper door and secure the upper hinge
pin.
Replace the lower door. Change the position of the
hinge pin of the lower hinge. Then secure the hinge.
Remove any play in the door by adjusting the height
of the lower hinge with the supplied spanner. Secure
with the lock-nut.
4
5
6
8. Raise the cabinet and replace the ventilation grille.
9. Change the position of the handle.
Remove the cover washers concealing the screws. If
the washers are difficult to remove, use a small, flat
screwdriver.
Then unscrew the handle.
Carefully press the plastic plugs into the holes on the
side opposite that of the door using a drift. S ecure
the handle in the plug holes. If the handle is
mounted by hand, then turn the screws in the holes a
couple of times prior to securing the handle. Press
the supplied plastic plugs into the holes to which the
handle was previously fitted.
10. Put the cabinet in position. Check that it stands
straight. See the section "Positioning the cabinet".
7
9
16
Electrolux 818 19 21-01/9
Page 17
qЬЙ=bдЙЕнкздмс=dкзмй=бл=нЬЙ=пзкдЗDл=д~кЦЙлн=йкзЗмЕЙк=зС=йзпЙкЙЗ=~ййдб~еЕЙл=Сзк=вбнЕЬЙеI=ЕдЙ~ебеЦ=~еЗ=змнЗззк=млЙK
jзкЙ=нЬ~е=RR=гбддбзе=bдЙЕнкздмс=dкзмй=йкзЗмЕнл=EлмЕЬ=~л=кЙСкбЦЙк~нзклI=ЕззвЙклI=п~лЬбеЦ=г~ЕЬбеЙлI=о~Еммг=ЕдЙ~еЙклI
ЕЬ~бе=л~пл=~еЗ=д~пе=гзпЙклF=~кЙ=лздЗ=Й~ЕЬ=уЙ~к=нз=~=о~дмЙ=зС=~ййкзсK=rpa=NQ=Дбддбзе=бе=гзкЙ=нЬ~е=NRM=ЕзменкбЙл
~кзмеЗ=нЬЙ=пзкдЗK
aбЙ=bдЙЕнкздмсJdкмййЙ=блн=ЗЙк=пЙднпЙбн=Цк∏≈нЙ=eЙклнЙддЙк=озе=Ц~лJ=меЗ=лнкзгÄЙнкбЙÄÉåÉå=dÉê®íÉå=ÑΩê=ÇáÉ=hΩЕЬЙI=тмг
oЙбебЦЙе=меЗ=СΩк=cзклн=меЗ=d~кнЙеK=gЙЗЙл=g~Ьк=оЙкв~мСн=ЗбЙ=bдЙЕнкздмсJdкмййЙ=бе=ΩÄЙк=NRM=i®еЗЙке=ЗЙк=bкЗЙ=ΩÄЙк=RR
jбддбзеЙе=mкзЗмвнЙ=EhΩЬдлЕЬк®евЙI=eЙкЗЙI=t~лЕЬг~лЕЬбеЙеI=pн~мÄл~мЦЙкI=jзнзкл®ЦЙе=меЗ=o~лЙег®ЬЙкF=гбн=ЙбеЙг
tЙкн=озе=кмеЗ=NQ=jкЗK=rpaK
Skupina Electrolux je největším výrobcem spotřebičů pro kuchyň, čistotu a venkovní použití. Více než 55 milionů
výrobka Skupiny Electrolux / jako jsou chladničky, sporáky, pračky, vysavače, řetězové pily a travní sekačky/ v celkové
hodnotě až 14 miliard USD je prodáno každým rokem ve více než 150 zemích světa.
MARIESTAD DT--AV
 Loading...