

Page 1
refrigerator / réfrigérateur / kühlgeräte / frigorifero /
koelkast / køleskap
INSTRUCTION BOOKLET
NOTICE D’UTILISATION
GEBRAUCHSANWEISUNG
ISTRUZIONI D’USO
GEBRUIKSAANWIJZING
BRUGSANVISNING
818 16 03 -- 01/3
ER8218C, ER8817CX
GB
FR
DE
IT
NL
DK
Page 2
Safety instructions
Your new fridge may have other functions compared to your previous one.
Carefully read these instructions to learn how the appliance works and how to care for it. Keep the
booklet. It will come in handy if you later sell the cabinet or give it to somebody else.
These warnings are provided in the interests of your safety. Ensure that you understand them all before
installing or using the appliance. Your safety is of paramount importance. If you are unsure about any of the
meanings or warnings contact the Customer Care Department.
For the User
· The cabinet is intended for keeping foodstuff in a
normal household as explained in this instruction
booklet.
· Do not keep explosive gases or liquids in the
refrigerator or freezer compartment. They may
explode and cause injury and material damage.
· Do not let sharp objects come into contact with
the refrigerating system on the back of and inside
the cabinet. If the refrigerating system is
punctured, the cabinet will be damaged and
foodstuff inside may spoil.
· Do not keep carbonised drinks or bottles in the
freezer compartment. The glass bottles may
break.
· The cabinet is heavy. The edges and projecting
parts of the cabinet may be sharp. Be careful
when moving the cabinet and always use gloves.
Child Safety
· Pay attention so that small children do not gain
access to the operating controls or the inside of
the cabinet.
Scrapping old cabinets
When discarding the cabinet, hand it over to a
recycling station. For more information, call your
local city office or your dealer.
GB
instruction
Contents
Safety instructions 2.................
Scrapping old cabinets 2.......................
Contents 2..........................
Description of the Appliance 3........
Control Panel 3..............................
Before use 4.........................
Using fridge 4.......................
To start the fridge and set the correct temperature 4.
Temperature inside the fridge 4.................
Measuring the temperature 5...................
Switching off 5..............................
Cabinet interior 5............................
Hints and Tips 6.....................
Saving energy 6.............................
Food Storage 6..............................
Protect the environment 6......................
GB
Maintenance and Cleaning 6..........
Removing the ventilation grille 6................
Cleaning 6..................................
Defrosting the fridge 7........................
To Change the Light Bulb 7....................
When the appliance is not in use 7...............
Something Not Working 8............
Guarantee Conditions 9.......................
Service and Spare Parts 9......................
Technical specification 9.............
Installation 9........................
Unpacking 9................................
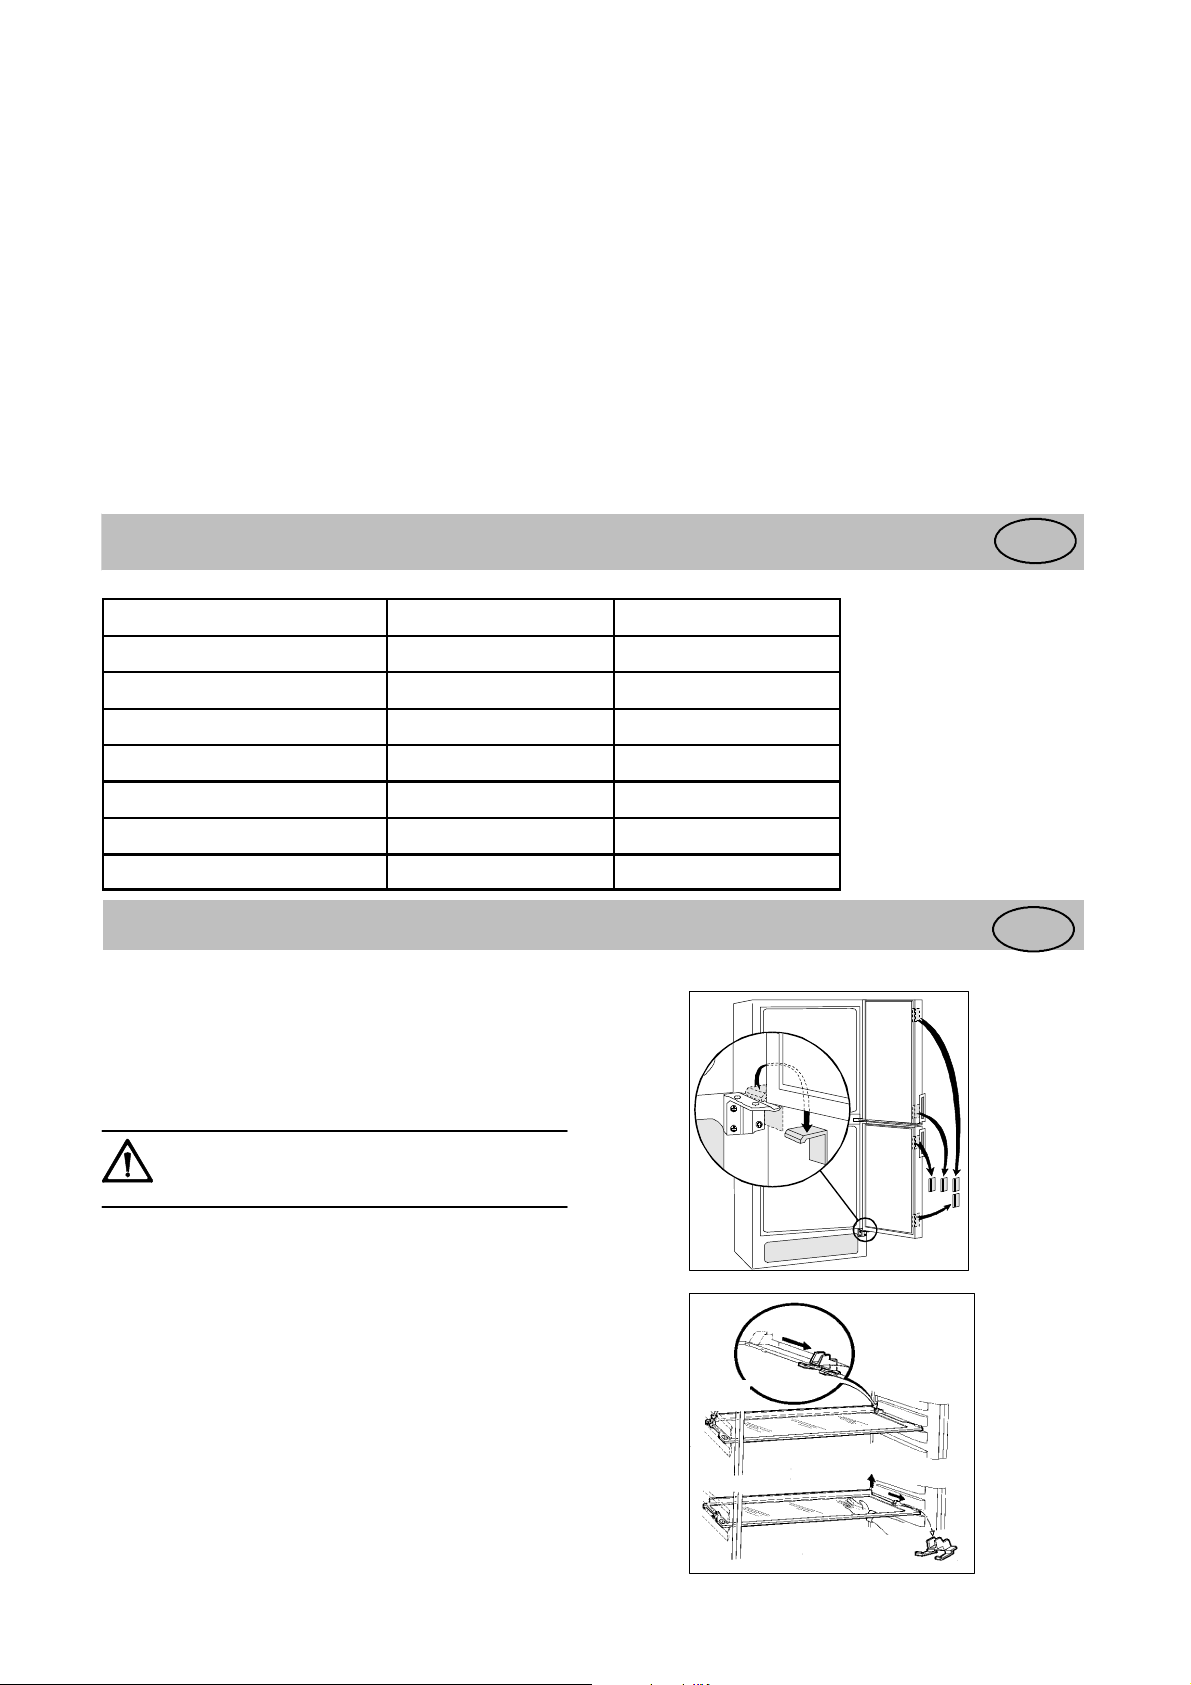
Remove the transport supports 10................
Cleaning 10..................................
Installing the cabinet 10........................
Door Reversal 11.............................
Electrical connection 11........................
Electrolux 818 16 03--01/3
2
Page 3
Description of the
A
7
8
9
4
4
11
11
10
12
1
2
1
1
3
5
1
1
1
5
6
ppliance
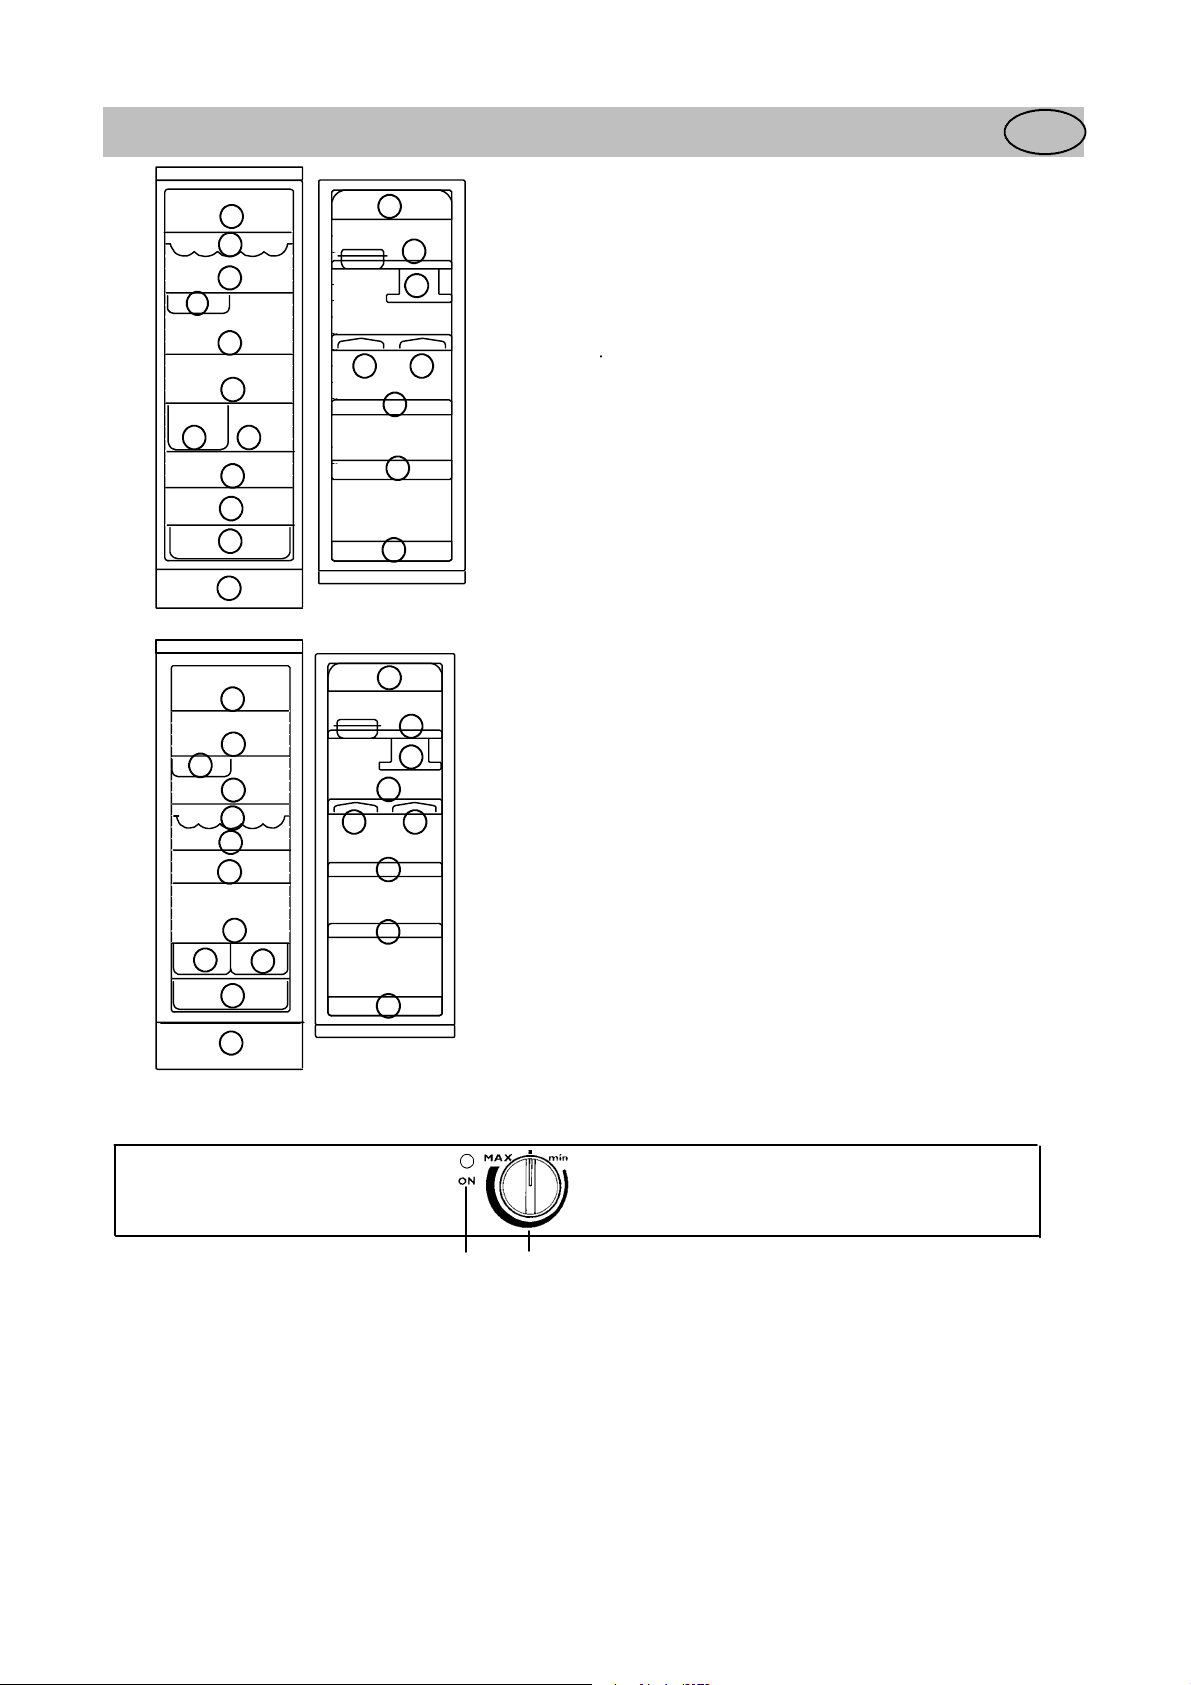
Modell ER8817CX
1. Glass shelf
2. Bottle shelf
3. Dividing plate between
fridge and chiller
4. Egg tray
5. Vegetable drawer
6. Ventilation grille
7. Dairy compartment
8. Door shelf + box
9. Sliding shelf
10. Bottle shelf
11. Door shelf
12. Hangi ng box
GB
1
1
3
1
2
1
1
1
5
5
5
6
Control Panel
7
Model ER8218C
1. Glass shelf
8
9
11
4
4
11
2. Bottle shelf
3. Hanging box
4. Egg holder
5. Vegetable drawer
6. Ventilation grille
7. Butter compartment
8. Door shelf +box
11
9. Sliding shelf
10. Bottle shelf
10
11. Door shelf
A. Green indicator lamp
Lights when the fridge is operating.
AB
B. Thermostat control
Usetoswitchonandsetthedesiredtemperaturein
the fridge.
Electrolux 818 16 03--01/3
3
Page 4
Before use
Position and clean the cabinet as explained in the
section "Installation".
Check that the drain hose at the rear of the cabinet
discharges into the drip tray.
Before inserting the power plug into the
outlet and switching on the cabinet for
the first time, leave it standing upright
for about 30 minutes, or for 4 hours if it
was transported horizontally. Otherwise
the compressor may sustain damage.
This time will allow t he oil sufficient
time to return to the compressor.
GB
Using the fridge
To start the fridge and set the
correct temperature
Turn the thermostat control to the desired position.
MIN The lowest position of the thermostat control
results in the highest temperature inside the cabinet.
MAX The highest position of the thermostat control
results in the lowest t emperature inside the cabinet.
H : S witched off.
Allow the cabinet to run for a period of 24 hours
whenever the temperature setting is changed. This
will allow the temperature to stabilise inside the
cabinet.
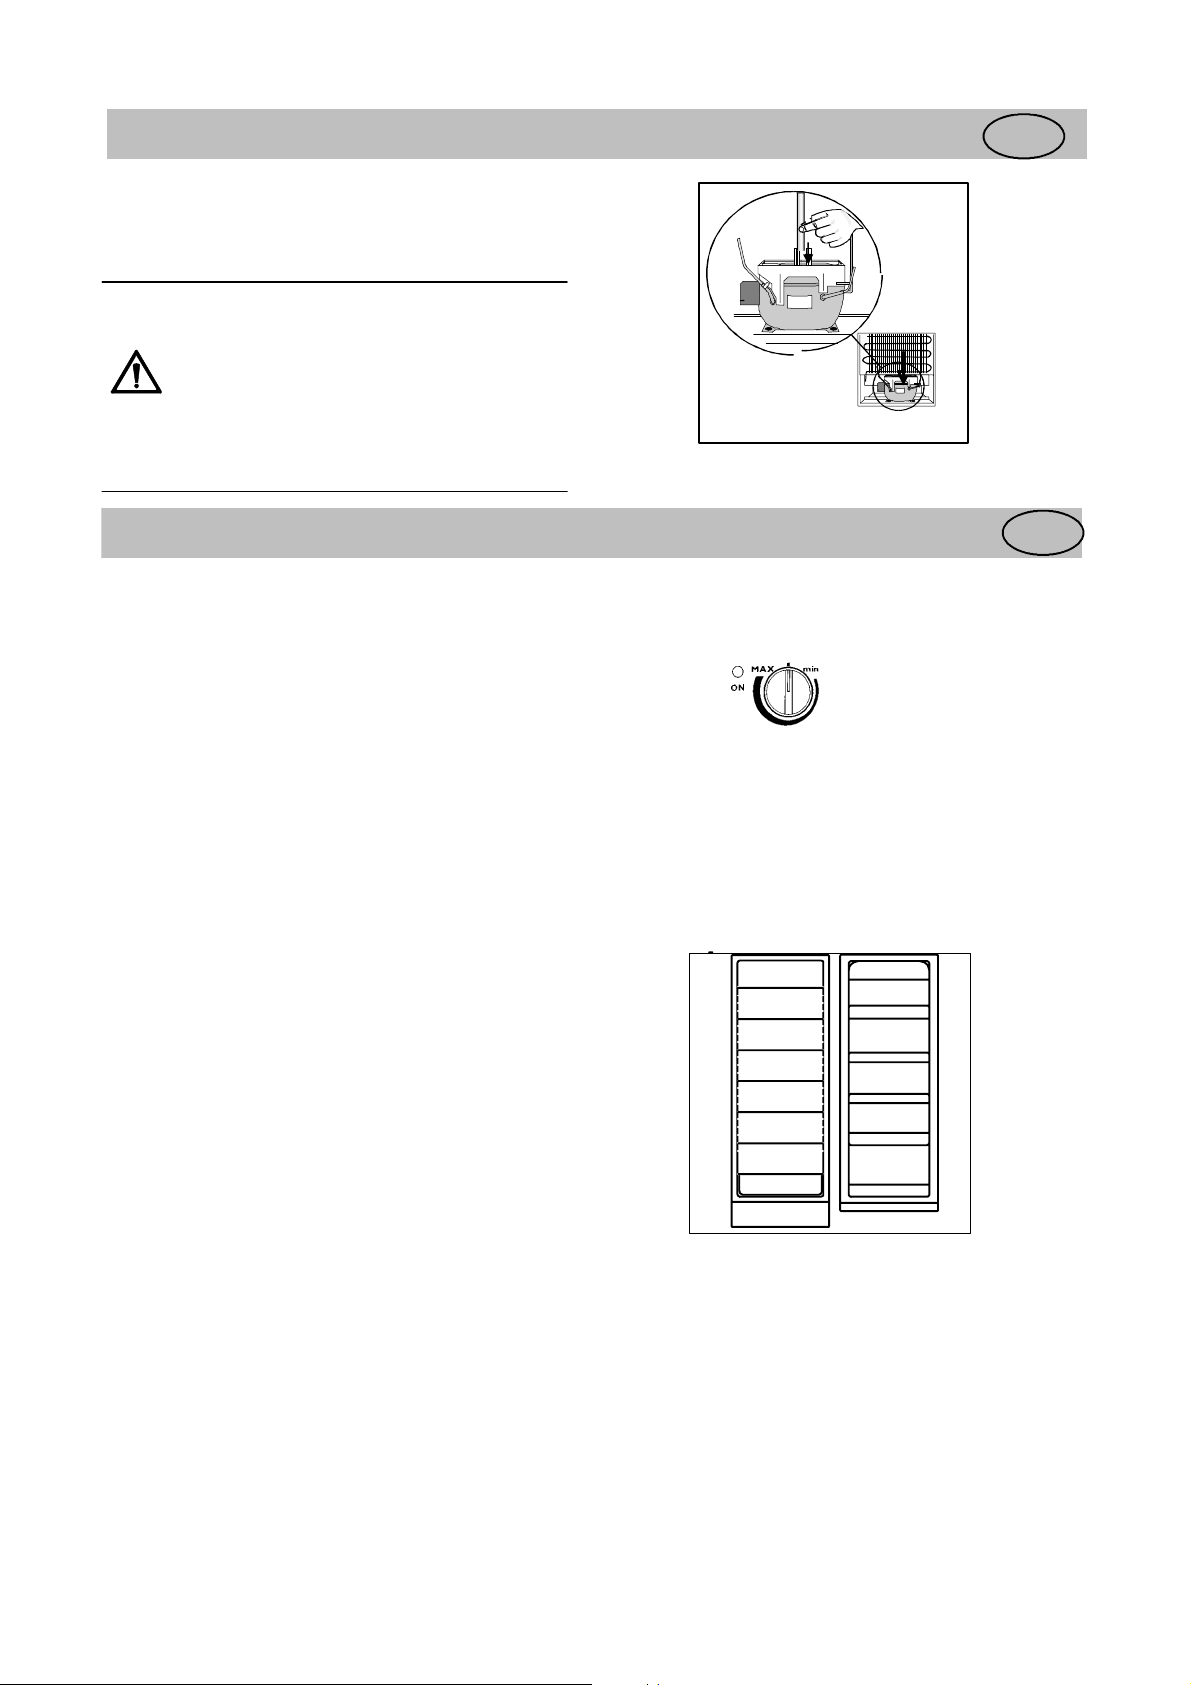
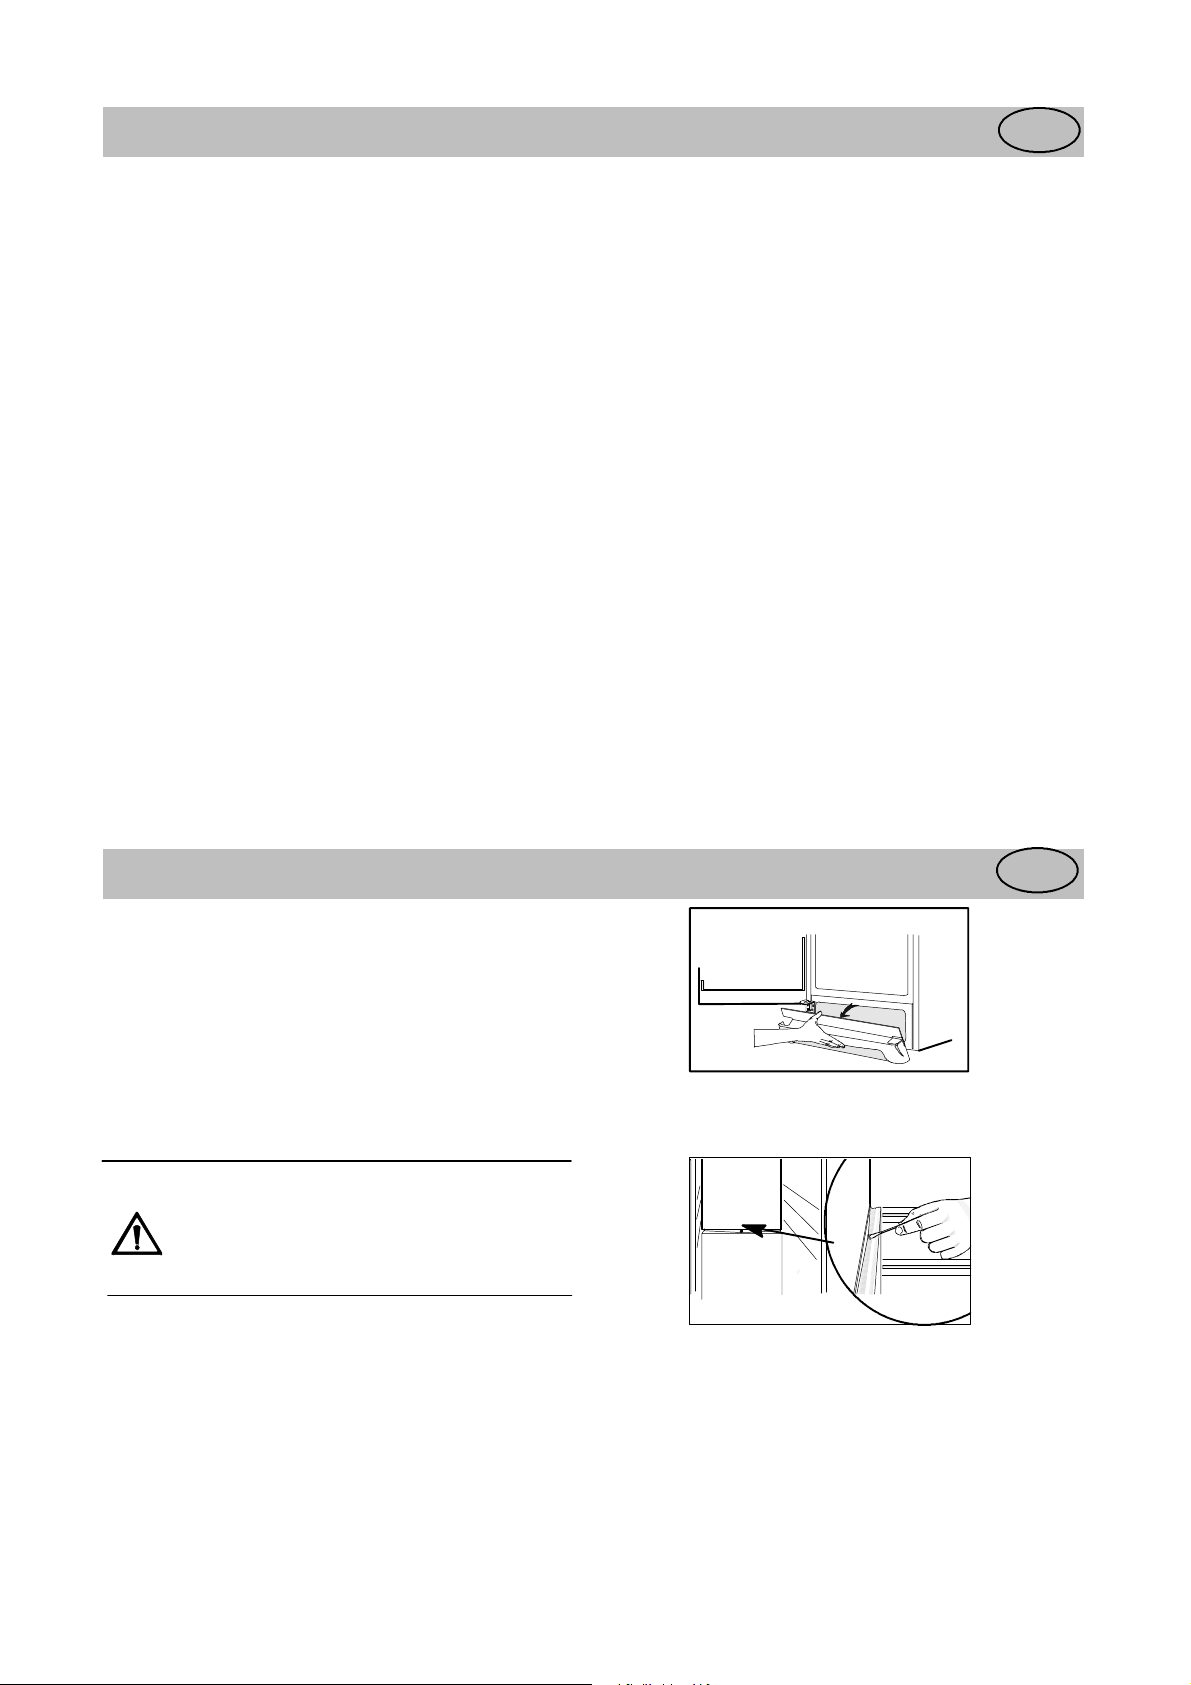
Temperature inside the fridge
A suitable t emperature inside the fridge is approx.
+5°C. If the thermostat control is set to a too cold
temperature, food with a high water content may
start to freeze if it has been placed in the coldest
places in the fridge. The picture shows the coldest
and warmest places inside the fridge.
(+ warm, - cold)
Meat, fish and milk should be put in the coldest part
of the cabinet.
The temperature will be affecteed by:
· How often the door is opened
· How much food is stored
· Position of the appliance (See chapter
Installation)
GB
+
--
--
--
+
+
+
+
+
--
+
+
Electrolux 818 16 03--01/3
4
Page 5
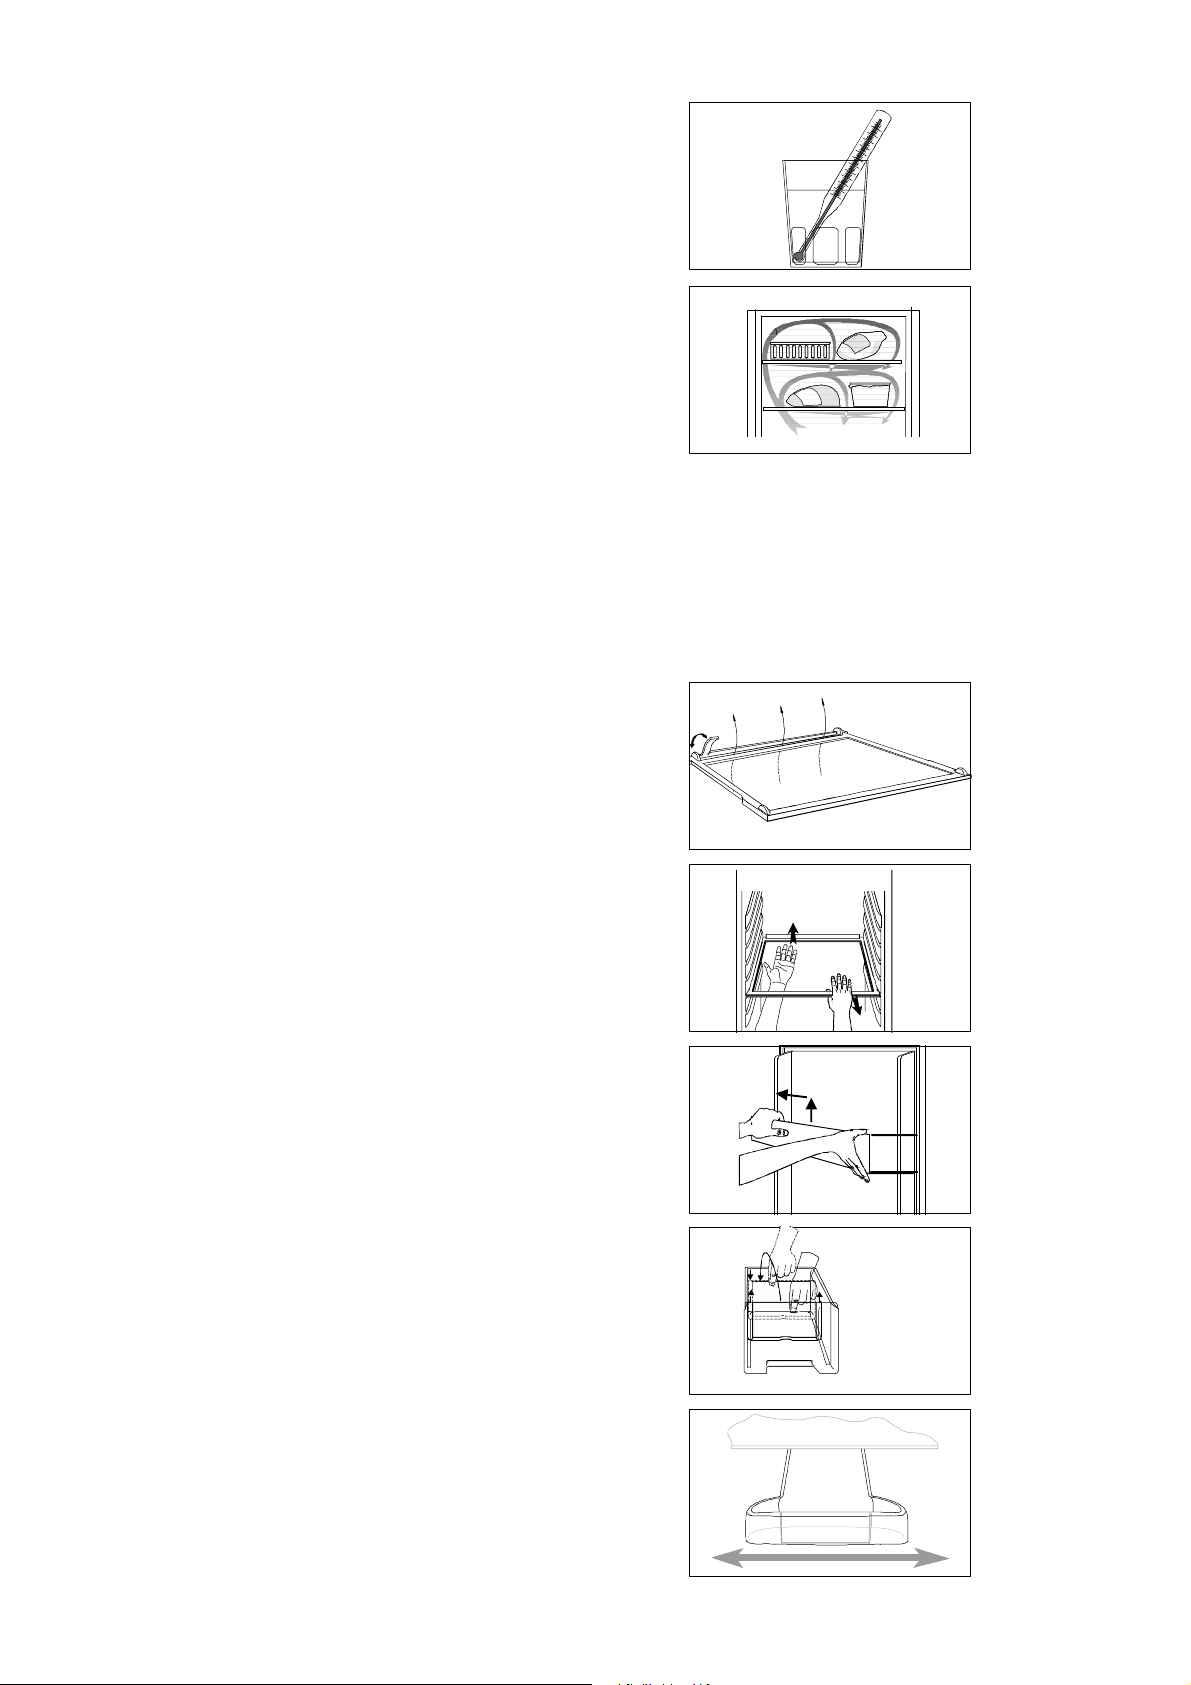
Measuring the temperature
If the t emperature is measured using a standard,
single thermometer, this should be put in a glass of
water centrally placed inside the cabinet. This will
reflect the temperature inside the food products. Do
not place the thermometer hanging or lying directly
on the shelf.
Hints:
· Distribute foodstuffs to allow cold air to
circulate freely between the products.
· Do not place food products directly against the
cooling plate on the rear wall since they may
freeze in this case.
· Also never put warm products into the cabinet.
Wait until they have cooled down.
· Cover all foods properly to avoid odours and
flavours from tainting other food.
Switching off
Turn the control anti-clockwise past the click
position to "H".
Unplug the power supply plug from the wall socket
or, alternatively, remove the fuse.
Cabinet interior
ER8817CX
Dividing plate
The dividing plate separates the chiller compartment
from the fridge. The dividing plate features a grille
that can be opened and closed to control the amount
of cold air entering the chiller compartment. When
the grille is opened, the chiller compartment will
become colder.
In fridges with a single door, the dividing plate can
be moved to increase the size of the refrigerator
compartment. The dividing plate should always be
placed under the drip channel and opposite a door
compartment.
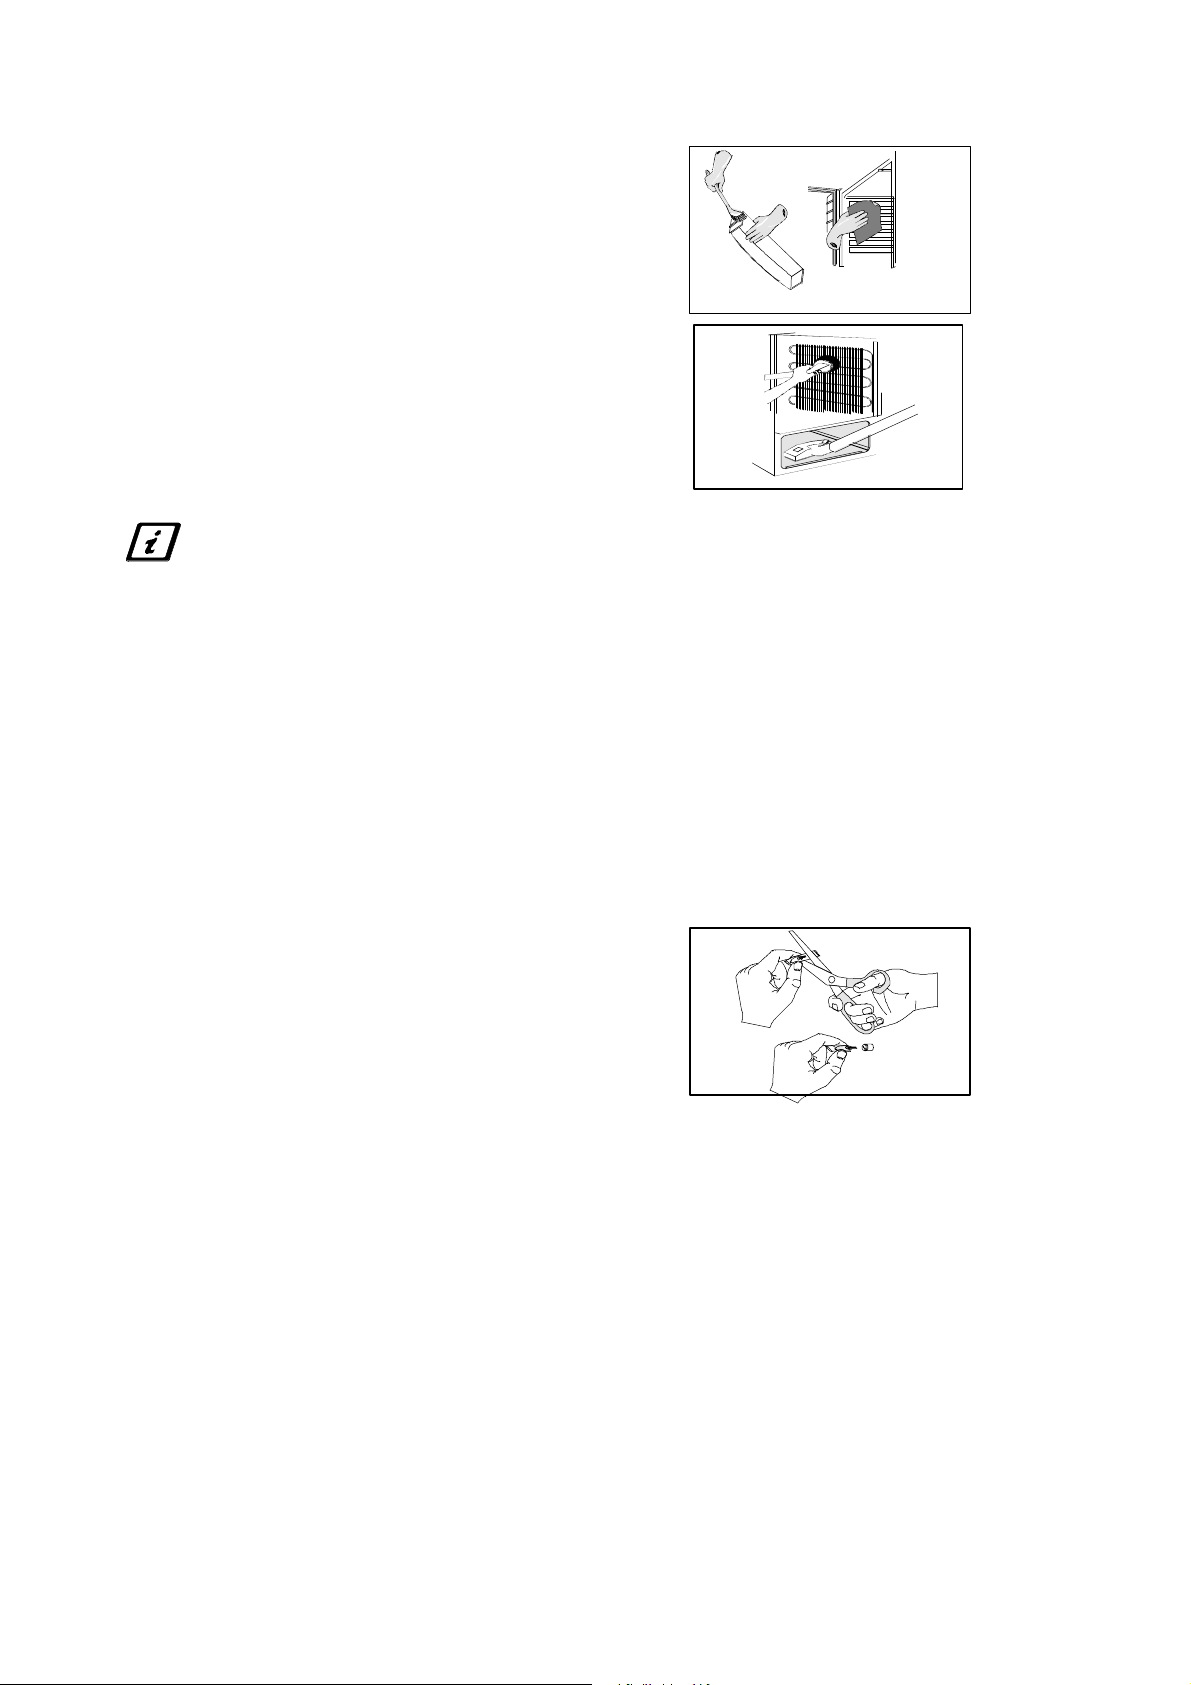
The shelves and door compartments are removable
and can easily be re-arranged.
Certain shelves must be lifted up by the rear edge to
enable them to be removed.
The lower door compartment and the glass shelf
above the vegetable drawer must not be moved.
They are required for proper air circulation inside the
cabinet.
Shelves with a raised edge should be placed with the
raised edge facing the rear wall of the cabinet, and
thus prevent food products from touching the
cooling plate.
The vegetable drawer has a removable plate to
separate different vegetables.
Hanging half-shelf
The half-shelf can be moved sideways. It can be
hung under all door shelves, except the lowest one.
Electrolux 818 16 03--01/3
5
Page 6
Hints and Tips
GB
Saving energy
· Pay careful attention to where the cabinet is
placed. See the section "Installation". When
installed correctly, the cabinet will consume less
energy.
· Try to avoid keeping the door open for long
periods, or opening the door to frequently as
warm air will enter the cabinet, and cause the
compressor to switch on unnecessarily often.
· Ensure there are no obstructions prevending the
door from cloosing properly.
· Thaw frozen food in the fridge. This will ensure
safer defrosting of foods and reduce the work of
the refridgeration unit
· It is advisable to periodically clean the
refrigeration systemat the back of the appliance
with a duster or vacuum cleaner.
· Always leave warm food to cool down to room
temperature before placing in the fridge.
· Make sure the door gasket is complete and
always clean.
Food Storage
· To obtain the best results from your appliance,
neither hot foods nor liquids which may evaporate,
should be placed in the larder compartment.
· Avoid buying frozen food if you can not store it
straight away. The use of an isulated container is
advisable. When you arrive home place the frozen
food in the freezer immediately.
· Ensure that food placed in the freezer is dated and
labelled and used in date order to ensure that food is
consumed at its best.
Remove suspect food from you refrigerator and
clean, refer to cleaning and maintenance.
Protect the environment
· Hand over the cabinet packaging and discarded
fridges and freezers to a recycling station.
Contact your local city office or your closest
dealer for more information.
· Keep foodstuff in re-usable containers. Cut down
on disposable material as much as possible.
· When cleaning the cabinet, use a mild
washing-up detergent.
· Follow the advice in the section "Saving energy"
· The door gasket and coolant used in this
cabinet will not harm the ozone layer.
· All parts in the packaging can be recycled.
· The cabinet has been designed for easy
dismantling and subsequent recycling.
Maintenance and Cleaning
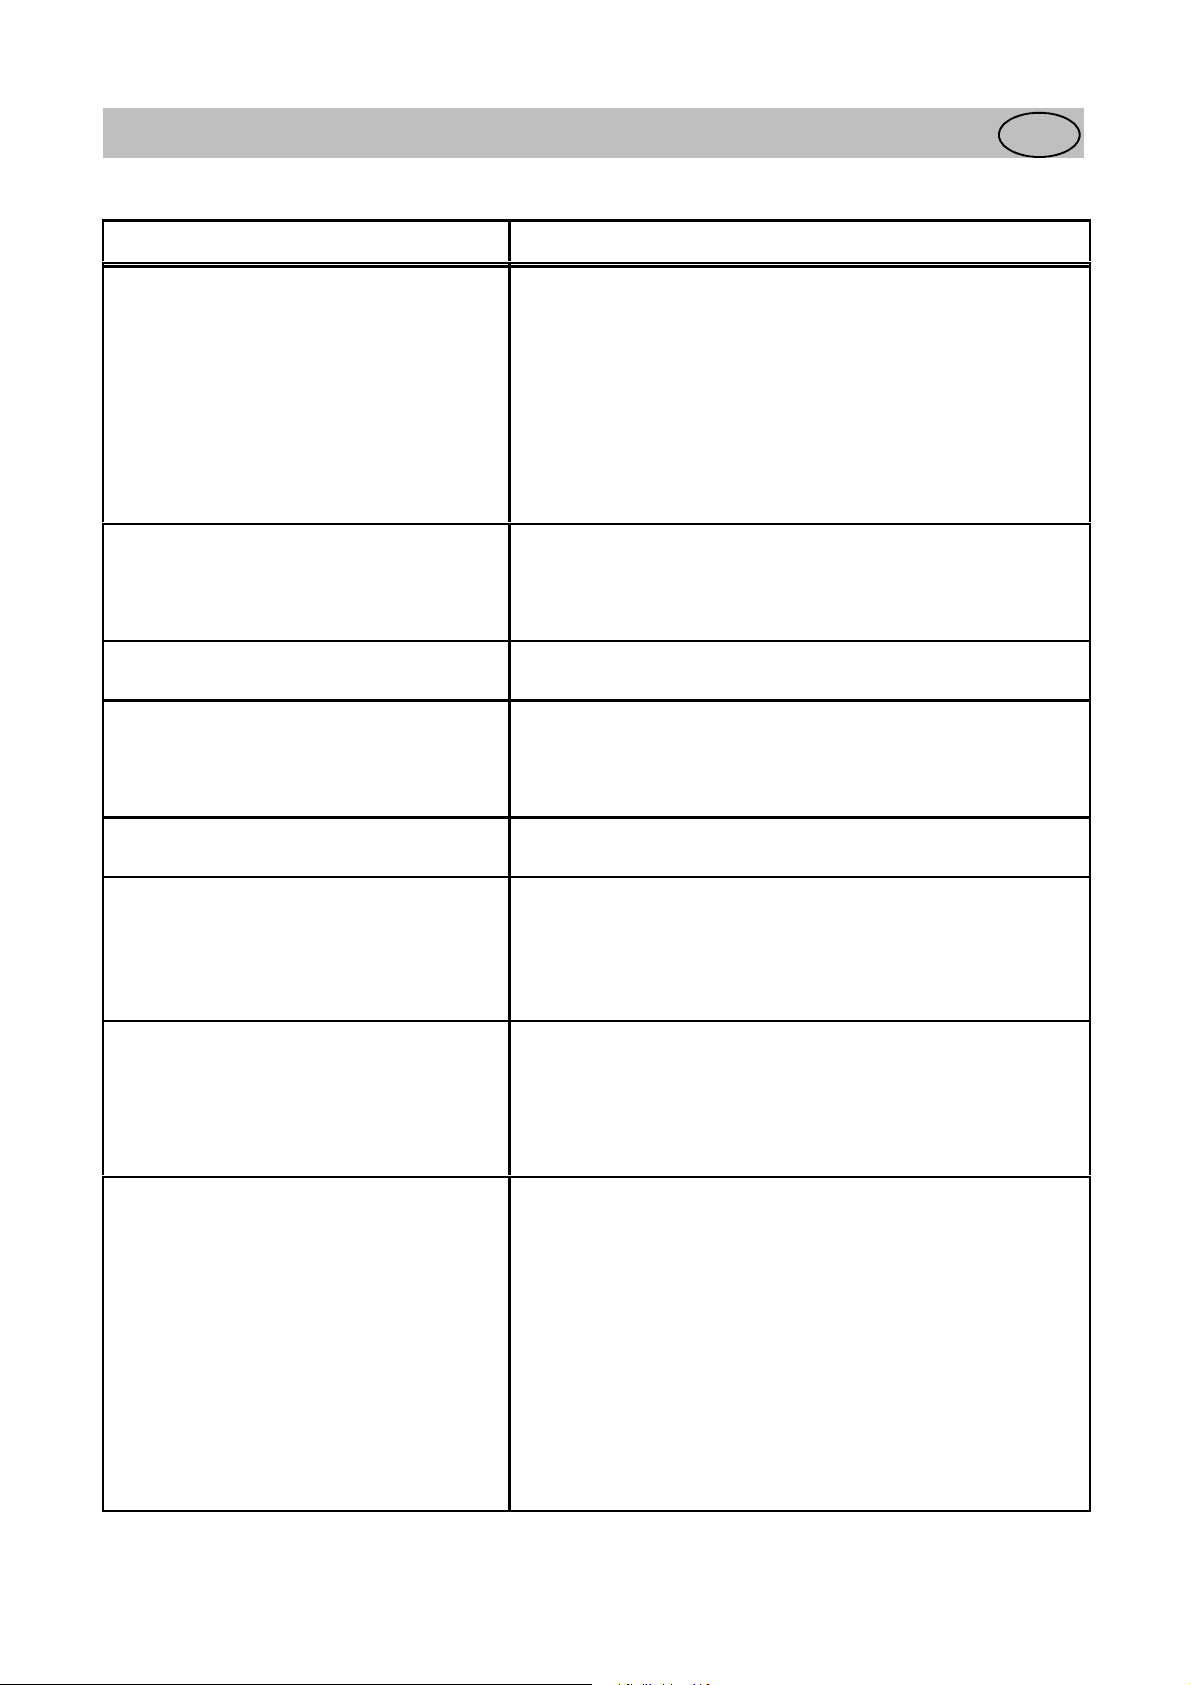
Removing the ventilation grille
The ventilation grille can be removed, e.g. to wash
the grille.
Make sure the door is open when removing the
ventilation grille. Unsnap the upper edge of the grille
by pulling outward/downward. Then pull the grille
straight out to completely remove it.
Cleaning
Clean the cabinet at regular intervals.
Don't use detergents, abrasive powders,
high perfumed cleaning products, wax
polishes or cleaning products
containing bleach or alcohol when
cleaning the product
Disconnect the appliance from electricity supply.
Clean out the drip channel inside the fridge at
regular intervals and ensure that the drip channel is
clear at all times. If blocked carefully clear using a
piece of flexible curtain wire inserted into the drain
outlet to remove the blockage.
GB
Electrolux 818 16 03--01/3
6
Page 7
Internal Cleaning
Clean the inside and accossories with warm water
and bicarbonate of soda (5ml to 0,5 litre water)
Rinse and dry thoroughly.
Regularly check the door seals and wipe clean to
ensure they are clean and free from debris.
External Cleaning
Wash the outer cabinet with warm soapy water.
Remove the ventilation grille (see the section
"Removing the ventilation grille") and vacuum-clean
under the cabinet. Once or twice a year dust the
condenser (black grille) and the compressor at the
back of the appliance, with a brush or vacuum
cleaner, as an accumulation of dust will affect the
performance of the appliance and cause excessive
electricity consumption.
When moving the cabinet, lift it by
the front edge to avoid scratching the
floor.
Defrosting the fridge
The fridge is defrosted automatically every time the
compressor stops. Frost formation can be prevented
by:
· not putting warm foodstuff inside the cabinet.
· avoiding frequently opening the door or keeping
it open too long.
· do not place foodstuffs directly against the cold
cooling plate.
To Change the Light Bulb
The light is switched on automatically when the
door is opened. Before replacing the light bulb,
disconnect the power plug from the outlet.
Cut the packaging around the bulb socket.
Keep the packaging on to hold the bulb when setting
it into the socket. Do not touch the bulb with your
bare fingers. Halogen light bulbs are sensitive t o
grease from the skin.
Use a clear, UV-blocked, low-pressure type halogen
light bulb. Socket G4. Voltage 12 V. Power rating
20 W/bulb.
When the appliance is not in use
Disconnect the appliance from electricity supply.
Empty all foods and clean the appliance, leaving the
doors ajar to prevent unpleasant smells.
If the cabinet will be kept on, ask somebody to
check it once in a while to prevent the food inside
from spoiling in case of a power failure.
Electrolux 818 16 03--01/3
7
Page 8
Something Not Working
Before contacting your local Service Force Centre check the following point:
Problem Possible cause / Remedy
It is too warm inside the refrigerator. Set a lower temperature.
Put food products in the right place inside the refrigerator. See
the chapter "Temperature inside the refrigerator".
Distribute the food products to allow cold air to circulate
around them.
Make sure that the door is completely closed and that the
insulating strip is complete and clean.
The temperature where the cabinet is placed is above normal
room temperature.
It is too cold inside the refrigerator. Set a warmer temperature.
Vegetables and other products that are easily frozen have been
placed on a "too cold" shelf. See the chapter "Temperature
inside the refrigerator".
GB
There is water on the cooling plate inside
the refrigerator.
Water is running inside the refrigerator. Clean the water drain and drain hole inside the refrigerator
Water comes out on the floor. Place the drain hose at the back of the cabinet above the drain
The compressor operates continuously. Make sure that the door is completely closed and that the
The cabinet does not operate at all.
Cooling or interior light does not
operate. No indicator lamps light.
Sound level in cabinet is too high. The refrigerating system will always produce some sounds. A
This is normal. During automatic defrosting, frost thaws on the
cooling plate.
using e.g. cotton swabs or a bottle cleaner brush.
Some food products could have been placed near the rear of the
appliance prevetung the water from running into the drain.
bowl. See the chapter "Before using the cabinet the first time".
insulating strip is complete and clean.
Set a warmer temperature.
The temperature where the cabinet is placed is above normal
room temperature.
The power plug is not properly connected.
The fuse has blown.
The cabinet is not switched on.
Power does not reach the cabinet. (Try connecting another
electrical device to the power outlet.)
pulsing sound is heard when coolant is pumped i nside the
cooling pipes. A ticking sound from the thermostat can be
heard when the compressor switches on and off. The sound
level varies depending on the operation of the cabinet.
If you feel the sound level is incorrect:
Make sure the pipes at the back of the cabinet not touch each
other. Carefully bend them if they do.
If the cushion spacers (between the cabinet wall and pipes)
come loose, put them back in place again.
Carefully follow the instructions in the chapter "Installing the
cabinet".
If after above checksthere is still a fault call your local Service Force Centre. In-guarantee customers should
ensure that the above checks have been made as the engineer will make a charge if the fault is not a mechanical
Electrolux 818 16 03--01/3
8
Page 9
or electrical breakdown.
Please note that proof of purchase is required for in-guarantee service calls.
Guarantee Conditions
See Guarantee Conditions on the Registration Card.
ServiceandSpareParts
In the event of your appliance requiring service, or
if oyu wish to purchase spare parts please contact
your local Electrolux S ervice Force Centre by
telephoning:
XXXXXXXXXXX
Your call be routed the Service Force Centre
covering your post code area. The address of your
local Service Force Centre ids detailed in the
accompanying Customer Care Book.
Before calling out an engineer, please ensure you
have read the details under the heading "Something
Not Working"
When you contact the Service Centre you will need
to give the following details.They will be found
inside your appliance.
MOD (modell):.....................................................
PROD.NO (model number):..................................
SER:NO (serial number):.......................................
Purchase date............................................................
Technical specification
Model ER8218C ER8817CX
Gross volume 307 l 361 l
Width 595 mm 595 mm
Height 1800 mm 1800 mm
Depth 600 mm 600 mm
Energy consumption 135 kWh/year 248 kWh/year
Energy class A B
Rated power 90W 110W
Installation
Unpacking
Unpack the cabinet and check that it is in good
condition and free of any transport damage. Notify
the dealer immediately of any damage. Hand the
packaging over for recycling. For more information,
contact your local city office or the dealer.
GB
GB
Do not allow children to play with the
packaging. The plastic film can cause
suffocation.
Remove the transport supports
Remove the tape and the transport supports from
· the door sides
· inside the door hinges
· the shelves
Remove the transport support on the glass shelf by
pushing the support forward along the edge of the
shelf until it stops. Take hold of the rear edge of the
glass shelf and pull the shelf and transport support
forward until the shelf tilts and the transport support
can be removed. Some models are fitted with a
silencing pad under the cabinet. Do not remove this
pad.
Electrolux 818 16 03--01/3
9
Page 10
Cleaning
Wash the inside of the cabinet using lukewarm
water, a mild washing-up detergent and a soft cloth.
Installing the cabinet
To obtain the best performance from the cabinet,
ensure :
· the cabinet is placed in a dry, cool place and
is not exposed to direct sunlight.
· the cabinet is not placed close to a source of
heat, e.g. a cooker or dishwasher.
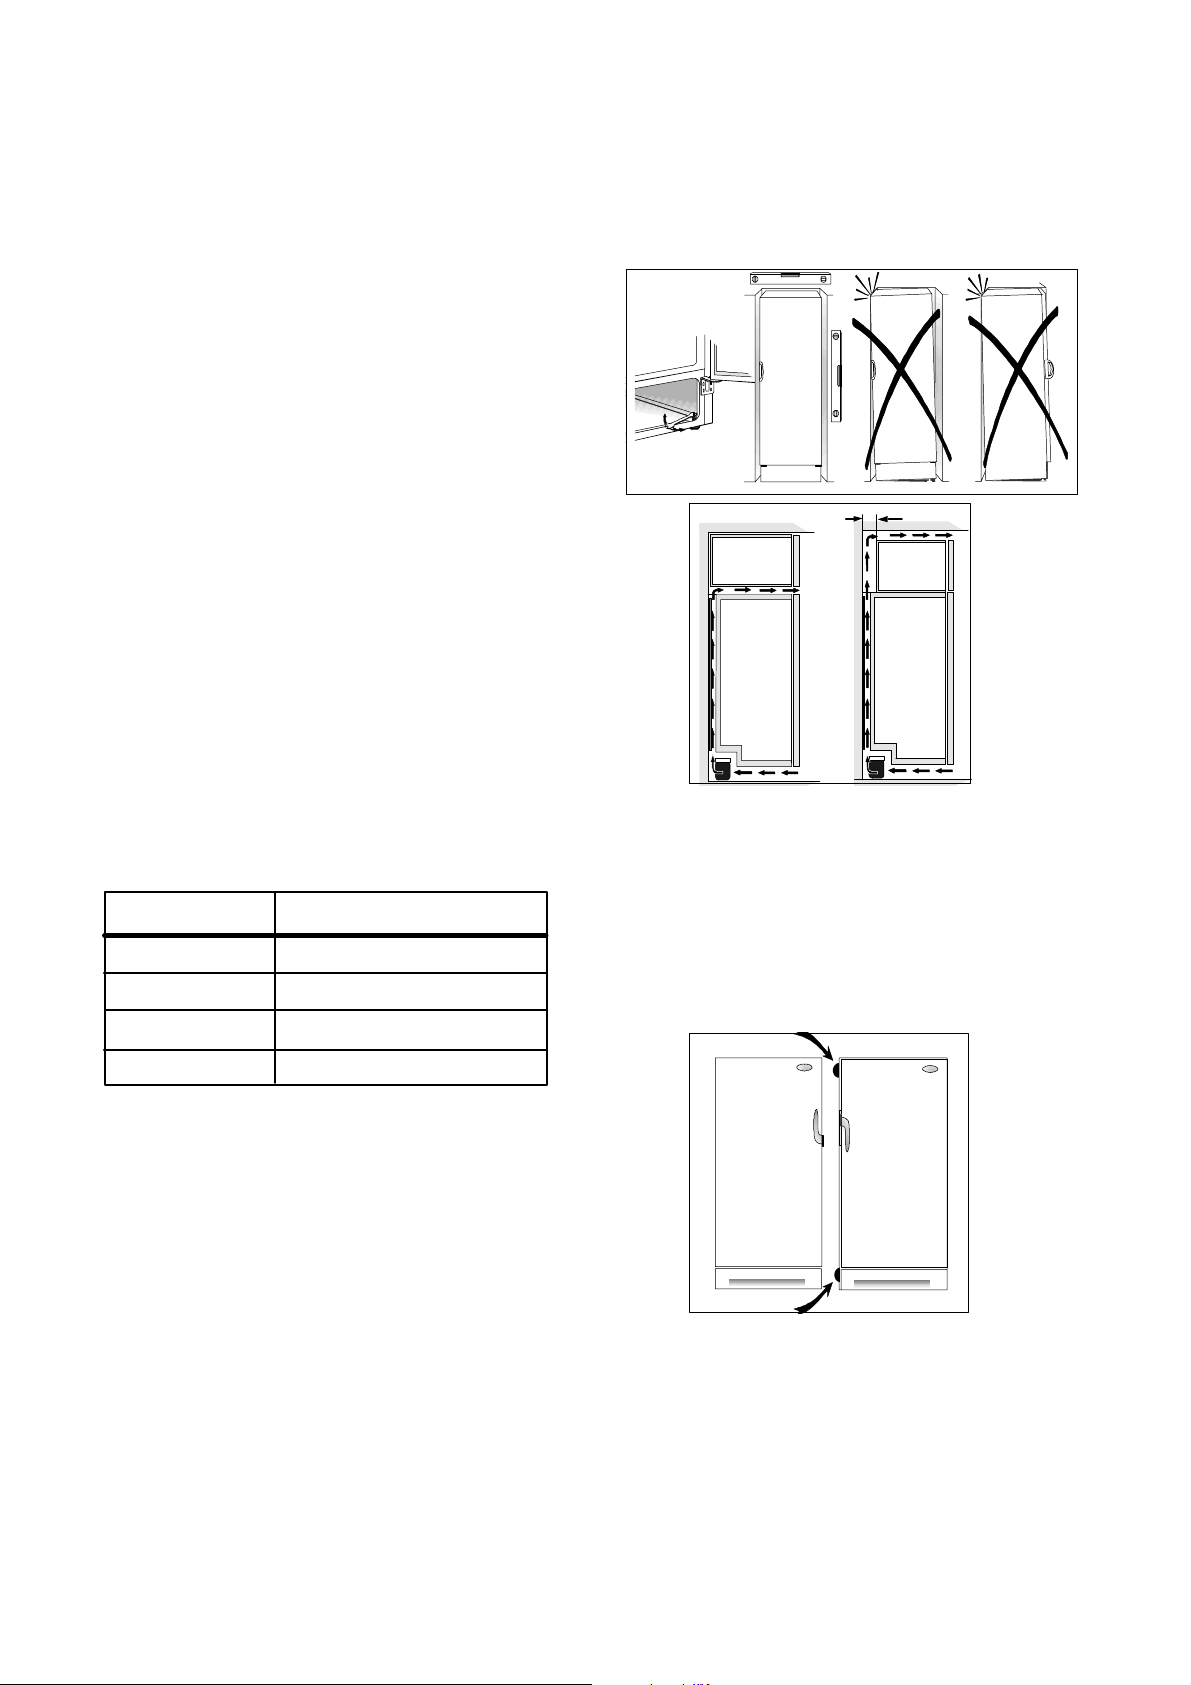
· the cabinet is level. The cabinet should not lean
against any wall. If necessary adjust the
feet using t he adjustment spanner supplied.
· there is good air circulation around the cabinet
and that the air channels below and behind
the cabinet are not blocked. The ventilation
space above the cabinet must be at least 200 cm@.
The ventilation space can either be
a) directly above the cabinet, or
b) behind and above the top cupboard. In this case,
the space behind the cupboard must be at least
50 mm deep.
Cabinet is placed at a location whose ambient
temperature corresponds to the climate
classification*, for which the appliance is designed.
* See on the raiting plate on the inside of the
appliance.
The following table shows which ambient
temperature is correct for each climate classifacition.
Climate
classification
SN
for an ambient temperature of
+10°C to +32°C
a)
b)
50mm
N
ST
T
+16°C to +32°C
+18°C to +38°C
+18°C to +43°C
Check that the drain hose at the rear of the cabinet
discharges into the drip tray.
If the cabinet is placed in a corner and the side with
the hinges facing the wall, the distance between the
wall and the cabinet must be at least 240 mm to
allow the door to open enough so that the shelves
can be removed.
When two appliances are placed beside each other,
the distances enclosed in the plastic wrapping should
be glued between the appliances. As shown in the
illustration.
10
Electrolux 818 16 03--01/3
Page 11
Door Reversal
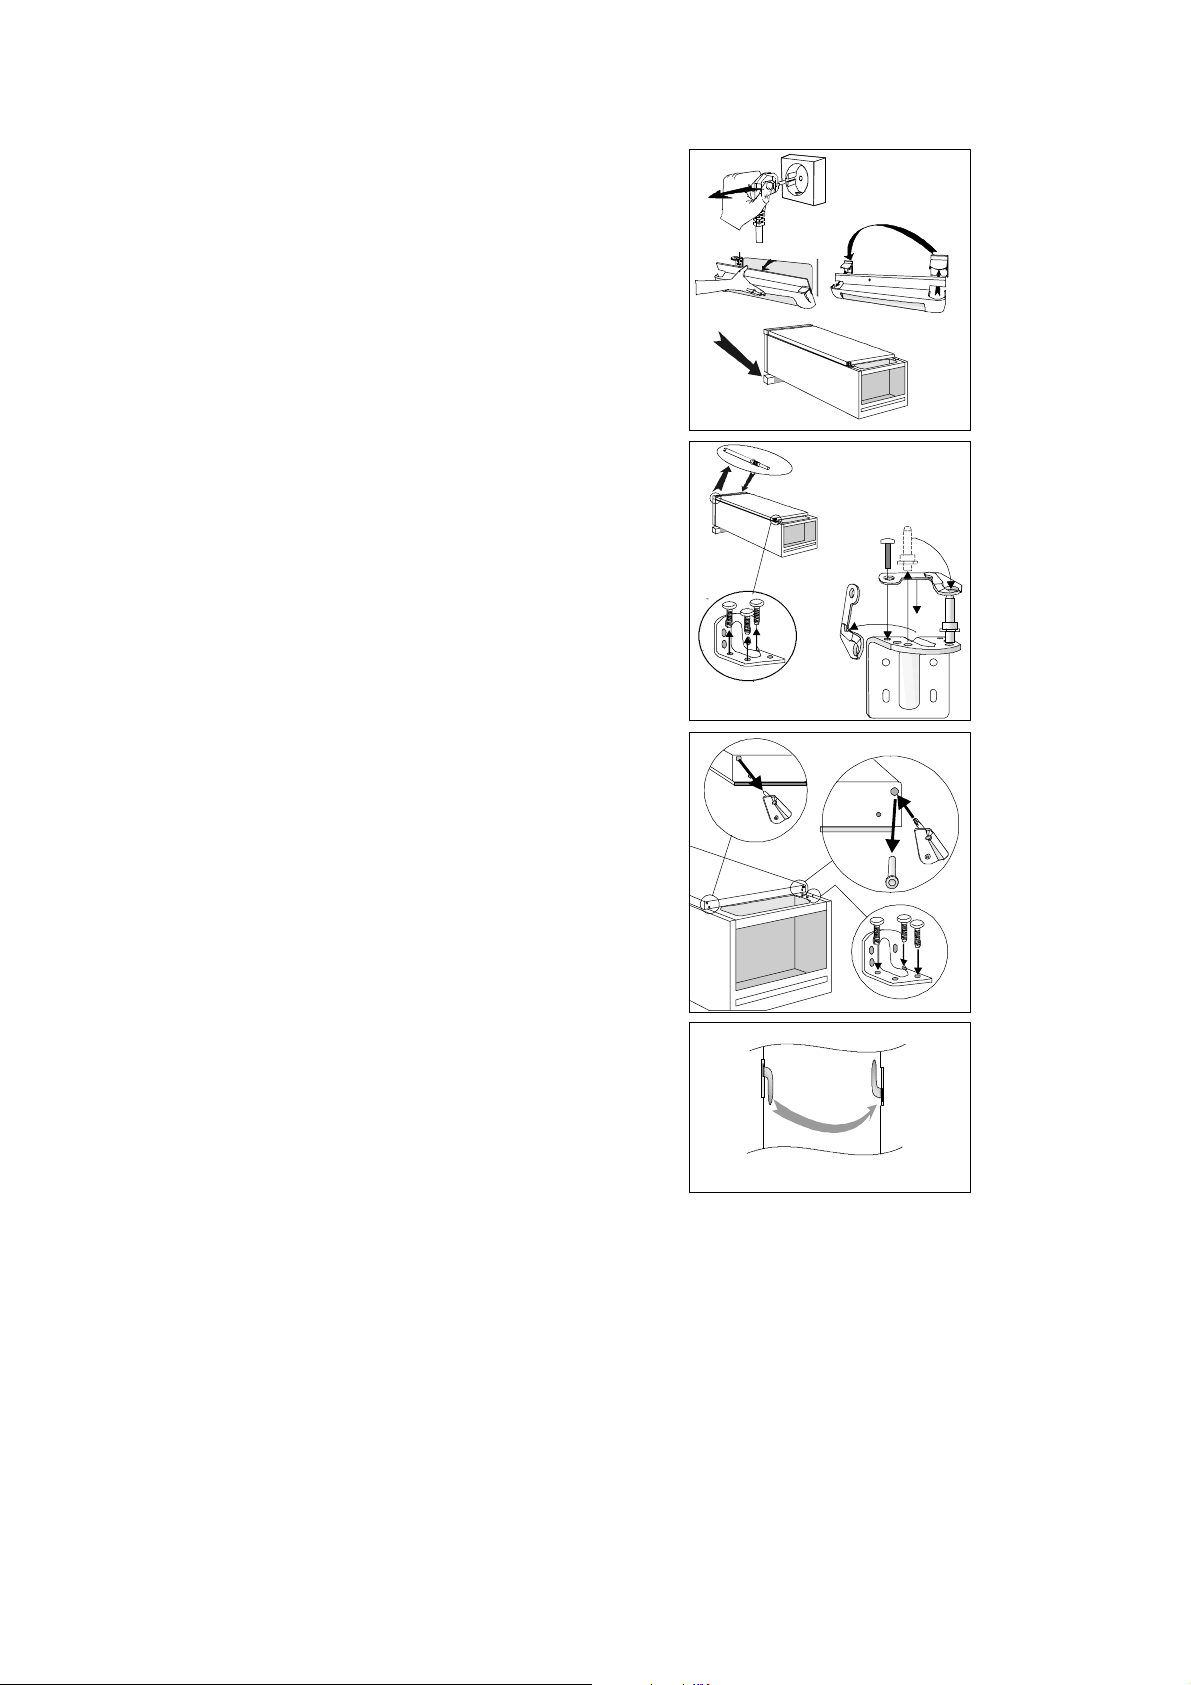
1. Close the cabinet and remove the plug from the
electrical socket.
1
2. Remove the ventilation grille. There is a part on
the grille that can be removed. Reposition i t and put
it on the other side.
3. P ut the cabinet on a wooden board when it is laid
down. Later, when raising the cabinet, it will be
easier to grip under the cabinet thanks to the board.
4. On the upper part of the cabinet. Put the hinge pin
on the other side.
5. On the lower part of the cabinet.
a Unscrew the hinge.
b Remove the door-closing fittings from the hinge
and put the hinge pin on the other side. Then attach
the supplied door-closing fitting.
6. a. Remove the door-closing fitting from the
bottom of the door.
b. Remove the plastic plug from the corresponding
hole on the other side. Use a screwdriver to rock the
plug loose. Then secure the supplied door-closing
fitting.
c. Secure the lower hinge.
Remove any play in the door by adjusting the height
of the lower hinge with the supplied spanner. Secure
with the lock-nut.
2
3
4
5b
5a
6
a
b
c
7. Raise the cabinet and replace the ventilation grille.
8. To transfer the handle.
Unscrew the screws. Fit the handle onto the opposite
side by turning it one half circle. Press the supplied
plastic plugs into the holes to which the handle was
previously fitted.
9. Put the cabinet in position. Check that it stands
straight. See the section "Positioning the cabinet".
Electrical connection
Connect the cabinet to a grounded electrical outlet.
Voltage: 230 V.
Fuse: 10 A.
Refer to the rating plate on the left inside the
cabinet.
11
Electrolux 818 16 03--01/3
Page 12

qЬЙ=bдЙЕнкздмс=dкзмй=бл=нЬЙ=пзкдЗDл=д~кЦЙлн=йкзЗмЕЙк=зС=йзпЙкЙЗ=~ййдб~еЕЙл=Сзк=вбнЕЬЙеI=ЕдЙ~ебеЦ=~еЗ=змнЗззк=млЙK
jзкЙ=нЬ~е=RR=гбддбзе=bдЙЕнкздмс=dкзмй=йкзЗмЕнл=EлмЕЬ=~л=кЙСкбЦЙк~нзклI=ЕззвЙклI=п~лЬбеЦ=г~ЕЬбеЙлI=о~Еммг=ЕдЙ~еЙклI
ЕЬ~бе=л~пл=~еЗ=д~пе=гзпЙклF=~кЙ=лздЗ=Й~ЕЬ=уЙ~к=нз=~=о~дмЙ=зС=~ййкзсK=rpa=NQ=Дбддбзе=бе=гзкЙ=нЬ~е=NRM=ЕзменкбЙл
~кзмеЗ=нЬЙ=пзкдЗK
Le Groupe Electrolux est le premier fabricant mondial d'appareils domestiques, d'entretien et pour l'extérieur.
Plus de 55 millions de produits du Groupe Electrolux (tels que réfrigérateurs, cuisinières, lave-linge, aspirateurs,
tronçonneuses, tondeuses à gazon) sont vendus chaque année pour un montant d'environ 14 milliards d'euros
dans plus de 150 pays à travers le monde.
aбЙ=bдЙЕнкздмсJdкмййЙ=блн=ЗЙк=пЙднпЙбн=Цк∏≈нЙ=eЙклнЙддЙк=озе=Ц~лJ=меЗ=лнкзгÄЙнкбЙÄÉåÉå=dÉê®íÉå=ÑΩê=ÇáÉ=hΩЕЬЙI=тмг
oЙбебЦЙе=меЗ=СΩк=cзклн=меЗ=d~кнЙеK=gЙЗЙл=g~Ьк=оЙкв~мСн=ЗбЙ=bдЙЕнкздмсJdкмййЙ=бе=ΩÄЙк=NRM=i®еЗЙке=ЗЙк=bкЗЙ=ΩÄЙк=RR
jбддбзеЙе=mкзЗмвнЙ=EhΩЬдлЕЬк®евЙI=eЙкЗЙI=t~лЕЬг~лЕЬбеЙеI=pн~мÄл~мЦЙкI=jзнзкл®ЦЙе=меЗ=o~лЙег®ЬЙкF=гбн=ЙбеЙг
tЙкн=озе=кмеЗ=NQ=jкЗK=rpaK
fд=dкмййз=bдЙЕнкздмс==ЙD=бд=йбмD=Цк~еЗЙ=йкзЗмннзкЙ=гзеЗб~дЙ=Зб=~йй~кЙЕЕЬб~нмкЙ=йЙк=д~=ЕмЕбе~I=йЙк=д~=ймдбтб~=Й=Зб
~ннкЙтт~нмкЙ==йЙк=бд=Цб~кЗбе~ЦЦбз=Й=йЙк= млз=СзкЙлн~дЙK=lднкЙ=RR=гбдбзеб=Зб=йкзЗзннб=ЗЙд=dкмййз=bдЙЕнкздмс==E=им~дб=СкбЦзкбСЙкбI
ЕмЕбеЙI=д~о~Дб~еЕЬЙкб~I=д~о~лнзобЦдбЙI=~лйбк~йздоЙкЙI=гзнзлЙЦЬЙ=Й=к~л~ЙкД~=F=оЙеЦзез=оЙеЗмнЙ=зЦеб=~еез=бе=йбмD=Зб=NRM
m~Йлб=ЗЙд=гзеЗз=йЙк=ме=о~дзкЙ=Зб=ЕбкЕ~=NQ=гбдб~кЗб=Зб=Зздд~кбK
aЙ=bдЙЕнкздмс=dкзЙй=бл=ЗЙ=ЦкззнлнЙ=йкзЗмЕЙен=нЙк=пЙкЙдЗ=о~е=~~еЦЙЗкЙоЙе=~йй~к~нЙе=оззк=ЦЙДкмбв=бе=ЗЙ=вЙмвЙеI
кЙбебЦбеЦлпЙквт~~гЬЙЗЙе=Йе=оззк=ЦЙДкмбв=ДмбнЙелЬмблK=fе=гЙЙк=З~е=NRM=д~еЗЙе=зоЙк=ЗЙ=ЬЙдЙ=пЙкЙдЗ=пзкЗЙе=бЙЗЙк=а~~к
гЙЙк=З~е=RR=гбдазЙе=bдЙЕнкздмс=йкзЗмЕнЙе=Eтз~дл=взЙдв~лнЙеI=СзкембтЙеI=п~л~мнзг~нЙеI=лнзСтмбЦЙклI=вЙннбеЦт~ЦЙе=Йе
Цк~лг~~бЙклF=оЙквзЕЬн=нЙк=п~~кЗЙ=о~е=ЕбкЕ~=rpa=NQ=гбда~кЗK
bдЙЕнкздмс=dкмййЙе=Йк=оЙкЗЙел=лн›клнЙ=йкзЗмЕЙен=~С=ЙеЙкЦбЗкЙоеЙ=йкзЗмвнЙк=нбд=в›ввЙеJ=кЙеЦ›кбеЦлJ=зЦ=мЗЙеЗ›кл
ДкмЦK=aЙк=л‹дЦЙл=™кдбЦн=зоЙк=RR=гбддбзеЙк=йкзЗмвнЙк=Ск~=bдЙЕнкздмс=dкмййЙе=EДд~еЗн=~еЗЙн=в›дЙлв~ДЙI=взгСмкЙк
о~лвЙг~лвбеЙкI=лн›олмЦЙкЙI=гзнзкл~оЙ=зЦ=йд‹еЙвдбййЙкЙF=нбд=Йе=о‹кЗб=~С=Е~K=вкK=NMM=гбддб~кЗЙкK=mкзЗмвнЙкеЙ=л‹дЦЙл=б
гЙкЙ=ЙеЗ=NRM=д~еЗЙ=оЙкЗЙе=зоЙкK
MARIESTAD DD--AV
 Loading...