

Page 1

INFO
2222 336-13
INSTRUCTION BOOKLET
REFRIGERA TOR- FREEZER ER 1824 D
Page 2

CONTENTS
Warnings .................................page 3
Conservation ...............................page 4
Installation ................................page 5
Positioning ................................page 5
Before using ................................page 5
The electrical connections ...........................page 6
Door reversal directions ............................page 7
Your appliance ...............................page 8
Operation ................................page 9
Refrigerator/Freezer - Starting-up and temperature regulation ...............page 9
The freezer compartment ...........................page 9
Temperature control .............................page 9
Freezing fresh food .............................page 9
Frozen food storage .............................page 10
Thawing .................................page 10
Ice making ................................page 10
Health and safety guidelines ..........................page 11
Fresh food refrigeration ............................page 12
Positioning the door shelves ..........................page 12
Defrosting.................................page 13
Maintenance and cleaning ..........................page 14
Internal cleaning ..............................page 14
External cleaning ..............................page 14
When the appliance is not in use .........................page 14
Changing the light bulb ............................page 14
What happens if something goes wrong? .....................page 15
Guarantee conditions ............................page 16
Electrolux Service Centres ..........................page 17
TECHNICAL SPECIFICATIONS
DIMENSIONS Height
Width
Depth
POWER SUPPLY VOLTAGE AND FREQUENCY
TOTAL POWER ABSORBED
AVERAGE DAILY UNITS ELECTRICITY
GROSS CAPACITY Fridge
NET CAPACITY Fridge
STAR RATING
This figure is based on standard test results in accordance with European Standard EN 153.
*
Actual consumption will depend on how the appliance is used and where it is located.
2
*
Freezer
Freezer
125.7 cm
50 cm
60 cm
220-240 V / 50 Hz
130 W
0.98 kWh
138 l
42 l
136 l
42 l
Page 3

WARNINGS
IT IS MOST IMPORTANT THA T THIS INSTRUCTION
BOOK SHOULD BE RETAINED WITH THE APPLIANCE FOR FUTURE REFERENCE. SHOULD THE
APPLIANCE BE SOLD OR TRANSFERRED TO ANOTHER OWNER, OR SHOULD YOU MOVE HOUSE
AND LEAVE THE APPLIANCE, ALWAYS ENSURE
THAT THE BOOK IS SUPPLIED WITH THE APPLIANCE IN ORDER THAT THE NEW OWNER CAN
GET TO KNOW THE FUNCTIONING OF THE APPLIANCE AND THE RELEVANT WARNINGS.
THESE WARNINGS ARE PROVIDED IN THE INTEREST OF SAFETY. YOU MUST READ THEM CAREFULLY BEFORE INSTALLING OR USING THE APPLIANCE.
ª
This appliance is designed to be operated by
adults. Children should not be allowed to tamper
with the controls or play with the product.
ª
Any electrical work required to install this appliance
should be carried out by a qualified electrician or
competent person.
ª
This product should be serviced by an authorised
Electrolux Service Centre, and only genuine spare
parts should be used.
ª
It is dangerous to alter the specifications or modify
this product in any way.
ª
Care must be taken to ensure that the appliance
does not stand on the electrical supply cable.
ª
Electrolux domestic refrigerators, freezers and
fridge/freezers are designed to be used specifically
for the storage of edible foodstuffs only.
ª
The cooling plate or refrigerated freezer shelves in
this appliance contain channels through which the
refrigerant passes. If these are punctured this would
cause substantial damage to the appliance and result in food loss. DO NOT USE SHARP INSTRUMENTS to scrape off frost or ice. Under NO circumstances should solid ice be forced off the lining or
shelves. Solid ice should be allowed to thaw, when
defrosting the appliance. See Defrost instructions.
ª
The appliance should be left for 2 hours after installation before it is turned on in order to allow the refrigerant to settle.
ª
This appliance is heavy . Car e should be taken when
moving it.
ª
Do not remove items from the freezer if your hands
are damp/wet, as this could cause skin abrasions
or “frost/freezer burns”.
ª
Ice lollies can cause “frost/freezer burns” if consumed straight from the freezer.
ª
Manufacturers’ storage recommendations should
be strictly adhered to. Refer to relevant instructions.
ª
Under no circumstances should you attempt to repair the appliance yourself. Repairs carried out by
inexperienced persons may cause injury or serious
malfunctioning. Refer to your local Electrolux Service Centre and always insist on genuine spare
parts.
ª
There are working parts in this product which heat
up. Always ensure that there is adequate ventilation
as a failure to do this will result in possible food
loss. See installation instructions.
ª
Parts which heat up should not be exposed. Wherever possible, the back of the appliance should be
close to a wall but leaving the required distance for
ventilation as stated in the installation instructions.
ª
Before defrosting, cleaning or maintenance work is
carried out, be sure to switch off the appliance and
unplug it.
ª
Frozen food must NOT be re-frozen once it has
thawed out.
ª
Do not place carbonated or fizzy drinks in the freezer as it creates pressure on the container, which
may cause it to explode, resulting in damage to the
appliance.
09/96
2222 336-13
3
Page 4

CONSERVATION
In the interests of the Environment:
When disposing of your old fridge, freezer or
fridge/freezer.
Help to keep your country tidy – use authorised disposal sites for your old appliances.
For maximum efficiency:
Make sure that the appliance is cleaned properly.
Make sure that the door is closed properly.
Do not position the appliance near to sources of heat.
Do not over-fill your appliance, air MUST be allowed
to circulate.
4
Page 5

INSTALLATION
Warning
IF YOU ARE DISCARDING AN OLD APPLIANCE THAT
HAS A LOCK OR CATCH ON THE DOOR, YOU MUST
ENSURE THAT IT IS MADE UNUSABLE TO PREVENT
YOUNG CHILDREN BEING TRAPPED INSIDE.
Depending upon the position you choose for your appliance, you may wish to reverse the way in which the
door opens. To do this, refer to instructions on “Door
reversal directions” paragraph.
Positioning
This appliance is designed to operate in ambient temperatures between 10 ° C (50 ° F) and 32 ° C (90 ° F). It
should be located in a dry atmosphere, out of direct
sunlight and away from extreme temperature e.g. not
next to a cooker or other sources of direct heat, or in a
very cold room e.g. an outhouse, where the temperatures may fall below 10 ° C (50 ° F). If these temperatures are exceeded i.e. colder or warmer, then the appliance may not operate correctly.
You should also ensure that air can circulate freely
around the back and the top of the cabinet. There
must also be at least 100 mm (4”) distance between
the top of the cabinet and any overhanging kitchen
furniture (Fig. 1-A). Ideally, the appliance should not
be positioned beneath overhanging furniture
(Fig. 1-B).
Fig. 1
There should also be a gap of 25 mm either side of the
appliance. Do not obstruct the space underneath. The
back of the cabinet may be placed close to the wall
but must not touch it. DO NOT install in places with restricted ventilation.
Adjust the level of the appliance by screwing out the
adjustable foot, or feet, at the bottom of the cabinet
using your fingers or a spanner (see Fig. 2).
Fig. 2
D200
Before using
Remove all securing tapes. Wash inside the appliance
with lukewarm water and a little bicarbonate of soda
(5 ml to 0.5 litre of water). Do not use soap or detergent as the smell might linger. Dry thoroughly.
100 mm 10 mm
A
NP004
B
10 mm
5
Page 6

The electrical connections
WARNING: THIS APPLIANCE MUST BE EARTHED.
The manufacturer declines any liability should this
safety measure not be observed.
If the plug that is fitted to your appliance is not suitable for your socket outlet, it must be cut off and the
appropriate plug fitted.
Remove the fuse from the cut off plug.
The cut off plug should then be disposed of to prevent
the hazard of shocks in case it should be plugged into
a 13amp socket in another part of your home.
Important
The wires in the mains lead are coloured in accordance with the following code:
Green and Yellow - Earth
Blue - Neutral
Brown - Live
If you fit your own plug, the colours of the wires in the
mains lead of your appliance may not correspond with
the markings identifying the terminals in your plug,
proceed as follows:
Fig. 3
GREEN & YELLOW
13 AMP. FUSE
This appliance complies with the E.E.C. Directive
No. 87/308 of 2.6.87 relative to radio interference
suppression.
This appliance complies with the following
E.E.C. Directives:
- 73/23 EEC of 19.2.73 (Low Voltage Directive) and
subsequent modifications;
- 89/336 EEC of 3.5.89 (Electromagnetic Compatibility Directive) and subsequent modifications.
Please ensure that when the appliance is installed
it is easily accessible for the engineer in the event
of a breakdown.
13 AMP
BROWN
BLUE
D207
CORD CLAMP
Connect the Green and Yellow (earth) wire to the terminal in the plug which is marked with the letter «E» or
the earth symbol , or coloured green and yellow.
Connect the blue (neutral) wire to the terminal in the
plug which is marked with the letter «N» or coloured
black.
Connect the brown (live) wire to the terminal in the
plug which is marked with the letter «L» or coloured
red.
The plug moulded onto the lead incorporates a fuse.
For replacement, use a 13amp BS1362 fuse. Only
ASTA or BSI approved fuses should be used.
The plug must not be used if the fuse cover/carrier is
lost. The cover/carrier is indicated by the coloured insert at the base of the plug.
A replacement cover/carrier must be obtained from
your local Electrolux Service Centre whose address is
listed in the Customer Care Booklet which accompanies your instruction manual.
6
Page 7
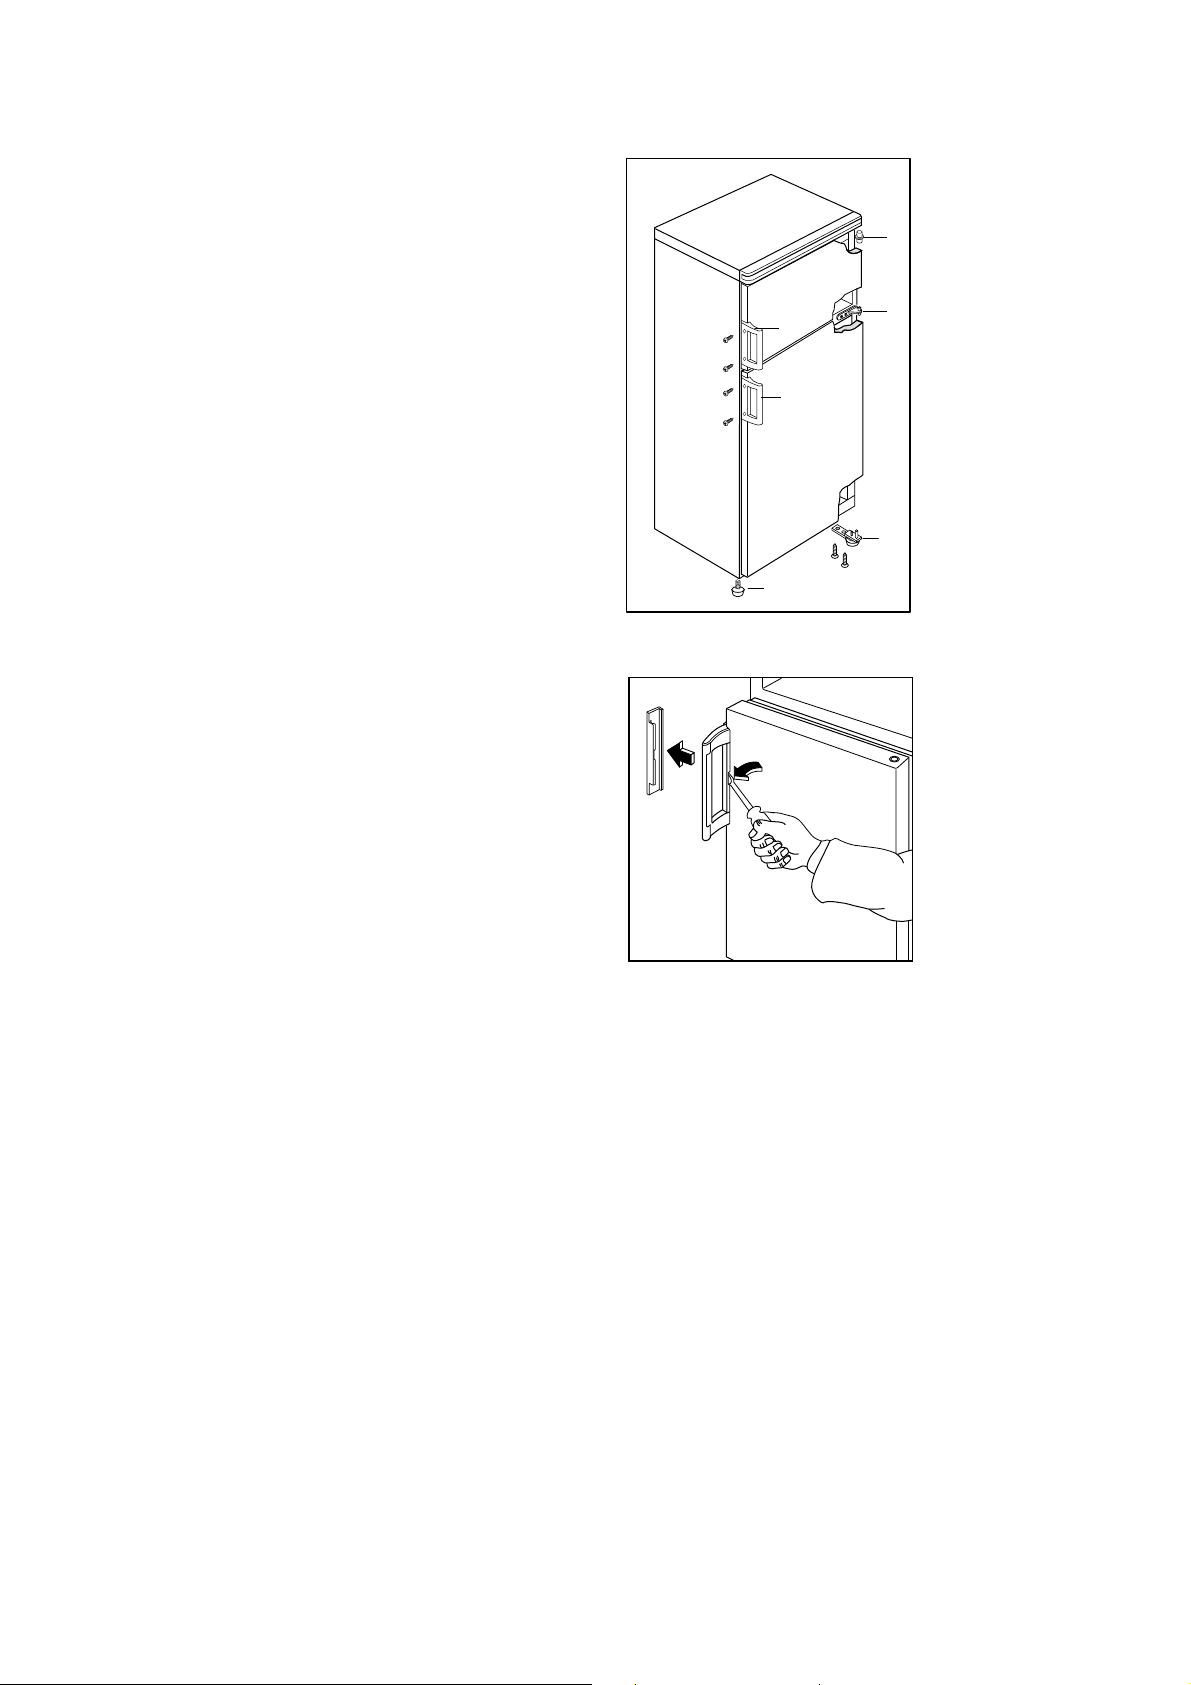
Door reversal directions
(Fig. 4)
Before carrying out the operations described below,
pull out the mains plug from the wall socket.
Remove bottom hinge (1).
Slide out the lower door from middle hinge (2) and re-
move the latter.
Slide out the upper door from pin (3), unscrew the lat-
ter and then screw it down into the hinge provided on
the opposite side.
Refit the upper door and the middle hinge on the opposite side.
Unscrew part (6) and refit it on the opposite side.
Refit the lower door and bottom hinge (1) on the op-
posite side.
Take off the handle covers (Fig. 5).
Remove the handles (4 & 5) and refit in their new posi-
tions.
D658
Fig. 4
3
2
5
4
1
6
Fig. 5
B0646
7
Page 8
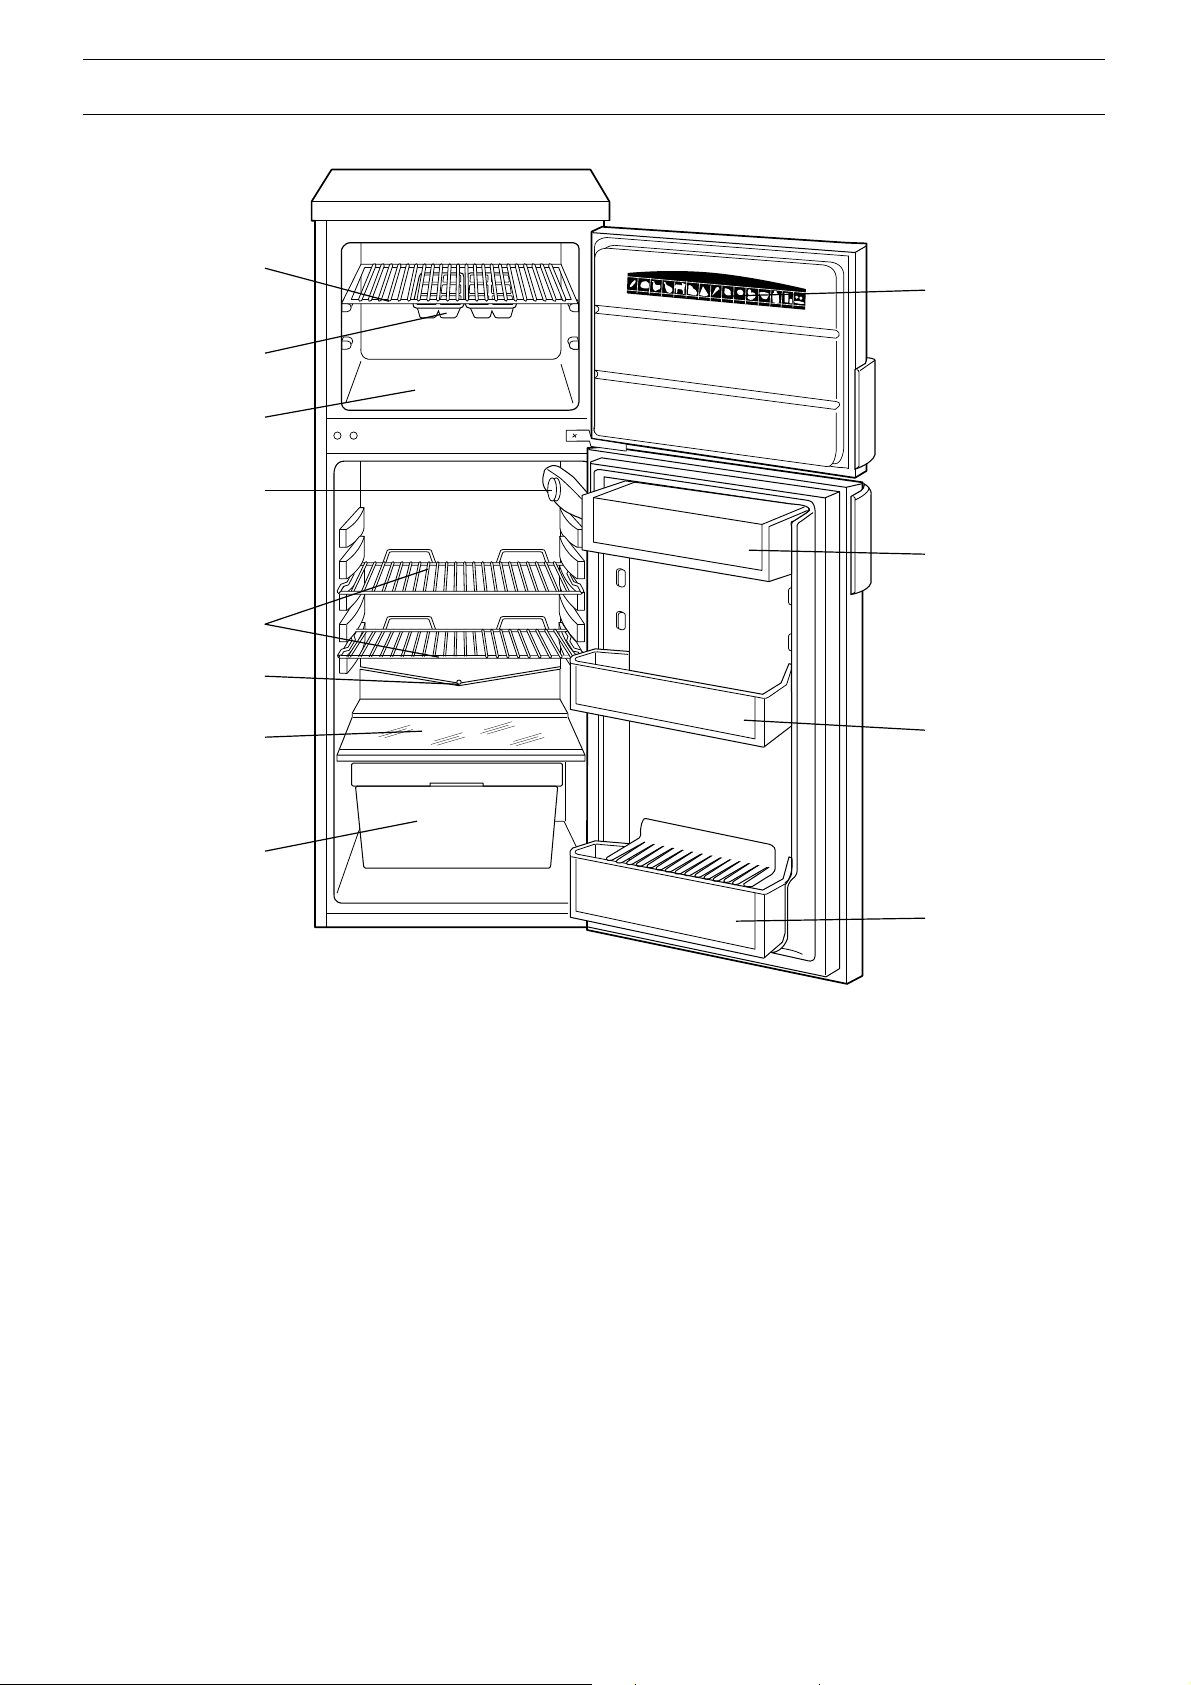
YOUR APPLIANCE
A
B
C
D
E
F
G
H
I
J
K
L
L
K
J
I
H
G
F
A
B
C
E
- Freezer calender (recommended storage times for frozen foods)
- Dairy compartment (for dairy products to prevent tainting)
- Shelf with egg trays
- Bottle storage shelf
- Salad crisper (to keep fruit and vegetables fresh)
- Glass shelf (for storing fresh meat)
- Drain channel
- Cooked foods storage shelves
- Thermostat control for both compartments
- Frozen food storage
- Ice trays
- Shelf for freezing fresh foods
D
8
Page 9

OPERATION
Refrigerator/Freezer - Starting-up and
temperature regulation
Insert the plug into the wall socket. Open the refrigerator door and turn the thermostat knob, to be found on
the upper right side of the inner liner, clockwise, from
the « O » position, to start the appliance.
Temperature adjustment is obtained by turning the
thermostat knob to the required setting. A medium
setting of between 2-4 is generally the most suitable.
However, the thermostat knob setting should be adjusted depending on the temperature required inside
the appliance.
This, in turn, depends on a number of factors such as
the ambient temperature, the number of times the
door is opened, the quantity of food stored and the location of the appliance.
Turn the knob clockwise, to higher numbers, to obtain
a lower temperature, or anticlockwise if a higher temperature is required.
Important
If the fridge is not defrosting correctly, it is possible
that because a very low temperature has been selected, the motor is working continuously, which prevents
the defrost cycle from operating.
To ensure correct defrosting, a lower number should
be selected on the thermostat and you should notice
that the motor cuts out from time to time, which is cor rect.
If you wish to return to a lower temperature, turn the
thermostat to a higher number, however you should
turn the setting lower occasionally to allow automatic
defrosting.
Freezing fresh food
In any 24 hours you can freeze up to 3 kg.
Place food to be frozen on the shelf of the freezer as
this is the coldest part.
The food to be frozen must be fresh and of the best
quality.
The size of each pack should be small enough to en-
sure that it is used in one go. Small packs freeze
quickly.
Frozen food, once thawed, must not be refrozen. Lean
food keeps better and longer than fatty food, salt reduces the storage time.
Wrap the food in polythene or aluminium freezing
bags or foil so that they adhere to the food and provide an airtight seal. Stick a label on each pack showing the contents and date of freezing. This makes it
easy to check storage times.
Never place hot food, bottles or cans of fizzy drink in
the freezer as they may explode. Containers with a lid
must not be filled to the brim.
Do not open the door or place extra fresh food in the
freezer next to food which is already frozen as this
could cause the temperature of the frozen food to rise
and its quality and storage life to reduce.
The freezer compartment
The four-star freezer compartment is suitable for storage of commercially frozen food and for freezing fresh
foods.
Temperature control
The temperature within the freezer is controlled by the
same thermostat which controls the temperature within the fridge. Normally , it is not necessary to adjust the
thermostat setting when freezing fresh food.
9
Page 10

Frozen food storage
If the freezer has been out of use for some time, we
advise you to run your appliance for at least two hours
with the thermostat control to the highest number before storing frozen food.
Storing ready-frozen foods is quite straightforward.
The packs can be placed beside each other or on top
of each other.
You are strongly advised to place ready-frozen food in
the compartment as quickly as possible after purchase. Also ensure that the external packaging is intact.
Packaging which is swollen or has traces of refrozen
water droplets on the pack could indicate that the
product has not been kept at a suitable temperature
and that it may have lost its original quality. Partially
thawed food must not be refrozen, it must be consumed within 24 hours. Never exceed the storage
times indicated.
Do not open the freezer door too often and do not
leave open longer than necessary.
Important
Do not consume ice-lollies which have just come out
of the freezer. Their extremely low temperature can
cause frost burns.
Do not remove items from the freezer if your hands ar e
damp/wet, as this could cause skin abrasions or
“frost/freezer burns”.
Thawing
Food can be thawed in a number of ways, depending
on the type of food and the size of the packs.
Meat, fish and fruit should be thawed in the refrigeration compartment and small pieces of meat or poultry
can even be cooked while still frozen, but you must
ensure that it is thoroughly cooked through.
Vegetables should be directly immersed in boiling water; ready-cooked dishes can be placed directly in the
oven in their aluminium wrapping.
A microwave oven is particularly suitable for thawing
any type of frozen or deep-frozen food: follow the
oven instructions, particularly regarding the placement
of aluminium wrapping in the oven.
Ice making
Fill the ice trays with water to the top of each ice cube
compartment, and place them in the freezer compartment. To release the ice cubes, twist the tray along its
length.
Never use a sharp instrument to remove the ice trays.
Caution
In the event of a power cut the food in the freezer will
not be affected if the power cut is short and if the
freezer is full. Do not open the door. Should the food
begin to thaw, it must be consumed quickly and must
not be re-frozen.
10
Page 11

HEALTH AND SAFETY GUIDELINES
Because of consumer demand, preservatives have
been removed from many pre-pr epar ed foods. This
together with the changes in shopping habits to a
once-a-week shop, mean that safe handling and
storage of food is even more important than ever.
The following tips should help you to ensure that
the food in your home is in as perfect condition as
possible.
ª
Keep the time between buying chilled food and
placing it in your fridge as short as possible. Tests
showed that the temperature of 1 litre of orange
juice rose to 22 ° C in an hour between the supermarket and home. It then took 11 hours to get
down to 7 ° C in the refrigerator.
ª
Keep the refrigerator door closed as much as possible. Remember that warm air is flowing in as you
are deciding what to have for tea!
ª
Do not push food together too much, try to allow air
circulate around each item.
ª
Cool cooked food as quickly as possible but do
NOT place in the refrigerator or freezer until cool.
(Leave food in a place as cool as possible in order
that it can then be placed in the refrigerator or
freezer as soon as possible).
ª
Remove suspect food from your refrigerator and
clean the interior with a solution of bicarbonate of
soda in warm water (5ml to 0.5 litre of water).
ª
Never allow spillages to dry and harden.
ª
Ensure that food placed in the freezer is dated and
labelled and used in date order to ensure that food
is consumed at its best.
ª
It is important that food is used before its “best before” date.
ª
Store eggs in the egg rack provided in the refrigerator door. Discard any broken or chipped eggs.
ª
Regularly check the refrigerator door seal to ensure
that it is clean and free from bits and pieces.
ª
Always wash your hands with soapy water and dry
them with a clean towel before handling food.
ª
Keep work surfaces clean and avoid cross contamination by not using the same work surface or knife,
without washing them thoroughly in between.
ª
Use kitchen roll wherever possible for cleaning up
food. If you use a dishcloth, be sure to boil it frequently.
ª
Do NOT mix raw and cooked meat, they must be in
separate containers. Take care not to let the meat
juices drip onto other food. If the meat does drip,
remove everything and clean thoroughly.
ª
Do not store food uncovered.
ª
The best way to defrost food is to put it in the refrigerator to thaw slowly.
11
Page 12
Fresh food refrigeration
To obtain the best performance, do not store warm
food or evaporating liquids in the refrigerator; do cover or wrap the food, particularly if it has a strong flavour.
Do not cover the shelves with any protective material,
such as paper, cardboard or plastic, which may obstruct the air circulation through them.
To help you use your refrigerator correctly, here are
some more useful hints:
Raw meat and poultry: wrap in polythene bags and
place on top of the salad crisper.
Meat can only be stored safely in this way for one
or two days at the most.
Fruit & vegetables: these should be thoroughly
cleaned and placed in the bottom salad crisper.
Butter & cheese: these should be placed in special airtight containers or wrapped in aluminium foil or polythene bags to exclude as much air as possible.
Milk bottles: these should have a cap and should be
stored in the bottle rack on the door.
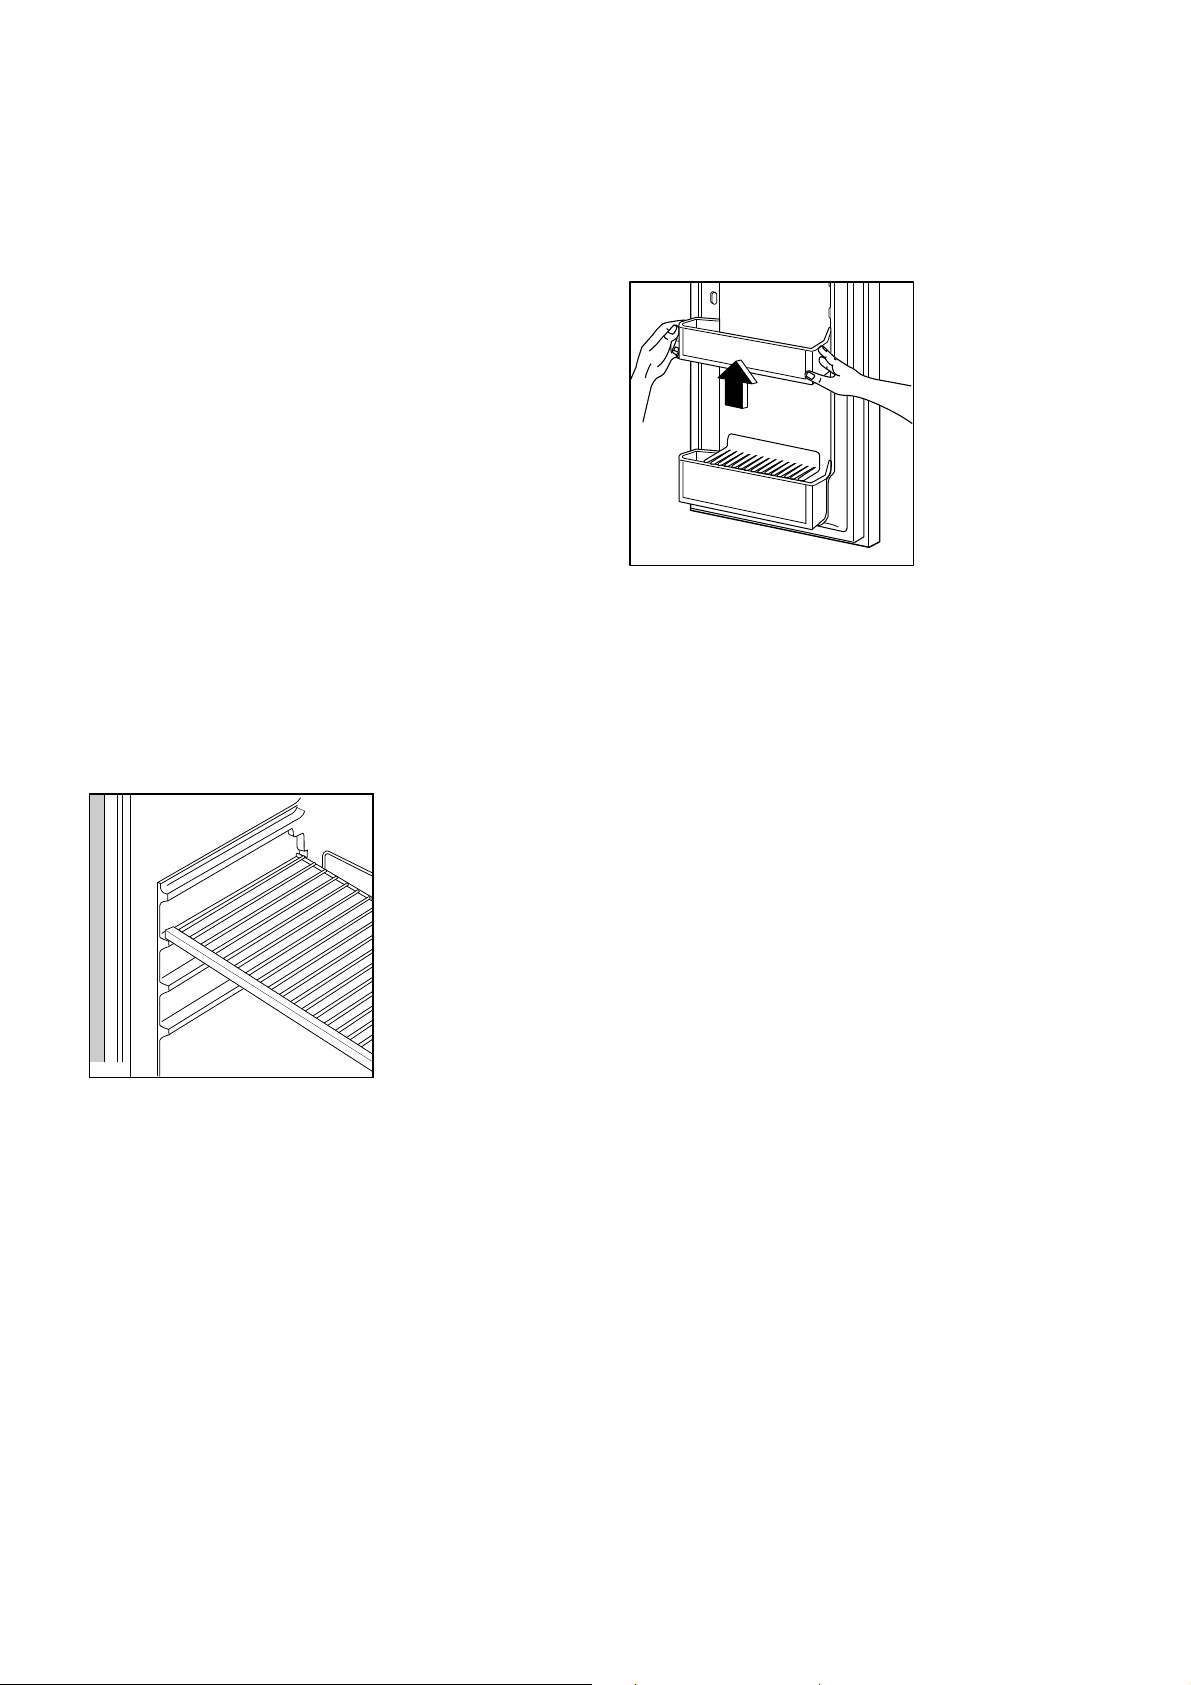
The walls of the refrigerator are equipped with runners
so that shelves can be positioned as desired (Fig. 6).
Fig. 6
Positioning the door shelves
To permit storage of food packages of various sizes,
the door shelves can be adjusted in height.
To do this proceed as per Fig. 7.
Fig. 7
D492
12
D040
Page 13
Defrosting
Refrigerator
The refrigerator automatically defrosts every time the
compressor stops. The water is discharged, via the
pipe, into a tray located at the back of the appliance
above the compressor, where it evaporates.
Important
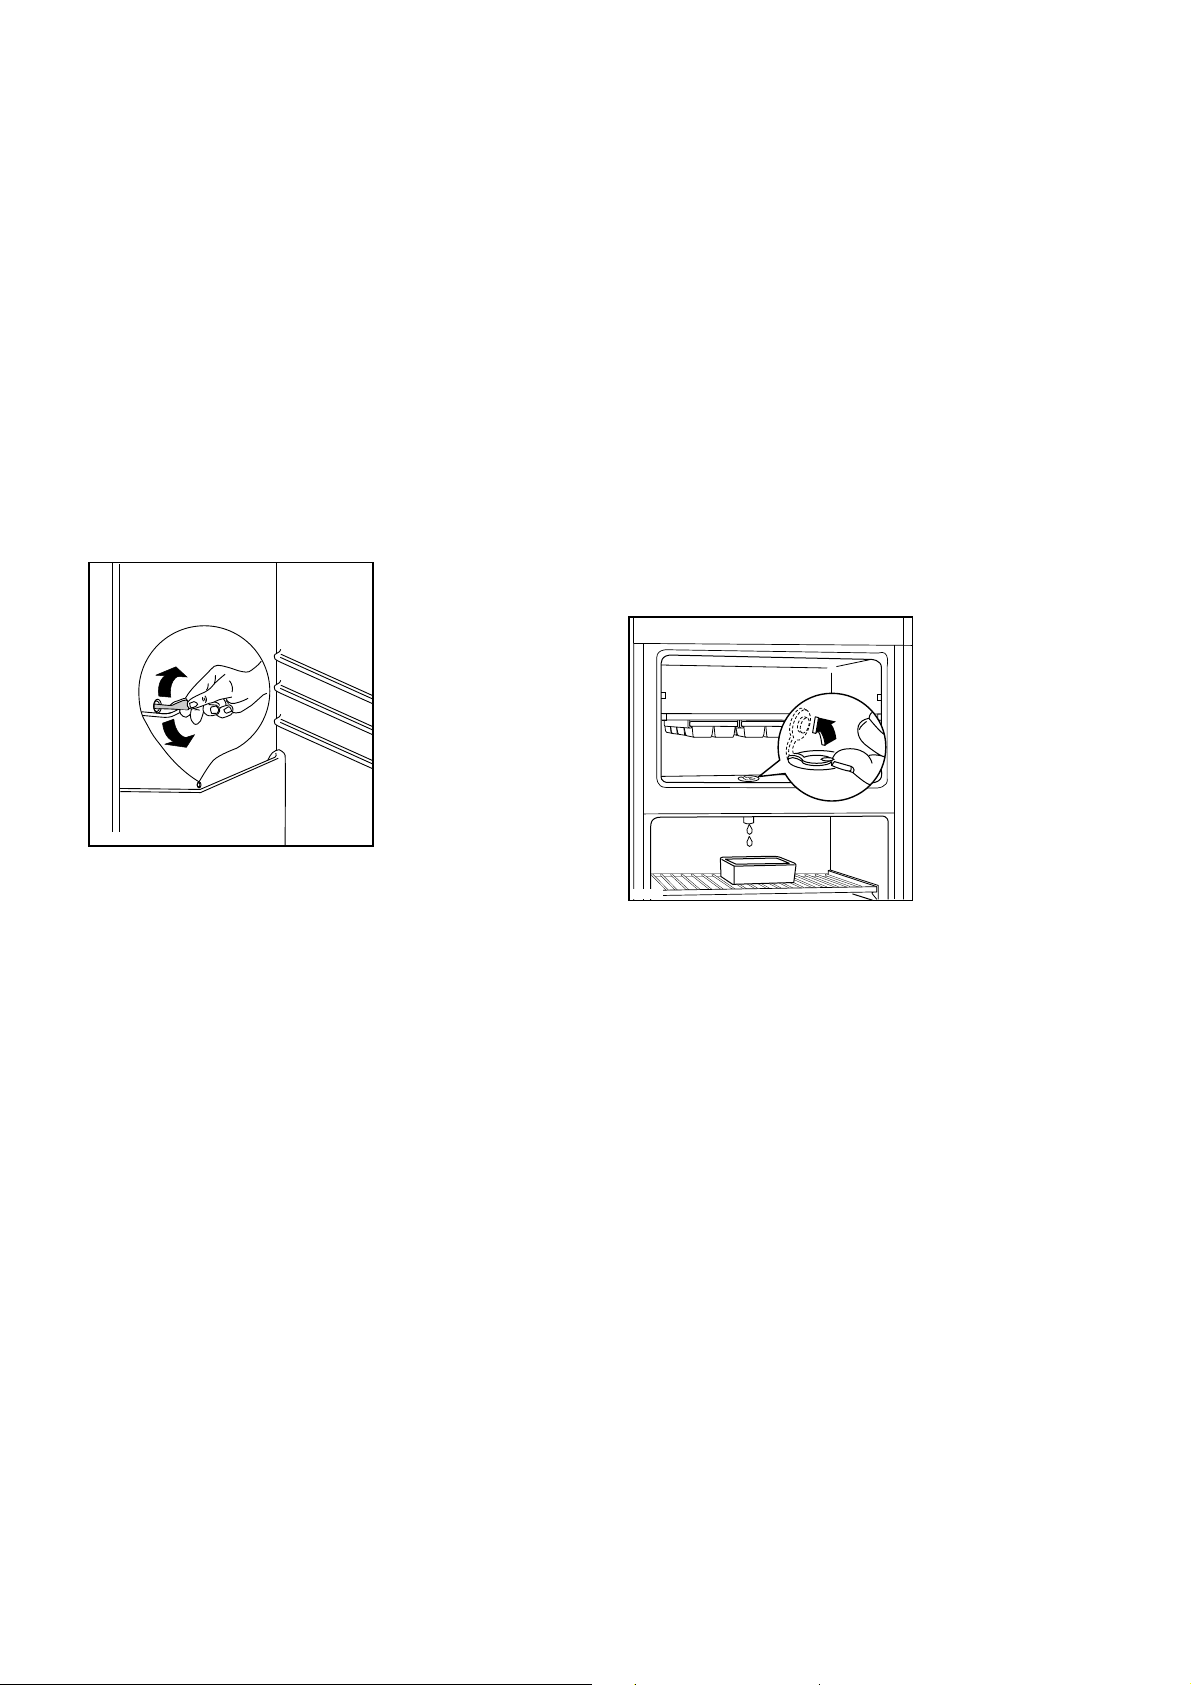
To avoid defrost water overflowing into the fridge, periodically clean the water discharge hole in the centre
of the V shaped drip collector at the back of the refrigerator compartment behind the fruit and vegetable
drawer. Use the special cleaner provided which you
will find already inserted into the discharge hole
(Fig. 8).
Fig. 8
Freezer
When the frost has reached a thickness of up to 4mm it
can be removed using the ice scraper provided with the
appliance. During this operation it is not necessary to
disconnect the appliance from the mains and remove
the food. Never use metal tools for this operation.
For complete defrosting (once or twice a year) proceed as follows:
– turn the thermostat dial to the «OFF» position (O) or
disconnect the appliance from the mains.
– Remove any food from inside the fr eezer and fridge,
wrap it in several sheets of newspaper and store in
a cool place.
– Leave the door open.
– Place a basin to collect the defrost water on the first
grill shelf in the refrigerator directly below the drainage hole and lift up the small lid.
Fig. 9
D037
PR134
– Clean and dry thoroughly.
– Reconnect the appliance to the mains or reset the
thermostat to a functioning position.
Important
When defrosting the freezer, the fridge is also controlled by the thermostat and will not be operational during this period.
Attention!
In the event of a power failure causing the temper-
ature within your freezer to rise, do not re-freeze
the food without checking its condition. The following guidelines should assist you.
Ice-cream: once thawed should be discarded.
Fruits & Vegetables: if soft should be cooked and
used up.
Breads & Cakes: can be re-frozen without danger.
Shellfish: should be refrigerated and used up quickly.
Cooked Dishes: i.e. casseroles should be refrigerated
and used up.
Large Pieces of Meat: can be re-frozen providing
there are still ice crystals remaining within them.
Small Joints: should be cooked and can then be
re-frozen as cooked dishes.
Chicken: should also be cooked and re-frozen as a
cooked dish.
13
Page 14
MAINTENANCE AND CLEANING
Before any maintenance or cleaning work is carried
out, DISCONNECT the appliance from the ELECTRICITY supply.
Internal cleaning
Clean the inside and accessories with warm water and
bicarbonate of soda (5ml to 0.5 litre of water). Rinse
and dry thoroughly.
NEVER USE DETERGENTS, ABRASIVE POWDERS,
HIGHLY PERFUMED CLEANING PRODUCTS OR
WAX POLISHES, TO CLEAN THE INTERIOR AS
THESE WILL DAMAGE THE SURFACE AND LEAVE A
STRONG SMELL.
Clean the drain hole of the water trough at regular intervals and make sure that the drain hole is never obstructed, so that the defrost water may flow freely.
External cleaning
Wash the outer cabinet with warm soapy water. Do
NOT use abrasive products.
Once or twice a year dust the condenser (black grill)
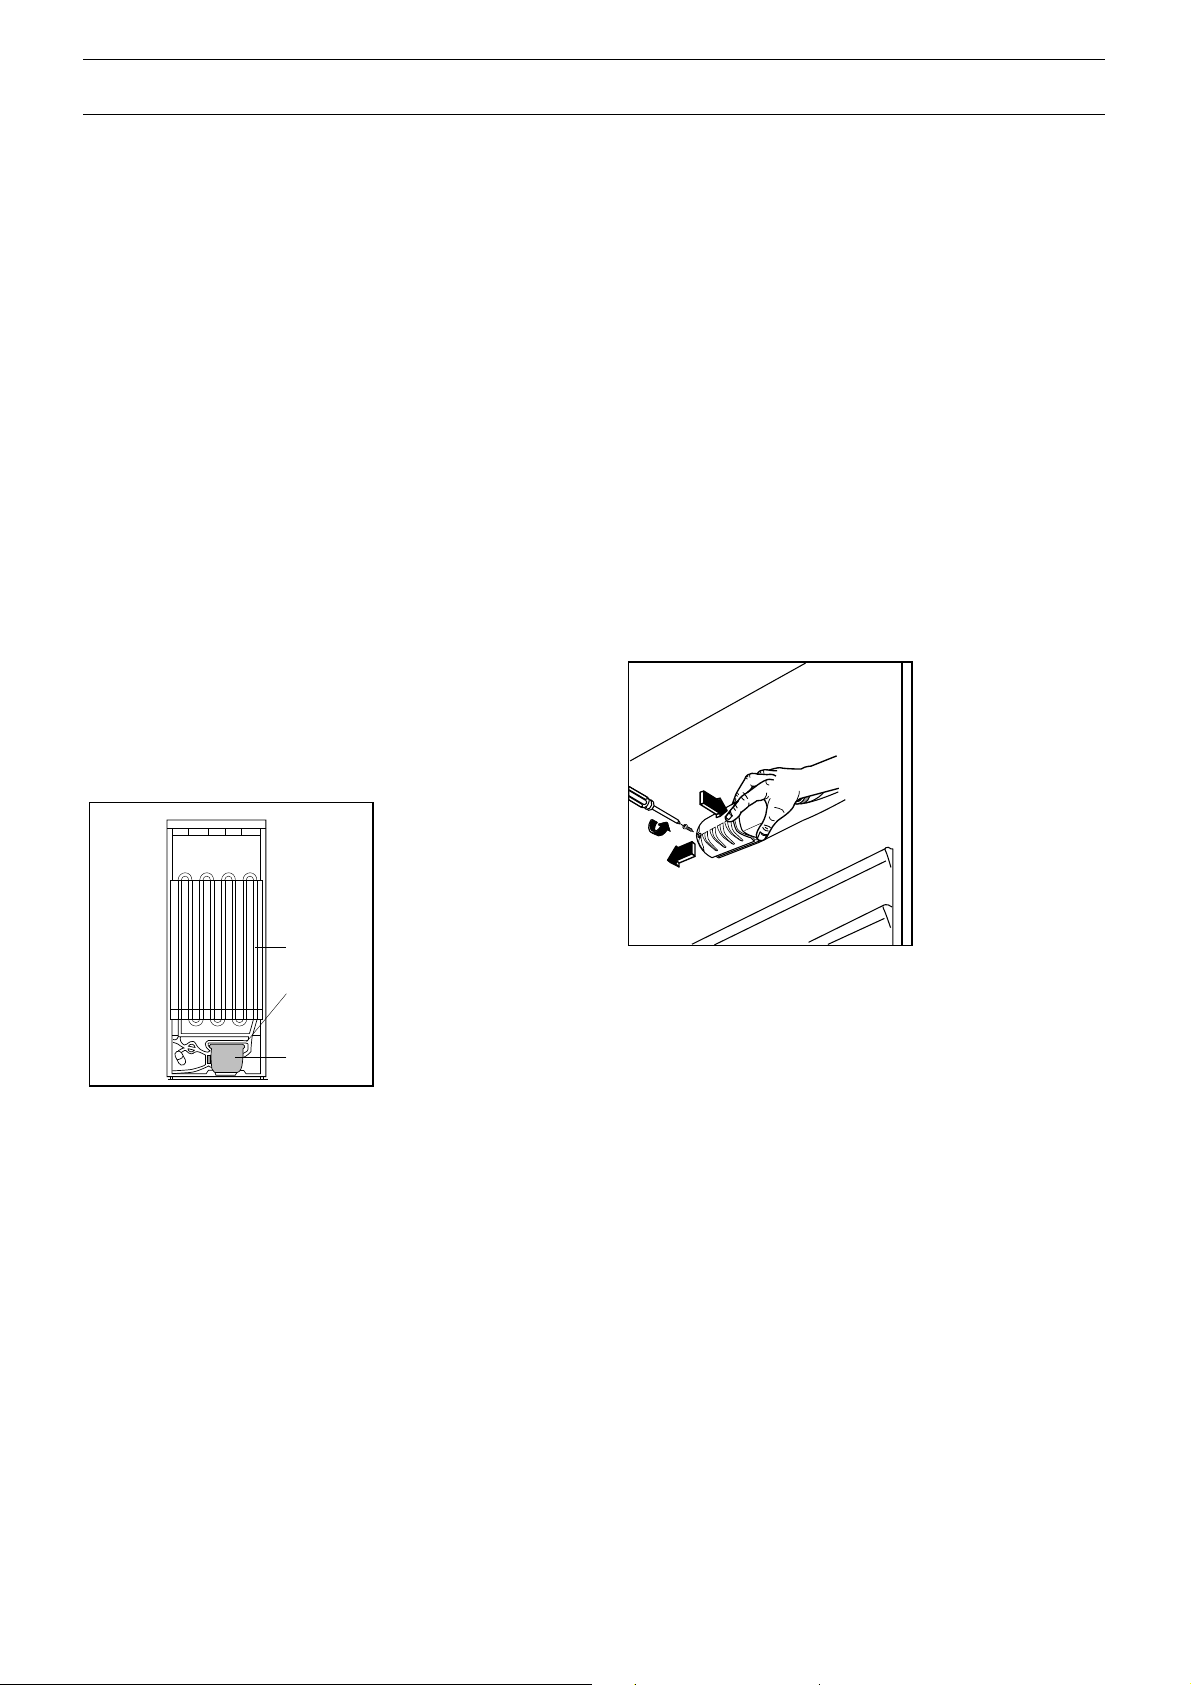
and the compressor at the back of the appliance, with
a brush or vacuum cleaner, see Fig. 10.
Fig. 10
When the appliance is not in use
When the appliance is not in use for long periods, disconnect from the electricity supply, empty all foods
and clean the appliance, leaving the doors ajar to prevent unpleasant smells.
Changing the light bulb
The light bulb inside the refrigerator compartment can
be reached as follows:
ª unscrew the light cover securing screws;
ª unhook the moving part by pressing it as shown in
the figure.
If the door is open and the light does not come on,
check that the bulb is properly screwed in; if it still
does not work, replace the bulb with one of the same
power.
The maximum rating is shown on the light cover.
Fig. 11
CONDENSER
DEFROST
TRAY
COMPRESSOR
D273
You MUST ensure that the appliance is switched OFF.
An accumulation of dust will affect the performance of
the appliance and cause excessive electricity consumption.
D411
14
Page 15

WHAT HAPPENS IF SOMETHING GOES WRONG?
Before contacting your local Electrolux Service Force
Centre, check the following points:
The appliance does not work...
Check that:
ª There is power at the socket.
ª Ensure that there is not a power cut by checking
the household lights.
ª The fuse has not blown.
ª The air circulation passages are not covered.
ª The thermostat dial is in the correct position.
Vibration or abnormal noises...
ª You may hear faint gurgling or bubbling sounds
when the refrigerant is pumped through the coils of
tubing at the rear, to the cooling plate/evaporator.
When the compressor is on, the refrigerant is being
pumped round, and you will hear a whirring or pulsating noise from the compressor.
A thermostat controls the compressor, and you will
hear a faint “click” when the thermostat cuts in and
out.
If, after the above checks, there is still a fault, call your
local Electrolux Service Centre. Please make sure you
give the model and serial number of the appliance.
This information can be found on the rating plate inside the fridge compartment on the left side behind
the vegetable drawer, or on the guarantee certificate.
Original spare parts can be purchased from Electrolux
Service Centres.
In-guarantee customers should ensure that the
above checks have been made as the engineer will
make a charge if the fault is not a mechanical or
electrical breakdown.
Please note that proof of purchase is required for
any in-guarantee service calls.
Before contacting your local Electrolux Service
Centre, make a note of the model and serial
number. This information can be found on the rating plate situated inside the cabinet behind the
bottom fridge/freezer drawer.
Traces of water on the bottom of the fridge compartment...
Check that:
ª The defrosting water dischar ge hole is not obstruct-
ed.
The light does not come on...
Check that:
ª The bulb is fitted correctly.
ª Replace the bulb if it has blown.
Fridge does not defrost...
Check that:
ª The thermostat setting is not too high (see page 9).
Other points to check...
Check that:
ª Have you turned the thermostat to the correct set-
ting?
ª Have doors been left open causing the temperature
to rise?
ª Sometimes the freezer door will be difficult to open
shortly after you have closed it. Don’t worry this is
due to pressure difference which will quickly equalise and allow the door to open normally.
15
Page 16

PEACE OF MIND FOR TWELVE MONTHS
Guarantee conditions
We, Electr olux, undertake that if, within twelve months
of the date of the purchase, this Electrolux appliance
or any part thereof is proved to be defective by reason
only of faulty workmanship or materials, we will, at our
option, repair or replace the same FREE OF ANY
CHARGE for labour, materials or carriage on condition
that:
ª The appliance has been correctly installed and
used only on the electricity supply stated on the rating plate.
ª The appliance has been used for normal domestic
purposes only, and in accordance with the manufacturer’s operating and maintenance instructions.
ª The appliance has not been serviced, maintained,
repaired, taken apart or tampered with by any person not authorised by us.
All service work under this guarantee must be undertaken by a Electrolux service representative or authorised agent.
Any appliance or defective part replaced shall become
the property of Electrolux.
This guarantee is in addition to your statutory and other legal rights.
Home visits are made between 8.30am and 5.30pm
Monday to Friday. Visits may be available outside
these hours in which case a charge will be made.
Exclusions
This guarantee does not cover:
ª Damage or calls resulting from transportation, im-
proper use or neglect, the replacement of any light
bulbs or removable parts of glass or plastic, or vacuum cleaner drive belts, brushes or dust bags.
ª Costs incurred for calls to put right an appliance
which is improperly installed or calls to appliances
outside the United Kingdom.
ª Appliances found to be in use within a commercial
environment, plus those which are the subject of
rental agreements.
ª Products of Electrolux manufacture which are NOT
marketed by Electrolux.
ª EU Countries - The standard guarantee is applica-
ble but is subject to the owner’s responsibility and
cost to ensure the appliance meets the standards
set by the country to which the product is taken.
Proof of purchase may be required. Electrolux Aftersales Service in the country concerned, will be
pleased to advise further.
16
Page 17
Electrolux Sales Service
Service Centres Addresses
CENTRE POSTAL DISTRICTS SERVICE APPTS. ADDRESS
ABERDEEN AB 01224-696569 Electrolux After Sales Service
ARGYLL PA24-26, 28-61 01369-703161 Electrolux After Sales Service
BARNSTAPLE EX18-23, 31-39 01271-328826 Electrolux After Sales Service
BORDERS TD 01573-224411 Electrolux After Sales Service
BRISTOL BA BS TA SP 0117-9211876 Electrolux After Sales Service
CANVEY E EC EN N NW W WC
CARDIFF CF NP 1-4, 6, 9-44 SA1-18
CUMBRIA CA 01228-594747 Electrolux After Sales Service
DUMFRIES &
GALLOWAY
DUNDEE
(Gas only)
DUNDEE DD
GLASGOW EH FK G KA1-26, 28-30 KY ML
GUERNSEY Guernsey 01481-46931 Guernsey Electricity
HAVERFORDWEST SA33-39
HEREFORD HR LD SY7,18
HULL YO4, 11-18, 25
INVERNESS IV1-39, 52-56
INVERNESS PH30-41 IV40-51 01855-821315 Electrolux After Sales Service
ISLE OF ARRAN KA27 01773-302909 Electrolux After Sales Service
ISLE OF BARRA HS9 Isle of Barra 01871-890206 Electrolux After Sales Service
ISLE OF LEWIS PA83-87 01851-705555 Electrolux After Sales Service
ISLE OF MAN IM 01624-687794 Electrolux After Sales Service
ISLE OF MULL PA62-75 01688-302262 Electrolux After Sales Service
ISLE OF WIGHT PO30-41 01983-872552 Electrolux After Sales Service
JERSEY Jersey 01534-505050 Jersey Electricity Company
AL CB HA HP LU MK SG
UB WD
CM CO IG RM SS
IP NR PE14-19, 30-38
SA 21-32
SA19, 20, 40, SA45-48 SY23-25
DG 01387-265166 Electrolux After Sales Service
Dundee Gas Only 01382-642828 Electrolux After Sales Service
PH8-18
PA1-19, 21-23 PH1-7
SA41-44
SA61-73
NP5,7,8
HU DN14
PH19-26, 42-44 KW1-14
0181-443-3464
0181-965-9699
0181-965-9699
01268-694144
01603-667017
01222-460131
01222-461972
01250-876285 Electrolux After Sales Service
0141-647-4381 Electrolux After Sales Service
01437-710914 Electrolux After Sales Service
01432-340334 Electrolux After Sales Service
01482-585678 Electrolux After Sales Service
01463-792952 Electrolux After Sales Service
Northeast Appliance Service, 8 Cornhill Arcade, Cornhill Drive,
Aberdeen, AB2 5UT
T.D.C. Refrigeration, Briar Hill, 7 Hill Street, Dunoon, Argyll, PA23 7AL
Mc Bain Refrigeration, P.O. Box 12,
Barnstaple, North Devon, EX31 2YB
James Stewart & Son, 2-8 Wood Market,
Kelso, Borders, TD5 7AX
Unit BE46, P.O. Box 372, Bristol, BS99 1UD
Electrolux After Sales Service
2-4 Sandhurst,
Kings Road, Canvey Island, SS8 0QY
Electrolux After Sales Service
Guardian Industrial Estate, Clydesmuir Road,
Tremorfa, Cardiff, CF2 2QS
ETB Services, Carlisle Enterprise Centre, James Street,
Carlisle, CA2 5AP
Allan Crossan (service), 93 Irish Street, Dumfries, Scotland, DG1 2PQ
Tayside Refrigeration, 3-7 Blackness Street,
Dundee, DD1 5LR
I Brogan Domestics, 41 Lesley Street,
Blairgowrie, Perthshire, PH10 6AT
20 Cunningham Road, Clyde Estate, Rutherglen, Glasgow, G73 1PP
PO Box 4, Vale, Guernsey, Channel Islands
C Butherway, 1 Church Road, Roch, Haverfordwest,
Dyfed, Wales, SA62 6AG
Domestic Repair Centre, Unit 3 Bank Buildings,
Cattle Market, Hereford, HR4 9HX
John Sizer, Unit 1 Boulevard Unit, Factory Estate, Hull, HU3 4AY
Highland Appliances, Unit 3B3 Smithton Industrial Estate,
Smithton, Inverness, IV1 2PD
George Ross Electrical, Forrestry Workshop,
Inchree, Onich, Inverness-shire, PH33 6SE
Arran Domestics, Unit 4 The Douglas Centre,
Brodick, Isle of Arran, KA27 8AJ
John Zerfahs, 244 Bruernish, Isle of Barra, Western Islands, HS9 5QY
N.D. Macleod, Churchhouse, 16 James Street,
Stornoway, Isle of Lewis, PA87 2QW
Manx Electricity, Service Workshop, North Quay, Douglas, Isle of Man
Brian Hogg, Braeside, Raeric Road, Tobermory, Isle of Mull, PA75 6PU
Wyatts Electrical Service, 4 Forelands Road, Bembridge, I O W, PO35 5XW
PO Box 45 Queens Road, St Helier,
Jersey, Channel Islands, JE4 8NY
05/96
17
Page 18
Electrolux Sales Service
Service Centres Addresses
CENTRE POSTAL DISTRICTS SERVICE APPTS. ADDRESS
LANCASTER LA 01772-316175 Electrolux After Sales Service
LEEDS BD DN1-7, 10-12 HD HG HX
LINCOLN DN21 sub codes 1,2 & 5 only
LIVERPOOL FY PR L WN CH CW
MANCHESTER BB BL OL M SK
NEWTON ABBOTT EX1-17 TQ
NORTH WALES LL 01745-591616 Electrolux After Sales Service
NORTHERN DL TS DH YO21,22
NORTHERN
IRELAND EAST
NORTHERN
IRELAND WEST
NUNEATON B1-48 62-79, 90-94, DY ST
ORKNEY KW15-17 01856-875457 Electrolux After Sales Service
REDDITCH GL OX WR (Not WR15) SN
REDRUTH TR1-20,26,27
ROTHESAY PA20 01700-504777 Electrolux After Sales Service
SHETLAND Own Sales 01595-692915 Electrolux After Sales Service
SHETLAND Own Sales 01595-692225 Electrolux After Sales Service
SHETLAND Own Sales 01595-692855 Electrolux After Sales Service
SHETLAND Own Sales 01806-566546 Electrolux After Sales Service
SHREWSBURY SY1-6 SY8-17 SY19-22 TF 01743-450279 Electrolux After Sales Service
SOUTH COAST BH, DT, P01-22, SO
SOUTH HUMBERSIDEDN8,9 DN15-20
TONBRIDGE SL GU1-35 RG
LS S WF YO1-3, 5-8 DE
NG-1-22 & 25
LN 1,2,4-6
LN3 sub codes 4,5 only
LN8-10 NG23,24 31-34 PE1-13, 20-25
WA (Not 14,15)
WA14 & 15 only
PL1-9,16,19-21
DH NE SR
BT1-30, 36-57, 63-67 01232-746591 Electrolux After Sales Service
BT31-35, 60-62, 68-82, 92-94 01861-510400 Electrolux After Sales Service
WS WV
CV, LE, NN, WR15
B49, 50, 60, 61, 80, 95-98.,
PL10-15,17,18, 22-35
TR21-25
DN21 Sub codes 3,4 only
DN31-40
LN3 (Sub codes 6), LN 7,11-13
CT DA ME TN
BN1-18 20-27 RH
TW BR CR SE SW SM KT
0113-2608511 Electrolux After Sales Service
01522-514603 Electrolux After Sales Service
0151-254-1724 Electrolux After Sales Service
0161-477-7758 Electrolux After Sales Service
01626-65909 Electrolux After Sales Service
01325-301400
0191-493-2025
0121-358-7076
0121-358-5051
01203-354424
01527-512919
01993-704411
01209-314407 Electrolux After Sales Service
01705-667411
0117-9211876
01472-267978 Electrolux After Sales Service
01252-24505
01732-357722
01273-694341
0181-658-9069
NL Services, Unit 333 Ranglet Road, Walton Summit,
Bamber Bridge, Preston, Lancashire, PR5 8AR
64-66 Cross Gates Road,
Leeds, LS15 7NN
Brian Hudson, Unit 8 Stonefield Park,
Clifton Street, Lincoln, LN5 8AA
Honeys Green Precinct, Honeys Green Lane,
West Derby, Liverpool, L12 9JH
Unit 30, Oakhill Trading Estate, Devonshire Road,
Worsley, Manchester, M28 3PT
South West Domestic Service, Unit 2 Zealley Industrial Estate,
Kingsteignton, Newton Abbott, South Devon, TQ12 3SJ
GMS (Cymru), Unit 2 Coed - Parc, Abergele Road,
Rhuddlan, Clwyd, Wales, LL18 5UG
Electrolux After Sales Service
PO Box 40, Preston Road, Aycliffe Industrial Estate,
Newton Aycliffe, Co. Durham, DL5 6XA
Unit C3, Edenderry Industrial Estate,
326, Crumlin Road, Belfast, BT14 7EE
G & O (Armagh) Service, Owenmore House, Kilwee Business Park, Upper
Dunmurray Lane, Belfast, BT17 OHD
Electrolux After Sales Service
Unit 23-24 Alliance Business Park, Townsend Drive,
Nuneaton, Warwickshire, CV11 6RX
Refrigeration Sales and Services, Hatson Ind. Estate,
Kirkwall, Orkney, KW15 1RE
Electrolux After Sales Service
Heming Road, Washford, Redditch, Worcestershire, B98 0DH
Cornwall Domestic Service, Unit 7D Pool Industrial Estate, Wilson Way,
Redruth, Cornwall, TR15 3QW
D McGlashan, Walker Enginering, Glenmhor,
Upper Serpentine, Rothesay, Strathclyde, PA20
George Robertson, 3/4 Carlton Place, Lerwick, Shetland, ZE1 0ED
Tait Electronic Systems Ltd, Holmsgarth Road,
Lerwick, Shetland, ZE1 0PW
Bolts Shetland Ltd, 26 North Road, Lerwick, Shetland, ZE1 0PE
Leask Electrical, Harsdale, Symbister, Whalsay, Shetland, ZE2 9AA
BLI Service, 6 Harlescott Barn, Harlescott Lane,
Shrewsbury, Shrops, SY1 3SY
Electrolux After Sales Service
Limberline Road, Hilsea, Portsmouth, Hampshire, PO3 5JJ
John Robinson (Electrical), 81 Pasture Street, Grimsby, DN32 9EP
Electrolux After Sales Service
Unit 30, Deacon Trading Estate, Morley Road,
Tonbridge, Kent, TN9 1RA
18
05/96
Printed on recycled paper
 Loading...