

Page 1
Built-In Electric Oven
Operating Instructions
822 923 589-A-101103-01
EOO 6620
g
Page 2

Dear customer,
Please read these operating instructions carefully.
Pay particular attention to the section “Safety information” on the first few
pages. Please retain these operating instructions for later reference. Pass
them on to possible new owners of the appliance.
The following symbols are used in the text:
1 Safety instructions
Warning: Information concerning your personal safety.
Important: Information on how to avoid damaging the appliance.
3 Information and practical tips
2 Environmental information
1.These numbers indicate step by step how to use the appliance.
2.…
3.…
These operating instructions contain information on steps you can take
yourself to rectify a possible malfunction. Refer to the section “What to do
if...”.
2
Page 3

Contents
Safety . . . . . . . . . . . . . . . . . . . . . . . . . . . . . . . . . . . . . . . . . . . . . . . . . . . . . . . 5
Disposal . . . . . . . . . . . . . . . . . . . . . . . . . . . . . . . . . . . . . . . . . . . . . . . . . . . . . 6
Description of the Appliance . . . . . . . . . . . . . . . . . . . . . . . . . . . . . . . . . . . . 7
General Overview . . . . . . . . . . . . . . . . . . . . . . . . . . . . . . . . . . . . . . . . . . . . . . 7
Control Panel. . . . . . . . . . . . . . . . . . . . . . . . . . . . . . . . . . . . . . . . . . . . . . . . . . 8
Oven Features . . . . . . . . . . . . . . . . . . . . . . . . . . . . . . . . . . . . . . . . . . . . . . . . . 8
Oven accessories . . . . . . . . . . . . . . . . . . . . . . . . . . . . . . . . . . . . . . . . . . . . . . 9
Before Using for the first time . . . . . . . . . . . . . . . . . . . . . . . . . . . . . . . . . . . 10
Initial Cleaning. . . . . . . . . . . . . . . . . . . . . . . . . . . . . . . . . . . . . . . . . . . . . . . . . 10
Using the Rings . . . . . . . . . . . . . . . . . . . . . . . . . . . . . . . . . . . . . . . . . . . . . . . 11
Cooking with the Rings . . . . . . . . . . . . . . . . . . . . . . . . . . . . . . . . . . . . . . . . . . 12
Switching on the dual fry/cook area . . . . . . . . . . . . . . . . . . . . . . . . . . . . . . . . 12
Using the Oven . . . . . . . . . . . . . . . . . . . . . . . . . . . . . . . . . . . . . . . . . . . . . . . 13
Switching the Oven On and Off . . . . . . . . . . . . . . . . . . . . . . . . . . . . . . . . . . . 13
Oven Functions . . . . . . . . . . . . . . . . . . . . . . . . . . . . . . . . . . . . . . . . . . . . . . . . 14
Inserting the general purpose pan, grill, and tray . . . . . . . . . . . . . . . . . . . . . . 15
Inserting/Removing the Fat Filter . . . . . . . . . . . . . . . . . . . . . . . . . . . . . . . . . . 15
Additional functions . . . . . . . . . . . . . . . . . . . . . . . . . . . . . . . . . . . . . . . . . . . . 16
Timer . . . . . . . . . . . . . . . . . . . . . . . . . . . . . . . . . . . . . . . . . . . . . . . . . . . . . 17
Meat cooking rod . . . . . . . . . . . . . . . . . . . . . . . . . . . . . . . . . . . . . . . . . . . . 18
Mechanical Door Lock . . . . . . . . . . . . . . . . . . . . . . . . . . . . . . . . . . . . . . . . . . 20
Uses, Tables and Tips . . . . . . . . . . . . . . . . . . . . . . . . . . . . . . . . . . . . . . . . . . 21
Baking . . . . . . . . . . . . . . . . . . . . . . . . . . . . . . . . . . . . . . . . . . . . . . . . . . . . . . . 21
Baking Table. . . . . . . . . . . . . . . . . . . . . . . . . . . . . . . . . . . . . . . . . . . . . . . . 23
Roasting . . . . . . . . . . . . . . . . . . . . . . . . . . . . . . . . . . . . . . . . . . . . . . . . . . . . . 29
Roasting Table . . . . . . . . . . . . . . . . . . . . . . . . . . . . . . . . . . . . . . . . . . . . . . 30
Meat Probe Table . . . . . . . . . . . . . . . . . . . . . . . . . . . . . . . . . . . . . . . . . . . . . . 32
Grilling . . . . . . . . . . . . . . . . . . . . . . . . . . . . . . . . . . . . . . . . . . . . . . . . . . . . . . . 33
Infrared Grilling. . . . . . . . . . . . . . . . . . . . . . . . . . . . . . . . . . . . . . . . . . . . . . 33
Turbo grilling. . . . . . . . . . . . . . . . . . . . . . . . . . . . . . . . . . . . . . . . . . . . . . . . 35
Preserving . . . . . . . . . . . . . . . . . . . . . . . . . . . . . . . . . . . . . . . . . . . . . . . . . . . . 36
Drying with Hot Air . . . . . . . . . . . . . . . . . . . . . . . . . . . . . . . . . . . . . . . . . . . . . 38
3
Page 4

Cleaning and Care. . . . . . . . . . . . . . . . . . . . . . . . . . . . . . . . . . . . . . . . . . . . . 39
Exterior of the Appliance. . . . . . . . . . . . . . . . . . . . . . . . . . . . . . . . . . . . . . . . . 39
Oven Interior . . . . . . . . . . . . . . . . . . . . . . . . . . . . . . . . . . . . . . . . . . . . . . . . . . 39
Accessories. . . . . . . . . . . . . . . . . . . . . . . . . . . . . . . . . . . . . . . . . . . . . . . . . . . 39
Fat Filter . . . . . . . . . . . . . . . . . . . . . . . . . . . . . . . . . . . . . . . . . . . . . . . . . . . . . 39
Shelf Support Rails . . . . . . . . . . . . . . . . . . . . . . . . . . . . . . . . . . . . . . . . . . . . . 40
Pyrolytic cleaning . . . . . . . . . . . . . . . . . . . . . . . . . . . . . . . . . . . . . . . . . . . . . . 41
Oven Lighting . . . . . . . . . . . . . . . . . . . . . . . . . . . . . . . . . . . . . . . . . . . . . . . . . 42
Oven Door . . . . . . . . . . . . . . . . . . . . . . . . . . . . . . . . . . . . . . . . . . . . . . . . . . . . 43
Oven door glass . . . . . . . . . . . . . . . . . . . . . . . . . . . . . . . . . . . . . . . . . . . . . . . 44
What to do if … . . . . . . . . . . . . . . . . . . . . . . . . . . . . . . . . . . . . . . . . . . . . . . . 46
Technical Data . . . . . . . . . . . . . . . . . . . . . . . . . . . . . . . . . . . . . . . . . . . . . . . . 47
Oven Interior Dimensions . . . . . . . . . . . . . . . . . . . . . . . . . . . . . . . . . . . . . . . . 47
Regulations, Standards, Directives . . . . . . . . . . . . . . . . . . . . . . . . . . . . . . . . . 47
Index . . . . . . . . . . . . . . . . . . . . . . . . . . . . . . . . . . . . . . . . . . . . . . . . . . . . . . . . 50
Service . . . . . . . . . . . . . . . . . . . . . . . . . . . . . . . . . . . . . . . . . . . . . . . . . . . . . . 51
4
Page 5

1 Safety
Electrical Safety
• The appliance may only be connected by a registered specialist.
• In the event of any faults or damage to the appliance: remove fuses or
switch off.
• It is not permissible to clean the appliance with a steam or high pressure
cleaner for safety reasons!
• Repairs to the appliance may only be carried out by specialists. Re-
pairs carried out by inexperienced persons may cause injury or serious
malfunctioning. If your appliance needs repairing, please contact your local AEG Service Force Centre or your specialist dealer.
Child Safety
• Never leave children unsupervised when the appliance is in use.
Safety whilst Using
• This appliance is intended to be used for cooking, frying and baking food
in the home.
• Take care when connecting electric appliances to sockets nearby. Do not
allow connecting leads to come into contact with hot rings or to catch beneath the hot oven door.
• Warning: Risk of burns! The interior of the oven becomes hot during use.
• Using ingredients containing alcohol in the oven may create an alcohol-air
mixture that is easily ignited. In this case, open the door carefully. Do not
have embers, sparks or naked flames in the vicinity when opening the
door.
To Avoid Damaging Your Appliance
• Do not line your oven with aluminium foil and do not place a baking tray or
dish on the oven floor, otherwise the oven enamel will be damaged by the
resulting build up of heat.
• Juice from fruit that drips from baking trays will leave marks that cannot
be removed. For very moist cakes, use the universal baking tray.
• Do not put any weight on the oven door when it is open.
• Never pour water directly into the hot oven. The enamel may be damaged.
• Using force, especially on the edges of the front glass panel, may break
the glass.
• Do not store inflammable objects in the oven. They may ignite when the
oven is switched on.
• Do not store moist food in the oven. The enamel may be damaged.
5
Page 6

2 Disposal
Disposing of the packaging material
All materials used can be fully recycled.
Plastics are marked as follows:
• >PE< for polyethylene, as used for the outer wrapping and the bags inside.
• >PS< for polystyrene foam, e.g., as used for the padding materials. They
are completely free of CFCs.
Disposal of old appliances
1 Warning: Before disposing of old appliances please make them inoperable
so that they cannot be the source of danger.
To do this, disconnect the appliance from the mains supply and remove
the mains lead.
To protect the environment, it is important that worn out appliances are disposed of in the correct manner.
• The appliance must not be disposed of with household rubbish.
• You can obtain information about collection dates or public refuse dispos-
al sites from your local refuse department or council.
6
Page 7
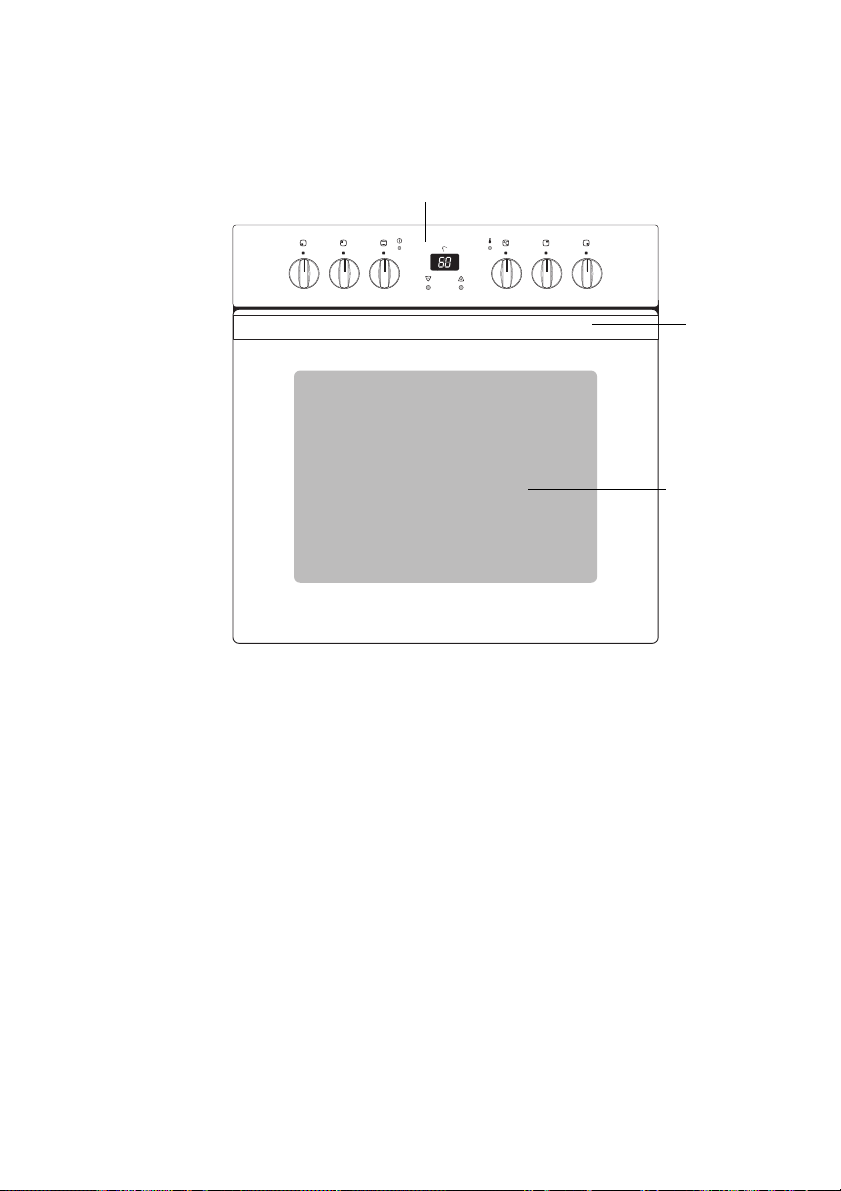
Description of the Appliance
General Overview
Control panel
Door
handle
Full glass
door
7
Page 8
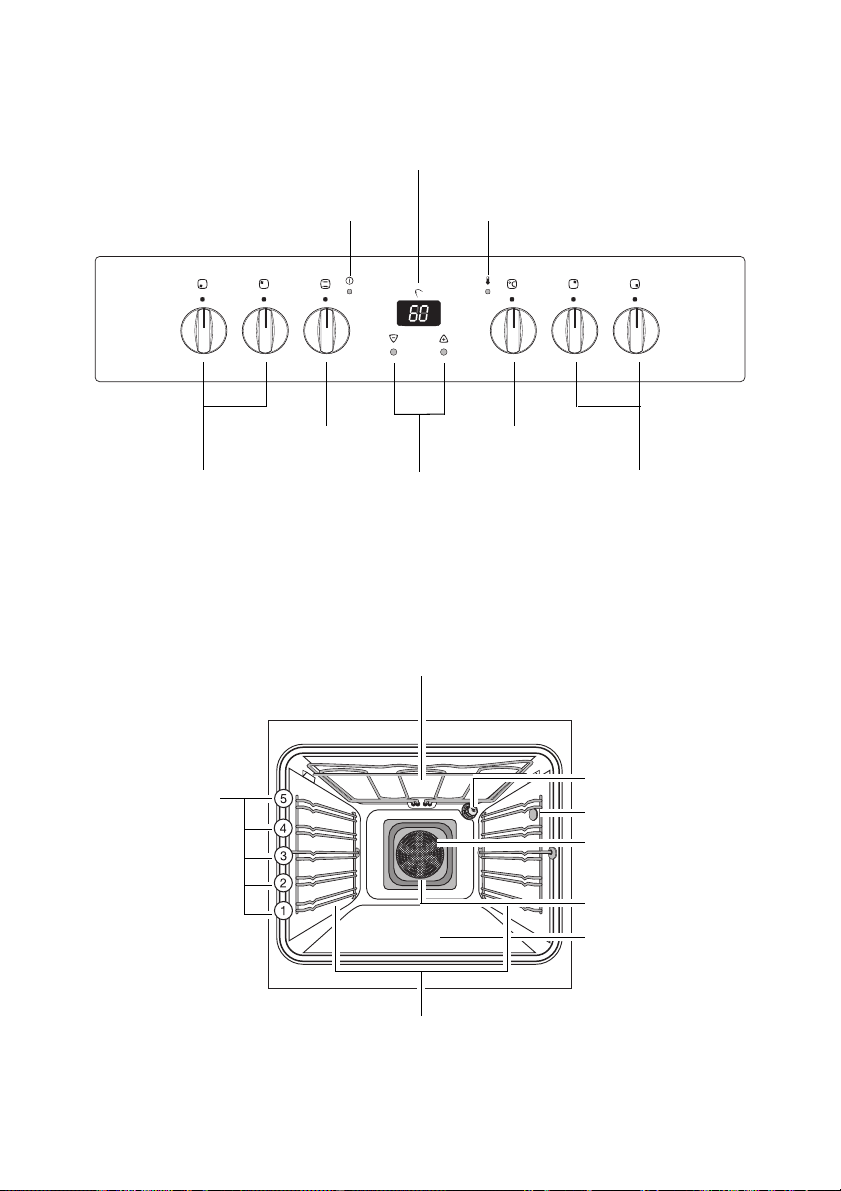
Control Panel
Temperature / Time Display
Oven Power Indicator
Oven Functions Temperature selector
Ring Switches
Oven Features
Shelf positions
Temperature Pilot Light
Settings buttons
Top heat and heating elements
Ring Switches
Oven lighting
Meat probe socket
Fat Filter
Rear wall heating element
Bottom Heat
Oven shelf runners, removable
8
Page 9
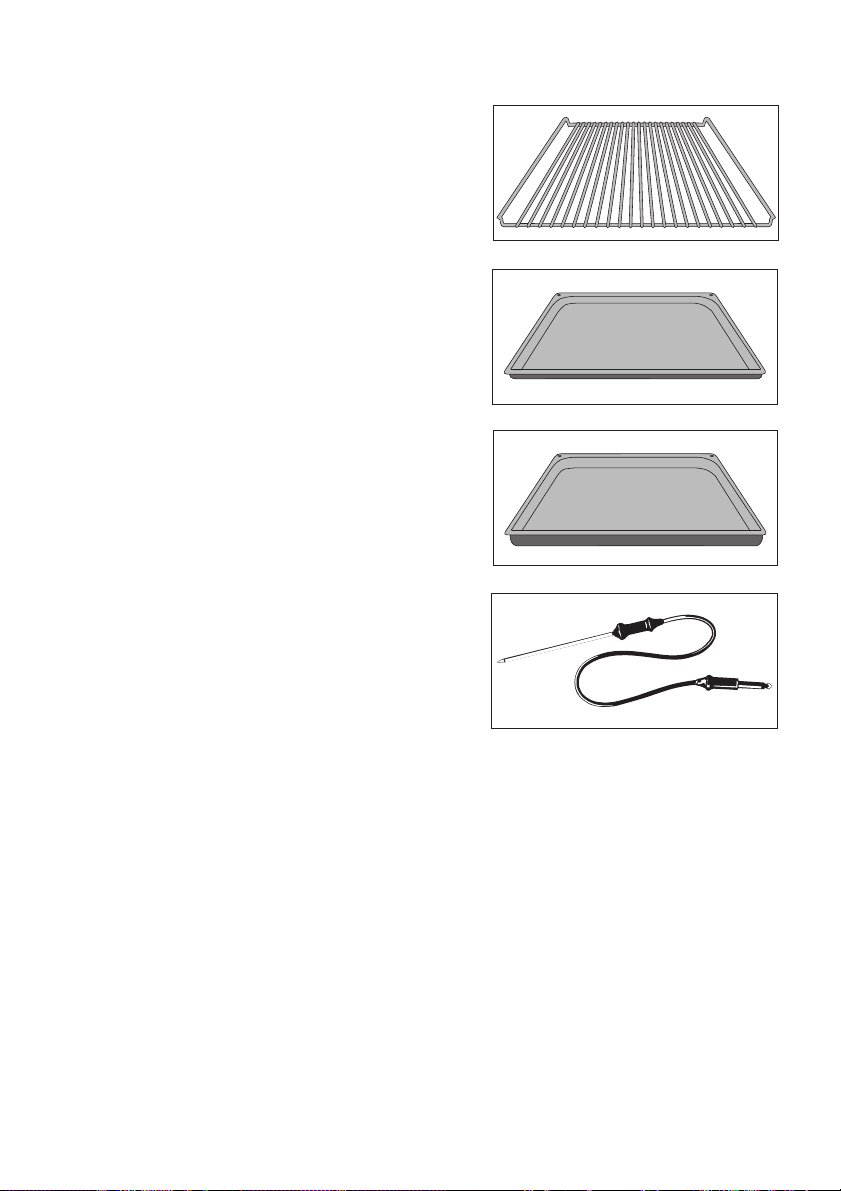
Oven accessories
Combination shelf
For dishes, cake tins, items for roasting
and grilling.
Baking tray
For cakes and biscuits.
General purpose pan
For roasting, or as a receptacle for
grease.
Meat probe
For determining exactly how far joints of
meat are cooked.
9
Page 10

Before Using for the first time
Initial Cleaning
Before using the oven for the first time you should clean it thoroughly.
1 Caution: Do not use any caustic, abrasive cleaners! The surface could be
damaged.
3 To clean metal fronts use commercially available cleaning agents.
1.Turn the oven function switch to oven lighting L.
2.Remove all accessories and the shelf support rails and wash them with
warm water and washing up liquid.
3.Then wash out the oven with warm water and washing-up liquid, and dry.
4.Wipe the front of the appliance with a damp cloth.
10
Page 11
Using the Rings
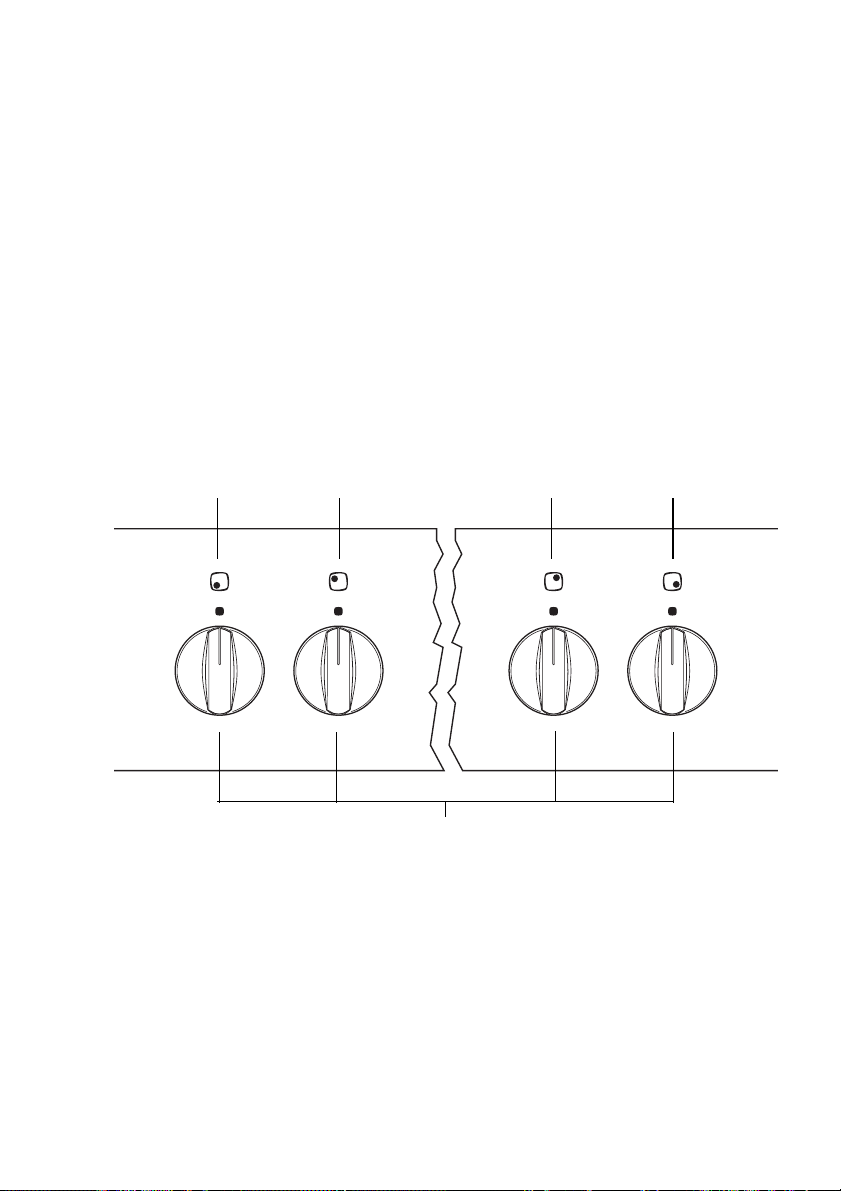
3 Also refer to the operating instructions for your built-in hob. It contains im-
portant information on ovenware, operation, cleaning and care.
Heat settings
• Heat settings can be set from 1-9.
• Intermediate positions are possible for settings 2-7.
1 = lowest output
9 = highest output
Z = double ring switching
2 Switch the cooking zone off approx. 5-10 minutes before cooking is finished
to make use of the residual heat. This saves electricity.
front left rear left rear right front right
Ring Switches
11
Page 12
Cooking with the Rings
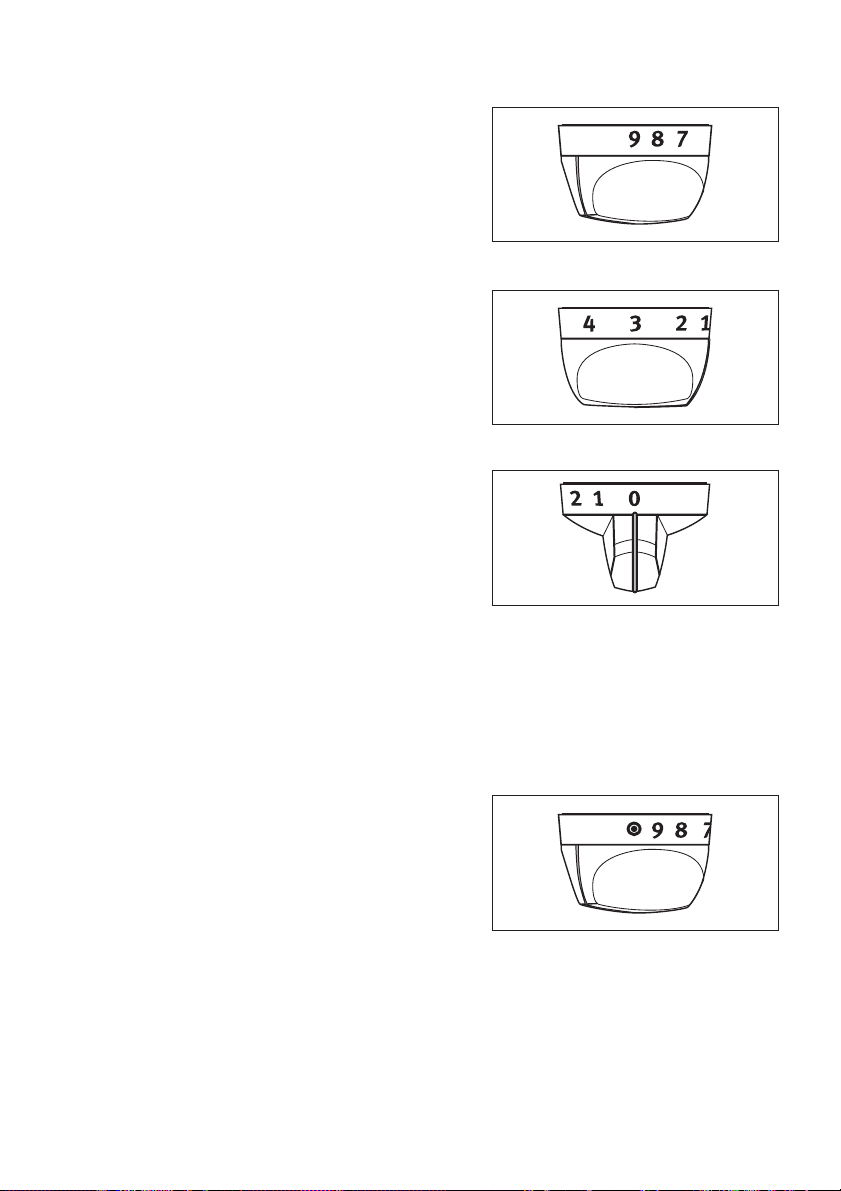
1.For heating up/browning, select a high
heat setting.
2.As soon as steam starts to form or the
oil is hot, turn back to the heat setting
necessary for further cooking.
3.To stop cooking, turn back to the zero
position.
Switching on the dual fry/cook area
1 The control for the dual fry/cook area is switched on by turning to the right,
and cannot be turned past the stop!
1.Turn the dual fry/cook control to the
right. Continue turning to Position 9, and
onto the Z symbol (you will feel a slight
resistance). The stop position will then
be clearly detectable.
2.Finally, turn back to the desired setting.
3.After cooking, turn back to the OFF po-
sition.
3 To use the dual fry/cook area again afterwards, the larger ring must be
switched back on.
12
Page 13
Using the Oven
Switching the Oven On and Off
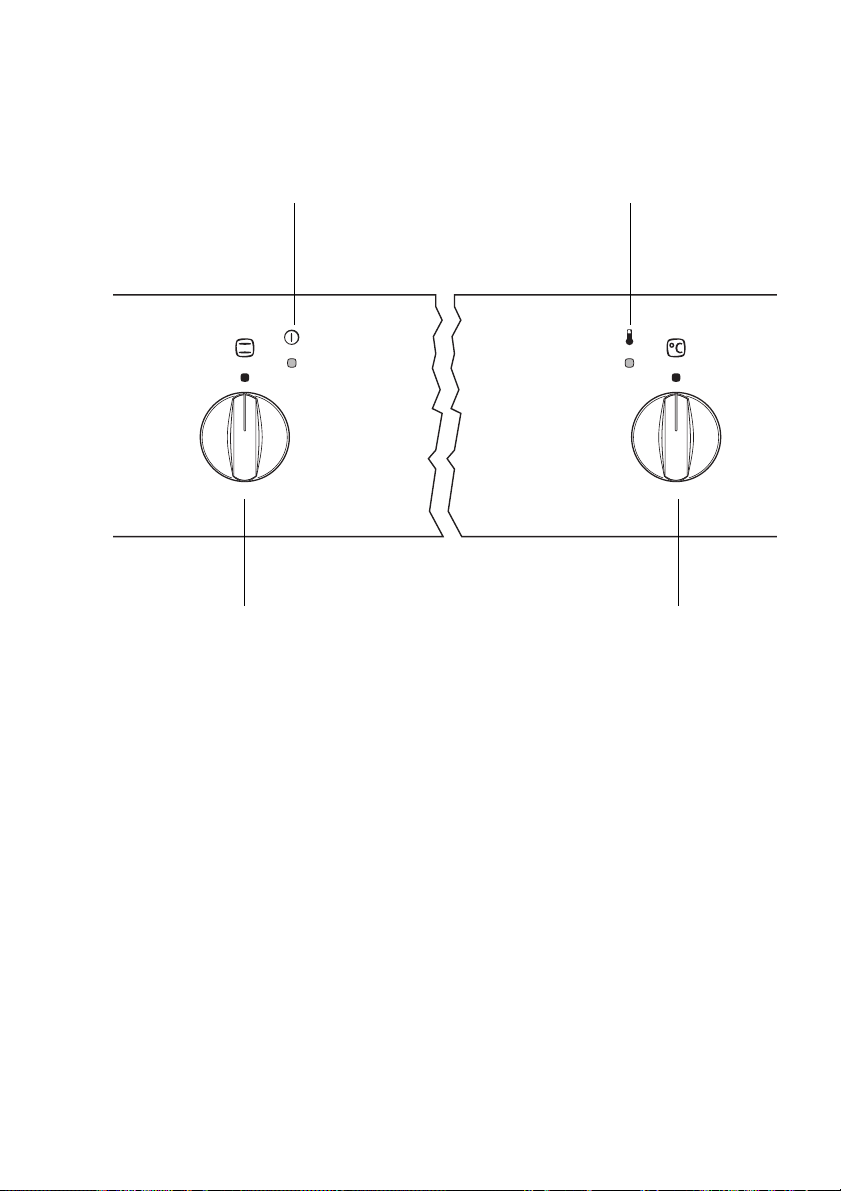
Oven Power Indicator
Temperature Pilot Light
Oven Functions
1.Turn the oven functions switch to the required function.
2.Turn the temperature selection switch to the required temperature.
The red oven power indicator is illuminated while the oven is in use.
The red temperature pilot light is illuminated while the oven is heating up.
3.To switch off the oven, turn the oven functions switch and the temperature
selection switch to the zero position.
Temperature selector
3 Cooling fan
When the oven is switched on, the fan comes on automatically to keep the
surfaces the appliance cool. When the oven is switched off, the fan continues to operate to cool the appliance down, then switches itself off.
13
Page 14

Oven Functions
The oven has the following functions:
L Oven lighting
With this function you can illuminate the oven interior, e.g., for cleaning.
The heating element is not in use.
¥ Hot Air
For roasting and baking on up to three levels simultaneously.
Set oven temperatures 20-40 °C lower than when using conventional.
The rear wall heating element is used and in addition the fan is switched on.
¡ Conventional
For baking or roasting on one level.
The conventional heating elements are in use.
¦ Pizza Setting
For baking pizza, fruit flans, quiches and flat sweet or savoury pies.
The rear wall heating element and bottom heat are used and in addition the
fan is switched on.
¼ Turbo All-Round Grill
For roasting larger joints of meat or poultry on one level. The function is
also suitable for gratinating and browning.
The grill heater elements and the ventilator operate simultaneously.
¸ Infrared Grill
For grilling flat foods that are arranged in the middle of the shelf such as
steaks, escalopes, fish or for toasting.
The grill heating element is in use.
º Infrared Wide-Area Grill
For grilling flat foods in larger quantities, such as steaks, escalopes, fish
or for toasting.
Top heat and the grill element are used.
O Top Heat
For browning foods topped with breadcrumbs and foods cooked au
gratin.
The top heating element is in use.
14
Page 15
U Bottom Heat
For crisping cakes that require a crisp base.
The bottom heating element is in use.
P Pyroluxe
For pyrolytic self-cleaning.
During this process splashes and deposits are burned in the oven and can
be washed off once the oven has cooled.
The oven is heated to approx. 500 °C.
Inserting the general purpose pan, grill, and tray
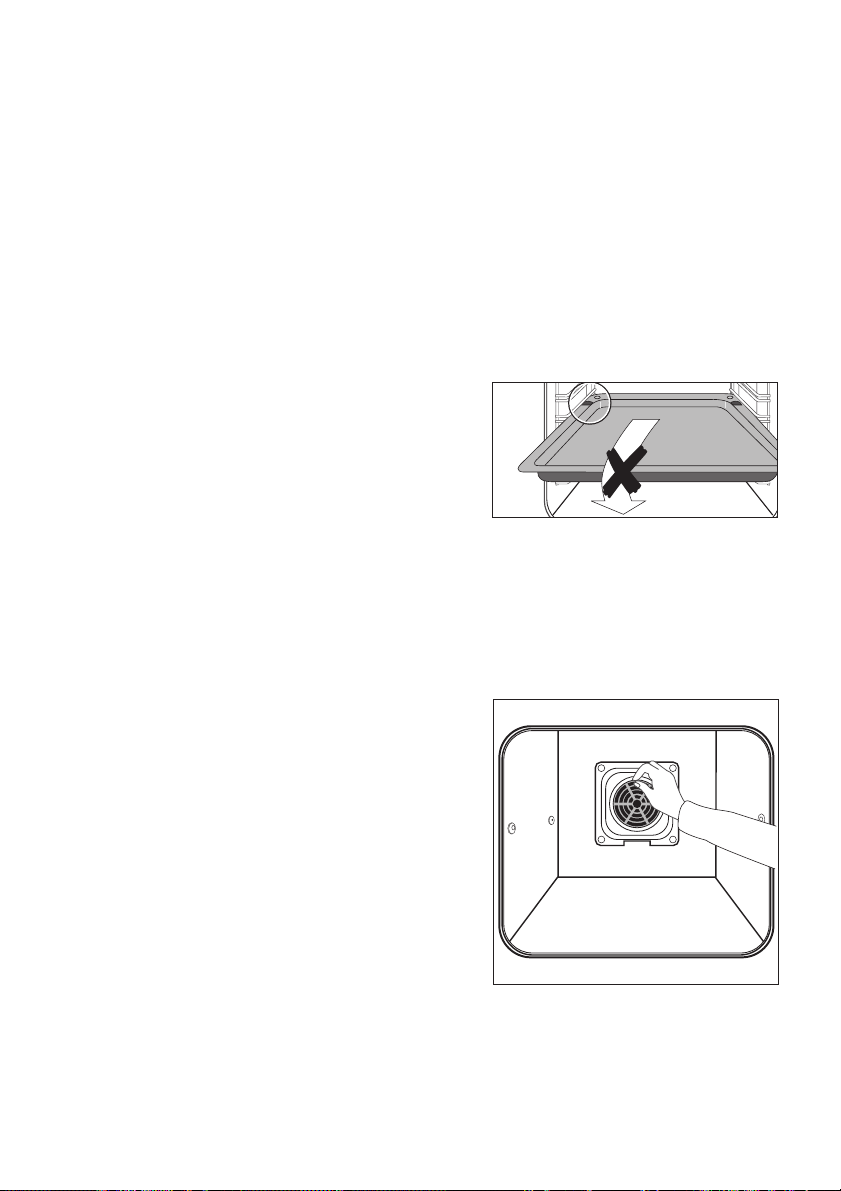
Inserting the general purpose pan and
tray:
The trays have a little bulge on the left
and right edges. These are provided as
positioning guides and must always be
located towards the rear when inserting
the tray.
For grills:
Insert the tray at the desired position.
Inserting/Removing the Fat Filter
The fat filter protects the rear wall heating
element against splashes of fat when
roasting.
Inserting the fat filter
Holding the fat filter by the tab, insert the two retainers into the
opening on the rear wall of the
oven (fan opening) from the top
downwards.
Removing the fat filter
Take hold of the tab on the fat filter and remove by pulling upwards.
15
Page 16
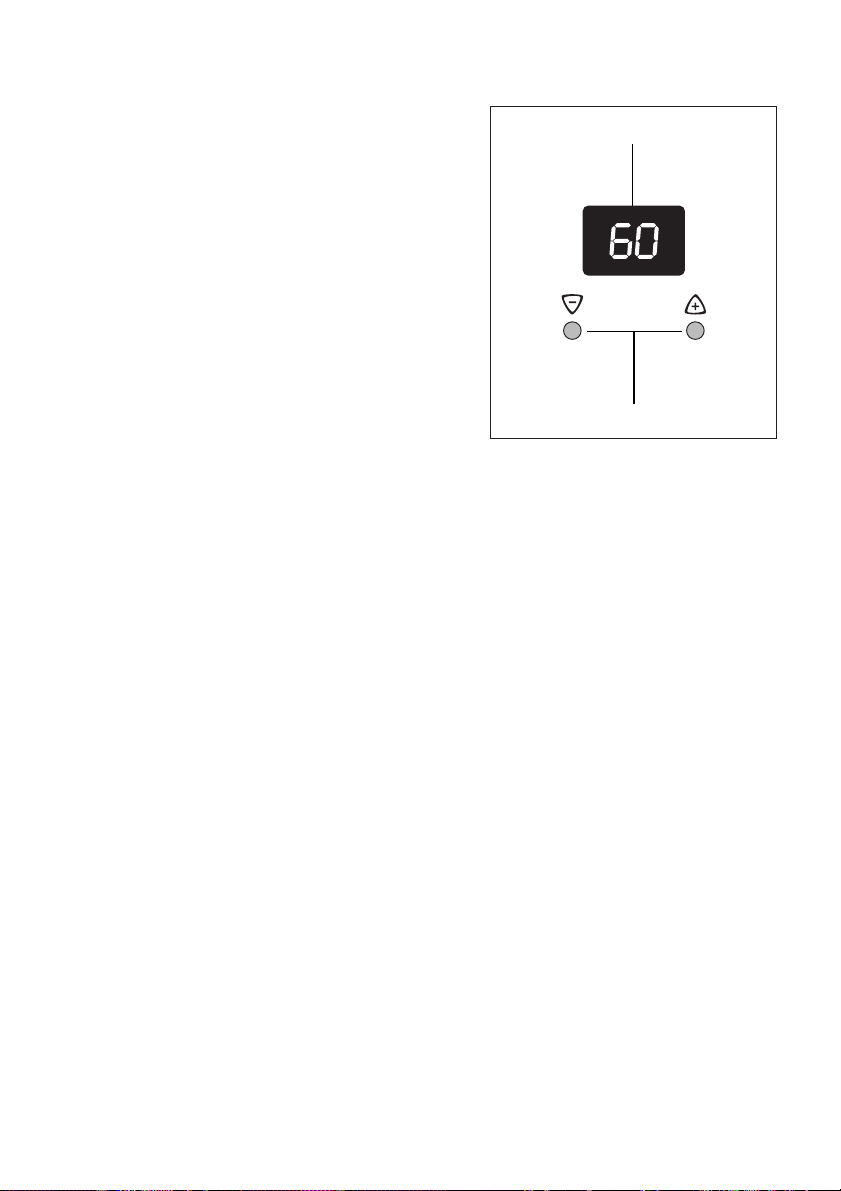
Additional functions
Either the timer or the meat cooking rod
can be set.
Timer
Setting the timer.
Meat Cooking Rod
Setting the core temperature.
Temperature / Time Display
Settings buttons
3 General Hints
• After a function has been selected, the display flashes for about
5 seconds. While it flashes, the desired time can be set using the + or -
buttons.
• When the desired time has been set, the display flashes for another
5 seconds. The set time begins to run.
• Press any of the buttons to stop the signal.
• The desired oven function and temperature can be selected before or af-
ter setting the clock functions.
• When cooking is finished, turn the oven and temperature selectors back
to zero.
16
Page 17
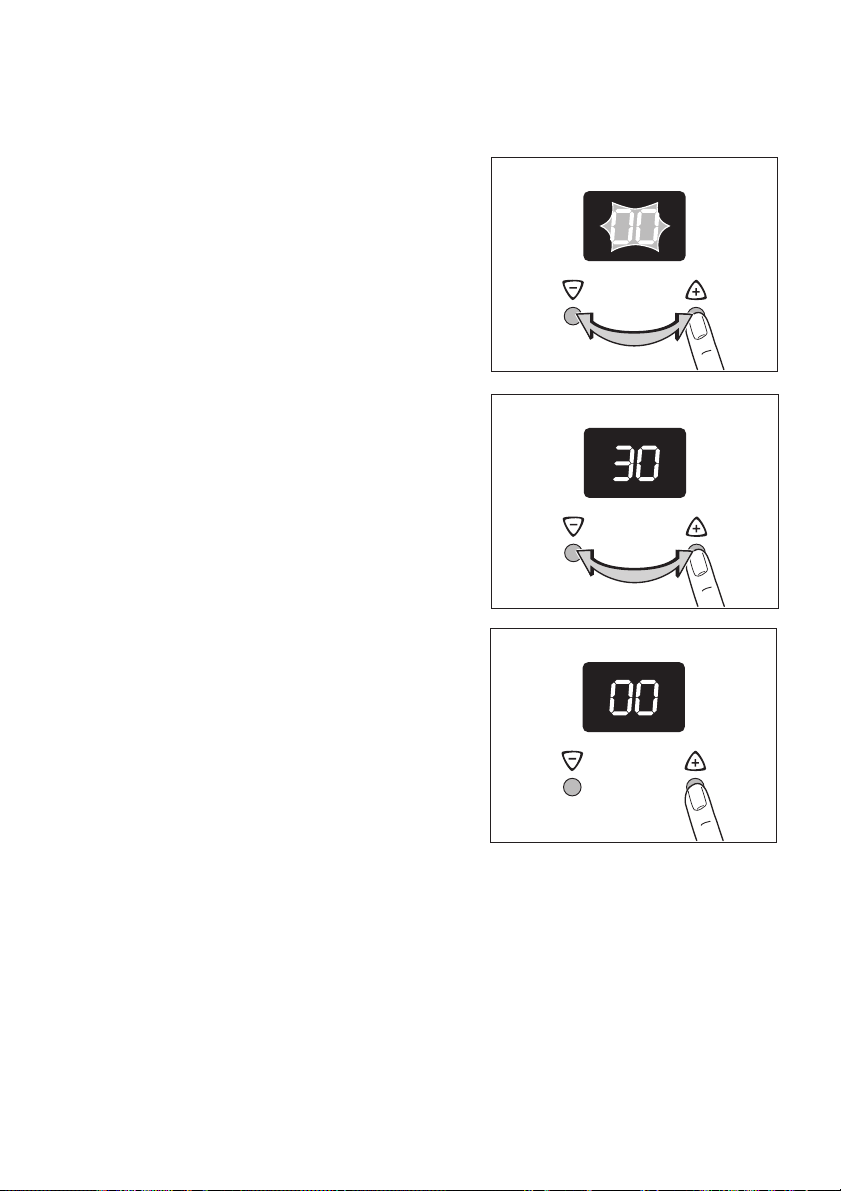
Timer
3 This function does not affect the operation of the oven.
1.Press any button.
"00" will flash in the display.
2.Within 5 seconds, set the desired time
period by pressing the + or - buttons. (Maximum: 99 minutes).
Within 5 seconds the display will show
the time remaining.
When the period of time is up, "00" will
be displayed and a signal will sound for
2 minutes.
3.The signal can be switched off by
pressing any button.
17
Page 18
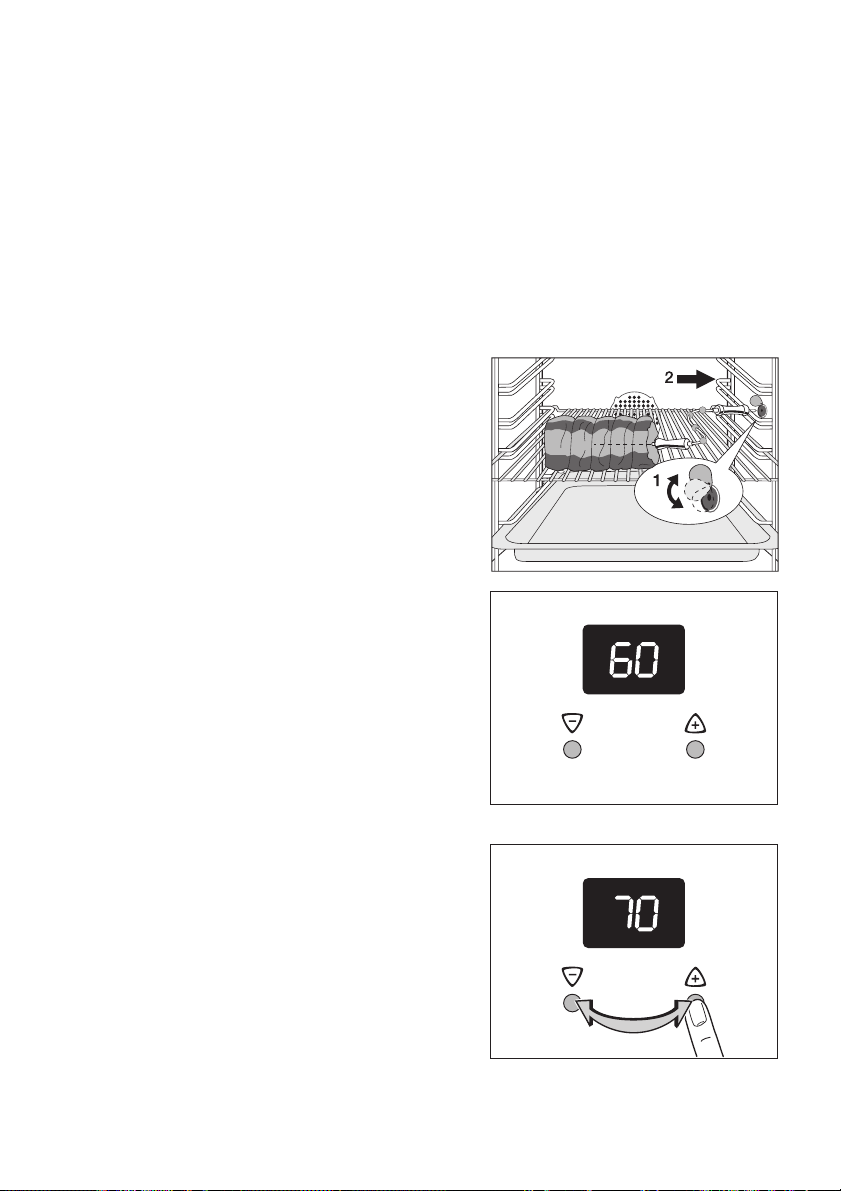
Meat cooking rod
A signal will sound when the set core temperature has been reached.
3 The oven must not be switched off!
The meat cooking rod may be used in combination with the lower/upper
heat setting, the hot air setting and the Turbo space grill setting.
Two temperatures are to be taken into consideration:
– The oven temperature: see Roasting Chart!
– Core temperature: see Meat Cooking rod Chart!
1 Warning: Only the accompanying meat cooking rod may be used. When re-
placing parts, use only the original spare parts.
1.Insert the end point of the meat cooking rod well into the meat to be roasted
so that the end point is located in the
middle of the meat.
2.Insert the meat cooking rod's plug into
the socket on the side wall of the oven
as far as it will go.
3.Set the desired oven function and temperatures.
The recommended temperature will appear in the display.
3 The core temperature will be displayed
as it increases from 30°C.
4.Set the desired core temperature using
the + or - buttons.
18
Page 19
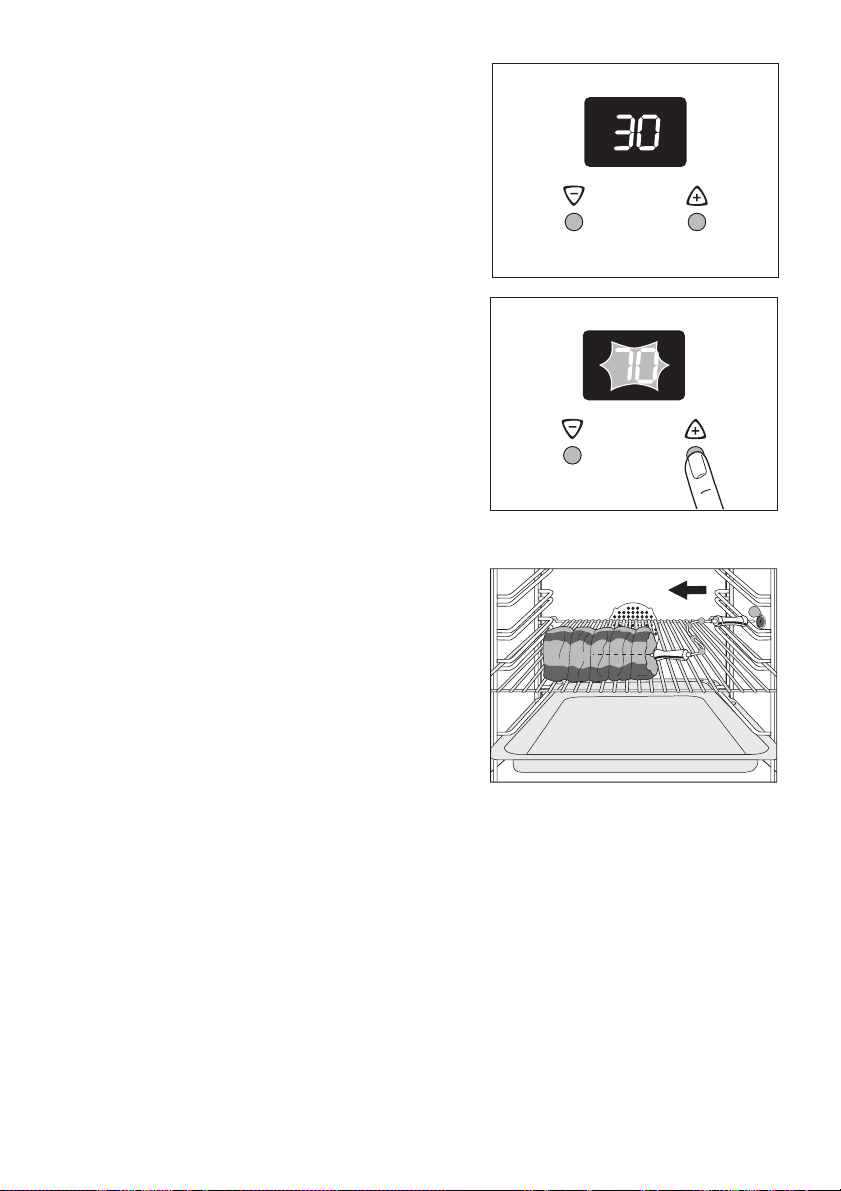
Within approximately 5 seconds the display will show the actual core temperature.
A signal will sound as soon as the actual
core temperature has reached the set
temperature.
The signal can be switched off by pressing any button.
1 Warning: The meat skewer is hot! Take
special care not to burn yourself when removing the plug and the end point!
3 The oven must not be switched off!
5.Remove the meat cooking rod's plug
from the socket and take the roasted
meat containing the meat cooking rod
out of the oven.
6.Switch off the oven functions and the
temperature.
Ascertaining or changing the core
temperature of the meat:
– The set core temperature can be dis-
played by pressing the + or - buttons
once.
– Additional changes can be made to the temperature initially set by repeat-
edly pressing the + or - buttons.
19
Page 20
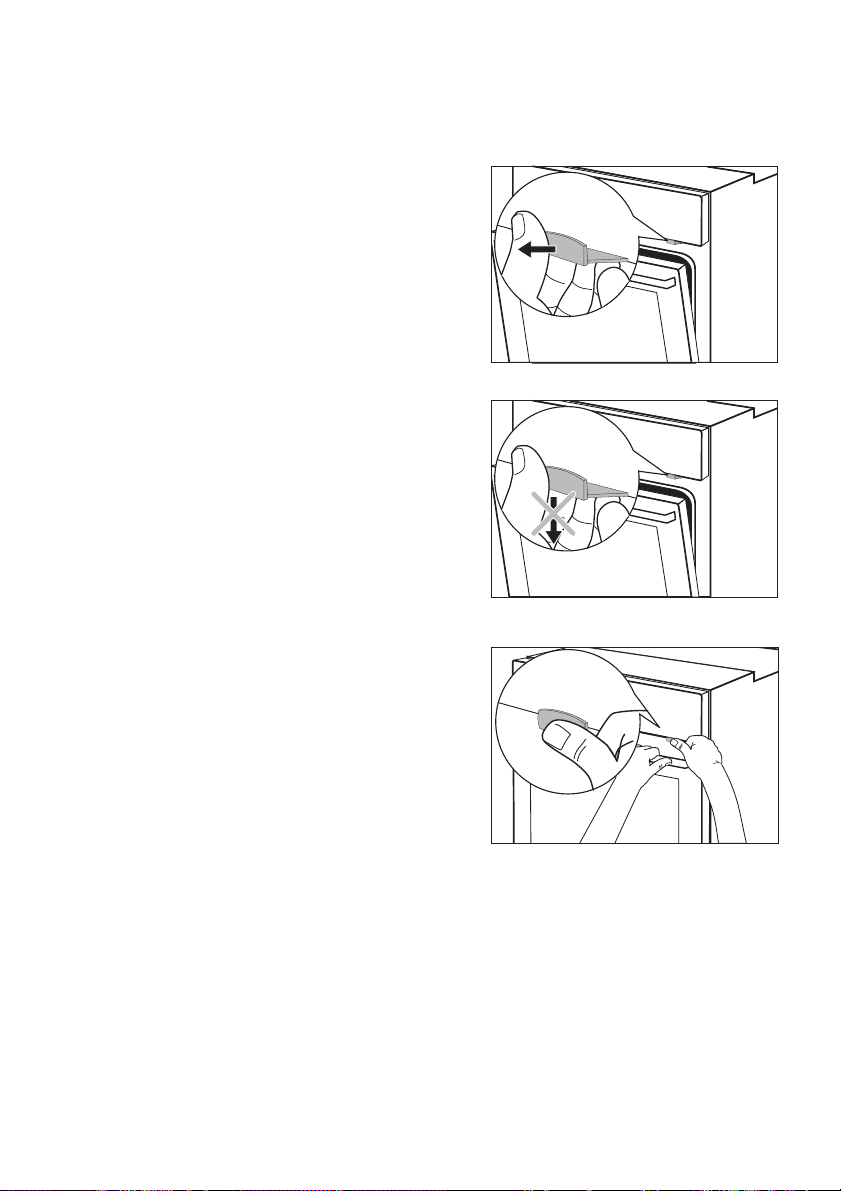
Mechanical Door Lock
When the appliance is delivered, the door lock is deactivated.
Activate the door lock
Pull the safety catch forwards until it
locks in place.
Open the oven door:
1.Shut the door.
2.Press the safety catch and keep it de-
pressed.
3.Open the doors.
Close the oven door
Close the door without pressing the safety catch.
Deactivating the door lock
Press the safety catch back into the panel.
3 Switching off the appliance does not cancel the mechanical door lock.
20
Page 21
Uses, Tables and Tips
Baking
For baking use the hot air ¥ oven function or conventional ¡.
3 When baking, remove the fat filter, as otherwise the baking time will be
longer and the surface will be browned unevenly.
Baking tins
• Cake tins made of dark metal and coated tins are suitable for
conventional ¡.
• Light metal tins, glass and ceramic moulds are also suitable for hot air ¥.
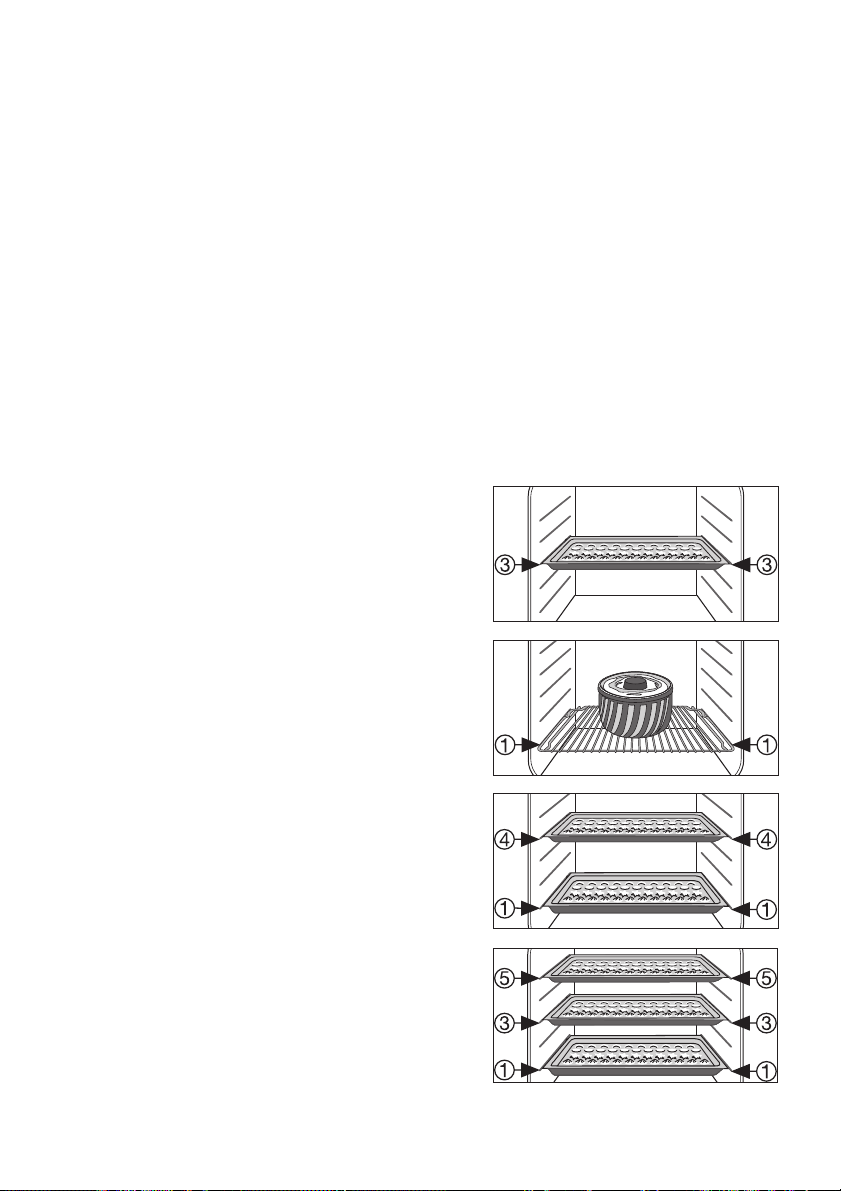
Shelf positions
• It is possible to bake on one level using conventional ¡.
• Using hot air ¥ you can bake dry, flat items and biscuits on up to three
baking trays simultaneously.
1 Baking tray:
e.g., shelf position 3
1 Cake tin:
e.g., shelf position
2 Baking trays:
shelf positions 1 and 4
3 Baking trays:
shelf positions 1, 3 and 5
21
Page 22

General Information
• Always count the shelf positions from the bottom upwards.
• Insert baking trays with the sloped edge to the front!
• Always place cake tins in the middle of the shelf.
• Using hot air ¥ or conventional ¡ you can also bake with two cake tins si-
multaneously by placing them side by side on the shelf. There is no significant increase in baking time.
3 When frozen foods are used the trays inserted may distort during cooking.
This is due to the large difference in temperature between the freezing temperature and the temperature in the oven. Once the trays have cooled the
distortion will disappear again.
Notes on the baking tables
In the tables you will find information on temperatures, cooking times and
shelf positions for a selection of dishes.
• The temperatures and cooking times are for guidance only since these are
dependent on the mixture, quantity and cake tin used.
• When using for the first time we recommend setting the lower temperature
and only select a higher temperature if necessary, e.g., if increased
browning is required or the cooking time is too long.
• If you cannot find specific information for one of your own recipes, use information given in a similar recipe for guidance.
• When cakes are baked on trays or in tins on more than one oven position
at once the baking time may be increased by 10-15 minutes.
• Items that might drip (e.g., pizzas, fruit flans) should only be prepared on
one level.
Variations in the height of the item to be baked can lead to different degrees
of browning at the start of baking. In this case please do not change the
temperature setting. Differences in the degree of browning will balance out
during baking.
2 For longer cooking times switch off the oven approx. 10 minutes before the
end of the cooking time to make use of the residual heat.
Unless otherwise stated, the information in the tables assumes starting with
a cold oven.
22
Page 23

Baking Table
The stated baking times are for guidance only.
Recommended cooking methods, shelf positions and temperatures are
printed in bold type.
Hot Air ¥ Conventional ¡
Type of pas-
try or cake
Sponge base
Pudding bowl
or ringshaped cakes
Madeira cake
(square/rectangular baking tin)
Flan case 150-170 3 170-190 2 20-25
Apple flan,
very thin
Fairy cakes 150-170 3 180-190 3 20-30
Shortcrust pastry
Large cheesecake
Covered fruit
pie
Cheesecake
on the tray
Puff pastry
French apple
tart
Sponge cake
Sponge cake
(DIN)
Flan case 150-160* 3 170-180* 3 25-30
Swiss roll 150-170* 3 180-200* 3 10-15
Temperature in °C
150-170 1 160-180 1 50-70
140-160 1 150-170 1 70-80
150-170 1 170-190* 1 45-60
140-160 1 170-190 1
150-170 1 170-190 1 50-60
--- --- 160-180 2 50-70
150-170* 1 190-200* 1 40-50
150-170 1 160-180 2 25-40
Shelf
position
Temperature in °C
Shelf
position
Baking time
in minutes
60-90 +
10 mins.
standing
time
23
Page 24
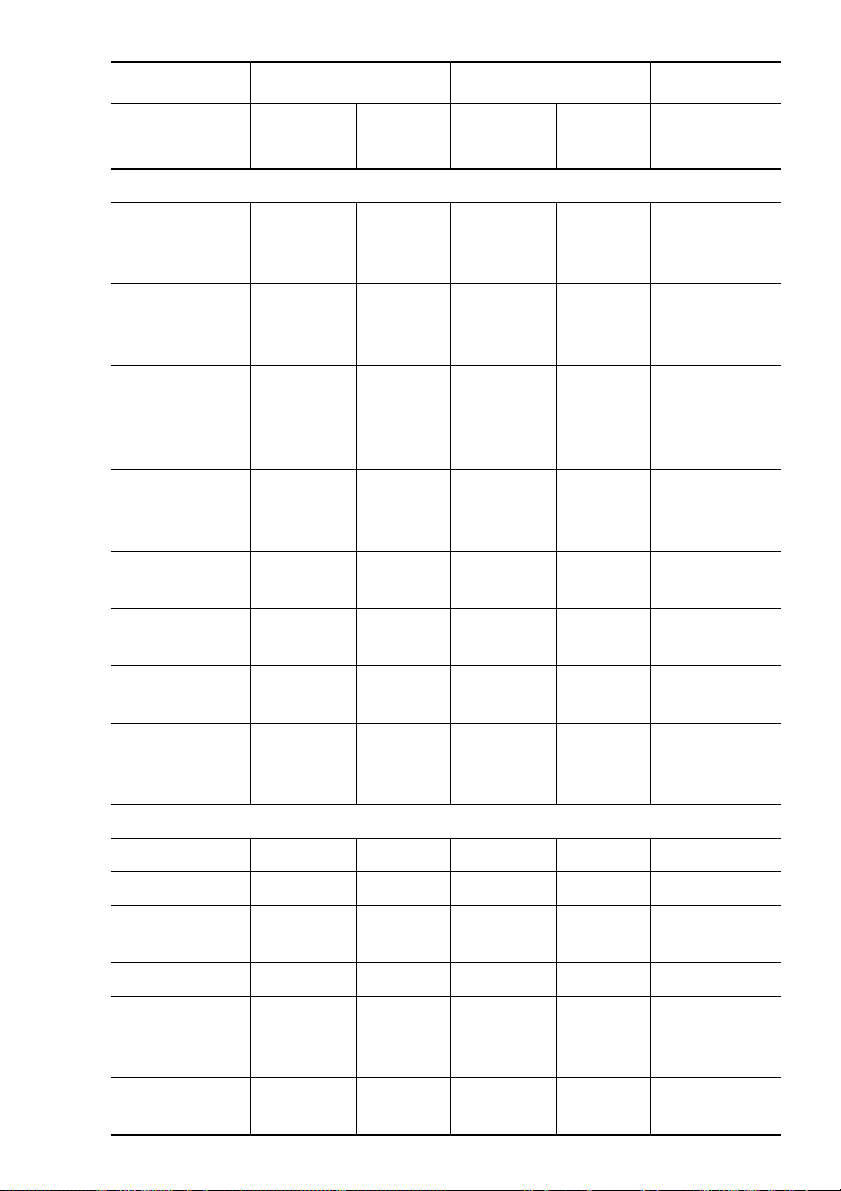
Hot Air ¥ Conventional ¡
Type of pas-
try or cake
Yeast dough
Pudding
bowl/ringshaped cakes
Plaited roll/
ring, plaited
Danish pastry
Butter cake/
sugar cake
sugar-topped
cakes
Sponge cake
with crumble
topping
Apple crumble (DIN)
Cheesecake
(tray)
Fruit loaf
(500 g flour)
Pizza
(round baking
sheet)
Biscuits
Meringues 80-90* 3 80-90 3 150-180
Macaroons 100-120 3 3 20-30
Small piped
biscuits
Anzac nutties --- --- 160-180 2 25-35
Items made
with puff pastry
Danish pastries
24
Temperature in °C
150-170 1 160-180 1 45-60
150-170 3 170-190 3 30-40
160-180 3 190-200* 3 25-30
150-170 3 180-190 3 20-40
150-170 3 170-190 3 35-50
150-170 3 170-190 3 45-50
150-170* 3 160-180* 3 40-70
230-250* 1 250-270* 1 10-25
140-160 --- 150-170 3 15-30
160-180* 3 180-200* 3 20-30
160-180* 3 170-190* 3 20-40
Shelf
position
Temperature in °C
Shelf
position
Baking time
in minutes
Page 25
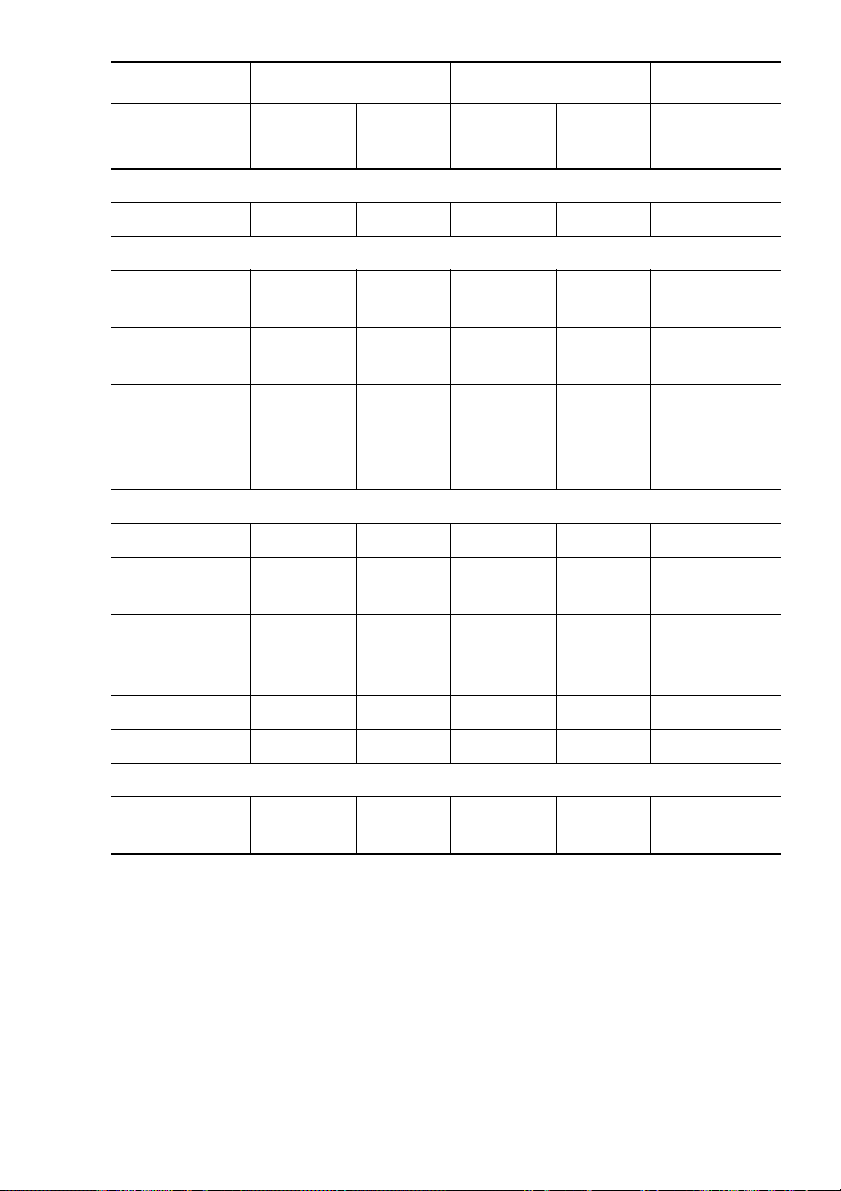
Hot Air ¥ Conventional ¡
Type of pas-
try or cake
Temperature in °C
Shelf
position
Temperature in °C
Shelf
position
Baking time
in minutes
Choux pastry
Cream puffs 160-180 3 190-210* 3 25-40
Shortcrust and rich pastries
Swiss apple
pie
Swiss cheese
pie
--- --- 210-230* 1 35-50
--- --- 210-230* 1 40-50
Spinach/vegetable quiche,
quiche lor-
--- --- 190-210* 1 40-60
raine
Bread and bread rolls
Herb bread 170-190* 3 190-210* 3 45-60
Tinned white
loaf
170-190* 2 180-200* 1 40-50
Unleavened
bread, pitta
--- --- 230-250* 2 15-25
bread
Pasta bake 180-200 1
Potato gratin 180-200 2
Dishes au gratin
Hawaiian
toast
* Pre-heat the oven
200-220 3 240-260 3 14-16
25
Page 26
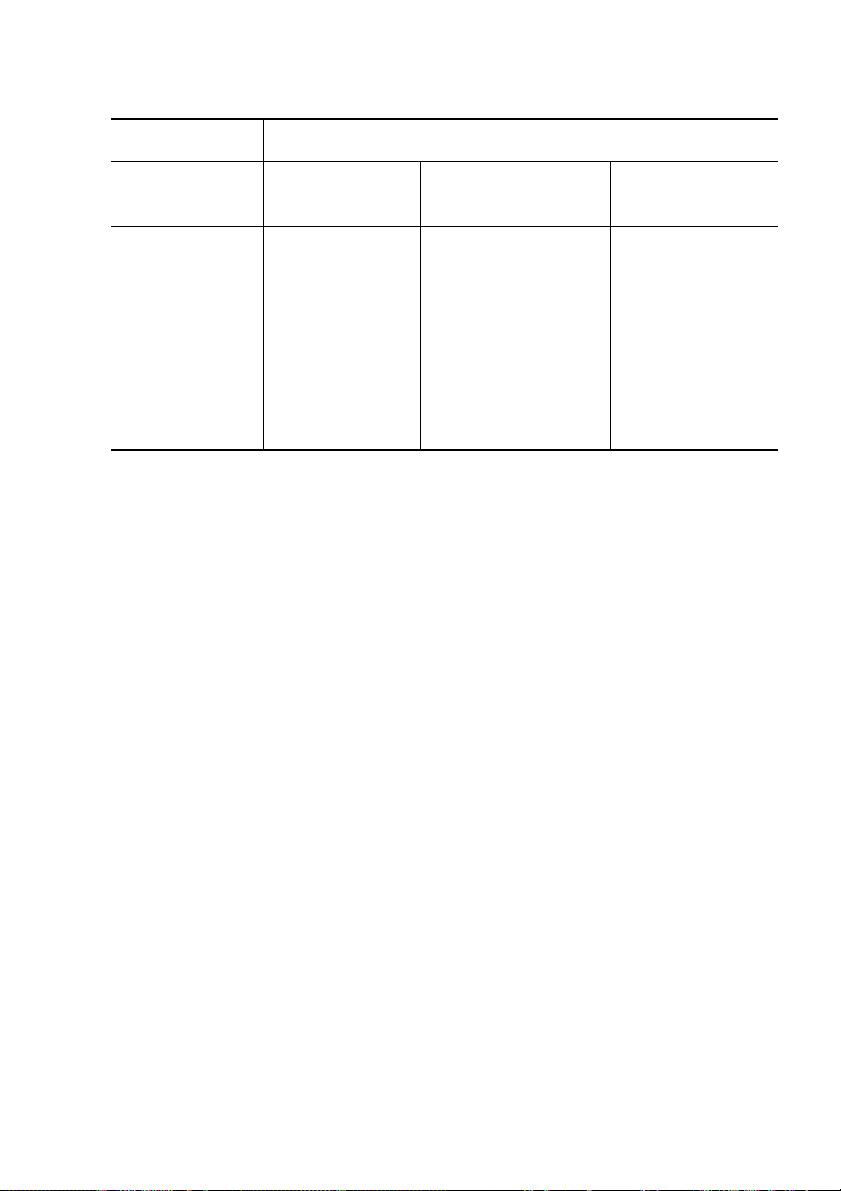
Frozen Foods
Hot Air ¥ + Conventional ¡
Type of pastry
or cake
Pizza (frozen)
Also observe the manufacturer’s instructions for all other frozen products.
Temperature
in °C
Follow the man-
ufacturer’s in-
structions as
stated on the
package
Shelf position
Lay on the grill
tray,
insert baking tray
below (shelf posi-
tion in accordance
with the manufac-
turer’s instructions
as stated on the
package)
Baking time
in minutes
Follow the manufacturer’s instructions as stated on
the package
26
Page 27
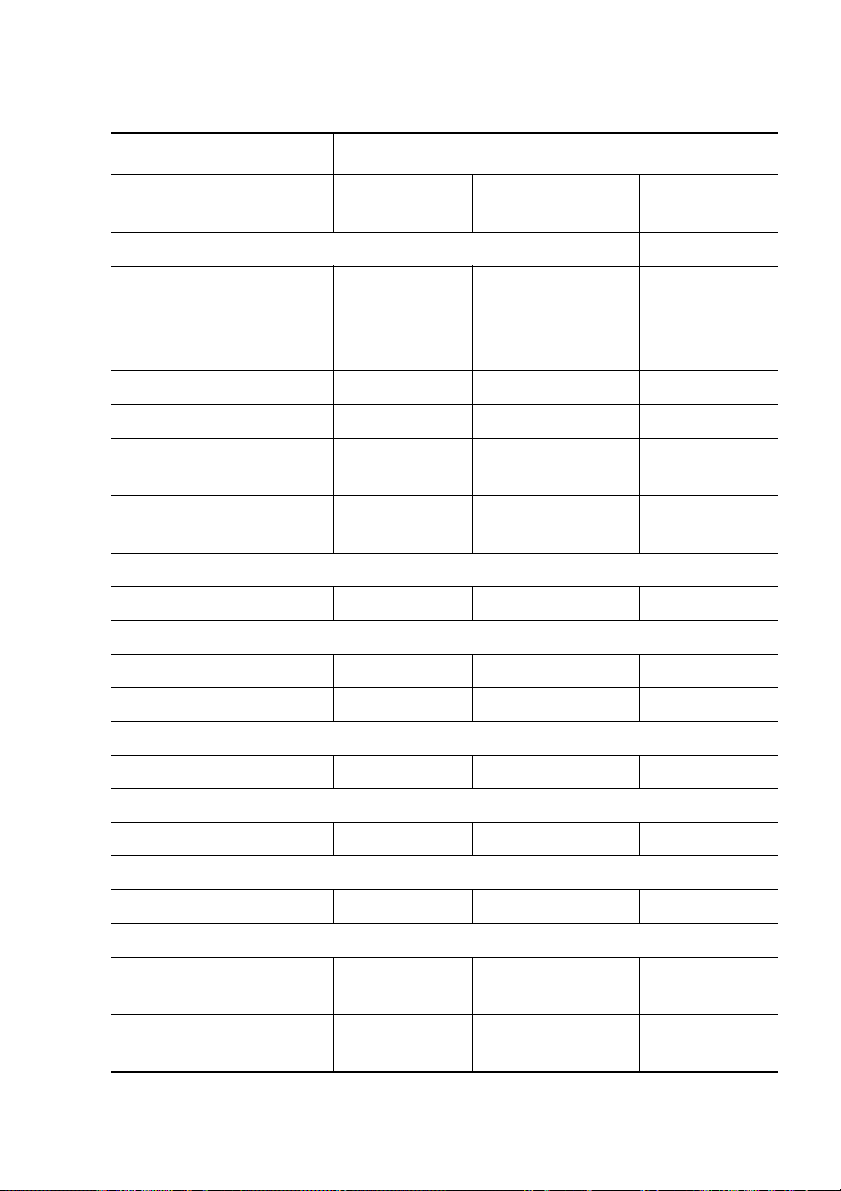
Pizza Setting
The stated baking times are for guidance only
Pizza Setting ¦
Type of pastry or cake
Temperature
in °C
Shelf position
Baking time
in minutes
Shortcrust pastry
Large cheesecake
(750 g soft cheese,
loose-bottomed tin,
26 cm)
150-160 2
60-90 +
10 mins.
standing time
Covered fruit pie 150-160 2 45-60
Cheesecake on the tray 150-160 2 45-55
Blackcurrant cake,
initial baking for base
Blackcurrant cake finish baking
160-170 2 15
150-160 2 30
Puff pastry
French apple tart 160-170* 2 40-45
Yeast dough
Cheesecake 150-160 2 35-45
Pizza 220* 1 15-20
Biscuits
Anzac nutties 160-170 1 25
Shortcrust and rich pastries
Spinach quiche 190-200 2 30-35
Bread and bread rolls
Unleavened bread 200-220* 2 21
Soufflés and dishes au gratin
Baked cabbage with a
crispy topping
Macaroni and leek
cheese
* Pre-heat the oven
180-200 1 30
180-200 1 37
27
Page 28
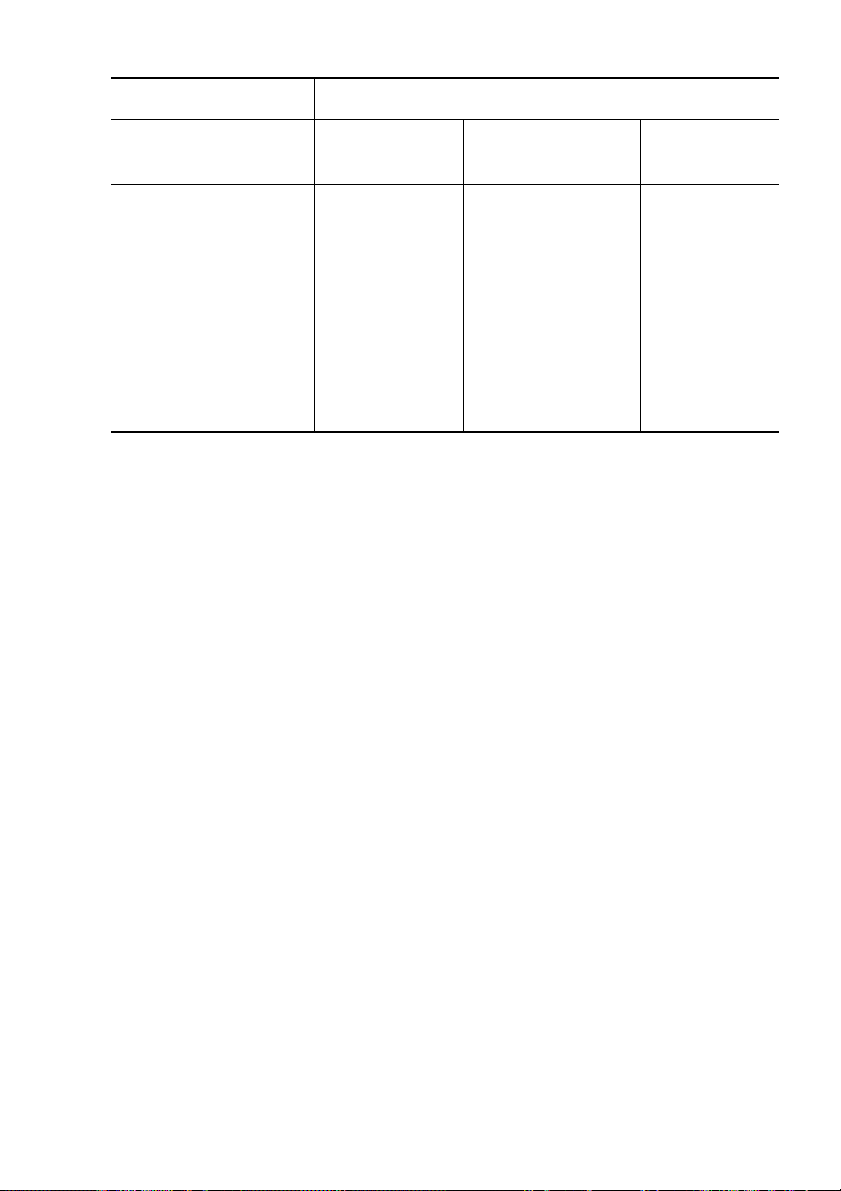
Frozen foods Pizza setting ¦
Type of pastry or
cake
Temperature
in °C
Shelf position
Baking time
in minutes
Lay on the grill
Frozen pizza
Follow the
manufacturer’s
instructions
as stated on
the
package
tray,
insert baking tray
below (shelf posi-
tion in accord-
ance with the
manufacturer’s instructions as stat-
ed on the
Follow the
manufactur-
er’s instruc-
tions
as stated on
the
package
package)
Also observe the manufacturer’s instructions for all other frozen products.
28
Page 29

Roasting
For roasting use the hot air ¥ oven function.
Ovenware for roasting
• Any heat-resistant dish is suitable for roasting (Refer to the manufacturer's
instructions!).
• If the dish has plastic handles, check that they are heat-resistant (refer to
manufacturer's instructions!).
• You can roast large roasting joints directly in the universal tray or on the
shelf with the universal tray inserted below (e.g., turkey, goose, 3-4
chickens, 3-4 knuckles of veal).
• We recommend roasting all lean forms of meat in a casserole dish with a
lid (e.g., veal, marinated beef, pot roast, frozen meat). In this way the
meat will retain its juices.
• You can roast all forms of meat that are to be browned or crisped in a cas-
serole dish without a lid (e.g., pork joints, meat loaf, lamb joints, mutton,
duck, 1-2 knuckles of veal, 1-2 chickens, small poultry, sirloin, fillet,
game).
3 If you use dishes for roasting the oven will not get so dirty!
Notes on the roasting table
Information is given in the table on suitable oven functions, temperature settings, cooking times and shelf positions for various types of meat. The information is for guidance.
• We recommend roasting meat and fish in the oven from a weight of 1kg.
• To stop meat juices or fat burning onto dishes or the oven, we recommend
adding a little liquid to the roasting dish.
• Turn the joint as required (after 1/2 - 2/3 of the cooking time).
3 Baste large joints and poultry with meat juices several times during cooking.
This will produce better roasting results.
2 Switch the oven off approx. 10 minutes before the end of the roasting time
to make use of the residual heat.
29
Page 30

Roasting Table
Insert either the tray or universal tray into the 1st shelf support rail.
Hot Air ¥
Food to be roasted
Pork
1 kg Pork joint
(spare rib/ham joint,
roasting joint), per cm
thickness
Smoked pork loin, per
cm thickness
Meat loaf 160-170 2 --- 60-70
Beef
Beef joint, per cm
thickness
Fillet of beef, per cm
thickness
Sirloin, per cm thickness
Veal
Veal joint, per cm thickness
Lamb
Leg of lamb (1800 g) 170-180 2 --- 90
Roasting smaller items on the baking tray
Sausages “cordon
bleu”
Sausages 220-230* 3 4+1 12-15
Escalope or chop coated with breadcrumbs
Rissoles 210-220* 3 4+1 15-20
Temperature in °C
150-160 2 --- 14-20
150-160 2 --- 10-15
150-160 2 --- 18-20
190-200* 2 --- 6-8
190-200* 2 --- 8-10
170-180 2 --- 14-17
220-230* 3 4+1 5-8
220-230* 3 4+1 15-20
Shelf position
1 Level 2 Levels
Roasting
time
in minutes
30
Page 31
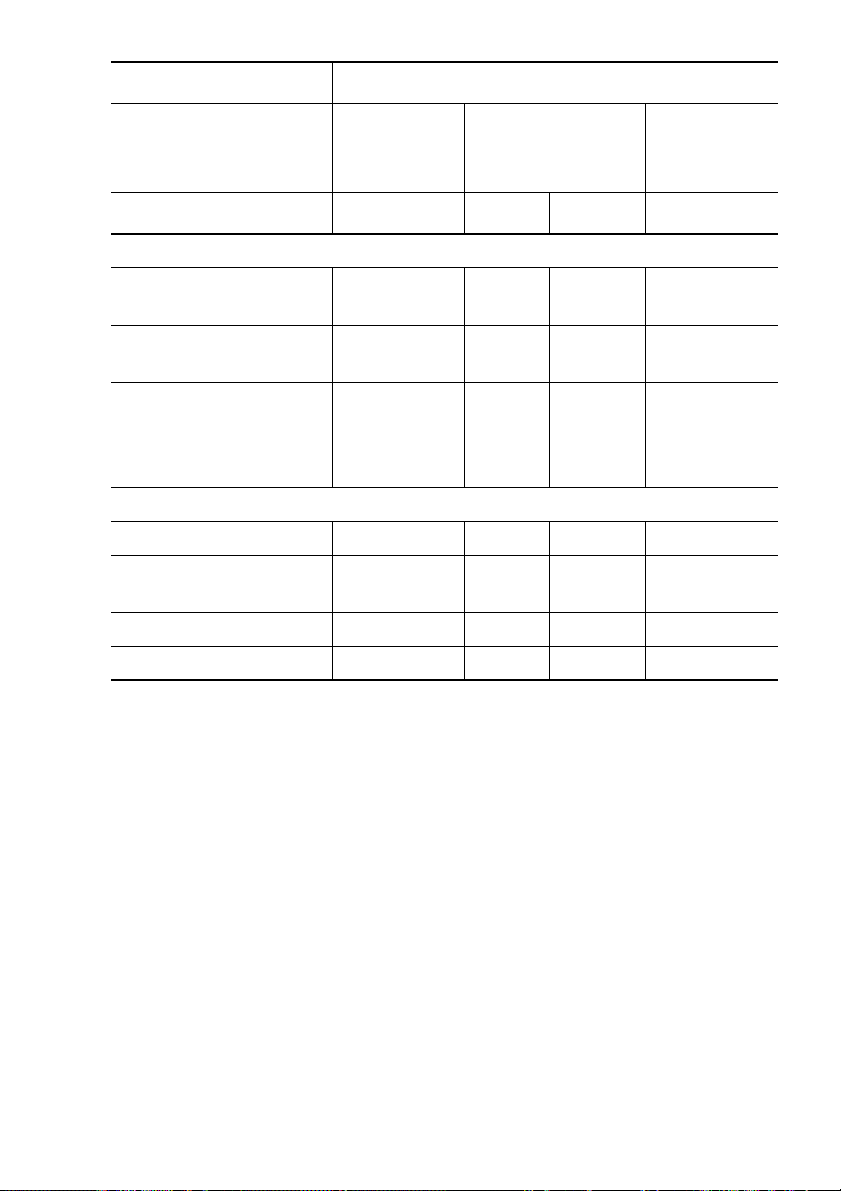
Hot Air ¥
Roasting
time
in minutes
Food to be roasted
Temperature in °C
Shelf position
1 Level 2 Levels
Fish
Trout weighing 200250 g
4 Trout fillets
(weight 200 g)
190-200 3 --- 20-25
170-180 3 --- 20-25
Perch fillet coated with
breadcrumbs
(total weight approx.
190-200 3 --- 25-30
1kg)
Poultry
Chicken 150-160 2 --- 55-60
1 kg Turkey roast, per
cm thickness
150-160 2 --- 11-15
Duck (2000-2500 g) 150-160 2 --- 90-120
Goose (4500 g 150-160 2 --- 150-180
* Pre-heat the oven
31
Page 32

Meat Probe Table
Food to be Cooked Meat Core Temperature
Beef
Rib steak or fillet steak rare
medium
well done
Pork
Shoulder of pork, ham joint, neck 80 - 82 °C
Chop (saddle), smoked pork loin 75 - 80 °C
Meat loaf 75 - 80 °C
Veal
Roast veal 75 - 80 °C
Knuckle of veal 85 - 90 °C
Mutton / lamb
Leg of mutton 80 - 85 °C
Saddle of mutton 80 - 85 °C
Roast lamb, leg of lamb 75 - 80 °C
Game
Saddle of hare 70 - 75 °C
Leg of hare 70 - 75 °C
Whole hare 70 - 75 °C
Saddle of venison 70 - 75 °C
Leg of venison 70 - 75 °C
45 - 50 °C
60 - 65 °C
75 - 80 °C
32
Page 33

Grilling
For grilling use the infrared grill ¸ oven function or infrared wide-area
grill º with temperature setting.
1 Warning: Always close the oven door when grilling.
3 Always pre-heat the empty oven using the grill functions for 5 minutes!
Ovenware for grilling
• Use the shelf unit and universal tray together for grilling.
Shelf positions
• For grilling flat foods you should mostly use the 4th shelf position from the
bottom.
Notes on the grilling table
The grilling times are only for guidance and will vary depending on the type
and quality of meat or fish.
• Grilling is particularly suitable for flat pieces of meat and fish.
• Turn the food approx. halfway through grilling.
Infrared Grilling
Food for
grilling
4-8 Pork chops
2-4 Pork chops
marinated pork
steaks
Fillet steak, rare
4 fillet steaks,
medium
Function
Infrared
wide-
area grill
Infrared
grill
Infrared
wide-
area grill
Infrared
grill
Infrared
wide-
area grill
Te mp er -
ature
in °C
275 1 4 15 10
275 1 4 12 12
275 1 4 12 12
275 1 4 5-7 4-6
275 1 4 6-8 5-7
Universal
tray
Shelf positions
Grill
tray
Grilling time
in minutes
1.
Page
2.
Page
33
Page 34

Food for
grilling
Function
Te mp er -
ature
in °C
Universal
tray
Grill
tray
Grilling time
in minutes
2 Half chicken
pieces
4 Half chicken
pieces
1-4 Chicken
thighs
4-6 Chicken
thighs
Grilled sausage,
up to 6 items
Grilled sausage,
more than 6
items
Coiled sausages,
up to 4 items
Coiled sausages,
up to 6 items
Whole fish
Toast (without
topping)
Infrared
grill
Infrared
wide-
area grill
Infrared
wide-
area grill
Infrared
wide-
area grill
Infrared
grill
Infrared
wide-
area grill
Infrared
grill
Infrared
wide-
area grill
Infrared
wide-
area grill
Infrared
wide-
area grill
Shelf positions
250 1 4 15-20 15-20
250 1 3 15-20 15-20
250 1 4 20 10
250 1 4 20 15
275 1 4 5-10 5
275 1 4 5-10 5
275 1 4 10 9
275 1 4 10 9
250 1 3 10 ---
275 1 4 1-2 1-2
1.
Page
2.
Page
34
Page 35
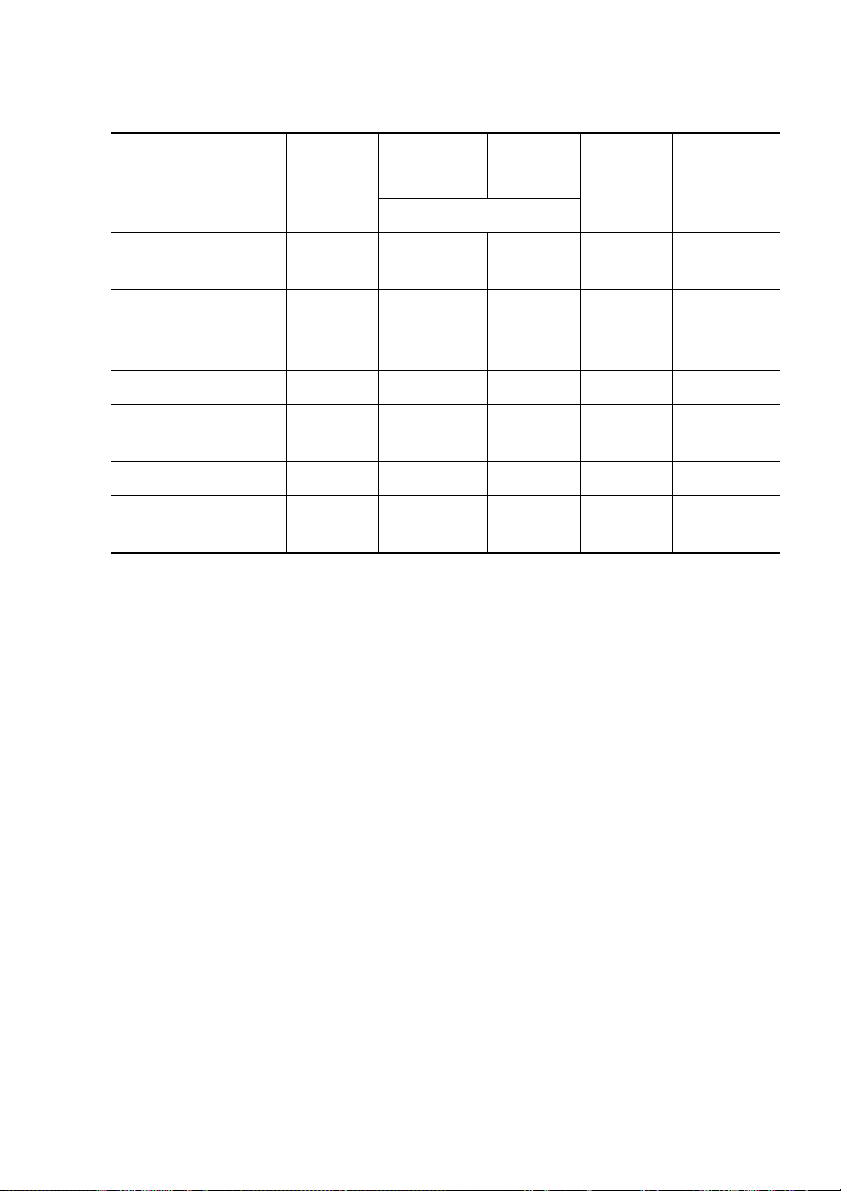
Turbo grilling
Function: Turbo grill ¼
Te mp er -
Dish
Chicken
(900-1000 g)
Stuffed pork
roasting joint
(2000 g)
Pasta bake 180 --- 2 30 ---
Potato bake
au gratin
Gnocchi au gratin 180 1 3 20-23 ---
Cauliflower
cheese
ature
in °C
160 1 2 50-60 25-30
160 1 2 90-95 45
200 1 3 20-23 ---
200 --- 3 15 ---
Universal
tray
Shelf positions
Grill tray
Grilling
time in
minutes
Turn
after ...
minutes
35
Page 36

Preserving
When preserving use the bottom heat oven function U.
Preserving jars
• When preserving use only commercially available jars that are the same
size.
3 Jars with twist-off tops or with a bayonet fastening and metal contain-
ers are not suitable.
Shelf positions
• Use the 1st shelf position from the bottom for preserving.
Notes on preserving
• Use the baking tray for preserving. There is room for up to six jars, each
with a capacity of 1 litre.
• The jars should all be filled to the same level and closed.
• Position the jars on the baking tray so that they do not come into contact
with one another.
• Pour approx. 1/2 litre of water into the baking tray to create sufficient
moisture in the oven.
• As soon as bubbles begin to appear in the first jars (for 1-litre jars this
takes about 35-60 minutes), switch off the oven or reduce the temperature
to 100 °C (see table).
Preserving Table
The states preserving times and temperatures are for guidance
Preserves
Soft fruit
Strawberries,
blueberries,
raspberries, ripe
gooseberries
Unripe gooseberries
Fruit with stones
Pears, quinces,
plums
36
Te mp e r-
ature in
°C
160-170 35-45 - -
160-170 35-45 10-15 -
160-170 35-45 10-15 -
Cooking
time until
bubbles form
Mins.
Continued
cooking
at 100 °C
Mins.
Standing time
with oven
switched off
Page 37
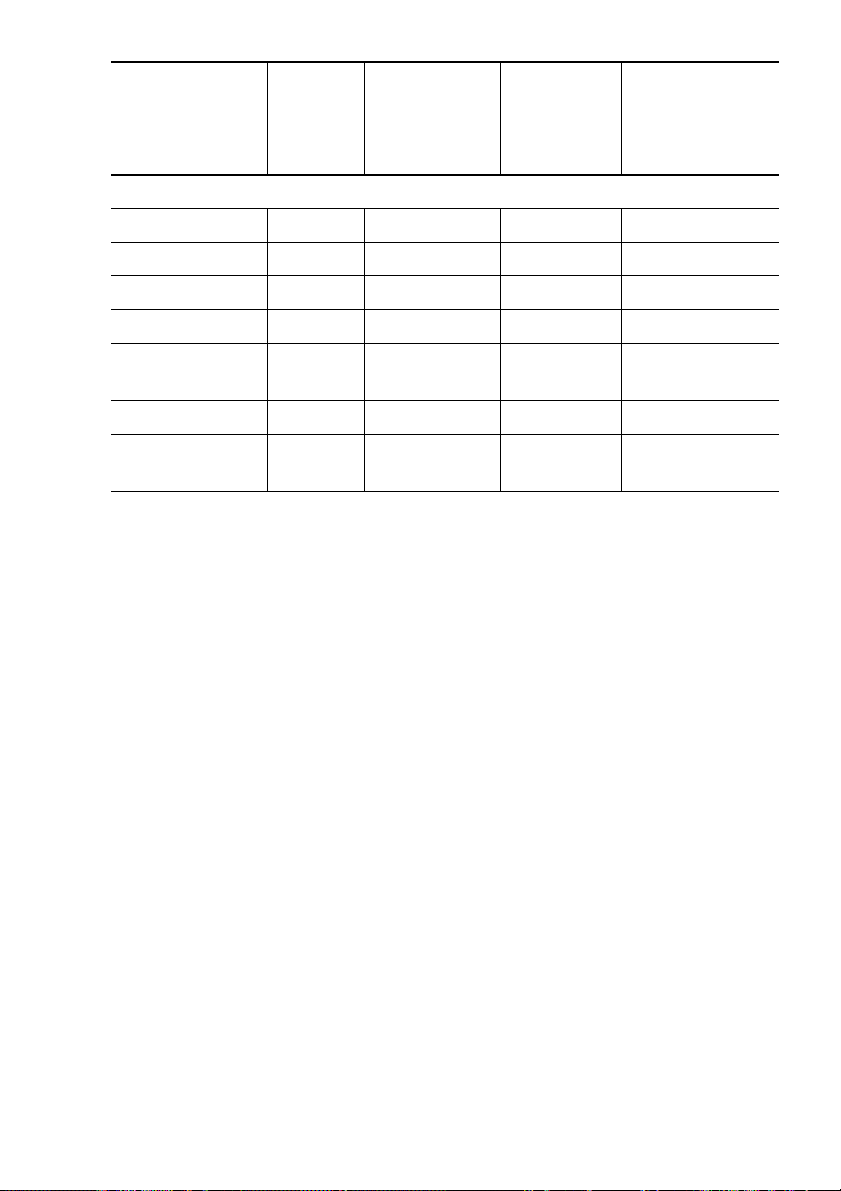
Continued
cooking
at 100 °C
Mins.
Preserves
Te mp e r-
ature in
°C
Cooking
time until
bubbles form
Mins.
Vegeta bles
Carrots 160-170 50-60 5-10 60
Mushrooms 160-170 40-60 10-15 60
Gherkins 160-170 50-60 - -
Mixed Pickles 160-170 50-60 15 -
Kohlrabi, peas,
asparagus
160-170 50-60 15-20 -
Beans 160-170 50-60 - -
Plum purée
160-1705045
-6-8 timer
-
-
Standing time
with oven
switched off
37
Page 38
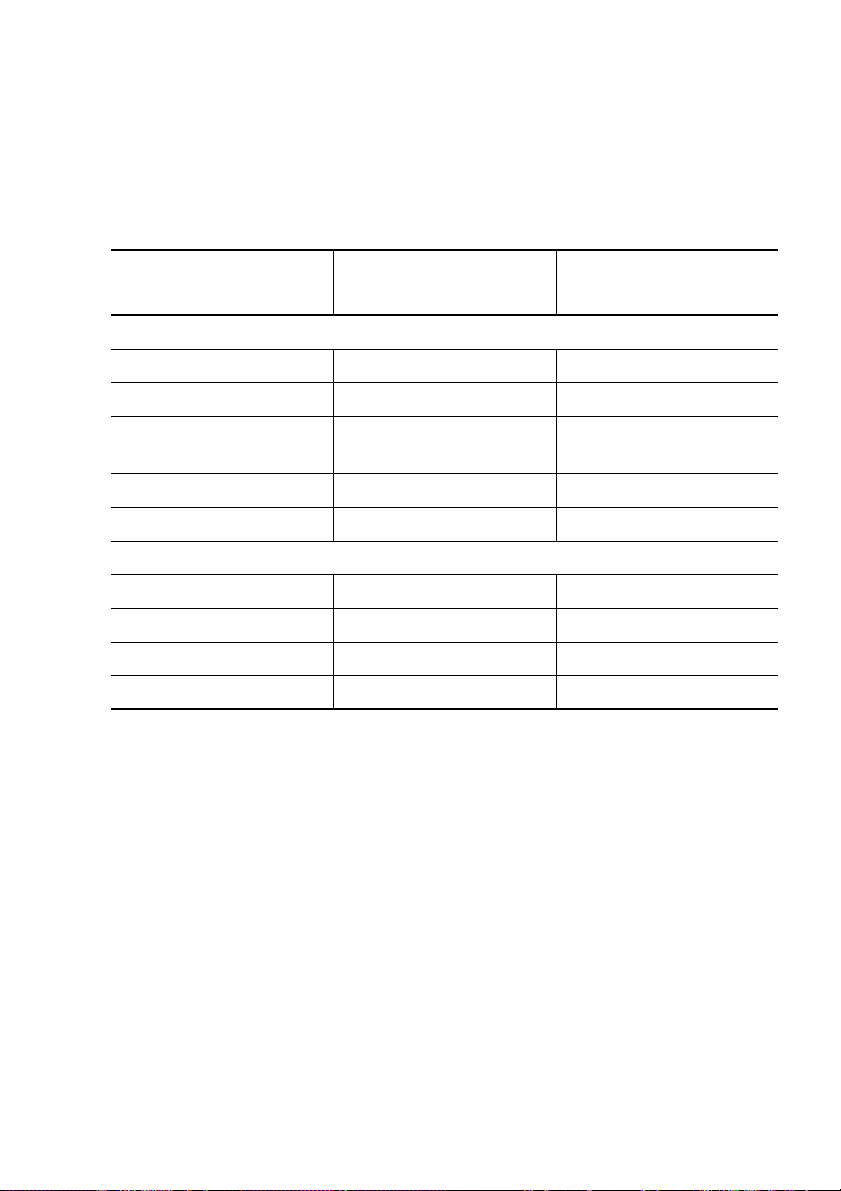
Drying with Hot Air
Use shelves lined with greaseproof paper or baking paper.
You will achieve a better result if you switch the oven off half way through
the drying time.
Open and leave to cool, preferably overnight. Then finish drying the dried
food.
Temperature in °C
Vegeta bles
Beans 60-70 6-8
Peppers (strips) 60-70 5-6
Vegetable s fo r ma king
soup
Mushrooms 50-60 6-8
Herbs 40-50 2-3
Fruit
Plums 60-70 8-10
Apricots 60-70 8-10
Sliced apple 60-70 6-8
Pears 60-70 6-9
60-70 5-6
Time in hours
(approximate guide)
38
Page 39

Cleaning and Care
1 Warning: For safety reasons cleaning the appliance with a steam jet cleaner
or high-pressure water cleaner is not permissible!
Exterior of the Appliance
• Wipe the front of the appliance with a soft cloth dipped in warm soapy
water.
• Do not use scourers, caustic cleaners or abrasive items.
• Use commercially available cleaners for metal fronts.
Oven Interior
1 Warning: The oven must be switched off and cold before cleaning.
3 Clean the appliance after each use. This is the easiest way to remove spills
and prevents them being burnt on. Residue which is not removed can cause
changes in the colour of the surface when the pyroluxe function is used.
1.Switch on the oven lighting for cleaning.
2.Every time you use the oven, wipe it out afterwards with water and wash-
ing-up liquid, then dry. Do not use any abrasive items.
3.Clean stubborn dirt with pyroluxe.
3 Information: There is no need to use an oven spray if you use pyroluxe
cleaning.
1 Important! If you prefer to use an oven spray, always follow the manufactur-
er's instructions.
Accessories
Wash all slide-in units (shelf unit, baking tray, shelf support rails etc.) after
each use and dry well. Soak briefly to make them easier to clean.
Fat Filter
1.Clean the fat filter in hot water and washing up liquid or in the dishwasher.
2.Badly burned on soiling can be removed by boiling the filter in a little water
to which 2-3 tablespoonsful of dishwasher cleaner has been added.
39
Page 40
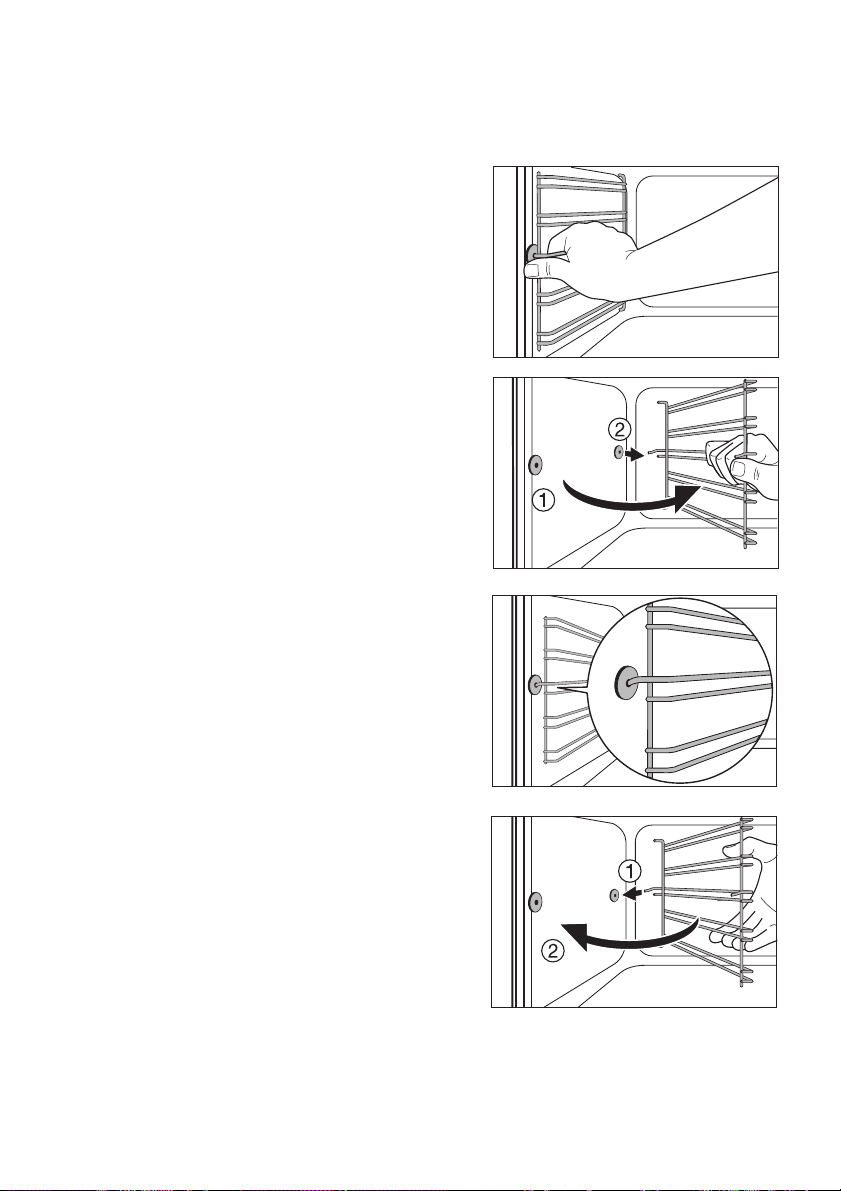
Shelf Support Rails
The shelf support rails on the left and right hand sides of the oven can be removed for cleaning the side walls.
Removing the shelf support rails
First pull the front of the rail away from
the oven wall (1) and then unhitch at the
back (2).
Fitting the shelf support rails
3 Important! The rounded ends of the
guide rails must be pointing forwards!
To re-insert, first hook the rail into place
at the back (1) and then insert the front
and press into place (2).
40
Page 41
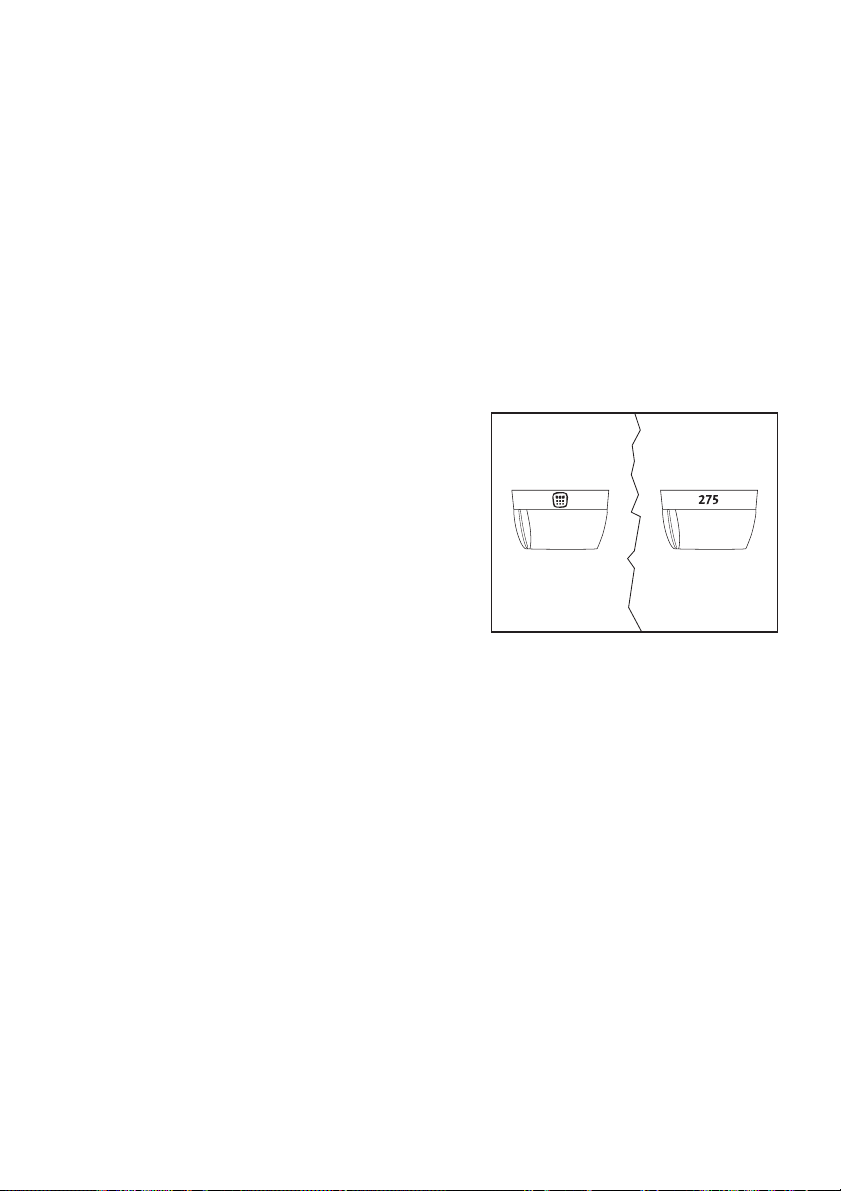
Pyrolytic cleaning
1 Caution! The oven becomes very hot during this process. All young children
must be kept at a safe distance.
1 Important! All removable parts including the side rails must be removed
from the oven before using the pyroluxe function.
3 If you are using any other removable oven accessories, these must be re-
moved before the pyrolytic cleaning process. If the oven shelf runners
are still in position, the temperature control light flashes. The pyroluxe
process then cannot be started due to a safety cut-out that protects
the oven shelf runners.
1.Remove any large pieces of dirt by hand.
2.Set the Oven Function selector to
P Pyrolysis.
3.Turn the temperature selector to the
right until it comes to the end stop. Pyrolysis will start after a few seconds,
and will switch itself off automatically
after 2 hours and 30 minutes.
3 During the process, the oven door is
locked and oven lighting is off. The temperature indicator light remains on until
the door is released.
4.When the pyrolytic process is completed, turn all controls to the Zero position.
5.After it has cooled down, wipe the oven with a soft cloth.
41
Page 42
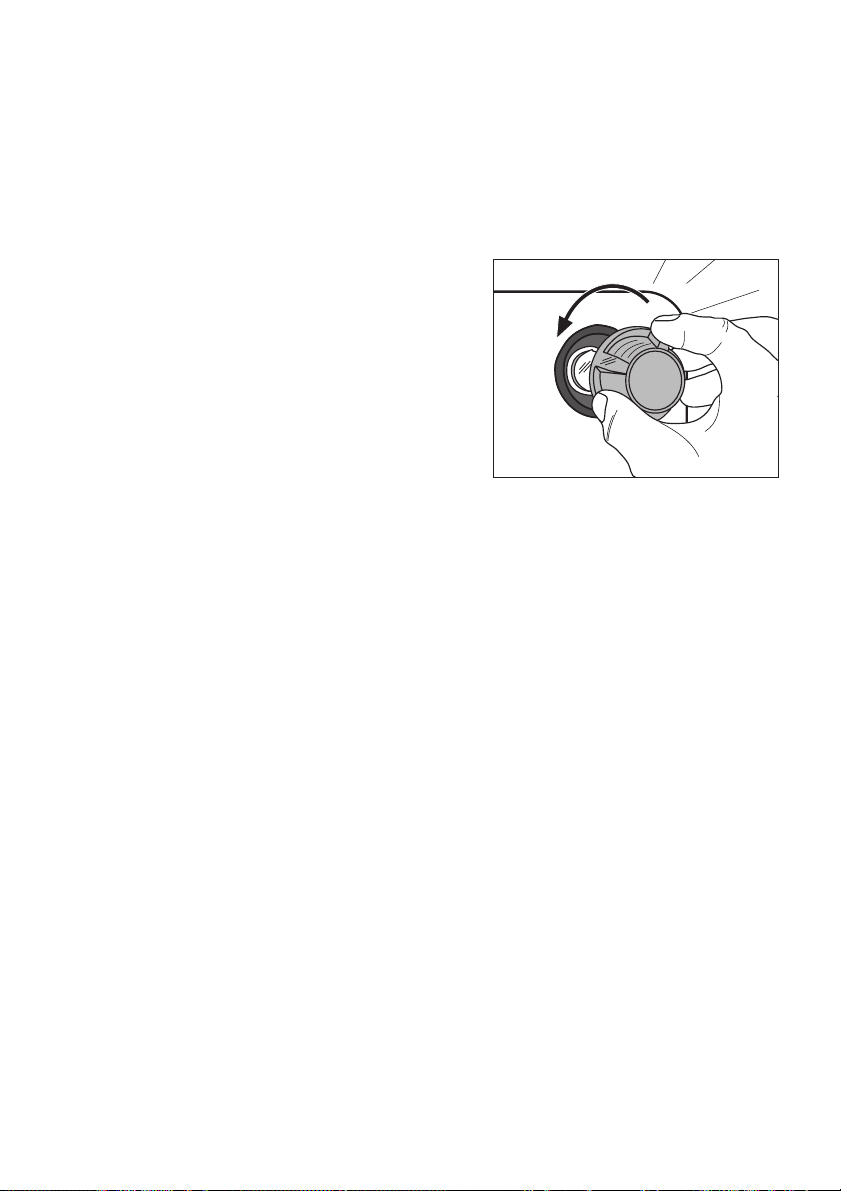
Oven Lighting
1 Warning: There is a danger of electric shock! Prior to changing the oven
light bulb:
– Switch off the oven!
– Remove the fuses in the fuse box or switch off the circuit breaker.
3 Place a cloth on the oven floor to protect the oven light and glass cover.
Replacing the oven light bulb/cleaning
the glass cover
1.Remove the glass cover by turning it
anti-clockwise and then clean it.
2.If necessary:
Replace bulb with a 40 watt, 230 V,
300 °C heat-resistant oven light bulb.
3.Refit the glass cover.
42
Page 43
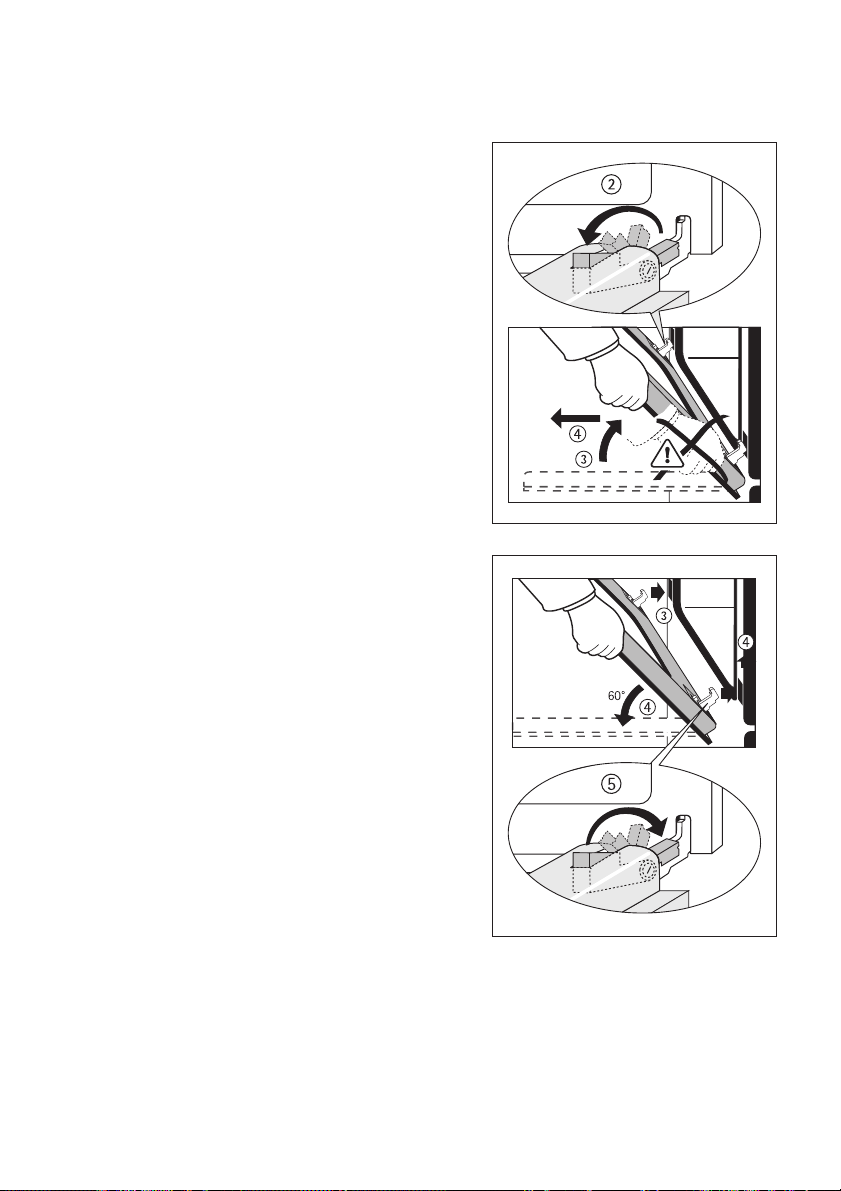
Oven Door
The oven door of your appliance may be removed for cleaning.
Removing the oven door
1.Open the oven door completely.
2.Completely fold back the brass-col-
oured clamping lever on both door
hinges.
3.Grip the oven door with both hands on
the sides and close it to about
3/4 going past the point of resist-
ance.
4.Pull the door away from the oven
(Caution: heavy!).
5.Place the door, with the outer surface
downwards, on a soft, flat surface, for
example a blanket, to avoid scratches.
Hanging the oven door
1.With both hands take hold of the sides
of the door from the side on which the
handle is positioned.
2.Hold the door at an angle of
approx. 60°.
3.Slide the door hinges simultaneously
as far as possible into the two slots on
the right and left at the bottom of the
oven.
4.Lift the door up until resistance is met
and then open fully.
5.Lift the brass-coloured clamping levers
on both door hinges back to their original position.
6.Close the oven door.
43
Page 44
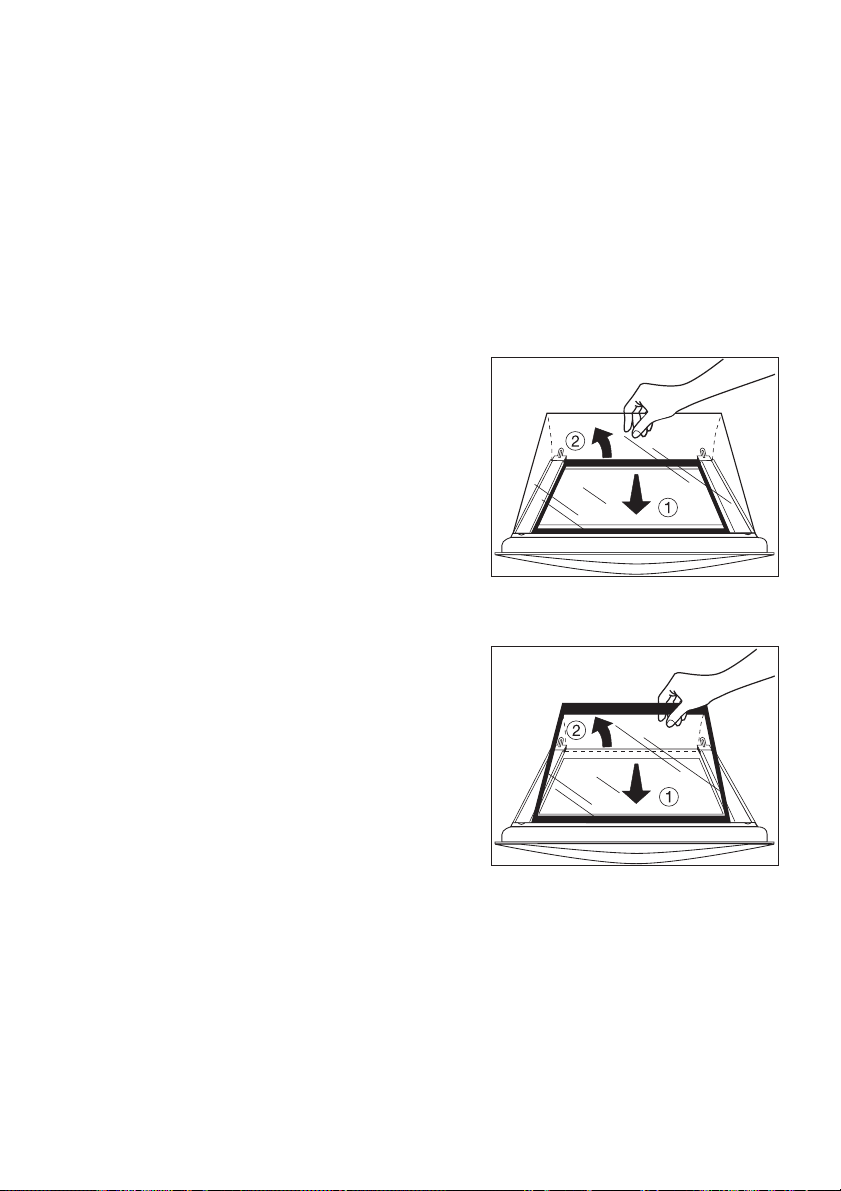
Oven door glass
The oven door is fitted with four sheets of glass set next to one another. The
inner sheets can be removed for cleaning.
1 Caution: The following steps are to be performed only when the oven door
has been removed. If the glass is removed while the door is attached, the
leighter weight may cause it to spring up and cause injury.
1 Important! Rough handling of the glass, especially at the edges of the front
plate, may cause it to break.
Removing the upper-most glass plate
1.Detach the door and, with the handle
downwards, lower it onto a soft, even
surface.
2.Grasp the upper plate of glass by its
lower edge and push it against the
pressure spring and towards the oven
door handle until it comes free.
3.Hold the plate gently underneath and
slide it out.
Removing the centre glass plates
1.Grasp the centre plates of glass by
their lower edges one after another and
push them towards the over door handle until they come free.
2.Hold the plates gently underneath and
slide them out.
Clean the door glass
44
Page 45
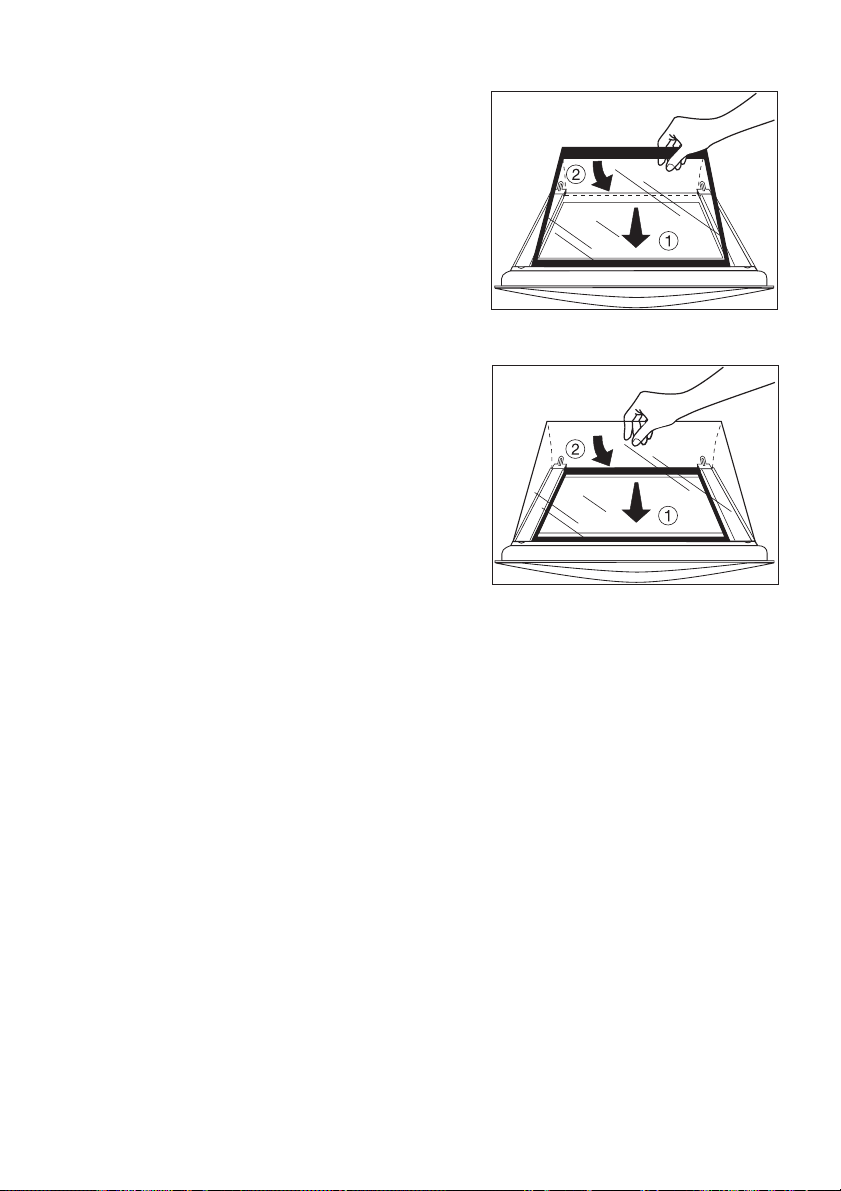
Replacing the centre glass plates
1.From above, insert the centre plates
obliquely into the retaining frame at the
handle, one after another.
2.Lower the centre plates down and push
them towards the lower edge of the
door as far under the retaining frame as
they will go.
Replacing the upper glass plate
1.From above, insert the upper-most
plate obliquely into the retaining frame
at the handle.
2.Lower the plate. Place the glass
against the pressure spring at the handle, and in front of the retaining frame
at the lower edge of the door. Push it
into the frame.
The glass plates must be firmly attached.
Re-attach the door to the oven
45
Page 46

What to do if …
Fault Possible Cause Remedy
Hotplates not working. The hotplate concerned
has not been switched
on.
A domestic electrical
protection device has
been tripped (or the
fuse has blown).
The oven does not
heat.
The oven light does not
come on.
The pyroluxe is not
working. The temperature control light is
flashing.
The oven has not been
switched on.
The required settings
have not been made.
The domestic electrical
protection device (fuse)
has been tripped.
The bulb has blown. Replace the bulb.
The oven shelf runner
has not been removed.
Switch on the hotplate
concerned.
Check the fuse or protection device.
Switch the oven on.
Check the settings.
Check the protective
devices.
If these are tripped repeatedly, you should
call a qualified electrician.
Remove oven shelf runner.
If you cannot remove the fault with the remedies described above,
please contact your local dealer or Customer Service.
1 Caution: repairs should only be undertaken by specialised repair techni-
cians. Inappropriate repairs may result in serious injury to the user.
In the event of damage caused by inappropriate repairs, the guarantee may
not cover the work carried out by Customer Service or your dealer's repair
technicians.
3 Advice on cookers with metal fronts:
Because of the cold surface at the front of the cooker, opening the oven
door during (or just after) baking or roasting may cause the glass to steam
up.
46
Page 47

Technical Data
Oven Interior Dimensions
Height x Width x Depth 31 cm x 41 cm x 41 cm
Capacity (usable capacity) 52 l
Regulations, Standards, Directives
This appliance meets the following standards:
• EN 60 335-1 and EN 60 335-2-6
relating to the safety of electrical appliances for household use and similar
purposes and
• EN 60350, or DIN 44546 / 44547 / 44548
relating to the operating features of electric cookers, hobs, ovens, and
grills for household use.
• EN 55014-2
• EN 55014
• EN 61000-3-2
• EN 61000-3-3
• relating to basic requirements for electro-magnetic compatibility protec-
tion (EMC).
5 This appliance complies with the following EU Directives:
• 73/23/EWG dated 19.02.1973 (Low Voltage Directive)
• 89/336/EWG dated 03.05.1989 (EMC Directive including Amending Direc-
tive 92/31/EWG).
47
Page 48

48
Page 49

49
Page 50

Index
A
Accessories . . . . . . . . . . . . . . . . . . . . . . . 9
B
Baking tray . . . . . . . . . . . . . . . . . . . . . . . 9
C
Cleaning
accessories
initial cleaning
oven door
oven interior
oven light bulb
Pyrolysis
shelf support rails
Clock
Timer
Clock Funktions
Combination shelf
Control panel
Conventional
Cooking
. . . . . . . . . . . . . . . . . . . . 39
. . . . . . . . . . . . . . . . . . 10
. . . . . . . . . . . . . . . . . . . . . 43
. . . . . . . . . . . . . . . . . . . 39
. . . . . . . . . . . . . . . . . 42
. . . . . . . . . . . . . . . . . . . . . . 41
. . . . . . . . . . . . . . . 40
. . . . . . . . . . . . . . . . . . . . . . . . . 16
. . . . . . . . . . . . . . . . . . 16
. . . . . . . . . . . . . . . . . . 9
. . . . . . . . . . . . . . . . . . . . . 8
. . . . . . . . . . . . . . . . . . . . . 14
. . . . . . . . . . . . . . . . . . . . . . 11, 12
D
Description of the appliance . . . . . . . . . . 7
Disposal
Door
Door Lock
. . . . . . . . . . . . . . . . . . . . . . . . . 6
. . . . . . . . . . . . . . . . . . . . . . . . . . . 43
. . . . . . . . . . . . . . . . . . . . . . . 20
F
Fat Filter . . . . . . . . . . . . . . . . . . . . . 15, 39
G
General purpose pan . . . . . . . . . . . . 9, 15
O
Oven
accessories
door
functions
. . . . . . . . . . . . . . . . . . . . . . . . . . 42
light
. . . . . . . . . . . . . . . . . . . . . 9
. . . . . . . . . . . . . . . . . . . . . . . . . . 43
. . . . . . . . . . . . . . . . . . . . . . 14
P
Preserving . . . . . . . . . . . . . . . . . . . . . . . 36
Preserving Table
pyrolysis
. . . . . . . . . . . . . . . . . . . . . . . . 41
. . . . . . . . . . . . . . . . . . 36
R
Repairs . . . . . . . . . . . . . . . . . . . . . . . . . . 5
Ring
use
. . . . . . . . . . . . . . . . . . . . . . . . . . 11
S
Safety . . . . . . . . . . . . . . . . . . . . . . . . . . . 5
Shelf support rails
. . . . . . . . . . . . . . . . . 40
T
Tables and tips . . . . . . . . . . . . . . . . . . . 21
Timer
. . . . . . . . . . . . . . . . . . . . . . . . . . . 17
U
Using the oven . . . . . . . . . . . . . . . . . . . 13
W
What to do if … . . . . . . . . . . . . . . . . . . . 46
50
Page 51
Service
In the “What to do if …” section a number of malfunctions are listed that you
can rectify yourself Look there first if a fault occurs.
Is it a technical fault?
If so, please contact your customer service centre. (You will find addresses
and telephone numbers in the section “Customer Service Centres”.)
Always prepare in advance for the discussion. This will make diagnosis of
the problem easier and also make it easier to decide if a customer service
visit is necessary:
Please make a note of the following information as accurately as possible:
• What form does the fault take?
• Under what circumstances does the fault occur?
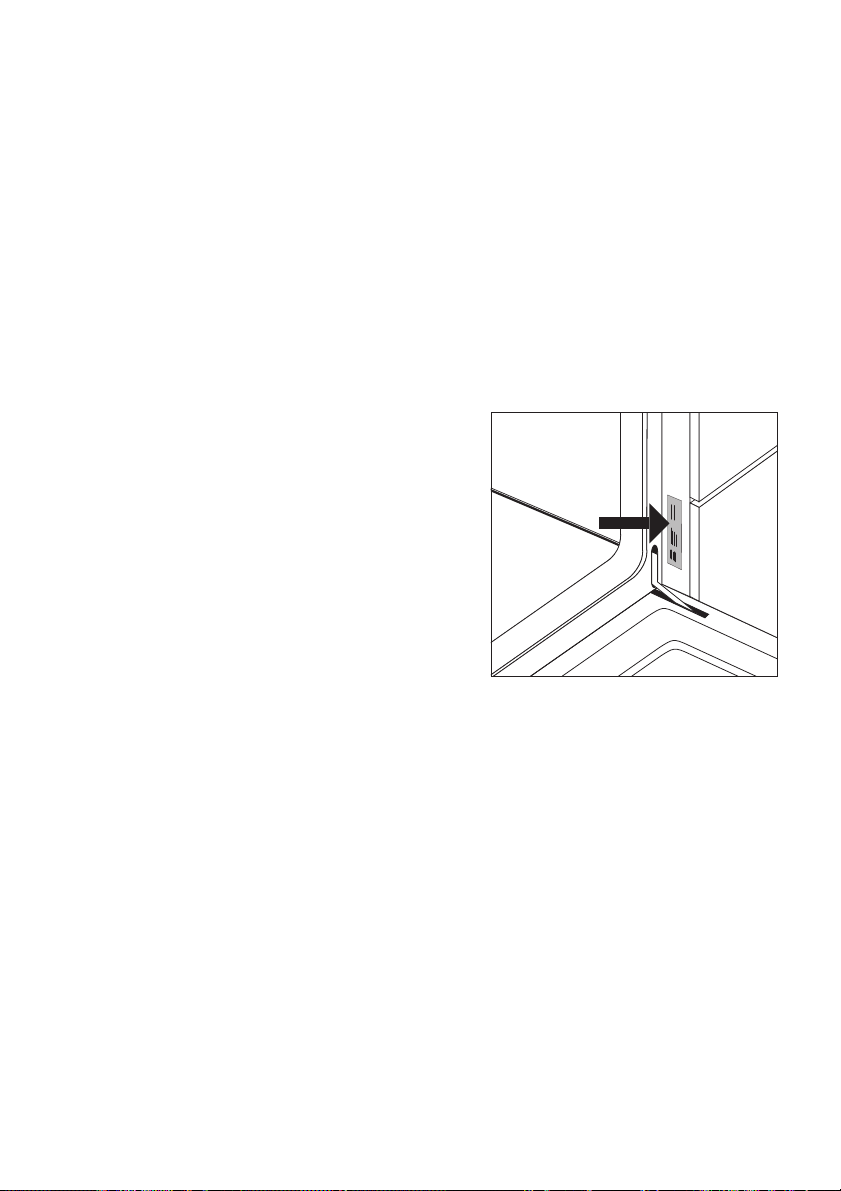
Prior to the telephone call it is important
that you make a note of the following appliance code numbers that are given on
the rating plate:
• model description,
• PNC code (9 digits),
• S No code (8 digits).
We recommend that you record the code
numbers here so that you always have
them to hand:
Model: . . . . . . . . . . .
PNC: . . . . . . . . . . .
S-No: . . . . . . . . . . .
When do you incur costs even during the warranty period?
• if you could have remedied the fault yourself using the fault table (see section “What to do if …”),
• if the customer service technician has to make several journeys because
he was not provided with all the relevant information before his visit and
therefore, forexample, has to fetch spare parts. These multiple trips can
be avoided if you prepare your phone call as described above.
51
Page 52

822 923 589-A-101103-01 Subject to change without notice
The Electrolux Group. The world´s No.1 choice.
The Electrolux Group is the world´s largest producer of powered appliances for kitchen, cleaning and outdoor
use. More than 55 million Electrolux Group products (such as refrigerators, cookers, washing machines,
vacuum cleaners, chain saws and lawn mowers) are sold each year to a value of approx. USD 14 billion in more
than 150 countries around the world.
 Loading...