

Page 1

Welcome to the world of Electrolux
Thank you for choosing a first class product from Electrolux, which hopefully
will provide you with lots of pleasure in the future. The Electrolux ambition is to offer
a wide variety of quality products that make your life more comfortable. You find
some examples on the cover in this manual. Please take a few minutes to study
this manual so that you can take advantage of the benefits of your new machine.
We promise that it will provide a superior User Experience delivering Ease-of-Mind.
Good luck!
32 electrolux
Page 2

English
For your safety
It is most important that the instruction booklet should be retained with the appliance for
future reference. Should the appliance be sold or transferred to another owner, or should
you move house and leave the appliance, always ensure that the booklet is supplied with the
appliance in order that the new owner can be acquainted with the functioning of the appliance
and the relevant warnings. These warnings are provided in the interest of safety. You must
read them carefully before installing or using the appliance.
Installation
! Any installation work must be undertaken
by a qualified electrician or competent
person.
! Installation and initial adjustment of your
oven MUST be carried out by qualified
personnel in compliance with current
regulations. Specific installation
instructions for the installer are given in this
booklet.
During use
! This appliance has been designed for
cooking edible foodstuffs only, and must
not be used for any other purposes.
! Always stand back from the oven when
opening the oven door during cooking or
at the end of it to allow any build up of
steam or heat to release.
! It is dangerous to alter the specifications
or modify the product in any way.
! Appliances become very hot with use, and
retain their heat for a long period after use.
Care should be taken to avoid touching
heating elements inside the oven.
! Always ensure that the control knobs are
in the “off” position when not in use.
! For hygiene and safety reasons, this
appliance should be kept clean at all times.
A build-up of fats or foodstuffs could result
in a fire.
! Never line any part of the oven with
aluminium foil.
! Easy clean-liners (if provided) should never
be cleaned with any other than soapy water.
! Never use steam or steam machines to
clean the appliance.
! Do not use harsh abrasive cleaners or
sharp metal scraper to clean the oven door
glass since they can scratch the surface,
which may result in shattering of the glass.
! Before any maintenance or cleaning work
is carried out on the appliance, always turn
off the isolator switch at the cooker point,
and allow to cool.
! Ensure that the shelves are put in place in
the correct way.
! This oven (even if it is linked to an electrical
cooking table) is made to function at 230 V
mono, double or three-phase with neutral.
! A polyphase linking without neutral (400 V)
can induce the distruction of the oven and
of the eventual cooking table.
People safety
! This appliance is not intended for use by
children or other persons whose physical,
sensory or mental capabilities or lack of
experience and knowledge prevents them
from using the appliance safely without
supervision or instruction by a responsible
person to ensure that they can use the
appliance safely.
! This appliance is designed to be operated
by adults. Children should not be allowed
to tamper with the controls or play with the
product.
! Children should be supervised at all times
and should not be allowed to touch the hot
surfaces or be in the vicinity when in use or
until the appliance has cooled after use.
! During oven cooking and grilling, the
appliance door and the surrounding parts
are warmed up to a very high temperature.
Be careful and keep children away from
electrolux 33
Page 3

the appliance while you are using it. When
you connect other appliances to a plug near
the oven, check carefully that the wire does
not touch warm parts of the oven and does
not get taken in the oven door.
Technical assistance
! This appliance should be serviced by an
authorized Network Service Centre, and
only genuine spare parts should be used.
! Under no circumstances should you
attempt to repair the appliance yourself.
Repairs carried out by inexperienced
persons may cause injury or serious
malfunctioning. Refer to your local Service
Centre. Always insist on genuine spare
parts.
Guide to Use the instructions
Safety Instructions
Step by step instructions for an
"
operation
The symbol
packaging indicates that this product may not
be treated as household waste. Instead it shall
be handed over to the applicable collection
point for the recycling of electrical and electronic
equipment. By ensuring this product is disposed
of correctly, you will help prevent potential negative consequences for the environment and
human health, which could otherwise be caused
by inappropriate waste handling of this product.
For more detailed information about recycling
of this product, please contact your local city
office, your household waste disposal service
or the shop where you purchased the product.
on the product or on its
Hints and Tips
This appliance complies with the
following E.E.C. Directives:
- 2006/95 (Low Voltage Directive);
- 89/336 (Electromagnetical Compatibility
Directive);
- 93/68 (General Directives)
and subsequent modifications.
34 electrolux
Page 4

Contents
For your safety 33
When the oven is first installed 35
Description of the appliance 36
Electric oven 37
Electronic programmer 40
Hints and tips for using the oven 44
Cooking tables 46
Cleaning and maintenance 48
What happens if something goes wrong 52
Technical data 53
Instructions for the Installer 54
Building-in 56
Service and spare parts 57
European guarantee 57
When the oven is first installed
Before using the appliance,
remove all packaging, both inside
and outside the appliance,
including the advertising labels
and any protective film.
The oven will work only if the time
of day has been set (please read
the relevant instructions).
Once the oven has been installed:
"
1. set the thermostat knob to 250;
2. switch the oven function control knob to
conventional cooking ( );
3. allow the oven to run empty for
approximately 45 minutes;
4. open a window for ventilation.
During this time, an unpleasant odour may
be emitted. This is absolutely normal, and
is caused by residues of manufacturing.
Repeat this operation for the full grill and
fan forced cooking function for about 5-
10 minutes.
Once this operation is carried out, let the
oven cool down, then clean the oven cavity
with a soft cloth soaked in warm soapy
water.
Fig. 1
To open the oven door, always
catch the handle in its central
part (Fig. 1).
Before cooking for the first time,
carefully wash the oven accessories.
electrolux 35
Page 5

Description of the appliance
13
7234810 59
6
1
11
12
1. Control Panel
2. Front right hotplate/cooking zone control
knob
3. Rear right hotplate/cooking zone control
knob
4. Cooking function control knob
5. Operating control light
6. Electronic programmer
7. Thermostat control light
36 electrolux
8. Thermostat control knob
9. Rear left hotplate/cooking zone control
knob
10. Front left hotplate/cooking zone control
knob
11. Grill
12. Oven lamp
13. Rating plate
Page 6

Electric oven
0
Oven Function (Fig. 2) and
Thermostat (Fig. 3) control
knobs
They enable to select the most appropriate
type of heating for the different cooking
requirements by appropriately connecting
the heating elements and adjusting
temperature to the required level.
OFF position
0
Oven light
Conventional cooking
Top heating element
Bottom heating element
Inner grill
Full grill
Thermal grilling
Fan forced cooking
Defrosting
Operating control light
The mains on light will come on when the
oven function control knob and/or the cooking
zone control knob are set.
Oven thermostat control light
This light goes off when the oven heats up
to the temperature set and comes on again
every time the thermostat cuts in to stabilize
temperature.
Fig. 2
Fig. 3
electrolux 37
Page 7

Cooking functions
Always cook with the oven door
closed.
Coventional cooking
Turn the oven function control knob to the
position and regulate the thermostat to
the temperature required.
Fan cooking ensures rapid elimination of
moisture and the dryer oven environment
stops the different aromas and flavours from
being transmitted from one food to another.
Fan cooking is recommended for cooking
cakes. To obtaing the best cooking results,
use the lowest set of runners.
Top heating element
Turn the oven function control knob to the
position and regulate the thermostat to
the temperature required.
Bottom heating element
Turn the oven function control knob to the
position and regulate the thermostat to
the temperature required.
Grilling
Turn the oven function control knob to posi-
tion (inner grill) or to position (full
grill) and regulate the thermostat to the
temperature required.
Full grill is recommended for large quantities of food.
Fan forced cooking
Turn the oven function control knob to posi-
tion and regulate the thermostat to the
temperature required.
The food is cooked by means of preheated
air force blown evenly round the inside of the
oven by a circular element set on the rear
wall of the oven itself. Hot air is spread
around the oven cavity by means of a fan.
This means that you can simultaneously
cook different types of foods positioned on
the various oven shelves.
Thermal grilling
Turn the oven function control knob to posi-
tion and regulate the thermostat to the
temperature required.
This function offers an alternative method of
cooking food items, normally associated
with conventional grilling. The grill element
and the oven fan operate alternately,
circulating hot air around the food.
When using this function, select a
maximum temperature of 200°C.
Defrosting
Turn the oven function control knob to posi-
tion and the thermostat to the OFF po-
sition « ».
When selecting this function, the oven fan
will circulateair at room temperature inside
the oven, assisting in thawing frozen food.
38 electrolux
Page 8

Hotplate control knobs
The control knobs for the hotplates (Fig. 4)
can be found on the oven control panel. The
energy regulator of the hotplates can be set
by means of a 7-position control knob:
0 = OFF
1 = Minimum
9 = Maximum
The intermediate positions give an
increasing heating power.
Double circuit cooking zone (Fig. 5)
If you wish to have the two electric circuits
work simultaneously, turn the knob to
maximum position 9 and then turn it
towards symbol “0”. You will hear a click.
Now the 2 circuits work together.
Then, you can regulate the power of the
cooking zone by turning the control knob
anticlockwise.
Carefully supervise cookings with
oil or fats, since these types of
food can result in a fire, when
over-heated.
Safety thermostat
In order to avoid excessive overheating due
to incorrect use of the appliance or else to a
faulty component, the oven is equipped with
a safety thermostat which cuts off the power
supply if necessary. Operation is restored
automatically when the oven temperature
decreases to normal values. Therefore, if the
thermostat cuts in because you have not
been using the appliance correctly, the oven
can be used again simply by waiting for the
appliance to cool down. If, instead, the
thermostat cuts in because of a faulty
component, you should call the Service
Department.
Fig. 4
Fig. 5
The Cooling Fan
This oven is provided with a cooling fan,
meant to keep the front panel, the knobs
and the oven door handle cool. The fan
switches on automatically after a few
minutes of cooking. Warm air is blown out
through the aperture near the oven door
handle. When the oven is switched off, the
fan will remain on in order to to keep the
controls cool, after which it switches off
automatically.
electrolux 39
Page 9

Electronic programmer
4
5
6
2
1
The oven will work only if the time of day has
been set. Moreover, the oven can also be operated
without any programme.
In the event of a power failure, all the settings (time
of day, programme setting or programme in
operation) will be cancelled.
When the power is restored, the numbers in the
display will flash, and the clock/timer has to be
reset.
3
7
8
1. Push button for selecting a function
2. Decreasing control button “ ”
3. Increasing control button “ ”
4. Display
5. “Cooking Duration” pilot lamp
6. “End of cooking” pilot lamp
7. “Minute minder” pilot lamp
8. “Time of day” pilot lamp
Setting the time of day
When the power supply is switched on, or after a power
failure, the “Time of day” pilot lamp will flash on the
display.
To set the correct time of day:
1. press button “ ” or “ ”.
2. After the setting is carried out, wait for 5 seconds: the
“Time of day” pilot lamp will go out and the display
will show the set time. The appliance is ready for use.
To reset the correct time of day:
1. press button repeatedly to select the “Time of
day” function. The relevant pilot lamp will start flashing.
Then proceed as described above.
The time of day may be reset only if no automatic
function (cook duration or end of cooking ) has
been set.
40 electrolux
Page 10
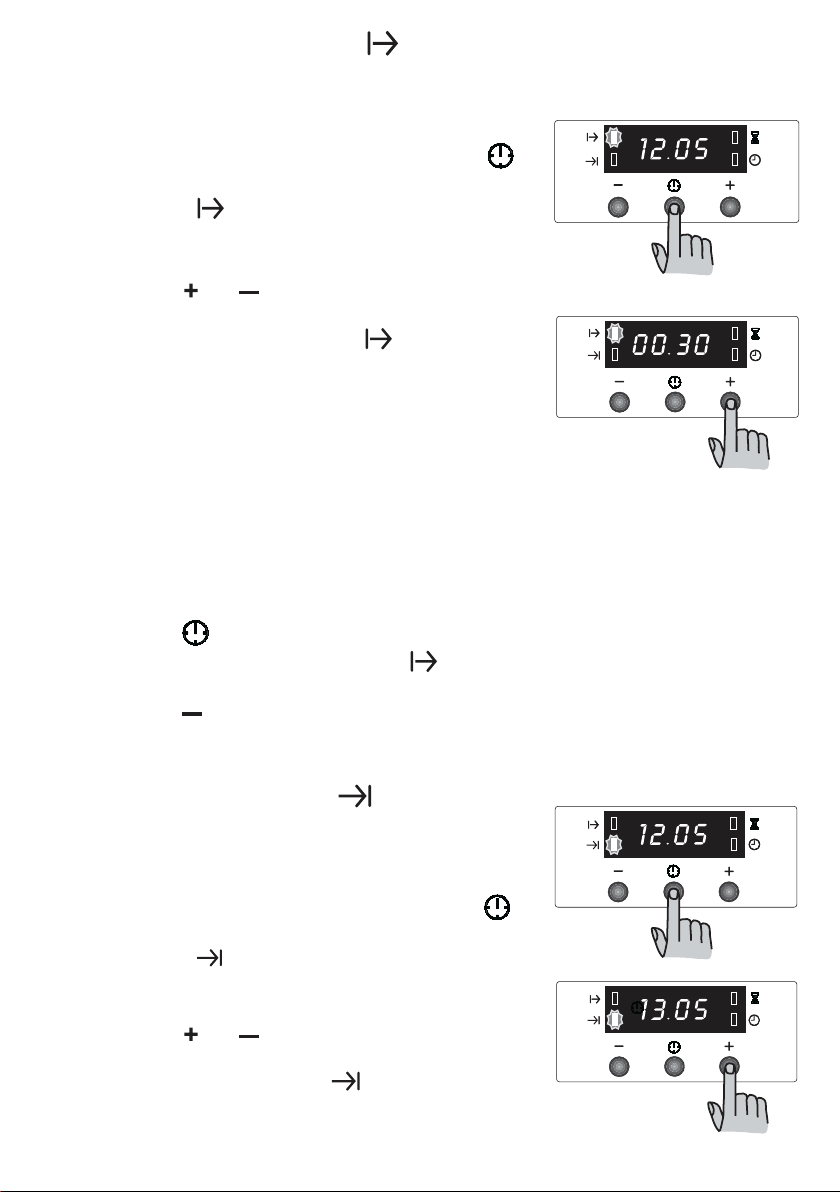
“Cooking Duration” function
Thanks to this function, the oven will automatically switch
off at the end of a programmed cooking duration time.
Place food in the oven, select a cooking function and
adjust the cooking temperature. Press button
repeatedly to select the “Cooking Duration” function. The
relevant pilot lamp will start flashing. Then, proceed
as follows:
To set the duration time:
1. press button “ ” or “ ”.
2. After the setting is carried out, wait for 5 seconds:
the "Cooking Duration" pilot lamp will come on
and the display will revert to the time of day.
3. When cooking time is over, the oven will be switched
off automatically and an acoustic alarm will be heard,
while the pilot lamp will start flashing. Turn the oven
function and the thermostat control knob to zero.
To switch off the acoustic alarm, press any button.
NOTE: when doing this operation, the oven will be
operated again, therefore, remember to turn the oven
function and the thermostat control knob to zero at
the end of the cooking time.
To cancel the duration time:
1. Press button repeatedly to select the “Cooking
Duration” function. The relevant pilot lamp will flash
and the display will show the remaining cooking time.
2. Press button “ ” until the display shows “0:00”. After
5 seconds the pilot lamp will go out and the display
will revert to the time of day.
“End of cooking” function
Thanks to this function, you can set the oven to switch off
automatically when a programmed end of cooking time is
over. Place food in the oven, select a cooking function and
adjust the cooking temperature. Press button
repeatedly to select the “End of cooking” function. The
relevant pilot lamp will start flashing. Then, proceed
as follows:
To set the end of cooking time:
1. press button “ ” or “ ”.
2. After the setting is carried out, wait for 5 seconds:
the “End of cooking” pilot lamp will come on and
the display will revert to the time of day.
electrolux 41
Page 11
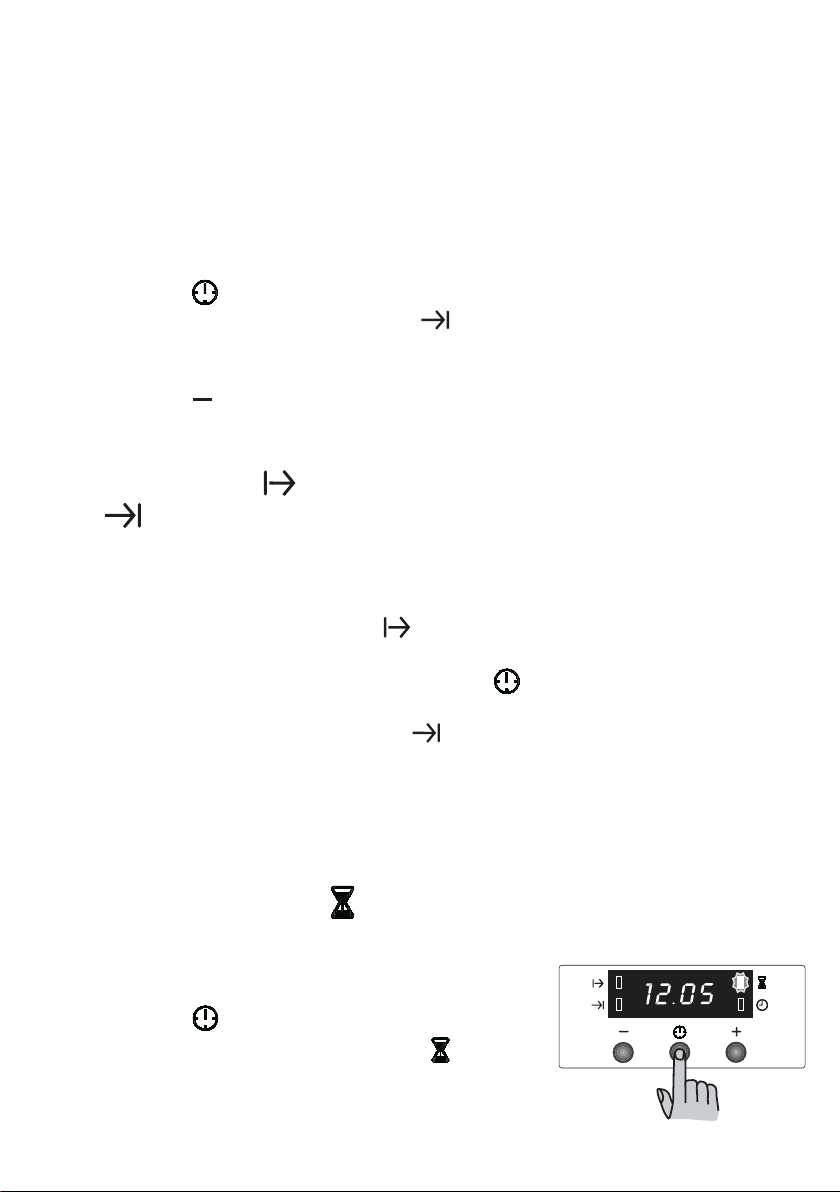
3. When cooking time is over, the oven will be switched
off automatically and an acoustic alarm will be heard,
while the pilot lamp will start flashing. Turn the oven
function and the thermostat control knob to zero.
To switch off the acoustic alarm, press any button.
NOTE: when doing this operation, the oven will be
operated again, therefore, remember to turn the oven
function and the thermostat control knob to zero when
cooking is over.
To cancel the end of cooking time:
1. Press button repeatedly to select the “End of
cooking” function. The relevant pilot lamp will flash
and the display will show the programmed End of
cooking time.
2. Press button “ ” until the display shows the current
time of day. The programmer will beep and the pilot
lamp will go out.
“Cooking duration” and “End of cooking
time” combined
The functions “Cooking duration” e “End of cooking time”
can be used simultaneously to set the oven to switch on
and off automatically at a later time.
1. With the “Cooking duration” function (carry out the
cooking duration setting as described in the relevant
chapter) set the duration time. Then, press button :
the display will show the programmed setting.
2. With the “End of cooking time” function (carry out
the End of cooking setting as described in the relevant
chapter) set the end of cooking time.
The relevant pilot lamps will come on and the display
will show the time of day. The oven will switch on and
off according to the set programmes.
“Minute minder” function
The minute minder alarm will sound at the end of a timed
period, but THE OVEN WILL REMAIN ON, if it is in use.
To set the minute minder:
1. Press button repeatedly to select the “Minute
minder” function. The relevant pilot lamp will start
flashing.
42 electrolux
Page 12
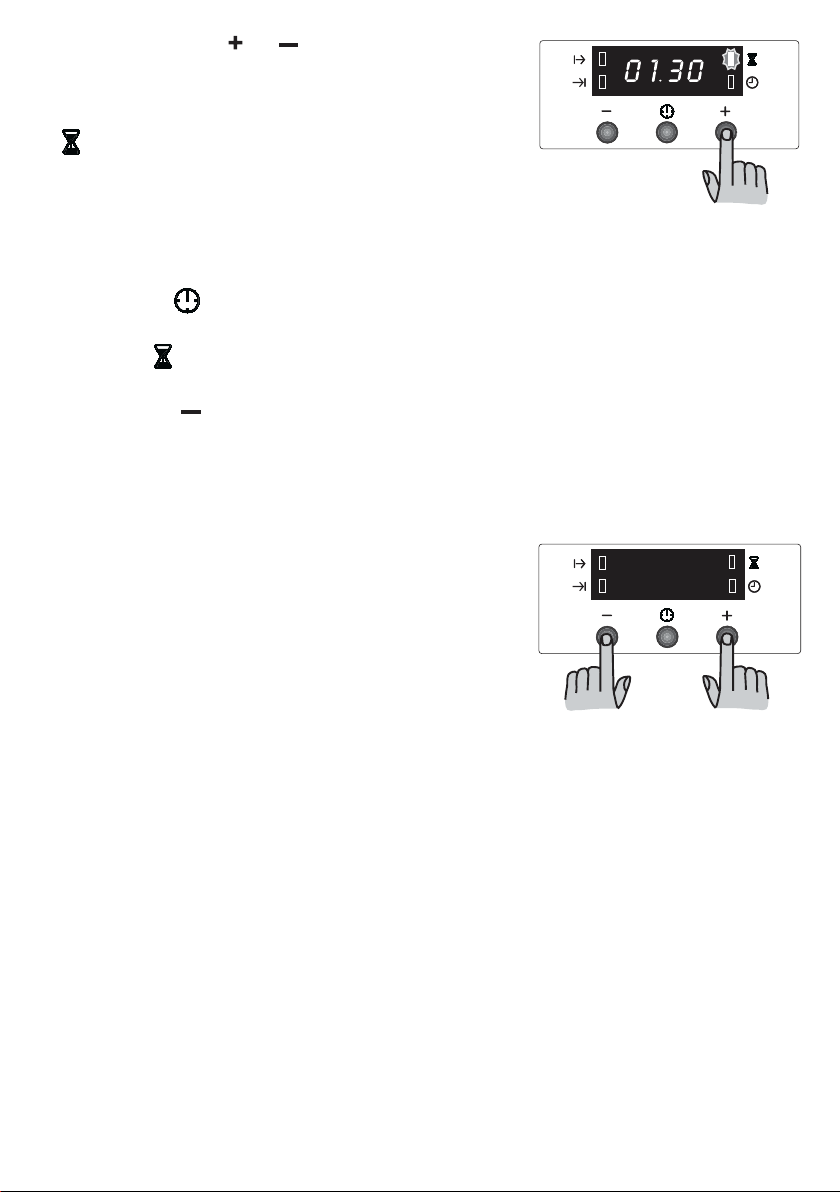
2. Then, press button “ ” or “ ” (maximum:
2 hours, 30 minutes).
3. After the setting is carried out, wait for 5
seconds: the “Minute minder” pilot lamp
will come on.
4. At the end of the timed period, the pilot
lamp will start flashing and acoustic
alarm will be heard. To switch off the
acoustic alarm, press any button.
To cancel the minute minder:
1. Press button repeatedly to select the
“Minute minder” function. The relevant
pilot lamp will flash and the display
will show the remaining time.
2. Press button “ ” until the display shows
“0:00”. After 5 seconds the pilot lamp will
go out and the display will revert to the
time of day.
How to switch off the display
1. Press two programmer push buttons
simoultaneously and keep them pressed
for about 5 seconds. The display will
switch off.
2. To switch on the display, press any
button.
The display can be switched off only
if no other functions have been set.
electrolux 43
Page 13
Hints and tips for using the oven
Always cook with the oven door
closed.
The oven is supplied with an exclusive system
which produces a natural circulation of air
and the constant recycling of steam. This
system makes it possible to cook in a
steamy environment and keep the dishes soft
inside and crusty outside. Moreover, the
cooking time and energy consumption are
reduced to a minimum. During cooking steam
may be produced which can be released when
opening the oven door. This is absolutely
normal.
However, always stand back from
the oven when opening the oven
door during cooking or at the end
of it to allow any build up of steam
or heat to release.
When food is heated, it produces
steam in the same way as a boiling
kettle does. When steam comes in
contact of the oven door glass, it will
condense and produce water droplets.
To reduce condensation, ensure the
oven is well heated before placing food
in the oven cavity. A short oven preheating (about 10 minutes) will then
be necessary before any cooking.
We recommend you to wipe away
condensation after each use of the
appliance.
Heißluftbetrieb
Shelf supports
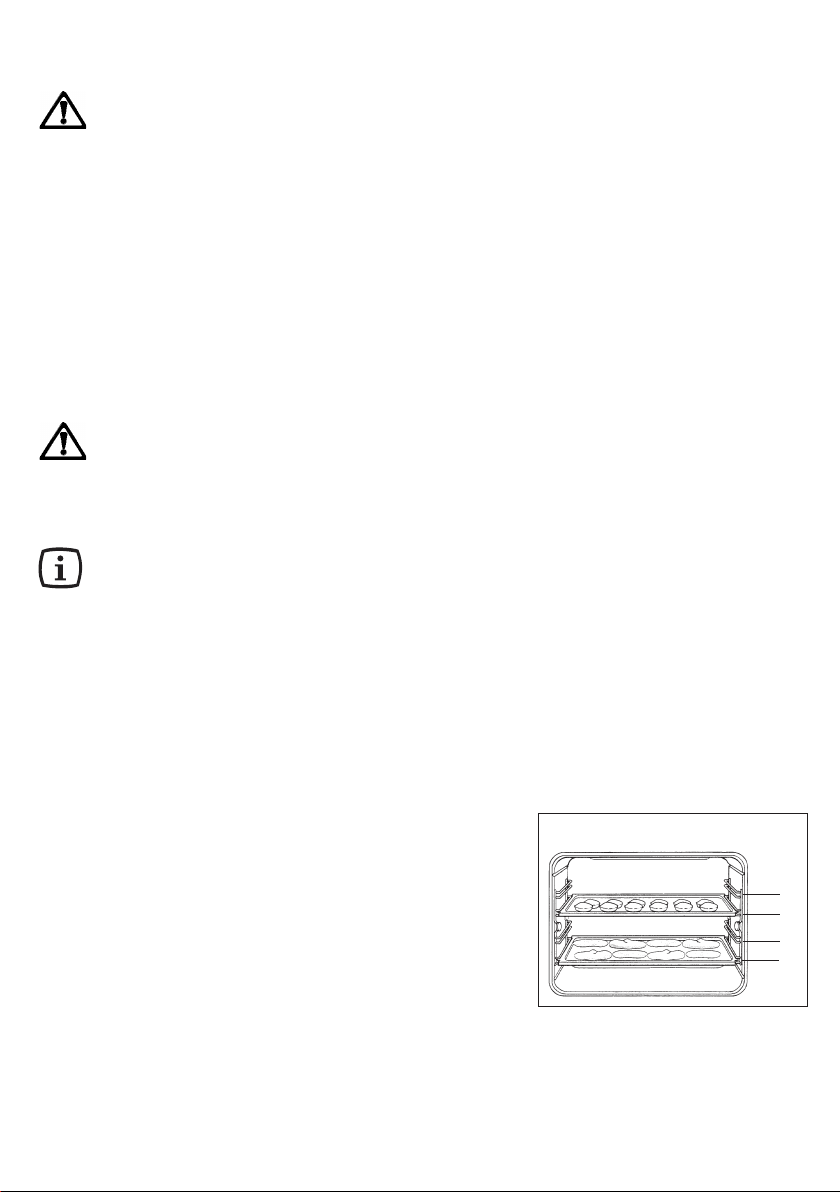
The oven has four shelf levels. The shelf
positions are counted from the bottom of the
oven as shown in the diagram (Fig. 6).
44 electrolux
4
3
2
1
Fig. 6
Page 14
Some hints
For baking cakes
Cakes require a moderate temperature
(normally between 150 °C and 200 °C). In
addition, the oven must be heated up
beforehand - for about 10 minutes.
The oven door should not be opened before at
least 3/4 of the set cooking time is up.
Normal short pastry dough should be cooked
in a mould or tin for 2/3 of total cooking time
required and then garnished as desired before
being cooked completely.
Clearly, the remaining cooking time depends
on the type of garnish used (jam, fruit, etc.).
Care should be taken to ensure that any dough
and cake mixes are of the right consistency
since an unduly moist mix lengthens cooking
time unnecessarily. The raw dough or mix
should therefore be fairly difficult to detach from
the spoon or beater.
If three shelves are filled with cakes and tarts
simultaneously, it is advisable to slot in an
extra shelf between the two lower shelves .
For cooking meat and fish
Meat cooked in the oven should weigh at least
1 kg to prevent it from becoming too dry during cooking. Very tender red meat to be cooked
rare, i.e. well cooked on the outside but
extremely juicy inside, requires
high-temperature cooking (200 °C-250 °C).
White meat, poultry and fish instead require
low-temperature cooking (150 °C-175 °C).
The ingredients for the accompanying sauce
or gravy should be put in the baking pan at the
very beginning only when cooking times are
short.
Otherwise they should be added during the
last half hour. A simple way of checking
whether meat is done or not is to press it with
a spoon; if the meat does not yield under this
pressure it means that it is done to a turn. In
the case of roast beef and fillet steaks, the
inside of which should remain fairly pink in
color, cooking times must be short.
The meat can be cooked in a baking pan or
else directly on the shelf - in this case a dripping
pan must obviously be placed underneath the
shelf to collect the juice.
Should you cook very fat food, place the meat
directly on the grill and the grill over the dripping
pan in order not to dirty the oven.
Once the meat is cooked, it is advisable to let
it rest for at least 15 minutes before carving
so that the juice does not seep out.
To prevent the formation of too much smoke
in the oven during roasting, it is a good idea to
pour a little water into the dripping pan and—
to prevent steam—to add a little bit more during cooking if the original amount dries up too
much.
Before serving, the various courses can be
kept hot in the oven which should be turned
down to the minimum temperature.
Warning! - Do not attempt to place
objects on the bottom of the oven and
do not cover it with aluminium foil while
cooking, as you can damage the
enamelled surfaces and the food you
are cooking.
Always place pans, heat-resisting pans
and aluminium foils on the oven shelves.
Warning! - Be careful when you insert
and extract the oven accessories (e.g.
dripping pan, grid etc...) from the oven
in order not to damage the enamelled
surfaces of the oven cavity.
Cooking times
Cooking times vary according to the type of
food to be cooked, its consistency, and
volume.We suggest that you take particular
note of your first cooking experiments with the
oven, since operating in the same conditions
for the same dishes you will of course obtain
similar results.
Only experience will enable you to make the
appropriate changes to values given on charts.
electrolux 45
Page 15
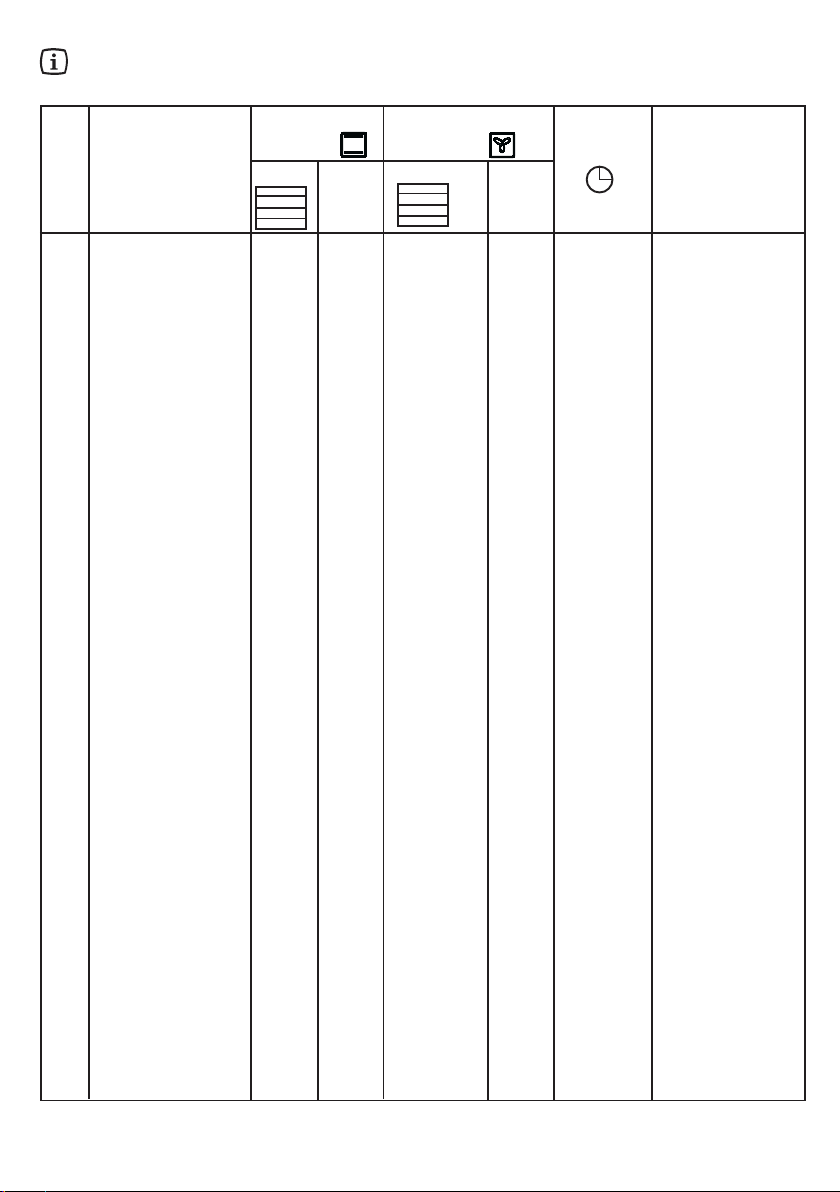
Cooking tables
Cooking times do not include pre-heating time. A short oven pre-heating (about 10 minutes) is necessary before any cooking.
Traditional cooking and fan forced cooking
Traditional
Cooking
TYPE OF DISH
Weight (gr.)
Level
4
3
2
1
temp.
°C
CAKES
Whipped up kneading
Shortbread dough
Butter-milk cheese cake
2 170 2 (1 and 3)* 160 45 ~ 60 In cake mould
2 170 2 (1 and 3)* 160 20 ~ 30 In cake mould
1 160 2 150 60 ~ 80 In cake mould
Apple cake 1 180 2 (1 and 3)* 170 40 ~ 60 In cake mould
Strudel 2 175 2 150 60 ~ 80
Jam-tart 2 175 2 (1 and 3)* 160 30 ~ 40
Fruit cake 1 175 1 160 45 ~ 60 In bread pan
Sponge cake 1 175 2 (1 and 3)* 160 30 ~ 40 In cake mould
Christmas cake 1 170 1 160 40 ~ 60 In cake mould
Plum cake 1 170 1 160 50 ~ 60 In bread pan
Small cakes 2 175 2 (1 and 3)* 160 25 ~ 35 In baking tray
Biscuits 2 160 2 (1 and 3)* 150 20 ~ 30 In baking tray
Meringues 2 100 2 (1 and 3)* 100 90 ~ 120 In baking tray
Buns 2 190 2 (1 and 3)* 180 12 ~ 20 In baking tray
Pastry: Choux 2 200 2 (1 and 3)* 190 15 ~ 25 In baking tray
BREAD AND PIZZA
1000 White bread 1 190 2 180 40 ~ 60 1-2 pieces
500 Rye bread 1 190 1 180 30 ~ 45 In bread pan
500 Bread rolls 2 200 2 (1 and 3)* 175 20 ~ 35 6-8 rolls
250 Pizza 1 210 2 (1 and 3)* 190 15 ~ 30 in baking pan
FLANS
Pasta flan 2 200 2 (1 and 3)* 175 40 ~ 50 in mould
Vegetable flan 2 200 2 (1 and 3)* 175 45 ~ 60 in mould
Quiches 1 200 2 (1 and 3)* 180 35 ~ 45 in mould
Lasagne 2 180 2 160 45 ~ 60 in mould
Cannelloni 2 200 2 175 40 ~ 55 in mould
MEAT
1000 Beef 2 190 2 175 50 ~ 70 On grid
1200 Pork 2 180 2 175 100 ~ 130 On grid
1000 Veal 2 190 2 175 90 ~ 120 On grid
English roast beef
1500
1500 underdone 2 210 2 200 50 ~ 60 On grid
1500 done 2 210 2 200 60 ~ 70 On grid
1500 well done 2 210 2 200 70 ~ 80 On grid
2000 Shoulder of pork 2 180 2 170 120 ~ 150 With rind
1200 Shin of pork 2 180 2 160 100 ~ 120 2 pieces
1200 Lamb 2 190 2 175 110 ~ 130 Leg
1000 Chicken 2 190 2 175 60 ~ 80 Whole
4000 Turkey 2 180 2 160 210 ~ 240 Whole
1500 Duck 2 175 2 160 120 ~ 150 Whole
3000 Goose 2 175 2 160 150 ~ 200 Whole
1200 Rabbit 2 190 2 175 60 ~ 80 Cut in pieces
1500 Hare 2 190 2 175 150 ~ 200 Cut in pieces
800 Pheasant 2 190 2 175 90 ~ 120 Whole
Meat loaf 2 180 2 160 40 ~ 60 in bread pan
FISH
1200 Trout/Sea bream 2 190 2 (1 and 3)* 175 30 ~ 40 3-4 fishes
1500 Tuna fish/Salmon 2 190 2 (1 and 3)* 175 25 ~ 35 4-6 fillets
(*) If you need to cook more than one dish at the same time, we recommend you to place them on the levels
quoted between brackets.
46 electrolux
Fan forced
cooking
Level
Cooking
time
4
temp.
3
2
°C
1
minutes
NOTES
Page 16
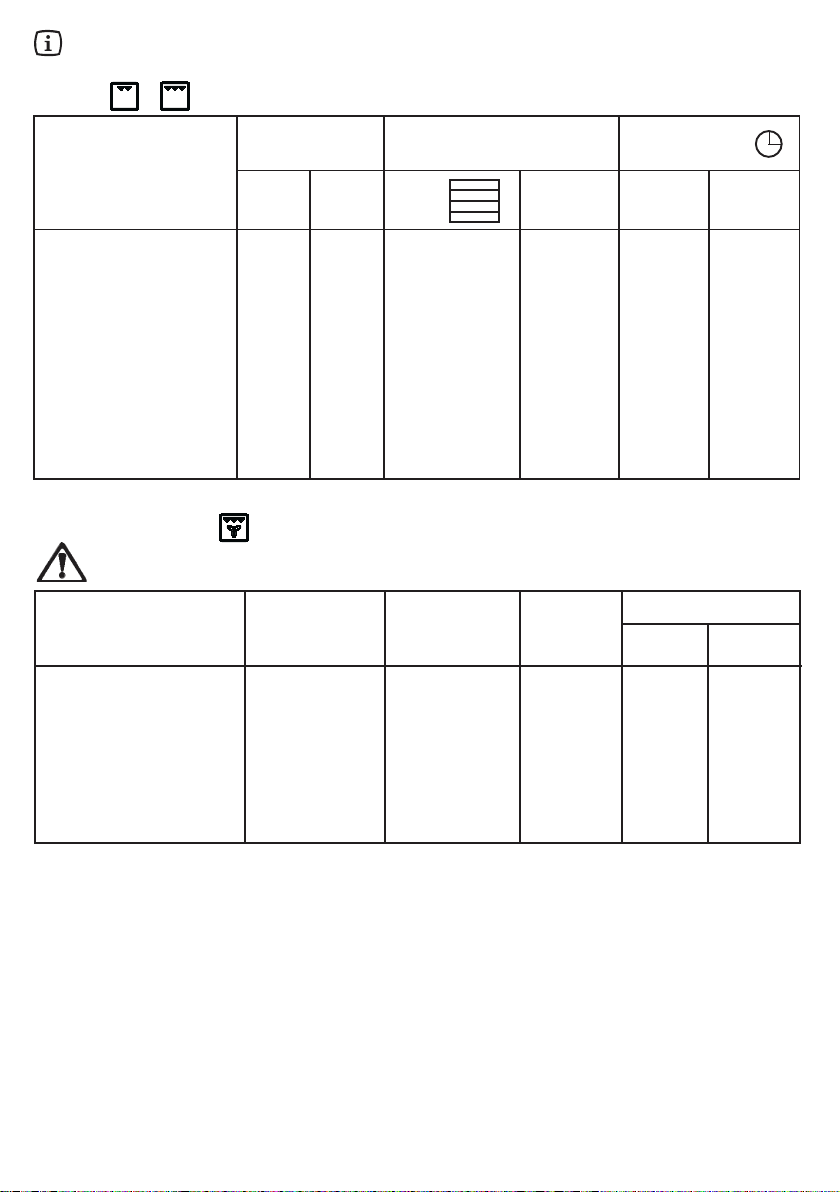
Cooking times do not include pre-heating time. A short oven pre-heating (about 10 minutes) is necessary before any cooking.
Grilling -
°C
Cooking time
(minutes)
Upper
side
Lower
side
Quantity
TYPE OF DISH
Pieces Weight
Fillet steaks
Beef-steaks 4 600 3 250 10 ~ 12 6 ~ 8
Sausages 8 — 3 250 12 ~ 15 10 ~ 12
Pork chops 4 600 3 250 12 ~ 16 12 ~ 14
Chicken (cut in two) 2 1000 3 250 30 ~ 35 25 ~ 30
Kebabs 4 — 3 250 10 ~ 15 10 ~ 12
Chicken (breast) 4 400 3 250 12 ~ 15 12 ~ 14
Hamburger 6 600 3 250 10 ~ 15 8 ~ 10
Fish (fillets) 4 400 3 250 12 ~ 14 10 ~ 12
Sandwiches 4-6 — 3 250 5 ~ 7 —
Toast 4-6 — 3 250 2~4 2 ~ 3
4 800 3 250 12 ~ 15 12 ~ 14
Level
Grilling
4
3
2
1
temp.
Thermal grilling
With thermal grilling select a maximum temperature of 200°C.
TYPE OF DISH Quantity Shelf Temp. Cooking time (minutes)
(gr.) level lower upper
Rolled joints
Chicken (cut in two) 1000 3 200 25 ~ 30 20 ~ 30
Chicken legs — 3 200 15 ~ 20 15 ~ 18
Quail
Vegetable gratin — 3 200 20 ~ 25 —
St. Jacques shells — 3 200 15 ~ 20 —
Mackerel — 3 200 15 ~ 20 10 ~ 15
Fish slices 800 3 200 12 ~ 15 8 ~ 10
(turkey) 1000 3 200 30 ~ 40 20 ~ 30
500 3 200 25 ~ 30 20 ~ 25
°C
side side
The oven temperatures are intended as a guide only. It may be necessary to increase or
decrease the temperatures to suit individual preferences and requirements.
electrolux 47
Page 17

Cleaning and maintenance
Before any cleaning switch the
oven off and let it cool down.
Never use steam or steam
machines to clean the appliance.
Important! Before carrying out
maintenance and cleaning
operations, make sure that your
oven is disconnected from the
mains power supply.
Cleaning must be carried out after the oven
has cooled down. Wash the enamelled parts
with lukewarm water and detergent. Do not
use abrasive products, such as steel wool
pads, acids etc. since these could damage
the various surfaces. Rinse stainless steel
parts with water after use, and dry them with
a soft cloth or chamois leather.
In the case of persistent stains, you can
use normal non-abrasive detergents or
products specific for stainless steel readily
available on the market. Another alternative
is a drop of hot vinegar. When cleaning the
oven door with the glass top cover use just
hot water, taking care to avoid using coarse
cloths or abrasive products.
The hot acids of fruit (e.g. Iemons, stewed
prunes, etc.) leave difficult-to-remove stains
on the enamelled surfaces; this inconvenient
may remove enamel gloss, but, it does not
impair oven operation.
Clean the oven thoroughly after use; in this
way it will be possible to remove cooking
residuals more easily, thus avoiding these
from burning the next time the oven is used.
48 electrolux
Page 18
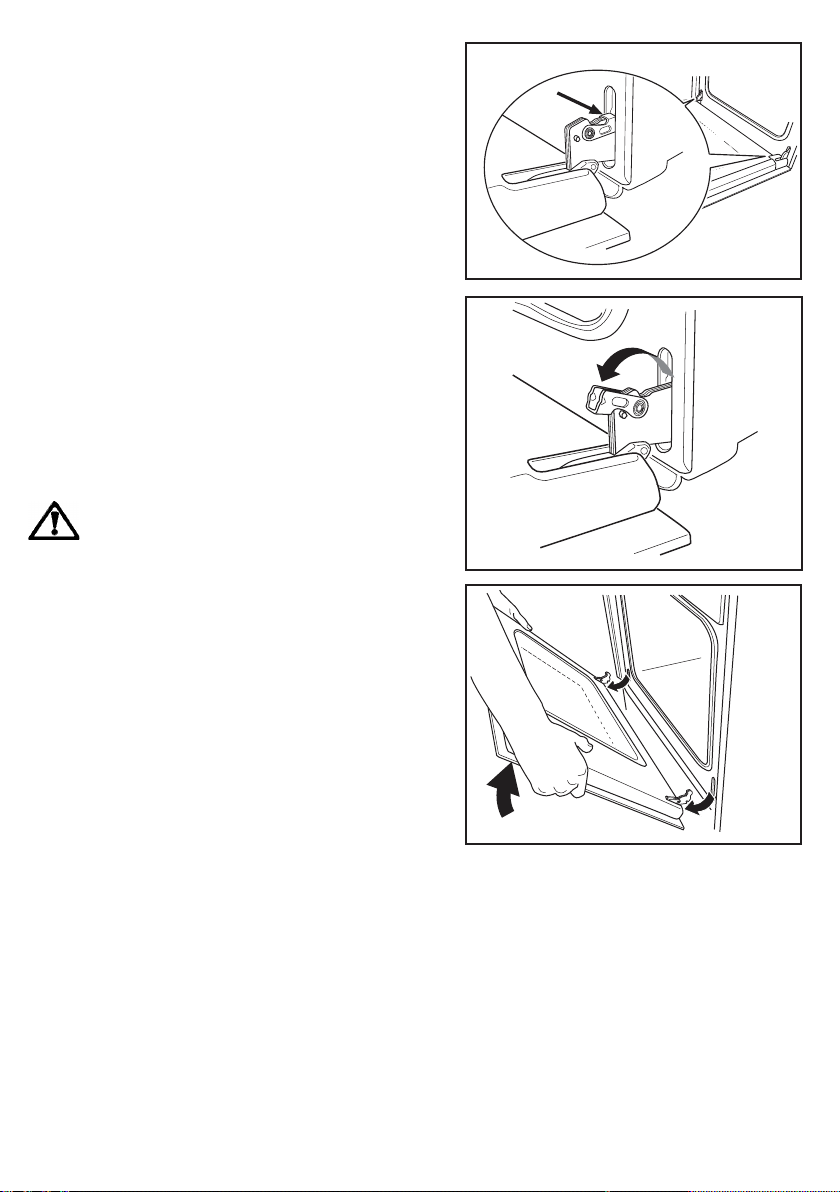
The Oven Door
Before cleaning the oven door, we
recommend you to remove it from the oven.
Proceed as follows:
"
1. open the oven door completely;
2. find the hinges linking the door to the oven
(see Fig. 7);
3. unlock and turn the small levers located
on the two hinges (see Fig. 8);
4. handle the door by its left- and right-hand
sides, then slowly turn it towards the oven
until it is half-closed (see Fig. 9);
5. gently pull the oven door off its site (see
Fig. 9);
6. place it on a steady plan;
Clean the oven door glass with warm
soapy water and a softh cloth only. Never use
harsh abrasives.
Once the cleaning is carried out, refit the
oven door, following the procedure in reverse.
DO NOT clean the oven door while
the glass panels are warm. If this
precaution is not observed the
glass panel may shatter.
If the door glass panel becomes
chipped or has deep scratches, the
glass will be weakened and must
be replaced to prevent the
possibility of the panel shattering.
Contact your local Service Centre
who will be pleased to advise
further.
Fig. 7
Fig. 8
Models in stainless steel or aluminium:
We recommend to clean the oven door using
only a wet sponge and dry it up after cleaning
with a soft cloth.
Never use steel wool, acids or abrasive
products as they can damage the oven
surface. Clean the oven control panel
following the same precautions.
Fig. 9
electrolux 49
Page 19
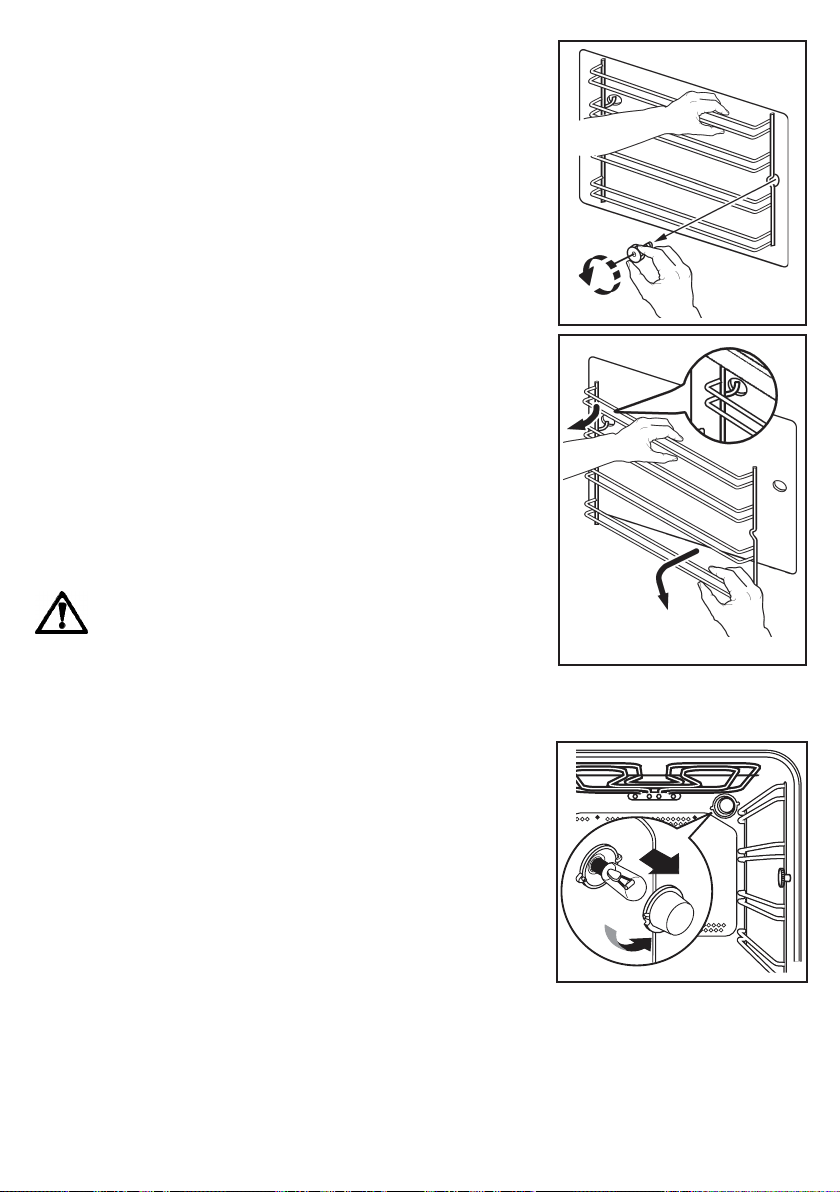
Oven Shelves and Shelf Supports
To clean the oven shelves, soak in warm
soapy water and remove stubborn marks with
a well wetted soap impregnated pad.
Rinse well and dry with a soft cloth.
The shelf supports can be removed for easy
cleaning.
Proceed as follows:
"
1. remove the front screw while keeping the
shelf support in position with the other hand
(Fig. 10);
2. disengage the rear hook and take off the
shelf support (Fig. 11);
3. once the cleaning is carried out, refit the
shelf supports following the procedure in
reverse.
Please, ensure the retaining nuts are secure
when refitting the shelf support.
Replacing the oven light
Disconnect the appliance from the
electricity supply.
If the oven bulb needs replacing, it must
comply with the following specifications:
electric power, 15 W/25 W; electric rate, 230
V (50 Hz); resistant to temperatures of 300°C;
connection type: E14. These bulbs are
available from your local Service Force Centre.
To replace the faulty bulb:
"
1. Ensure the oven is disconnected from the
electrical supply.
2. Turn the glass cover anticlockwise (Fig.
12).
3. Remove the faulty bulb and replace it with
the new one.
4. Refit the glass cover.
5. Reconnect to the electrical supply.
Fig. 10
Fig. 11
Fig. 12
50 electrolux
Page 20
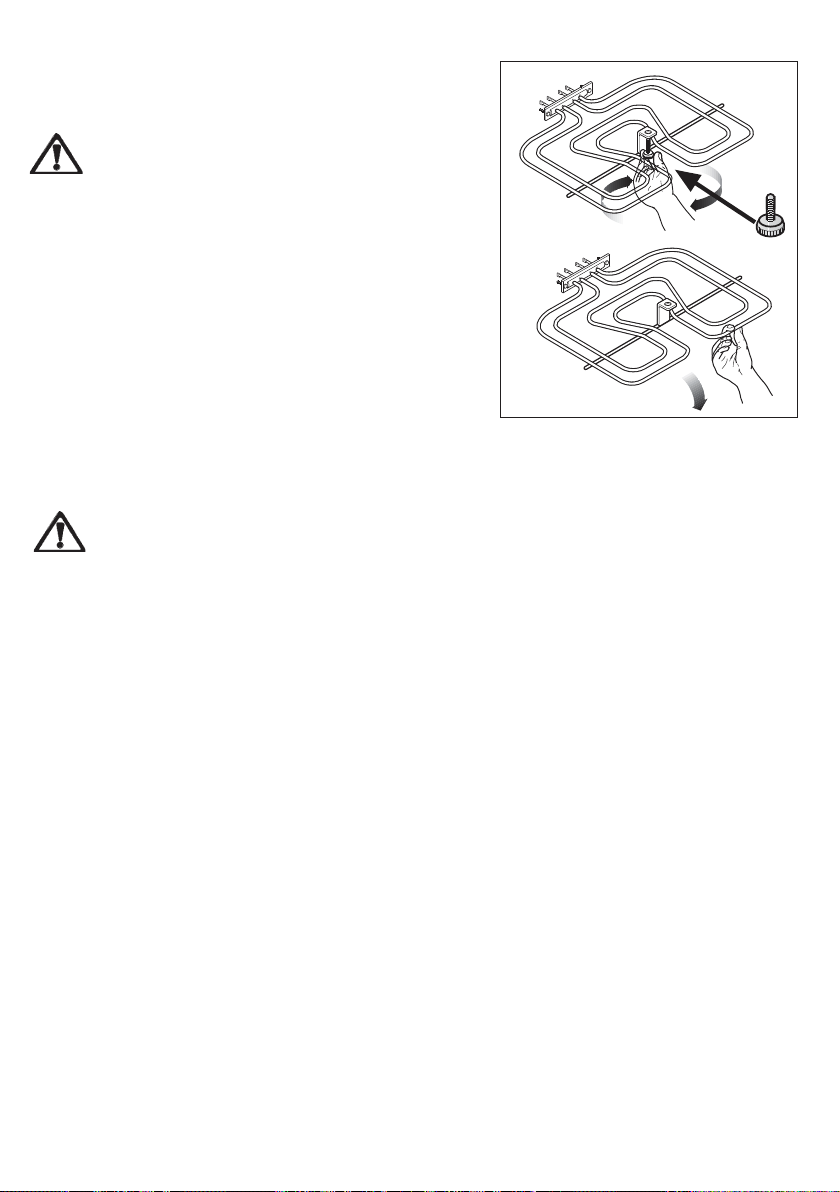
The hinged grill
This model is fitted with a hinged grill element to make the roof of the oven especially
easy to clean.
Before proceeding ensure the
oven is cool and disconnected
from the electricity supply.
1. Undo the screw fastening the grill element (see Fig. 13). When carrying out
this operation for the first time, we recommend using a screwdriver.
2. Then gently pull the grill downwards to
allow access to the oven roof (see Fig.
13).
3. Clean the oven roof with a suitable
cleaner and wipe dry before returning
the hinged grill element to its original position.
4. Carefully push the grill element up into
its original position and re-tighten the retaining nut.
Ensure the retaining nut on the
grill element is properly tightened
so that it does not fall down when
in use.
Fig. 13
electrolux 51
Page 21

What happens if something goes wrong
If the appliance is not working correctly, please carry out the following checks, before
contacting your local Service Centre.
SYMPTOM
$
The oven does not come on.
$
The oven temperature light does
not come on.
$
The oven light does not come on.
$
It takes too much time to finish the
dishes, or they are cooked too fast.
$
Steam and condensation settle on
the food and the oven cavity.
$
The display shows "12.00".
SOLUTION
#Check the appliance is wired in properly, and
the socket switch or the switch from the
mains supply to the oven are ON.
#Turn the thermostat knob on a temperature
or
#Turn the oven function control knob on a
function.
#Turn the oven function control knob on a
function
or
#Buy a new oven light bulb, asking for it to your
local Service Centre and replace it by following
the instruction provided in this booklet.
#Refer to the contents of this booklet,
especially to the chapter "Electric oven".
#Leave dishes inside the oven no longer than
15-20 minutes after the cooking is completed.
#Set the time of day (see chapter "Setting the
time of day").
52 electrolux
Page 22

Technical data
Dimension of the oven recess
Height 593 mm
Width 560 mm
Depth 550 mm
Dimensions of the oven cavity
Height 335 mm
Width 395 mm
Depth 400 mm
Capacity 53 l
Oven thermostat regulation: from 50°C up
to 250°C
Heating elements ratings
Bottom heating element 1000 W
Top heating element 800 W
Full oven (Top+Bottom) 1800 W
Grill heating elements inner 1650 W
full 2450 W
This appliance can be connected to the
below listed ceramic hobs:
Type: EHC 650
Maximum power absorbed: 6,2 kW
Power supply voltage (50 Hz) 230 V
Type: EHL 6645
Maximum power absorbed 7,6 kW
Power supply voltage (50 Hz) 230 V
Type: EHL 6650
Maximum power absorbed 7,6 kW
Power supply voltage (50 Hz) 230 V
Type: EHL 6690
Maximum power absorbed 7,6 kW
Power supply voltage (50 Hz) 230 V
Type: EHL 6625
Maximum power absorbed 6,5 kW
Power supply voltage (50 Hz) 230 V
Nominal heating power
Oven with ceramic hob
8,7 kW - 9,0 kW-10,1 kW
Fan oven heating element 2000 W
Oven lamp 25 W
Convection fan 25 W
Cooling fan 25 W
Maximum power rating 2500 W
Voltage tension (50 Hz) 400 V 3 N ~
electrolux 53
Page 23

Instructions for the Installer
The instructions given below are
designed specifically for a
qualified installer and should aid
him or her to perform all
installation, adjustment, and
maintenance operations with
absolute precision and in
compliance with all current
legislation and regulations. We
strongly recommend that all
operations for the installation of
your cooker be carryed out by
Qualified Personnel in accordance
with existing rules and regulations.
Electrical connection
Prior to making the electrical connection,
make sure that:
— the protection fuse and the domestic wiring
system are suitable to carry the total
electric load of the oven (see rating plate);
— your domestic wiring system has an
efficient earth connection in compliance
with rules and laws in force;
— the wall socket or the omnipole switch used
for the electrical connection can easily be
reached after the oven is built in.
This appliance is delivered without an electric
supply cable, therefore, you will have to fit to it
a supply cable with standard plug, suitable for
the total electric load shown on the rating plate.
The plug is to be inserted into a suitable wall
socket. If you require a direct connection to
the electric network (mains), it will be
necessary to fit between the appliance and
the mains an omnipole switch, with a minimum
gap between contacts of 3 mm, suitable for
the required load and in compliance with rules
in force. The green & yellow ground wire must
not be interrupted by the switch, and should
be 2-3 cm longer than the phase and neutral
wires. The supply cable must in all cases be
laid out in such a way as to ensure that it
54 electrolux
Page 24
does not reach at any given point a
temperature 50°C higher than the ambient
temperature.
Suitable power supply cables are the following
types, considering the respective necessary
section of cable: H07 RN-F, H05 RN-F, H05
RR-F, H05 VV-F, H05 V2V2-F (T90), H05 BB-F.
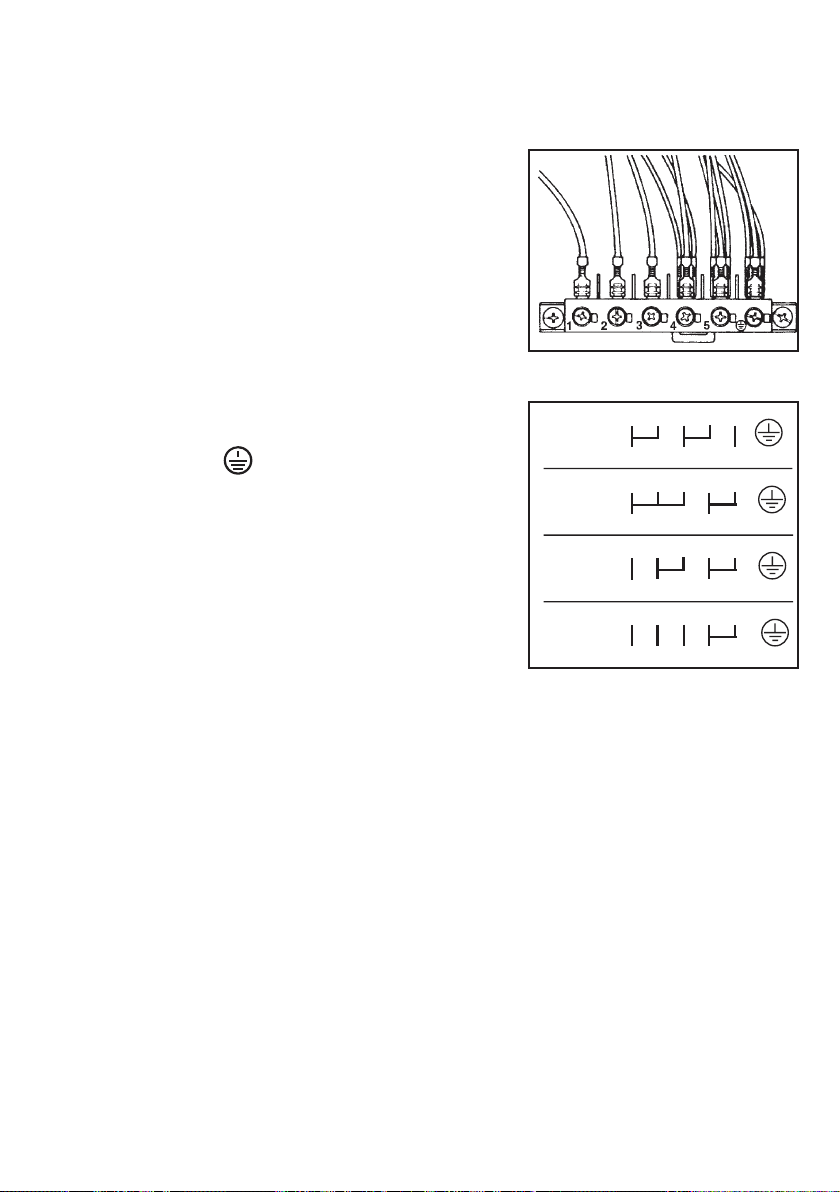
Connecting the terminal board
The appliance incorporates an easily
accessible 6-pole terminal board whose
jumpers (bridges) are already pre-set for
operation on 400 V tri-phase with neutral wire
(Fig. 14). In case a different mains voltage is
present, the jumpers on the terminal board
must be rearranged as shown in the diagram
(Fig. 15). The ground cable must be
connected to terminal . After connecting
the supply cable to the terminal board, secure
it with a junction clamp.
Electrical connection with the
hob
This oven can be connected to hobs
indicated in the paragraph "Technical data".
The socket for connecting the hob is located
at the top of the oven cabinet. The hobs
come complete with connecting leads for
the hot plates/heat areas and ground cable;
these leads feature plug-in connectors.
Connection of the hob to the oven is carried
out by plugging-in these connectors to the
corresponding oven socket.
The plug-to-socket connection design is
such as to prevent possible wrong
plugging-ins.
The Manufacturer disclaims any
liability in case these
accident-preventing rules are not
observed.
230V 3~
230V 1~
400V 2N~
400V 3N~
Fig. 14
1 2 3 4 5
L1 L2 L3 PE
1 2 3 4 5
L1 N PE
1 2 3 4 5
L1 L2 N PE
1 2 3 4 5
L1 L2 L3 N PE
Fig. 15
electrolux 55
Page 25
Building-in
To ensure correct operation of the built-in
assembly, the kitchen cabinet and the recess
for the built-in appliance must have suitable
dimensions. When the appliance is fitted-in,
there must be no open spaces left and it
must be closed on all sides by the kitchen
furniture to prevent the possibility of
inadvertently touching “live” (current carrying)
parts of the oven. All parts ensuring such a
protection, including any covering panel (for
instance, if the appliance is installed at the
end or at the beginning of a kitchen counter)
must be fastened in such a way as to prevent
removal of the same without the aid of some
tool. This appliance can be placed with its
back and with one side close to appliances
or walls of higher height. The other side,
instead, must be placed close to furniture or
appliances, having the same height.
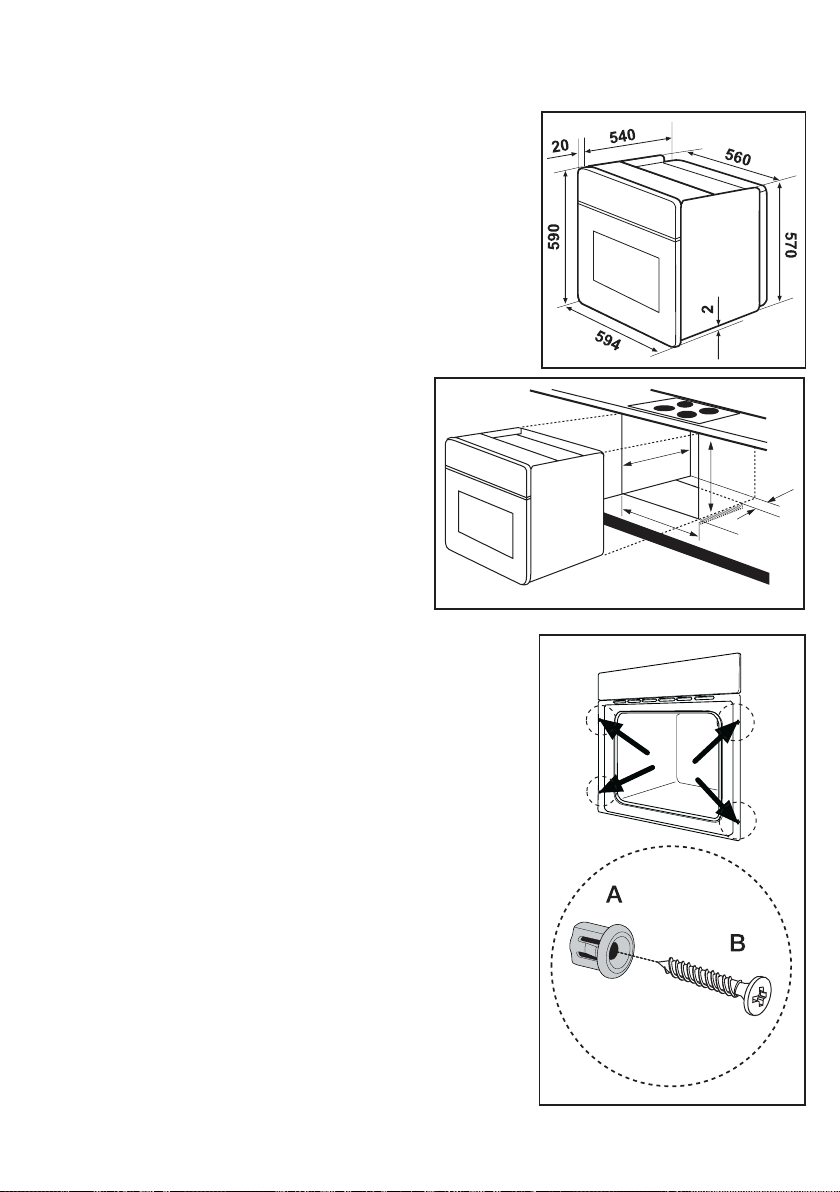
Overall oven dimensions (Fig. 16)
Building-in under a kitchen
counter
The recess must have the dimensions
shown in Fig. 17. Before carrying out the
building-in of the oven, connect it to the hob
(see corresponding chapter); then recess
completely the oven under the counter; open
the oven door and secure the oven to the
kitchen cabinet .
Fig. 16
550 M
5
6
0
- 5
IN
3
9
5
7
0
0
0
1
÷
0
8
Fig. 17
Securing the oven to the cabinet
- Fit the appliance into the cabinet recess.
- Open the oven door and secure the oven
to the kitchen cabinet by placing the four
distance holders (A) in the holes provided
in the oven frame and then inserting the
four wood screws (B) (Fig. 18).
56 electrolux
Fig. 18
Page 26
Service and spare parts
If after the checks listed in the chapter
"What happens if something goes wrong",
the appliance still does not work correctly,
contact your local Service Centre,
specifying the type of malfunctioning, the
appliance model (Mod.), the product
number (Prod. No.) and the serial number
(Ser. No.) marked on the identification plate.
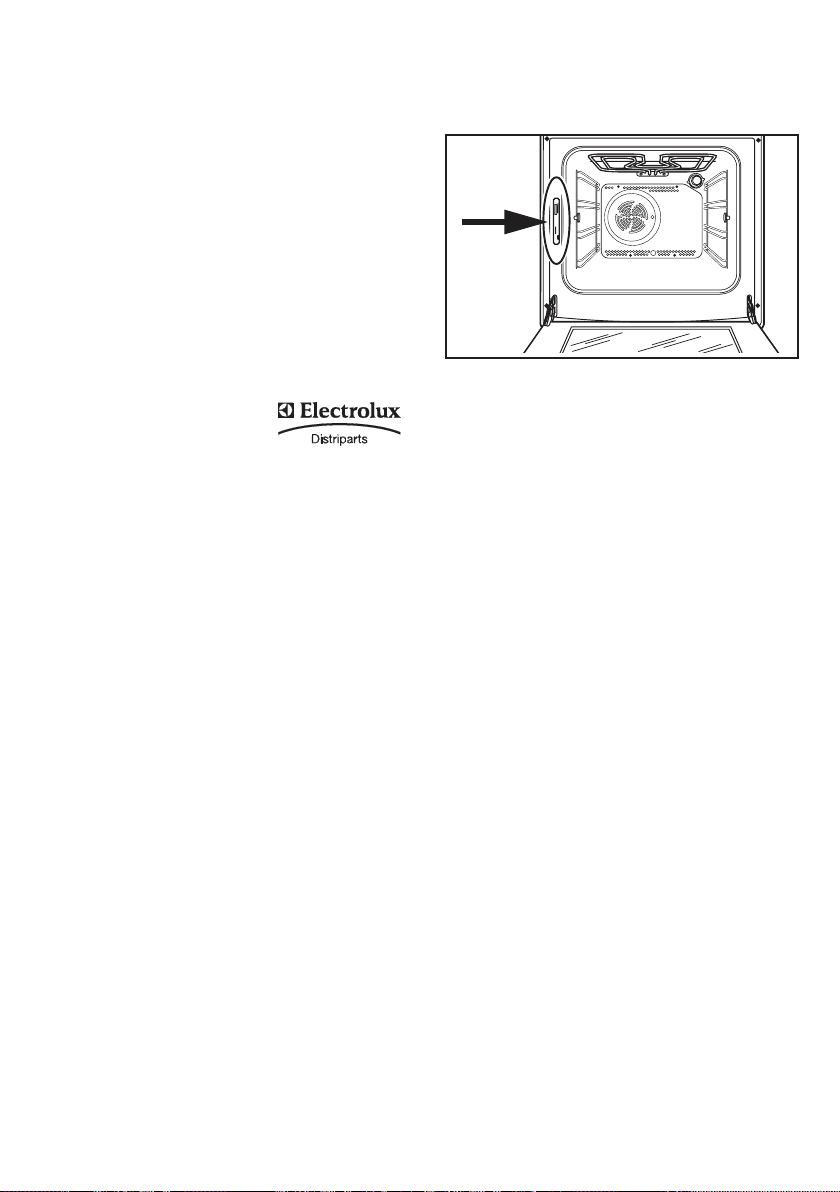
This plate is placed on the front external
edge of the oven cavity.
Original spare parts, certified by the product
manufacturer and carrying this symbol, are
only available at our
Service Centre and
authorized spare parts
shops.
European guarantee
This appliance is guaranteed by Electrolux in each of the countries listed at the back of
this user manual, for the period specified in the appliance guarantee or otherwise by law.
If you move from one of these countries to another of the countries listed below the
appliance guarantee will move with you subject to the following qualifications:
• The appliance guarantee starts from the date you first purchased the appliance which
will be evidenced by production of a valid purchase document issued by the seller of
the appliance.
• The appliance guarantee is for the same period and to the same extent for labour and
parts as exists in your new country of residence for this particular model or range of
appliances.
• The appliance guarantee is personal to the original purchaser of the appliance and
cannot be transferred to another user.
• The appliance is installed and used in accordance with instructions issued by Electrolux
and is only used within the home, i.e. is not used for commercial purposes.
• The appliance is installed in accordance with all relevant regulations in force within your
new country of residence.
The provisions of this European Guarantee do not affect any of the rights granted to you by
law.
electrolux 57
Page 27
58 electrolux
 Loading...