

Page 1

EOL5821AOX
................................................ .............................................
EN OVEN USER MANUAL 2
RO CUPTOR MANUAL DE UTILIZARE 32
Page 2

www.electrolux.com
2
CONTENTS
1. SAFETY INFORMATION . . . . . . . . . . . . . . . . . . . . . . . . . . . . . . . . . . . . . . . . . . . . . . . . . . . 3
2. SAFETY INSTRUCTIONS . . . . . . . . . . . . . . . . . . . . . . . . . . . . . . . . . . . . . . . . . . . . . . . . . . 4
3. PRODUCT DESCRIPTION . . . . . . . . . . . . . . . . . . . . . . . . . . . . . . . . . . . . . . . . . . . . . . . . . 6
4. BEFORE FIRST USE . . . . . . . . . . . . . . . . . . . . . . . . . . . . . . . . . . . . . . . . . . . . . . . . . . . . . . 6
5. CONTROL PANEL . . . . . . . . . . . . . . . . . . . . . . . . . . . . . . . . . . . . . . . . . . . . . . . . . . . . . . . 7
6. DAILY USE . . . . . . . . . . . . . . . . . . . . . . . . . . . . . . . . . . . . . . . . . . . . . . . . . . . . . . . . . . . . . 9
7. CLOCK FUNCTIONS . . . . . . . . . . . . . . . . . . . . . . . . . . . . . . . . . . . . . . . . . . . . . . . . . . . . 12
8.
AUTOMATIC PROGRAMMES . . . . . . . . . . . . . . . . . . . . . . . . . . . . . . . . . . . . . . . . . . . . . . 13
9. USING THE ACCESSORIES . . . . . . . . . . . . . . . . . . . . . . . . . . . . . . . . . . . . . . . . . . . . . . . 14
10.
ADDITIONAL FUNCTIONS . . . . . . . . . . . . . . . . . . . . . . . . . . . . . . . . . . . . . . . . . . . . . . . . 15
11. HELPFUL HINTS AND TIPS . . . . . . . . . . . . . . . . . . . . . . . . . . . . . . . . . . . . . . . . . . . . . . . 17
12.
CARE AND CLEANING . . . . . . . . . . . . . . . . . . . . . . . . . . . . . . . . . . . . . . . . . . . . . . . . . . . 26
13. WHAT TO DO IF… . . . . . . . . . . . . . . . . . . . . . . . . . . . . . . . . . . . . . . . . . . . . . . . . . . . . . . 29
14.
TECHNICAL DATA . . . . . . . . . . . . . . . . . . . . . . . . . . . . . . . . . . . . . . . . . . . . . . . . . . . . . . 30
15. INSTALLATION . . . . . . . . . . . . . . . . . . . . . . . . . . . . . . . . . . . . . . . . . . . . . . . . . . . . . . . . . 30
16. ENVIRONMENT CONCERNS . . . . . . . . . . . . . . . . . . . . . . . . . . . . . . . . . . . . . . . . . . . . . . 31
WE’RE THINKING OF YOU
Thank you for purchasing an Electrolux appliance. You’ve chosen a product that brings with it
decades of professional experience and innovation. Ingenious and stylish, it has been designed
with you in mind. So whenever you use it, you can be safe in the knowledge that you’ll get great
results every time.
Welcome to Electrolux.
Visit our website for:
Get usage advice, brochures, trouble shooter, service information:
www.electrolux.com
Register your product for better service:
www.electrolux.com/productregistration
Buy Accessories, Consumables and Original spare parts for your appliance:
www.electrolux.com/shop
CUSTOMER CARE AND SERVICE
We recommend the use of original spare parts.
When contacting Service, ensure that you have the following data available.
The information can be found on the rating plate. Model, PNC, Serial Number.
Warning / Caution-Safety information
General information and tips
Environmental information
Subject to change without notice.
Page 3

1. SAFETY INFORMATION
Before the installation and use of the appliance, carefully
read the supplied instructions. The manufacturer is not
responsible if an incorrect installation and use causes injuries and damages. Always keep the instructions with
the appliance for future reference.
1.1 Children and vulnerable people safety
WARNING!
Risk of suffocation, injury or permanent disability.
• This appliance can be used by children aged from 8
years and above and persons with reduced physical,
sensory or mental capabilities or lack of experience and
knowledge if they are supervised by an adult or a person who is responsible for their safety.
• Do not let children play with the appliance.
• Keep all packaging away from children.
• Keep children and pets away from the appliance when
it operates or when it cools down. Accessible parts are
hot.
• If the appliance has a child safety device, we recommend that you activate it.
• Cleaning and user maintenance shall not be made by
children without supervision.
ENGLISH 3
1.2 General Safety
• Internally the appliance becomes hot when in operation. Do not touch the heating elements that are in the
appliance. Always use oven gloves to remove or put in
accessories or ovenware.
• Do not use a steam cleaner to clean the appliance.
• Before maintenance cut the power supply.
Page 4

www.electrolux.com
4
• Do not use harsh abrasive cleaners or sharp metal
• Only use the core temperature sensor recommended
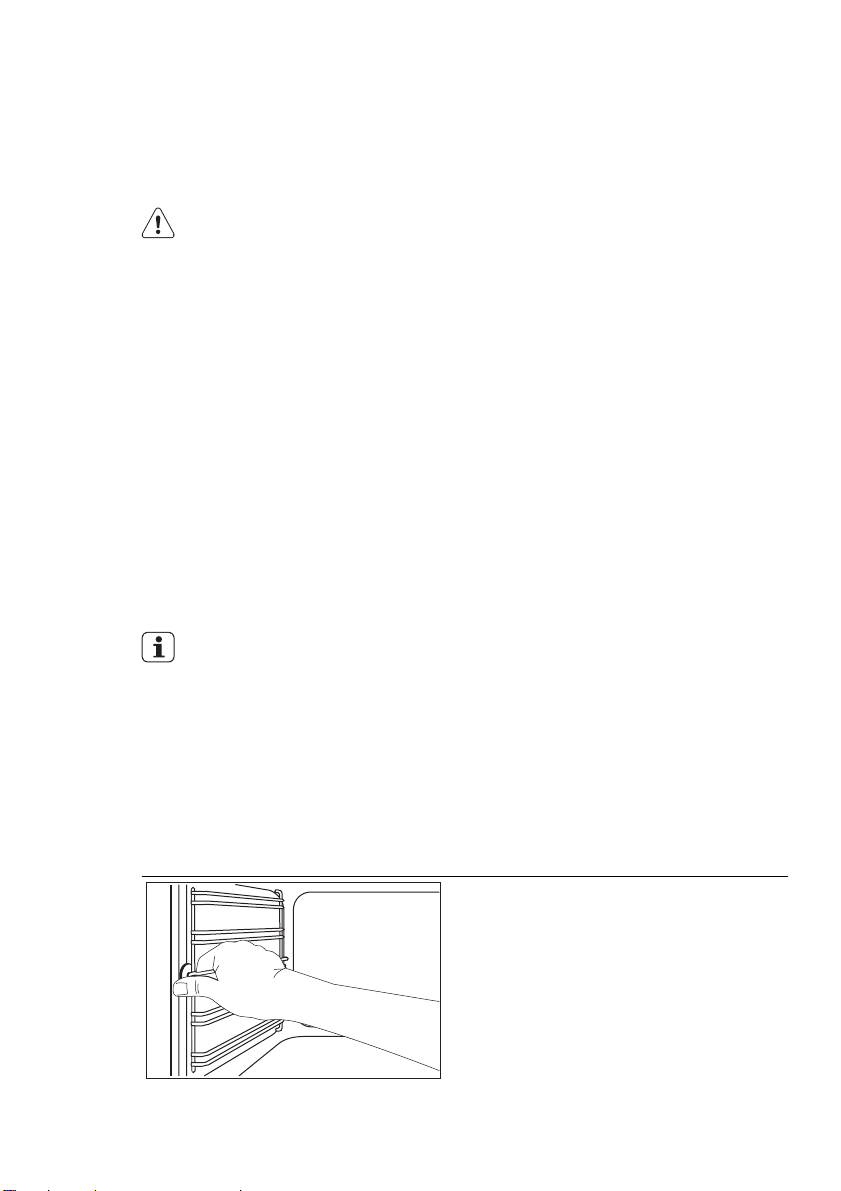
• To remove the shelf supports first pull the front of the
scrapers to clean the glass door since they can scratch
the surface, which may result in shattering of the glass.
for this appliance.
shelf support and then the rear end away from the side
walls. Install the shelf supports in the opposite sequence.
2.
SAFETY INSTRUCTIONS
2.1 Installation
WARNING!
Only a qualified person must install this appliance.
• Remove all the packaging.
• Do not install or use a damaged appli-
ance.
• Obey the installation instruction sup-
plied with the appliance.
• Always be careful when you move the
appliance because it is heavy. Always
wear safety gloves.
• Do not pull the appliance by the handle.
• Keep the minimum distance from the
other appliances and units.
• Make sure that the appliance is installed
below and adjacent safe structures.
• The sides of the appliance must stay
adjacent to appliances or to units with
the same height.
Electrical connection
WARNING!
Risk of fire and electrical shock.
• All electrical connections should be
made by a qualified electrician.
• The appliance must be earthed.
• Make sure that the electrical information
on the rating plate agrees with the power supply. If not, contact an electrician.
• Always use a correctly installed shockproof socket.
• Do not use multi-plug adapters and extension cables.
• Make sure not to cause damage to the
mains plug and to the mains cable.
Contact the Service or an electrician to
change a damaged mains cable.
• Do not let mains cables to come in
touch with the appliance door, specially
when the door is hot.
• The shock protection of live and insulated parts must be fastened in such a
way that it cannot be removed without
tools.
• Connect the mains plug to the mains
socket only at the end of the installation. Make sure that there is access to
the mains plug after the installation.
• If the mains socket is loose, do not
connect the mains plug.
• Do not pull the mains cable to disconnect the appliance. Always pull the
mains plug.
• Use only correct isolation devices: line
protecting cut-outs, fuses (screw type
fuses removed from the holder), earth
leakage trips and contactors.
• The electrical installation must have an
isolation device which lets you disconnect the appliance from the mains at all
poles. The isolation device must have a
contact opening width of minimum 3
mm.
Page 5

2.2 Use
WARNING!
Risk of injury, burns or electric
shock or explosion.
• Use this appliance in a household environment.
• Do not change the specification of this
appliance.
• Make sure that the ventilation openings
are not blocked.
• Do not let the appliance stay unattended during operation.
• Deactivate the appliance after each
use.
• Internally the appliance becomes hot
when in operation. Do not touch the
heating elements that are in the appliance. Always use oven gloves to remove or put in accessories or ovenware.
• Be careful, when you open the appliance door while the appliance is in operation. Hot air can release.
• Do not operate the appliance with wet
hands or when it has contact with water.
• Do not apply pressure on the open
door.
• Do not use the appliance as a work
surface or as a storage surface.
• Always keep the appliance door closed
when the appliance is in operation.
• Open the appliance door carefully. The
use of ingredients with alcohol can
cause a mixture of alcohol and air.
• Do not let sparks or open flames to
come in contact with the appliance
when you open the door.
• Do not put flammable products or items
that are wet with flammable products
in, near or on the appliance.
WARNING!
Risk of damage to the appliance.
ENGLISH 5
– do not put water directly into the hot
appliance.
– do not keep moist dishes and food in
the appliance after you finish the cooking.
– be careful when you remove or install
the accessories.
• Discoloration of the enamel has no effect on the performance of the appliance. It is not a defect in the sense of
the warranty law.
• Use a deep pan for moist cakes. Fruit
juices cause stains that can be permanent.
2.3 Care and Cleaning
WARNING!
Risk of injury, fire or damage to
the appliance.
• Before maintenance, deactivate the appliance and disconnect the mains plug
from the mains socket.
• Make sure the appliance is cold. There
is the risk that the glass panels can
break.
• Replace immediately the door glass
panels when they are damaged. Contact the Service.
• Be careful when you remove the door
from the appliance. The door is heavy!
• Clean regularly the appliance to prevent
the deterioration of the surface material.
• Remaining fat or food in the appliance
can cause fire.
• Clean the appliance with a moist soft
cloth. Only use neutral detergents. Do
not use abrasive products, abrasive
cleaning pads, solvents or metal objects.
• If you use an oven spray, obey the safety instructions on the packaging.
• Do not clean the catalytic enamel (if applicable) with any kind of detergent.
• To prevent damage or discoloration to
the enamel:
– Do not put ovenware or other objects
in the appliance directly on the bottom.
– Do not put aluminium foil directly on
the bottom of the appliance.
2.4 Internal light
• The type of light bulb or halogen lamp
used for this appliance, is only for
household appliances. Do not use it for
house lighting.
WARNING!
Risk of electrical shock.
Page 6

www.electrolux.com
6
• Before replacing the lamp, disconnect
the appliance from the power supply.
• Only use lamps with the same specifications.
2.5 Disposal
WARNING!
Risk of injury or suffocation.
3. PRODUCT DESCRIPTION
1
5
4
3
8
2
1
7
6
Electronic programmer
1
Socket for the core temperature sen-
2
sor
Grill
3
Oven lamp
4
• Disconnect the appliance from the
mains supply.
• Cut off the mains cable and discard it.
• Remove the door catch to prevent children and pets to get closed in the appliance.
Fan
5
Shelf support, removable
6
Rating plate
7
Shelf positions
2
3
4
5
8
3.1 Oven accessories
• Wire shelf
For cookware, cake tins, roasts.
Baking tray
•
For cakes and biscuits.
• Grill- / Roasting pan
To bake and roast or as pan to collect
fat.
Core temperature sensor
•
To measure how far the food is cooked.
Telescopic runners
•
For shelves and trays.
4. BEFORE FIRST USE
WARNING!
Refer to "Safety information"
chapter.
4.1 Initial cleaning
• Remove all accessories and removable
shelf supports (if applicable).
• Clean the appliance before first use.
Refer to the chapter "Care and
cleaning".
4.2 First connection
When you connect the appliance to the
mains, or after a power cut, you must set
the language, display contrast, display
brightness and time of day.
1.
Touch or to set the value.
2.
Touch OK to confirm.
4.3 Preheating
Preheat the empty appliance to burn off
the remaining grease.
Page 7

1.
Set the function and the maximum
temperature.
2.
Let the appliance operate for 45 minutes.
3.
Set the function and the maximum
temperature.
5. CONTROL PANEL
Electronic programmer
1 10
2 43 8 95 6 7
Use the sensor fields to operate the appliance
Number
1
2
3
4
5
6
Sensor
field
ENGLISH 7
4.
Let the appliance operate for 15 mi-
nutes.
Accessories can become hotter than usually. The appliance can emit an odour and
smoke. This is normal. Make sure that the
airflow is sufficient.
11
Function Comment
On / off To activate and deactivate the appli-
ance.
Heating Functions or Assisted Cooking
To choose a heating function or an Assisted Cooking function. To have access to the necessary function, touch
the field once or twice when the appliance is activated. To activate or deactivate the light, touch the field for 3 seconds.
Home key To go back one level in the menu. To
show the main menu, touch the field for
3 seconds.
Temperature
selection
To set the temperature or show the current temperature in the appliance. To
activate or deactivate the Fast Heat Up
function, touch the field for 3 seconds.
Favourite Programme
To save and have access to your favourite programmes.
Up key To move up in the menu.
7
Down key To move down in the menu.
Page 8

www.electrolux.com
8
Number
Sensor
field
Function Comment
Time and additional functions
8
9
10
11
Display
—
A
Minute Minder To set the Minute Minder .
OK To confirm the selection or setting.
Display Shows the current settings of the appli-
B C
DE
Other indicators in the display
Symbol Function
Minute Minder The function operates.
Time of day The display shows the time of day.
Duration The display shows the necessary time for cook-
ing.
End Time The display shows when the cooking time is
completed.
Time Indication The display shows how long a heating function
operates. Press
have the time go back to zero.
Heat-up indicator The display shows the temperature in the appli-
ance.
Fast Heat Up indicator
The function operates. This function decreases
the heat-up time.
Weight Automatic The display shows that the automatic weight
system operates or that you can change the
weight.
Heat + Hold The function operates.
To set different functions. When a heating function operates, touch the sensor
field to set the timer, Child Safety, Favourite Programme memory, Heat +
Hold or Set + Go or to change the settings of the core temperature sensor
(for selected models only).
ance.
A)
Heating function
B)
Time of day
C)
Heat-up indicator
D)
Temperature
E)
Duration and End Time functions
and at the same time to
Page 9

6. DAILY USE
ENGLISH 9
WARNING!
Refer to "Safety information"
chapter.
6.1 Navigating the menus
Operation of the menus:
1.
Activate the appliance.
6.2 The menus in overview
Main menu
Sym-
Submenus for: Basic Settings
Sym-
Menu item Application
bol
Specials Contains a list of additional heating functions.
Heating Functions Contains a list of heating functions.
Assisted Cooking
Favourite Programme
Basic Settings Contains a list of other settings.
Submenu Description
bol
Set Time of Day Sets the current time on the clock.
Time Indication
SET + GO
Heat + Hold
Extra time Activates and deactivates the function.
2.
Press or to select the menu
option.
3.
Press OK to move to submenu or ac-
cept setting.
At every point you can get back to the
main menu with
Contains a list of automatic cooking programmes.
Contains a list of favourite cooking programmes
stored by user.
When ON, the display shows the current time
when you deactivate the appliance.
When ON, you can activate the functions when
you activate the heating function.
When ON, you can activate this function when
you activate the heating function.
Display Contrast Adjusts the display contrast by degrees.
Display Brightness Adjusts the display brightness by degrees.
Set Language Sets the language for the display.
Buzzer Volume
Key Tones
Adjusts the volume of press-tones and signals
by degrees.
Activates and deactivates the tone of the touch
fields.
Page 10

www.electrolux.com
10
Sym-
Submenu Description
bol
Alarm/Error Tones Activates and deactivates the alarm tones.
Service Shows the software version and configuration.
Factory Settings Resets all settings to factory settings.
6.3 Heating functions
Submenu for: Heating Functions
Heating function Application
True Fan Cooking To bake maximum on three shelf positions at
Pizza Setting To bake food on one oven level for a more in-
Conventional Cooking To bake and roast food on one shelf position.
Slow Cook To prepare very lean and tender roasted food.
the same time. When you use this function,
decrease the oven temperature by 20 - 40 °C
from the standard temperatures you use for
Conventional Cooking . Also to dry food.
tensive browning and a crispy bottom. When
you use this function, decrease the oven temperature by 20 - 40 °C from the standard
temperatures you use for Conventional Cooking . .
Bottom Heat To bake cakes with crispy bottoms.
ECO Roasting The ECO functions let you optimize the ener-
gy consumption during cooking. It is necessary to set the cooking time first.
Frozen Foods To make convenience food such as chips,
wedges or spring rolls crispy.
Grilling To grill flat food in the middle of the grill and
to toast bread.
Fast Grilling To grill flat food in large quantities and to
toast bread.
Turbo Grilling To roast larger meat joints or poultry with
bones on one shelf position. Also to gratinate
and to brown.
Page 11

Submenu for: Specials
Heating function Application
Bread Baking To bake bread.
ENGLISH 11
Au Gratin To prepare dishes such as lasagna or pota-
Dough Proving To raise the yeast dough before baking.
Plate Warming To preheat a plate for serving.
Preserving To preserve vegetables in glasses and liquid
Drying To dry sliced fruit such as apples, plums or
Keep Warm To keep cooked food warm.
Defrost To defrost frozen food.
6.4 Activating a heating function
1.
Activate the appliance.
2. Select the Heating Functions menu.
Press OK to confirm.
3.
Set the heating function. Press OK to
confirm.
4.
Set the temperature. Press OK to
confirm.
Press once or twice to go directly to the Heating Functions
menu (when the appliance is activated).
6.5 Heat-up indicator
When you activate a heating function, the
bar on the display comes on. The bar
shows that the temperature increases.
6.6 Fast Heat Up indicator
This function decreases the heat-up time.
To activate the function, hold
onds. You will see the heat-up indicator
alternates.
for 3 sec-
to gratin. Also to gratinate and to brown.
(e.g. mixed pickles).
peaches and vegetables such as tomatoes,
zucchini or mushrooms.
6.7 Residual heat
When you deactivate the appliance, the
display shows the residual heat. You can
use the heat to keep the food warm.
6.8 Energy saving
The appliance contains features which help you save energy during everyday cooking:
• Residual heat:
– When the heating function or pro-
gramme operates, the heating elements are deactivated 10 % earlier
(the lamp and fan continue to operate). For this feature to operate, the
cooking time must be longer than 30
minutes or you must use the clock
functions ( Duration , End Time ).
– When the appliance is off, you can
use the heat to keep food warm. The
display shows the remaining temperature.
• Cooking with the lamp off - Touch
and hold
vate the lamp during cooking.
for 3 seconds to deacti-
Page 12

www.electrolux.com
12
• Eco functions - refer to " Heating
Functions ".
7. CLOCK FUNCTIONS
7.1 Clock functions
Symbol Function Description
Minute Minder
Duration
End Time
If you set the time for a clock function, the
time starts to count down after 5 seconds.
If you use the clock functions Duration
the appliance deactivates the
heating elements after 90 % of the
set time. The appliance uses the
residual heat to continue the
cooking procedure until the time
ends (3 - 20 minutes).
Setting the clock functions
1.
Set a heating function.
2.
Press again and again until the
display shows the necessary clock
function and the related symbol.
3.
Press or to set the necessary
time. Press OK to confirm.
When the time ends, an acoustic signal sounds. The appliance deactivates. The display shows a message.
4.
Press a sensor field to stop the signal.
and End Time ,
To set a countdown (max 2 h 30 min). This function
has no effect on the operation of the appliance. You
can also activate it when the appliance is off. Use
to activate the function. Press or to set the
minutes and OK to start.
To set how long the appliance has to be in operation (max. 23 h 59 min).
To set the switch-off time for a heating function
(max. 23 h 59 min).
•
With Duration
Time
heating function and the temperature first. Then you can set
the clock function. The appliance deactivates automatically.
•
You can use Duration
End Time
if you want to automatically activate and deactivate the appliance at a given time later.
• When you use the Core temperature sensor (if applicable),
the Duration
you must set the
functions do not operate.
and End
and
at the same time
and End Time
7.2 Heat + Hold
The Heat + Hold function keeps prepared
food warm at 80 °C for 30 minutes. It activates after the baking or roasting procedure ends.
• You can activate or deactivate
the function in the Basic Settings menu.
• Conditions for the function:
– The set temperature is more
than 80 °C.
– The function Duration is set.
Activating the function
1.
Activate the appliance.
Page 13

2.
Select the heating function.
3.
Set the temperature above 80 °C.
4.
Press again and again until the
display shows Heat + Hold . Press
OK to confirm.
When the function ends, an acoustic signal sounds.
The Heat + Hold function operates for 30
minutes.
The Heat + Hold function stays on if you
change the heating functions.
7.3 Extra Time
The Extra Time function makes the heating function continue after the Duration
ends.
8. AUTOMATIC PROGRAMMES
ENGLISH 13
• Applicable for all heating functions with
Duration or Weight Automatic.
• Not applicable for heating functions
with CT Sensor .
Activating the function:
1.
When the cooking time ends, an
acoustic signal sounds. Press a sensor field.
2.
The display shows the message for
Extra Time for five minutes.
3.
Press to activate (or to cancel).
4.
Set the length of the Extra Time .
Press OK to confirm.
8.1 Assisted Cooking with
Recipe Automatic
This appliance has a set of recipes you
can use. Recipes are fixed and you cannot change them.
Activating the function:
1.
Activate the appliance.
2.
Select the Assisted Cooking menu.
Press OK to confirm.
3.
Select the category and dish. Press
OK to confirm.
4.
Select Recipe Automatic . Press OK
to confirm.
When you use the Manual function, the appliance uses automatic
settings. You can change them as
with other functions.
8.2 Assisted Cooking with
Weight Automatic
This function automatically calculates the
roasting time. To use it, it is necessary to
input the food weight.
Activating the function:
1.
Activate the appliance.
2.
Select Assisted Cooking . Press OK
to confirm.
3.
Select the category and dish. Press
OK to confirm.
4.
Select the Weight Automatic . Press
OK to confirm.
5.
Touch or to set the food
weight. Press OK to confirm.
The automatic programme starts. You
can change the weight at any time. Press
or to change the weight. When
the time ends, an acoustic signal sounds.
Press a sensor field to deactivate the signal.
With some programmes turn over
the food after 30 minutes. The
display shows a reminder.
Page 14

www.electrolux.com
14
9. USING THE ACCESSORIES
WARNING!
Refer to "Safety information"
chapter.
9.1 Core temperature sensor
The core temperature sensor measures
the core temperature of the meat. When
the meat is at the set temperature, the
appliance deactivates.
There are two temperatures to be set:
• The oven temperature.
• The core temperature.
Only use the core temperature
sensor supplied with the appliance or genuine replacement
parts.
1.
Put the tip of the core temperature
sensor into the centre of the meat.
2.
Activate the appliance.
3.
Put the core temperature sensor plug
into the socket on the front of the appliance.
The display shows the core temperature sensor symbol.
4.
Press or in less than 5 seconds to set the core temperature.
5.
Set the oven function and, if necessary, the oven temperature.
The appliance calculates an approximate end time. The end time is different for different quantities of food, the
set oven temperature (minimum 120
°C) and the operating mode. The appliance calculates the end time in approximately 30 minutes.
6.
Make sure that the core temperature
sensor stays in the meat and in the
core temperature sensor socket during the cooking.
7.
If necessary, you can set a new core
temperature during the cooking. To
do this, touch
8.
When the meat is at the set core temperature, an acoustic signal sounds.
The appliance deactivates automatically.
Touch a sensor field to stop the signal.
9.
Remove the core temperature sensor
plug from the socket . Remove the
meat from the appliance.
WARNING!
The core temperature sensor is
hot. There is a risk of burns. Be
careful when you remove the tip
and plug of the core temperature
sensor.
.
Page 15

9.2 Telescopic runners
°C
°C
ENGLISH 15
1.
Pull out the right and left hand telescopic runners.
2.
Put the wire shelf on the telescopic
runners and carefully push them into
the appliance.
Make sure you push back the tele-
scopic runners fully in the appliance
before you close the oven door.
Keep the installation instructions
for the telescopic runners for future use.
With telescopic runners you can put in
and remove the shelves more easily.
10. ADDITIONAL FUNCTIONS
10.1 Favourite Programme
menu
You can save your favourite settings, like
duration, temperature or heating function.
They are available in the Favourite Programme menu. You can save 20 programmes.
Saving a programme
1.
Activate the appliance.
CAUTION!
Do not clean the telescopic runners in the dishwasher. Do not lubricate the telescopic runners.
2.
Set a heating function or an Assisted
Cooking function.
3.
Touch again and again until the
display shows SAVE . Press OK to
confirm.
4.
The display shows the first free memory position.
Press OK to confirm.
5.
Enter the name of the programme.
The first letter flashes.
Page 16

www.electrolux.com
16
6.
7.
• You can overwrite a memory position.
• You can change the name of a pro-
Activating the programme
1.
2.
3.
Press
directly.
10.2 Function Lock
The Function Lock prevents an accidental
change of the heating function. You can
activate the Function Lock only when the
appliance operates.
Activating the Function Lock :
1.
2.
3.
4.
5.
Deactivating the Function Lock :
1.
2.
Touch or to change the letter.
Press OK.
Touch or to move the cursor
to the right or to the left. Press OK.
The next letter flashes. Do steps 5
and 6 again as necessary.
Press and hold OK to save.
Useful information:
When the display shows the first free
memory position, touch
or and
press OK to overwrite an existing programme.
gramme in the menu Edit Programme
Name .
Activate the appliance.
Select the Favourite Programme
menu. Press OK to confirm.
Select your favourite programme
name. Press OK to confirm.
to go to Favourite Programme
Activate the appliance.
Set a heating function or setting.
Press again and again until the
display shows Function Lock.
Press OK to confirm.
The door locks and the symbol of a
key comes on in the display.
If the appliance has the Pyrolytic
cleaning function and the function
operates, the door is locked.
Press . The display shows a message.
Press and then OK to confirm.
10.3 Child Lock
The Child Lock prevents an accidental
operation of the appliance .
Activating and deactivating the Child
Lock function:
1.
Activate the appliance.
2.
Touch and at the same time
until the display shows a message.
If the appliance has the Pyrolytic
cleaning function and the function
operates, the door is locked.
A message comes on in the display when you touch a sensor
field.
To unlock the appliance, touch
and
at the same time again until the display
shows a message.
10.4 SET + GO
The SET + GO function lets you set a
heating function (or programme) and use
it later with one press of the sensor field.
Activating the function:
1.
Activate the appliance.
2.
Set the heating function.
3.
Press again and again until the
display shows Duration .
4.
Set the time.
5.
Press again and again until the
display shows SET + GO .
6.
Press OK to confirm.
To start SET + GO , press any sensor field
(except for
). The set heating function
starts.
When the heating function ends, an
acoustic signal sounds.
Useful information:
• When the heating function operates,
the Function Lock is on.
• You can activate and deactivate the
SET + GO function in the Basic Settings menu.
10.5 Automatic switch-off
For safety reasons the appliance deactivates after some time:
Page 17

• If an oven function operates.
• If you do not change the oven temperature.
Oven tempera-
Switch-off time
ture
30 °C - 120 °C 12.5 h
120 °C - 200 °C 8.5 h
200 °C - 250 °C 5.5 h
250 °C - maxi-
3.0 h
mum °C
The automatic switch-off works
with all functions, except Light ,
Duration and End Time .
10.6 Cooling fan
When the appliance operates, the cooling
fan activates automatically to keep the
11. HELPFUL HINTS AND TIPS
ENGLISH 17
surfaces of the appliance cool. If you deactivate the appliance, the cooling fan
continues to operate until the temperature
in the appliance cools down.
10.7 Safety thermostat
Incorrect operation of the appliance or defective components can cause dangerous
overheating. To prevent this, the oven has
a safety thermostat which interrupts the
power supply. The oven activates again
automatically when the temperature
drops.
11.1 Inner side of the door
In some models, on the inner side of
the door you can find:
• The numbers of the shelf positions.
• Information about the heating functions,
recommended shelf positions and temperatures for typical dishes.
The temperature and baking times
in the tables are guidelines only.
They depend on the recipes and
the quality and quantity of the ingredients used.
• The appliance has five shelf levels.
Count the shelf levels from the bottom
of the appliance floor.
• The appliance has a special system
which circulates the air and constantly
recycles the steam. With this system
you can cook in a steamy environment
and keep the food soft inside and crusty outside. It decreases the cooking
time and energy consumption to a minimum.
• Moisture can condense in the appliance
or on the door glass panels. This is normal. Always stand back from the appli-
ance when you open the appliance
door while cooking. To decrease the
condensation, operate the appliance for
10 minutes before cooking.
• Clean the moisture after each use of
the appliance.
• Do not put the objects directly on the
appliance floor and do not put aluminium foil on the components when you
cook. This can change the baking results and cause damage to the enamel.
11.2 Baking cakes
• Do not open the oven door before 3/4
of the set cooking time is up.
• If you use two baking trays at the same
time, keep one empty level between
them.
11.3 Cooking meat and fish
• Use a deep pan for very fatty food to
prevent the oven from stains that can
be permanent.
• Leave the meat for approximately 15
minutes before carving so that the juice
does not seep out.
Page 18

www.electrolux.com
18
• To prevent too much smoke in the oven
11.4 Cooking times
Cooking times depend on the type of
food, its consistency, and volume.
11.5 Baking and roasting table
CAKES
Whisked
recipes
Shortbread
dough
Buttermilk
cheesecake
Apple cake
(Apple pie)
Strudel 3 175 2 150 60 - 80 In a baking
Jam-tart 2 170 2 (left and
Sponge
cake
Christmas
cake / Rich
fruit cake
Plum cake 1 175 2 160 50 - 60 In a bread
Small cakes
- one level
Small cakes
- two levels
Small cakes
- three levels
during roasting, add some water into
the deep pan. To prevent the smoke
condensation, add water each time after it dries up.
Conventional
TYPE OF
DISH
Cooking
Shelf po-
sition
Temp
[°C]
2 170 3 (1 and 4) 160 45 - 60 In a cake
2 170 3 (1 and 4) 160 20 - 30 In a cake
1 170 2 165 60 - 80 In a 26 cm
2 170 1 (left and
2 170 2 160 50 - 60 In a 26 cm
2 160 1 or 2 140
3 170 3 150 -
- - 2 and 4 150 -
- - 1, 3 and 5 150 -
Initially, monitor the performance when
you cook. Find the best settings (heat setting, cooking time, etc.) for your cookware, recipes and quantities when you
use this appliance.
True Fan Cook-
ing
Shelf po-
sition
Tem
p
[°C]
Cooking
time
[min]
160 80 - 100 In two 20
right)
165 30 - 40 In a 26 cm
right)
90 - 120 In a 20 cm
–
150
20 - 30 In a baking
160
25 - 35 In a baking
160
30 - 45 In a baking
160
Notes
mould
mould
cake mould
cm cake
moulds on a
wire shelf
1)
tray
cake mould
cake mould
cake
1)
mould
1)
tin
tray
tray
tray
Page 19

ENGLISH 19
TYPE OF
DISH
Biscuits /
pastry
Conventional
Cooking
Shelf po-
Temp
sition
3 140 3 140 -
[°C]
True Fan Cook-
ing
Shelf po-
sition
Tem
p
[°C]
150
Cooking
time
Notes
[min]
30 - 35 In a baking
tray
stripes - one
level
Biscuits /
pastry
- - 2 and 4 140 150
35 - 40 In a baking
tray
stripes - two
levels
Biscuits /
pastry
- - 1, 3 and 5 140 150
35 - 45 In a baking
tray
stripes three levels
Meringues one level
Meringuestwo levels
Buns 3 170 –
Eclairs - one
level
Eclairs - two
levels
3 120 3 120 80 - 100 In a baking
tray
- - 2 and 4 120 80 - 100 In a baking
1)
tray
3 190 12 - 20 In a baking
190
tray
1)
3 190 3 170 25 - 35 In a baking
tray
- - 2 and 4 170 35 - 45 In a baking
tray
Plate tarts 2 180 2 170 45 - 70 In a 20 cm
cake mould
Rich fruit
cake
Victoria
sandwich
1)
Preheat for 10 minutes.
1 160 2 150 110 - 120 In a 24 cm
cake mould
1 170 2 (left and
right)
160 50 - 60 In a 20 cm
cake mould
BREAD AND PIZZA
TYPE OF
DISH
Conventional
Cooking
Shelf po-
sition
Temp
[°C]
True Fan Cook-
ing
Shelf po-
sition
Tem
p
[°C]
Cooking
time
[min]
Notes
White bread 1 190 1 190 60 - 70 1 - 2 pieces,
500 gr per
1)
piece
Rye bread 1 190 1 180 30 - 45 In a bread tin
Page 20

www.electrolux.com
20
TYPE OF
DISH
Conventional
Cooking
Shelf po-
sition
Temp
[°C]
True Fan Cook-
ing
Shelf po-
sition
Tem
p
[°C]
Cooking
time
[min]
Notes
Bread rolls 2 190 2 (2 and 4) 180 25 - 40 6 - 8 rolls in
a baking
1)
tray
Pizza 1 200 -
210
1 200 -
210
10 - 20 In a baking
tray or a
deep pan
Scones 3 200 3 190 10 - 20 In a baking
1)
tray
1)
Preheat for 10 minutes.
FLANS
TYPE OF
DISH
Conventional
Cooking
Shelf po-
sition
Tem
True Fan Cook-
Shelf po-
p
[°C]
sition
ing
Tem
p
[°C]
Cooking
time
[min]
Notes
Pasta flan 2 200 2 180 40 - 50 In a mould
Vegetable
2 200 2 175 45 - 60 In a mould
flan
Quiches 1 180 1 180 50 - 60
Lasagne 2 180 -
190
Cannelloni 2 180 -
190
1)
Preheat for 10 minutes.
2 180 -
190
2 180 -
190
25 - 40
25 - 40
In a mould
In a mould
In a mould
1)
1)
1)
1)
MEAT
TYPE OF
DISH
Conventional
Cooking
Shelf po-
sition
Tem
p
[°C]
True Fan Cook-
ing
Shelf po-
sition
Tem
p
[°C]
Cooking
time [min]
Notes
Beef 2 200 2 190 50 - 70 On a wire
shelf
Pork 2 180 2 180 90 - 120 On a wire
shelf
Veal 2 190 2 175 90 - 120 On a wire
shelf
Page 21

ENGLISH 21
TYPE OF
DISH
English roast
beef, rare
English roast
beef, medi-
Conventional
Cooking
Shelf po-
Tem
sition
2 210 2 200 50 - 60 On a wire
2 210 2 200 60 - 70 On a wire
p
[°C]
True Fan Cook-
ing
Shelf po-
sition
Tem
p
[°C]
Cooking
time [min]
Notes
shelf
shelf
um
English roast
beef, well
2 210 2 200 70 - 75 On a wire
shelf
done
Shoulder of
2 180 2 170 120 - 150 With rind
pork
Shin of pork 2 180 2 160 100 - 120 2 pieces
Lamb 2 190 2 175 110 - 130 Leg
Chicken 2 220 2 200 70 - 85 Whole
Turkey 2 180 2 160 210 - 240 Whole
Duck 2 175 2 220 120 - 150 Whole
Goose 2 175 1 160 150 - 200 Whole
Rabbit 2 190 2 175 60 - 80 Cut in pieces
Hare 2 190 2 175 150 - 200 Cut in pieces
Pheasant 2 190 2 175 90 - 120 Whole
FISH
TYPE OF
DISH
Trout / Sea
Conventional
Cooking
Shelf po-
Tem
sition
2 190 2 175 40 - 55 3 - 4 fish
p
[°C]
Shelf po-
True Fan Cook-
ing
Tem
sition
p
[°C]
Cooking
time [min]
Notes
bream
Tuna fish /
2 190 2 175 35 - 60 4 - 6 fillets
Salmon
11.6 Grilling
Preheat the empty oven for 10 minutes, before cooking.
Quantity Grilling Cooking time [min]
TYPE OF DISH Pieces [g] Shelf po-
sition
Fillet steaks 4 800 4 max. 12 - 15 12 - 14
Temp
[°C]
1st side 2nd side
Page 22

www.electrolux.com
22
TYPE OF DISH Pieces [g] Shelf po-
Beef steaks 4 600 4 max. 10 - 12 6 - 8
Sausages 8 - 4 max. 12 - 15 10 - 12
Pork chops 4 600 4 max. 12 - 16 12 - 14
Chicken (cut in
2)
Kebabs 4 - 4 max. 10 - 15 10 - 12
Breast of chicken
Hamburger 6 600 4 max. 20 - 30 -
Fish fillet 4 400 4 max. 12 - 14 10 - 12
Toasted sandwiches
Toast 4 - 6 - 4 max. 2 - 4 2 - 3
11.7 Turbo Grilling
Beef
Roast beef or fillet, rare
Roast beef or fillet, medium
Roast beef or fillet, well done
1)
Quantity Grilling Cooking time [min]
sition
Temp
[°C]
1st side 2nd side
2 1000 4 max. 30 - 35 25 - 30
4 400 4 max. 12 - 15 12 - 14
4 - 6 - 4 max. 5 - 7 -
TYPE OF DISH Quantity
per cm of
thickness
per cm of
thickness
per cm of
thickness
Preheat the oven.
Shelf posi-
tion
1
1
1
Tempera-
ture [°C]
190 - 200
180 - 190
170 - 180
1)
1)
1)
Time [min]
5 - 6
6 - 8
8 - 10
Pork
TYPE OF DISH Quantity
Shoulder, neck,
ham joint
1 - 1.5 kg 1 160 - 180 90 - 120
Shelf posi-
tion
Tempera-
ture [°C]
Time [min]
Chop, spare rib 1 - 1.5 kg 1 170 - 180 60 - 90
Meat loaf 750 g - 1 kg 1 160 - 170 50 - 60
Pork knuckle
(precooked)
750 g - 1 kg 1 150 - 170 90 - 120
Page 23

ENGLISH 23
Veal
TYPE OF
DISH
Quantity Shelf posi-
tion
Temperature
[°C]
Time [min]
Roast veal 1 kg 1 160 - 180 90 - 120
Knuckle of
1.5 - 2 kg 1 160 - 180 120 - 150
veal
Lamb
TYPE OF
DISH
Leg of lamb,
Quantity Shelf posi-
tion
Temperature
[°C]
Time [min]
1 - 1.5 kg 1 150 - 170 100 - 120
roast lamb
Saddle of
1 - 1.5 kg 1 160 - 180 40 - 60
lamb
Poultry
TYPE OF
DISH
Poultry portions
Chicken , half 400 - 500 g
Quantity Shelf posi-
tion
200 - 250 g
1 200 - 220 30 - 50
each
1 190 - 210 35 - 50
Temperature
[°C]
Time [min]
each
Chicken, pou-
1 - 1.5 kg 1 190 - 210 50 - 70
lard
Duck 1.5 - 2 kg 1 180 - 200 80 - 100
Goose 3.5 - 5 kg 1 160 - 180 120 - 180
Turkey 2.5 - 3.5 kg 1 160 - 180 120 - 150
Turkey 4 - 6 kg 1 140 - 160 150 - 240
Fish (steamed)
TYPE OF
DISH
Quantity Shelf posi-
tion
Temperature
[°C]
Time [min]
Whole fish 1 - 1.5 kg 1 210 - 220 40 - 60
11.8 Defrosting
TYPE OF
DISH
[g]
Defrosting
time [min]
Chicken 1000 100 - 140 20 - 30
Further de-
frosting time
[min]
Notes
Place the chicken on
an upturned saucer
placed on a large
plate. Turn halfway
through.
Page 24

www.electrolux.com
24
TYPE OF
DISH
[g]
Defrosting
time [min]
Further de-
frosting time
[min]
Notes
Meat 1000 100 - 140 20 - 30 Turn halfway through.
Meat 500 90 - 120 20 - 30 Turn halfway through.
Trout 150 25 - 35 10 - 15 -
Strawberries 300 30 - 40 10 - 20 -
Butter 250 30 - 40 10 - 15 -
Cream can also be
Cream 2 x 200 80 - 100 10 - 15
whipped when still
slightly frozen in pla-
ces.
Gateau 1400 60 60 -
11.9 Preserving
Soft fruit
PRESERVE
Strawberries, blueberries, raspberries, ripe gooseberries
Temperature
[°C]
Cooking time
until simmering
[min]
160 – 170 35 – 45 –
Further cooking
time at 100 °C
[min]
Stone fruit
PRESERVE
Pears, quinces,
plums
Temperature
[°C]
Cooking time
until simmering
[min]
160 – 170 35 – 45 10 – 15
Further cooking
time at 100 °C
[min]
Vegetables
PRESERVE
Carrots
Temperature
[°C]
1)
160 – 170 50 – 60 5 – 10
Cooking time
until simmering
[min]
Further cooking
time at 100 °C
[min]
Cucumbers 160 – 170 50 – 60 –
Mixed pickles 160 – 170 50 – 60 5 – 10
Kohlrabi, peas, asparagus
1)
After you deactivate the appliance, leave the preserve in the oven.
160 – 170 50 – 60 15 – 20
Page 25

ENGLISH 25
11.10 Drying
Cover the oven shelves with baking
parchment.
VEGETABLES
TYPE OF
DISH
Beans 3 1/4 60 - 70 6 - 8
Peppers 3 1/4 60 - 70 5 - 6
Vegetables for
soup
Mushrooms 3 1/4 50 - 60 6 - 8
Herbs 3 1/4 40 - 50 2 - 3
FRUIT
TYPE OF
DISH
Plums 3 1/4 60 - 70 8 - 10
Apricots 3 1/4 60 - 70 8 - 10
Apple slices 3 1/4 60 - 70 6 - 8
Pears 3 1/4 60 - 70 6 - 9
Shelf position
1 level 2 levels
3 1/4 60 - 70 5 - 6
Shelf position
1 level 2 levels
Temperature
[°C]
Temperature
[°C]
Time [hr]
Time [hr]
11.11 Core temperature sensor table
TYPE OF DISH Core temperature [°C]
Roast veal 75 - 80
Veal knuckle 85 - 90
English roast beef, rare 45 - 50
English roast beef, medium 60 - 65
English roast beef, well done 70 - 75
Shoulder of pork 80 - 82
Shin of pork 75 - 80
Lamb 70 - 75
Chicken 98
Hare 70 - 75
Trout / Sea bream 65 - 70
Tuna fish / Salmon 65 - 70
Information on acrylamides
Important! According to the newest
scientific knowledge, if you brown food
(specially the one which contains starch),
acrylamides can pose a health risk. Thus,
we recommend that you cook at the
Page 26
www.electrolux.com
26
lowest temperatures and do not brown
food too much.
12. CARE AND CLEANING
WARNING!
Refer to "Safety information"
chapter.
• Clean the front of the appliance with a
soft cloth with warm water and a cleaning agent.
• To clean metal surfaces use a usual
cleaning agent.
• Clean the oven interior after each use.
Then you can remove dirt more easily
and it does not burn on.
• Clean stubborn dirt with a special oven
cleaner.
• Clean all oven accessories after each
use and let them dry. Use a soft cloth
with warm water and a cleaning agent.
• If you have nonstick accessories, do
not clean them using aggressive
agents, sharp-edged objects or a dishwasher. It can destroy nonstick coating.
Stainless steel or aluminium
appliances:
Clean the oven door with a wet
sponge only. Dry it with a soft
cloth.
Do not use steel wool, acids or
abrasive materials, as they can
cause damage to the oven surface. Clean the oven control panel
with the same precautions.
12.1 Cleaning the door gasket
• Regularly do a check of the door gasket. The door gasket is around the
frame of the oven cavity. Do not use the
appliance if the door gasket is damaged. Contact the Service Centre.
• To clean the door gasket, refer to the
general information about cleaning.
12.2 Shelf supports
You can remove the shelf supports to
clean the side walls.
Removing the shelf supports
1.
Pull the front of the shelf support away
from the side wall.
Page 27

ENGLISH 27
2.
Pull the rear end of the shelf support
away from the side wall and remove
it.
1
2
Installing the shelf supports
Install the shelf supports in the opposite
sequence.
The rounded ends of the shelf
supports must point to the front.
12.3 Oven lamp
WARNING!
Be careful when you change the
oven lamp. There is a risk of electrical shock.
Before you change the oven lamp:
• Deactivate the oven.
• Remove the fuses in the fuse box or
deactivate the circuit breaker.
Put a cloth on the bottom of the
oven to prevent damage to the
oven light and glass cover.
Always hold the halogen lamp
with a cloth to prevent grease residue from burning on the lamp.
1.
Turn the glass cover counterclockwise to remove it.
2.
Clean the glass cover.
3.
Replace the oven light bulb with an
applicable 300 °C heat-resistant oven
light bulb.
Use the same oven lamp type.
4.
Install the glass cover.
12.4 Oven ceiling
You can remove the grill to clean the oven
ceiling more easily.
WARNING!
Deactivate the appliance before
you remove the grill. Make sure
that the appliance is cold. There is
a risk of burns.
1.
Remove the screw which holds the
grill. For the first time, use a screwdriver.
2.
Carefully pull the grill down.
3.
Clean the oven ceiling with a soft
cloth with warm water and a cleaning
agent, and let it dry.
4.
Install the grill in the opposite sequence.
WARNING!
Make sure that the grill is correctly
installed and that it does not fall
down.
12.5 Cleaning the oven door
The oven door has three panels of glass
installed one behind the other. You can
remove the oven door and the internal
glass panels to clean them.
CAUTION!
Do not use the appliance without
the glass panels.
Page 28

www.electrolux.com
28
Removing the oven door and the glass panels
The direction in which you open
the door depends on your oven
model. You open the door from
the right side in some models and
from the left side in others.
A
B
1.
Press the buttons at the sides of the
door trim (A) on the upper cover and
pull it upwards to remove it.
2.
Hold the inner glass B tightly with
both hands and slide it upwards to
remove it from its initial position. Do
the same with the second glass panel.
CAUTION!
Make sure that you tightly hold the
glasses to prevent them from falling.
Clean the door with a wet sponge and rub
it dry with a soft cloth. Do not use steel
wool, acids or abrasive cleaning agents
because they can damage the surface.
When the oven door is clean, install the
glass panels in the opposite sequence.
The middle glass panel has a small dot on
the top and the second one has screen
printings. Make sure that you put the middle glass panel in the correct seats.
The screen-printing zone must face the
inner side of the door. Make sure that after the installation the surface of the glass
panel frame is not rough when you touch
it.
Page 29
13. WHAT TO DO IF…
WARNING!
Refer to "Safety information"
chapter.
Problem Possible cause Remedy
The appliance does
not heat up.
The appliance does
not heat up.
The appliance does
not heat up.
The appliance does
not heat up.
The appliance does
not heat up.
The display shows
F111.
The lamp does not
operate.
The display shows
“Demo”. The appliance does not heat
up. The fan does
not operate.
If you cannot find a solution to the problem yourself, contact your dealer or the
service centre.
We recommend that you write the data here:
Model (MOD.) .........................................
Product number (PNC) .........................................
Serial number (S.N.) .........................................
ENGLISH 29
The appliance is deactiva-
Activate the appliance.
ted.
The clock is not set. Set the clock.
The necessary settings are
not set.
Make sure that the settings
are correct.
The Child Lock is activated. Refer to "Deactivating the
Child Lock".
The fuse is released. Make sure that the fuse is
the cause of the malfunction. If the fuse releases
again and again, contact an
authorized electrician.
The CT Sensor plug is not
correctly installed into the
socket.
Put the plug of core temperature sensor as far as possible into the socket.
The lamp is defective. Replace the lamp.
The test mode is activated.
1.
Deactivate the appliance.
2.
Touch and hold until
the appliance activates
and deactivates.
3.
Touch and hold and
at the same time until an acoustic signal
sounds and “d” goes
out.
The necessary data for the service centre
is on the rating plate. The rating plate is
on the front frame of the appliance cavity.
Page 30

www.electrolux.com
30
14. TECHNICAL DATA
Voltage 230 V
Frequency 50 Hz
15. INSTALLATION
WARNING!
Refer to "Safety information"
chapter.
15.1 Building In
558
573
min. 550
20
590
min. 560
min. 550
20
600
548
20
589
15.2 Securing the appliance to
min. 560
the cabinet
1.
Open the appliance door.
2.
594
5
Fasten the appliance to the cabinet.
Put the four distance holders (A) into
the holes in the frame and then tighten the four screws (B) supplied with
the appliance.
AB
15.3 Electrical installation
WARNING!
Only a qualified person must do
the electrical installation.
Page 31
The manufacturer is not responsible if you do not follow the safety
precautions from the chapter
"Safety Information".
This appliance is supplied with a main
plug and a main cable.
ENGLISH 31
Total power
Section of the ca-
ble
maximum 1380W3 x 0.75 mm²
maximum 2300W3 x 1 mm²
15.4 Cable
Cable types applicable for installation or
replacement: H07 RN-F, H05 RN-F, H05
RRF, H05 VV-F, H05 V2V2-F (T90), H05
BB-F.
For the section of the cable refer to the
total power (on the rating plate) and to the
table:
16. ENVIRONMENT CONCERNS
Recycle the materials with the symbol
. Put the packaging in applicable
containers to recycle it.
Help protect the environment and human
health and to recycle waste of electrical
maximum 3680W3 x 1.5 mm²
The hearth cord (green / yellow cable)
must be 2 cm longer than phase and neutral cables (blue and brown cables).
and electronic appliances. Do not dispose
appliances marked with the symbol
with the household waste. Return the
product to your local recycling facility or
contact your municipal office.
Page 32

www.electrolux.com
32
CUPRINS
1. INFORMAŢII PRIVIND SIGURANŢA . . . . . . . . . . . . . . . . . . . . . . . . . . . . . . . . . . . . . . . . . . . . . . . . . . . . . . 33
2. INSTRUCŢIUNI PRIVIND SIGURANŢA . . . . . . . . . . . . . . . . . . . . . . . . . . . . . . . . . . . . . . . . . . . . . . . . . . . . 34
3. DESCRIEREA PRODUSULUI . . . . . . . . . . . . . . . . . . . . . . . . . . . . . . . . . . . . . . . . . . . . . . . . . . . . . . . . . . . 36
4. ÎNAINTE DE PRIMA UTILIZARE . . . . . . . . . . . . . . . . . . . . . . . . . . . . . . . . . . . . . . . . . . . . . . . . . . . . . . . . . 36
5. PANOUL DE COMANDĂ . . . . . . . . . . . . . . . . . . . . . . . . . . . . . . . . . . . . . . . . . . . . . . . . . . . . . . . . . . . . . . . 37
6. UTILIZAREA ZILNICĂ . . . . . . . . . . . . . . . . . . . . . . . . . . . . . . . . . . . . . . . . . . . . . . . . . . . . . . . . . . . . . . . . . 38
7. FUNCŢIILE CEASULUI . . . . . . . . . . . . . . . . . . . . . . . . . . . . . . . . . . . . . . . . . . . . . . . . . . . . . . . . . . . . . . . . 41
8. PROGRAME AUTOMATE . . . . . . . . . . . . . . . . . . . . . . . . . . . . . . . . . . . . . . . . . . . . . . . . . . . . . . . . . . . . . . 43
9. UTILIZAREA ACCESORIILOR . . . . . . . . . . . . . . . . . . . . . . . . . . . . . . . . . . . . . . . . . . . . . . . . . . . . . . . . . . . 43
10. FUNCŢII SUPLIMENTARE . . . . . . . . . . . . . . . . . . . . . . . . . . . . . . . . . . . . . . . . . . . . . . . . . . . . . . . . . . . . . . 45
11. SFATURI UTILE . . . . . . . . . . . . . . . . . . . . . . . . . . . . . . . . . . . . . . . . . . . . . . . . . . . . . . . . . . . . . . . . . . . . . . 46
12. ÎNGRIJIREA ŞI CURĂŢAREA . . . . . . . . . . . . . . . . . . . . . . . . . . . . . . . . . . . . . . . . . . . . . . . . . . . . . . . . . . . 55
13. CE TREBUIE FĂCUT DACĂ... . . . . . . . . . . . . . . . . . . . . . . . . . . . . . . . . . . . . . . . . . . . . . . . . . . . . . . . . . . . 58
14. DATE TEHNICE . . . . . . . . . . . . . . . . . . . . . . . . . . . . . . . . . . . . . . . . . . . . . . . . . . . . . . . . . . . . . . . . . . . . . . 58
15. INSTALAREA . . . . . . . . . . . . . . . . . . . . . . . . . . . . . . . . . . . . . . . . . . . . . . . . . . . . . . . . . . . . . . . . . . . . . . . . 59
16. PROTEJAREA MEDIULUI ÎNCONJURĂTOR . . . . . . . . . . . . . . . . . . . . . . . . . . . . . . . . . . . . . . . . . . . . . . . 60
NE GÂNDIM LA DUMNEAVOASTRĂ
Vă mulţumim că aţi achiziţionat un aparat Electrolux. Aţi ales un produs care include decenii de experienţă
profesională şi de inovaţie. Ingenios şi stilat, a fost conceput special pentru dumneavoastră. Pentru ca oricând îl
utilizați puteţi fi sigur de aceleaşi rezultate extraordinare.
Bine aţi venit la Electrolux.
Vizitaţi website-ul la:
Aici găsiţi sfaturi privind utilizarea, broşuri, informaţii care vă ajută la rezolvarea unor probleme apărute
şi informaţii despre service:
www.electrolux.com
Înregistraţi-vă produsul pentru a beneficia de servicii mai bune:
www.electrolux.com/productregistration
Cumpăraţi accesorii, consumabile şi piese de schimb originale pentru aparatul dvs.:
www.electrolux.com/shop
SERVICIUL DE RELAŢII CU CLIENŢII ŞI SERVICE
Vă recomandăm utilizarea pieselor de schimb originale.
Atunci când contactaţi unitatea de Service, asiguraţi-vă că aveţi disponibile următoarele informaţii.
Informaţiile pot fi găsite pe plăcuţa cu datele tehnice. Model, PNC, Număr de serie.
Avertisment / Atenţie-Informaţii privind siguranţa.
Informaţii şi recomandări generale
Informaţii cu privire la mediul înconjurător
Ne rezervãm dreptul asupra efectuãrii de modificãri.
Page 33

1. INFORMAŢII PRIVIND SIGURANŢA
Înainte de instalarea şi de utilizarea aparatului, citiţi cu atenţie in‐
strucţiunile furnizate. Producătorul nu este responsabil dacă insta‐
larea şi utilizarea incorectă a aparatului provoacă răniri şi daune.
Păstraţi întotdeauna instrucţiunile împreună cu aparatul pentru
consultare ulterioară.
1.1 Siguranţa copiilor şi a persoanelor vulnerabile
AVERTIZARE
Risc de sufocare, de rănire sau de provocare a unei incapa‐
cităţi funcţionale permanente.
• Acest aparat poate fi utilizat de copiii cu vârsta mai mare de 8
ani, de persoanele cu capacităţi fizice, senzoriale sau mentale
reduse sau de persoanele fără cunoştinţe sau experienţă dacă
sunt supravegheate de o persoană responsabilă pentru siguran‐
ţa lor.
• Nu lăsaţi copiii să se joace cu aparatul.
• Nu lăsaţi la îndemâna copiilor ambalajul produsului.
• Nu lăsaţi copiii şi animalele să se apropie de aparat atunci când
acesta este în funcţiune sau când se răceşte. Componentele ac‐
cesibile sunt fierbinţi.
• Dacă aparatul are un dispozitiv de siguranţă pentru copii, vă re‐
comandăm să-l activaţi.
• Curăţarea şi întreţinerea curentă nu trebuie efectuate de copii
nesupravegheaţi.
ROMÂNA 33
1.2 Aspecte generale privind siguranţa
• Aparatul devine fierbinte în interior pe durata funcţionării. Nu
atingeţi elementele de încălzire care sunt în aparat. Folosiţi în‐
totdeauna mănuşi de protecţie pentru a scoate sau a pune în in‐
terior accesorii sau vase.
• Nu folosiţi un aparat de curăţat cu abur pentru a curăţa aparatul.
• Întrerupeţi alimentarea cu electricitate înainte de a efectua ope‐
raţiile de întreţinere.
Page 34

www.electrolux.com
34
• Nu folosiţi substanţe abrazive dure sau răzuitoare ascuţite de
• Utilizaţi senzorul recomandat pentru acest aparat.
• Pentru a scoate suporturile pentru raft trebuie să trageţi mai întâi
metal pentru a curăţa sticla uşii deoarece acestea pot zgâria su‐
prafaţa, ceea ce poate conduce la spargerea sticlei.
de partea din faţă a suportului, după care să îndepărtaţi capătul
din spate de pereţii laterali. Instalaţi suporturile pentru raft în or‐
dine inversă.
2.
INSTRUCŢIUNI PRIVIND SIGURANŢA
• Folosiţi întotdeauna o priză cu protecţie la
2.1 Instalarea
AVERTIZARE
Doar o persoană calificată va instala
acest aparat.
• Îndepărtaţi toate ambalajele.
• Dacă aparatul este deteriorat, nu îl instalaţi
sau utilizaţi.
• Respectaţi instrucţiunile de instalare furnizate
împreună cu aparatul.
• Procedaţi cu atenţie sporită atunci când mutaţi
aparatul deoarece acesta este greu. Purtaţi
întotdeauna mănuşi de protecţie.
• Nu trageţi aparatul de mâner.
• Respectaţi distanţele minime faţă de alte apa‐
rate şi corpuri de mobilier.
• Verificaţi dacă aparatul este instalat având în
jurul său structuri de siguranţă.
• Laturile aparatului trebuie să rămână în apro‐
pierea altor aparate sau unităţi cu aceeaşi
înălţime.
Conexiunea la reţeaua electrică
AVERTIZARE
Risc de incendiu şi de electrocutare.
• Toate conexiunile electrice trebuie realizate
de către un electrician calificat.
• Aparatul trebuie legat la împământare.
• Verificaţi dacă informaţiile de natură electrică,
specificate pe plăcuţa cu datele tehnice, co‐
respund sursei de tensiune. Dacă nu, contac‐
taţi un electrician.
• Nu folosiţi adaptoare cu căi multiple şi cabluri
• Procedaţi cu atenţie pentru a nu deteriora şte‐
•Nu lăsaţi cablurile de alimentare electrică să
• Protecţia la electrocutare a pieselor aflate sub
• Introduceţi ştecherul în priză numai după în‐
• Dacă priza de curent prezintă jocuri, nu co‐
• Nu trageţi de cablul de alimentare pentru a
• Folosiţi doar dispozitive de izolare adecvate:
• Instalaţia electrică trebuie să fie prevăzută cu
electrocutare corect instalată.
prelungitoare.
cherul şi cablul de alimentare electrică. Con‐
tactaţi centrul de service sau un electrician
pentru a schimba un cablu de alimentare de‐
teriorat.
intre în contact cu uşa aparatului, în special
atunci când uşa este fierbinte.
tensiune şi izolate trebuie fixată astfel încât să
nu permită scoaterea ei fără folosirea unor
unelte.
cheierea procedurii de instalare. Asiguraţi-vă
că priza poate fi accesată după instalare.
nectaţi la ea ştecherul.
scoate din priză aparatul. Trageţi întotdeauna
de ştecher.
întrerupătoare pentru protecţia liniei, siguranţe
fuzibile (siguranţele cu şurub trebuie scoase
din suport), mecanisme de decuplare pentru
scurgeri de curent şi contactoare.
un dispozitiv de izolare, care vă permite să
deconectaţi aparatul de la reţea la toţi polii.
Dispozitivul izolator trebuie să aibă o deschi‐
dere între contacte de cel puţin 3 mm.
Page 35

2.2 Utilizarea
AVERTIZARE
Risc de rănire, arsuri sau de electrocu‐
tare sau explozie.
• Utilizaţi acest aparat într-un mediu casnic.
• Nu modificaţi specificaţiile acestui aparat.
• Nu blocaţi fantele de ventilaţie.
• Nu lăsaţi aparatul nesupravegheat în timpul
funcţionării.
• Dezactivaţi aparatul după fiecare întrebuinţa‐
re.
• Aparatul devine fierbinte în interior pe durata
funcţionării. Nu atingeţi elementele de încălzi‐
re care sunt în aparat. Folosiţi întotdeauna
mănuşi de protecţie pentru a scoate sau a pu‐
ne în interior accesorii sau vase.
• Procedaţi cu atenţie la deschiderea uşii apara‐
tului atunci când aparatul este în funcţiune.
Este posibilă emisia de aer fierbinte.
• Nu acţionaţi aparatul având mâinile umede
sau când acesta este în contact cu apa.
• Nu aplicaţi presiune asupra uşii deschise.
• Nu utilizaţi aparatul ca suprafaţă de lucru sau
ca loc de depozitare.
• Ţineţi întotdeauna închisă uşa aparatului atun‐
ci când acesta este în funcţiune.
• Deschideţi uşa aparatului cu atenţie. Utilizarea
unor ingrediente cu conţinut de alcool poate
determina prezenţa aburilor de alcool în aer.
• Nu lăsaţi scânteile sau flăcările deschise să
intre în contact cu aparatul atunci când des‐
chideţi uşa.
• Produsele inflamabile sau obiectele umezite
cu produse inflamabile nu trebuie introduse în
aparat, nici puse adiacent sau deasupra aces‐
tuia.
AVERTIZARE
Pericol de deteriorare a aparatului.
• Pentru a preveni deteriorarea sau decolorarea
emailului:
– Nu puneţi vase sau alte obiecte în aparat di‐
rect pe baza acestuia.
– Nu puneţi folie din aluminiu direct pe baza
aparatului.
– nu puneţi apă direct în aparatul fierbinte.
– nu ţineţi vase umede şi alimente în interiorul
aparatului după încheierea gătirii.
– procedaţi cu atenţie la demontarea sau in‐
stalarea accesoriilor.
ROMÂNA 35
• Decolorarea emailului nu are niciun efect asu‐
pra funcţionării aparatului. Nu este un defect
în ceea ce priveşte garanţia legală.
• Folosiţi o cratiţă adâncă pentru prăjiturile siro‐
poase. Sucurile de fructe lasă pete care pot fi
permanente.
2.3 Îngrijirea şi curăţarea
AVERTIZARE
Pericol de rănire, incendiu sau de dete‐
riorare a aparatului.
• Înainte de a curăţa aparatul, deconectaţi-l şi
scoateţi ştecherul din priză.
• Verificaţi dacă aparatul s-a răcit. Există riscul
de spargere a panourilor vitrate.
• Înlocuiţi imediat panourile vitrate ale uşii dacă
acestea sunt deteriorate. Contactaţi Centrul
de Service.
• Atenţie când scoateţi uşa aparatului. Aceasta
este grea!
• Curăţaţi regulat aparatul pentru a preveni de‐
teriorarea materialului de la suprafaţă.
• Resturile de grăsimi sau de alimente din apa‐
rat pot duce la apariţia unui incendiu.
• Curăţaţi aparatul cu o lavetă moale umedă.
Utilizaţi numai detergenţi neutri. Nu folosiţi
produse abrazive, bureţi abrazivi, solvenţi sau
obiecte metalice.
• Dacă folosiţi un spray pentru cuptor, respecta‐
ţi instrucţiunile de siguranţă de pe ambalaj.
• Nu curăţaţi emailul catalitic (dacă este cazul)
cu nici un tip de detergent.
2.4 Bec interior
• Tipul de bec sau de lampă cu halogen utilizat
pentru acest aparat este destinat exclusiv
aparatelor electrocasnice. Nu îl utilizaţi în alte
scopuri.
AVERTIZARE
Risc de electrocutare.
• Deconectaţi aparatul de la sursa de alimenta‐
re electrică înainte de a înlocui becul.
• Folosiţi doar becuri cu aceleaşi specificaţii.
2.5 Aruncarea la gunoi
AVERTIZARE
Risc de rănire sau de sufocare.
• Deconectaţi aparatul de la sursa de alimenta‐
re.
Page 36

www.electrolux.com
36
• Tăiaţi cablul electric şi îndepărtaţi-l. • Scoateţi dispozitivul de blocare a uşii pentru a
3. DESCRIEREA PRODUSULUI
1
5
4
3
8
2
1
7
6
Dispozitiv de programare electronic
1
Priză pentru senzor
2
Grătar
3
Bec cuptor
4
Ventilator
5
preveni închiderea copiilor sau a animalelor
de companie în aparat.
Suportul pentru raft, detaşabil
6
Plăcuţă cu date tehnice
7
Poziţii rafturi
8
2
3.1 Accesoriile cuptorului
3
• Raft sarma
4
5
Pentru veselă, forme pentru prăjituri, fripturi.
• Tava de gatit
Pentru prăjituri şi fursecuri.
• Grill- / Cratiţă pentru frigere
Pentru coacere şi frigere sau ca tavă pentru
grăsime.
• Senzor
Pentru a măsura cât de bine sunt făcute ali‐
mentele.
• Ghidaje telescopice
Pentru rafturi şi tăvi.
4. ÎNAINTE DE PRIMA UTILIZARE
AVERTIZARE
Consultaţi capitolul "Informaţii privind si‐
guranţa".
4.1 Curăţarea iniţială
• Scoateţi toate accesoriile şi suporturile rafturi‐
lor detaşabile (dacă este cazul).
• Curăţaţi aparatul înainte de prima utilizare.
Consultaţi capitolul "Îngrijirea şi curăţa‐
rea".
4.2 Prima conectare
Când conectaţi aparatul la sursa de tensiune sau
după o întrerupere a alimentării electrice, trebuie
să setaţi limba, contrastul şi luminozitatea afişa‐
jului, precum şi timpul.
1.
Atingeţi sau pentru a seta valoa‐
rea.
2.
Atingeţi OK pentru a confirma.
4.3 Preîncălzirea
Preîncălziţi aparatul gol pentru a arde grăsimile
rămase.
1.
Setaţi funcţia şi temperatura maximă.
2.
Lăsaţi aparatul să funcţioneze timp de 45 de
minute.
3.
Setaţi funcţia şi temperatura maximă.
4.
Lăsaţi aparatul să funcţioneze timp de 15 de
minute.
Accesoriile pot deveni mai fierbinţi decât de obi‐
cei. Aparatul poate emite un miros şi fum. Acest
lucru este normal. Aerisiţi bine încăperea.
Page 37

5. PANOUL DE COMANDĂ
Dispozitiv de programare electronic
1 10
2 43 8 95 6 7
Pentru controlul aparatului utilizaţi câmpurile cu senzor
Număr
Câmp sen‐
zor
1
Pornit/Oprit Pentru activarea şi dezactivarea aparatului.
ROMÂNA 37
11
Funcţie Observaţie
Functii de gatire
sau Gatire asistata
2
Pentru a selecta o funcţie de gătire sau o
funcţie Gatire asistata . Pentru a avea acces
la funcţia necesară, atingeţi câmpul o dată sau
de două ori când aparatul este activat. Pentru
a activa sau dezactiva lumina, apăsaţi câmpul
timp de 3 secunde.
3
la ecranul iniţial
Tasta de revenire
Pentru a reveni la meniul anterior din meniu.
Pentru a afişa meniul principal, apăsaţi câm‐
pul timp de 3 secunde.
Selectarea tempe‐
4
raturii
Pentru a seta temperatura sau a afişa tempe‐
ratura curentă din aparat. Pentru a activa sau
a dezactiva funcţia Incalzire rapida , apăsaţi
câmpul timp de 3 secunde.
5
6
7
Programele Favo‐
rite
Tasta sus Pentru a vă deplasa sus în meniu.
Tasta jos Pentru a vă deplasa jos în meniu.
Timp şi funcţii su‐
plimentare
Pentru a salva şi pentru a avea acces la pro‐
gramele favorite.
Pentru a seta funcţii diferite. Când operează o
funcţie de gătire, atingeţi câmpul cu senzor
pentru a seta cronometrul, Dispozitivul de si‐
8
guranţă pentru copii, memoria Programele Fa‐
vorite , Gatire + Pastrare , Setare + Pornire
sau pentru a schimba setările senzorului (doar
pentru anumite modele).
9
Cronometru Pentru a seta Cronometru .
10
11
—
OK Pentru confirmarea selecţiei sau setării.
Afişaj Afişează setările curente ale aparatului.
Page 38

www.electrolux.com
38
Afişaj
A
B C
DE
Alţi indicatori apar pe afişaj
Pictogramă Funcţie
Cronometru Funcţia este în desfăşurare.
Timpul Afişajul indică ora curentă a zilei.
Durata Afişajul indică durata necesară pentru gătire.
Sfarsit la Afişajul indică când durata de gătire s-a terminat.
Indicare timp Afişajul indică durata de acţiune a funcţiei de gătire.
Apăsaţi
la zero.
Indicatorul de încălzi‐reAfişajul indică temperatura din aparat.
Indicator Incalzire ra‐
pida
Funcţia este în desfăşurare. Această funcţie reduce tim‐
pul de încălzire.
Stab. auto a greutatii Afişajul indică funcţionarea sistemului de stabilire auto‐
mată a greutăţii sau faptul că puteţi modifica greutatea.
Gatire + Pastrare Funcţia este în desfăşurare.
A)
Funcţie de gătire
B)
Timpul
C)
Indicatorul de încălzire
D)
Temperatură
E)
Funcţiile Durata şi Sfarsit la
şi simultan pentru a seta timpul înapoi
6. UTILIZAREA ZILNICĂ
AVERTIZARE
Consultaţi capitolul "Informaţii privind si‐
guranţa".
6.1 Navigarea prin meniuri
Utilizarea meniurilor:
1.
Activaţi aparatul.
6.2 Prezentare generală a meniurilor
Meniul principal
Picto‐
gramă
Funcţie meniu Aplicaţie
Specialitati Conţine o listă a funcţiilor de gătire suplimentare.
2.
Apăsaţi sau pentru a selecta opţiu‐
nea de meniu.
3.
Pentru a trece la submeniu sau a accepta
setarea apăsaţi OK.
Puteţi reveni la meniul principal în orice moment
atingând
Page 39

ROMÂNA 39
Picto‐
gramă
Funcţie meniu Aplicaţie
Functii de gatire Conţine o listă a funcţiilor de gătire.
Gatire asistata Conţine o listă a programelor de gătire automată.
Programele Favorite
Setari de baza Conţine o listă a celorlalte setări.
Submeniuri pentru: Setari de baza
Picto‐
gramă
Submeniu Descriere
Setati timpul Reglează ora ceasului.
Indicare timp
SETARE + PORNIRE
Gatire + Pastrare
Extindere timp Activează şi dezactivează funcţia.
Contrast la display Reglează contrastul afişajului în grade.
Luminozitate display Reglează luminozitatea afişajului în grade.
Conţine o listă a programelor de gătit favorite salvate de
utilizator.
Când este pornit şi dezactivaţi aparatul, afişajul indică
ora curentă.
Când este pornit, puteţi activa funcţiile când activaţi o
funcţie de gătit.
Când este activ, puteţi activa această funcţie când acti‐
vaţi funcţia de gătire.
Limba de utilizare Setează limba de afişare.
Volum la apasare pe tas‐teReglează în grade volumul tonurilor emise la apăsarea
tastelor şi semnalelor sonore.
Tonul de la taste Activează şi dezactivează tonurile asociate tastelor.
Alarma/Ton de eroare Activează şi dezactivează tonurile de alarmă.
Service Indică versiunea software şi configuraţia.
Setari initiale Resetează toate valorile la setările iniţiale.
6.3 Funcţii de gătire
Submeniu pentru: Functii de gatire
Funcţie de gătire Aplicaţie
Aer cald Pentru coacerea pe trei poziţii ale raftului simultan.
Când folosiţi această funcţie, micşoraţi temperatura
cuptorului cu 20 - 40 °C faţă de temperaturile stan‐
dard pe care le folosiţi pentru Caldura de sus + jos .
De asemenea, pentru deshidratarea alimentelor.
Page 40

www.electrolux.com
40
Funcţie de gătire Aplicaţie
Pizza Pentru coacerea pe un nivel al cuptorului a mâncăru‐
rilor care necesită o rumenire mai intensă şi o bază
crocantă. Când folosiţi această funcţie, micşoraţi tem‐
peratura cuptorului cu 20 - 40 °C faţă de temperaturi‐
le standard pe care le folosiţi pentru Caldura de sus +
jos . .
Caldura de sus + jos Pentru a coace şi a prăji alimentele pe o singură po‐
ziţie a raftului.
Gatire la temp. scazuta Pentru a prepara friptură foarte fragedă şi fără grăsi‐
me.
Incalzire jos Pentru a coace prăjituri cu bază crocantă.
ECO Prajire Funcţiile ECO vă permit să optimizaţi consumul de
energie în timpul gătirii. Prin urmare, este necesar să
setaţi mai întâi durata de gătire.
Preparate congelate Pentru a găti semipreparate cum ar fi cartofi prăjiţi,
wedges sau bulete crocante.
Grill Pentru frigerea la grătar a alimentelor plate în mijlocul
grătarului şi pentru pâine prăjită.
Grill rapid Pentru frigerea la grătar a alimentelor plate în can‐
tităţi mari şi pâine prăjită.
Gatire intensiva Pentru a frige bucăţi mai mari de carne roşie sau de
găină cu os pe o poziţie a raftului. De asemenea,
pentru gratinare şi rumenire.
Submeniu pentru: Specialitati
Funcţie de gătire Aplicaţie
Coacere paine Pentru coacerea pâinii.
La gratar Pentru a prepara mâncăruri cum ar fi lasagna sau
cartofi gratinaţi. De asemenea, pentru gratinare şi
rumenire.
Aluaturi Pentru creşterea aluatului cu drojdie înainte de
coacere.
Incalzire farfuriei Pentru a pre-încălzi o farfurie înainte de servire.
Pastreaza cald Pentru a conserva legumele în borcane şi lichid (de
ex. murături asortate).
Uscare Pentru a deshidrata fructele feliate cum ar fi mere,
prune şi piersici, precum şi legume cum ar fi roşii,
zucchini sau ciuperci.
Page 41
Funcţie de gătire Aplicaţie
Mentine cald Pentru a păstra mâncarea gătită caldă.
Decongelare Pentru a decongela preparate congelate.
ROMÂNA 41
6.4 Activarea unei funcţii de gătire
1. Activaţi aparatul.
2. Selectaţi meniul Functii de gatire . Apăsaţi
OK pentru confirmare.
3. Setaţi funcţia de încălzire. Apăsaţi OK pentru
confirmare.
4. Reglaţi temperatura. Apăsaţi OK pentru con‐
firmare.
Apăsaţi o dată sau de două ori pen‐
tru a accesa direct meniul Functii de ga‐
tire (când aparatul este activat).
6.5 Indicatorul de încălzire
La activarea unei funcţii de gătire, pe afişaj apare
bara indicatoare. Aceasta indică creşterea tem‐
peraturii.
6.6 Indicator Incalzire rapida
Această funcţie reduce timpul de încălzire. Pen‐
tru activarea funcţiei ţineţi apăsat
secunde. Veţi vedea afişajul de încălzire modifi‐
cându-se.
timp de 3
6.7 Căldura reziduală
La dezactivarea aparatului, pe afişaj este indi‐
cată căldura reziduală. Aceasta poate fi utilizată
pentru menţinerea alimentelor calde.
6.8 Economisirea energiei
Aparatul dispune de unele funcţii care
vă ajută la economisirea energiei în tim‐
pul procesului zilnic de gătire:
• Căldura reziduală:
– Când funcţia de gătire sau programul ope‐
rează, elementele de încălzire sunt dezacti‐
vate cu 10 % mai devreme (becul şi ventila‐
torul continuă să funcţioneze). Pentru ca
această caracteristică să funcţioneze, dura‐
ta de gătire trebuie să fie mai lungă de 30
de minute sau trebuie să utilizaţi funcţiile
ceasului ( Durata , Sfarsit la ).
– Când aparatul este oprit, puteţi utiliza
căldura pentru a păstra alimentele calde.
Afişajul indică temperatura rămasă.
•
Gătitul cu becul stins - Ţineţi apăsat
de 3 secunde pentru a dezactiva becul pe du‐
rata gătirii.
• Funcţii eco - consultaţi " Functii de gatire ".
timp
7. FUNCŢIILE CEASULUI
7.1 Funcţiile ceasului
Picto‐
gramă
Funcţie Descriere
Cronometru
Pentru a seta o numărătoare inversă (max. 2 ore şi 30 de mi‐
nute). Această funcţie nu are nicio influenţă asupra func‐
ţionării aparatului. Îl puteţi activa şi când aparatul este oprit.
Pentru activarea funcţiei utilizaţi
apăsaţi
sau şi OK pentru activare.
. Pentru a seta minutele,
Page 42

www.electrolux.com
42
Picto‐
gramă
Dacă setaţi timpul aferent unei funcţii a ceasului,
numărătoarea inversă începe după 5 secunde.
Dacă utilizaţi funcţiile ceasului Durata
tivează elementele de încălzire după 90
% din timpul setat. Aparatul utilizează
căldura reziduală pentru a continua pro‐
cesul de gătire până la terminarea tim‐
pului (3 - 20 minute).
Setarea funcţiilor ceasului
1.
Setaţi o funcţie de gătire.
2.
Apăsaţi în mod repetat, până când afi‐
şajul indică funcţia necesară a ceasului şi
simbolul aferent.
3.
Apăsaţi pe sau pentru a seta ora
dorită. Apăsaţi OK pentru confirmare.
La încheierea duratei este emis un semnal
sonor. Aparatul se dezactivează. Afişajul in‐
dică un mesaj.
4.
Pentru a opri semnalul apăsaţi un câmp cu
senzor.
•
•
• Când utilizaţi Senzorul (dacă este ca‐
Funcţie Descriere
Durata
Sfarsit la
şi Sfarsit la , aparatul dezac‐
Cu Durata
mai întâi trebuie să setaţi funcţia de
gătire şi temperatura. Apoi puteţi se‐
ta funcţia ceasului. Aparatul se de‐
zactivează automat.
Puteţi utiliza Durata
în acelaşi timp, dacă doriţi să
activaţi automat şi să dezactivaţi
aparatul ulterior.
zul), funcţiile Durata
nu funcţionează.
Pentru a seta timpul de funcţionare a aparatului (max. 23 h şi
59 min).
Pentru a seta perioada de decuplare a unei funcţii de gătire
(max. 23 h şi 59 min).
şi Sfarsit la ,
şi Sfarsit la
şi Sfarsit la
7.2 Gatire + Pastrare
Funcţia Gatire + Pastrare păstrează alimentele
preparate calde la 80 °C timp de 30 de minute.
Aceasta este activată după încheierea procedurii
de coacere sau prăjire.
• Puteţi activa sau dezactiva funcţia
din meniul Setari de baza .
• Condiţii pentru funcţie:
– Temperatura setată trebuie să fie
peste 80 °C.
– Trebuie să fie setată Durata func‐
ţiei.
Activarea funcţiei
1.
Activaţi aparatul.
2.
Selectaţi funcţia de gătire.
3.
Setaţi temperatura peste 80 °C.
4.
Atingeţi în mod repetat până când afişa‐
jul indică Gatire + Pastrare . Apăsaţi OK
pentru confirmare.
La încheierea funcţiei este emis un semnal so‐
nor.
Funcţia Gatire + Pastrare este activă timp de 30
de minute.
Funcţia Gatire + Pastrare rămâne pornită dacă
schimbaţi funcţiile de gătire.
7.3 Extindere timp
Funcţia Extindere timp are ca efect continuarea
funcţiei de gătire după ce Durata se termină.
• Aplicabilă pentru toate funcţiile de gătire cu
Durata sau Stab. auto a greutatii.
• Nu este aplicabilă pentru funcţiile cuptorului
cu Senzor .
Activarea funcţiei:
1.
La încheierea duratei de gătire este emis un
semnal sonor. Apăsaţi orice câmp cu sen‐
zor.
2.
Afişajul indică mesajul pentru Extindere timp
cinci minute.
3.
Apăsaţi pentru activarea funcţiei (sau
pentru anulare).
4.
Setaţi durata pentru Extindere timp . Apăsaţi
OK pentru confirmare.
Page 43

8. PROGRAME AUTOMATE
ROMÂNA 43
8.1 Gatire asistata cu Retete
automate
Acest aparat dispune de un set de reţete pe care
le puteţi utiliza. Acestea sunt fixe şi nu pot fi mo‐
dificate.
Activarea funcţiei:
1.
Activaţi aparatul.
2.
Selectaţi meniul Gatire asistata . Apăsaţi
OK pentru confirmare.
3.
Selectaţi categoria şi mâncarea. Apăsaţi OK
pentru confirmare.
4.
Selectaţi Retete automate . Apăsaţi OK
pentru confirmare.
Când utilizaţi funcţia Manual , aparatul
foloseşte setările automate. Acestea pot
fi modificate la fel ca celelalte funcţii.
8.2 Gatire asistata cu Stab. auto a
greutatii
Această funcţie calculează automat timpul nece‐
sar coacerii. Pentru a o utiliza, este necesar să
introduceţi greutatea alimentelor.
9. UTILIZAREA ACCESORIILOR
Activarea funcţiei:
1.
Activaţi aparatul.
2.
Selectaţi Gatire asistata . Apăsaţi OK pentru
confirmare.
3.
Selectaţi categoria şi mâncarea. Apăsaţi OK
pentru confirmare.
4.
Selectaţi Stab. auto a greutatii . Apăsaţi OK
pentru confirmare.
5.
Atingeţi sau pentru a seta greuta‐
tea alimentelor. Apăsaţi OK pentru confir‐
mare.
Este iniţiat programul automat. Puteţi modifica
greutatea în orice moment. Apăsaţi
pentru a schimba greutatea. La încheierea dura‐
tei este emis un semnal sonor. Pentru a dezacti‐
va semnalul apăsaţi un câmp cu senzor.
În cazul anumitor programe, trebuie să
întoarceţi preparatul după 30 de minute.
În acest sens, afişajul indică un memen‐
to.
sau
AVERTIZARE
Consultaţi capitolul "Informaţii privind si‐
guranţa".
9.1 Senzor
Senzorul măsoară temperatura zonei de mijloc a
cărnii. Când carnea este la temperatura setată,
aparatul este dezactivat.
Trebuie setate două temperaturi:
• Temperatura cuptorului.
• Temperatura zonei de mijloc a cărnii.
Utilizaţi doar senzorul furnizat cu apara‐
tul sau piese de schimb originale.
1.
Introduceţi vârful senzorului în mijlocul
cărnii.
2.
Activaţi aparatul.
3.
Introduceţi conectorul senzorului în priza din
partea frontală a aparatului.
Pe afişaj va apărea simbolul pentru senzor.
4.
Apăsaţi sau în mai puţin de 5 se‐
cunde pentru a seta temperatura zonei de
mijloc.
5.
Setaţi funcţia cuptorului şi, dacă este nece‐
sar, temperatura acestuia.
Page 44
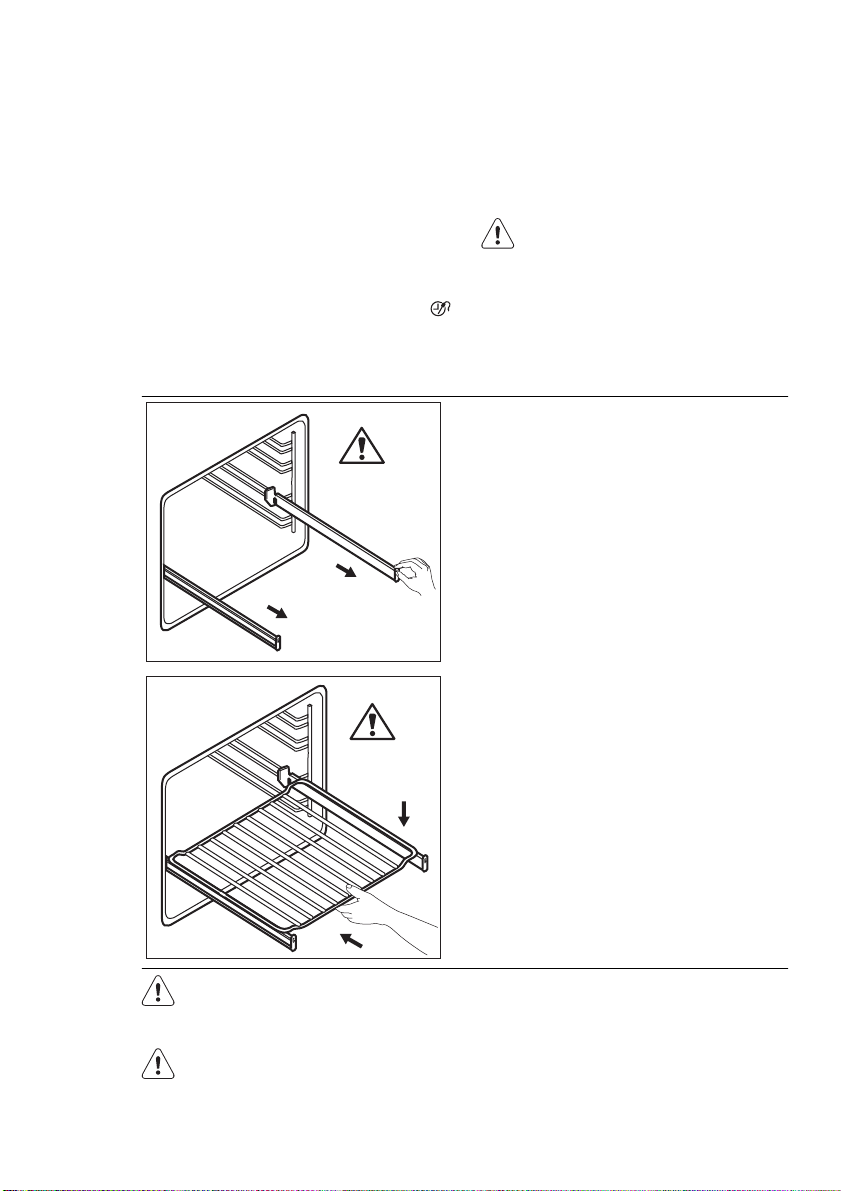
www.electrolux.com
44
6.
7.
9.2 Ghidajele telescopice
Aparatul calculează un timp aproximativ
pentru finalizare. Timpul de finalizare diferă
în funcţie de cantităţile de alimente, de tem‐
peratura setată pentru cuptor (minim 120
°C) şi de modul de operare. Aparatul calcu‐
lează timpul de finalizare în aproximativ 30
de minute.
În timpul procesului de gătire, senzorul tre‐
buie să rămână introdus în carne şi în priza
pentru senzor.
Dacă este necesar, pe durata gătirii puteţi
seta o nouă temperatură pentru zona de
mijloc. Pentru a face acest lucru, atingeţi
.
°C
8.
Când carnea atinge temperatura zonei de
mijloc setată, este emis un semnal sonor.
Aparatul se dezactivează automat.
Pentru a opri semnalul atingeţi un câmp cu
senzor.
9.
Scoateţi conectorul senzorului din priză.
Scoateţi carnea din aparat.
AVERTIZARE
Senzorul este fierbinte. Pericol de arsu‐
ri. Procedaţi cu atenţie la extragerea
vârfului şi a conectorului senzorului.
1.
Trageţi complet în afară ghidajele telescopi‐
ce din stânga şi dreapta.
°C
Păstraţi instrucţiunile de instalare de la
ghidajele telescopice pentru utilizarea
lor ulterioară.
ATENŢIE
Nu curăţaţi ghidajele telescopice în ma‐
şina de spălat vase. Nu lubrifiaţi ghida‐
jele telescopice.
2.
Puneţi grătarul pe ghidajele telescopice,
apoi împingeţi-l cu atenţie în interiorul apa‐
ratului.
Înainte de a închide uşa cuptorului, verifica‐
ţi dacă aţi împins ghidajele telescopice
complet în aparat.
Cu ajutorul ghidajelor telescopice puteţi monta
sau scoate rafturile cu uşurinţă.
Page 45

10. FUNCŢII SUPLIMENTARE
ROMÂNA 45
10.1 Meniul Programele Favorite
Puteţi salva setările preferate precum durata,
temperatura sau funcţia de gătire. Acestea sunt
disponibile în meniul Programele Favorite . Puteţi
salva 20 de programe.
Salvarea unui program
1.
Activaţi aparatul.
2.
Pentru a selecta o funcţie de gătire sau o
funcţie Gatire asistata .
3.
Atingeţi în mod repetat până când afişa‐
jul indică SALVEAZA . Apăsaţi OK pentru
confirmare.
4.
Afişajul indică prima poziţie liberă în memo‐
rie.
Apăsaţi OK pentru confirmare.
5.
Introduceţi numele programului. Prima literă
se aprinde intermitent.
Apăsaţi
ra. Apăsaţi OK.
6.
Atingeţi sau pentru a deplasa cur‐
sorul la dreapta sau la stânga. Apăsaţi OK.
Litera următoare se aprinde intermitent.
Efectuaţi paşii 5 şi 6 din nou, dacă este ne‐
cesar.
7.
Pentru a salva ţineţi apăsat OK.
• Puteţi scrie peste o poziţie în memorie. Când
afişajul indică prima poziţie liberă în memorie,
apăsaţi pe
a suprascrie un program existent.
• Puteţi modifica denumirea unui program din
meniul Numele programului .
Activarea programului
1.
Activaţi aparatul.
2.
Selectaţi meniul Programele Favorite .
Apăsaţi OK pentru confirmare.
3.
Alegeţi numele pentru programul favorit.
Apăsaţi OK pentru confirmare.
Apăsaţi
Favorite .
sau pentru a schimba lite‐
Informaţii utile:
sau şi apăsaţi OK pentru
pentru a accesa direct Programele
10.2 Blocare
Blocare previne schimbarea accidentală a func‐
ţiei de gătire. Puteţi activa funcţia de Blocare nu‐
mai în timp ce aparatul funcţionează.
Activarea funcţiei Blocare :
1.
Activaţi aparatul.
2.
Selectaţi o funcţie de gătire sau o setare.
3.
Apăsaţi în mod repetat până când afişa‐
jul indică Blocare .
4.
Apăsaţi OK pentru confirmare.
5.
Uşa se blochează şi pe afişaj apare picto‐
grama unei chei.
Dacă aparatul are funcţia de Curăţare
pirolitică şi funcţia operează, uşa este
blocată.
Dezactivarea funcţiei Blocare :
1.
Apăsaţi . Afişajul indică un mesaj.
2.
Apăsaţi urmat de OK pentru a confirma.
10.3 Blocare acces copii
Funcţia Blocare acces copii împiedică utilizarea
accidentală a aparatului.
Activarea şi dezactivarea funcţiei Blocare acces
copii:
1.
Activaţi aparatul.
2.
Apăsaţi şi în acelaşi timp până când
afişajul indică un mesaj.
Dacă aparatul are funcţia de Curăţare
pirolitică şi funcţia operează, uşa este
blocată.
Un mesaj se aprinde pe afişaj când
atingeţi un câmp cu senzor.
Pentru a debloca aparatul, atingeţi
acelaşi timp până când afişajul indică un mesaj.
şi în
10.4 SETARE + PORNIRE
Funcţia SETARE + PORNIRE permite setarea
unei funcţii de gătire (sau a unui program) şi utili‐
zarea ulterioară a acesteia cu o singură apăsare
a câmpului cu senzor.
Activarea funcţiei:
1.
Activaţi aparatul.
2.
Setaţi funcţia de încălzire.
3.
Atingeţi în mod repetat până când afişa‐
jul indică Durata .
4.
Setaţi durata.
5.
Atingeţi în mod repetat până când afişa‐
jul indică SETARE + PORNIRE .
Page 46

www.electrolux.com
46
6.
Pentru a porni SETARE + PORNIRE , apăsaţi
oricare câmp cu senzor (cu excepţia
ţia de gătire setată este activată.
La încheierea funcţiei de gătire este emis un
semnal sonor.
• În timpul acţiunii funcţiei de gătire, Blocare es‐
• Puteţi activa şi dezactiva funcţia SETARE +
10.5 Oprirea automată
Din motive de siguranţă aparatul se dezacti‐
vează după o anumită perioadă de timp:
• Dacă o funcţie a cuptorului este în desfăşura‐
• Dacă nu modificaţi temperatura cuptorului.
Apăsaţi OK pentru confirmare.
). Func‐
Informaţii utile:
te activă.
PORNIRE din meniul Setari de baza .
re.
Temperatură cuptor Perioadă de decu‐
plare
30 °C - 120 °C 12,5 ore
120 °C - 200 °C 8,5 ore
Temperatură cuptor Perioadă de decu‐
plare
200 °C - 250 °C 5,5 ore
250 °C - temperatura
3,0 ore
maximă °C
Oprirea automată funcţionează cu toate
funcţiile, cu excepţia Iluminare cuptor ,
Durata şi Sfarsit la .
10.6 Suflantă cu aer rece
Când aparatul funcţionează, suflanta cu aer rece
porneşte automat pentru a menţine reci suprafe‐
ţele aparatului. Dacă opriţi aparatul, suflanta cu
aer rece continuă să funcţioneze până când tem‐
peratura din aparat scade şi aparatul se răceşte.
10.7 Termostatul de siguranţă
Funcţionarea incorectă a aparatului sau compo‐
nentele defecte pot să cauzeze supraîncălzirea
periculoasă. Pentru a preveni acest lucru, cupto‐
rul are un termostat de siguranţă care întrerupe
alimentarea cu curent. În momentul în care tem‐
peratura scade, cuptorul se activează din nou în
mod automat.
11. SFATURI UTILE
11.1 Partea interioară a uşii
La anumite modele, pe partea interioară a uşii se
află:
• Numerele pentru poziţiile raftului.
• Informaţii referitoare la funcţiile de încălzire,
poziţiile recomandate pentru rafturi şi tempe‐
raturile pentru preparatele standard.
Temperatura şi duratele de coacere din
tabele au rol consultativ. Acestea de‐
pind de reţete şi de calitatea şi cantita‐
tea ingredientelor utilizate.
• Aparatul are cinci niveluri pentru rafturi.
Număraţi nivelurile rafturilor din partea de jos
a podelei aparatului.
• Aparatul are un sistem special care produce o
circulaţie naturală a aerului şi o reciclare con‐
stantă a aburului. Cu acest sistem puteţi găti
într-un mediu cu aburi şi puteţi păstra prepara‐
tele moi în interior şi crocante la exterior. Re‐
duce la minimum durata de gătire şi consumul
de energie.
• Umezeala poate produce condens în aparat
sau pe panourile de sticlă ale uşii. Acest lucru
este normal. Utilizatorul trebuie să se în‐
depărteze întotdeauna de aparat atunci când
deschide uşa aparatului pe durata gătirii. Pen‐
tru a reduce condensul, lăsaţi aparatul să
funcţioneze timp de 10 minute înainte de găti‐
re.
• Curăţaţi umezeala rămasă după fiecare utili‐
zare a aparatului.
• Nu puneţi obiecte direct pe podeaua aparatu‐
lui şi nu puneţi folie din aluminiu pe compo‐
nente atunci când gătiţi. În caz contrar este
posibilă modificarea rezultatelor obţinute şi se
poate cauza deteriorarea stratului de email.
11.2 Coacerea prăjiturilor
• Nu deschideţi uşa cuptorului înainte ca 3/4 din
durata de coacere să fi trecut.
Page 47

ROMÂNA 47
• Dacă utilizaţi două tăvi de coacere în acelaşi
timp, lăsaţi un nivel liber între ele.
11.3 Gătirea cărnii şi a peştelui
• Utilizaţi o cratiţă adâncă pentru alimentele
foarte grase pentru a evita pătarea perma‐
nentă a cuptorului.
• Lăsaţi carnea aproximativ 15 minute înainte
de a o tăia, astfel încât sucul să nu se prelingă
afară.
• Pentru a împiedica formarea de prea mult fum
în cuptor pe durata frigerii, se recomandă
adăugarea de puţină apă în cratiţa adâncă.
Pentru a preveni condensarea fumului,
adăugaţi apă de fiecare dată după ce se eva‐
poră.
11.4 Durate de gătit
Duratele de gătit depind de tipul de alimente, de
consistenţa şi volumul lor.
La început, monitorizaţi performanţa când gătiţi.
Găsiţi cele mai bune setări (setarea căldurii, du‐
rata de gătit, etc.) pentru vasele, reţetele şi can‐
tităţile dvs. când utilizaţi acest aparat.
11.5 Tabele pentru coacere şi frigere
PRĂJITURI
TIP DE MÂN‐
CARE
Reţete cu
compoziţie
bătută cu telul
Aluat fraged 2 170 3 (1 şi 4) 160 20 - 30 Într-o formă
Prăjitură cu
brânză şi lapte
bătut
Prăjitură cu
mere (plăcintă
cu mere)
Strudel 3 175 2 150 60 - 80 Într-o tavă de
Tartă cu gem 2 170 2 (stânga şi
Pandispan 2 170 2 160 50 - 60 Într-o formă
Tort de
crăciun / Tort
bogat în fructe
Prăjitură cu
prune
Caldura de sus + jos Aer cald
Nivel raft
Temp
[°C]
Nivel raft
Temp
[°C]
Durată de
gătire [min]
2 170 3 (1 şi 4) 160 45 - 60 Într-o formă
pentru prăjituri
pentru prăjituri
1 170 2 165 60 - 80 Într-o formă
pentru prăjituri
2 170 1 (stânga şi
dreapta)
160 80 - 100 În două forme
pentru prăjituri
de 20 cm pe
165 30 - 40 Într-o formă
dreapta)
pentru prăjituri
pentru prăjituri
2 160 1 sau 2 140 –
150
90 - 120 Într-o formă
pentru prăjituri
de 20 cm
1 175 2 160 50 - 60 Într-o tavă de
Observaţii
de 26 cm
un raft de
1)
sârmă
coacere
de 26 cm
de 26 cm
1)
pâine
1)
Page 48

www.electrolux.com
48
TIP DE MÂN‐
CARE
Prăjituri mici pe un nivel
Prăjituri mici pe două nive‐
Caldura de sus + jos Aer cald
Nivel raft
Temp
[°C]
Nivel raft
3 170 3 150 -
- - 2 şi 4 150 -
Temp
[°C]
160
160
Durată de
gătire [min]
Observaţii
20 - 30 Într-o tavă de
coacere
25 - 35 Într-o tavă de
coacere
luri
Prăjituri mici -
pe trei niveluri
Biscuiţi / pati‐
serie - pe un
- - 1, 3 şi 5 150 160
3 140 3 140 -
150
30 - 45 Într-o tavă de
coacere
30 - 35 Într-o tavă de
coacere
nivel
Biscuiţi / pati‐
serie - pe două
- - 2 şi 4 140 150
35 - 40 Într-o tavă de
coacere
niveluri
Biscuiţi / pati‐
serie - pe trei
- - 1, 3 şi 5 140 150
35 - 45 Într-o tavă de
coacere
niveluri
Bezele - pe un
nivel
Bezele - pe
două niveluri
Chifle dulci 3 170 –
Eclere - pe un
nivel
Eclere - pe
două niveluri
3 120 3 120 80 - 100 Într-o tavă de
coacere
- - 2 şi 4 120 80 - 100 Într-o tavă de
coacere
3 190 12 - 20 Într-o tavă de
190
coacere
3 190 3 170 25 - 35 Într-o tavă de
coacere
- - 2 şi 4 170 35 - 45 Într-o tavă de
coacere
Tarte 2 180 2 170 45 - 70 Într-o formă
pentru prăjituri
de 20 cm
Tort cu multe
fructe
1 160 2 150 110 - 120 Într-o formă
pentru prăjituri
de 24 cm
Sandviş Victo‐
ria
1 170 2 (stânga şi
dreapta)
160 50 - 60 Într-o formă
pentru prăjituri
de 20 cm
1)
Preîncălziţi timp de 10 minute.
1)
1)
Page 49

ROMÂNA 49
PÂINE ŞI PIZZA
TIP DE MÂN‐
CARE
Caldura de sus + jos Aer cald
Nivel raft
Temp
[°C]
Nivel raft
Temp
[°C]
Durată de
gătire [min]
Observaţii
Paine alba 1 190 1 190 60 - 70 1 - 2 bucăţi,
500 g per bu‐
1)
cată
Pâine de se‐
cară
1 190 1 180 30 - 45 Într-o tavă de
pâine
Chifle 2 190 2 (2 şi 4) 180 25 - 40 6 - 8 role într-o
tavă de coace‐
1)
re
Pizza 1 200 -
210
1 200 -
210
10 - 20 Într-o tavă de
coacere sau
cratiţă
1)
adâncă
Pateuri 3 200 3 190 10 - 20 Într-o tavă de
1)
coacere
1)
Preîncălziţi timp de 10 minute.
TARTE
TIP DE MÂN‐
CARE
Caldura de sus + jos Aer cald
Nivel raft
Temp
[°C]
Nivel raft
Temp
[°C]
Durată de
gătire [min]
Observaţii
Tarte cu paste 2 200 2 180 40 - 50 Într-o formă
Tarte cu legu‐
2 200 2 175 45 - 60 Într-o formă
me
Tarte tip Qui‐
che
Lasagne 2 180 -
Paste Cannel‐
loni
1)
Preîncălziţi timp de 10 minute.
1 180 1 180 50 - 60
190
2 180 -
190
2 180 -
190
2 180 -
190
25 - 40
25 - 40
Într-o formă
Într-o formă
Într-o formă
1)
1)
1)
CARNE
TIP DE MÂN‐
CARE
Caldura de sus + jos Aer cald
Nivel raft
Temp
[°C]
Nivel raft
Temp
[°C]
Durată de
gătire [min]
Observaţii
Vită 2 200 2 190 50 - 70 Pe un raft de
sârmă
Porc 2 180 2 180 90 - 120 Pe un raft de
sârmă
Page 50

www.electrolux.com
50
TIP DE MÂN‐
CARE
Caldura de sus + jos Aer cald
Nivel raft
Temp
[°C]
Nivel raft
Temp
[°C]
Durată de
gătire [min]
Observaţii
Viţel 2 190 2 175 90 - 120 Pe un raft de
sârmă
Friptură de vită
englezească,
2 210 2 200 50 - 60 Pe un raft de
sârmă
în sânge
Friptură de vită
englezească,
2 210 2 200 60 - 70 Pe un raft de
sârmă
gătită mediu
Friptură de vită
englezească,
2 210 2 200 70 - 75 Pe un raft de
sârmă
bine făcută
Ceafă de porc 2 180 2 170 120 - 150 Cu şorici
Picior de porc 2 180 2 160 100 - 120 2 bucăţi
Miel 2 190 2 175 110 - 130 Pulpă
Pui 2 220 2 200 70 - 85 Întreg
Curcan 2 180 2 160 210 - 240 Întreg
Raţă 2 175 2 220 120 - 150 Întreagă
Gâscă 2 175 1 160 150 - 200 Întreagă
Iepure 2 190 2 175 60 - 80 Bucăţi
Iepure de
2 190 2 175 150 - 200 Bucăţi
câmp
Fazan 2 190 2 175 90 - 120 Întreg
PESTE
TIP DE MÂN‐
CARE
Păstrăv/Do‐
Caldura de sus + jos Aer cald
Nivel raft
Temp
[°C]
Nivel raft
Temp
[°C]
Durată de
gătire [min]
2 190 2 175 40 - 55 3 - 4 peşti
Observaţii
radă
Ton/Somon 2 190 2 175 35 - 60 4 - 6 fileuri
11.6 Grill
Preîncălziţi cuptorul timp de 10 minute,
înainte de gătire.
Cantitate Grill Durată de gătire [min]
TIP DE MÂNCA‐REBucăţi [g] Nivel raft Temp
[°C]
File bucăţi 4 800 4 max. 12-15 12-14
Friptură de vită 4 600 4 max. 10-12 6-8
Pe o parte Pe cealaltă
parte
Page 51

ROMÂNA 51
Cantitate Grill Durată de gătire [min]
TIP DE MÂNCA‐REBucăţi [g] Nivel raft Temp
[°C]
Pe o parte Pe cealaltă
parte
Cârnaţi 8 - 4 max. 12-15 10-12
Cotlet de porc 4 600 4 max. 12-16 12-14
Pui (tăiat în două) 2 1000 4 max. 30-35 25-30
Kebab 4 - 4 max. 10-15 10-12
Piept de pui 4 400 4 max. 12-15 12-14
Hamburger 6 600 4 max. 20-30 File de peşte 4 400 4 max. 12-14 10-12
Sandviş cu pâine
4-6 - 4 max. 5-7 -
prăjită
Pâine prăjită 4-6 - 4 max. 2-4 2-3
11.7 Gatire intensiva
Vită
TIP DE MÂNCARE Cantitate Nivel raft
Friptură de vită sau
file, în sânge
Friptură de vită sau
file, gătită mediu
Friptură de vită sau
file, bine făcută
1)
Preîncălziţi cuptorul.
pentru fiecare
cm de grosime
pentru fiecare
cm de grosime
pentru fiecare
cm de grosime
1
1
1
Temperatură
[°C]
190 - 200
180 - 190
170 - 180
1)
1)
1)
Timp [min]
5 - 6
6 - 8
8 - 10
Porc
TIP DE MÂNCARE Cantitate Nivel raft
Temperatură
[°C]
Timp [min]
Spată, ceafă, pulpă 1 - 1,5 kg 1 160 - 180 90 - 120
Cotlet, antricot 1 - 1,5 kg 1 170 - 180 60 - 90
Bucata de carne 750 g - 1 kg 1 160 - 170 50 - 60
Picior de porc (se‐
mipreparat)
750 g - 1 kg 1 150 - 170 90 - 120
Viţel
TIP DE MÂNCA‐
Cantitate Nivel raft Temperatură [°C] Timp [min]
RE
Friptura de vitel 1 kg 1 160 - 180 90 - 120
Picior de vitel 1,5 - 2 kg 1 160 - 180 120 - 150
Page 52

www.electrolux.com
52
Miel
TIP DE MÂNCA‐
Pulpa de miel,
friptura de miel
Spată de miel 1 - 1,5 kg 1 160 - 180 40 - 60
Gaina
TIP DE MÂNCA‐
Porţii de pui 200 - 250 g fie‐
Pui, jumătate 400 - 500 g fie‐
Pui, pasăre îndo‐
pată
Rata 1,5 - 2 kg 1 180 - 200 80 - 100
Gasca 3,5 - 5 kg 1 160 - 180 120 - 180
Curcan 2,5 - 3,5 kg 1 160 - 180 120 - 150
Curcan 4 - 6 kg 1 140 - 160 150 - 240
Peşte (în abur)
TIP DE MÂNCA‐
Peste intreg 1 - 1,5 kg 1 210 - 220 40 - 60
RE
Cantitate Nivel raft Temperatură [°C] Timp [min]
1 - 1,5 kg 1 150 - 170 100 - 120
Cantitate Nivel raft Temperatură [°C] Timp [min]
RE
1 200 - 220 30 - 50
care
1 190 - 210 35 - 50
care
1 - 1,5 kg 1 190 - 210 50 - 70
Cantitate Nivel raft Temperatură [°C] Timp [min]
RE
11.8 Decongelare
TIP DE MÂN‐
CARE
[g]
Timp decon‐
gelare [minu‐
te]
Pui 1000 100 - 140 20 - 30
Carne 1000 100 - 140 20 - 30
Carne 500 90 - 120 20 - 30
Păstrăv 150 25 - 35 10 - 15 Căpşuni 300 30 - 40 10 - 20 Unt 250 30 - 40 10 - 15 -
Timp suplimentar
de decongelare
[minute]
Observaţii
Puneţi puiul pe platanul in‐
ferior întors, pe o farfurie
mare. Întoarceţi la jumăta‐
tea duratei de gătit.
Întoarceţi la jumătatea du‐
ratei de gătit.
Întoarceţi la jumătatea du‐
ratei de gătit.
Page 53

ROMÂNA 53
TIP DE MÂN‐
CARE
[g]
Timp decon‐
gelare [minu‐
te]
Timp suplimentar
de decongelare
[minute]
Observaţii
Frişca se poate bate chiar
Frişcă 2 x 200 80 - 100 10 - 15
dacă au mai rămas unele
părţi uşor îngheţate.
Prăjitură 1400 60 60 -
11.9 Pastreaza cald
Fructe moi
CONSERVARE Temperatură [°C]
Fierbere până la apa‐
riţia bulelor de aer
[min]
Se continuă gătirea la
100 °C [min]
Căpşune, afine,
zmeură, agrişe coap‐
160 – 170 35 – 45 –
te
Fructe cu sâmbure
CONSERVARE Temperatură [°C]
Fierbere până la apa‐
riţia bulelor de aer
[min]
Se continuă gătirea la
100 °C [min]
Pere, gutui, prune 160 – 170 35 – 45 10 – 15
Legume
CONSERVARE Temperatură [°C]
Morcovi
1)
160 – 170 50 – 60 5 – 10
Fierbere până la apa‐
riţia bulelor de aer
[min]
Se continuă gătirea la
100 °C [min]
Castraveţi 160 – 170 50 – 60 –
Murături asortate 160 – 170 50 – 60 5 – 10
Gulie, mazăre, spa‐
ranghel
1)
După dezactivarea aparatului lăsaţi alimentele conservate în cuptor.
160 – 170 50 – 60 15 – 20
11.10 Uscare
Acoperiţi rafturile cuptorului cu foi de copt.
LEGUME
TIP DE MÂNCA‐
RE
Nivel raft
1 nivel 2 niveluri
Temperatură [°C] Timp [ore]
Fasole 3 1/4 60 - 70 6 - 8
Ardei 3 1/4 60 - 70 5 - 6
Page 54

www.electrolux.com
54
TIP DE MÂNCA‐
RE
Legume pentru
supă
Nivel raft
1 nivel 2 niveluri
Temperatură [°C] Timp [ore]
3 1/4 60 - 70 5 - 6
Ciuperci 3 1/4 50 - 60 6 - 8
Ierburi 3 1/4 40 - 50 2 - 3
FRUCT
TIP DE MÂNCA‐
RE
Nivel raft
1 nivel 2 niveluri
Temperatură [°C] Timp [ore]
Prune 3 1/4 60 - 70 8 - 10
Caise 3 1/4 60 - 70 8 - 10
Felii de măr 3 1/4 60 - 70 6 - 8
Pere 3 1/4 60 - 70 6 - 9
11.11 Tabel pentru senzor
TIP DE MÂNCARE
Friptura de vitel 75 - 80
Picior de vitel 85 - 90
Friptură de vită englezească, în sânge 45 - 50
Friptură de vită englezească, gătită mediu 60 - 65
Friptură de vită englezească, bine făcută 70 - 75
Ceafă de porc 80 - 82
Picior de porc 75 - 80
Miel 70 - 75
Pui 98
Iepure de câmp 70 - 75
Păstrăv/Doradă 65 - 70
Ton/Somon 65 - 70
Informaţii despre acrilamide
Important Conform celor mai noi informaţii
ştiinţifice, dacă vă gătiţi mâncarea cu crustă arsă
(mai ales cea care conţine amidon), acrilamidele
pot fi un factor de risc al sănătăţii. De aceea, vă
recomandăm să gătiţi la cele mai mici
temperaturi şi să nu vă rumeniţi prea mult
mâncarea.
Temperatura zonei de mijloc
[°C]
Page 55
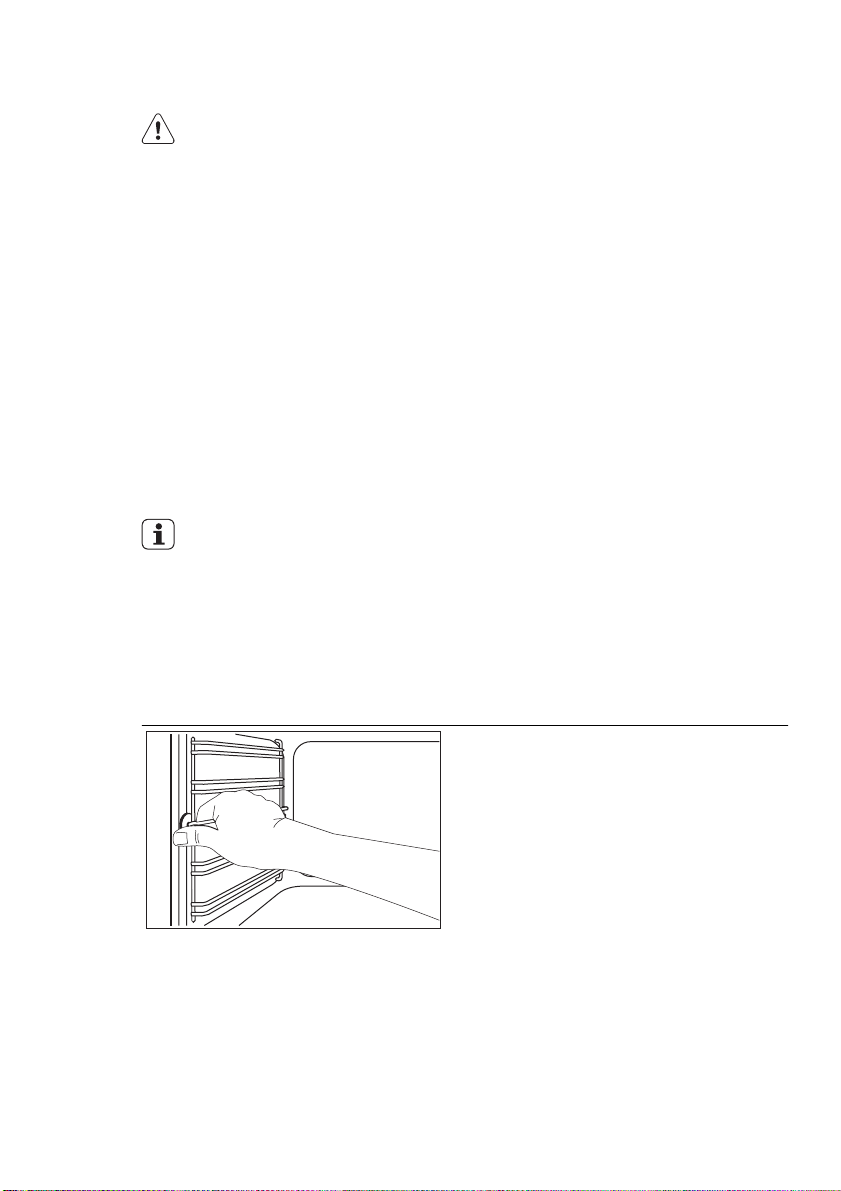
12. ÎNGRIJIREA ŞI CURĂŢAREA
ROMÂNA 55
AVERTIZARE
Consultaţi capitolul "Informaţii privind si‐
guranţa".
• Curăţaţi partea din faţă a cuptorului cu o cârpă
moale, apă caldă şi agent de curăţare.
• Utilizaţi un agent de curăţare obişnuit pentru a
curăţa suprafeţele metalice.
• Curăţaţi interiorul cuptorului după fiecare utili‐
zare. Astfel, puteţi îndepărta murdăria mai
uşor şi aceasta nu se mai arde.
• Curăţaţi murdăria rezistentă cu produs special
de curăţat cuptorul.
• Curăţaţi toate accesoriile cuptorului după fie‐
care utilizare şi uscaţi-le. Folosiţi o lavetă
moale cu apă caldă şi un agent de curăţare.
• Dacă aveţi accesorii anti-aderente, nu le
curăţaţi utilizând agenţi agresivi, obiecte cu
margini ascuţite sau în maşina de spălat vase.
Stratul anti-aderent poate fi distrus.
Pentru modelele din inox sau aluminiu:
Curăţaţi uşa cuptorului numai cu un bu‐
rete ud. Uscaţi-o cu o lavetă moale.
A nu se folosi bureţi din sârmă, acizi
sau produse abrazive, deoarece aces‐
tea pot deteriora suprafaţa cuptorului.
Curăţaţi panoul de comandă al cuptoru‐
lui cu aceeaşi precauţie.
12.1 Curăţarea garniturii uşii
• Verificaţi la intervale regulate garnitura uşii.
Garnitura uşii se află în jurul cadrului cavităţii
cuptorului. Nu utilizaţi aparatul dacă garnitura
uşii este deteriorată. Contactaţi centrul de ser‐
vice.
• Pentru a curăţa garnitura uşii consultaţi infor‐
maţiile generale despre curăţenie.
12.2 Suporturi pentru raft
Pentru a curăţa pereţii laterali puteţi scoate su‐
porturile pentru raft.
Scoaterea suporturilor pentru raft
1.
Trageţi partea din faţă a suportului pentru
raft şi îndepărtaţi-o de peretele lateral.
Page 56

www.electrolux.com
56
2.
Trageţi partea din spate a suportului pentru
raft şi îndepărtaţi-o de peretele lateral şi
scoateţi-o în afară.
1
2
Instalarea suporturilor pentru raft
Instalaţi suporturile pentru raft în ordine inversă.
Capetele rotunde ale suporturilor pentru
raft trebuie îndreptate spre înainte.
12.3 Bec cuptor
AVERTIZARE
Aveţi grijă când schimbaţi becul cupto‐
rului. Există pericol de electrocutare.
Înainte de a schimba becul cuptorului:
• Dezactivaţi cuptorul.
• Decuplaţi siguranţele din tablou sau dezacti‐
vaţi întrerupătorul.
Puneţi o cârpă pe fundul cuptorului pen‐
tru a preveni deteriorarea becului cupto‐
rului şi a capacului de sticlă.
Întotdeauna ţineţi becul halogen cu aju‐
torul unei cârpe pentru a preveni arde‐
rea reziduurilor de grăsime pe bec.
1.
Scoateţi şurubul care susţine grătarul. Pen‐
tru prima dată, utilizaţi o şurubelniţă.
2.
Trageţi cu atenţie grătarul în jos.
3.
Curăţaţi tavanul cuptorului cu o lavetă moa‐
le şi amestec de apă caldă cu agent de
curăţare şi lăsaţi-l să se usuce.
4.
Instalaţi grătarul în ordine inversă.
AVERTIZARE
Verificaţi dacă grătarul este instalat co‐
rect şi nu cade.
1.
Rotiţi capacul de sticlă la stânga şi scoateţil.
2.
Curăţaţi capacul de sticlă.
3.
Înlocuiţi becul cuptorului cu altul cores‐
punzător, rezistent la o temperatură de 300
°C.
Utilizaţi acelaşi tip de bec de cuptor.
4.
Instalaţi capacul de sticlă.
12.4 Tavanul cuptorului
Pentru curăţarea tavanului cuptorului puteţi scoa‐
te grătarul.
AVERTIZARE
Dezactivaţi aparatul înainte de a scoate
grătarul. Verificaţi dacă aparatul s-a
răcit. Pericol de arsuri.
12.5 Curăţarea uşii cuptorului
Uşa cuptorului are trei panouri de sticlă montate
unul peste celălalt. Puteţi să scoateţi uşa cupto‐
rului şi panourile de sticlă de la interior pentru a
le curăţa.
ATENŢIE
Nu utilizaţi aparatul fără panourile de
sticlă.
Direcţia în care deschideţi uşa depinde
de modelul cuptorului. Deschideţi uşa
dinspre dreapta pentru unele modele şi
dinspre stânga pentru alte modele.
Page 57

Scoaterea uşii cuptorului şi a panourilor de sticlă
1.
A
B
Apăsaţi butoanele din lateralele uşii (A) de
pe capacul superior şi trageţi în sus pentru
a îl scoate.
2.
Ţineţi bine cu ambele mâini panoul intern
de sticlă B şi trageţi-l în sus pentru a îl
scoate de la locul lui. Repetaţi acţiunea cu
al doilea panou de sticlă.
ATENŢIE
Ţineţi foarte bine de panourile de sticlă
pentru a nu le scăpa.
ROMÂNA 57
Curăţaţi uşa cu un burete ud şi uscaţi cu o lavetă
moale. A nu se folosi spălătoare de sârmă, acizi
sau produse abrazive de curăţare deoarece pot
deteriora suprafaţa.
Când uşa cuptorului este curată, instalaţi panou‐
rile de sticlă în ordine inversă. Panoul de sticlă
din mijloc are un mic punct în partea de sus şi
cel de-al doilea este serigrafiat. Verificaţi dacă aţi
pus panoul de sticlă din mijloc în suporturile co‐
recte.
Zona serigrafiată trebuie îndreptată cu faţa spre
partea interioară a uşii. După instalare asiguraţivă că suprafaţa cadrului panoului de sticlă nu
prezintă asperităţi la atingere.
Page 58

www.electrolux.com
58
13. CE TREBUIE FĂCUT DACĂ...
AVERTIZARE
Consultaţi capitolul "Informaţii privind si‐
guranţa".
Problemă Cauză posibilă Soluţie
Cuptorul nu se
încălzeşte.
Cuptorul nu se
încălzeşte.
Cuptorul nu se
încălzeşte.
Cuptorul nu se
încălzeşte.
Cuptorul nu se
încălzeşte.
Afişajul indică F111. Conectorul pentru Senzor nu es‐
Becul nu funcţionează. Becul este defect. Înlocuiţi becul.
Afişajul indică "Demo".
Cuptorul nu se
încălzeşte. Ventilatorul
nu funcţionează.
Dacă nu puteţi găsi singur o soluţie la problemă,
contactaţi dealerul sau centrul de service.
Vă recomandăm să notaţi datele aici:
Model (MOD.) .........................................
Numărul produsului (PNC) .........................................
Numărul de serie (S.N.) .........................................
Aparatul este dezactivat. Activaţi aparatul.
Ceasul nu este setat. Setaţi ceasul.
Nu au fost efectuate setările ne‐
cesare.
Funcţia Blocare acces copii este
activată.
Siguranţa este arsă. Verificaţi dacă siguranţa este
te introdus corect în priză.
Modul test este activat.
Verificaţi dacă setările sunt co‐
recte.
Consultaţi secţiunea "Dezactiva‐
rea dispozitivului Blocare acces
copii".
cauza defecţiunii. Dacă siguran‐
ţele se declanşează în mod re‐
petat, adresaţi-vă unui electrician
autorizat.
Introduceţi conectorul senzorului
cât mai adânc în priză.
1.
Dezactivaţi aparatul.
2.
Menţineţi apăsat până
când aparatul se activează
şi dezactivează.
3.
Menţineţi apăsat şi
în acelaşi timp până când
este emis un semnal sonor
şi "d" se stinge.
Datele necesare centrului de service se găsesc
pe plăcuţa cu date tehnice. Aceasta este ampla‐
sată pe cadrul frontal din interiorul aparatului.
14. DATE TEHNICE
Tensiune 230 V
Page 59

Frecvenţă 50 Hz
15. INSTALAREA
ROMÂNA 59
AVERTIZARE
Consultaţi capitolul "Informaţii privind si‐
guranţa".
15.1 Încorporarea în mobilier
548
594
5
573
590
558
min. 560
min. 550
20
20
589
15.2 Fixarea aparatului de mobilier
1.
Deschideţi uşa aparatului.
2.
Fixaţi aparatului de mobilier. Puneţi patru
distanţatoare (A) în orificiile din cadru şi
strângeţi cele patru şuruburi (B) furnizate
împreună cu aparatul.
AB
15.3 Conectarea la alimentarea
electrică
AVERTIZARE
Conectarea electrică trebuie efectuată
numai de către o persoană calificată.
600
min. 550
20
min. 560
Producătorul nu este responsabil dacă
nu respectaţi măsurile de siguranţă des‐
crise în capitolul „Informaţii privind sigu‐
ranţa”.
Acest aparat este livrat cu fişă şi cablu de conec‐
tare electrică.
15.4 Cablu
Tipurile de cabluri adecvate pentru instalare sau
înlocuire: H07 RN-F, H05 RN-F, H05 RRF, H05
VV-F, H05 V2V2-F (T90), H05 BB-F.
Pentru secţiunea cablului consultaţi puterea to‐
tală consumată (de pe plăcuţa cu date tehnice) şi
tabelul:
Page 60

www.electrolux.com
60
Putere totală ab‐
sorbită
maxim 1380 W 3 x 0,75 mm²
maxim 2300 W 3 x 1 mm²
Secţiunea cablului
Putere totală ab‐
sorbită
maxim 3680 W 3 x 1,5 mm²
Cablul de masă (cablul verde/galben) trebuie să
fie cu 2 cm mai lung decât cele de fază şi de nul
(cablurile albastru şi maro).
16. PROTEJAREA MEDIULUI ÎNCONJURĂTOR
şi electrocasnice. Nu aruncaţi aparatele marcate
Reciclaţi materialele marcate cu simbolul
Pentru a recicla ambalajele, acestea trebuie
puse în containerele corespunzătoare.
Ajutaţi la protejarea mediului şi a sănătăţii umane
şi la reciclarea deşeurilor din aparatele electrice
.
cu acest simbol
menajere. Returnaţi produsul la centrul local de
reciclare sau contactaţi administraţia oraşului
dvs.
Secţiunea cablului
împreună cu deşeurile
Page 61

ROMÂNA 61
Page 62

www.electrolux.com
62
Page 63

ROMÂNA 63
Page 64

www.electrolux.com/shop
397280471-B-282012
 Loading...