

Page 1
EN
user manual 02
FR
notice d’utilisation 20
DE
benutzernformation 38
NL
gebruiksaanwijzing 56
ES
manual de usuario 74
Built in electric oven
Four intégré
Inbouwoven
Einbaubackofen
Horno integrado
EOK68600X
Page 2
2 electrolux
EN
Safety information 02
Product Description 03
Control panel 04
Oven functions 05
Before using for the fi rst time 06
Using the oven 06
Cooking tables 10
Child lock function 14
EN
Contents
Safety information
In the interest of your safety and to
ensure the correct use, before installing
and fi rst using the appliance, read this
user manual carefully, including its hints
and warnings. To avoid unnecessary
mistakes and accidents, it is important
to ensure that all people using the
appliance are thoroughly familiar with
its operation and safety features. Save
these instructions and make sure that
they remain with the appliance if it is
moved or sold, so that everyone using
it through its life will be properly
informed on appliance use and safety.
Correct use
• The oven must not be operated with the
door open.
• The manufacturer will not be held
responsible if this oven is used for
anything other than domestic purposes.
• Only use the oven when it is installed
within kitchen units.
• Do not store oils, fats or infl ammable
materials inside the oven, as it could be
dangerous if the oven is switched on.
• Do not lean or sit on the open door of the
oven as it could damage the door and be
dangerous for you.
• Do not cover the bottom of the oven with
aluminium foil, as it could affect cooking
and damage the interior enamelling of the
oven.
• To use the oven, insert the tray or rack
supplied onto the side guides inside the
oven. The trays and racks are fi tted with
Oven safety cut-out 14
Water Cleaning function 14
Care and cleaning 15
Environment concerns 16
What to do if… 17
Technical data 17
Installation 18
Subject to change without notice
a system to facilitate partial extraction
and make handling easier.
• Do not put containers or food on the fl oor
of the oven. Always use the trays and
grids.
• Do not spill water on the fl oor of the oven
while it is working as this could damage
the enamel.
• While using the oven, open the door
as little as possible to reduce electricity
consumption.
• Use protective gloves if you need to work
inside the hot oven.
• To cool the oven, open the door to allow
ventilation and odours to escape from
inside.
• In recipes with a high liquid content, it is
normal for condensation to form on the
oven door.
Child safety
• The appliance is not intended for use by
young children or infi rm persons without
supervision. Young children should be
supervised to ensure they do not play
with the appliance.
• Do not allow children to approach the oven
while it is in use, as high temperatures can
be reached.
Installation
• Check your oven for any transport
damage. Never connect a damaged
machine. If your oven is damaged
contact your supplier.
Page 3
electrolux 3
EN
• All packaging must be removed before
use.
• Any electrical work required to install
this appliance must be carried out by a
qualifi ed and competent person.
• For safety reasons it is dangerous to alter
the specifi cations or attempt to modify
this product in any way.
• Never use the oven if the electrical supply
cable is damaged; or if the control panel,
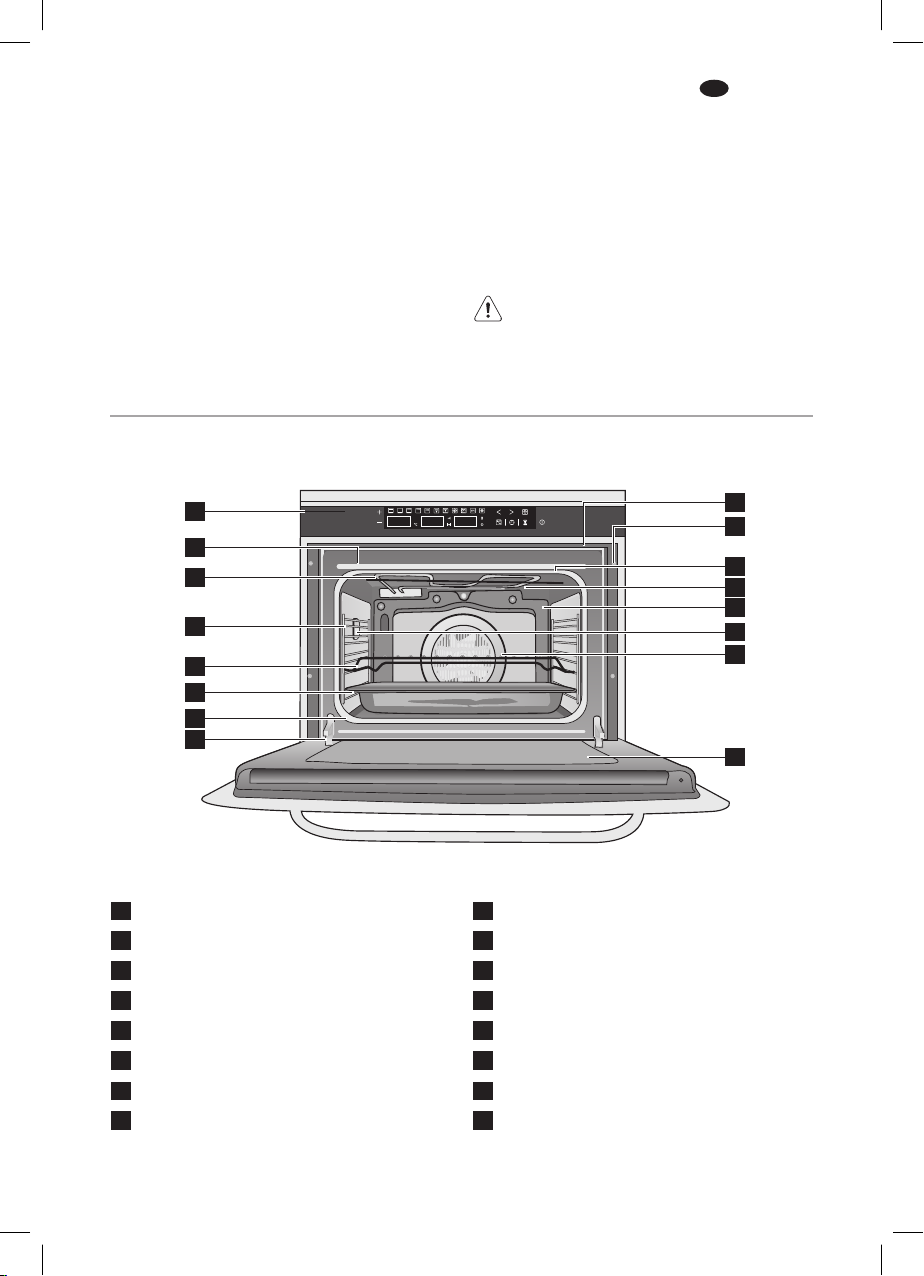
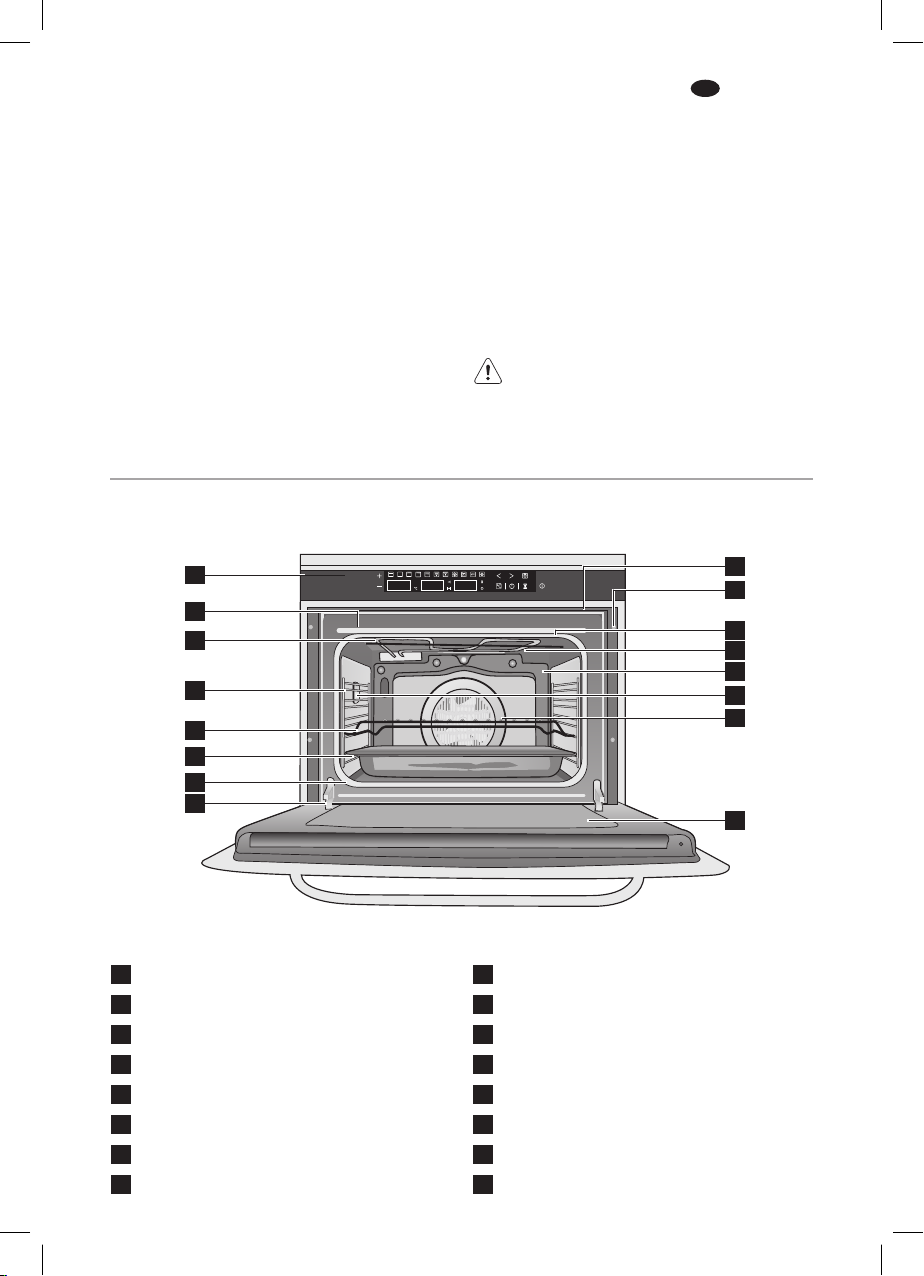
Product description
General Overview
1
2
3
4
5
6
7
8
work top or plinth area are damaged
such that the inside of the appliance
is freely accessible. Contact your local
Service Force centre, in order to avoid
hazard.
• All sides of the oven must never be drilled
to prevent damage to hydraulic and
electric components.
Warning! For electrical connection
carefully follow the instructions given in
specifi c paragraphs.
9
10
11
12
13
14
15
16
1
Control Panel
2
Oven Seal
3
Grill Element
4
Chrome Support
5
Grid
6
Tray
7
Hinge
8
Door
9
Air Outlet
10
Fixing to Unit
11
Grill Screen
12
Smoke Outlet
13
Rear Panel
14
Light
15
Fan
16
Large Interior Glass Door
Page 4

4 electrolux
EN
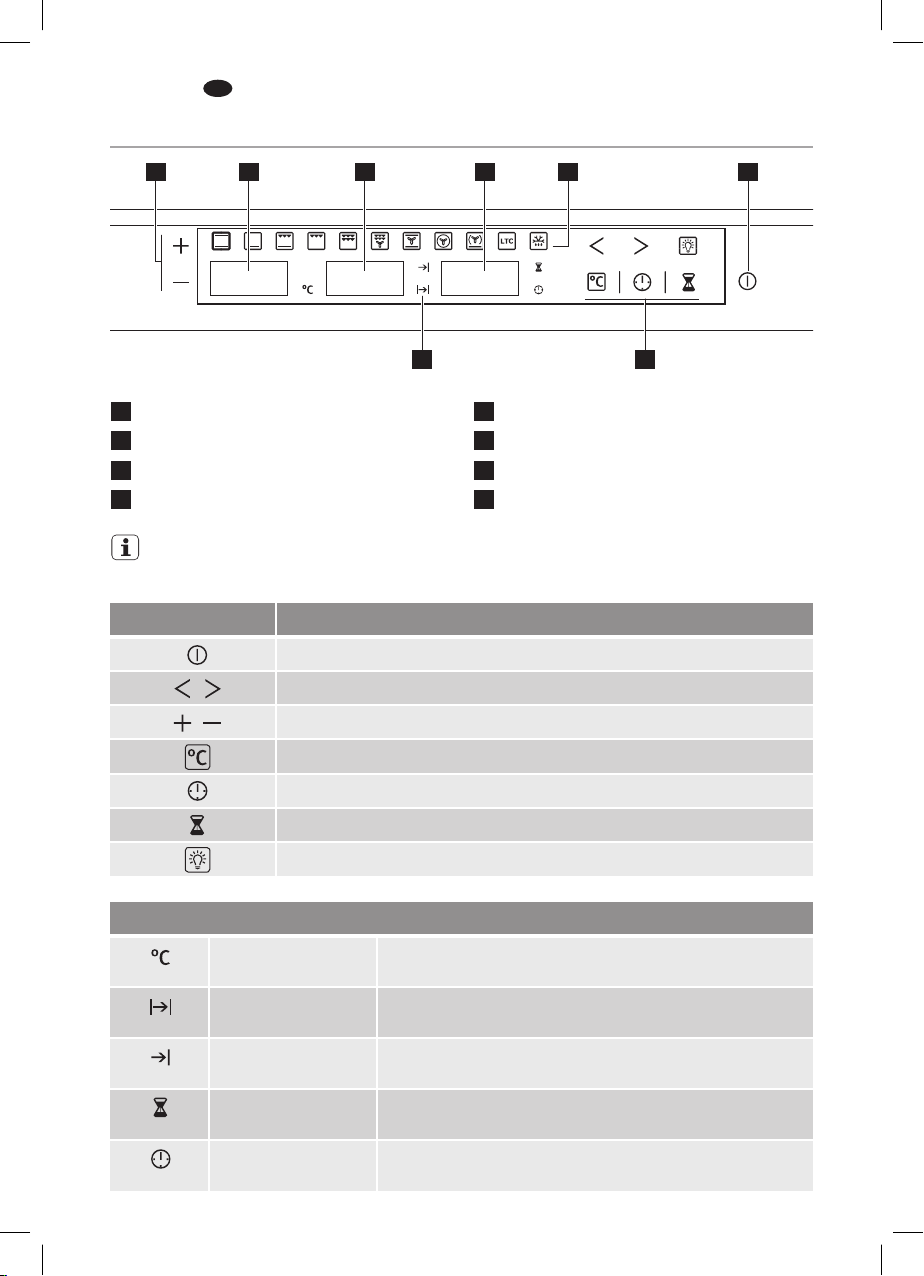
Control panel
2 4
1
Increase/Decrease Buttons
2
Temperature display
3
Time display
4
Time functions display
3
6
5
Oven functions
6
Indicator lights
7
Function buttons
8
On / Off button
5
The oven will only work if the time of day has been set.
However, the oven can also be operated without any programme.
Buttons Function
To switch appliance on or off
To Select oven functions
To set temperature and time values or defrosting level
81
7
To set temperature values
To select clock functions
To set minute minder
To switch light on or off
Oven temperature
Cooking duration
End of cooking
Minute minder
Time of day
Indicator lights
Flashes when setting temperature is carried out.
Illuminates when a programmed cooking duration is set
and will start fl ashing when the cooking time is over.
Illuminates when a programmed end of cooking is set and
will start fl ashing when the cooking time is over.
Illuminates when the minute minder alarm is set.
Flashes when setting the time of day is carried out
Page 5
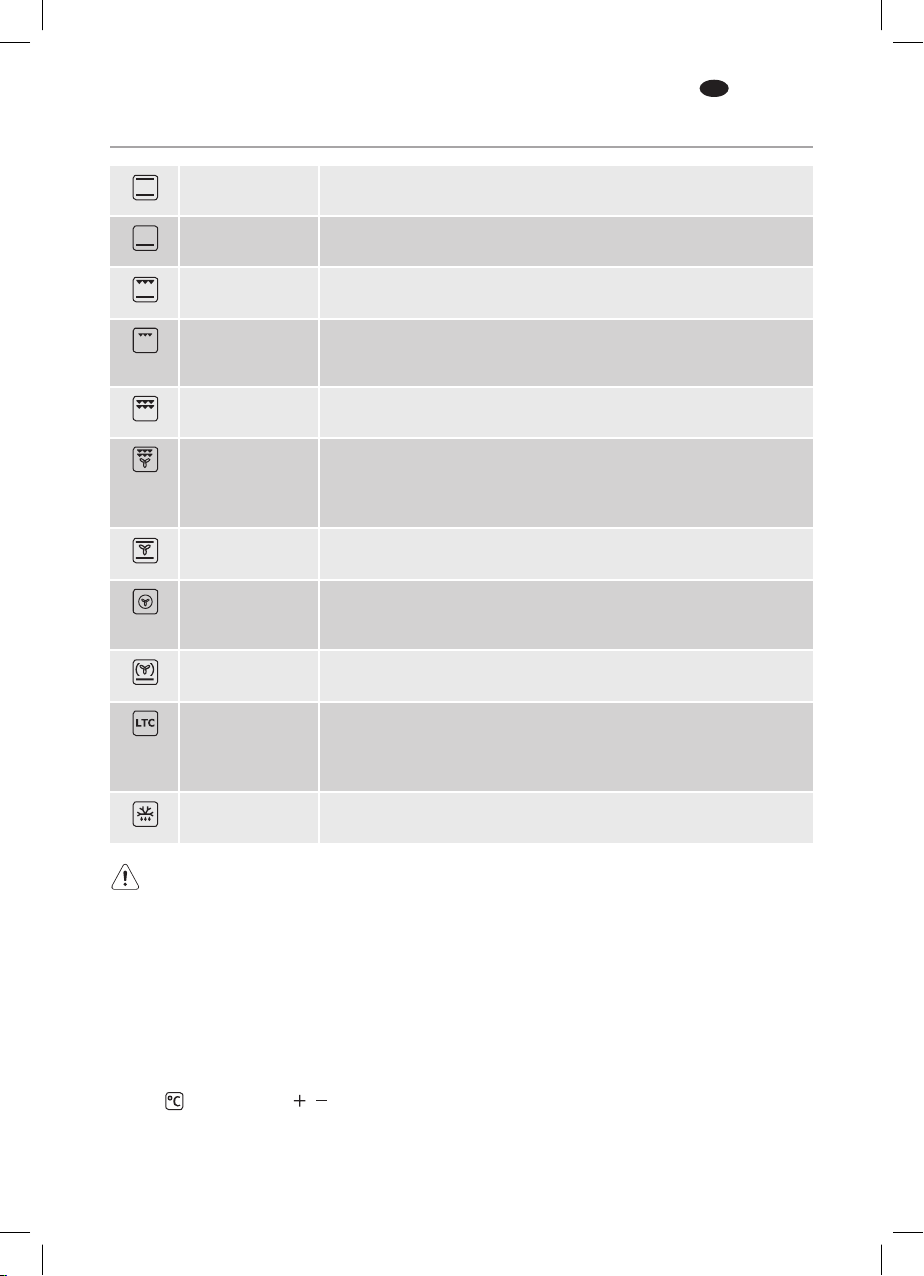
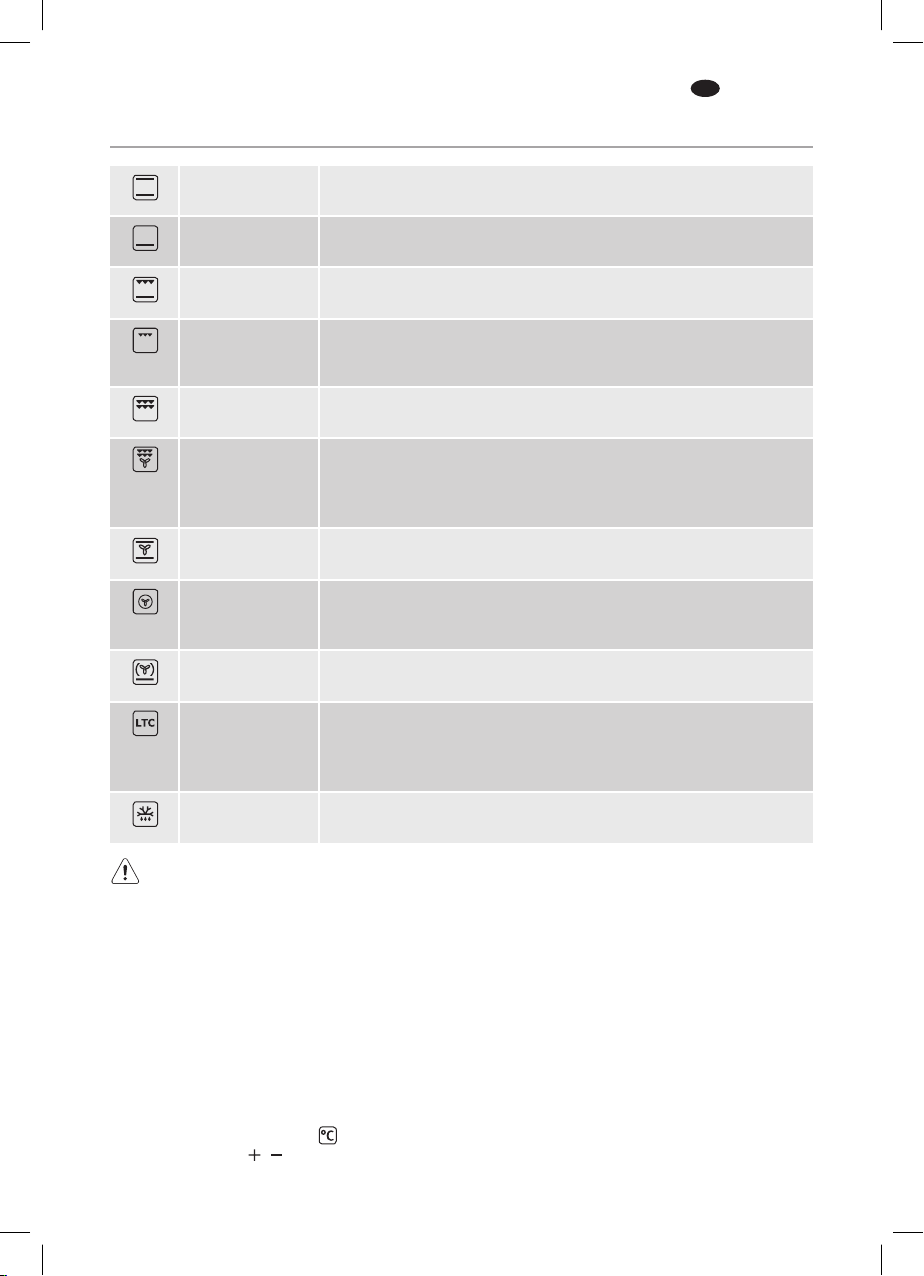
Oven functions
electrolux 5
EN
Conventional
Lower
element
Grill and Lower
element
Single Grill
Dual Grill
Dual Grill
with fan
Conventional
with fan
Turbo
Lower element
with fan
Low
temperature
cooking
Defrosting
It is used for sponges and cakes where the heat received must be
uniform to achieve a spongy texture.
Heat only from beneath. Suitable for heating dishes and raising pastry
and similar.
Special for roasts. It can be used for any piece, whatever its size.
For preparing dishes with superfi cial roasting. It allows the outer layer
to be browned without affecting the inside of the food. Ideal for fl at
food, such as steaks, ribs, fi sh, toast.
Allows greater surfaces to be prepared, than with the grill, together
with higher power reducing the time required for browning of the food.
Allows uniform roasting at the same time as surface browning. Ideal
for grills. Special for large volume pieces, such as poultry game etc.
It is recommended to put the item on a rack with a tray beneath to
collect the stock and juices.
Suitable for roasts and cakes. The fan spreads the heat evenly throughout
the inside of the oven to reduce cooking time and temperature.
The fan distributes the heat produced by an element located at the
rear of the oven. Due to the uniform heat distribution, it allows
roasting and baking to take place at two heights at the same time.
Ideal for baking pizzas, pies, and fruit tarts or sponges.
Designed to cook casseroles, stews, etc, in the traditional way, and
for all recipes specifying long cooking times and low heat. For the
best results, we recommend using covered casserole pans with lids,
fi rst making sure that they can be used in the oven.
For defrosting e.g. gateaux and fl ans, butter, bread, fruit or other
frozen foods.
Caution!
While using the Grill, Dual Grill or Dual Grill with fan, the door must be kept closed.
Recommendations for Defrosting Food
The defrost function works by means of a
2-level system of hot air. HI is for meats in
general and LO is for fi sh, cakes, pastries
and bread. When selecting the defrost
function, select HI or LO on the temperature
display by pressing on the temperature
button
and then the buttons.
• Unpackaged food should be placed on
the oven tray or on a dish.
• Defrost large pieces of meat or fi sh by
placing them over the grid with a tray
underneath to collect any liquid.
Meat and fi sh do not need to be completely
•
thawed before cooking. Condiments
can be added once the surface is soft.
• Food should always be cooked after
defrosting.
• Do not refreeze defrosted food.
Page 6
6 electrolux
EN
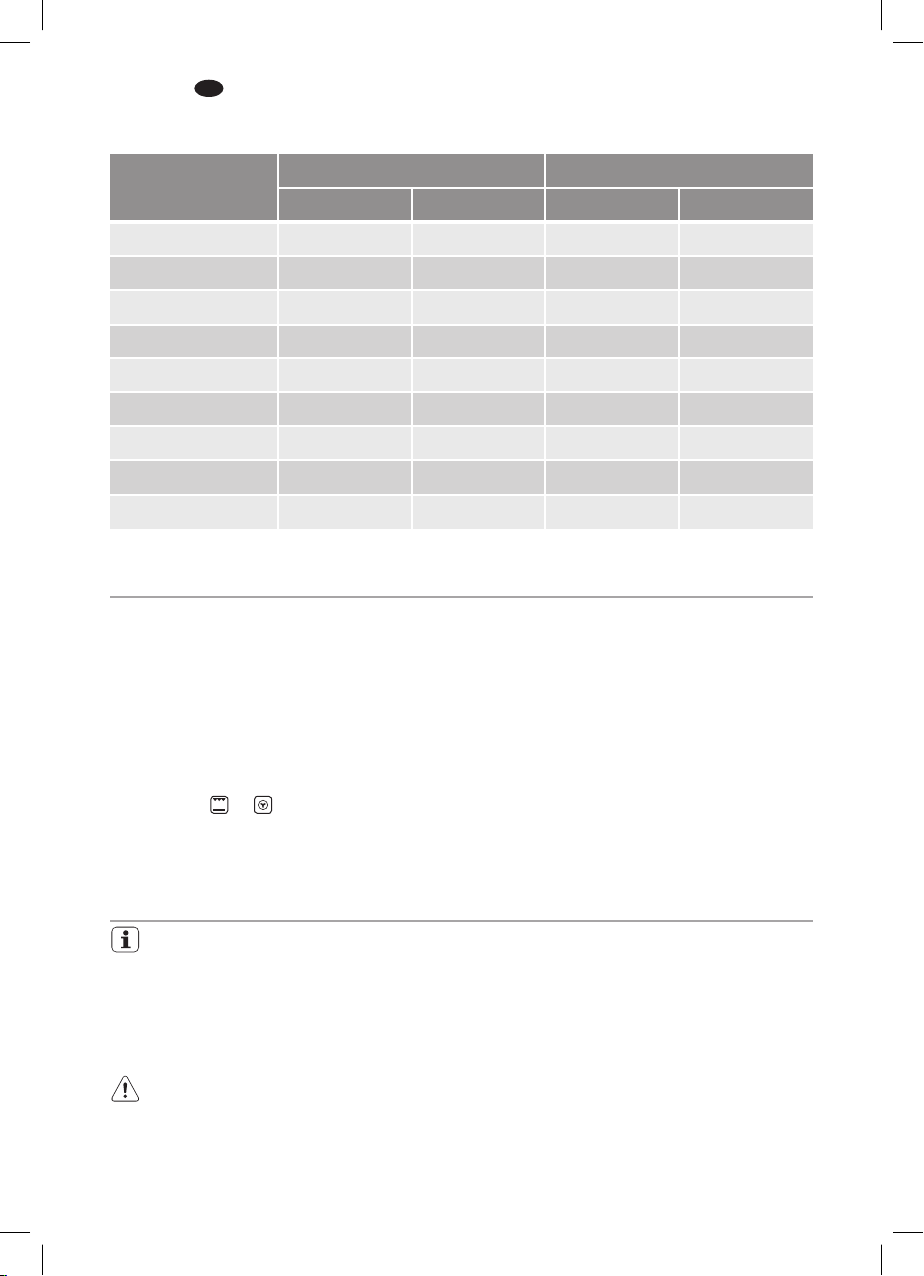
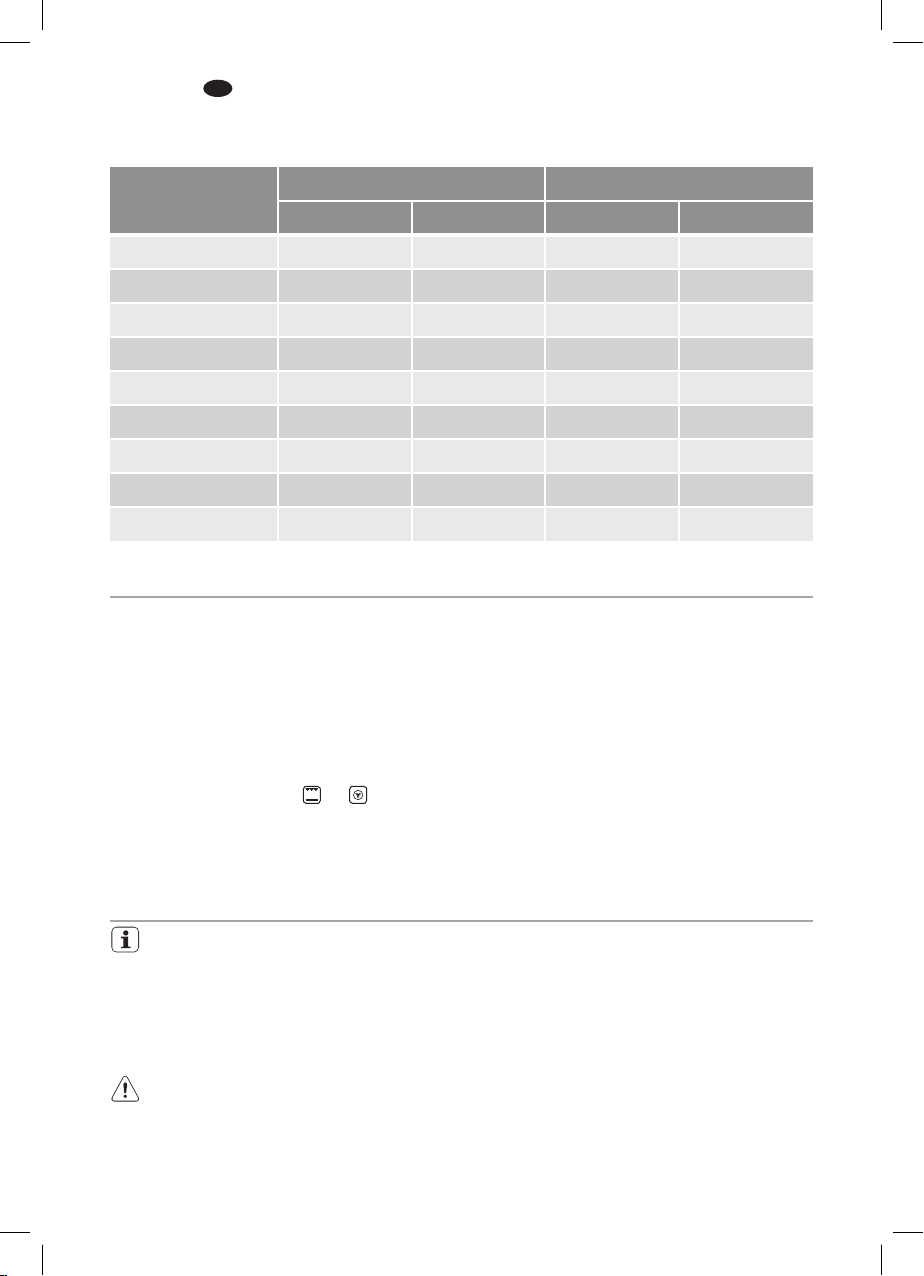
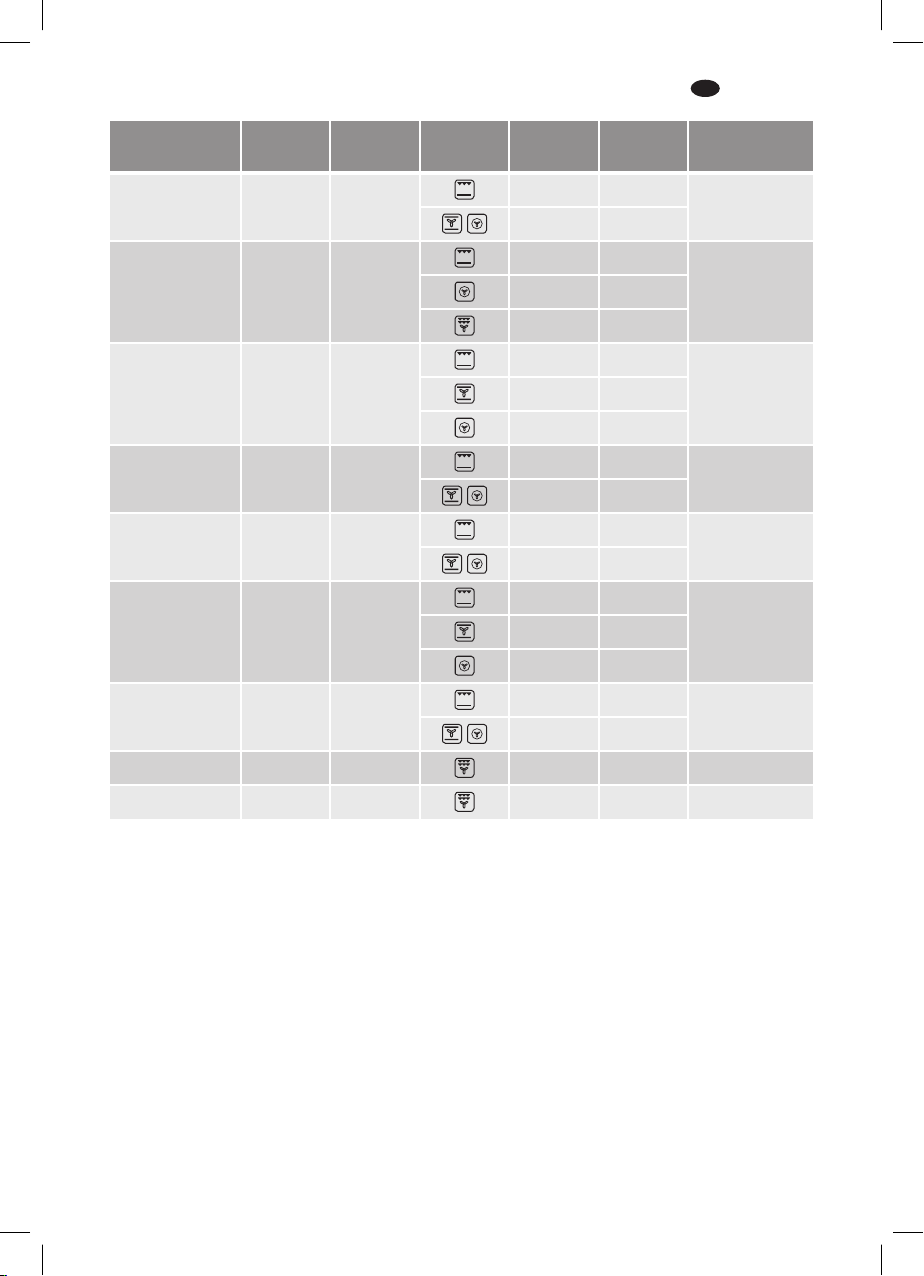
See the following chart for defrosting times and temperature levels
FOOD
Bread
Cake
Fish
Fish
Chicken
Chicken
Rib steak
Minced meat
Minced meat 1 Kg 120 min
LO LEVEL
Weight Time
1/2 Kg 35 min
1/2 Kg 25 min
1/2 Kg 30 min
1 Kg 40 min
HI LEVEL
Weight Time
1 Kg 75 min
1,5 Kg 90 min
1/2 Kg 40 min
1/2 Kg 60 min
Before using for the fi rst time
Carefully read this Instruction Manual to
achieve the best results from your oven.
Due to the manufacturing process there
may be residues of grease and other
substances. To eliminate these, proceed
as follows:
Remove all the packaging material, including
•
the protective plastic, if included.
• Select the
or function at 200ºC for
one hour. To do so, consult the feature
list provided with this manual.
• To cool the oven open the door to allow
ventilation and odours to escape from
inside.
• After cooling, clean the oven and the
accessories.
During the fi rst use, fumes and odours may
occur and the kitchen should therefore be
well ventilated.
Using the oven
In the event of a power failure, all the
settings (time of day, programme
setting or programme in operation) will
be cancelled.
When the power is restored, the
numbers in the display will fl ash, and
the clock/timer has to be reset.
Caution!
The electronic clock features TouchControl technology. To operate, simply
touch the glass control symbols with
your fi ngertip.
The touch control sensitivity continuously
adapts to changing conditions. Ensure
that the glass front of the control panel
is clean and free of any obstacles when
turning on the oven.
If the clock does not respond correctly
when you touch the glass, you will
need to turn off the oven for a few
seconds and then turn it back on. By
doing this, the buttons adjust
automatically and will react once
more to fi ngertip control.
Page 7
electrolux 7
EN
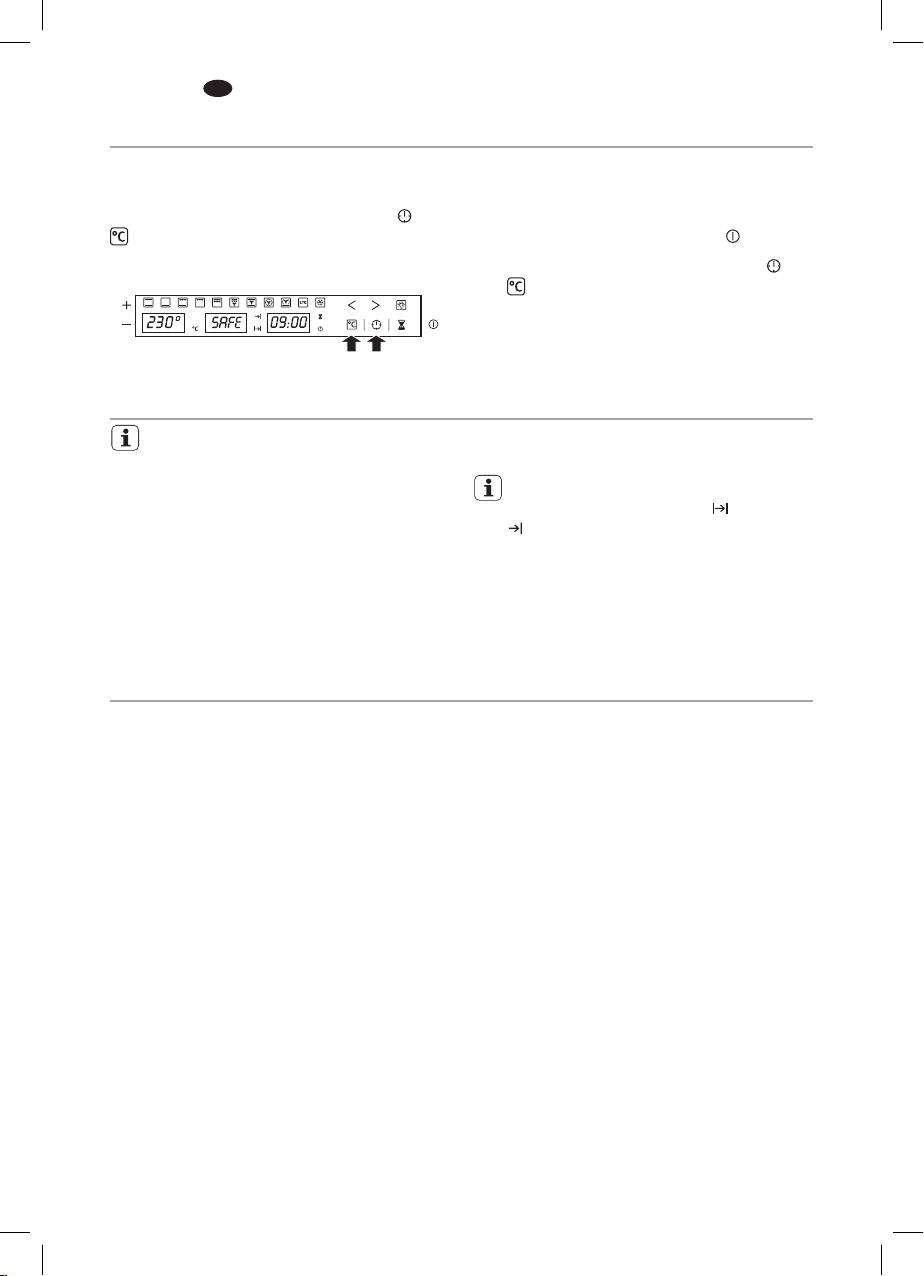
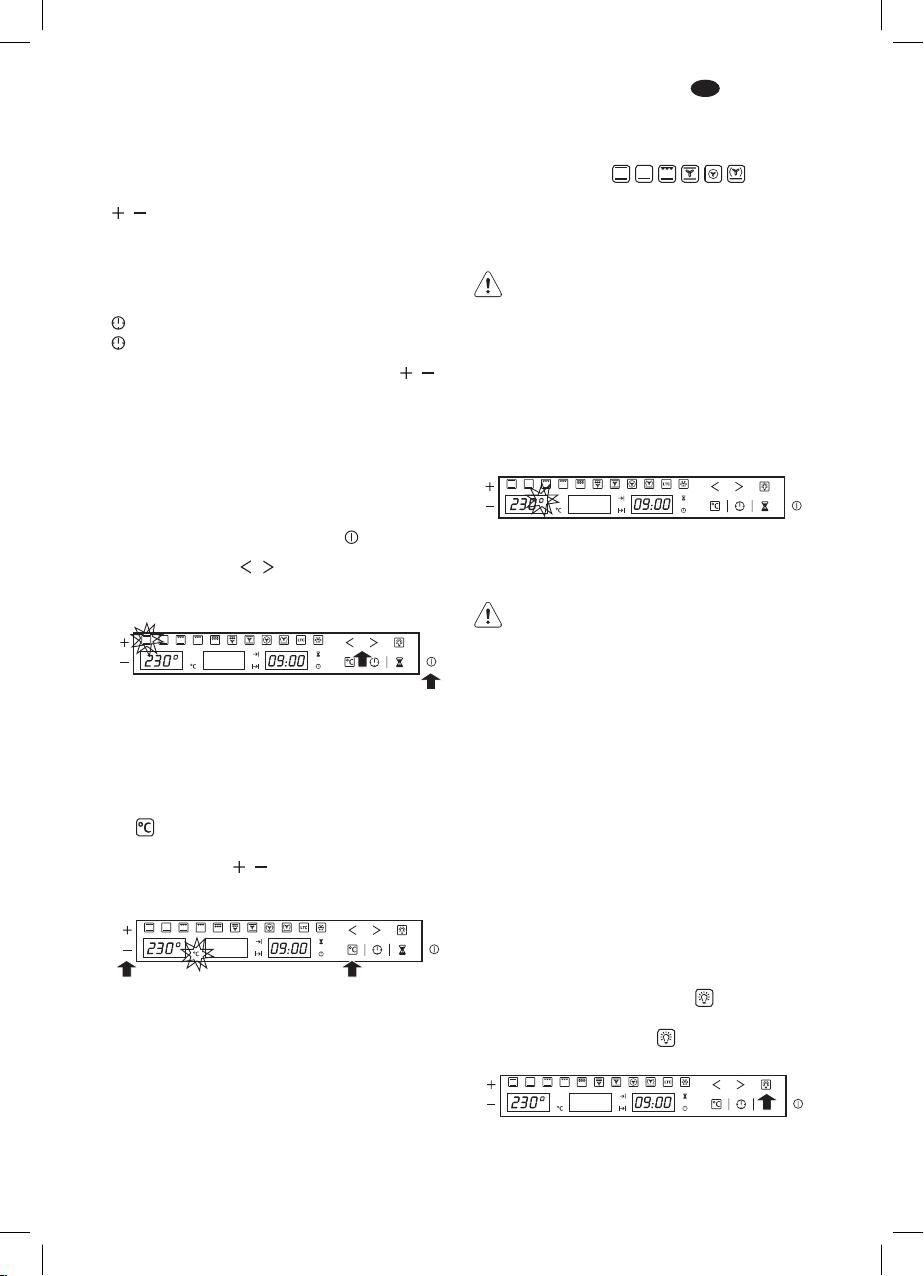
Setting the Electronic Clock
When turning your oven on, you will see
the clock fl ashing 12:00. Set the clock by
touching the
symbols on the glass.
You will hear 2 beeps confi rming the time
has been set.
If you want to change the time, turn the
oven off. Touch the clock button
indicator fl ashes
.
Change the time by touching the
until the
buttons. The two beeps you hear after that
will confi rm the new time has been set.
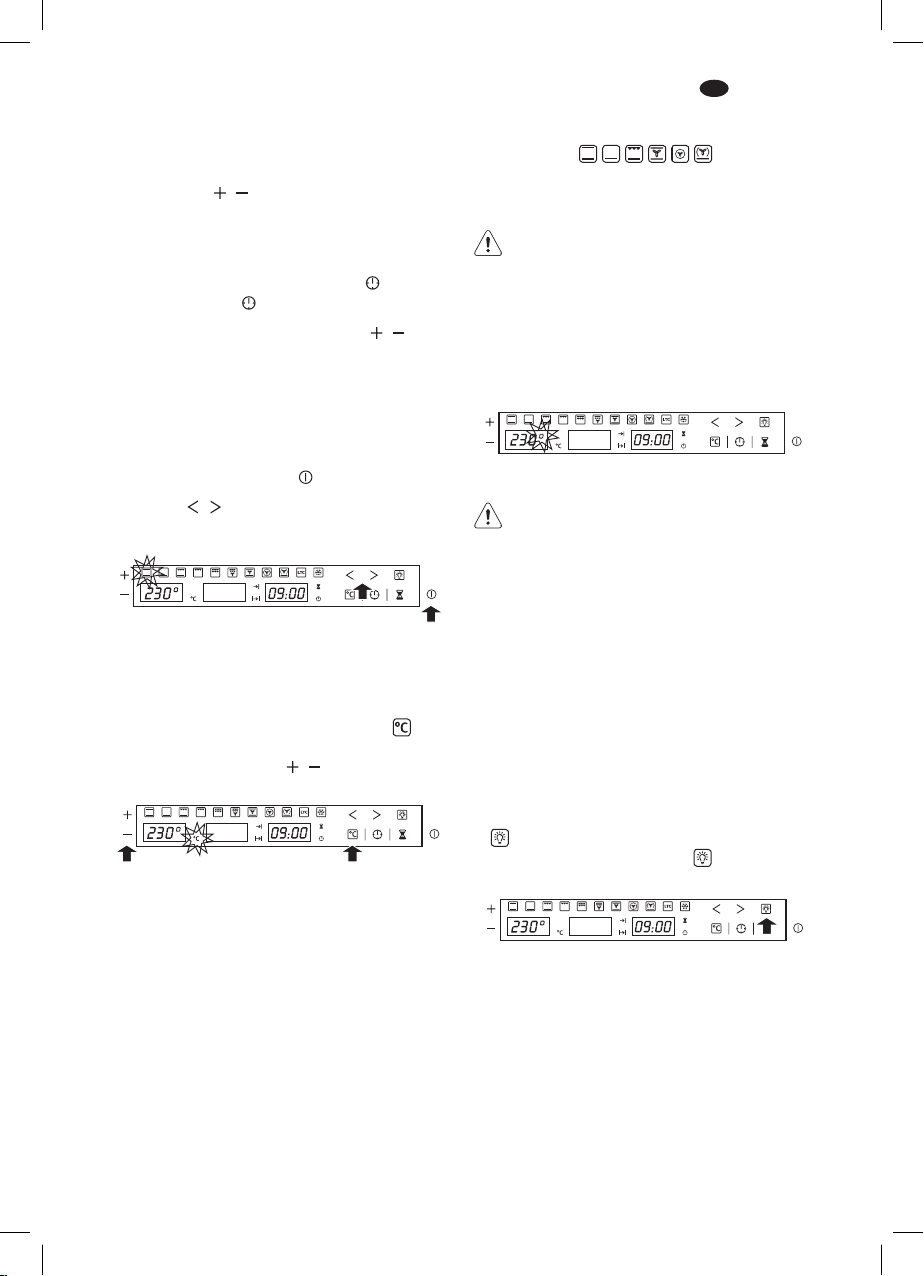
Manual operation
After setting the clock, the oven is ready for
use:
1 Press the On button .
2 Press
to select the desired
cooking function.
3 The temperature display will show the
preset temperature for that cooking
function.
Press on the temperature button
to
change it. Select the desired temperature
by pressing on the
buttons.
4 The top oven cavity will start to heat up.
Functions
will start the
fast preheating function for a few
minutes. The oven will beep when it
reaches the selected temperature.
Caution! this preheating function turns
on the turbo motor at the back of the
top oven cavity.
5 During oven heating, the temperature
degree symbol on the temperature
display will fl ash to show that the food is
being heated.
6 Press on the Off button to stop cooking.
Caution! When cooking has fi nished,
you will notice that oven cooling feature
will work until the temperature inside
the oven has been suitably lowered.
Oven Lighting
The inside light will go on:
– When the oven door is open. If the door
is not closed after a certain time, the light
will turn off to reduce power
consumption.
– When any cooking function is selected.
The light will turn off after a certain time.
If you want to turn the light on during
cooking, just touch the Oven Light button
. If you want to turn off the light press
the the Oven Light button
.
Page 8
8 electrolux
EN
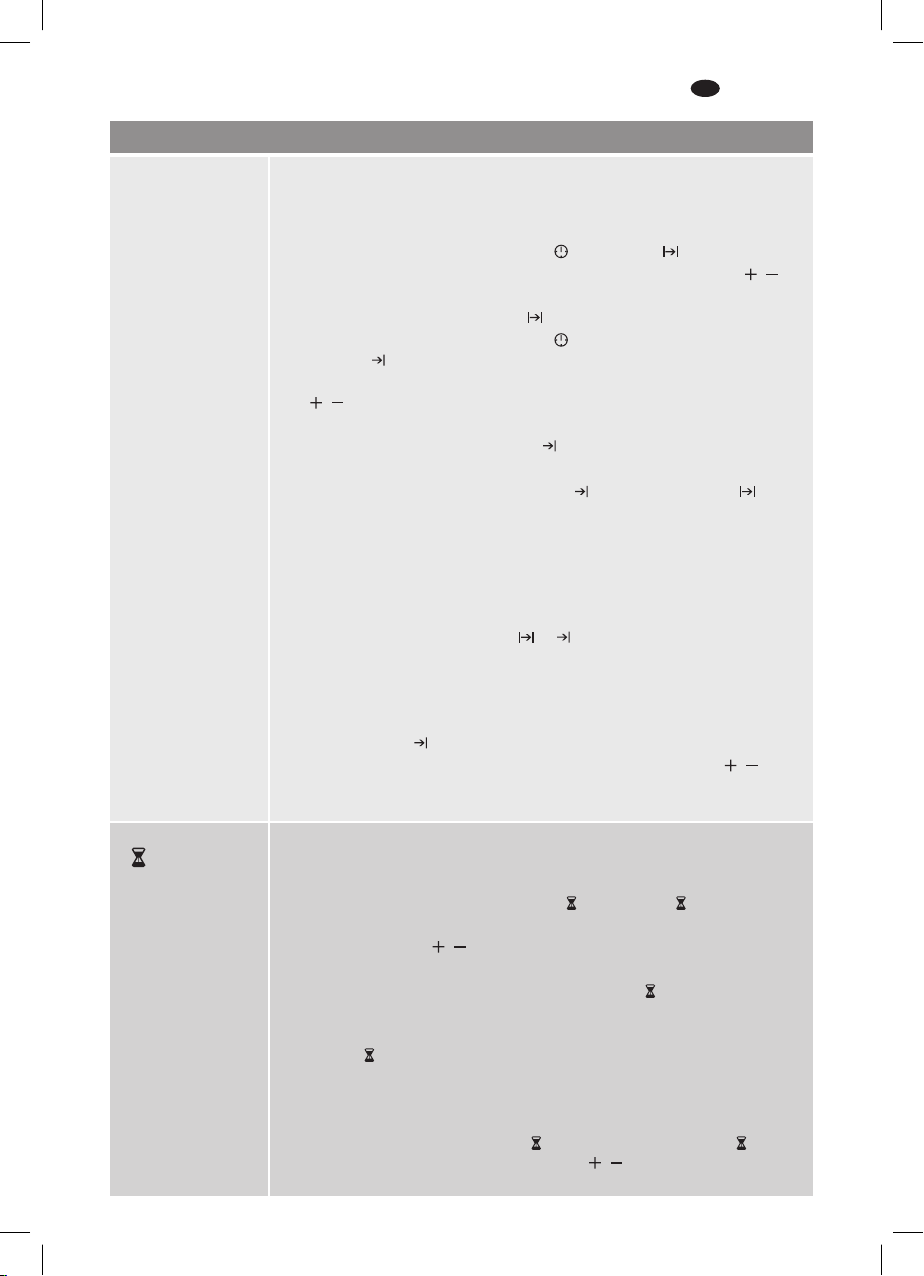
Electronic clock functions
Electronic programmer functions
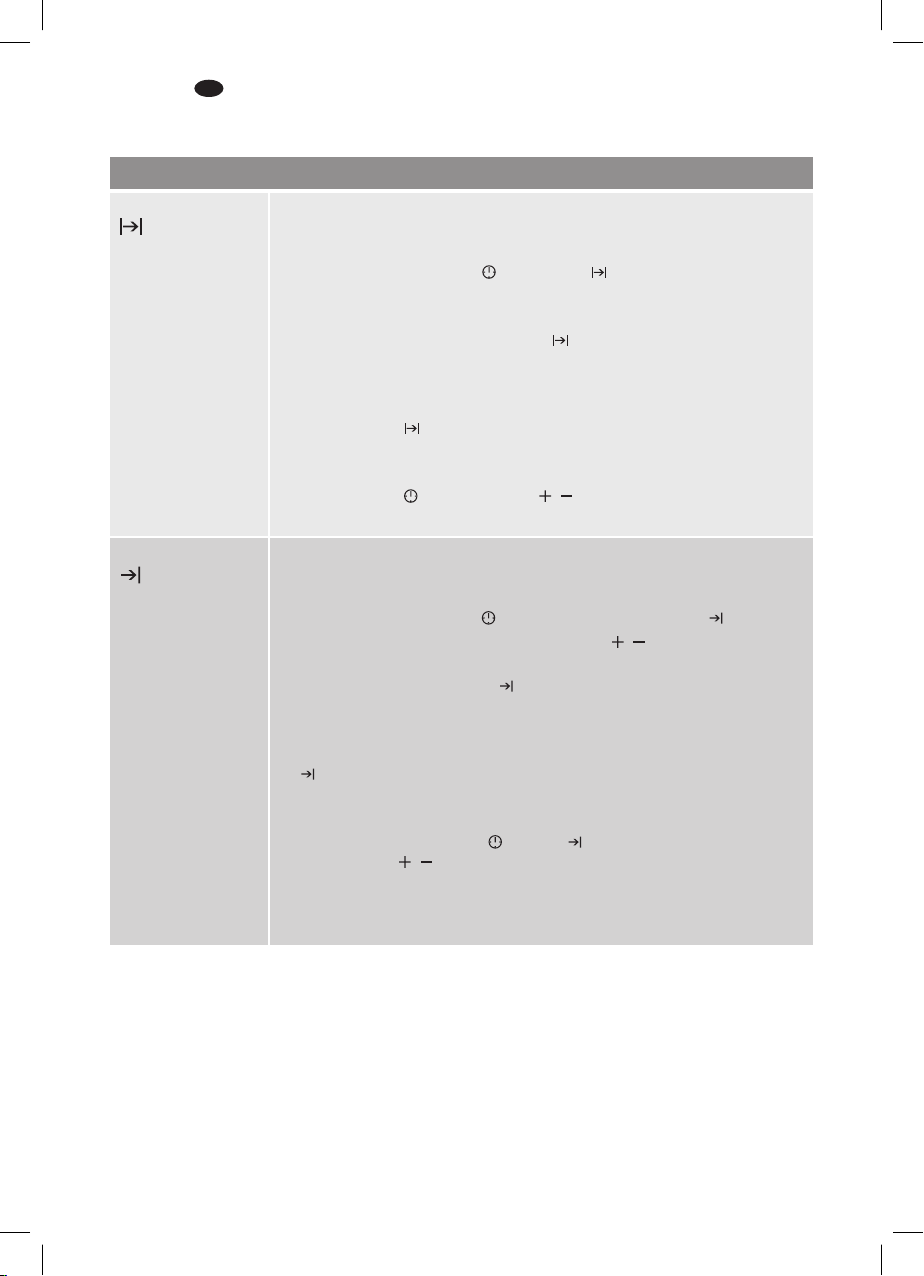
Cooking Duration This function allows you to programme cooking time length, after which
the oven will turn off automatically.
Programming Cooking Time:
1 Press on the clock button
2 Select the cooking time by pressing the or buttons.
3 Two consecutive beeps will then sound and the display will show the
remaining cooking time. The symbol will fl ash slowly to indicate that
the oven will switch itself automatically.
4 Select a cooking function and temperature.
5 Once the cooking time is complete, the oven will turn off, an alarm will
sound and the symbol will fl ash more quickly.
6 Press on any button on the control panel to stop the alarm.
You can change the programmed time whenever you want by touching
the clock button and then on the buttons.
The two beeps you hear after that will confi rm the new time has been set.
End of cooking This function allows you to programme the time for cooking to stop, after
which the oven will turn off automatically.
Programming the Cooking Stop Time:
1 Press on the clock button several times until the symbol lights up.
2 Select the cooking stop time by pressing the buttons.
3 Two consecutive beeps will then sound and the display will show the
remaining cooking time. The symbol will fl ash slowly to indicate that
the oven will switch itself automatically.
4 Select a cooking function and temperature.
5 Once it is the set time, the oven will turn off, an alarm will sound and the
symbol will fl ash more quickly.
6 Press on any button on the control panel to stop the alarm.
You can change the programmed cooking stop time at any moment by
pressing on the clock button until the symbol fl ashes and then by
pressing on the buttons. The two beeps you hear after that will
confi rm the new time has been set.
You can use this function even if you are already cooking with the oven. If
this is the case, follow all of the above instructions except No. 4.
. The symbol will light up.
Page 9
electrolux 9
EN
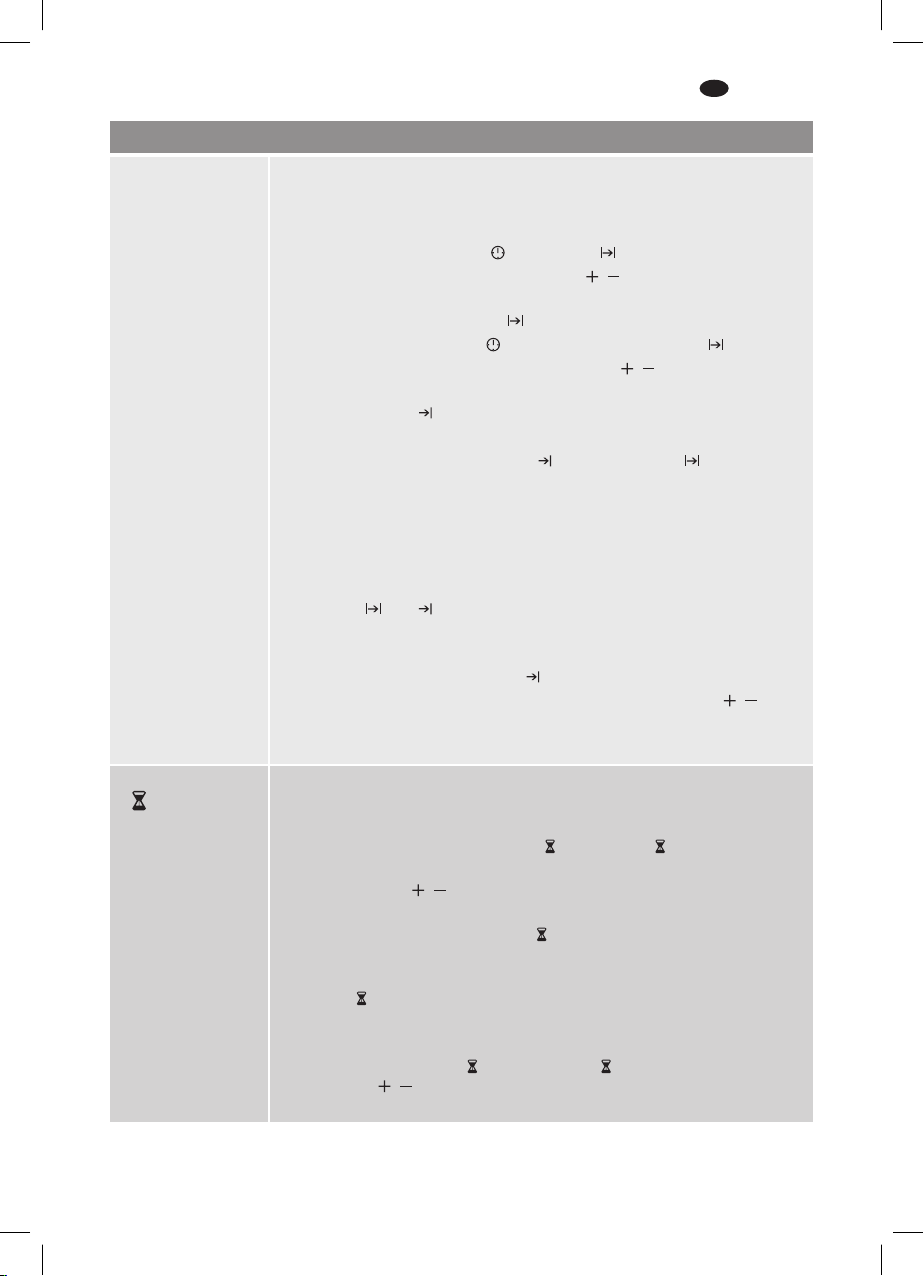
Electronic programmer functions
Cooking duration
Cooking duration
and End of
and End of
cooking
cooking time
time combined
combined
This function allows both cooking time length and the stop time to be
programmed. With this function, the oven switches on automatically at the
set time and operates for the cooking time it has been programmed for. It
switches itself off automatically at the entered stop time.
1 Press on the clock button
. The symbol will light up.
2 Select the cooking time by pressing the buttons.
3 Two consecutive beeps will then sound, and the display will show the
remaining cooking time. The symbol will fl ash slowly.
4 Press on the clock button several times until the symbol lights up.
5 Select the cooking stop time by pressing the buttons.
6 This will be confi rmed by two beeps. The current time will show on the
display and the symbol will remain lit.
7 Select a cooking function and temperature.
8 The oven will remain off, with the symbol lit and the symbol
fl ashing slowly. The clock will show the current time and the inside light
will remain off. The oven is now programmed.
9 When it is time to start cooking, the oven will switch on and will operate
for the programmed cooking time. The time function display will show
the remaining cooking time.
10 Once the set time is reached, the oven will turn off, an alarm will sound
and the and symbols will fl ash.
11 Press on any button on the control panel to stop the alarm.
If you wish to change the cooking stop time while cooking is in progress,
press on the clock button until the symbol fl ashes.
You can then change the cooking stop time by pressing on the
buttons.
The two beeps you hear after that will confi rm the new time has been set.
Minute minder A beep will go sound when the set time has fi nished, whether the oven is
on or off.
Programming the Minute Minder:
1 Press on the minute minder button . The symbol lights up.
2 Select the length of time after which you want the alarm to sound by
pressing on the buttons.
3 You will then hear two beeps; the display will show the time left before
the alarm sounds and the symbol will fl ash slowly, indicating that the
timer has been set.
4 Once the programmed time has passed, an alarm will sound and the
symbol will begin to fl ash more quickly.
5 Press on any button on the control panel to stop the alarm.
You can change the programmed time whenever you want by touching
the minute minder button until the symbol fl ashes, and then
touching the buttons. The two beeps you hear after that will confi rm
the new time has been set.
Page 10
10 electrolux
EN
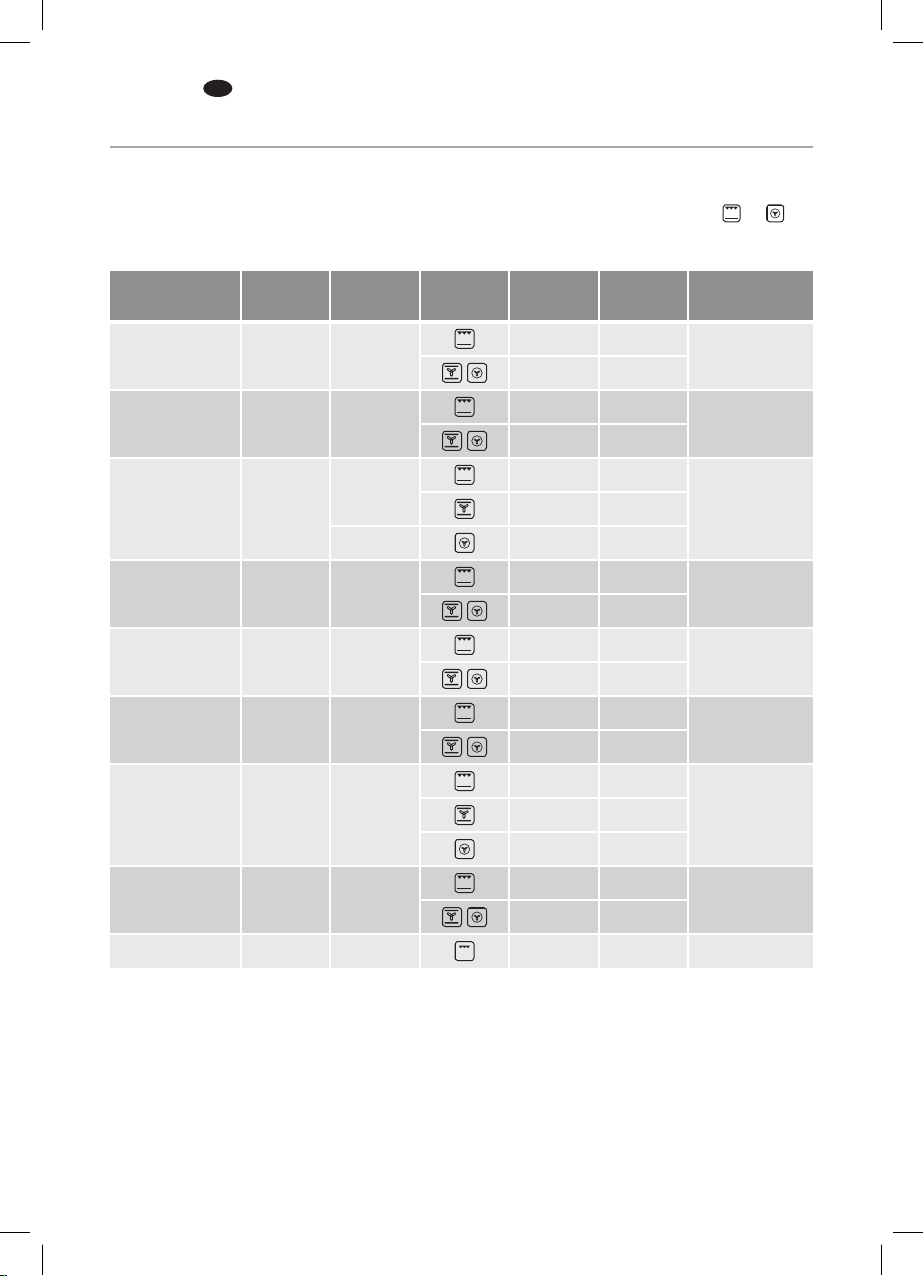
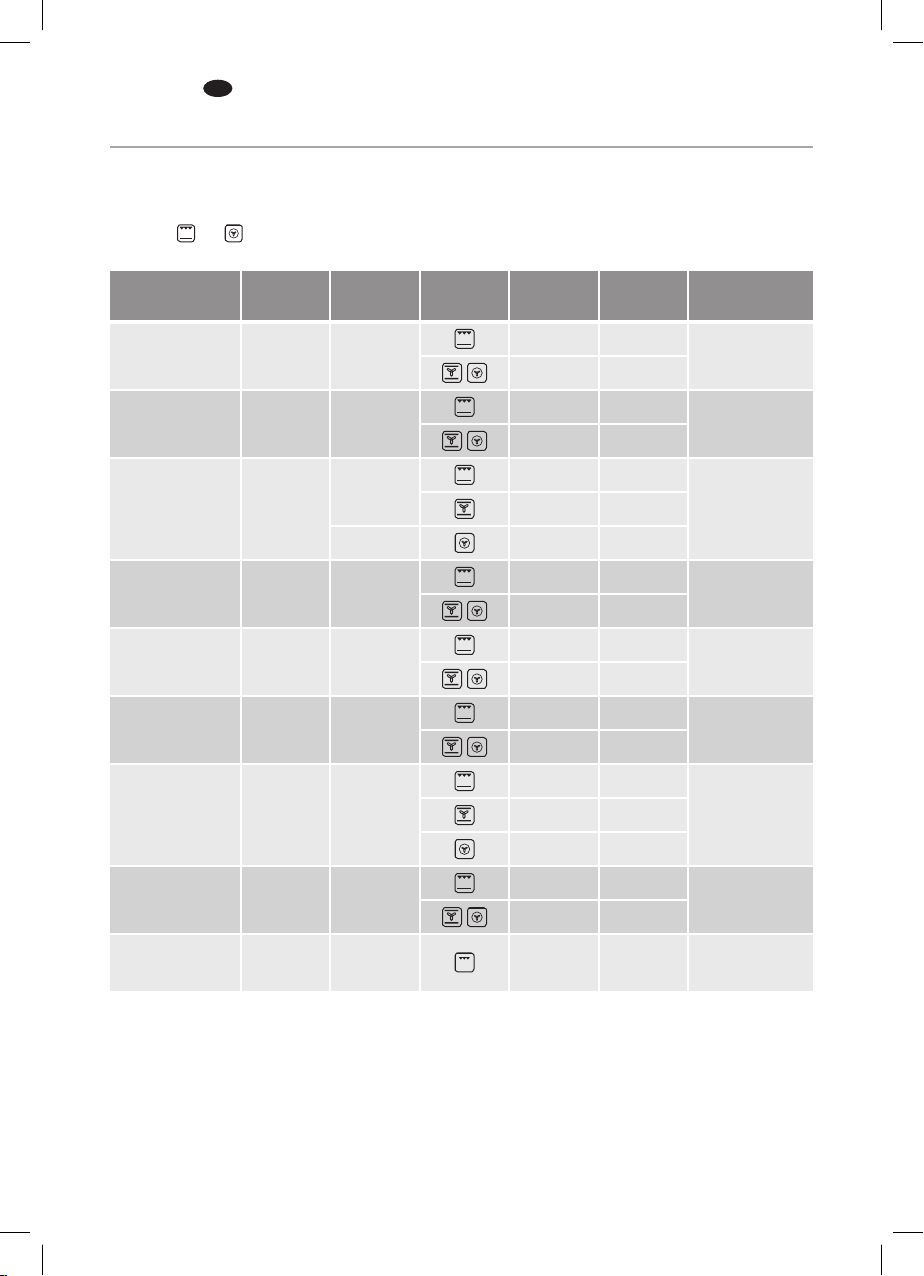
Cooking Tables
The Cooking Tables show examples of temperature ranges and approximate cooking
times. The cooking mode depends on the model.
For the best results we recommend the oven to be preheated with the function
for 10 minutes.
or
Starters
Baked rice 1,0 Lower
Pasty 1,2
Vegetable
Pastry
Vegetable Pie 1,0
Baked
potatoes
Pizza 0,6
Quiche 0,8
Weight
(Kg)
1,0
1,0 Lower
Tray
Position
Intermediate
Intermediate
Intermediate
Intermediate
Intermediate
Cooking
Mode
Temperat.
(ºC)
180-200 25-30
170-190 20-25
170-190 45-50
160-180 30-35
190-210 25-30
180-200 25-30
170-190 35-40 Lower
190-210 55-60
170-190 45-50
180-200 55-60
180-200 40-45
190-210 15-20
170-190 10-15
180-200 40-45
170-190 40-45
Time
(min)
Receptacle
Shallow
oven dish
Tray
Shallow dish
Shallow dish
Tray
Grid
Quiche Mould 160-180 35-40
Stuffed
tomatoes
Lasagne 1,0
0,8
Intermediate
Intermediate
170-190 10-12
160-180 10-12
180-200 8-10 Shallow dish
Tray
Page 11

electrolux 11
EN
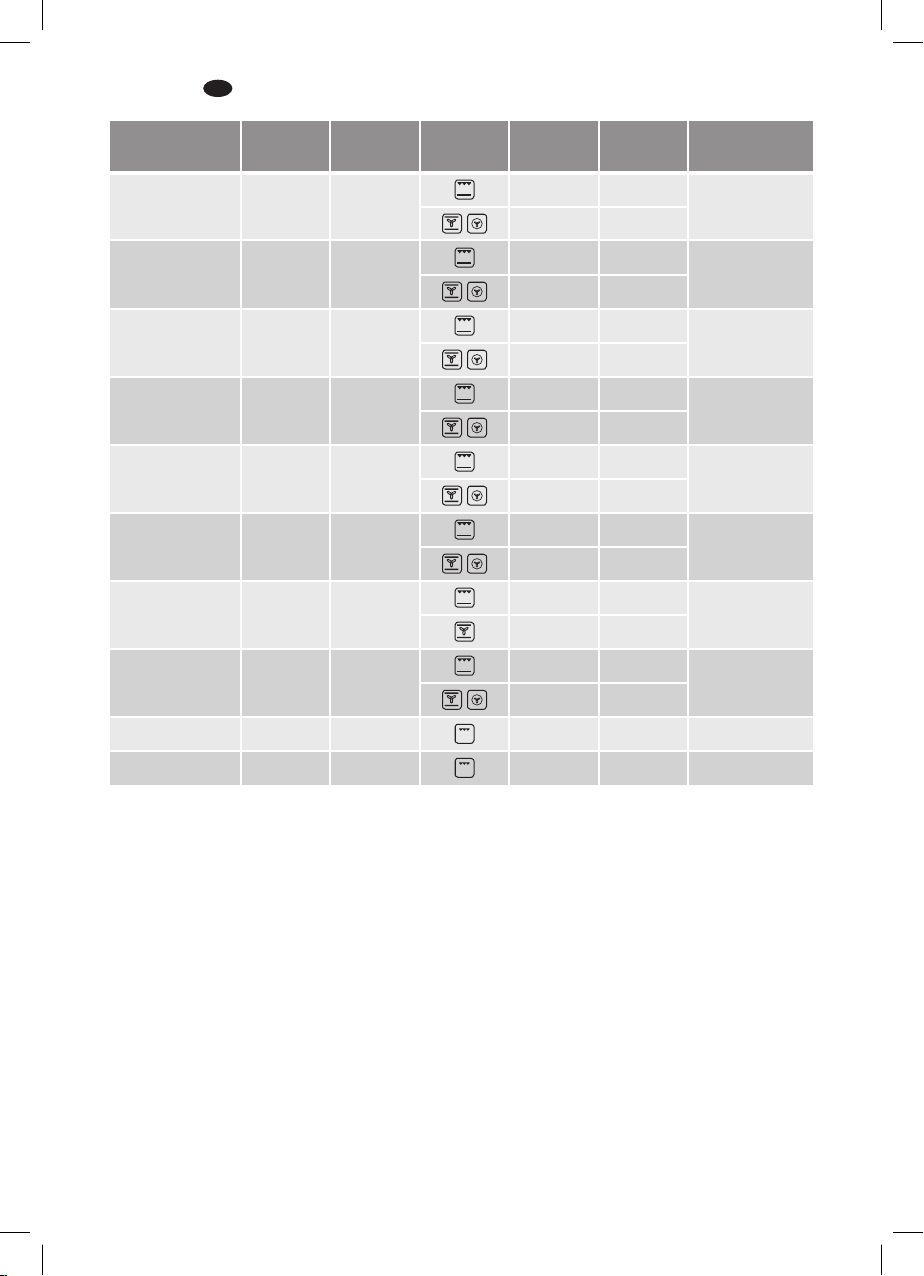
MEAT
Suckling Pig 1,4
Rabbit 1,2
Lamb 1,0
Salted Pork
Loin
Chicken 1,2 Lower
Roast-beef 0,6
Fillet Steak
Pastry
Brochettes 0,3 Higher 180-200 10-12 Grid
Weight
(Kg)
0,6
1,0
Tray
Position
Intermediate
Intermediate
Intermediate
Intermediate
Intermediate
Intermediate
Cooking
Mode
Temperat.
(ºC)
190-210 70-75
170-190 70-75
180-200 55-60
170-190 30-35
190-210 50-55
180-200 50-55
170-190 35-40
170-190 40-45
190-210 50-55
170-190 45-50
190-210 30-35
190-210 30-35
180-200 35-40
160-180 30-35
Time
(min)
Receptacle
Tray
Tray 170-190 45-50
Tray 170-190 45-50
Tray
Tray
Tray 180-200 25-30
Tray
Sausages 0,6 Higher 190-210 10-15 Grid
Page 12
12 electrolux
EN
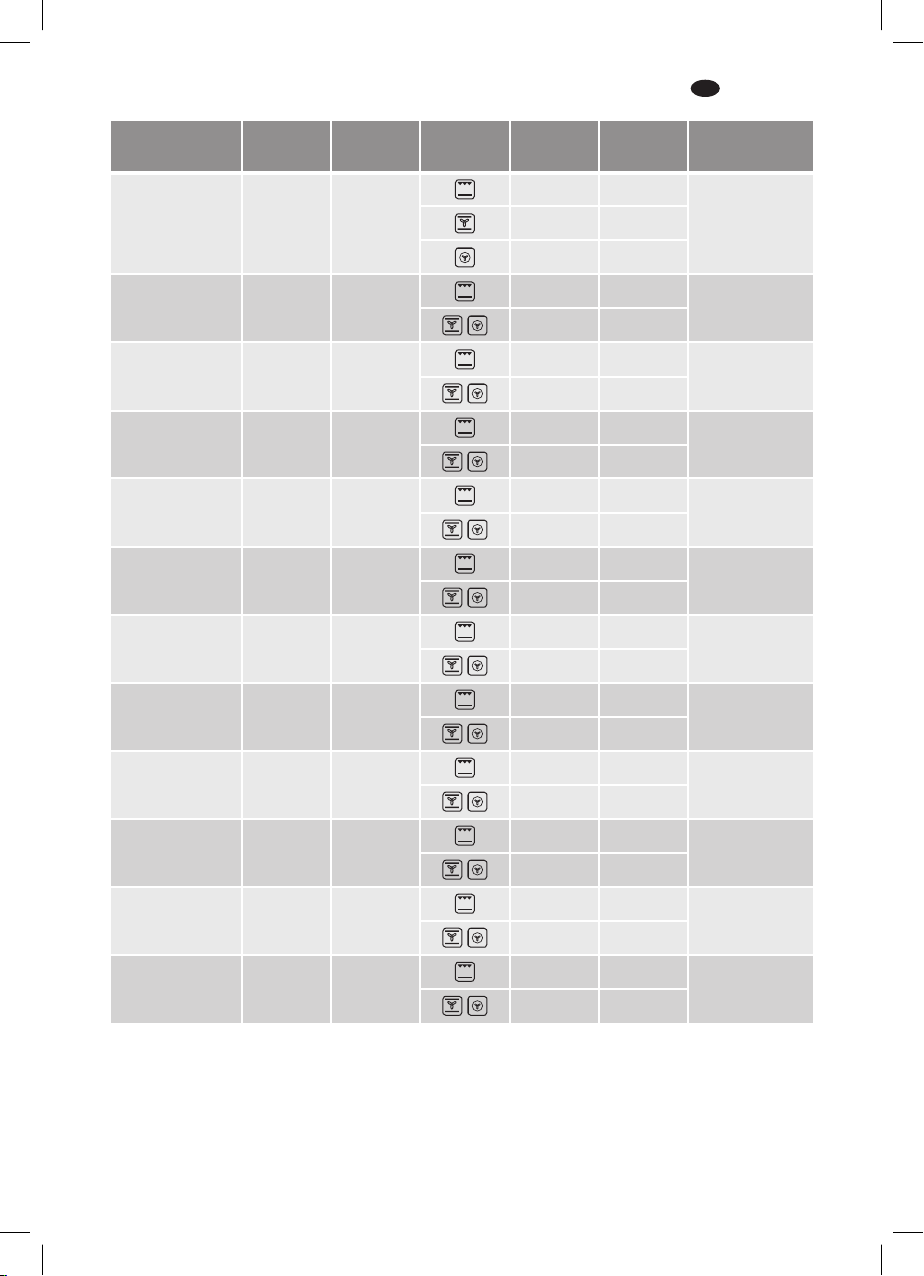
FISH
Red Bream 1,0
Salted
Dorado
Sole 1,0
Sea-bass 1,0
Hake 1,1
Fish Pie 1,1
Salmon in
greased
paper
Trout 1,1
Fillet of Fish 1,0 Higher 170-190 15-20 Grid
Weight
(Kg)
1,0
1,0
Tray
Position
Intermediate
Intermediate
Intermediate
Intermediate
Intermediate
Intermediate
Intermediate
Intermediate
Cooking
Mode
Temperat.
(ºC)
180-200 25-30
170-190 20-25
190-210 25-30
180-200 25-30
170-190 15-20
160-180 10-15
190-210 20-25
180-200 10-15
190-210 25-30
180-200 20-25
190-210 60-65
190-210 60-65
180-200 20-25
170-190 15-20
190-210 20-25
180-200 15-20
Time
(min)
Receptacle
Tray
Tray
Tray
Tray
Tray
Casserole dish
Tray
Tray
Sardines 1,0 Higher 180-200 10-15 Grid
Page 13
electrolux 13
EN
CAKES AND
DESSERTS
Sponge Cake 0,5
Swiss Roll 0,5
Flan 0,8
Biscuits 1,0
Vol-au-vents 0,3
Cup Cakes 0,7
Baked Apples 0,5
Meringue 0,35
Baked
bananas
Plum-Cake 0,6
Apple Pie 0,8
Cheesecake 0,8
Weight
(Kg)
0,5
Tray
Position
Intermediate
Intermediate
Intermediate
Intermediate
Intermediate
Intermediate
Intermediate
Intermediate
Intermediate
Intermediate
Intermediate
Intermediate
Cooking
Mode
Temperat.
(ºC)
150-170 35-40
170-190 30-35
160-180 30-35
170-190 10-15
160-180 10-15
160-180 55-60
150-170 50-55
160-180 20-25
150-170 20-25
170-190 20-25
160-180 15-20
160-180 20-25
160-180 20-25
180-200 30-35
170-190 20-25
100-120 70-75
100-120 60-65
180-200 20-25
170-190 15-20
170-190 55-60
160-180 50-55
170-190 45-50
160-180 40-45
180-200 40-45
170-190 40-45
Time
(min)
Receptacle
Cake Mould
Tray
Bread Mould
Tray
Tray
Tray
Tray
Tray
Casserole dish
Cake Mould
Tray
Cheesecake
Mould
Page 14
14 electrolux
EN
Child lock function
This function locks the oven, preventing
small children from playing with it.
To turn on the function, press on the
buttons until you hear a long beep.
The oven is now locked.
and
Oven safety cut-out
If not switched off after a certain time,
or if the temperature is not modifi ed,
the oven switches off automatically.
The oven switches itself off when the oven
temperature is:
50-120ºC after 12,5 hours
120-200ºC after 8,5 hours
200-250ºC after 5,5 hours
If the oven is Off the word SAFE appears on
the time display.
When the oven is on all the buttons keys
are locked except the off button
To switch off the child lock, touch the
and
buttons simultaneously until you
hear a long beep and SAFE goes out in the
display.
Press any button for using the appliance
after a safety cut out.
The safety cut-out is cancelled if the
clock function DURATION
is set.
.
or END
Water Cleaning function
About this function
In order to keep you appliance working
properly it should be regularly cleaned to
prevent any build up of food, deposits or
greases.
This function can help to make the cleaning
process easier and more convenient for you.
How it works
By using heat, Steam and few drops of
washing up liquid food deposit are
loosened and softened enough to make
their removal much easier-eliminating the
need to scrub the enamel and avoid any
scratches on the surface.
How to use:
• Remove all internal components (side
shelves support/grids/pans ) before use.
• Put 500ml approximately of water with
a few drops of washing up liquid added
into a large absorbent sponge which is
placed on the base of the oven cavity.
• If the oven cavity is heavily soiled, you
may want to leave the solution to soak
for a short time.
• Close the oven door.
• Select the “Bottom” function at a
temperature of 220°C.
• Select with the Timer a period of 5 minutes.
• After the cycle is fi nished please wait 15
minutes before opening the door.
•
Make sure that the appliance is switched off.
• Use the large absorbent sponge to
remove any excess of water from the
base of the cavity.
• You can now clean the inside of the oven.
• Make sure at the end to dry all the inside
and the surround of the appliance,
particularly the door seals.
Page 15
Care and Cleaning
Caution!
Before carrying out any work, the
appliance must be disconnected from
the mains electricity supply.
Cleaning the Inside of the Oven
• The inside of the oven should be cleaned
to remove food and grease deposits,
which can give off smoke or odours and
cause stains to appear.
• With the oven cold and for enamelled
surfaces (e.g. the fl oor of the oven) use a
nylon brush or sponge with warm soapy
water. If using special oven cleaning
products, use only on enamelled surfaces
and follow the manufacturer’s instructions.
Caution!
Do not clean the inside of your oven
with a steam or pressurised water jet.
Do not use either metallic scouring
pads or any material that could scratch
the enamel.
Cleaning the Oven Exterior
and Accessories
Clean the outside of the oven and the
accessories with warm soapy water or with
a mild detergent.
Caution!
Never use metallic scouring pads or
commercial or scouring powders that
could scratch the enamel. For stainless
steel surfaces, proceed with care and
only use sponges or cloths that cannot
scratch them.
To clean the outside of the oven do not
attempt to remove the controls, as for
this, the oven has to be fi rst removed
from the kitchen unit.
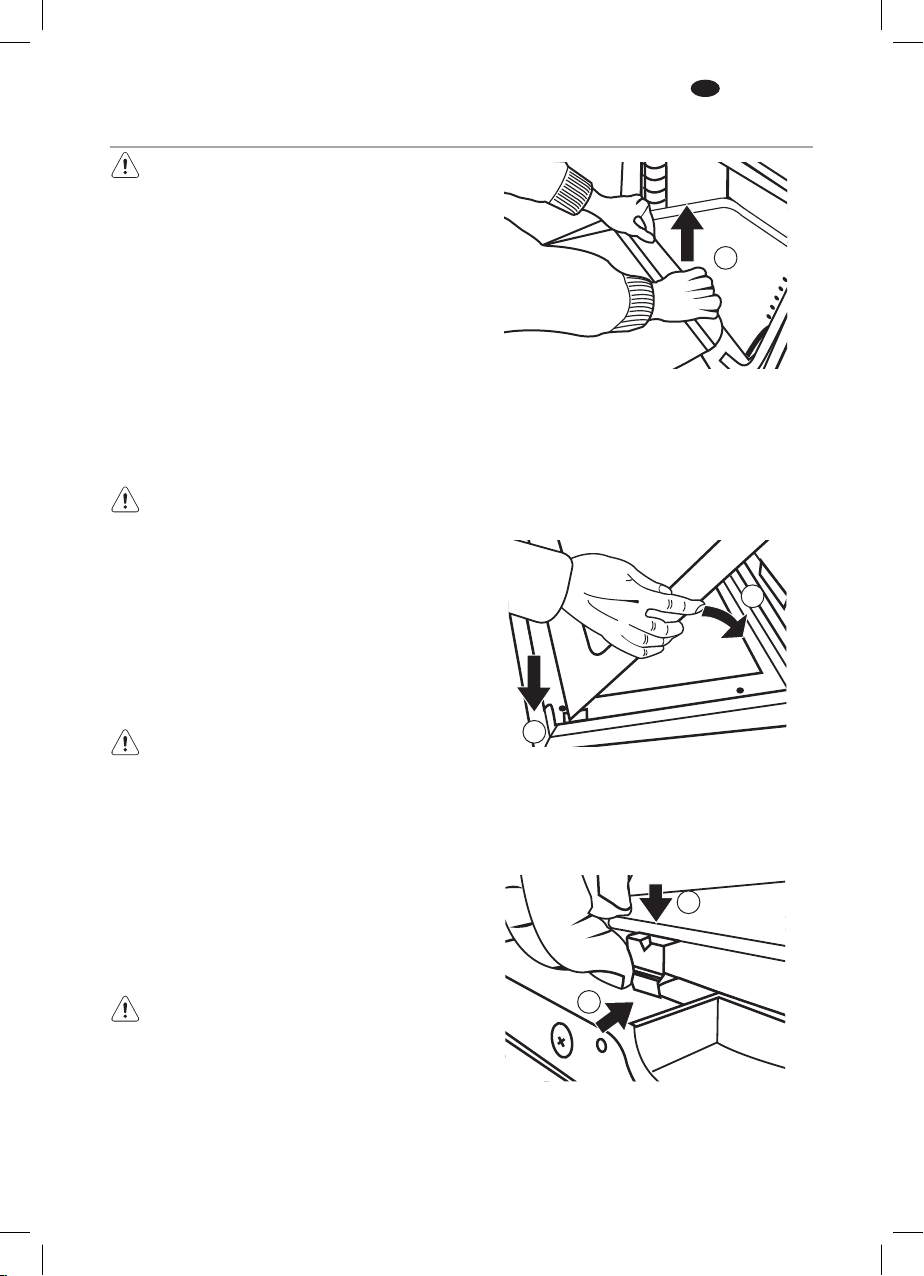
Cleaning the Large Interior Glass Door
Warning!
Be careful: the oven door closes when
the interior glass is removed.
1. Open the oven door.
2. Pull the glass upwards from the bottom
(A).
electrolux 15
EN
A
3. The interior glass is now free. Remove it.
4. Clean the interior glass and the inside of
the oven door.
5. Insert the supports on the interior glass
into the grooves at the top of the door
(B).
C
B
6. Lower the glass into the door (C).
7. The glass is fi xed to the door by pressing
the two lower supports (D) while
pushing the glass into the door (E).
E
D
Page 16
16 electrolux
EN
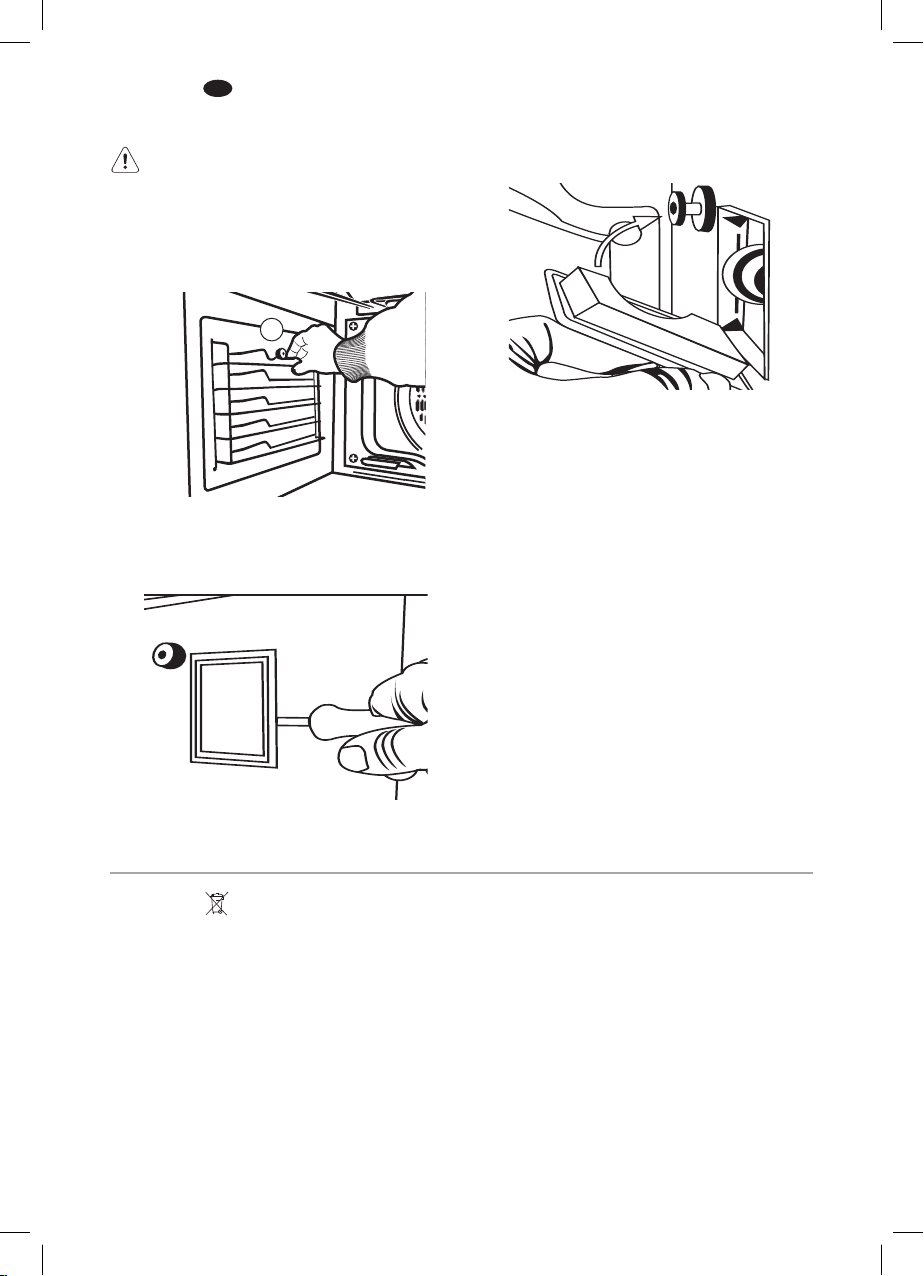
Changing the oven bulb
Caution!
To change the bulb, fi rst ensure that
the oven is disconnected from the
power supply.
1. Ease out the chrome supports, releasing
them from the bolt (F).
F
2. Loosen the lens from the lamp holder
with the help of the appropriate tool.
Exchange the bulb.
3. Replace the lens, making sure it fi ts in
the correct position without forcing it.
The replacement bulb must be temperature
resistant to 300°C. These can be ordered
from the Technical Service Department.
Enviroments concerns
The symbol on the product or on its
packaging indicates that this product may
not be treated as household waste. Instead
it shall be handed over to the applicable
collection point for the recycling of electrical
and electronic equipment. By ensuring this
product is disposed of correctly, you will
help prevent potential negative
consequences for the environment and
human health, wich could otherwise be
caused by inappropriate waste handling
of this product. Please contact your local
city offi ce, your household waste disposal
service or the shop where you purchased
the product
Ecological Packaging
The packaging materials are completely
recyclable and can be used again. Check
with your local authority on the regulations
for disposing of this material.
Page 17
electrolux 17
EN
What to do if…
If the appliance is not working correctly, please check the following before contacting the
Electrolux Service Centre.
Problem Solution
The oven does not work.
The inside light of the oven
does not work.
Smoke is given off while the
oven is working.
Expected cooking results are
not achieved.
Steam and condensation settle on
the food and in the oven cavity.
The oven fan is noisy.
The display shows "12.00".
Check the connection to the electrical circuit.
Check the fuses and current limiter of your installation.
Ensure the clock is in the manual or programmed mode.
Check the position of the function and temperature selectors.
Change the bulb.
Check its assembly in accordance with the instruction manual.
This is normal during its fi rst use.
Periodically clean the oven.
Reduce the amount of grease or oil added to the tray.
Do not use higher temperature settings than those in the cooking tables.
Review the cooking tables to obtain guidance on the working of
your oven.
When the cooking process is completed, do not leave the dishes
standing in the oven for longer than 15-20 minutes.
Check that shelves and bakeware are not vibrating in contact
with the oven back panel.
Set the time of day (see chapter "Setting the time of day").
Warning!
If, despite these recommendations, the problem continues, contact our Technical
Assistance Service.
Technical Data
If the equipment does not work, please
contact the Technical Service Department
and advise them of the problem, indicating:
1 Serial number (S-No)
2 Appliance model. (Model)
3 Product number (PNC)
You will fi nd this information on the rating
plate on the lower part of the oven when
the door is opened.
The item that you have bought meets the
European directives on electrical material
safety (73/23/CEE) and electromagnetic
compatibility (89/336/CEE).
Page 18
18 electrolux
EN
Installation
This information is intended for the installer,
as the person responsible for assembly and
electrical connection. If you install the oven
yourself, the manufacturer will not be held
responsible for any possible damage.
Installation must only be performed by a
fully qualifi ed electrician who must ensure
regulations laid down for installation are
observed.
Before Installation. Comments
• To unpack the oven, pull the tab located
on the lower part of the box.
• A niche is required in the kitchen unit as
per the dimensions shown on the fi gure,
providing a minimum depth of 580 mm.
(See fi gures 1 and 2 describing oven
fi tting on the page 90-91).
• To fi t multifunction ovens in their locations,
the back part of the unit, must not have
any projections (reinforcements, pipes,
sockets, etc).
• The adhesive used for the plastic
covering of kitchen furniture must be able
to withstand temperatures up to 85ºC.
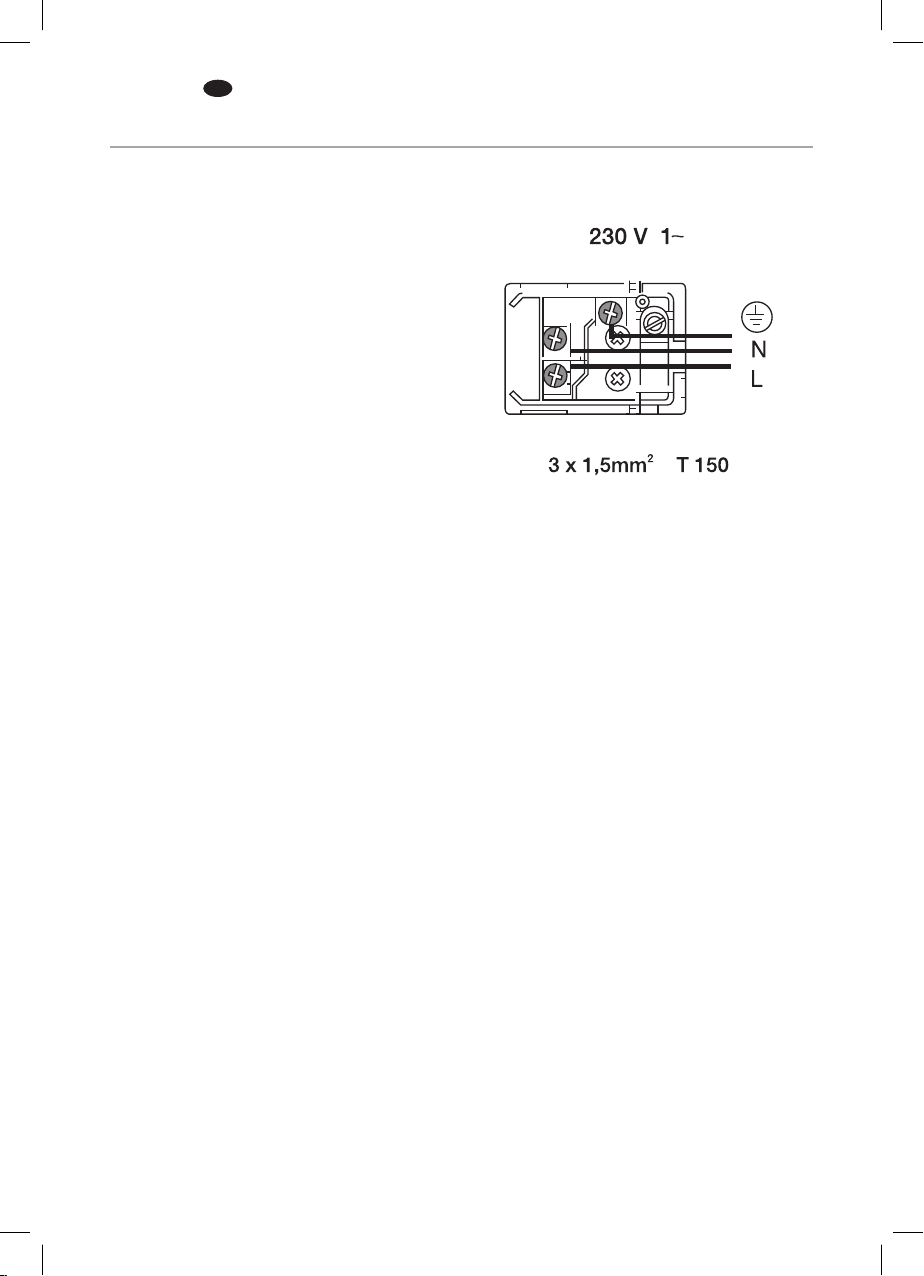
Electrical Connection.
Legal Requirements
The installer must check that:
• The voltage and cycles of the mains
supply correspond to that indicated on
the rating plate.
• The electrical installation can stand the
maximum power indicated on the rating
plate.
• The connection diagram is shown in the
following fi gure:
• The electrical connection has adequate
earthing in accordance with regulations in
force.
• The connection must be carried out with
an omnipolar switch, of an adequate size
for the current drawn. There must be a
minimum aperture between contacts of 3
mm to enable disconnection in the case of
emergency, cleaning or bulb exchange.
Under no circumstances must the earth
wire pass through this switch.
After connecting the electricity, check
that all the electrical parts of the oven are
working.
Page 19

electrolux 19
EN
Installing the Oven
For all ovens and after carrying out the
electrical connection,
1 Introduce the oven into the kitchen unit,
taking care not to trap the cable.
2 Fix the oven to the unit by means of the
2 screws supplied via the holes that can
be seen when the door is opened.
3 Check that the oven housing is not in
contact with the sides of the unit and
that there is at least 2 mm separating
the neighbouring units.
Page 20
20 electrolux
FR
Sommaire
Informations de sécurité 20
Description du produit 21
Tableau de commandes 22
Fonctions du four 23
Avant la première utilisation 24
Utilisation du four 24
Tableaux de cuisson 28
Fonction sécurité enfants 32
FR
Informations de sécurité
Pour votre sécurité et afi n de garantir
une utilisation correcte, avant d’installer
et d’utiliser pour la première fois
cet appareil électroménager, lisez
attentivement la notice d’utilisation, ainsi
que ses conseils et avertissements.
Pour éviter des erreurs et des accidents
inutiles, il est important de s’assurer
que toutes les personnes utilisant
l’appareil électroménager connaissent
son fonctionnement et ses mesures
de sécurité. Rangez ces instructions
et assurez-vous de les conserver avec
l’appareil électroménager si vous le
déplacez ou le vendez, afi n que toute
personne l’utilisant au cours de sa durée
de vie soit informée de son utilisation et
des avertissements de sécurité.
Utilisation correcte
• Le four doit toujours fonctionner porte
fermée.
• Le fabricant ne sera en aucun cas
responsable si le four est utilisé à des fi ns
autres que domestiques.
• Utilisez le four uniquement lorsqu’il est
installé dans une cuisine.
• Ne laissez pas d’huile, de graisse ni de
matières infl ammables à l’intérieur du
four, car cela peut être dangereux lorsque
le four est mis en marche.
• Ne vous appuyez pas et ne vous asseyez
pas sur la porte ouverte du four car vous
pourriez l’endommager et cela pourrait
être dangereux pour vous.
• Ne recouvrez pas la sole du four avec
du papier aluminium car cela pourrait
Arrêt automatique du four 32
Fonction nettoyage à l'eau 32
Entretien et nettoyage 33
Considérations environnementales 34
Que faire si... 35
Informations techniques 35
Installation 36
Sous réserve de modifi cations sans
avertissement préalable
affecter la cuisson et endommager l’émail
intérieur du four.
• Pour utiliser le four, introduisez la plaque
ou la grille fournie dans les guides
latéraux intérieurs. Les plaques et les
grilles sont pourvues d’un système
permettant de les retirer partiellement et
facilitant leur manipulation.
• Ne placez aucun récipient ou aliment
sur la sole du four. Utilisez toujours les
plaques et les grilles.
• Ne versez pas d’eau sur la sole
lorsque le four fonctionne car cela
pourrait endommager l’émail.
• Lorsque vous utilisez le four, ouvrez la
porte le moins possible afi n de réduire
la consommation d’électricité.
• Utilisez des gants de protection lorsque
vous devez intervenir à l’intérieur du four
chaud.
• Pour refroidir le four, ouvrez la porte afi n
de faciliter la ventilation et la sortie des
odeurs provenant de l’intérieur.
• Pour les recettes à forte teneur en liquide,
il est normal que de la condensation se
forme sur la porte du four.
Sécurité enfants
• Cet appareil électroménager n’est pas
conçu pour être utilisé par de jeunes
enfants ou des personnes handicapées
sans surveillance. Il faut surveiller les
jeunes enfants pour éviter qu’ils ne jouent
avec l’appareil électroménager.
• Ne laissez pas les enfants s’approcher
du four lorsqu’il fonctionne, car il
peut atteindre des températures élevées.
Page 21
electrolux 21
FR
Installation
• Vérifi ez que le four n’a subi aucun dommage
pendant le transport. Ne branchez jamais
un appareil électroménager endommagé. Si
votre four est endommagé, contactez votre
fournisseur.
• Retirez tout l’emballage avant de l’utiliser.
• Tous les travaux électriques nécessaires
pour installer cet appareil électroménager
doivent être effectués par une personne
qualifi ée et compétente.
• Pour des raisons de sécurité, ne changez
pas les spécifi cations et n’essayez pas
de modifi er ce produit.
Description du produit
1
2
3
4
5
6
7
8
• N’utilisez pas le four si le câble
d’alimentation électrique est endommagé
ou si le panneau de commandes,
la partie supérieure ou la base sont
endommagés, de sorte qu’il soit possible
d’accéder à l’intérieur de l’appareil
électroménager. Contactez votre service
technique local pour éviter tout danger.
• Ne percez pas les côtés du four
afi n d’éviter d’endommager les
composants hydrauliques et électriques.
Attention ! Pour réaliser le
branchement électrique, suivez
attentivement les instructions des
sections correspondantes.
9
10
11
12
13
14
15
16
1
Tableau de commandes
2
Joint de porte
3
Gril
4
Support chromé
5
Grille
6
Plaque
7
Charnière
8
Porte
9
Sortie d’air
10
Fixation à l'unité
11
Écran du gril
12
Évacuation de la fumée
13
Panneau arrière
14
Lumière
15
Ventilateur
16
Vitre intérieure de la porte
Page 22
22 electrolux
FR
Tableau de commandes
2 4
1
Boutons
2
Indicateur de température
3
Indicateur de temps
4
Indicateur des fonctions de temps
3
6
5
Fonctions du four
6
Voyants indicateurs
7
Boutons
8
Boutons
Le four ne fonctionne que si l'heure a été défi nie.
Le four peut cependant être utilisé sans avoir été programmé.
Boutons Fonction
Pour brancher ou débrancher le four
Pour sélectionner les fonctions du four
Pour régler la température et la durée ou le niveau de décongélation
5
7
81
Pour régler les valeurs des températures
Pour sélectionner les fonctions de l’horloge
Pour régler la minuterie
Pour allumer et éteindre la lumière
Température du
four
Durée de la
cuisson
Fin de la cuisson
Minuterie
Heure
Voyants indicateurs
Clignote pendant le réglage de la température
S'allume lors de la programmation du temps de cuisson et
commence à clignoter lorsque celui-ci est écoulé.
Il s'allume lors de la programmation de la fi n de la cuisson
et commence à clignoter lorsque la cuisson s’achève.
S'allume lors de l'activation de l'alarme de la minuterie.
Il clignote lors du réglage de l'heure.
Page 23
Fonctions du four
electrolux 23
FR
Traditionnelle
Sole
Gril et sole
Gril simple
Gril double
Gril double et
ventilateur
Conventionnelle
et ventilateur
Turbo
Sole et
ventilateur
Cuisson
à basse
température
Décongélation
Utilisée pour les biscuits et les tartes lorsque la chaleur doit être
uniforme pour obtenir une texture moelleuse.
Chauffe uniquement par le bas. Idéale pour réchauffer des plats et
élaborer des gâteaux, etc.
Spécialement conçue pour les rôtis. Peut être utilisée avec n'importe
quel morceau, quelle que soit sa taille.
Pour préparer des plats légèrement rôtis. Elle permet de dorer l’extérieur
sans modifi er l'intérieur des aliments. Idéale pour des morceaux plats,
comme des steaks, des côtelettes, du poisson et du pain grillé.
Permet de cuisiner des surfaces plus volumineuses qu'avec le gril simple, et
grâce à sa puissance accrue, elle réduit le temps de cuisson des aliments.
Permet de rôtir de manière uniforme tout en dorant en surface. Idéale pour les
grillades. Spécialement conçue pour les morceaux de grande taille, comme
des volailles, etc. Il est recommandé de placer le morceau sur la grille avec
une plaque en dessous afi n de récupérer le jus de cuisson.
Idéale pour les rôtis et gâteaux. Le ventilateur diffuse la chaleur à
l'intérieur du four pour réduire le temps et la température de cuisson.
Le ventilateur répartit la chaleur produite grâce à un élément situé
à l'arrière du four. Grâce à la diffusion uniforme de la chaleur, il est
possible de rôtir et d'enfourner sur deux hauteurs en même temps.
Idéale pour les pizzas, gâteaux et tartes aux fruits ou biscuits.
Conçue pour cuisiner des ragoûts, etc. au style traditionnel, et pour toutes les
recettes nécessitant des temps de cuisson longs avec peu de chaleur. Pour
obtenir un résultat optimal, nous recommandons d'utiliser des casseroles avec des
couvercles, mais il faut toujours vérifi er qu'elles sont adaptées à cet électroménager.
Pour décongeler par ex. des tartes et des fl ans, du beurre, du pain,
des fruits ou d'autres aliments surgelés.
Attention !
Quand vous utilisez les fonctions gril, gril double ou gril double et ventilateur, la porte
doit rester fermée.
Recommandations pour décongeler
des aliments
La fonction décongélation fonctionne
avec un système d'air chaud à 2 niveaux.
HI sert pour la viande en général et LO
pour les poissons, tartes, gâteaux ainsi
que pour le pain. Si vous sélectionnez la
fonction Décongélation, réglez HI ou LO sur
l'indicateur de température d'abord à l'aide
du bouton de température
et ensuite
avec les boutons .
•
Il faut placer les aliments sans emballage
sur la plaque du four ou dans un récipient.
• Pour décongeler de grosses pièces de
viande ou de poisson, il faut les disposer
sur la grille et placer une plaque en
dessous pour récupérer le jus.
• La viande et le poisson n'ont pas besoin
d'être totalement décongelés pour être
cuisinés. Les condiments peuvent être
ajoutés lorsque la surface est déjà ramollie.
• Les aliments doivent être cuisinés une fois
décongelés.
• Ne recongelez pas des aliments qui ont été
décongelés.
Page 24
24 electrolux
FR
Veuillez consulter le tableau suivant indiquant les temps de décongélation et les niveaux de
température :
ALIMENT
Pain
Gâteau
Poisson
Poisson
Poulet
Poulet
Entrecôte
Viande hachée
Viande hachée 1 kg 120 min
NIVEAU BAS (LO)
Poids Temps
1/2 kg 35 min
1/2 kg 25 min
1/2 kg 30 min
1 kg 40 min
NIVEAU HAUT (HI)
Poids Temps
1 kg 75 min
1,5 kg 90 min
1/2 kg 40 min
1/2 kg 60 min
Avant la première utilisation
Lisez attentivement cette notice d’utilisation
pour obtenir les meilleurs résultats avec
votre four. Des résidus de graisse et autres,
produits lors du processus de fabrication,
peuvent rester. Pour les éliminer, procédez
ainsi :
•
Retirez l’emballage, plastiques de protection
inclus, le cas échéant.
• Sélectionnez la fonction
ou à 200°C
pendant une heure. Pour ce faire, consultez
la liste des caractéristiques fournie dans
cette notice.
• Pour refroidir le four, ouvrez la porte afi n de
faciliter la ventilation et la sortie des odeurs
provenant de l’intérieur.
• Une fois refroidi, nettoyez le four et les
accessoires.
De la fumée ou des odeurs peuvent survenir
lors de la première utilisation, la cuisine devra
donc être correctement ventilée.
Utilisation du four
En cas d'interruption de l'alimentation
électrique, tous les réglages seront effacés
(heure, réglages de programmation
ou programmation en cours). Lorsque
l'alimentation électrique reviendra, les
chiffres à l'écran clignoteront et l'horloge /
minuterie devra être réglée à nouveau.
Attention !
Cette horloge électronique est équipée
de la technologie Touch-Control
(écran tactile). Pour l'utiliser, il suffi t de
toucher les symboles qui fi gurent sur le
tableau de commandes.
La sensibilité de l’écran tactile
s’adapte constamment aux conditions
extérieures. Lorsque vous branchez le
four, assurez-vous que la surface vitrée
du tableau de commandes est toujours
propre et dépourvue de résidus.
Si l’horloge ne répond pas
correctement lorsque vous touchez
la vitre avec le doigt, il faudra alors
débrancher le four puis le rebrancher
après quelques secondes. Les boutons
se régleront alors automatiquement et
réagiront à nouveau au contrôle tactile.
Page 25
electrolux 25
FR
Réglage de l'horloge électronique
Lorsque vous mettrez en route le four,
12:00 se met à clignoter sur l'horloge.
Réglez l'horloge à l'aide des symboles
du tableau. Vous entendrez 2 bips qui
confi rmeront que le réglage de l'heure a été
réalisé.
Si vous souhaitez modifi er l'heure, vous
devez éteindre le four. Touchez le bouton
de l'horloge jusqu'à ce que l'indicateur
commence à clignoter
Modifi ez l'heure à l'aide des boutons
.
Vous entendrez ensuite deux nouveaux bips
qui confi rmeront le réglage du changement
d'heure.
Fonctionnement manuel
Une fois l'horloge réglée, votre four est prêt
à fonctionner :
1 Appuyez sur le bouton On
2 Appuyez sur
pour sélectionner la
.
fonction de cuisson souhaitée.
3 L'indicateur de température affi chera
la température prédéfi nie pour cette
fonction de cuisson.
Appuyez sur le bouton de température
afi n de la modifi er. Sélectionnez la
température souhaitée en appuyant sur
les boutons
.
4 La cavité supérieure du four
commencera à chauffer.
Les fonctions
lanceront la fonction de chauffage
rapide pendant quelques minutes. Le
four émettra un bip lorsqu'il atteindra la
température sélectionnée.
Attention ! Cette fonction de
préchauffage active le moteur turbo
situé à l'arrière de la cavité supérieure
du four.
5 Pendant le chauffage du four, le symbole
des degrés clignotera sur l'indicateur de
température pour indiquer que l'aliment
est en train de cuire.
6 Appuyez sur le bouton Off 4 pour arrêter
la cuisson.
Attention ! Une fois la cuisson
achevée, la fonction de refroidissement
du four restera activée jusqu'à ce que
la température à l'intérieur descende au
niveau approprié.
Éclairage du four
La lumière intérieure s'allumera :
– Lors de l'ouverture de la porte du four.
Si la porte ne se ferme pas au bout d'un
certain temps, la lumière s'éteindra pour
réduire la consommation électrique.
– Lors de la sélection d'une fonction de
cuisson.
La lumière s'éteindra au bout d'un certain
temps.
Si vous souhaitez allumer la lumière
pendant la cuisson, touchez simplement
le bouton Lumière du four
. Pour
éteindre la lumière, appuyez à nouveau
sur ce même bouton
.
Page 26

26 electrolux
FR
Fonctions de l’horloge électronique
Fonctions du programmateur électronique
Durée de la
cuisson
Fin de la cuisson Cette fonction vous permet de programmer la fi n de la cuisson, après
Cette fonction vous permet de programmer la durée de cuisson. Une fois
ce temps écoulé, le four s'éteindra automatiquement.
Programmation du temps de cuisson :
1 Appuyez sur le bouton de l'horloge
2 Sélectionnez le temps de cuisson en appuyant sur les boutons .
3 Vous entendrez deux bips consécutifs et l'écran affi chera le temps de
cuisson restant. Le symbole se mettra à clignoter lentement pour
signaler que le four va s'éteindre automatiquement.
4 Sélectionnez une fonction de cuisson et une température.
5 Une fois le temps de cuisson achevé, le four s'éteindra, une alarme
sonore se déclenchera et le symbole se mettra à clignoter plus
rapidement.
6 Appuyez sur n'importe quel bouton du tableau de commandes pour
arrêter l'alarme.
Vous pourrez changer le temps programmé à tout moment en appuyant
sur le bouton de l'horloge et ensuite sur les boutons .
Vous entendrez ensuite deux nouveaux bips qui confi rmeront le réglage
du changement d'heure.
laquelle le four s'éteindra automatiquement.
Programmation de l'heure de fi n de cuisson :
1 Appuyez sur le bouton de l'horloge plusieurs fois jusqu'à ce que le
symbole s'allume.
2 Sélectionnez le temps de fi n de cuisson en appuyant sur les boutons
.
3 Vous entendrez deux bips consécutifs et l'écran affi chera le temps de
cuisson restant. Le symbole se mettra à clignoter lentement pour
signaler que le four va s'éteindre automatiquement.
4 Sélectionnez une fonction de cuisson et une température.
5 Une fois le temps de cuisson écoulé, le four s'éteindra, une alarme
sonore se déclenchera et le symbole se mettra à clignoter plus
rapidement.
6 Appuyez sur n'importe quel bouton du tableau de commandes pour
arrêter l'alarme.
Il est possible de modifi er l'heure programmée de fi n de cuisson à tout
moment en appuyant d'abord sur le bouton de l'horloge , jusqu'à ce
que le symbole se mette à clignoter, et ensuite sur les boutons
. Vous entendrez ensuite deux nouveaux bips qui confi rmeront le
réglage du changement d'heure.
Vous pourrez utiliser cette fonction même si vous êtes déjà en train de
cuisiner avec le four. Dans ce cas, veuillez suivre les instructions ci-dessus
à l'exception de l'étape 4.
. Le symbole s'allumera.
Page 27
electrolux 27
FR
Fonctions du programmateur électronique
Cooking duration
Temps de cuisson
and End of
et fi n de la
cooking
cuisson combinés
time combined
Cette fonction permet de programmer de manière simultanée le temps
de cuisson et la fi n de la cuisson. Avec cette fonction, le four s'allume
automatiquement à l'heure réglée et fonctionne pendant le temps de cuisson
pour lequel il a été programmé. Il s'éteint automatiquement à l'heure défi nie.
1 Appuyez sur le bouton de l'horloge
. Le symbole s'allumera.
2 Sélectionnez le temps de cuisson en appuyant sur les boutons
3 Vous entendrez deux bips consécutifs et l'indicateur affi chera le temps
de cuisson restant. Le symbole
4 Appuyez sur le bouton de l'horloge
clignotera lentement.
plusieurs fois jusqu'à ce que le
symbole s'allume.
5 Sélectionnez le temps de fi n de cuisson en appuyant sur les boutons
.
6 La confi rmation sera signalée par deux bips. L'heure actuelle
s'affi chera à l'écran et le symbole
restera allumé.
7 Sélectionnez une fonction de cuisson et une température.
8 Le four restera éteint, avec le symbole
allumé et le symbole en
train de clignoter lentement. L'horloge affi chera l'heure actuelle et la
lumière intérieure restera éteinte. Le four est maintenant programmé.
9 Lorsqu'il sera temps de commencer la cuisson, le four s'allumera et
fonctionnera pendant le temps de cuisson programmé. L'indicateur de
la fonction de temps affi chera le temps de cuisson restant.
10 Une fois le temps de cuisson écoulé, le four s'éteindra, une alarme sonore
se déclenchera et les symboles
et se mettront à clignoter.
11 Appuyez sur n'importe quel bouton du tableau de commandes pour
arrêter l'alarme.
Si vous souhaitez modifi er l'heure de fi n de cuisson alors que le four est
toujours en fonctionnement, appuyez sur le bouton de l'horloge jusqu'à que
ce que le symbole
Modifi ez le temps de fi n de cuisson en appuyant sur les boutons
se mette à clignoter.
.
Vous entendrez ensuite deux nouveaux bips qui confi rmeront le réglage du
changement d'heure.
Minuterie Vous entendrez un bip à la fi n du temps programmé, que le four soit
allumé ou éteint.
Programmation de la minuterie:
1 Appuyez sur le bouton de la minuterie . Le symbole s'allumera.
2 Sélectionnez le temps au bout duquel devra se déclencher l'alarme à
l'aide des boutons .
3 Vous entendrez ensuite deux bips, l'écran affi chera le temps restant
avant le déclenchement de l'alarme et le symbole clignotera
lentement pour indiquer que la minuterie a été réglée.
4 Une fois le temps programmé écoulé, une alarme se déclenchera et le
symbole commencera à clignoter plus vite.
5 Appuyez sur n'importe quel bouton du tableau de commandes pour
arrêter l'alarme.
Vous pourrez changer le temps programmé à tout moment en appuyant
d'abord sur le bouton de minuterie jusqu'à ce que le symbole se
mette à clignoter et ensuite sur les boutons . Vous entendrez ensuite
deux nouveaux bips qui confi rmeront le réglage du changement d'heure.
.
Page 28
28 electrolux
FR
Tableaux de cuisson
Les tableaux de cuisson donnent des exemples de températures et de temps
approximatifs de cuisson. Le mode de cuisson dépend du modèle.
Pour obtenir de meilleurs résultats, nous recommandons de préchauffer le four avec la
fonction
ou pendant 10 minutes.
ENTRÉES
Riz au four 1,0 Basse
Tourte 1,2
Feuilleté de
légumes
Galette de
légumes
Pommes de
terre au four
Pizza 0,6
Quiche 0,8
Poids
(Kg)
1,0
1,0
1,0 Basse
Position de
la plaque
Intermédiaire
Intermédiaire
Intermédiaire
Intermédiaire
Intermédiaire
Mode de
cuisson
Températ.
(ºC)
180-200 25-30
170-190 20-25
170-190 45-50
160-180 30-35
190-210 25-30
180-200 25-30
170-190 35-40Basse
190-210 55-60
170-190 45-50
180-200 55-60
180-200 40-45
190-210 15-20
170-190 10-15
180-200 40-45
170-190 40-45
Temps
(min)
Récipient
Plaque peu
profonde
Plaque
Plaque peu
profonde
Plaque peu
profonde
Plaque
Grille
Moule à quiche 160-180 35-40
Tomates
farcies
Lasagnes 1,0
0,8
Intermédiaire
Intermédiaire
170-190 10-12
160-180 10-12
180-200 8-10
Plaque
Plaque peu
profonde
Page 29
electrolux 29
FR
VIANDES
Cochon
de lait
Lapin 1,2
Agneau 1,0
Echine de
porc
Poulet 1,2 Basse
Rosbif 0,6
Aloyau
feuilleté
Brochettes 0,3 Haute 180-200 10-12 Grille
Poids
(Kg)
1,4
0,6
1,0
Position de
la plaque
Intermédiaire
Intermédiaire
Intermédiaire
Intermédiaire
Intermédiaire
Intermédiaire
Mode de
cuisson
Températ.
(ºC)
190-210 70-75
170-190 70-75
180-200 55-60
170-190 30-35
190-210 50-55
180-200 50-55
170-190 35-40
170-190 40-45
190-210 50-55
170-190 45-50
190-210 30-35
190-210 30-35
180-200 35-40
160-180 30-35
Temps
(min)
Récipient
Plaque
Plaque 170-190 45-50
Plaque 170-190 45-50
Plaque
Plaque
Plaque 180-200 25-30
Plaque
Saucisses 0,6 Haute 190-210 10-15 Grille
Page 30

30 electrolux
FR
POISSON
Daurade 1,0
Daurade au
sel
Sole 1,0
Loup 1,0
Colin 1,1
Terrine de
poisson
Saumon en
papillote
Truite 1,1
Filet de poisson 1,0 Haute 170-190 15-20 Grille
Poids
(Kg)
1,0
1,1
1,0
Position de
la plaque
Intermédiaire
Intermédiaire
Intermédiaire
Intermédiaire
Intermédiaire
Intermédiaire
Intermédiaire
Intermédiaire
Mode de
cuisson
Températ.
(ºC)
180-200 25-30
170-190 20-25
190-210 25-30
180-200 25-30
170-190 15-20
160-180 10-15
190-210 20-25
180-200 10-15
190-210 25-30
180-200 20-25
190-210 60-65
190-210 60-65
180-200 20-25
170-190 15-20
190-210 20-25
180-200 15-20
Temps
(min)
Récipient
Plaque
Plaque
Plaque
Plaque
Plaque
Casserole
Plaque
Plaque
Sardines 1,0 Haute 180-200 10-15 Grille
Page 31

electrolux 31
FR
GÂTEAUX ET
DESSERTS
Gâteau 0,5
Gâteau roulé 0,5
Flan 0,8
Biscuits 1,0
Vol-au-vents 0,3
Madeleines 0,7
Pommes au
four
Meringue 0,35
Bananes au
four
Cake 0,6
Tarte aux
pommes
Gâteau au
fromage
Poids
(Kg)
0,5
0,5
0,8
0,8
Position de
la plaque
Intermédiaire
Intermédiaire
Intermédiaire
Intermédiaire
Intermédiaire
Intermédiaire
Intermédiaire
Intermédiaire
Intermédiaire
Intermédiaire
Intermédiaire
Intermédiaire
Mode de
cuisson
Températ.
(ºC)
150-170 35-40
170-190 30-35
160-180 30-35
170-190 10-15
160-180 10-15
160-180 55-60
150-170 50-55
160-180 20-25
150-170 20-25
170-190 20-25
160-180 15-20
160-180 20-25
160-180 20-25
180-200 30-35
170-190 20-25
100-120 70-75
100-120 60-65
180-200 20-25
170-190 15-20
170-190 55-60
160-180 50-55
170-190 45-50
160-180 40-45
180-200 40-45
170-190 40-45
Temps
(min)
Récipient
Moule à tarte
Plaque
Moule à pain
Plaque
Plaque
Plaque
Plaque
Plaque
Casserole
Moule à tarte
Plaque
Moule à gâteau
au fromage
Page 32

32 electrolux
FR
Fonction sécurité enfants
Cette fonction verrouille le four pour éviter
que les enfants ne jouent avec.
Pour activer cette fonction, appuyez sur les
boutons
retentisse.
Le four est alors verrouillé.
et jusqu'à ce qu'un long bip
Arrêt automatique du four
Le four s'arrête automatiquement s'il n'est
pas éteint au bout d'un certain temps ou
si la température n'est pas modifi ée.
Le four s'arrête lorsque la température est de :
50-120 ºC au bout de 12,5 heures
120-200 ºC au bout de 8,5 heures
200-250 ºC au bout de 5,5 heures
Si le four est éteint, vous pourrez lire le mot
SAFE (sûr) sur l'indicateur de temps.
Lorsque le four est allumé, tous les
boutons sont verrouillés sauf le bouton de
déconnexion
Pour désactiver la sécurité pour enfants,
appuyez sur les boutons
simultanément jusqu'à ce qu'un long bip
retentisse et que le mot SAFE disparaisse
de l'écran.
Appuyez sur n'importe quel bouton de
l'appareil après un arrêt automatique.
L'arrêt automatique est annulé lorsque
la fonction de l'horloge DURÉE
FIN
.
et
ou
est réglée.
Fonction de nettoyage à l’eau
À propos de cette fonction
Pour assurer un fonctionnement correct,
cet appareil électroménager devra être
nettoyé fréquemment afi n d’éliminer
les résidus d’aliments ou de graisse.
Cette fonction permet de vous faciliter le
processus de nettoyage.
Comment fonctionne-t-elle ?
Avec de la chaleur, de la vapeur et quelques
gouttes de liquide vaisselle, les résidus
d’aliments se détachent et se ramollissent
suffi samment pour faciliter leur élimination,
tout en évitant de frotter l’émail.
Comment l’utiliser ?
• Retirez tous les accessoires du four avant
d’utiliser cette fonction.
• Versez environ 500 ml d’eau avec quelques
gouttes de liquide vaisselle sur une grande
éponge absorbante (taille recommandée
: 360 x 300 mm), que vous devrez placer
sur la sole du four. Si l’intérieur du four est
très sale, laissez-la s’imbiber de la solution
pendant un moment avant de lancer la
fonction.
• Fermez la porte du four et sélectionnez la
fonction de la partie inférieure du four.
• Réglez la commande du thermostat sur
200°C.
• Réglez le programme de temps de
cuisson sur 4 minutes en utilisant
les boutons de fonction de l’horloge
électronique. La température du four
augmentera.
• Réglez l’alarme de la minuterie sur 21
minutes à l’aide des boutons de fonction
de l’horloge électronique.
• 4 minutes plus tard, une alarme
sonore retentira et le four s’éteindra
automatiquement.
• Placez la fonction du four et la
commande du thermostat sur zéro. Pour
éteindre l’alarme sonore, appuyez sur
n’importe quel bouton.
• Le cycle de nettoyage dure 21 minutes.
Une fois achevé, une alarme retentira.
Page 33

electrolux 33
FR
• Une fois le nettoyage terminé,
assurez-vous d’éteindre l’appareil
électroménager.
• Utilisez la grande éponge absorbante pour
éliminer l’excès d’eau à l’intérieur du four.
• Vous pouvez maintenant nettoyer
l’intérieur du four avec de l’eau
savonneuse et une brosse douce en
plastique, un chiffon, une éponge ou tout
autre ustensile non abrasif.
Entretien et nettoyage
Attention!
Avant d’effectuer toute intervention,
débranchez l’alimentation électrique
principale de l’appareil électroménager.
Nettoyage de l’intérieur du four
• Nettoyez l’intérieur du four pour éliminer
les résidus d’aliments et de graisse car
ils peuvent dégager de la fumée ou des
odeurs et entraîner l’apparition de taches.
• Le four étant froid, sur les surfaces en
émail (par ex., la sole du four), utilisez
une brosse en nylon ou une éponge avec
de l’eau savonneuse chaude. Si vous
utilisez des produits spécialement conçus
pour nettoyer les fours, appliquez-les
uniquement sur les surfaces en émail en
respectant les instructions du fabricant.
Attention!
Ne nettoyez pas l’intérieur du four avec
de la vapeur ou de l’eau sous pression.
N’utilisez pas non plus d’éponges
métalliques ou de matériaux pouvant
rayer l’émail.
Nettoyage de l’extérieur du four et des
accessoires
Nettoyez l’extérieur du four et les
accessoires à l’eau tiède et savonneuse, ou
avec un détergeant doux.
Attention!
N’utilisez pas d’éponges métalliques
ou de poudres de nettoyage pouvant
rayer l’émail. Sur les surfaces en inox,
procédez avec soin et utilisez des
éponges ou des chiffons ne rayant pas.
Pour nettoyer l’extérieur du four,
n’essayez pas de retirer les
commandes car, pour ce faire, il faut
d’abord retirer le four de la cuisine.
• Pour la saleté diffi cile à éliminer, utilisez
une spatule spéciale (par ex., une spatule
pour vitrocéramique).
• Nettoyez abondamment l’intérieur du four
avec de l’eau et un chiffon. Séchez-le
bien ensuite avec un chiffon sec et
doux. Assurez-vous de nettoyer et de
sécher dedans et autour de l’appareil
électroménager, surtout les joints de la
porte.
Nettoyage de la vitre intérieure de la porte
Attention!
Faites attention : la porte du four
se ferme lorsque l’on retire la vitre
intérieure.
1. Ouvrez la porte du four.
2. Tirez la vitre vers le haut depuis la
partie inférieure (A).
A
3. La vitre intérieure sera libérée. Retirez-la.
4. Nettoyez la vitre intérieure et
l’intérieur de la porte du four.
5. Introduisez les supports de la vitre
intérieure.
C
B
6. Introduisez la vitre dans la porte
(C) dans les rainures de la partie
supérieure de cette dernière (B).
Page 34

34 electrolux
FR
7. La vitre se fi xe à la porte en serrant les
deux supports inférieurs (D) tout en
poussant la vitre vers l’intérieur de la
porte (E).
E
D
Remplacer l’ampoule du four
Attention!
Pour remplacer l’ampoule,
assurez-vous tout d’abord que le four
est bien débranché.
1. Retirez les supports chromés en
desserrant la vis (F).
F
2. Retirez la lentille du support de la lampe
à l’aide d’un outil adapté. Remplacez
l’ampoule.
3. Replacez la lentille en vous assurant
qu’elle s’encastre dans la position
correcte sans la forcer.
Considérations environnementales
Le symbole sur le produit ou son
emballage indique qu’il ne peut pas être
traité comme un déchet domestique. Il
doit, au contraire, être déposé dans un
centre de collecte pour le recyclage des
équipements électriques et électroniques.
Avec une mise au rebut correcte de
ce produit, vous contribuerez à éviter
d’éventuelles conséquences négatives pour
l’environnement et la santé de l’homme,
qui pourraient découler d’une gestion
L’ampoule de rechange doit supporter des
températures allant jusqu’à 300°C. Il est
possible de commander ces ampoules
auprès du service technique Electrolux.
incorrecte des déchets. Veuillez contacter
votre mairie, son service de collecte des
déchets ou la boutique où vous avez
acheté ce produit.
Emballage écologique
Les matériaux de l’emballage sont
totalement recyclables et réutilisables.
Demandez aux autorités locales les normes
d’élimination de ce matériau.
Page 35

electrolux 35
FR
Que faire si...
Si l’appareil électroménager ne fonctionne pas correctement, veuillez procéder aux
vérifi cations suivantes avant de contacter le Service technique d’Electrolux.
Problème Solution
Le four ne fonctionne pas.
La lumière à l’intérieur du four
ne fonctionne pas.
De la fumée sort lorsque le
four fonctionne.
Impossible d’obtenir les résultats de cuisson souhaités.
La vapeur et la condensation s’accumulent
sur les aliments et à l’intérieur du four.
Le ventilateur du four fait du
bruit.
L’écran indique « 12:00 ».
Vérifi ez le branchement au réseau électrique.
Vérifi ez les fusibles et le limiteur de courant de l’installation.
Vérifi ez si l’horloge se trouve en mode manuel ou programmé.
Vérifi ez la position des sélecteurs de fonction et de température..
Remplacez l’ampoule.
Vérifi ez qu’elle est installée conformément à la notice.
Ceci est normal lors de la première utilisation.
Nettoyez régulièrement le four.
Diminuez la quantité de graisse ou d’huile sur la plaque.
N’utilisez pas une température supérieure à celle indiquée dans les tableaux de cuisson.
Consultez les tableaux de cuisson pour apprendre à utiliser le
four.
A la fi n du processus de cuisson, ne laissez pas les plaques dans
le four pendant plus de 15-20 minutes.
Vérifi ez que la plaque et les aliments ne vibrent pas au contact
du panneau arrière du four.
Réglez l’heure (voir la section « Réglage de l’heure »).
Attention !
Si le problème persiste malgré ces recommandations, contactez le Service
d’assistance technique.
Informations techniques
Si l’équipement ne fonctionne pas,
contactez le Service technique et
informez-les du problème en indiquant :
1 Le numéro de série (S-No)
2 Le modèle de l’appareil électroménager
(Model)
3 Le numéro du produit (PNC)
Vous trouverez ces informations sur la
plaque signalétique de la partie inférieure du
four lorsque vous ouvrez la porte.
L’appareil que vous venez d’acquérir
respecte les directives européennes
en matière de sécurité du matériel
électrique (73/23/CEE) et de compatibilité
électromagnétique (89/336/CEE).
Page 36

36 electrolux
FR
Installation
Ces informations sont destinées à
l’installateur, la personne responsable du
montage et du branchement électrique.
Si vous installez vous-même le four, le
fabricant n’assumera pas la responsabilité
des dommages éventuels.
L’installation ne doit être réalisée que par un
électricien qualifi é, qui devra s’assurer de
respecter la réglementation s’appliquant à
l’installation.
Avant l’installation. Commentaires
• Pour déballer le four, tirez sur la languette
située sur la partie inférieure de la boîte.
• Un espace des dimensions indiquées
sur l’image et une profondeur minimale
de 580 mm sont nécessaires dans la
cuisine. (Voir l’image de la page 91-92
qui décrit la mise en place du four).
• Pour installer les fours multifonction, la
partie arrière de l’unité ne doit présenter
aucun élément saillant (renforts, tuyaux,
prises, etc.).
• L’adhésif utilisé pour le cache plastique
du meuble de la cuisine doit pouvoir
supporter des températures supérieures
à 85°C.
Branchement électrique. Obligations
légales
L’installateur devra vérifi er que :
• La tension et la fréquence du courant
correspondent à celles indiquées sur la
plaque signalétique.
• L’installation électrique peut supporter
la puissance maximale indiquée sur la
plaque signalétique.
• Le schéma des connexions est indiqué
sur l’illustration suivante :
• Le branchement électrique dispose d’une
prise de terre adéquate, conformément à
la législation en vigueur.
• Le branchement doit être réalisé avec un
interrupteur omnipolaire de taille adaptée
au courant qu’il doit supporter. Il doit y
avoir une ouverture minimale de 3 mm
entre les contacts afi n de permettre
le débranchement en cas d’urgence,
de nettoyage ou de remplacement
de l’ampoule. Le câble de terre ne
devra en aucun cas passer par cet
interrupteur. Une fois le branchement
électrique achevé, vérifi ez que tous
les composants électriques du four
fonctionnent.
Page 37

electrolux 37
FR
Installation du four
Pour tous les fours et après avoir effectué le
branchement électrique :
1 Introduisez le four dans la cuisine en
veillant à ne pas coincer le câble.
2 Fixez le four à l’unité en insérant les 2
vis fournies dans les orifi ces visibles en
ouvrant la porte.
3 Vérifi ez que l’extérieur du four n’est pas
en contact avec les côtés de l’unité et
qu’il y a un espace minimum de 2 mm
entre eux.
Page 38

38 electrolux
EN
Inhaltsverzeichnis
Sicherheitsinformationen 38
Produktbeschreibung 39
Bedienfeld 40
Funktionen des Backofens 41
Vor dem ersten Gebrauch 42
Benutzung des Backofens 42
Gartabellen 46
Kindersicherung 50
DE
Sicherheitsinformationen
Für Ihre Sicherheit und zur Gewährleistung
eines korrekten Einsatzes bitten wir Sie, vor
der Installation und dem ersten Gebrauch das
Anwenderhandbuch mit seinen Ratschlägen
und Warnungen aufmerksam durchzulesen.
Um Fehler und unnötige Unfälle zu
vermeiden, ist es wichtig, sicherzustellen,
dass alle Personen, die das Elektrogerät
benutzen, dessen Funktionsweise und die
Sicherheitsmaßnahmen kennen. Bewahren
Sie diese Anweisungen auf. Stellen Sie bitte
auch sicher, dass sie bei Umstellung oder
Verkauf mit dem Elektrogerät aufbewahrt
werden, sodass jeder, der es während
seiner Lebensdauer benutzt, über dessen
Gebrauch und Sicherheit informiert ist.
Sachgemäße Nutzung
• Die Backofentür muss während des
Betriebs immer geschlossen sein.
•
Der Hersteller übernimmt keine Haftung, wenn der
Backofen für andere Verwendungszwecke als im
Haushalt eingesetzt wird.
• Verwenden Sie den Backofen nur, wenn
er in einer Küche eingebaut ist.
•
Bewahren Sie weder Öl, Fett noch brennbare
Materialien im Backofeninneren auf, da sie
beim Einschalten des Backofens eine
mögliche Gefahrenquelle darstellen.
• Stützen Sie sich nicht auf der geöffneten
Backofentür ab und setzen Sie sich nicht
darauf, da Sie sie beschädigen und sich
selbst gefährden könnten.
• Decken Sie den Backofenboden nicht
mit Alufolie ab, da dadurch der Garablauf
beeinträchtigt und die Emaille im
Backofeninnern beschädigt werden könnte.
Automatisches Ausschalten des Backofens
Funktion der Wasserreinigung 50
Pfl ege und Reinigung 51
Umwelterwägungen 52
Was tun, wenn...? 53
Technische Daten 53
Installation 54
Änderungen vorbehalten
•
Schieben Sie zum Gebrauch des Backofens
das zum Lieferumfang gehörende Blech oder
den Rost auf die seitlichen Führungsschienen.
Bleche und Roste sind mit einem System
versehen, das deren teilweise Entnahme
ermöglicht und den Umgang erleichtert.
•
Stellen Sie keine Behälter oder Lebensmittel
auf den Backofenboden. Verwenden Sie
immer die Bleche und Roste.
• Gießen Sie kein Wasser auf den
Backofenboden, während er in Betrieb ist,
da die Emaille beschädigt werden könnte.
• Öffnen Sie die Backofentür während des
Backofenbetriebs so wenig wie möglich,
um den Stromverbrauch gering zu halten.
• Tragen Sie bei evtl. Handhabungen im
heißen Backofen Handschuhe.
Öffnen Sie die Backofentür, um den Backofen
•
abzukühlen und das Entweichen der Gerüche
aus dem Backofeninnern zu fördern.
•
Bei Rezepten mit hohem Flüssigkeitsgehalt
ist es normal, dass sich auf der
Backofentür Kondensationen bilden.
Kindersicherung
•
Dieses Elektrogerät ist nicht für den Gebrauch
durch kleine Kinder oder Behinderte ohne
Aufsicht vorgesehen. Kleine Kinder müssen
beaufsichtigt werden, um zu vermeiden, dass
sie mit dem Elektrogerät spielen.
•
Vermeiden Sie bitte, dass sich Kinder dem
laufenden Backofen nähern können, da er
sehr hohe Temperaturen erreichen kann.
Installation
• Prüfen Sie bitte nach, ob der Backofen
keine Transportschäden erlitten hat.
Schließen Sie niemals ein beschädigtes
50
Page 39

electrolux 39
DE
Elektrogerät an. Sollte Ihr Backofen
beschädigt sein, müssen Sie sich mit
dem Lieferanten in Verbindung setzen.
• Entfernen Sie bitte vor Gebrauch das
gesamte Verpackungsmaterial.
Alle für die Installation dieses Elektrogeräts
•
erforderlichen elektrischen Tätigkeiten müssen
von einer qualifi zierten und kompetenten
Person durchgeführt werden.
•
Aus Sicherheitsgründen dürfen weder die
Spezifi kationen noch das Gerät verändert werden.
Produktbeschreibung
1
2
3
4
5
6
7
8
•
Verwenden Sie den Backofen nicht, wenn
Stromversorgungskabel, Schalterleiste,
Ober- oder Unterteil beschädigt sind und man
Zugriff auf das Innere des Elektrogeräts hat.
Setzen Sie sich mit Ihrem örtlichen
Kundendienst in Verbindung, um Gefahren
zu vermeiden.
•
Bohren Sie die Seitenwände des Backofens
nicht auf, um Schäden an hydraulischen
und elektrischen Bauteilen zu vermeiden.
Achtung!
Befolgen Sie bitte aufmerksam
die Anweisungen der entsprechenden Abschnitte für den Elektroanschluss.
9
10
11
12
13
14
15
16
1
Bedienfeld
2
Türdichtung
3
Grill
4
Chromlaufschiene + Teleskopführungen
5
Gitter
6
Backblech
7
Scharnier
8
Tür
9
Luftaustritt
10
Befestigung an die Einheit
11
Grillschale
12
Abzug
13
Rückwand
14
Beleuchtung
15
Umluftventilator
16
Innenglasscheibe der Tür
Page 40

40 electrolux
Bedienfeld
DE
1
Knöpfe + / -
2
Temperaturanzeige
3
Zeitanzeige
4
Zeitfunktionsanzeige
2 4
3
6
5
Backofenfunktionen
6
Anzeigen
7
Knöpfe
8
Knöpfe
5
Der Backofen funktioniert nur, wenn die Tageszeit eingestellt wurde.
Der Backofen kann aber auch ohne Programmierung eingesetzt werden.
Knöpfe Funktion
Zum Ein- und Ausschalten des Backofens
Zum Wählen der Funktionen des Backofens
Zur Einstellung von Temperatur und Zeit bzw. der Auftaustufen
81
7
Zur Einstellung der Temperaturwerte
Zum Wählen der Uhrfunktionen
Zum Einstellen des Kurzzeitmessers
Zum Ein- und Ausschalten der Beleuchtung
Temperatur des
Backofens
Gar-Dauer
Garzeit-Ende
Kurzzeitmesser
Tageszeit
Anzeigen
Blinkt solange die Temperatur eingestellt wird.
Leuchtet auf, wenn die Garzeit programmiert wird, und
beginnt zu blinken, wenn diese erreicht wurde.
Leuchtet auf, wenn das Garzeit-Ende programmiert
wurde, und beginnt zu blinken, wenn dieses erreicht wurde
Leuchtet auf, wenn der Minutenalarm programmiert wird.
Blinkt, wenn die Tageszeit eingestellt wird.
Page 41

Funktionen des Backofens
electrolux 41
DE
Normal
Unterhitze
Grill und
Unterhitze
Einfacher Grill
Doppel-Grill
Doppel-Grill mit
Umluft
Normal mit
Umluft
Turbo
Unterhitze mit
Umluft
NiedertemperaturGaren
Auftauen
Verwendung für Kuchen und Tortenböden, bei denen die
Wärmeeinwirkung gleichmäßig sein muss, damit diese gut aufgehen.
Es wird nur von der Unterseite Wärme zugeführt. Geeignet zum Anwärmen
von Tellern, zum Aufgehen von Teigmassen oder für ähnliche Anwendungen.
Besonders geeignet zum Braten. Kann für Grillgut mit beliebiger
Größe eingesetzt werden.
Zum Anbräunen. Gestattet das Anbräunen der Außenschicht, ohne
das Innere der Nahrungsmittel zu beeinfl ussen. Geeignet für fl aches
Grillgut, wie Beefsteaks, Rippchen, Fisch und Toastbrot.
Grillen auf größerer Oberfl äche und mit größerer Leistung als mit dem
Grill; hierdurch erfolgt ein schnelleres Bräunen der Speisen.
Gestattet gleichzeitig ein gleichmäßiges Garen und Anbräunen der
Oberfl äche. Ideal zum Grillen. Besonders für großes Grillgut wie Gefl ügel
usw. Es wird empfohlen, das Grillgut auf den Rost zu legen und die
Auffangschale darunter einzuschieben, um Bratensaft und Fett aufzufangen.
Geeignet zum Braten und für Gebäck. Der Umluftventilator verteilt die Wärme gleichmäßig im Ofen und verringert damit die Garzeit und –temperatur.
Der Umluftventilator verteilt die Wärme, die durch das im hinteren Teil des
Backofens gelegene Element erzeugt wird. Dank der gleichmäßigen
Wärmeverteilung, kann gleichzeitig auf beiden Höhen gebacken und gebraten werden.
Ideal für Pizzen, Gebäck, Obstkuchen und Plätzchen.
Konzipiert zum Garen von Schmortöpfen, Schmorbraten usw. nach traditioneller Art und im Allgemeinen
für Gerichte, die einer Garung bei niedriger Temperatur und über einen längeren Zeitraum bedürfen.
Um ein optimales Resultat zu erreichen, empfehlen wir, Schmortöpfe mit Deckel einzusetzen, aber
zuerst zu überprüfen, ob diese überhaupt für dieses Elektrogerät geeignet sind.
Zum Auftauen von z. B. Torten und Puddings, Brot, Obst oder
sonstigen tiefgekühlten Lebensmitteln.
Achtung!
Beim Einsatz des Grills, Doppel-Grills bzw. Doppel-Grills mit Umluft muss die Tür
geschlossen sein.
Empfehlungen zum Auftauen von
Lebensmitteln
Die Auftaufunktion erfolgt über ein Warmluftsystem auf zwei 2 Höhen. HI ist für Fleisch
im Allgemeinen und LO für Fisch, Kuchen,
Gebäck und Brot. Bei Wahl der Auftaufunktion, HI bzw. LO auf dem
Temperaturwähler einstellen, indem der
Temperaturknopf
dann die Knöpfe
gedrückt wird und
betätigt werden.
• Die Lebensmittel ohne Verpackung bzw.
in einem Behälter auf das Backblech des
• Große Fleisch- oder Fischstücke auf dem
Rost mit einem Backblech darunter zum
Auffangen des Safts auftauen.
• Fleisch und Fisch müssen vor dem
Kochen nicht vollkommen aufgetaut sein.
Gewürze können bereits hinzugefügt
werden, wenn die Oberfl äche weich ist.
• Lebensmittel nach dem Auftauen gleich
zubereiten.
• Einmal aufgetaute Lebensmittel nicht
wieder einfrieren.
Backofens legen.
Page 42

42 electrolux
DE
Konsultieren Sie die nachfolgende Tabelle der Auftauzeiten und Temperaturstufen:
LEBENS-MITTEL
Brot
Gebäck
Fisch
Fisch
Hühnchen
Hühnchen
Beefsteak
Hackfl eisch
Hackfl eisch 1 Kg 120 min
UNTERE STUFE (LO)
Gewicht Zeit
1/2 Kg 35 min
1/2 Kg 25 min
1/2 Kg 30 min
1 Kg 40 min
OBERE STUFE (HI)
Gewicht Zeit
1 Kg 75 min
1,5 Kg 90 min
1/2 Kg 40 min
1/2 Kg 60 min
Vor dem ersten Gebrauch
Lesen Sie dieses Handbuch aufmerksam
durch, um beste Ergebnisse mit Ihrem
Backofen zu erzielen. Aufgrund des
Fertigungsablaufs können Fettreste und
sonstige Substanzen vorhanden sein.
Gehen Sie bitte wie folgt vor, um sie zu
entfernen:
•
Entfernen Sie das Verpackungsmaterial inkl.
evtl. vorhandener Kunststoffschutzvorrichtungen.
• Schalten Sie eine Stunde lang Funktion
oder
bei 200°C ein. Lesen Sie dazu die
Liste der Eigenschaften, die in diesem
Handbuch zur Verfügung gestellt wird.
• Öffnen Sie die Backofentür, um den Backofen abzukühlen und das Entweichen
der Gerüche aus dem Backofeninnern zu
fördern.
• Nachdem der Backofen abgekühlt ist,
müssen Sie Backofen und Zubehör reinigen.
Beim ersten Einsatz können Rauch und
Gerüche entstehen, weshalb die Küche gut
belüftet sein sollte.
Benutzung des Backofens
Bei Stromausfall erlöschen alle Einstellungen
(Tageszeit, Programmeinstellungen bzw.
laufendes Programm). Nach Wiederherstellung
der Stromversorgung werden blinken
die Ziffern auf der Anzeige und die
Uhr/Zeitschaltuhr muss eingestellt werden.
Achtung!
Die Elektronikuhr verfügt über
Touch-Control-Technologie. Zur
Bedienung einfach die Glas-Symbole
mit dem Finger berühren.
Die Empfi ndlichkeit der Touch-Control
passt sich fortwährend den
Umgebungsbedingungen an.
Bitte achten Sie darauf, dass die
Glasoberfl äche der Vorderseite der
Bedienelemente sauber und frei von
jeglichen Verunreinigungen ist.
Wenn die Uhr beim Berühren des
Glases mit dem Finger nicht richtig
reagiert, muss der Backofen vom
Stromnetz getrennt und nach einem
kurzen Augenblick wieder angeschlossen
werden. Dadurch justieren sich die
Knöpfe automatisch und reagieren
erneut auf die Fingerberührung.
Page 43

electrolux 43
DE
Einstellung der Elektronikuhr
Bei Inbetriebnahme des Backofens werden
Sie sehen, dass die Uhr bei 12:00 ständig
blinkt. Stellen Sie die Uhr durch Berühren
der Symbole des Bedienungsfelds ein.
Sie werden 2 Töne hören, mit denen die
Einstellung der Uhr bestätigt wird. Zum
Verändern der Uhrzeit den Backofen
abstellen. Den Knopf
bis die Anzeige
der Uhr berühren,
blinkt.
Nun die Uhrzeit durch Berühren der Knöpfe
umstellen. Die zwei Signaltöne, die
Sie anschließend hören, bestätigen die
Umstellung der Uhrzeit.
Manueller Betrieb
Nach Einstellung der Uhrzeit ist der
Backofen einsatzbereit:
1 Den Knopf On drücken.
drücken, um die gewünschte
2
Garfunktion zu wählen.
3 Auf der Temperaturanzeige erscheint die
für diese Garfunktion voreingestellte Zeit.
Zum Ändern, den Temperaturknopf
drücken. Die gewünschte Temperatur
durch Drücken der Knöpfe
wählen.
4 Die obere Backofenmulde beginnt sich
aufzuheizen. Bei den Funktionen
Aufheizfunktion für einige
wird die schnelle
Minuten
aktiviert. Der Backofen wird einen
Signalton von sich geben, wenn die
gewählte Temperatur erreicht wurde.
Achtung! Mit dieser Aufheizfunktion
wird der an der Rückseite der oberen
Backofenmulde befi ndliche Turbomotor
gestartet.
5 Während sich der Backofen aufheizt,
blinkt das Gradsymbol in der
Temperaturanzeige, um anzuzeigen,
dass sich das Gargut erwärmt.
6 Knopf Off 4 betätigen, um das Garen zu
beenden.
Achtung! Nach dem Beenden des
Garvorgangs werden Sie feststellen,
dass die Kühlung des Backofens
weiterläuft, bis die Temperatur des
Backofeninnenraums auf ein
angemessenes Niveau gesunken ist.
Beleuchtung des Backofens
Das Innenlicht leuchtet auf, wenn:
– die Backofentür geöffnet wird. Wenn die
Tür nach gewisser Zeit nicht geschlossen
wird, erlöscht das Licht automatisch, um
Strom zu sparen.
– irgendeine Garfunktion eingestellt wird.
Nach einiger Zeit schaltet sich das Licht aus.
Möchten Sie das Licht während des
Garvorgangs einschalten, drücken Sie
einfach den Innenlichtknopf des
Backofens
. Zum Ausschalten des
Lichts erneut den Lichtknopf des
Backofens
drücken.
Page 44

44 electrolux
DE
Funktionen der Elektronikuhr
Funktionen des elektronischen Programmierers
Garzeit-Dauer Diese Funktion ermöglicht die Einstellung der Dauer und Endzeit der
Garung. Nach Ablauf dieser Zeit schaltet sich der Backofen automatisch ab.
Programmierung der Garzeit-Dauer:
1 Den Uhrknopf drücken. Das Symbol wird aufl euchten.
2 Die Garzeit durch Drücken der Knöpfe + - wählen.
3 Es werden zwei akustische Signale nacheinander zu hören sein und auf
der Anzeige erscheint die verbleibende Garzeit. Das Symbol wird
langsam blinken, um anzuzeigen, dass der Backofen sich automatisch
abschaltet.
4 Wählen Sie eine Garfunktion und eine Temperatur.
5 Nach Ablauf der Garzeit ertönt ein Alarm und das Symbol wird
schneller blinken.
6
Irgendeinen Knopf des Bedienfelds betätigen, um den Alarm abzustellen.
Die eingestellte Zeit kann jederzeit nach Wunsch geändert werden, indem
der Uhrknopf und dann die Knöpfe gedrückt werden.
Die beiden Signaltöne, die Sie anschließend hören, bestätigen die
Umstellung auf die neue Garzeit.
Garzeit-Ende Diese Funktion ermöglicht es, die Beendigung der Garzeit zu
programmieren, wonach sich der Backofen automatisch ausschalten wird.
Programmierung des Garzeit-Endes:
1 Den Uhrknopf mehrfach antippen, bis das Symbol aufl euchtet.
2 Das Garzeit-Ende durch Drücken der Knöpfe einstellen.
3 Es ertönen zwei aufeinanderfolgende Signaltöne, woraufhin die Anzeige
die verbleibende Garzeit anzeigen wird. Das Symbol wird langsam
blinken, um anzuzeigen, dass der Backofen sich automatisch
ausschalten wird.
4 Eine Garfunktion und Temperatur wählen.
5 Wenn die eingestellte Dauer abgelaufen ist, wird sich der Backofen
ausschalten und der Alarm ertönen; das Symbol blinkt dann schneller.
6
Irgendeinen Knopf des Bedienfelds betätigen, um den Alarm abzustellen.
Das eingestellte Garzeit-Ende kann jederzeit nach Belieben geändert
werden, indem der Uhrknopf solange gedrückt wird, bis das
Symbol blinkt und danach die Knöpfe betätigt werden. Die
beiden Signaltöne, die Sie anschließend hören, bestätigen die Umstellung
auf die neue Zeit.
Diese Funktion kann selbst dann genutzt werden, wenn bereits im
Backofen gegart wird. In diesem Fall die obigen Anleitungen mit
Ausnahme von Nr. 4 befolgen.
Page 45

Cooking duration
Kombinierte
and End of
Garzeit und
cooking
Garzeit-Ende
time combined
electrolux 45
DE
Funktionen des elektronischen Programmierers
Diese Funktion gestattet es, zusammen die Garzeit und das Garzeit-Ende
einzustellen. Mit dieser Funktion schaltet sich der Backofen automatisch
zur eingestellten Zeit ein und funktioniert während der programmierten
Garzeit. Er schaltet sich dann automatisch zur programmierten Zeit wieder ab.
1 Den Uhrknopf antippen. Das Symbol wird aufl euchten.
2 Die Garzeit durch Drücken der Knöpfe wählen.
3 Es werden zwei akustische Signale nacheinander zu hören sein und
auf der Anzeige erscheint die verbleibende Garzeit. Das Symbol
wird dann langsam blinken.
4 Den Uhrknopf mehrfach antippen, bis das Symbol aufl euchtet.
5 Das Garzeit-Ende durch Drücken der Knöpfe wählen.
6 Dies wird mit zwei Signaltönen bestätigt. Es wird dann die aktuelle Zeit
auf der Anzeige angezeigt und das Symbol bleibt erleuchtet.
7 Wählen Sie eine Garfunktion und eine Temperatur.
8 Der Backofen bleibt ausgeschaltet, bei erleuchtetem Symbol und
langsam blinkendem Symbol . Die Uhr zeigt dann die aktuelle Zeit
an und die Innenbeleuchtung bleibt erloschen. Der Backofen ist nun
programmiert.
9 Wenn der Zeitpunkt des Garbeginns gekommen ist, wird sich der
Backofen einschalten und während der programmierten Garzeit in
Betrieb sein. Die Anzeige der Zeitfunktion wird die verbleibende Garzeit
angeben.
10 Wenn die eingestellte Zeit verstrichen ist, wird sich der Backofen
ausschalten und es ertönt ein Alarm; ferner werden die Symbole
und aufl euchten.
11
Auf irgendeinen Knopf des Bedienfelds drücken, um den Alarm abzustellen.
Wenn Sie das Garzeit-Ende verstellen möchten, während der Backofen im
Betrieb ist, den Uhrknopf drücken, bis das Symbol blinkt.
Das Garzeit-Ende verändern, indem die Knöpfe angetippt werden.
Die beiden Signaltöne, die danach zu hören sind, bestätigen die neue Uhrzeit.
Kurzzeitmesser Ein Signalton ertönt, wenn die eingestellte Zeit abgelaufen ist, unabhängig
davon, ob der Backofen ein- oder ausgeschaltet ist.
Programmierung des Kurzzeitmessers:
1 Den Kurzzeitmesser-Knopf antippen. Das Symbol leuchtet auf.
2 Die Zeit auswählen, nach der der Alarm klingeln soll, indem die Knöpfe
gedrückt werden.
3 Sie werden dann zwei Signaltöne hören; die Anzeige wird die restliche
Zeit angeben, bis der Alarm einsetzt, und das Symbol wird langsam
blinken, um anzuzeigen, dass der Kurzzeitmesser (Timer) eingeschaltet
wurde.
4 Nach Ablauf der programmierten Zeit setzt der Alarm ein und das
Symbol beginnt, schneller zu blinken.
5
Auf irgendeinen Knopf des Bedienfelds drücken, um den Alarm abzustellen.
Die programmierte Zeit kann jederzeit wieder geändert werden, indem
der Kurzzeitmesser-Knopf solange gedrückt wird, bis das Symbol
blinkt, anschließend die Knöpfe betätigen. Die beiden Signaltöne,
die danach zu vernehmen sind, bestätigen die neue Uhrzeit.
Page 46

46 electrolux
DE
Gartabellen
Die Gartabellen zeigen Temperaturbeispiele und ungefähre Garzeiten. Die Gardauer hängt
vom Modell ab.
Um bessere Ergebnisse zu erzielen, empfehlen wir, den Backofen mit Funktion
10 Minuten lang vorzuheizen.
oder
VORSPEISEN
Im Ofen
gegarter Reis
Gefüllte
Teigtasche
Blätterteigtaschen
mit Gemüse
Gemüsekuchen
Ofenkartoffeln 1,0 Unten
Pizza 0,6
Quiche 0,8
Gewicht
(Kg)
1,0 Unten
1,2
1,0
1,0
Blechstellung
Mittelstellung
Mittelstellung
Mittelstellung
Mittelstellung
Mittelstellung
Garmodus
Temperatur
(ºC)
180-200 25-30
170-190 20-25
170-190 45-50
160-180 30-35
190-210 25-30
180-200 25-30
170-190 35-40Unten
190-210 55-60
170-190 45-50
180-200 55-60
180-200 40-45
190-210 15-20
170-190 10-15
180-200 40-45
160-180 35-40
170-190 40-45
Zeit
(min)
Behältnis
Nicht sehr tiefes
Blech
Backblech
Nicht sehr tiefes
Blech
Nicht sehr tiefes
Blech
Backblech
Rost
Quiche-
Backform
Gefüllte
Tomaten
Lasagne 1,0
0,8
Mittelstellung
Mittelstellung
170-190 10-12
160-180 10-12
180-200 8-10
Backblech
Nicht sehr tiefes Blech
Page 47

electrolux 47
DE
FLEISCH
Spanferkel 1,4
Kaninchen 1,2
Lamm 1,0
Schweinelende 0,6
Hähnchen 1,2 Unten
Roastbeef 0,6
Filet in
Blätterteig
Spieße 0,3 Oben 180-200 10-12 Rost
Gewicht
(Kg)
1,0
Blechstellung
Mittelstellung
Mittelstellung
Mittelstellung
Mittelstellung
Mittelstellung
Mittelstellung
Garmodus
Temperatur
(ºC)
190-210 70-75
170-190 70-75
180-200 55-60
170-190 30-35
190-210 50-55
180-200 50-55
170-190 35-40
170-190 40-45
190-210 50-55
170-190 45-50
190-210 30-35
190-210 30-35
180-200 35-40
160-180 30-35
Zeit
(min)
Behältnis
Backblech
Backblech 170-190 45-50
Backblech 170-190 45-50
Backblech
Backblech
Backblech 180-200 25-30
Backblech
Würstchen 0,6 Oben 190-210 10-15 Rost
Page 48

48 electrolux
DE
FISCH
Seebrasse 1,0
Dorade im
Salzmantel
Seezunge 1,0
Wolfsbarsch 1,0
Seehecht 1,1
Fischpastete 1,1
Lachs in
Pergamentpapier
Forelle 1,1
Fischfi let 1,0 Oben 170-190 15-20 Rost
Gewicht
(Kg)
1,0
1,0
Blechstellung
Mittelstellung
Mittelstellung
Mittelstellung
Mittelstellung
Mittelstellung
Mittelstellung
Mittelstellung
Mittelstellung
Garmodus
Temperatur
(ºC)
180-200 25-30
170-190 20-25
190-210 25-30
180-200 25-30
170-190 15-20
160-180 10-15
190-210 20-25
180-200 10-15
190-210 25-30
180-200 20-25
190-210 60-65
190-210 60-65
180-200 20-25
170-190 15-20
190-210 20-25
180-200 15-20
Zeit
(min)
Behältnis
Backblech
Backblech
Backblech
Backblech
Backblech
Topf
Backblech
Backblech
Sardinen 1,0 Oben 180-200 10-15 Rost
Page 49

electrolux 49
DE
SÜSSSPEISEN
UND DESSERTS
Biskuit 0,5
Biskuitrolle 0,5
Pudding 0,8
Plätzchen 1,0
Vol-au-vents 0,3
Madeleines 0,7
Bratäpfel 0,5
Baiser 0,35
Gebackene
Bananen
Plum-Cake 0,6
Apfelkuchen 0,8
Käsekuchen 0,8
Gewicht
(Kg)
0,5
Blechstellung
Mittelstellung
Mittelstellung
Mittelstellung
Mittelstellung
Mittelstellung
Mittelstellung
Mittelstellung
Mittelstellung
Mittelstellung
Mittelstellung
Mittelstellung
Mittelstellung
Garmodus
Temperatur
(ºC)
150-170 35-40
170-190 30-35
160-180 30-35
170-190 10-15
160-180 10-15
160-180 55-60
150-170 50-55
160-180 20-25
150-170 20-25
170-190 20-25
160-180 15-20
160-180 20-25
160-180 20-25
180-200 30-35
170-190 20-25
100-120 70-75
100-120 60-65
180-200 20-25
170-190 15-20
170-190 55-60
160-180 50-55
170-190 45-50
160-180 40-45
180-200 40-45
170-190 40-45
Zeit
(min)
Behältnis
Kuchenform
Backblech
Kastenform
Backblech
Backblech
Backblech
Backblech
Backblech
Topf
Kuchenform
Backblech
Käsekuchenform
Page 50

50 electrolux
DE
Kindersicherung
Diese Funktion verriegelt den Backofen, um zu
verhindern, dass Kinder mit diesem spielen.
Um diese Funktion zu aktivieren, die Knöpfe
und gleichzeitig drücken, bis ein lan-
ger Signalton ertönt.
Der Backofen ist nun verriegelt.
Wenn der Backofen eingeschaltet ist, ist
das Wort SAFE (sicher) auf der Zeitanzeige
zu sehen.
Selbst bei eingeschaltetem Backofen sind
nun alle Knöpfe blockiert, mit Ausnahme
des Ausschaltknopfes
Zur Entriegelung der Kindersicherung die
Knöpfe
Sie einen langen Signalton hören und das
Wort SAFE von der Anzeige verschwindet.
Automatisches Ausschalten des Backofens
Der Backofen stellt sich automatisch ab, wenn er
nicht nach einer gewissen Zeit ausgeschaltet wird
bzw. sich die Temperatur nicht verändert.
Der Backofen schaltet sich, wenn die Temperatur
50-120ºC beträgt, nach 12,5 Stunden aus
120-200ºC beträgt, nach 8,5 Stunden aus
200-250ºC beträgt, nach 5,5 Stunden aus
Einen beliebigen Knopf drücken, um das
Elektrogerät nach dem automatischen
Ausschalten wieder in Betrieb zu nehmen.
Die automatische Ausschaltfunktion
wird aufgehoben, wenn die Uhrfunktion
DAUER
werden.
Funktion der Wasserreinigung
Über diese Funktion
Um einen ordnungsgemäßen Betrieb gewährleisten
zu können, muss dieses Elektrogerät häufi g
gereinigt werden. Damit soll verhindert werden, dass
Speise- oder Fettreste darin verbleiben. Mit dieser
Funktion wird der Reinigungsvorgang erleichter
Wie funktioniert sie?
Anhand von Wärme, Dampf und ein paar Tropfen
Spülmittel lösen sich die Lebensmittelreste und weichen
soweit auf, dass sie viel einfacher entfernt werden
können und die Emaille nicht gescheuert werden muss.
Wie wird sie eingesetzt?
• Entfernen Sie sämtliches Zubehör aus dem
Backofen, bevor diese Funktion eingesetzt wird.
• Gießen Sie ca. 500 ml Wasser mit einigen
Tropfen Spülmittel auf einen großen, saugfähigen
Schwamm (empfohlene Größe: 360 x 300 mm),
den sie auf den Boden im Backofeninnern legen.
Sollte das Backofeninnere sehr stark verschmutzt
sein, lassen Sie die Lösung eine Weile einziehen,
bevor die Funktion eingeschaltet wird.
• Schließen Sie die Backofentür und wählen
Sie die Funktion für das Backofenunterteil.
Stellen Sie den Thermostatschalter auf 200ºC.
•
• Stellen Sie das Programm der Gardauer
auf 4 Minuten ein, indem Sie die
Funktionsknöpfe der Elektronikuhr
betätigen. Die Backofentemperatur steigt.
• Stellen Sie den Alarm der Programmieruhr
auf 21 Minuten, indem Sie die
Funktionsknöpfe der Elektronikuhr betätigen.
•
Nach 4 Minuten ertönt ein akustischer Alarm und
der Backofen schaltet automatisch ab.
• Stellen Sie Backofenfunktion und
Thermostatschalter auf Null. Um den
akustischen Alarm auszuschalten, drücken
Sie bitte einen beliebigen Knopf.
• Der Reinigungszyklus dauert 21 Minuten.
Nach Ablauf ertönt ein akustischer Alarm.
• Nach Abschluss der Reinigung müssen Sie
sicherstellen, dass der Backofen ausgeschaltet wird.
• Verwenden Sie den saugfähigen
Schwamm, um überschüssiges Wasser
aus dem Backofeninneren zu entfernen.
Nun können Sie das Backofeninnere mit warmem
•
Seifenwasser und einer zarten Kunststoffbürste, einem Tuch, Schwamm oder anderen, nicht
scheuernden Utensilien reinigen.
• Verwenden Sie einen speziellen Spachtel
(z. B. Spachtel für Glaskeramik) zur
Entfernung hartnäckiger Verschmutzungen.
• Reinigen Sie das Backofeninnere mit
reichlich sauberem Wasser und einem
Lappen. Trocknen Sie es anschließend mit
einem trockenen, weichen Tuch. Stellen
Sie sicher, dass das Backofeninnere und
Umgebung sowie vor allem die
Türdichtungen sauber und trocken sind.
.
und gleichzeitig betätigen, bis
oder ENDE eingestellt
Page 51

Pfl ege und Reinigung
Achtung!
Vor allen Tätigkeiten muss der
Backofen von der Hauptstromversorgung getrennt werden.
Reinigung des Ofeninnenraums
•
Reinigen Sie den Backofeninnenraum, um
Lebensmittel- und Fettreste zu entfernen, da
diese Rauch und Gerüche oder das
Entstehen von Flecken verursachen können.
•
Bei kaltem Backofen und auf emaillierten Flächen
(z. B. auf dem Backofenboden) sollten Sie eine
Nylonbürste oder einen Schwamm mit warmem
Seifenwasser verwenden. Wenn Sie spezielle
Backofenreinigungsmittel benutzen, dann nur auf
den emaillierten Oberfl ächen und nach
Anweisungen des Herstellers.
Achtung!
Benutzen Sie zum Reinigen des
Backofeninnenraums keine Dampf- oder
Hochdruckreiniger. Verwenden Sie auch
keine Metalltopfkratzer oder Materialien,
die die Emaille zerkratzen könnten.
Reinigung des Außenbereichs des
Ofens und des Zubehörs
Reinigen Sie die Backofenaußenfl äche und
das Zubehör mit lauwarmem Seifenwasser
oder einem milden Reinigungsmittel.
Achtung!
Verwenden Sie keine Metalltopfkratzer oder
Scheuerpulver, die die Emaille zerkratzen
könnten. Gehen Sie vorsichtig mit
Edelstahlfl ächen um und verwenden Sie
Schwämme oder Tücher, die keine Kratzer
verursachen. Versuchen Sie beim Reinigen
der Backofenaußenfl äche nicht, die Schalter
abzunehmen, da dafür zuerst der Backofen
aus der Küche ausgebaut werden muss.
Reinigung der Innenglasscheibe der
Ofentür
Achtung!
Seien Sie vorsichtig: Die Backofentür
wird geschlossen, wenn die
Innenscheibe entfernt wird.
1. Öffnen Sie die Backofentür.
2. Ziehen Sie die Scheibe am unteren Teil
(A) nach oben.
electrolux 51
DE
A
3. Die Innenscheibe ist frei. Entnehmen Sie
sie.
4. Reinigen Sie die Innenscheibe und das
Innere der Backofentür.
5. Führen Sie die Halterungen der
Innenscheibe ein.
C
B
6. Schieben Sie die Scheibe durch die
Rillen an der Türoberseite (B) in die Tür
(C) hinein.
7. Die Scheibe wird an der Tür befestigt,
indem die beiden unteren Haltungen (D)
gleichzeitig mit der Scheibe in die Tür (E)
geschoben werden.
E
D
Page 52

52 electrolux
DE
Auswechseln der Ofenlampe
Achtung!
Bevor Sie die Glühbirne auswechseln,
stellen Sie bitte sicher, dass der Backofen
von der Stromversorgung getrennt ist.
1. Entnehmen Sie die verchromten
Halterungen, indem Sie die Schraube (F)
lösen.
F
2. Entfernen Sie die Linse aus der
Lampenhalterung mithilfe eines
angemessenen Werkzeugs. Wechseln
Sie die Glühbirne aus.
3. Bringen Sie die Linse wieder an und
stellen Sie sicher, dass sie ohne Gewalt
in der richtigen Stellung einrastet.
Die Ersatzglühbirne muss für Temperaturen
bis 300°C ausgelegt sein. Sie können diese
Glühbirnen beim Electrolux-Kundendienst
bestellen.
Umwelterwägungen
Das Symbol auf dem Produkt oder auf
dessen Verpackung gibt an, dass dieses
Erzeugnis nicht wie Hausmüll entsorgt
werden darf. Es muss zu einer Sammelstelle
zur Wiederverwendung elektrischer und
elektronischer Geräte gebracht werden.
Anhand der ordnungsgemäßen Entsorgung
dieses Produkts tragen Sie dazu bei, dass
schädliche Auswirkungen auf die Umwelt
und die menschliche Gesundheit aufgrund
einer fehlerhaften Abfallentsorgung
vermieden werden. Setzen Sie sich bitte mit
Ihrer Gemeindeverwaltung, Ihrer Müllabfuhr
oder dem Laden, in dem Sie das Produkt
erworben haben, in Verbindung.
Ökologische Verpackung
Das Verpackungsmaterial ist vollständig
wiederverwertbar. Erkundigen Sie sich bei
den örtlichen Behörden über die
Vorschriften zur Entsorgung dieses
Materials.
Page 53

electrolux 53
DE
Was tun, wenn...
Wenn das Elektrogerät nicht richtig funktioniert, führen Sie bitte folgende Überprüfungen
durch, bevor Sie sich mit dem Electrolux-Kundendienst in Verbindung setzen.
Störung Abhilfe
Der Backofen funktioniert
nicht.
Das Innenlicht im
Backofen funktioniert nicht.
Bei laufendem Backofen
entsteht Rauch.
Die gewünschten Garergebnisse
werden nicht erzielt.
Dampf und Kondensation sammeln sich in
den Speisen und im Backofeninnern.
Der Backofenlüfter macht
Geräusche.
Auf dem Display steht “12:00”.
Prüfen Sie nach, ob er an die Stromversorgung angeschlossen ist.
Überprüfen Sie die Sicherungen und den Leistungsbegrenzer der Installation.
Prüfen Sie nach, ob sich die Zeituhr im manuellen Modus
befi ndet oder ob sie programmiert ist.
Überprüfen Sie die Stellung der Funktions- und Temperaturwahlschalter.
Wechseln Sie die Glühbirne aus.
Prüfen Sie, ob sie nach Anweisungen des Handbuchs installiert ist.
Beim ersten Gebrauch ist das normal.
Reinigen Sie den Backofen häufi g.
Verringern Sie die Fett- oder Ölmenge auf dem Backblech.
Verwenden Sie keine höheren Temperaturen als die in den
Gartabellen angegebenen.
Sehen Sie in den Gartabellen nach, um den Gebrauch des
Backofens zu erlernen.
Lassen Sie Backbleche nach Abschluss des Garvorgangs nicht
länger als 15-20 Minuten im Backofen.
Prüfen Sie nach, ob Blech oder Speisen im Kontakt mit der Backofenrückwand vibrieren.
Einstellung der Uhrzeit (siehe Abschnitt “Einstellung der Uhrzeit”).
Achtung!
Sollte das Problem trotz dieser Ratschläge weiterhin bestehen, setzen Sie sich bitte
mit dem technischen Kundendienst in Verbindung.
Technische Daten
Wenn das Gerät nicht funktioniert, müssen
Sie sich an den Kundendienst wenden
und ihm das Problem schildern. Dazu sind
folgende Angaben erforderlich:
1 Seriennummer (S-No)
2 Elektrogerätmodell (Model)
3 Produktnummer (PNC)
Sie fi nden dieses Informationen auf dem
Typenschild auf der Backofenunterseite (bei
geöffneter Tür).
Das von Ihnen gekaufte Gerät entspricht
den Europäischen Sicherheitsrichtlinien
für elektrische Geräte (73/23/EWG) und
elektromagnetische Verträglichkeit (89/336/
EWG).
Page 54

54 electrolux
DE
Installation
Diese Informationen sind für den Installateur,
d. h. für die Person, die für Montage und
den elektrischen Anschluss zuständig ist,
vorgesehen. Wenn Sie den Backofen selbst
anschließen, übernimmt der Hersteller
keinerlei Haftung für eventuelle Schäden.
Die Installation darf nur durch einen
qualifi zierten Elektriker erfolgen, welcher
sicherstellen muss, dass die für die
Installation anwendbaren Vorschriften
eingehalten werden.
Vor der Installation. Anmerkungen
•
Ziehen Sie zum Auspacken des Backofens
an der Lasche am unteren Teil der Packung.
• In der Küche ist eine Nische mit den auf
der Abbildung dargestellten Abmessungen
und 580 mm Mindesttiefe erforderlich
(siehe Abbildung auf Seite 91-92, wo die
Anbringung des Backofens
beschrieben ist).
• Um Mehrzweckherde an ihrem Standort
aufstellen zu können, dürfen auf der
Rückseite des Geräts keine Vorsprünge
(Verstärkungen, Rohre, Stecker usw.)
vorhanden sein.
• Der für die Kunststoffabdeckung des
Küchenmöbels eingesetzte Kleber muss
Temperaturen über 85°C ertragen können.
Stromanschluss. Gesetzliche
Anforderungen
Der Installateur muss Folgendes prüfen:
• Netzspannung und -frequenz
entsprechen den Angaben auf dem
Typenschild.
• Die Elektroinstallation kann die auf dem
Typenschild angegebene Höchstleistung
ertragen.
• Das auf folgender Abbildung abgebildete
Anschlussdiagramm:
• Der Stromanschluss verfügt über eine
ordnungsgemäße Erdung, nach gültiger
Gesetz-gebung.
• Der Anschluss muss über einen allpoligen
Stecker mit angemessener Größe für den
zu ertragenden Strom erfolgen. Zwischen
den Kontakten muss eine Mindestöffnung
von 3 mm bestehen, um das Abschalten
im Notfall, beim Reinigen oder
Auswechseln der Glühbirne zu
ermöglichen.
Das Erdungskabel darf unter keinen
Umständen durch diesen Stecker
verlaufen.
Nach dem Stromanschluss müssen alle
elektrischen Bauteile des Backofens auf
ihre Funktion geprüft werden.
Page 55

electrolux 55
DE
Einbau des Backofens
Für alle Backöfen und nach dem Anschluss
an das Stromnetz:
1 Führen Sie den Backofen in die Küche
ein, wobei darauf zu achten ist, dass
das Kabel nicht geklemmt wird.
2 Befestigen Sie den Backofen am
Möbelstück, indem die 2 zum
Lieferumfang gehörenden Schrauben in
die Bohrungen, die bei geöffneter Tür
sichtbar sind, eingeführt werden.
3 Prüfen Sie nach, dass das
Backofengehäuse nicht mit den
Seitenwänden des Möbelstücks in
Kontakt ist und dass mindestens 2 mm
Trennung dazwischen vorhanden sind.
Page 56

56 electrolux
NL
Inhoudsopgave
Veiligheidsinformatie 56
Omschrijving van het product 57
Bedieningspaneel 58
Functies van de oven 59
Vóór het eerste gebruik 60
Gebruik van de oven 60
Baktabellen 64
Kinderbeveiligingsfunctie 68
NL
Veiligheidsinformatie
Lees, voor uw veiligheid en om een juist
gebruik te garanderen, eerst aandachtig
de gebruikershandleiding en de adviezen
en waarschuwingen daarin, alvorens dit
huishoudelijk apparaat te installeren en het
voor het eerst te gebruiken. Om onnodige
fouten en ongevallen te vermijden, is het
belangrijk om ervoor te zorgen dat iedereen
die het apparaat gebruikt de werking en
veiligheidsmaatregelen kent. Bewaar deze
gebruiksaanwijzing en zorg ervoor dat ze bij
het apparaat wordt bewaard als dit verhuisd
of verkocht wordt, zodat degene die het
in de loop van zijn levensduur gebruikt de
informatie over het gebruik en de veiligheid
ervan kan nalezen.
Juist gebruik
• De oven mag alleen met gesloten deur in
werking zijn.
• De fabrikant is niet aansprakelijk als de
oven wordt gebruikt voor andere
doeleinden dan voor huishoudelijk gebruik.
• Gebruik de oven alleen wanneer deze in
een keuken is geïnstalleerd.
Bewaar geen olie, vet of brandbare materialen
•
in de oven, aangezien dit gevaarlijk kan zijn
wanneer de oven wordt aangezet.
• Leun niet op de geopende ovendeur. Dit
kan de ovendeur beschadigen en uw
veiligheid in gevaar brengen.
• Bedek de bodem van de oven niet met
aluminiumfolie, aangezien dit het bakproces
kan beïnvloeden en het binnenemail van
de oven kan beschadigen.
• Om de oven te gebruiken, dient de
meegeleverde bakplaat of het rooster te
Automatische uitschakeling van de oven 68
Reinigingsfunctie met water 68
Onderhoud en reiniging 69
Milieuoverwegingen 70
Wat te doen als... 71
Technische gegevens 71
Installatie 72
Onderhevig aan wijzigingen zonder bericht vooraf
worden aangebracht in de zijgeleiders
aan de binnenkant van de oven. De
bakplaten en roosters zijn voorzien van
een systeem waarmee zij gedeeltelijk
kunnen worden uitgetrokken en waardoor
de bediening ervan wordt vereenvoudigd.
• Zet geen schalen of etenswaren op de
bodem van de oven. Gebruik altijd de
bakplaten en roosters.
• Giet terwijl de oven in werking is geen
water op de bodem. Hiermee kan het
email worden beschadigd.
• Open tijdens gebruik van de oven de
ovendeur zo min mogelijk. Hiermee wordt
het energieverbruik gereduceerd.
Gebruik ovenhandschoenen als u iets in de
•
warme oven moet zetten of eruit moet halen.
• Open de deur om de oven te laten
afkoelen. Op deze manier wordt de oven
geventileerd en blijven er geen geuren in
de oven hangen.
Bij recepten met een hoog vloeistofgehalte
•
is het normaal dat er condens op de
ovendeur ontstaat.
Veiligheid voor kinderen
• Dit apparaat is niet bedoeld voor gebruik
door kleine kinderen of gehandicapte
personen zonder toezicht. Kleine kinderen
moeten in de gaten worden gehouden
om te voorkomen dat ze met het
apparaat gaan spelen.
• Laat kinderen tijdens het bakken niet in
de buurt van de oven komen, aangezien
deze hoge temperaturen bereikt.
Page 57

electrolux 57
NL
Installatie
• Controleer of de oven tijdens het
transport niet is beschadigd. Sluit nooit
een beschadigd huishoudelijk apparaat
aan. Als uw oven beschadigd is, neem
dan contact op met de leverancier.
• Verwijder de verpakking alvorens het
apparaat te gebruiken.
• Alle elektrische aansluitingen die nodig
zijn voor het installeren van dit
huishoudelijke apparaat dienen door een
gekwalifi ceerde en bevoegde persoon te
worden uitgevoerd.
•
Om veiligheidsredenen mogen de eigenschappen
van dit product niet worden gewijzigd.
Omschrijving van het product
1
2
3
4
5
6
7
8
• Gebruik de oven niet als de stroomkabel
is beschadigd of wanneer het
bedieningspaneel, de bovenkant of
onderkant zijn beschadigd. Neem contact
op met uw plaatselijke technische dienst
om risico’s te voorkomen.
• Boor geen gaten in de zijkanten van de
oven om schade aan de hydraulische en
elektrische onderdelen te voorkomen.
Opgelet! Voor de elektrische
aansluiting dienen de aanwijzingen uit
de desbetreffende paragrafen
aandachtig in acht genomen te worden.
9
10
11
12
13
14
15
16
1
Bedieningspaneel
2
Deurpakking
3
Grill
4
Verchroomde steun
5
Rooster
6
Bakplaat
7
Scharnier
8
Deur
9
Luchtuitlaat
10
Bevestiging aan de eenheid
11
Grillscherm
12
Rookuitlaat
13
Achterpaneel
14
Lamp
15
Ventilator
16
Binnenglas van de deur
Page 58

58 electrolux
NL
Bedieningspaneel
1
Knoppen
2
Temperatuurindicator
3
Tijdindicator
4
Tijdfunctie-indicator
2 4
3
6
5
Functies van de oven
6
Controlelampjes
7
Knoppen
8
Knoppen
5
De oven werkt alleen als de tijd van de dag is ingesteld.
De oven kan echter ook zonder enige programmering worden gebruikt.
Knoppen Functie
De oven in- of uitschakelen
De ovenfuncties selecteren
De temperatuur en de tijd of het ontdooiniveau instellen
81
7
De temperatuurwaarden instellen
De functies van de klok instellen
De kookwekker instellen
Het licht in- en uitschakelen
Oventemperatuur
Baktijd
Beëindiging van
het bakproces
Kookwekker
Tijd van de dag
Controlelampjes
Knippert terwijl de temperatuur wordt ingesteld.
Het lampje gaat branden wanneer de baktijd wordt
geprogrammeerd en begint te knipperen wanneer die tijd is bereikt.
Het lampje gaat branden wanneer de eindtijd van het bakproces wordt
geprogrammeerd en begint te knipperen wanneer die tijd is bereikt.
Gaat branden wanneer het alarm van de kookwekker
wordt geprogrammeerd.
Knippert wanneer de tijd van de dag wordt ingesteld.
Page 59

Functies van de oven
electrolux 59
NL
Conventioneel
Ovenvloer
Grill en
ovenvloer
Eenvoudige grill
Dubbele grill
Dubbele grill en
ventilator
Conventioneel
en ventilator
Turbo
Ovenvloer en
ventilator
Bereiding op
een lage
temperatuur
Ontdooien
Wordt gebruikt voor cakes en taarten omdat de warmte gelijkmatig
verdeeld moet worden om een luchtige textuur te verkrijgen.
Verwarmt alleen de onderkant. Geschikt voor het opwarmen van
gerechten en het bakken van taarten en dergelijke.
Speciaal voor gebraad. Kan gebruikt worden voor elk stuk vlees of
vis, ongeacht de grootte.
Voor het bereiden van gerechten met een oppervlakkig braadproces.
Hiermee kan de buitenlaag goudbruin worden gebakken zonder de binnenkant van de etenswaren
aan te tasten. Ideaal voor platte gerechten zoals fi lets, koteletten, vis en geroosterd brood.
Hiermee kunnen grotere oppervlakken bereid worden dan met de grill en, dankzij
het hogere vermogen, worden de etenswaren sneller goudbruin gebakken.
Hiermee kan gelijkmatig gebraden worden, terwijl het oppervlak
goudbruin gebakken wordt. Ideaal voor geroosterde gerechten.
ciaal voor grote stukken vlees, zoals pluimvee, etc. Het is aanbevolen om het stuk vlees op
de rooster te plaatsen en daaronder een bakplaat om het bakvocht op te vangen.
Geschikt voor gebraad en gebak. De ventilator verdeelt de warmte
gelijkmatig in de oven, waardoor de baktijd en –temperatuur wordt verlaagd.
De ventilator verdeelt de warmte die wordt geproduceerd door een
element aan de achterkant van de oven.
Dankzij de gelijkmatige verdeling van de warmte, kan op twee hoogtes tegelijk worden gebraden en gebakken.
Ideaal voor pizza's, gebak en vruchtentaarten of cakes.
Bestemd om op traditionele wijze stoofgerechten en dergelijke te bereiden en
voor recepten die een lange bereidingstijd met lage temperatuur vereisen.
Voor een optimaal resultaat raden we aan om ovenschotels met een deksel te
gebruiken. Kijk dan wel eerst of ze geschikt zijn voor dit huishoudelijke apparaat.
Om bijv. taarten en puddingen, boter, brood, fruit of andere
diepvriesproducten te ontdooien.
Spe-
Opgelet!
Bij gebruik van de grill, de dubbele grill of de dubbele grill met ventilator moet de
ovendeur gesloten blijven.
Aanbevelingen voor het ontdooien van
etenswaren
De ontdooifunctie werkt met een
warmeluchtsysteem op 2 niveaus. HI is
voor vlees in het algemeen en LO is voor
vis, taarten, gebak en brood. Wanneer de
ontdooifunctie wordt geselecteerd, dient HI
of LO op de temperatuurindicator te worden
ingesteld door de temperatuurknop en
daarna de knoppen
en in te drukken.
• Leg de etenswaren onverpakt op de
• Ontdooi grote stukken vlees of vis op de
rooster met daaronder een bakplaat om
vloeistoffen op te vangen.
• Vlees en vis hoeven niet volledig te
worden ontdooid om ze te braden.
Specerijen kunnen worden toegevoegd
wanneer het buitenvlak al zacht is.
• Als de etenswaren eenmaal ontdooid zijn,
moeten ze bereid worden.
Vries ontdooide etenswaren niet opnieuw in.
•
bakplaat of in een schaal.
Page 60

60 electrolux
NL
Raadpleeg de onderstaande tabel voor ontdooitijden en temperatuurniveaus:
ETENSWAAR
Brood
Taart
Vis
Vis
Kip
Kip
Entrecote
Gehakt
Gehakt 1 Kg 120 min
LAAG NIVEAU (LO)
Gewicht Tijd
1/2 Kg 35 min
1/2 Kg 25 min
1/2 Kg 30 min
1 Kg 40 min
HOOG NIVEAU (HI)
Gewicht Tijd
1 Kg 75 min
1,5 Kg 90 min
1/2 Kg 40 min
1/2 Kg 60 min
Vóór het eerste gebruik
Lees deze gebruiksaanwijzing aandachtig
om de beste resultaten met uw oven te
bereiken. Als resultaat van het
productieproces kunnen er vetresten of
andere stoffen achter zijn gebleven. Ga als
volgt te werk om ze te verwijderen:
•
Verwijder de verpakking, met inbegrip van
de plastic bescherming, als die er is.
• Zet de oven een uur lang op functie
of
op 200°C. Raadpleeg hiervoor het bij deze
handleiding ingesloten gegevensblad.
• Open de deur om de oven te laten afkoelen.
Op deze manier wordt de oven geventileerd
en blijven er geen geuren in de oven hangen.
• Maak de oven en de accessoires, nadat
deze zijn afgekoeld, schoon.
Tijdens het eerste gebruik kunnen er geuren
en rook ontstaan. Daarom moet de keuken
goed worden geventileerd.
Gebruik van de oven
Als de stroomtoevoer wordt
onderbroken, worden alle instellingen
(tijd van de dag, programmainstellingen of lopende programmering)
gewist. Wanneer de stroomtoevoer
wordt hersteld, knipperen de nummers
op het scherm en de klok/timer moet
opnieuw worden ingesteld.
Opgelet!
De elektronische klok is uitgerust met
TouchControl-technologie. Om deze te
gebruiken, hoeft u slechts de
symbolen van het bedieningspaneel
met de vinger aan te raken.
De gevoeligheid van de TouchControl
past zich continu aan in functie van de
omgevingsomstandigheden. Zorg ervoor
dat het glas van het bedieningspaneel
altijd schoon en vrij van obstakels is
wanneer u de oven aansluit.
Als de klok niet juist reageert wanneer
u het glas aanraakt, dient u de oven uit
te zetten en een paar seconden later
weer aan te zetten. Daarna worden de
knoppen automatisch ingesteld en
reageren zij weer op de aanraakbediening.
Page 61

electrolux 61
NL
Instelling van de elektronische klok
Wanneer u de oven in werking stelt, zult u
zien dat op de klok 12:00 gaat knipperen.
Stel de klok in door de symbolen
en
van het bedieningspaneel aan te raken.
U hoort 2 pieptonen die de instelling van de
tijd bevestigen.
Zet de oven uit als u de tijd wilt wijzigen.
Raak knop
indicator
Wijzig de tijd door de knoppen
van de klok aan totdat
knippert.
en aan
te raken. U hoort twee pieptonen die de
instelling van de nieuwe tijd bevestigen.
Handmatige werking
Wanneer de klok is gelijkgezet, is uw oven
klaar voor gebruik.
1 Druk op knop On .
2 Druk
in om de gewenste
bakfunctie te selecteren.
3 De temperatuurindicator toont de
vooraf ingestelde temperatuur van deze
bakfunctie.
Druk op de temperatuurknop
om de
temperatuur te wijzigen. Selecteer de
gewenste temperatuur door de knoppen
en in te drukken.
4 De bovenste ruimte van de oven begint
te verwarmen. De functies
starten de snelle verwarmingsfunctie gedurende enkele minuten. De
oven zendt een pieptoon uit wanneer de
geselecteerde temperatuur is bereikt.
Opgelet! Deze voorverwarmingsfunctie
activeert de turbomotor aan de
achterkant van de bovenste ovenruimte.
5 Terwijl de oven verwarmt, knippert het
gradensymbool van de
temperatuurindicator om aan te geven
dat het etenswaar wordt verwarmd.
6 Druk op knop Off 4 om het bakproces te
stoppen.
Opgelet! Wanneer het bakproces is
beëindigd, blijft de koelfunctie van de
oven geactiveerd totdat de
temperatuur in de oven tot een
geschikt niveau is gedaald.
Verlichting van de oven
Het binnenlicht van de oven gaat branden:
– Wanneer de ovendeur wordt geopend.
Als de ovendeur na een tijdje niet wordt
gesloten, gaat het licht uit om het
stroomverbruik te verminderen.
– Als een bakfunctie wordt gekozen.
Na een tijdje gaat het licht uit.
Als u het licht tijdens het bakproces wilt
aandoen, raakt u de knop Ovenlicht
aan. Om het licht uit te doen, drukt u
opnieuw de knop Ovenlicht
in.
Page 62

62 electrolux
NL
Functies van de elektronische klok
Functies van de elektronische programmeerinrichting
Baktijd Met deze functie kunt u de baktijd programmeren. Na deze tijd gaat de
oven automatisch uit.
Programmering van de baktijd:
Eindtijd van het
bakproces
1 Druk de kloktoets
2 Selecteer de baktijd door de knoppen en in te drukken.
3 Er zijn twee opeenvolgende pieptonen te horen en op het scherm
verschijnt de resterende baktijd. Het symbool gaat langzaam
knipperen om aan te geven dat de oven automatisch uit zal gaan.
4 Selecteer een temperatuur en bakfunctie.
5 Zodra de baktijd is afgelopen, gaat de oven uit. Er gaat een alarm af en
het symbool gaat sneller knipperen.
6 Druk op een willekeurige knop van het bedieningspaneel om het alarm
uit te schakelen.
U kunt de geprogrammeerde tijd altijd wijzigen door de kloktoets en
daarna de knoppen en aan te raken.
U hoort twee pieptonen die de instelling van de nieuwe tijd bevestigen.
Met deze functie kunt u het eindmoment van het bakproces
programmeren. Na deze tijd gaat de oven automatisch uit.
Programmering van de eindtijd van het bakproces:
1
Druk de kloktoets meerdere keren in tot het symbool gaat branden.
2 Selecteer de eindtijd van het bakproces door de knoppen en in te
drukken.
3 Er zijn twee opeenvolgende pieptonen te horen en op het scherm
verschijnt de resterende baktijd. Het symbool gaat langzaam
knipperen om aan te geven dat de oven automatisch uit zal gaan.
4 Selecteer een temperatuur en bakfunctie.
5 Wanneer de ingestelde tijd wordt bereikt, gaat de oven uit. Er gaat een
alarm af en het symbool gaat sneller knipperen.
6 Druk op een willekeurige knop van het bedieningspaneel om het alarm
uit te schakelen.
De geprogrammeerde eindtijd van het bakproces kan steeds gewijzigd
worden door de kloktoets in te drukken tot het symbool gaat
knipperen en door daarna de knoppen en in te drukken. U hoort
twee pieptonen die de instelling van de nieuwe tijd bevestigen.
U kunt deze functie zelfs gebruiken als u reeds met de oven aan het
bakken of braden bent. Volg in dit geval de bovenstaande aanwijzingen
op, behalve nr. 4.
in. Het symbool gaat branden.
Page 63

electrolux 63
NL
Functies van de elektronische programmeerinrichting
Cooking duration
Combinatie van
and End of
baktijd en eindtijd
cooking
van het
time combined
bakproces
Met deze functie kan de baktijd tegelijk met de eindtijd van het bakproces
worden geprogrammeerd. Met deze functie gaat de oven automatisch
op het ingestelde tijdstip en werkt hij gedurende de geprogrammeerde
baktijd. De oven gaat automatisch uit op het ingestelde tijdstip.
1 Druk de kloktoets
in. Het symbool gaat branden.
2 Selecteer de baktijd door de knoppen en in te drukken.
3 Er zijn twee opeenvolgende pieptonen te horen en op de indicator
verschijnt de resterende baktijd. Het symbool gaat langzaam
knipperen.
4
Druk de kloktoets meerdere keren in tot het symbool gaat branden.
5 Selecteer de eindtijd van het bakproces door de knoppen en in
te drukken.
6 Dit wordt bevestigd met twee pieptonen. De huidige tijd wordt op het
scherm weergegeven en het symbool blijft branden.
7 Selecteer een temperatuur en bakfunctie.
8 De oven blijft uit, terwijl het symbool blijft branden en het symbool
langzaam blijft knipperen. De klok geeft de huidige tijd weer en de
binnenverlichting blijft uit. De oven is nu geprogrammeerd.
9 Wanneer het tijd is om het bakproces te beginnen, gaat de oven aan.
Hij werkt gedurende de geprogrammeerde baktijd. De indicator van de
tijdfunctie geeft de resterende baktijd weer.
10 Wanneer de ingestelde tijd wordt bereikt, gaat de oven uit. Er gaat een
alarm af en de symbolen en gaan knipperen.
11 Druk op een willekeurige knop van het bedieningspaneel om het alarm
uit te schakelen.
Als u de eindtijd van het bakproces wilt wijzigen terwijl de oven in werking
is, dient u de kloktoets in te drukken totdat het symbool knippert.
Wijzig de eindtijd van het bakproces door de knoppen en in te drukken.
U hoort twee pieptonen die de instelling van de nieuwe tijd bevestigen.
Kookwekker U hoort een pieptoon wanneer de ingestelde tijd is afgelopen, ongeacht
het feit of de oven aan of uit is.
Programmering van de kookwekker:
1 Druk de minutentoets in. Het symbool gaat branden.
2 Selecteer de tijd waarna het alarm moet afgaan door de knoppen en
in te drukken.
3 Daarna hoort u twee pieptonen; het scherm toont de tijd die ontbreekt
opdat het alarm afgaat en het symbool gaat langzaam knipperen om
aan te geven dat de timer is ingesteld.
4 Zodra de geprogrammeerde tijd voorbij is, gaat het alarm af en begint
het symbool
sneller te knipperen.
5 Druk op een willekeurige knop van het bedieningspaneel om het alarm
uit te schakelen.
U kunt de geprogrammeerde tijd altijd wijzigen door de kookwekkertoets
in te drukken totdat het symbool knippert en daarna de knoppen
en aan te raken. U hoort twee pieptonen die de instelling van de
nieuwe tijd bevestigen.
aan
Page 64

64 electrolux
NL
Baktabellen
De baktabellen tonen voorbeelden van bij benadering aangegeven baktemperaturen en
-tijden. De bakwijze is afhankelijk van het model.
Voor de beste resultaten raden wij aan om de oven tien minuten met de functie
voor te verwarmen.
of
VOORGERECHTEN
Rijst uit de
oven
Pastei 1,2 Midden
Bladerdeeg
met groenten
Groentetaart 1,0 Midden
Gepofte
aardappels
Pizza 0,6 Midden
Quiche 0,8 Midden
Gewicht
(Kg)
1,0 Laag
1,0
1,0 Laag
Positie van
de bakplaat
Midden
Bakfunctie
Temperatuur
(ºC)
180-200 25-30
170-190 20-25
170-190 45-50
160-180 30-35
190-210 25-30
180-200 25-30
170-190 35-40Laag
190-210 55-60
170-190 45-50
180-200 55-60
180-200 40-45
190-210 15-20
170-190 10-15
180-200 40-45
170-190 40-45
Tijd
(min)
Schaal
Ondiepe
bakplaat
Bakplaat
Ondiepe
bakplaat
Ondiepe
bakplaat
Bakplaat
Rooster
Quichevorm 160-180 35-40
Gevulde
tomaten
Lasagne 1,0 Midden 180-200 8-10
0,8 Midden
170-190 10-12
160-180 10-12
Bakplaat
Ondiepe bakplaat
Page 65

electrolux 65
NL
VLEESGERECHTEN
Speenvarken 1,4 Midden
Konijn 1,2 Midden
Lamsvlees 1,0 Midden
Varkensfi let 0,6 Midden
Kip 1,2 Laag
Rosbief 0,6 Midden
Haas in
bladerdeeg
Vleesspiezen 0,3 Hoog 180-200 10-12 Rooster
Gewicht
(Kg)
1,0 Midden
Positie van
de bakplaat
Bakfunctie
Temperatuur
(ºC)
190-210 70-75
170-190 70-75
180-200 55-60
170-190 30-35
190-210 50-55
180-200 50-55
170-190 35-40
170-190 40-45
190-210 50-55
170-190 45-50
190-210 30-35
190-210 30-35
180-200 35-40
160-180 30-35
Tijd
(min)
Schaal
Bakplaat
Bakplaat 170-190 45-50
Bakplaat 170-190 45-50
Bakplaat
Bakplaat
Bakplaat 180-200 25-30
Bakplaat
Worstjes 0,6 Hoog 190-210 10-15 Rooster
Page 66

66 electrolux
NL
VIS
Zeebrasem 1,0 Midden
Met zout
bereide
goudbrasem
Tong 1,0 Midden
Zeebaars 1,0 Midden
Heek 1,1 Midden
Vistaart 1,1 Midden
Zalm in
papillot
Forel 1,1 Midden
Visfi let 1,0 Hoog 170-190 15-20 Rooster
Gewicht
(Kg)
1,0 Midden
1,0 Midden
Positie van
de bakplaat
Bakfunctie
Temperatuur
(ºC)
180-200 25-30
170-190 20-25
190-210 25-30
180-200 25-30
170-190 15-20
160-180 10-15
190-210 20-25
180-200 10-15
190-210 25-30
180-200 20-25
190-210 60-65
190-210 60-65
180-200 20-25
170-190 15-20
190-210 20-25
180-200 15-20
Tijd
(min)
Schaal
Bakplaat
Bakplaat
Bakplaat
Bakplaat
Bakplaat
Ovenschotel
Bakplaat
Bakplaat
Sardientjes 1,0 Hoog 180-200 10-15 Rooster
Page 67

electrolux 67
NL
ZOETE SPIJZEN EN
NAGERECHTEN
Cake 0,5 Midden
Boomstam 0,5 Midden
Pudding 0,8 Midden
Koekjes 1,0 Midden
Vol-au-vents 0,3 Midden
Cakejes 0,7 Midden
Gestoofde
appels
Schuimtaart 0,35 Midden
Gestoofde
bananen
Plumcake 0,6 Midden
Appeltaart 0,8 Midden
Kaastaart 0,8 Midden
Gewicht
(Kg)
0,5 Midden
0,5 Midden
Positie van
de bakplaat
Bakfunctie
Temperatuur
(ºC)
150-170 35-40
170-190 30-35
160-180 30-35
170-190 10-15
160-180 10-15
160-180 55-60
150-170 50-55
160-180 20-25
150-170 20-25
170-190 20-25
160-180 15-20
160-180 20-25
160-180 20-25
180-200 30-35
170-190 20-25
100-120 70-75
100-120 60-65
180-200 20-25
170-190 15-20
170-190 55-60
160-180 50-55
170-190 45-50
160-180 40-45
180-200 40-45
170-190 40-45
Tijd
(min)
Schaal
Taartvorm
Bakplaat
Broodvorm
Bakplaat
Bakplaat
Bakplaat
Bakplaat
Bakplaat
Ovenschotel
Taartvorm
Bakplaat
Vorm voor
kaastaart
Page 68

68 electrolux
NL
Kinderbeveiligingsfunctie
Deze functie vergrendelt de oven om te
voorkomen dat kinderen ermee spelen.
Om deze functie te activeren, dienen de
toetsen en ingedrukt te worden totdat
een lange pieptoon te horen is.
De oven is nu vergrendeld.
Als de oven uit is, staat het woord SAFE
(veilig) op de tijdindicator.
Wanneer de oven aan staat, zijn alle knoppen
behalve de uitschakelknop
Om de kinderbeveiliging uit te schakelen,
dienen de knoppen
worden ingedrukt totdat een lange pieptoon
is te horen en het woord SAFE niet langer
op het scherm verschijnt.
Automatische uitschakeling van de oven
De oven gaat automatisch uit als deze niet
na een bepaalde tijd wordt uitgezet of als
de temperatuur niet wordt gewijzigd.
De oven wordt uitgeschakeld wanneer de
onderstaande temperaturen worden bereikt:
50-120ºC na afl oop van 12,5 uur
120-200ºC na afl oop van 8,5 uur
200-250ºC na afl oop van 5,5 uur
Druk een willekeurige knop in om het
huishoudelijke apparaat na een
automatische uitschakeling te gebruiken.
De automatische uitschakeling wordt
geannuleerd wanneer de klokfunctie
DUUR
Reinigingsfunctie met water
Informatie over deze functie
Om een goede werking te garanderen, dient dit
apparaat regelmatig te worden schoongemaakt
om te voorkomen dat er voedselresten of vet in
achterblijven. Met deze functie wordt uw oven
gemakkelijker en comfortabeler gereinigd.
Werking
Met behulp van warmte, stoom en een paar
druppels afwasmiddel worden de
voedselresten voldoende losgeweekt om
gemakkelijk te kunnen worden verwijderd zonder
dat het email hoeft te worden schoongeboend.
Gebruiksaanwijzing
• Verwijder alle accessoires uit de oven
alvorens deze functie te gebruiken.
• Giet ongeveer 500 ml water met een paar
druppels afwasmiddel op een grote absorberende
spons (aanbevolen grootte: 360 x 300 mm), die
u op de bodem van de oven dient te leggen. Als
de oven van binnen erg vies is, laat hem dan
een tijdje goed doordrenken met de oplossing
alvorens de functie in werking te stellen.
• Sluit de ovendeur en selecteer de functie
aan de onderkant van de oven.
• Stel de controleknop van de thermostaat op
200°C in.
•
Stel het baktijdprogramma op 4 minuten in door
de functieknoppen van de elektronische klok in
werking te stellen. De oventemperatuur neemt toe.
• Stel het kookwekkeralarm op 21 minuten in
door de functieknoppen van de
elektronische klok in werking te stellen.
• Na 4 minuten gaat een geluidsalarm af en
gaat de oven automatisch uit.
• Zet de functie van de oven en de
controleknop van de thermostaat op nul.
Druk op wat voor knop dan ook om het
geluidsalarm uit te schakelen.
• De reinigingscyclus duurt 21 minuten. Er
gaat na afl oop een alarm af.
• Wanneer het reinigingsproces is voltooid,
schakelt u het apparaat uit.
• Gebruik de grote absorberende spons om
het overtollige water uit de oven te halen.
• Nu kunt u de binnenkant van de oven met
warm zeepwater en een zachte plastic
borstel, een doek, een spons of een
ander niet schurend werktuig schoonmaken.
• Gebruik voor hardnekkig vuil een speciale
spatel (bijv. een spatel voor glaskeramiek).
•
Maak de binnenkant met veel schoon water en een
doek schoon. Maak hem vervolgens met een zachte,
droge doek droog. Zorg ervoor dat u het apparaat
bin-nenin en rondom, met name de pakkingen van de
deur, goed schoonmaakt en afdroogt.
vergrendeld.
en tegelijkertijd te
of EIND is ingesteld.
Page 69

Onderhoud en reiniging
Opgelet!
Alvorens wat voor werk dan ook uit te
voeren dient de stroomtoevoer van het
apparaat te worden afgesloten.
Reiniging van de binnenkant van de oven
•
Maak de binnenkant van de oven schoon
om vet- en voedselresten te verwijderen,
aangezien deze rook en geuren kunnen
afscheiden of vlekken kunnen veroorzaken.
• Maak de oven afgekoeld schoon en
gebruik voor geëmailleerde oppervlakken
(bijvoorbeeld de bodem van de oven) een
nylon borstel of een spons met lauwwarm
zeepwater. Als u speciale ovenreinigers
gebruikt, breng deze dan alleen aan op
de geëmailleerde oppervlakken en volg
de aanwijzingen van de fabrikant op.
Opgelet!
Maak de binnenkant van de oven
niet met stoom- of hogedrukreinigers
schoon. Gebruik evenmin metalen
schuursponsen of materialen die het
email kunnen krassen.
Reiniging van de buitenkant van de
oven en van de accessoires
Maak de buitenkant van de oven en de
accessoires met lauwwarm zeepwater of
met een zacht reinigingsmiddel schoon.
Opgelet!
Gebruik geen metalen schuursponsen of
reinigingspoeders die het email kunnen
krassen. Wees voorzichtig met roestvrij
stalen oppervlakken en gebruik hiervoor
sponzen of doeken die niet krassen.
Probeer geen knoppen te verwijderen
om de buitenkant van de oven schoon te
maken, want hiervoor moet de oven eerst
uit de keuken worden gehaald.
Reiniging van het binnenglas van de
ovendeur
Opgelet!
Wees voorzichtig: de ovendeur gaat dicht
wanneer het binnenglas wordt verwijderd.
1. Open de ovendeur.
2. Trek van de onderkant (A) het glas
omhoog.
electrolux 69
NL
A
3. Het binnenglas komt vrij. Verwijder het.
4. Maak het binnenglas en de binnenkant
van de ovendeur schoon.
5. Breng de steunen van het binnenglas
via de gleuven aan de bovenkant van de
ovendeur (B) aan.
C
B
6. Breng het glas in de ovendeur (C) aan.
7. Het glas wordt vastgezet aan de
ovendeur door de twee onderste steunen
(D) aan te drukken terwijl het glas in de
deur (E) wordt geduwd.
E
D
Page 70

70 electrolux
NL
Het lampje van de oven verwisselen
Opgelet!
Zorg er eerst voor dat de oven van
het elektriciteitsnet wordt afgesloten
alvorens de lamp te verwisselen.
1. Verwijder de verchroomde steunen door
de schroef (F) los te draaien.
F
2. Maak het glas van de lampfi tting los
met behulp van geschikt gereedschap.
Verwissel het lampje.
3. Monteer opnieuw het glas en zorg
ervoor dat het zonder te forceren in de
goede positie komt te zitten.
Het vervangingslampje dient temperaturen
tot 300°C te kunnen verdragen. Deze
lampjes kunnen besteld worden bij de
Technische Dienst van Electrolux.
Milieuoverwegingen
Het symbool op het product of op de
verpakking geeft aan dat dit product niet
kan worden behandeld als huishoudelijk
afval. Het moet naar een ophaalpunt voor
het recyclen van elektrische en
elektronische apparatuur worden
gebracht. Als dit product op juiste wijze
wordt verwijderd, helpt u mogelijke
negatieve gevolgen voor het milieu en
de gezondheid van de mens door een
eventuele onjuiste behandeling van het afval
voorkomen. Neem alstublieft contact op
met uw gemeente, uw vuilophaaldienst of
de winkel waar u dit product heeft gekocht.
Milieuvriendelijke verpakking
De verpakkingsmaterialen zijn volledig
recyclebaar en kunnen opnieuw gebruikt
worden. Raadpleeg de plaatselijke
autoriteiten inzake de normen voor de
verwijdering van dit materiaal.
Page 71

electrolux 71
NL
Wat te doen als...
Als het huishoudelijke apparaat niet juist werkt, kijk dan het volgende na alvorens contact
op te nemen met de Technische Dienst van Electrolux.
Probleem Oplossing
De oven werkt niet
Het binnenlicht van de oven
werkt niet
Er komt rook uit de oven
wanneer deze in werking is
De gewenste bakresultaten
worden niet bereikt
De stoom en condens verzamelen
zich in de etenswaren en in de oven
De ventilator van de oven
maakt lawaai
Het scherm toont “12:00”
Controleer de aansluiting op het elektriciteitsnet.
Controleer de zekeringen en de stroombegrenzer van de installatie.
Controleer of de klok in de handmatige of geprogrammeerde functie staat.
Controleer de stand van de functie- en temperatuurschakelaar.
Verwissel het lampje.
Controleer of het is geïnstalleerd zoals is aangegeven in de gebruiksaanwijzing.
Dat is normaal wanneer u de oven voor de eerste keer gebruikt.
Maak de oven regelmatig schoon.
Verminder de hoeveelheid vet of olie van de bakplaat.
Gebruik geen hogere temperatuur dan de in de baktabellen aangeduide temperatuur.
Raadpleeg de baktabellen om te leren hoe u de oven moet
gebruiken.
Wanneer het bereidingsproces is afgelopen, laat dan de
bakplaten niet langer dan 15-20 minuten in de oven staan.
Controleer of de bakplaat en de etenswaren niet trillend in
aanraking komen met het achterpaneel van de oven.
Stel de tijd van de dag in (zie paragraaf “Instellen van de tijd van de dag”).
Opgelet!
Als het probleem ondanks deze adviezen aanhoudt, neem dan contact op met de
Technische Dienst.
Technische gegevens
Als het apparaat niet werkt, neem dan
contact op met de technische dienst en
geef naast het probleem de onderstaande
gegevens door:
1 Serienummer (S-No)
2 Model van het apparaat (Model)
3 Productnummer (PNC)
U vindt deze informatie op het
gegevensplaatje aan de onderkant van de
oven wanneer de deur geopend is.
Het apparaat dat u heeft gekocht voldoet
aan de Europese richtlijnen inzake veiligheid
bij gebruik van elektrisch materiaal (73/23/
EEG) en elektromagnetische compatibiliteit
(89/336/EEG).
Page 72

72 electrolux
NL
Installatie
Deze informatie is bestemd voor de
installateur, de verantwoordelijke persoon
voor de montage en de elektrische
aansluiting. Als u de oven zelf installeert,
stelt de fabrikant zich niet aansprakelijk voor
mogelijke schade.
De installatie mag alleen worden verricht
door een gekwalifi ceerde elektricien die de
voor de installatie geldende normen in acht
moet nemen.
Vóór de installatie. Opmerkingen
• Trek, om de oven uit te pakken, aan het
lipje aan de onderkant van de doos.
• Er is een opening in de keuken nodig
met de afmetingen die in de afbeelding
worden getoond en met een minimale
diepte van 580 mm. (Zie de afbeelding op
bladzijde 91-92 waarop de plaatsing van
de oven wordt omschreven).
• Om de multifunctionele oven op zijn
plaats aan te brengen, mag de
achterkant van het meubel geen
uitsteeksels hebben (versterkingen,
buizen, stopcontacten, etc.).
• De voor de plastic afdekking van het
keukenmeubel gebruikte plakmiddel
moet temperaturen van meer dan 85°C
kunnen verdragen.
Stroomaansluiting. Wettelijke eisen
De installateur dient te controleren of:
• De netspanning en netfrequentie
overeenkomen met de op het
gegevensplaatje aangeduide spanning
en frequentie.
• De elektrische aansluiting het op het
gegevensplaatje aangeduide maximale
vermogen kan verdragen.
• Het aansluitschema wordt in de
onderstaande fi guur getoond:
• De elektrische aansluiting beschikt
conform de geldige wetgeving over de
juiste aarding.
• De aansluiting dient te worden verricht
met een meerpolige schakelaar met een
voor de stroom die deze moet verdragen
geschikte grootte. U dient een minimale
afstand van 3 mm tussen de contacten
aan te houden, zodat het apparaat in
geval van nood, reiniging of verwisseling
kan worden afgesloten.
De aardkabel mag onder geen beding
door deze schakelaar lopen.
Na de elektriciteit te hebben
aangesloten, moet gecontroleerd worden
of alle elektrische onderdelen van de
oven functioneren.
Page 73

electrolux 73
NL
Oveninstallatie
Voor alle ovens en na de elektrische
aansluiting geldt:
1 Breng de oven voorzichtig in het
keukenmeubel aan zonder de kabel te
klemmen.
2 Maak de oven d.m.v. de twee
meegeleverde schroeven aan het
keukenmeubel vast. Draai ze in de gaten
die zichtbaar zijn als de ovendeur open is.
3 Zorg ervoor dat de ovenkast niet in
aanraking komt met de zijkanten van het
keukenmeubel en dat er minstens een
ruimte van 2 mm tussen beide is.
Page 74

74 electrolux
ES
Índice
Información de seguridad 74
Descripción del producto 75
Panel de mandos 76
Funciones del horno 77
Antes de usar por primera vez 78
Uso del horno 78
Tablas de cocción 82
Función de bloqueo para niños 86
ES
Información de seguridad
Por su seguridad y para garantizar un
uso correcto, antes de instalar y usar
por primera vez este electrodoméstico,
lea con atención el manual del usuario,
incluidos sus consejos y advertencias.
Para evitar errores y accidentes
innecesarios, es importante asegurarse
de que todas las personas que
usen el electrodoméstico conocen
su funcionamiento y sus medidas de
seguridad. Guarde estas instrucciones
y asegúrese de que se conservan con
el electrodoméstico si se cambia de
sitio o se vende, de modo que quien
lo utilice a lo largo de su vida útil esté
informado sobre su uso y seguridad.
Uso correcto
• El horno siempre tiene que funcionar con
la puerta cerrada.
• El fabricante no asumirá ninguna
responsabilidad si el horno se usa para
otros fi nes distintos a los domésticos.
• Use el horno sólo cuando esté instalado
en una cocina.
• No guarde aceites, grasas ni materiales
infl amables en su interior, ya que puede
ser peligroso si pone el horno en
funcionamiento.
• No se apoye ni se siente sobre la puerta
abierta del horno, ya que podría dañarla
y resultar peligroso para usted.
• No cubra con papel de aluminio el
fondo del horno, ya que podría afectar a
la cocción y dañar el esmalte interior del
horno.
Desconexión automática del horno 86
Función de limpieza con agua 86
Cuidado y limpieza 87
Consideraciones medioambientales 88
Qué hacer si... 89
Datos técnicos 89
Instalación 90
Sujeto a cambios sin previo aviso
• Para usar el horno, introduzca la bandeja
o la rejilla que se suministra en las guías
laterales interiores. Las bandejas y rejillas
están provistas de un sistema que permite
su extracción parcial y facilita su manejo.
• No deposite recipientes ni alimentos
en el fondo del horno. Emplee siempre
las bandejas y rejillas.
• No vierta agua en el fondo del horno
mientras esté en funcionamiento, ya que
podría dañar el esmalte.
• Cuando use el horno, abra la puerta lo
menos posible para reducir el consumo
de electricidad.
• Emplee guantes de protección cuando
tenga que maniobrar dentro del horno
caliente.
• Para enfriar el horno, abra la puerta para
facilitar la ventilación y la salida de olores
de su interior.
• En recetas con un alto contenido
de líquidos es normal que se
produzcan condensaciones en la puerta
del horno.
Seguridad para niños
• Este electrodoméstico no está diseñado
para ser usado por niños pequeños
o personas discapacitadas sin
supervisión. Se debe vigilar a los niños
pequeños para evitar que jueguen con el
electrodoméstico.
• No permita que los niños se acerquen al
horno cuando está en funcionamiento,
porque se pueden alcanzar temperaturas
elevadas.
Page 75

electrolux 75
ES
Instalación
• Compruebe que el horno no ha sufrido
daños durante el transporte. No conecte
nunca un electrodoméstico dañado. Si su
horno está dañado, póngase en contacto
con el proveedor.
• Retire todo el embalaje antes de usarlo.
• Todos los trabajos eléctricos necesarios
para instalar este electrodoméstico
deben ser realizados por una persona
cualifi cada y competente.
• Por razones de seguridad, no cambie las
especifi caciones ni intente modifi car este
producto.
Descripción del producto
1
2
3
4
5
6
7
8
• No use el horno si el cable del suministro
eléctrico está dañado, o si el panel de
mandos, la parte superior o la base están
dañados, de modo que se pueda acceder
al interior del electrodoméstico. Póngase
en contacto con su servicio técnico local
para evitar peligros.
• No perfore los laterales del horno para
evitar daños en los componentes
hidráulicos y eléctricos.
¡Atención! Para realizar la conexión
eléctrica, siga atentamente las
instrucciones de los correspondientes
apartados.
9
10
11
12
13
14
15
16
1
Panel de mandos
2
Junta de puerta
3
Grill
4
Soporte cromado
5
Rejilla
6
Bandeja
7
Bisagra
8
Puerta
9
Salida de aire
10
Fijación a la unidad
11
Pantalla de grill
12
Salida de humos
13
Panel trasero
14
Luz
15
Ventilador
16
Cristal interior de puerta
Page 76

76 electrolux
ES
Panel de mandos
2 4
1
Botones + / -
2
Indicador de temperatura
3
Indicador de tiempo
4
Indicador de funciones de tiempo
3
6
5
Funciones del horno
6
Pilotos indicadores
7
Botones de función
8
Botón On / Off
5
El horno sólo funciona si se ha ajustado la hora del día.
Sin embargo, el horno también se puede usar sin ninguna programación.
Botones Función
Para conectar o desconectar el horno.
Para seleccionar funciones del horno.
Para ajustar la temperatura y el tiempo o el nivel de descongelación.
81
7
Para ajustar valores de temperatura.
Para seleccionar funciones de reloj.
Para ajustar el minutero.
Para conectar o desconectar la luz
Temperatura del
horno
Duración de
cocción
Finalización de la
cocción
Minutero
Hora del día
Pilotos indicadores
Parpadea mientras se está ajustando la temperatura.
Se ilumina cuando se programa el tiempo de cocción y
empieza a parpadear cuando se ha alcanzado.
Se ilumina cuando se programa la fi nalización de la
cocción y empieza a parpadear cuando se ha alcanzado.
Se ilumina cuando se programa la alarma del minutero.
Parpadea cuando se ajusta la hora del día.
Page 77

Funciones del horno
electrolux 77
ES
Convencional
Solera
Grill y solera
Grill simple
Grill doble
Grill doble y
ventilador
Convencional y
ventilador
Turbo
Solera y
ventilador
Cocción a baja
temperatura
Descongelación
Se usa para bizcochos y tartas porque el calor debe ser uniforme
para lograr una textura esponjosa.
Calienta sólo desde abajo. Adecuado para calentar platos y elaborar
pasteles y similares.
Especial para asados. Se puede usar con cualquier pieza, independientemente de su tamaño.
Para preparar platos con un asado superfi cial.
Permite dorar la capa exterior sin afectar al interior del alimento. Ideal
para piezas planas, como fi letes, costillas, pescado y pan tostado.
Permite cocinar superfi cies más grandes que con el grill y, gracias a su
mayor potencia, reducir el tiempo necesario para dorar los alimentos.
Permite asar uniformemente a la vez que se dora la superfi cie. Ideal
para parrilladas. Especial para piezas de gran tamaño, como aves
de corral, etc. Se recomienda colocar la pieza en la rejilla con una
bandeja debajo para recoger los caldos y jugos de la cocción.
Adecuado para asados y pasteles. El ventilador distribuye el calor por todo el
interior del horno para reducir el tiempo y la temperatura de cocción.
El ventilador distribuye el calor producido por un elemento situado en la parte
posterior del horno.
Gracias a la distribución uniforme del calor, se puede asar y hornear a dos alturas a la vez.
Idóneo para pizzas, pasteles y tartas de frutas o bizcochos.
Diseñado para cocinar cazuelas, guisados, etc. al estilo tradicional, y para
todas las recetas que requieran tiempos de cocción largos con poco calor.
Para obtener un resultado óptimo, recomendamos que utilice cazuelas con
tapas, pero debe comprobar primero que son aptas para este electrodoméstico.
Para descongelar p.ej. tartas y fl anes, mantequilla, pan, fruta u otros
alimentos congelados.
¡Atención!
Al usar el grill, el grill doble o el grill doble y ventilador, la puerta debe permanecer
cerrada.
Recomendaciones para descongelar
alimentos
La función de descongelación funciona
con un sistema de aire caliente a 2 niveles.
HI es para carnes en general y LO es para
pescados, tartas, pasteles y pan. Cuando
seleccione la función Descongelación,
ajuste HI o LO en el indicador de temperatura
pulsando el botón de temperatura
después los botones
Se debe colocar los alimentos sin envase
•
.
y
en la bandeja del horno o en un recipiente.
• Descongele piezas grandes de carne o
pescado colocándolas sobre la parrilla
con una bandeja debajo para recoger los
jugos.
•
La carne y el pescado no necesitan estar
totalmente descongelados antes de
cocinarlos. Los condimentos se pueden
añadir cuando la superfi cie ya está blanda.
• Los alimentos han de cocinarse una vez
descongelados.
• No vuelva a congelar los alimentos
descongelados.
Page 78

78 electrolux
ES
Consulte la siguiente tabla de tiempos de descongelación y niveles de temperatura:
ALIMENTO
Pan
Pastel
Pescado
Pescado
Pollo
Pollo
Entrecot
Carne picada
Carne picada 1 Kg 120 min
NIVEL BAJO (LO)
Peso Tiempo
1/2 Kg 35 min
1/2 Kg 25 min
1/2 Kg 30 min
1 Kg 40 min
NIVEL ALTO (HI)
Peso Tiempo
1 Kg 75 min
1,5 Kg 90 min
1/2 Kg 40 min
1/2 Kg 60 min
Antes de usar por primera vez
Lea con atención este manual de
instrucciones para obtener los mejores
resultados de su horno.
Como resultado del proceso de fabricación,
pueden quedar restos de grasa y otras
sustancias. Para eliminarlos, proceda de la
siguiente manera:
Retire el embalaje, incluidos los plásticos
•
protectores, si los hubiera.
ó
• Seleccione la función
a 200ºC
durante una hora. Para ello, consulte la lista
de características que se proporciona en
este manual.
• Para enfriar el horno, abra la puerta para
facilitar la ventilación y la salida de olores
de su interior.
• Una vez frío, limpie el horno y los
accesorios.
Durante el primer uso, pueden producirse
humos y olores, por lo que la cocina
debería estar bien ventilada.
Uso del horno
Si se interrumpe el suministro eléctrico,
se borrarán todos los ajustes (hora del día,
ajustes de programación o programación
en curso). Cuando se restablezca
el suministro eléctrico, los números
de la pantalla parpadearán y el reloj/
temporizador deberá ajustarse de nuevo.
¡Atención!
El reloj electrónico incorpora tecnología
Touch-Control. Para manejarlo,
simplemente toque los símbolos del
panel de mandos con el dedo.
La sensibilidad del Touch-Control
se adapta continuamente a las
condiciones cambiantes. Asegúrese
de que el cristal frontal del panel de
mandos esté siempre limpio y libre de
obstáculos cuando conecte el horno.
Si el reloj no responde correctamente
cuando toque el cristal, deberá apagar
el horno y volver a conectarlo unos
segundos después. Al hacerlo, los
botones se ajustarán automáticamente
y reaccionarán de nuevo al control
táctil.
Page 79

electrolux 79
ES
Ajuste del reloj electrónico
Cuando ponga en marcha el horno verá
que en el reloj parpadean las 12:00. Ajuste
el reloj tocando los símbolos
del
panel. Oirá 2 pitidos que confi rman el ajuste
de la hora.
Si desea modifi car la hora, apague el
horno. Toque el botón
el indicador
parpadee.
del reloj hasta que
Modifi que la hora tocando los botones
. Los dos pitidos que oiga después
confi rmarán el ajuste de la nueva hora.
Funcionamiento manual
Tras poner el reloj en hora, su horno está
listo para cocinar:
1 Pulse el botón On
2 Pulse
para seleccionar la función
.
de cocción deseada.
3 El indicador de temperatura mostrará
la temperatura preajustada para esa
función de cocción.
Pulse el botón de temperatura
para
modifi carla. Seleccione la temperatura
deseada pulsando los botones
.
4 La cavidad superior del horno
comenzará a calentarse. Las funciones
iniciarán la función
de calentamiento rápido durante unos
minutos. El horno pitará cuando alcance
la temperatura seleccionada.
¡Atención! esta función de
precalentamiento activa el motor turbo
situado en la parte posterior de la
cavidad superior del horno.
5 Mientras se calienta el horno, el símbolo
de los grados en el indicador de
temperatura parpadeará para indicar
que el alimento se está calentando.
6 Pulse el botón Off para detener la coc-
ción.
¡Atención! Cuando la cocción haya
fi nalizado, advertirá que la función de
enfriamiento del horno permanecerá
activada hasta que la temperatura en
el interior del horno se haya rebajado
hasta el nivel adecuado.
Iluminación del horno
La luz interior se encenderá:
– Cuando se abra la puerta del horno. Si
la puerta no se cierra después de un
tiempo, la luz se apagará para reducir el
consumo eléctrico.
– Cuando se seleccione cualquier función
de cocción.
La luz se apagará pasado un
tiempo.
Si desea encender la luz durante la
cocción, simplemente toque el botón Luz
del horno
nuevamente el botón Luz del horno
. Para apagar la luz, pulse
.
Page 80

80 electrolux
ES
Funciones del reloj electrónico
Funciones del programador electrónico
Duración
de cocción
Finalización
de la cocción
Esta función le permitirá programar la duración de cocción, y pasado este
tiempo el horno se desconectará automáticamente.
Programación del tiempo de cocción:
1 Pulse el botón de reloj
2 Seleccione el tiempo de cocción pulsando los botones .
3 Se oirán dos pitidos consecutivos y la pantalla mostrará el tiempo de
cocción restante. El símbolo parpadeará lentamente para señalar
que el horno se apagará automáticamente.
4 Seleccione una función de cocción y una temperatura.
5 Una vez fi nalizado el tiempo de cocción, el horno se apagará, sonará
una alarma y el símbolo parpadeará más rápido.
6 Pulse cualquier botón del panel de mandos para detener la alarma.
Podrá cambiar el tiempo programado siempre que lo desee tocando el
botón de reloj y luego los botones .
Los dos pitidos que oiga después confi rmarán el ajuste de la nueva hora.
Esta función le permitirá programar el momento de fi nalización de la
cocción, tras el cual el horno se desconectará automáticamente.
Programación de la hora de fi nalización de cocción:
1 Presione el botón de reloj varias veces hasta que el símbolo se
ilumine.
2 Seleccione el tiempo de fi nalización de cocción pulsando los botones
.
3 Se oirán dos pitidos consecutivos y la pantalla mostrará el tiempo de
cocción restante. El símbolo parpadeará lentamente para señalar
que el horno se apagará automáticamente.
4 Seleccione una función de cocción y una temperatura.
5 Cuando se alcance la duración ajustada, el horno se apagará, sonará
una alarma y el símbolo parpadeará más rápido.
6 Pulse cualquier botón del panel de mandos para detener la alarma.
Es posible cambiar la hora de fi nalización de cocción programada en
cualquier momento pulsando el botón de reloj hasta que el símbolo
parpadee y pulsando después los botones . Los dos pitidos que
oiga después confi rmarán el ajuste de la nueva hora.
Podrá utilizar esta función incluso si ya está cocinando con el horno. En
ese caso, siga las instrucciones de arriba salvo la Nº 4.
. El símbolo se iluminará.
Page 81

electrolux 81
ES
Funciones del programador electrónico
Cooking duration
Tiempo de
and End of
cocción y
cooking
fi nalización
time combined
de la cocción
combinados
Esta función permite programar conjuntamente el tiempo de cocción
y la fi nalización de la cocción. Con esta función, el horno se conecta
automáticamente en la hora ajustada y funciona durante el tiempo de
cocción para el que ha sido programado. Se apaga automáticamente a la
hora ajustada.
1 Pulse el botón de reloj
. El símbolo se iluminará.
2 Seleccione el tiempo de cocción pulsando los botones .
3 Se oirán dos pitidos consecutivos y el indicador mostrará el tiempo de
cocción restante. El símbolo parpadeará lentamente.
4 Presione el botón de reloj varias veces hasta que el símbolo se
ilumine.
5 Seleccione el tiempo de fi nalización de cocción pulsando los botones
.
6 Se confi rmará con dos pitidos. Se mostrará la hora actual en la
pantalla y el símbolo permanecerá iluminado.
7 Seleccione una función de cocción y una temperatura.
8 El horno se mantendrá apagado, con el símbolo encendido y el
símbolo parpadeando lentamente. El reloj mostrará la hora actual y
la luz interior permanecerá apagada. El horno está ahora programado.
9 Cuando sea hora de iniciar la cocción, el horno se encenderá y
funcionará durante el tiempo de cocción programado. El indicador de
la función de tiempo mostrará el tiempo de cocción restante.
10 Cuando se alcance el tiempo ajustado, el horno se apagará, sonará
una alarma y los símbolos y parpadearán.
11 Pulse cualquier botón del panel de mandos para detener la alarma.
Si desea modifi car la hora de fi nalización de cocción mientras el horno
está en marcha, pulse el botón de reloj hasta que el símbolo parpadee.
Modifi que el tiempo de fi nalización de cocción pulsando los botones .
Los dos pitidos que oiga después confi rmarán el ajuste de la nueva hora.
Minutero Se oirá un pitido cuando fi nalice el tiempo ajustado, independientemente
de que el horno esté encendido o apagado.
Programación del minutero:
1 Pulse el botón de minutero . El símbolo se iluminará.
2 Seleccione el tiempo después del cual deberá sonar la alarma pulsando
los botones .
3 Oirá entonces dos pitidos; la pantalla mostrará el tiempo que falta para
que suene la alarma y el símbolo parpadeará lentamente para indicar
que se ha ajustado el temporizador.
4 Una vez transcurrido el tiempo programado, sonará una alarma y el
símbolo comenzará a parpadear más rápido.
5 Pulse cualquier botón del panel de mandos para detener la alarma.
Podrá cambiar el tiempo programado siempre que lo desee tocando
el botón de minutero hasta que el símbolo parpadee y luego los
botones
. Los dos pitidos que oiga después confi rmarán el ajuste de
la nueva hora.
Page 82

82 electrolux
ES
Tablas de cocción
Las tablas de cocción muestran ejemplos de temperaturas y tiempos aproximados de
cocción. El modo de cocción depende del modelo.
Para obtener mejores resultados, recomendamos precalentar el horno con la función
durante 10 minutos.
ó
ENTRANTES
Arroz al horno 1,0 Baja
Empanada 1,2 Intermedia
Hojaldre
de verduras
Pastel
de verduras
Patatas
asadas
Pizza 0,6 Intermedia
Quiche 0,8 Intermedia
Peso
(Kg)
1,0
1,0 Intermedia
1,0 Baja
Posición de
la bandeja
Intermedia
Modo de
cocción
Temperat.
(ºC)
180-200 25-30
170-190 20-25
170-190 45-50
160-180 30-35
190-210 25-30
180-200 25-30
170-190 35-40Baja
190-210 55-60
170-190 45-50
180-200 55-60
180-200 40-45
190-210 15-20
170-190 10-15
180-200 40-45
160-180 35-40
170-190 40-45
Tiempo
(min)
Recipiente
Bandeja poco
honda
Bandeja
Bandeja poco
honda
Bandeja poco
honda
Bandeja
Rejilla
Molde para
quiche
Tomates
rellenos
Lasaña 1,0 Intermedia 180-200 8-10
0,8 Intermedia
170-190 10-12
160-180 10-12
Bandeja
Bandeja poco
honda
Page 83

electrolux 83
ES
CARNES
Cochinillo 1,4 Intermedia
Conejo 1,2 Intermedia
Cordero 1,0 Intermedia
Lomo
de cerdo
Pollo 1,2 Baja
Rosbif 0,6 Intermedia
Solomillo
al hojaldre
Brochetas 0,3 Alta 180-200 10-12 Rejilla
Peso
(Kg)
0,6 Intermedia
1,0 Intermedia
Posición de
la bandeja
Modo de
cocción
Temperat.
(ºC)
190-210 70-75
170-190 70-75
180-200 55-60
170-190 30-35
190-210 50-55
180-200 50-55
170-190 35-40
170-190 40-45
190-210 50-55
170-190 45-50
190-210 30-35
190-210 30-35
180-200 35-40
160-180 30-35
Tiempo
(min)
Recipiente
Bandeja
Bandeja 170-190 45-50
Bandeja 170-190 45-50
Bandeja
Bandeja
Bandeja 180-200 25-30
Bandeja
Salchichas 0,6 Alta 190-210 10-15 Rejilla
Page 84

84 electrolux
ES
PESCADO
Besugo 1,0 Intermedia
Dorada
a la sal
Lenguado 1,0 Intermedia
Lubina 1,0 Intermedia
Merluza 1,1 Intermedia
Pastel de
pescado
Salmón
en papillote
Trucha 1,1 Intermedia
Filete de pescado
Peso
(Kg)
1,0 Intermedia
1,1 Intermedia
1,0 Intermedia
1,0 Alta 170-190 15-20 Rejilla
Posición de
la bandeja
Modo de
cocción
Temperat.
(ºC)
180-200 25-30
170-190 20-25
190-210 25-30
180-200 25-30
170-190 15-20
160-180 10-15
190-210 20-25
180-200 10-15
190-210 25-30
180-200 20-25
190-210 60-65
190-210 60-65
180-200 20-25
170-190 15-20
190-210 20-25
180-200 15-20
Tiempo
(min)
Recipiente
Bandeja
Bandeja
Bandeja
Bandeja
Bandeja
Cazuela
Bandeja
Bandeja
Sardinas 1,0 Alta 180-200 10-15 Rejilla
Page 85

electrolux 85
ES
DULCES Y
POSTRES
Bizcocho 0,5 Intermedia
Brazo
de gitano
Flan 0,8 Intermedia
Galletas 1,0 Intermedia
Volovanes 0,3 Intermedia
Magdalenas 0,7 Intermedia
Manzanas
asadas
Merengue 0,35 Intermedia
Plátanos
asados
Plum-Cake 0,6 Intermedia
Tarta de
manzana
Tarta de
queso
Peso
(Kg)
0,5 Intermedia
0,5 Intermedia
0,5 Intermedia
0,8 Intermedia
0,8 Intermedia
Posición de
la bandeja
Modo de
cocción
Temperat.
(ºC)
150-170 35-40
170-190 30-35
160-180 30-35
170-190 10-15
160-180 10-15
160-180 55-60
150-170 50-55
160-180 20-25
150-170 20-25
170-190 20-25
160-180 15-20
160-180 20-25
160-180 20-25
180-200 30-35
170-190 20-25
100-120 70-75
100-120 60-65
180-200 20-25
170-190 15-20
170-190 55-60
160-180 50-55
170-190 45-50
160-180 40-45
180-200 40-45
170-190 40-45
Tiempo
(min)
Recipiente
Molde para
tartas
Bandeja
Molde para pan
Bandeja
Bandeja
Bandeja
Bandeja
Bandeja
Cazuela
Molde para
tartas
Bandeja
Molde para tarta
de queso
Page 86

86 electrolux
ES
Función de bloqueo para niños
Esta función bloquea el horno para evitar
que los niños jueguen con él.
Para activar esta función, pulse los botones
y hasta oír un pitido largo. El horno
está ahora bloqueado.
Desconexión automática del horno
El horno se desconecta automáticamente
si no se apaga al cabo de cierto tiempo
o si la temperatura no se modifi ca.
El horno se desconecta cuando la
temperatura es de:
50-120ºC al cabo de 12,5 horas
120-200ºC al cabo de 8,5 horas
200-250ºC al cabo de 5,5 horas
Si el horno está apagado, se leerá la
palabra SAFE (Seguro) en el indicador de
tiempo.
Cuando el horno está encendido, todos
los botones están bloqueados excepto el
botón de desconexión .
Para desactivar el bloqueo para niños,
toque los botones
hasta que oiga un pitido largo y la palabra
SAFE desaparezca de la pantalla.
Pulse cualquier botón para utilizar el
electrodoméstico tras una desconexión
automática.
La desconexión automática se anula
cuando la función de reloj DURACIÓN
o FIN está ajustada.
y simultáneamente
Función de limpieza con agua
Acerca de esta función
Para garantizar un buen funcionamiento,
este electrodoméstico debería limpiarse
con frecuencia para evitar que queden
restos de alimentos o grasas. Esta función
permite que el proceso de limpieza le
resulte más fácil y cómodo.
Cómo funciona
Usando calor, vapor y unas gotas de
lavavajillas, los restos de alimentos se
despegan y ablandan lo sufi ciente como
para que su eliminación resulte mucho más
fácil, evitando así la necesidad de restregar
el esmalte.
Cómo se usa
• Retire todos los accesorios del horno
antes de usar esta función.
• Vierta unos 500 ml de agua con
unas gotas de lavavajillas sobre una
esponja absorbente grande (tamaño
recomendado: 360 x 300 mm), que
deberá colocar en la base del interior del
horno. Si el interior del horno está muy
sucio, deje que se empape bien con la
solución durante un rato antes de poner
en marcha la función.
• Cierre la puerta del horno y seleccione la
función de la parte inferior del horno.
• Ajuste el mando de control del
termostato a 200°C.
• Ajuste el programa de tiempo de cocción
a 4 minutos accionando los botones
de función del reloj electrónico. La
temperatura del horno aumentará.
• Ajuste la alarma del minutero a 21
minutos accionando los botones de
función del reloj electrónico.
• Transcurridos 4 minutos, se oirá una
alarma acústica, y el horno se apagará
automáticamente.
• Ponga a cero la función del horno y
el mando de control del termostato.
Para apagar la alarma acústica, pulse
cualquier botón.
• El ciclo de limpieza dura 21 minutos.
Sonará una alarma una vez completado.
Page 87

electrolux 87
ES
• Cuando la limpieza haya terminado,
asegúrese de apagar el electrodoméstico.
• Use la esponja absorbente grande para
eliminar el exceso de agua del interior del
horno.
• Ya puede limpiar el interior del horno con
agua jabonosa caliente y un cepillo suave
de plástico, un paño, una esponja o
cualquier otro utensilio no abrasivo.
Cuidado y limpieza
¡Atención!
Antes de realizar ningún trabajo,
desconecte el suministro eléctrico
principal del electrodoméstico.
Limpieza del interior del horno
• Limpie el interior del horno para eliminar
los restos de alimentos y grasa ya
que pueden despedir humo u olores y
provocar la aparición de manchas.
• Con el horno frío y en superfi cies
esmaltadas (por ej., el suelo del horno),
use un cepillo de nailon o una esponja
con agua jabonosa caliente. Si usa
productos de limpieza especiales
para hornos, aplíquelos sólo sobre
las superfi cies esmaltadas y siga las
instrucciones del fabricante.
¡Atención!
No limpie el interior del horno con
vapor o agua a presión. Tampoco
utilice estropajos metálicos o materiales
que puedan rayar el esmalte.
Limpieza del exterior del horno y de los
accesorios
Limpie el exterior del horno y los accesorios
con agua jabonosa templada o con un
detergente suave.
¡Atención!
No use estropajos metálicos o polvos
limpiadores que puedan rayar el
esmalte. En superfi cies de acero
inoxidable, proceda con cuidado y use
esponjas o paños que no las rayen.
Para limpiar el exterior del horno, no
intente sacar los mandos porque, para
ello, hay que extraer primero el horno
de la cocina.
• Para la suciedad difícil de eliminar utilice
una espátula especial (por ej., una
espátula para vitrocerámicas).
• Limpie el interior de horno con abundante
agua limpia y un paño. A continuación,
séquelo bien con un paño seco y suave.
Asegúrese de limpiar y secar el interior y
alrededores del electrodoméstico, sobre
todo las juntas de la puerta.
Limpieza del cristal interior de la puerta
¡Atención!
Tenga cuidado: la puerta del horno se
cierra cuando se saca el cristal interior.
1. Abra la puerta del horno.
2. Tire del cristal hacia arriba desde la
parte inferior (A).
A
3. El cristal interior estará libre. Sáquelo.
4. Limpie el cristal interior y el interior de la
puerta del horno.
5. Introduzca los soportes del cristal interior.
C
B
6. Introduzca el cristal en la puerta (C) por
las ranuras de la parte superior de la
puerta (B).
Page 88

88 electrolux
ES
7. El cristal se sujeta a la puerta apretando
los dos soportes inferiores (D) a la vez
que se empuja el cristal hacia dentro de
la puerta (E).
E
D
Cambiar la bombilla del horno
¡Atención!
Para cambiar la bombilla, asegúrese
primero de que el horno está
desconectado de la corriente eléctrica.
1. Saque los soportes cromados
afl ojando el tornillo (F).
F
2. Saque la lente del soporte de la
lámpara con la ayuda de una
herramienta adecuada. Cambie la
bombilla.
3. Vuelva a colocar la lente asegurándose
de que encaja en la posición correcta
sin forzarla.
Consideraciones medioambientales
El símbolo en el producto o en su
embalaje indica que este producto no
puede ser tratado como basura doméstica.
Por el contrario, debe llevarse a un punto
de recogida para el reciclaje de equipos
eléctricos y electrónicos. Al deshacerse
correctamente de este producto, ayudará a
evitar las posibles consecuencias negativas
para el medio ambiente y la salud humana
que podrían derivarse de una gestión
La bombilla de recambio debe soportar
temperaturas de hasta 300°C. Estas
bombillas se pueden pedir al Servicio
Técnico Electrolux.
indebida de la basura. Por favor, póngase
en contacto con su ayuntamiento, su
servicio de recogida de basuras o la tienda
donde ha adquirido este producto
Embalaje ecológico
Los materiales del embalaje son totalmente
reciclables y se pueden usar de nuevo.
Consulte a las autoridades locales las
normas para la eliminación de este material.
Page 89

electrolux 89
ES
Qué hacer si...
Si el electrodoméstico no funciona correctamente, por favor realice las siguientes
comprobaciones antes de ponerse en contacto con el Servicio Técnico de Electrolux.
Problema Solución
El horno no funciona.
La luz interior del horno no
funciona.
Sale humo cuando el horno
está en funcionamiento.
No se obtienen los resultados
de cocción deseados.
El vapor y la condensación se acumulan
en los alimentos y en el interior del horno.
El ventilador del horno hace
ruido.
La pantalla muestra “12:00”.
Compruebe la conexión a la red eléctrica.
Compruebe los fusibles y el limitador de corriente de la instalación.
Compruebe si el reloj está en modo manual o programado.
Compruebe la posición de los selectores de función y temperatura.
Cambie la bombilla.
Compruebe que está instalada según se indica en el manual de instrucciones.
Es normal la primera vez que se usa.
Limpie el horno con frecuencia.
Reduzca la cantidad de grasa o aceite de la bandeja.
No use una temperatura mayor que la indicada en las tablas de cocción.
Consulte las tablas de cocción para aprender a usar el horno.
Cuando termine el proceso de cocción, no deje las bandejas en
el horno durante más de 15-20 minutos.
Compruebe que la bandeja y los alimentos no vibran en contacto
con el panel posterior del horno.
Ajuste la hora del día (vea el apartado “Ajuste de la hora del día”).
¡Atención!
Si a pesar de estas recomendaciones el problema continúa, póngase en contacto con
el Servicio de Asistencia Técnica.
Datos técnicos
Si el equipo no funciona, póngase en contacto con el Servicio Técnico e infórmeles
del problema indicando:
1 Número de serie (S-No)
2 Modelo del electrodoméstico (Model)
3 Número de producto (PNC)
Encontrará esta información en la placa de
características de la parte inferior del horno
cuando la puerta está abierta.
El artículo que usted ha adquirido cumple
con las directivas europeas en materia de
seguridad del material eléctrico (73/23/CEE)
y compatibilidad electromagnética
(89/336/CEE).
Page 90

90 electrolux
ES
Instalación
Esta información está destinada al
instalador, la persona responsable del
montaje y la conexión eléctrica. Si instala
el horno usted mismo, el fabricante no se
responsabilizará de los posibles daños.
La instalación sólo debe ser llevada a cabo
por un electricista cualifi cado, que deberá
asegurarse de observar la normativa
aplicable a la instalación.
Antes de instalar. Comentarios
• Para desembalar el horno, tire de la
pestaña que hay en la parte inferior de la
caja.
• Se necesita un hueco en la cocina con
las dimensiones que se muestran en la
imagen y con una profundidad mínima
de 580 mm. (Vea la imagen de la página
91-92, que describe la colocación del
horno).
• Para colocar en su sitio los hornos
multifunción, la parte posterior de la
unidad no debe tener salientes
(refuerzos, tubos, enchufes, etc.).
• El adhesivo usado para la cubierta
plástica del mueble de la cocina debe
poder soportar temperaturas superiores
a 85°C.
Conexión eléctrica. Requisitos legales
El instalador deberá comprobar que:
• La tensión y la frecuencia de la corriente
se corresponde con la indicada en la
placa de características.
• La instalación eléctrica puede soportar la
potencia máxima indicada en la placa de
características.
• El diagrama de conexión se muestra
en la siguiente imagen:
• La conexión eléctrica cuenta con una
toma de tierra adecuada, conforme a
la legislación vigente.
• La conexión debe realizarse con un
interruptor omnipolar del tamaño
adecuado a la corriente que debe
soportar. Debe haber una apertura
mínima de 3 mm entre contactos para
permitir la desconexión en caso de
emergencia, limpieza o cambio de la
bombilla. El cable de tierra no deberá
pasar por este interruptor bajo ninguna
circunstancia. Después de conectar la
electricidad, compruebe que funcionan
todos los componentes eléctricos del
horno.
Page 91

electrolux 91
600
558-568
min. 450
min. 580
540
455
594
23
348
ES
Instalación del horno
Para todos los hornos y tras haber realizado
la conexión eléctrica:
1 Introduzca el horno en la cocina con
cuidado de no atrapar el cable.
2 Fije el horno a la unidad insertando los
2 tornillos suministrados en los agujeros
que pueden observarse una vez abierta
la puerta.
3 Compruebe que la carcasa del horno
no está en contacto con los laterales de
la unidad y que hay al menos 2 mm de
separación entre ellos.
Page 92
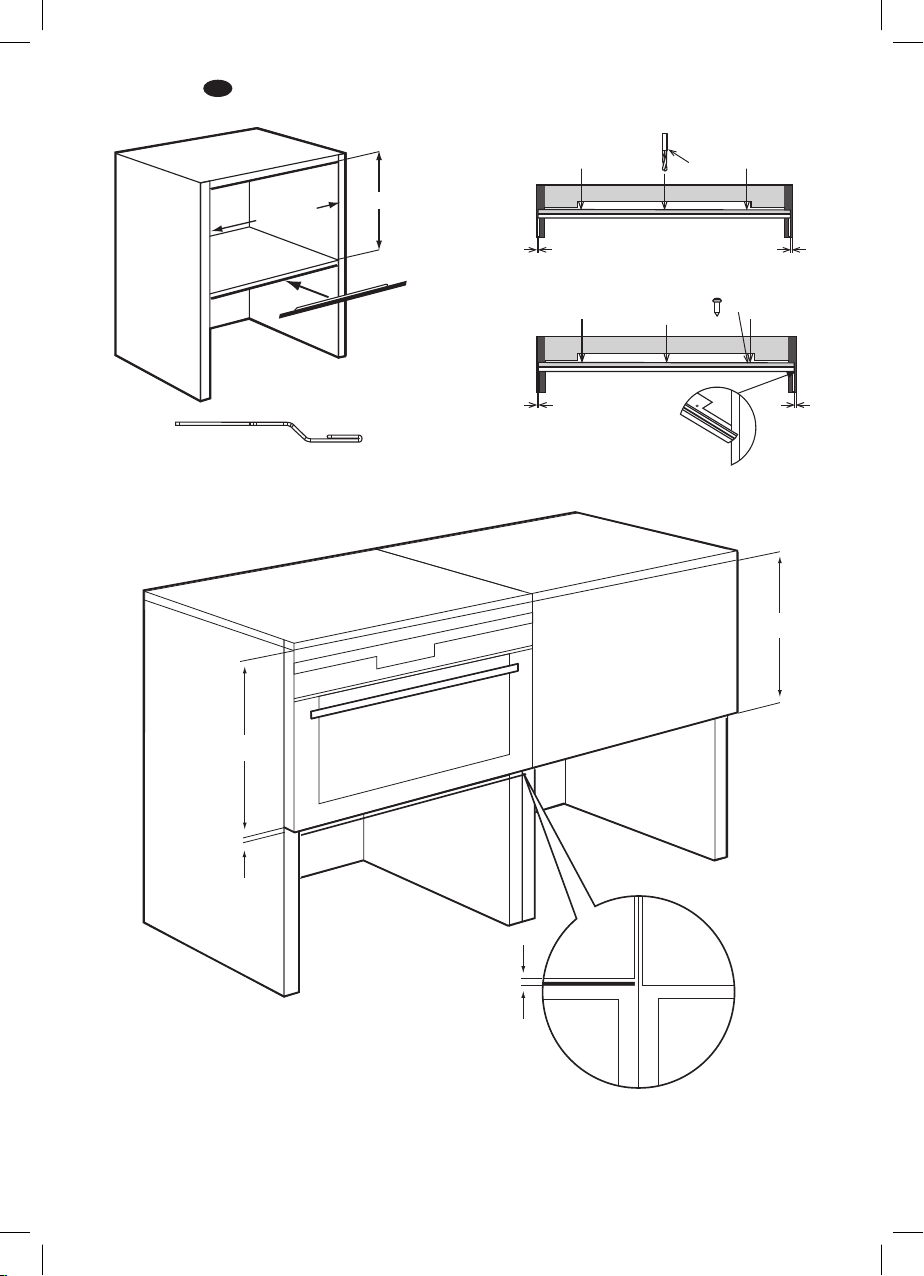
92 electrolux
ES
3 x Ø2mm
455
min. 560
450
==
4 x 12 3x
==
460
5
5
Page 93

electrolux 93
ES
Page 94

94 electrolux
ES
Page 95

electrolux 95
ES
Page 96

www.electrolux.com/shop
3172391-000
 Loading...