

Page 1

user manual
Built-In Electric Oven
EOB65100
Page 2

We were thinking of you
when we made this product
Page 3

Welcome to the world of Electrolux
Thank you for choosing a first class
product from Electrolux, which hopefully
will provide you with lots of pleasure in
the future. The Electrolux ambition is to
offer a wide variety of quality products
that make your life more comfortable.
You will find some examples on the cover in this manual. Please take a few minutes to study this manual so that you
can take advantage of the benefits of
your new machine. We promise that it
will provide a superior User Experience
delivering Ease-of-Mind. Good luck!
electrolux 3
Page 4

4 electrolux contents
T
1
Contents
Safety instructions 5
Description of the Appliance 7
Before Using for the first time 10
Using the Oven 12
Uses, Tables and Tips 31
Cleaning and Care 47
What to do if … 57
Installation Instructions 58
Disposal 62
Guarantee/Customer Service 63
Service 66
he following symbols are used in this user manual:
Important information concerning your personal safety and information on
how to avoid damaging the appliance.
3 General information and tips
2 Environmental information
Page 5

Safety instructions
5
This appliance conforms with the
following EU Directives:
– 73/23/EEC dated 19.02.1973 Low
Voltage Directive
– 89/336/EEC dated 03.05.1989 EMC
Directive inclusive of Amending Directive 92/31/EEC
– 93/68/EEC dated 22.07.1993 CE
Marking Directive
Electrical safety
• This appliance must be only con-
nected by a registered electrician.
• In the event of a fault or damage to
the appliance: Take the fuses out or
switch off.
• Repairs to the appliance must only
be carried out by qualified service
engineers. Considerable danger
may result from improper repairs. If
repairs become necessary, please
contact our Customer Services or
your dealer.
Child Safety
• Never leave children unsupervised
when the appliance is in use.
Safety whilst Using
• This appliance is intended to be
used for cooking, roasting and baking food in the home.
• Take care when connecting electric
appliances to sockets nearby. Do
not allow connecting leads to come
into contact with or to catch beneath
the hot oven door.
safety instructions electrolux 5
• Warning: Risk of burns! The interi-
or of the oven becomes hot during
use.
• Using ingredients containing alcohol
in the oven may create an alcohol-air
mixture that is easily ignited. In this
case, open the door carefully. Do not
have embers, sparks or naked
flames in the vicinity when opening
the door.
Information on acrylamides
According to the latest scientific
knowledge, intensive browning of
food, especially in products containing starch, can constitute a
health risk due to acrylamides.
Therefore we recommend cooking
at the lowest possible temperatures
and not browning foods too much.
How to avoid damage to the
appliance
• Do not line the oven with aluminium
foil and do not place baking trays,
pots, etc. on the oven floor, as the
heat that builds up will damage the
oven enamel.
• Fruit juices dripping from the baking
tray will leave stains, which you will
not be able to remove. For very moist
cakes, use a deep tray.
• Do not put any strain on the oven
door when open.
• Never pour water directly into the
oven when it is hot. This could cause
damage to or discoloration of the
enamel.
• Rough handling, especially around
the edges of the front panel, can
cause the glass to break.
Page 6

6 electrolux safety instructions
• Do not store any flammable materials inside the oven. These could ignite when the oven is switched on.
• Do not store any moist foods inside
the oven. This could damage the
oven enamel.
• After switching off the cooling fan, do
not keep uncovered dishes in the oven. Moisture may condense in the
oven interior or on the glass doors
and may get into the units.
Note on enamel coating
Changes in the colour of the oven’s
enamel coating as a result of use do not
affect the appliance’s suitability for normal and correct use. They therefore do
not constitute a defect in the sense of
the warranty law.
Page 7
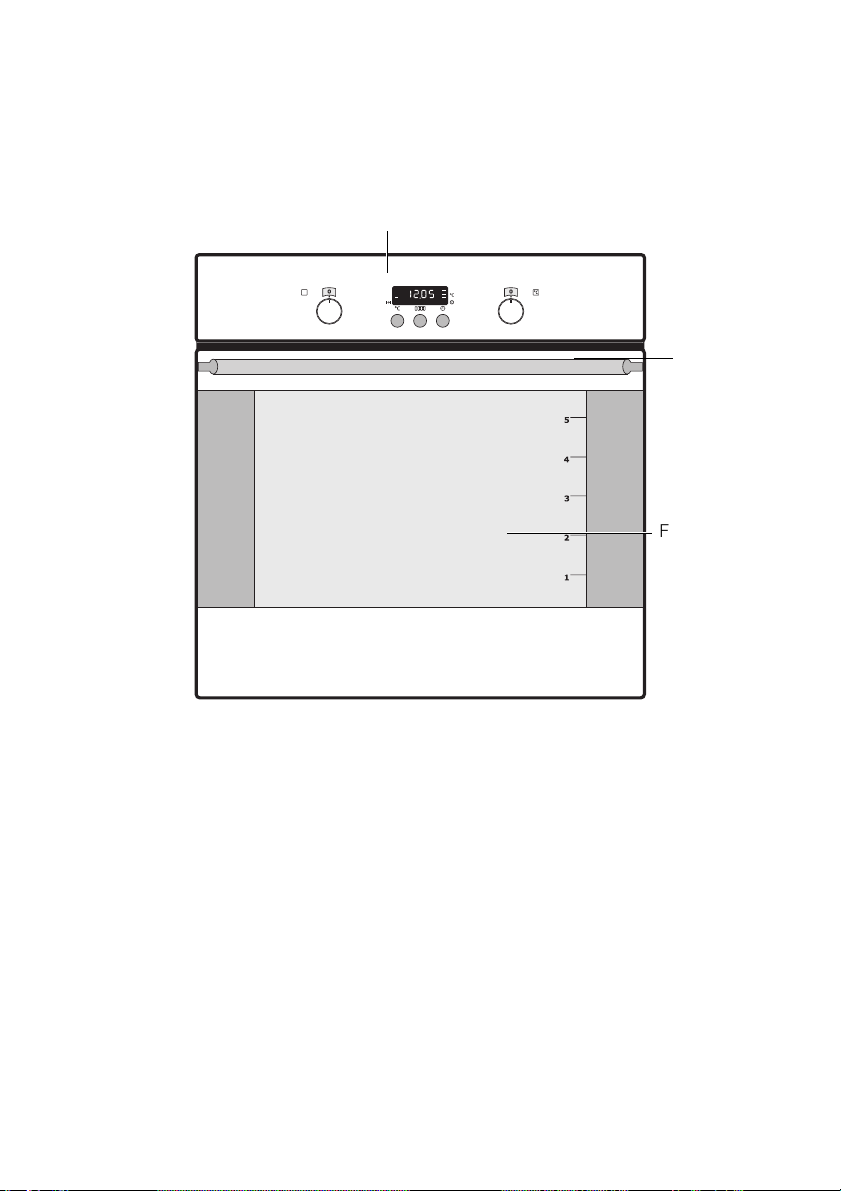
Description of the Appliance
General Overview
Control panel
description of the appliance electrolux 7
Door
handle
Full glass door
Page 8
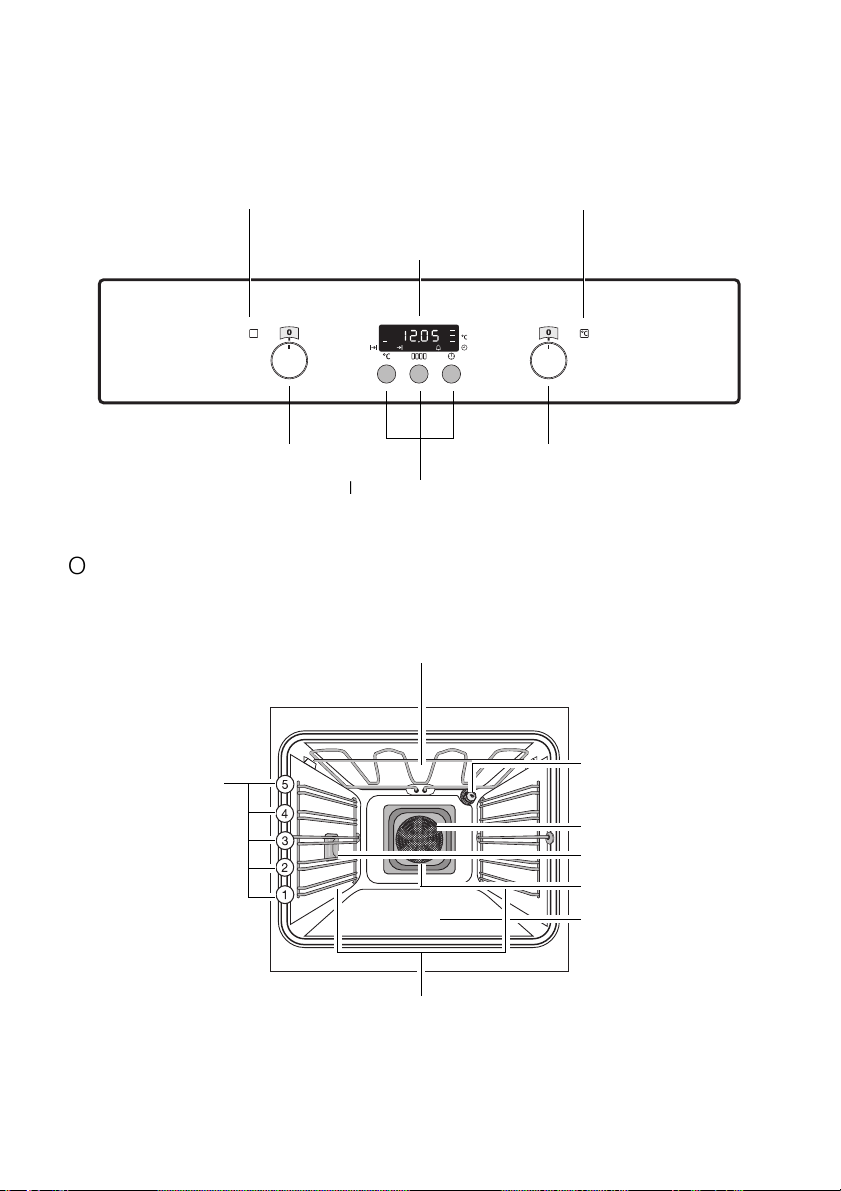
8 electrolux description of the appliance
Control Panel
Oven Power Indicator Oven Power Indicator
Temperature / Time Display
Oven Functions
Oven Features
Shelf positions
Temperature / Time Selection
Clock function buttons
Top heat and heating elements
Oven lighting
Fat Filter
Oven lighting
Fan heating element
Fan
Bottom Heat
Oven shelf runners,
removable
Page 9
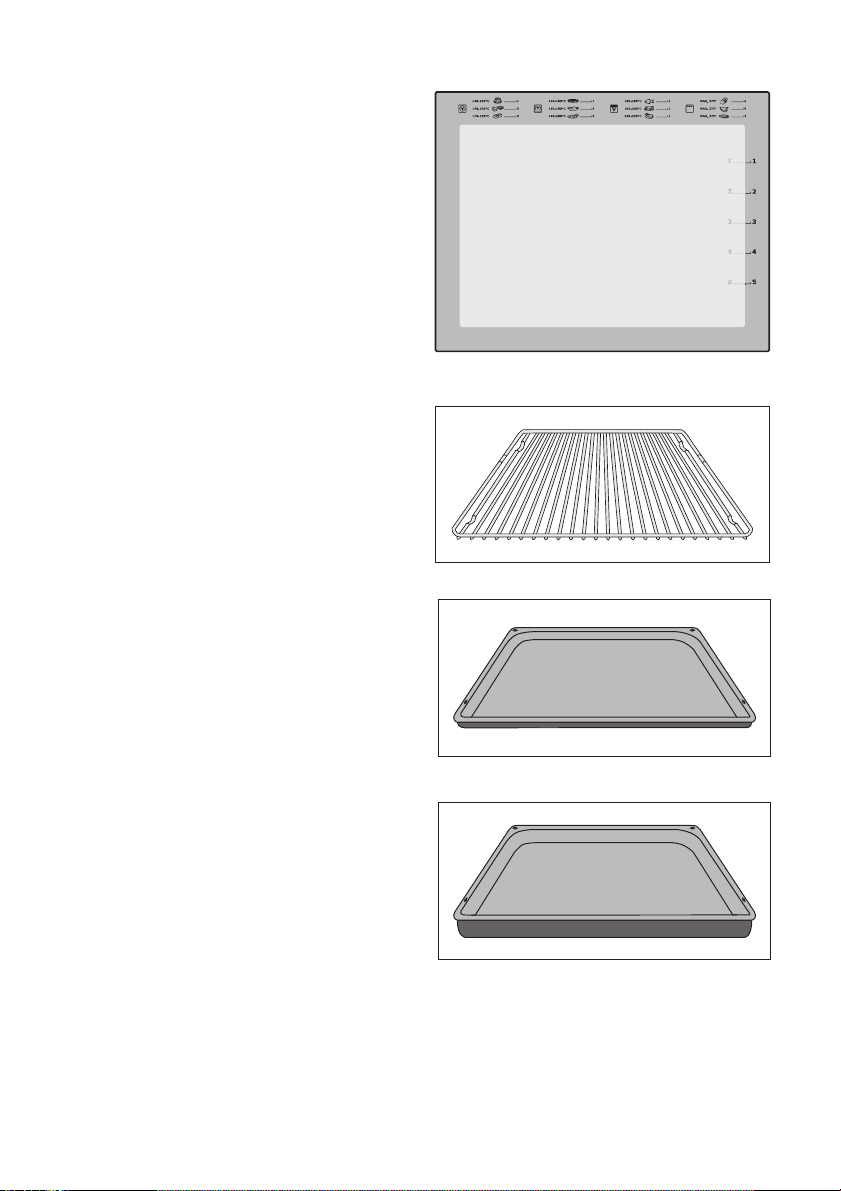
Inside of door
On the inside of the oven door you will
find the numbers of the different oven
shelves.
You will also find some brief information
about the oven's functions, recommended shelves and temperatures for
cooking the most popular dishes.
Oven accessories
Oven shelf
For cookware, cake tins, roasts and
grilled foods.
Baking tray
For cakes and biscuits.
description of the appliance electrolux 9
Roasting Pan
For baking and roasting or as a pan for
collecting fat.
Page 10
10 electrolux before using for the first time
Before Using for the first time
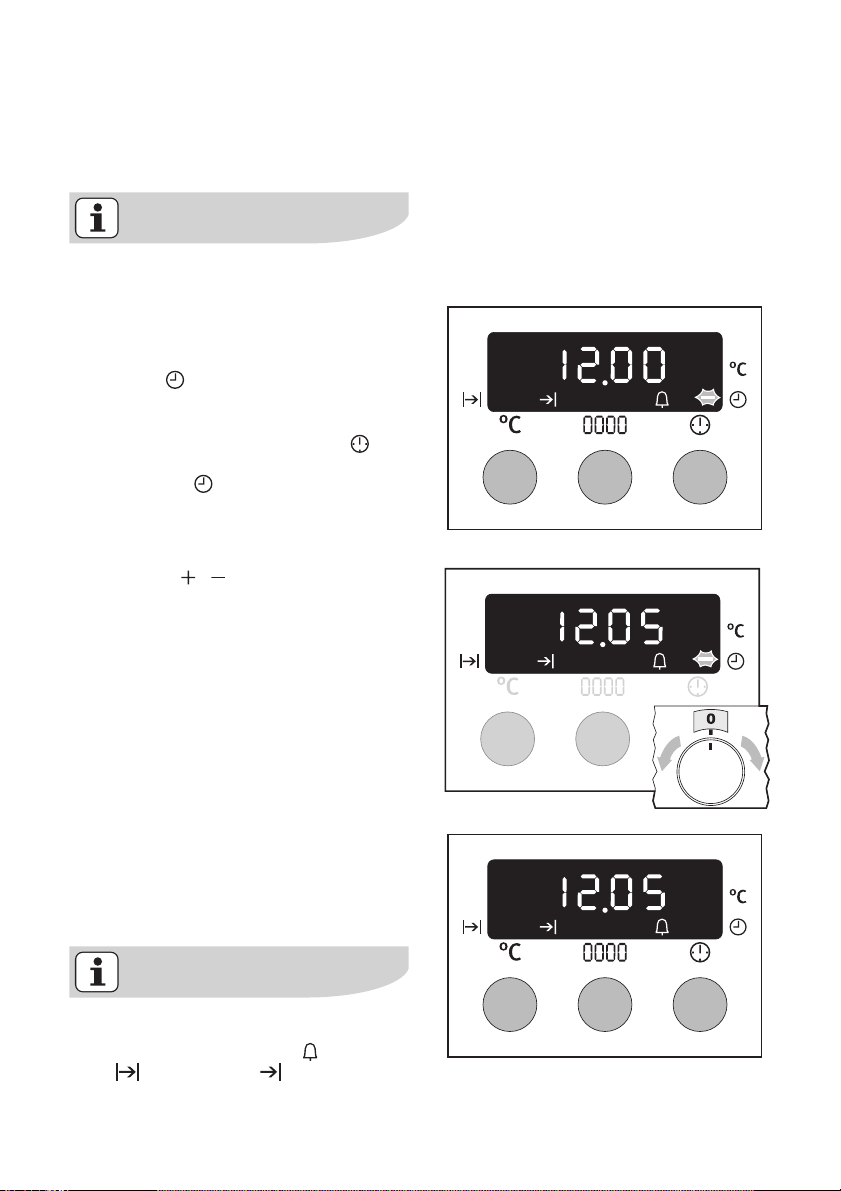
Setting and changing the time
The oven only operates when the
time has been set.
When the appliance has been connected to the electrical supply or when there
has been a power cut, the function indicator Time flashes automatically.
1. To change a time that has already
been set, press the Selection button repeatedly until the function indicator Time flashes.
2. Using the / control knob, set the
current time.
After approx. 5 seconds, the flashing
stops and the clock displays the time of
day set.
The appliance is now ready to use.
The time can only be modified, if the
child safety device is deactivated,
none of the Countdown , Cook
time or End time clock functions and no oven function is set.
Page 11
Initial Cleaning
Before using the oven for the first time
you should clean it thoroughly.
Caution: Do not use any caustic or
abrasive cleaners. The surface
could be damaged.
To clean metal fronts use commercially available cleaning agents.
1. Set the oven functions dial to
Light .
2. Remove all accessories and the shelf
support rails and wash them with
warm water and washing up liquid.
3. Then wash out the oven with warm
water and washing-up liquid, and
dry.
4. Wipe the front of the appliance with
a damp cloth.
before using for the first time electrolux 11
Page 12
12 electrolux using the oven
Using the Oven
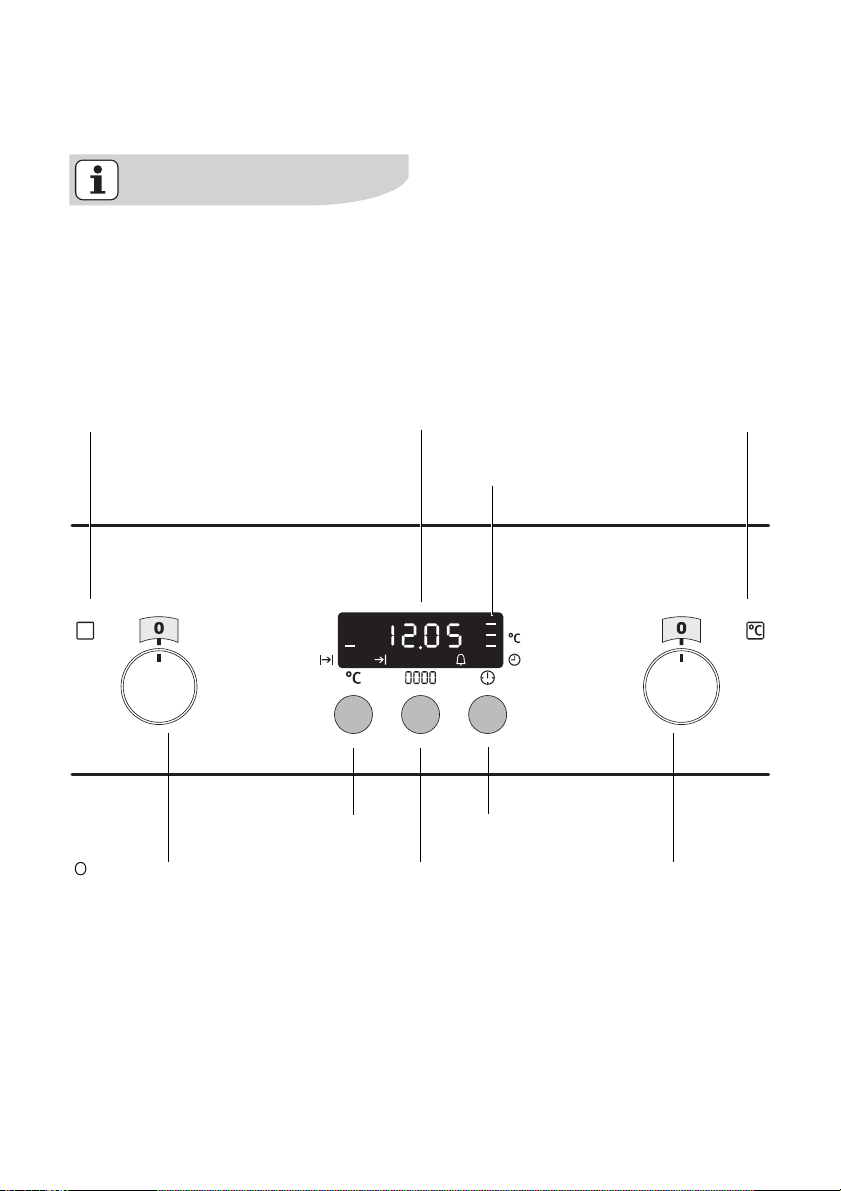
The oven is equipped with retractable
buttons for “Oven functions” and “Tem-
perature selection”. To use, press the
relevant button. The button then sticks
out.
Switching the Oven On and Off
Oven Power Indicator
Temperature / Time Display
Oven Power Indicator
Heat indicator
Oven Functions
Selection button Temperature check
Change display
Temperature / Time Selection
Page 13
Switching the oven on
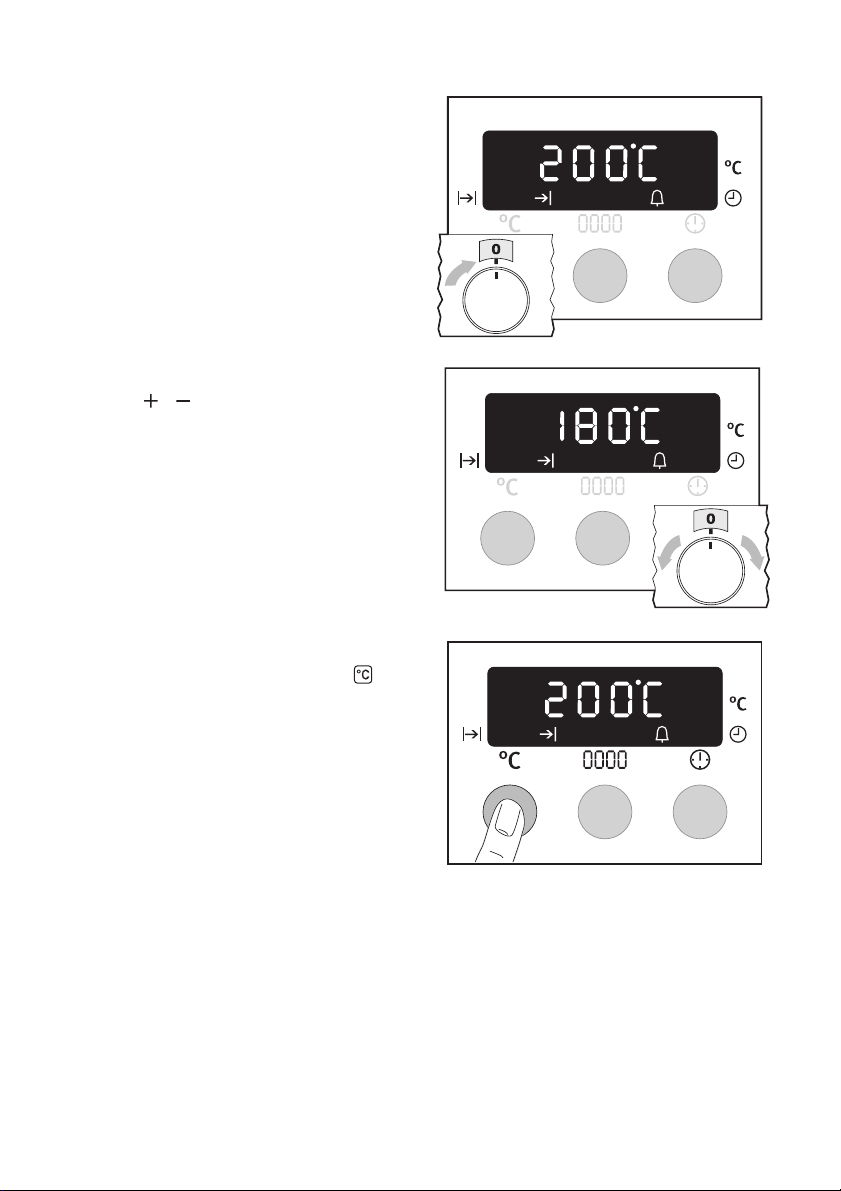
Turn the oven functions dial to the desired function. The power indicator light
lights up. The temperature display
shows the suggested temperature for
the oven function selected.
The oven starts to heat up.
When the temperature set is reached,
an audible signal sounds.
Changing the oven temperature
Turn the / control knob to raise or
lower the temperature.
The setting changes in 5 °C steps.
using the oven electrolux 13
Checking the temperature
Press Temperature check button .
The current oven temperature appears
in the temperature display.
Page 14
14 electrolux using the oven
Switching the oven off
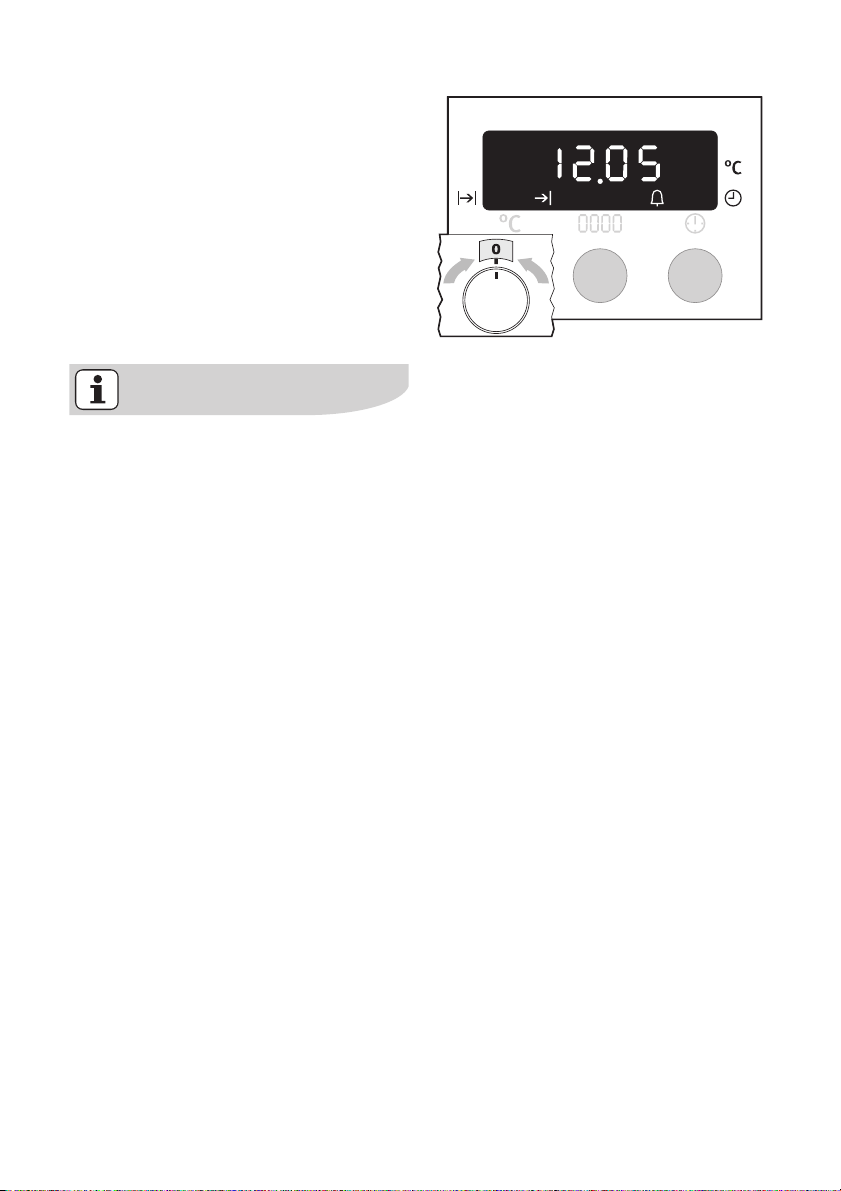
To turn the oven off, turn the oven functions dial to the OFF position.
Cooling fan
The fan switches on automatically
in order to keep the appliance’s surfaces cool. When the oven is
switched off, the fan continues to
run to cool the appliance down, then
switches itself off automatically.
Page 15

Heat indicator
Warming up indicator
When the oven function has been
switched on the bars that slowly
light up one after the other indicate
how far the oven has heated up.
Residual heat indicator
When the oven has been switched
off, the bars that are still lit indicate
the remaining residual heat in the
oven.
using the oven electrolux 15
With the oven functions Pizza setting ,
Conventional and Convection
grilling the heating up time is shortened by the automatic function
Speedcook.
Page 16

16 electrolux using the oven
Oven Functions
The oven has the following functions:
Oven function Application
Light
Using this function you can
Convection with
ring heating
element
Conventional
Pizza setting
Convection grilling
Grill
Dual grill
Bottom heat
For
the oven interior, e.g. for cleaning.
For roasting and
three levels
Set the oven temperatures
20-40 °C lower than when using upper/lower heat.
For
baking
oven level
For baking on one oven level dishes
that require
ing and a crispy base
Set the oven temperatures 20-40 °C
lower than when using Conventional.
For
roasting
poultry on one level.
The function is also suitable for
and
nating
For
grilling
middle of the grill
the
toasting
grilling
quantities
For
baking
crusty bases
baking
at the same time.
and
roasting
.
more intensive brown-
larger joints of meat or
browning
flat foodstuffs placed in
.
flat foodstuffs in
and for
cakes with
.
.
toasting
crispy or
light up
on
up to
on
one
.
and for
large
.
grati-
Heating element/
fan
---
Rear heating element,
fan
Top heat, bottomheat
Bottom heat, rear wall
heating element, fan
Grill, top heat, fan
Grill
Grill, top heat
Bottom heat
Page 17
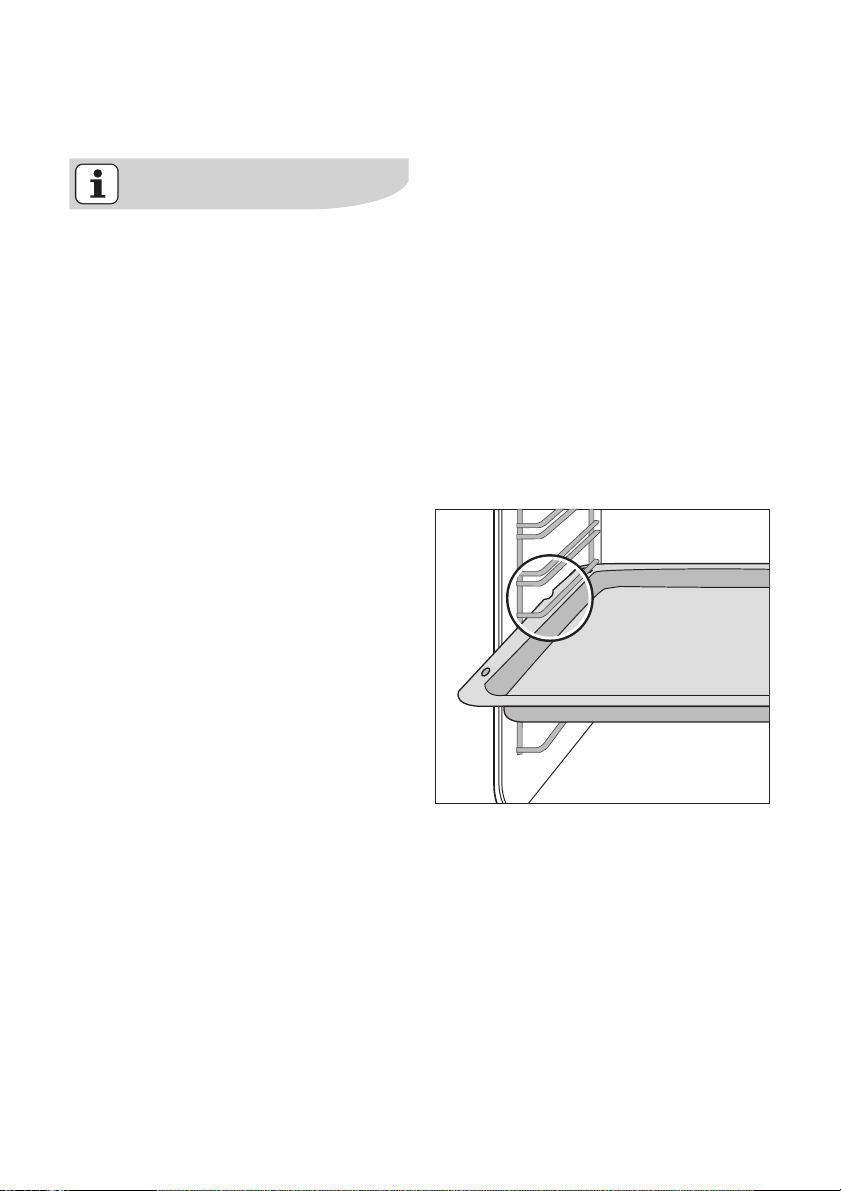
Inserting the Oven Shelf, Baking
Tray and Roasting Pan
Shelf runner safety and anti-tip device
As a shelf runner safety device, all
insertable components have a small
curved indentation at the bottom on
the right and left-hand edge.
Always insert insertable components so that this indentation is at
the back of the oven interior. This indentation is also important for preventing the insertable components
from tipping.
Inserting the baking tray or roasting
pan
Push the baking tray or roasting pan between the guide bars of the selected
oven level.
using the oven electrolux 17
Page 18
18 electrolux using the oven
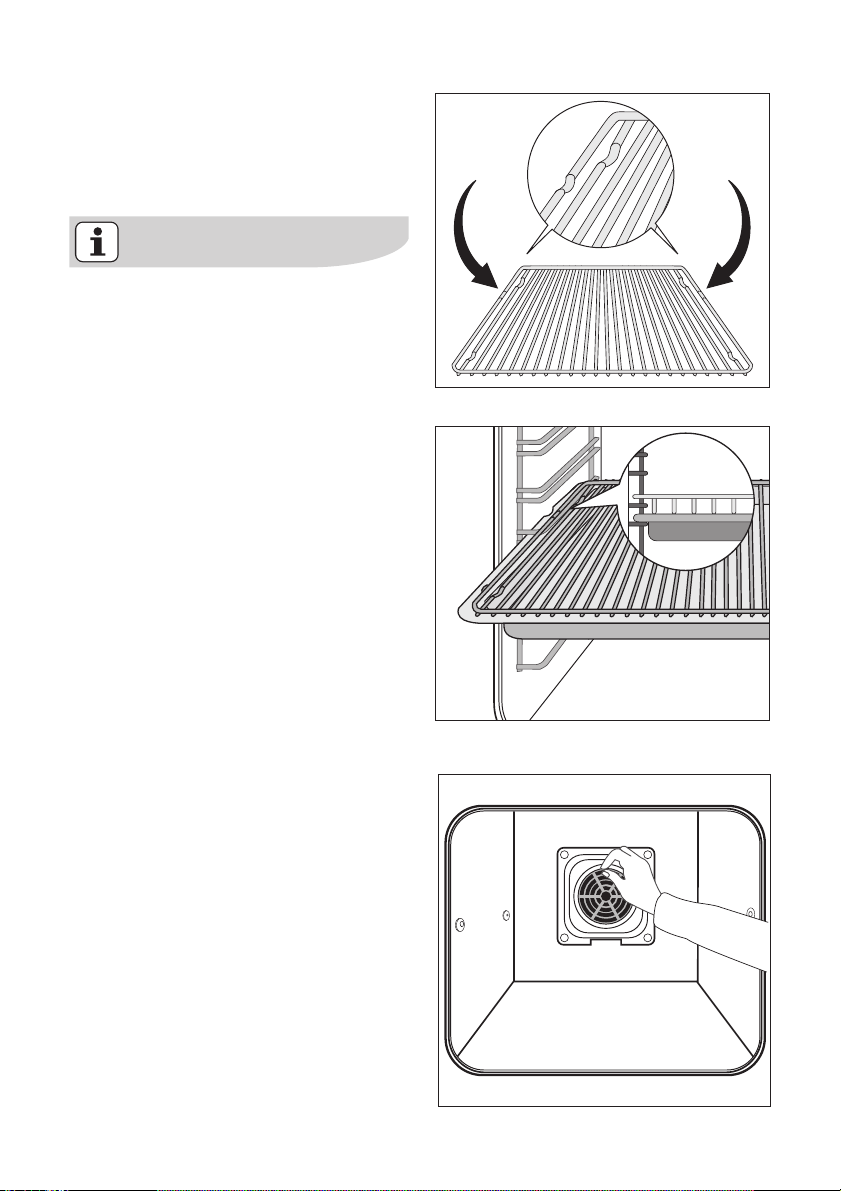
Inserting the oven shelf:
Insert the oven shelf so that the feet
point downwards.
Push the oven shelf between the guide
bars of the selected oven level.
The high rim around the oven shelf
is an additional device to prevent
cookware from slipping.
Inserting the oven shelf and roasting pan together
Lay the oven shelf on the roasting pan.
Push the roasting pan between the
guide bars of the selected oven level.
Inserting/Removing the Grease Filter
Only use the grease filter when
roasting to protect the rear heating ele-
ments from fat splashes.
Inserting the grease filter
Hold the grease filter by the grip and
insert the two mounts downwards into
the opening on the rear wall of the
oven (fan opening).
Taking out the grease filter
Hold the grease filter by the grip and
unhook it.
Page 19
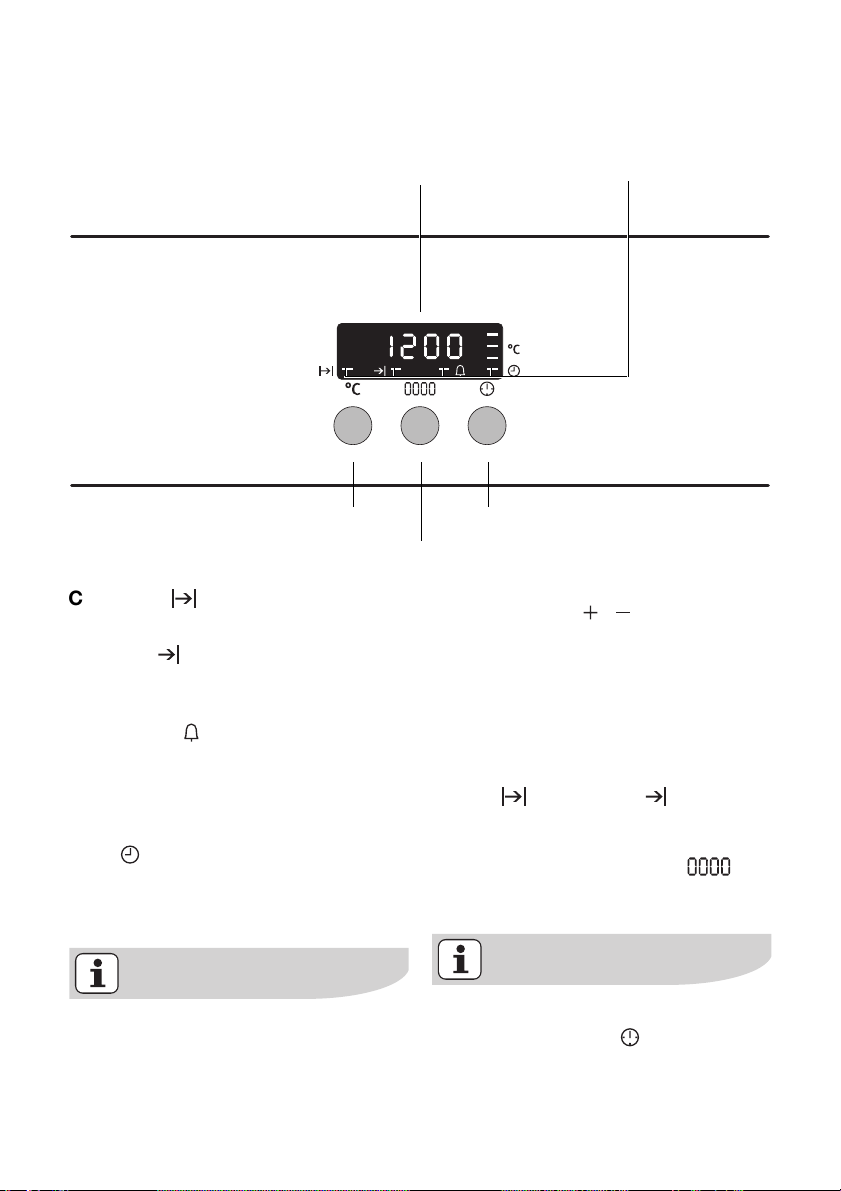
Clock Functions
using the oven electrolux 19
Temperature / Time Display
Temperature check
Change display
Cook time
To set how long the oven is to be in use.
End time
To set when the oven is to switch off
again.
Countdown
To set a countdown. A signal sounds after the time has elapsed.
This function does not affect the functioning of the oven.
Time
To set, change or check the time
(See also section “Before Using for the
First Time”).
Clock function indicators
Selector Button
the desired times can be set or modified using the / dial.
• When the desired time has been set,
the function indicator continues to
flash for approx. 5 seconds. After
that the function indicator is then lit.
The set time begins to run in the
background.
• When the clock functions Cook
time and End time have been
completed, the oven functions
dial must be turned back to ”0“.
• Using the Change display but-
ton, you can switch between the
oven temperature and the time.
How to use the clock functions
• After a clock function has been selected, the corresponding function
indicator flashes for
about 5 seconds. During this period,
Checking the time set or remaining.
Press the Selection button re-
peatedly, until the appropriate clock
function flashes and the time set or
remaining is displayed.
Page 20
20 electrolux using the oven
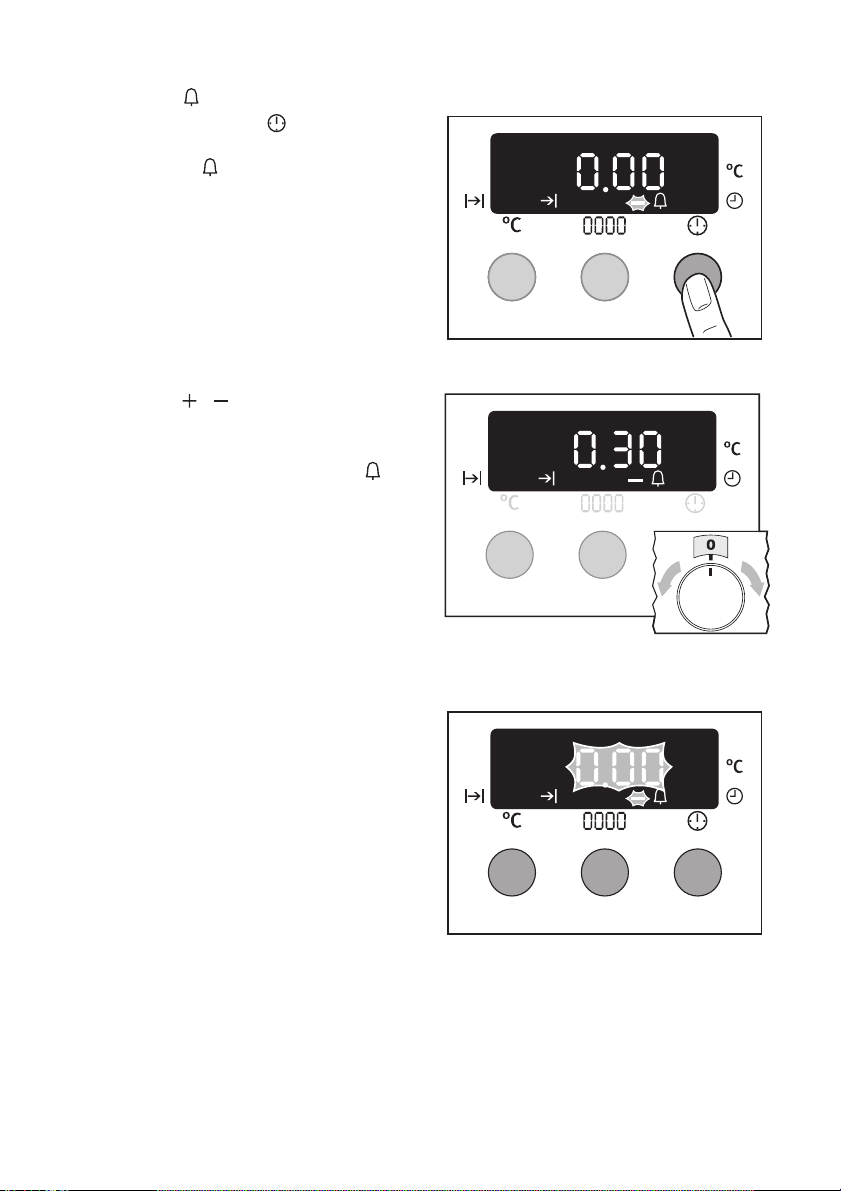
Countdown
1. Press the Selection button re-
peatedly until the function indicator
Countdown flashes.
2. Using the / control knob set the
desired countdown
(max. 99.00minutes).
The function indicator Countdown
lights up.
When 90% of the time set has elapsed,
an audible signal sounds.
When the time has elapsed, ”0.00“ and
the function indicator flash.
An audible signal sounds.
To stop the flashing and the audible signal:
Press any button.
Page 21
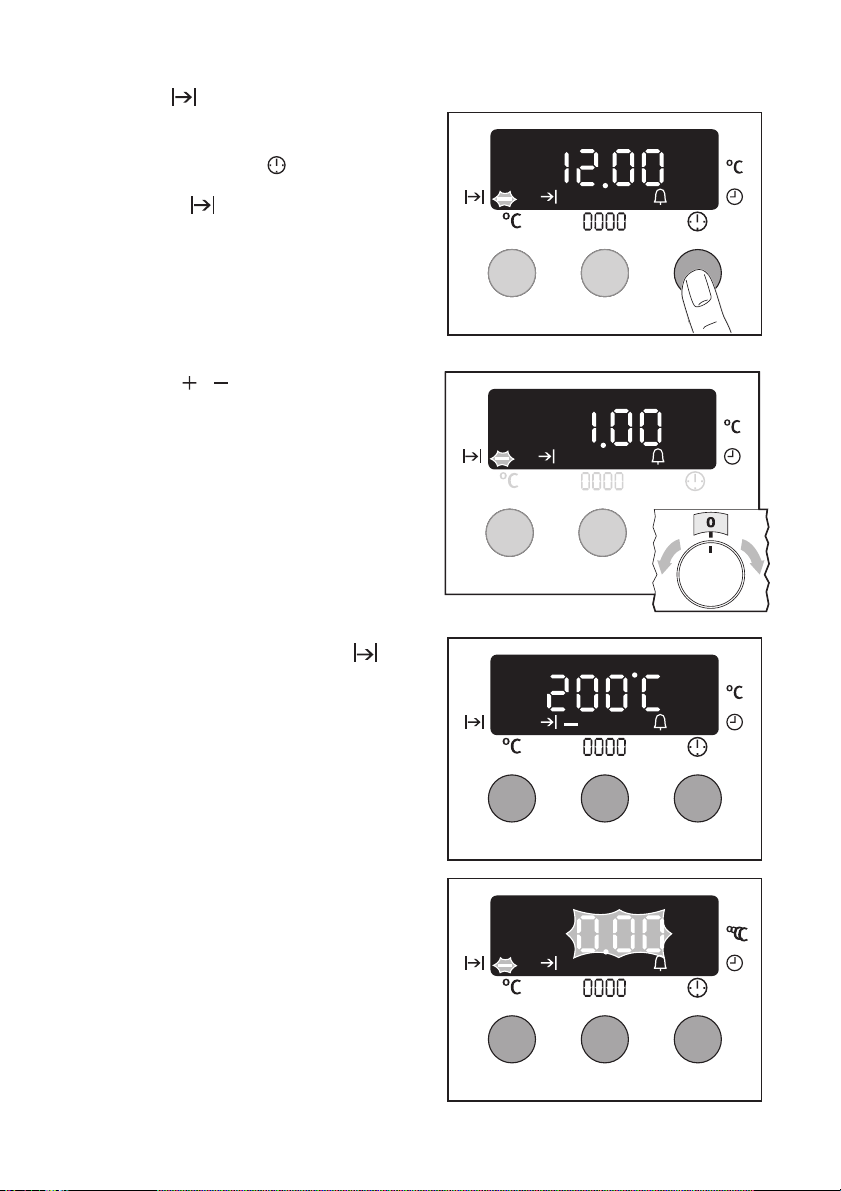
Cook time
1. Select the oven function and temperature.
2. Press the Selection button re-
peatedly until the function indicator
Cook time flashes.
3. Using the / control knob set the
desired cooking time.
(max. 09.59hours).
using the oven electrolux 21
The function indicator Cook time
lights up and the oven comes on
immediately.
When the time has elapsed, ”0.00“ and
the function indicator flash.
An audible signal sounds for 2 minutes.
The oven switches itself off.
To stop the flashing and the audible signal:
Turn the oven functions dial to ”0”.
Page 22
22 electrolux using the oven
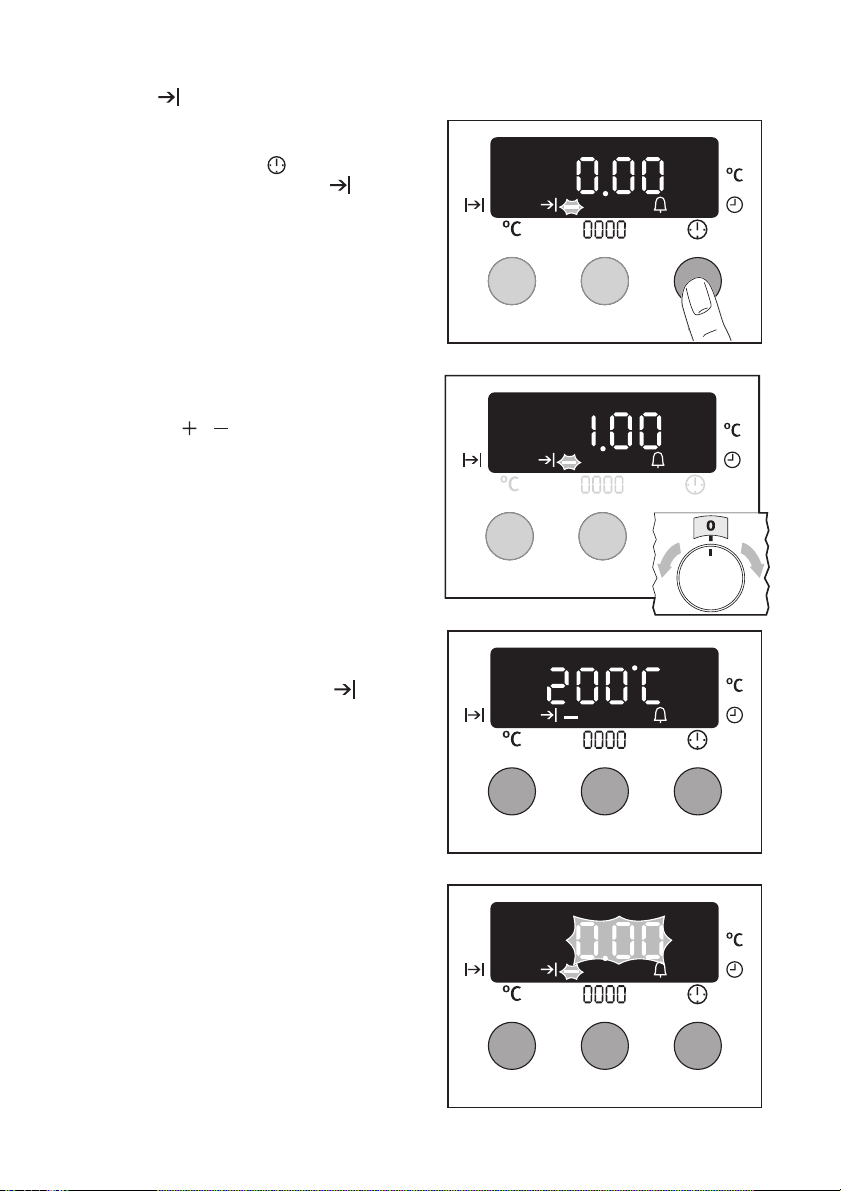
End time
1. Select the oven function and temperature.
2. Press the Selection button re-
peatedly until the End time function indicator flashes.
3. Using the / control knob set the
desired switch-off time.
The function indicator End time lights
up and the oven comes on immediately.
When the time has elapsed, ”0.00“ and
the function indicator flash.
An audible signal sounds for 2 minutes.
The ovenswitches itself off.
To stop the flashing and the audible signal:
Turn the oven functions dial to ”0”.
Page 23
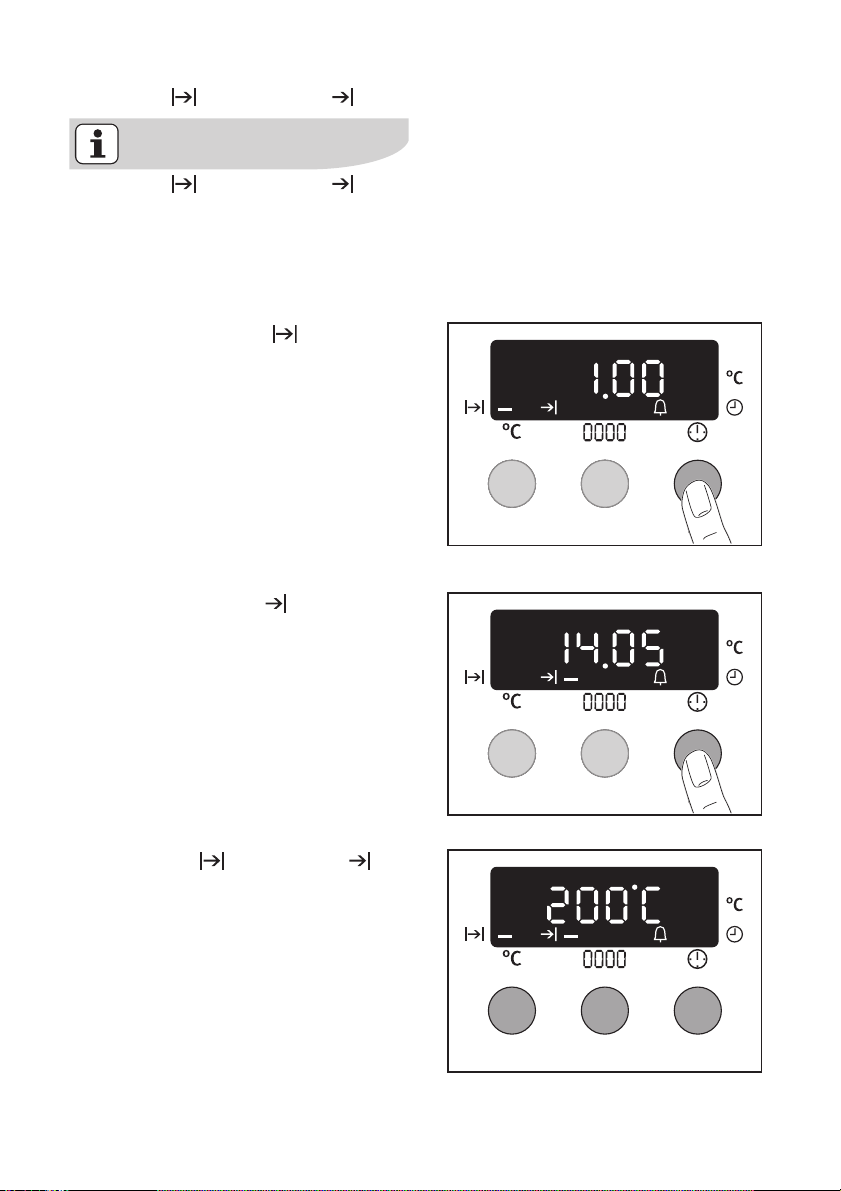
Cook time and End time combined
Cook time and End time can
be used simultaneously, if the oven
is to be switched on and off automatically at a later time.
1. Select the oven function and temperature.
2. Using the Cook time function, set
the time that the dish needs to cook,
In this example, 1 hour.
3. Using the End time function, set
the time at which the dish should be
ready.
In this case, 14:05.
using the oven electrolux 23
The Cook time and End time
function indicators light up and the temperature is shown in the display.
In this example, 200°C.
The oven switches on automatically at
the time calculated.
In this case, at 13:05.
And switches itself off again when the
cook time entered has elapsed.
In this case, at 14:05.
Page 24
24 electrolux using the oven
Other Functions
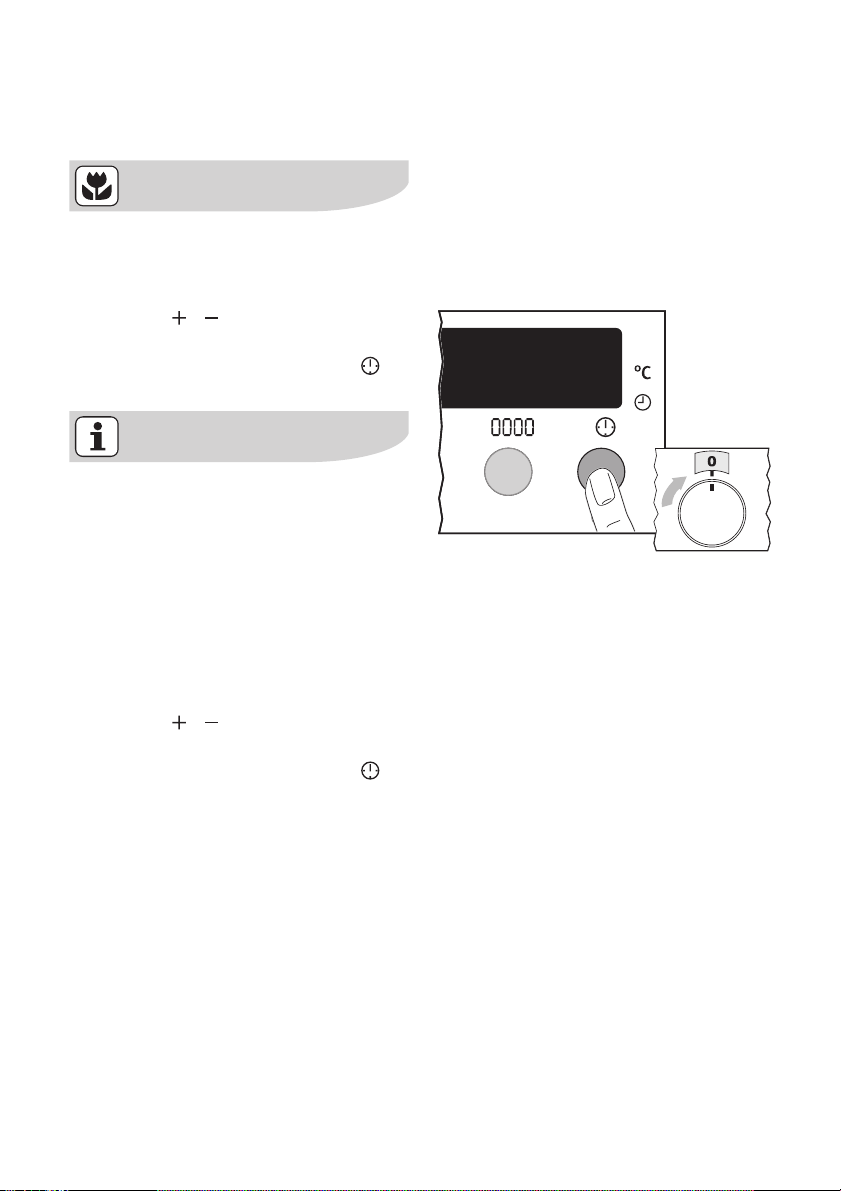
Switching off the display
You can save energy by switching
off the clock display.
Switching off the clock display
1. Turn the / control knob to the
right and hold it.
2. In addition press the Selection
button until the display goes out.
As soon as the appliance is
switched on again, the display
comes on automatically.
When the appliance is next
switched off, the clock display goes
out again.
To have the clock display on permanently again, you must set the clock
again.
Switching on the clock display
1. Turn the / control knob to the
right and hold it.
2. In addition press the Selection
button, until the display appears
again.
Page 25
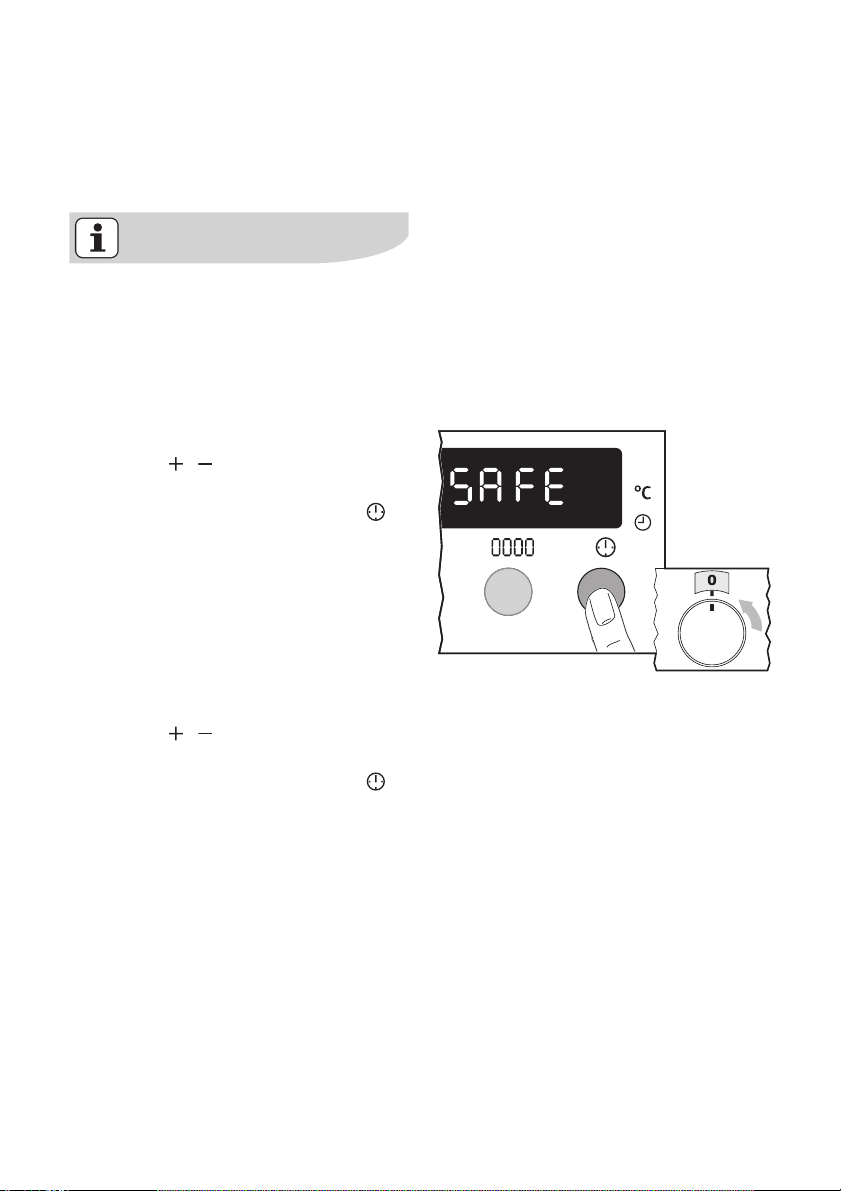
Ovenís child safety device
The oven is fitted with a child safety device. As soon as the child safety device
is activated, the oven cannot be
switched on.
• The child safety device works only
for the oven, not for the cooking
rings.
• For the child safety device to be activated, none of the oven functions
must be selected.
Activating the child safety device
1. Turn the / dial to the left and hold
it.
2. In addition, press the Selection
button, until ”SAFE“ appears in the
display.
The child safety device has now been
activated.
using the oven electrolux 25
Deactivating the child safety device
1. Turn the / dial to the left and hold
it.
2. In addition, press the Selection
button, until ”SAFE“ disappears from
the display.
The child safety device has now been
deactivated and the oven is again ready
for use.
Page 26
26 electrolux using the oven
Oven safety cut-out
If not switched off after a certain
time, or if the temperature is not
modified, the oven switches off automatically.
The last temperature set flashes in
the temperature display.
The oven switches off when the
oven temperature is:
30 - 120°C after 12.5 hours
120 - 200°C after 8.5 hours
200 - 250°C after 5.5 hours
250 - max°C after 3.0 hours
Switching on after a safety cut-out
Switch the oven off completely.
It can then be switched on again.
The safety cut-out is cancelled if the
clock function Cook time or End
time is set.
Page 27
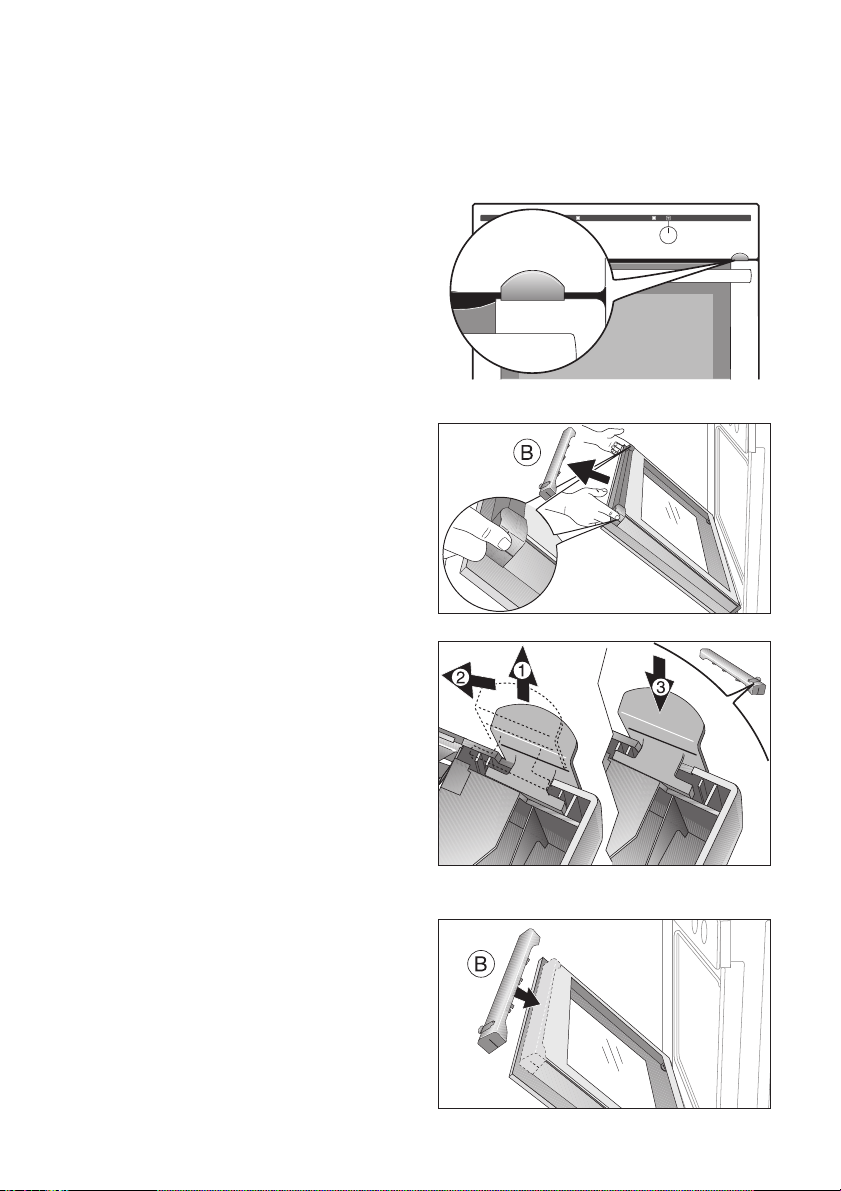
Mechanical door lock
When the appliance is delivered the
door lock is deactivated.
Activating door lock
1. Take hold of the door trim (B) on the
upper edge of the door at both sides
and press inwards to release the clip
seal. Then remove the door trim by
pulling it upwards.
using the oven electrolux 27
2. Activate lever:
Remove lever (1) and
move 4mm to the left (2)
and insert (3).
3. Take hold of the door trim (B) at each
side, position it on the inside edge of
the door and plug the door trim (B)
into the upper edge of the door
Page 28
28 electrolux using the oven
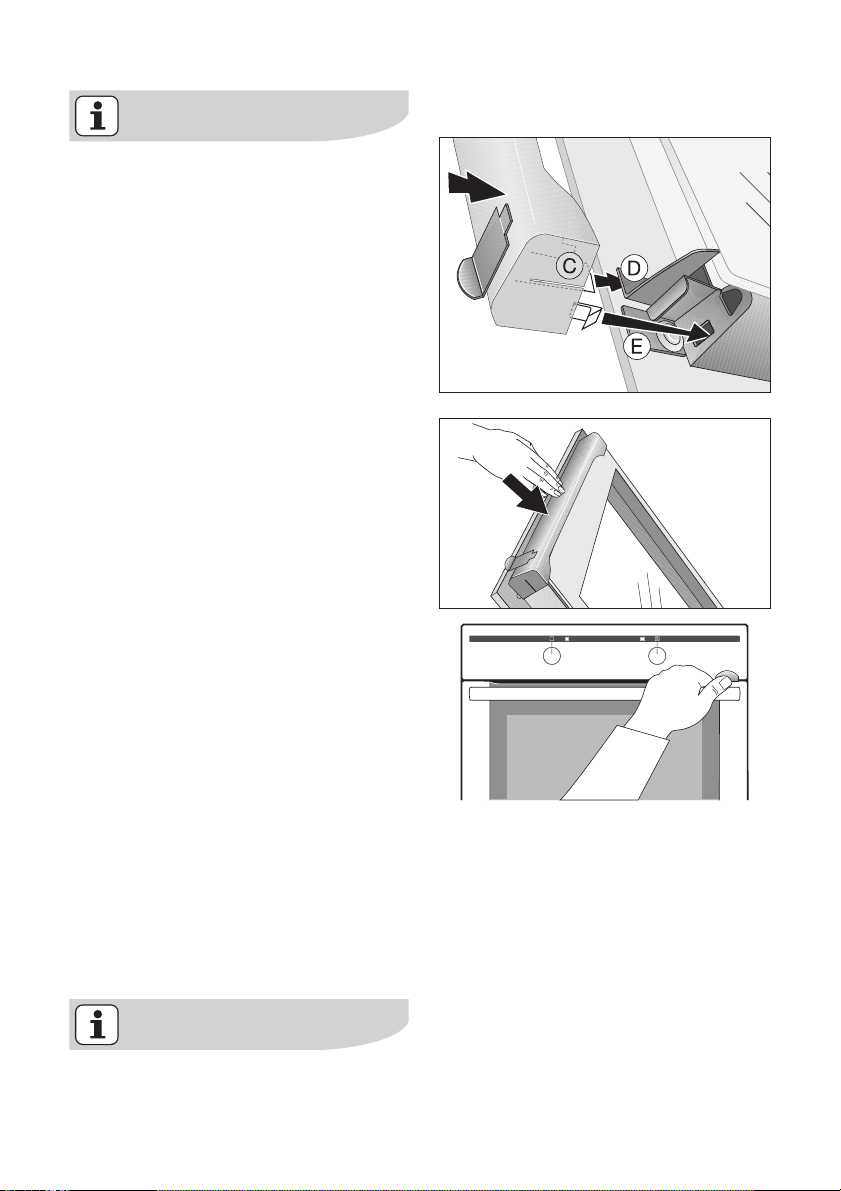
On the open side of the door trim (B)
there is a guide bar (C). This must be
pushed between the outer door
panel and the guide corner (D).
The clip seal (E) must be snapped in.
To open the oven door.
1. Keep lever pressed.
2. Open the door.
To close the oven
Close door without pressing the le-
ver.
Deactivating door lock
To deactivate the door lock, the lever is
moved to the right again. Proceed as
described above.
Switching off the appliance does
not remove the mechanical door
lock.
Page 29
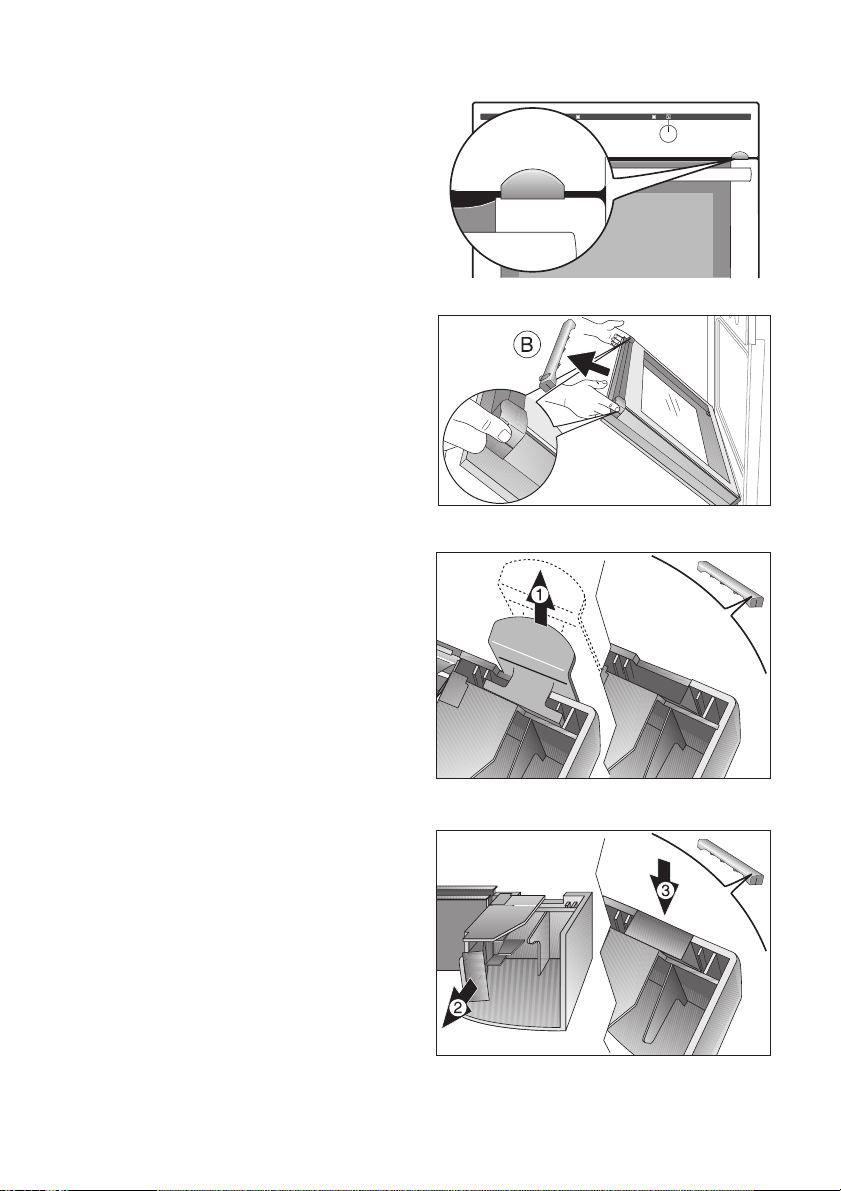
Removing door lock
1. Take hold of the door trim (B) on the
upper edge of the door at both sides
and press inwards to release the clip
seal. Then remove the door trim by p
ulling it upwards.
2. Demount lever:
Remove lever (1).
using the oven electrolux 29
3. Remove trim from the under side of
the door trim (B)(2) and push in (3).
Page 30
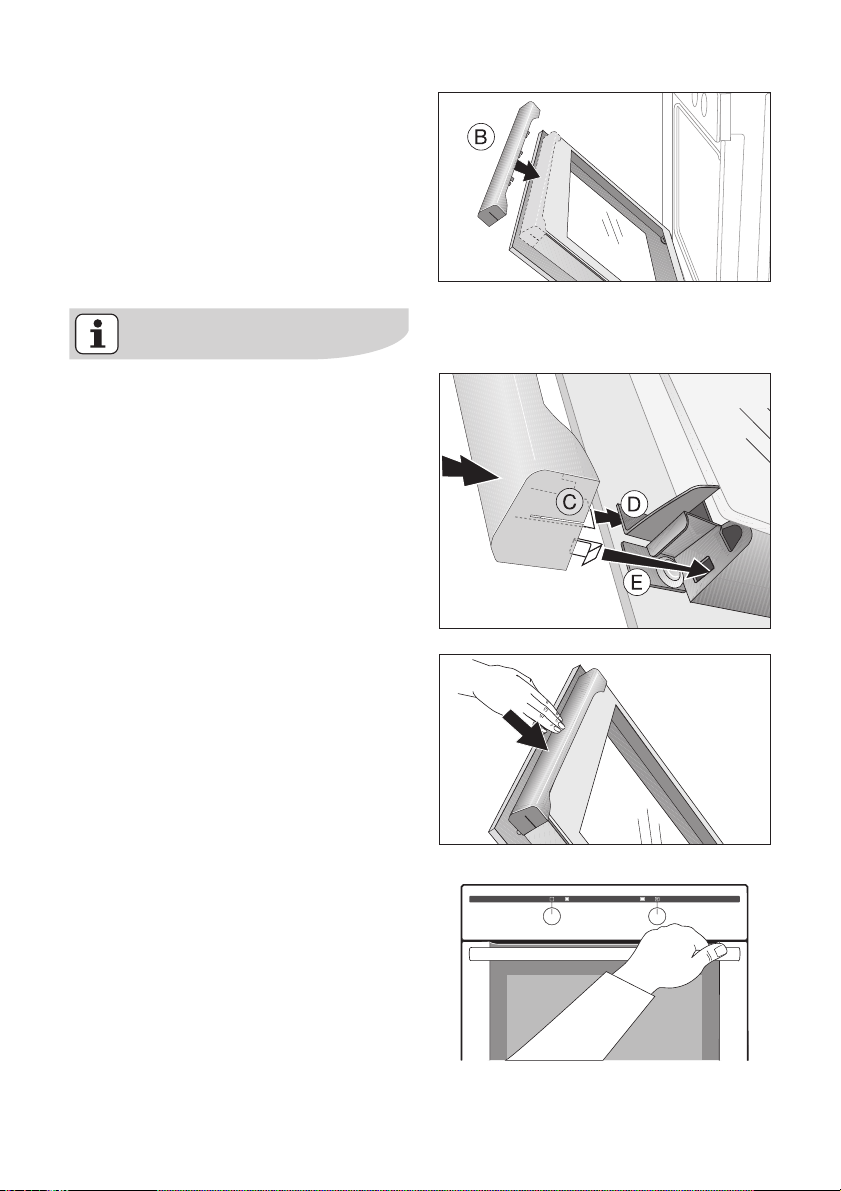
30 electrolux using the oven
4. Take hold of the door trim(B) at each
side, position it on the inside edge of
the door and push the door trim (B)
onto the upper edge of the door
On the open side of the door trim (B)
there is a guide bar(C). This must be
pushed between the outer door
panel and the guide corner (D).
The clip seal(E) must be snapped in.
5. Close the oven door.
Page 31

Uses, Tables and Tips
Baking
Oven function: Convection with ring
heating element or
Conventional
Baking tins
• For Conventional dark metal and
non-stick tins are suitable.
• For Convection with ring heating
element bright metal tins are also
suitable.
Oven levels
• Baking with Conventional is pos-
sible on one oven level.
• With Convection with ring heating
element you can bake on up to 3
baking trays at the same time:
uses, tables and tips electrolux 31
Page 32
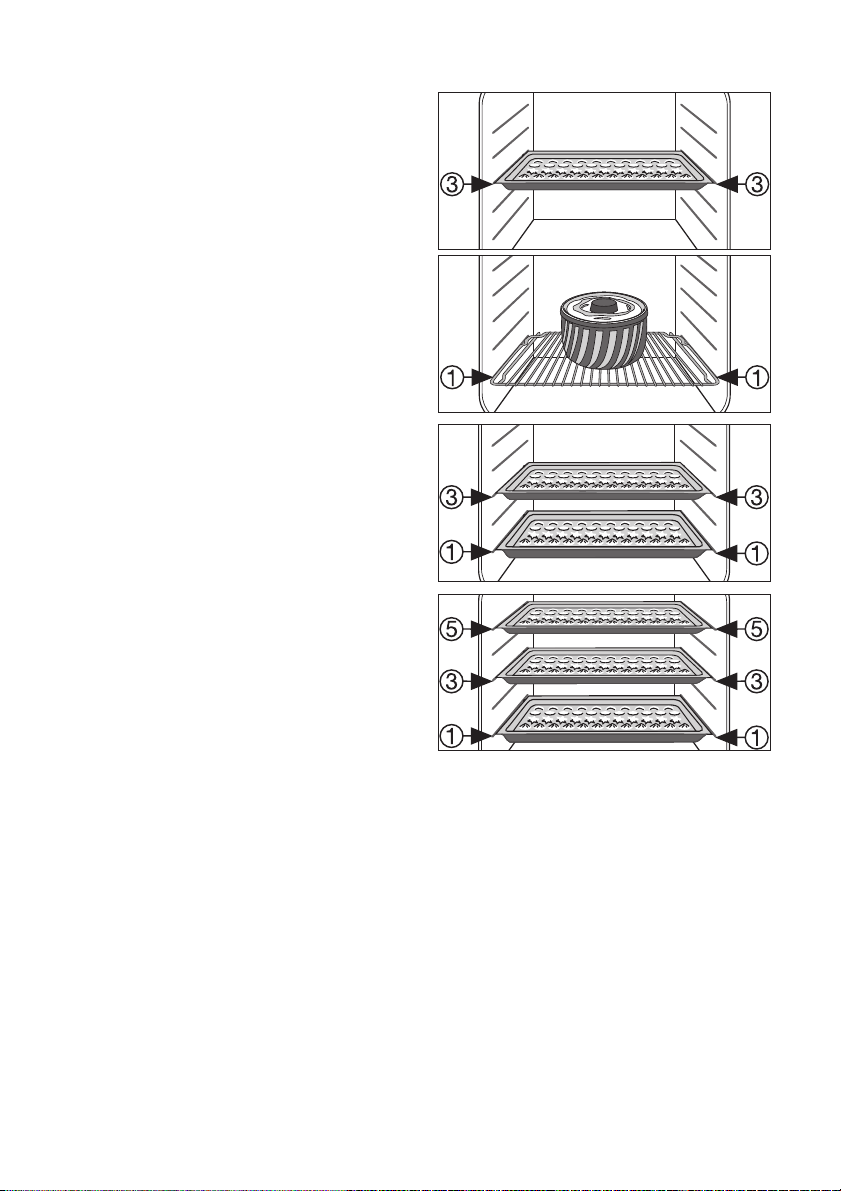
32 electrolux uses, tables and tips
1 baking tray:
e.g. oven level 3
1 cake tin:
e.g. oven level 1
2 baking trays:
z. g., oven levels 1 and 3
3 baking trays:
oven levels 1, 3 and 5
Page 33
uses, tables and tips electrolux 33
General Instructions
• Insert the tray with the bevel at the
front.
• With Conventional or Convection
with ring heating element you can
also bake with two tins next to one
another on the oven shelf at the
same time. This does not significantly increase baking time.
When frozen foods are used the
trays inserted may distort during
cooking. This is due to the large difference in temperature between the
freezing temperature and the temperature in the oven. Once the trays
have cooled the distortion will disappear again.
How to use the Baking Tables
The tables give the required temperature settings, baking times and oven
shelf levels for a selection of typical dishes.
• Temperatures and baking times are
for guidance only, as these will depend on the consistency of pastry,
dough or mixture, the amount and
the type of baking tin.
• We recommend using the lower
temperature the first time and then if
necessary, for example, if a deeper
browning is required, or baking time
is too long, selecting a higher temperature.
• If you cannot find the settings for a
particular recipe, look for the one
that is most similar.
• If baking cakes on baking trays or in
tins on more than one level, baking
time may be extended by 1015 minutes.
• Moist recipes (for example, pizzas,
fruit flans, etc.) are baked on one level.
• Cakes and pastries at different
heights may brown at an uneven rate
at first. If this occurs, please do not
change the temperature setting.
Different rates of browning even out
as baking progresses.
• Your new oven may bake or roast differently to your previous appliance.
So adapt your normal settings (temperature, cooking times) and oven
shelf levels to the recommendations
in the following tables.
With longer baking times, the oven
can be switched off about
10 minutes before the end of baking
time, to make use of the residual
heat.
Unless otherwise stated, the values
given in the tables assume that
cooking is started with the oven
cold.
Page 34
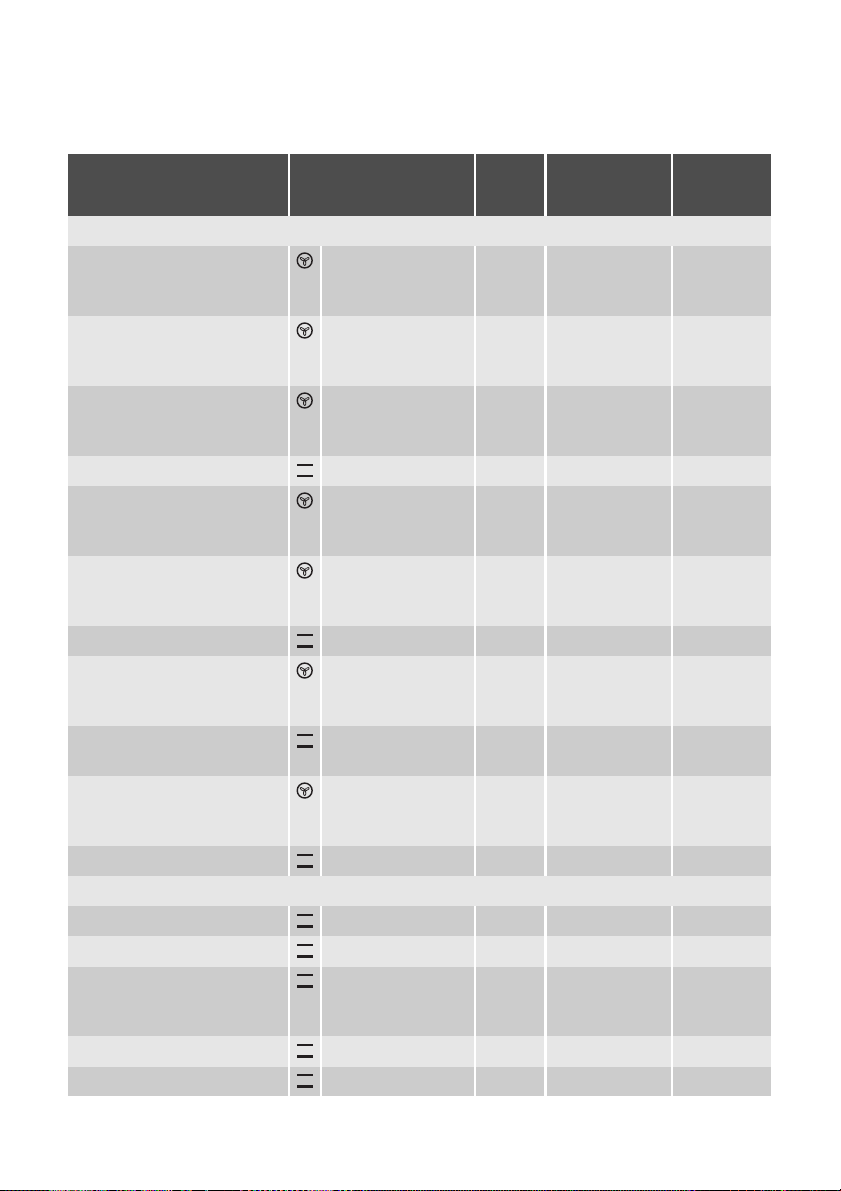
34 electrolux uses, tables and tips
Baking table
Baking on one oven level
Type of
baking
Oven function
Oven
level
Temperature°CTime
Hr: Mins.
Baking in tins
Ring cake or brioche Convection with
1 150-160 0:50-1:10
ring heating
element
Madeira cake/fruit cakes Convection with
1 140-160 1:10-1:30
ring heating
element
Sponge cake Convection with
1 140 0:25-0:40
ring heating
element
Sponge cake Conventional 1 160 0:25-0:40
Flan base - short pastry Convection with
3 170-180
1)
0:10-0:25
ring heating
element
Flan base - sponge mixture Convection with
3 150-170 0:20-0:25
ring heating
element
Apple pie Conventional 1 170-190 0:50-1:00
Apple pie (2tins Ø20 cm,
diagonally off set)
Convection with
ring heating
1 160 1:10-1:30
element
Apple pie (2tins Ø20 cm,
Conventional 1 180 1:10-1:30
diagonally off set)
Savoury flan (e. g, quiche lorraine)
Convection with
ring heating
1 160-180 0:30-1:10
element
Cheesecake Conventional 1 170-190 1:00-1:30
Cakes/pastries/breads on baking trays
Plaited bread/bread crown Conventional 3 170-190 0:30-0:40
1)
230
160-180
1)
1)
1)
0:40-1:00
0:25
0:30-1:00
0:15-0:30
0:10-0:20
Christmas stollen Conventional 3 160-180
Bread (rye bread)
Conventional 1
-first of all
-then
Cream puffs/eclairs Conventional 3 160-170
Swiss roll Conventional 3 180-200
Page 35
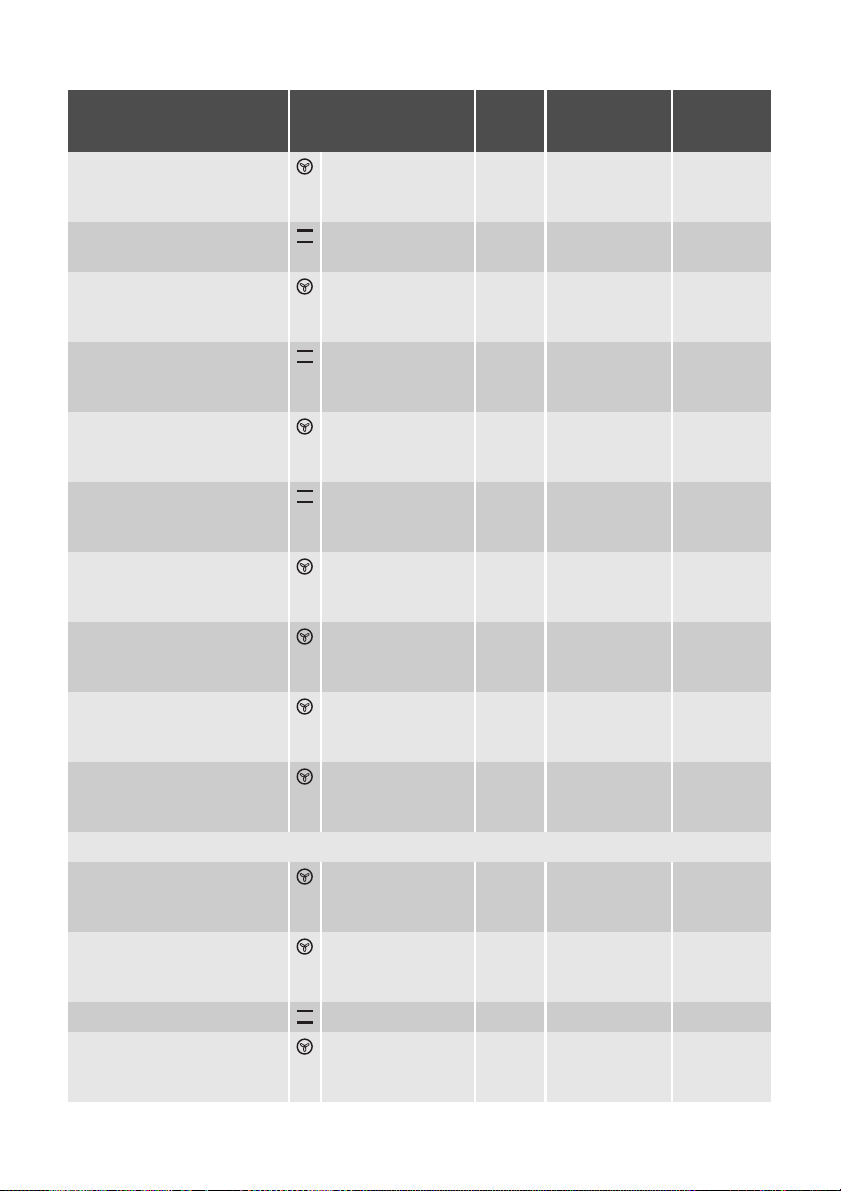
uses, tables and tips electrolux 35
Type of
baking
Cake with crumble topping
(dry)
Oven function
Convection with
ring heating
Oven
Temperature°CTime
level
3 150-160 0:20-0:40
element
Buttered almond cake/sugar
Conventional 3 190-210
cakes
Fruit flans
(made with yeast dough/
sponge mixture)
2)
Fruit flans
(made with yeast dough/
sponge mixture)
2)
Fruit flans made with short
pastry
Convection with
3 150 0:35-0:50
ring heating
element
Conventional 3 170 0:35-0:50
Convection with
3 160-170 0:40-1:20
ring heating
element
Yeast cakes with delicate
Conventional 3 160-180
toppings (e. g, quark, cream,
custard)
Pizza (with a lot of topping)
2)
Convection with
1 180-200
ring heating
element
Pizza (thin crust) Convection with
1 200-220
ring heating
element
Unleavened bread Convection with
1 200-220 0:08-0:15
ring heating
element
Tarts (CH) Convection with
1 180-200 0:35-0:50
ring heating
element
Biscuits
Short pastry biscuits Convection with
3 150-160 0:06-0:20
ring heating
element
Viennese whirls Convection with
3 140 0:20-0:30
ring heating
element
Viennese whirls Conventional 3 160
Biscuits made with sponge
mixture
Convection with
ring heating
3 150-160 0:15-0:20
element
Hr: Mins.
1)
0:15-0:30
1)
0:40-1:20
1)
0:30-1:00
1)
0:10-0:25
1)
0:20-0:30
Page 36
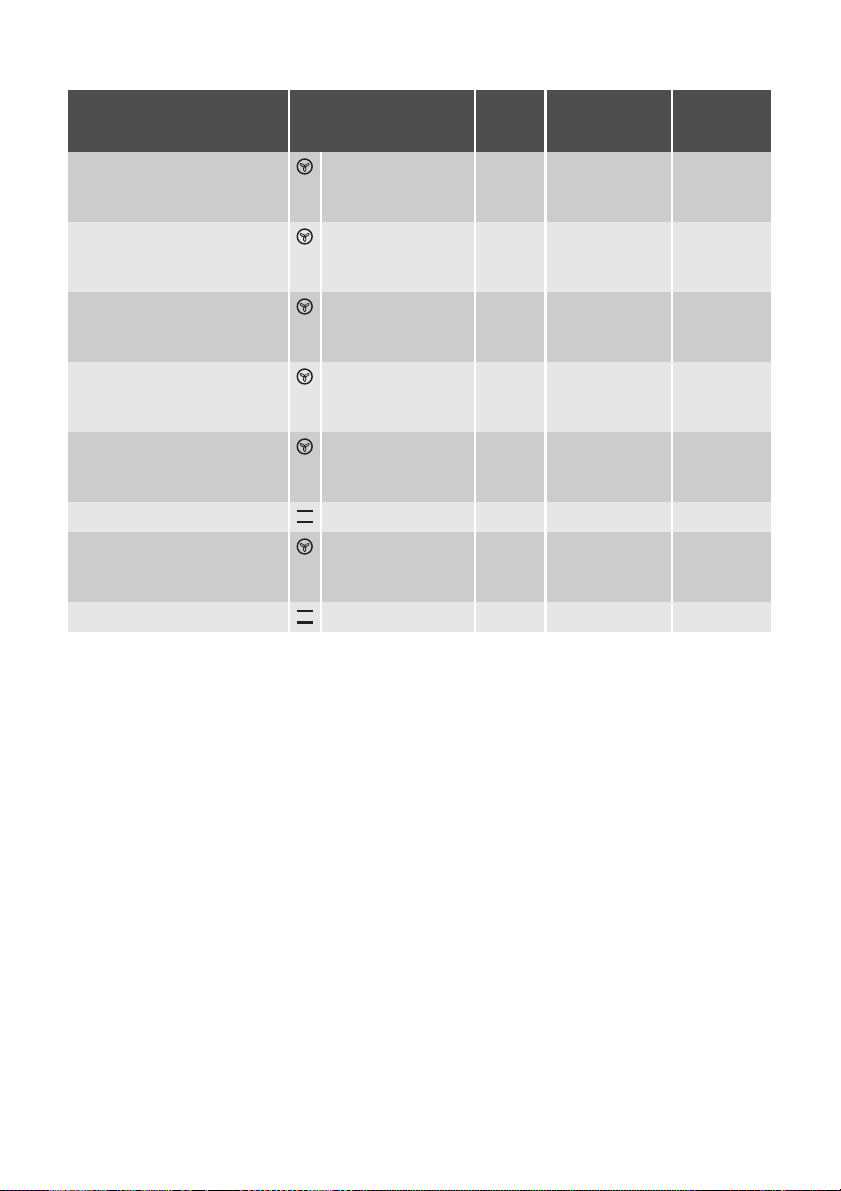
36 electrolux uses, tables and tips
Type of
baking
Pastries made with egg
white, meringues
Oven function
Convection with
ring heating
Oven
Temperature°CTime
level
3 80-100 2:00-2:30
element
Macaroons Convection with
3 100-120 0:30-0:60
ring heating
element
Biscuits made with yeast
dough
Convection with
ring heating
3 150-160 0:20-0:40
element
Puff pastries Convection with
3 170-180
ring heating
element
Rolls Convection with
3 160
ring heating
element
Rolls Conventional 3 180
Small cakes (20per tray) Convection with
3 140
ring heating
element
Small cakes (20per tray) Conventional 3 170
1) Pre-heat the oven
2) Use the drip tray or roasting tray
Hr: Mins.
1)
0:20-0:30
1)
1)
1)
1)
0:20-0:35
0:20-0:35
0:20-0:30
0:20-0:30
Page 37
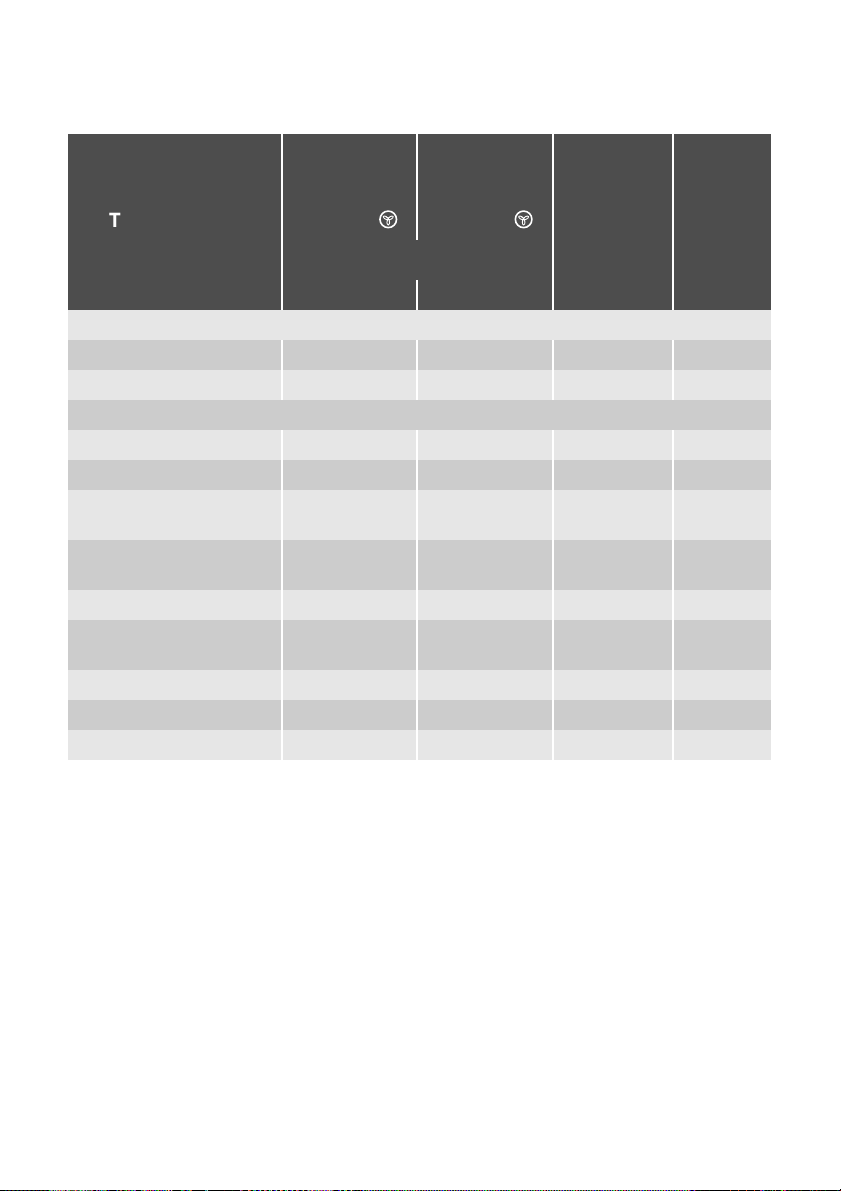
Baking on more than one oven level
uses, tables and tips electrolux 37
Type of baking
Convection
with ring
heating
element
Convection
with ring
heating
element
Time
Hours:
Mins.
Shelf positions from bottom
2 levels 3 levels
Cakes/pastries/breads on baking trays
Cream puffs/Eclairs 1/4 --- 160-180
Dry streusel cake 1/3 --- 140-160 0:30-0:60
Biscuits/small cakes/pastries/rolls
Short pastry biscuits 1/3 1/3/5 150-160 0:15-0:35
Viennese whirls 1/3 1/3/5 140 0:20-0:60
Biscuits made with sponge
mixture
Biscuits made with egg
white, meringues
Macaroons 1/3 --- 100-120 0:40-1:20
Biscuits made with yeast
dough
Puff pastries 1/3 --- 170-180
Rolls 1/4 --- 160 0:30-0:55
Small cakes (20per tray) 1/4 --- 140
1) Pre-heat the oven
1/3 --- 160-170 0:25-0:40
1/3 --- 80-100 2:10-2:50
1/3 --- 160-170 0:30-0:60
Temperature in °C
1))
1)
1)
0:35-0:60
0:30-0:50
0:25-0:40
Page 38

38 electrolux uses, tables and tips
Tips on Baking
Baking results Possible cause Remedy
The cake is not browned
Wrong oven level Place cake lower
enough underneath
The cake sinks (becomes
soggy, lumpy, streaky)
Oven temperature too high Use a slightly lower setting
Baking time too short Set a longer baking time
Baking times cannot be reduced by setting higher
temperatures
Too much liquid in the mixture Use less liquid.
Pay attention to mixing times,
especially if using mixing machines
Cake is too dry Oven temperature too low Set oven temperature higher.
Baking time too long Set a shorter baking time
Cake browns unevenly Oven temperature too high and
baking time too short
Set a lower oven temperature
and a longer baking time
Mixture is unevenly distributed Spread the mixture evenly on the
baking tray
Grease filter is inserted Take out the grease filter
Cake does not cook in
the baking time given
Temperature too low Use a slightly higher oven setting
Grease filter is inserted Take out the grease filter
Page 39
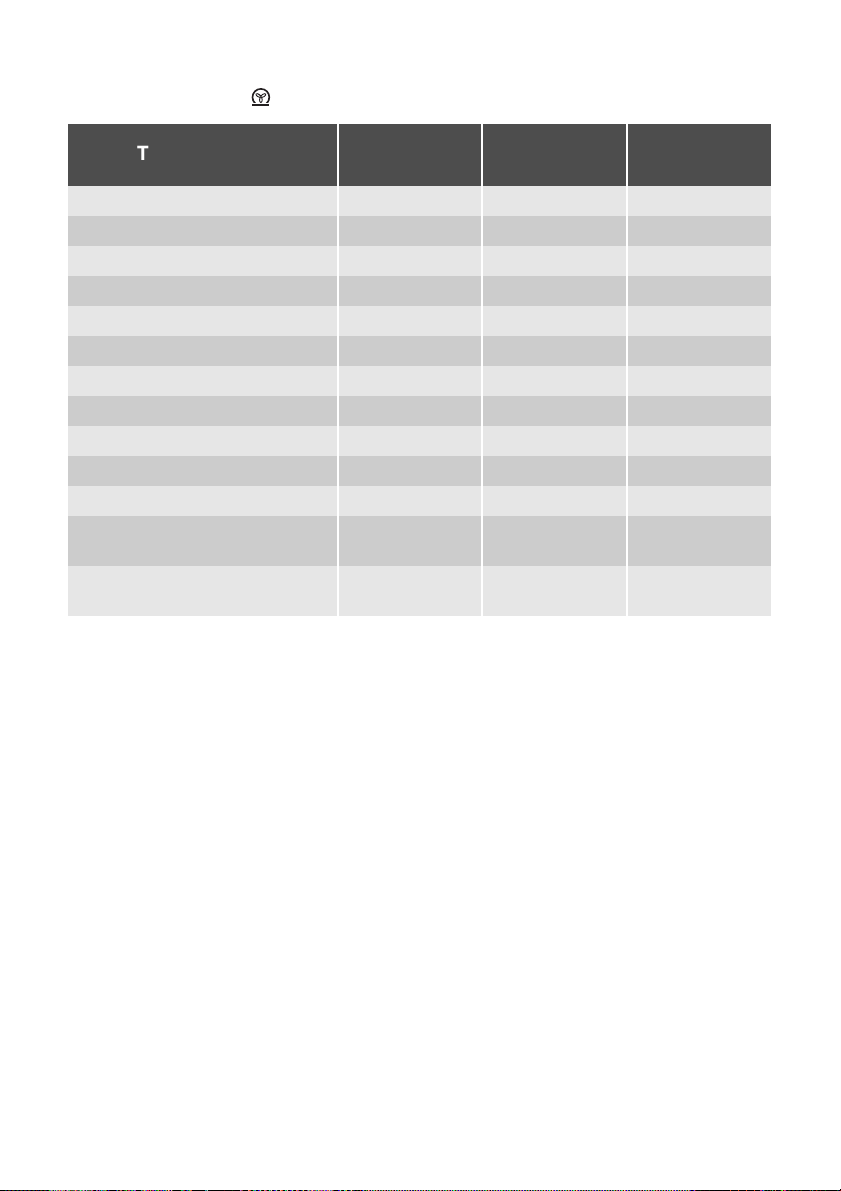
Table Pizza setting
uses, tables and tips electrolux 39
Type of baking Shelf position
Temperature
°C
Pizza (thin crust) 1 180 - 200
1)
Time
Hr: Mins.
20 - 30
Pizza (with a lot of topping) 1 180 - 200 20 - 30
Ta rt s 1 180 - 200 45 - 60
Spinach flan 1 160 -180 45 - 60
Quiche Lorraine 1 170 - 190 40 - 50
Quark flan, round 1 140 - 160 60 - 90
Quark flan on tray 1 140 - 160 50 - 60
Apple cake, covered 1 150 - 170 50 - 70
Vegetable pie 1 160 - 180 50 - 60
Unleavened bread 1 250 - 270
Puff pastry flan 1 160 - 180
Flammekuchen (Pizza-like dish
from Alsace)
Piroggen (Russian version of calzone)
1) Pre-heat the oven
1 250 - 270
1 180 - 200
1)
1)
1)
1)
10 - 20
40 - 50
12 - 20
15 - 25
Page 40
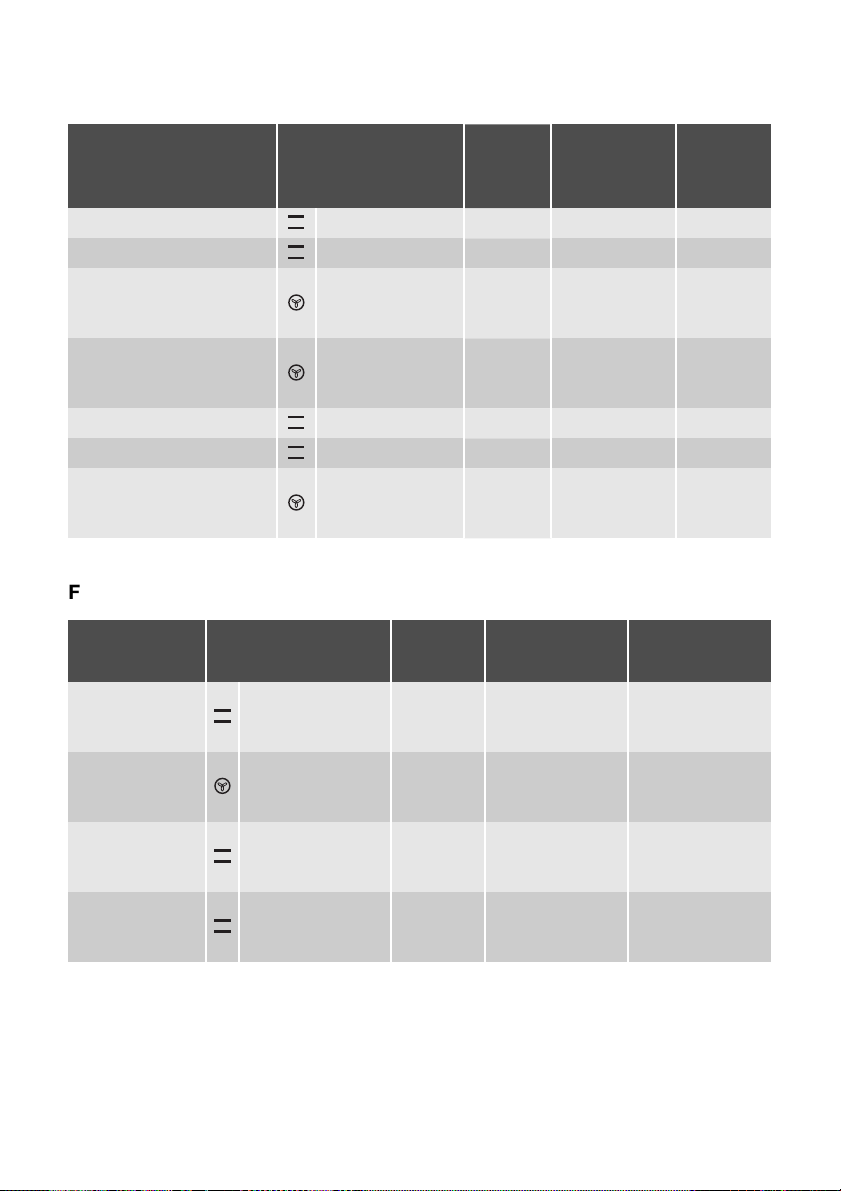
40 electrolux uses, tables and tips
Table for Bakes and Gratins
Dish Oven function
Pasta bake Conventional 1 180-200 0:45-1:00
Lasagne Conventional 1 180-200 0:25-0:40
Vegetables au gratin
Baguettes topped with
melted cheese
Sweet bakes Conventional 1 180-200 0:40-0:60
Fish bakes Conventional 1 180-200 0:30-1:00
Stuffed vegetables
1) Pre-heat the oven
1)
1)
Convection with
ring heating
element
Convection with
ring heating
element
Convection with
ring heating
element
Shelf
position
1 160-170 0:15-0:30
1 160-170 0:15-0:30
1 160-170 0:30-1:00
Tem pe ra -
ture
°C
Time
Hr: Mins.
Frozen Ready Meals Table
Food to be
cooked
Frozen pizza Conventional 3
1)
Chips
(500 g)
Baguettes Conventional 3
Fruit flans Conventional 3
1) Comments: Turn chips 2 or 3 times during cooking
Oven function
Convection with
ring heating
element
Shelf
Temperature
position
as per manufac-
turer’s instruc-
3 200-220
as per manufac-
turer’s instruc-
as per manufac-
turer’s instruc-
°C
tions
tions
tions
Time
as per manufac-
turer’s instruc-
tions
as per manufac-
turer’s instruc-
tions
as per manufac-
turer’s instruc-
tions
as per manufac-
turer’s instruc-
tions
Page 41

Roasting
Oven function: Conventional or
Convection grilling
Roasting dishes
• Any heat-resistant ovenware is suitable to use for roasting (please read
the manufacturer's instructions).
• Large roasting joints can be roasted
directly in the roasting tray or on
the oven shelf with the roasting
tray placed below it.
• For all lean meats, we recommend
roasting these in a roasting tin
with a lid. This will keep the meat
more succulent.
• All types of meat, that can be
browned or have crackling, can be
roasted in the roasting tin without
the lid.
uses, tables and tips electrolux 41
Tips on using the roasting chart
The information given in the follow-
ing table is for guidance only.
• We recommend cooking meat and
fish weighing 1 kg and above in
the oven.
• To prevent escaping meat juices or
fat from burning on to the pan, we
recommend placing some liquid in
the roasting pan.
• If required, turn the roast (after 1/2 -
2/3 of the cooking time).
• Baste large roasts and poultry with
their juices several times during
roasting. This will give better roasting
results.
• You can switch the oven off
about 10 minutes before the end of
the roasting time, in order to utilise
the residual heat.
Page 42
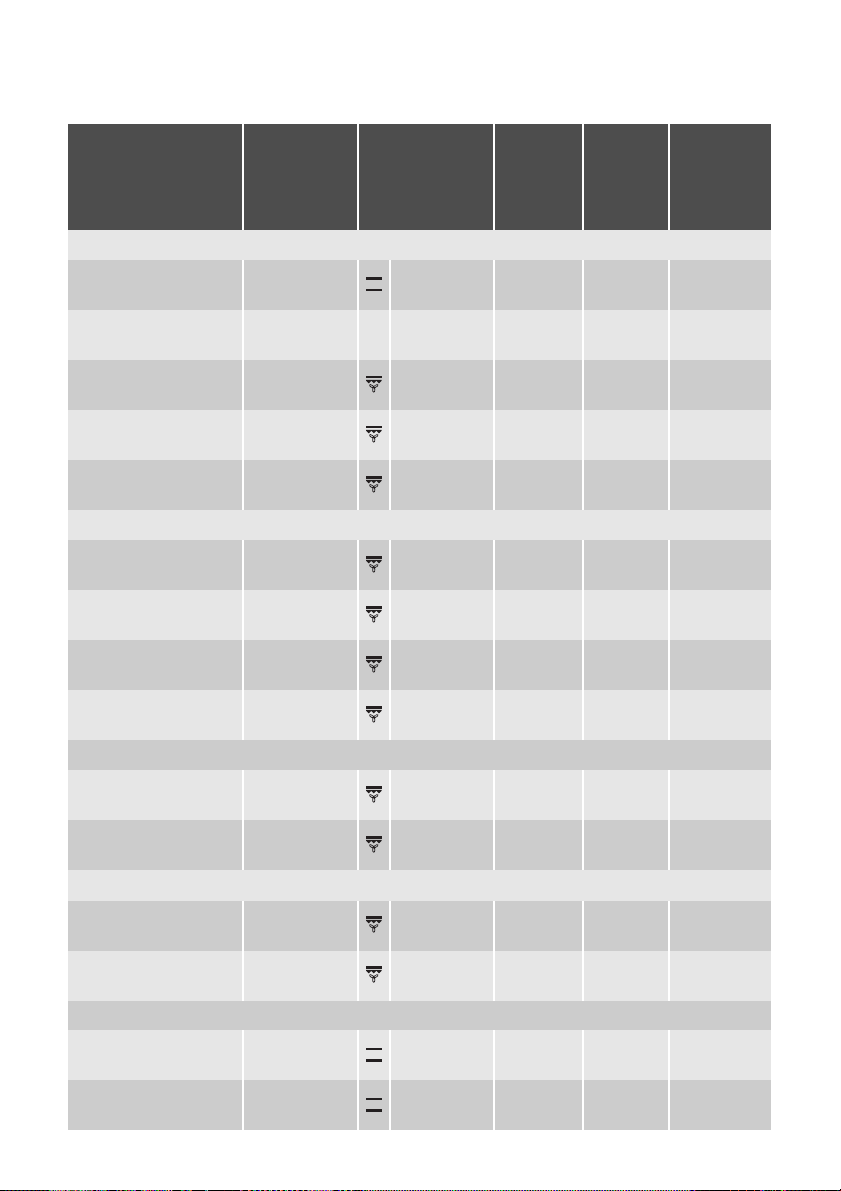
42 electrolux uses, tables and tips
Roasting table
Type of meat Quantity Ovenfunction
Beef
Pot roast 1-1.5 kg
Roast beef or fillet
- rare
- medium
- well done
Pork
Shoulder, neck, ham
joint
Chop, spare rib 1-1.5 kg
Meat loaf 750 g-1 kg
Porkknuckle (precooked)
Veal
Roast veal 1 kg
Knuckle of veal 1.5-2 kg
Lamb
Leg of lamb, roast
lamb
Saddle of lamb 1-1.5 kg
Game
Saddle of hare, leg of
hare
Saddle of venison 1.5-2 kg
per cm.
of thickness
per cm.
of thickness
per cm.
of thickness
1-1.5 kg
750 g-1 kg
1-1.5 kg
up to 1 kg
Convention-
Convection
grilling
Convection
grilling
Convection
grilling
Convection
grilling
Convection
grilling
Convection
grilling
Convection
grilling
Convection
grilling
Convection
grilling
Convection
grilling
Convection
grilling
Convention-
Convention-
Tem -
Shelf
position
pera-
ture
°C
al
al
al
1 200-250 2:00-2:30
1
1 180-190 0:06-0:08
1 170-180 0:08-0:10
1 160-180 1:30-2:00
1 170-180 1:00-1:30
1 160-170 0:45-1:00
1 150-170 1:30-2:00
1 160-180 1:30-2:00
1 160-180 2:00-2:30
1 150-170 1:15-2:00
1 160-180 1:00-1:30
3
1 210-220 1:15-1:45
190-
200
220-
250
1)
1)
Time
Hours
mins.
per cm. of
thickness
0:05-0:06
0:25-0:40
Page 43
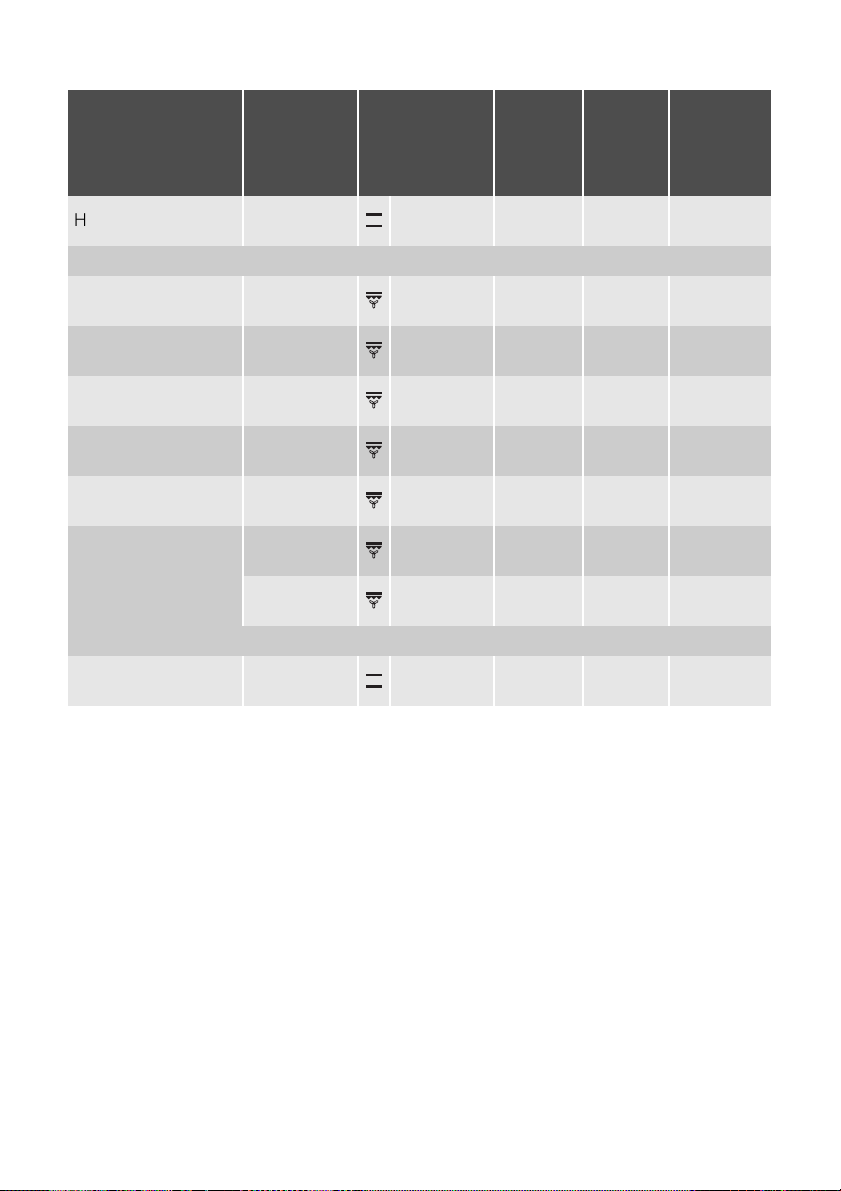
uses, tables and tips electrolux 43
Type of meat Quantity Ovenfunction
Haunch of venison 1.5-2 kg
Poultry
Poultry portions
Half chicken
Chicken, poulard 1-1.5 kg
Duck 1.5-2 kg
Goose 3.5-5 kg
Turk ey
Fish (steamed)
Whole fish 1-1.5 kg
1) Pre-heat the oven
200-250g
each
400-500g
each
2.5-3.5 kg
4-6 kg
Convention-
Convection
Convection
Convection
Convection
Convection
Convection
Convection
Convention-
al
grilling
grilling
grilling
grilling
grilling
grilling
grilling
al
Tem -
Shelf
position
pera-
ture
°C
1 200-210 1:30-2:15
1 200-220 0:35-0:50
1 190-210 0:35-0:50
1 190-210 0:45-1:15
1 180-200 1:15-1:45
1 160-180 2:30-3:30
1 160-180 1:45-2:30
1 140-160 2:30-4:00
1 210-220 0:45-1:15
Time
Hours
mins.
Page 44
44 electrolux uses, tables and tips
Grill Sizes
Oven function: Grill or Dual grill
with maximum temperature setting
Important: Always grill with the oven
door closed.
The empty oven should always be
pre-heated with the grill functions
for 5 minutes.
• For grilling, place the shelf in the
recommended shelf position.
• Always insert the tray for collecting
the fat into the first shelf position
from the bottom.
• The grilling times are guidelines.
• Grilling is particularly suitable for flat
pieces of meat or fish.
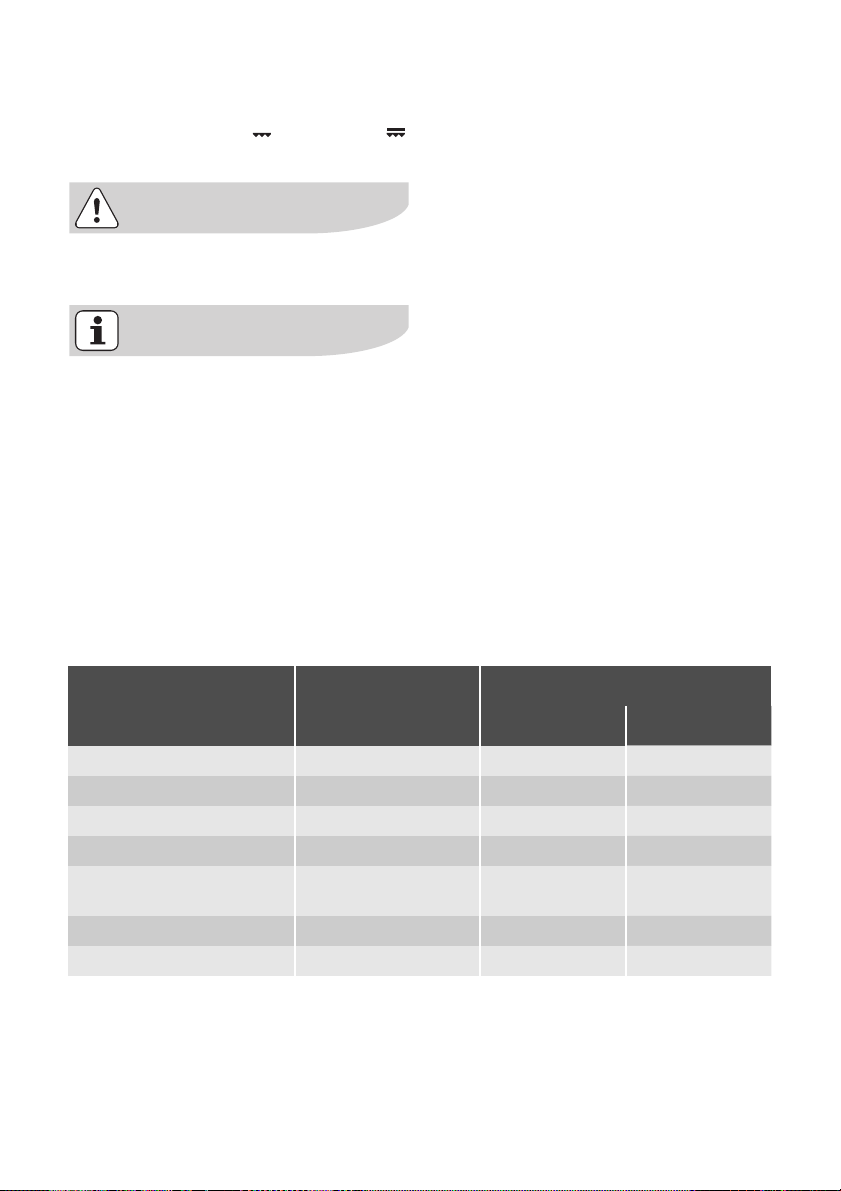
Grilling table
Grilling time
Food to be grilled Oven level
1st side 2nd side
Burgers 4 8-10 mins. 6-8 mins.
Pork fillet 4 10-12 mins. 6-10 mins.
Sausages 4 8-10 mins. 6-8 mins.
Fillet steaks, veal steaks 4 6-7 mins. 5-6 mins.
Fillet of beef, roast beef
(approx. 1 kg)
1)
Toast
Toast with topping 3 6-8 mins. ---
1) Do not pre-heat
3 10-12 mins. 10-12 mins.
3 4-6 mins. 3-5 mins.
Page 45
Drying
Oven function: Convection with ring
heating element
• Use oven shelves covered with
greaseproof paper or baking parchment.
• You get a better result if you switch
the oven off halfway through the drying time, open the door and leave the
oven to cool down overnight.
• After this finish drying the food to be
dried.
uses, tables and tips electrolux 45
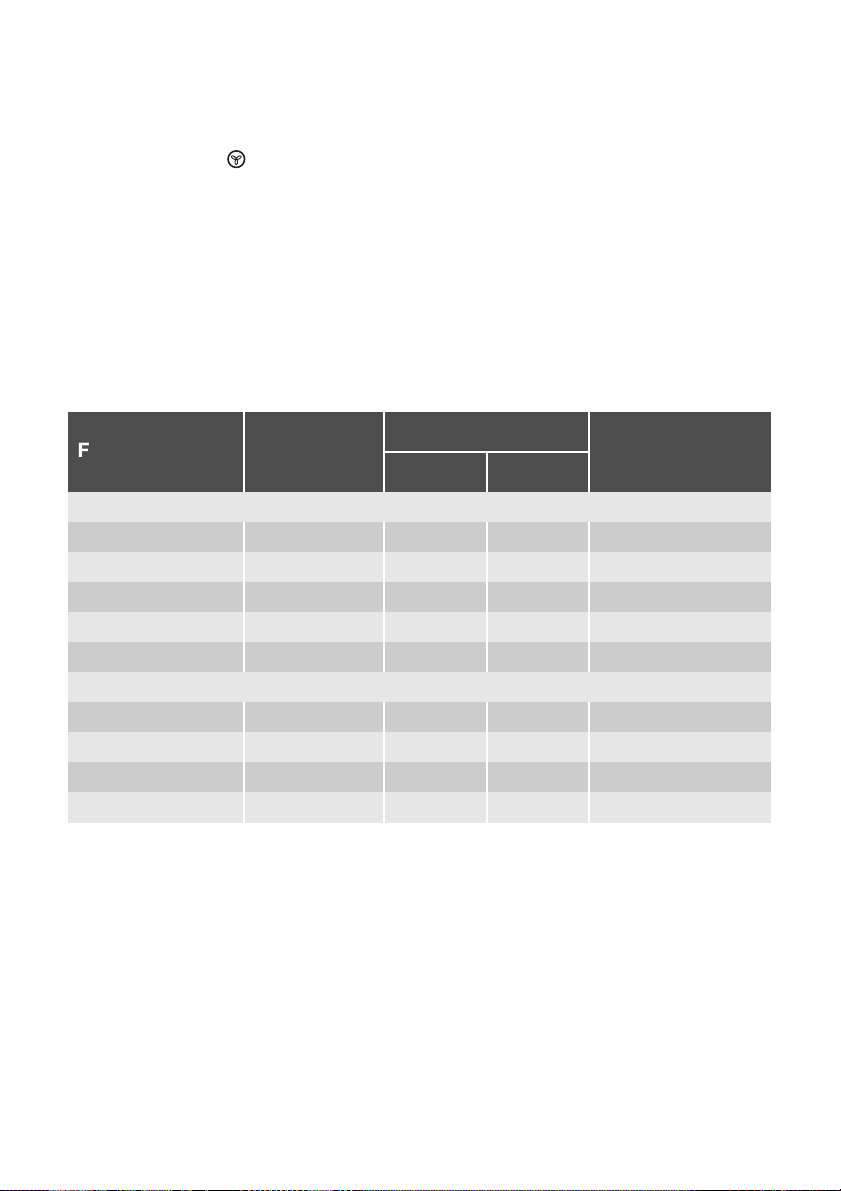
Food to be dried
Vegetables
Beans 60-70 3 1 / 4 6-8
Peppers (strips) 60-70 3 1 / 4 5-6
Vegetables for soup 60-70 3 1 / 4 5-6
Mushrooms 50-60 3 1 / 4 6-8
Herbs 40-50 3 1 / 4 2-3
Fruit
Plums 60-70 3 1 / 4 8-10
Apricots 60-70 3 1 / 4 8-10
Apple slices 60-70 3 1 / 4 6-8
Pears 60-70 3 1 / 4 6-9
Temperature
in °C
Oven level
1 level 2 levels
Time in hours
(Guideline)
Page 46
46 electrolux uses, tables and tips
Making Preserves
Oven function: Bottom heat
• For preserving, use only commercially available preserve jars of the same
size.
• Jars with twist-off or bayonet
type lids and metal tins are not
suitable.
• When making preserves, the first
shelf position from the bottom is
the one most used.
• Use the shelf for making preserves.
There is enough room on this for up
to six 1-litre preserving jars.
• The jars should all be filled to the
same level and clamped shut.
• Place the jars on the baking tray in
such a way that they are not touching each other.
• Pour approx. 1/2 litre of water into
the baking tray so that sufficient
moisture is produced in the oven.
• As soon as the liquid starts to pearl
in the first jars (after about 3560 minutes with 1 litre jars), switch
the oven off or reduce the temperature to 100°C (see table).
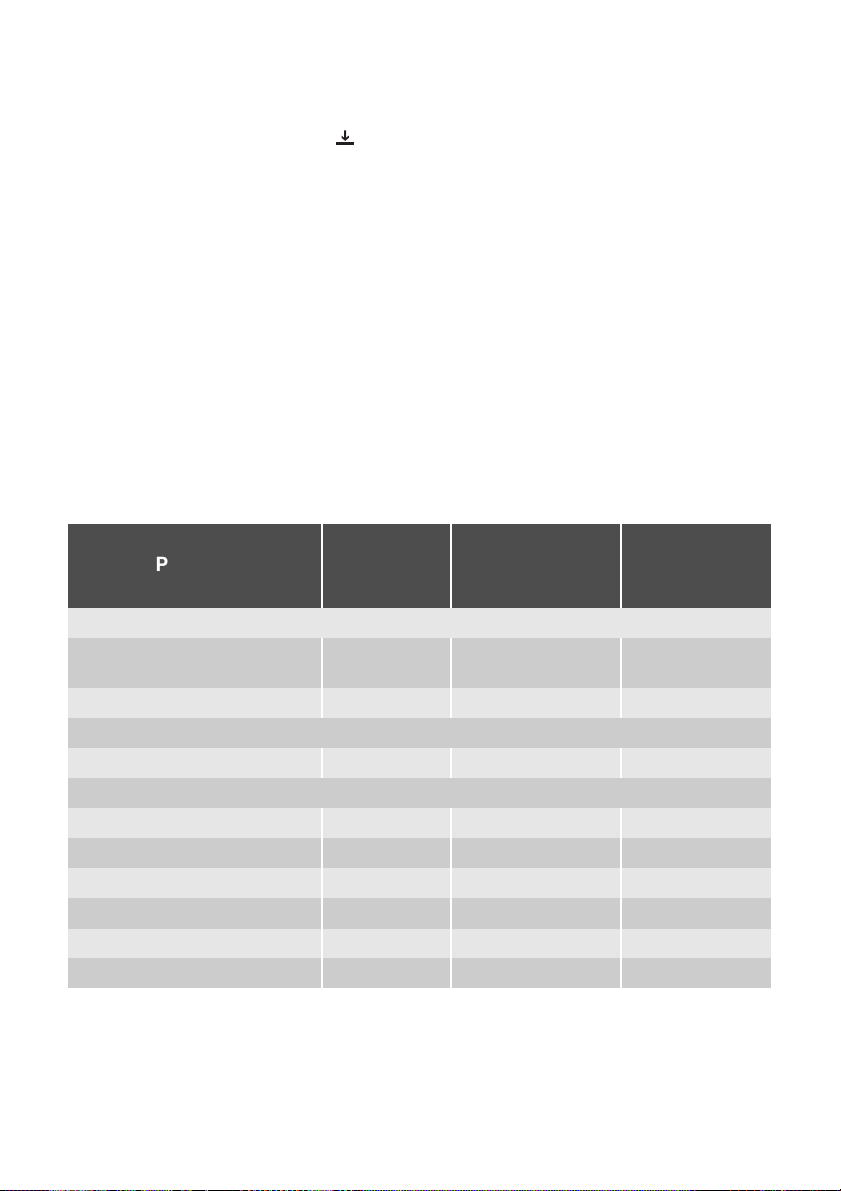
Preserves table
The times and temperatures for making
preserves are for guidance only.
Preserve
Soft fruit
Strawberries, blueberries, raspberries, ripe gooseberries
Unripe gooseberries 160-170 35-45 10-15
Stone fruit
Pears, quinces, plums 160-170 35-45 10-15
Vegetables
Carrots
Mushrooms
Cucumbers 160-170 50-60 ---
Mixed pickles 160-170 50-60 15
Kohlrabi, peas, asparagus 160-170 50-60 15-20
Beans 160-170 50-60 ---
1) Leave standing in oven when switched off
1)
1)
Temperature
in°C
160-170 35-45 ---
160-170 50-60 5-10
160-170 40-60 10-15
Cooking time
until simmering
in mins.
Continue to
cook at 100°C
in mins.
Page 47

Cleaning and Care
Warning: For cleaning, the appliance must be switched off and
cooled down.
Warning: For safety reasons, do not
clean the appliance with steam jet
or high-pressure cleaning equipment.
cleaning and care electrolux 47
Important: If using an oven spray,
please follow the manufacturer's instructions exactly.
Accessories
Wash all slide-in units (shelf unit, baking
tray, shelf support rails etc.) after each
use and dry well. Soak briefly to make
them easier to clean.
Fat Filter
Attention: Do not use any scouring
agents, sharp cleaning tools or
scourers.
Outside of the appliance
• Wipe the front of the appliance with
a soft cloth and warm water and
washing up liquid.
• For metal fronts, use normal commercially available cleaning agents.
Oven interior
Clean the appliance after each use. In
this way, dirt is easier to clean off and is
not allowed to burn on.
1. For cleaning, turn the oven light on.
2. After every use, wipe the oven with a
solution of washing-up liquid and allow to dry.
Clean stubborn dirt with a special
oven cleaner.
1. Clean the fat filter in hot water and
washing up liquid or in the dishwasher.
2. Badly burned on soiling can be removed by boiling the filter in a little
water to which 2-3 tablespoonsful of
dishwasher cleaner has been added.
Page 48
48 electrolux cleaning and care
Shelf Support Rails
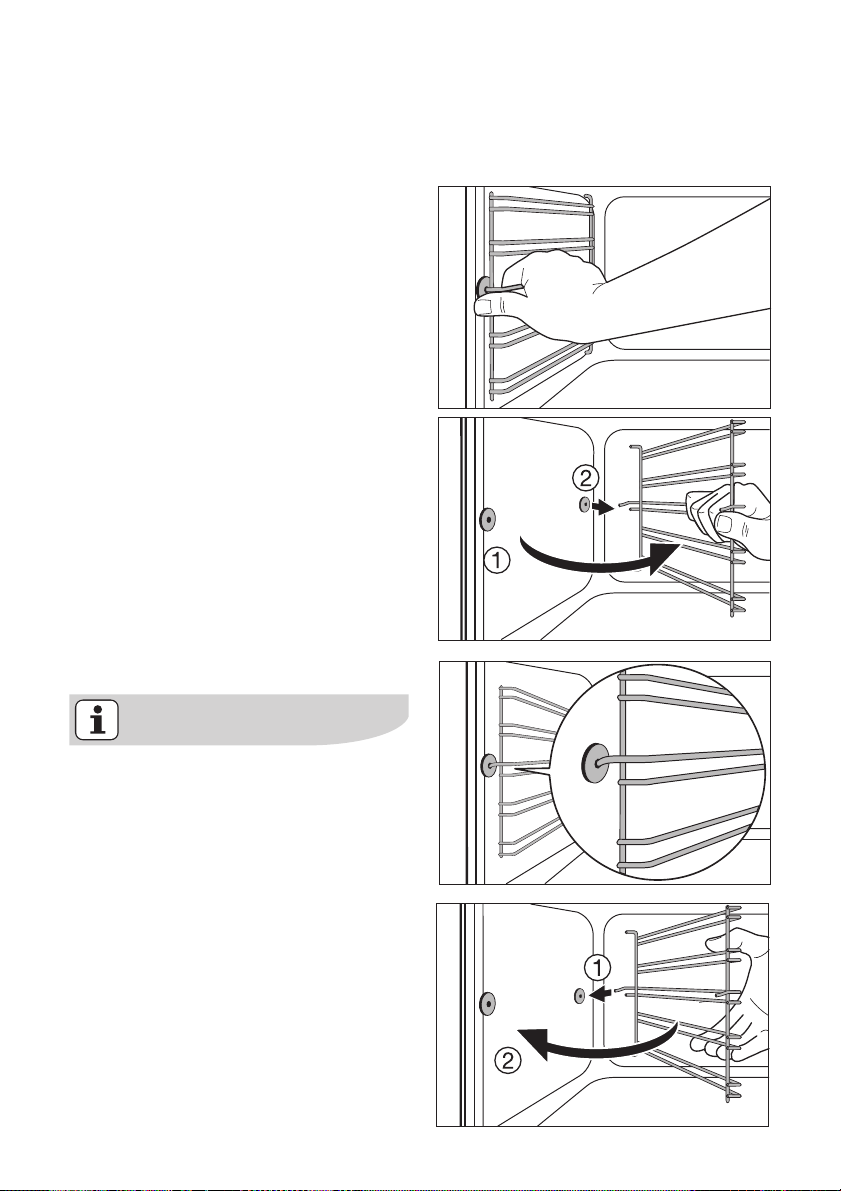
The shelf support rails on the left and
right hand sides of the oven can be removed for cleaning the side walls.
Removing the shelf support rails
First pull the front of the rail away from
the oven wall (1) and then unhitch at the
back (2).
Fitting the shelf support rails
Important! The rounded ends of the
guide rails must be pointing forwards!
To re-insert, first hook the rail into place
at the back (1) and then insert the front
and press into place (2).
Page 49
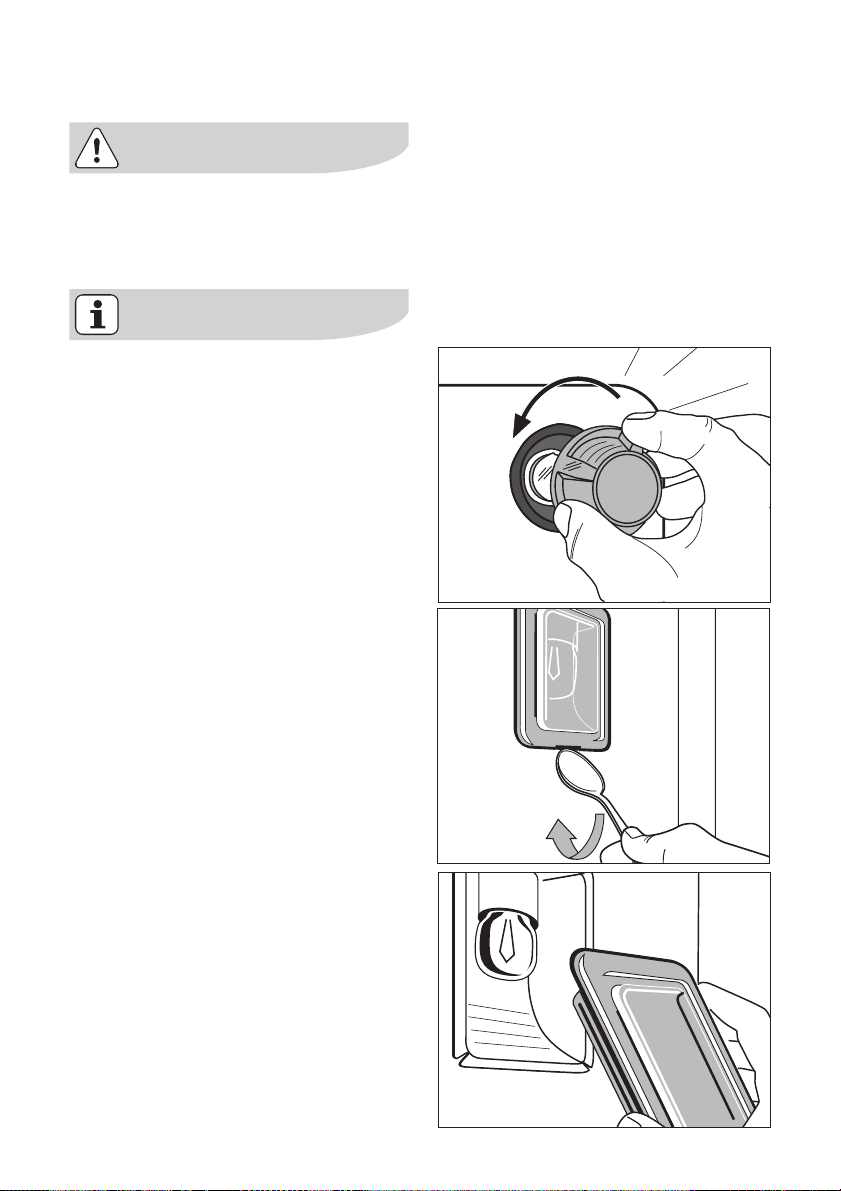
Oven Lighting
Warning: Risk of electric shock! Prior to changing the oven light bulb:
– Switch off the oven!
– Disconnect from the electricity sup-
ply.
Place a cloth on the oven floor to
protect the oven light and glass cover.
Changing the oven light bulb/cleaning the glass cover
1. Remove the glass cover by turning it
anti-clockwise and then clean it.
2. If necessary: replace with
25 watt, 230 V, 300 °C heat-resistant oven lighting.
3. Refit the glass cover.
cleaning and care electrolux 49
Changing side oven light/Cleaning
glass cover
1. Remove the left shelf support rail.
2. Remove the glass cover with the aid
of a narrow, blunt implement (e.g.,
teaspoon) and clean it.
3. If necessary:
replace bulb with a 25 watt,
230 V, 300 °C heat-resistant, oven
light bulb.
4. Refit the glass cover.
5. Insert the shelf support rail.
Page 50
50 electrolux cleaning and care
Oven Ceiling
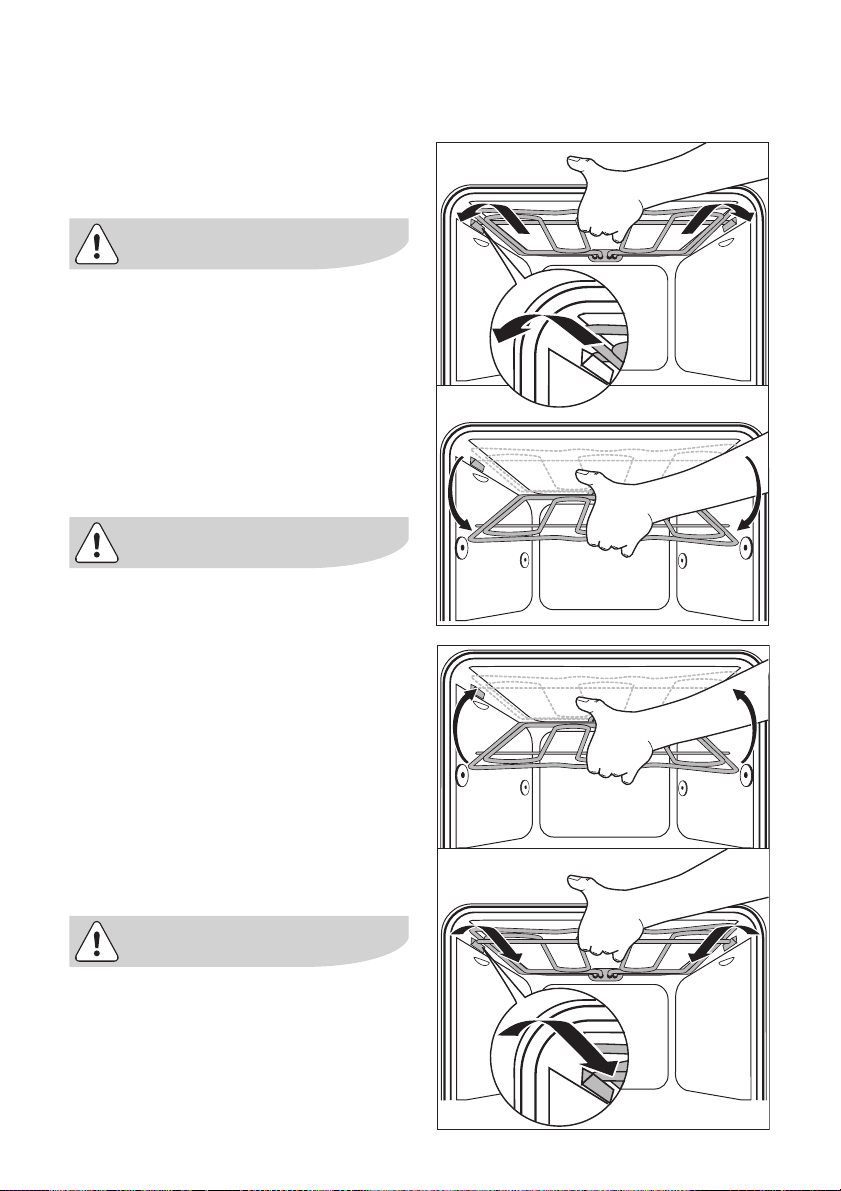
The upper heating element can be folded down to make it easier to clean the
oven ceiling.
Folding down the heating element
Warning: Only fold down the heating
element when the oven is switched
off and there is no risk of being
burnt!
1. Remove the side shelf support rails.
2. Grip the heating element at the front
and pull it forwards and out over the
support lug on the inner wall of the
oven.
3. The heating element will now fold
down.
Caution: Do not use force to press
the heating element down! The
heating element might break.
Cleaning the oven ceiling
Repositioning the heating element
1. Move the heating element back up
towards the oven ceiling.
2. Pull the heating element forwards
against the spring pressure and
guide it over the oven support lug.
3. Settle it onto the support.
4. Insert shelf support rail.
Important: The heating element
must be positioned correctly and
securely on both sides above the
support lug on the inner wall of the
oven.
Page 51
Oven door
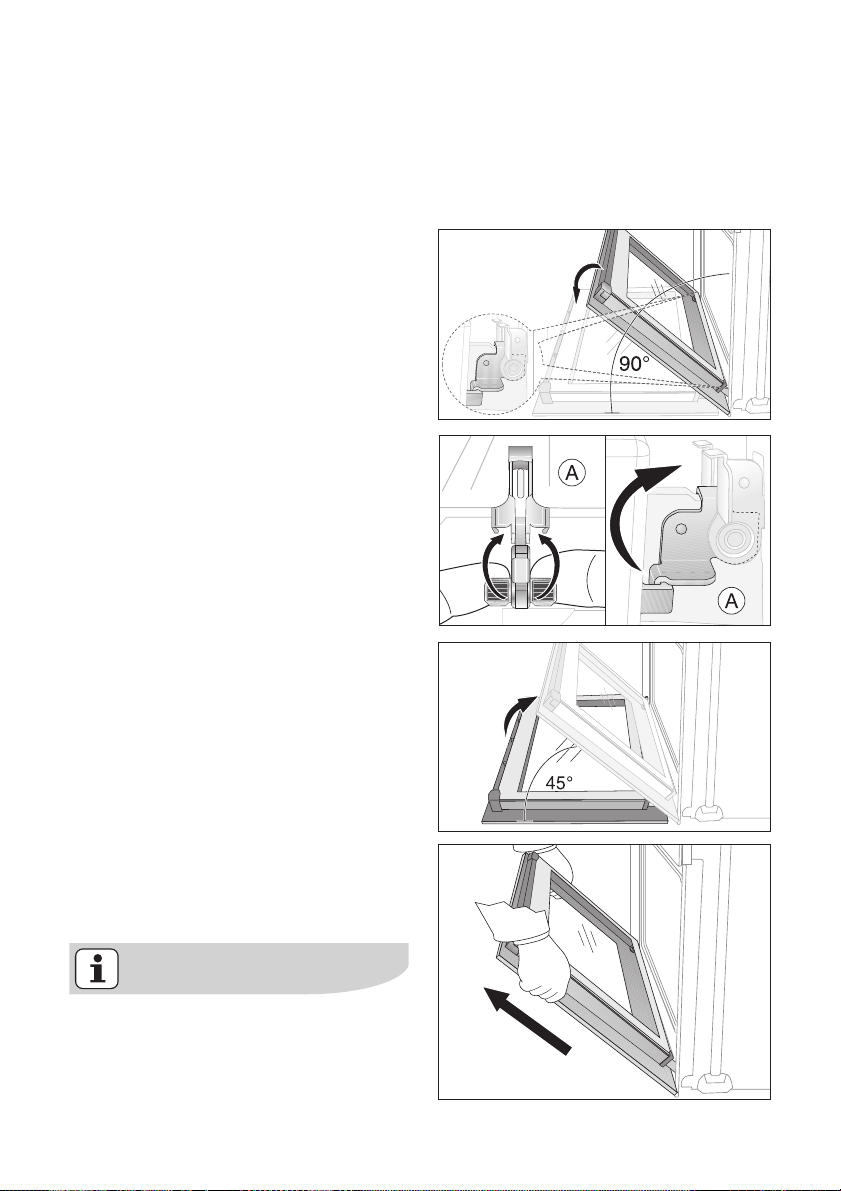
For easier cleaning of the oven interior
the oven door of your appliance can be
taken off its hinges.
Removing the oven door from its
hinges
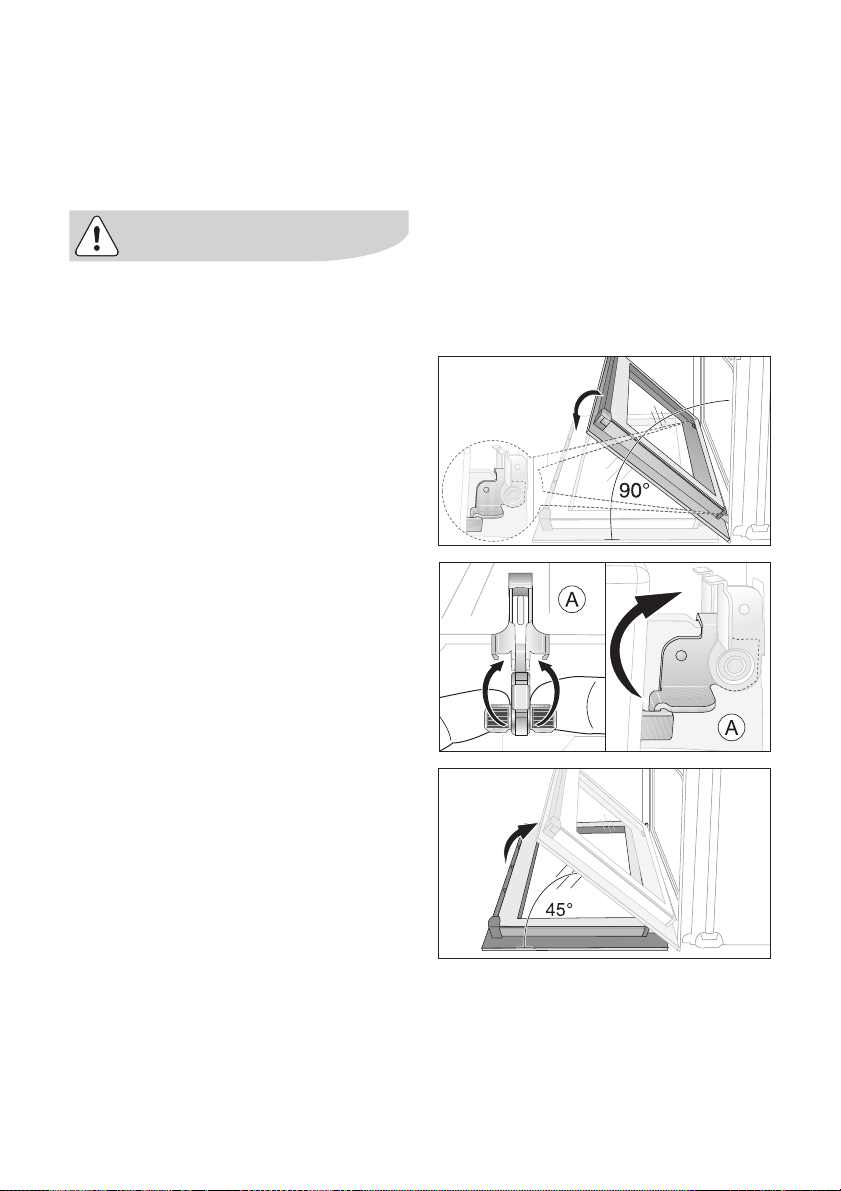
1. Open the oven door as far as it will
go.
2. Undo the clamping levers (A) on
both door hinges fully.
cleaning and care electrolux 51
3. Close the oven door as far as the first
position (approx. 45°).
4. Take hold of the oven door with a
hand on each side and pull it away
from the oven at an upwards angle
(Take care: It is heavy).
Lay the oven door with the outer
side facing downwards on something soft and level, for example, a
blanket in order to prevent scratches.
Page 52
52 electrolux cleaning and care
Hanging the oven door back on its
hinges
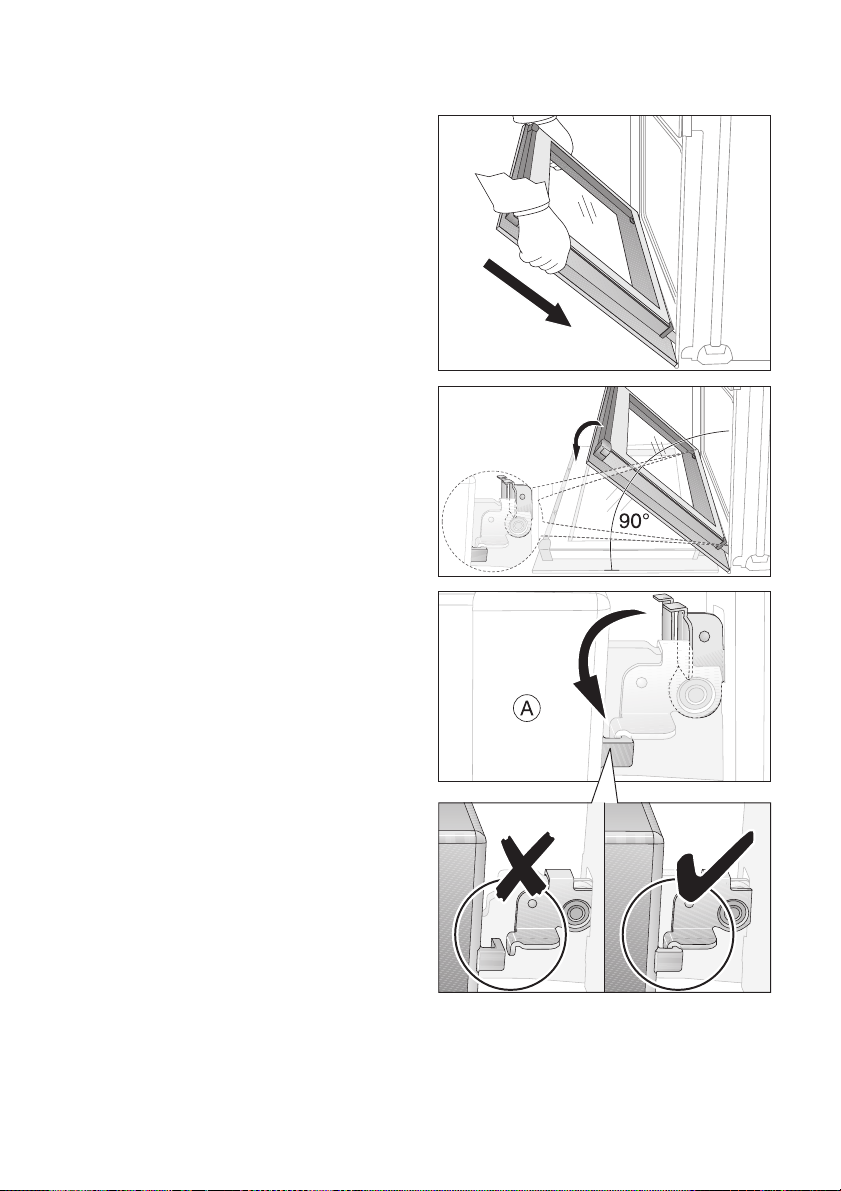
1. From the handle side take hold of the
oven door with a hand on each side
and hold at an angle of approx. 45°.
Position the recesses on the bottom
of the oven door on the hinges on
the oven.
Let the door slide down as far as it
will go.
2. Open the oven door as far as it will
go.
3. Fold up the clamping levers (A) on
both door hinges back into their original positions.
4. Close the oven door.
Page 53
Oven door glass
The oven door is fitted with three panels
of glass mounted one behind the other.The inner panels can be removed for
cleaning.
Important! Rough handling, especially around the edges of the front
panel, can cause the glass to break.
Removing the door glass panels
1. Open the oven door as far as it will
go.
2. Undo the clamping levers (A) on
both door hinges fully
cleaning and care electrolux 53
3. Close the oven door as far as the first
position (approx. 45°).
Page 54
54 electrolux cleaning and care
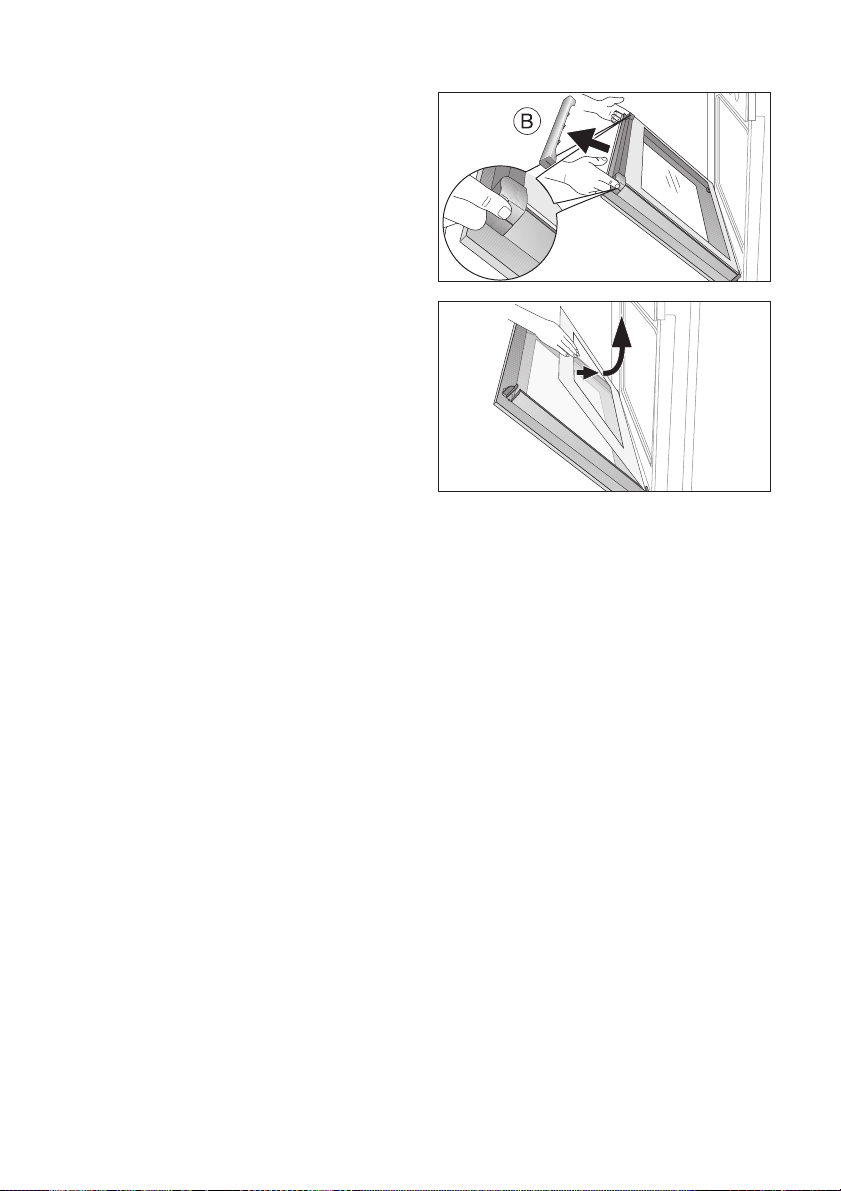
4. Take hold of the door trim (B) on the
upper edge of the door at both sides
and press inwards to release the clip
seal. Then remove the door trim by
pulling it upwards.
5. Take hold of the door glass panels on
their upper edge one after the other
and take them out of the guide by
pulling them upwards..
Cleaning the door glass panels
Clean the door glass panels thoroughly
with a solution of water and washing up
liquid. Then dry them carefully
Page 55
Putting the door glass panels back.
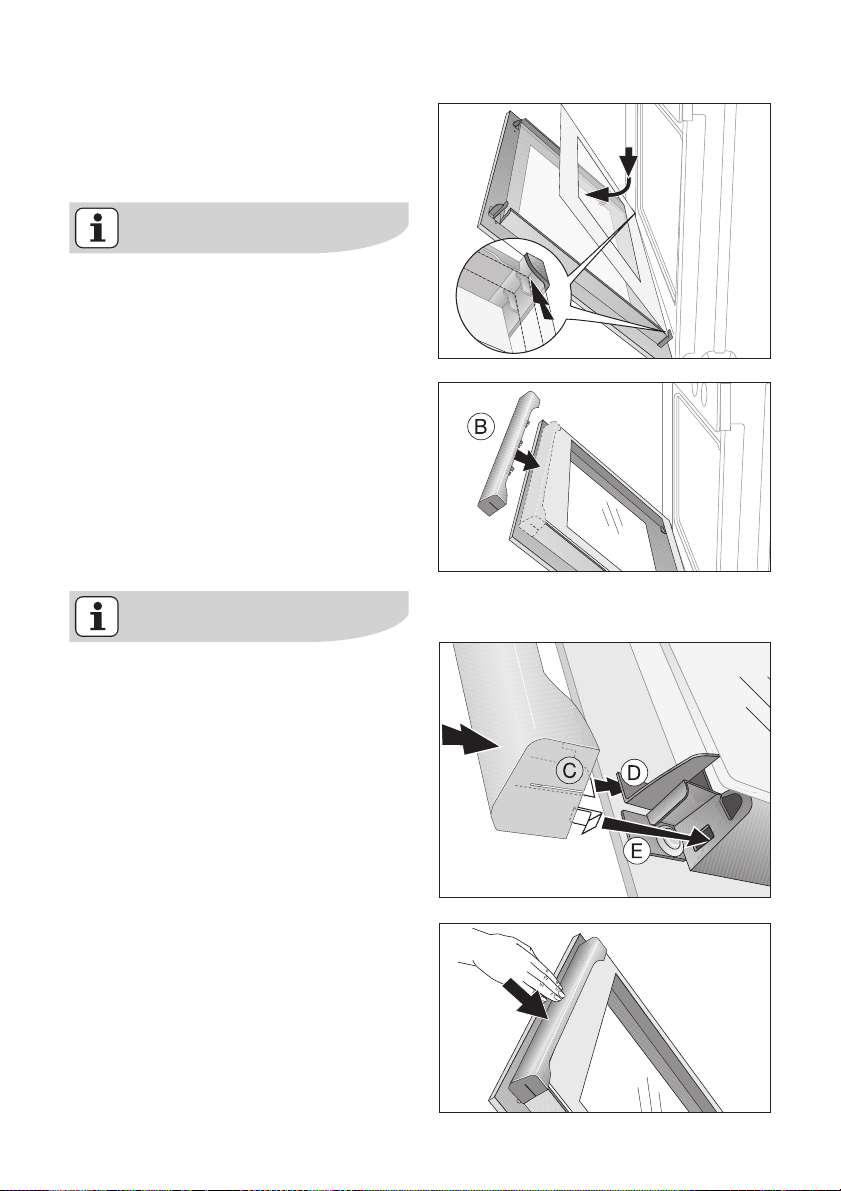
1. From above insert the door glass
panels at an angle into the door profile at the bottom edge of the door
one after the other and lower them.
Insert the smaller panel first, then
the larger panel.
2. Take hold of the door trim (B) at each
side, position it on the inside edge of
the door and plug the door trim (B)
into the upper edge of the door
cleaning and care electrolux 55
On the open side of the door trim (B)
there is a guide bar (C). This must be
pushedThis must be pushed between the outer door panel and the
guide corner (D).
The clip seal (E) must be snapped in.
Page 56
56 electrolux cleaning and care
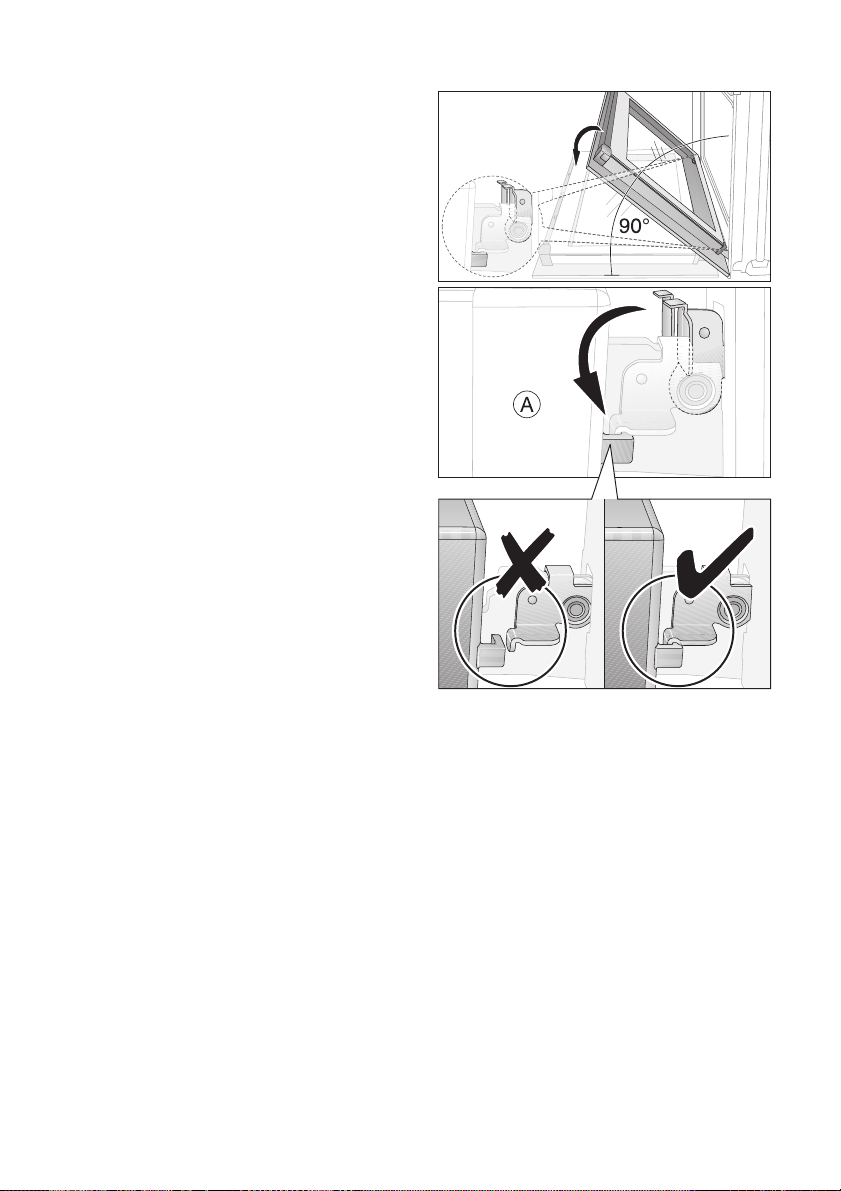
3. Open the oven door as far as it will
go
4. Fold up theclamping levers (A) on
both door hinges back into their
original positions
5. Close the oven door.
Page 57
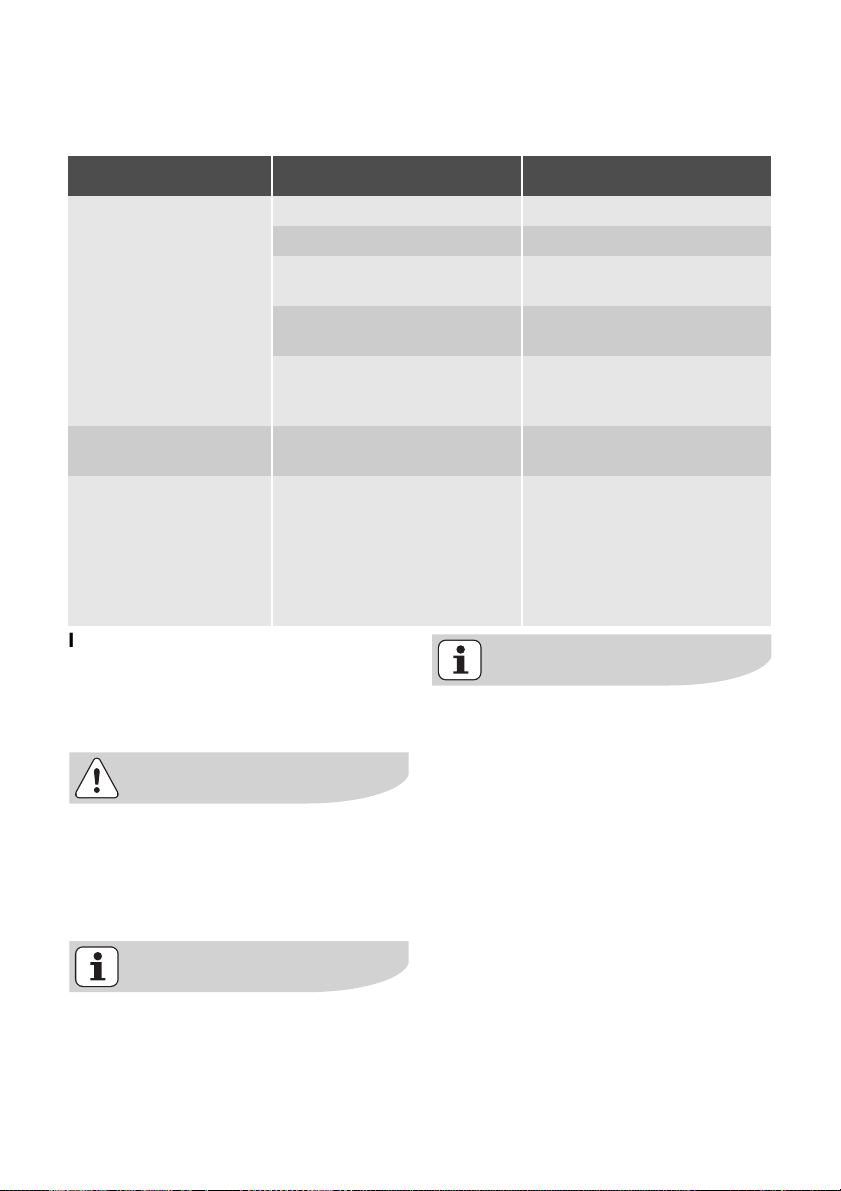
what to do if … electrolux 57
What to do if …
Problem Possible cause Remedy
The oven is not heating up The oven is not switched on. Switch the oven on.
The clock has not been set. Set the clock.
The required settings have not
been set.
The oven’s safety fuse has been
tripped.
The fuse in the house’s electrical
wiring (fuse box) has been
tripped.
The oven lighting is not
operating.
In the clock display there
appears a fault code that
is not listed above
If you are unable to remedy the
The oven light bulb is faulty. Change the oven light bulb.
Fault in the electronics Switch off the appliance via the
problem by following the above
suggestions, please contact your
dealer or the Customer Care Department.
Warning! Repairs to the appliance
are only to be carried out by qualified service engineers. Considerable danger to the user may result
from improper repairs.
Advice on cookers with metal
fronts:
Because of the cold surface at the
front of the cooker, opening the
oven door during (or just after) baking or roasting may cause the glass
to steam up.
Check the settings.
See Safety cut-out.
Check the fuse. If the fuses trip
repeatedly, please call an authorised electrician.
house fuse or the safety switch in
the fuse box and switch it on
again.
If displayed again, please contact the Customer Care Department
If the appliance has been wrongly
operated, the visit from the customer service technician or dealer may
not take place free of charge, even
during the warranty period.
Page 58
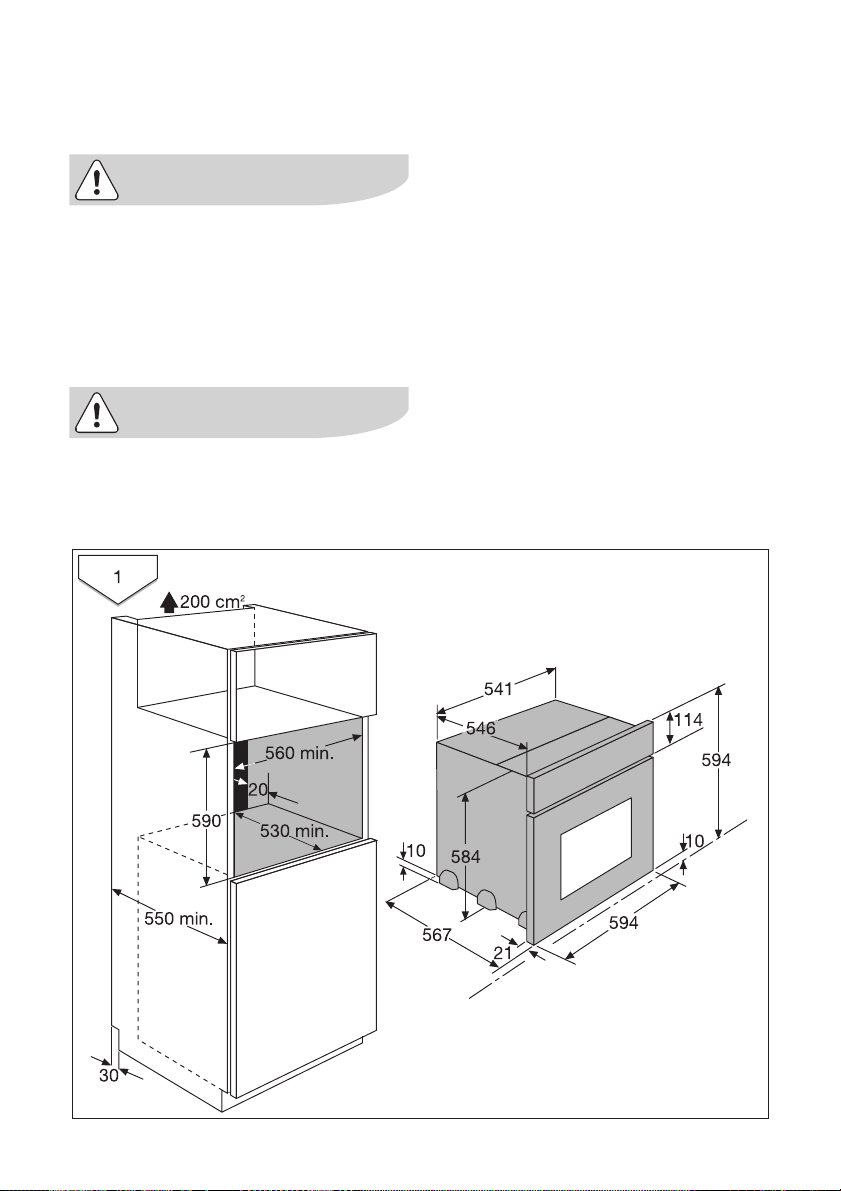
58 electrolux installation instructions
Installation Instructions
Attention: The new appliance may
only be installed and connected by a
registered expert.
Please comply with this. If you do
not, any damage resulting is not
covered by the warranty.
Safety information for the installer
• The electrical installation is to be set
up so that the appliance can be iso-
lated from the mains with a minimum
3mm all-pole contact separation.
Suitable separation devices include
e.g. cut-outs, fuses (screw fuses are
to be taken out of the holder), RCD’s
and contactors.
• Anti-shock protection must be provided by the installation.
• The built-in unit must meet the stability requirements of DIN 68930.
• Built-in ovens and built-in cooking
surfaces are fitted with special connection systems. For safety reasons,
they must only be combined with appliances from the same manufacturer.
Page 59
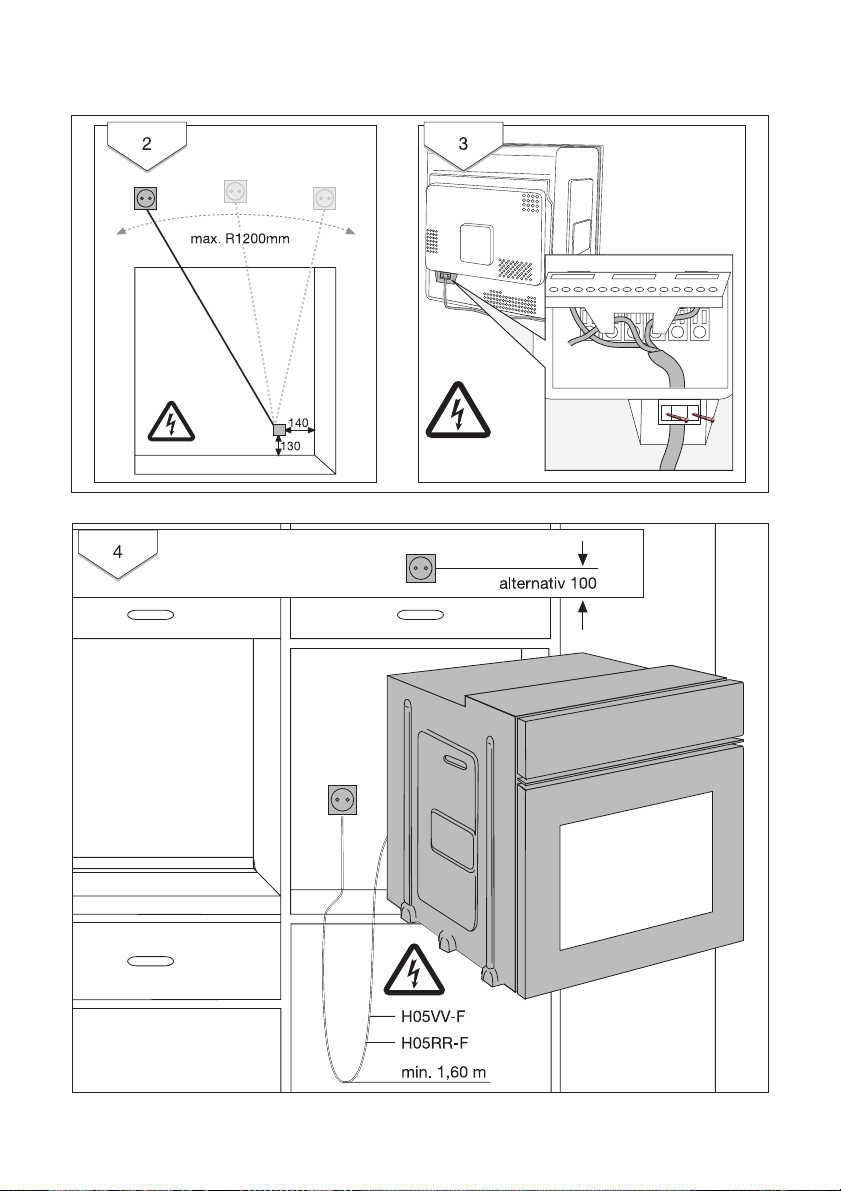
installation instructions electrolux 59
Page 60
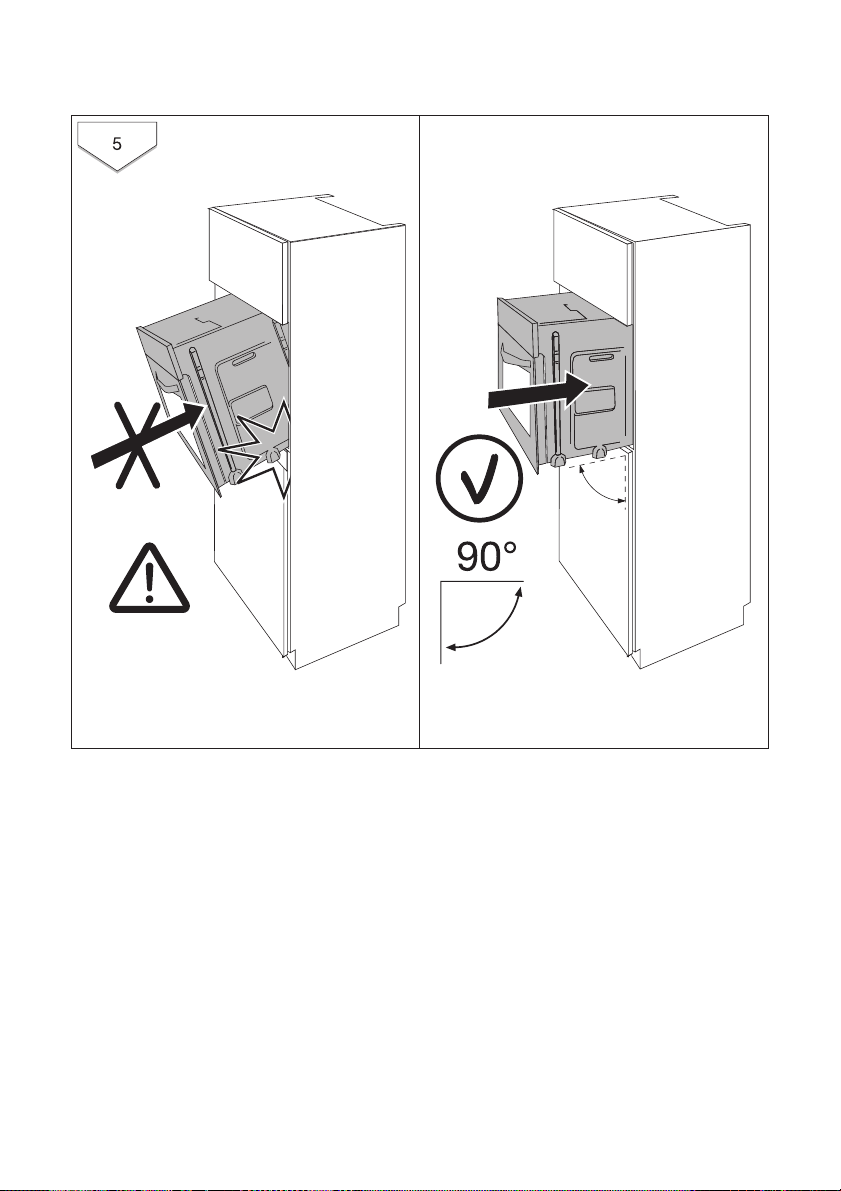
60 electrolux installation instructions
Page 61
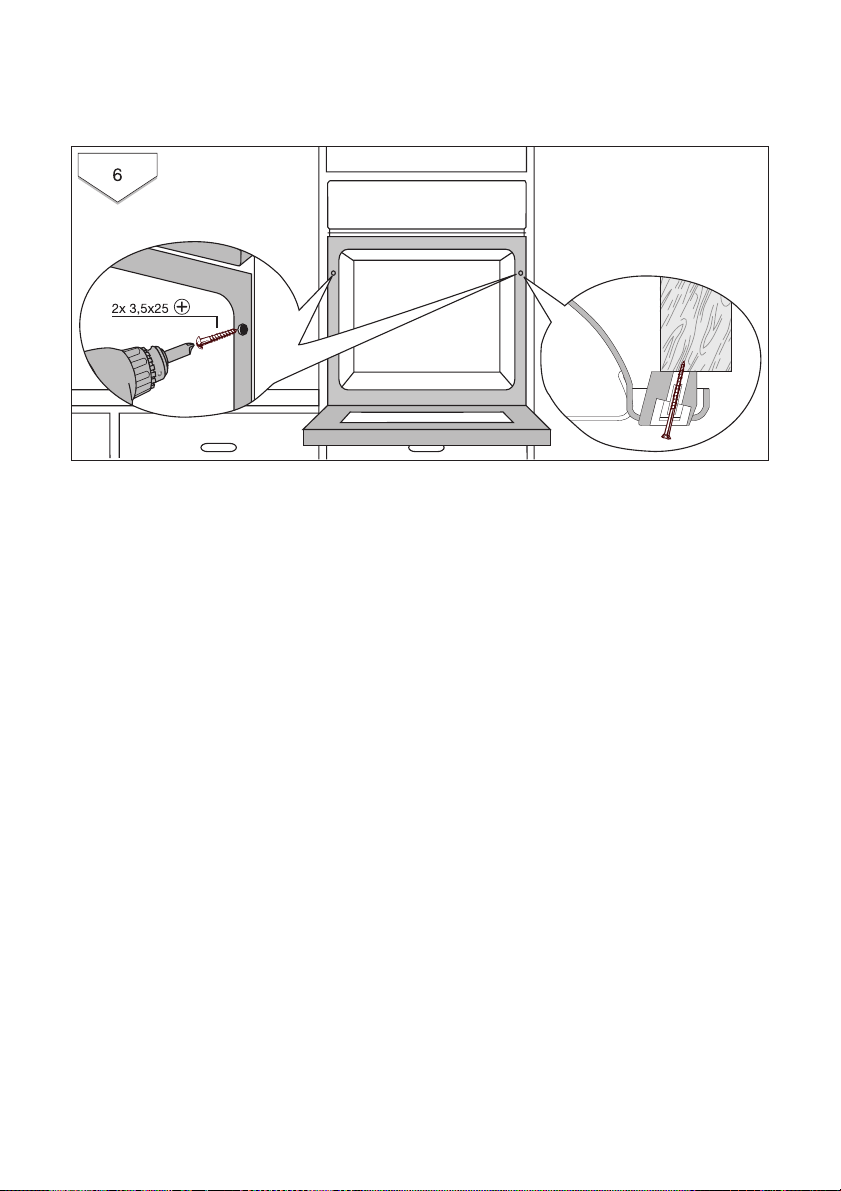
installation instructions electrolux 61
Page 62

62 electrolux disposal
Disposal
Packaging material
The packaging materials are envi-
ronmentally friendly and can be recycled. The plastic components are
identified by markings, e.g. >PE<,
>PS<, etc. Please dispose of the
packaging materials in the appropriate container at the community
waste disposal facilities.
Old appliance
The symbol
its packaging indicates that this
product may not be treated as
household waste. Instead it shall be
handed over to the applicable collection point for the recycling of
electrical and electronic equipment.
By ensuring this product is disposed of correctly, you will help prevent potential negative
consequences for the environment
and human health, which could otherwise be caused by inappropriate
waste handling of this product. For
more detailed information about recycling of this product, please contact your local city office, your
household waste disposal service
or the shop where you purchased
the product.
Warning: So that the old appliance
can no longer cause any danger,
make it unusable before disposing
of it.
To do this, disconnect the appliance
from the mains supply and remove
the mains cable from the appliance.
W on the product or on
Page 63

Guarantee/Customer Service
European Guarantee
This appliance is guaranteed by Electrolux in
each of the countries listed at the back of this
user manual, for the period specified in the appliance guarantee or otherwise by law. If you move
from one of these countries to another of the
countries listed below the appliance guarantee
will move with you subject to the following qualifications:
• The appliance guarantee starts from the date
• The appliance guarantee is for the same pe-
• The appliance guarantee is personal to the
• The appliance is installed and used in ac-
• The appliance is installed in accordance with
The provisions of this European Guarantee do
not affect any of the rights granted to you by law.
you first purchased the appliance which will
be evidenced by production of a valid purchase document issued by the seller of the
appliance.
riod and to the same extent for labour and
parts as exists in your new country of residence for this particular model or range of
appliances.
original purchaser of the appliance and cannot be transferred to another user.
cordance with instructions issued by Electrolux and is only used within the home, i.e. is
not used for commercial purposes.
all relevant regulations in force within your
new country of residence.
guarantee/customer service electrolux 63
Page 64
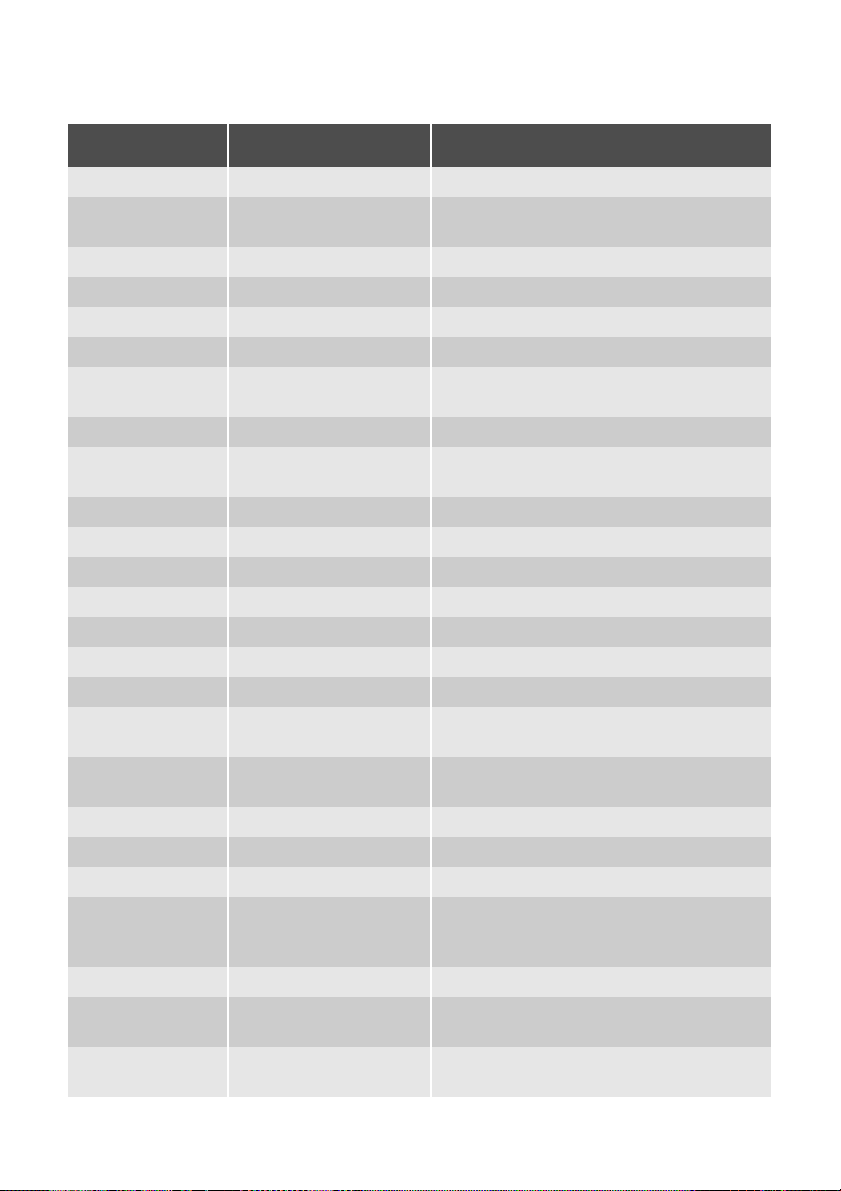
64 electrolux guarantee/customer service
www.electrolux.com
p t b
Albania +35 5 4 261 450 Rr. Pjeter Bogdani Nr. 7 Tirane
Belgique/België/
Belgien
Èeská republika
Danmark +45 70 11 74 00 Sjællandsgade 2, 7000 Fredericia
Deutschland +49 180 32 26 622 Muggenhofer Str. 135, 90429 Nürnberg
Eesti +37 2 66 50 030 Mustamäe tee 24, 10621 Tallinn
España +34 902 11 63 88
France www.electrolux.fr
Great Britain +44 8705 929 929
Hellas +30 23 10 56 19 70 4 Limnou Str., 54627 Thessaloniki
Hrvatska +385 1 63 23 338 Slavonska avenija 3, 10000 Zagreb
Ireland +353 1 40 90 753 Long Mile Road Dublin 12
Italia +39 (0) 434 558500 C.so Lino Zanussi, 26 - 33080 Porcia (PN)
Latvija +37 17 84 59 34 Kr. Barona iela 130/2, LV-1012, Riga
Lietuva
Luxembourg +35 2 42 43 13 01 Rue de Bitbourg, 7, L-1273 Hamm
Magyarország +36 1 252 1773
Nederland +31 17 24 68 300
Norge +47 81 5 30 222 Risløkkvn. 2 , 0508 Oslo
Österreich +43 18 66 400 Herziggasse 9, 1230 Wien
Polska +48 22 43 47 300 ul. Kolejowa 5/7, Warsaw
Portugal +35 12 14 40 39 39
Romania +40 21 451 20 30 Str. Garii Progresului 2, S4, 040671 RO
Schweiz/Suisse/
Svizzera
Slovenija +38 61 24 25 731
+32 2 363 04 44 Bergensesteenweg 719, 1502 Lembeek
+420 2 61 12 61 12
+370 5 2780609
+41 62 88 99 111 Industriestrasse 10, CH-5506 Mägenwil
Budìjovická 3, Praha 4, 140 21
Carretera M-300, Km. 29,900
Alcalá de Henares Madrid
Addington Way, Luton, Bedfordshire
LU4 9QQ
Verkių 29, LT09108 Vilnius
H-1142 Budapest XIV,
Erzsébet királyné útja 87
Vennootsweg 1, 2404 CG Alphen aan den Rijn
Quinta da Fonte - Edificio Gonçalves Zarco Q 35
2774 - 518 Paço de Arcos
Electrolux Ljubljana d.o.o.
Gerbiceva 98, 1000 Ljubljana
Page 65

p t b
Electrolux Slovakia s.r.o., Electrolux Domáce
Slovensko
Suomi www.electrolux.fi
Sverige +46 (0)771 76 76 76
Türkiye
Россия
+421 2 43 33 43 22
+90 21 22 93 10 25
+7 095 937 7837
spotrebièe SK, Seberíniho 1, 821 03 Bratislava
Electrolux Service, S:t Göransgatan 143,
S-105 45 Stockholm
Tarlabaþý caddesi no : 35 Taksim
Istanbul
129090 Москва, Олимпийский проспект, 16,
БЦ „Олимпик“
guarantee/customer service electrolux 65
Page 66
66 electrolux service
Service
In the event of technical faults, please
first check whether you can remedy the
problem yourself with the help of the operating instructions (section “What to do
if…”).
If you were not able to remedy the problem yourself, please contact the Customer Care Department or one of our
service partners.
In order to be able to assist you quickly,
we require the following information:
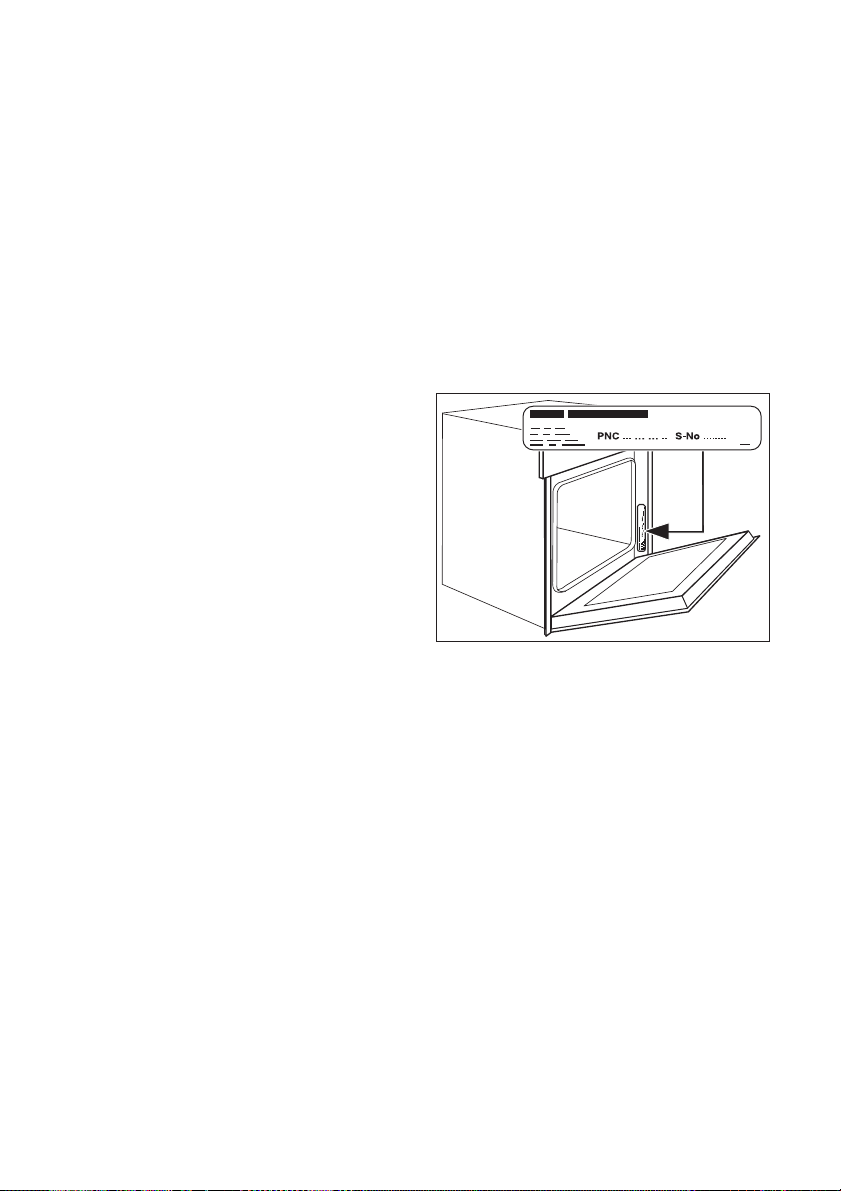
– Model description
– Product number (PNC)
– Serial number (S No.)
(for numbers see rating plate)
– Type of fault
– Any error messages displayed by the
appliance
So that you have the necessary reference numbers from your appliance at
hand, we recommend that you write
them in here:
Model description: .....................................
PNC: .....................................
S No: .....................................
Page 67

Page 68

www.electrolux.com
822 928 403-A-031106-01
 Loading...