

Page 1

user manual
EOB63002
Page 2

2 electrolux
Electrolux. Thinking of you.
Share more of our thinking at www.electrolux.com
CONTENTS
Safety information 2
Product description 4
Daily use 5
Helpful hints and tips 8
SAFETY INFORMATION
Before the installation and use, read this
manual carefully:
•For your personal safety and the safety of
your property
• For the respect of the environment
• For the correct operation of the appliance.
Always keep these instructions with the appliance also if you move or sell it.
The manufacturer is not responsible if incorrect installation or use results in damage.
Children and vulnerable people safety
• This appliance can be used by children
aged from 8 years and above and persons with reduced physical, sensory or
mental capabilities or lack of experience
and knowledge if they have been given
supervision or instruction concerning use
of the appliance in safe way and understand the hazards involved. Children shall
not play with the appliance.
• Keep all packaging away from children.
There is the risk of suffocation or physical
injury.
• WARNING: Keep children and animals
away from the appliance when the door
is open or the appliance is in the operation, because it becomes hot. There is
the risk of injury or other permanent disability.
• If the appliance has Child Lock or Key
Lock (Control Lock) function, use it. It
prevents children and animals from accidental operation of the appliance.
General safety
• Do not change the specifications of this
appliance. There is the risk of injury and
damage to the appliance.
Care and cleaning 17
What to do if… 19
Environment concerns 20
Subject to change without notice
• Do not let the appliance stay unattended
during operation.
• Switch off the appliance after each use.
Installation
• Only an approved electrician can install
and connect the appliance. Contact an
approved service centre. This is to prevent the risks of structural damage or
physical injury.
• Make sure that the appliance is not damaged because of transport. Do not connect a damaged appliance. If necessary,
contact the supplier.
• Remove all packaging, stickers and layers from the appliance before first use.
Do not remove the rating plate. It can invalidate the guarantee.
• Fully obey the laws, ordinances, directives and standards in force in the country where you use the appliance (safety
regulations, recycling regulations, electrical and/or gas safety rules etc.)!
• Make sure that the appliance is disconnected from the power supply during installation.
• This appliance is heavy. Take care when
you move it. Always use safety gloves.
Never pull the appliance by the handle.
• The appliance must have the electrical installation which lets you disconnect the
appliance from the mains at all poles with
a contact opening width of minimum 3
mm.
• You must have correct isolation devices:
line protecting cut-outs, fuses (screw
type fuses removed from the holder),
earth leakage trips and contactors.
• Make sure that the appliance is installed
under and adjacent safe structures.
Page 3

electrolux 3
• Keep the minimum distances to other appliances and units.
• The appliance cannot be positioned on a
base.
• Built in ovens and built in cooking surfaces are fitted with special connection
system. For safety reasons you must only
combine appliances from the same manufacturer.
Electrical connection
• The appliance must be earthed.
• Make sure that the electrical data on the
rating plate agree with your domestic
power supply.
• Information on the voltage is on the rating
plate.
• Always use a correctly installed shockproof socket.
• When you connect electrical appliances
to mains sockets, do not let cables touch
or come near the hot appliance door.
• Do not use multi-way plugs, connectors
and extension cables. There is the risk of
fire.
• Do not replace or change the mains cable. Contact the service centre.
• Make sure not to squash or cause damage to the mains plug (if applicable) and
cable behind the appliance.
• Make sure that the mains connection is
accessible after the installation.
• Do not pull the mains cable to disconnect
the appliance. Always pull the mains plug
– if applicable.
Use
• The appliance is only for domestic use.
Do not use the appliance for commercial
and industrial use.
• Only use the appliance for domestic
cooking tasks. This is to prevent physical
injury to persons or prevent damage to
property.
• Do not use the appliance as a work surface or storage surface.
• Do not put flammable products or items
that are wet with flammable products,
and/or fusible objects (made of plastic or
aluminium) in, near or on the appliance.
There is the risk of explosion or fire.
• The interior of the appliance becomes hot
during use. There is the risk of burns.
Use gloves when you insert or remove
the accessories or pots.
• Always stay away from the appliance
when you open the door while the appliance is in operation. Hot steam can release. There is the risk of skin burns.
• To prevent damage or discoloration to
the enamel:
– do not put any objects directly on the
appliance floor and do not cover it with
aluminium foil;
– do not put hot water directly into the
appliance;
– do not keep moist dishes and food in
the appliance after you finish the cooking.
• Discoloration of the enamel has no effect
on the performance of the appliance
• Do not use this appliance if it is in contact
with water. Do not operate the appliance
with wet hands.
• Do not apply pressure on the open door.
• Always close the appliance door, even
while grilling.
Care and cleaning
• Before maintenance, switch off the appliance and disconnect the appliance from
the power supply.
• Before maintenance, make sure that the
appliance is cold. There is the risk of
burns. There is the risk that the glass
panels can break.
• Keep the appliance clean at all times. A
build-up of fats or other foodstuff can result in a fire.
• Regular cleaning prevents the surface
material from deteriorating
•For your personal safety and the safety of
your property, only clean the appliance
with water and a soap. Do not use flammable products or products that can
cause corrosion.
• Do not clean the appliance with steam
cleaners, high-pressure cleaners, sharp
objects, abrasive cleaning agents, abrasive sponges and stain removers
• If you use an oven spray, follow the instructions from the manufacturer. Do not
spray anything on the fat filter (if applicable), the heating elements and the thermostat sensor.
Page 4

4 electrolux
• Do not clean the glass door with abrasive
cleaning agents or metal scraper. Heat
resistant surface of the inner glass can
break and shatter.
• When the door glass panels are damaged they become weak and can break.
You must replace them. Contact the
service centre.
• Be careful when you remove the door
from the appliance. The door is heavy!
• Do not clean catalytic enamel (if applicable).
Oven lamp
• Bulb lamps used in this appliance are
special lamps selected for household appliances use only. They cannot be used
for the full or partial illumination of a
household room.
• If it becomes necessary to replace the
lamp use one of the same power and
specifically designed for household appliances only.
PRODUCT DESCRIPTION
General overview
2 63 4 5
• Disconnect the appliance from the power
supply before the replacement of the
oven lamp. There is the risk of electrical
shock.
Service centre
• Only an approved engineer can repair or
work on the appliance. Contact an approved service centre.
• Use only original spare parts.
Disposal of the appliance
• To prevent the risk of physical injury or
damage
– Disconnect the appliance from the
power supply.
– Cut off the mains cable and discard it.
– Discard the door catch. This prevents
children or small animals from being
closed inside of the appliance. There is
the risk of suffocation.
1
12
1 Control panel
2 Power indicator
3 Control knob for oven functions
7
8
9
10
11
4 Display
5 Control knob for temperature
6 Temperature light
Page 5

7 Heating element
8 Oven lamp
9 Fan
10 Bottom heat
11 Oven shelf runners, removable
12 Shelf positions
DAILY USE
Warning! Refer to "Safety information"
chapter.
Initial Cleaning
• Remove all parts from the appliance.
• Clean the appliance before first use.
Important! Refer to chapter "Care and
Cleaning".
Setting the time
The oven only operates after time set.
When you connect the appliance to the
electrical supply or in case of a power cut,
the Time function indicator flashes automatically.
Oven Functions
Oven function Application
Light Use this function to light up the oven interior.
Convection with ring heating
element
Pizza Setting To bake on one oven level food with a more intensive
Conventional To bake and roast on one oven level.
To bake on three oven levels maximum at the same time.
Decrease the oven temperatures (20-40 °C) compared with
Conventional. And to dry food.
browning and a crispy base. Decrease the oven temperatures (20-40 °C) compared with Conventional
electrolux 5
Oven accessories
Oven shelf
•
For cookware, cake tins, roasts.
Flat baking tray
•
For cakes and biscuits.
To set the current time use " + " or " - "
button.
After approximately 5 seconds, the flashing
stops and the display shows the time of
day set.
For time change you must not set an
automatic function (Duration
or End
) at the same time.
To use the oven, push the retractable
knob. The knob then comes out.
Switching the Oven On and Off
1. Turn the oven functions control knob to
an oven function.
2. Turn the temperature control knob to a
temperature.
The power indicator comes on while
the oven is in operation.
The temperature light comes on while
the oven temperature increases.
3. To switch off the oven, turn the oven
functions control knob and the temperature control knob to the Off position.
Cooling fan
When the appliance operates, the cooling
fan switches on automatically. If you switch
off the appliance, the cooling fan continues
to operate until the appliance cools down.
Page 6

6 electrolux
Oven function Application
Bottom heat To bake cakes with crispy or crusty bases and to preserve
food.
Defrost To defrost frozen food.
Grill To grill flat food in the middle of the grill and to toast.
Dual grill To grill flat food in large quantities and to toast.
Convection grilling To roast larger joints of meat or poultry on one level. Also to
gratinate and brown.
Inserting the oven accessories
Put in the slide-in accessories so that the
double side edges are at the back of the
oven and point down to the bottom. Push
the slide-in accessories between the guidebars of one of the oven levels.
The deep roasting pan and the oven
shelf have double side edges. These
edges and the shape of the guide-bars
causes the anti-tilt safety for the oven
accessories.
Inserting the oven shelf and deep
roasting pan together
Put the oven shelf on the deep roasting
pan. Push the deep roasting pan between
the guide-bars of one of the oven levels.
Page 7

Electronic programmer
1 32 4
electrolux 7
1 Duration and End time indicator
2 Time display
3 Timer active indicator
4 Minute minder indicator
5 Button "+"
6 Selection button
7 Button "-"
567
Setting the clock functions
1. Push the Selection button again and
2.
3. Push any button to stop the signal.
Clock function Application
Time of day Shows the time. To set, change or check the time.
Minute minder To set a countdown time.
Duration To set how long the oven has to be in operation.
End To set the switch-off time for an oven function.
Duration and End can be used at
the same time, if the oven is to be
A signal sounds, after the time period is completed.
This function has no effect on the operation of the oven.
Cancelling the clock functions
1. Push the Selection button again and
switched on and off automatically later.
In this case first set Duration
End
.
, then
2. Push and hold button "- ".
again until necessary function indicator
flashes.
To set the time for Minute minder
Duration
or End , use "+" or "-"
,
button.
The related function indicator comes
on.
When the time period is completed, the
function indicator flashes and an
acoustic signal sounds for 2 minutes.
With the functions Duration and End
the oven switches off automatically.
again until necessary function indicator
flashes.
After some seconds the clock function
goes out.
Page 8

8 electrolux
HELPFUL HINTS AND TIPS
Baking
General instructions
• Your new oven may bake or roast differently to the appliance you had before.
Adapt your usual settings (temperature,
cooking times) and shelf levels to the values in the tables.
• With longer baking times, the oven can
be switched off about 10 minutes before
the end of baking time, to use the residual heat.
When you use frozen food, the trays in
the oven can twist during baking. When
the trays get cold again, the distortion
will be gone.
Tips on baking
Baking results Possible cause Remedy
The cake is not
browned sufficiently
below
The cake sinks (becomes soggy, lumpy,
streaky)
The cake sinks (becomes soggy, lumpy,
streaky)
The cake sinks (becomes soggy, lumpy,
streaky)
Cake is too dry Oven temperature too low Set a higher oven temperature
Cake is too dry Baking time too long Set a shorter baking time
Cake does not brown
equally
Cake does not brown
equally
Cake does not cook in
the baking time set
Incorrect oven level Put the cake on a lower oven level
Oven temperature too high Use a lower setting
Baking time is too short Set a longer baking time
Too much liquid in the mixture
Oven temperature too high
and baking time too short
No equal mixture Put the mixture equally on the baking tray
Temperature too low Use a slightly higher oven temperature set-
Baking on one oven level - Baking in tins
Type of baking Oven function Level Temperature
Ring cake or brioche Convection with
Madeira cake/Fruit
cakes
ring heating ele-
ment
Convection with
ring heating ele-
ment
How to use the Baking Tables
• We recommend to use the lower temperature the first time.
• If you cannot find the settings for a special recipe, look for the one that is almost
the same.
• Baking time can be extended by 10-15
minutes, if you bake cakes on more than
one level.
• Cakes and pastries at different heights
do not always brown equally at first. If
this occurs, do not change the temperature setting. The differences equalize during the baking procedure.
Do not set higher temperatures to decrease baking times
Use less liquid. Look at the mixing times,
specially when you use mixing machines
Set a lower oven temperature and a longer
baking time
ting
(°C)
1 150 - 160 0:50 - 1:10
1 140 - 160 1:10 - 1:30
Time (h:min)
Page 9

electrolux 9
Type of baking Oven function Level Temperature
Time (h:min)
(°C)
Sponge cake Convection with
1 140 0:25 - 0:40
ring heating ele-
ment
Sponge cake Conventional 1 160 0:25 - 0:40
Flan base - short pas-
1)
try
Flan base - sponge
mixture
Convection with
ring heating ele-
ment
Convection with
ring heating ele-
3 170-180 0:10 - 0:25
3 150 - 170 0:20 - 0:25
ment
Apple pie Conventional 1 170 - 190 0:50 - 1:00
Apple pie (2 tins, Ø 20
cm, diagonally off set)
Convection with
ring heating ele-
1 160 1:10 - 1:30
ment
Apple pie (2 tins, Ø 20
Conventional 1 180 1:10 - 1:30
cm, diagonally off set)
Savoury flan (e.g. quiche lorraine)
Convection with
ring heating ele-
1 160 - 180 0:30 - 1:10
ment
Curd Cheese Cake Conventional 1 170 - 190 1:00 - 1:30
1) Pre-heat oven
Baking on one oven level - Cakes/pastries/breads on baking trays
Type of baking Oven function Level Temperature
(°C)
Plaited bread/bread
Conventional 3 170 - 190 0:30 - 0:40
crown
Christmas stollen
1)
Conventional 3 160 - 180 0:40 - 1:00
Bread ( rye bread) Conventional 1
- first of all
1)
230 0:25
- then 160 - 180 0:30 - 1:00
Cream puffs/eclairs
Swiss roll
1)
Cake with crumble
topping (dry)
1)
Conventional 3 160 - 170 0:15 - 0:30
Conventional 3 180 - 200 0:10 - 0:20
Convection with
3 150 - 160 0:20 - 0:40
ring heating ele-
ment
Buttered almond
cake/sugar cakes
1)
Fruit flans (made with
yeast dough / sponge
2)
mixture)
Fruit flans (made with
yeast dough / sponge
2)
mixture)
Conventional 3 190 - 210 0:15 - 0:30
Convection with
3 150 0:35 - 0:50
ring heating ele-
ment
Conventional 3 170 0:35 - 0:50
Time (h:min)
Page 10

10 electrolux
Type of baking Oven function Level Temperature
Fruit flans made with
short pastry
Convection with
ring heating ele-
3 160 - 170 0:40 - 1:20
ment
Yeast cakes with deli-
Conventional 3 160 - 180 0:40 - 1:20
cate toppings (e.g.
quark, cream, cus-
1)
tard)
Pizza (with a lot of
1)2)
topping)
Pizza (thin crust)
1)
Convection with
ring heating ele-
ment
Convection with
ring heating ele-
1 180 - 200 0:30 - 1:00
1 200 - 220 0:10 - 0:25
ment
Unleavened bread Convection with
1 200 - 200 0:08 - 0:15
ring heating ele-
ment
Tarts (CH) Convection with
1 180 - 200 0:35 - 0:50
ring heating ele-
ment
1) Pre-heat oven
2) Use the deep roasting pan
Baking on one oven level - Biscuits
Type of baking Oven function Level Temperature
Short pastry biscuits Convection with
ring heating ele-
ment
Viennese whirls Convection with
ring heating ele-
ment
Viennese whirls
1)
Biscuits made with
sponge mixture
Conventional 3 160 0:20 - 0:30
Convection with
ring heating ele-
ment
Pastries made with
egg white, meringues
Convection with
ring heating ele-
ment
Macaroons Convection with
ring heating ele-
ment
Biscuits made with
yeast dough
Convection with
ring heating ele-
ment
Puff pastries
1)
Convection with
ring heating ele-
ment
Rolls
1)
Convection with
ring heating ele-
ment
3 150 - 160 0:06 - 0:20
3 140 0:20 - 0:30
3 150 - 160 0:15 - 0:20
3 80 - 100 2:00 - 2:30
3 100 - 120 0:30 - 0:60
3 150 - 160 0:20 - 0:40
3 170 - 180 0:20 - 0:30
3 160 0:20 - 0:35
(°C)
Time (h:min)
Time (h:min)
(°C)
Page 11

electrolux 11
Type of baking Oven function Level Temperature
Time (h:min)
(°C)
1)
Rolls
Small cakes (20 per
1)
tray)
Small cakes (20 per
1)
tray)
1) Pre-heat oven
Conventional 3 180 0:20 - 0:35
Convection with
3 140 0:20 - 0:30
ring heating ele-
ment
Conventional 3 170 0:20 - 0:30
Baking on more than one level - Cakes/pastries/breads on baking trays
Convection
Type of baking
with ring heat-
ing element
2 levels
Cream puffs / Eclairs
1)
1 / 4 --- 160 - 180 0:35 - 0:60
Dry streusel cake 1 / 3 --- 140 - 160 0:30 - 0:60
1) Pre-heat oven
Convection
with ring heat-
ing element
3 levels
Temperature
(°C)
Time (h:min)
Baking on more than one level - Biscuits/small cakes/pastries/rolls
Convection
Type of baking
with ring heat-
ing element
2 levels
Short pastry biscuits 1 / 3 1 / 3 /5 150 - 160 0:15 - 0:35
Viennese whirls 1 / 3 1 / 3 /5 140 0:20 - 0:60
Biscuits made with
1 / 3 --- 160 - 170 0:25 - 0:40
sponge mixture
Biscuits made with
1 / 3 --- 80 - 100 2:10 - 2:50
egg white, meringues
Macaroons 1 / 3 --- 100 - 120 0:40 - 1:20
Biscuits made with
1 / 3 --- 160 - 170 0:30 - 0:60
yeast dough
Puff pastries
1)
1 / 3 --- 170 - 180 0:30 - 0:50
Rolls 1 /4 --- 160 0:30 - 0:45
Small cakes (20 per
1)
tray)
1) Pre-heat oven
1 /4 --- 140 0:25 - 0:40
Convection
with ring heat-
ing element
3 levels
Temperature
(°C)
Time (h:min)
Pizza setting table
To see which oven function you must
use please refer to the oven functions
list in Daily use chapter.
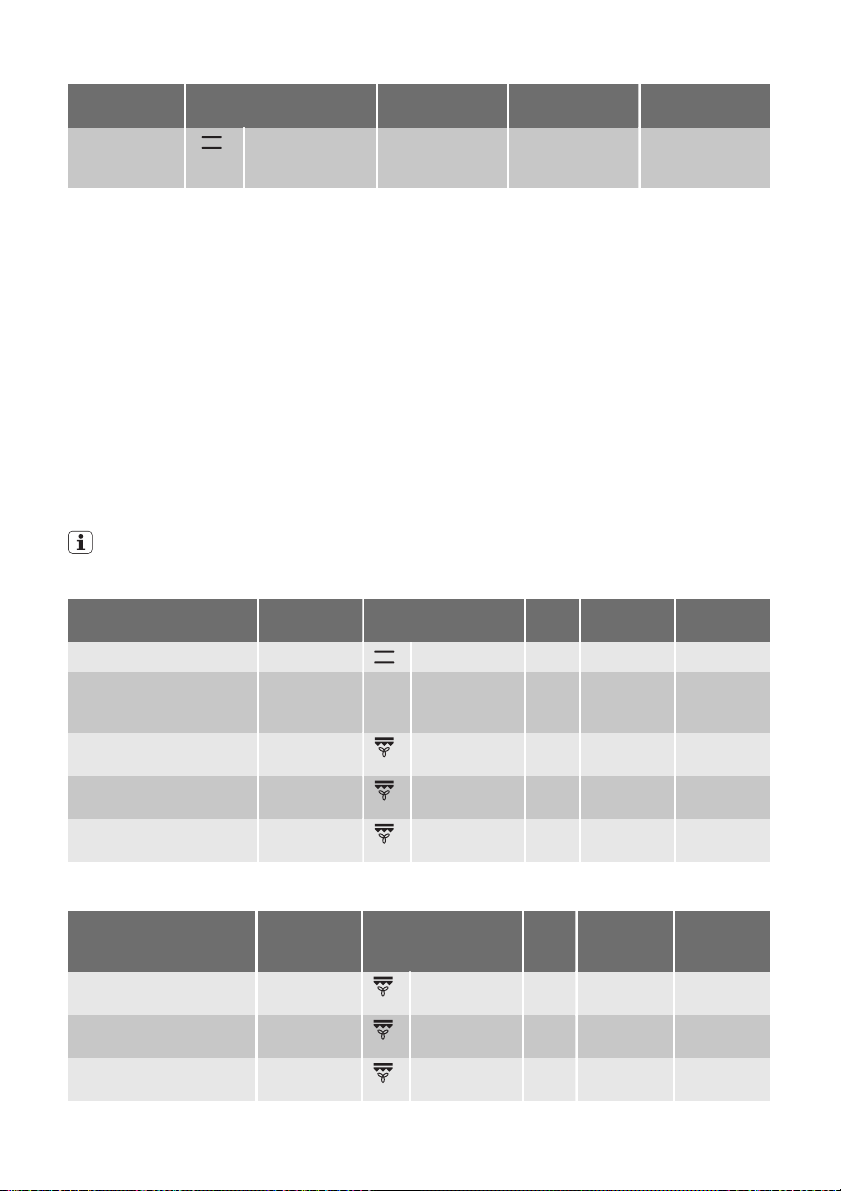
Type of baking Shelf level Temperature °C Time (Mins)
Pizza (thin crust)
1)
Pizza (with a lot of topping)
Tarts 1 180 - 200 45 - 60
1 180 - 200 20 - 30
1 180 - 200 20 - 30
Page 12

12 electrolux
Type of baking Shelf level Temperature °C Time (Mins)
Spinach flan 1 160 - 180 45 - 60
Quiche Lorraine 1 170 - 190 40 - 50
Curd Cheese Cake ,
1 140 - 160 60 - 90
round
Curd Cheese Cake on
1 140 - 160 50 - 60
tray
Apple cake, covered 1 150 - 170 50 - 70
Vegetable pie 1 160 - 180 50 - 60
Unleavened bread
Puff pastry flan
1)
1)
Flammekuchen (Pizzalike dish from Alsace)
Piroggen (Russian version of calzone)
1) Pre-heat the oven
1)
1)
1 250 - 270 10 - 20
1 160 - 180 40 - 50
1 250 - 270 12 - 20
1 180 - 200 15 - 25
Table for Bakes and Gratin
Dish Oven function Shelf
level
Pasta bake Conventional 1 180-200 0:45-1:00
Lasagne Conventional 1 180-200 0:25-0:40
Vegetables au gratin
1)
Convection with
ring heating ele-
ment
Baguettes topped with
melted cheese
1)
Convection with
ring heating ele-
ment
Sweet bakes Conventional 1 180-200 0:40-0:60
Fish bakes Conventional 1 180-200 0:30-1:00
Stuffed vegetables Convection with
ring heating ele-
ment
1) preheat the oven
Temperature°CTime Hr : Min
1 160-170 0:15-0:30
1 160-170 0:15-0:30
1 160-170 0:30-1:00
Ready meals
Food to be
cooked
Frozen pizza Conventional 3 refer to instruc-
1)
Chips
Baguettes Conventional 3 refer to instruc-
Oven function Shelf level Temperature
°C
tions of the
manufacturer
Convection with
3 200-220 refer to instruc-
ring heating ele-
ment
tions of the
manufacturer
Time
refer to instruc-
tions of the
manufacturer
tions of the
manufacturer
refer to instruc-
tions of the
manufacturer
Page 13
electrolux 13
Food to be
cooked
Fruit flans Conventional 3 refer to instruc-
1) Comment: Turn chips 2 or 3 times during cooking
Roasting
Roasting dishes
• Use heat-resistant ovenware to roast
(please read the instructions of the manufacturer).
• Large roasting joints can be roasted directly in the deep roasting pan or on the
oven shelf above the deep roasting pan
(selected models only).
• Roast lean meats in a roasting tin with a
lid. This well keep the meat more succulent.
• All types of meat, that can be browned or
have crackling, can be roasted in the
Oven function Shelf level Temperature
°C
tions of the
manufacturer
Tips on using the roasting table.
• Roast meat and fish that weighs more
than 1 kg .
• Put some water in the roasting tray to
prevent meat juices or fat from burning to
the pan.
• Turn the meat if it is necessary (after 1/2 2/3 of the cooking time).
• For better results, baste large pieces of
meat and poultry with the cooking juices
several times during the cooking time.
• Stop the oven approximately 10 minutes
before the end of roasting time to use the
residual heat.
Time
refer to instruc-
tions of the
manufacturer
roasting tin without the lid.
The data in the table is for guidance
only.
Beef
Type of meat Quantity Oven function Shelf
Port roast 1 - 1,5 kg Conventional 1 200 - 250 2:00 - 2:30
Roast beef or fillet for each
1)
- rare
- medium for each cm
- well done for each cm
1) preheat the oven
for each cm
of thickness
of thickness
of thickness
Convection
grilling
Convection
grilling
Convection
grilling
Tempera-
level
ture °C
1 190 - 200 0:05 - 0:06
1 180 - 190 0:06 - 0:08
1 170 - 180 0:08 - 0:10
Time
(h:min)
cm of
thickness
Pork
Type of meat Quantity Oven function Shel
Shoulder, neck, ham
joint
Chop, spare rib 1 - 1.5 kg Convection
Meat loaf 750 g - 1 kg Convection
1 - 1.5 kg Convection
grilling
grilling
grilling
Tempera-
f
level
ture °C
1 160 - 180 1:30 - 2:00
1 170 - 180 1:00 - 1:30
1 160 - 170 0:45 - 1:00
Time
(h:min)
Page 14

14 electrolux
Type of meat Quantity Oven function Shel
Porknuckle (precooked) 750 g - 1 kg Convection
grilling
Tempera-
f
level
ture °C
1 150 - 170 1:30 - 2:00
Time
(h:min)
Veal
Type of meat Quantity Oven function Shel
Roast Veal 1 kg Convection
grilling
Knuckle of veal 1,5 -2 kg Convection
grilling
Tempera-
f
level
ture °C
1 160 - 180 1:30 - 2:00
1 160 - 180 2:00 - 2:30
Time
(h:min)
Lamb
Type of meat Quantity Oven function Shel
Leg of lamb, roast lamb 1 - 1,5 kg Convection
grilling
Saddle of lamb 1 - 1,5 kg Convection
grilling
Tempera-
f
level
ture °C
1 150 - 170 1:15 - 2:00
1 160 - 180 1:00 - 1:30
Time
(h:min)
Game
Type of meat Quantity Oven function Shel
Saddle of hare, leg of
1)
hare
Saddle of venison 1,5 - 2 kg Conventional 1 210 - 220 1:15 - 1:45
Haunch of venison 1,5 - 2 kg Conventional 1 200 - 210 1:30 - 2:15
1) preheat the oven
up to 1 kg Conventional 3 220 - 250 0:25 - 0:40
f
level
Tempera-
ture °C
Time
(h:min)
Poultry
Type of meat Quantity Oven function Shel
Poultry portions 200 - 250 g
each
Half chicken 400 - 500 g
each
chicken, poulard 1 - 1,5 kg Convection
Duck 1.5 - 2 kg Convection
Goose 3.5 - 5 kg Convection
Turkey 2.5 - 3.5 kg Convection
Convection
grilling
Convection
grilling
grilling
grilling
grilling
grilling
Tempera-
f lev-
ture °C
el
1 200 - 220 0:35 - 0:50
1 190 - 210 0:35 - 0:50
1 190 - 210 0:45 - 1:15
1 180 - 200 1:15 - 1:45
1 160 - 180 2:30 - 3:30
1 160 - 180 1:45 - 2:30
Time
(h:min)
Page 15

electrolux 15
Type of meat Quantity Oven function Shel
Turkey 4 - 6 kg Convection
grilling
Tempera-
f lev-
ture °C
el
1 140 - 160 2:30 - 4:00
Time
(h:min)
Fish ( steamed)
Type of meat Quantity Oven function Shel
Whole fish 1 - 1,5 kg Conventional 1 210 - 220 0:45 - 1:15
Grilling
Always use the grilling function with
maximum temperature setting
Important! Always grill with the oven door
closed
Always pre-heat the empty oven with
• Always set the pan to collect the fat
into the first shelf level.
• Grill only flat pieces of meat or fish.
To see which oven function you must
use please refer to the oven functions
list in Daily use chapter.
f lev-
el
Tempera-
ture °C
Time
(h:min)
the grill functions for 5 minutes.
• Set the shelf in the shelf level as recommended in the grilling table.
Food to grill Shelf level Time
1st side 2nd side
Burgers 4 8 - 10 mins. 6 - 8 mins.
Pork fillet 4 10 - 12 mins. 6 - 10 mins.
Sausages 4 8 - 10 mins. 6 - 8 mins.
Filet steaks, veal
steaks
Filet of beef, roast beef
( approximately 1 kg)
1)
Toast
Toast with topping 3 6 - 8 mins. -------
1) Do not pre-heat
Preserving
• Only use usual preserving jars of the
same dimension.
• Do not use jars with twist-off or bayonet
type lids and metal tins.
• Use the first shelf level from the bottom.
• Use the baking tray. You can put six 1-litre jars maximum on it.
• Fill all the jars to the same level and close
them correctly.
• Put the jars on the shelf, make sure that
they do not touch each other.
4 6 - 7 mins 5 - 6 mins.
3 10 - 12 mins. 10 - 12 mins.
3 4 - 6 mins. 3 - 5 mins.
• Fill approximately 1/2 litre of water into
the flat baking tray to have sufficient
moisture in the oven.
• When the liquid lightly starts to bubble in
the first jars (after about 35-60 minutes
with 1 litre jars), switch off the oven or
decrease the temperature to 100°C ( see
table).
To see which oven function you must
use please refer to the oven functions
list in Daily use chapter.
Page 16
16 electrolux
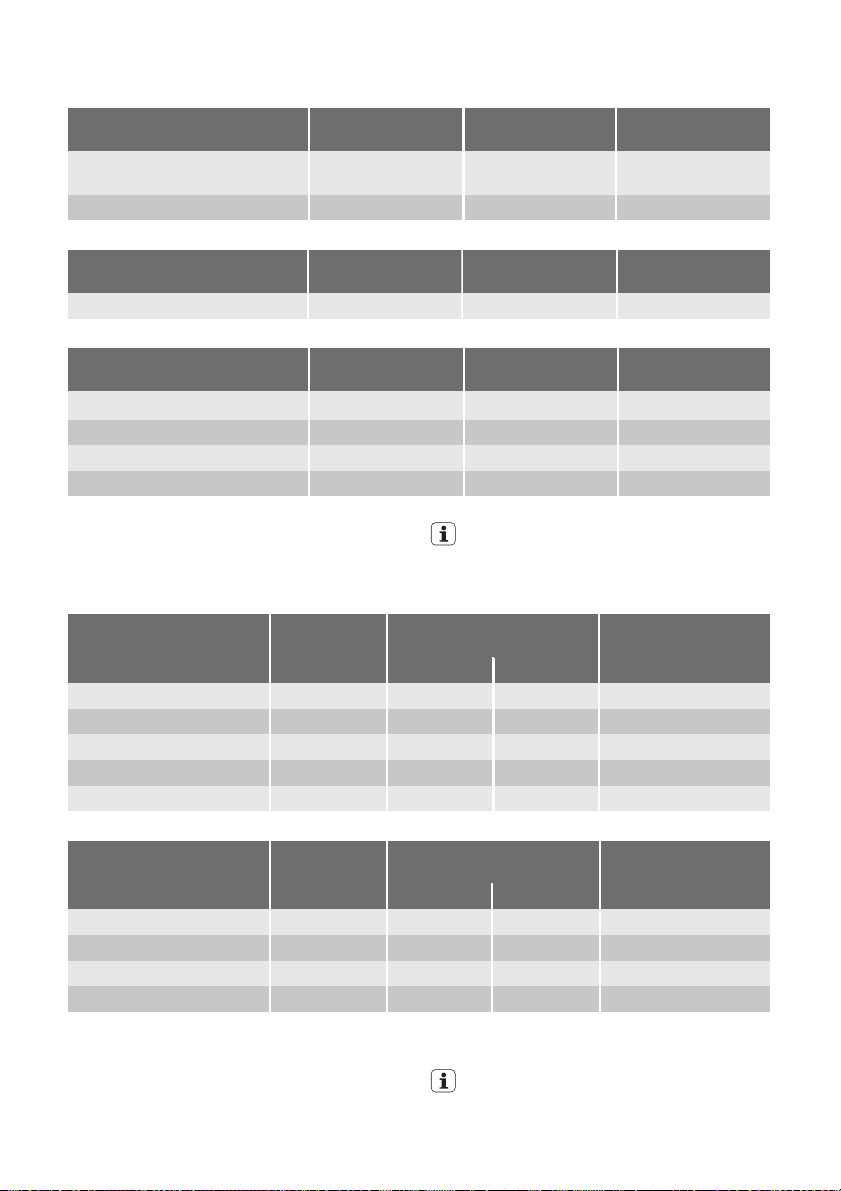
Soft fruit
Preserve Temperature in°CTime until sim-
Strawberries, blueberries, raspberries, ripe gooseberries
Unripe gooseberries 160 - 170 35 - 45 10 - 15
160 - 170 35 - 45 ---
mering in mins.
Continue to cook
at 100°C in mins.
Stone fruit
Preserve Temperature in°CTime until sim-
mering in mins.
Pears, quinces, plums 160 - 170 35 - 45 10 - 15
Continue to cook
at 100°C in mins.
Vegetables
Preserve Temperature in°CTime until sim-
1)
Carrots
Cucumbers 160 - 170 50 - 60 ---
Mixed pickles 160 - 170 50 - 60 15
Kohlrabi, peas, asparagus 160 - 170 50 - 60 15 - 20
1) Leave standing in oven when switched off
160 - 170 50 -60 5 - 10
Drying
• Cover the oven shelves with baking
parchment.
mering in mins.
To see which oven function you must
use please refer to the oven functions
list in Daily use chapter.
Continue to cook
at 100°C in mins.
Vegetables
Food to be dried Temperature
in °C
1 level 2 levels
Beans 60 - 70 3 1 / 4 6 - 8
Peppers (strips) 60 - 70 3 1 / 4 5 - 6
Vegetables for soup 60 - 70 3 1 / 4 5 - 6
Mushrooms 50 - 70 3 1 / 4 6 - 8
Herbs 40 - 50 3 1 / 4 2 - 3
Shelf level Time in hours
(Guideline)
Fruit
Food to be dried Temperature
in °C
1 level 2 levels
Plums 60 - 70 3 1 / 4 8 - 10
Apricots 60 - 70 3 1 / 4 8 - 10
Apple slices 60 - 70 3 1 / 4 6 - 8
Pears 60 - 70 3 1 / 4 6 - 9
Defrosting
• Put the food out of the packaging and
set it on a plate on the oven shelf.
• Do not cover with a plate or bowl. This
can extend the time to defrost very
much.
Shelf level Time in hours
(Guideline)
• Put the oven shelf in the first shelf level
from the bottom.
To see which oven function you must
use please refer to the oven functions
list in Daily use chapter.
Page 17
electrolux 17
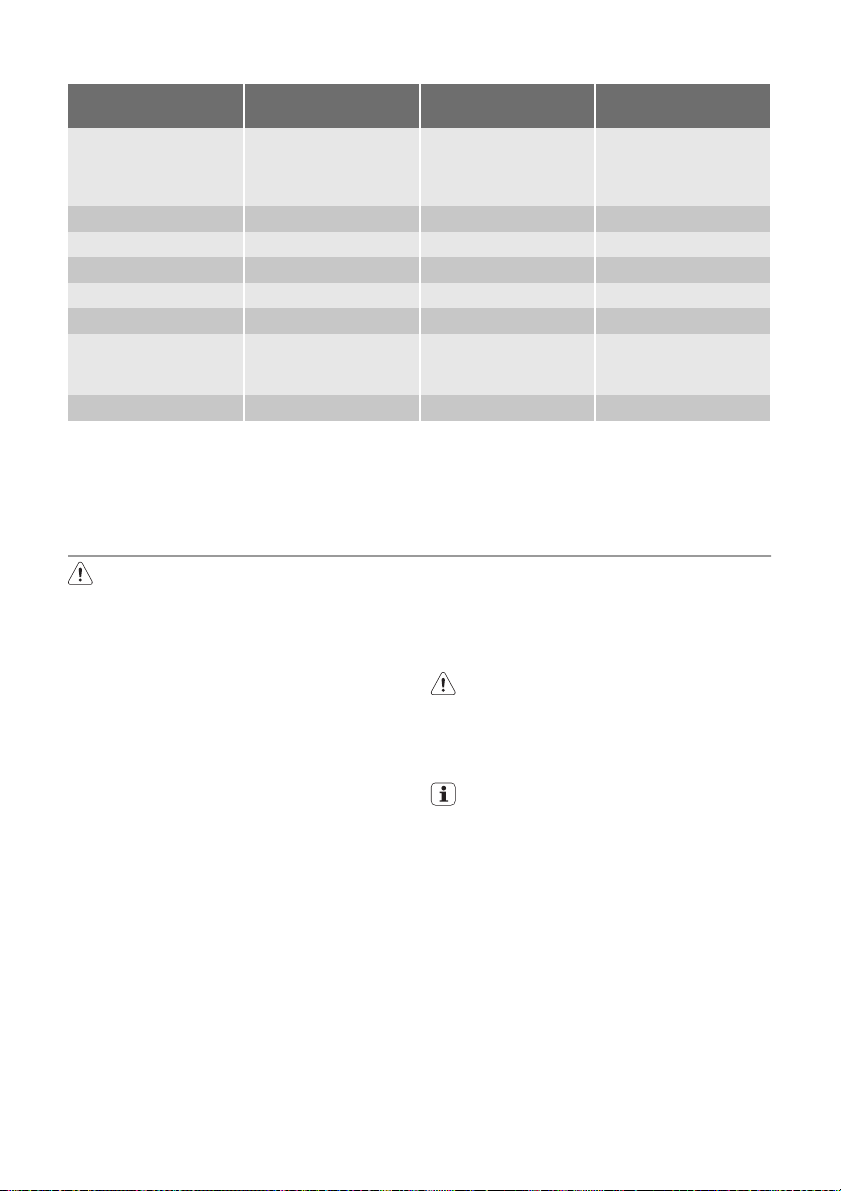
Dish Defrosting time
(mins)
Chicken, 1000 g 100-140 20-30 Place the chicken on
Meat, 1000 g 100-140 20-30 Turn halfway through
Meat, 500 g 90-120 20-30 Turn halfway through
Trout, 150g 25-35 10-15 -------
Strawberries, 300g 30-40 10-20 -------
Butter, 250g 30-40 10-15 -------
Cream, 2 x 200g 80-100 10-15 Cream can also be
Gateau, 1400g 60 60 -------
Information on acrylamides
Important! According to the newest
scientific knowledge, if you brown food
(specially the one which contains starch),
Further defrosting
time (mins)
Comments
an upturned saucer
placed on a large plate
Turn halfway through
whipped when still
slightly frozen in places
acrylamides can pose a health risk. Thus,
we recommend that you cook at the lowest
temperatures and do not brown food too
much.
CARE AND CLEANING
Warning! Refer to "Safety information"
chapter.
• Clean the front of the appliance with a
soft cloth with warm water and cleaning
agent.
• To clean metal surfaces use a usual
cleaning agent
• Clean the oven interior after each use.
Thus you can remove dirt more easily
and it does not burn on.
• Clean all oven accessories (with a soft
cloth with warm water and cleaning
agent) after each use and let them dry.
• If you have nonstick accessories, do not
clean them using an aggressive agents,
sharp edged objects or dishwasher. It
can cause a damage to the nonstick
coating!
Catalytic walls and roof
The walls and the roof with a catalytic coating are self-cleaning. They absorb fat which
collects on walls while the oven operates.
To support this self-cleaning process
heat the oven without any food
regularly:
• Turn the oven light on.
• Remove accessories from the oven.
• Select an oven function.
• Set the oven temperature to 250 °C and
let oven operate for 1 hour.
• Clean the oven cavity with a soft and
damp sponge.
Warning! Do not attempt to clean
catalytic surface with oven sprays,
abrasive cleaners, soap or other
cleaning agents. This will damage the
catalytic surface.
Discolouration of the catalytic surface
has no effect on catalytic properties.
Page 18

18 electrolux
Shelf Support Rails
Removing the shelf support rails
1. Pull the front of the shelf support rail
away from the side wall.
2. Pull the rear shelf support rail away
from the side wall and remove it.
2
1
2. Clean the glass cover.
3. Replace the oven light bulb with applicable 300°C heat-resistant oven light
bulb.
4. Install the glass cover.
Oven door and glass panels
To clean the oven door remove it.
Caution! Be careful when you remove
the door from the appliance. The door
is heavy!
Removing the oven door
1. Open the oven door as far as it goes.
2. Lift up clamping levers (A) on the two
door hinges fully.
A
A
3. Close the oven door until the first position (angle approx. 45°).
Installing the shelf support rails
Install the shelf support rails in opposite sequence.
The rounded ends of the shelf support
rails must point to the front!
Oven lamp
Warning! There is a danger of
electrical shock!
Before you change the oven lamp:
• Switch off the oven.
• Remove the fuses in the fuse box or
switch off the circuit breaker.
Put a cloth on the bottom of the oven
for protection of the oven light and
glass cover.
Replacing the oven light bulb/cleaning the
glass cover
1. Turn the glass cover anti-clockwise to
remove it.
45°
4. Hold of the oven door with one hand
on each side and pull it away from the
oven at an upwards angle.
Put the oven door with the outer side
down on a soft and level surface to
prevent scratches.
5. Now you can remove the inner glass
panels and clean them.
To install the door follow the procedure
in reverse.
Page 19

electrolux 19
The oven door has 2, 3 or 4 panels of
glass (depends on the model)
Removing and cleaning the door glasses
1. Hold the door trim (B) on the top edge
of the door at the two sides and push
inwards to release the clip seal.
2
B
1
2. Pull the door trim to the front to remove
it.
3. Hold the door glass panels on their top
edge one by one and pull them upwards out of the guide
4. Clean the door glass panels.
To install panels follow the procedure in
reverse. Insert the smaller panel first,
then the larger.
WHAT TO DO IF…
Warning! Refer to "Safety information"
chapter.
Problem Possible cause Remedy
The oven does not heat up The oven is not switched on Switch on the oven
The oven does not heat up The clock is not set Set the clock
The oven does not heat up The necessary settings are not
The oven does not heat up The fuse in the fuse box is re-
The oven lamp does not operate
Steam and condensation settle
on the food and in the oven
cavity
The display shows “12.00” A power cut Reset the clock
set
leased
The oven lamp is defective Replace the oven lamp
You left the dish in the oven for
too long
Control the settings
Control the fuse. If the fuse is
released more than one time,
refer to a qualified electrician.
Do not leave the dishes in the
oven for longer than 15-20 minutes after the cooking process
ends
Page 20

20 electrolux
If you cannot find a solution to the problem
yourself, contact your dealer or the service
centre.
We recommend that you write the data here:
Model (MOD.) .........................................
Product number (PNC) .........................................
Serial number (S.N.) .........................................
The necessary data for the service centre is
on the rating plate. The rating plate is on
the front frame of the oven cavity.
ENVIRONMENT CONCERNS
The symbol on the product or on its
packaging indicates that this product may
not be treated as household waste. Instead
it should be taken to the appropriate
collection point for the recycling of electrical
and electronic equipment. By ensuring this
product is disposed of correctly, you will
help prevent potential negative
consequences for the environment and
human health, which could otherwise be
caused by inappropriate waste handling of
this product. For more detailed information
about recycling of this product, please
contact your local council, your household
waste disposal service or the shop where
you purchased the product.
Packaging material
The packaging material is environmentally-friendly and recyclable. Plastic
parts are marked with international abbreviations such as PE, PS, etc. Dispose of the packaging material in the
containers provided for this purpose at
your local waste management facility.
Page 21

electrolux 21
Page 22

22 electrolux
Page 23

electrolux 23
Page 24

www.electrolux.com/shop
892946692-A-072011
 Loading...