

Page 1
Built-In Electric Oven
User information
822 923 233-B-290605-07
EOB5665
g
Page 2

Dear Customer,
Please read this instruction book carefully.
Above all, please observe the “safety” section on the first few pages. Please
retain this instruction book for later reference. Pass them on to any subsequent owners of the appliance.
The following symbols are used in the text:
1 Safety Instructions
Warning: Information concerning your personal safety.
Important: Information on how to avoid damaging the appliance.
3 Information and practical tips
2 Environmental information
1. These numbers indicate step by step how to use the appliance.
2. …
3. …
These operating instructions contain information on steps you can take
yourself to rectify a possible malfunction. Refer to the section “What to do
if...”.
2
Page 3

Contents
Operating Instructions . . . . . . . . . . . . . . . . . . . . . . . . . . . . . . . . . . . . . 5
Safety instructions . . . . . . . . . . . . . . . . . . . . . . . . . . . . . . . . . . . . . . . . . . . . 5
Disposal . . . . . . . . . . . . . . . . . . . . . . . . . . . . . . . . . . . . . . . . . . . . . . . . . . . . . 6
Description of the Appliance . . . . . . . . . . . . . . . . . . . . . . . . . . . . . . . . . . . . 7
General Overview . . . . . . . . . . . . . . . . . . . . . . . . . . . . . . . . . . . . . . . . . . . . . . 7
Control Panel. . . . . . . . . . . . . . . . . . . . . . . . . . . . . . . . . . . . . . . . . . . . . . . . . . 7
Oven Features. . . . . . . . . . . . . . . . . . . . . . . . . . . . . . . . . . . . . . . . . . . . . . . . . 8
Oven Accessories . . . . . . . . . . . . . . . . . . . . . . . . . . . . . . . . . . . . . . . . . . . . . . 8
Before using for the first time . . . . . . . . . . . . . . . . . . . . . . . . . . . . . . . . . . . 9
Setting the Time . . . . . . . . . . . . . . . . . . . . . . . . . . . . . . . . . . . . . . . . . . . . . . . 9
Setting Manual Operation . . . . . . . . . . . . . . . . . . . . . . . . . . . . . . . . . . . . . . . . 9
Initial Cleaning. . . . . . . . . . . . . . . . . . . . . . . . . . . . . . . . . . . . . . . . . . . . . . . . . 10
Operating the Oven . . . . . . . . . . . . . . . . . . . . . . . . . . . . . . . . . . . . . . . . . . . . 11
Switching the Oven On and Off . . . . . . . . . . . . . . . . . . . . . . . . . . . . . . . . . . . 11
Oven Functions . . . . . . . . . . . . . . . . . . . . . . . . . . . . . . . . . . . . . . . . . . . . . . . . 12
Attaching/Removing the Grill Pan Handle. . . . . . . . . . . . . . . . . . . . . . . . . . . . 13
Clock Functions . . . . . . . . . . . . . . . . . . . . . . . . . . . . . . . . . . . . . . . . . . . . . . . 14
Usage, Tables and Tips. . . . . . . . . . . . . . . . . . . . . . . . . . . . . . . . . . . . . . . . . 18
Baking . . . . . . . . . . . . . . . . . . . . . . . . . . . . . . . . . . . . . . . . . . . . . . . . . . . . . . . 18
Baking table . . . . . . . . . . . . . . . . . . . . . . . . . . . . . . . . . . . . . . . . . . . . . . . . 20
Roasting . . . . . . . . . . . . . . . . . . . . . . . . . . . . . . . . . . . . . . . . . . . . . . . . . . . . . 23
Roasting Table . . . . . . . . . . . . . . . . . . . . . . . . . . . . . . . . . . . . . . . . . . . . . . 24
Grilling . . . . . . . . . . . . . . . . . . . . . . . . . . . . . . . . . . . . . . . . . . . . . . . . . . . . . . . 26
Grilling Table. . . . . . . . . . . . . . . . . . . . . . . . . . . . . . . . . . . . . . . . . . . . . . . . 26
Defrosting . . . . . . . . . . . . . . . . . . . . . . . . . . . . . . . . . . . . . . . . . . . . . . . . . . . . 28
Defrosting table . . . . . . . . . . . . . . . . . . . . . . . . . . . . . . . . . . . . . . . . . . . . . 28
Drying with the Fan Oven . . . . . . . . . . . . . . . . . . . . . . . . . . . . . . . . . . . . . . . . 29
Cleaning and care . . . . . . . . . . . . . . . . . . . . . . . . . . . . . . . . . . . . . . . . . . . . . 30
Exterior of the Appliance. . . . . . . . . . . . . . . . . . . . . . . . . . . . . . . . . . . . . . . . . 30
Oven Interior . . . . . . . . . . . . . . . . . . . . . . . . . . . . . . . . . . . . . . . . . . . . . . . . . . 30
Accessories. . . . . . . . . . . . . . . . . . . . . . . . . . . . . . . . . . . . . . . . . . . . . . . . . . . 30
Shelf Support Rails . . . . . . . . . . . . . . . . . . . . . . . . . . . . . . . . . . . . . . . . . . . . . 31
Oven Lighting . . . . . . . . . . . . . . . . . . . . . . . . . . . . . . . . . . . . . . . . . . . . . . . . . 32
Oven Roof . . . . . . . . . . . . . . . . . . . . . . . . . . . . . . . . . . . . . . . . . . . . . . . . . . . . 33
Oven Door . . . . . . . . . . . . . . . . . . . . . . . . . . . . . . . . . . . . . . . . . . . . . . . . . . . . 34
Oven Door Glass. . . . . . . . . . . . . . . . . . . . . . . . . . . . . . . . . . . . . . . . . . . . . . . 35
3
Page 4

What to do if … . . . . . . . . . . . . . . . . . . . . . . . . . . . . . . . . . . . . . . . . . . . . . . . 36
Technical Data . . . . . . . . . . . . . . . . . . . . . . . . . . . . . . . . . . . . . . . . . . . . . . . . 37
Oven Interior Dimensions . . . . . . . . . . . . . . . . . . . . . . . . . . . . . . . . . . . . . . . . 37
Regulations, Standards, Directives. . . . . . . . . . . . . . . . . . . . . . . . . . . . . . . . . 37
Installation Instructions . . . . . . . . . . . . . . . . . . . . . . . . . . . . . . . . . . . . 38
Safety Instructions for the Installer . . . . . . . . . . . . . . . . . . . . . . . . . . . . . . . . . 38
Electrical Connection . . . . . . . . . . . . . . . . . . . . . . . . . . . . . . . . . . . . . . . . . . 39
Warranty conditions. . . . . . . . . . . . . . . . . . . . . . . . . . . . . . . . . . . . . . . . 44
Index . . . . . . . . . . . . . . . . . . . . . . . . . . . . . . . . . . . . . . . . . . . . . . . . . . . . . . . 46
Service and Spare Parts. . . . . . . . . . . . . . . . . . . . . . . . . . . . . . . . . . . . 47
4
Page 5

Operating Instructions
1 Safety instructions
5 This appliance conforms with the following EU Directives:
– 73/23/EEC dated 19.02.1973 Low Voltage Directive
– 89/336/EEC dated 03.05.1989 EMC Directive inclusive of Amending Di-
rective 92/31/EEC
– 93/68/EEC dated 22.07.1993 CE Marking Directive
Electrical safety
• This appliance must be connected by a qualified electrician only.
• In the event of a fault or damage to the appliance: take the fuses out or
switch off.
• Repairs to the appliance must only be carried out by qualified service
engineers. Considerable danger may result from improper repairs. If re-
pairs become necessary, please contact your local Service Force Centre.
Child Safety
• Never leave children unsupervised when the appliance is in use.
Safety whilst Using
• This appliance is intended to be used for cooking, roasting and baking
food in the home.
• Take care when connecting electric appliances to sockets nearby. Do not
allow connecting leads to come into contact with or to catch beneath the
hot oven door.
• Warning: Risk of burns! The interior of the oven becomes hot during use.
• Using ingredients containing alcohol in the oven may create an alcohol-air
mixture that is easily ignited. In this case, open the door carefully. Do not
have embers, sparks or naked flames in the vicinity when opening the
door.
5
Page 6

How to avoid damage to the appliance
• Do not line the oven with aluminium foil and do not place baking trays,
pots, etc. on the oven floor, as the heat that builds up will damage the
oven enamel.
• Fruit juices dripping from the baking tray will leave stains, which you will
not be able to remove. For very moist cakes, use a deep tray.
• Do not put any strain on the oven door when open.
• Never pour water directly into the oven when it is hot. This could cause
damage to the enamel and discoloration.
• Rough handling, especially around the edges of the front panel, can cause
the glass to break.
• Do not store any flammable materials inside the oven. These could ignite
when the oven is switched on.
• Do not store any moist foods inside the oven. This could damage the oven
enamel.
Disposal
2 Packaging material
The packaging materials are environmentally friendly and can be recycled.
The plastic components are identified by markings, e.g. >PE<, >PS<, etc.
Please dispose of the packaging materials in the appropriate container at
your local waste disposal facilities.
2 Old appliance
The symbol
uct may not be treated as household waste. Instead it shall be handed over
to the applicable collection point for the recycling of electrical and electronic
equipment. By ensuring this product is disposed of correctly, you will help
prevent potential negative consequences for the environment and human
health, which could otherwise be caused by inappropriate waste handling of
this product. For more detailed information about recycling of this product,
please contact your local city office, your household waste disposal service
or the shop where you purchased the product.
W on the product or on its packaging indicates that this prod-
1 Warning: Before disposing of old appliances please make them inoperable
so that they cannot be a source of danger.
To do this, disconnect the appliance from the mains supply and remove
the mains cable from the appliance.
6
Page 7
Description of the Appliance
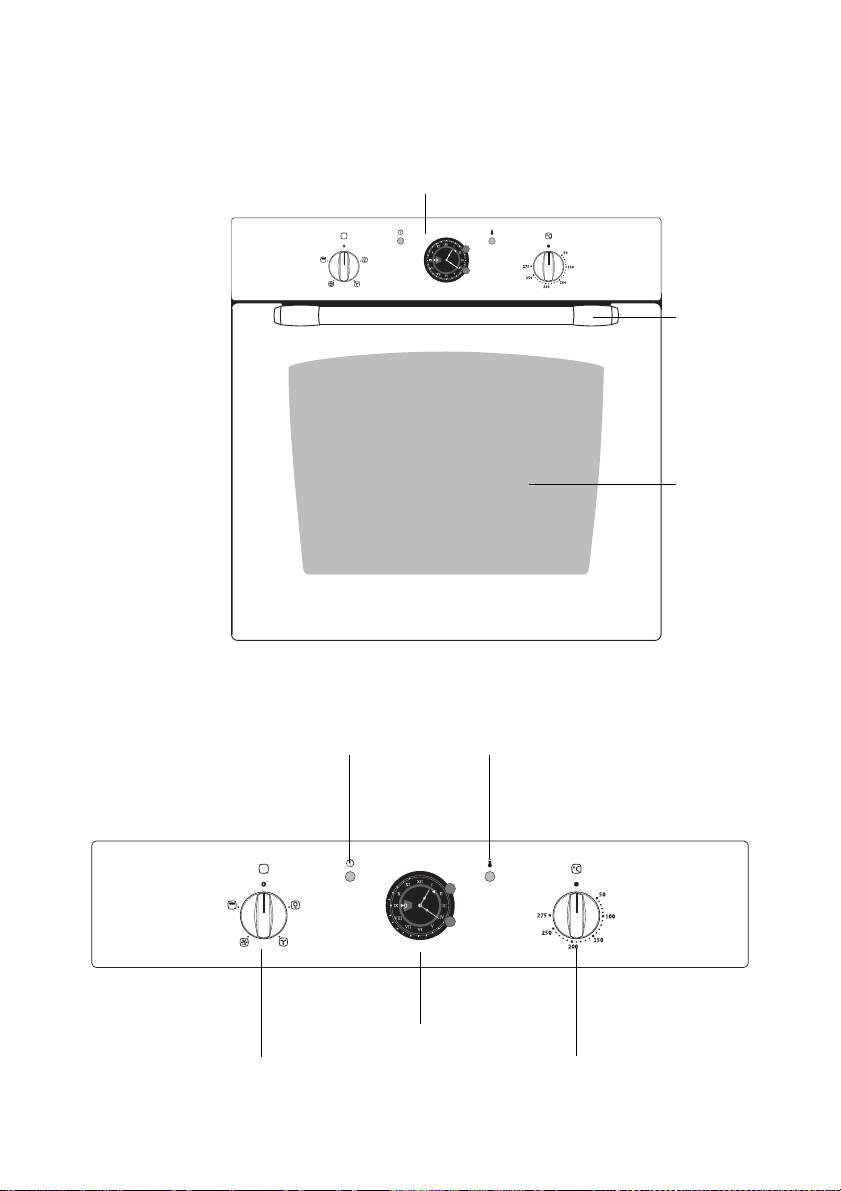
General Overview
Control panel
Door
handle
Full glass
door
Control Panel
Oven Functions
Temperature Pilot LightOven Power Indicator
Clock with Automatic-Functions
Temperature Selection
7
Page 8
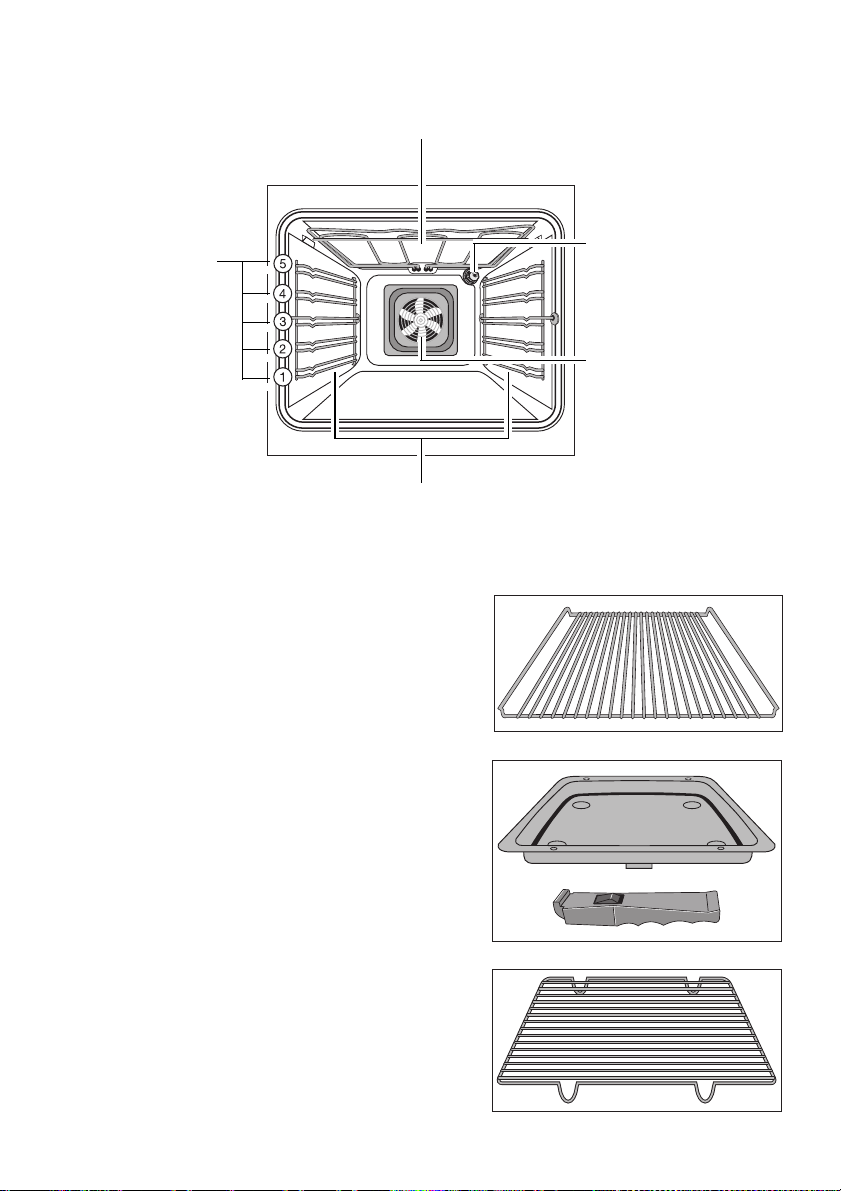
Oven Features
Top heat and heating elements
Shelf positions
Oven shelf runners, removable
Oven Accessories
Combination shelf
For dishes, cake tins, items for roasting
and grilling.
Oven lighting
Fan heating
element
Grill pan with handle
Support for the grill tray as a collecting
vessel for fat
Grill tray
Insert for the grill pan for grilling smaller
amounts of food
8
Page 9
Before using for the first time
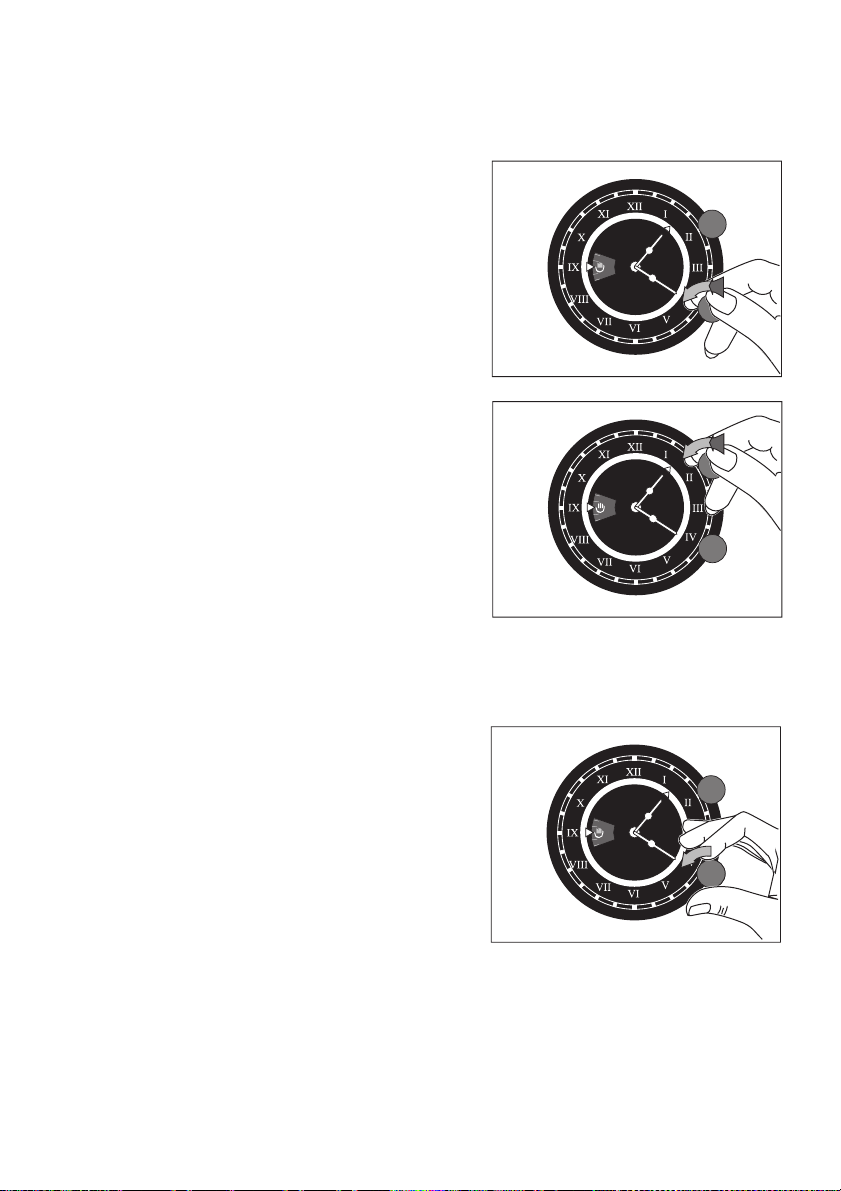
Setting the Time
1. Press the function setting button in as
far as it will go and set the current time
by simultaneously turning anticlockwise.
2. Pressing the start setting button, turn it
until the start indicator engages at the
current time.
1 The red start indicator must be in the
same position as the hour indicator, otherwise the clock will be in automatic operation (start and cook time) and the
oven cannot be switched on.
Setting Manual Operation
Turn the function setting button anticlockwise until H appears in the display.
1 If J or 0 is set, it is not possible to select
an oven function.
9
Page 10

Initial Cleaning
Before using the oven for the first time you should clean it thoroughly.
1 Caution: Do not use any caustic, abrasive cleaners! The surface could be
damaged.
3 To clean any metal front panels use commercially available cleaning agents.
1. Turn the oven function switch to oven lighting L.
2. Remove all accessories and the shelf support rails and wash them with
warm water and washing up liquid.
3. Then wash out the oven with warm water and washing-up liquid and dry.
4. Wipe the front of the appliance with a damp cloth.
10
Page 11
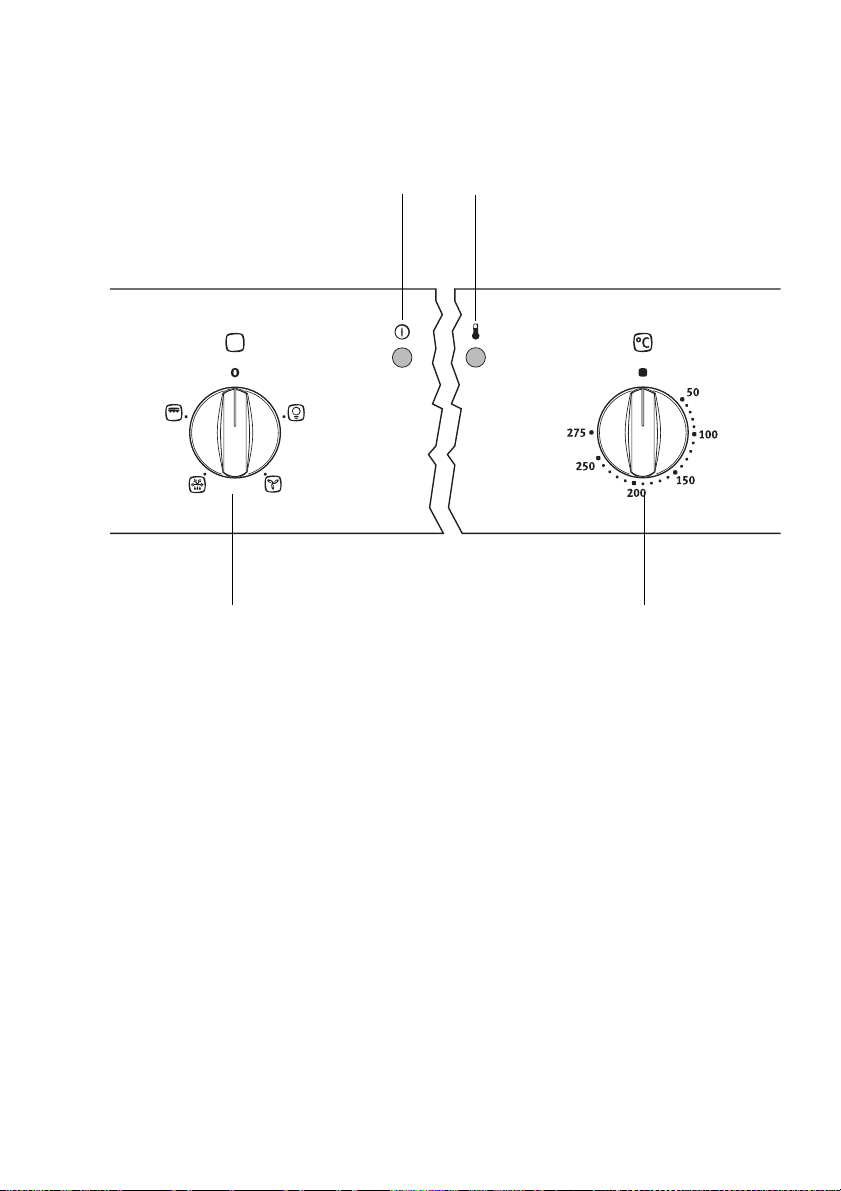
Operating the Oven
Switching the Oven On and Off
Oven Power Indicator
Temperature Pilot Light
Oven Functions
1. Turn the oven functions switch to the required function.
2. Turn the temperature selection switch to the required temperature.
The red oven power indicator is illuminated whilst the oven is in use.
The red temperature pilot light is only illuminated whilst the oven is heating up.
3. To switch off the oven, turn the oven functions switch and the temperature
selection switch to the zero position.
Temperature Selection
3 Cooling fan
The fan switches on automatically in order to keep the appliance’s surfaces
cool. When the oven is switched off, the fan continues to run to cool the appliance down, then switches itself off automatically.
11
Page 12

Oven Functions
The oven has the following functions:
L Oven lighting
With this function you can illuminate the oven interior e.g. for cleaning.
The heating element is not in use.
¥ Fan Oven
For roasting and baking on up to three levels simultaneously.
Set oven temperatures 20-40 °C lower than when using conventional.
The fan heating element is used and in addition the fan is switched on.
A Defrost
To begin to thaw and to defrost such items as flan, butter, bread, fruit or
other frozen foods.
For this function the fan operates without heating.
º Grill
For grilling flat foods in larger quantities, such as steaks, escalopes, fish
or for toasting.
Top heat and the grill element are used.
12
Page 13

Attaching/Removing the Grill Pan Handle
The handle is particularly useful for removing the grill pan and tray more
easily from the hot oven.
Attaching the handle
Insert the handle at an angle from above
into the recess in the side of the grill pan
(1) press and hold the release button, lift
the handle gently and then lower it (2) let
go of the release button.
1 Warning: Risk of burning!
Important: Check that the handle is securely attached!
Removing the handle
Press the release button on the top of the
handle (1) and lift up the handle (2) to remove it.
1 Important: Never leave the handle in the
heated oven! Overheating can cause the
handle to deform or break, and may
cause an injury.
13
Page 14
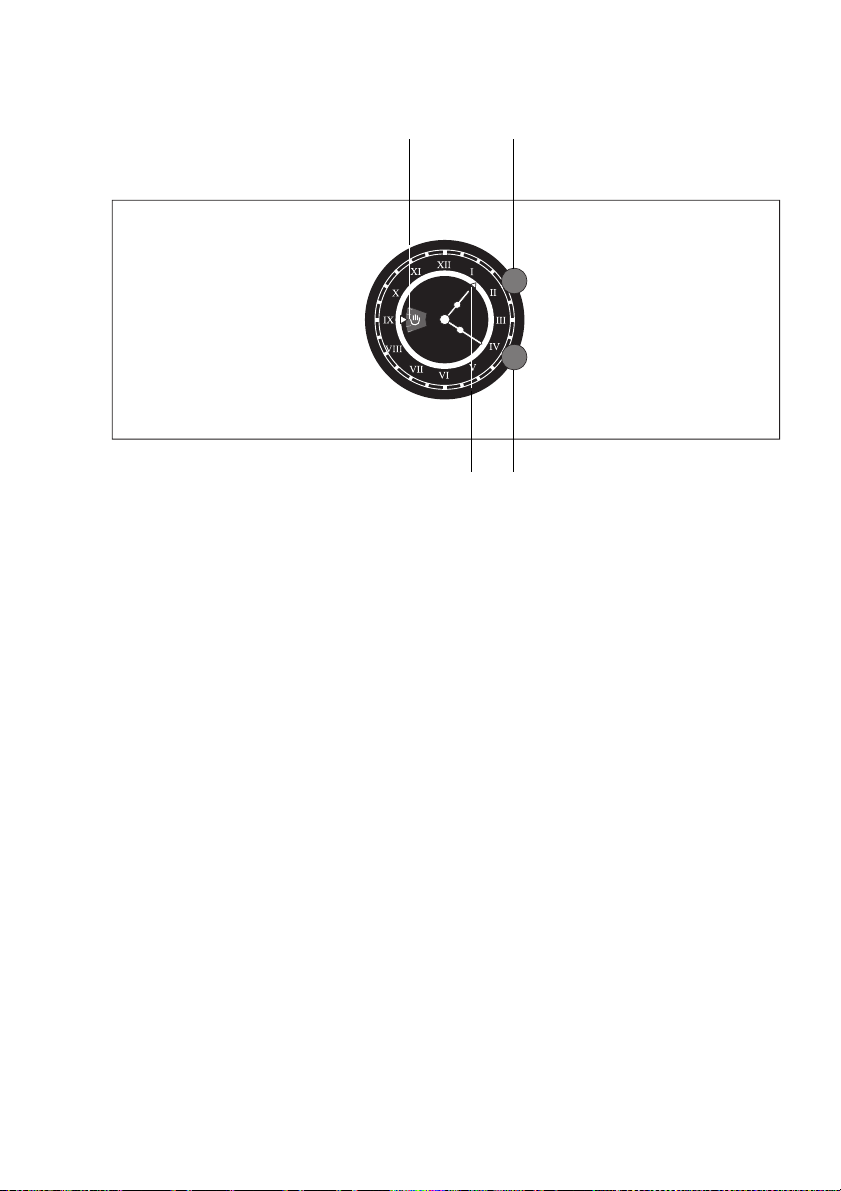
Clock Functions
Start setting buttonFunction Display
Function setting buttonStart indicator (Red)
Countdown timer
To set a countdown. A signal sounds after the time has elapsed.
Cook time d
To set how long the oven is to be in use.
Start and cook time
For setting when the oven is to switch on and then off.
Time W
To set, change or check the time
(See also section “Before Using for the First Time”).
3 General information
• The required oven function and oven temperature must be selected before
setting the start and cook time clock function.
• The acoustic signal can be switched off by turning the function setting
button to H .
• After working with the start and cook time function the appliance must be
changed from automatic operation to manual operation by turning the
function setting button to H.
• When you have finished cooking return the oven function and temperature
selection switches to the off position.
14
Page 15
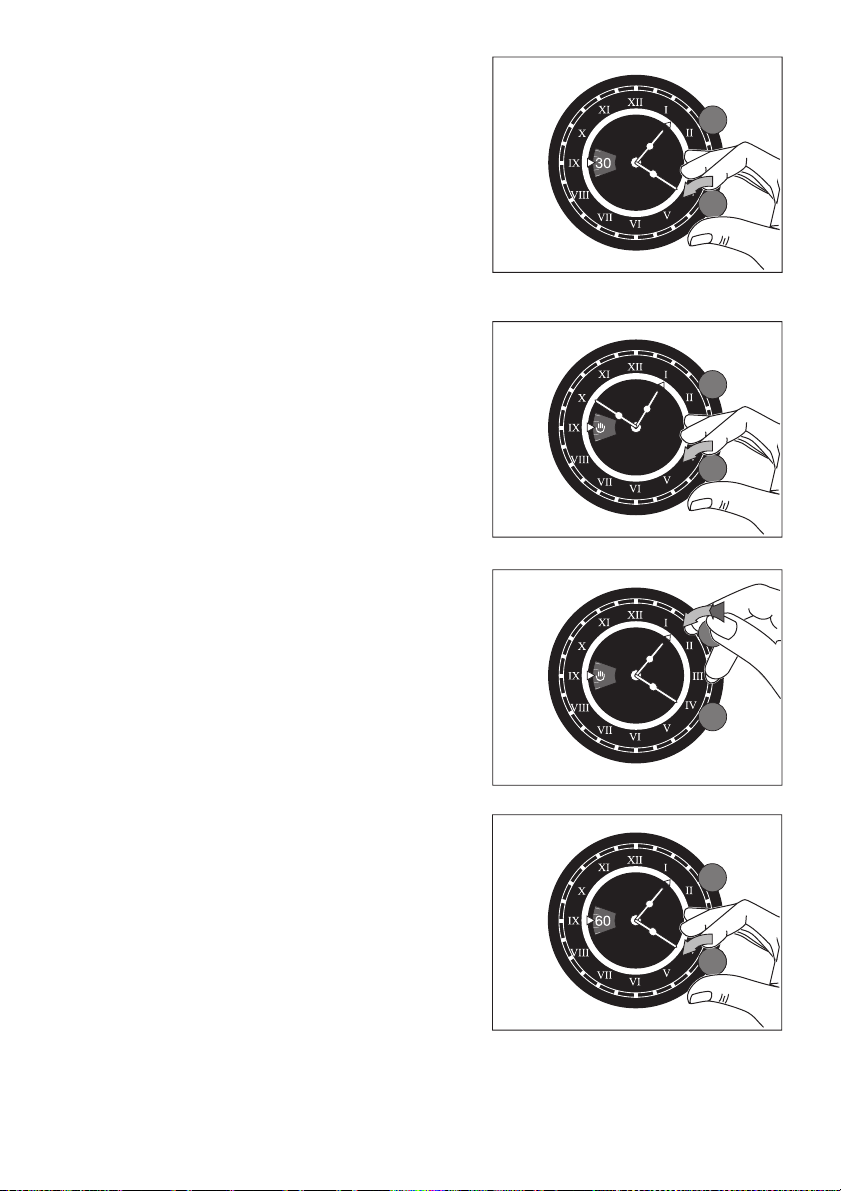
Countdown timer
3 The oven must not be operating when
this function is used.
1. Turn the function setting button anticlockwise until the required countdown
appears in the display, e.g., 30.
When the time has expired, a signal will
sound for 1 minute.
2. Cancel the acoustic signal by turning
the function setting button to H.
Cook time
1. Select oven function and temperature.
2. Pressing the start setting button, turn it
until the start indicator engages at the
current time.
3. Turn the function setting button anticlockwise until the required cook time
appears in the display.
When the time has expired a signal
sounds for 1 minute and the oven switches off.
4. When you have finished cooking return
the oven function and temperature selection switches to the off position.
Set the function setting button to H.
The appliance is ready for use again.
15
Page 16
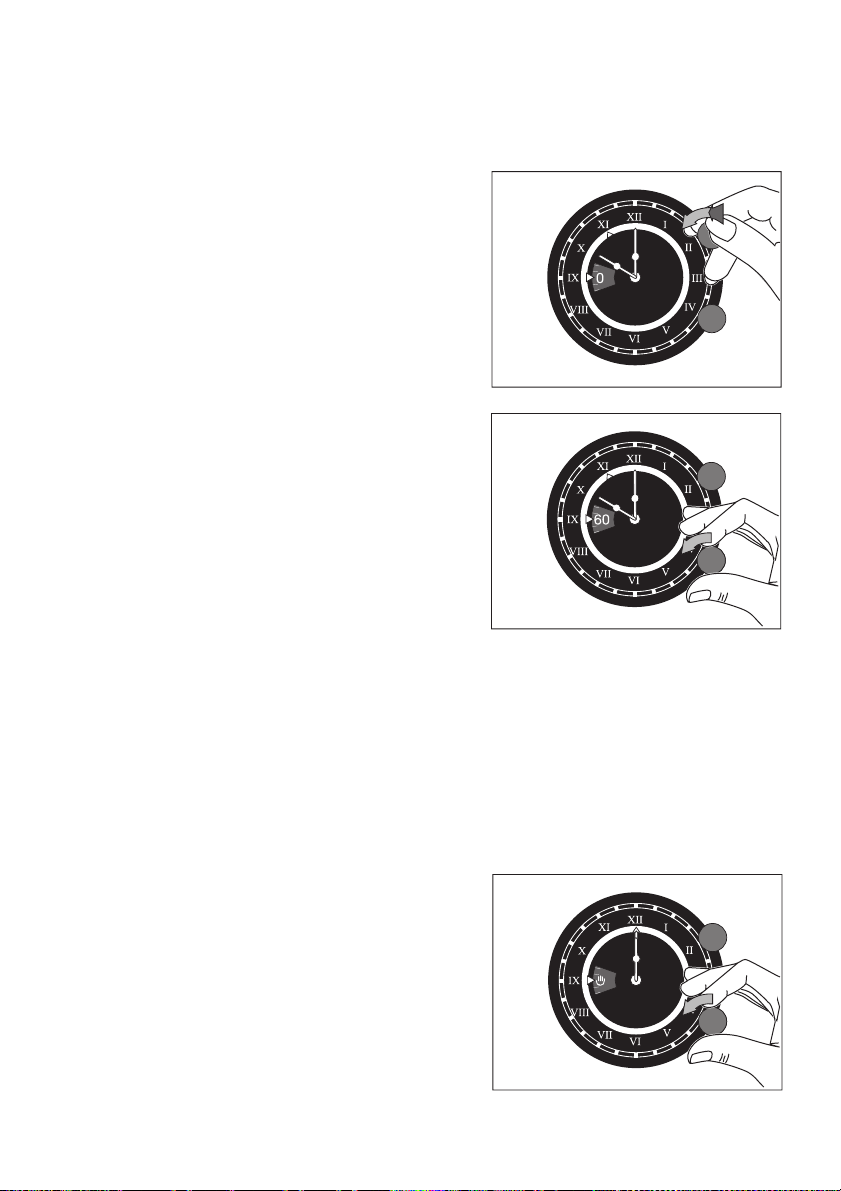
Start and cook time
1 Start and cook time are set if the oven is to switch on and off automatically
at a later time.
1. Select oven function and temperature.
2. Pressing the start setting button, turn it
anticlockwise until the start indicator is
pointing to the required start time.
e.g., XI for 11:00 hrs.
3. Turn the function setting button anticlockwise until the required cook time
appears in the display.
e.g., 60 mins.
The oven will switch on automatically at
the calculated time,
and it will switch off again after the set
time has expired.
When the time has expired a signal will
sound for 1 minute and the oven will
switch off.
e.g., 12:00 hrs.
4. When you have finished cooking return
the oven function and temperature selection switches to the off position.
5. Set the function setting button to H.
The appliance is ready for use again.
16
Page 17

Changing the time
3 The time can only be changed if an auto-
matic function has not been set.
Press the function setting button and
turn it anticlockwise until the required
time has been set.
17
Page 18
Usage, Tables and Tips
Baking
Use the fan ¥ oven function to bake.
Baking tins
• Metal, glass and ceramic tins are suitable for use with the fan oven
function ¥.
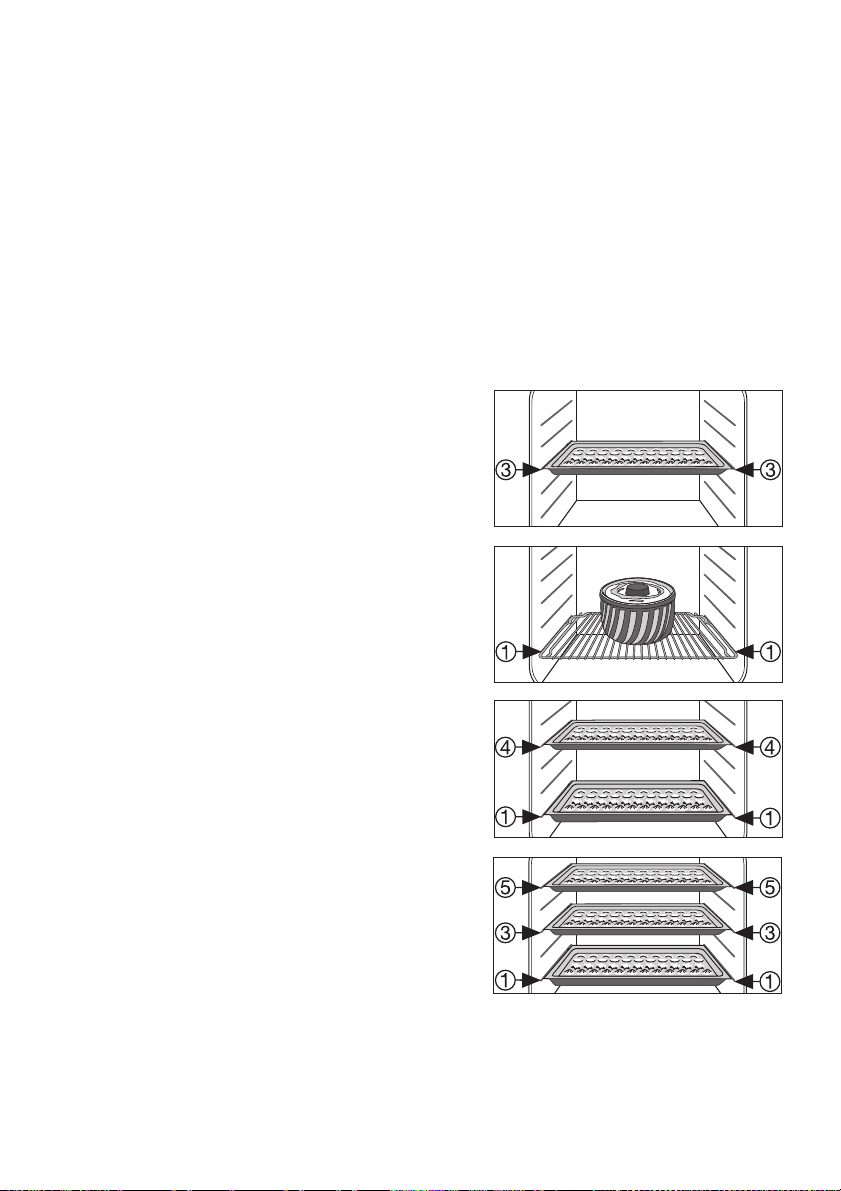
Shelf position
• When using the fan oven ¥ function you are able to bake dry, flat items on
up to 3 baking trays simultaneously.
1 baking tray:
e.g. shelf level 3
1 baking tin:
e.g. shelf level 1
2 baking trays:
Shelf level 1 and 4
3 baking trays:
Shelf levels 1, 3 and 5
18
Page 19

General tips
• Be sure to count the shelf positions from bottom to top.
• Insert the baking tray so that the slope is at the front.
• Always place cake tins in the middle of the shelf.
• When using the fan oven ¥ function you are also able to bake two tins
side by side on a rack simultaneously. This increases the baking time only
slightly.
3 When frozen foods are used the trays inserted may distort during cooking.
This is due to the large difference in temperature between the freezing temperature and the temperature in the oven. Once the trays have cooled the
distortion will disappear again.
Notes about the baking table
In the charts you will find the temperature indications, cooking times and
shelf levels required for a selection of dishes.
• The temperatures and baking times are to be used as a guide only, as they
depend on the composition of the dough, the amount, and the type of
cake tin.
• We recommend setting the oven to the lower temperature the first time
and to select a higher temperature only if required, e.g. if additional
browning is desired or if the baking time is too long.
• Should you be unable to find any exact indications for one of your own
recipes, use those given for a similar item as a guide.
• When baking cakes on baking trays or in tins on more than one shelf level
the baking time may need to be lengthened by 10-15 minutes.
• Moist items (e.g. pizzas, cakes with fruit toppings etc.) should be cooked
on one level only.
• Differences in height between the items baked may mean that at the beginning of the baking period they are browned to different degrees. In
such case please do not change the temperature set. Differences in the
degree of browning will even out during the course of the baking period.
2 Where the baking time required is relatively long, you can switch off the
oven approx. 10 minutes prior to the end of the baking period thereby making use of the residual heat.
Unless otherwise stated, the charts are applicable for use when placing
items into a cold oven.
19
Page 20
Baking table
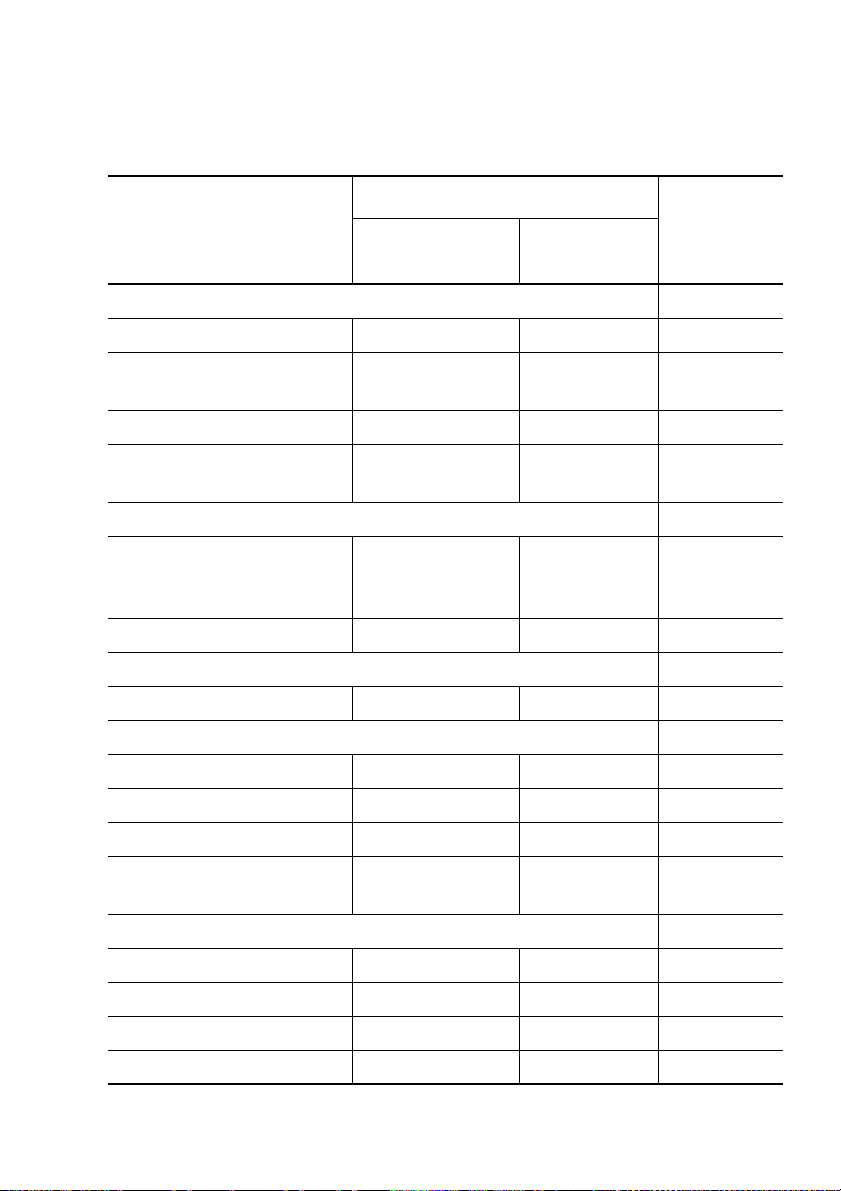
The baking times given are to be used as a guide only.
The recommended cooking methods, shelf level and temperatures are
printed in bold.
Fan Oven ¥
Item type
Batter
Ring cake 150-170 1 50-70
Loaf cake
(log tin)
Base for fruit slice 150-170 3 20-25
Apple cake, very thin
crust
Shortcrust
Cheesecake 140-160 1
Covered fruit tart 150-170 1 50-60
Puff pastry
French apple cake 150-170* 1 40-50
Sponge mixture
Sponge cake (DIN) 150-170 1 25-40
Temperature in °CShelf posi-
tion
140-160 1 70-80
150-170 1 45-60
Baking
time in
minutes
60-90 + 10
min. residu-
al heat
Base for fruit slice 150-160* 3 25-30
Sponge roll 150-170* 3 10-15
Small sponge cakes
(Fairy/Queen)
Yeast
Ring cake 150-170 1 45-60
Yeast roll/-ring 150-170 3 30-40
Streusel cake 150-170 3 20-40
Apple-streusel cake (DIN) 150-170 3 35-50
20
160-180 3 25-30
Page 21
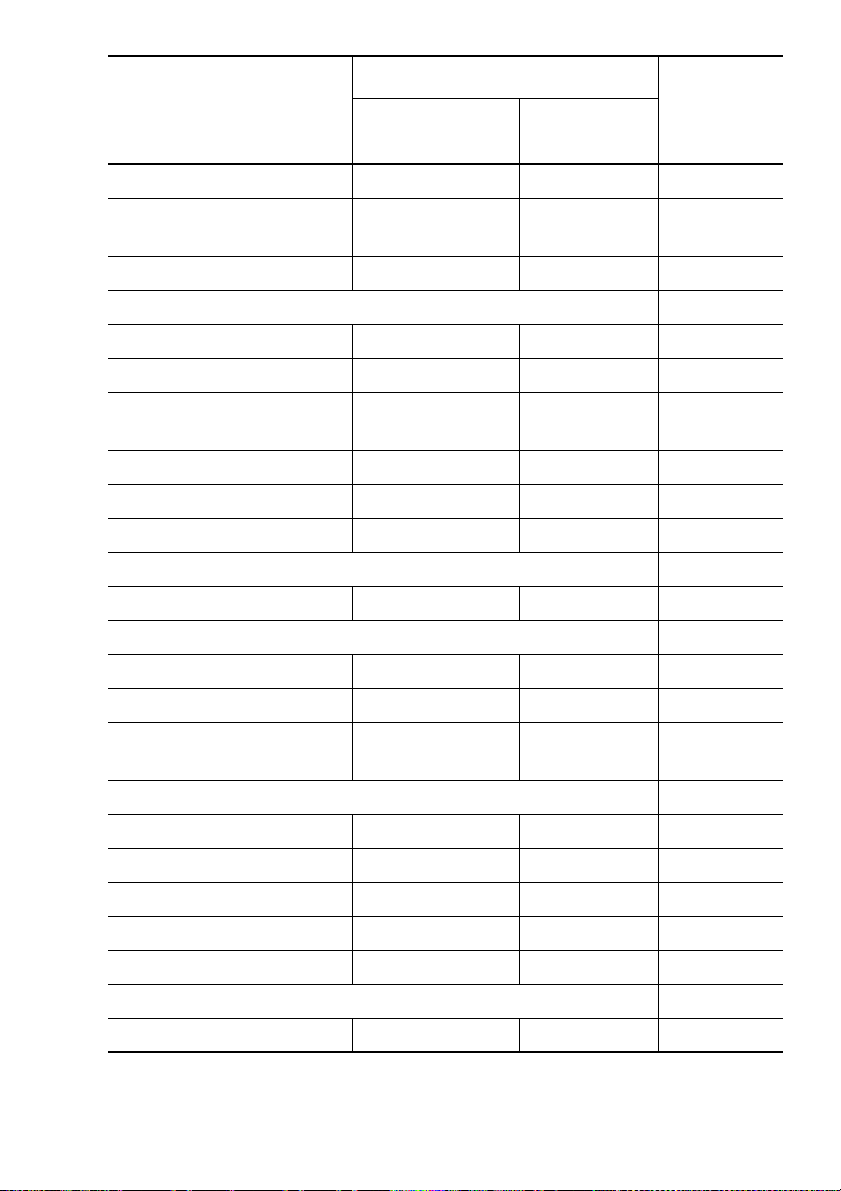
Item type
Fan Oven ¥
Temperature in °CShelf posi-
tion
Baking
time in
minutes
Cheesecake (tray-size) 150-170 3 45-50
Christmas fruit cake
(500g flour)
150-170* 3 40-70
Pizza (round pizza tray) 230-250* 1 10-25
Biscuits
Meringues 80-90* 3 150-180
Macaroons 100-120 3 20-30
Shortbread biscuits 140-160
4+1
1+5+3
15-30
Nut biscuits --- --- 25-35
Puff pastry items 160-180* 4+1 20-30
Yeast rolls, small 160-180* 4+1 20-40
Choux pastry
Cream puffs 160-180 4+2 25-40
rubbed dough types
Swiss apple tart --- --- 35-50
Swiss-style cheese tart --- --- 40-50
Spinach-/vegetable tarts,
Quiche Lorraine
--- --- 40-60
Bread and bread rolls
Brown bread 170-190* 3 45-60
White bread, loaf 170-190* 2 40-50
Flat bread, pita --- --- 15-25
Baked pasta dishes 180-200 1
Potato gratin 180-200 2
Cooking ”au gratin”
Hawaiian toast* 200-220 3 14-16
* Pre-heat the oven
21
Page 22
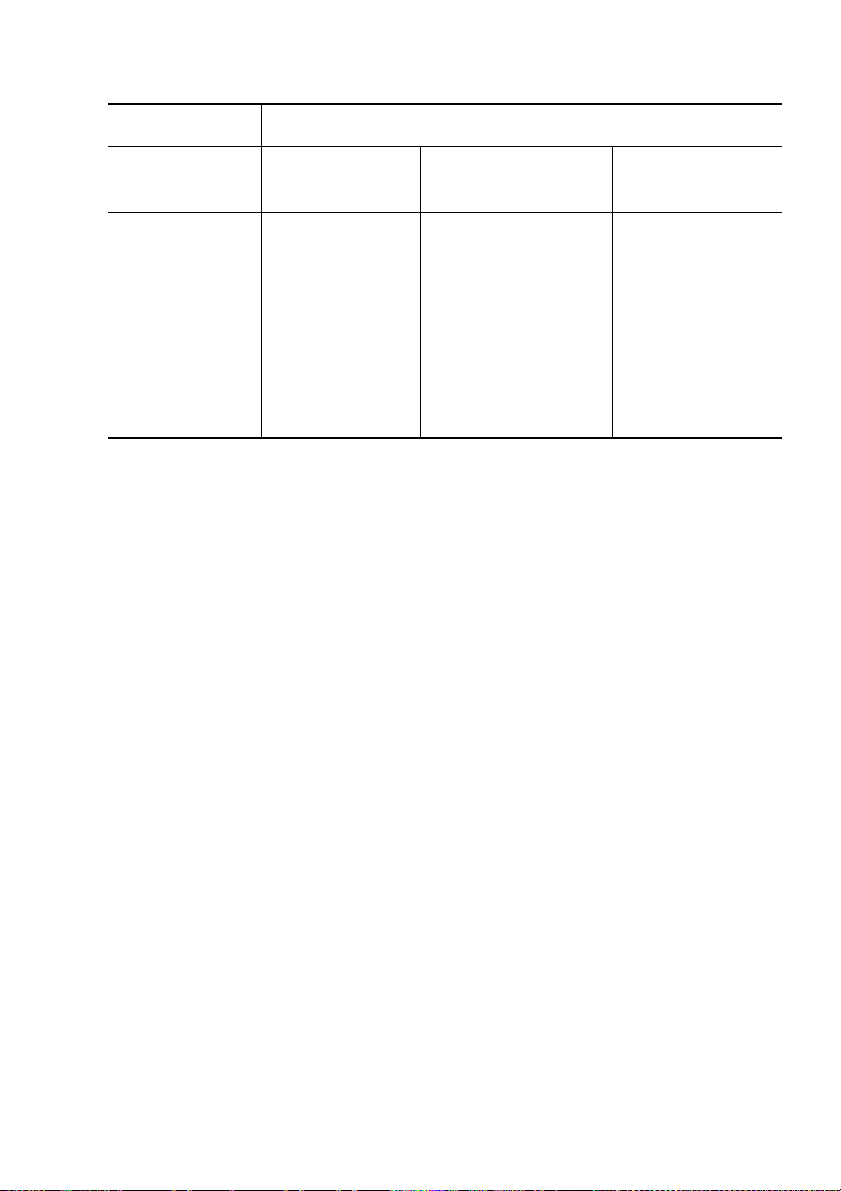
Frozen Foods
Fan Oven ¥
Type of pastry
or cake
Pizza (frozen)
Also observe the manufacturer’s instructions for all other frozen products.
Te mp e ra t ur e
in °C
Follow the man-
ufacturer’s in-
structions as
stated on the
package
Shelf position
Lay on the grill
tray,
insert baking tray
below (shelf posi-
tion in accordance
with the manufac-
turer’s instructions
as stated on the
package)
Baking time
in minutes
Follow the manufacturer’s instructions as stated on
the package
22
Page 23

Roasting
For roasting use the fan ¥ oven function.
Ovenware for roasting
• Any heat-resistant dish is suitable for roasting (Refer to the manufacturer's
instructions!).
• If the dish has plastic handles, check that they are heat-resistant (refer to
manufacturer's instructions!).
• You can roast large roasting joints directly in the universal tray or on the
shelf with the universal tray inserted below (e.g., turkey, goose, 3-4
chickens, 3-4 knuckles of veal).
• We recommend roasting all lean forms of meat in a casserole dish with a
lid (e.g., veal, marinated beef, pot roast, frozen meat). In this way the
meat will retain its juices.
• You can roast all forms of meat that are to be browned or crisped in a cas-
serole dish without a lid (e.g., pork joints, meat loaf, lamb joints, mutton,
duck, 1-2 knuckles of veal, 1-2 chickens, small poultry, sirloin, fillet,
game).
3 If you use dishes for roasting the oven will not get so dirty!
Notes on the roasting table
Information is given in the table on suitable oven functions, temperature settings, cooking times and shelf positions for various types of meat. The information is for guidance.
• We recommend roasting meat and fish in the oven from a weight of 1kg.
• To stop meat juices or fat burning onto dishes or the oven, we recommend
adding a little water to the roasting dish.
• Turn the joint as required (after 1/2 - 2/3 of the cooking time).
3 Baste large joints and poultry with meat juices several times during cooking.
This will produce better roasting results.
2 Switch the oven off approx. 10 minutes before the end of the roasting time
to make use of the residual heat.
23
Page 24
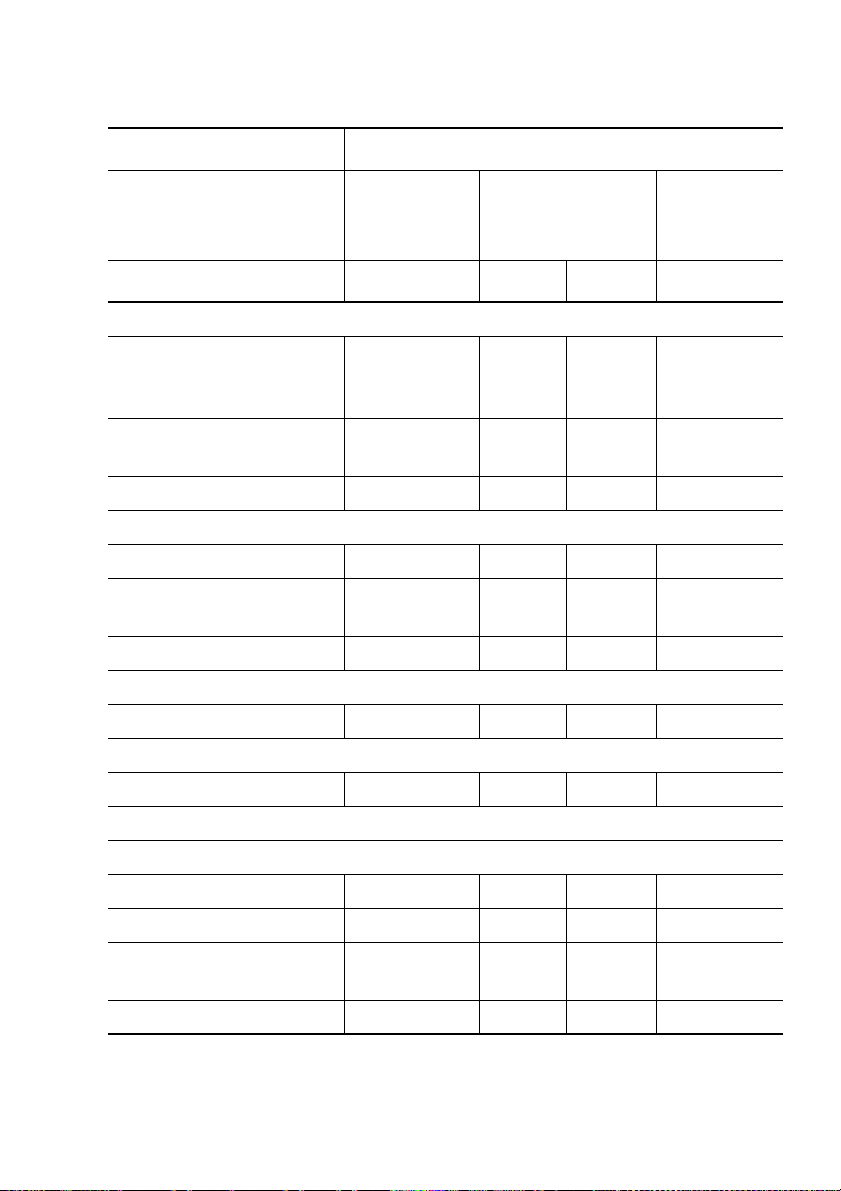
Roasting Table
Insert either the tray or universal tray into the 1st shelf support rail.
Fan Oven ¥
Food to be roasted
Pork
1 kg Pork joint
(spare rib/ham joint,
roasting joint)
Smoked pork loin,
1-1,5kg
Meat loaf 160-170 2 --- 60-70
Beef
Beef joint, 1-1,5kg 150-160 2 --- 120-150
Fillet of beef,
per cm thickness
Sirloin, per cm thickness 190-200* 2 --- 8-10
Vea l
1 kg Veal joint 170-180 2 --- 90-120
Lamb
Tempera-
ture in °C
150-160 2 --- 90-120
150-160 2 --- 60-90
190-200* 2 --- 6-8
Shelf position
1 Level 2 Levels
Roasting
time
in minutes
Leg of lamb (1800 g) 170-180 2 --- 90
Poultry
Roasting smaller items on the baking tray
Sausages “cordon bleu” 220-230* 3 4+1 5-8
Sausages 220-230* 3 4+1 12-15
Escalope or chop coated
with breadcrumbs
Rissoles 210-220* 3 4+1 15-20
24
240-250* 3 4+1 13-15
Page 25
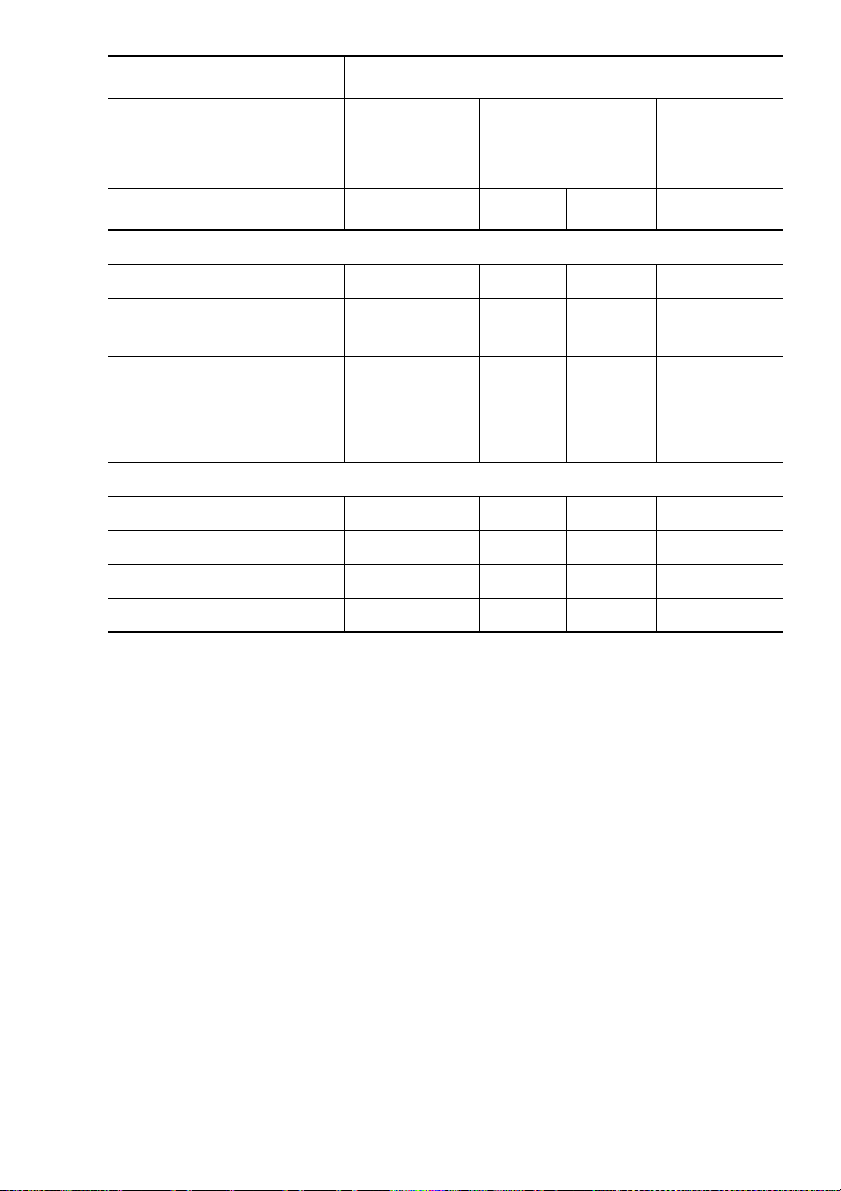
Fan Oven ¥
Roasting
time
in minutes
Food to be roasted
Tempera-
ture in °C
Shelf position
1 Level 2 Levels
Fish
Trout weighing 200-250g 190-200 3 --- 20-25
4 Trout fillets
(weight 200g)
170-180 3 --- 20-25
Perch fillet coated with
breadcrumbs
(total weight approx.
190-200 3 --- 25-30
1kg)
Poultry
1 kg Turkey roast 150-160 2 --- 90-120
Chicken 150-160 2 --- 55-60
Duck (2000-2500 g) 150-160 2 --- 90-120
Goose (4500 g) 150-160 2 --- 150-180
* Pre-heat the oven
25
Page 26
Grilling
To grill, use grill º oven function together with the appropriate temperature
setting.
1 Important: Always close the oven door when grilling.
3 Always pre-heat the empty oven for 5 minutes using the grill functions.
Grilling implements
• When grilling, use an oven rack and a universal tray together.
Shelf position
• When grilling flatter foods, use mainly the 4th shelf level from the bottom.
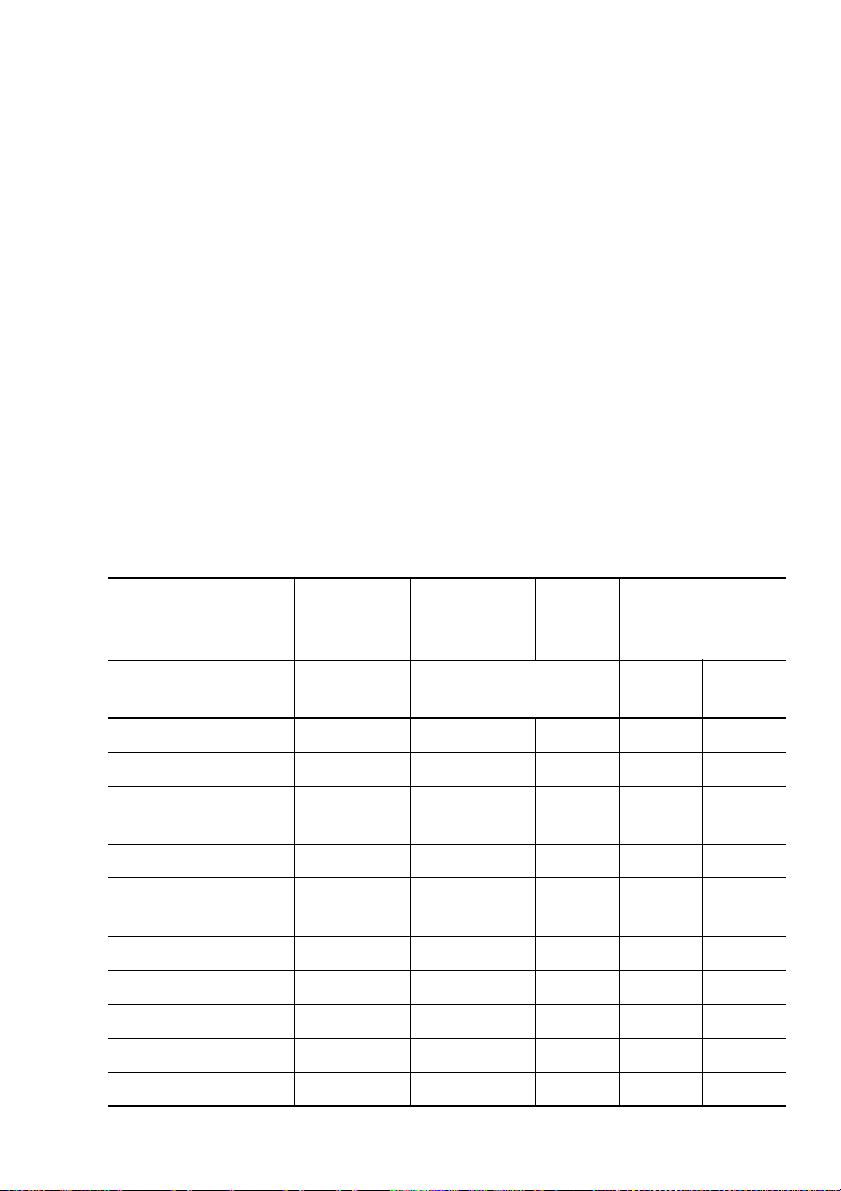
Notes about the grilling tables
The grilling times are to be used as a guide only and depend on the type
and quality of the fish and meat.
• Flatter cuts of meat and fish are especially well suited for grilling.
• Turn the items in the middle of the grilling period.
Grilling Table
Item
4-8 pork chops 275 1 4 15 10
2-4 pork chops 275 1 4 12 12
marinated pork
steaks
Fillet steak, rare 275 1 4 5-7 4-6
4 fillet steaks,
medium
2 chicken halves 250 1 4 15-20 15-20
4 chicken halves 250 1 3 15-20 15-20
1-4 chicken thighs 250 1 4 20 10
4-6 chicken thighs 250 1 4 20 15
Grilling sausages, 275 1 4 5-10 5
26
Temperature in °C
275 1 4 12 12
275 1 4 6-8 5-7
Universal
tray
Shelf position
Grill-
ing
rack
Grilling time in
side
minutes
1st
2nd
side
Page 27

Item
Temperature in °C
Universal
tray
Grill-
ing
rack
Grilling time in
minutes
Shelf position
Sausage coils 275 1 4 10 9
whole fish 250 1 3 10 ---
Toast (without topping)
275 1 4 1-2 1-2
1st
side
2nd
side
27
Page 28
Defrosting
To defrost food, use the oven’s defrosting function A without setting a temperature.
Defrosting dishes
• Put the food on a plate and put the plate on the tray.
• Use only parchment paper or film to cover the food. Do not use plates or
dishes as they significantly increase the defrosting time.
Shelf levels
• Insert the shelf in the 1st position from the bottom to defrost.
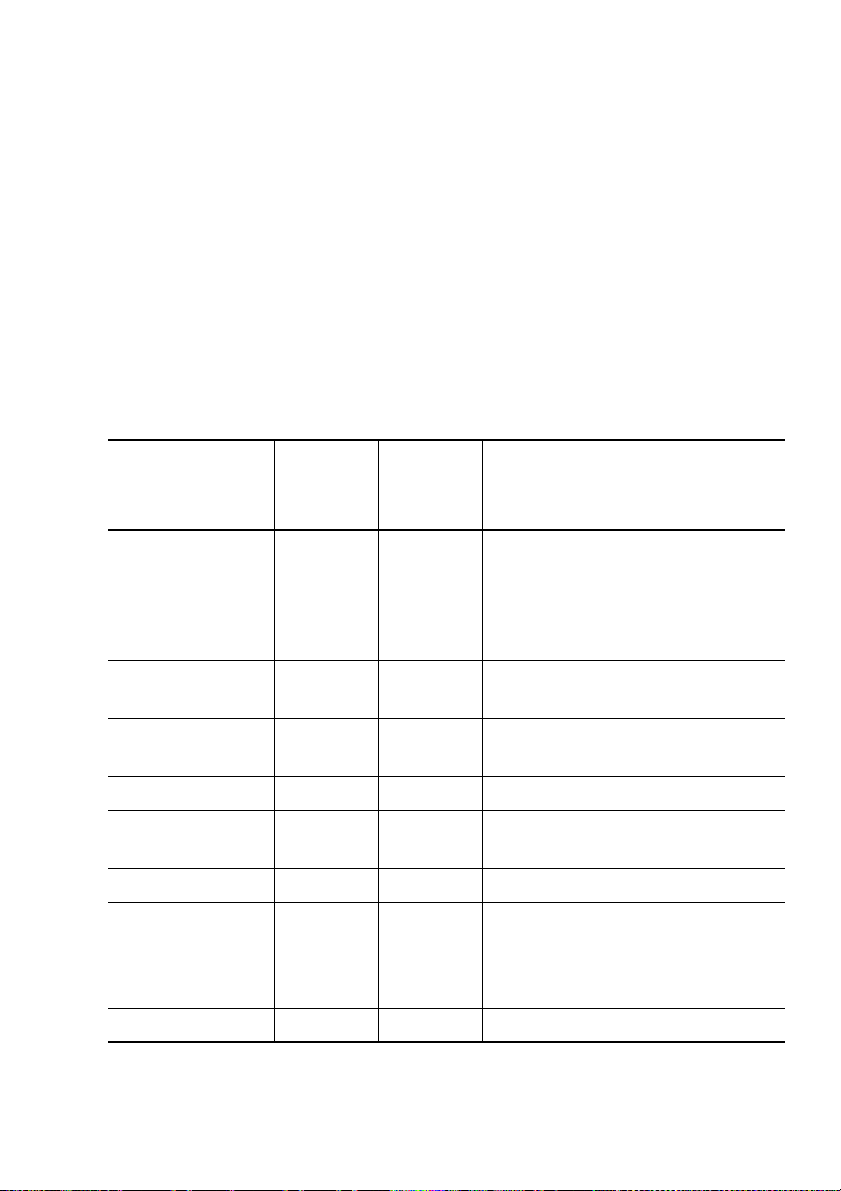
Notes on the defrosting table
The table below offers some guidance on defrosting times.
Defrosting table
Defrost-
Dish
Chicken, 1000 g 100-140 20-30
Meat, 1000 g 100-140 20-30
Meat, 500 g 90-120 20-30
Trout, 150 g 25-35 10-15 Defrost open.
Strawberries,
300 g
Butter, 250 g 30-40 10-15 Defrost open.
Cream, 2 x 200 g 80-100 10-15
Flan, 1400 g 60 60 Defrost open.
ing time
Mins.
30-40 10-20 Defrost open.
Standing
time
Mins.
Place the chicken on an upsidedown saucer on a large plate.
Defrost open and turn after half
the time, or defrost covered with
film.
Defrost open and turn after half
the time or cover with film.
Defrost open and turn after half
the time or cover with film.
Defrost open
(Cream can also be whipped
well if parts of it are still slightly
frozen).
Note
28
Page 29
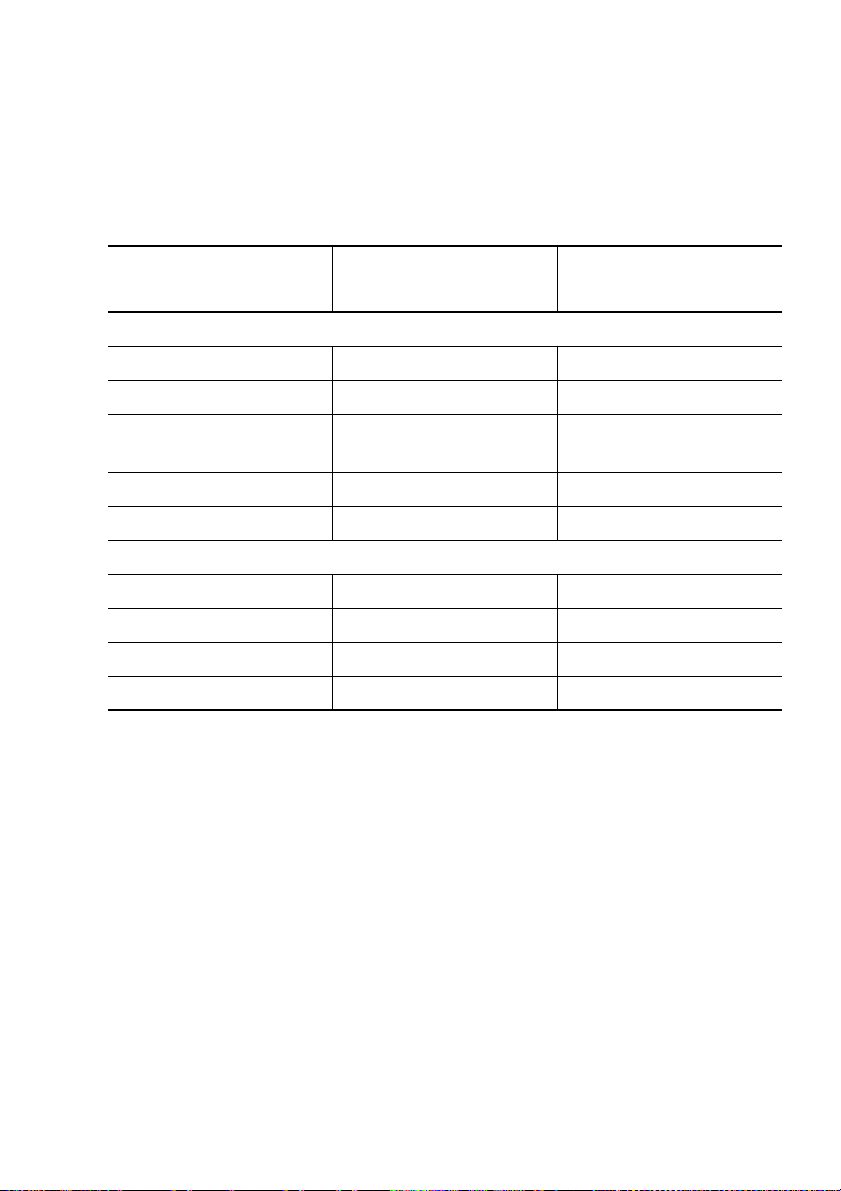
Drying with the Fan Oven
Use trays lined with greaseproof paper or baking paper.
You will achieve a better result if you switch the oven off half way through
the drying time.
Open and leave to cool, preferably overnight. Then finish drying the dried
food.
Temperature in °C
Vegetables
Beans 60-70 6-8
Peppers (strips) 60-70 5-6
Vegetables for making
soup
60-70 5-6
Mushrooms 50-60 6-8
Herbs 40-50 2-3
Fruit
Plums 60-70 8-10
Apricots 60-70 8-10
Sliced apple 60-70 6-8
Pears 60-70 6-9
Time in hours
(approximate guide)
29
Page 30

Cleaning and care
1 Warning: For safety reasons cleaning the appliance with a steam jet cleaner
or high-pressure water cleaner is not permissible!
Exterior of the Appliance
• Wipe the front of the appliance with a soft cloth dipped in warm soapy
water.
• Do not use scourers, caustic cleaners or abrasive items.
• Use commercially available cleaners for metal fronts.
Oven Interior
1 Warning: The oven must be switched off and cold before cleaning.
Clean the appliance after each use. This is the easiest way to remove spills
and prevents them being burnt on.
1. Switch on the oven lighting when cleaning.
2. Every time you use the oven, wipe it out afterwards with water and wash-
ing-up liquid, then dry. Do not use any abrasive items.
3. Remove stubborn marks with special oven cleaners.
1 Important: Always follow the manufacturer's instructions when using oven
spray!
Accessories
Wash all slide-in units (shelf unit, baking tray, shelf support rails etc.) after
each use and dry well. Soak briefly to make them easier to clean.
30
Page 31
Shelf Support Rails
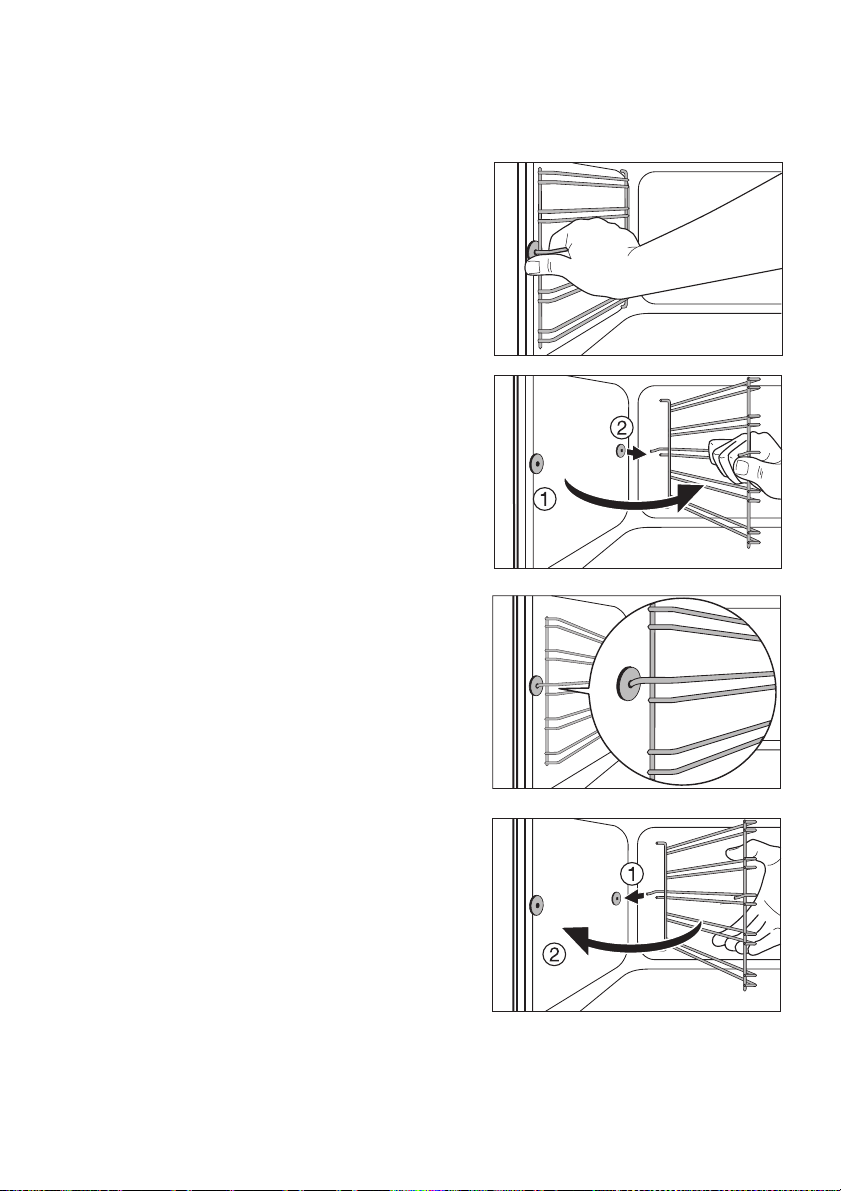
The shelf support rails on the left and right hand sides of the oven can be removed for cleaning the side walls.
Removing the shelf support rails
First pull the front of the rail away from
the oven wall (1) and then unhook at the
back (2).
Fitting the shelf support rails
3 Important! The rounded ends of the
guide rails must be pointing forwards!
To re-insert, first hook the rail into place
at the back (1) and then insert the front
and press into place (2).
31
Page 32
Oven Lighting
1 Warning: Risk of electric shock! Prior to changing the oven light bulb:
– Switch off the oven!
– Disconnect from the electricity supply.
3 Place a cloth on the oven floor to protect the oven light and glass cover.
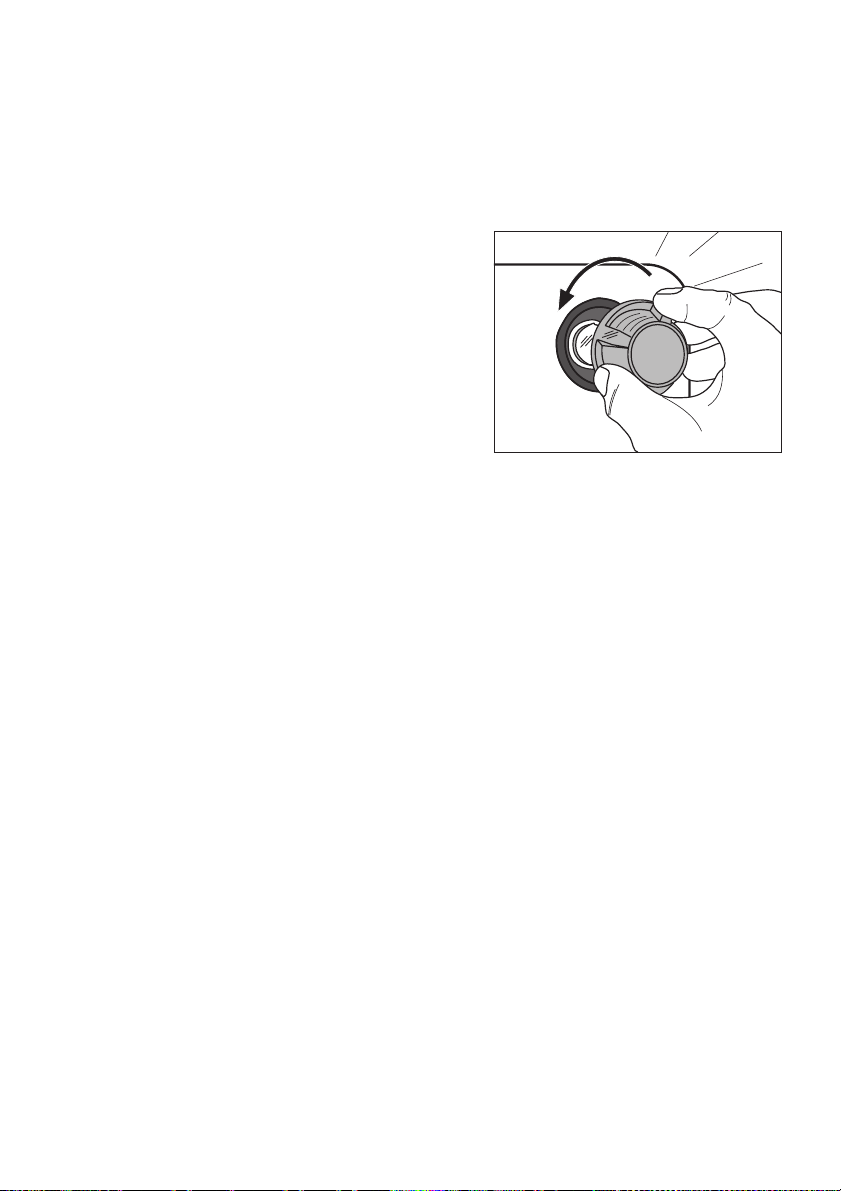
Changing the oven light bulb/cleaning
the glass cover
1. Remove the glass cover by turning it
anti-clockwise and then clean it.
2. If necessary: replace with
25 watt, 230 V, 300 °C heat-resistant
oven lighting.
3. Refit the glass cover.
32
Page 33
Oven Roof
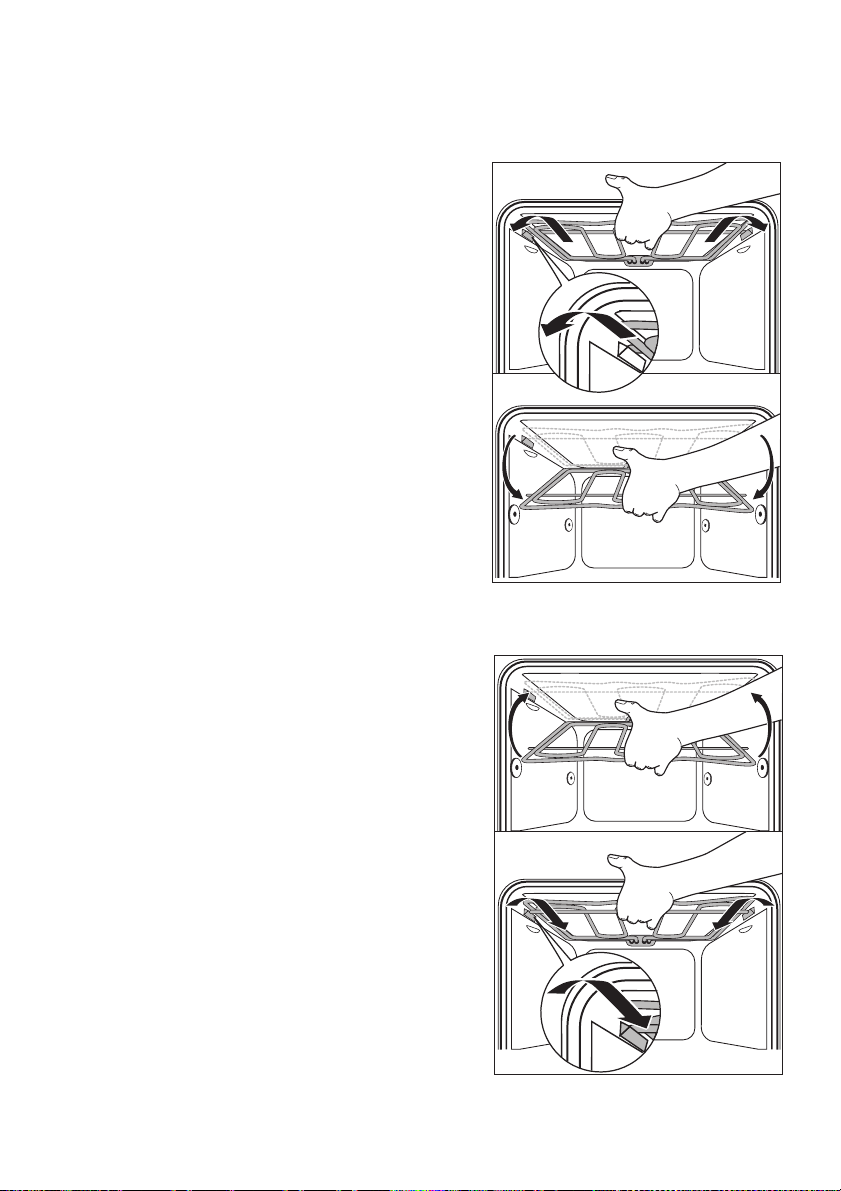
The upper heating element can be folded down to make it easier to clean
the oven roof.
Folding down the heating element
1 Warning: Only fold down the heating
element when the oven is switched off
and there is no risk of being burnt!
1. Remove the side shelf support rails.
2. Grip the heating element at the front
and pull it forwards and out over the
support lug on the inner wall of the oven.
3. The heating element will now fold
down.
1 Caution: Do not use force to press the
heating element down! The heating element might break.
Clean the oven roof
Repositioning the heating element
1. Move the heating element back up towards the oven roof.
2. Pull the heating element forwards
against the spring pressure and guide it
over the oven support lug.
3. Settle it onto the support.
4. Insert shelf support rail.
1 Important: The heating element must be
positioned correctly and securely on both
sides above the support lug on the inner
wall of the oven.
33
Page 34
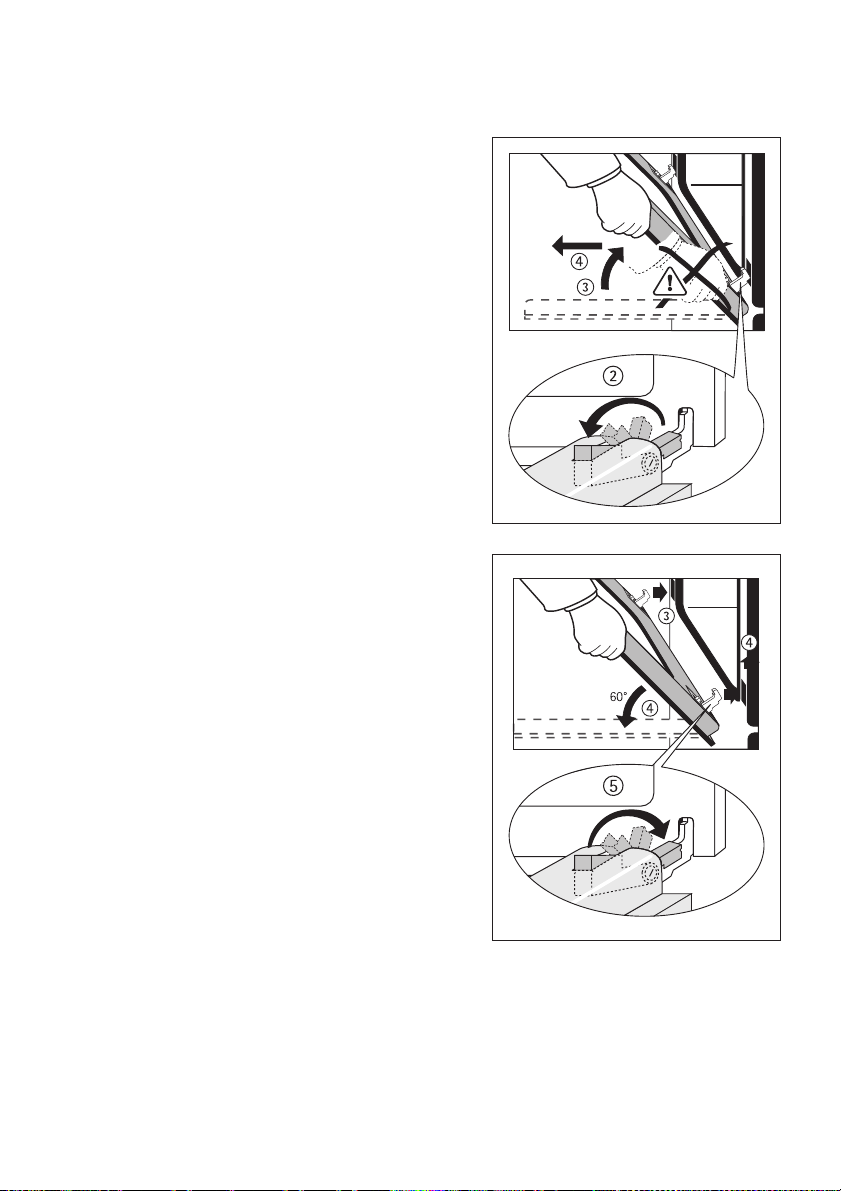
Oven Door
The door of your appliance may be removed for cleaning.
Removing the oven door
1. Open the oven door completely.
2. Completely fold back the clamping
levers on both door hinges.
3. Grip the oven door with both hands
and close it about 3/4 going past the
point of resistance.
4. Pull the door away from the oven (Caution: the door is heavy!)
5. Place the door, with the outer surface
downwards, on a soft, flat surface, (for
example on a blanket) to avoid scratches.
Hanging the oven door
1. From the side of the door on which the
handle is positioned, take hold of the
sides of the door with both hands.
2. Hold the door at an angle of approx.
60°.
3. Insert the door hinges as far as possible into the two slots on the right and
left at the bottom of the oven at the
same time.
4. Lift the door up until resistance is met
and then open it fully.
5. Fold the clamping levers on both door
hinges back into their original position.
6. Close the oven door
34
Page 35
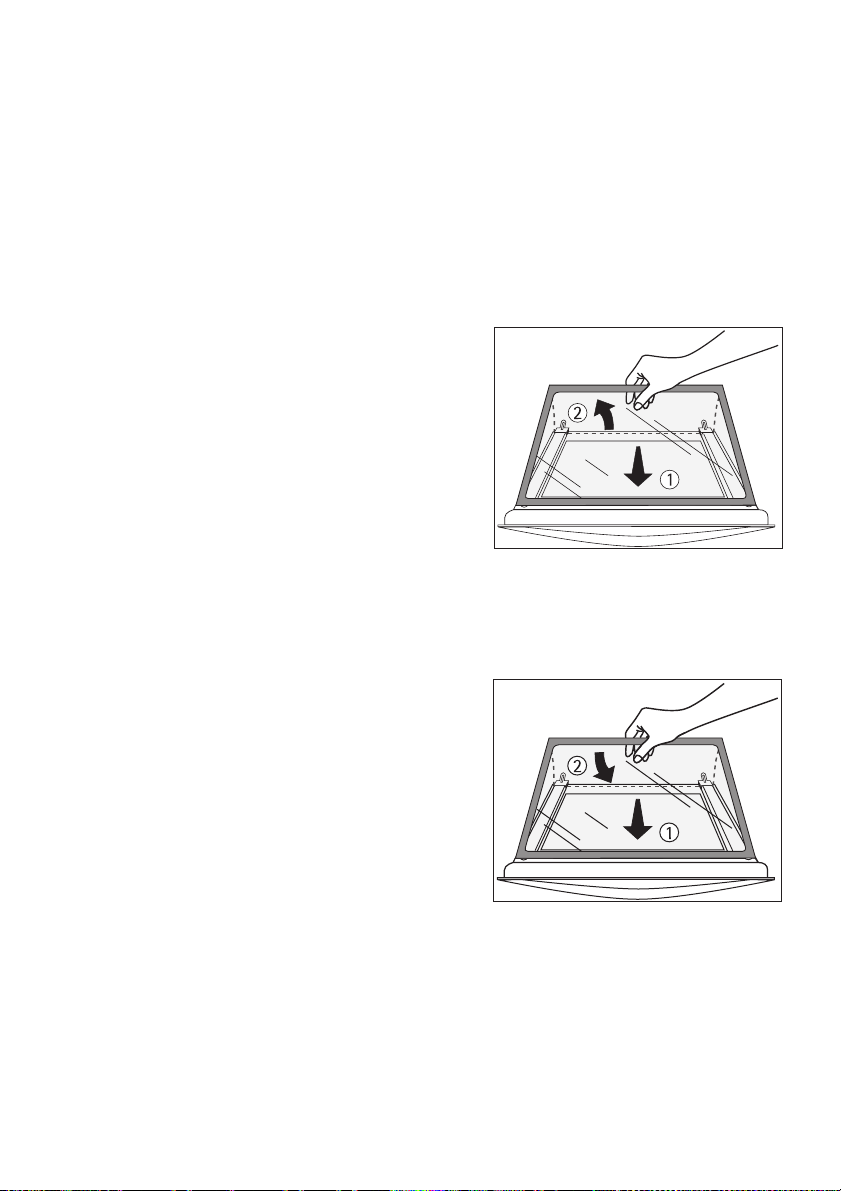
Oven Door Glass
The oven door is fitted with two glass panels mounted one behind the other.
The inner panel can be removed for cleaning.
1 Caution: the following steps must be performed only with the oven door re-
moved! If the glass is removed while the door is attached, the lighter
weight may cause it to spring up and cause injury.
1 Important! Rough handling of the glass, especially at the edges of the front
panel, may cause it to break.
Removing the glass from the door
1. Detach the door and, with the handle
downwards, place it on a soft, even
surface.
2. Grasp the top glass panel underneath,
and push it towards the door handle
against the pressure spring, until it
comes free (
3. Hold the panel gently underneath, and
slide it out (
Clean the glass panel
á ).
à ).
Inserting the glass to the door
1. Insert the panel at an angle from above
into the section of the door in which the
handle is located (
2. Lower the panel. Place the glass
against the pressure spring at the handle end, and in front of the retaining
frame at the bottom of the door, then
push it into the frame (
The glass panel must be firmly attached!
Re-hang the door to the oven.
á ).
à ).
35
Page 36
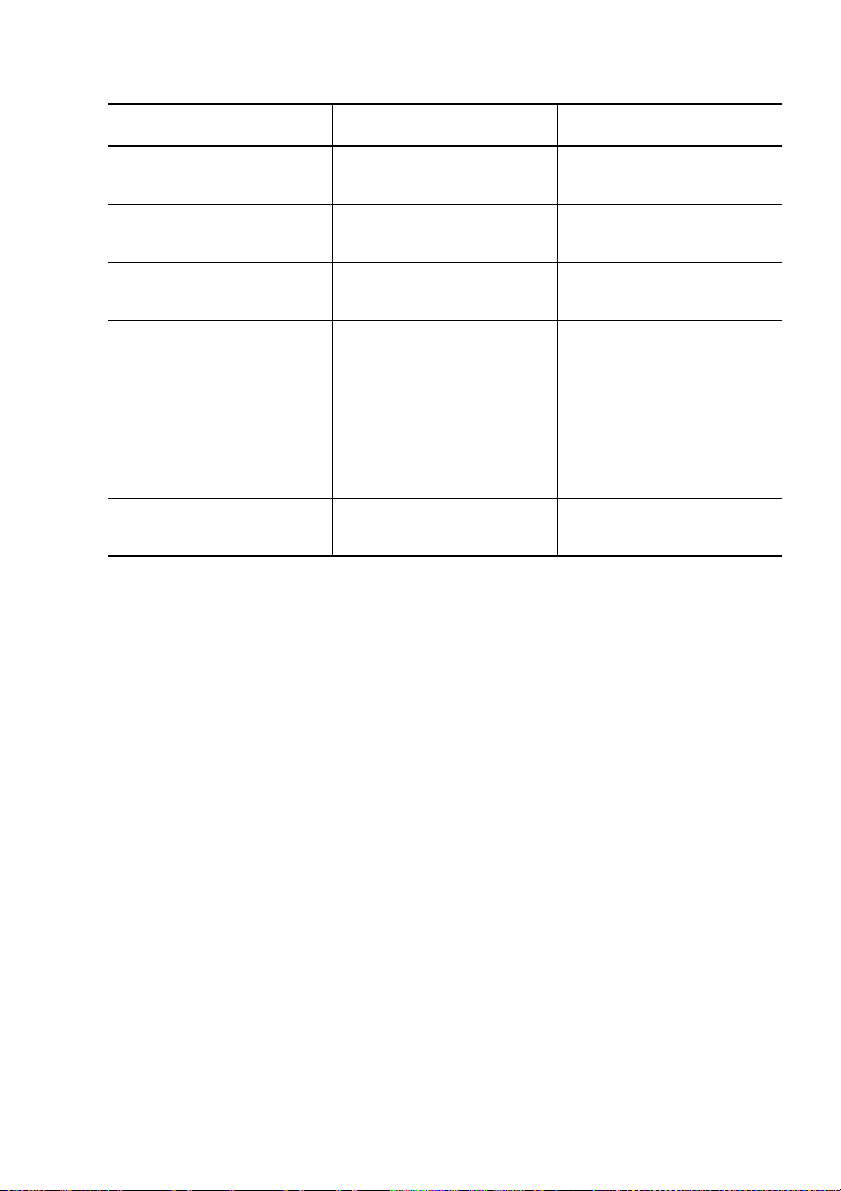
What to do if …
Symptom Possible cause Remedy
The oven does not heat
up.
The oven lighting does
not come on.
If you are unable to remedy the fault with the above assistance, please
contact your specialist dealer or Service Force Centre.
The oven has not been
switched on.
The time has not been
set.
The necessary settings
have not been made.
The circuit breaker (at
the household fuse
box) has tripped or the
fuse has blown.
The oven light bulb is
faulty.
Switch on the oven.
Set the time.
Check the settings.
Check the circuit breaker or fuse.
If the circuit breaker
trips or the fuse blows
several times, please
contact an approved
electrician.
Change the oven light
bulb.
1 Warning: Repairs to the appliance may only be carried out by approved
service engineers! Repairs carried out by inexperienced persons may cause
serious injury to the user.
If the appliance has been used incorrectly, the customer service engineer’s
visit or that of the specialist dealer will not be free of charge, even during the
warranty period.
3 Advice on cookers with metal fronts:
Because of the cooler surface at the front of the cooker, opening the
oven door during (or just after) baking or roasting may cause the glass
to steam up.
36
Page 37

Technical Data
Oven Interior Dimensions
Height x Width x Depth 31 cm x 41 cm x 41 cm
Capacity (usable capacity) 52 l
Regulations, Standards, Directives
This appliance meets the following standards:
• EN 60 335-1 and EN 60 335-2-6
relating to the safety of electrical appliances for household use and similar
purposes and
• EN 60350, or DIN 44546 / 44547 / 44548
relating to the operating features of electric cookers, hobs, ovens, and
grills for household use.
• EN 55014-2
• EN 55014
• EN 61000-3-2
• EN 61000-3-3
relating to basic requirements for electro-magnetic compatibility protection (EMC)
5 This appliance complies with the following EU Directives:
• 73/23/EWG dated 19.02.1973 (Low Voltage Directive)
• 89/336/EWG dated 03.05.1989 (EMC Directive including Amending Direc-
tive 92/31/EWG).
37
Page 38

Installation Instructions
1 Important: The new appliance may only be installed and connected by a
qualified electrician / competent person.
1 Please observe this instruction, otherwise the warranty will not cover any
damage that may occur.
Safety Instructions for the Installer
• A device must be provided in the electrical installation which allows the
appliance to be disconnected from the mains at all poles with a contact
opening width of at least 3 mm.
Suitable isolation devices are, for example, circuit breakers, fuses (screwtype fuses are to be removed from the holder), earth leakage trips and
contactors.
• The installation must guarantee shock protection.
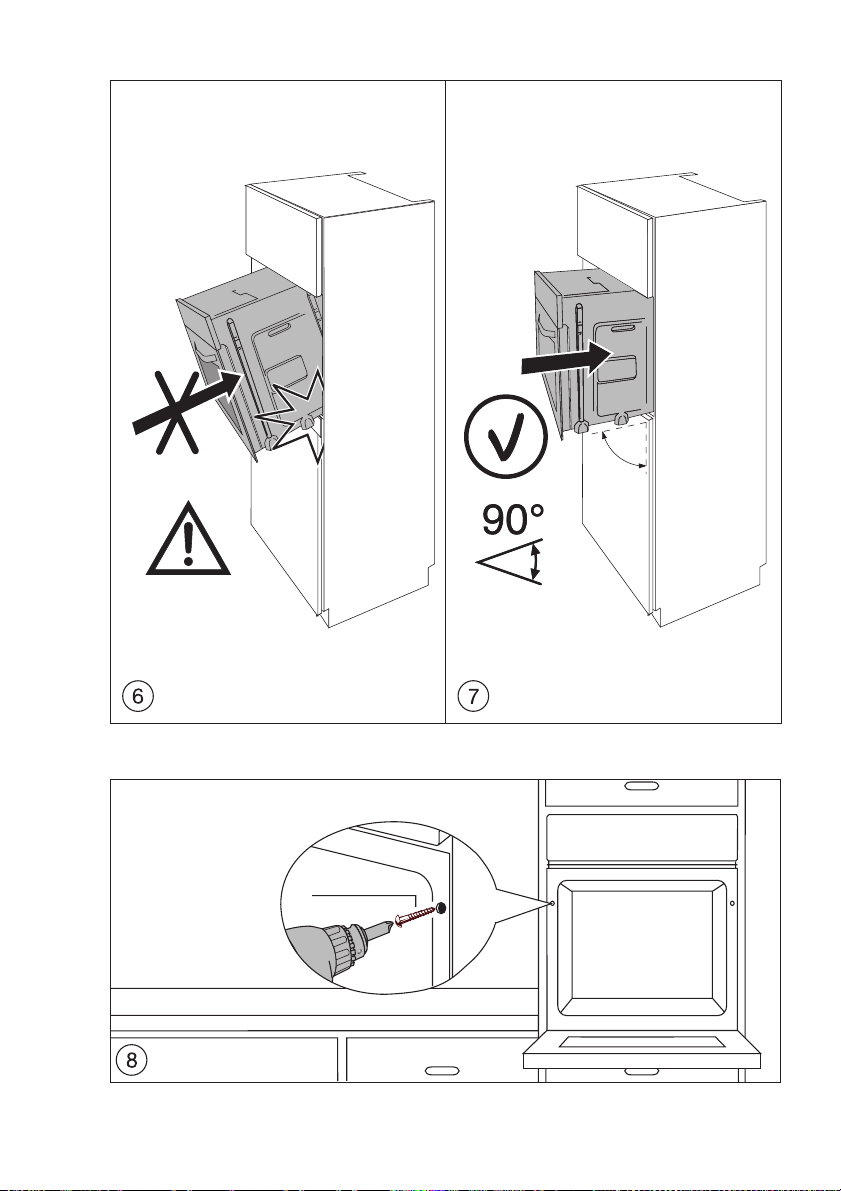
• The stability of the unit in which the appliance is fitted must satisfy the re-
quirements of DIN 68930.
• Built-in ovens and hobs are fitted with special connector systems. They
may only be combined with appliances with a matching system.
38
Page 39

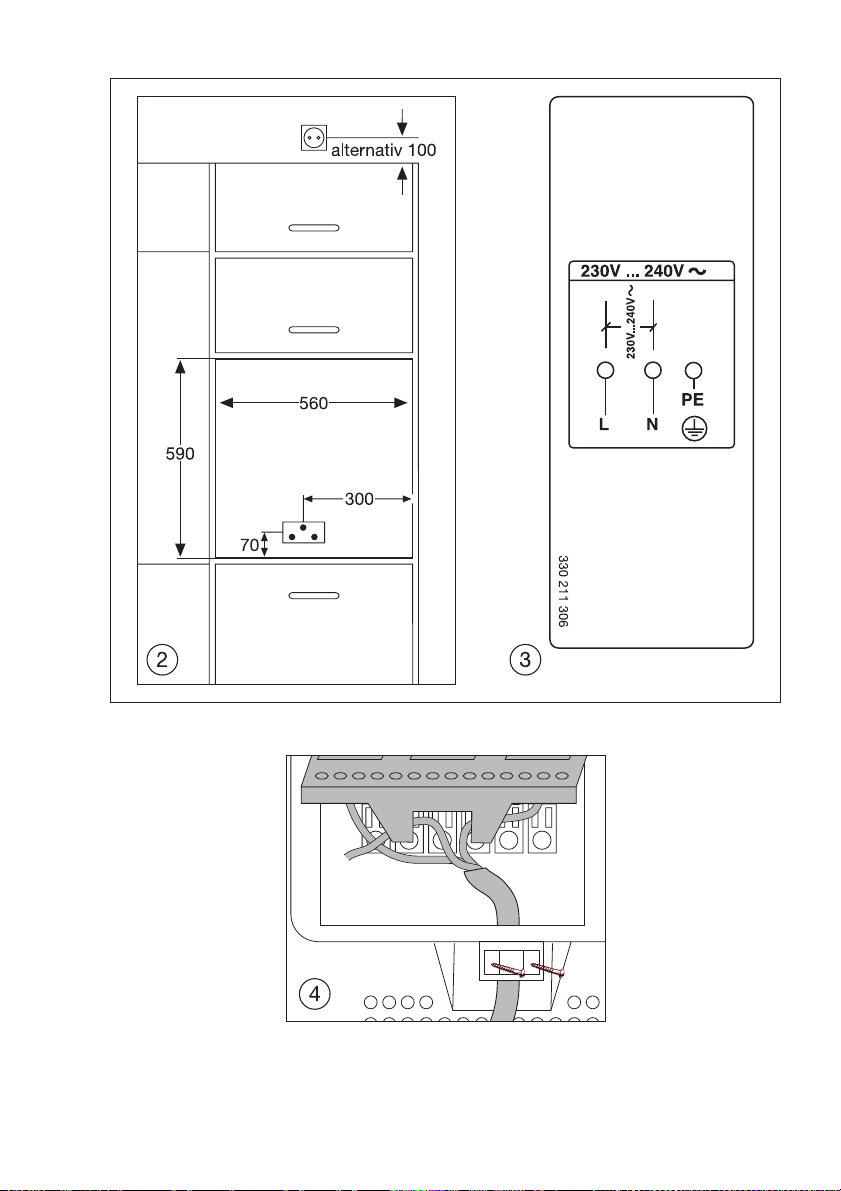
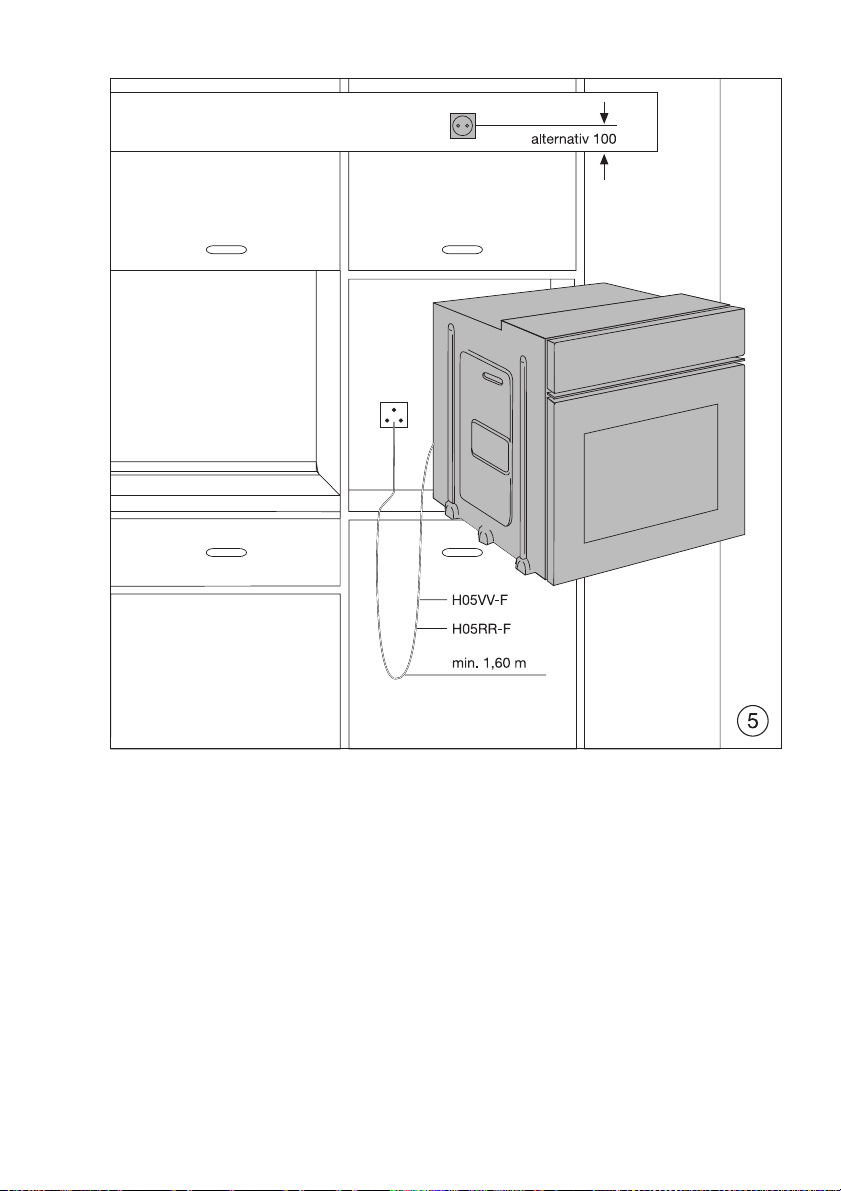
Electrical Connection
The oven is designed to be connected to 230-240V~(50Hz) electricity
supply.
The oven has an easily accessible terminal block which is marked as
follows:
Letter L - Live terminal
Letter N - Neutral terminal
E -Earth terminal
1 This oven must be earthed!
The cable used to connect the oven to the electrical supply must
comply to the specifications given below.
For UK use only
Connection
via
Cooker Control
Circuit
It is necessary that you install a double pole switch between the oven and
the electricity supply (mains), with a minimum gap of 3mm
between the switch contacts and of a type suitable for the required load in
compliance with the current regulations.
The switch must not break the yellow and green earth cable at any point.
Important
After installation and connecting, the cable must be placed so that it cannot
at any point reach a temperature of more than 50°C above the ambient temperature.
Before the oven is connected, check that the main fuse and the domestic
installation can support the load; and that the power supply is properly
earthed.
The manufacturer declines any responsibility should these safety
measures not be carried out.
Min. size
Cable/flex
2,5 mm
Cable/flex
type
2
PVC/PVC
twin and earth
Fuse
min: 15A
max: 20A
39
Page 40
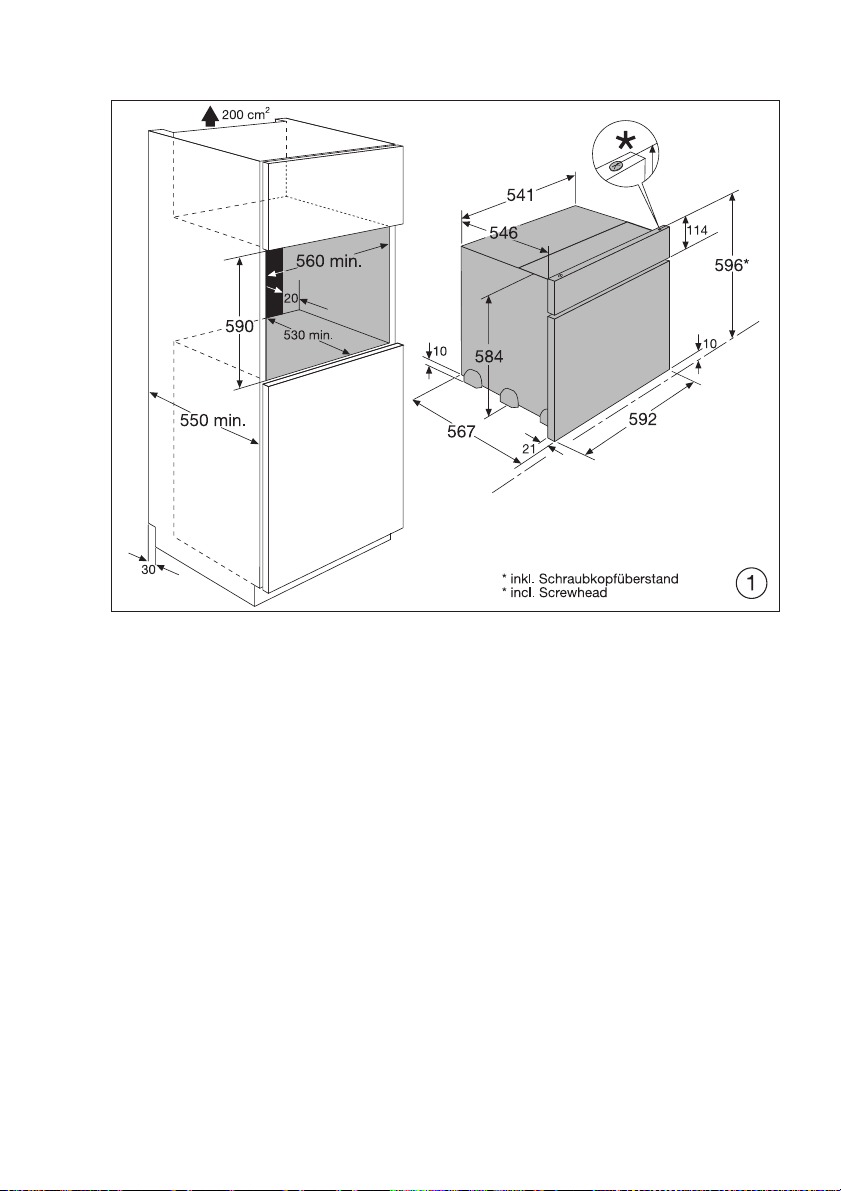
41
40
Page 41
Page 42
43
42
Page 43
3,5x25
Page 44

Warranty conditions
Standard guarantee conditions
We, Electrolux, undertake that if within 12 months of the date of the purchase this Electrolux appliance or any part thereof is proved to be defective
by reason only of faulty workmanship or materials, we will, at our option repair or replace the same FREE OF CHARGE for labour, materials or carriage
on condition that:
• The appliance has been correctly installed and used only on the electricity
supply stated on the rating plate.
• The appliance has been used for normal domestic purposes only, and in
accordance with the manufacturer’s instructions.
• The appliance has not been serviced, maintained, repaired, taken apart or
tampered with by any person not authorised by us.
• All service work under this guarantee must be undertaken by a Service
Force Centre.
• Any appliance or defective part replaced shall become the Company’s
property.
• This guarantee is in addition to your statutory and other legal rights.
Home visits are made between 8.30am and 5.30pm Monday to Friday. Visits
may be available outside these hours in which case a premium will be
charged.
Exclusions
This guarantee does not cover:
• Damage or calls resulting from transportation, improper use or neglect,
the replacement of any light bulbs or removable parts of glass or plastic.
• Costs incurred for calls to put right an appliance which is improperly installed or calls to appliances outside the United Kingdom.
• Appliances found to be in use within a commercial environment, plus
those which are subject to rental agreements.
• Products of Electrolux manufacture which are not marketed by Electrolux.
44
Page 45

European Guarantee
If you should move to another country within Europe then your guarantee
moves with you to your new home subject to the following qualifications:
• The guarantee starts from the date you first purchased your product.
• The guarantee is for the same period and to the same extent for labour
and parts as exists in the new country of use for this brand or range of
products.
• This guarantee relates to you and cannot be transferred to another user.
• Your new home is within the European Community (EC) or European Free
Trade Area.
• The product is installed and used in accordance with our instructions and
is only used domestically, i.e. a normal household.
• The product is installed taking into account regulations in your new country.
Before you move please contact your nearest Customer Care centre, listed
below, to give them details of your new home. They will then ensure that the
local Service Organisation is aware of your move and able to look after you
and your appliances.
France Senlis +33 (0) 3 44 62 20 13
Germany Nürnberg +49 (0) 800 234 7378
Italy Pordernone +39 (0) 800 11 7511
Sweden Stockholm +46 (0) 20 78 77 50
UK Luton +44 (0) 8705 950 950
45
Page 46

Index
A
Accessories . . . . . . . . . . . . . . . . . . . . . . . 8
C
Cleaning
accessories
initial cleaning
Oven Ceiling
Oven door glass
Oven light bulb
shelf support rails
Clock
Changing the time
Cook time
Countdown
Setting the time
setting the time
Clock Functions
Combination shelf
Control panel
Customer service
. . . . . . . . . . . . . . . . . . . . 30
. . . . . . . . . . . . . . . . . . 10
. . . . . . . . . . . . . . . . . . . 33
. . . . . . . . . . . . . . . . 35
. . . . . . . . . . . . . . . . . 32
. . . . . . . . . . . . . . . 31
. . . . . . . . . . . . . . . 17
. . . . . . . . . . . . . . . . . . . . . 15
. . . . . . . . . . . . . . . . . . . . 15
. . . . . . . . . . . . . . . . . 14
. . . . . . . . . . . . . . . . . 14
. . . . . . . . . . . . . . . . . . 14
. . . . . . . . . . . . . . . . . . 8
. . . . . . . . . . . . . . . . . . . . . 7
. . . . . . . . . . . . . . . . . 47
D
Defrost . . . . . . . . . . . . . . . . . . . . . . . . . 12
Defrosting
Description of the appliance
. . . . . . . . . . . . . . . . . . . . . . . 28
. . . . . . . . . . 7
G
Grill pan . . . . . . . . . . . . . . . . . . . . . . . . . . 8
Grill tray
. . . . . . . . . . . . . . . . . . . . . . . . . . 8
M
Manual operation . . . . . . . . . . . . . . . . . . 9
O
Oven
accessories
functions
light bulb
operating
. . . . . . . . . . . . . . . . . . . . . 8
. . . . . . . . . . . . . . . . . . . . . . 12
. . . . . . . . . . . . . . . . . . . . . . 32
. . . . . . . . . . . . . . . . . . . . . . 11
R
Repairs . . . . . . . . . . . . . . . . . . . . . . . . . . 5
S
Shelf support rails . . . . . . . . . . . . . . . . . 31
T
Tables and tips . . . . . . . . . . . . . . . . . . . 18
Time
. . . . . . . . . . . . . . . . . . . . . . . . . . . . 9
W
Warranty . . . . . . . . . . . . . . . . . . . . . . . . 44
What to do if ...
. . . . . . . . . . . . . . . . . . . 36
46
Page 47
Service and Spare Parts
If the event of your appliance requiring service, or if you wish to purchase
spare parts, please contact Service Force by telephoning:
0870 5 929 929
Your telephone call will be automatically routed to the Service Force Centre
covering your post code area.
For the address of your local Service Force Centre and further information
about Service Force, please visit the website at
www. serviceforce.co.uk
Before calling out an engineer, please ensure you have read the details under the heading „What to do if...“
When you contact the Service Force Centre you will need to give the following details:
1. Your name, address and post code.
2. Your telephone number.
3. Clear and concise details of the fault.
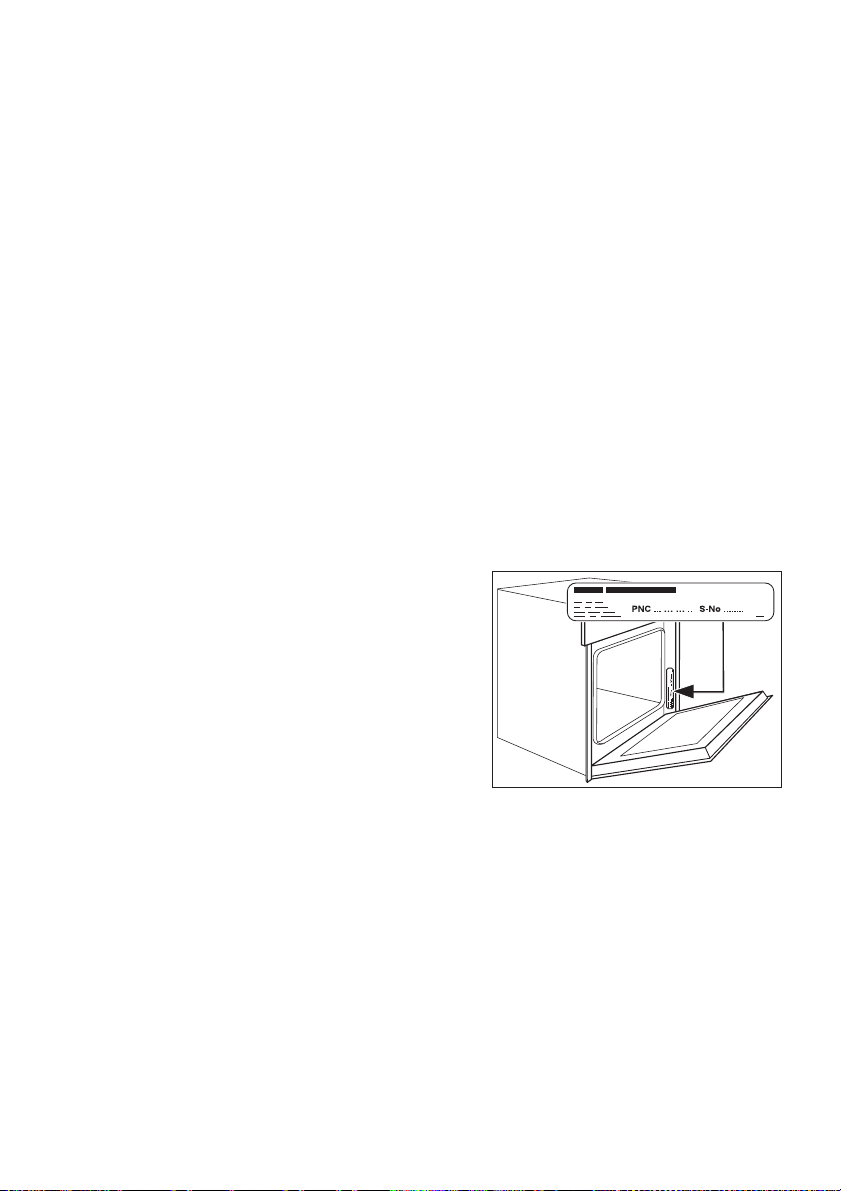
4. The model and serial number of the appliance (found on the rating
plate)
5. The purchase date.
Please note that a valid purchase receipt
or guarantee documentation is required
for in-guarantee service calls.
Customer Care
For general enquiries concerning your
Electrolux appliance, or for further information on Electrolux products please
contact our Customer Care Department
by letter or telephone at the address below or visit our website at
www.electrolux.co.uk.
Customer Care Department
Major Appliances
Electrolux
Addington Way
Luton
Bedfordshire, LU4 9QQ
Tel: 08705 350350 (*)
For Customer Service in the Republic of
Ireland please contact us at the address
below:
AEG/ Electrolux Group (Ire) Ltd
Long Mile Road/ Dublin 12
Republic of Ireland
Tel: +353 (0) 1 4090753
Email: [email protected]
(*) Calls may be recorded for training purposes
47
Page 48

©
Electrolux plc 2003
822 923 233-B-290605-07 Subject to change without notice
The Electrolux Group. The world´s No.1 choice.
The Electrolux Group is the world´s largest producer of powered appliances for kitchen, cleaning and outdoor
use. More than 55 million Electrolux Group products (such as refrigerators, cookers, washing machines,
vacuum cleaners, chain saws and lawn mowers) are sold each year to a value of approx. USD 14 billion in more
than 150 countries around the world.
 Loading...