

Page 1

user manual
Built-in oven
EOB53004
Page 2
2 electrolux
Electrolux. Thinking of you.
Share more of our thinking at www.electrolux.com
Contents
Safety information 2
Product description 3
Before first use 4
Daily use 4
Helpful hints and tips 6
Cooking tables 7
Subject to change without notice
Care and cleaning 8
What to do if… 11
Installation 12
Electrical connection 13
Environment concerns 13
After sales service 13
Safety information
For your safety and correct operation of
the appliance, read this manual carefully
before installation and use. Always keep
these instructions with the appliance
even if you move or sell it. Users must
fully know the operation and safety features of the appliance.
Correct use
• Do not leave the appliance unattended
during operation.
• The appliance is designed exclusively for
domestic use.
• The appliance must not be used as a work
surface or as a storage surface.
• Do not place or store flammable liquids,
highly inflammable materials or fusible objects (e.g. plastic film, plastic, aluminium) in
or near the appliance.
• Watch out when connecting electric appliances to sockets nearby. Do not allow
connecting leads to come into contact
with or to catch beneath the hot oven door.
• Do not keep moist dishes and food in the
oven after finishing the cooking as the
moist can damage the enamel or get into
the units.
• Do not do repairs yourself to prevent injury
and damage to the appliance. Always contact your local Service Centre.
• Do not use harsh abrasive or sharp metal
scrappers to clean the oven door glass
since they can scratch the surface, which
may result in shattering of the glass.
Note on enamel coating
Changes in the colour of the oven enamel coating as a result of use do not
affect the appliance suitability for normal
and correct use. They therefore do not
constitute a defect in the sense of the
warranty law.
Child safety
• Only adults can use this appliance. Children must get supervision to make sure
that they do not play with the appliance.
• Keep all packaging away from children.
There is a risk of suffocation.
• Keep children away from the appliance
when it operates. Reachable parts can become very hot during use. There is risk of
burns.
General safety
• This appliance is not intended for use by
persons (including children) with reduced
physical, sensory or mental capabilities, or
lack of experience and knowledge, unless
they have been given supervision or instruction concerning use of the appliance
by a person responsible for their safety.
• The inner side of the appliance becomes
very hot during use. Be careful and do not
touch any heating elements. There is risk
of burns.
• Always stand back from the appliance
when opening the oven door during cooking or at the end of it to allow any build up
of steam or heat to release.
Installation
• Make sure that the appliance is not damaged because of transport. Do not connect a damaged appliance. If necessary,
contact the supplier.
Page 3
electrolux 3
• Only an authorised service engineer can
repair this appliance. Use only original
spare parts.
• Built-in appliances can only be used after
they are built-in to suitable built-in units
and work surfaces that meet standards.
• Do not change the specifications or modify
this product. Risk of injury and damage to
the appliance.
Warning! Carefully obey the
instructions for electrical connections.
Product description
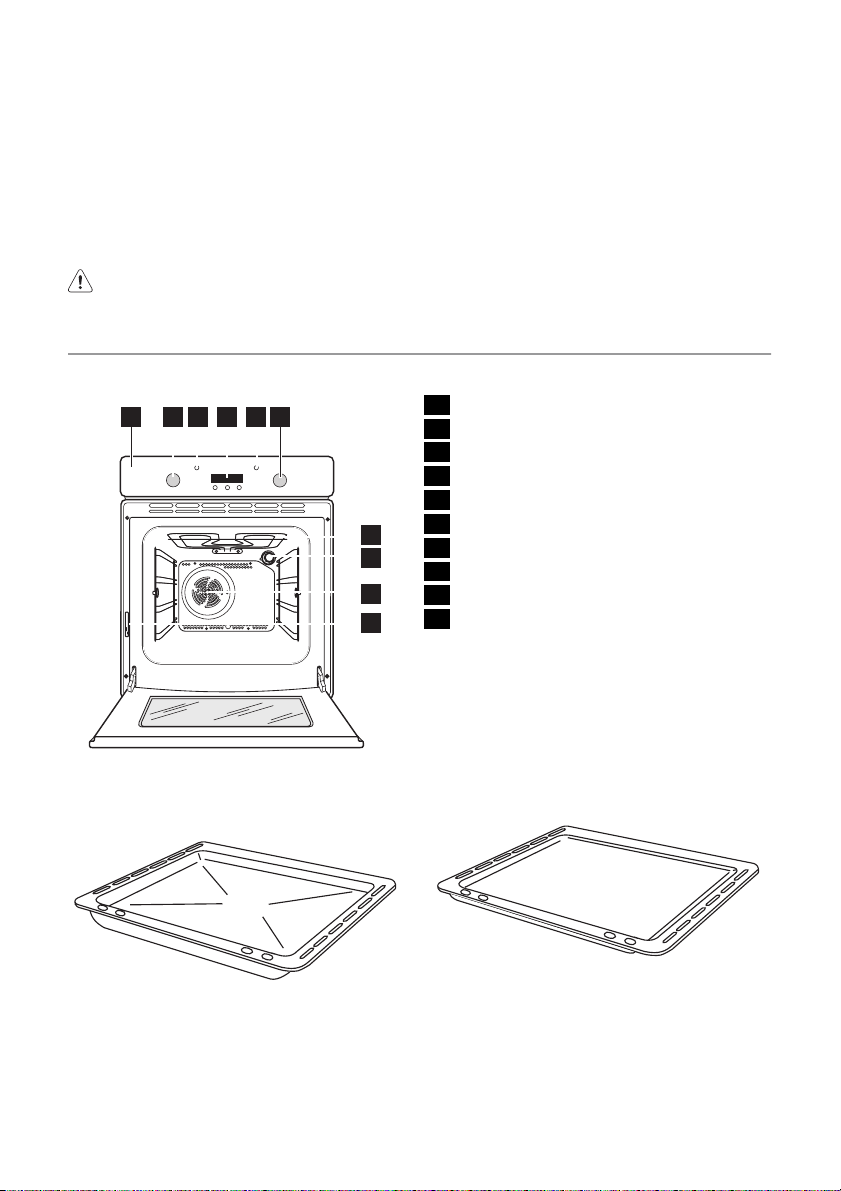
General overview
1
3
4
2
56
7
8
9
10
Information on acrylamides
Important! According to the latest scientific
knowledge, intensive browning of food,
especially in products containing starch, can
constitute a health risk due to acrylamides.
Therefore, we recommend cooking at the
lowest possible temperatures and not
browning foods too much.
1 Control panel
2 Temperature control knob
3 Temperature indicator
4 Display
5 Power indicator
6 Control knob for oven function
7 Grill
8 Oven lamp
9 Fan
10 Rating plate
Accessories
Dripping pan
Baking tray
Page 4
4 electrolux
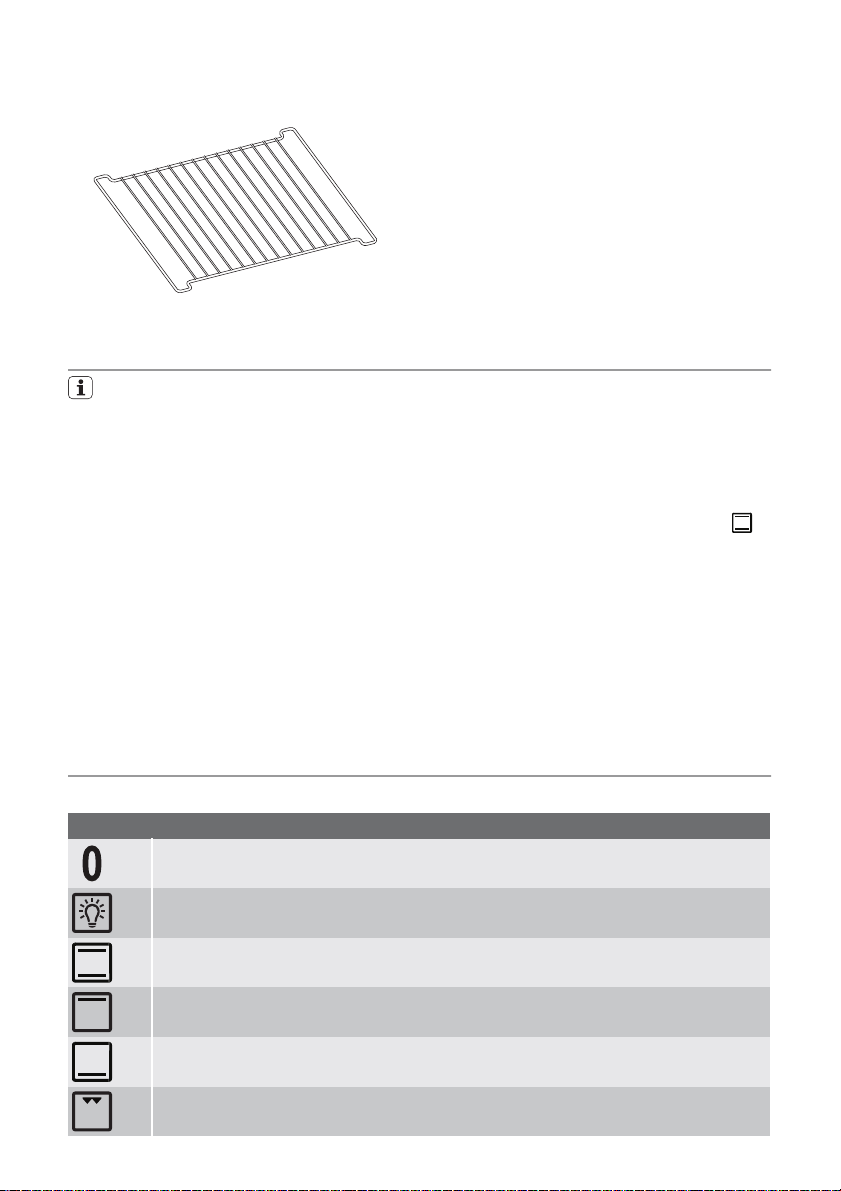
Oven shelf
Before first use
Remove all packaging, both inside and
outside the oven, before using the appliance. Do not remove the rating plate.
When you connect the appliance to the electrical supply or in case of a power cut, the
Time function indicator flashes automatically.
You have to set the time of the day. If the time
of the day is not set the appliance does not
work.
Important! To open the oven door, always
catch the handle in the centre.
Setting the time
To set the current time use " + " or " - " but-
ton. After approx. 5 seconds the flashing
stops and the clock displays the time of the
day set.
Initial cleaning
Clean the appliance before first use. Clean
the accessories and the oven interior with a
soft cloth with warm water and soap.
After that preheat the oven up without food.
Preheating
Turn the oven function control knob to
and run the oven for 45 minutes at maximum
temperature, to burn off any residue from the
cavity surface. Accessories can become hotter than in normal use. During this period an
odour can be emitted. This is normal. Make
sure the room is well ventilated.
Daily use
Oven functions
OFF position
Oven light - lights up without any cooking function.
Conventional cooking - heats both from the top and bottom element. To bake and
roast on one oven level.
Top heating element - heats only from the top of the oven. To finish cooked dishes.
Bottom heating element - heats only from the bottom of the oven. To bake cakes with
crispy or crusty bases.
Inner grill - to grill flat food items in small quantities in the middle of the shelf. To make
toasts.
Symbols
Page 5
electrolux 5
Symbols
Full grill - the full grill element is on. To grill flat food items in large quantities. To make
toasts.
Fan cooking - to roast or roast and bake the food that requires the same cooking
temperature, using more than one shelf, without flavour transference.
Defrost - thaws frozen food. The temperature control knob must be on off position.
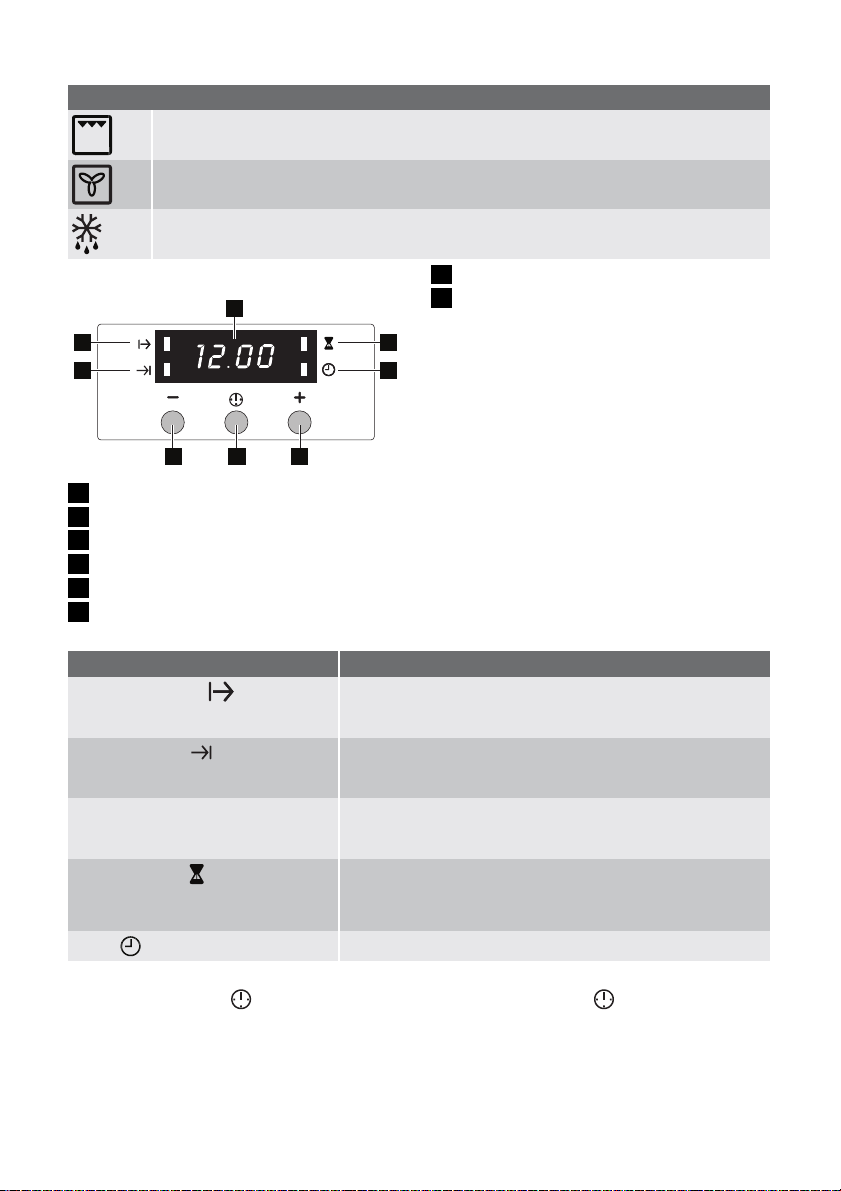
Display
4
5
6
12 3
7
8
1 Selector button
2 Decreasing control button
3 Increasing control button
4 Display
5 Cooking duration indicator
6 End of cooking indicator
Clock functions
Function Description
Cooking duration
End of cooking
Cooking duration and End of
cooking combined .
Minute minder
Clock
To set how long the oven is to be in use.
When the time elapses, an audible signal sounds. The oven
switches off automatically.
To set when the oven is to switch off.
When the time elapses, an audible signal sounds. The oven
switches off automatically.
To set delayed start of the appliance.
The oven switches on automatically at the time calculated and
switches off when the set Cooking duration time elapses.
To set a countdown. A signal sounds when the time elapses.
Push any button to stop the signal sound.
Important! Minute minder does not switch the oven off.
To set the time.
Setting the clock function
Push Selector button
again and again until
the function indicator shows the right function. Push " + " and " - " buttons to set desired
cooking time.
7 Minute minder indicator
8 Time of day indicator
Switching the appliance on
Set the oven function and the temperature.
Setting the oven function
Turn the control knob for oven functions (refer to "Product description") clockwise .
Setting the temperature
Turn the temperature control knob (refer to
"Product description") clockwise. You can
set the temperature between 50 °C and 250
°C.
Switching the appliance off
Turn the temperature and oven functions
control knobs to the off position.
Cancelling the clock function
Push Selector button again and again until
the function indicator shows the right function and push " - " button. After few seconds
the clock function goes out.
Page 6

6 electrolux
Switching off the display
If you switch off the display, you decrease energy consumption.
You can switch off the display if no other
function is set.
1. Push " + " and " - " at the same time and
hold for 5 seconds.
2. To switch the display on again, push any
button.
Power indicator
The power indicator (refer to "Product description") comes on when the control knob
for oven function is set.
Temperature indicator
The temperature indicator (refer to "Product
description") comes on when the oven heats
up. It goes off when the oven reaches the
correct temperature. It then cycles on and off
to show the temperature adjusts.
Helpful hints and tips
Warning! Always close the oven door
when you cook, even while grilling.
Do not put baking trays, pots, etc. on the
oven floor to prevent damage to the
oven enamel.
Be careful when you remove or install the
accessories to prevent damage to the
oven enamel.
• The oven has four shelf levels. Count the
shelf levels from the bottom of the oven
floor.
• You can cook different dishes on two levels at the same time. Place the shelves on
level 1 and 3.
• The oven is supplied with a special system
which circulates the air and constantly recycles the steam. This system allows to
cook in a steamy environment and keep
the food soft inside and crusty outside. It
reduces the cooking time and energy consumption to a minimum.
• Moisture can condense in the appliance or
on the glass doors. This is normal. Always
stand back form the appliance when you
open the oven door while cooking. To reduce condensation, run the oven for 10
minutes before cooking.
The cooling fan
The cooling fan (not visible) keeps the front
panel, the knobs and the oven door handle
cool. When the oven is on the fan switches
on automatically. Warm air blows out
through the air vents near the oven door handle. To keep the controls cool, the cooling fan
can still run after the oven is off.
Safety thermostat
To prevent dangerous overheating (through
incorrect use of the appliance or defective
components), the oven is fitted with a safety
thermostat, which interrupts the power supply. The oven switches back on again automatically, when the temperature drops.
Should the safety thermostat fail to work, do
not attempt to fix it yourself. Please contact
After Sales Service.
• Wipe away moisture after every use of the
appliance.
Baking cakes
• The best temperature for baking cakes is
between 150 °C and 200 °C.
• Preheat the oven for approximately 10 minutes before baking.
• Do not open the oven door before 3/4 of
the set cooking time is up.
• If you use two baking trays at the same
time, keep one level empty between them.
Cooking meat and fish
• Do not cook meat with weight below 1 kg.
Cooking too small quantities makes the
meat too dry.
• To keep the red meat well cooked outside
and juicy inside set the temperature between 200 °C-250 °C.
• For white meat, poultry and fish set the
temperature between 150°C-175°C.
• Use a dripping pan for very fat food to prevent the oven from stains that can be permanent.
• Leave the meat for approximately 15 minutes before carving so that the juice does
not seep out.
Page 7
electrolux 7
• To avoid too much smoke in the oven during roasting, pour a little water into the
dripping pan.
• To avoid too much steam in the oven during roasting, add a little bit more after the
Initially, monitor the performance when you
cook. Find the best settings (heat setting,
cooking time, etc.) for your cookware, recipes and quantities when you use this appliance.
original amount dries up.
Cooking times
Cooking times depend on the type of food,
its consistency, and volume.
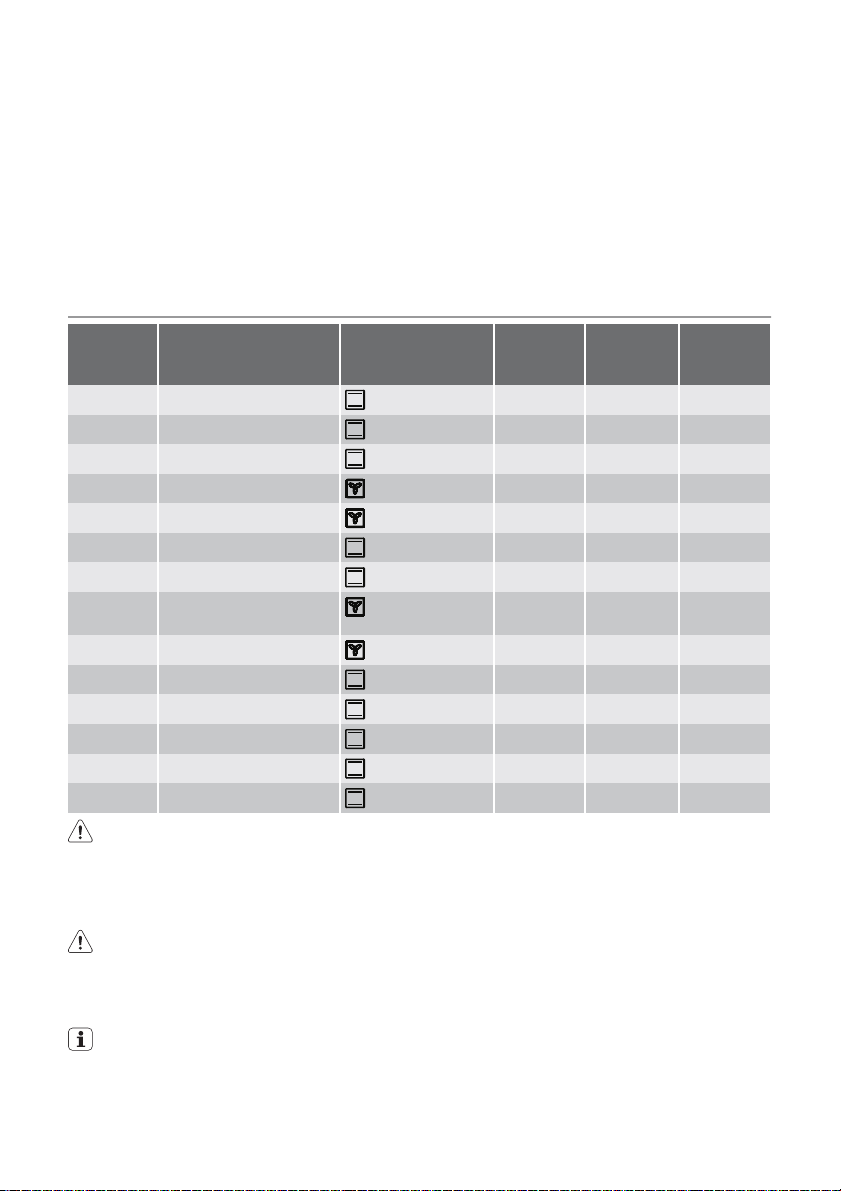
Cooking tables
Weight
(kg)
1 Pork / lamb 2 180 110-130
1 Veal / Beaf 2 190 70-100
1,2 Chicken/Rabbit 2 190 70-80
1,5 Duck 1 160 120-150
3 Goose 1 160 150-200
4 Turkey 1 180 210-240
1 Fish 2 190 30-40
1 Stuffed Pepperoni To-
matos/Roasted Potatos
Instant cakes 2 160 45-55
1 Pies 2 160 80-100
Biscuits 3 140 25-35
2 Lasagne 2 180 45-60
1 White Bread 2 190 50-60
1 Pizza 1 190 25-35
Warning! Do not line the oven with
aluminium foil and do not place a
roasting pan or baking tray on the floor.
Build-up heat can damage the oven
enamel.
Warning! Always cook with the oven
door closed, even while grilling. Be
Food Oven Function Level Oven
tempera-
ture (°C)
2 190 50-70
careful when opening the drop down
oven door. Do not allow it to fall open support the door using the door handle,
until it is fully open.
Cooking
Time
(min)
Grilling
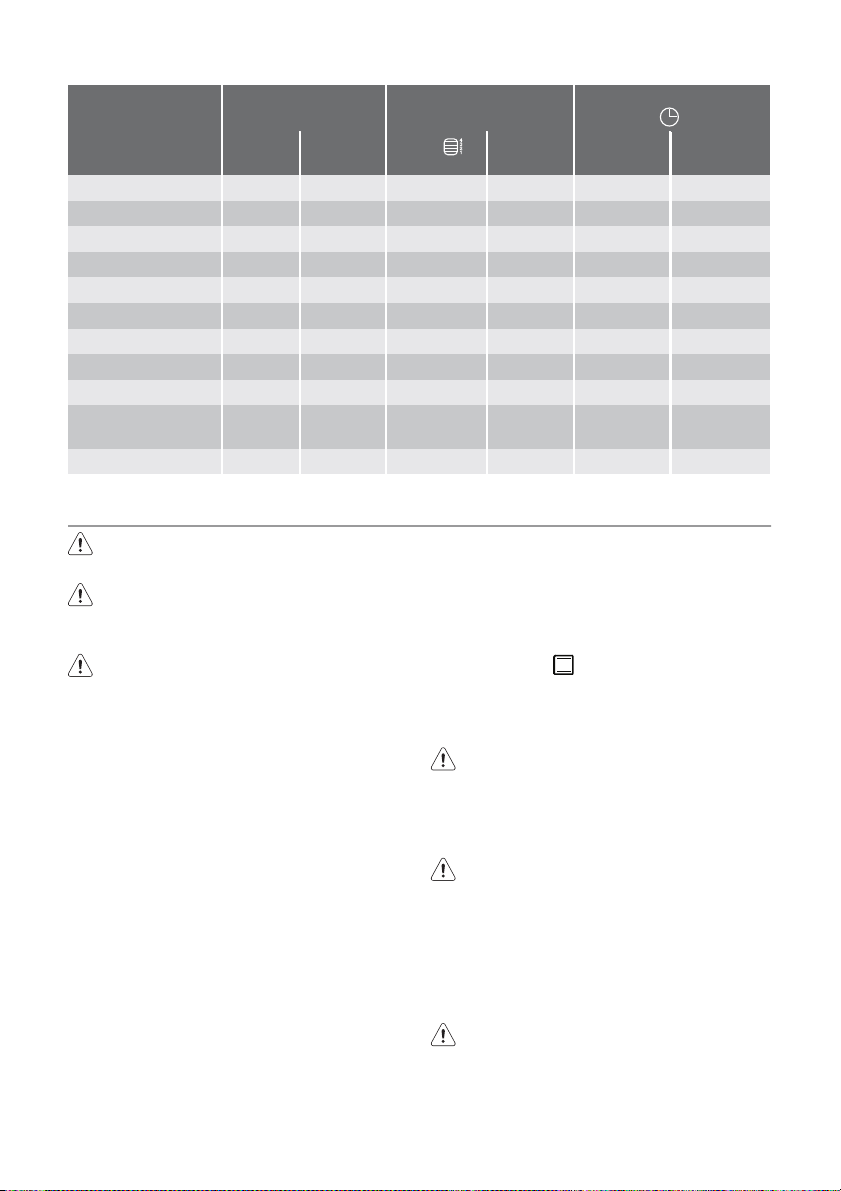
Preheat the empty oven for 10 minutes,
before cooking.
Page 8
8 electrolux
Quantity Grilling Cooking time in minutes
TYPE OF DISH Pieces g
Fillet steaks 4 800 3 250 12-15 12-14
Beef steaks 4 600 3 250 10-12 6-8
Sausages 8 / 3 250 12-15 10-12
Pork chops 4 600 3 250 12-16 12-14
Chicken (cut in 2) 2 1000 3 250 30-35 25-30
Kebabs 4 / 3 250 10-15 10-12
Breast of chicken 4 400 3 250 12-15 12-14
Hamburger 6 600 3 250 20-30
Fish Fillet 4 400 3 250 12-14 10-12
Toasted sandwiches
Toast 4-6 / 3 250 2-4 2-3
4-6 / 3 250 5-7 /
level
Temp.
(°C)
1st side 2nd side
Care and cleaning
Warning! Switch the appliance off and
let it cool down before you clean it.
Warning! For safety reasons, do not
clean the appliance with steam blasters
or high-pressure cleaners.
Warning! Keep the appliance clean at
all times. A build-up of fats or other
foodstuffs can cause a fire, especially in
the dripping pan.
Outside of the appliance
• Clean the front of the appliance with a soft
cloth and warm water with soap.
• For metal fronts, use normal cleaning
agents.
• Do not use scouring agents and abrasive
sponges.
Oven interior
• Turn the oven lamp on before cleaning.
• Clean the oven with a soft cloth with warm
water and soap and leave it to dry .
Accessories
Clean all slide-in units with a soft cloth with
warm water and soap (shelf, baking tray,
shelf support rails etc.) after each use and dry
well. Soak briefly to make them easier to
clean.
Care of catalytic liners
The top and the walls of the oven have catalytic enamel on them. Catalytic enamel
eradicate oil and fat which collects when you
cook.
To clean the oven cavity set the oven function
control knob to
and run the oven for 45
minutes at the maximum temperature.
For good performance of the catalytic liners
follow this procedure once a week.
Warning! Keep children away when you
clean the oven cavity with high
temperature. The oven surface
becomes very hot and there is risk of
burns.
Warning! Do not attempt to clean
catalytic enamel.
Cleaning the oven door
The oven door has two panels of glass installed one behind the other. To make the
cleaning easier remove the oven door and
the internal panel of glass.
Warning! The oven door can close if
you try to remove the internal panel of
glass when the door is still assembled.
Page 9
Warning! Make sure that the glass
panels are cool, before you clean the
glass door. There is risk that the glass
breaks.
Warning! When the door glass panels
are damaged or have scratches, the
glass becomes weak and can break. To
prevent this you must replace them. For
more instructions, contact your local
Service Centre.
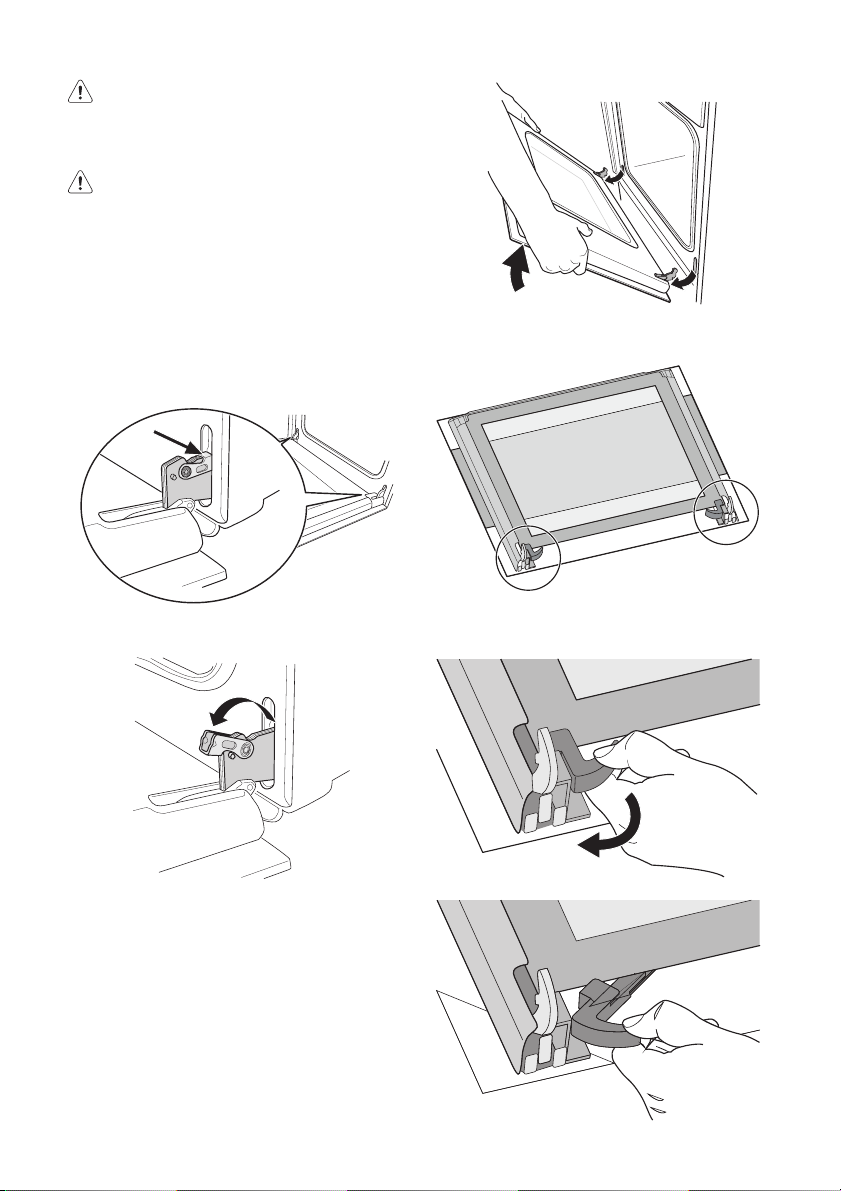
Removing the oven door and the glass
panel
1. Open the door fully and hold the two door
hinges.
2. Lift and turn the levers on the two hinges.
electrolux 9
4. Place the door on a stable surface protected by a soft cloth.
5. Release the locking system to remove the
internal panel of glass.
3. Close the oven door to the first opening
position (approx. 45°). Then pull forward
and remove it from its seat.
Page 10
10 electrolux
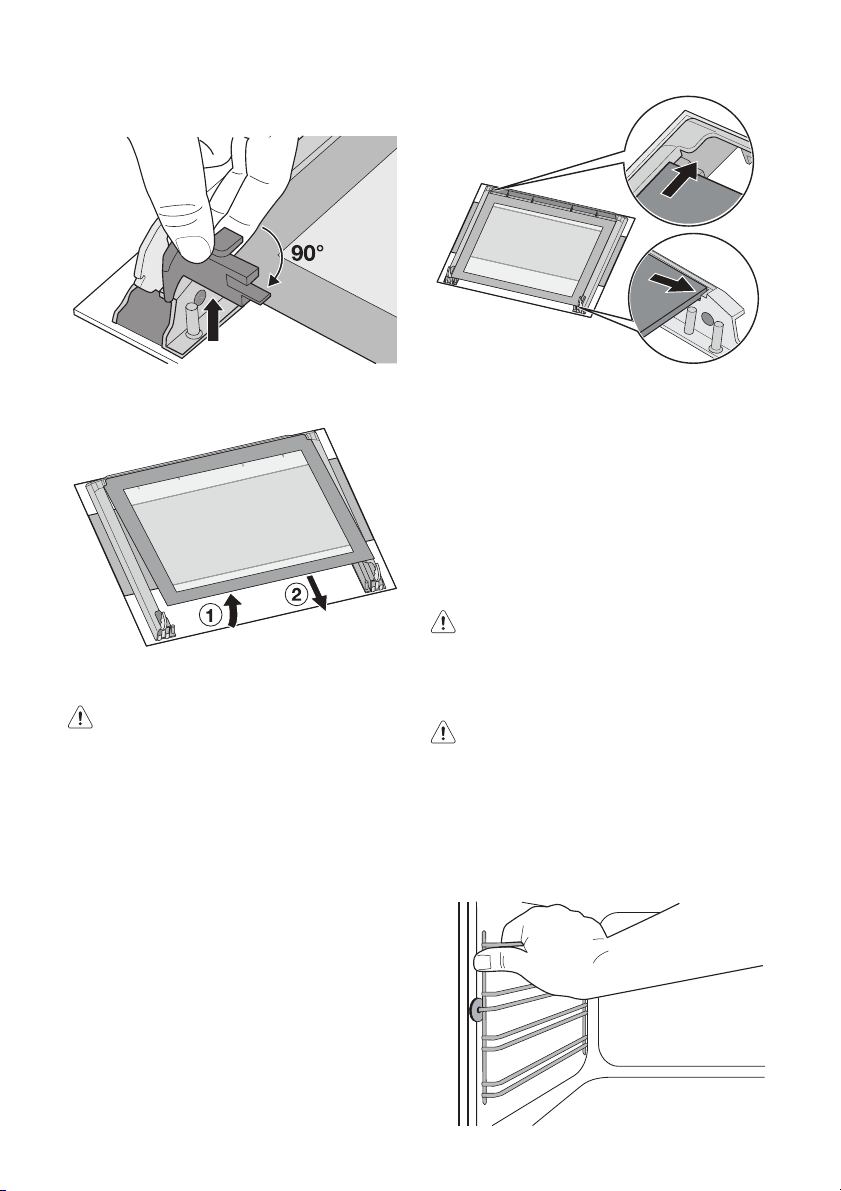
6. Turn 2 fasteners by 90° and remove them
from their seats.
7. Carefully lift and remove the panel of
glass.
Clean the glass panel with water and soap.
Dry it carefully.
Warning! Only clean the glass panel
with water and a soap. Abrasive
cleaning agents, stain removers and
sharp objects (e.g. knives or scrapers)
can cause damage to the glass.
Inserting the door and the glass panel
When the cleaning procedure is completed,
insert the glass panel and the oven door. To
do so, do the steps in reverse.
The decorated internal panel marked with a
decorative frame must be assembled with
the screen-printing outside of the oven. The
panel of glass is assembled correctly if you
do not feel any roughness when you pass
your fingers over the surface.
Insert the internal panel of glass into the right
seats as on the picture.
Models in stainless steel or aluminium
Clean the oven door and control panel in
stainless steel or aluminium only with a moist
sponge. After that dry it carefully with a soft
cloth. Do not use steel wool, acids or cleaning agents as they can damage the surface.
Removable shelf runners and catalytic
panels
To clean the oven cavity remove the shelf
runners and catalytic panels.
Warning! Be careful when you remove
the shelf runners. The catalytic panels
are not attached to the oven cavity and
can fall out when you remove the shelf
runners.
Warning! Before maintenance, make
sure that the appliance is cool. There is
risk of burns because of residual heat.
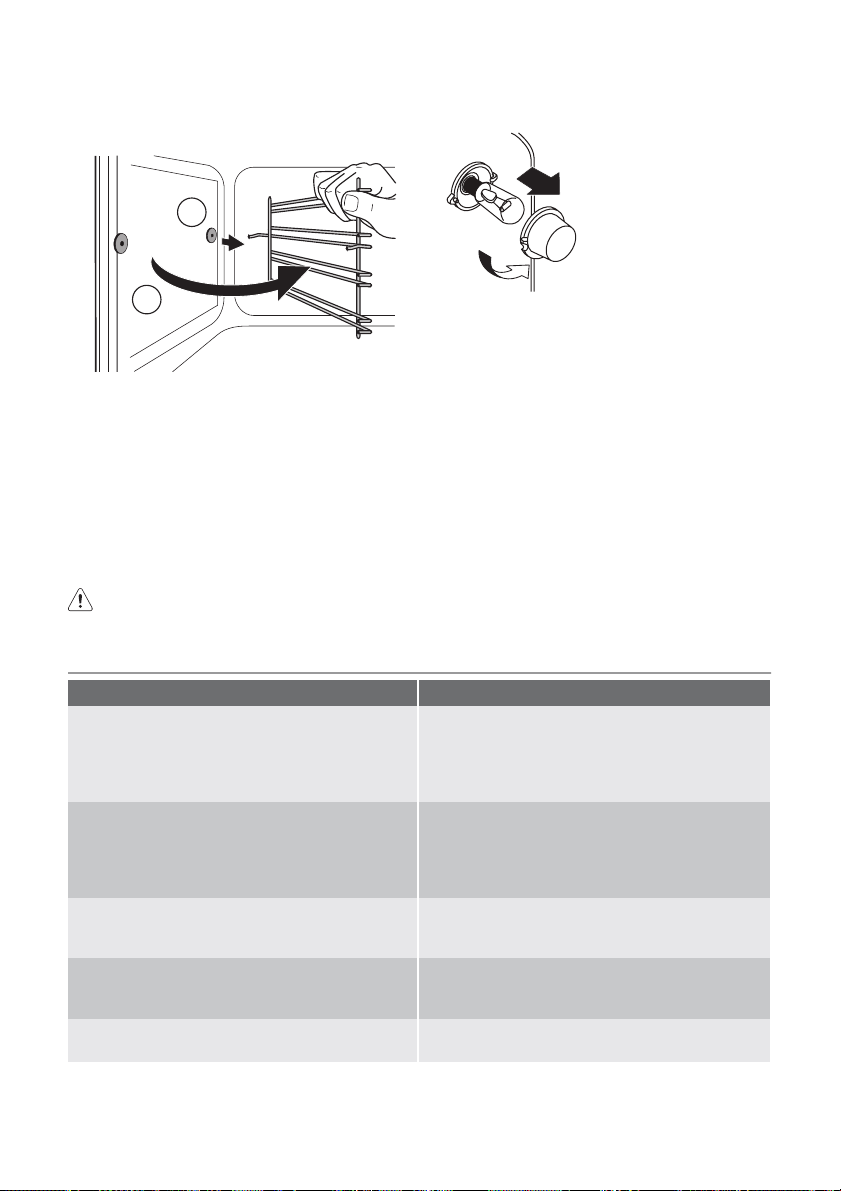
Removing the side rails
1. Use one hand to pull the front part of the
shelf runners. Hold the shelf runners and
catalytic panel in place with the other
hand.
Page 11
electrolux 11
2. Hold the shelf runners and catalytic panel
in place and at the same time unhook the
switch off the appliance and disconnect
it from the electrical supply.
shelf runners at the back.
2
1
1. Turn the glass cover anti - clockwise and
remove it. Clean the glass cover.
2. If necessary, replace the old oven lamp
with a 15/25 watt, 230V (50Hz), 300 °C
Clean the shelf runners with warm water and
soap. Wipe it with a soft cloth. Never use
abrasive products which can damage it.
heat resistant oven lamp (Connection
type: E14).
3. Refit the glass cover.
When you finish cleaning put the shelf runners and catalytic panels back. To put the
shelf runners and catalytic panels back, follow the procedure in reverse.
Changing the oven lamp and cleaning
the glass cover
Warning! Before you change the oven
lamp (refer to "Product description"),
What to do if…
Problem Solution of the problem
The oven does not operate. Check if:
The oven temperature light does not come on. Set:
The oven light is not working. • Set a function with the control knob for oven
Steam and condensation settle on the food and
in the oven cavity.
“12.00” appears on the display and the clock LED
is flashing.
If there is a fault, first try to find a solution to
the problem yourself. If you cannot find a sol-
• the oven function and temperature are set.
• the appliance is correctly connected and the
mains supply to the oven is ON.
• the time of day is set..
• the temperature with the temperature control
knob.
• the oven function with the control knob for oven
function.
function .
• Check the light bulb and replace it if necessary.
Do not leave the dishes standing in the oven for
longer than 15-20 minutes after the cooking process ends.
Reset the time.
ution to the problem yourself, contact your
dealer or the After Sales Service.
Page 12
12 electrolux
Installation
Warning! Only a qualified and
competent person must do the
installation of the appliance. If you do not
contact qualified or competent person,
the guarantee becomes invalid if there is
damage.
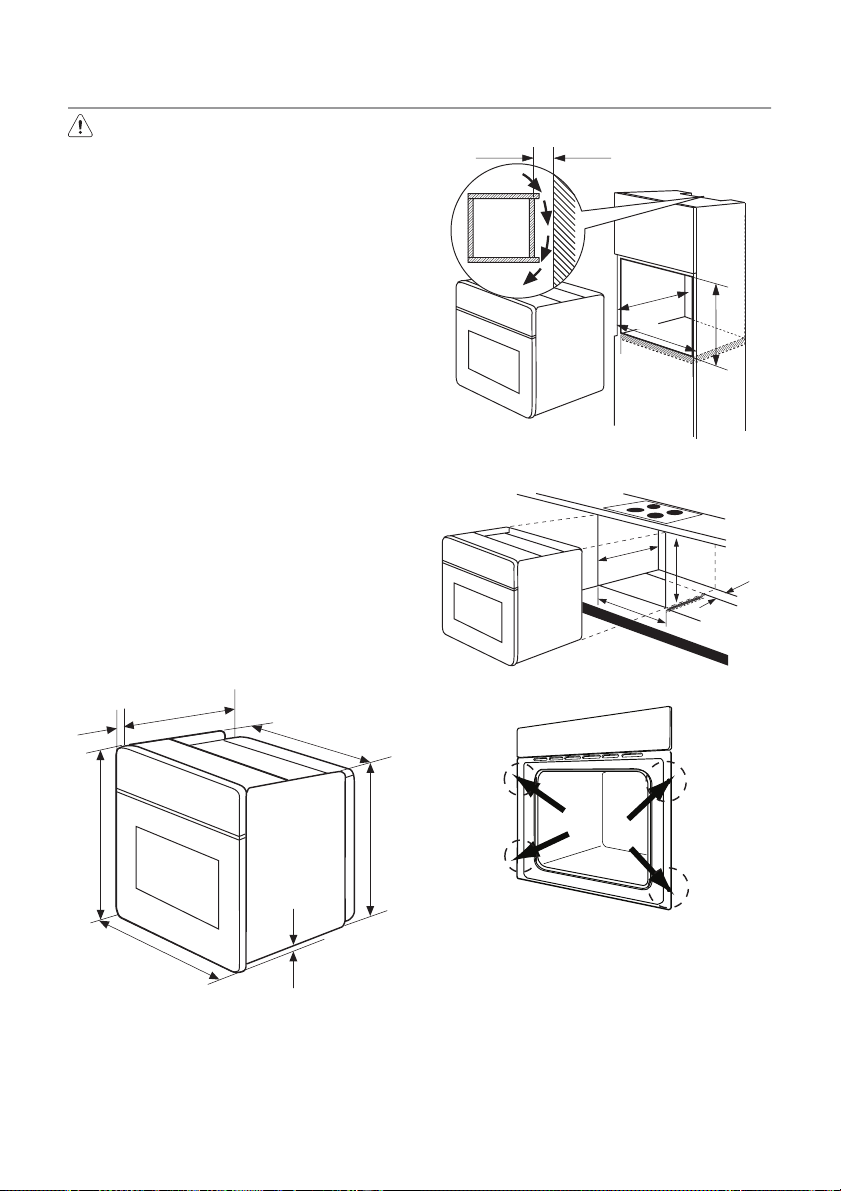
• Before you built in the appliance to the
kitchen cabinet make sure that the recess
dimensions are suitable.
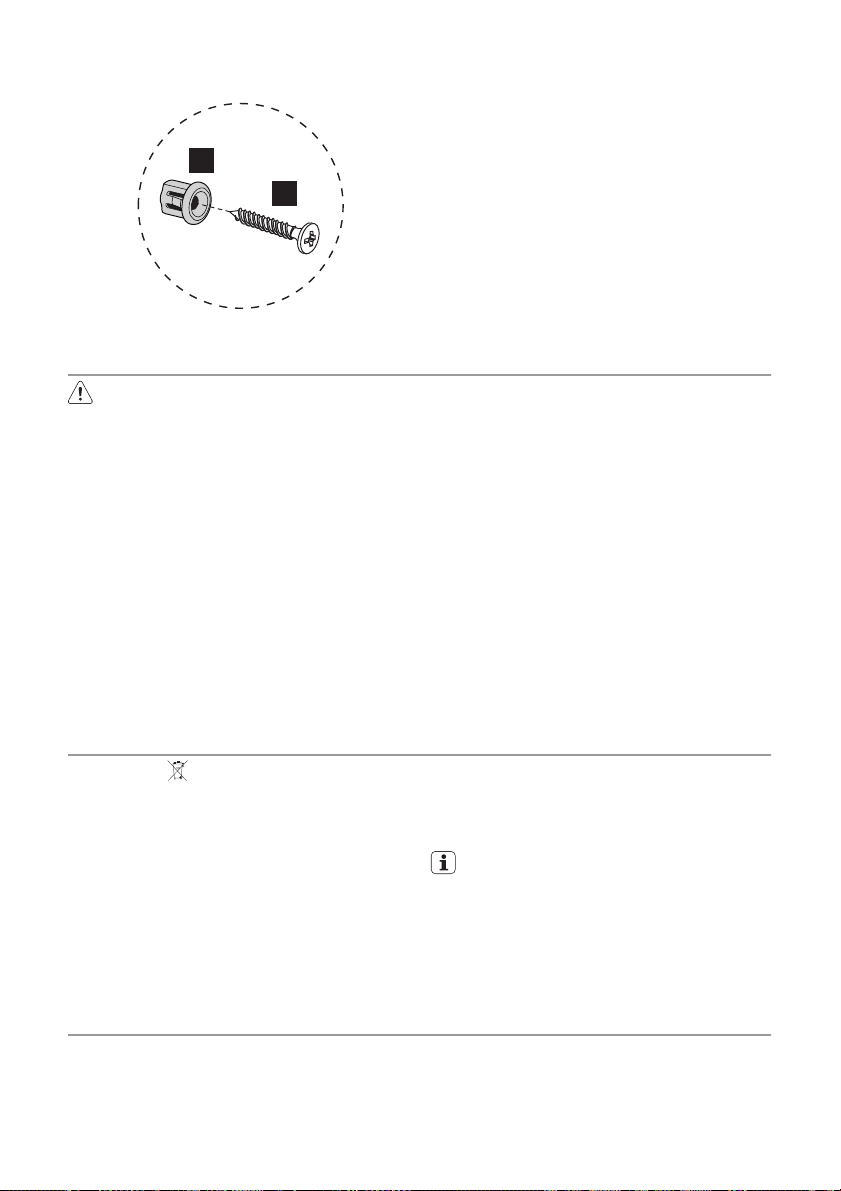
• Make sure that there is anti-shock protection for the installation.
• According to the regulations of force, all
parts which ensure the anti-shock protection must be fixed in such a way that they
cannot be undone without tools.
• The appliance can be placed with its back
and one side close to the higher appliances or walls. The other side must be
placed close to the furniture with the same
height.
• The built-in unit must meet the stability requirements of DIN 68930.
• Built-in ovens and built-in cooking surfaces are fitted with special connection systems. For safety reasons, you must only
combine appliances from the same manufacturer.
50
550 min
560÷570
550 min
560-570
593
580
80÷100
20
540
560
570
590
2
594
Page 13
A
B
Electrical connection
Warning! Only a qualified and
competent person must do the electrical
installation.
• The manufacturer is not responsible if you
do not follow these safety precautions.
• Ground the appliance according to safety
precautions.
• Make sure that the rated voltage and type
of power on the rating plate agree with the
voltage and the power of the local power
supply.
• This appliance is supplied with a mains cable without plug.
• Any electrical component must be installed or replaced by the After Sales Service
technician or qualified service personnel.
electrolux 13
• Always use a correctly installed shockproof socket.
• Do not use multi-way plugs, connectors
and extension cables. There is a risk of fire.
• Make sure that the mains plug is accessible after installation.
• Do not pull the mains cable to disconnect
the appliance. Always pull the mains plug.
• Connect the appliance to the mains using
a device that allows to disconnect the appliance from the mains at all poles with a
contact opening width of at least 3 mm,
eg. automatic line protecting cut-out, earth
leakage trips or fuse.
• Information on the voltage is given on the
rating plate (refer to "Product description").
Environment concerns
The symbol on the product or on its
packaging indicates that this product may
not be treated as household waste. Instead
it should be taken to the appropriate
collection point for the recycling of electrical
and electronic equipment. By ensuring this
product is disposed of correctly, you will help
prevent potential negative consequences for
the environment and human health, which
could otherwise be caused by inappropriate
waste handling of this product. For more
After sales service
In order to be able to assist you quickly, we
recommend you to write the following information:
• Model description ............
detailed information about recycling of this
product, please contact your local council,
your household waste disposal service or the
shop where you purchased the product.
The packaging materials are environmentally friendly and can be recycled.
The plastic components are identified by
markings, e.g. >PE<, >PS<, etc. Discard the packaging materials in the applicable container at the community
waste disposal facilities.
• Product number (PNC) ............
• Serial number (S.N.) ............
This information is given on the rating plate
(refer to "Product description").
Page 14

14 electrolux
If you operated the appliance wrongly, or
the installation was not carried out by a
registered engineer, the visit from the After Sales Service technician or dealer
may not take place free of charge, even
during the warranty period.
Page 15

electrolux 15
Page 16

www.electrolux.com
397121551-A-122008
 Loading...