

Page 1
Built-In Electric Oven
User information
EOB 2613
822 923 021 -A- 08.02.02-03
g
Page 2

Dear customer,
Please read these operating instructions carefully.
Pay particular attention to the section “Safety information” on the first few pages. Please retain these
operating instructions for later reference. Pass them
on to possible new owners of the appliance.
The following symbols are used in the
text:
1
Warning: Information concerning your personal
safety.
Important: Information on how to avoid damaging
the appliance.
3
2
1. These numbers indicate step by step how to use
2. ...
3. ...
Safety instructions
Information and practical tips
Environmental information
the appliance.
2
Page 3

Contents
Operating Instructions . . . . . . . . . . . . . . . . . . . . . . . . . . . . . . . . . . . . . . . . . . . . . . . . . . . . . . . . . . . . . 4
Safety . . . . . . . . . . . . . . . . . . . . . . . . . . . . . . . . . . . . . . . . . . . . . . . . . . . . . . . . . . . . . . . . . . . . . . . . . . . . . . 4
Disposal . . . . . . . . . . . . . . . . . . . . . . . . . . . . . . . . . . . . . . . . . . . . . . . . . . . . . . . . . . . . . . . . . . . . . . . . . . . . 5
Description of the Appliance . . . . . . . . . . . . . . . . . . . . . . . . . . . . . . . . . . . . . . . . . . . . . . . . . . . . . . . . . . . 6
General Overview . . . . . . . . . . . . . . . . . . . . . . . . . . . . . . . . . . . . . . . . . . . . . . . . . . . . . . . . . . . . . . . . . . . . . . 6
Control Panel . . . . . . . . . . . . . . . . . . . . . . . . . . . . . . . . . . . . . . . . . . . . . . . . . . . . . . . . . . . . . . . . . . . . . . . . . 6
Oven Features . . . . . . . . . . . . . . . . . . . . . . . . . . . . . . . . . . . . . . . . . . . . . . . . . . . . . . . . . . . . . . . . . . . . . . . . 7
Oven accessories . . . . . . . . . . . . . . . . . . . . . . . . . . . . . . . . . . . . . . . . . . . . . . . . . . . . . . . . . . . . . . . . . . . . . . 7
Before Using for the First Time . . . . . . . . . . . . . . . . . . . . . . . . . . . . . . . . . . . . . . . . . . . . . . . . . . . . . . . . . . 8
Initial Cleaning . . . . . . . . . . . . . . . . . . . . . . . . . . . . . . . . . . . . . . . . . . . . . . . . . . . . . . . . . . . . . . . . . . . . . . . . 8
Using the Oven . . . . . . . . . . . . . . . . . . . . . . . . . . . . . . . . . . . . . . . . . . . . . . . . . . . . . . . . . . . . . . . . . . . . . . . 9
Switching the Oven On and Off . . . . . . . . . . . . . . . . . . . . . . . . . . . . . . . . . . . . . . . . . . . . . . . . . . . . . . . . . . . 9
Oven Functions . . . . . . . . . . . . . . . . . . . . . . . . . . . . . . . . . . . . . . . . . . . . . . . . . . . . . . . . . . . . . . . . . . . . . . . 10
Timer . . . . . . . . . . . . . . . . . . . . . . . . . . . . . . . . . . . . . . . . . . . . . . . . . . . . . . . . . . . . . . . . . . . . . . . . . . . . . . . 10
Inserting the general purpose tray . . . . . . . . . . . . . . . . . . . . . . . . . . . . . . . . . . . . . . . . . . . . . . . . . . . . . . . . . 10
Rotisserie Rod . . . . . . . . . . . . . . . . . . . . . . . . . . . . . . . . . . . . . . . . . . . . . . . . . . . . . . . . . . . . . . . . . . . . . . . . 11
Uses, Tables and Tips . . . . . . . . . . . . . . . . . . . . . . . . . . . . . . . . . . . . . . . . . . . . . . . . . . . . . . . . . . . . . . . . . 12
Baking . . . . . . . . . . . . . . . . . . . . . . . . . . . . . . . . . . . . . . . . . . . . . . . . . . . . . . . . . . . . . . . . . . . . . . . . . . . . . . 12
Baking Table . . . . . . . . . . . . . . . . . . . . . . . . . . . . . . . . . . . . . . . . . . . . . . . . . . . . . . . . . . . . . . . . . . . . . . . . . . 13
Roasts . . . . . . . . . . . . . . . . . . . . . . . . . . . . . . . . . . . . . . . . . . . . . . . . . . . . . . . . . . . . . . . . . . . . . . . . . . . . . . 14
Roasting Table . . . . . . . . . . . . . . . . . . . . . . . . . . . . . . . . . . . . . . . . . . . . . . . . . . . . . . . . . . . . . . . . . . . . . . . . 14
Grilling . . . . . . . . . . . . . . . . . . . . . . . . . . . . . . . . . . . . . . . . . . . . . . . . . . . . . . . . . . . . . . . . . . . . . . . . . . . . . . 16
Infrared Grilling . . . . . . . . . . . . . . . . . . . . . . . . . . . . . . . . . . . . . . . . . . . . . . . . . . . . . . . . . . . . . . . . . . . . . . 16
Spit-Roasting with the Rotisserie Rod . . . . . . . . . . . . . . . . . . . . . . . . . . . . . . . . . . . . . . . . . . . . . . . . . . . . . 17
Preserving . . . . . . . . . . . . . . . . . . . . . . . . . . . . . . . . . . . . . . . . . . . . . . . . . . . . . . . . . . . . . . . . . . . . . . . . . . . 18
Cleaning and Care . . . . . . . . . . . . . . . . . . . . . . . . . . . . . . . . . . . . . . . . . . . . . . . . . . . . . . . . . . . . . . . . . . . . 19
Exterior of the Appliance . . . . . . . . . . . . . . . . . . . . . . . . . . . . . . . . . . . . . . . . . . . . . . . . . . . . . . . . . . . . . . . . 19
Oven Interior . . . . . . . . . . . . . . . . . . . . . . . . . . . . . . . . . . . . . . . . . . . . . . . . . . . . . . . . . . . . . . . . . . . . . . . . . 19
Accessories . . . . . . . . . . . . . . . . . . . . . . . . . . . . . . . . . . . . . . . . . . . . . . . . . . . . . . . . . . . . . . . . . . . . . . . . . . 19
Oven Lighting . . . . . . . . . . . . . . . . . . . . . . . . . . . . . . . . . . . . . . . . . . . . . . . . . . . . . . . . . . . . . . . . . . . . . . . . . 20
Oven Door . . . . . . . . . . . . . . . . . . . . . . . . . . . . . . . . . . . . . . . . . . . . . . . . . . . . . . . . . . . . . . . . . . . . . . . . . . . 21
Oven door glass . . . . . . . . . . . . . . . . . . . . . . . . . . . . . . . . . . . . . . . . . . . . . . . . . . . . . . . . . . . . . . . . . . . . . . . 22
What to do if ... . . . . . . . . . . . . . . . . . . . . . . . . . . . . . . . . . . . . . . . . . . . . . . . . . . . . . . . . . . . . . . . . . . . . . . . 23
Technical Data . . . . . . . . . . . . . . . . . . . . . . . . . . . . . . . . . . . . . . . . . . . . . . . . . . . . . . . . . . . . . . . . . . . . . . . 24
Oven Interior Dimensions . . . . . . . . . . . . . . . . . . . . . . . . . . . . . . . . . . . . . . . . . . . . . . . . . . . . . . . . . . . . . . . . 24
Regulations, Standards, Directives . . . . . . . . . . . . . . . . . . . . . . . . . . . . . . . . . . . . . . . . . . . . . . . . . . . . . . . . 24
Installation Instructions . . . . . . . . . . . . . . . . . . . . . . . . . . . . . . . . . . . . . . . . . . . . . . . . . . . . . . . . . . . . 25
Safety Instructions for the Installer . . . . . . . . . . . . . . . . . . . . . . . . . . . . . . . . . . . . . . . . . . . . . . . . . . . . . . . . 25
Customer Service Centres . . . . . . . . . . . . . . . . . . . . . . . . . . . . . . . . . . . . . . . . . . . . . . . . . . . . . . . . . 31
Index. . . . . . . . . . . . . . . . . . . . . . . . . . . . . . . . . . . . . . . . . . . . . . . . . . . . . . . . . . . . . . . . . . . . . . . . . . . . . . . 34
Service. . . . . . . . . . . . . . . . . . . . . . . . . . . . . . . . . . . . . . . . . . . . . . . . . . . . . . . . . . . . . . . . . . . . . . . . . . . . . 35
3
Page 4

Operating Instructionsating Instructions
1 Safety
Electrical Safety
• The appliance may only be connected by a regis-
tered specialist.
• In the event of any faults or damage to the appli-
ance: remove fuses or switch off.
•It is not permissible to clean the appliance with a
steam or high pressure cleaner for safety reasons!
• Repairs to the appliance may only be carried
out by specialists. Repairs carried out by inexperienced persons may cause injury or serious
malfunctioning. If your appliance needs repairing,
please contact your local AEG Service Force
Centre or your specialist dealer.
Child Safety
• Never leave children unsupervised when the
appliance is in use.
Safety whilst Using
• This appliance is intended to be used for cooking,
frying and baking food in the home.
• Take care when connecting electric appliances to
sockets nearby. Do not allow connecting leads to
come into contact with hot rings or to catch
beneath the hot oven door.
• Warning: Risk of burns! The interior of the oven
becomes hot during use.
• Using ingredients containing alcohol in the oven
may create an alcohol-air mixture that is easily
ignited. In this case, open the door carefully. Do
not have embers, sparks or naked flames in the
vicinity when opening the door.
To Avoid Damaging Your Appliance
• Do not line your oven with aluminium foil and do
not place a baking tray or dish on the oven floor,
otherwise the oven enamel will be damaged by
the resulting build up of heat.
• Juice from fruit that drips from baking trays will
leave marks that cannot be removed. For very
moist cakes, use the universal baking tray.
• Do not put any weight on the oven door when it is
open.
• Never pour water directly into the hot oven. The
enamel may be damaged.
• Using force, especially on the edges of the front
glass panel, may break the glass.
• Do not store inflammable objects in the oven.
They may ignite when the oven is switched on.
• Do not store moist food in the oven. The enamel
may be damaged.
4
Page 5

2 Disposalposal
Disposing of the packaging material
All materials used can be fully recycled.
Plastics are marked as follows:
• >PE< for polyethylene, as used for the outer
wrapping and the bags inside.
• >PS< for polystyrene foam, e.g., as used for the
padding materials. They are completely free of
CFCs.
Disposal of old appliances
1
To protect the environment, it is important that worn
out appliances are disposed of in the correct manner.
• The appliance must not be disposed of with
• You can obtain information about collection dates
Warning: Before disposing of old appliances
please make them inoperable so that they
cannot be the source of danger.
To do this, disconnect the appliance from
the mains supply and remove the mains
lead.
household rubbish.
or public refuse disposal sites from your local
refuse department or council.
5
Page 6
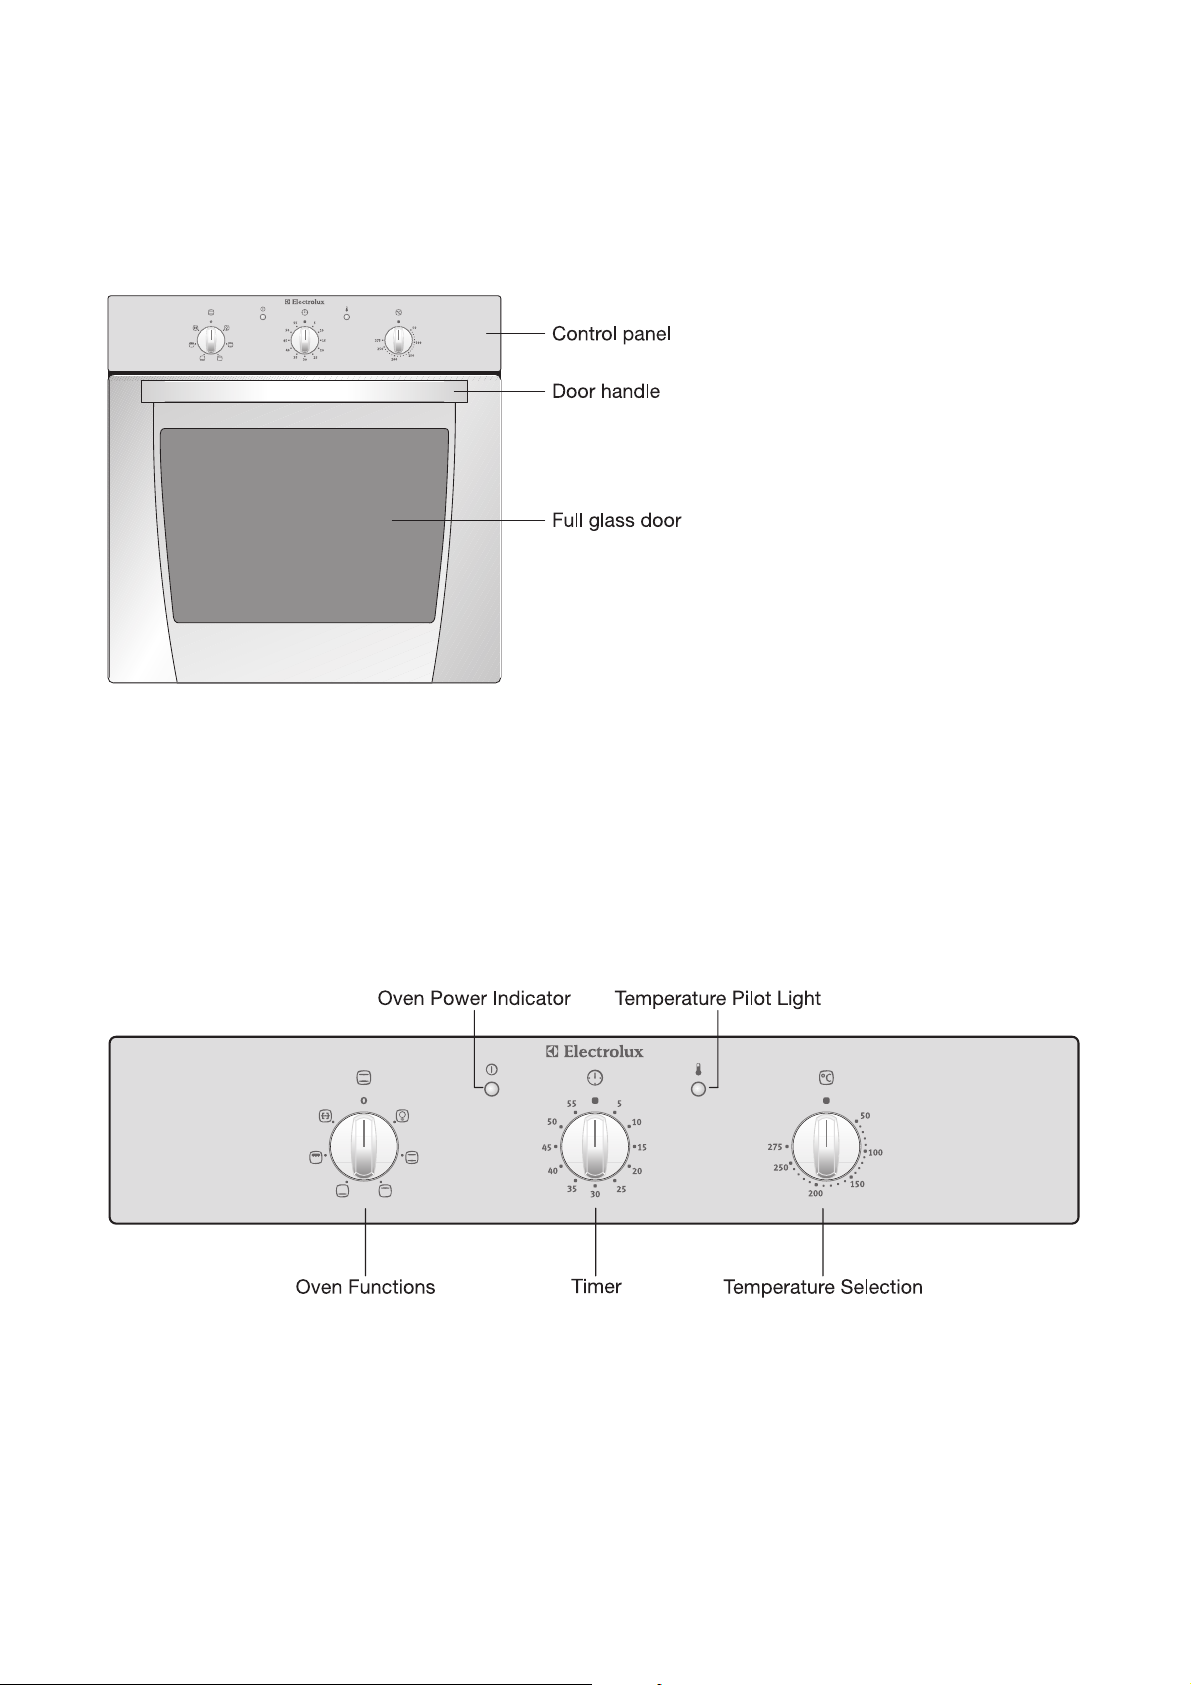
Description of the Appliancen of the Applianceance
General Overview
Control Panel
6
Page 7
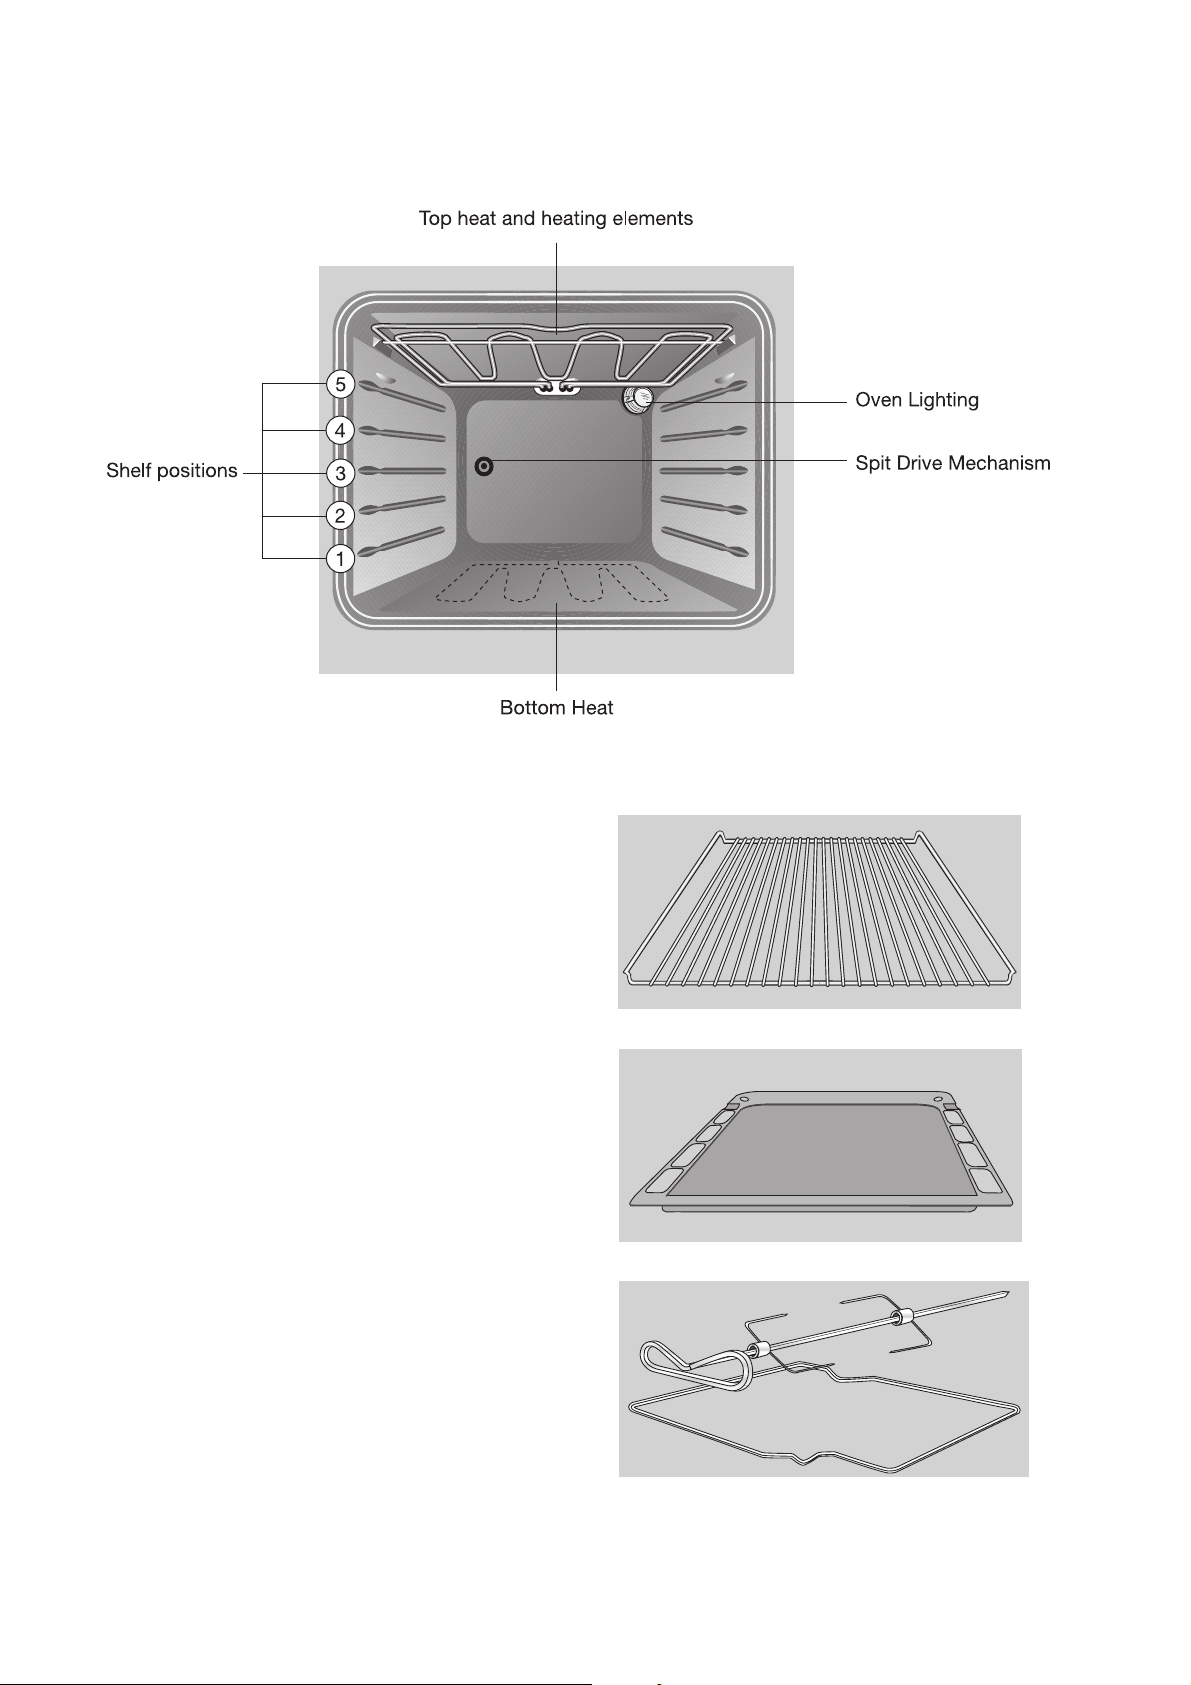
Oven Features
Oven accessories
Combination shelf
For dishes, cake tins, items for roasting and grilling.
Baking tray
For cakes and biscuits
Rotisserie rod and supporting frame
7
Page 8

Before Using for the First Timesing for the First TimeFirst Time
Initial Cleaning
Before using the oven for the first time you should
clean it thoroughly.
1
3
• Turn the oven function switch to oven lighting.
• Remove all accessories and the shelf support
• Then wash out the oven with warm water and
• Wipe the front of the appliance with a damp cloth.
Caution: Do not use any caustic, abrasive
cleaners! The surface could be damaged.
To clean metal fronts use commercially
available cleaning agents.
rails and wash them with warm water and washing up liquid.
washing-up liquid, and dry.
8
Page 9
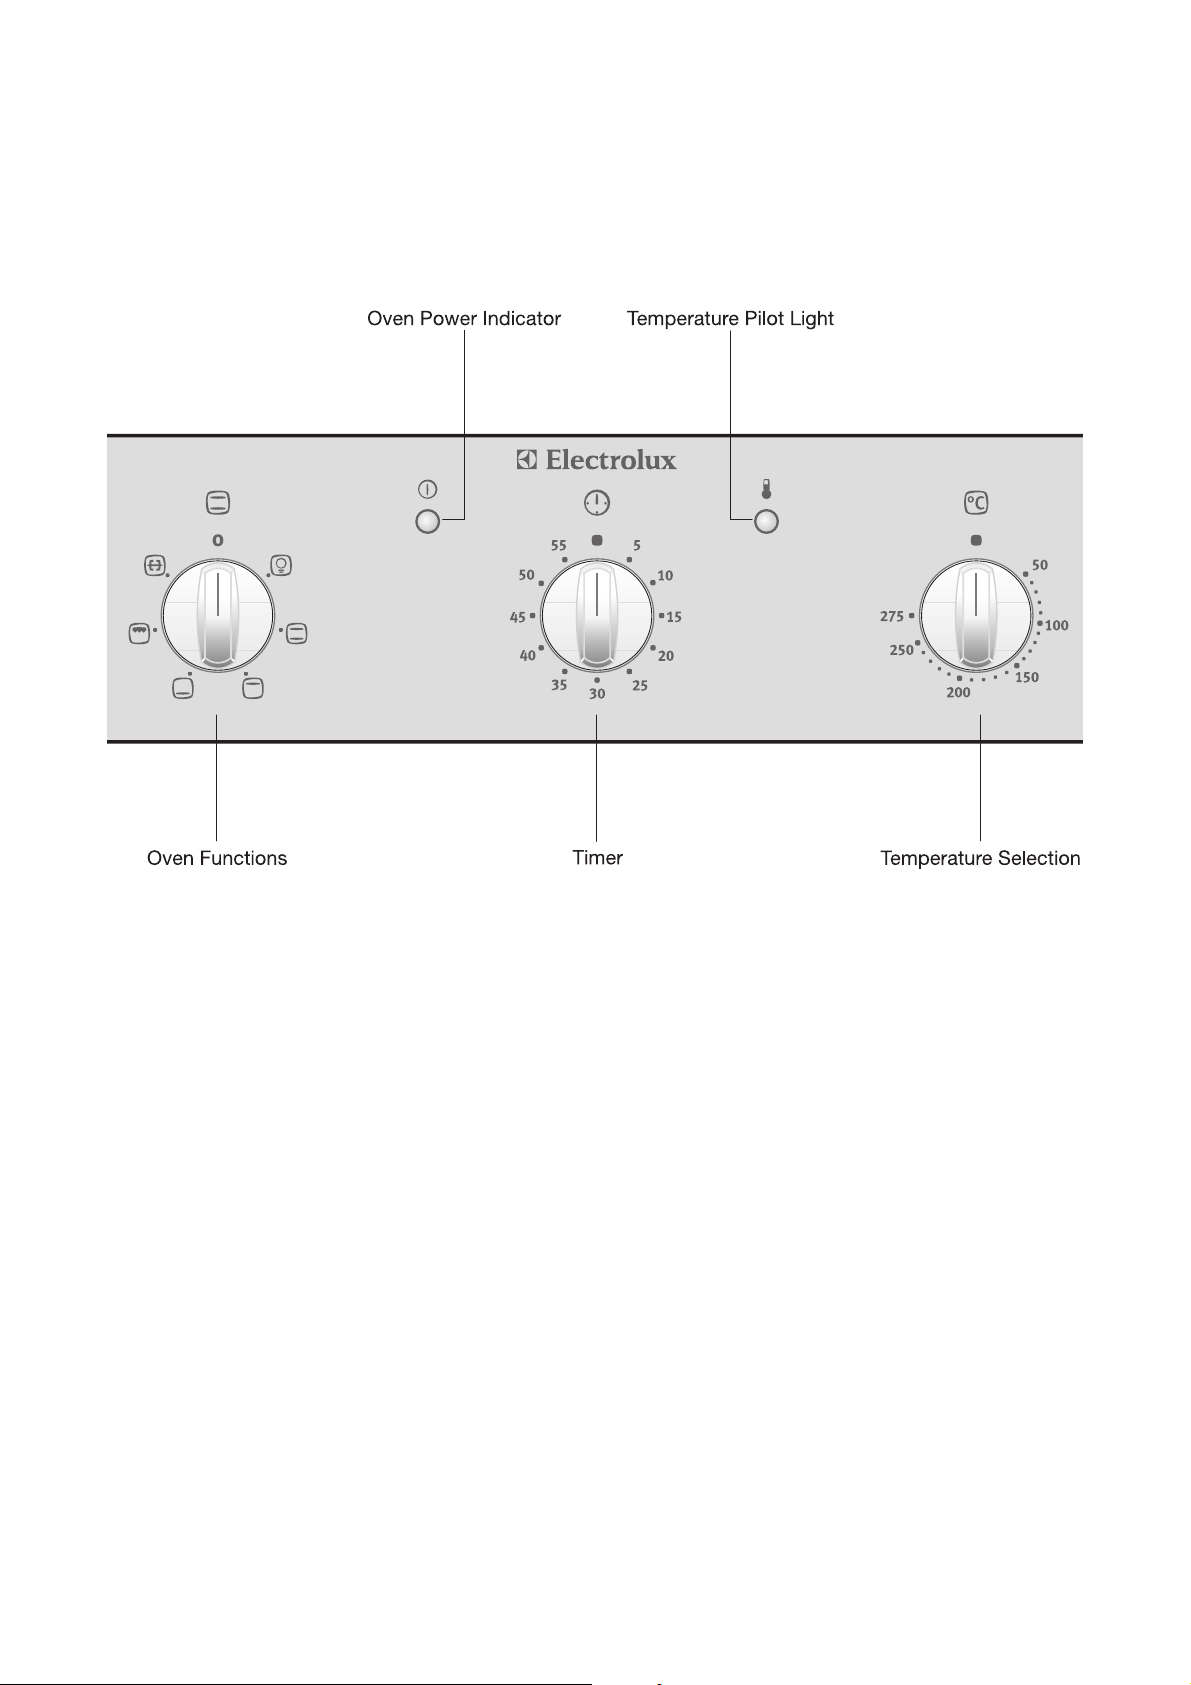
Using the Oven ng the Oven
Switching the Oven On and Off
1. Turn the “oven functions” switch to the required
function.
2. Turn the “temperature selection” switch to the
required temperature.
The red oven power indicator is illuminated while
the oven is in use.
The red temperature pilot light is illuminated while
the oven is heating up.
3. To switch off the oven, turn the “oven functions”
switch and the “temperature selection” switch to
the zero position.
3
Cooling fan
The fan comes on automatically when the oven is in
use in order to keep the surfaces of the appliance
cool. Once the oven has been switched off, the fan
continues running to cool down the appliance and
then switches itself off automatically.
9
Page 10
Oven Functions
The oven has the following functions:
L Oven Lighting
With this function you can illuminate the oven inte-
rior, e.g., for cleaning.
The heating element is not in use.
O Conventional
For baking or roasting on one level.
The conventional heating elements are in use.
J Top Heat
For browning foods topped with breadcrumbs
and foods cooked au gratin.
The top heating element is in use.
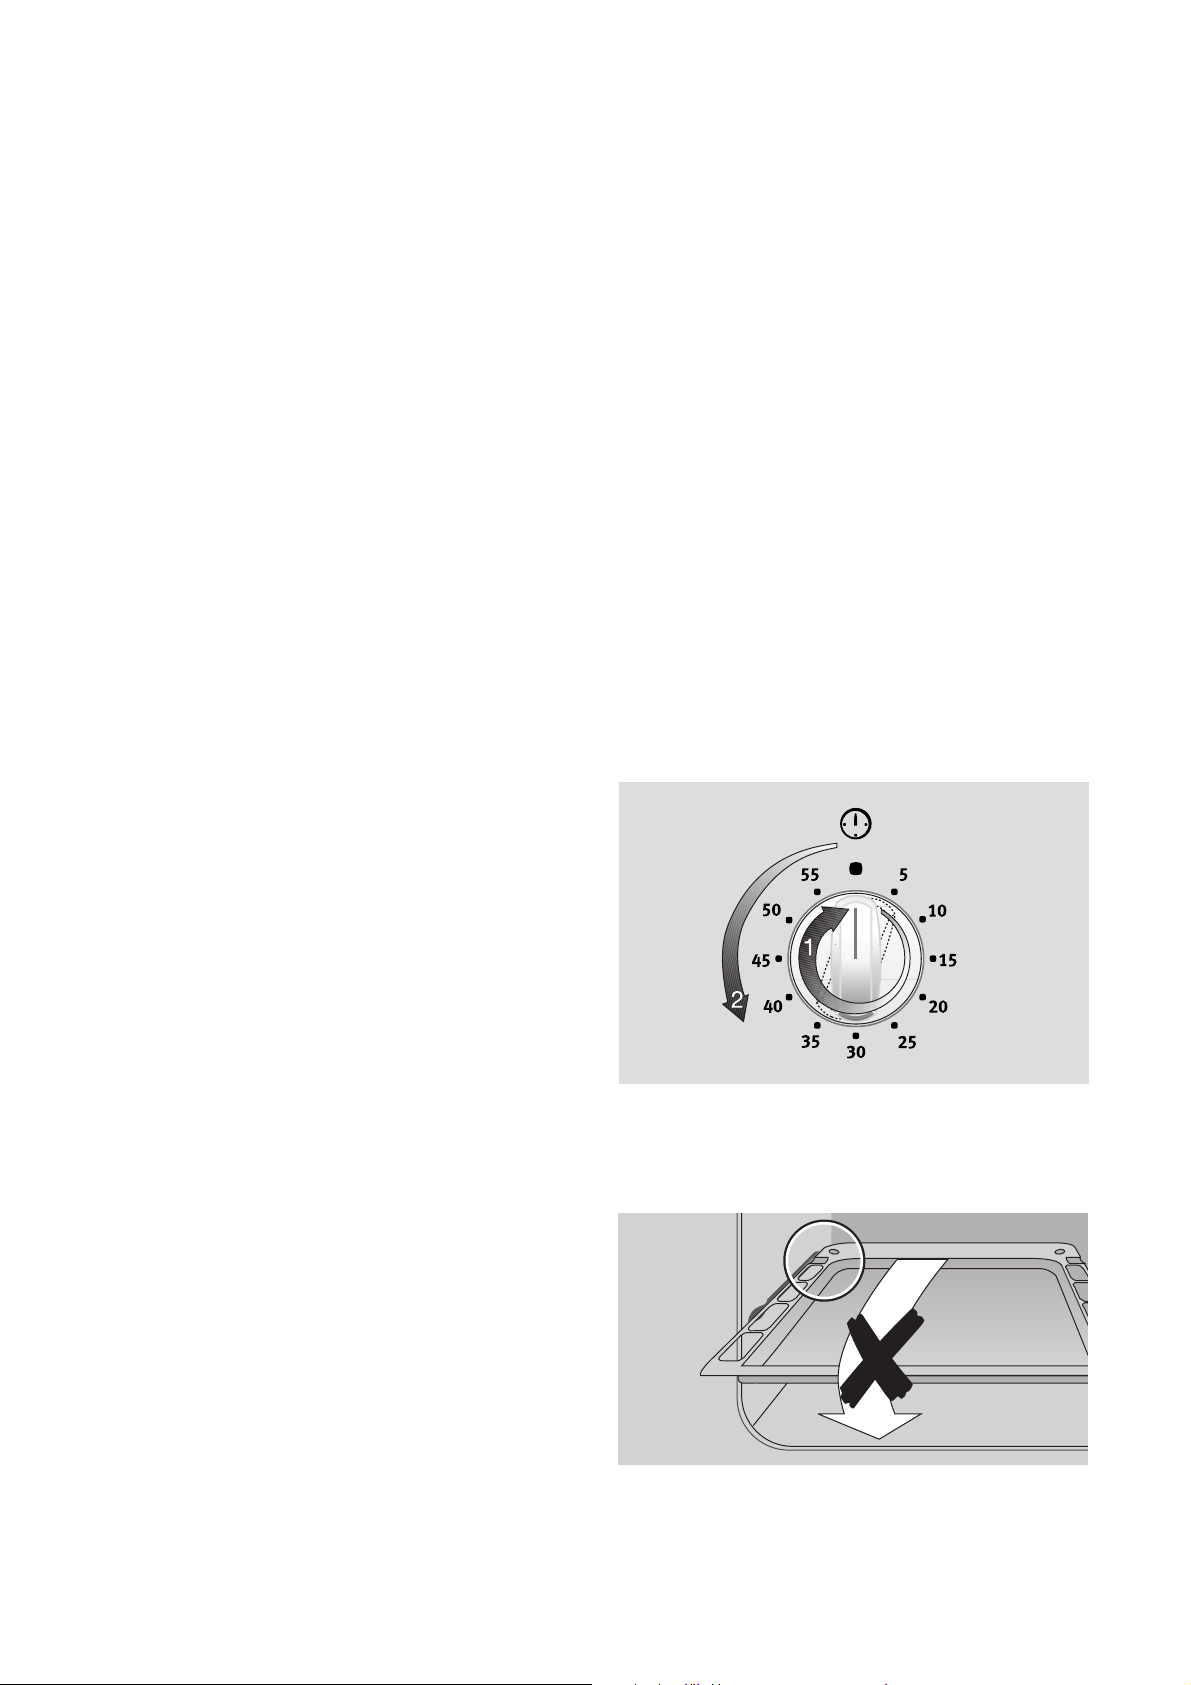
Timer
To set a time. A signal is sounded when the time has
elapsed.
This function has no effect on oven operation.
Ü Bottom Heat
For crisping cakes that require a crisp base.
The bottom heating element is in use.
F Infrared Grill
For grilling flat foods that are arranged in the middle
of the shelf such as steaks, escalopes, fish or for
toasting.
The grill heating element is in use.
_ Wide-Area Spit-Roasting using the
Rotisserie Rod
For spit-roasting larger poultry and meat roasts.
The top heating element and the grill element are in
use.
Set the timer knob to 60 minutes, then turn it to the
desired length of time. (60 minutes maximum).
A signal is sounded when the time has elapsed.
To change your setting, just turn the knob to the
desired value.
To stop the timer before the set time has elapsed,
turn the knob to OFF.
Inserting the general purpose traypurpose tray
3
Inserting the tray/ general purpose tray:
The bulges must be positioned towards the rear.
General purpose tray
The tray has a little bulge on the left and
right edges. These are provided as positioning guides and must always be located
towards the rear when inserting the tray.
10
Page 11
Rotisserie Rod
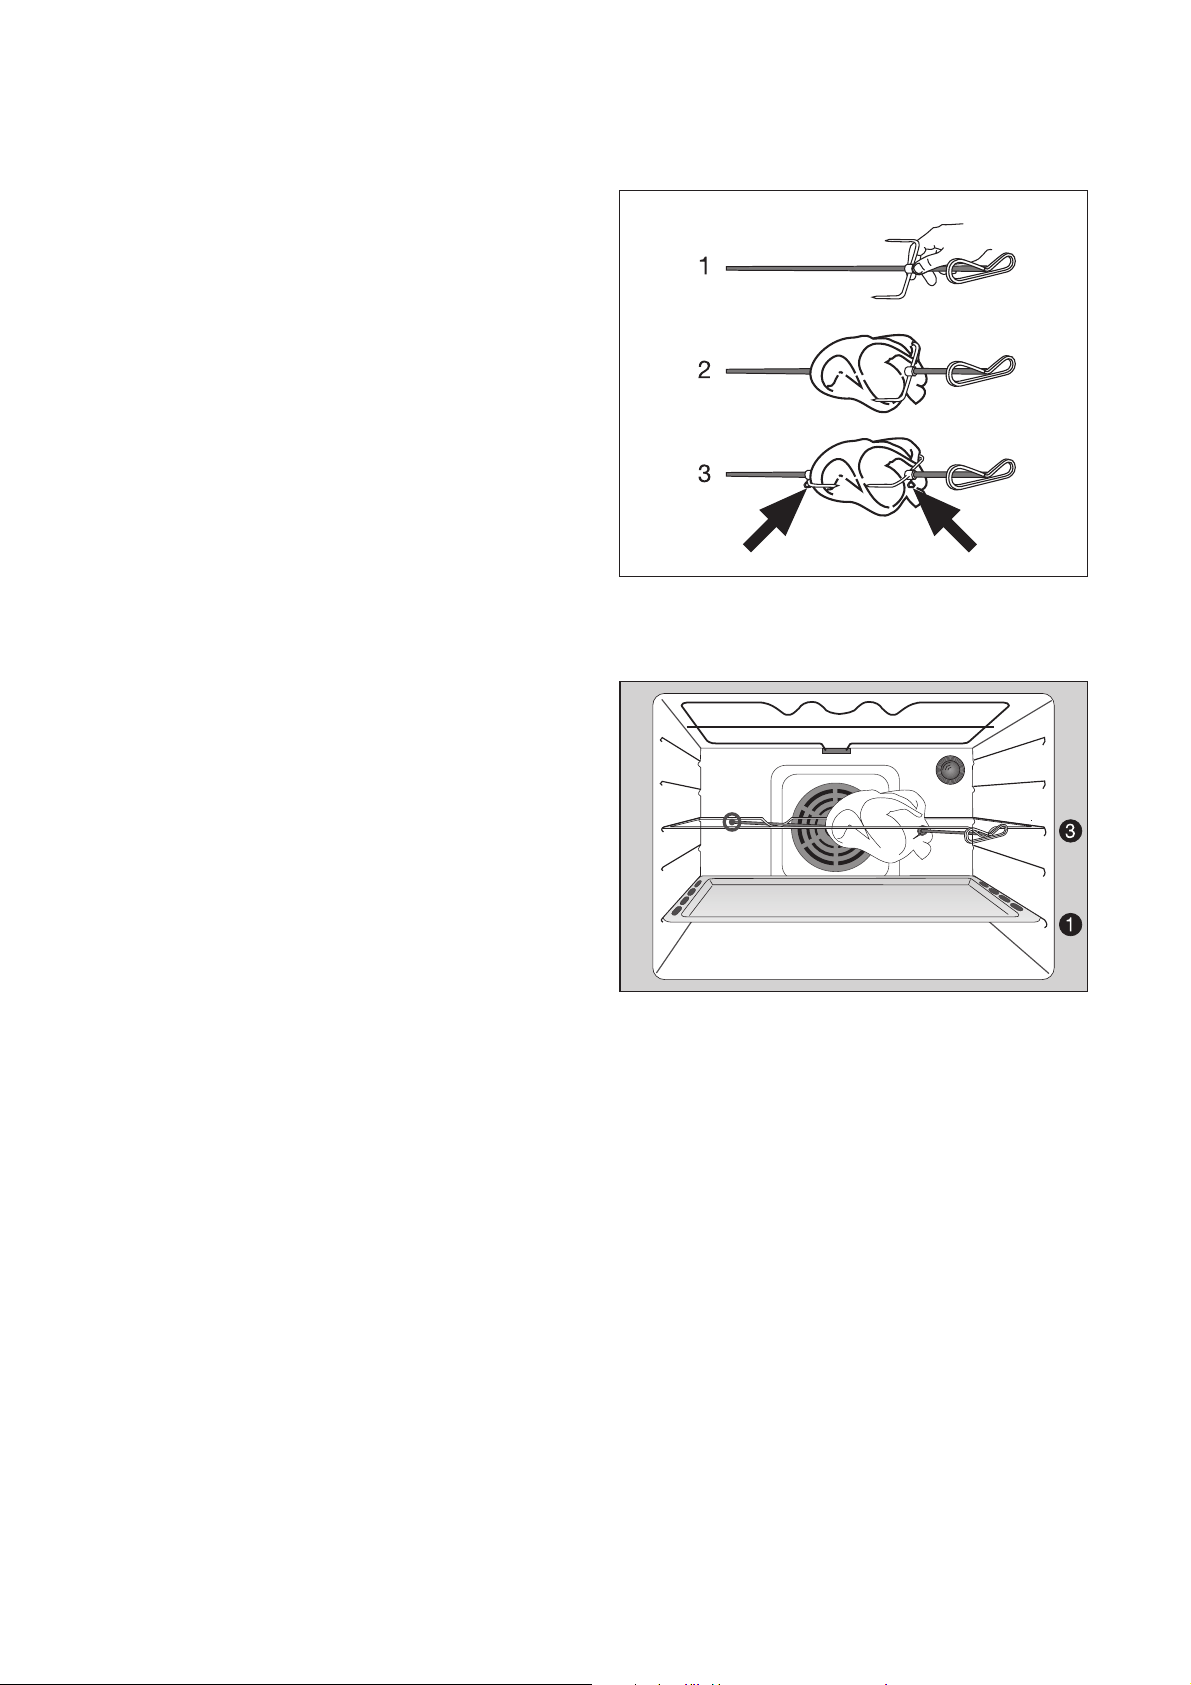
Securing the item to be grilled
1. Thread the fork onto the rotisserie rod.
2. Skewer the item to be grilled, then thread the sec-
ond fork onto the rod
3
3. Screw the forks in place.
Placing the rotisserie rod in position
1. Place the general purpose tray in the first shelf
2. Lay the rotisserie rod on the supporting frame
3. Push the tip of the rotisserie rod into the left rear
4. Set the oven function and the temperature as
Align the item so that it is in the centre of the
rod.
position from the bottom.
and place it all into the oven at once on the third
shelf position from the bottom.
section of the oven until it is touching the back
wall.
indicated in the rotisserie chart.
3
Watch to check that the rotisserie rod is in
fact turning.
Removing the rotisserie rod
1
1. Switch off the oven.
2. Slowly pull the supporting frame out of the oven
Caution: The rotisserie rod and the support-
ing frame are extremely hotafter roasting. Be
careful not to burn yourself when removing it.
along with the rotisserie rod.
11
Page 12
Uses, Tables and Tipsses, Tables and Tips
Baking
For baking, use the oven’s Top/Bottom Heat O function.
Baking tins
• Dark metal or coated tins are suitable for Top/
Bottom O heating.
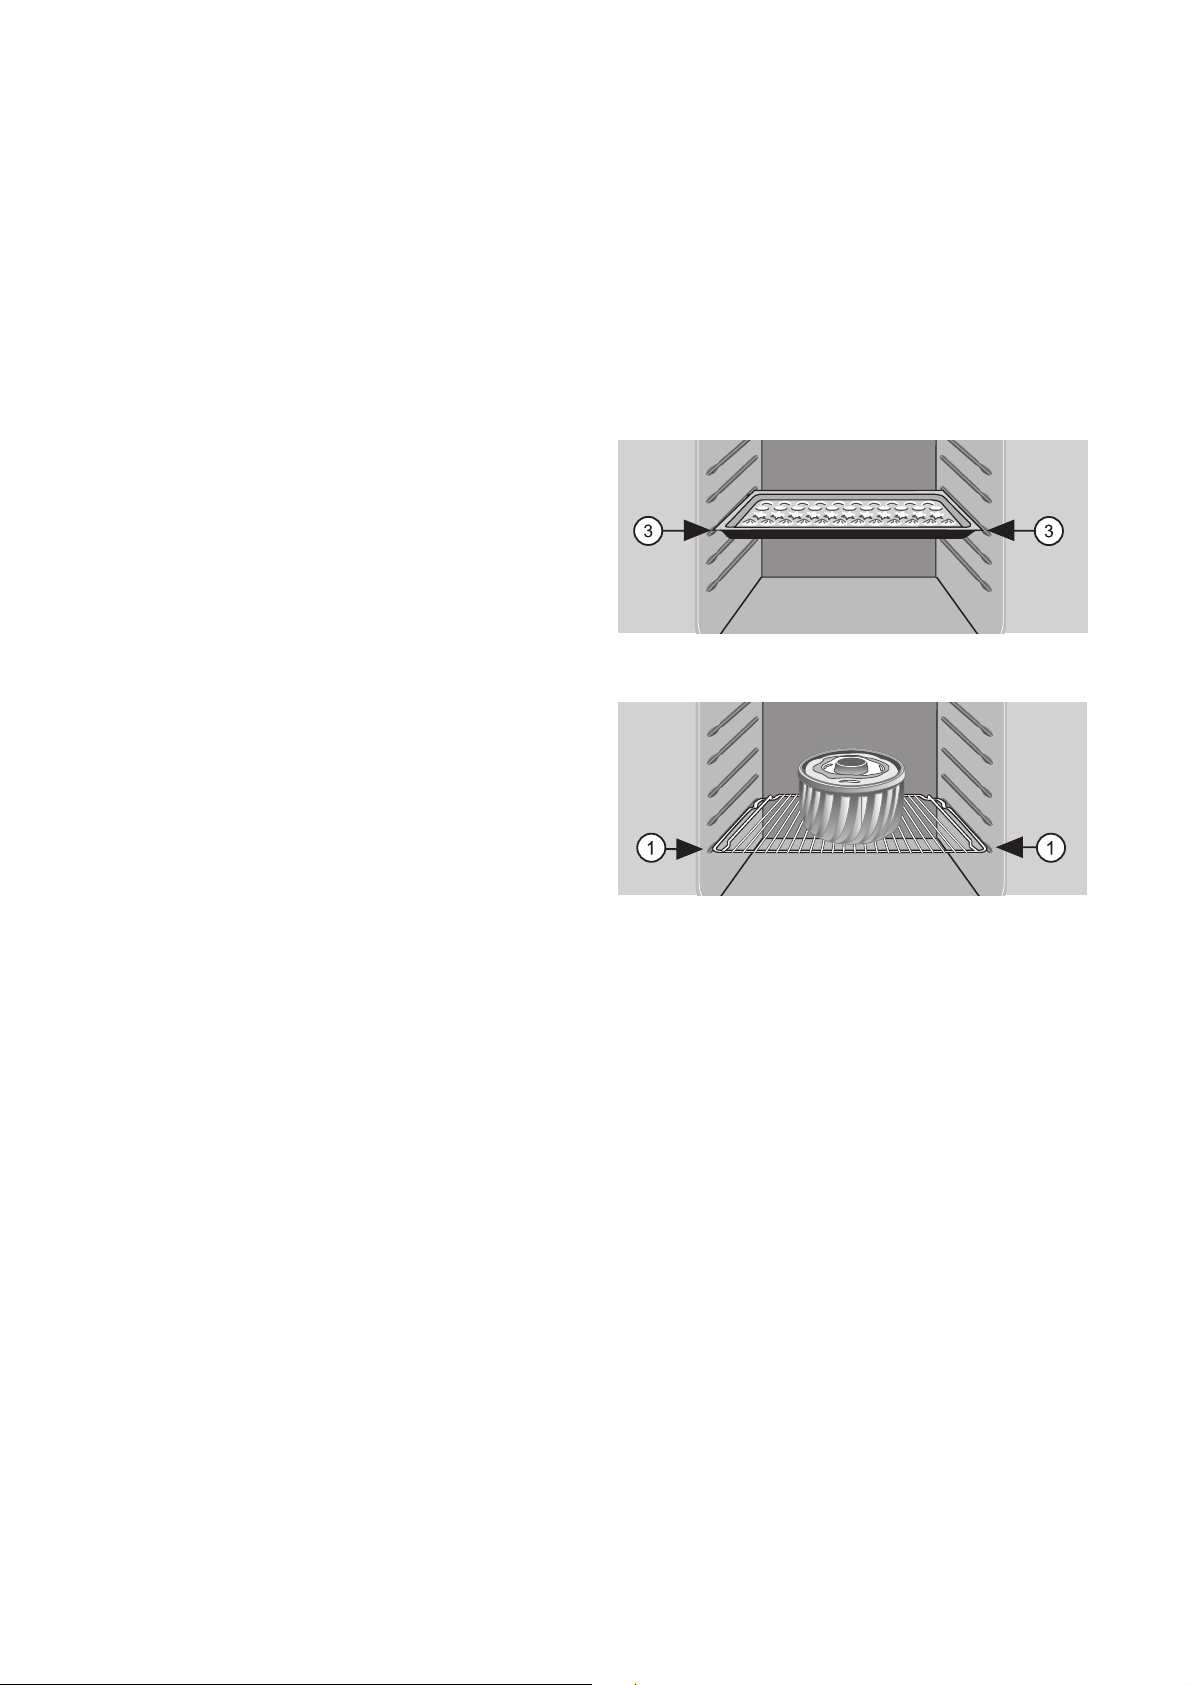
1 Baking tray: could be placed at. Position 3
1 Baking tins: could be placed at. Position 1
Tray l ev els
•With Top/BottomO heating, baking can be done
on one tray.
3
• When choosing the oven position, make sure you
• Insert the tray with the bevelled edge towards
• Always place baking tins at the centre of the grill.
• With the Top/Bottom Heat O feature, you can
General advice
are counting from the bottom.
you!
bake two tins on the grill at the same time. In this
case, the baking time will be only slightly longer.
How to use the Baking Tables
The tables show a selection of dishes, with recommended temperature settings, cooking times, and
oven positions.
• Temperatures and baking times are given for
guidance only, to be adapted according to the
particular combination of pastry, quantity, and
baking tin(s).
• To begin with, we recommend setting to the lower
temperature, and then adjusting to suit individual
requirements. For example, a higher temperature
can be set if a darker brown is desired, or if baking time is found to be too long.
• The tables do not give recipes for the cakes or
pastries described; for recipe details, please refer
to the recipe for a similar item.
• Widely different baking items may show different
initial rates of browning while baking. In this case,
please do not change the temperature setting.
Rates of browning will even out later in the baking
process.
2
With longer baking times, the oven can be
turned off about 10 minutes before the end
of the required time, to make use of the
residual heat in the oven.
Unless otherwise stated, the temperatures
indicated are those to which the oven is preheated.
12
Page 13

Baking Table
Top/Bottom heat
Baking type Temperature in °C Tray position from
bottom
Cake mixture
Ring cake or 'Gugelhupf' 160-180 1 50-70
Frankfurter ring cake (half tin) 150-170 1 45-60
Royal/Madeira cake (rectangular tin) 150-170, pre-heated 1 70-85
Pie pastry 150-190, pre-heated 2 15-25
Fancy apple gateau 150-190, pre-heated 1 45-60
Short pastry
Cheese flan (750 gr. cottage cheese) 170-190 1 65-90 + 10 Min.
covered fruit gateau 170-190 2 50-60
Cheese flan (tray) 160-180, pre-heated 2 50-70
Puff pastry
French. apple gateau 190-200, pre-heated 1 40-50
Sponges
Sponge cake (DIN) 160-180, pre-heated 3 25-40
Suggested baking
time in minutes
After-heating
Fruit ingredients 170-190, pre-heated 3 20-25
Swiss roll 180-200, pre-heated 3 10-20
Raised pastry
Ring cake or 'Gugelhupf' 160-180 1 45-55
Plaited buns 170-190 3 15-40
Cakes with cream filling, or sugar/
almond toppings
With sugar vermicelli 160-180, pre-heated 3 20-40
Fruit cakes (tray) with sugar vermicelli
(DIN)
Cheese/yeast cake 170-190 3 45-50
Christmas loaf (500 gr. flour) 160-180, pre-heated 3 40-70
Pizza (fresh) 250-275, pre-heated 1 10-25
Biscuits
Meringues 100-200 3 100-200
Macaroons 120-140, pre-heated 3 20-30
Small biscuits & cakes (DIN) 160-180, pre-heated 3 15-30
180-200, pre-heated 3 20-35
170-190 3 25-50
Walnut cakes 170-180 3 25-30
Puff pastry 180-210, pre-heated 3 20-30
Pastry (made with yeast dough) 170-190, pre-heated 3 20-40
13
Page 14

Roasts
For roasting, use the oven’s Top/Bottom Heat O feature.
Ovenware
• Any heat-resistant dish is suitable for roasting
(please read the manufacturer’s instructions).
• For oven dishes with artificial handles, make sure
that these are heat-resistant (please read the
manufacturer’s instructions).
• Large roasts can be cooked on the general pur-
pose tray or on the grill with the general purpose tray underneath (for example, turkey,
goose, 3-4 chickens, 3-4 knuckles of veal).
• We recommend cooking all lean meats in a cas-
serole with a lid (for example, pot roasts, braised
beef or veal, deep-fried meats). This renders the
meat juicier.
• If crackling is desired, meat can be cooked in a
casserole without a lid (for example, pork, meat
loafs, lamb, mutton, duck, 1-2 knuckles of veal,
1-2 chickens, small poultry, roast beef, fillets,
game fowl).
3
• We recommend using the oven to cook fish or
• To avoid burning the meat juices or fats, we rec-
• If necessary, turn the roast over (at 1/2 or 2/3 of
3
2
How to use the Roasting Table
The table indicates the most suitable oven
feature, temperature settings, and cooking
times to apply for various types of meat. The
suggested values are for guidance only.
meat weighting from 1kg upwards.
ommend adding a little liquid to the oven dish.
the way through cooking time).
Tip: baste large roasts and poultry with the
juices several times while roasting. This will
give you better results.
You can switch off the oven around 10 minutes before roasting time has ended, to
make use of the residual heat.
3
Tip: roasting in an oven dish will be less
messy!
Roasting Table
For each, place the baking tray/general purpose pan at position 1
Top/Bottom heat
Type of ro a s t
Pork
1kg pork roasts
(Spare ribs or ham, rolled roasts),
for each cm. thick
Smoked loin of pork, for each cm. thick 190-200 2 10-12
Meat loaf 200-210 2 60-70
Rind
Roast beef, for each cm. thick 200-210 2 18-20
Temperature in °C Tray position from
bottom
180-190 2 14-20
Roasting time in
minutes
Fillet of beef, for each cm. thick 220-230 2 6-8
Roast beef, for each cm. thick 220-230 2 8-10
Vea l
Roast veal, for each cm. thick 190-200 2 14-17
Lamb
Leg of lamb (1800 g) 190-200 2 90-120
14
Page 15

Top/Bottom heat
Type of ro a s t
Temperature in °C Tray position from
bottom
Roasting time in
minutes
Poultry
1 kg. rolled turkey roast,
for each cm. thick
180-190 2 11-13
Quick-fries
Sausages (cordon bleu) 220-230, pre-heated 3 6-8
Fried/grilled sausages 230-240, pre-heated 3 12-13
Escalopes, in batter 240-250, pre-heated 3 13-15
Cutlets, in batter 240-250, pre-heated 3 13-15
Rissoles 230-240, pre-heated 3 15-20
Chicken legs 220-230, pre-heated 3 20-30
Fish
Trout, for each 200 - 250 gr. 200-210 3 15-20
4 fillets of trout
(for each 200 gr.)
Fillet of zander, in batter
(total weight around 1 kg)
170-180 3 10-20
190-200 3 25-30
Poultry
Chicken 180-190 2 55-65
Duck (2000-2500 g) 180-190 2 90-120
Goose (4500 g) 180-190 2 150-180
15
Page 16

Grilling
For grilling use the infrared grill F oven function or
infrared wide-area grill Z with temperature setting.
1
3
Ovenware for grilling
• Use the shelf unit and universal tray together for
Shelf positions
• For grilling flat foods you should mostly use the
Warning: Always close the oven door when
grilling.
Always pre-heat the empty oven using the
grill functions for 5 minutes!
grilling.
4th shelf position from the bottom.
Infrared Grilling
always pre-heat for 5 minutes
Food for grilling Function Tempera-
ture in °C
Notes on the grilling table
The grilling times are only for guidance and will vary
depending on the type and quality of meat or fish.
• Grilling is particularly suitable for flat pieces of
meat and fish.
• Turn the food approx. halfway through grilling.
Universal
tray
Shelf support rail from
Grill tray Grilling time
bottom
1. Page 2. Page
in minutes
Infrared
4-8 Pork chops
2-4 Pork chops Infrared grill 275 1 4 12 12
marinated pork steaks
Fillet steak, rare Infrared grill 275 1 4 5-7 4-6
4 fillet steaks, medium
2 Half chicken pieces Infrared grill 250 1 4 15-20 15-20
4 Half chicken pieces
1-4 Chicken thighs
4-6 Chicken thighs
wide-area
grill
Infrared
wide-area
grill
Infrared
wide-area
grill
Infrared
wide-area
grill
Infrared
wide-area
grill
Infrared
wide-area
grill
275 1 4 15 10
275 1 4 12 12
275 1 4 6-8 5-7
250 1 3 15-20 15-20
250 1 4 20 10
250 1 4 20 15
Grilled sausage,
up to 6 items
Grilled sausage,
more than 6 items
16
Infrared grill 275 1 4 5-10 5
Infrared
wide-area
grill
275 1 4 5-10 5
Page 17

Coiled sausages,
up to 4 items
Infrared grill 275 1 4 10 9
Coiled sausages,
up to 6 items
Whole fish
Toast (without topping)
Infrared
wide-area
grill
Infrared
wide-area
grill
Infrared
wide-area
grill
275 1 4 10 9
250 1 3 10 ---
275 1 4 1-2 1-2
Spit-Roasting with the Rotisserie Rod
Food to be spitroasted
1 chicken approx. 1
2 chicken
1 duck 1,5-2
Quantity
kg
each
approx. 1
Function Temperature°CSpit-roasting time in hrs:mins
_ Wide-area spit-roast
with rotisserie rod
_ Wide-area spit-roast
with rotisserie rod
_ Wide-area spit-roast
with rotisserie rod
240 1:00-1:10
240 1:15-1:20
240 1:20-1:40
(as a guide)
1 rolled pork roast 1
Knuckle of pork
(pre-cooked or ½ hr)
1-1,3
_ Wide-area spit-roast
with rotisserie rod
_ Wide-area spit-roast
with rotisserie rod
240 1:45-2:15
240 2:00-2:30
17
Page 18

Preserving
When preserving use the bottom heat oven function.
Preserving jars
• When preserving use only commercially available
jars that are the same size.
3
Jars with twist-off tops or with a bayonet
fastening and metal containers are not
suitable.
Notes on preserving
• Use the baking tray for preserving. There is room
• The jars should all be filled to the same level and
• Position the jars on the baking tray so that they
• Pour approx. 1/2 litre of water into the baking tray
Shelf positions
•Use the 1st shelf position from the bottom for
preserving.
• As soon as bubbles begin to appear in the first
Preserving Table
The states preserving times and temperatures are for guidance
Preserves Temperature in
°C
Soft fruit
Cooking time until
bubbles form
Mins.
for up to six jars, each with a capacity of 1 litre.
closed.
do not come into contact with one another.
to create sufficient moisture in the oven.
jars (for 1-litre jars this takes about 35-60 minutes), switch off the oven or reduce the temperature to 100 °C (see table).
Continued
cooking
at 100 °C
Mins.
Standing time
with oven
switched off
Strawberries, blueberries,
raspberries, ripe gooseberries
Unripe gooseberries 160-170 35-45 10-15 -
Fruit with stones
Pears, quinces, plums 160-170 35-45 10-15 -
Vegetables
Carrots 160-170 50-60 5-10 60
Mushrooms 160-170 40-60 10-15 60
Gherkins 160-170 50-60 - -
Mixed pickles 160-170 50-60 15 -
Kohlrabi, peas, asparagus 160-170 50-60 15-20 -
Beans 160-170 50-60 - -
Plum purée
160-170 35-45 - -
160-170
50
45
-6-8 timer
-
-
18
Page 19

Cleaning and Care
1
Warning: For safety reasons cleaning the
appliance with a steam jet cleaner or highpressure water cleaner is not permissible!
Exterior of the Appliance
Wipe the front of the appliance with a soft cloth
dipped in warm soapy water.
• Do not use scourers, caustic cleaners or abrasive
items.
• Use commercially available cleaners for metal
fronts.
Oven Interior
1
Clean the appliance after each use. This is the easiest way to remove spills and prevents them being
burnt on.
Warning: The oven must be switched off
and cold before cleaning.
1. Switch on the oven lighting when cleaning.
2. Every time you use the oven, wipe it out after-
wards with water and washing-up liquid, then dry.
Do not use any abrasive items.
3. Remove stubborn marks with special oven cleaners.
1
Important: Always follow the manufacturer's instructions when using oven spray
Accessories
Wash all slide-in units (shelf unit, baking tray, shelf
support rails etc.) after each use and dry well. Soak
briefly to make them easier to clean.
19
Page 20
Oven Lighting
1
3
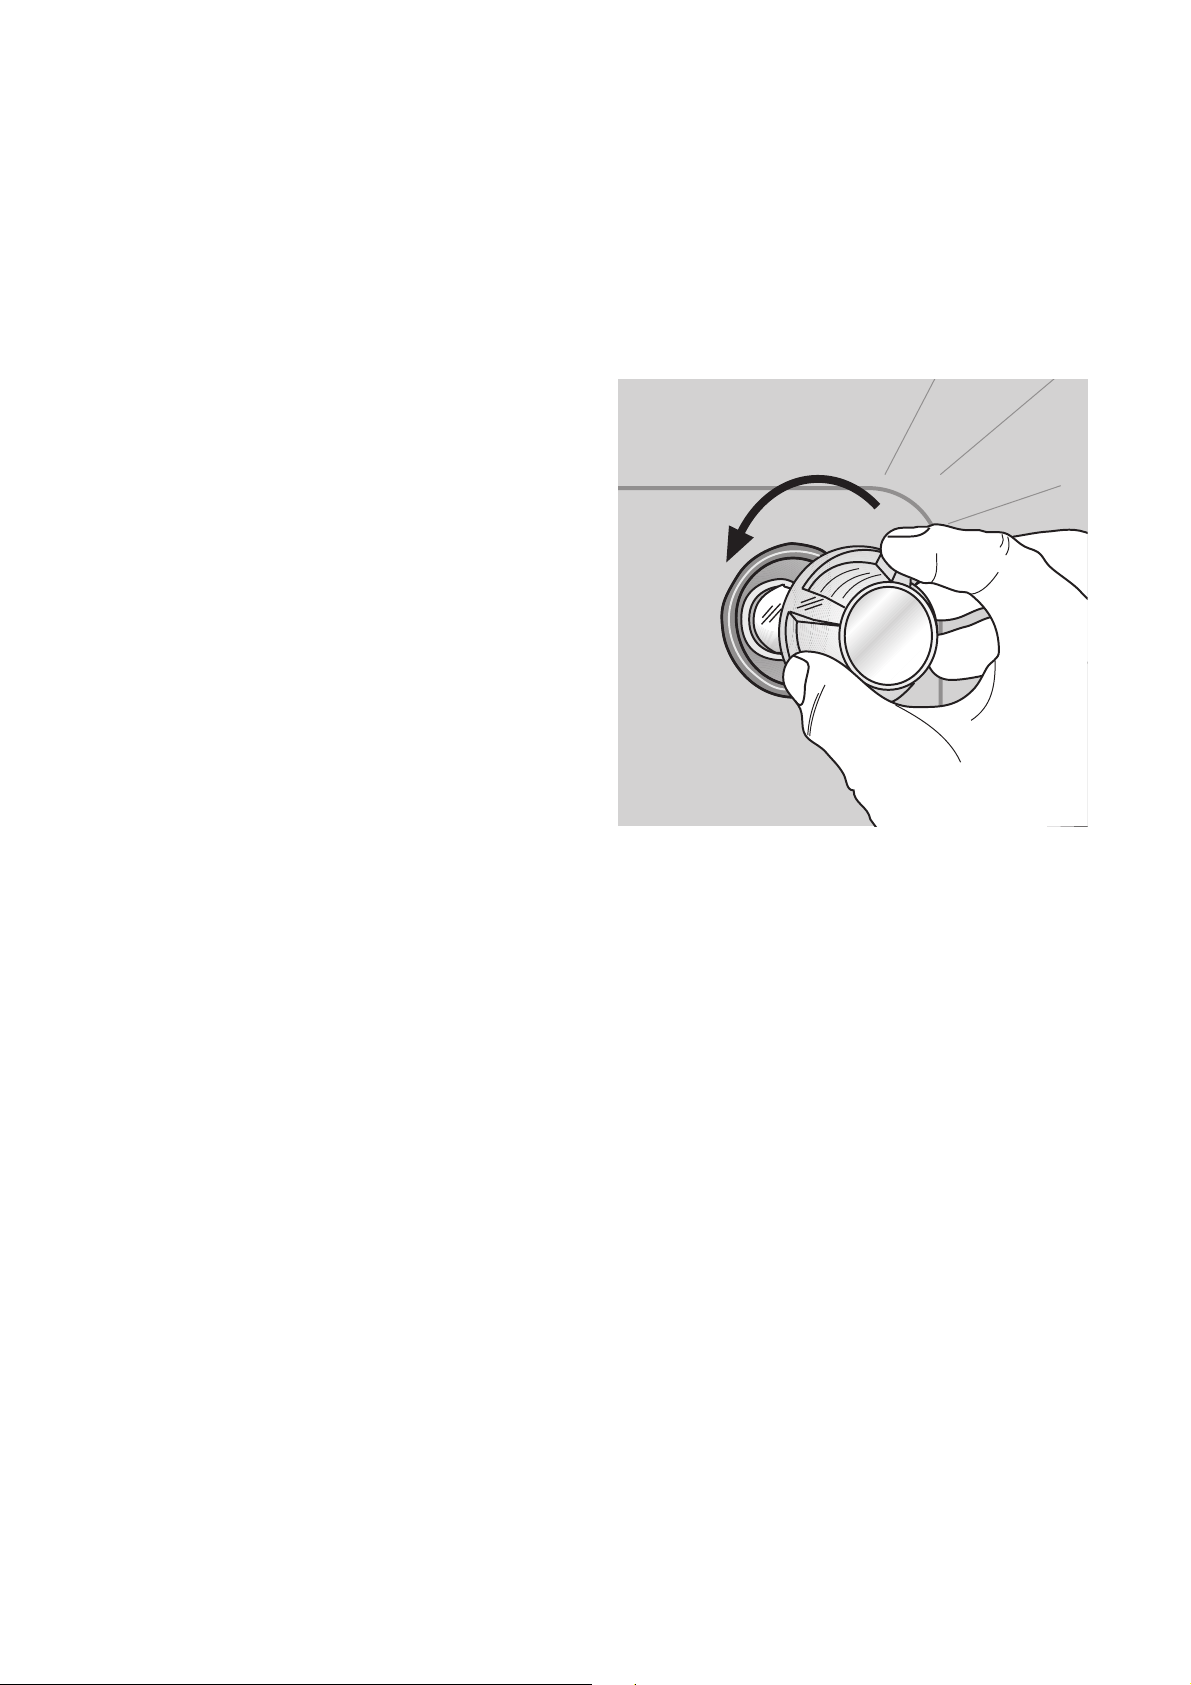
Changing the oven light bulb/cleaning
the glass cover
1. Remove the glass cover by turning it anti-clock-
2. If necessary: replace with
3. Refit the glass cover.
Warning: Risk of electric shock! Prior to
changing the oven light bulb:
– Switch off the oven!
– Disconnect from the electricity supply.
Place a cloth on the oven floor to protect the
oven light and glass cover.
wise and then clean it.
25 watt, 230 V, 300 °C heat-resistant oven
lighting.
20
Page 21
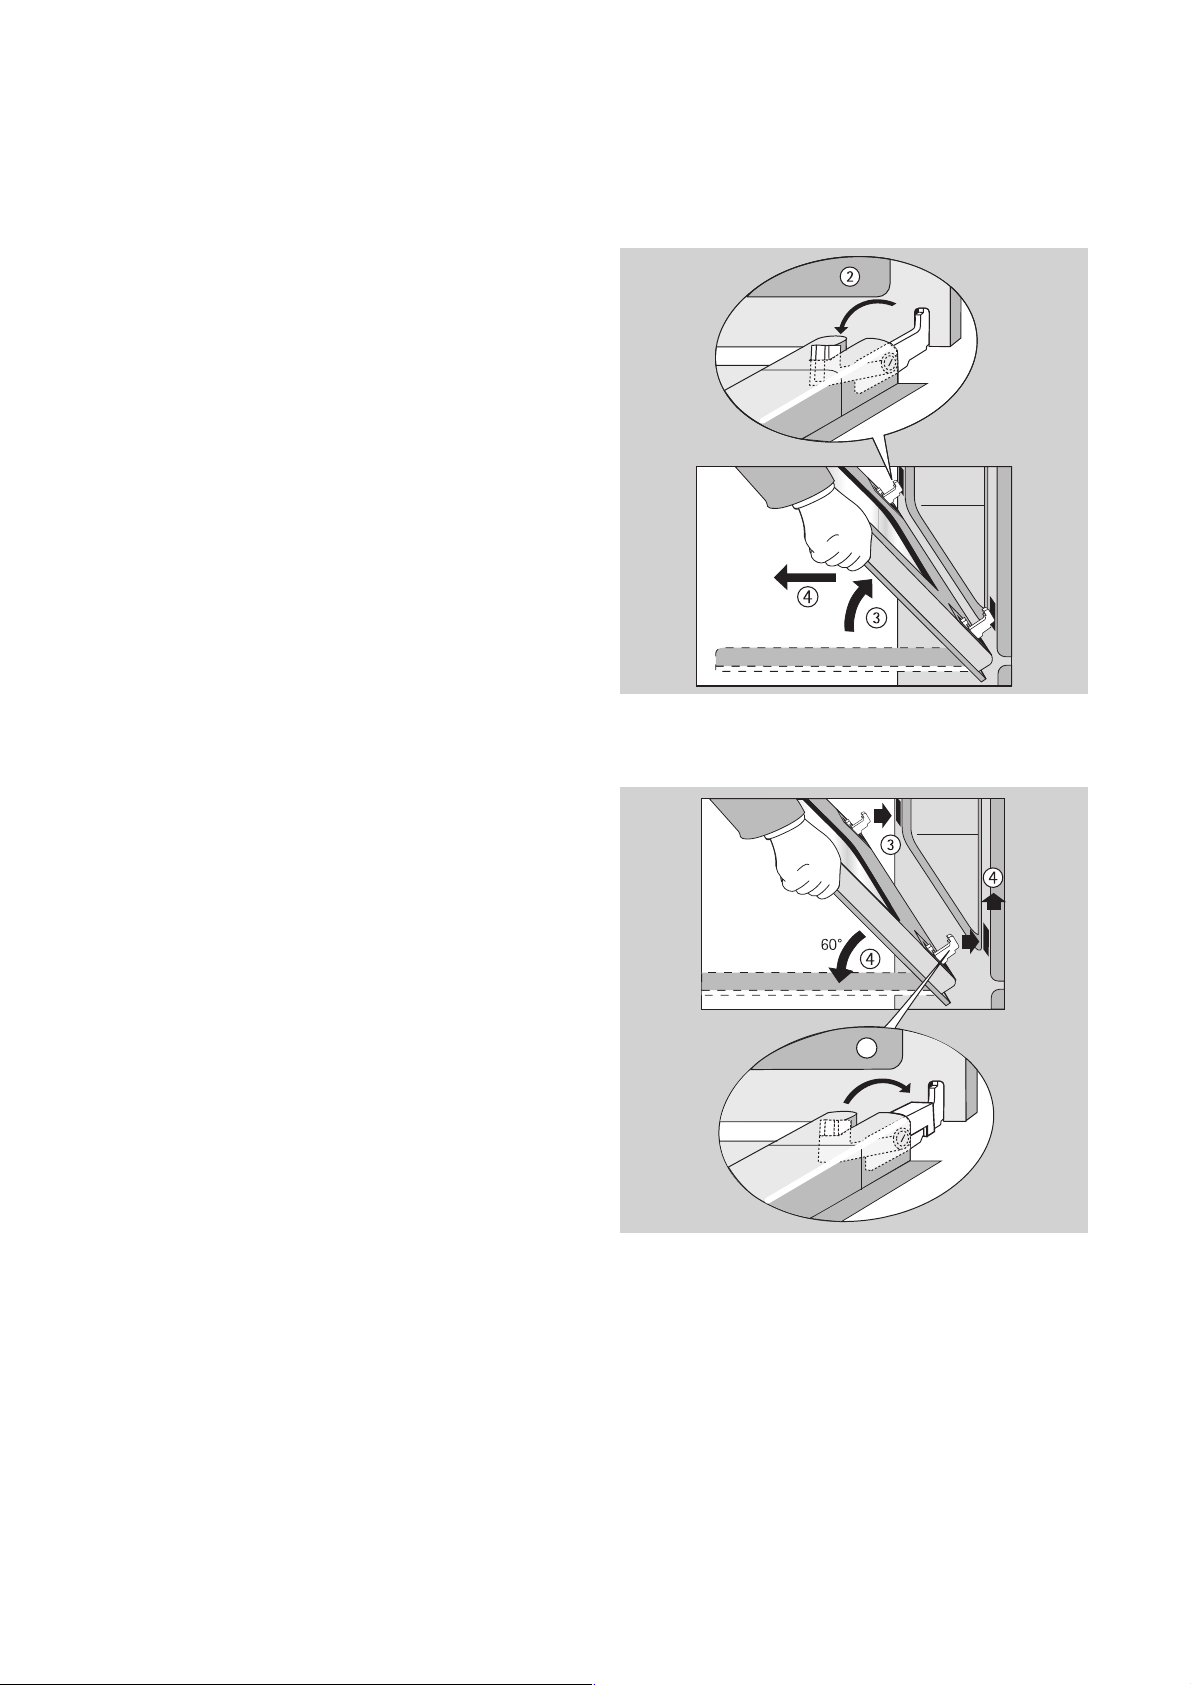
Oven Door
The oven door of your appliance may be removed for
cleaning.
Removing the oven door
1. Open the oven door completely.
2. Completely fold back the brass-coloured
clamping lever on both door hinges.
3. Grip the oven door with both hands on the sides
and close it to about
3/4 going past the point of resistance.
4. Pull the door away from the oven
(Caution: heavy!).
5. Place the door, with the outer surface downwards, on a soft, flat surface, for example a blanket, to avoid scratches.
Hanging the oven door
1. With both hands take hold of the sides of the
door from the side on which the handle is positioned.
2. Hold the door at an angle of approx. 60°.
3. Slide the door hinges simultaneously as far as
possible into the two slots on the right and left at
the bottom of the oven.
4. Lift the door up until resistance is met and then
open fully.
5. Lift the brass-coloured clamping levers on both
door hinges back to their original position.
6. Close the oven door.
5
21
Page 22
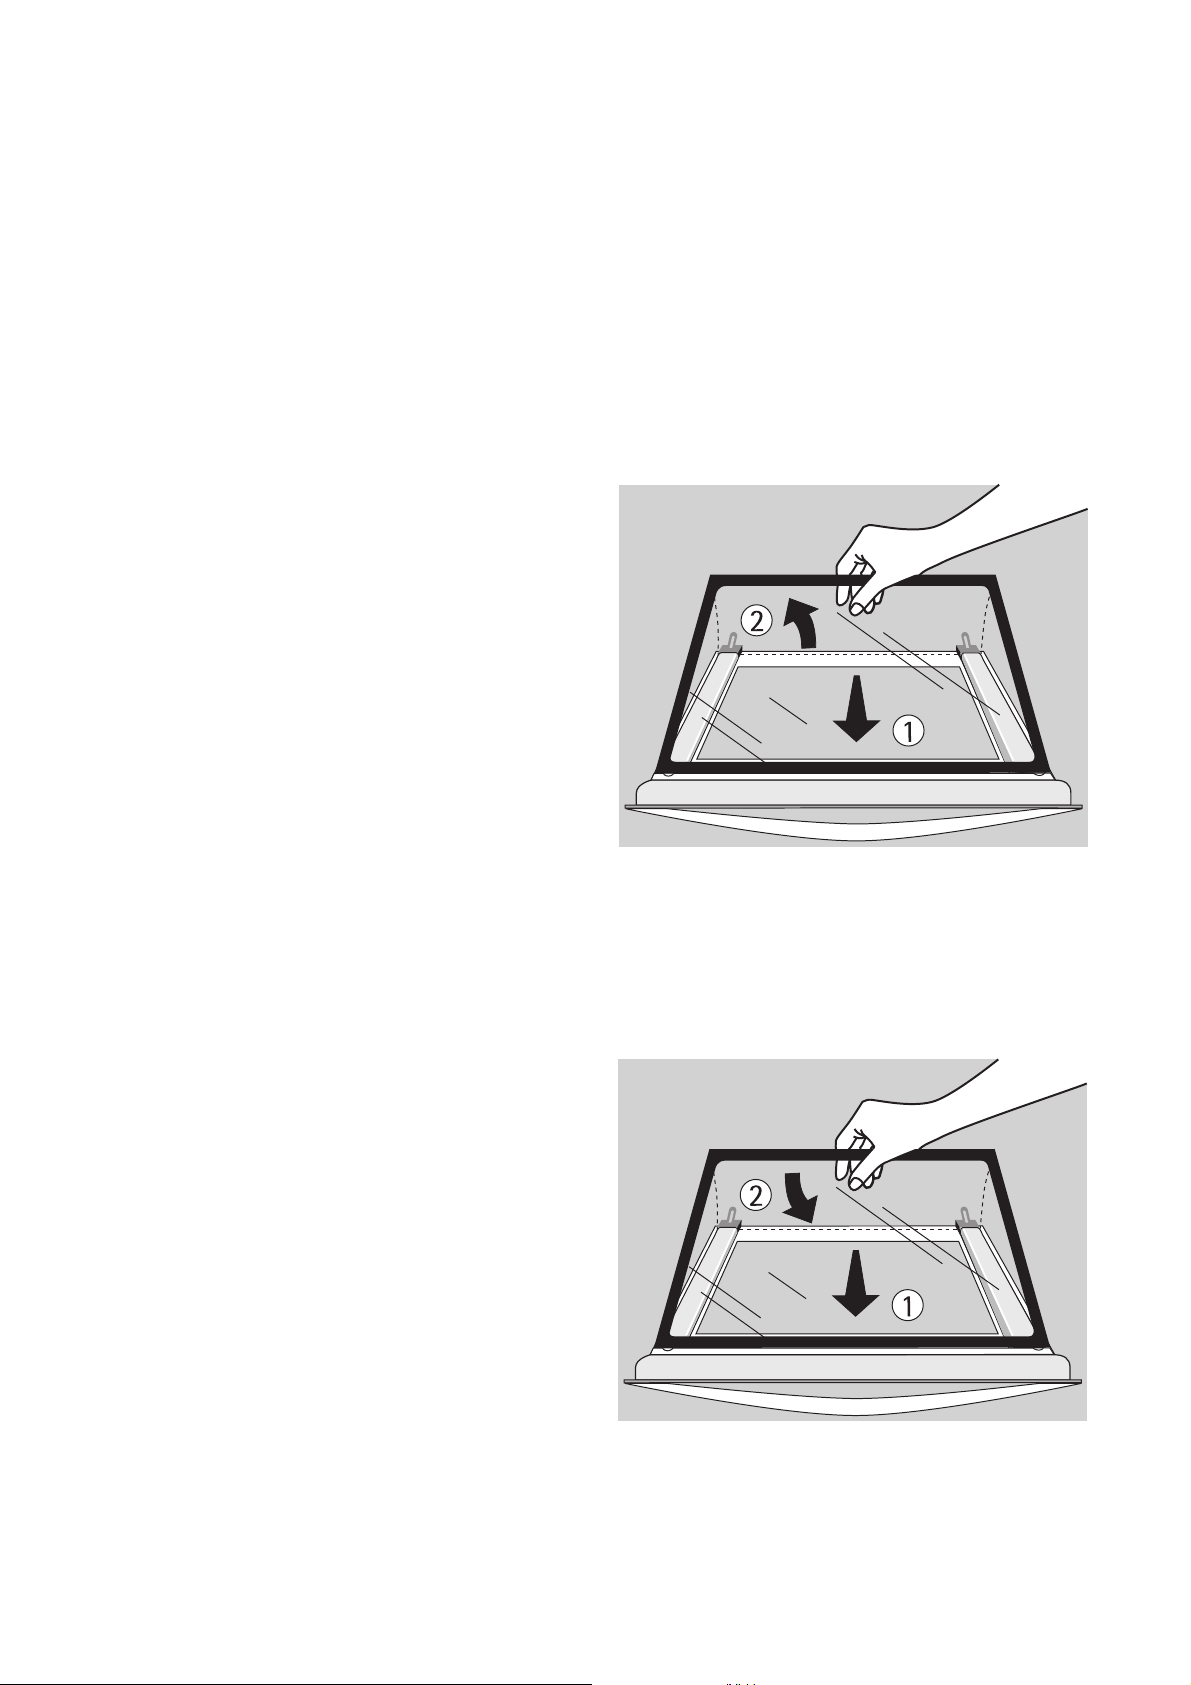
Oven door glass
The oven door has two glass plates, set next to each
other. The inner plate can be removed for cleaning.
1
1
Removing the glass from the door
1. Detach the door and, with the handle downwards,
2. Grasp the top glass plate underneath, and push it
3. Hold the plate gently underneath, and slide it out.
Caution: the following steps must be per-
formed only with the oven door removed! If
the glass is removed while the door is
attached, the lighter weight may cause it to
spring up and cause injury.
Important! Rough handling of the glass,
especially at the edges of the front plate,
may cause it to break.
lower it onto a soft, even surface.
towards the door handle against the pressure
spring, until it comes free.
Cleaning the glass
Attaching the glass to the door
1. Insert the plate obliquely into the retaining frame
at the handle.
2. Lower the plate. Place the glass against the pressurespring at the handle, and in front of the
retaining frame at the bottom of the door, then
push it into the frame.
The glass plate must be firmly attached!
Re-attach the door to the oven.
22
Page 23

What to do if ...
Fault Possible cause Remedy
The oven does not heat.
The oven light does not come on. The bulb has blown.
If you cannot remove the fault with the remedies
described above, please contact your local dealer
or Customer Service.
1
In the event of damage caused by inappropriate
repairs, the guarantee may not cover the work carried out by Customer Service or your dealer's repair
technicians.
Caution: repairs should only be undertaken
by specialised repair technicians. Inappropriate repairs may result in serious injury to
the user.
The oven has not been switched
on.
The required settings have not
been made.
The domestic electrical protection
device (fuse) has been tripped.
Switch the oven on.
Check the settings.
Check the fuses or protection
devices.
If these are tripped repeatedly, you
should call a qualified electrician.
Replace the bulb (see Care and
Cleaning).
Advice on cookers with metal fronts:
3
Because of the cold surface at the front of
the cooker, opening the oven door during (or
just after) baking or roasting may cause the
glass to steam up.
23
Page 24

Technical Data
Oven Interior Dimensions
Height x Width x Depth 31 cm x 41 cm x 41 cm
Capacity (usable capacity) 52 l
Regulations, Standards, Directives
This appliance meets the following standards:
• EN 60 335-1 and EN 60 335-2-6
relating to the safety of electric appliances for
household use and similar purposes and
• EN 60350 and
• DIN 44546 / 44547 / 44548
relating to the operating features of household
electric cookers.
• EN 55014-2
• EN 55014
• EN 61000-3-2
• EN 61000-3-3
relating to basic requirements for electromagnetic
compatibility protection (EMC).
4
• 73/23/EWG dated 19.02.1973 (Low Voltage
• 89/336/EWG dated 03.05.1989 (EMC Directive
This appliance complies with the following
EC directives:
Directive)
including
Amending Directive 92/31/EWG).
24
Page 25

Installation Instructionsstallation Instructions
1
Important: The new appliance may only be
installed and connected by an approved
specialist.
Please observe this instruction, otherwise
the warranty will not cover any damage that
may occur.
1
Safety Instructions for the Installery Instructions for the Installer
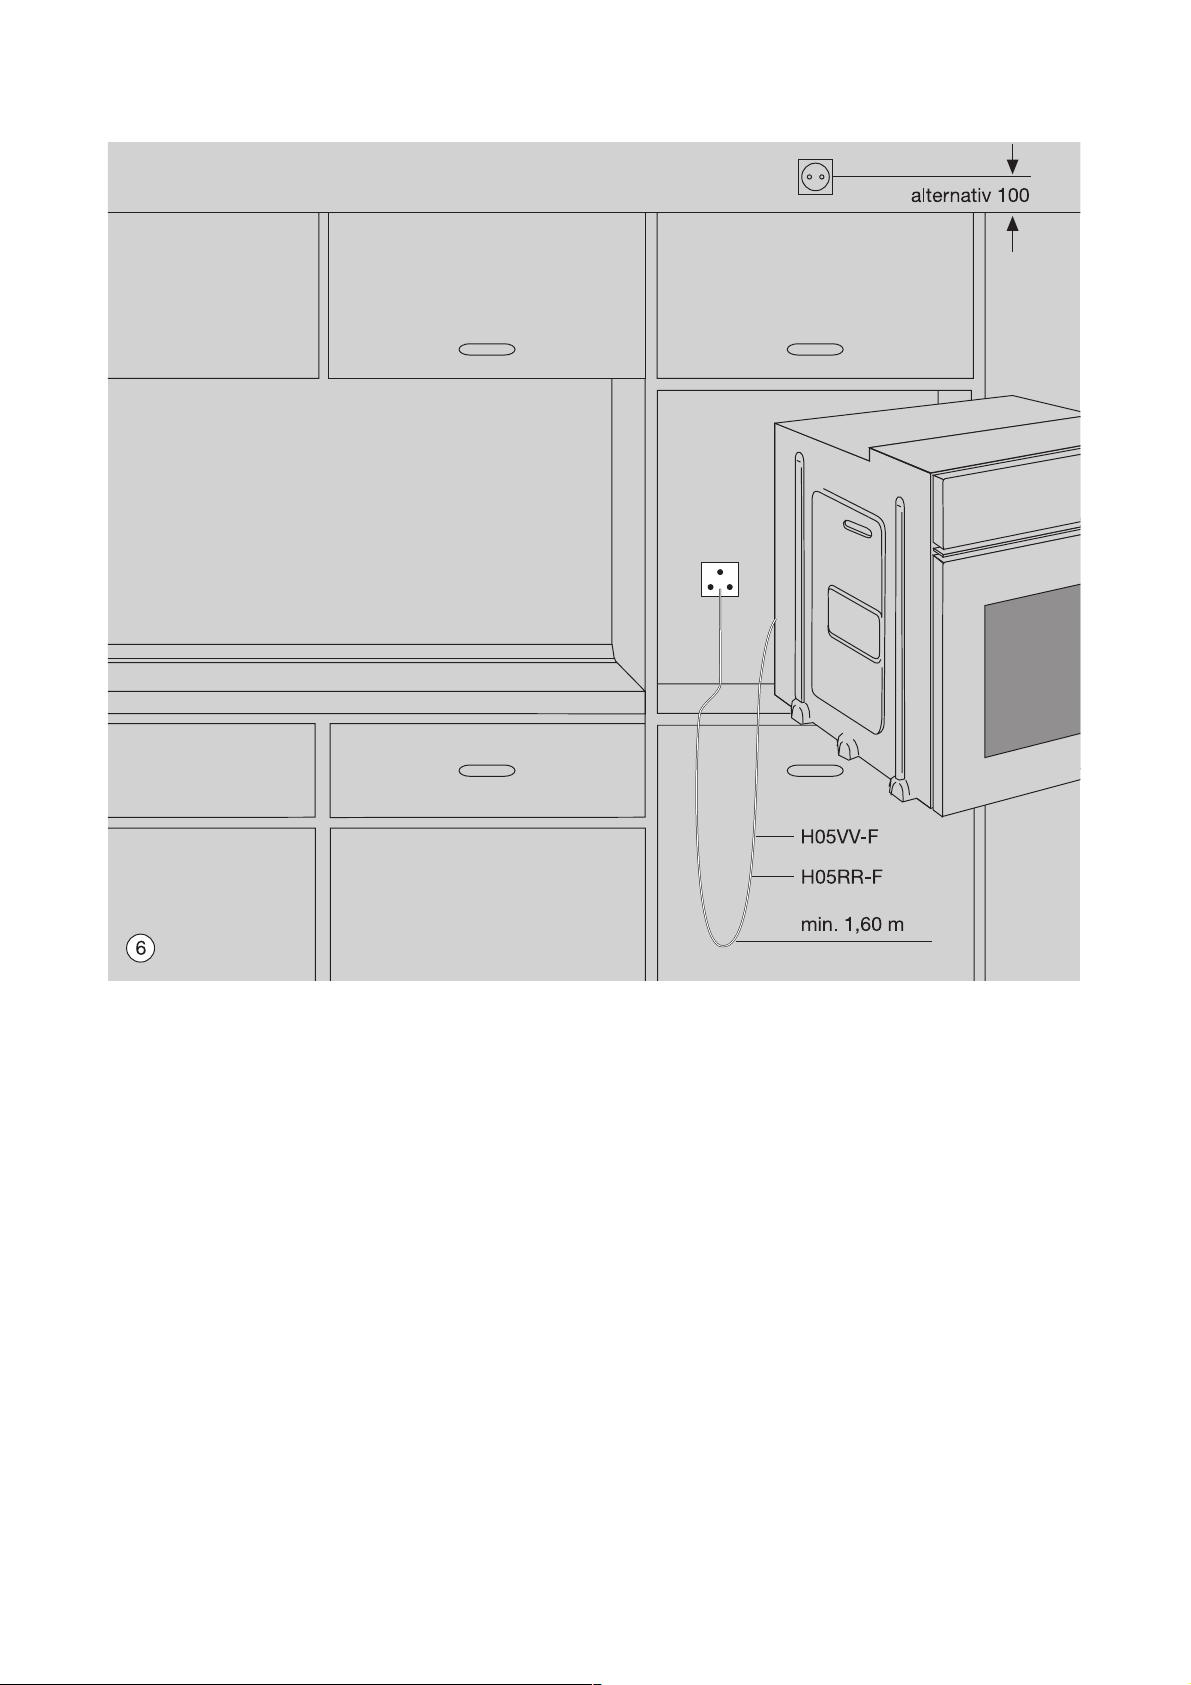
• A device must be provided in the electrical installation which allows the appliance to be disconnected from the mains at all poles with a contact
opening width of at least 3 mm.
Suitable isolation devices are, for example, circuit
breakers, fuses (screw-type fuses are to be
removed from the holder), earth leakage trips and
contactors.
• The installation must guarantee shock protection.
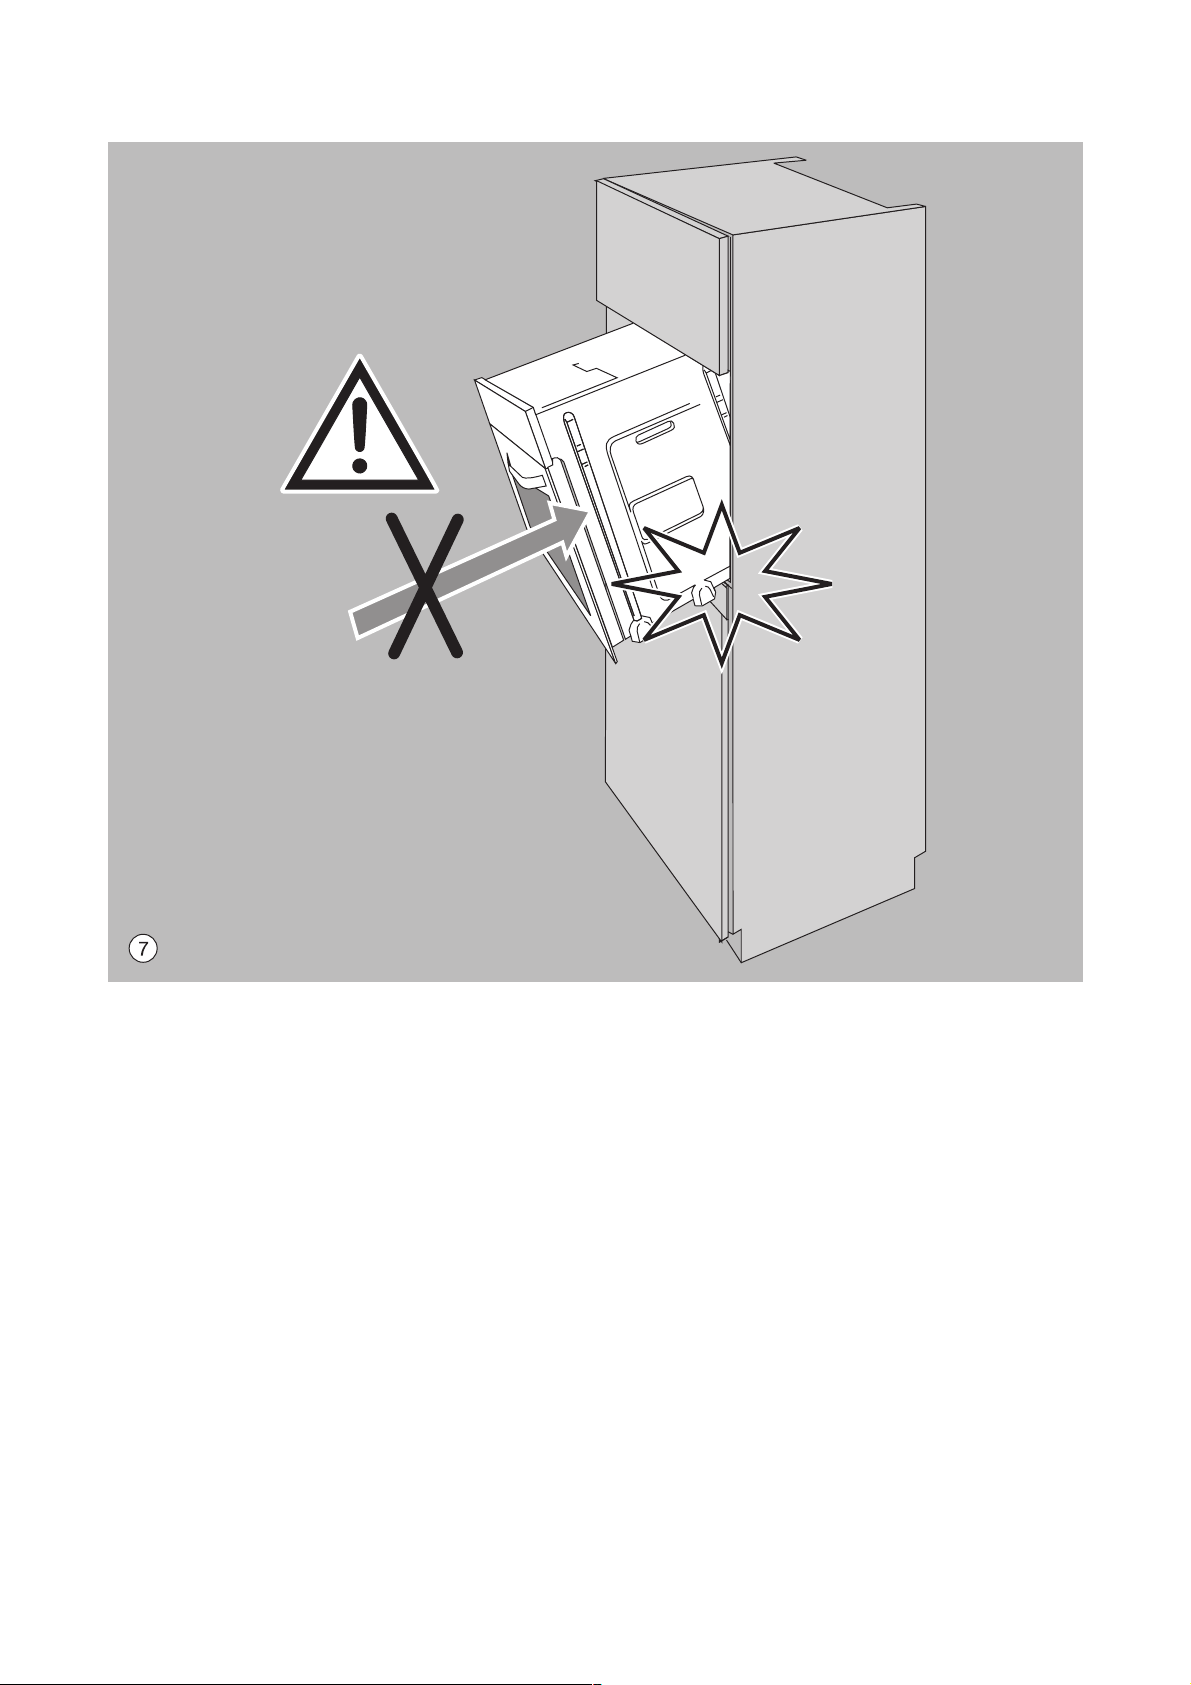
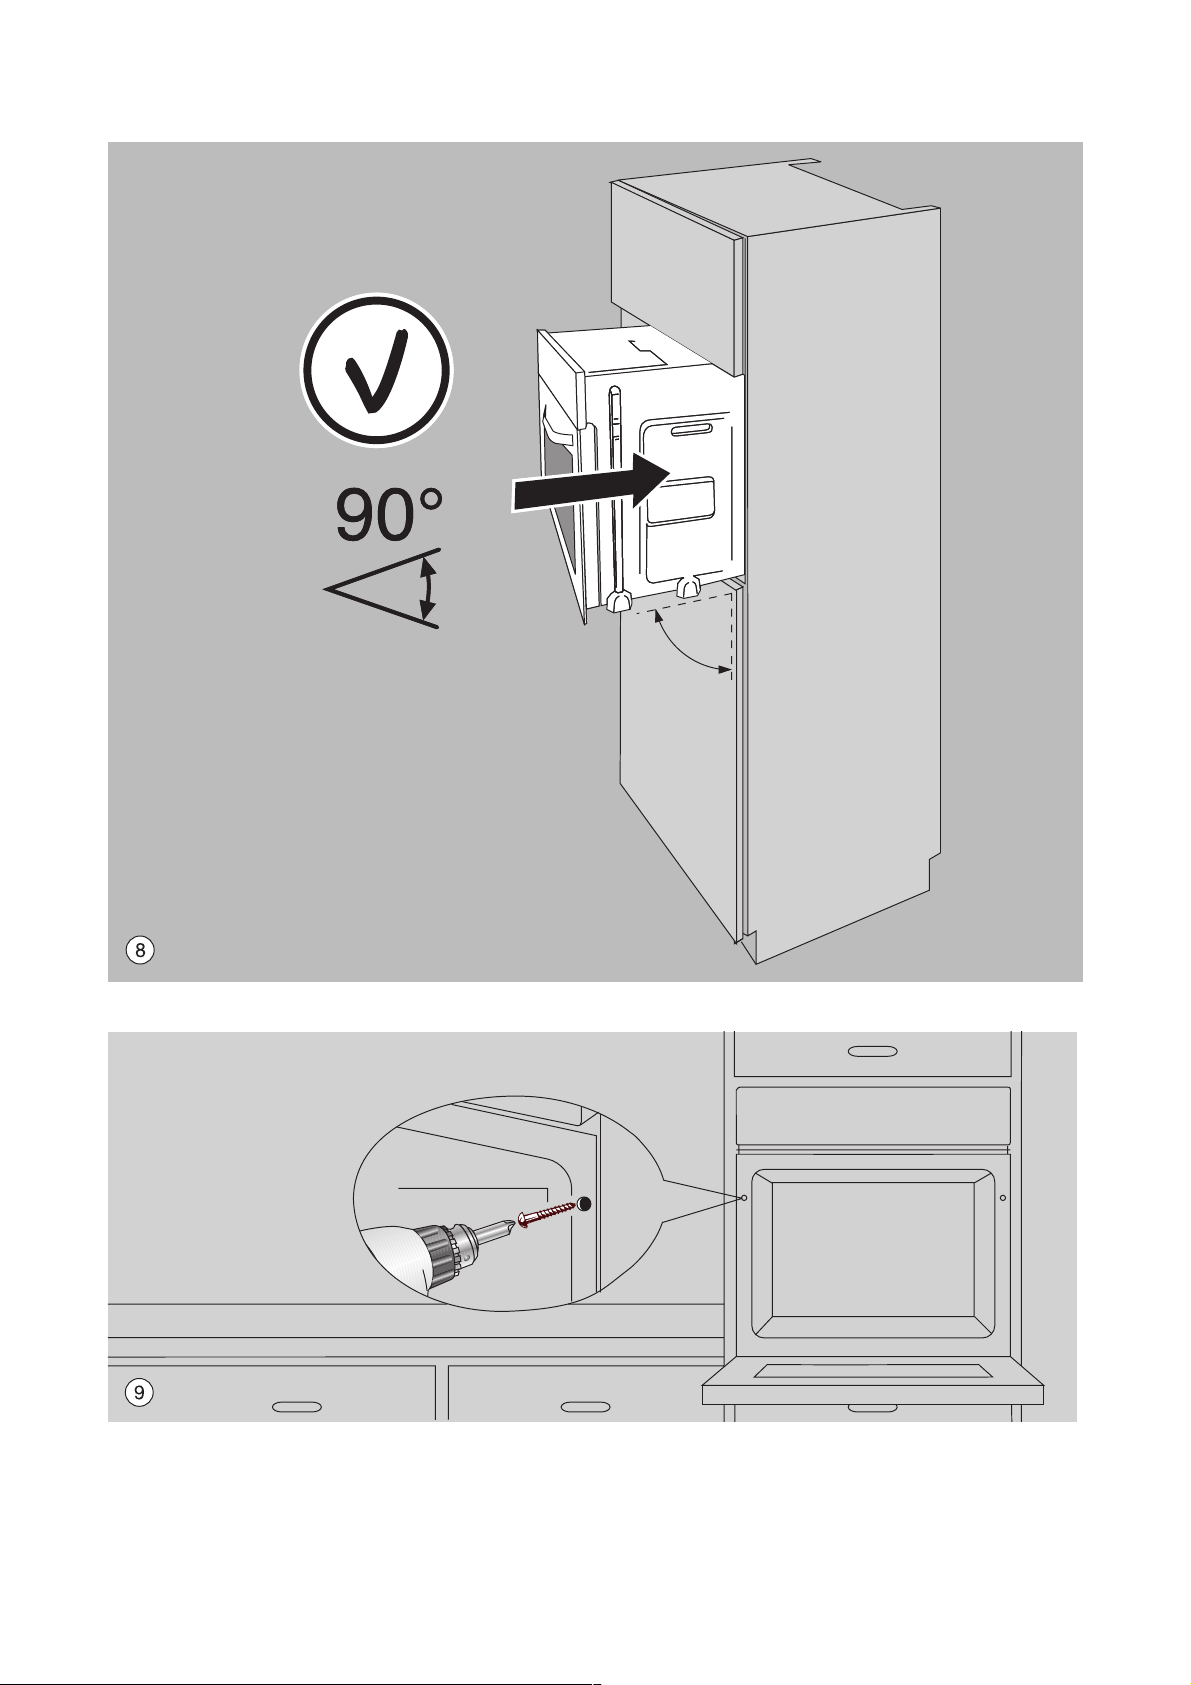
• The stability of the unit in which the appliance is
fitted must satisfy the requirements of DIN 68930.
• Built-in ovens and hobs are fitted with special
connector systems. They may only be combined
with appliances with a matching system.
25
Page 26
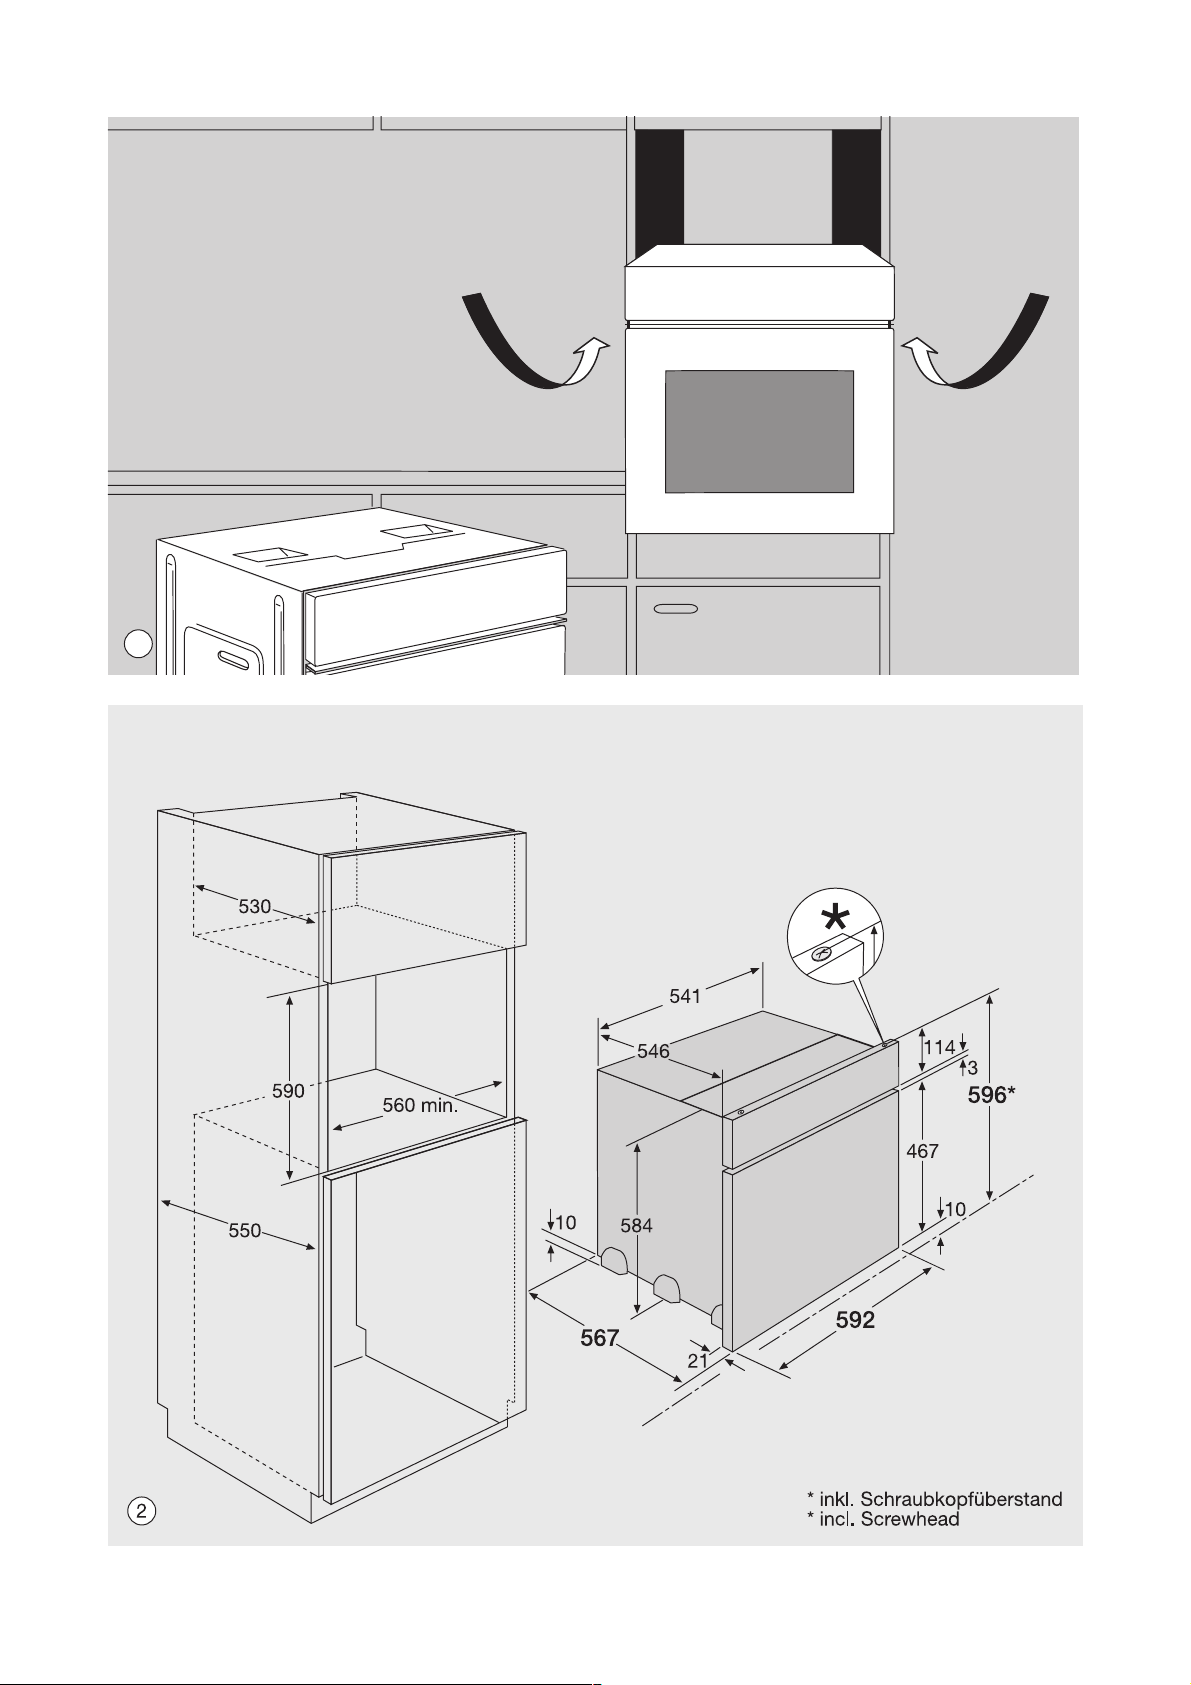
1
26
Page 27
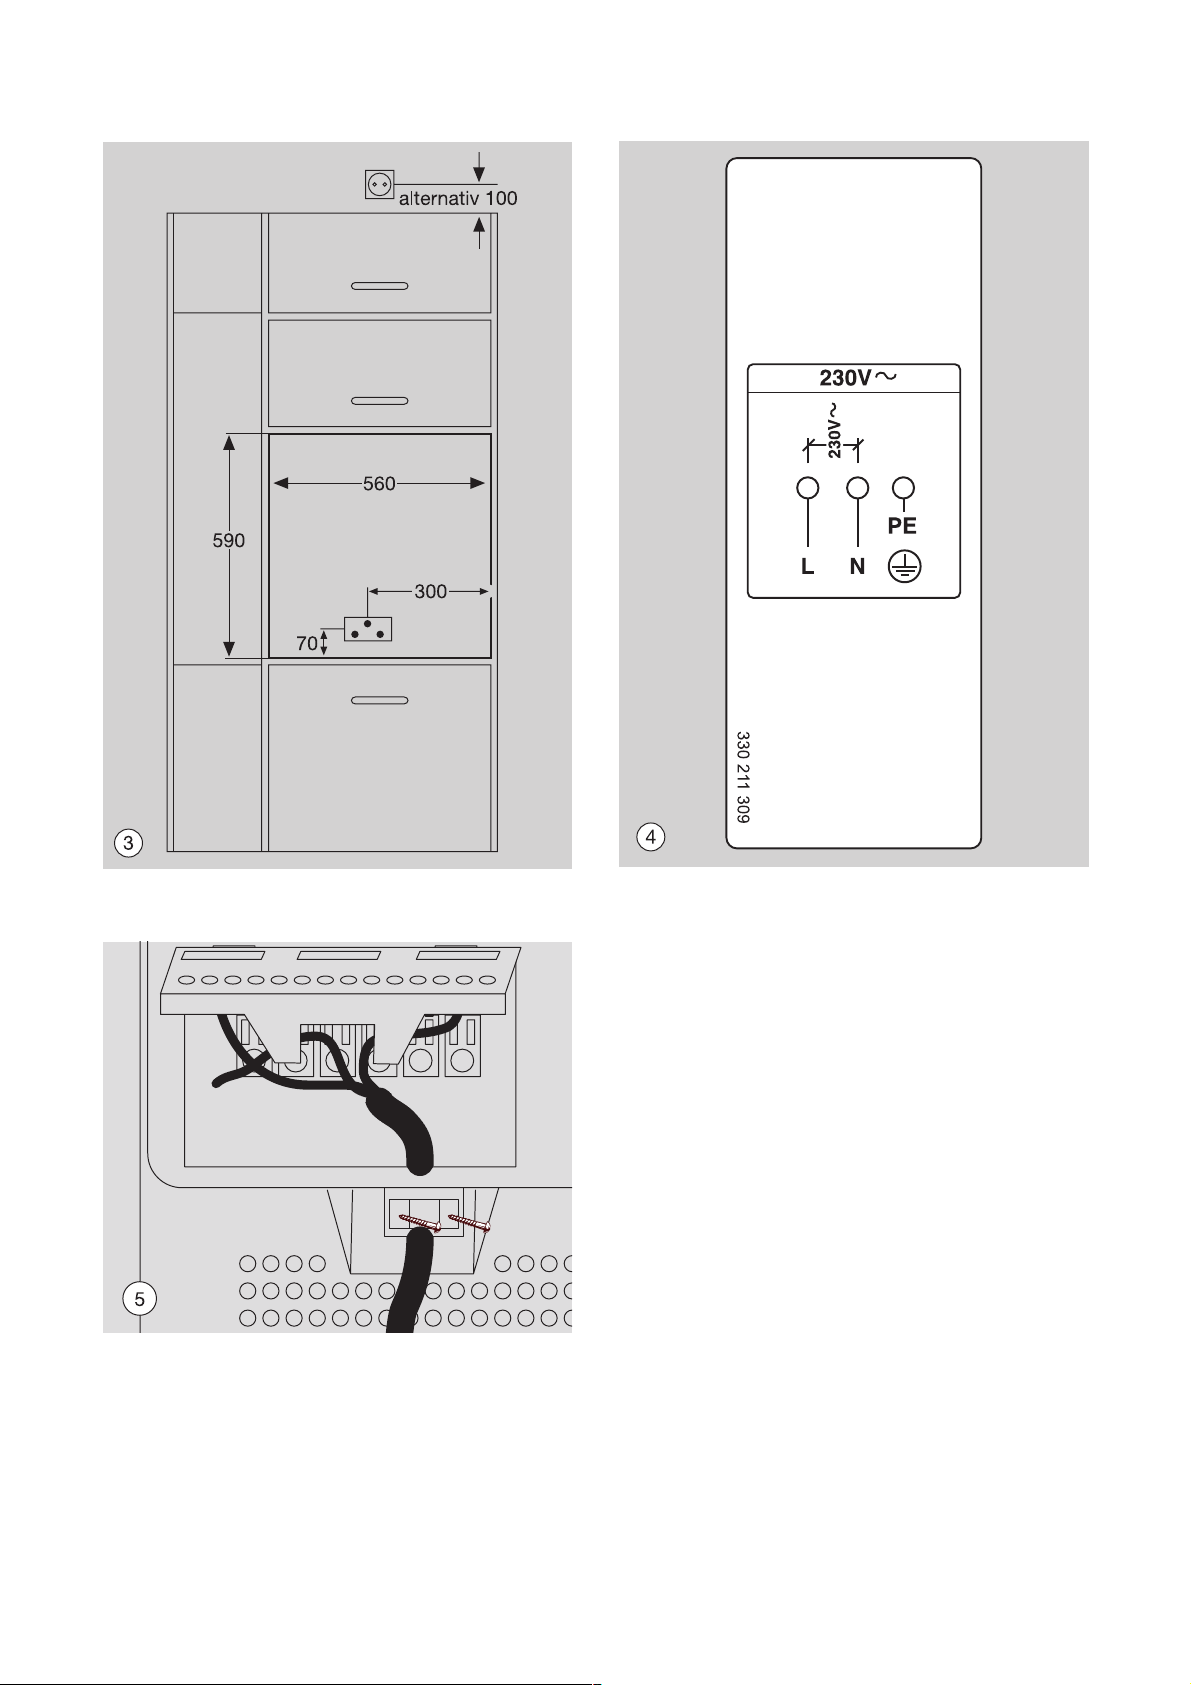
272829
Page 28
Page 29
Page 30
30
3,5x25
Page 31
Customer Service Centresmer Service Centrestres
Singapore
Electrolux SEA Pte Ltd
10 Toh Guan Road, # 07-01 TT International Tradepark
Singapore 608838
Tel: + 65 7616200
Malaysia
Electrolux Home Appliances Sdn Bhd
Axis Plaza, level 2
No 5, Jalan Penyair U1 / 44
Seksyen U1, 40150 Shah Alam
Selangor Darul Ehsan
Tel: + 603 55691222
Indonesia
PT. Electrolux Indonesia
Customer Care & Service Centre
Electrolux Building
Jl. KH. Hasyim Ashari No. 17
Jakarta 10130
Indonesia
Tel: + 6221 6328025, 6331350
Vietnam
Electrolux Vietnam Ltd
133 Thai Ha Road
Hanoi, Vietnam
Tel: + 844 8574882
Thailand
31
Page 32

Page 33

Page 34

Index
A
Accessories . . . . . . . . . . . . . . . . . . . . . . . . . . . . . . 7
B
Baking tray . . . . . . . . . . . . . . . . . . . . . . . . . . . . . . . 7
Bottom heat . . . . . . . . . . . . . . . . . . . . . . . . . . . . . 10
C
Cleaning
accessories . . . . . . . . . . . . . . . . . . . . . . . . . . . 19
initial cleaning . . . . . . . . . . . . . . . . . . . . . . . . . . . 8
oven door . . . . . . . . . . . . . . . . . . . . . . . . . . . . . 21
Combination shelf . . . . . . . . . . . . . . . . . . . . . . . . . 7
Control panel . . . . . . . . . . . . . . . . . . . . . . . . . . . . . 6
Conventional . . . . . . . . . . . . . . . . . . . . . . . . . . . . 10
Customer service . . . . . . . . . . . . . . . . . . . . . . . . . 35
D
Description of the appliance . . . . . . . . . . . . . . . . . 6
Disposal . . . . . . . . . . . . . . . . . . . . . . . . . . . . . . . . . 5
Door . . . . . . . . . . . . . . . . . . . . . . . . . . . . . . . . . . . 21
G
General purpose tray . . . . . . . . . . . . . . . . . . . . . . 10
O
Oven
accessories . . . . . . . . . . . . . . . . . . . . . . . . . . . . 7
door . . . . . . . . . . . . . . . . . . . . . . . . . . . . . . . . . 21
functions . . . . . . . . . . . . . . . . . . . . . . . . . . . . . . 10
light bulb . . . . . . . . . . . . . . . . . . . . . . . . . . . . . . 20
P
Preserving . . . . . . . . . . . . . . . . . . . . . . . . . . . . . . 18
Preserving Table . . . . . . . . . . . . . . . . . . . . . . . . . . 18
R
Repairs . . . . . . . . . . . . . . . . . . . . . . . . . . . . . . . . . . 4
Rotisserie rod . . . . . . . . . . . . . . . . . . . . . . . . . . . . . 7
S
Safety . . . . . . . . . . . . . . . . . . . . . . . . . . . . . . . . . . . 4
T
Tables and tips . . . . . . . . . . . . . . . . . . . . . . . . . . . 12
Top Heat . . . . . . . . . . . . . . . . . . . . . . . . . . . . . . . . 10
Tray, general purpose tray . . . . . . . . . . . . . . . . . . 10
U
Using the oven . . . . . . . . . . . . . . . . . . . . . . . . . . . . 9
W
What to do if ... . . . . . . . . . . . . . . . . . . . . . . . . . . 23
34
Page 35
Servicece
The section "What do I do if...“ lists some faults that
you can remedy yourself. Look there first if a fault
occurs.
Is it a technical fault?
Then contact your nearest customer service centre.
Always prepare in advance for the discussion. By
doing so you will make it easier to diagnose the fault
and decide whether customer service is necessary.
Please make a note of the folllowing information as
accurately as possible:
• What form does the fault take?
• Under what circumstances does the fault occur?
Prior to the telephone call it is imperative that you
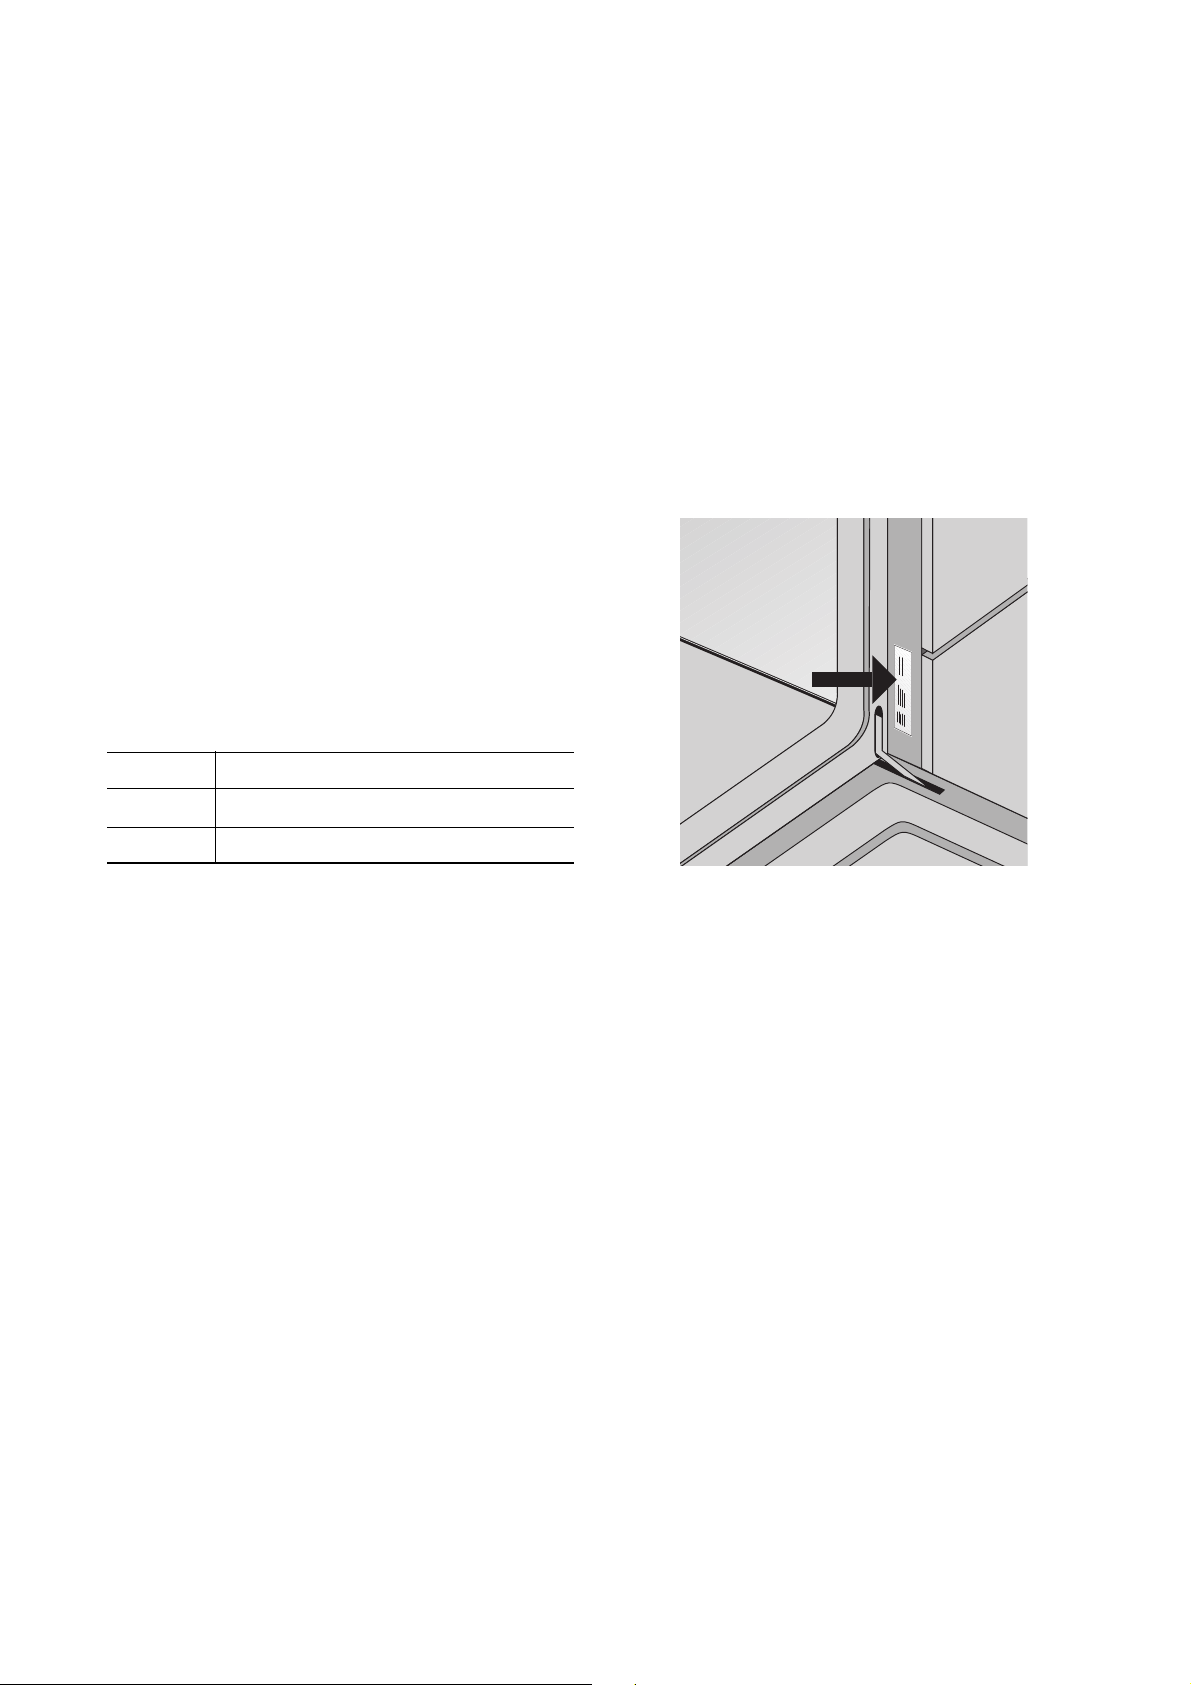
make a note of the following appliance code numbers that are given on the rating plate:
•Model Code
• PNC Code (9 digits),
• S No Code (8 digits).
We recommend that you record the code numbers
here so that you always have them to hand:
Model: ...............................................................
PNC:
...............................................................
S-No: ...............................................................
When do you incur costs even during the
warranty period?
• if you could have remedied the fault using the
fault table (see section "What to do if ...“),
• if the customer service technician has to make
several journeys because he was not provided
with all the relevant information before his visit
and therefore, for example, has to fetch spare
parts. These multiple trips can be avoided if you
prepare for your phone call as described above.
35
Page 36

 Loading...