

Page 1

EOB2200
................................................ .............................................
EN OVEN USER MANUAL 2
IT FORNO ISTRUZIONI PER L’USO 18
Page 2

www.electrolux.com
2
CONTENTS
1. SAFETY INSTRUCTIONS . . . . . . . . . . . . . . . . . . . . . . . . . . . . . . . . . . . . . . . . . . . . . . . . . . 3
2. PRODUCT DESCRIPTION . . . . . . . . . . . . . . . . . . . . . . . . . . . . . . . . . . . . . . . . . . . . . . . . . 5
3. BEFORE FIRST USE . . . . . . . . . . . . . . . . . . . . . . . . . . . . . . . . . . . . . . . . . . . . . . . . . . . . . . 5
4. DAILY USE . . . . . . . . . . . . . . . . . . . . . . . . . . . . . . . . . . . . . . . . . . . . . . . . . . . . . . . . . . . . . 6
5. CLOCK FUNCTIONS . . . . . . . . . . . . . . . . . . . . . . . . . . . . . . . . . . . . . . . . . . . . . . . . . . . . . 6
6. ADDITIONAL FUNCTIONS . . . . . . . . . . . . . . . . . . . . . . . . . . . . . . . . . . . . . . . . . . . . . . . . . 7
7. HELPFUL HINTS AND TIPS . . . . . . . . . . . . . . . . . . . . . . . . . . . . . . . . . . . . . . . . . . . . . . . . 7
8.
CARE AND CLEANING . . . . . . . . . . . . . . . . . . . . . . . . . . . . . . . . . . . . . . . . . . . . . . . . . . . 11
9. WHAT TO DO IF… . . . . . . . . . . . . . . . . . . . . . . . . . . . . . . . . . . . . . . . . . . . . . . . . . . . . . . 15
10.
INSTALLATION . . . . . . . . . . . . . . . . . . . . . . . . . . . . . . . . . . . . . . . . . . . . . . . . . . . . . . . . . 16
11. ENVIRONMENT CONCERNS . . . . . . . . . . . . . . . . . . . . . . . . . . . . . . . . . . . . . . . . . . . . . . 17
WE’RE THINKING OF YOU
Thank you for purchasing an Electrolux appliance. You’ve chosen a product that brings with it
decades of professional experience and innovation. Ingenious and stylish, it has been designed
with you in mind. So whenever you use it, you can be safe in the knowledge that you’ll get great
results every time.
Welcome to Electrolux.
Visit our website for:
Get usage advice, brochures, trouble shooter, service information:
www.electrolux.com
Register your product for better service:
www.electrolux.com/productregistration
Buy Accessories, Consumables and Original spare parts for your appliance:
www.electrolux.com/shop
CUSTOMER CARE AND SERVICE
We recommend the use of original spare parts.
When contacting Service, ensure that you have the following data available.
The information can be found on the rating plate. Model, PNC, Serial Number.
Warning / Caution-Safety information
General information and tips
Environmental information
Subject to change without notice.
Page 3

ENGLISH 3
1.
SAFETY INSTRUCTIONS
Before the installation and use of the appliance, carefully read the supplied instructions. The manufacturer is not responsible if an incorrect installation and
use causes injuries and damages. Always
keep the instructions with the appliance
for future reference.
1.1 Children and vulnerable
people safety
WARNING!
Risk of suffocation, injury or permanent disability.
• This appliance can be used by children
aged from 8 years and above and persons with reduced physical, sensory or
mental capabilities or lack of experience
and knowledge if they have been given
supervision or instruction for the operation of the appliance by a person who is
responsible for their safety.
• Do not let children play with the appliance.
• Keep all packaging away from children.
• Keep children and pets away from the
appliance when it operates or when it
cools down. Accessible parts are hot.
• If the appliance has a child safety device, we recommend that you activate
it.
• Cleaning and user maintenance shall
not be made by children without supervision.
1.2 Installation
WARNING!
Only a qualified person must install this appliance.
• Remove all the packaging.
• Do not install or use a damaged appliance.
• Obey the installation instruction supplied with the appliance.
• Always be careful when you move the
appliance because it is heavy. Always
wear safety gloves.
• Do not pull the appliance by the handle.
• Keep the minimum distance from the
other appliances and units.
• Make sure that the appliance is installed
below and adjacent safe structures.
• The sides of the appliance must stay
adjacent to appliances or to units with
the same height.
Electrical connection
WARNING!
Risk of fire and electrical shock.
• All electrical connections should be
made by a qualified electrician.
• The appliance must be earthed.
• Make sure that the electrical information
on the rating plate agrees with the power supply. If not, contact an electrician.
• Always use a correctly installed shockproof socket.
• Do not use multi-plug adapters and extension cables.
• Make sure not to cause damage to the
mains plug and to the mains cable.
Contact the Service or an electrician to
change a damaged mains cable.
• Do not let mains cables to come in
touch with the appliance door, specially
when the door is hot.
• The shock protection of live and insulated parts must be fastened in such a
way that it cannot be removed without
tools.
• Connect the mains plug to the mains
socket only at the end of the installation. Make sure that there is access to
the mains plug after the installation.
• If the mains socket is loose, do not
connect the mains plug.
• Do not pull the mains cable to disconnect the appliance. Always pull the
mains plug.
• Use only correct isolation devices: line
protecting cut-outs, fuses (screw type
fuses removed from the holder), earth
leakage trips and contactors.
• The electrical installation must have an
isolation device which lets you disconnect the appliance from the mains at all
poles. The isolation device must have a
Page 4

www.electrolux.com
4
1.3 Use
• Use this appliance in a household envi-
• Do not change the specification of this
• Make sure that the ventilation openings
• Do not let the appliance stay unatten-
• Deactivate the appliance after each
• Internally the appliance becomes hot
• Be careful, when you open the appli-
• Do not operate the appliance with wet
• Do not apply pressure on the open
• Do not use the appliance as a work
• Always keep the appliance door closed
• Open the appliance door carefully. The
• Do not let sparks or open flames to
• Do not put flammable products or items
• To prevent damage or discoloration to
contact opening width of minimum 3
mm.
WARNING!
Risk of injury, burns or electric
shock or explosion.
ronment.
appliance.
are not blocked.
ded during operation.
use.
when in operation. Do not touch the
heating elements that are in the appliance. Always use oven gloves to remove or put in accessories or ovenware.
ance door while the appliance is in operation. Hot air can release.
hands or when it has contact with water.
door.
surface or as a storage surface.
when the appliance is in operation.
use of ingredients with alcohol can
cause a mixture of alcohol and air.
come in contact with the appliance
when you open the door.
that are wet with flammable products
in, near or on the appliance.
WARNING!
Risk of damage to the appliance.
the enamel:
– Do not put ovenware or other objects
in the appliance directly on the bottom.
– Do not put aluminium foil directly on
the bottom of the appliance.
– do not put water directly into the hot
appliance.
– do not keep moist dishes and food in
the appliance after you finish the cooking.
– be careful when you remove or install
the accessories.
• Discoloration of the enamel has no effect on the performance of the appliance. It is not a defect in the sense of
the warranty law.
• Use a deep pan for moist cakes. Fruit
juices cause stains that can be permanent.
1.4 Care and Cleaning
WARNING!
Risk of injury, fire or damage to
the appliance.
• Before maintenance, deactivate the appliance and disconnect the mains plug
from the mains socket.
• Make sure the appliance is cold. There
is the risk that the glass panels can
break.
• Replace immediately the door glass
panels when they are damaged. Contact the Service.
• Be careful when you remove the door
from the appliance. The door is heavy!
• Clean regularly the appliance to prevent
the deterioration of the surface material.
• Remaining fat or food in the appliance
can cause fire.
• Clean the appliance with a moist soft
cloth. Only use neutral detergents. Do
not use abrasive products, abrasive
cleaning pads, solvents or metal objects.
• If you use an oven spray, obey the safety instructions on the packaging.
• Do not clean the catalytic enamel (if applicable) with any kind of detergent.
1.5 Internal light
• The type of light bulb or halogen lamp
used for this appliance, is only for
household appliances. Do not use it for
house lighting.
Page 5
WARNING!
Risk of electrical shock.
• Before replacing the lamp, disconnect
the appliance from the power supply.
• Only use lamps with the same specifications.
1.6 Disposal
WARNING!
Risk of injury or suffocation.
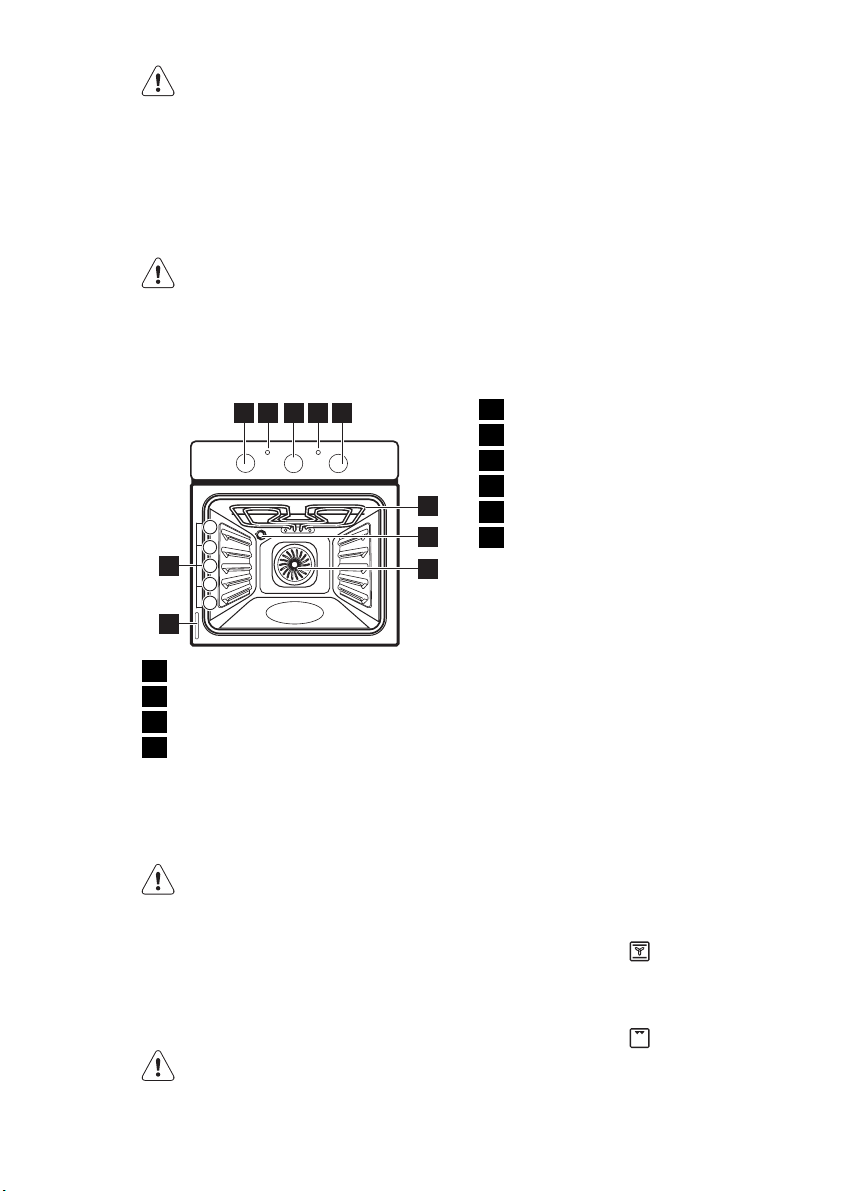
2. PRODUCT DESCRIPTION
2 43 51
5
4
3
10
2
1
9
Knob for the oven functions
1
Power indicator
2
Knob for the timer
3
Temperature indicator
4
• Disconnect the appliance from the
mains supply.
• Cut off the mains cable and discard it.
• Remove the door catch to prevent children and pets to get closed in the appliance.
Knob for the temperature
5
Grill
6
Oven lamp
7
Fan
6
7
8
8
Rating plate
9
Shelf positions
10
2.1 Oven accessories
• Grill- / Roasting pan
To bake and roast or as pan to collect
fat.
Wire shelf
•
For cookware, cake tins, roasts.
ENGLISH 5
3. BEFORE FIRST USE
WARNING!
Refer to "Safety information"
chapter.
3.1 Initial cleaning
• Remove all accessories and removable
shelf supports (if applicable).
• Clean the appliance before first use.
Refer to the chapter "Care and
cleaning".
3.2 Preheating
Preheat the empty appliance to burn off
the remaining grease.
1.
Set the function and the maximum
temperature.
2.
Let the appliance operate for 45 minutes.
3.
Set the function and the maximum
temperature.
4.
Let the appliance operate for 15 mi-
nutes.
Accessories can become hotter than usually. The appliance can emit an odour and
Page 6
www.electrolux.com
6
smoke. This is normal. Make sure that the
airflow is sufficient.
4. DAILY USE
WARNING!
Refer to "Safety information"
chapter.
4.1 Activating and deactivating
the appliance
1.
Turn the knob for the oven functions
to an oven function.
The power indicator comes on while
the appliance operates.
2.
Turn the knob for the temperature to
a temperature.
The temperature indicator comes on
while the temperature in the appliance
increases.
3.
To deactivate the appliance, turn the
knob for the oven functions and the
knob for the temperature to the Off
position.
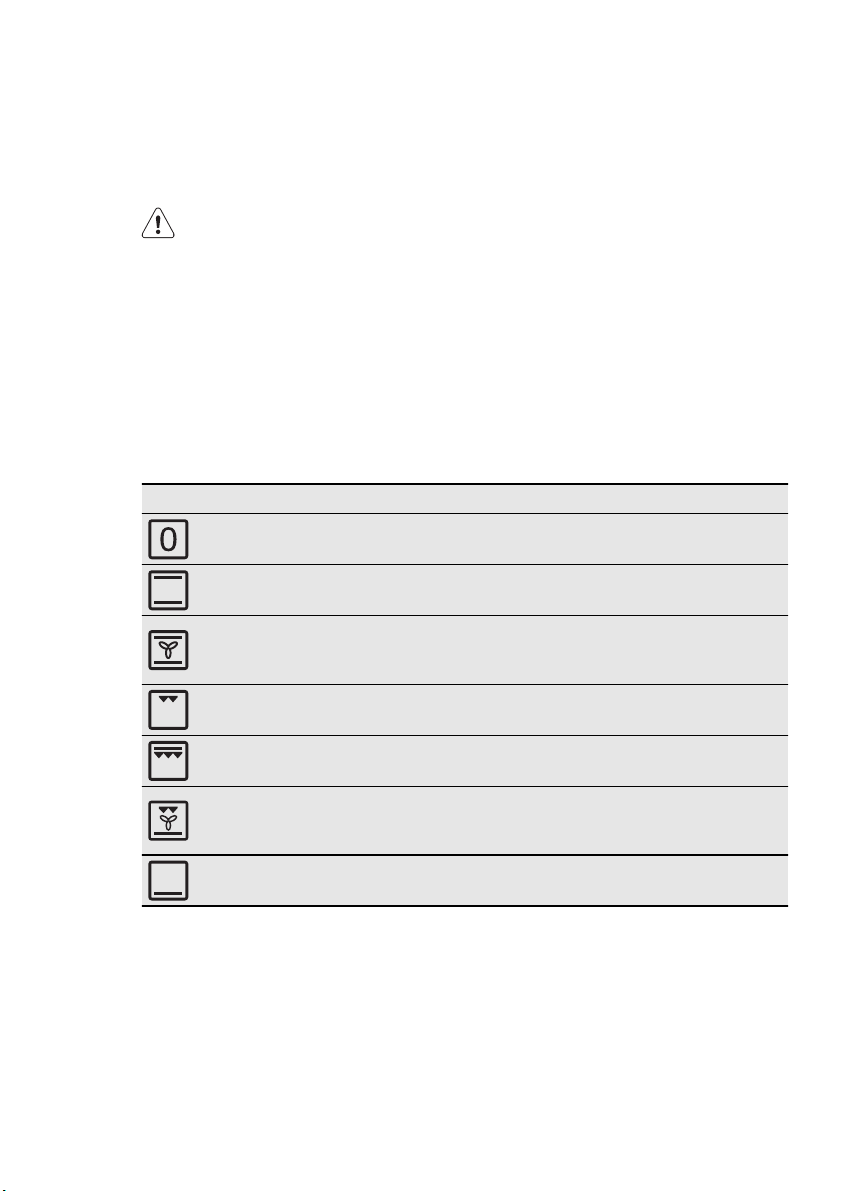
4.2 Oven functions
Oven function Application
Off position The appliance is off.
Conventional
Cooking
Fan Cooking
Grilling
Fast Grilling
Pizza Setting
Bottom Heat
To bake and roast on one oven level. The top and bot-
tom heating elements operate at the same time.
To roast or roast and bake food with the same cooking
temperature, on more than one shelf, without flavour
transference.
To grill flat food items in small quantities in the middle of
the shelf. To make toast.
To grill flat food items in large quantities. To make toast.
The full grill element operates.
To make pizza, quiche or pie. The grill and bottom ele-
ment provide direct heat and the fan circulates the hot
air to cook the pizza toppings or pie filling.
To bake cakes with crispy or crusty bottom. Only the
bottom heating element operates.
5. CLOCK FUNCTIONS
5.1 Minute Minder + End of
Cooking
Use it to set an automatic switch-off time
for an oven function.
1.
Set an oven function and the temper-
ature.
2.
Turn the knob for the timer as far as it
goes, then turn it to necessary time
period.
Page 7

3.
After the time period is completed, an
acoustic signal sounds. The appliance
deactivates.
Normal setting
the timer to
: Turn the knob for
. In this position you oper-
6. ADDITIONAL FUNCTIONS
ENGLISH 7
ate the appliance manually. The Minute
Minder + End of Cooking is off.
6.1 Cooling fan
When the appliance operates, the cooling
fan activates automatically to keep the
surfaces of the appliance cool. If you deactivate the appliance, the cooling fan
continues to operate until the temperature
in the appliance cools down.
6.2 Safety thermostat
Incorrect operation of the appliance or defective components can cause dangerous
7. HELPFUL HINTS AND TIPS
• The appliance has five shelf levels.
Count the shelf levels from the bottom
of the appliance floor.
• The appliance has a special system
which circulates the air and constantly
recycles the steam. With this system
you can cook in a steamy environment
and keep the food soft inside and crusty outside. It decreases the cooking
time and energy consumption to a minimum.
• Moisture can condense in the appliance
or on the door glass panels. This is normal. Always stand back from the appliance when you open the appliance
door while cooking. To decrease the
condensation, operate the appliance for
10 minutes before cooking.
• Clean the moisture after each use of
the appliance.
• Do not put the objects directly on the
appliance floor and do not put aluminium foil on the components when you
cook. This can change the baking results and cause damage to the enamel.
overheating. To prevent this, the oven has
a safety thermostat which interrupts the
power supply. The oven activates again
automatically when the temperature
drops.
7.1 Baking cakes
• Do not open the oven door before 3/4
of the set cooking time is up.
• If you use two baking trays at the same
time, keep one empty level between
them.
7.2 Cooking meat and fish
• Use a deep pan for very fatty food to
prevent the oven from stains that can
be permanent.
• Leave the meat for approximately 15
minutes before carving so that the juice
does not seep out.
• To prevent too much smoke in the oven
during roasting, add some water into
the deep pan. To prevent the smoke
condensation, add water each time after it dries up.
7.3 Cooking times
Cooking times depend on the type of
food, its consistency, and volume.
Page 8

www.electrolux.com
8
Initially, monitor the performance when
you cook. Find the best settings (heat setting, cooking time, etc.) for your cook-
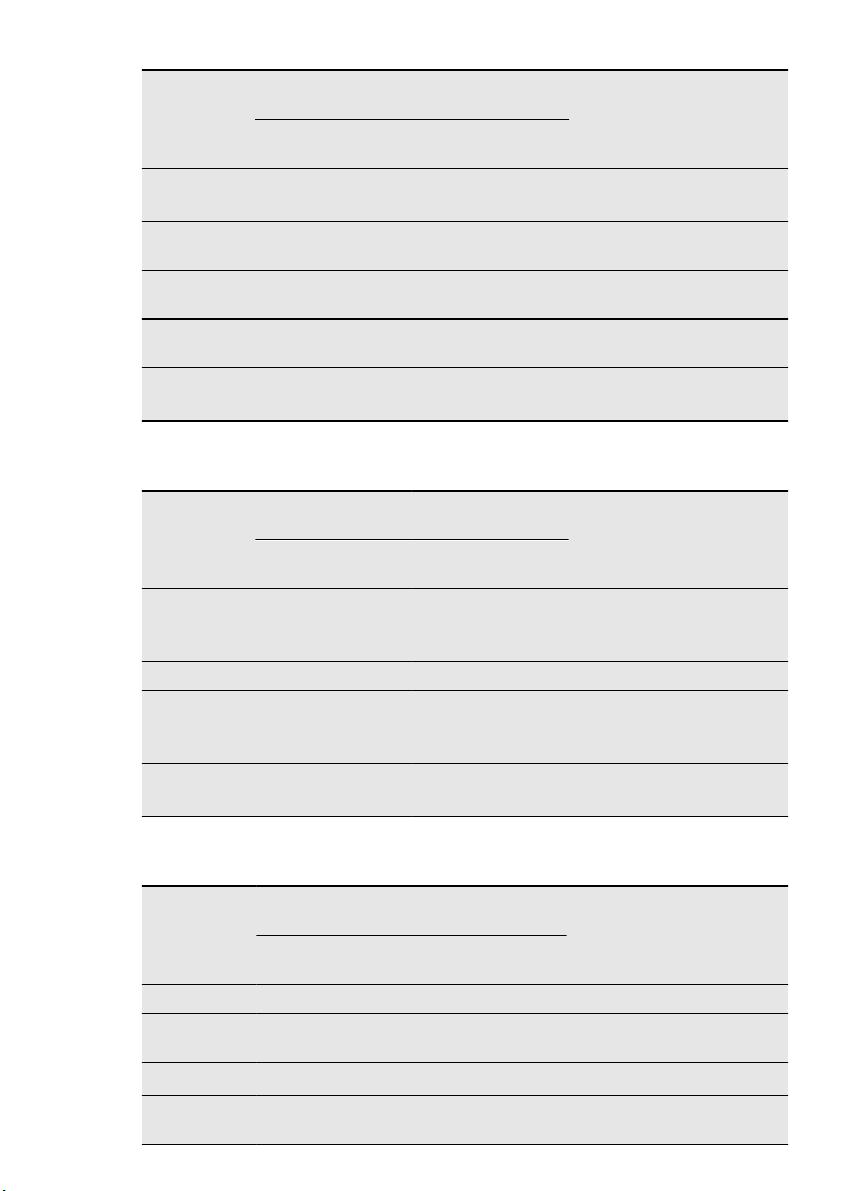
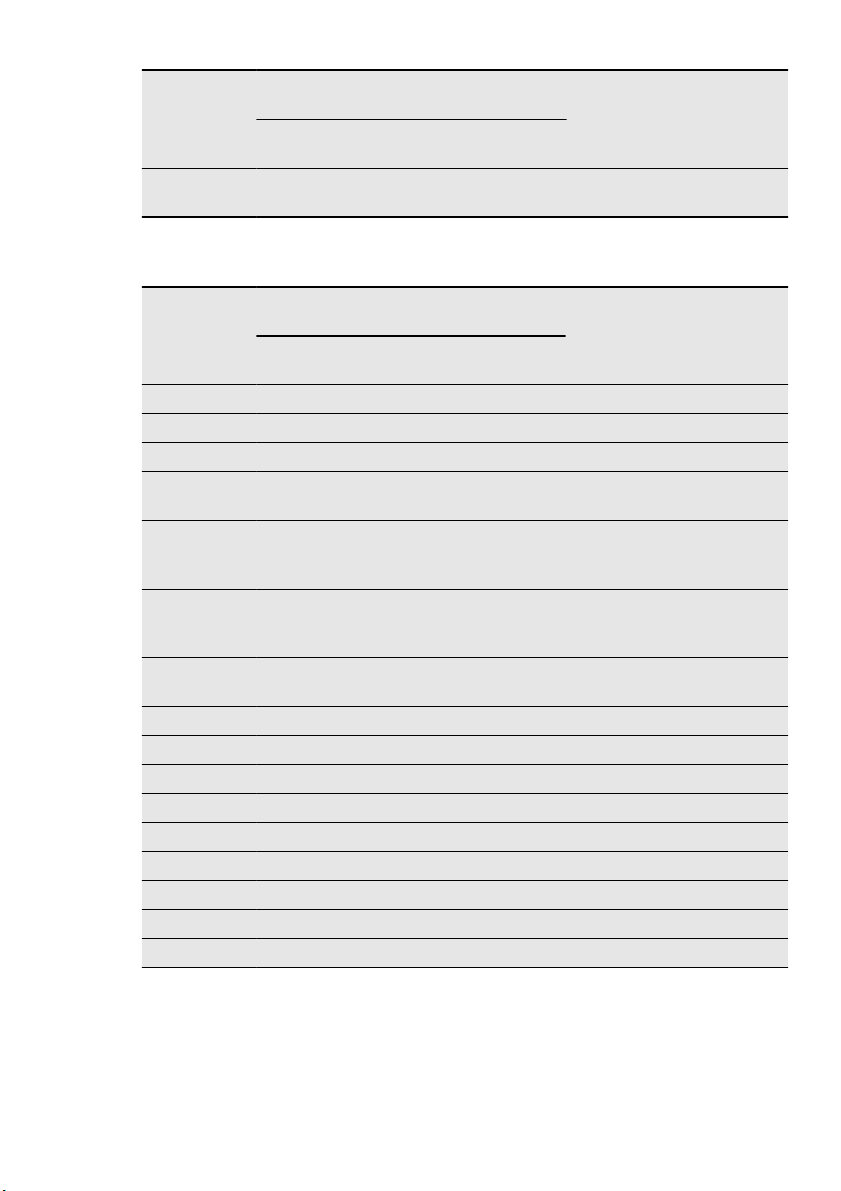
7.4 Baking and roasting table
CAKES
Whisked
recipes
Shortbread
dough
Buttermilk
cheesecake
Apple cake
(Apple pie)
Strudel 3 175 2 150 60 - 80 In a baking
Jam-tart 2 170 2 (left and
Sponge
cake
Christmas
cake / Rich
fruit cake
Plum cake 1 175 2 160 50 - 60 In a bread tin
TYPE OF
DISH
ware, recipes and quantities when you
use this appliance.
Conventional
Cooking
Shelf po-
sition
Temp
[°C]
Fan Cooking
Shelf po-
sition
Temp
[°C]
Cooking
time
[min]
2 170 3 160 45 - 60 In a cake
2 170 3 160 20 - 30 In a cake
1 170 1 160 70 - 80 In a 26 cm
cake mould
on a wire shelf
2 170 2 (left and
right)
160 80 - 100 In two 20 cm
cake moulds
165 30 - 40 In a 26 cm
right)
cake mould
2 170 2 160 50 - 60 In a 26 cm
cake mould
2 170 2 150 90 - 120 In a 20 cm
cake mould
Notes
mould
mould
on a wire
1)
shelf
tray
1)
1)
Small cakes
- one level
Small cakes
- two levels
Biscuits /
pastry strips
3 170 3 140 -
150
- - 2 and 4 140 150
3 140 3 140 -
150
20 - 30 In a baking
tray
25 - 35 In a baking
tray
30 - 35 In a baking
tray
- one level
Biscuits /
pastry strips
- - 2 and 4 140 150
35 - 40 In a baking
tray
- two levels
Meringues 3 120 3 120 80 - 100 In a baking
tray
Page 9
ENGLISH 9
TYPE OF
DISH
Conventional
Cooking
Shelf po-
sition
Temp
[°C]
Fan Cooking
Shelf po-
sition
Temp
[°C]
Cooking
time
[min]
Notes
Buns 3 190 3 180 15 - 20 In a baking
1)
tray
Eclairs 3 190 3 170 25 - 35 In a baking
tray
Plate tarts 2 180 2 170 45 - 70 In a 20 cm
cake mould
Rich fruit
cake
Victoria
sandwich
1)
Preheat the oven for 10 minutes.
1 160 2 150 110 - 120 In a 24 cm
cake mould
1 170 1 (left and
right)
160 50 - 60 In a 20 cm
cake mould
BREAD AND PIZZA
TYPE OF
DISH
Conventional
Cooking
Shelf po-
sition
Temp
[°C]
Fan Cooking
Shelf po-
sition
Temp
[°C]
Cooking
time
[min]
Notes
White bread 1 190 1 190 60 - 70 1 - 2 pieces,
500 gr per
1)
piece
Rye bread 1 190 1 180 30 - 45 In a bread tin
Pizza 1 230 -
250
1 230 -
250
10 - 20 In a baking
tray or a deep
1)
pan
Scones 3 200 3 190 10 - 20 In a baking
1)
tray
1)
Preheat for 10 minutes.
1)
FLANS
TYPE OF
DISH
Conventional
Cooking
Shelf
position
Temp
[°C]
Fan Cooking
Shelf po-
sition
Temp
[°C]
Cooking
time
[min]
Notes
Pasta flan 2 200 2 180 40 - 50 In a mould
Vegetable
2 200 2 175 45 - 60 In a mould
flan
Quiches 1 180 1 180 50 - 60
Lasagne 2 180 -
190
2 180 -
190
25 - 40
In a mould
In a mould
1)
1)
Page 10
www.electrolux.com
10
Conventional
TYPE OF
DISH
Cooking
Shelf
position
Temp
[°C]
Cannelloni 2 180 -
190
1)
Preheat for 10 minutes.
Fan Cooking
Shelf po-
sition
2 180 -
Temp
[°C]
190
Cooking
time
[min]
25 - 40
Notes
In a mould
1)
MEAT
TYPE OF
DISH
Conventional
Cooking
Shelf
position
Temp
[°C]
Fan Cooking
Shelf
position
Temp
[°C]
Cooking
time
[min]
Notes
Beef 2 200 2 190 50 - 70 On a wire shelf
Pork 2 180 2 180 90 - 120 On a wire shelf
Veal 2 190 2 175 90 - 120 On a wire shelf
English roast
2 210 2 200 50 - 60 On a wire shelf
beef, rare
English roast
2 210 2 200 60 - 70 On a wire shelf
beef, medium
English roast
2 210 2 200 70 - 75 On a wire shelf
beef, well
done
Shoulder of
2 180 2 170 120 - 150 With rind
pork
Shin of pork 2 180 2 160 100 - 120 Two pieces
Lamb 2 190 2 175 110 - 130 Leg
Chicken 2 220 2 200 70 - 85 Whole
Turkey 2 180 2 160 210 - 240 Whole
Duck 2 175 2 220 120 - 150 Whole
Goose 2 175 1 160 150 - 200 Whole
Rabbit 2 190 2 175 60 - 80 Cut in pieces
Hare 2 190 2 175 150 - 200 Cut in pieces
Pheasant 2 190 2 175 90 - 120 Whole
Page 11
ENGLISH 11
FISH
TYPE OF
DISH
Trout / Sea
Conventional
Cooking
Shelf
position
Temp
[°C]
2 190 2 175 40 - 55 3 - 4 fish
Fan Cooking
Shelf
position
Temp
[°C]
Cooking
time
[min]
Notes
bream
Tuna fish /
2 190 2 175 35 - 60 4 - 6 fillets
Salmon
7.5 Grilling
Preheat the empty oven for 10 minutes, before cooking.
Quantity Grilling Cooking time [min]
TYPE OF DISH Pieces [g] Shelf po-
sition
Fillet steaks 4 800 4 max. 12 - 15 12 - 14
Beef steaks 4 600 4 max. 10 - 12 6 - 8
Sausages 8 - 4 max. 12 - 15 10 - 12
Pork chops 4 600 4 max. 12 - 16 12 - 14
Chicken (cut in
2 1000 4 max. 30 - 35 25 - 30
2)
Kebabs 4 - 4 max. 10 - 15 10 - 12
Breast of chick-
4 400 4 max. 12 - 15 12 - 14
en
Hamburger 6 600 4 max. 20 - 30 Fish fillet 4 400 4 max. 12 - 14 10 - 12
Toasted sand-
4 - 6 - 4 max. 5 - 7 -
wiches
Toast 4 - 6 - 4 max. 2 - 4 2 - 3
Information on acrylamides
Important! According to the newest
scientific knowledge, if you brown food
(specially the one which contains starch),
acrylamides can pose a health risk. Thus,
we recommend that you cook at the
lowest temperatures and do not brown
food too much.
Temp
[°C]
1st side 2nd side
8. CARE AND CLEANING
WARNING!
Refer to "Safety information"
chapter.
• Clean the front of the appliance with a
soft cloth with warm water and a cleaning agent.
• To clean metal surfaces use a usual
cleaning agent.
Page 12

www.electrolux.com
12
• Clean the oven interior after each use.
• Clean stubborn dirt with a special oven
• Clean all oven accessories after each
• If you have nonstick accessories, do
8.1 Cleaning the door gasket
• Regularly do a check of the door gas-
• To clean the door gasket, refer to the
Then you can remove dirt more easily
and it does not burn on.
cleaner.
use and let them dry. Use a soft cloth
with warm water and a cleaning agent.
not clean them using aggressive
agents, sharp-edged objects or a dishwasher. It can destroy nonstick coating.
Stainless steel or aluminium
appliances:
Clean the oven door with a wet
sponge only. Dry it with a soft
cloth.
Do not use steel wool, acids or
abrasive materials, as they can
cause damage to the oven surface. Clean the oven control panel
with the same precautions.
ket. The door gasket is around the
frame of the oven cavity. Do not use the
appliance if the door gasket is damaged. Contact the Service Centre.
general information about cleaning.
Before you change the oven lamp:
• Deactivate the oven.
• Remove the fuses in the fuse box or
deactivate the circuit breaker.
Put a cloth on the bottom of the
oven to prevent damage to the
oven light and glass cover.
Always hold the halogen lamp
with a cloth to prevent grease residue from burning on the lamp.
1.
Turn the glass cover counterclockwise to remove it.
2.
Clean the glass cover.
3.
Replace the oven light bulb with an
applicable 300 °C heat-resistant oven
light bulb.
Use the same oven lamp type.
4.
Install the glass cover.
8.3 Cleaning the oven door
The oven door has two glass panels. You
can remove the oven door and the internal glass panel to clean it.
The oven door can close if you try
to remove the internal glass panel
before you remove the oven door.
8.2 Oven lamp
WARNING!
Be careful when you change the
oven lamp. There is a risk of electrical shock.
Page 13

Removing the oven door and the glass panel
1.
Open the door fully and hold the two
door hinges.
2.
Lift and turn the levers on the two
hinges.
ENGLISH 13
3.
Close the oven door to the first opening position (halfway). Then pull forward and remove the door from its
seat.
Page 14

www.electrolux.com
14
4.
Put the door on a soft cloth on a stable surface.
5.
Release the locking system to remove the internal glass panel.
6.
Turn the two fasteners by 90° and remove them from their seats.
90°
7.
Carefully lift (step 1) and remove (step
2) the glass panel.
8.
Clean the glass panel with water and
soap. Dry the glass panel carefully.
2
1
Page 15

Installing the door and the glass panel
9. WHAT TO DO IF…
WARNING!
Refer to "Safety information"
chapter.
Problem Possible cause Remedy
The appliance does not
operate.
The appliance does not
operate.
The appliance does not
operate.
The oven lamp does not
operate.
Steam and condensation
collect on the food and in
the oven.
If you cannot find a solution to the problem yourself, contact your dealer or the
service centre.
We recommend that you write the data here:
Model (MOD.) .........................................
Product number (PNC) .........................................
Serial number (S.N.) .........................................
When the cleaning is completed, install
the glass panel and the oven door. Do the
above steps in the opposite sequence.
The screen-printing zone must face the
inner side of the door. Make sure that after the installation the surface of the glass
panel frame on the screen-printing zones
is not rough when you touch it.
Make sure that you install the internal
glass panel in the seats correctly. Refer to
the illustration.
The appliance is not activated.
The Minute Minder + End
of Cooking programmer
is not set.
The fuse in the fuse box
is released.
The oven lamp is defective.
You left the dish in the
oven for too long.
The necessary data for the service centre
is on the rating plate. The rating plate is
on the front frame of the appliance cavity.
ENGLISH 15
Activate the appliance.
Refer to the chapter "Daily Use".
Set the Minute Minder +
End of Cooking programmer. Refer to the chapter
"Clock functions".
Do a check of the fuse. If
the fuse is released more
than one time, contact a
qualified electrician.
Replace the oven lamp.
Do not keep the dishes in
the oven for longer than
15 - 20 minutes after the
cooking ends.
Page 16

www.electrolux.com
16
10. INSTALLATION
WARNING!
Refer to "Safety information"
chapter.
10.1 Building In
558
573
548
594
20
589
A
B
10.2 Electrical installation
WARNING!
Only a qualified person must do
the electrical installation.
The manufacturer is not responsible if you do not follow the safety
precautions from the chapter
"Safety Information".
590
600
min. 550
20
min. 560
min. 550
20
min. 560
5
This appliance is supplied with a main
plug and a main cable.
10.3 Cable
Cable types applicable for installation or
replacement: H07 RN-F, H05 RN-F, H05
RRF, H05 VV-F, H05 V2V2-F (T90), H05
BB-F.
For the section of the cable refer to the
total power (on the rating plate) and to the
table:
Total power
maximum 1380W3 x 0.75 mm²
maximum 2300W3 x 1 mm²
maximum 3680W3 x 1.5 mm²
The hearth cord (green / yellow cable)
must be 2 cm longer than phase and neutral cables (blue and brown cables).
Section of the ca-
ble
Page 17

11. ENVIRONMENT CONCERNS
ENGLISH 17
Recycle the materials with the symbol
. Put the packaging in applicable
containers to recycle it.
Help protect the environment and human
health and to recycle waste of electrical
and electronic appliances. Do not dispose
appliances marked with the symbol
with the household waste. Return the
product to your local recycling facility or
contact your municipal office.
Page 18

www.electrolux.com
18
INDICE
1. ISTRUZIONI DI SICUREZZA . . . . . . . . . . . . . . . . . . . . . . . . . . . . . . . . . . . . . . . . . . . . . . . 19
2. DESCRIZIONE DEL PRODOTTO . . . . . . . . . . . . . . . . . . . . . . . . . . . . . . . . . . . . . . . . . . . . 21
3. PREPARAZIONE AL PRIMO UTILIZZO . . . . . . . . . . . . . . . . . . . . . . . . . . . . . . . . . . . . . . . 22
4. UTILIZZO QUOTIDIANO . . . . . . . . . . . . . . . . . . . . . . . . . . . . . . . . . . . . . . . . . . . . . . . . . . 22
5. FUNZIONI DEL TIMER . . . . . . . . . . . . . . . . . . . . . . . . . . . . . . . . . . . . . . . . . . . . . . . . . . . 23
6. FUNZIONI AGGIUNTIVE . . . . . . . . . . . . . . . . . . . . . . . . . . . . . . . . . . . . . . . . . . . . . . . . . . 23
7. CONSIGLI E SUGGERIMENTI UTILI . . . . . . . . . . . . . . . . . . . . . . . . . . . . . . . . . . . . . . . . . 23
8.
PULIZIA E CURA . . . . . . . . . . . . . . . . . . . . . . . . . . . . . . . . . . . . . . . . . . . . . . . . . . . . . . . . 28
9. COSA FARE SE… . . . . . . . . . . . . . . . . . . . . . . . . . . . . . . . . . . . . . . . . . . . . . . . . . . . . . . . 32
10.
INSTALLAZIONE . . . . . . . . . . . . . . . . . . . . . . . . . . . . . . . . . . . . . . . . . . . . . . . . . . . . . . . . 33
11. CONSIDERAZIONI AMBIENTALI . . . . . . . . . . . . . . . . . . . . . . . . . . . . . . . . . . . . . . . . . . . . 34
PENSATI PER VOI
Grazie per aver acquistato un'apparecchiatura Electrolux. Avete scelto un prodotto che ha alle
spalle decenni di esperienza professionale e innovazione. Ingegnoso ed elegante, è stato
progettato pensando a voi. Quindi, in qualsiasi momento desiderate utilizzarlo, potete esser certi
di ottenere sempre i migliori risultati.
Benvenuti in Electrolux.
Visitate il nostro sito web per:
ricevere consigli, scaricare i nostri opuscoli, eliminare eventuali anomalie, ottenere
informazioni sull'assistenza.
www.electrolux.com
registrare il vostro prodotto e ricevere un servizio migliore:
www.electrolux.com/productregistration
acquistare accessori, materiali di consumo e ricambi originali per la vostra
apparecchiatura:
www.electrolux.com/shop
SERVIZIO CLIENTI E MANUTENZIONE
Consigliamo sempre l’impiego di ricambi originali.
Quando si contatta l'Assistenza, accertarsi di disporre dei seguenti dati.
Le informazioni si trovano sulla targhetta di identificazione. Modello, numero dell'apparecchio
(PNC), numero di serie.
Avvertenza / Attenzione - Importanti Informazioni di Sicurezza
Informazioni e consigli generali
Informazioni in materia di sicurezza ambientale
Con riserva di modifiche.
Page 19

ITALIANO 19
1.
ISTRUZIONI DI SICUREZZA
Leggere attentamente le istruzioni fornite
prima di installare e utilizzare l'apparecchiatura. Il produttore non è responsabile
se un'installazione ed un uso non corretto
dell'apparecchiatura provocano lesioni e
danni. Tenere sempre le istruzioni a portata di mano in caso di necessità durante
l'utilizzo.
1.1 Sicurezza dei bambini e
delle persone vulnerabili
AVVERTENZA!
Rischio di soffocamento, lesioni o
invalidità permanente.
• Questa apparecchiatura può essere
usata da bambini a partire dagli 8 anni
e da adulti con limitate capacità fisiche,
sensoriali o mentali o con scarsa esperienza o conoscenza sull'uso dell'apparecchiatura, se sorvegliati o se sono
stati istruiti relativamente all'uso dell'apparecchiatura e hanno capito i rischi
coinvolti.
• Non consentire ai bambini di giocare
con l'apparecchiatura.
• Tenere i materiali di imballaggio fuori
dalla portata dei bambini.
• Tenere i bambini e gli animali domestici
lontano dall'apparecchiatura durante il
funzionamento o raffreddamento. Le
parti accessibili sono incandescenti.
• Se l’apparecchiatura dispone di un dispositivo di sicurezza per i bambini,
consigliamo di attivarlo.
• La pulizia e gli interventi di manutenzione non devono essere eseguiti dai
bambini senza supervisione.
1.2 Installazione
AVVERTENZA!
L'installazione dell'apparecchiatura deve essere svolta unicamente
da personale qualificato.
• Rimuovere tutti i materiali di imballaggio.
• Non installare e utilizzare l'apparecchiatura se è danneggiata.
• Attenersi alle istruzioni fornite insieme
all'apparecchiatura.
• Prestare sempre attenzione in fase di
spostamento dell'apparecchiatura, dato
che è molto pesante. Indossare sempre
di guanti di sicurezza.
• Non tirare l’apparecchiatura per la maniglia.
• È necessario rispettare le distanze minime dalle altre apparecchiature.
• Assicurarsi che l'apparecchiatura sia installata sotto e vicino a parti adeguatamente ancorate a una struttura fissa.
• I lati dell'apparecchiatura devono restare adiacenti ad apparecchiature o unità
con la stessa altezza.
Collegamento elettrico
AVVERTENZA!
Rischio di incendio e scossa elettrica.
• Tutti i collegamenti elettrici dovrebbero
essere realizzati da un elettricista qualificato.
• L'apparecchiatura deve disporre di una
messa a terra.
• Verificare che i dati elettrici riportati sulla
targhetta del modello corrispondano a
quelli dell'impianto. In caso contrario,
contattare un elettricista.
• Utilizzare sempre una presa antishock
elettrico correttamente installata.
• Non utilizzare prese multiple e prolunghe.
• Accertarsi di non danneggiare la spina
e il cavo. Contattare il Centro di assistenza o un elettricista qualificato per
sostituire un cavo danneggiato.
• Evitare che i cavi rimangano a contatto
della porta dell'apparecchiatura, in particolare quando la porta è calda.
• I dispositivi di protezione da scosse
elettriche devono essere fissati in modo
tale da non poter essere disattivati senza l'uso di attrezzi.
• Inserire la spina di alimentazione nella
presa solo al termine dell'installazione.
Verificare che la spina di alimentazione
rimanga accessibile dopo l'installazione.
Page 20

www.electrolux.com
20
• Nel caso in cui la spina di corrente sia
• Non tirare il cavo di alimentazione per
• Servirsi unicamente di dispositivi di iso-
• L'impianto elettrico deve essere dotato
allentata, non collegarla alla presa.
scollegare l’apparecchiatura. Tirare solo
la spina.
lamento adeguati. interruttori automatici, fusibili (quelli a tappo devono essere
rimossi dal portafusibile), sganciatori
per correnti di guasto a terra e relé.
di un dispositivo di isolamento che consenta di scollegare l'apparecchiatura
dalla presa di corrente a tutti i poli. Il dispositivo di isolamento deve avere una
larghezza dell'apertura di contatto non
inferiore ai 3 mm.
• Tenere sempre chiusa la porta dell'apparecchiatura quando quest'ultima è in
funzione.
• Aprire la porta dell'apparecchiatura con
cautela. L'uso di ingredienti contenenti
alcol può causare una miscela di alcol e
aria.
• Evitare la presenza di scintille o fiamme
aperte vicino all'apparecchiatura quando si apre la porta.
• Non appoggiare o tenere liquidi o materiali infiammabili, né oggetti facilmente
incendiabili sull'apparecchiatura, al suo
interno o nelle immediate vicinanze.
AVVERTENZA!
Vi è il rischio di danneggiare l'apparecchiatura.
1.3 Utilizzo
AVVERTENZA!
Rischio di ferite, ustioni, scosse
elettriche o esplosioni.
• Utilizzare l’apparecchiatura in un ambiente domestico.
• Non apportare modifiche alle specifiche
di questa apparecchiatura.
• Verificare che le aperture di ventilazione
non siano ostruite.
• Non lasciare mai l'apparecchiatura incustodita durante il funzionamento.
• Spegnere l'apparecchiatura dopo ogni
utilizzo.
• All'interno l'apparecchiatura si scalda
mentre è in funzione. Non toccare le resistenze dell'apparecchiatura. Servirsi
sempre degli appositi guanti da forno
per estrarre o inserire accessori o pentole resistenti al calore.
• Prestare attenzione in fase di apertura
della porta dell'apparecchiatura quando
quest'ultima è in funzione. Può fuoriuscire aria calda.
• Non mettere in funzione l'apparecchiatura con le mani umide o quando c'è un
contatto con l'acqua.
• Non esercitare pressione sulla porta
aperta.
• Non utilizzare l'apparecchiatura come
superficie di lavoro o come piano di appoggio.
• Per evitare danni o scolorimento dello
smalto:
- Non mettere pentole resistenti al calore o altri oggetti sulla superficie inferiore
dell'apparecchiatura.
- Non appoggiare la pellicola di alluminio direttamente sulla superficie inferiore dell'apparecchiatura.
- Non mettere direttamente acqua all'interno dell'apparecchiatura calda.
- Non tenere piatti umidi e cibo all'interno dell'apparecchiatura dopo aver terminato la fase di cottura.
- Prestare attenzione quando si tolgono
o inseriscono gli accessori.
• Lo scolorimento dello smalto non influisce sulle prestazioni dell'apparecchiatura. Non si tratta di un'anomalia ai sensi
di legge.
• Per le torte molto umide, usare una leccarda. I succhi di frutta provocano
macchie che possono essere permanenti.
1.4 Pulizia e manutenzione
AVVERTENZA!
Vi è il rischio di lesioni, incendio o
danni all'apparecchiatura
• Prima di eseguire qualunque intervento
di manutenzione, spegnere l'apparecchiatura ed estrarre la spina dalla presa.
• Controllare che l'apparecchiatura sia
fredda. Vi è il rischio che i pannelli di vetro si rompano.
Page 21

• Sostituire immediatamente i pannelli in
vetro della porta nel caso in cui siano
danneggiati. Contattare il Centro Assistenza.
• Prestare attenzione quando si rimuove
la porta dall'apparecchio. La porta è
pesante!
• Pulire regolarmente l'apparecchiatura
per evitare il deterioramento dei materiali che compongono la superficie.
• I residui di grassi o alimenti all'interno
dell'apparecchiatura possono causare
incendi.
• Pulire l'apparecchiatura con un panno
inumidito e morbido. Utilizzare solo detergenti neutri. Non usare prodotti abrasivi, spugnette abrasive, solventi od oggetti metallici.
• Nel caso in cui si usino spray per il forno, attenersi alle istruzioni di sicurezza
indicate sulla confezione.
• Non pulire lo smalto catalitico (ove presente) con detergente di alcun tipo.
1.5 Luce interna
• Il tipo di lampadine utilizzate in questa
apparecchiatura sono lampade speciali
ITALIANO 21
per elettrodomestici. Non usarle per l'illuminazione di casa.
AVVERTENZA!
Rischio di scosse elettriche.
• Prima di sostituire la lampada, scollegare l’apparecchiatura dalla rete elettrica.
• Servirsi unicamente di lampadine con le
stesse specifiche tecniche.
1.6 Smaltimento
AVVERTENZA!
Rischio di lesioni o soffocamento.
• Staccare la spina dall'alimentazione
elettrica.
• Tagliare il cavo di rete e smaltirlo.
• Rimuovere il blocco porta per evitare
che bambini e animali domestici rimangano chiusi all’interno dell’apparecchiatura.
2. DESCRIZIONE DEL PRODOTTO
2 43 51
5
4
3
10
2
1
9
Manopola delle funzioni forno
1
Spia di accensione
2
Manopola del timer
3
Indicatore della temperatura
4
6
7
8
Manopola della temperatura
5
Grill
6
Lampadina del forno
7
Ventola
8
Targhetta dei dati
9
Posizioni della griglia
10
2.1 Accessori del forno
• Grill/Leccarda
Per cuocere al forno, arrostire o come
recipiente per raccogliere i grassi.
• Ripiano a filo
Per pentole, torte in stampo, arrosti.
Page 22

www.electrolux.com
22
3. PREPARAZIONE AL PRIMO UTILIZZO
AVVERTENZA!
Fare riferimento al capitolo "Informazioni per la sicurezza".
3.1 Prima pulizia
• Togliere tutti gli accessori e i supporti ripiani rimovibili (se presenti).
• Pulire il forno prima di utilizzarlo per la
prima volta.
Vedere capitolo "Pulizia e cura".
3.2 Preriscaldamento
Preriscaldare l'apparecchiatura vuota per
bruciare i residui di grasso.
4. UTILIZZO QUOTIDIANO
AVVERTENZA!
Fare riferimento al capitolo "Informazioni per la sicurezza".
4.1 Attivazione e disattivazione
dell'apparecchiatura
1.
Ruotare la manopola di regolazione
delle funzioni del forno per selezionare
una funzione del forno.
La spia di accensione si illumina mentre l'apparecchiatura è in funzione.
1.
Impostare la funzione e la temperatura massima.
2.
Lasciare in funzione l'apparecchiatura
per 45 minuti.
3.
Impostare la funzione e la temperatura massima.
4.
Lasciare in funzione l'apparecchiatura
per 15 minuti.
Gli accessori possono riscaldarsi più del
solito. L'apparecchiatura può produrre un
odore sgradevole e fumo. Non si tratta di
un’anomalia. Accertarsi che il flusso d'aria
sia sufficiente.
2.
Ruotare la manopola di regolazione
della temperatura per selezionare una
temperatura.
L'indicatore della temperatura si ac-
cende quando l'apparecchiatura è in
fase di riscaldamento.
3.
Per disattivare l'apparecchiatura, ruo-
tare la manopola di regolazione delle
funzioni del forno e la manopola di re-
golazione della temperatura in posi-
zione di spento.
4.2 Funzioni del forno
Funzione del forno Uso
Posizione di
spento
Cottura tradi-
zionale
Cottura ventila-
ta
Grill
Per cuocere e arrostire su un solo livello. Le resistenze
superiore e inferiore funzionano contemporaneamente.
Per arrostire o arrostire e cuocere al forno cibi che ri-
chiedono la stessa temperatura, utilizzando più di un ri-
Per grigliare cibi di ridotto spessore in piccole quantità
nella parte centrale del ripiano. Per preparare i toast.
L'apparecchiatura è spenta.
piano, senza trasferimento di sapori.
Page 23

Funzione del forno Uso
Grill rapido
Per la cottura di una pizza, quiche o torta. Il grill e la resi-
Cottura pizza
la ventola fa circolare l'aria per dorare in superficie la piz-
Cottura finale
5. FUNZIONI DEL TIMER
5.1 Contaminuti - Fine della
cottura
Per impostare un orario di spegnimento
automatico di una funzione del forno.
1.
Impostare una funzione del forno e la
temperatura.
2.
Ruotare la manopola del timer fino al
limite massimo, quindi portarla sul
tempo necessario.
ITALIANO 23
Per grigliare cibi di ridotto spessore in grandi quantità.
Per preparare i toast. Funziona l'intero elemento grill.
stenza inferiore forniscono il calore direttamente mentre
za o cuocere uniformemente le torte farcite.
Per dorare torte con fondi friabili. Funziona solo la resi-
stenza inferiore.
3.
Una volta trascorso il tempo imposta-
to, viene emesso un segnale acusti-
co. L'apparecchiatura si spegne.
Impostazione normale
manopola del timer su
sizione si aziona l'apparecchiatura manualmente. La funzione Contaminuti - Fine
della cottura è spenta.
: Ruotare la
. In questa po-
6. FUNZIONI AGGIUNTIVE
6.1 Ventola di raffreddamento
Quando l'apparecchiatura è in funzione, la
ventola di raffreddamento si attiva in modo automatico per tenere fresche le superfici dell'apparecchiatura. Dopo aver disattivato l'apparecchiatura, la ventola di
raffreddamento continua a funzionare fino
a che l'apparecchiatura non si è raffreddata.
6.2 Termostato di sicurezza
Un utilizzo inappropriato dell'apparecchiatura o componenti difettosi possono pro-
vocare un surriscaldamento pericoloso.
Per evitare che questo accada, il forno è
dotato di un termostato di sicurezza che
interrompe l'alimentazione della corrente
elettrica. All'abbassamento della temperatura, il forno si riaccende automaticamente.
7. CONSIGLI E SUGGERIMENTI UTILI
• L'apparecchiatura presenta cinque livelli
con ripiano. Contare i livelli con ripiano
dal basso dell'apparecchiatura.
• L'apparecchiatura è dotata di un sistema speciale che fa circolare l'aria e ricicla costantemente il vapore. Con que-
Page 24

www.electrolux.com
24
• L'umidità può condensarsi all'interno
• Al termine dell'uso dell'apparecchiatura
• Non posizionare oggetti direttamente
7.1 Cottura di dolci
• Non aprire la porta del forno prima che
• Se si usano due lamiere dolci contem-
sto sistema è possibile cucinare in un
ambiente pieno di vapore, mantenendo
il cibo soffice all'interno e croccante all'esterno. Si riduce il tempo di cottura e
si abbatte il consumo di energia.
dell'apparecchiatura o sui pannelli di
vetro della porta. Non si tratta di
un’anomalia. Quando si apre la porta
durante la cottura, tenersi sempre a distanza dall'apparecchiatura. Per ridurre
la condensa, prima della cottura accendere l'apparecchiatura per 10 minuti.
eliminare l'umidità.
sul ripiano dell'apparecchiatura e non
ricoprire i componenti con pellicola d'alluminio durante la cottura. Così facendo
si possono alterare i risultati di cottura e
danneggiare lo smalto.
siano trascorsi 3/4 del tempo di cottura.
poraneamente, tenere un livello vuoto
tra una e l'altra.
7.2 Cottura di carni e pesce
• Usare una leccarda per alimenti ad alto
contenuto di grassi, onde evitare che
nel forno si formino macchie che non
possono più essere rimosse.
• Lasciare riposare la carne per circa 15
minuti prima di tagliarla, in modo da
non perdere il sughetto.
• Per evitare la formazione eccessiva di
fumo all'interno del forno durante la
cottura arrosto, aggiungere dell'acqua
nella leccarda. Per evitare la condensa
di fumo, aggiungere acqua ogni volta
che finisce.
7.3 Tempi di cottura
I tempi di cottura dipendono dal tipo, dalla
consistenza e dal volume del cibo.
Inizialmente, monitorare i risultati della
cottura. Trovare le impostazioni migliori (livello di potenza, tempo di cottura, ecc.)
per le proprie pentole, ricette e quantità
quando si usa l'apparecchiatura.
7.4 Tabella per la cottura al forno ed arrosto
TORTE E DOLCI
TIPO DI
PIATTO
Pietanze
frullate
Impasto per
pasta frolla
Torta di ricotta
Torta di mele (Apple pie)
Cottura tradizio-
nale
Posizione ripia-
no
Temp
.[°C]
2 170 3 160 45 - 60 In uno stampo
2 170 3 160 20 - 30 In uno stampo
1 170 1 160 70 - 80 In uno stampo
2 170 2 (sinistra
Cottura ventila-
ta
Posizione ripia-
no
Temp
.[°C]
160 80 - 100 In due stampi
e destra)
Durata
cottura
[min.]
Note
per dolci
per dolci
per dolci da
26 cm su di
una griglia
per dolci da
20 cm su di
una griglia
1)
Page 25

ITALIANO 25
TIPO DI
PIATTO
Cottura tradizio-
nale
Posizione ripia-
no
Temp
.[°C]
Cottura ventila-
ta
Posizione ripia-
no
Temp
.[°C]
Durata
cottura
[min.]
Note
Strudel 3 175 2 150 60 - 80 In una piastra
da forno
Crostata 2 170 2 (sinistra
e destra)
165 30 - 40 In uno stampo
per dolci da
26 cm
Torta con
lievito in polvere
Dolce di Natale/Torta di
frutta ricca
Torta di prugne
Torte piccole - un livello
Torte piccole - due livelli
Biscotti/strisce di pa-
2 170 2 160 50 - 60 In uno stampo
per dolci da
26 cm
2 170 2 150 90 - 120 In uno stampo
per dolci da
1)
20 cm
1 175 2 160 50 - 60 In uno stampo
1)
3 170 3 140 -
150
- - 2 e 4 140 150
3 140 3 140 -
150
per il pane
20 - 30 In una piastra
da forno
25 - 35 In una piastra
da forno
30 - 35 In una piastra
da forno
sticcini - un
livello
Biscotti/strisce di pa-
- - 2 e 4 140 150
35 - 40 In una piastra
da forno
sticcini - due
livelli
Meringhe 3 120 3 120 80 - 100 In una piastra
da forno
Focaccine 3 190 3 180 15 - 20 In una piastra
da forno
1)
Eclair 3 190 3 170 25 - 35 In una piastra
da forno
Tortine alla
piastra
2 180 2 170 45 - 70 In uno stampo
per dolci da
20 cm
Torta di frutta ricca
1 160 2 150 110 - 120 In uno stampo
per dolci da
24 cm
Pasticcini
per il tè
1 170 1 (sinistra
e destra)
160 50 - 60 In uno stampo
per dolci da
1)
20 cm
Page 26

www.electrolux.com
26
1)
PANE E PIZZA
Pane bianco 1 190 1 190 60 - 70 1-2 pezzi, cia-
Pane di segale
Pizza 1 230 -
Focaccine 3 200 3 190 10 - 20 In una piastra
1)
FLAN
Sformato di
pasta
Sformato di
verdure
Quiche 1 180 1 180 50 - 60 In uno stam-
Lasagne 2 180 -
Cannelloni 2 180 -
1)
Preriscaldare il forno per 10 minuti.
Cottura tradizio-
TIPO DI
PIATTO
nale
Posizione ripia-
no
Temp
.[°C]
1 190 1 180 30 - 45 In uno stampo
250
Preriscaldare per 10 minuti.
Cottura tradi-
TIPO DI
PIATTO
zionale
Posizione ripia-
no
Temp
.[°C]
2 200 2 180 40 - 50 In uno stampo
2 200 2 175 45 - 60 In uno stampo
190
190
Preriscaldare per 10 minuti.
Cottura ventilata
Posizione ripia-
no
Temp
.[°C]
1 230 -
250
Cottura ventila-
ta
Posizio-
ne ripia-
no
Temp
.[°C]
2 180 -
190
2 180 -
190
Durata
cottura
Note
[min.]
scuno da 500
1)
gr.
per il pane
10 - 20 In una lamiera
dolci o in una
leccarda
da forno
1)
1)
Durata
cottura
Note
[min.]
1)
po
25 - 40 In uno stam-
1)
po
25 - 40 In uno stam-
1)
po
Page 27

ITALIANO 27
CARNE
TIPO DI
PIATTO
Cottura tradi-
zionale
Posizione ripia-
Temp
no
.[°C]
Cottura ventila-
ta
Posizione ripia-
no
Temp
.[°C]
Durata
cottura
[min.]
Note
Manzo 2 200 2 190 50 - 70 Su di una gri-
glia
Maiale 2 180 2 180 90 - 120 Su di una gri-
glia
Vitello 2 190 2 175 90 - 120 Su di una gri-
glia
Roast beef
inglese al
2 210 2 200 50 - 60 Su di una gri-
glia
sangue
Roast beef
inglese a
2 210 2 200 60 - 70 Su di una gri-
glia
cottura media
Roast beef
inglese ben
2 210 2 200 70 - 75 Su di una gri-
glia
cotto
Spalla di
2 180 2 170 120 - 150 Con cotica
maiale
Stinco di
2 180 2 160 100 - 120 Due pezzi
maiale
Agnello 2 190 2 175 110 - 130 Cosciotto
Pollo 2 220 2 200 70 - 85 Intero
Tacchino 2 180 2 160 210 - 240 Intero
Canard 2 175 2 220 120 - 150 Intero
Oca 2 175 1 160 150 - 200 Intero
Coniglio 2 190 2 175 60 - 80 Tagliato a pez-
zi
Lepre 2 190 2 175 150 - 200 Tagliato a pez-
zi
Fagiano 2 190 2 175 90 - 120 Intero
Page 28

www.electrolux.com
28
PESCE
Trota/Orata 2 190 2 175 40 - 55 3- 4 pesci
Tonno/Sal-
mone
7.5 Grill
Bistecche di filetto
Bistecche di
manzo
Salsicce 8 - 4 max. 12-15 10-12
Braciole di
maiale
Pollo (tagliato a
metà)
Kebab 4 - 4 max. 10-15 10-12
Petto di pollo 4 400 4 max. 12-15 12-14
Hamburger 6 600 4 max. 20-30 Filetto di pesce 4 400 4 max. 12-14 10-12
Toast farciti 4-6 - 4 max. 5-7 Toast 4-6 - 4 max. 2-4 2-3
Informazioni sulle acrilamidi
Importante Secondo le più recenti
scoperte scientifiche, se si rosolano
alimenti (in particolari quelli contenenti
TIPO DI
PIATTO
Cottura tradi-
zionale
Posizione ripia-
Temp
no
.[°C]
Cottura ventila-
ta
Posizione ripia-
no
Temp
.[°C]
Durata
cottura
[min.]
2 190 2 175 35 - 60 4-6 filetti
Preriscaldare il forno vuoto per 10
minuti prima di iniziare la cottura.
Quantità Grill Tempo di cottura
(in minuti)
TIPO DI PIE-
TANZA
Pezzi (g) Posizio-
ne griglia
Temp.
(°C)
1° lato 2° lato
4 800 4 max. 12-15 12-14
4 600 4 max. 10-12 6-8
4 600 4 max. 12-16 12-14
2 1000 4 max. 30-35 25-30
amido), le acrilamidi possono
rappresentare un rischio per la salute.
Raccomandiamo pertanto di cuocere alle
temperature più basse e di non rosolare
eccessivamente gli alimenti.
Note
8. PULIZIA E CURA
AVVERTENZA!
Fare riferimento al capitolo "Informazioni per la sicurezza".
• Pulire la parte anteriore dell'apparecchiatura con un panno morbido inumidito con acqua tiepida saponata.
Page 29

• Per pulire le superfici metalliche, utilizzare un normale detergente.
• Pulire l'interno del forno dopo ogni utilizzo. In questo modo è possibile eliminare più facilmente le macchie.
• Rimuovere lo sporco tenace con detergenti speciali per forno.
• Dopo ogni utilizzo, pulire gli accessori
da forno e farli asciugare accuratamente. Utilizzare un panno morbido inumidito con acqua tiepida saponata.
• Non pulire gli accessori anti-aderenti
con detergenti aggressivi, oggetti appuntiti o in lavastoviglie. Ciò potrebbe
danneggiare il rivestimento anti-aderente.
Apparecchiature in acciaio
inox o alluminio:
Pulire la porta del forno esclusivamente con una spugna umida.
Asciugarla con un panno morbido.
Evitare l’uso di lane di acciaio, acidi o prodotti abrasivi che potrebbero danneggiare la superficie del
forno. Pulire il pannello dei comandi del forno, prendendo le
stesse precauzioni.
8.1 Pulizia della guarnizione
della porta
• Controllare regolarmente la guarnizione
della porta. La guarnizione della porta si
trova attorno al telaio della cavità del
forno. Non utilizzare l'apparecchiatura
se la guarnizione della porta è danneggiata. Contattare il Centro di Assistenza.
• Per pulire la guarnizione della porta si
prega di fare riferimento alle informazioni generali sulla pulizia.
ITALIANO 29
Prima di sostituire la lampadina del
forno:
• Disattivare il forno.
• Togliere i fusibili dal quadro elettrico o
spegnere l'interruttore principale.
Per proteggere la lampadina del
forno e la calotta di vetro stendere
un panno sul fondo del forno.
Tenere sempre la lampada alogena con uno straccio per evitare
che dei residui di grasso vi brucino sopra.
1.
Ruotare la calotta di vetro in senso
antiorario per estrarla.
2.
Pulire la calotta di vetro.
3.
Sostituire la lampadina del forno con
un'altra lampadina idonea, termoresistente a 300 °C.
Utilizzare lo stesso tipo di lampadina.
4.
Rimontare la calotta di vetro.
8.3 Pulizia della porta del forno
La porta del forno è dotata di due pannelli
di vetro. È possibile rimuovere la porta del
forno e il pannello interno di vetro per pulirli.
La porta del forno potrebbe richiudersi se si tenta di rimuovere il
pannello di vetro prima di togliere
la porta del forno.
8.2 Lampadina forno
AVVERTENZA!
Si prega di prestare attenzione in
fase di sostituzione della lampadina del forno. Sussiste il rischio di
scosse elettriche.
Page 30

www.electrolux.com
30
Rimozione della porta del forno e del pannello di vetro
1.
Aprire completamente la porta ed afferrare le due cerniere.
2.
Alzare e ruotare le levette poste sulle
due cerniere.
3.
Chiudere la porta del forno fino alla
prima posizione di apertura (circa
metà). Tirare in avanti la porta, sfilandola dalla sua sede.
Page 31

ITALIANO 31
4.
Appoggiare la porta su una superficie
stabile e coperta da un panno morbido.
5.
Sganciare il sistema di bloccaggio
per rimuovere il pannello di vetro interno.
6.
Ruotare di 90° le due chiusure e sfilarle dalle loro sedi.
90°
7.
Sollevare con cura (passo 1) ed
estrarre (passo 2) il pannello di vetro.
8.
Pulire il pannello di vetro con dell'acqua saponata. Asciugare il pannello
di vetro facendo attenzione.
2
1
Page 32

www.electrolux.com
32
Installazione della porta e del pannello di vetro
9. COSA FARE SE…
AVVERTENZA!
Fare riferimento al capitolo "Informazioni per la sicurezza".
Problema Causa possibile Solution
L'apparecchiatura non
funziona.
L'apparecchiatura non
funziona.
L'apparecchiatura non
funziona.
La lampadina del forno
non si accende.
Vapore e acqua di condensa si depositano sugli
alimenti e nel forno.
Qualora non sia possibile trovare una soluzione al problema, contattare il rivenditore o il Centro di Assistenza.
Le informazioni necessarie per il centro di
assistenza sono indicate sulla targhetta
Si consiglia di annotarle in questo spazio:
Modello (MOD.) .........................................
Al termine della pulizia, rimontare il pannello di vetro e la porta del forno. Eseguire
la procedura illustrata in precedenza, seguendo la sequenza inversa.
Accertarsi che la serigrafia sia sul lato interno della porta. Verificare che dopo l'installazione, la superficie della cornice del
pannello di vetro, nei punti delle serigrafie,
non risulti ruvida al tatto.
Accertarsi di installare il pannello di vetro
interno nelle sedi corrette. Fare riferimento
all'immagine.
L'apparecchiatura è disattivata.
La funzione Contaminuti Fine della cottura non è
stata impostata.
È scattato il fusibile nella
scatola dei fusibili.
La lampadina del forno è
guasta.
Gli alimenti sono stati lasciati nel forno troppo a
lungo.
dei dati. La targhetta si trova sul telaio anteriore della cavità dell'apparecchiatura.
Accendere il forno. Consultare il capitolo "Utilizzo
quotidiano".
Impostare la funzione
Contaminuti - Fine della
cottura. Fare riferimento
al capitolo "Funzioni dell'orologio".
Controllare il fusibile. Se il
fusibile è scattato più di
una volta, contattare un
elettricista qualificato.
Sostituire la lampadina
del forno.
Al termine della cottura,
non lasciare gli alimenti
nel forno per più di 15-20
minuti.
Page 33

Numero Prodotto (PNC) .........................................
Numero di serie (S.N.) .........................................
10. INSTALLAZIONE
AVVERTENZA!
Fare riferimento al capitolo "Informazioni per la sicurezza".
ITALIANO 33
10.1 Incasso
558
573
min. 550
20
590
min. 560
min. 550
20
600
548
20
589
594
5
min. 560
A
B
10.2 Installazione dell'impianto
elettrico
AVVERTENZA!
L’installazione dell'apparecchiatura deve essere eseguita da personale qualificato.
Il produttore non è responsabile
qualora non vengano applicate le
precauzioni del capitolo "Informazioni per la sicurezza".
La dotazione standard dell'apparecchiatura al momento della fornitura prevede una
spina e un cavo di rete.
10.3 Cavo
Tipi di cavo adatti all'installazione o per la
sostituzione: H07 RN-F, H05 RN-F, H05
RRF, H05 VV-F, H05 V2V2-F (T90), H05
BB-F.
Per la sezione del cavo fare riferimento alla potenza totale (sulla targhetta dei dati)
ed alla tabella:
Page 34

www.electrolux.com
34
Potenza totale Sezione del cavo
massimo 1.380W3 x 0,75 mm²
massimo 2.300W3 x 1 mm²
11. CONSIDERAZIONI AMBIENTALI
Riciclare i materiali con il simbolo
Buttare l'imballaggio negli appositi
contenitori per il riciclaggio.
Aiutare a proteggere l’ambiente e la salute
umana e a riciclare rifiuti derivanti da
apparecchiature elettriche ed elettroniche.
.
Potenza totale Sezione del cavo
massimo 3.680W3 x 1,5 mm²
Il cavo di terra (verde/giallo) deve essere 2
cm più lungo dei cavi di fase e neutro (rispettivamente blu e marrone).
Non smaltire le apparecchiature che
riportano il simbolo
rifiuti domestici. Portare il prodotto al
punto di riciclaggio più vicino o contattare
il comune di residenza.
insieme ai normali
Page 35

ITALIANO 35
Page 36

www.electrolux.com/shop
397281601-A-212012
 Loading...