

AEG END52801X, END52800X User Manual
USER INSTRUCTIONS
FROST FREE
REFRIGERATION
ENG
ii contents refrigeration
16
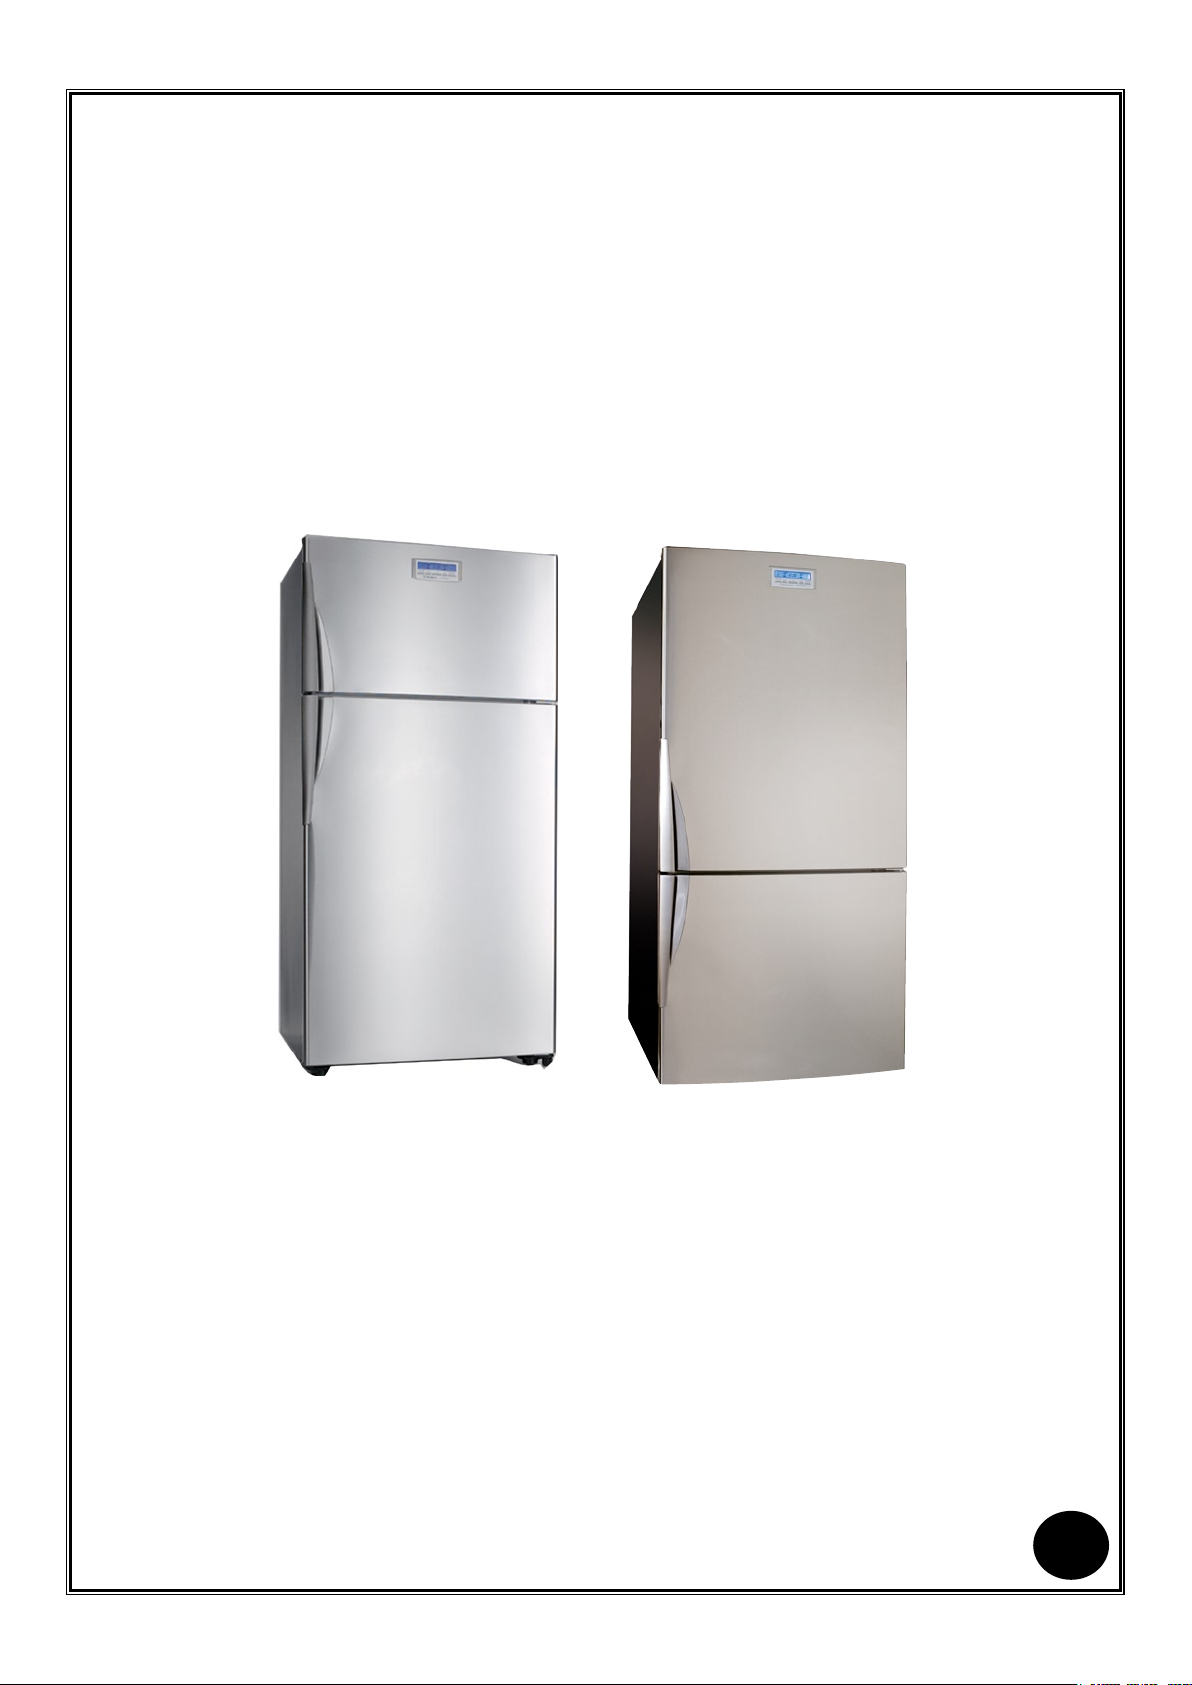
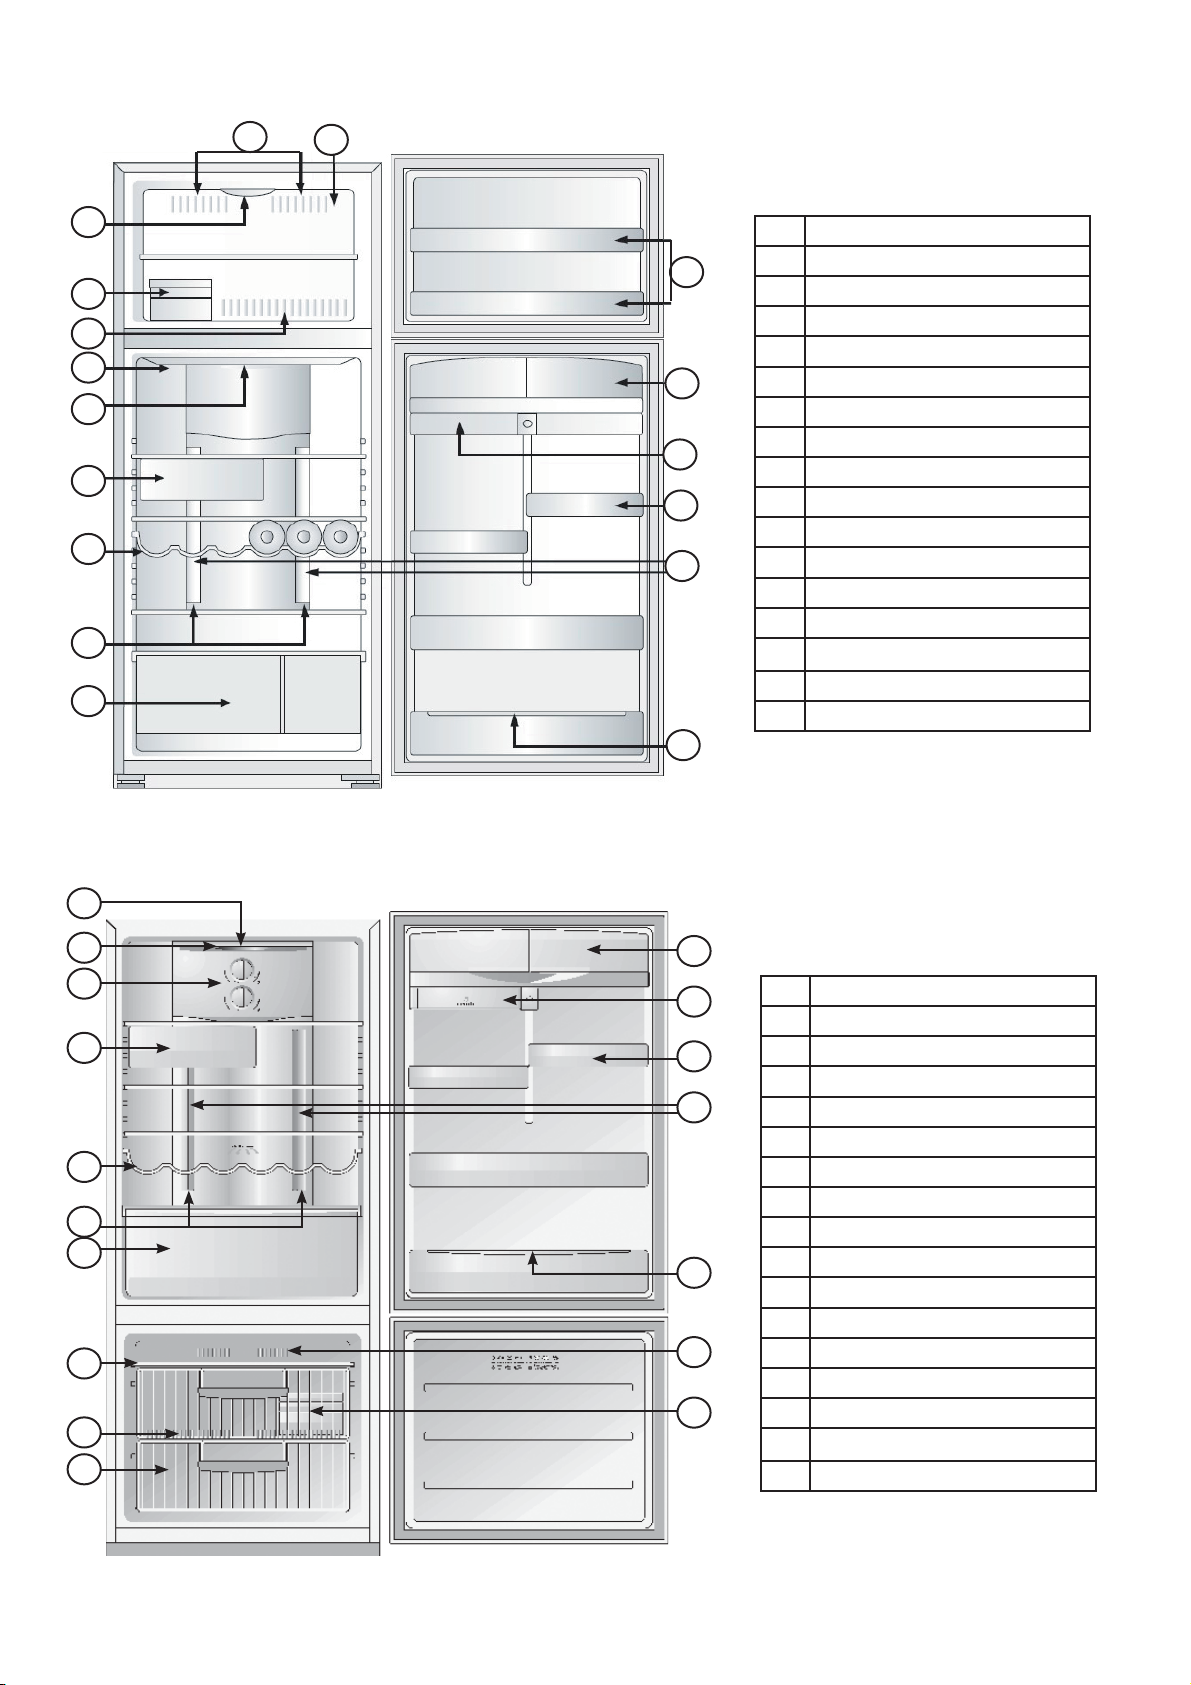
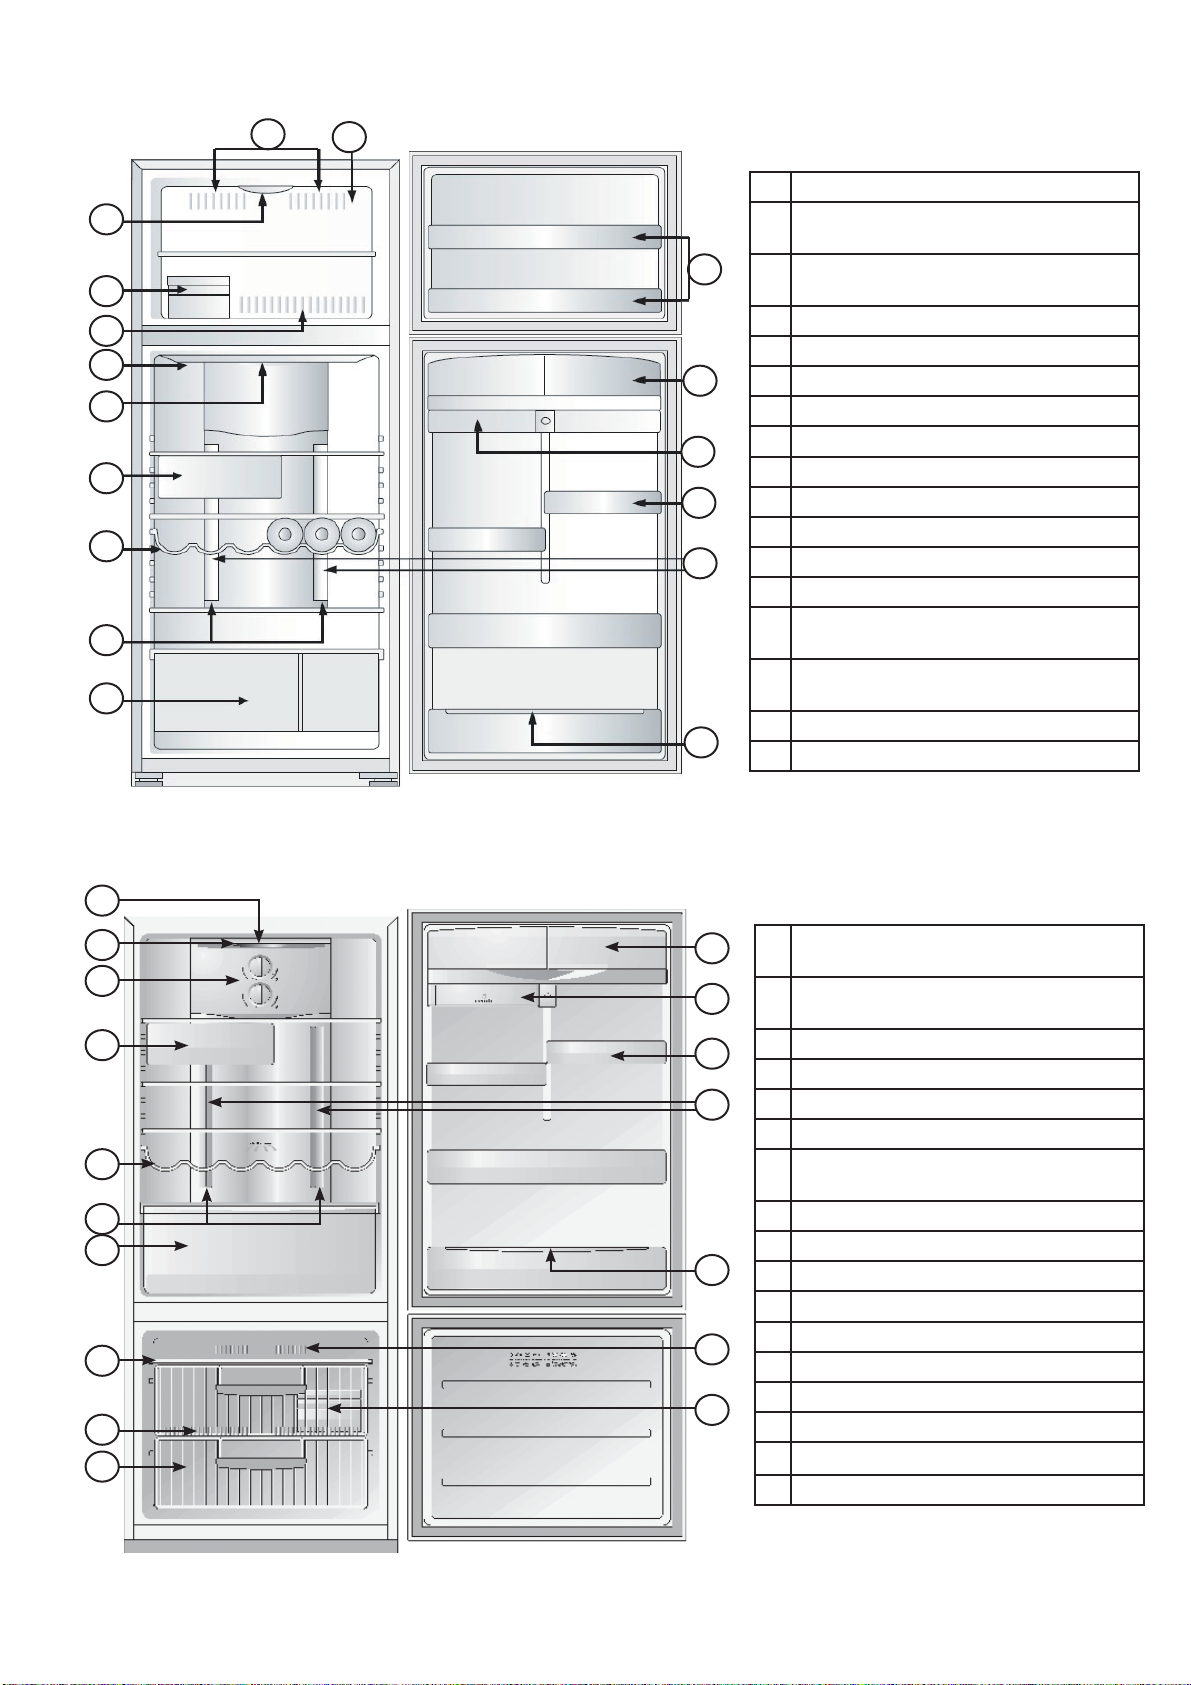
Top Freezer Model
17
15
14
13
12
11
10
9
8
7
1 Freezer Bins
1
2 Twin Dairy Compartments
3 Store Safe Bin (where fitted)
4 Adjustable Door Bins
5 Multi Flow Outlets
2
6 Bottle Restrainer
7 Converta Bin(s)
3
8 Feature Lighting (where fitted)
9 Wine Rack (where fitted)
4
10 Deli Bin (where fitted)
11 Food Compartment Light
5
12 Air Curtain Cooling
13 Freezer Air Returns
14 Ice Cube Tray Lid & Storage Bin
15 Freezer Light (where fitted)
16 Freezer Air Outlets
17 Freezer Temperature Sensor
6
17
16
15
14
13
12
11
10
9
8
Bottom Freezer Model
1
2
1 Twin Dairy Compartments
2 Store Safe Bin (where fitted)
3
3 Adjustable Door Bins
4 Multi Flow Outlets
4
5 Bottle Restrainer
6 Freezer Air Outlets
7 Ice Cube Tray Lid & Storage Bin
8 Freezer Baskets
9 Freezer Air Returns
5
10 Freezer Top Shelf
11 Converta Bin(s)
12 Feature Lighting (where fitted)
6
13 Wine Rack (where fitted)
14 Deli Bin (where fitted)
7
15 Manual Control (where fitted)
16 Air Curtain Cooling
17 Food Compartment Light
Note: Product illustrations demonstrate various features but may not be
completely in line with current products.
electrolux refrigeration contents i
environmental tip
Congratulations
Congratulations and thank you for choosing our refrigerator/
freezer. We are sure you will find your new appliance
a pleasure to use. Before you use the appliance, we
recommend that you read through the entire user manual,
which provides the description of the appliance and its
functions.
To avoid the risks that are always present when you use
an electric appliance, it is important that the appliance is
installed correctly and that you read the safety instructions
carefully to avoid misuse and hazards.
We recommend that you keep this instruction booklet for
future reference and pass it on to any future owners.
After unpacking the appliance please check it is not
damaged. If in doubt, do not use the appliance but contact
your local Electrolux Customer Care Centre.
Contents
• Important safety instructions 4
• Installing your new appliance 5
• Initial start up 6
• Electronic display controls – electronic models only 6
• Controlling the temperature 6
• Manual (rotary) controls – manual models 8
• How to use the features of your appliance 9
• Care and maintenance 11
• General information 12
• Troubleshooting 13
• Specifications 14
Information on disposal for users
• Most of the packing materials are recyclable. Please
dispose of those materials through your local recycling
depot or by placing them in appropriate collection
containers.
• If you wish to discard this product, please contact your
local authorities and ask for the correct method of
disposal.
warning
caution
tips and information
warning
4 important safety instructions electrolux refrigeration
warning
warning
Important safety instructions
Please read the user manual carefully and store in a
handy place for later reference.
The symbols you will see in this booklet have these
meanings:
This symbol indicates information concerning your
personal safety
This symbol indicates information on how to avoid
damaging the appliance
This symbol indicates tips and information about use
of the appliance
This symbol indicates tips and information about
economical and ecological use of the appliance
Meanings of symbols used in this manual are shown
below:
The appliance must be plugged into its own
dedicated 220-240V, 50Hz AC electrical outlet.
It must be possible to disconnect the appliance from
the mains power supply; the plug must therefore be
easily accessible after installation.
Ensure that the electric outlet is properly earthed
to ground. Consult a qualified electrician if you are
unsure.
Do not use an extension cord or adapter plug.
If the power cord is damaged, it should be replaced
by a service technician or a qualified person.
Unplug the appliance before cleaning and before
changing the light bulb to avoid electric shock.
Never unplug the appliance by pulling on the power
cord. Always grip the plug firmly, and pull straight
out of the receptacle to prevent damaging the power
cord.
Choose a location that is not too cold - the
temperature should be above 10°C.
Put the appliance in a dry place, avoiding areas of
high moisture or humidity.
Don’t put the appliance in frosty or unprotected
areas, for example in a garage or on a verandah.
Don’t put the appliance in direct sunlight.
Don’t put the appliance near stoves, fires or heaters.
This symbol indicates never to do this
This symbol indicates always do this
• If pressurised aerosol containers bear
the word ‘flammable’ and/or a small
flame symbol,
do not store them inside any refrigerator
or freezer.
If you do so you may cause an explosion.
• When you dispose of your old refrigerators
and freezers, remove any doors. Children can
suffocate if they get trapped inside.
• This appliance contains insulation formed with
flammable blowing gases. Avoid safety hazards by
carefully disposing of this appliance.
When correctly installed, your appliance should:
• have adequate clearance to the back and sides for air
circulation (refer to page 5).
• be aligned to the surrounding cupboards.
• have doors that will self-close from a partially open
position.
• Have the stability foot in place (see diagram on page 5)
to prevent the appliance falling forward when a door
with heavy food load is opened.
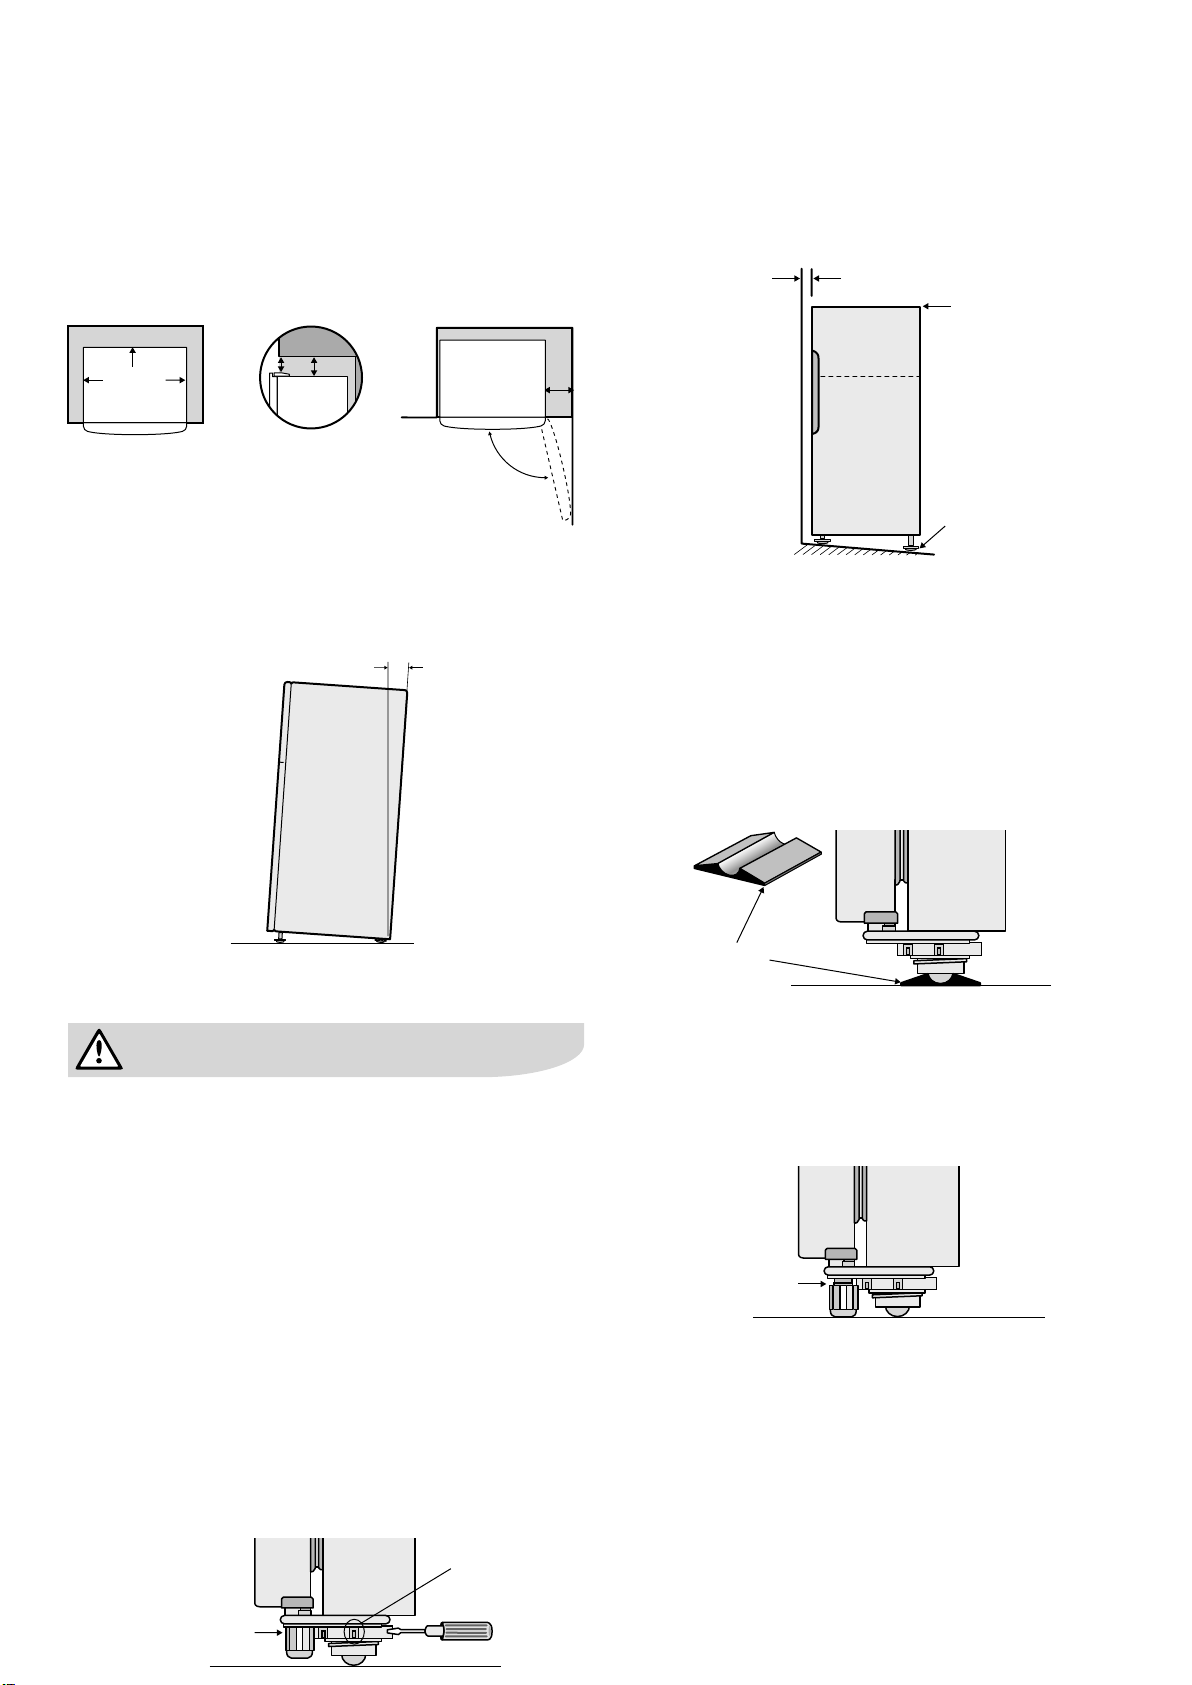
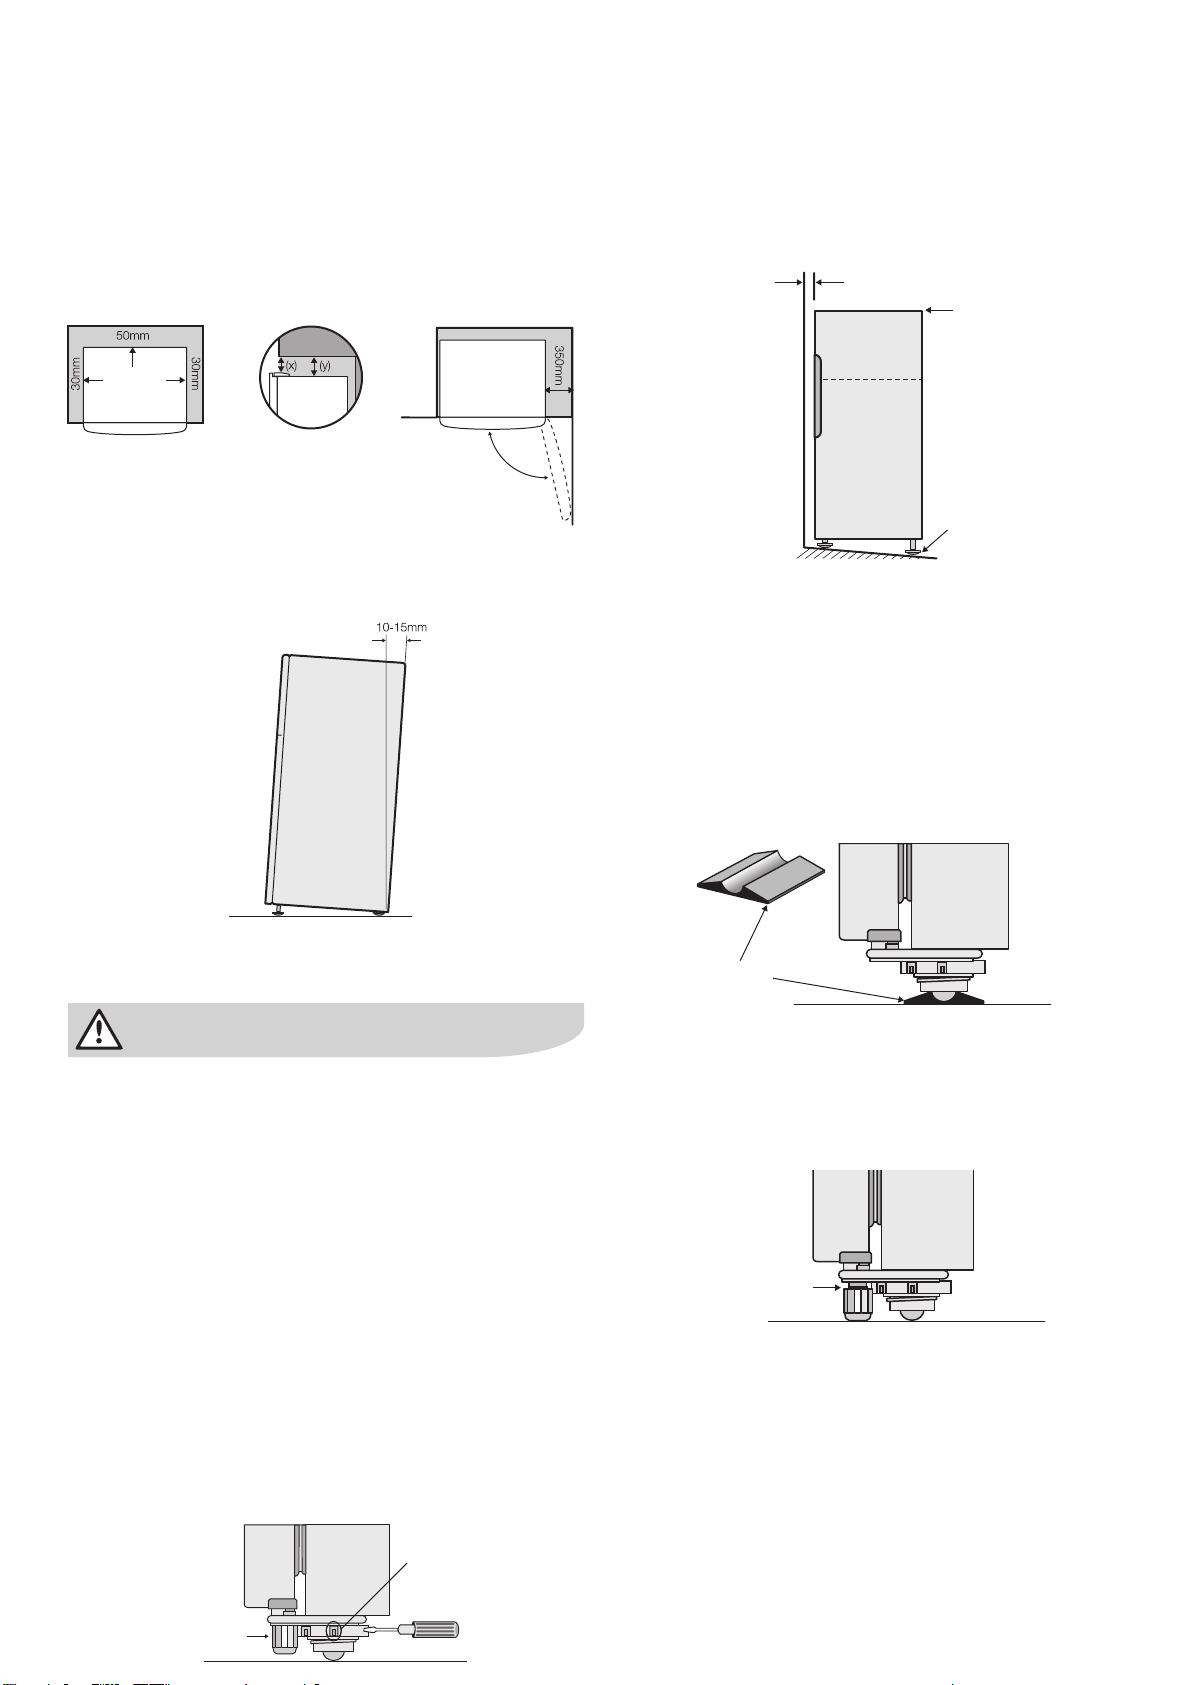
5 installing your new appliance electrolux refrigeration
caution
(x)
50mm
30mm
30mm
Recommended
airspace
CABINET
DOOR
350mm
(y)
10-15mm
Fixed rear
rollers
Height adjustable
front rollers
Top of refrigerator
is level ie. horizontal
Adjust fr
ont rollers
for uneveness of floo
r
eg. wind this roller
down or up
A
ligned to
cupboards
ie. even gap
Large plastic
ro
ller nut
Stability foot
wound up
Roller Stop
Stability foot
wound down
Installing your new appliance
Clearance around your appliance
If you do not have a cupboard with a rear gap, the
recommended clearance area on top increases from
50mm to 90mm (x) and from 32mm to 72mm (y).
When positioned in a corner area, spacing of at least
350mm (400mm for E:Line models) on the hinge side will
allow the doors to open enough to enable the removal of
bins and shelves.
Note:
Doors are designed to sit proud of cabinetry (not flush).
Installing your appliance
The appliance should arrive with the front adjustable
rollers wound down to tilt the top of the appliance
backwards by about 10-15mm from upright.
4. Check the alignment of the appliance to the
surrounding cupboards. The top of the appliance
should be level from side to side (see diagram below).
If you need to adjust the level, use the adjustable
rollers as discussed in Step 3.
5. If the appliance now rocks from one corner to the
opposite rear corner, this means that the floor is
uneven; you will need to put some packing under
one of the rear rollers.You could use thin pieces of
solid material, such as thin board, vinyl floor tiles or
laminate. Place the packing so that it will sit under
one of the rear rollers when the appliance is rolled into
position.
6. On certain floor surfaces the appliance may roll
forward during operation. Where provided a “Roller
Stop” can be placed under the front rollers.
The stability foot should also be wound fully up so it will not
interfere with the operation of the rollers (see diagram in Step
3).
The rollers are designed for forward or backward
movement only. They are not castors. Moving the
appliance sideways may damage your floor and
the rollers.
1. Roll the appliance into its final position.
2. The top of the appliance should be tilted back by
3. If the appliance is not tilted back, you can adjust the
approximately 10-15mm (see diagram above). This will
allow the doors to self-close providing a consistent
door seal.
two front rollers by turning the large, plastic roller nut
(see diagram below). This will increase the height of
the rollers. One turn of the nut will tilt the appliance
back approximately 10mm. If you have difficulty
turning the roller nut you can have someone tilt the
appliance back, so that you have better access.
Alternatively, you can access the rollers from the side,
using a flat screwdriver to help you turn the nut (see
diagram below).
7. You may now need to fine-tune the installation by
repeating Steps 3, 4 and 5.
8. When you have the appliance in final position, wind
the stability foot down until it just makes contact with
the floor. Whenever you need to move the appliance,
be sure to wind the foot back up so that the appliance
can roll freely.
9. Clean your appliance thoroughly following the
instructions on page 10 and wipe off any dust that has
accumulated during shipping.
10. Plug the appliance into the power point. Don’t use a
double adaptor. If you need to roll the appliance out to
get at the power point, remember to raise the stability
foot before you do so.
11. We recommend that you let your appliance run for two
to three hours before you put any food in it. This will
allow you to check that it is operating properly.
Congratulations! You have successfully installed your new
appliance.
6 initial start up/electronic display controls – electronic models electrolux refrigeration
tips and information
tips and information
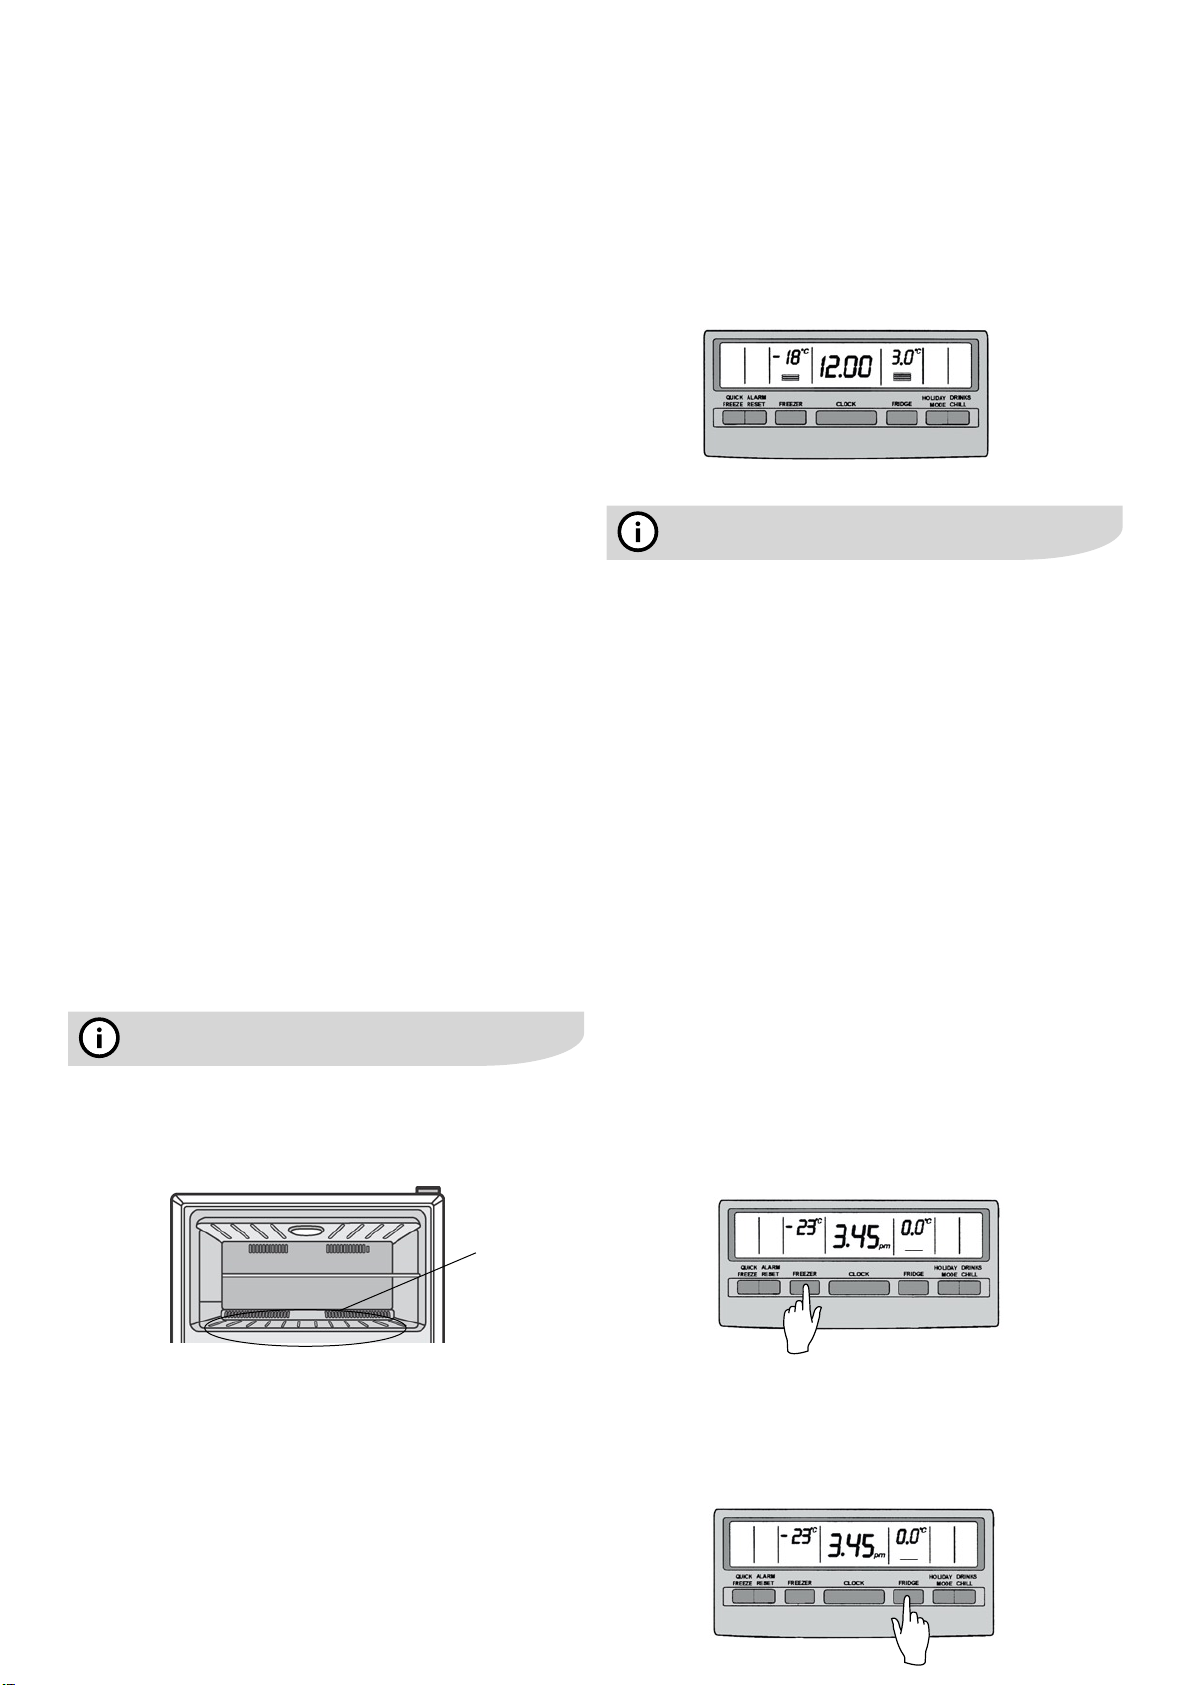
Initial start up Electronic display controls – electronic
models only
The appliance transfers heat from food placed inside the
appliance to the outside air.
This process makes the rear, the sides and the area
adjacent to the doors, particularly at initial start up, feel
warm. This is normal.
There is a cooling coil located behind the rear wall of
the cabinet. This coil cools and removes moisture from
the air. A fan then circulates cold, dry air throughout the
cabinet.
This air circulation means that foods are refrigerated far
more quickly than in appliances where the air remains
relatively static.
Avoid placing food against air outlets as this will affect air
circulation (see diagrams on inside cover).
A light frosting will occasionally occur on the cold interior
of the freezer when the door is opened frequently. This
is normal and will disappear after a few days in most
climates.
Make sure you fully close the freezer door after you load
or remove food. If the door is left partly open, a heavy
frost will coat the inside of the freezer. If a frost develops,
remove it. Take care to properly close the door and the
frost will not reoccur.
Your new energy efficient appliance uses a high-speed
compressor and other energy efficient components that
may produce different noises to your old appliance.
These sounds are normal and include:
• compressor running noise.
• air movement noise from the small fan motor.
• occasional gurgling, similar to water boiling.
• a popping noise, heard during automatic defrosting.
• a clicking noise, just prior to the compressor starting
up.
These noises are normal and not cause for alarm.
Further details can be found on page 11.
The electronic display panel consists of an LCD display
with blue backlighting and 7 push buttons. When the
power is first turned on, you will see the default settings,
with the white backlighting on.
If no buttons have been pressed and the fridge door is
closed the backlighting will turn off after 30 seconds.
A good indication of optimal freezer temperature is
ice cream that is frozen, but still soft enough for easy
scooping.
For the fridge compartment, we recommend using
drinking water and simply adjusting the fridge controls
until the water is at your ideal temperature.
Controlling the temperature
The default temperature for the refrigerator is 3°C, with
a default of -18°C for the freezer. If you want to change
the temperatures, use the instructions below. You should
make only small adjustments and wait 24 hours to see
whether you need to make further changes.
Note:
When you set a temperature, you set an average
temperature for the whole appliance cabinet.
Temperatures inside each compartment may vary,
depending on how much food you store and where you
place it. High or low room temperature may also affect
the actual temperature inside the appliance.
• On a top mount freezer (TM) refrigerator (where the
freezer is on top of the fresh food compartment):
Do not place food forward of the ribs on the bottom
of the freezer, it will keep the door open. So make
sure food is stored behind the ribs.
Ribs
• On a bottom mount freezer (BM) refrigerator, single
door all refrigerator (AR) and single door all freezer
(AF):
Ensure freezer baskets and shelves are pushed
completely back to prevent them holding the door
open.
Changing the freezer temperature
Press the freezer button to make the freezer colder in 1°C
steps. Once -23°C is reached the display will return to 14°C with the next button press. You’ll notice that the bar
graph gets smaller with colder freezer settings.
Changing the refrigerator temperature
Press the fridge button to make the fridge colder in 1°C
steps. Once 0°C is reached the display will return to 7°C
with the next button press. The bar graph gets smaller
with colder settings.
electrolux refrigeration electronic display controls – electronic models 7
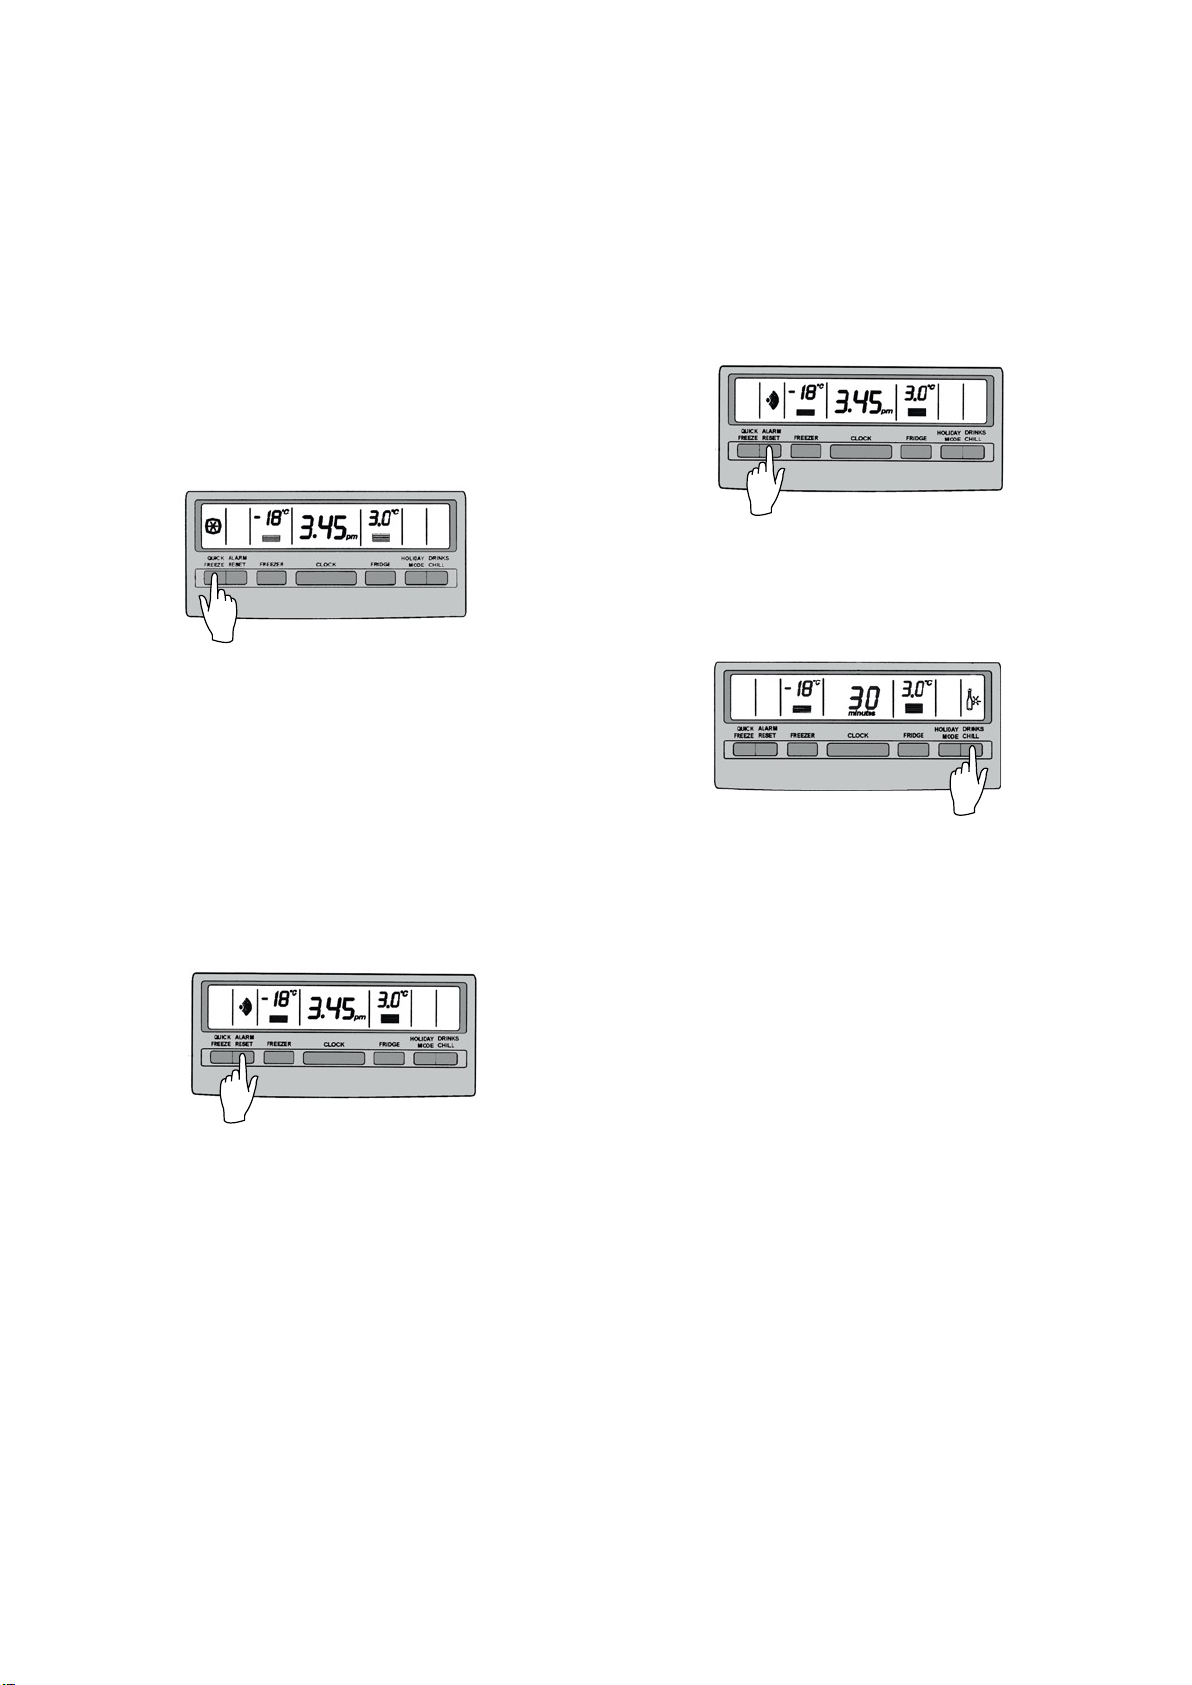
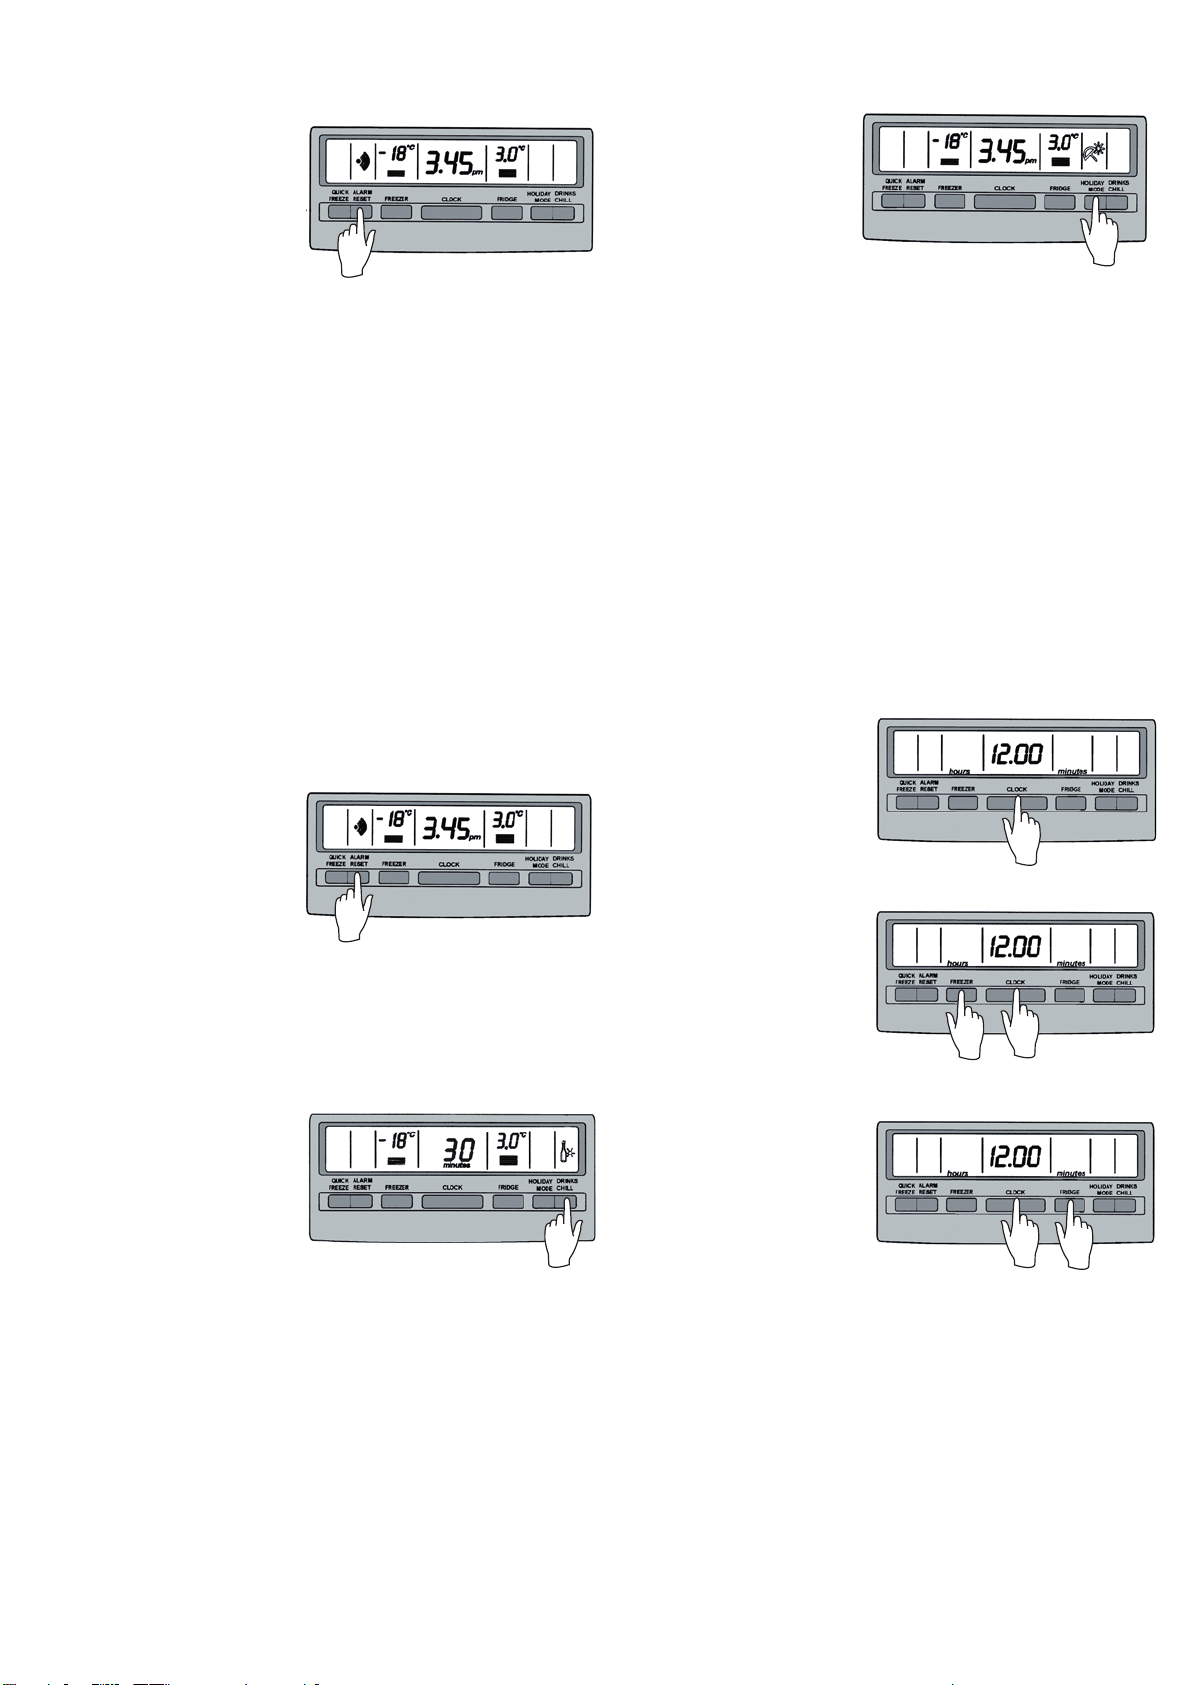
Quick freeze function
Use the quick freeze function when you add a large
amount of food to the freezer compartment. This freezes
the food quickly but does not affect the temperature in
the refrigerator compartment.
To use this function, press the quick freeze button once.
An animated icon will light up. The quick freeze function
will now operate for 90 minutes. If you want to turn the
quick freeze function off before 90 minutes have passed,
simply press the quick freeze button again. The icon will
disappear and the freezer will return to normal operation.
Door alarm
If the refrigerator door is left open for longer than 2
minutes a buzzer will sound and an icon above the alarm
reset button will flash. The refrigerator temperature
settings and bar graph will also flash.
If you want to leave the door open while you load the
fridge, you can turn the alarm off for 8 minutes by
pressing the alarm reset button.
Drinks chill timer
To use the timer, press the drinks chill button once to set
a 10 minute time limit, twice for 20 minutes and three
times for 30 minutes. Press four times to turn the timer
off.
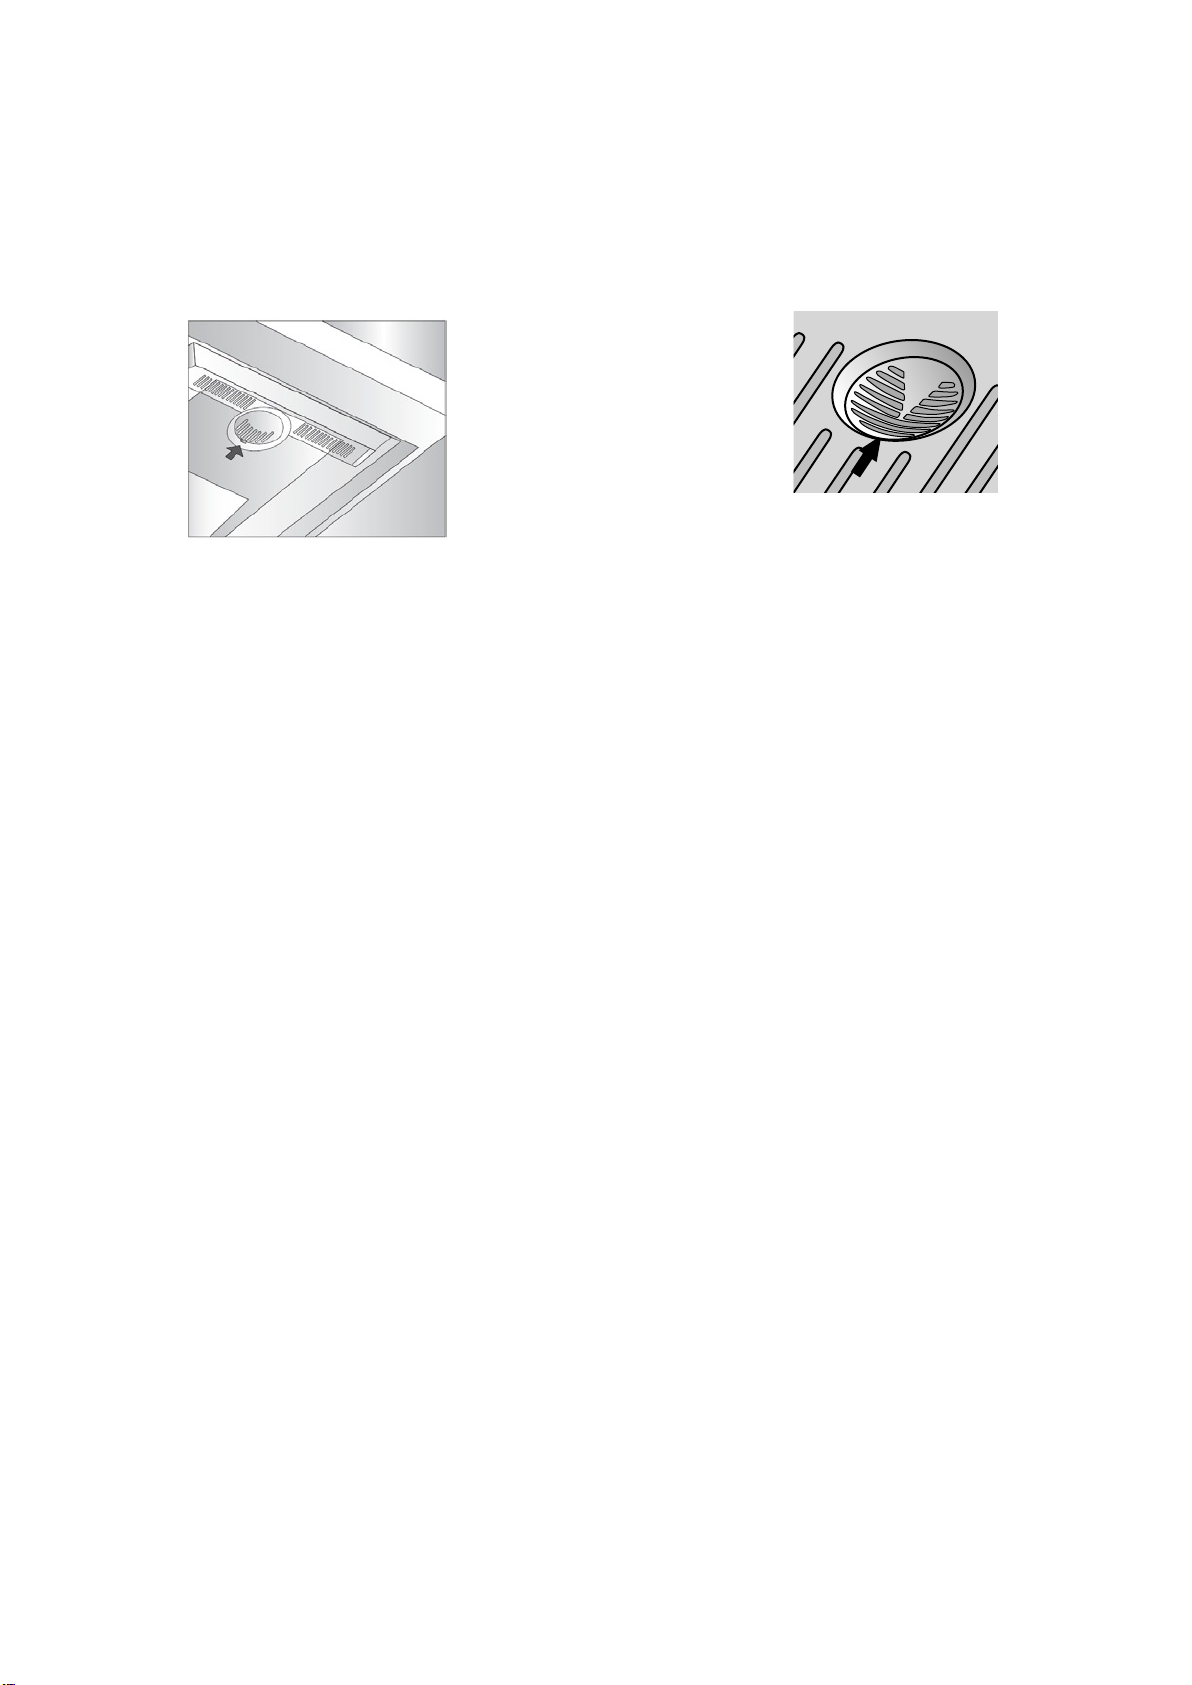
Freezer temperature alarm
If the alarm is sounding for no apparent reason, check
whether anything is holding the door open.
If the freezer becomes too warm due to the freezer door
being left open or warm food being placed too close to the
temperature sensor in the freezer (see diagrams on inside
cover for the sensor location), a buzzer will sound, the icon
above the alarm reset button, the freezer set temperature
and bar graph will all flash until the alarm reset button is
pressed. Once pressed the alarm disable icon adjacent to
the alarm reset button will illuminate for 50 minutes, or until
the temperature reaches an acceptable level.
Make sure nothing is holding the freezer door open and
move any warm food away from the temperature sensor
(see diagrams on inside cover for the sensor location).
If the freezer is still too warm after 50 minutes the alarm
will sound again, indicating that something may be wrong
with your appliance.
Note:
The freezer temperature alarm can be reset for 12 hours
by pressing the alarm reset button continuously for 10
seconds.
If you set the drinks chill timer it will sound an alarm to
remind you that you have left drinks in your freezer for
quick chilling.
An animated icon appears beside the drinks chill button
with a countdown timer.
The timer will count down in 1 minute increments; you
can change the time or turn the timer off even after the
countdown has started. When the countdown is finished
a buzzer will sound and the icon beside the alarm will
flash until the alarm reset button is pressed.
To stop the alarm and turn off the drinks chill timer, press
the alarm reset button. If your drink is chilled, take it out
of the freezer. If it is not cold enough, reset the drinks chill
function (remembering that the drink is already partially
chilled).
Suggested chilling times:
• 10 minutes for cans of drink
• 20 minutes for bottles of wine
• 30 minutes for bottles of soft drink.
8 manual (rotary) controls – manual models electrolux refrigeration
tips and information
tips and information
• Holiday mode
If you think that you will be away from your appliance for
an extended period and would like to take advantage of
maximum energy efficiency. Then, just before you leave press
the Holiday mode button once and the appliance will enter
Holiday Mode, as indicated by the umbrella and sun symbol.
Holiday mode will now operate until the button is pressed or
the refrigerator door is opened.
Note:
Opening the freezer door has no effect on the operation of
the Holiday Mode.
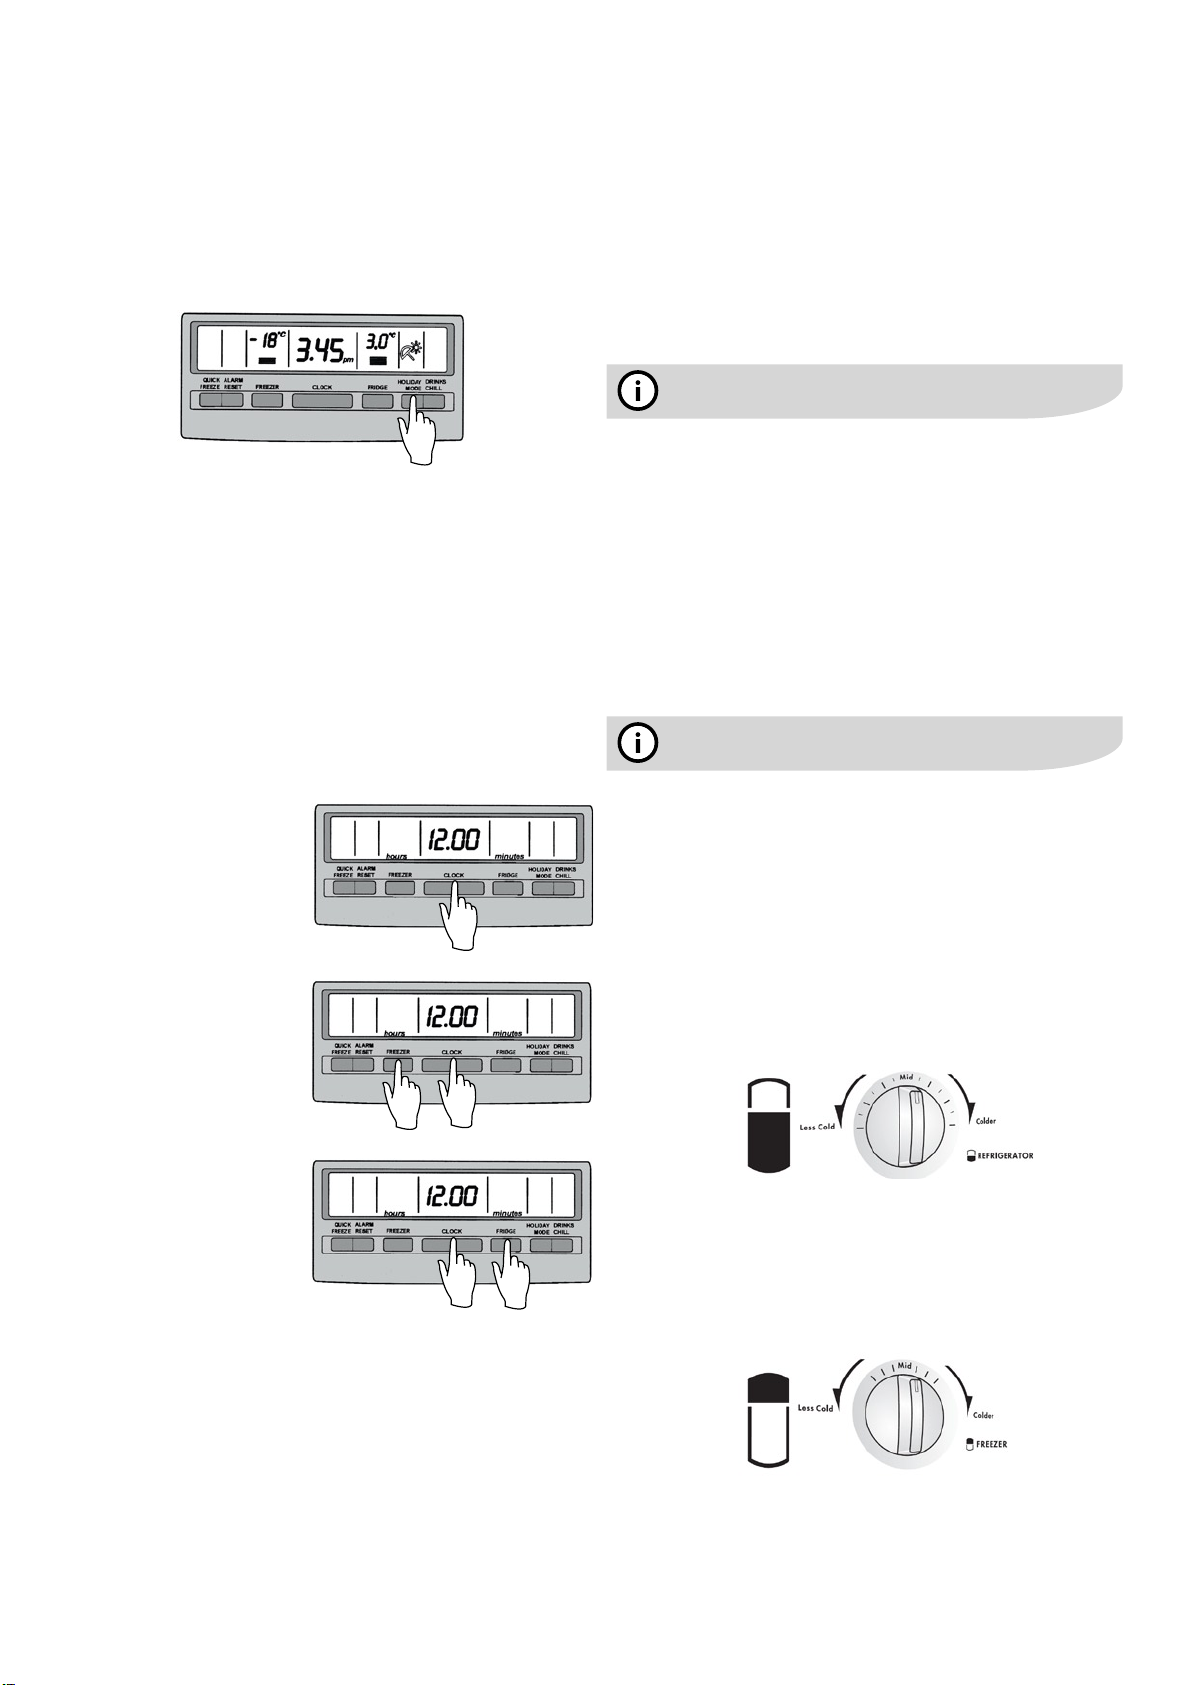
Setting the Clock
If no buttons have been pressed and the fridge door is
closed the backlighting will turn off after 30 seconds. The
display will go into clock mode. When the display is in clock
mode, you can view the refrigerator settings by pressing
the freezer, clock or fridge button once. This reactivates
the full display. Opening the fridge door also activates the
full display. However, the display will return to clock mode
30 seconds after the last button press or the closing of the
refrigerator door.
1) If the display is in clock
mode press the clock button
once to activate the display,
then press and hold the
clock button down for two
seconds; hours and minutes
will then appear on the
display
2) While holding down the
clock button, press the
freezer button to advance
the hours. (Hold the freezer
button down for continuous
and fast advance). After
the first 12 hours. The PM
indicator will appear.
Manual (rotary) controls – manual models
Controlling the temperature
Set the temperature by using the main temperature
controls at the rear of the refrigerator compartment.
When you first start your refrigerator, set both refrigerator
and freezer controls to MID. The refrigerator temperature
control is affected by altitude and it is recommended
that it be set warmer to compensate. e.g. At 1000 metres
above sea level set the refrigerator temperature control to
one setting warmer than MID.
A good indication of optimal freezer temperature is
ice cream that is frozen, but still soft enough for easy
scooping.
For the fridge compartment, we recommend using
drinking water and simply adjusting the fridge controls
until the water is at your ideal temperature.
To change settings. When you change temperature
settings, make small adjustments and wait 24 hours
before assessing whether you need to make any further
changes.
• Coldest freezer setting is not recommended in normal
and very hot climates as this will limit the cooling to
the refrigerator section.
• In very cold climates (where temperatures are below
10°C) the freezer may need to be set colder.
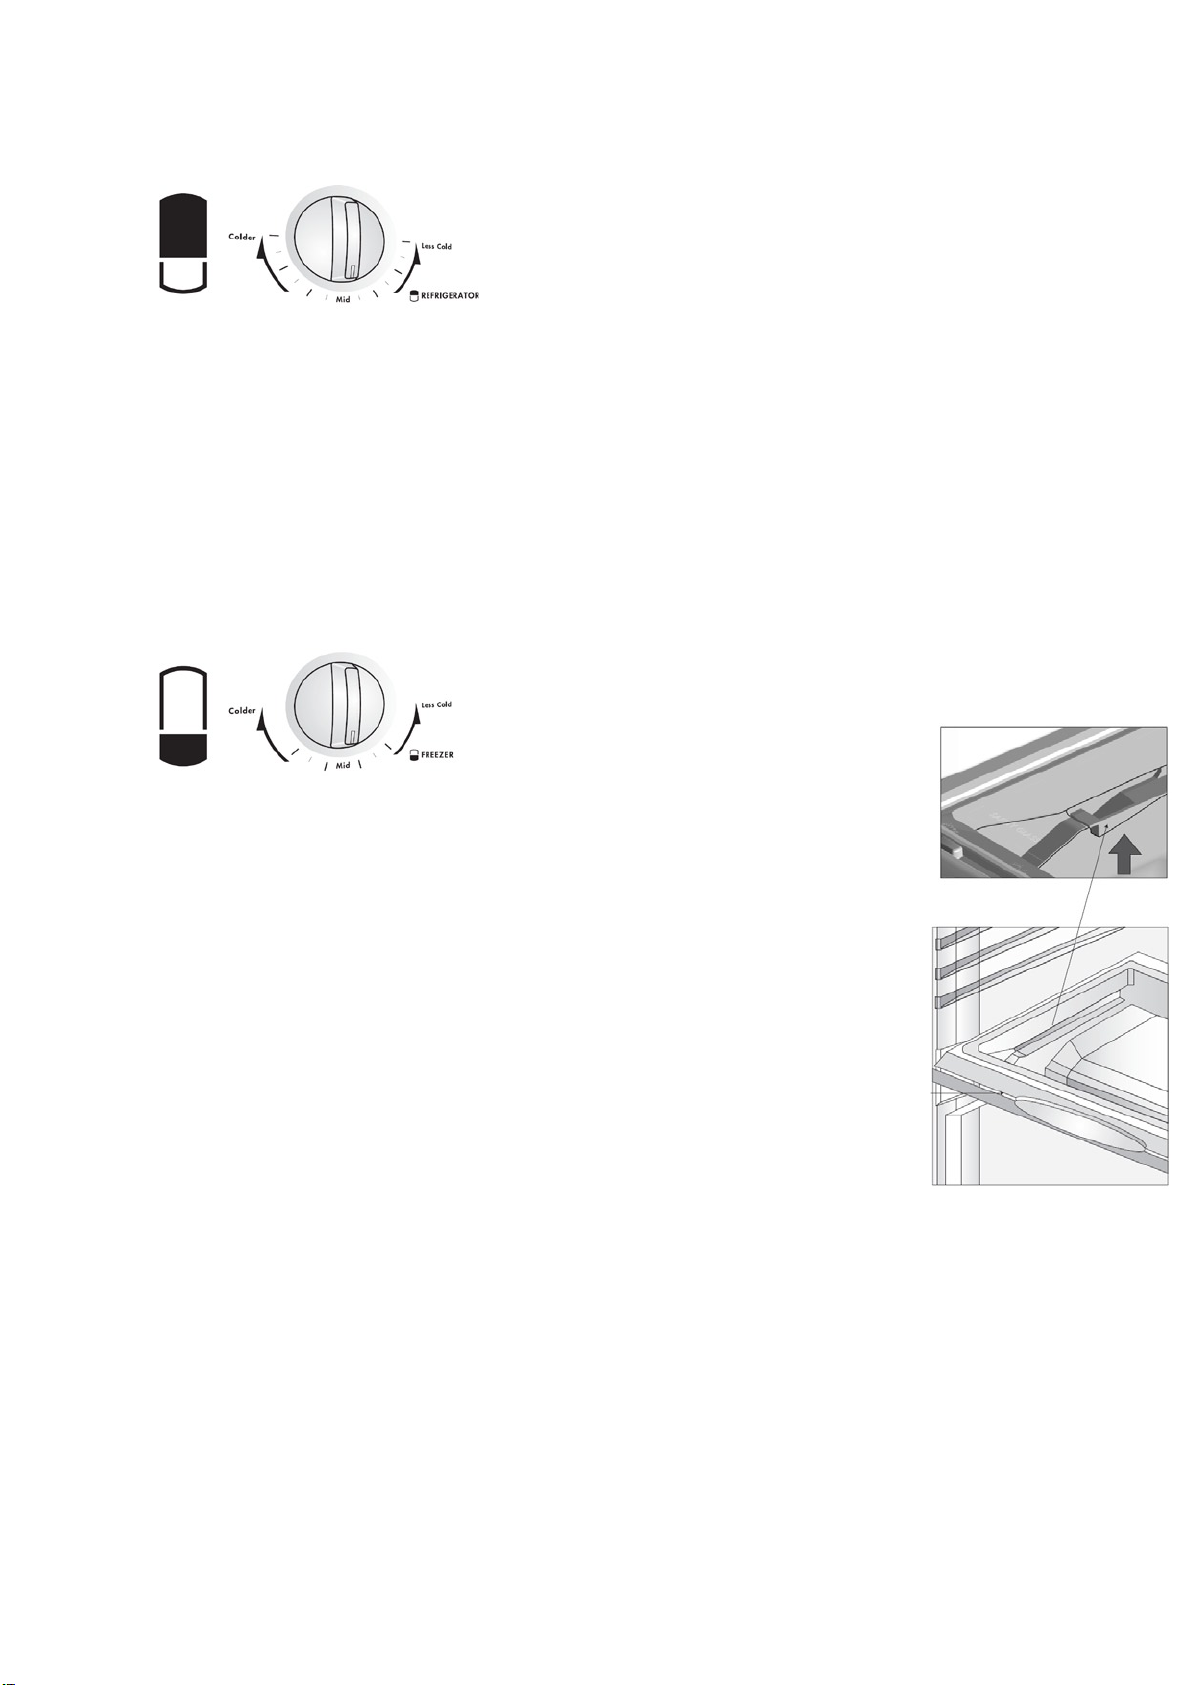
• Adjusting the refrigerator temperature – top mount
freezer (TM) model
1. Select the refrigerator control (bottom knob).
2. Rotate the knob clockwise to set colder.
3. Rotate the knob anti-clockwise to set less cold.
3) While holding down the
clock button, press the
fridge button to advance the
minutes. (Hold the fridge
button down for continuous
and fast advance).
4) When the correct time is displayed, release the clock
button.
Turning the clock on and off
If the display is in clock mode, press the clock button once
to activate the display. then press the clock button once
to turn the clock off. The display will return to clock mode
30 seconds after the last button press or the closing of the
refrigerator door. (However the display will be blank because
the clock is OFF).
To turn the clock back on, press the clock button once while
the display is in clock mode..
Note: the time still advances while the display is off.
• Adjusting the freezer temperature – top mount freezer
(TM) model
1. Select the freezer control (top knob).
2. Rotate the knob clockwise to set colder.
3. Rotate the knob anti-clockwise to set less cold.
electrolux refrigeration how to use the features of your appliance 9
How to use the features of your
appliance
• Adjusting the refrigerator temperature – bottom
mount freezer (BM) model
1. Select the refrigerator control (top knob).
2. Rotate the knob clockwise to set colder.
3. Rotate the knob anti-clockwise to set less cold.
• Adjusting the freezer temperature – bottom mount
freezer (BM) model
1. Select the freezer control (bottom knob).
2. Rotate the knob clockwise to set colder.
3. Rotate the knob anti-clockwise to set less cold.
This section tells you how to make the most of the
refrigerator’s many useful features and how to clean them.
DOOR STORAGE BINS
Both the refrigerator and freezer have door storage bins.
You can adjust the refrigerator bins to meet different
storage needs. All the door bins are completely removable
for cleaning. If you want to remove or adjust a bin, lift it
over the support lugs on the inner door panel. Push the bin
down over the support lugs to lock it in place.
DAIRYCOMPARTMENT (WHERE FITTED)
You can use the Dairy Compartment to store foods such
as butter, margarine and cheese. The Dairy Compartment
is slightly warmer than the rest of the refrigerator
compartment.
CONVERTABIN
You can use the Converta Bin to store vegetables, fruit or
small goods. You can change the humidity inside the bin by
adjusting a humidity slide control.
STORING VEGETABLES
You should store vegetables in the Converta Bin
remembering to set the humidity
slide control to the vegetable
indicator.
STORING FRUIT AND
SMALLGOODS
You can also store fruit in the
Converta Bin remembering to set
the humidity control to the fruit
indicator.
CONVERTABIN AND SHELF
REMOVAL
• Remove Converta Bin(s) by
pulling forward, then up and further
forward.
• Remove the glass (if fitted) by
pushing up from the underside.
Handle the glass with care.
• Lift the catches on the underside
of the shelf and pull the shelf
forward.
10 how to use the features of your appliance electrolux refrigeration
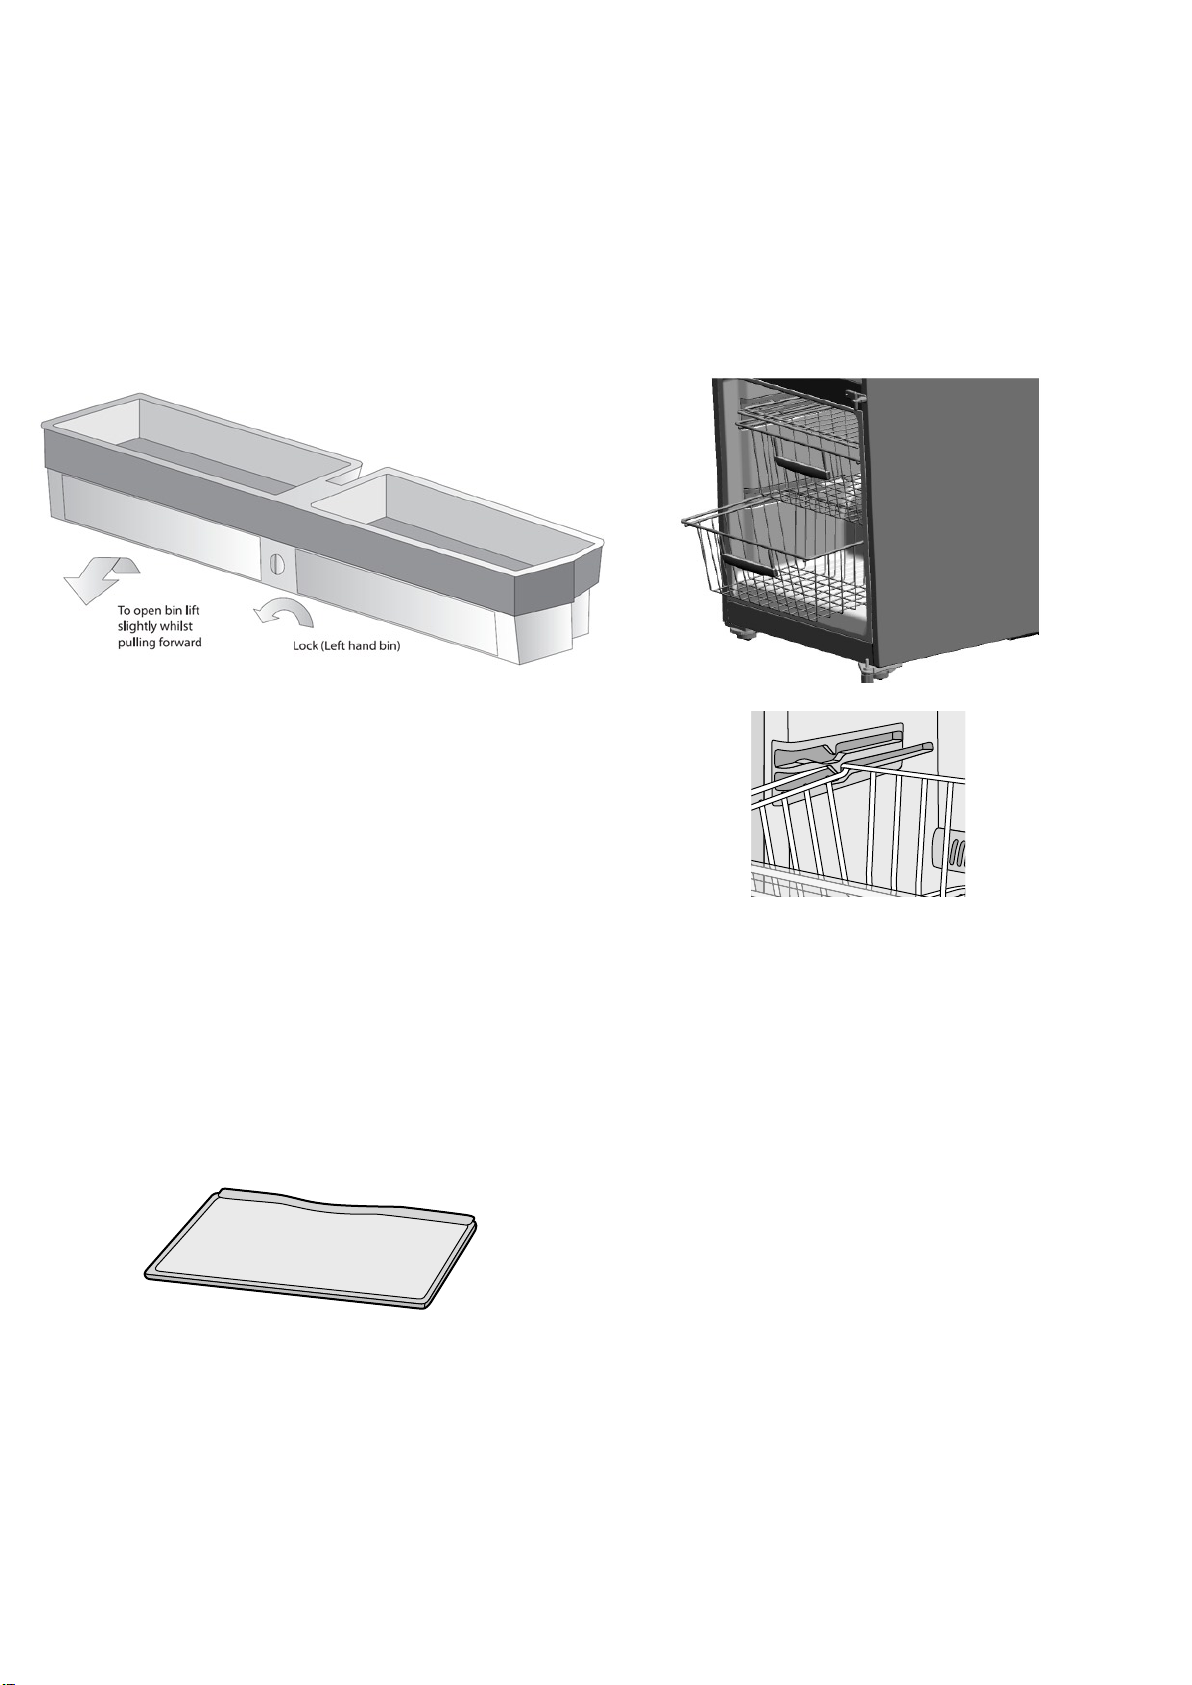
STORE SAFE BIN(S) (WHERE FITTED)
These bins are designed for the storage of items such as
cosmetics and medicines and slide out for easy access.
The left hand bin has a lock that is operated by turning
the knob located on the fixed area between the bins. This
may be turned with a coin.
Do not store solvents or flammable materials such
as nail polish remover or lighter fluid inside your
refrigerator. They will affect the life of the plastic
components and may taint stored food.
FREEZER BASKETS (WHERE FITTED)
Freezer Baskets and a Freezer Shelf are fitted to bottom
freezer refrigerators.
Wire baskets areused to provide easy visibility of the
contents. Both the baskets and the shelf pull out for
easyaccess and have a stop to prevent the basket and
shelf being pulled out too far.
To remove the basket or shelf pull it out until it hits
thestop then lift the front to unhook the stop while
continuingto pull forward.
REMOVALOF THE STORE SAFE BIN
You can remove the Store Safe Bin(s) for cleaning.
Remove the bin by simply pulling past the stop in the
runners, you need to lift the bin while pulling it forward.
Note: A small amount of force is required to overcome
the front stop.
THE DELI BIN (WHERE FITTED)
You can use the Deli Bin to store foods such as small
goods, fresh or cooked meat and cheese.You can also
use it as an additional crisper. The bin will prevent
strong food odours or smellsgoing into the rest of the
refrigerator.To remove the Deli Bin, pull it forward, then lift
it up and pull it further forward.
SPILL SAFE GLASS SHELVES (where fitted)
Spill safe glass shelves keep spills on the shelf. A shelf
retaining system minimizes accidental movement of
shelves. The shelves can be adjusted to many different
heights. Spill safe glass shelves are not to be used as
slide out shelves.
WIRE SHELVES (WHERE FITTED)
To remove these shelves from the cabinet, lift the rear of
the shelf and pull forward.
WINE RACK (WHERE FITTED)The wine rack can be used
to store various types of bottles such as wine or beer.
Bottlesshould be stored with the bottom end towards the
back of the refrigerator. If you want toremove the wine
rack or change its position, lift the rear of the rack and
pull forward.
Care and maintenance
electrolux refrigeration care and maintenance 11
Changing the light bulb
•Refrigerator Light
1. Switch off the power at the power point and
remove the refrigerator’s electric cord fromthe
power point.
2. Carefully unclip the light cover. You do this by
pulling the light cover tab at the reartowards the
front of the cabinet.
3. Unscrew the light bulb and replace it with a bulb
that is the same as the original (25 watts)
4. Replace the light cover by hooking the light cover
lugs into the front of the housing and pressing the
rear of the cover up until it clips in.
5. Wait 5 minutes to ensure pressures in the
refrigeration system are equalized. Then turn the
refrigerator on at the power point.
• Freezer light (where fitted)
1. Switch off the power at the power point and
remove the refrigerator’s power cord from the
power point.
2. Carefully unclip the light cover. You do this by
pulling the light cover tab at the rear towards the
front of the cabinet.
Top freezer model
(electronic models only)
3. Unscrew the light bulb and replace it with a bulb
that is the same as the original.
4. Replace the light cover by hooking the light cover
lugs into the front of the housing and pressing the
rear of the cover up until it clips in.
5. Wait 5 minutes to ensure pressures in the
refrigeration system are equalized. Then reconnect
and turn the refrigerator on at the power point.
12 care and maintenance/general information electrolux refrigeration
warning
caution
caution
warning
General information
Cleaning the appliance
It is important to use your appliance safely. This means
you need to supervise young children and infirm persons
BEFORE CLEANING: Turn appliance off at the power
point, then remove power cord from socket. This will
make sure there is no chance of getting an electric
shock.
• Doors and exterior – white
You should only clean the doors with luke-warm
soapy water and a soft cloth, rinsing with clean water
and then wipe the surface with clean water and a soft
clean cloth to remove soap residue.
• Doors and exterior – stainless steel
Your stainless steel appliance is manufactured from
a mark resistant stainless steel. This stainless steel
has a special advanced protective coating that eases
the removal of marks such as finger prints and water
spots. To keep your stainless steel appliance looking
at its best, you should clean it regularly. You should
only clean the stainless steel doors with luke-warm
soapy water and a soft cloth, rinsing with clean water
and then wipe the surface with clean water and a soft
clean cloth to remove soap residue.
It is important to wipe in the direction of the grain
of the stainless steel to avoid undue marking of the
surface.
Do not use stainless steel cleaners, abrasive pads or
other cleaners as they are likely to scratch the surface.
Damage to this product after delivery is not covered by
your warranty
when they use it. You need to make sure that young
children do not play with the appliance. Follow the tips
below.
always do this
Check the power point is properly grounded - if you
are not sure get an electrician to check it.
Switch off the appliance at the power point before
you clean or move it.
If the supply cord is damaged you should have it
replaced by the manufacturer, it’s service agent or
similarly qualified person. This will prevent a safety
hazard.
never do this
Never let children play with the appliance.
Never store spray cans, explosive liquids or
flammable liquids in the refrigerator.
Never store fizzy drinks in the freezer compartment.
Never lick icy foods when they first come out of the
freezer. This can freeze burn your lips and mouth.
Never try to repair the appliance yourself.
Never use electric heaters or dryers to defrost the
freezer because you can receive an electric shock.
Never use electrical appliances inside the food
storage areas.
This appliance contains insulation formed with
flammable blowing gases. For safety reasons, take
care when you dispose of it.
Do not damage the appliance circuit.
• Interior
You should clean the appliance interior regularly.
It will be easiest to clean when the food supply
is low. Wash the interior with a soft cloth and use
an unscented mild soap with luke-warm water.
Thoroughly dry all surfaces and removable parts.
Avoid getting water on appliance controls. If you have
taken out any removable parts, replace them and
switch the power on before re-stocking the appliance
with food. Naturally, you should keep the interior of
your appliance hygienic by promptly and thoroughly
wiping up any food spills.
• Door seals
Take care to keep door seals clean. Sticky food and
drink can cause seals to stick to the cabinet and
tear when you open the door. Wash seal with a mild
detergent and warm water. Rinse thoroughly and dry.
Never use hot water, solvents, commercial kitchen
cleaners, aerosol cleaners, metal polishes, caustic or
abrasive cleaners, or scourers to clean this appliance, as
they will damage it. Many commercially available cleaning
products and detergents contain solvents that will
damage your refrigerator. When cleaning, use only a soft
cloth with an unscented mild soap and luke warm water.
When you dispose of your old refrigerator or freezer,
remove any doors. Children can suffocate if they get
trapped inside.
Switching off your appliance
If the appliance needs to be switched off for an extended
period, the following steps should be taken to reduce the
symptoms of mould:
1. Remove all food.
2. Remove the power plug from the power point.
3. Clean and dry the interior thoroughly.
4. Ensure that all the doors are wedged open slightly for
air circulation.
Safety

Troubleshooting
electrolux refrigeration troubleshooting 13
If you think something may be wrong with your
refrigerator, you can carry out some easy checks before
calling for service. You may locate the problem, sparing
yourself from inconvenience and saving time and money.
problem solution
When your appliance
is not operating
When there is
refrigerator/freezer
noise
If there are odours
inside the appliance
• Check that the power cord is plugged
into the power outlet properly and that
the outlet is switched ‘ON’.
• Try running another appliance from the
power outlet. If no power is coming from
the outlet you may have blown a fuse
or tripped a circuit of your household
power supply.
• Try adjusting the temperature control to
a slightly “colder” position.
• It is normal for the freezer fan NOT to
operate during the automatic defrost
cycle, or for a short time after the
appliance is switched on.
Modern refrigerators/freezers with
increased storage capacity use high
speed compressors. These can provide
a seemingly high level of sound which is
quite normal. Normal operational sounds
include:
• Occasional gurgling, similar to water
boiling.
• Air flow noise (air circulates because of
a small fan).
• A popping noise heard during automatic
defrost.
• A clicking noise heard just before
the compressor starts (this is merely
the automatic switching action of
the temperature control, turning the
compressor on or off).
Other strange sounds may mean that
you need to check and take action. For
example, noises may mean that:
• The cabinet is not level.
• The floor is uneven or weak.
• Bottles are badly placed and rattling.
• There are vibrations from an object
on top of or behind or beside the
refrigerator.
• The back of the refrigerator cabinet is
touching the wall.
Remember it is quite normal for noise
to seem louder just after the refrigerator
starts operating.
• The interior may need cleaning.
• Some foods produce odours.
• Some containers and wrapping can
cause odours.
• Ask yourself if the odour started about
the same time you started storing
something unusual.
When the motor
seems to run more
than expected
If the temperature in
the refrigerator is too
warm
If the temperature
in the refrigerator is
too cold
If heavy frosting
occurs in the freezer
If water drips on the
floor
Your new appliance provides you with
large capacities in both the refrigerator
section and the separate freezer. It is
normal for the motor to operate frequently.
However, to keep operation to a minimum,
check the following:
• Are doors kept open too long or too
often?
• Are controls set too cold? Refer to page
6 “Controlling temperature”.
• Have large amounts of warm food just
recently been stored? Summer, festive
seasons and holidays usually mean a lot
more work for your appliance.
• If the day is hot or the room is very
warm, the appliance will need to run
more than normal.
• The appliance will run more than normal
just after you install it or when it has
been turned off for a long time.
• Check that the appliance has enough
clearance at the sides, back and top.
Refer to page 2 “Installing your new
appliance”.
• Refer to page 6 “Controlling
temperature”.
• You may have kept the door open too
long or too frequently.
• Food containers or packaging may be
holding a door open.
• Refer to page 6 “Controlling
temperature”.
• Increase the temperature to avoid high
energy consumption.
Make sure you fully close the freezer and
fridge doors. If the doors are left partly
open a heavy frost will coat the inside of
the freezer. If a frost develops, remove it.
Take care to properly close the doors and
the frost will not reoccur.
The defrost water tray, (located on the
compressor at the back of the cabinet),
may not be properly positioned, or the
drain tube may not be properly positioned
to direct water into this tray. You may need
to pull the refrigerator away from the wall
to check the tray and tube.
If you still require service
If you have a problem, and the problem persists after
you have made the checks mentioned above, contact
your nearest approved Service Centre or the dealer you
bought the refrigerator from. Be ready to quote the model
number, 9-digit PNC and 8-digit serial number, which is
stated on the label inside the refrigerator compartment.
14 specifications electrolux refrigeration
MODEL GROUP
ITEM
HEIGHT 172.0 172.0
DIMENSIONS (cm)
POWER SUPPLY VOLTAGE AND
FREQUENCY
TOTAL POWER ABSORBED (W)
*AVERAGE DAILY UNITS ELECTRICITY (kWh) 1.07 1.19
GROSS CAPACITY (litres)
STORAGE CAPACITY (litres)
*This figure is based on standard test results in accordance with European Standard EN 153. Actual
consumption will depend on how the appliance is used and where it is located.
This appliance complies with E.E.C Directive No. 87/308 of 2-6-87 relative to radio interference
suppression
This appliance complies the following E.E.C Directives:
WIDTH 80.2 80.2
DEPTH 74.3 74.3
FRIDGE 395.7 348.7
FREEZER 121.4 156.3
FRIDGE 377.3 330.6
FREEZER 98.4 132.7
Top Freezer
Model
220-240v 50Hz
Bottom Freezer
Model
- 73/23 EEC of 19.2.73 (Low Voltage Directive) and subsequent modifications;
- 89/336 EEC of 3-5-89 (Electromagnetic Compatibility Directive) and subsequent modifications
The symbol on the product or on its packaging indicates that this product may not be treated as household waste.
Instead it shall be handed over to the applicable collection point for the recycling of electrical and electronic equipment.
By ensuring this product is disposed of correctly, you will help prevent potential negative consequences for the
environment and human health, which could otherwise be caused by inappropriate waste handling of this product. For
more detailed information about recycling of this product, please contact your local city office, your household waste
disposal service or the shop where you purchased the product.
MODE D’EMPLOI
LA RÉFRIGÉRATION
SANS GIVRE
FRE
ii Table des matières
15
14
13
12
11
10
9
8
7
16
17
Modèle avec congélateur dans la partie supérieure
1 Bacs du congélateur
2 Double compartiment pour produits
laitiers
1
3 Bac de stockage sécurisé (lorsqu’il en
est équipé)
4 Bacs de porte modulables
5 Sorties d’air à débit multiple
2
6 Casiers à bouteilles
7 Bac(s) à légumes
3
8 Eclairage partiel (lorsqu’il en est équipé)
9 Porte-bouteilles (lorsqu’il en est équipé)
4
10 Bac à charcuterie (lorsqu’il en est équipé)
11 Lumière du compartiment à aliments
5
12 Refroidissement par rideau d’air
13 Retours d’air du congélateur
14 Couvercle du compartiment à glaçons et
bac de rangement
15 Lumière du congélateur (lorsqu’il en est
équipé)
6
16 Sorties d’air du congélateur
17 Capteur de température du congélateur
17
16
15
14
13
12
11
10
9
8
Modèle avec congélateur dans la partie inférieure
1
2
3
1 Double compartiment pour produits
2 Bac de stockage sécurisé (lorsqu’il en est
3 Bacs de porte modulables
4 Sorties d’air à débit multiple
4
5 Casiers à bouteilles
6 Sorties d’air du congélateur
7 Couvercle du compartiment à glaçons et
8 Paniers du congélateur
9 Retours d’air du congélateur
5
10 Clayette supérieure du congélateur
11 Bac(s) à légumes
12 Eclairage partiel (lorsqu’il en est équipé)
6
13 Porte-bouteilles (lorsqu’il en est équipé)
14 Bac à charcuterie (lorsqu’il en est équipé)
7
15 Manual Control (where fitted)
16 Air Curtain Cooling
17 Lumière du compartiment à aliments
laitiers
équipé)
bac de rangement
Remarque : les illustrations de produits servent à expliquer les diverses fonctions mais ne
correspondent pas forcément exactement aux produits actuels.
Réfrigération, table des matières i
Conseil pour l’environnement
Félicitations
Avant d’utiliser cet appareil, nous vous recommandons de
lire entièrement le manuel de l’utilisateur qui fournit une
description du produit et de ses fonctions.
An d’éviter les risques inhérents à l’utilisation d’un
appareil électrique, il est important que le réfrigérateur soit
installé correctement et que vous preniez connaissance
des instructions de sécurité an d’éviter une mauvaise
utilisation et écarter les dangers.
Nous vous conseillons de conserver ce manuel pour une
consultation ultérieure et nous vous recommandons de
le remettre aux futurs propriétaires en cas de cession de
l’appareil.
Une fois l’appareil déballé, veuillez vérier qu’il ne soit
pas endommagé. En cas de doute, ne l’utilisez pas et
contactez votre centre de services Electrolux le plus
proche.
Table des matières
• Consignes importantes concernant la sécurité 4
• Installation de votre nouvel appareil 5
• Première mise en marche 6
• Commandes à afchage électronique –
modèles électroniques uniquement 6
• Contrôle de la température 6
• Comment utiliser les fonctions de votre appareil 9
• Entretien et maintenance 11
• Informations générales 12
• Localisation des pannes 13
• Spécications 14
Informations concernant la mise au rebut
• La majorité des matériaux d’emballage sont
recyclables. Veuillez les déposer au centre de recyclage
local ou les placer dans les bacs à ordure appropriés.
• Si vous souhaitez jeter ce produit, veuillez contacter les
autorités locales pour connaître la procédure à suivre.
Avertissement
Attention
Conseils et informations
Conseil pour l’environnement
Avertissement
4 Consignes importantes concernant la sécurité
Avertissement
Avertissement
Consignes importantes concernant la
sécurité
Veuillez lire attentivement ce mode d’emploi et
conservez-le à portée de main pour une consultation
ultérieure.
Les symboles utilisés dans ce livret ont les signications
suivantes :
Ce symbole est associé à une information concernant
votre propre sécurité
Ce symbole est associé à une information permettant
d’éviter d’endommager l’appareil
Ce symbole est associé aux conseils et informations
concernant l’utilisation de l’appareil
Ce symbole est associé aux conseils et informations
concernant une utilisation économique et écologique
de l’appareil
Les signications des symboles utilisés dans ce manuel
sont indiquées ci-dessous :
Ce symbole indique de ne jamais faire cela
Cet appareil doit être branché seul (sans prise
multiple) dans une prise électrique de 220-240 V, 50
Hz CA.
Il doit être possible de débrancher l’appareil de
l’alimentation générale ; par conséquent la prise doit
être facilement accessible après installation.
Veillez à ce que la prise électrique soit correctement
mise à la terre. Faites appel à un électricien
professionnel en cas de doute.
N’utilisez pas de rallonge ni d’adaptateur.
Si le cordon d’alimentation est endommagé, celui-ci
doit être remplacé par un technicien de maintenance
ou une personne qualiée.
Débranchez l’appareil avant de le nettoyer et avant
de changer l’ampoule an d’éviter les risques
d’électrocution.
Ne débranchez jamais l’appareil en tirant sur le
cordon d’alimentation. Saisissez toujours fermement
la prise et tirez droit pour ne pas endommager le
cordon d’alimentation.
Choisissez un endroit qui ne soit pas trop froid ; la
température doit être supérieure à 10 °C.
Mettez l’appareil dans un endroit sec en évitant les
zones humides.
Ne mettez pas l’appareil dans un endroit non protégé
ou exposé aux gelées comme un garage ou une
véranda.
Ne placez pas l’appareil à la lumière directe du soleil.
Ne placez pas l’appareil à proximité de cuisinières,
cheminées ou chauffage.
Ce symbole indique de toujours faire cela
• Si des aérosols pressurisés comportent
le terme “inammable” et/ou le symbole
d’une petite amme, ne les stockez pas
au réfrigérateur ni au congélateur.
Cela pourrait provoquer une explosion.
• Lors de la mise au rebut de vos anciens
réfrigérateurs et congélateurs, retirez les portes.
Il existe un risque de suffocation si des enfants se
retrouvent coincés à l’intérieur.
• Cet appareil renferme une isolation formée par
des gaz inammables. Evitez tout danger pour la
sécurité en respectant les consignes d’élimination
de ce produit.
Une fois bien installé l’appareil doit :
• disposer d’un espace sufsant à l’arrière et sur les
côtés pour la circulation de l’air (se reporter à la
page 5).
• être aligné avec les placards environnants.
• avoir les portes qui se referment automatiquement
depuis une position partiellement ouverte.
• Mettez les pieds stabilisateurs en place (voir le
schéma page 5) pour éviter que l’appareil ne tombe
en avant lorsque la porte très chargée est ouverte.
5 Installation de votre nouvel appareil
Attention
Espace vide
recommandé
PORTE DE
L’ARMOIRE
Pieds avant
réglables roulants
Pieds arrières
fixes
A
ligné sur les
placards,
c’est à dire
que l’espace
doit être régulier
Le haut du
réfrigérateur
est de niveau,
c’est à dire
horizontal
Ajustez les pieds
roulants avant en
cas d’irrégularité
du sol, par ex.
remontez ou
abaissez ce pied
Pied stabilisateur
remonté
Grand écrou
en plastique
Dispositif de blocage
Pied stabilisateur
étendu
Installation de votre nouvel appareil
Espace autour de votre appareil
Si vous ne disposez pas d’un placard avec un espace à
l’arrière, l’espace recommandé en haut augmente de 50
mm à 90 mm (x) et de 32 mm à 72 mm (y).
Lorsqu’il est placé dans un coin, un espace d’au moins
350 mm (400 mm pour les modèles de la ligne E) du côté
des charnières permettra d’ouvrir sufsamment la porte
pour retirer les bacs et les clayettes.
Remarque :
Les portes sont conçues pour être quelque peu
éloignées du meuble (pas exactement au même niveau).
Installation de votre appareil
L’appareil doit arriver avec les pieds avant réglables
roulants étendus an de surélever l’avant de l’appareil de
10 à 15 mm.
4. Vériez que l’appareil soit bien aligné avec les placards
environnants. Le haut de l’appareil doit être de niveau
(voir schéma ci-dessous). Si vous devez ajuster
le niveau, utilisez les pieds roulants ajustables tel
qu’expliqué à l’étape 3.
5. Si l’appareil bascule d’avant en arrière, cela signie
que le sol n’est pas plat ; le cas échéant, placez une
cale sous l’un des pieds roulants arrière. Vous pouvez
utiliser un petit morceau de matériau solide comme un
feuillet de bois, un morceau de tapis vinylique ou de
contre-plaqué. Placez la cale de sorte à ce qu’elle se
positionne sous l’un des pieds lorsque l’appareil est
remis en place.
6. Sur certains sols, il se peut que l’appareil avance
pendant le fonctionnement. Le cas échéant, un
dispositif de blocage de pied roulant peut être placé
sous les pieds avant.
Le pied stabilisateur doit également être entièrement
remonté an de ne pas gêner le fonctionnement des pieds
roulants (voir le schéma de l’étape 3).
Les pieds roulants ont été conçus pour des mouvements
en avant ou en arrière uniquement. Ils ne pivotent pas. Le
déplacement latéral de l’appareil pourrait endommager le
sol et les pieds roulants.
1. Faites rouler l’appareil jusqu’à sa position nale.
2. Le haut de l’appareil doit être incliné vers l’arrière de
3. Si l’appareil n’est pas incliné vers l’arrière, vous pouvez
10 à 15 mm environ (voir schéma ci-dessus). Cela
permet une fermeture automatique et hermétique des
portes.
régler les deux pieds roulants avant en tournant le
grand écrou en plastique (voir schéma ci-dessous).
Cela augmentera la hauteur des pieds roulants. Un
tour d’écrou inclinera l’appareil vers l’arrière d’environ
10 mm. Si vous éprouvez des difcultés à tourner
l’écrou, vous pouvez demander à quelqu’un de
maintenir l’appareil incliné vers l’arrière an de vous
permettre un meilleur accès. Alternativement, vous
pouvez accéder aux pieds roulants latéralement, en
utilisant un tournevis plat pour vous aider à tourner
l’écrou (voir schéma ci-dessous).
7. Vous devrez peut être parfaire l’installation en
reprenant les étapes 3, 4 et 5.
8. Une fois l’appareil dans sa position nale, abaissez
le pied stabilisateur jusqu’à ce qu’il touche le sol.
Lorsque vous devez déplacer l’appareil, assurez-vous
de remonter le pied an qu’il puisse rouler librement.
9. Nettoyez minutieusement votre appareil en suivant
les instructions de la page 10 et essuyez la poussière
accumulée pendant le transport.
10. Branchez l’appareil. N’utilisez pas de prise multiple.
11. Nous vous recommandons de laisser fonctionner
l’appareil pendant deux à trois heures avant de placer
la nourriture. Cela vous permettra de vérier qu’il
fonctionne correctement.
Félicitations ! Vous avez réussi l’installation de votre
nouvel appareil.
6 Première mise en marche/commandes à af chage électronique – modèles électroniques
L’appareil évacue la chaleur des aliments qu’il contient
vers l’extérieur. En raison de ce processus, lors de la
première mise en marche, l’arrière, les côtés et la zone
près de la porte dégagent de la chaleur. Cela est normal.
Un serpentin de refroidissement se trouve derrière la paroi
arrière de la carrosserie. Le serpentin sert à refroidir et à
retirer l’humidité de l’air. Un ventilateur fait alors circuler
de l’air froid et sec dans le réfrigérateur. La circulation
de l’air signi e que les aliments sont réfrigérés bien plus
rapidement que dans les appareils où l’air ne circule pas.
Evitez de placer des aliments contre les sorties d’air car
cela entraverait la circulation de l’air (voir les schémas
sur la couverture interne). Un léger givre apparaîtra
occasionnellement à l’intérieur du réfrigérateur lorsque la
porte est fréquemment ouverte. Ce phénomène est normal
et disparaîtra en quelques jours dans la plupart des climats.
Assurez-vous de bien refermer la porte du congélateur
après avoir ajouté ou retiré des aliments. Si la porte est
partiellement ouverte, un givre épais recouvrira l’intérieur
du congélateur. Faites attention à bien refermer la porte et
vous éviterez toute nouvelle formation de givre.
Votre appareil utilise un compresseur haute pression et
d’autres composants à faible consommation d’énergie
susceptibles de produire un bruit différent de celui de votre
ancien appareil.
Ces sons sont normaux et incluent :
• Le bruit de fonctionnement du compresseur.
• Le bruit du mouvement de l’air produit par le moteur du
petit ventilateur.
• Des gargouillements occasionnels, évoquant de l’eau qui
bout.
• Des bruits secs, émis lors du dégivrage automatique.
• Un cliquetis, émis juste avant la mise en marche du
compresseur.
Vous trouverez de plus amples détails en page 11.
Conseils et informations
• En ce qui concerne un réfrigérateur avec congélateur
dans la partie supérieure (lorsque le congélateur est
au-dessus du compartiment pour produits frais) :
Ne placez pas d’aliments dépassant des nervures
en bas du congélateur, cela empêcherait de fermer
la porte. Assurez-vous que les aliments sont stockés
derrière les nervures.
• En ce qui concerne un réfrigérateur avec congélateur
dans la partie inférieure :
Veillez à ce que les paniers et les clayettes du
congélateur soient poussés à fond a n qu’ils
n’empêchent pas la fermeture de la porte.
Le panneau d’af chage
électronique se compose
d’un af chage LCD
avec un rétroéclairage
bleu et de sept boutons
poussoirs. Lors de
la première mise en
marche, les réglages par défaut s’af cheront, avec le
rétroéclairage bleu allumé. Si aucun bouton n’a été activé et
si la porte est fermée, le rétroéclairage s’éteindra au bout de
30 secondes.
Contrôle de la température
La température par défaut du réfrigérateur est de 3 °C et
de –18 °C pour le congélateur. Si vous souhaitez modi er
les températures, suivez les instructions ci-dessous. Vous
ne devriez réaliser que de petits ajustements et attendre 24
heures pour voir si d’autres modi cations sont nécessaires.
Remarque :
Lorsque vous réglez une température, il s’agit d’une
température moyenne pour tout l’appareil. Les températures
des différents compartiments peuvent varier, en fonction de
la quantité de nourriture stockée et de la manière dont elle
est rangée. Une température ambiante faible ou élevée peut
également affecter la température à l’intérieur de l’appareil.
Changement de la température du congélateur
Appuyez sur le bouton du congélateur a n de réduire la
température par pas
de 1 °C. Une fois la
température de – 23
°C atteinte, l’af chage
repassera à – 14 °C
lorsque la touche est
de nouveau activée.
Le graphique à barres
diminue pour les réglages de congélateur les plus froids.
Changement de la température du réfrigérateur
Appuyez sur le bouton du réfrigérateur a n de réduire la
température par pas
de 1 °C. Une fois la
température de 0 °C
atteinte, l’af chage
repassera à 7 °C lorsque
la touche est de nouveau
activée. Le graphique à
barres diminue pour les
réglages les plus froids.
Fonction de surgélation (quick freeze)
Utilisez la fonction de surgélation lorsque vous ajoutez
une grande quantité
de nourriture dans le
congélateur. Cette
fonction congèle
rapidement la nourriture
mais n’affecte pas
la température du
réfrigérateur.
Pour l’utiliser, appuyez
une fois sur la touche de surgélation. Une icône animée
s’allume. La fonction de surgélation dure 90 minutes. Si
vous souhaitez l’inactiver avant la n des 90 minutes,
appuyez de nouveau sur la touche de surgélation. L’icône
disparaîtra et le congélateur reprendra un fonctionnement
normal.
Première mise en marche Commandes à af chage électronique
Nervures
Commandes à afchage électronique – modèles électroniques 7
Alarme de température du congélateur
Si l’alarme sonne sans
raison apparente, vériez
que rien n’entrave la
fermeture de la porte.
Si le congélateur se
réchauffe trop parce que
la porte est restée ouverte
ou parce que des aliments
chauds ont été placés trop près du capteur de température
du congélateur (voir les schémas de la couverture intérieure
pour l’emplacement du capteur), un buzzer retentira, l’icône
au-dessus de la touche de réinitialisation de l’alarme, le
réglage de température du congélateur et le graphique à
barres clignoteront jusqu’à ce que la touche de réinitialisation
de l’alarme soit enfoncée. Une fois cette touche activée,
l’icône de désactivation de l’alarme, à côté de la touche de
réinitialisation de l’alarme, s’éclairera pendant 50 minutes, ou
jusqu’à ce que la température atteigne un niveau acceptable.
Assurez-vous que rien n’empêche la fermeture de la porte et
éloignez tous les aliments chauds du capteur de température
(voir les schémas sur la couverture intérieure pour
l’emplacement du capteur). Si le congélateur est toujours trop
chaud au bout de 50 minutes, l’alarme retentira de nouveau,
indiquant un problème éventuel de l’appareil.
Remarque :
L’alarme de température du congélateur peut être réinitialisée
pendant 12 heures en appuyant continuellement sur la touche
de réinitialisation de l’alarme pendant 10 secondes.
Alarme de la porte
Si la porte du réfrigérateur
reste ouverte pendant
plus de 2 minutes, un
buzzer retentira et une
icône au-dessus de la
touche de réinitialisation
de l’alarme clignotera. Les
réglages de température
du réfrigérateur et le
graphique à barres clignoteront également.
Si vous souhaitez laisser la porte ouverte pendant le
chargement du réfrigérateur, vous pouvez inactiver
l’alarme pendant 8 minutes en appuyant sur la touche de
réinitialisation de l’alarme.
Minuterie de refroidissement de boissons
Pour utiliser la minuterie,
appuyez une fois sur la
touche de refroidissement
de boissons pour
sélectionner une limite de
10 minutes, deux fois pour
20 minutes et trois fois
pour 30 minutes. Appuyez
quatre fois pour inactiver la minuterie.
Si vous activez la minuterie de refroidissement de boissons,
une alarme retentira pour vous rappeler que vous avez placé
des boissons dans le congélateur pour un refroidissement
rapide. Une icône animée apparaît à côté de la touche de
refroidissement de boissons avec un chronomètre. Celui-ci
compte par pas de 1 minute ; vous pouvez modier la durée
ou inactiver la minuterie même lorsque le compte à rebours
a été lancé. Une fois le temps écoulé, un buzzer retentira et
l’icône à côté de l’alarme clignotera jusqu’à ce que la touche
de réinitialisation de l’alarme soit enfoncée.
Pour arrêter l’alarme et inactiver la minuterie de
refroidissement de boissons, appuyez sur la touche de
réinitialisation de l’alarme. Si votre boisson est assez fraîche,
sortez-la du congélateur. Si elle n’est pas assez froide,
réinitialisez la fonction de refroidissement de boissons (sans
oublier que la boisson est déjà partiellement refroidie).
Mode vacances
Si vous pensez partir
pendant une certaine
période et vous souhaitez
proter de l’efcacité
énergétique maximale de
votre appareil, alors, juste
avant de partir, appuyez
une fois sur la touche mode
vacances (holiday mode) et l’appareil passera dans ce mode,
tel qu’indiqué par le symbole avec le soleil et le parasol.
Le mode vacances fonctionnera jusqu’à ce que la touche soit
activée ou la porte du réfrigérateur ouverte.
Remarque :
L’ouverture de la porte du congélateur n’affecte pas le
mode vacances.
Réglage de l’horloge
Si aucune touche n’a été enfoncée et si la porte du
réfrigérateur est fermée, le rétroéclairage s’éteindra au
bout de 30 secondes. L’afchage passera en mode
horloge. Lorsque l’afchage est en mode horloge, vous
pouvez visualiser les réglages du réfrigérateur en appuyant
une fois sur la touche du congélateur, de l’horloge ou
du réfrigérateur. Cela active tout l’afchage. Cependant,
l’afchage repassera en mode horloge 30 secondes après
avoir appuyé sur la dernière touche ou après avoir fermé la
porte du réfrigérateur.
1) Si l’afchage est en mode
horloge, appuyez une fois
sur la touche de l’horloge
pour l’activer, puis maintenez
enfoncée la touche horloge
pendant deux secondes ;
les heures et les minutes
apparaîtront alors sur
l’afchage.
2) Tout en maintenant
la touche de l’horloge
enfoncée, appuyez sur la
touche du congélateur pour
faire avancer les heures.
(Maintenez la touche du
congélateur enfoncée pour
une avance rapide et en continu).
Les 12 premières heures écoulées,
l’indicateur PM apparaîtra.
3) Tout en maintenant
la touche de l’horloge
enfoncée, appuyez sur la
touche du réfrigérateur pour
faire avancer les minutes.
(Maintenez la touche du
réfrigérateur enfoncée pour
une avance rapide et en continu).
4) Une fois l’heure exacte afchée, relâchez la touche de
l’horloge.
Activer et inactiver l’horloge
Si l’afchage est en mode horloge, appuyez une fois
sur la touche de l’horloge pour activer l’afchage, puis
appuyez une fois sur la touche de l’horloge pour inactiver
cette dernière. L’afchage repassera en mode horloge 30
secondes après avoir appuyé sur la dernière touche ou
après avoir fermé la porte du réfrigérateur. (Cependant
l’afchage sera vierge car l’horloge est inactivée).
Pour réactiver l’horloge, appuyez une fois sur la touche de
l’horloge lorsque l’afchage est en mode horloge.
Remarque : le temps continue à avancer lorsque l’afchage
est inactivé.
 Loading...