

Page 1

user manual
manual de instruções
Fridge-Freezer
Combinado
END42405W
Page 2

2 electrolux
Electrolux. Thinking of you.
Share more of our thinking at www.electrolux.com
Contents
Safety information 2
Control panel 4
First use 5
Daily use 5
Helpful hints and tips 6
How to use the water dispenser with BRITA
MAXTRA filter cartridge 7
Subject to change without notice
Care and cleaning 13
What to do if… 14
Technical data 16
Installation 16
Environmental concerns 19
Safety information
In the interest of your safety and to ensure
the correct use, before installing and first using the appliance, read this user manual
carefully, including its hints and warnings. To
avoid unnecessary mistakes and accidents,
it is important to ensure that all people using
the appliance are thoroughly familiar with its
operation and safety features. Save these instructions and make sure that they remain
with the appliance if it is moved or sold, so
that everyone using it through its life will be
properly informed on appliance use and safety.
For the safety of life and property keep the
precautions of these user's instructions as
the manufacturer is not responsible for damages caused by omission.
Children and vulnerable people safety
• This appliance is not intended for use by
persons (including children) with reduced
physical, sensory or mental capabilities, or
lack of experience and knowledge, unless
they have been given supervision or instruction concerning use of the appliance
by a person responsible for their safety.
Children should be supervised to ensure
that they do not play with the appliance.
• Keep all packaging well away from children. There is risk of suffocation.
• If you are discarding the appliance pull the
plug out of the socket, cut the connection
cable (as close to the appliance as you
can) and remove the door to prevent playing children to suffer electric shock or to
close themselves into it.
• If this appliance featuring magnetic door
seals is to replace an older appliance having a spring lock (latch) on the door or lid,
be sure to make that spring lock unusable
before you discard the old appliance. This
will prevent it from becoming a death trap
for a child.
General safety
Caution! Keep ventilation openings
clear of obstruction.
• The appliance is intended for keeping
foodstuff and/or beverages in a normal
household as explained in this instruction
booklet.
• Do not use a mechanical device or any artificial means to speed up the thawing
process.
• Do not use other electrical appliances
(such as ice cream makers) inside of refrigerating appliances, unless they are approved for this purpose by the manufacturer.
• Do not damage the refrigerant circuit.
• The refrigerant isobutane (R600a) is contained within the refrigerant circuit of the
appliance, a natural gas with a high level of
environmental compatibility, which is nevertheless flammable.
During transportation and installation of
the appliance, be certain that none of the
components of the refrigerant circuit become damaged.
If the refrigerant circuit should become
damaged:
Page 3

electrolux 3
– avoid open flames and sources of igni-
tion
– thoroughly ventilate the room in which
the appliance is situated
• It is dangerous to alter the specifications or
modify this product in any way. Any damage to the cord may cause a short-circuit,
fire and/or electric shock.
Warning! Any electrical component
(power cord, plug, compressor) must be
replaced by a certified service agent or
qualified service personnel.
1. Power cord must not be lengthened.
2. Make sure that the power plug is not
squashed or damaged by the back of
the appliance. A squashed or damaged power plug may overheat and
cause a fire.
3. Make sure that you can come to the
mains plug of the appliance.
4. Do not pull the mains cable.
5. If the power plug socket is loose, do
not insert the power plug. There is a
risk of electric shock or fire.
6. You must not operate the appliance
without the lamp cover
1)
of interior
lighting.
• This appliance is heavy. Care should be
taken when moving it.
• Do not remove nor touch items from the
freezer compartment if your hands are
damp/wet, as this could cause skin abrasions or frost/freezer burns.
• Avoid prolonged exposure of the appliance to direct sunlight.
Daily Use
• Do not put hot pot on the plastic parts in
the appliance.
• Do not store flammable gas and liquid in
the appliance, because they may explode.
• Do not place food products directly
against the air outlet on the rear wall.
2)
• Frozen food must not be re-frozen once it
has been thawed out.
• Store pre-packed frozen food in accordance with the frozen food manufacturer's
instructions.
• Appliance's manufacturers storage recommendations should be strictly adhered
to. Refer to relevant instructions.
• Do not place carbonated or fizzy drinks in
the freezer compartment as it creates
pressure on the container, which may
cause it to explode, resulting in damage to
the appliance.
• Ice lollies can cause frost burns if consumed straight from the appliance.
Care and cleaning
• Before maintenance, switch off the appliance and disconnect the mains plug from
the mains socket.
• Do not clean the appliance with metal objects.
• Do not use sharp objects to remove frost
from the appliance. Use a plastic scraper.
• Regularly examine the drain in the refrigerator for defrosted water. If necessary,
clean the drain. If the drain is blocked, water will collect in the bottom of the appliance.
Installation
Important! For electrical connection
carefully follow the instructions given in
specific paragraphs.
• Unpack the appliance and check if there
are damages on it. Do not connect the appliance if it is damaged. Report possible
damages immediately to the place you
bought it. In that case retain packing.
• It is advisable to wait at least four hours
before connecting the appliance to allow
the oil to flow back in the compressor.
• Adequate air circulation should be around
the appliance, lacking this leads to overheating. To achieve sufficient ventilation
follow the instructions relevant to installation.
• Wherever possible the back of the product
should be against a wall to avoid touching
or catching warm parts (compressor, condenser) to prevent possible burn.
• The appliance must not be located close
to radiators or cookers.
• Make sure that the mains plug is accessible after the installation of the appliance.
1) If the lamp cover is foreseen
2) If the appliance is Frost Free
Page 4
4 electrolux
•
Connect to potable water supply only.
3)
Service
• Any electrical work required to do the servicing of the appliance should be carried out
by a qualified electrician or competent person.
• This product must be serviced by an authorized Service Centre, and only genuine
spare parts must be used.
Environment Protection
This appliance does not contain gasses
which could damage the ozone layer, in
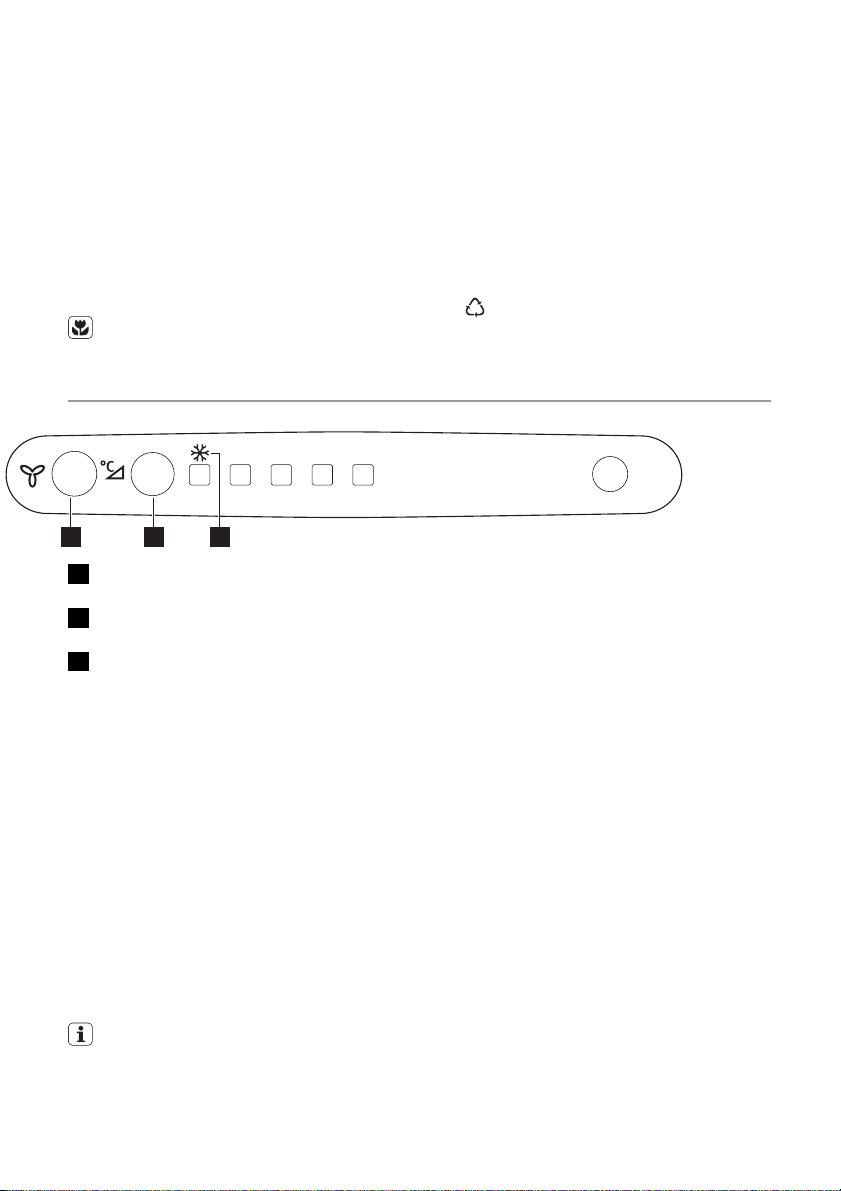
Control panel
+2 +4 +5 +6 +8
21 3
1 Fan function switch
Fan light
2 Temperature regulator
Action Freeze button
3 Action Freeze indicator
Switching on
Remove, if present, the remove label stuck
on the inside of the freezer compartment.
Insert the plug into the wall socket.
Switching off
To switch off the appliance remove the mains
plug.
Temperature regulation
The temperature is automatically regulated.
To operate the appliance, proceed as follows:
• press the temperature regulator more
times until the LED corresponding to the
required temperature lights up. Selection
is progressive, varying from +2°C to +8°C.
A medium setting is generally the most
suitable.
either its refrigerant circuit or insulation
materials. The appliance shall not be discarded together with the urban refuse
and rubbish. The insulation foam contains flammable gases: the appliance
shall be disposed according to the applicable regulations to obtain from your
local authorities. Avoid damaging the
cooling unit, especially at the rear near
the heat exchanger. The materials used
on this appliance marked by the symbol
are recyclable.
However, the exact setting should be chosen
keeping in mind that the temperature inside
the appliance depends on:
• room temperature
• how often the door is opened
• the quantity of food stored
• the location of the appliance.
Important! If the ambient temperature is
lower than 16°C press the temperature
regulator until the LED corresponding to the
lowest temperature lights up.
Action Freeze function
You can activate the Action Freeze function
by pressing the Action Freeze button more
times until the LED corresponding to the
symbol Action Freeze indicator lights up.
You can deactivate the Action Freeze function by pressing the Action Freeze button
more times until the required temperature is
selected.
3) If a water connection is foreseen
Page 5

First use
Cleaning the interior
Before using the appliance for the first time,
wash the interior and all internal accessories
with lukewarm water and some neutral soap
so as to remove the typical smell of a brandnew product, then dry thoroughly.
Daily use
Movable shelves
The walls of the refrigerator are equipped
with a series of runners so that the shelves
can be positioned as desired.
electrolux 5
Important! Do not use detergents or abrasive powders, as these will damage the finish.
this result, pull the shelf up so it can rotate
upwards and be placed on the next higher
level.
Vegetable drawer with humidity control
The drawer is suitable for storing fruit and
vegetables.
Bottle rack
Place the bottles (with the opening facing
front) in the pre-positioned shelf.
Important! If the shelf is positioned
horizontally, place only closed bottles.
This bottle holder shelf can be tilted in order
to store previously opened bottles. To obtain
There is a grille (if foreseen) on the bottom of
the drawer to separate the fruit and vegetables from any humidity that may form on the
bottom surface.
All parts inside the drawer can be removed
for cleaning purposes
To regulate the humidity in the vegetable drawer there is a
device with slits (adjustable by means of
a sliding lever).
When the ventilation
slots are closed:
Page 6

6 electrolux
the natural moisture content of the food in the
fruit and vegetable compartments is preserved for longer.
When the ventilation slots are opened:
more air circulation results in a lower air moisture content in the fruit and vegetable compartments.
Positioning the door shelves
To permit storage of food packages of various sizes, the door shelves can be placed at
different heights.
To make these adjustments proceed as follows:
gradually pull the shelf in the direction of the
arrows until it comes free, then reposition as
required.
Air cooling
The Dynamic Air Cooling (DAC) fan let food
cool quickly and a more uniform temperature
in the compartment.
You can activate the fan by pressing the fan
function switch (refer to "Control panel"). The
fan light comes on.
Important! Switch on the fan when the
ambient temperature exceeds 25°C.
Freezing fresh food
The freezer compartment is suitable for
freezing fresh food and storing frozen and
deep-frozen food for a long time.
To freeze fresh food activate the Action
Freeze function at least 24 hours before placing the food to be frozen in the freezer compartment.
Move the shelf present in the freezer compartment to the middle seat, keeping it horizontal.
Place the fresh food to be frozen on that
shelf.
The maximum amount of food that can be
frozen in 24 hours is specified on the rating
plate, a label located on the inside of the appliance.
The freezing process lasts 24 hours: during
this period do not add other food to be frozen.
After 24 hours, when the freezing process is
completed, return to the required temperature (refer to "Temperature regulation").
Storage of frozen food
When first starting-up or after a period out of
use, before putting the products in the compartment let the appliance run at least 2
hours on the higher settings.
Important! In the event of accidental
defrosting, for example due to a power
failure, if the power has been off for longer
than the value shown in the technical
characteristics chart under "rising time", the
defrosted food must be consumed quickly or
cooked immediately and then re-frozen (after
cooling).
Thawing
Deep-frozen or frozen food, prior to being
used, can be thawed in the refrigerator compartment or at room temperature, depending
on the time available for this operation.
Small pieces may even be cooked still frozen,
directly from the freezer: in this case, cooking
will take longer.
Helpful hints and tips
Hints for energy saving
• Do not open the door frequently or leave it
open longer than absolutely necessary.
• If the ambient temperature is high and the
Temperature Regulator is set to low temperature and the appliance is fully loaded,
the compressor may run continuously,
causing frost or ice on the evaporator. If
this happens, set the Temperature Regulator toward warmer settings to allow automatic defrosting and so a saving in electricity consumption.
Hints for fresh food refrigeration
To obtain the best performance:
• do not store warm food or evaporating liquids in the refrigerator
• do cover or wrap the food, particularly if it
has a strong flavour
• position food so that air can circulate freely
around it
Hints for refrigeration
Useful hints:
Page 7

electrolux 7
Meat (all types) : wrap in polythene bags and
place on the glass shelf above the vegetable
drawer.
For safety, store in this way only one or two
days at the most.
Cooked foods, cold dishes, etc..: these
should be covered and may be placed on any
shelf.
Fruit and vegetables: these should be thoroughly cleaned and placed in the special
drawer(s) provided.
Butter and cheese: these should be placed
in special airtight containers or wrapped in
aluminium foil or polythene bags to exclude
as much air as possible.
Milk bottles: these should have a cap and
should be stored in the bottle rack on the
door.
Bananas, potatoes, onions and garlic, if not
packed, must not be kept in the refrigerator.
Hints for freezing
To help you make the most of the freezing
process, here are some important hints:
• the maximum quantity of food which can
be frozen in 24 hrs. is shown on the rating
plate;
• the freezing process takes 24 hours. No
further food to be frozen should be added
during this period;
• only freeze top quality, fresh and thoroughly cleaned, foodstuffs;
• prepare food in small portions to enable it
to be rapidly and completely frozen and to
make it possible subsequently to thaw only
the quantity required;
• wrap up the food in aluminium foil or polythene and make sure that the packages
are airtight;
• do not allow fresh, unfrozen food to touch
food which is already frozen, thus avoiding
a rise in temperature of the latter;
• lean foods store better and longer than
fatty ones; salt reduces the storage life of
food;
• water ices, if consumed immediately after
removal from the freezer compartment,
can possibly cause the skin to be freeze
burnt;
• it is advisable to show the freezing in date
on each individual pack to enable you to
keep tab of the storage time.
Hints for storage of frozen food
To obtain the best performance from this appliance, you should:
• make sure that the commercially frozen
foodstuffs were adequately stored by the
retailer;
• be sure that frozen foodstuffs are transferred from the foodstore to the freezer in the
shortest possible time;
• not open the door frequently or leave it
open longer than absolutely necessary.
• Once defrosted, food deteriorates rapidly
and cannot be refrozen.
• Do not exceed the storage period indicated by the food manufacturer.
How to use the water dispenser with BRITA MAXTRA filter cartridge
BRITA water filter unit
Internal components:
Page 8
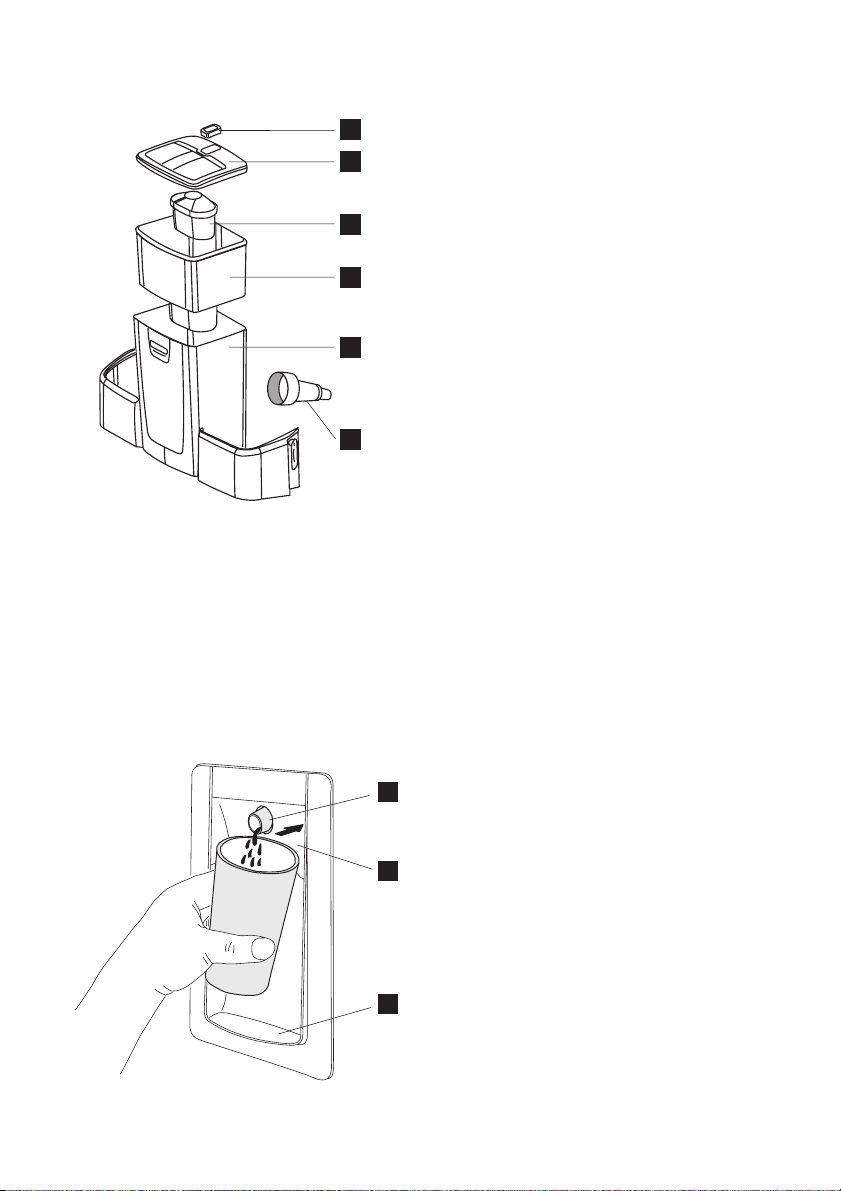
8 electrolux
6
3
5
2
1
4
1 Water tank
2 Funnel
3 Tank lid
4Valve + gasket
5 Including BRITA MAXTRA filter
6 BRITA Memo - the electronic cartridge
exchange indicator
External components:
2 Water lever
3 Water drop tray
Initial operations to use your water
dispenser
1. Remove every tape and other protection
system from the tank assembly
2. clean the components, as described into
"Water dispenser cleaning procedure", in
order to remove eventual residue.
Water dispenser cleaning procedure
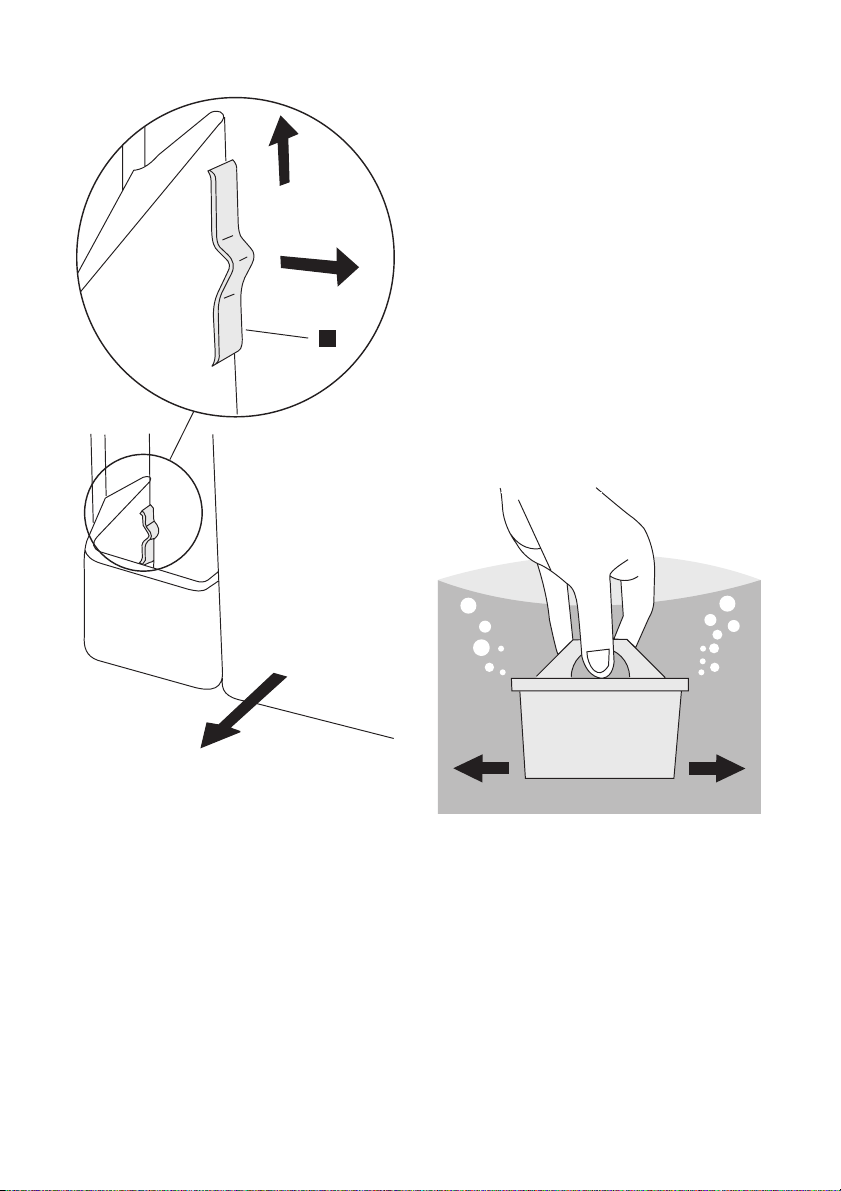
1. Unblock the two stopping elements on
the sides of the tank as shown in the pictures:
– take out the BRITA MAXTRA cartridge
from the water filter unit
– press the stopping elements in the
middle and move it up
– move the stopper into direction of the
central tank.
2. Push up the tank along the direction of
the valve.
3. Remove the lid and the funnel.
1Dispenser
1
2
3
Page 9
electrolux 9
8. Put the assembled tank on the door
along the valve direction.
9. Block the stopping elements in the in-
verse order of unblock.
10. Insert again the BRITA MAXTRA car-
tridge in the funnel .
How to use the BRITA MAXTRA filter
cartridge
Step 1: Preparing the cartridge
To prepare your BRITA filter cartridge, please
remove the protective wrapper (note: cartridge and inside wrapper may appear moist,
A
this is simply condensation).
Immerse the cartridge in cold water and
shake it gently to remove any air bubbles.
The filter now is ready to use.
As required for some other water filter cartridges, there is no need to pre-soak the new
Maxtra Cartridge.
4. Unscrew the valve in counter clockwise
(pay particular attention not to lose the
Valve Gasket because is necessary to a
correct functioning of the features ).
5. Clean the tank lid, the valve and the gasket with a solution of warm water and
neutral soap. Rinse it and put it inside the
door hole during the cleaning of the other
components (in order to avoid cold air
leakage from the fridge).
6. Clean the tank and the funnel into the
dishwasher or with a solution of warm
water and neutral soap and rinse them.
7. After the tank components cleaning take
back the valve from the fridge door and
assembly the tank in the inverse order
(4;3;2;1) of disassembly (pay attention at
the valve gasket positioning ).
Step 2: Insert in the water tank
Remove the tank lid. Before inserting the cartridge, remove the funnel and clean it thoroughly by rising it and wiping it dry.
Then, thoroughly clean the inside of the water
tank with a dump cloth and wipe it dry as
well.
Place the cartridge into the filter tank and
push downwards until it 'clicks' firmly into
place.
The cartridge should stay in place if the funnel
is turned upside down.
Page 10

10 electrolux
Step 3: Rinse the cartridge
pour it inside the tank through the cover as
shown into the picture (use the lid every time
that you want to fill your water).
Important! In order to avoid risk of spillage
of water during closing and opening of the
refrigerator door, we recommend to not fill
completely the water tank but leave a head
space of air (max. refilling limit till the frontal
marks).
If you have not used all filtered water in the
water tank within 1-2 days, please discard
any water left inside the BRITA water filter unit
before refilling it.
Allow the water to filter through and repeat
"Step 4" as many times as you want until the
BRITA water filter unit is filled up.
Remove cartridge with ring pull handle
2x 3x=ok
Take the funnel out of the BRITA water filter
unit, fill it under the tap with cold tap water
and allow it to filter through.
Discard the first two fillings into the sink.
These first two fillings are used to flush the
filter cartridge.
Then, place the funnel back into BRITA water
filter unit.
Place the cover back onto the jug and press
it carefully downwards to ensure it fits correctly into place.
Step 4: Refill the water tank
To fill the tank with cold water, simply open
the flip top lid, take a jug of tap water and
To exchange the cartridge after four weeks,
simply use the ring pull handle on the top of
the cartridge to remove it from the funnel,
and repeat steps 1 - 3 above.
The BRITA Memo
For maximum filter performance and optimum taste, it is important to change your
BRITA cartridge regularly. BRITA recom-
Page 11
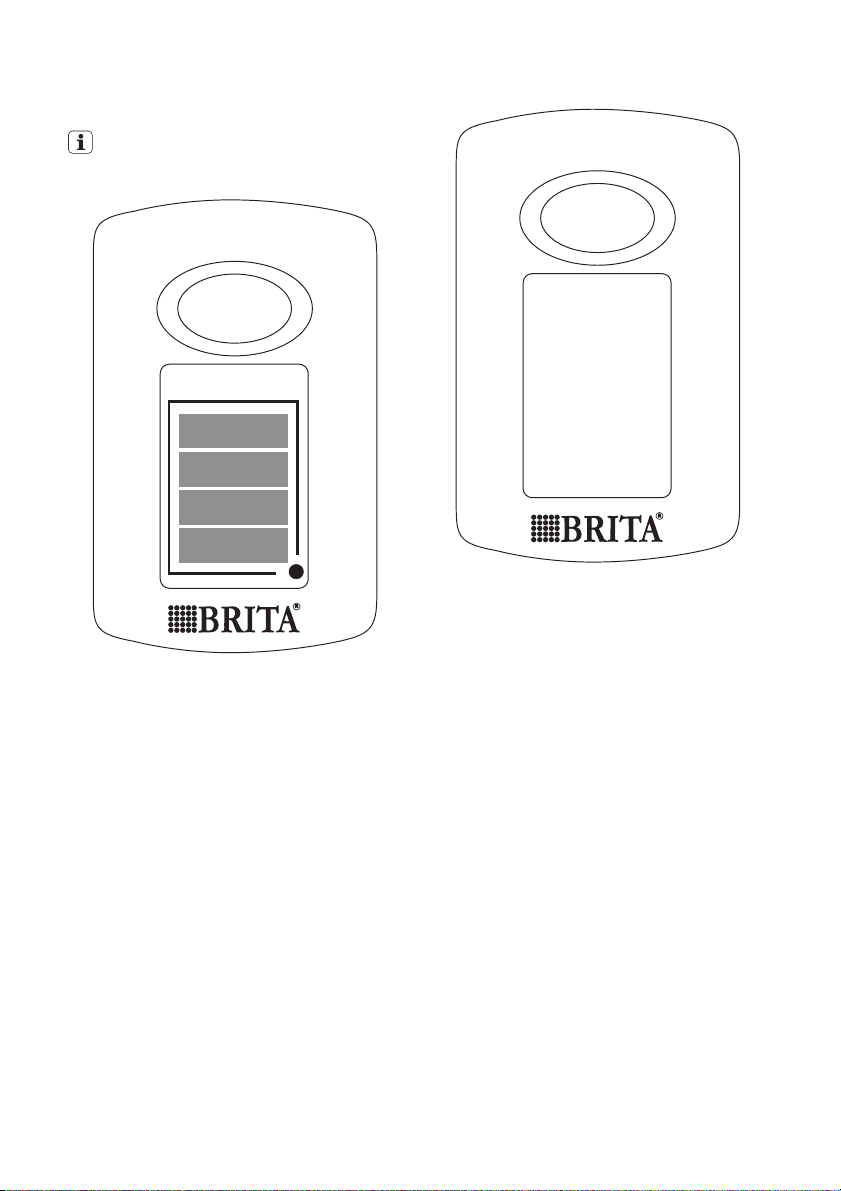
mends that you replace the cartridge in the
BRITA unit of your fridge every four weeks.
BRITA Memo automatically reminds you
when to change the cartridge.
electrolux 11
START
START
%
100
75
50
25
The unique BRITA Memo measures the recommended time of use of your cartridge.
Memo is easy to use and automatically reminds your when to change your cartridge.
The BRITA Memo is located on the lid of the
water tank. Operation is really simple.
Start the Memo display
To start Memo please press and hold down
the start button on the lid until all four bars
appear in the display and flash twice. The
Memo is now set.
%
100
75
50
25
Functional control
The flashing dot in the bottom right corner of
the Memo indicates that the Memo is working.
Page 12

12 electrolux
START
%
100
75
50
Every week one bar will disappear to show
the remaining cartridge life. After four weeks
all four bars will disappear. This, and a flashing arrow, indicate that the cartridge should
now be changed.
Insert a new cartridge according to the instructions and reactivate the Memo as described above.
START
Change display
START
25
%
100
75
50
25
%
100
75
50
25
When only one bar is showing, you should
just check whether you have a new BRITA
MAXTRA filter cartridge to hand.
Important! The Memo is only designed to be
used with BRITA filter cartridges.
BRITA Memo: the electronic cartridge exchange indicator has a life of approximately
5 years. At the end of the Memo's life, please
remember that it is an electronic device and
to dispose on the Memo according to all applicable provisions and regulations.
To remove the exhausted Memo place a
screwdriver in the notch next to the Memo
and push it out.
Please note that Memo should not be removed for any other reason than to dispose
of it.
Page 13

Important information
• The fridge door valve hole must be closed
with the Water Valve during the regular
functioning of the appliance.
• Use only drinking water. The use of any
other drink type can leave residues, taste
or odor in the reservoir and in the tap.
• It is possible to hear some noises caused
by air entering when the water left the reservoir.
• In case the water does not flow well, press
the driving lever once again. Keep the
glass below the tap for some instants, in
order to assure that all the water is collected by the glass.
• Do not use gasified drinks, such as soft
drinks. The drink can leak due to the gas
pressure.
• Remember that water is a foodstuff.
Please consume filtered water within one
to two days.
electrolux 13
• Should your BRITA water filter unit not be
in use for a prolonged period (e.g. vacation), we recommend that you discard any
water left inside the system and leave the
cartridge inside the filter tank.
Before using the system again take out the
cartridge and repeat steps 1 to 4 of "How
to use the BRITA MAXTRA filter cartridge".
• The BRITA water filter unit is designed for
use only with municipally treated tap water
(note: this water is constantly controlled
and according to legal regulations safe to
drink) or with water from private supplies
which has been tested safe to drink.
If an instruction is received from the authorities that mains water must be boiled,
the BRITA filtered water has also to be
boiled. When the instruction to boil water
is no longer in force, the entire filter system
must be cleaned and a new cartridge inserted.
More information on the use of BRITA filter
cartridges and the Memo can be found in the
BRITA information guide.
You can purchase new BRITA filter cartridges and Memo through consumer
service network of Electrolux or BRITA.
Care and cleaning
Caution! Unplug the appliance before
carrying out any maintenance operation.
This appliance contains hydrocarbons in
its cooling unit; maintenance and recharging must therefore only be carried
out by authorized technicians.
Periodic cleaning
The equipment has to be cleaned regularly:
• clean the inside and accessories with lukewarm water and some neutral soap.
• regularly check the door seals and wipe
clean to ensure they are clean and free
from debris.
• rinse and dry thoroughly.
Important! Do no t p ul l, m ov e o r d ama ge an y
pipes and/or cables inside the cabinet.
Never use detergents, abrasive powders,
highly perfumed cleaning products or wax
polishes to clean the interior as this will damage the surface and leave a strong odour.
Clean the condenser (black grill) and the
compressor at the back of the appliance with
a brush or a vacuum cleaner. This operation
will improve the performance of the appliance and save electricity consumption.
Important! Take care of not to damage the
cooling system.
Many proprietary kitchen surface cleaners
contain chemicals that can attack/damage
the plastics used in this appliance. For this
reason it is recommended that the outer casing of this appliance is only cleaned with
warm water with a little washing-up liquid
added.
After cleaning, reconnect the equipment to
the mains supply.
Page 14

14 electrolux
Defrosting of the refrigerator
Frost is automatically eliminated from the
evaporator of the refrigerator compartment
every time the motor compressor stops, during normal use. The defrost water drains out
through a trough into a special container at
the back of the appliance, over the motor
compressor, where it evaporates.
It is important to periodically clean the defrost
water drain hole in the middle of the refrigerator compartment channel to prevent the
water overflowing and dripping onto the food
inside. Use the special cleaner provided,
which you will find already inserted into the
drain hole.
Defrosting of the freezer
The freezer compartment of this model, on
the other hand, is a "no frost" type. This
means that there is no buildup of frost when
it is in operation, neither on the internal walls
nor on the foods.
The absence of frost is due to the continuous
circulation of cold air inside the compartment, driven by an automatically controlled
fan.
Periods of non-operation
When the appliance is not in use for long periods, take the following precautions:
• disconnect the appliance from elec-
tricity supply
• remove all food
defrost
4)
and clean the appliance and all
•
accessories
• leave the door/doors ajar to prevent unpleasant smells.
If the cabinet will be kept on, ask somebody
to check it once in a while to prevent the food
inside from spoiling in case of a power failure.
What to do if…
Warning! Before troubleshooting,
disconnect the mains plug from the
mains socket.
Only a qualified electrician or competent
person must do the troubleshooting that
is not in this manual.
Problem Possible cause Solution
The appliance does not
operate. The lamp does
not operate.
The mains plug is not connected
The appliance has no power.
4) If foreseen.
The appliance is switched off. Switch on the appliance.
to the mains socket correctly.
There is no voltage in the mains
socket.
Important! There are some sounds during
normal use (compressor, refrigerant
circulation).
Connect the mains plug to the
mains socket correctly.
Connect a different electrical appliance to the mains socket.
Contact a qualified electrician.
Page 15

electrolux 15
Problem Possible cause Solution
The lamp does not work.
The lamp is defective. Refer to "Replacing the lamp".
The compressor operates
continually.
The door is not closed correctly. Refer to "Closing the door".
The door has been opened too
The product temperature is too
The room temperature is too
Water flows on the rear
plate of the refrigerator.
Water flows into the refrigerator.
Products prevent that water flows
Water flows on the
ground.
The temperature in the
appliance is too low.
The temperature in the
appliance is too high.
The door is not closed correctly. Refer to "Closing the door".
The product temperature is too
Many products are stored at the
The temperature in the refrigerator is too high.
The temperature in the
freezer is too high.
There is too much frost.
The door is not closed correctly. Refer to "Closing the door".
The temperature regulator is not
Replacing the lamp
Caution! Disconnect the plug from the
mains socket.
1. Remove the screw from the lamp cover.
The lamp is in stand-by. Close and open the door.
The temperature is not set correctly.
frequently.
high.
high.
During the automatic defrosting
process, frost defrosts on the rear
plate.
The water outlet is clogged. Clean the water outlet.
into the water collector.
The melting water outlet does not
flow in the evaporative tray above
the compressor.
The temperature regulator is not
set correctly.
The temperature regulator is not
set correctly.
high.
same time.
There is no cold air circulation in
the appliance.
Products are too near to each
other.
Food is not wrapped correctly. Wrap the food correctly.
set correctly.
Set a higher temperature.
Do not keep the door open longer
than necessary.
Let the product temperature decrease to room temperature before
storage.
Decrease the room temperature.
This is correct.
Make sure that products do not
touch the rear plate.
Attach the melting water outlet to
the evaporative tray.
Set a higher temperature.
Set a lower temperature.
Let the product temperature decrease to room temperature before
storage.
Store less products at the same
time.
Make sure that there is cold air circulation in the appliance.
Store products so that there is cold
air circulation.
Set a higher temperature.
2. Pull outwards the rear hook of the lamp
cover by using a screwdriver and remove
the lamp cover pulling downwards.
3. Replace the lamp with one of the same
power (the maximum power is shown on
the lamp cover).
4. Install the lamp cover.
Page 16

16 electrolux
5. Tighten the screw to the lamp cover.
6. Connect the plug to the mains socket.
7. Open the door. Make sure that the light
comes on.
Closing the door
1. Clean the door gaskets.
2. If necessary, adjust the door. Refer to "Installation".
3. If necessary, replace the defective door
gaskets. Contact the Service Center.
Technical data
Dimension of the recess
Height 1800 mm
Width 695 mm
Depth 669 mm
Rising Time 20 h
The technical information are situated in the
rating plate on the internal left side of the appliance and in the energy label.
Installation
Read the "Safety Information" carefully
for your safety and correct operation of
the appliance before installing the
appliance.
Positioning
Install this appliance at a location where the
ambient temperature corresponds to the climate class indicated on the rating plate of the
appliance:
Climate
class
SN +10°C to + 32°C
N +16°C to + 32°C
ST +16°C to + 38°C
T +16°C to + 43°C
Ambient temperature
Location
The appliance should be installed well away
from sources of heat such as radiators, boilers, direct sunlight etc. Ensure that air can
circulate freely around the back of the cabinet. To ensure best performance, if the appliance is positioned below an overhanging
wall unit, the minimum distance between the
top of the cabinet and the wall unit must be
at least 100 mm . Ideally, however, the appliance should not be positioned below overhanging wall units. Accurate levelling is ensured by one or more adjustable feet at the
base of the cabinet.
Warning! It must be possible to
disconnect the appliance from the mains
power supply; the plug must therefore
be easily accessible after installation.
Page 17

100 mm
AB
electrolux 17
10 mm
10 mm
Electrical connection
Before plugging in, ensure that the voltage
and frequency shown on the rating plate correspond to your domestic power supply.
The appliance must be earthed. The power
supply cable plug is provided with a contact
for this purpose. If the domestic power supply socket is not earthed, connect the appliance to a separate earth in compliance with
current regulations, consulting a qualified
electrician.
The manufacturer declines all responsibility if
the above safety precautions are not observed.
This appliance complies with the E.E.C. Directives.
Rear spacers
Inside the appliance you find two
spacers which must be fitted as shown
in the figure.
Slacken the screws and insert the spacer
under the screw head, then retighten the
screws.
Door reversibility
Warning! Before carrying out any
operations, remove the plug from the
power socket.
Important! To carry out the following
operations, we suggest that this be made
with another person that will keep a firm hold
on the doors of the appliance during the
operations.
To change the opening direction of the door,
do these steps:
1. Remove the upper hinge taking care for
the upper door not to fall off and keep it
for future actions.
Page 18

18 electrolux
2. Remove the upper door.
3. Remove the upper support and mount it
in the opposite side.
4. Unscrew the middle hinge (H). Unscrew
the plastic plugs located on the opposite
side of the central hinge and introduce
them in the holes occupied before by the
hinge.
H
7. Carefully place the appliance on its back,
totally unscrew the adjustable foot and
screw it in the opposite side.
8. Remove the bottom hinge by unscrewing its fixing screws.
9. Using a 12 mm spanner, unscrew the
hinge pin and reassemble it on the opposite side of the hinge.
10. Reassemble the lower hinge in the opposite side, using the screws previously
removed.
11. Carefully replace the appliance in its
working position and adjust the level of
the appliance by screwing / unscrewing
the adjustable feet at the bottom of the
cabinet using your fingers or a tool.
5. Remove the lower door.
6. Pull off the ventilation grille which is fixed
by two screws.
12. Slide the hole cover out of the ventilation
grille by pushing it in the direction of the
arrow and reassemble it on the opposite
side.
Page 19

electrolux 19
13. Refit the ventilation grille, fixing the
screws.
14. Reassemble the lower door.
15. Reassemble the middle hinge (H) in the
opposite side.
16. Reassemble the upper door.
17. In your documentation bag you will find
the upper hinge necessary to make the
reversibility. Please screw it in place.
Environmental concerns
The symbol on the product or on its
packaging indicates that this product may
not be treated as household waste. Instead
it should be taken to the appropriate
collection point for the recycling of electrical
and electronic equipment. By ensuring this
product is disposed of correctly, you will help
prevent potential negative consequences for
Do a final check to make sure that:
• All screws are tightened.
• The magnetic seal adheres to the cabinet.
• The door opens and closes correctly.
If the ambient temperature is cold (i.e. in Winter), the gasket may not fit perfectly to the
cabinet. In that case, wait for the natural fitting of the gasket.
In case you do not want to carry out the
above mentioned operations, contact the
nearest After Sales Service Force. The After
Sales Service specialist will carry out the reversibility of the doors at your cost.
the environment and human health, which
could otherwise be caused by inappropriate
waste handling of this product. For more
detailed information about recycling of this
product, please contact your local council,
your household waste disposal service or the
shop where you purchased the product.
Page 20

20 electrolux
Electrolux. Thinking of you.
Saiba mais sobre a nossa filosofia em www.electrolux.com
Índice
Informações de segurança 20
Painel de controlo 22
Primeira utilização 23
Utilização diária 23
Sugestões e conselhos úteis 25
Como usar o dispensador de água com o
cartucho filtrante BRITA MAXTRA 26
Sujeito a alterações sem aviso prévio
Manutenção e limpeza 32
O que fazer se… 33
Dados técnicos 35
Instalação 35
Preocupações ambientais 38
Informações de segurança
Para a sua própria segurança e para garantir
uma utilização correcta, antes de instalar e
usar o aparelho pela primeira vez, leia atentamente este manual do utilizador, incluindo
as suas sugestões e advertências. Para evitar erros e acidentes desnecessários, é importante que todas as pessoas que utilizam
o aparelho conheçam o seu funcionamento
e as características de segurança. Guarde
estas instruções e certifique-se de que elas
acompanham o aparelho em caso de transferência ou venda, para que todos os que
venham a usá-lo estejam devidamente informados quanto à sua utilização e segurança.
Para sua segurança e da propriedade, guarde as precauções destas instruções de utilização, uma vez que o fabricante não é responsável pelos danos causados por omissão.
Segurança para crianças e pessoas
vulneráveis
• Este aparelho não se destina a ser utiliza-
do por pessoas (incluindo crianças) com
capacidades físicas, sensoriais ou mentais
reduzidas ou sem experiência e conhecimento, excepto se lhes tiver sido dada supervisão ou instrução relativa à utilização
do aparelho por uma pessoa responsável
pela sua segurança.
As crianças devem ser vigiadas para assegurar que não brincam com o aparelho.
• Mantenha todas as embalagens fora do
alcance das crianças. Existe o risco de asfixia.
• Se eliminar o aparelho retire a ficha da tomada, corte o cabo eléctrico (o mais perto
do aparelho possível) e retire a porta para
evitar que crianças a brincar sofram choques eléctricos ou se fechem dentro do
aparelho.
• Se este aparelho, com vedantes de porta
magnéticos for substituir um aparelho
mais velho com fecho de mola (lingueta)
na porta ou tampa, certifique-se de que o
fecho de mola está desactivado antes de
eliminar o velho aparelho. Tal irá evitar que
se torne numa armadilha fatal para uma
criança.
Segurança geral
Cuidado Mantenha as aberturas de
ventilação sem obstruções.
• O aparelho tem como objectivo guardar
alimentos e/ou bebidas numa casa normal, como explicado neste manual de instruções.
• Não utilize um dispositivo mecânico ou
qualquer meio artificial para acelerar o processo de descongelação.
• Não utilize outros aparelhos eléctricos (tais
como máquinas de fazer gelados) dentro
dos aparelhos de refrigeração, a não ser
que sejam aprovados para este fim pelo
fabricante.
• Não danifique o circuito refrigerante.
• O refrigerante isobutano (R600a) está contido no circuito refrigerante do aparelho,
um gás natural com um alto nível de com-
Page 21

electrolux 21
patibilidade ambiental, que é, no entanto,
inflamável.
Durante o transporte e a instalação do
aparelho, certifique-se de nenhum dos
componentes do circuito refrigerante está
danificado.
Se o circuito refrigerante se danificar:
– evite chamas livres e fontes de ignição
– ventile totalmente a divisão onde o apa-
relho se encontra
• É perigoso alterar as especificações ou
efectuar qualquer tipo de alteração neste
produto. Quaisquer danos no cabo poderão provocar um curto-circuito, incêndio
e/ou choque eléctrico.
Advertência Qualquer componente
eléctrico (cabo de alimentação, ficha,
compressor) tem de ser substituído por
um técnico certificado ou um técnico
qualificado.
1. Não deve colocar extensões no cabo
de alimentação.
2. Certifique-se de que a ficha não está
esmagada ou danificada pela parte
traseira do aparelho. Uma ficha esmagada ou danificada pode sobreaquecer e causar um incêndio.
3. Certifique-se de que consegue alcan-
çar a ficha do aparelho.
4. Não puxe o cabo de alimentação.
5. Se a tomada da ficha de alimentação
estiver solta, não introduza a ficha de
alimentação. Existe um risco de choque eléctrico ou incêndio.
6. Não deve utilizar o aparelho sem a
tampa da lâmpada
5)
iluminação inte-
rior.
• Este aparelho é pesado. Tenha cuidado
quando o deslocar.
• Não retire nem toque nos itens do compartimento do congelador se estiver com
as mãos molhadas, pois pode causar
abrasões na pele ou queimaduras de gelo.
• Evite a exposição prolongada do aparelho
à luz solar directa.
Utilização diária
• Não coloque panelas quentes nas partes
de plástico do aparelho.
• Não guarde gases ou líquidos inflamáveis
no aparelho, porque podem explodir.
• Não coloque alimentos directamente contra a saída de ar na ventilação traseira.
6)
• Depois de descongelados, os alimentos
não devem ser recongelados.
• Guarde alimentos congelados pré-embalados de acordo com as instruções do fabricante do alimento congelado.
• As recomendações de armazenamento
dos fabricantes do aparelho devem ser
estritamente cumpridas. Consulte as respectivas instruções.
• Não coloque bebidas gaseificadas dentro
do congelador, uma vez que cria pressão
no recipiente, podendo fazer com que expluda, provocando danos no aparelho.
• Os gelados de gelo podem provocar queimaduras de gelos se forem consumidos
imediatamente depois de retirados do
aparelho.
Limpeza e manutenção
• Antes da manutenção, desligue o aparelho e retire a ficha da tomada.
• Não limpe o aparelho com objectos de
metal.
• Não utilize objectos afiados para remover
o gelo do aparelho. Utilize um raspador de
plástico.
• Inspeccione regularmente o orifício de
descarga do frigorífico para presença de
água descongelada. Se necessário, limpe
o orifício de descarga. Se o orifício estiver
bloqueado, a água irá acumular na parte
inferior do aparelho.
Instalação
Importante Para efectuar a ligação
eléctrica, siga atentamente as instruções
fornecidas nos parágrafos específicos.
• Desembale o aparelho e verifique se existem danos. Não ligue o aparelho se estiver
danificado. Em caso de danos, informe
imediatamente o local onde o adquiriu.
Nese caso, guarde a embalagem.
• É recomendável aguardar pelo menos duas horas antes de ligar o aparelho, para
permitir que o óleo regresse ao compressor.
5) Se a tampa da lâmpada tiver
6) Se o aparelho não criar gelo
Page 22

22 electrolux
• Assegure uma circulação de ar adequada
à volta do aparelho, caso contrário pode
provocar sobreaquecimento. Para garantir
uma ventilação suficiente, siga as instruções relevantes para a instalação.
• Sempre que possível, a traseira do aparelho deve ficar virada para uma parede para
evitar toques nas partes quentes (compressor, condensador) e possíveis queimaduras.
• Não coloque o aparelho perto de radiadores ou fogões.
• Certifique-se de que a ficha de alimentação fica acessível após a instalação do
aparelho.
• Ligue apenas a uma fonte de água potá-
7)
vel.
Assistência
• Quaisquer trabalhos eléctricos necessários para a manutenção do aparelho devem ser efectuados por um electricista
qualificado ou pessoa competente.
Painel de controlo
• A manutenção deste produto deve ser
efectuada por um Centro de Assistência
autorizado, o qual deverá utilizar apenas
peças sobressalentes originais.
Protecção ambiental
Este aparelho não contém gases que
possam danificar a camada de ozono,
tanto no circuito refrigerante como nos
materiais de isolamento. O aparelho não
deverá ser eliminado juntamente com o
lixo doméstico. A espuma de isolamento
contém gases inflamáveis: o aparelho
deverá ser eliminado de acordo com as
normas aplicáveis que pode obter junto
das autoridades locais. Evite danificar a
unidade de arrefecimento, especialmente na parte traseira, perto do permutador de calor. Os materiais utilizado neste
aparelho marcados pelo símbolo
recicláveis.
são
+2 +4 +5 +6 +8
21 3
1 Botão de activação da ventoinha
Lâmpada da ventoinha
2 Regulador da temperatura
Botão Action Freeze
3 Indicador Action Freeze
Ligar
Se presente, remova a etiqueta colada no
interior do compartimento do congelador.
Introduza a ficha na tomada.
Desligar
Para desligar o aparelho, retire a ficha da tomada.
Regulação da temperatura
A temperatura é regulada automaticamente.
Para utilizar o aparelho, proceda do seguinte
modo:
7) Se estiver prevista uma ligação hídrica
• Mantenha o regulador da temperatura
pressionado até que o LED correspondente à temperatura pretendida se acenda. A selecção é gradual, variando entre
+2°C e +8°C. Sempre que premir a tecla,
é seleccionada a temperatura indicada pelo led.
Normalmente, uma definição média é a
mais adequada.
No entanto, a definição exacta deve ser escolhida tendo em conta que a temperatura
dentro do aparelho depende da:
• temperatura ambiente
• frequência de abertura da porta
• quantidade de alimentos conservados
• localização do aparelho.
Page 23

electrolux 23
Importante Se a temperatura ambiente for
inferior a 16 °C, prima o regulador da
temperatura, até que se acenda o LED
correspondente à temperatura inferior.
Action Freeze Função
Pode activar a função Action Freeze premindo o botão Action Freeze mais vezes, até
Primeira utilização
Limpeza do interior
Antes de utilizar o aparelho pela primeira vez,
limpe o interior e todos os acessórios internos com água morna e sabão neutro de modo a remover o cheiro típico de um produto
novo, de seguida seque minuciosamente.
Utilização diária
Prateleiras móveis
As paredes do frigorífico estão equipadas
com uma série de guias de modo a que as
prateleiras possam ser posicionadas como
quiser.
que o LED correspondente ao indicador do
símbolo Action Freeze se acenda.
Pode desactivar a função Action Freeze premindo o botão Action Freeze mais vezes, até
que seja seleccionada a temperatura pretendida.
Importante Não utilize detergentes ou pós
abrasivos, pois estes danificam o acabamento.
Prateleira para garrafas
Coloque as garrafas (com a abertura para a
frente) na prateleira pré-posicionada.
Importante Se a prateleira estiver colocada
na horizontal coloque apenas garrafas
fechadas.
Esta prateleira suporte para garrafas pode
ser inclinada para poder armazenar garrafas
que já tenham sido abertas. Para tal, puxe a
prateleira para cima para que possa rodar
para cima e ser colocada no nível seguinte
em cima.
Page 24

24 electrolux
Gaveta de vegetais com controlo de
humidade
A gaveta é indicada para o armazenamento
de fruta e vegetais.
Existe uma grelha (se prevista) no fundo da
gaveta, destinada a separar a fruta e os vegetais de qualquer humidade que se possa
formar na superfície do fundo.
Todas as componentes existentes no interior
da gaveta podem ser removidas para efeitos
de limpeza.
Para regular a humidade na gaveta de
vegetais existe um
dispositivo com frestas (ajustável através
de uma alavanca de
deslize).
Quando as frestas de
ventilação se encontram fechadas:
o teor natural de humidade dos alimentos
armazenados no compartimento de fruta e
vegetais é preservado durante mais tempo.
Quando as frestas de ventilação se encontram abertas:
uma maior circulação de ar resulta num teor
de humidade do ar inferior no compartimento de fruta e vegetais.
Posicionar as prateleiras da porta
Para permitir o armazenamento de embalagens de alimentos de vários tamanhos, as
prateleiras da porta podem ser colocadas a
diferentes alturas.
Para fazer estes ajustes, proceda do seguinte modo:
puxe gradualmente a prateleira na direcção
das setas até se soltar, de seguida, reposicione como quiser.
Refrigeração do ar
A ventoinha da Refrigeração Dinâmica do Ar
(DAC-Dynamic Air Cooling) permite refrigerar
rapidamente os alimentos e obter uma tem-
peratura mais uniforme dentro do compartimento.
Pode activar o ventilador premindo o botão
de activação da ventoinha (consultar "Painel
de controlo"). A lâmpada da ventoinha acende-se.
Importante Ligue a ventoinha quando a
temperatura ambiente exceder os 25 °C.
Congelação de alimentos frescos
O compartimento congelador é adequado
para a congelação de alimentos frescos e
para a conservação a longo prazo de alimentos congelados e ultracongelados.
Para congelar alimentos frescos active a função Action Freeze, pelo menos, 24 horas antes de colocar os alimentos no compartimento congelador.
Desloque a prateleira que se encontra no
compartimento congelador, mantendo-a na
posição horizontal e colocando-a na posição
intermédia.
Volte a colocar nessa prateleira os alimentos
frescos a congelar.
A quantidade máxima de alimentos que podem ser congelados em 24 horas está indicada na "chapa de identificação", uma etiqueta presente nas paredes internas do aparelho.
O processo de congelação dura 24 horas:
durante este período, não introduza novos
alimentos a congelar.
Após 24 horas, quando o processo de congelação tiver terminado, regresse à temperatura desejada (consulte "Regulação da
temperatura").
Armazenamento de alimentos
congelados
Quando ligar pela primeira vez ou após um
período sem utilização, antes de colocar os
produtos no compartimento, deixe o aparelho em funcionamento durante no mínimo 2
horas nas definições mais elevadas.
Page 25

electrolux 25
Importante Em caso de descongelação
acidental, por exemplo, devido a falta de
electricidade, se a alimentação estiver
desligada por mais tempo que aquele
mostrado na tabela de características
técnicas em "tempo de reinício", os
alimentos descongelados têm de ser
consumidos rapidamente ou cozinhados
imediatamente e depois, novamente
congelados (depois de arrefecerem).
Sugestões e conselhos úteis
Conselhos para poupar energia
• Não abra muitas vezes a porta nem a deixe
aberta mais tempo do que o necessário.
• Se a temperatura ambiente for alta e o regulador de temperatura se encontrar na
definição de baixa temperatura com o
aparelho completamente cheio, o compressor pode funcionar continuamente,
causando gelo no evaporador. Se isto
acontecer, coloque o regulador de temperatura em definições mais quentes, para
permitir a descongelação automática,
poupando assim no consumo de electricidade.
Conselhos para a refrigeração de
alimentos frescos
Para obter o melhor desempenho:
• não guarde alimentos quentes ou líquidos
que se evaporam no frigorífico
• cubra ou embrulhe os alimentos, particularmente se tiverem um cheiro forte
• posicione os alimentos de modo a que o
ar possa circular livremente em redor
Conselhos para a refrigeração
Conselhos úteis:
Carne (todos os tipos) : embrulhe em sacos
de politeno e coloque na prateleira de vidro
acima da gaveta de vegetais.
Por motivos de segurança, guarde desta forma por um dia ou dois no máximo.
Alimentos cozinhados, pratos frios, etc: estes devem estar cobertos e podem ser colocados em qualquer prateleira.
Fruta e vegetais: estes devem ser minuciosamente limpos e colocados nas gavetas especiais fornecidas.
Manteiga e queijo: estes devem ser colocados em recipientes herméticos especiais ou
Descongelação
Os alimentos congelados, antes de serem
utilizados, podem ser descongelados no
compartimento do frigorífico ou à temperatura ambiente, dependendo do tempo disponível para esta operação.
Os pedaços pequenos podem mesmo ser
cozinhados ainda congelados, directamente
do congelador: neste caso, a confecção irá
demorar mais.
embrulhados em folha de alumínio ou sacos
de politeno para excluir o máximo de ar possível.
Garrafas de leite: estas devem ter uma tampa e devem ser armazenadas na prateleira
de garrafas na porta.
Bananas, batatas, cebolas e alho, se não estiverem embalados, não devem ser guardados no frigorífico.
Conselhos para a congelação
Para o ajudar a tirar partido do processo de
congelação, eis alguns conselhos importantes:
• a quantidade máxima de alimentos que
pode ser congelada em 24h. está mostrada na placa de dados;
• O processo de congelamento demora 24
horas. Não devem ser adicionados mais
alimentos para congelação durante este
período;
• congele apenas alimentos de alta qualidade, frescos e extremamente limpos;
• Prepare os alimentos em pequenas quantidades para permitir que sejam rápida e
completamente congeladas e para tornar
possível subsequentemente descongelar
apenas a quantidade necessária;
• embrulhe os alimentos em folha de alumínio ou politeno e certifique-se de que as
embalagens são herméticas;
• Não permita que os alimentos frescos e
descongelados entrem em contacto com
os alimentos já congelados, evitando assim o aumento de temperatura dos alimentos congelados;
• os alimentos sem gordura são melhores
para armazenar que os alimentos com
gordura; o sal reduz o tempo de armazenamento dos alimentos;
Page 26

26 electrolux
• a água congela. Se for consumida imediatamente após a remoção do compartimento do congelador, poderá causar
queimaduras de gelo na pele;
• é aconselhável que anote a data de congelação em cada embalagem individual
para permitir que saiba o tempo de armazenamento.
Conselhos para o armazenamento de
alimentos congelados
Para obter o melhor desempenho deste aparelho, deve:
• certificar-se de que os alimentos congelados comercialmente foram armazenados
adequadamente pelo vendedor;
• ter a certeza que os alimentos congelados
são transferidos do supermercado para o
congelador no tempo mais curto possível;
• não abra muitas vezes a porta nem a deixe
aberta mais tempo do que o necessário.
• Uma vez descongelados, os alimentos degradam rapidamente e não podem tornar
a ser congelados.
• Não exceda o período de armazenamento
indicado pelo fabricante de alimentos.
Como usar o dispensador de água com o cartucho filtrante BRITA
MAXTRA
Unidade de filtragem de água BRITA
Componentes internos:
6
3
5
Componentes externos:
1
2
2
1
4
1 Reservatório da água
2 Funil
3 Tampa do reservatório
4 Válvula + vedante
5 Incluindo o cartucho filtrante
6 BRITA Memo - indicador electrónico de
troca de cartucho
3
1Dispensador
2 Nível da água
3 Tabuleiro recolhe gotas
Operações iniciais para utilizar o
dispensador de água
1. Remova a fita adesiva e qualquer outro
sistema de protecção do conjunto do reservatório
2. Limpe os componentes, tal como descri-
to em "Limpeza do dispensador de
água", para eliminar eventuais resíduos.
Page 27

electrolux 27
Limpeza do dispensador de água
1. Destrave os dois elementos de bloqueio
nos lados do reservatório tal como indicado nas figuras abaixo:
– Retire o cartucho BRITA MAXTRA da
unidade de filtragem da água
– Pressione os elementos de bloqueio
no meio e eleve-os
– Desloque o bloqueador em direcção
ao centro do reservatório.
2. Puxe o reservatório para cima, na direcção da válvula.
3. Retire a tampa e o funil.
A
cessário para o correcto funcionamento
da unidade).
5. Lave a tampa do reservatório, a válvula
e o vedante com uma solução de água
morna e sabão neutro. Enxagúe e insira-
-os no orifício da porta durante a limpeza
dos restantes componentes (para evitar
fugas de ar frio do frigorífico).
6. Lave o reservatório e o funil na máquina
de lavar louça ou com uma solução de
água morna e sabão neutro, por fim, enxagúe-os.
7. Após a limpeza, volte a retirar a válvula
da porta do frigorífico e monte o reservatório pela ordem inversa (4;3;2;1) à da
desmontagem (tenha atenção à posição
do vedante da válvula).
8. Coloque o reservatório montado na porta, na direcção da válvula.
9. Trave os elementos de bloqueio pela ordem inversa à da destravagem.
10. Volte a colocar o cartucho BRITA MAXTRA no funil.
Como usar o cartucho filtrante BRITA
MAXTRA
Passo 1: Preparar o cartucho
Para preparar o cartucho filtrante BRITA retire o invólucro protector (nota: o cartucho e
o interior do invólucro podem apresentar humidade, trata-se apenas de condensação).
Coloque o cartucho em água fria e abane-o
ligeiramente para remover quaisquer bolhas
de ar. O filtro está agora pronto a ser usado.
Ao contrário de outros cartuchos filtrantes
para água, não é necessário embeber previamente o novo cartucho Maxtra.
4. Desenrosque a válvula, rodando-a para
a esquerda (tenha atenção para não soltar o vedante da válvula, pois este é ne-
Page 28

28 electrolux
Passo 2: Inserir no reservatório da água
Retire a tampa do reservatório. Antes de inserir o cartucho, retire o funil, lave-o, enxagúe-o e seque-o bem.
A seguir, limpe bem o interior do reservatório
da água com um pano húmido e seque-o.
Coloque o cartucho no reservatório do filtro
e empurre para baixo, até fazer 'click'.
Ao virar o funil para baixo o cartucho deverá
ficar no lugar.
Passo 3: Limpar o cartucho
2x 3x=ok
Retire o funil da unidade de filtragem da água
BRITA, encha-o à torneira com água fria e
aguarde que esta seja filtrada.
Deixe escorrer os dois primeiros enchimentos para o lava-louça. Estes dois primeiros
enchimentos servem para limpar o cartucho
filtrante.
A seguir, volte a colocar o funil na unidade de
filtragem da água BRITA.
Volte a colocar a tampa e pressione cuidadosamente para garantir que esta fica bem
fechada.
Passo 4: Encher o reservatório da água
Page 29

electrolux 29
Para encher o reservatório com água fria,
basta abrir a tampa no topo e despejar um
jarro de água da torneira tal como indicado
na figura (utilize a tampa de cada vez que
desejar encher com água).
Importante Para evitar o risco de
derramemento de água durante o fecho e
abertura da porta do frigorífico,
recomendamos que não encha totalmente o
depósito de água, deixando algum espaço
com ar (limite de enchimento máximo até às
marcas na frente).
Caso não tenha usado toda a água filtrada
no reservatório dentro de 1 a 2 dias, despeje
a água restante antes de voltar a encher a
unidade de filtragem da água BRITA.
Aguarde até que a água seja filtrada e repita
o "Passo 4" tantas vezes até que a unidade
de filtragem da água BRITA esteja cheia.
Retirar o cartucho com a pega em forma
de anel
O Memo BRITA
Para obter o máximo desempenho e um sabor ideal, é importante trocar regularmente o
cartucho BRITA. A BRITA recomenda que
troque o cartucho na unidade de filtragem da
água BRITA do seu frigorífico a cada quatro
semanas.
O Memo BRITA lembra-o automaticamente quando deve trocar o cartucho.
START
%
100
75
50
25
Para trocar o cartucho, passadas quatro semanas, basta puxá-lo pela pega em forma
de anel para o retirar do funil e repetir os
passos 1 a 3 acima descritos.
O original Memo BRITA mede o tempo de
uso recomendado do cartucho.
O Memo é fácil de usar e lembra-o automaticamente quando trocar o cartucho.
O Memo BRITA encontra-se na tampa do
reservatório da água. O seu funcionamento
é muito simples.
Iniciar o visor do Memo
Para iniciar o Memo, prima o botão na tampa
e mantenha-o premido até surgirem as quatro barras no visor e estas piscarem duas
vezes. O Memo está agora configurado.
Page 30

30 electrolux
START
%
100
75
50
25
Controlar o funcionamento
O ponto intermitente no canto inferior direito
do Memo indica que este está a funcionar.
START
%
100
75
50
25
Mudar o visor
START
%
100
75
50
25
Page 31

electrolux 31
Em cada semana desaparece uma barra para indicar a vida útil restante do cartucho.
Após quatro semanas todas as barras terão
desaparecido. Isto e uma seta intermitente
indicam que o cartucho deve ser agora trocado.
Insira um cartucho novo de acordo com as
instruções e reactive o Memo tal como acima
descrito.
START
%
100
75
50
25
Quando for visível apenas uma barra, deverá
verificar se possui um cartucho filtrante BRITA MAXTRA novo disponível.
Importante O Memo foi concebido para ser
usado apenas com cartuchos filtrantes
BRITA.
Memo BRITA: O indicador electrónico de troca de cartucho tem uma vida útil de aproximadamente 5 anos. No fim da vida útil do
Memo lembre-se de que se trata de um dispositivo electrónico, devendo ser eliminado
de acordo com as disposições e regulamentos aplicáveis.
Para retirar o Memo gasto, insira uma chave
de fendas na ranhura junto ao Memo e puxe-
-o para fora.
Não se esqueça que o Memo não deve ser
retirado por qualquer outro motivo que não
seja a sua eliminação.
Informações importantes
• O orifício da válvula da porta do frigorífico
tem de estar fechado com a válvula da
água durante o normal funcionamento do
aparelho.
• Utilize apenas água potável. A utilização
de outro tipo de bebida pode deixar resíduos, sabor ou cheiro no reservatório e na
torneira.
• É possível ouvir alguns ruídos provocados
pela entrada de ar durante a saída da água
do reservatório.
• Se a água não sair correctamente, volte a
pressionar a alavanca de accionamento.
Mantenha o copo debaixo da torneira durante alguns instantes para assegurar que
este recolhe toda a água.
• Não utilize bebidas gaseificadas, como sejam refrigerantes. A bebida pode verter
devido à pressão do gás.
• Lembre-se de que a água é um produto
alimentar. Consuma a água filtrada dentro
de um a dois dias.
• Caso não use a unidade de filtragem da
água BRITA durante um período de tempo
prolongado (p. ex. férias), recomendamos
a despejar toda a água existente no sistema e a deixar o cartucho dentro do reservatório do filtro.
Antes de voltar a usar o sistema, retire o
cartucho e repita os passos 1 a 4 de "Como usar o cartucho filtrante BRITA MAXTRA".
• A unidade de filtragem da água BRITA foi
concebida para ser usada apenas com
água municipal da torneira (nota: esta
água é constantemente controlada, sendo
apta para beber de acordo com os regulamentos legais) ou com água de fontes
privadas, que tenham sido testadas e declaradas aptas para beber.
Page 32

32 electrolux
Caso sejam recebidas instruções das autoridades no sentido de ferver a água da
torneira, a água filtrada BRITA terá igualmente de ser fervida. Quando as instruções para ferver a água deixarem de estar
em vigor, todo o sistema de filtragem tem
de ser limpo e inserido um novo cartucho.
Pode encontrar mais informações sobre os
cartuchos filtrantes BRITA e o Memo no manual informativo BRITA.
Manutenção e limpeza
Cuidado Retire a ficha da tomada antes
de efectuar qualquer operação de
manutenção.
Este aparelho contém hidrocarbonetos
na sua unidade de arrefecimento; a manutenção e a recarga devem, por isso,
ser efectuadas exclusivamente por técnicos autorizados.
Limpeza periódica
O equipamento tem de ser limpo regularmente:
• limpe o interior e os acessórios com água
morna e sabão neutro.
• verifique regularmente os vedantes de
porta e limpe-os para se certificar de que
estão limpos e sem resíduos.
• lave e seque minuciosamente.
Importante Não puxe, desloque nem
danifique quaisquer tubos e/ou cabos dentro
do armário.
Nunca utilize detergentes, pós abrasivos,
produtos de limpeza muito perfumados ou
cera de polir para limpar o interior, pois isto
irá danificar a superfície e deixar um odor forte.
Limpe o condensador (grelha preta) e o compressor no fundo do aparelho com uma escova ou um aspirador. Esta operação irá melhorar o desempenho do aparelho e poupar
o consumo de electricidade.
Importante Tenha cuidado para não
danificar o sistema de arrefecimento.
Muitos agentes de limpeza de superfícies de
cozinhas contêm químicos que podem atacar/danificar os plásticos usados neste aparelho. Por esta razão é aconselhável que a
estrutura exterior deste aparelho seja limpa
Pode adquirir novos cartuchos filtrantes
BRITA e o Memo através da rede de assistência ao consumidor da Electrolux
ou da BRITA.
apenas com água morna com um pouco de
solução de limpeza adicionada.
Após a limpeza, volte a ligar o equipamento
à tomada de alimentação.
Descongelar o frigorífico
O gelo é automaticamente eliminado do evaporador do compartimento do frigorífico
sempre que o compressor de motor pára,
durante a utilização normal. A água resultante da descongelação é descarregada por um
canal para um recipiente especial, colocado
na parte traseira por cima do aparelho, sobre
o compressor de motor, onde evapora.
É importante limpar periodicamente o orifício
de descarga da água resultante da descongelação no centro do canal do compartimento do frigorífico para evitar que um fluxo
excessivo de água pingue sobre os alimentos. Utilize o agente de limpeza fornecido,
que irá encontrar já inserido no orifício de
descarga.
Page 33

electrolux 33
•
Descongelar o congelador
O compartimento do congelador deste modelo, por sua vez, é do tipo "no frost". Isto
significa que não há qualquer formação de
gelo durante o seu funcionamento, quer nas
paredes interiores, quer nos alimentos.
A ausência de gelo deve-se à circulação
contínua de ar frio no interior do compartimento, accionado por um ventilador controlado automaticamente.
Períodos de inactividade
desligue o aparelho da tomada da
electricidade
• retire todos os alimentos
•
descongelação
8)
e limpe o aparelho e to-
dos os acessórios
• deixe a(s) porta(s) aberta(s) para evitar
cheiros desagradáveis.
Se o armário for mantido ligado, peça a alguém para o verificar esporadicamente, para
evitar que os alimentos no interior se estraguem em caso de falha eléctrica.
Quando o aparelho não é utilizado por longos períodos, observe as seguintes precauções:
O que fazer se…
Advertência Antes da resolução de
problemas, retire a ficha da tomada.
A resolução de problemas que não se
encontram no manual só deve ser efectuada por um electricista qualificado ou
uma pessoa competente.
Problema Possível causa Solução
O aparelho não funciona.
A lâmpada não funciona.
A ficha não está correctamente
O aparelho não tem alimentação.
A lâmpada não funciona. A lâmpada está no modo de es-
A lâmpada está defeituosa. Consulte "Substituir a lâmpada".
O compressor funciona
continuamente.
A porta não está fechada correc-
A porta foi aberta muitas vezes. Não mantenha a porta aberta mais
A temperatura do produto está
A temperatura ambiente está
A água escorre na placa
traseira do frigorífico.
O aparelho está desligado. Ligue o aparelho.
inserida na tomada.
Não existe tensão na tomada.
pera.
A temperatura não está regulada
correctamente.
tamente.
muito alta.
muito alta.
Durante o processo de descon-
gelação automático, o gelo é
descongelado na placa traseira.
Importante Existem alguns ruídos durante
a utilização normal (compressor, circulação
de refrigerante).
Ligue a ficha do aparelho correctamente à tomada de alimentação.
Ligue um aparelho eléctrico diferente à tomada.
Contacte um electricista qualificado.
Feche e abra a porta.
Defina uma temperatura mais elevada.
Consulte "Fechar a porta".
tempo do que o necessário.
Deixe que a temperatura do pro-
duto diminua até à temperatura
ambiente antes de o guardar.
Diminua a temperatura ambiente.
Isto está correcto.
8) Se previsto.
Page 34

34 electrolux
Problema Possível causa Solução
A água escorre para o frigorífico.
Os produtos evitam que a água
A água escorre para o
chão.
A temperatura no aparelho está demasiado baixa.
A temperatura no aparelho está demasiado alta.
A porta não está fechada correc-
A temperatura do produto está
Muitos produtos armazenados
A temperatura no frigorífico está demasiado alta.
A temperatura no congelador está demasiado alta.
Existe demasiado gelo. Os alimentos não estão embala-
A porta não está fechada correc-
A temperatura não está regulada
A saída de água está obstruída. Limpe a saída da água.
escorra para o colector de água.
A saída de água descongelada
não escorre para o tabuleiro de
evaporação acima do compressor.
A temperatura não está regulada
correctamente.
A temperatura não está regulada
correctamente.
tamente.
muito alta.
ao mesmo tempo.
Não existe circulação de ar frio no
aparelho.
Os produtos estão demasiado
perto uns dos outros.
dos correctamente.
tamente.
correctamente.
Substituir a lâmpada
Cuidado Desligue a ficha da tomada
eléctrica.
1. Retire o parafuso da tampa da lâmpada.
2. Puxe o gancho traseiro da tampa da lâmpada, utilizando uma chave de fendas, e
retire a tampa da lâmpada, puxando para
baixo.
3. Substitua a lâmpada por uma com a
mesma potência (a potência máxima está indicada na cobertura da lâmpada).
4. Instale a tampa da lâmpada.
5. Aperte o parafuso na tampa da lâmpada.
6. Ligue a ficha do aparelho à tomada de
alimentação.
7. Abra a porta. Certifique-se de que a lâmpada se acende.
Fechar a porta
1. Limpe as juntas da porta.
2. Se necessário, ajuste a porta. Consulte
"Instalação".
Certifique-se de que os produtos
não tocam na placa traseira.
Engate a saída de água descongelada no tabuleiro de evaporação.
Defina uma temperatura mais elevada.
Defina uma temperatura mais baixa.
Consulte "Fechar a porta".
Deixe que a temperatura do produto diminua até à temperatura
ambiente antes de o guardar.
Armazene menos produtos ao
mesmo tempo.
Certifique-se de que existe circulação de ar frio no aparelho.
Armazene os produtos de forma a
haver circulação de ar frio.
Embale os alimentos correctamente.
Consulte "Fechar a porta".
Defina uma temperatura mais elevada.
Page 35

3. Se necessário, substitua as juntas de
porta defeituosas. Contacte o Centro de
Assistência.
Dados técnicos
Dimensão do nicho de instalação
Altura 1800 mm
Largura 695 mm
Profundidade 669 mm
Tempo de reinício 20 h
As informações técnicas encontram-se na
placa de dados no lado esquerdo interno do
aparelho e na etiqueta de energia.
Instalação
Leia as "Informações de segurança"
cuidadosamente para a sua segurança
e funcionamento correcto do aparelho
antes de o instalar.
Posicionamento
Instale este aparelho num local com uma
temperatura ambiente que corresponde à
classe climática indicada na placa de dados
do aparelho:
Classe
climáti-
ca
SN +10 °C a + 32 °C
N +16 °C a + 32 °C
ST +16 °C a + 38 °C
T +16 °C a + 43 °C
Temperatura ambiente
Local
O aparelho deve ser instalado afastado de
fontes de calor, como sejam radiadores, termoacumuladores, luz solar directa, etc. Certifique-se de que o ar pode circular livremente na traseira do aparelho. Para garantir o
melhor desempenho, se o aparelho estiver
sob um armário suspenso, a distância mínima entre o topo do aparelho e o armário é
de 100 mm. No entanto, o aparelho não deve
ser colocado sob armários suspensos. O nivelamento preciso é garantido por um ou
mais pés ajustáveis na base do aparelho.
Advertência Tem de ser possível
desligar o aparelho da fonte de corrente;
Assim, a ficha tem de estar facilmente
acessível após a instalação.
100 mm
AB
10 mm
Ligação eléctrica
Antes de ligar, certifique-se de que a tensão
e a frequência indicadas na placa de dados
correspondem à fonte de alimentação doméstica.
O aparelho deve ter uma ligação à terra. A
ficha do cabo de alimentação é fornecida
com um contacto para este objectivo. Se a
tomada da fonte de alimentação doméstica
não estiver ligada à terra, ligue o aparelho a
electrolux 35
10 mm
Page 36

36 electrolux
uma ligação à terra separada, em conformidade com as normas actuais, consultando
um electricista qualificado.
O fabricante declina toda a responsabilidade
caso as precauções de segurança acima
não sejam cumpridas.
Este aparelho cumpre com as directivas.
E.E.C.
Separadores traseiros
No interior do aparelho, existem dois se-
paradores que devem ser instalados
conforme ilustrado.
Desaperte os parafusos, introduza o separador debaixo da cabeça do parafuso e volte
a apertar os parafusos.
1. Retire a dobradiça superior com cuidado para que a porta superior não caia e
guarde-a para utilização futura.
2. Retire a porta superior.
3. Retire o suporte superior e monte-o no
lado oposto.
4. Desaparafuse a dobradiça central (H).
Desaparafuse os tampões de plástico
localizados do lado oposto da dobradiça
central e introduza-os nos orifícios ocupados anteriormente pela dobradiça.
H
Reversibilidade da porta
Advertência Antes de executar
qualquer operação retire a ficha da
tomada.
Importante Recomendamos que execute
as seguintes operações com outra pessoa,
que irá segurar as portas do aparelho
durante as operações.
Para alterar o sentido de abertura, faça o seguinte:
5. Retire a porta inferior.
6. Retire a grelha de ventilação, que está
fixada por dois parafusos.
Page 37

7. Com cuidado, coloque o aparelho deitado de costas, desaparafuse totalmente o pé ajustável e aparafuse-o no lado
oposto.
8. Retire a dobradiça do fundo desenroscando os parafusos que a fixam.
9. Com uma chave de bocas de 12 mm,
desaparafuse o pino da dobradiça e volte a instalá-lo no lado oposto da dobradiça.
10. Volte a instalar a dobradiça inferior no
lado oposto com os parafusos que retirou anteriormente.
11. Com cuidado, volte a colocar o aparelho
na sua posição de funcionamento e
ajuste o nível do aparelho aparafusando/
desaparafusando o pé ajustável no fundo com os seus dedos ou uma ferramenta.
electrolux 37
12. Retire a cobertura do orifício da grelha
de ventilação, puxando-a na direcção da
seta, e volte a instalá-la no lado oposto.
13. Volte a colocar a grelha de ventilação e
aperte os parafusos.
14. Volte a instalar a porta inferior.
15. Volte a instalar a dobradiça central (H) no
lado oposto.
16. Volte a instalar a porta superior.
17. No saco da documentação poderá encontrar a dobradiça superior necessária
para efectuar esta reversibilidade. Coloque o parafuso no lugar.
Faça uma verificação final para se certificar
de que:
• Todos os parafusos estão apertados.
• A junta magnética está colada ao apare-
lho.
• A porta abre e fecha correctamente.
Se a temperatura ambiente for fria (por ex. no
Inverno), pode acontecer que a junta não
adira perfeitamente ao aparelho. Nesse caso, aguarde o encaixe natural do vedante.
Caso não queira executar as operações acima mencionadas, contacte o Centro de
Apoio ao Cliente mais perto. Os custos da
execução da reversibilidade das portas pelo
técnico do Centro de Apoio ao Cliente serão
suportados por si.
Page 38

38 electrolux
Preocupações ambientais
O símbolo no produto ou na embalagem
indica que este produto não pode ser tratado
como lixo doméstico. Em vez disso, deve ser
entregue ao centro de recolha selectiva para
a reciclagem de equipamento eléctrico e
electrónico. Ao garantir uma eliminação
adequada deste produto, irá ajudar a evitar
eventuais consequências negativas para o
meio ambiente e para a saúde pública, que,
de outra forma, poderiam ser provocadas
por um tratamento incorrecto do produto.
Para obter informações mais
pormenorizadas sobre a reciclagem deste
produto, contacte os serviços
municipalizados locais, o centro de recolha
selectiva da sua área de residência ou o
estabelecimento onde adquiriu o produto.
Page 39

electrolux 39
Page 40

www.electrolux.com
Para comprar acessórios e consumiveis na nossa loja web, por favor, visite:
www.electrolux.pt
222351463-00-022010
 Loading...