

Page 1

user manual
manual de instrucciones
Fridge-Freezer
Frigorífico-congelador
END42396X
Page 2
2 electrolux
Electrolux. Thinking of you.
Share more of our thinking at www.electrolux.com
Contents
Safety information 2
Control panel 4
First use 5
Daily use 5
Helpful hints and tips 6
How to use the water dispenser with BRITA
MAXTRA filter cartridge 7
Subject to change without notice
Care and cleaning 13
What to do if… 14
Technical data 15
Installation 15
Environmental concerns 18
Safety information
In the interest of your safety and to ensure
the correct use, before installing and first using the appliance, read this user manual
carefully, including its hints and warnings. To
avoid unnecessary mistakes and accidents,
it is important to ensure that all people using
the appliance are thoroughly familiar with its
operation and safety features. Save these instructions and make sure that they remain
with the appliance if it is moved or sold, so
that everyone using it through its life will be
properly informed on appliance use and safety.
For the safety of life and property keep the
precautions of these user's instructions as
the manufacturer is not responsible for damages caused by omission.
Children and vulnerable people safety
• This appliance is not intended for use by
persons (including children) with reduced
physical, sensory or mental capabilities, or
lack of experience and knowledge, unless
they have been given supervision or instruction concerning use of the appliance
by a person responsible for their safety.
Children should be supervised to ensure
that they do not play with the appliance.
• Keep all packaging well away from children. There is risk of suffocation.
• If you are discarding the appliance pull the
plug out of the socket, cut the connection
cable (as close to the appliance as you
can) and remove the door to prevent playing children to suffer electric shock or to
close themselves into it.
• If this appliance featuring magnetic door
seals is to replace an older appliance having a spring lock (latch) on the door or lid,
be sure to make that spring lock unusable
before you discard the old appliance. This
will prevent it from becoming a death trap
for a child.
General safety
Caution! Keep ventilation openings
clear of obstruction.
• The appliance is intended for keeping
foodstuff and/or beverages in a normal
household as explained in this instruction
booklet.
• Do not use a mechanical device or any artificial means to speed up the thawing
process.
• Do not use other electrical appliances
(such as ice cream makers) inside of refrigerating appliances, unless they are approved for this purpose by the manufacturer.
• Do not damage the refrigerant circuit.
• The refrigerant isobutane (R600a) is contained within the refrigerant circuit of the
appliance, a natural gas with a high level of
environmental compatibility, which is nevertheless flammable.
During transportation and installation of
the appliance, be certain that none of the
components of the refrigerant circuit become damaged.
If the refrigerant circuit should become
damaged:
Page 3

electrolux 3
– avoid open flames and sources of igni-
tion
– thoroughly ventilate the room in which
the appliance is situated
• It is dangerous to alter the specifications or
modify this product in any way. Any damage to the cord may cause a short-circuit,
fire and/or electric shock.
Warning! Any electrical component
(power cord, plug, compressor) must be
replaced by a certified service agent or
qualified service personnel.
1. Power cord must not be lengthened.
2. Make sure that the power plug is not
squashed or damaged by the back of
the appliance. A squashed or damaged power plug may overheat and
cause a fire.
3. Make sure that you can come to the
mains plug of the appliance.
4. Do not pull the mains cable.
5. If the power plug socket is loose, do
not insert the power plug. There is a
risk of electric shock or fire.
6. You must not operate the appliance
without the lamp cover
1)
of interior
lighting.
• This appliance is heavy. Care should be
taken when moving it.
• Do not remove nor touch items from the
freezer compartment if your hands are
damp/wet, as this could cause skin abrasions or frost/freezer burns.
• Avoid prolonged exposure of the appliance to direct sunlight.
Daily Use
• Do not put hot pot on the plastic parts in
the appliance.
• Do not store flammable gas and liquid in
the appliance, because they may explode.
• Do not place food products directly
against the air outlet on the rear wall.
2)
• Frozen food must not be re-frozen once it
has been thawed out.
• Store pre-packed frozen food in accordance with the frozen food manufacturer's
instructions.
• Appliance's manufacturers storage recommendations should be strictly adhered
to. Refer to relevant instructions.
• Do not place carbonated or fizzy drinks in
the freezer compartment as it creates
pressure on the container, which may
cause it to explode, resulting in damage to
the appliance.
• Ice lollies can cause frost burns if consumed straight from the appliance.
Care and cleaning
• Before maintenance, switch off the appliance and disconnect the mains plug from
the mains socket.
• Do not clean the appliance with metal objects.
• Do not use sharp objects to remove frost
from the appliance. Use a plastic scraper.
• Regularly examine the drain in the refrigerator for defrosted water. If necessary,
clean the drain. If the drain is blocked, water will collect in the bottom of the appliance.
Installation
Important! For electrical connection
carefully follow the instructions given in
specific paragraphs.
• Unpack the appliance and check if there
are damages on it. Do not connect the appliance if it is damaged. Report possible
damages immediately to the place you
bought it. In that case retain packing.
• It is advisable to wait at least four hours
before connecting the appliance to allow
the oil to flow back in the compressor.
• Adequate air circulation should be around
the appliance, lacking this leads to overheating. To achieve sufficient ventilation
follow the instructions relevant to installation.
• Wherever possible the back of the product
should be against a wall to avoid touching
or catching warm parts (compressor, condenser) to prevent possible burn.
• The appliance must not be located close
to radiators or cookers.
• Make sure that the mains plug is accessible after the installation of the appliance.
1) If the lamp cover is foreseen
2) If the appliance is Frost Free
Page 4
4 electrolux
•
Connect to potable water supply only.
3)
Service
• Any electrical work required to do the servicing of the appliance should be carried out
by a qualified electrician or competent person.
• This product must be serviced by an authorized Service Centre, and only genuine
spare parts must be used.
Environment Protection
This appliance does not contain gasses
which could damage the ozone layer, in
Control panel
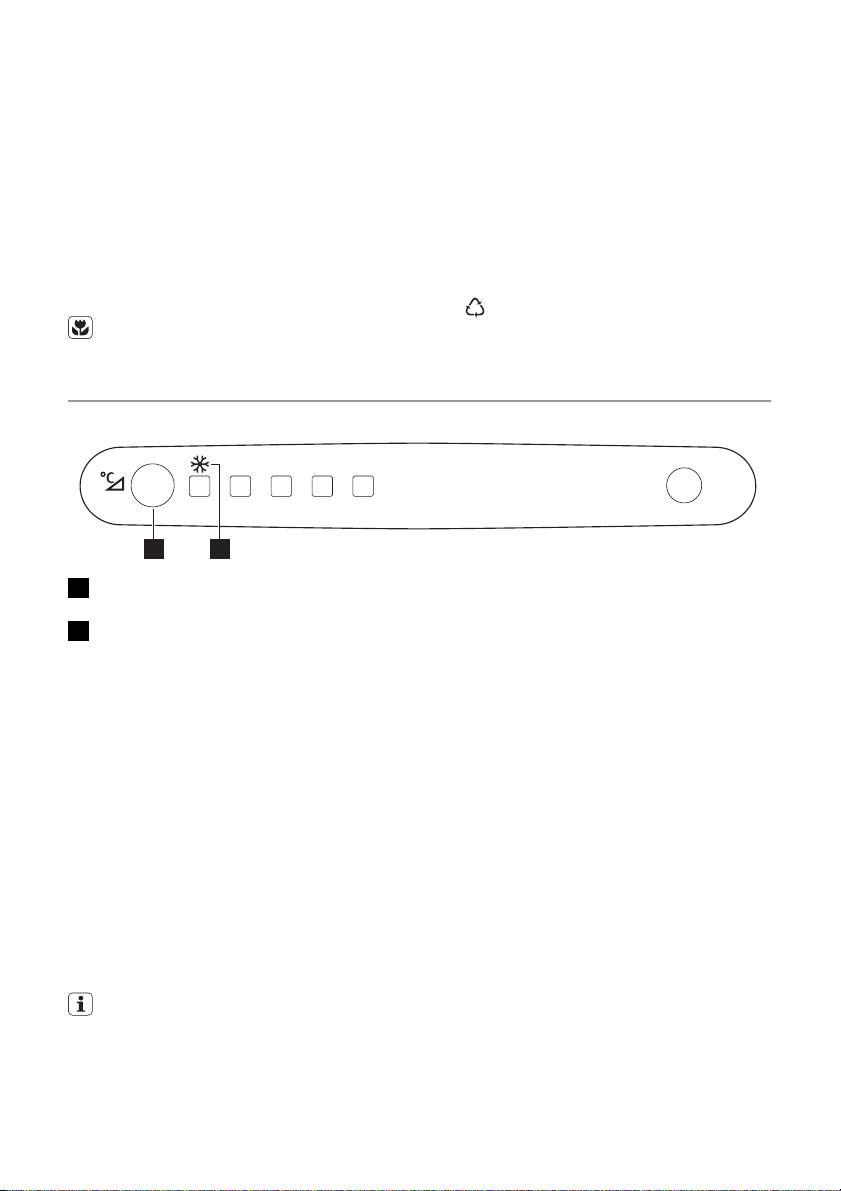
+2 +4 +5 +6 +8
1 2
1 Temperature regulator
Action Freeze button
2 Action Freeze indicator
Switching on
Remove, if present, the remove label stuck
on the inside of the freezer compartment.
Insert the plug into the wall socket.
Switching off
To switch off the appliance remove the mains
plug.
Temperature regulation
The temperature is automatically regulated.
To operate the appliance, proceed as follows:
• press the temperature regulator more
times until the LED corresponding to the
required temperature lights up. Selection
is progressive, varying from +2°C to +8°C.
A medium setting is generally the most
suitable.
either its refrigerant circuit or insulation
materials. The appliance shall not be discarded together with the urban refuse
and rubbish. The insulation foam contains flammable gases: the appliance
shall be disposed according to the applicable regulations to obtain from your
local authorities. Avoid damaging the
cooling unit, especially at the rear near
the heat exchanger. The materials used
on this appliance marked by the symbol
are recyclable.
However, the exact setting should be chosen
keeping in mind that the temperature inside
the appliance depends on:
• room temperature
• how often the door is opened
• the quantity of food stored
• the location of the appliance.
Important! If the ambient temperature is
lower than 16°C press the temperature
regulator until the LED corresponding to the
lowest temperature lights up.
Action Freeze function
You can activate the Action Freeze function
by pressing the Action Freeze button more
times until the LED corresponding to the
symbol Action Freeze indicator lights up.
You can deactivate the Action Freeze function by pressing the Action Freeze button
more times until the required temperature is
selected.
3) If a water connection is foreseen
Page 5

First use
Cleaning the interior
Before using the appliance for the first time,
wash the interior and all internal accessories
with lukewarm water and some neutral soap
so as to remove the typical smell of a brandnew product, then dry thoroughly.
Daily use
Movable shelves
The walls of the refrigerator are equipped
with a series of runners so that the shelves
can be positioned as desired.
Bottle rack
Place the bottles (with the opening facing
front) in the pre-positioned shelf.
Important! If the shelf is positioned
horizontally, place only closed bottles.
electrolux 5
Important! Do not use detergents or abrasive powders, as these will damage the finish.
this result, pull the shelf up so it can rotate
upwards and be placed on the next higher
level.
Positioning the door shelves
To permit storage of food packages of various sizes, the door shelves can be placed at
different heights.
To make these adjustments proceed as follows:
gradually pull the shelf in the direction of the
arrows until it comes free, then reposition as
required.
Air cooling
The Dynamic Air Cooling (DAC) fan let food
cool quickly and a more uniform temperature
in the compartment.
You can switch on the fan by pressing the
switch shown in the picture. The green light
comes on.
This bottle holder shelf can be tilted in order
to store previously opened bottles. To obtain
B
Page 6
6 electrolux
Important! Switch on the fan when the
ambient temperature exceeds 25°C.
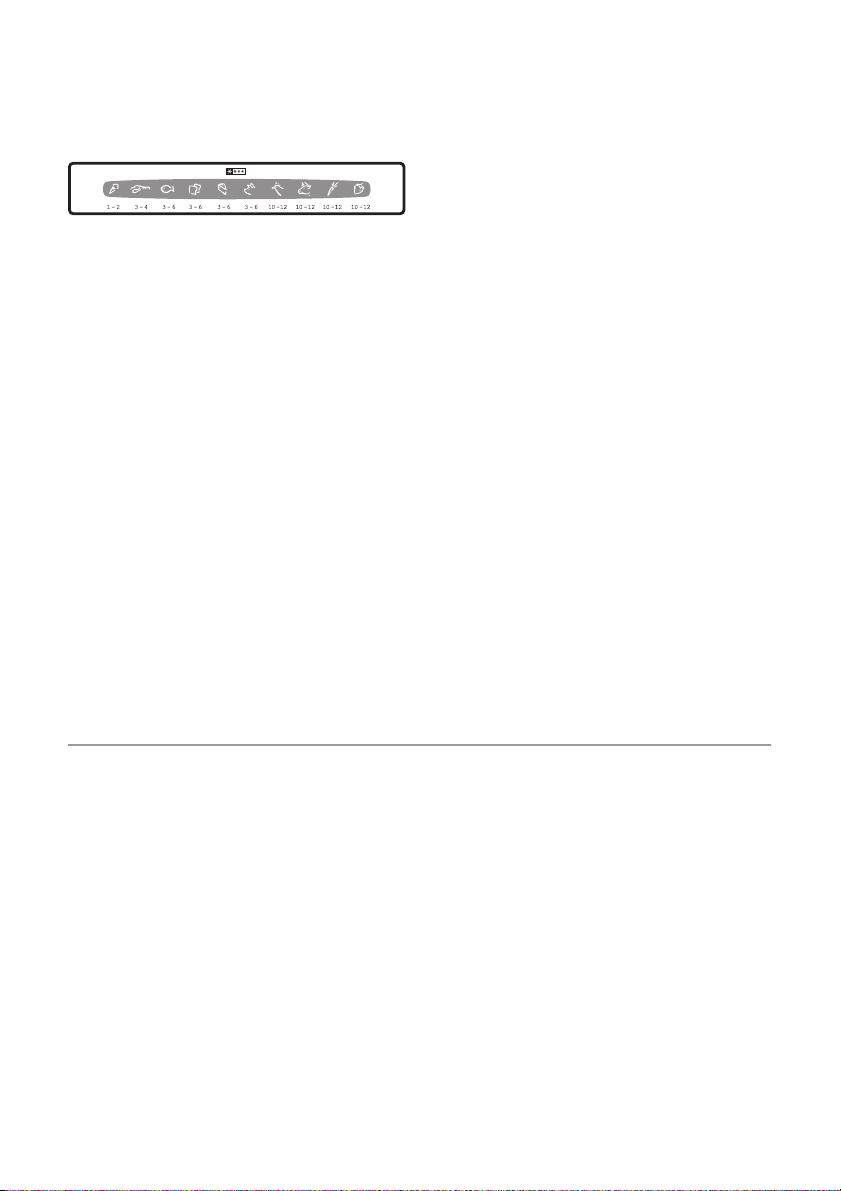
Freezing Calendar
The symbols show different types of frozen
goods.
The numbers indicate storage times in
months for the appropriate types of frozen
goods. Whether the upper or lower value of
the indicated storage time is valid depends
on the quality of the foods and treating before
freezing.
Freezing fresh food
The freezer compartment is suitable for
freezing fresh food and storing frozen and
deep-frozen food for a long time.
To freeze fresh food activate the Action
Freeze function at least 24 hours before placing the food to be frozen in the freezer compartment.
Move the shelf present in the freezer compartment to the middle seat, keeping it horizontal.
Place the fresh food to be frozen on that
shelf.
The maximum amount of food that can be
frozen in 24 hours is specified on the rating
plate, a label located on the inside of the appliance.
The freezing process lasts 24 hours: during
this period do not add other food to be frozen.
After 24 hours, when the freezing process is
completed, return to the required temperature (refer to "Temperature regulation").
Storage of frozen food
When first starting-up or after a period out of
use, before putting the products in the compartment let the appliance run at least 2
hours on the higher settings.
Important! In the event of accidental
defrosting, for example due to a power
failure, if the power has been off for longer
than the value shown in the technical
characteristics chart under "rising time", the
defrosted food must be consumed quickly or
cooked immediately and then re-frozen (after
cooling).
Thawing
Deep-frozen or frozen food, prior to being
used, can be thawed in the refrigerator compartment or at room temperature, depending
on the time available for this operation.
Small pieces may even be cooked still frozen,
directly from the freezer: in this case, cooking
will take longer.
Helpful hints and tips
Hints for energy saving
• Do not open the door frequently or leave it
open longer than absolutely necessary.
• If the ambient temperature is high and the
Temperature Regulator is set to low temperature and the appliance is fully loaded,
the compressor may run continuously,
causing frost or ice on the evaporator. If
this happens, set the Temperature Regulator toward warmer settings to allow automatic defrosting and so a saving in electricity consumption.
Hints for fresh food refrigeration
To obtain the best performance:
• do not store warm food or evaporating liquids in the refrigerator
• do cover or wrap the food, particularly if it
has a strong flavour
• position food so that air can circulate freely
around it
Hints for refrigeration
Useful hints:
Meat (all types) : wrap in polythene bags and
place on the glass shelf above the vegetable
drawer.
For safety, store in this way only one or two
days at the most.
Cooked foods, cold dishes, etc..: these
should be covered and may be placed on any
shelf.
Fruit and vegetables: these should be thoroughly cleaned and placed in the special
drawer(s) provided.
Butter and cheese: these should be placed
in special airtight containers or wrapped in
aluminium foil or polythene bags to exclude
as much air as possible.
Page 7
electrolux 7
Milk bottles: these should have a cap and
should be stored in the bottle rack on the
door.
Bananas, potatoes, onions and garlic, if not
packed, must not be kept in the refrigerator.
Hints for freezing
To help you make the most of the freezing
process, here are some important hints:
• the maximum quantity of food which can
be frozen in 24 hrs. is shown on the rating
plate;
• the freezing process takes 24 hours. No
further food to be frozen should be added
during this period;
• only freeze top quality, fresh and thoroughly cleaned, foodstuffs;
• prepare food in small portions to enable it
to be rapidly and completely frozen and to
make it possible subsequently to thaw only
the quantity required;
• wrap up the food in aluminium foil or polythene and make sure that the packages
are airtight;
• do not allow fresh, unfrozen food to touch
food which is already frozen, thus avoiding
a rise in temperature of the latter;
• lean foods store better and longer than
fatty ones; salt reduces the storage life of
food;
• water ices, if consumed immediately after
removal from the freezer compartment,
can possibly cause the skin to be freeze
burnt;
• it is advisable to show the freezing in date
on each individual pack to enable you to
keep tab of the storage time.
Hints for storage of frozen food
To obtain the best performance from this appliance, you should:
• make sure that the commercially frozen
foodstuffs were adequately stored by the
retailer;
• be sure that frozen foodstuffs are transferred from the foodstore to the freezer in the
shortest possible time;
• not open the door frequently or leave it
open longer than absolutely necessary.
• Once defrosted, food deteriorates rapidly
and cannot be refrozen.
• Do not exceed the storage period indicated by the food manufacturer.
How to use the water dispenser with BRITA MAXTRA filter cartridge
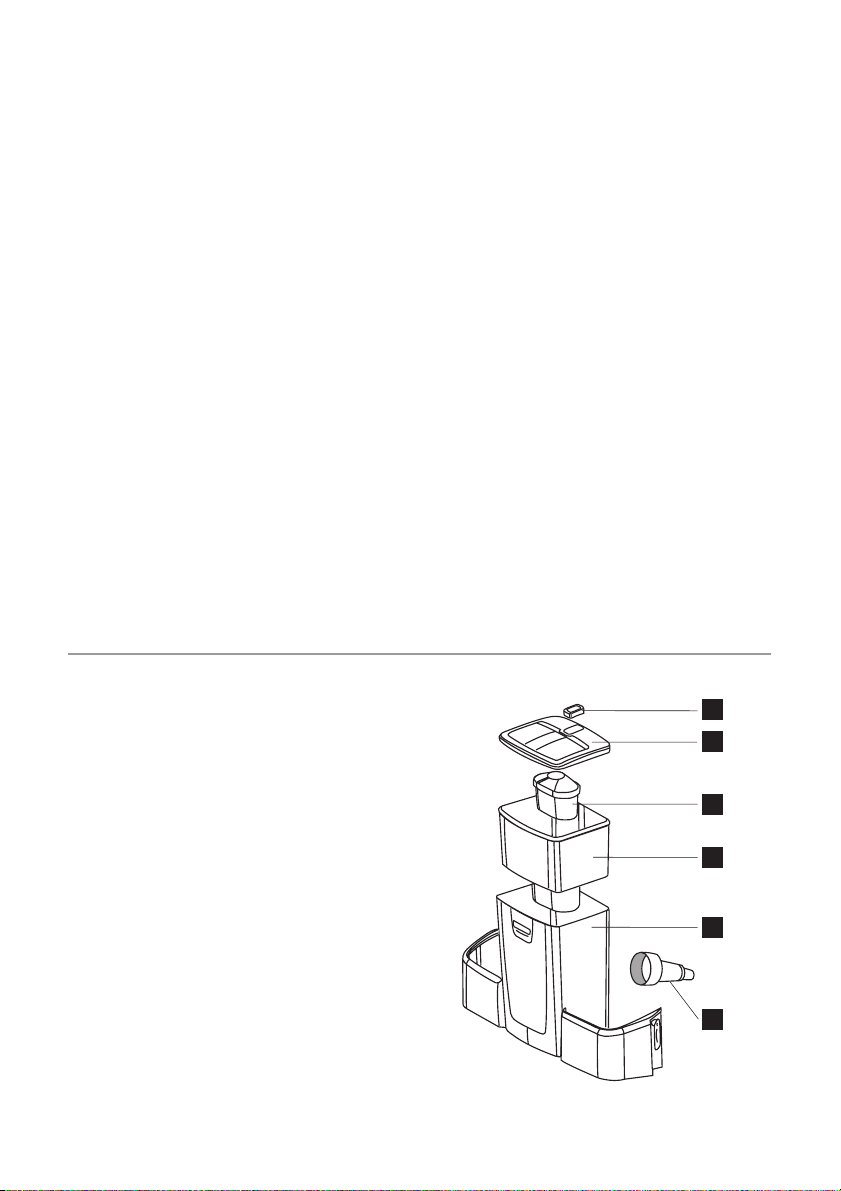
BRITA water filter unit
Internal components:
6
3
5
2
1
4
Page 8
8 electrolux
1 Water tank
2 Funnel
3 Tank lid
4Valve + gasket
5 Including BRITA MAXTRA filter
6 BRITA Memo - the electronic cartridge
exchange indicator
External components:
3. Remove the lid and the funnel.
1
A
2
3
1Dispenser
2 Water lever
3 Water drop tray
Initial operations to use your water
dispenser
1. Remove every tape and other protection
system from the tank assembly
2. clean the components, as described into
"Water dispenser cleaning procedure", in
order to remove eventual residue.
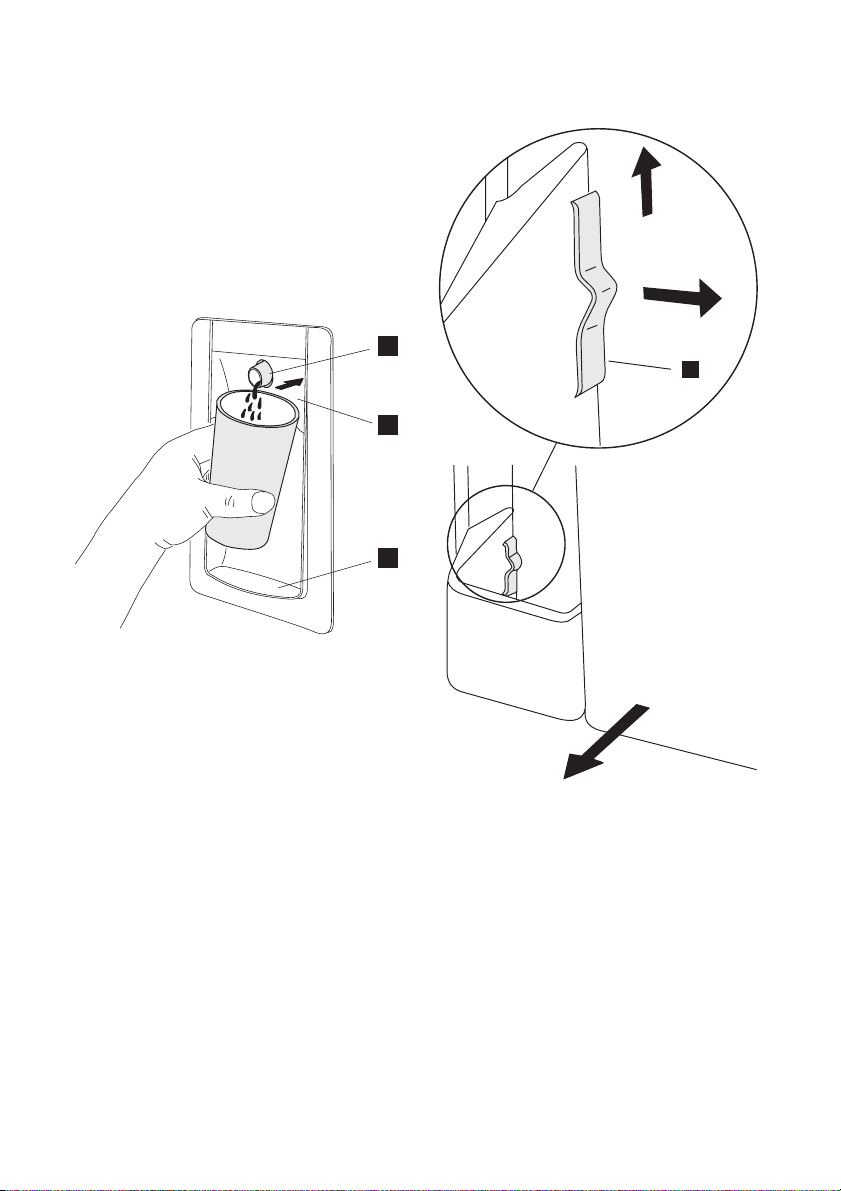
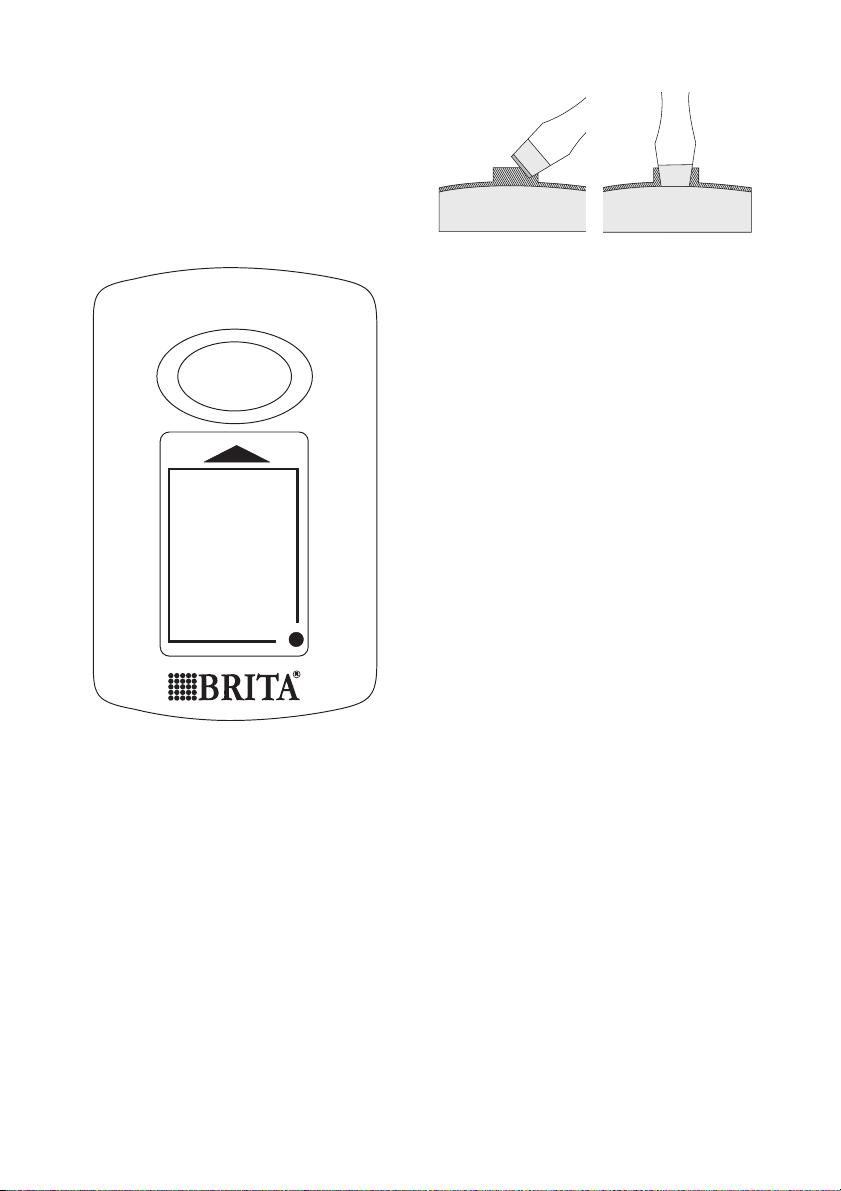
Water dispenser cleaning procedure
1. Unblock the two stopping elements on
the sides of the tank as shown in the pictures:
– take out the BRITA MAXTRA cartridge
from the water filter unit
– press the stopping elements in the
middle and move it up
– move the stopper into direction of the
central tank.
2. Push up the tank along the direction of
the valve.
4. Unscrew the valve in counter clockwise
(pay particular attention not to lose the
Valve Gasket because is necessary to a
correct functioning of the features ).
5. Clean the tank lid, the valve and the gasket with a solution of warm water and
neutral soap. Rinse it and put it inside the
door hole during the cleaning of the other
components (in order to avoid cold air
leakage from the fridge).
6. Clean the tank and the funnel into the
dishwasher or with a solution of warm
water and neutral soap and rinse them.
7. After the tank components cleaning take
back the valve from the fridge door and
assembly the tank in the inverse order
(4;3;2;1) of disassembly (pay attention at
the valve gasket positioning ).
Page 9
8. Put the assembled tank on the door
along the valve direction.
9. Block the stopping elements in the inverse order of unblock.
10. Insert again the BRITA MAXTRA cartridge in the funnel .
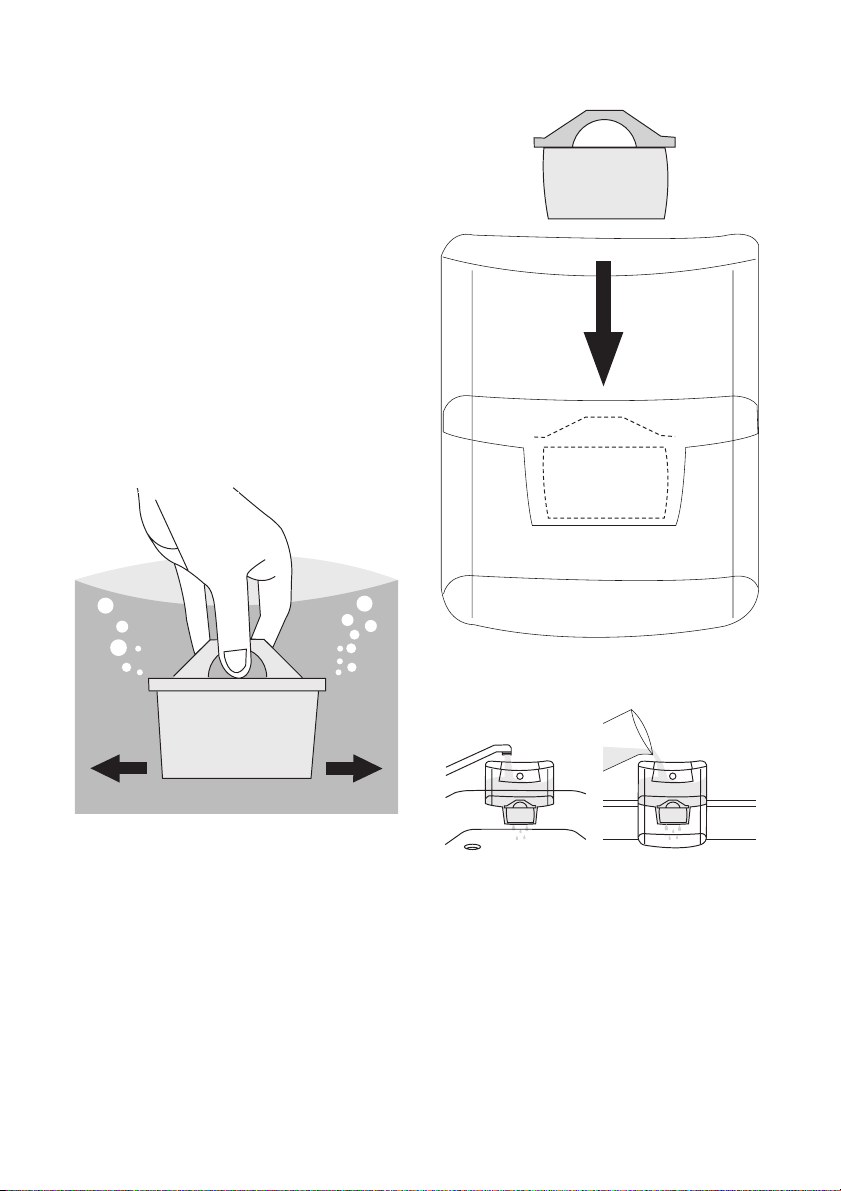
How to use the BRITA MAXTRA filter
cartridge
Step 1: Preparing the cartridge
To prepare your BRITA filter cartridge, please
remove the protective wrapper (note: cartridge and inside wrapper may appear moist,
this is simply condensation).
Immerse the cartridge in cold water and
shake it gently to remove any air bubbles.
The filter now is ready to use.
As required for some other water filter cartridges, there is no need to pre-soak the new
Maxtra Cartridge.
electrolux 9
Step 2: Insert in the water tank
Remove the tank lid. Before inserting the cartridge, remove the funnel and clean it thoroughly by rising it and wiping it dry.
Then, thoroughly clean the inside of the water
tank with a dump cloth and wipe it dry as
well.
Place the cartridge into the filter tank and
push downwards until it 'clicks' firmly into
place.
The cartridge should stay in place if the funnel
is turned upside down.
Step 3: Rinse the cartridge
2x 3x=ok
Take the funnel out of the BRITA water filter
unit, fill it under the tap with cold tap water
and allow it to filter through.
Discard the first two fillings into the sink.
These first two fillings are used to flush the
filter cartridge.
Then, place the funnel back into BRITA water
filter unit.
Place the cover back onto the jug and press
it carefully downwards to ensure it fits correctly into place.
Step 4: Refill the water tank
Page 10
10 electrolux
To fill the tank with cold water, simply open
the flip top lid, take a jug of tap water and
pour it inside the tank through the cover as
shown into the picture (use the lid every time
that you want to fill your water).
Important! In order to avoid risk of spillage
of water during closing and opening of the
refrigerator door, we recommend to not fill
completely the water tank but leave a head
space of air (max. refilling limit till the frontal
marks).
If you have not used all filtered water in the
water tank within 1-2 days, please discard
any water left inside the BRITA water filter unit
before refilling it.
Allow the water to filter through and repeat
"Step 4" as many times as you want until the
BRITA water filter unit is filled up.
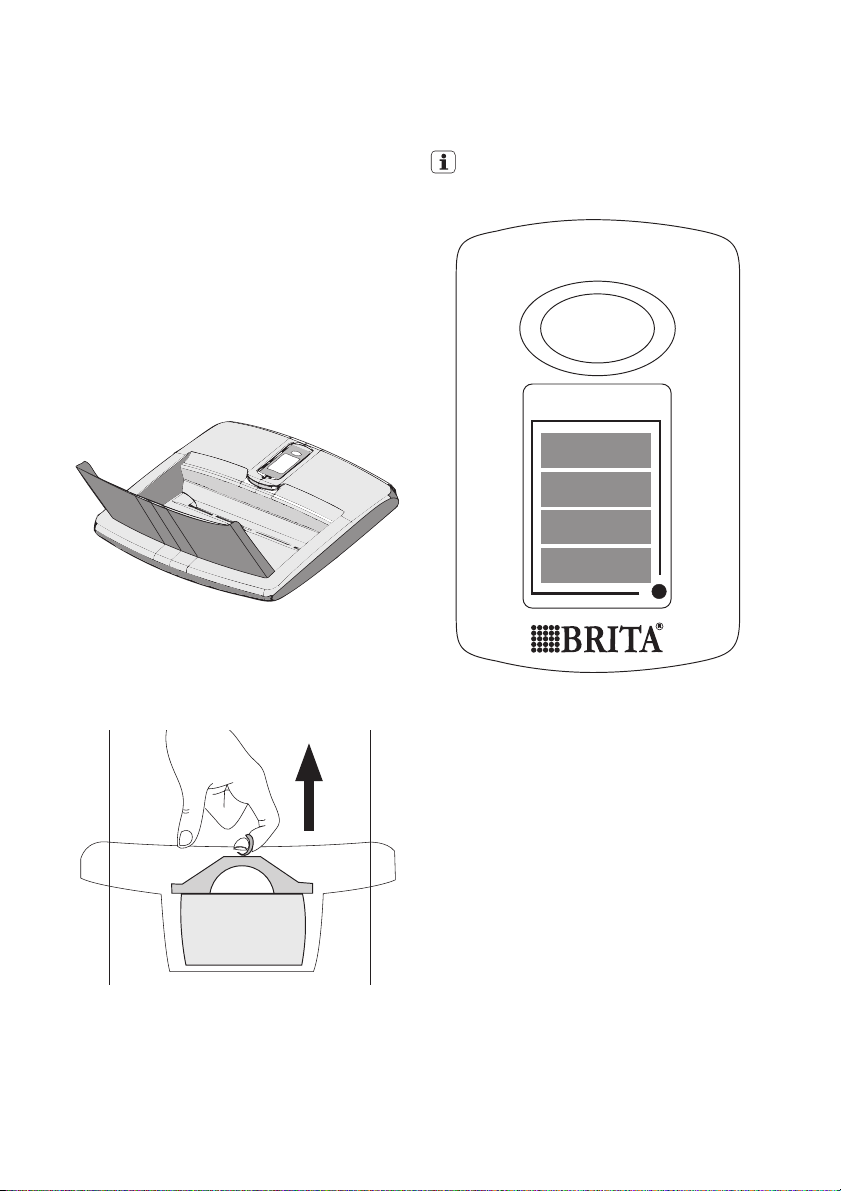
Remove cartridge with ring pull handle
BRITA cartridge regularly. BRITA recommends that you replace the cartridge in the
BRITA unit of your fridge every four weeks.
BRITA Memo automatically reminds you
when to change the cartridge.
START
%
100
75
50
25
The unique BRITA Memo measures the recommended time of use of your cartridge.
Memo is easy to use and automatically reminds your when to change your cartridge.
The BRITA Memo is located on the lid of the
water tank. Operation is really simple.
Start the Memo display
To start Memo please press and hold down
the start button on the lid until all four bars
appear in the display and flash twice. The
Memo is now set.
To exchange the cartridge after four weeks,
simply use the ring pull handle on the top of
the cartridge to remove it from the funnel,
and repeat steps 1 - 3 above.
The BRITA Memo
For maximum filter performance and optimum taste, it is important to change your
Page 11
electrolux 11
START
%
100
75
50
25
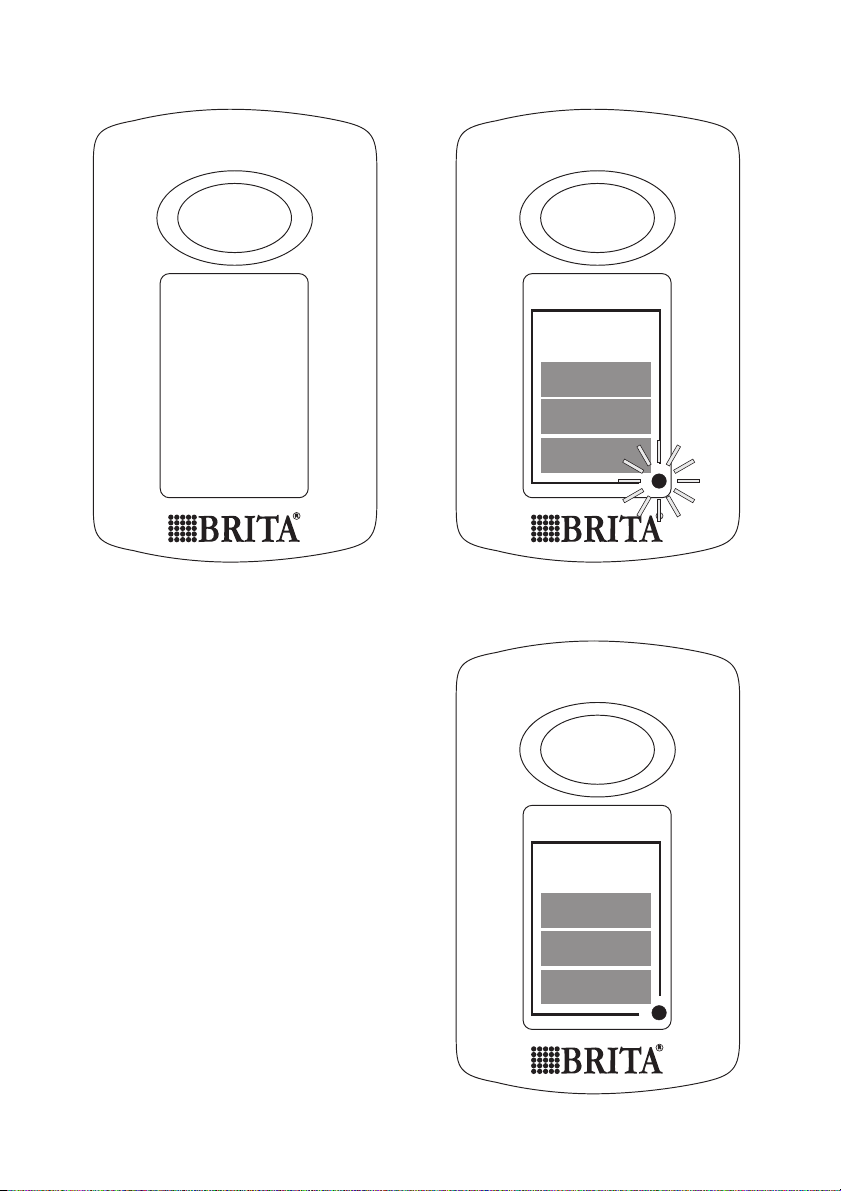
Functional control
The flashing dot in the bottom right corner of
the Memo indicates that the Memo is working.
START
%
100
75
50
25
Change display
START
%
100
75
50
25
Page 12
12 electrolux
Every week one bar will disappear to show
the remaining cartridge life. After four weeks
all four bars will disappear. This, and a flashing arrow, indicate that the cartridge should
now be changed.
Insert a new cartridge according to the instructions and reactivate the Memo as described above.
START
%
100
75
50
25
When only one bar is showing, you should
just check whether you have a new BRITA
MAXTRA filter cartridge to hand.
Important! The Memo is only designed to be
used with BRITA filter cartridges.
BRITA Memo: the electronic cartridge exchange indicator has a life of approximately
5 years. At the end of the Memo's life, please
remember that it is an electronic device and
to dispose on the Memo according to all applicable provisions and regulations.
To remove the exhausted Memo place a
screwdriver in the notch next to the Memo
and push it out.
Please note that Memo should not be removed for any other reason than to dispose
of it.
Important information
• The fridge door valve hole must be closed
with the Water Valve during the regular
functioning of the appliance.
• Use only drinking water. The use of any
other drink type can leave residues, taste
or odor in the reservoir and in the tap.
• It is possible to hear some noises caused
by air entering when the water left the reservoir.
• In case the water does not flow well, press
the driving lever once again. Keep the
glass below the tap for some instants, in
order to assure that all the water is collected by the glass.
• Do not use gasified drinks, such as soft
drinks. The drink can leak due to the gas
pressure.
• Remember that water is a foodstuff.
Please consume filtered water within one
to two days.
• Should your BRITA water filter unit not be
in use for a prolonged period (e.g. vacation), we recommend that you discard any
water left inside the system and leave the
cartridge inside the filter tank.
Before using the system again take out the
cartridge and repeat steps 1 to 4 of "How
to use the BRITA MAXTRA filter cartridge".
• The BRITA water filter unit is designed for
use only with municipally treated tap water
(note: this water is constantly controlled
and according to legal regulations safe to
drink) or with water from private supplies
which has been tested safe to drink.
If an instruction is received from the authorities that mains water must be boiled,
the BRITA filtered water has also to be
boiled. When the instruction to boil water
is no longer in force, the entire filter system
must be cleaned and a new cartridge inserted.
More information on the use of BRITA filter
cartridges and the Memo can be found in the
BRITA information guide.
Page 13

You can purchase new BRITA filter cartridges and Memo through consumer
service network of Electrolux or BRITA.
Care and cleaning
Caution! Unplug the appliance before
carrying out any maintenance operation.
This appliance contains hydrocarbons in
its cooling unit; maintenance and recharging must therefore only be carried
out by authorized technicians.
Periodic cleaning
The equipment has to be cleaned regularly:
• clean the inside and accessories with lukewarm water and some neutral soap.
• regularly check the door seals and wipe
clean to ensure they are clean and free
from debris.
• rinse and dry thoroughly.
Important! Do no t p ul l, m ov e o r d ama ge an y
pipes and/or cables inside the cabinet.
Never use detergents, abrasive powders,
highly perfumed cleaning products or wax
polishes to clean the interior as this will damage the surface and leave a strong odour.
Clean the condenser (black grill) and the
compressor at the back of the appliance with
a brush or a vacuum cleaner. This operation
will improve the performance of the appliance and save electricity consumption.
Important! Take care of not to damage the
cooling system.
Many proprietary kitchen surface cleaners
contain chemicals that can attack/damage
the plastics used in this appliance. For this
reason it is recommended that the outer casing of this appliance is only cleaned with
warm water with a little washing-up liquid
added.
After cleaning, reconnect the equipment to
the mains supply.
Defrosting of the refrigerator
Frost is automatically eliminated from the
evaporator of the refrigerator compartment
every time the motor compressor stops, during normal use. The defrost water drains out
through a trough into a special container at
4) If foreseen.
electrolux 13
the back of the appliance, over the motor
compressor, where it evaporates.
It is important to periodically clean the defrost
water drain hole in the middle of the refrigerator compartment channel to prevent the
water overflowing and dripping onto the food
inside. Use the special cleaner provided,
which you will find already inserted into the
drain hole.
Defrosting of the freezer
The freezer compartment of this model, on
the other hand, is a "no frost" type. This
means that there is no buildup of frost when
it is in operation, neither on the internal walls
nor on the foods.
The absence of frost is due to the continuous
circulation of cold air inside the compartment, driven by an automatically controlled
fan.
Periods of non-operation
When the appliance is not in use for long periods, take the following precautions:
•
disconnect the appliance from electricity supply
• remove all food
defrost
4)
and clean the appliance and all
•
accessories
Page 14

14 electrolux
• leave the door/doors ajar to prevent unpleasant smells.
If the cabinet will be kept on, ask somebody
to check it once in a while to prevent the food
inside from spoiling in case of a power failure.
What to do if…
Warning! Before troubleshooting,
disconnect the mains plug from the
mains socket.
Only a qualified electrician or competent
person must do the troubleshooting that
is not in this manual.
Problem Possible cause Solution
The appliance does not
operate. The lamp does
not operate.
The mains plug is not connected
The appliance has no power.
The lamp does not work. The lamp is in stand-by. Close and open the door.
The lamp is defective. Refer to "Replacing the lamp".
The compressor operates
continually.
The door is not closed correctly. Refer to "Closing the door".
The door has been opened too
The product temperature is too
The room temperature is too
Water flows on the rear
plate of the refrigerator.
Water flows into the refrigerator.
Products prevent that water flows
Water flows on the
ground.
The temperature in the
appliance is too low.
The temperature in the
appliance is too high.
The door is not closed correctly. Refer to "Closing the door".
The appliance is switched off. Switch on the appliance.
to the mains socket correctly.
There is no voltage in the mains
socket.
The temperature is not set correctly.
frequently.
high.
high.
During the automatic defrosting
process, frost defrosts on the rear
plate.
The water outlet is clogged. Clean the water outlet.
into the water collector.
The melting water outlet does not
flow in the evaporative tray above
the compressor.
The temperature regulator is not
set correctly.
The temperature regulator is not
set correctly.
Important! There are some sounds during
normal use (compressor, refrigerant
circulation).
Connect the mains plug to the
mains socket correctly.
Connect a different electrical appliance to the mains socket.
Contact a qualified electrician.
Set a higher temperature.
Do not keep the door open longer
than necessary.
Let the product temperature decrease to room temperature before
storage.
Decrease the room temperature.
This is correct.
Make sure that products do not
touch the rear plate.
Attach the melting water outlet to
the evaporative tray.
Set a higher temperature.
Set a lower temperature.
Page 15

electrolux 15
Problem Possible cause Solution
The product temperature is too
Many products are stored at the
The temperature in the refrigerator is too high.
The temperature in the
freezer is too high.
There is too much frost. Food is not wrapped correctly. Wrap the food correctly.
The door is not closed correctly. Refer to "Closing the door".
The temperature regulator is not
high.
same time.
There is no cold air circulation in
the appliance.
Products are too near to each
other.
set correctly.
Let the product temperature decrease to room temperature before
storage.
Store less products at the same
time.
Make sure that there is cold air circulation in the appliance.
Store products so that there is cold
air circulation.
Set a higher temperature.
Replacing the lamp
1. Disconnect the plug from the mains
socket.
2. Press on the rear hook of the lamp cover
by a screwdriver and at the same time pull
and rotate the cover in the direction of the
arrow.
3. Replace the lamp with one of the same
power (the maximum power is shown on
A
max 25 W
B
the lamp cover).
4. Install the lamp cover by fixing it into its
original position.
5. Connect the plug to the mains socket.
6. Open the door. Make sure that the light
comes on.
Closing the door
1. Clean the door gaskets.
2. If necessary, adjust the door. Refer to "Installation".
3. If necessary, replace the defective door
gaskets. Contact the Service Center.
Technical data
Dimension of the recess
Height 1800 mm
Width 695 mm
Depth 669 mm
Rising Time 20 h
The technical information are situated in the
rating plate on the internal left side of the appliance and in the energy label.
Installation
Read the "Safety Information" carefully
for your safety and correct operation of
the appliance before installing the
appliance.
Page 16

16 electrolux
Positioning
Install this appliance at a location where the
ambient temperature corresponds to the climate class indicated on the rating plate of the
appliance:
Climate
class
SN +10°C to + 32°C
N +16°C to + 32°C
ST +16°C to + 38°C
T +16°C to + 43°C
Ambient temperature
Location
The appliance should be installed well away
from sources of heat such as radiators, boilers, direct sunlight etc. Ensure that air can
circulate freely around the back of the cabinet. To ensure best performance, if the appliance is positioned below an overhanging
wall unit, the minimum distance between the
top of the cabinet and the wall unit must be
at least 100 mm . Ideally, however, the appliance should not be positioned below overhanging wall units. Accurate levelling is ensured by one or more adjustable feet at the
base of the cabinet.
Warning! It must be possible to
disconnect the appliance from the mains
power supply; the plug must therefore
be easily accessible after installation.
Electrical connection
Before plugging in, ensure that the voltage
and frequency shown on the rating plate correspond to your domestic power supply.
The appliance must be earthed. The power
supply cable plug is provided with a contact
for this purpose. If the domestic power supply socket is not earthed, connect the appliance to a separate earth in compliance with
current regulations, consulting a qualified
electrician.
The manufacturer declines all responsibility if
the above safety precautions are not observed.
This appliance complies with the E.E.C. Directives.
Rear spacers
Inside the appliance you find two
spacers which must be fitted as shown
in the figure.
Slacken the screws and insert the spacer
under the screw head, then retighten the
screws.
100 mm
AB
10 mm
10 mm
Door reversibility
Warning! Before carrying out any
operations, remove the plug from the
power socket.
Page 17

Important! To carry out the following
operations, we suggest that this be made
with another person that will keep a firm hold
on the doors of the appliance during the
operations.
To change the opening direction of the door,
do these steps:
1. Remove the upper hinge taking care for
the upper door not to fall off and keep it
for future actions.
2. Remove the upper door.
3. Remove the upper support and mount it
in the opposite side.
4. Unscrew the middle hinge (H). Unscrew
the plastic plugs located on the opposite
side of the central hinge and introduce
them in the holes occupied before by the
hinge.
electrolux 17
7. Carefully place the appliance on its back,
totally unscrew the adjustable foot and
screw it in the opposite side.
8. Remove the bottom hinge by unscrewing its fixing screws.
9. Using a 12 mm spanner, unscrew the
hinge pin and reassemble it on the opposite side of the hinge.
10. Reassemble the lower hinge in the opposite side, using the screws previously
removed.
11. Carefully replace the appliance in its
working position and adjust the level of
the appliance by screwing / unscrewing
the adjustable feet at the bottom of the
cabinet using your fingers or a tool.
H
5. Remove the lower door.
6. Pull off the ventilation grille which is fixed
by two screws.
12. Slide the hole cover out of the ventilation
grille by pushing it in the direction of the
arrow and reassemble it on the opposite
side.
Page 18

18 electrolux
13. Refit the ventilation grille, fixing the
screws.
14. Reassemble the lower door.
15. Reassemble the middle hinge (H) in the
opposite side.
16. Reassemble the upper door.
17. In your documentation bag you will find
the upper hinge necessary to make the
reversibility. Please screw it in place.
Environmental concerns
The symbol on the product or on its
packaging indicates that this product may
not be treated as household waste. Instead
it should be taken to the appropriate
collection point for the recycling of electrical
and electronic equipment. By ensuring this
product is disposed of correctly, you will help
prevent potential negative consequences for
Do a final check to make sure that:
• All screws are tightened.
• The magnetic seal adheres to the cabinet.
• The door opens and closes correctly.
If the ambient temperature is cold (i.e. in Winter), the gasket may not fit perfectly to the
cabinet. In that case, wait for the natural fitting of the gasket.
In case you do not want to carry out the
above mentioned operations, contact the
nearest After Sales Service Force. The After
Sales Service specialist will carry out the reversibility of the doors at your cost.
the environment and human health, which
could otherwise be caused by inappropriate
waste handling of this product. For more
detailed information about recycling of this
product, please contact your local council,
your household waste disposal service or the
shop where you purchased the product.
Page 19

Electrolux. Thinking of you.
Conozca mejor nuestros conceptos en www.electrolux.com
Índice de materias
Información sobre seguridad 19
Panel de mandos 21
Primer uso 22
Uso diario 22
Consejos útiles 24
Cómo utilizar el dispensador de agua con
cartucho de filtro BRITA MAXTRA 25
Salvo modificaciones
Mantenimiento y limpieza 30
Qué hacer si… 31
Datos técnicos 33
Instalación 33
Aspectos medioambientales 36
Información sobre seguridad
Por su seguridad y para garantizar el funcionamiento correcto del aparato, antes de instalarlo y utilizarlo por primera vez lea atentamente este manual del usuario, incluidos los
consejos y advertencias. Para evitar errores
y accidentes, es importante que todas las
personas que utilicen el aparato estén perfectamente al tanto de su funcionamiento y
de las características de seguridad. Conserve estas instrucciones y no olvide mantenerlas junto al aparato en caso de su desplazamiento o venta para que quienes lo utilicen a
lo largo de su vida útil dispongan siempre de
la información adecuada sobre el uso y la
seguridad.
Por la seguridad de personas y bienes, siga
las normas de seguridad indicadas en estas
instrucciones, ya que el fabricante no se hace responsable de daños provocados por
omisiones.
Seguridad de niños y personas
vulnerables
• Este electrodoméstico no está diseñado
para que lo usen personas (incluidos niños) con discapacidad física, sensorial o
mental, o con experiencia y conocimiento
insuficientes, a menos que una persona
responsable de su seguridad les supervise
o instruya en el uso del electrodoméstico.
No permita que los niños jueguen con el
electrodoméstico.
• Mantenga los materiales de embalaje ale-
jados de los niños. Existe riesgo de asfixia.
• Si va a desechar el aparato, extraiga el enchufe de la toma, corte el cable de conexión (tan cerca del aparato como pueda) y
retire la puerta para impedir que los niños
al jugar puedan sufrir descargas eléctricas
o quedar atrapados en su interior.
• Si este aparato, que cuenta con juntas de
puerta magnéticas, sustituirá a un aparato
más antiguo con cierre de muelle (pestillo)
en la puerta, cerciórese de inutilizar el cierre de muelle antes de desechar el aparato
antiguo. Evitará así que se convierta en
una trampa mortal para niños.
Instrucciones generales de seguridad
Precaución Mantenga las aberturas de
ventilación sin obstrucciones.
• El aparato está diseñado para conservar
los alimentos y bebidas de una vivienda
normal, como se explica en este folleto de
instrucciones.
• No utilice dispositivos mecánicos ni medios artificiales para acelerar el proceso de
descongelación.
• No utilice otros aparatos eléctricos (como
máquinas de hacer helados) dentro de
aparatos de refrigeración, a menos que el
fabricante haya autorizado su utilización.
• No dañe el circuito refrigerante.
• El circuito refrigerante del aparato contiene
isobutano (R600a). Es un gas natural con
un gran nivel de compatibilidad medioambiental, aunque es inflamable.
electrolux 19
Page 20

20 electrolux
Durante el transporte y la instalación del
aparato, cerciórese de no provocar daños
al circuito de refrigerante.
Si el circuito de refrigerante se daña:
– evite fuegos al descubierto y fuentes de
encendido
– ventile bien la habitación en la que se
encuentra el aparato
• Es peligroso alterar las especificaciones o
intentar modificar este producto en modo
alguno. Cualquier daño en el cable de alimentación puede provocar cortocircuito,
incendio o descarga eléctrica.
Advertencia Los componentes eléctricos (cable de alimentación, enchufe,
compresor) debe sustituirlos un técnico
autorizado o personal de reparaciones
profesional.
1. El cable de alimentación no se debe
prolongar.
2. Compruebe que el enchufe no está
aplastado ni dañado por la parte trasera del aparato. Un enchufe aplastado o dañado puede recalentarse y provocar un incendio.
3. Cerciórese de que tiene acceso al en-
chufe del aparato.
4. No tire del cable de alimentación.
5. Si la toma de red está floja, no intro-
duzca el enchufe. Existe riesgo de descarga eléctrica o incendio.
6. No debe utilizar el aparato sin la cu-
bierta de la bombilla
5)
de la iluminación
interior.
• Este aparato es pesado. Debe tener precauciones durante su desplazamiento.
• No retire ni toque elementos del compartimento congelador con las manos húmedas o mojadas, ya que podría sufrir abrasión de la piel o quemaduras por congelación.
• Evite la exposición prolongada del aparato
a la luz solar directa.
Uso diario
• No coloque recipientes calientes sobre las
piezas plásticas del aparato.
• No almacene gas ni líquido inflamable en
el aparato, ya que podrían estallar.
• No coloque alimentos directamente contra la salida de aire de la pared posterior.
6)
• Los alimentos que se descongelen no deben volver a congelarse.
• Guarde los alimentos congelados, que se
adquieren ya envasados, siguiendo las
instrucciones del fabricante.
• Se deben seguir estrictamente las recomendaciones del fabricante del aparato
sobre el almacenamiento. Consulte las
instrucciones correspondientes.
• No coloque bebidas carbonatadas o con
gas en el congelador, ya que se genera
presión en el recipiente, que podría estallar
y dañar el aparato.
• Si se consumen polos helados retirados
directamente del aparato, se pueden sufrir
quemaduras causadas por el hielo.
Cuidado y limpieza
• Antes de realizar tareas de mantenimiento,
apague el aparato y desconecte el enchufe de la toma de red. Si no puede acceder
a la toma de red, corte el suministro eléctrico.
• No limpie el aparato con objetos metálicos.
• No utilice objetos afilados para eliminar el
hielo del aparato. Utilice un raspador plástico.
• Inspeccione habitualmente el desagüe del
agua descongelada del frigorífico. Si es
necesario, limpie el desagüe. Si el desagüe
se bloquea, el agua se acumulará en la
base del aparato.
Instalación
Importante Para realizar la conexión
eléctrica, siga atentamente las instrucciones
de los párrafos correspondientes.
• Desembale el aparato y compruebe que
no tiene daños. No conecte el aparato si
está dañado. Informe de los posibles daños de inmediato a la tienda donde lo adquirió. En ese caso, conserve el material
de embalaje.
• Es recomendable esperar al menos dos
horas antes de conectar el aparato, para
permitir que el aceite regrese al compresor.
5) Si está previsto el uso de cubierta para la bombilla
6) Si el aparato no acumula escarcha (Frost Free)
Page 21

electrolux 21
• El aparato debe contar con circulación de
aire adecuada alrededor, ya que de lo contrario se produce recalentamiento. Para
conseguir una ventilación suficiente, siga
las instrucciones correspondientes a la
instalación.
• Siempre que sea posible, la parte posterior
del producto debe estar contra una pared,
para evitar que se toquen las partes calientes (compresor, condensador) y se
produzcan quemaduras.
• El aparato no debe colocarse cerca de radiadores ni de hornillas de cocina.
• Asegúrese de que es posible acceder al
enchufe después de instalar el electrodoméstico.
• Realice la conexión sólo con el suministro
de agua potable.
7)
Servicio técnico
• Un electricista homologado deberá realizar las tareas que se requieran para ejecutar el servicio o mantenimiento de este
electrodoméstico.
Panel de mandos
• Las reparaciones de este aparato debe
realizarlas un centro de servicio técnico
autorizado y sólo se deben utilizar recambios originales.
Protección del medio ambiente
Este aparato no contiene gases perjudiciales para la capa de ozono, ni en el
circuito de refrigerante ni en los materiales aislantes. El aparato no se debe desechar junto con los residuos urbanos.
La espuma aislante contiene gases inflamables: el aparato se debe desechar
de acuerdo con la normativa vigente,
que puede solicitar a las autoridades locales. No dañe la unidad de refrigeración, en especial la parte trasera, cerca
del intercambiador de calor. Los materiales de este aparato marcados con el
símbolo
son reciclables.
+2 +4 +5 +6 +8
1 2
1 Regulador de temperatura
Tecla Action Freeze
2 Indicador Action Freeze
Encendido
Retire cualquier etiqueta que pueda haber
adherida en el interior del compartimento
congelador.
Introduzca el enchufe en la toma.
Apagado
Para apagar el aparato, extraiga el enchufe
de la toma de corriente.
Regulación de la temperatura
La temperatura se regula automáticamente.
7) Si está prevista una conexión de agua
Para utilizar el aparato, proceda de la manera
siguiente:
• Mantenga pulsado el regulador de temperatura hasta que se encienda el LED correspondiente a la temperatura que desea.
La selección es progresiva y oscila de +2
°C a +8 °C. La temperatura indicada por
el LED cambia cada vez que se pulsa la
tecla.
Lo más conveniente es ajustar la temperatura en una posición intermedia.
Sin embargo, el ajuste exacto debe elegirse
teniendo en cuenta que la temperatura interior del aparato depende de:
• la temperatura ambiente
• la frecuencia con que se abre la puerta
Page 22

22 electrolux
• la cantidad de alimentos guardados
• la ubicación del aparato.
Importante Si la temperatura ambiente es
inferior a 16 °C, pulse el regulador hasta que
se encienda el LED correspondiente a la
temperatura mínima.
Función Action Freeze
La función Action Freeze se puede activar
pulsando la tecla Action Freeze varias veces
Primer uso
Limpieza de las partes internas
Antes del empleo limpiar todas las partes internas con agua tibia y jabón neutro, a fin de
eliminar el característico olor de nuevo y secarlas luego cuidadosamente.
Uso diario
Estantes móviles
Las paredes del frigorífico cuentan con guías
para colocar los estantes del modo que se
prefiera.
hasta que se encienda el LED correspondiente al símbolo Action Freeze .
Para desactivar la función Action Freeze pulse una o varias veces la tecla Action Freeze
hasta que aparezca la temperatura que desee.
Importante No emplear detergentes o polvos abrasivos que podrían dañar las superficies.
Estante botellero
Coloque las botellas (con la parte del tapón
hacia fuera) en el estante botellero provisto al
efecto.
Importante Si coloca el botellero en
posición horizontal, úselo sólo para botellas
cerradas.
El estante botellero puede inclinarse para
guardar botellas previamente abiertas. Para
inclinarlo, tire del estante hacia arriba de forma que pueda girarlo y colocarlo en el nivel
más alto siguiente.
Page 23

electrolux 23
Colocación de los estantes de la puerta
La puerta va provista de estantes que pueden colocarse a distintas alturas para guardar alimentos de tamaños diferentes.
Para cambiar la posición de los estantes:
eleve paulatinamente el estante en la dirección de la flecha hasta retirarlo del soporte y
colóquelo en la posición que desee.
Enfriamiento por aire
El ventilador de Enfriamiento dinámico por
aire (DAC) permite enfriar rápidamente los
alimentos y mantener una temperatura uniforme en el compartimento.
Para activar el ventilador, pulse el interruptor
que muestra la figura. Se enciende una luz
verde.
B
Importante Encienda el ventilador cuando
la temperatura ambiente supere los 25 °C.
Calendario de congelación
Los símbolos muestran los distintos tipos de
alimentos congelados.
Los números indican los tiempos de almacenamiento en meses de cada tipo de alimento congelado. Que el valor superior o inferior del tiempo de almacenamiento indicado sea válido dependerá de la calidad de los
alimentos y del tratamiento aplicado antes de
la congelación.
Congelación de alimentos frescos
El compartimento congelador está ideado
para la congelación de alimentos frescos y
para la conservación a largo plazo de alimentos congelados y ultracongelados.
Para congelar alimentos frescos active la
función Action Freeze al menos 24 horas antes de introducir los alimentos en el compartimento congelador.
Mueva el estante hasta la mitad del compartimento congelador procurando mantenerlo
en horizontal.
Coloque los alimentos frescos que vaya a
congelar en el estante.
La cantidad máxima de alimentos que puede
congelarse en 24 horas se indica en la placa
de datos técnicos, una etiqueta situada en el
interior del aparato.
El proceso de congelación dura 24 horas:
durante ese periodo no deben añadirse otros
alimentos para congelación.
Al cabo de 24 horas, cuando haya finalizado
el proceso de congelación, vuelva a ajustar
la temperatura adecuada (consulte "Regulación de la temperatura").
Almacenamiento de alimentos
congelados
Al poner en marcha el aparato por primera
vez o después de un periodo sin uso, déjelo
en marcha al menos durante 2 horas con un
ajuste alto antes de colocar los productos en
el compartimento.
Importante En caso de producirse una
descongelación accidental, por ejemplo, por
un corte del suministro eléctrico, si la
interrupción ha sido más prolongada que el
valor indicado en la tabla de características
técnicas bajo "tiempo de elevación", los
alimentos descongelados deben
consumirse cuanto antes o cocinarlos de
inmediato y volverlos a congelar (después de
que se hayan enfriado).
Descongelación
Los alimentos ultracongelados o congelados, antes de utilizarlos, se pueden descongelar en el compartimento frigorífico o a temperatura ambiente, dependiendo del tiempo
de que se disponga.
Es posible incluso cocinar piezas pequeñas
congeladas, tomadas directamente del congelador; en tal caso, el tiempo de cocción
será más prolongado.
Page 24

24 electrolux
Consejos útiles
Consejos para ahorrar energía
• No abra la puerta con frecuencia ni la deje
abierta más tiempo del estrictamente necesario.
• Si la temperatura ambiente es elevada, la
temperatura del aparato se ha ajustado en
los valores más altos y está totalmente lleno, el compresor podría funcionar de manera continua, provocando la formación
de escarcha o hielo en el evaporador. Si
esto sucede, gire el regulador de temperatura a valores inferiores para permitir la
descongelación automática y ahorrar en el
consumo eléctrico.
Consejos para la refrigeración de
alimentos frescos
Para obtener los mejores resultados:
• no guarde en el frigorífico alimentos calientes ni líquidos en evaporación;
• cubra o envuelva los alimentos, en especial si tienen sabores fuertes;
• coloque los alimentos de modo que el aire
pueda circular libremente entre ellos.
Consejos para la refrigeración
Consejos útiles:
Carne (de todo tipo): guárdela en bolsas de
plástico y colóquela en el estante de vidrio,
sobre el cajón de las verduras.
Por razones de seguridad, guárdela de ese
modo durante uno o dos días, como máximo.
Alimentos cocinados, platos fríos, etc..: los
debe cubrir y puede colocarlos en cualquiera
de los estantes.
Frutas y verduras: se deben limpiar a conciencia y colocar en los cajones especiales
suministrados a tal efecto.
Mantequilla y queso: colóquelos en recipientes herméticos especiales o envueltos en papel de aluminio o en bolsas de plástico, para
excluir tanto aire como sea posible.
Botellas de leche: deben tener tapa y se colocarán en el estante para botellas de la puerta.
Los plátanos, las patatas, las cebollas y los
ajos, si no están empaquetados, no deben
guardarse en el frigorífico.
Consejos sobre la congelación
Estos consejos son importantes para poder
aprovechar al máximo el proceso de congelación:
• la cantidad máxima de alimentos que puede congelarse en 24 horas se muestra en
la placa de datos técnicos;
• el proceso de congelación requiere 24 horas. Durante ese periodo no deben añadirse otros alimentos para congelación;
• congele sólo productos alimenticios de
máxima calidad, frescos y perfectamente
limpios;
• prepare los alimentos en porciones pequeñas para que se congelen de manera
rápida y total, así como para poder descongelar posteriormente sólo las cantidades necesarias;
• envuelva los alimentos en papel de aluminio o polietileno y compruebe que los envoltorios quedan herméticamente cerrados;
• no permita que alimentos frescos y sin
congelar entren en contacto con alimentos
ya congelados, para evitar el aumento de
temperatura de los segundos;
• los alimentos magros se congelan mejor
que los grasos; la sal reduce el tiempo de
almacenamiento de los alimentos;
• el hielo, si se consume inmediatamente
después de retirarlo del compartimento
congelador, puede provocar quemaduras
por congelación en la piel;
• es recomendable etiquetar cada paquete
con la fecha de congelación para controlar
el tiempo que permanecen almacenados.
Consejos para el almacenamiento de
alimentos congelados
Para obtener el máximo rendimiento de este
aparato, deberá:
• comprobar que el comerciante ha mantenido los productos congelados correctamente almacenados;
• procurar que los alimentos congelados
pasen de la tienda al congelador en el menor tiempo posible;
• evitar la apertura frecuente de la puerta o
dejarla abierta más del tiempo estrictamente necesario.
Page 25

electrolux 25
• Una vez descongelados, los alimentos se
deterioran con rapidez y no pueden congelarse otra vez.
• No supere el tiempo de almacenamiento
indicado por el fabricante de los alimentos.
Cómo utilizar el dispensador de agua con cartucho de filtro BRITA
MAXTRA
Unidad de filtro de agua BRITA
Componentes internos:
6
3
5
2
1
1Dispensador
4
1 Depósito de agua
2Embudo
3 Tapa del depósito
4 Válvula + junta
5 Incluido el cartucho de filtro BRITA
6 Memo BRITA: indicador electrónico de
cambio de cartucho
Componentes externos:
2 Nivel de agua
3 Bandeja de retención de goteo
Operaciones iniciales para el uso del
dispensador de agua
1. Retire cintas y otros sistemas de protec-
ción del conjunto del depósito.
2. Limpie los componentes como se indica
en el capítulo "Procedimiento de limpieza
del dispensador de agua", con el fin de
eliminar los posibles residuos.
Procedimiento de limpieza del
dispensador de agua
1. Abra los dos elementos de retención si-
tuados a los lados del depósito, como se
indica en las ilustraciones:
– retire el cartucho BRITA MAXTRA de
la unidad de filtro de agua
– presione los elementos de retención
de la mitad y muévalo hacia arriba
– desplace el elemento de retención ha-
cia el depósito central.
2. Empuje el depósito hacia arriba en di-
rección a la válvula.
3. Retire la tapa y el embudo.
1
2
3
Page 26

26 electrolux
(preste atención a la colocación de la
junta de la válvula).
8. Coloque el depósito montado en la puer-
ta, en dirección a la válvula.
9. Cierre los elementos de retención en or-
den inverso al de apertura.
10. Vuelva a insertar el cartucho BRITA
MAXTRA en el embudo.
Cómo utilizar el cartucho de filtro BRITA
MAXTRA
Paso 1: Preparación del cartucho
Para preparar el cartucho de filtro BRITA, re-
A
tire el envoltorio de protección (nota: el cartucho y el envoltorio interior pueden aparecer
húmedos; esto se debe sencillamente a la
condensación).
Sumerja el cartucho en agua fría y sacúdalo
con suavidad para eliminar las posibles burbujas de aire. Ya puede utilizar el filtro.
A diferencia de lo que sucede con otros cartuchos de filtro de agua, no es es necesario
remojar previamente el nuevo cartucho Maxtra.
4. Desenrosque la válvula girando de derecha a izquierda (preste especial atención
para no aflojar la junta de la válvula, ya
que es necesaria para que la unidad funcione correctamente).
5. Limpie la tapa del depósito, la válvula y
la junta con una solución de agua tibia y
jabón neutro. Aclare y colóquela dentro
del orificio de la puerta durante la limpieza de los demás componentes (para evitar fugas de aire frío desde el frigorífico).
6. Limpie el depósito y el embudo en el lavavajillas o con una solución de agua tibia y jabón neutro y aclárelos.
7. Después de limpiar los componentes del
depósito retire la válvula de la puerta del
frigorífico y monte el depósito en orden
inverso (4-3-2-1) al del desmontaje
Paso 2: Introducción en el depósito de
agua
Retire la tapa del depósito. Antes de introducir el cartucho, retire el embudo y límpielo
bien, aclarándolo y secándolo con un paño.
A continuación limpie bien el interior del depósito de agua con un paño húmedo y séquelo a fondo.
Coloque el cartucho en el depósito de agua
y empújelo hacia abajo, hasta que encaje en
su sitio con un chasquido.
Page 27

electrolux 27
El cartucho debe permanecer en su sitio si
se invierte la posición del embudo.
Paso 4: Rellenado del depósito de agua
Para llenar el depósito con agua fría, simplemente abra la tapa superior abatible, vierta
una jarra de agua en el depósito a través de
la cubierta como se muestra en la ilustración
(utilice la tapa cada vez que desee llenar el
depósito de agua).
Importante Para evitar que el agua salpique
al abrir y cerrar la puerta del frigorífico se
recomienda no llenar completamente el
depósito y dejar espacio suficiente para que
el aire circule (las marcas frontales indican el
límite de llenado máximo).
Si no ha utilizado toda el agua filtrada del depósito en uno o dos días, deshágase del
agua que pueda haber en el interior de la
unidad de filtro de agua BRITA antes de volver a llenarlo.
Paso 3: Enjuague del cartucho
2x 3x=ok
Retire el embudo de la unidad de filtro BRITA,
llénelo de agua del grifo y déjela filtrar.
Deseche en el fregadero los dos primeros
llenados. Estos se utilizan para enjuagar el
cartucho de filtro.
A continuación vuelva a colocar el embudo
en la unidad de filtro de agua BRITA.
Vuelva a colocar la tapa en el recipiente y
presiónela con cuidado hacia abajo para cerciorarse de que encaja correctamente en su
sitio.
Espere a que el agua se filtre y repita el "Paso
4" tantas veces como sean necesarias hasta
que la unidad de filtro de agua BRITA se llene.
Retire el cartucho tirando del anillo
Para cambiar el cartucho al cabo de cuatro
semanas, utilice el asa con anillo de la parte
Page 28

28 electrolux
superior del cartucho para extraerlo del embudo y repita los pasos del 1 al 3 anteriores.
Indicador Memo BRITA
Para obtener el máximo rendimiento del filtro
y un sabor óptimo, es importante cambiar el
cartucho BRITA periódicamente. BRITA recomienda que sustituya el cartucho de la
unidad BRITA del frigorífico cada cuatro semanas.
El indicador Memo BRITA le recuerda
automáticamente cuándo tiene que
cambiar el filtro.
START
%
100
75
50
START
%
100
75
50
25
El exclusivo indicador Memo BRITA mide el
tiempo de uso recomendado del cartucho.
Memo es fácil de usar y le recuerda automáticamente cuándo debe cambiar el cartucho.
El indicador Memo BRITA se encuentra en la
tapa del depósito de agua. El funcionamiento
es muy sencillo.
Encienda el visor Memo
Para activar Memo, presione sin soltar el botón de inicio situado en la tapa hasta que
aparezcan cuatro barras en la pantalla y parpadeen dos veces. El indicador Memo ya está activado.
25
Control de funcionamiento
El punto parpadeante en la esquina inferior
derecha de Memo indica que éste se encuentra funcionando.
Page 29

START
electrolux 29
Cada semana desaparece una barra, para
indicar el tiempo restante del cartucho. Al
cabo de cuatro semanas desaparecen las
cuatro barras. Esto, unido a la flecha parpadeante, indica que es necesario cambiar el
cartucho.
Introduzca un cartucho nuevo siguiendo las
instrucciones y reactive Memo como se ha
indicado antes.
%
100
Cambio del indicador
START
75
50
25
%
100
75
50
START
%
100
75
50
25
Cuando sólo haya una barra visible, compruebe si tiene un nuevo cartucho de filtro
BRITA MAXTRA disponible.
25
Page 30

30 electrolux
Importante El indicador Memo está
diseñado para utilizarse con cartuchos de
filtro BRITA exclusivamente.
Memo BRITA: el indicador electrónico de
cambio de cartucho tiene una duración aproximada de 5 años. Al finalizar la duración
de"Memo", recuerde que es un dispositivo
electrónico y deséchelo de acuerdo con la
normativa vigente para dichos aparatos.
Para retirar un indicador "Memo" agotado,
coloque un destornillador en la ranura situada junto a él y empújelo hacia fuera.
Recuerde que no se debe extraer el indicador para ningún otro fin que no sea desecharlo.
Información importante
• El orificio de la válvula en la puerta del fri-
gorífico debe estar cerrado con la válvula
de agua durante el funcionamiento normal
del aparato.
• Utilice sólo agua potable. Si utiliza cual-
quier otro tipo de bebida, podría dejar residuos, sabor y olor en el depósito y en el
grifo.
• Es posible que se oiga algún ruido provo-
cado por el aire que penetra al salir el agua
del depósito.
• Si el agua no fluye bien, vuelva a presionar
la palanca de accionamiento. Mantenga el
vaso debajo del grifo durante algunos instantes, para asegurarse de que toda el
agua cae en él.
• No utilice bebidas carbonatadas, como las
gaseosas. El líquido puede gotear debido
a la presión del gas.
• Recuerde que el agua es un alimento.
Consuma el agua filtrada en un plazo de
uno a dos días.
• Si la unidad de filtro de agua BRITA no se
utiliza durante un tiempo prolongado (como en vacaciones), es conveniente que
deseche el agua que haya quedado en el
sistema y deje el cartucho dentro del depósito del filtro.
Antes de volver a utilizar el sistema, retire
el cartucho y repita los pasos del 1 al 4
indicados en el apartado "Cómo utilizar el
cartucho de filtro de agua BRITA MAXTRA".
• La unidad de filtro de agua BRITA ha sido
diseñada para utilizarse sólo con agua potable tratada y procedente de la red de
suministro local (nota: se trata de aguas
bajo control y vigilancia permanentes conforme a la normativa legal vigente para el
agua de consumo) o con agua procedente
de manantiales privados y sometida a las
pruebas y controles de seguridad necesarios.
Si las autoridades advierten sobre la necesidad de hervir el agua, deberá hervirse
también el agua filtrada por BRITA. Una
vez levantada la recomendación de hervir
el agua, será necesario limpiar todo el sistema de filtro e introducir un cartucho nuevo.
En la guía de información sobre BRITA puede
consultar más detalles sobre el uso de los
cartuchos de filtro BRITA y del indicador 'Memo'.
Para comprar nuevos cartuchos de filtro
BRITA e indicadores Memo puede dirigirse a la red de servicios de asistencia
técnica de Electrolux o BRITA.
Mantenimiento y limpieza
Precaución Antes de realizar tareas de
mantenimiento, desenchufe el aparato.
Este equipo contiene hidrocarburos en
la unidad de refrigeración; por tanto, el
mantenimiento y la recarga deben estar
a cargo exclusivamente de técnicos autorizados.
Limpieza periódica
El equipo debe limpiarse de manera habitual:
• limpie el interior y los accesorios con agua
templada y un jabón neutro.
• revise y limpie periódicamente las juntas
de la puerta para mantenerlas limpias y sin
restos;
Page 31

• Aclare y seque a fondo.
Importante No mueva, dañe ni tire de los
conductos o cables del interior del armario.
No utilice detergentes, polvos abrasivos,
productos de limpieza perfumados ni cera
para limpiar el interior, ya que dañarán la superficie y dejarán un fuerte olor.
Limpie el condensador (rejilla negra) y el
compresor de la parte posterior del aparato
con un cepillo o un aspirador. Esa operación
mejorará el rendimiento del aparato y reducirá el consumo eléctrico.
Importante Tenga cuidado para no dañar el
sistema de refrigeración.
Muchas marcas de limpiadores de superficies de cocina contienen químicos que pueden atacar o dañar los plásticos del aparato.
Por tal razón, se recomienda que el exterior
del aparato se limpie sólo con agua templada
a la que se añadirá un poco de líquido lavavajillas.
Después de la limpieza, vuelva a conectar el
aparato a la toma de red.
Descongelación del frigorífico
La escarcha se elimina automáticamente del
evaporador del frigorífico cada vez que se
detiene el compresor, durante el funcionamiento normal. El agua de la descongelación
se descarga hacia un recipiente especial situado en la parte posterior del aparato, sobre
el motor compresor, donde se evapora.
Es importante limpiar periódicamente el orificio de salida del agua de descongelación
situado en la mitad del canal del compartimento frigorífico para evitar que el agua desborde y caiga sobre los alimentos del interior.
Utilice el limpiador especial suministrado,
que hallará ya colocado en el orificio de desagüe.
electrolux 31
Descongelación del congelador
El compartimento congelador de este modelo es de tipo "no frost" y no produce escarcha. Esto significa que, durante el funcionamiento, no se forma escarcha ni en las paredes internas del aparato ni sobre los alimentos.
La ausencia de escarcha se debe a la continua circulación del aire frío en el interior del
compartimento impulsado por un ventilador
controlado automáticamente.
Periodos sin funcionamiento
Si el aparato no se utiliza durante un tiempo
prolongado, tome las siguientes precauciones:
•
desconecte el aparato de la red eléctrica;
• extraiga todos los alimentos;
•
descongele
8)
y limpie el aparato y todos
los accesorios;
• deje la puerta(s) entreabierta para prevenir
olores desagradables.
Si va a mantener el armario en marcha, solicite a alguien que lo inspeccione de vez en
cuando para evitar que los alimentos se
echen a perder en caso de un corte de energía.
Qué hacer si…
Advertencia Antes de realizar cualquier
reparación, desconecte el enchufe del
aparato de la toma de red.
8) Si está previsto.
Sólo un electricista o un técnico profesional debe llevar a cabo cualquier reparación que no figure en este manual.
Page 32

32 electrolux
Importante Se producen ruidos durante el
funcionamiento normal (compresor,
circulación del refrigerante).
Problema Causa probable Solución
El aparato no funciona. La
bombilla no funciona.
El aparato no está correctamente
El aparato no recibe corriente. No
La bombilla no funciona. La bombilla está en espera. Cierre y abra la puerta.
La bombilla está defectuosa. Consulte "Cambio de la bombilla".
El compresor funciona
continuamente.
La puerta no está bien cerrada. Consulte "Cierre de la puerta".
La puerta se ha abierto con ex-
La temperatura de los productos
La temperatura ambiente es de-
El agua fluye por la placa
posterior del frigorífico.
El agua fluye al interior del
frigorífico.
Los productos impiden que el
El agua fluye hacia el suelo.
La temperatura del aparato es demasiado baja.
La temperatura del aparato es demasiado alta.
La puerta no está bien cerrada. Consulte "Cierre de la puerta".
La temperatura de los productos
Se han guardado muchos pro-
La temperatura del frigorífico es demasiado alta.
La temperatura del congelador es demasiado alta.
El aparato está apagado. Encienda el aparato.
enchufado a la toma de corriente.
hay tensión en la toma de corriente.
La temperatura no se ha ajustado
correctamente.
cesiva frecuencia.
es demasiado alta.
masiado alta.
Durante el proceso de descon-
gelación automática, el hielo se
descongela en la placa posterior.
La salida de agua está obstruida. Limpie la salida de agua.
agua fluya al colector de agua.
El agua de la descongelación no
fluye hacia la bandeja de evaporación situada sobre el compresor.
El regulador de temperatura no
se ha ajustado correctamente.
El regulador de temperatura no
se ha ajustado correctamente.
es demasiado alta.
ductos al mismo tiempo.
No hay circulación de aire frío en
el aparato.
Los alimentos están demasiado
juntos.
Enchufe el aparato correctamente
a la toma de corriente.
Enchufe otro aparato eléctrico a la
toma de corriente.
Llame a un electricista cualificado.
Seleccione una temperatura más
alta.
No mantenga abierta la puerta más
tiempo del necesario.
Deje que la temperatura de los alimentos descienda a la temperatura ambiente antes de guardarlos.
Reduzca la temperatura ambiente.
Esto es normal.
Asegúrese de que los alimentos no
entran en contacto con la placa
posterior.
Fije la salida de agua de descongelación a la bandeja de evaporación.
Seleccione una temperatura más
alta.
Seleccione una temperatura más
baja.
Deje que la temperatura de los alimentos descienda a la temperatura ambiente antes de guardarlos.
Guarde menos productos al mismo tiempo.
Compruebe que el aire frío circula
libremente en el aparato.
Disponga los productos de modo
que el aire frío pueda circular entre
ellos.
Page 33

electrolux 33
Problema Causa probable Solución
Hay demasiada escarcha.
La puerta no está bien cerrada. Consulte "Cierre de la puerta".
El regulador de temperatura no
Los alimentos no están envueltos
correctamente.
se ha ajustado correctamente.
Envuelva los alimentos correctamente.
Seleccione una temperatura más
alta.
Cambio de la bombilla
1. Desconecte el enchufe de la toma de corriente.
2. Presione sobre el gancho trasero de la
cubierta de la bombilla con un destornillador mientras tira y gira la cubierta en la
dirección de la flecha.
3. Cambie la bombilla por otra de la misma
potencia (la potencia máxima se indica en
A
max 25 W
B
la cubierta de la bombilla).
4. Instale la cubierta de la bombilla fijándola
en su posición original.
5. Conecte el enchufe a la toma de red.
6. Abra la puerta. Compruebe que la bombilla se enciende.
Cierre de la puerta
1. Limpie las juntas de la puerta.
2. Si es necesario, ajuste la puerta. Consulte "Instalación".
3. Si es necesario, cambie las juntas de
puerta defectuosas. Contacte al Centro
de servicio técnico.
Datos técnicos
Medidas de la cavidad
Altura 1800 mm
Anchura 695 mm
Fondo 669 mm
Tiempo de elevación 20 h
La información técnica se encuentra en la
placa de datos técnicos en el lado interior iz-
quierdo del aparato y en la etiqueta de energía.
Instalación
Lea atentamente la "información de
seguridad" para garantizar su propia
seguridad y el correcto funcionamiento
del electrodoméstico antes de instalar el
electrodoméstico.
Colocación
Instale el aparato en un punto en el que la
temperatura ambiente se corresponda con
la clase climática indicada en la placa de datos técnicos del aparato:
Clase
climáti-
ca
SN +10°C a + 32°C
N +16°C a + 32°C
ST +16°C a + 38°C
T +16°C a + 43°C
Temperatura ambiente
Page 34

34 electrolux
Ubicación
Instale el aparato alejado de fuentes de calor,
como radiadores, calderas, luz solar directa,
etc. Asegúrese también de que el aire puede
circular sin obstáculos por la parte trasera del
armario. Para garantizar el mejor rendimiento, si el aparato se coloca debajo de un mueble de cocina colgado en la pared, deje una
distancia mínina de 100 mm entre la parte
superior del aparato y el mueble de pared.
No obstante, lo ideal sería que el aparato no
fuera debajo de ningún mueble colgado en
la pared. La base del aparato va provista de
una o varias patas ajustables para garantizar
un nivelado correcto del mismo.
Advertencia Puede que en algún
momento sea necesario desenchufar el
aparato de la toma de corriente; por lo
tanto, el enchufe debe quedar accesible
tras la instalación del aparato.
100 mm
Este aparato es conforme con las directivas
de la CEE.
Piezas de separación traseras
En el interior del electrodoméstico hay
dos piezas de separación que se instalan como se muestra en la figura.
Afloje los tornillos, introduzca la pieza de separación por debajo la cabeza de los tornillos
y vuelva a apretarlos.
AB
10 mm
Conexión eléctrica
Antes de conectar el aparato, compruebe
que el voltaje y la frecuencia que aparecen
en la placa de datos técnicos se corresponden con el suministro de la vivienda.
El aparato debe tener conexión a tierra. El
enchufe del cable de alimentación se suministra con un contacto para tal fin. Si la toma
de red de la vivienda carece de conexión a
tierra, conecte el aparato a una toma de tierra
conforme con la normativa, después de consultar a un electricista profesional.
El fabricante rechaza toda responsabilidad si
no se toman las precauciones antes indicadas.
10 mm
Puerta reversible
Advertencia Antes de llevar a cabo
cualquier operación, desenchufe el
electrodoméstico.
Importante Para realizar los procedimientos
que se indican a continuación es aconsejable
contar con la ayuda de otra persona para
que sujete bien las puertas del
electrodoméstico.
Para cambiar el sentido de apertura de la
puerta, siga estos pasos:
1. Con el máximo cuidado para evitar que
la puerta se caiga, retire la bisagra superior y guárdela por si la necesita en
otro momento.
Page 35

2. Extraiga la puerta superior.
3. Retire el soporte superior y móntelo en
el lado opuesto.
4. Desatornille la bisagra intermedia (H).
Desatornille los tacos de plástico situados en el lado opuesto de la bisagra
central e insértelos en los orificios donde
estaba la bisagra.
H
electrolux 35
7. Con mucho cuidado, coloque el aparato
sobre la parte trasera, desatornille totalmente la pata ajustable y atorníllela en el
lado opuesto.
8. Extraiga los tornillos de fijación de la bisagra inferior y retírela.
9. Con una llave de 12 mm, desatornille el
pasador de la bisagra y vuelva a montarlo en el lado opuesto de la bisagra.
10. Vuelva a montar la bisagra inferior en el
lado opuesto con los tornillos que ha retirado previamente.
11. Con mucho cuidado, vuelva a colocar el
aparato en posición vertical y nivélelo girando la pata ajustable de la base a derecha o izquierda con la mano.
5. Retire la puerta inferior.
6. Extraiga la rejilla de ventilación fijada con
dos tornillos.
12. Deslice la cubierta del orificio para extraerla de la rejilla de ventilación empujándola en la dirección de la flecha, y
vuelva a montarla en el lado opuesto.
Page 36

36 electrolux
13. Vuelva a colocar la rejilla de ventilación y
fíjela con los tornillos.
14. Vuelva a colocar la puerta inferior.
15. Vuelva a montar la bisagra intermedia (H)
en el lado opuesto.
16. Vuelva a montar la puerta superior.
17. En la bolsa con la documentación encontrará la bisagra superior necesaria
para realizar el cambio de apertura de la
puerta. Coloque el tornillo en su lugar.
Realice una verificación final para comprobar
que:
• Todos los tornillos están apretados.
• La guarnición magnética se adhiere al
mueble.
• La puerta abre y cierra correctamente.
Es posible que la junta no encaje a la perfección en el mueble si la temperatura ambiente
es baja (es decir, en invierno). En tal caso,
espere hasta que la junta se fije al mueble de
forma natural.
Si prefiere no realizar los procedimientos antes mencionados, póngase en contacto con
el Centro de servicio técnico más próximo. El
personal del Centro de servicio técnico cambiará el sentido de apertura de las puertas
con gastos a su cargo.
Aspectos medioambientales
El símbolo que aparece en el aparato o
en su embalaje, indica que este producto no
se puede tratar como un residuo normal del
hogar. Se deberá entregar, sin coste para el
poseedor, bien al distribuidor, en el acto de
la compra de un nuevo producto similar al
que se deshecha, bien a un punto municipal
de recolección selectiva de equipos
eléctricos y electrónicos para su reciclaje. Al
asegurarse de que este producto se
desecha correctamente, usted ayudará a
evitar posibles consecuencias negativas
para el medio ambiente y la salud pública, lo
cual podría ocurrir si este producto no se
gestionara de forma adecuada. Para obtener
información más detallada sobre el reciclaje
de este producto, póngase en contacto con
el Ayuntamiento de su Municipio, ó con la
tienda donde lo compró.
Page 37

electrolux 37
Page 38

38 electrolux
Page 39

electrolux 39
Page 40

www.electrolux.com
Para comprar accesorios, consumibles y recambios en nuestra tienda online, por favor visite
nuestro site:
www.electrolux.es
222348584-00-012010
 Loading...