

Page 1

UUsseerr mmaannuuaall
MMaannuuaall ddee iinnssttrruuççõõeess
END 42395 W
Fridge - Freezer
Frigorífico - Congelador
Page 2

2
electrolux
Welcome to the world of Electrolux
You’ve chosen a first class product from Electrolux, which hopefully will provide
you with lots of pleasure in the future. Electrolux ambition is to offer a wide variety
of quality products that would make your life even more comfortable. You can look
at some examples on the cover in this manual. But now it’s time to study this
manual and start using and enjoying the benefits from your new machine. We
promise that it’ll make your life a little easier. Good luck!
Page 3
electrolux
3
The following symbols are used in this manual:
Important information concerning your personal safety and information on
how to avoid damaging the appliance.
General information and tips
Environmental information
The symbol on the product or on its packaging indicates that this product
may not be treated as household waste. Instead it shall be handed over to the
applicable collection point for the recycling of electrical and electronic equipment.
By ensuring this product is disposed of correctly, you will help prevent potential
negative consequences for the environment and human health, which could
otherwise be caused by inappropriate waste handling of this product. For more
detailed information about recycling of this product, please contact your local city
office, your household waste disposal service or the shop where you purchased
the product.
Page 4

4
electrolux
CONTENTS
Safety IInformation 05
Use 008
Cleaning the interior 08
Control panel 08
Operation 08
Switching off 08
Temperature regulation 09
Adjusting the temperature 09
Action Freeze Function 09
Fresh food refrigeration 09
How to use the water dispenser with
BRITA MAXTRA filter cartridge BRITA
water filter unit 10
Movable shelves 16
Bottle rack 16
Positioning the door shelves 16
Drawer 17
Humidity Control 17
Air recycling 18
Freezing Calendar 18
Ice cubes 18
Freezing fresh food 19
Storing deep-frozen food 19
Thawing 19
Hints 20
Hints for refrigeration 20
Hints for freezing 20
Hints for storage of frozen food 21
Interior light 21
Maintenance 222
Periodic cleaning 22
Defrosting 22
Technical information 23
Customer sservice aand sspare pparts 223
Installation 24
Location 24
Rear spacers 24
Electrical connection 25
Door reversibility 25
Page 5

electrolux
5
SAFETY
INFORMATION
It iis mmost iimportant tthat tthis
instruction bbook sshould bbe rretained
with tthe aappliance ffor ffuture rreference.
Should tthe aappliance bbe ssold oor
transferred tto aanother oowner, oor
should yyou mmove hhouse aand lleave tthe
appliance, aalways eensure tthat tthe
book iis ssupplied wwith tthe aappliance iin
order tthat tthe nnew oowner ccan bbe
acquainted wwith tthe ffunctioning oof tthe
appliance aand tthe rrelevant wwarnings.
If tthis aappliance ffeaturing mmagnetic
door sseals iis tto rreplace aan oolder
appliance hhaving aa sspring llock ((latch)
on tthe ddoor oor llid, bbe ssure tto mmake
that sspring llock uunusable bbefore yyou
discard tthe oold aappliance. TThis wwill
prevent iit ffrom bbecoming aa ddeath-ttrap
for aa cchild.
These wwarnings aare pprovided iin tthe
interest oof ssafety. YYou mmust rread tthem
carefully bbefore iinstalling oor uusing tthe
appliance.
General Safety
• This appliance is not intended for
use by persons (including children)
with reduced physical, sensory or
mental capabilities, or lack of
experience and knowledge, unless
they have been given supervision
or instruction concerning use of the
appliance by a person responsible
for their safety.
Children should be supervised to
ensure that they do not play with
the appliance.
• It is dangerous to alter the
specifications or modify this
product in any way.
• Before any cleaning or
maintenance work is carried out,
be sure to switch off and unplug
the appliance.
• This appliance is heavy. Care
should be taken when moving it
• Ice lollies can cause frost burns if
consumed straight from the
appliance.
• Take uutmost ccare wwhen hhandling
your aappliance sso aas nnot tto ccause
any ddamages tto tthe ccooling uunit
with cconsequent ppossible ffluid
leakages.
• The aappliance mmust nnot bbe llocated
close tto rradiators oor ggas ccookers.
• Avoid pprolonged eexposure oof tthe
appliance tto ddirect ssunlight.
• There mmust bbe aadequate vventilation
round tthe bback oof tthe aappliance
and aany ddamage tto tthe rrefrigerant
circuit mmust bbe aavoided.
• For ffreezers oonly ((except bbuilt-iin
models): aan iideal llocation iis tthe
cellar oor bbasement.
• Do nnot uuse oother eelectrical
appliances ((such aas iice ccream
makers) iinside oof rrefrigerating
appliances.
Service/Repair
• Any electrical work required to
install this appliance should be
carried out by a qualified electrician
or competent person
Page 6

6
electrolux
• This product should be serviced by
an authorized Service Centre, and
only genuine spare parts should be
used.
• Under no circumstances should
you attempt to repair the appliance
yourself. Repairs carried out by
inexperienced persons may cause
injury or more serious
malfunctioning. Refer to your local
Service Centre, and always insist
on genuine spare parts.
• This appliance contains
hydrocarbons in its cooling unit;
maintenance and recharging must
therefore only be carried out by
authorized technicians.
Use
• The domestic refrigerators and
freezers are designed to be used
specifically for the storage of edible
foodstuffs only.
• Best performance is obtained with
ambient temperature between
+18°C and +43°C (class T); +18°C
and +38°C (class ST); +16°C and
+32°C (class N); +10°C and +32°C
(class SN). The class of your
appliance is shown on its rating
plate.
Warning: when the ambient
temperature is not included within
the range indicated for the class of
this appliance, the following
instructions must be observed:
when the ambient temperature
drops below the minimum level, the
storage temperature in the freezer
compartment cannot be
guaranteed; therefore it is advisable
to use the food stored as soon as
possible.
• Frozen food must not be re-frozen
once it has been thawed out.
• Manufacturers’ storage
recommendations should be strictly
adhered to. Refer to relevant
instructions.
• The inner lining of the appliance
consists of channels through which
the refrigerant passes. If these
should be punctured this would
damage the appliance beyond
repair and cause food loss. DO
NOT USE SHARP INSTRUMENTS
to scrape off frost or ice. Frost may
be removed by using the scraper
provided. Under no circumstances
should solid ice be forced off the
liner. Solid ice should be allowed to
thaw when defrosting the
appliance.
• Do not place carbonated or fizzy
drinks in the freezer as it creates
pressure on the container, which
may cause it to explode, resulting
in damage to the appliance.
Installation
• During normal operation, the
condenser and compressor at the
back of the appliance heat up
considerably. For safety reasons,
minimum ventilation must be as
shown in the instructions.
Attention: kkeep vventilation oopenings
clear oof oobstruction.
Page 7

electrolux
7
Environment
Protection
This aappliance ddoes nnot ccontain
gasses wwhich ccould ddamage tthe oozone
layer, iin eeither iits rrefrigerant ccircuit oor
insulation mmaterials. TThe aappliance
shall nnot bbe ddiscarded ttogether wwith
the uurban rrefuse aand rrubbish. AAvoid
damaging tthe ccooling uunit, eespecially
at tthe rrear nnear tthe hheat eexchanger.
Information oon yyour llocal ddisposal ssites
may bbe oobtained ffrom mmunicipal
authorities. TThe mmaterials uused oon tthis
appliance mmarked bby tthe ssymbol
are rrecyclable.
• Care must be taken to ensure that
the appliance does not stand on
the electrical supply cable.
Important:
if the supply cord is
damaged, it must be replaced by a
special cord or assembly availa-ble
from the manufacturer or its service
agent.
• If the appliance is transported
horizontally, it is possible that the
oil contained in the compressor
flows in the refrigerant circuit. It is
advisable to wait at least two hours
before connecting the appliance to
allow the oil to flow back in the
compressor.
• There are working parts in this
product which heat up. Always
ensure that there is adequate
ventilation as a failure to do this will
result in component failure and
possible food loss. See installation
instructions.
• Parts which heat up should not be
exposed. Wherever possible the
back of the product should be
against a wall.
Page 8
8
electrolux
USE
Cleaning the interior
Before using the appliance for the first
time, wash the interior and all internal
accessories with luke-warm water and
some neutral soap so as to remove
the typical smell of a brand-new
product, then dry thoroughly.
Do nnot uuse ddetergents oor
abrasive ppowders, aas tthese wwill
damage tthe ffinish.
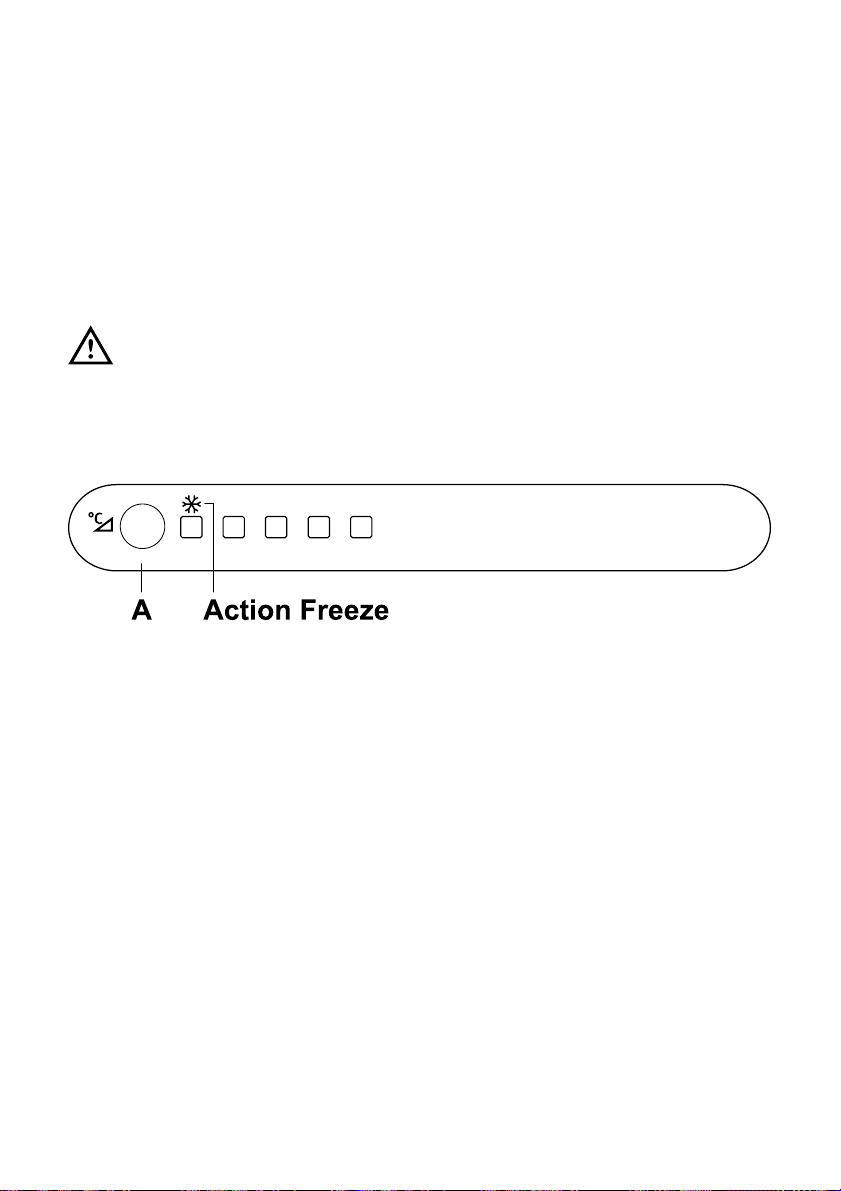
Control Panel
A.
Button for temperature regulation
Operation
Remove, iif ppresent, tthe ““Remove”
label sstuck oon tthe iinside oof tthe ffreezer
compartment.
Insert the plug into the wall socket.
Switching off
To switch off the appliance remove the
mains plug.
+2 +4 +5 +6 +8
Page 9

electrolux
9
Action Freeze Function
To quickly lower the freezer
compartment temperature activate the
Action Freeze function .
Press the button A more times until the
LED corresponding to the symbol (*)
lights up.
To deselect the Action Freeze function
press mote times the button until the
required temperature is selected.
Fresh food refrigeration
To obtain the best performance:
• do not store warm food or
evaporating liquids in the
refrigerator;
• do cover or wrap the food,
particularly if it has a strong flavour.
• Position food so that air can
circulate freely around it.
Temperatur regulation
The temperature indicated by the LED
is selected each time the button is
pressed.
Lla Selection is progressive,varying
from +2 °C to +8 °C.
Press the button more times until the
LED corresponding to the required
temperature lights up.
Adjusting the
temperature
The temperature inside may be
influenced by these factors.
• room temperature
• how often the doors are opened
• amount of food stored
• appliance position
A medium setting is generally the most
suitable.
If the ambient temperature is lower
than 16°C press the Temperature
Regulator until the LED corresponding
to the lowest temperature lights up.
Page 10
10
electrolux
How to use the water dispenser with
BRITA MAXTRA filter cartridge BRITA
water filter unit
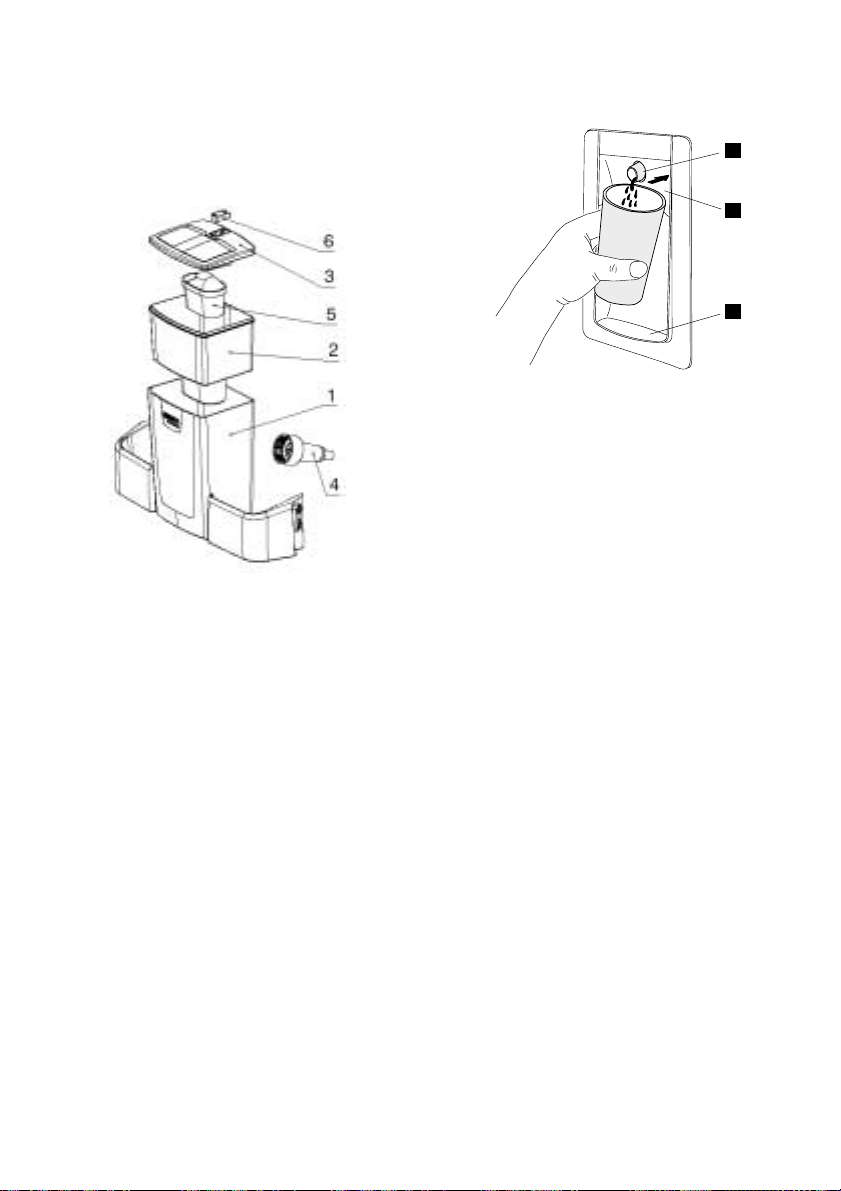
Internal components:
1.water tank
2.funnel
3.tank lid
4.valve +gasket
5.including BRIT A MAXTRA filter cartridge
6.BRITA Memo -the electronic cartridge
exchange indicator
External components:
7.Dispenser
8.Water Lever
9.Water drop tray
INITIAL OPERATIONS TO USE YOUR
WATER DISPENSER
1.Remove every tape and other protection
system from the tank assembly;
2.Clean the components as described
into the WATER DISPENSER CLEANING
PROCEDURE chapter in order to remove
eventual residues;
WATER DISPENSER CLEANING
PROCEDURE
1.Unblock the two stopping elements on
the sides of the tank as shown in the
pictures;
-Take out the BRITA MAXTRA cartridge
from the water filter unit
-Press the stopping elements in the
middle and move it up.
-Move the stopper into direction of the
central tank
1
2
3
Page 11

electrolux
11
2.2.Push up the tank along the direction
of the Valve
3.Remove the lid and the funnel
4.Unscrew the valve in counter clockwise
(pay particular attention to lose the Valve
Gasket because is necessary toa correct
functioning of the features);
5.Clean the tank lid,the valve and the
gasket with a solution of warm water and
neutral soap.Rinse it and put it inside the
door hole during the cleaning of the other
components (in order to avoid cold air
leakage from the fridge);
6.Clean the tank and funnel into the
dishwasher or with a solution of warm
water and neutral soap and rinse them;
7.After the tank components cleaning
take back the valve from the fridge door
and assembly the tank in the inverse
order (4;3;2;1)of disassembly (pay
attention at the valve gasket positioning);
8.Put the tank assembled on the door
along the valve direction;
9.Block the stopping elements in inverse
order of unblock;
10.Insert again the BRIT A MAXTRA
cartridge in the funnel as described in
chapter "How to change the BRIT A
MAXTRA cartridge".
How to use the BRITA MAXTRA
filter cartridge
STEP 1:PREPARING THE
CARTRIDGE
To prepare your BRITA filter
cartridge,please remove protective
wrapper (note:cartridge and inside
wrapper may appear moist, this is simply
condensation). Immerse cartridge in cold
water and shake it gently to remove any
air bubbles.The filter now is ready to use.
As required for some other water filter
cartridges, there is no need to pre-soak
the new Maxtra Cartridge.
Page 12
12
electrolux
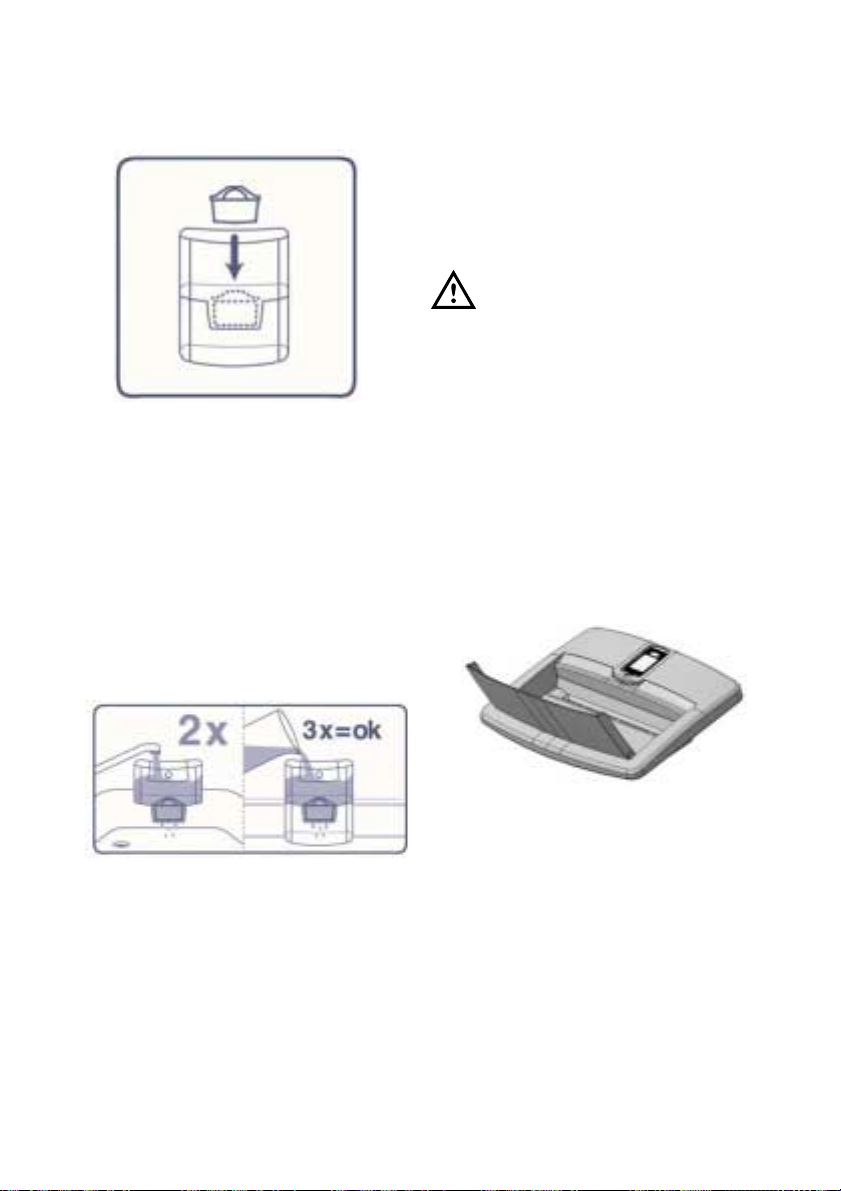
STEP 2:INSERT IN THE WATER
TANK
Remove the tank lid.Before inserting the
cartridge,remove the funnel and clean it
thoroughly by rising it and wiping it
dry.Then thoroughly clean the inside of the
water tank with a dump cloth and wipe it
dry as well. Place the cartridge into the
filter tank and push downwards until it
'clicks' firmly into place.The cartridge
should stay in place if the funnel is turned
upside down.
STEP 3:RINSE CARTRIDGE
Take the funnel out of the BRITA water filter
unit,fill it under the tap with cold tap water
and allow it to filter through.Discard the first
two fillings into the sink.These first two
fillings are used to flush the filter cartridge.
Then place the funnel back into BRIT A
water filter unit.
Place the cover back onto the jag and
press it carefully downwards to ensur e it
fits correctly into place.
STEP 4:REFILL WATER TANK
To fill the tank with cold water, simply
open the flip top lid, take a jug of tap
water and pour it inside the tank through
the cover as shown into the picture (use
the lid every time that you want to filter
your water).
Important!
In order to avoid risk of spillage of water
during closing and opening of the
refrigerator door,we recommend to not fill
completely the water tank but leave a
head space of air.
NOTE:IF YOU HAVE NOT USED ALL
FILTERED WATER IN THE WATER TANK
WITHIN 1-2 DAYS PLEASE DISCARD
ANY WATER LEFT INSIDE THE BRITA
WATER FILTER UNIT BEFORE
REFILLING IT.
Allow the water to filter through and
repeat STEP 4 on page 15 as many times
as you want until the BRIT A water filter
unit is filled up.
Page 13
electrolux
13
REMOVE CARTRIDGE WITH RING
PULL HANDLE
To exchange the cartridge after four
weeks, simply use the ring pull handle on
the top of the cartridge to remove it from
the funnel,and repeat steps 1 -3 above;
THE BRITA MEMO
For maximum filter performance
andoptimum taste,it is important to change
your BRITA cartridge regularly. BRITA
recommends that you replace the cartridge
in the BRITA unit of your fridge every four
weeks.
BRITA Memo automatically reminds
you when to change the cartridge.
The unique BRITA Memo measures the
recommended time of use of your
cartridge. Memo is easy to use and
automatically reminds your when to
change your cartridge.The BRITA Memo is
located on the lid of the water tank.
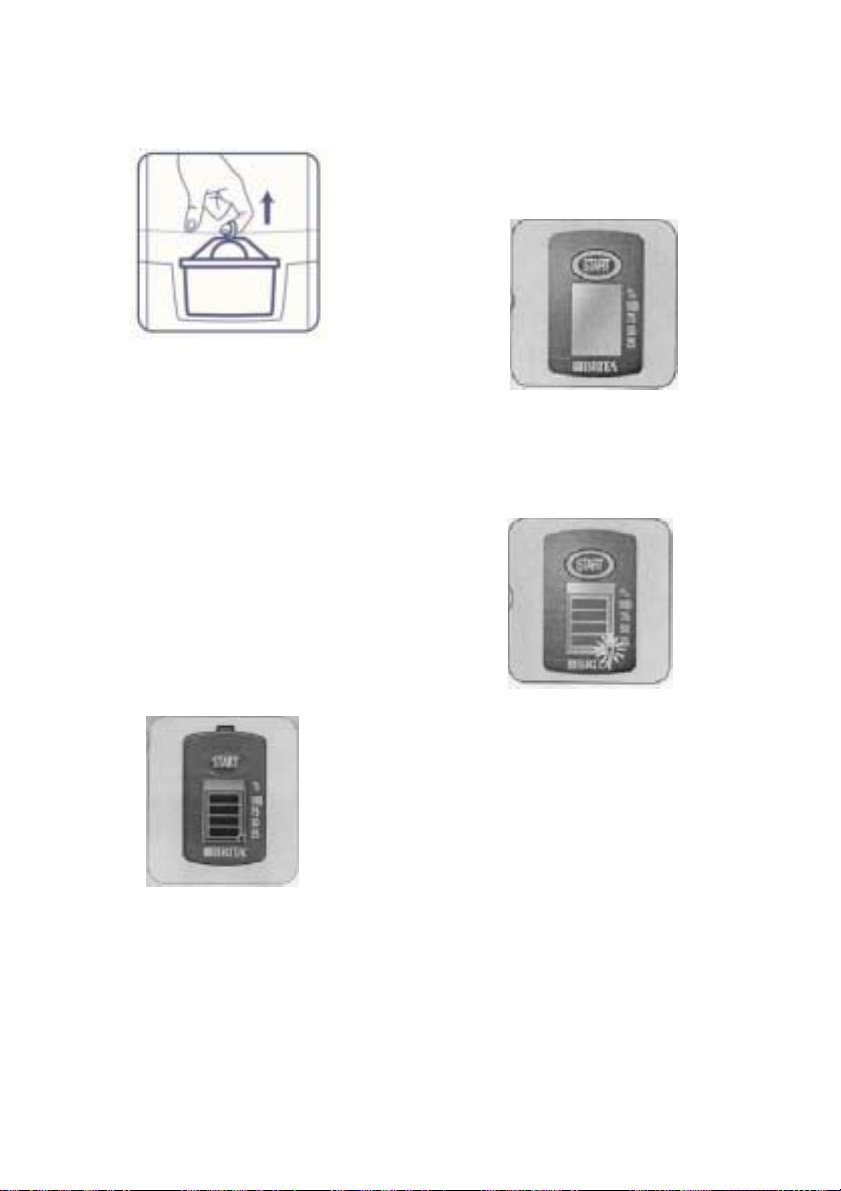
Operation is really simple.
Start the Memo display:
To start Memo please press and hold
down the start button on the lid until all four
bars appear in the display and flash
twice.The Memo is now set.
Functional control:
The flashing dot in the bottom right corner
of the Memo indicates that the Memo is
working.
Page 14
14
electrolux
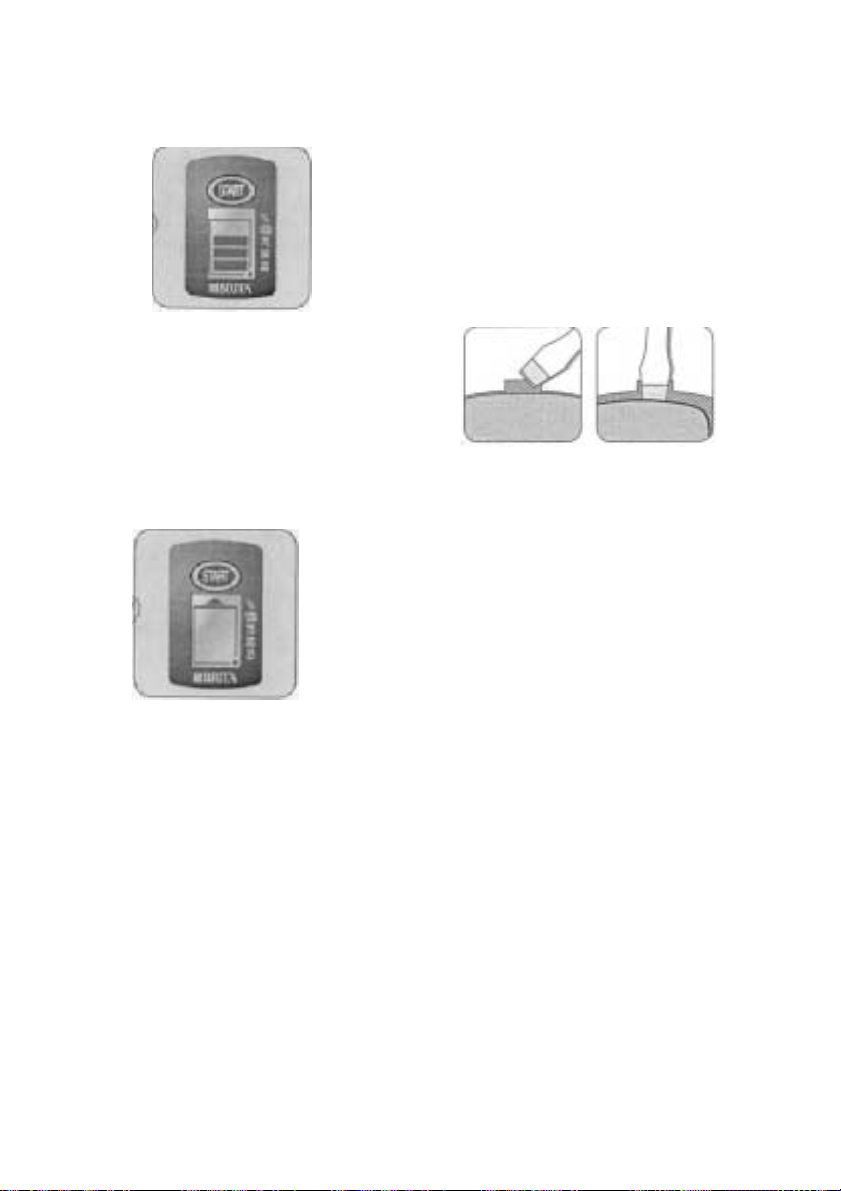
Change display:
Every week one bar will disappear to
show the remaining cartridge life. After
four weeks all four bars will disappear.
This,and a flashing arrow indicate that the
cartridge should now be changed. Insert
a new cartridge according to the
instructions and reactivate the Memo as
described above.
NOTE:When only one bar is showing, you
should just check whether you have a
new BRIT A MAXTRA filter cartridge to
hand.
Important:
The Memo is only designed to
be used with BRIT A filter cartridges.
BRIT A "MEMO"-the electronic cartridge
exchange indicator has a life of
approximately 5 years. At the end of the
"MEMO's"life please remember that it is
an electronic device and to dispose on
the "MEMO"according to all applicable
provisions and regulations.To remove the
exhausted "MEMO"place a screwdriver in
the notch next to the "MEMO"and push it
out.
Please note that "MEMO"should not be
removed for any other reason than to
dispose of it.
Page 15

electrolux
15
IMPORTANT INFORMATION
• The fridge door valve hole MUST
BE CLOSED with the WATER
VALVE during the regular
functioning of the appliance.
• Use only drinking water.The use of
any other drink type can leave
residues,taste or odor in the
reservoir and in the tap.
• It is possible to hear some noises
caused by air entering when the
water left the reservoir.
• In case the water does not flow
well, press the driving lever once
again. Keep the glass below the tap
for some instants,in order to assure
that all the water is collected by the
glass.
• Do not use gasified drinks,such as
soft drinks.The drink can leak due
to the gas pressure.
• Remember that water is a foodstuff.
Please consume filtered water
within one to two days.
• Should your BRITA water filter unit
not be in use for a prolonged
period (e.g. vacation),we
recommend that you discard any
water left inside the system and
leave the cartridge inside the filter
tank.Before using the system again
take out the cartridge and repeat
steps 1 to 4 of “How to use the
BRITA MAXTRA water filter
cartridge ” on page 15.
• The BRITA water filter unit is
designed for use only with
municipally treated tap water
(note:this water is constantly
controlled and according to legal
regulations safe to drink)or with
water from private supplies which
has been tested safe to drink.If an
instruction is received from the
authorities that mains water must
be boiled,the BRITA filtered water
also be boiled. When the instruction
to boil water is no longer in force,
the entire filter system must be
cleaned and a new cartridge
inserted.
More information on the use of
BRITA filter cartridges and the
‘Memo ’ can be found in the BRITA
information guide.
You can purchase new BRITA filter
cartridges and 'Memo' through
consumer service network of
Electrolux or BRITA.
Page 16
16
electrolux
Movable shelves
The walls of the refrigerator are
equipped with a series of runners so
that the shelves can be positioned as
desired.
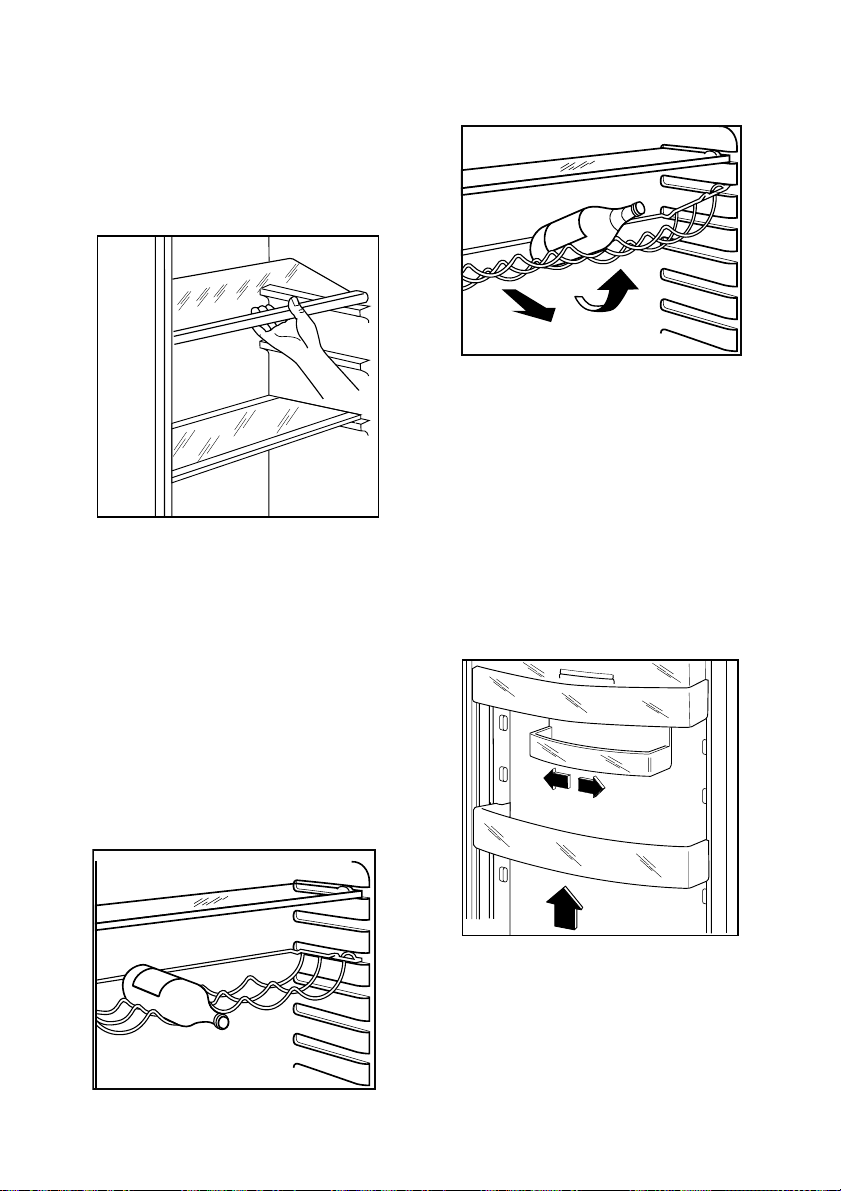
Bottle rack
Place bottles in the rack with the
bottleneck to the front.
Important: Only store unopened
bottles horizontally.
The bottle rack can be tilted for storing
opened bottles.
To do this pull the bottle rack forward
until it can be tilted upwards, then
slide up the front support to the next
level .
Positioning the door
shelves
To permit storage of food packages of
various sizes, the door shelves can be
placed at different heights.
To make these adjustments proceed
as follow: Gradually pull the shelf in
the direction of the arrows until it
comes free, then reposition as
required.
D338
PRXXX
Page 17
electrolux
17
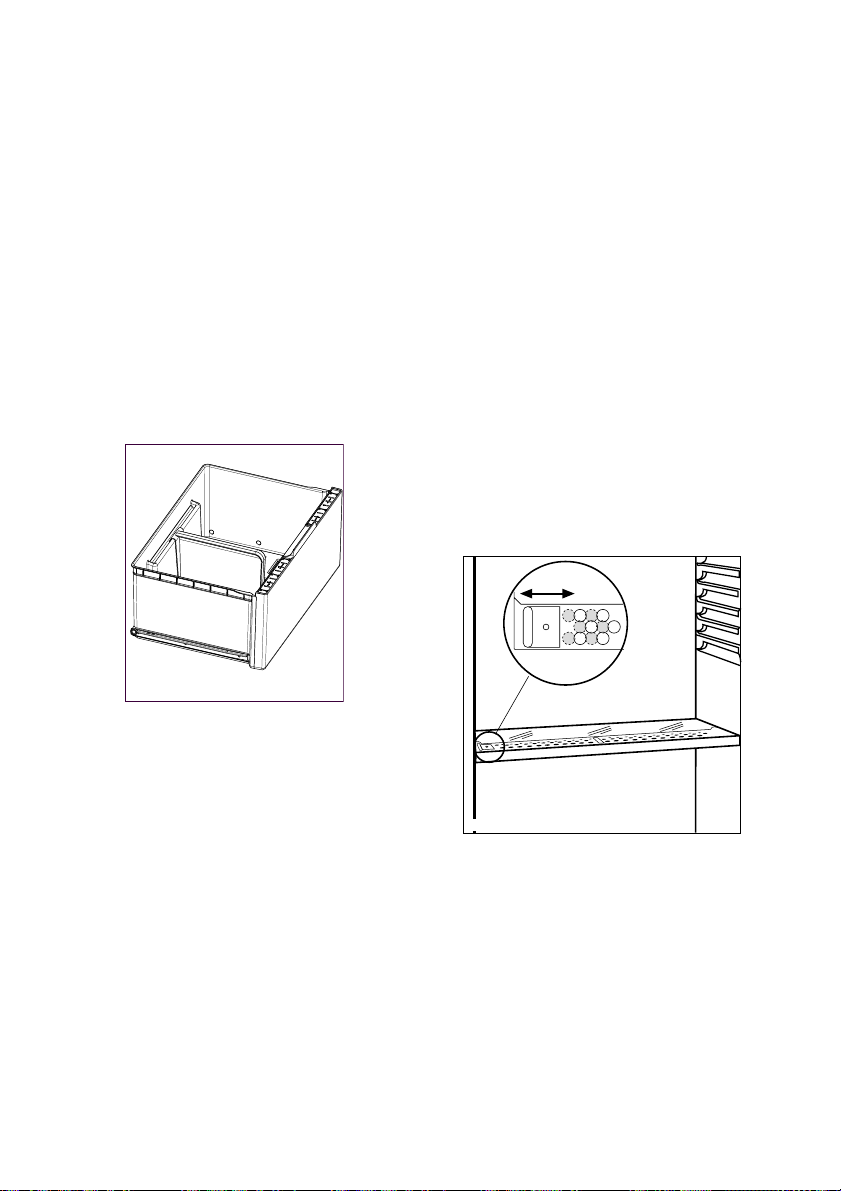
Drawer
The drawer is suitable for storing fruit
and vegetables. There is a separator
inside the drawer that can be placed in
different positions to suit personal
needs.
There is a grille (if forseen) on the
bottom of the drawer to separate the
fruit and vegetables from any humidity
on the bottom surface.
All parts inside the drawer can be
removed for cleaning purposes.
Humidity Control
The drawer incorporates a device with
slots (adjustable by means of a sliding
lever),which makes it possible to regulate
the temperature in the vegetable
drawer(s).
The opening in the ventilation slots can be
adjusted with the slider. Right slider:
Ventilation slots opened.
With the ventilation slots opened, more air
circulation results in a lower air moisture
content in the fruit and vegetable
compartments. Left slider: Ventilation slots
closed. When the ventilation slots are
closed, the natural moisture content of the
food in the fruit and vegetable
compartments is preserved for longer.
PR271
Page 18

18
electrolux
Air recycling
The refrigerator compartment is
equipped with a special
D.A.C.(Dynamic Air Cooling) fan which
can be turned on with the switch B
with the green light on, means that the
fan is working.
As a suggestion the fan (D.A.C.)
should be used with ambient
temperature exceeding 25°C .
This device allows for rapid cooling of
foods and a more uniform temperature
in the compartment.
Freezing Calendar
The symbols show different types of
frozen goods.
The numbers indicate storage times in
months for the appropriate types of
frozen goods. Whether the upper or
lower value of the indicated storage time
is valid depends on the quality of the
foods and pre-treating before fr eezing.
Ice-cube production
This appliance is equipped with one or
more trays for the production of icecubes. Fill these trays with water, then
put them in the freezer compartment.
Do nnot uuse mmetallic iinstruments tto
remove tthe ttrays ffrom tthe ffreezer.
10 -1210 -1210 - 1210 - 123-63-63-63-63-41-2
Page 19

electrolux
19
Thawing
Deep-frozen or frozen food, prior to
being used, can be thawed in the
refrigerator compartment or at room
temperature, depending on the time
available for this operation.
Small pieces may even be cooked still
frozen, directly from the freezer: in this
case, cooking will take longer.
Freezing fresh food
The freezer compartment is suitable for
freezing fresh food and storing frozen
and deep-frozen food for a long time.
To freeze fresh food activate the Action
Freeze function (*) at least 24 hours
before placing the food to be frozen in
the freezer compartment.
Move the Twist&Serve ice dispenser to
the middle of the shelf on which it is
hooked.
Move the shelf to the middle seat,
keeping it horizontal.
Place the fresh food to freeze on the
shelf.
The maximum amount of food that can
be frozen in 24 hours is specified on
the rating plate ,a label located on the
inside of the appliance.
The freezing process lasts for 24
hours: during this period do not add
other food .
After 24 hours,when the freezing
process is completed,return to the
required temperature by pressing the
button A.
Storing deep-frozen food
When switching on or after an idle
period,it is advisable to operate the
appliance to the coldest setting for at
least 2 hours before introducing deepfrozen food.
To do this,select the Action Freeze
function (*).
After 2 hours select the required
temperature by pressing the button A.
To obtain best results it is advisable to
keep the freezer shelf on the middle
seats.
Page 20

20
electrolux
• the freezing process takes 24
hours. No further food to be frozen
should be added during this period;
• only freeze top quality, fresh and
thoroughly cleaned, foodstuffs;
• prepare food in small portions to
enable it to be rapidly and
completely frozen and to make it
possible subsequently to thaw only
the quantity required;
• wrap up the food in aluminium foil
or polythene and make sure that
the packages are airtight;
• do not allow fresh, unfrozen food to
touch food which is already frozen,
thus avoiding a rise in temperature
of the latter;
• lean foods store better and longer
than fatty ones; salt reduces the
storage life of food;
• ice cubes, if consumed immediately
after removal from the freezer
compartment, can possibly cause
the skin to be freeze burnt;
• it is advisable to show the freezingin date on each individual pack to
enable you to keep tab of the
storage time;
• do nnot pput ccarbonated lliquids ((fizzy
drinks, eetc.) iin tthe ffreezer
compartment aas tthey mmay bburst.
HINTS
Hints for refrigeration
Useful hints:
Meat ((all ttypes):
wrap in polythene
bags and place on the glass shelf
above the vegetable drawer.
For ssafety, sstore iin tthis wway oonly oone
or ttwo ddays aat tthe mmost.
Cooked ffoods, ccold ddishes, eetc..:
these should be covered and may be
placed on any shelf.
Fruit aand vvegetables:
these should be
thoroughly cleaned and placed in the
special drawer(s) provided.
Butter aand ccheese:
these should be
placed in special airtight containers or
wrapped in aluminium foil or polythene
bags to exclude as much air as
possible.
Milk bbottles:
these should have a cap
and should be stored in the bottle rack
on the door.
Bananas, ppotatoes, oonions aand ggarlic,
if nnot ppacked, mmust nnot bbe kkept iin tthe
refrigerator.
Hints for freezing
To help you make the most of the
freezing process, here are some
important hints:
• the maximum quantity of food
which can be frozen in 24 hrs. is
shown on the rating plate;
Page 21

electrolux
21
Interior light
If it becomes necessary to replace the
lamp, pressing as shown in the figure.
Attention
Replace the lamp with one of the same
power (the maximum power is shown
on the light diffuser).
Hints for storage of
frozen food
To obtain the best performance from
this appliance, you should:
• make sure that the commercially
frozen foodstuffs were adequately
stored by the retailer;
• be sure that frozen foodstuffs are
transferred from the foodstore to
the freezer in the shortest possible
time;
• not open the door frequently or
leave it open longer than absolutely
necessary.
• Once defrosted, food deteriorates
rapidly and cannot be refrozen.
• Do not exceed the storage period
indicated by the food manufacturer.
Page 22

22
electrolux
MAINTENANCE
Unplug tthe aappliance bbefore
carrying oout aany mmaintenance
operation.
Warning
This aappliance ccontains
hydrocarbons iin iits ccooling uunit;
maintenance aand rrecharging
must ttherefore oonly bbe ccarried
out bby aauthorized ttechnicians.
Periodic cleaning
Many pproprietary kkitchen ssurface
cleaners ccontain cchemicals tthat ccan
attack/damage tthe pplastics uused iin
this aappliance. FFor tthis rreason iit iis
recommended tthat tthe oouter ccasing oof
this aappliance iis oonly ccleaned wwith
warm wwater wwith aa llittle wwashing-uup
liquid aadded.
Clean the inside with warm water and
bicarbonate of soda.
Rinse and dry thoroughly.
Clean the condenser (black grill) and
the compressor at the back of the
appliance with a brush or a vacuum
cleaner. This operation will improve the
performance of the appliance and
save electricity consumption.
Defrosting
Fridge
Frost is automatically eliminated from
the evaporator of the refrigerator
compartment every time the motor
compressor stops, during normal use.
The defrost water drains out through a
trough into a special container at the
back of the appliance, over the motor
compressor, where it evaporates.
It iis iimportant tto pperiodically cclean tthe
defrost wwater ddrain hhole iin tthe mmiddle
of tthe rrefrigerator ccompartment
channel tto pprevent tthe wwater
overflowing aand ddripping oonto tthe ffood
inside. UUse tthe sspecial ccleaner
provided, wwhich yyou wwill ffind aalready
inserted iinto tthe ddrain hhole.
Freezer
Your appliance is frost free, which
means there is no need to manually
defrost it as this will be carried out
automatically.
D037
Page 23

electrolux
23
CUSTOMER SERVICE
AND SPARE PARTS
If the appliance is not functioning
properly, check that:
• the plug is firmly in the wall socket
and the mains power switch is on;
• there is an electricity supply (find
out by plugging in another
appliance);
• the temperature is set correctly.
• If there are water drops on the
bottom of the cabinet, check that
the defrost water drain opening is
not obstructed (see “Defrosting”
section).
• If your appliance is still not working
properly after making the above
checks, contact the nearest service
centre.
To oobtain ffast sservice, iit iis eessential
that wwhen yyou aapply ffor iit yyou sspecify
the mmodel aand sserial nnumber oof yyour
appliance wwhich ccan bbe ffound oon tthe
guarantee ccertificate oor oon tthe rrating
plate llocated iinside tthe aappliance, oon
the bbottom lleft-hhand sside
.
TECHNICAL INFORMATION
323
78
0,890
325
1800
695
669
Net Fridge Capacity lt.
Energy Consumption kWh/24h
Energy Consumption kWh/year
Dimensions mm
High
Net Freezer Capacity lt
Width
Depth
The technical infomation are situated in the rating plate on the internal left side of
the appliance.
Page 24

24
electrolux
INSTALLATION
Location
The appliance should be installed well
away from sources of heat such as
radiators, boilers, direct sunlight etc.
Ensure that air can circulate freely
around the back of the cabinet. To
ensure best performance, if the
appliance is positioned below an
overhanging wall unit, the minimum
distance between the top of the
cabinet and the wall unit must be at
least 100 mm . Ideally, however, the
appliance should not be positioned
below overhanging wall units. Accurate
levelling is ensured by one or more
adjustable feet at the base of the
cabinet.
Attention
It must be possible to disconnect the
appliance from the mains power
supply; the plug must therefore be
easily accessible after installation.
Rear spacers
In tthe aappliance, tthere aare ttwo sspacers
which mmust bbe ffitted aas sshown iin tthe
figure ..
Slacken the screws and insert the
spacer under the screw head, then retighten the screws.
NP005
100 mm10 mm
10 mm
Page 25

electrolux
25
Electrical connection
Before plugging in, ensure that the
voltage and frequency shown on the
serial number plate correspond to your
domestic power supply. Voltage can
vary by ±6% of the rated voltage.
For operation with different voltages, a
suitably sized auto-transformer must
be used.
The aappliance mmust bbe eearthed.
The power supply cable plug is
provided with a contact for this
purpose.
If the domestic power supply socket is
not earthed, connect the appliance to
a separate earth in compliance with
current regulations, consulting a
specialist technician.
The MManufacturer ddeclines aall
responsibility iif tthe aabove ssafety
precautions aare nnot oobserved.
This appliance complies with
the following E.E.C. Directives:
•
87/308 EEEC
of 2/6/87 relative to
radio interference suppression.
•
73/23 EEEC
of 19.2.73 (Low Voltage
Directive) and subsequent
modifications;
•
89/336 EEEC
of 3.5.89
(Electromagnetic Compatibility
Directive) and subsequent
modifications.
Door reversibility
The side at which the door opens can be
changed from the right side (factory
adjustment) to the left side, if the
installation site requires.
Warning!
When changing the side
at which the door opens, the appliance
may not be connected to the mains.
Remove plug from the mains beforehand.
Procced aas ffollows:
To carry out the following operations, we
suggest that this be made with another
person that will keep a firm hold on the
doors of the appliance during the
operations.
Before carrying out any operations,
remove the plug from the power
socket.
1. Remove the upper hinge taking
care for the upper door not to fall
off and keep it for future actions;
2. remove the upper door;
3. Remove the upper support and
mount it in the opposite side
4. unscrew the middle hinge.(H)
Unscrew the plastic plugs located on
the opposite side of the central hinge
and introduce them in the holes
occupied before by the hinge;
Page 26

26
electrolux
11.Carefully replace the appliance in its
working position and adjust the
level of the appliance by screwing/
unscrewing the adjustable feet at
the bottom of the cabinet using
your fingers or a tool;
12.Slide the hole cover out of the
ventilation grille by pushing it in the
direction of the arrow and
reassemble it on the opposite side;
13.refit the ventilation grille, fixing the
screws;
14.reassemble the lower door;
15.reassemble the middle hinge (H) in
the opposite side;
16.reassemble the upper door.
17.In your documentation bag you will
find the upper hinge necessary to
make the reversibility. Please screw
it in place.
5. remove the lower door;
6. pull off the ventilation grille which is
fixed by two screws;
7. Carefully place the appliance on its
back, totally unscrew the adjustable
foot and screw it in the opposite
side.
8. remove the bottom hinge by
unscrewing its fixing screws;
9. using a 12 mm spanner, unscrew
the hinge pin and reassemble it on
the opposite side of the hinge;
10.reassemble the lower hinge in the
opposite side, using the screws
previously removed;
H
Page 27

electrolux
27
Warning
After hhaving rreversed tthe oopening
direction oof tthe ddoors ccheck tthat aall tthe
screws aare pproperly ttightened aand tthat
the mmagnetic sseal aadheres tto tthe
cabinet. IIf tthe aambient ttemperature iis
cold ((i.e. iin WWinter), tthe ggasket mmay nnot
fit pperfectly tto tthe ccabinet. IIn tthat ccase,
wait ffor tthe nnatural ffitting oof tthe ggasket
or aaccelerate tthis pprocess bby hheating
up tthe ppart iinvolved wwith aa nnormal
hairdrier.
D419
Page 28

28
electrolux
Bem-vindo ao mundo Electrolux
Obrigado por ter escolhido adquirir um produto de primeira classe da Electrolux,
que esperamos lhe traga muito prazer no futuro. A ambição da Electrolux é
oferecer uma vasta variedade de produtos de qualidade que tornem a sua vida
ainda mais confortável. Pode encontrar alguns exemplos na capa deste manual.
Tire alguns minutos para estudar este manual para que possa começar a tirar
partido dos benefícios do seu novo aparelho. Nós prometemos que lhe irá
proporcionar uma experiência superior e confortante como utilizador. Boa sorte!
Page 29

electrolux
29
Os símbolos que se seguem são utilizados neste manual
Informações importantes relativas à segurança pessoal e como evitar
danos no aparelho
Informações gerais e sugestões
Informações ambientais
O símbolo no produto ou na embalagem indica que este produto não pode
ser tratado como lixo doméstico. Em vez disso, deve ser entregue ao centro de
recolha selectiva para a reciclagem de equipamento eléctrico e electrónico.
Ao garantir uma eliminação adequada deste produto, irá ajudar a evitar eventuais
consequências negativas para o meio ambiente e para a saúde pública, que, de
outra forma, poderiam ser provocadas por um tratamento incorrecto do produto.
Para obter informações mais pormenorizadas sobre a reciclagem deste produto,
contacte os serviços municipalizados locais, o centro de recolha selectiva da sua
área de residência ou o estabelecimento onde adquiriu o produto.
Page 30

30
electrolux
ÍNDICES
Advertências ee cconselhos
importantes 31
Uso ee ffuncionamiento 34
Limpeza das partes internas 34
Painel de comando 34
Coloção em funcionamento 34
Descrição do aparelho 34
Arranque 35
Régulação da température 35
Funcção Action Freeze 35
Refrigeração dos alimentos 35
Como usar o dispensador de água com
o cartucho filtrante BRIT A MAXTRA 36
Prateleiras amovíveis 42
Prateleira para garrafas 42
Colocação das pratelairas da porta 42
Gaveta 43
Controle de umidade 43
Recirculação de ar 44
Calendário de congelamento 44
Congelação de alimentos frescos 44
Conservação de alimentos
congelados 44
Descongelação 45
Fabricação de cubos de gelo 45
Conselhos 45
Conselhos para a refrigeração 45
Conselhos para a congelação 45
Conselhos para a conservação dos
alimentos congelados 46
Lâmpada de iluminação 46
I
Manutenção 47
Limpeza periódica 47
Paragem prolongada 47
Descongelação 48
Dados TTecnicos 49
Assistência ttécnica ee ppeças dde
substituição 49
Instalação 50
Colocação 50
Espaçadores posteriores 50
Ligação eléctrica 51
Reversibilidade das portas 52
Page 31

electrolux
31
ADVERTÊNCIAS E
CONSELHOS
IMPORTANTES
É mmuito iimportante qque eeste mmanual dde
utilização aacompanhe oo aaparelho ppara
garantir uuma ffutura uutilização ccorrecta.
Se oo aaparelho ffor vvendido oou
emprestado aa uuma ooutra ppessoa, oo
manual dde uutilização ddeve, ccomo aacima
se ffaz nnotar, aacompanhá-llo, dde mmaneira
que oo uutilizador ppossa sser iinformado ddo
seu ffuncionamento, ddas aadvertências ee
conselhos. SSe eeste aaparelho, mmunido
de ffecho mmagnético, vveio ssubstituir uum
outro qque ttinha pportas ccom ffecho dde
mola, aaconselhamos aa iinutilizar eeste
fecho, aantes ddo aaparelho sser pposto
definitivamente dde llado. EEsta pprecaução
procura eevitar qque ccrianças, bbrincando,
se ppossam ffechar nno aaparelho oo qque
seria aaltamente pperigoso.
Essas aadvertências ttêm ppor ffim
garantir aa ssegurança ddos uutilizadores.
Agradecemos, pportanto, qque lleia oo
manual aatentamente, aantes dde iinstalar
e uutilizar oo aaparelho.
Segurança
• Este aparelho não se destina a ser
utilizado por pessoas (incluindo
crianças) com capacidades mentais,
sensoriais e físicas reduzidas, ou com
falta de experiência e conhecimento, a
não ser que sejam supervisionadas ou
recebam instruções relativamente à
utilização do aparelho, por parte de
uma pessoa responsável pela sua
segurança.
As crianças devem ser
supervisionadas para garantir que não
brincam com o electrodoméstico.
• É perigoso modificar ou tentar
modificar as características deste
aparelho.
• Este aparelho é pesado. Tenha o
maior cuidado quando o deslocar
• Não consuma certos produtos, tais
como gelados, imediatamente
após terem saído do aparelho; a
temperatura muito baixa a que se
encontram pode provocar
queimaduras.
• Este aaparelho ccontém
hidrocarbonetos nno ccircuito
refrigerante; pportanto, aa
manutenção ee aa rrecarga ddevem
ser eefectuadas eexclusivamente ppor
pessoal aautorizado ppelo pprodutor.
• Preste aa mmáxima aatenção aao
deslocar oo aaparelho, ppara nnão
danificar aas ppartes ddo ccircuito
refrigerante, eevitando aassim
possíveis ssaídas dde ffluido.
• O aaparelho nnão ddeve sser iinstalado
perto dde eelementos dde
aquecimento oou ffogões dde ggás.
• Evite aa eexposição pprolongada ddo
aparelho aaos rraios ddo ssol.
• A pparte dde ttrás ddo aaparelho ddeve
receber uuma ssuficiente vventilação ee
deve sser eevitado qqualquer ddano aao
circuito rrefrigerante.
• Somente ppara oos ccongeladores
(excepto oos dde eencaixe): aa mmelhor
colocação éé nna ccave.
Assistência
• Se uma eventual modificação da
instalação eléctrica, na casa do
utilizador, tiver de ser feita para tornar
possível a instalação do aparelho,
deve, esta, ser efectuada por pessoal
qualificado.
Page 32

32
electrolux
• Este aparelho deve ser assistido
por um Centro de Assistência
autorizado, sendo apenas
aplicadas peças de origem.
• Em caso de avaria, não tente você
mesmo, reparar o aparelho. As
reparações executadas por pessoas
inexperientes, podem causar danos
físicos e mate-riais (aumentando as
avarias a serem reparadas). Faça
apelo ao seu Centro de Assistência
mais próximo e insista em peças
genuínas.
Utilização
• Os frigoríficos e/ou congeladores
domésticos destinam-se,
unicamente, à conservação e/ou
congelação de alimentos.
• Os melhores rendimentos são
conseguidos com temperaturas
ambiente incluídas entre +18°C e
+43°C (Classe T); +18°C e +38°C
(Classe ST); +16°C e +32°C
(Classe N); +10°C e +32°C (Classe
SN); a classe a que pertence o
aparelho é indicada na placa de
matrícula (posta na cela ao lado do
compartimento dos legumes).
Atenção: com temperaturas
ambiente não incluídas nas
indicadas para a classe climática a
que pertence o produto, é preciso
cumprir as indicações seguintes:
quando a temperatura ambiente
descer abaixo do valor mínimo,
pode não ser garantida a
temperatura de conservação no
compartimento congelador;
portanto, aconselha-se a
consumar rapidamente os
alimentos nele contidos.
• Um produto descongelado não
deve, em nenhum caso, voltar a
ser congelado.
• Siga as indicações do fabricante
para a conservação e/ou
congelação dos alimentos.
• O revestimento interior do aparelho
em composto de pequenos tubos
por onde passa o refrigerante. Se
estes tubos forem danificados o
aparelho ficará irremediavelmente
avariado, provocando a perda dos
alimentos no seu interior. NÃO
UTILIZE OBJECTOS
PONTEAGUDOS para raspar o gelo
acumulado. Esse gelo pode ser
raspado utilizando a espátula que é
fornecida com o aparelho. Para
eliminar grandes quantidades de gelo
acumulado, é aconselhável deixá-lo
derreter. Veja as instruções para a
descongelação.
• Não coloque no compartimento/
congelador a baixa temperatura,
garrafas ou latas com bebidas
gaseificadas dado que se cria uma
pressão elevada no interior da garrafa
e/ou lata havendo o perigo de este
explodir. Desta explosão resultariam
danos graves para o aparelho.
Instalação
• Durante o normal funcionamento o
condensador e o compressor,
colocados na parte de trás do
aparelho, aquecem sensivelmente.
Por razões de segurança a
ventilação deve ser como indicado
na respectiva Figura.
Page 33

electrolux
33
Atenção: mmantenha aas aaberturas
para aa vventilação llivres dde qqualquer
obstrução.
• O aparelho aquece, sensivelmente,
ao nível do con-densador e do
compressor. Certifique-se que o ar
circula, livremente, à volta do
aparelho. Uma ventila-ção
insuficiente ocasionaria um mau
funcionamen-to, danos para o
aparelho e perda dos alimentos no
seu interior. Siga as instruções
para a correcta instalação do
aparelho.
• Assegure-se, quando instalar o
aparelho, que este não repousa
sobre o cabo de alimentação
eléctrica.
Importante:
se o cabo de
alimentação se danificar, deverá ser
substituído por um cabo especial ou
por um conjunto, disponíveis junto do
construtor ou do serviço de
assistência técnica.
• Os componentes do aparelho que
aquecem devido ao seu
funcionamento não devem estar
expostos. Sempre que possível as
costas do aparelho devem ficar
encostadas a uma parede
• Desligue sempre a tomada de
corrente antes de proceder à limpeza
ou qualquer operação de
manutenção do aparelho.
• Ao transportar o aparelho na
horizontal, pode acontecer que o
óleo contido no compressor escorra
para o circuito refrigerante. É portanto
aconselhável esperar pelo menos
duas horas antes de ligar o aparelho
à corrente.
Protecão do
ambiente
Este aaparelho nnão ccontem, nno sseu
circuito rrefrigerante ee nnas ssuas
matérias iisolantes, ggases nnocivos àà
camada dde oozono.Mesmo aassim eeste
aparelho ddeve, qquando ffor
destruido,receber oos ccuidados
convenientes, dde aacordo ccom aas
disposições eem vvigor ppara aa pprotecção
do mmelo aambiente. OOs mmateriais
utilizados nneste aaparelho, mmarcados
com oo ssimbolo ssão rreciclàveis.
Page 34

34
electrolux
USO E
FUNCIONAMIENTO
Limpeza das partes
internas
Estando o aparelho convenientemente
instalado, antes de o utilizar,
aconselhamos a sua limpeza
cuidadosa com água tépida e sabão
neutro para retirar o cheiro
característico do “novo”.
Painel de comando
A. Tecla para a regulação da temperatura
Colocação em
funcionamento
Retire, sse eexistente, aa eetiqueta
"Retirar" ccolada nno iinterior ddo
frigorífico.
Encaixar a ficha de ligação à rede na
tomada.
Descrição do aparelho
Retirar a ficha de ligaçã o à rede da
tomada.
Não uutilize ddetergentes oou ppós
abrasivos, qque ppodem ddanificar oos
acabamentos. EEnxague ee sseque
cuidadosamente.
+2 +4 +5 +6 +8
Page 35

electrolux
35
Arranque
Sempre que premir a tecla,é
seleccionada a temperatura indicada
pelo led.
A selecção é gradual,variando entre
+2 ° C e +8 °C.
Continue a premir a tecla até que o
led correspondente à temperatura
desejada se acenda.
Régulação da
température
A temperatura interna poderá ser
influenciada pelos seguintes factores:
• temperatura ambiente
• frequência de abertura das portas
• quantidade de alimentos
conservados
• colocação do aparelho
Normalmente, uma definição média é
a mais adequada.
Se a temperatura ambiente for inferior
a 16 °C, prima o Regulador da
Temperatura, até que se acenda o
LED correspondente à temperatura
inferior.
Função Action Freeze
Para arrefecer rapidamente a
temperatura do compartimento
congelador,active a função Action
Freeze .
Pressione o botão A mais vezes
indicada pela seta até que o led
correspondente ao símbolo (*) se
acenda.
Para anular a função Action Freeze
pressione o botão A mais vezes até
escolher a temperatura desejada.
Refrigeração dos
alimentos
Para obter um melhor rendimento do
seu aparelho:
• reparta as provisões de maneira a
que o ar possa circular, facilmente,
à volta delas;
• não introduza, na caixa, alimentos
ainda quentes ou líquidos em
evaporação;
• cubra os alimentos, de especial
modo se são aromáticos.
Page 36

36
electrolux
Como usar o dispensador
de água com o cartucho
filtrante BRITA MAXTRA
Unidade de filtragem de água BRITA
Componentes internos:
1. Reservatório da água
2. Funil
3. Tampa do reservatório
4. Válvula + vedante
5. Incluindo o cartucho filtrante
BRIT A MAXTRA
6. BRIT A Memo - indicador electrónico de
troca de cartucho
Componentes externos:
7. Dispensador
8. Nível da água
9. Tabuleiro recolhe gotas
OPERAÇÕES INICIAIS NA 1ª
UTILIZAÇÃO DO DISPENSADOR DE
ÁGUA
1. Remova a fita adesiva e qualquer outro
sistema de protecção do conjunto do
reservatório;
2. Limpe os componentes tal como
descrito no capítulo LIMPEZA DO
DISPENSADOR DE ÁGUA para eliminar
eventuais resíduos;
LIMPEZA DO DISPENSADOR DE
ÁGUA
1. Destrave os dois elementos de
bloqueio nos lados do reservatório tal
como indicado nas figuras abaixo;
- Retire o cartucho BRITA MAXTRA da
unidade de filtragem da água;
- Pressione os elementos de bloqueio no
meio e eleve-os;
- Desloque o bloqueador em direcção ao
centro do reservatório.
1
2
3
Page 37

electrolux
37
2. Puxe o reservatório para cima, na
direcção da válvula;
3. Retire a tampa e o funil;
4. Desenrosque a válvula, rodando-a para
a esquerda (tenha atenção para não
soltar o vedante da válvula, pois este é
necessário para o correcto funcionamento
da unidade);
5. Lave a tampa do reservatório, a válvula
e o vedante com uma solução de água
morna e sabão neutro. Enxagúe e insiraos no orifício da porta durante a limpeza
dos restantes componentes (para evitar
fugas de ar frio do frigorífico);
6. Lave o reservatório e o funil na
máquina de lavar louça ou com uma
solução de água morna e sabão neutro,
por fim, enxagúe-os;
7. Após a limpeza, volte a retirar a válvula
da porta do frigorífico e monte o
reservatório pela ordem inversa (4;3;2;1) à
da desmontagem (tenha atenção à
posição do vedante da válvula);
8. Coloque o reservatório montado na
porta, na direcção da válvula;
9. Trave o elementos de bloqueio pela
ordem inversa à da destravagem;
10. Volte a inserir o cartucho
BRIT A MAXTRA no funil tal como descrito
no capítulo "Como trocar o cartucho
BRIT A MAXTRA".
Como usar o cartucho filtrante BRITA
MAXTRA
PASSO 1: PREPARAR O CARTUCHO
Para preparar o cartucho filtrante BRITA
retire o invólucro pr otector (nota: o
cartucho e o interior do invólucro podem
apresentar humidade, trata-se apenas de
condensação). Coloque o cartucho em
água fria e abane-o ligeiramente para
remover quaisquer bolhas de ar. O filtro
está agora pronto a ser usado. Ao
contrário de outros cartuchos filtrantes
para água, não é necessário embeber
previamente o novo cartucho Maxtra.
Page 38

38
electrolux
PASSO 2: INSERIR NO
RESERVATÓRIO DA ÁGUA
Retire a tampa do reservatório. Antes de
inserir o cartucho, retire o funil, lave-o,
enxagúe-o e seque-o bem. A seguir,
limpe bem o interior do reservatório da
água com um pano húmido e seque-o.
Coloque o cartucho no reservatório do
filtro e empurre para baixo, até fazer
'click'. Ao virar o funil para baixo o
cartucho deverá ficar no lugar.
PASSO 3: ENXAGUAR O CARTUCHO
Retire o funil da unidade de filtragem da
água BRIT A, encha-o à torneira com
água fria e aguarde que esta seja filtrada.
Deixe escorrer os dois primeiros
enchimentos para o lava-louça. Estes dois
primeiros enchimentos servem para
limpar o cartucho filtrante.
A seguir, volte a colocar o funil na unidade
de filtragem da água BRIT A.
Volte a colocar a tampa e pressione
cuidadosamente para garantir que esta
fica bem fechada.
PASSO 4: ENCHER O
RESERVATÓRIO DA ÁGUA
Para encher o reservatório com água fria,
basta abrir a tampa no topo e despejar
um jarro de água da torneira tal como
indicado na figura (utilize a tampa de cada
vez que desejar filtrar a água).
Atenção!
Para evitar que a água se entorne quando
abre e fecha a porta do frigorífico,
recomenda-se que não encha
completamento o dispensador de água.
NOT A: 3857 CASO NÃO TENHA USADO
TODA A ÁGUA FILTRADA NO
RESERVATÓRIO DENTRO DE 1 A 2
DIAS, DESPEJE A ÁGUA REST ANTE
ANTES DE VOLT AR A ENCHER A
UNIDADE DE FILTRAGEM DA ÁGUA
BRIT A.
Aguarde até que a água seja filtrada e
repita o PASSO 4 tantas vezes até que a
unidade de filtragem da água BRIT A
esteja cheia;
Page 39

electrolux
39
RETIRAR O CARTUCHO COM A
PEGA EM FORMA DE ANEL
Para trocar o cartucho, passadas quatro
semanas, basta puxá-lo pela pega em
forma de anel para o retirar do funil e
repetir os passos 1 a 3 acima descritos;
O MEMO BRITA
Para obter o máximo desempenho e um
sabor ideal, é importante trocar
regularmente o cartucho BRITA. A BRITA
recomenda que troque o cartucho na
unidade de filtragem da água BRIT A do
seu frigorífico a cada quatro semanas.
O Memo BRIT A lembra-o
automaticamente quando deve trocar o
cartucho.
O original Memo BRIT A mede o tempo de
uso recomendado do cartucho. O Memo
é fácil de usar e lembra-o
automaticamente quando trocar o
cartucho. O Memo BRIT A encontra-se na
tampa do reservatório da água. O seu
funcionamento é muito simples.
Iniciar o visor do Memo:
Para iniciar o Memo, prima o botão na
tampa e mantenha-o premido até
surgirem as quatro barras no visor e estas
piscarem duas vezes. O Memo está
agora configurado.
Controlar o funcionamento:
O ponto intermitente no canto inferior
direito do Memo indica que este está a
funcionar .
Page 40

40
electrolux
Mudar o visor:
Em cada semana desaparece uma barra
para indicar a vida útil restante do
cartucho. Após quatro semanas todas as
barras terão desaparecido. Isto e uma
seta intermitente indicam que o cartucho
deve ser agora trocado. Insira um
cartucho novo de acordo com as
instruções e reactive o Memo tal como
acima descrito.
NOT A: 3857 Quando for visível apenas
uma barra, deverá verificar se possui um
cartucho filtrante BRIT A MAXTRA novo
disponível.
Importante: O Memo foi concebido para
ser usado apenas com cartuchos
filtrantes BRIT A.
"MEMO" BRIT A - O indicador electrónico
de troca de cartucho tem uma vida útil de
aproximadamente 5 anos. No fim da vida
útil do "MEMO" lembre-se de que se trata
de um dispositivo electrónico, devendo
ser eliminado de acordo com as
disposições e regulamentos aplicáveis.
Para retirar o "MEMO" gasto, insira uma
chave de fendas na ranhura junto ao
"MEMO" e puxe-o para fora.
Não se esqueça que o "MEMO" não
deve ser retirado por qualquer outro
motivo que não seja a sua eliminação.
INFORMAÇÃO IMPORTANTE
• O orifício da válvula da porta do
frigorífico TEM DE EST AR FECHADO
com a VÁLVULA DA ÁGUA durante o
normal funcionamento do aparelho
• Utilize apenas água potável. A
utilização de outro tipo de bebida
pode deixar resíduos, sabor ou cheiro
no reservatório e na torneira
• É possível ouvir alguns ruídos
provocados pela entrada de ar
durante a saída da água do
reservatório
• Se a água não sair correctamente,
volte a pressionar a alavanca de
accionamento. Mantenha o copo
debaixo da torneira durante alguns
instantes para assegurar que este
recolhe toda a água
Page 41

electrolux
41
• Não utilize bebidas gaseificadas,
como sejam refrigerantes. A bebida
pode verter devido à pressão do gás
• Lembre-se de que a água é um
produto alimentar. Consuma a água
filtrada dentro de um a dois dias.
• Caso não use a unidade de filtragem
da água BRIT A durante um período
de tempo prolongado (p. ex. férias),
recomendamos a despejar toda a
água existente no sistema e a deixar o
cartucho dentro do reservatório do
filtro. Antes de voltar a usar o sistema,
retire o cartucho e repita os passos 1
a 4 de Como usar o cartucho filtrante
BRIT A MAXTRA.
• A unidade de filtragem da água BRITA
foi concebida para ser usada apenas
com água municipal da torneira (nota:
esta água é constantemente
controlada, sendo apta para beber de
acordo com os regulamentos legais)
ou com água de fontes privadas, que
tenham sido testadas e declaradas
aptas para beber. Caso sejam
recebidas instruções das autoridades
no sentido de ferver a água da
torneira, a água filtrada BRITA terá
igualmente de ser fervida. Quando as
instruções para ferver a água
deixarem de estar em vigor, todo o
sistema de filtragem tem de ser limpo
e inserido um novo cartucho.
Pode encontrar mais informações sobre
os cartuchos filtrantes BRIT A e o 'Memo'
no manual informativo BRIT A.
Para aquisição de novos cartuchos de
filtros BRITA e 'Memo' deverá entrar em
contacto com o serviço a clientes da
Electrolux ou da BRITA.
Page 42

42
electrolux
Prateleiras amovíveis
Nas paredes do compartimento há
calhas que permitem colocar as
prateleiras a diferentes alturas.
Prateleira para garrafas
Colocar as garrafas da prateleira com
a boca para frente.
Atenção: Só guardar deitadas garrafas
que ainda não tenham sido abertas.
Para guardar garrafas já abertas, a
prateleira para garrafas pode ser
colocada na posição inclinada.
Para tal, puxe a prateleira para
garrafas para frente, até que seja
possível levantá-la. Em seguida,
colocar a prateleira da frente em um
nível mais alto.
Colocação das
prateleiras da porta
Pode modificar a posição das
prateleiras da porta. Para isso
proceda da seguinte forma:
Empurre gradualmente a prateleira no
sentido que indica a seta até
desencaixa-la. Depois monte-a no
lugar desejado fazendo a operação
inversa.
D338
PRXXX
Page 43

electrolux
43
Controle de umidade
Na prateleira de vidro està instalado
um dispositivo com fendas (reguláveis
através de uma alavanca corrediça),
que permite de regular a temperatura
no espaço da gaveta de verduras.
Com as fendas fechadas será obtida
uma temperatura mais quentefria e
major umidade. Com as fendas
abertas será obtida uma temperatura
mais fria e menos umidad
Gaveta
A gaveta é apropriada para conservar
fruta e verdura. Dentro da gaveta há
um separador que pode ser colocado
em várias posições para criar
subcompartimentos a fim de satisfazer
melhor as próprias necessidades.
Uma grade no fundo da gaveta
permite de separar a fruta e a verdura
da humidade que pode-se formar na
superfície do fundo.
Todas as partes dentro da gaveta
podem ser removidas para a limpeza.
PR271
Page 44

44
electrolux
Congelação de
alimentos frescos
O compartimento congelador é
adequado para a congelação de
alimentos frescos e para a
conservação a longo prazo de
alimentos congelados e
ultracongelados.
Para a congelação de alimentos
frescos, accione a função Action
Freeze (*) pelos menos 24 h antes de
inserir os alimentos a congelar no
compartimento congelador.
Desloque oo ddispensador dde
geloTwist&Serve ppara aa pposição
central rrelativamente àà pprateleira oonde
está eengatado.
Desloque a prateleira que se encontra
no compartimento congelador,
mantendo-a na posição horizontal e
colocando-a na posição intermédia.
Volte a colocar nessa prateleira os
alimentos frescos a congelar.
A quantidade máxima de alimentos
que podem ser congelados em 24
horas está indicada na chapa de
identificação ,uma etiqueta presente
nas paredes internas do aparelho.
O processo de congelação dura 24
horas:durante este período,não
introduza novos alimentos a congelar.
Após 24 horas, quando o processo de
congelação tiver terminado, regresse à
temperatura desejada premindo a
tecla A.
Conservação de alimentos
congelados
Quando se ligar o aparelho,ou após
Calendário de
congelamento
Os simbolos indicam diferentes tipos
de produtos congelados.
Os números fornecem, em meses, o
tempo de armazenamento para o
respectivo tipo de produto congelado.
Se o valor válido do tempo de
armazenamento indicado é o superior
ou o inferior, depende da qualidade do
género alimenticio e da sua
preparação antes do congelamento.
10 -1210 -1210 - 1210 - 123-63-63-63-63-41-2
Recirculação de ar
O compartimento geladeira é dotado
de uma ventoinha especial D.A.C.
(Dynamic Air Cooling) que é ativada
agindo no interruptor B, o sinal
luminoso aceso significa que a
ventoinha está funcionando.
Aconselha-se o uso da ventoinha
(D.A.C.) quando a temperatura
ambiente ultrapassa os 25°C.
Este dispositivo permite um
arrefecimento rápido dos alimentos e
uma uniformidade melhor da
temperatura dentro do
compartimento.
Page 45

electrolux
45
um período de inactividade, é
aconselhável colocá-lo em
funcionamento máximo pelo menos 2
horas antes de introduzir
os alimentos congelados.
Para isso, seleccione a função Action
Freeze (*).
Após 2 horas selecionar a
temperatura desejada premindo a
tecla A.
Para obter o melhor desempenho, é
aconselhável manter a prateleira do
congelador nas posições intermédias.
Descongelação
Os alimentos congelados devem ser
descongelados antes da sua
utilização, no compartimento
refrigerador ou à temperatura
ambiente conforme o tempo
disponível para a operação.
No caso de se tratar de produtos
pouco espessos ou divididos, ponhaos directamente, a cozer: nesse caso
o tempo de cozedura será mais longo.
Fabricação de cubos de
gelo
O seu aparelho está dotado de uma
ou mais cuvetes para a formação de
cubinhos de gelo. Tais cuvetes devem
ser enchidas com água potável e
colocadas no especial compartimento.
Aconselha-se não usar objectos
metálicos para tirar as cuvetes.
Não cconsuma oos ccubos dde ggelo oou oos
sorvetes llogo qque oos rretire ddo
congelador: aa ttemperatura mmuito bbaixa
a qque sse eencontram ppode pprovocar
queimaduras.
CONSELHOS
Conselhos para a
refrigeração
Carne ((de qqualquer ttipo):
envolva
esses alimentos em sacos plásticos e
coloque-as na divisão imediatamente
acima das caixas para legumes.
O pperíodo dde cconservação éé dde 11 aa 22
dias, nno mmáximo.
Alimentos ccozidos, ppratos ffrios, eetc:
coloque-os, bem cobertos, numa
prateleira qualquer.
Frutas ee llegumes:
nas caixas de
legumes depois de lavados.
Bananas, bbatatas, ccebola ee aalho, sse
não fforem ppreparados, nnão sse
conservam nno rrefrigerador.
Conselhos para a
congelação
Para obter as máximas vantagens da
congelação, uns conselhos
importantes são:
• a quantidade máxima de alimentos
que podem ser congelados em 24
horas é indicada na «placa
sinalética»;
• o processo de congelação dura 24
horas; nesse período, não
introduza novos produtos para
congelar;
• congele só alimentos de excelente
qualidade, frescos e bem lavados;
• Reparta tudo em pequenos
pacotes proporcionados ao
consumo familiar, de forma a
serem utilizados de uma só vez.
Os pacotes de pequenas
Page 46

46
electrolux
dimensões permitem obter uma
congelação rápida e uniforme;
• as provisões a congelar devem ser
fechadas em embalagens
impermeáveis de qualidade
alimentar. Feche cuidadosamente
os pacotes eliminando as bolsas
de ar;
• evite introduzir os produtos a
congelar em contacto com os já
congelados; isto vai evitar o
aumento da temperatura destes
últimos;
• considere que os alimentos
magros conservam-se melhor e
durante mais tempo que os gordos
e que o sal reduz a duração da
congelção.
• não consuma certos produtos, tais
como sorvetes por exemplo, logo
que os retire do congelador: a
temperatura muito baixa a que se
encontram pode provocar
queimaduras.
• indique, em cada pacote, a data
da congelação de forma a poder
controlar o tempo de conservação;
• não ccoloque ggarrafas oou llatas dde
bebidas ggasosas nno ccongelador,
pois ppodem eexplodir.
Conselhos para a
conservação dos
alimentos congelados
Para utilizar do melhor modo o
compartimento é necessario:
• Verifique se os produtos
congelados foram conservados
bem pelo revendedor;
• que o transporte, da compra até à
colocação no congelador, seja
breve;
• não ultrapasse o período de
conservação indicado nas
embalagens;
• não abra frequentemente a porta e
não a deixe aberta mais do que for
necessário.
Lâmpada de iluminação
A lâmpada de iluminação do
compartimento de refrigeração pode
ser alcançada pressionando como
indicado na figura.
Atenção
Substituir aa llâmpada ccom uuma dde
potência iigual ((a ppotência mmáxima eestá
contida nno ddifusor dde lluz).
Page 47

electrolux
47
MANUTENÇÃO
Antes dde qqualquer iintervenção
no aaparelho, aaconselhamos qque
se ddesligue aa ttomada dde
corrente.
Aviso
Este eelectrodoméstico ccontém
hidrocarbonetos nno ssistema dde
refrigeração; aa mmanutenção ee aa
recarga ddeve sser, pportanto,
executada aapenas ppor ttécnicos
autorizados.
Limpeza periódica
Muitos ddetergentes eespecíficos ppara
as ssuperfícies dda ccozinha ccontêm
agentes qquímicos qque ppodem
corromper/danificar aas ppartes eem
plástico ppresentes nneste aaparelho.
Aconselha-sse, ppor iisso, dde llimpar oo
revestimento eexterno ddeste aaparelho
só ccom áágua qquente jjuntamente ccom
uma ppequena qquantidade dde
detergente llíquido ppara aa llouça.
Lave as paredes e acessórios com
água tépida e bicarbonato de soda.
Enxague e seque cuidadosamente;
limpe o condensador e o
motocompressor com uma escova ou
um aspirador. Esta operação vai
melhorar o funcionamento com
conseguinte poupança de energia.
Paragem prolongada
No caso de se ausentar por um
período prolongado, desligue a
tomada de corrente, esvazie, degele e
limpe o aparelho.
Mantenha as portas entre-abertas
durante toda a não utilização, para
facilitar a circulação do ar no interior e
evitar a formação de cheiros
desagradáveis.
Page 48

48
electrolux
Descongelação
A descongelação do refrigerador dáse automaticamente durante cada
período de paragem do compressor.
A água proveniente do descongelação
é evacuada para um recipiente situado
na parte detrás do aparelho, por cima
do compressor, e onde ela se
evapora.
Não sse eesqueça dde llimpar
periodicamente oo oorifício dde eescoamento
de áágua ddo ddescongelação qque sse
encontra nno ccentro dda ggoteira ddo
compartimento rrefrigerador ppara eevitar
que aa áágua ppossa ttransbordar ee ccair
sobre oos aalimentos. UUtilize ppara eesse
efeito aa ppequena bbarra qque sse eencontra
no oorifício.
O compartimento congelador é do
tipo "no frost"; isto significa que o
mesmo é caracterizado pela total
ausência de gelo durante o
funcionamento, tanto nas paredes
internas do compartimento como nos
alimentos.
A falta de gelo é devido à circulação
contínua de ar frio dentro do
compartimento, provocada por um
ventilador comandado
automaticamente.
D037
D037
Page 49

electrolux
49
ASSISTÊNCIA
TÉCNICA E PEÇAS DE
SUBSTITUIÇÃO
Se o aparelho não funcionar verifique:
• Se a ficha está bem introduzida na
tomada e se há corrente na rede.
• Se o botão do termóstato está na
posição correcta.
No caso de haver vibrações ou
ruídos verifique se o aparelho está em
contacto com moveis que podem
transmitir ou ampliar ruídos e
vibrações.
Verifique também se as tubagens do
sistema refrigerante não vibram. Se
houver restos de água no interior do
frigorifico verifique se o orifício de
descarga não está obstruído.
Se depois de todas estas verificações
o problema persistir dirija-se ao seu
vendedor ou o serviço de assistência
mais perto da sua residência.
Para oobter uuma aassistência mmais
rápida iindique oos ddados dda pplace dde
identificac,ão ddo aaparelho qque sse
encontra nno iinterior ddo
electrodoméstico nna pparede ddo ffundo
no llado eesquerdo, ee ttambém oo
modelo nnúmero dde sserie ee ccertificado
de ggarantia.
DADOS TECNICOS
323
78
0,890
325
4
20
1800
695
669
Capacidade lìquida em litros do frigorìfico
Consumo energético en kWh/24h
Consumo energético en kWh/ano
Capacidade de congelação em kg/24h
Autonomia por corte de energia de –18°C a –9°C por h
Capacidade lìquida em litros do congelador
Dimensões em mm
Altura
Largura
Profundidade
Os dados técnicos são indicados na placa de matrícula que se encontra no
lado esquerdo interno do apareho.
Page 50

50
electrolux
INSTALAÇÃO
Colocação
Coloque o aparelho longe de qualquer
fonte de calor (aquecimento, fogões,
ou raios solares demasiado
intensos).Verifique que nas parses
posterior, superior e inferior o ar pode
circular livremente. Para um melhor
funcionamento verifique que a parse
superior têm pelo menos 100 mm de
distancia de algum móvel suspenso
por cima do aparelho . A solução
preferível é indicada na (sem móvel).
Um ou vários pés niveladores situados
na base têm a função de nivelar o
aparelho correctamente.
Importante
O aparelho deve
poder ser
desligado da rede; uma vez realizada a
instalação, portanto, é necessário que
a ficha fique acessível.
Espaçadores posteriores
No interior do aparelho encontram se
dois espaçadores que hão de ser
montados nos figuras.
Desapertar oos pparafusos, iinserir oo
espaçador ddebaixo dda ccabeça ddo
parafuso ee vvoltar aa aapertar.
NP005
100 mm10 mm
10 mm
Page 51

electrolux
51
Ligação eléctrica
Verifique, antes de ligar o aparelho, se
a voltagem e a frequência indicadas na
placa sinalética correspondem às da
sua rede. Tolerância admitida na
voltagem nominal: ±6%. Para a
adaptação do aparelho a voltagens
diferentes, é indispensável a adjunção
de um auto-transformador de uma
potência adequada.
Verifique sse aa ttomada dde
corrente dda pparede eestá eem bbom
estado ee aapta aa rreceber aa fficha ddo ffio
de aalimentação ddo aaparelho.
Esta última está conforme às normas
em vigor e possui uma entrada para a
ligação à terra. Essa ficha pode ser
ligada a qualquer tomada de corrente
desde que esta tenha uma ponta de
ligação à terra. No caso em que a
tomada não tenha a ligação à terra,
ligar o aparelho a uma instalação de
ligação à terra separada, conforme as
normas em vigor, consultando para
isso um técnico especializado.
A CCasa CConstrutora ddeclina ttoda ee
qualquer rresponsabilidade nno ccaso dde
esta nnorma ccontra oos aacidentes nnão
ser ccumprida ee sse vverificarem
acidentes ooriginados ppor ddeficiente
ligação àà tterra, oou ffalta ddela.
Este aparelho está conforme as
seguintes Directrizes
Comunitárias:
-887/308
de 2/6/87 respeitante à
supressão das interferências radioeléctricas.
- 773/23 CCEE
19/02/73 (Baixa Tensão)
e sucessivas modificações;
- 889/336 CCEE
03/05/89
(Compatibilidade Electromagnética)
e sucessivas modificações.
Page 52

52
electrolux
Reversibilidade das portas
Antes de qualquer operação tire a
ficha da tomada de corrente.
Para a inversão aja da seguinte
maneira:
Para proceder à colocação da porta
aconselhamos que não o faça sozinho
pois é necessário segurar firmemente
a porta durante a sua colocação.
1. remover a dobradiça superior e o
suporte superior verificando que a
porta superior não se
desenganche:
2. remover a porta superior;
3. desaparafusar a dobradiça central.
Desaparafusar os pinos de plástico
posicionados no lado oposto da
dobradiça central e inseri-los nos
furos antes ocupados pela dobradiça;
4. remover a porta inferior;
5. extrair a grelha de ventilação fixada
por dois parafusos;
6 remover a dobradiça inferior
desaparafusando os relativos
parafusos de fixação;
7. usando uma chave de 12
mm,desaparafusar o perno da
dobradiça e remontá-la no lado
oposto da dobradiça;
8. regular o nível do corpo do
eletrodoméstico desaparafusando
manualmente ou com uma
ferramenta o pé ou os pés
reguláveis presentes no fundo;
H
Page 53

electrolux
53
9. remontar a dobradiça inferior no
lado oposto usando os parafusos
removidos anteriormente.Fazer
deslizar a cobertura dos furos fora
da grelha de ventilação
empurrando a na direção da seta e
remontá-la no lado oposto;
10.remontar a grelha de ventilação
fixando os parafusos;
11.remontar a porta inferior;
12.remontar a dobradiça central no
lado oposto;
13.recolocar a porta superior;
Atenção
Depois dde mmudado oo ssentido dde
abertura dda pporta, ccontrole sse aa
vedação mmagnética ffica ppegada aao
móvel. SSe aa ttemperatura aambiente
estiver mmuito ffria, aa bborracha ppode nnão
aderir pperfeitamente ee, nneste ccaso,
deverá eesperar qque eesa sse aajuste
naturalmente oou aacelerar oo pprocesso
com uum ssecador dde ccabelo.
D419
Page 54

Page 55

Page 56

2223 514-62-00 04092009
wwwwww..eelleeccttrroolluuxx..ccoomm
www.electrolux.pt
 Loading...