

Page 1
UUsseerr mmaannuuaall
MMaannuuaall ddee IInnssttrruucccciioonneess
MMaannuuaall ddee iinnssttrruuççõõeess
END 32321 W
Fridge - Freezer
Frigorífico - Congelador
Frigorífico - Congelador
Page 2

Page 3

electrolux
3
Welcome to the world of Electrolux
You’ve chosen a first class product from Electrolux, which hopefully will provide
you with lots of pleasure in the future. Electrolux ambition is to offer a wide variety
of quality products that would make your life even more comfortable. You can look
at some examples on the cover in this manual. But now it’s time to study this
manual and start using and enjoying the benefits from your new machine. We
promise that it’ll make your life a little easier. Good luck!
Page 4
4
electrolux
The following symbols are used in this manual:
Important information concerning your personal safety and information on
how to avoid damaging the appliance.
General information and tips
Environmental information
The symbol on the product or on its packaging indicates that this product
may not be treated as household waste. Instead it shall be handed over to the
applicable collection point for the recycling of electrical and electronic equipment.
By ensuring this product is disposed of correctly, you will help prevent potential
negative consequences for the environment and human health, which could
otherwise be caused by inappropriate waste handling of this product. For more
detailed information about recycling of this product, please contact your local city
office, your household waste disposal service or the shop where you purchased
the product.
Page 5

electrolux
5
CONTENTS
Safety IInformation 06
Use 009
Cleaning the interior 09
Control panel 09
Operation 09
Switching off 09
Temperature regulation 10
Adjusting the temperature 10
Action Freeze Function 10
Fresh food refrigeration 10
Movable shelves 11
Bottle rack 11
Positioning the door shelves 11
Air recycling 12
Ice-cube production 12
Freezing Calendar 13
Freezing fresh food 13
Storing deep-frozen food 13
Thawing 13
Installation of the taste guard filter 14
Replacing the taste guard filter 14
Hints 15
Hints for refrigeration 15
Hints for freezing 15
Hints for storage of frozen food 16
Maintenance 116
Periodic cleaning 16
Interior light 17
Defrosting 17
Technical information 18
Customer sservice aand sspare pparts 118
Installation 19
Location 19
Rear spacers 19
Shelf holders 19
Electrical connection 20
Door reversibility 20
European GGuarantee 23
www.electrolux.com 24
Page 6

6
electrolux
SAFETY
INFORMATION
It iis mmost iimportant tthat tthis
instruction bbook sshould bbe rretained
with tthe aappliance ffor ffuture rreference.
Should tthe aappliance bbe ssold oor
transferred tto aanother oowner, oor
should yyou mmove hhouse aand lleave tthe
appliance, aalways eensure tthat tthe
book iis ssupplied wwith tthe aappliance iin
order tthat tthe nnew oowner ccan bbe
acquainted wwith tthe ffunctioning oof tthe
appliance aand tthe rrelevant wwarnings.
If tthis aappliance ffeaturing mmagnetic
door sseals iis tto rreplace aan oolder
appliance hhaving aa sspring llock ((latch)
on tthe ddoor oor llid, bbe ssure tto mmake
that sspring llock uunusable bbefore yyou
discard tthe oold aappliance. TThis wwill
prevent iit ffrom bbecoming aa ddeath-ttrap
for aa cchild.
These wwarnings aare pprovided iin tthe
interest oof ssafety. YYou mmust rread tthem
carefully bbefore iinstalling oor uusing tthe
appliance.
General Safety
• This appliance is designed to be
operated by adults. Children
should not be allowed to tamper
with the controls or play with the
product.
• It is dangerous to alter the
specifications or modify this
product in any way.
• Before any cleaning or
maintenance work is carried out,
be sure to switch off and unplug
the appliance.
• This appliance is heavy. Care
should be taken when moving it
• Ice lollies can cause frost burns if
consumed straight from the
appliance.
• Take uutmost ccare wwhen hhandling
your aappliance sso aas nnot tto ccause
any ddamages tto tthe ccooling uunit
with cconsequent ppossible ffluid
leakages.
• The aappliance mmust nnot bbe llocated
close tto rradiators oor ggas ccookers.
• Avoid pprolonged eexposure oof tthe
appliance tto ddirect ssunlight.
• There mmust bbe aadequate vventilation
round tthe bback oof tthe aappliance
and aany ddamage tto tthe rrefrigerant
circuit mmust bbe aavoided.
• For ffreezers oonly ((except bbuilt-iin
models): aan iideal llocation iis tthe
cellar oor bbasement.
• Do nnot uuse oother eelectrical
appliances ((such aas iice ccream
makers) iinside oof rrefrigerating
appliances.
Service/Repair
• Any electrical work required to
install this appliance should be
carried out by a qualified electrician
or competent person
• This product should be serviced by
an authorized Service Centre, and
only genuine spare parts should be
used.
• Under no circumstances should
you attempt to repair the appliance
yourself. Repairs carried out by
Page 7

electrolux
7
inexperienced persons may cause
injury or more serious
malfunctioning. Refer to your local
Service Centre, and always insist
on genuine spare parts.
• This appliance contains
hydrocarbons in its cooling unit;
maintenance and recharging must
therefore only be carried out by
authorized technicians.
Use
• The domestic refrigerators and
freezers are designed to be used
specifically for the storage of edible
foodstuffs only.
• Best performance is obtained with
ambient temperature between
+18°C and +43°C (class T); +18°C
and +38°C (class ST); +16°C and
+32°C (class N); +10°C and +32°C
(class SN). The class of your
appliance is shown on its rating
plate.
Warning: when the ambient
temperature is not included within
the range indicated for the class of
this appliance, the following
instructions must be observed:
when the ambient temperature
drops below the minimum level, the
storage temperature in the freezer
compartment cannot be
guaranteed; therefore it is advisable
to use the food stored as soon as
possible.
• Frozen food must not be re-frozen
once it has been thawed out.
• Manufacturers’ storage
recommendations should be strictly
adhered to. Refer to relevant
instructions.
• The inner lining of the appliance
consists of channels through which
the refrigerant passes. If these
should be punctured this would
damage the appliance beyond
repair and cause food loss. DO
NOT USE SHARP INSTRUMENTS
to scrape off frost or ice. Frost may
be removed by using the scraper
provided. Under no circumstances
should solid ice be forced off the
liner. Solid ice should be allowed to
thaw when defrosting the
appliance.
• Do not place carbonated or fizzy
drinks in the freezer as it creates
pressure on the container, which
may cause it to explode, resulting
in damage to the appliance.
Installation
• During normal operation, the
condenser and compressor at the
back of the appliance heat up
considerably. For safety reasons,
minimum ventilation must be as
shown in the instructions.
Attention: kkeep vventilation oopenings
clear oof oobstruction.
• Care must be taken to ensure that
the appliance does not stand on
the electrical supply cable.
Important:
if the supply cord is
damaged, it must be replaced by a
special cord or assembly availa-ble
from the manufacturer or its service
agent.
Page 8

8
electrolux
• If the appliance is transported
horizontally, it is possible that the
oil contained in the compressor
flows in the refrigerant circuit. It is
advisable to wait at least two hours
before connecting the appliance to
allow the oil to flow back in the
compressor.
• There are working parts in this
product which heat up. Always
ensure that there is adequate
ventilation as a failure to do this will
result in component failure and
possible food loss. See installation
instructions.
• Parts which heat up should not be
exposed. Wherever possible the
back of the product should be
against a wall.
Environment
Protection
This aappliance ddoes nnot ccontain
gasses wwhich ccould ddamage tthe
ozone llayer, iin eeither iits rrefrigerant
circuit oor iinsulation mmaterials. TThe
appliance sshall nnot bbe ddiscarded
together wwith tthe uurban rrefuse aand
rubbish. AAvoid ddamaging tthe ccooling
unit, eespecially aat tthe rrear nnear tthe
heat eexchanger. IInformation oon yyour
local ddisposal ssites mmay bbe oobtained
from mmunicipal aauthorities. TThe
materials uused oon tthis aappliance
marked bby tthe ssymbol aare
recyclable.
Page 9
electrolux
9
USE
Cleaning the interior
Before using the appliance for the first
time, wash the interior and all internal
accessories with luke-warm water and
some neutral soap so as to remove
the typical smell of a brand-new
product, then dry thoroughly.
Do nnot uuse ddetergents oor
abrasive ppowders, aas tthese wwill
damage tthe ffinish.
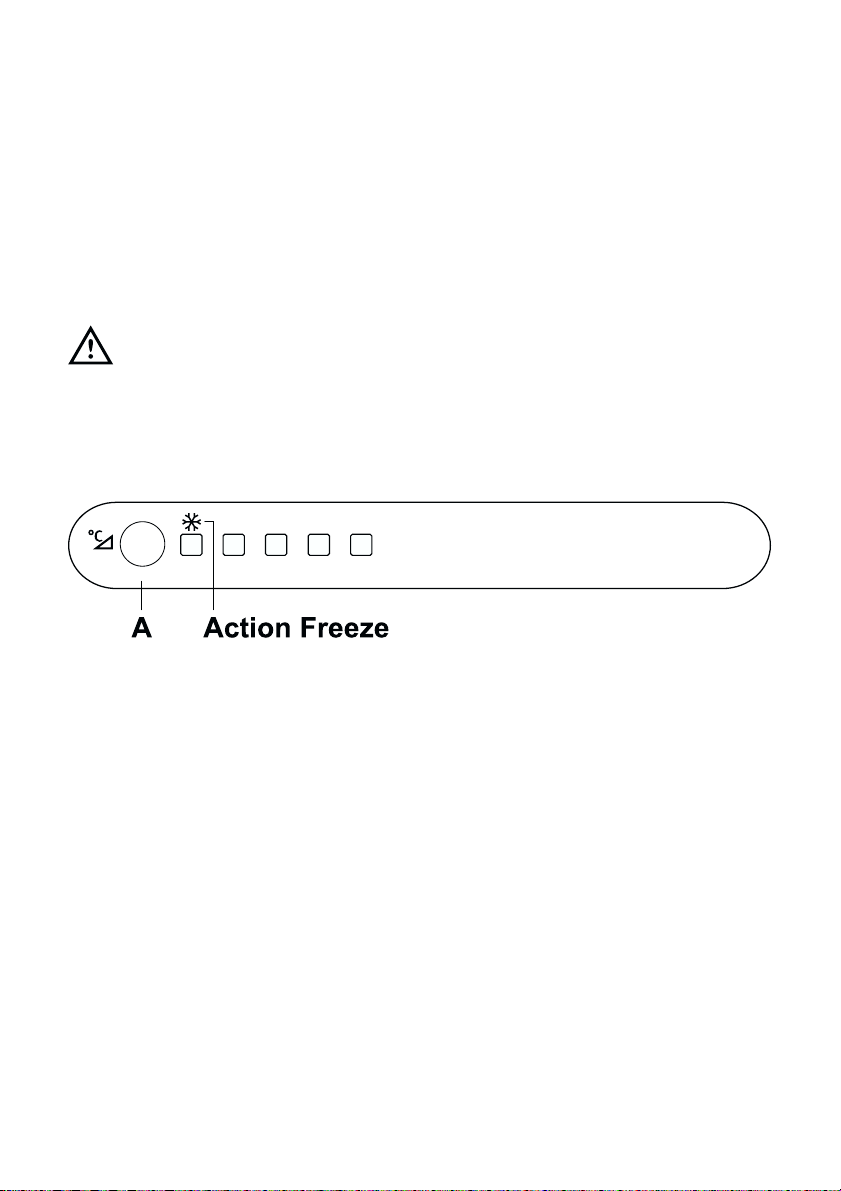
Control Panel
A.
Button for temperature regulation
Operation
Remove, iif ppresent, tthe ““Remove”
label sstuck oon tthe iinside oof tthe ffreezer
compartment.
Insert the plug into the wall socket.
Switching off
To switch off the appliance remove the
mains plug.
+2 +4 +5 +6 +8
Page 10

10
electrolux
Action Freeze Function
To quickly lower the freezer
compartment temperature activate the
Action Freeze function .
Keep pressing the button A until the
LED corresponding to the symbol (*)
lights up.
To deselect the Action Freeze function
keep pressing the button until the
required temperature is selected.
Fresh food refrigeration
To obtain the best performance:
• do not store warm food or
evaporating liquids in the
refrigerator;
• do cover or wrap the food,
particularly if it has a strong flavour.
• Position food so that air can
circulate freely around it.
Temperatur regulation
The temperature indicated by the LED
is selected each time the button is
pressed.
Lla Selection is progressive,varying
from +2 °C to +8 °C.
Keep the button pressed until the LED
corresponding to the required
temperature lights up.
Adjusting the
temperature
The temperature inside may be
influenced by these factors.
• room temperature
• how often the doors are opened
• amount of food stored
• appliance position
Page 11

electrolux
11
Movable shelves
The walls of the refrigerator are
equipped with a series of runners so
that the shelves can be positioned as
desired.
Bottle rack
Place bottles in the rack with the
bottleneck to the front.
Important: Only store unopened
bottles horizontally.
The bottle rack can be tilted for storing
opened bottles.
To do this pull the bottle rack forward
until it can be tilted upwards, then
slide up the front support to the next
level .
Positioning the door
shelves
To permit storage of food packages of
various sizes, the door shelves can be
placed at different heights.
To make these adjustments proceed
as follow: Gradually pull the shelf in
the direction of the arrows until it
comes free, then reposition as
required.
D338
Page 12
12
electrolux
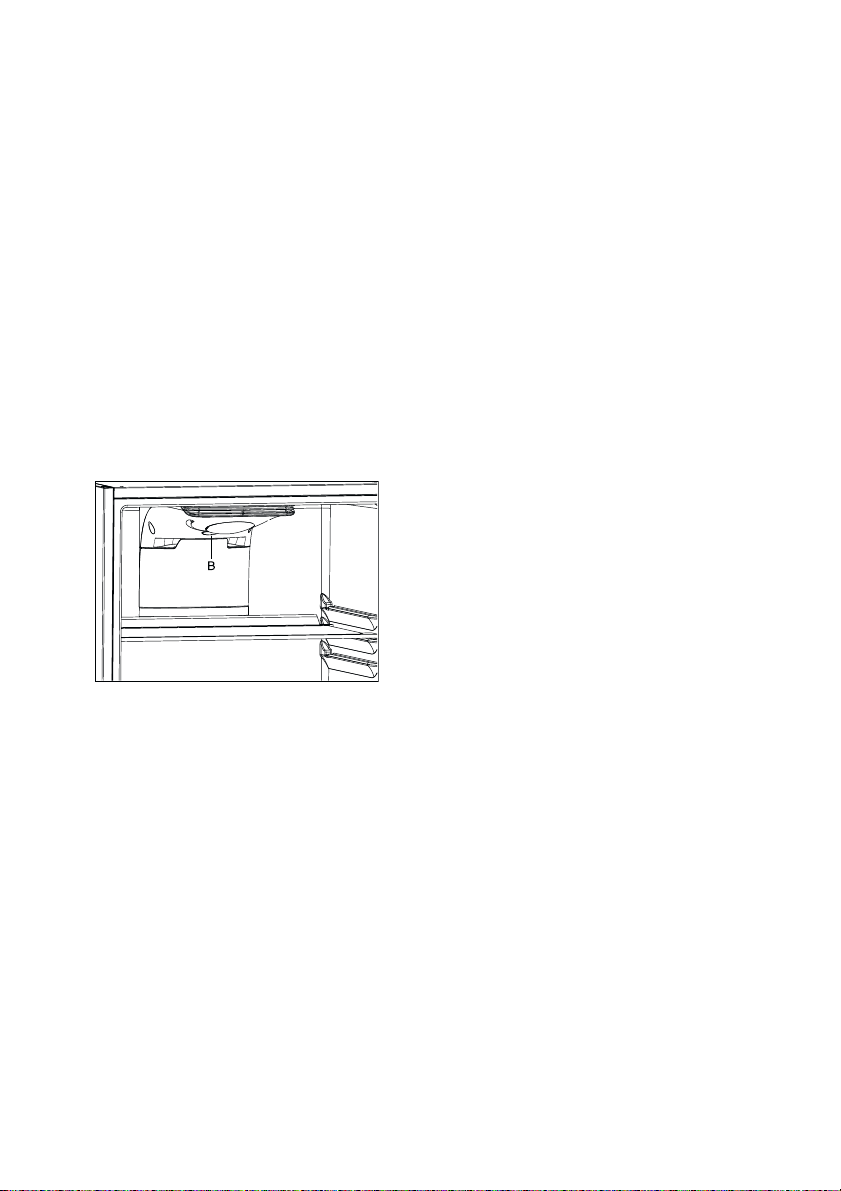
Air recycling
The refrigerator compartment is
equipped with a special
D.A.C.(Dynamic Air Cooling) fan which
can be turned on with the switch B,
with the green light on the fan is
working.
As suggestion the fan (D.A.C.) should
be used with ambient temperature
exceeding 25°C .
This device allows rapid cooling of
foods and a more uniform temperature
in the compartment.
Ice-cube production
This appliance is equipped with one or
more trays for the production of icecubes. Fill these trays with water, then
put them in the freezer compartment.
Do nnot uuse mmetallic iinstruments tto
remove tthe ttrays ffrom tthe ffreezer.
Page 13
electrolux
13
Freezing Calendar
The symbols show different types of
frozen goods.
The numbers indicate storage times in
months for the appropriate types of frozen
goods. Whether the upper or lower value
of the indicated storage time is valid
depends on the quality of the foods and
pre-treating before freezing.
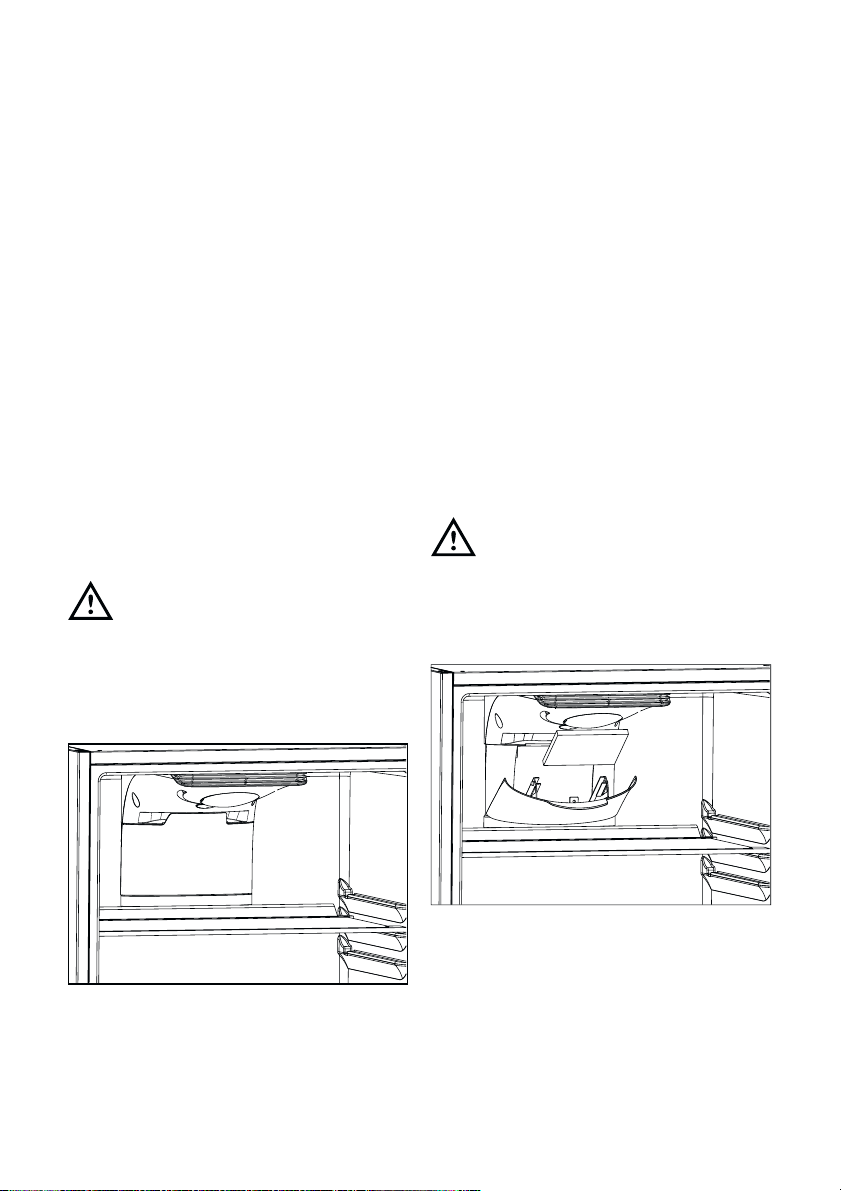
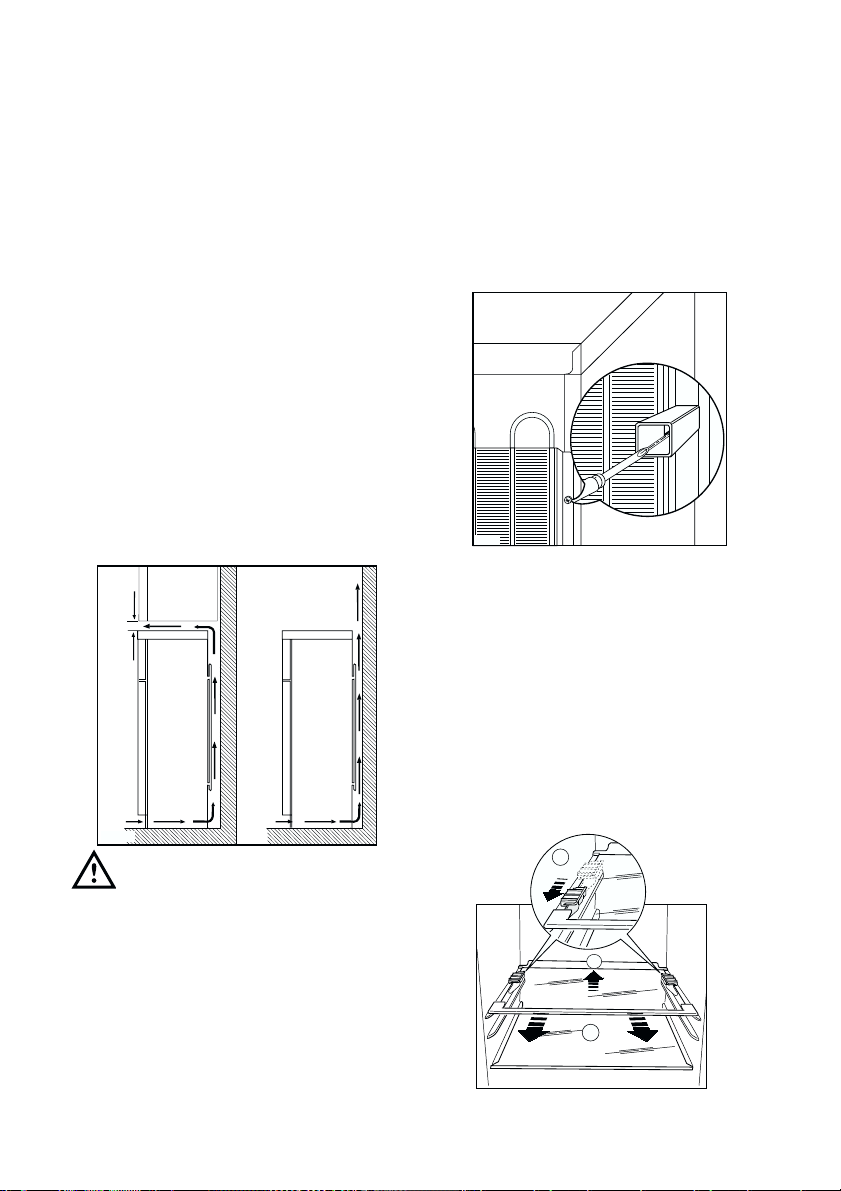
Freezing fresh food
The freezer compartment is suitable for
freezing fresh food and storing frozen
and deep-frozen food for a long time.
To freeze fresh food activate the Action
Freeze function (*) at least 24 hours
before placing the food to be frozen in
the freezer compartment.
Move the Twist&Serve ice dispenser to
the middle of the shelf on which it is
hooked.
Move the shelf to the upper seat,
keeping it horizontal.
Place the fresh food to freeze on the
shelf.
The maximum amount of food that can
be frozen in 24 hours is specified on
the rating plate ,a label located on the
inside of the appliance.
The freezing process lasts for 24
hours: during this period do not add
other food .
After 24 hours, when the freezing
process is completed, return to the
required temperature by pressing the
button A.
Storing deep-frozen food
When switching on or after an idle
period,it is advisable to operate the
appliance to the coldest setting for at
least 2 hours before introducing deepfrozen food.
To do this,select the Action Freeze
function (*).
After 2 hours select the required
temperature by pressing the button A.
To obtain best results it is advisable to
keep the freezer shelf on the upper
seats.
Thawing
Deep-frozen or frozen food, prior to
being used, can be thawed in the
refrigerator compartment or at room
temperature, depending on the time
available for this operation.
Small pieces may even be cooked still
frozen, directly from the freezer: in this
case, cooking will take longer.
10 -1210 -1210 - 1210 - 123-63-63-63-63-41-2
Page 14
14
electrolux
Installation of the Taste
Guard Filter
Taste guard filter is an active carbon
filter which absorbs bad odors and
permits to maintain the best flavour
and aroma for all foodstuffs without
risk of odour cross contamination.
On delivery the active carbon filter is
placed in a plastic bag to secure its
length of life.
Before the appliance is turned on,
remove the filter from its plastic bag
and place it inside the flap.
• Pull the flap outward
• Insert the active carbon filter in the
slot found in the back of the flap
• Close the flap.
During the operation,always keep
the air ventilation flap closed.The
filter should be handled carefully to
prevent its surface from being
scratched.
Replacing the Taste
Guard filter
To get the best performance the active
carbon filter should be changed once
every year.
New active carbon filters can be
purchased from your local dealer.
• The filter is placed behind the flap
and can be reached by pulling the
flap outward.
• Pull out of the slot the exhausted
charcoal filter.
• Insert the new charcoal filter in the
slot
• Close the flap.
During the operation,always keep
the air ventilation flap closed.The
filter should be handled carefully to
prevent its surface from being
scratched.
Page 15

electrolux
15
• only freeze top quality, fresh and
thoroughly cleaned, foodstuffs;
• prepare food in small portions to
enable it to be rapidly and
completely frozen and to make it
possible subsequently to thaw only
the quantity required;
• wrap up the food in aluminium foil
or polythene and make sure that
the packages are airtight;
• do not allow fresh, unfrozen food to
touch food which is already frozen,
thus avoiding a rise in temperature
of the latter;
• lean foods store better and longer
than fatty ones; salt reduces the
storage life of food;
• ice cubes, if consumed immediately
after removal from the freezer
compartment, can possibly cause
the skin to be freeze burnt;
• it is advisable to show the freezing-
in date on each individual pack to
enable you to keep tab of the
storage time;
• do nnot pput ccarbonated lliquids ((fizzy
drinks, eetc.) iin tthe ffreezer
compartment aas tthey mmay bburst.
HINTS
Hints for refrigeration
Useful hints:
Meat ((all ttypes):
wrap in polythene
bags and place on the glass shelf
above the vegetable drawer.
For ssafety, sstore iin tthis wway oonly oone
or ttwo ddays aat tthe mmost.
Cooked ffoods, ccold ddishes, eetc..:
these should be covered and may be
placed on any shelf.
Fruit aand vvegetables:
these should be
thoroughly cleaned and placed in the
special drawer(s) provided.
Butter aand ccheese:
these should be
placed in special airtight containers or
wrapped in aluminium foil or polythene
bags to exclude as much air as
possible.
Milk bbottles:
these should have a cap
and should be stored in the bottle rack
on the door.
Bananas, ppotatoes, oonions aand ggarlic,
if nnot ppacked, mmust nnot bbe kkept iin tthe
refrigerator.
Hints for freezing
To help you make the most of the
freezing process, here are some
important hints:
• the maximum quantity of food
which can be frozen in 24 hrs. is
shown on the rating plate;
• the freezing process takes 24
hours. No further food to be frozen
should be added during this
period;
Page 16
16
electrolux
MAINTENANCE
Unplug tthe aappliance bbefore
carrying oout aany mmaintenance
operation.
Warning
This aappliance ccontains
hydrocarbons iin iits ccooling uunit;
maintenance aand rrecharging
must ttherefore oonly bbe ccarried
out bby aauthorized ttechnicians.
Periodic cleaning
Many pproprietary kkitchen ssurface
cleaners ccontain cchemicals tthat ccan
attack/damage tthe pplastics uused iin
this aappliance. FFor tthis rreason iit iis
recommended tthat tthe oouter ccasing oof
this aappliance iis oonly ccleaned wwith
warm wwater wwith aa llittle wwashing-uup
liquid aadded.
Clean the inside with warm water and
bicarbonate of soda.
Rinse and dry thoroughly.
Clean the condenser (black grill) and
the compressor at the back of the
appliance with a brush or a vacuum
cleaner. This operation will improve the
performance of the appliance and
save electricity consumption.
Hints for storage of
frozen food
To obtain the best performance from
this appliance, you should:
• make sure that the commercially
frozen foodstuffs were adequately
stored by the retailer;
• be sure that frozen foodstuffs are
transferred from the foodstore to
the freezer in the shortest possible
time;
• not open the door frequently or
leave it open longer than absolutely
necessary.
• Once defrosted, food deteriorates
rapidly and cannot be refrozen.
• Do not exceed the storage period
indicated by the food manufacturer.
Page 17
electrolux
17
Freezer
Your appliance is frost free, which
means there is no need to manually
defrost it as this will be carried out
automatically.
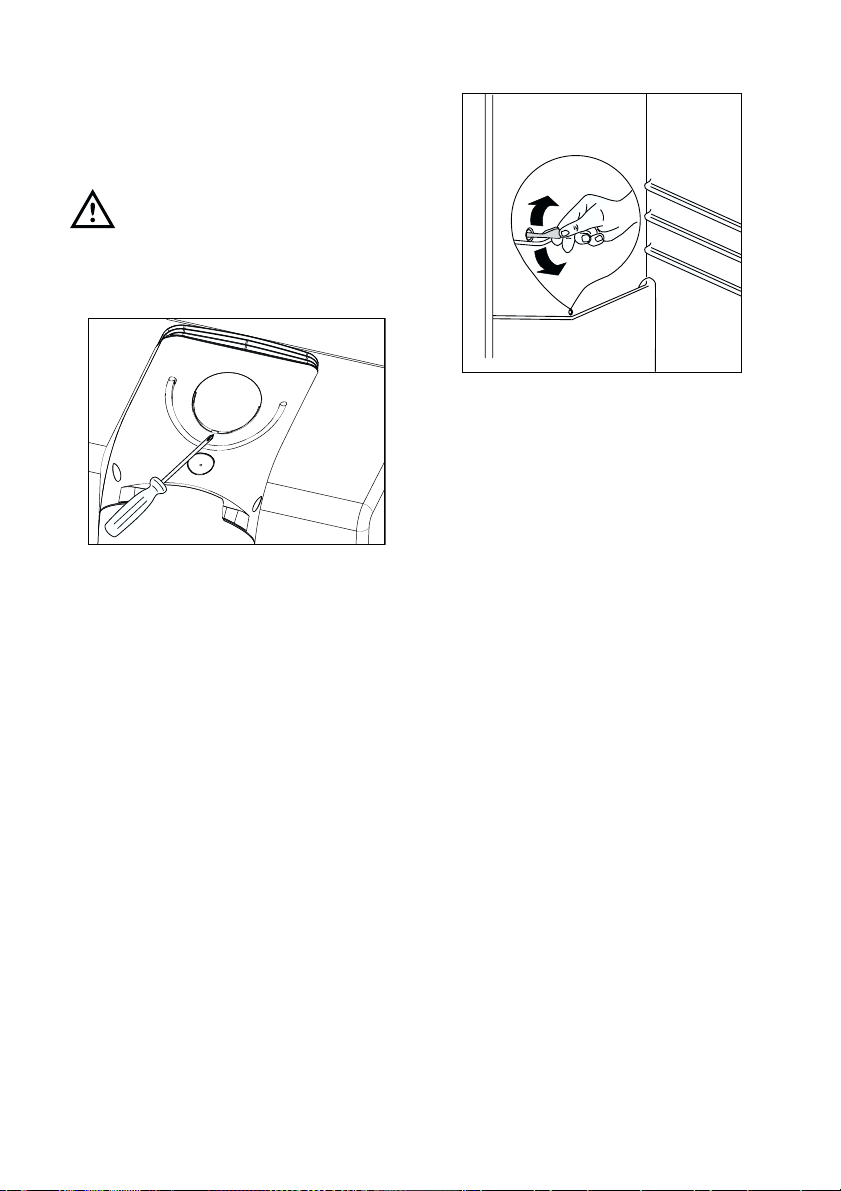
Interior light
If it becomes necessary to replace the
lamp, press as shown in the picture.
Attention
Replace the lamp with one of the same
power (the maximum power is shown
on the light diffuser).
Defrosting
Fridge
Frost is automatically eliminated from
the evaporator of the refrigerator
compartment every time the motor
compressor stops, during normal use.
The defrost water drains out through a
trough into a special container at the
back of the appliance, over the motor
compressor, where it evaporates.
It iis iimportant tto pperiodically cclean tthe
defrost wwater ddrain hhole iin tthe mmiddle
of tthe rrefrigerator ccompartment
channel tto pprevent tthe wwater
overflowing aand ddripping oonto tthe ffood
inside. UUse tthe sspecial ccleaner
provided, wwhich yyou wwill ffind aalready
inserted iinto tthe ddrain hhole.
D037
Page 18
18
electrolux
CUSTOMER SERVICE
AND SPARE PARTS
If the appliance is not functioning
properly, check that:
• the plug is firmly in the wall socket
and the mains power switch is on;
• there is an electricity supply (find
out by plugging in another
appliance);
• the temperature is set correctly.
• If there are water drops on the
bottom of the cabinet, check that
the defrost water drain opening is
not obstructed (see “Defrosting”
section).
• If your appliance is still not working
properly after making the above
checks, contact the nearest service
centre.
To oobtain ffast sservice, iit iis eessential
that wwhen yyou aapply ffor iit yyou sspecify
the mmodel aand sserial nnumber oof yyour
appliance wwhich ccan bbe ffound oon tthe
guarantee ccertificate oor oon tthe rrating
plate llocated iinside tthe aappliance, oon
the bbottom lleft-hhand sside.
TECHNICAL INFORMATION
256
58
0,770
281
4
20
1750
Net Fridge Capacity lt.
Energy Consumption kWh/24h
Energy Consumption kWh/year
Freezing Capacity 24h
Rising time
Net Freezer Capacity lt
Dimensions mm
The technical infomation are situated in the rating plate on the internal left side of
the appliance.
600
645
Width
Depth
High
Page 19
electrolux
19
Shelf holders
Your appliance is equipped with shelf
retainers that make it possible to
secure the shelves during
transportation.
To remove them proceed as follows:
Move the shelf holders in the direction
of the arrow, raise the shelf from the
rear and push it forward until it is freed
and remove the retainers.
INSTALLATION
Location
The appliance should be installed well
away from sources of heat such as
radiators, boilers, direct sunlight etc.
Ensure that air can circulate freely
around the back of the cabinet. To
ensure best performance, if the
appliance is positioned below an
overhanging wall unit, the minimum
distance between the top of the
cabinet and the wall unit must be at
least 100 mm . Ideally, however, the
appliance should not be positioned
below overhanging wall units. Accurate
levelling is ensured by one or more
adjustable feet at the base of the
cabinet.
Attention
It must be possible to disconnect the
appliance from the mains power
supply; the plug must therefore be
easily accessible after installation.
Rear spacers
In tthe bbag wwith tthe ddocumentation,
there aare ttwo sspacers wwhich mmust bbe
fitted aas sshown iin tthe ffigure ..
Slacken the screws and insert the
spacer under the screw head, then retighten the screws.
NP005
100 mm10 mm
10 mm
PR153
A
B
C
Page 20
20
electrolux
Electrical connection
Before plugging in, ensure that the
voltage and frequency shown on the
serial number plate correspond to your
domestic power supply. Voltage can
vary by ±6% of the rated voltage.
For operation with different voltages, a
suitably sized auto-transformer must
be used.
The aappliance mmust bbe eearthed.
The power supply cable plug is
provided with a contact for this
purpose.
If the domestic power supply socket is
not earthed, connect the appliance to
a separate earth in compliance with
current regulations, consulting a
specialist technician.
The MManufacturer ddeclines aall
responsibility iif tthe aabove ssafety
precautions aare nnot oobserved.
This appliance complies with
the following E.E.C. Directives:
•
87/308 EEEC
of 2/6/87 relative to
radio interference suppression.
•
73/23 EEEC
of 19.2.73 (Low Voltage
Directive) and subsequent
modifications;
•
89/336 EEEC
of 3.5.89
(Electromagnetic Compatibility
Directive) and subsequent
modifications.
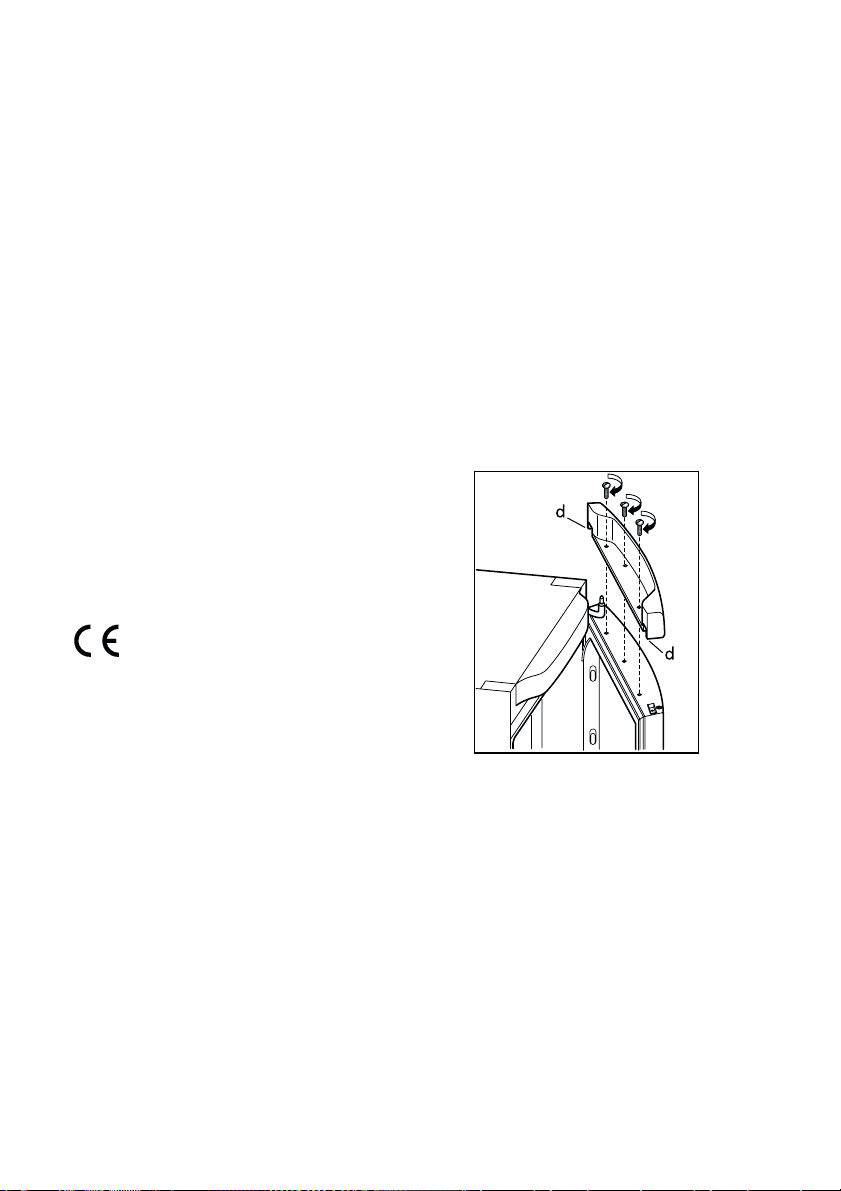
Door reversibility
Before carrying out any operations,
remove the plug from the power
socket.
To change the opening direction of the
door, proceed as follows:
- To carry out the following
operations, we suggest that this be
made with another person that will
keep a firm hold on the doors of
the appliance during the operations.
- Open the door with the appliance in
the upright position. Unscrew the
screws and remove the upper door
plastic trim.
- Remove the little plastic cover from
the door plastic trim and refit on the
opposite side (d).
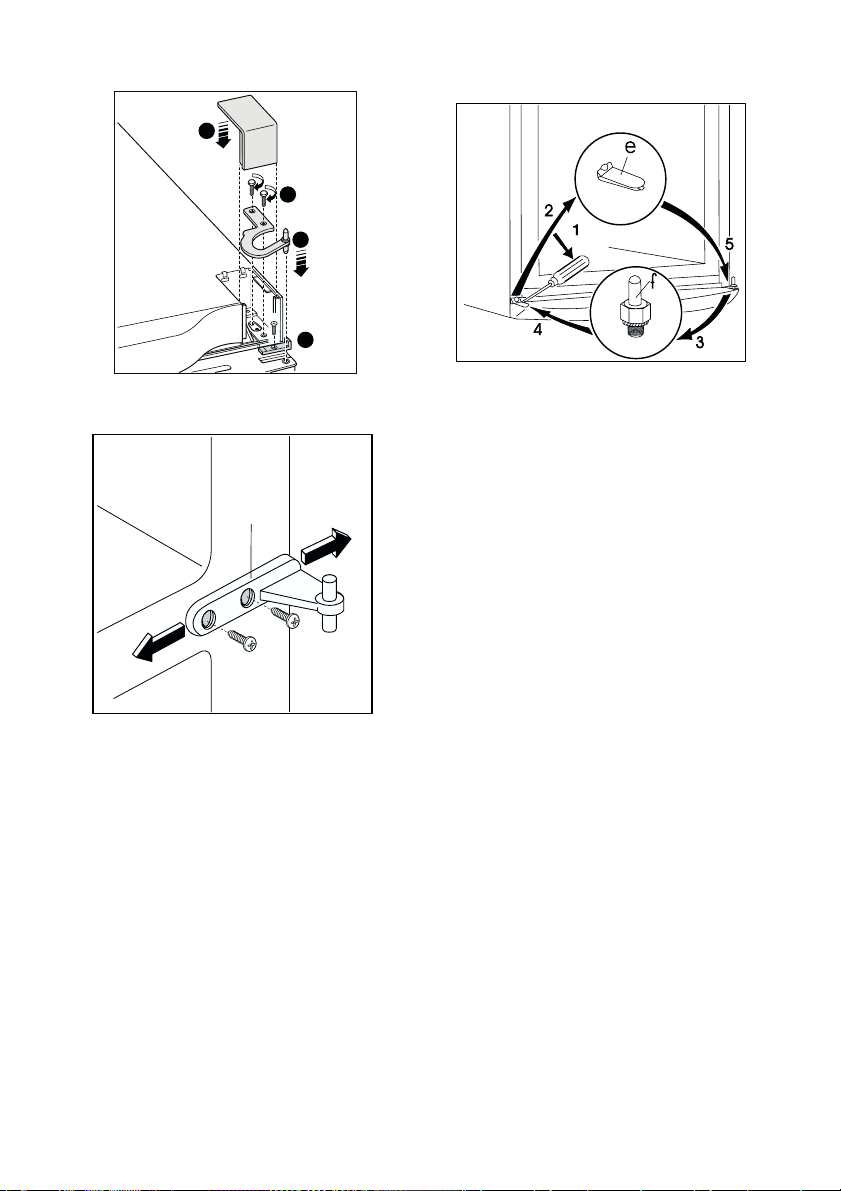
- Lay down the appliance back side
down.
- Remove the plastic hinge covers dx
and sx (3).
- Unscrew the upper hinge and
remove it (1-2)
- Unscrew the screw and remove the
door stopper (4).
Page 21
electrolux
21
- Remove the upper door
- Unscrew the center hinge (H)
- Remove the lower door. If forseen,
remove the upper plastic plug of
the door and reinsert on the
opposite side.
- Remove using a tool the cover (e),
unscrew the pivot pin of the lower
hinge (f) and rescrew on the
opposite side.
- Reinsert the cover (e) on the
opposite side.
- Reinsert the lower door on the pivot
pin (f).
- Rescrew the center hinge (H) on
the opposite side . Do not forget
the plastic spacer, inserted under
the center hinge (H).
- Reinsert the upper door on the
center hinge (H).
- Pay attention that the front board of
the doors are parallel to the front
board of the top.
- Fix the door stopper on the
opposite side (4).
- Position and fix the upper hinge on
the opposite side (1-2)
- Reinsert the 2 plastic hinge covers
(3).
- Lift up the appliance to vertical
position.
- Open the door and reposition the
upper door plastic trim with
screws.
1
4
3
2
H
Page 22
22
electrolux
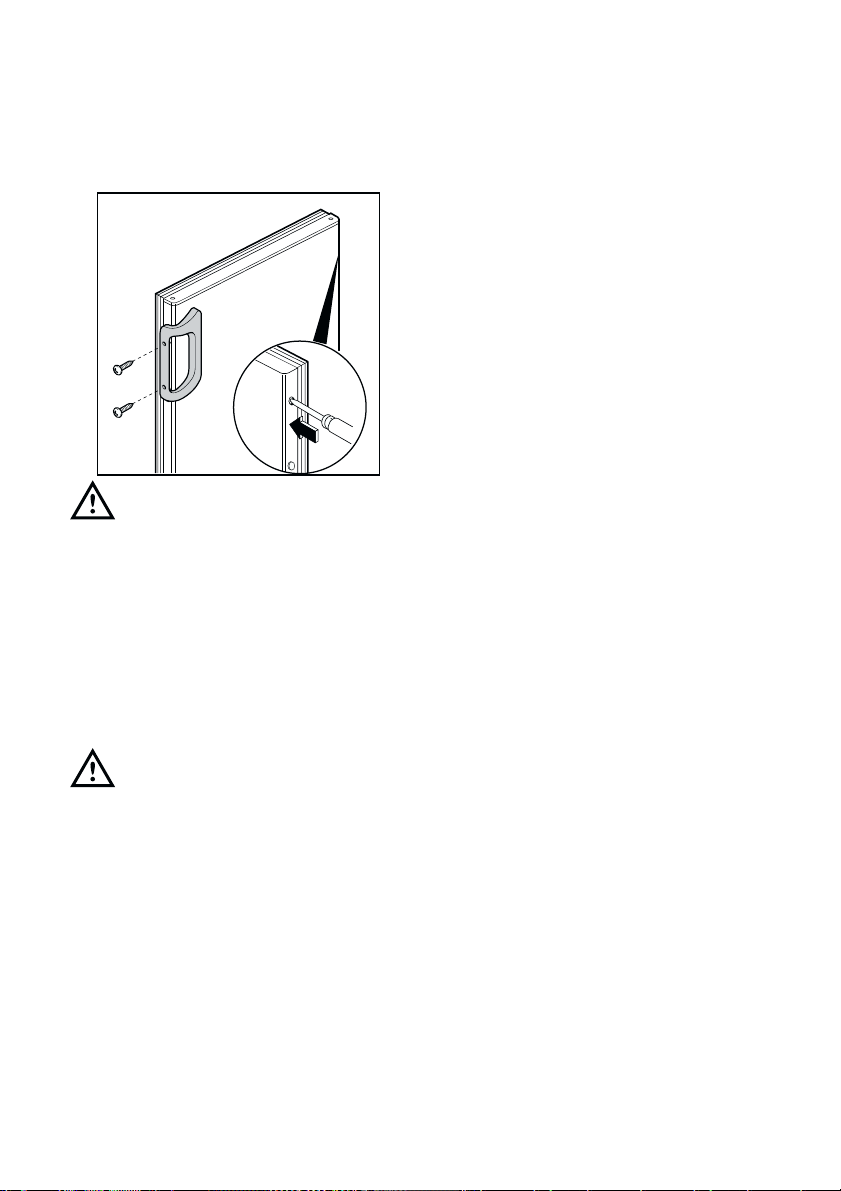
- Fix the handles on the opposite
side, insert the plastic plugs into the
holes left open that can be found in
the instruction for use bag.
Reposition, level the appliance,
wait for at least two hours and
then connect it to the power
socket.
In case you do not want to carry out the
above mentioned operations, contact the
nearest After Sales Service Force.. The
After Sales Service specialist will carry
out the reversibility of the doors at your
cost.
Warning
After hhaving rreversed tthe oopening
direction oof tthe ddoors ccheck tthat aall tthe
screws aare pproperly ttightened aand tthat
the mmagnetic sseal aadheres tto tthe
cabinet.
If tthe aambient ttemperature iis ccold ((i.e.
in WWinter), tthe ggasket mmay nnot ffit
perfectly tto tthe ccabinet. IIn tthat ccase,
wait ffor tthe nnatural ffitting oof tthe ggasket
or aaccelerate tthis pprocess bby hheating
up tthe ppart iinvolved wwith aa nnormal
hairdrier. LLay ddown tthe aappliance bback
side ddown
.
Page 23

electrolux
23
EUROPEAN GUARANTEE
This appliance is guaranteed by Electrolux in each of the countries listed at the
back of this user manual, for the period specified in the appliance guarantee or
otherwise by law. If you move from one of these countries to another of the
countries listed, the appliance guarantee will move with you subject to the
following qualifications:
• The appliance guarantee starts from the date you first purchased the appliance
which will be evidenced by production of a valid purchase document issued by
the seller of the appliance.
• The appliance guarantee is for the same period and to the same extent for
labour and parts as exists in your new country of residence for this particular
model or range of appliances.
• The appliance guarantee is personal to the original purchaser of the appliance
and cannot be transferred to another user.
• The appliance is installed and used in accordance with instructions issued by
Electrolux and is only used within the home, i.e. is not used for commercial
purposes.
• The appliance is installed in accordance with all relevant regulations in force
within your new country of residence.
The provisions of this European Guarantee do not affect any of the rights granted
to you by law.
Page 24

24
electrolux
Suomi
www.electrolux.fi
Sverige
+46 (0)771 76 76 76
Electrolux Service, S:t Göransgatan 143, S-105 45 Stockholm
Türkiye
+90 21 22 93 10 25
Tarlaba caddesi no : 35 Taksim stanbul
+7 095 937 7837
Albania
+35 5 4 261 450
Rr. Pjeter Bogdani Nr. 7 Tirane
Belgique/België/Belgien
+32 2 363 04 44
Bergensesteenweg 719, 1502 Lembeek
Danmark
+45 70 11 74 00
Sjællandsgade 2, 7000 Fredericia
eská republika
+420 2 61 12 61 12
Bud jovická 3, Praha 4, 140 21
Deutschland
+49 180 32 26 622
Muggenhofer Str. 135, 90429 Nürnberg
Eesti
+37 2 66 50 030
Mustamäe tee 24, 10621 Tallinn
España
+34 902 11 63 88
Carretera M-300,Km.29,900 Alcalá de Henares Madrid
France
Great Britain
+44 8705 929 929
Addington Way, Luton, Bedfordshire LU4 9QQ
Hellas
+30 23 10 56 19 70
4, Limnou Str., 54627 Thessaloniki
Hrvatska
+385 1 63 23 338
Slavonska avenija 3, 10000 Zagreb
Ireland
+353 1 40 90 753
Long Mile Road Dublin 12
Italia
+39 (0) 434 558500
C.so Lino Zanussi, 26 - 33080 Porcia (PN)
Latvija
+37 17 84 59 34
Kr. Barona iela 130/2, LV-1012, Riga
Lietuva
+370 5 2780609
Verki 29, LT-09108 Vilnius
Luxembourg
+35 2 42 43 13 01
Rue de Bitbourg, 7, L-1273 Hamm
Magyarország
+36 1 252 1773
H-1142 Budapest XIV, Erzsébet királyné útja 87
Nederland
+31 17 24 68 300
Vennootsweg 1, 2404 CG - Alphen aan den Rijn
Norge
+47 81 5 30 222
Risløkkvn. 2 , 0508 Oslo
Österreich
+43 18 66 400
Herziggasse 9, 1230 Wien
Polska
+48 22 43 47 300
ul. Kolejowa 5/7, Warsaw
Portugal
+35 12 14 40 39 39
Quinta da Fonte-Edificio Gonçalves Zarco-Q 35-2774-518 Paço de Arcos
Romania
+40 21 451 20 30
Str. Garii Progresului 2, S4, 040671 RO
Schweiz-Suisse-Svizzera
+41 62 88 99 111
Industriestrasse 10, CH-5506 Mägenwil
Slovenija
+38 61 24 25 731
Electrolux Ljubljana d.o.o., Gerbi eva 98, 1000 Ljubljana
Slovensko
+421 2 43 33 43 22
Electrolux Slovakia s.r.o., Electrolux Domáce spotrebi e SK, Seberíniho 1, 821 03 Bratislava
www.electrolux.com
ě
á
ŏ
ŝ
www.electrolux.fr
È
129090 Москва, Олимпийский проспект, 16, БЦ "Олимпик"
ģ
ě
Россия
Page 25

electrolux
25
Bienvenido al mundo Electrolux
Gracias por elegir un producto Electrolux de primera clase, el cual esperamos le
proporcione una gran satisfacción en el futuro. Electrolux ambiciona ofrecerle una
amplia variedad de productos de calidad que haga su vida más cómoda. Usted
encontrará algunos ejemplos en la portada de este manual. Por favor, tómese
unos minutos para estudiar este manual de modo que pueda aprovecharse de los
beneficios de su nueva máquina. Nosotros prometemos proporcionarle una
experiencia superior como usuario y mucha tranquilidad. ¡Buena suerte!
Page 26

26
electrolux
En este manual se utilizan los símbolos siguientes
Información importante para su seguridad personal y para evitar daños al
electrodoméstico
Información general y consejos
Información medioambiental
El símbolo en el producto o en su embalaje indica que este producto no se
puede tratar como desperdicios normales del hogar. Este producto se debe
entregar al punto de recolección de equipos eléctricos y electrónicos para
reciclaje. Al asegurarse de que este producto se deseche correctamente, usted
ayudará a evitar posibles consecuencias negativas para el ambiente y la salud
pública, lo cual podría ocurrir si este producto no se manipula de forma adecuada.
Para obtener información más detallada sobre el reciclaje de este producto,
póngase en contacto con la administración de su ciudad, con su servicio de
desechos del hogar o con la tienda donde compró el producto.
Page 27

electrolux
27
INDICE
Advertencias yy cconsejos iimportants 228
Uso 31
Limpieza de las partes internas 31
Panel de mando 31
Puesta en marcha 31
Apagar el aparato 31
Temperatur Regulación 32
Regulación de la temperatura 32
Función Action Freeze 32
Refrigeración de alimentos y bebidas 32
Rejillas movibles 33
Compartimiento para botellas 33
Ubicación estantes contrapuerta 33
Circulación de aire 34
Producción de cubitos de hielo 34
Calendario de productos
congelados 34
Congelación de los alimentos
frescos 35
Conservación de alimentos
congelados 35
Descongelación de los alimentos
congelados 35
Instalación del filtro de protección del
sabor 36
Cambio del filtro de protección del
sabor 36
Consejos 37
Consejos para refrigeración 37
Consejos para congelación 37
Consejos para conservación de
alimentos congelados 38
Manutención 38
Limpieza periódica 38
Lampara de illuminación 39
Desescarche 39
Datos ttécnicos 40
Come aactuar ssi eel aaparata nno
funciona 40
Instalación 41
Colocación 41
Retenes-Repisas 41
Distanciadores posteriores 41
Conexión electrica 42
Reversibilidad de las puertas 42
Garantía/Servicio ppostventa 45
Garantía EEuropea 47
www.electrolux.com 48
Page 28

28
electrolux
ADVERTENCIAS Y
CONSEJOS
IMPORTANTS
Es mmuy iimportante cconservar eeste
libro dde iinstrucciones jjunto aal aaparato
por ssi ffuera nnecesario cconsultarlo. SSi eel
aparato sse vvendiese oo ttransfiriese aa
otra ppersona, aacuérdese dde eentregarlo
junto ccon éél ppara qque eel nnuevo
propietario cconozca eel ffuncionamiento
de lla mmáquina yy ssus aadvertencias.
En ccaso dde qque eeste aaparato, ddotado
de ccierre mmagnético, ssustituya uuno
con ccierre aautomático, aaconsejamos
que lla ccerradura dde eeste úúltimo qquede
inservible, aantes dde ddeshacerse dde éél.
Así sse eevitará qque llos nniños, jjugando,
puedan qquedarse eencerrados ddentro,
con ggrave ppeligro dde ssus vvidas.
Estas aadvertencias hhan ssido
redactadas ppara ssu sseguridad yy ppara
la sseguridad dde llos ddemás. LLe
rogamos, ppor llo ttanto, lleerlas
atentamente aantes dde iinstalar yy uutilizar
el aaparato.
Seguridad
• Este aparato ha sido proyectado
para ser usado por adultos. Por lo
tanto, tener cuidado que los niños
no se acerquen para jugar con él.
• Es peligroso modificar o intentar
modificar las características de
este aparato.
• Quitar siempre el enchufe de la toma
de corriente antes de efectuar
cualquier operación de limpieza o
manutención (como la substitución
de la bombilla en aquellos aparatos
que la tienen).
• No consumir nunca los cubitos de
hielo recién sacados del
congelador ya que podrían
provocar quemaduras.
• Estos aparatos son pesados. Tener
cuidado en los desplazamientos.
• EEste aaparato nno ccontiene een eel
circuito rrefrigerante yy een eel
aislamiento, ggases rrefrigerantes
nocivos ppare eel oozono. EEl aaparato
no ddebe sser eeliminado jjunto ccon
los ddeshechos uurbanos yy
chatarras. SSe ddebe eevitar eel ddaño
del ccircinto rrefrigerante, ssobre ttodo
en lla pparse pposterior ccerca ddel
intercambiador. LLas iinformaciones
sobre llos ccentros dde rrecepción sson
suministradas ppor llas aautoridades
municipales
• PPrestar lla mmáxima aatención ddurante
las ooperaciones dde ddesplazamiento
pare nno ddañar llas pparses ddel
circuito rrefrigerante aa ffin dde eevitar
las pposibles ssalidas dde lliquido.
• EEl aaparato nno ddebe sser ccolocado
cerca dde ttermosifones oo ccocinas aa
gas.
• EEvitar lla eexposición pprolongada ddel
aparato aa llos rrayos ssolares
• LLa pparse pposterior ddel aaparato ddebe
recibir uuna ccirculación dde aaire
suficiente yy sse ddebe eevitar ccualquier
daño aal ccircuito rrefrigerante.
• SSolamente ppare llos ccongeladores
(excluidos llos eempotrados): ssu
mejor uubicación ees eel ssótano.
Page 29

electrolux
29
• NNo iintroducir aaparatos eeléctricos
en eel iinterior ddel eequipo ((por
ejemplo: ffabricadora dde hhelados).
Asistencia
• Cualquier modificación que
eventualmente fuese necesaria a la
instalación eléctrica doméstica
para poder instalar el aparato tiene
que ser realizada sólo por personal
competente.
• Para eventuales intervenciones
dirigirse a un Centro de Asistencia
Técnica autorizado y exigir las
piezas de repuesto originales.
• En caso de necesitar reparaciones
no intentar hacerlas personalmente.
Las reparaciones efectuadas por
personas no competentes pueden
provocar daños. Ponerse en
contacto con el Centro de
Asistencia más cercano y emplear
sólo repuestos originales.
Uso
• Los frigoríficos y/o congeladores
domésticos están destinados sólo
a la conservación y/o congelación
de alimentos.
• Las mejores prestaciones se
obtienen con temperaturas
ambiente comprendidas entre
+18°C y +43°C (Clase T); +18°C y
+38°C (Clase ST); +16°C y +32°C
(Clase N); +10°C y +32°C (Clase
SN); la clase de pertenencia está
indicada en la placa matrícula
situada en la cámara al lado del
cajón verduras.
Atención:
en caso de temperaturas
ambiente diferentes de las
indicadas para la clase climática a
la cual pertenece este producto, es
preciso observar las indicaciones
siguientes: cuando la temperatura
ambiente desciende por debajo del
valor mínimo puede suceder que la
temperatura de conservación en el
vano congelador no esté
garantizada; por lo tanto, se
aconseja que se consuman a lo
más pronto los alimentos
presentes en su interior.
• Los productos que hayan sido
descongelados no se tienen que
volver a congelar.
• Seguir atentamente las
indicaciones del fabricante para la
conservación y/o congelación de
los alimentos.
• En todos los aparatos de
refrigeración y congelación existen
superficies que se cubren con
escarcha. Según el modelo, la
escarcha puede ser eliminada
automáticamente (desescarche
automático) o manualmente. No
intentar nunca quitar la escarcha con
un objeto puntiagudo ya que se
podría dañar irremediablemente el
evaporador. Utilizar para ello sólo el
rascador de plástico que se
suministra con el aparato. Por el
mismo motivo no despegar nunca las
cubetas del hielo con un cuchillo o
cualquier otro objeto puntiagudo.
• No colocar en el compartimiento
de la baja temperatura (congelador
o conservador) bebidas gaseosas
que podrían explotar.
Page 30

30
electrolux
Instalación
• El aparato se calienta
considerablemente en la proximidad
del condensador y del compresor,
por lo tanto hay que verificar que el
aire pueda circular libremente
alrededor del mismo. Una ventilación
insuficiente puede causar un mal
funcionamiento y daños al aparato.
Seguir cuidadosamente las
instrucciones que se dan para la
instalación.
• Una vez instalado el aparato
verificar que no esté apoyado
sobre el cable de alimentación.
Importante:
en caso de que el
cable de alimentación se dañe,
deberá ser sustituido con un cable
especial. Ambos cables pueden
ser solicitados al fabricante o al
Servicio de asistencia.
• Si el aparato es transportado en
forma horizontal es posible que el
aceite contenido en el compresor
pase al circuito refrigerante.
Esperar por lo menos dos horas
antes de poner en marcha el
aparato para dar tiempo a que el
aceite regrese al compresor.
Protección del
ambiente
Este aaparato nno ccontiene een eel ccircuito
refrigerante yy een eel aaislamiento, ggases
refrigerantes nnocivos ppara eel oozono. EEl
aparato nno ddebe sser eeliminado jjunto
con llos ddeshechos uurbanos yy
chatarras. SSe ddebe eevitar eel ddano ddel
circinto rrefrigerante, ssobre ttodo een lla
parte pposterior ccerca ddel
intercambiador. LLas iinformaciones
sobre llos ccentros dde rrecepciõn sson
suministradas ppor llas aautoridades
municipales; LLos mmateriales uusados een
este aaparato mmarcados ccon eel ssimbolo
son rreciclables.
Page 31

electrolux
31
USO
Limpieza de las partes
internas
Antes del empleo limpiar todas las
partes internas con agua tibia y jabón
neutro, a fin de eliminar el
característico olor de nuevo y secarlas
luego cuidadosamente.
No eemplear ddetergentes oo
polvos aabrasivos qque ppodrían
dañar llas ssuperficies.
Panel de mando
A.
Teclas para el ajuste de temperatura
Puesta en marcha
Quite, ssi eexíste lla eetiqueta ““quitar”
pegada ssobre eel iinterior ddel
compartimento dde ccongelador.
Introducir el enchufe en la toma de
corriente.
Apagar el aparato
Desenchufar la clavija de la toma de
red.
+2 +4 +5 +6 +8
Page 32

32
electrolux
Refrigeracíon de alimentos
y bebidas
Para utilizar de la mejor manera el
compartimiento refrigerante, es
necesario:
• no introducir comidas calientes o
líquidos en en evaporacíon;
• tapar o envolver los alimentos,
especialmente si son aromáticos;
• no colocar sobre las rejillas
papeles, cartones o plásticos que
obstaculicen la circulacíon del aire.
Temperatur Regulación
Cada vez que se presiona el botón,se
selecciona la temperatura indicada por
el led.
La selección es progresiva y varía de
+2 ° C a +8 °C.
Seguir presionando el botón hasta que
se encienda el led correspondiente a la
temperatura deseada.
Regulación de la
temperatura
Los siguientes factores pueden influir
en la temperatura interna:
• temperatura ambiente
• frecuencia de apertura de las
puertas
• cantidad de alimentos conservados
• ubicación del aparato
Función Action Freeze
Para enfriar rápidamente la
temperatura del compartimiento
congelador, activar la función Action
Freeze .
Seguir presionando el botón indicado
por la flecha hasta que se encienda el
led correspondiente al símbolo (*).
Para desactivar la función Action
Freeze presionar el botón y mantenerlo
pulsado hasta alcanzar la temperatura
deseada.
Page 33

electrolux
33
Rejillas movibles
En las paredes del compartimento
existen unas guías que consienten
poner las rejillas a distintas alturas.
Compartimiento para
botellas
Almacene las botellas con el cuello
hacia adelante.
Atención: Coloque echadas sólo las
botellas sin abrir.
Para guardar botellas ya abiertas
puede usted alzar el compartimiento
hasta dejarlo inclinado.
Para ello tire del compartimiento hacia
adelante hasta que sea posible virarlo
hacia arriba e introduzca entonces la
superficie delantera en el nivel
inmediato superior.
Ubicación estantes de la
contrapuerta
Para poder colocar confecciones de
varios tamaños es posible colocar los
estantes de la contrapuerta a varias
alturas.
La operación se efectúa de la
siguiente manera: Empujar
gradualmente el estante en el sentido
indicado por las flechas hasta llegar a
desengancharlo, luego volverlo a
montar en la posición deseada.
D338
Page 34

10 -1210 -1210 - 1210 - 123-63-63-63-63-41-2
34
electrolux
Circulación de aire
El compartimiento frigorífico está
provisto de un ventilador especial
D.A.C. (Dynamic Air Cooling) que se
activa actuando sobre el interruptor B;
el piloto verde encendido indica que el
ventilador está en marcha.
Se aconseja el uso del ventilador
(D.A.C.) cuando la temperatura
ambiente exceda de los 25°C.
La activación de este dispositivo
determina la refrigeración rápida de los
alimentos y la máxima uniformidad de
temperatura en el compartimiento.
Producción de cubitos
de hielo
El congelador lleva dos cubetas para la
producción de hielo suficientes para
les necesidades familiares. Llene estas
cubetas con agua inasta les 3/4 partes
y colóquela en los compartimientos. Si
el agua que hay en su zona tiene
muchas sales minerales
(especialmente caliza), se aconseja
utilizar agua mineral sin gas para la
producción de los cubitos de hielo.
Los cubitos de hielo pueden sacarse
fácilmente de la cubeta con una ligera
torsión. No utilice nunca instrumentos
metálicos para despegar les cubetas
del congelador.
Calendario de productos
congelados
Los símbolos indican diferentes tipos
de productos congelados.
Las cifras indican el tiempo de
conservación en meses para cada tipo
de producto congelado. La validez del
valor máximo o mínimo establecido del
tiempo de conservación de los
productos congelados depende de la
calidad y de la preparación de ellos
antes de ser congelados. El valor
mínimo corresponde a víveres con un
elevado porcentaje de grasa.
Page 35

electrolux
35
Congelación de
alimentos frescos
El compartimiento congelador es
adecuado para congelar alimentos
frescos y para conservar,a largo
plazo, alimentos congelados y
ultracongelados.
Para congelar alimentos frescos,
activar la función Action Freeze (*) al
menos 24 h antes de colocar los
alimentos por congelar en el
compartimiento congelador.
Colocar el dispensador de hielo
Twist&Serve en el centro del estante
en el que está fijado.
Desplazar el estante del
compartimiento congelador hasta la
posición superior, manteniéndolo bien
plano.
Colocar los alimentos frescos por
congelar en dicho estante.
La cantidad máxima de alimentos que
se pueden congelar en 24 horas está
indicada en la placa de matrícula ,una
etiqueta presente en las paredes
internas del aparato.
El proceso de congelación dura 24
horas:durante este período no hay
que añadir más alimentos por
congelar.
Tras 24 horas, cuando el proceso de
congelación ha terminado, restablecer
la temperatura deseada presionando
el botón A.
Conservación de
alimentos congelados
Al poner en marcha el aparato o tras
un período de inactividad,se aconseja
hacerlo funcionar a pleno régimen por
al menos dos horas antes de colocar
alimentos congelados.
Para esto, activar la función Action
Freeze (*).
Después de 2 horas seleccionar la
temperatura deseada presionando el
botón A.
Para obtener las mejores prestaciones
se aconseja mantener el estante del
congelador en las posiciones superior.
Descongelación de los
alimentos congelados
Antes de utilizar los alimentos
congelados, se pueden descongelar
en el frigorífico (carne, pescado, etc.)
o a temperatura ambiente (los otros
alimentos), depende del tiempo
disponibile para la operación. Los
alimentos congelados confeccionados
en porciones poqueñas o separadas
pueden cocinarse directamente sin
tener que descongelarlos; en este
caso, naturalmente, el tiempo de
cocción necesario será algo más largo
que el habitual.
Page 36

36
electrolux
Instalación del filtro de
protección del sabor
El filtro de protección del sabor es un
filtro de carbón activo que absorbe los
malos olores y permite mantener el
sabor y el aroma de todos los
alimentos en condiciones
óptimas;además,evita que se
produzca una contaminación cruzada
de olores.
El filtro de carbón activo se suministra
en una bolsa de plástico para
garantizar su duración.
Antes de encender el
electrodoméstico, saque el filtro de la
bolsa y colóquelo dentro de la
compuerta.
• Tire de la compuerta.
• Introduzca el filtro de carbón activo
en la ranura que hay en el reverso
de compuerta.
• Cierre la compuerta.
Mantenga cerrada la compuerta
de ventilación durante el
funcionamiento. El filtro debe
manipularse con cuidado para
evitar que su superficie se raye.
Cambio del filtro de
protección del sabor
Para garantizar un rendimiento óptimo,
es preciso cambiar el filtro de carbón
activo una vez al año.
En su distribuidor local puede adquirir
filtros de carbón activo nuevos.
• Como el filtro está detrás de la
compuerta,es preciso tirar de la
compuerta para acceder al filtro.
• Tire de la ranura del filtro de carbón
vegetal usado.
• Introduzca un filtro nuevo en la
ranura.
• Cierre la compuerta.
Mantenga cerrada la compuerta
de ventilación durante el
funcionamiento.El filtro debe
manipularse con cuidado para
evitar que su superficie se raye.
Page 37

electrolux
37
Consejos para congelación
• Todos los productos por congelar
tienen que ser frescos y de buena
calidad.
• Los alimentos por congelar tienen
que estar confeccionados en
porciones suficientes al consumo
familiar, para que puedan utilizarse
en una sola vez.
• Las confecciones pequeñas
permiten una congelación más
rápida y uniforme. No hay que
olvidar que una vez
descongelados, la calidad de los
alimentos se deteriora
rápidamente.
• Los alimentos con bajo contenido
de grasas se conservan mejor que
los que tienen mucha grasa. La sal
(alli donde se encuentre) reduce la
duración de la conservación.
• Los alimentos por congelar tienen
que encerrarse en bolsitas
impermeables al aire o en
recipientes especiales. Cierre
cuidadosamente les bolsitas o los
recipientes sacando todo el aire de
su interior.
• No meta nunca en el congelador
botellas o latas de bebidas
gaseosas: podrian explotar.
• No introduzca nunca alimentos o
liquidos calientes. No llene
demasiado les bolsitas o los
contenedores con tapa de los
alimentos por congelar.
CONSEJOS
Consejos para refrigeración
Para un correcto uso aconsejamos:
Carne:
debe ser envuelta en saquitos
de plástico y colocada en el espacio
situado sobre los cajones verdura.
En eesta pposicíon lla ccarne ppuede sser
conservada aal mmáximo ppor 11 aa 22 ddias.
Alimentos ccocinados ,, pplatos ffríos, eetc.
tienen que conservarse bien cubiertos
y se pueden colocar en cualquier
bandeja del frigorífico.
Fruta yy vverdura:
una vez lavada, ha de
colocarse en el cajón (cajones) inferior.
Mantequilla yy qqueso:
deben colocarse
en los reci-pientes adecuados o
envueltos en hojas de aluminio o
politileno, a fin de evitar el contacto
con el aire.
Leche eembotellada:
bien tapada, en la
contropuerta.
Bananas, ppapas, ccebollas yy aajo, ssi nno
están cconfeccionados, nno sse ddeben
colocar een ffrigorífico.
Page 38

38
electrolux
MANUTENCIÓN
Desenchufar ssiempre eel
aparato aantes dde pproceder aa
cualquier ooperación dde llimpieza.
Atención
Este aaparato ccontiene
hidrocarburos een eel ccircuito
refrigerante; ppor llo ttanto eel
mantenimiento yy lla rrecarga
deben sser eefectuados
exclusivamente ppor ppersonal
autorizado ppor lla eempresa.
Limpieza periódica
Muchos ddetergentes eespecíficos ppara
las ssuperficies dde ccocina ccontienen
agentes qquímicos qque ppuede
atacar/perjudicar llas ppartes een pplástico
presentes een eeste aaparato. SSe aaconseja
pues llimpiar eel rrevestimiento dde eeste
aparato ssólo ccon aagua ccaliente qque
contenga uuna ppequeña ccantidad dde
detergente llíquido ppara vvajillas.
Limpiar el interior con agua templada
y bicarbonato y las partes exteriores
esmaltadas con cera a la silicona;
limpiar el condensador y el
motocompresor con un cepillo o un
aspirador.
Esta operación mejorará el
funcionamiento con el consiguiente
ahorro de energia.
Consejos para conservación
de alimentos congelados
• Controle siempre la fecha de
preparación indicada sobre los
alimentos congelados comprados
en las tiendas y respete los
vencimientos.
• No abra la puerta del congelador
muy a menudo y déjela abierta
sólo el tiempo indispensable. Los
aumentos innecesarios de
temperatura reducen
considerablemente la duración de
conservación de los alimentos.
• Controle que todas les
confecciones de alimentos
congelados estén intactas; de no
estarlo los alimentos podrían
estropearse. Si les confecciones
presentan signos de humedad o
están hinchadas, quiere decir que
los alimentos no tran sido
conservados correctamente y por
lo tanto el producto ha perdido
parte de su calidad de origen.
• Cuando se compran alimentos
congelados, es aconsejable llevar
una bolsa termoaislante. Se
recomienda, asimismo adquirirlos
al finalizar sus compras.
• Envuélvalos en papel de periódico
y métalos en el congelador en
cuanto llegue a su casa.
• Controle con atención el producto
al comprarlo ya que los alimentos
que se tran descongelado, aun
sólo parcialmente, no tienen que
volver a congelarle sino que tran
de ser consumidos antes de
transcurridas 24 horas.
Page 39

electrolux
39
Lámpara de iluminación
Para la sustitución eventual de la lámpara
oprimir como se indica en la figura.
Attention
Sustituir la lámpara por otra de igual
potencia (la potencia máxima está
indicada en el difusor de luz).
Desescarche
La escarcha del evaporador del
compartimento refrigerante se elimina
automáticamente a cada interrupcion
del motocompresor. El agua de la
escarcha derretida, mediante un canal
adecuado, se recoge en un pequeño
depósito colocado en la parte
posterior sobre el motocompresor del
aparato, de donde evapora.
Se rrecomienda llimpiar pperiódicamente
el aagujero dde ddesagüe ddel aagua dde
desescarche, ssituado een lla pparte
central ddel ccanal een eel ccompartimiento
refrigerante, uutilizando eel ««limpiador»
adecuado qque sse eencuentra een eel
agujero, ppara eevitar qque eel aagua dde
desescarche ccaiga ssobre llos aalimentos.
Atención
Se rrecomienda nno uutilizar uutensilios
metálicos ppara qquitar lla eescarcha aa ffin
de eevitar ggraves ddaños aal aaparato.
No uusar ddispositivo mmecánico aalguno uu
otro mmedio aartificial ppara aacelerar eel
processo dde ddesescarche eexcepto llos
recomendados.
El compartimento del congelador es
de tipo "no frost"; esto significa que
éste se caracteriza por la completa
ausencia de escarcha durante el
funcionamiento, tanto en las paredes
internas del compartimento como en
los alimentos.
La ausencia de escarcha es
consecuencia de la circulación
continua de aire frío en el interior del
compartimento, provocada por un
ventilador controlado
automáticamente.
D037
Page 40

40
electrolux
COMO ACTUAR SI EL
APARATO NO FUNCIONA
Si el aparato presentase anomalías
será oportuno controlar:
• Que esté bien enchufado y que el
interruptor de la instalación
eléctrica esté conectado.
• Que no haya un corte de energía
eléctrica.
• Que el mando del termostato se
encuentre en su posición correcta.
• Si el compresor funciona sin
interrupción, verificar que el
termostato no se encuentre en una
posición
• Además si el aparato hace
demasiado ruido verificar que los
costados no estén en contacto con
muebles que pueden causar ruidos
o vibraciones y que la unidad
refrigerante no vibre.
• Si se ven restos de agua en el
fondo del refrigerador comprobar
que el orificio de desagüe de la
escarcha derretida no esté
obturado (ver cápitulo
Desescarche).
Después de hacer las verificaciones
anteriores, si la anomalía persiste,
llame al Centro de Asistencia Técnica
más cercano.
Es iimportante een eel mmomento dde
llamar pproporcionar lla rreferencia ddel
modelo yy eel nnúmero dde mmatrícula ddel
aparato iindicados een eel ccertificado dde
garantía oo een lla ttarjeta mmatrícula.
DATOS TÉCNICOS
256
58
0,770
281
4
20
1750
600
645
Capacidad neta del frigorífico en litros
Consumo energético en kWh/día
Consumo energético en kWh/año
Capacidad de congelación en kg/día
Tiempo de aumento de la temperatura de –18°C a –9°C/hora
Capacidad neta del congelador en litros
Dimensiones en mm
Altura
Ancho
Profundidad
Los datos técnicos se indican en la placa-matrícula situada sobre el lado
izquierdo interno del aparato.
Page 41

electrolux
41
INSTALACIÓN
Colocación
Situar el aparato lejos de fuentes de calor,
como: radiadores, estufas, exposición
directa a los rayos del sol, etc.
Asegurarse de que en les partes
posterior, superior e inferior no haya
ningún obstáculo que impida la
circulacidn del aire.
Para que el aparato rinda mejor, la
distancia mínima entre la parte superior
y el eventual mueble pénsil de encima,
debería ser por lo menos de 100 mm .
La solución preferible, de todos
modos, seria la ilustrada en la (sin
mueble). Dos patas graduables,
situadas en la base del mueble,
consienten rivelarlo a la perfección.
Asegurarse de que la toma de
corriente y el enchute sean
compatibles entre sí sin tener que
interponer reducciones ladrones o
adaptadores varios. Si fuera necesario,
cambiar la toma de la instalación de la
casa con una adepta.
Importante
Se debe
poder desenchufar el aparato;
por lo tanto una vez efectuada la
instalación es necesario que el enchufe
no quede escondido
Retenes-Repisas
Su aparato dispone de retenes-repisas
que permiten bloquear las repisas
durante el transporte.
Para quitarlos actuar como sigue:
mover los retenes-repisas en la
dirección de la flecha, subir el vidrio
por la parte trasera y empujarlo hacia
adelante hasta que queda libre,
seguidamente quitar los retenes.
Distanciadores posteriores
En la bolsita de la documentacion hay
dos distanciadores que deberàn ser
montados como se muestra en la
figura.
Aflojar los tornillos, introducir el
distanciador debajo de la cabeza del
tronillo y volver a atornillar.
A
B
C
NP005
100 mm10 mm
10 mm
PR153
Page 42

42
electrolux
Conexión eléctrica
Antes de enchufar el aparato, asegurarse
de que la tensión y la frecuencia
indicadas en la tarjeta matrícula,
correspondan a las de la instalación
doméstica. Se admite una oscilación
de 6% sobre la tensión nominal.
Para el funcionamiento a tensiones
distintas, habrá que utilizar un
autotransformador de potencia
adecuada. Asegurarse de que la toma
de corriente y el enchufe sean
compatibles entre sí sin tener que
interponer reducciones ladrones o
adaptadores varios. Si fuera necesario,
cambiar la toma de la instalación de la
casa con una adapta.
Es iindispensable cconectar eel
aparato aa uuna ttoma dde ttierra
eficaz.
Para ello el enchufe del cable de
alimentación está dotado de un
adecuado contacto. Si la toma de
corriente de la instalación doméstica
no estuviera conectada a tierra,
conectar el aparato a una instalación
de tierra, conforme a las leyes en vigor,
consultando para ello con un técnico
especializado.
El ffabricante ddeclina ttoda
responsabilidad een eel ccaso qque eesta
norma nno ssea rrespetada.
Este aparato es conforme a las
siguientes Directivas
Comunitarias:
-
87/308 CCEE
del 2/6/87 relativa a la
supresión de interferencias radio.
-
73/23 CCEE
19/02/73 (Baja tensión)
y modificaciones sucesivas;
-
89/336 CCEE
03/05/89
(Compatibilidad electromagnética) y
modificaciones sucesivas.
Reversibilidad de las
puertas
Antes de llevar a cabo alguna
operación, quitar el enchufe de
alimentación. Para cambiar el sentido
de apertura de la puerta, proceder de
la siguiente forma:
- Abrir la puerta superior con el
frigorífico en posición vertical.
Desatornillar los tornillos de la
cornisa puerta superior de plástico.
- Extraer el tapón y montarlo en el
lado opuesto (d).
- Tumbar el aparato sobre la parte
posterior.
- Quitar las cubiertas de plástico de
la bisagra (3).
- Desatornillar la bisagra superior y
quitarla (1-2).
- Desatornillar los tornillos y quitar el
tope puerta (4).
Page 43

electrolux
43
- Quitar la puerta superior
- Desatornillar la bisagra central (H).
- Retirar la puerta inferior. Si
existiese quitar el tapón de plástico
de la puerta y reinsertarlo en la
posición contraria.
- Retirar usando una herramienta la
cubierta (e) y desatornilla el eje de
la bisagra inferior (f) y atornillalo en
el lado contrario.
- Reinsertar la cubierta (e) en el lado
contrario.
- Reinsertar la puerta inferior sobre
eje (f).
- Atornillar la bisagra central (H) en el
lado contrario. No olvide insertar el
distanciador de plástico situado
bajo la bisagra central (H).
- Reinsertar la puerta superior en la
bisagra central (H).
- Poner atención para que el canto
frontal de la puerta tiene que estar
en paralelo con el panel superior.
- Ajustar el perno puerta en el lado
contrario (4).
- Posicionar y ajustar la bisagra
superior en el lado contrario (1-2).
- Reinsertar las dos cubiertas de
plástico de las bisagras (3).
- Levantar el aparato situándolo en
su posición vertical.
- Abrir la puerta y colocar la cornisa
puerta superior con tornillos.
1
4
3
2
H
Page 44

44
electrolux
- Fijar la manilla de la puerta en el
lado opuesto. Insertar los tapones
de plástico en los agujeros que
quedan. Los tapones los puedes
encontrar en la bolsa de las
instrucciones
Colocar de nuevo, nivelar el
aparato, esperar por lo menos dos
horas antes de y conectar la
alimentación.
De todas formas si no pudiera realizar
las operaciones mencionadas,
contacte con tu Servicio Técnico mas
cercano. El Servicio postventa
especializado llevará acabo la
reversibilidad de la puerta por su
cuenta.
Advertencia
Después dde hhaber ccambiado eel
sentido dde aapertura dde llas ppuertas
compruebe qque ttodos llos ttornillos
estén ddebidamente aapretados yy qque lla
guarnición mmagnética sse aajusta
correctamente aal mmueble.
Si lla ttemperatura aambiente ees bbaja
(p.ej. iinvierno), lla gguarnición mmagnética
quizás nno aajuste pperfectamente. EEn eel
caso mmencionado, eespere aa qque lla
guarnición sse aajuste ssola oo aacelere
este pproceso ccalentando lla zzona
afectada ccon uun ssecador nnormal dde
pelo ..
Page 45

electrolux
45
GARANTÍA/SERVICIO POSTVENTA
Condiciones dde GGarantía: EELECTROLUX HHOME PPRODUCTS EESPAÑA, SS.A.
garantiza al usuario del aparato cuyos datos de identificación figuran en el
presente documento, durante el plazo de dos (2) años desde la fecha de su
entrega, la reparación totalmente gratuita de las averías que experimente el
aparato, incluyendo la presente garantía tanto el coste de las piezas de recambio
como el de la mano de obra y, en su caso, el del desplazamiento del personal
técnico del Servicio Oficial de la Marca al domicilio del usuario.
En el supuesto de que el producto, por su tamaño y movilidad, fuera susceptible
de ser trasportado por el usuario al Taller Oficial de la Marca, éste quedará liberado
de la obligación de trasladar su personal técnico al domicilio del usuario.
Para hacer uso del derecho de garantía aquí reconocido, será requisito necesario
que el aparato se destine al uso privado. También será necesario presentar al
personal técnico de la marca, antes de su intervención, la factura o tique de
compra del aparato o el albarán de entrega correspondiente si éste fuera posterior,
en unión del presente documento.
Exclusiones:
La presente garantía no cubre la instalación, nivelación, instrucciones
de uso del aparato ni sustitución de lámparas. No quedan cubiertas por esta
garantía y por tanto la misma quedará sin efecto en los casos de averías
producidas como consecuencia de:
• Fuerza mayor (fenómenos atmosféricos, geológicos, etc.)
• Uso inadecuado o no acorde con las instrucciones del fabricante.
• Falta de mantenimiento y limpieza: filtros con objetos tales como botones,
monedas, etc; condensadores con polvo, pelusa u otros elementos que
impidan la libre circulación del aire; cubetas de detergente con residuos, etc.
• Uso de productos de limpieza abrasivos que causen daños en chapa, pintura
y plásticos.
• La rotura accidental de componentes de plástico y vidrio.
• La instalación y/o conexión incorrectas o no reglamentarias (voltaje, presión de
gas o agua, conexión eléctrica o hidráulica no adecuadas).
• Los daños estéticos no denunciados en el momento de la entrega.
La garantía no tendrá efecto en caso de manipulación de la placa de
características del aparato o de los datos que figuren en la factura, tique de
compra o albarán de entrega de aquél o de los consignados en este documento.
Tampoco producirá efecto si se produjesen intervenciones de personal técnico no
autorizado o no perteneciente al Servicio Oficial de la marca.
Se informa al usuario que, además de la garantía reconocida en este documento,
tiene la protección que le concede la Ley 23/2003, de 10 de julio, respecto de la
Page 46

46
electrolux
exigencia de que el bien adquirido sea conforme con el contrato de compraventa,
pudiendo reclamar al vendedor, en caso de disconformidad, por las faltas que se
pongan de manifiesto en el plazo de dos (2) años desde la entrega. En ese
supuesto, tendrá derecho a solicitar la reparación gratuita del bien o a la
sustitución de éste, salvo que una de esas opciones resulte imposible o
desproporcionada.
EELLEECCTTRROOLLUUXX HHOOMMEE PPRROODDUUCCTTSS EESSPPAAÑÑAA,, SS..AA..-SSoocciieeddaadd UUnniippeerrssoonnaall
Albacete, n 3C - 28027 MADRID - CIF A08145872
CCeennttrraall SSeerrvviicciioo TTééccnniiccoo
Ctra. M-300 km, 29,900
Apdo. 119
28802 Alcalá de Henares (Madrid)
RReecceeppcciióónn ddee LLllaammaaddaass
Averías 902 116 388
Atención Usuarios:
e-mail: usuarios.postventa@electrolux.es
PPaarraa EEssppaaññaa::
Puede comprar recambios y accesorios on-line entre en
http://www.service.electrolux.com y seleccione Tienda Virtual
Page 47

electrolux
47
GARANTÍA EUROPEA
Este aparato está garantizado por Electrolux en cada uno de los países indicados
en la parte posterior de este manual durante el periodo especificado en la garantía
del aparato o el periodo que prevea la ley. Si usted se traslada de uno de estos
países a otro de los países abajo indicados, la garantía del aparato se desplazará
con usted siempre que se cumplan los siguientes requisitos:
• La garantía entra en vigor el día en que usted compre el aparato, que se
demostrará mediante un justificante de compra válido emitido por el vendedor
del aparato.
• La garantía del aparato tendrá el mismo periodo de validez y cubrirá las
mismas piezas y mano de obra que las garantías emitidas en su nuevo país de
residencia para ese modelo o gama de aparatos en concreto.
• La garantía del aparato es personal del comprador original e intransferible.
• El aparato deberá ser instalado y utilizado según las instrucciones de Electrolux
y es únicamente de uso doméstico, lo que significa que no podrá ser utilizado
con fines comerciales.
• El aparato deberá ser instalado observando todas las normativas relevantes
que estén en vigor en su nuevo país de residencia.
Las disposiciones de esta Garantía Europea no afectan a los derechos que le
correspondan por ley.
Page 48

48
electrolux
Suomi
www.electrolux.fi
Sverige
+46 (0)771 76 76 76
Electrolux Service, S:t Göransgatan 143, S-105 45 Stockholm
Türkiye
+90 21 22 93 10 25
Tarlaba caddesi no : 35 Taksim stanbul
+7 095 937 7837
Albania
+35 5 4 261 450
Rr. Pjeter Bogdani Nr. 7 Tirane
Belgique/België/Belgien
+32 2 363 04 44
Bergensesteenweg 719, 1502 Lembeek
Danmark
+45 70 11 74 00
Sjællandsgade 2, 7000 Fredericia
eská republika
+420 2 61 12 61 12
Bud jovická 3, Praha 4, 140 21
Deutschland
+49 180 32 26 622
Muggenhofer Str. 135, 90429 Nürnberg
Eesti
+37 2 66 50 030
Mustamäe tee 24, 10621 Tallinn
España
+34 902 11 63 88
Carretera M-300,Km.29,900 Alcalá de Henares Madrid
France
Great Britain
+44 8705 929 929
Addington Way, Luton, Bedfordshire LU4 9QQ
Hellas
+30 23 10 56 19 70
4, Limnou Str., 54627 Thessaloniki
Hrvatska
+385 1 63 23 338
Slavonska avenija 3, 10000 Zagreb
Ireland
+353 1 40 90 753
Long Mile Road Dublin 12
Italia
+39 (0) 434 558500
C.so Lino Zanussi, 26 - 33080 Porcia (PN)
Latvija
+37 17 84 59 34
Kr. Barona iela 130/2, LV-1012, Riga
Lietuva
+370 5 2780609
Verki 29, LT-09108 Vilnius
Luxembourg
+35 2 42 43 13 01
Rue de Bitbourg, 7, L-1273 Hamm
Magyarország
+36 1 252 1773
H-1142 Budapest XIV, Erzsébet királyné útja 87
Nederland
+31 17 24 68 300
Vennootsweg 1, 2404 CG - Alphen aan den Rijn
Norge
+47 81 5 30 222
Risløkkvn. 2 , 0508 Oslo
Österreich
+43 18 66 400
Herziggasse 9, 1230 Wien
Polska
+48 22 43 47 300
ul. Kolejowa 5/7, Warsaw
Portugal
+35 12 14 40 39 39
Quinta da Fonte-Edificio Gonçalves Zarco-Q 35-2774-518 Paço de Arcos
Romania
+40 21 451 20 30
Str. Garii Progresului 2, S4, 040671 RO
Schweiz-Suisse-Svizzera
+41 62 88 99 111
Industriestrasse 10, CH-5506 Mägenwil
Slovenija
+38 61 24 25 731
Electrolux Ljubljana d.o.o., Gerbi eva 98, 1000 Ljubljana
Slovensko
+421 2 43 33 43 22
Electrolux Slovakia s.r.o., Electrolux Domáce spotrebi e SK, Seberíniho 1, 821 03 Bratislava
www.electrolux.com
ě
á
ŏ
ŝ
www.electrolux.fr
È
129090 Москва, Олимпийский проспект, 16, БЦ "Олимпик"
ģ
ě
Россия
Page 49

electrolux
49
Bem-vindo ao mundo Electrolux
Obrigado por ter escolhido adquirir um produto de primeira classe da Electrolux,
que esperamos lhe traga muito prazer no futuro. A ambição da Electrolux é
oferecer uma vasta variedade de produtos de qualidade que tornem a sua vida
ainda mais confortável. Pode encontrar alguns exemplos na capa deste manual.
Tire alguns minutos para estudar este manual para que possa começar a tirar
partido dos benefícios do seu novo aparelho. Nós prometemos que lhe irá
proporcionar uma experiência superior e confortante como utilizador. Boa sorte!
Page 50

50
electrolux
Os símbolos que se seguem são utilizados neste manual
Informações importantes relativas à segurança pessoal e como evitar
danos no aparelho
Informações gerais e sugestões
Informações ambientais
O símbolo no produto ou na embalagem indica que este produto não pode
ser tratado como lixo doméstico. Em vez disso, deve ser entregue ao centro de
recolha selectiva para a reciclagem de equipamento eléctrico e electrónico.
Ao garantir uma eliminação adequada deste produto, irá ajudar a evitar eventuais
consequências negativas para o meio ambiente e para a saúde pública, que, de
outra forma, poderiam ser provocadas por um tratamento incorrecto do produto.
Para obter informações mais pormenorizadas sobre a reciclagem deste produto,
contacte os serviços municipalizados locais, o centro de recolha selectiva da sua
área de residência ou o estabelecimento onde adquiriu o produto.
Page 51

electrolux
51
ÍNDICES
Advertências ee cconselhos
importantes 52
Uso ee ffuncionamiento 55
Limpeza das partes internas 55
Painel de comando 55
Coloção em funcionamento 55
Descrição do aparelho 55
Arranque 56
Régulação da température 56
Função Action Freeze 56
Refrigeração dos alimentos 56
Frabricação de cubos de gelo 56
Prateleira amovíveis 57
Prateleira para garrafas 57
Colocação das pratelairas da porta 57
Recirculação de ar 58
Calendário de congelamento 58
Congelação dos alimentos frescos 58
Conservação dos alimentos
congelados 59
Descongelação 59
Instalação do filtro taste Guard 60
Substituir o filtro taste Guard 60
Conselhos 61
Conselhos para a refrigeração 61
Conselhos para a congelação 61
Conselhos para a conservação dos
alimentos congelados 61
Manutenção 62
Limpeza periódica 62
Paragem prolongada 62
Lâmpada de iluminação 62
Descongelação 63
Dados TTecnicos 64
Assistência ttécnica ee ppeças dde
substituição 64
Instalação 65
Colocação 65
Fixadores para prateleiras 65
Espaçadores posteriores 65
Ligação eléctrica 66
Reversibilidade das portas 66
Garantia/Assistência TTécnica 669
Garantia EEuropeia 71
www.electrolux.com 72
Page 52

52
electrolux
ADVERTÊNCIAS E
CONSELHOS
IMPORTANTES
É mmuito iimportante qque eeste mmanual dde
utilização aacompanhe oo aaparelho ppara
garantir uuma ffutura uutilização ccorrecta.
Se oo aaparelho ffor vvendido oou
emprestado aa uuma ooutra ppessoa, oo
manual dde uutilização ddeve, ccomo aacima
se ffaz nnotar, aacompanhá-llo, dde mmaneira
que oo uutilizador ppossa sser iinformado ddo
seu ffuncionamento, ddas aadvertências ee
conselhos. SSe eeste aaparelho, mmunido
de ffecho mmagnético, vveio ssubstituir uum
outro qque ttinha pportas ccom ffecho dde
mola, aaconselhamos aa iinutilizar eeste
fecho, aantes ddo aaparelho sser pposto
definitivamente dde llado. EEsta pprecaução
procura eevitar qque ccrianças, bbrincando,
se ppossam ffechar nno aaparelho oo qque
seria aaltamente pperigoso.
Essas aadvertências ttêm ppor ffim
garantir aa ssegurança ddos uutilizadores.
Agradecemos, pportanto, qque lleia oo
manual aatentamente, aantes dde iinstalar
e uutilizar oo aaparelho.
Segurança
• Este aparelho foi concebido para ser
utilizado por adultos. Deve, por isso,
pô-lo ao abrigo das crianças não
consentindo que dele se sirvam como
brinquedo.
• É perigoso modificar ou tentar
modificar as características deste
aparelho.
• Este aparelho é pesado. Tenha o
maior cuidado quando o deslocar
• Não consuma certos produtos, tais
como gelados, imediatamente
após terem saído do aparelho; a
temperatura muito baixa a que se
encontram pode provocar
queimaduras.
• Este aaparelho ccontém
hidrocarbonetos nno ccircuito
refrigerante; pportanto, aa
manutenção ee aa rrecarga ddevem
ser eefectuadas eexclusivamente ppor
pessoal aautorizado ppelo pprodutor.
• Preste aa mmáxima aatenção aao
deslocar oo aaparelho, ppara nnão
danificar aas ppartes ddo ccircuito
refrigerante, eevitando aassim
possíveis ssaídas dde ffluido.
• O aaparelho nnão ddeve sser iinstalado
perto dde eelementos dde
aquecimento oou ffogões dde ggás.
• Evite aa eexposição pprolongada ddo
aparelho aaos rraios ddo ssol.
• A pparte dde ttrás ddo aaparelho ddeve
receber uuma ssuficiente vventilação ee
deve sser eevitado qqualquer ddano aao
circuito rrefrigerante.
• Somente ppara oos ccongeladores
(excepto oos dde eencaixe): aa mmelhor
colocação éé nna ccave.
Assistência
• Se uma eventual modificação da
instalação eléctrica, na casa do
utilizador, tiver de ser feita para tornar
possível a instalação do aparelho,
deve, esta, ser efectuada por pessoal
qualificado.
• Este aparelho deve ser assistido
por um Centro de Assistência
autorizado, sendo apenas
aplicadas peças de origem.
Page 53

electrolux
53
• Em caso de avaria, não tente você
mesmo, reparar o aparelho. As
reparações executadas por pessoas
inexperientes, podem causar danos
físicos e mate-riais (aumentando as
avarias a serem reparadas). Faça
apelo ao seu Centro de Assistência
mais próximo e insista em peças
genuínas.
Utilização
• Os frigoríficos e/ou congeladores
domésticos destinam-se,
unicamente, à conservação e/ou
congelação de alimentos.
• Os melhores rendimentos são
conseguidos com temperaturas
ambiente incluídas entre +18°C e
+43°C (Classe T); +18°C e +38°C
(Classe ST); +16°C e +32°C
(Classe N); +10°C e +32°C (Classe
SN); a classe a que pertence o
aparelho é indicada na placa de
matrícula (posta na cela ao lado do
compartimento dos legumes).
Atenção: com temperaturas
ambiente não incluídas nas
indicadas para a classe climática a
que pertence o produto, é preciso
cumprir as indicações seguintes:
quando a temperatura ambiente
descer abaixo do valor mínimo,
pode não ser garantida a
temperatura de conservação no
compartimento congelador;
portanto, aconselha-se a
consumar rapidamente os
alimentos nele contidos.
• Um produto descongelado não
deve, em nenhum caso, voltar a
ser congelado.
• Siga as indicações do fabricante
para a conservação e/ou
congelação dos alimentos.
• O revestimento interior do aparelho
em composto de pequenos tubos
por onde passa o refrigerante. Se
estes tubos forem danificados o
aparelho ficará irremediavelmente
avariado, provocando a perda dos
alimentos no seu interior. NÃO
UTILIZE OBJECTOS
PONTEAGUDOS para raspar o gelo
acumulado. Esse gelo pode ser
raspado utilizando a espátula que é
fornecida com o aparelho. Para
eliminar grandes quantidades de gelo
acumulado, é aconselhável deixá-lo
derreter. Veja as instruções para a
descongelação.
• Não coloque no compartimento/
congelador a baixa temperatura,
garrafas ou latas com bebidas
gaseificadas dado que se cria uma
pressão elevada no interior da garrafa
e/ou lata havendo o perigo de este
explodir. Desta explosão resultariam
danos graves para o aparelho.
Instalação
• Durante o normal funcionamento o
condensador e o compressor,
colocados na parte de trás do
aparelho, aquecem sensivelmente.
Por razões de segurança a
ventilação deve ser como indicado
na respectiva Figura.
Atenção: mmantenha aas aaberturas
para aa vventilação llivres dde qqualquer
obstrução.
Page 54

54
electrolux
• O aparelho aquece, sensivelmente,
ao nível do con-densador e do
compressor. Certifique-se que o ar
circula, livremente, à volta do
aparelho. Uma ventila-ção
insuficiente ocasionaria um mau
funcionamen-to, danos para o
aparelho e perda dos alimentos no
seu interior. Siga as instruções
para a correcta instalação do
aparelho.
• Assegure-se, quando instalar o
aparelho, que este não repousa
sobre o cabo de alimentação
eléctrica.
Importante:
se o cabo de
alimentação se danificar, deverá ser
substituído por um cabo especial ou
por um conjunto, disponíveis junto do
construtor ou do serviço de
assistência técnica.
• Os componentes do aparelho que
aquecem devido ao seu
funcionamento não devem estar
expostos. Sempre que possível as
costas do aparelho devem ficar
encostadas a uma parede
• Desligue sempre a tomada de
corrente antes de proceder à limpeza
ou qualquer operação de
manutenção do aparelho.
• Ao transportar o aparelho na
horizontal, pode acontecer que o
óleo contido no compressor escorra
para o circuito refrigerante. É portanto
aconselhável esperar pelo menos
duas horas antes de ligar o aparelho
à corrente.
Protecão do
ambiente
Este aaparelho nnão ccontem, nno sseu
circuito rrefrigerante ee nnas ssuas
matérias iisolantes, ggases nnocivos àà
camada dde oozono.Mesmo aassim eeste
aparelho ddeve, qquando ffor
destruido,receber oos ccuidados
convenientes, dde aacordo ccom aas
disposições eem vvigor ppara aa pprotecção
do mmelo aambiente. OOs mmateriais
utilizados nneste aaparelho, mmarcados
com oo ssimbolo ssão rreciclàveis.
Page 55

electrolux
55
USO E
FUNCIONAMIENTO
Limpeza das partes
internas
Estando o aparelho convenientemente
instalado, antes de o utilizar,
aconselhamos a sua limpeza
cuidadosa com água tépida e sabão
neutro para retirar o cheiro
característico do “novo”.
Painel de comando
A. Tecla para a regulação da temperatura
Colocação em
funcionamento
Retire, sse eexistente, aa eetiqueta
"Retirar" ccolada nno iinterior ddo
frigorífico.
Encaixar a ficha de ligação à rede na
tomada.
Descrição do aparelho
Retirar a ficha de ligaçã o à rede da
tomada.
Não uutilize ddetergentes oou ppós
abrasivos, qque ppodem ddanificar oos
acabamentos. EEnxague ee sseque
cuidadosamente.
+2 +4 +5 +6 +8
Page 56

56
electrolux
Arranque
Sempre que premir a tecla,é
seleccionada a temperatura indicada
pelo led.
A selecção é gradual,variando entre
+2 ° C e +8 °C.
Continue a premir a tecla até que o
led correspondente à temperatura
desejada se acenda.
Régulação da
température
A temperatura interna poderá ser
influenciada pelos seguintes factores:
• temperatura ambiente
• frequência de abertura das portas
• quantidade de alimentos
conservados
• colocação do aparelho
Função Action Freeze
Para arrefecer rapidamente a
temperatura do compartimento
congelador,active a função Action
Freeze .
Continue a premir a tecla indicada
pela seta até que o led
correspondente ao símbolo (*) se
acenda.
Para anular a função Action Freeze
prima a tecla até escolher a
temperatura desejada.
Refrigeração dos
alimentos
Para obter um melhor rendimento do
seu aparelho:
• reparta as provisões de maneira a
que o ar possa circular, facilmente,
à volta delas;
• não introduza, na caixa, alimentos
ainda quentes ou líquidos em
evaporação;
• cubra os alimentos, de especial
modo se são aromáticos.
Fabricação de cubos de
gelo
O seu aparelho está dotado de uma
ou mais cuvetes para a formação de
cubinhos de gelo. Tais cuvetes devem
ser enchidas com água potável e
colocadas no especial compartimento.
Aconselha-se não usar objectos
metálicos para tirar as cuvetes.
Não cconsuma oos ccubos dde ggelo oou oos
sorvetes llogo qque oos rretire ddo
congelador: aa ttemperatura mmuito bbaixa
a qque sse eencontram ppode pprovocar
queimaduras.
Page 57

electrolux
57
Prateleiras amovíveis
Nas paredes do compartimento há
calhas que permitem colocar as
prateleiras a diferentes alturas.
Prateleira para garrafas
Colocar as garrafas da prateleira com
a boca para frente.
Atenção: Só guardar deitadas garrafas
que ainda não tenham sido abertas.
Para guardar garrafas já abertas, a
prateleira para garrafas pode ser
colocada na posição inclinada.
Para tal, puxe a prateleira para
garrafas para frente, até que seja
possível levantá-la. Em seguida,
colocar a prateleira da frente em um
nível mais alto.
Colocação das
prateleiras da porta
Pode modificar a posição das
prateleiras da porta. Para isso
proceda da seguinte forma:
Empurre gradualmente a prateleira no
sentido que indica a seta até
desencaixa-la. Depois monte-a no
lugar desejado fazendo a operação
inversa.
D338
Page 58

58
electrolux
Calendário de
congelamento
Os simbolos indicam diferentes tipos
de produtos congelados.
Os números fornecem, em meses, o
tempo de armazenamento para o
respectivo tipo de produto congelado.
Se o valor válido do tempo de
armazenamento indicado é o superior
ou o inferior, depende da qualidade do
género alimenticio e da sua
preparação antes do congelamento.
Congelação de
alimentos frescos
O compartimento congelador é
adequado para a congelação de
alimentos frescos e para a
conservação a longo prazo de
alimentos congelados e
ultracongelados.
Para a congelação de alimentos
frescos, accione a função Action
Freeze (*) pelos menos 24 h antes de
inserir os alimentos a congelar no
compartimento congelador.
Desloque oo ddispensador dde
geloTwist&Serve ppara aa pposição
central rrelativamente àà pprateleira oonde
está eengatado.
Desloque a prateleira que se encontra
no compartimento congelador,
mantendo-a na posição horizontal e
colocando-a na posição superior.
10 -1210 -1210 - 1210 - 123-63-63-63-63-41-2
Recirculação de ar
O compartimento geladeira é dotado
de uma ventoinha especial D.A.C.
(Dynamic Air Cooling) que é ativada
agindo no interruptor B, o sinal
luminoso aceso significa que a
ventoinha está funcionando.
Aconselha-se o uso da ventoinha
(D.A.C.) quando a temperatura
ambiente ultrapassa os 25°C.
Este dispositivo permite um
arrefecimento rápido dos alimentos e
uma uniformidade melhor da
temperatura dentro do
compartimento.
Page 59

electrolux
59
Descongelação
Os alimentos congelados devem ser
descongelados antes da sua
utilização, no compartimento
refrigerador ou à temperatura
ambiente conforme o tempo
disponível para a operação.
No caso de se tratar de produtos
pouco espessos ou divididos, ponhaos directamente, a cozer: nesse caso
o tempo de cozedura será mais longo.
Volte a colocar nessa prateleira os
alimentos frescos a congelar.
A quantidade máxima de alimentos
que podem ser congelados em 24
horas está indicada na chapa de
identificação ,uma etiqueta presente
nas paredes internas do aparelho.
O processo de congelação dura 24
horas:durante este período,não
introduza novos alimentos a congelar.
Após 24 horas, quando o processo de
congelação tiver terminado, regresse à
temperatura desejada premindo a
tecla A.
Conservação de alimentos
congelados
Quando se ligar o aparelho,ou após
um período de inactividade,é
aconselhável colocá-lo em
funcionamento máximo pelo menos 2
horas antes de introduzir
os alimentos congelados.
Para isso, seleccione a função Action
Freeze (*).
Após 2 horas selecionar a
temperatura desejada premindo a
tecla A.
Para obter o melhor desempenho,é
aconselhável manter a prateleira do
congelador nas posições superior.
Page 60

60
electrolux
Instalação do filtro Taste
Guard
O filtro Taste guard é um filtro de
carvão activo que absorve os maus
odores e permite preservar o melhor
sabor e aroma para todos os
alimentos,sem o risco de
contaminação de odores entre
géneros alimentícios.
Aquando da entrega,o filtro de carvão
está num saco de plástico para manter
a respectiva longevidade.
Antes que o aparelho seja ligado,retire
o filtro do saco de plástico e oloque-o
dentro da aba.
• Puxe a aba para fora
• Insira o filtro de carvão activo na
ranhura existente na parte posterior
da aba
• Feche a aba.
Durante o funcionamento,
mantenha sempre fechada a
aba da ventilação de ar.O filtro
deve ser manuseado com
cuidado,para que a superfície
não seja arranhada.
Substituir o filtro Taste
Guard
Para obter o melhor desempenho, o
filtro de carvão deve ser substituído
todos os anos.
Podem ser adquiridos novos filtros de
carvão activo junto do representante
local.
• O filtro é colocado atrás da aba e
pode ser alcançado puxando a aba
para fora.
• Puxe o filtro de carvão usado para
fora da ranhura.
• Introduza o novo filtro de carvão na
ranhura
• Feche a aba.
Durante o funcionamento,
mantenha sempre fechada a
aba da ventilação de ar.O filtro
deve ser manuseado com
cuidado, para que a superfície
não seja arranhada.
Page 61

electrolux
61
CONSELHOS
Conselhos para a
refrigeração
Carne ((de qqualquer ttipo):
envolva
esses alimentos em sacos plásticos e
coloque-as na divisão imediatamente
acima das caixas para legumes.
O pperíodo dde cconservação éé dde 11 aa 22
dias, nno mmáximo.
Alimentos ccozidos, ppratos ffrios, eetc:
coloque-os, bem cobertos, numa
prateleira qualquer.
Frutas ee llegumes:
nas caixas de
legumes depois de lavados.
Bananas, bbatatas, ccebola ee aalho, sse
não fforem ppreparados, nnão sse
conservam nno rrefrigerador.
Conselhos para a
congelação
Para obter as máximas vantagens da
congelação, uns conselhos
importantes são:
• a quantidade máxima de alimentos
que podem ser congelados em 24
horas é indicada na «placa
sinalética»;
• o processo de congelação dura 24
horas; nesse período, não
introduza novos produtos para
congelar;
• congele só alimentos de excelente
qualidade, frescos e bem lavados;
• Reparta tudo em pequenos
pacotes proporcionados ao
consumo familiar, de forma a
serem utilizados de uma só vez.
Os pacotes de pequenas
dimensões permitem obter uma
congelação rápida e uniforme;
• as provisões a congelar devem ser
fechadas em embalagens
impermeáveis de qualidade
alimentar. Feche cuidadosamente
os pacotes eliminando as bolsas
de ar;
• evite introduzir os produtos a
congelar em contacto com os já
congelados; isto vai evitar o
aumento da temperatura destes
últimos;
• considere que os alimentos
magros conservam-se melhor e
durante mais tempo que os gordos
e que o sal reduz a duração da
congelção.
• não consuma certos produtos, tais
como sorvetes por exemplo, logo
que os retire do congelador: a
temperatura muito baixa a que se
encontram pode provocar
queimaduras.
• indique, em cada pacote, a data
da congelação de forma a poder
controlar o tempo de conservação;
• não coloque garrafas ou latas de
bebidas gasosas no congelador,
pois podem explodir.
Conselhos para a
conservação dos
alimentos congelados
Para utilizar do melhor modo o
compartimento é necessario:
• Verifique se os produtos
congelados foram conservados
bem pelo revendedor;
• que o transporte, da compra até à
colocação no congelador, seja
breve;
Page 62

62
electrolux
• não ultrapasse o período de
conservação indicado nas
embalagens;
• não abra frequentemente a porta e
não a deixe aberta mais do que for
necessário.
MANUTENÇÃO
Antes dde qqualquer iintervenção
no aaparelho, aaconselhamos qque
se ddesligue aa ttomada dde
corrente.
Aviso
Este eelectrodoméstico ccontém
hidrocarbonetos nno ssistema dde
refrigeração; aa mmanutenção ee aa
recarga ddeve sser, pportanto,
executada aapenas ppor ttécnicos
autorizados.
Limpeza periódica
Muitos ddetergentes eespecíficos ppara
as ssuperfícies dda ccozinha ccontêm
agentes qquímicos qque ppodem
corromper/danificar aas ppartes eem
plástico ppresentes nneste aaparelho.
Aconselha-sse, ppor iisso, dde llimpar oo
revestimento eexterno ddeste aaparelho
só ccom áágua qquente jjuntamente ccom
uma ppequena qquantidade dde
detergente llíquido ppara aa llouça.
Lave as paredes e acessórios com
água tépida e bicarbonato de soda.
Enxague e seque cuidadosamente;
limpe o condensador e o
motocompressor com uma escova ou
um aspirador. Esta operação vai
melhorar o funcionamento com
conseguinte poupança de energia.
Paragem prolongada
No caso de se ausentar por um
período prolongado, desligue a
tomada de corrente, esvazie, degele e
limpe o aparelho.
Mantenha as portas entre-abertas
durante toda a não utilização, para
facilitar a circulação do ar no interior e
evitar a formação de cheiros
desagradáveis.
Lâmpada de iluminação
A lâmpada de iluminação do
compartimento de refrigeração pode
ser alcançada pressionando como
indicado na figura.
Atenção
Substituir aa llâmpada ccom uuma dde
potência iigual ((a ppotência mmáxima
está ccontida nno ddifusor dde lluz).
Page 63

electrolux
63
Descongelação
A descongelação do refrigerador dáse automaticamente durante cada
período de paragem do compressor.
A água proveniente do descongelação
é evacuada para um recipiente situado
na parte detrás do aparelho, por cima
do compressor, e onde ela se
evapora.
Não sse eesqueça dde llimpar
periodicamente oo oorifício dde eescoamento
de áágua ddo ddescongelação qque sse
encontra nno ccentro dda ggoteira ddo
compartimento rrefrigerador ppara eevitar
que aa áágua ppossa ttransbordar ee ccair
sobre oos aalimentos. UUtilize ppara eesse
efeito aa ppequena bbarra qque sse eencontra
no oorifício.
O compartimento congelador é do
tipo "no frost"; isto significa que o
mesmo é caracterizado pela total
ausência de gelo durante o
funcionamento, tanto nas paredes
internas do compartimento como nos
alimentos.
A falta de gelo é devido à circulação
contínua de ar frio dentro do
compartimento, provocada por um
ventilador comandado
automaticamente.
D037
D037
Page 64

64
electrolux
ASSISTÊNCIA
TÉCNICA E PEÇAS DE
SUBSTITUIÇÃO
Se o aparelho não funcionar verifique:
• Se a ficha está bem introduzida na
tomada e se há corrente na rede.
• Se o botão do termóstato está na
posição correcta.
No caso de haver vibrações ou
ruídos verifique se o aparelho está em
contacto com moveis que podem
transmitir ou ampliar ruídos e
vibrações.
Verifique também se as tubagens do
sistema refrigerante não vibram. Se
houver restos de água no interior do
frigorifico verifique se o orifício de
descarga não está obstruído.
Se depois de todas estas verificações
o problema persistir dirija-se ao seu
vendedor ou o serviço de assistência
mais perto da sua residência.
Para oobter uuma aassistência mmais
rápida iindique oos ddados dda pplace dde
identificac,ão ddo aaparelho qque sse
encontra nno iinterior ddo
electrodoméstico nna pparede ddo ffundo
no llado eesquerdo, ee ttambém oo
modelo nnúmero dde sserie ee ccertificado
de ggarantia.
DADOS TECNICOS
256
58
0,770
281
4
20
1750
600
645
Capacidade lìquida em litros do frigorìfico
Consumo energético en kWh/24h
Consumo energético en kWh/ano
Capacidade de congelação em kg/24h
Autonomia por corte de energia de –18°C a –9°C por h
Capacidade lìquida em litros do congelador
Dimensões em mm
Altura
Largura
Profundidade
Os dados técnicos são indicados na placa de matrícula que se encontra no
lado esquerdo interno do apareho.
Page 65

electrolux
65
INSTALAÇÃO
Colocação
Coloque o aparelho longe de qualquer
fonte de calor (aquecimento, fogões,
ou raios solares demasiado
intensos).Verifique que nas parses
posterior, superior e inferior o ar pode
circular livremente. Para um melhor
funcionamento verifique que a parse
superior têm pelo menos 100 mm de
distancia de algum móvel suspenso
por cima do aparelho . A solução
preferível é indicada na (sem móvel).
Um ou vários pés niveladores situados
na base têm a função de nivelar o
aparelho correctamente.
Importante
O aparelho deve
poder ser
desligado da rede; uma vez
realizada a instalação, portanto, é
necessário que a ficha fique acessível.
Fixadores para prateleiras
O seu aparelho é equipado com
fixadores para prateleiras que
permitem de bloquear as prateleiras
durante o transporte.
Para removê-los executar quanto segue:
mexer os fixadores de prateleiras no
sentido da seta, levantar o vidro na
parte traseira e empurrá-lo para a
frente até liberá-lo e remover os
fixadores.
Espaçadores posteriores
Na bolsinha da documentação
encontram se dois espaçadores que
hão de ser montados nos figuras.
Desapertar oos pparafusos, iinserir oo
espaçador ddebaixo dda ccabeça ddo
parafuso ee vvoltar aa aapertar.
A
B
C
NP005
100 mm10 mm
10 mm
PR153
Page 66

66
electrolux
Ligação eléctrica
Verifique, antes de ligar o aparelho, se
a voltagem e a frequência indicadas na
placa sinalética correspondem às da
sua rede. Tolerância admitida na
voltagem nominal: ±6%. Para a
adaptação do aparelho a voltagens
diferentes, é indispensável a adjunção
de um auto-transformador de uma
potência adequada.
Verifique sse aa ttomada dde
corrente dda pparede eestá eem bbom
estado ee aapta aa rreceber aa fficha ddo ffio
de aalimentação ddo aaparelho.
Esta última está conforme às normas
em vigor e possui uma entrada para a
ligação à terra. Essa ficha pode ser
ligada a qualquer tomada de corrente
desde que esta tenha uma ponta de
ligação à terra. No caso em que a
tomada não tenha a ligação à terra,
ligar o aparelho a uma instalação de
ligação à terra separada, conforme as
normas em vigor, consultando para
isso um técnico especializado.
A CCasa CConstrutora ddeclina ttoda ee
qualquer rresponsabilidade nno ccaso dde
esta nnorma ccontra oos aacidentes nnão
ser ccumprida ee sse vverificarem
acidentes ooriginados ppor ddeficiente
ligação àà tterra, oou ffalta ddela.
Este aparelho está conforme as
seguintes Directrizes
Comunitárias:
-887/308
de 2/6/87 respeitante à
supressão das interferências radioeléctricas.
- 773/23 CCEE
19/02/73 (Baixa Tensão)
e sucessivas modificações;
- 889/336 CCEE
03/05/89
(Compatibilidade Electromagnética)
e sucessivas modificações.
Reversibilidade das portas
Antes de levar a cabo qualquer
operação, remova a ficha da tomada.
Para mudar a direcção de abertura da
porta proceda do seguinte modo:
- Para levar a cabo as seguintes
operações, nós sugerimos que o
faça com outra pessoa que possa
segurar firmemente as portas do
aparelho durante as operações.
- Abra a porta com o aparelho na
posição vertical. Desaperte os
parafusose e remova a parte
superior de plástico da porta.
- Remova a bucha e reposicione no
lado contrário (d).
- Deite o aparelho com a parte
traseira para baixo.
- Remova as coberturas de plástico
da dobradiça dx e sx (3).
- Desaparafuse a dobradiça superior
e remova-a (1-2).
- Desaperte o parafuso e remova a
bucha da porta (4).
Page 67

electrolux
67
- Remova a porta superior.
- Desaparafuse a dobradiça central (H)
- Remova a porta inferior. Se
previsto, remova a parte de
plástico da ficha da porta e reinsira
do outro lado.
- Remova usando uma ferramenta a
capa (e) , desaparafuse o pino no
eixo da dobradiça inferior (f) e
reaparafuse no lado oposto.
- Reinsira a cobertura (e) no lado
oposto.
- Reinsira a porta inferior no pino do
eixo (f).
- Aparafuse a dobradiça central (H)
no lado oposto. Não se esqueça
do espaçador de plástico, inserido
debaixo da dobradiça central (H).
- Reinsira a porta superior na
dobradiça central (H).
- Preste atenção à parte da frente
das portas, que é paralela à parte
superior.
- Fixe as buchas da porta no lado
oposto (4).
- Posicione e fixe a dobradiça
superior no lado oposto (1-2)
- Reinsira as coberturas das
dobradiças.
- Eleve o aparelho para a posição
vertical.
- Abra a porta e reposicione a parte
superior de plástico da porta com
parafusos.
1
4
3
2
H
Page 68

68
electrolux
- Fixe as pegas no lado oposto,
insira as fichas de plástico nos
buracos livres que podem ser
encontrados nas instruções, num
saco.
Reposicione, eleve o aparelho,
espere pelo menos duas horas antes
de ligue na ficha de alimentação.
Em qualquer caso, se não desejar
levar a cabo as operações acima
descritas, contacte o Concessionário
de Assitência Técnica mais próximo. O
Concessionário, especialista no serviço
pós venda levará a cabo a
reversibilidade das portas.
Aviso
Depois dde rreverter aa ddirecção dde
abertura ddas pportas, vverifique qque
todos oos pparafusos eestão
correctamente aapertados ee qque oo sselo
magnético aadere aao aaparelho.
Se aa ttemperatura aambiente éé ffria, ((ex.
no IInverno), aa bborracha ppode nnão
aderir pperfeitamenteao aaparelho. EEm
qualquer ccaso, eespere ppelo nnatural
ajustamento dda bborracha, oou aacelere
este pprocesso aaquecendo aa pparte nnão
aderente ccom uum ssecador dde ccabelo.
Page 69

electrolux
69
GARANTIA/ASSISTÊNCIA TÉCNICA
Estimado Cliente:
Queremos felicitá-lo pela sua compra e agradecer a confiança depositada na
nossa empresa.
O seu electrodoméstico dispõe de uma garantia de 24 meses para mão-de-obra
e peças.
Se durante o período de garantia o seu electrodoméstico tiver uma avaria,
contacte o Serviço Técnico Oficial.
ASSISTÊNCIA TTÉCNICA OOFICIAL
21 4440 339 339
SERVIÇO DDE AAPOIO AAO CCLIENTE
21 4440 339 000
(de 2a a 6a feira. das 10H-13H e das 14H-17H)
CONDIÇÕES DE GARANTIA
1. O aparelho que acaba de adquirir possui uma garantia de dois anos a partir
da data de aquisição. Os pedidos de assistência na garantia são gratuitos,
mediante apresentação do respectivo certificado juntamente com a factura
de compra.
2. A presente garantia do fabricante (2 anos) cobre a substituição de peças,
mão de obra e deslocação.
3. Em caso de imobilização do seu aparelho por período superior a 15 dias, a
garantia será prolongada adicionando o tempo de imobilização à data de
entrega nos nossos serviços.
4. Nos pedidos de assistência na garantia de Pequenos Electrodomésticos, os
aparelhos a reparar deverão ser entregues directamente no ponto de
assistência.
EXCLUSÕES DE GARANTIA
Substituições de peças danificadas por mau manuseamento, instalação
incorrecta, danos de transporte e danos provocados por condições atmosféricas
adversas; Intervenções por pessoal técnico não autorizado pelo
ELECTROLUX
SERVICE
; substituições de lâmpadas, filtros, juntas de borracha, vidros, botões,
puxadores e acessórios de aspiradores; Todos os serviços de manutenção
provocados pelo desgaste ou pela utilização do aparelho; Pedidos de
demonstração de montagem e explicações de funcionamento; Danos no esmalte
e/ou na pintura provocados por cortes ou pancadas; Uso intensivo em locais
Page 70

70
electrolux
públicos ou profissionais, a menos que se trate de um produto adequado para o
efeito; Desobstrução de bombas de limpeza e filtros.
•
MANIPULAÇÃO
nos dados da placa de Matrícula do presente aparelho ou
deste certificado.
•
INSTALAÇÃO IINCORRECTA EE NNÃO RREGULAMENTAR
(tensão, pressão de
gás ou de água, ligações eléctricas ou hidráulicas não adequadas).
Assistência TTécnica - EELECTROLUX SSERVICE - QQuinta dda FFonte, EEdifício
Gonçalves ZZarco - QQ 335, 22774-5518 PPaço dde AArcos.
NOTA 11: DDeve cconservar aa ffactura dde ccompra jjunto ddeste CCertificado dde GGarantia
NOTA 22: PPara aa vvalidade ddesta ggarantia, nno mmomento dda iintervenção ttécnica éé
absolutamente iimprescindível aapresentar aao ppessoal aautorizado oo
presente ccertificado jjunto dda ffactura llegal dde ccompra ddo aaparelho
devidamente ppreenchida.
Page 71

electrolux
71
GARANTIA EUROPEIA
Este aparelho possui garantia da Electrolux em cada um dos países listados na
parte de trás deste manual, para o período especificado na garantia do seu
aparelho ou, caso contrário, pela lei. Se mudar de um destes países para outro
dos países listados em baixo, a garantia do aparelho mudará também, estando
sujeita aos seguintes requisitos:
• A garantia do seu aparelho tem inicio na data em que adquiriu o aparelho, a
qual terá como prova o documento válido de compra emitido pelo vendedor
do aparelho.
• A garantia do aparelho é válida para o mesmo período de tempo e para o
mesmo tipo de trabalho e peças existente no seu novo país de residência para
este modelo em particular ou gama de aparelhos.
• A garantia do aparelho é pessoal, para o comprador original, e não pode ser
transferida para outro utilizador.
• O aparelho é instalado e usado de acordo com as instruções emitidas pela
Electrolux e destina-se apenas ao uso doméstico, ou seja, não é usado para
fins comerciais.
• O aparelho é instalado de acordo com todas as normas relevantes em vigor no
seu novo país de residência.
As condições desta Garantia Europeia não afecta nenhum dos seus direitos
concedidos por lei.
Page 72

72
electrolux
Suomi
www.electrolux.fi
Sverige
+46 (0)771 76 76 76
Electrolux Service, S:t Göransgatan 143, S-105 45 Stockholm
Türkiye
+90 21 22 93 10 25
Tarlaba caddesi no : 35 Taksim stanbul
+7 095 937 7837
Albania
+35 5 4 261 450
Rr. Pjeter Bogdani Nr. 7 Tirane
Belgique/België/Belgien
+32 2 363 04 44
Bergensesteenweg 719, 1502 Lembeek
Danmark
+45 70 11 74 00
Sjællandsgade 2, 7000 Fredericia
eská republika
+420 2 61 12 61 12
Bud jovická 3, Praha 4, 140 21
Deutschland
+49 180 32 26 622
Muggenhofer Str. 135, 90429 Nürnberg
Eesti
+37 2 66 50 030
Mustamäe tee 24, 10621 Tallinn
España
+34 902 11 63 88
Carretera M-300,Km.29,900 Alcalá de Henares Madrid
France
Great Britain
+44 8705 929 929
Addington Way, Luton, Bedfordshire LU4 9QQ
Hellas
+30 23 10 56 19 70
4, Limnou Str., 54627 Thessaloniki
Hrvatska
+385 1 63 23 338
Slavonska avenija 3, 10000 Zagreb
Ireland
+353 1 40 90 753
Long Mile Road Dublin 12
Italia
+39 (0) 434 558500
C.so Lino Zanussi, 26 - 33080 Porcia (PN)
Latvija
+37 17 84 59 34
Kr. Barona iela 130/2, LV-1012, Riga
Lietuva
+370 5 2780609
Verki 29, LT-09108 Vilnius
Luxembourg
+35 2 42 43 13 01
Rue de Bitbourg, 7, L-1273 Hamm
Magyarország
+36 1 252 1773
H-1142 Budapest XIV, Erzsébet királyné útja 87
Nederland
+31 17 24 68 300
Vennootsweg 1, 2404 CG - Alphen aan den Rijn
Norge
+47 81 5 30 222
Risløkkvn. 2 , 0508 Oslo
Österreich
+43 18 66 400
Herziggasse 9, 1230 Wien
Polska
+48 22 43 47 300
ul. Kolejowa 5/7, Warsaw
Portugal
+35 12 14 40 39 39
Quinta da Fonte-Edificio Gonçalves Zarco-Q 35-2774-518 Paço de Arcos
Romania
+40 21 451 20 30
Str. Garii Progresului 2, S4, 040671 RO
Schweiz-Suisse-Svizzera
+41 62 88 99 111
Industriestrasse 10, CH-5506 Mägenwil
Slovenija
+38 61 24 25 731
Electrolux Ljubljana d.o.o., Gerbi eva 98, 1000 Ljubljana
Slovensko
+421 2 43 33 43 22
Electrolux Slovakia s.r.o., Electrolux Domáce spotrebi e SK, Seberíniho 1, 821 03 Bratislava
www.electrolux.com
ě
á
ŏ
ŝ
www.electrolux.fr
È
129090 Москва, Олимпийский проспект, 16, БЦ "Олимпик"
ģ
ě
Россия
Page 73

Page 74

Page 75

Page 76

2223 457-12-00 18042007
wwwwww..eelleeccttrroolluuxx..ccoomm
www.electrolux.es
www.electrolux.pt
 Loading...