

Page 1
user manual
Οδηγίες Χρήσης
manual de instruções
manual de instrucciones
Fridge-Freezer
Ψυγειοκαταψύκτης
Combinado
Frigorífico-congelador
ENB43396X
Page 2
2 electrolux
Electrolux. Thinking of you.
Share more of our thinking at www.electrolux.com
Contents
Safety information 2
Control panel 4
First use 5
Daily use 5
Helpful hints and tips 7
How to use the water dispenser with BRITA
MAXTRA filter cartridge 8
Subject to change without notice
Care and cleaning 14
What to do if… 15
Technical data 17
Installation 17
Environmental concerns 20
Safety information
In the interest of your safety and to ensure
the correct use, before installing and first using the appliance, read this user manual
carefully, including its hints and warnings. To
avoid unnecessary mistakes and accidents,
it is important to ensure that all people using
the appliance are thoroughly familiar with its
operation and safety features. Save these instructions and make sure that they remain
with the appliance if it is moved or sold, so
that everyone using it through its life will be
properly informed on appliance use and safety.
For the safety of life and property keep the
precautions of these user's instructions as
the manufacturer is not responsible for damages caused by omission.
Children and vulnerable people safety
• This appliance is not intended for use by
persons (including children) with reduced
physical, sensory or mental capabilities, or
lack of experience and knowledge, unless
they have been given supervision or instruction concerning use of the appliance
by a person responsible for their safety.
Children should be supervised to ensure
that they do not play with the appliance.
• Keep all packaging well away from children. There is risk of suffocation.
• If you are discarding the appliance pull the
plug out of the socket, cut the connection
cable (as close to the appliance as you
can) and remove the door to prevent playing children to suffer electric shock or to
close themselves into it.
• If this appliance featuring magnetic door
seals is to replace an older appliance having a spring lock (latch) on the door or lid,
be sure to make that spring lock unusable
before you discard the old appliance. This
will prevent it from becoming a death trap
for a child.
General safety
Caution! Keep ventilation openings
clear of obstruction.
• The appliance is intended for keeping
foodstuff and/or beverages in a normal
household as explained in this instruction
booklet.
• Do not use a mechanical device or any artificial means to speed up the thawing
process.
• Do not use other electrical appliances
(such as ice cream makers) inside of refrigerating appliances, unless they are approved for this purpose by the manufacturer.
• Do not damage the refrigerant circuit.
• The refrigerant isobutane (R600a) is contained within the refrigerant circuit of the
appliance, a natural gas with a high level of
environmental compatibility, which is nevertheless flammable.
During transportation and installation of
the appliance, be certain that none of the
components of the refrigerant circuit become damaged.
If the refrigerant circuit should become
damaged:
Page 3
electrolux 3
– avoid open flames and sources of igni-
tion
– thoroughly ventilate the room in which
the appliance is situated
• It is dangerous to alter the specifications or
modify this product in any way. Any damage to the cord may cause a short-circuit,
fire and/or electric shock.
Warning! Any electrical component
(power cord, plug, compressor) must be
replaced by a certified service agent or
qualified service personnel.
1. Power cord must not be lengthened.
2. Make sure that the power plug is not
squashed or damaged by the back of
the appliance. A squashed or damaged power plug may overheat and
cause a fire.
3. Make sure that you can come to the
mains plug of the appliance.
4. Do not pull the mains cable.
5. If the power plug socket is loose, do
not insert the power plug. There is a
risk of electric shock or fire.
6. You must not operate the appliance
without the lamp cover
1)
of interior
lighting.
• This appliance is heavy. Care should be
taken when moving it.
• Do not remove nor touch items from the
freezer compartment if your hands are
damp/wet, as this could cause skin abrasions or frost/freezer burns.
• Avoid prolonged exposure of the appliance to direct sunlight.
Daily Use
• Do not put hot pot on the plastic parts in
the appliance.
• Do not store flammable gas and liquid in
the appliance, because they may explode.
• Do not place food products directly
against the air outlet on the rear wall.
2)
• Frozen food must not be re-frozen once it
has been thawed out.
• Store pre-packed frozen food in accordance with the frozen food manufacturer's
instructions.
• Appliance's manufacturers storage recommendations should be strictly adhered
to. Refer to relevant instructions.
• Do not place carbonated or fizzy drinks in
the freezer compartment as it creates
pressure on the container, which may
cause it to explode, resulting in damage to
the appliance.
• Ice lollies can cause frost burns if consumed straight from the appliance.
Care and cleaning
• Before maintenance, switch off the appliance and disconnect the mains plug from
the mains socket.
• Do not clean the appliance with metal objects.
• Do not use sharp objects to remove frost
from the appliance. Use a plastic scraper.
• Regularly examine the drain in the refrigerator for defrosted water. If necessary,
clean the drain. If the drain is blocked, water will collect in the bottom of the appliance.
Installation
Important! For electrical connection
carefully follow the instructions given in
specific paragraphs.
• Unpack the appliance and check if there
are damages on it. Do not connect the appliance if it is damaged. Report possible
damages immediately to the place you
bought it. In that case retain packing.
• It is advisable to wait at least four hours
before connecting the appliance to allow
the oil to flow back in the compressor.
• Adequate air circulation should be around
the appliance, lacking this leads to overheating. To achieve sufficient ventilation
follow the instructions relevant to installation.
• Wherever possible the back of the product
should be against a wall to avoid touching
or catching warm parts (compressor, condenser) to prevent possible burn.
• The appliance must not be located close
to radiators or cookers.
• Make sure that the mains plug is accessible after the installation of the appliance.
1) If the lamp cover is foreseen
2) If the appliance is Frost Free
Page 4
4 electrolux
•
Connect to potable water supply only.
3)
Service
• Any electrical work required to do the servicing of the appliance should be carried out
by a qualified electrician or competent person.
• This product must be serviced by an authorized Service Centre, and only genuine
spare parts must be used.
Environment Protection
This appliance does not contain gasses
which could damage the ozone layer, in
Control panel
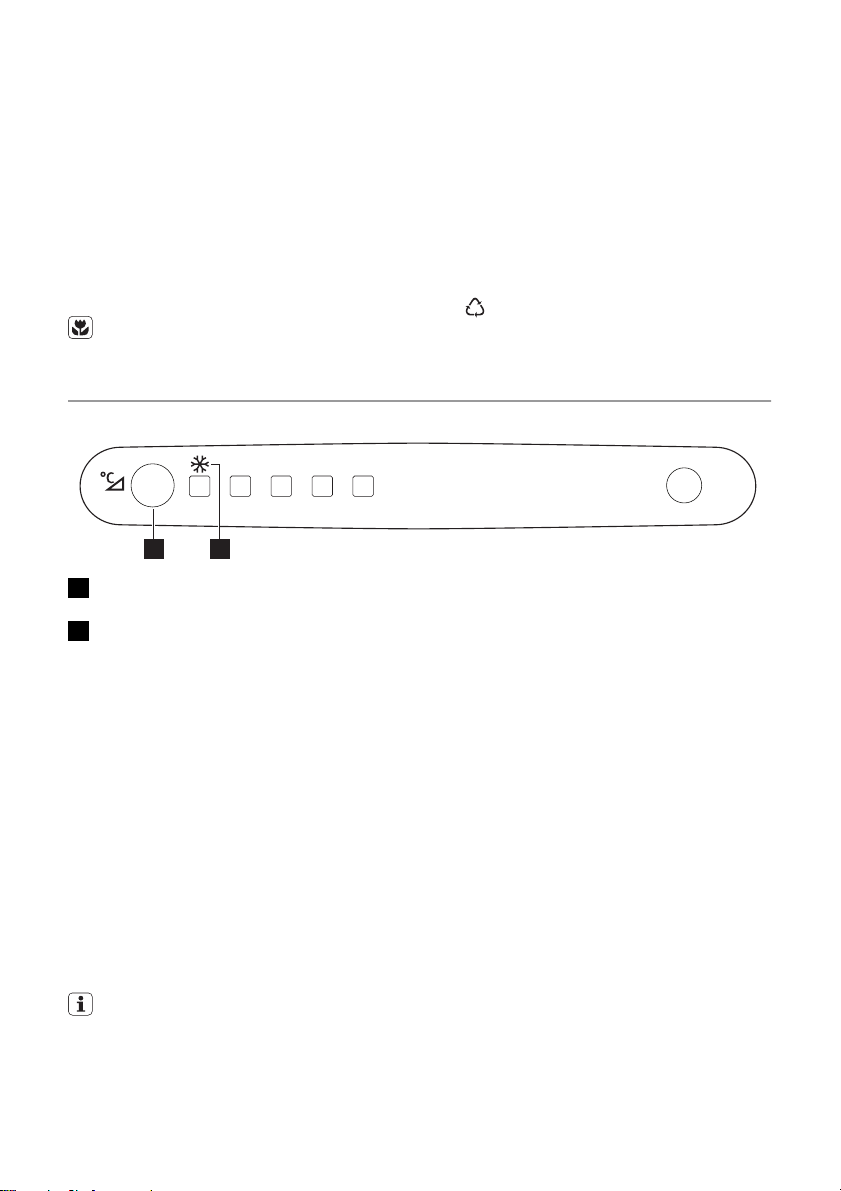
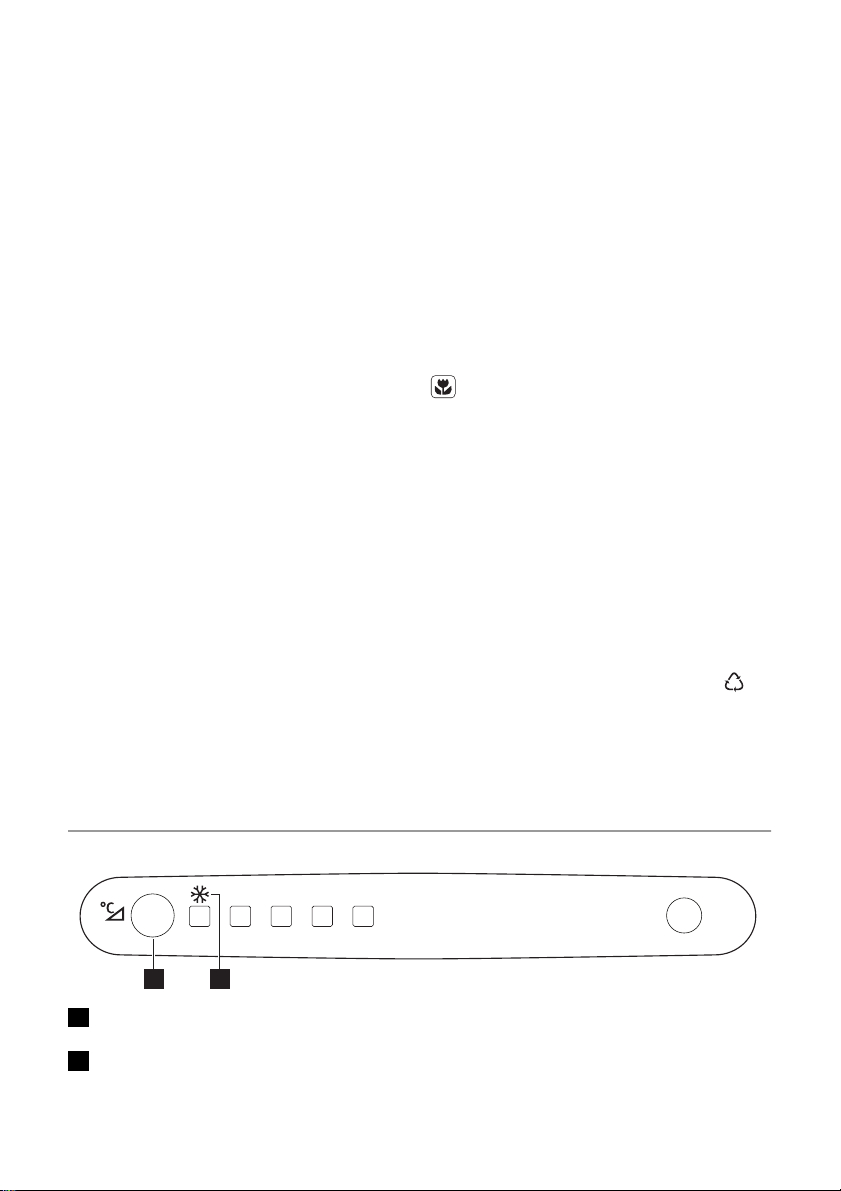
+2 +4 +5 +6 +8
1 2
1 Temperature regulator
Action Freeze button
2 Action Freeze indicator
Switching on
Remove, if present, the remove label stuck
on the inside of the freezer compartment.
Insert the plug into the wall socket.
Switching off
To switch off the appliance remove the mains
plug.
Temperature regulation
The temperature is automatically regulated.
To operate the appliance, proceed as follows:
• press the temperature regulator more
times until the LED corresponding to the
required temperature lights up. Selection
is progressive, varying from +2°C to +8°C.
A medium setting is generally the most
suitable.
either its refrigerant circuit or insulation
materials. The appliance shall not be discarded together with the urban refuse
and rubbish. The insulation foam contains flammable gases: the appliance
shall be disposed according to the applicable regulations to obtain from your
local authorities. Avoid damaging the
cooling unit, especially at the rear near
the heat exchanger. The materials used
on this appliance marked by the symbol
are recyclable.
However, the exact setting should be chosen
keeping in mind that the temperature inside
the appliance depends on:
• room temperature
• how often the door is opened
• the quantity of food stored
• the location of the appliance.
Important! If the ambient temperature is
lower than 16°C press the temperature
regulator until the LED corresponding to the
lowest temperature lights up.
Action Freeze function
You can activate the Action Freeze function
by pressing the Action Freeze button more
times until the LED corresponding to the
symbol Action Freeze indicator lights up.
You can deactivate the Action Freeze function by pressing the Action Freeze button
more times until the required temperature is
selected.
3) If a water connection is foreseen
Page 5
First use
Cleaning the interior
Before using the appliance for the first time,
wash the interior and all internal accessories
with lukewarm water and some neutral soap
so as to remove the typical smell of a brandnew product, then dry thoroughly.
Daily use
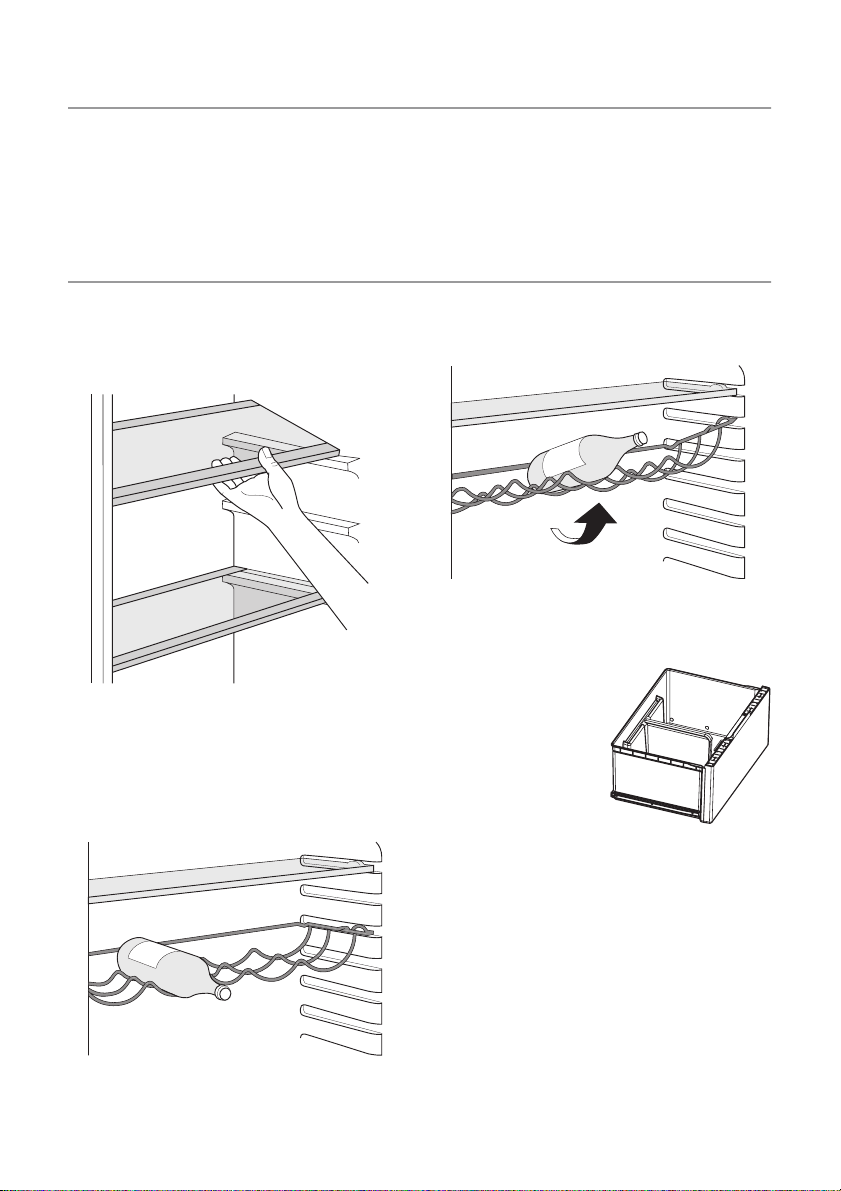
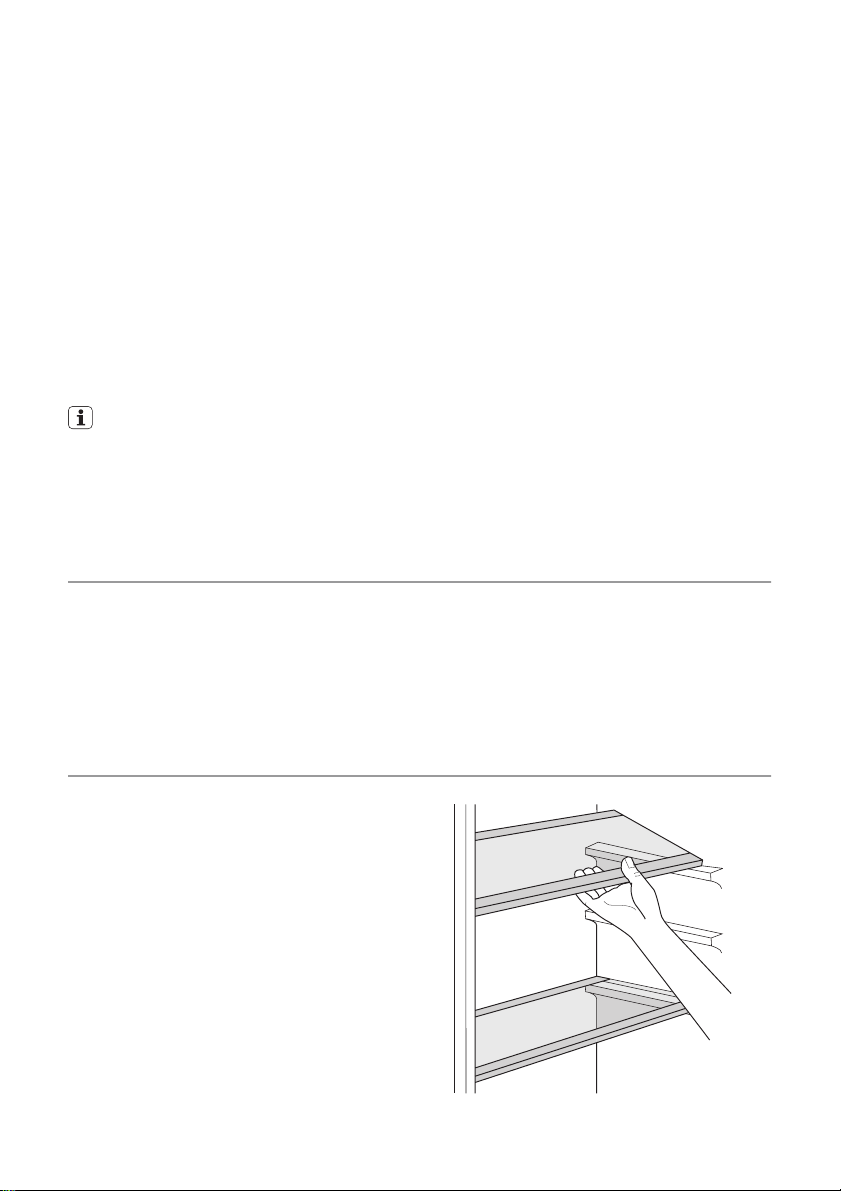
Movable shelves
The walls of the refrigerator are equipped
with a series of runners so that the shelves
can be positioned as desired.
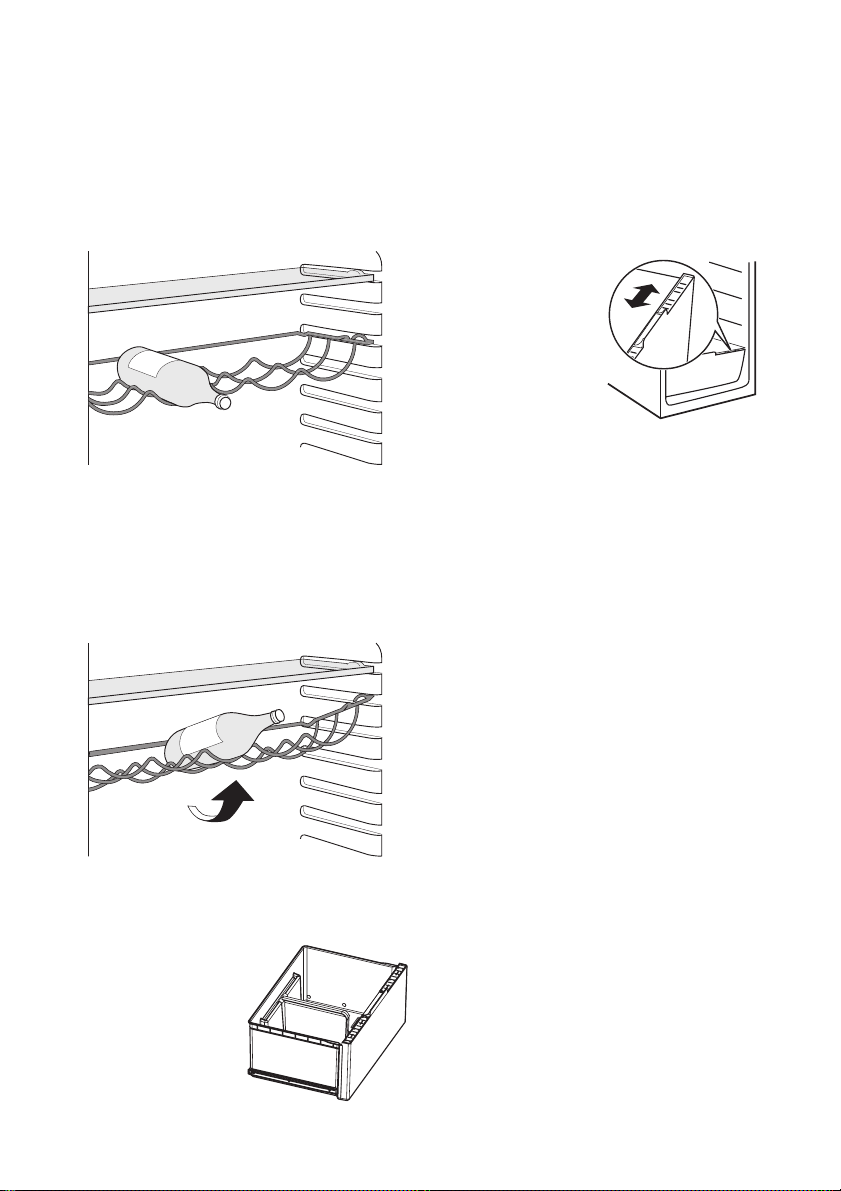
Bottle rack
Place the bottles (with the opening facing
front) in the pre-positioned shelf.
Important! If the shelf is positioned
horizontally, place only closed bottles.
electrolux 5
Important! Do not use detergents or abrasive powders, as these will damage the finish.
this result, pull the shelf up so it can rotate
upwards and be placed on the next higher
level.
Vegetable drawer with humidity control
The drawer is suitable for storing fruit and
vegetables.
There is a separator
inside the drawer that
can be placed in different positions to allow for the subdivision best suited to
personal needs.
There is a grille (if
foreseen) on the bottom of the drawer to
separate the fruit and vegetables from any
humidity that may form on the bottom surface.
All parts inside the drawer can be removed
for cleaning purposes
This bottle holder shelf can be tilted in order
to store previously opened bottles. To obtain
Page 6
6 electrolux
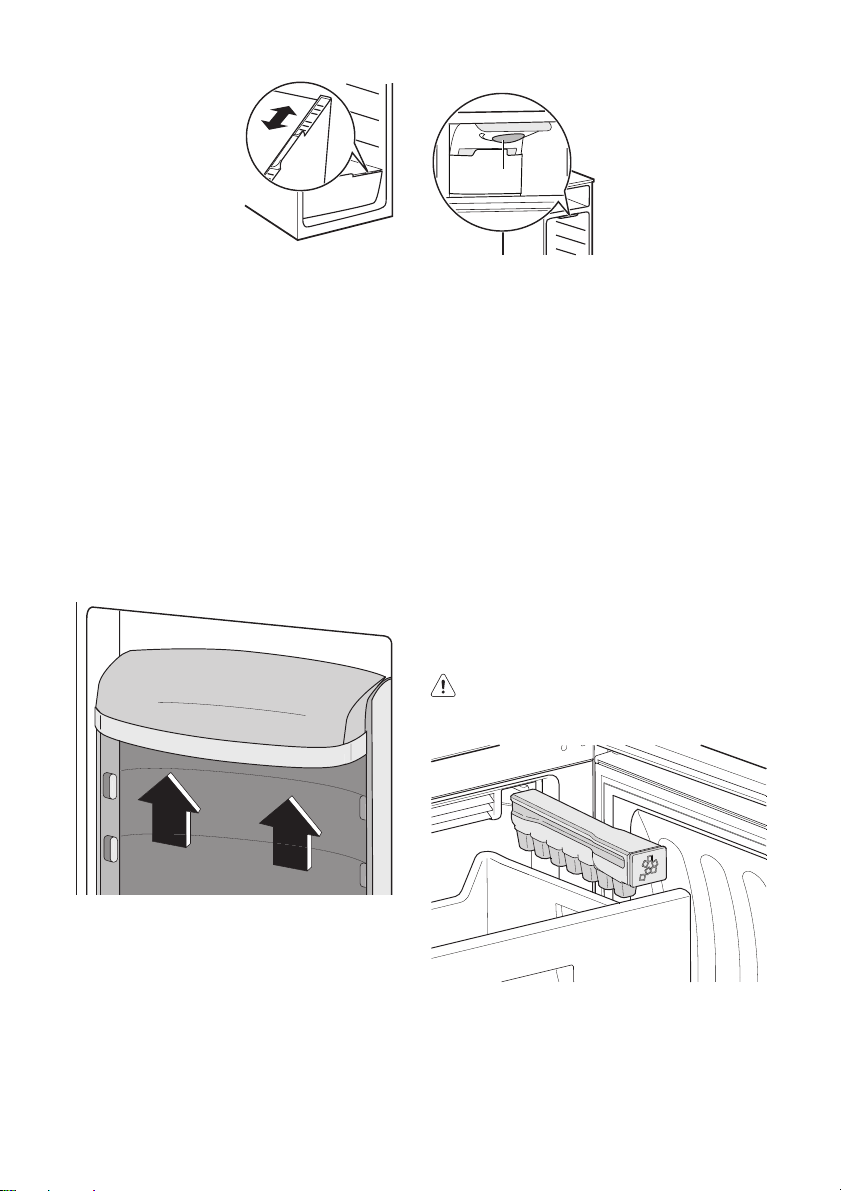
To regulate the humidity in the vegetable drawer the glass
shelf incorporates a
device with slits (adjustable by means of
a sliding lever).
When the ventilation
slots are closed:
the natural moisture
content of the food in the fruit and vegetable
compartments is preserved for longer.
When the ventilation slots are opened:
more air circulation results in a lower air moisture content in the fruit and vegetable compartments.
Positioning the door shelves
To permit storage of food packages of various sizes, the door shelves can be placed at
different heights.
To make these adjustments proceed as follows:
gradually pull the shelf in the direction of the
arrows until it comes free, then reposition as
required.
B
Important! Switch on the fan when the
ambient temperature exceeds 25°C.
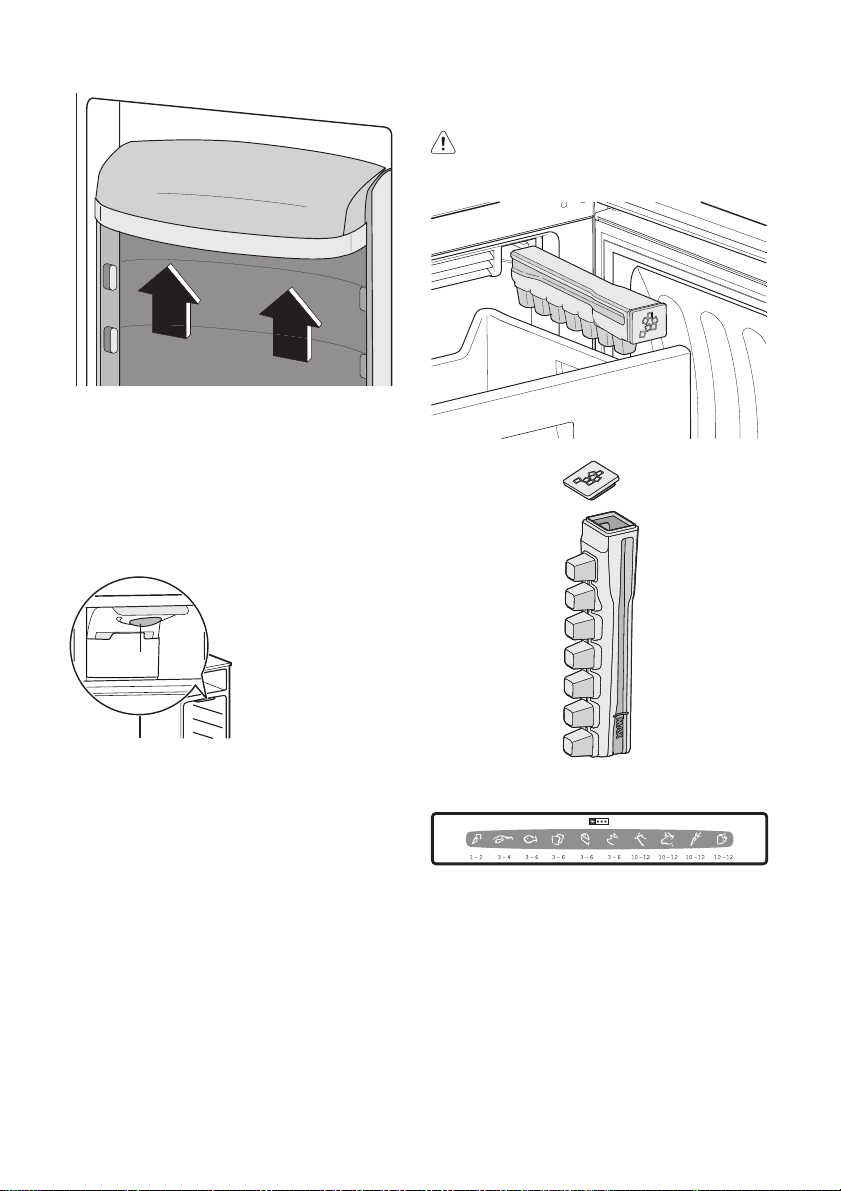
Ice-cube production
This appliance is equipped with one or more
trays for the production of ice- cubes.
These are insert on the sides of the upper
freezer drawer.
Pull out the upper freezer drawer. Extract the
ice-tray. Pull out the tap. Fill with water to the
limit indicated "MAX".
Refit the tap and insert the tray in the appropriate place.
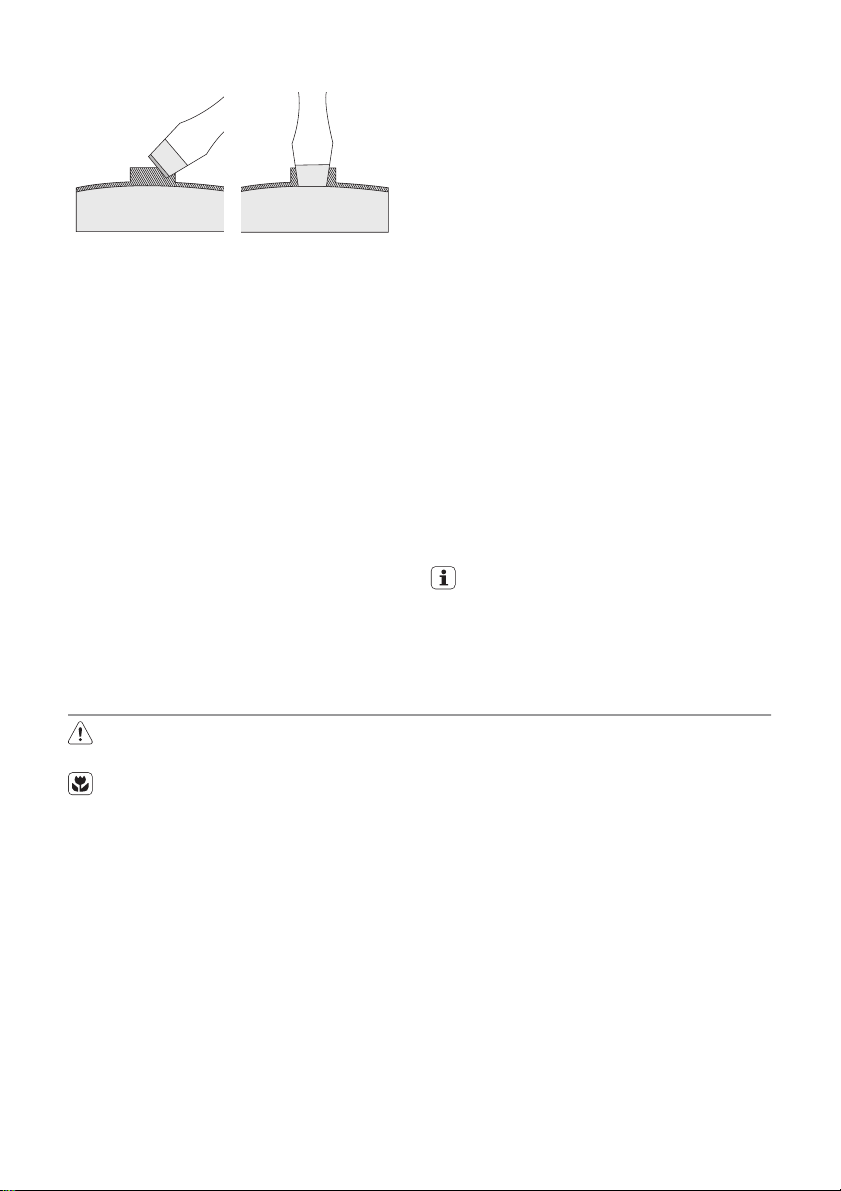
To remove the ice cubes rotate the tray with
the ice needles towards the top and hit on a
rigid surface.
To semplify the release of the ice needles it
is recommended to keep the closed tray under if possible luke warm water for a few seconds.
Warning! Do not use metallic
instruments to remove the trays from the
freezer.
Air cooling
The Dynamic Air Cooling (DAC) fan let food
cool quickly and a more uniform temperature
in the compartment.
You can switch on the fan by pressing the
switch shown in the picture. The green light
comes on.
Page 7
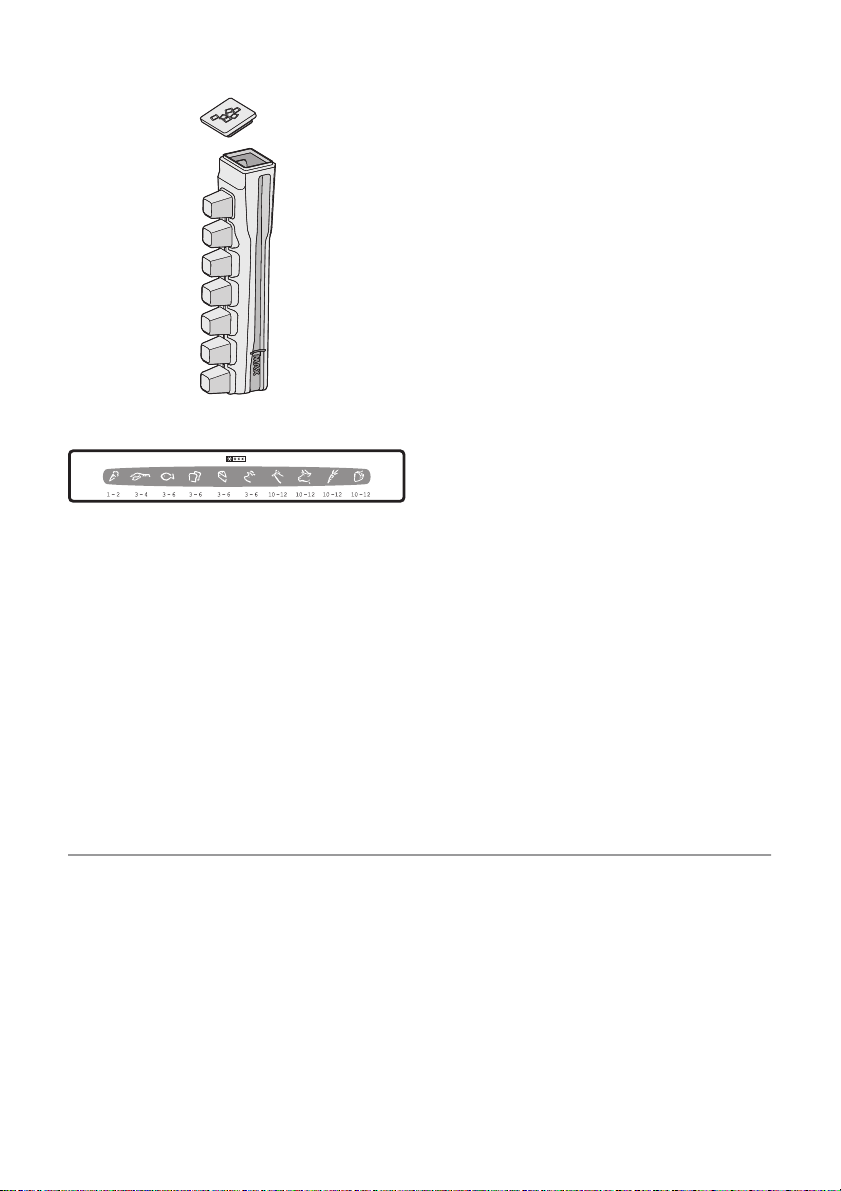
Freezing Calendar
The symbols show different types of frozen
goods.
The numbers indicate storage times in
months for the appropriate types of frozen
goods. Whether the upper or lower value of
the indicated storage time is valid depends
on the quality of the foods and treating before
freezing.
Freezing fresh food
The freezer compartment is suitable for
freezing fresh food and storing frozen and
deep-frozen food for a long time.
To freeze fresh food activate the Action
Freeze function at least 24 hours before plac-
electrolux 7
ing the food to be frozen in the freezer compartment.
Place the fresh food to be frozen in the bottom compartment.
The maximum amount of food that can be
frozen in 24 hours is specified on the rating
plate , a label located on the inside of the
appliance.
The freezing process lasts 24 hours: during
this period do not add other food to be frozen.
Storage of frozen food
When first starting-up or after a period out of
use, before putting the products in the compartment let the appliance run at least 2
hours on the higher settings.
Important! In the event of accidental
defrosting, for example due to a power
failure, if the power has been off for longer
than the value shown in the technical
characteristics chart under "rising time", the
defrosted food must be consumed quickly or
cooked immediately and then re-frozen (after
cooling).
Thawing
Deep-frozen or frozen food, prior to being
used, can be thawed in the refrigerator compartment or at room temperature, depending
on the time available for this operation.
Small pieces may even be cooked still frozen,
directly from the freezer: in this case, cooking
will take longer.
Helpful hints and tips
Hints for energy saving
• Do not open the door frequently or leave it
open longer than absolutely necessary.
• If the ambient temperature is high and the
Temperature Regulator is set to low temperature and the appliance is fully loaded,
the compressor may run continuously,
causing frost or ice on the evaporator. If
this happens, set the Temperature Regulator toward warmer settings to allow automatic defrosting and so a saving in electricity consumption.
Hints for fresh food refrigeration
To obtain the best performance:
• do not store warm food or evaporating liquids in the refrigerator
• do cover or wrap the food, particularly if it
has a strong flavour
• position food so that air can circulate freely
around it
Hints for refrigeration
Useful hints:
Page 8
8 electrolux
Meat (all types) : wrap in polythene bags and
place on the glass shelf above the vegetable
drawer.
For safety, store in this way only one or two
days at the most.
Cooked foods, cold dishes, etc..: these
should be covered and may be placed on any
shelf.
Fruit and vegetables: these should be thoroughly cleaned and placed in the special
drawer(s) provided.
Butter and cheese: these should be placed
in special airtight containers or wrapped in
aluminium foil or polythene bags to exclude
as much air as possible.
Milk bottles: these should have a cap and
should be stored in the bottle rack on the
door.
Bananas, potatoes, onions and garlic, if not
packed, must not be kept in the refrigerator.
Hints for freezing
To help you make the most of the freezing
process, here are some important hints:
• the maximum quantity of food which can
be frozen in 24 hrs. is shown on the rating
plate;
• the freezing process takes 24 hours. No
further food to be frozen should be added
during this period;
• only freeze top quality, fresh and thoroughly cleaned, foodstuffs;
• prepare food in small portions to enable it
to be rapidly and completely frozen and to
make it possible subsequently to thaw only
the quantity required;
• wrap up the food in aluminium foil or polythene and make sure that the packages
are airtight;
• do not allow fresh, unfrozen food to touch
food which is already frozen, thus avoiding
a rise in temperature of the latter;
• lean foods store better and longer than
fatty ones; salt reduces the storage life of
food;
• water ices, if consumed immediately after
removal from the freezer compartment,
can possibly cause the skin to be freeze
burnt;
• it is advisable to show the freezing in date
on each individual pack to enable you to
keep tab of the storage time.
Hints for storage of frozen food
To obtain the best performance from this appliance, you should:
• make sure that the commercially frozen
foodstuffs were adequately stored by the
retailer;
• be sure that frozen foodstuffs are transferred from the foodstore to the freezer in the
shortest possible time;
• not open the door frequently or leave it
open longer than absolutely necessary.
• Once defrosted, food deteriorates rapidly
and cannot be refrozen.
• Do not exceed the storage period indicated by the food manufacturer.
How to use the water dispenser with BRITA MAXTRA filter cartridge
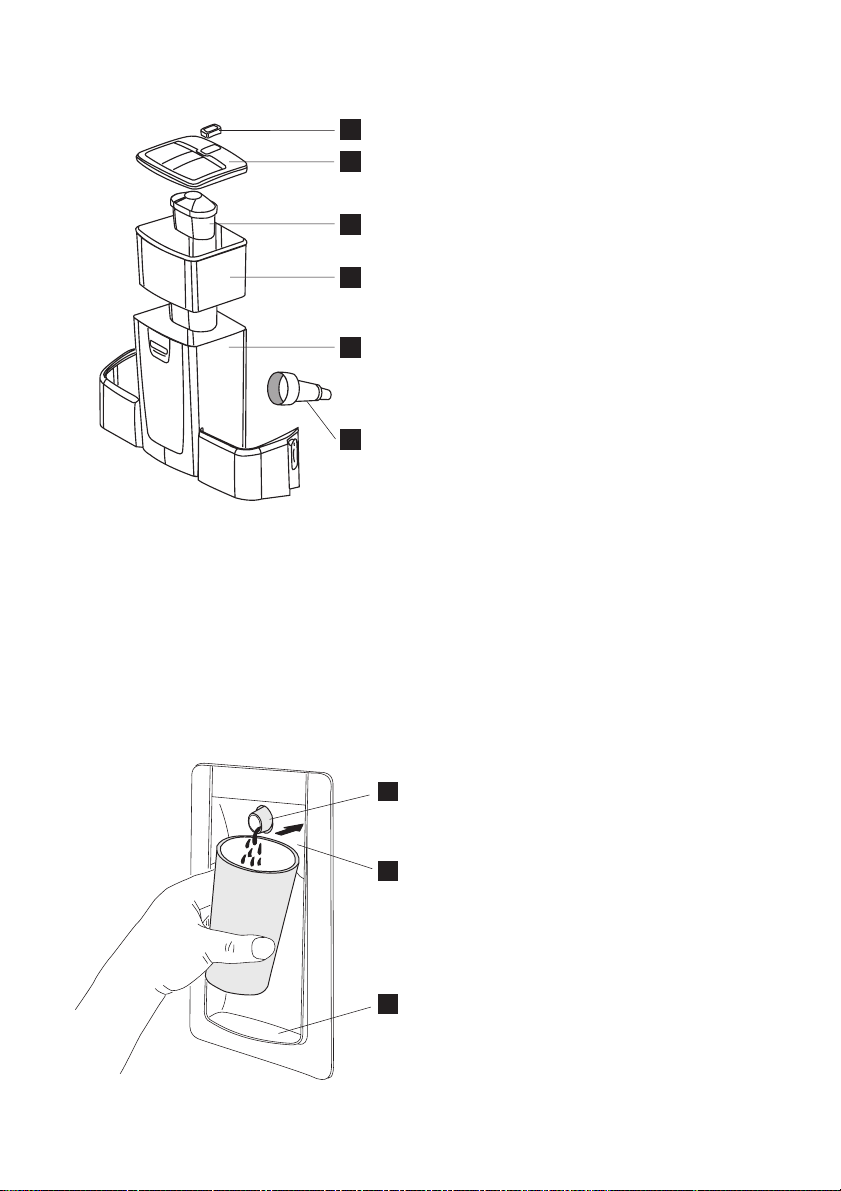
BRITA water filter unit
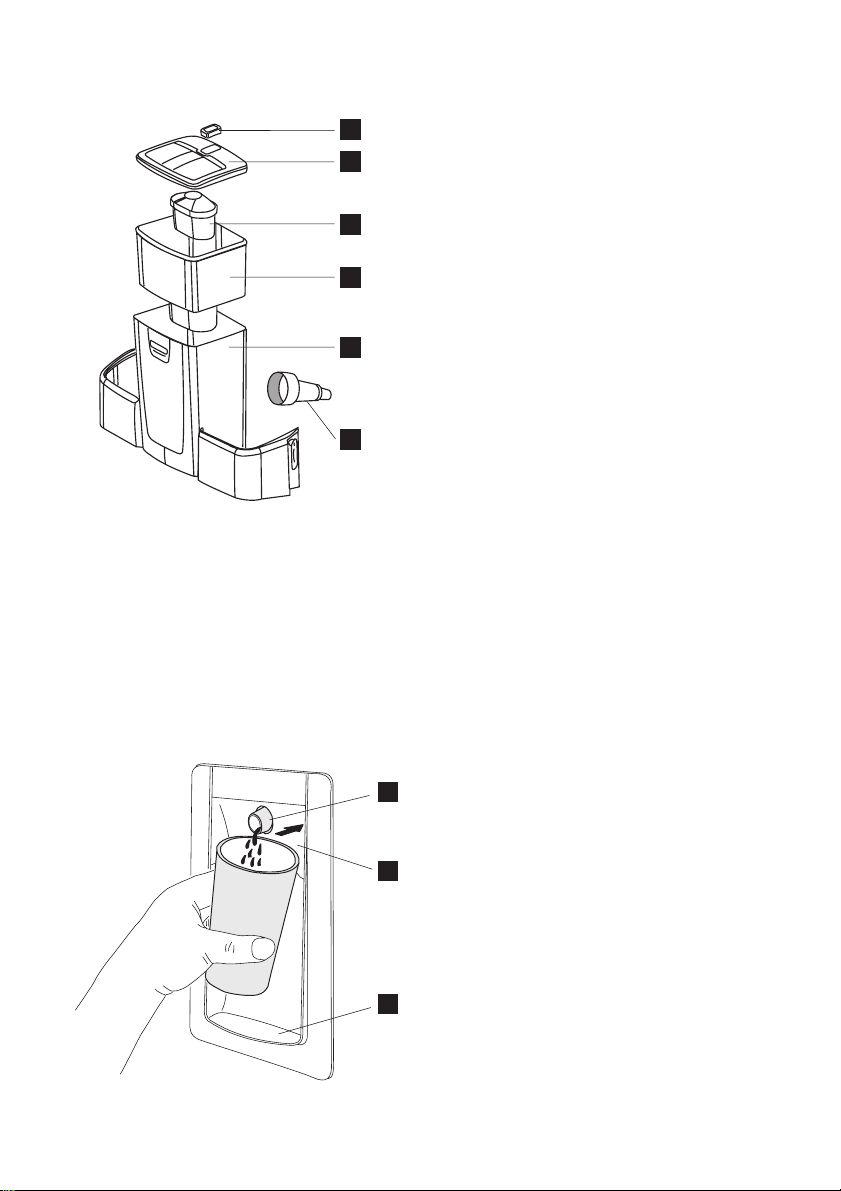
Internal components:
Page 9
6
3
5
2
1
4
1 Water tank
2 Funnel
3 Tank lid
4Valve + gasket
5 Including BRITA MAXTRA filter
6 BRITA Memo - the electronic cartridge
exchange indicator
External components:
electrolux 9
2 Water lever
3 Water drop tray
Initial operations to use your water
dispenser
1. Remove every tape and other protection
system from the tank assembly
2. clean the components, as described into
"Water dispenser cleaning procedure", in
order to remove eventual residue.
Water dispenser cleaning procedure
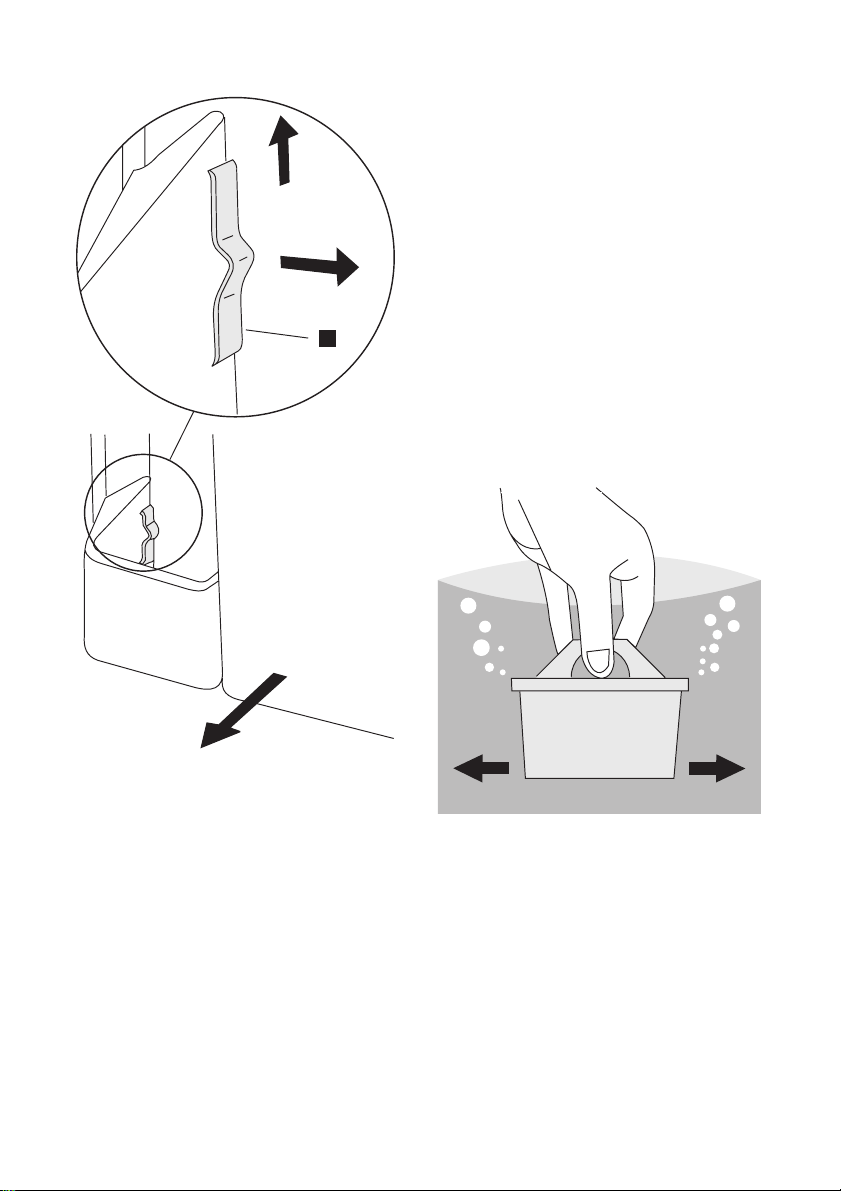
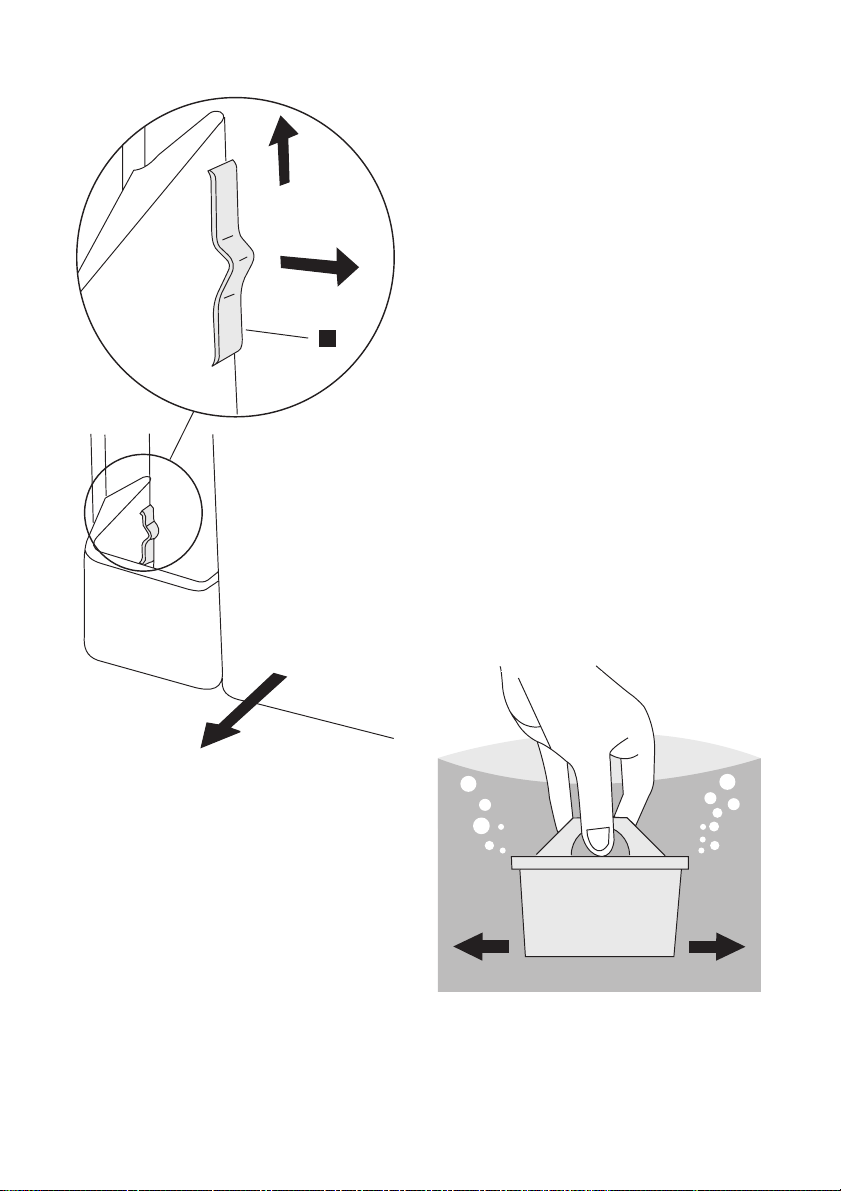
1. Unblock the two stopping elements on
the sides of the tank as shown in the pictures:
– take out the BRITA MAXTRA cartridge
from the water filter unit
– press the stopping elements in the
middle and move it up
– move the stopper into direction of the
central tank.
2. Push up the tank along the direction of
the valve.
3. Remove the lid and the funnel.
1Dispenser
1
2
3
Page 10
10 electrolux
8. Put the assembled tank on the door
along the valve direction.
9. Block the stopping elements in the in-
verse order of unblock.
10. Insert again the BRITA MAXTRA car-
tridge in the funnel .
How to use the BRITA MAXTRA filter
cartridge
Step 1: Preparing the cartridge
To prepare your BRITA filter cartridge, please
remove the protective wrapper (note: cartridge and inside wrapper may appear moist,
A
this is simply condensation).
Immerse the cartridge in cold water and
shake it gently to remove any air bubbles.
The filter now is ready to use.
As required for some other water filter cartridges, there is no need to pre-soak the new
Maxtra Cartridge.
4. Unscrew the valve in counter clockwise
(pay particular attention not to lose the
Valve Gasket because is necessary to a
correct functioning of the features ).
5. Clean the tank lid, the valve and the gasket with a solution of warm water and
neutral soap. Rinse it and put it inside the
door hole during the cleaning of the other
components (in order to avoid cold air
leakage from the fridge).
6. Clean the tank and the funnel into the
dishwasher or with a solution of warm
water and neutral soap and rinse them.
7. After the tank components cleaning take
back the valve from the fridge door and
assembly the tank in the inverse order
(4;3;2;1) of disassembly (pay attention at
the valve gasket positioning ).
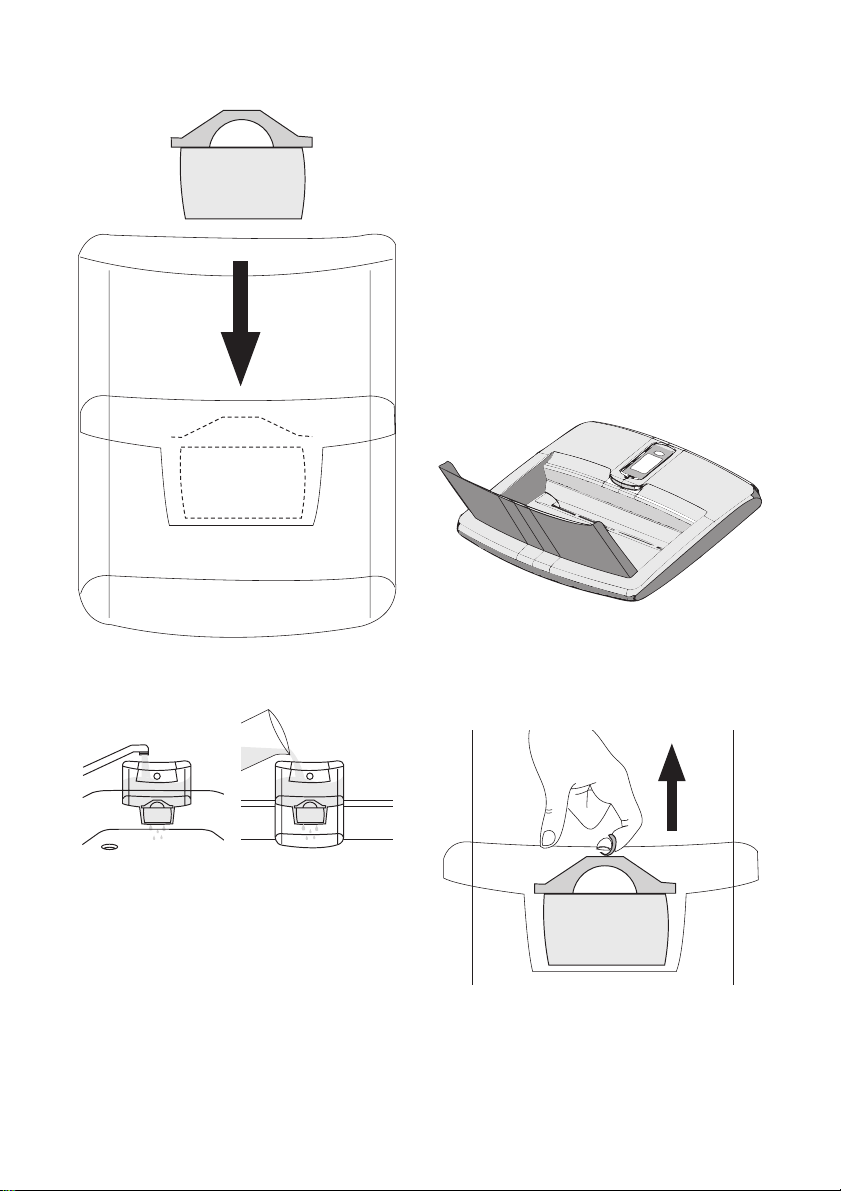
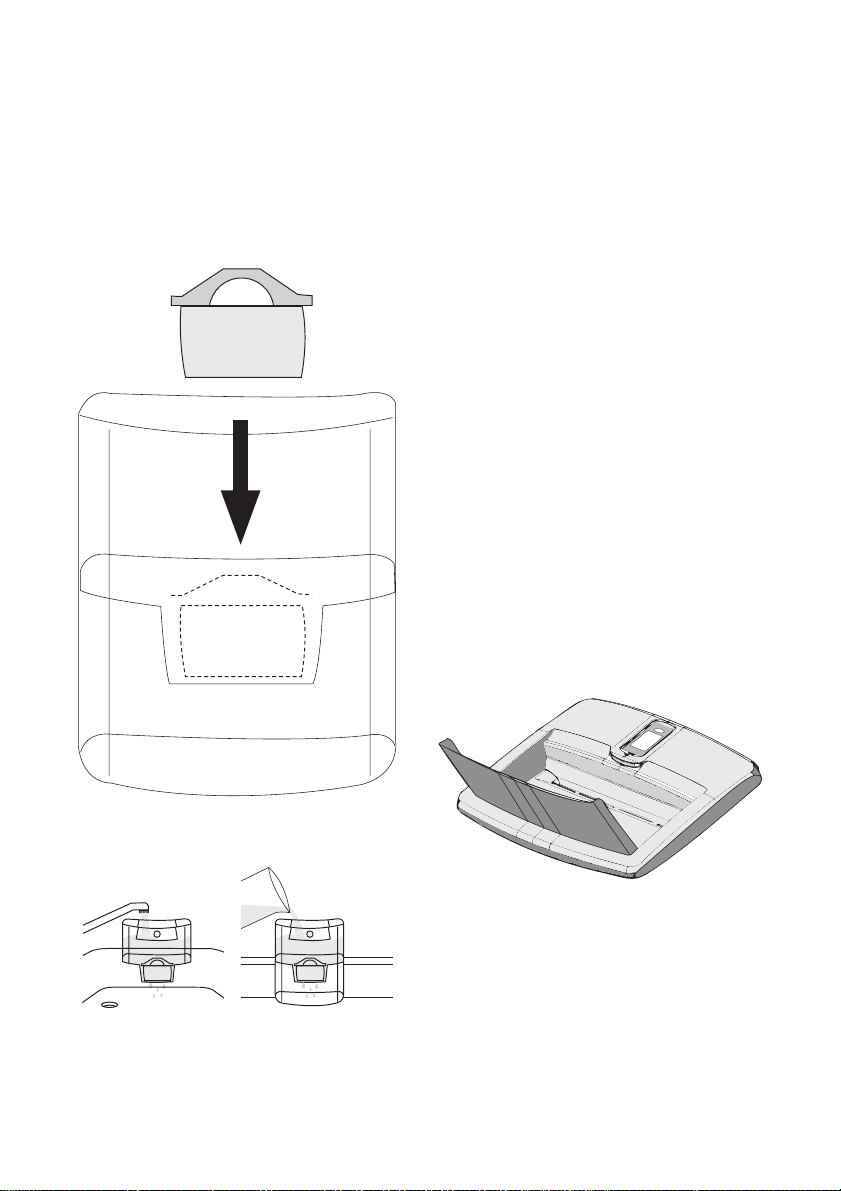
Step 2: Insert in the water tank
Remove the tank lid. Before inserting the cartridge, remove the funnel and clean it thoroughly by rising it and wiping it dry.
Then, thoroughly clean the inside of the water
tank with a dump cloth and wipe it dry as
well.
Place the cartridge into the filter tank and
push downwards until it 'clicks' firmly into
place.
The cartridge should stay in place if the funnel
is turned upside down.
Page 11
electrolux 11
To fill the tank with cold water, simply open
the flip top lid, take a jug of tap water and
pour it inside the tank through the cover as
shown into the picture (use the lid every time
that you want to fill your water).
Important! In order to avoid risk of spillage
of water during closing and opening of the
refrigerator door, we recommend to not fill
completely the water tank but leave a head
space of air (max. refilling limit till the frontal
marks).
If you have not used all filtered water in the
water tank within 1-2 days, please discard
any water left inside the BRITA water filter unit
before refilling it.
Step 3: Rinse the cartridge
2x 3x=ok
Take the funnel out of the BRITA water filter
unit, fill it under the tap with cold tap water
and allow it to filter through.
Discard the first two fillings into the sink.
These first two fillings are used to flush the
filter cartridge.
Then, place the funnel back into BRITA water
filter unit.
Place the cover back onto the jug and press
it carefully downwards to ensure it fits correctly into place.
Step 4: Refill the water tank
Allow the water to filter through and repeat
"Step 4" as many times as you want until the
BRITA water filter unit is filled up.
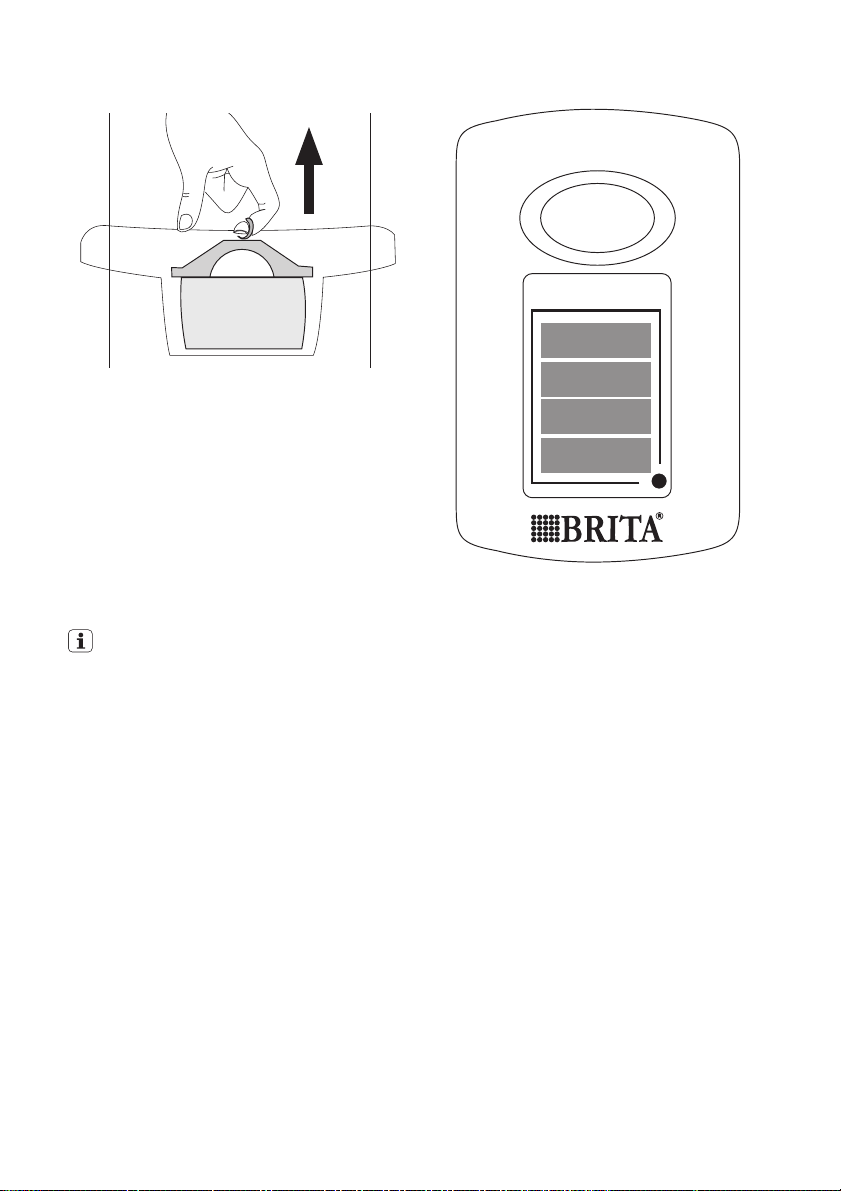
Remove cartridge with ring pull handle
To exchange the cartridge after four weeks,
simply use the ring pull handle on the top of
the cartridge to remove it from the funnel,
and repeat steps 1 - 3 above.
Page 12
12 electrolux
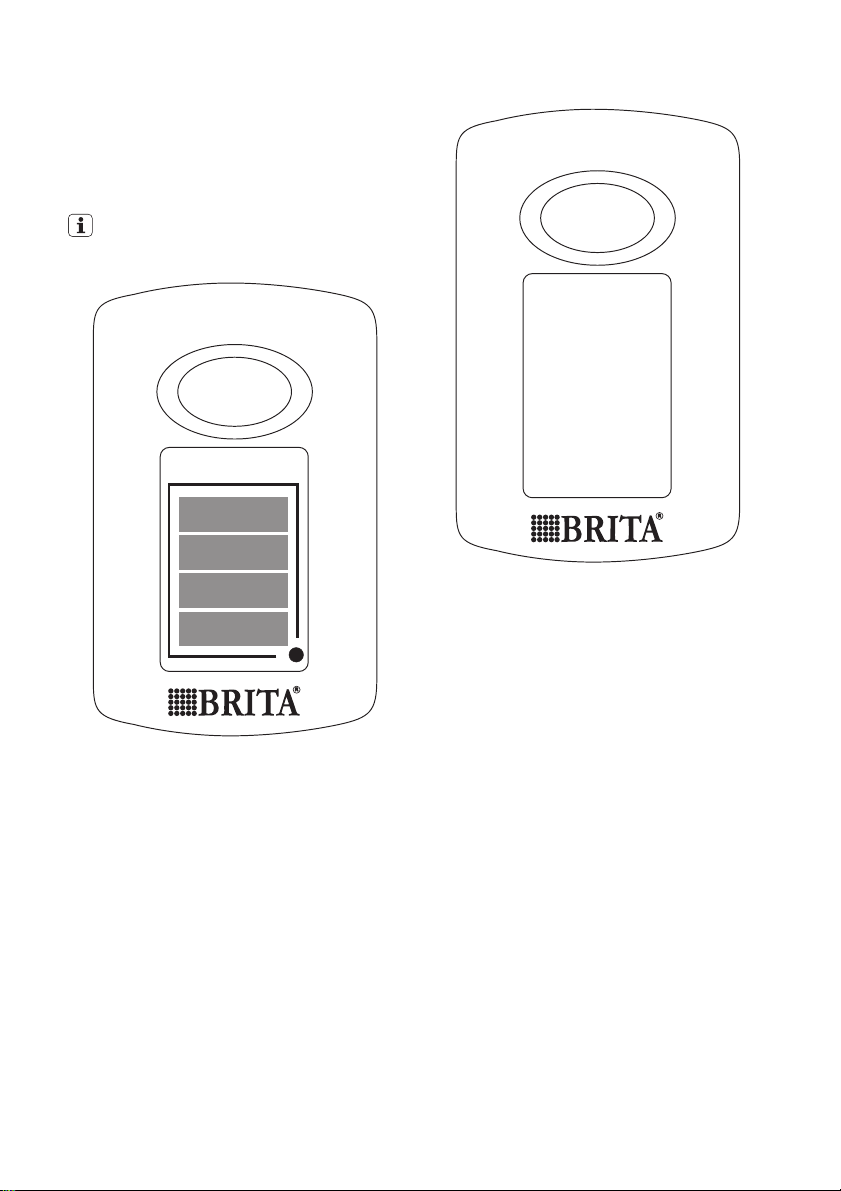
The BRITA Memo
For maximum filter performance and optimum taste, it is important to change your
BRITA cartridge regularly. BRITA recommends that you replace the cartridge in the
BRITA unit of your fridge every four weeks.
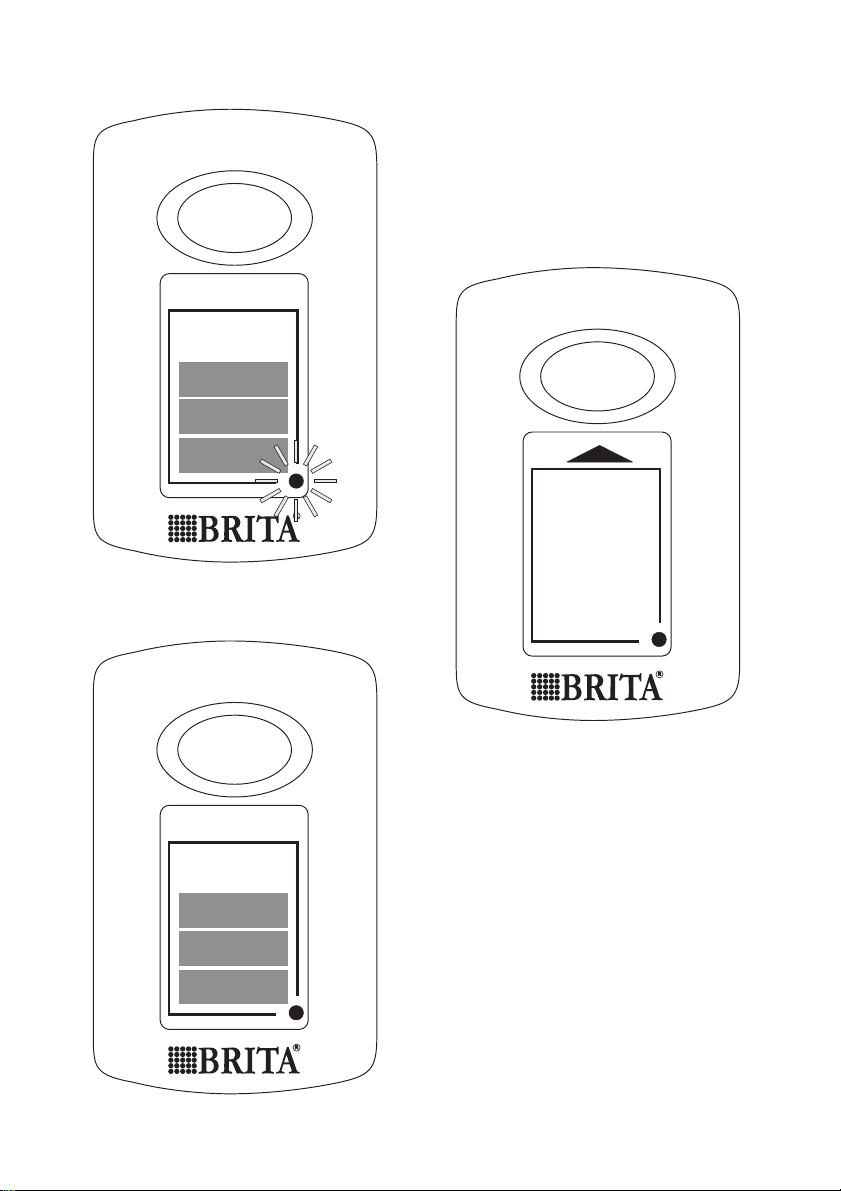
BRITA Memo automatically reminds you
when to change the cartridge.
START
%
100
START
%
100
75
50
25
The unique BRITA Memo measures the recommended time of use of your cartridge.
Memo is easy to use and automatically reminds your when to change your cartridge.
The BRITA Memo is located on the lid of the
water tank. Operation is really simple.
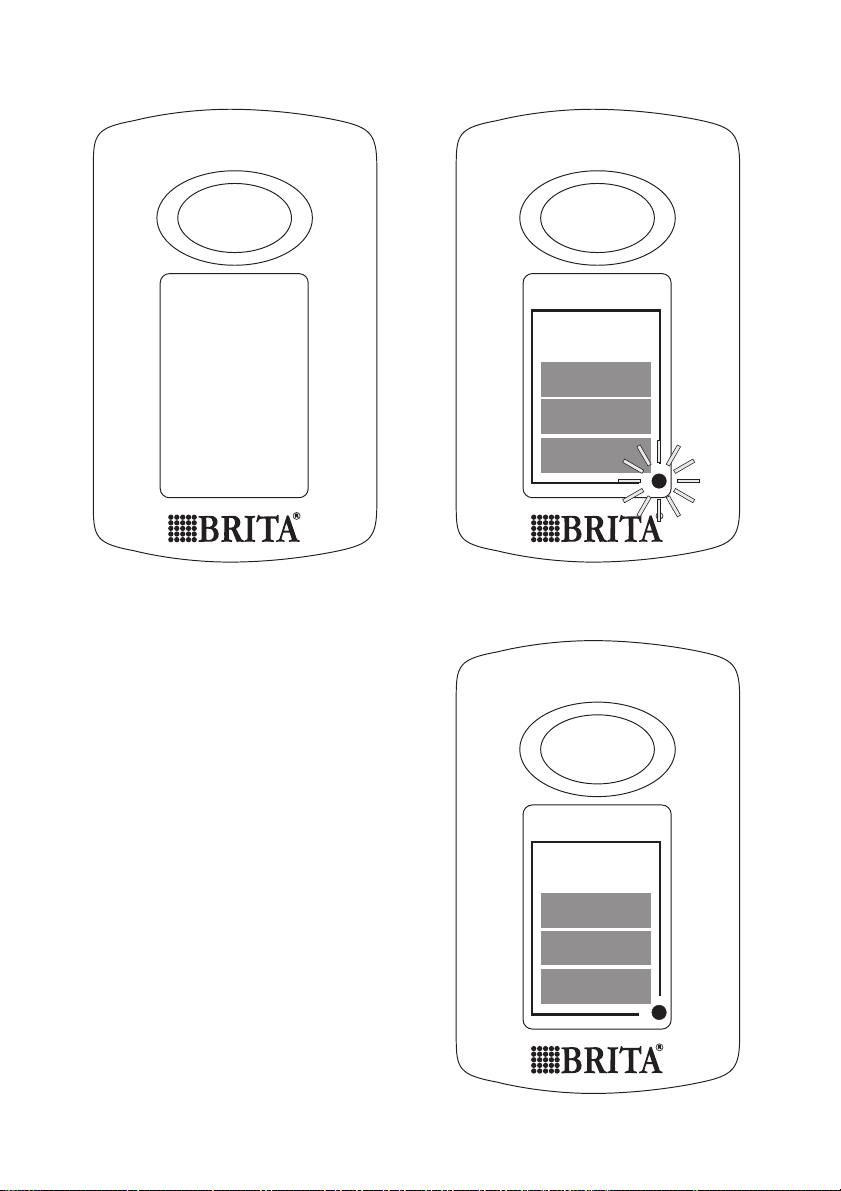
Start the Memo display
To start Memo please press and hold down
the start button on the lid until all four bars
appear in the display and flash twice. The
Memo is now set.
75
50
25
Functional control
The flashing dot in the bottom right corner of
the Memo indicates that the Memo is working.
Page 13
START
%
100
75
50
electrolux 13
Every week one bar will disappear to show
the remaining cartridge life. After four weeks
all four bars will disappear. This, and a flashing arrow, indicate that the cartridge should
now be changed.
Insert a new cartridge according to the instructions and reactivate the Memo as described above.
START
Change display
START
25
%
100
75
50
25
%
100
75
50
25
When only one bar is showing, you should
just check whether you have a new BRITA
MAXTRA filter cartridge to hand.
Important! The Memo is only designed to be
used with BRITA filter cartridges.
BRITA Memo: the electronic cartridge exchange indicator has a life of approximately
5 years. At the end of the Memo's life, please
remember that it is an electronic device and
to dispose on the Memo according to all applicable provisions and regulations.
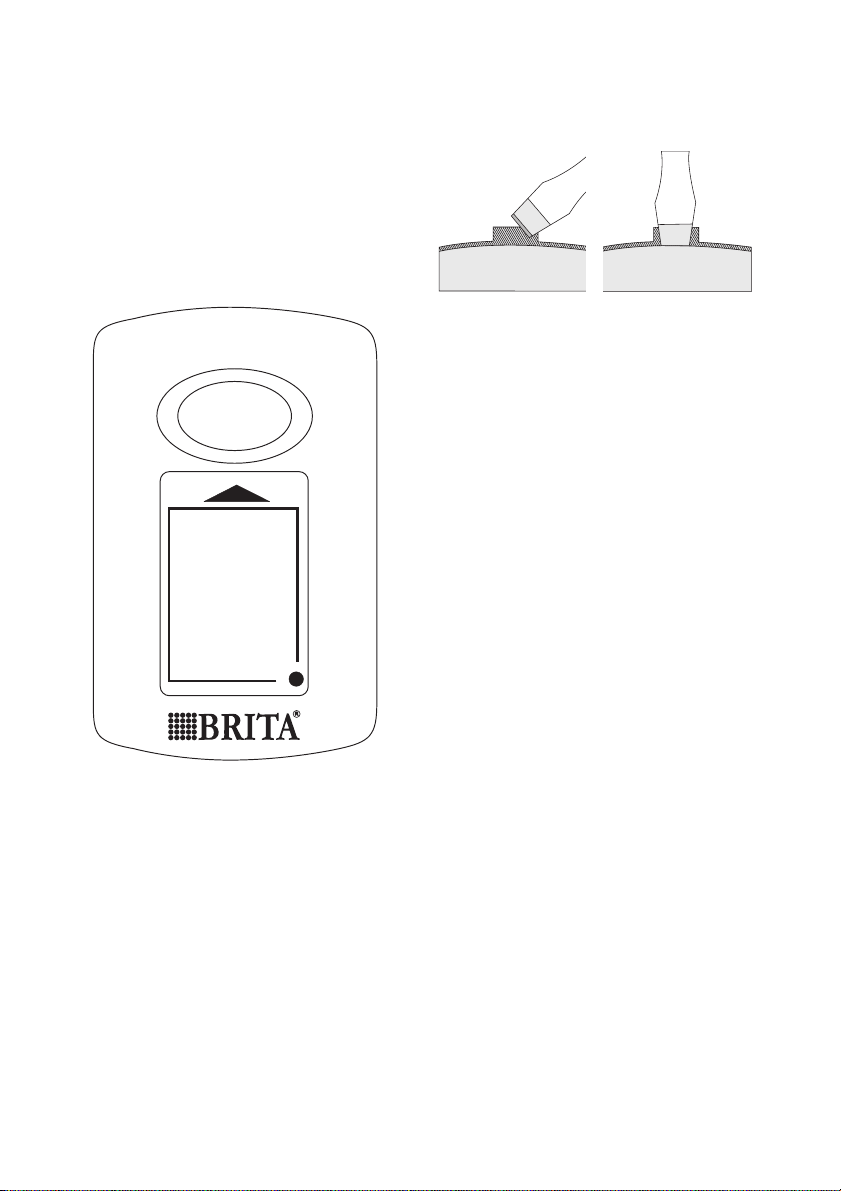
To remove the exhausted Memo place a
screwdriver in the notch next to the Memo
and push it out.
Please note that Memo should not be removed for any other reason than to dispose
of it.
Page 14
14 electrolux
Important information
• The fridge door valve hole must be closed
with the Water Valve during the regular
functioning of the appliance.
• Use only drinking water. The use of any
other drink type can leave residues, taste
or odor in the reservoir and in the tap.
• It is possible to hear some noises caused
by air entering when the water left the reservoir.
• In case the water does not flow well, press
the driving lever once again. Keep the
glass below the tap for some instants, in
order to assure that all the water is collected by the glass.
• Do not use gasified drinks, such as soft
drinks. The drink can leak due to the gas
pressure.
• Remember that water is a foodstuff.
Please consume filtered water within one
to two days.
• Should your BRITA water filter unit not be
in use for a prolonged period (e.g. vacation), we recommend that you discard any
water left inside the system and leave the
cartridge inside the filter tank.
Before using the system again take out the
cartridge and repeat steps 1 to 4 of "How
to use the BRITA MAXTRA filter cartridge".
• The BRITA water filter unit is designed for
use only with municipally treated tap water
(note: this water is constantly controlled
and according to legal regulations safe to
drink) or with water from private supplies
which has been tested safe to drink.
If an instruction is received from the authorities that mains water must be boiled,
the BRITA filtered water has also to be
boiled. When the instruction to boil water
is no longer in force, the entire filter system
must be cleaned and a new cartridge inserted.
More information on the use of BRITA filter
cartridges and the Memo can be found in the
BRITA information guide.
You can purchase new BRITA filter cartridges and Memo through consumer
service network of Electrolux or BRITA.
Care and cleaning
Caution! Unplug the appliance before
carrying out any maintenance operation.
This appliance contains hydrocarbons in
its cooling unit; maintenance and recharging must therefore only be carried
out by authorized technicians.
Periodic cleaning
The equipment has to be cleaned regularly:
• clean the inside and accessories with lukewarm water and some neutral soap.
• regularly check the door seals and wipe
clean to ensure they are clean and free
from debris.
• rinse and dry thoroughly.
Important! Do no t p ul l, m ov e o r d ama ge an y
pipes and/or cables inside the cabinet.
Never use detergents, abrasive powders,
highly perfumed cleaning products or wax
polishes to clean the interior as this will damage the surface and leave a strong odour.
Clean the condenser (black grill) and the
compressor at the back of the appliance with
a brush or a vacuum cleaner. This operation
will improve the performance of the appliance and save electricity consumption.
Important! Take care of not to damage the
cooling system.
Many proprietary kitchen surface cleaners
contain chemicals that can attack/damage
the plastics used in this appliance. For this
reason it is recommended that the outer casing of this appliance is only cleaned with
warm water with a little washing-up liquid
added.
After cleaning, reconnect the equipment to
the mains supply.
Defrosting of the refrigerator
Frost is automatically eliminated from the
evaporator of the refrigerator compartment
every time the motor compressor stops, dur-
Page 15
electrolux 15
ing normal use. The defrost water drains out
through a trough into a special container at
the back of the appliance, over the motor
compressor, where it evaporates.
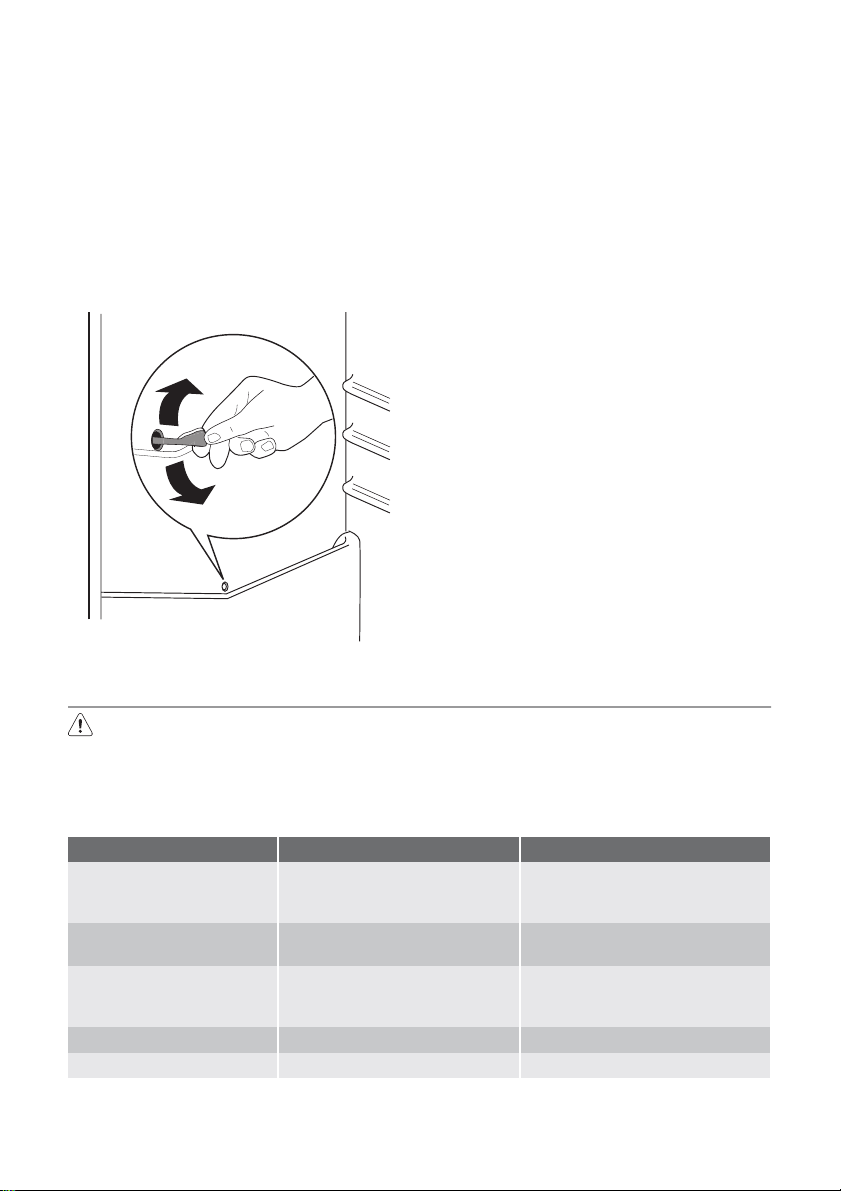
It is important to periodically clean the defrost
water drain hole in the middle of the refrigerator compartment channel to prevent the
water overflowing and dripping onto the food
inside. Use the special cleaner provided,
which you will find already inserted into the
drain hole.
Defrosting of the freezer
The freezer compartment of this model, on
the other hand, is a "no frost" type. This
means that there is no buildup of frost when
it is in operation, neither on the internal walls
nor on the foods.
The absence of frost is due to the continuous
circulation of cold air inside the compartment, driven by an automatically controlled
fan.
Periods of non-operation
When the appliance is not in use for long periods, take the following precautions:
• disconnect the appliance from elec-
tricity supply
• remove all food
defrost
4)
and clean the appliance and all
•
accessories
• leave the door/doors ajar to prevent unpleasant smells.
If the cabinet will be kept on, ask somebody
to check it once in a while to prevent the food
inside from spoiling in case of a power failure.
What to do if…
Warning! Before troubleshooting,
disconnect the mains plug from the
mains socket.
Only a qualified electrician or competent
person must do the troubleshooting that
is not in this manual.
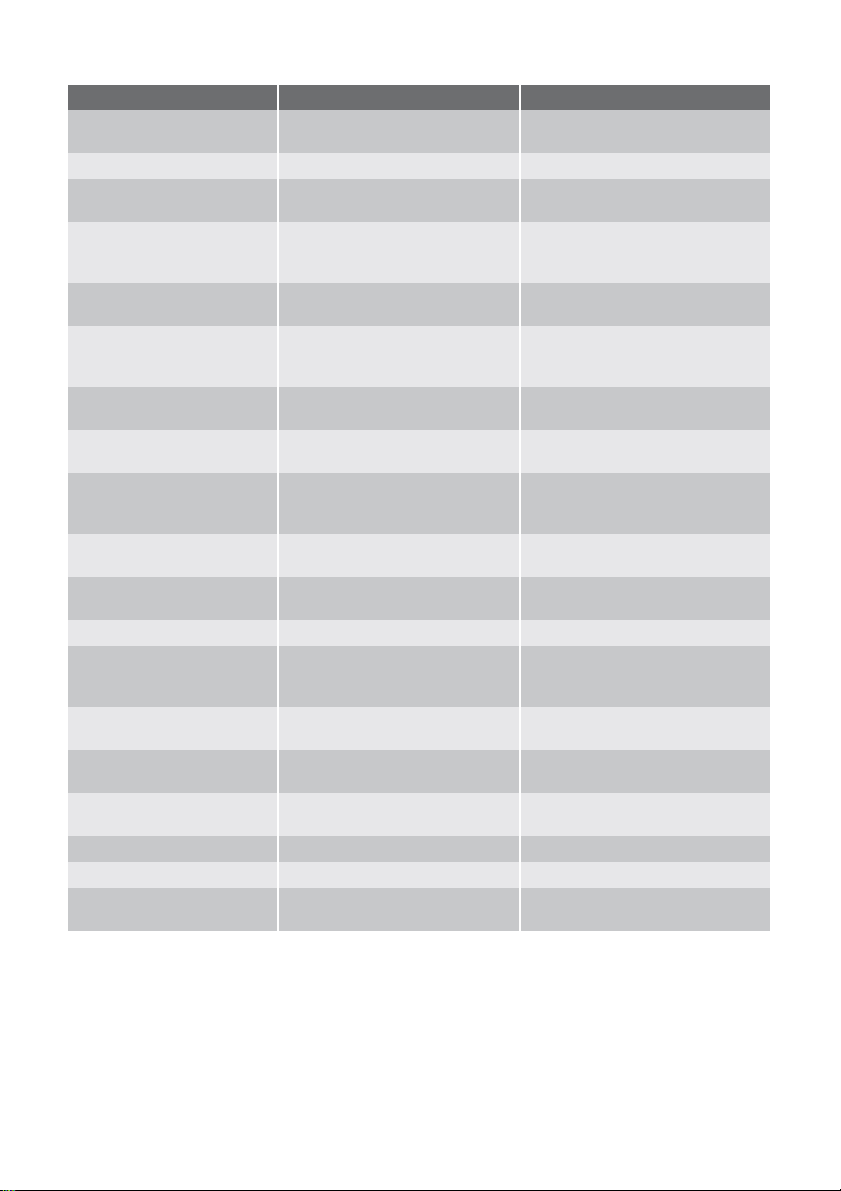
Problem Possible cause Solution
The appliance does not
operate. The lamp does
not operate.
The mains plug is not connected
The appliance has no power.
The lamp does not work.
The lamp is defective. Refer to "Replacing the lamp".
4) If foreseen.
The appliance is switched off. Switch on the appliance.
to the mains socket correctly.
There is no voltage in the mains
socket.
The lamp is in stand-by. Close and open the door.
Important! There are some sounds during
normal use (compressor, refrigerant
circulation).
Connect the mains plug to the
mains socket correctly.
Connect a different electrical appliance to the mains socket.
Contact a qualified electrician.
Page 16
16 electrolux
Problem Possible cause Solution
The compressor operates
continually.
The door is not closed correctly. Refer to "Closing the door".
The door has been opened too
The product temperature is too
The room temperature is too
Water flows on the rear
plate of the refrigerator.
Water flows into the refrigerator.
Products prevent that water flows
Water flows on the
ground.
The temperature in the
appliance is too low.
The temperature in the
appliance is too high.
The door is not closed correctly. Refer to "Closing the door".
The product temperature is too
Many products are stored at the
The temperature in the refrigerator is too high.
The temperature in the
freezer is too high.
There is too much frost.
The door is not closed correctly. Refer to "Closing the door".
The temperature regulator is not
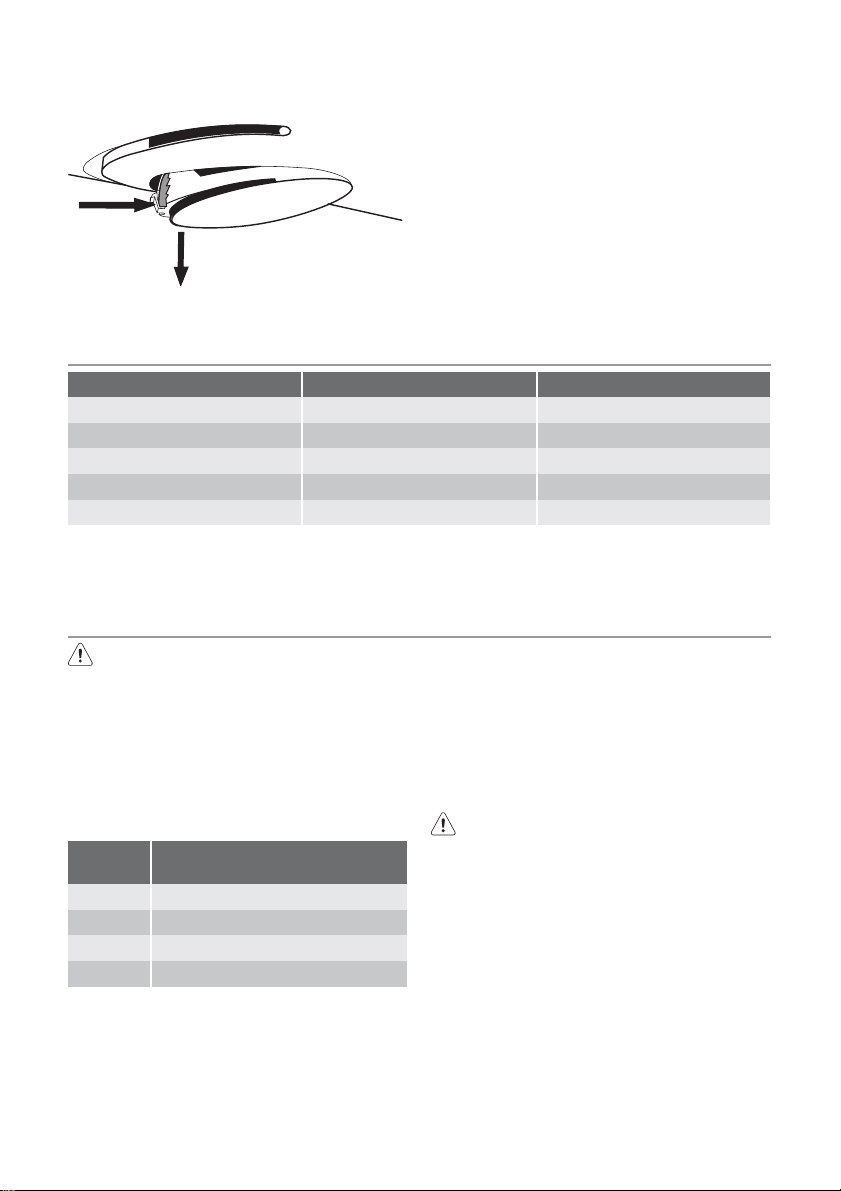
Replacing the lamp
1. Disconnect the plug from the mains
socket.
2. Press on the rear hook of the lamp cover
by a screwdriver and at the same time pull
The temperature is not set correctly.
frequently.
high.
high.
During the automatic defrosting
process, frost defrosts on the rear
plate.
The water outlet is clogged. Clean the water outlet.
into the water collector.
The melting water outlet does not
flow in the evaporative tray above
the compressor.
The temperature regulator is not
set correctly.
The temperature regulator is not
set correctly.
high.
same time.
There is no cold air circulation in
the appliance.
Products are too near to each
other.
Food is not wrapped correctly. Wrap the food correctly.
set correctly.
4. Install the lamp cover by fixing it into its
original position.
5. Connect the plug to the mains socket.
6. Open the door. Make sure that the light
comes on.
Set a higher temperature.
Do not keep the door open longer
than necessary.
Let the product temperature decrease to room temperature before
storage.
Decrease the room temperature.
This is correct.
Make sure that products do not
touch the rear plate.
Attach the melting water outlet to
the evaporative tray.
Set a higher temperature.
Set a lower temperature.
Let the product temperature decrease to room temperature before
storage.
Store less products at the same
time.
Make sure that there is cold air circulation in the appliance.
Store products so that there is cold
air circulation.
Set a higher temperature.
and rotate the cover in the direction of the
arrow.
3. Replace the lamp with one of the same
power (the maximum power is shown on
the lamp cover).
Page 17
Closing the door
1. Clean the door gaskets.
2. If necessary, adjust the door. Refer to "Installation".
3. If necessary, replace the defective door
A
max 25 W
gaskets. Contact the Service Center.
B
Technical data
Dimension of the recess
Height 1950 mm
Width 695 mm
Depth 669 mm
Rising Time 20 h
The technical information are situated in the
rating plate on the internal left side of the appliance and in the energy label.
electrolux 17
Installation
Read the "Safety Information" carefully
for your safety and correct operation of
the appliance before installing the
appliance.
Positioning
Install this appliance at a location where the
ambient temperature corresponds to the climate class indicated on the rating plate of the
appliance:
Climate
class
SN +10°C to + 32°C
N +16°C to + 32°C
ST +16°C to + 38°C
T +16°C to + 43°C
Location
The appliance should be installed well away
from sources of heat such as radiators, boilers, direct sunlight etc. Ensure that air can
circulate freely around the back of the cabinet. To ensure best performance, if the ap-
Ambient temperature
pliance is positioned below an overhanging
wall unit, the minimum distance between the
top of the cabinet and the wall unit must be
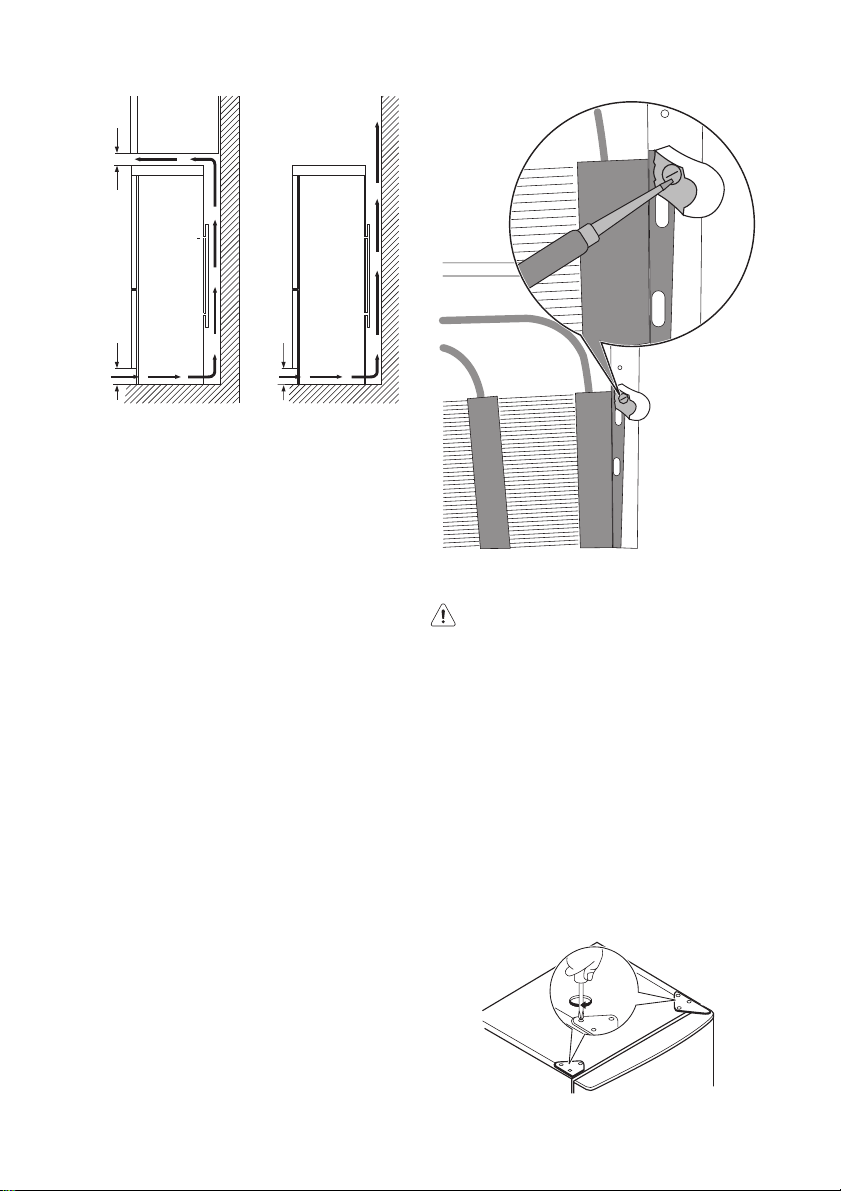
at least 100 mm . Ideally, however, the appliance should not be positioned below overhanging wall units. Accurate levelling is ensured by one or more adjustable feet at the
base of the cabinet.
Warning! It must be possible to
disconnect the appliance from the mains
power supply; the plug must therefore
be easily accessible after installation.
Page 18
18 electrolux
100 mm
AB
15 mm
15 mm
Electrical connection
Before plugging in, ensure that the voltage
and frequency shown on the rating plate correspond to your domestic power supply.
The appliance must be earthed. The power
supply cable plug is provided with a contact
for this purpose. If the domestic power supply socket is not earthed, connect the appliance to a separate earth in compliance with
current regulations, consulting a qualified
electrician.
The manufacturer declines all responsibility if
the above safety precautions are not observed.
This appliance complies with the E.E.C. Directives.
Rear spacers
Inside the appliance you find two
spacers which must be fitted as shown
in the figure.
Slacken the screws and insert the spacer
under the screw head, then retighten the
screws.
Door reversibility
Warning! Before carrying out any
operations, remove the plug from the
power socket.
Important! To carry out the following
operations, we suggest that this be made
with another person that will keep a firm hold
on the doors of the appliance during the
operations.
To change the opening direction of the door,
do these steps:
1. Remove the upper hinge taking care for
the upper door not to fall off and keep it
for future actions.
Page 19
electrolux 19
2. Remove the upper door.
3. Remove the upper support and mount it
in the opposite side.
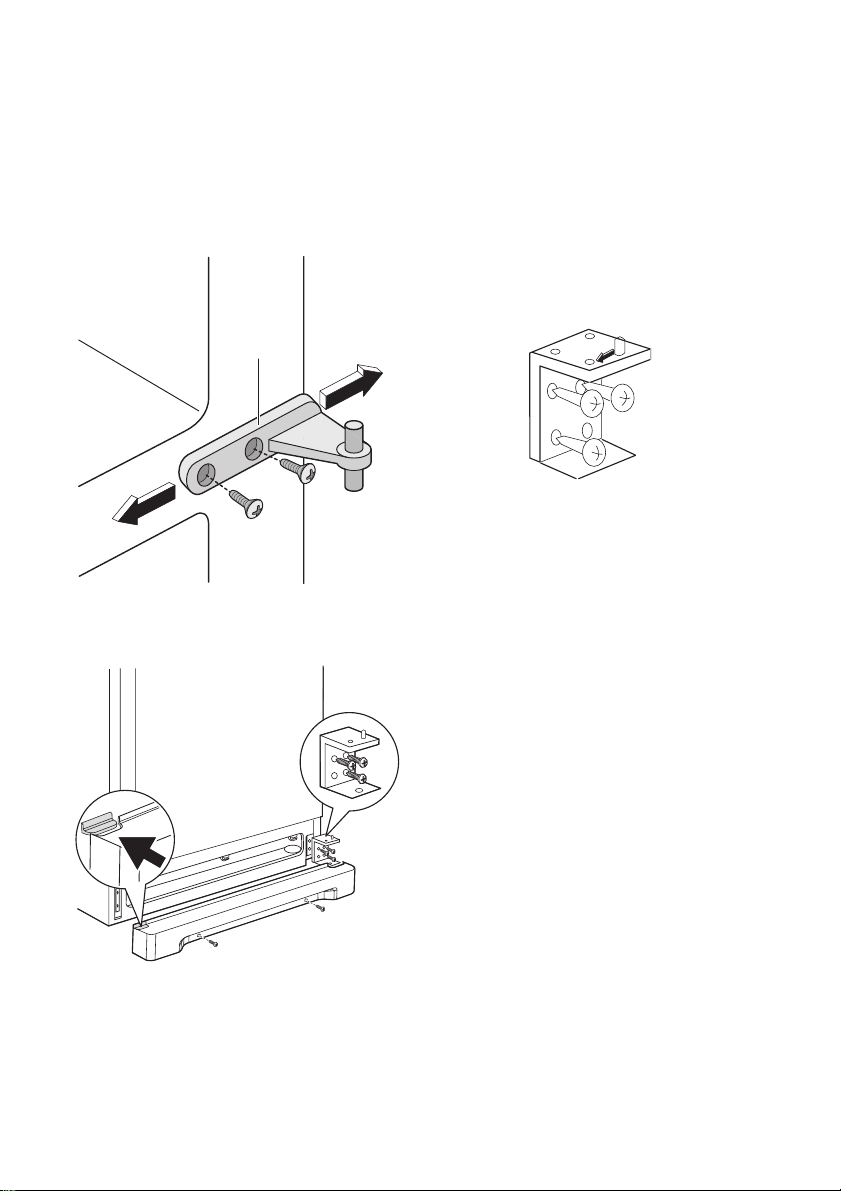
4. Unscrew the middle hinge (H). Unscrew
the plastic plugs located on the opposite
side of the central hinge and introduce
them in the holes occupied before by the
hinge.
H
5. Remove the lower door.
6. Pull off the ventilation grille which is fixed
by two screws.
10. Reassemble the lower hinge in the opposite side, using the screws previously
removed.
11. Carefully replace the appliance in its
working position and adjust the level of
the appliance by screwing / unscrewing
the adjustable feet at the bottom of the
cabinet using your fingers or a tool.
12. Slide the hole cover out of the ventilation
grille by pushing it in the direction of the
arrow and reassemble it on the opposite
side.
13. Refit the ventilation grille, fixing the
screws.
14. Reassemble the lower door.
15. Reassemble the middle hinge (H) in the
opposite side.
16. Reassemble the upper door.
17. In your documentation bag you will find
the upper hinge necessary to make the
reversibility. Please screw it in place.
7. Carefully place the appliance on its back,
totally unscrew the adjustable foot and
screw it in the opposite side.
8. Remove the bottom hinge by unscrewing its fixing screws.
9. Using a 12 mm spanner, unscrew the
hinge pin and reassemble it on the opposite side of the hinge.
Page 20
20 electrolux
Environmental concerns
The symbol on the product or on its
packaging indicates that this product may
not be treated as household waste. Instead
it should be taken to the appropriate
collection point for the recycling of electrical
and electronic equipment. By ensuring this
product is disposed of correctly, you will help
prevent potential negative consequences for
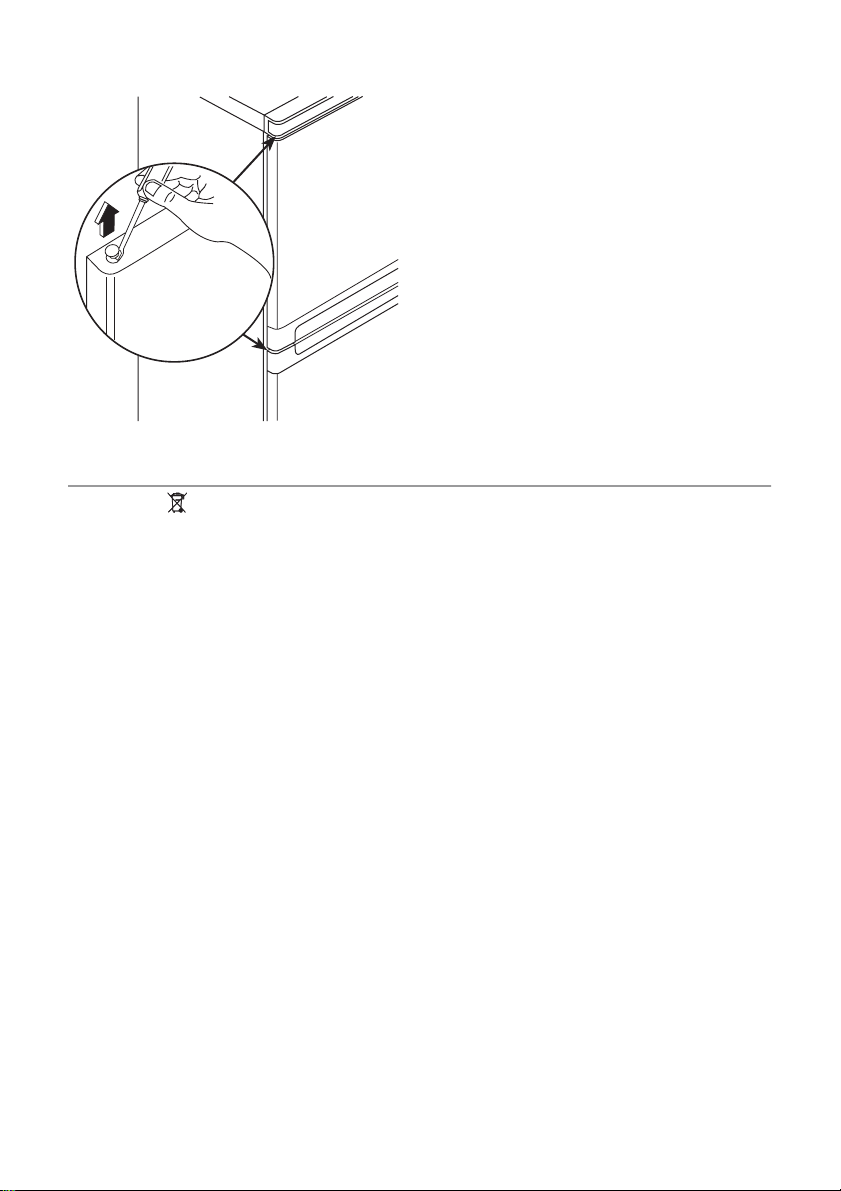
Do a final check to make sure that:
• All screws are tightened.
• The magnetic seal adheres to the cabinet.
• The door opens and closes correctly.
If the ambient temperature is cold (i.e. in Winter), the gasket may not fit perfectly to the
cabinet. In that case, wait for the natural fitting of the gasket.
In case you do not want to carry out the
above mentioned operations, contact the
nearest After Sales Service Force. The After
Sales Service specialist will carry out the reversibility of the doors at your cost.
the environment and human health, which
could otherwise be caused by inappropriate
waste handling of this product. For more
detailed information about recycling of this
product, please contact your local council,
your household waste disposal service or the
shop where you purchased the product.
Page 21
Electrolux. Thinking of you.
Μοιραστείτε τη φιλοσοφία μας στο www.electrolux.com
Περιεχόμενα
Πληροφορίες ασφαλείας 21
Πίνακας χειριστηρίων 23
Πρώτη χρήση 24
Καθημερινή χρήση 24
Χρήσιμες συμβουλές 27
Τρόπος χρήσης του διανομέα νερού με
φύσιγγα φίλτρου BRITA MAXTRA 28
Υπόκειται αε αλλαγές χωρίς προειδποίηση
Φροντίδα και καθάρισμα 35
Τι να κάνετε αν... 36
Τεχνικά χαρακτηριστικά 38
Εγκατάσταση 38
Περιβαλλοντικά θέματα 41
Πληροφορίες ασφαλείας
Χά ρη της ασφάλ ειάς σας και για ν α εξ ασφα ‐
λιστεί η σωστή χρήση, πριν την εγκατάστα‐
ση κ αι την πρώτη χρήση τ ης συσ κευής , δια‐
βάστε προσεκτικά αυτό το εγχειρίδιο χρή‐
στη, συμπεριλαμβανομένων των συμβου‐
λών και των προειδοποιήσεών του. Για την
αποφυγή περιττών λαθών και ατυχημάτων,
είναι σημαντικό να εξασφαλίσετε ότι όλα τα
άτομα που χρησιμοποιούν τη συσκευή γνω‐
ρίζουν καλά τη λειτουργία της και τα χαρα‐
κτηριστικά ασφαλείας της. Φυλάξτε τις οδη‐
γίες αυτές και βεβαιωθείτε ότι παραμένουν
με τη συσκευή εάν μετακινηθεί ή πωληθεί,
έτσι ώστε οποιοσδήποτε τη χρησιμοποιήσει
κατά τη διάρκεια της ζωής της να είναι σω‐
στά ενημερωμένος για τη συσκευή και την
ασφάλεια.
Για την ασφάλεια της ζωής και της περιου‐
σίας, φυλάξτε τις προφυλάξεις αυτών των
οδηγιών χρήσης επειδή ο κατασκευαστής
δεν φέρει ευθύνη για ζημιές που θα προ‐
κληθούν από παραλείψεις.
Ασφάλεια παιδιών και ευπαθών ατόμων
• Η συσκ ευή αυ τή δεν προορ ί ζετα ι για χ ρή‐
ση από άτομα (συμπεριλαμβανομένων
των παιδιών) με μειωμένη σωματική ή
πνευματική ικανότητα ή έλλειψη εμπει‐
ρίας και γνώσης, εκτός και εάν επιβλέπο‐
νται ή έχουν λάβει οδηγίες σχετικά με τη
χρήση της συσκευής από άτομο υπεύθυ‐
νο για την ασφάλειά τους.
Τα παιδιά πρέπει να εποπτεύονται ώστε
να εξασφαλίζεται ότι δεν παίζουν με τη
συσκευή.
• Κρατήστε όλα τα υλικά της συσκευασίας
μακριά από τα παιδιά. Υπάρχει κίνδυνος
ασφυξίας.
• Εάν απορρίψετε τη συσκευή, βγάλτε το
φις του ηλεκτρικού καλωδίου από την
πρίζα, κόψτε το καλώδιο σύνδεσης (όσο
μπορείτε πιο κοντά στη συσκευή) και
αφαιρέστε την πόρτα για να την αποφυγή
ηλεκτροπληξίας ή παγίδευσης μέσα στη
συσκευή παιδιών που παίζουν.
• Εάν η συσκευή, η οποία διαθέτει μαγνη‐
τικά λάστιχα πόρτας, θα αντικαταστήσει
μια παλαιότερη συσκευή με μάνδαλο
στην πόρτα ή το καπάκι, μην παραλείψετε
να καταστρέψετε το μάνδαλο προτού
απορρίψετε την παλαιά συσκευή. Με αυ‐
τό τον τρόπο θα αποτρέψετε τη μετατρο‐
πή του ψυγείου σε θανάσιμη παγίδα για
παιδιά.
Γενική ασφάλεια
ΠΡΟΣΟΧΗ Μη φράζετε τα ανοίγματα
εξαερισμού.
• Η συσκευή προορίζεται για τη φύλαξη
τροφίμων ή/και αναψυκτικών σε ένα συν‐
ηθισμένο νοικοκυριό όπως εξηγείται σε
αυτό το εγχειρίδιο οδηγιών.
• Μη χρησιμοποιείτε μηχανικές συσκευές ή
άλλα τεχνητά μέσα για την επιτάχυνση
της διαδικασίας ξεπαγώματος.
• Μη χρησιμοποιείτε άλλες ηλεκτρικές συ‐
σκευές (όπως παγωτομηχανές) στο εσω‐
τερικό ψυκτικών συσκευών, εκτός αν είναι
electrolux 21
Page 22
22 electrolux
εγκεκριμένες για το σκοπό αυτό από τον
κατασκευαστή.
• Μην προκαλείτε ζημιά στο ψυκτικό υγρό.
• Το ψυκτικό ισοβουτάνιο (R600a) που πε‐
ριέχεται στο κύκλωμα του ψυκτικού
υγρού της συσκευής, είναι ένα φυσικό αέ‐
ριο με υψηλό επίπεδο περιβαλλοντικής
συμβατότητας, το οποίο ωστόσο είναι εύ‐
φλεκτο.
Κατά τη μεταφορά και εγκατάσταση της
συσκευής, βεβαιωθείτε ότι δεν προκαλεί‐
ται ζημιά σε κανένα εξάρτημα του κυκλώ‐
ματος του ψυκτικού υγρού.
Εάν προκληθεί ζημιά στο κύκλωμα του
ψυκτικού υγρού:
– αποφύγετε τις γυμνές φλόγες και τις
πηγές ανάφλεξης
– εξαερίστε καλά το χώρο στον οποίο
βρίσκεται η συσκευή
• Η οποιαδήποτε αλλαγή των τεχνικών χα‐
ρακτηριστικών ή τροποποίηση αυτού του
προϊόντος είναι επικίνδυνη. Εάν το καλώ‐
διο υποστεί οποιαδήποτε ζημιά, μπορεί
να προκληθεί βραχυκύκλωμα, πυρκαγιά
ή/και ηλεκτροπληξία.
ΠΡΟΕΙΔΟΠΟΙΗΣΗ Κάθε ηλεκτρικό
εξάρτημα (ηλεκτρικό καλώδιο, φις, συ‐
μπιεστής) πρέπει να αντικατασταθεί
από πιστοποιημένο αντιπρόσωπο σέρ‐
βις ή από καταρτισμένο προσωπικό
σέρβις.
1. Το ηλεκτρικό καλώδιο δεν είναι δυνα‐
τό να επιμηκυνθεί.
2. Προσέξτε να μη συνθλιφτεί ή να μην
υποστεί ζημιά το φις τροφοδοσίας
από την πλάτη της συσκευής. Το φις
του ηλεκτρικού καλωδίου που έχει
συνθλιφτεί ή υποστεί ζημιά ενδέχεται
να υπερθερμανθεί και να προκαλέσει
πυρκαγιά.
3. Βεβαιωθείτε ότι μπορείτε να φθάσετε
το φις τροφοδοσίας της συσκευής.
4. Μην τραβάτε το φις τροφοδοσίας.
5. Εάν η ηλεκτρική πρίζα είναι χαλαρή,
μην εισαγάγετε το φις. Υπάρχει κίνδυ‐
νος ηλεκτροπληξίας ή πρόκλησης
πυρκαγιάς.
6. Η συσκευή δεν πρέπει να χρησιμο‐
ποιείται χωρίς το κάλυμμα του λαμ‐
5)
πτήρα
5) Εάν προβλέπεται κάλυμμα λαμπτήρα
6) Αν η συσκευή δεν συγκεντρώνει πάγο
του εσωτερικού φωτός.
• Η συσκευή είναι βαριά. Θα πρέπει να δί‐
νετε προσοχή κατά τη μεταφορά της.
• Μην αφαιρείτε και μην αγγίζετε αντικείμε‐
να στο θάλαμο της κατάψυξης αν τα χέρια
σας είναι νωπά/βρεγμένα επειδή μπορεί
να προκληθούν εκδορές στο δέρμα ή
κρυοπαγήματα.
• Αποφύγετε την παρατεταμένη έκθεση της
συσκευής στο απευθείας ηλιακό φως.
Καθημερινή χρήση
• Μην τοποθετείτε ζεστές κατσαρόλες στα
πλαστικά μέρη της συσκευής.
• Μην φυλάσσετε εύφλεκτα αέρια και υγρά
στη συσκευή επειδή μπορεί να εκραγούν.
• Μην τοποθετείτε τρόφιμα απευθείας πά‐
νω στην έξοδο αέρα στο πίσω τοίχωμα.
6)
• Τα κατεψυγμένα τρόφιμα δεν πρέπει να
καταψύχονται και πάλι αφού αποψυ‐
χθούν.
• Αποθηκεύετε τα προσυσκευασμένα κατε‐
ψυγμένα τρόφιμα σύμφωνα με τις οδηγίες
του κατασκευαστή για κατεψυγμένα τρό‐
φιμα.
• Θα πρέπει να τηρούνται αυστηρά οι συ‐
στάσεις αποθήκευσης των παρασκευα‐
στών της συσκευής. Ανατρέξτε στις σχε‐
τικές οδηγίες.
• Μην τοποθετείτε ανθρακούχα ποτά στον
καταψύκτη εφόσον δημιουργείται πίεση
στο δοχείο, το οποίο μπορεί να εκραγεί,
προκαλώντας ζημιές στη συσκευή.
• Τα παγωτά τύπου ξυλάκι γρανίτα μπορεί
να προκαλέσουν εγκαύματα από πάγο
εάν καταναλωθούν απευθεί ας α πό τη συ‐
σκευή.
Φροντίδα και καθαρισμός
• Πριν από τη συντήρηση, απενεργοποιή‐
στε τη συσκευή και αποσυνδέστε το φις
τροφοδοσίας από την πρίζα. Εάν δεν
μπορείτε να πλησιάσετε την πρίζα, δια‐
κόψτε την παροχή ρεύματος.
• Μην καθαρίζετε τη συσκευή με μεταλλικά
αντικείμενα.
• Μη χρησιμοποιείτε αιχμηρά αντικείμενα
για να αφαιρείτε τον πάγο από τη συ‐
σκευή. Χρησιμοποιείτε πλαστική ξύστρα.
• Ελέγχετε τακτικά την αποστράγγιση του
ψυγείου για νερό απόψυξης. Εάν χρεια‐
στεί, καθαρίστε την αποστράγγιση. Εάν η
αποστράγγιση είναι φραγμένη, θα συσ‐
Page 23
electrolux 23
σωρεύεται νερό στο κάτω μέρος της συ‐
σκευής.
Εγκατάσταση
ΣΗΜΑΝΤΙΚΟ Για τη σύνδεση του
ηλεκτρικού ακολουθήστε προσεκτικά τις
οδηγίες που δίνονται στις αντίστοιχες
παραγράφους.
• Αποσυσκευάστε τη συσκευή και ελέγξτε
αν έχει υποστεί ζημιές. Μη συνδέετε τη
συσκευή εάν έχει υποστεί ζημιά. Αναφέ‐
ρετε αμέσως ενδεχόμενες ζημιές στο μέ‐
ρος όπου αγοράσατε τη συσκευή. Σε αυ‐
τή την περίπτωση, φυλάξτε τη συσκευα‐
σία.
• Είναι σκόπιμο να περιμένετε τουλάχιστον
δύο ώρες προτού συνδέσετε τη συσκευή,
ώστε το έλαιο να επιστρέψει και πάλι στο
συμπιεστή.
• Θα πρέπει να υπάρχει επαρκή κυκλοφο‐
ρία του αέρα γύρω από τη συσκευή. Δια‐
φορετικά θα προκληθεί υπερθέρμανση.
Για την επίτευξη επαρκούς κυκλοφορίας
αέρα ακολουθήστε τις σχετικές οδηγίες
της εγκατάστασης.
• Όποτε είναι δυνατό, η πλάτη της συ‐
σκευής πρέπει να βρίσκεται κοντά σε τοί‐
χο για την αποφυγή επαφής ή πιασίματος
με ζεστά μέρη (συμπιεστής, συμπυκνω‐
τής) και της πιθανότητας εγκαύματος.
• Η συσκευή δεν πρέπει να τοποθετείται
κοντά σε σώματα καλοριφέρ ή φούρνους.
• Βεβαιωθείτε ότι υπάρχει εύκολη πρόσβα‐
ση στο φις τροφοδοσίας μετά την εγκατά‐
σταση της συσκευής.
• Συνδέετε τη συσκευή μόνο με την παροχή
πόσιμου νερού.
7)
Σέρβις
• Οι ηλεκτρολογικές εργασίες που απαιτού‐
νται για το σέρβις της συσκευής θα πρέ‐
πει να εκτελούνται από επαγγελματία
ηλεκτρολόγο ή άλλο κατάλληλα καταρτι‐
σμένο άτομο.
• Το προϊόν αυτό θα πρέπει να επισκευά‐
ζεται από εξουσιοδοτημένα Κέντρα Σέρ‐
βις, ενώ θα πρέπει να χρησιμοποιούνται
μόνο γνήσια ανταλλακτικά.
Προστασία του περιβάλλοντος
Η συσκευή αυτή δεν περιέχει αέρια τα
οποία μπορούν να προκαλέσουν ζημιά
στο στρώμα του όζοντος, είτε στο κύ‐
κλωμα ψυκτικού υγρού ή στα μονωτικά
υλικά της. Η συσκευή δε θα πρέπει να
απορρίπτεται μαζί με τα οικιακά απορ‐
ρίμματα. Ο αφρός μόνωσης περιέχει
εύφλεκτα αέρια: Η συσκευή θα πρέπει
να απορρίπτεται σύμφωνα με τους
ισχύοντες κανονισμούς που θα λάβετε
από τις τοπικές αρχές. Αποφύγετε να
προκαλέσετε ζημιά στην ψυκτική μονά‐
δα, ειδικά στο πίσω μέρος κοντά στον
εναλλάκτη θερμότητας. Τα υλικά που
χρησιμοποιούνται σε αυτή τη συσκευή
και σημειώνονται με το σύμβολο
εί‐
ναι ανακυκλώσιμα.
Πίνακας χειριστηρίων
+2 +4 +5 +6 +8
1 2
1 Ρυθμιστής θερμοκρασίας
Πλήκτρο Action Freeze
2 Ένδειξη Action Freeze
7) Εάν προβλέπεται σύνδεση νερού
Ενεργοποίηση
Αφαιρέστε, εφόσον υπάρχει, την ετικέτα
αφαίρεσης, που είναι κολλημένη στο εσω‐
τερικό του θαλάμου κατάψυξης.
Συνδέστε το φις στην πρίζα τοίχου.
Page 24
24 electrolux
Απενεργοποίηση
Για να απενεργοποιήσετε τη συσκευή, απο‐
συνδέστε το φις από την πρίζα.
Ρύθμιση θερμοκρασίας
Η θερμοκρασία ρυθμίζεται αυτόματα.
Για να χρησιμοποιήσετε τη συσκευή, ακο‐
λουθήστε την παρακάτω διαδικασία:
• Κρατήστε πιεσμένο το ρυθμιστή θερμο‐
κρασίας ώσπου να ανάψει η λυχνία LED
που αντιστοιχεί στην απαιτούμενη θερμο‐
κρασία. Η επιλογή είναι προοδευτική και
κυμα ίνεται από +2 °C έως +8°C. Η θερ μο‐
κρασία που υποδεικνύεται από τη λυ‐
χνία LED επιλέγεται κάθε φορά που πιέ‐
ζεται το πλήκτρο.
Πιο κατάλληλη είναι συνήθως μια με‐
σαία ρύθμιση.
Ωστόσο, η ακριβής ρύθμιση πρέπει να επι‐
λεγεί λαμβάνοντας υπόψη ότι η θερμοκρα‐
σία στο εσωτερικό της συσκευής εξαρτάται
από:
Πρώτη χρήση
Καθάρισμα του εσωτερικού
Προτού χρησιμοποιήσετε τη συσκευή για
πρώτη φορά, πλύντε το εσωτερικό και όλα
τα εσωτερικά εξαρτήματα με χλιαρό νερό και
λίγο ουδέτερο σαπούνι για να αφαιρέσετε
την τυπική μυρωδιά των καινούριων προϊό‐
ντων και στη συνέχεια στεγνώστε καλά.
• τη θερμοκρασία δωματίου,
• πόσο συχνά ανοίγει η πόρτα,
• την ποσότητα των τροφίμων που αποθη‐
κεύονται,
• τη θέση της συσκευής.
ΣΗΜΑΝΤΙΚΟ Αν η θερμοκρασία
περιβάλλοντος είναι χαμη λότε ρη από 16 °C,
πιέστε το ρυθμιστή θερμοκρασίας ώσπου
να ανάψει η λυχνία LED που αντιστοιχεί στη
χαμηλότερη θερμοκρασία.
Action Freeze Λειτουργία
Μπορείτε να ενεργοποιήσετε τη λειτουργία
Action Freeze πατώντας το πλήκτρο Action
Freeze αρκετές φορές μέχρι να ανάψει η
λυχνία LED που αντιστοιχεί στο σύμβολο
Action Freeze .
Για να απενεργοποιήσετε τη λειτουργία
Action Freeze, πατήστε αρκετές φορές το
πλήκτρο Action Freeze μέχρι να επιλεγεί η
απαιτούμενη θερμοκρασία.
ΣΗΜΑΝΤΙΚΟ Μη χρησιμοποιείτε απορρυ‐
παντικά ή σκόνες που χαράζουν διότι κατα‐
στρέφουν το φινίρισμα.
Καθημερινή χρήση
Μετακινούμενα ράφια
Τα τοιχώματα του ψυγείου είναι εφοδιασμέ‐
να με μια σειρά αυλακώσεων ώστε να είναι
δυνατή η κατ' επιλογή τοποθέτηση των ρα‐
φιών.
Page 25
electrolux 25
Σχάρα μπουκαλιών
Τοποθετήστε τα μπουκάλια (με το άνοιγμα
προς τα εμπρός) στο ήδη τοποθετημένο ρά‐
φι.
ΣΗΜΑΝΤΙΚΟ Αν το ράφι είναι
τοποθετημένο οριζόντια, τοποθετήστε μόνο
κλειστά μπουκάλια.
Το ράφι με τη σχάρα μπουκαλιών μπορεί να
πάρει κλίση για την αποθήκευση ανοιγμέ‐
νων μπουκαλιών. Για να κάνετε κάτι τέτοιο
τραβήξτε τη σχάρα μπουκαλιών προς τα
εμπρός μέχρι να μπορεί να περιστραφεί και
να τοποθετηθεί στο αμέσως υψηλότερο επί‐
πεδο.
Συρτάρι λαχανικών με έλεγχο υγρασίας
Το συρτάρι είναι κατάλληλο για την αποθή‐
κευση φρούτων και λαχανικών.
Στο εσωτερικό του
συρταριού υπάρχει
ένα διαχωριστικό
που μπορεί να τοπο‐
θετηθεί σε διάφορες
θέσεις ώστε να διαι‐
ρεί το χώρο του συρ‐
ταριού σύμφωνα με
τις εκάστοτε ανάγκες.
Στο κάτω μέρος του συρταριού υπάρχει μια
γρίλια (αν προβλέπεται) η οποία διαχωρίζει
τα φρούτα και τα λαχανικά από την υγρασία
που μπορεί να σχηματιστεί στην κάτω επι‐
φάνειά του.
Όλα τα εξαρτήματα στο εσωτερικό του συρ‐
ταριού μπορούν να αφαιρούνται για καθά‐
ρισμα
Για να ρυθμίσετε την
υγρασία στο συρτάρι
λαχανικών, το γυάλι‐
νο ράφι διαθέτει ένα
εξάρτημα με σχισμές
(ρυθμιζόμενες μέσω
ενός συρόμενου μο‐
χλού).
Όταν οι σχισμές
εξαερισμού είναι
κλειστές:
διατηρείται περισσότερο η συγκέντρωση
του τροφίμου σε φυσική υγρασία στους θα‐
λάμους φρούτων και λαχανικών.
Όταν οι σχισμές εξαερισμού είναι ανοικτές:
η μεγαλύτερη κυκλοφορία αέρα έχει ως
αποτέλεσμα χαμηλότερη συγκέντρωση
υγρασίας στον αέρα στους θαλάμους φρού‐
των και λαχανικών.
Τοποθέτηση των ραφιών της πόρτας
Για να είναι δυνατή η αποθήκευση συσκευα‐
σιών τροφίμων διαφόρων μεγεθών, τα ρά‐
φια της πόρτας μπορούν να τοποθετούνται
σε διαφορετικό ύψος.
Για να πραγματοποιήσετε αυτές τις προ‐
σαρμογές κάντε τα εξής:
Τραβήξτε σταδιακά το ράφι προς την κατεύ‐
θυνση των βελών μέχρι να απελευθερωθεί
και στη συνέχεια τοποθετήστε το ξανά όπως
θέλετε.
Page 26
26 electrolux
Ψύξη αέρα
Ο ανεμιστήρας της δυναμικής ψύξης αέρα
(DAC) κάνει δυνατή την ταχεία ψύξη των
τροφίμων και μια πιο ομοιόμορφη θερμο‐
κρασία μέσα στο θάλαμο.
Μπορείτε να ενεργοποιήσετε τον ανεμιστή‐
ρα αν πιέσετε το διακόπτη που απεικονίζε‐
ται στην εικόνα. Ανάβει το πράσινο φως.
στό δίσκο κάτω από χλιαρό νερό για λίγα
δευτερόλεπτα.
ΠΡΟΕΙΔΟΠΟΙΗΣΗ Μη χρησιμοποιείτε
μετα λλι κά αντικείμε να για την αφαίρεση
των δίσκων από τον καταψύκτη.
B
ΣΗΜΑΝΤΙΚΟ Ενεργοποιήστε τον
ανεμιστήρα όταν η θερμοκρασία
περιβάλλοντος υπερβαίνει τους 25°C.
Παγάκια
Η συσκευή αυτή είναι εξοπλισμένη με μία ή
περισσότερες θήκες για παγάκια.
Αυτές εισάγονται στα πλαϊνά του επάνω
συρταριού της κατάψυξης.
Τραβήξτε έξω το επάνω συρτάρι της κατά‐
ψυξης. Βγάλτε τη θήκη με τα παγάκια. Βγάλ‐
τε την τάπα. Γεμίστε με νερό έως την ένδει‐
ξη "MAX".
Τοποθετήστε ξανά την τάπα και εισάγετε το
δίσκο στο κατάλληλο μέρος.
Για να αφαιρέσετε τα παγάκια στρέψτε το
δίσκο με τις βελόνες προς το επάνω μέρος
και χτυπήστε σε μια σταθερή επιφάνεια.
Για να διευκολυνθεί η απελευθέρωση των
βελονών συστήνεται να κρατήσετε τον κλει‐
Ημερολόγιο κατάψυξης
Τα σύμβολα αναπαριστούν διαφορετικούς
τύπους κατεψυγμένων τροφίμων.
Οι αριθμοί υποδηλώνουν τους χρόνους
αποθήκευσης σε μήνες για τους ανάλογους
τύπους κατεψυγμένων τροφίμων. Κατά πό‐
σο ισχύει η ανώτερη ή η κατώτερη τιμή του
εμφανιζόμενου χρόνου αποθήκευσης εξαρ‐
τάται από την ποιότητα των τροφίμων και
την επεξεργασία τους πριν την κατάψυξή
τους.
Κατάψυξη φρέσκων τροφίμων
Ο θάλαμος του καταψύκτη είναι κατάλληλος
για την κατάψυξη φρέσκων τροφίμων και τη
Page 27

electrolux 27
μακροχρόνια αποθήκευση κατεψυγμένων
και βαθιά κατεψυγμένων τροφίμων.
Για να καταψύξετε φρέσκα τρόφιμα, ενερ‐
γοποιήστε τη λειτουργία Action Freeze του‐
λάχιστον 24 ώρες προτού τοποθετήσετε τα
τρόφιμα στο θάλαμο κατάψυξης.
Τοποθετήστε τα τρόφιμα προς κατάψυξη
στον κάτω θάλαμο.
Η μέγιστη ποσότητα τροφίμων που μπορεί
να καταψυχθεί σε 24 ώρες καθορίζεται στην
πινακίδα τεχνικών στοιχείων , μια ετικέτα
που βρίσκεται στο εσωτερικό της συσκευής.
Η διαδικασία κατάψυξης διαρκεί 24 ώρες:
κατά τη διάρκεια αυτής της περιόδου, μην
προσθέτετε άλλα τρόφιμα στον καταψύκτη.
Αποθήκευση κατεψυγμένων τροφίμων
Κατά την αρχική ενεργοποίηση ή μετά από
μια περίοδο μη λειτουργίας, προτού τοπο‐
θετήσετε τα προϊόντα στο θάλαμο, η συ‐
σκευή πρέπει να λειτουργήσει για τουλάχι‐
στον 2 ώρες σε υψηλότερες ρυθμίσεις.
Χρήσιμες συμβουλές
Συμβουλές εξοικονόμησης ενέργειας
• Μην ανοίγετε την πόρτα συχνά και μην
την αφήνετε ανοικτή για περισσότερο
από ότι είναι απολύτως απαραίτητο.
• Εάν η θερμοκρασία περιβάλλοντος είναι
υψηλή, ο ρυθμιστής θερμοκρασίας βρί‐
σκεται στην υψηλότερη ρύθμιση και η συ‐
σκευή είναι εντελώς φορτωμένη, ο συ‐
μπιεστής ίσως λειτουργεί συνεχώς δη‐
μιουργώντας πάγο στον εξατμιστήρα.
Εάν προκύψει αυτό, περιστρέψτε το ρυθ‐
μιστή θερμοκρασίας προς τις χαμηλότε‐
ρες ρυθμίσεις ώστε να είναι δυνατή η αυ‐
τόματη απόψυξη κι επομένως η εξοικο‐
νόμηση ηλεκτρικής ενέργειας.
Συμβουλές ψύξης φρέσκων τροφίμων
Για να έχετε τα καλύτερα αποτελέσματα:
• μην αποθηκεύετε στο ψυγείο ζεστά τρό‐
φιμα ή υγρά που εξατμίζονται
• μην καλύπτετε ή τυλίγετε τα τρόφιμα,
ιδιαίτερα εάν μυρίζουν έντονα
• τοποθετείτε τα τρόφιμα με τέτοιο τρόπο
ώστε ο αέρας να κυκλοφορεί ελεύθερα
γύρω τους
Συμβουλές ψύξης
Χρήσιμες συμβουλές:
ΣΗΜΑΝΤΙΚΟ Σε περίπτωση κατά λάθος
απόψυξης, για παράδειγμα σε περίπτωση
διακοπής ρεύματος, εάν το ρεύμα ήταν
κομμένο για περισσότερο από την τιμή που
αναγράφεται στον πίνακα τεχνικών
χαρακτηριστικών στην ενότητα "χρόνος
ανόδου", τα αποψυγμένα τρόφιμα πρέπει
να καταναλωθούν σύντομα ή να
μαγειρευτούν αμέσως και στη συνέχεια να
καταψυχθούν και πάλι (μετά την ψύξη).
Ξεπάγωμα
Τα τρόφιμα βαθιάς ή μη κατάψυξης, πριν τη
χρήση τους, μπορούν να ξεπαγώνονται στο
θάλαμο ψύξης ή σε θερμοκρασία δωματίου,
ανάλογα το διαθέσιμο χρόνο ξεπαγώματος.
Τα μι κρ ά τ εμά χι α μ πο ρο ύν να μα γε ιρ εύ ον τα ι
ακόμη και κατεψυγμένα, απευθείας από τον
καταψύκτη: σε αυτή την περίπτωση, το μα‐
γείρεμα διαρκεί περισσότερο.
Κρέας (όλοι οι τύποι) τυλίξτε σε πλαστικές
σακούλες και τοποθετήστε το στο γυάλινο
ράφι επάνω από το συρτάρι των λαχανικών.
Για λόγους ασφαλείας, αποθηκεύστε με αυ‐
τό τον τρόπο μόνο για μια ή δύο ημέρες το
πολύ.
Μαγειρεμένα τρόφιμα, κρύα πιάτα, κλπ: αυ‐
τά θα πρέπει να καλύπτονται και μπορούν
να τοποθετούνται σε οποιοδήποτε ράφι.
Φρούτα και λαχανικά: αυτά θα πρέπει να
πλένονται καλά και να τοποθετούνται στο(α)
ειδικό(ά) συρτάρι(α) που παρέχεται(ονται).
Βούτυρο και τυρί: αυτά θα πρέπει να τοπο‐
θετούνται σε ειδικά αεροστεγή δοχεία ή να
τυλίγονται με αλουμινόχαρτο ή σε πλαστικές
σακούλες αφαιρώντας όσο το δυνατόν πε‐
ρισσότερο τον αέρα.
Μπουκάλια γάλακτος: αυτά θα πρέπει να εί‐
ναι τα πωμένα κ αι θα πρέ πει να αποθη κεύο ‐
νται στη σχάρα μπουκαλιών στην πόρτα.
Οι μπανάνες, οι πατάτες, τα κρεμμύδια και
το σκόρδο, εάν δεν είναι συσκευασμένα,
πρέπει να διατηρούνται στο ψυγείο.
Συμβουλές κατάψυξης
Για να σας βοηθήσουμε να εκμεταλλεύεστε
στο έπακρο τη διαδικασία κατάψυξης, ακο‐
λουθούν ορισμένες σημαντικές συμβουλές:
Page 28

28 electrolux
• η μέγιστη ποσότητα τροφίμων που μπο‐
ρεί να καταψυχθεί σε 24 ώρες. αναγρά‐
φεται στην πινακίδα τεχνικών στοιχείων;
• η διαδικασία κατάψυξης διαρκεί 24 ώρες.
Κατά τη διάρκεια αυτής της περιόδου δε
θα πρέπει να προστίθενται άλλα τρόφιμα
για κατάψυξη;
• καταψύχετε μόνο πρώτης ποιότητας,
φρέσκα και καλά καθαρισμένα τρόφιμα;
• αποθηκεύετε τα τρόφιμα σε μικρές μερί‐
δες ώστε να είναι δυνατή η γρήγορη και
πλήρης κατάψυξή του και το μεταγενέ‐
στερο ξεπάγωμα μόνο της απαιτούμενης
ποσότητας;
• τυλίγετε τα τρόφιμα σε αλουμινόχαρτο ή
πλαστικές σακούλες και εξασφαλίζετε ότι
οι συσκευασίες είναι αεροστεγείς;
• μην αφήνετε φρέσκα, μη κατεψυγμένα
τρόφιμα να έρχονται σε επαφή με ήδη κα‐
τεψυγμένα τρόφιμα, ώστε να αποτρέπε‐
ται η αύξηση της θερμοκρασίας των δεύ‐
τερων;
• τα άπαχα τρόφιμα αποθηκεύονται καλύ‐
τερα και για μεγαλύτερο διάστημα από τα
λιπαρά; το αλάτι μειώνει τη δυνατή διάρ‐
κεια αποθήκευσης των τροφίμων;
•οι γρανίτες, εάν καταναλωθούν αμέσως
μετά την έξοδό τους από την κατάψυξη,
μπορούν να προκαλέσουν στο δέρμα
εγκαύματα από πάγο;
• είναι σκόπιμο να γράφετε την ημερομηνία
κατάψυξης σε κάθε συσκευασία ώστε να
μπορείτε να συνάγετε το χρόνο αποθή‐
κευσης;
Συμβουλές για την αποθήκευση
κατεψυγμένων τροφίμων
Για να πετύχετε την καλύτερη απόδοση από
αυτή τη συσκευή, θα πρέπει:
• να είστε σίγουροι ότι οι συνθήκες διατή‐
ρησης των κατεψυγμένων τροφίμων του
εμπορίου ήταν κατάλληλες στο κατάστη‐
μα αγοράς;
• να εξασφαλίζετε την ταχύτερη δυνατή με‐
ταφορά των κατεψυγμένων τροφίμων
από το κατάστημα αγοράς τους στον κα‐
ταψύκτη;
• μην ανοίγετε την πόρτα συχνά και μην την
αφήνετε ανοικτή για περισσότερο από ότι
είναι απολύτως απαραίτητο.
• Μετά το ξεπάγωμα, τα τρόφιμα χαλάνε
γρήγορα και δεν μπορούν να καταψυ‐
χθούν και πάλι.
• Μην υπερβαίνετε τους χρόνους αποθή‐
κευσης που υποδεικνύονται από τους
παρασκευαστές των τροφίμων.
Τρόπος χρήσης του διανομέα νερού με φύσιγγα φίλτρου BRITA
MAXTRA
Μονάδα νερού με φίλτρο BRITA
Εσωτερικά εξαρτήματα:
Page 29
6
3
5
2
1
4
1 Δοχείο νερού
2Χωνί
3 Καπάκι δοχείου
4 Βαλβίδα + λάστιχο
5 Μαζί με φίλτρο BRITA MAXTRA
6 BRITA Memo - η ηλεκτρονική ένδειξη
αλλαγής φύσιγγας
Εξωτερικά εξαρτήματα:
electrolux 29
2Στάθμη νερού
3 Δίσκος για σταγόνες νερού
Αρχικές εργασίες για τη χρήση του διανομέα
νερού
1. Αφαιρέστε όλες τις αυτοκόλλητες ταινίες
και άλλες προστατευτικές διατάξεις από
το δοχείο.
2. Καθαρίστε τα εξαρτήματα, όπως περι‐
γράφεται στην παράγραφο "Διαδικασία
καθαρισμού του διανομέα νερού", προ‐
κειμένου να αφαιρέσετε τυχόν υπολείμ‐
ματα.
Διαδικασία καθαρισμού του διανομέα νερού
1. Απασφαλίστε τους δύο αναστολείς στα
πλαϊνά του δοχείου όπως απεικονίζεται
στις εικόνες:
– Βγάλτε τη φύσιγγα BRITA MAXTRA
από τη μονάδα φίλτρου νερού.
– Πιέστε τους αναστολείς στη μέση και
μετακινήστε την προς τα επάνω.
– Μετακινήστε τον αναστολέα προς την
κατεύθυνση του κεντρικού δοχείου.
2. Σπρώξτε το δοχείο στη διεύθυνση της
βαλβίδας.
3. Αφαιρέστε το καπάκι και το χωνί.
1Διανομέας
1
2
3
Page 30
30 electrolux
στε το δοχείο ακολουθώντας την αντί‐
στροφη σειρά (4,3,2,1) της αποσυναρ‐
μολόγησης (προσέχετε ιδιαίτερα τη θέ‐
ση του λάστιχου της βαλβίδας).
8. Τοποθετήστε το συναρμολογημένο δο‐
χείο στην πόρτα στη διεύθυνση της
βαλβίδας.
9. Ασφαλίστε τους αναστολείς, ακολου‐
θώντας την αντίστροφη σειρά της απα‐
σφάλισης.
10. Τοποθετήστε ξανά τη φύσιγγα BRITA
MAXTRA στο χωνί.
A
Τρόπος χρήσης της φύσιγγας φίλτρου
BRITA MAXTRA
Βήμα 1: Προετοιμάστε τη φύσιγγα
Για να προετοιμάσετε τη φύσιγγα φίλτρου
BRITA, αφαιρέστε το προστατευτικό κάλυμ‐
μα (Σημείωση: Η φύσιγγα και το εσωτερικό
κάλυμμα μπορεί να είναι υγρά, αυτό είναι
απλώς συμπύκνωση).
Βυθίστε τη φύσιγγ α σε κρ ύο νερό και τινά ξτε
την απαλά για να αφαιρέσετε τυχόν φυσα‐
λίδες αέρα. Το φίλτρο είναι τώρα έτοιμο για
χρήση.
Αντίθετα από μερικές άλλες φύσιγγες φίλ‐
τρου νερού, δεν υπάρχει ανάγκη να διαπο‐
τίσετε εκ των προτέρων την καινούργια φύ‐
σιγγα Maxtra.
4. Ξεβιδώστε τη βαλβίδα αριστερόστροφα
(προσέχετε ιδιαίτερα να μη χάσετε το
λάστιχο της βαλβίδα επειδή είναι απα‐
ραίτητο για τη σωστή λειτουργία των
χαρακτηριστικών).
5. Καθαρίστε το καπάκι του δοχείου, τη
βαλβίδα και το λάστιχο με διάλυμα ζε‐
στού νερού και ουδέτερου σαπουνιού.
Ξεβγάλτε το και τοποθετήστε το μέσα
στην οπή πόρτας, ενώ καθαρίζετε τα
άλλα εξαρτήματα (για να μη διαρρέει
κρύος αέρας από το ψυγείο).
6. Καθαρίστε το δοχείο και το χωνί σε πλυ‐
ντήριο πιάτων ή με διάλυμα ζεστού νε‐
ρού και ουδέτερου σαπουνιού, και ξεβ‐
γάλτε τα.
7. Αφού καθαρίσετε τα εξαρτήματα του
δοχείου, βγάλτε τη βαλβίδα από την
πόρτα του ψυγείου και συναρμολογή‐
Βήμα 2: Τοποθετήστε στο δοχείο νερού
Αφαιρέστε το καπάκι δοχείου. Πριν τοποθε‐
τήσετε τη φύσιγγα, αφαιρέστε το χωνί και
καθαρίστε το καλά, ξεπλένοντάς το και
σκουπίζοντάς το μέχρι να στεγνώσει.
Page 31
electrolux 31
Κατόπιν, καθαρίστε πολύ καλά το εσωτερι‐
κό του δοχείου νερού με ένα νωπό πανί και
σκουπίστε το καλά μέχρι να στεγνώσει.
Τοποθετήστε τη φύσιγγα στο δοχείο φίλ‐
τρου και σπρώξτε την προς τα κάτω μέχρι
να ασφαλίσει καλά.
Η φύσιγγα πρέπει να παραμένει στη θέση
της αν αναποδογυρίσετε το χωνί.
Απορρίψτε τα δύο πρώτα γεμίσματα στη
βρύση. Αυτά τα δύο πρώτα γεμίσματα χρη‐
σιμοποιούνται για την έκπλυση της φύσιγ‐
γας φίλτρου.
Κατόπιν, τοποθετήστε το χωνί ξανά στη μο‐
νάδα φίλτρου νερού BRITA.
Τοποθετήστε το κάλυμμα ξανά στο δοχείο
και πιέστε το προσεκτικά προς τα κάτω για
να εξασφαλίσετε ότι ταιριάζει σωστά στη θέ‐
ση του.
Βήμα 4: Γεμίστε ξανά το δοχείο με νερό
Για να γεμίσετε το δοχείο με κρύο νερό,
απλώς ανοίξτε το αναδιπλούμενο καπάκι,
ρίξτε μια κανάτα νερό μέσα στο δοχείο μέσω
του καλύμματος, όπως απεικονίζεται στην
εικόνα (χρησιμοποιήστε το καπάκι κάθε φο‐
ρά που θέλετε να γεμίσετε με νερό).
ΣΗΜΑΝΤΙΚΟ Προκειμένου να αποφευχθεί
ο κίνδυνος έκχυσης νερού κατά το κλείσιμο
και άνοιγμα της πόρτας του ψυγείου,
συνιστάται να μη γεμίσετε μέχρι τέρμα το
δοχείο νερού, αλλά να αφήνετε λίγο χώρο
με αέρα (μεγ. όριο πλήρως μέχρι τις
μπροστινές ενδείξεις).
Αν δεν έχετε χρησιμοποιήσει όλο το φιλτρα‐
ρισμένο νερό στο δοχείο νερού εντός 1-2
ημέρες, πετάξτε το νερό που απομένει μέσα
στη μονάδα φίλτρου νερού BRITA πριν την
ξεναγεμίσετε.
Βήμα 3: Ξεπλύντε τη φύσιγγα
2x 3x=ok
Βγάλτε το χωνί από τη μονάδα φίλτρου νε‐
ρού BRITA, γεμίστε το στη βρύση με κρύο
νερό βρύσης και αφήστε το νερό να φιλτρα‐
ριστεί.
Αφήστε το νερό να φιλτραριστεί και επανα‐
λάβετε το "Βήμα 4" όσες φορές επιθυμείτε
ώσπου να γεμίσει η μονάδα φίλτρου νερού
BRITA.
Page 32
32 electrolux
Αφαιρέστε τη φύσιγγα με το δακτύλιο.
START
%
100
Για να αλλάξετε τη φύσιγγα κάθε τέσσερις
εβδομάδες, απλώς χρησιμοποιήστε το δα‐
κτύλιο στο επάνω μέρος της φύσιγγας για
να την αφαιρέσετε από το χωνί και επανα‐
λάβετε τα παραπάνω βήματα 1 έως 3.
BRITA Memo
Για μέγιστη απόδοση φίλτρου και βέλτιστη
γεύση, είναι σημαντικό να αλλάζετε τακτικά
τη φύσιγγα BRITA. Η BRITA συνιστά να αλ‐
λάζετε τη φύσιγγα στη μονάδα BRITA του
ψυγείου σας κάθε τέσσερις εβδομάδες.
Το BRITA Memo σάς υπενθυμίζει αυ‐
τόματα όταν πρέπει να αλλάξετε τη φύ‐
σιγγα.
75
50
25
Το μοναδικό χαρακτηριστικό BRITA Memo
μετράει το συνιστώμενο χρόνο χρήσης της
φύσιγγάς σας.
Το Memo είναι εύκολο στη χρήση και σας
υπενθυμίζει αυτόματα όταν πρέπει να αλ‐
λάξετε τη φύσιγγα.
Το BRITA Memo βρίσκεται στο καπάκι του
δοχείου νερού. Η λειτουργία είναι απλή.
Έναρξη της ένδειξης Memo
Για να ξεκινήσετε το Memo, πιέστε συνεχό‐
μενα το πλήκτρο έναρξης στο καπάκι
ώσπου να εμφανιστούν στην οθόνη και οι
τέσσερις γραμμές και μετά να αναβοσβή‐
σουν δύο φορές. Το Memo είναι τώρα ρυθ‐
μισμένο.
Page 33
electrolux 33
START
%
100
75
50
25
Λειτουργικός έλεγχος
Η κουκκίδα που αναβοσβήνει στην κάτω δε‐
ξιά γωνία του Memo υποδεικνύει ότι το
Memo λειτουργεί.
START
%
100
75
50
25
Αλλαγή ένδειξης
START
%
100
75
50
25
Page 34
34 electrolux
Κάθε εβδομάδα σβήνει μία γραμμή για να
εμφανίζεται η διάρκεια λειτουργίας της φύ‐
σιγγας που απομένει. Μετά από τέσσερις
εβδομάδες, θα έχουν σβήσει και οι τέσσερις
γραμμές. Το γεγονός αυτό και ένα βέλος
που αναβοσβήνει υποδεικνύουν ότι πρέπει
να αλλάξετε τώρα τη φύσιγγα.
Εισάγετε μια νέα φύσιγγα σύμφωνα με τις
οδηγίες και ενεργοποιήστε ξανά το Memo,
όπως περιγράφεται παραπάνω.
START
%
100
75
50
25
Όταν εμφανίζεται μόνο μία γραμμή, πρέπει
να ελέγξετε αν έχετε μια καινούργια φύσιγγα
φίλτρου BRITA MAXTRA.
ΣΗΜΑΝΤΙΚΟ Το Memo είναι σχεδιασμένο
ώστε να χρησιμοποιείται μόνο με φύσιγγες
φίλτρων BRITA.
BRITA Memo: Η ηλεκτρονική ένδειξη για
την αλλαγή της φύσιγγας έχει διάρκεια λει‐
τουργίας περίπου 5 χρόνια. Στο τέλος της
διάρκειας λειτουργίας του Memo, να θυμη‐
θείτε ότι είναι μια ηλεκτρονική συσκευή και
πρέπει να απορρίψετε το Memo σύμφωνα
με τις ισχύουσες διατάξεις και κανονισμούς.
Για να αφαιρέσετε το αναλωμένο Memo, το‐
ποθετήστε το κατσαβίδι στην εγκοπή δίπλα
από το Memo και σπρώξτε το προς τα έξω.
Να γνωρίζετε ότι δεν πρέπει να αφαιρέσετε
το Memo για κανέναν άλλο λόγο, εκτός από
την απόρριψή του.
Σημαντικές πληροφορίες
• Η οπή της βαλβίδας στην πόρτα του ψυ‐
γείου πρέπει να κλείνετε με τη βαλβίδα
νερού κατά την κανονική λειτουργία της
συσκευής.
• Να χρησιμοποιείτε μόνο πόσιμο νερό. Αν
χρησιμοποιήσετε οποιοδήποτε άλλο τύ‐
πο ποτού, μπορεί να αφήσει υπολείμμα‐
τα, γεύση ή οσμή στο δοχείο και τη βρύ‐
ση.
• Μπορεί να ακούσετε θορύβους λόγω της
εισροής αέρα όταν αφήνετε το νερό στο
δοχείο.
• Αν το νερό δεν ρέει καλά, πιέστε το μοχλό
μία ακόμη φορά. Κρατήστε το ποτήρι κά‐
τω από τη βρύση για λίγο, για να σιγου‐
ρευτείτε ότι όλο το νερό θα συλλεχτεί στο
ποτήρι.
• Μη χρησιμοποιείτε αεριούχα ποτά, όπως
αναψυκτικά. Το ποτό μπορεί να διαρρεύ‐
σει λόγω της πίεσης του αερίου.
• Θυμηθείτε ότι καταναλώνετε το νερό. Να
πίνετε το φιλτραρισμένο νερό εντός μίας
ή δύο ημερών.
• Αν δεν πρόκειται να χρησιμοποιήσετε τη
μονάδα φίλτρου νερού BRITA για μεγάλη
χρονική περίοδο (π.χ. διακοπές), συν‐
ιστάται να απορρίψετε τυχόν νερό που
απομένει στο εσωτερικό του συστήματος
και να αφήσετε τη φύσιγγα μέσα στο δο‐
χείο φίλτρου.
Πριν χρησιμοποιήσετε ξανά το σύστημα,
βγάλτε τη φύσιγγα και επαναλάβετε τα
βήματα 1 έως 4 "Τρόπος χρήσης της φύ‐
σιγγας φίλτρου BRITA MAXTRA".
• Η μονάδα φίλτρου νερού BRITA έχει σχε‐
διαστεί για χρήση μόνο με νερό βρύσης
που έχει υποστεί επεξεργασία σε δημοτι‐
κές εγκαταστάσεις (Σημείωση: Το νερό
αυτό ελέγχεται συνεχώς και είναι ασφα‐
λές για πόση, σύμφωνα με τους τοπικούς
κανονισμούς) ή με νερό από ιδιωτικές
Page 35
electrolux 35
προμήθειες οι οποίες έχουν ελεγχθεί και
βρέθηκαν ασφαλή για πόση.
Αν ληφθεί εντολή από τις αρχές ότι πρέπει
να βράζετε το νερό του κεντρικού συστή‐
ματος, πρέπει να βράσετε και το φιλτρα‐
ρισμένο νερό BRITA. Όταν η εντολή για
το βράσιμο του νερού δεν ισχύει πλέον,
πρέπει να καθαρίσετε ολόκληρο το σύ‐
στημα φίλτρου και να τοποθετήσετε νέα
φύσιγγα.
Φροντίδα και καθάρισμα
ΠΡΟΣΟΧΗ Πριν από οποιαδήποτε
εργασία συντήρησης αποσυνδέετε τη
συσκευή από την πρίζα.
Η συσκευή αυτή περιέχει υδρογονάν‐
θρακες στην ψυκτική μονάδα της; Οι
εργασίες συντήρησης και επαναφόρτι‐
σης θα πρέπει επομένως να πραγμα‐
τοποιούνται μόνο από εξουσιοδοτημέ‐
νους τεχνικούς.
Τακτικό καθάρισμα
Η συσκευή πρέπει να καθαρίζεται τακτικά:
• Καθαρίστε το εσωτερικό και τα εξαρτήμα‐
τα με χλιαρό νερό και λίγο φυσικό σαπού‐
νι.
• Ελέγχετε τακτικά τα λάστιχα της πόρτας
και σκουπίστε τα για να εξασφαλίσετε ότι
είναι καθαρά και δεν φέρουν ακαθαρσίες.
• Ξεπλύντε και στεγνώστε καλά.
ΣΗΜΑΝΤΙΚΟ Μην τραβάτε, μετακινείτε ή
προκαλείτε ζημιά σε σωλήνες ή/και καλώδια
που βρίσκονται στο εσωτερικό του
θαλάμου.
Ποτέ μη χρησιμοποιείτε απορρυπαντικά,
σκόνες που χαράζουν, καθαριστικά με πολύ
άρωμα ή γυαλιστικό κερί για να καθαρίσετε
το εσωτερικό, διότι αυτά τα υλικά φθείρουν
την επιφάνεια και αφήνουν έντονη οσμή.
Καθαρίστε το συμπυκνωτή (μαύρη γρίλια)
και το συμπιεστή στο πίσω μέρος της συ‐
σκευής με μια βούρτσα ή μια ηλεκτρική
σκούπα. Κάτι τέτοιο βελτιώνει την απόδοση
της συσκευής και εξοικονομεί ηλεκτρική
ενέργεια.
ΣΗΜΑΝΤΙΚΟ Προσέχετε ώστε να μην
προκληθεί ζημιά στο ψυκτικό σύστημα.
Πολλά ιδιοσκευάσματα καθαρισμού για την
κουζίνα περιέχουν χημικά που μπορούν να
Θα βρείτε περισσότερες πληροφορίες για τη
χρήση των φυσιγγών φίλτρων BRITA και το
χαρακτηριστικό Memo στον οδηγό πληρο‐
φοριών της BRITA.
Μπορείτε να αγοράσετε καινούργιες
φύσιγγες φίλτρων BRITA και το Memo
μέσω του Κέντρου Σέρβις της
Electrolux ή της BRITA.
προσβάλλουν/ καταστρέψουν τα πλαστικά
που χρησιμοποιούνται σε αυτή τη συσκευή.
Για το λόγο αυτό συστήνεται το εξωτερικό
περίβλημα της συσκευής να καθαρίζεται μό‐
νο με χλιαρό νερό αφού προσθέσετε και λί‐
γο υγρό για τα πιάτα.
Μετά τον καθαρισμό, συνδέστε ξανά τον
εξοπλισμό στην κεντρική παροχή.
Απόψυξη του ψυγείου
Ο πάγος εξαλείφεται αυτόματα από τον εξα‐
τμιστήρα του θαλάμου ψύξης κάθε φορά
που σταματά ο συμπιεστής κινητήρα κατά
τη διάρκεια της κανονικής χρήσης. Το νερό
από τον πάγο αποστραγγίζεται μέσω μιας
σκάφης σε ένα ειδικό δοχείο στο πίσω μέ‐
ρος της συσκευής, επάνω από το συμπιε‐
στή κινητήρα, όπου κι εξατμίζεται.
Είναι σημαντικό να καθαρίζεται τακτικά η
οπή αποστράγγισης του νερού από τον πά‐
γο στη μέση του καναλιού του θαλάμου ψύ‐
ξης ώστε να αποτρέπεται η υπερχείλιση και
το στάξιμο νερού στα τρόφιμα στο εσωτερι‐
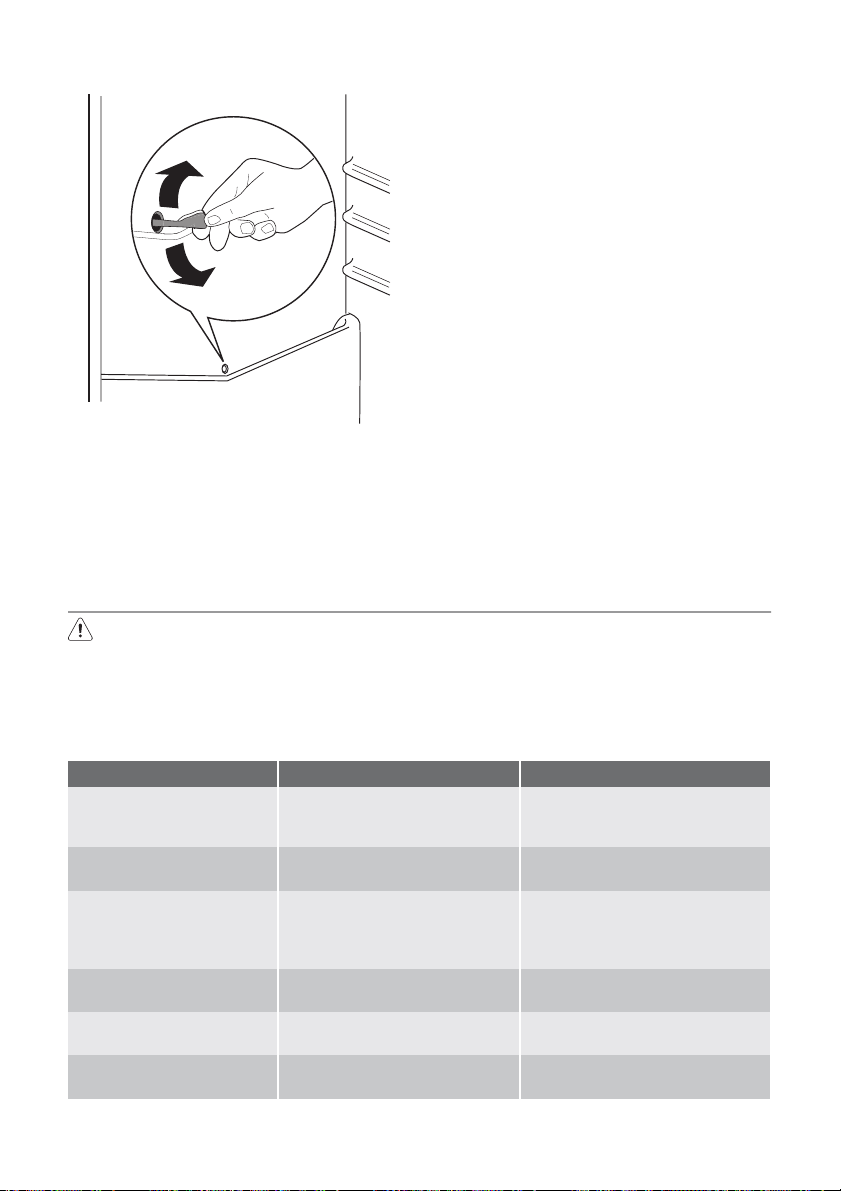
κό του. Χρησιμοποιείτε τον ειδικό καθαρι‐
στήρα που παρέχεται, τον οποίο θα βρείτε
ήδη τοποθετημένο μέσα στην οπή απο‐
στράγγισης.
Page 36
36 electrolux
Η απουσία του πάγου οφείλεται στη συνεχή
κυκλοφορία κρύου αέρα στο εσωτερικό του
θαλάμου, η οποία παράγεται από έναν αυ‐
τόματα ελεγχόμενο ανεμιστήρα.
Περίοδοι εκτός λειτουργίας
Όταν η συσκευή δε χρησιμοποιείται για με‐
γάλα χρονικά διαστήματα, παίρνετε τις ακό‐
λουθες προφυλάξεις:
• αποσυνδέστε τη συσκευή από την ηλεκ‐
τρική τροφοδοσία
• αφαιρέστε όλα τα τρόφιμα
•
κάντε απόψυξη
σκευή και όλα τα εξαρτήματα
• αφήστε τις πόρτες ελαφρώς ανοικτές για
να αποτρέψετε τις δυσάρεστες οσμές.
Εάν ο θάλαμος επρόκειτο να παραμείνει
ενεργοποιημένος, ζητήστε από κάποιον να
Απόψυξη της κατάψυξης
Ο θάλαμος κατάψυξης αυτού του μοντέλου,
είναι "no frost". Αυτό σημαίνει ότι δεν υπάρ‐
τον ελέγχει αν τακτά διαστήματα για να μην
χαλάσουν τα τρόφιμα στο εσωτερικό στην
περίπτωση διακοπής ρεύματος.
χει συσσώρευση πάγου όταν λειτουργεί,
ούτε στα εσωτερικά τοιχώματα ούτε στα
τρόφιμα.
Τι να κάνετε αν...
ΠΡΟΕΙΔΟΠΟΙΗΣΗ Πριν από την
αντιμετώπιση προβλημάτων,
αποσυνδέστε το φις τροφοδοσίας από
την πρίζα.
Η αντιμετώπιση των προβλημάτων που
δεν αναφέρονται στο παρόν εγχειρίδιο
θα πρέπει να διεξάγεται μόνο από
Πρόβλημα Πιθανή αιτία Επίλυση
Η συσκευή δεν λειτουργεί.
Ο λαμπτήρας δεν λειτουρ‐
γεί.
Το φις δεν έχει συνδεθεί σωστά
Η συσκευή δεν έχει ισχύ. Δεν
Ο λαμπτήρας δεν λειτουρ‐
γεί.
Ο λαμπτήρας είναι ελαττωματι‐
Ο συμπιεστής λειτουργεί
συνεχώς.
Η συσκευή είναι απενεργοποιη‐
μένη.
στην πρίζα.
υπάρχει τάση ρεύματος στην
πρίζα.
Ο λαμπτήρας είναι σε αναμονή. Κλείστε και ανοίξτε την πόρτα.
κός.
Δεν έχει ρυθμιστεί σωστά η θερ‐
μοκρασία.
επαγγελματία ηλεκτρολόγο ή άλλο κα‐
τάλληλα καταρτισμένο άτομο.
ΣΗΜΑΝΤΙΚΟ Ακούγονται κάποιοι ήχοι κατά
τη διάρκεια της κανονικής χρήσης
(συμπιεστής, κυκλοφορία ψυκτικού).
8)
και καθαρίστε τη συ‐
Ενεργοποιήστε τη συσκευή.
Συνδέστε σωστά το φις στην πρί‐
ζα.
Συνδέστε μια άλλη ηλεκτρική συ‐
σκευή στην πρίζα.
Επικοινωνήστε με επαγγελματία
ηλεκτρολόγο.
Ανατρέξτε στην ενότητα "Αντικα‐
τάσταση του λαμπτήρα".
Ρυθμίστε υψηλότερη θερμοκρα‐
σία.
8) Εάν προβλέπεται.
Page 37
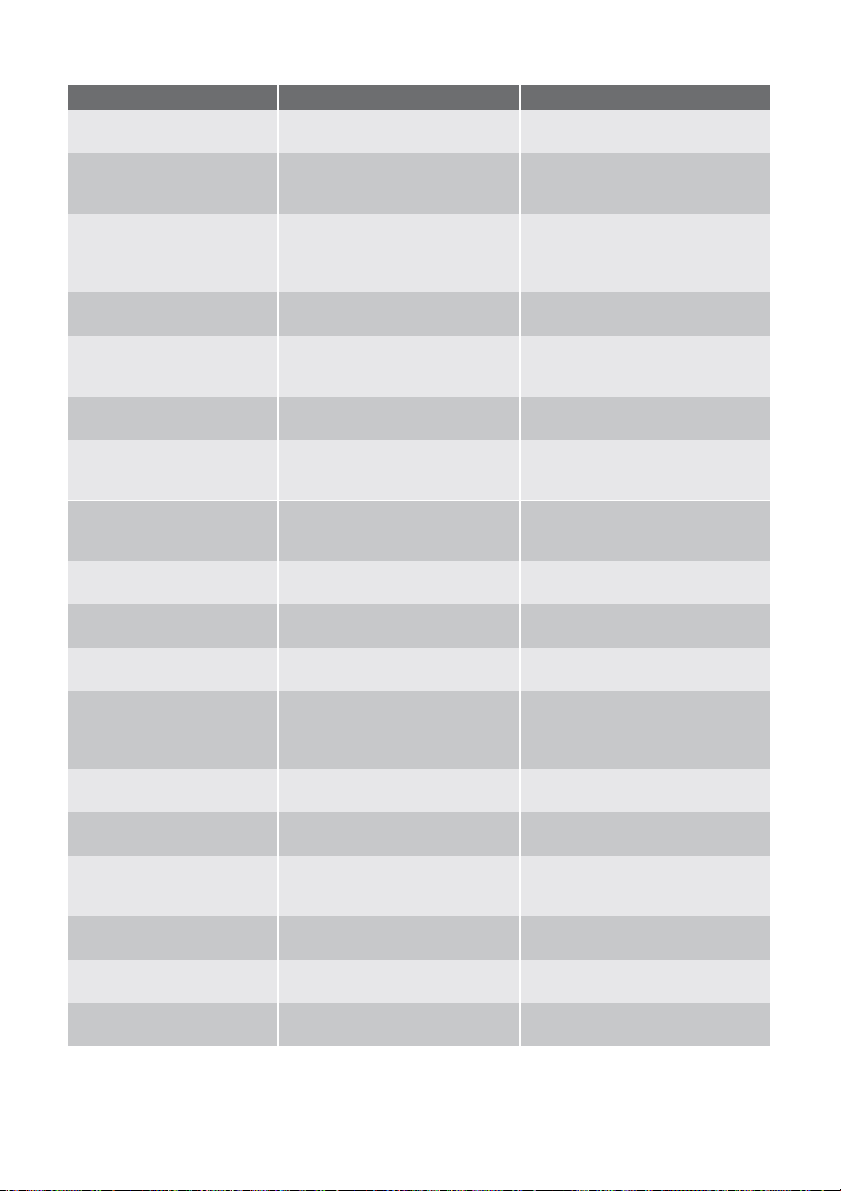
electrolux 37
Πρόβλημα Πιθανή αιτία Επίλυση
Η πόρτα δεν έχει κλείσει σωστά. Ανατρέξτε στην παράγραφο
Η πόρτα ανοίχθηκε πολύ συχνά. Μην αφήνετε την πόρτα ανοικτή
Η θερμοκρασία του προϊόντος
Η θερμοκρασία δωματίου είναι
Υπάρχει ροή νερού στην πί‐
σω πλάκα του ψυγείου.
Υπάρχει ροή νερού στο
εσωτερικό του ψυγείου.
Υπάρχουν προϊόντα που απο‐
Υπάρχει ροή νερού στο δά‐
πεδο.
Η θερμοκρασία στη συ‐
σκευή είναι πολύ χαμηλή.
Η θερμοκρασία στη συ‐
σκευή είναι πολύ υψηλή.
Η πόρτα δεν έχει κλείσει σωστά. Ανατρέξτε στην παράγραφο
Η θερμοκρασία του προϊόντος
Πολλά προϊόντα αποθηκεύονται
Η θερμοκρασία στον κατα‐
ψύκτη είναι πολύ υψηλή.
Η θερμοκρασία στον κατα‐
ψύκτη είναι πολύ υψηλή.
Υπάρχει πολύς πάγος. Τα τρόφιμα δεν είναι σωστά τυ‐
Η πόρτα δεν έχει κλείσει σωστά. Ανατρέξτε στην παράγραφο
Δεν έχει ρυθμιστεί σωστά η θερ‐
Αντικατάσταση του λαμπτήρα
1. Αποσυνδέστε το φις από την πρίζα.
είναι πολύ υψηλή.
πολύ υψηλή.
Κατά τη διάρκεια της αυτόματης
διαδικασίας απόψυξης, ο πάγος
αποψύχεται στην πίσω πλάκα.
Η έξοδος νερού είναι φραγμένη. Καθαρίστε την έξοδο νερού.
τρέπουν τη ροή νερού στο συλ‐
λέκτη νερού.
Η έξοδος του νερού απόψυξης
δεν ρ έε ι στο δ ίσκο εξά τμιση ς πά‐
νω από το συμπιεστή.
Δεν έχει ρυθμιστεί σωστά η θερ‐
μοκρασία.
Δεν έχει ρυθμιστεί σωστά η θερ‐
μοκρασία.
είναι πολύ υψηλή.
ταυτόχρονα.
Δεν υπάρχει καθόλου κυκλοφο‐
ρία κρύου αέρα στη συσκευή.
Τα προϊόντα είναι πολύ κοντά
μεταξύ τους.
λιγμένα.
μοκρασία.
2. Πιέστε τον πίσω γάντζο του καλύμματος
του λαμπτήρα με ένα κατσαβίδι και ταυ‐
τόχρονα τραβήξτε και περιστρέψτε το
"Κλείσιμο της πόρτας".
περισσότερο από ότι είναι απολύ‐
τως απαραίτητο.
Αφήστε τη θερμοκρασία του
προϊόντος να μειωθεί σε θερμο‐
κρασία δωματίου πριν από τη φύ‐
λαξη.
Μειώστε τη θερμοκρασία περι‐
βάλλοντος.
Αυτό είναι φυσιολογικό.
Βεβαιωθείτε ότι τα προϊόντα δεν
έρχονται σε επαφή με την πίσω
πλάκα.
Συνδέστε την έξοδο του νερού
απόψυξης στο δίσκο εξάτμισης.
Ρυθμίστε υψηλότερη θερμοκρα‐
σία.
Ρυθμίστε χαμηλότερη θερμοκρα‐
σία.
"Κλείσιμο της πόρτας".
Αφήστε τη θερμοκρασία του
προϊόντος να μειωθεί σε θερμο‐
κρασία δωματίου πριν από τη φύ‐
λαξη.
Αποθηκεύστε λιγότερα προϊόντα.
Βεβαιωθείτε ότι υπάρχει κυκλοφο‐
ρία κρύου αέρα στη συσκευή.
Αποθηκεύστε τα προϊόντα ώστε
να υπάρχει κυκλοφορία κρύου αέ‐
ρα.
Τυλίξτε τα τρόφιμα σωστά.
"Κλείσιμο της πόρτας".
Ρυθμίστε υψηλότερη θερμοκρα‐
σία.
Page 38
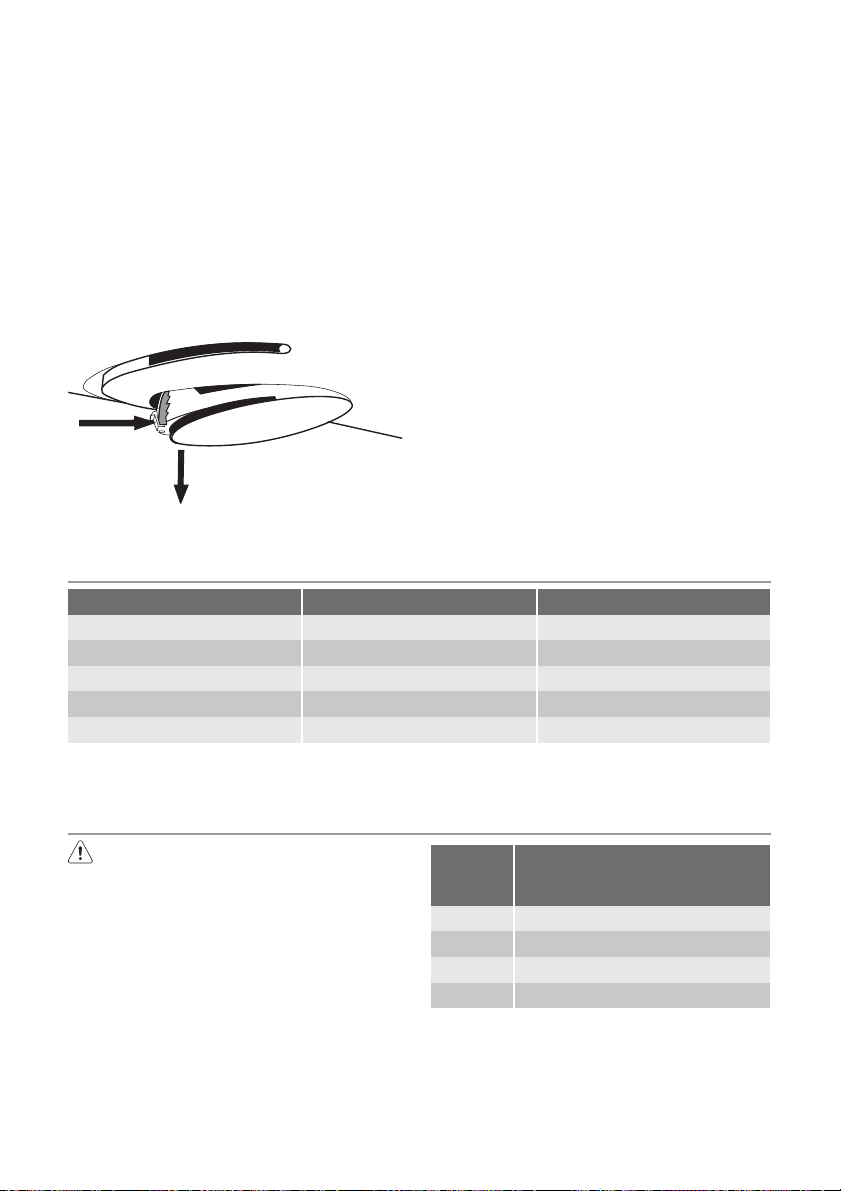
38 electrolux
κάλυμμα προς την κατεύθυνση του βέ‐
λους.
3. Αλλάξτε το λαμπτήρα με έναν της ίδιας
ισχύος (η μέγιστη ισχύς φαίνεται στο κά‐
λυμμα του λαμπτήρα).
4. Στερεώστε το κάλυμμα του λαμπτήρα
στην αρχική θέση του για να το τοποθε‐
τήσετε.
5. Συνδέστε το φις στην πρίζα.
6. Ανοίξτε την πόρτα. Βεβαιωθείτε ότι ο
Κλείσιμο της πόρτας
1. Καθαρίστε τα στεγανοποιητικά λάστιχα
της πόρτας.
2. Εάν χρειαστεί, προσαρμόστε την πόρτα.
Ανατρέξτε στο "Εγκατάσταση".
3. Εάν χρειαστεί, αντικαταστήστε τα ελατ‐
τωματικά στεγανοποιητικά λάστιχα της
πόρτας. Επικοινωνήστε με το κέντρο
σέρβις.
λαμπτήρας ανάβει.
A
max 25 W
B
Τεχνικά χαρακτηριστικά
Διαστάσεις εσοχής
Ύψος 1950 mm
Πλάτος 695 mm
Βάθος 669 mm
Χρόνος ανόδου 20 h
Τα τεχνικά στοιχεία βρίσκονται στην πινακί‐
δα τεχνικών στοιχείων στην εσωτερική αρι‐
στερή πλευρά της συσκευής και στην ετικέ‐
τα ενέργειας.
Εγκατάσταση
Πριν την εγκατάσταση της συσκευής
διαβάστε προσεκτικά τις "Πληροφορίες
ασφάλειας" για την ασφάλειά σας και τη
σωστή λειτουργία της συσκευής.
Τοποθέτηση
Εγκαταστήστε τη συσκευή αυτή σε χώρο
όπου η θερμοκρασία περιβάλλοντος αντι‐
στοιχεί στην κλιματική κατηγορία που υπο‐
δεικνύεται στην πινακίδα χαρακτηριστικών
της συσκευής:
Κλιματική
κατηγο‐
ρία
SN +10°C έως + 32°C
N +16°C έως + 32°C
ST +16°C έως + 38°C
T +16°C έως + 43°C
Θερμοκρασία περιβάλλοντος
Θέση
Η συσκευή θα πρέπει να εγκαθίσταται μα‐
κριά από πηγές θερμότητας, όπως καλορι‐
φέρ, λέβητες, απευθείας ηλιακό φως, κλπ.
Βεβαιωθείτε ότι ο αέρας μπορεί να κυκλο‐
φορήσει ελεύθερα στο πίσω μέρος του θα‐
Page 39
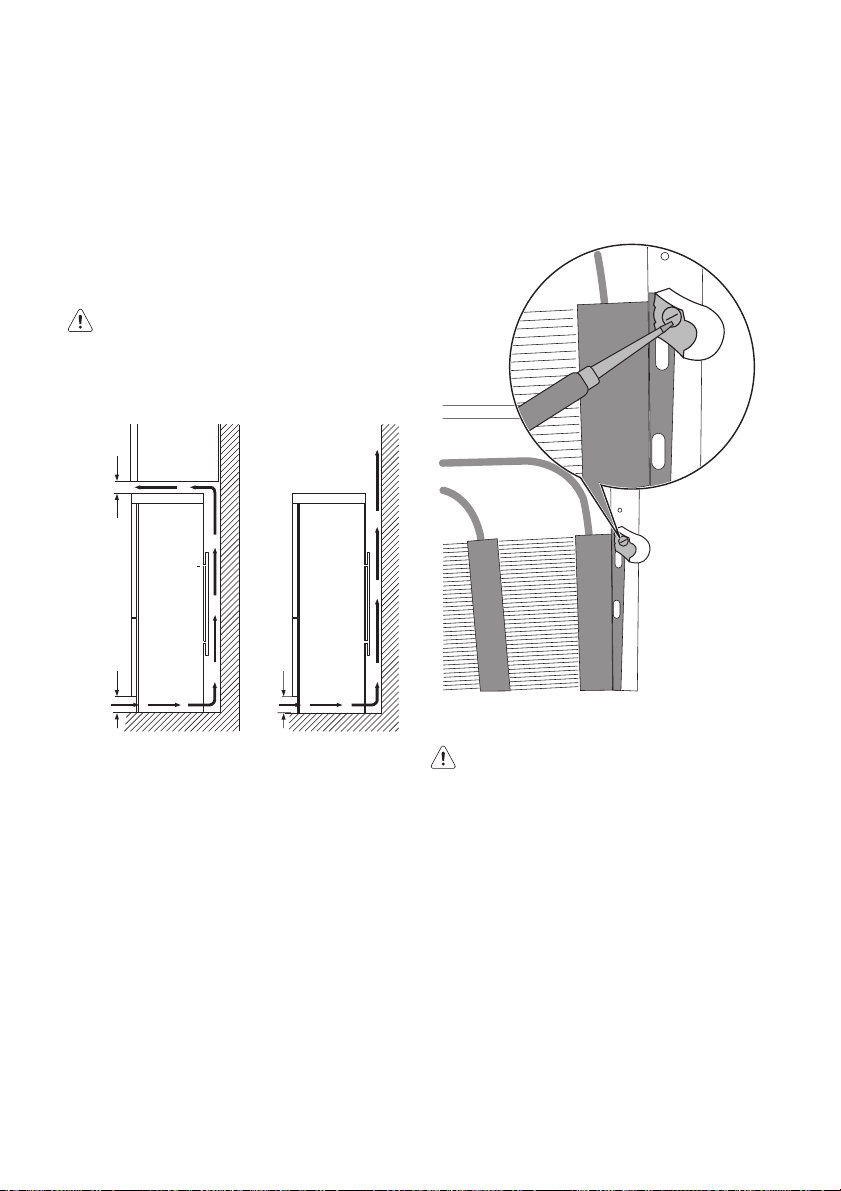
electrolux 39
λάμου. Για να εξασφαλίσετε τη βέλτιστη
απόδοση, αν η συσκευή έχει τοποθετηθεί
κάτω από ένα κρεμαστό ντουλάπι, η ελάχι‐
στη απόσταση μεταξύ του επάνω μέρους
της καμπίνας και του ντουλαπιού πρέπει να
είναι τουλάχιστον 100 χιλιοστά. Ιδανικά,
ωστόσο, η συσκευή δεν θα πρέπει να το‐
ποθετείται κάτω από κρεμαστά ντουλάπια.
Η ακριβής οριζοντίωση εξασφαλίζεται από
ένα ή περισσότερα ρυθμιζόμενα πόδια στη
βάση της καμπίνας.
ΠΡΟΕΙΔΟΠΟΙΗΣΗ Πρέπει να είναι
δυνατή η αποσύνδεση της συσκευής
από την πρίζα. Επομένως, η
πρόσβαση στο φις πρέπει να είναι
εύκολη μετά την εγκατάσταση.
100 mm
AB
Πίσω αποστάτες
Εντός της συσκευασίας υπάρχουν δύο
αποστάτες, οι οποίοι πρέπει να τοποθετού‐
νται όπως φαίνεται στην εικόνα.
Χαλαρώστε τις βίδες και εισάγετε τον απο‐
στάτη κάτω από το κεφάλι της βίδας και στη
συνέχεια σφίξτε τις βίδες ξανά.
15 mm
15 mm
Ηλεκτρική σύνδεση
Πριν από τη σύνδεση, επαληθεύστε ότι η
τάση και η συχνότητα που αναγράφονται
στην πινακίδα τεχνικών χαρακτηριστικών
αντιστοιχούν στα χαρακτηριστικά της παρο‐
χής σας.
Η συσκευή πρέπει να γειώνεται. Το φις του
καλωδίου τροφοδοσίας διαθέτει μια επαφή
γι' αυτό το σκοπό. Εάν η πρίζα δεν είναι
γειωμένη, συνδέστε τη συσκευή σε μια με‐
μονωμένη γείωση σύμφωνα με τους τρέχο‐
ντες κανονισμούς, αφού συμβουλευθείτε
έναν επαγγελματία ηλεκτρολόγο.
Σε περίπτωση μη τήρησης των παραπάνω
προφυλάξεων ασφαλείας, ο κατασκευα‐
στής δε φέρει καμία ευθύνη.
Αυτή η συσκευή είναι σύμφωνη με τις ακό‐
λουθες Οδηγίες της. ΕΟΚ.
Δυνατότητα αντιστροφής της πόρτας
ΠΡΟΕΙΔΟΠΟΙΗΣΗ Προτού
πραγματοποιήσετε οποιαδήποτε
ενέργεια, αποσυνδέστε το φις από την
πρίζα.
ΣΗΜΑΝΤΙΚΟ Για να πραγματοποιήσετε τις
ακόλουθες ενέργειες, συστήνουμε να σας
βοηθήσει ακόμη ένα άτομο το οποίο θα
συγκρατεί καλά τις πόρτες της συσκευής
κατά τη διάρκεια αυτών των ενεργειών.
Για να αλλάξετε την πλευρά ανοίγματος της
πόρτας, ακολουθήστε τα εξής βήματα:
1. Αφαιρέστε τον επάνω μεντεσέ προσέ‐
χοντας να μην πέσει η επάνω πόρτα και
φυλάξτε τον για τυχόν μελλοντική αλλα‐
γή.
Page 40
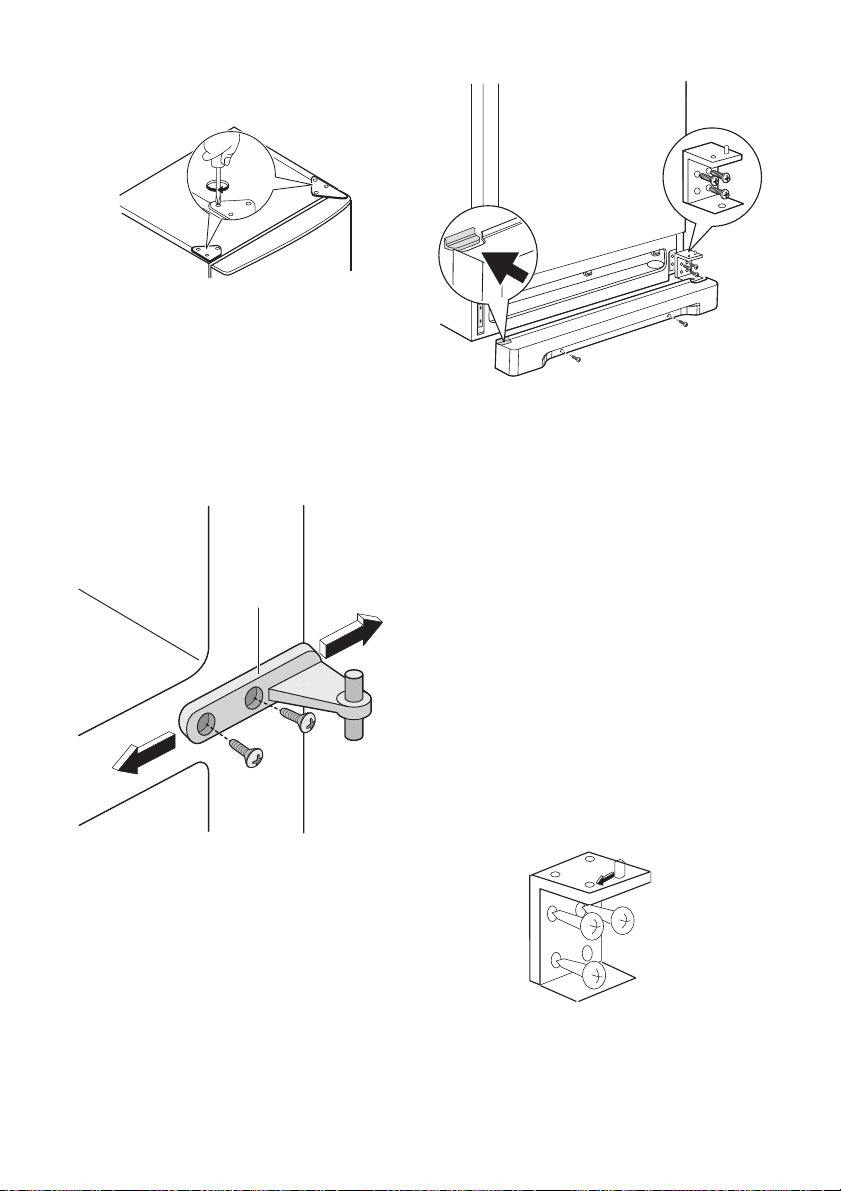
40 electrolux
2. Αφαιρέστε την επάνω πόρτα.
3. Αφαιρέστε το επάνω στήριγμα και το‐
ποθετήστε το στην αντίθετη πλευρά.
4. Ξεβιδώστε το μεσαίο μεντεσέ (H). Ξεβι‐
δώστε τις πλαστικές τάπες που βρίσκο‐
νται στην αντίθετη πλευρά του κεντρι‐
κού μεντεσέ και τοποθετήστε τις στις
οπές που κάλυπτε πριν ο μεντεσές.
H
7. Ακουμπήστε προσεκτικά τη συσκευή
στην πλάτη της, ξεβιδώστε εντελώς το
ρυθμιζόμενο πέλμα και βιδώστε το στην
αντίθετη πλευρά.
8. Βγάλτε το κάτω μεντεσέ ξεβιδώνοντας
τις βίδες στερέωσής του.
9. Με ένα κλειδί 12 χιλιοστών, ξεβιδώστε
τον πείρο του μεντεσέ και τοποθετήστε
τον ξανά στην αντίθετη πλευρά του με‐
ντεσέ.
10. Τοποθετήστε ξανά τον κάτω μεντεσέ
στην αντίθετη πλευρά, χρησιμοποιώ‐
ντας τις βίδες που είχατε αφαιρέσει.
11. Τοποθετήστε ξανά και προσεκτικά τη
συσκευή στη θέση της και αλφαδιάστε
τη συσκευή βιδώνοντας / ξεβιδώνοντας
τα ρυθμιζόμενα πέλματα, στο κάτω μέ‐
ρος της καμπίνας, με τα δάχτυλά σας ή
με ένα εργαλείο.
5. Αφαιρέστε την κάτω πόρτα.
6. Τραβήξτε και βγάλτε τη γρίλια αερι‐
σμού, η οποία είναι στερεωμένη με δύο
βίδες.
12. Σπρώξτε το κάλυμμα οπής εκτός της
γρίλιας εξαερισμού πιέζοντάς το προς
Page 41
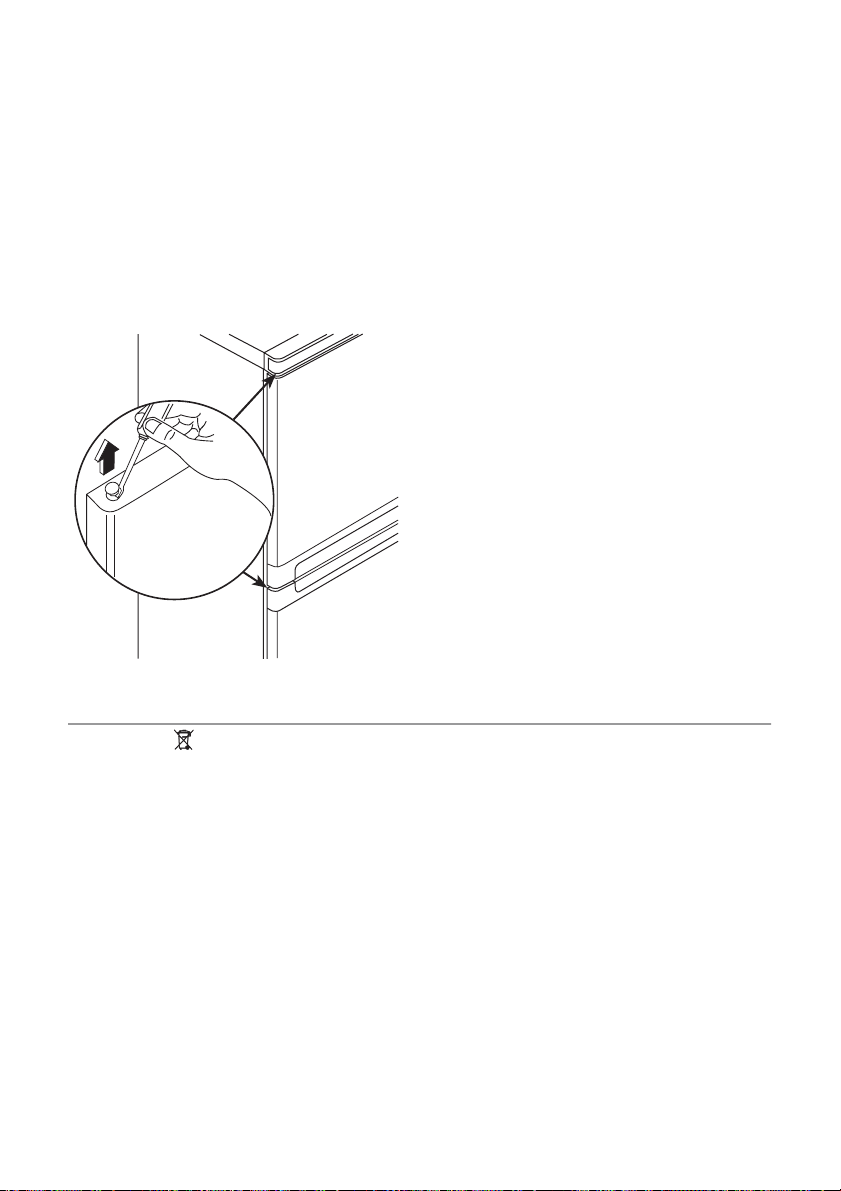
electrolux 41
την κατεύθυνση του βέλους και επανα‐
τοποθετήστε το στην αντίθετη πλευρά.
13. Στερεώστε τις βίδες για να τοποθετήσε‐
τε ξανά τη γρίλια αερισμού.
14. Τοποθετήστε ξανά την κάτω πόρτα.
15. Τοποθετήστε ξανά το μεσαίο μεντεσέ
(H) στην αντίθετη πλευρά.
16. Τοποθετήστε ξανά την επάνω πόρτα.
17. Στη σακούλα με τα έντυπά σας θα βρεί‐
τ ε τ ον ε πά νω με ντ εσ έ π ου χρ ει άζ ε τα ι γ ια
να κάνετε την αντιστροφή. Βιδώστε τον
στη θέση του.
Κάντε ένα τελικό έλεγχο για να βεβαιωθείτε
ότι:
• Όλες οι βίδες είναι σφιγμένες.
• Το μαγνητικό λάστιχο προσκολλάται στο
θάλαμο.
• Η πόρτα ανοίγει και κλείνει σωστά.
Εάν η θερμοκρασία περιβάλλοντος είναι χα‐
μηλή (δηλ. το χειμώνα), το λάστιχο μπορεί
να μην εφαρμόζει απόλυτα στο θάλαμο. Σε
εκε ίνη τη ν π ερ ίπ τω ση, πε ρι μέ νε τε τ ο φ υσ ικ ό
ταίριασμα του λάστιχου.
Αν δεν θέλετε να πραγματοποιήσετε οι ίδιοι
τις ενέργειες που περιγράφονται παραπά‐
νω, επικοινωνήστε με το Κέντρο Σέρβις. Ο
τεχνικός του Κέντρου Σέρβις θα πραγματο‐
ποιήσει την αντιστροφή των πορτών με δικά
σας έξοδα.
Περιβαλλοντικά θέματα
Το σύµβολο στο προϊόν ή επάνω στη
συσκευασία του υποδεικνύει ότι δεν πρέπει
να µ εταχειρίζεστε το προϊόν αυτό ως
οικιακό απόρριµµα . Αντιθέτως θα πρέπει
να παραδίδεται στο κατάλληλο σηµείο
συλλογής για την ανακύκλωση ηλεκτρικού
και ηλεκτρονικού εξοπλισµού.
Εξασφαλίζοντας ότι το προϊόν αυτό
διατίθεται σωστά, συµβάλλετε στην
αποτροπή ενδεχόµενων αρνητικών
συνεπειών για το περιβάλλον και την
ανθρώπινη υγεία, οι οποίες θα µπορούσαν
διαφορετικά να προκληθούν από
ακατάλληλο χειρισµό απόρριψης του
προϊόντος αυτού. Για λεπτοµερέστερες
πληροφορίες σχετικά µε την ανακύκλωση
του προϊόντος αυτού, επικοινωνήστε µε το
δηµαρχείο της περιοχής σας, την τοπική
σας υπηρεσία αποκοµιδής οικιακών
απορριµµάτων ή µε το κατάστηµα όπου
αγοράσατε το προϊόν.
Page 42
42 electrolux
Electrolux. Thinking of you.
Saiba mais sobre a nossa filosofia em www.electrolux.com
Índice
Informações de segurança 42
Painel de controlo 44
Primeira utilização 45
Utilização diária 45
Sugestões e conselhos úteis 48
Como usar o dispensador de água com o
cartucho filtrante BRITA MAXTRA 49
Sujeito a alterações sem aviso prévio
Manutenção e limpeza 54
O que fazer se… 55
Dados técnicos 57
Instalação 57
Preocupações ambientais 60
Informações de segurança
Para a sua própria segurança e para garantir
uma utilização correcta, antes de instalar e
usar o aparelho pela primeira vez, leia atentamente este manual do utilizador, incluindo
as suas sugestões e advertências. Para evitar erros e acidentes desnecessários, é importante que todas as pessoas que utilizam
o aparelho conheçam o seu funcionamento
e as características de segurança. Guarde
estas instruções e certifique-se de que elas
acompanham o aparelho em caso de transferência ou venda, para que todos os que
venham a usá-lo estejam devidamente informados quanto à sua utilização e segurança.
Para sua segurança e da propriedade, guarde as precauções destas instruções de utilização, uma vez que o fabricante não é responsável pelos danos causados por omissão.
Segurança para crianças e pessoas
vulneráveis
• Este aparelho não se destina a ser utilizado por pessoas (incluindo crianças) com
capacidades físicas, sensoriais ou mentais
reduzidas ou sem experiência e conhecimento, excepto se lhes tiver sido dada supervisão ou instrução relativa à utilização
do aparelho por uma pessoa responsável
pela sua segurança.
As crianças devem ser vigiadas para assegurar que não brincam com o aparelho.
• Mantenha todas as embalagens fora do
alcance das crianças. Existe o risco de asfixia.
• Se eliminar o aparelho retire a ficha da tomada, corte o cabo eléctrico (o mais perto
do aparelho possível) e retire a porta para
evitar que crianças a brincar sofram choques eléctricos ou se fechem dentro do
aparelho.
• Se este aparelho, com vedantes de porta
magnéticos for substituir um aparelho
mais velho com fecho de mola (lingueta)
na porta ou tampa, certifique-se de que o
fecho de mola está desactivado antes de
eliminar o velho aparelho. Tal irá evitar que
se torne numa armadilha fatal para uma
criança.
Segurança geral
Cuidado Mantenha as aberturas de
ventilação sem obstruções.
• O aparelho tem como objectivo guardar
alimentos e/ou bebidas numa casa normal, como explicado neste manual de instruções.
• Não utilize um dispositivo mecânico ou
qualquer meio artificial para acelerar o processo de descongelação.
• Não utilize outros aparelhos eléctricos (tais
como máquinas de fazer gelados) dentro
dos aparelhos de refrigeração, a não ser
que sejam aprovados para este fim pelo
fabricante.
• Não danifique o circuito refrigerante.
• O refrigerante isobutano (R600a) está contido no circuito refrigerante do aparelho,
um gás natural com um alto nível de com-
Page 43
electrolux 43
patibilidade ambiental, que é, no entanto,
inflamável.
Durante o transporte e a instalação do
aparelho, certifique-se de nenhum dos
componentes do circuito refrigerante está
danificado.
Se o circuito refrigerante se danificar:
– evite chamas livres e fontes de ignição
– ventile totalmente a divisão onde o apa-
relho se encontra
• É perigoso alterar as especificações ou
efectuar qualquer tipo de alteração neste
produto. Quaisquer danos no cabo poderão provocar um curto-circuito, incêndio
e/ou choque eléctrico.
Advertência Qualquer componente
eléctrico (cabo de alimentação, ficha,
compressor) tem de ser substituído por
um técnico certificado ou um técnico
qualificado.
1. Não deve colocar extensões no cabo
de alimentação.
2. Certifique-se de que a ficha não está
esmagada ou danificada pela parte
traseira do aparelho. Uma ficha esmagada ou danificada pode sobreaquecer e causar um incêndio.
3. Certifique-se de que consegue alcan-
çar a ficha do aparelho.
4. Não puxe o cabo de alimentação.
5. Se a tomada da ficha de alimentação
estiver solta, não introduza a ficha de
alimentação. Existe um risco de choque eléctrico ou incêndio.
6. Não deve utilizar o aparelho sem a
tampa da lâmpada
9)
iluminação inte-
rior.
• Este aparelho é pesado. Tenha cuidado
quando o deslocar.
• Não retire nem toque nos itens do compartimento do congelador se estiver com
as mãos molhadas, pois pode causar
abrasões na pele ou queimaduras de gelo.
• Evite a exposição prolongada do aparelho
à luz solar directa.
Utilização diária
• Não coloque panelas quentes nas partes
de plástico do aparelho.
• Não guarde gases ou líquidos inflamáveis
no aparelho, porque podem explodir.
• Não coloque alimentos directamente contra a saída de ar na ventilação traseira.
10)
• Depois de descongelados, os alimentos
não devem ser recongelados.
• Guarde alimentos congelados pré-embalados de acordo com as instruções do fabricante do alimento congelado.
• As recomendações de armazenamento
dos fabricantes do aparelho devem ser
estritamente cumpridas. Consulte as respectivas instruções.
• Não coloque bebidas gaseificadas dentro
do congelador, uma vez que cria pressão
no recipiente, podendo fazer com que expluda, provocando danos no aparelho.
• Os gelados de gelo podem provocar queimaduras de gelos se forem consumidos
imediatamente depois de retirados do
aparelho.
Limpeza e manutenção
• Antes da manutenção, desligue o aparelho e retire a ficha da tomada. Se não conseguir alcançar a tomada, corte a fonte de
alimentação.
• Não limpe o aparelho com objectos de
metal.
• Não utilize objectos afiados para remover
o gelo do aparelho. Utilize um raspador de
plástico.
• Inspeccione regularmente o orifício de
descarga do frigorífico para presença de
água descongelada. Se necessário, limpe
o orifício de descarga. Se o orifício estiver
bloqueado, a água irá acumular na parte
inferior do aparelho.
Instalação
Importante Para efectuar a ligação
eléctrica, siga atentamente as instruções
fornecidas nos parágrafos específicos.
• Desembale o aparelho e verifique se existem danos. Não ligue o aparelho se estiver
danificado. Em caso de danos, informe
imediatamente o local onde o adquiriu.
Nese caso, guarde a embalagem.
• É recomendável aguardar pelo menos duas horas antes de ligar o aparelho, para
9) Se a tampa da lâmpada tiver
10) Se o aparelho não criar gelo
Page 44
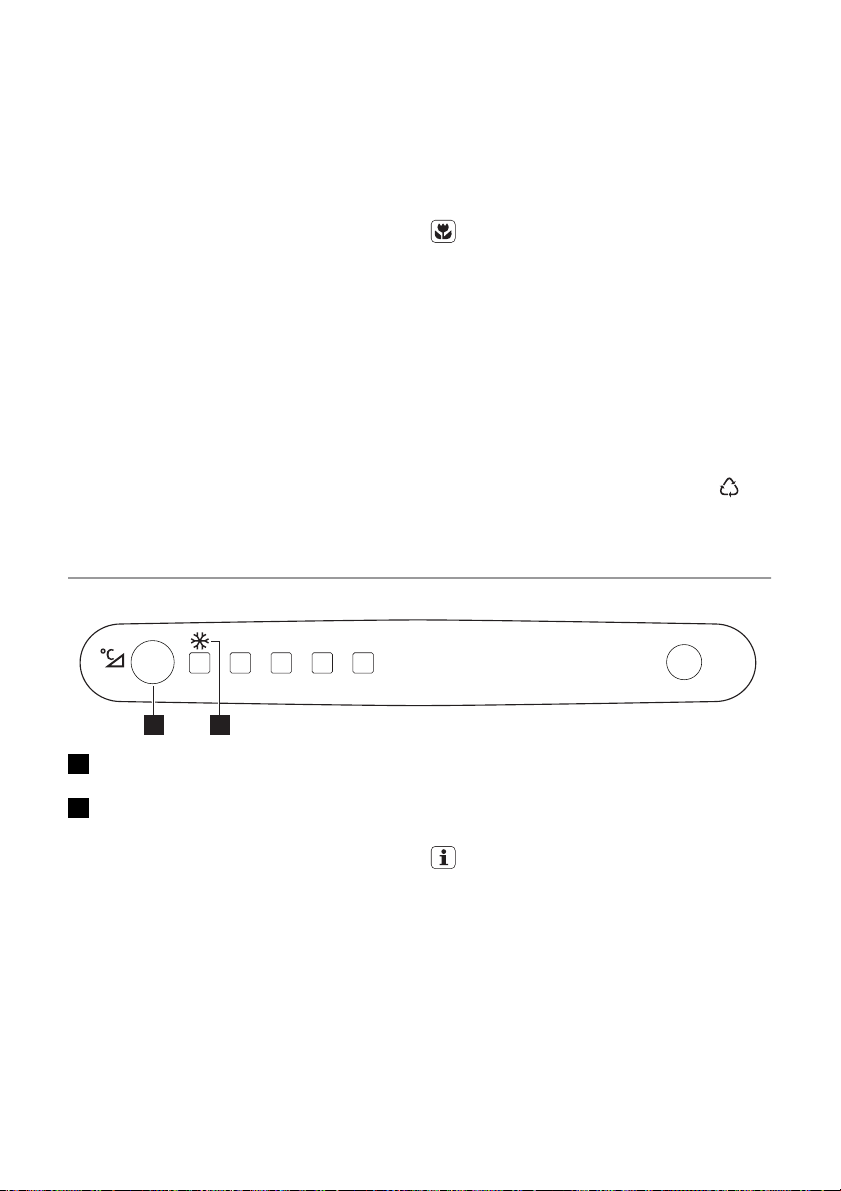
44 electrolux
permitir que o óleo regresse ao compressor.
• Assegure uma circulação de ar adequada
à volta do aparelho, caso contrário pode
provocar sobreaquecimento. Para garantir
uma ventilação suficiente, siga as instruções relevantes para a instalação.
• Sempre que possível, a traseira do aparelho deve ficar virada para uma parede para
evitar toques nas partes quentes (compressor, condensador) e possíveis queimaduras.
• Não coloque o aparelho perto de radiadores ou fogões.
• Certifique-se de que a ficha de alimentação fica acessível após a instalação do
aparelho.
• Ligue apenas a uma fonte de água potá-
11)
vel.
Assistência
• Quaisquer trabalhos eléctricos necessários para a assistência da máquina devem
Painel de controlo
ser efectuados por um electricista qualificado ou pessoa competente.
• Este aparelho deve ser reparado por um
Centro de assistência autorizado, o qual
deverá utilizar apenas peças originais.
Protecção ambiental
Este aparelho não contém gases que
possam danificar a camada de ozono,
tanto no circuito refrigerante como nos
materiais de isolamento. O aparelho não
deverá ser eliminado juntamente com o
lixo doméstico. A espuma de isolamento
contém gases inflamáveis: o aparelho
deverá ser eliminado de acordo com as
normas aplicáveis que pode obter junto
das autoridades locais. Evite danificar a
unidade de arrefecimento, especialmente na parte traseira, perto do permutador de calor. Os materiais utilizado neste
aparelho marcados pelo símbolo
são
recicláveis.
+2 +4 +5 +6 +8
1 2
1 Regulador da temperatura
Botão Action Freeze
2 Indicador Action Freeze
Ligar
Se presente, remova a etiqueta colada no
interior do compartimento do congelador.
Introduza a ficha na tomada.
Desligar
Para desligar o aparelho, retire a ficha da tomada.
Regulação da temperatura
A temperatura é regulada automaticamente.
Para utilizar o aparelho, proceda do seguinte
modo:
• Mantenha o regulador da temperatura
pressionado até que o LED correspondente à temperatura pretendida se acen-
11) Se estiver prevista uma ligação hídrica
da. A selecção é gradual, variando entre
+2°C e +8°C. Sempre que premir a tecla,
é seleccionada a temperatura indicada pelo led.
Normalmente, uma definição média é a
mais adequada.
No entanto, a definição exacta deve ser escolhida tendo em conta que a temperatura
dentro do aparelho depende da:
• temperatura ambiente
• frequência de abertura da porta
• quantidade de alimentos conservados
• localização do aparelho.
Importante Se a temperatura ambiente for
inferior a 16 °C, prima o regulador da
temperatura, até que se acenda o LED
correspondente à temperatura inferior.
Page 45
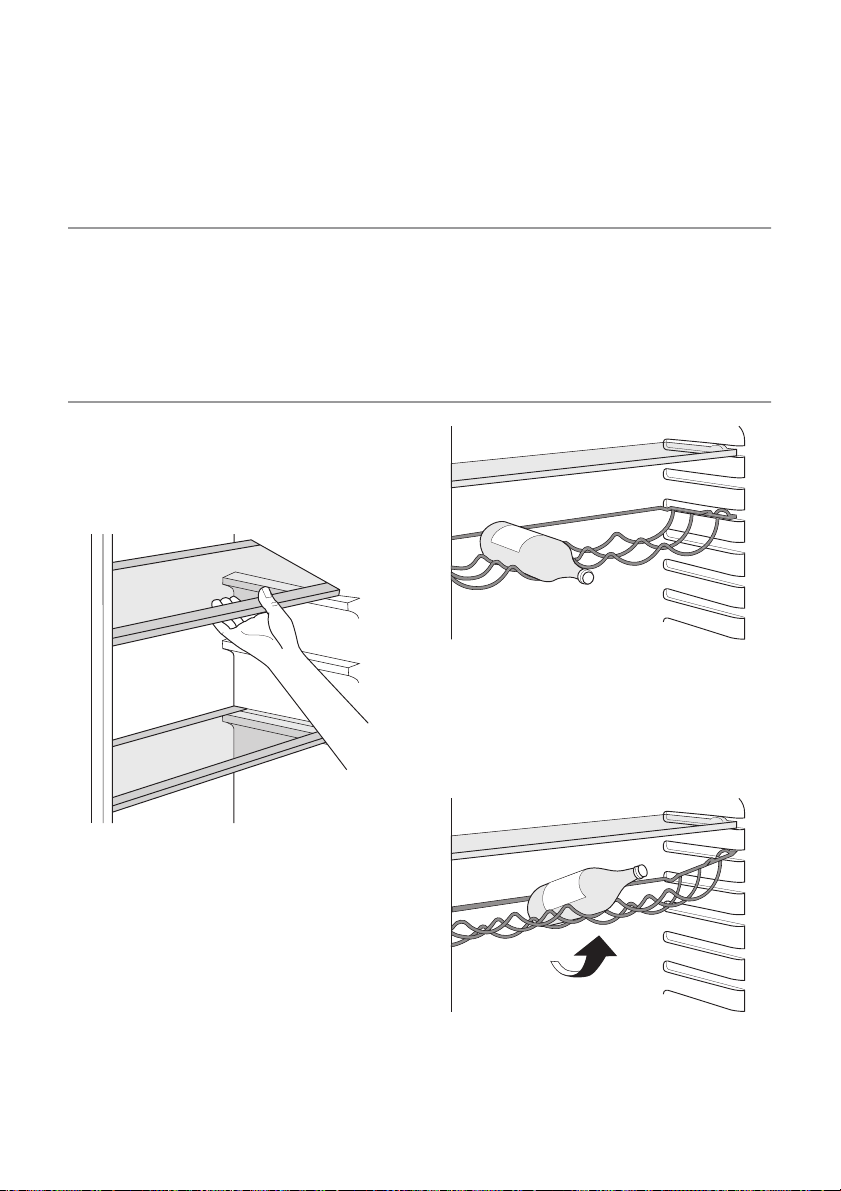
electrolux 45
Action Freeze Função
Pode activar a função Action Freeze premindo o botão Action Freeze mais vezes, até
que o LED correspondente ao indicador do
símbolo Action Freeze se acenda.
Primeira utilização
Limpeza do interior
Antes de utilizar o aparelho pela primeira vez,
limpe o interior e todos os acessórios internos com água morna e sabão neutro de modo a remover o cheiro típico de um produto
novo, de seguida seque minuciosamente.
Utilização diária
Prateleiras móveis
As paredes do frigorífico estão equipadas
com uma série de guias de modo a que as
prateleiras possam ser posicionadas como
quiser.
Pode desactivar a função Action Freeze premindo o botão Action Freeze mais vezes, até
que seja seleccionada a temperatura pretendida.
Importante Não utilize detergentes ou pós
abrasivos, pois estes danificam o acabamento.
Prateleira para garrafas
Coloque as garrafas (com a abertura para a
frente) na prateleira pré-posicionada.
Importante Se a prateleira estiver colocada
na horizontal coloque apenas garrafas
fechadas.
Esta prateleira suporte para garrafas pode
ser inclinada para poder armazenar garrafas
que já tenham sido abertas. Para tal, puxe a
prateleira para cima para que possa rodar
para cima e ser colocada no nível seguinte
em cima.
Gaveta de vegetais com controlo de
humidade
A gaveta é indicada para o armazenamento
de fruta e vegetais.
Page 46
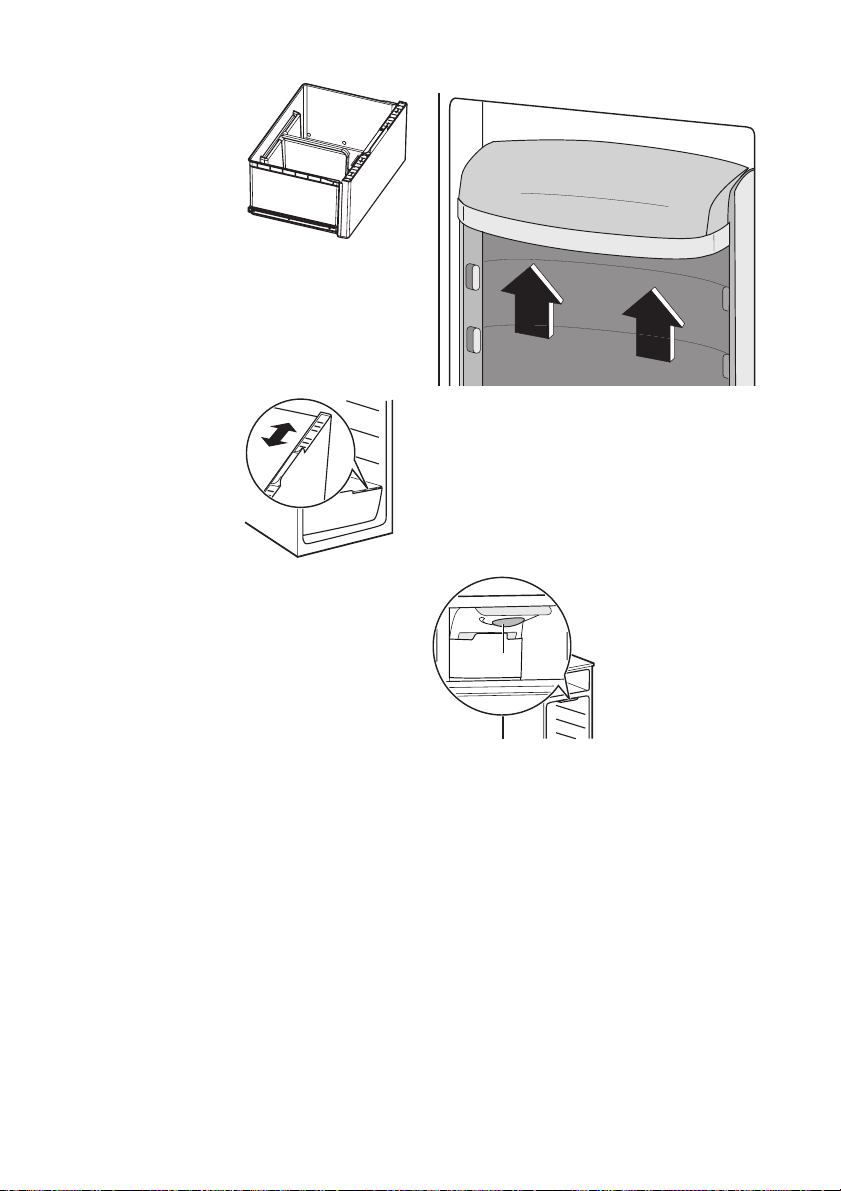
46 electrolux
No interior da gaveta
existe um separador
que pode ser colocado em diferentes posições, de forma a
permitir a subdivisão
ideal para as necessidades pessoais.
Existe uma grelha (se
prevista) no fundo da
gaveta, destinada a separar a fruta e os vegetais de qualquer humidade que se possa
formar na superfície do fundo.
Todas as componentes existentes no interior
da gaveta podem ser removidas para efeitos
de limpeza
Para regular a humidade na gaveta de
vegetais, a prateleira
de vidro incorpora
um dispositivo com
frestas (ajustável
através de uma alavanca de deslize).
Quando as frestas de
ventilação se encontram fechadas:
O teor natural de humidade dos alimentos
armazenados no compartimento de fruta e
vegetais é preservado durante mais tempo.
Quando as frestas de ventilação se encontram abertas:
uma maior circulação de ar resulta num teor
de humidade do ar inferior no compartimento de fruta e vegetais.
Posicionar as prateleiras da porta
Para permitir o armazenamento de embalagens de alimentos de vários tamanhos, as
prateleiras da porta podem ser colocadas a
diferentes alturas.
Para fazer estes ajustes, proceda do seguinte modo:
puxe gradualmente a prateleira na direcção
das setas até se soltar, de seguida, reposicione como quiser.
Arrefecimento por ar
A ventoinha Dynamic Air Cooling (DAC) permite que os alimentos arrefeçam rapidamente e proporciona uma temperatura mais uniforme no compartimento.
Pode ligar a ventoinha pressionando o interruptor indicado na figura. A luz verde acende-se.
B
Importante Ligue a ventoinha quando a
temperatura ambiente exceder os 25°C.
Produção de cubos de gelo
Este aparelho possui um ou mais tabuleiros
para a produção de cubos de gelo.
Estes são inseridos nos lados da gaveta superior do congelador.
Puxe para fora a gaveta superior do congelador. Retire o tabuleiro dos cubos de gelo.
Retire a tampa. Encha com água até ao limite
indicado por "MAX".
Volte a colocar a tampa e introduza o tabuleiro no local adequado.
Para remover os cubos de gelo, rode ao
contrário o tabuleiro com os cubos de gelo
e bata com ele numa superfície rígida.
Para simplificar a libertação do gelo, recomenda-se que coloque o tabuleiro debaixo
de água tépida durante alguns segundos.
Page 47
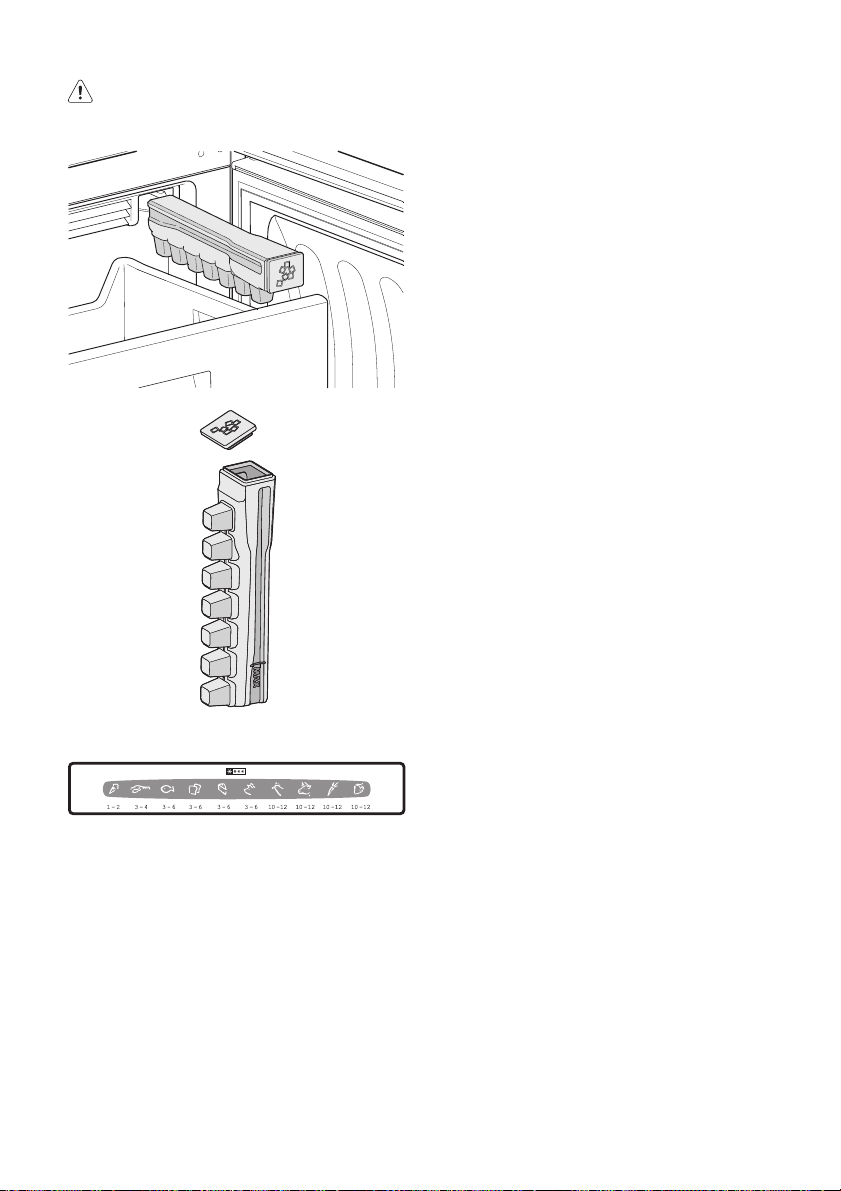
electrolux 47
Advertência Não utilize instrumentos
metálicos para remover os tabuleiros do
congelador.
Calendário de congelação
Os símbolos indicam diferentes tipos de alimentos congelados.
Os números indicam os tempos de armazenamento em meses para os respectivos tipos de alimentos congelados. A validade do
valor superior ou inferior do tempo de armazenamento indicado depende da qualidade
dos alimentos e do tratamento antes da congelação.
Congelação de alimentos frescos
O compartimento congelador é adequado
para a congelação de alimentos frescos e
para a conservação a longo prazo de alimentos congelados e ultracongelados.
Para congelar alimentos frescos active a função Action Freeze, pelo menos, 24 horas antes de colocar os alimentos a congelar no
compartimento congelador.
Coloque os alimentos frescos a serem congelados no compartimento superior.
A quantidade máxima de alimentos que podem ser congelados em 24 horas está indicada na chapa de quantidades , uma etiqueta presente no interior do aparelho.
O processo de congelamento demora 24
horas: durante este período, não introduza
novos alimentos a congelar.
Armazenamento de alimentos
congelados
Quando ligar pela primeira vez ou após um
período sem utilização, antes de colocar os
produtos no compartimento, deixe o aparelho em funcionamento durante no mínimo 2
horas nas definições mais elevadas.
Importante Em caso de descongelação
acidental, por exemplo, devido a falta de
electricidade, se a alimentação estiver
desligada por mais tempo que aquele
mostrado na tabela de características
técnicas em "tempo de reinício", os
alimentos descongelados têm de ser
consumidos rapidamente ou cozinhados
imediatamente e depois, novamente
congelados (depois de arrefecerem).
Descongelação
Os alimentos congelados, antes de serem
utilizados, podem ser descongelados no
compartimento do frigorífico ou à temperatura ambiente, dependendo do tempo disponível para esta operação.
Os pedaços pequenos podem mesmo ser
cozinhados ainda congelados, directamente
do congelador: neste caso, a confecção irá
demorar mais.
Page 48

48 electrolux
Sugestões e conselhos úteis
Conselhos para poupar energia
• Não abra muitas vezes a porta nem a deixe
aberta mais tempo do que o necessário.
• Se a temperatura ambiente for alta e o regulador de temperatura se encontrar na
definição de baixa temperatura com o
aparelho completamente cheio, o compressor pode funcionar continuamente,
causando gelo no evaporador. Se isto
acontecer, coloque o regulador de temperatura em definições mais quentes, para
permitir a descongelação automática,
poupando assim no consumo de electricidade.
Conselhos para a refrigeração de
alimentos frescos
Para obter o melhor desempenho:
• não guarde alimentos quentes ou líquidos
que se evaporam no frigorífico
• cubra ou embrulhe os alimentos, particularmente se tiverem um cheiro forte
• posicione os alimentos de modo a que o
ar possa circular livremente em redor
Conselhos para a refrigeração
Conselhos úteis:
Carne (todos os tipos) : embrulhe em sacos
de politeno e coloque na prateleira de vidro
acima da gaveta de vegetais.
Por motivos de segurança, guarde desta forma por um dia ou dois no máximo.
Alimentos cozinhados, pratos frios, etc: estes devem estar cobertos e podem ser colocados em qualquer prateleira.
Fruta e vegetais: estes devem ser minuciosamente limpos e colocados nas gavetas especiais fornecidas.
Manteiga e queijo: estes devem ser colocados em recipientes herméticos especiais ou
embrulhados em folha de alumínio ou sacos
de politeno para excluir o máximo de ar possível.
Garrafas de leite: estas devem ter uma tampa e devem ser armazenadas na prateleira
de garrafas na porta.
Bananas, batatas, cebolas e alho, se não estiverem embalados, não devem ser guardados no frigorífico.
Conselhos para a congelação
Para o ajudar a tirar partido do processo de
congelação, eis alguns conselhos importantes:
• a quantidade máxima de alimentos que
pode ser congelada em 24h. está mostrada na placa de dados;
• O processo de congelamento demora 24
horas. Não devem ser adicionados mais
alimentos para congelação durante este
período;
• congele apenas alimentos de alta qualidade, frescos e extremamente limpos;
• Prepare os alimentos em pequenas quantidades para permitir que sejam rápida e
completamente congeladas e para tornar
possível subsequentemente descongelar
apenas a quantidade necessária;
• embrulhe os alimentos em folha de alumínio ou politeno e certifique-se de que as
embalagens são herméticas;
• Não permita que os alimentos frescos e
descongelados entrem em contacto com
os alimentos já congelados, evitando assim o aumento de temperatura dos alimentos congelados;
• os alimentos sem gordura são melhores
para armazenar que os alimentos com
gordura; o sal reduz o tempo de armazenamento dos alimentos;
• a água congela. Se for consumida imediatamente após a remoção do compartimento do congelador, poderá causar
queimaduras de gelo na pele;
• é aconselhável que anote a data de congelação em cada embalagem individual
para permitir que saiba o tempo de armazenamento.
Conselhos para o armazenamento de
alimentos congelados
Para obter o melhor desempenho deste aparelho, deve:
• certificar-se de que os alimentos congelados comercialmente foram armazenados
adequadamente pelo vendedor;
• ter a certeza que os alimentos congelados
são transferidos do supermercado para o
congelador no tempo mais curto possível;
• não abra muitas vezes a porta nem a deixe
aberta mais tempo do que o necessário.
Page 49
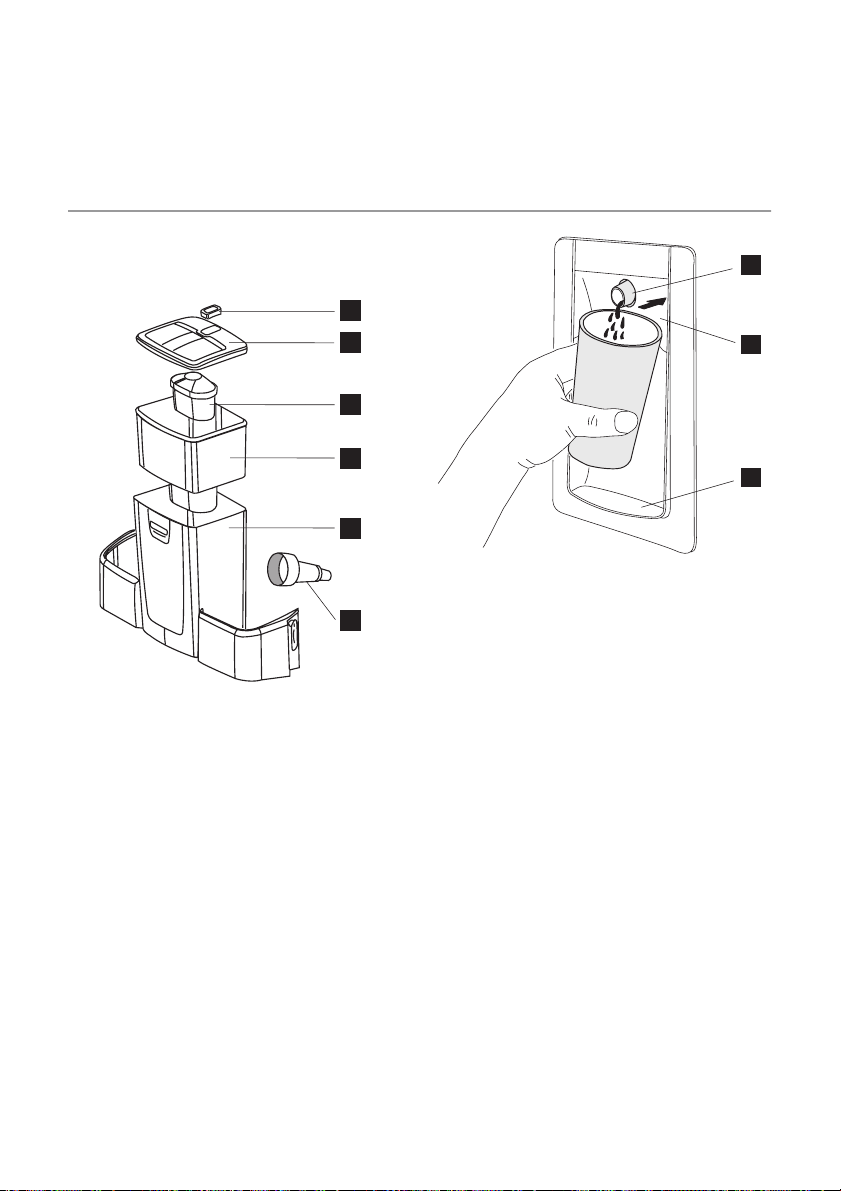
electrolux 49
• Uma vez descongelados, os alimentos degradam rapidamente e não podem tornar
a ser congelados.
• Não exceda o período de armazenamento
indicado pelo fabricante de alimentos.
Como usar o dispensador de água com o cartucho filtrante BRITA
MAXTRA
Unidade de filtragem de água BRITA
Componentes internos:
6
3
5
2
1
1Dispensador
4
1 Reservatório da água
2 Funil
3 Tampa do reservatório
4 Válvula + vedante
5 Incluindo o cartucho filtrante
6 BRITA Memo - indicador electrónico de
troca de cartucho
Componentes externos:
2 Nível da água
3 Tabuleiro recolhe gotas
Operações iniciais para utilizar o
dispensador de água
1. Remova a fita adesiva e qualquer outro
sistema de protecção do conjunto do reservatório
2. Limpe os componentes, tal como descri-
to em "Limpeza do dispensador de
água", para eliminar eventuais resíduos.
Limpeza do dispensador de água
1. Destrave os dois elementos de bloqueio
nos lados do reservatório tal como indicado nas figuras abaixo:
– Retire o cartucho BRITA MAXTRA da
unidade de filtragem da água
– Pressione os elementos de bloqueio
no meio e eleve-os
– Desloque o bloqueador em direcção
ao centro do reservatório.
2. Puxe o reservatório para cima, na direc-
ção da válvula.
3. Retire a tampa e o funil.
1
2
3
Page 50
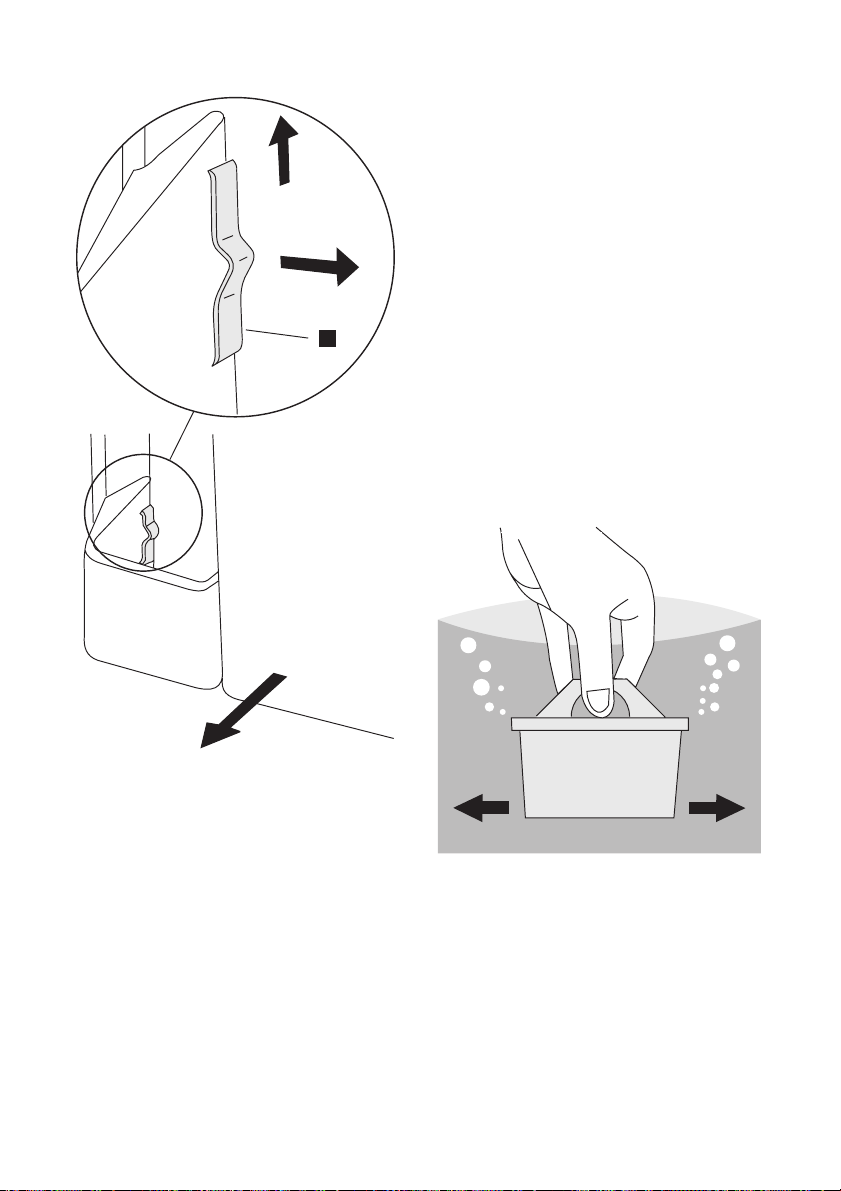
50 electrolux
desmontagem (tenha atenção à posição
do vedante da válvula).
8. Coloque o reservatório montado na por-
ta, na direcção da válvula.
9. Trave os elementos de bloqueio pela or-
dem inversa à da destravagem.
10. Volte a colocar o cartucho BRITA MAX-
TRA no funil.
Como usar o cartucho filtrante BRITA
MAXTRA
Passo 1: Preparar o cartucho
Para preparar o cartucho filtrante BRITA re-
A
tire o invólucro protector (nota: o cartucho e
o interior do invólucro podem apresentar humidade, trata-se apenas de condensação).
Coloque o cartucho em água fria e abane-o
ligeiramente para remover quaisquer bolhas
de ar. O filtro está agora pronto a ser usado.
Ao contrário de outros cartuchos filtrantes
para água, não é necessário embeber previamente o novo cartucho Maxtra.
4. Desenrosque a válvula, rodando-a para
a esquerda (tenha atenção para não soltar o vedante da válvula, pois este é necessário para o correcto funcionamento
da unidade).
5. Lave a tampa do reservatório, a válvula
e o vedante com uma solução de água
morna e sabão neutro. Enxagúe e insira-
-os no orifício da porta durante a limpeza
dos restantes componentes (para evitar
fugas de ar frio do frigorífico).
6. Lave o reservatório e o funil na máquina
de lavar louça ou com uma solução de
água morna e sabão neutro, por fim, enxagúe-os.
7. Após a limpeza, volte a retirar a válvula
da porta do frigorífico e monte o reservatório pela ordem inversa (4;3;2;1) à da
Passo 2: Inserir no reservatório da água
Retire a tampa do reservatório. Antes de inserir o cartucho, retire o funil, lave-o, enxagúe-o e seque-o bem.
A seguir, limpe bem o interior do reservatório
da água com um pano húmido e seque-o.
Coloque o cartucho no reservatório do filtro
e empurre para baixo, até fazer 'click'.
Ao virar o funil para baixo o cartucho deverá
ficar no lugar.
Page 51
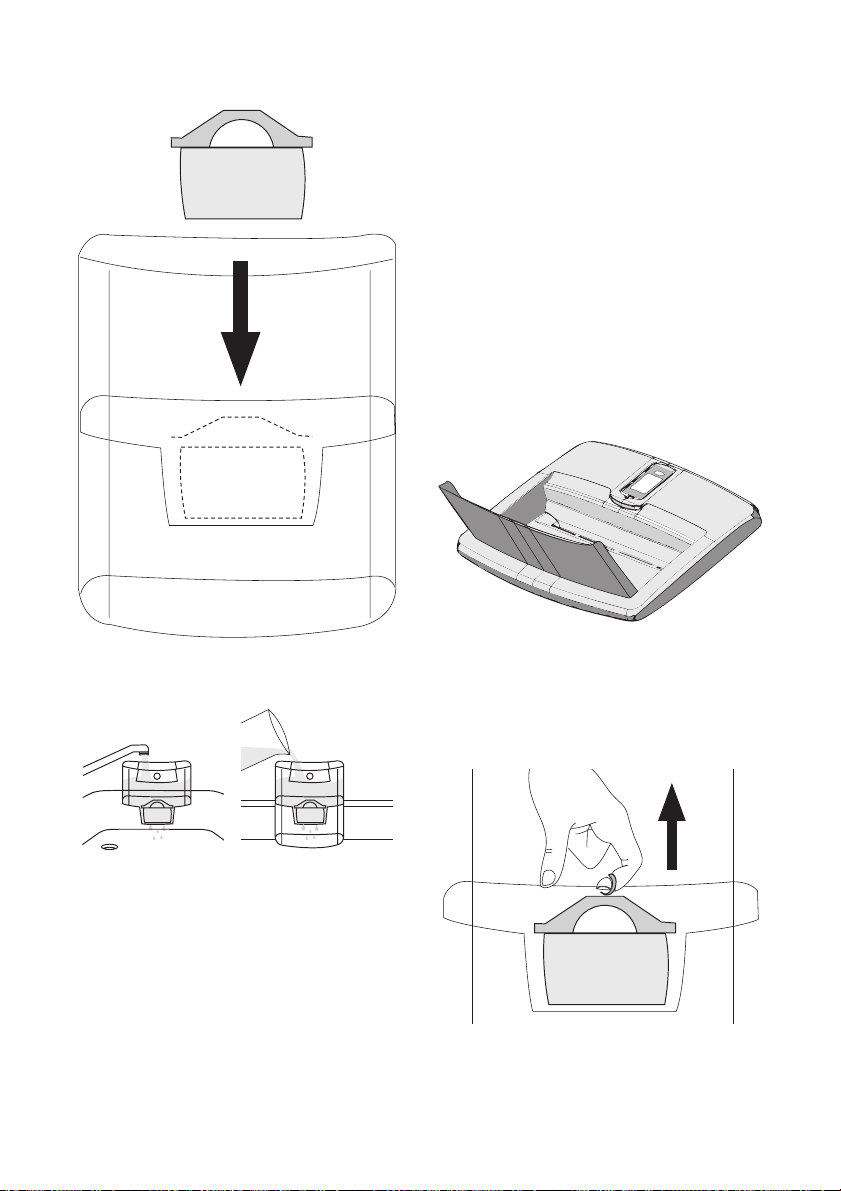
electrolux 51
Para encher o reservatório com água fria,
basta abrir a tampa no topo e despejar um
jarro de água da torneira tal como indicado
na figura (utilize a tampa de cada vez que
desejar encher com água).
Importante Para evitar o risco de
derramemento de água durante o fecho e
abertura da porta do frigorífico,
recomendamos que não encha totalmente o
depósito de água, deixando algum espaço
com ar (limite de enchimento máximo até às
marcas na frente).
Caso não tenha usado toda a água filtrada
no reservatório dentro de 1 a 2 dias, despeje
a água restante antes de voltar a encher a
unidade de filtragem da água BRITA.
Passo 3: Limpar o cartucho
2x 3x=ok
Retire o funil da unidade de filtragem da água
BRITA, encha-o à torneira com água fria e
aguarde que esta seja filtrada.
Deixe escorrer os dois primeiros enchimentos para o lava-louça. Estes dois primeiros
enchimentos servem para limpar o cartucho
filtrante.
A seguir, volte a colocar o funil na unidade de
filtragem da água BRITA.
Volte a colocar a tampa e pressione cuidadosamente para garantir que esta fica bem
fechada.
Passo 4: Encher o reservatório da água
Aguarde até que a água seja filtrada e repita
o "Passo 4" tantas vezes até que a unidade
de filtragem da água BRITA esteja cheia.
Retirar o cartucho com a pega em forma
de anel
Para trocar o cartucho, passadas quatro semanas, basta puxá-lo pela pega em forma
de anel para o retirar do funil e repetir os
passos 1 a 3 acima descritos.
Page 52
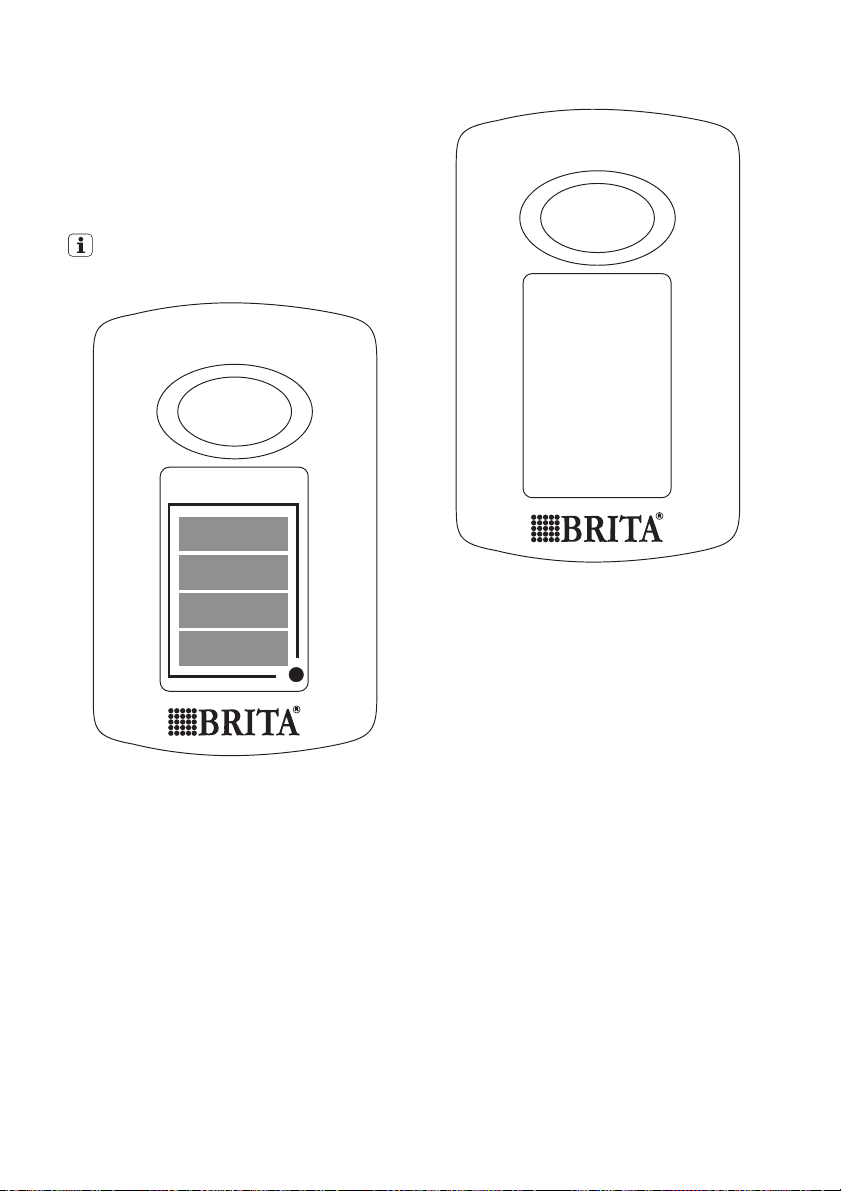
52 electrolux
O Memo BRITA
Para obter o máximo desempenho e um sabor ideal, é importante trocar regularmente o
cartucho BRITA. A BRITA recomenda que
troque o cartucho na unidade de filtragem da
água BRITA do seu frigorífico a cada quatro
semanas.
O Memo BRITA lembra-o automaticamente quando deve trocar o cartucho.
START
%
100
START
%
100
75
50
25
75
50
25
O original Memo BRITA mede o tempo de
uso recomendado do cartucho.
O Memo é fácil de usar e lembra-o automaticamente quando trocar o cartucho.
O Memo BRITA encontra-se na tampa do
reservatório da água. O seu funcionamento
é muito simples.
Iniciar o visor do Memo
Para iniciar o Memo, prima o botão na tampa
e mantenha-o premido até surgirem as quatro barras no visor e estas piscarem duas
vezes. O Memo está agora configurado.
Controlar o funcionamento
O ponto intermitente no canto inferior direito
do Memo indica que este está a funcionar.
Page 53
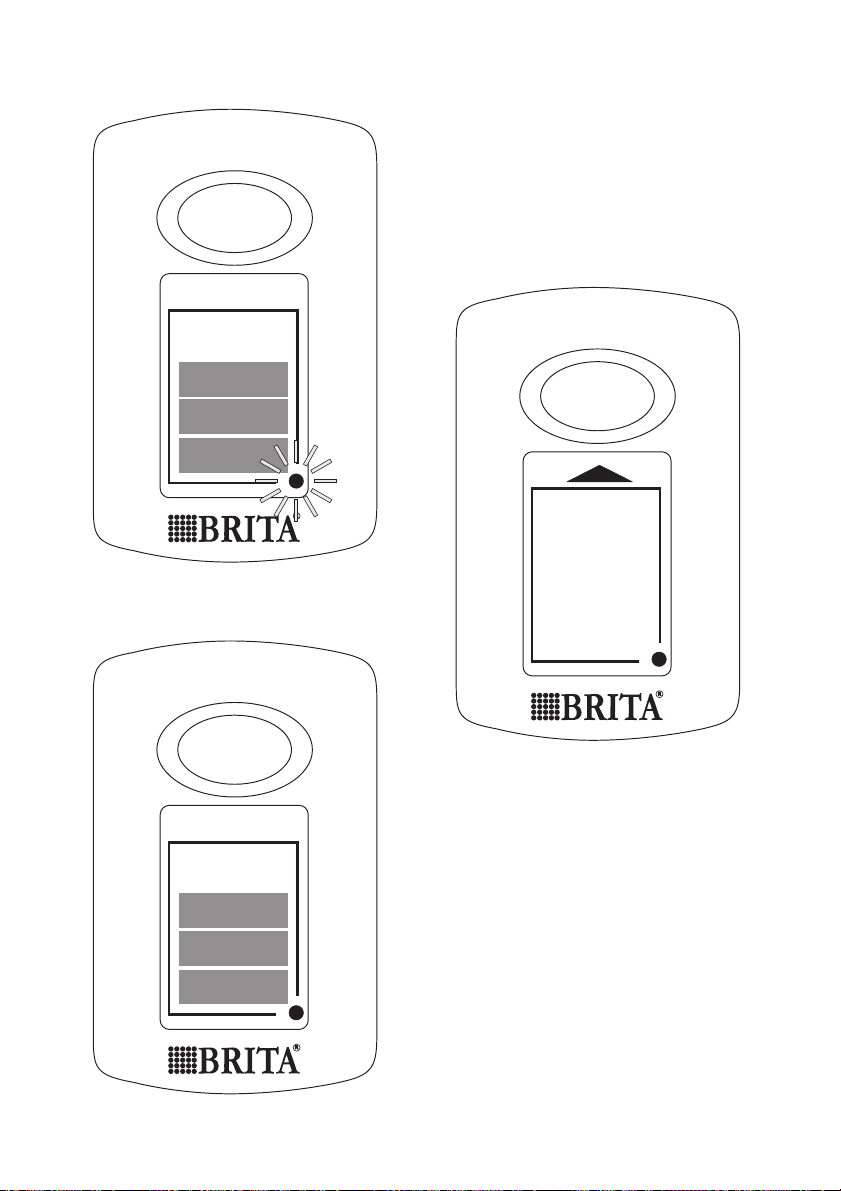
START
electrolux 53
Em cada semana desaparece uma barra para indicar a vida útil restante do cartucho.
Após quatro semanas todas as barras terão
desaparecido. Isto e uma seta intermitente
indicam que o cartucho deve ser agora trocado.
Insira um cartucho novo de acordo com as
instruções e reactive o Memo tal como acima
descrito.
%
100
Mudar o visor
START
75
50
25
%
100
75
50
START
%
100
75
50
25
Quando for visível apenas uma barra, deverá
verificar se possui um cartucho filtrante BRITA MAXTRA novo disponível.
25
Page 54
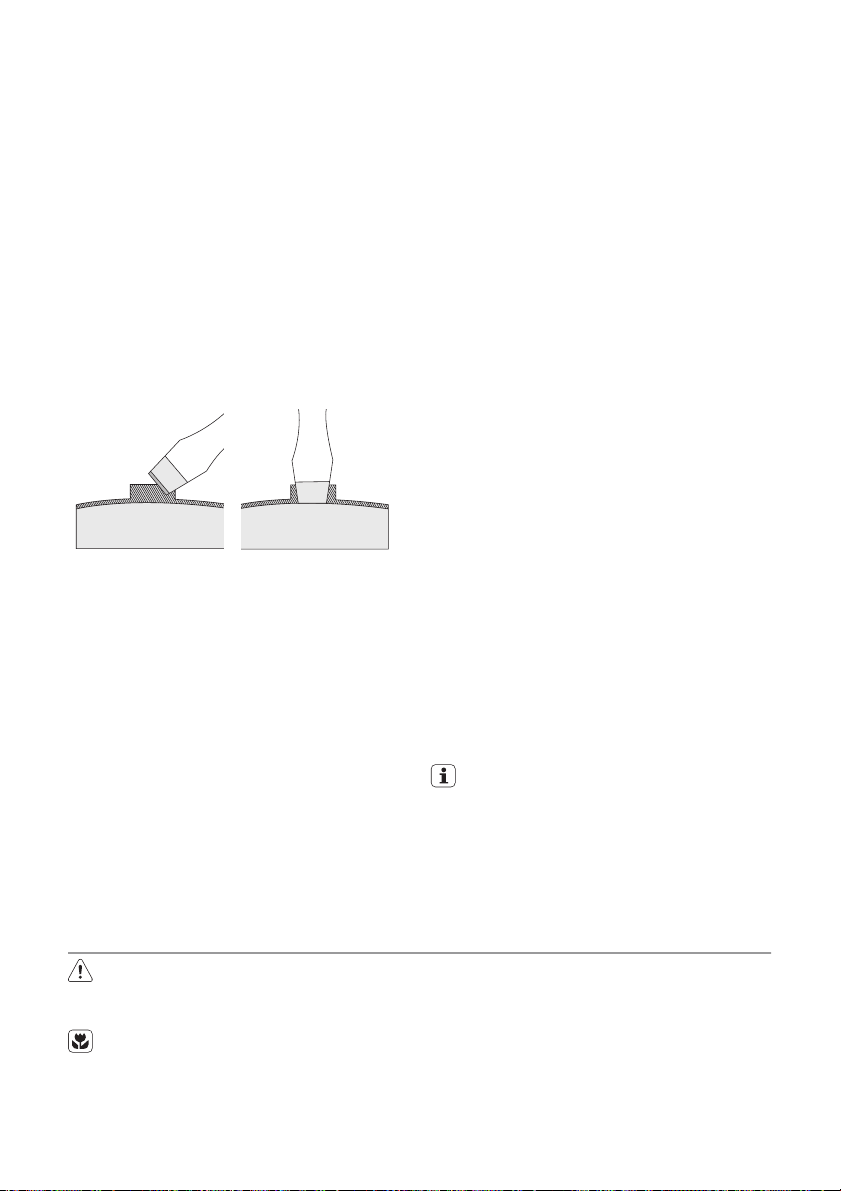
54 electrolux
Importante O Memo foi concebido para ser
usado apenas com cartuchos filtrantes
BRITA.
Memo BRITA: O indicador electrónico de troca de cartucho tem uma vida útil de aproximadamente 5 anos. No fim da vida útil do
Memo lembre-se de que se trata de um dispositivo electrónico, devendo ser eliminado
de acordo com as disposições e regulamentos aplicáveis.
Para retirar o Memo gasto, insira uma chave
de fendas na ranhura junto ao Memo e puxe-
-o para fora.
Não se esqueça que o Memo não deve ser
retirado por qualquer outro motivo que não
seja a sua eliminação.
Informações importantes
• O orifício da válvula da porta do frigorífico
tem de estar fechado com a válvula da
água durante o normal funcionamento do
aparelho.
• Utilize apenas água potável. A utilização
de outro tipo de bebida pode deixar resíduos, sabor ou cheiro no reservatório e na
torneira.
• É possível ouvir alguns ruídos provocados
pela entrada de ar durante a saída da água
do reservatório.
• Se a água não sair correctamente, volte a
pressionar a alavanca de accionamento.
Mantenha o copo debaixo da torneira durante alguns instantes para assegurar que
este recolhe toda a água.
• Não utilize bebidas gaseificadas, como sejam refrigerantes. A bebida pode verter
devido à pressão do gás.
• Lembre-se de que a água é um produto
alimentar. Consuma a água filtrada dentro
de um a dois dias.
• Caso não use a unidade de filtragem da
água BRITA durante um período de tempo
prolongado (p. ex. férias), recomendamos
a despejar toda a água existente no sistema e a deixar o cartucho dentro do reservatório do filtro.
Antes de voltar a usar o sistema, retire o
cartucho e repita os passos 1 a 4 de "Como usar o cartucho filtrante BRITA MAXTRA".
• A unidade de filtragem da água BRITA foi
concebida para ser usada apenas com
água municipal da torneira (nota: esta
água é constantemente controlada, sendo
apta para beber de acordo com os regulamentos legais) ou com água de fontes
privadas, que tenham sido testadas e declaradas aptas para beber.
Caso sejam recebidas instruções das autoridades no sentido de ferver a água da
torneira, a água filtrada BRITA terá igualmente de ser fervida. Quando as instruções para ferver a água deixarem de estar
em vigor, todo o sistema de filtragem tem
de ser limpo e inserido um novo cartucho.
Pode encontrar mais informações sobre os
cartuchos filtrantes BRITA e o Memo no manual informativo BRITA.
Pode adquirir novos cartuchos filtrantes
BRITA e o Memo através da rede de assistência ao consumidor da Electrolux
ou da BRITA.
Manutenção e limpeza
Cuidado Retire a ficha da tomada antes
de efectuar qualquer operação de
manutenção.
Este aparelho contém hidrocarbonetos
na sua unidade de arrefecimento; a manutenção e a recarga devem, por isso,
ser efectuadas exclusivamente por técnicos autorizados.
Limpeza periódica
O equipamento tem de ser limpo regularmente:
• limpe o interior e os acessórios com água
morna e sabão neutro.
• verifique regularmente os vedantes de
porta e limpe-os para se certificar de que
estão limpos e sem resíduos.
• lave e seque minuciosamente.
Page 55
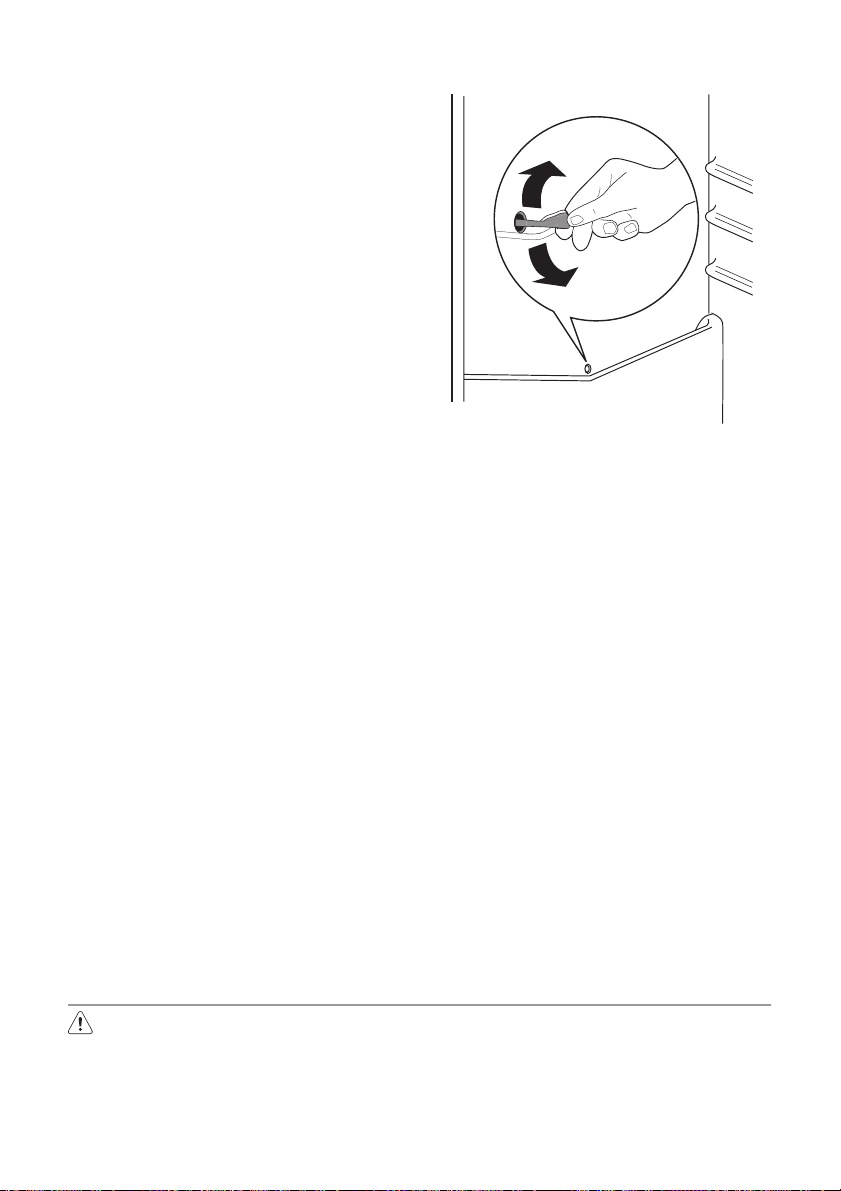
Importante Não puxe, desloque nem
danifique quaisquer tubos e/ou cabos dentro
do armário.
Nunca utilize detergentes, pós abrasivos,
produtos de limpeza muito perfumados ou
cera de polir para limpar o interior, pois isto
irá danificar a superfície e deixar um odor forte.
Limpe o condensador (grelha preta) e o compressor no fundo do aparelho com uma escova ou um aspirador. Esta operação irá melhorar o desempenho do aparelho e poupar
o consumo de electricidade.
Importante Tenha cuidado para não
danificar o sistema de arrefecimento.
Muitos agentes de limpeza de superfícies de
cozinhas contêm químicos que podem atacar/danificar os plásticos usados neste aparelho. Por esta razão é aconselhável que a
estrutura exterior deste aparelho seja limpa
apenas com água morna com um pouco de
solução de limpeza adicionada.
Após a limpeza, volte a ligar o equipamento
à tomada de alimentação.
Descongelar o frigorífico
O gelo é automaticamente eliminado do evaporador do compartimento do frigorífico
sempre que o compressor de motor pára,
durante a utilização normal. A água resultante da descongelação é descarregada por um
canal para um recipiente especial, colocado
na parte traseira por cima do aparelho, sobre
o compressor de motor, onde evapora.
É importante limpar periodicamente o orifício
de descarga da água resultante da descongelação no centro do canal do compartimento do frigorífico para evitar que um fluxo
excessivo de água pingue sobre os alimentos. Utilize o agente de limpeza fornecido,
que irá encontrar já inserido no orifício de
descarga.
electrolux 55
Descongelar o congelador
O compartimento do congelador deste modelo, por sua vez, é do tipo "no frost". Isto
significa que não há qualquer formação de
gelo durante o seu funcionamento, quer nas
paredes interiores, quer nos alimentos.
A ausência de gelo deve-se à circulação
contínua de ar frio no interior do compartimento, accionado por um ventilador controlado automaticamente.
Períodos de inactividade
Quando o aparelho não é utilizado por longos períodos, observe as seguintes precauções:
• desligue o aparelho da tomada da
electricidade
• retire todos os alimentos
•
descongelação
12)
e limpe o aparelho e to-
dos os acessórios
• deixe a(s) porta(s) aberta(s) para evitar
cheiros desagradáveis.
Se o armário for mantido ligado, peça a alguém para o verificar esporadicamente, para
evitar que os alimentos no interior se estraguem em caso de falha eléctrica.
O que fazer se…
Advertência Antes da resolução de
problemas, retire a ficha da tomada.
A resolução de problemas que não se
encontram no manual só deve ser efec-
12) Se previsto.
tuada por um electricista qualificado ou
uma pessoa competente.
Page 56
56 electrolux
Importante Existem alguns ruídos durante
a utilização normal (compressor, circulação
de refrigerante).
Problema Possível causa Solução
O aparelho não funciona.
A lâmpada não funciona.
A ficha não está correctamente
O aparelho não tem alimentação.
A lâmpada não funciona.
A lâmpada está defeituosa. Consulte "Substituir a lâmpada".
O compressor funciona
continuamente.
A porta não está fechada correc-
A porta foi aberta muitas vezes. Não mantenha a porta aberta mais
A temperatura do produto está
A temperatura ambiente está
A água escorre na placa
traseira do frigorífico.
A água escorre para o frigorífico.
Os produtos evitam que a água
A água escorre para o
chão.
A temperatura no aparelho está demasiado baixa.
A temperatura no aparelho está demasiado alta.
A porta não está fechada correc-
A temperatura do produto está
Muitos produtos armazenados
A temperatura no frigorífico está demasiado alta.
O aparelho está desligado. Ligue o aparelho.
inserida na tomada.
Não existe tensão na tomada.
A lâmpada está no modo de espera.
A temperatura não está regulada
correctamente.
tamente.
muito alta.
muito alta.
Durante o processo de descon-
gelação automático, o gelo é
descongelado na placa traseira.
A saída de água está obstruída. Limpe a saída da água.
escorra para o colector de água.
A saída de água descongelada
não escorre para o tabuleiro de
evaporação acima do compressor.
A temperatura não está regulada
correctamente.
A temperatura não está regulada
correctamente.
tamente.
muito alta.
ao mesmo tempo.
Não existe circulação de ar frio no
aparelho.
Ligue a ficha do aparelho correctamente à tomada de alimentação.
Ligue um aparelho eléctrico diferente à tomada.
Contacte um electricista qualificado.
Feche e abra a porta.
Defina uma temperatura mais elevada.
Consulte "Fechar a porta".
tempo do que o necessário.
Deixe que a temperatura do pro-
duto diminua até à temperatura
ambiente antes de o guardar.
Diminua a temperatura ambiente.
Isto está correcto.
Certifique-se de que os produtos
não tocam na placa traseira.
Engate a saída de água descongelada no tabuleiro de evaporação.
Defina uma temperatura mais elevada.
Defina uma temperatura mais baixa.
Consulte "Fechar a porta".
Deixe que a temperatura do produto diminua até à temperatura
ambiente antes de o guardar.
Armazene menos produtos ao
mesmo tempo.
Certifique-se de que existe circulação de ar frio no aparelho.
Page 57
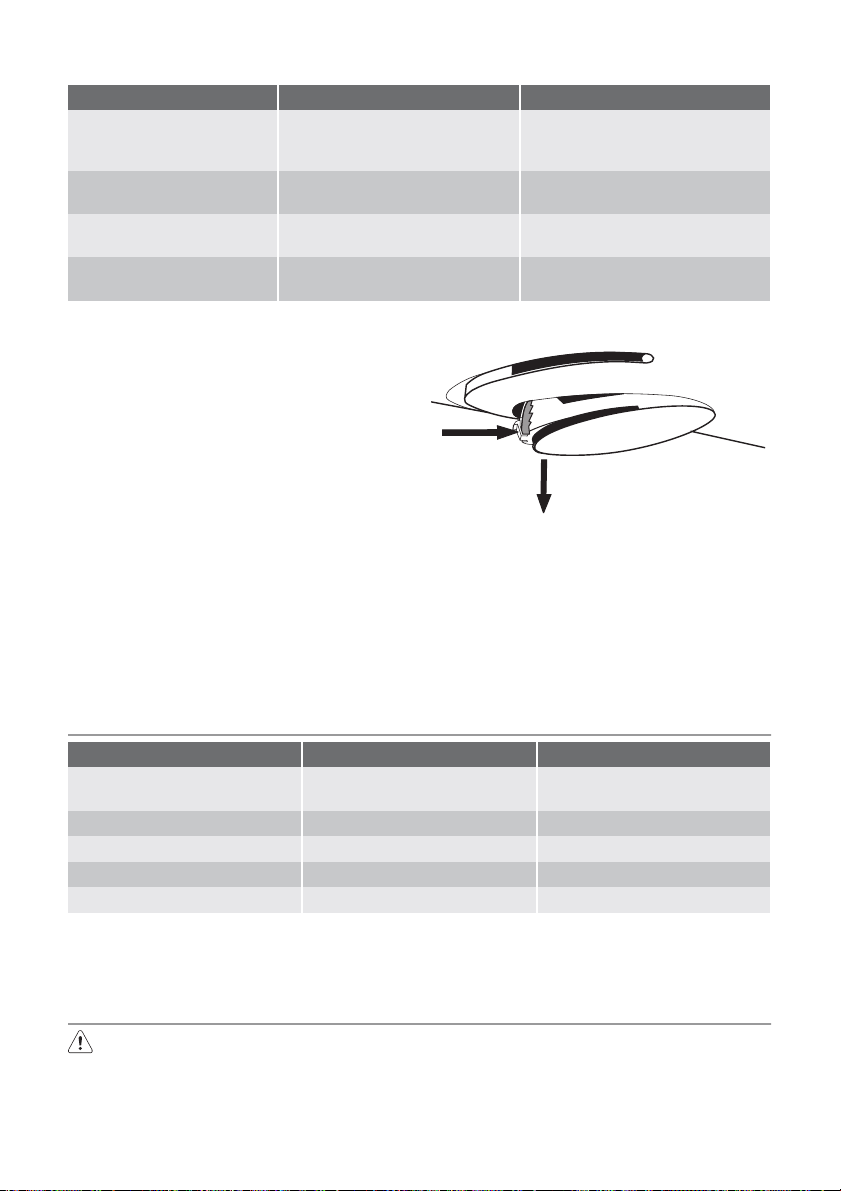
Problema Possível causa Solução
A temperatura no congelador está demasiado alta.
Existe demasiado gelo. Os alimentos não estão embala-
A porta não está fechada correc-
A temperatura não está regulada
Os produtos estão demasiado
perto uns dos outros.
dos correctamente.
tamente.
correctamente.
Substituir a lâmpada
1. Desligue a ficha da tomada.
2. Prima o gancho traseiro da tampa da
lâmpada com uma chave de fendas e, ao
mesmo tempo, rode a tampa na direcção
da seta.
A
3. Substitua a lâmpada por uma com a
mesma potência (a potência máxima está indicada na cobertura da lâmpada).
4. Instale a tampa da lâmpada fixando-a na
sua posição original.
5. Ligue a ficha do aparelho à tomada de
alimentação.
6. Abra a porta. Certifique-se de que a lâmpada se acende.
Fechar a porta
1. Limpe as juntas da porta.
2. Se necessário, ajuste a porta. Consulte
"Instalação".
3. Se necessário, substitua as juntas de
porta defeituosas. Contacte o Centro de
Assistência.
electrolux 57
Armazene os produtos de forma a
haver circulação de ar frio.
Embale os alimentos correctamente.
Consulte "Fechar a porta".
Defina uma temperatura mais elevada.
max 25 W
B
Dados técnicos
Dimensão do nicho de instalação
Altura 1950 mm
Largura 695 mm
Profundidade 669 mm
Tempo de reinício 20 h
As informações técnicas encontram-se na
placa de dados no lado esquerdo interno do
aparelho e na etiqueta de energia.
Instalação
Leia as "Informações de segurança"
cuidadosamente para a sua segurança
e funcionamento correcto do aparelho
antes de o instalar.
Posicionamento
Instale este aparelho num local com uma
temperatura ambiente que corresponde à
classe climática indicada na placa de dados
do aparelho:
Page 58
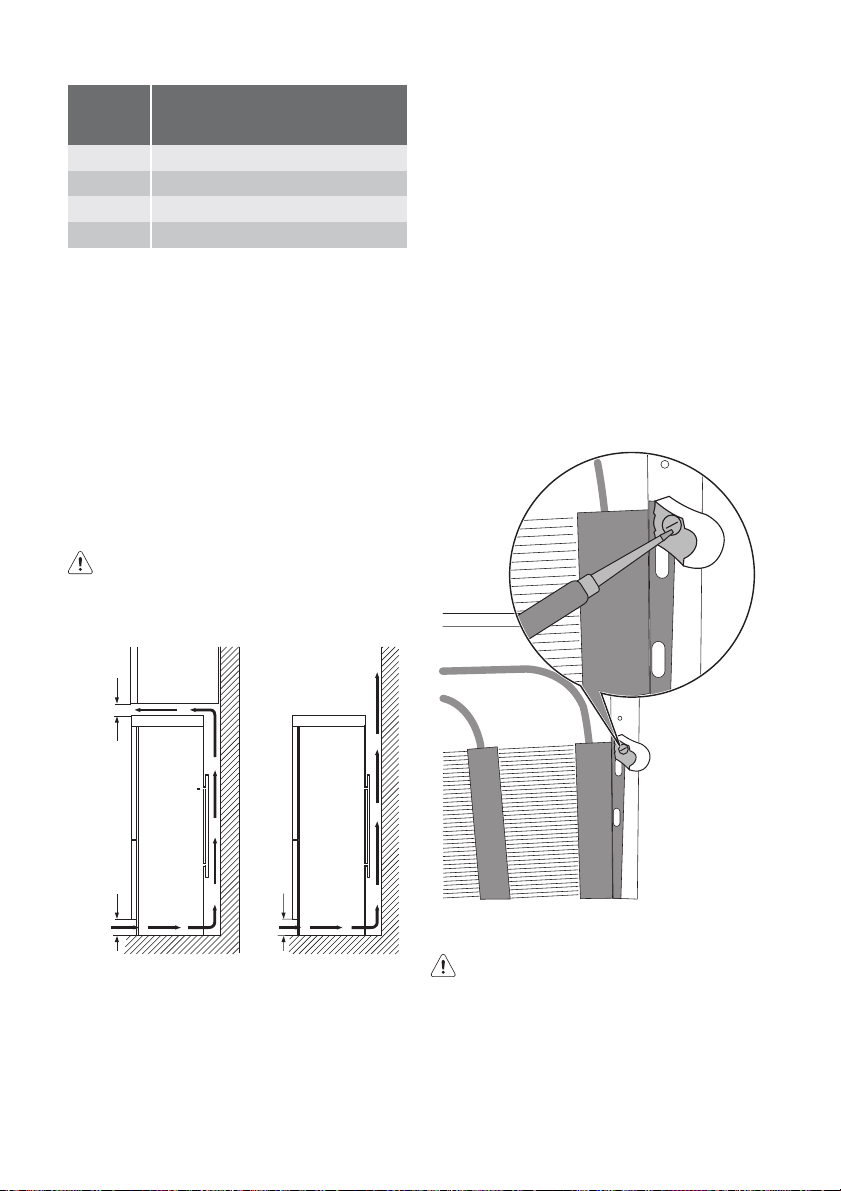
58 electrolux
Classe
climáti-
ca
SN +10 °C a + 32 °C
N +16 °C a + 32 °C
ST +16 °C a + 38 °C
T +16 °C a + 43 °C
Temperatura ambiente
Local
O aparelho deve ser instalado afastado de
fontes de calor, como sejam radiadores, termoacumuladores, luz solar directa, etc. Certifique-se de que o ar pode circular livremente na traseira do aparelho. Para garantir o
melhor desempenho, se o aparelho estiver
sob um armário de parede suspenso, a distância mínima entre o topo do armário e o
armário de parede deverá ser de, no mínimo,
100 mm . No entanto, o aparelho não deve
ser colocado sob armários suspensos. O nivelamento preciso é garantido por um ou
mais pés ajustáveis na base do aparelho.
Advertência Tem de ser possível
desligar o aparelho da fonte de corrente;
Assim, a ficha tem de estar facilmente
acessível após a instalação.
tomada da fonte de alimentação doméstica
não estiver ligada à terra, ligue o aparelho a
uma ligação à terra separada, em conformidade com as normas actuais, consultando
um electricista qualificado.
O fabricante declina toda a responsabilidade
caso as precauções de segurança acima
não sejam cumpridas.
Este aparelho cumpre com as directivas.
E.E.C.
Separadores traseiros
No interior do aparelho, existem dois se-
paradores que devem ser instalados
conforme ilustrado.
Desaperte os parafusos, introduza o separador debaixo da cabeça do parafuso e volte
a apertar os parafusos.
100 mm
AB
15 mm
Ligação eléctrica
Antes de ligar, certifique-se de que a tensão
e a frequência indicadas na placa de dados
correspondem à fonte de alimentação doméstica.
O aparelho deve ter uma ligação à terra. A
ficha do cabo de alimentação é fornecida
com um contacto para este objectivo. Se a
15 mm
Reversibilidade da porta
Advertência Antes de executar
qualquer operação retire a ficha da
tomada.
Importante Recomendamos que execute
as seguintes operações com outra pessoa,
que irá segurar as portas do aparelho
durante as operações.
Para alterar o sentido de abertura, faça o seguinte:
Page 59
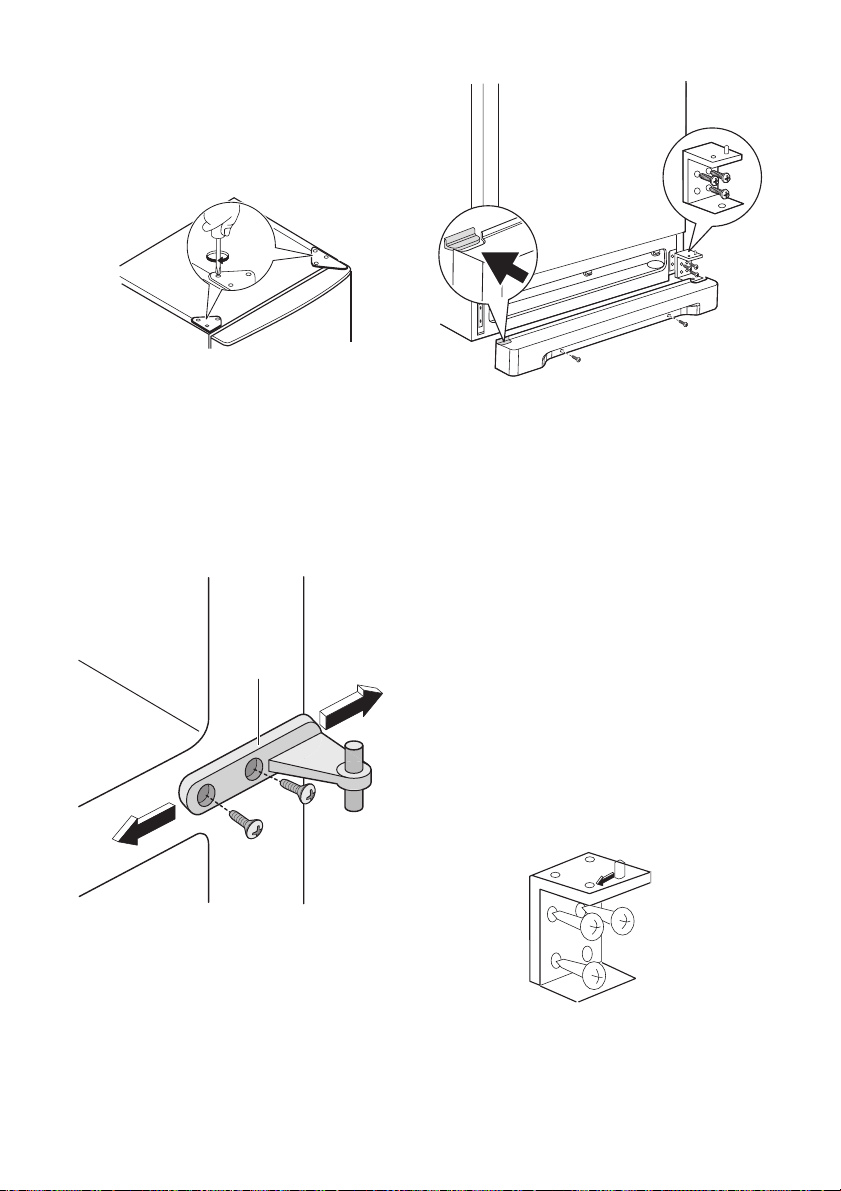
1. Retire a dobradiça superior com cuidado para que a porta superior não caia e
guarde-a para utilização futura.
electrolux 59
2. Retire a porta superior.
3. Retire o suporte superior e monte-o no
lado oposto.
4. Desaparafuse a dobradiça central (H).
Desaparafuse os tampões de plástico
localizados do lado oposto da dobradiça
central e introduza-os nos orifícios ocupados anteriormente pela dobradiça.
H
5. Retire a porta inferior.
6. Retire a grelha de ventilação, que está
fixada por dois parafusos.
7. Com cuidado, coloque o aparelho deitado de costas, desaparafuse totalmente o pé ajustável e aparafuse-o no lado
oposto.
8. Retire a dobradiça do fundo desenroscando os parafusos que a fixam.
9. Com uma chave de bocas de 12 mm,
desaparafuse o pino da dobradiça e volte a instalá-lo no lado oposto da dobradiça.
10. Volte a instalar a dobradiça inferior no
lado oposto com os parafusos que retirou anteriormente.
11. Com cuidado, volte a colocar o aparelho
na sua posição de funcionamento e
ajuste o nível do aparelho aparafusando/
desaparafusando o pé ajustável no fundo com os seus dedos ou uma ferramenta.
Page 60
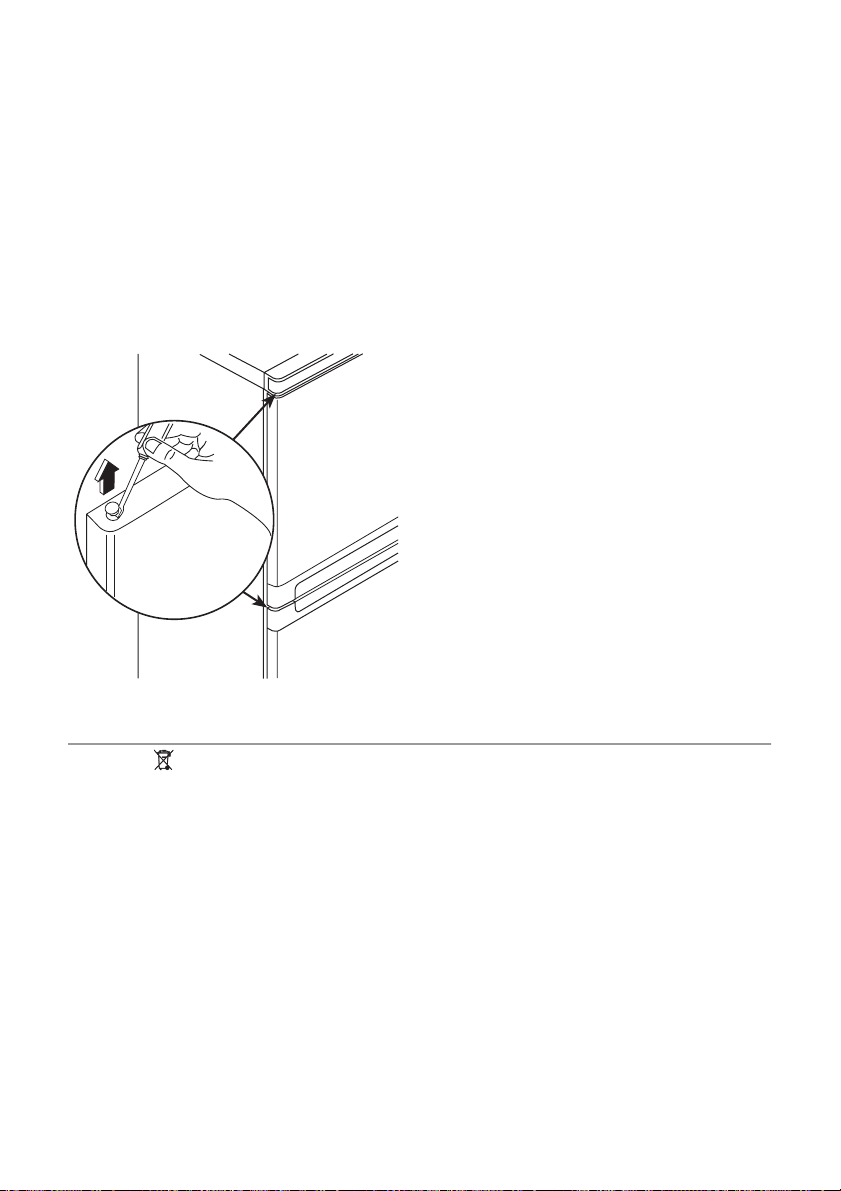
60 electrolux
12. Retire a cobertura do orifício da grelha
de ventilação, puxando-a na direcção da
seta, e volte a instalá-la no lado oposto.
13. Volte a colocar a grelha de ventilação e
aperte os parafusos.
14. Volte a instalar a porta inferior.
15. Volte a instalar a dobradiça central (H) no
lado oposto.
16. Volte a instalar a porta superior.
17. No saco da documentação poderá encontrar a dobradiça superior necessária
para efectuar esta reversibilidade. Coloque o parafuso no lugar.
Faça uma verificação final para se certificar
de que:
• Todos os parafusos estão apertados.
• A junta magnética está colada ao aparelho.
• A porta abre e fecha correctamente.
Se a temperatura ambiente for fria (por ex. no
Inverno), pode acontecer que a junta não
adira perfeitamente ao aparelho. Nesse caso, aguarde o encaixe natural do vedante.
Caso não queira executar as operações acima mencionadas, contacte o Centro de
Apoio ao Cliente mais perto. Os custos da
execução da reversibilidade das portas pelo
técnico do Centro de Apoio ao Cliente serão
suportados por si.
Preocupações ambientais
O símbolo no produto ou na embalagem
indica que este produto não pode ser tratado
como lixo doméstico. Em vez disso, deve ser
entregue ao centro de recolha selectiva para
a reciclagem de equipamento eléctrico e
electrónico. Ao garantir uma eliminação
adequada deste produto, irá ajudar a evitar
eventuais consequências negativas para o
meio ambiente e para a saúde pública, que,
de outra forma, poderiam ser provocadas
por um tratamento incorrecto do produto.
Para obter informações mais
pormenorizadas sobre a reciclagem deste
produto, contacte os serviços
municipalizados locais, o centro de recolha
selectiva da sua área de residência ou o
estabelecimento onde adquiriu o produto.
Page 61
Electrolux. Thinking of you.
Conozca mejor nuestros conceptos en www.electrolux.com
Índice de materias
Información sobre seguridad 61
Panel de mandos 63
Primer uso 64
Uso diario 64
Consejos útiles 67
Cómo utilizar el dispensador de agua con
cartucho de filtro BRITA MAXTRA 68
Salvo modificaciones
Mantenimiento y limpieza 73
Mantenimiento y limpieza 74
Datos técnicos 76
Instalación 76
Aspectos medioambientales 79
Información sobre seguridad
Por su seguridad y para garantizar el funcionamiento correcto del aparato, antes de instalarlo y utilizarlo por primera vez lea atentamente este manual del usuario, incluidos los
consejos y advertencias. Para evitar errores
y accidentes, es importante que todas las
personas que utilicen el aparato estén perfectamente al tanto de su funcionamiento y
de las características de seguridad. Conserve estas instrucciones y no olvide mantenerlas junto al aparato en caso de su desplazamiento o venta para que quienes lo utilicen a
lo largo de su vida útil dispongan siempre de
la información adecuada sobre el uso y la
seguridad.
Por la seguridad de personas y bienes, siga
las normas de seguridad indicadas en estas
instrucciones, ya que el fabricante no se hace responsable de daños provocados por
omisiones.
Seguridad de niños y personas
vulnerables
• Este electrodoméstico no está diseñado
para que lo usen personas (incluidos niños) con discapacidad física, sensorial o
mental, o con experiencia y conocimiento
insuficientes, a menos que una persona
responsable de su seguridad les supervise
o instruya en el uso del electrodoméstico.
No permita que los niños jueguen con el
electrodoméstico.
• Mantenga los materiales de embalaje alejados de los niños. Existe riesgo de asfixia.
• Si va a desechar el aparato, extraiga el enchufe de la toma, corte el cable de conexión (tan cerca del aparato como pueda) y
retire la puerta para impedir que los niños
al jugar puedan sufrir descargas eléctricas
o quedar atrapados en su interior.
• Si este aparato, que cuenta con juntas de
puerta magnéticas, sustituirá a un aparato
más antiguo con cierre de muelle (pestillo)
en la puerta, cerciórese de inutilizar el cierre de muelle antes de desechar el aparato
antiguo. Evitará así que se convierta en
una trampa mortal para niños.
Instrucciones generales de seguridad
Precaución Mantenga las aberturas de
ventilación sin obstrucciones.
• El aparato está diseñado para conservar
los alimentos y bebidas de una vivienda
normal, como se explica en este folleto de
instrucciones.
• No utilice dispositivos mecánicos ni medios artificiales para acelerar el proceso de
descongelación.
• No utilice otros aparatos eléctricos (como
máquinas de hacer helados) dentro de
aparatos de refrigeración, a menos que el
fabricante haya autorizado su utilización.
• No dañe el circuito refrigerante.
• El circuito refrigerante del aparato contiene
isobutano (R600a). Es un gas natural con
un gran nivel de compatibilidad medioambiental, aunque es inflamable.
electrolux 61
Page 62
62 electrolux
Durante el transporte y la instalación del
aparato, cerciórese de no provocar daños
al circuito de refrigerante.
Si el circuito de refrigerante se daña:
– evite fuegos al descubierto y fuentes de
encendido
– ventile bien la habitación en la que se
encuentra el aparato
• Es peligroso alterar las especificaciones o
intentar modificar este producto en modo
alguno. Cualquier daño en el cable de alimentación puede provocar cortocircuito,
incendio o descarga eléctrica.
Advertencia Los componentes eléctricos (cable de alimentación, enchufe,
compresor) debe sustituirlos un técnico
autorizado o personal de reparaciones
profesional.
1. El cable de alimentación no se debe
prolongar.
2. Compruebe que el enchufe no está
aplastado ni dañado por la parte trasera del aparato. Un enchufe aplastado o dañado puede recalentarse y provocar un incendio.
3. Cerciórese de que tiene acceso al en-
chufe del aparato.
4. No tire del cable de alimentación.
5. Si la toma de red está floja, no intro-
duzca el enchufe. Existe riesgo de descarga eléctrica o incendio.
6. No debe utilizar el aparato sin la cu-
bierta de la bombilla
13)
de la ilumina-
ción interior.
• Este aparato es pesado. Debe tener precauciones durante su desplazamiento.
• No retire ni toque elementos del compartimento congelador con las manos húmedas o mojadas, ya que podría sufrir abrasión de la piel o quemaduras por congelación.
• Evite la exposición prolongada del aparato
a la luz solar directa.
Uso diario
• No coloque recipientes calientes sobre las
piezas plásticas del aparato.
• No almacene gas ni líquido inflamable en
el aparato, ya que podrían estallar.
• No coloque alimentos directamente contra la salida de aire de la pared posterior.
14)
• Los alimentos que se descongelen no deben volver a congelarse.
• Guarde los alimentos congelados, que se
adquieren ya envasados, siguiendo las
instrucciones del fabricante.
• Se deben seguir estrictamente las recomendaciones del fabricante del aparato
sobre el almacenamiento. Consulte las
instrucciones correspondientes.
• No coloque bebidas carbonatadas o con
gas en el congelador, ya que se genera
presión en el recipiente, que podría estallar
y dañar el aparato.
• Si se consumen polos helados retirados
directamente del aparato, se pueden sufrir
quemaduras causadas por el hielo.
Cuidado y limpieza
• Antes de realizar tareas de mantenimiento,
apague el aparato y desconecte el enchufe de la toma de red. Si no puede acceder
a la toma de red, corte el suministro eléctrico.
• No limpie el aparato con objetos metálicos.
• No utilice objetos afilados para eliminar el
hielo del aparato. Utilice un raspador plástico.
• Inspeccione habitualmente el desagüe del
agua descongelada del frigorífico. Si es
necesario, limpie el desagüe. Si el desagüe
se bloquea, el agua se acumulará en la
base del aparato.
Instalación
Importante Para realizar la conexión
eléctrica, siga atentamente las instrucciones
de los párrafos correspondientes.
• Desembale el aparato y compruebe que
no tiene daños. No conecte el aparato si
está dañado. Informe de los posibles daños de inmediato a la tienda donde lo adquirió. En ese caso, conserve el material
de embalaje.
• Es recomendable esperar al menos dos
horas antes de conectar el aparato, para
permitir que el aceite regrese al compresor.
13) Si está previsto el uso de cubierta para la bombilla
14) Si el aparato no acumula escarcha (Frost Free)
Page 63
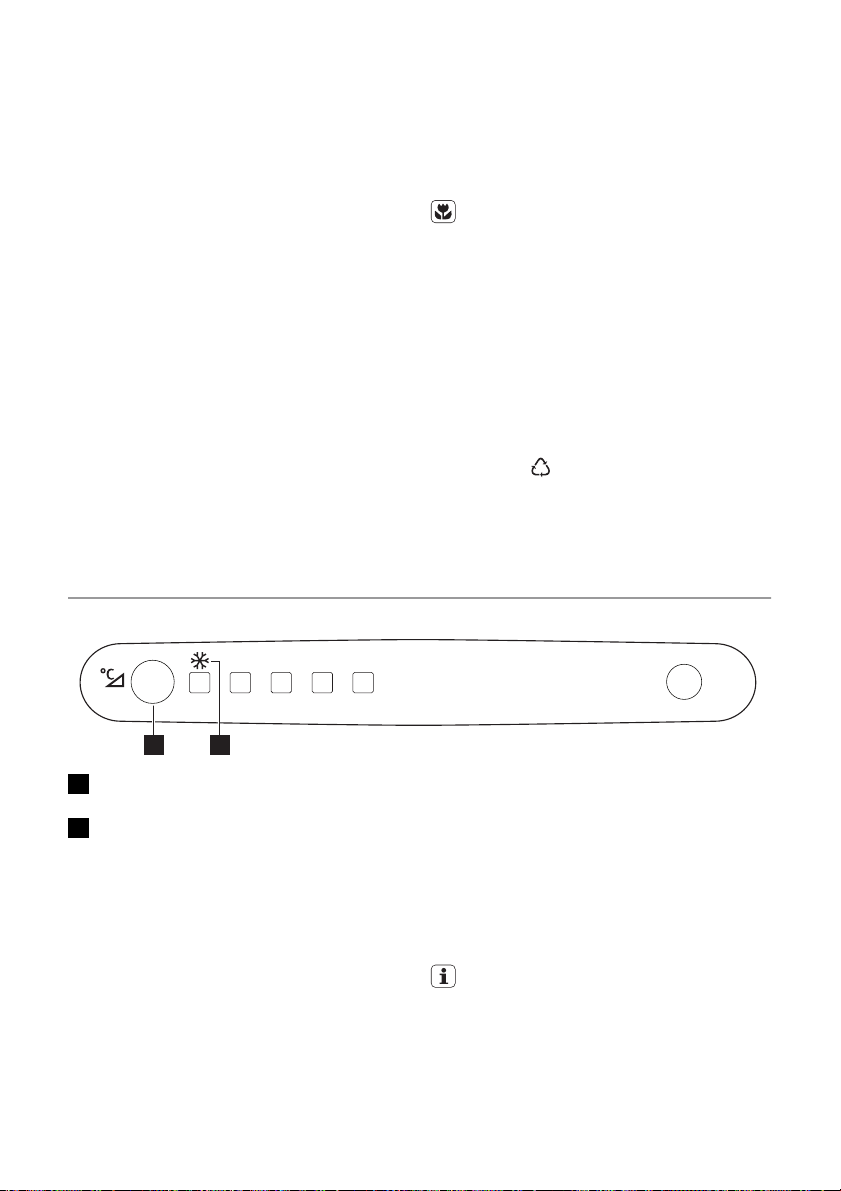
electrolux 63
• El aparato debe contar con circulación de
aire adecuada alrededor, ya que de lo contrario se produce recalentamiento. Para
conseguir una ventilación suficiente, siga
las instrucciones correspondientes a la
instalación.
• Siempre que sea posible, la parte posterior
del producto debe estar contra una pared,
para evitar que se toquen las partes calientes (compresor, condensador) y se
produzcan quemaduras.
• El aparato no debe colocarse cerca de radiadores ni de hornillas de cocina.
• Asegúrese de que es posible acceder al
enchufe después de instalar el electrodoméstico.
• Realice la conexión sólo con el suministro
de agua potable.
15)
Servicio técnico
• Un electricista homologado deberá realizar las tareas que se requieran para ejecutar el servicio o mantenimiento de este
electrodoméstico.
Panel de mandos
• Las reparaciones de este aparato debe
realizarlas un centro de servicio técnico
autorizado y sólo se deben utilizar recambios originales.
Protección del medio ambiente
Este aparato no contiene gases perjudiciales para la capa de ozono, ni en el
circuito de refrigerante ni en los materiales aislantes. El aparato no se debe desechar junto con los residuos urbanos.
La espuma aislante contiene gases inflamables: el aparato se debe desechar
de acuerdo con la normativa vigente,
que puede solicitar a las autoridades locales. No dañe la unidad de refrigeración, en especial la parte trasera, cerca
del intercambiador de calor. Los materiales de este aparato marcados con el
símbolo
son reciclables.
+2 +4 +5 +6 +8
1 2
1 Regulador de temperatura
Tecla Action Freeze
2 Indicador Action Freeze
Encendido
Retire cualquier etiqueta que pueda haber
adherida en el interior del compartimento
congelador.
Introduzca el enchufe en la toma.
Apagado
Para apagar el aparato, extraiga el enchufe
de la toma de corriente.
Regulación de la temperatura
La temperatura se regula automáticamente.
15) Si está prevista una conexión de agua
Para utilizar el aparato, proceda de la manera
siguiente:
• Mantenga pulsado el regulador de temperatura hasta que se encienda el LED correspondiente a la temperatura que desea.
La selección es progresiva y oscila de +2
°C a +8 °C. La temperatura indicada por
el LED cambia cada vez que se pulsa la
tecla.
Lo más conveniente es ajustar la temperatura en una posición intermedia.
Sin embargo, el ajuste exacto debe elegirse
teniendo en cuenta que la temperatura interior del aparato depende de:
• la temperatura ambiente
• la frecuencia con que se abre la puerta
Page 64
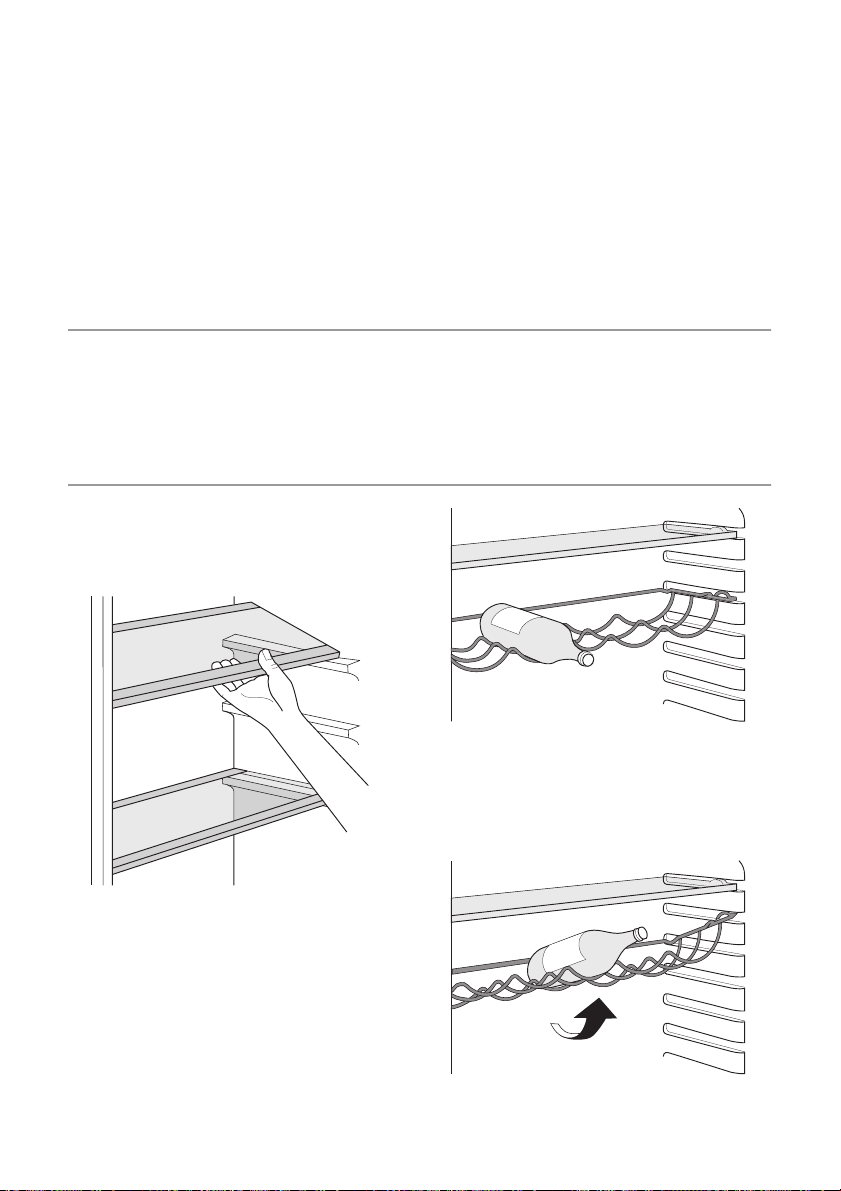
64 electrolux
• la cantidad de alimentos guardados
• la ubicación del aparato.
Importante Si la temperatura ambiente es
inferior a 16 °C, pulse el regulador hasta que
se encienda el LED correspondiente a la
temperatura mínima.
Función Action Freeze
La función Action Freeze se puede activar
pulsando la tecla Action Freeze varias veces
Primer uso
Limpieza de las partes internas
Antes del empleo limpiar todas las partes internas con agua tibia y jabón neutro, a fin de
eliminar el característico olor de nuevo y secarlas luego cuidadosamente.
Uso diario
Estantes móviles
Las paredes del frigorífico cuentan con guías
para colocar los estantes del modo que se
prefiera.
hasta que se encienda el LED correspondiente al símbolo Action Freeze .
Para desactivar la función Action Freeze pulse una o varias veces la tecla Action Freeze
hasta que aparezca la temperatura que desee.
Importante No emplear detergentes o polvos abrasivos que podrían dañar las superficies.
Estante botellero
Coloque las botellas (con la parte del tapón
hacia fuera) en el estante botellero provisto al
efecto.
Importante Si coloca el botellero en
posición horizontal, úselo sólo para botellas
cerradas.
El estante botellero puede inclinarse para
guardar botellas previamente abiertas. Para
inclinarlo, tire del estante hacia arriba de forma que pueda girarlo y colocarlo en el nivel
más alto siguiente.
Page 65
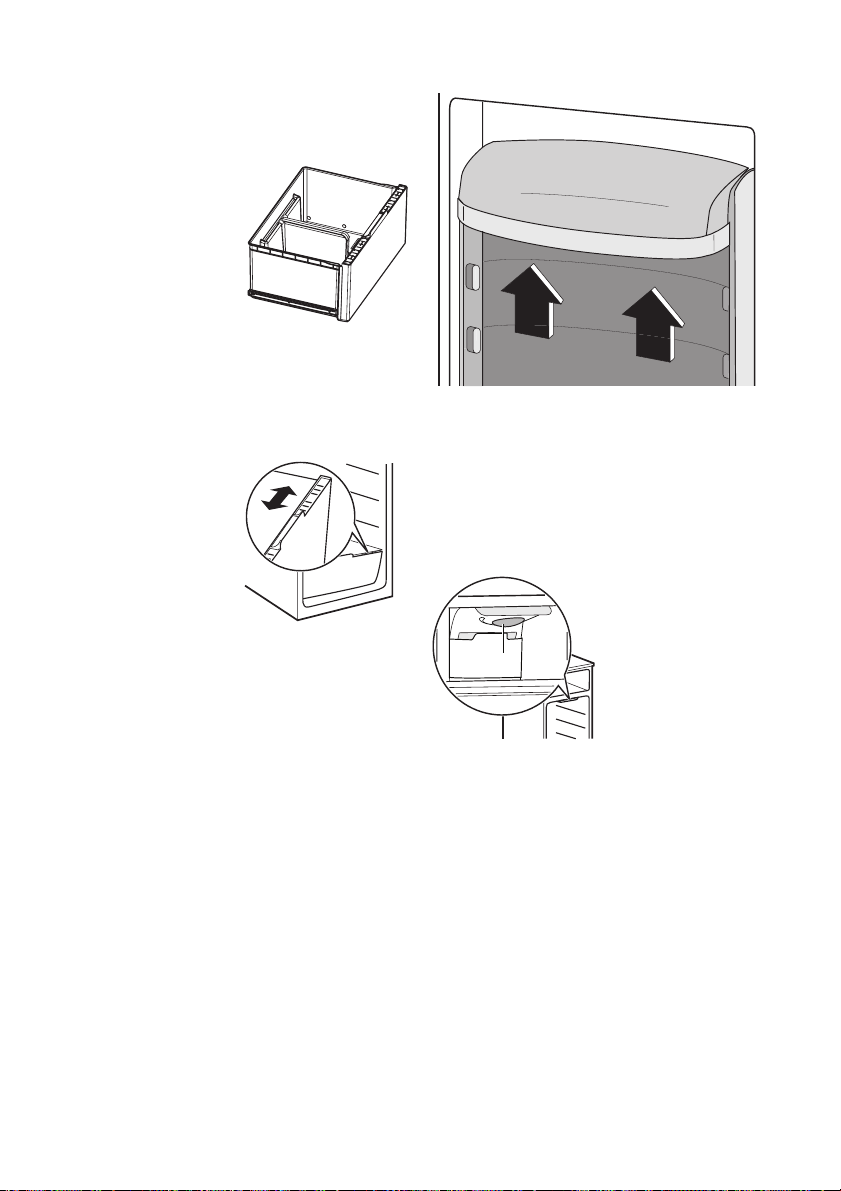
Cajón de verduras con control de
humedad
Este cajón es adecuado para guardar frutas
y verduras.
Existe un separador
dentro del cajón que
se puede colocar en
diferentes posiciones
para permitir la subdivisión más adecuada a las necesidades
personales.
Existe una rejilla (si se
ha previsto) en el fondo del cajón para separar las frutas y verduras de cualquier tipo de humedad que se forme en la superficie inferior.
Todas las piezas situadas en el interior del
cajón se pueden retirar para la limpieza
Para regular la humedad en el cajón de
verduras, el estante
de vidrio incorpora un
dispositivo con rendijas (ajustable mediante una palanca de
deslizamiento).
Cuando las ranuras
de ventilación están
cerradas:
el contenido de humedad natural de los alimentos situados en los cajones de frutas y
verduras se conserva durante más tiempo.
Cuando las ranuras de ventilación están
abiertas:
una mayor circulación de aire da lugar a un
menor contenido de humedad del aire en los
cajones de frutas y verduras.
Colocación de los estantes de la puerta
Para poder guardar alimentos de distintos
tamaños, los estantes de la puerta se pueden colocar a diferentes alturas.
Para realizar esos ajustes proceda de la manera siguiente:
eleve paulatinamente el estante en la dirección de la flecha hasta retirarlo del soporte y
colóquelo en la posición que desee.
electrolux 65
Enfriamiento por aire
El ventilador de Enfriamiento dinámico por
aire (DAC) permite enfriar rápidamente los
alimentos y mantener una temperatura uniforme en el compartimento.
Para activar el ventilador, pulse el interruptor
que muestra la figura. Se enciende una luz
verde.
B
Importante Encienda el ventilador cuando
la temperatura ambiente supere los 25 °C.
Producción de cubitos de hielo
Este aparato cuenta con una o varias bandejas para la producción de cubitos de hielo.
Estas bandejas están ubicadas en los laterales del cajón superior del congelador.
Retire el cajón superior del congelador. Extraiga la bandeja del hielo. Retire la tapa. Rellene de agua hasta el límite indicado "MAX".
Vuelva a colocar la tapa e introduzca la bandeja en su lugar.
Para extraer los cubitos de hielo, gire la bandeja con los cubitos hacia arriba y presione
sobre una superficie rígida.
Para extraer más fácilmente los cubitos de
hielo se recomienda colocar la bandeja ce-
Page 66
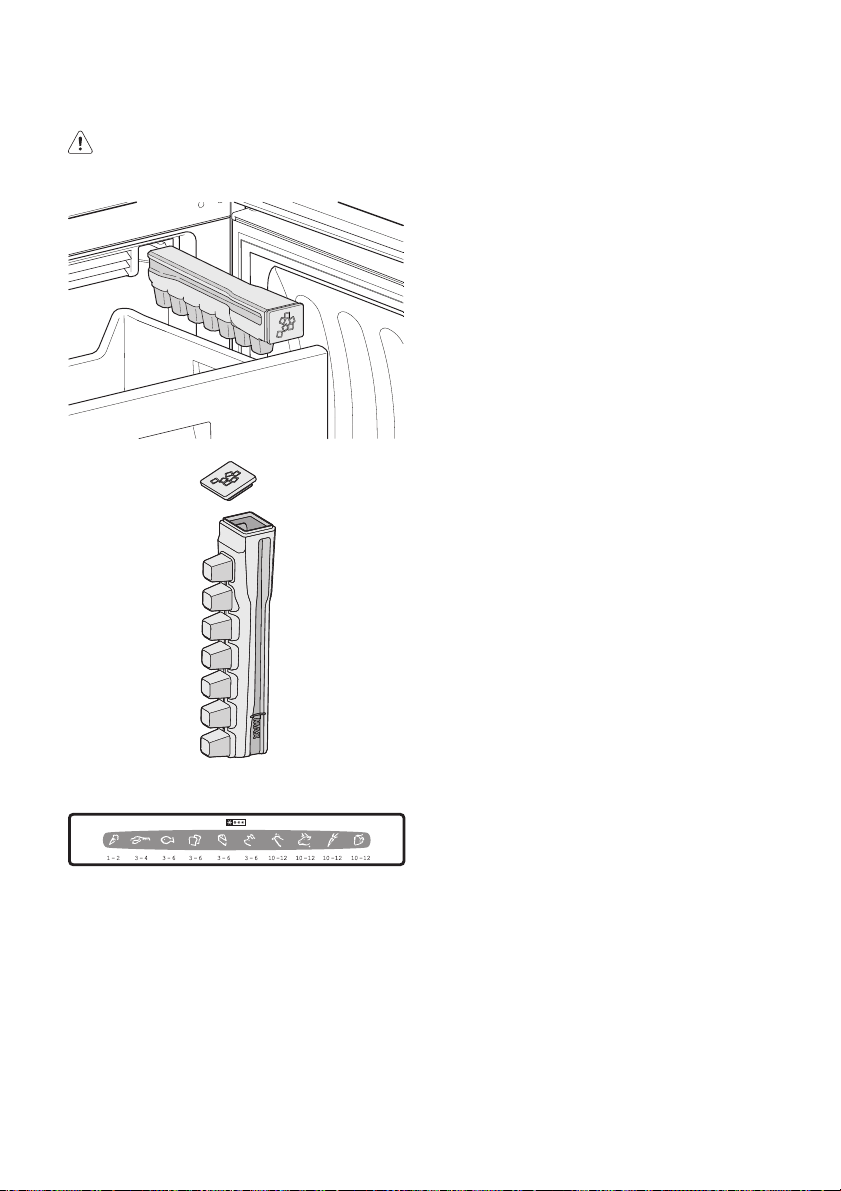
66 electrolux
rrada debajo de agua templada durante unos
segundos.
Advertencia No utilice instrumentos
metálicos para retirar las bandejas del
congelador.
Calendario de congelación
Los símbolos muestran los distintos tipos de
alimentos congelados.
Los números indican los tiempos de almacenamiento en meses de cada tipo de alimento congelado. Que el valor superior o inferior del tiempo de almacenamiento indicado sea válido dependerá de la calidad de los
alimentos y del tratamiento aplicado antes de
la congelación.
Congelación de alimentos frescos
El compartimento congelador está ideado
para la congelación de alimentos frescos y
para la conservación a largo plazo de alimentos congelados y ultracongelados.
Para congelar alimentos frescos active la
función Action Freeze al menos 24 horas antes de introducir los alimentos en el compartimento congelador.
Coloque los alimentos que vaya a congelar
en el compartimento inferior.
La cantidad máxima de alimentos que puede
congelarse en 24 horas se indica en la placa
de datos técnicos , una etiqueta situada en
el interior del aparato.
El proceso de congelación dura 24 horas:
durante ese periodo no deben añadirse otros
alimentos para congelación.
Almacenamiento de alimentos
congelados
Al poner en marcha el aparato por primera
vez o después de un periodo sin uso, déjelo
en marcha al menos durante 2 horas con un
ajuste alto antes de colocar los productos en
el compartimento.
Importante En caso de producirse una
descongelación accidental, por ejemplo, por
un corte del suministro eléctrico, si la
interrupción ha sido más prolongada que el
valor indicado en la tabla de características
técnicas bajo "tiempo de elevación", los
alimentos descongelados deben
consumirse cuanto antes o cocinarlos de
inmediato y volverlos a congelar (después de
que se hayan enfriado).
Descongelación
Los alimentos ultracongelados o congelados, antes de utilizarlos, se pueden descongelar en el compartimento frigorífico o a temperatura ambiente, dependiendo del tiempo
de que se disponga.
Es posible incluso cocinar piezas pequeñas
congeladas, tomadas directamente del congelador; en tal caso, el tiempo de cocción
será más prolongado.
Page 67

Consejos útiles
Consejos para ahorrar energía
• No abra la puerta con frecuencia ni la deje
abierta más tiempo del estrictamente necesario.
• Si la temperatura ambiente es elevada, la
temperatura del aparato se ha ajustado en
los valores más altos y está totalmente lleno, el compresor podría funcionar de manera continua, provocando la formación
de escarcha o hielo en el evaporador. Si
esto sucede, gire el regulador de temperatura a valores inferiores para permitir la
descongelación automática y ahorrar en el
consumo eléctrico.
Consejos para la refrigeración de
alimentos frescos
Para obtener los mejores resultados:
• no guarde en el frigorífico alimentos calientes ni líquidos en evaporación;
• cubra o envuelva los alimentos, en especial si tienen sabores fuertes;
• coloque los alimentos de modo que el aire
pueda circular libremente entre ellos.
Consejos para la refrigeración
Consejos útiles:
Carne (de todo tipo): guárdela en bolsas de
plástico y colóquela en el estante de vidrio,
sobre el cajón de las verduras.
Por razones de seguridad, guárdela de ese
modo durante uno o dos días, como máximo.
Alimentos cocinados, platos fríos, etc..: los
debe cubrir y puede colocarlos en cualquiera
de los estantes.
Frutas y verduras: se deben limpiar a conciencia y colocar en los cajones especiales
suministrados a tal efecto.
Mantequilla y queso: colóquelos en recipientes herméticos especiales o envueltos en papel de aluminio o en bolsas de plástico, para
excluir tanto aire como sea posible.
Botellas de leche: deben tener tapa y se colocarán en el estante para botellas de la puerta.
Los plátanos, las patatas, las cebollas y los
ajos, si no están empaquetados, no deben
guardarse en el frigorífico.
electrolux 67
Consejos sobre la congelación
Estos consejos son importantes para poder
aprovechar al máximo el proceso de congelación:
• la cantidad máxima de alimentos que puede congelarse en 24 horas se muestra en
la placa de datos técnicos;
• el proceso de congelación requiere 24 horas. Durante ese periodo no deben añadirse otros alimentos para congelación;
• congele sólo productos alimenticios de
máxima calidad, frescos y perfectamente
limpios;
• prepare los alimentos en porciones pequeñas para que se congelen de manera
rápida y total, así como para poder descongelar posteriormente sólo las cantidades necesarias;
• envuelva los alimentos en papel de aluminio o polietileno y compruebe que los envoltorios quedan herméticamente cerrados;
• no permita que alimentos frescos y sin
congelar entren en contacto con alimentos
ya congelados, para evitar el aumento de
temperatura de los segundos;
• los alimentos magros se congelan mejor
que los grasos; la sal reduce el tiempo de
almacenamiento de los alimentos;
• el hielo, si se consume inmediatamente
después de retirarlo del compartimento
congelador, puede provocar quemaduras
por congelación en la piel;
• es recomendable etiquetar cada paquete
con la fecha de congelación para controlar
el tiempo que permanecen almacenados.
Consejos para el almacenamiento de
alimentos congelados
Para obtener el máximo rendimiento de este
aparato, deberá:
• comprobar que el comerciante ha mantenido los productos congelados correctamente almacenados;
• procurar que los alimentos congelados
pasen de la tienda al congelador en el menor tiempo posible;
• evitar la apertura frecuente de la puerta o
dejarla abierta más del tiempo estrictamente necesario.
Page 68
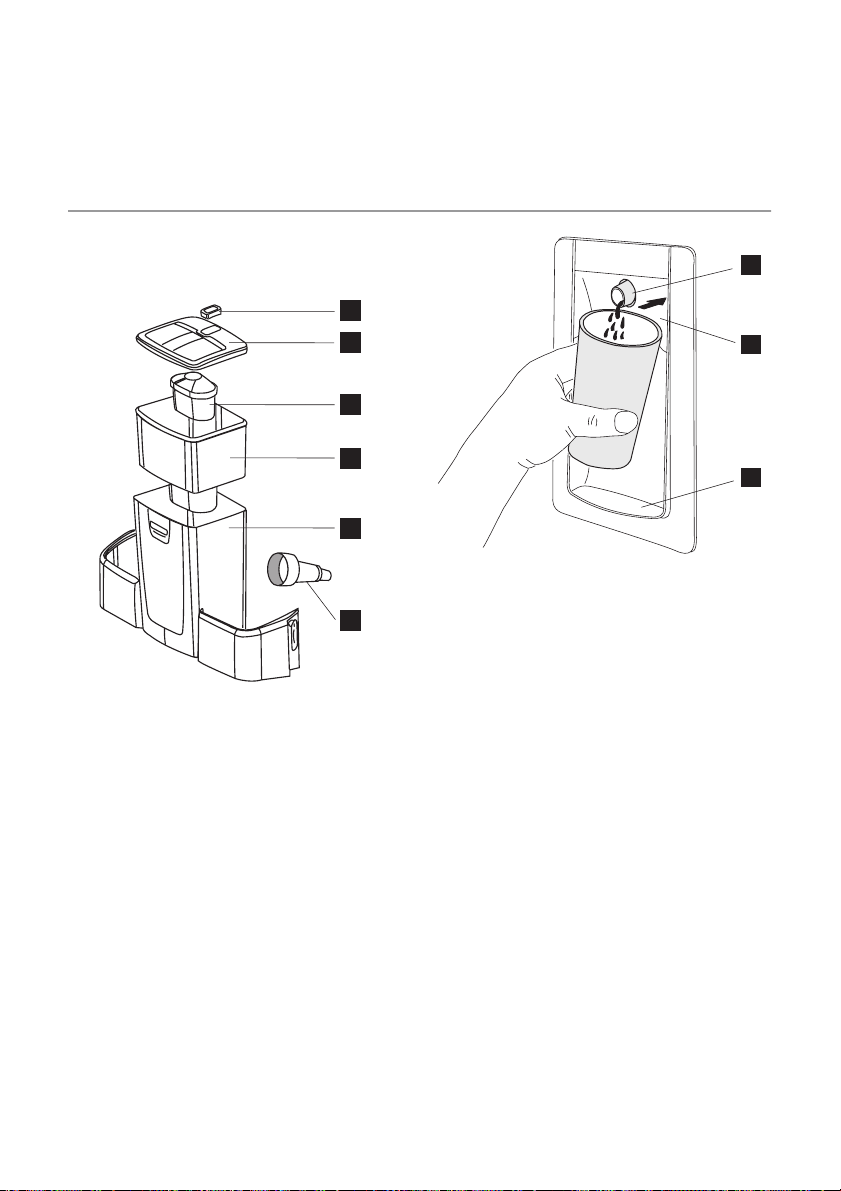
68 electrolux
• Una vez descongelados, los alimentos se
deterioran con rapidez y no pueden congelarse otra vez.
• No supere el tiempo de almacenamiento
indicado por el fabricante de los alimentos.
Cómo utilizar el dispensador de agua con cartucho de filtro BRITA
MAXTRA
Unidad de filtro de agua BRITA
Componentes internos:
6
3
5
2
1
1Dispensador
4
1 Depósito de agua
2Embudo
3 Tapa del depósito
4 Válvula + junta
5 Incluido el filtro BRITA MAXTRA
6 Memo BRITA: indicador electrónico de
cambio de cartucho
Componentes externos:
2 Palanca del agua
3 Bandeja de retención de goteo
Operaciones iniciales para el uso del
dispensador de agua
1. Retire cintas y otros sistemas de protec-
ción del conjunto del depósito.
2. Limpie los componentes como se indica
en el capítulo "Procedimiento de limpieza
del dispensador de agua", con el fin de
eliminar los posibles residuos.
Procedimiento de limpieza del
dispensador de agua
1. Abra los dos elementos de retención si-
tuados a los lados del depósito, como se
indica en las ilustraciones:
– retire el cartucho BRITA MAXTRA de
la unidad de filtro de agua
– presione los elementos de retención
de la mitad y muévalo hacia arriba
– desplace el elemento de retención ha-
cia el depósito central.
2. Empuje el depósito hacia arriba en di-
rección a la válvula.
3. Retire la tapa y el embudo.
1
2
3
Page 69
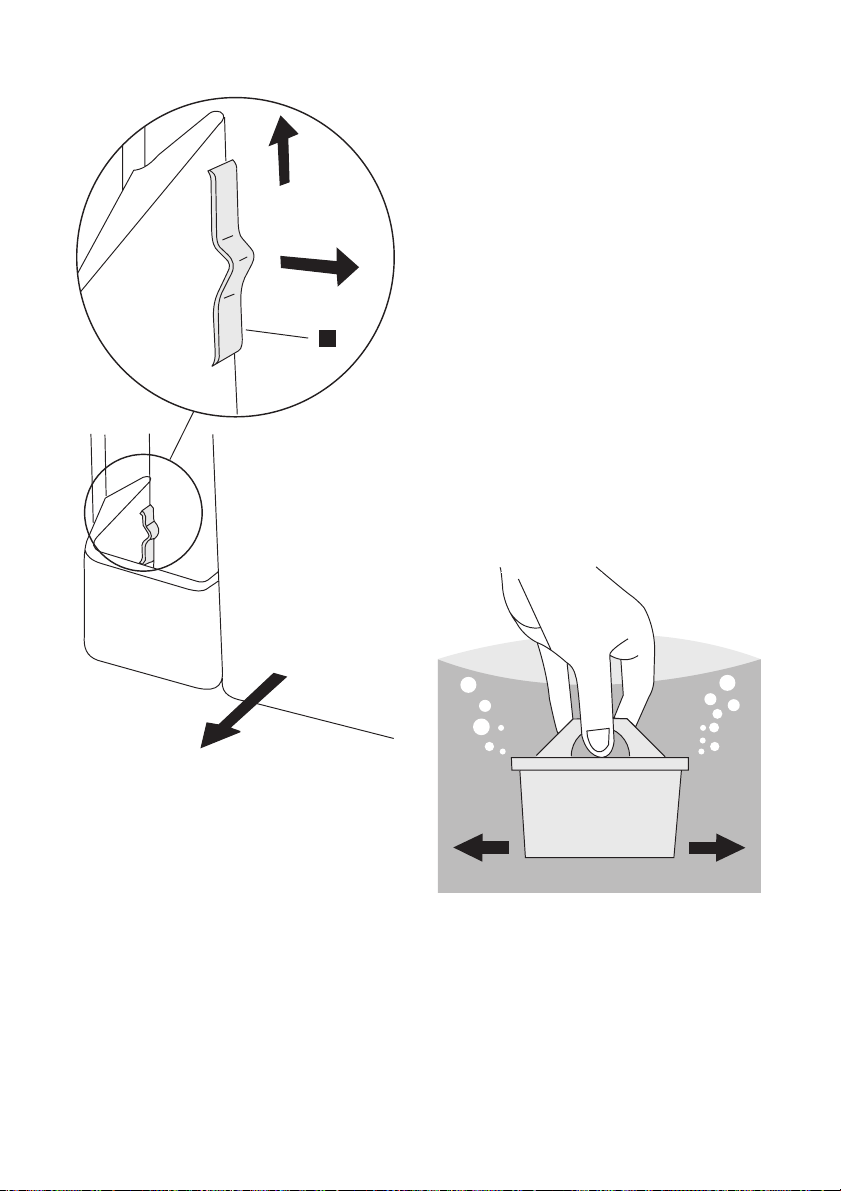
electrolux 69
(preste atención a la colocación de la
junta de la válvula).
8. Coloque el depósito montado en la puer-
ta, en dirección a la válvula.
9. Cierre los elementos de retención en or-
den inverso al de apertura.
10. Vuelva a insertar el cartucho BRITA
MAXTRA en el embudo.
Cómo utilizar el cartucho de filtro BRITA
MAXTRA
Paso 1: Preparación del cartucho
Para preparar el cartucho de filtro BRITA, re-
A
tire el envoltorio de protección (nota: el cartucho y el envoltorio interior pueden aparecer
húmedos; esto se debe sencillamente a la
condensación).
Sumerja el cartucho en agua fría y sacúdalo
con suavidad para eliminar las posibles burbujas de aire. Ya puede utilizar el filtro.
A diferencia de lo que sucede con otros cartuchos de filtro de agua, no es es necesario
remojar previamente el nuevo cartucho Maxtra.
4. Desenrosque la válvula girando de derecha a izquierda (preste especial atención
para no aflojar la junta de la válvula, ya
que es necesaria para que la unidad funcione correctamente).
5. Limpie la tapa del depósito, la válvula y
la junta con una solución de agua tibia y
jabón neutro. Aclare y colóquela dentro
del orificio de la puerta durante la limpieza de los demás componentes (para evitar fugas de aire frío desde el frigorífico).
6. Limpie el depósito y el embudo en el lavavajillas o con una solución de agua tibia y jabón neutro y aclárelos.
7. Después de limpiar los componentes del
depósito retire la válvula de la puerta del
frigorífico y monte el depósito en orden
inverso (4-3-2-1) al del desmontaje
Paso 2: Inserción en el depósito de agua
Retire la tapa del depósito. Antes de introducir el cartucho, retire el embudo y límpielo
bien, aclarándolo y secándolo con un paño.
A continuación limpie bien el interior del depósito de agua con un paño húmedo y séquelo a fondo.
Coloque el cartucho en el depósito de agua
y empújelo hacia abajo, hasta que encaje en
su sitio con un chasquido.
Page 70
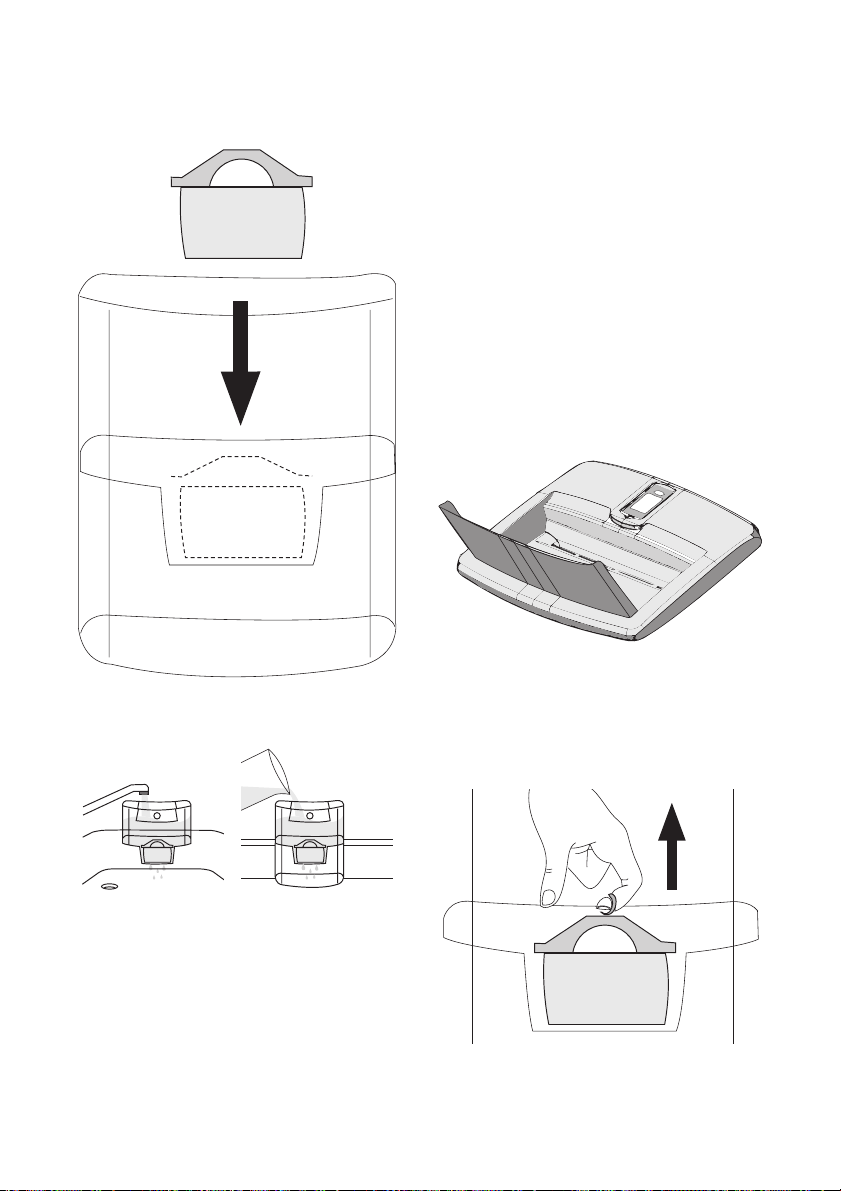
70 electrolux
El cartucho debe permanecer en su sitio si
se invierte la posición del embudo.
Para llenar el depósito con agua fría, simplemente abra la tapa superior abatible, vierta
una jarra de agua en el depósito a través de
la cubierta como se muestra en la ilustración
(utilice la tapa cada vez que desee llenar el
depósito de agua).
Importante Para evitar que el agua salpique
al abrir y cerrar la puerta del frigorífico se
recomienda no llenar completamente el
depósito y dejar espacio suficiente para que
el aire circule (las marcas frontales indican el
límite de llenado máximo).
Si no ha utilizado toda el agua filtrada del depósito en uno o dos días, deshágase del
agua que pueda haber en el interior de la
unidad de filtro de agua BRITA antes de volver a llenarlo.
Paso 3: Enjuague del cartucho
2x 3x=ok
Retire el embudo de la unidad de filtro BRITA,
llénelo de agua del grifo y déjela filtrar.
Deseche en el fregadero los dos primeros
llenados. Estos se utilizan para enjuagar el
cartucho de filtro.
A continuación vuelva a colocar el embudo
en la unidad de filtro de agua BRITA.
Vuelva a colocar la tapa en el recipiente y
presiónela con cuidado hacia abajo para cerciorarse de que encaja correctamente en su
sitio.
Paso 4: Llenado del depósito de agua
Espere a que el agua se filtre y repita el "Paso
4" tantas veces como sean necesarias hasta
que la unidad de filtro de agua BRITA se llene.
Retire el cartucho tirando del anillo
Para cambiar el cartucho al cabo de cuatro
semanas, utilice el asa con anillo de la parte
superior del cartucho para extraerlo del embudo y repita los pasos del 1 al 3 anteriores.
Page 71
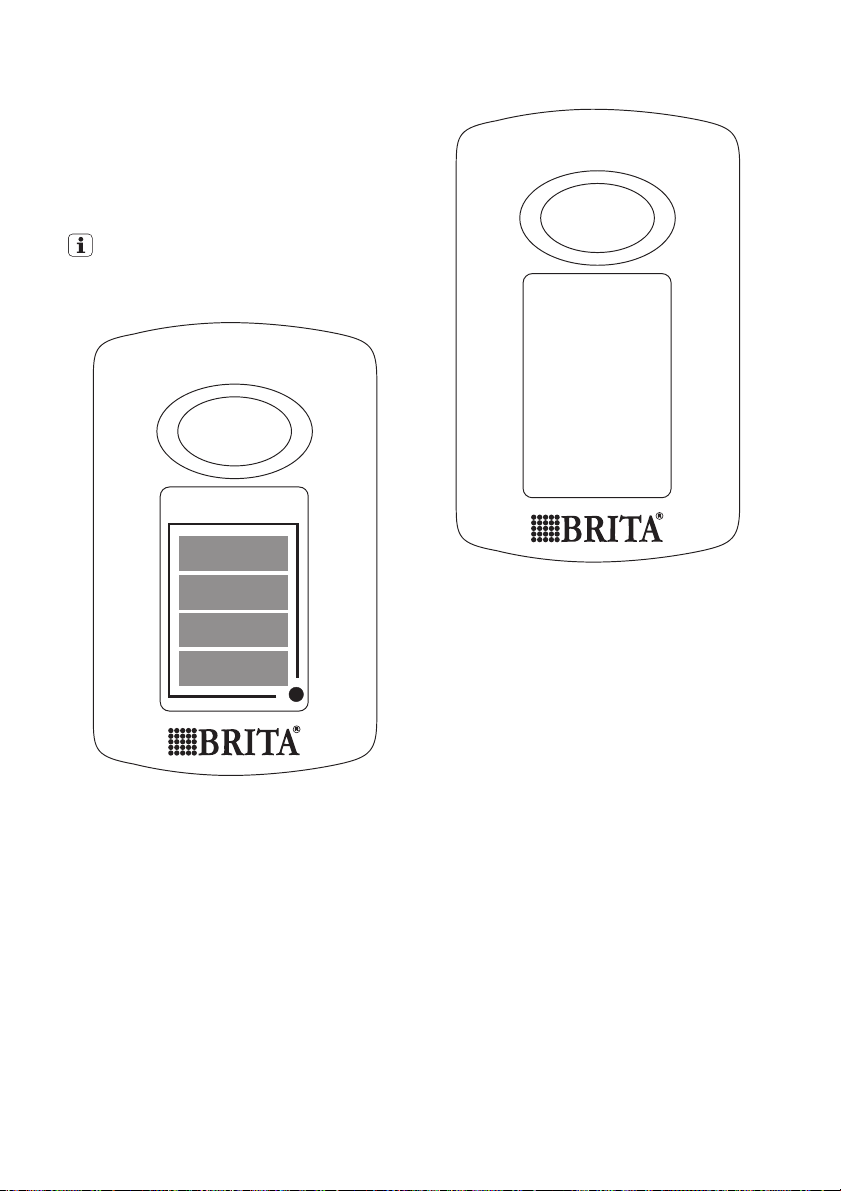
Indicador Memo BRITA
Para obtener el máximo rendimiento del filtro
y un sabor óptimo, es importante cambiar el
cartucho BRITA periódicamente. BRITA recomienda que sustituya el cartucho de la
unidad BRITA del frigorífico cada cuatro semanas.
El indicador Memo BRITA le recuerda
automáticamente cuándo tiene que
cambiar el filtro.
electrolux 71
START
%
100
75
START
%
100
75
50
25
El exclusivo indicador Memo BRITA mide el
tiempo de uso recomendado del cartucho.
Memo es fácil de usar y le recuerda automáticamente cuándo debe cambiar el cartucho.
El indicador Memo BRITA se encuentra en la
tapa del depósito de agua. El funcionamiento
es muy sencillo.
Encendido del visor Memo
Para activar Memo, presione sin soltar el botón de inicio situado en la tapa hasta que
aparezcan cuatro barras en la pantalla y parpadeen dos veces. El indicador Memo ya está activado.
50
25
Control de funcionamiento
El punto parpadeante en la esquina inferior
derecha de Memo indica que éste se encuentra funcionando.
Page 72
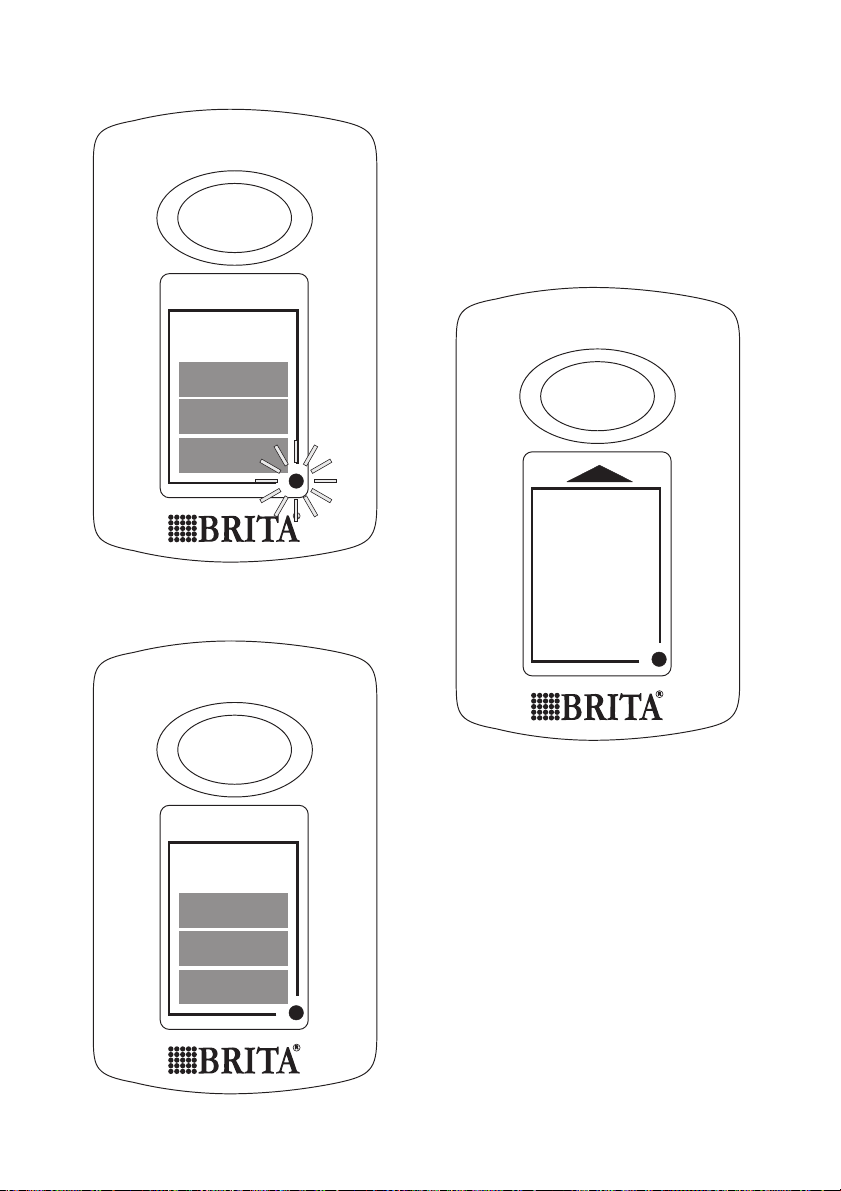
72 electrolux
START
Cada semana desaparece una barra, para
indicar el tiempo restante del cartucho. Al
cabo de cuatro semanas desaparecen las
cuatro barras. Esto, unido a la flecha parpadeante, indica que es necesario cambiar el
cartucho.
Introduzca un cartucho nuevo siguiendo las
instrucciones y reactive Memo como se ha
indicado antes.
%
100
Cambio del visor
START
75
50
25
%
100
75
50
25
START
%
100
75
50
25
Cuando sólo haya una barra visible, compruebe si tiene un nuevo cartucho de filtro
BRITA MAXTRA disponible.
Importante El indicador Memo está
diseñado para utilizarse con cartuchos de
filtro BRITA exclusivamente.
Memo BRITA: el indicador electrónico de
cambio de cartucho tiene una duración aproximada de 5 años. Al finalizar la duración
de"Memo", recuerde que es un dispositivo
electrónico y deséchelo de acuerdo con la
normativa vigente para dichos aparatos.
Para retirar un indicador "Memo" agotado,
coloque un destornillador en la ranura situada junto a él y empújelo hacia fuera.
Recuerde que no se debe extraer el indicador para ningún otro fin que no sea desecharlo.
Page 73
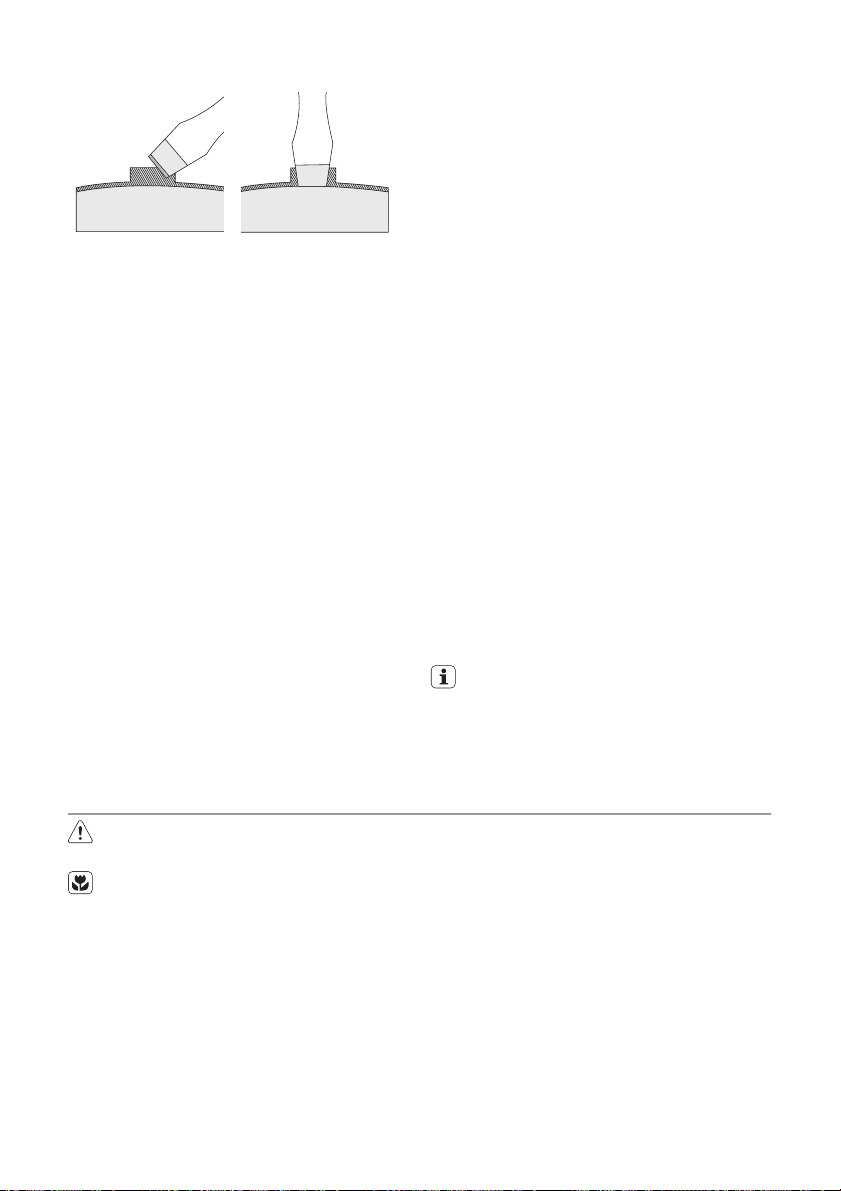
Información importante
• El orificio de la válvula en la puerta del fri-
gorífico debe estar cerrado con la válvula
de agua durante el funcionamiento normal
del aparato.
• Utilice sólo agua potable. Si utiliza cual-
quier otro tipo de bebida, podría dejar residuos, sabor y olor en el depósito y en el
grifo.
• Es posible que se oiga algún ruido provo-
cado por el aire que penetra al salir el agua
del depósito.
• Si el agua no fluye bien, vuelva a presionar
la palanca de accionamiento. Mantenga el
vaso debajo del grifo durante algunos instantes, para asegurarse de que toda el
agua cae en él.
• No utilice bebidas carbonatadas, como las
gaseosas. El líquido puede gotear debido
a la presión del gas.
• Recuerde que el agua es un alimento.
Consuma el agua filtrada en un plazo de
uno a dos días.
• Si la unidad de filtro de agua BRITA no se
utiliza durante un tiempo prolongado (como en vacaciones), es conveniente que
electrolux 73
deseche el agua que haya quedado en el
sistema y deje el cartucho dentro del depósito del filtro.
Antes de volver a utilizar el sistema, retire
el cartucho y repita los pasos del 1 al 4
indicados en el apartado "Cómo utilizar el
cartucho de filtro de agua BRITA MAXTRA".
• La unidad de filtro de agua BRITA ha sido
diseñada para utilizarse sólo con agua potable tratada y procedente de la red de
suministro local (nota: se trata de aguas
bajo control y vigilancia permanentes conforme a la normativa legal vigente para el
agua de consumo) o con agua procedente
de manantiales privados y sometida a las
pruebas y controles de seguridad necesarios.
Si las autoridades advierten sobre la necesidad de hervir el agua, deberá hervirse
también el agua filtrada por BRITA. Una
vez levantada la recomendación de hervir
el agua, será necesario limpiar todo el sistema de filtro e introducir un cartucho nuevo.
En la guía de información sobre BRITA puede
consultar más detalles sobre el uso de los
cartuchos de filtro BRITA y del indicador 'Memo'.
Para comprar nuevos cartuchos de filtro
BRITA e indicadores Memo puede dirigirse a la red de servicios de asistencia
técnica de Electrolux o BRITA.
Mantenimiento y limpieza
Precaución Antes de realizar tareas de
mantenimiento, desenchufe el aparato.
Este equipo contiene hidrocarburos en
la unidad de refrigeración; por tanto, el
mantenimiento y la recarga deben estar
a cargo exclusivamente de técnicos autorizados.
Limpieza periódica
El equipo debe limpiarse de manera habitual:
• limpie el interior y los accesorios con agua
templada y un jabón neutro.
• revise y limpie periódicamente las juntas
de la puerta para mantenerlas limpias y sin
restos;
• Aclare y seque a fondo.
Importante No mueva, dañe ni tire de los
conductos o cables del interior del armario.
No utilice detergentes, polvos abrasivos,
productos de limpieza perfumados ni cera
para limpiar el interior, ya que dañarán la superficie y dejarán un fuerte olor.
Limpie el condensador (rejilla negra) y el
compresor de la parte posterior del aparato
con un cepillo o un aspirador. Esa operación
mejorará el rendimiento del aparato y reducirá el consumo eléctrico.
Importante Tenga cuidado para no dañar el
sistema de refrigeración.
Page 74
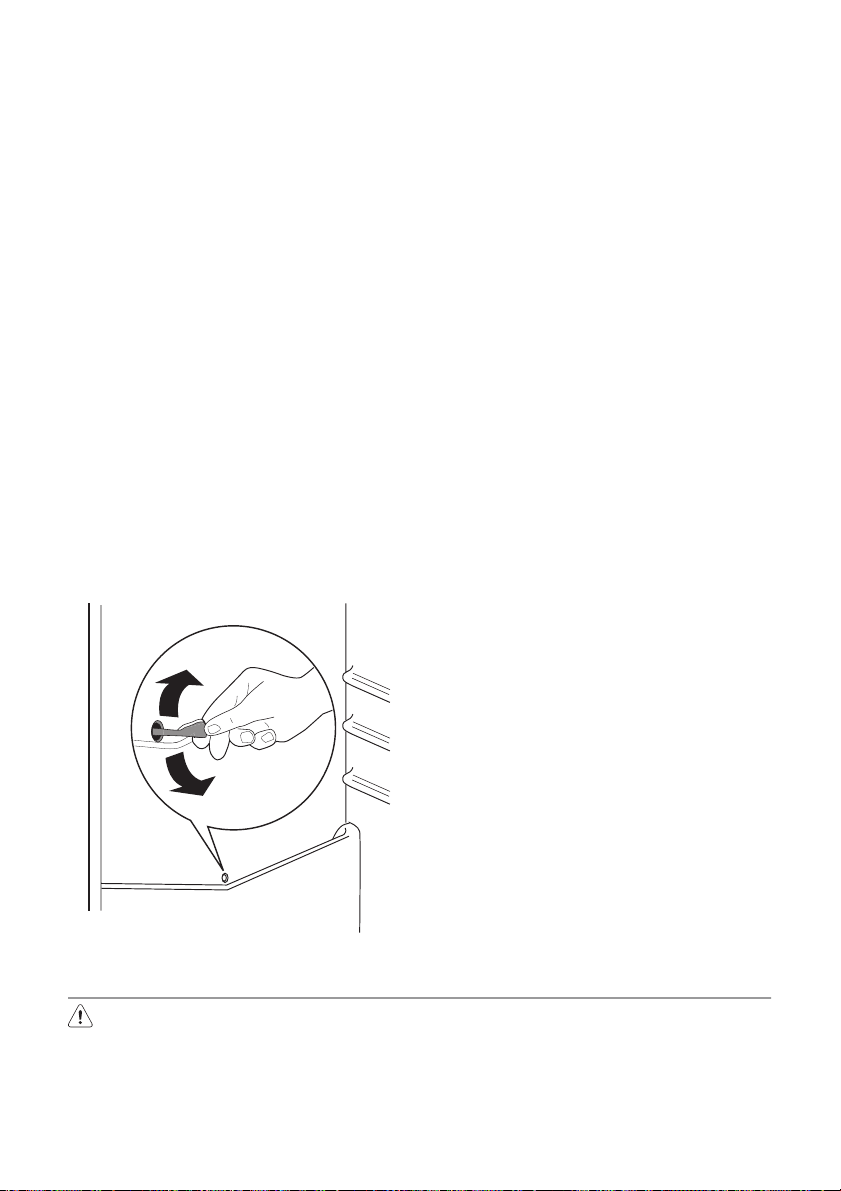
74 electrolux
Muchas marcas de limpiadores de superficies de cocina contienen químicos que pueden atacar o dañar los plásticos del aparato.
Por tal razón, se recomienda que el exterior
del aparato se limpie sólo con agua templada
a la que se añadirá un poco de líquido lavavajillas.
Después de la limpieza, vuelva a conectar el
aparato a la toma de red.
Descongelación del frigorífico
La escarcha se elimina automáticamente del
evaporador del frigorífico cada vez que se
detiene el compresor, durante el funcionamiento normal. El agua de la descongelación
se descarga hacia un recipiente especial situado en la parte posterior del aparato, sobre
el motor compresor, donde se evapora.
Es importante limpiar periódicamente el orificio de salida del agua de descongelación
situado en la mitad del canal del compartimento frigorífico para evitar que el agua desborde y caiga sobre los alimentos del interior.
Utilice el limpiador especial suministrado,
que hallará ya colocado en el orificio de desagüe.
Descongelación del congelador
El compartimento congelador de este modelo es de tipo "no frost" y no produce escarcha. Esto significa que, durante el funcionamiento, no se forma escarcha ni en las paredes internas del aparato ni sobre los alimentos.
La ausencia de escarcha se debe a la continua circulación del aire frío en el interior del
compartimento impulsado por un ventilador
controlado automáticamente.
Periodos sin funcionamiento
Si el aparato no se utiliza durante un tiempo
prolongado, tome las siguientes precauciones:
•
desconecte el aparato de la red eléctrica;
• extraiga todos los alimentos;
•
descongele
16)
y limpie el aparato y todos
los accesorios;
• deje la puerta(s) entreabierta para prevenir
olores desagradables.
Si va a mantener el armario en marcha, solicite a alguien que lo inspeccione de vez en
cuando para evitar que los alimentos se
echen a perder en caso de un corte de energía.
Mantenimiento y limpieza
Advertencia Antes de realizar cualquier
reparación, desconecte el enchufe del
aparato de la toma de red.
Sólo un electricista o un técnico profesional debe llevar a cabo cualquier reparación que no figure en este manual.
16) Si está previsto.
Importante Se producen ruidos durante el
funcionamiento normal (compresor,
circulación del refrigerante).
Page 75
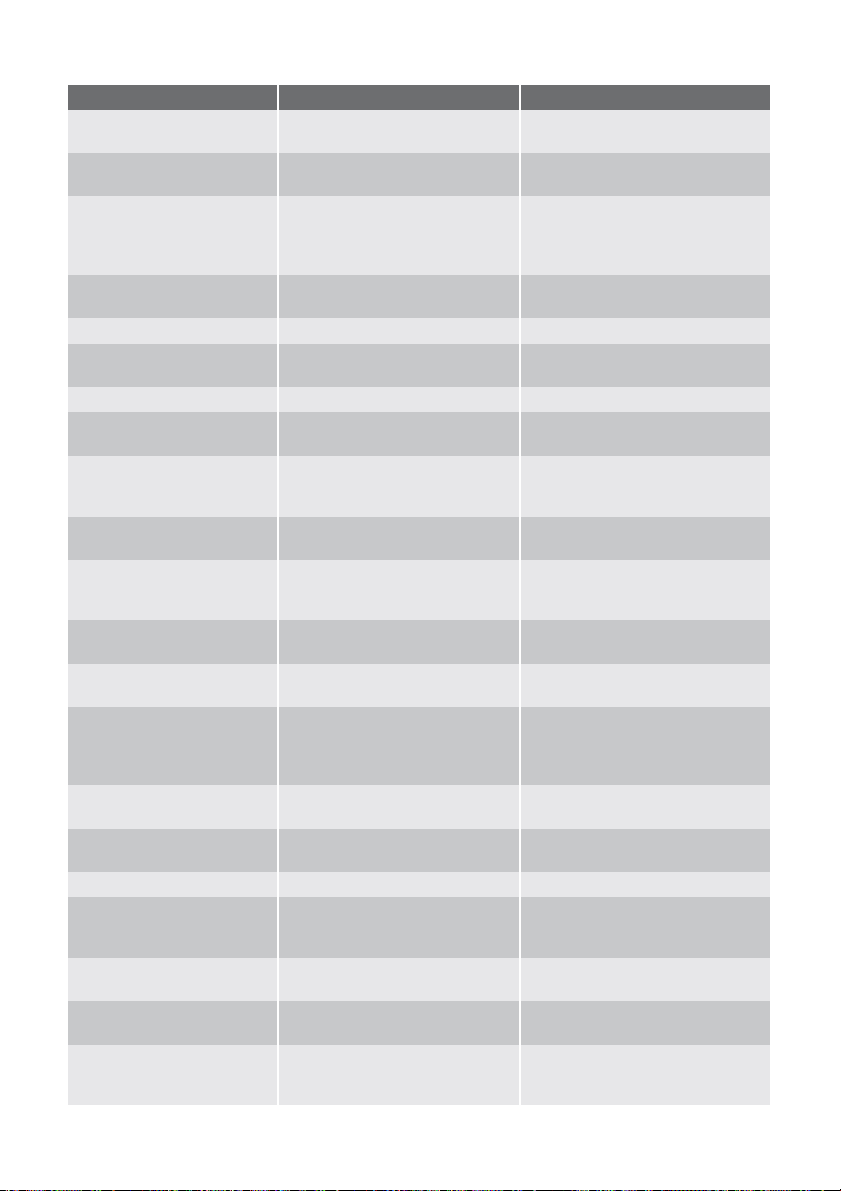
electrolux 75
Problema Causa posible Solución
El aparato no funciona. La
El aparato está apagado. Encienda el aparato.
bombilla no funciona.
El aparato no está bien enchufa-
do a la toma de corriente.
El aparato no recibe corriente. No
hay voltaje en la toma de corriente.
Enchufe el aparato correctamente
a la toma de corriente.
Enchufe otro aparato eléctrico a la
toma de corriente.
Llame a un electricista homologado.
La bombilla no funciona.
La bombilla está en modo de es-
Cierre y abra la puerta.
pera.
La bombilla está defectuosa. Consulte "Cambio de la bombilla".
El compresor funciona
continuamente.
El ajuste de temperatura no es
correcto.
Seleccione una temperatura más
alta.
La puerta no está bien cerrada. Consulte "Cierre de la puerta".
La puerta se ha abierto con ex-
cesiva frecuencia.
La temperatura del producto es
demasiado alta.
No mantenga la puerta abierta más
tiempo del necesario.
Deje que la temperatura del pro-
ducto descienda a la temperatura
ambiente antes de guardarlo.
La temperatura ambiente es de-
Reduzca la temperatura ambiente.
masiado alta.
El agua fluye por la placa
posterior del frigorífico.
Durante el proceso de descongelación automática, la escarcha
Esto es correcto.
se derrite en la placa posterior.
El agua fluye por el inte-
La salida del agua está obstruida. Limpie la salida del agua.
rior del frigorífico.
Los productos impiden que el
agua fluya al colector de agua.
El agua fluye hacia el suelo.
El agua de la descongelación no
fluye hacia la bandeja de evaporación situada sobre el compre-
Compruebe que los productos no
tocan la placa posterior.
Fije la salida de agua de descon-
gelación a la bandeja de evapora-
ción.
sor.
La temperatura del aparato es muy baja.
La temperatura del aparato es demasiado alta.
El ajuste de temperatura no es
correcto.
El ajuste de temperatura no es
correcto.
Seleccione una temperatura más
alta.
Seleccione una temperatura más
baja.
La puerta no está bien cerrada. Consulte "Cierre de la puerta".
La temperatura del producto es
demasiado alta.
Deje que la temperatura del pro-
ducto descienda a la temperatura
ambiente antes de guardarlo.
Se han almacenado muchos pro-
ductos a la vez.
La temperatura del frigorífico es demasiado alta.
La temperatura del congelador es demasiado al-
No hay circulación de aire frío en
el aparato.
Los productos están demasiado
próximos entre sí.
ta.
Guarde menos productos al mis-
mo tiempo.
Compruebe que el aire frío puede
circular libremente en el aparato.
Guarde los productos de modo
que haya circulación de aire frío
entre ellos.
Page 76
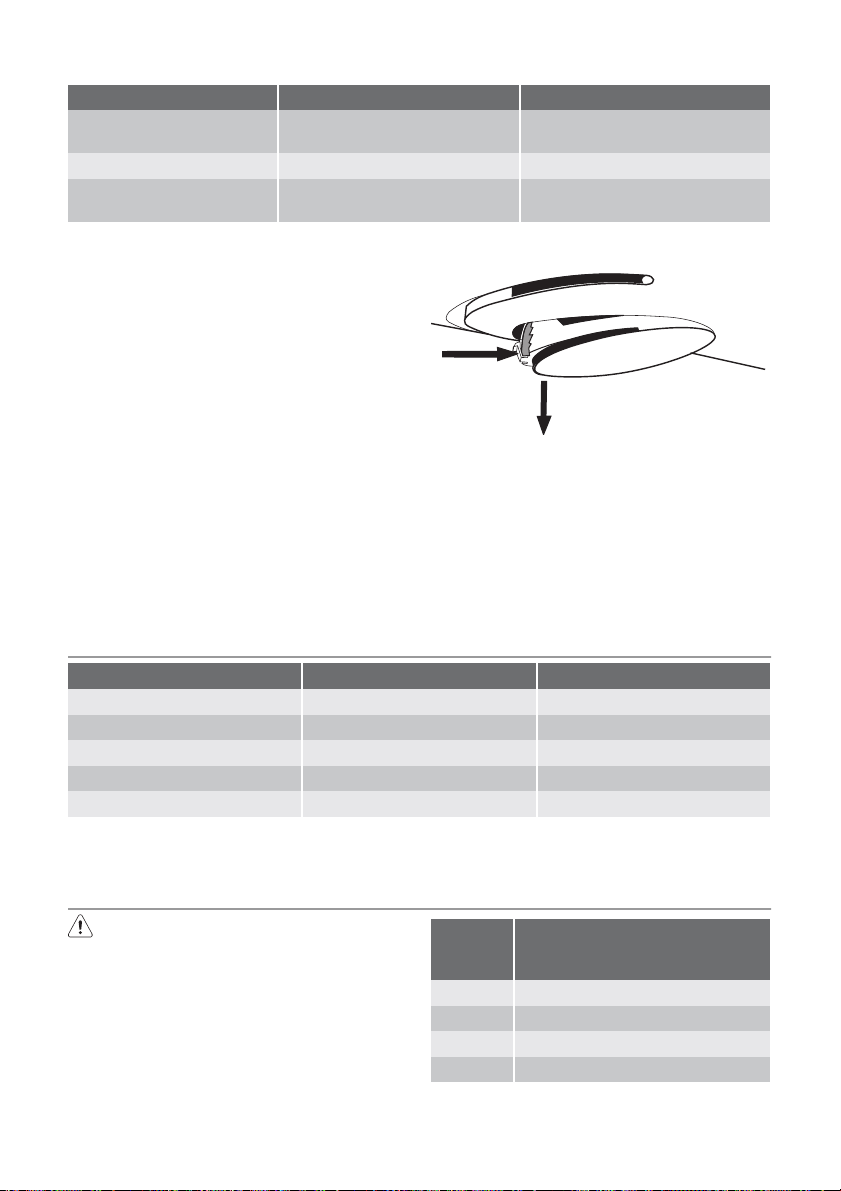
76 electrolux
Problema Causa posible Solución
Hay demasiada escarcha.
La puerta no está bien cerrada. Consulte "Cierre de la puerta".
El ajuste de temperatura no es
Los alimentos no están bien envueltos.
correcto.
Envuelva bien los alimentos.
Seleccione una temperatura más
alta.
Cambio de la bombilla
1. Desconecte el enchufe de la toma de corriente.
2. Presione sobre el gancho trasero de la
cubierta de la bombilla con un destornillador mientras tira y gira la cubierta en la
dirección de la flecha.
3. Cambie la bombilla por otra de la misma
potencia (la potencia máxima se indica en
A
max 25 W
B
la cubierta de la bombilla).
4. Instale la cubierta de la bombilla fijándola
en su posición original.
5. Conecte el enchufe a la toma de red.
6. Abra la puerta. Compruebe que la bombilla se enciende.
Cierre de la puerta
1. Limpie las juntas de la puerta.
2. Si es necesario, ajuste la puerta. Consulte "Instalación".
3. Si es necesario, cambie las juntas de
puerta defectuosas. Contacte al Centro
de servicio técnico.
Datos técnicos
Medidas de la cavidad
Altura 1950 mm
Anchura 695 mm
Fondo 669 mm
Tiempo de elevación 20 h
La información técnica se encuentra en la
placa de datos técnicos en el lado interior iz-
quierdo del aparato y en la etiqueta de energía.
Instalación
Lea atentamente la "información de
seguridad" para garantizar su propia
seguridad y el correcto funcionamiento
del electrodoméstico antes de instalar el
electrodoméstico.
Colocación
Instale el aparato en un punto en el que la
temperatura ambiente se corresponda con
la clase climática indicada en la placa de datos técnicos del aparato:
Clase
climáti-
ca
SN +10°C a + 32°C
N +16°C a + 32°C
ST +16°C a + 38°C
T +16°C a + 43°C
Temperatura ambiente
Ubicación
El aparato se debe instalar lejos de fuentes
de calor como, por ejemplo, radiadores, cal-
Page 77
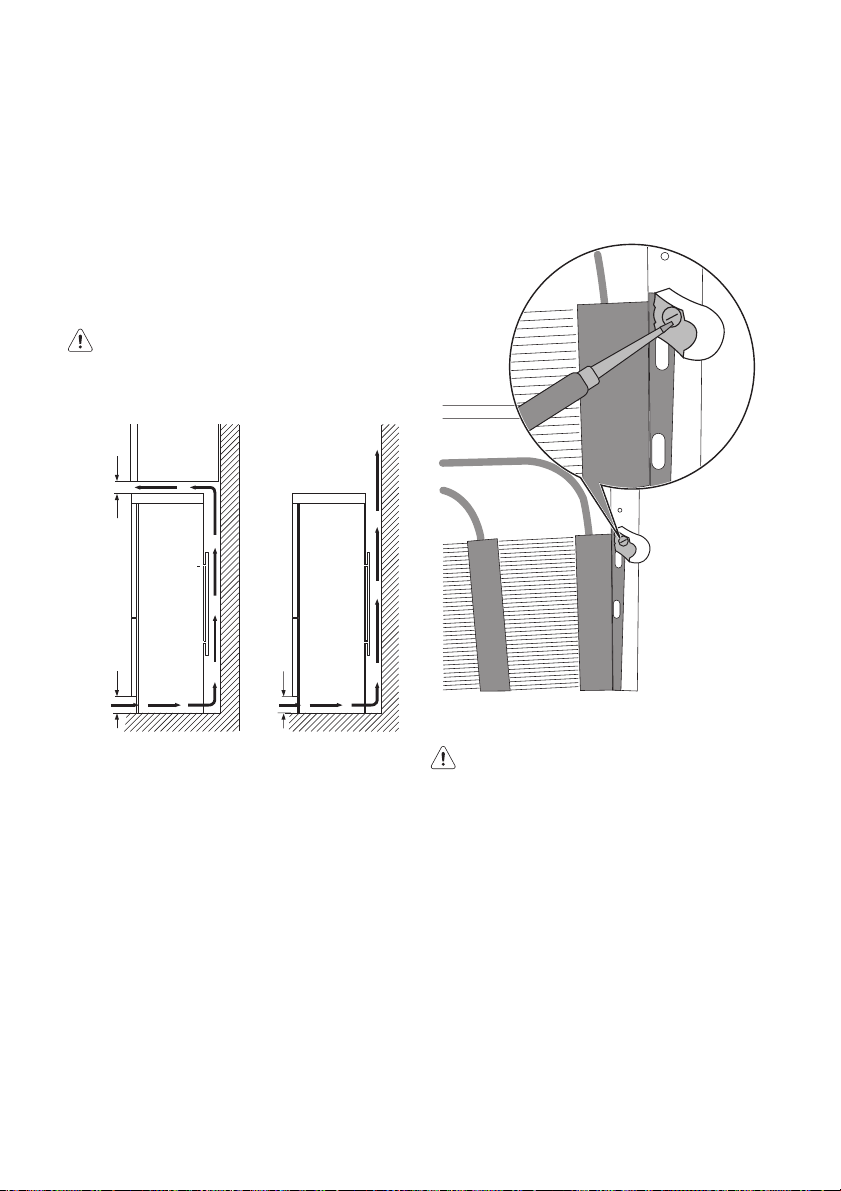
electrolux 77
deras, luz solar directa, etc. Asegúrese de
que el aire pueda circular libremente en la
parte trasera del mueble. Para garantizar el
máximo rendimiento, si el aparato se coloca
debajo de un armario que sobresale, la distancia mínima entre la parte superior del
mueble y el armario debe ser de como mínimo 100 mm. No obstante, lo ideal sería que
el aparato no se colocase debajo de armarios que sobresalgan. La correcta nivelación
se garantiza mediante una o más patas ajustables en la base del mueble.
Advertencia El aparato se debe poder
desconectar del suministro de corriente;
por tanto, el enchufe debe ser fácilmente
accesible después de la instalación.
100 mm
AB
Piezas de separación traseras
En el interior del aparato hay dos sepa-
radores que deben instalarse como se
muestra en la figura.
Afloje los tornillos, introduzca la pieza de separación por debajo la cabeza de los tornillos
y vuelva a apretarlos.
15 mm
15 mm
Conexión eléctrica
Antes de conectar el aparato, compruebe
que el voltaje y la frecuencia que aparecen
en la placa de datos técnicos se corresponden con el suministro de la vivienda.
El aparato debe tener conexión a tierra. El
enchufe del cable de alimentación se suministra con un contacto para tal fin. Si la toma
de red de la vivienda carece de conexión a
tierra, conecte el aparato a una toma de tierra
conforme con la normativa, después de consultar a un electricista profesional.
El fabricante rechaza toda responsabilidad si
no se toman las precauciones antes indicadas.
Este aparato es conforme con las directivas
de la CEE.
Puerta reversible
Advertencia Antes de llevar a cabo
cualquier operación, desenchufe el
electrodoméstico.
Importante Para realizar los procedimientos
que se indican a continuación es aconsejable
contar con la ayuda de otra persona para
que sujete bien las puertas del
electrodoméstico.
Para cambiar el sentido de apertura de la
puerta, siga estos pasos:
1. Con el máximo cuidado para evitar que
la puerta se caiga, retire la bisagra superior y guárdela por si la necesita en
otro momento.
Page 78
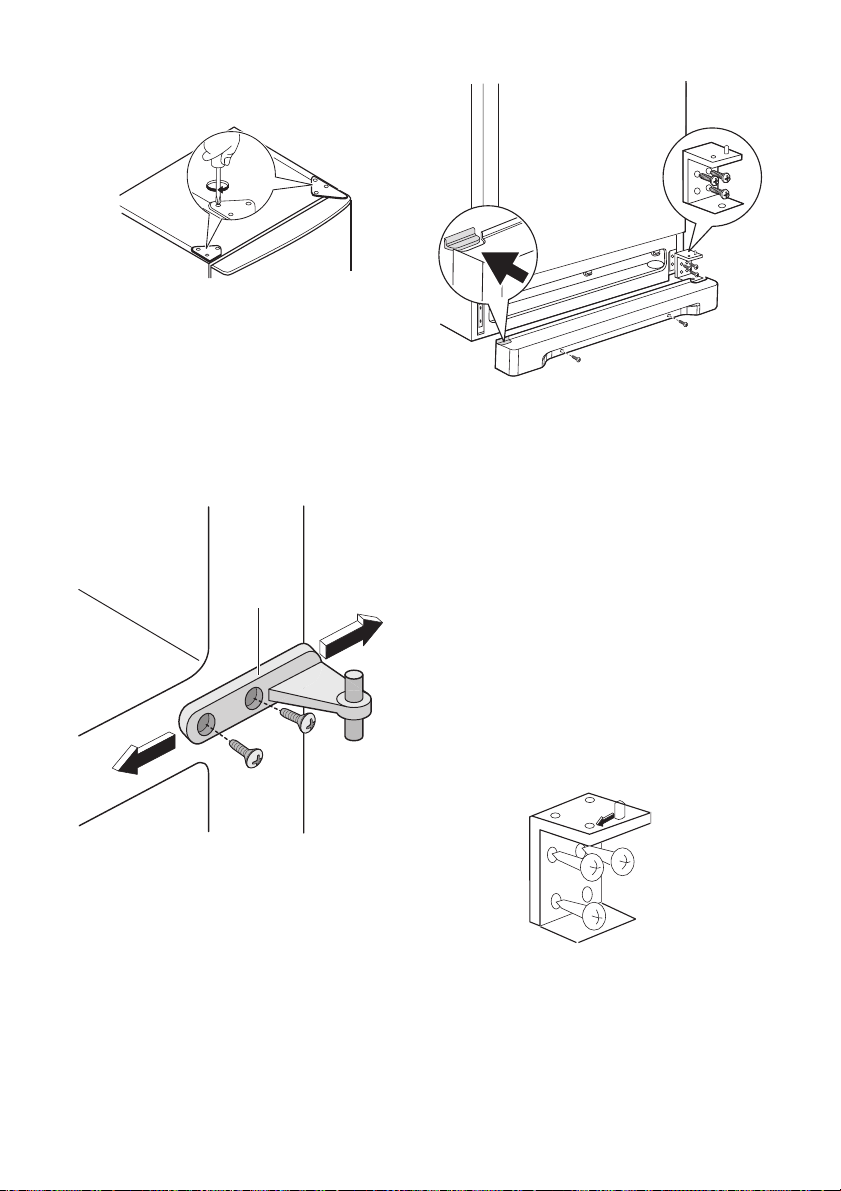
78 electrolux
2. Extraiga la puerta superior.
3. Retire el soporte superior y móntelo en
el lado opuesto.
4. Desatornille la bisagra intermedia (H).
Desatornille los tacos de plástico situados en el lado opuesto de la bisagra
central e insértelos en los orificios donde
estaba la bisagra.
H
7. Con mucho cuidado, coloque el aparato
sobre la parte trasera, desatornille totalmente la pata ajustable y atorníllela en el
lado opuesto.
8. Extraiga los tornillos de fijación de la bisagra inferior y retírela.
9. Con una llave de 12 mm, desatornille el
pasador de la bisagra y vuelva a montarlo en el lado opuesto de la bisagra.
10. Vuelva a montar la bisagra inferior en el
lado opuesto con los tornillos que ha retirado previamente.
11. Con mucho cuidado, vuelva a colocar el
aparato en posición vertical y nivélelo girando la pata ajustable de la base a derecha o izquierda con la mano.
5. Retire la puerta inferior.
6. Extraiga la rejilla de ventilación fijada con
dos tornillos.
12. Deslice la cubierta del orificio para extraerla de la rejilla de ventilación empujándola en la dirección de la flecha, y
vuelva a montarla en el lado opuesto.
Page 79
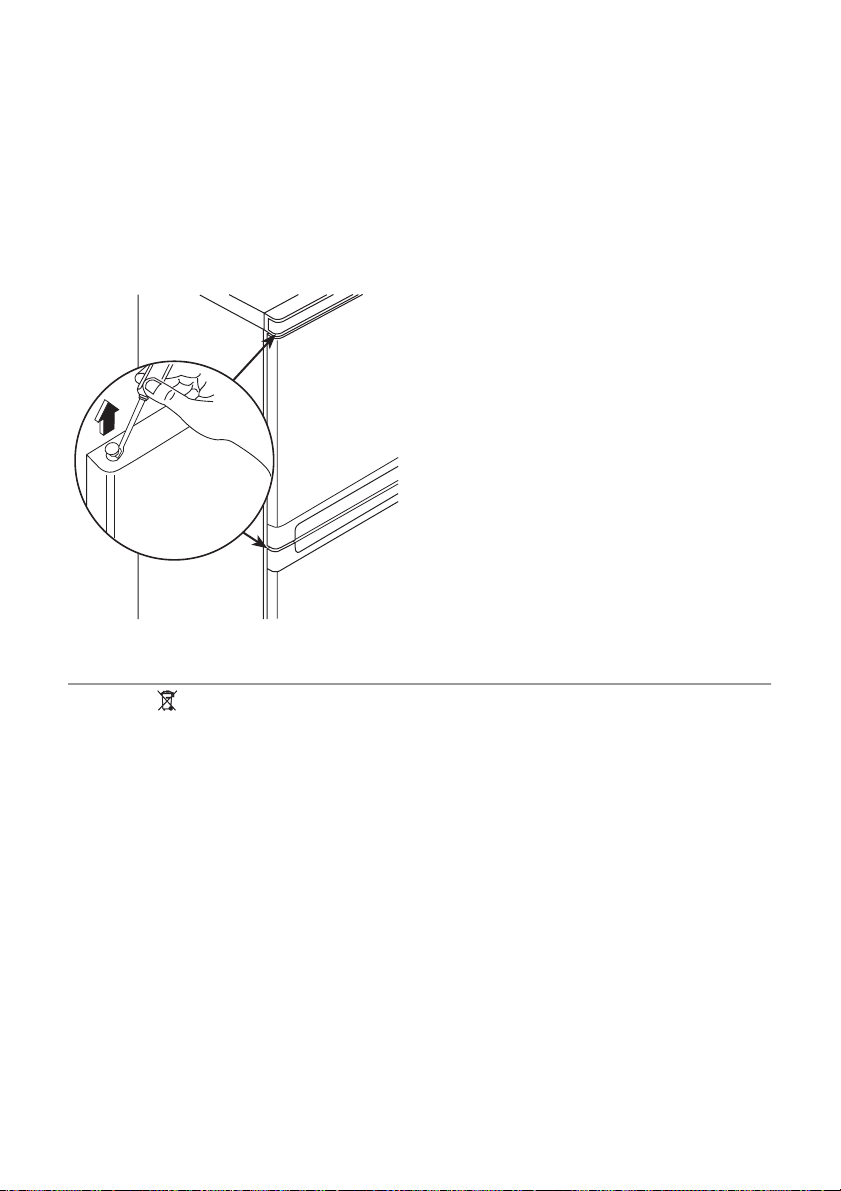
electrolux 79
13. Vuelva a colocar la rejilla de ventilación y
fíjela con los tornillos.
14. Vuelva a colocar la puerta inferior.
15. Vuelva a montar la bisagra intermedia (H)
en el lado opuesto.
16. Vuelva a montar la puerta superior.
17. En la bolsa con la documentación encontrará la bisagra superior necesaria
para realizar el cambio de apertura de la
puerta. Coloque el tornillo en su lugar.
Realice una verificación final para comprobar
que:
• Todos los tornillos están apretados.
• La guarnición magnética se adhiere al
mueble.
• La puerta abre y cierra correctamente.
Es posible que la junta no encaje a la perfección en el mueble si la temperatura ambiente
es baja (es decir, en invierno). En tal caso,
espere hasta que la junta se fije al mueble de
forma natural.
Si prefiere no realizar los procedimientos antes mencionados, póngase en contacto con
el Centro de servicio técnico más próximo. El
personal del Centro de servicio técnico cambiará el sentido de apertura de las puertas
con gastos a su cargo.
Aspectos medioambientales
El símbolo que aparece en el aparato o
en su embalaje, indica que este producto no
se puede tratar como un residuo normal del
hogar. Se deberá entregar, sin coste para el
poseedor, bien al distribuidor, en el acto de
la compra de un nuevo producto similar al
que se deshecha, bien a un punto municipal
de recolección selectiva de equipos
eléctricos y electrónicos para su reciclaje. Al
asegurarse de que este producto se
desecha correctamente, usted ayudará a
evitar posibles consecuencias negativas
para el medio ambiente y la salud pública, lo
cual podría ocurrir si este producto no se
gestionara de forma adecuada. Para obtener
información más detallada sobre el reciclaje
de este producto, póngase en contacto con
el Ayuntamiento de su Municipio, ó con la
tienda donde lo compró.
Page 80

www.electrolux.com
www.electrolux.gr
Para comprar acessórios e consumiveis na nossa loja web, por favor, visite:
www.electrolux.pt
Para comprar accesorios, consumibles y recambios en nuestra tienda online, por favor visite
nuestro site:
www.electrolux.es
222350612-00-14102009
 Loading...