

Page 1
USER MANUAL
8221913 - 76 - 01
Model EMS2820
z
Page 2

Page 3

EMS2820 t English
Contents
Before using your microwave oven 4
Technical data 4
Safety instructions 5
– Utensil safety 5
– Testing suitability of 6
– Food safety 6
– Oven utensils and accessories guide 7
– Unpacking 7
How to operate your microwave oven 8
– Name and function of parts 8
– Turntable Installation 8
– Control panel 9
– Setting the Clock 10
– Child Safety Lock 10
– To Stop the Oven 10
– Switching the beeper off 11
– Quick Start 11
– Microwave Power setting Guide 11
– Microwave cooking 12
– Automatic Defrost 13
– Automatic Reheat 14
– Snack Function 15
– Recommendations for Manual Defrost 16
– Auto Reheat Programmes Chart 17
– Auto Defrost Programmes Chart 18
– Snack Function Programmes Chart 19
Microwave Hints 20
Care and cleaning 21
– Cleaning the accessories (turntable a nd support) 21
– Cleaning the interior 21
– Cleaning the exterior 21
Guarantee Conditions 22
3
Page 4

EMS2820 t English
'SRKVEXYPEXMSRWSRXLITYVGLEWISJ]SYVRI[1MGVS[EZI3ZIR
Thank you for having chosen a Electrolux product. We are convinced that you will find your new microwave
oven very useful and that it will be of great help to you. As with all new kitchen appliances, it will take some
time to learn all the new functions and features, but with time, this oven will become indispensable to you.
Before using your Microwave Oven
Read through the instruction manual carefully. In order that you can get the best from your new Electrolux
Microwave Oven, the following instructions have been prepared. Please make sure you read them carefully.
It is important that this instruction book is ret ained with the appliance for future reference. Should the appliance
be sold or transferred to another owner, or if you move house and leave the appliance, always ensure that the
book is supplied with the appliance or that the new owner can be acquainted with the f unct ioning of the
appliance and the relevant warnings.
Please ensure you have read the whole instruction book before using the appliance and that you follow the
recommendations given.
Technical data
Overall dimension Weight 16 kg
Width 517 mm
Depth 440 mm
Height 297 mm
Cavity dimension Fuse 10A
Width 335 mm
Depth 340 mm
Height 256 mm
Volume 28 Litre
Power source 230V, 50 Hz
Power consumption 1400W
Power output 1000W
4
Page 5

EMS2820 t English
Safety Instructions
• The built-in safety interlock switches prevent the
microwave oven from operating when the door is
open.
• Do not tamper with them, or attempt to operat e
the oven with the door open as open door
operation can result in exposure to microwave
energy.
• Do not allow food spills or cleaner residue to
accumulate on door sealing surfaces. See the
Cleaning and Care section for cleaning
instructions.
• Do not operate the oven if it is damaged until it
has been repaired by qualified service p ersonnel.
• It is particularly important that the oven door
closes properly and that there is no damage to
the: (1) door (warped), (2) hinges and latches
(broken or insecure), (3) door seals and sealing
surface.
• Under no circumstances should you attempt to
repair the appliance yourself. Repairs carried out
by inexperienced persons may cause injury or
serious malfunctioning. Contact your local Service
Force Centre.
• Do not remove the outer case, door or control
panel at any time. Doing so may cause exposure
to extremely high voltage.
• Install or locate this oven only in accordance with
“INSTALLATION INSTRUCTIONS” found in this
manual.
• Use the appliance for its intended use as
described in this manual. Do not use corrosive
chemicals in this appliance. This type of oven is
specifically designed to heat, cook, or defrost
food. It is not designed for industrial or laboratory
use neither for commercial use as this will
invalidate the guarantee.
• Do not operate the oven empty. If food or water is
not present to absorb the microwave energy, the
magnetron tube can be damaged.
• The appliance is not intended for use by young
children or infirm persons without supervision;
Young children should be supervised to ensure
that they do not play with the applia nce
• Do not store this appliance outdoors. Do not use
this product near water.
• Do not attempt to dry clothing or newspap ers in
the microwave oven. These items can ignite.
• Do not use the cavity for storage purposes. Do
not leave paper products, cooking utensils, or
food in the cavity when not in use.
Utensil safety
Most glass, glass ceramic and heat-resistant
glassware utensils are excellent for use in the
microwave oven. Although microwave energy will not
heat most glass and ceramic items, these utensils
can become hot as heat transfers from the food t o
the container. The use of oven gloves to remove
dishes is recommended.
It is quite normal for steam to be emitted around
the door, or for misting to occur on the door, or
even for water droplets to appear below the door
during the cooking cycle. This is merely
condensation from the heat of the food and does
not affect the safety of your oven. The door is
not intended to seal
the oven cavity completely.
• Do not force the turntable to rotate by hand. This
may cause malfunctioning.
• Arcing in the oven during microwave operation
usually occurs from use of metallic utensils.
Continuous arcing, however, can damage the unit.
Stop the programme and check the utensil.
• Care should be taken not to obstruct any air vents
located on the top, rear, side and bottom of the
oven
.
m Do not use this oven for commercial
purposes. This oven is made for domestic
use only.
5
Page 6

EMS2820 t English
Testing suitability of cookware Food safety
Do not heat food in a can in the microwave oven.
• Place the cookware in the microwave along wit h a
glass half full of water. Heat on 1000 W (100%)
for one minute. If the cookware feels hot, you
should not use it. If it is just slightly warm, you can
use it for reheating but not for cooking. If the dish
is room temperature, it is suitable for microwave
cooking.
• Paper napkins, wax paper, paper towels, plat es,
cups, cartons, freezer wrap and cardboard are
great convenience utensils. Always be sure
containers are filled with food to absorb energy
and thus avoid the possibility of overheat ing.
• Many plastic dishes, cups, freezer containers an d
plastic wraps may be used in the microwave
oven. Follow manufacturer’s instructions wh en
using plastics in the oven. Avoid using plastic
utensils with foods that have high fat or sugar
content since these foods reach high
temperatures and could melt some plastics.
Metal utensils and utensils wit h metallic trim
•
should not be used in the microwave oven, unl ess
specifically recommended for microwave use.
Containers with restricted openings, such as
•
bottles, should not be used for microwave
cooking.
Use caution when removing a lid or cover from a
•
dish to avoid steam burns.
WARNING : Do not leave oven unattend ed , and
look at it from time to time when
heating or cooking food in plastic,
paper or other combustible
containers. If smoke i s ob served,
keep door closed, switch the oven
off or disconnect oven until smoke
stops.
•
Always remove the food to a suitable contain er.
Deep fat frying should not be done in the
•
microwave oven, because the fat temperature
cannot be controlled, hazardous situations can
result.
Popcorn may be prepared in the microwave oven,
•
but only in special packages or utensils designed
specifically for this purpose. This cooking
operation should never be un-attended.
Pierce foods with non-porous skins or
•
membranes to prevent steam build-up and
bursting. Apples, potatoes, chicken livers, and
egg yolks are examples of items that should be
pierced.
WARNING: When heating liquids, e.g. soups, sauces
and beverages in your microwave oven, overheat ing
the liquid beyond boiling point can occu r without
evidence of bubbling. This could result in a sudden
boil over of the hot liquid. To prevent t his possibility
the following steps should be taken:
1. Avoid using straight-sided containers with narrow
necks.
2. Do not overheat.
3. Stir the liquid before placing the cont ainer in the
oven and again halfway through the he at ing time.
4. After heating, allow to stand in the oven f or a
short time, stirring again before carefully removing
the container.
Some products such as whole eggs and sealed
•
containers – for example, closed glass jars – may
explode and should not be heated in this oven.
Occasionally, poached eggs may explode during
cooking. Always pierce the yolk, then cover and
allow the standing time of one minute b efore
removing cover.
NOTE:
Do not force the turntable to rotate by han d. This
•
may cause malfunctioning.
Arcing in the oven during microwave operation
•
usually occurs from use of metallic ut ensils.
Continuous arcing, however, can damag e the
unit. Stop the programme and check the utens il.
Care should be taken not to obstruct any air vents
•
located on the top, rear, side and bottom of the
oven.
Do not use this oven for commercial purposes.
This oven is made for domestic u se on l y.
Keep these instructions
6
Page 7
EMS2820 t English
Oven utensils and accessories guide
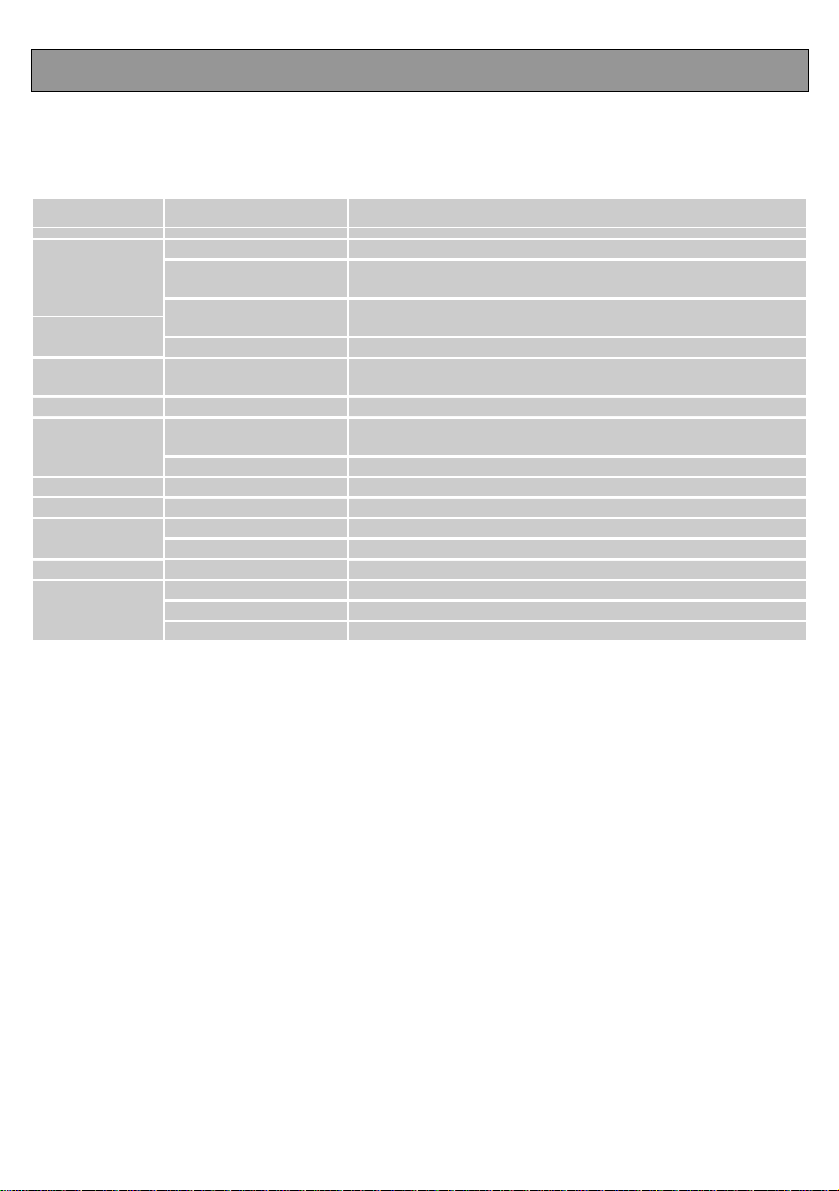
A variety of Utensils and Materials may be used for cooki ng in your microwave oven. For your safety and to
prevent damaging utensils and your oven choose appropriate utensils and materials for each cooking method.
The list below is a general guide.
Material Utensils Microwave
Corning ware YES
Heat resistant glass
Ceramic &
Glass
China
Pottery*2 YES
Plastic
Metal Baking pan NO
Paper
Wood NO
Accessories
Glass ware with metal
ware
decoration
Lead crystal glass NO
Without metal
decoration
Microwave oven
heat-proof wear
Plastic wrap YES
Aluminium foil*3 YES
Cups, plates, towels YES
Waxed paper YES
Grill rack NO
Turntable YES
Turntable support YES
YES*1
NO
YES
YES
YES: Utensils and accessories to use NO: Utensils and accessories to avoid
*1 Only if there is no metal trim.
*2 Only if it does not have a glaze containing metal.
*3 NOTE: Use aluminium foil only for shielding purposes, over use may cause arcing.
Unpacking
N.B. When you unpack the oven, check that the prod uc t is free from damage. Dam age or any missing parts must be
reported immediately to the retailer. The oven, parts of the oven or the acc es sories may be wrappe d by a pr otection foil. If
so, you must remove this foil before using the oven. Do not leave packing mater ial so that small childr en c an play with it.
This can be hazardous.
7
Page 8
EMS2820 t English
How to operate your microwave oven
1
2
3
5
6
4
7
8
4
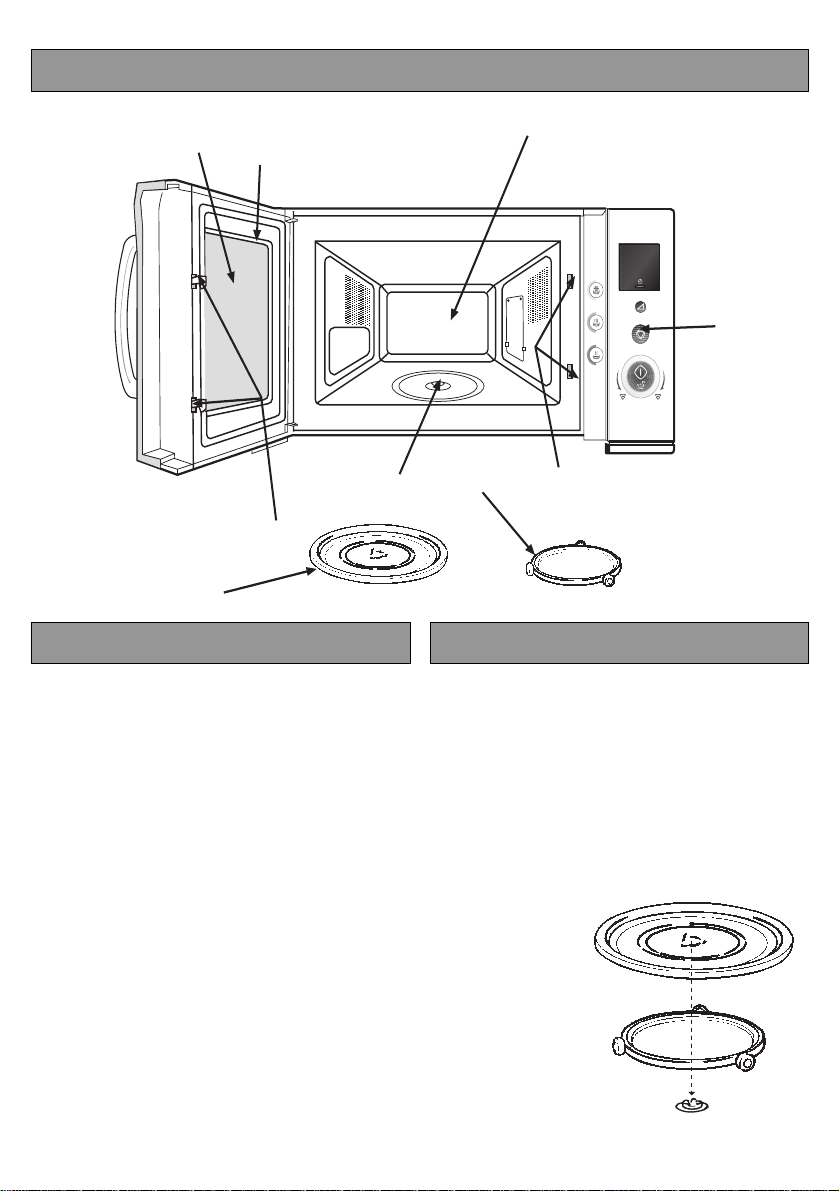
Name and function of parts Turntable Installation
1. Cooking compartment. Wipe the compartment
clean after using the oven.
2. Viewing window. Food can be checked whi le the
microwave oven is in operation.
3. Oven door. The door must always be firmly
closed while cooking.
4. Safety Latch and Interlock System.
5. Control panel.
6. Drive shaft for turntable.
7. Turntable.
8. Turntable support.
1. Place the turntable support on the cavity Bot t om.
2. Place the turntable on top of the t urntable support
as shown in the diagram. Make sure that turntable
hub is securely locked in the turntable shaft. Never
place the turntable upside dow n.
• Both turntable and turntable support must always be
used during cooking.
• All food and containers of food are always placed on
this turntable for cooking.
• This turntable rotates clockwise and anticlockwise;
this is normal.
Turntable
Roller rest
Turntable Shaft
8
Page 9
EMS2820 t English
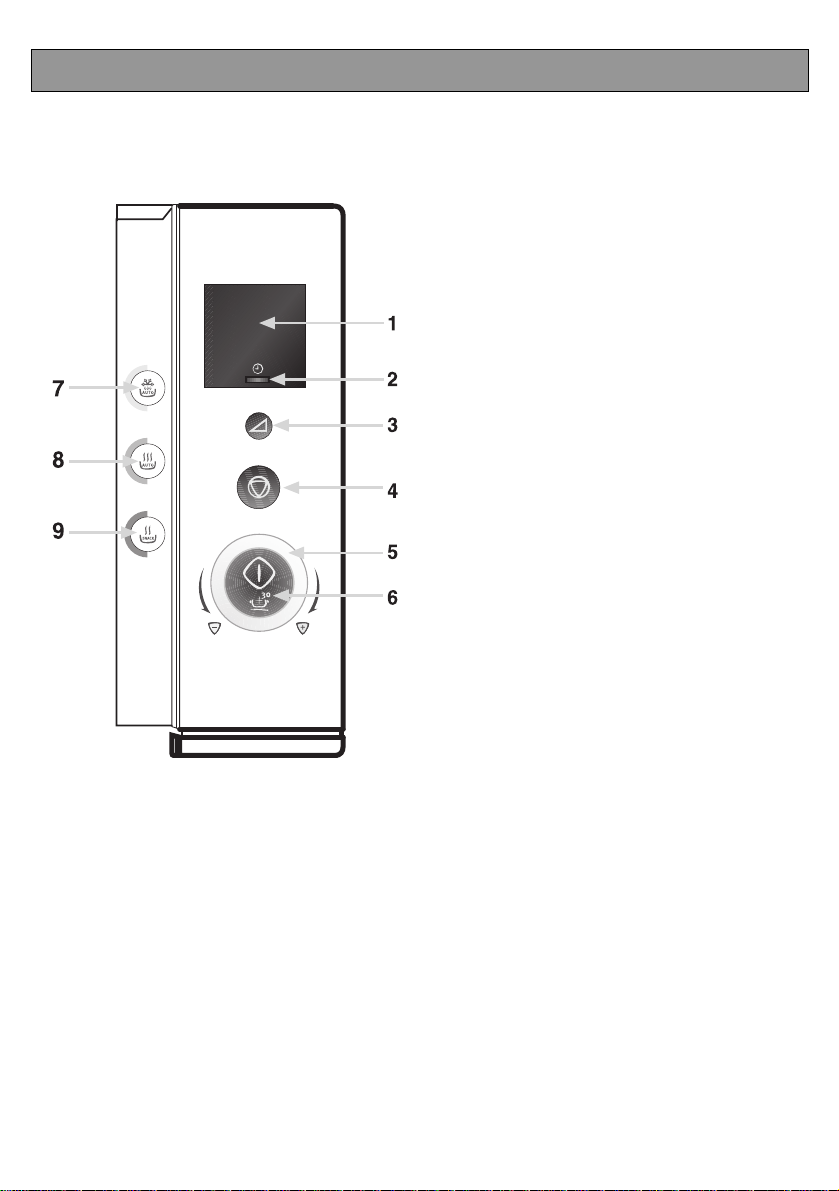
Control Panel
1. Display Window
To view either Cook time, Power level and time
of day.
2. Clock
To set the time of day
3. Power
To set the desired Microwave power level
4. Stop/Clear
To stop or pause your Microwave
5. Setting Control Knob
Used to set desired cooking times.
6. Quick Start
To start your microwave
7. Auto Defrost
Used to set desired Defrost mode.
8. Auto Reheat
Used to set desired Reheat mode.
9. Snack Function
Used to set desired Snack mode.
9
Page 10

EMS2820 t English
Setting the Clock
When your oven is plugged in for the first time or when pow er resumes after a power interruption, the display
window flash and show " ---- "
Example: To set 4.30
1. Touch the Clock button.
2. Set the time to " 4:00 " using the setting control knob
3. Touch the Clock Button
4. Set the time to " 4:30 " using the setting control knob
5. Touch the Clock button. (The Time will now b e set)
NOTE : It is possible to display the current time even after starting the mode set, by pressing the
Clock button (the time is displayed for 2 seconds).
Child safety lock
This oven has a safety feature which prevent s t he accidental running of the oven by a child. After the lock has
been set, no part of the microwave oven will operate until the child lock feature has be en cancelled.
To set:
1. Touch the ’ Stop/Clear ’ button and the ’ Clock ’ button at the same time. ’ L ’ will apear in the display.
To cancel the child lock, simply touch the ’ Stop/Clear ’ button and the ’ Clock ’ button at the same time.
To Stop the Oven
There are two way to stop the oven whilst it is in use.
1. Press the Stop/Clear button
• You may restart the oven by pressing the Start button
• Pressing Stop/Clear again will reset the current programme
2. Open the door
• You may restart the oven by closing the door and pressing the Start button
• Pressing Stop/Clear again will cancel the current programme
At the end of each cooking the cooling fan will remain in operation until the oven door is opened.
10
Page 11
EMS2820 t English
Switching the Beeper Off
This oven has a feature which allows you to t urn of f the beeper. When this is set you will turn off the beeps
which occur when you press a button, this will also disarm the beeps which occur at the end of a program.
To set:
1. Touch the ’ Stop/Clear ’ button and the ’ Start ’ button at the same time. ’ OFF ’ will apear in the display.
To cancel, simply touch the ’ Stop/Clear ’ button and the ’ Start ’ button at the same time.
Quick Start
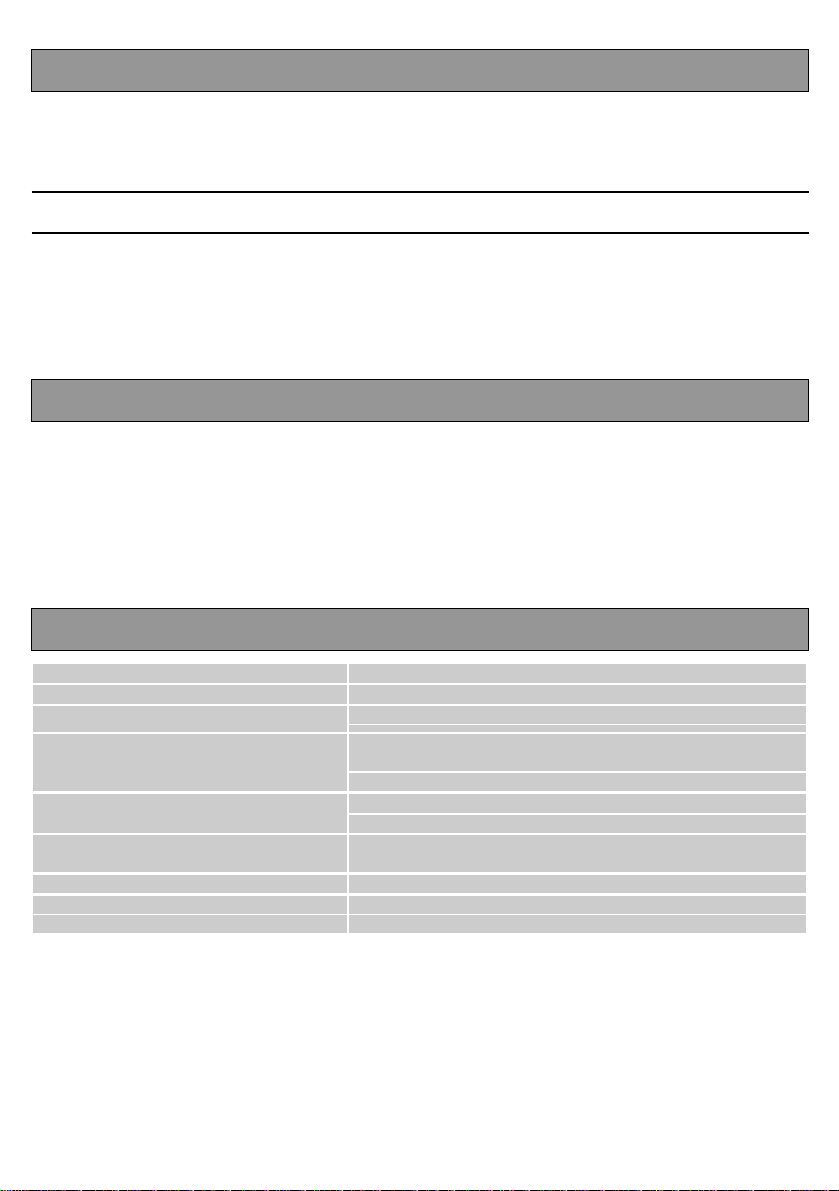
Pressing the ’ Start ’ button allows you to start your microwave at full power (1000W) for 30 seconds.
Each time you press the ’ Start ’ button you will increase the cooking time by 30 seconds.
Microwave Power setting Guide
Power Setting Suggested use
100W Keeping warm : Keeping foods warm
180W
300W
600W Reheat : Reheating of casseroles and st ews.. Reheating pre-
850W Reheat : Roasting joints of meat and poultry.
1000W Max Power; Boiling or reheating liquids. Cooking vegetables.
Thawing frozen foods.
Simmer : Completing the cooking cycle of some pot roast s .
Casseroles and stews.
Baked custards or cheesecakes.
Medium : Faster defrosting for casseroles and stews.450W
Baking cakes and sponge puddings
cooked foods.
Preheating a browning dish.
11
Page 12

EMS2820 t English
Microwave Cooking
1. Open the door, place the food on the t urntable.
Close the door.
2. Press the ’ Power ’ button until the desired power
level is reached.
3. Set the desired time by turning the setting control
knob.
4. Press Start (The oven begins cooking.)
Example: To cook at 450W for 15 minutes
1. Touch the Power button 4 times ( ’ 450 ’ should now be showing in the display window).
2. Turn the setting control knob
( ’ 15:00 ’ should now be showing in the display window).
3. Press start. The Oven will now start cooking.
To turn off the oven during cooking, simply touch the
Stop/Clear button.
Note: After use, be sure to press the Stop/ Clear
button Twice as this will ensure th at you h ave
reset the microwave.
12
Page 13
EMS2820 t English
Automatic Defrost
For manual defrosting, use 180W microwave p ower. To speed up the defrosting of dense foods over 450g
(1lb), the oven may be started on 1000W (100%) power for 1 - 3 minutes, then reduced to (180W) until
defrosting is complete.
1. Open the door, place the food on the t urntable.
2. Press the ’ Auto Defrost ’ button until the desired
programme is reached.
3. Turn the setting control knob untill the required
quantity is reached.
4. Close the door.
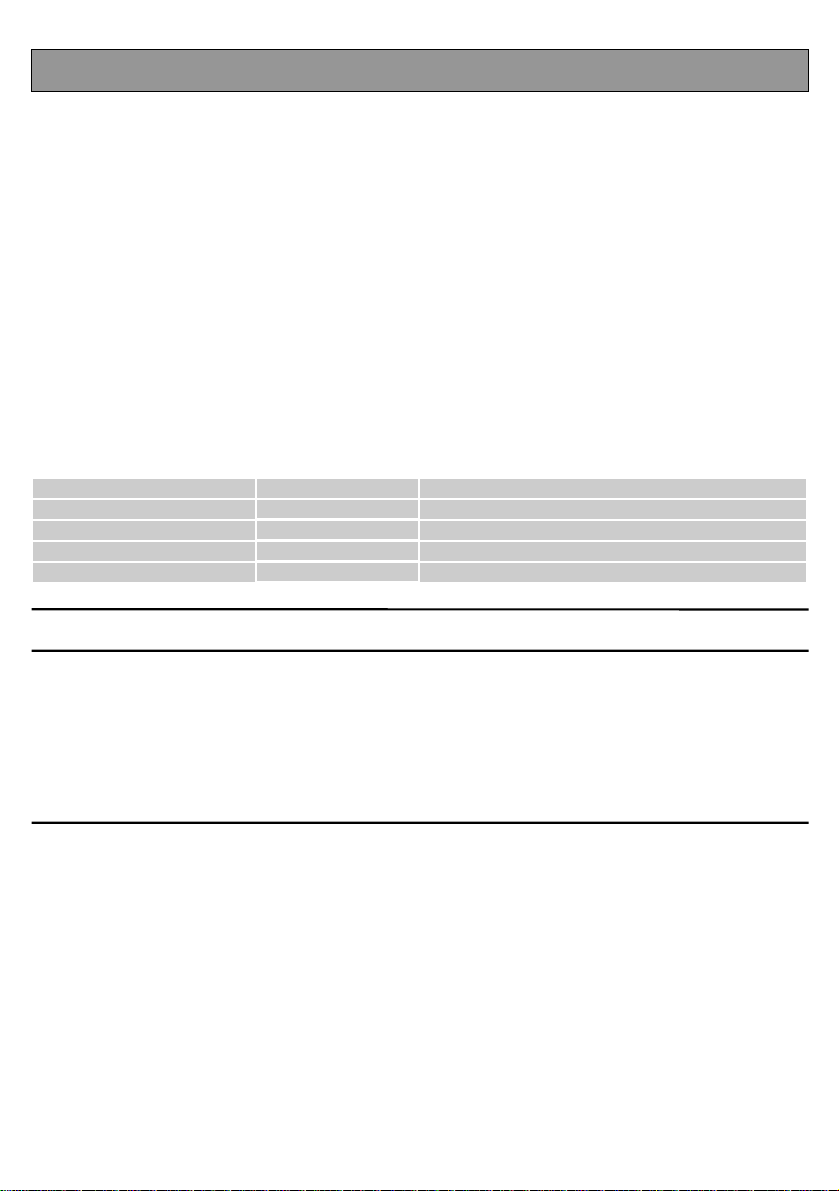
NOTE : During Automatic Defrost the oven wi ll automatically select the required microwave
Selection Chart for Auto Cook functions :-
Example: To automatically defro st 500g of Fish.
1. Open the door.
2. Touch the Auto defrost button 3 times
3. Turn the setting control knob until 500 is showing in the display window.
power and cooking time.
Auto Programme Press Button Portion Size
Meat
Poultry
Fish
Bread / Cake
Once
Twice
Three Times
Four Times
5. Press Start (The oven begins defrosting.)
NOTE : For details See Table Below.
To turn off the oven during cooking, simply touch the
Stop/Clear button.
NOTE : After use, be sure to press the Stop/ Clear
button Twice as this will ensure th at you h ave
reset the microwave.
200 - 2000g
200 - 2000g
200 - 2000g
125 - 1000g
4. Colse the door then press start. The Oven will now start defrosting.
See Auto Defrost Programme Chart for further d etai ls.
13
Page 14
EMS2820 t English
Auto Reheat
This oven can be used to automatically ReHeat Chilled Ready Meals , Frozen Ready Meals, Drinks and Chilled
Soup.
1. Open the door, place the food on the t urntable.
2. Press the ’ Auto Reheat ’ but ton until the desired
programme is reached.
3. Turn the setting control knob untill the required
quantity is reached.
4. Close the door.
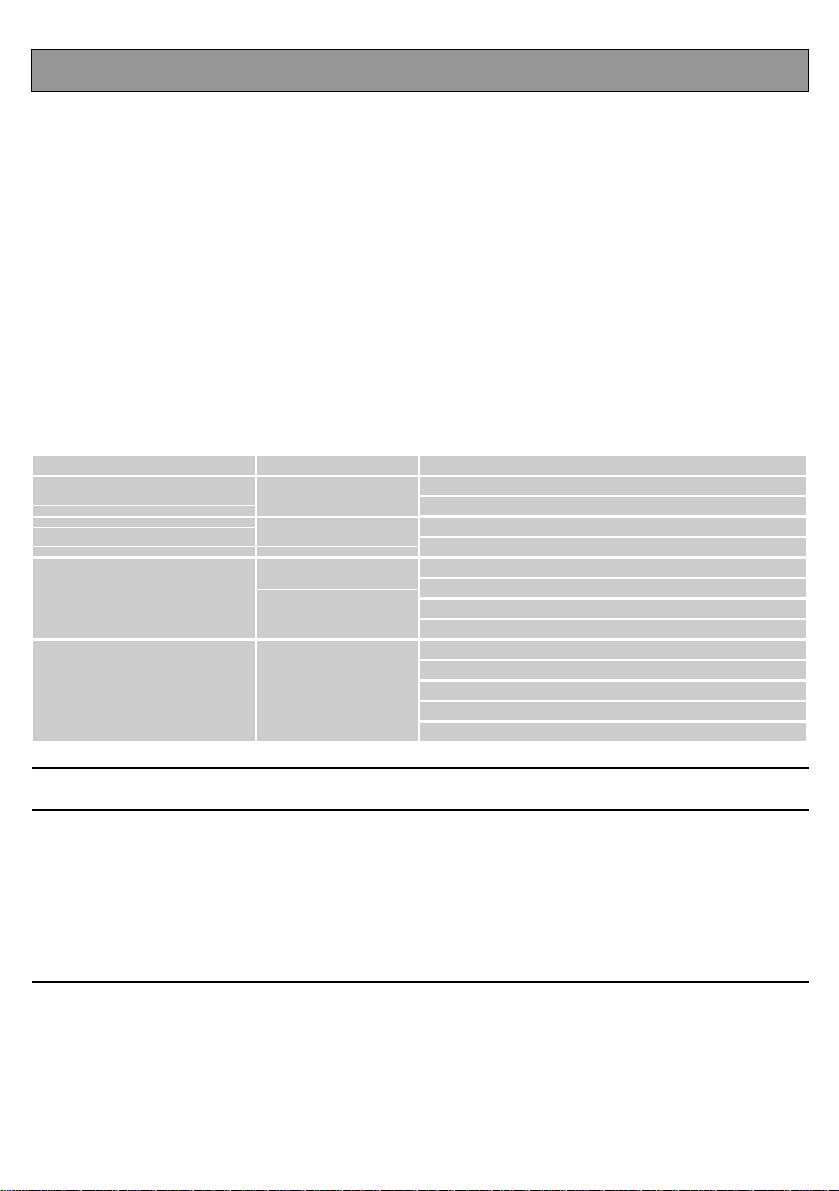
NOTE : During AUTO COOK the oven will automatically select the required microwave power
Selection Chart for Auto Cook functions :-
Chilled Ready Meals
Frozen Ready Meals Twice
and cooking time.
Auto Programme Press Button Portion Size
Once
Drinks
Chilled Soup
Three Times
Four Times
5. Press Start (The oven begins cooking.)
NOTE : For details See Table Below
To turn off the oven during cooking, simply touch the
Stop/Clear button.
NOTE : After use, be sure to press the Stop/ Clear
button Twice as this will ensure th at you h ave
reset the microwave.
300 - 350 g
400 - 450 g
300 - 350 g
400 - 450 g
1 Cup 150ml
2 Cups 300ml
3 Cups 450ml
4 Cups 600ml
200 - 250 ml
300 - 350 ml
400 - 450 ml
500 - 550 ml
600 - 650 ml
Example: To automatically co ok a 400g Frozen Ready Meal.
1. Open the door.
2. Touch the Auto Reheat button 2 times
3. Turn the setting control knob until 400 - 450 is showing in the display window.
4. Colse the door then press start. The Oven will now start cooking.
See Auto Cook Programme Chart for further details.
14
Page 15
EMS2820 t English
Snack Function
This oven can be used to automatically ReHeat Chilled Ready Meals , Frozen Ready Meals, Drinks and Chilled
Soup.
1. Open the door, place the food on the t urntable.
2. Press the ’ Auto Reheat ’ but ton until the desired
programme is reached.
3. Turn the setting control knob untill the required
quantity is reached.
4. Close the door.
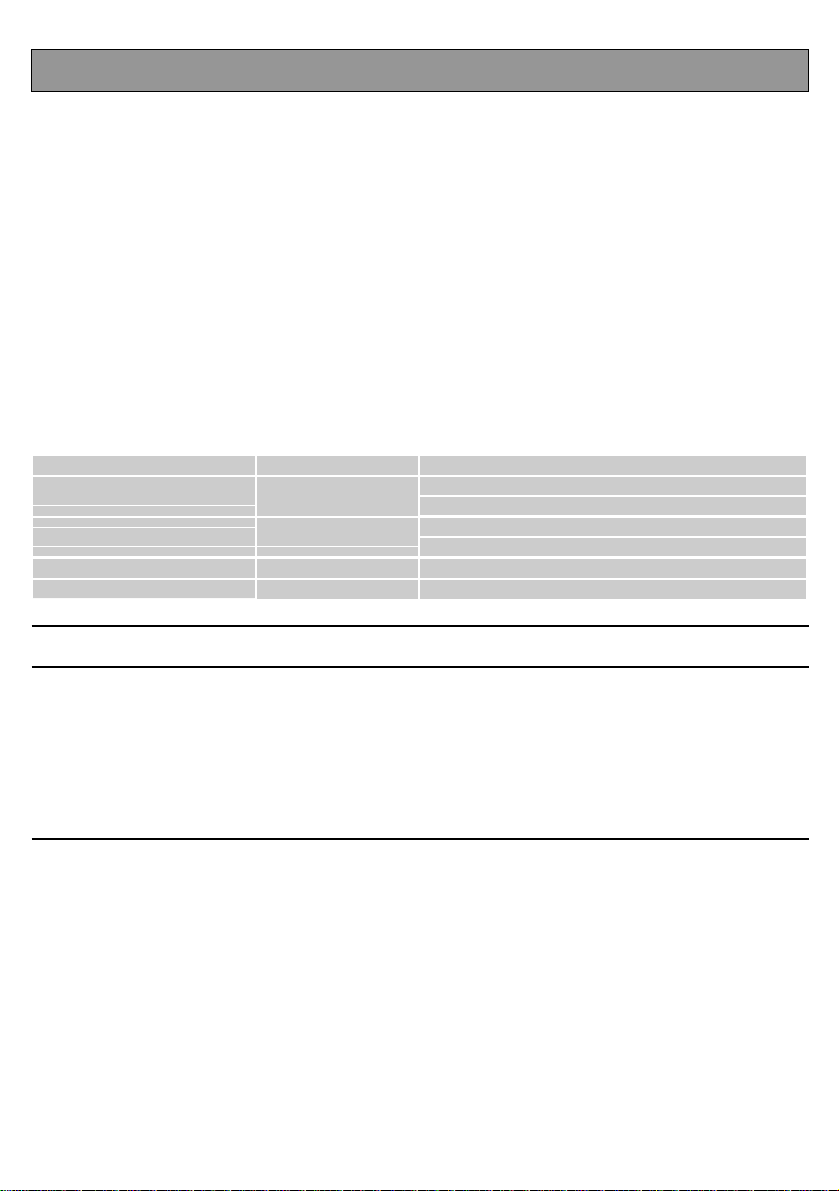
NOTE : During th Snack Function the oven will automatically select the required microwave
Selection Chart for Snack functions :-
Hamburger (Chilled)
Mini Ravioli (Chilled) Twice
Example: To automatically co ok 300g of mini ravioli.
1. Open the door.
2. Touch the Auto Reheat button 2 times
power and cooking time.
Auto Programme Press Button Portion Size
Once
Popcorn
Nachos
Three Times
Four Times
5. Press Start (The oven begins cooking.)
NOTE : For details See Table Below
To turn off the oven during cooking, simply touch the
Stop/Clear button.
NOTE : After use, be sure to press the Stop/ Clear
button Twice as this will ensure th at you h ave
reset the microwave.
150 g (1 Portion)
300g (2 Portions)
200 - 250 g
300 - 350 g
100g Packet
125 g + 50g of Cheese
3. Turn the setting control knob until 300 - 350 is showing in the display window.
4. Colse the door then press start. The Oven will now start cooking.
See Snack Function Programme Chart for further details.
15
Page 16
EMS2820 t English
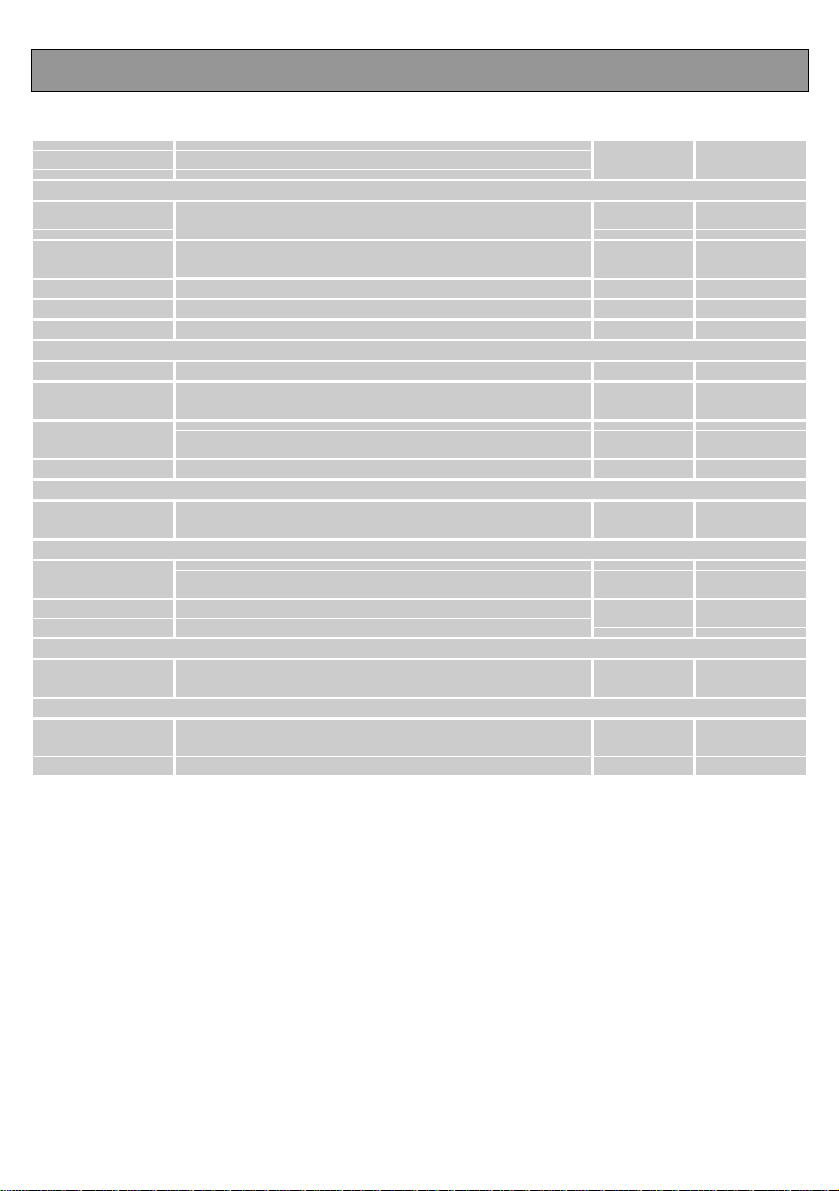
Recommendations for Manual Defrost
Some foods such as bread and fruit, can successfully be thawed manually by using this power setting (180W).
FOOD PREPARATION
Bread
Small loaf
Sliced large loaf
2 slices Place on kitchen paper. 45–60 sec. 5 min.
1 bread roll Place on kitchen paper. 45–60 sec. 5 min.
2 bread rolls Place on kitchen paper. 1–11/2 min. 5 min.
Cakes and Pastry
Gateau 450g/1 lb Remove from packaging, place on plate. 9–11 min. 15–30 min.
Cheesecake
450g/1 lb
Pie (cooked)
450g/1 lb
Pastry 450g/1 lb Remove from packaging, place on plate. 7– 9 min. 15–30 min.
Butter
250g/8.8 oz
(1 packet)
Fruit
225g/8 oz
Soft berry fruits
450g/1 lb
Soft berry fruits
Plated meal
400g/14 oz
Vegetables
Place on microwave-proof rack or kitchen paper.
Turn over halfway through defrosting time.
Place on microwave-proof rack or kitchen paper.
Turn over halfway through defrosting time.
Remove from packaging, place on plate. 9–11 min. 15–30 min.
Remove from packaging, place on plate. 7– 9 min. 15–30 min.
If foil wrapped, remove from wrapper and place on a
plate
Place in a single layer in a shallow dis h. 5– 6 min. 5–10 min.
Place in a single layer in a shallow dis h.
Cover with a plate or non P.V.C. cling film.
To reheat, microwave on 100% (1000W)for 3–4 m inut es.
It is not necessary to defrost vegetables befor e cooking.
All vegetables can be thawed and cooked on
100% (1000W)
Defrost
time
8–10 min. 10–15 min.
10–13 min. 10 min
3– 4 min. 5–10 min.
7– 8 min. 5–10 min.
7– 8 min 5–10 min.
STANDING
TIME
Defrosting Tips
1. It is better to underestimate defrosting t ime if you are unsure. Food will continue to defrost during the
standing time.
2. Separate food as soon as possible.
3. Turn large items, e.g. joints, halfw ay through the defrosting time.
4. Remove any thawed food as soon as possible.
5. Remove or open any packaging before defrost ing.
6. Place food in a larger container than that which it was frozen in, this will allow for easy st irring.
7. Begin thawing poultry, breast side down and turn over halfway through defrostin g time or at pause.
Delicate areas such as wing tips can be shielded with small pieces of smooth foil.
Standing time is very important, particularly f or large, dense foods which cannot be stirred to ens ure that the
centre is completely defrosted before cooki ng.
16
Page 17

EMS2820 t English
Auto Defrost Programmes Chart
Category Standing Time Recomendations
Shield the edges with aluminium foil.
Turn the meat over, when the oven
Meat 20 - 60 minutes
Poultry 20 - 60 minutes
Fish 20 - 50 Minutes
Bread / Cake
5 - 30 Minutes
beeps. This programme is suitable for
beef, lamb, pork, steaks, chops, minced
meat.
Shield the leg and wing tips with
aluminium foil. Turn the poultry over,
when the oven beeps. This programme is
suitable for whole chicken as well as for
chicken portions.
Shield the tail of a whole fish with
aluminium foil. Turn the fish over, when
the oven beeps. This programme is
suitable for whole fishes as well as for
fish fillets.
Put bread on a piece of kitchen paper
and turn over, as soon as the oven
beeps. Place cake on a ceramic plate
and if possible, turn over, as soon as the
oven beeps. (Oven keeps operating and
is stopped, when you open the door.)
This programme is suitable for all kinds
of bread, sliced or whole, as well as for
bread rolls and baguettes. Arrange bread
rolls in a circle.
This programme is suitable for all kinds
of yeast cake, biscuit, cheese cake and
puff pastry. It is not suitable for short/
crust pastry, fruit and cream cakes as
well as for cake with chocolate topping.
17
Page 18
EMS2820 t English
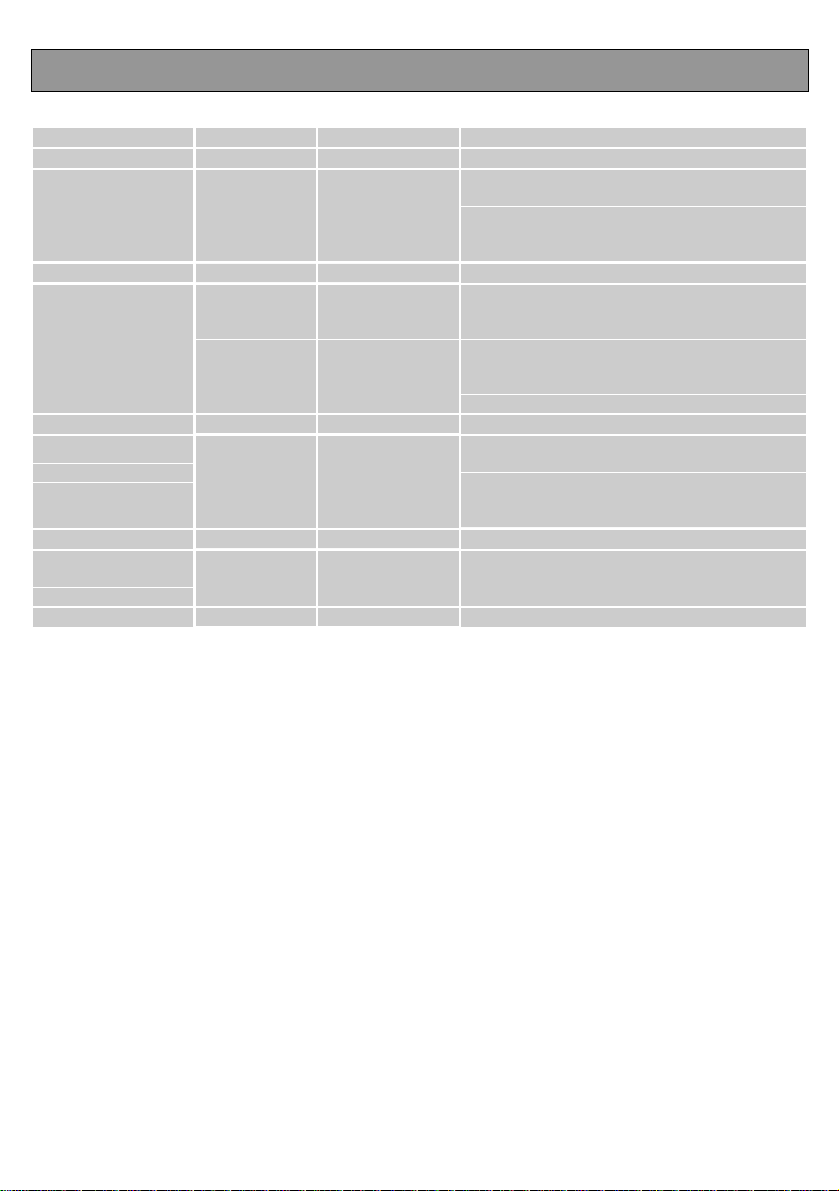
Auto Reheat Programmes Chart
Auto Programme Press Button Standing Time Recomendations
Put the meal on a ceramic plate and cover it
Chilled Ready Meal Once 3 minutes
Frozen Ready Meal
Twice 4 minutes
with microwave cling film. This programme is
suitable for the meals consisting of 3
components (e. g. meat with sauce, vegetables
and side dishes like potatoes, rice or pasta).
Take frozen ready meal and check if dish is
suitable for microwave. Pierce film of ready
meal. Put the frozen ready meal in the centre.
This programme is suitable for frozen ready
meals consisting of 3 components (e. g. meat
with sauce, vegetables and a side dish lik e
potatoes, rice or pasta).
Drinks (Room
Temperature)
(coffee, tea, milk,
water)
Soup (Chilled)
Three Times 1 - 2 Minutes
Four Times 2 - 3 minutes
Pour into a ceramic cup and reheat uncovered.
Place 1 cup in the centre, 2 opposite of each
other and 3 or 4 in a circle. Stir carefully before
and after standing time, be careful while t aking
them out of oven.
Pour into a deep ceramic soup plate or bowl
and cover during heating and standing. Stir
carefully before and after standing time.
18
Page 19

EMS2820 t English
Snack Function Programmes Chart
Auto Programme Press Button Standing Time Recomendations
Put hamburger (bread roll with slice of beef) or
Hamburger
(Chilled)
Mini Ravioli
(Chilled)
Popcorn Three Times -
Once 1 - 2 minutes
Twice 3 minutes
cheeseburger on kitchen paper. Put one
hamberger in the centre of turntable, p ut two
hambergers opposite to each other on
turntable. After reheating garnis h with lettuce,
tomato slice, dressing and spices.
Put chilled ready mini ravioli in a microwav e
proof plastic dish in the centre of turntable.
Pierce film of ready product or cover with
microwave wrap. Stir carefully before and after
standing time. This programme is suitable for
ravioli, as well as for noodles in sauce.
Use special popcorn product for preparing on
microwave oven, Follow the instructions of
food manufacturer and put the bag in the
centre of turntable. During this programme
corn will pop and the bag will increase i n
volume. Be careful when taking out and
opening the hot bag.
Nachos
Four Times
Put nachos (tortilla chips) on a flat c eramic
-
plate. Put 50g grated cheddar chesse and
spices on top.
19
Page 20

EMS2820 t English
Microwave Tips
Microwave Hints
Always keep the oven clean – avoid spill-overs
•
and do not forget to clean under the glass tray
and the inside of the door.
Preferably use round or oval casseroles with a lid
•
when cooking in your microwave oven.
Do not use metal or metal decorated casseroles.
•
Certain plastic materials can melt and be warped
by hot food.
Cover the food when cooking. Use a glass lid, a
•
plate or grease proof paper.
Pastry, bread and the like can be defrosted
•
directly in a bread basket or on a paper towel.
If frozen food is heated in its packaging, t he
•
packaging should be opened. Packaging
containing metal or metal decoration must not be
used unless specifically recommended for use in
the microwave. Remove metal clips and wire ties.
Smaller pieces of aluminium foil can be used t o
•
cover parts that easily over cook such as chicken
legs.
Food with peel or skin should be pierced with a
•
fork – e.g. potatoes and sausages. Do not boil
eggs in the microwave oven as they can explode.
Put large, thick pieces close to the edge of the
•
casserole and try to cut the food in to even sized
pieces. Always place the food in the centre of t he
oven.
The food will be evenly cooked if you stir or turn it
•
a few times.
Always set a shorter cooking time than indicated
•
in your recipe to avoid over cooking. The larger
the amount of food the longer it takes.
Use little or no water for vegetables.
•
Use less salt and spices than for ‘normal’ cooking.
•
Season afterwards.
•
Allow a few minutes ‘standing’ time after the oven
•
has switched off to ensure complete and even
cooking results.
Always ensure food is piping hot through out
•
before serving.
Use pot holders or gloves when taking dishes and
•
food from the oven.
Softening Honey
•
If you have a jar of honey which has
crystallised, remove lid and pl ac e the jar in the
oven, microwave on medium power for 2
minutes.
Melting Chocolate
•
Break 100g of chocolate into squares, place in
A bowl and heat on high power for 1-2
minutes and stir well.
Softening or Melting Butter
•
Melting takes a few seconds on high power.
Softening is best done more gently on low
power.
Freshen or Warm Bread
•
Use medium power for few seconds.
Peeling Garlic easily
•
Heat 3 or 4 cloves of garlic on high power for
15 seconds. Squeeze at one end until the
clove pops out.
Fruit Juice
•
Citrus fruits will yield more juic e if they are
heated on high power for 15 seconds before
squeezing.
Cooking Porridge
•
Porridge is easily cooked in the serving dish
with no sticky pan to wash. Follow food
manufacturers’ recommendations.
20
Page 21

EMS2820 t English
g
Care and cleanin
The oven must always be clean. Residue of food from spillovers or spatters will attract microwave energy
causing it to burn on. This could reduce the eff iciency of the oven and may cause bad odours. Do not attempt
to tamper with or make any adjustments or repairs to any part of the oven. Repairs should only be done by a
qualified service technician.
Be sure the oven is disconnected from the electricity supply before cleaning.
Cleaning the accessories (turntable and support)
Clean them with mild detergent after removing them from the cavity. The turntable supp ort should be carefully
handled.
CAUTION: The inside of the oven and t urnt able get very hot, so do not touch them immediately af t er use.
Cleaning the interior
Always keep the inside of the oven clean. Wipe up spill-overs and food spatters immediately. Deposits that are
allowed to remain on the oven walls, door seal and door surface will absorb microwave energy, reduce the
efficiency of the oven, and possibly damag e the oven interior. Use mild, liquid deterg ent, warm water and a
soft, clean cloth to remove deposits.
NEVER USE ABRASIVE CLEANERS, COMMERCIAL OVEN CLEANERS OR STEEL WOOL PADS ON
ANY PART OF THE MICROWAVE OVE N.
To loosen difficult deposits, boil a cup of water in the microwave oven for 2 or 3 minutes.
NEVER USE A KNIFE OR ANY UTENSIL TO REMOVE DEPOSITS FROM OVEN SURFACES.
To remove odours from the oven interior, boil a cup of water plus 2 tablespoons of lemon juice f or 5 minutes.
Cleaning the exterior
Open the oven door when cleaning the control panel. This will prevent the oven f r om being turned on
accidentally. You should clean outside surfaces of the oven with mild liquid deterg ent and water followed by a
wiping with clear water to remove any excess detergent. Dry with a soft cloth.
Spray-on window cleaners or all purpose spray-on kitchen cleaners can also be used. Never use abrasive
cleaners, scouring pads or harsh chemicals on outside surf aces of your oven. To prevent damage to the
working parts, do not allow water to seep int o ventilation openings.
21
Page 22

EMS2820 t English
ELECTROLUX APPLIANCE WARRANTY – NEW ZEALAND
This benchtop microwave appliance is warranted by Electrolux Limited
(“the Company”) from the date of purchase.
The following terms and conditions apply:
1. The Company or its Authorised Service Centre will pay the cost of repairing or replacing all parts of the
appliance which the Company or its Authorised Service Centre find defective for a period of 12 months
following the date of purchase (the "Warranty Period").
2. During the Warranty Period the Company or its Authorised Service Centre, will pay t he cost of repairing or
replacing all parts, which they find are defective.
3. Light globes, batteries and filters are replaceable parts and are not covered under this warranty.
4. The appliance must be installed and operated in accordance with the Company’s instructions.
5. This Warranty does not apply to normal wear and tear, or any service, which is needed aft er an accident ,
negligence, alteration or misuse.
6. This Warranty also does not apply to damage caused if your appliance has been dismantled, repaired or
serviced by any person other than someone authorised by the Company.
7. If you live outside the service area of the Company or its Authorised Service Centre, t his warranty does not
cover the cost of transport of the appliance for service nor the Aut horised Service Centre's travelling costs
to and from your home.
8. If you are required to transport the appliance to the Company or its Aut horised Service Cent re, it must be
securely packed and insured. The Company does not accept any responsibility for loss or damage prior to
it being received by the Company or its Authorised Service Centre.
9. This warranty is the only express warranty given by the Company.
10. This Warranty does not cover loss, damage or expense to this appliance caused directly or indirectly by
power surges, electrical storm damage or incorrect power current.
11. The Company (and any company related to the Company) will not be liable for any special incidental or
consequential damages or for loss, damage or expense directly or indirectly arising from the use or inability
to use this appliance, or for personal injury or loss or destruction of other property.
12. Nothing in this warranty is intended to limit the rights you may have under the Consumer Guarantees Act
1993, except to the extent permitted by that Act, and all provisions of this warranty shall be read as
modified to the extent necessary to give effect to that intention.
13. The Consumer Guarantees Act 1993 does not apply if your appliance is acquired for the purposes of a
“business” (as defined in that Act).
14. This warranty is limited to 90 days from date of purchase if the appliance is used for commercial use.
IMPORTANT NOTICE
Before calling a service technician please carefully check the warranty terms and conditions, the
operating instructions and service booklet if applicable. If the product fails for any of the customer
responsibility reasons detailed therein, a service fee will be charged. Please present proof of
purchase to any Authorised Service Centre should warranty service be required.
FOR FURTER INFORMATION OR DETAILS OF YOUR NEAREST AUTHORIZED SERVICE CENTRE
PLEASE PHONE ELECTROLUX LIMITED ON
(Then dial customer services on exten sion #6)
Tel: 0508-730 730 (Toll Free)
22
Page 23

Page 24
 Loading...