

Page 1
User Manual
Microwave oven
EMS26415
Page 2
We were thinking of you
when we made this product
Page 3

AUS
Welcome to the world of
Electrolux
You’ve chosen a first class
product from Electrolux, which
hopefully will provide you with lots of
pleasure in the future. Electrolux
ambition is to offer a wide variety of
quality products that would make
your life even more comfortable. You
can look at some examples on the
cover in this manual. But now it’s
time to study this manual and start
using and enjoying the benefits from
your new machine. We promise that
it’ll make your life a little easier. Good
luck!
electrolux
3
Page 4

4
electrolux
AUS
Safety information 5
Product description 9
Before first use 11
Operation 12
Programme charts 19
Recipes 25
Care & cleaning 31
What to do if . . . 32
Specifications 32
Installation 33
Environmental information 35
Guarantee 36
Contents
Page 5
electrolux safety information
Important safety instructions: Read carefully & keep
for future reference
5
To avoid the danger of fire
The microwave oven should not
be left unattended during operation.
Power levels that are too high or
cooking times that are too long may
overheat foods resulting in a fire.
The electrical outlet must be readily
accessible so that the unit can be
unplugged easily in an emergency.
The AC power supply must be
240 V, 50 Hz, with a minimum 15 A
distribution line fuse, or a minimum 15 A
distribution circuit breaker.
Itisrecommended thata separate circuit
serving only this appliance be provided.
Do not store or use the oven outdoors.
If food being heated begins to
smoke, DO NOT OPEN THE DOOR.
Turn off and unplug the oven and wait
until the food has stopped smoking.
Opening the door while food is
smoking may cause a fire.
Only use microwave-safe
containers and utensils.
Do not leave the oven unattended
when using disposable plastic, paper
or other combustible food containers.
Clean the waveguide cover, the
oven cavity, the turntable and
turntable support after use. These
must be dry and free from grease.
Built-up grease may overheat and
begin to smoke or catch fire.
Donot place flammable materials near
the oven or ventilation openings.Do not
block theventilation openings.
Remove all metallic seals, wire twists,
etc., from food andfood packages. Arcing
onmetallic surfaces may causea fire.
Donot usethe microwave oven to heat
oil for deep frying. The temperature cannot
becontrolled and the oilmay catch fire.
Tomake popcorn,only usespecial
microwave popcorn makers.
Donot store food or any other items
inside the oven.
Check thesettings after you start the
oven to ensure theoven is operating as
desired.
See the corresponding hints in this
operation manual.
To avoid the possibility of injury
Warning: Do not operate the oven
if it is damaged or malfunctioning.
Check the following before use:
a) The door; make sure the door
closes properly and ensure it is not
misaligned or warped.
b) The hinges and door safety latches;
check to make sure they are not
broken or loose.
c) The door seals and sealing
surfaces; ensure that they have
not been damaged.
d) Inside the oven cavity or on the
door; make sure there are no dents.
e) The power supply cord and plug;
ensure that they are not damaged.
Never adjust, repair or modify the
oven yourself. It is hazardous for
anyone other than a competent
person to carry out any service or
repair operation which involves the
removal of a cover which gives
protection against exposure to
microwave energy.
Page 6

6
electrolux safety information
Donot operate the oven with thedoor
openoralter the door safetylatches in any
way.
Donot operate the oven if thereisan
object between thedoorseals and sealing
surfaces.
Do not allow grease or dirt to build
up on the door seals and adjacent
parts. Follow instructions for “Care &
cleaning”. Failure to maintain the
oven in a clean condition could lead
to a deterioration of the surface that
could adversely affect the life of the
appliance and possibly result in a
hazardous situation.
Individuals with PACEMAKERS should
check withtheirdoctor orthe manufacturer
ofthe pacemakerfor precautions regarding
microwave ovens.
To avoid the possibility of electric
shock
Under no circumstances should you
remove the outer cabinet.
Never spill or insert any objects intothe
door lock openings or ventilation openings.
Inthe event of aspill, turn off andunplug the
oven immediately andcall an authorised
ELECTROLUX service agent.
Donot immerse the power supply cord
orplug in water or any other liquid. Do not
allow the power supply cord torun overany
hot or sharp surfaces, such asthe hot air
vent areaat the top rear of the oven.
Donot attempt to replace the oven
lamp yourselfor allowanyonewho is not
authorised by ELECTROLUX to do so. If the
oven lampfails, pleaseconsult your dealer
orcall an authorised ELECTROLUX service
agent.
Ifthe power supplycord of this
appliance is damaged, it mustbe replaced
with a special cord. The exchange must be
made by an authorised ELECTROLUX
serviceagent.
To avoid the possibility of explosion
and sudden boiling
Warning:Liquids and other foods
mustnot be heated insealed containers
sincethey are liable to explode.
Never usesealedcontainers. Remove
seals andlids before use. Sealed
containers canexplodedue to a build up
ofpressure evenafter the oven hasbeen
turned off.
Take carewhen microwaving liquids.
Use a wide-mouthedcontainer to allow
bubblesto escape.
Microwave heating of beverages
can result in delayed eruptive boiling,
therefore care has to be taken when
handling the container.
Toprevent sudden eruption of boiling
liquid and possible scalding:
1. Stirliquidprior to heating/reheating.
2. It is advisable to insert a glass rod or
similarutensil into the liquid whilst
reheating.
3. Let liquid stand forat least20 seconds
inthe ovenat the end of cooking time to
preventdelayed eruptive boiling.
Do not cook eggs in their shells
and whole hard boiled eggs should
not be heated in microwave ovens
since they may explode even after
microwave cooking has ended. To
cook or reheat eggs which have not
been scrambled or mixed, pierce the
yolks and the whites, or the eggs may
explode. Shell and slice hard boiled
eggs before reheating them in the
microwave oven.
Pierce the skin of such foods as
potatoes, sausages and fruit before
cooking, or they may explode.
To avoid the possibility of burns
Usepotholdersor oven gloves when
removing foodfrom the ovento prevent
burns.
Page 7

electrolux safety information
7
Always open containers, popcorn
makers, oven cookingbags, etc., away from
the faceand hands to avoid steam burns.
To avoid burns, always test food
temperature and stir before serving
and pay special attention to the
temperature of food and drink given
to babies, children or the elderly.
Temperature of thecontainer is nota
trueindicationofthe temperatureofthe food
ordrink; alwayscheck thefood temperature.
Always stand back from the oven door
whenopening to avoidburns from escaping
steam andheat.
Slice stuffed baked foodsafter heatingto
release steam and avoidburns.
Keepchildrenawayfrom the door and
accessibleparts that maybecome hot when
the grill is in use. Children should be kept
awaytoprevent them burning themselves.
Donot touch theoven door, outer
cabinet, rearcabinet, oven cavity, ventilation
openings, accessoriesand dishes during
GRILL mode, DUAL GRILL modeand
AUTOCOOK operation as theywill become
hot.Before cleaning make suretheyare not
hot.
To avoid misuse by children
Warning: Only allow children to use
theoven without supervision when
adequate instructions have been given
so that the child isable to usethe oven
in a safe way and understands the
hazards of improper use.
This appliance is not intended for use
bypersons (including children) with
reducedphysical, sensory ormental
capabilities, or lack of experience and
knowledge, unless they have beengiven
supervision orinstruction concerning use
ofthe applianceby a personresponsibile
for their safety.
Children should be supervised to ensure
that theydo not play with theappliance.
Donot leanor swingon the oven door.
Donot playwith theoven or use it as atoy.
Children should be taught all important
safety instructions: use of potholders,
carefulremoval of food coverings; paying
specialattention to packaging (e.g. selfheatingmaterials)designed to make food
crisp, asthey maybe extra hot.
Other warnings
Never modify the oven in any way.
This oven is for home food preparation
only and may only be used for cooking
food. It is not suitable for commercial or
laboratory use.
To promote trouble-free use of
your oven and avoid damage
Never operate the oven when itis
empty except where recommended in the
operation manual, see page 16 note 2.
Doing so may damage the oven.
When using abrowning dishor selfheatingmaterial, always place a heatresistant insulator such as a porcelainplate
under it to prevent damage to the turntable
and turntable support due toheat stress.
The preheating time specified inthe dish’s
instructions must not be exceeded.
Donot use metal utensils, which reflect
microwaves and may cause electrical
arcing.Do not put cans in the oven.
Only usethe turntable and the turntable
supportdesigned for this oven. Donot
operatethe ovenwithout the turntable.
Toprevent the turntable from breaking:
a) Before cleaning the turntable with water,
leave the turntable to cool.
b) Do notput hot foods or hotutensils on
a cold turntable.
Page 8

8
c) Donot put cold foods orcold
Donot place anything on theouter cabinet
during operation.
microwaving ifthe oven is still hot from
using the GRILL mode, DUAL GRILL mode
and AUTO COOK operation because they
may melt. Plasticcontainers must not be
used during above modes unless the
container manufacturer says they are
suitable.
electrolux safety information
utensils on ahot turntable.
Donot use plastic containers for
Important:
Ifyou are unsure how to connect your oven,
please consultanauthorised,qualified
electrician.
Neither the manufacturer nor the dealer
can accept any liabilityfor damage tothe
ovenorpersonal injuryresultingfromfailure
toobserve the correctelectrical connection
procedure.
Water vapour or dropsmay occasionally
formonthe oven walls or around the door
seals and sealing surfaces. Thisisa normal
occurrence andisnot anindication of
microwave leakageora malfunction.
Page 9
Product description
1 2
electrolux product description
3
4
5
9
9876
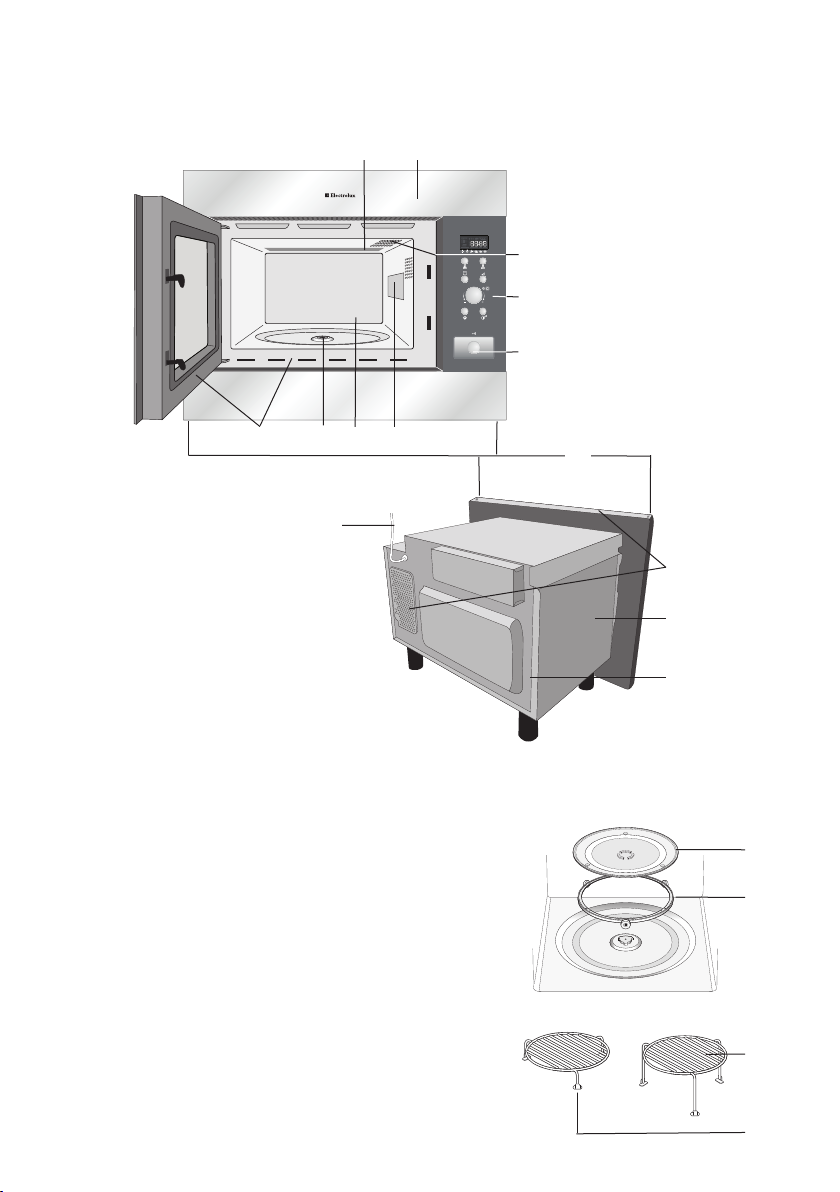
1 Grill heating element
2 Front trim
3 Oven lamp
14
4 Control panel
5 Door opening button
6 Waveguide cover
7 Oven cavity
8 Seal packing
9 Door seals and sealing
surfaces
10 Fixing points (4 points)
11 Ventilation openings
12 Outer cover
13 Rear cabinet
14 Power supply cord
Check to make sure the following accessories are
provided:
(1) Turntable (2) Turntable support
(3) High rack (4) Low rack
(5) 4 fixing screws (not shown)
• Place the turntable support in the seal packing
on the floor of the cavity.
• Then place the turntable on the turntable
support.
• To avoid turntable damage, ensure dishes or
containers are lifted clear of the turntable rim
when removing them from the oven.
Important:
When you order accessories, please mention two
items: part name and model name to your dealer
or an authorised ELECTROLUX service agent.
10
11
12
13
1
2
3
4
Page 10
10
electrolux product description
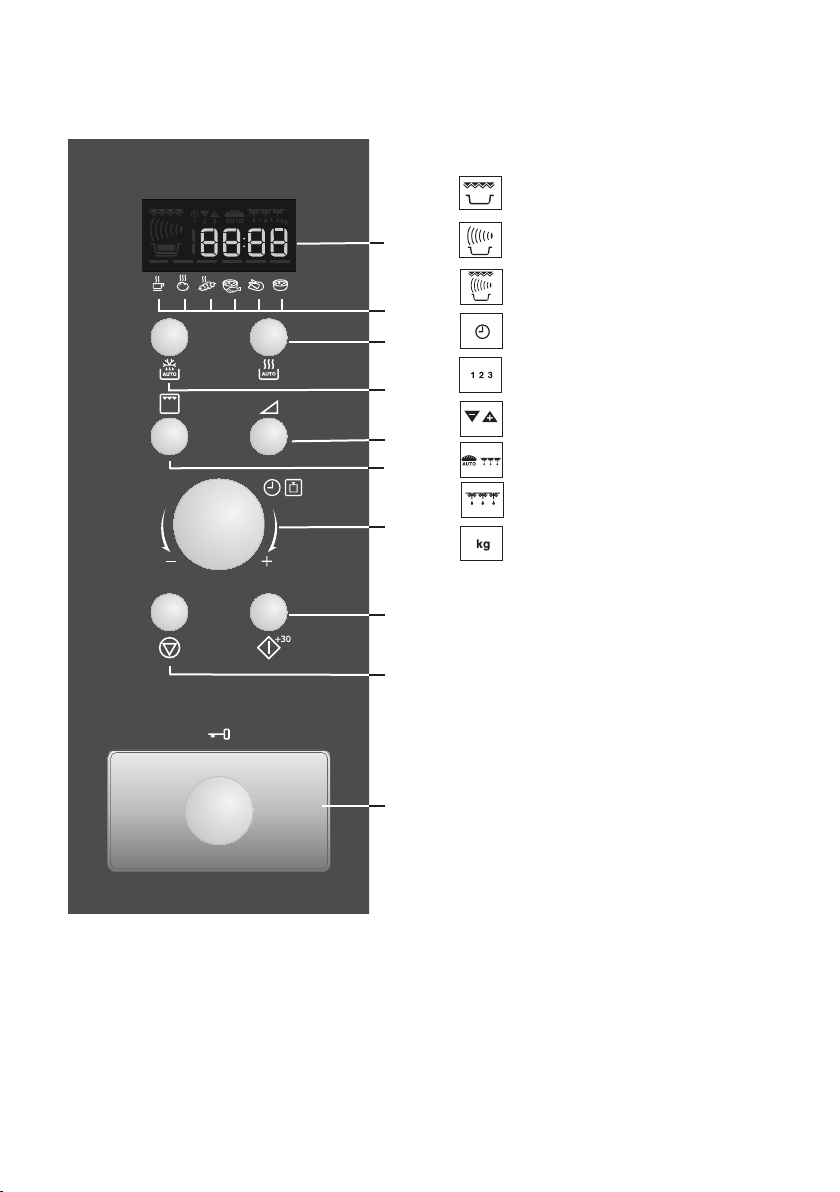
Control panel
1 Digital display indicators
Grill
1
2
3
4
5
6
7
2 AUTO COOK indicators
8
3 AUTO COOK button
4 AUTO DEFROST button
9
5 POWER LEVEL button
6 GRILL button
7 TIMER/WEIGHT KNOB
8 START/+30 button
9 STOP button
10
10 DOOR OPENING button
Microwave
Dual
Clock
Cooking stages
Plus/Minus
Auto Defrost bread
Auto Defrost
Weight
Page 11
Before first use
electrolux before first use
11
Econ mode
The oven is set in ‘ENERGY SAVE’
mode (‘Econ’).
1. Plug in the oven.
2. The display will be blank.
3. Open the door and the power
comes on.
4. Close the door and ‘Econ’ will be
displayed.
5. The display will count down from
3:00 to zero.
6. When zero is reached, the oven
goes into ‘Econ’ mode and the
display goes blank.
7. To cancel ‘Econ’ mode, set the
clock.
8. To set ‘Econ’ mode when the
clock is set, open the door, press
start for 5 seconds, press stop
then close the door.
Setting the clock
The oven has a 12 hour clock.
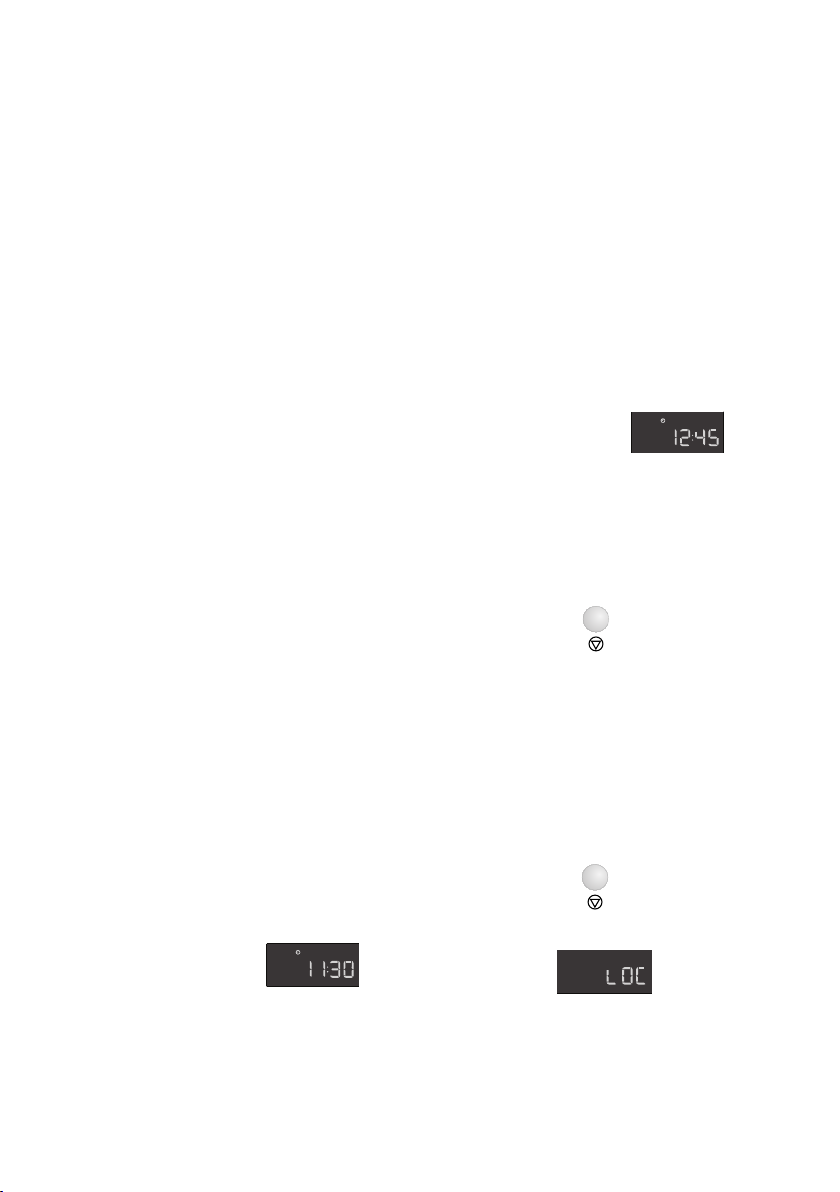
Example: To set the clock to 11:30.
1. Plug in the oven.
2. The display will be blank.
3. Open the door and the power
comes on.
4. Whilst the door is open, rotate the
TIMER/WEIGHT knob to adjust the
hour.
5. Press the START/+30 button once
then rotate the TIMER/WEIGHT
knob to adjust the minutes.
6. Press the START/+30 button.
7. Check the display:
8. Close the door.
Important:
1. You can rotate the TIMER/WEIGHT
knob clockwise or anti-clockwise.
2. ENERGY SAVE mode cannot be
set when the clock is set.
Adjusting the time when the
clock is set or oven is in
‘Econ’ mode
Example: To set the clock to 12:45.
1. Open the door.
2. Press and hold the START/+30
button for 5 seconds. The oven will
beep. Rotate the TIMER/WEIGHT
knob to adjust the hour.
3. Press the START/+30 button once
then rotate the TIMER/WEIGHT
knob to adjust the minutes.
4. Press the START/+30 button.
5. Check the display:
Using the STOP button
Use the STOP button to:
1. Erase a mistake during programming.
2. Stop the oven temporarily during
cooking, press once.
3. Cancel a programme during cooking,
touch twice.
Child safety lock
The oven has a safety feature which
prevents the accidental running of the
oven by a child. When the lock has been
set, no part of the microwave will operate
until the lock feature has been cancelled.
Example: To set the child safety lock.
1. Press and hold the stop button
for 5 seconds.
The oven will beep twice and ‘LOC’ will
be displayed:
Note:
• To cancel the child safety lock, press
and hold the stop button for 5
seconds, the oven will beep twice
and the time of day will be displayed.
• Child safety lock cannot be set if the
clock is not set.
Page 12

12
electrolux operation
Microwave cooking advice
To cook/defrost food in a microwave
oven, the microwave energy must be able
to pass through the container to penetrate
the food. Therefore it is important to
choose suitable cookware.
It is important to turn, rearrange or stir
food to ensure even heating.
Standing time is necessary after
cooking, as it enables the heat to disperse
equally throughout the food.
Round/oval dishes are preferable to
square/oblong ones, as the food in the
corners tends to overcook.
Food characteristics
Composition Foods high in fat or sugar(e.g.Christmaspudding, mince pies) requireless heating
Density Food densitywill affect the amount of cooking time needed. Light porous foods, such
Quantity The cookingtime must be increased as theamountof food placedinthe oven
Size Smallfoods and smallpieces cookfasterthan large ones, as microwaves canpen-
Shape Foodswhich are irregular in shape, such as chicken breasts or drumsticks, take
Temperature Theinitial temperatureoffood affects the amount of cooking timeneeded. Chilled
offood foodswill take longer to cookthan food at room temperature. Cut into foods with
time.Care should betaken as overheating can lead to fire.
ascakesorbread, cookmore quickly than heavy,dense foods,such as roasts and
casseroles.
increases. E.g.Four potatoes willtake longer to cook than two.
etrate fromall sides to thecentre. For even cookingmake allthe pieces thesame size.
longer to cook in the thicker parts. Round shapes cook moreevenly thansquare
shapes whenmicrowave cooking.
fillings,for examplejam doughnuts, torelease heat or steam.
Cooking techniques
Arrange Placethe thickest parts of food towards theoutside of the dish. E.g. Chicken
Cover Use vented microwave cling filmora suitable lid.
Pierce Foods with ashell, skinormembrane must be pierced in severalplaces before cooking
Stir, turn and For even cooking it is essential to stir, turn and rearrange food during cooking. Always
rearrange stir and rearrange from the outside towards the centre.
Stand Standing time is necessary after cooking to enable the heat to disperse equally
Shield Some areas of food being defrosted may become warm. Warm areas can be shielded
drumsticks.
orreheatingas steamwill build up andmay cause foodtoexplode, e.g. Potatoes, Fish,
Chicken, Sausages.
IImmppoorrttaanntt:
even after cooking has ended, e.g. poached, hard boiled.
throughout the food.
with small pieces of foil, which reflect microwaves, e.g. legs and wings on a chicken.
:
Eggs should not be heated using microwave power as they may explode,
Page 13

electrolux operation
Microwave safe cookware
Cookware Microwave Comments
safe
Aluminium foil/ / Small pieces of aluminium foil can be used to shield food from
foil containers overheating. Keep foil at least 2 cm from the oven walls, as
arcing may occur. Foil containers are not recommended
unless specified by the manufacturer, e.g. Microfoil ®, follow
instructions carefully.
Browning Always follow the manufacturers instructions. Do not exceed
dishes heating times given. Be very careful as these dishes become
very hot.
China and ceramics / Porcelain, pottery, glazed earthenware and bone china are
usually suitable, except for those with metallic decoration.
Glassware Care should be taken if using fine glassware as it can break or
e.g. Pyrex ® crack if heated suddenly.
Metal It is not recommended to use metal cookware when using
microwave power as it will arc, which can lead to fire.
Plastic / polystyrene Care must be taken as some containers warp, melt or
e.g. fast food discolour at high temperatures.
containers
Cling film Should not touch the food and must be pierced to let the
steam escape.
Freezer / roasting Must be pierced to let steam escape. Ensure bags are
bags suitable for microwave use. Do not use plastic or metal ties,
as they may melt or catch fire due to the metal arcing.
Paper - plates, cups Only use for warming or to absorb moisture. Care must be
and kitchen paper taken as overheating may cause fire.
Straw and wooden Always attend the oven when using these materials as
containers overheating may cause fire.
Recycled paper and May contain extracts of metal which will cause ‘arcing’ and
newspaper may lead to fire.
13
Page 14
14
AUTO
+
AUTO
electrolux operation
Microwave cooking
Your oven can be programmed for
up to 90 minutes.The input unit of
cooking time varies from 10 seconds to
five minutes. It depends on the total
length of the cooking time as shown in
Manual defrosting
For manual defrosting (without
operating the Auto Defrost feature), use
270 W. The defrost symbol appears in
the window display whenever the
power level is selected.
the table.
Cooking time Increasing unit
0-5 minutes 10 seconds
5-10 minutes 30 seconds
10-30 minutes 1 minute
30-90 minutes 5 minutes
Microwave power levels
Your oven has 6 power levels:
Power Suggested use
setting
900 W/ Used for fast cooking or reheating e.g. soup, casseroles, canned food, hot beverages,
HIGH vegetables, fish, etc.
630 W Used for longer cooking of dense foods such as roast joints, meat loaf and plated meals,
450 W For dense foods which require a long cooking time when cooked conventionally,
270 W/ To defrost, select this power setting, to ensure that the dish defrosts evenly. This
DEFROST setting is also ideal for simmering rice, pasta, dumplings and cooking egg
90 W For gentle defrosting, eg. cream gateaux or pastry.
0 W For standing/kitchen timer.
also for sensitive dishes such as cheese sauce and sponge cakes. At this reduced setting,
the sauce will not boil over and food will cook evenly without over cooking at the sides.
e.g. beef dishes, it is advisable to use this power setting to ensure the meat will be tender.
custard.
W = WATT
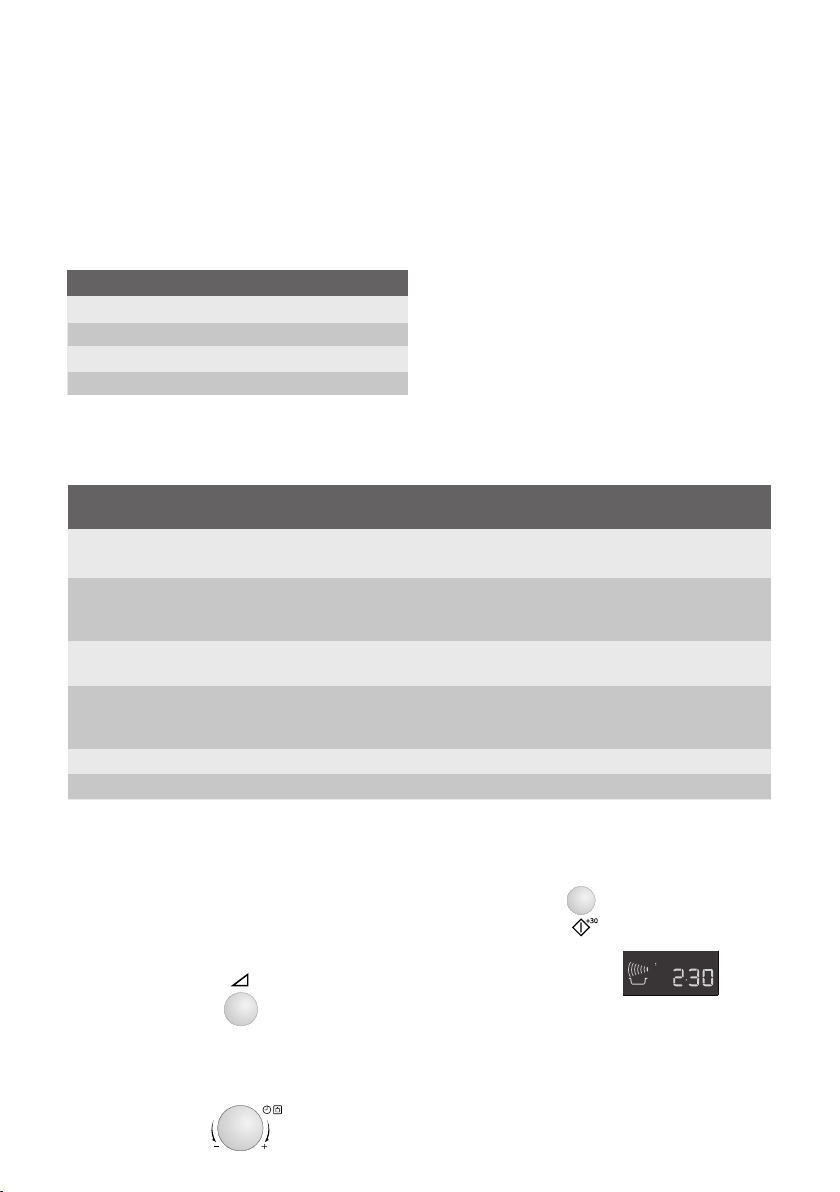
Example: To heat soup for 2 minutes
and 30 seconds on 630 W microwave
power.
1. Press the power level button twice.
x2
2. Enter the time by rotating the
TIMER/WEIGHT knob
clockwise/anti-clockwise until 2:30
is displayed.
3. Press the START/+30 button.
x1
4. Check the display:
Important:
If the power level is not selected,
HIGH/900 W is automatically set.
Page 15
electrolux operation
1
AUTO
+
AUTO
15
Note:
• When the door is opened during the
cooking process, the cooking time
on the digital display stops
automatically. The cooking time
starts to count down again when the
door is closed and the START/+30
button is pressed.
• If you wish to know the power level
during cooking, press the POWER
button once.
• You can increase or decrease the
cooking time during cooking by
rotating the TIMER/WEIGHT knob.
• You can change the POWER level
during cooking by pressing the
power button.
• To cancel a programme during
cooking, touch the STOP button twice.
Kitchen timer
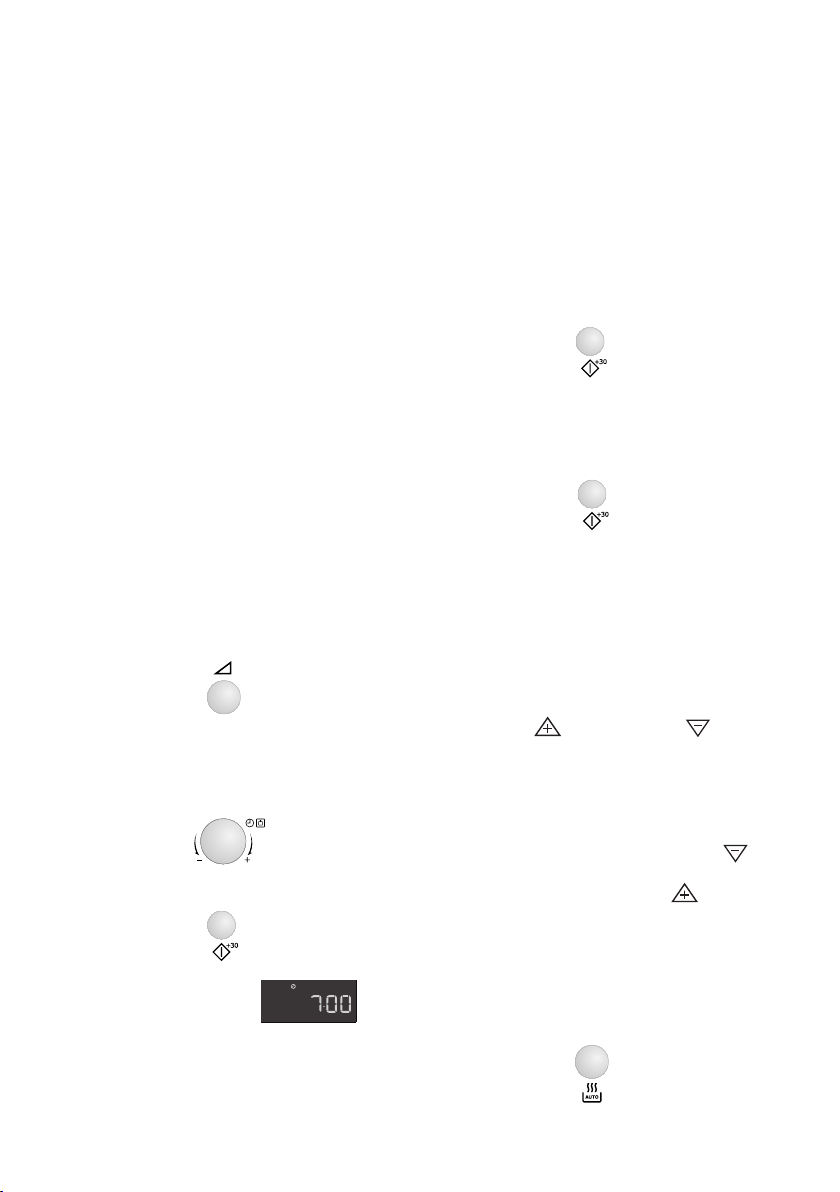
Example: To set the kitchen timer for
7 minutes.
1. Press the power level button 7
times.
x7
Add 30 seconds
The START/+30 button allows you to
operate the two following functions:
1. Direct Start
You can directly start cooking on
900 W/HIGH microwave power
level for 30 seconds by pressing
the START/+30 button.
x1
2. Extend the cooking time
You can extend the cooking time
for multiples of 30 seconds if the
button is pressed while the oven is
in operation.
x1
Note:
• You can also use +30 seconds
during grill mode.
• You cannot use this function during
AUTO COOK or AUTO DEFROST.
Plus & minus
2. Enter the time by rotating
the TIMER/WEIGHT knob
clockwise/anti-clockwise until 7:00
is displayed.
3. Press the START/+30 button.
x1
4. Check the display:
Note:
• To pause the timer, press the STOP
button. To resume the timer press
START/+30, to exit press STOP
again.
The PLUS and MINUS
function enables you to decrease or
increase the cooking time when using
the automatic programmes.
If you prefer boiled potatoes which are
cooked but still firm, use MINUS .
Alternatively, if you prefer boiled
potatoes softer, use PLUS .
Example: To cook 0.3 kg of boiled
potatoes, well done.
1. Select the menu required by pressing
the AUTO COOK button twice.
x2
Page 16
16
1
1
1
1
2
2
A
UTO
+
AUTO
1 2
1
1
1
AUTO
+
AUTO
electrolux operation
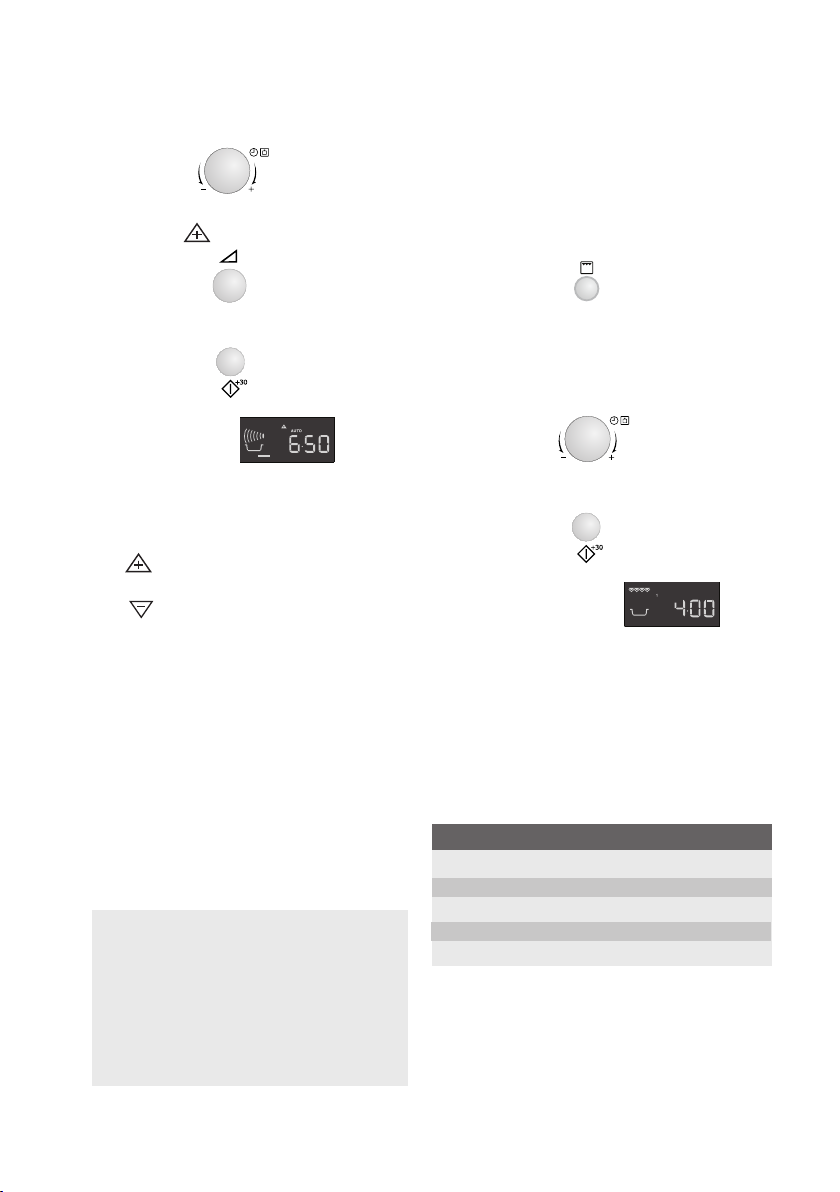
2. Turn the TIMER/WEIGHT knob until
0.3 kg is displayed.
3. Touch the power button once to select
the PLUS adjustment.
x1
4. Press the START/+30 button.
x1
5. Check the display:
Note:
To cancel PLUS/MINUS, press the
power level key 3 times.
If you select PLUS the display will
show .
If you select MINUS, the display will
show .
Grill & dual grill cooking
This microwave oven has two
GRILL cooking modes:
1. Grill only.
2. Dual Grill (grill with microwave).
Important:
1. The high or the low rack is
recommended for grilling.
2. You may detect smoke or a
burning smell when using the grill
for the first time, this is normal and
does not indicate a fault with the
oven. To avoid this problem, when
using the oven for the first time,
operate the grill without food for 20
minutes.
Grill only cooking
This mode can be used to Grill/Brown
food.
Example: To make toast for 4 minutes.
1. Press the grill button once.
x1
2. Enter the time by rotating the
TIMER/WEIGHT knob
clockwise/anti-clockwise until 4:00
is displayed.
3. Press the START/+30 button.
x1
4. Check the display:
Dual grill cooking
This mode uses a combination of
Grill power and Microwave power (90
W to 630 W). The microwave power
level is preset to 270 W.
Button Power setting
Grill x 1 0 W
Grill x 2 270 W
Grill x 3 450 W
Grill x 4 630 W
Grill x 5 0 W
Page 17
electrolux operation
1
1
1
1 2
2
AUTO
+
AUTO
1
1
1 2
1
1
1
1 2
2
AUTO
+
AUTO
1
1
1 2
1
1
1
1
2
2
AUTO
+
AUTO
1
1
1 2
17
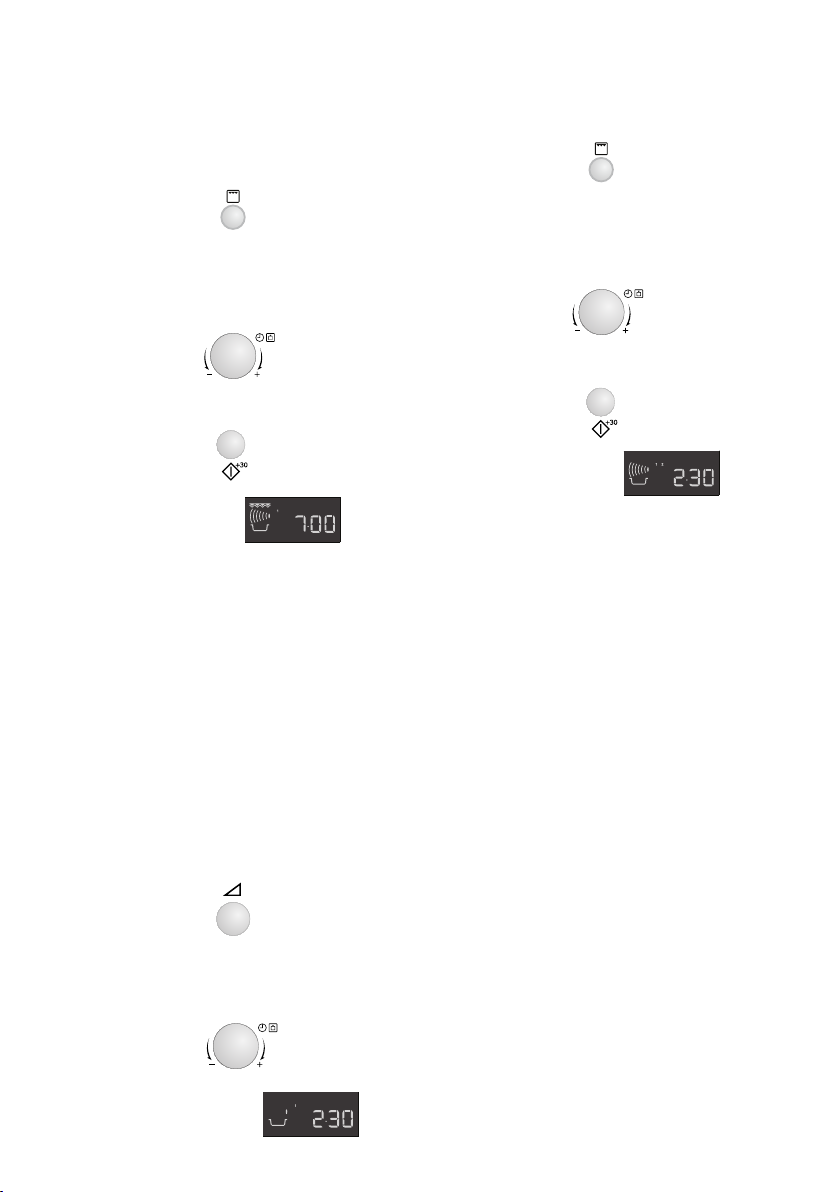
Example: To cook grill skewers for 7
minutes on DUAL GRILL (450 W).
1. Press the grill button 3 times.
x3
2. Enter the time by rotating the
TIMER/WEIGHT knob clockwise/anticlockwise until 7:00 is displayed.
3. Press the START/+30 button.
x1
4. Check the display:
Multiple sequence cooking
A sequence of 3 stages (maximum)
can be programmed using
combinations of MICROWAVE, GRILL
or DUAL GRILL.
Stage 2
1. Press the grill button once.
x1
2. Enter the desired cooking time by
rotating the TIMER/WEIGHT knob
clockwise until 5:00 is displayed.
3. Press the START/+30 button.
x1
4. Check the display:
The oven will begin to cook for
2 minutes and 30 seconds at 630 W,
and then for 5 minutes on Grill only.
Example: To cook:
2 minutes and 30 seconds on 630 W
power (Stage 1)
5 minutes grill only (Stage 2)
Stage 1
1. Press the power button twice.
x2
2. Enter the desired time by rotating
the TIMER/WEIGHT knob
clockwise until 2:30 is displayed.
3. Check the display:
Page 18
18
1
1
1
1 2
2
AUTO
+
AUTO
1 2
1
1
1
1 2
2
A
UTO
+
AUTO
AUTO
1
1
1 2
electrolux operation
Auto cook & auto
defrost operation
AUTO COOK and AUTO DEFROST
automatically work out the correct
cooking mode and cooking time. You
can choose from 6 AUTO COOK and 2
AUTO DEFROST menus.
Auto Cook
Auto cook Symbol Setting
Beverage Microwave
Boiled Potatoes/ Microwave
Jacket Potatoes
Grilled Microwave
Skewers + grill
Gratinated Microwave
Fish Fillet + grill
Grilled Microwave
Chicken + grill
Gratin Microwave
+ grill
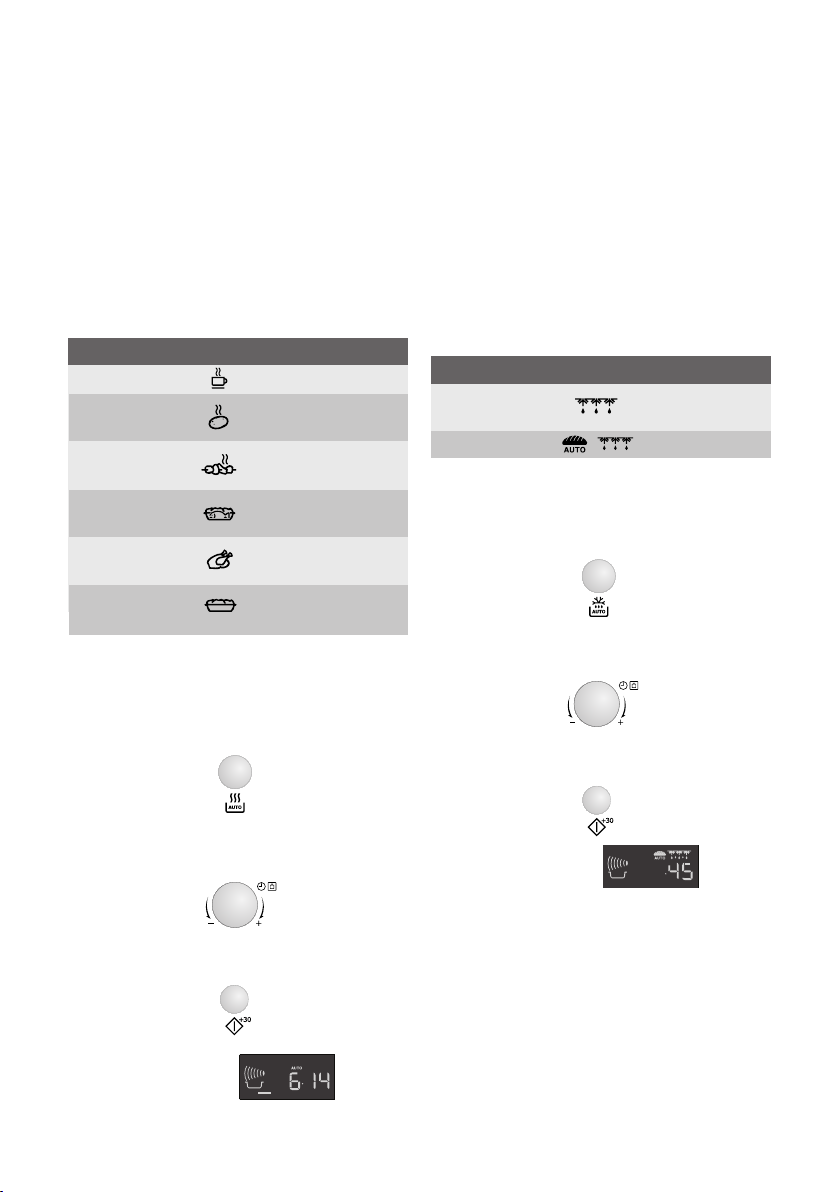
Example: To cook 0.3 kg of boiled
potatoes.
When action is required (e.g. to turn
food over) the oven stops and the
audible bell sounds, remaining cooking
time and the indicator will flash on the
display. To continue cooking, press the
START/+30 button. At the end of the
Auto cook time, the programme will
automatically stop. The audible bell
sounds and the cooking symbol will flash.
After 1 minute and a reminder beep, the
time of day will be displayed.
Auto Defrost
Auto defrost Symbol Setting
Meat/Fish/ Microwave
Poultry
Bread Microwave
Example: To defrost 0.2 kg of bread.
1. Select the menu required by pressing
the AUTO DEFROST button twice.
x2
2. Turn the TIMER/WEIGHT knob until
0.2 is displayed.
1. Select the menu required by pressing
the AUTO COOK button twice.
x2
2. Turn the TIMER/WEIGHT knob until
0.3 kg is displayed.
3. Press the START/+30 button.
x1
4. Check the display:
3. Press the START/+30 button.
x1
4. Check the display:
When action is required (e.g. to turn
food over) the oven stops and the
audible bell sounds, remaining cooking
time and the indicator will flash on the
display. To continue cooking, press the
START/+30 button. At the end of the
Auto defrost time, the programme will
automatically stop. The audible bell
sounds and the cooking symbol will flash.
After 1 minute and a reminder beep, the
time of day will be displayed.
Page 19
electrolux programme charts
Programme charts
Auto cook & auto defrost charts
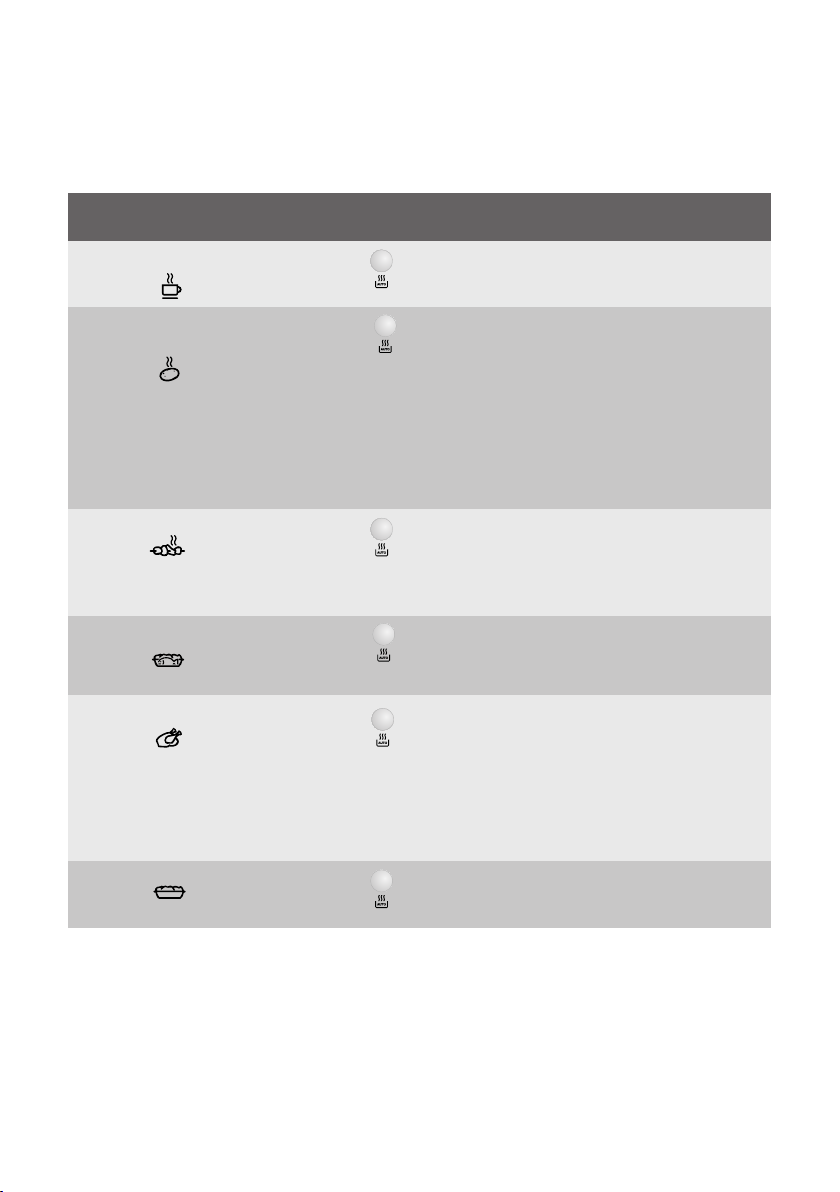
Auto Weight (increasing Button Procedure
cook unit) / Utensils
Beverage 1-6 cups • Place cup towards edge of turntable.
(Tea/Coffee) 1 cup = 200 ml
Boiled and 0,2 - 1,0 kg (100 g) Boiled Potatoes: Peel the potatoes and cut
jacket potatoes Bowl and lid them into similar sized pieces.
Grill skewers 0,2 - 0,8 kg (100 g) • See recipe for “Grill skewers” on page 21.
High rack • Place on the high rack and cook.
Gratinated 0,5 - 1,5 kg* (100 g) • See recipes for “Gratinated fish fillet” on page
fish fillet Gratin dish 21.
Low rack
Grilled chicken 0,9 - 1,8 kg (100 g) • Mix together 2 tbsp oil, 1 tsp paprika, salt
Flan dish and pepper and spread on the chicken.
Low rack • Pierce the skin of the chicken.
Gratin 0,5 - 1,5 kg* (100 g) • See recipes for “Gratin” on page 22.
Gratin dish
Low rack * Total weight of all ingredients.
x1
x2
Jacket Potatoes: Choose potatoes of similar
size and wash them.
• Put the boiled or jacket potatoes into a bowl.
• Add the required amount of water (per 100 g),
approx 2 tbsp and a little salt.
• Cover with a lid.
• When the audible bell sounds, stir and re-cover.
• After cooking, stand for approx. 2 min.
x3
• When the audible bell sounds, turn over.
• After cooking, remove and put on a plate for
serving.
x4
* Total weight of all ingredients.
x5
• Put chicken breast side down in a flan dish.
• Place on the low rack and cook.
• When the audible bell sounds, turn over.
• After cooking, leave for approx. 3 min in the
oven, remove and put on a plate for serving.
x6
19
Important: Chilled foods are cooked from 5 oC, frozen foods are cooked from -18 oC.
Page 20
20
Auto Weight (increasing Button Procedure
defrost unit) / Utensils
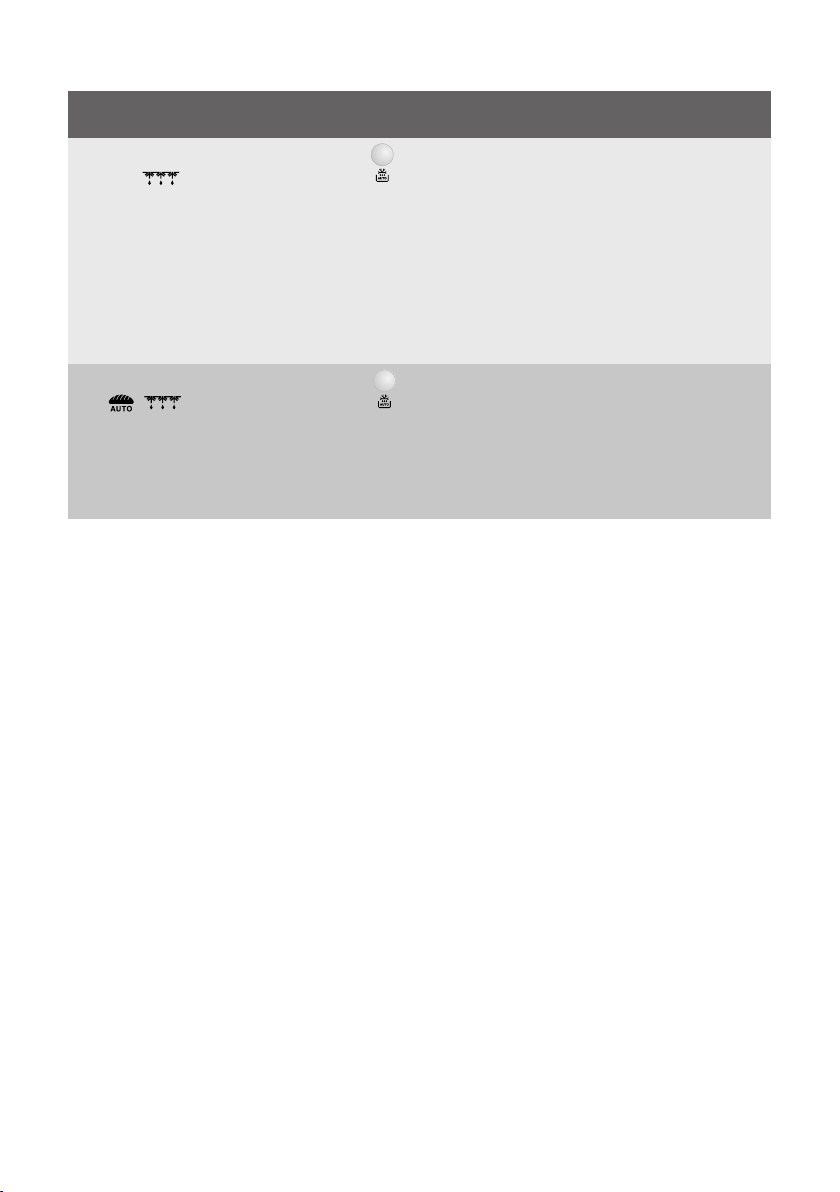
Meat, fish 0,2 - 1,0 kg (100 g) • Place the food in a flan dish in the centre of
poultry Flan dish the turntable.
(Whole fish, fish
steaks, fish fillets,
chicken legs,
chicken breast,
minced meat,
steak, chops,
burgers, sausages)
Bread 0,1 - 1,0 kg (100 g) • Distribute in a flan dish in the centre of the
Important: Chilled foods are cooked from 5 oC, frozen foods are cooked from -18 oC.
electrolux programme charts
Flan dish turntable. For 1,0 kg distribute directly on the
x1
• When the audible bell sounds, turn the food
over, rearrange and separate. Shield thin parts
and warm spots with aluminium foil.
• After defrosting, wrap in aluminium foil for 15-
45 min, until thoroughly defrosted.
Note: Not suitable for whole poultry.
• Minced meat: When the audible bell
sounds, turn the food over. Remove the
defrosted parts if possible.
x2
turntable.
• When the audible bell sounds, turn over,
rearrange and remove defrosted slices.
• After defrosting cover in aluminium foil and
stand for 5-15 min, until thoroughly defrosted.
Note:
• Enter the weight of the food only. Do
not include the weight of the
container.
• For food weighing more or less than
weights/quantities given in the Auto
cook & defrost charts, use manual
operation.
• The final temperature will vary
according to the initial temperature.
Check food is piping hot after
cooking.
• When action is required (e.g. to turn
food over) the oven stops and the
audible bell sounds, remaining
cooking time and the indicator will
flash on the display. To continue
cooking, press the START/+30
button.
• After Micro/Grill/Dual grill modes the
cooling fan may come on.
• If the clock is not set the ‘Econ’
mode will come on approx 3 minutes
after cooking is finished.
Important: Auto defrost
1. Steaks and Chops should be frozen
in one layer.
2. Minced meat should be frozen in a
thin shape.
3. After turning over, shield the
defrosted portions with small, flat
pieces of aluminium foil.
4. The poultry should be processed
immediately after defrosting.
Page 21

Recipes for auto cook
electrolux programme charts
21
Grill skewers
4 pieces
400 g pork cutlets, cubed
100 g streaky bacon
100 g onions, quartered
250 g tomatoes, quartered
100 g green pepper, cubed
2 tbsp oil
4 tsp paprika
salt
1 tsp cayenne pepper
1 tsp worcester sauce
Gratinated fish fillet, ‘Esterhazy’
0,5 kg 1,0 kg 1,5 kg
230 g 450 g 680 g fish fillet
100 g 200 g 300 g leeks (cut into rings)
20 g 40 g 60 g onion (finely sliced)
40 g 100 g 140 g carrot (grated)
10 g 10 g 20 g butter or margarine
salt, pepper and
1 tbsp 1
1
/2tbsp 2 tbsp lemon juice
50 g 100 g 150 g crème fraiche
50 g 100 g 150 g Gouda (grated)
nutmeg
1. Thread meat and vegetables
alternately on 4 wooden skewers.
2. Mix the oil with the spices and brush
over the kebabs.
3. Place the kebabs on the high rack
and cook on AUTO COOK “Grill
skewers”.
1. Put vegetables, butter and the spices
into a casserole dish and mix well.
Cook for 2-6 min on 900 W
depending on weight.
2. Wash the fish, dry and sprinkle with
lemon juice and salt.
3. Mix the crème fraiche with the
vegetables and season again.
4. Put half of the vegetables in a gratin
dish. Place the fish on top and cover
with the remaining vegetables.
5. Spread the Gouda over the top, place
on the low rack and cook on AUTO
COOK “Gratinated fish fillet”.
6. After cooking, stand for approx. 5 min.
Gratinated fish fillet, ‘Italian’
0,5 kg 1,0 kg 1,5 kg
200 g 430 g 630 g fish fillet
1
/2tbsp 1 tbsp 11/2tbsp lemon juice
1
/2tbsp 1 tbsp 11/2tbsp anchovy butter
30 g 50 g 80 g Gouda (grated)
salt and pepper
150 g 300 g 450 g fresh tomatoes
1 tbsp 11/2tbsp 2 tbsp chopped mixed
100 g 180 g 280 g Mozzarella
1
/2tbsp3/4tbsp 1 tbsp basil (chopped)
herbs
1. Wash and dry the fish and sprinkle
with lemon juice, salt and anchovy
butter.
2. Place in a gratin dish.
3. Sprinkle the Gouda over the fish.
4. Place the tomatoes on top of the
cheese.
5. Season with salt, pepper and the
mixed herbs.
6. Drain the Mozzarella, cut into slices
and place on the tomatoes. Sprinkle
the basil over the cheese.
7. Place the gratin dish on the low rack
and cook on AUTO COOK
“Gratinated fish fillet”.
8. After cooking, stand for approx. 5 min.
Page 22

22
electrolux programme charts
Spinach gratin
0,5 kg 1,0 kg 1,5 kg
150 g 300 g 450 g leaf spinach
15 g 30 g 45 g onion (finely
5 g 10 g 15 g butter or margarine
150 g 300 g 450 g boiled potatoes
35 g 75 g 110 g cooked ham (diced)
50 g 100 g 150 g crème fraiche
123eggs
40 g 75 g 115 g grated cheese
(cooked)
chopped)
salt, pepper and
nutmeg
(to grease the dish)
(sliced)
Potato and courgette gratin
0,5 kg 1,0 kg 1,5 kg
5 g 10 g 15 g butter or margarine
200 g 400 g 600 g boiled potatoes
115 g 230 g 345 g courgette (finely
75 g 150 g 225 g crème fraiche
123eggs
1
/
12clove of garlic
2
40 g 80 g 120 g grated Gouda
10 g 20 g 30 g sunflower kernels
(to grease the dish)
(sliced)
sliced)
(crushed)
salt and pepper
cheese
1. Mix together the leaf spinach with the
onion and season with salt, pepper and
nutmeg.
2. Grease the gratin dish. Place alternate
layers of potato slices, diced ham and
spinach in the dish. The top layer should
be spinach.
3. Mix the eggs with crème fraiche, add
salt and pepper and pour over the
gratin.
4. Cover the gratin with the grated cheese.
5. Place on the low rack and cook on
AUTO COOK “Gratin”.
6. After cooking, stand for 5-10 min.
1. Grease the gratin dish and place
alternate layers of potato slices and
courgette in the dish.
2. Mix the eggs with crème fraiche,
season with salt, pepper and garlic and
pour over the gratin.
3. Sprinkle the Gouda cheese over the
gratin.
4. Finally sprinkle the gratin with sunflower
kernels.
5. Place on the low rack and cook on
AUTO COOK “Gratin”.
6. After cooking, stand for 5-10 min.
Page 23

electrolux programme charts
Cooking charts
Abbreviations used
tbsp = tablespoon
tsp = teaspoon
Food / Drink Quantity Setting Power Time Method
Milk 1 cup 150 Micro 900 W approx. 1 do not cover
Water 1 cup 150 Micro 900 W approx. 2 do not cover
6 cups 900 Micro 900 W 8-10 do not cover
1 dish 1000 Micro 900 W 9-11 do not cover
One plate meal 400 Micro 900 W 4-6 sprinkle some water onto the sauce,
(vegetables, meat cover, stir halfway through heating
and trimmings)
Soup / stew 200 Micro 900 W 1-2 cover, stir after heating
Vegetables 200 Micro 900 W 2-3 if necessary add some water, cover,
Meat, 1 slice* 200 Micro 900 W approx. 3 thinly spread sauce over the top, cover
Fish fillet* 200 Micro 900 W 3-5 cover
Cake, 1 slice 150 Micro 450 W
Baby food, 1 jar 190 Micro 450 W
Melting Margarine 50 Micro 900 W
or Butter*
Melting chocolate 100 Micro 450 W 3-4 stir occasionally
* from chilled
Food Quantity Setting Power Time Method Standing
Goulash 500 Micro 270 W 8-9 stir halfway through defrosting 10-30
Cake, 1 slice 150 Micro 270 W 1-3 place in a flan dish 5
Fruit e.g. cherries, 250 Micro 270 W 3-5 spread out evenly, turn over 5
strawberries, halfway through defrosting
raspberries, plums
The times shown in the table are guidelines which may vary according to freezing temperature, quality
and weight of the foodstuffs.
Food Quantity Setting Power Time Added Method Standing
-g- -Level- -Min- water time
Fish fillet 300 Micro 900 W 9-11 - cover 2
One plate 400 Micro 900 W 8-10 - cover, stir after 6 minutes 2
meal
Broccoli 300 Micro 900 W 6-8 3-5 cover, stir halfway through cooking 2
Peas 300 Micro 900 W 6-8 3-5 cover, stir halfway through cooking 2
Mixed 500 Micro 900 W 9-11 3-5 cover, stir halfway through cooking 2
vegetables
Cup = cupful
kg = kilogram
g = gram
l = litre
ml = millilitre
cm = centimetre
min = minutes
Heating food & drink
-g/ml- -Level- -Min-
500 Micro 900 W 3-5 stir halfway through heating
1
/2-1 place in a flan dish
1
/2-1 transfer into a suitable microwaveable
container, after heating stir well and
test the temperature
1
/
cover
2
Defrosting
-g- -Level- -Min- time
Defrosting & cooking
-tbsp- -Min-
-Min-
23
Page 24
24
electrolux programme charts
Cooking, grilling & browning
Food Quantity Setting Power Time Method Standing
-g- -Level- -Min- time
-Min-
Broccoli 500 Micro 900 W 6-8 add 4 - 5 tbsps water, cover, stir -
halfway through cooking
Peas 500 Micro 900 W 6-8 cover, add 4 - 5 tbsps water, stir -
halfway through cooking
Carrots 500 Micro 900 W 9-11 cut into rings, add 4 - 5 tbsps water, -
cover, stir halfway through cooking
Roasts 1000 Micro 450 W 16-18 season to taste, place on the low 10
(pork, veal, Dual Grill 450 W 5-7 * rack, turn over after *
lamb) Micro 450 W 14-16
Dual Grill 450 W 4-6
1500 Micro 450 W 26-28 10
Dual Grill 450 W 5-8 *
Micro 450 W 26-28
Dual Grill 450 W 4-5
Roast beef 1000 Micro 630 W 5-8 season to taste, place on the low rack, 10
(medium) Dual Grill 630 W 8-10 * turn over after *
Dual Grill 630 W 3-5
1500 Micro 630 W 12-15 10
Dual Grill 630 W 12-15 *
Dual Grill 630 W 4-6
Chicken legs 200 Dual Grill 450 W 6-7 * season to taste, place skin side down 3
Grill 4-6 on the high rack, turn over after *
Rump steaks 400 Grill 11-12 * place on the high rack, turn over
2 pieces, Grill 6-8 after *, season after grilling
medium
Browning of Grill 8-13 place dish on the low rack
gratin dishes
Cheese 1 piece Micro 450 W
1
/2toast the bread and spread with
toastie Grill 5-6 butter, top with a slice of cooked ham,
4 pieces Micro 450 W
1
/2-1 a slice of pineapple and a slice of
Grill 5-6 cheese
Frozen pizza 300 Micro 450 W 4-6 place on the low rack
Dual Grill 450 W 4-6
400 Micro 450 W 6-7
Dual Grill 450 W 5-7
Page 25

Recipes
electrolux recipes
25
All the recipes in this book are
calculated on the basis of 4 servings
unless otherwise stated.
Adapting recipes for the microwave
oven
If you would like to adapt your favourite
recipes for the microwave, you should take
note of the following: Shorten cooking
times by a third to a half. Follow the
example of the recipes in this book.
Foods which have a high moisture content such as meat, fish, poultry, vegetables,
fruit, stews and soups can be prepared in
your microwave without any difficulty.
Onion soup
Utensils: Bowl with lid (2 l capacity)
4 soup bowls (200 ml)
Ingredients
10 g butter or margarine
100 g onions, sliced
800 ml meat stock
salt and pepper
2 slices bread
40 g grated cheese
Foods which have little moisture, such
as platters of food, should have the surface
moistened prior to heating or cooking.
The amount of liquid to be added to
raw foods, which are to be braised, should
be reduced to about two thirds of the
quantity in the original recipe. If necessary,
add more liquid during cooking.
The amount of fat to be added can be
reduced considerably. A small amount of
butter, margarine or oil is sufficient to
flavour food. For this reason your
microwave is excellent for preparing low-fat
foods as part of a diet.
1. Grease the bowl, add the sliced
onion, meat stock and the seasoning.
Cover and cook.
9-11 min. 900 W
2. Toast the slices of bread, cut them
into cubes and divide them among
the soup bowls. Pour the soup over
the toast cubes and sprinkle on the
cheese.
3. Place the bowls on the turntable, and
grill.
6-7 min. Grill
Page 26

26
electrolux recipes
Aubergines stuffed with minced
meat
Utensils: Bowl with lid (1 l capacity)
Shallow flan dish
(approx. 30 cm long)
Ingredients
250 g aubergines
200 g tomatoes
1 tbsp olive oil to grease the dish
100 g onions, chopped
4 mild green chillies, seeds
removed
200 g minced beef
2 garlic cloves, crushed
2 tbsp parsley, chopped
salt and pepper
paprika
60 g Feta cheese, cubed
1. Cut the aubergines in half lengthways.
Scoop out the flesh with a teaspoon
to leave a shell about 1 cm thick. Dice
the scooped-out flesh.
2. Remove the skin from the tomatoes
and chop.
3. Grease the bottom of the bowl with
the olive oil. Add the onions, cover and
cook.
2 min. 900 W
4. Cut the chillies into rings. Retain a third
for the garnish. Mix the minced meat
with the diced aubergines, onions,
tomatoes, chilli rings, garlic and
parsley. Season to taste.
5. Dry the aubergine halves. Fill with half
of the mince mixture, spread the feta
cheese on top, and then add the rest
of the filling.
6. Arrange the aubergine halves in the
greased oven proof dish, place the
dish on the low rack and cook.
11-13 min. Dual Grill (630 W)
Garnish the aubergine halves with the
chilli rings and continue cooking.
4-7 min. Dual Grill (630 W)
After cooking, stand for approx. 2 min.
Mushrooms with rosemary
Utensils: Bowl with lid (1 l capacity)
Shallow round dish with lid
(approx. 22 cm diameter)
Ingredients
8 large mushrooms
(approx. 225 g), whole
20 g butter or margarine
50 g onion, finely chopped
50 g bacon, finely diced
black pepper
fresh rosemary, chopped
125 ml dry white wine
125 ml cream
20 g flour
1. Remove the stalks from the
mushrooms. Chop the stalks into
small pieces.
2. Grease the shallow dish. Add the
onions, the diced bacon and the
mushroom stalks. Season with pepper
and rosemary, cover and cook.
3-5 min. 900 W
Leave to cool.
3. Heat the cream and 100 ml of the
wine in the bowl.
1-3 min. 900 W
4. Mix the remaining wine with the flour,
stir into the hot liquid, cover and cook.
Stir once during cooking.
approx. 1 min. 900 W
5. Fill the mushrooms with the bacon
mixture and put in shallow dish. Pour
the sauce over the mushrooms and
cook on the low rack.
6-8 min. Dual Grill (630 W)
After cooking, stand for approx. 2 min.
Page 27

electrolux recipes
27
Sole fillets
Utensils: Shallow oval oven dish with
microwave cling film
(approx. 26 cm long)
Ingredients
400 g sole fillets
1 lemon, whole
150 g tomatoes
10 g butter
1 tbsp vegetable oil
1 tbsp parsley, chopped
salt and pepper
4 tbsp white wine
20 g butter or margarine
Fish fillet with cheese sauce
Utensils: Bowl with lid (1 l capacity)
Shallow round gratin dish
(approx. 25 cm diameter)
Ingredients
800 g fish fillets
2 tbsp lemon juice
salt
10 g butter or margarine
50 g onion, finely chopped
20 g flour
100 ml white wine
1 tsp vegetable oil to grease the dish
100 g Emmental cheese, grated
2 tbsp parsley, chopped
1. Wash the fish and pat dry. Remove
any bones.
2. Cut the lemon and the tomatoes into
thin slices.
3. Grease the oven dish with butter.
Place the fish fillets in the dish and
drizzle with vegetable oil.
4. Sprinkle parsley over the dish, place
the tomato slices on top and season.
Place the lemon slices on top of the
tomatoes and pour the white wine
over them.
5. Place small pats of butter on top of the
lemon, cover and cook.
11-13 min. 630 W
After cooking, stand for approx. 2 min.
1. Wash the fish, pat dry and sprinkle
with lemon juice. Rub with salt.
2. Grease the bowl. Add the diced onion,
cover and cook.
1-2 min. 900 W
3. Sprinkle the flour over the onions and
white wine and mix.
4. Grease the gratin dish and place the
fish in it. Pour the sauce over the fish
and sprinkle with cheese. Place on the
low rack and cook.
7-8 min. 450 W
14-16 min. Dual Grill (450 W)
After cooking, stand for approx. 2 min.
Almond trout
Utensils: Shallow oval gratin dish
(approx. 32 cm long)
Ingredients
4 trout (200 g), trimmed
juice of one lemon
salt
30 g butter or margarine
50 g flour
10 g butter or margarine to grease
the dish
50 g almond flakes
1. Wash and dry the trout and sprinkle
with lemon juice. Rub salt to the
interior and exterior of the fish and
leave to stand for 15 min.
2. Melt the butter.
1 min. 900 W
3. Dry the fish, spread with butter and roll
in the flour.
4. Grease the dish. Put the trout in the
dish and cook on the low rack. Two
thirds through the cooking turn the trout
and scatter the almonds over them.
15-18 min. Dual Grill (450 W)
After cooking, stand for approx. 2 min.
Page 28

28
electrolux recipes
Zürich veal stew
Utensils: Dish with lid (2 l capacity)
Ingredients
600 g veal fillet
10 g butter or margarine
50 g onion, finely chopped
100 ml white wine
seasoned gravy browning, for
approx. 1/2 l gravy
300 ml cream
1 tbsp parsley, chopped
Veal cutlets with mozzarella
Utensils: Shallow square gratin dish
with lid (approx. 25 cm long)
Ingredients
150 g Mozzarella cheese, sliced
500 g tinned tomatoes, drained
4 veal cutlets (600 g)
20 ml olive oil
2 cloves of garlic, chopped
20 g capers
oregano
salt and pepper
1. Cut the veal into strips.
2. Grease the dish with the butter. Put
the meat and onion into the dish,
cover and cook. Stir once during
cooking.
6-9 min. 900 W
3. Add the white wine, gravy browning
and cream, stir, cover and continue
cooking. Stir occasionally.
3-5 min. 900 W
4. Stir the mixture after cooking, stand for
approx. 5 min. Garnish with parsley.
1. Wash the veal, dry and beat flat. Place
in the dish.
2. Puree the tomatoes, add the garlic, oil,
salt and pepper, capers and oregano
and pour over the veal. Cover and
cook.
15-19 min. 630 W
Turn the cutlets over.
3. Place slices of mozzarella on each
cutlet, season and cook uncovered on
the high rack.
9-12 min. Dual Grill (630 W)
After cooking, stand for approx. 5 min.
Stuffed ham
Utensils: Bowl with lid (2 l capacity)
Oval gratin dish (approx. 26 cm
long)
Ingredients
150 g leaf spinach, chopped
150 g fromage frais
50 g Emmental cheese, grated
pepper and paprika
8 slices cooked ham (400 g)
125 ml water
125 ml cream
20 g flour
20 g butter or margarine
10 g butter or margarine to grease
the dish
1. Mix the spinach with the cheese and
fromage frais, season to taste.
2. Place a tablespoon of the filling on top
of each slice of the cooked ham, and
roll up. Secure the ham with a wooden
skewer.
3. Make a béchamel sauce; to do this,
pour the water and cream into a bowl
and heat.
2-4 min. 900 W
Mix the flour and butter to make a
roux, add to the liquid, and whisk until
dissolved. Cover, cook until thick.
1-2 min. 900 W
Stir and taste.
4. Place the sauce into the greased dish,
place the filled rolls of ham into sauce
and cook with lid.
10-12 min. Dual Grill (630 W)
After cooking, stand for approx. 5 min.
Page 29

electrolux recipes
29
Lasagne
Utensils: Bowl with lid (2 I capacity)
Shallow square dish with lid
(approx. 20 x 20 x 6 cm)
Ingredients
300 g tinned tomatoes
50 g ham, chopped
50 g onion, finely chopped
1 clove of garlic, crushed
250 g minced beef
2 tbsp tomato puree
salt and pepper
150 ml crème fraiche
100 ml milk
50 g Parmesan cheese, grated
1 tsp mixed chopped herbs
1 tsp olive oil
1 tsp vegetable oil to grease the dish
125 g lasagne verde
1 tbsp Parmesan cheese, grated
Courgette and noodle gratin
Utensils: Gratin dish (approx. 26 cm long)
Ingredients
80 g macaroni, cooked
400 g tinned tomatoes, chopped
150 g onion, finely chopped
basil, thyme, salt and pepper
1 tbsp oil to grease the dish
450 g courgettes, sliced
150 g sour cream
2 eggs
100 g Cheddar cheese, grated
1. Chop the tomatoes, mix with the ham
and onion, garlic, minced beef and
tomato puree. Season, cover and cook.
5-8 min. 900 W
2. Mix the crème fraiche with the milk,
Parmesan cheese, herbs, oil and
spices.
3. Grease the dish and cover the bottom
with about
1
/3of the pasta. Put half of
the minced meat mixture on the pasta
and pour on some sauce. Repeat and
finish with the remaining pasta on top.
Cover the pasta with lots of sauce and
sprinkle with Parmesan cheese. Cook
with the lid on.
13-17 min. 630 W
After cooking, stand for approx. 5-10
min.
1. Mix the tomatoes with the onions and
season well. Add the macaroni. Pour
the tomato sauce over the macaroni
and spread the courgette slices on top.
2. Beat the sour cream and the eggs and
pour over the gratin. Sprinkle the
grated cheese on top. Place on the low
rack and cook.
18-21 min. 900 W
7-8 min. Dual Grill (630 W)
After cooking, stand for approx. 5-10
min.
Pears in chocolate sauce
Utensils: Bowl with lid (2 I capacity)
Bowl with lid (1 I capacity)
Ingredients
4 whole pears, peeled (600 g)
60 g sugar
10 g vanilla sugar
1 tbsp pear liqueur
150 ml water
130 g dark chocolate, chopped
100 g crème fraiche
1. Place the sugar, vanilla sugar, pear
liqueur and water into the bowl, stir,
cover and cook.
1-2 min. 900 W
2. Place the pears in the liquid, cover
and cook.
5-8 min. 900 W
Take the pears out of the cooking
liquid, and place in the refrigerator.
3. Put 50 ml of the cooking liquid into the
smaller bowl. Add the chocolate and
crème fraiche, cover and cook.
2-3 min. 900 W
4. Stir the sauce well, pour over the
pears to serve.
Page 30

30
electrolux recipes
Semolina pudding with raspberry
sauce
Utensils: Bowl with lid (2 I capacity)
4 Ramekin dishes
Ingredients
500 ml milk
40 g sugar
15 g chopped almonds
50 g semolina
1 egg yolk
1 tbsp water
1 egg white
250 g raspberries
50 ml water
40 g sugar
Cheesecake
Utensils: Spring form tin
(approx. 26 cm diameter)
Ingredients
Base:
300 g flour
1 tbsp cocoa
10 g baking powder
150 g sugar
1 egg
10 g butter or margarine to grease
the tin
Filling:
150 g butter or margarine
100 g sugar
10 g vanilla sugar
3 eggs
400 g fromage frais
40 g powdered vanilla pudding mix
1. Put the milk, sugar and almonds in the
bowl, cover and cook.
3-5 min. 900 W
2. Add the semolina, stir, cover and cook.
10-12 min. 270 W
3. Beat the egg yolk with the water in a
cup, and stir into the hot mixture. Beat
the egg white until it is stiff, and fold it
into the mixture. Pour the pudding
mixture into ramekins.
4. To make the sauce, wash the
raspberries, dab them dry carefully, and
place them in a bowl with the water
and sugar. Cover and heat.
2-3 min. 900 W
5. Purée the raspberries and serve either
hot or cold with the semolina pudding.
1. In a bowl, mix together the flour,
cocoa, baking powder and sugar.
2. Add the egg and butter and mix in a
food processor.
3. Grease the tin. Roll out the dough
and line the tin, leaving 2 cm around
the edges to form a rim. Bake the
pastry.
6-8 min. 630 W
4. Whisk the butter and sugar until light
and fluffy. Slowly whisk in the eggs.
Add the fromage frais and the
powdered vanilla pudding mix.
5. Spread the mixture over the
cheesecake base and cook.
15-19 min. 630 W
Page 31

Care & cleaning
CAUTION: DO NOT USE
COMMERCIAL OVEN CLEANERS,
STEAM CLEANERS, ABRASIVE,
HARSH CLEANERS, ANY THAT
CONTAIN SODIUM HYDROXIDE OR
SCOURING PADS ON ANY PART OF
YOUR MICROWAVE OVEN.
CLEAN THE OVEN AT REGULAR
INTERVALS AND REMOVE ANY FOOD
DEPOSITS. Failure to maintain the
oven in a clean condition could lead to
a deterioration of the surface that
could adversely affect the life of the
appliance and possibly result in a
hazardous situation.
Oven exterior
The outside of your oven can be
easily cleaned with mild soap and water.
Make sure that the soap is wiped off
with a moist cloth, and dry the exterior with
a soft towel.
Control panel
Open the door before cleaning to
deactivate the control panel. Care should
be taken in cleaning the control panel.
Using a cloth dampened with water
only, gently wipe the panel until it becomes
clean. Avoid using excessive amounts of
water. Do not use any sort of chemical or
abrasive cleaner.
electrolux care & cleaning
Oven interior
1. For cleaning, wipe any spatters or spills
with a soft damp cloth or sponge after
each use while the oven is still warm.
For heavier spills, use mild soap and
wipe several times with a damp cloth
until all residues are removed.
2. Make sure that mild soap or water do
not penetrate the small vents in the
walls which may cause damage to the
oven.
3. Do not use spray type cleaners on the
oven interior.
4. Heat up your oven regularly by using
the grill. Remaining food or fat splashed
can cause smoke or a bad smell.
Turntable & turntable support
Remove the turntable and turntable
support from the oven. Wash the
turntable and turntable support in mild
soapy water. Dry with a soft cloth. Both
the turntable and the turntable support
are dishwasher safe.
Door
To remove all trace of dirt, regularly
clean both sides of the door, the door seals
and surfaces with a soft, damp cloth. Do
not use harsh abrasive cleaners or sharp
metal scrapers to clean the oven door glass
since they can scratch the surface, which
may result in shattering of the glass.
Racks
These should be washed in a mild
washing up liquid solution and dried. The
rack is dishwasher safe.
Important:
A steam cleaner should not be used.
31
Reduced power level
Important:
If you cook the food over the
standard time with only the same
cooking mode, the power of the oven
will lower automatically to avoid
Cooking mode Standard time Reduced power level
Microwave (900 W) 20 minutes Microwave - 630 W
Grill 20 minutes Grill - 50 %
Dual Grill Grill - 20 minutes Grill - 50 %
overheating. (The microwave power level
will be reduced or the grill heating
element will begin to light on and off.)
After pausing for 90 seconds, full power
can be reset.
Page 32

32
electrolux what to do if . . & specifiactions
What to do if . .
Problem Check if . . .
The microwave appliance - The fuses in the fuse box are working,
is not working properly? - There has not been a power outage,
The microwave mode is - The door is properly closed,
not working? - The door seals and their surfaces are clean,
The turntable is not turning? - The turntable support is correctly connected to the drive,
The microwave will not - Isolate the appliance from the fuse box.
switch off? - Call an authorised ELECTROLUX service agent.
The interior light is not - Call your local ELECTROLUX service agent. The interior light bulb
working? can be exchanged only by a trained ELECTROLUX service agent.
The food is taking longer - Set a longer cooking time (double quantity = nearly double time) or
to heat through and cook - If the food is colder than usual, rotate or turn from time to time or
than before? - Set a higher power setting.
- If the fuses continue to blow, please contact a qualified electrician.
- The START/+30-button has been pressed.
- The ovenware does not extend beyond the turntable,
- Food does not extend beyond the edge of the turntable preventing
it from rotating,
- There is nothing in the well beneath the turntable.
Specifications
AC Line Voltage
Distribution line fuse/circuit breaker
AC Power required: Microwave
Microwave/Grill
Output power: Microwave
Microwave Frequency
Outside Dimensions
Cavity Dimensions
Oven Capacity
Turntable
Weight
Oven lamp
* This Product fulfils the requirement of the European standard EN55011.
In conformity with this standard, this product is classified as group 2 class B equipment.
Group 2 means that the equipment intentionally generates radio-frequency energy in the form of
electromagnetic radiation for the heat treatment of food.
Class B equipment means that the equipment is suitable to be used in domestic establishments.
** Internal capacity is calculated by measuring maximum width, depth and height.
Actual capacity for holding food is less.
This oven complies with the requirements of Directives 2004/108/EC and 2006/95/EC.
SPECIFICATIONS ARE SUBJECT TO CHANGE WITHOUT NOTICE AS
PART OF CONTINUOUS IMPROVEMENT
: 240 V, 50 Hz, single phase
: Minimum 15 A
: 1.42 kW
Grill
: 1.00 kW
: 2.4 kW
: 900 W (IEC 60705)
Grill
: 1000 W
: 2450 MHz * (Group 2, Class B)
: 594 mm (W) x 459mm (H) x 404 mm (D)
: 342 mm (W) x 207 mm (H) x 368 mm (D) **
: 26 litres **
: ø 325 mm, glass
: approx. 19.5 kg
: 25 W/240 - 250 V
Page 33
Installation
D
4 mm
electrolux installation
33
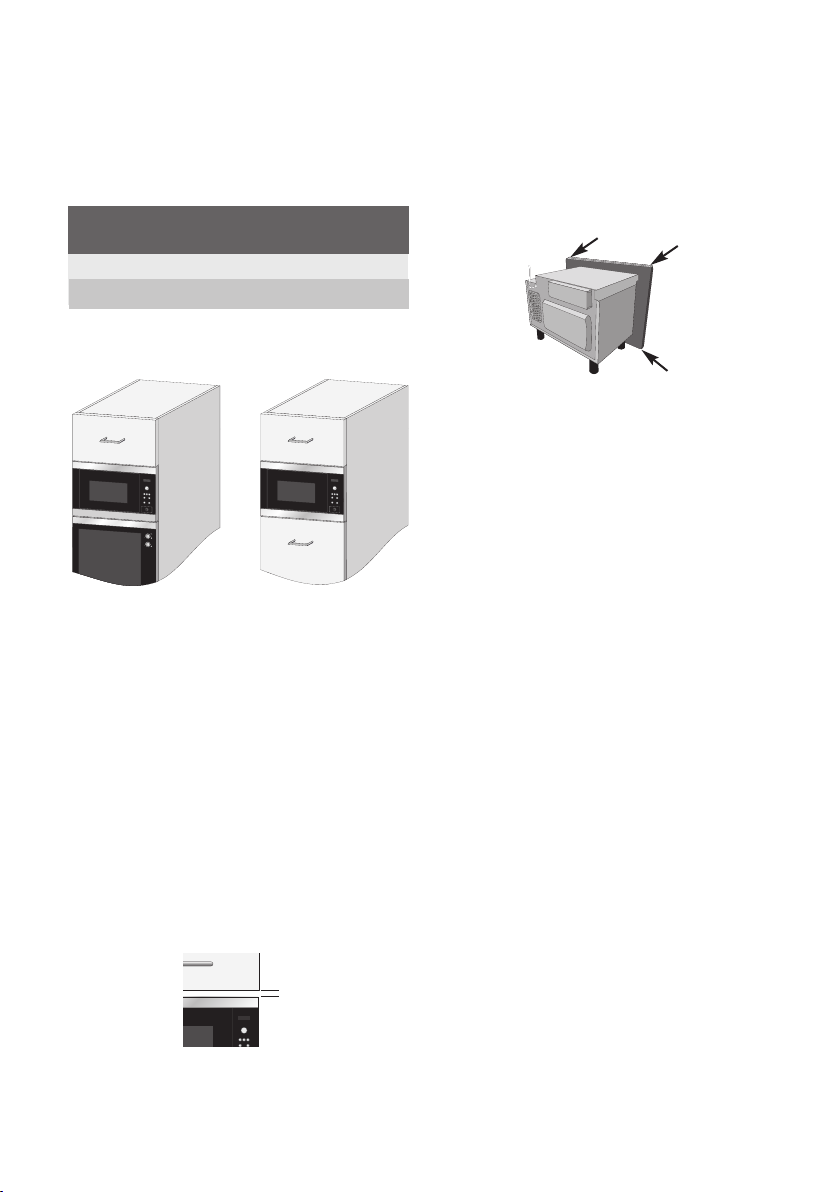
The microwave can be fitted in
position A or B:
Position Niche Size
A 560x550x450
B 560x500x450
Measurements in (mm)
Position A
Conventional
oven
W D H
Position B
Installing the appliance
1. Remove all packaging and check
carefully for any signs of damage.
2. Fit the appliance into the kitchen cupboard slowly, and without force, until
the front frame of the oven seals
against the front opening of the
cupboard.
3. Ensure the appliance is stable and
not leaning. Ensure that a 4 mm gap
is kept between the cupboard door
above and the top of the frame (see
diagram).
Fixing Option 1:
Fix the oven in position with the screws
provided. The fixing points are located on
the top and bottom corners of the oven.
Fixing Option 2:
Please see the template sheet supplied
with this oven.
Important:
Ensure the bottom of the oven is
85 cm or more above the floor.
It is important to ensure that the
installation of this product conforms
to the instructions in this operation
manual and the conventional oven
manufacturer’s installation
instructions.
Page 34
34
electrolux installation
Connecting the appliance to
the power supply
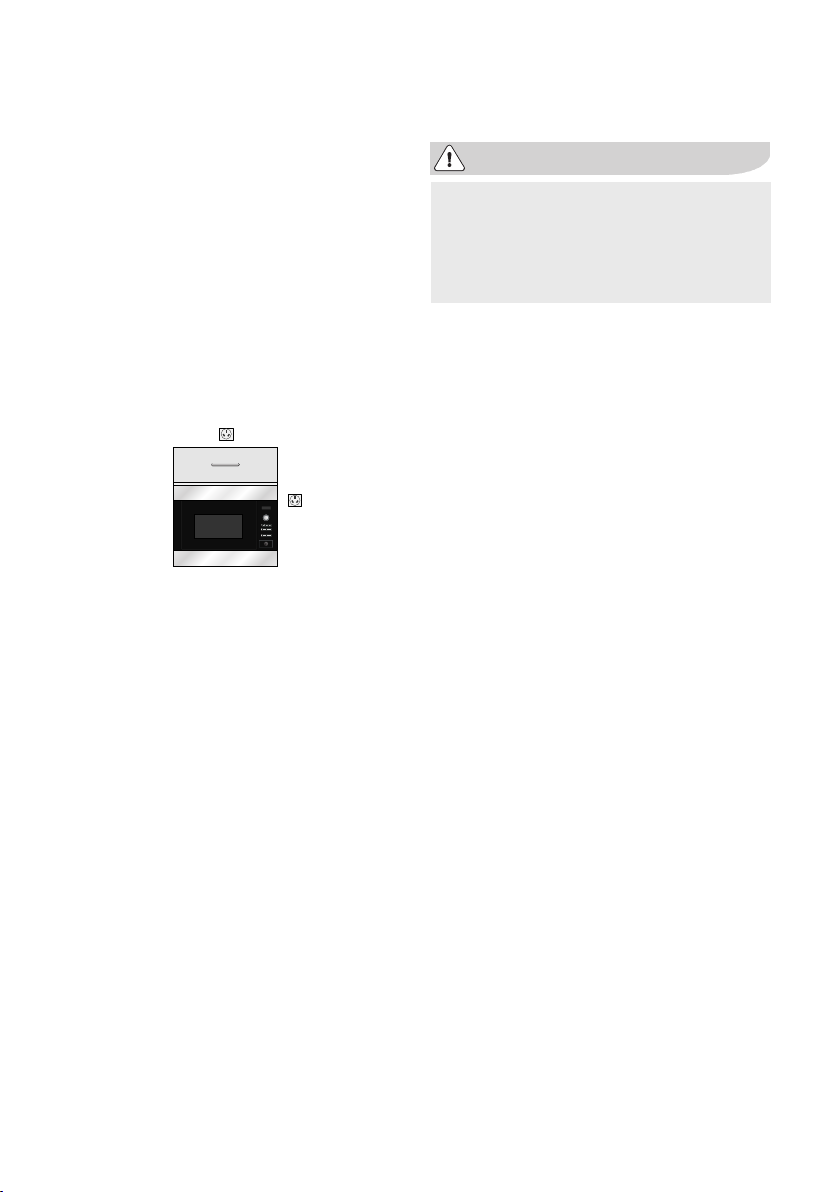
• The electrical outlet should be
readily accessible so that the unit
can be unplugged easily in an
emergency. Or it should be
possible to isolate the oven from
the supply by incorporating a
switch in the fixed wiring in
accordance with the wiring rules.
• The socket should not be
positioned behind the cupboard.
• The best position is above the cupboard, see (A).
(A)
• Connect the appliance to a single
phase 240 V/50 Hz alternating
current via a correctly installed earth
socket.
• The power supply cord may only
be replaced by an electrician.
• Before installing, tie a piece of string
to the power supply cord to facilitate
connection to point (A) when the
appliance is being installed.
• When inserting the appliance into
the high-sided cupboard, DO NOT
crush the power supply cord.
• Do not immerse the power supply
cord or plug in water or any other
liquid.
Electrical connections
WARNING: THIS APPLIANCE
MUST BE EARTHED.
The manufacturer declines
any liability should this safety
measure not be observed.
If the plug that is fitted to your
appliance is not suitable for your
socket outlet, you must call a qualified
electrician to install the required socket
and wiring.
Page 35

electrolux environmental information
Environmental information
35
Ecologically responsible disposal
of packaging materials and old
appliances
Packaging materials
Electrolux microwave ovens
require effective packaging to protect
them during transportation. Only the
minimum packaging necessary is
used. Packaging materials (e.g. foil or
styrofoam) can place children at risk.
Danger of suffocation. Keep
packaging material away from
children.
All packaging materials used are
environment friendly and can be
recycled. The cardboard is made
from recycled paper and the wooden
parts are untreated. Plastic items are
marked as follows:
«PE» polyethylene eg packaging film
«PS» polystyrene eg packaging
(CFC-free)
«PP» polypropylene eg packaging
straps
By using and re-using the packaging,
raw materials are saved and waste
volume is reduced. Packaging should
be taken to your nearest recycling
centre. Contact your local council for
information.
The symbol on the product or
on its packaging indicates that this
product may not be treated as
household waste. Instead it should be
taken to the appropriate collection point
for the recycling of electrical and
electronic equipment. By ensuring this
product is disposed of correctly, you
will help prevent potential negative
consequences for the environment and
human health, which could otherwise
be caused by inappropriate waste
handling of this product. For more
detailed information about recycling of
this product, please contact your local
council, your household waste disposal
service or the shop where you
purchased the product.
Disposal of old appliances
Old appliances should be made safe
before disposal by removing the plug,
and cutting off and disposing of the
power cable.
It should then be taken to the
nearest recycling centre. Check with
your local Council or Environmental
Health Office to see if there are facilities
in your area for recycling the appliance.
Page 36
36
Warranty
FOR SALES IN AUSTRALIA AND NEW ZEALAND
A
PPLIANCE
: EL
ECTROLUX COMBO MICROWAVE
This document sets out the terms and conditions of product warr anties
for Electrolux branded appliances. It is a n important document. Please
k
eep it with your proof of pu rchase docu ments in a safe place for future
r
eference should you require service for your Electrolux appliance.
General Terms and Conditions
1
. In this warranty
(a) 'Electrolux' means Electrolux Home Products Pty Ltd ABN 51 004 762
341 in respect of Appl iances purchased in Austral ia and Electrolux
(NZ) Limited in res pect of Appliances purchased in N ew Zealand;
(b) 'Appliance' means any Elec trolux product purchased by you
a
ccompanied by thi s document;
(c) 'Warranty Period' mea ns
(i) where you use the Appl iance for personal, domesti c or household
p
urposes in Aust ralia the period of 24 months an d in New
Z
ealand the period of 24 months;
(ii) where you use the Appli ance for commercial purposes, in
Australia the p eriod of 3 months and i n New Zealand the perio d
of 3 months, (if the period stated is 0 months you are not
covered by this produc t warranty)
f
ollowing the date of original purchase of the Appliance;
(d) 'y ou' means the purchaser of the Appli ance not having purchased the
appliance for re-sal e, and 'your' has a correspondi ng meaning.
2. This warr anty only applies to Applia nces purchased and used in A ustralia
o
r New Zealand and is in addition to (and does not excl ude, restrict, or
modify in any way) any non-excludable statutory warr anties in Australia or
New Zealand.
3. Electrolux warrants that, when dispatched from an Elec trolux warehouse,
the Appliance is free fr om defects in materials and workma nship for the
Warranty Period.
4. During the Warranty Period Electrol ux or its Authorised Service Centre will,
at no extra cha rge if your appliance is readil y acces sible without special
equipment, and subject to th ese terms and conditions, re pair or replace
any parts which it considers to be defective. You agree that any replaced
Appliances or parts become the property of Elec trolux. This warranty does
not apply to light gl obes, batteries, filters or si milar perishable parts.
5. Parts and Appliances not supplied by Electr olux are not covered by t his
warranty.
6. Where you are w ithin an Electrolux service a rea, this warranty covers the
cost of transport of the Appliance to and from Authorised Service Ce ntres
of Electrolux a nd travelling costs for representati ves of the Authorised
Service Centre t o and from your home or busi ness. If you are outside an
Electrolux service area, y ou will bear these costs. For information ab out
whether you are withi n an Electrolux service area, ple ase phone 13 13 49
in Australia, or 0800 1 0 66 10 in New Zealand.
7. Proof of purc hase is required before you can make a claim under this
warranty.
8. You may not make a claim under this warranty unless t he defect claimed is
due to faulty or defective parts or workmans hip. Electrolux is not lia ble in
the following situ ations (which are not exhaustive):
(a) The Appliance is damaged by:
(
i) accident
(ii) misuse or abuse, inc luding failure to properly mai ntain or service
(
iii) norm al wear and tear
(
iv) power s urges, electrical s torm damage or incorrect power sup ply
(v) incomplete or improper ins tallation
(vi) inc orrect, improper or inappropriat e operation
(vii) insect or vermin infestation.
(
b) The Appliance is modified without aut hority from Electrolux in writ ing.
(c) The Appliance's serial number o r warranty seal has been removed or
defaced.
(d) The Appl iance was serviced or repaired by anyone other than
E
lectrolux or its Aut horised Service Centres.
9
. This warranty, the contract t o which it relates and t he relationship between
you and Electrolux are governed by the law applic able in the Australian
S
tate where the Appli ance was purchased or the law applicable in New
Z
ealand if the Applianc e was purchased in New Zealand. Where the
A
ppliance was purchas ed in New Zealand for business purpos es the
Consumer Guarant ee Act does not apply.
Limitation of Liability
1
0. T o the extent permitted by law:
(
a) Electrolux exc ludes all warranties other th an as contained in this
document;
(b) Electrolux shall not be liable for any loss or damage whether direct or
indirect or consequential arising f rom your purchase, use or non-use
of the Appliance.
1
1. Provisions of the Trade Practices Act and State consumer legislation in
Australia, and the Consumer Guarantees A ct, the Sale of Goods Act and
the Fair Trading Ac t in New Zealand, imply warrant ies or conditions, or
impose obligations , upon Electrolux which cannot be excluded, restricted
or modified. To t he extent permitted by law, the lia bility of Electrolux (if
any) arising out of or in relation to the Applianc e or any services supplied
by Electrolux shall b e limited (where it is fair and reaso nable to do so),:
(a) in the case of Appliances, at i ts option, to the replacem ent or repair of
the Appliances or t he supply of equivalent product s or the payment of
the cost of replacing the A ppliances or having the Appliances rep aired
or of acquiring equiv alent Appliances. Upon being repl aced, parts and
Appliances beco me the property of Electrolux; or
(b) in the case of services , at its option, to the supply of the servi ces
again or the payment of the cost of having the services re-supplied;
and in the case of Ap pliances or services suppli ed in New Zealand, loss or
damage whether direct or indirect or consequential that is reasonably
foreseeable.
Privacy
You acknowledge th at in the event that you make a warranty claim it will be
necessary for El ectrolux and its Authorise d Service Centres to exchange
information in rel ation to you to enable Elec trolux to meet its obligati ons under
this warranty.
Important Notice
Before Calling a Service Technician please check carefully the operating instructions, service booklet and the warranty terms and conditions.
FOR SERVICE
OR TO FIND THE ADDRESS OF YOUR
NEAREST STATE SERVICE CENTRE IN
AUSTRALIA
Please call 13 13 49
For the cost of a local call (Australia only)
SERVICE AUSTRALIA
ELECTROLUX HOME PRODUCTS
FOR SPARE PARTS
OR TO FIND THE ADDRESS OF YOUR
NEAREST STATE SPARE PARTS CENTRE
IN AUSTRALIA
Please call 13 13 50
For the cost of a local call (Australia only)
FOR SERVICE
OR TO FIND THE ADDRESS OF YOUR
NEAREST AUTHORISED SERVICE
CENTRE IN
NEW ZEALAND
Free call 0800 10 66 10
(New Zealand only)
NEW ZEALAND SPARE PARTS CENTRES
AUCKLAND Prime Distributors Ltd. 8 Highbrook Drive, East Tamaki . . . . . . . . . . .. . (09) 273 3580
CHRISTCHURCH Prime Distributors Ltd. Unit 1, 127 Montreal Street . . . . . . . . . . . (03) 377 1009
R. Redpath Ltd. 55 Ferry Road . . . . . . . . . . . . . . . . . . . . . . . . . . (03) 379 0446
DUNEDIN Appliance Parts Company, 590 Hillside Road . . . . . . . . . . . . . . . . . . . . . . ( 03) 455 5443
ELECTROLUX HOME PRODUCTS
electrolux guarantee
Page 37

www.electrolux.com
electrolux
37
Albania +35 5 4 261 450 Rr. Pjeter Bogdani Nr. 7 Tirane
Belgique/België/ +32 2 363 04 44 Bergensesteenweg 719, 1502 Lembeek
Belgien
Česká republika +420 2 61 12 61 12 Budějovická 3, Praha 4, 140 21
Danmark +45 70 11 74 00 Sjællandsgade 2, 7000 Fredericia
Deutschland +49 180 32 26 622 Muggenhofer Str. 135, 90429 Nürnberg
Eesti +37 2 66 50 030 Mustamäe tee 24, 10621 Tallinn
España +34 902 11 63 88 Carretera M-300, Km. 29,900 Alcalá de
France www.electrolux.fr
Great Britain +44 8705 929 929 Addington Way, Luton, Bedfordshire LU4 9QQ
Hellas +30 23 10 56 19 70 4, Limnou Str., 54627 Thessaloniki
Hrvatska +385 1 63 23 338 Slavonska avenija 3, 10000 Zagreb
Ireland +353 1 40 90 753 Longmile Road Dublin 12
Italia +39 (0) 434 558500 C.so Lino Zanussi, 26 - 33080 Porcia (PN)
Latvija +37 17 84 59 34 Kr. Barona iela 130/2, LV-1012, Riga
Lituania +370 5 27 80 609 Verkiu 29, 09108 Vilnius, Lithuania
Luxembourg +35 2 42 43 13 01 Rue de Bitbourg, 7, L-1273 Hamm
Magyarország +36 1 252 1773 H-1142 Budapest XIV, Erzsébet királyné útja 87
Nederland +31 17 24 68 300 Vennootsweg 1, 2404 CG - Alphen aan den Rijn
Norge +47 81 5 30 222 Risløkkvn. 2 , 0508 Oslo
Österreich +43 18 66 400 Herziggasse 9, 1230 Wien
Polska +48 22 43 47 300 ul. Kolejowa 5/7, Warsaw
Portugal +35 12 14 40 39 39 Quinta da Fonte - Edificio Gonçalves Zarco -
Romania +40 21 44 42 581 B-dul Timisoara 90, S6, Bucharest
Schweiz - Suisse - +41 62 88 99 111 Industriestrasse 10, CH-5506 Mägenwil
Svizzera
Slovenija +38 61 24 25 731 Trzaska 132, 1000 Ljubljana
Slovensko +421 2 43 33 43 22 Electrolux Slovakia s.r.o., Electrolux Domáce
Suomi www.electrolux.fi
Sverige +46 (0)771 76 76 76 Electrolux Service, S:t Göransgatan 143, S-105
Türkiye +90 21 22 93 10 25 Tarlabaşı Caddesi No: 35 Taksim İstanbul
Pоссия +7 095 937 7837 129090 Mосква, Oлимпийский проспект,
u
Henares Madrid
Q 35 -2774-518 Paço de Arcos
˘
˘
spotrebice SK, Seberíniho 1, 821 03 Bratislava
45 Stockholm
16, Бц "Oлимпик"
˘
Page 38

Page 39
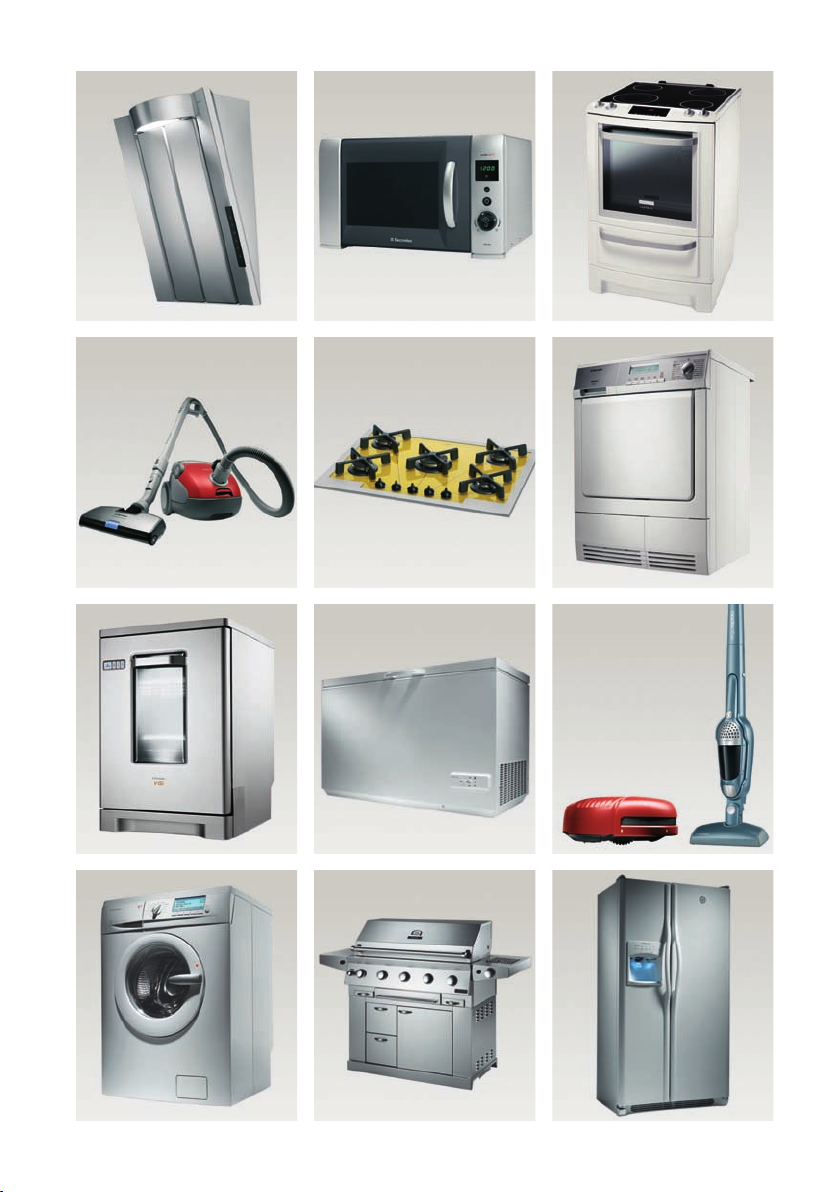
Page 40
www.electrolux.com
TINS-A591URR0
 Loading...