

Page 1
INSTRUCTION BOOK
LIBRETTO INSTRUZIONI
MANUAL DE INSTRUCCIONES
8221912-29
EMS 2485
GB
E
I
Page 2

9961 5484 - 11/02
Page 3

For the user
Before using your microwave oven 4
Safety Instructions 5
Utensil safety 5
Testing suitability of cookware 5
Foil containers 6
Food safety 6
Safety instructions when cooking by Grill 7
Oven utensils and accessories guide 8
Description of the microwave oven
and accessories
The microwave oven 9
Accessories 10
Control panel 11
Before using your microwave oven
for the first time
Cleaning 12
Setting the clock 12
General operating instructions 13
How to operate your microwave oven
Microwave cooking 15
Microwave setting guide 16
Minute timer with alarm 16
Grill cooking 17
Microwave and Grill cooking 18
Automatic programmes 19
Auto Defrost 19
Automatic Cooking Programmes 21
Combination cooking Microwave and Grill 22
Quick Start 22
Child Lock 23
Microwave Hints 23
Charts
Defrosting 24
Cooking vegetables 26
Cooking fish 26
Grilling table 27
Combined Microwave and Grilling table 27
Care and cleaning 28
Care and cleaning (grill) 28
Cleaning the accessories (turntable, support
and rack) 28
Cleaning the interior 28
Cleaning the exterior 28
Service and spare parts 29
Guarantee conditions
Standard guarantee conditions 30
Exclusions 30
For the installer
Installation
Electrical connections 31
Connecting to the mains 32
Build-In model 32
Technical data 32
3
EMS 2485 t
Contents
Page 4

4
EMS 2485 t
Read through the instruction manual carefully. In
order that you can get the best from your new
Electrolux microwave oven, the following instructions
have been prepared. Please make sure you read
them carefully.
It is important that this instruction book is retained
with the appliance for future reference. Should the
appliance be sold or transferred to another owner,
or if you move house and leave the appliance,
always ensure that the book is supplied with the
appliance so that the new owner can become acquainted with the functioning of the appliance and
the relevant w arnings.Please ensure you hav e read
the whole instruction book before using the appliance and that you follow the recommendations
given.
Before using your microwave oven
N.B. When you unpack the oven, check that the
product is free from damage.Damage or any missing
parts must be repor ted immediately to the retailer.
The oven, parts of the oven or the accessories may
be wrapped by a protection foil. If so, you must
remove this foil before using the oven. Do not
leave packing material so that small children can
play with it.This can be hazardous.
Unpacking
Page 5
5
EMS 2485 t
• The built-in safety interlock switches prevent
the microwave oven from operating when the
door is open.
• Do not tamper with them, or attempt to operate the
oven with the door open as open door operation
can result in exposure to microwave energy.
• Do not allow food spills or cleaner residue to
accumulate on door sealing surfaces. See the
Cleaning and Care section for cleaning instructions.
• It is particularly important that the oven door closes
properly and that there is no damage to the:
(1) door (warped), (2) hinges and latches (broken
or insecure), (3) door seals and sealing surface.
If the door, hinges / latches or door seals
are damaged, the microwave must not be
operated until it has been repaired by an
authorized service engineer.
It is hazardous for anyone except factory
trained service personnel to service or make
adjustments to this oven. Contact your local
Electrolux Service Force Center if service
should be required.
• Do not remove the outer case, door or control
panel at any time. Doing so may cause exposure
to extremely high voltage.
• Install or locate this oven only in accordance with
‘installation instructions’ found in this manual.
• Use the appliance for its intended use as described
in this manual. Do not use corrosive chemicals in
this appliance. This type of oven is specifically
designed to heat, cook, or defrost food.It is not designed for industrial or laboratory use neither for
commercial use as this will invalidate the guarantee .
• Do not operate the oven without the turntable
correctly positioned nor empty. If food or water is
not present to absorb the microwave energy, the
magnetron tube can be damaged.
• Do not store this appliance outdoors. Do not use
this product near water.
• Do not attempt to dry clothing or newspapers in
the microwave oven.These items can ignite.
• In order to evacuate moisture, your appliance is
fitted with a delayed ventilation function. Depending on the applied cooking mode (solo / grill /
combination), the oven ventilation will continue to
operate after the cooking end. It switches off automatically after 3 minutes.
• Do not use the cavity for storage purposes.Do not
leave paper products, cooking utensils, or food in
the cavity when not in use.
If smoke is observed, switch off or unplug the
appliance and keep the door closed in order
to stifle any flames. Never use water.
Only allow children to use the microwave
without supervision when adequate instructions have been given so that the child is able
to use the microwave in a safe way and
understands the hazards of improper use.
Utensil safety
• Most glass, glass ceramic and heat-resistant
glassware utensils are excellent for use in the
microwave oven. Although microwave energy will
not heat most glass and ceramic items, these
utensils can become hot as heat transfers from
the food to the container. Use oven gloves to remove dishes.
Testing suitability of cookware
• Place the cookware in the microwav e along with a
glass half full of water. Heat on 900W (100%) for
one minute. If the cookware feels hot, you should
not use it. If it is just slightly warm, you can use it
for reheating but not for cooking. If the dish is room
temperature, it is suitable for microwave cooking.
• Paper napkins, wax paper, paper towels, plates,
cups, cartons, freezer wrap and cardboard are
great convenience utensils. Always be sure containers are filled with food to absorb energy and
thus avoid the possibility of overheating.
• Many plastic dishes, cups, freezer containers and
plastic wraps may be used in the microwave oven.
Follow manufacturer’s instructions when using
plastics in the oven. Avoid using plastic utensils
with foods that hav e high fat or sugar content since
these foods reach high temperatures and could
melt some plastics.
• Do not leave the oven unattended, heating or
cooking food in plastic, paper or other combustible containers. If smoke is observed, keep door
closed, switch the oven off or disconnect oven
until smoke stops.
Safety instructions
!
!
!
!
Page 6
6
EMS 2485 t
• Metal containers and containers with metallic trim
should not be used in the microwave oven, unless
specifically recommended for microwave use.
• Containers with restricted openings, such as bottles,
should not be used for microwave cooking.
• Use caution when removing a lid or cover from a
dish to avoid steam burns.
Foil containers
Shallow foil containers may safely be used to reheat
foods in your microwave oven providing the following
rules are observed:
1. Foil containers should not be more than 3 cms (1
¼”) deep.
2. Foil lids must not be used.
3.The foil containers must be at least two-thirds full
of food. Empty containers must never be used.
4. Foil containers should be used singly in the
microwave oven and should not be allowed to
touch the sides.If your oven has a metal turntable or
cooking rack, the foil container should be placed
on an uptur ned ovenproof plate.
5. Foil containers should never be re-used in the
microwave oven.
6.If the microwave oven has been in use for
15 minutes or more, allow it to cool before using it
again.
7.The container and turntable may become hot
during use, take great care when removing either
from the oven.It is advisable to use an ov en cloth or
glove when doing so.
8. Remember when using an aluminium foil container
that the reheating or cooking times may be longer
than you are used to, always ensure that the food
is piping hot before serving.
Food safety
• Do not heat food in a can in the microwave oven.
Always remove the food to a suitable container.
• Deep fat frying should not be done in the microwav eoven, because the fat temperature cannot be
controlled, hazardous situations can result.
• Popcorn may be prepared in the microwave oven,
but only in special packages or utensils designed
specifically for this purpose.This cooking operation should never be unattended.
• Pierce foods with non-porous skins or membranes
to prevent steam build-up and bursting. Apples,
potatoes, chicken livers, and egg yolks are
examples of items that should be pierced.
• The contents of feeding bottles and baby food jars
are to be stirred or shaken and the temperature is
to be checked before consumption, in order to
avoid burns.
When heating liquids, e.g.soups, sauces and
beverages in your microwave oven, overheating the liquid beyond boiling point can
occur without evidence of bubbling. This
could result in a sudden boil over of the hot
liquid. To prevent this possibility the following
steps should be taken:
1. Avoid using straight-sided containers with narrow
necks.
2. Do not overheat.
3. Stir the liquid before placing the container in the
oven and again halfway through the heating time.
4. After heating, allow to stand in the oven for a short
time, stirring again before carefully removing the
container.
Some products such as whole eggs and
sealed containers – for example, closed
glass jars – may explode and should not be
heated in this oven. Occasionally, poached
eggs may explode during cooking. Always
pierce the yolk, then cover and allow the
standing time of one minute before removing
cover.
Keep these instructions!
!
!
Page 7

7
EMS 2485 t
Safety instructions when
cooking by grill
1.The glass viewing window may break if water is
spilled on it during grilling.
2. Be sure to use an oven glove when loading and
unloading the oven. Containers get very hot in
the oven, so be careful not to burn yourself. The
turntable and metal rack also get very hot so be
sure to use an oven glove when handling them.
3. Do not touch the inner or outer viewing window
with metal components when loading or unloading
the oven.The inside of the door and oven get very
hot so take care when attending food in the o ven.
4. Do not put the turntable or containers in cold
water or try to cool them quickly after use.
5. Do not place items on top of the cabinet.The top
of the cabinet gets very hot, so anything placed on
it may be damaged by the heat.
It is quite normal for steam to be emitted
around the door, or for misting to occur on
the door, or e v en f or water droplets to appear
below the door during the cooking cycle.
This is merely condensation from the heat of
the food and does not affect the safety of
your oven.The door is not intended to seal
the oven cavity completely.
• Do not force the turntable to rotate by hand.
This may cause malfunctioning.
• Arcing in the oven during microwave operation usually occurs from use of metallic
utensils. Continuous arcing, however, can
damage the unit. Stop the programme and
check the utensil.
• Care should be taken not to obstruct any
air vents located on the top, rear, side and
bottom of the oven.
Do not use this oven for commercial purposes.
This oven is made for domestic use only.
i
i
!
Page 8
8
EMS 2485 t
Oven utensils and accessories guide
A variety of utensils and materials may be used for
cooking in your microwave oven.For your safety
and to prevent damaging utensils and your oven
choose appropriate utensils and materials for each
cooking method.The list below is a general guide.
Material Utensils Microwave Grill Microwave and
Cooking Cooking Grill cooking
Ceramic & Glass Corning ware YES YES YES
Heat resistant
glass ware YES YES YES
Glass ware with
metal decoration NO NO NO
Lead crystal glass NO NO NO
China Without metal
decoration YES YES YES
Pottery YES YES YES
Plastic Microwave oven
heat-proof wear YES NO NO
Plastic wrap YES NO NO
Metal Metal baking pan NO YES NO
Aluminium foil* YES YES YES
Paper Cups, plates, towels YES NO NO
Waxed paper YES NO NO
Wood NO NO NO
Accessories Grill rack NO YES YES
Turntable YES YES YES
Tur ntable support YES YES YES
YES: Utensils and accessories to use NO: Utensils and accessories to avoid
*NOTE: Use aluminium foil only for shielding purposes, overuse may cause arcing.
Page 9
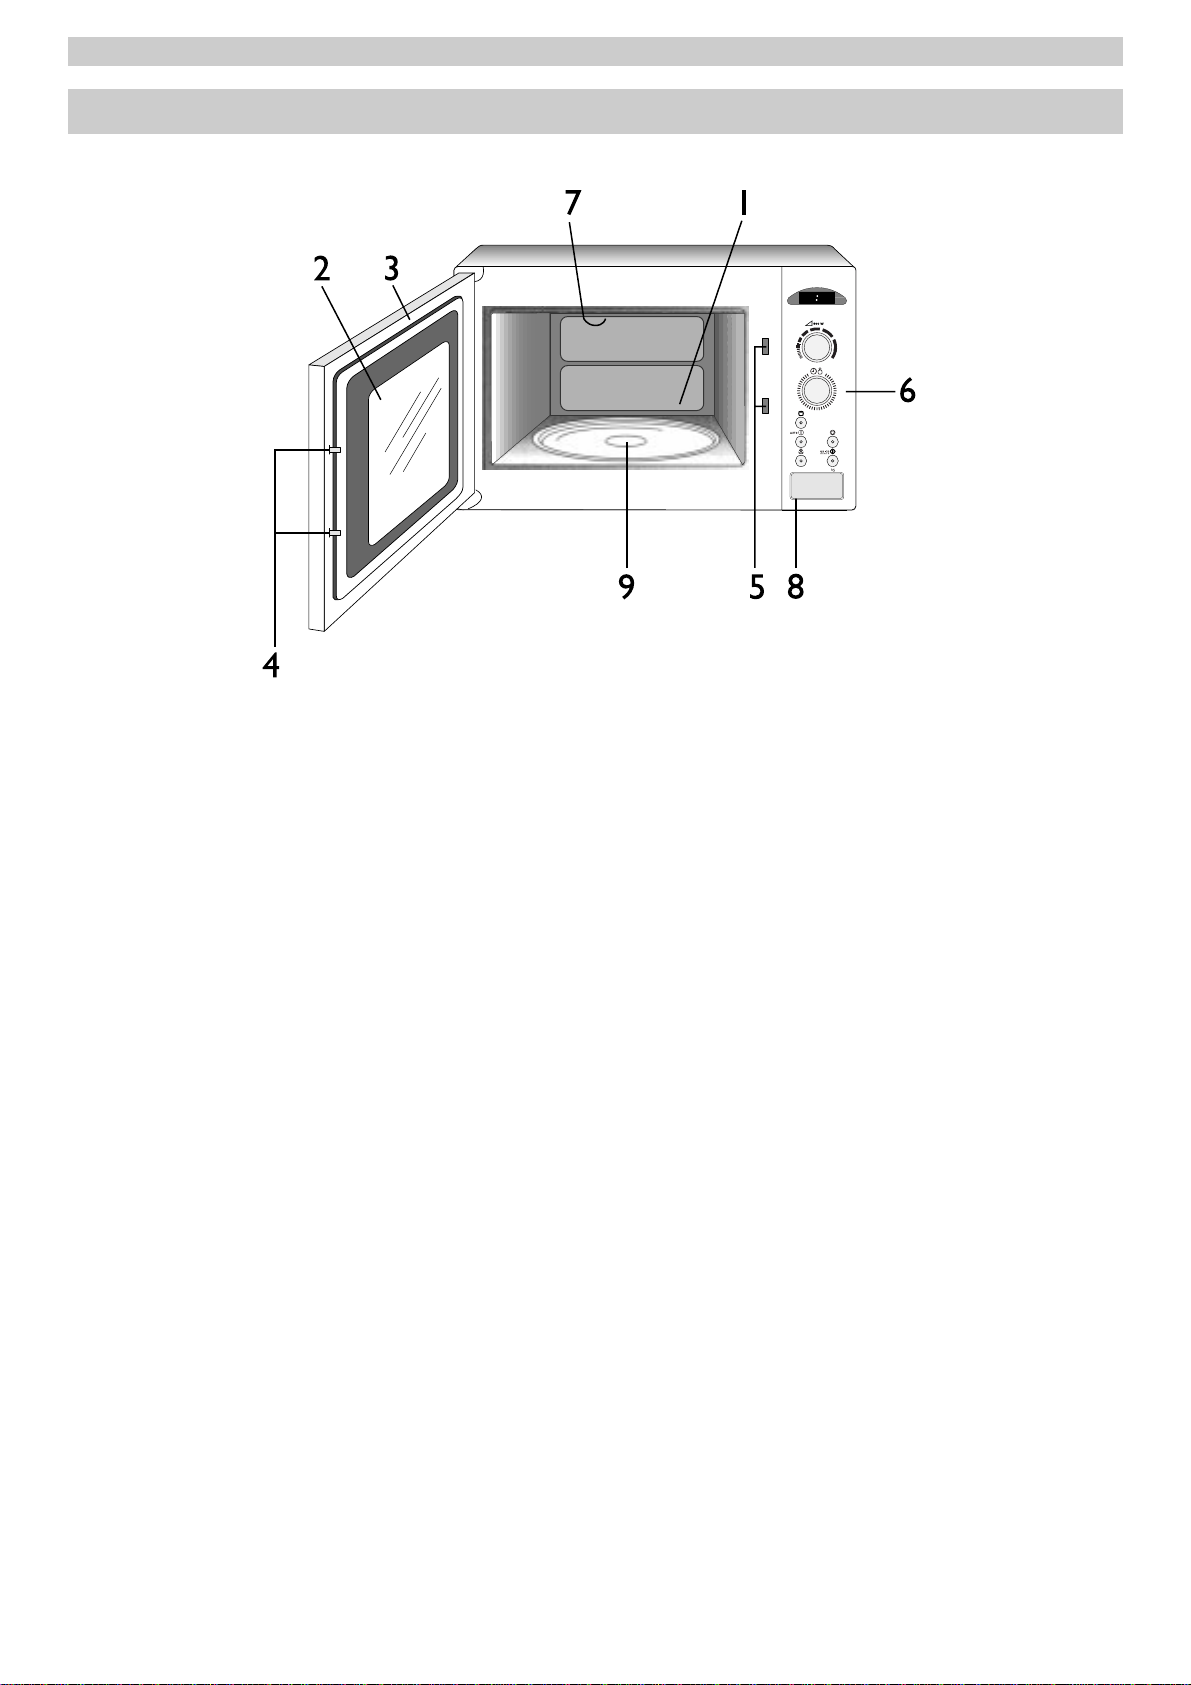
9
EMS 2485 t
The microwave oven
1 Cooking compar tment
2 Viewing window
3 Oven door
4 Door catch
5 Safety interlock system
6 Control panel
7 Grill element
8 Door open button
9 Drive shaft for turntable
Description of the microwave oven and accessories
8 888
Page 10
10
EMS 2485 t
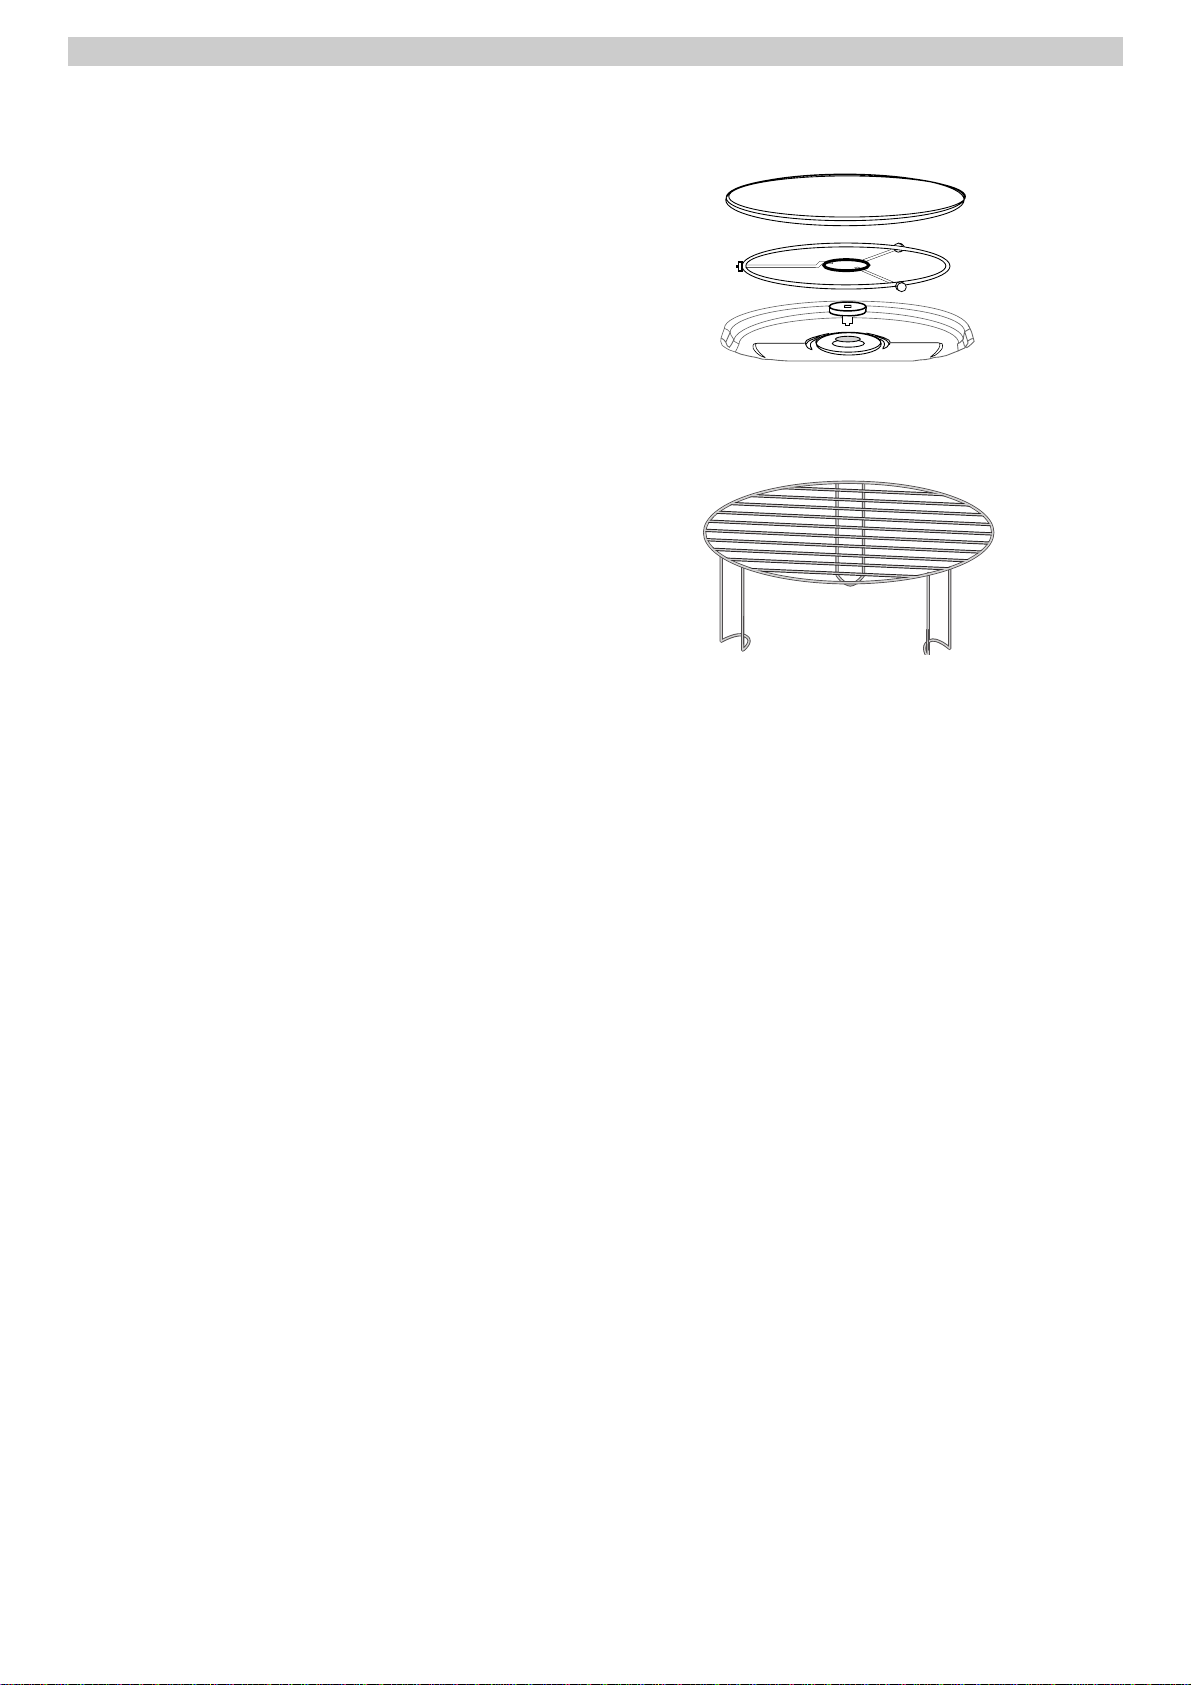
Accessories
Turntable and turntable support
The turntable and turntable support should be in-stalled
as shown in the diagram.Take care to ensure the turntable support is properly in place.
The turntable may turn clockwise or counterclock-wise
during operation. Do not rotate the turntable manually, as
you could damage the drive system.
Rack
For the use with the grill function, to brown shallow dishes.
It has to be postioned on the center of the turntable.
Page 11
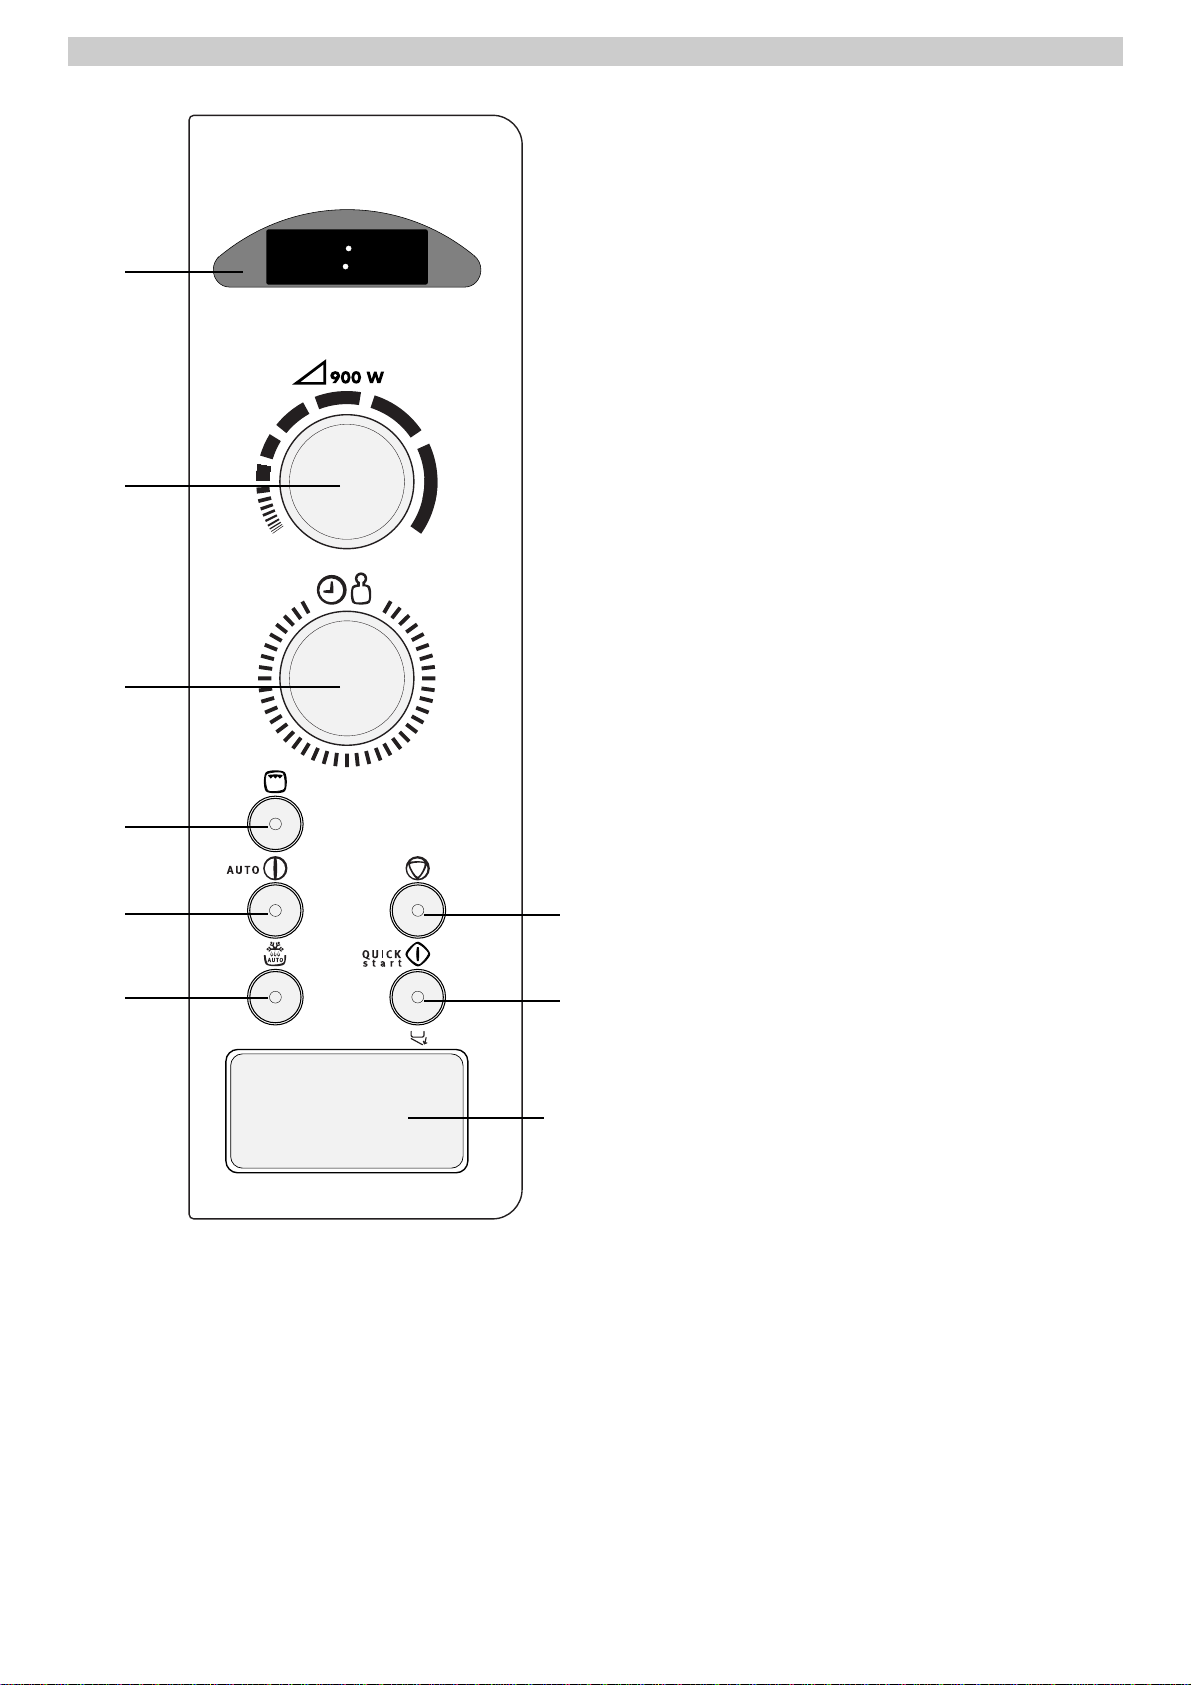
Control panel
1. Display window – showing time of day, cooking time
and weight.
2. Power knob – for desired microwave power level.
3. Timer knob – to select cooking time or weight.
4. Grill.
5. Auto – for Automatic cooking programmes.
6. Auto Defrost by weight.
7. Stop/Clear – to cancel or interrupt a cooking pro-
gramme.
8. Start – to start desired programme and to star t
the Quick start programme.
9. Door open.
11
EMS 2485 t
1
2
3
4
5
6
7
8
9
8 888
Page 12
12
EMS 2485 t
Cleaning
Wipe over the front of the appliance with a damp cloth.Do
not use abrasive cleaning agents (these can damage the
surface).For stainless steel fronts use a suitable stainless
steel cleaning agent that leaves a protective film against
fingerprints.
Before you first use the appliance, remove all the accessories (including the turntable and turntable support) from
the cooking area. Wash the acces-sories in warm water
and washing up liquid.Wipe the cooking space with a soft,
damp cloth.
Before using your microwave oven for the first time
Setting the clock
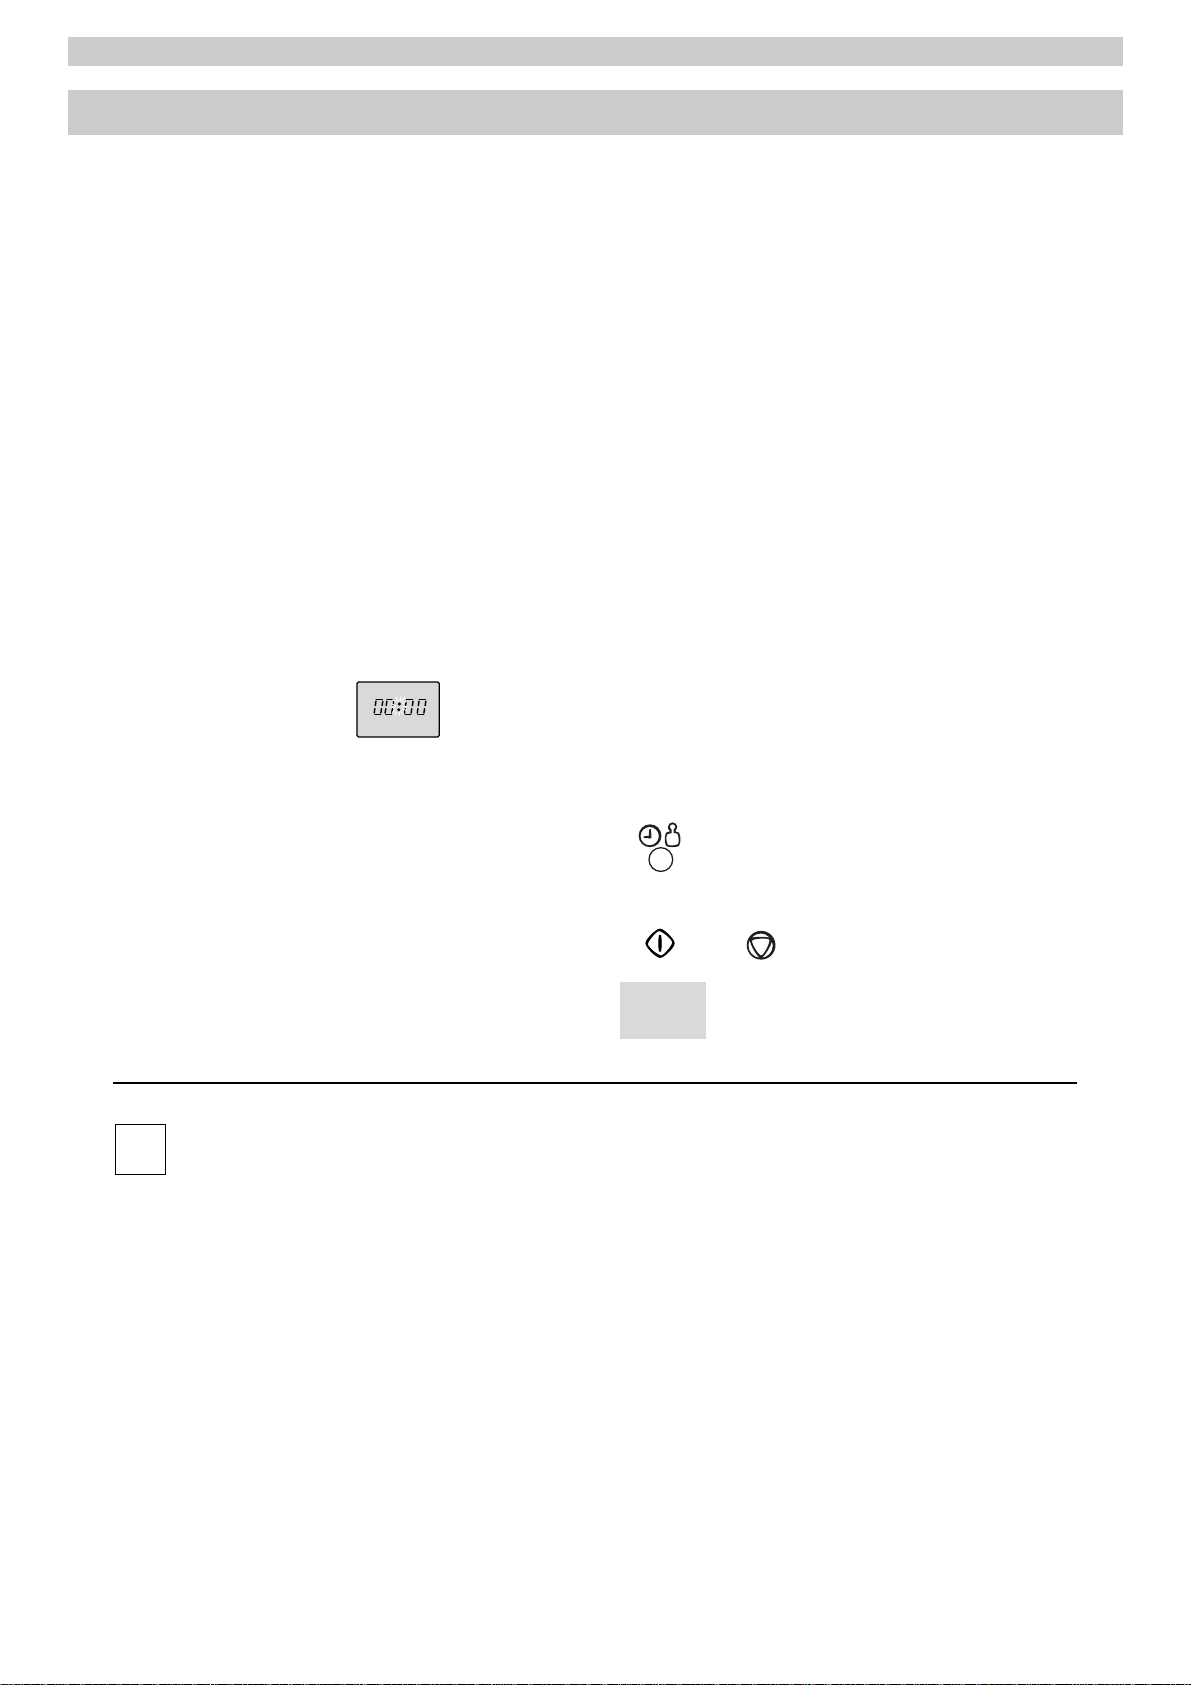
Plug the appliance into the mains.The display
starts to flash "00:00".
The dots between the digits
will flash rapidly.
Example:To set 12:15:
Set the time of day with the Timer knob.
Confirm by pressing either the Start button
or the Clear button.
The time of the day is displayed.
The Timer knob can be turned clockwise (to increase) or counterclockwise (to decrease).
The time of day can be changed at any time by turning the Timer knob and confirming
with the Start-or Clear button (press it 5 seconds).
i
11 22 :: 11 55
The dots between the digits flash slowly.
The appliance is now ready for use.
Page 13
13
EMS 2485 t
Action Comments
1. Press door open button. The door opens.
2. Place food in the cooking space.
3. Shut the door. An audible click will be heard when the door is shut.
If the door is not shut properly the appliance will not
function.
4. Select the cooking functions and time Turn the timer knob clockwise to increase and
according to the instructions given in counterclockwise to decrease time.
the following pages.
5. Press the Start button. The appliance starts.The display shows the selected cooking time, and counts down in seconds.
When grilling, the signal light representing this
operating mode lights up.
6. End of cooking sequence. The end of the cooking sequence is indicated by
an audible tone.The appliance and the interior light
will switch off. The time of day appears in the
display.
If the oven is not started within 4 minutes, the settings are automatically cancelled and the time of day
reappears in the display.
If maximum cooking time setting "60:00" is exceeded during the setting, the display shows "00:00".
i
i
General operating instructions
Page 14
14
EMS 2485 t
Action Comments
1. Interrupting the cooking process The cooking operation stops. In the display, the
(e.g. for stirring): two dots between the digits flash.The selected
Open the door by pressing the door button. settings are unaffected.
2. Shut the door and press the Star t button. The countdown will continue.
3. Cancelling the programme: The cooking process is cancelled.The appliance and
Press the Clear button. the interior lighting switch off.Time of day is
displayed.
4. Modifying the selected cooking time: The cooking time in the display changes.
turn the Timer knob clockwise or counterclockwise.
5. Modifing the selected microwave power: The new power setting is displayed for 5 seconds.
Rotate the Power knob. The cooking process continues with the new
power setting.
6. Operating of the grill: "
GGrriill ll
" and
""OOnnllYY
" are displayed successively for
Press the Grill button. 0,5 seconds each. When working with grill and
microwave power (e. g. 900 W), "
GGrr ii llll
" and the
chosen microwave power (
9900 00
) are displayed
successively for 0,5 seconds each.
If the new selection reaches "00:00" in the display, the cooking time is over and an audible signal
will be heard. The appliance and the interior lighting switch off. During a cooking process, the
cooking time can be increased to a maximum of 60 minutes.
i
Page 15
15
EMS 2485 t
Microwave cooking
This basic microwav e cooking method allo ws y ou to
cook food for a desired time .In addition to the maximum power level, you can select 9 different microwave power levels, 80W to 900W.
Foods with high moisture content should be cooked
on maximum power, as this is the fastest cooking
method and maintains the natural flavour and texture
of the foods.
How to operate your microwave oven
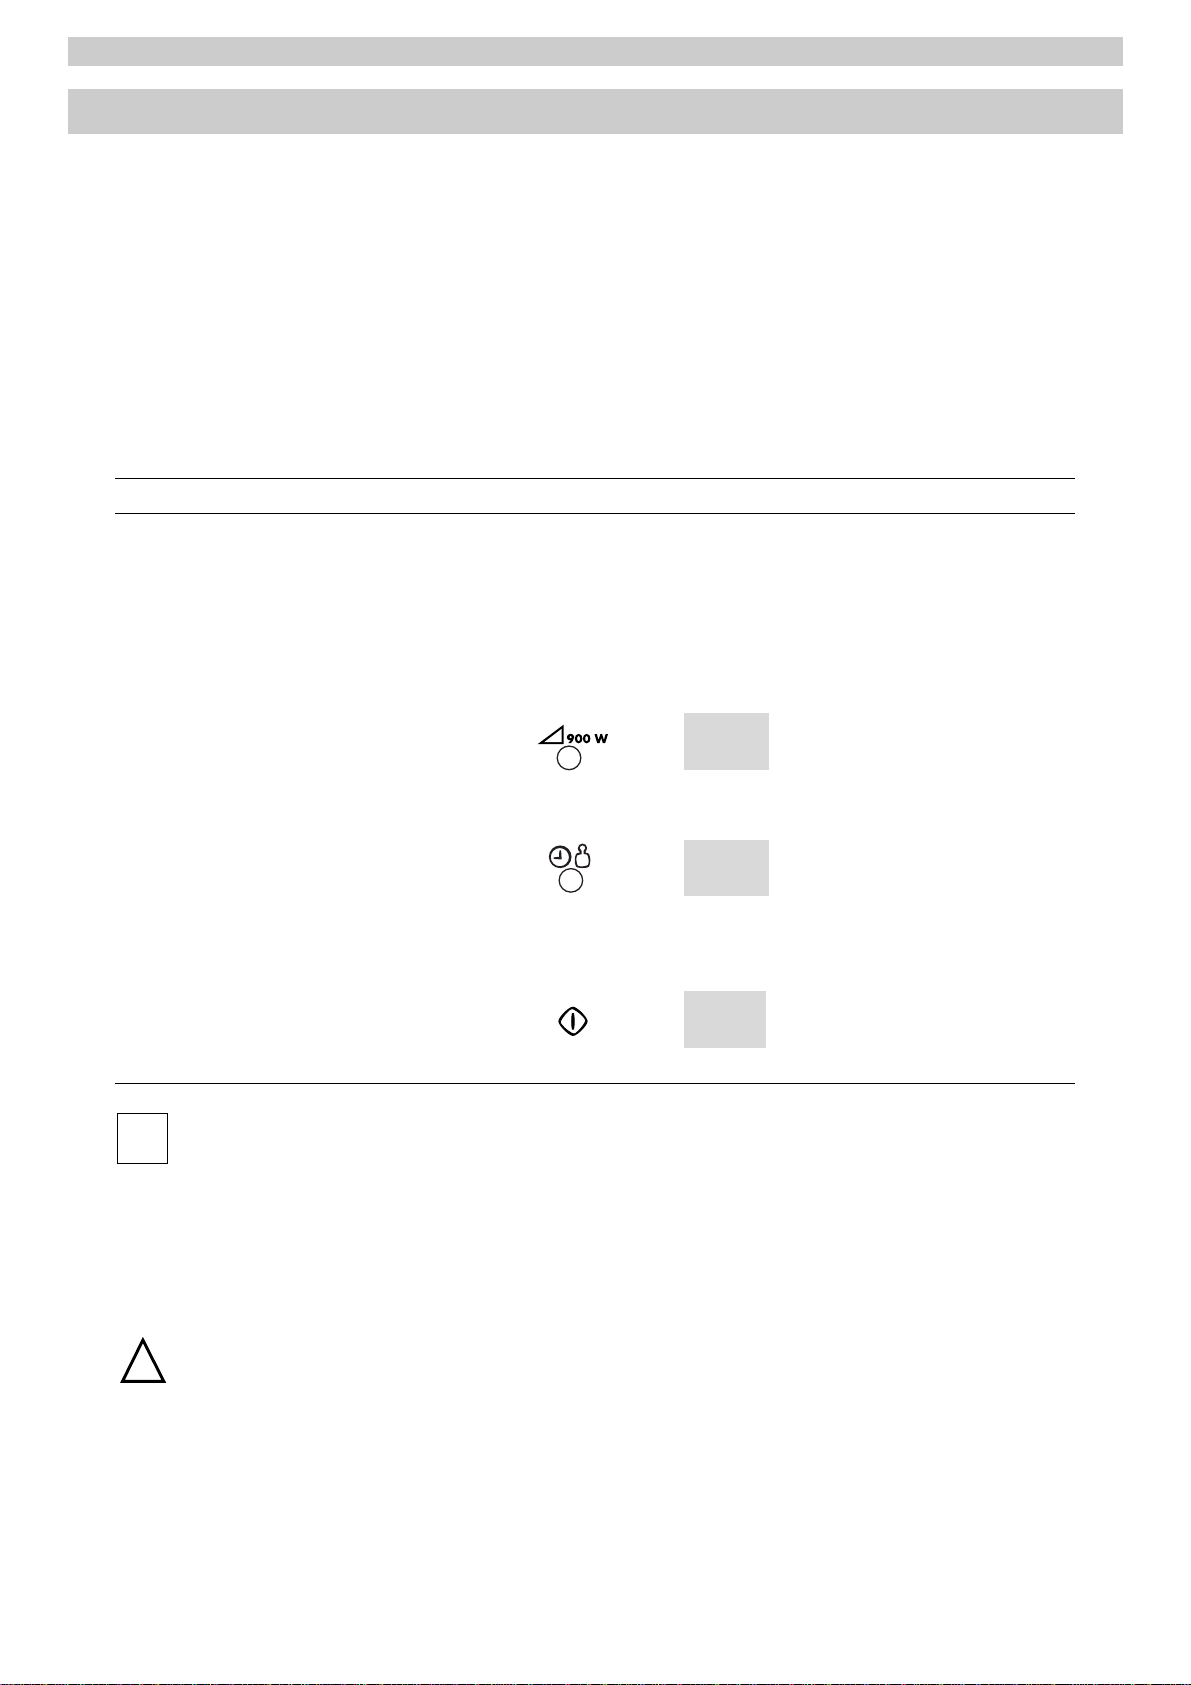
Example:To cook at 900W for 1 min 15 s:
1. Set the required microwave power
by turning the Power knob.
The time of day disappears
from the display and the selected
microwave power appears.
Turn to the left = lower power
Turn to the right = higher power
2. Set the required cooking time by
turning the Timer knob.The chosen
time appears in the display.
3. Press the Star t button.
The selected time starts to count down.
Cooking time can be set as follows:
from 0 to 2 min in 5 second steps
from 2 to 5 min in 10 second steps
from 5 to 10 min in 20 second steps
from 10 to 20 min in 30 second steps
starting from 20 min in 1-min. steps
Maximum programme length is 60 minutes.
Metal items must be kept at least 2 cm from the oven sides and the oven door.
i
00 11 :: 11 44
00 11 :: 11 55
99 00 00
!
Page 16
16
EMS 2485 t
Microwave setting guide
Minute timer with alarm
The minute timer with alarm can also be used
as a general purpose reminder.The timer works
without selecting a cooking function.
How to set:
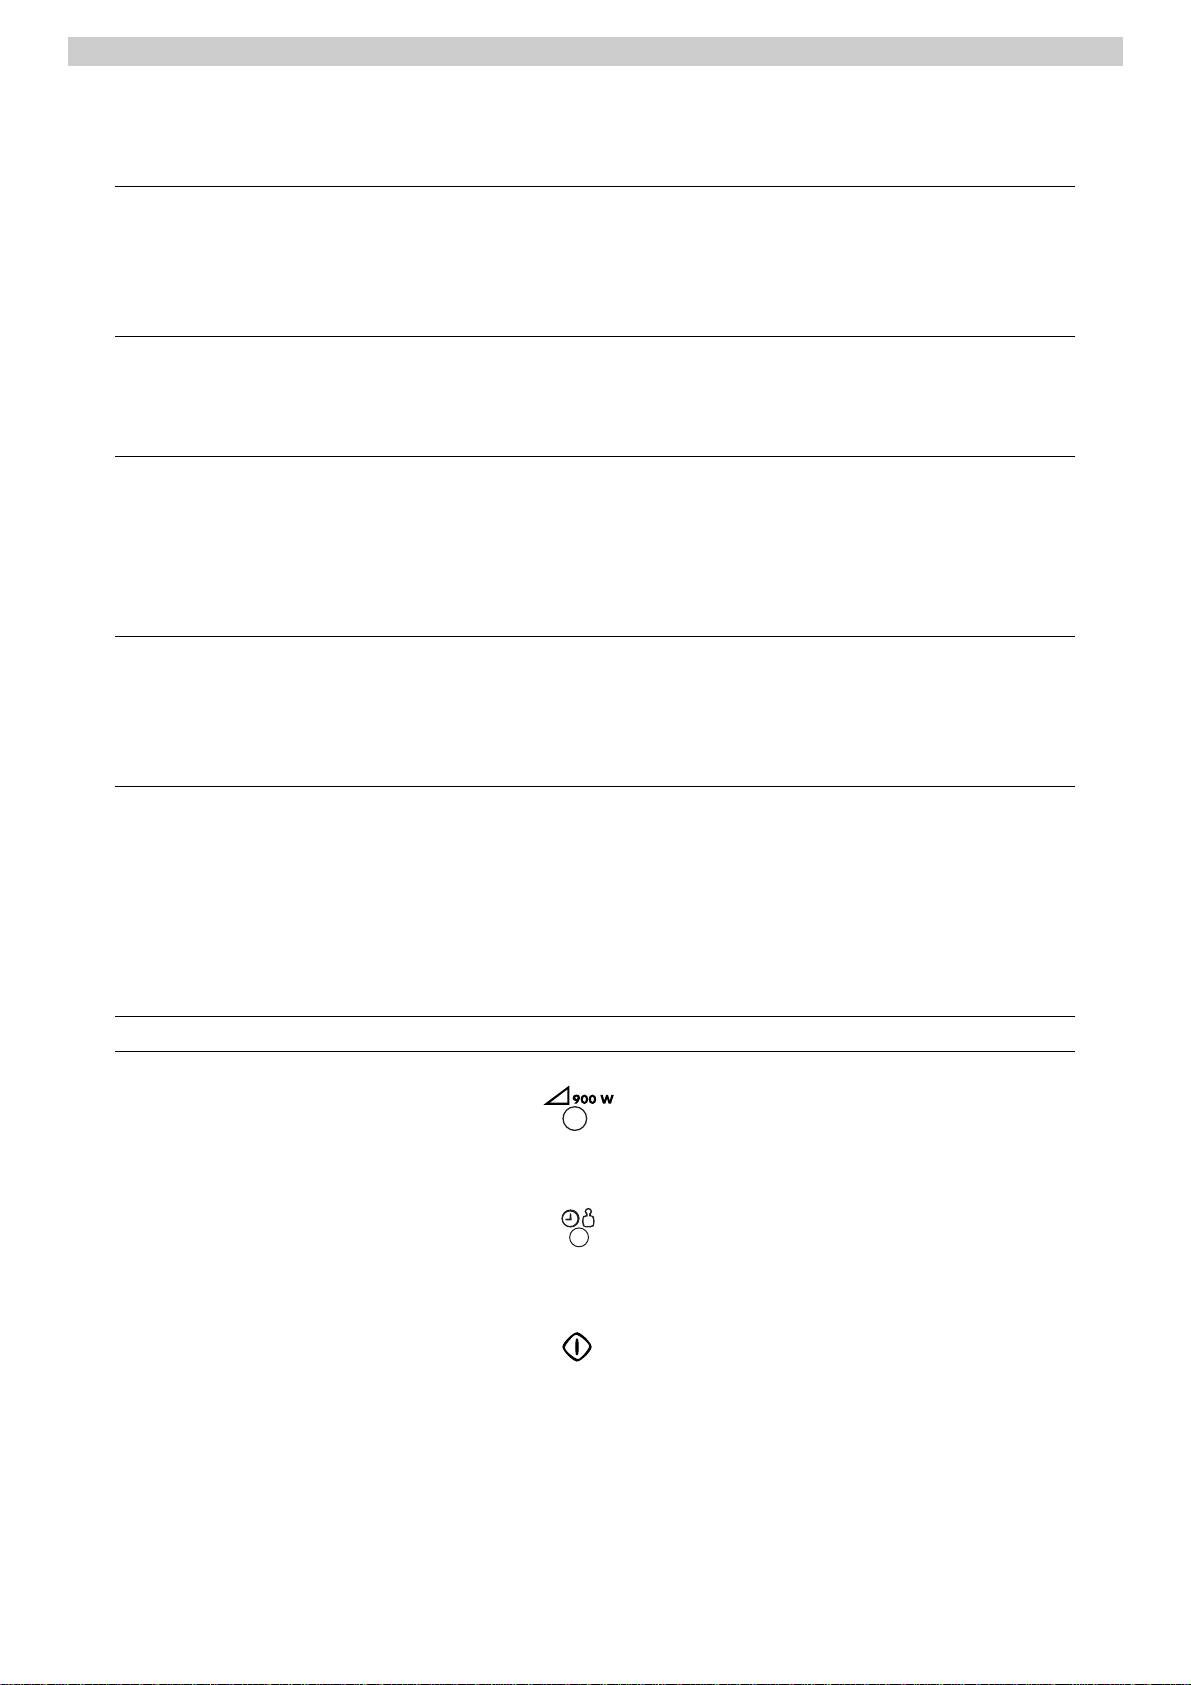
1. Select the microwave power "
0
" using
the Power knob (all the way to the left)
and ensure the grill is off.
2. Set the required time with the Timer knob.
The time of day disappears from the display
and the selected length of time appears.
3. Press the Star t button. The pre-set time
will start to count down. An audible signal
will sound when the timer has finished
counting down.
900W – heating liquids
700W – to start roasting, stewing, etc.
– cooking vegetables
– cooking dishes
600W – defrosting and heating of deep frozen ready made meals
500W – heating refrigerated ready made meals
– finish cooking casseroles
– cooking egg based dishes
450W – finish cooking casseroles
350W – cooking of delicate dishes
250W – heating baby food in glass jar
– soaking rice
– heating delicate dishes
– melting of gelatin
150W – defrosting meat, fish and bread
80W – defrosting cheese, cream and butter
– defrosting cakes with cream or butter icing
– to let dough rise
– warming cold dishes, drinks, softening butter
Page 17
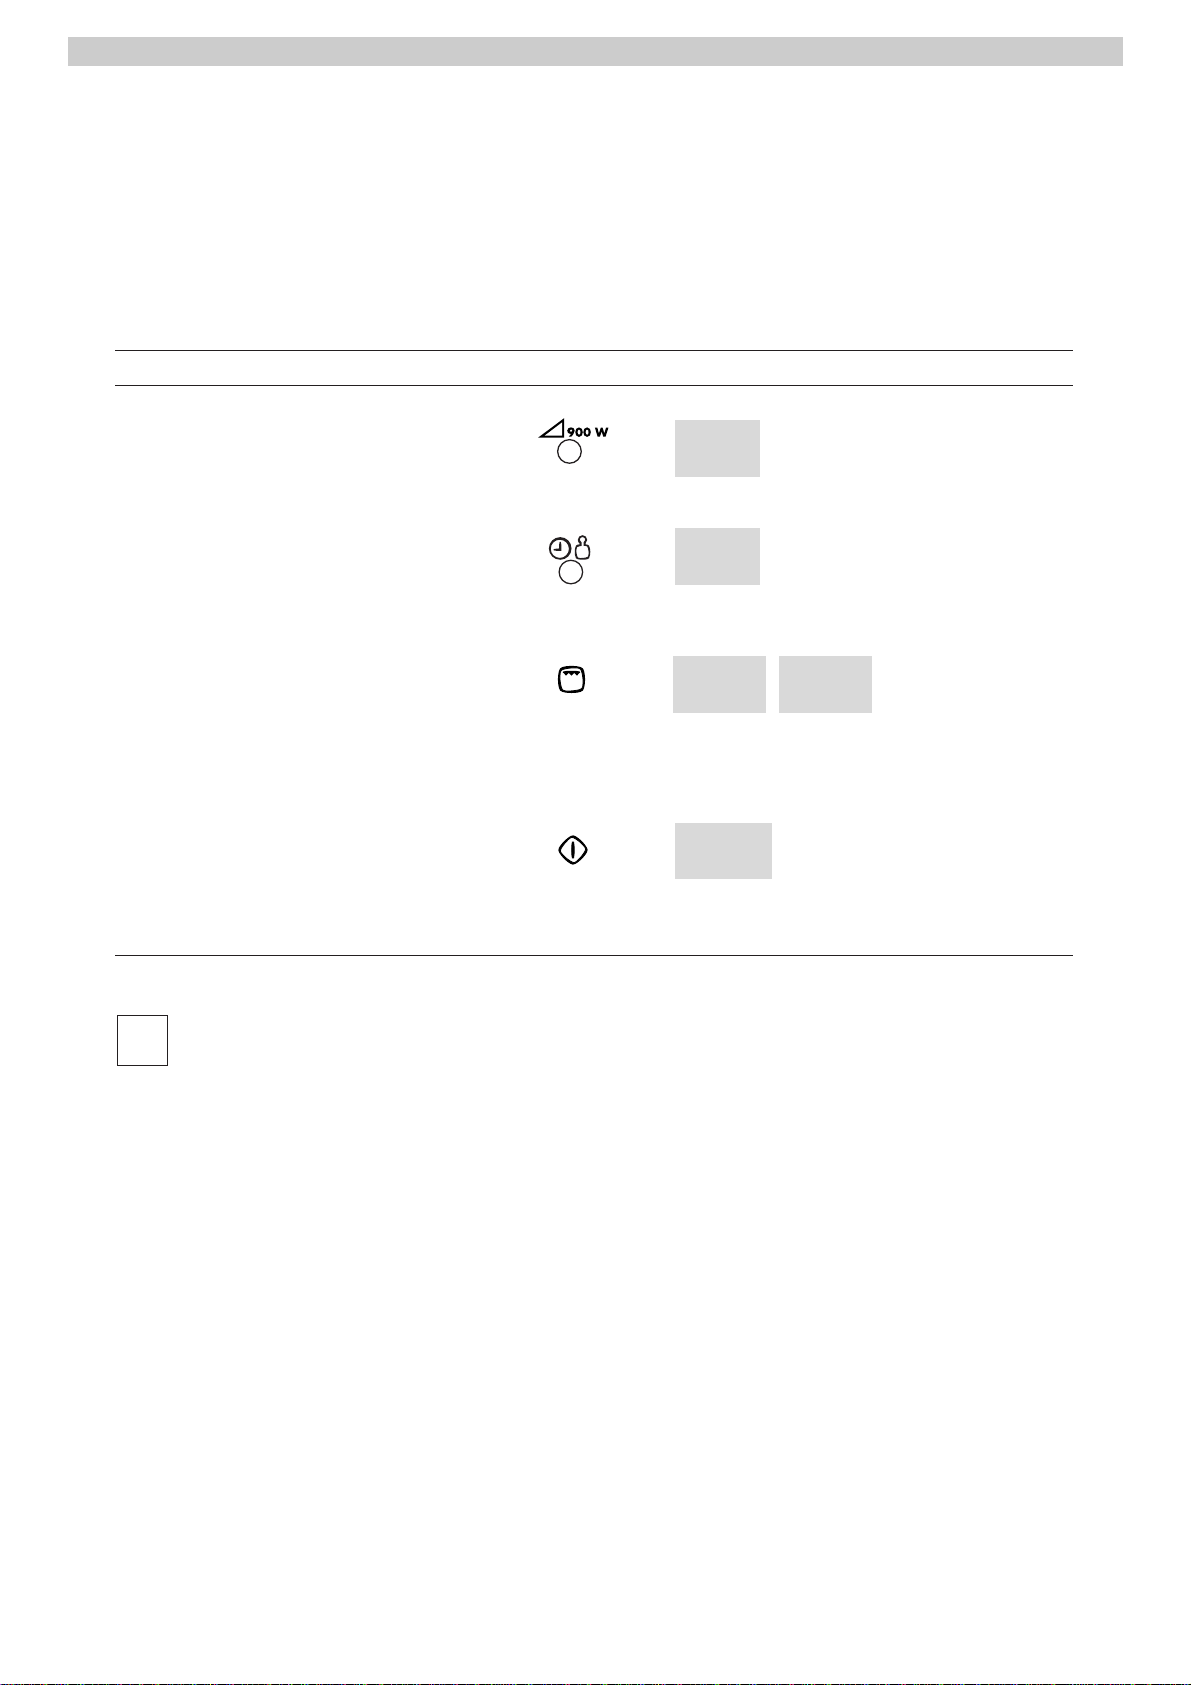
Example: Set oven to Grill for 20 minutes with Grill:
1. Tur n the Power knob until reaching " 00".
The time of day disappears.
2. Set the required grilling time by
using the Timer knob
3. Press the button for the grill function.The
signal light for grill comes on.
GG rr ii ll ll
and
OO nn ll YY
appear alternatively in the display.
4. Press the Star t button. The pre-set time
will start to count down.
If you press the grill button while grilling, the oven turns off. The clock time appears in the display.
i
17
EMS 2485 t
Grill cooking
This method is ideal for toasting bread or muffins.
Remember the oven will be hot, always use oven
gloves.Place shallow dishes on grilling rack.
Cooking time can be set to a maximum of 60 minutes.
22 00 :: 00 00
00
11 99 :: 55 99
OO hh ll
YY
GG éé ii TT TT
Page 18
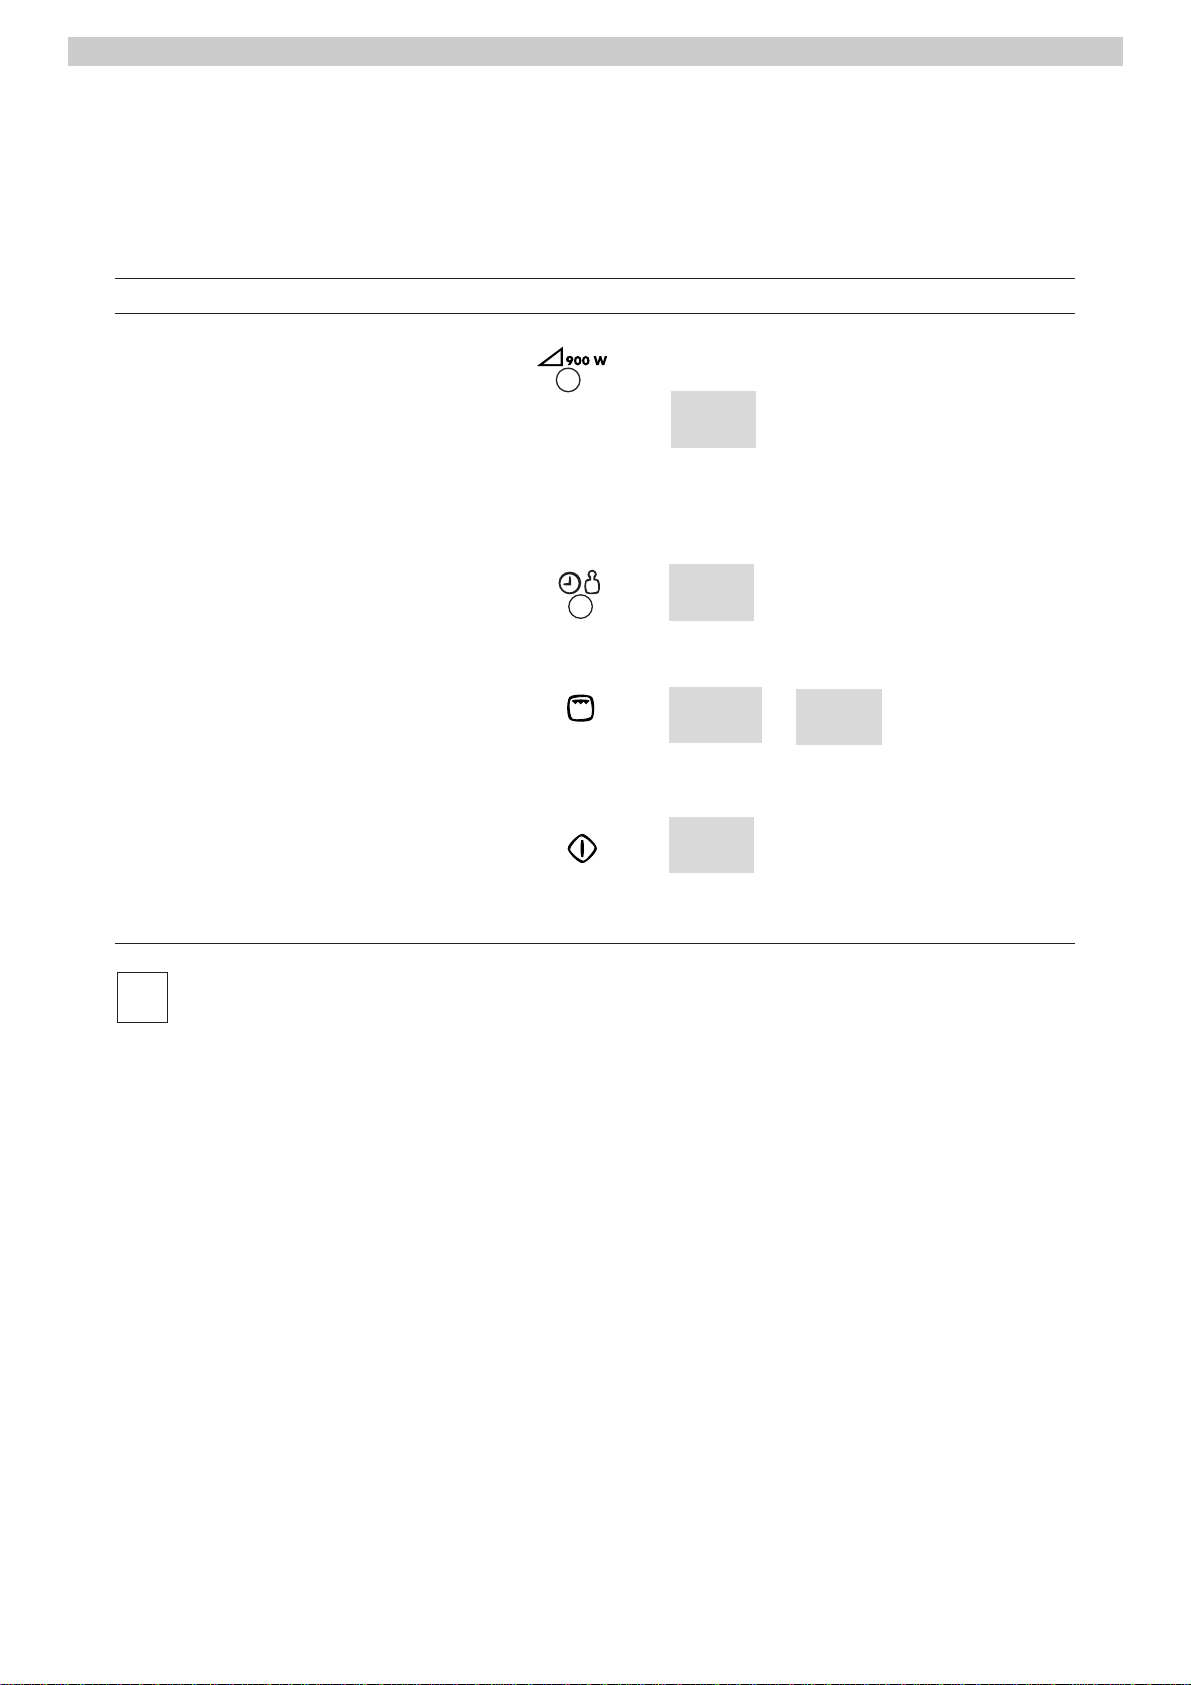
Example: Set Microwave and Grill Cooking using Grill with Microwave power 900W for 20 minutes:
1. Set the required microwave power output
using the Power knob.
The time of day disappears from the display.
The selected microwave power appears in
the display (in watts).
2. Set the required time using the Timer knob.
3. Press the button for Grill function.
GG rr ii ll ll
and
99 00 00
appear alternatively
in the display. The signal light comes on.
4. Press the Star t button, The pre-set time will
start to count down.
If you press the grill button while grilling, the grill turns off and the signal light for grill goes off.
The appliance functions in microwave mode only.
i
18
EMS 2485 t
Microwave and Grill cooking
This function allows you to combine the advantages of the speed and convenience of a Micro-
wave with the browning and crisping benefits of a
Grill.
99 00 00
11 99 :: 55 99
99 00 00
22 00 :: 00 00
GG éé ii TT TT
Page 19
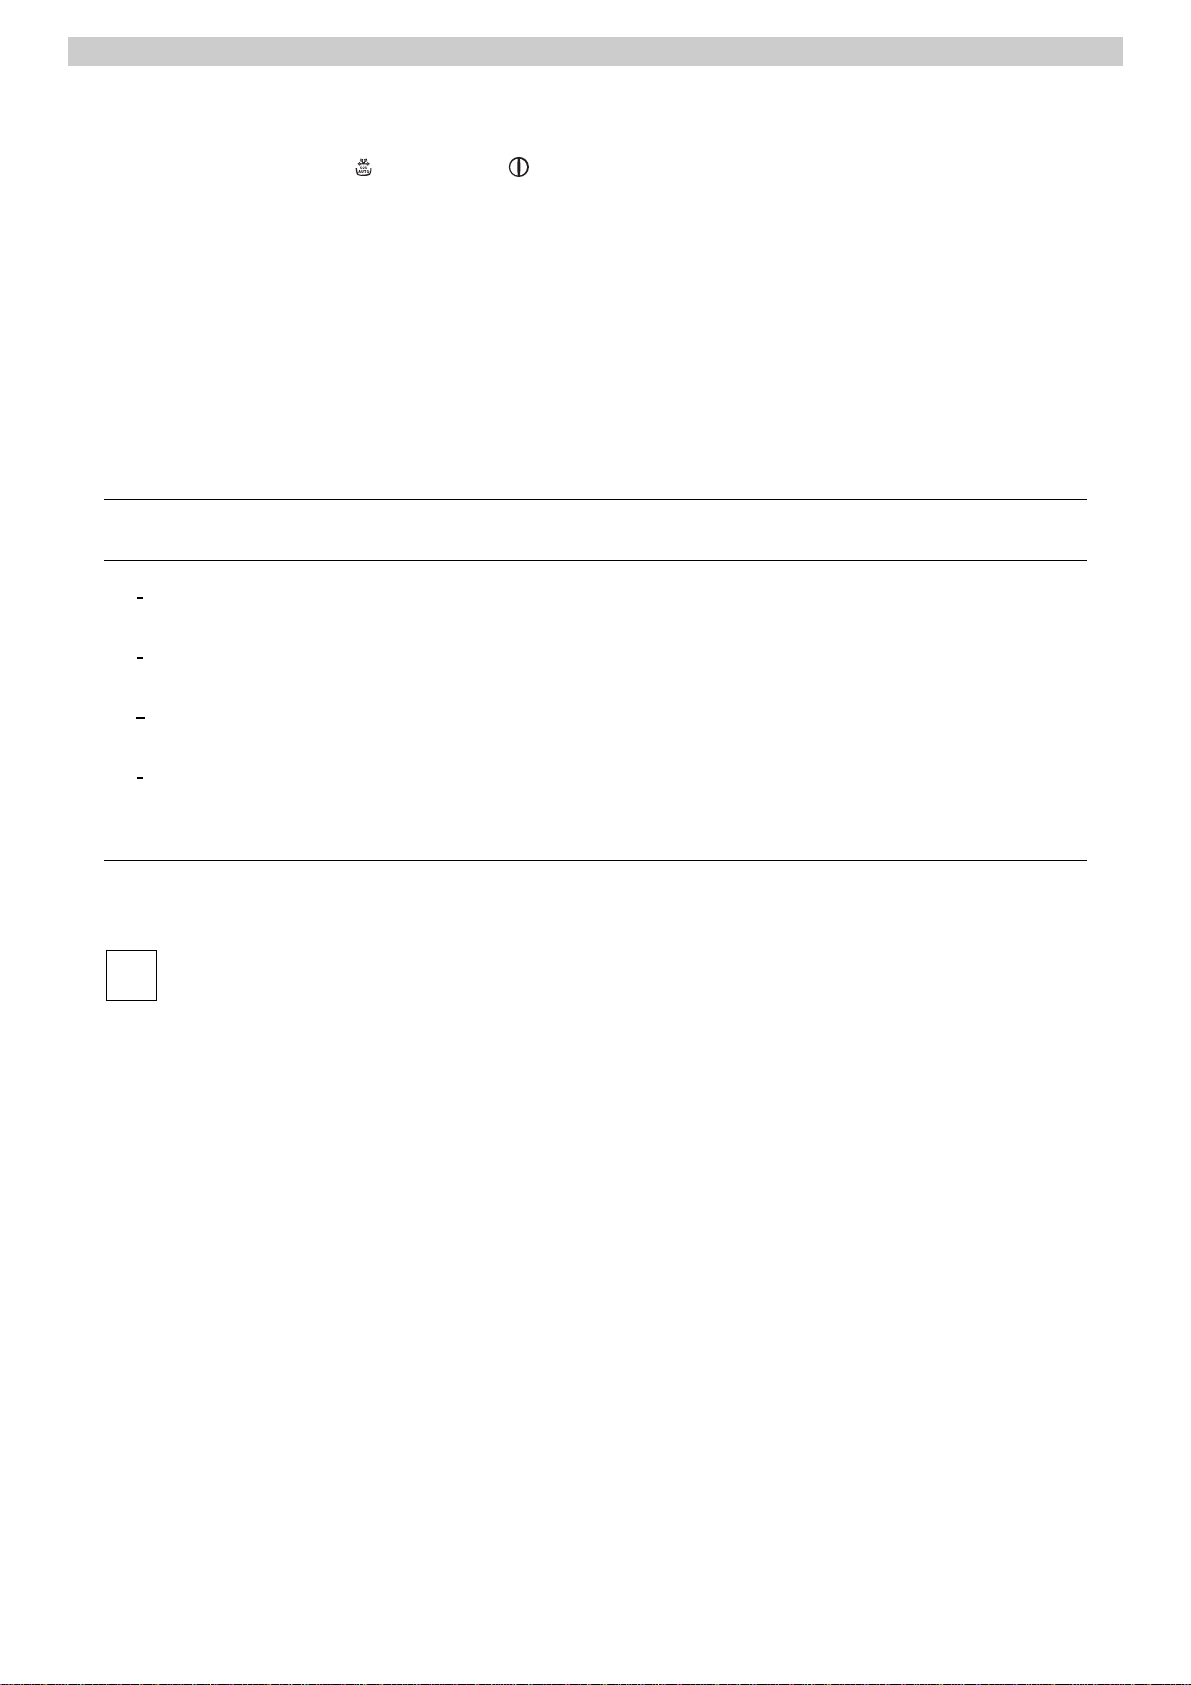
19
EMS 2485 t
Automatic Programmes
Programmes for defrosting and cooking are
available. After having selected the programme,
merely enter the weight of the dish, the rest of the
programming is done automatically. The following
gives you an overview of what food can be defrosted,
cooked or combination cooked with which programme .
Progr. Food Examples Weight
categories from – up to
JJ 11
Poultry
1
Poultry (whole or portions) 100 – 2000 g
JJ 22
Meat Pork roast, Goulash 100 – 2000 g
JJ 33
Fish Fish (whole or fillets) 100 – 1000 g
JJ 44
Delicate cakes Cream pie 100 – 1000 g
and pastries
1
Cover legs and wings with aluminium foils before defrosting.
Unpack the frozen dish, place on top of a small overturned dish set inside a larger one to hold the liquid
from defrosting. Follow our recommended standing time (general rule: standing time = defrosting time).
A triple beep will sound halfway through defrost time.Turn or mix dish and, if possible, break up into pieces.
Let the oven cool down for 15 minutes after using the grill if you wish to use an automatic defrost programme .
i
Auto Defrost
The Auto Defrost by Weight feature is an accurate defrosting method for frozen meat, poultry, or fish.
Page 20
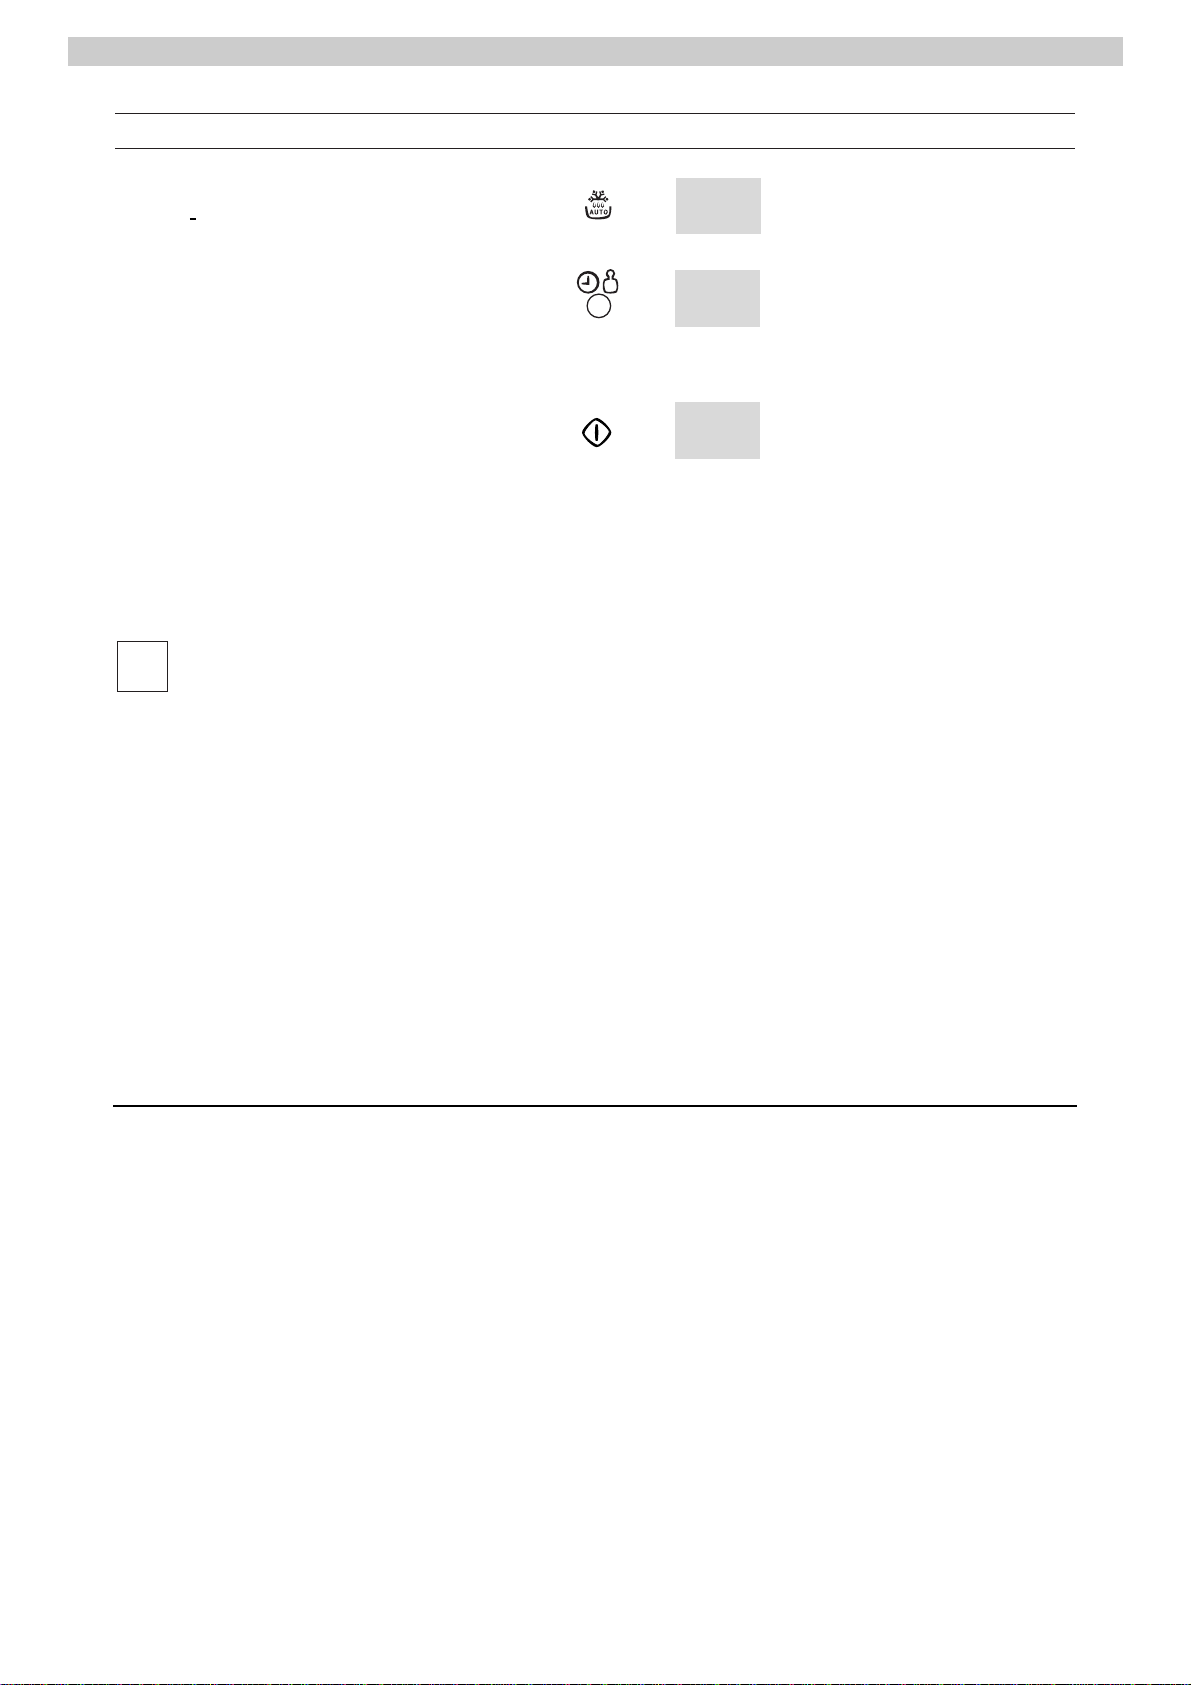
Example:To defrost a 1.0 Kg Chicken:
1. Press the button for Automatic Defrost
until
JJ 11
appears in the display.
2. Use the Timer/weight knob to set the weight.
3. Press the Star t button. The display shows
the defrost time.
4. If you want to modify the settings,
press the Clear button and start again.
Midway through the programme, three short beeps will be heard. Stir or turn the food item at this
time.The programme is not interrupted.
i
20
EMS 2485 t
Defrosting Tips
1. It is better to underestimate defrosting time if you
are unsure. Food will continue to defrost during
the standing time.
2. Separate food as soon as possible.
3. Tur n large items, e.g. joints, halfway through the
defrosting time, or at pause.
4. Remove any thawed food as soon as possible.
5. Remove or open any packaging bef ore defrosting.
6. Place food in a larger container than that which
it was frozen in, this will allow for easy stirring.
7. Begin thawing poultry , breast side do wn and turn
over halfwa y through defrosting time or at pause .
Delicate areas such as wing tips can be shielded
with small pieces of smooth foil.
8. Standing time is very important, par ticularly for
large, dense foods which cannot be stirred to
ensure that the centre is completely defrosted
before cooking.
22 44 :: 44 88
11 00 00 00
Manual defrosting
For manual defrosting (without using Auto Defrost features) use 150W.To speed up the defrosting of dense
foods over 450g (1lb), the oven may be started on full power for 1–3 minutes, then be reduced to 150W until
defrosting is complete.
11
j
-
Page 21
21
EMS 2485 t
Automatic Cooking Programmes
Progr. Food Examples Weight
categories from – up to
CC 11
Fresh vegetables I Brussels sprouts, cabagge, carrots, celeriac 100 – 1000 g
CC 22
Fresh vegetables II Corgettes, leeks, potatoes, spinach, fennel,
cauliflower, broccoli 100 – 1000 g
CC 33
Frozen vegetables Carrots, cauliflower, Brussels sprouts, leeks,
corgettes, spinach, broccoli 100 – 1000 g
Cook covered, in a heat-resistant glass dish, whenever possible.A triple beep r ings halfway through
cook time. If cooking over 500 g of vegetables, stir once or twice.
Please add water in the following amounts:
– for fresh vegetables (I+II): 100 – 500 g: 3 – 6 tablespoons / 500 – 1000 g: 9 – 12 tablespoons.
– for frozen vegetables: 100 – 500 g: 3 – 9 tablespoons / 500 – 1000 g: 9 – 15 tablespoons.
i
Example:To cook 500 g Fresh Vegetables I:
1. Press the button for Automatic Cooking
programme until
CC 11
appears in the display.
2. Use the Timer/weight knob to set the weight.
3. Press the Star t button.
The display shows the time.
55 00 00
CC 11
11 44 :: 00 00
Page 22
22
EMS 2485 t
Combination cooking Microwave and Grill
Progr. Food Weight Comments
categories from – up to
CC GG 11
Chicken 1(fresh) 200 – 2000 g If cooking a dish weighing over 500 g, 3 beeps remind
Chicken in pieces you to turn the food halfway through the cooking time.
CC GG 22
Pork roast 2(fresh) 400 – 1200 g See above.
CC GG 33
Gratin
3
200 – 2000 g If cooking a dish weighing 200 – 500 g, you should
place the dish on the grill rack.
1
If cooking a weight from 1000 – 1400 g, please use a deep heat-resistant dish, directly on the turntable, do not cover. Set chicken pieces directly on the rack.
2
The pork roast should be cooked in a deep heat-resistant dish, set directly on the turntable. Do not cover.
3
Enter the total weight of the dish.
The automatic cooking times are calculated for foods at + 5° C (e.g. refrigerated foods)
The weight can be set as follows:
– from 100 to 1000 g in 25 g-steps,
– from 1000 to 2000 g in 50 g-steps.
For all dishes not covered by automatic programmes, enter manually microwave output power and time
according to cook tables.
i
Quick Start
How to set
The Quick Start function provides full microwave
power from 30 seconds up to 2 minutes and
30 seconds, in 30 second intervals.
Example: Heating a cup of water (1 min 30 s):
1. Press the Star t/Quick button three times.
The time appears in the display
and the appliance starts to work.
2. You may increase the time by 30 second
intervals while the programme is running
up to a limit of 2 minutes and 30 seconds
by pressing the Start/Quick button.
00 11 :: 33 00
Page 23
23
EMS 2485 t
• Always keep the oven clean – avoid spill-overs
and do not forget to clean under the glass tray
and the inside of the door.
• Preferably use round or oval casseroles with a
lid when cooking in your microwave oven.
• Do not use metal or metal decorated casserole
dishes.Certain plastic materials can melt and be
warped by hot food.
• Cover the food when cooking. Use a glass lid,
a plate or grease proof paper.
• Pastry, bread and the like can be defrosted
directly in a bread basket or on a paper towel.
• If frozen food is heated in its packaging, the
packaging should be opened. Packaging
containing metal or metal decoration must not
be used unless specifically recommended for
use in the microwave. Remove metal clips and
wire ties.
• Smaller pieces of aluminium foil can be used
to cover parts that easily overcook such as
chicken legs.
• Food with peel or skin should be pierced with
a fork – e.g. potatoes and sausages. Do not boil
eggs in the microwave oven as they can explode.
• Put large, thick pieces close to the edge of the
casserole and try to cut the food in to even-s iz e d
pieces.Always place the food in the centre of the
oven.
• The food will be more evenly cooked if you stir or
turn it regularly.
• Always set a shorter cooking time than indicated
in your recipe to avoid overcooking. The larger
the amount of food the longer it takes.
• Use little or no water for vegetables.
• Use less salt and spices than for ‘normal’ cooking.
• Season afterwards.
• Allow a few minutes ‘standing time’ after the
oven has switched off to ensure complete and
even cooking results.
• Always ensure food is piping hot throughout
before serving.
• Use gloves when taking dishes and food from
the oven.
Microwave Hints
Child lock
This oven is equipped with a Child Lock Safety feature to prevent accidental operation by children.
How to set :
First press the Clear button 5 times, then press the Start
button.The display shows
""LL OO CC ""
.
The safety lock prevents the oven from oper ating. There
will be no effect if you turn either knob or any button.
LL OO CC
How to cancel :
Press the Clear button 5 times, then press the Start button. A beep will sound then. The time of the day will
appear in the display again and the appliance will function as normal.
Page 24

24
EMS 2485 t
Defrosting
Dish Weight Power Duration Standing Remarks/Hints
(in g) (Watt) (min) time (min)
Meat
Whole meat 500 150 10–15 10–15 Tur n once. Cover fatty parts with aluminium
foil midway through.
Steak 200 150 4–6 5–10 Turn once.
Mixed chopped meat 500 150 9–14 5-10 Remove defrosted chopped meat midway
through programme.
Poultry
Chicken 1000 150 20–30 15–30 Turn once. Cover legs and wings with alu-
minium foil midway through programme.
Duck 1500– 150 35–45 40–60 As for chicken.
2000 150 50–60 40–60
Fish
Fish
Whole fish 500 150 10–15 15–20 Turn once. Cover fins with aluminium foil.
Shrimps/Crab 250 150 6–8 15–20 Stir thoroughly after half the defrosting time.
Dairy produce
Cottage cheese 500 150 15–20 15–20 Remove any aluminium foil wrapping.
Divide and stir frozen pieces from time to time.
Butter 250 150 2–3 15–20 Remove any aluminium foil wrapping.
Cheese 250 150 2–4 20-30 Turn once.
Cream 200 ml 150 6–8 15–20 Remove any aluminium foil wrapping.
Stir frozen from time to time.
Fruit
Strawberries 500 150 7-9 10–15 Defrost in a covered container, turn once.
Cherries 250
150
5–7 5–10 As for strawberries.
Black currants 250
150
5–7 10–15 As for strawberries.
Red currants 250
150
4–6 5–10 As for strawberries.
Charts
Page 25

25
EMS 2485 t
Defrosting
Description Weight Power Duration Standing Remarks/Hints
(in g) (Watt) (min) time (min)
Bread
Rolls (50 g) 4 units 150 1–3 3–5 Set on a paper towel, turn once.
Whole meal, 1 slice 150 15s–30s 3–5 Defrost in a covered container.
mixed, rye (60–80 g)
Loaf 500 150 6–8 15–20 Cover cutting surface.
Pastry
Dry cakes e.g. cakes
with short crust pastr y 300 80 2–3 5–10 Set on a paper towel, cover.
Fruit flans baked
on a baking sheet 400–450 80 4–8 10–20 As for dry cakes.
1 slice cheese cake 400 80 4–8 10–20 As for dry cakes.
1 slice covered
apple tart 400 80 3–5 10–20 As for dry cakes.
Cream and buttercream layer cakes 300–400 80 2–4 10–20 Begin defrosting of cakes in the appli-
ance, then remove.
Melting food
Chocolate/toppings 100 700 2–3 Break up into pieces, stir from time to
time.
Butter 50 900 15s-45s To warm set time for 30 sec. longer.
Heating of refrigerated food and drink
1 jar baby food 125–250 450 30s–50s 2–3 Heat jar without lid. Stir after warming.
Check temperature.
1 ready meal on a plate 350–400 900 2–3 2–3 Heat in a covered container. Place
gravy alongside in a cup.
1 portion of meat 150 900 45s–1 2–3 All meat, except breaded meat, should
be heated in a covered container.
1 portion vegetables,
potatoes or rice 200 900 1–1min30 2–3 Heat in covered container, stir once.
1 cup soup 200 ml 900 1min20–2 2–3 Heat clear soup uncovered, cover thick
soups. Stir.
Drinks
Milk or baby food 200 ml 900 35–45 2–3 Remove any lids. Stir after warming!
Boil 1 cup water 180 ml 900 1min30–2 2–3 Stir instant coffee or tea when the
water has stopped boiling.
1 cup milk 200 ml 900 1min50–2 2–3 Heat milk till it is just hot enough to
drink. Stir.
1 cup coffee (reheat) 200 ml 900 45–55 2–3 Stir. Check temperature!
Page 26
Description Weight Power Duration Standing Remarks/Hints
(in g) (Watt) (min) time (min)
Defrosting and heating of frozen convenience foods
1 portion meat
with gravy 150 700 2–4 2–3 Heat in a covered container.
Stir now and again.
1 portion meat with
vegetables, garnish 350–450 700 7–14 2–3 As for meat with gravy.
Cooking vegetables
Cook all vegetables in a covered container.
Description Weight Liquid Power Duration Standing Remarks/Hints
(in g) added (Watt) (min) time (min)
Cauliflower 500 1/8 l 900 8–10 2 Dot with butter.
Frozen broccoli 300 1/8 l 900 7–9 2 Stalks facing outwards.
Mushrooms 250 none 900 4–6 2 Cut into slices.
Frozen peas and
carrots 300 ½ cup 900 7–9 2
Carrots 250 2–3 tsp 900 6–8 2 Cut into cubes or slices.
Potatoes 250 2–3 tsp 900 4–6 2 Peel and quarter.
Red/Green peppers 250 none 900 4–6 2 Cut into cubes or slices.
Leeks 250 ½ cup 900 4–6 2 Cut into rings or pieces.
Frozen Brussels
Sprouts 300 ½ cup 900 7–9 2
Cooking fish
Description Weight Power Duration Standing Remarks/Hints
(in g) (Watt) (min) time (min)
Fish fillets 500 500 6–8 2 Cook covered.Turn half-
way through the cooking
time.
Whole fish 800
1) 900 3–5 3 Cover during cooking.
2) 450 9-11 3 Cover flat parts with alu-
minium foil.
The times stated here are for guidance only.
i
26
EMS 2485 t
Page 27
Grilling table
Description Weight Accessories Time Grill
(in g) (min)
Fish
Mackerels 600–800 Rack 18–24 3
Sardines 6–8 pieces Rack 18–20 3
Meat
Sausages
1
6–8 pieces Rack 20–26 3
Frozen chopped meat 2 pieces Rack 18–20 3
2 Rumpsteak
1
400 each Rack 20–30 3
Others
Toast 4 slices Rack 2–3 3
Toasted snacks 2 slices Rack 4–8 3
1
First preheat the oven for 2½ minutes.
The grill temperatures and times given are for guidance only.
Grilling is ideal for flat pieces of meat and fish.
Unless otherwise stated, the settings given in the table are for use in cold oven.
Flat foods should be turned only once. Larger, rounder pieces should be turned more often.
Fish are best placed head to tail on the rack.
Combined Microwave and Grilling table
Description Weight Accessories Shelf level Microwave Time Grill
(in g) from base power (Watt) (min)
Noodle casserole 500 g noodles shallow dish Turntable 250 10–15 3
Potatoes au gratin 800 g potatoes shallow dish Turntable 900 20–25 2
Lasagne 800 g shallow dish Tur ntable 250 15–20 1
Meatloaf 500 g deep dish Tur ntable 900 10–12 3
Onion soup au gratin 2 bowls soup bowls Turntable 450 4–6 2
The ranges of time given are for guidance only, as they depend upon the composition and the size
of the item being cooked, as well as the desired finish.
i
i
27
EMS 2485 t
Page 28
28
EMS 2485 t
Care and cleaning
The oven must alw a ys be clean.Residue of food from
spill-overs or spatters will absorb microw ave energy
causing it to burn on. This could reduce the efficiency of the oven and may cause unpleasant odours.
Do not attempt to tamper with or make any adjustments or repairs to any part of the oven. Repairs
should only be made by an authorised service engineer.
Be sure the oven is off or the unit is
unplugged before cleaning.
Cleaning the accessories
(turnable, support and rack)
Clean them with mild detergent after removing them
from the cavity. The turntable support should be
carefully handled.
The inside of the oven and turntable get
very hot, so do not touch them immediately
after use.
Cleaning the interior
Soilage that is allowed to remain on the oven walls,
door seal and door surface will absorb microwave
energy, reduce the efficiency of the oven, and possibly damage the oven interior.
Use mild, liquid detergent, warm water and a soft,
clean cloth to remove soilagel.NEVER USE ABRASIVE CLEANERS, COMMERCIAL OVEN CLEANERS OR STEEL WOOL PADS ON ANY PART OF
THE MICROWAVE OVEN.
To loosen difficult soilage, boil a cup of water in the
microwave oven for 2 or 3 minutes. NEVER USE A
KNIFE OR ANY UTENSIL TO REMOVE SOILAGE
FROM OVEN SURFACES.
To remove odours from the oven interior, boil a cup of
water plus 2 tablespoons of lemon juice f or 5 minutes.
Cleaning the exterior
Open the oven door when cleaning the control
panel. This will prevent the oven from being turned
on accidentally.You should clean outside surfaces of
the oven with mild liquid detergent and water followed
by a wiping with clear water to remove any excess
detergent. Dry with a soft cloth. Pay special attention to the door seal and front of the cavity which
must be kept clean at all times.If these surfaces are
damaged because of excessive soiling, call in a specialised technician before using your microwave
oven.
Spray-on window cleaners or all purpose spray-on
kitchen cleaners can also be used. Never use abrasive cleaners, scouring pads or harsh chemicals on
outside surfaces of your oven. To prevent damage
to the working parts, do not allow water to seep
into ventilation openings.
!
!
Page 29

29
EMS 2485 t
Service and spare parts
If the appliance does not function correctly,
please carry out the following checks before
contacting your local Service Force Centre.
If the oven does not come on:
• Check the appliance is connected correctly.
• Check that the oven is plugged in properly.
• Replace the fuse in the plug, if required, with anot-
her of the same rating and check that the plug has
been wired correctly.
• Check that the socket switch and/or the switch
from the mains supply to the oven are ON.
• Check that the socket is receiving power, by
plugging in an appliance you know to be working.
• Check that the the fuse in the fuse box is intact.
If the microwave does not function:
• The child safety lock may have been set.
• Check the controls are set correctly.
• Check settings/procedures against the instruction
booklet
• Check the door closes properly (if food particles or
other objects have become stuck inside the door,
it will not close properly and microwave cooking
will not take place).
• Check the start pad has been depressed.
• If the grill function has been used, the oven may not
have cooled sufficiently.
If after carrying out the above checks, the oven still
does not function correctly, contact your local
Electrolux Service Centre by telephoning:
IMPORTANT:
If you call out an engineer to a fault listed above,
or to repair a fault caused by incorrect use or
installation, a charge will be made even if the
appliance is under guarantee.
When you contact the service centre they will need
the following information:
1.Your name, address and postcode
2.Your telephone number
3. Clear concise details of the fault
4.The model number
5. Date of purchase
We suggest you make a note below so you have
the details to hand:
Model: EMS 2485
Serial Number: . . . . . . . . . . . . . . . . . . . . . . . . . . .
Date of Purchase: . . . . . . . . . . . . . . . . . . . . . . . .
In-guarantee customers should ensure the necessary checks have been made as the engineer
will make a charge if the problem is not a
mechanical or electrical breakdown.
Please note that proof of purchase will be required
for in-guarantee calls.
Spare parts
Spare parts may be purchased through your local
Service Centre.
Customer care
For general enquiries concerning your Electrolux
appliance, or for further information on Electrolux
products, please contact your Customer Care
Department.
Page 30

Guarantee conditions
Standard guarantee conditions
We, Electrolux, undertake that if within 24 months
of the date of the purchase this Electrolux appliance
or any part thereof is proved to be defective by reason only of faulty workmanship or materials, we will,
at our option repair or replace the same FREE OF
CHARGE for labour, materials or carriage on condition that:
• The appliance has been correctly installed and
used only on the electricity supply stated on the
rating plate.
• The appliance has been used for normal domestic
purposes only, and in accordance with the
manufacturer’s instructions.
• The appliance has not been serviced, maintained,
repaired, taken apart or tampered with by any
person not authorised by us.
• All service work under this guarantee must be
undertaken by an Electrolux service centre.
• Any appliance or defective part replaced shall
become the Company’s proper ty.
• This guarantee is in addition to your statutory and
other legal rights.
Home visits are made between 8.30am and
5.30pm Monday to Friday. Visits may be available
outside these hours in which case a premium will be
charged.
Exclusions
This guarantee does not cover:
• Damage or calls resulting from transportation,
improper use or neglect, the replacement of any
light bulbs or removable parts of glass or plastic.
• Appliances found to be in use within a commercial
or similar environment, plus those which are subject
to rental agreements.
• Products of Electrolux manufacture which are not
marketed by Electrolux.
European Guarantee
If you should move to another country within
Europe then your guarantee mov es with y ou to your
new home subject to the following qualifications:
The guarantee starts from the date you first purchased your product.
The guarantee is for the same period and to the
same extent for labour and parts as exist in the
new country of use for this brand or range of products.
This guarantee relates to you and cannot be
transferred to another user.
Your new home is within the European
Community (EC) or European Free Trade
Area.
The product is installed and used in accordance
with our instructions and is only used domestically, i.e. a nor mal household
The electrical supply complies with the specification given in the rating label.
The product is installed taking into account regulations in your new country.
Before you move, please contact your nearest
Customer Care centre, listed below, to give them
details of your new home.They will then ensure that
the local Service Organisation is aware of your
move and able to look after you and your appliances.
France Senlis +33 (0) 3 44 62 22 22
Germany Nürnberg +49 (0) 911 323 2600
Italy Pordenone +39 (0) 1678 47053
Sweden Stockholm +46 (0) 20 78 77 50
UK Slough +44 (0) 1753 219 898
30
EMS 2485 t
Page 31
31
EMS 2485 t
1. Remove any promotion label from the door.
2.This oven can be used as a free standing oven or
built-in, into a kitchen cabinet using kit number
BF 246, which is supplied with the oven.T o install
the oven in a kitchen cabinet follow the instructions supplied with the building-in kit. The oven
should be installed on a flat, level surface. The
surface must be strong enough to safely bear the
weight (18 kg) of the oven, and the contents. To
avoid the possibility of causing vibration or noise
the oven must be in a stable position.
3. Keep the oven away from heat and water.
Exposure to heat and water can lower oven efficiency and lead to malfunctioning, so be sure to
install the oven aw a y from heat and water sources .
4.
Do not block air vents on the top and the sides of
the cabinet and also do not place any articles on
the top of the oven. A gap all around the oven is
necessary : 100 mm above the oven and any
objects, 50 mm on the sides and behind the
oven. If air vents are blocked during operation,
the oven ma y overheat, and this may lead to malfunctioning.Hot air escapes from the vents, so be
sure not to obstruct it or let curtains come between the oven and the rear wall.
5. Place the oven as far away from radios and TV’s
as possible. This oven does conform to EEC
requirements* of radio interference suppression,
but some interference ma y occur if it is placed too
close to a radio or TV, so keep them as far apart
as possible.
6. If positioned in a corner, leave a gap of at least
5 cm from the right side wall.
IMPORTANT! The oven can be placed almost
anywhere in the kitchen. Make sure the oven is
placed on a flat, level surface and that vents as
well as the surface underneath the oven are not
blocked (for sufficient ventilation).
Electrical connections
THIS APPLIANCE MUST BE EARTHED.
The manufacturer declines any liability
should this safety measure not be ob-
served.
If the plug that is fitted to your appliance is not suitable for y our socket outlet, it must be cut off and the
appropriate plug fitted.
Remove the fuse from the cut off plug.The cut off
plug should then be disposed of to prevent the
hazard of shocks in case it should be plugged into
a 16 Amp socket in another part of your home.
IMPORTANT
The wires in the mains lead are coloured in accordance with the following code:
GREEN AND YELLOW EARTH
BLUE NEUTRAL
BROWN LIVE
If you fit your own plug, the colours of the wires in
the mains lead of your appliance may not correspond with the mar kings identifying the ter minals in
your plug, proceed as follows:
Connect the green and yellow (earth) wire to the
terminal in the plug which is marked with the letter
‘E’or the earth symbol ( ) or coloured green and
yellow.
Connect the blue (neutral) wire to the terminal in the
plug which is marked with the letter ‘N’ or coloured
black.
Connect the brown (live) wire to the terminal in the
plug which is marked with the letter ‘L’ or coloured
red.
For the installer
!
Page 32

The plug moulded on to the lead incorporates a
fuse. For replacement, use a 16 Amp BS1362 fuse.
Only ASTA or BSI approved fuses should be used.
The plug must not be used if the fuse cover/carrier
is lost.The cover/carrier is indicated by the coloured
insert at the base of the plug.
A replacement cover/carrier is indicated by the
coloured insert at the base of the plug.
A replacement cover/carrier must be obtained from
your local Electrolux Service Centre.
This appliance complies with E.E.C. directive No.
87/308 of 2.6.87 relative to radio interference suppression.
Connecting to the mains
The oven is deliv ered with the po w er cord and a plug
for 230 V, 50Hz, ear thed socket outlet.
Earth protection minimizes the risks should a shor tcircuit occur. Check to ensure the voltage of the
oven matches the supply.
N.B. If the oven is connected to the socket via an
extension cord, make sure the cord is earthed.
Thi
s applianc
e must not be used on a
nonearth protected power supply. Contact
an electrician if you are uncertain regarding
electricial connection of the oven or provision
of earth protection of the supply.
This appliance must be earthed. If this
appliance is fitted with a non-rewirable plug
for which your socket is unsuitable, the plug
should be cut off and the appropriate plug
fitted. If it is necessary to change the fuse in
a nonrewirable plug, the fuse cover must be
refitted. If the fuse cover is lost or damaged,
the plug must not be used until a replacement
is obtained.
Build-in model
To install the appliance in a kitchen cabinet, use the
appropriate mounting frame. Note the relevant instructions for installation and connection. When
building in to a high cabinet, you may use the liftdoor. Note the relevant information for installation
and connection given in the operating instructions
of the lift door.
Attention !
Never operate the microwave oven with the lift door
closed. Such operation would damage your appliance and invalidate the guarantee.
Connect to a plug socket with protective earth
contact and fused with a 16 A-L automatic device or
16 A slow-blowing fuse. When the oven is installed,
there must be a possibility of disconnecting it from
mains with a contact break of at least 3 mm on all
poles.
A suitable size of LS-switch, or a melting or fly-out
fuse, are suitable contact-breakers.
32
EMS 2485 t
Building in kit BF 246
Overall dimension Width 540 mm
Depth 416 mm
Height 316 mm
Cavity Width 350 mm
Depth 351 mm
Height 210 mm
Volume 24 l
Power source 230 V, 50 Hz
Fuse 16A
Power consumption
(microwave + grill) 2750W
Power Output 900W
Grill 1250W
Weight 19 kg
Technical data
!
 Loading...