

Page 1

User Manual
Freestanding Cooker
EKM6645X
Page 2

CONGRATULATIONS
Congratulations and thank you for choosing our cooker. We are sure you
will find your new cooker a pleasure to use. Before you use the cooker, we
recommend that you read through the whole user manual, which provides
the description of the cooker and its functions. To avoid the risks that are
always present when you use an electric/gas appliance, it is important that
the cooker is installed correctly and that you read the safety instructions
carefully to avoid misuse and hazards. We recommend that you keep this
user manual for future reference and pass it on to any future owners. After
unpacking the cooker please check it is not damaged. If in doubt, do not use
the appliance but contact your local Electrolux Customer Care Centre.
ONTENTS
C
1. PRESENTATION AND SIZES OF PRODUCT
2. WARNINGS
3. INSTALLATION AND PREPARATIONS FOR USE
4. USE OF YOUR COOKER
5. CLEANING AND MAINTENANCE
6. SERVICE AND TRANSPORT
7. STANDARD WARRANTY CONDITIONS
2
Page 3
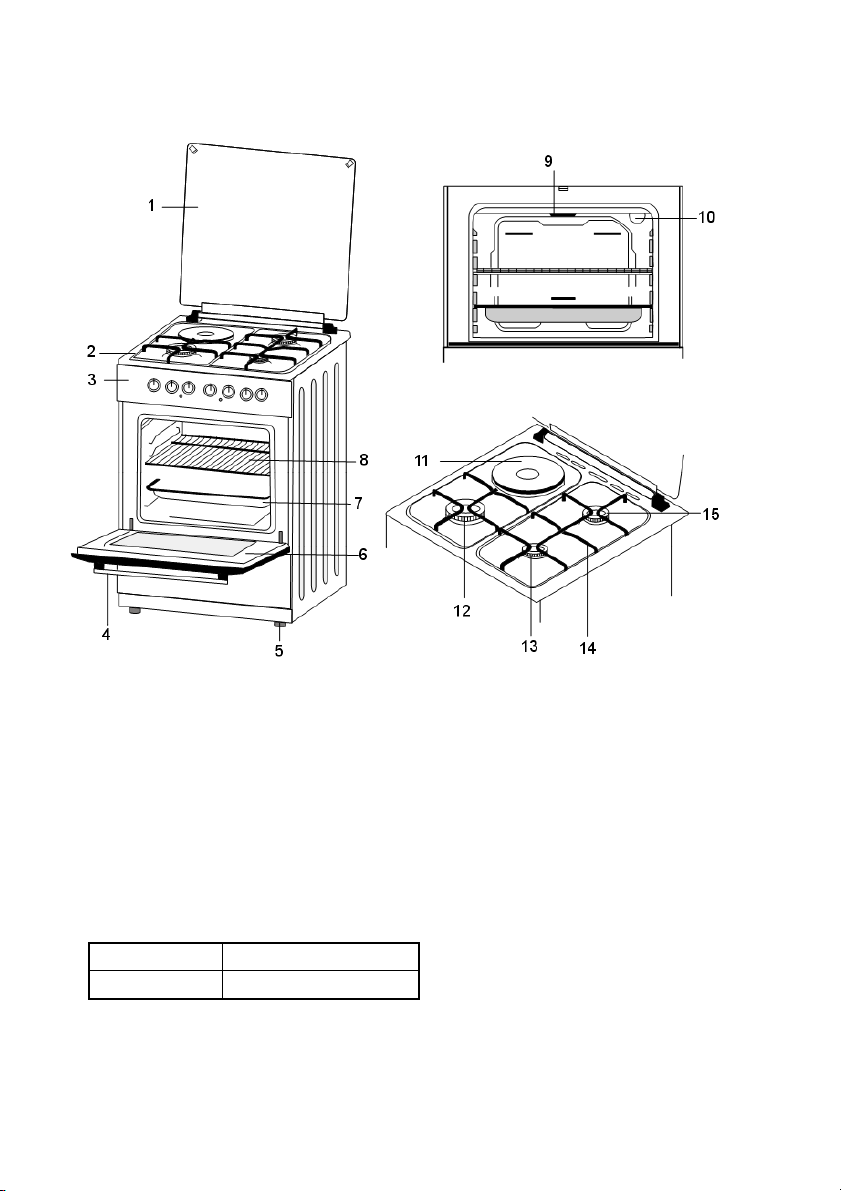
PART 1 : PRESENTATION AND SIZES OF PRODUCT
Part of List :
1- Cooktop Cover 9- Grill
2- Cooktop 10- Oven Lamp
3- Control Panel 11- Hotplate
4- Oven Door Handle 12- Rapid Burner
5- Supply leg 13- Auxillary Burner
6- Oven Door 14- Semi-Rapid Burner
7- Oven Tray
8- Wire Grid
MODEL SIZE(cm)
EKM6645X 60x60x85
3
Page 4

PART 2 : WARNINGS
TAKE ALL IMPORTANT SECURITY MEASURES AND READ THE MANUAL
COMPLETELY BEFORE USING THE APPLIANCE
• This appliance has been designed for domestic use only.
• Check whether there is any damage after you unpacked the appliance. If
there is any defect; do not use the appliance and immediately contact the
authorized maintenance service. As the materials used for package ( nylon,
stapler, strafoam. etc.) may be harmful to children, they should be disposed
immediately.
• The appliance must be set up by an authorized technician and put into use.
The producer is not responsible for any damage that might be caused by
defective placement.
• Before connecting your appliance to the power socket, check whether it is
appropriate for the features determined on the package and/or data plate on
the appliance.
• Compare the features of the electricity organization with the technical
information on the presentation label before plugging the appliance in.
• The feeding cable must never be changed by the customer. When it is
damaged by any reason, please contact to your authorized service.
• Before changing the oven’s lamp, plug it off.
• Turn the appliance off before cleaning or maintenance. You can do it after
unplugging or turning the main switches off.
• Some parts of appliance may hold its heat for a long time, it is required to
wait for it to cool before touching areas that are exposed to the heat directly.
• This appliance is not intended for use by persons (including children) with
reduced physical, sensory and mental capabilities, or lack of experience and
knowledge, unless they have been given supervision or instruction
concerning use of the appliance by a person responsible for their safety.
• Children should be supervised to ensure that they do not play with the
appliance.
4
Page 5

CAUTION: The use of a gas cooking appliance results in the production of heat,
•
moisture and products of combustion in the room in which it is installed. Ensure
that the kitchen is well ventilated especially when the appliance is in use, keep
natural ventilation holes open or install a mechanical ventilation device(mechanical
extractor hood).
• Prolonged intensive use of the appliance may call for additional
ventilation,for example opening a window or more effective ventilation; for
example increasing the level of mechanical ventilation, where present.
• Do not keep flammable materials close while the appliance is operating.
• Pay attention to the cables of the other electrical devices operating near the
appliance, so as not to touch to hot points.
• Pay attention the switches to be ‘’0’’, when the appliance does not operate.
• The glass covers that some models have may crack when they are exposed
to extreme heat. Do not cover the glass cover without being sure that the
cooker is off and cooled completely.
• This manual is prepared for more than one model in common. Your
appliance may not have some of the features that is explained in manual.
Pay attention to the expressions that have figures, while you are reading the
operating manual.
• Keep children away from the oven.
• During the use the appliance gets hot. Take special care to prevent touching
of heating elements inside oven cavity.
• During grilling mode the oven door should be closed.
• Do not use steam cleaners for cleaning the cooking hobs and oven cavity.
• Before opening the lid covering the hot-plates, take care that no liquids are
on the top of the lid. Do not close the lid until the hobs have cooled down.
• Take care that the lid is in correct position before operation.
• In case that the oven will be placed on a socket steps must be resorted to
prevent falling down of the oven from the socket.
5
Page 6
FOR EFFICIENCY AND SECURITY OF APPLIANCE, WE RECOMMEND YOU
ALWAYS TO USE THE ORIGINAL SPARE PARTS AND TO CALL ONLY OUR
AUTHORIZED SERVICES WHEN IN CASE OF A NEED.
PART 3 : INSTALLATION AND PREPARATION FOR USE
This modern, functional and practical cooker, that was manufactured with the most
quality parts and materials, will meet your needs in every respect. You must surely
read this manual in order not to have any problem in future and to be able to have
successfull results. The following information are the required rules for right
installation and service processes. It must be read especially by the technician who
will install the appliance.
Contact to Authorized Service for mounting of your cooker.
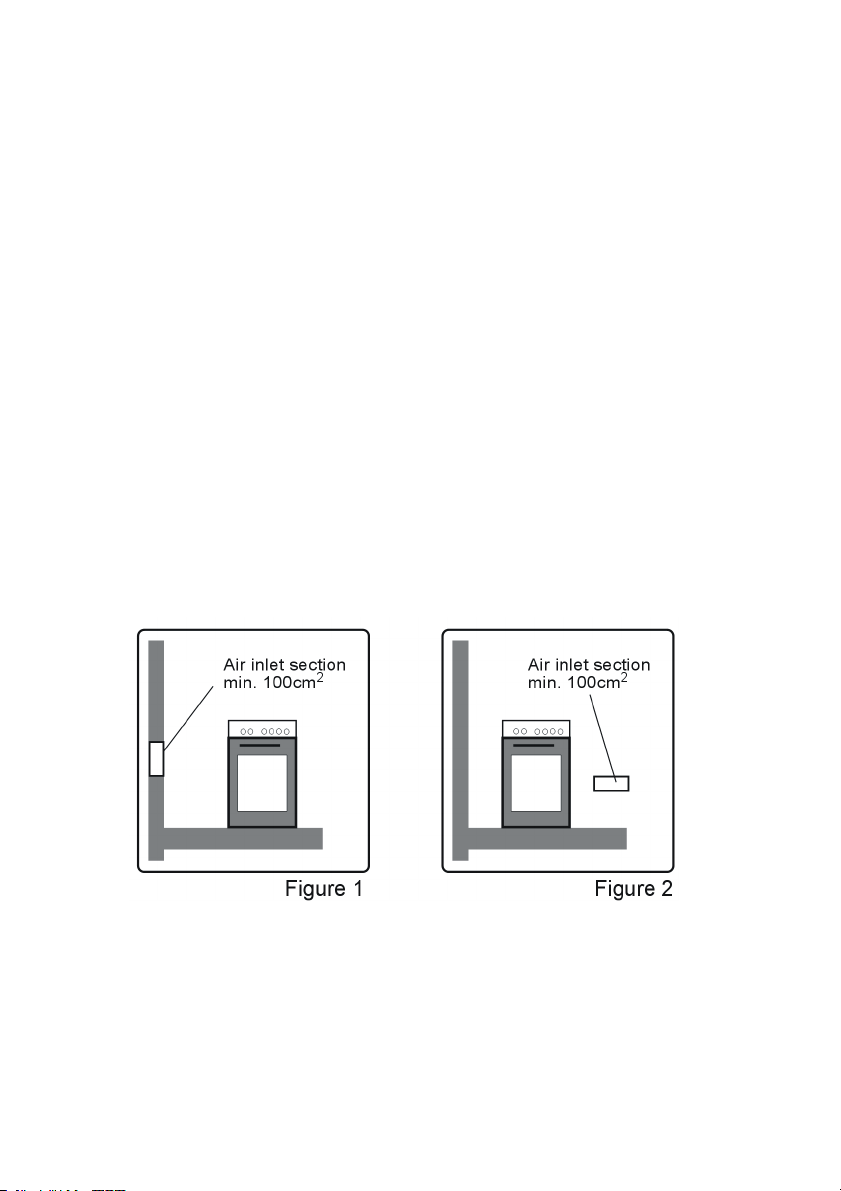
3.1 ENVIRONMENT WHERE YOUR APPLIANCE WILL BE INSTALLED
Your cooker must be set up and used where there is ventilation.
While operating, this appliance needs 2m3/h air per kw input. There must be a
natural ventilation enough to provide the gas to be used in the environment. The
average air flow must directly come in through the air holes that will be opened on
the walls that are opened towards outside.
These air holes must have at least the cross section of 100cm2 that is
effective for air transition (One or more air holes can be opened.) (Figure1-2)
This hole (or holes) must be opened both from the inside and from the outside
as it/they will never be clogged and preferably must be placed close to the
bottom and at opposite side of the smokes of the burned gases that were
emptied. If it seems not possible to open these ventilations in the place where
6
Page 7
the appliance is set up, the needed air can also be obtained through the next
place in condition that this place must not be the bed room or a dangerous
place and also it must be ventilated as required.
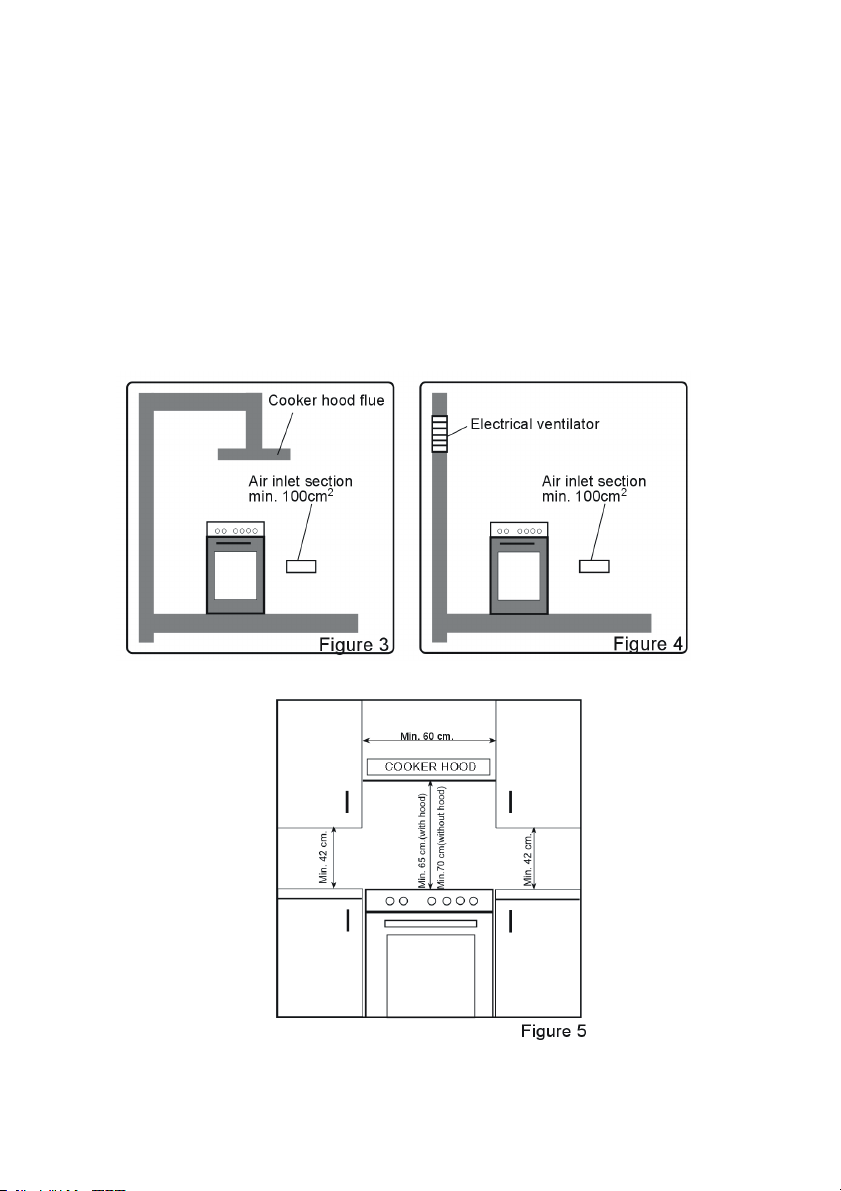
Extraction of the fumes from kitchen
The cooking appliances that operate with gas, discard the burnt gas wastes out
directly to the outside or through the cooker hood that were connected to the
ducting hose. If it seems not possible to install a hood, it is required to set an
extraction fan onto the window or wall that is opened to the outside. This fan
must have the capacity to change the air of the kitchen environment 3-5 times
of its own volume of air per hour (Figure 3-4).
7
Page 8

3.2 INSTALLATION OF COOKER
• There are some factors that must be paid attention to while installing your
cooker. Do pay attention to our below suggestions in order to be able to
prevent any problems and/or dangerous situations that may occur later.
• It can be placed close to other furniture on condition that in the area where
the cooker is set up, the furniture’s height must not exceed the height of the
cooker panel.
• Pay attention not to place it near the refrigerator, there must be no
flammable or in flammable materials such as curtain, waterproof cloth etc.
that will begin to burn quickly, while selecting place for cooker.
• It is required there must be at least 2 cm blank space between the back
cover of cooker and wall for air circulation.
• The furniture close to cooker must be manufactured resistant to heat more
than 50 C° of the room temperature.
• If the kitchen furniture are higher than the pan which the cookers are on, it
must be at least 11 cm away from the cooker’s side.
• The minimum heights from the cooker’s pan and cooker hood must be at
650mm (Figure 5). If there is no cooker hood, the height from cooker’s pan
and cabinet above must not be less than 700mm.
.3 ADJUSTMENT OF FEET
3
Your oven stands on 4 adjustable feet. As the feet are adjusted in low
location, it is required to control whether it is balanced before installing the
oven. You can make this adjustment as turning the feet clockwise if required.
It is possible to raise the appliance maximum 30mm via the feet. If the feet are
adjusted appropriately, it is required not to move the appliance by dragging,
otherwise it is required to place it by lifting it up.
WARNING : In order to prevent tipping of the appliance, this stabilizing means
must be installed. Refer to the instructions for installation.
8
Page 9

Document bag contains an anti-tilting kit. Anti-tilting bracket (1) should be removed
from the kit and installed onto the wall with the following measures as shown in the
figure. Height can be adjusted by loosing the screw of the bracket. The adaptor (2)
that will provide connection of the anti-tilting bracket to the oven is preinstalled to
the oven with 4 screws. Height can be adjusted by loosening the 4 screws of the
adaptor. The oven is leaned backwards with an angle so that the anti-tilting bracket
fits into the adaptor and then it is pushed forwards forwards.
For EKM6645X;
9
Page 10

3.4 MOUNTING OF GAS HOSE AND IMPERVIOUSNESS CONTROL
The gas of appliance must also be connected in accordance with standards. The
adjusted gas type of appliance must be determined on the type signboard on the
back of the appliance. You can find the information related to appropriate gas
types and appropriate gas injectors on technical data table. Pay attention that the
feeding gas pressure must be appropriate for the values on technical data table to
be able to get the most efficiency and to ensure the least consumption. If the
pressure of used gas is different than these values or changeable, it is required to
affix an available pressure regulator on the entrance pipe. It is surely required to
contact to the authorized service to make these adjusments.
The plastic hose that is fixed onto the gas entrance of appliance with a pipe collar,
must be used while connecting for Butane-Propane gas. Connect your appliance
with a short and impervious hose as much as possible to the gas resource. The
hose’s permitted maximum lenght is 1.5m. The hose that brings gas to the
appliance must be changed (1) once a year for your security.
The points that must be paid attention while connecting the hose;
• No parts of the hose must not touch to any place that has heat more than
500C.
• The lenght of hose must not exceed 1.5m.
• The hose must not be ruptured, be tightened or be folded.
• The hose must not touch to the sharp corners, moving things, must not be
defective.
• The hose must be controlled from end before mounting, it must be observed
whether there is any production defect.
• As gas is turned on, all connection parts and hose must be controlled with
prepared much bubbly water at first after the gas entrance connections are
completely finished. Never use a lighter, match, etc. while making this
process.
• The tightening pipe collars must clear of rust.
• The use dates must not have exceeded over 5 years.
10
Page 11

• As affixing an end of hose to the detector, other end to the gas entrance
adaptor of oven tightly, hold it with a sheet iron pipe collar and screwdriver
very tightly. If no connection is made with hose in limitation of conditions
that were explained above, flexible metal hose can be used. It is required to
contact to the authorized service to be able to connect appropriately at
security standards on this condition and a technician must do this
connection.
• Your cooker is adjusted to operate by LPG.
• The flexible hose must not come in contact with sharp edges and there must
be no damage.
ATTENTION!!!
Do not use any match and lighter for control of gas leakage.
Adjusting The Reduced Flame Position :
n appliances equipped with Flame Failure Devices and microswitches at the
I
same time,the control panel should be removed in order to reach the
adjusting screw safely.
For reduced flame position the by pass screw must be loosened in
transformation from LPG to NG. In transformation from NG to LPG, the same
screw must be fastened. Make sure that the appliance is unpluged from the
electric current and the gas feed is open.
Ignite the burners and leave them on in minimum position. Remove the knobs
because the screws are accesible only when the knobs are removed.
With the help of a small screwdriver fasten or loosen the by pass screw 900,
which makes the flame of the burner come down to the minimum (Figure 6).
When the flame has a length of at least 4mm, the gas is well distributed.
Make sure that the flame does not die out when passing from the maximum
position to the minimum position.
Changing the Gas Inlet :
The gas feeding pipe which comfirms to the regulations on effect “A” placed
on pipe support must be visible for all its lenght, it must be placed with great
attention to avoid any contact with parts that will heat up. It is necassary to
block the pipe with a griddle.
11
Page 12

It is recomended to always place a joint between the elbow ang gas supply
pipe. Spain, Italy, Portugal, Luxemburg, Greece and Deutschland autorize the
connection of the gas hose to gas connection medium as it is shown in “B”.
For these countries, the shape of gas connection medium must conform to
national rules and norms on effect. For Denmark, Netherlands, France,
Algeria, Ireland the connection is obtained by using the pieces “E” and flexible
hoses as seen in “C” or rigid pipes. This type of connection can also be used
in France, Algeria, Spain, Italy, Portugal, Greece and Luxemburg. For the
United Kingdom, The gas connection shall be carried out as shown in “D”.
In all cases, the flexible gas supplyer hose can neither pass behind an oven
nor be contact with combustible premises. Minimum distance between the
appliance and combustible promises must be 20mm. After the connection
had been realized, it has to be tested. This test can be done by applying a
soapy liquid to the connection. No bubble should appear. If there are
bubbles,check the connection joint and recheck it if necassary.
3.5 ELECTRIC CONNECTION AND SECURITY
During the electric connection, surely follow the instructions below.
• The earthing cable must be connected to the terminal. You have to ensure
the cable with insulation to be connected to the power source during the
connection of cable. If there is not any appropriate earthed electric outlet in
accordance with regulations in the place where the appliance will be
installed, immediately contact to our authorized service.
• The earthed electric outlet must be close to the appliance. Do not use the
extension cord.
12
Page 13

• The feeding cable must not touch to the hot surface of the product. In case
the feeding cable is damaged, contact to Authorized Service. The cable
must be changed by the authorized service.
• The wrong electric connection may damage your appliance. Such damage
is not in guarantee extent.
• The appliance is adjusted as appropriate for 220-240 Volts and 400V 3N
Volts of electricity. If the network electricity is different than this informed
value, immediately contact to our authorized service.
• The electric cable must not touch to the hot parts of appliance and the
back part of the appliance. Otherwise the electric cable of appliance may
be damaged. And this situation may cause short circuit.
• The producer firm declares that it has no responsibility against any kind of
damages and losses that emanate from the following security norms.
3. 6 GENERAL WARNINGS AND MEASURES
• Your appliance is produced in accordance with the related security
instructions connected with electrical appliance. The maintenance and
repair works must be made just by the authorized service technician who is
trained by the producer firm.
• Installation and repair works without following rule
s may endanger you.
13
Page 14

• While your appliance operates, surfaces can be hot. The interior surfaces
of oven, components that ensures the heat and steam that goes out are
quite hot. Even if the appliance is turned off, these parts hold its heat for a
specific time. Do not touch onto the hot surfaces. Keep children away.
• Do not leave the cooker while cooking with solid or liquid oils. There may
be flaming up on condition of extreme heating. Never pour water to the
flames occuring from oil.
• Cover the saucepan or frypan with its cover in order to choke the flame
that was occured in this case and turn the cooker off.
• The oven and heat adjustment switches must be adjusted and oven’s clock
must be programmed for cooking in your oven. Otherwise the oven does
not operate.
• Do not leave anything on it when the door of oven is open. You may
unbalance your appliance or break the cover.
• Unplug it when you do not use the appliance.
• Protect your appliance against atmospheric effects. Do not leave it to
effects such as sun, rain, snow, powder etc.
ART 4 : USE OF YOUR OVEN
P
4.1 CONTROL PANEL
Timer Thermostat Control Knob Front Left Burner Back Right Burner
Oven Control Knob Back Left Heater Front Right Burner
14
Page 15

4.2 USE OF COOKERS CONTAINING GAS
Surely and carefully read the instructions that ore
enriched with pictures for your use of convenience and
to be able to get the most efficiency from your
appliance. The signs on the control switches, states
that which cookers are turned on by them. Use your
electrical lighter or match to turn on any cooker
containing gas. Press onto the witch, turn to maximum
at the opposite of clockwise. Each cooker can operate at maximum, minimum,
moderate and powers among them.
These positions are shown with maximum and minimum signs apart from off “0”
position on switches. You can adjust to wished location by turning the switch from
off position opposite to clockwise and carrying it out in a suitable manner to the
signs. Also, to turn off the apparatus, it is required to turn the switch clockwise and
until it stops (It stops at “0” location).
Auto-Ignition System in Cookers
Some models have immediate ignition system on cookers. You can easily
recognize them via the turning on spark plugs. To operate the system; it is
required to press slightly onto the switch marked with its symbol, as turning the
switch of the cooker that you want to turn on opposite to clockwise.
In order to obtain the most efficiency from the cookers, pay attention to the sizes
of saucepans that you put the on the cookers and the sausepans to have flat
bases. Do not use concave and convex based saucepans. Pay attention to use
saucepans that have sizes determined in figure. If the dishes that have less than
14cm diameter, use a coffee pot carrier.
Gas Flame Failure Device (FFD) (If Your Product Has This Feature)
Gas flame failure device is used for every flammable gas in order to prevent the
gas leakage by the result of turning on the gas taps by the children randomly or
dying down that may occur by the result of overflowing of liquidover the burners.
Turn the switch opposite to clockwise onwards. This situation will ignite
automatically one after another. After the turning on, when the switch is held on
pressed location for approximately 3 seconds as pressing forward until the point
where the switch reaches, the thermic component senses the cooker’s flame and
opes the gas way. At dying out that may be because of overflowing of liquid and
such reasons, the thermic unit senses the loss of heat and cuts off the gas way in
a time period less than 90 seconds.
15
Page 16

4. 3 USE OF HOTPLATES
The electrical cooker is commanded by 7 graded switches. “0” of the grades is off
location. The use fields in response to other 6 grades are below.
1: Keeping hot location
2-3: Heating locations at low heat
4-5-6: Cooking - roasting and boiling locations
The upper part of hotplates is covered by a protective material resistant to heat.
Turn the switch of the electrical cooker to “3” and then operate the cooker for 5
minutes in order to burn and so to toughen the protective layer at first use.
During use of electrical cookers, it is required to pay attention to the used
saucepans to have smooth bases. If appropriate sized and smooth based
saucepans are used, you can get the most efficiency from your cooker. It is not
suggested to use the little size saucepans on the big size cooker, because this will
cause heat loss and so energy will be wasted.
• Make sure your cooker is off after cooking, turn knob to “0” location.
16
Page 17

• Also never touch it as the cooker will be hot for a speific time after it was
turned off.
• Do not let children to come close to it.
• Clean the electrical cooker with a wet cloth after using the electrical cooker.
If there is excessively getting dirty situation, you can clean it with water with
detergent rather well.
• Heat for a few minutes for the upper part to dry after cleaning. If you will not
use its upper part for a while, ensure to occur a thin oil layer as oiling with
machine oil.
4.4 USE OF OVEN PART
4. 4.1 TECHNICAL FEATURES OF YOUR OVEN
4. 4. 2 Use of Oven Function Switches
This switch allows you to select the oven functions. The functions and their grades
are shown at the following table. Also, the detailed instructions and their uses will
also be explained in details in the next pages.
Your oven’s thermostat and warning lamps and lower and upper heaters
start operating.
Your oven’s thermostat and lamps, lower heater start operating.
Your oven’s thermostat and lamps, upper heater start operating.
Your oven’s thermostat and warning lamps and grill heater and chicken
turning function start operating.
Lower - Upper Heater Function ( Static Cooking )
The heat that is spreaded from the lower and upper heating elements into your oven
equally, ensures the food’s button and top to be cooked equally. It is recommended to
p
re-heat the oven for 10 minutes. Leave the dish to be cooked in recommended period.
17
Page 18

The Lower-Upper Heater location is the function that is preferred to cook cake, sponge
cake, flan, spaghetti in oven, lasagna, pizza. At the end of cooking process, turn the
oven’s switch and heat set up switch off and cancel the time program. Take the cooked
food from the oven, put onto a safe place and open the oven’s door and ensure the
oven is cool completely. As the oven will be hot at that moment, stay away from the
oven and keep your children away from the oven.
Lower Heater Function
At this cooking the best is spreaded from the lower heating element. Lower heating
function is appropriate for heating the food instead of cooking.
Upper Heater Function
In this type of cooking, the heat emanating from upper heating element cooks the
upper side of the foor. Upper heating function is appropriate for frying the upper
side of already cooked food and heating the food.
Grill and Turnspit Function
This function is used to grill and to spit roast chicken, cooked food on a skewer. To
operate the turnspit, use the “turning skewer”. To grill, place the food onto the chrome
rack, at the highest level. You can start grilling after placing the deep tray onto the 3rd
Shelf. The tray will collect oils that drop from food.
Turn your oven’s function switch to the location of this function. Place your food into the
oven after pre heating of 5 minutes. At the end of cooking, as in all other cooking
processes; turn off the oven’s switch and heat set up switch. Cancel the oven’s time
program and take the cooked food from oven and leave onto a safe place. Do not come
close to the oven until it will cool and keep children away.
Warning: Max. set of thermostat 190
4. 4. 3 Use of Minute Minder
Operation with time set Turn the timer knob in
clockwise direction in order to set time between 0-90
minutes as seen in figure on right side. When the
adjusted time ends, a single warning sound is
heard.
o
C
18
Page 19

4. 4. 4 Accessories Used in Oven
You can use glass dishes, cake molds, special oven trays that are appropriate for use in
oven, that you are able to assure in market, apart from the oven trays and grill wire
chicken roasting skewer that are given together with your oven. Pay attention to the
information related to the subject that were given by the manufacturer firm. In case
small size dishes are used, place the dish onto the grill wire, as it will completely be on
the middle part of the wire. The following information must also be followed for the
enameled dishes.
If the food that will be cooked does not cover the oven tray completely, if the food is
taken from the deep freezer or the tray is being used for collection of food’s juices that
flow during grilling, the form changes can be observed in tray because of the high heat
that occur during cooking or roasting.
The tray will return to its old form only when the tray cooled after cooking. This is a
normal physical event that occurs during heat transfer. Do not leave this tray or dish in
cold environment right away after cooking in glass tray or dish. Do not put onto the cold
and wet grounds. Place on a dry kitchen cloth or dish cross, ensure it to cools slowly.
Otherwise the glass tray or dish may be broken.
If you use the grill in your oven; we recommend you to use the grill that was given in tray
together with product. ( If your product includes this material ) So, the oils that spatter
and flow, will not dirty the inside of oven. If you will use the big wire grill; put a tray onto
one of the lower shelves for oils not to be collected. Also put some water into it for
cleaning easiness.
PART 5 : CLEANING AND MAINTENANCE OF YOUR OVEN
5. 1 CLEANING
Be sure that all control switches are off and your appliance cooled before cleaning your
oven. Plug off the appliance. Ensure whether they are appropriate and recommended
by the manufacturer before using the cleaning materials on your oven. As they may
damage the surfaces, do not use caustic creams, abrasive cleaning powders, thick wire
wool or hard tools. In case the liquids that overflows around your oven burn, the
enameled place may be damaged. Immediately clean the overflew liquids.
Cleaning of Inside of Your Oven
Switch off and unplug the cooker before you start cleaning.
The inside of enameled oven is cleaned in the best way when the oven is warm.
Wipe the oven with a soft cloth that had been hemmed in soapy water after each use.
19
Page 20

Later wipe it with a wet cloth once more and then dry it. It may be required to use a
liquid cleaning material from time to time and make a complete cleaning. Do not clean
with dry and powder cleansers.
Cleaning of Gas Cookers, Hob Part
Lift up the saucepan carriers, hats and heads of cookers containing gas on upper
part of your oven. Wipe and clean the back panel with a soapy cloth. Wash the
hats and heads of cookers containing gas and rinse them. Pay attention to detents
to pass and settle completely while placing the back panels after drying. Do not
clean the back panel with a wire for dirty dishes. It causes the surface be
scratched. The enamel where the saucepan carriers touch to the flame on end
parts, may get old and shabby. The end parts of which the enamels get old and
shabby do not cause to rust.
Cleaning of Your Oven’s Cover
In order to be able to clean the cover of your oven from inside and outside, use a glass
cleaner. Then rinse, dry it with a dry cloth. The cover can be pulled out for cleaning as shown
in the following figure.
* Open the cover completely.
* Pass the metal pin through the holes as shown on picture
* Do this process for both hinges.
* Lift up the cover slightly, pull towards the outside smoothly. The cover will come out.
* Again place it into hinge holes while pinning the cover to its place.
Do not clean the oven’s cover while the glass panels are hot. This is to prevent breakages.
5.2 MAINTENENCE
Change of Oven Lamp
The change of oven lamp must be done by authorized technician. The rating the ampoule
should be 230V, 25Watt, Type E14 before changing the lamp,the oven should be plugged off
and it should be cool.
20
Page 21

PART 6: SERVICE AND TRANSPORT
6.1 Requirements Before Contacting to Service
If the oven does not operate;
The oven may be plugged off, there has been a blow-out. On models fitted with a
timer, time may not be regulated.
If the oven does not heat;
The heat may be not adjusted with oven’s heater control switch.
If the interior lighting lamp does not light;
The electricity must be controlled.
It must be controlled whether the lamps are defective. If they are defective, you
can change them as following the guide.
Cooking ( if lower-upper part does not cook equally ) ;
Control the shelf locations, cooking period and heat values according to the
manual.
Except these, if you still have any problem with your product, please call to
the “Authorized Service”.
6.2 Information Related to Transport
If you need any transport;
• Keep the original case of product and carry it with its original case when
needed to be carried. Follow the transport signs on case.
• Tape the cooker on upper parts, hats and heads and saucepan carriers to
the cooking panels.
• Place a paper between the upper cover and cooking panel, cover the upper
cover, then tape it to the side surfaces of oven.
• Tape cardboard or paper onto the front cover on interior glass of oven as it
will be suitable to the trays, for the wire grill and trays in your oven not to
damage to the oven’s cover during transport. Also tape the oven’s covers to
the side walls.
If it does not have the original case, take measure for the external surfaces (glass
and painted surfaces) of oven against possible blows.
21
Page 22

Gas table
I3H
PH Class:1
PART 7: STANDARD WARRANTY CONDITIONS
We, Electrolux, undertake that if within 12 months of the date of the purchase this
Electrolux appliance or any part thereof is proved to be defective by reason only of
faulty workmanship or materials, we will, at our option repair or replace the same
FREE OF CHARGE for labour, materials or carriage on condition that:
• The appliance has been correctly installed and used only on the electricity
supply stated on the rating plate.
• The appliance has been used for normal domestic purposes only, and in
accordance with the manufacturer instructions.
• The appliance has not been serviced, maintained, repaired, taken apart or
tampered with by any person not authorized by us.
All service work under this guarantee must be undertaken by an Electrolux Service
Center. Any appliance or defective part replaced shall become the Company
property. This warranty is in addition to your statutory and other legal rights. This
warranty does not include maintenance, like cleaning of hood.
The manufacturer waives all liability for failure to observe the instructions for the
appropriate installation, maintenance and use of the appliance.
22
Page 23

Customer Care Centre
Thailand
Tel: (+66 2) 725 9000
Electrolux Thailand Co., Ltd.
14th Floor, 1919 New Petchburi Road
Bangkapi, Huay Kwang
Bangkok 10320
Indonesia
Tel: (+62 21) 522 7180
PT. Electrolux Indonesia
Gedung Sentra Mulia, Suite 501
Jl. HR. Rasuna Said
Kav. x-6 No. 8, Jakarta 12940
Singapore
Tel: (+65) 6507 8699
e-mail: customercare.sin@electrolux.com.sg
Electrolux S.E.A Pte. Ltd.
11 Lorong 3 Toa Payoh, Jackson Square
Block B, #01-13/14/15
Singapore 319579
Vietnam
Toll Free: 1800-58-88-99
Tel: (+84 8) 910 5465
Electrolux Vietnam Ltd .
Saigon Trade Center, Suite 2607
37 Ton Duc Thang Street, District 1
Ho Chi Minh City
Philippines
Toll Free: 1800-1888-0801
Tel: (+63 2) 875 3589
Electrolux Philippines Inc.
25th Floor, Equitable Bank Tower 8751
Paseo De Roxas, Makati
Office Tel: (+63 2) 845 4510
Malaysia
Toll Free: 1300-88-11-22
Tel: (+60 3) 7843 5999
e-mail: customer.care@electrolux.com.my
Electrolux Home Appliances Sdn. Bhd.
7th Floor, Tower 2, Jaya 33,
No 3. Jalan Semangat, Seksyen 13,
46100 Petaling Jaya, Selangor
23
Page 24

52040731 04/11 R001
Do you remember the last time you opened a gift that made you say “Oh! How did you know?
The Thoughtful Design Innovator.
That’s exactly what I wanted!” That’s the kind of feeling that the designers at Electrolux seek to
evoke in everyone who chooses or uses one of our products. We devote time, knowledge, and a
great deal of thought to anticipating and creating the kind of appliances that our customers really
This kind of thoughtful care means innovating with insight. Not design for design’s sake, but
design for the user’s sake. For us, thoughtful design means making appliances easier to use and
tasks more enjoyable to perform, freeing our customers to experience that ultimate 21st century
luxury, ease of mind. Our aim is to make this ease of mind more available to more people in
more parts of their everyday lives, all over the world. So when we say we’re thinking of you, you
know we mean just that.
The “Thinking of you” promise from Electrolux goes beyond meeting the needs of today’s
consumers. It also means we’re committed to making appliances safe for the environment—now
and for future generations.
Electrolux. Thinking of you.
Share more of our thinking at www.electrolux.com
need and want.
24
 Loading...