

Page 1

Руководство по
эксплуатации
instruction booklet
RU
Gas Cooker
Газоэлектрическая плита
EKG 603102
Page 2

Page 3

Welcome to the world of Electrolux
Thank you for choosing a first class product from Electrolux, which hopefully will
provide you with lots of pleasure in the future.
The Electrolux ambition is to offer a wide variety of quality products that make
your life more comfortable.
You find some examples on the cover in this manual. Please take a few minutes
to study this manual so that you can take advantage of the benefits of your new
machine.
We promise that it will provide a superior User Experience delivering Ease-ofMind.
Good luck!
Page 4

4 electrolux
Contents
For the user For the installer
Important safety information 5
Control Panel 9
Using the hob 11
Gas oven 14
When using the oven for the first 16
time
The electronic minute minder 17
Hints and tips for using the oven 20
Suggestions for gas burners 25
Cooking table 26
Cleaning and maintenance 28
Something not working 33
Service and spare parts 43
European guarantee 44
Technical data 34
Instructions for the installer 35
Gas connection 36
Electrical connection 42
Guide to Use the instructions
The following symbols will be found in the text to guide you throughout the
Instructions:
Safety Instructions
Step by step instructions for an operation
)
Hints and Tips
Environmental information
This appliance complies with the following E.E.C. Directives:
• 2006/95 (Low Voltage Directive);
• 89/336 (Electromagnetical Compatibility Directive);
• 90/396 (Gas Appliance Directive);
• 93/68 (General Directives);
and subsequent modifications.
Page 5

electrolux 5
ENGLISHENGLISH
ENGLISH
ENGLISHENGLISH
Important safety information
These warnings have been given for the safety of you and others. We
therefore ask you to carefully read the procedures of installing and using
this cooker.
Installation
• The work of installation must be carried
out by competent and qualified
installers according to the regulations
in force.
• Any modifications to the domestic
electrical mains which may be
necessary for the installation of the
appliance should be carried out only
by competent personnel.
• Ensure that air can circulate around
the gas appliance. Poor ventilation
can produce a lack of oxygen.
• This appliance is not connected to a
combustion products evacuation
device. It must be installed and
connected in accordance with current
installation regulations. Particular
attention shall be given to the relevant
requirements regarding ventilation.
• The use of a gas cooking appliance
results in the production of heat and
moisture in the room in which it is
installed. Ensure that the kitchen is
well ventilated: keep natural ventilation
holes open or install a mechanical
ventilation device (mechanical
extractor hood).
• Prolonged intensive use of the
appliance may call for additional
ventilation, for example opening of a
window, or more effective ventilation,
for example increasing the level of
mechanical ventilation where present.
• Avoid installation of the cooker near
inflammable material (e.g. curtains,
tea towels, etc.).
• Supply the appliance with the type of
gas stamped on the relevant adhesive
label situated in the immediate vicinity
of the gas connection tube.
• The appliance has to be placed on the
floor and it cannot be placed on a
base.
People Safety
• This appliance has been designed for
use by adults. Take care, therefore,
that children do not attempt to play
with it.
• The appliance remains hot for a long
time after being switched off. Supervise
children at all times, paying attention
that they do not touch surfaces or
remain in the vicinity of the appliance
when in use or when not completely
cooled.
• This appliance is not intended for use
by children or other persons whose
physical, sensory or mental
capabilities or lack of experience and
knowledge prevents them from using
the appliance safely without
Page 6

6 electrolux
supervision or instruction by a
responsible person to ensure that
they can use the appliance safely.
During Operation
• This product is intended for the
cooking of food and must not be used
for other purposes.
• It is dangerous to modify, or attempt
to modify, the characteristics of this
appliance.
• The appliance becomes very hot with
use, and retain their heat for a long
period after use. Care should be taken
to avoid touching heating elements
inside the oven.
• Always stand back from the oven
when opening the oven door
during cooking or at the end of it
to allow any build up of steam or
heat to release.
• Unstable or deformed pans should
not be placed on the burners or plates
in order to avoid accidents caused by
upsetting or boiling over.
• Particular care should be taken when
cooking with oil or fat.
• If the appliance is fitted with a cover,
its function is to protect the surface
from dust when closed and to accumulate splashes of grease when open.
Do not use for other purposes.
• Always clean the cover before closing.
• Leave the burners and/or plates to
cool before closing.
• All the covers, in plate glass or enamel,
are removable to facilitate cleaning.
• Always ensure that the knobs are
in the « 0 » or « » (Stop) position
when the appliance is not in use.
• Always insert the dripping pan when
using the grill or when cooking meat
on the grid. Pour a little water into the
dripping pan to avoid grease burning
and creating unpleasant smells.
• Always use oven gloves to remove
dishes from the oven.
• The oven accessories should be
washed before using for the first time.
• Take care when using cleaning
products in spray form: never direct
the spray onto the resistance or the
thermostat bulb.
• If, when placing food in the oven, or
when removing it, a large quantity of
oil, juice, etc. spills onto the bottom of
the oven, re-clean before starting to
cook to avoid unpleasant smoke and
also the possibility of these
substances catching fire.
• For reasons of hygiene and safety
this appliance must always be kept
clean. A build up of grease or other
food can cause fires.
• This appliance cannot be cleaned
with steam or with a steam cleaning
machine.
• Do not use harsh abrasive cleaners or
sharp metal scraper to clean the oven
door glass since they can scratch the
surface, which may result in shattering
of the glass.
• The gas oven becomes hot with the
movement of air. The holes on the
bottom of the oven must never be
obstructed. Do not cover the sides of
the oven with aluminium foil, in
particular the lower part of the opening.
Page 7

• The appliance is heavy, move it
carefully.
• Before maintenance and cleaning
disconnect the appliance and allow to
cool.
• To facilitate ignition, light the
burners before placing pans on
the grid. After having lit the burners
check that the flame is regular.
• Always lower the flame or turn it off
before removing the pan.
• Ensure that the oven grids are inserted
correctly.
• Only heat-resistant plates may be
placed in the drawer situated under
the oven.Do not put combustible
materials there.
Service
• In case of repairs, do not attempt to
correct yourself. Repairs carried out
by unqualified persons can cause
damage. Contact an authorized
Technical Assistance Centre and
insist an original spareparts.
electrolux 7
The symbol on the product or on
its packaging indicates that this product
may not be treated as household waste.
Instead it shall be handed over to the
applicable collection point for the
recycling of electrical and electronic
equipment. By ensuring this product is
disposed of correctly, you will help
prevent potential negative consequences
for the environment and human health,
which could otherwise be caused by
inappropriate waste handling of this
product. For more detailed information
about recycling of this product, please
contact your local city office, your
household waste disposal service or the
shop where you purchased the product.
Environmental
Information
• After installation, please dispose of
the packaging with due regard to
safety and the environment.
• When disposing of an old appliance,
make it unusable, by cutting off the
cable.
Page 8

8 electrolux
It is very important that this
instruction book should be kept
safely for future consultation. If the
appliance should be sold or given to
another person, please ensure that
the booklet goes together with it,
so that the new owner can know of
the functions of the machine and
also be aware of the warnings.
These instructions are only for the
countries stated by the symbol
printed on the front cover of this
instruction book.
MANUFMANUF
MANUF
MANUFMANUF
ACTURER:ACTURER:
ACTURER:
ACTURER:ACTURER:
ELECTROLUX POLAND SP. Z.O.O.
ul. Kazimierza Odnowiciela 28
58-100 Swidnica (Poland)
Page 9

Control Panel
electrolux 9
8
1. Oven light push button
2. Back left burner control knob
(semi-rapid)
3. Front left burner control knob
(rapid)
4. Front right burner control knob
(auxiliary)
5. Back right burner control knob
(semi-rapid)
6. Gas oven and electric grill control
knob
7. Electronic Programmer
8. Grill function pilot light
21
6543
7
Page 10

10 electrolux
The Oven Cavity
Electric Grill Oven Light
Gas Oven
Bottom Plate
Accessories
Baking Tray Oven Shelf Dripping Pan
Page 11

Using the hob
Control knobs on the front
panel
The knobs for using the gas hob of the
cooker are found on the control panel.
The regulation knobs could be turned in
anti-clockwise direction until the small
flame symbol, and vice-versa for the
larger symbol.
z No gas supply
Maximum gas supply
Minimum gas supply
Ignition of gas burners
• To ignite a burner, before positioning
the saucepan, push the corresponding
knob in completely and turn in an
anticlockwise direction to the
electrolux 11
maximum position ( ).
• Once a flame has appeared, hold the
control knob pressed in for around 5
seconds so as to activate the Oven
Safety Device (Thermocouple).
• Upon ignition regulate the flame as
required.
• If after a few attempts the burner does
not ignite, check that the baffle and its
cap are correctly positioned.
• To interrupt the supply of gas, turn the
knob in a clockwise direction to the
position " z ".
During cooking, when using fats
or oils, take particular care as
they can, when over-heated,
self-ignite.
Page 12

12 electrolux
In the absence of electricity,
ignition can occur without the
electrical device; in this case
approach the burner with a flame,
push the relevant knob down and
turn it anti-clockwise until it
reaches the "maximum" position.
To ensure maximum burner efficiency,
you should only use pots and pans with
a flat bottom fitting the size of the burner
used (see table).
Burner} minimum maximum
diameter diameter
Large (rapid) 180 mm. 260 mm.
Medium (semi-rapid) 120 mm. 220 mm.
Small (auxiliary) 80 mm. 160 mm.
FO 0204
A - Burner cap
B - Burner crown
C - Ignition candle
D - Thermocouple
Page 13

Recommended pottery
Remember that a wide-bottomed pan
allows a faster cooking than a narrow
one. Always use pots which properly fit
what you have to cook.
Particularly make sure that the pans are
not too small for liquids, since these
could easily overflow.
Moreover, the pans should not be too
large for a faster cooking. In fact, grease
and juices may spread on the bottom
and burn easily.
It is better to use non-openable moulds
for baking cakes. In fact, an openable
mould lets juices and sugar leak
through, falling on the bottom of the oven
and consequently burning on the bottom
of the baking tray, making cleaning
difficult.
Avoid putting plastic-handled pans in the
oven as they are not heat-proof.
You should use oans with the right
diameter to fit the burner, in order to
make the most out of it, thus reducing
gas consumption.
It is also advisable to cover any boiling
casserole and, as soon as the liquid
starts boiling, lower the flame enough
to keep the boiling point.
Pots must not enter the control
zone.
Make sure pots do not protrude
over the edges of the cooktop
and that they are centrally
positioned on the rings in order
to obtain lower gas
consumption.
electrolux 13
Page 14

14 electrolux
Gas oven controls
Ignition
• Push the Oven/Grill control knob
inwards and turn it anti-clockwise to
its maximum setting (8) keeping the
control knob pressed in.
• Once a flame has appeared, hold the
Control Knob pressed in for around
10-15 seconds so as to activate the
Oven Safety Device (Thermocouple).
When cooking with the oven,
the lid must be kept open to
avoid over-heating
In the event of a loss of power, you
can light the oven holding a flame to
the oven burner (manual ignition)..
Manual ignition
• Open the oven door;
• Hold a flame near the hole in the
bottom of the oven cavity as shown in
the diagram.
• push the oven control knob in and turn
it anti-clockwise until the maximum
temperature position is reached;
• keep the oven knob pressed in for
approximately 10-15 seconds until
the safety valve automatically keeps
the oven burner lit.
• If the burner does not light first time,
keep the oven door open and wait one
minute at least before repeating the
operation. Once the oven has been lit,
adjust the flame as required.
• To adjust the flame, turn the oven
knob to the position corresponding to
the temperature desired, after a few
minutes of work.
Do not keep the control knob
pressed for more than 15
seconds.
If the burner does not light even
after 15 seconds, release the
control knob, turn it the „off“
position and wait for at least one
minute before trying to light the
burner again.
If the burner accidentally goes out,
turn the control knob to the „off“
position and wait for at least 1
minute before trying to light the
burner again.
hole for manual ignition
Page 15

Electric Grill - Thermostat
1
2
3
4
5
6
7
8
Control Knob
Turn the thermostat control knob anticlockwise to select temperatures between
1 and 8. (table pag.27)
Electric grill
Press and turn the knob clockwise until
the stop position is reached , at the
same time the grill control light will come
on. Place the dripping pan under the wire
shelf so as to prevent fat from dripping
on the bottom of the oven.
Oven light push button
The oven lamp switch allows you to turn
on the oven internal illumination.
Grill function control light
The grill control light will come on when
the oven control knob is turned to symbol
. The light will remain on until the
correct temperature is reached. It will
then cycle on and off to show the grill
heating element temperature is being
maintained.
electrolux 15
Page 16

16 electrolux
When using the oven for the first
time
Before using the appliance, remove
all packaging, both inside and
outside the appliance, including the
advertising labels and any protective
film..
When using the oven for the first time:
a) Ignite the gas oven burner and set
the gas oven control knob to "8".
b) allow the oven to run empty for
approximately 45 minutes;
c) open a window for ventilation.
During this time, an unpleasant odour
may be emitted. This is absolutely
normal, and is caused by residues of
manufacturing.
Once this operation is carried out, let
the oven cool down, then clean the oven
cavity with a soft cloth soaked in warm
soapy water.
This procedure should be repeated with
the grill function for approximately
5-10 minutes.
Before cooking for the first time, carefully
wash the oven accessories.
To open the oven door, always
catch the handle in its central
part.
Page 17

The electronic minute minder
electrolux 17
This oven has a 24-hour clock.
When the electricity
is first switched on,
the display will show
12.00 and the time
indicator neon will
flash.
The increase and decrease
control buttons operate slowly at
first and then more rapidly. They
should be pressed separately.
Press the increase
button until the
correct time is
showing.
To set the countdown
The ‚Countdown‘ gives an audible
reminder at the end of any period of
cooking.
In the event of an interuption of the
electricity supply, the clock will stop and
you will not be able to use the main oven.
5 sec
If necessary press
the decrease button
to help set the
correct time.
The time indicator
neon will flash for
5 seconds then go
out.
Press the selector control button until
the countdown indicator neon is
illuminated and the display reads 0.00
Press the increase button. Release the
button once the interval to be timed is
reached e.g. 30 minutes.
Page 18

18 electrolux
This must be
completed within 5
seconds of first
pressing the selector
control button.
During the operation
of the countdown the
If necessary press
the decrease button
to achieve the
correct time
interval.
remaining time period
will show in the
display
To cancel the countdown
The sound and the
countdown indicator neon
can be stopped by
pressing any button, then
the display reverts to the
time of day
At the end of the timed
period a sound will be
heard intermittently and
the countdown indicator
neon will flash for up to 2
minutes.
Press the selector
control button until
the countdown
indicator neon
flashes.
Press the decrease
button until 0.00 is
shown in the
display.
The countdown
indicator neon will
continue to flash for
a few seconds and
then return to the
time of day.
Page 19

Energy save mode
By switching off the time display you
can save energy.
Switching on the time display
Press any button to switch on the
display.
Switching off the time display
Press and hold any two buttons until
the display switches off.
electrolux 19
Page 20

20 electrolux
Hints and tips for using the oven
Always cook with the oven door
closed.
Stand clear when opening the
drop down oven door. Do not
allow it to fall open - support the
door using the door handle, until
it is fully open.
4
3
2
The oven has four shelf levels, and
is supplied with one shelf.
The shelf positions are counted
from the bottom of the oven as
shown in the diagram.
It is important that the shelf is
correctly positioned.
Do not place cookware directly
on the oven base.
When cooking with the oven or
grill, the cover must be kept
open to avoid overheating.
1
Page 21
Shelf supports
Shelf level 2 is fitted with telescopic
shelf supports to allow en easier operation
when inserting or removing the shelves.
1. Pull the right and left hand telescopic
shelf supports completely out, as
shown in the picture.
2. Place the shelf or the grill pan on the
telescopic shelf supports, then gently
push them all inside the oven (see the
picture).
Do not attempt to close the oven
door if the telescopic shelf
supports are not completely
inside the oven. This could
damage the door enamel and
glass.
electrolux 21
Page 22

22 electrolux
Condensation and Steam
The oven is supplied with an exclusive
system which produces a natural
circulation of air and the constant
recycling of steam. This system makes
it possible to cook in a steamy
environment and keep the dishes soft
inside and crusty outside. Moreover, the
cooking time and energy consumption
are reduced to a minimum. During
cooking steam may be produced which
can be released when opening the oven
door. This is absolutely normal.
However, always stand back
from the oven when opening
the oven door during cooking or
at the end of it to allow any build
up of steam or heat to release.
When food is heated, it produces
steam in the same way as a
boiling kettle does. When steam
comes in contact of the oven
door glass, it will condense and
produce water droplets.
To reduce condensation, ensure
the oven is well heated before
placing food in the oven cavity.
A short oven pre-heating (about
10 minutes) will then be
necessary before any cooking.
We recommend you to wipe
away condensation after each
use of the appliance.
Page 23

electrolux 23
For the cooking of cakes
Pre-heat the oven, unless indicated
differently, for at least 10 minutes before
use. Do not open the oven door when
cooking dishes which must raise (e.g.
raised pastries and soufflés); the jet of
cold air would block the raising process.
To check if cakes are cooked, insert a
toothpick into the mixture; if it comes
out clean the cake is ready. Wait until
at least 3/4 of the cooking time has
passed before doing this check.
As a general rule remember that:
a dish which is well-cooked on the
outside but not sufficiently cooked inside
would have required a lower temperature
and longer cooking time. On the
contrary, a “dry” texture would have
required a shorter time and higher
cooking temperature.
For the cooking of meat
Meat to be cooked in the oven should
weigh at least 1 kilo to avoid its becoming
too dry. If you want roasts with a good
colour, use very little oil. If the piece is
lean, use oil or butter or a little of both.
Butter or oil are on the other hand
unnecessary if the piece has a strip of
fat. If the piece has a strip of fat on one
side only, put it in the oven with this side
upwards; when melting the fat will
grease the lower side sufficiently.
Red meat should be removed from the
fridge one hour before cooking otherwise
the sudden change of temperature could
cause it to become tough. A roast,
especially if of red meat, must not be
salted at the beginning of cooking as
salt causes juices and blood to seep
out of the meat, thus preventing the
formation of a well-browned crust.
It is advisable to salt the outside of the
meat after just over half the cooking time.
Place the roast in the oven in a dish
having a low rim; a deep dish shields
heat.
Meat can be placed on an ovenproof dish
or directly on the grill, under which the
dripping pan will be inserted to collect
juice. Ingredients for gravy should only
be put in the dish immediately if cooking
time is brief, otherwise they should be
added during the last half hour.
Begin cooking rare meat at a high
temperature, reducing the temperature
to finish cooking the inside.
The cooking temperature for white meat
can be moderate throughout.
The degree of cooking can be checked
by pressing the meat with a fork; if it
does not give the meat is cooked.
At the end of cooking it is advisable to
wait at least 15 minutes before cutting
the meat in order that the juices are not
lost.
Before serving plates can be kept warm
in the oven at minimum temperature.
For the cooking of fish
Cook small fish from start to finish at a
high temperature. Cook medium-sized
fish initially at a high temperature and
then gradually lower the temperature.
Cook large fish at a moderate
temperature from start to finish.
Check that baked fish is cooked by
gently lifting one side of the gut; the
meat must be white and opaque
throughout, except in the case of
salmon, trout or similar.
Page 24

24 electrolux
Grilling
The following types of meat are suitable
for grilling. Mostly meat or offal cut in
slices or pieces of various sizes, but not
usually very thick, poultry cut in half and
flattened, fish, some vegetables (e.g.
courgettes, aubergines, tomatoes, etc.),
skewers of meat or fish and seafood.
Meat and fish to be grilled should be
lightly brushed with oil and always
placed on the grill; meat should be salted
upon completion of cooking; whereas
fish should be salted on the inside before
cooking. The grill should be positioned
in the guides nearest or furthest from the
grill element according to the thickness
of the meat, in order to avoid burning the
surface and cooking the inside
insufficiently.
The formation of smoke caused by drops
of juice and fat can be avoided by pouring
1 or 2 glasses of water into the dripping
pan.
The grill can also be used to brown, toast
bread and grill certain types of fruit, such
as bananas, halved grapefruit, slices of
pineapple, apples, etc. Fruit should not
be placed too near the source of heat.
Cooking times
Cooking times can vary according to the
type of food, its consistency and its
volume. It is advisable to watch when
cooking for the first time and check
results since when preparing the same
dishes, in the same conditions, similar
results are obtained.
The cooking tables relating to cooking
in the oven and by grill are provided as a
guide to prepare dishes accoriding to
suggested times.
Experience will show possible variations
to the values set out in the table.
Nevertheless carefully follow the
indications given in the receipe you
intend to follow.
Attention: do not place any utensils
such as dripping pan, cake tins,
casseroles, pyrex dishes, aluminium foil
or other on the base of the oven when
the oven is in use. A stagnation of heat
would result which would compromise
the results of cooking and could damage
the oven enamel.
Page 25

Suggestions for gas burners
Start your cooking with a big flame by
turning the knob to the symbol . Then
adjust the flame as necessary.
The outside of the flame is much hotter
than its inside (nucleus). Accordingly ,
the top of the flame should lick the
bottom of the pan. Excessive flames
mean a waste of gas.
In contrast with electric grids, gas
burners do not require flat-bottomed
pans: the flames lick the bottom and
spread the heat all over the surface.
No special pans are required for gas
burners. However, thinwalled pans
transmit the heat to the food more
quickly than thick-walled ones.
Since heat doesn't spread evenly on the
pan's bottom, the food may only be
partially heated. Consequently it is
advisable to stir the food many times.
A thick pan bottom prevents partial
overheating as it allows sufficient thermic
compensation.
Avoid very small pans. Wide and shallow
pans are more suitable than narrow and
deep ones as they allow a faster
heating. Cooking is not quickened by
placing narrow pans on wide burners.
The result is just a waste of gas. For a
proper usage, place small pans on small
burners and large pans on large burners.
Remember to cover pans to reduce gas
consumption.
electrolux 25
Page 26

26 electrolux
Cooking table
Cooking times do not include pre-heating time. A short oven pre-heating
(about 10 minutes) is necessary before any cooking
dooffosdniK
sdluomnisekacerutximnetaeB
ekacruolfetihwdnakcalB5712 07-06
ekac-daerbtalflayoR5713 07-06
ekacatirehgraM5713 04-53
yr
tsaP
dehsinragebotekacfomottoB0023 02-51
ekacdrucklim-rettuB0022 04-53
ekacmaJ0022
sdluomnisekachguodgninevaeL
ehcoirB0022 04-53
sekacllamS
yrtsaP0023 51-01
ffupmaerC0023 04-03
eugnireM0413 021
engasaL
taeM )ssenkcihtfomcyrevero
faol-taeM0022 04-03
yrtluoP
gk3esooG0022 012-051
gk5yekruT5712 042tuoba
emaG
eraH0022 09-06
birreed-eoR0022 051-09
hcnuahreeD5
hsiF
stellumyerG0022 05-04
azziP
llirG
spohC302-51
segasuaS352-02
* The number of the slide refers to the lowest one (excepted the position on the bottom of the
oven, since the dripping pan cannot be inserted).
femitgnikooc(
taemtsaorgnikoocgnoL5712 51-21
taemtsaorgnikooctrohS0022 21-01
gk2-2/11kcuD00
nekcihctsaoR0022 09-06
selbategeV
nalfelbategevdelioB0022 54-04
nekcihcdellirG207-06
gk6,0tipsehtnolaevtsaoR 08-07
tipsehtnonekcihC 09-06
-arepmeT
C°erut
5222 05-04
22 081-021
712 081-09
0422 52-02
*edils
nevosaG
gnitresnI
gnikooC
niemit
setunim
04-53
Page 27

electrolux 27
Approximate temperatures corresponding to the indication on the selector
1 2 3 4 5 6 7 8
150°C 170°C 190°C 200°C 210°C 220°C 230°C 240°C
Grilling
Quantity
Level
TYPE OF DISH
Pieces
Fillet steaks
Beef-steaks 4 600 3 10 ~ 12 6 ~ 8
Sausages 8 — 3 12 ~ 15 10 ~ 12
Pork chops 4 600 3 12 ~ 16 12 ~ 14
Chicken (cut in two) 2 1000 3 30 ~ 35 25 ~ 30
Kebabs 4 — 3 10 ~ 15 10 ~ 12
Chicken (breast) 4 400 3 12 ~ 15 12 ~ 14
Hamburger 6 600 3 10 ~ 15 8 ~ 10
Fish (fillets) 4 400 3 12 ~ 14 10 ~ 12
Sandwiches 4-6 — 3 5 ~ 7 —
Toast 4-6 — 3 2 ~ 4 2 ~ 3
Weight
4 800 3 12 ~ 15 12 ~ 14
Cooking time
(minutes)
4
3
Upper
2
1
side
Lower
side
Page 28

28 electrolux
Cleaning and maintenance
Before each operation,
disconnect the appliance.
This appliance cannot be
cleaned with steam or with a
steam cleaning machine.
The oven should be kept clean
at all times. A build-up of fats or
other foodstuffs could result in a
fire, especially in the grill pan.
Cleaning the cooker
Drops of sauce, fruit juice etc., should
be removed as soon as possible with a
soft cloth soaked in warm detergent
water. Do not use steel wool or knives
to take off layers of crust. Remove
stubborn marks with a well wetted soap
impregnated pad, but care must be taken
not to scratch the enamel. Wash the
enamelled grids with water and
detergent; these can also be washed a
dishwasher.
Take off the burner covers and the grids
and wash them carefully with warm water
and detergent. Dry them well before
putting them back in position.
Moreover, make sure that these are
properly re-placed. The burner can be
rubbed with steel wool or a slightly
abrasive cloth.
Clean the oven door and crystal cover,
in models equipped with these items,
only with warm water, and avoid the use
of rough cloths or abrasive substances;
in cookers with an automatic ignition the
sparkling bulb should be cleaned
periodically and accurately to avoid
difficulties in lighting; furthermore check
that the burner holes are not obstructed.
Cleaning the oven
Clean carefully the oven cavity after use
when it is still warm. In fact, at this
moment it is easy to take off deposits
of fat or other substances such as fruit
juice, sugar particles or fat. You can use
warm detergent water or one of the
appropriate spray oven cleaners. Do not
direct the spray at the mat steel parts
as this could damage them and always
follow the manufacturer's instructions.
Clean the oven accessories with warm
water and detergent. Remove possible
incrustations with a slightly abrasive
powder.
Never line any part of the oven
with aluminium foil. It would
result in an accumulation of heat
which might damage the
cooking results and also
damage the enamel.
Controls - Sundries
Periodically check the condition of the
flexible pipe of gas connection and make
it replaced by skilled technicians as
soon as it shows abnormalities. Annual
replacement is recommended.
Page 29

Cleaning of the oven with
enamel coating
Principle:
Cleaning of the smooth and shiny
enamel oven walls should be done
manually.
Regular maintenance:
After preparing meat dishes, the oven
walls should be cleaned by means of a
sponge and a detergent in order to
remove possible fat splashes. By doing
so, the oven will produce less steam
when using it the next bme and it will
remain clean for a longer period. Soils
from overboiling on the bottom plate can
be eliminated more easily if the bottom
plate is removed from the oven.
Long-term maintenance:
Use only appropriate products available
on the market.
electrolux 29
Page 30

30 electrolux
Cleaning the oven door
For a more complete cleaning of the oven
door, it is advisable to disassemble it in
the following way (Fig. 10):
1. open the door fully;
2. turn the two caps situated on the arm
of the hinge to 180° (diagram 1 and
2);
3. partially close the door to an angle
of 30°;
4. lift the door and extract from the front
(diagram 3).
Re-mount the door by reversing the
operation described above.
Models in stainless steel or aluminium:
We recommend to clean the oven door
using only a wet sponge and dry it up
after cleaning with a soft cloth.
Never use steel wool, acids or abrasive
products as they can damage the oven
surface.
Clean the oven control panel following
the same precautions.
1
2
3
Page 31

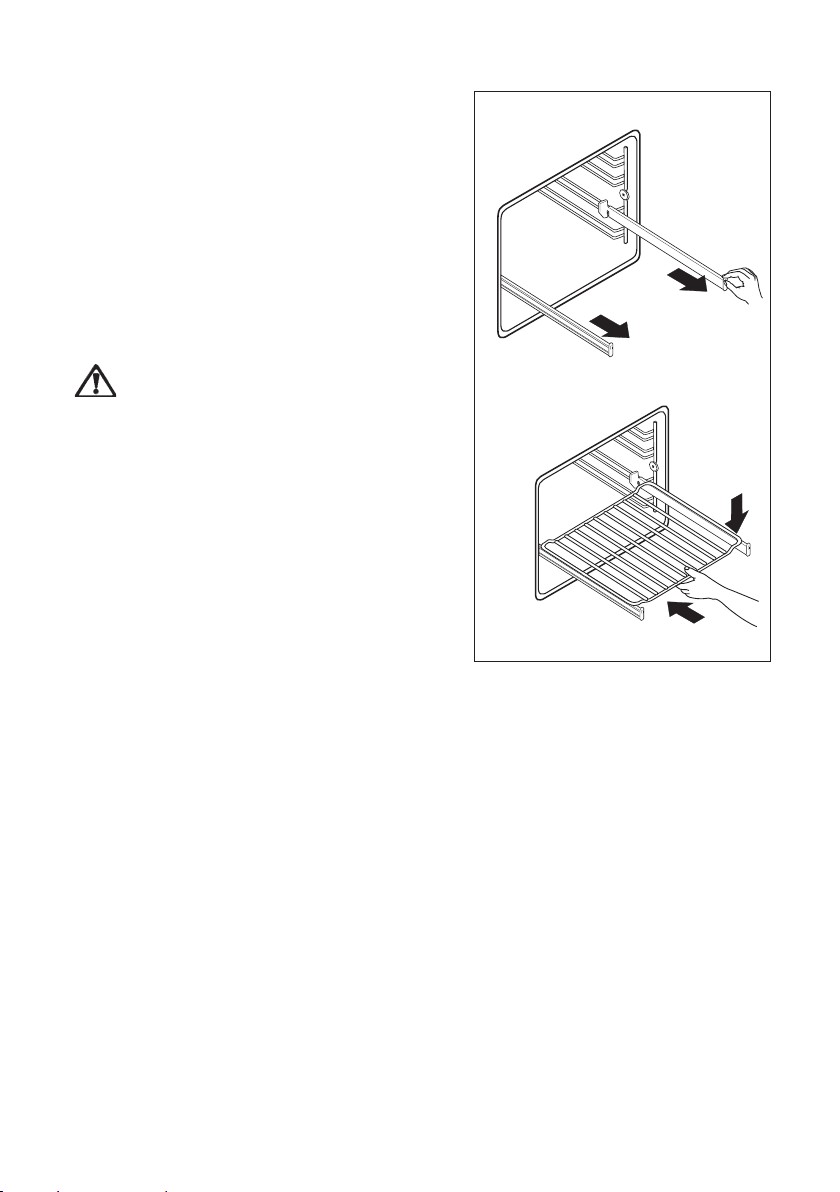
Telescopic pull-out shelf
supports
The side rails with telescopic pull-out shelf
supports can be completely removed for
cleaning.
Removal
Take hold of the side rails on one side of the
oven and undo the knurled nut at the front.
Lift the side rails at the back in order to
unhook them (see diagram).
Do the same thing on the other side of the
oven.
Cleaning
Clean the two sets of side rails with
telescopic shelf supports on the outside
only with commercially available
detergents.
The telescopic shelf supports must
not be cleaned in the dishwasher.
Attention, the rollers must not be greased.
Insertion
After cleaning, first insert the dry side rails
with the hook into the hole at the back,
then fasten at the front with the knurled nut.
electrolux 31
Page 32

32 electrolux
Replacing the Oven Light
If the oven bulb needs replacing, it must
comply with the following specifications:
- Power: 15 W / 25 W,
- Voltage: 230 V (50 Hz),
- Temperature Rating of 300 °C,
- Thread type: E14.
These bulbs are available from your local
Service Force Centre.
) To replace the faulty bulb:
1. Ensure the oven is disconnected
from the electrical supply.
2. Turn the glass cover
anticlockwise.
3. Remove the faulty bulb and replace
with the new one.
4. Refit the glass cover.
5. Reconnect to the electrical supply.
Page 33

electrolux 33
Something not working
If the appliance doesn't work properly check the following points before asking for
service:
lamronbasmeessagfowolfehT•:tahterusekaM
rpeht
•;gnikrowsirotalugererusse
•.nepoyletelpmocsievlavelttobeht
moorehtnillemssaG•
•doognidnadenoitisopllewsiebutylppu
taeht'nseodnevoehT• gnikrrowtcerrocehtnierasbonknevoehttahterusekaM•
ikooC•
gnolootsiemitgn
ekomssecudorprekoocehT• fosehsalpS.e
krowt'nseodpmalnevoehT• ehtwolloftiecalpe
:tahterusekaM
ssageht
etawypaos
.r
.snoitisop
.dekoocebot
t,ylreporpdenaelct'nsi
roT.tuotnrubsahpmalehT•
;detcurtsbotoneraselohredaepsemalfeht•
.raeyaecnotsaeltatiecalperotrebmemer;noitidnoc
daetsniesu;hctamahtiwsagfoepacsenarofkoolreveN
dooffoepytehtroftcerrocsierutarepmetehttahtkcehC•
suretfanevoehtnaelcotuoyesivdaeW•
nevoehtfi,dnataemfognikoocehtgnirudrucconactaf
dabdnaekomsecudorpeseh
.)gninaelcgninrecnochpargarapees(.llems
.hpargarapevitalerehtninevigsnoitcurtsni
Page 34

34 electrolux
Technical data
Hob
Rear left burner (semi-rapid)
2000 W (G20 20 mbar/G30 30 mbar)1400 W (G20 13 mbar)
Front left burner (rapid)
3000 W (G20 20 mbar)-2800 W (G30)1900 W (G20 13 mbar)
Rear right burner (semi-rapid)
2000 W (G20 20 mbar/G30 30 mbar)1400 W (G20 13 mbar)
Front right burner (auxiliary)
1000 W (G20 20 mbar/G30 30 mbar)900 W (G20 13 mbar)
Dimensions of the appliance
Height 850 mm
Depth 600 mm
Width 600 mm
Oven Capacity 56 l
Appliance Class 1 and Class 2 Sub-Class
1
Category: II2H3B/P
Appliance set for use with gas type:
G20 20 mbar
Technical Data
Oven
Electric Grill 1650 W
Gas Oven burner
2700 W (G20 20 mbar-G30 30 mbar) -
2400 W (G20 13 mbar)
Oven light 15 W
Total Electric Rating 1675 W
Supply voltage (50 Hz) 230 V
Page 35

Instructions for the installer
The following instructions are meant for
a qualified installer, in order that the
operations of installation, regulation, and
service are executed according to the
existing regulations.
Whenever changes are mode involving
the disconnection of the machine it is
necessary to proceed with maximum
caution.
THE MANUFACTURING
COMPANY DECLINES ANY
RESPONSABILITY FOR
POSSIBLE DAMAGES
RESULTING FROM AN
INSTALLATION WHICH DOESN'T
COMPLY WITH THE RULES IN
FORCE.
Our responsability will not be involved in
case of accidents caused by a defective
or non existent earth connection.
Combustion products
discharge
Gas cooking units must discharge
combustion products through hoods
directly connected to flues or outside.
Positioning
This appliance has been designed to be
placed close to furniture units not
exceeding the height of the working level.
The distance between the hob and the
side wall/furniture (if present) should be
minimum 450 mm.
electrolux 35
Installation environnement
Warning - This unit can be installed and
can work only in constantly ventilated
rooms, according to rules in force. In
order to make the gas unit work properly,
it is necessary that air sufficient to gas
combustion can naturally flow in the
room. (The installer must follow the rules
in force).
The air flow into the room must come
directly through openings of external
walls. These openings (or opening)
should be realized in such a way not to
be occluded both from inside and
outside.
Installation and maintenance must be
carried out by a qualified technician, in
compliance with rules in force,
particularly NBND 51003.
The electric coonection must be carried
out in compliance with rule NBN.
Levelling
The appliance is provided with adjustable small feet placed in the back corners of the base.
By adjusting the small feet it is possible
to ensure a uniform distribution of the liquids contained in pans or pots.
A
B
C
D
A Gas Rail
B Gasket
C Elbow
D LPG Rubber Pipe Holder
E Pipe Holder
B
E
Page 36

36 electrolux
Gas connection
Gas connection must be carried out
according to the rules in force. The
manufacturing company release the unit,
once tested, adjusted for the kind of gas
stated on the rating plate located on the
back of the range, next to connection
pipe. Be sure that you are going to connect
the unit to the same kind of gas written on
the plate.
D
B
E
Gas connection
LPG : use the rubber pipe holder «D».
Natural gas : use the pipe holder «E».
Always insert the gasket «B». Then
proceed with the gas connection, as
indicated in the relevant paragraphs.
Connection using flexible non
metal pipes
When the connection can be easily
inspected in its full extent, there is the
chance to use a flexible pipe according to
the rules in force. The flexible pipe must
be tightly fixed using clamps according to
the rules in force.
The flexible pipe should be made
ready for use in such a way that:
- nowhere it can reach overtemperature,
other than room temperature, higher
than 30°C; if the flexible pipe, to reach
the cock, must run behind the range,
it must be installed as shown in the
diagram;
- it is no longer than 1500 mm;
- it shows no throttles;
- it is not subject to traction or torsion;
- it does not get in touch with cutting
edges or corners;
- it can be easily inspected in order to
check its condition.
B Gasket
D LPG Rubber Pipe Holder
E Pipe Holder
Page 37

The control of preservation of the
flexible pipe consists in checking that:
- it doesn't show cracks, cuts, marks of
burnings both on the end parts and on
its full extent;
- the material is not hardened, but shows
its normal elasticity;
- the fastening clamps are not rusted;
- expiry term is not due.
If one or more abnormalities are seen,
do not repair the pipe, but replace it.
IMPORTANT
Once installation is complete,
check the perfect seal of every pipe
fitting, using a soapy solution, never
a flame.
IMPORTANT
The replacement/conversion of
the appliance should only be
undertaken by a registered
engineer or competent person.
It is important to note that this model
is designed for use with natural gas
G20 20 mbar but it can be
converted for use with natural gas
G20 13 mbar (only for Russia) or
liquid gas G30 30 mbar providing
the correct injectors are fitted. The
gas rate is adjusted to suit.
Adaptation to different kinds of
gas
To adapt the appliance to a different
kind of gas from the one the appliance
has been set for, follow the instructions
below in their order.
electrolux 37
YES
Gas pipeline
Flexible Rubber
Electric
Cable
NO
Gas pipeline
Flexible Rubber
Electric
cable
Hob burners nozzles replacement
1. Remove the pan supports.
2. Extract the caps and the wall baffles
of the burners.
Page 38

38 electrolux
3. Using a socket spanner 7 unscrew
and remove (see diagram) the nozzles replacing them with the ones required for the kind of gas in use (see
table “Burner characteristics”).
4. Reassemble the parts following the
same procedure backwards.
Replace the rating label (placed near
the gas supply pipe) with the relevant
one for the new type of gas supply. You
can find this label in the package of the
injectors supplied with the appliance.
These burners do not need any
primary air regulation.
Hob burners - Adjustment of minimum level
To adjust the minimum level:
1. turn the knob on the position of mini-
mum flame;
2. remove the knob;
3. With a thin screwdriver, adjust the
by-pass screw positioned in the
centre of the gas tap control shaft
(see picture). If changing from natural gas 20 mbar to liquid gas, completely tighten the adjustment screw
in. If changing from liquid gas to
natural gas 20 mbar, undo the bypass screw about 1/2 of a turn. If
changing from natural gas 20 mbar
to natural gas 13 mbar undo the bypass screw about 1/4 of a turn. If
changing from liquid gas to natural
gas 13 mbar, undo the by-pass
screw about 3/4 of a turn.
4. Reassemble the parts following the
same procedure backwards.
Check that, turning quickly the knob
from the maximum position to the
minimum one, the flame does not go out.
by-pass screw
Page 39

Replacement of gas oven
burner nozzle
To replace the gas oven nozzle, follow
this procedure:
1. Remove the bottom plate of the oven
cavity (“A”);
2. Undo the two fixing screws (“C”)
which keep the oven gas burner in
place
3. Gently slide the oven gas burner off
the injector support (“D”) and slowly
move it to the left hand side, taking
care not to cause stress to the spark
plug connection wire (“E”) and the
thermocouple (“F”) conductor;
4. With a socket spanner 7 unscrew and
remove the gas burner injector (“D”),
and replace it with the required one
(see table "Burner characteristics");
5. Reassemble the burner following the
same procedure in reverse.
6. Replace the gas type sticker (it is
located near the gas connection
ramp) with the one relevant to the
new gas type which is supplied with
the injector kit.
electrolux 39
Minimum level adjustment of
gas oven burner
After setting the oven on maximum
temperature with door closed for about
10 minutes, turn the knob to minimum.
To reach the thermostat by-pass screw
("G") and adjust the minimum level, act
as follows:
1. take out the gas oven and electric
grill control knob.
2. With a thin screwdriver, adjust the
by-pass screw positioned in the
centre of the gas tap control shaft
(see picture). If changing from natural gas 20 mbar to liquid gas,
Page 40

40 electrolux
completely tighten the adjustment screw
in. If changing from liquid gas to natural gas 20 mbar, undo the by-pass
screw about 1/2 of a turn. If changing
from natural gas 20 mbar to natural
gas 13 mbar undo the by-pass screw
about 1/4 of a turn. If changing from
liquid gas to natural gas 13 mbar,
undo the by-pass screw about 3/4 of
a turn.
3. Reassemble the knobs following the
same procedure backwards.
4. Finally check that turning quickly the
tap from maximum position to
minimum position, the flame does not
go out.
Page 41

Burner characteristics
BURNER RAPID SEMI-RAPID AUXILIARY OVEN
TYPE
OF
GAS
NATURAL
GAS
20
mbar
LPG GAS
30 mbar
NATURAL
GAS
13 mbar*
POSITION MAX MIN MAX MIN MAX MIN MAX MIN
NOMINAL THERMAL
POWER (kW) 3.0 0.75 2.0 0.45 1.0 0.33 2.7 1.0
NOMINAL FLOW
RATE (m3/h) 0.286 0.062 0.190 0.043 0.095 0.031 0.257 0.095
NOZZLE REFERENCE 119 Adjust. 96 Adjust. 70 Adjust. 114 Adjust.
NOMINAL THERMAL
POWER (kW) 2.8 0.75 2.0 0.45 1.0 0.33 2.7 1.0
NOMINAL FLOW
RATE (g/h) 2 04 47 145 33 73 24 196 73
NOZZLE REFERENCE 86 42 71 32 50 28 83 52
1/100 mm
NOMINAL THERMAL
POWER (kW) 1.9 0.75 1.4 0.45 0 .9 0.33 2.4 1.0
NOMINAL FLOW
RATE (g/h) 0.181 0.062 0.133 0.043 0.086 0.031 0.229 0.095
NOZZLE REFERENCE 120 Adjust. 105 Adjust. 80 Adjust. 123 Adjust.
1/100 mm X
(large) (medium) (small)
* Natural gas G20 13 mbar to be used only in Russia
By-pass diameters
electrolux 41
Burner By-pass in 1/100 of mm.
Auxiliary 28
Semi-rapid 32
Rapid 42
Oven 52
Page 42

42 electrolux
Electrical connection
The unit is preset to work with a voltage
of single phase 230 V.
Before making the connection make sure
that:
— the energy power available in the
user's house is sufficient for the normal
supply of this appliance (see rating
plate).
— the unit is correctly connected to
earth through a suitable plug and
according to the installation country
Laws.
— the socket or the omnipolar switch
used for the connection must be easilv
reached with the installed appliance.
The appliance is supplied with electric
cable, therefore you will have to fit it with
a standard plug, suitable for the total
electric load shown on the rating plate.
The plug isto be inserted into a suitable
wall socket.
If you wish to directly connect to the
mains, you have to interpose an
omnipolar switch with a minimum
opening between contacts of 3 mm,
between the unit and the mains,
complying with the existing regulations.
The brown live wire (originating from the
clamp of the cooker junction box) must
always be connected to the phase of the
mains supply. In any case, the supply
cord must be positioned in such a way
as it doesn't reach in any point a
temperature higher by 50°C than the
room temperature.
Should the supply cord need to be
replaced, use only the following cable
types:
H05RR-F / H05VV-F / H05V2V2-F (T90).
It is necessary that the yellow/green
earth wire is about 2cm longer than the
live and neutral ones.
After the connection, test the heating
elements for about 3 minutes to ensure
that they are working correctly.
The manufacturer refuses any
responsability in cases where
normal safety measures are not
observed.
Neutral wire
Phase
Ground (yellow - green)
Page 43

Service and spare parts
If after the checks listed in the previous
chapter, the appliance still does not work
correctly, contact your locals Service
Centre, specifying the type of
malfunctioning, the appliance model
(Mod.), the product number (Prod. No.)
and the serial number (Ser. No.) marked
on the identification plate.
This plate is placed on the front external
edge of the oven cavity.
Original spareparts, certified by the
product manufacturer and carrying this
symbol are only
available at our Service
Centre and authorized
spareparts shops.
electrolux 43
Page 44

44 electrolux
European Guarantee
This appliance is guaranteed by Electrolux in each of the countries listed at the
back of this user manual, for the period specified in the appliance guarantee or
otherwise by law. If you move from one of these countries to another of the countries
listed below the appliance guarantee will move with you subject to the following
qualifications:
• The appliance guarantee starts from the date you first purchased the appliance
which will be evidenced by production of a valid purchase document issued by
the seller of the appliance.
• The appliance guarantee is for the same period and to the same extent for labour
and parts as exists in your new country of residence for this particular model or
range of appliances.
• The appliance guarantee is personal to the original purchaser of the appliance
and cannot be transferred to another user.
• The appliance is installed and used in accordance with instructions issued by
Electrolux and is only used within the home, i.e. is not used for commercial
purposes.
• The appliance is installed in accordance with all relevant regulations in force
within your new country of residence.
The provisions of this European Guarantee do not affect any of the rights granted to
you by law.
Page 45

electrolux 45
Page 46

46 electrolux
Добро пожаловать в мир Electrolux
Вы выбрали первоклассный продукт от Electrolux, который, мы надеемся, доставит
Вам много радости в будущем. Electrolux стремится предложить как можно более
широкий ассортимент качественной продукции, который сможет сделать Вашу
жизнь еще более удобной. Вы можете увидеть несколько экземпляров на обложке
этой инструкции. Внимательно изучите данное руководство, чтобы правильно
использовать Ваш новый прибор и наслаждаться его преимуществами. Мы
гарантируем, что он сделает Вашу жизнь намного легче благодаря легкости в
использовании. Удачи!
Page 47

electrolux 47
Оглавление
Инструкции для пользователя Инструкции для установщика
Важная информация по безопасности 48
Панель управления 52
Правильная эксплуатация плиты 54
Газовый духовой шкаф 57
Первое включение духового шкафа 59
Электронный таймер 60
Советы и рекомендации по
эксплуатации духового шкафа 63
Рекомендации по эксплуатации
газовых горелок 68
Таблица приготовления блюд 69
Чистка и уход 71
Возможные неисправности 76
Гарантия/сервисная служба 87
Европейская гарантия 87
Технические данные 77
Указания для установщика 78
Электрическое подключение 85
Пояснение к пользованию настоящей инструкцией
В тексте Вам встретятся следующие символы, которые помогут Вам
ориентироваться в положениях настоящей инструкции:
Указания по безопасности
Указания по пошаговому выполнению той или иной операции
Советы и рекомендации
Информация по охране окружающей среды
Данное изделие соответствует следующим Директивам Европейского Союза:
• 2006/95 (Директива по низковольтной аппаратуре);
• 89/336 (Директива по электромагнитной совместимости);
• 90/396 (Директива по бытовым газовым приборам);
• 93/68 (Общие директивы);
с последующими модификациями.
Page 48

48 electrolux
РУССКИЙ
Важные указания по безопасности
Данные предупреждения представлены в целях Вашей безопасности и
безопасности окружающих. Поэтому мы просим Вас внимательно
ознакомиться с правилами установки и эксплуатации данной плиты.
Установка
• Работы по установке должны
выполняться компетентными
квалифицированными специалистами
в соответствии с действующими
нормами.
• В случае, если для установки прибора
требуется произвести какие-либо
модификации домашней электросети,
то эти работы должны выполняться
только компетентными
специалистами.
• Обеспечьте свободную циркуляцию
воздуха вокруг газового прибора.
Недостаточный приток воздуха может
привести к нехватке кислорода.
• Данное изделие поставляется без
устройства для вытяжки и удаления
продуктов сгорания. Такое устройство
должно быть установлено и
подсоединено в соответствии с
действующими правилами. Особое
внимание следует уделить
соблюдению правил в отношении
вентиляции.
• Использование газового прибора для
приготовления пищи приводит к
выделению тепла и влажности в
помещении, в котором он установлен.
Обеспечьте надлежащую вентиляцию
кухни: держите открытыми отверстия
для естественной вентиляции или
установите устройство для
механической вытяжки (вытяжной
вентилятор).
• При интенсивном и продолжительном
пользовании варочной панелью может
потребоваться дополнительная
вентиляция, например, за счет
открытия окна или увеличения
мощности вентилятора, если таковой
имеется.
• Не устанавливайте прибор вблизи от
огнеопасных материалов (например,
занавесок, полотенец и т.д.).
• Прибор поставляется для работы с
типом газа, указанным на паспортной
табличке, размещенной с задней
стороны плиты, вблизи газового
соединительного патрубка.
• Прибор должен быть установлен на
пол, а не на подставку.
Указания по безопасности
людей
• Плита предназначена для
эксплуатации взрослыми. Поэтому не
позволяйте детям играть вблизи нее.
• После выключения прибор еще долго
остается горячим. Необходимо
присматривать за детьми все время,
обращая внимание на то, чтобы они не
трогали поверхности прибора и не
играли вблизи него во время его
эксплуатации, а также до тех пор, пока
он полностью не остынет.
• Данное изделие не предназначено для
эксплуатации детьми и другими
лицами, которые по своим физическим,
сенсорным или ментальным
способностям, вследствие недостатка
опыта или знаний не могут безопасно
эксплуатировать изделие без
присмотра отвечающего за их
безопасность лица или получения от
него соответствующих инструкций,
позволяющих им безопасно
эксплуатировать устройство.
Page 49

• вследствие недостатка опыта или
знаний не могут безопасно
эксплуатировать изделие без
присмотра отвечающего за их
безопасность лица или получения от
него соответствующих инструкций,
позволяющих им безопасно
эксплуатировать устройство.
При эксплуатации
• Данное изделие предназначено для
приготовления пищи и не должно
использоваться в любых иных целях.
• Изменение или попытка изменения
характеристик плиты, или внесение
каких-либо изменений в ее
конструкцию сопряжены с
опасностью.
• Во время использования прибор
сильно нагревается и в течение
длительного времени остается
горячим. Будьте осторожны и не
прикасайтесь к нагревательным
элементам внутри духового шкафа.
• Всегда держитесь на расстоянии от
духового шкафа при открытии его
дверцы во время приготовления
пищи или по его окончании, чтобы
дать возможность выйти избыткам
пара или тепла.
• Не ставьте неустойчивую или
деформированную посуду на горелки
или конфорки, чтобы не допустить
несчастных случаев вследствие
опрокидывания или проливания.
• Особое внимание следует уделять при
приготовлении блюд с использованием
масла или жира.
• В моделях, оборудованных крышкой,
назначением этой крышки является
предотвращение попадания пыли на
поверхность (в закрытом состоянии) и
улавливание брызг жира (в открытом
состоянии). Не используйте крышку
в других целях.
• Всегда протирайте крышку перед тем,
как закрыть прибор.
electrolux 49
•
Закрывать прибор можно только после
того, как горелки и (или) конфорки
полностью остынут.
• Все крышки, как стеклянные, так и
эмалированные, для удобства чистки
сделаны съемными.
• Всегда следите за тем, чтобы
управляющие ручки были в
положении « 0 » или «
когда прибор не используется.
• Всякий раз при использовании гриля
или приготовлении мяса на решетке
устанавливайте противень для сбора
жира. Для предотвращения подгорания
жира и образования неприятных
запахов налейте в этот противень
немного воды.
• Доставая блюда из духового шкафа,
всегда используйте кухонные рукавицы.
• Перед первым использованием также
тщательно вымойте принадлежности,
прилагаемые к духовому шкафу.
• Будьте осторожны при использовании
чистящих спреев: ни в коем случае не
направляйте спрей непосредственно на
нагревательный элемент или на датчик
термостата.
• Если, при помещени продуктов в
духовой шкаф или вынимании их из
него, на дно духового шкафа
выплеснулось большое количество
масла, сока и т.д., удалите их перед тем,
как продолжать приготовление для
того, чтобы не допустить образования
неприятных запахов, а также
возможного возгорания данных
веществ.
• В целях гигиены и безопасности всегда
содержите прибор в чистоте.
Скопление жира или остатков других
продуктов может привести к
возгоранию.
• Данное изделие не подлежит чистке
паром или с помощью пароочистителя.
• Не используйте жесткие абразивные
чистящие средства или острые
металлические скребки для чистки
стекла дверцы духового шкафа, т.к.
ими можно поцарапать его поверхность,
в результате чего стекло
лопнуть.
» (Стоп),
может
Page 50

50 electrolux
• Газовый духовой шкаф нагревается за
счет циркуляции воздуха. Отверстия,
имеющиеся на дне духового шкафа, ни
в коем случае не должны быть
загорожены. Не покрывайте боковые
стороны духового шкафа алюминиевой
фольгой, в частности, нижнюю часть
дверцы.
• Прибор обладает значительным весом,
передвигайте его с осторожностью.
• Перед проведением операций по уходу
и чистке отсоедините прибор от сети и
дайте ему остыть.
• Для облегчения розжига зажигайте
горелки перед тем, как
устанавливать посуду на решетку.
После розжига горелок убедитесь, что
пламя стабильно.
• Всякий раз перед тем как снять посуду
с горелки, приглушайте или
выключайте пламя.
• Убедитесь, что решетки духового
шкафа установлены правильно.
• В выдвижном ящике, расположенном
под духовым шкафом, можно хранить
только огнеупорную посуду.Не кладите
туда воспламеняемые материалы.
Символ на самом изделии или его
упаковке указывает на то, что при
утилизации данного изделия с ним
нельзя обращаться как с обычными
бытовыми отходами. Поэтому оно
должно быть передано в пункт сбора
для переработки электрического и
электронного оборудования. Обеспечив
правильную утилизацию данного
изделия, Вы поможете предотвратить
потенциальные негативные последствия
для окружающей среды и здоровья
человека, которые могли бы иметь
место в противном случае. За более
подробной информацией о правилах
утилизации и переработки данного
изделия обращайтесь в местные органы
власти, в службу по утилизации отходов
или в магазин, в котором Вы приобрели
данное изделие.
Техническое обслуживание
• В случае необходимости ремонта не
пытайтесь устранить неисправность
самостоятельно. Ремонт,
выполненный некомпетентными
лицами, может привести к
повреждениям прибора. Обратитесь в
местный авторизованный сервисный
центр и требуйте использования
только фирменных запчастей.
Информация по охране
окружающей среды
• После установки изделия
утилизируйте упаковку с должным
соблюдением правил безопасности и
охраны окружающей среды.
• При утилизации старого изделия
выведите его из строя, обрезав
сетевой шнур как можно ближе к
изделию.
Page 51

Очень важно сохранить настоящее
руководство для того, чтобы им можно
было воспользоваться в будущем в
справочных целях. В случае продажи или
передачи изделия другому лицу убедитесь,
что оно передается вместе с руководством,
для того чтобы новый владелец мог
ознакомиться с правилами
функционирования изделия и с указаниями
по безопасности.
ПРОИЗВОДИТЕЛЬ:
ELECTROLUX POLAND SP. Z.O.O.
ul. Kazimierza Odnowiciela 28
58-100 Swidnica (Польша)
electrolux 51
Данное руководство предназначено
только для тех стран, символическое
обозначение которых напечатано на
обложке данного руководства.
Page 52

52 electrolux
Панель управления
8
1. Кнопка включения освещения
духового шкафа
2. Ручка управления левой задней
горелкой (для ускоренного
приготовления)
3. Ручка управления левой передней
горелкой (быстродействующей)
4. Ручка управления правой передней
горелкой (вспомогательной)
5.
Ручка управления правой задней
горелкой (для ускоренного
приготовления)
6. Ручка управления газовым духовым
шкафом и электрическим грилем
7. Электронный программатор
8. Индикаторная лампочка режима
“Гриль”
21
6543
7
Page 53

Камера духового шкафа
electrolux 53
Электрический
гриль
Нижняя поверхность
газового духового
Лампочка освещения
духового шкафа
шкафа
Принадлежности
Решетка духового шкафа Противень для выпечки Противень для сбора жира
Page 54

54 electrolux
Правильная эксплуатация плиты
Ручки управления на
передней панели
Ручки управления газовыми горелками
варочной панели находятся на панели
управления плиты. Ручки управления
газовыми горелками можно
поворачивать против часовой стрелки к
символу малого пламени и против
часовой стрелки - к символу большого
пламени.
Нет подачи газа
Максимальная подача газа
Минимальная подача газа
Включение газовых горелок
• Для того чтобы зажечь горелку, перед
тем как ставить на нее кастрюлю,
нажмите до конца на соответствующую
ручку управления и поверните ее в
направлении против часовой стрелки, в
положение максимальной подачи газа
(
).
• После появления пламени, удерживайте
ручку управления нажатой в течение
приблизительно 5 секунд так, чтобы
включить предохранительное устройство
духового шкафа (термопару).
• При необходимости, после включения
отрегулируйте пламя.
• Если после нескольких попыток Вам не
удалось зажечь горелку, проверьте
правильность положения разделителя
пламени и крышки горелки.
• Для того чтобы прекратить подачу газа,
поверните ручку в направлении по
часовой стрелке в положение “ “.
При приготовлении блюд с
использованием жира или масла
будьте особенно внимательны, так
как при перегреве данные
вещества могут воспламениться.
Page 55

электрического устройства; При
отсутствии электропитания розжиг
горелки можно выполнить и без в
этом случае поднесите к горелке
огонь, нажмите соответствующую
ручку управления вниз и поверните
ее против часовой стрелки до
достижения положения “максимум”.
Для обеспечения максимальной
эффективности горелки необходимо
пользоваться только кастрюлями и
сковородами с плоским дном,
подходящим к используемой горелке по
размерам (см. таблицу).
electrolux 55
Горелка} минимальный максимальный
Большая (
быстродействующая
Средняя (для ускоренного
приготовления)
Малая (
вспомогательная
диаметр диаметр
) 180 мм 260 мм
120 мм 220 мм
) 80 мм 160 мм
FO 0204
A - Крышка горелки
B - Рассекатель горелки
C - Свеча зажигания
D - Термопара
Page 56

56 electrolux
Рекомендуемая посуда
Помните, что кастрюли с широким дном
позволяют уменьшить время приготовления
по сравнению с кастрюлями с узким дном.
Всегда используйте посуду,
соответствующую приготавливаемому
блюду.
В частности, при приготовлении жидкостей
обращайте внимание, чтобы размер посуды
не был слишком мал, т.к. в противном
случае они могут легко перелиться через
край.
Кроме того, для обеспечения более
быстрого приготовления пищи, посуда не
должна быть чрезмерно широкой.
Действительно, жир и соки могут
распределиться по дну и легко
воспламениться.
Для выпечки кондитерских изделий лучше
использовать неразъемные формы. В самом
деле, соки и сахар могут вытечь из
разъемной формы, стекая на дно духового
шкафа и, соответственно, пригореть на дне
противня, затрудняя его чистку.
Не помещайте в духовой шкаф посуду с
пластиковыми ручками, если только они не
являются теплостойкими.
Необходимо пользоваться посудой,
диаметр которой соответствует размеру
горелки, в целях оптимального
использования прибора и, следовательно,
снижения потребления газа.
Также рекомендуется накрывать крышкой
кастрюли с кипящими жидкостями и, как
только жидкость в кастрюле начинает
кипеть, убавлять пламя до минимума,
необходимого для того, чтобы
поддерживать температуру кипения.
Ни в коем случае нельзя
ставить посуду на зону
управления прибором.
Следите, чтобы кастрюля не
выступала за края варочной
панели и стояла на горелке по
центру – таким образом, Вы
снизите расход газа.
Page 57

electrolux 57
Газовый духовой шкаф
Розжиг
• Вдавите ручку управления духовым
шкафом/грилем внутрь и поверните ее
против- часовой стрелки, в положение
максимальной подачи газа (240),
удерживая ручку управления нажатой.
• После появления пламени удерживайте
ручку управления нажатой в течение
приблизительно 10-15 секунд так, чтобы
включить предохранительное устройство
духового шкафа (термопару).
При приготовлении в духовом
шкафу крышка должна оставаться
открытой, чтобы не допустить
перегрева
В случае отключения электроэнергии,
Вы можете включить духовой шкаф,
поднеся огонь к горелке духового
шкафа (ручной розжиг).
Ручной розжиг
• Откройте дверь духового шкафа;
• Поднесите пламя к отверстию,
расположенному в нижней части камеры
духового шкафа, как показано на
рисунке.
• нажмите на ручку управления духовым
шкафом и поверните ее против часовой
стрелки до достижения положения
максимального значения температуры;
• удерживайте ручку управления духовым
шкафом нажатой в течение
приблизительно 10-15 секунд до тех пор,
пока предохранительный клапан не будет
поддерживать огонь горелки
автоматически.
• Если горелка не загорится с первого раза,
оставьте дверь духового шкафа открытой
и подождите, по крайней мере, одну
минуту, перед тем как повторить
операцию. После того как горелка
духового шкафа загорится, отрегулируйте
пламя, если это необходимо.
• Для того чтобы отрегулировать огонь,
через несколько минут работы поверните
ручку управления духовым шкафом в
положение, соответствующее желаемой
температуре.
Не нажимайте ручку
управления более 15 секунд.
Если горелка не загорится даже
через 15 секунд, отпустите ручку
управления, поверните ее в
положение „выкл.“ и подождите,
по крайней мере, одну минуту,
прежде чем попытаться вновь
разжечь ее.
Если горелка случайно погасла,
поверните ручку управления в
положение „выкл.“ и подождите,
по крайней мере, одну минуту,
прежде чем попытаться снова
разжечь ее.
отверстие для ручного
розжига
Page 58

58 electrolux
1
2
3
4
5
6
7
8
Электрический гриль -
Ручка выбора температуры
(ручка термостата)
Поворачивая ручку выбора температуры
против часовой стрелки, Вы можете
выбрать температуру приготовления в
пределах от 1 до 8. (
70).
См. таблицу на стр
Электрический гриль
Нажмите и поворачивайте ручку
управления по часовой стрелке до тех
пор, пока не будет достигнуто
положение останова
одновременно загорится индикаторная
лампа гриля. Поместите под решетку
противень для сбора жира, чтобы
предотвратить стекание жира на дно
духового шкафа.
Кнопка освещения
духового шкафа
Выключатель лампочки духового
шкафа позволяет Вам включить
внутреннее освещение духового шкафа.
,
Индикаторная лампочка
работы гриля
Индикаторная лампочка работы гриля
загорается при установке ручки
управления духового шкафа на символ
. Она будет гореть до тех пор, пока
эта температура не будет достигнута.
Затем она будет гаснуть и загораться,
указывая на поддержание заданной
температуры.
Page 59

Первое включение духового шкафа
Перед тем, как приступать к
эксплуатации плиты, удалите все
элементы упаковки, находящиеся
как внутри, так и снаружи
прибора, включая рекламные
наклейки и защитную пленку..
Первое включение духового шкафа:
a) Зажгите горелку газового духового
шкафа и установите ручку управления
в положение “8”.
b) Дайте духовому шкафу поработать
вхолостую в течение примерно
45 минут;
c) Откройте окно, чтобы проветрить
помещение.
В это время может появиться
неприятный запах. Это - совершенно
нормальное явление, вызванное
выгоранием производственных
материалов.
После выполнения этой операции дайте
духовому шкафу остыть, затем
протрите его изнутри мягкой тряпкой,
смоченной в теплом мыльном растворе.
Данную процедуру необходимо
повторить с функцией “Гриль”
течение примерно 5-10 минут.
Перед первым приготовлением пищи
тщательно вымойте принадлежности
духового шкафа.
в
electrolux 59
Открывая дверцу духового
шкафа, всегда беритесь за
центральную часть ручки.
Page 60

60 electrolux
Электронный таймер
Таймер духового шкафа показывает
время в формате 24 часов.
При первом включении
с использование
электричества на
дисплее отображается
12.00, а неоновый
индикатор времени
мигает.
Кнопки увеличения или уменьшения
времени вначале изменяют значение
времени медленно, а затем быстрее.
Их следует нажимать по отдельности.
Нажимайте кнопку
увеличения до тех
пор, пока не
отобразится
правильное время.
Установка обратного отсчета времени
В случае отключения электроэнергии,
часы выключаются, и использование
духового шкафа становится
невозможным.
5 sec
При необходимости,
нажимайте кнопку
уменьшения
времени для
установки
правильного
времени.
Неоновый
индикатор
времени будет
мигать в течение 5
секунд, а затем
погаснет.
Функция обратного отсчета
обеспечивает подачу звукового сигнала
по окончании периода приготовления.
Нажимайте кнопку селектора до тех
пор, пока неоновый индикатор
обратного отсчета не загорится, а на
дисплее не отобразится 0.00
Нажмите кнопку увеличения времени.
Отпустите кнопку, как только
отсчитываемое время достигнет,
например, 30 минут.
Page 61

Операция должна
быть завершена в
течение 5 секунд с
момента первого
нажатия на кнопку
селектора.
Во время работы
функции обратного
При необходимости,
нажимайте кнопку
уменьшения
времени, чтобы
установить нужный
промежуток
времени.
отсчета оставшееся
время отображается
на дисплее
Отмена обратного отсчета времени
electrolux 61
Звуковой сигнал и неоновый
индикатор обратного
отсчета можно выключить
посредством нажатия
любой кнопки, после чего на
дисплее вновь отобразится
время суток
По окончании заданного
периода подается
прерывистый звуковой
сигнал, а неоновый
индикатор обратного
отсчета мигает в течение
2 минут.
Нажимайте кнопку
селектора до тех
пор, пока не
замигает неоновый
индикатор
обратного отсчета.
Нажимайте кнопку
уменьшения
времени до тех пор,
пока на дисплее не
отобразится 0.00.
Неоновый
индикатор обратного
отсчета будет мигать
в течение
нескольких секунд, а
затем на нем вновь
отобразится время
суток.
Page 62

62 electrolux
Энергосберегающий режим
Выключение дисплея времени
позволяет экономить электроэнергию.
Включение дисплея времени
Для включения дисплея нажмите
любую кнопку.
Выключение дисплея времени
Нажмите и удерживайте любые две
кнопки до тех пор, пока дисплей не
выключится.
Page 63

electrolux 63
Советы и рекомендации по эксплуатации
духового шкафа
Всегда готовьте при закрытой
дверце духового шкафа.
Держитесь в стороне при
открывании откидывающейся
дверцы духового шкафа. Не
давайте ей упасть придерживайте ее рукой за
ручку до тех пор, пока она
полностью не откроется.
Духовой шкаф имеет четыре
уровня установки решеток или
противней; одна решетка входит
в комплект поставки.
Положения уровней решеток
отсчитываются снизу, как
показано на рисунке.
Необходимо, чтобы противень
был установлен правильно.
Не ставьте посуду непосредственно
на дно духового шкафа.
При приготовлении в духовом
шкафу или на гриле всегда
оставляйте крышку плиты
открытой для предотвращения
ее перегрева
4
3
2
1
Page 64

64 electrolux
Телескопические держатели полок
Держатели противней на 2-ом уровне
укомплектованы телескопическими
направляющими, облегчающими
выдвижение противней и установку их в
духовой шкаф.
1. Двумя руками полностью выдвиньте
телескопические направляющие, как
показано на рис.
2. Установите противень, решетку или
поддон для сбора жира на
телескопические направляющие и
осторожно задвиньте их в духовой шкаф
(см. рисунок).
Не пытайтесь закрывать дверцу
духовки. если телескопические
держатели полок не полностью
задвинуты внутрь духовки. Это
может привести к повреждению
эмали и стекла.
Page 65

Конденсация и пар
Духовой шкаф оборудован эксклюзивной
системой, обеспечивающей естественную
циркуляцию воздуха и постоянную
рециркуляцию пара. Эта система
позволяет готовить под воздействием
пара и получать хорошо прожаренные,
хрустящие снаружи и мягкие внутри
блюда. Более того, при этом сводятся к
минимуму время приготовления и
потребление энергии. Во время
приготовления образуется пар, который
выходит наружу при открытии дверцы
духового шкафа. Это совершенно
нормальное явление.
Тем не менее, всегда держитесь
на расстоянии от духового
шкафа при открытии его дверцы
во время приготовления пищи
или по его окончании, чтобы
дать возможность выйти
избыткам пара или тепла.
При нагревании продуктов
происходит образование пара,
как в обычном чайнике. При
попадании пара на стеклянную
дверцу духового шкафа он
конденсируется, в результате
чего на ней образуются
капельки воды.
Для уменьшения конденсации
не забывайте хорошо прогреть
духовой шкаф перед тем, как
поместить туда продукты. Перед
любым приготовлением пищи
требуется кратковременный
(около 10 минут) прогрев
духового шкафа.
Мы рекомендуем Вам протирать
дверцу для удаления
конденсата после каждого
использования духового шкафа.
electrolux 65
Page 66

66 electrolux
Выпекание кондитерских изделий
Перед началом приготовления прогрейте
духовой шкаф в течение не менее 10
минут, если не указано иное. Не
открывайте дверцу духового шкафа,
если приготавливаемое блюдо должно
подняться (например, при приготовлении
пирогов или суфле); струя холодного
воздуха не даст тесту подняться. Чтобы
проверить, готовы ли пироги, вставьте в
тесто зубочистку; если к зубочистке не
прилипло тесто, выпечка готова. Перед
выполнением этой проверки подождите,
пока не пройдет, по крайней мере, 3/4
времени приготовления.
В качестве общего правила, помните,
что:
если блюдо хорошо пропечено снаружи,
но недостаточно пропечено внутри,
значит его нужно было готовить на
меньшей температуре, но дольше по
времени. В противоположном случае,
“высушенное” тесто требует более
высокой температуры приготовления за
меньшее время.
Приготовление мяса
Мясо, приготавливаемое в духовом
шкафу, должно весить не менее 1 кг, в
противном случае оно может оказаться
пересушенным. Если Вы хотите
приготовить поджаренное мясо
красивого цвета, используйте совсем
небольшое количество масла. Если
кусок мяса постный, используйте
растительное или животное масло, либо
небольшое количество и того, и другого
сразу. Сливочное или растительное
масло не требуется, если на куске мяса
имеется слой жира. Если на куске мяса
слой жира имеется только с одной
стороны, положите его в духовой шкаф
данной стороной вверх; когда жир
расплавится, он достаточно смажет и
нижнюю сторону.
Красное мясо необходимо вынуть из
холодильника за один час до его
приготовления, в противном случае,
вследствие резкого изменения
температуры, оно может стать жестким.
Жаркое, особенно из красного мяса, не
следует солить в начале приготовления,
т.к. при добавлении соли мясо выделяет
кровь и соки, что препятствует
образованию аппетитной корочки.
Рекомендуется солить мясо сверху по
истечении половины времени
приготовления.
Поставьте жаркое в духовку, поместив
его на блюдо с низкими краями; глубокая
посуда препятствует распространению
тепла.
Мясо можно поместить в жаростойкую
посуду или непосредственно на гриль,
под который вставляется противень для
сбора сока. Ингредиенты для подливки
кладутся непосредственно в посуду
только в случае непродолжительного
времени приготовления, в противном
случае их нужно добавлять в последние
полчаса.
Если Вы хотите приготовить мясо с
кровью, начните приготовление при
высокой температуре, в дальнейшем
постепенно понижая температуру.
Температура приготовления белого мяса
должна быть умеренной от начала и до
конца приготовления.
Степень готовности мяса легко
проверить, надавив на его вилкой; если
она входит в мясо свободно, оно готово.
По окончании приготовления
рекомендуется подождать не менее 15
минут перед тем, как резать мясо, чтобы
из него вытек сок.
Чтобы сохранить блюдо теплым до
подачи на стол, его можно оставить в
духовом шкафу при минимальной
температуре.
Приготовление рыбы
Готовьте мелкую рыбу при высокой
температуре от начала и до конца
приготовления. Готовьте рыбу средней
величины вначале при высокой
температуре, а затем постепенно
понижайте температуру.
Page 67

electrolux 67
Готовьте крупную рыбу при умеренной
температуре от начала и до конца
приготовления.
Проверьте готовность рыбы, осторожно
приподняв одну сторону брюшка; мясо
рыбы должно быть белым и
непрозрачным по всей длине, за
исключением лосося, фореля и другой
подобной рыбы.
Приготовление на гриле
Для приготовления на гриле подходят
следующие типы мяса. Основные типы
мяса и требухи, разрезанные на куски
различных размеров, но обычно не
очень толстые; птица, разрезанная
пополам и отбитая; рыба; некоторые
овощи (например, кабачки, баклажаны,
помидоры и т.д.); кусочки мяса, рыбы
или морепродуктов, нанизанные на
шампуры.
Мясо и рыба слегка смазываются
растительным маслом и помещаются на
гриль; мясо солят по окончании
приготовления; при этом рыбу следует
посолить изнутри перед
приготовлением. Гриль
устанавливается на направляющие,
расположенные ближе или дальше от
нагревательного элемента, в
зависимости от толщины куска, чтобы
не допустить подгорания его
поверхности и недостаточного
прожаривания внутри.
Чтобы не допустить образования дыма,
вызванного каплями сока и жира, на
противень для сбора жира можно
налить 1 или 2 стакана воды.
Гриль также можно использовать для
подрумянивания хлеба и приготовления
тостов, а также некоторых видов
фруктов, таких как бананы, порезанные
пополам грейпфруты, кусочки ананаса,
яблоки и т.д. Фрукты нужно помещать
не слишком близко к источнику тепла.
Время приготовления
Время приготовления варьируется в
зависимости от типа приготовляемоых
продуктов, их консистенции и
количества. При первом приготовлении
каких-либо блюд рекомендуется
наблюдать за результатом и проверить,
получены ли сходные результаты при
приготовлении тех же блюд в тех же
условиях.
Таблицы приготовления блюд в духовом
шкафу и на гриле предоставлены в
качестве руководства при
приготовлении блюд в соответствии с
рекомендуемым временем.
На практике возможны отклонения от
значений, приведенных в таблице.
Тем не менее, необходимо тщательно
следовать указаниям, приведенным
в рецепте блюда, которое Вы хотите
приготовить.
Внимание: не кладите никакие
принадлежности, например, противень
для сбора жира, противни для выпечки,
кастрюли, жаропрочные тарелки,
алюминиевую фольгу и др., на дно
духового шкафа во время его
использования. Застой тепла может
привести к ухудшению результатов
приготовления пищи, а также к
повреждению эмали, покрывающей
духовой шкаф.
Page 68

68 electrolux
Рекомендации по использованию газовых горелок
Начинайте приготовление на большом
пламени, повернув ручку управления на
символ
пламени, как Вам нужно.
Наружная сторона пламени имеет гораздо
более высокую температуру, чем его
внутренняя часть (центр). Соответственно,
верхняя часть пламени должна
соприкасаться с дном посуды. Избыточный
огонь означает перерасход газа.
В отличие от электрических конфорок,
газовые горелки не требуют
использования посуды с ровным дном:
пламя соприкасается с дном и
распределяет тепло по всей поверхности.
Для приготовления на газовых горелках не
требуется никакой специальной посуды.
Однако посуда с тонкими стенками
быстрее передает пище тепло, чем посуда
с толстыми стенками.
Если тепло распределяется по посуде
неравномерно, пища может приготовиться
лишь частично. Соответственно,
рекомендуется неоднократно помешивать
пищу.
Толстое дно посуды предотвращает
частичный перегрев, поскольку
обеспечивает достаточную термическую
компенсацию.
Не используйте посуду слишком малых
размеров. Широкие и мелкие кастрюли
предпочтительны по отношению к узким и
глубоким, поскольку обеспечивают более
быстрое нагревание. Если поставить узкую
кастрюлю на широкую горелку,
приготовление тем самым не ускоряется.
Результатом будет только перерасход
газа. Для правильной эксплуатации,
ставьте маленькие кастрюли на маленькие
горелки, а большие кастрюли - на широкие
горелки.
Не забывайте накрывать посуду крышкой
для сокращения расхода газа.
. Затем отрегулируйте величину
Page 69

electrolux 69
Таблица приготовления
Время приготовления не включает в себя время предварительного прогрева
духового шкафа. Перед любым приготовлением пищи требуется
кратковременный (около 10 минут) прогрев духового шкафа
воткудорпыпиТ
-арепмеТ
C°,арут
*ьневорУ
йывозаГ
факшйовохуд
икчепывялдхамрофватсетоготибзвзиытроТ
трот"йылеб-онреЧ"
икшепеЛ
"атиреграМ"троТ
акче
пыВ
жроК
горипйынрыС
момеждстроТ
икчепывялдхамрофватсетоговежжордзиытроТ
акчолуБ
еынжорипеикьнелаМ
акчепыВ
еонжорипеонраваЗ
езеБ
яьназаЛ
осяМ йыджаканяинелвото
ацитП
гк3ьсуГ
ь
чиД
цяаЗ
ищовО
абыР
ьлафеК
ацциП
ьлирГ
еынвибтО
иксисоС207-06
Ку ьлиргацир
* Номер направляющей считается снизу (за исключением положения на дне духового шкафа,
т.к. противень для сбора жира не может быть вставлен).
гирпямерв(
)аксукынищлотртемитнас
асямзиеокражеоннеражорпоньлиС
асямзиеокражеоннеражорпобалС
шрафйонсяМ
гк2-5,1актУ
ацирукяанераЖ
гк5акйеднИ
илусокикшырбеР
агоняьнелО
имащовосгориП
гк6,0елетреванынитялетзиеокраЖ
5712 07-06
5713 07-06
5713 04-53
0023 02-51
0022 04-53
0022
0022 04
0023 51-01
0023 04-03
0413 021
5222 05-04
5712 51-21
0022 21-
0022 04-03
0022 081-021
0022 012-051
0022 09-06
5712 042олоко
0022 09-06
0022 051-09
5712 081-09
0022 54-04
0022 05-04
0422 52-02
302-51
352-02
ямерВ
04-53
-53
01
08-07
09-06
-нелвотогирп
хатунимв,яи
Page 70

70 electrolux
Примерные температуры, соответствующие показаниям селектора
1 2 3 4 5 6 7 8
150°C 170°C 190°C 200°C 210°C 220°C 230°C 240°C
Приготовление на гриле
Количество
БЛЮДО
штук
Кусочки филе 4 800 3 12 ~ 15 12 ~ 14
Бифштексы 4 600 3 10 ~ 12 6 ~ 8
Колбаски 8 — 3 12 ~ 15 10 ~ 12
Свиная отбивная 4 600 3 12 ~ 16 12 ~ 14
Курица
(разрезанная пополам) 2 1000 3 30 ~ 35 25 ~ 30
Кебаб 4 — 3 10 ~ 15 10 ~ 12
Курица (грудка) 4 400 3 12 ~ 15 12 ~ 14
Гамбургер 6 600 3 10 ~ 15 8 ~ 10
Рыба (филе) 4 400 3 12 ~ 14 10 ~ 12
Сэндвичи 4-6 — 3 5 ~ 7 —
Тосты 4-6 — 3 2 ~ 4 2 ~ 3
Вес
Уровень
Время приготовления
4
3
2
1
(минут)
Верхняя
сторона
Нижняя
сторона
Page 71

Чистка и уход
electrolux 71
Перед проведением любых
операций отключите прибор от
сети.
Данное изделие не подлежит
чистке паром или с помощью
пароочистителя.
Духовой шкаф следует содержать
в чистоте. Скопление жира или
остатков других продуктов может
привести к возгоранию, особенно
при приготовлении на гриле.
Чистка плиты
Капли подливки, фруктового сока и т.д.
необходимо удалять как можно скорее с
помощью мягкой тряпки, смоченной в
теплой воде с моющим средством. Для того
чтобы счистить спекшуюся корку, не
применяйте стальные губки или ножи.
Стойкие пятна удаляйте с помощью
влажной толстой тряпки, пропитанной
мылом, стараясь при этом не поцарапать
эмаль. Эмалированные решетки мойте
теплой водой с моющим средством; их
можно мыть также в посудомоечной
машине.
Снимите крышки с горелок и решетки и
тщательно промойте их в теплой воде с
моющим средством. Перед установкой их
на место вытрите их как следует.
Кроме того, необходимо проверить, что они
были правильно установлены на место.
Горелки можно оттирать металлической
губкой или тканью, обладающей
небольшим абразивным эффектом.
Мойте дверцу духового шкафа и
стеклянную крышку (если Ваша модель
оборудована данными деталями) только
горячей водой, не допуская использования
жестких салфеток или абразивных
материалов; в плитах с автоматическим
розжигом свечу зажигания необходимо
периодически тщательно чистить, чтобы не
допустить проблем с розжигом; затем
проверьте, чтобы отверстия горелки не
были загорожены.
Чистка духового шкафа
После использования тщательно
вычистите камеру духового шкафа,
пока она еще не остыла. В этот момент
легко удалить остатки жира, вытекшие
из фруктов соки, частицы сахара и т.д.
Вы можете воспользоваться теплой
водой с моющим средством, либо одним
из специальных спреев для чистки
духовых шкафов. Не направляйте спрей
на матовые стальные поверхности,
поскольку так можно повредить их, и
всегда соблюдайте инструкции
изготовителя. Мойте принадлежности
духового шкафа теплой водой с
моющим средством. В случае
образования нагара удаляйте его
чистящим порошком с небольшим
абразивным эффектом.
Ни в коем случае не накрывайте
какие-либо поверхности
духового шкафа алюминиевой
фольгой. Это приведет к
аккумуляции тепла, в результате
чего возможно ухудшение
результата приготовления, а
также повреждение эмали.
Органы управления Принадлежности
Периодически проверяйте состояние
гибкого шланга, служащего для
подключения плиты к газовой
магистрали, и обеспечивайте его замену
силами квалифицированных
специалистов сразу же при
обнаружении неисправностей.
Рекомендуется заменять его раз в год.
Page 72

72 electrolux
Чистка духового шкафа с
эмалевым покрытием
Принцип:
Чистка гладких блестящих эмалевых
стенок духового шкафа должна
производиться вручную.
Регулярный уход:
После приготовления мясных блюд
стенки духового шкафа необходимо
промыть с помощью губки и моющего
средства, чтобы удалить возможные
брызги жира. После выполнения данной
операции, при следующем использовании
духовой шкаф производит меньше пара и
остается чистым на более
продолжительное время. Загрязнения от
выкипания с нижней плоскости
удаляются легче, если ее вынуть из
духового шкафа.
Долговременный уход:
Используйте только специальные
вещества, имеющиеся на рынке.
Page 73

electrolux 73
Чистка дверцы духового
шкафа
Для более полной чистки дверцы
духового шкафа рекомендуется
размонтировать ее следующим образом
(Рис. 10):
1. полностью откройте дверцу;
2. поверните две крышки,
расположенные на рычажках петель,
на 180° (рисунки 1 и 2);
3. частично закройте дверцу так, чтобы
она оказалась под углом 30°;
4. снимите дверцу, потянув ее вверх и на
себя (рисунок 3).
Установите дверцу на место, повторив
вышеописанные операции в обратном
порядке.
Модели из нержавеющей стали или
алюминия:
Мы рекомендуем чистить дверцу
духового шкафа только влажной губкой
и затем протереть ее мягкой тряпкой.
Никогда не используйте стальные губки,
а также кислотные или абразивные
средства, т.к. они могут повредить
поверхности духового шкафа.
Выполняйте чистку панели управления
духового шкафа с соблюдением
аналогичных предосторожностей.
1
2
3
Page 74

74 electrolux
Полки духовки и держатели полок
Мойте полки духовки теплой водой с
мылом; трудноудалимые загрязнения
удаляйте с помощью губки, хорошо
смоченной в мыльном растворе. Затем
сполосните их чистой водой и насухо
протрите мягкой тряпкой. Для удобства
чистки держатели полок можно снять.
Для этого действуйте следующим
образом:
1. снимите передний винт, другой рукой
удерживая держатель полки на своем
месте ;
2. высвободите задний крюк и снимите
держатель полки;
3. по окончании чистки установите
держатели полок на свои места,
выполнив вышеописанную процедуру
в обратном порядке.
После установки держателей на место
проверьте, чтобы стопорные гайки были
плотно затянуты.
При чистке держателей полок не
удаляйте смазку, нанесенную
сзади телескопических
направляющих. Она необходима
для обеспечения их правильного
функционирования.
Page 75

Замена лампочки освещения
духового шкафа
В случае необходимости замены
лампочки, следует использовать
лампочку со следующими параметрами:
- Мощность: 15 Вт/ 25 Вт,
- Напряжение: 230 В (50 Гц),
- Номинальная рабочая температура 300 °C,
- Тип цоколя: E14.
Эти лампочки можно приобрести в
авторизованном сервисном центре.
Замена перегоревшей лампочки:
1. Убедитесь, что духовой шкаф
отсоединен от сети электропитания.
2. Поверните стеклянный плафон против
часовой стрелки.
3. Выньте неисправную лампочку и
замените ее на новую.
4. Установите на место стеклянный
плафон.
5. Снова включите плиту в сеть.
electrolux 75
Page 76

76 electrolux
Возможные неисправности
Если прибор не функционирует должным образом, то перед тем, как обращаться
в сервисный центр, произведите следующие проверки:
•яинелвотогирпямервеонремзерЧ
•яинещевсоакчопмалтеатобареН
.азагачадопяанчотатсодеН•:отч,ьсетидебУ
лугер•
•.тырктоюьтсонлопеноллабмовозаганьлитнев
мозагтенхапиинещемопВ•:отч,ьсетидебУ
амыдеинавозарбО• елсопфак
афакшоговохуд
•ианежолопсароньливарп
ястеаверганенфакшйовохуД• аф
.еледзар
азагичадопабурт
нжомзовасям
;ынеросазенелетакессарвяитсревто•
;оньливарптеатобаряинелвадротя
етйавыбазен;ииняотсосмешорохвястидохан
енадгокиН.догвазарогондоежеренееьтянем
омзовикреворпялдямалпетйузьлопси
.иинежолопмоньливарпвястядохан
шйовохудьтитсичмаВмеуднемокерыМ•
азйынтяирпенимыдясьтавывозарботудуб
.)ектсичйыннещявсоп,ледзар
кечетухынж
.ровтсарйыньлымоготэотсемветйузьлопси;азаг
акшоговохудяинелварпуикчуротч,ьсетидебУ•
нарбывяинешонтоосьтсоньливарпетьреворП•
йон
.адюлбогомеялвотогирпмопитсырутарепмет
иинелвотогирпирП.ищипяинелвотогирпогоджак
иикнетсанарижгзырбеинадапопо
оннемервеовсилсе;афакшоговохудыремаконд
яинарогывхиетатьлузерв,уктсичогеьтинлопывен
.мс(.хап
етйуделсынемазееялД.алерогерепакчопмаЛ•
мещюувтстевтоосвмыннедевирп,мяиназаку
Page 77

Технические данные
Плита
Задняя левая горелка (для ускоренного
приготовления)
2000 Вт (G20 20 мбар/G30 30 мбар)1400 Вт (G20 13 мбар)
Передняя левая горелка
(быстродействующая)
3000 Вт (G20 20 мбар)-2800 Вт (G30)1900 Вт (G20 13 мбар)
Задняя правая горелка
приготовления)
2000 Вт (G20 20 мбар/G30 30 мбар)1400 Вт (G20 13 мбар)
Передняя правая горелка (вспомогательная)
1000 Вт (G20 20 мбар/G30 30 мбар)-
900 Вт (G20 13 мбар)
Размеры плиты
Высота 850 мм
Глубина 600 мм
Ширина 600 мм
Объем духового шкафа 56
Прибор класса 1 и класса 2, подкласса 1
Категория: II2H3B/P
Прибор настроен для работы на газе
следующего типа: G20/20 мбар
(для ускоренного
л
electrolux 77
Технические данные
Духовой шкаф
Электрический гриль 1650 Вт
Горелка газового духового шкафа
2700 Вт (G20 20 мбар/G30 30 мбар) -
2400 Вт (G20 13 мбар)
Лампочка освещения духового шкафа 15 Вт
Общая электрическая мощность 1675 Вт
Напряжение питания (50 Гц) 230 В
Page 78

78 electrolux
Указания для установщика
Следующие указания предназначены
для квалифицированного специалиста и
их задачей является помочь ему
произвести установку плиты в
соответствии с действующими нормами.
При выполнении каких-либо операций,
требующих отсоединения плиты от
электропитания, следует действовать с
максимальной осторожностью.
ИЗГОТОВИТЕЛЬ СНИМАЕТ С СЕБЯ
ВСЯКУЮ ОТВЕТСТВЕННОСТЬ ЗА
ВОЗМОЖНЫЙ УЩЕРБ,
ЯВИВШИЙСЯ РЕЗУЛЬТАТОМ УСТАНОВКИ
ПРИБОРА, НЕСООТВЕТСТВУЮЩЕЙ
ДЕЙСТВУЮЩИМ НОРМАМ
.
Требования к установке
Внимание - Плита должна
устанавливаться и эксплуатироваться
только в постоянно вентилируемом
помещении в соответствии с
действующими нормами и правилами.
Для обеспечения правильной работы
газового прибора необходимо
обеспечить достаточный для сгорания
газа приток воздуха в помещение.
(Установщик должен придерживаться
действующих норм).
Воздух должен поступать в кухню
непосредственно через отверстия,
выполненные в наружных стенах. Эти
отверстия (или отверстие) должны быть
выполнены таким образом, который
исключал бы возможность их
перегораживания как изнутри, так и
снаружи.
Установка и техобслуживание плиты
должны проводиться
квалифицированным специалистом в
соответствии с действующими нормами,
особенно с учетом NBND 51003.
Подключение к электрической сети
должно выполняться в соответствии с
нормой NBN.
Компания-изготовитель не несет
ответственности в случае инцидентов,
вызванных некачественным
заземлением или отсутствием
заземления.
Удаление продуктов сгорания
Продукты сгорания газовых кухонных
приборов должны удаляться с помощью
вытяжки, непосредственно
соединенной с воздуховодом вытяжной
вентиляции или выходящей наружу.
Размещение
Плита предназначена для установки
рядом с предметами мебели, высота
которых не превышает высоту рабочей
поверхности варочной панели.
Pасстояние между газовой плитой и
боковой стеной/стенкой кухонной
мебели (если такая мебель имеется)
должно быть не менее 450 мм.
Выравнивание по высоте
Печь оборудована небольшими
регулируемыми ножками,
расположенными в задних углах корпуса.
Путем регулирования высоты ножек
можно обеспечить равномерное
распределение пищевых жидкостей,
содержащихся в сковородах или
кастрюлях.
A Газовая магистраль
B Прокладка
C Колено
D Резиновый трубодержатель для
сжиженного нефтяного газа
E Трубодержатель
D
A
B
C
B
E
Page 79

Подключение к газовой магистрали
Электрическое подключение должно
выполняться в соответствии с
действующими нормами. Компанияизготовитель отгружает плиту после
проведения приемосдаточных
испытаний, настроенную на работу с
типом газа, указанным на паспортной
табличке, размещенной с задней
стороны, вблизи соединительного
патрубка. Убедитесь, что тип газа в
Вашей магистрали соответствует типу
газа, указанному на паспортной
табличке.
Подключение к газовой магистрали
LPG (СЖИЖЕННЫЙ НЕФТЯНОЙ ГАЗ):
используйте резиновый трубодержатель
«D».
Природный газ : используйте резиновый
трубодержатель «E».
Всегда устанавливайте прокладку «B».
Затем выполняйте подключение, как
указано в соответствующих разделах.
B Прокладка
D Резиновый держатель трубы
для сжиженного нефтяного
газа
E Трубодержатель
D
electrolux 79
E
B
Подключение с помощью гибкого
неметаллического шланга
Если соединение можно легко осмотреть
на всем его протяжении, то допускается
использовать гибкий шланг в соответствии
с действующими правилами. Гибкий шланг
должен быть плотно закреплен хомутами
в соответствии с действующими
правилами.
Гибкий шланг должен соответствовать
следующим требованиям:
- температура ни одной из его частей не
должна превышать комнатную более,
чем на 30°C; если шланг нужно
пропустить сзади плиты, его следует
прокладывать так, как указано на
рисунке;
- он не должен быть длиннее 1500 мм;
- на нем не должно быть сужений;
- он не должен быть ни натянут, ни
перекручен;
- он не должен касаться острых
кромок или углов;
- его можно легко осмотреть, чтобы
проверить его состояние.
Page 80

80 electrolux
Контроль сохранности гибкого шланга
включает в себя проверку того, что:
- на нем нет трещин, порезов, следов
горения, как на концах, так и по всей
его длине;
- материал шланга не стал жестким, а
сохранил свою нормальную
эластичность;
- на хомутах крепления отсутствует
ржавчина;
- срок годности шланга не истек.
В случае обнаружения одного или
нескольких дефектов не ремонтируйте
шланг, а замените его.
ВНИМАНИЕ
После завершения установки
проверьте, что трубные соединения
абсолютно герметичны, для этого
используйте мыльный раствор и ни
в коем случае не используйте
пламя.
ВНИМАНИЕ
Замена/переоборудование
прибора должны производиться
только сертифицированным
специалистом или иным
компетентным лицом.
Важно отметить, что данная
модель предназначена для работы
на природном газе G20 давлением
20 мбар, но может быть
переоборудована для работы на
природном газе G20 с давлением
13 мбар (только для России) или на
сжиженном газе G30 с давлением
30 мбар при условии установки
соответствующих инжекторов.
Расход газа соответствует
потребностям функционирования.
ДА
Газопровод
гибкий
резиновый
Электрический
кабель
НЕТ
Газопровод
гибкий резиновый
Электрический
кабель
Переоборудование на другие
типы газа
Для
переналадки духового шкафа на тип
газа, отличный от того, на работу с
которым он настроен, следуйте
приведенным ниже инструкци
ям.
Замена инжекторов горелок
варочной па
1 Снимите решетки для посуды.
2. Снимите крышки и разделители
пламени горелок.
нели
Page 81

3. С помощью торцевого ключа на 7
открутите и снимите (см. рисунок)
инжекторы и замените их на те,
которые соответствуют
применяемому типу газа (см. таблицу
“Параметры горелок”).
4. Установите все детали на место,
выполнив в обратном порядке
вышеописанную процедуру.
Замените идентификационную
табличку (размещенную вблизи трубы
подачи газа) на табличку,
соответствующую новому типу
используемого газа. Вы найдете эту
табличку в пакете с инжекторами,
поставляемом вместе с прибором.
Данные горелки не требуют какой-либо
регулировки подачи первичного
воздуха.
Горелки варочной панели - Регулировка
минимального уровня пламени
Регулировка минимального уровня
пламени:
1. поверните ручку в положение,
соответствующее минимальному пламени;
2. снимите ручку;
3. тонкой отверткой отрегулируйте положение
винта обводного клапана, расположенного
по центру газового крана (см. рисунок). При
переоборудовании с природного газа
давлением 20 мбар на сжиженный нефтяной
газ (LPG) закрутите регулировочный винт до
упора. При переоборудовании со
сжиженного нефтяного газа (LPG) на
природный газ давлением 20 мбар открутите
винт обводного клапана примерно на 1/2
оборота. При переоборудовании панели с
природного газа давлением 20 мбар на
природный газ давлением 13 мбар открутите
винт обводного клапана примерно на 1/4
оборота. При переоборудовании со
сжиженного нефтяного газа (LPG) на
природный газ давлением 13 мбар открутите
винт обводного клапана примерно на 3/4
оборота.
4. Установите все детали на место,
Убедитесь, что при быстром повороте
ручки из максимального положения в
минимальное пламя не гаснет.
electrolux 81
Винт обводного клапана
выполнив в обратном порядке
вышеописанную процедуру.
Page 82

82 electrolux
Замена инжектора горелки
газового духового шкафа
Для того чтобы заменить инжектор
горелки духового шкафа, выполните
следующие действия:
1. Снимите нижнюю панель камеры
духового шкафа (“A”);
2. Отвинтите два винта (“C”) крепления
горелки духового шкафа
3. Осторожно сдвиньте горелку духового
шкафа с держателя инжектора (“D”) и
медленно сдвиньте ее влево так,
чтобы не натягивать соединительные
провода, идущие к свече зажигания
(“E”) и к (“F”) термопаре;
4. С помощью торцевого ключа на 7
открутите и снимите инжектор
духового шкафа (“D”) и замените его
на нужный (см. таблицу “Параметры
горелок”);
5. Выполните повторную сборку горелки,
повторив вышеописанную процедуру в
обратном порядке.
6. Замените идентификационную
табличку (размещенную вблизи трубы
подачи газа) на табличку,
соответствующую новому типу
используемого газа, поставляемую
вместе с комплектом инжекторов.
Регулировка минимального
уровня пламени горелки
газового духового шкафа
После установки духового шкафа на
максимальную температуру при закрытой
дверце примерно на 10 минут, поверните
ручку управления на минимум.
Для доступа к винту обводного клапана
термостата (“G”) и регулировки
минимального уровня пламени
действуйте следующим образом:
1. снимите ручку управления духовым
шкафом и электрическим грилем.
2. тонкой отверткой отрегулируйте
положение винта обводного клапана,
расположенного по центру газового крана
(см. рисунок). При переоборудовании
плиты с природного газа с давлением 20
мбар на сжиженный газ
Page 83

завинтите регулировочный винт до
упора. При переоборудовании со
сжиженного нефтяного газа (LPG) на
природный газ давлением 20 мбар
открутите винт обводного клапана
примерно на 1/2 оборота. При
переоборудовании панели с
природного газа давлением 20 мбар на
природный газ давлением 13 мбар
открутите винт обводного клапана
примерно на 1/4 оборота. При
переоборудовании со сжиженного
нефтяного газа (LPG) на природный
газ давлением 13 мбар открутите винт
обводного клапана примерно на 3/4
оборота.
3. Установите ручку на место, выполнив
вышеописанную процедуру в обратном
порядке.
4. В заключение убедитесь, что при
быстром повороте ручки из
максимального положения в
минимальное пламя не гаснет.
electrolux 83
Page 84

84 electrolux
Параметры горелок
ГОРЕЛКА
ТИП
ГАЗА
ПОЛОЖЕНИЕ МАКС МИН МАКС МИН МАКС МИН МАКС МИН
ПРИРОДНЫЙ
20 мбар
СЖИЖЕННЫЙ
НЕФТЯНОЙ
ГАЗ
30 мбар
ПРИРОДНЫЙ
13 мбар*
НОМИНАЛЬНАЯ ТЕПЛОВАЯ
МОЩНОСТЬ (кВт) 3,0 0,75 2,0 0,45 1,0 0,33 2,7 1,0
ГАЗ
НОМИНАЛЬНЫЙ РАСХОД
РАСХОД (м
ДИАМЕТР ИНЖЕКТОРА 119 Регул. 96 регул. 70 регул. 114 регул.
НОМИНАЛЬНАЯ ТЕПЛОВАЯ
МОЩНОСТЬ (кВт) 2,8 0,75 2,0 0,45 1,0 0,33 2,7
НОМИНАЛЬНЫЙ РАСХОД
РАСХОД (г/ч) 204 47 145 33 73 24 196 73
ДИАМЕТР ИНЖЕКТОРА 86 42 71 32 50 28 83 52
1/100 мм
НОМИНАЛЬНАЯ ТЕПЛОВАЯ
МОЩНОСТЬ (кВт) 1,9 0,75 1,4 0,45 0,9 0,33 2,4 1,0
ГАЗ
НОМИНАЛЬНЫЙ
РАСХОД (г/ч) 0,181 0,062 0,133 0,043 0,086 0,031 0,229 0,095
ДИАМЕТР ИНЖЕКТОРА 120 Регул. 105 регул. 80 регул. 123 регул.
1/100 мм
3
/ч) 0,286 0,062 0,190 0,043 0,095 0,031 0,257 0,095
* Природный газ G20 13 с давл.мбар подлежит использованию только в России
БЫСТРОДЕЙСТВУЮЩАЯ
(большая) (средняя) (малая)
УСКОРЕННОГО
ПРИГОТОВЛЕНИЯ ШКАФА
ВСПОМОГАТЕЛЬНАЯ
ДЛЯ ДУХОВОГО
X
Диаметр обводного клапана
Горелка Диам. обходного
винта в 1/100 мм
Вспомогательная 28
Для ускоренного
приготовления 32
Быстродействующая 42
Духовой шкаф
52
Page 85

Электрическое подключение
electrolux 85
Плита предназначена для включения в
сеть однофазного напряжения
номиналом 230 В.
Перед выполнением электрического
подключения убедитесь в том, что:
— параметры сети электропитания у Вас
дома позволяют выдерживать
нагрузку, создаваемую включением
плиты (см. табличку технических
данных).
— прибор правильно заземлен через
соответствующую вилку сетевого
шнура, в соответствии с
законодательством страны, в которой
установлен прибор.
— к сетевой розетке или
многополюсному размыкателю,
используемому для электрического
подключения, должен обеспечиваться
легкий доступ после установки плиты.
Плита укомплектована сетевым
шнуром, к которому Вам следует
подключить стандартную вилку,
соответствующую полной
электрической нагрузке, указанной на
табличке с техническими данными. Эту
вилку следует включать в
соответствующую сетевую розетку.
В случае фиксированного
подсоединения к сети между плитой и
сетевыми проводами необходимо
установить многополюсный
размыкатель с минимальным зазором
между разомкнутыми контактами,
равным 3 мм, соответствующий
существующим требованиям.
Коричневый провод (подключенный к
контакту клеммной колодки плиты)
всегда должен соединяться с фазой
сети. В любом случае, сетевой шнур
должен быть размещен таким образом,
чтобы он ни в коем случае не мог
нагреться до температуры, на 50 °C
превышающей комнатную температуру.
При необходимости замены сетевого
шнура используйте только специальный
кабель:
H05RR-F / H05VV-F / H05V2V2-F (T90).
Желто-зеленый провод заземления
должен быть на 2 см длиннее проводов
фазы и нейтрали.
После выполнения подключения
проверьте работу нагревательных
элементов в течение около 3 минут,
чтобы убедиться в правильности их
функционирования.
Изготовитель снимает с себя всякую
ответственность в случае
несоблюдения стандартных мер
безопасности.
Нейтральный
Фаза
Заземление
(желто-зеленый)
провод
Page 86

86 electrolux
Сервис и запасные
части
Если после проведения проверок,
описанных в предыдущем разделе,
прибор по-прежнему не работает
должным образом, обратитесь в
авторизованный сервисный центр,
указав тип неисправности, модель
прибора (Mod.), продуктовый номер
(Prod. No.) и серийный номер (Ser. No.),
указанные в табличке паспортных
данных.
Эта табличка находится внутри
духового шкафа с передней внешней
стороны.
Оригинальные запчасти,
сертифицированные изготовителем
прибора и снабженные
данным символом,
имеются только в
наших сервисных
центрах и в авторизованных магазинах
по продаже запчастей.
Page 87

electrolux 87
Гарантия/сервисная служба
Сервисное обслуживание и запасные части
В случае необходимости ремонта прибора, или если Вы хотите приобрести запасные
части, обращайтесь в наш ближайший авторизованный сервисный центр (список
сервисных центров прилагается). Если у вас возникли вопросы по использованию
прибора или Вы хотите узнать о других приборах концерна ELECTROLUX, звоните на
нашу информационную линию по телефону (495) 937 78 37 или (495) 956 29 17.
ЕВРОПЕЙСКАЯ ГАРАНТИЯ
Данное устройство поддерживается гарантией Electrolux в каждой из стран,
перечисленных на обороте этого руководства, в течение срока, указанного в
гарантии на устройство или в ином определенном законом порядке. В случае
Вашего перемещения из одной из этих стран в любую другую из
нижеперечисленных стран, гарантия на устройство переместится вместе с Вами
при условии соблюдения следующих требований:
• Гарантия на устройство начинает действовать с даты, в которую Вы впервые
приобрели это устройство, подтверждением которой будет служить предъявление
действительного удостоверяющего покупку документа, выданного продавцом
устройства.
• Гарантия на устройство действует в течение того же срока и в пределах того же
объема работ и конструктивных частей, какие действуют в новой стране Вашего
проживания применительно к данной конкретной модели или серии устройств.
• Гарантия на устройство является персональной для первоначального покупателя
этого устройства и не может быть передана другому пользователю.
• Устройство установлено и используется в соответствии с инструкциями, изданными
Electrolux, только в пределах домашнего хозяйства, т.е. не используется в
коммерческих целях.
• Устройство установлено в соответствии со всеми применимыми нормативными
документами, действующими в новой стране вашего проживания.
Положения настоящей Европейской Гарантии не нарушают никаких
предоставленых Вам по закону прав.
Page 88

88 electrolux
Page 89

electrolux 89
Page 90

92 electrolux
www.electrolux.ru
35905-4611 Ред.0 06/08
 Loading...