

AEG EKG603101X, EKG603101W User Manual

Руководство по
эксплуатации
instruction booklet
RU
Gas Cooker
Газоэлектрическая плита
EKG 603101


Welcome to the world of Electrolux
Thank you for choosing a first class product from Electrolux, which hopefully will
provide you with lots of pleasure in the future.
The Electrolux ambition is to offer a wide variety of quality products that make
your life more comfortable.
You find some examples on the cover in this manual. Please take a few minutes
to study this manual so that you can take advantage of the benefits of your new
machine.
We promise that it will provide a superior User Experience delivering Ease-ofMind.
Good luck!
4 electrolux
Contents
For the user For the installer
Important safety information 5
Control Panel 9
Using the hob 11
Gas oven 14
When using the oven for the first 16
time
The electronic minute minder 17
Hints and tips for using the oven 20
Suggestions for gas burners 24
Cooking table 25
Cleaning and maintenance 27
Something not working 31
Service and spare parts 41
European guarantee 42
Technical data 32
Instructions for the installer 33
Electrical connection 40
Guide to Use the instructions
The following symbols will be found in the text to guide you throughout the
Instructions:
Safety Instructions
Step by step instructions for an operation
)
Hints and Tips
Environmental information
This appliance complies with the following E.E.C. Directives:
• 2006/95 (Low Voltage Directive);
• 89/336 (Electromagnetical Compatibility Directive);
• 90/396 (Gas Appliance Directive);
• 93/68 (General Directives);
and subsequent modifications.

electrolux 5
ENGLISHENGLISH
ENGLISH
ENGLISHENGLISH
Important safety information
These warnings have been given for the safety of you and others. We
therefore ask you to carefully read the procedures of installing and using
this cooker.
Installation
• The work of installation must be carried
out by competent and qualified
installers according to the regulations
in force.
• Any modifications to the domestic
electrical mains which may be
necessary for the installation of the
appliance should be carried out only
by competent personnel.
• Ensure that air can circulate around
the gas appliance. Poor ventilation
can produce a lack of oxygen.
• This appliance is not connected to a
combustion products evacuation
device. It must be installed and
connected in accordance with current
installation regulations. Particular
attention shall be given to the relevant
requirements regarding ventilation.
• The use of a gas cooking appliance
results in the production of heat and
moisture in the room in which it is
installed. Ensure that the kitchen is
well ventilated: keep natural ventilation
holes open or install a mechanical
ventilation device (mechanical
extractor hood).
• Prolonged intensive use of the
appliance may call for additional
ventilation, for example opening of a
window, or more effective ventilation,
for example increasing the level of
mechanical ventilation where present.
• Avoid installation of the cooker near
inflammable material (e.g. curtains,
tea towels, etc.).
• Supply the appliance with the type of
gas stamped on the relevant adhesive
label situated in the immediate vicinity
of the gas connection tube.
• The appliance has to be placed on the
floor and it cannot be placed on a
base.
People Safety
• This appliance has been designed for
use by adults. Take care, therefore,
that children do not attempt to play
with it.
• The appliance remains hot for a long
time after being switched off. Supervise
children at all times, paying attention
that they do not touch surfaces or
remain in the vicinity of the appliance
when in use or when not completely
cooled.
• This appliance is not intended for use
by children or other persons whose
physical, sensory or mental
capabilities or lack of experience and
knowledge prevents them from using
the appliance safely without

6 electrolux
supervision or instruction by a
responsible person to ensure that
they can use the appliance safely.
During Operation
• This product is intended for the
cooking of food and must not be used
for other purposes.
• It is dangerous to modify, or attempt
to modify, the characteristics of this
appliance.
• The appliance becomes very hot with
use, and retain their heat for a long
period after use. Care should be taken
to avoid touching heating elements
inside the oven.
• Always stand back from the oven
when opening the oven door
during cooking or at the end of it
to allow any build up of steam or
heat to release.
• Unstable or deformed pans should
not be placed on the burners or plates
in order to avoid accidents caused by
upsetting or boiling over.
• Particular care should be taken when
cooking with oil or fat.
• If the appliance is fitted with a cover,
its function is to protect the surface
from dust when closed and to accumulate splashes of grease when open.
Do not use for other purposes.
• Always clean the cover before closing.
• Leave the burners and/or plates to
cool before closing.
• All the covers, in plate glass or enamel,
are removable to facilitate cleaning.
• Always ensure that the knobs are
in the « 0 » or « z » (Stop) position
when the appliance is not in use.
• Always insert the dripping pan when
using the grill or when cooking meat
on the grid. Pour a little water into the
dripping pan to avoid grease burning
and creating unpleasant smells.
• Always use oven gloves to remove
dishes from the oven.
• The oven accessories should be
washed before using for the first time.
• Take care when using cleaning
products in spray form: never direct
the spray onto the resistance or the
thermostat bulb.
• If, when placing food in the oven, or
when removing it, a large quantity of
oil, juice, etc. spills onto the bottom of
the oven, re-clean before starting to
cook to avoid unpleasant smoke and
also the possibility of these
substances catching fire.
• For reasons of hygiene and safety
this appliance must always be kept
clean. A build up of grease or other
food can cause fires.
• This appliance cannot be cleaned
with steam or with a steam cleaning
machine.
• Do not use harsh abrasive cleaners or
sharp metal scraper to clean the oven
door glass since they can scratch the
surface, which may result in shattering
of the glass.
• The gas oven becomes hot with the
movement of air. The holes on the
bottom of the oven must never be
obstructed. Do not cover the sides of
the oven with aluminium foil, in
particular the lower part of the opening.

• The appliance is heavy, move it
carefully.
• Before maintenance and cleaning
disconnect the appliance and allow to
cool.
• To facilitate ignition, light the
burners before placing pans on
the grid. After having lit the burners
check that the flame is regular.
• Always lower the flame or turn it off
before removing the pan.
• Ensure that the oven grids are inserted
correctly.
• Only heat-resistant plates may be
placed in the drawer situated under
the oven.Do not put combustible
materials there.
Service
• In case of repairs, do not attempt to
correct yourself. Repairs carried out
by unqualified persons can cause
damage. Contact an authorized
Technical Assistance Centre and
insist an original spareparts.
electrolux 7
The symbol on the product or on
its packaging indicates that this product
may not be treated as household waste.
Instead it shall be handed over to the
applicable collection point for the
recycling of electrical and electronic
equipment. By ensuring this product is
disposed of correctly, you will help
prevent potential negative consequences
for the environment and human health,
which could otherwise be caused by
inappropriate waste handling of this
product. For more detailed information
about recycling of this product, please
contact your local city office, your
household waste disposal service or the
shop where you purchased the product.
Environmental
Information
• After installation, please dispose of
the packaging with due regard to
safety and the environment.
• When disposing of an old appliance,
make it unusable, by cutting off the
cable.

8 electrolux
It is very important that this
instruction book should be kept
safely for future consultation. If the
appliance should be sold or given to
another person, please ensure that
the booklet goes together with it,
so that the new owner can know of
the functions of the machine and
also be aware of the warnings.
MANUFACTURER:
ELECTROLUX POLAND SP. Z.O.O.
ul. Kazimierza Odnowiciela 28
58-100 Swidnica
These instructions are only for the
countries stated by the symbol
printed on the front cover of this
instruction book.
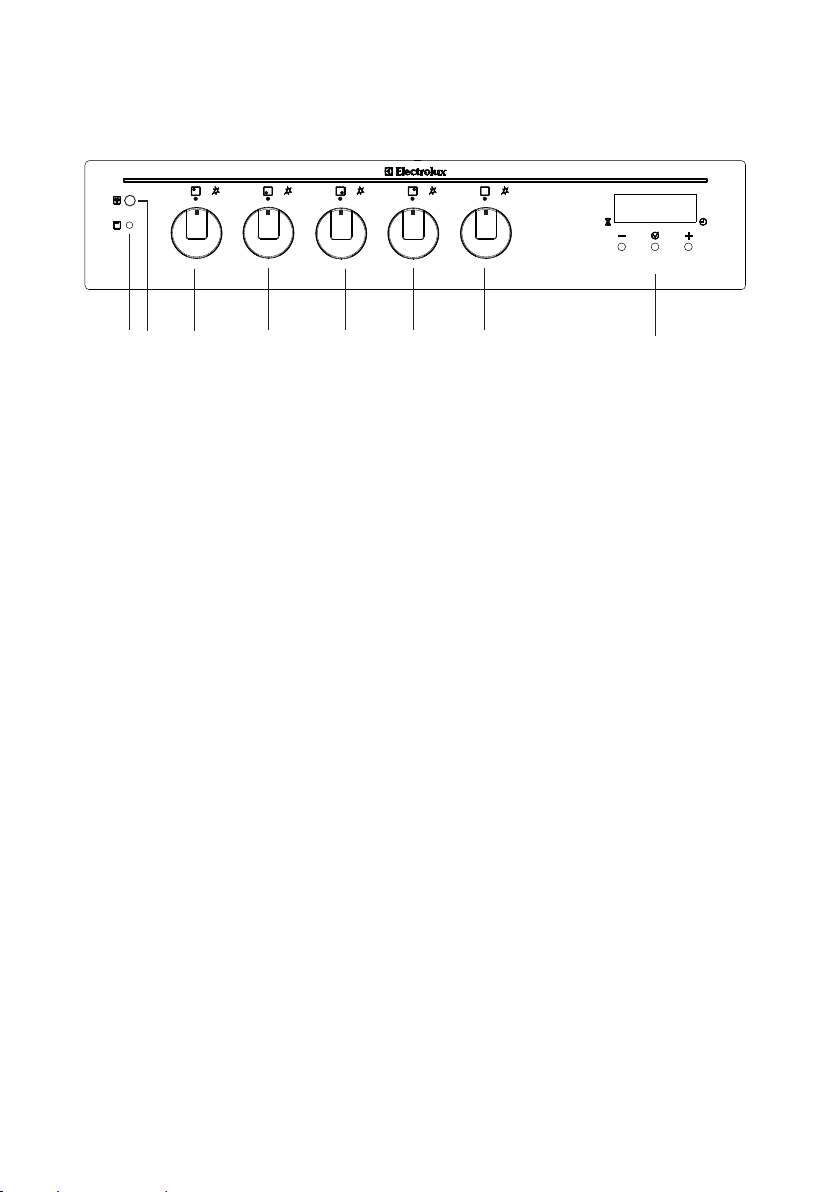
Control Panel
electrolux 9
8
1. Oven light push button
2. Back left burner control knob
(semi-rapid)
3. Front left burner control knob
(rapid)
4. Front right burner control knob
(auxiliary)
5. Back right burner control knob
(semi-rapid)
6. Gas oven and electric grill control
knob
7. Electronic Programmer
8. Grill function pilot light
21
6543
7
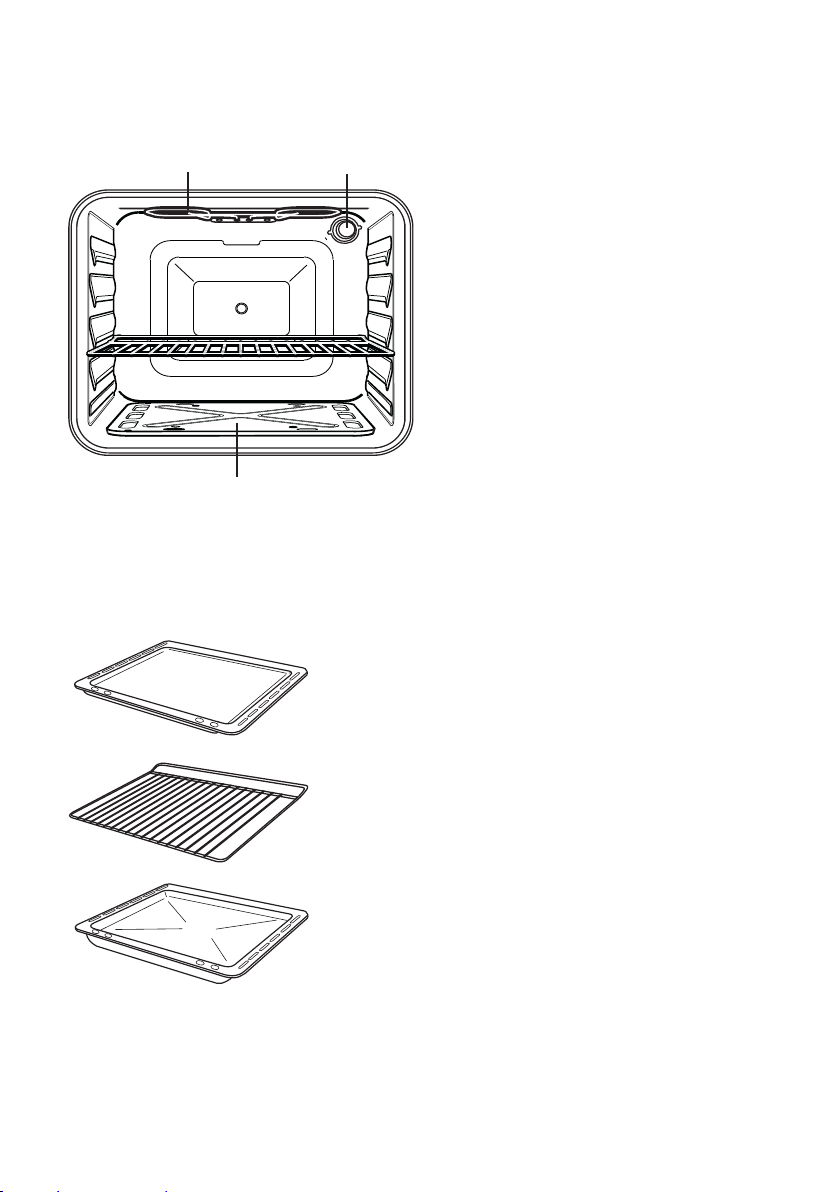
10 electrolux
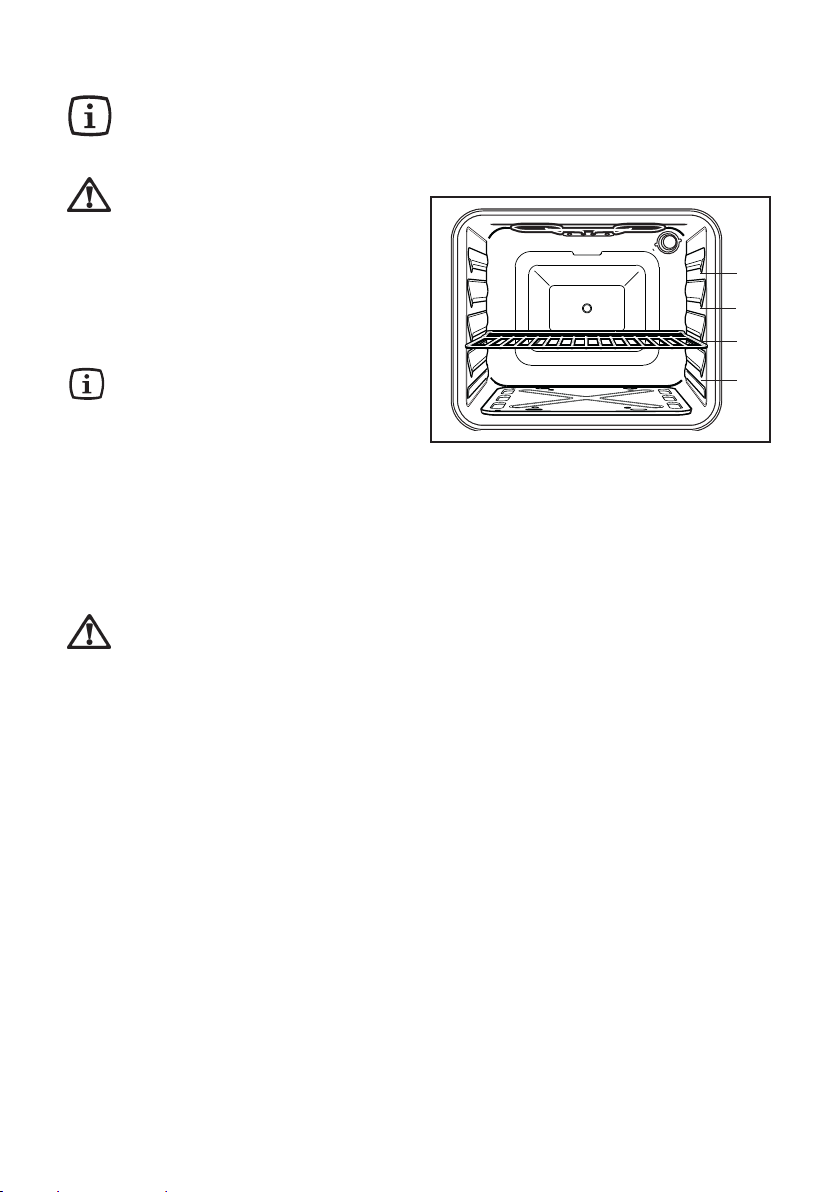
The Oven Cavity
Electric Grill Oven Light
Gas Oven
Bottom Plate
Accessories
Baking Tray
Oven Shelf
Dripping Pan
Using the hob
Control knobs on the front
panel
The knobs for using the gas hob of the
cooker are found on the control panel.
The regulation knobs could be turned in
anti-clockwise direction until the small
flame symbol, and vice-versa for the
larger symbol.
z No gas supply
Maximum gas supply
Minimum gas supply
Ignition of gas burners
• To ignite a burner, before positioning
the saucepan, push the corresponding
knob in completely and turn in an
anticlockwise direction to the
electrolux 11
maximum position ( ).
• Once a flame has appeared, hold the
control knob pressed in for around 5
seconds so as to activate the Oven
Safety Device (Thermocouple).
• Upon ignition regulate the flame as
required.
• If after a few attempts the burner does
not ignite, check that the baffle and its
cap are correctly positioned.
• To interrupt the supply of gas, turn the
knob in a clockwise direction to the
position " z ".
During cooking, when using fats
or oils, take particular care as
they can, when over-heated,
self-ignite.
12 electrolux
In the absence of electricity,
ignition can occur without the
electrical device; in this case
approach the burner with a flame,
push the relevant knob down and
turn it anti-clockwise until it
reaches the "maximum" position.
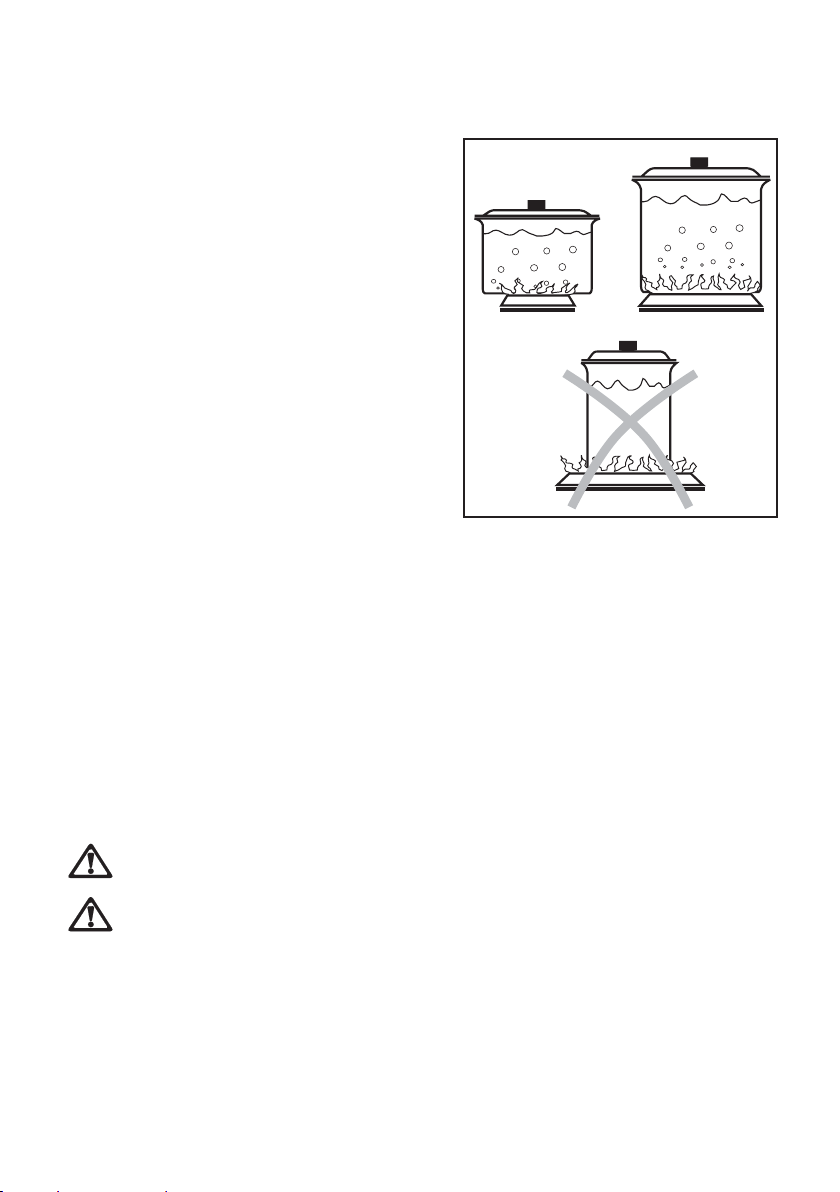
To ensure maximum burner efficiency,
you should only use pots and pans with
a flat bottom fitting the size of the burner
used (see table).
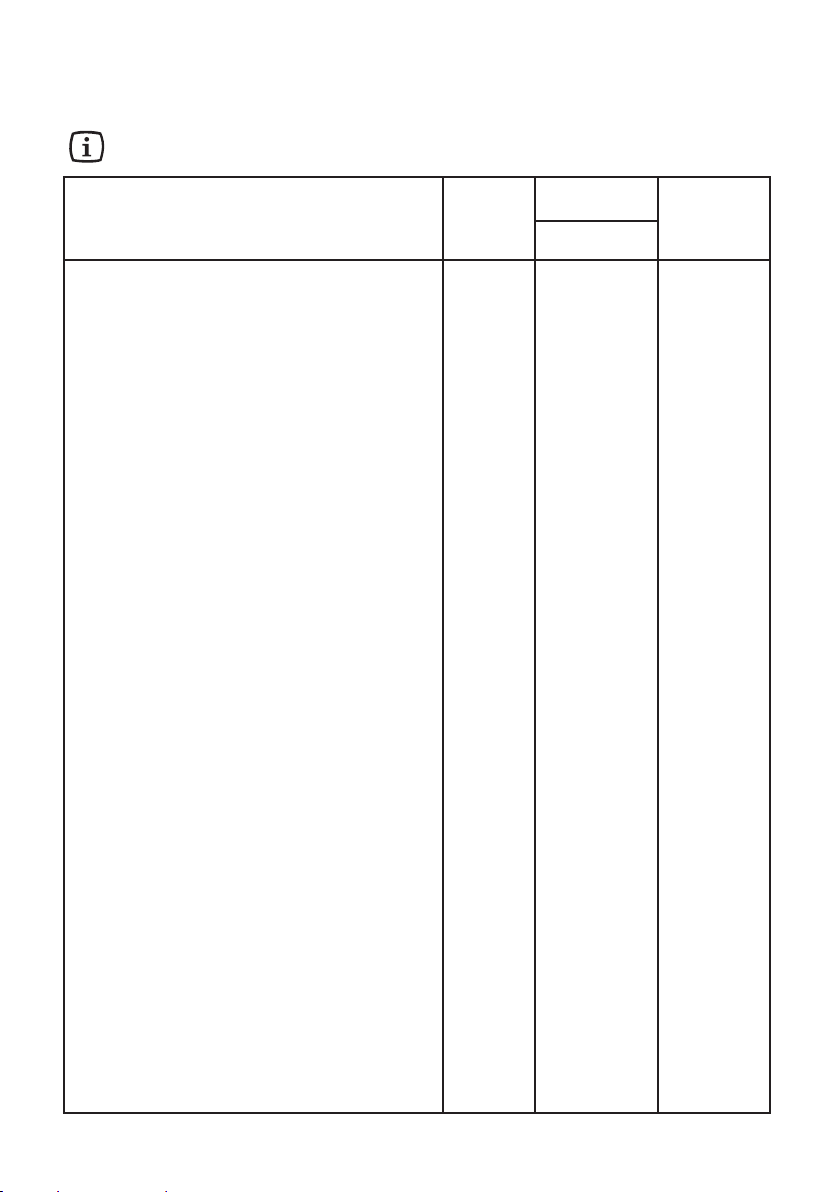
Burner} minimum maximum
diameter diameter
Large (rapid) 180 mm. 260 mm.
Medium (semi-rapid) 120 mm. 220 mm.
Small (auxiliary) 80 mm. 160 mm.
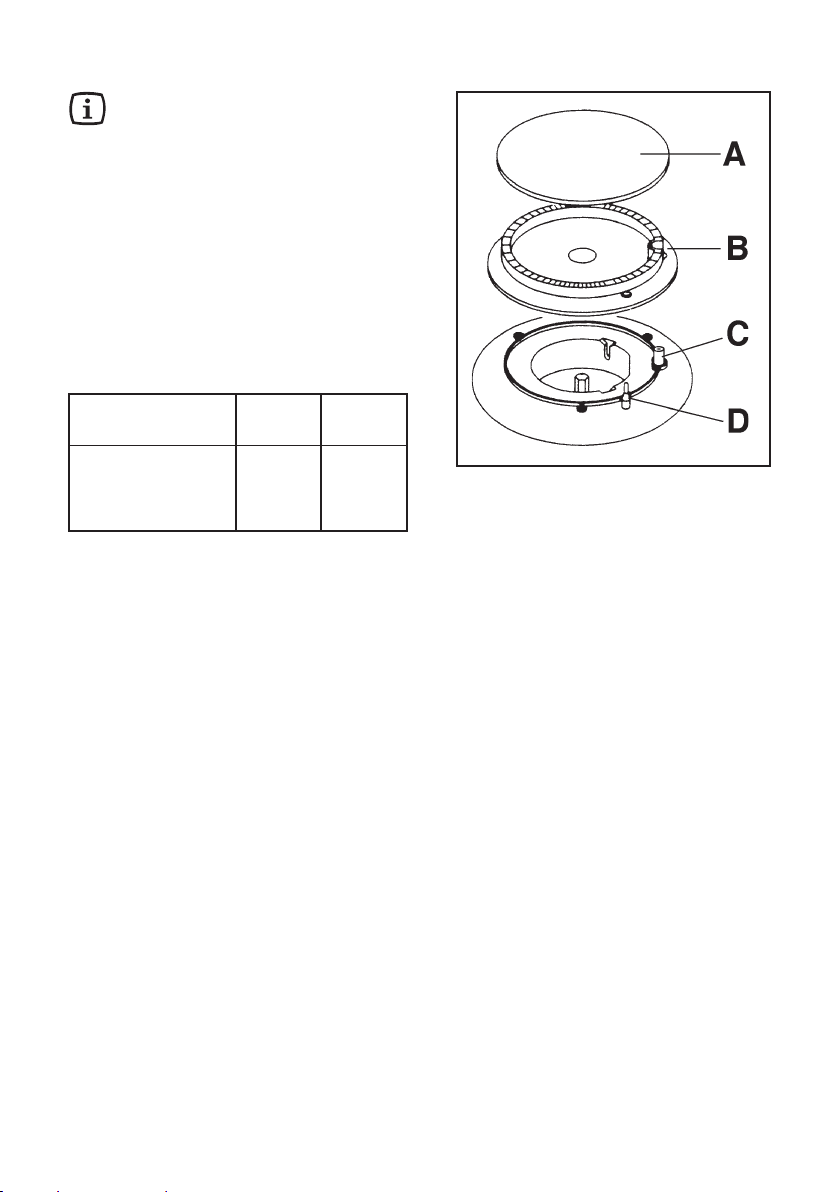
FO 0204
A - Burner cap
B - Burner crown
C - Ignition candle
D - Thermocouple
Recommended pottery
Remember that a wide-bottomed pan
allows a faster cooking than a narrow
one. Always use pots which properly fit
what you have to cook.
Particularly make sure that the pans are
not too small for liquids, since these
could easily overflow.
Moreover, the pans should not be too
large for a faster cooking. In fact, grease
and juices may spread on the bottom
and burn easily.
It is better to use non-openable moulds
for baking cakes. In fact, an openable
mould lets juices and sugar leak
through, falling on the bottom of the oven
and consequently burning on the bottom
of the baking tray, making cleaning
difficult.
Avoid putting plastic-handled pans in the
oven as they are not heat-proof.
You should use oans with the right
diameter to fit the burner, in order to
make the most out of it, thus reducing
gas consumption.
It is also advisable to cover any boiling
casserole and, as soon as the liquid
starts boiling, lower the flame enough
to keep the boiling point.
Pots must not enter the control
zone.
Make sure pots do not protrude
over the edges of the cooktop
and that they are centrally
positioned on the rings in order
to obtain lower gas
consumption.
electrolux 13
14 electrolux
Gas oven controls
Ignition
• Push the Oven/Grill control knob
inwards and turn it anti-clockwise to
its maximum setting (8) keeping the
control knob pressed in.
• Once a flame has appeared, hold the
Control Knob pressed in for around
10-15 seconds so as to activate the
Oven Safety Device (Thermocouple).
When cooking with the oven,
the lid must be kept open to
avoid over-heating
In the event of a loss of power, you
can light the oven holding a flame to
the oven burner (manual ignition)..
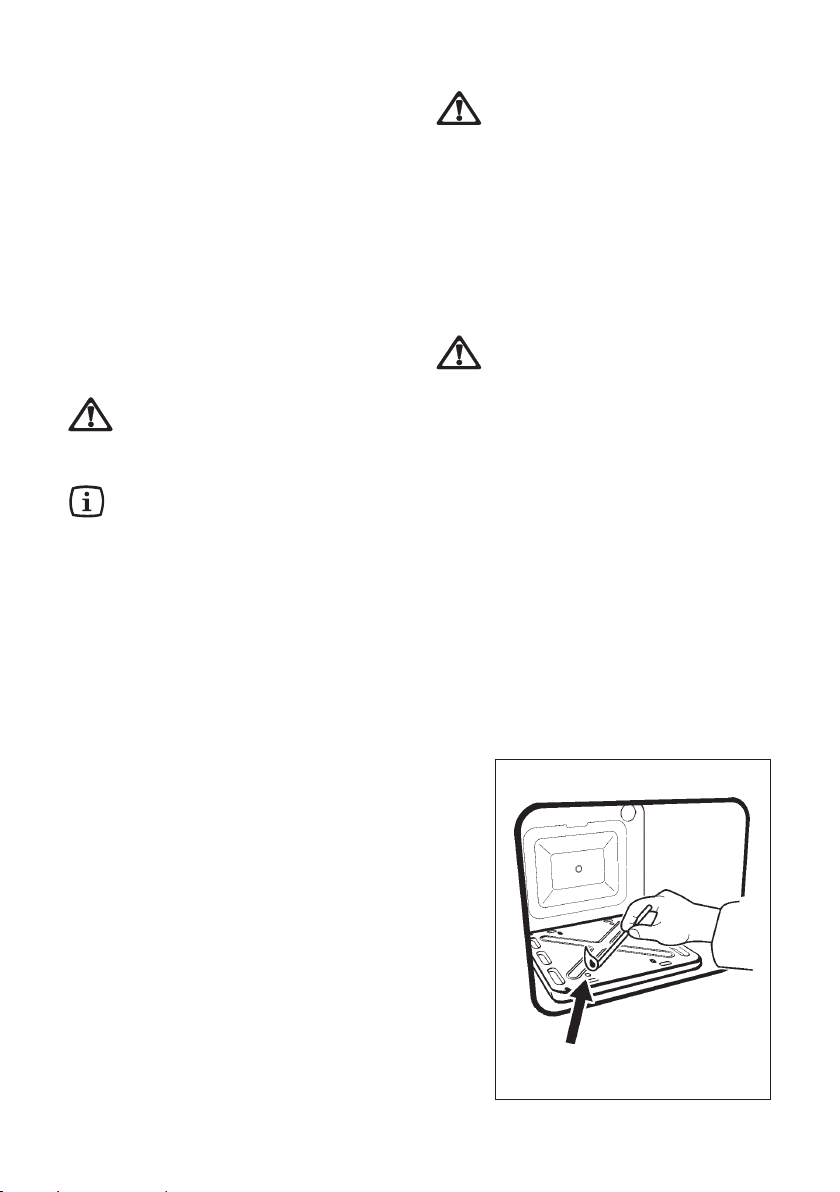
Manual ignition
• Open the oven door;
• Hold a flame near the hole in the
bottom of the oven cavity as shown in
the diagram.
• push the oven control knob in and turn
it anti-clockwise until the maximum
temperature position is reached;
• keep the oven knob pressed in for
approximately 10-15 seconds until
the safety valve automatically keeps
the oven burner lit.
• If the burner does not light first time,
keep the oven door open and wait one
minute at least before repeating the
operation. Once the oven has been lit,
adjust the flame as required.
• To adjust the flame, turn the oven
knob to the position corresponding to
the temperature desired, after a few
minutes of work.
Do not keep the control knob
pressed for more than 15
seconds.
If the burner does not light even
after 15 seconds, release the
control knob, turn it the „off“
position and wait for at least one
minute before trying to light the
burner again.
If the burner accidentally goes out,
turn the control knob to the „off“
position and wait for at least 1
minute before trying to light the
burner again.
hole for manual ignition
1
2
3
4
5
6
7
8
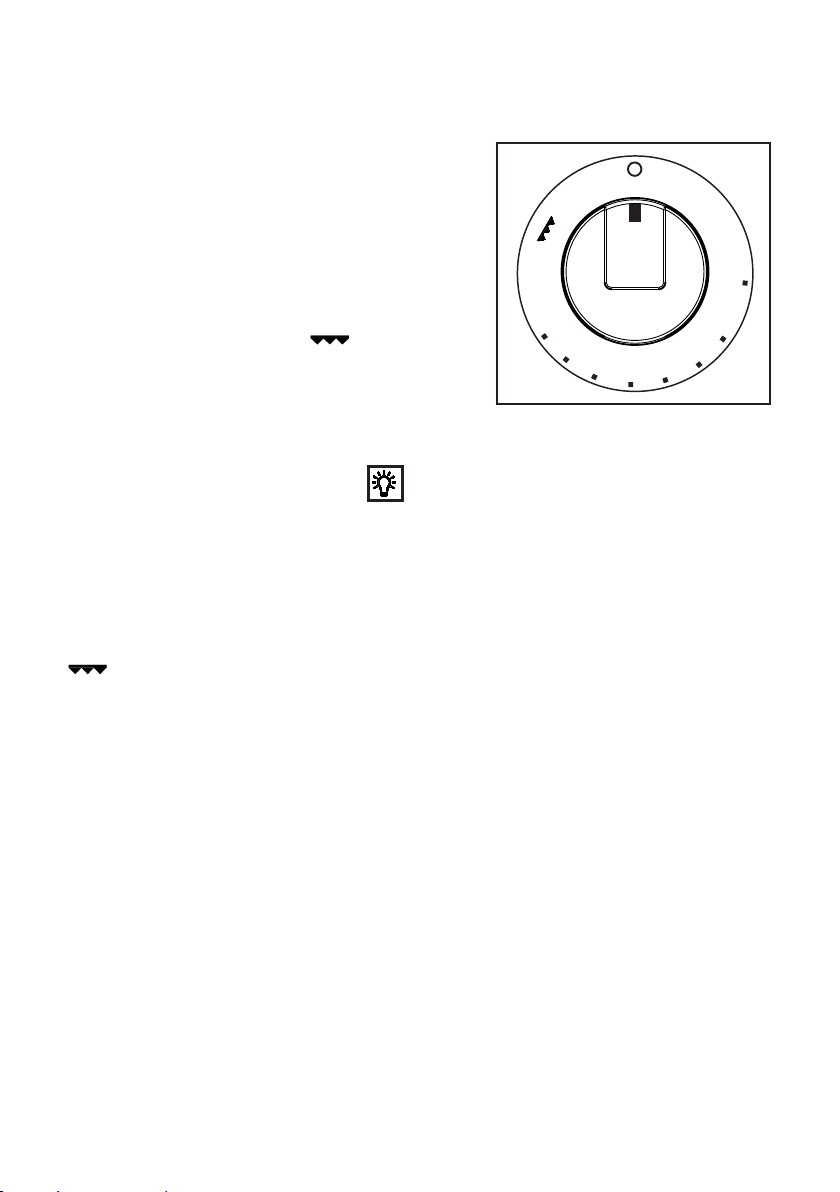
Electric Grill - Thermostat
Control Knob
Turn the thermostat control knob anticlockwise to select temperatures between
1 and 8. (table pag.26)
Electric grill
Press and turn the knob clockwise until
the stop position is reached , at the
same time the grill control light will come
on. Place the dripping pan under the wire
shelf so as to prevent fat from dripping
on the bottom of the oven.
Oven light push button
The oven lamp switch allows you to turn
on the oven internal illumination.
Grill function control light
The grill control light will come on when
the oven control knob is turned to symbol
. The light will remain on until the
correct temperature is reached. It will
then cycle on and off to show the grill
heating element temperature is being
maintained.
electrolux 15
16 electrolux
When using the oven for the first
time
Before using the appliance, remove
all packaging, both inside and
outside the appliance, including the
advertising labels and any protective
film..
When using the oven for the first time:
a) Ignite the gas oven burner and set
the gas oven control knob to "8".
b) allow the oven to run empty for
approximately 45 minutes;
c) open a window for ventilation.
During this time, an unpleasant odour
may be emitted. This is absolutely
normal, and is caused by residues of
manufacturing.
Once this operation is carried out, let
the oven cool down, then clean the oven
cavity with a soft cloth soaked in warm
soapy water.
This procedure should be repeated with
the grill function for approximately
5-10 minutes.
Before cooking for the first time, carefully
wash the oven accessories.
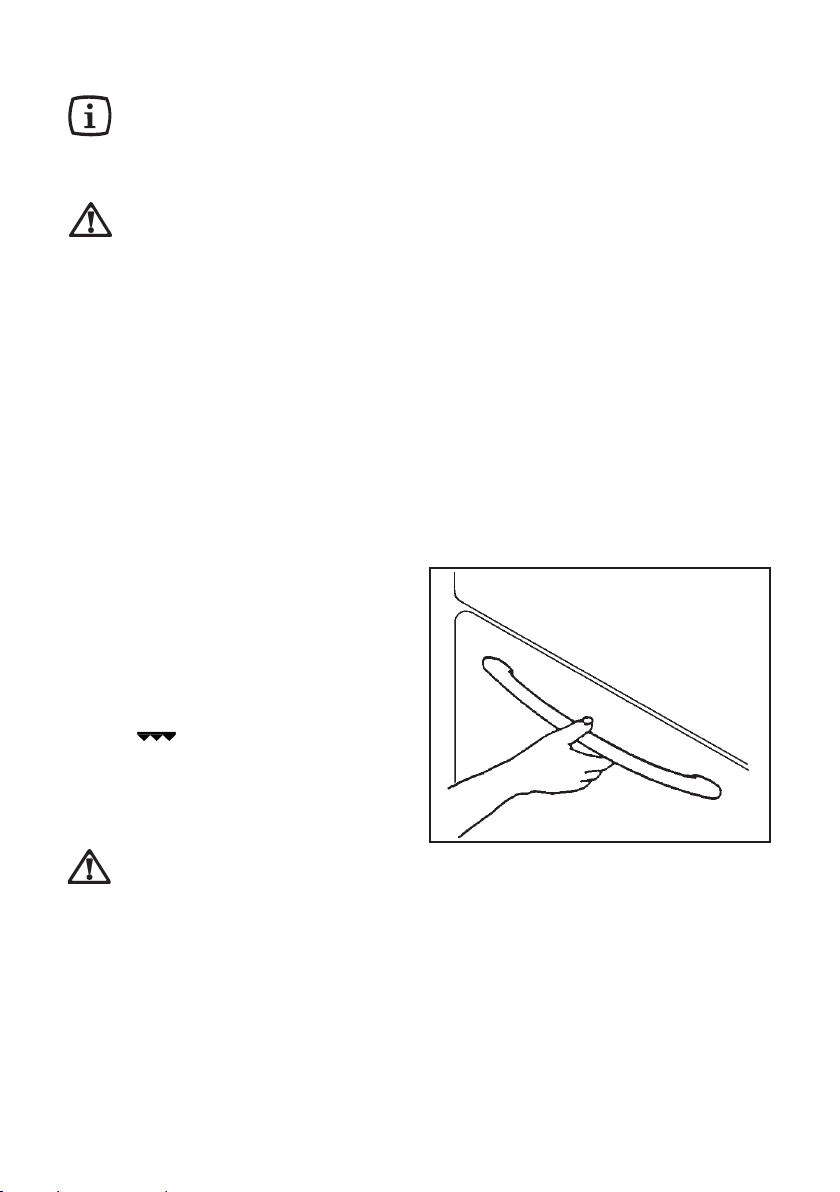
To open the oven door, always
catch the handle in its central
part.
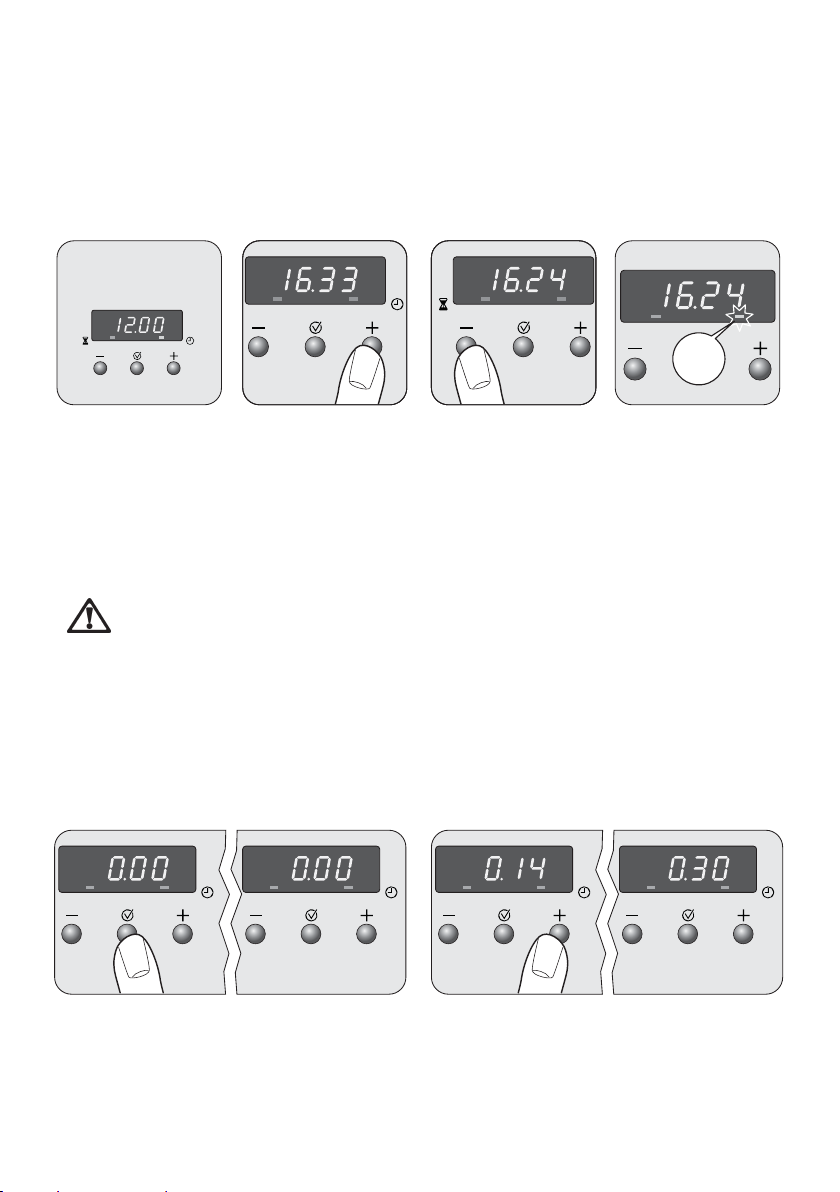
The electronic minute minder
electrolux 17
This oven has a 24-hour clock.
When the electricity
is first switched on,
the display will show
12.00 and the time
indicator neon will
flash.
The increase and decrease
control buttons operate slowly at
first and then more rapidly. They
should be pressed separately.
Press the increase
button until the
correct time is
showing.
To set the countdown
The ‚Countdown‘ gives an audible
reminder at the end of any period of
cooking.
In the event of an interuption of the
electricity supply, the clock will stop and
you will not be able to use the main oven.
5 sec
If necessary press
the decrease button
to help set the
correct time.
The time indicator
neon will flash for
5 seconds then go
out.
Press the selector control button until
the countdown indicator neon is
illuminated and the display reads 0.00
Press the increase button. Release the
button once the interval to be timed is
reached e.g. 30 minutes.
18 electrolux
This must be
completed within 5
seconds of first
pressing the selector
control button.
During the operation
of the countdown the
If necessary press
the decrease button
to achieve the
correct time
interval.
remaining time period
will show in the
display
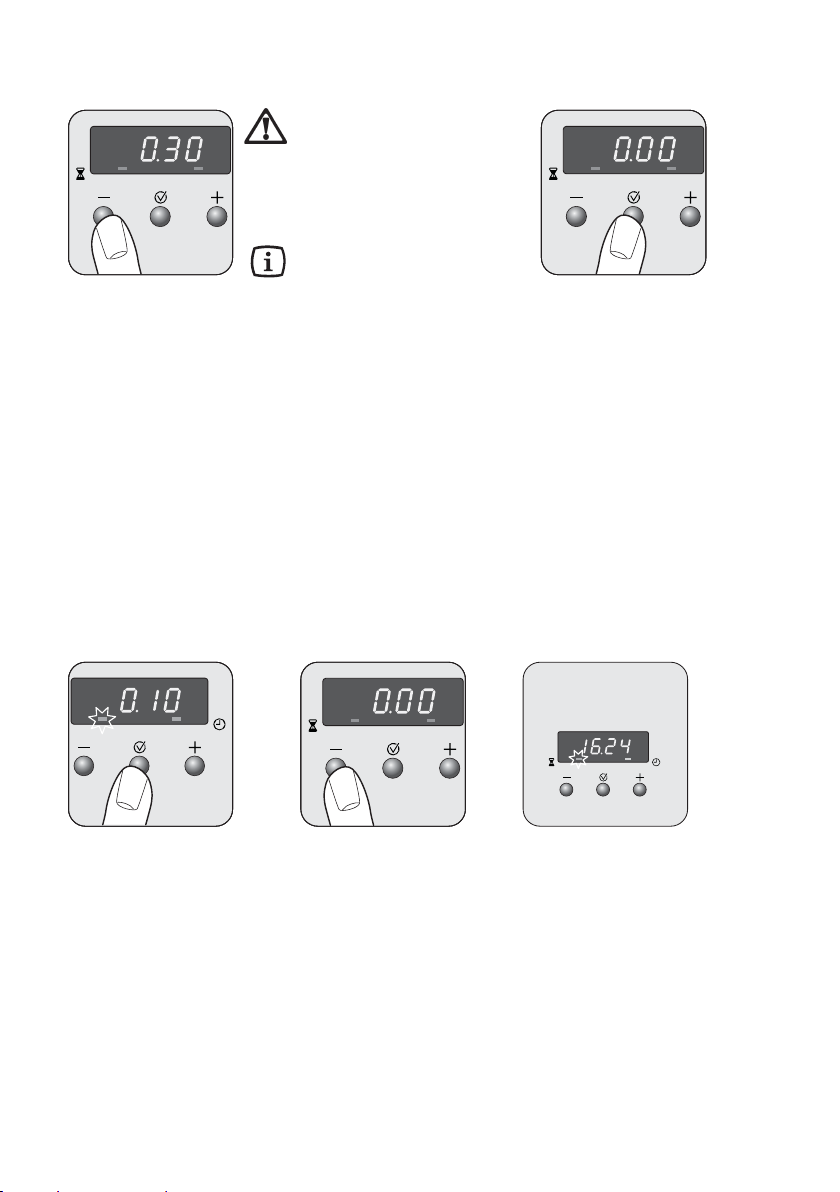
To cancel the countdown
The sound and the
countdown indicator neon
can be stopped by
pressing any button, then
the display reverts to the
time of day
At the end of the timed
period a sound will be
heard intermittently and
the countdown indicator
neon will flash for up to 2
minutes.
Press the selector
control button until
the countdown
indicator neon
flashes.
Press the decrease
button until 0.00 is
shown in the
display.
The countdown
indicator neon will
continue to flash for
a few seconds and
then return to the
time of day.

Energy save mode
By switching off the time display you
can save energy.
Switching on the time display
Press any button to switch on the
display.
Switching off the time display
Press and hold any two buttons until
the display switches off.
electrolux 19
20 electrolux
Hints and tips for using the oven
Always cook with the oven door
closed.
Stand clear when opening the
drop down oven door. Do not
allow it to fall open - support the
door using the door handle, until
it is fully open.
4
3
2
The oven has four shelf levels, and
is supplied with one shelf.
The shelf positions are counted
from the bottom of the oven as
shown in the diagram.
It is important that the shelf is
correctly positioned.
Do not place cookware directly
on the oven base.
When cooking with the oven or
grill, the cover must be kept
open to avoid overheating.
1
Condensation and Steam
The oven is supplied with an exclusive
system which produces a natural
circulation of air and the constant
recycling of steam. This system makes
it possible to cook in a steamy
environment and keep the dishes soft
inside and crusty outside. Moreover, the
cooking time and energy consumption
are reduced to a minimum. During
cooking steam may be produced which
can be released when opening the oven
door. This is absolutely normal.
However, always stand back
from the oven when opening
the oven door during cooking or
at the end of it to allow any build
up of steam or heat to release.
When food is heated, it produces
steam in the same way as a
boiling kettle does. When steam
comes in contact of the oven
door glass, it will condense and
produce water droplets.
To reduce condensation, ensure
the oven is well heated before
placing food in the oven cavity.
A short oven pre-heating (about
10 minutes) will then be
necessary before any cooking.
We recommend you to wipe
away condensation after each
use of the appliance.
electrolux 21

22 electrolux
For the cooking of cakes
Pre-heat the oven, unless indicated
differently, for at least 10 minutes before
use. Do not open the oven door when
cooking dishes which must raise (e.g.
raised pastries and soufflés); the jet of
cold air would block the raising process.
To check if cakes are cooked, insert a
toothpick into the mixture; if it comes
out clean the cake is ready. Wait until
at least 3/4 of the cooking time has
passed before doing this check.
As a general rule remember that:
a dish which is well-cooked on the
outside but not sufficiently cooked inside
would have required a lower temperature
and longer cooking time. On the
contrary, a “dry” texture would have
required a shorter time and higher
cooking temperature.
For the cooking of meat
Meat to be cooked in the oven should
weigh at least 1 kilo to avoid its becoming
too dry. If you want roasts with a good
colour, use very little oil. If the piece is
lean, use oil or butter or a little of both.
Butter or oil are on the other hand
unnecessary if the piece has a strip of
fat. If the piece has a strip of fat on one
side only, put it in the oven with this side
upwards; when melting the fat will
grease the lower side sufficiently.
Red meat should be removed from the
fridge one hour before cooking otherwise
the sudden change of temperature could
cause it to become tough. A roast,
especially if of red meat, must not be
salted at the beginning of cooking as
salt causes juices and blood to seep
out of the meat, thus preventing the
formation of a well-browned crust.
It is advisable to salt the outside of the
meat after just over half the cooking time.
Place the roast in the oven in a dish
having a low rim; a deep dish shields
heat.
Meat can be placed on an ovenproof dish
or directly on the grill, under which the
dripping pan will be inserted to collect
juice. Ingredients for gravy should only
be put in the dish immediately if cooking
time is brief, otherwise they should be
added during the last half hour.
Begin cooking rare meat at a high
temperature, reducing the temperature
to finish cooking the inside.
The cooking temperature for white meat
can be moderate throughout.
The degree of cooking can be checked
by pressing the meat with a fork; if it
does not give the meat is cooked.
At the end of cooking it is advisable to
wait at least 15 minutes before cutting
the meat in order that the juices are not
lost.
Before serving plates can be kept warm
in the oven at minimum temperature.
For the cooking of fish
Cook small fish from start to finish at a
high temperature. Cook medium-sized
fish initially at a high temperature and
then gradually lower the temperature.
Cook large fish at a moderate
temperature from start to finish.
Check that baked fish is cooked by
gently lifting one side of the gut; the
meat must be white and opaque
throughout, except in the case of
salmon, trout or similar.

electrolux 23
Grilling
The following types of meat are suitable
for grilling. Mostly meat or offal cut in
slices or pieces of various sizes, but not
usually very thick, poultry cut in half and
flattened, fish, some vegetables (e.g.
courgettes, aubergines, tomatoes, etc.),
skewers of meat or fish and seafood.
Meat and fish to be grilled should be
lightly brushed with oil and always
placed on the grill; meat should be salted
upon completion of cooking; whereas
fish should be salted on the inside before
cooking. The grill should be positioned
in the guides nearest or furthest from the
grill element according to the thickness
of the meat, in order to avoid burning the
surface and cooking the inside
insufficiently.
The formation of smoke caused by drops
of juice and fat can be avoided by pouring
1 or 2 glasses of water into the dripping
pan.
The grill can also be used to brown, toast
bread and grill certain types of fruit, such
as bananas, halved grapefruit, slices of
pineapple, apples, etc. Fruit should not
be placed too near the source of heat.
Cooking times
Cooking times can vary according to the
type of food, its consistency and its
volume. It is advisable to watch when
cooking for the first time and check
results since when preparing the same
dishes, in the same conditions, similar
results are obtained.
The cooking tables relating to cooking
in the oven and by grill are provided as a
guide to prepare dishes accoriding to
suggested times.
Experience will show possible variations
to the values set out in the table.
Nevertheless carefully follow the
indications given in the receipe you
intend to follow.
Attention: do not place any utensils
such as dripping pan, cake tins,
casseroles, pyrex dishes, aluminium foil
or other on the base of the oven when
the oven is in use. A stagnation of heat
would result which would compromise
the results of cooking and could damage
the oven enamel.

24 electrolux
Suggestions for gas burners
Start your cooking with a big flame by
turning the knob to the symbol . Then
adjust the flame as necessary.
The outside of the flame is much hotter
than its inside (nucleus). Accordingly ,
the top of the flame should lick the
bottom of the pan. Excessive flames
mean a waste of gas.
In contrast with electric grids, gas
burners do not require flat-bottomed
pans: the flames lick the bottom and
spread the heat all over the surface.
No special pans are required for gas
burners. However, thinwalled pans
transmit the heat to the food more
quickly than thick-walled ones.
Since heat doesn't spread evenly on the
pan's bottom, the food may only be
partially heated. Consequently it is
advisable to stir the food many times.
A thick pan bottom prevents partial
overheating as it allows sufficient thermic
compensation.
Avoid very small pans. Wide and shallow
pans are more suitable than narrow and
deep ones as they allow a faster
heating. Cooking is not quickened by
placing narrow pans on wide burners.
The result is just a waste of gas. For a
proper usage, place small pans on small
burners and large pans on large burners.
Remember to cover pans to reduce gas
consumption.
electrolux 25
Cooking table
Cooking times do not include pre-heating time. A short oven pre-heating
(about 10 minutes) is necessary before any cooking
dooffosdniK
sdluomnisekacerutximnetaeB
ekacruolfetihwdnakcalB5712 07-06
ekac-daerbtalflayoR5713 07-06
ekacatirehgraM5713 04-53
yr
tsaP
dehsinragebotekacfomottoB0023 02-51
ekacdrucklim-rettuB0022 04-53
ekacmaJ0022
sdluomnisekachguodgninevaeL
ehcoirB0022 04-53
sekacllamS
yrtsaP0023 51-01
ffupmaerC0023 04-03
eugnireM0413 021
engasaL
taeM )ssenkcihtfomcyrevero
faol-taeM0022 04-03
yrtluoP
gk3esooG0022 012-051
gk5yekruT5712 042tuoba
emaG
eraH0022 09-06
birreed-eoR0022 051-09
hcnuahreeD5
hsiF
stellumyerG0022 05-04
azziP
llirG
spohC302-51
segasuaS352-02
* The number of the slide refers to the lowest one (excepted the position on the bottom of the
oven, since the dripping pan cannot be inserted).
femitgnikooc(
taemtsaorgnikoocgnoL5712 51-21
taemtsaorgnikooctrohS0022 21-01
gk2-2/11kcuD00
nekcihctsaoR0022 09-06
selbategeV
nalfelbategevdelioB0022 54-04
nekcihcdellirG207-06
gk6,0tipsehtnolaevtsaoR 08-07
tipsehtnonekcihC 09-06
-arepmeT
C°erut
5222 05-04
22 081-021
712 081-09
0422 52-02
*edils
nevosaG
gnitresnI
gnikooC
niemit
setunim
04-53
26 electrolux
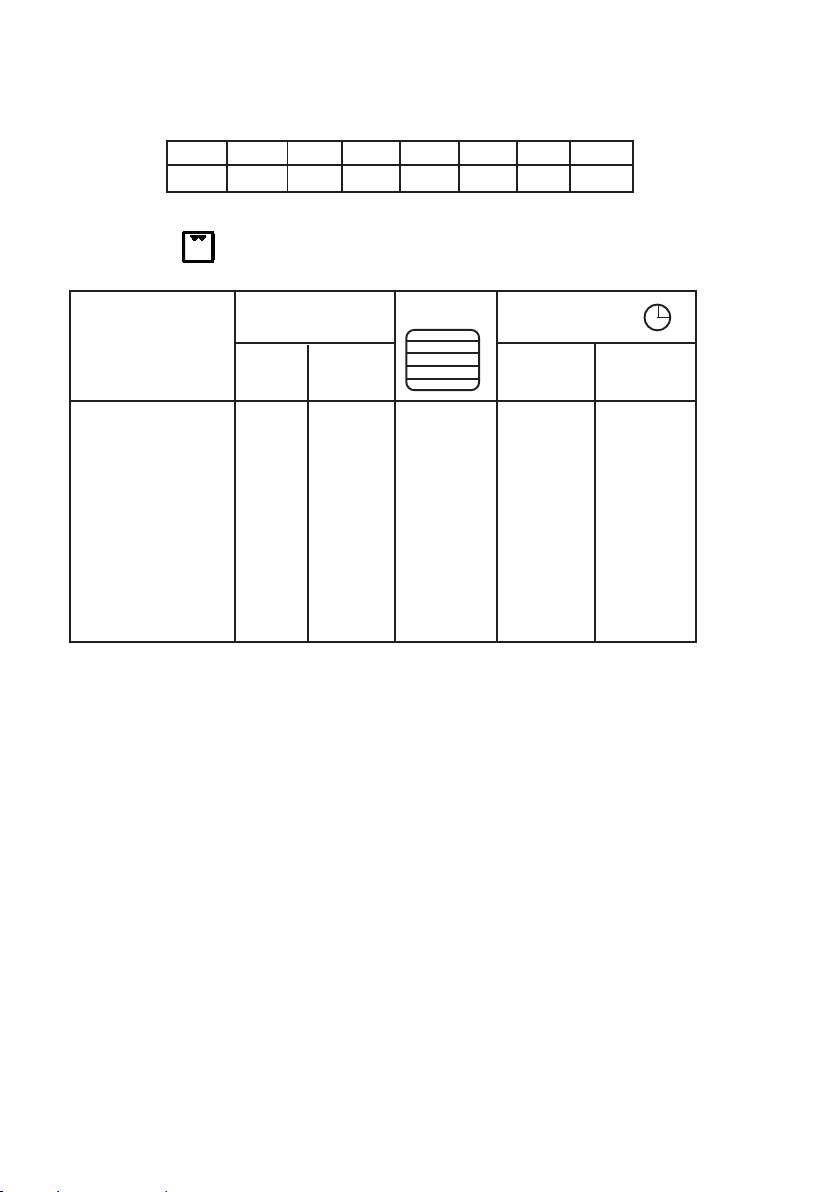
Approximate temperatures corresponding to the indication on the selector
1 2 3 4 5 6 7 8
150°C 170°C 190°C 200°C 210°C 220°C 230°C 240°C
Grilling
Quantity
Level
TYPE OF DISH
Pieces
Fillet steaks
Beef-steaks 4 600 3 10 ~ 12 6 ~ 8
Sausages 8 — 3 12 ~ 15 10 ~ 12
Pork chops 4 600 3 12 ~ 16 12 ~ 14
Chicken (cut in two) 2 1000 3 30 ~ 35 25 ~ 30
Kebabs 4 — 3 10 ~ 15 10 ~ 12
Chicken (breast) 4 400 3 12 ~ 15 12 ~ 14
Hamburger 6 600 3 10 ~ 15 8 ~ 10
Fish (fillets) 4 400 3 12 ~ 14 10 ~ 12
Sandwiches 4-6 — 3 5 ~ 7 —
Toast 4-6 — 3 2 ~ 4 2 ~ 3
Weight
4 800 3 12 ~ 15 12 ~ 14
Cooking time
(minutes)
4
3
Upper
2
1
side
Lower
side

Cleaning and maintenance
electrolux 27
Before each operation,
disconnect the appliance.
This appliance cannot be
cleaned with steam or with a
steam cleaning machine.
The oven should be kept clean
at all times. A build-up of fats or
other foodstuffs could result in a
fire, especially in the grill pan.
Cleaning the cooker
Drops of sauce, fruit juice etc., should
be removed as soon as possible with a
soft cloth soaked in warm detergent
water. Do not use steel wool or knives
to take off layers of crust. Remove
stubborn marks with a well wetted soap
impregnated pad, but care must be taken
not to scratch the enamel. Wash the
enamelled grids with water and
detergent; these can also be washed a
dishwasher.
Take off the burner covers and the grids
and wash them carefully with warm water
and detergent. Dry them well before
putting them back in position.
Moreover, make sure that these are
properly re-placed. The burner can be
rubbed with steel wool or a slightly
abrasive cloth.
Clean the oven door and crystal cover,
in models equipped with these items,
only with warm water, and avoid the use
of rough cloths or abrasive substances;
in cookers with an automatic ignition the
sparkling bulb should be cleaned
periodically and accurately to avoid
difficulties in lighting; furthermore check
that the burner holes are not obstructed.
Cleaning the oven
Clean carefully the oven cavity after use
when it is still warm. In fact, at this
moment it is easy to take off deposits
of fat or other substances such as fruit
juice, sugar particles or fat. You can use
warm detergent water or one of the
appropriate spray oven cleaners. Do not
direct the spray at the mat steel parts
as this could damage them and always
follow the manufacturer's instructions.
Clean the oven accessories with warm
water and detergent. Remove possible
incrustations with a slightly abrasive
powder.
Never line any part of the oven
with aluminium foil. It would
result in an accumulation of heat
which might damage the
cooking results and also
damage the enamel.
Controls - Sundries
Periodically check the condition of the
flexible pipe of gas connection and make
it replaced by skilled technicians as
soon as it shows abnormalities. Annual
replacement is recommended.
 Loading...