

AEG EKG101199X User Manual

Instructions booklet
mod. EKG 101199 X

GB
GENERAL INFORMATION
SAFEGUARDING THE ENVIRONMENT
Packaging disposal
Sort packaging into different materials
(cardboard, polystyrene etc.) and dispose of
them in accordance with local waste disposal
laws.
- This appliance must be installed in
accordance with the regulations in force and
must only be used in well ventilated rooms.
Consult the instructions booklet before installing
and using the appliance.
- This household appliance has been designed for
cooking and it must therefore be used for this
purpose only.
DEAR CUSTOMER,
Carefully read these instructions before using
the appliance and keep them for future
consultation.
Keep potentially hazardous packaging
(plastic bags, polystyrene etc.) out of the reach
of children.
WARRANTY
Your new appliance is covered by a warranty.
The warranty certificate is herewith enclosed. If it
is missing, ask the retailer for it, indicating date of
purchase, model, and data plate number which are
printed on the data plate identifying the appliance
(fig. 8B ).
Keep the part intended for the user, and show it
upon request to the After-sales Service, along with
proof of purchase.
If you fail to do so, the after-sales service will be
obliged to charge you in full for any repair work
carried out.
Original spare parts should be purchased only from
our After-sales Service and Spare Parts Authorised
Centres.
AFTER-SALES SERVICE
Before leaving the factory, this appliance has been
tested and set up by skilled personal, in order to
ensure optimum performance.
Any repair or intervention subsequently required
must be carried out with the utmost care and
attention.
For this reason, we recommend you always contact
the Sales Centre or your nearest After-sales Service.
Always specify the nature of the problem and the
appliance model.
*
RECOMENDATIONS AND PRECAUTIONS
ATTENTION:
The use of a gas cooking appliance results in the
production of heat and moisture in the room in
which it is installed. Ensure that the kitchen is well
ventilated:
keep natural ventilation holes open or install a
mechanical ventilation device (mechanical extractor
hood).
Prolonged intensive use of the appliance may call
for additional ventilation, for example opening of a
window, or more effective ventilation, for example
increasing the level of mechanical ventilation where
present.
Prior to installation, ensure that the local distribution
conditions (nature of the gas and gas pressure)
and the adjustment of the appliance are compatible.
- Before using the appliance, remember to remove
the protective plastic film present on some parts
of the appliance (facia-panel, parts in stainless
steel, etc.)
- Do not use the appliance for the purpose of
heating.
- When the appliance is not in use, we recommend
you unplug it from the mains electricity and
shut the gas tap.
IN THE EVENT OF FIRE:
In the event of fire,
valve of the gas supply, unplug the appliance
from the mains. Never, under any
circumstances, pour water on burning oil.
Do not store flammable products or aerosol
containers near the burners, and do not vaporize
them near lighted burners.
FOR YOUR SAFETY AND THAT OF YOUR
CHILDREN.
Do not store items that are attractive to children
above or near the appliance.
Keep children well away from the appliance: bear
in mind that some parts of the appliance and the
pans become dangerously hot during use, and
that they take a while to cool down.
In order to avoid any unintentional accidents, pan
handles should be turned inwards to the rear of
the cooker, not outwards into the room or over
adjacent burners.
When cooking, do not use clothes with large flared
sleeves; in case of accidental contact with a lit
burner.
immediately shut the main
2
3
4
5
6
7
8
9
10
2
GB
The appliance must not be used by people
(including children) with limited physical,
sensory or mental abilities, or without
experience or expertise, unless they have
received instructions for using it from those
responsible for their safety.
Young children should be supervised to ensure
they not play with the appliance.
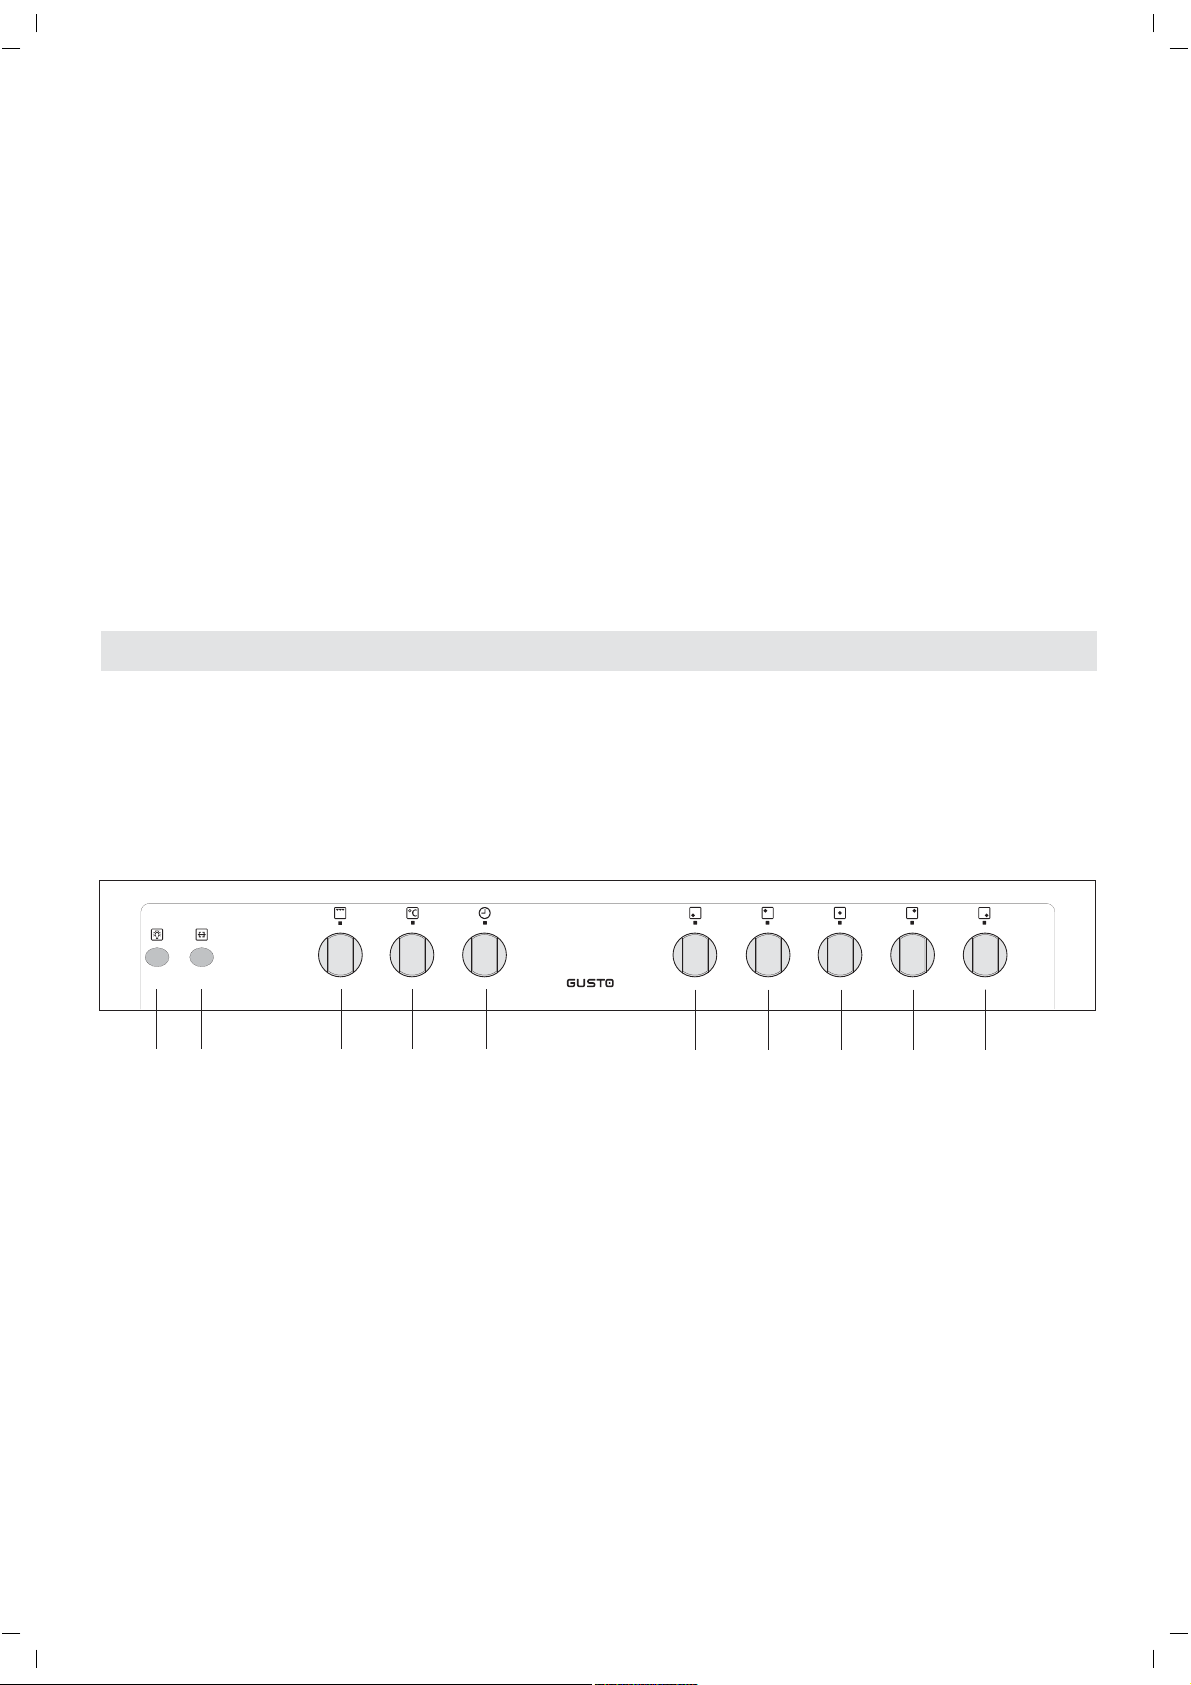
Control panel
WARNING - OVEN:
When the oven or the grill are in use, accessible
parts can become very hot; it is necessary to
keep children well away from the appliance.
- Never cook food on the base of the oven.
- Keep fingers away from the area of the hinges
when closing the door as it is possible to trap
them.
- Do not let children sit down on or play with the
oven door. Do not use the drop down door as a
stool to reach cabinets above.
LOWER DRAWER
DO not place inflammable materials or plastic
utensils in the warming drawer (situated below the
ovens).
1 Oven light
2 Turnspit
3 Control knob for grill function
4 Control knob for oven thermostat
5 Control knob for minuter minder
112
3
4
6 Control knob ( left rapid burner )
7 Control knob ( left semi rapid burner )
8 Control knob ( Triple crown burner )
9 Control knob ( right semi rapid burner )
10 Control knob ( auxiliary burner )
5
6
7
8
9
10
3
GB
COOK-TOP USE
USING THE GAS BURNERS
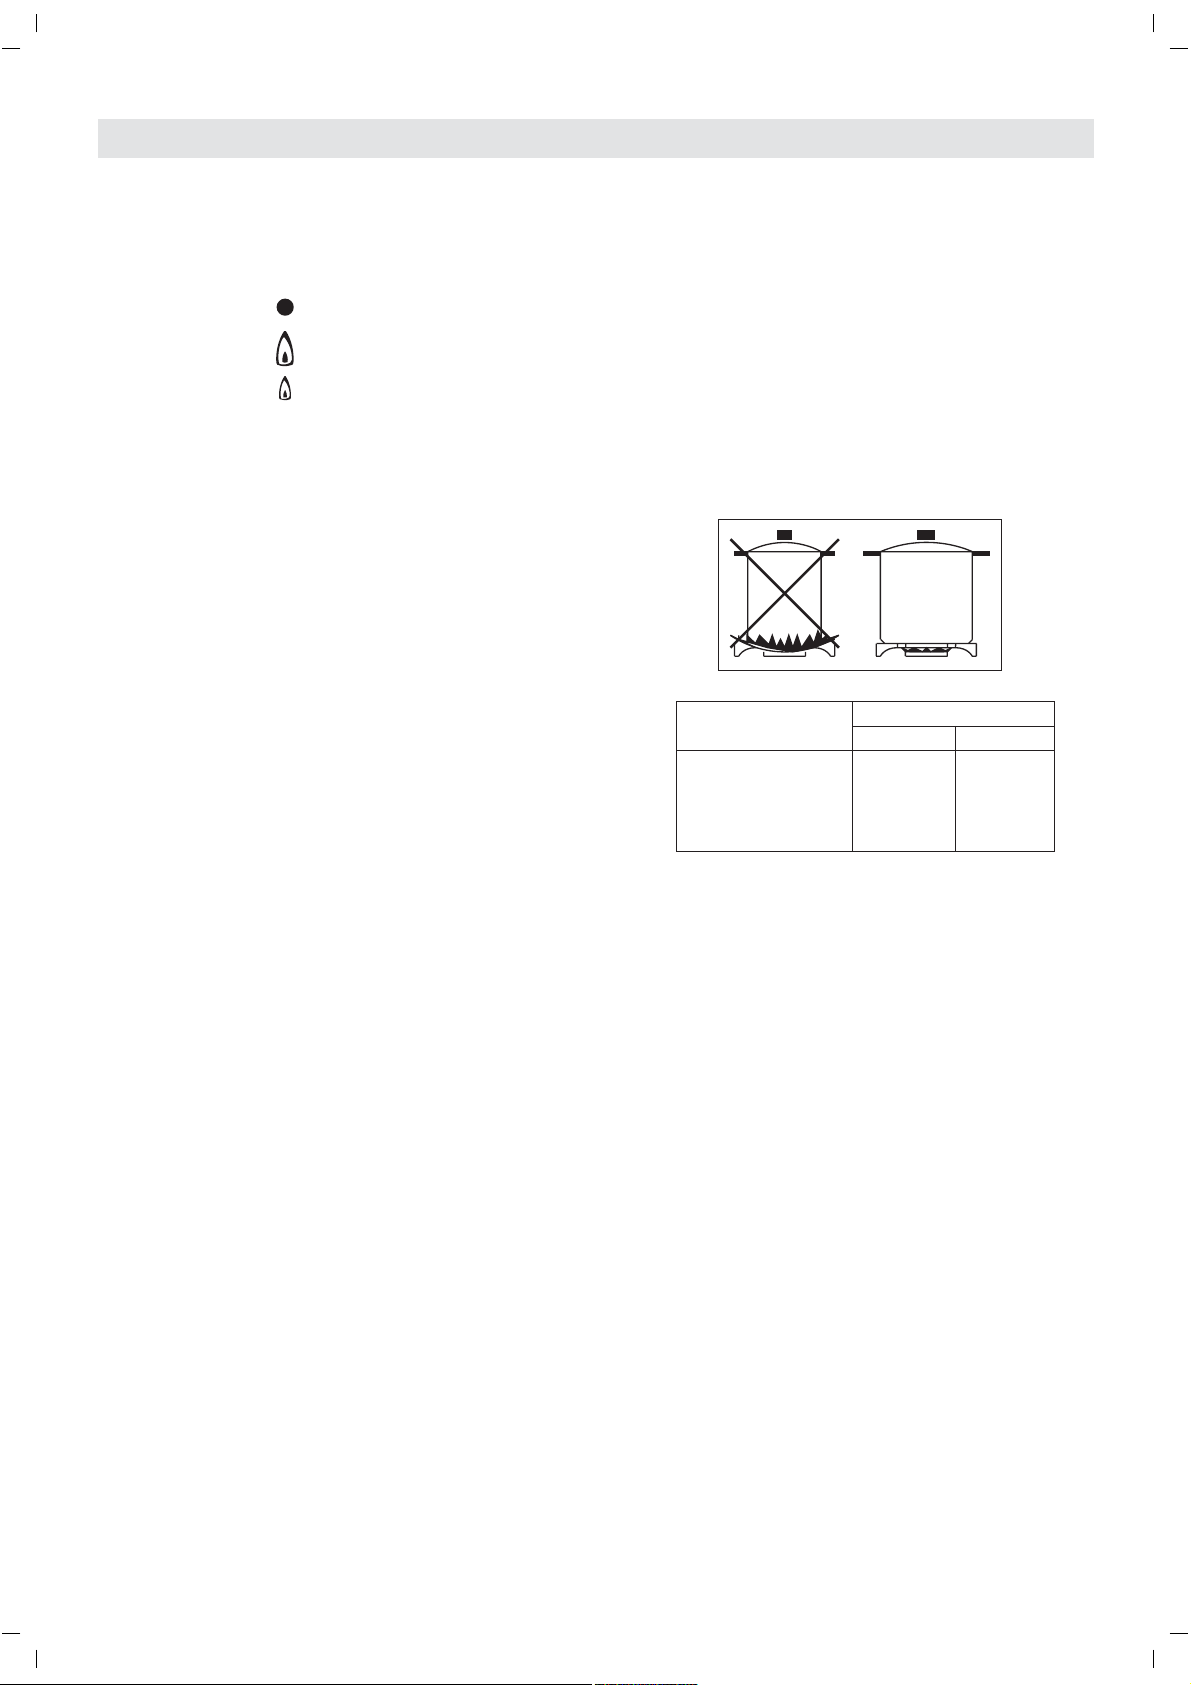
The following symbols are found on the control
panel next to each knob:
- Circle gas off
- Large flame maximum setting
- Small flame minimum setting
The minimum position is at the end of the anticlockwise rotation of the knob. Knob positions must
be set between max. and min.; never set the knobs
between max. and off.
MANUAL IGNITION
(during mains power failure)
To ignite the burner, press the knob of the selected
burner and turn it anticlockwise to the
maximum
position then light with a match.
AUTOMATIC ELECTRIC IGNITION
To ignite the burner, press the knob of the selected
burner and turn it anticlockwise to the
maximum
position. Keeping the knob pressed in, the automatic
ignition of the burner will operate.
In case of power failure, the burner can also be lit
using a match.
ENERGY SAVING TIPS
The diameter of the pan bottom should be the
same as that of the burner. The burner flame
must never exceed the pans diameter.
Use flat-bottomed pans only.
Whenever possible, keep a lid on the pan while
cooking.
This allows you cook using less heat.
Cook vegetables, potatoes, etc. with as little
water as possible to reduce cooking times.
BURNERS PANS
Ø min. Ø max
RAPID 180 mm 220 mm
SEMIRAPID 120 mm 200 mm
AUXILIARY 80 mm 160 mm
TRIPLE CROWN 220 mm 260 mm
APPLIANCES WITH SAFETY VALVE
Follow the same procedure described above to
ignite the burners.
In this case, however, once you have turned the
knob to the open setting, hold it pressed in for 10
seconds.
If for any reason the burner flame goes out, the
safety valve automatically shuts off the gas supply
to the burner in question.
4
GB
USING OF THE GAS OVEN
Before the first use of the oven
The first time the oven is used, it may give off
smells, these are caused by residues left by the
production processes and is quite normal.
Ensure
there is adequate ventilation in the room before
performing this action.
(It is necessary to heat
up the oven at the maximum temperature for
about 30-40 minutes in order to burn off these
residues).
It is perfectly normal for the oven to
smoke when first used; wait for the smoke to stop
before placing food into the oven.
The oven is fitted with: a grill shelf for cooking food
in oven dishes or for placing directly on the grill
shelf itself, a drip-tray for cooking sweets, biscuits,
pizzas, etc., or for collecting juices and fats from
food cooked directly on the grill shelf.
ATTENTION:
- always use the oven with the oven door closed
-
do not cook foods on the bottom in the base
of the oven.
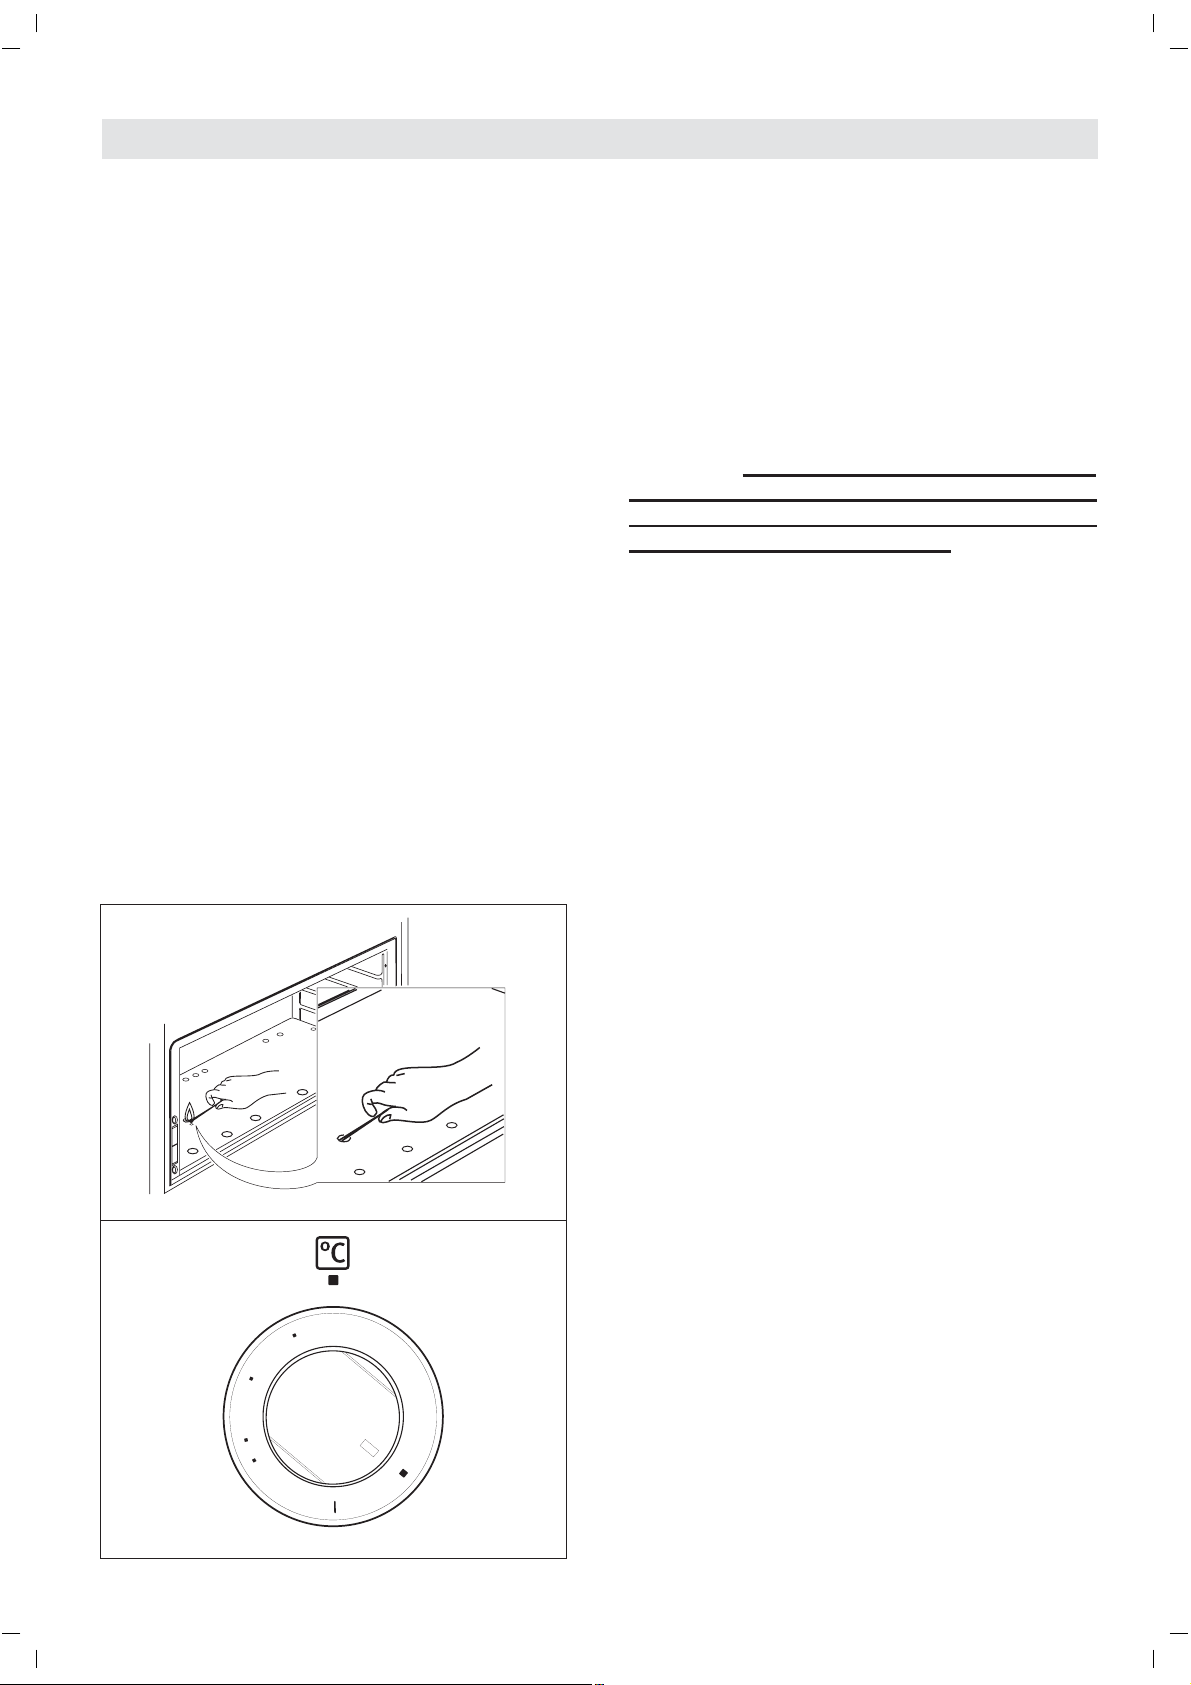
MANUAL IGNITION
(during mains power failure)
To ignite the oven burner, simply insert a match
through the opening (fig. 1) and then turn the knob
to the maximum setting as shown in figure 2.
AUTOMATIC ELECTRIC IGNITION
The oven door must always be completely open,
before the burner ignition
To ignite the burner, press the knob and turn it anticlockwise to the maximum position (fig. 2).
Keeping the knob pressed in, the automatic ignition
of the burner will operate.
In case of power failure, the burner can also be lit
using a match. (fig. 1).
WARNING: Do not operate the ignition for more
than 15 seconds. If the burner fails to ignite,
leave the oven door open for at least 1 minute
before pressing the knob again.
APPLIANCES WITH SAFETY VALVE
Follow the same procedure described above to
ignite the burners.
In this case, however, once you have turned the
knob to the open setting, hold it pressed in for 10
seconds.
If for any reason the burner flame goes out, the
safety valve automatically shuts off the gas supply
to the burner.
Fig. 1
Fig. 2
250
210
170
140
5
GB
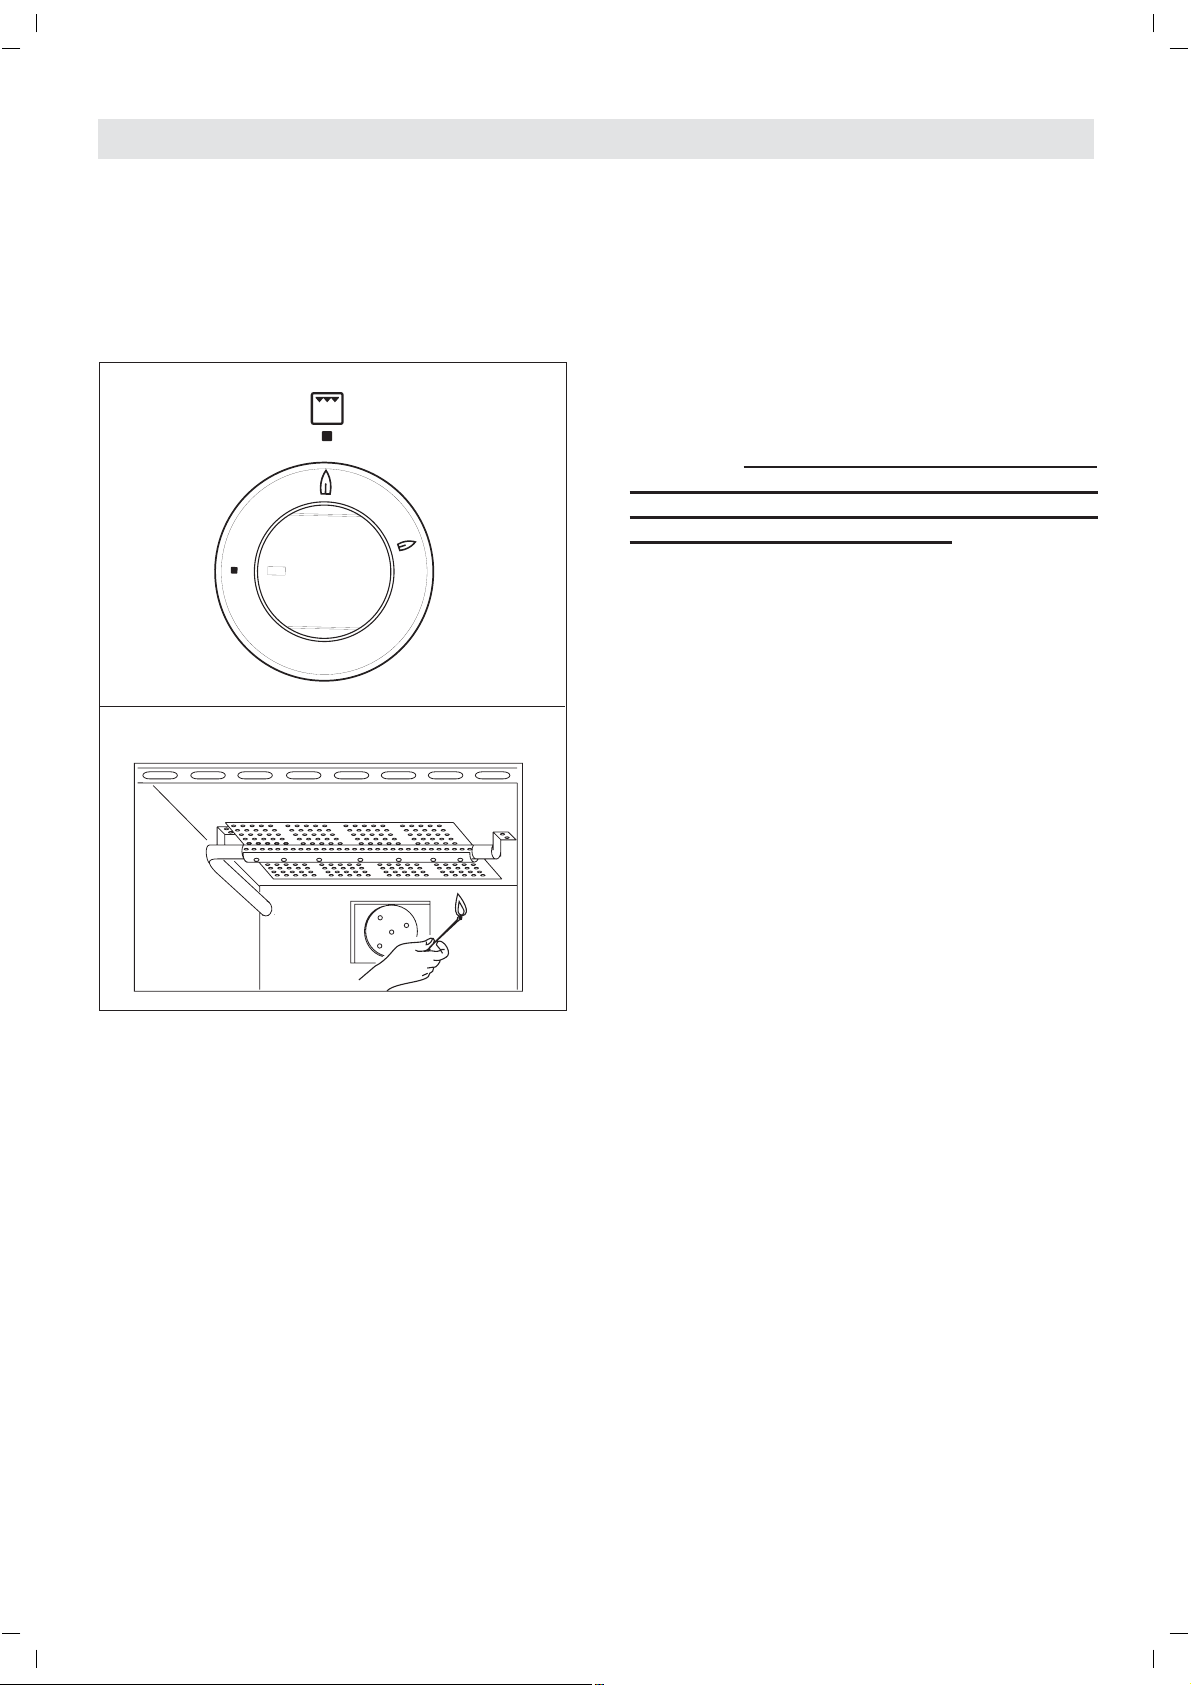
USING OF THE GAS GRILL
Manual ignition of the grill
(during mains power failure)
Open the oven door and turn the grill knob to max.
position (fig. 3).
Bring a light match near the holes of the burner
placed on the oven upper part (fig.4).
Fig. 3
Fig. 4
Automatic electric ignition.
The oven door must always be completely open,
before the burner ignition.
To ignite the burner, press the knob and turn it to
the max. position (see fig. 3). Keeping the knob
pressed in, the automatic ignition of the burner will
operate.
In case of power failure, the burner can also be lit
using a match. (fig. 4).
WARNING:
than 15 seconds. If the burner fails to ignite,
leave the oven door open for at least 1 minute
before pressing the knob again.
APPLIANCES WITH SAFETY VALVE
Follow the same procedure described above to
ignite the burners.
In this case, however, once you have turned the
knob to the open setting, hold it pressed in for 10
seconds.
If for any reason the burner flame goes out, the
safety valve automatically shuts off the gas supply
to the burner.
Do not operate the ignition for more
NOTE: some grill cooking must be carried out
with oven burner on.
6
GB
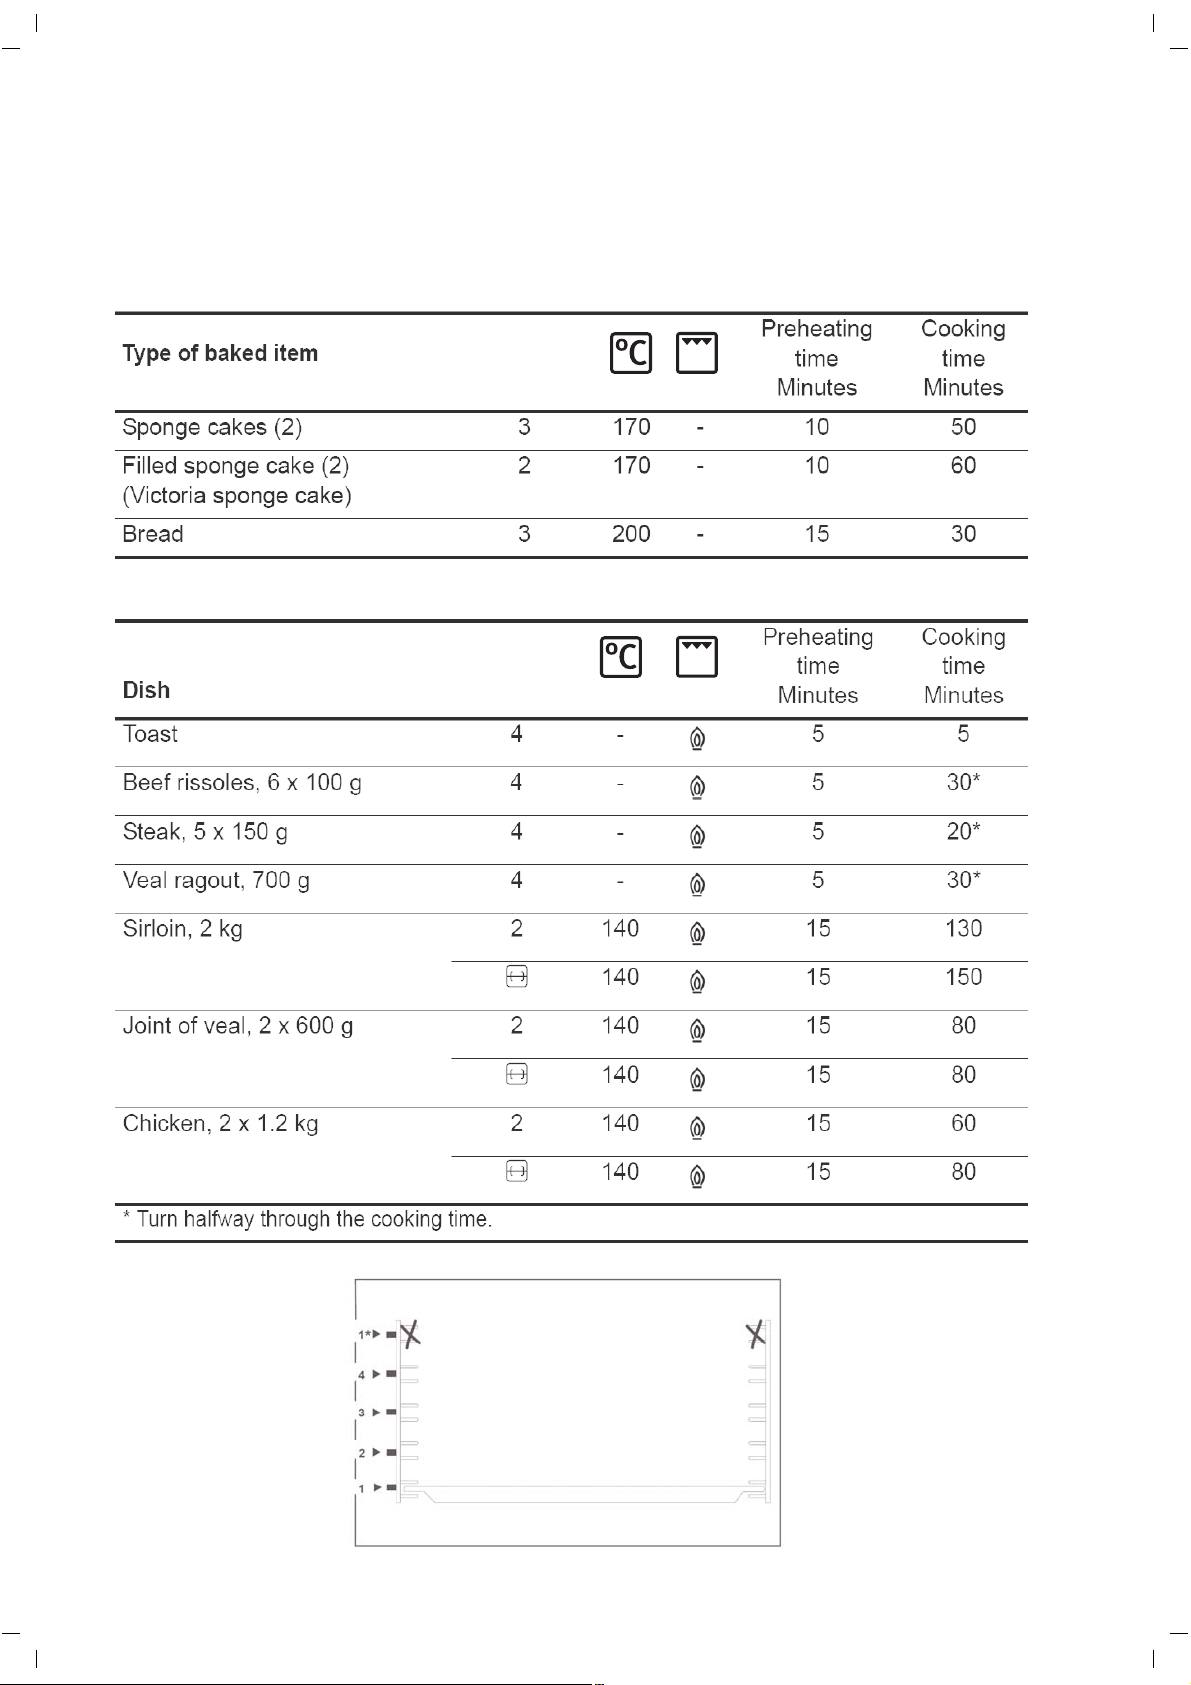
Note: The following tables provide a guide for cooking some of the most popular dishes. The
cooking times recommended in these tables are approximate. After a few attemps, we are sure
that you will be able to adjust the times to get the results you want.
Cooking table
Gas oven
Shelf
position
Gas grill
Shelf
position
*Do not use
Shelf positions
7
GB
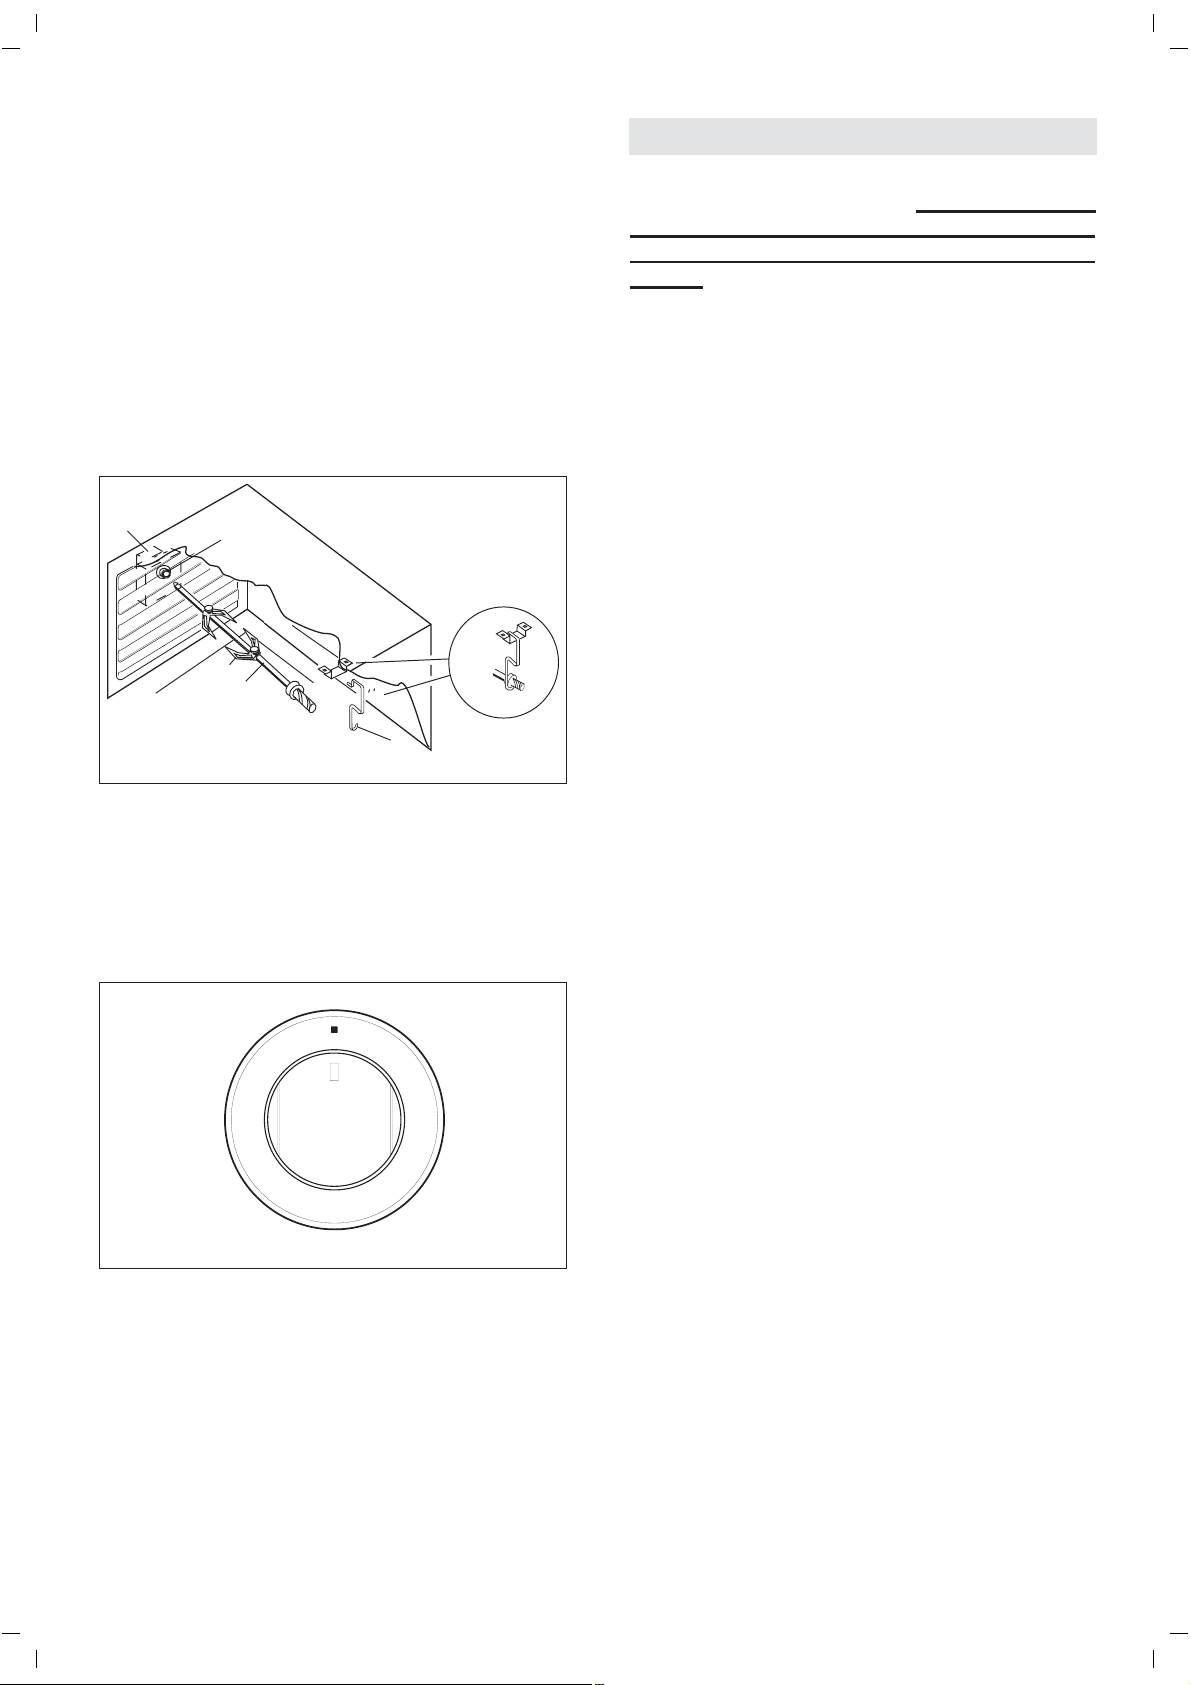
TURNSPIT
For utilization of the turnspit follow the instructions
described .
- Put the food in spit L (see fig. 7), paying attention
to block it within the two forks F and to balance
it, in order to avoid any unnecessary effort in
motor R.
- Put the spit on support G, after having put its
opposite end into hole P of motor R.
- Place the drip-tray with a little water under the
spit.
- To remote the spit, operate in the opposite direction
using protecting glove in isolating wool (fig. 5).
Fig. 5
R
MINUTES COUNTERS (Fig. 6)
Turn the knob clockwise to set the desired cooking
time. The minutes minder can be adjusted from 1
to 60 minutes.
A sound signal will inform you that the chosen time
is up.
P
F
L
G
Fig. 6
5
10
15
20
25
55
50
45
40
35
30
CARE AND MAINTENANCE
Before cleaning the appliance
, turn off the mains
gas tap and unplug the appliance or disconnect
power at the main circuit breaker of the electrical
system.
Do not clean appliance surfaces when still hot.
Do not use steam cleaners to clean the oven.
ENAMELLED SURFACES
Clean with a damp sponge using soap and water.
Grease can be easily removed using hot water or
a specific cleansing agent for enamelled surfaces.
Do not use abrasive cleansers.
Do not leave any acid or alkaline substances (lemon
juice, vinegar, salt, etc.) on the enamel.
Clean the parts in stainless steel with specific
cleansers for stainless steel surfaces.
These detergents must be applied using a soft
cloth.
GRIDS AND BURNERS
To clean the cooktop burners, remove by pulling
upwards and soak them for approximately 10
minutes in hot water with a little detergent. After
cleaning and washing them, dry them carefully.
Make sure that burner holes are not clogged.
Clean the burners once a week or more frequently
if necessary.
MAKE SURE YOU HAVE ASSEMBLED THE
BURNERS CORRECTLY.
OVEN
Clean enamelled parts with a damp sponge using
soap and water. Grease can be easily removed
using hot water or a specific cleansing agent for
enamelled surfaces.
Do not use abrasive cleansers.
Install shelves by locating them in the horizontal
guide rails on the oven walls.
The interior glass of the oven
The interior glass of the oven door can be removed:
with the door in a semi-open position, remove the
screws A and B and the profime C
as shown in
fig. 6B.
Use both hands to remove the glass as shown in
figures 6C.
After cleaning, refit the glass by proceeding in
reverse order.
8
 Loading...