

AEG EKC70751X, EKC60751X User Manual

user manual
Cooker
EKC70751


Welcome to the world of Electrolux
You’ve chosen a first class product from
Electrolux, which hopefully will provide
you with lots of pleasure in the future.
Electrolux ambition is to offer a wide variety
of quality products that would make your
life even more comfortable. You can look at
some examples on the cover in this manual.
But now it’s time to study this manual and
start using and enjoying the benefits from
your new machine. We promise that it’ll
make your life a little easier. Good luck!
2

Contents
Safety ...........................................................................4
Installation ..................................................................6
Changing plinth height ......................................6
Adjusting the level ............................................... 7
Anti-tip guard ..................................................8
Electrical connections ......................................... 9
Base trim ...............................................................9
Safety functions .......................................................10
Function lock (cooker) ..................................10
Function lock (oven) .....................................10
The extractor fan .........................................10
The door lock .................................................11
Description of product .........................................12
The cooker ....................................................12
The oven ........................................................13
Before using for the first time .............................14
Setting the clock ...........................................14
Heating the oven without food ...................14
Telescopic runners ........................................15
Using the ceramic glass plate ...............................18
The heating zones .........................................19
Using the oven ........................................................26
The oven functions .......................................26
Oven display .................................................27
Choice of oven functions ..............................28
Heat indicator ...............................................29
Other functions .............................................34
Oven safety switch-off ..................................34
Practical use ..................................................35
Cleaning and care ...................................................42
Cleaning the cooker .....................................42
Cleaning the ceramic glass plate ................43
Cleaning the oven .........................................44
Technical data ..........................................................53
European Guarantee.....................................54
Practical advice and tips ........................................56
Problems and remedies .........................................58
3
Safety
Cookers are being developed the whole time. You cannot always use your new cooker
in the same way as your old one. For this reason, you should read the instructions
carefully and familiarise yourself with your new cooker and what it can do. This cooker
is intended for normal household us e. Please let us know if you have views or questions
about your cooker and its use.
Our address and telephone number are in the Service chapter.
Text marked with a
VERY CAREFULLY
cooker.
WARNING TRIANGLE
, so that you do not inj ure y ou rself or others, or damage the
Unpacking
Check that the cooker is in good condition
and undamaged. Transport damage must
be reported immediately to the company
where you bought it. For direct deliveries,
any transport damage must be notified to
Customer Services within seven days in
accordance with the consignment note.
The packing material can be recycled.
Contact your local authority if yo u do not
know where you can deposit it.
Do not forget to remove the packing
material from inside the oven before
using the oven.
Installation
Any work required on the cooker must be
carried out by a qualified expert. Any work
carried out by non-qualified people can
mean poorer cook er per forman ce and res ult
in personal injury an d/or dama ge to proper ty .
For cookers fitted with a plug: Make
sure that the plug is properly inserted into
the wall outlet.
The cooker is heavy. Edges and
corners with which you do not normally
come into contact, can be sharp. Use
gloves when moving the cooker.
THE ANTI-TIP GUARD
that you avoid the cooker tipping when
subjected to abnormal loading.
must be fitted so
concerns safety.
IMPORTANT! Do not place the
cooker on an extra plinth or other heightincreasing unit. This means more risk that
the cooker will tip over!
READ THIS TEXT
Children and the cooker
Children are by nature inquisitive and
interested in most things, including the
cooker. In the interests of safety, we
should like to mention a few things that
you should think about if you have
children or children come to visit:
There must be a bench surface at least
40 cm (16") wide on both sides of the
cooker.
If you have a
your cooker, then this must be fitted .
DOOR LOCK
Never allow children to use the bladescraper.
Let children help you at the cooker,
but teach them that pots and pans, hobs
and ovens become very hot and retain
heat for some time after use.
THEM CAN RESULT IN BURNS
HEATING PLATE GUARD
THE
must also functio n p ro per ly.
TOUCHING
.
for
Use
Never use a cracked ceramic glass plate.
Liquids could, if they b oi l ov er, or during
cleaning, penetrate down into the live
electrical components. Disconnect the
4

electricity to the cooker and contact
service for repairs.
Never lay aluminium foil, plastic
material or similar on the ceramic glass
plate. If a heating zone is turned on by
mistake, paper/plastic could burn or melt.
Never leave a deep fat fryer, melting
fat, paraffin or other easily ignited
material without supervision. in the event
of fire, turn off the cooker knobs and
switch off the extractor fan.
THE FIRE WITH A POT LID
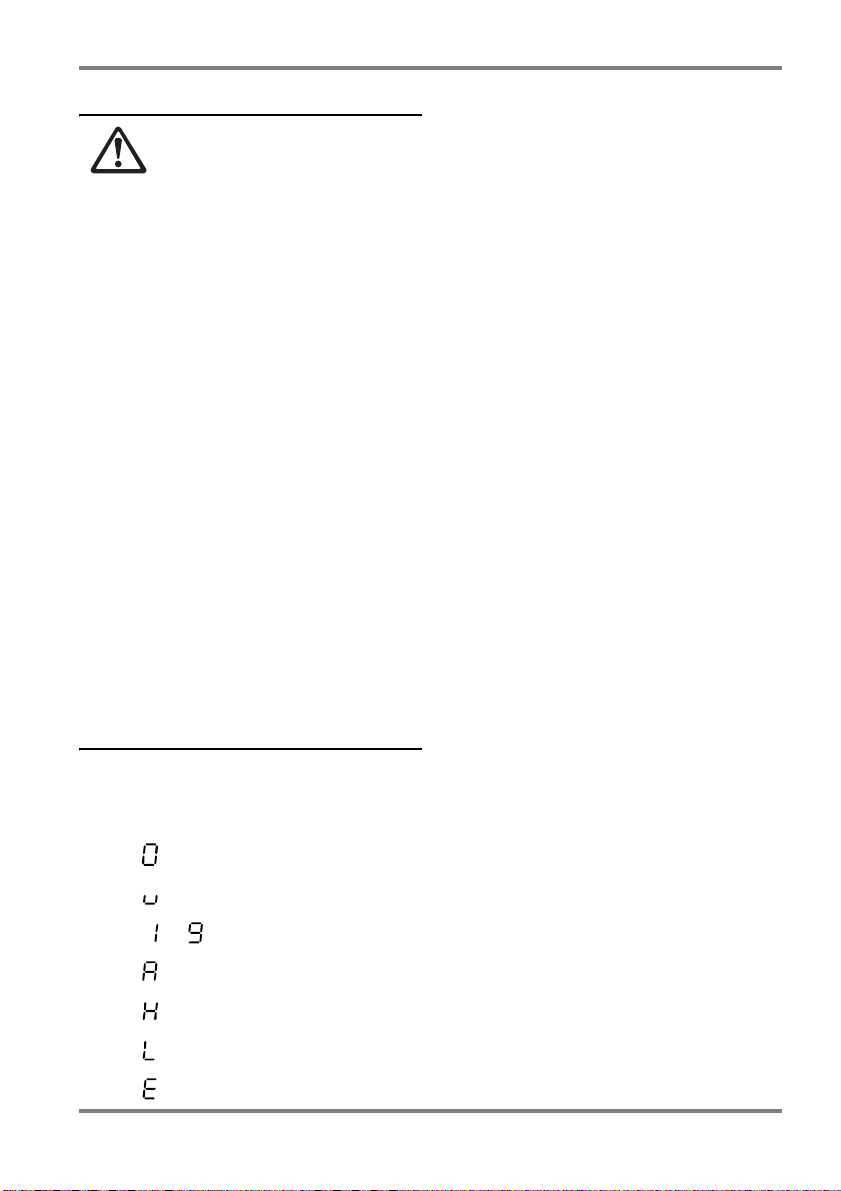
Never stand on the ceramic glass
plate.
Check that the cooker is properly
turned off when not in use, with all the
knobs at zero.
Warning! Alcohol and similar
substances, which can form explosive
gases, or other substances that can cause a
fire or exp losion must not be used in the
oven.
The ceramic glass plate must be used
with the greatest care. For example,
flaming with brandy or other forms of
alcohol can result in traces of fact in the
extractor fan igniting and causing serious
fires. In the same way, flames and
burning fat can cause injuries.
Do not place chemicals or cleaning
agents in the drawer.
EXTINGUISH
, never use water.
Cleaning
Keep the ceramic glass plate and the ov en
clean. Fat and spilled material can cause
much smoke when heated and are also a
possible fire hazard.
While the oven is still hot, you must
use the scraper blade immediately to
remove sugar and boiled-over material
with a high sugar content, for example
marmalade, as well as melted plastic and
foil to avoid damaging the ceramic glass
plate. Be careful,the blade scraper is very
sharp.
Maintenance & service
Turn all the knobs to zero before
replacing a burned-out oven light bulb.
Before you change the bulb, make sure
that the cooker is disconnected from the
mains. For cookers with a cable, pull out
the plug. For other cookers, disconnect
the power supply by using the universal
pole switch.
Service and repairs should be carried
out by a company that is approved by the
supplier. Use only original spare parts.
At the end of the appliances
life
The symbol on the product or on its
packaging indicates that this product may
not be treated as househo ld waste. Instead
it shall be handed over to the applicable
collection point for the recycling of
electrical and electronic equipment.
By ensuring this product is disposed
of correctly, you will help prevent
potential negative consequences for the
environment and human health, which
could otherwise be caused by
inappropriate waste handling of this
product.
For more detailed information about
recycling of this product, please contact
your local city office, your household
waste disposal service or the shop where
you purchased the product.
5
Installation
Any work required on the cooker
must be carried out by
EXPERT
.
The cooker is heavy. Edges
and corners with which you do not
normally come into contact, can be
USE GLOVES
sharp.
cooker.
When delivered, the cooker is adapted to a
bench height of 900 mm. The cooker has a
telescopic plinth. You can change the height
so that the cooker suits a bench height from
848 mm up tol 933 mm.
T ake car e when positioning the cooker
so that it does not block the ventilation
outlets (behind the cooker and above the
hood). The cooker must not be pushed in
under a tiled edge or similar.
The cooker must have a bench area on
both sides (see “Safety”).
Make sure that the cooker cable is not
crushed when the cooker is moved.
A QUALIFIED
when moving the
6
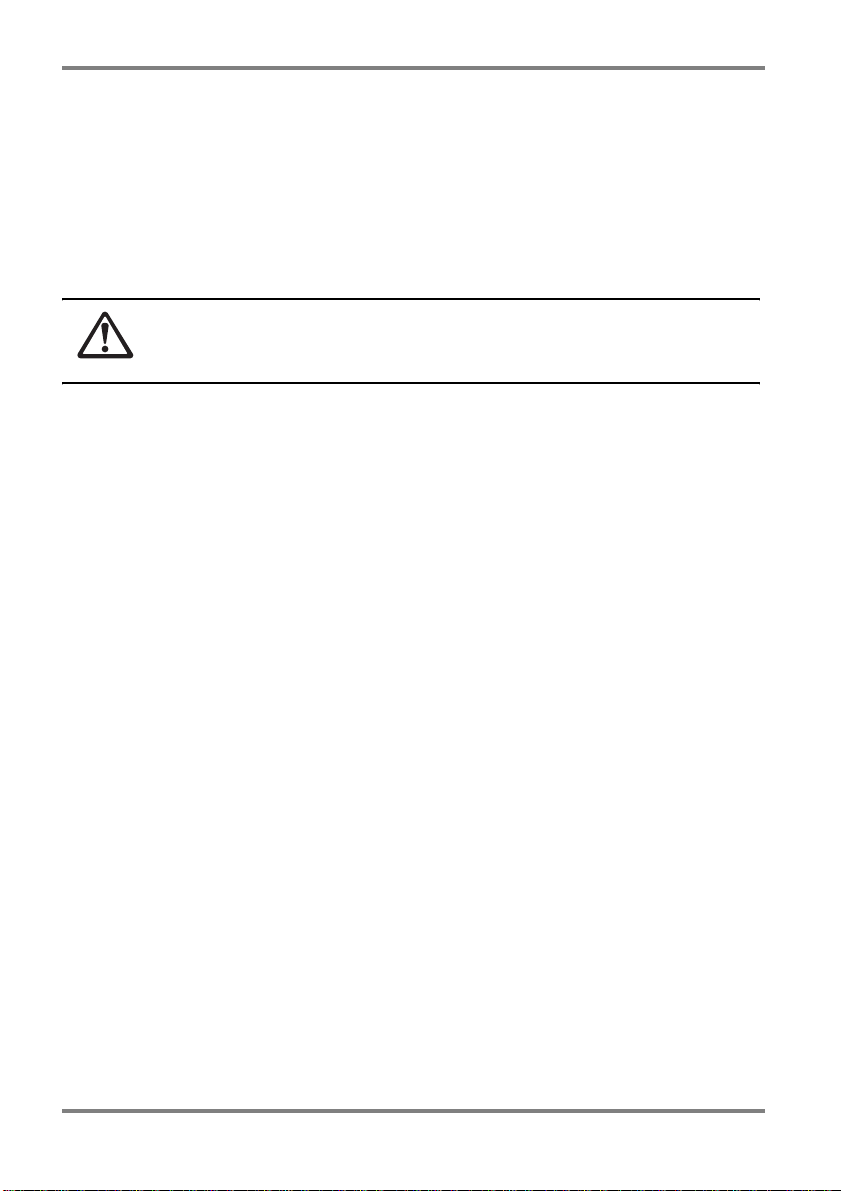
Changing plinth height
If you want to change the height, first read
through all the points below befo re you start .
1 Lay down the cooker gently (
ILLUSTRATION
). Use, for example, the
polystyrene from the packaging
between the cooker and the floor as
protection. Think abou t placing a
protective layer under the rear lower
corners of the cooker to protect the
floor.
2 Unscrew the screws A (4
ILLUSTRATION
). Pull out the inner base
slightly if you only wish to change the
height. Pull the brackets on which the
wheels and feet are fitted.
IMPORTANT
! Be careful, there are
sharp edges under the cooker.
3 Screw in the screws again A in one of
the holes for a bench height of 850 to
920 mm. The distance between the
holes varies from 7 to 14 mm (
ILLUSTRATION A
).
4 Lift the cooker upright and connect it
up electrically. Push the cooker back
into position and make sure that it is
absolutely level before fitting the
safety equipment.
SEE
SCREWS, SEE
SEE
A
A
A
A
14
7
7
A
14
14
14
920
850
Adjusting the level
The cooker must stand level, for example to
ensure that fat is evenly divided in the
frying-pan. Place a spirit level or a frying
pan containing water on the ceramic glass
plate when you want to check whether the
cooker is level.
If necessary, from the front of the plinth,
you can adjust the cooker wheels and feet by
15 mm. Use a screwdriver to adjust the rear
wheels and a Polygrip for the front feet.
7
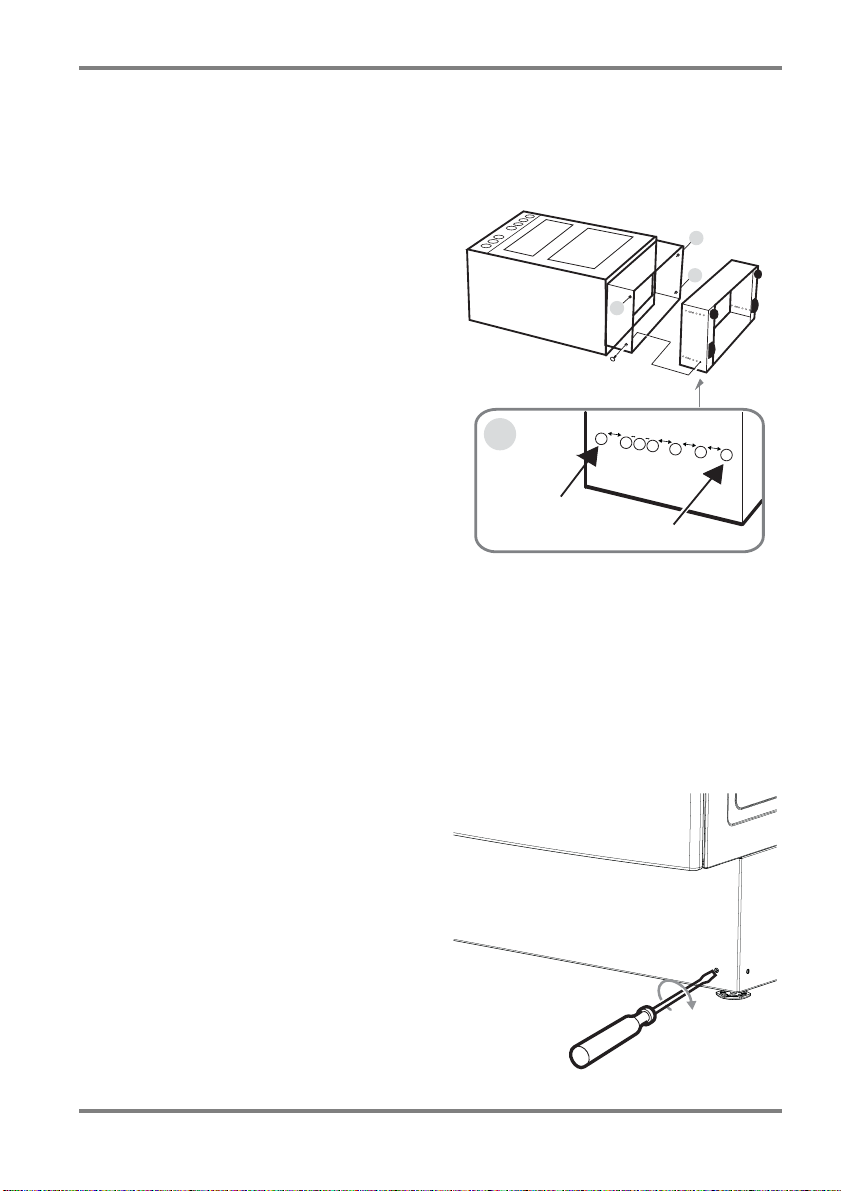
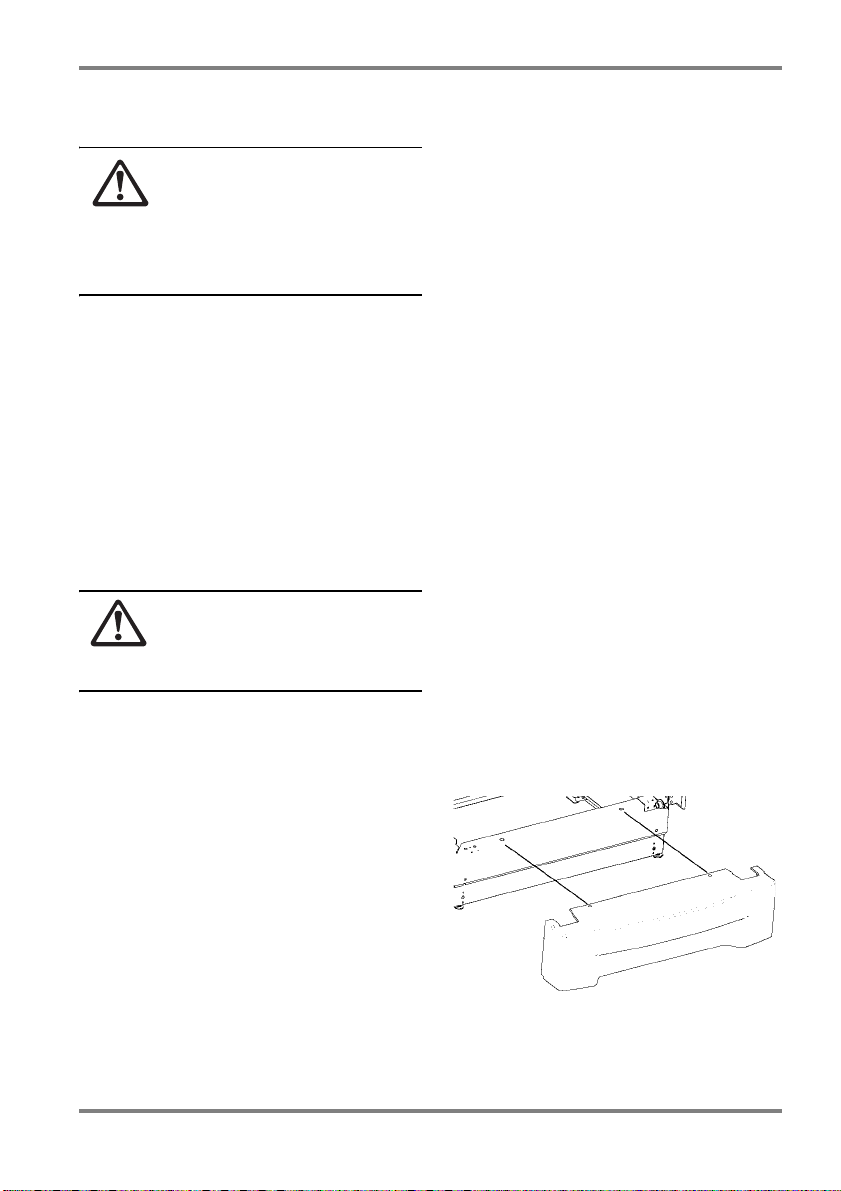
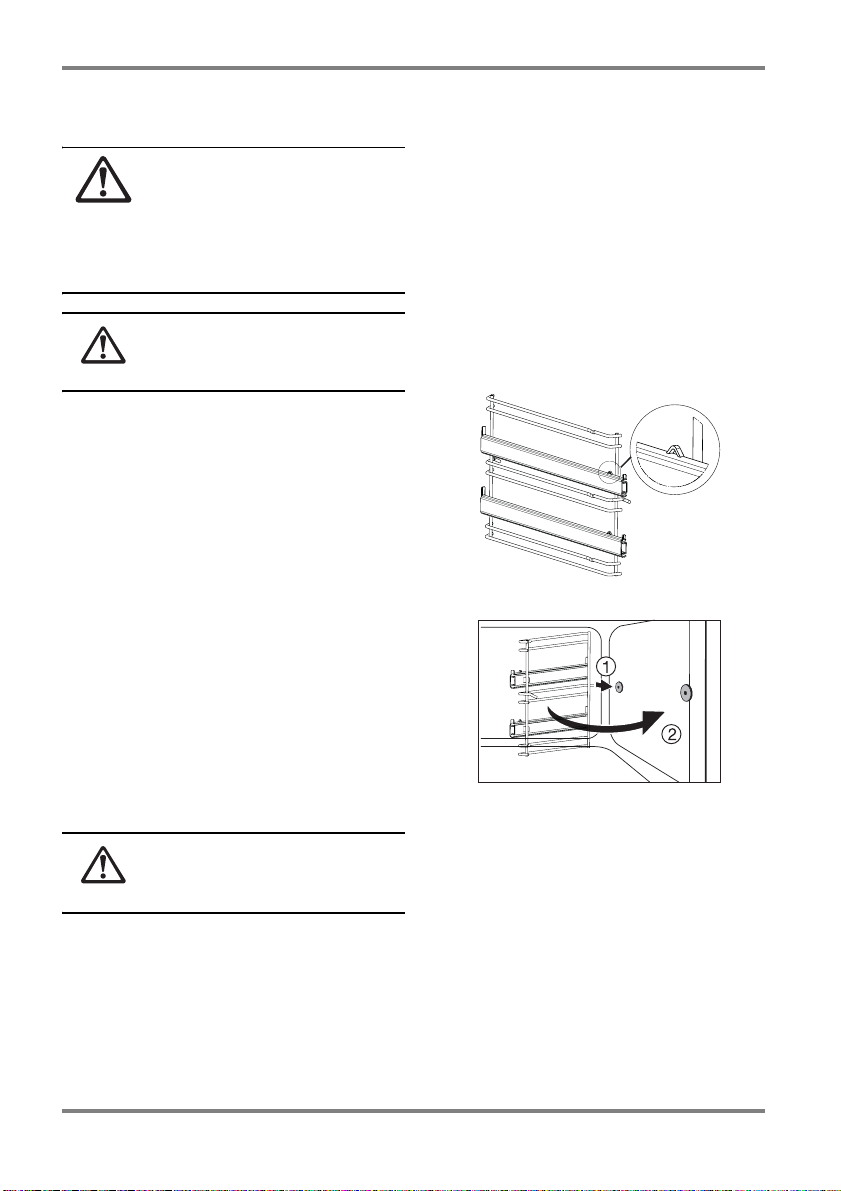
The anti-tip guard
The anti-tip guard must be fitted to
prevent the cooker from tipping under
abnormal loading.
The anti-tip guard only functions
when the cooker has been pushed
into position.
HOW TO FIT THE ANTI-TIP GUARD
ON THE COOKER
:
Before fitting the anti-tip guard, make
sure that the cooker has been
adjusted to the correct height and
is standing level (see page 7).
2 The attachment (B) is fitted to the
left side when delivered. Measure
out where the anti-tip guard (A) is
to be located, 60 mm (2.4") down
from the edge of the ceramic glass
plate and 50 mm (2.0") from the
wall(cupboard). Screw it firmly
into solid material or use suitable
reinforcement. The entire anti-tip
guard (A+B) can also be located
on the right-hand side (
SEE FIG
. 1).
Make sure that the surface
behind the cooker is smooth.
If there are tiles or a moulding
behind
the edge of the ceramic
glass plate then there must be a
space with the same dimension
between the anti-tip guard and
the wall. This is so that the antitip guard is firmly attached to
the cooker and functions
correctly.
cooker (B) when the cooker is
pushed in (
SEE FIG
. 2).
NOTE! If the space between the bench
cupboards is greater than t he widt h of t h e
cooker, then you must adjust the side
measurement if you want to centre the
cooker.
1
Check that the anti-tip guard
projects at least 20 mm (0.8")
into the hole in the back of the
2
8
Electrical connections
Any work required on the cooker
must be carried out by a
EXPERT
. Work carried out by nonqualified people can impair the
cooker and cause injury to people
and/or damage to property.
QUALIFIED
The electrical installation is to include a
device whereby it is possible to separate all
the poles of the equipment from the power
supply, with a contact opening of at least
3 mm.
This requirement must be satisfied for
safety reasons.
The connected rating and voltage are
shown on the data plate. There is a wiring
diagram on the back of the cooker.
Base trim (optional accessory)
CAUTION! Take due care when
fitting the base trim to the cooker.
Edges which you do not normally
come into contact with can be sharp.
IMPORTANT! ONLY FITS COOKERS WITH
A HEIGHT OF
900 MM.
Remove the protective film before fitting the
base trim.
1 Remove the drawer from the cooker
by lifting it diagonally upwards and
then pulling it all the way out.
2 Fit the base trim by pressing it firmly
onto the plinth (snap attachment, no
tools needed).
3 Replace the drawer.
9
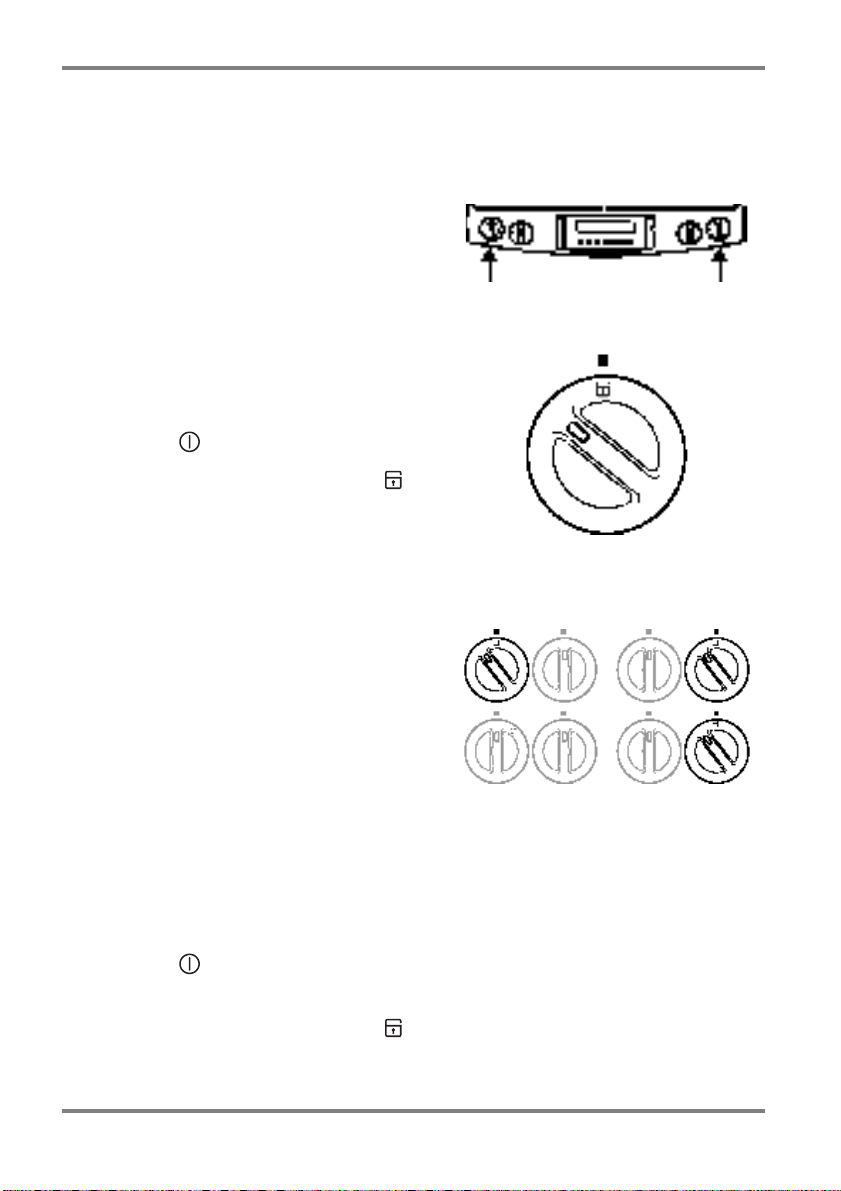
Safety functions
Function lock (cooker)
The function lock is built into the outer
cooker knob.
IMPORTANT! The main power supply to
the cooker is not switched off.
LOCK THE COOKER LIKE THIS
(
SEE ILLUSTRATION
1. Switch on the oven with the On/Off
button .
2. Turn the knob anti-clockwise to .
HOW YOU USE THE COOKER
At the same time, turn the two knobs to the
forward zones anti-clockwise. Within
10 seconds, then turn one of the knobs anticlockwise once more. You can use the hob
as usual.
):
Function lock (oven)
This is to protect the set oven functions from accidental changes.
ENGAGING THE FUNCTION LOCK
1. Switch on the oven with the On/Off
button .
2. Select oven function.
3. Turn the knob anti-clockwise to .
To unlock the oven, see the description above concerning the use of the cooker.
10

The coolingfan
The cooker is fitted with a coolingfan. The
purpose of the fan is to keep the appliance
cool.
The coolingfan starts automatically
when the oven is used. When only th e hob is
used, the extractor fan has a delayed start.
When the cooker is switched off, the
coolingfan starts automatically after oven
temperature has decreased to 120
o
C.
The door lock
The door lock makes it difficult for children
to open the door. The lock is engaged when
the cooker is delivered, but can be
disconnected as necessary.
O
PEN THE DOOR
Move the lock (see illustration) to the
right before opening the door.
D
ISENGAGING THE LOCK
Check that the oven is not hot!
Move the lock to the right, lift it up
and move it a little further to the right,
then lift the left-hand edge of the
button.
E
NGAGING THE LOCK
Move the lock to the right and
downwards.
11
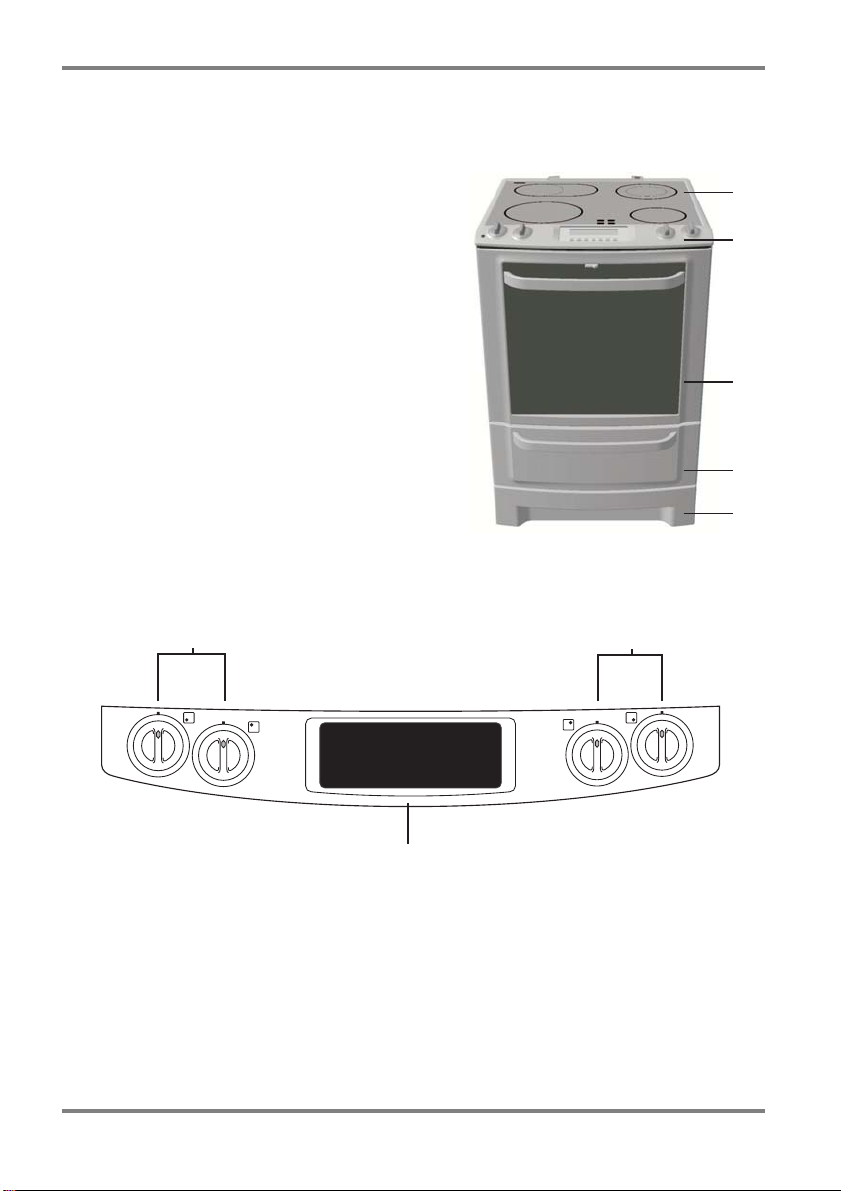
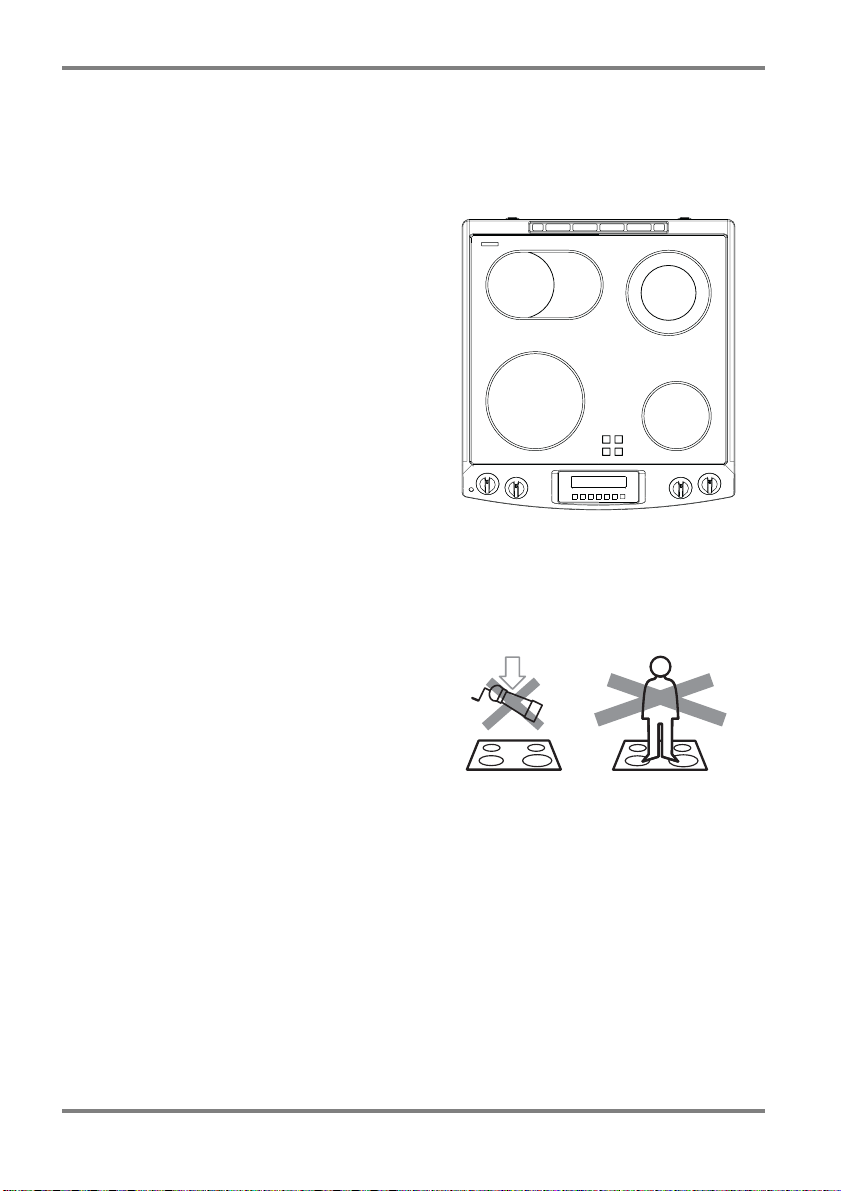
Description of product
Cooker
1 Ceramic hob
2 Control panel
3Oven
4 Storage drawer
5 Plinth
Control panel
11
1
2
3
4
5
1 Knobs for the hob
2 Timerdisplay
2
12
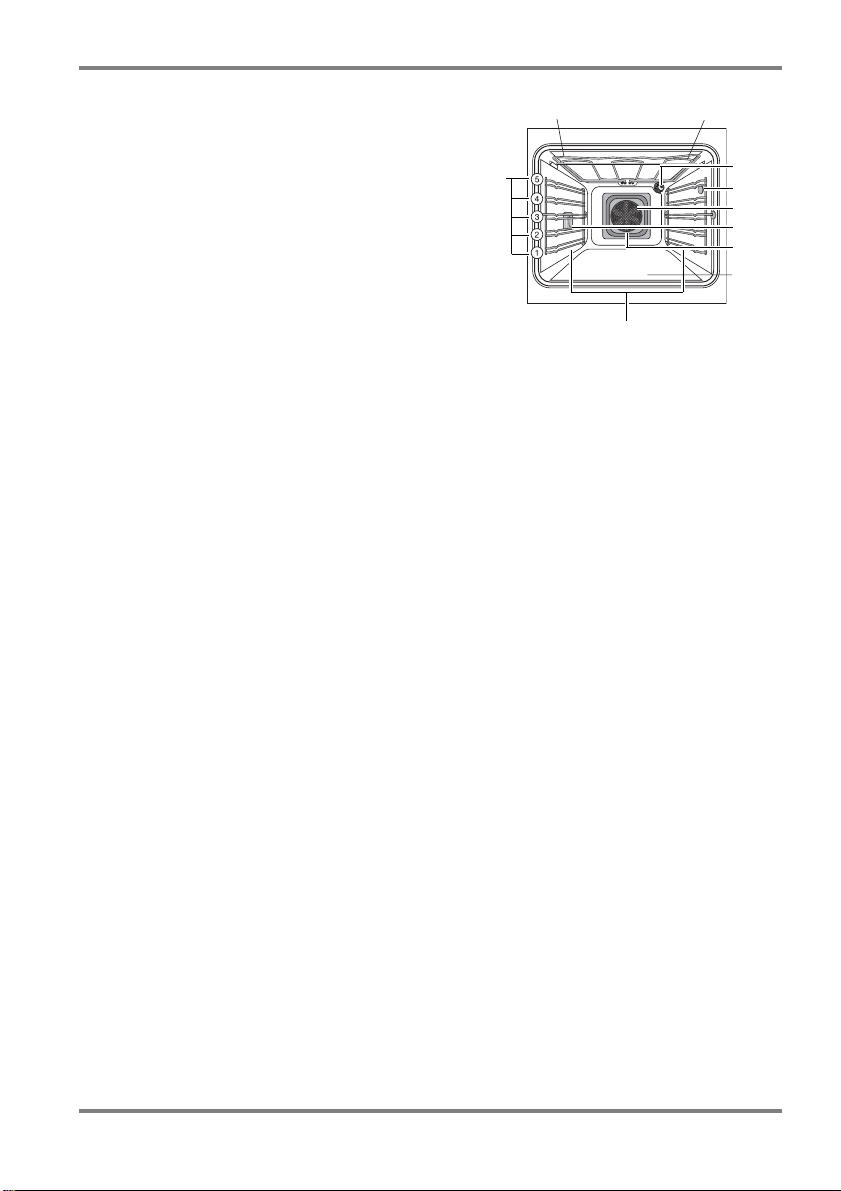
Oven
1 Top heat element
2 Heating element
3 Oven lighting, 40W
4 Meat probe socket
5 Fan cover
6 Oven lighting, 25W
7 Fan heating element
8 Bottom heat
9 Oven shelf runners, removable
10 Shelf positions
10
1
9
2
3
4
5
6
7
8
13
Before using for the first time
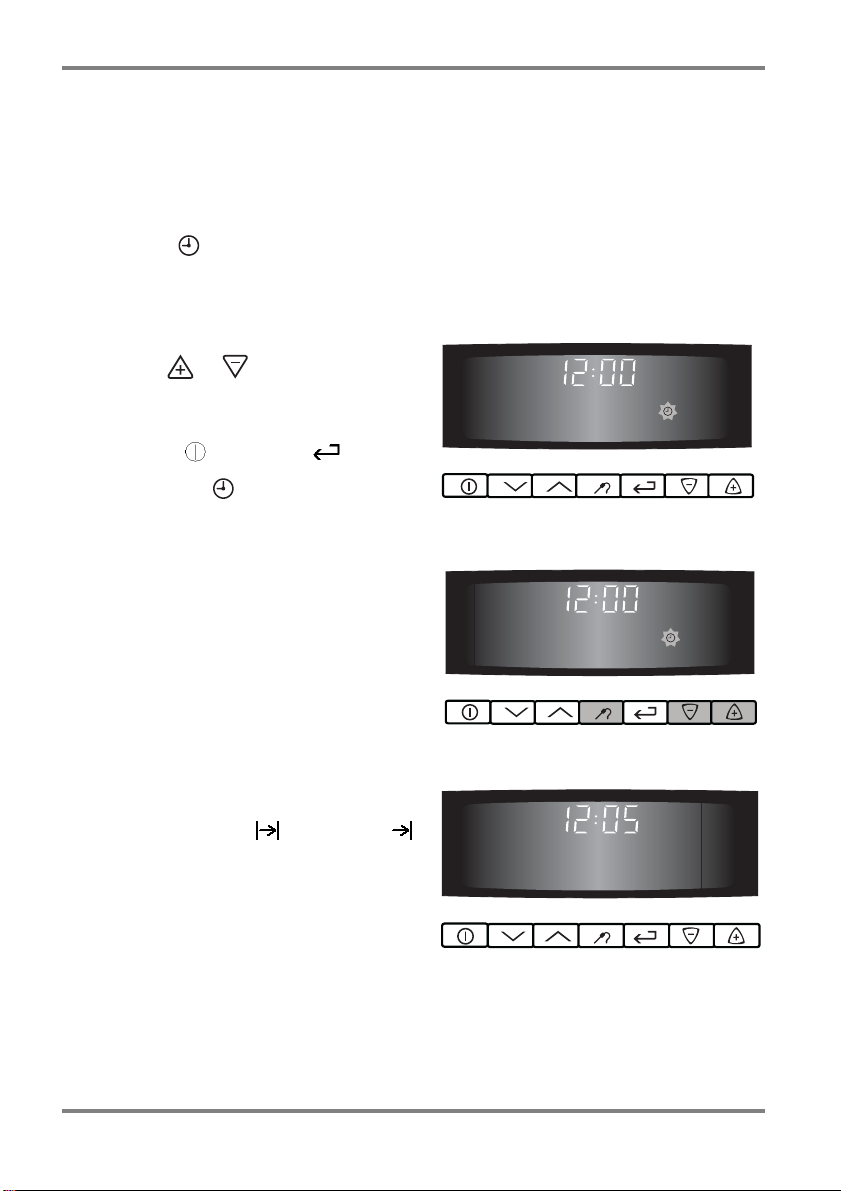
Setting the clock
When the power to the oven is connected, a
clock symbol flashes until you have set
the time on the clock.
SET THE TIME LIKE THIS
1 Press or to set the right time.
2 To change time already set, press
On/Off . Then press a few
times until flashes. Follow the
instructions in alternative 1.
After about 5 seconds, the clock
stops flashing and the time is shown
in the display.
Now you can use the cooker.
The clock can only be changed if the child
proof lock is not activated, none of the clock
functions Cooking time or S top time
or any other oven function is set.
:
14
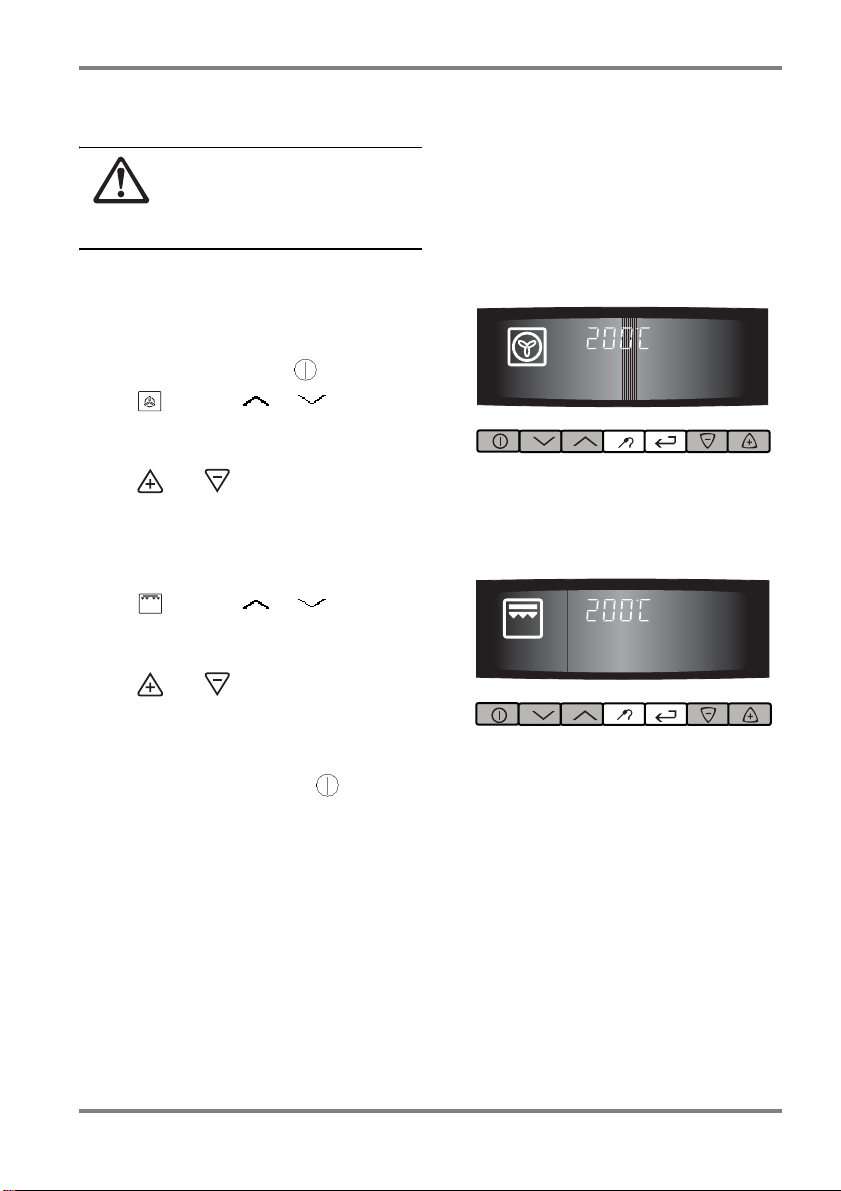
Heating the oven without food
Keep children under supervision!
The cooker gets very hot. Do not
forget to remove the packing
material from inside the oven.
The oven must be burnt off before it is used for
the first time. Then do this:
1 Open the oven door and remove all
the accessories from the oven cavity.
2 Switch on the oven . Select hot air
by using or . Select a
temperature of 200oC. The
temperature can be changed by using
and . The oven door must be
closed.
3 Leave the oven at this setting for
about one hour.
4 Move over to the Max. grill function
by using or . Select a
temperature of 200
temperature can be changed by using
and . The oven door must be
closed.
5 Leave the oven at this setting for
about 30 minutes
6 Switch off the cooker .
7 Then leave the oven door open for
about two hours and air out the kitchen.
8 Clean the oven, the door and the ov en
step units with hot water and
washing-up liquid. Dry the oven
There may still be a slight smell when the
oven is used for the first time. This will not
affect the food in any way and is not a
health-hazard.
o
C. The
Clean the accessories
Wash the shelves, baking tray, etc. with hot
water and washing-up l iquid. Rinse and dry.
15
Removable telescopic runners
To prevent scratches during transport,
the telescopic runners are delivered
with a protective film. This coating
must be removed from the rails
before they are used, otherwise it can
burn fast and damage the rails.
CAUTION! Make sure that the
cooker anti-tip guard is fitted, see
page 8
The telescopic runners replace the ordinary
oven step units which are fitted when the
cooker is delivered. They consist of two rails
that can be pulled out. The shelves, the
roasting pan and the grid are laid on top of
the rails. A locating pin keeps the shelf in
position (see the illustration). Using the
telescopic runners facilitates cooking. For
example, when steak or chips are to be
basted, the roasting pan is easily pulled out
on the rails.
Fitting the rails
First remove the oven step units that are
fitted (see page 49). When fitting, the rails
are first inserted in the inner hole (1) and
then in the outer (2). Push into position.
NOTE THAT THE LOCATING PIN IS TURNED OUTWARDS AND FORWARDS
The rails must be in their pushed-in
position when the oven door is
closed.
16
.
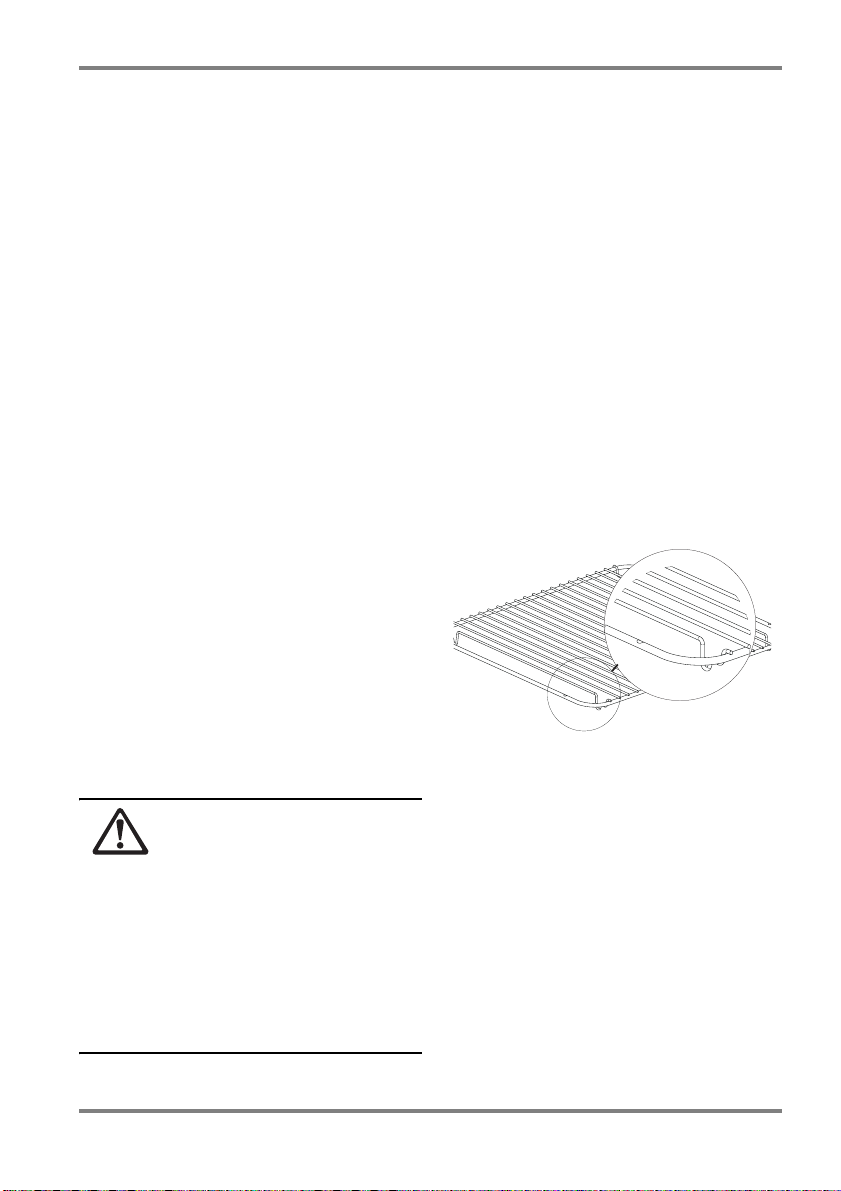
Using grids, baking plates and roasting pan
It is important for the oven grid, the baking
plate and the roasting pan to be fixed
between the stops at the front and rear edges
of the rails to prevent them from falling off
the rails. Place the baking plate/roasting pan/
grid in the rear edge and fix against the fr ont
edge. The locating pin fits into a slot under
the edge of the baking plate/roasting pan,
which means that the baking plate/roasting
pan are held in position.The rails must be in
their pushed-in position when the grid/
baking plate/roasting pan are inserted. For
the best shelf stability, make sure that the
bevelled edge is inwards in the oven. Pull
the accessories carefully when using them so
that the plate/pan/grid does not fall off the
rails. Maximum load 20kg (44 lb.).
Using the oven grid
The locating pin is not used for the gr id. The
oven grid has a marking on its upper surface.
This marking must be at the front (towards
the oven door) when in use. Make sure that
food placed on the grid is positioned behind
the marking. Otherwise there is a risk that it
will not be cooked properly at the front. The
grid can be placed in the roasting pan. The
maximum weight to be placed on the grid is
10kg (22 lb.).
CAUTION! Make sure that the
locating pin hooks in under the shelf/
roasting pan and that the shel f/
roasting pan rests on the rails,
otherwise it can fall of f the rails i n the
pulled-out position. When the shelf/
roasting pan is remo ve d in the pu lle dout position, the rails must be pu shed
back again so that the oven door can
be closed. Use oven gloves because
the rails are hot.
17
Using the ceramic glass plate
The hob can not be used if the oven is not switched on, see page 27.
The hob has four heating zones with:
•
MIN./MAX. SIZE
•
A SWIVEL WINDOW
information about the zone.
•
AUTOMAX
whereby the zone heats up rapidly to
the heating level you need (for
cooking/roasting) without it being
necessary to change the knob setting.
•
HEAT WARNER
switched off a zone, the swivel
window lights up
zone is hotter than about 55°C.
•
AUTOMATIC SWITCH-OFF
The higher the heating level, the
earlier the zone is switched off.
When you switch on a zone, it lights up for
varying lengths of time depending on the
level you have selected o n the kno b. In order
to prevent over-heating the zone occasionally
goes out, even in the highest heating
position.
The glass in the hob tolerates heat, cold
and temperature shocks, but is sensitive to
impact. If a spice mill or a spice jar falls
onto it, the glass hob can crack. Never use
the hob to stand on, off-load materials onto
or use as a storage area.
on the rear zones.
which provides
, an automatic heater-
. When you have
H
as long as the
after a time.
18
Never use a cracked cer amic glass plat e
or a cooker with a cracked timer glass.
Immediately after use (while the
ceramic glass plate is still h ot) use the
scraper blade to remove sugar and
boiled-over material with a high
sugar content such as, for example,
marmalade, as well as melted plasti c
and foil to avoid damage to the plate.
Never leave a deep fat fryer, melting
fat, paraffin or other easily ignited
material without supervision. in the
event of fire, turn the cooker knobs to
zero and switch off the extractor fan.
EXTINGUISH A FIRE WITH A POT
LID
, never use water.
Make sure that there is no sand, sugar
or salt on the cooking ut ensils. Sand
can cause scratches, while sugar and
salt can ruin the ceramic glass plate.
Always dry pots an d pa ns be f o r e
placing them on the ceramic glass
plate. The coloured decor on the
ceramic glass plate can become worn
and scratched
The heating zones
The indication area can show the following:
• that the hob is switched on
• selection of heat retention setting
• - , selected setting
• Automax
• residual heat
• that the child-proof blocking unit (function lock) has been activated
• Faulty function /Over-heating
19
 Loading...