

AEG EKC63307X User Manual

user manual
Cooker
EKC63307
2 electrolux
Electrolux. Thinking of you.
Share more of our thinking at www.electrolux.com
Contents
Safety information 2
Product description 4
Before first use 5
Hob - Daily Use 6
Hob - Helpful hints and tips 6
Hob - Care and Cleaning 7
Oven - Daily Use 7
Subject to change without notice
Oven - Helpful hints, tips and cooking
tables 10
Oven - Care and Cleaning 17
What to do if… 20
Installation 20
Disposal 21
Safety information
For your safety and correct operation of the
appliance, read this manual carefully before
installation and use. Always keep these instructions with the appliance even if you
move or sell it. Users must fully know the operation and safety features of the appliance.
The manufacturer is not responsible for damages caused by incorrect installation and
use.
Children and vulnerable people safety
• This appliance can be used by children
aged from 8 years and above and persons
with reduced physical, sensory or mental
capabilities or lack of experience and
knowledge if they have been given supervision or instruction concerning use of the
appliance in a safe way and understand
the hazards involved. Children shall not
play with the appliance.
• Keep all packaging well away from children. There is risk of suffocation.
• Keep children away from the appliance.
There is risk of injury or other permanent
disability.
• If the appliance has Switch On Lock or Key
Lock, use it. It prevents children and small
pets from accidental use of the appliance.
General safety
• Do not change the specifications or modify
this product. There is risk of injury and
damage to the appliance.
• Remove all packaging, stickers and layers
from the appliance before first use.
• Set the cooking zones to "off" after each
use.
Use
• The appliance is designed exclusively for
domestic cooking tasks.
• Do not use the appliance as a work surface
or storage surface.
• Do not leave the appliance unattended
during operation. In the event of fire, switch
off the appliance. Extinguish the fire
with a pot lid , never use water.
• Risk of burns! Do not put metallic objects, for example cutlery or saucepan lids,
on the cooking surface, as they can become hot.
• If the objects or cookware fall on the hob
surface, the surface can be damaged.
• Cookware made of cast iron, cast aluminium or with damaged bottoms can
scratch the hob surface if you move them
on the surface.
• If there is a crack on the surface, disconnect power supply to prevent the electric
shock.
• Do not let cookware boil dry to prevent the
damage to cookware and hob surface.
• Do not use the cooking zones with empty
cookware or without cookware.
• Discoloration of the enamel does not affect
the performance of the appliance. The
guarantee does not become invalid.
• Do not apply pressure on the appliance
door.
• The interior of the appliance becomes hot
during use. There is risk of burns. Use

electrolux 3
gloves when you insert or remove the accessories and pots.
• Users with an implanted pacemakers must
keep their upper body min. 30 cm from induction cooking zones that are switched
on.
• Always stand back from the appliance
when you open the appliance door during
operation (especially with Steam Cooking).
It allows any build up of steam or heat to
release.
• To prevent damage or discoloration to the
enamel:
– do not put any objects directly on the
appliance floor and do not cover it with
aluminium foil
– do not put hot water directly into the ap-
pliance
– do not keep moist dishes and food in the
appliance after you finish the cooking
• Do not use this appliance if it is in contact
with water. Do not operate the appliance
with wet hands.
• Do not keep moist dishes and food in the
appliance after you finish the cooking as
the moist can damage the enamel or get
into the units.
• Do not put or keep the flammable liquids
and materials or fusible objects (made of
plastic or aluminium), on or near the appliance.
• Only heat-resistant accessories can be
placed in the compartment situated below
the oven. Do not put combustible ma-
terials there.
• Always ensure that the oven vent located
at the centre back of the hob is left unobstructed to ensure ventilation of the oven
cavity.
Care and cleaning
• Before maintenance, switch off the appliance and disconnect the mains plug from
the mains socket. Make sure that the appliance is cold.
• Keep the appliance clean at all times. A
buid-up of fats or other foodstuff can result
in a fire.
• Regular cleaning prevents the surface material from deteriorating.
• Only clean the appliance with water and
soap. Sharp objects, abrasive cleaning
agents, abrasive sponges and stain re-
movers can cause damage to the appliance.
• Do not clean the appliance with steam
cleaners or high-presure cleaners.
• Do not clean the glass door with abrasive
cleaning agents or metal scraper. Heat resistant surface of the inner glass can break
and shatter.
• Make sure that the glass panels are cold,
before you clean them. There is risk that
the glass breaks.
• Be careful when you remove the door from
the appliance. The door is heavy!
• When the door glass panels are damaged
they become weak and can break. You
must replace them. For more instructions,
contact the Service Centre.
• If you use an oven spray, follow the instructions from the manufacturer. Never
spray anything onto the fat filter (if present),
the heating elements and the thermostat
sensor.
• During pyrolytic cleaning (if present), stubborn dirt can damage the colour of the
surface.
• Do not clean catalytic enamel (if present).
• Be careful when you change the oven
lamp. There is risk of electrical shock!
Installation
• Only an authorized service technician can
install, connect or repair the appliance.
• Fully obey the laws, ordinances, directives
and standards in force in the country
where you use the appliance (safety regulations, recycling regulations, electrical
and/or gas safety rules etc.)!
• If you do not comply with Installation instructions, the guarantee becomes invalid
in case any damage.
• Make sure that the appliance is not damaged because of transport. Do not connect a damaged appliance. If necessary,
contact the supplier.
• Avoid installation of the appliance near
easy inflammable material (e.g. curtains,
tea towels, etc.)
• Remove all packaging before first use.
• This appliance is heavy. Take care when
you move it. Always use safety gloves.
Never pull the appliance by the handle or
by the hob.
4 electrolux
• Keep the minimum distances to other appliances and units!
• Important! Do not place the cooker on an
extra plinth or other height increasing unit.
This means more risk that the appliance
tips over!
Electrical connection
•
The appliance must be earthed.
• Make sure that the electrical information
on the rating plate agree with your domestic power supply.
• Always use a correctly installed shockproof socket.
• Do not use multi-way plugs, connectors
and extension cables. There is a risk of fire.
• Do not replace or modify the mains cable
yourself. Contact the Service Centre.
• The appliance must have the electrical installation which lets you disconnect the
appliance from the mains at all poles with
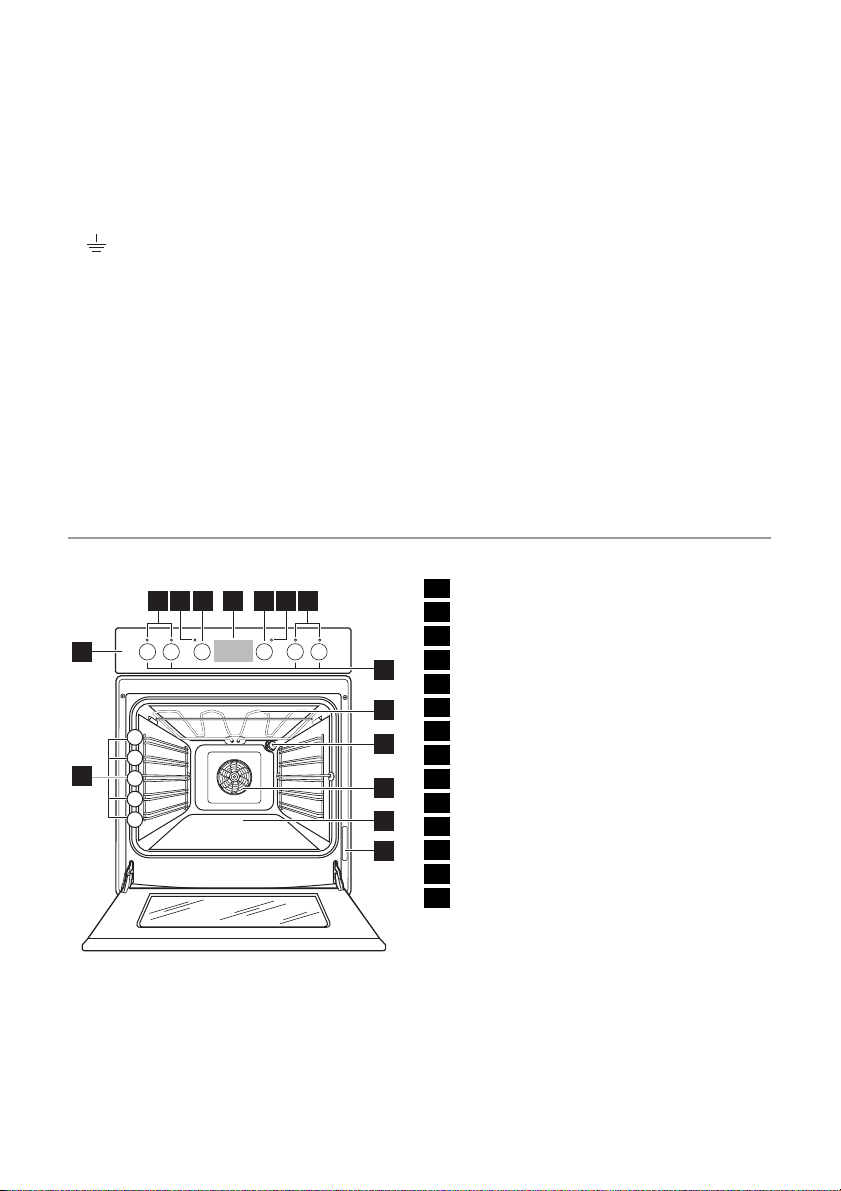
Product description
General overview
2 7
14
3 654
1
5
4
3
2
1
2
8
9
10
11
12
13
a contact opening width of minimum 3
mm.
• Make sure that the mains plug and cable
is not squashed or damaged by the back
of the appliance (if present).
• Make sure that the mains plug is accessible after installation.
• Do not pull the mains cable to disconnect
the appliance. Always pull the mains plug.
•You must have correct isolation devices:
line protecting cut-outs, fuses (screw type
fuses removed from the holder), earth
leakage trips and contactors.
• Information on the voltage is on the rating
plate.
Service
• Only an authorised service engineer can
repair this appliance. Use only original
spare parts. Contact an authorized Service
Centre.
1 Control panel
2 Cooking zone indicators
3 Power indicator
4 Oven function control knob
5 Electronic programmer
6 Oven temperature control knob
7 Temperature control light
8 Hob control knobs
9 Heating element
10 Oven lamp
11 Fan
12 Bottom heat
13 Rating plate
14 Shelf runner
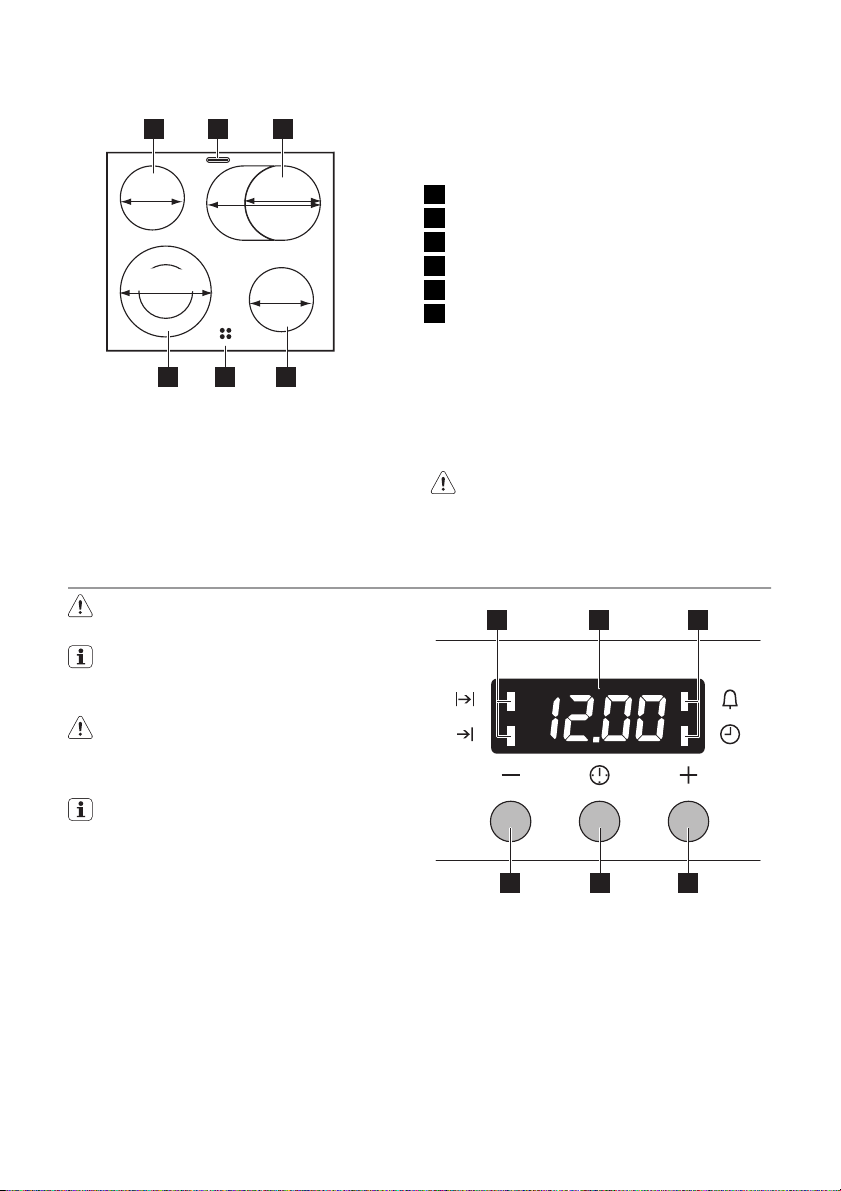
Cooking surface layout
1 2 3
electrolux 5
145
mm
120/210
mm
265
mm
170
mm
145
mm
456
Accessories
• Deep roasting pan
To bake and roast or as pan to collect fat.
•
Oven shelf
For cookware, cake tins, roasts.
• Flat baking tray
For cakes and biscuits.
Before first use
Warning! Refer to "Safety information"
chapter.
Remove all packaging, both inside and
outside the oven, before using the appliance. Do not remove the rating plate.
Caution! To open the oven door, always
hold the handle in the centre.
Setting the time
The oven only operates after time set.
1 Single cooking zone 1200 W
2 Oven steam outlet
3 Oval cooking zone 2300 W
4 Single cooking zone 1200 W
5 Residual heat indicator
6 Double cooking zone 2200 W
•
Storage drawer
Below the oven cavity is the storage drawer.
Warning! The storage drawer can
become hot when the appliance
operates.
1 2 3
456
When you connect the appliance to the elec-
trical supply or in case of a power cut, the
Time function indicator flashes automatically.
To set the current time use " + " or " - " but-
ton.
After approximately 5 seconds, the flashing
stops and the display shows the time of day
set.
6 electrolux
For time change you must not set an automatic function (Duration
or End
) at the same time.
Initial Cleaning
• Remove all parts from the appliance.
• Clean the appliance before first use.
Caution! Do not use abrasive cleaning
agents! This can damage the surface.
Refer to chapter "Care and Cleaning".
Hob - Daily Use
Warning! Refer to "Safety information"
chapter.
Heat settings
Control knob Function
0
1-9
1. Turn the control knob to a necessary heat
setting.
2. To complete the cooking process, turn
the control knob to the “0” position.
Use of the double zone
Warning! To set double zone on turn
the control knob with the double zone to
the right (do not turn it thought the stop
position).
Off position
Heat settings
(1 = lowest heat setting; 9=
highest heat setting)
Preheating
Set
and maximum temperature and run
an empty oven for 45 minutes, to burn off any
residue from the cavity surface. Accessories
can become hotter than in normal use. During this period an odour can be emitted. This
is normal. Make sure the room is well ventilated.
1. Turn the control knob to the right - to po-
sition "9".
2. Turn the control knob slowly to symbol
until you can hear a click.
At this time the two cooking zones are on.
3. To set necessary heat setting refer to
"Heat settings".
Residual heat indicator
The residual heat indicator comes on when a
cooking zone is hot.
Warning! Risk of burns from residual
heat!
When a cooking zone operates, it hums
for a short time. This is typical of all ceramic glass cooking zones and does not
show that the appliance operates incorrectly.
Hob - Helpful hints and tips
Cookware
• The bottom of the cookware must be
as thick and flat as possible.
• Cookware made of enamelled steel
and with aluminium or copper bottoms can cause discoloration on glass
ceramic surface.
Energy saving
• If possible, always put the lids on the
cookware.
Heat
setting
1 Keep cooked foods warm as re-
Use to: Time Hints
Examples of cooking applications
The data in the table is for guidance only.
quired
• Put cookware on a cooking zone before you start it.
• Stop the cooking zones before the
end of the cooking time to use residual
heat.
• The bottom of pans and cooking
zones must have the same dimension.
Cover
electrolux 7
Heat
setting
1-2 Hollandaise sauce, melt: butter, choco-
late, gelatine
1-2 Solidify: fluffy omelettes, baked eggs 10-40
2-3 Simmer rice and milkbased dishes, heat-
ing up ready-cooked meals
3-4 Steam vegetables, fish, meat 20-45
4-5 Steam potatoes 20-60
4-5 Cook larger quantities of food, stews and
soups
6-7 Gentle fry: escalope, veal cordon bleu,
cutlets, rissoles, sausages, liver, roux,
eggs, pancakes, doughnuts
7-8 Heavy fry, hash browns, loin steaks,
steaks
9 Boil large quantities of water, cook pasta, sear meat (goulash, pot roast), deep fry chips
Use to: Time Hints
5-25 min Mix occasionally
min
25-50
min
min
min
60-150
min
as required
5-15 min Turn halfway through
Cook with a lid on
Add at least twice as much liquid as
rice, stir milk dishes part way through
Add a few tablespoons of liquid
Use max. ¼ l water for 750 g of potatoes
Up to 3 l liquid plus ingredients
Turn halfway through
Hob - Care and Cleaning
Warning! Refer to "Safety information"
chapter.
Clean the appliance after each use.
Always use cookware with clean bottom.
Scratches or dark stains on the glass
ceramic have no effect on how the appliance operates.
Removing the dirt:
1. – Remove immediately: melting plas-
tic, plastic foil, and food containing
sugar. Use a special glass ceramic
scraper. Put the scraper on the glass
ceramic surface at an acute angle and
slide the blade on the surface.
– Stop the appliance and let it cool
down before you clean: limescale
rings, water rings, fat stains, shiny metallic discolorations. Use a special
cleaner for glass ceramic or stainless
steel.
2. Clean the appliance with a damp cloth
and some detergent.
3.
At the end rub the appliance dry with
a clean cloth.
Oven - Daily Use
Warning! Refer to "Safety information"
chapter.
Switching the Oven On and Off
1. Turn the oven functions control knob to
an oven function.
2. Turn the temperature control knob to a
temperature.
The power indicator comes on while the
oven is in operation.
The temperature indicator comes on
while the oven temperature increases.
3. To switch off the oven, turn the oven
functions control knob and the temperature control knob to the Off position.
Safety thermostat
To prevent dangerous overheating (due to
incorrect use of the appliance or defective
components), the oven has a safety thermostat, which interrupts the power supply. The
8 electrolux
oven switches back on again automatically,
when the temperature drops.
Cooling fan
When the appliance operates, the cooling fan
switches on automatically to keep the surfa-
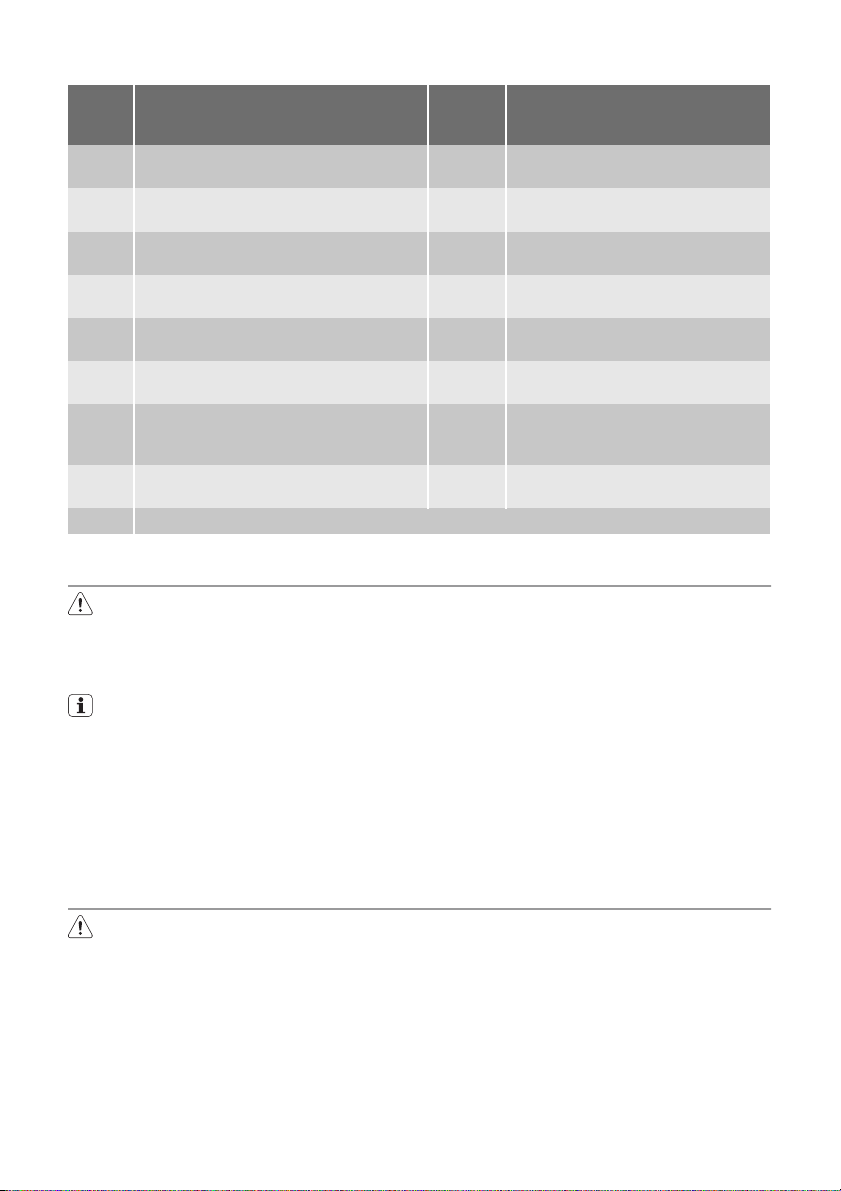
Oven Functions
Oven function Application
Light Use this function to light up the oven interior.
Convection with ring heating
element
Pizza Setting To bake on one oven level food with a more intensive brown-
Conventional To bake and roast on one oven level.
Bottom heat To bake cakes with crispy or crusty bases and to preserve
Defrost To defrost frozen food.
Grill To grill flat food in the middle of the grill and to toast.
Dual grill To grill flat food in large quantities and to toast.
To bake on three oven levels maximum at the same time. Decrease the oven temperatures (20-40 °C) compared with
Conventional. And to dry food.
ing and a crispy base. Decrease the oven temperatures
(20-40 °C) compared with Conventional
food.
ces of the appliance cool. If you switch off the
appliance, the cooling fan continues to operate until the appliance cools down.
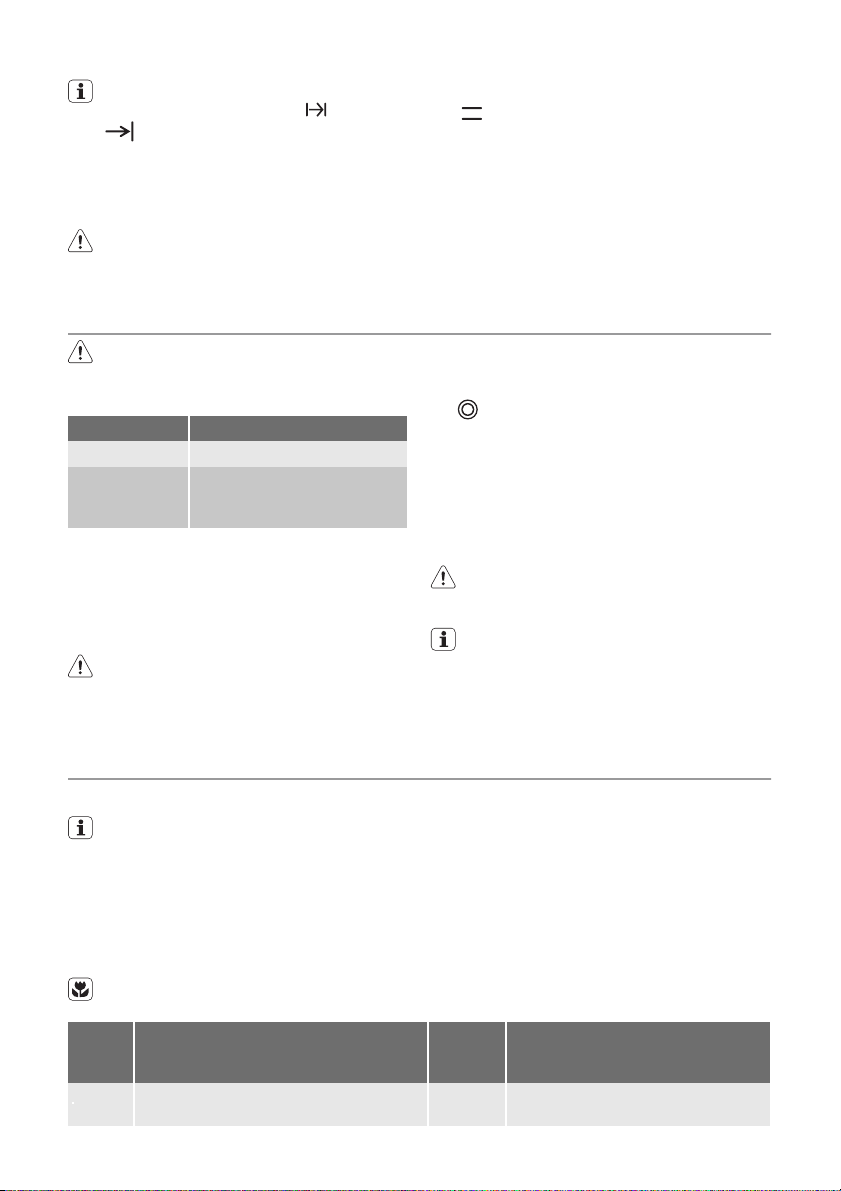
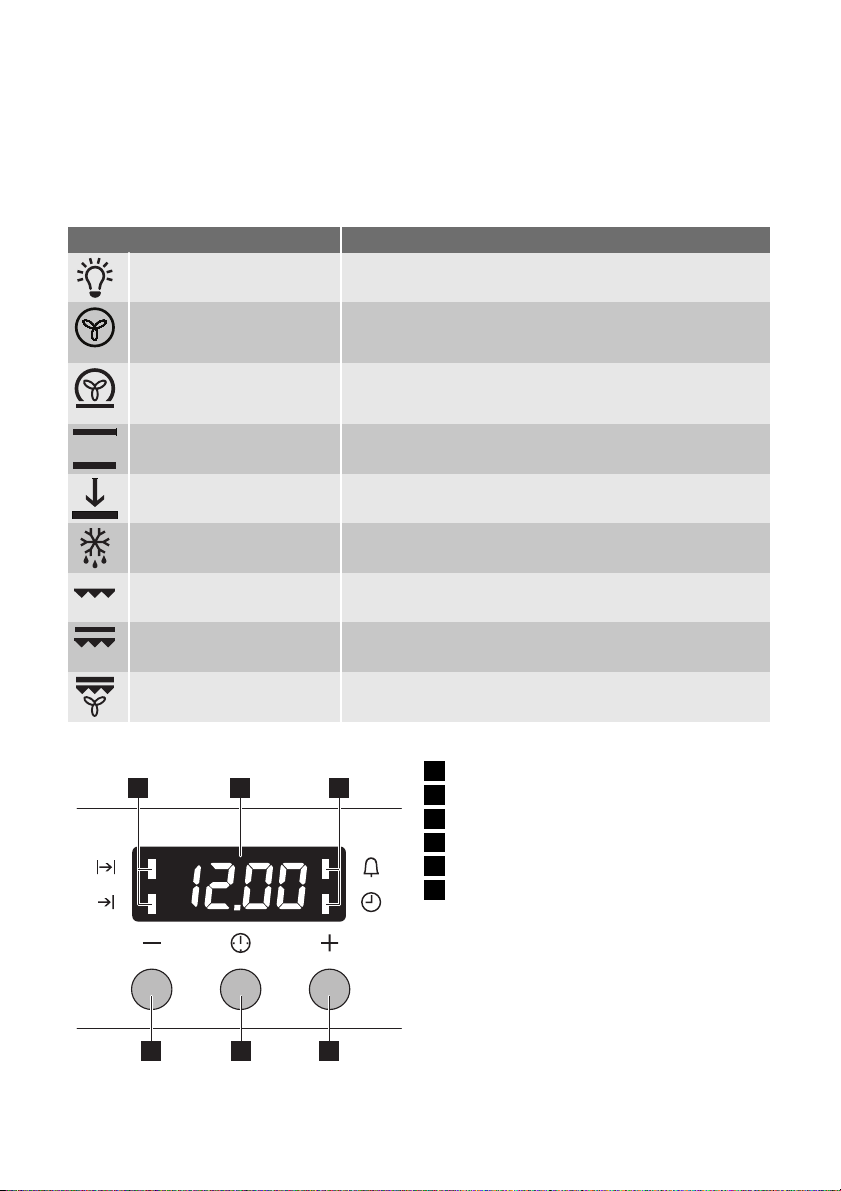
Display
Convection grilling To roast larger joints of meat or poultry on one level. Also to
1 2 3
gratinate and brown.
1 Function Indicators
2 Time display
3 Function Indicators
4 Button "+"
5 Selector Button
6 Button "-"
456
 Loading...