

Page 1
Electric cookers
INSTRUCTION BOOKLET
35676-6601
Mod. EK 6765
1
Page 2
ENGLISH
Important safety information
This warnings has been given for the safety of you and others. We therefore ask you to carefully read the procedures of
installing and using this cooker.
Installation
The work of installation must be carried out by
competent and qualified installers according to the
regulations in force.
Any modifications to the domestic electrical mains
which may be necessary for the installation of the
appliance should be carried out only by competent
personnel.
Avoid installation of the cooker near inflammable
material (e.g. curtains, tea towels, etc.).
Child Safety
This appliance has been designed for use by adults.
Take care, therefore, that children do not attempt to
play with it.
The appliance remains hot for a long time after being
switched off. Supervise children at all times, paying
attention that they do not touch surfaces or remain
in the vicinity of the appliance when in use or when
not completely cooled.
During Operation
This product is intended for the cooking of food and
must not be used for other purposes.
It is dangerous to modify, or attempt to modify, the
characteristics of this appliance.
Unstable or deformed pans should not be placed on
the burners or plates in order to avoid accidents
caused by upsetting or boiling over.
Particular care should be taken when cooking with
oil or fat.
If the appliance is fitted with a cover, its function is to
protect the surface from dust when closed and to accumulate splashes of grease when open. Do not use
for other purposes.
Always clean the cover before closing.
Leave the burners and/or plates to cool before
closing.
All the covers, in plate glass or enamel, are
removable to facilitate cleaning.
Always ensure that the knobs are in the «
(Stop) position when the appliance is not in use.
Always insert the dripping pan when using the grill
or when cooking meat on the grid. Pour a little water
into the dripping pan to avoid grease burning and
creating unpleasant smells.
Always use oven gloves to remove dishes from the
oven.
The accessories (grid and dripping pan) should be
washed before using for the first time.
Take care when using cleaning products in spray
form: never direct the spray onto the resistance or
the thermostat bulb.
If, when placing food in the oven, or when removing
it, a large quantity of oil, juice, etc. spills onto the
bottom of the oven, re-clean before starting to cook
to avoid unpleasant smoke and also the possibility
of these substances catching fire.
For reasons of hygiene and safety this appliance
2
»
must always be kept clean. A build up of grease or
other food can cause fires.
The oven becomes hot with the movement of air. The
holes on the bottom of the oven must never be
obstructed. Do not cover the sides of the oven with
aluminium foil, in particular the lower part of the
opening.
The appliance is heavy, move it carefully.
Before maintenance and cleaning disconnect the
appliance and allow to cool.
Ensure that the oven grids are inserted correctly (see
instructions).
If there are self-cleaning panels they should only be
cleaned with soap and water (see cleaning
instructions).
Only heat-resistant plates may be placed in the
drawer situated under the oven.Do not put
combustible materials there.
Service
In case of repairs, do not attempt to correct yourself.
Repairs carried out by unqualified persons can cau-
se damage. Contact an authorized Technical
Assistance Centre and insist an original spareparts.
Environmental Information
After installation, please dispose of the packaging with
due regard to safety and the environment.
When disposing of an old appliance, make it unusable,
by cutting off the cable.
Guide to Use the instructions
The following symbols will be found in the text to guide
you throughout the Instructions:
Safety Instructions
F
Step by step instructions for an operation
Hints and Tips
Environmental information
This appliance complies with the following
E.E.C. Directives:
73/23 - 90/683 (Low Voltage Directive);
89/336 (Electromagnetical Compatibility
Directive);
93/68 (General Directives);
and subsequent modifications.
It is very important that this instruction book
should be kept safely for future consultation. If
the appliance should be sold or given to
another person, please ensure that the booklet
goes together with it, so that the new owner
can know of the functions of the machine and
also be aware of the warnings.
Page 3
Contents
For the user
Important safety information 2
Description of the appliance 3
Ceramic glass hob 4
Practical Hints 5
Electric oven 6
When using the oven for the first time 7
24 Hour Clock and Timer 8
Suggestions for using the oven 10
Cooking tables 11
Cleaning and maintenance 12
Something not working 13
Technical assistance 13
For the installer
Technical data 14
Instructions for the installer 14
Electrical connection 15
MANUFACTURER: ELECTROLUX ZANUSSI S.p.A.
Viale Bologna 298
47100 FORLÌ (Italy)
These instructions are only for the countries
stated by the symbol printed on the front cover
of this instruction book.
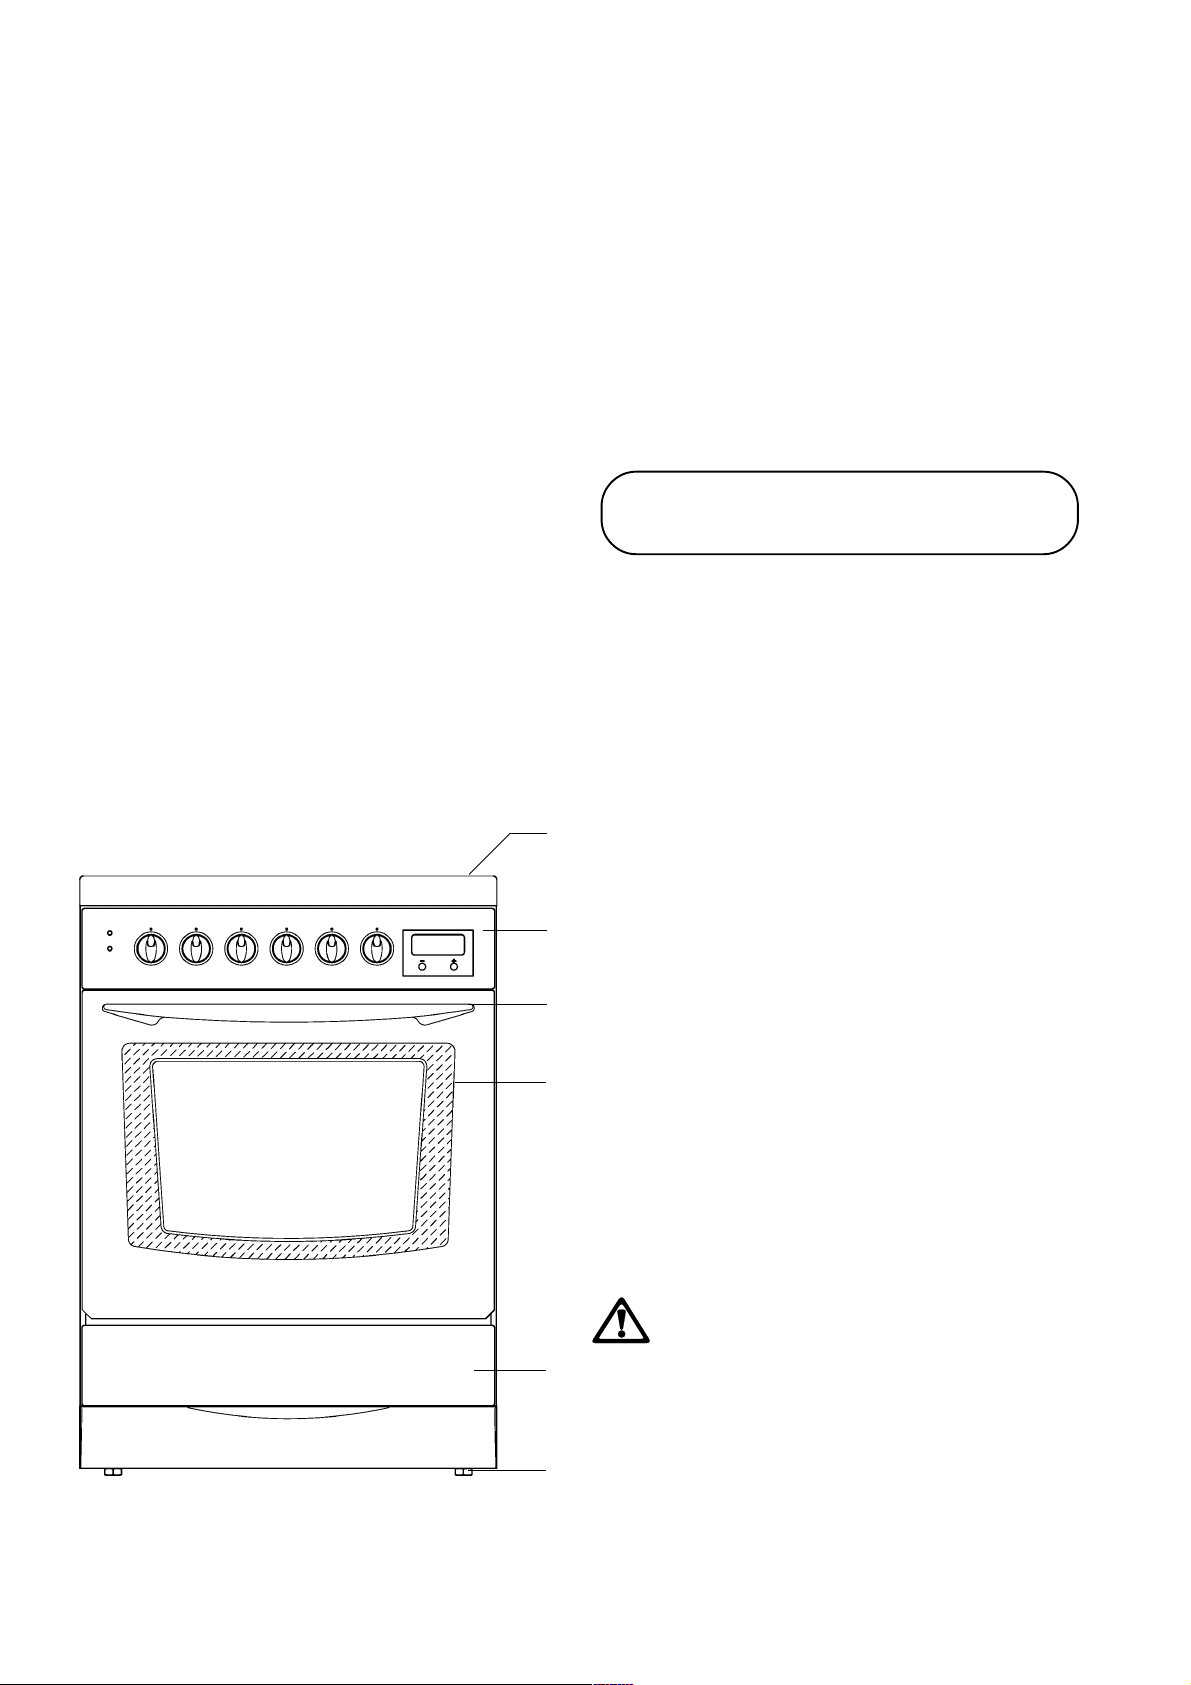
Description of the appliance
1
1. Ceramic hob
2
2. Control panel
3
4
Storage drawer
IMPORTANT: Only heat-resistant plates may be
placed in the storage drawer situated under the
oven. Do not put combustible materials there.
5
3. Oven handle
4. Oven door
5. Storage drawer
6. Adjustable feet
6
3
Page 4
Ceramic glass hob
It is important to note that the plate may smoke
and produce a slightly unpleasant odour when
used for the first time. This is quite normal and will
disappear after a short while.
Using the hotplates
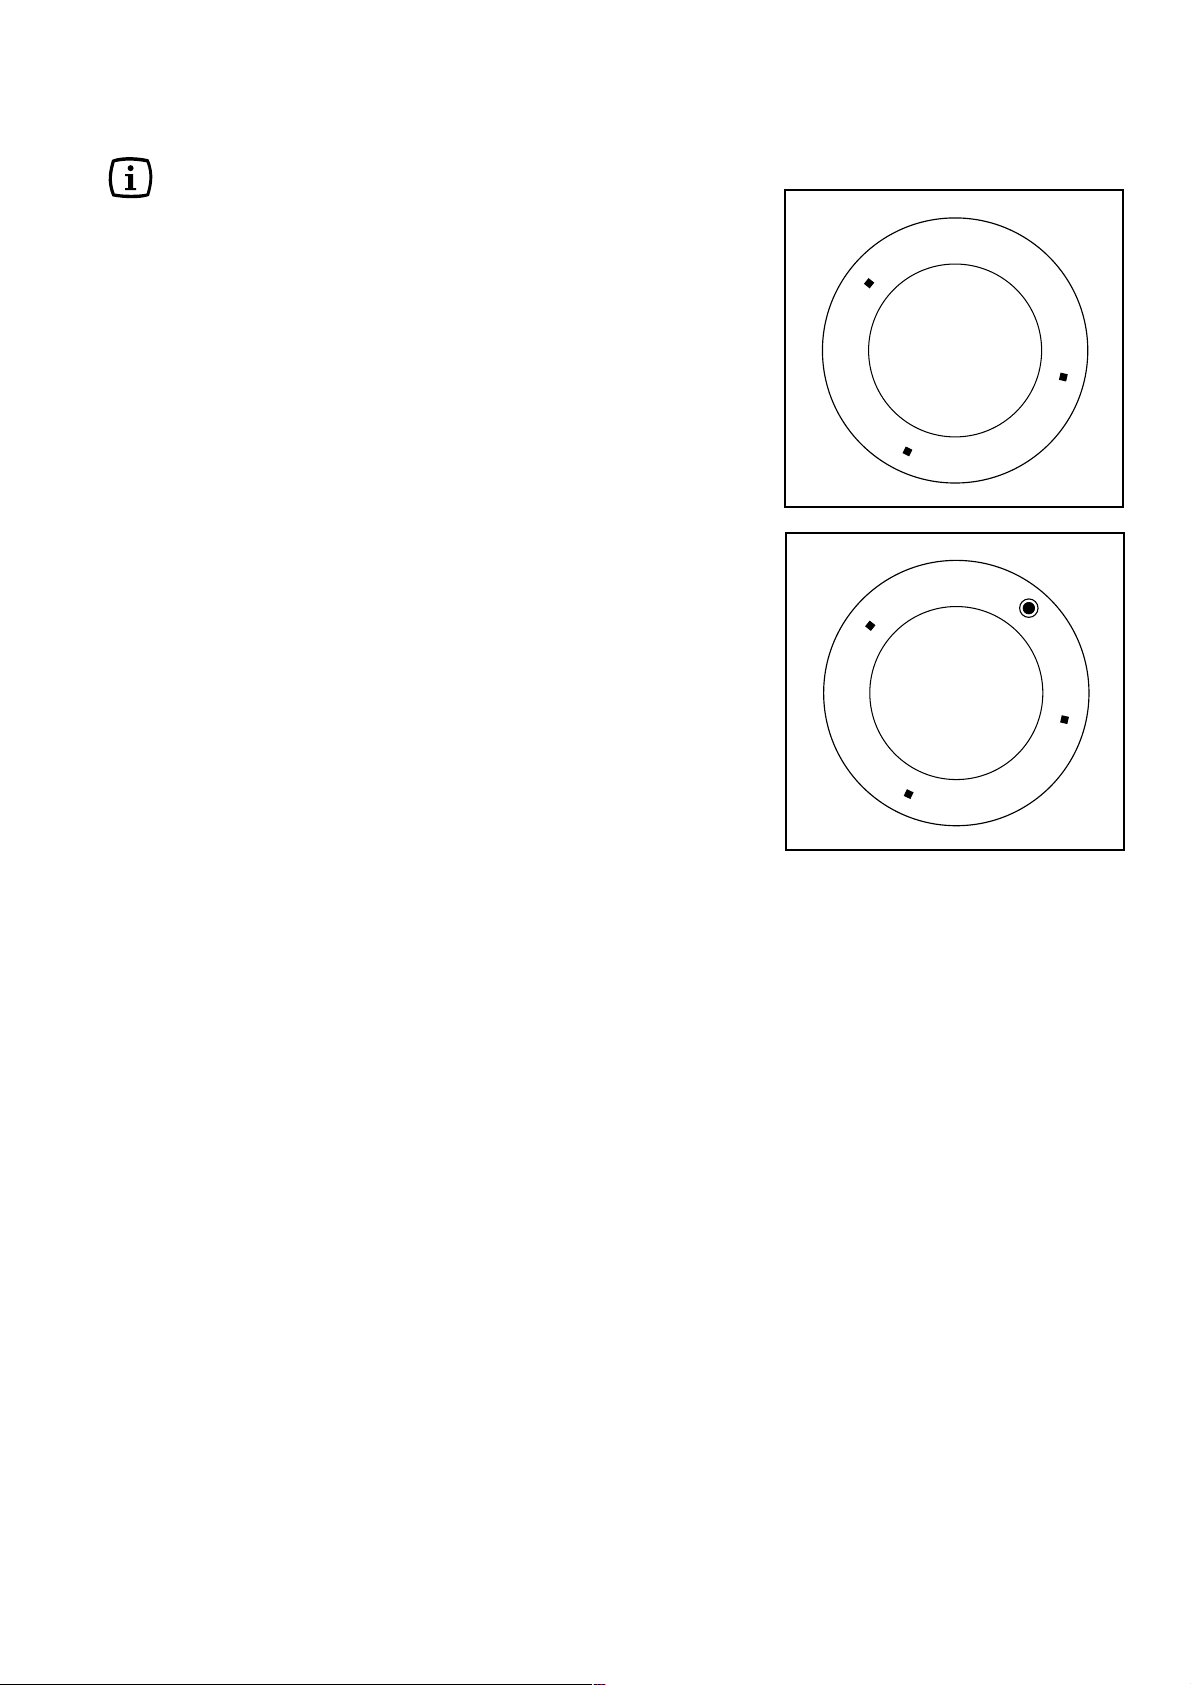
The control panel incorporates knobs to operate the four
hot plates. The cooking zones and relevant control knobs
are of two types:
0
3
1
A) normal cooking zone: the control knob (fig. 1) is a 7
position control knob: 0 = off and 1-3 indicate the
levels of power up to the mawimum.
We recommend the plates are switched to maximum
(3) for a short while to boost the cooking zone, and
then adjusted to the required setting.
B) double circuit cooking zone (front left)
- To switch on the smaller cooking zone, turn the
relevant control knob (fig. 2) to the required heat setting
between 1 and 3.
- To switch on both heating elements, turn the control
knob to maximum heat setting (3) then turn the knob
further to nearly reach the 0 symbol. You will hear a
click and the wider cooking zone will switch on.
Then turn back the knob and adjust it to the required
heat setting. Now the two heating elements will operate together, giving a higher power output that a
normal cooking zone.
Hob pilot lights
The ceramic glass hob is equipped with four pilot lights
corresponding to each cooking zone. The corresponding
light turns on some minutes after the plate has been set
into operation, and stays on during the whole time of
functioning and also when the plate is off to show the
presence of residual heat in the pyroceram surface.
The pilot light turns finally off only when the surface
temperature decreases to safety values (lukewarm temperature), more o less 50°C, allowing users to clean the
plate with no risk.
Fig. 1
Fig. 2
2
FO 2086
0
3
1
2
FO 2621
4
Page 5
Practical Hints
The ceramic glass hob is resistent to sudden changes
in temperature, it is insensitive to heat and cold and hals
also a good resistence to mechanical blows; a sharpened
object, however, no matter if it is small (for example a
point of a knife) can irreparably damage the cooking
surface, jeopardising its functionality.
Before using the cooking plate for the first time, carefully
wash the pyroceram plate with a non-abrasive detergent,
dry it and then wsitch it on for about 10 minutes at the
highest position.
When using the cooking plate for the first time, unpleasant
smells, or smell of burnt material, might be smelt: this is
absolutely normal and it is due to the evaporation of
greasy working residues and of hte dope used during the
installation. These smells will vanish after some time of
working.
Attention: is the surface shows a crack,
immediately switch the equipment off and call
the Aftersales Service.
Suitable pans and pots
Remember that a large pan offers a larger surface to
heat and therefore cooks food quicker than a narrow pan.
Always use pans of a size suitable for the food to be
cooked. In particular, take care that pans are not too
small for liquid preparations which could easily spill over
or that they are not too big for food which must be cooked
quickly; uncovered areas on the bottom are easily burnt
by fats and juice.
For cakes, it is preferable to use tins which do not open.
A tin which opens lets out fruit juices and sugar which,
when spilling onto the bottom of the oven, caramelize
and are difficult to clean. Avoid placing pans with plastic
handles in the oven as they may not support the heat.
Saucepans suitable for use on solid plate hobs should
have several characteristics:
- they should be heavy duty.
- they should fit the heat area exactly, or be slightly
larger for efficient use, NEVER smaller.
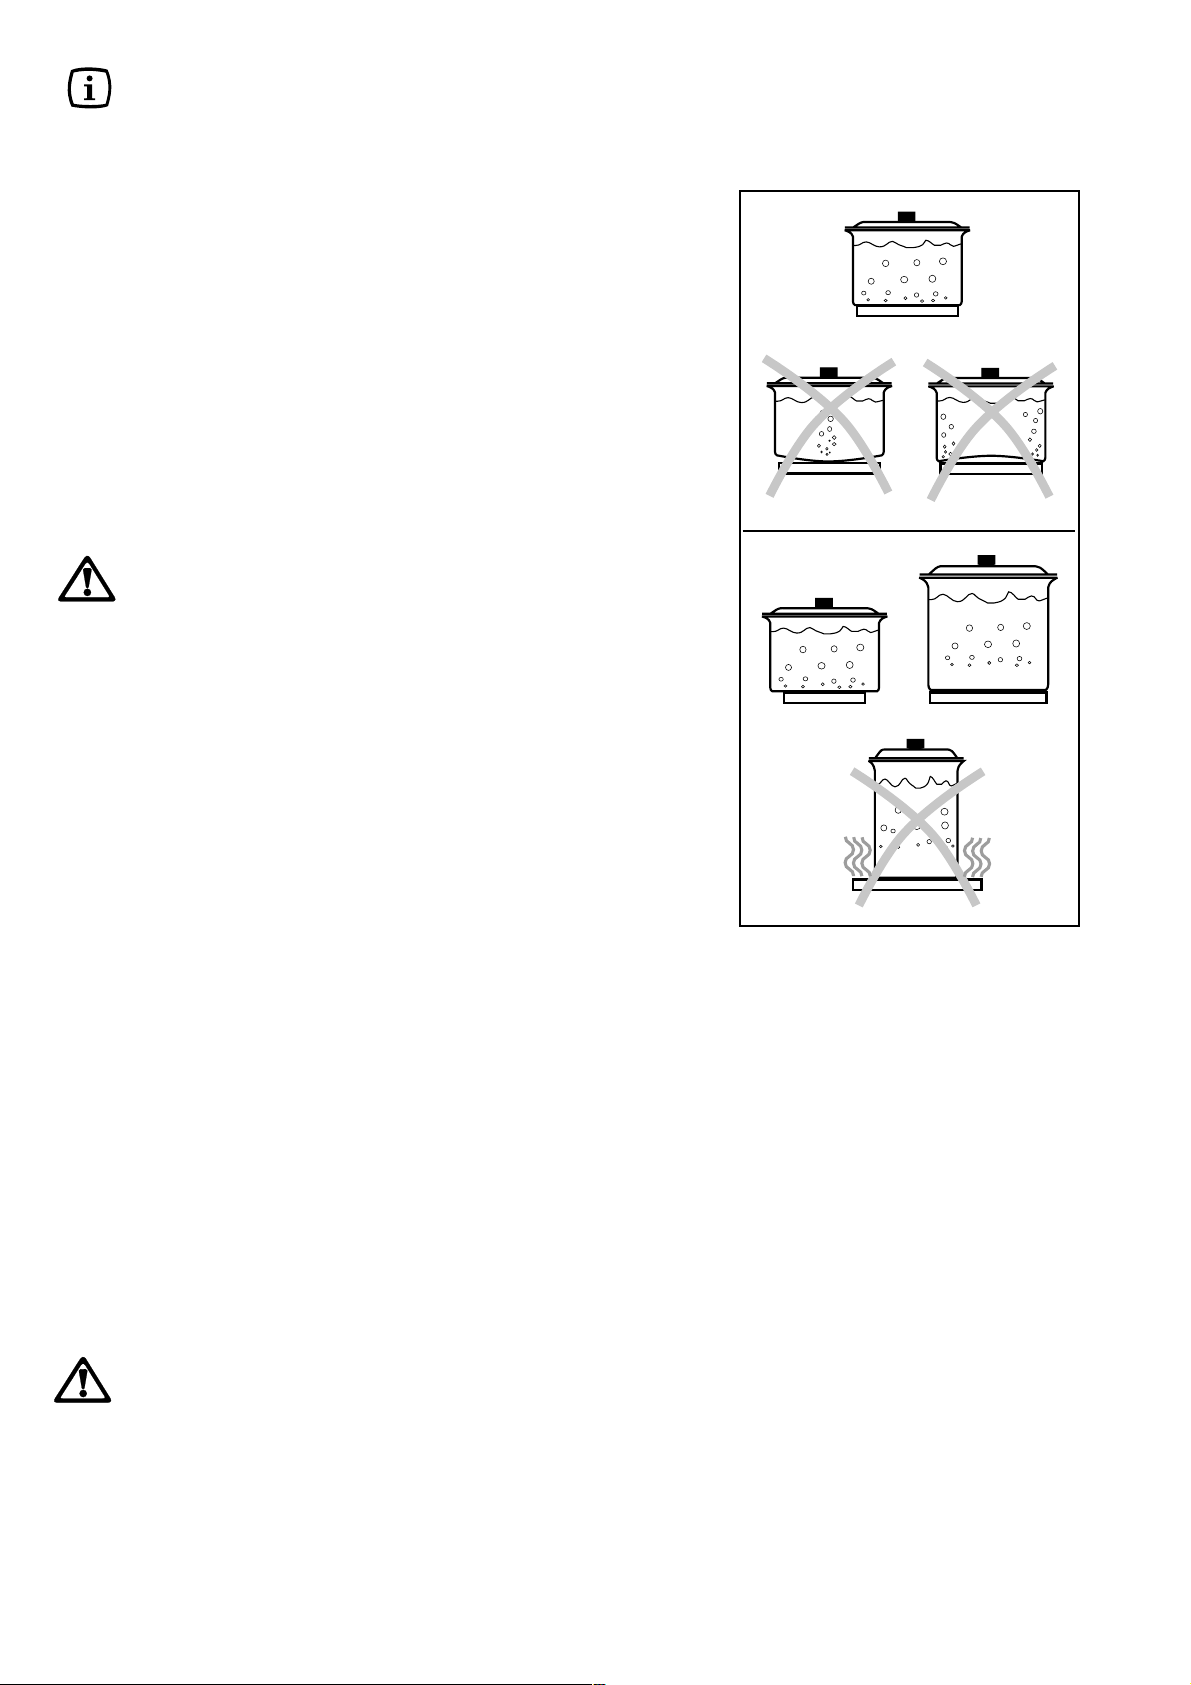
- they should have a flat base to ensure good contact
with the plate (Fig. 3).
This is particularly important when using pans for high
temperature frying or pressure cooking.
Ensure pans are large enough to avoid liquids being split
onto the plates. Never leave the plates on without a pan
on them or with an empty pan on them. Particular care
should be taken when cooking with oil or fat.
During cooking, when using fats or oils, take
particular care as they can, when overheated, self-ignite.
Fig. 3
5
Page 6
Electric oven
0
5
0
1
0
5
1
0
0
2
0
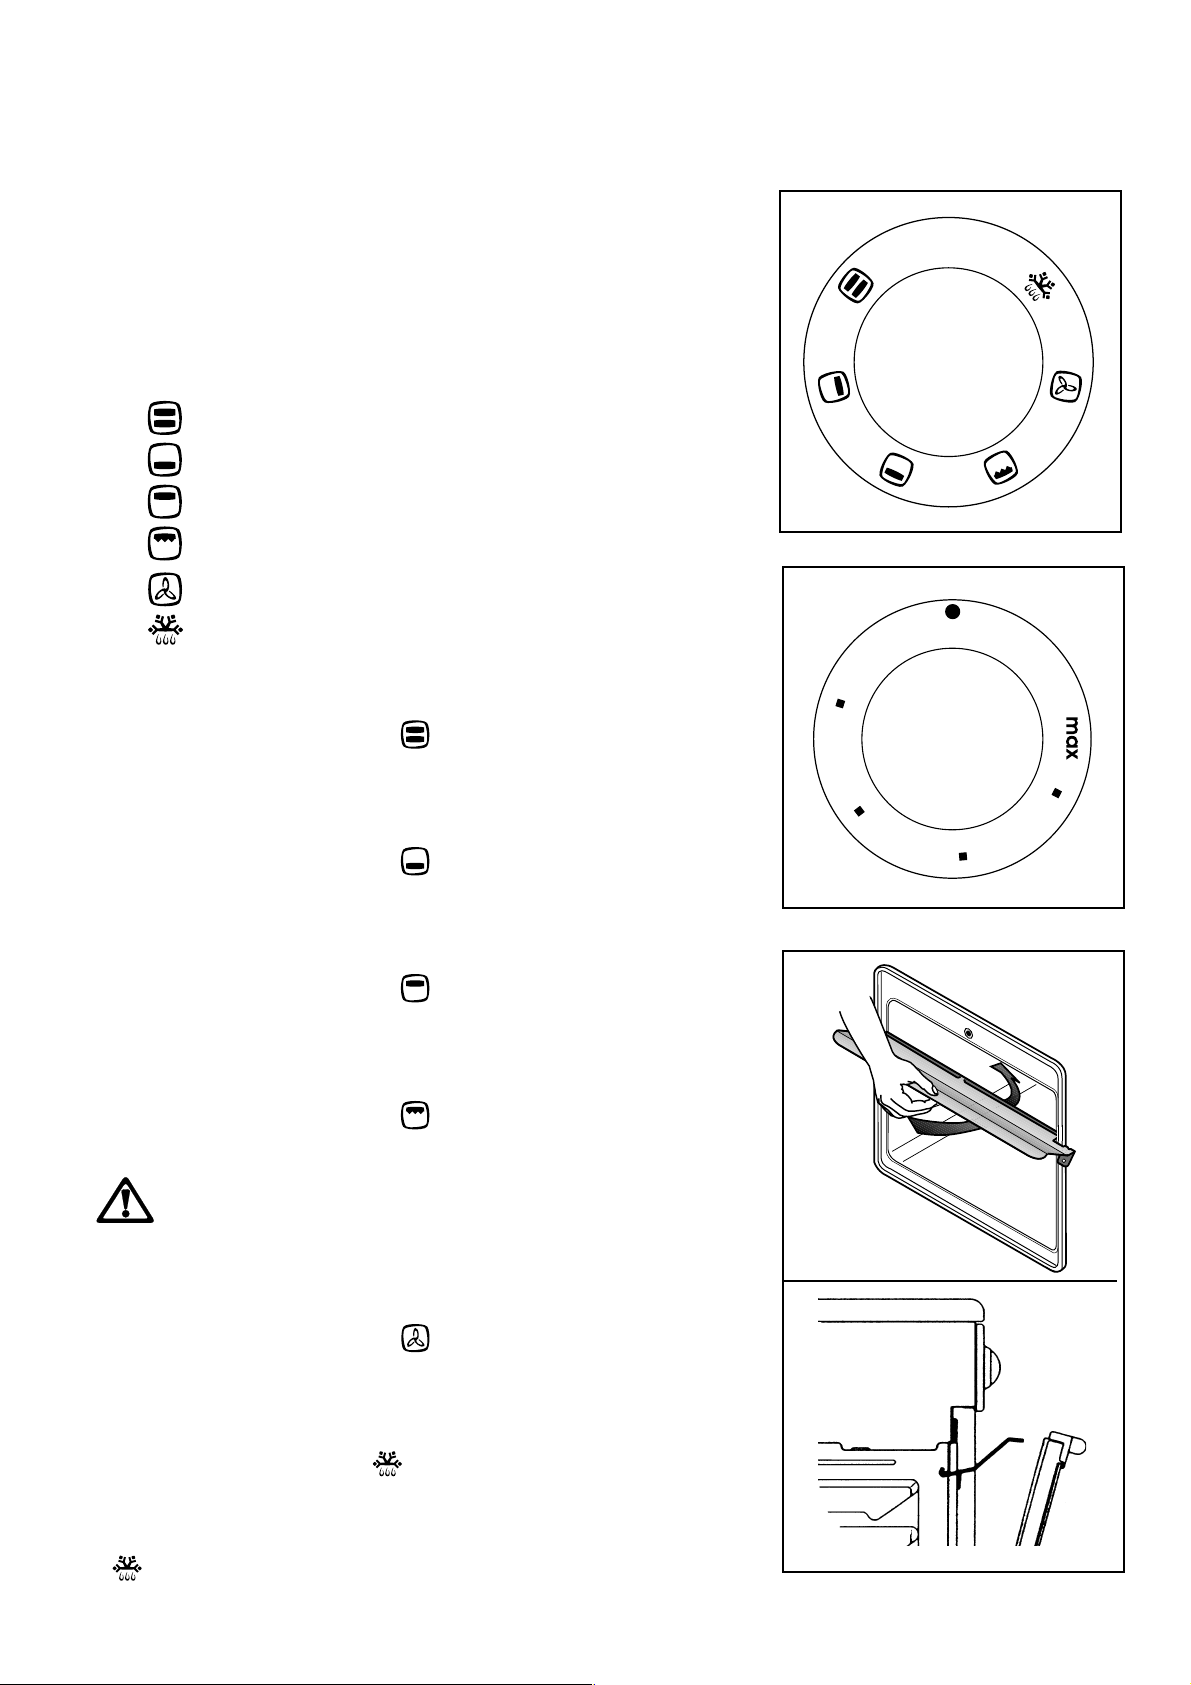
Switch to choose type of cooking
(Fig.4) and thermostat regulation
(Fig. 5).
These two switches allow you to select the type of cooking
(choice of heating element) as well as temperature,
according to the requirements of the recipe.
The oven light stays on in all positions.
Explanation of symbols
Upper and lower heating
Lower element
Top element
Grill
Fan cooking
Defrosting
Traditional cooking
Turn the switch to the position and regulate the
thermostat to the temperature required.
Fig. 4
0
FO 2622
Bottom heating only
Turn the switch to the position and regulate the
thermostat to the temperature required.
Top heating only
Turn the switch to the position and regulate the
thermostat to the temperature required.
Grilling
Turn the switch to the position and regulate the
thermostat to the temperature required.
While the grill is in function, leave the door
half-open and to put the protective screen to
the knob (fig. 6).
Fan cooking
Turn the switch to the position and regulate the
thermostat to the temperature required.
Fig. 5
FO 0156
FO 2124
Defrosting
Turn the switch to the position .
In this function, the electric ventilator fans cold air inside
the oven, which begins to defreeze food.
When the cooking selector switch is placed in position
regulate the thermostat to position l.
6
Fig. 6
FO 0375
Page 7
Thermostat Pilot lamp (°C)
When lit indicates the operation of one or more heating
elements.
Cooker Pilot lamp
When lit indicates the operation of one or more heating
elements.
Dripping pans and grids
The oven is equipped with an enamelled dripping-pan
which function is to collect the juices dripping from the
meat on the grill or on the spit, and a grid for the cooking
of foods on the grill or in a pan.
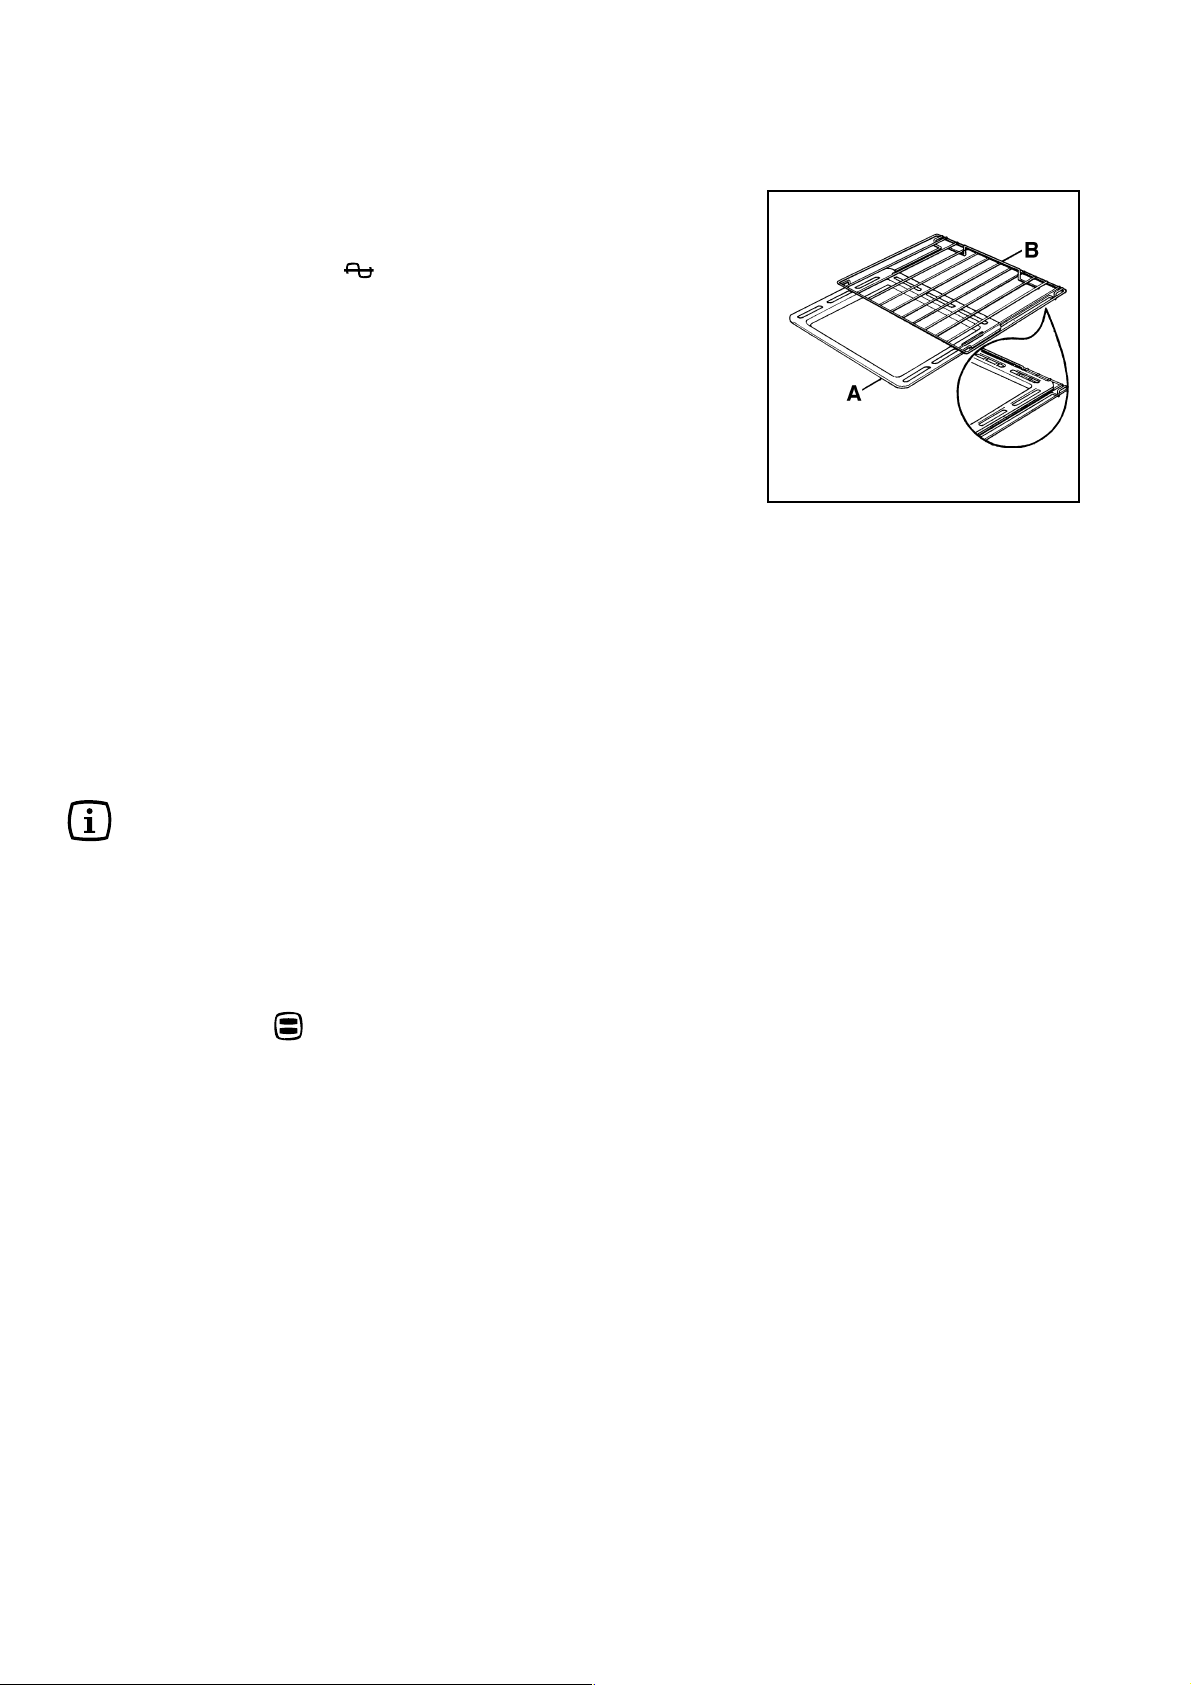
In models provided with oven grids with a position catch
(fig. 7) and when cooking on the grill or on the spit, you
are advised to fit the dripping-pan (A-fig. 7) in the guides
beneath the grill (B-fig. 7) to avoid dirtying the oven.
if you need to place the dripping-pan over the oven grid
during cooking, position it as shown in the particular of
Fig. 7.
Fig. 7
FO 0190
When using the oven for the
first time
F
When using the oven for the first time
a) set the oven knob to and the thermostat knob to
MAX;
b) allow the oven to run empty for approximately 45
minutes;
c) open a window for ventilation.
During this time, an unpleasant odour may be emitted.
This is absolutely normal, and is caused by residues of
manufacturing.
Once this operation is carried out, let the oven cool down,
then clean the oven cavity with a soft cloth soaked in warm
soapy water.
Before cooking for the first time, carefully wash the shelf
and the dripping pan.
7
Page 8
24 Hour Clock and Timer
1. ( - ) DECREASE CONTROL & TIMER SETTING
BUTTON
2. ( + ) INCREASE CONTROL
(
) COOKPOT SYMBOL
Setting the time of day
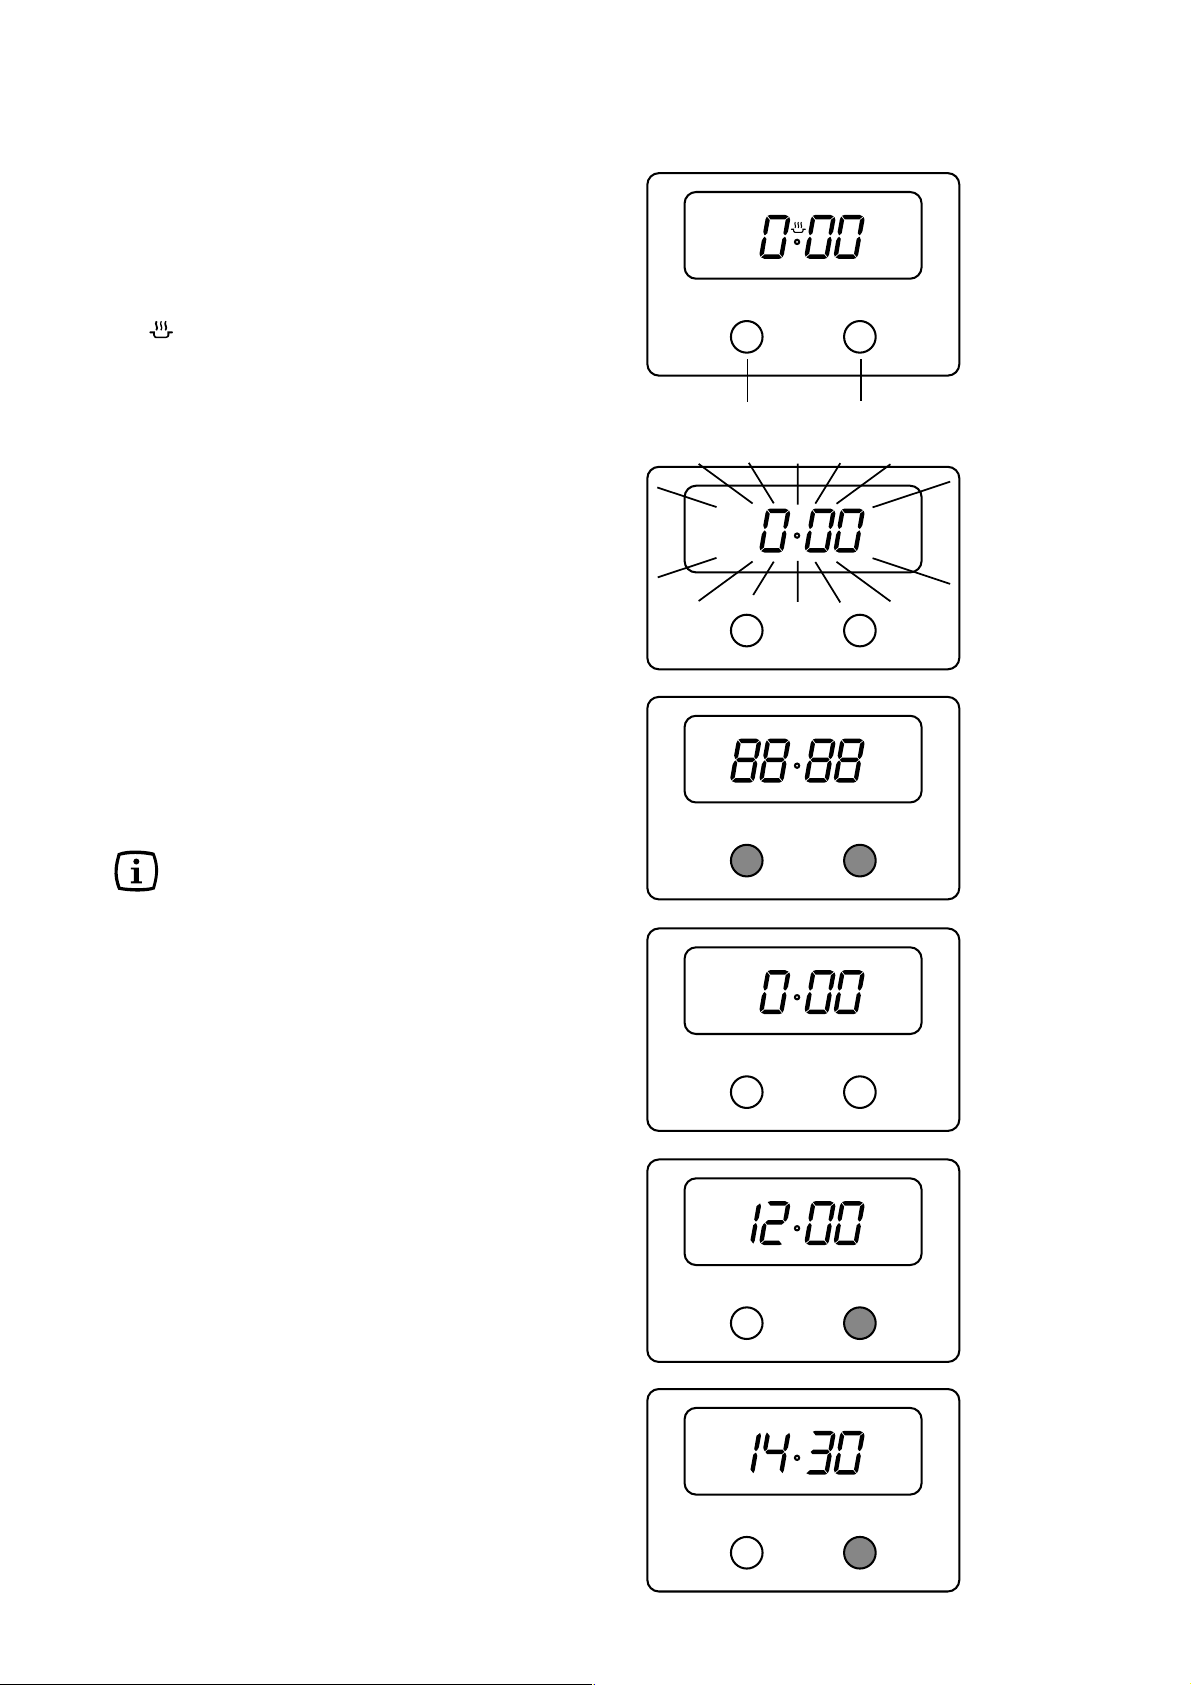
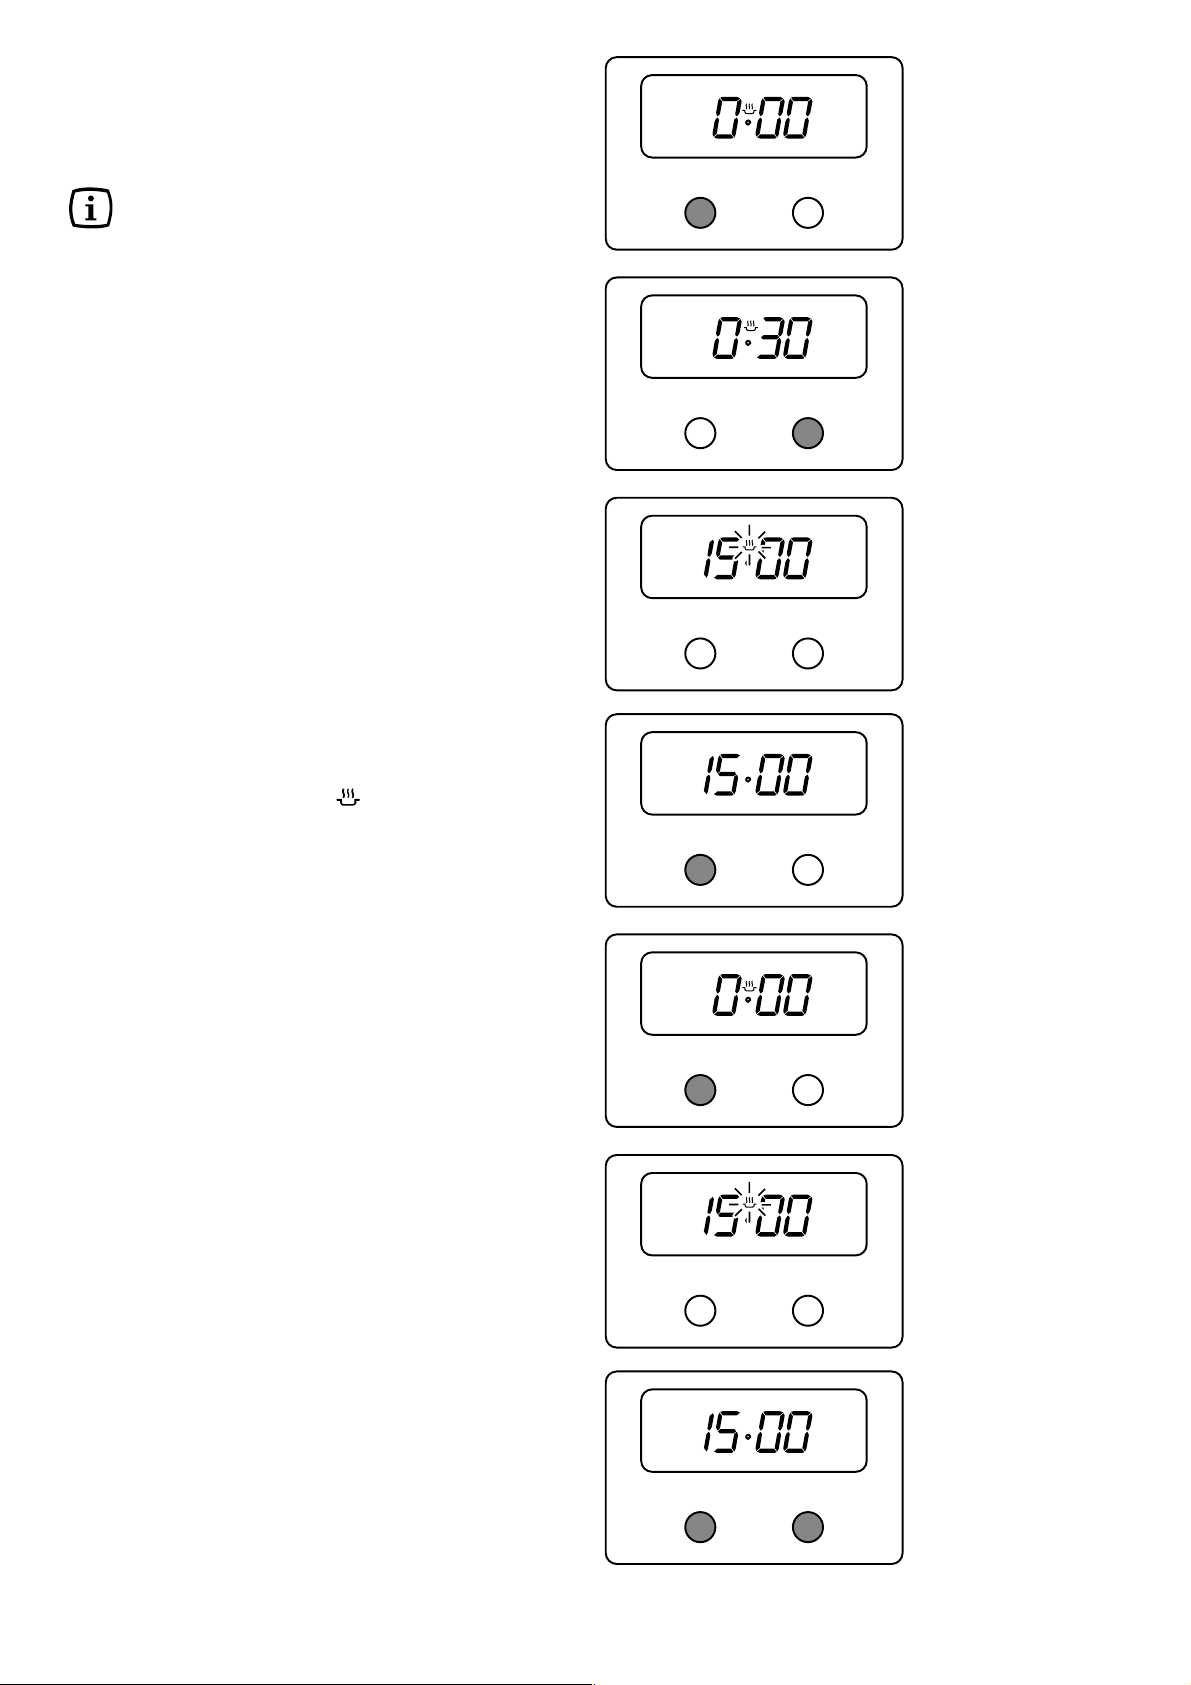
When the electricity supply is first switched ON, the
display will flash 0.00. See Fig. 8.1.
Press buttons (1) and (2) together. The display will
momentarily read 88.88 (See Fig.8.2). Release buttons,
0.00 will appear in the display as shown in Fig.8.3. Within
5 seconds press button (2), 12.00 will show in the display
as Fig. 8.4.
Within 5 seconds, press and hold either button (1) to
decrease or button (2) to increase the time until the
correct time of day on the 24 hour clock is reached, e.g.
14.30. See Fig. 8.5.
NOTE: The increase and decrease control buttons
operate slowly at first and then more rapidly. They
should be pressed separately.
-+
12
-
-
+
+
Fig. 8
Fig. 8.1
Fig. 8.2
-
-
-
+
Fig. 8.3
+
Fig. 8.4
+
Fig. 8.5
8
Page 9
The timer
IMPORTANT:The timer can be used to time a set
cooking period. At the end of the cook time the
timer will automatically switch off the oven if in
use.
The timer gives an audible reminder at the end of
any period of cooking up to 23 hours and 59
minutes.
-
+
Fig. 8.6
To set, press button (1) and the display will read 0.00, see
Fig. 8.6.
Release button (1) and press and hold button (2). The
display will count up in one minute intervals until the
interval to be timed is reached, e.g. 30 minutes, see Fig.
8.7. If necessary, press and hold button (1) to achieve
the correct time interval.
The timer will begin to count down once set. At the end
of the timed period, the timer will click, switching the
oven OFF if in use.
An audible signal will sound for up to 2 minutes.
The cookpot symbol will flash and the time of day will
show in the display. See Fig. 8.8.
To stop the sound press button (1). The display will stop
flashing. The cookpot symbol (
8.9. If using the oven it will come on again once button
(1) has been depressed. When cooking is complete
remove food and turn OFF oven temperature control.
) will go out. See Fig.
To cancel the timer
-+
-
-
+
+
Fig. 8.7
Fig. 8.8
Fig. 8.9
Press and release button (1). Then press and hold button
(1) and the display will count down in one minute intervals
to 0.00. See Fig. 8.10. Release button (1).
After a few seconds the cookpot symbol will flash and the
time of day will show in the display. See Fig. 8.11
If the oven is in use this will switch OFF after a few
seconds.
To reset, press button (1) and (2) together. See Fig. 8.12.
Things to note
1. The time of day must be set before the oven will operate. There will be a few seconds dealy before the
oven switches on.
2. The timer function controls the main oven only and
will switch the oven OFF at the end of a timed period.
This function is useful if you want to begin cooking
now and have the oven switch OFF automatically.
3. If you have used the timer to time food cooking in the
oven you will need to reset the timer before the oven
can operate again.
-
-
-
+
Fig. 8.10
+
Fig. 8.11
+
Fig. 8.12
9
Page 10

Suggestions for using the oven
Traditional cooking
As heat originates from top and bottom, dishes should
preferably be placed in the middle. If cooking requires more
heat from the bottom or the top, use the upper or lower
level.
Fan cooking
Heat is transmitted to dishes by hot air forcibly circulated
inside the oven by a fan placed at the back of the oven. By
this method, heat is quickly and evenly circulated
throughout the oven, permitting several different dishes to
be cooked at the same time on different levels (Fig. 9).
With this cooking method, through the elimination of
humidity in the air and a drier environment, smells and
tastes are not given off and do not mix with those of other
dishes. You can also cook on only one level. In this case,
it is advisable to place the dish on the lower level for better
cooking control. This oven is particularly suitable for
defreezing rapidly, sterilizing preserves, homemade jams
and, finally, for drying mushrooms and fruit.
Using the oven
For the cooking of cakes
Pre-heat the oven, unless indicated differently, for at least
10 minutes before use. Do not open the oven door when
cooking dishes which must raise (e.g. raised pastries and
soufflés); the jet of cold air would block the raising
process. To check if cakes are cooked, insert a toothpick
into the mixture; if it comes out clean the cake is ready.
Wait until at least 3/4 of the cooking time has passed
before doing this check.
As a general rule remember that:
a dish which is well-cooked on the outside but not
sufficiently cooked inside would have required a lower
temperature and longer cooking time. On the contrary, a
dry texture would have required a shorter time and higher
cooking temperature.
For the cooking of meat
Meat to be cooked in the oven should weigh at least 1
kilo to avoid its becoming too dry. If you want roasts with
a good colour, use very little oil. If the piece is lean, use
oil or butter or a little of both. Butter or oil are on the other
hand unnecessary if the piece has a strip of fat. If the
piece has a strip of fat on one side only, put it in the oven
with this side upwards; when melting the fat will grease
the lower side sufficiently. Red meat should be removed
from the fridge one hour before cooking otherwise the
sudden change of temperature could cause it to become
tough. A roast, especially if of red meat, must not be
salted at the beginning of cooking as salt causes juices
and blood to seep out of the meat, thus preventing the
formation of a well-browned crust. It is advisable to salt
the outside of the meat after just over half the cooking
time. Place the roast in the oven in a dish having a low
rim; a deep dish shields heat.
Meat can be placed on an ovenproof dish or directly on
the grill, under which the dripping pan will be inserted to
collect juice. Ingredients for gravy should only be put in
the dish immediately if cooking time is brief, otherwise
they should be added during the last half hour. Begin
cooking rare meat at a high temperature, reducing the
temperature to finish cooking the inside. The cooking temperature for white meat can be moderate throughout.
The degree of cooking can be checked by pressing the
meat with a fork; if it does not give the meat is cooked.
At the end of cooking it is advisable to wait at least 15
minutes before cutting the meat in order that the juices
are not lost. Before serving plates can be kept warm in
the oven at minimum temperature.
Grilling
The following types of meat are suitable for grilling. Mostly
meat or offal cut in slices or pieces of various sizes, but
not usually very thick, poultry cut in half and flattened,
fish, some vegetables (e.g. courgettes, aubergines,
tomatoes, etc.), skewers of meat or fish and seafood.
Meat and fish to be grilled should be lightly brushed with
oil and always placed on the grill; meat should be salted
upon completion of cooking; whereas fish should be
salted on the inside before cooking. The grill should be
positioned in the guides nearest or furthest from the grill
element according to the thickness of the meat, in order
to avoid burning the surface and cooking the inside
insufficiently. The formation of smoke caused by drops of
juice and fat can be avoided by pouring l or 2 glasses of
water into the dripping pan. The grill can also be used to
brown, toast bread and grill certain types of fruit, such as
bananas, halved grapefruit, slices of pineapple, apples,
etc. Fruit should not be placed too near the source of
heat.
Cooking times
Cooking times can vary according to the type of food, its
consistency and its volume. It is advisable to watch when
cooking for the first time and check results since when
preparing the same dishes, in the same conditions,
similar results are obtained.
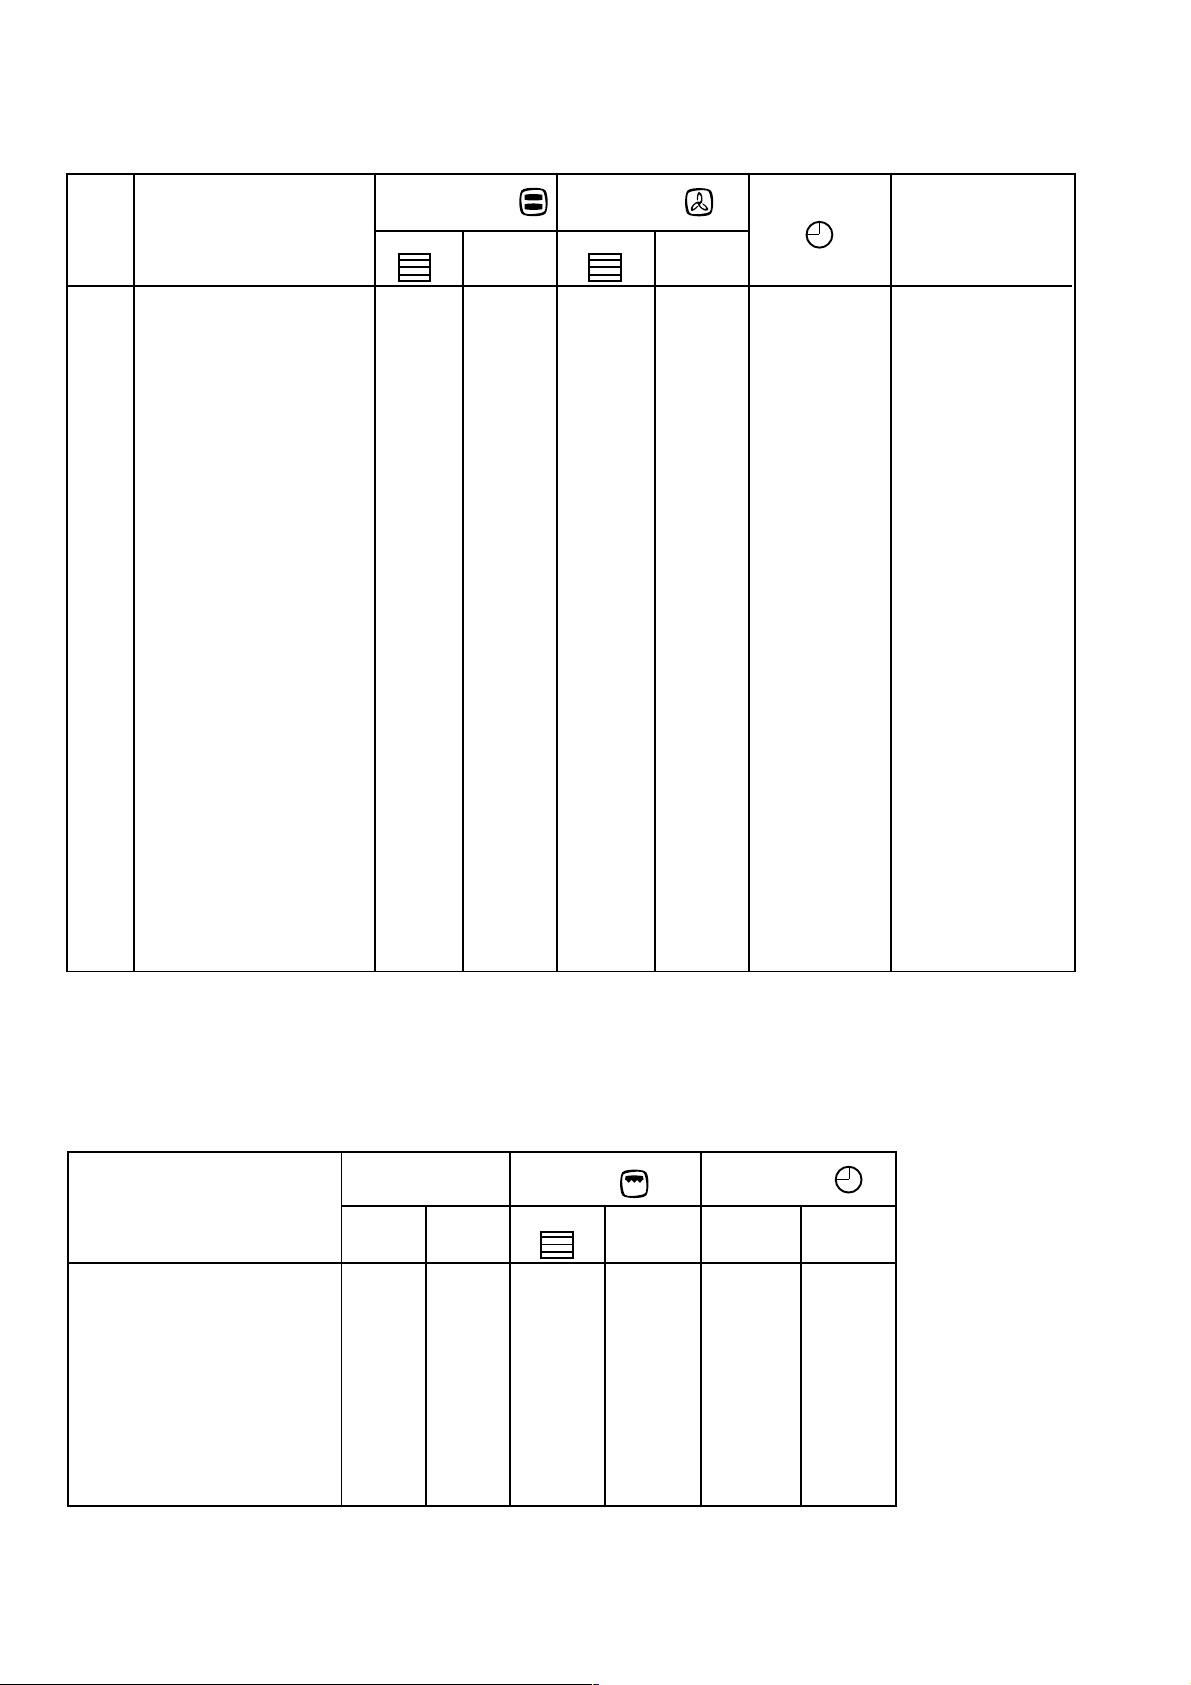
The COOKING TABLE relating to cooking in the oven
and by grill is provided as a guide. Experience will show
possible variations to the values set out in the table.
Nevertheless carefully follow the indications given
in the receipe you intend to follow.
Attention: do not place any utensils such as dripping
pan, cake tins, casseroles, pyrex dishes, aluminium foil
or other on the base of the oven when the oven is in use.
A stagnation of heat would result which would compromise the results of cooking and could damage the oven
enamel.
Fan cooking
FO 0061
Fig. 9
10
Page 11
Cooking tables
Traditional and fan cooking
°C
Cooking times
REMARKS
in Minutes
Traditional cooking
g.
QUANTITY
1000 White bread 1 200 2 175 45 ~ 60 1 load
500 Wholemeal bread 1 200 2 175 30 ~ 45 in tin
500 Bread rolls 2 200
250 Pizza 1 220
1000 Roast beef 2 200 2 175 50 ~ 70 Cooked on the grill
1200 Roast pork 2 200 2 175 100 ~ 130 Cooked on the grill
1000 Roast veal 2 200 2 175 90 ~ 120 Cooked on the grill
1500 Roast sirloin 2 220 2 200 50 ~ 70 Cooked on the grill
1200 Lamb 2 200 2 175 110 ~ 130 Leg
1000 Chicken 2 200 2 175 60 ~ 80 Whole
4000 Turkey 2 200 2 175 210 ~ 240 Whole
1500 Duck 2 175 2 160 120 ~ 150 Whole
3000 Goose 2 175 2 160 150 ~ 200 Whole
1200 Rabbit 2 200 2 175 60 ~ 80 In pieces
1000 Whole 2 200
800 Fillets 2 200
FOODS
CAKES
Mixture with beaten egg whites
With raised mixture 1 180
Shortpastry - pie base 2 180
Cheesecake 1 175 2 150 60 ~ 80
Apply pie 1 180
Strudel 2 175
Jam tarts 2 180
Small cakes 2 180
Biscuits 2 180
Meringues 2 100
BREAD AND PIZZA
FLANS
Macaroni 2 200
Vegetable 2 200
Small quiches 2 200
Lasagne 2 200 2 175 45 ~ 60
MEAT
FISH
Level
Te m p e -
4
3
2
1
2 180
rature
°C
Fan cooking
Level
4
3
2
1
2 (1 and 3)
2 (1 and 3)
2 (1 and 3)
2 (1 and 3)
2 (1 and 3)
2 (1 and 3)
2 (1 and 3)
2 (1 and 3)
2 (1 and 3)
2 (1 and 3)
2 (1 and 3)
2 (1 and 3)
2 (1 and 3)
2 (1 and 3)
2 (1 and 3)
2 (1 and 3)
Te m p e rature
160 45 ~ 60
160 20 ~ 35
160 20 ~ 30
160 40 ~ 60
150 60 ~ 80
160 45 ~ 60
160 15 ~ 25
160 10 ~ 20
100 90 ~ 120
175 20 ~ 35 8 bread rolls
200 20 ~ 35 on tray
175 40 ~ 50
175 45 ~ 60
175 35 ~ 45
175 140 ~ 60 2 fish
175 30 ~ 40 4 fillets
REMARKS
1) Cooking times do not include preheating, we advise you, particularly for cakes, pizzas, bread, to preheat the oven for approximately 10
minutes.
2) The indication of levels between brackets is the one to be used when cooking on several levels.
3) All cooking must be carried out with the oven door closed.
Grilling
°C
Cooking time
in minutes
To p
Bottom
Quantity
FOODS
Steak
Pork chops 4 600 4 max. 12 8
Sausages 8 500 4 max. 10 6
Chicken pieces 6 800 3 max. 30 20
Various kebabs 4 700 4 max. 12 10
Chicken breast 4 400 4 max. 13 10
Halved tomatoes 8 500 4 max. 12
Fish, fillets 4 400 4 max. 8 6
Scallops 6 4 max. 12
Welsh rarebit 4 4 max. 8
Slices of bread 4 4 max. 2~3 1
The dripping pan must be inserted on the lowest level
Number of
pieces
4 800 4 max. 10 8
Grams
Grilling
Level
Te m p e -
4
3
rature
2
1
11
Page 12
Cleaning and maintenance
Before each operation, disconnect the
appliance.
Cleaning the cooker
Drops of sauce, fruit juice etc., should be removed as
soon as possible with a soft cloth soaked in warm
detergent water. Do not use steel wool or knives to take
off layers of crust. Remove stubborn marks with a well
wetted soap impregnated pad, but care must be taken
not to scratch the enamel. Wash the enamelled grids
with water and detergent; these can also be washed a
dishwasher.
Take off the burner covers and the grids and wash them
carefully with warm water and detergent. Dry them well
before putting them back in position.
Moreover, make sure that these are properly re-placed.
The burner can be rubbed with steel wool or a slightly
abrasive cloth.
Clean the oven door and crystal cover, in models
equipped with these items, only with warm water, and
avoid the use of rough cloths or abrasive substances; in
cookers with an automatic ignition the sparkling bulb
should be cleaned periodically and accurately to avoid
difficulties in lighting; furthermore check that the burner
holes are not obstructed.
Cleaning the oven
Clean carefully the oven cavity after use when it is still
warm. In fact, at this moment it is easy to take off
deposits of fat or other substances such as fruit juice,
sugar particles or fat. You can use warm detergent water
or one of the appropriate spray oven cleaners. Do not
direct the spray at the mat steel parts as this could
damage them and always follow the manufacturer's
instructions. Clean the oven acces-sories (grate, gridplate etc.) with warm water and detergent.
Remove possible incrustations with a slightly abrasive
powder.
Light metallic stains (aluminium residues) can be removed
from the cooking zone with a ceramic hob cleaning agent.
Sugar solutions, food stuffs with a high sugar content
must be removed immediately with a scraper. If this type
of soilage is not removed immediately it can cause
irreparable damage to the ceramic surface. When the
surface has cooled wipe over with a damp cloth.
Before using any detergent or cleaning agent on the
ceramic top, ensure they are recommended by the
manufacturer for use on ceramic hobs.
Do not apply any cleaning agents to hot cooking zones.
Ensure any residues are wiped off before the cooking
zones are used again.
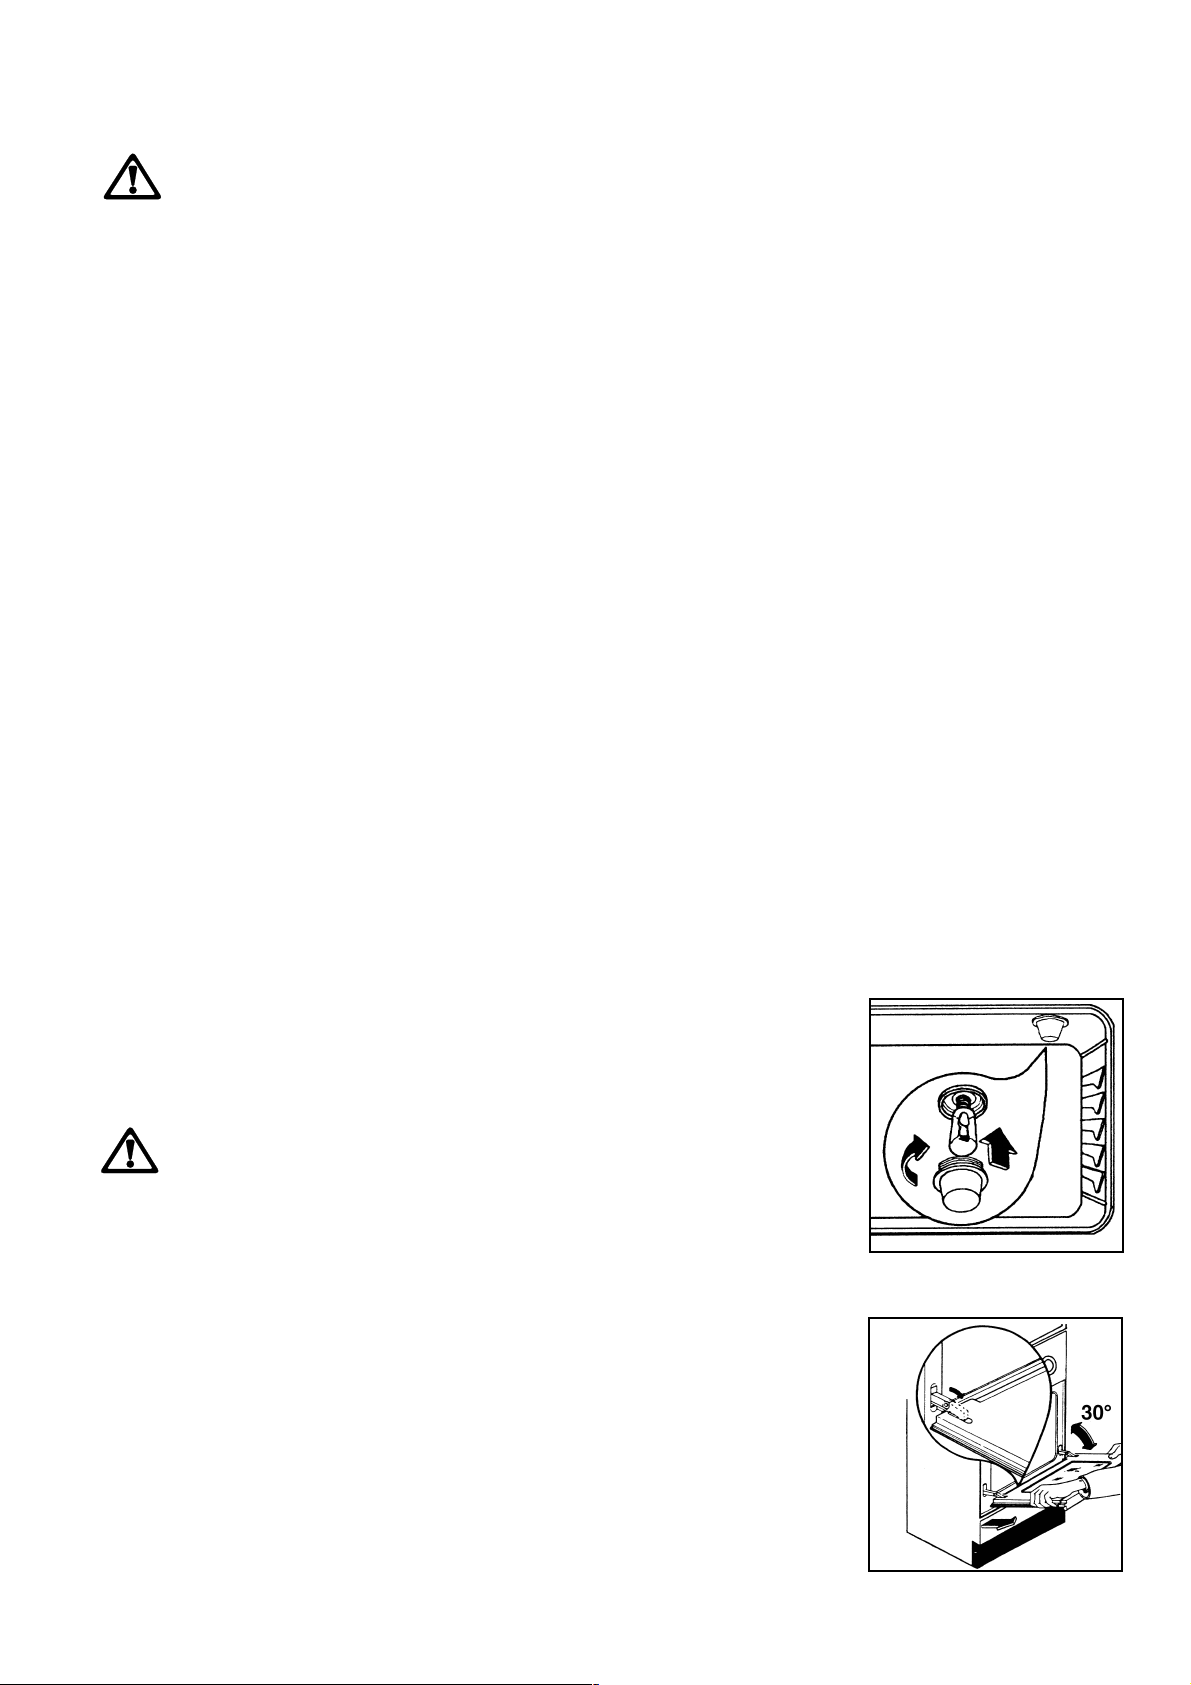
Oven lamp replacement (Fig. 10)
Disconnect the appliance. Unscrew the lamp and
substitute it with another fitting for a higher tempera-
ture (300°C) with the folowing characteristics:
Tension: 230 V (50Hz)
Power: 15W
Connection: E14
Cleaning the oven door
For a more complete cleaning of the oven door, it is
advisable to disassemble it in the following way (Fig.
11): open the door fully, turn the two caps situated on the
arm of the hinge to 180°, partially close the door to an
angle of 30°, lift the door and extract from the front.
Re-mount the door by reversing the operation described
above.
Never line any part of the oven with
aluminium foil. It would result in an
accumulation of heat which might damage
the cooking results and also damage the
enamel.
Cleaning the hob
Before cleaning, make sure the hob is cool.
Never use aggressive or abrasive agents, such as oven
sprays, stain or rust removers, scouring powders, or
sponges with an abrasive effect.
Special cleaning agents and ceramic hob scrapers are
available from department stores.
Slight, non-burnt soilage can be wiped off with a damp
cloth. Burnt soilage has to be removed with a scraper.
Afterwards wipe off the ceramic hob with a damp cloth.
12
Fig. 10
Fig. 11
FO 0424
FO 0967
Page 13

Something not working
If the appliance does not work correctly, before contacting
the technical assistance, check the following points:
If the appliance fails to operate:
check that the socket switch and/or the switch from
the supply to the oven are ON.
If the oven does not come on:
check that it is properly plugged in.
check that the socket switch is turned on.
check that the socket is supplying power - do this by
plugging in another appliance that is known to be
working properly.
check that the fuse is intact.
If the hob area does not work:
check that you are turning the correct control knob.
The oven does not heat:
check that the oven switch is in the working position.
Cooking time is too long:
check that the temperature chosen is suitable to the
food to be cooked.
The oven produces smoke:
we advise you to clean the oven after each use; when
cooking meat splashes of fat are formed, if they are
not cleaned they can cause smoke and smells during
successive cooking (see paragraph concerning
cleaning).
The oven light does not work:
the lamp has certainly burnt; to replace follow the
instructions provided in the paragraph on this subject.
If, after all the controls indicated above, the appliance
still does not work, contact your nearest technical
assistance centre providing them with full details of your
appliance: model and registration number.
Technical assistance
Original spareparts
Before leaving our workshops, this appliance has been
tested and adjusted by experts and specialized personnel
in order to give you the best possible results. Any repairs
or adjustments necessary thereafter should be made with
great care and attention.
For this reason, we recommend you should always
contact the retailer who sold you the appliance or our
nearest Assistance Centre specifying the type of fault
and the model of your appliance.
Original spareparts, certified by the product manufacturer
and carrying the following symbol
are only available at our Technical Assistance Centre and
authorized spareparts shops.
13
Page 14
Technical data
Oven:
Top element 1000 W
Bottom element 1200 W
Top + Bottom element 2200 W
Grill 1800 W
Rear element 2000 W
Oven fan 30 W
Oven lamp 15 W
Max. power rating: 2215 W
Voltage tension (50 Hz)
230 V
Dimensions of the appliance
Height 850 mm
Width 600 mm
Depth 600 mm
Appliance Class 1 and Class 2 Sub-Class 1
Total cooker rating: 8015 W
Hob
Max. power rating: 5800 W
Instructions for the installer
The following instructions are meant for a qualified
installer, in order that the operations of installation,
regulation, and service are executed according to the
existing regulations.
Whenever changes are mode involving the disconnection
of the machine it is necessary to proceed with maximum
caution.
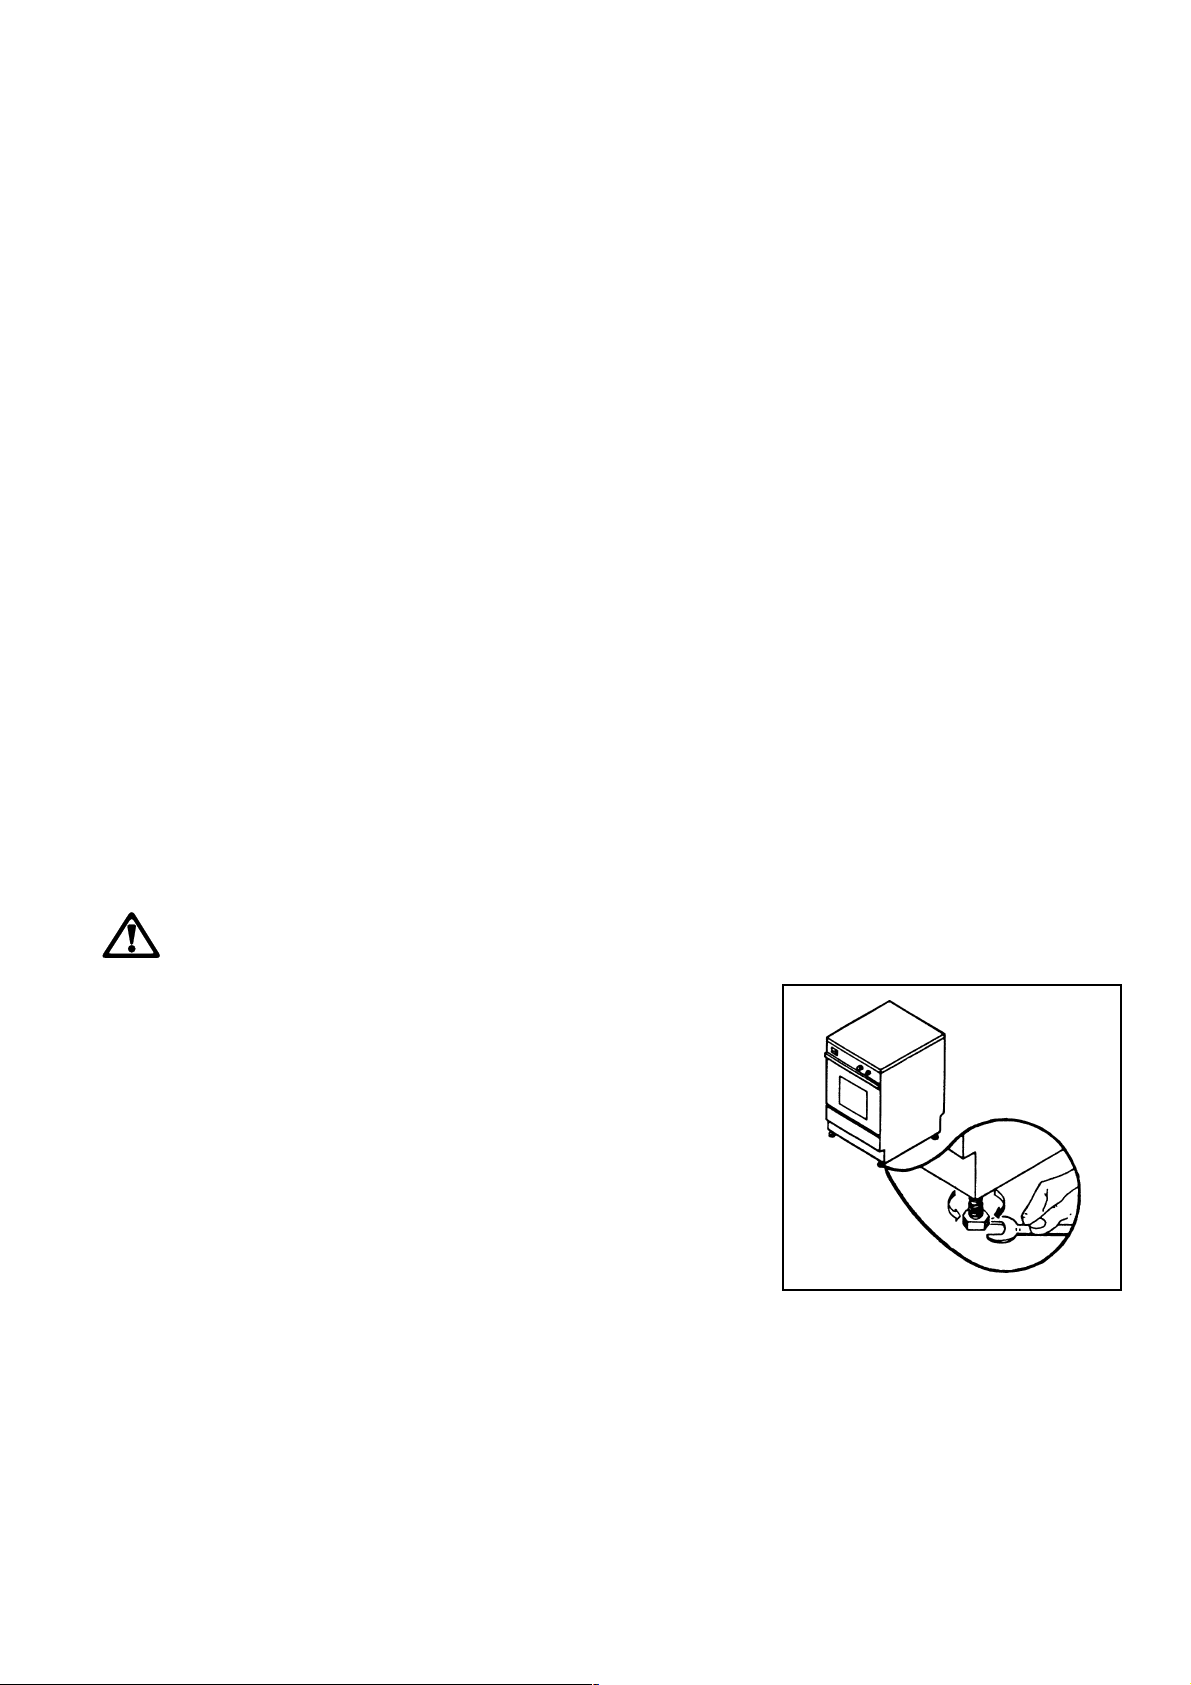
Levelling
The appliance is provided with adjustable small feet
placed in the back and front corners od the base.
By adjusting the small feet (fig.12) it is possible to
change the height of the appliance so as to ensure a
better levelling with other surfaces and a uniform
distribution of the liquids contained in pans or pots.
THE MANUFACTURING COMPANY DECLINES
ANY RESPONSABILITY FOR POSSIBLE
DAMAGES
RESULTING FROM AN INSTALLATION WHICH
DOESN'T COMPLY WITH THE RULES IN FORCE
Installation environnement
Installation and maintenance of the appliance must be
carried out by a professional qualified according to the
articles regulating the art in force.
Once the cooker has been installed it is important to
remove the protective materials which were put on in the
factory.
We shall not be responsible in case of accidents or
incidents caused by inexisting or defective earthing.
Positioning
The appliance is of type X.
It has been designed to be placed between two furniture
units whose height does not exceed the cooker's plate
height (EN 60 335-2-6).
Fig. 12
FO 0063
14
Page 15
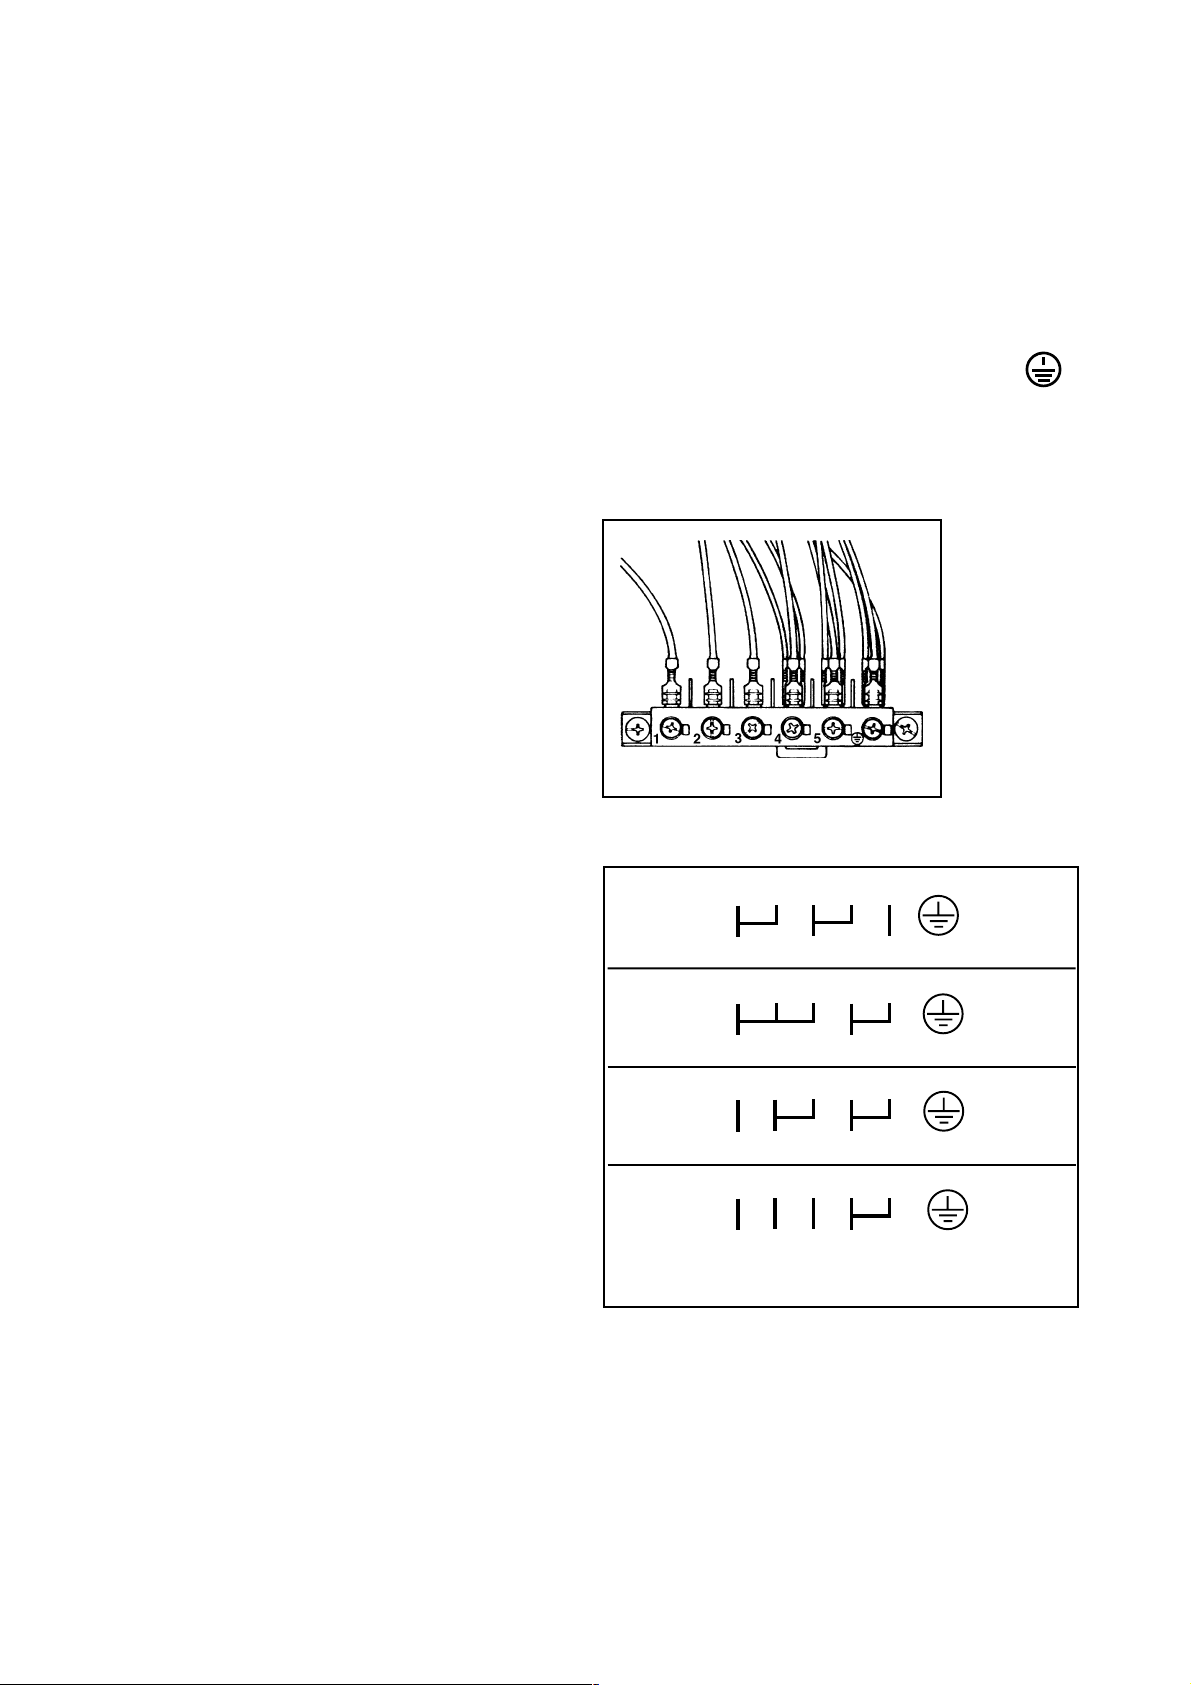
Electrical connection
Prior to making the electric al connection, make sure
that:
- The protection fuse and the domestic wire system
are suitable to carry the total electric load of the oven
(see rating plate).
- Your domestic wiring system has an efficient earth
connection in compliance with the rules and laws in
force.
- The wall socket or the omnipole switch used for the
electrical connection can easily be reached after the
oven is built in.
Depending on the models, the appliance is delivered with
or without electric supply cable. If it is not supplied with
cable, you will have to fit a supply cable with standard
plug, suitable for the total electric load shown on the
rating plate. The plug is to be inserted into a suitable
wall socket. Only the following cable types can be used
(considering the respective necessary section of cable):
H07 RN-F, H05 RN-F, H05 RR-F, H05 VV-F.
If you require a direct connection to the electric network
(mains), it will be necessary to fit between the appliance
and the mains an omnipole switch, aith a minimum gap
between contacts of 3 mm. suitable for the required load
and in compliance with rules in force. The green 1 yellow
ground wire must not be interrupted by the switch.
The supply cable must in all cases be laid out in such a
way as to ensure that it does not reach at any given
point a temperature 50°C higher than the ambient temperature.
The manufacturer disclaims any liability in case these
accident-preventing rules are not observed.
Connecting the terminal board
The appliance incorporates an easily accessible 6-pole
terminal board whose jumpers (bridges) are already preset for operation on 400 V three-phase with neutral wire
(Fig. 13). In case where different mains voltage is present,
the jumpers on the terminal board must be arranged as
shown in the diagram (Fig. 14).
The ground cable must be connected to terminal .
After connecting the supply cable to the terminal board,
secure it with a junction clamp.
FO 0330
1 2 3 4 5
230V 3~
L1 L2 L3 PE
Fig. 13
Section
of cable
(min.)
4 x 1.5 mm
2
230V 1~
400V 2N~
400V 3N~
FO 0584-EN
1 2 3 4 5
L1 N PE
1 2 3 4 5
L1 L2 N PE
1 2 3 4 5
L1 L2 L3 N PE
Section
of cable
(min.)
3 x 2.5 mm
Section
of cable
(min.)
4 x 2.5 mm
Section
of cable
(min.)
5 x 1.5 mm
Fig. 14
2
2
2
15
 Loading...