

AEG EK5122, EK6127, EK6125B, EK6123 User Manual

PART RESERVED FOR THE USER
1. TECHNICAL DATA........................................................................................................................... 80
2. PRECAUTIONS TO BE TAKEN IN USE........................................................................................... 81
3. DESCRIPTION OF THE COOKER................................................................................................... 82
3.1 The Control Panel .................................................................................................................. 82
3.2 Cooker Hob ............................................................................................................................ 82
3.3 Lid ........................................................................................................................................... 82
3.4 Oven ....................................................................................................................................... 83
3.5 Oven/Grill Control.................................................................................................................. 83
3.6 Audible Signal Timer ............................................................................................................. 83
3.7 Indicator rings ....................................................................................................................... 83
3.8 Oven Illumination .................................................................................................................. 84
3.7 Oven Accessories ................................................................................................................. 84
4. GUIDE IN USE ................................................................................................................................. 85
4.1 Lightning the Hob Burners................................................................................................... 85
4.2 Lightning the Oven Burners................................................................................................. 86
4.3 Using the Grill........................................................................................................................ 87
5. ADVICE ON HOW TO USE YOUR STOVE....................................................................................... 88
5.1 Cooking on the Hob Burners................................................................................................ 88
5.2 Cooking in the Oven ............................................................................................................. 89
5.3 Cooking with the Grill ........................................................................................................... 90
5.4 Cooking with the Spit............................................................................................................ 91
......................................................
80
6. COOKING GUIDE ............................................................................................................................ 92
6.1 A Guide to Cooking in the Oven .......................................................................................... 92
6.2 Cooking chart for grill dishes...............................................................................................93
7. CLEANING ....................................................................................................................................... 94
7.1 Cleaning the Hob................................................................................................................... 94
7.2 Cleaning of the Oven with enamel coating ......................................................................... 94
7.3 Cleaning the Catalytic Enamel Oven ................................................................................... 94
8. WHERE A FAULT OCCURS, WHAT DO I DO ? .............................................................................. 95
9. IDENTIFICATION PLATE................................................................................................................. 96
PART INTENDED FOR THE INSTALLER
1. SAFETY INSTRUCTIONS FOR INSTALLATION ............................................................................ 97
2. INST ALLING THE UNIT ................................................................................................................... 98
2.1 Installing the Unit in position ............................................................................................... 98
2.2 Gas Connection..................................................................................................................... 98
2.3 Electrical Connection.......................................................................................................... 100
2.4 Replacing the Oven Lamp .................................................................................................. 100
.............................................
97
3. CHANGING THE GAS TYPE ......................................................................................................... 101
3.1 Changing the Hob Burners Jets......................................................................................... 101
3.2 Regulating the Hob Burners Minimum Gas Flow ............................................................. 102
3.3 Changing the Oven Burners Jets....................................................................................... 102
3.4 Regulating the Oven Burners Minimum Gas Flow ........................................................... 103
79

PART RESERVED FOR THE USER
1.TECHNICAL DATA
Insulation Class: ..................................................... class 1
Natural gas equipment regulation .......................... G20 20 mbar - G25 25 mbar
Conversion options : Butane, Propane
Electical connection characteristics .......................230 V 50 Hz
Electrical power consumptio ................................... 1,819 kW
Nominal heat flow ................................................... 11 kW
Category .................................................................I I 2E+3+
1.1 The Cooker hob
Lid ........................................................................... steel or glass, depending on models
1 auxiliary burner .................................................... 1,00 kW Ø 55 mm
2 medium speed burners........................................2,00 kW Ø 71 mm
1 high speed burner................................................ 3,00 kW Ø 102 mm
Electric ignition ...................................................... depending on models
1.2 The oven
Oven Fuel ............................................................... gaz
Oven bumer Output ................................................ 3,00 kW
Oven Thermocouple Safety Device......................... yes
Electric ignition ....................................................... depending on models
Grill ......................................................................... electric
Grill Output..............................................................1,8 kW
Oven Lamp .............................................................0,015 kW, except mod. EK 6121
Nettoyage................................................................ Black enamel or catalysing enamel, depending on models
1.3 Accessories (depending on models)
1 grid support
1 Pastry tray
1 Dripping Pan
1 Turnspit
Accessory storage drawer
Protective Screen for the knobs
1.4 Dimensions
Height, cover raised ................................................ 144 cm
Height...................................................................... 85 cm
Width (EK 5122) ..................................................... 50 cm
Width (EK 6121/3/5/7) ............................................ 60 cm
Depth ...................................................................... 60 cm
Usable volume ........................................................ 45 l (EK 5122) - 57 l (EK 6121/3/5/7)
The mark indicates that the Gas Equipment Directive, 90/396, the Electromagnetic Directive, 89/336 and
Directive 93/68 have all been complied with. The unit complies with Directive 72/23.
80
2. PRECA UTION T O BE TAKEN IN USE
Please read your «Instructions for Use» manual
carefully and keep it safely: it has been written in
order to allow you to use your cooker in the optimum
manner.
● Before using your cooker for the first time, please
heat up the oven, while empty, so as to burn off the
smell of the insulation as well as the protective
greases utilised during manufacture:
- Lift the lid,
- Remove the protective film as well as the selfadhesive labels,
- Remove the publicity stickers,
- Set the oven temperature control to its maximum
position and heat the oven for 30 minutes, then
setting to the grill position, for another 10 minutes,
approximately .
During this operation, your cooker will give off
smoke.
The room should be suitably aerated so as to
reduce the smell and the smoke density.
● T ake the precaution of w ashing the oven accessories
(Grill, Pastry Tray, Drip Tray).
● In use, a gas cooker unit produces both heat and
humidity within the room where it is installed. Please
ensure that the kitchen is properly aerated: keep the
natural aeration openings open, or a mechanicjÊ
aeration device should be installed.
● Intensive or prolonged use of the cooker could
necessitate additional aeration, by opening a
window, or via more efficient aeration, for example,
by increasing the power of the mechanical ventilator ,
should one be installed.
● Your cooker has been designed solely for culinary
use, and not for any other purpose.
● Never pull your cooker via the door handle.
● The outer surfaces of your cook er become hot both
when using the oven and during its cleaning
sequence. Please keep children well away.
● Do not store either maintenance products or
inflammable products in the drawer.
● Never place aluminium foil directly into contact with
the sole plate as this could damage the enamel
surface.
● Never use the drip tray as a roasting dish.
● Please take care nev er to leav e anything on the hob
while the burners are in use (tea towels, dish cloths,
aluminium foil, etc.)
● Wipe off any dirt on the surface of the lid before
opening it.
For your safety:
Turn off each of the burners and wait for the
upper part of the hob to cool before closing
the lid.
● Change the gas supply pipe well before the expiry
date indicated on this part.
● Never use a propane bottle within your kitchen, or
any other closed area.
● Where any fault in operation occurs, please, first of
all, refer to the Chapter entitled «Where a fault
occurs, what do I do ?» If, after having chec ked these
various points, the fault still persists , please contact
your retailer’s After Sales Service. Please giv e them
the Model Reference No and the Serial Number of
your cooker. These are mark ed on the identification
plate. Do not attempt to repair your cook er yourself,
this could cause grave injury.
● Before manually cleaning your cook er, please chec k
that none of the cooker elements is either switched
on or live. Each of the Control Knobs should be set
to STOP.
● Please ensure that the burner rings are kept
scrupulously clean. Any dirt on these could be the
cause of poor ignition.
● If you dismantle the burner rings for cleaning, please
ensure that:
- the burner rings are sitting in a stable position on
the burners
- the burner crowns are in place
● Always insist on original spare parts, certified by the
C
C
E
E
E
E
I
I
P
P
C
R
manufacturer
O
.
U
N
E
S
T
T
C
R
U
81
3. DESCRIPTION OF THE COOKER
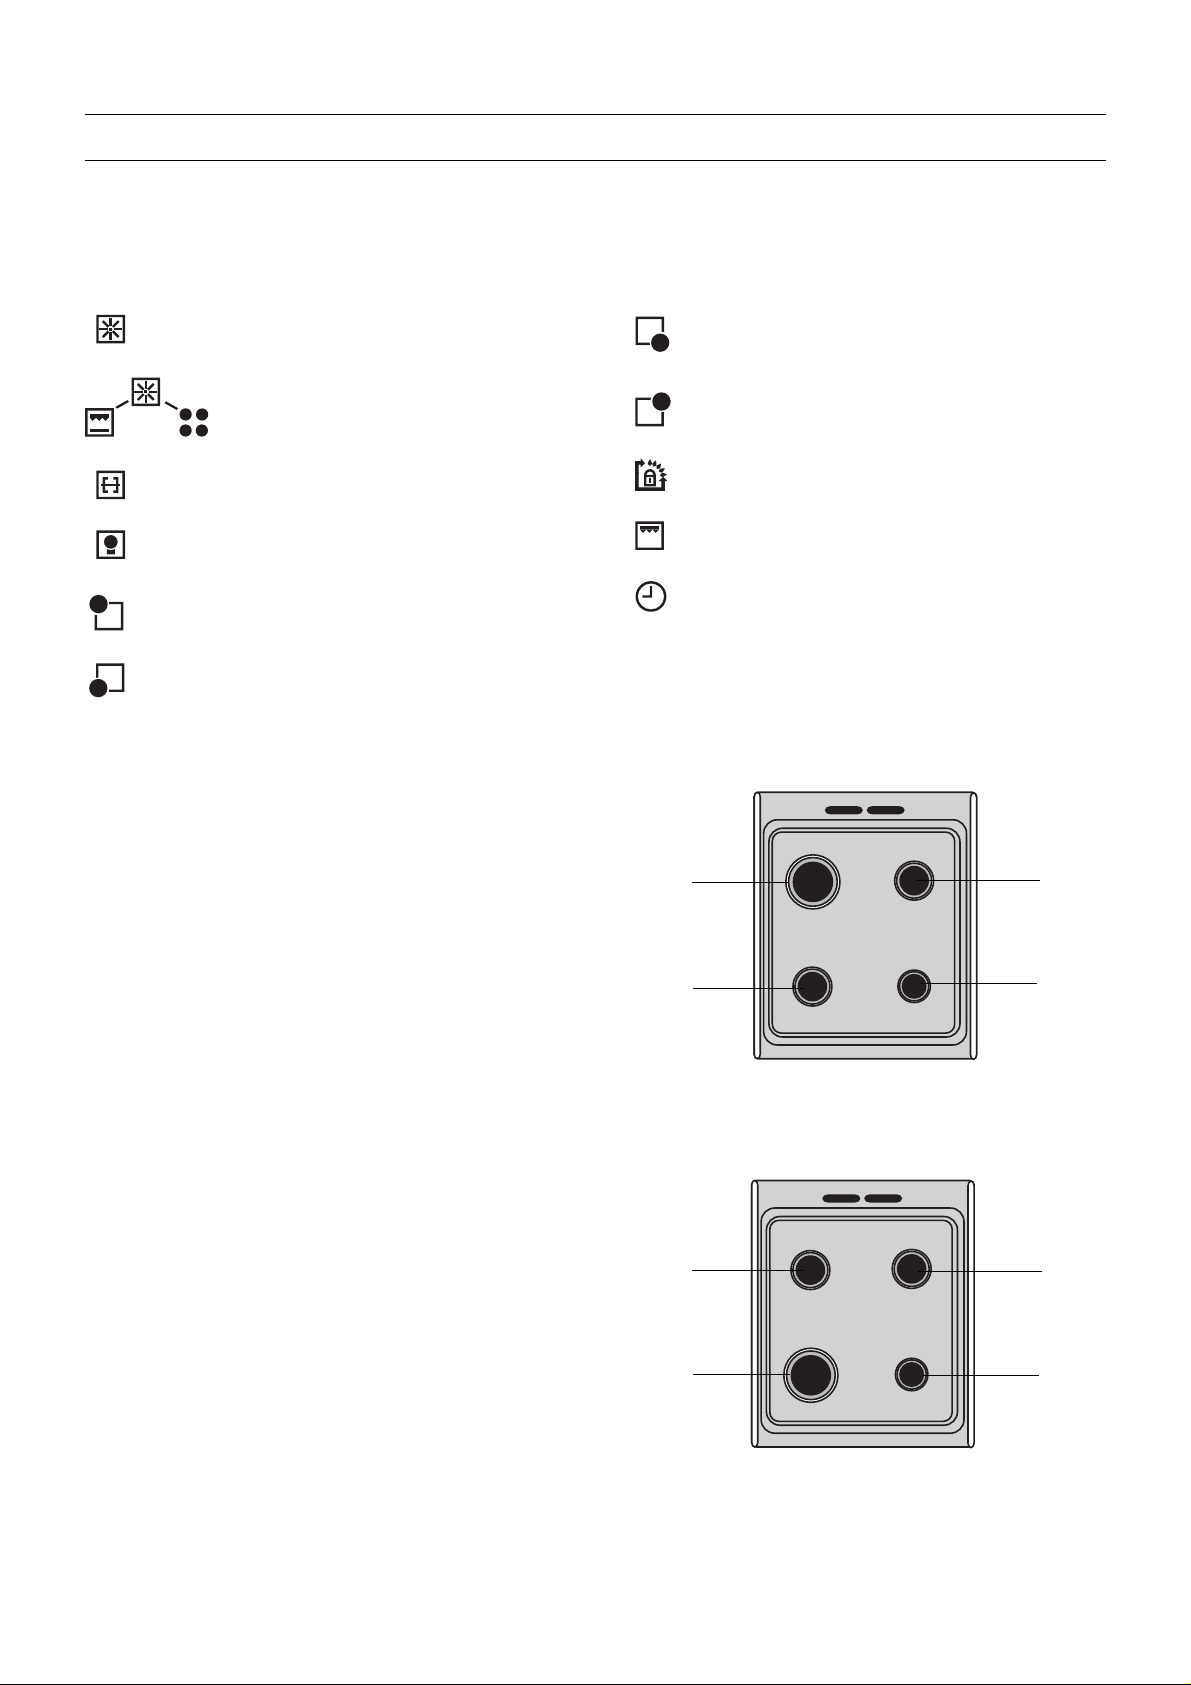
3.1 The Control Panel : symbols
Electric Ignition System for the Hob
Electric Ignition System for the Hob
and the Oven
Turnspit
Oven Lamp
Left-Rear Burner Control Knob
Left-Front Burner Control Knob
3.2 Cooker Hob
Your Cooker Hob is equipped with progressively
diminishing burners.
These are characterised by their flexibility in regulation,
these allow you:
Right-Front Burner Control Knob
Right-Rear Burner Control Knob
Oven and Grill Control Knob
Grill Control Lamp
Audible Signal Timer
High-speed
burner
3,00 kW
Half-speed
burner
2,00 kW
Half-speed
burner
2,00 kW
Auxiliary
burner
1,00 kW
- to very easily obtain each of the cooking speeds
between full speed and reduced flow.
- to identify the position appropriate for each type
of cooking suited to your personal habits and
subsequently find this posHion without fumbling.
3.3 Lid
Before closing the lid, please wait for the upper part of the
hob to cool, in order to not damage the lid.
When the oven is being used, the lid should be in the
raised position.
82
Half-speed
burner
2,00 kW
High-speed
burner
3,00 kW
Mod. EK 5122
Half-speed
burner
2,00 kW
Auxiliary
burner
1,00 kW
Mod. EK 6121/3/5/7
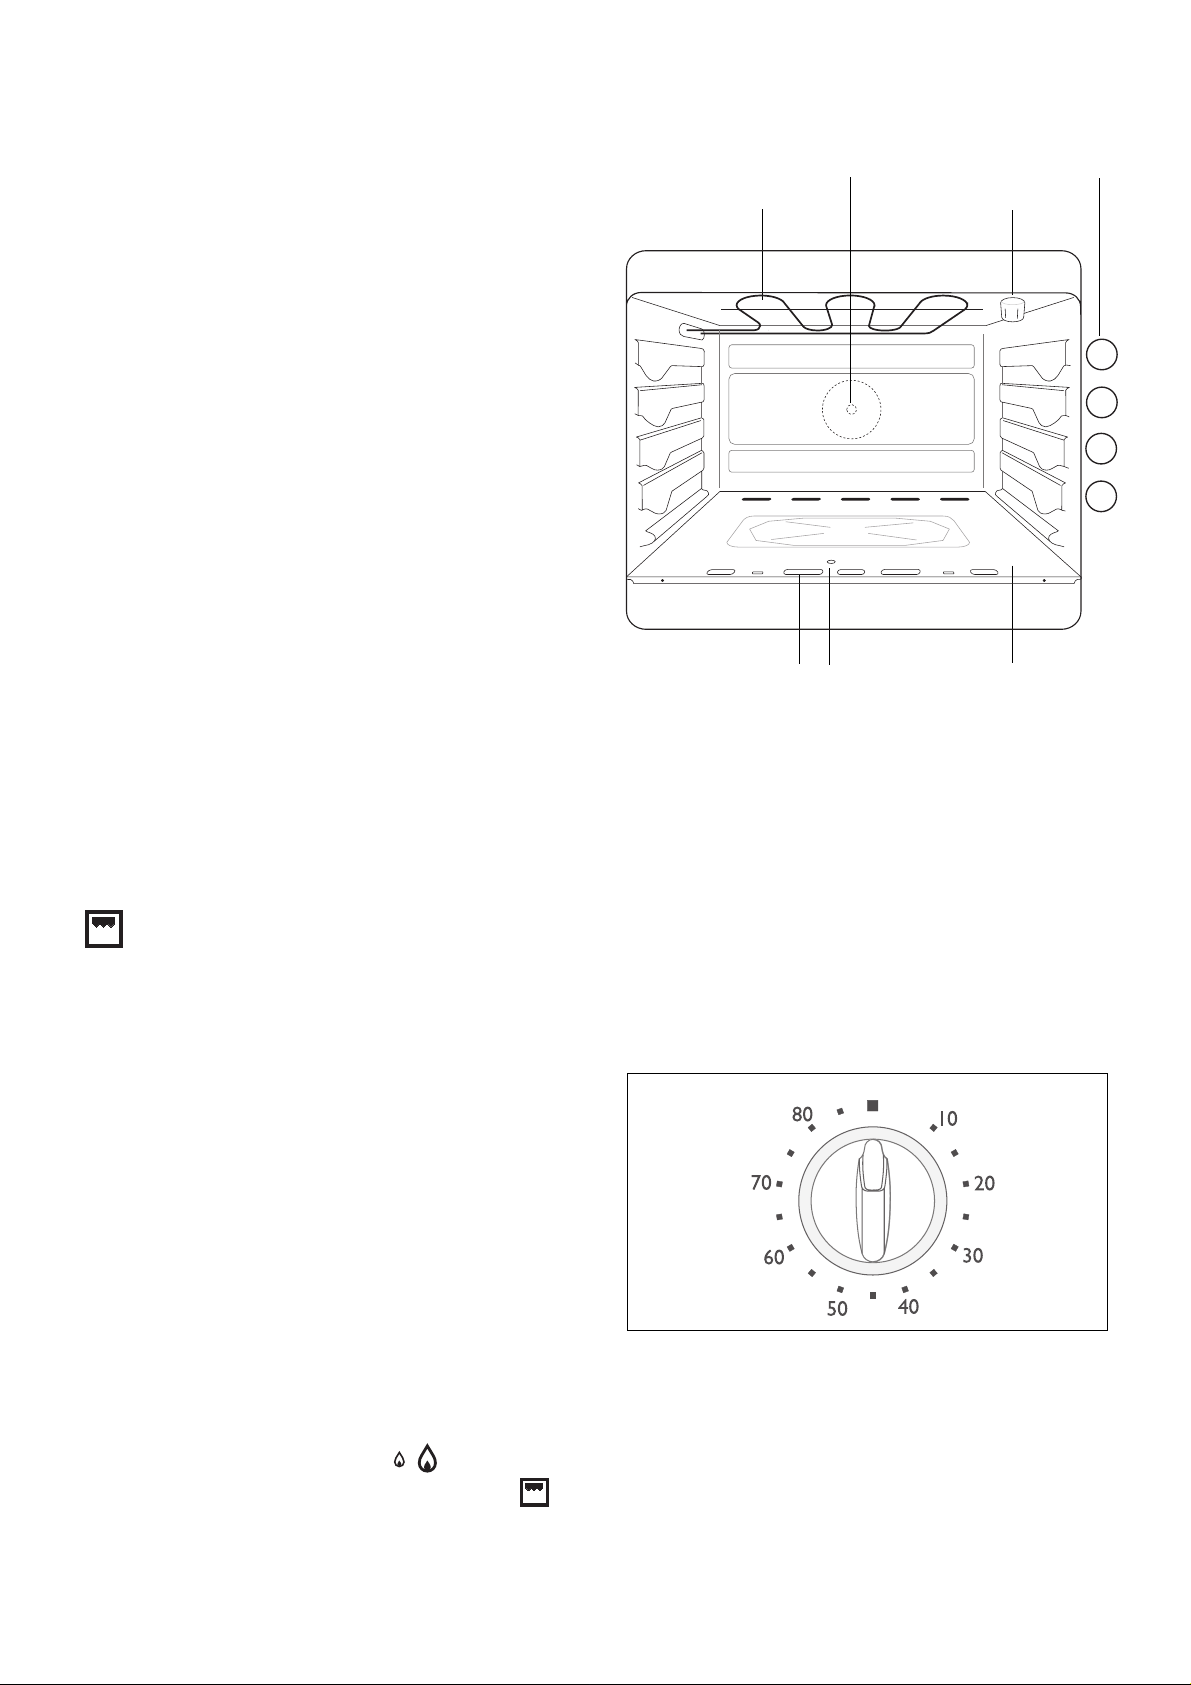
3.4 Oven
The Oven is fitted with a Gas Burner at sole plate level
and an Electrically Operated Grill in the oven roof. It can
be used for normal cooking, or as a grill. These two
modes of operation cannot be employed simultaneously.
● The Oven Burner is fitted with a Thermocouple-type
Safety Device. Should the flame be accidentally
extinguished (a violent draught, major spillage of
water or milk, etc.) a thermocouple safety device cuts
off the supply of gas to the Oven burner.
● In Standard Mode, there are 8 gradations of
adjustment level.
● In order to change from Standard Cooking to
GrillType Cooking, it is first necessary to extinguish
the Oven Burner, then to light the Grill.
● When cooking in the oven, please ensure that the
cooker lid is maintained in the open position in order
to avoid any risk of overheating.
3.5 Oven / Grill Control
This allows you to select the appropriate oven
temperature and to set the grill element in operation.
Rotating Spit
Motor Drive Orifice
Grill
Flame spy hole
Manual
ignition
orifice
Oven tray levels
Lamp
4
3
2
1
Oven
Sole
Plate
What the Symbols mean:
● OFF Position
1-8 Oven Temperature Setting
Grill Setting
3.6 Audible Signal Timer
This allows you to select a cooking time. After this period
of time has elapsed, the sounder rings, but does not halt
cooking.
● Set the Oven Control Knob to the OFF Position.
● For cooking times of less than 15 minutes, tum the
knob to a higher position, then bring it back to the
setting desired.
3.7 Indicator rings
The controls of your cooker are made up of an indicator
knob and an Indicator ring. The Indicator rings are
silkscreen printed:
The Hob Burner Indicator Ring: ●
The Oven Indicator Ring: ● 1 2 3 4 5 6 7 8
These graduations assist you in correctly reinstalling the
Indicator Rings following removal.
83
3.8 Oven lllumination
This lights when the Oven lllumination Button is pressed.
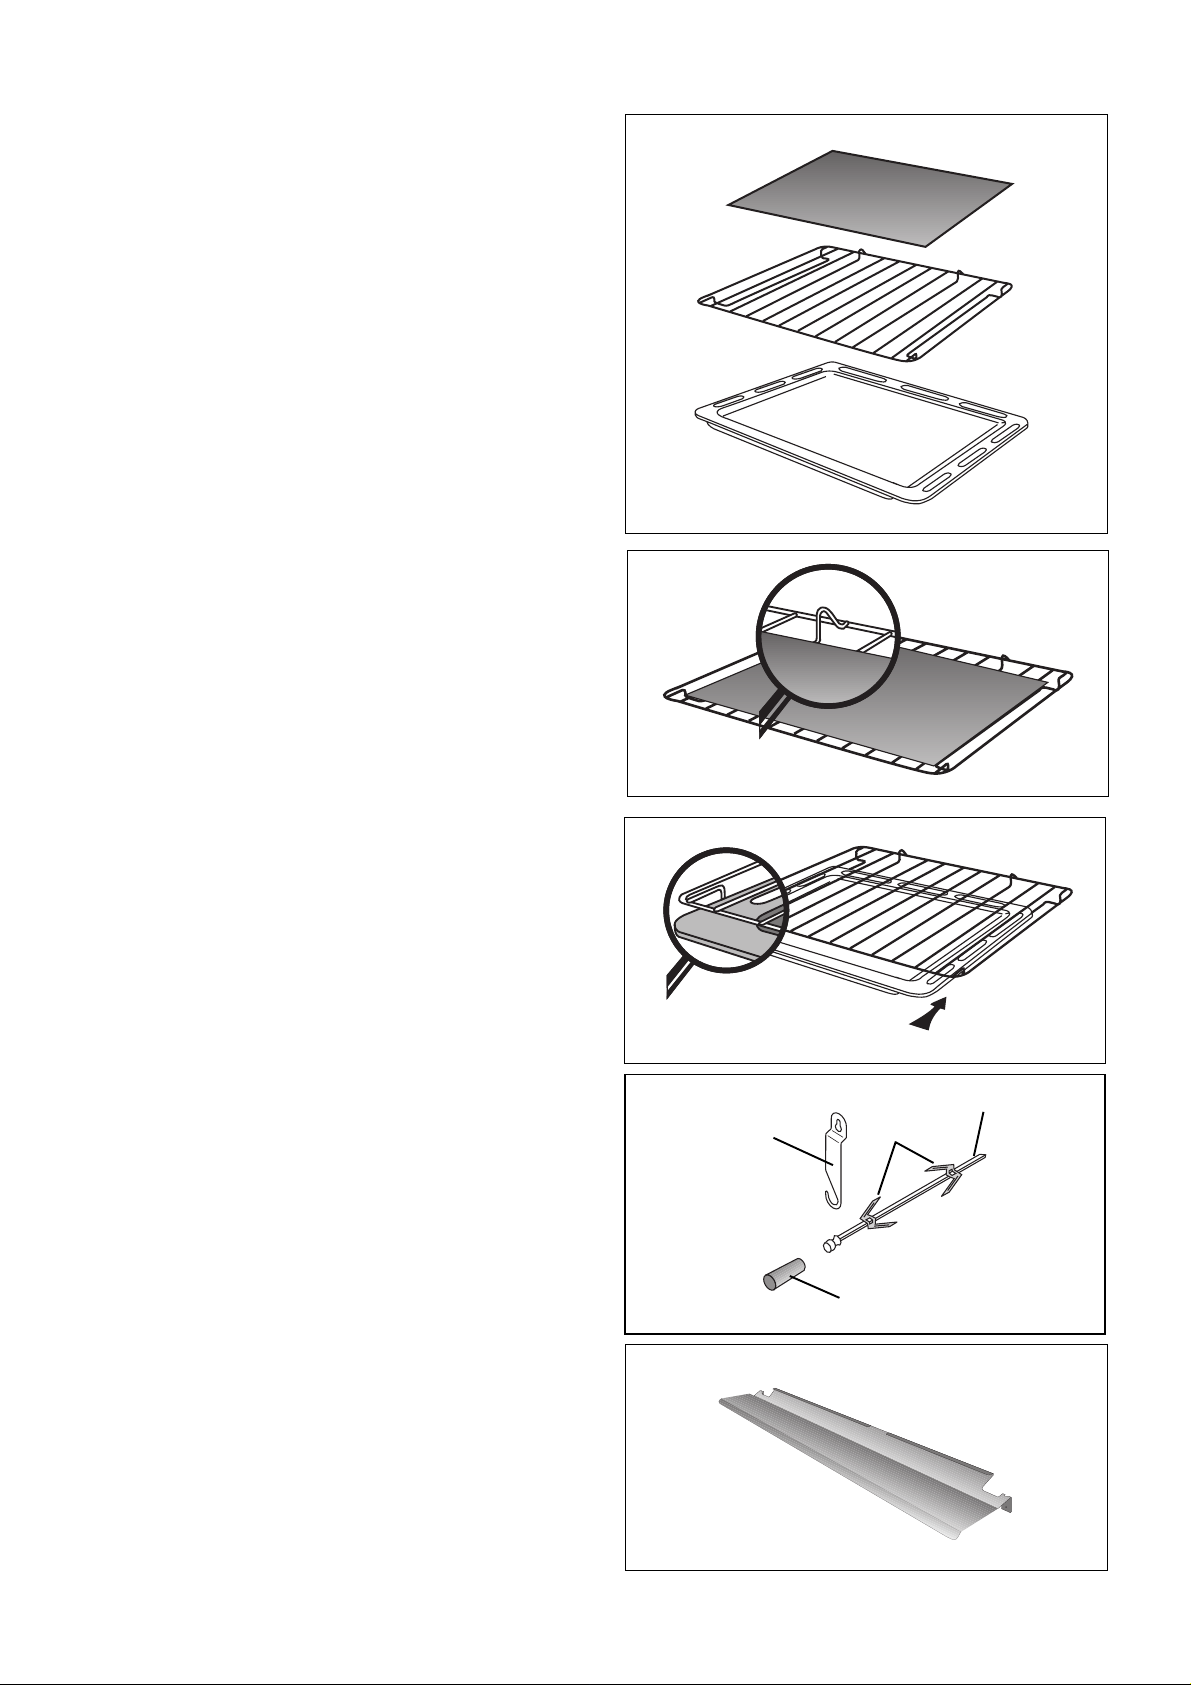
3.9 Oven Accessories
Your oven is equipped with the following:
1 Pastry Tray
1 Plate Support Grill
1 Drip Tray
1 Spit
The pastry laid either on the Pastry Tray, or on the Plate
Support Grill should not weigh any more than 7 to 8
kilograms.
The Pastry Tray
This is used for cooking or reheating Pizzas, small
individual pastries, laid directly on the Tray.
The Tray should be laid directly on the Tray Support Grid.
Special Oven Grid : Slide the Tray Support Grid into
the support slides, positioning the Pastry Tray stops
against the end of the oven (please, see the
illustration).
The Plate Support Grill
This is intended to support dishes (roasts, baked dishes,
pastry dishes or cake ffns, etc.) as well as grilled foods.
When you cook food directly on the grill, slide the drip tray
into the level 1 rails (the holes pointing towards the back
of the oven to allow air to circulate).
Special Oven Grid : slid the drip tray into the the rails
located under the Tray Support Grid (please see the
illustration).
The Drip Tray
This is used to collect the juices from grills.
It has not been designed to be used as a cooking dish.
When you are not using the Drip Tray, please ensure that
it is removed from the oven.
The Rotating Spit
This is composed of:
1 Spit
1 Removable Spit Handle
2 Spit Forks
1 Spit Support
Spit support
Spit
Forks
Removable spit
handle
Protective Screen
This is used while cooking with the grill. It protects the
Control Knobs from the heat given off.
84
4. GUIDE IN USE
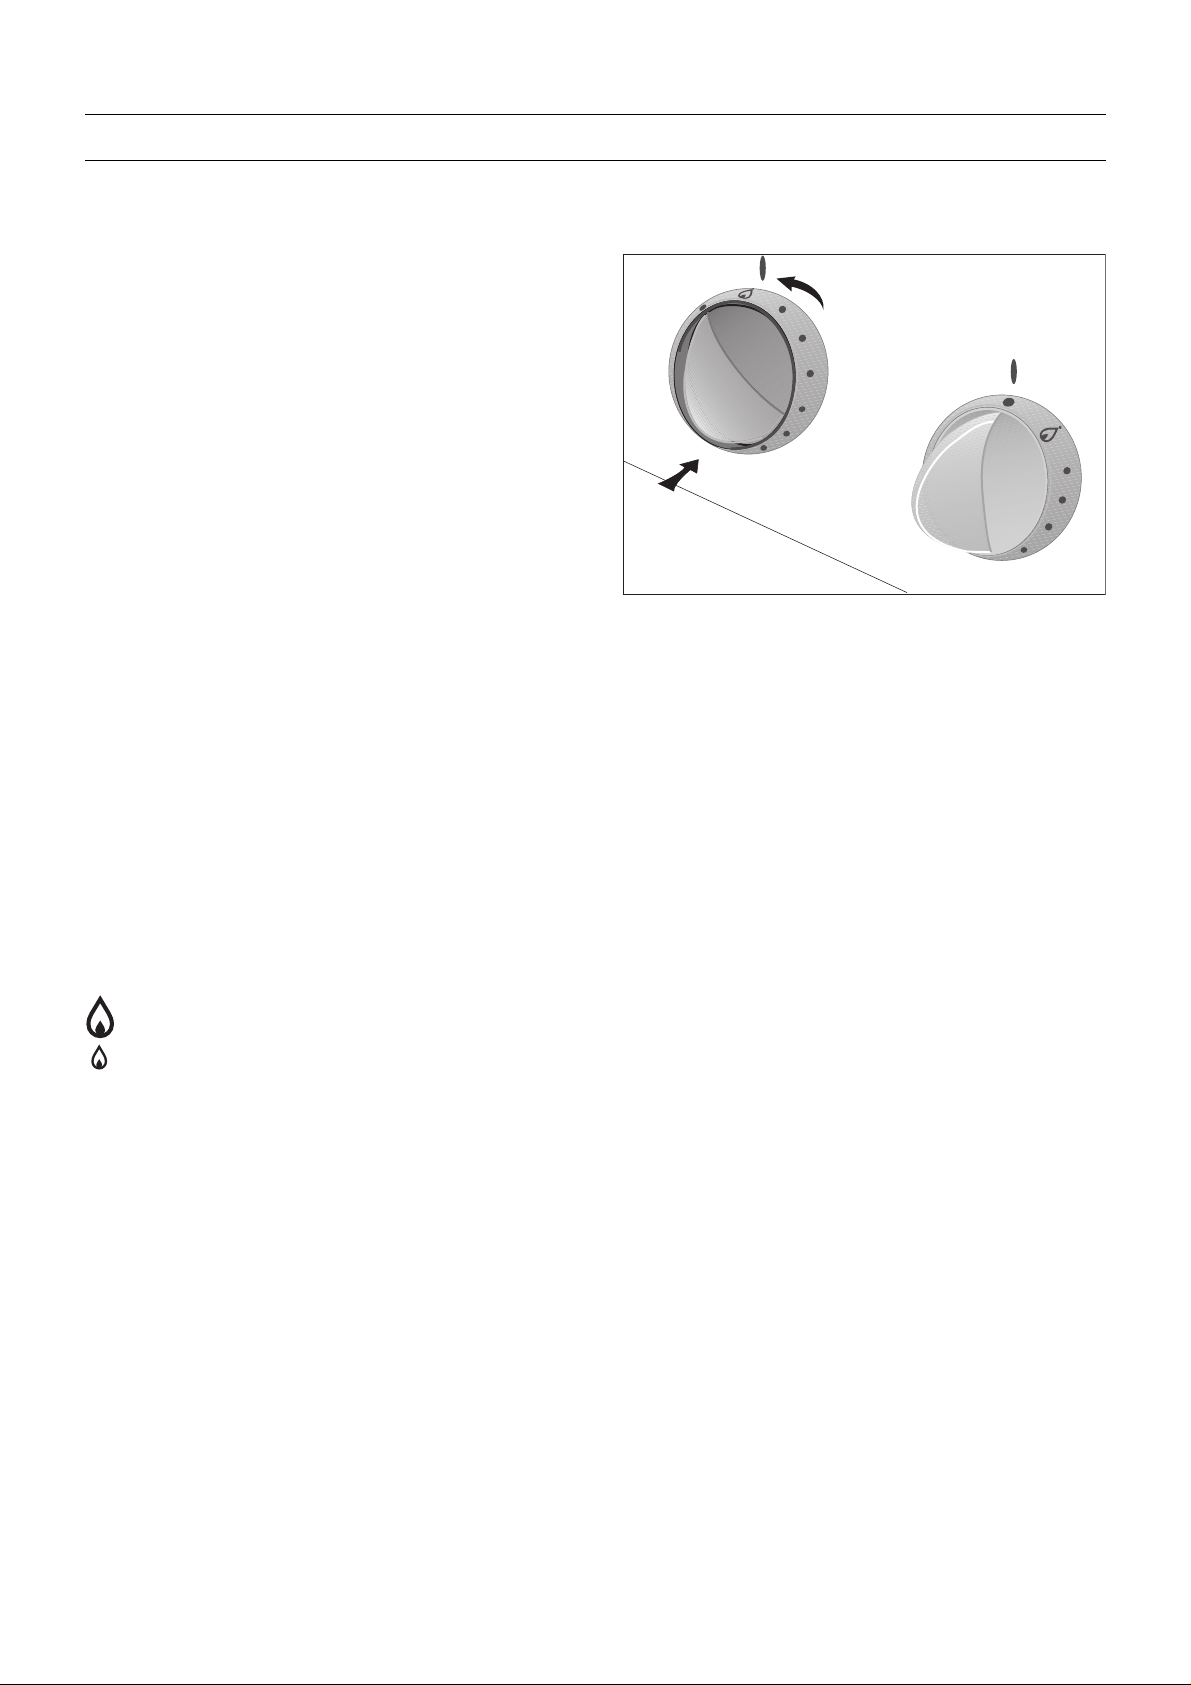
4.1 Lighting the Hob Burners
To light the Burners:
● Push the selected Control Knob inwards and turn it
anti-clockwise to its maximum setting keeping the
Control Knob pressed in.
● At the same time, press the electronic ignition button
so as to obtain sparks. K eep the button pressed until
a flame appears (sparks are produced approximately
once per second).
● Only for Mod. EK 6127 : Once a flame has
appeared, hold the Control Knob pressed in for
around 10 seconds so as to activate the Oven Saf ety
Device (Thermocouple).
When lighting the burners manually: Hold a flame
near the hob burner. Never turn the Control Knob
before approaching the burner with the flame.
To extinguish the burners:
● Turn the Control Knob clockwise to the stop, at the
OFF position.
The Main Settings Used:
•
Minimum setting
OFF position
Maximum setting
85
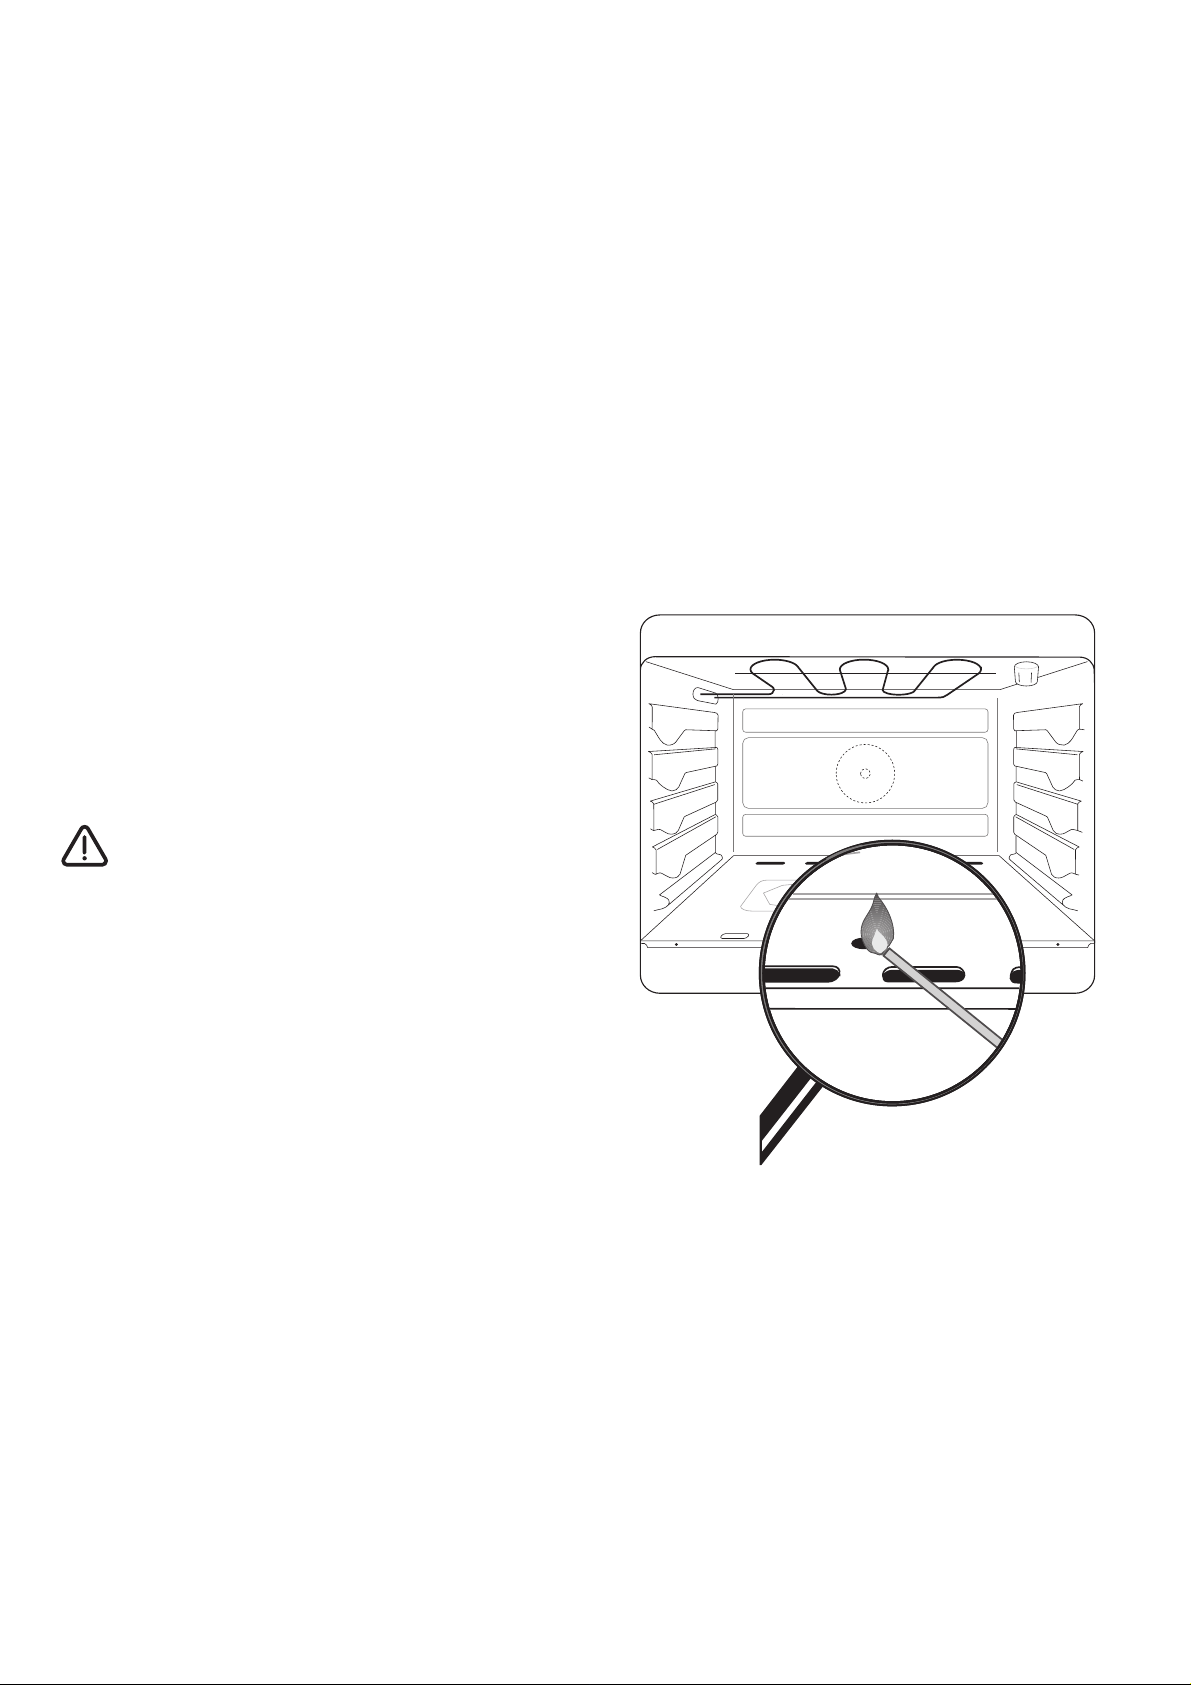
4.2 Lighting the Oven Burners
● Push the Oven/Grill Control Knob inwards and turn
it anti-clockwise to its maximum setting keeping the
Control Knob pressed in.
● At the same time, press the electronic ignition button
so as to obtain sparks. Keep the button pressed until
a flame appears (sparks are produced approximately
once per second).
● Once a flame has appeared, hold the Control Knob
pressed in for around 10 seconds so as to activate
the Oven Safety Device (Thermocouple).
● Should the bumer extinguish, repeat the operation,
maintaining the Control Knob pressed for 15
seconds, maximum.
● Check that there is a flame via the inspection orifice
at the front of the sole plate.
● Now adjust the Control Knob to the setting desired.
When lighting the oven manually: Hold a flame near
the oven ignition orifice, as shown in the illustration.
Never turn the Control Knob before approaching the
burner with the flame.
IMPORTANT:
Should the oven burner be accidentally
extinguished, turn the Control Knob to the OFF
position. Then wait 1 or 2 minutes before again
attempting to ignite it.
86
 Loading...