

Page 1
cooker
INSTRUCTION BOOK
821 03 88-01/1
EK 5147
Page 2

Contents
Contents
Safety ............................................................ 3
The Cooker ................................................ 4
Unpacking .......................................... 4
The accessories ................................. 4
The safety equipment ............................... 5
Non-tip device ................................... 5
The hob guard (optional accessory) 5
The door catch .................................. 6
Before the first use ................................... 6
Cleaning the cooker .......................... 6
Wash the accessories ....................... 6
Setting the clock ................................ 7
Heat the hotplates ............................ 7
Heat the oven empty ....................... 7
The control panel ...................................... 8
The indicator light bulbs ................... 8
The hob ....................................................... 9
Using the hob ....................................9
Cleaning the hotplates ....................11
The oven ...................................................12
The functions of the oven .............. 12
Buttons for the clock .......................13
The timer .........................................13
Oven time ........................................14
End time ..........................................14
Oven time and end time ................ 15
Practical use ..................................... 15
Cleaning and maintenance ............19
Installation ................................................. 21
To adjust the plinth height .............21
Levelling the cooker ........................21
Electrical connection .......................22
Service ....................................................... 23
Technical data .......................................... 24
Practical tips and advice .........................25
Problems and actions needed ..............26
At the end of the cooker’s life .............26
2
Page 3

Safety
Safety
Cooker technology is constantly improving. The way you use your new cooker may be different from the way
you used your old one. Please read the whole instruction book before using your new cooker. This cooker is
intended for normal domestic use. Take care of the instruction book which will be needed by the new owner if the
cooker is sold or passed on to someone else. Do not hesitate to contact us with questions or viewpoints about the
cooker and its use.
ANY TEXT MARKED WITH A warning triangle is to do with safety. PLEASE READ THESE TEXTS CAREFULLY, so that you
do not harm yourself, others or the cooker.
Children and the cooker
Children are naturally curious and interested in most
things, including the cooker. From a safety point of
view, we would like to emphasis the following for
those with children at home:
There should be worktops on both sides of the
cooker extending at least 40 cm to left and to right.
Alternatively the cooker can be installed with a wall or
a tall kitchen unit on one side and a worktop on the
other side. The
vent the cooker from tipping forwards if subjected to
an abnormal loading.
The
HOB GUARD (included or optional) should be
fitted and the
activated.
Children should be allowed to help with cooking,
but teach them that pans, hotplates and ovens become
hot and retain their heat for some time after use.
TOUCHING THESE CAN CAUSE BURNS.
NON-TIP DEVICE should be fitted to pre-
DOOR CATCH/DOOR CATCHES should be
Installation
Work on the cooker must be carried out by a qualified
electrician. Work performed by unqualified persons
can damage the cooker, and may also lead to personal
injury and/or damage to property.
The cooker is heavy. Certain edges and corners
which will not normally be exposed may be sharp. Use
gloves when moving the cooker.
The
NON-TIP DEVICE should be fitted, to prevent the
cooker from tipping if subjected to an abnormal
loading.
When using the cooker
Never leave the cooker unattended while deep frying,
or when using it for melting fats, paraffin wax or other
flammable substances. In the event of a fire, turn off
all the controls and turn off the cooker hood fan.
SMOTHER THE FIRE WITH A PAN LID, never use water.
On the hob, use only pans which are intended for
use on hotplates. Use only ovenproof dishes and containers in the oven.
Check that the cooker is switched off when not in
use. All controls should be turned off.
Cleaning
Keep the ceramic hob and oven clean. Fat and spillages give off smoke and odours when heated, and, at
worst, can cause fires.
Maintenance and service
Turn all controls off before changing any bulbs.
Service and repairs should be carried out by a
service company approved by the supplier. Use only
spare parts supplied by such companies.
At the end of the cooker’s life
Help prevent accidents when the cooker has reached
the end of its useful life. Make sure first that the lead is
completely disconnected from the electrical supply
(pull out the plug, or have the cooker safely disconnected from the wall), then cut the electrical lead at the
point where it enters the cooker. Make sure that the
door catch/door catches have been deactivated.
3
Page 4
The Cooker
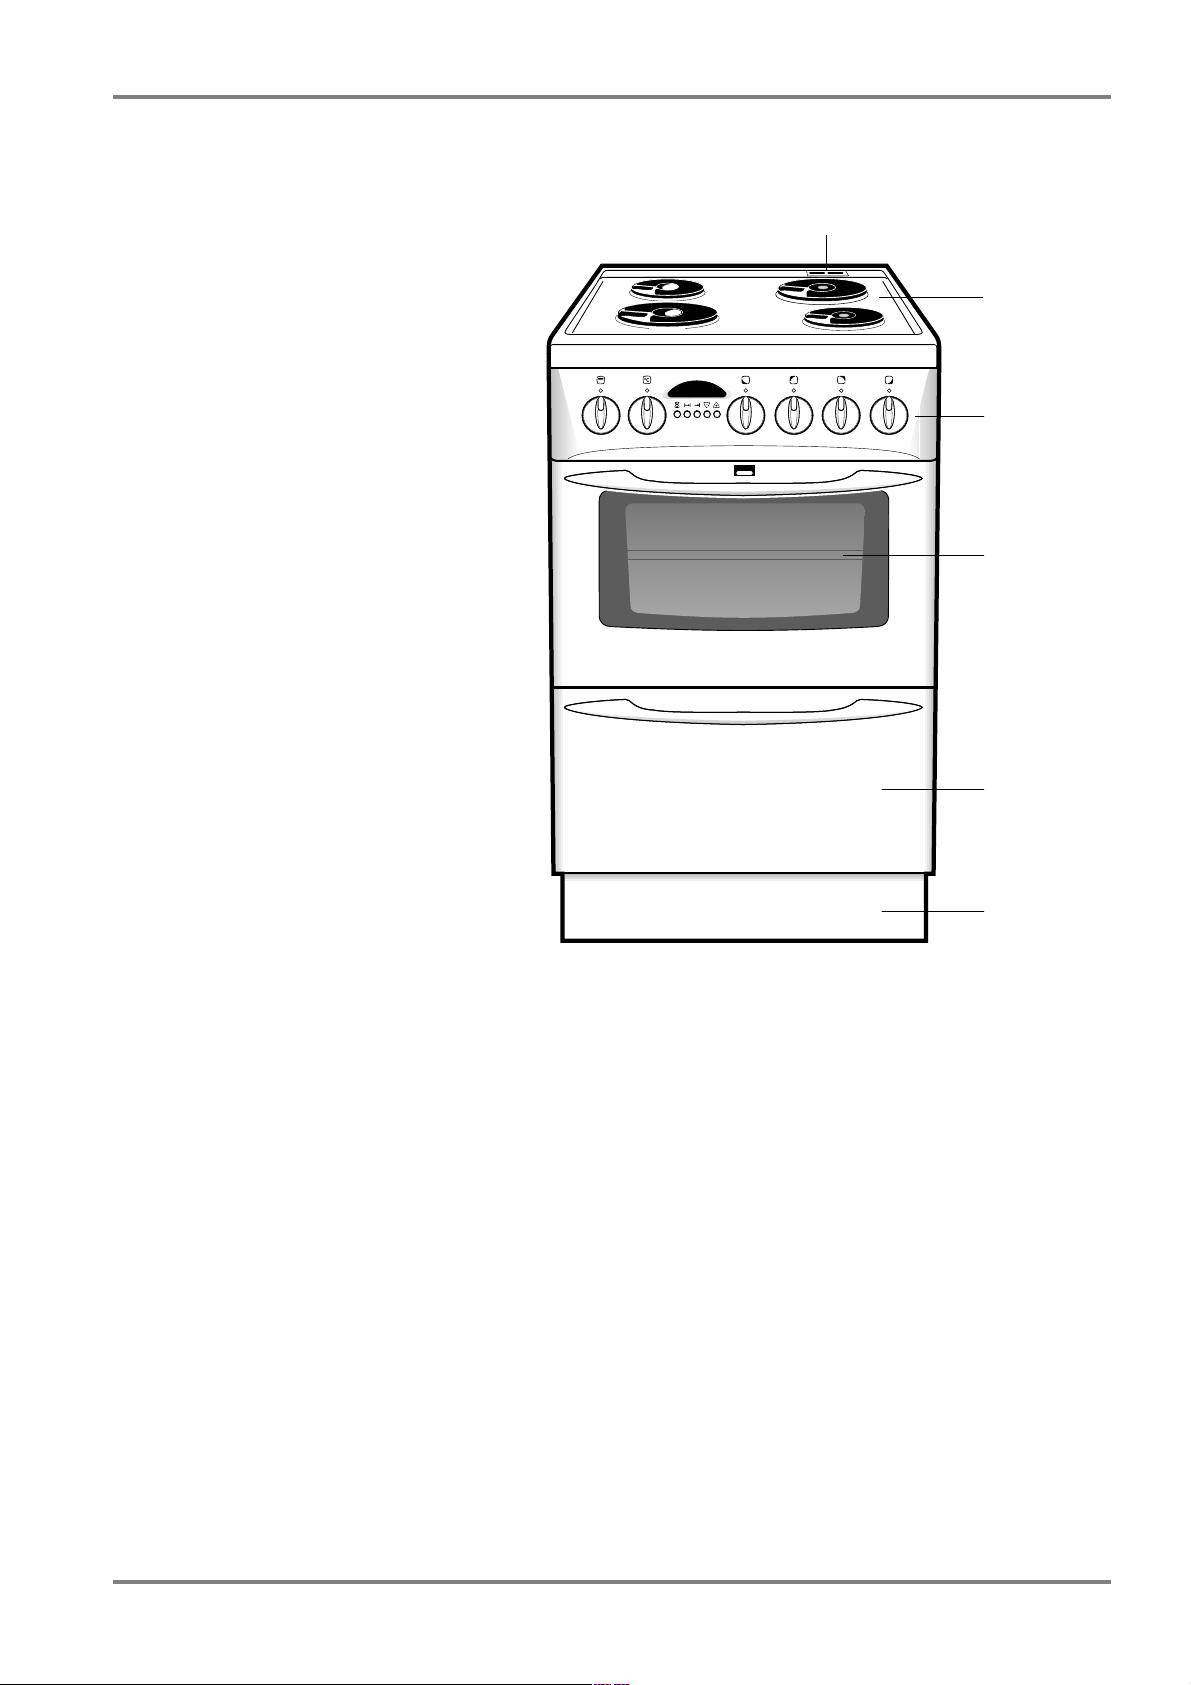
The Cooker
1 Removable oven vent
2 Hob with HOTPLATES
3 Control panel with controls,
buttons and an information
window
4 Oven
5 Storage drawer
6 Plinth
To make it easier to clean behind
the cooker, it has wheels at the rear.
To move the cooker forwards, open
the oven door, lift carefully holding
the upper edge and then pull the
cooker out from the wall.
1
2
3
4
5
Unpacking
Check that the cooker is undamaged and in perfect
condition. Any damage occurred during transportation
should be reported to the retailer immediately.
The packaging materials can be recycled. Contact
your local council to find out where to take them.
6
The accessories
THE FOLLOWING ACCESSORIES ARE SUPPLIED WITH THE
COOKER:
• Enamelled baking trays and oven dish
• Oven shelf
• Non-tip device, including fittings
• Roasting sensor
• Instruction book
THE FOLLOWING MAY BE PURCHASED AS OPTIONAL
ACCESSORIES:
• Hob guard, including fittings
4
Page 5

The safety equipment
The safety equipment
There should be at least 40 cm of worktops on both sides
of the cooker
(SEE PICTURE). Alternatively the cooker can be
installed with a wall or a tall kitchen unit on one side and
a worktop on the other.
Child safety is further improved if the following
equipment is fitted/in use:
Non-tip device
The non-tip device should be fitted, to prevent the
cooker from tipping if subjected to an abnormal
loading. The non-tip device can only provide protection when the cooker is pushed into its normal
position.
Before fitting the non-tip device, make sure the cooker has
been levelled and adjusted to the correct plinth height (see
“Installation” on p. 21).
1 Draw a line on the wall – after levelling the
cooker – along the top edge of the hob (see illustration).
2 The measurements shown can be applied
whether the non-tip device is fitted on the left or
the right (see illustration). Measure and mark
where the non-tip device is to be placed, then
screw it onto a solid material or a suitable reinforcement or fixings.
NOTE! If the space between kitchen units is wider than
the cooker, you will need to alter the measurements
shown in the illustration if the cooker is to be centred.
3 If you alter the measurements, remember to
align the cooker correctly when pushing it into
place, so that the non-tip device enters the hole
on the cooker rear.
min. 40 cm
min. 40 cm
35-65 mm
55-60 mm
The hob guard (optional accessory)
The hob guard should be fitted to make it harder
for children to reach pans on the hob.
1 Press the plugs into the front holes.
2 Place the guard on the cooker with the plugs over the
edge of the hob.
3 Angle the guard downwards and then back upwards
so the edges on its two sides engage under the edge
of the hob.
4 Lock it in place with the rear plugs.
2
1
3
5
4
5
Page 6

The safety equipment
The door catch
The door catch makes it harder for children to open the
oven door/storage drawer. The catches are already
activated when the cooker is supplied new, but can be
deactivated if necessary.
TO DEACTIVATE THE DOOR CATCH, DO AS FOLLOWS:
A To open the door, lift the lever at the same time as
pulling the door towards you.
B When you want to deactivate the catch, open the
door (make sure the oven is not hot).
1 Press down the catch on the inner top edge of the
door at the same time as you
2 press down the lever on the front of the door and
3 push it inwards.
C To activate the door catch, pull the lever on the front
of the door outwards.
A
1
B
C
2
3
Before the first use
Cleaning the cooker
Clean the cooker with a clean cloth, hot water and a
little washing-up liquid straight after use.
ABRASIVE CLEANERS OR SCOURING AGENTS, except on some
parts of the cooker that might occasionally need
cleaning more thoroughly. Don’t forget to clean
underneath the oven vent cover. This can be washed
in a dishwasher.
Remember that the non-tip device does not work
when the cooker has been pulled forward to clean
behind it.
Wash the accessories
Wash the baking tray, oven dish etc. in hot water and
washing-up liquid. Rinse and dry.
NEVER USE
6
Page 7

Setting the clock
Once the cooker is connected to the power supply,
some symbols will start flashing until you have set the
time on the clock.
HOW TO SET THE CLOCK:
1 The symbol A and 0:00 will be flashing in the
information window.
2 Press the and , buttons at the same time,
release the button first, then the button,
and set the right time using or . The time
is set in minutes. The
disappears.
A symbol in the window
Heat the hotplates
When supplied, the hotplates have been pretreated
with an anti-corrosion product which will provide better protection if the hotplates are heated without pans
the first time.
Heat one hotplate at a time on full power for no
more than five minutes. The hotplates will get very
hot, so be extra mindful of the safety of anyone near
the cooker during this procedure. Some smoke and
fumes are to be expected as the remaining solvent
evaporates. Finish heating the hotplates before you
first heat the oven.
The safety equipment
A
max. 5 min.
Heat the oven empty
Children should be supervised!
The cooker will get very hot.
Before you use the oven for the first time, you need to
heat it empty. Follow these instructions:
1 Select (top/bottom heat) and maximum tem-
perature. The oven door should be shut.
2 Ventilate the room. Switch off the oven once the
“new” smell and fumes have ceased.
3 Use hot water and washing-up liquid to wipe the
oven, side racks and the inside of the door. Then
wipe all of these parts dry.
max.°C
7
Page 8
The safety equipment
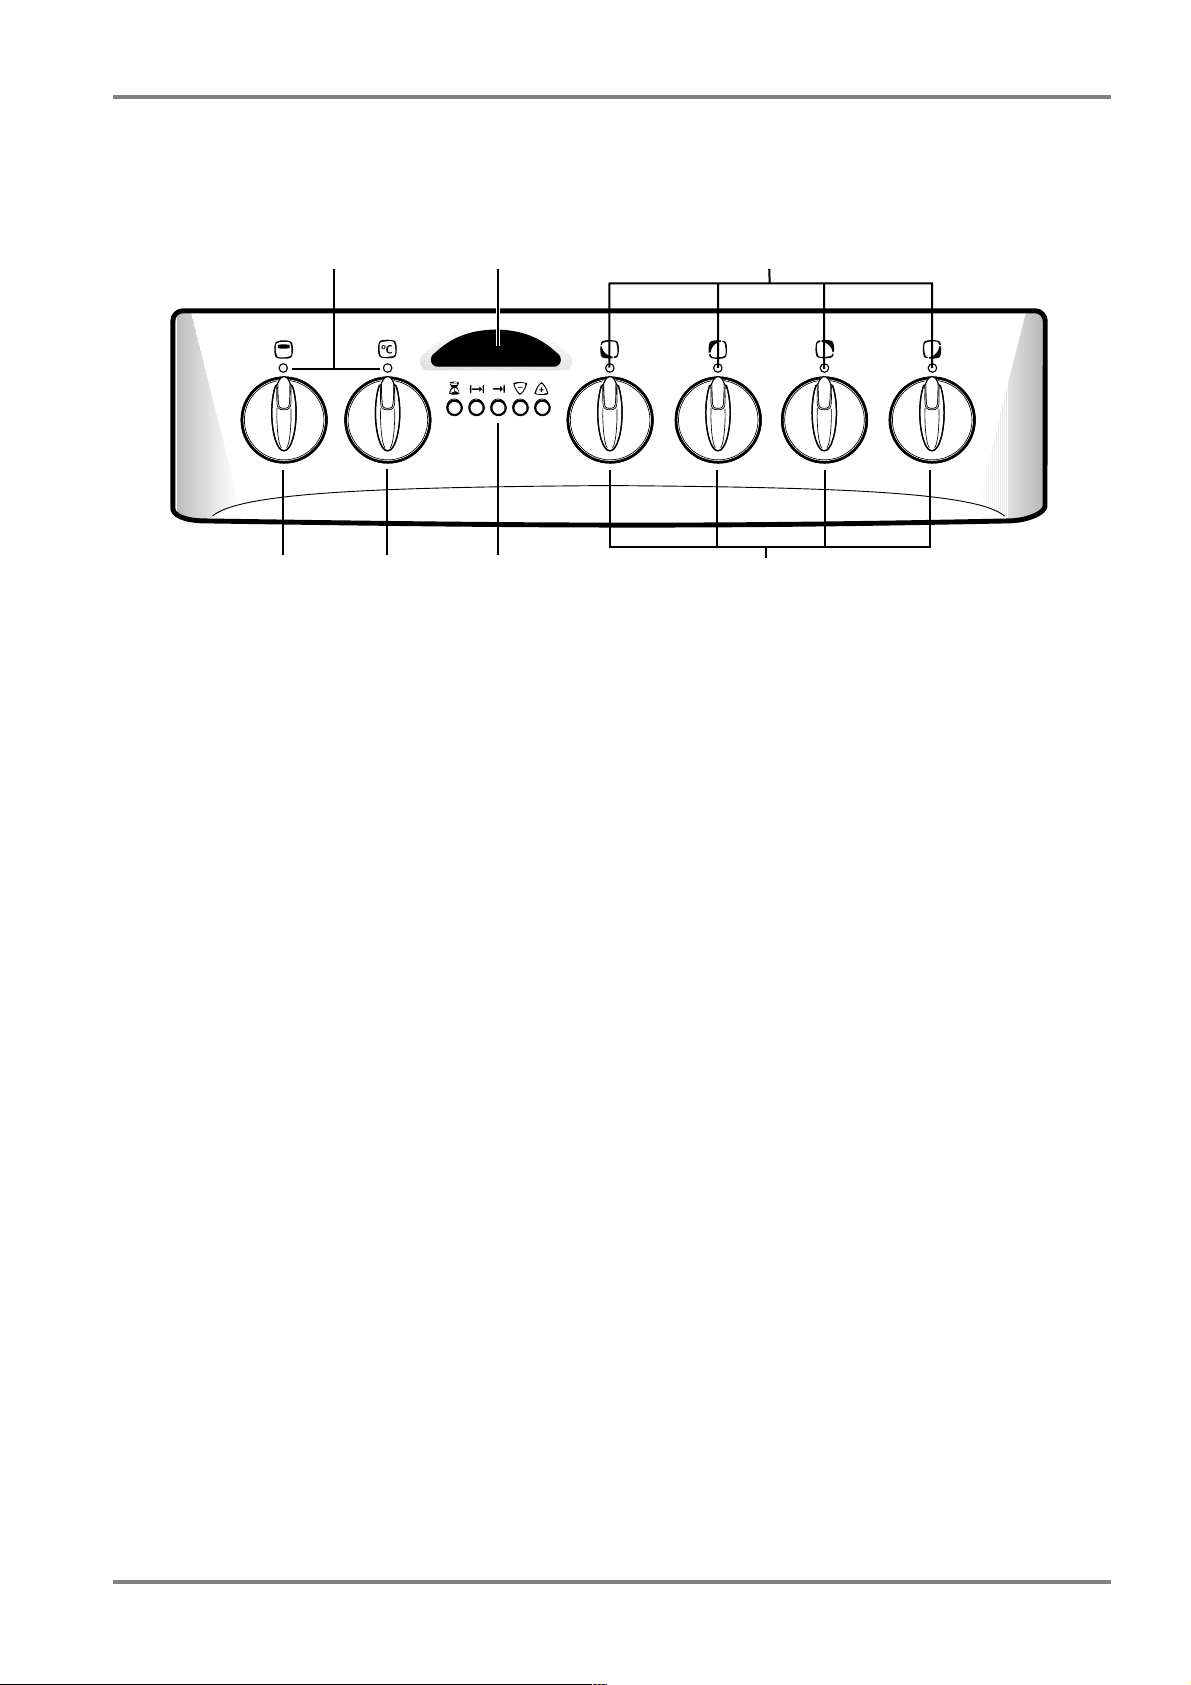
The control panel
1b 5a
1a HOB indicator lights
1b OVEN indicator lights
2 OVEN function control
3 OVEN temperature control
4 HOTPLATE controls
5a Information window
5b Buttons for THE CLOCK
1a
5b23 4
The indicator light bulbs
These are neon indicator lights, which normally have
a long service life. If one should fail, contact your
service centre.
8
Page 9
The hob
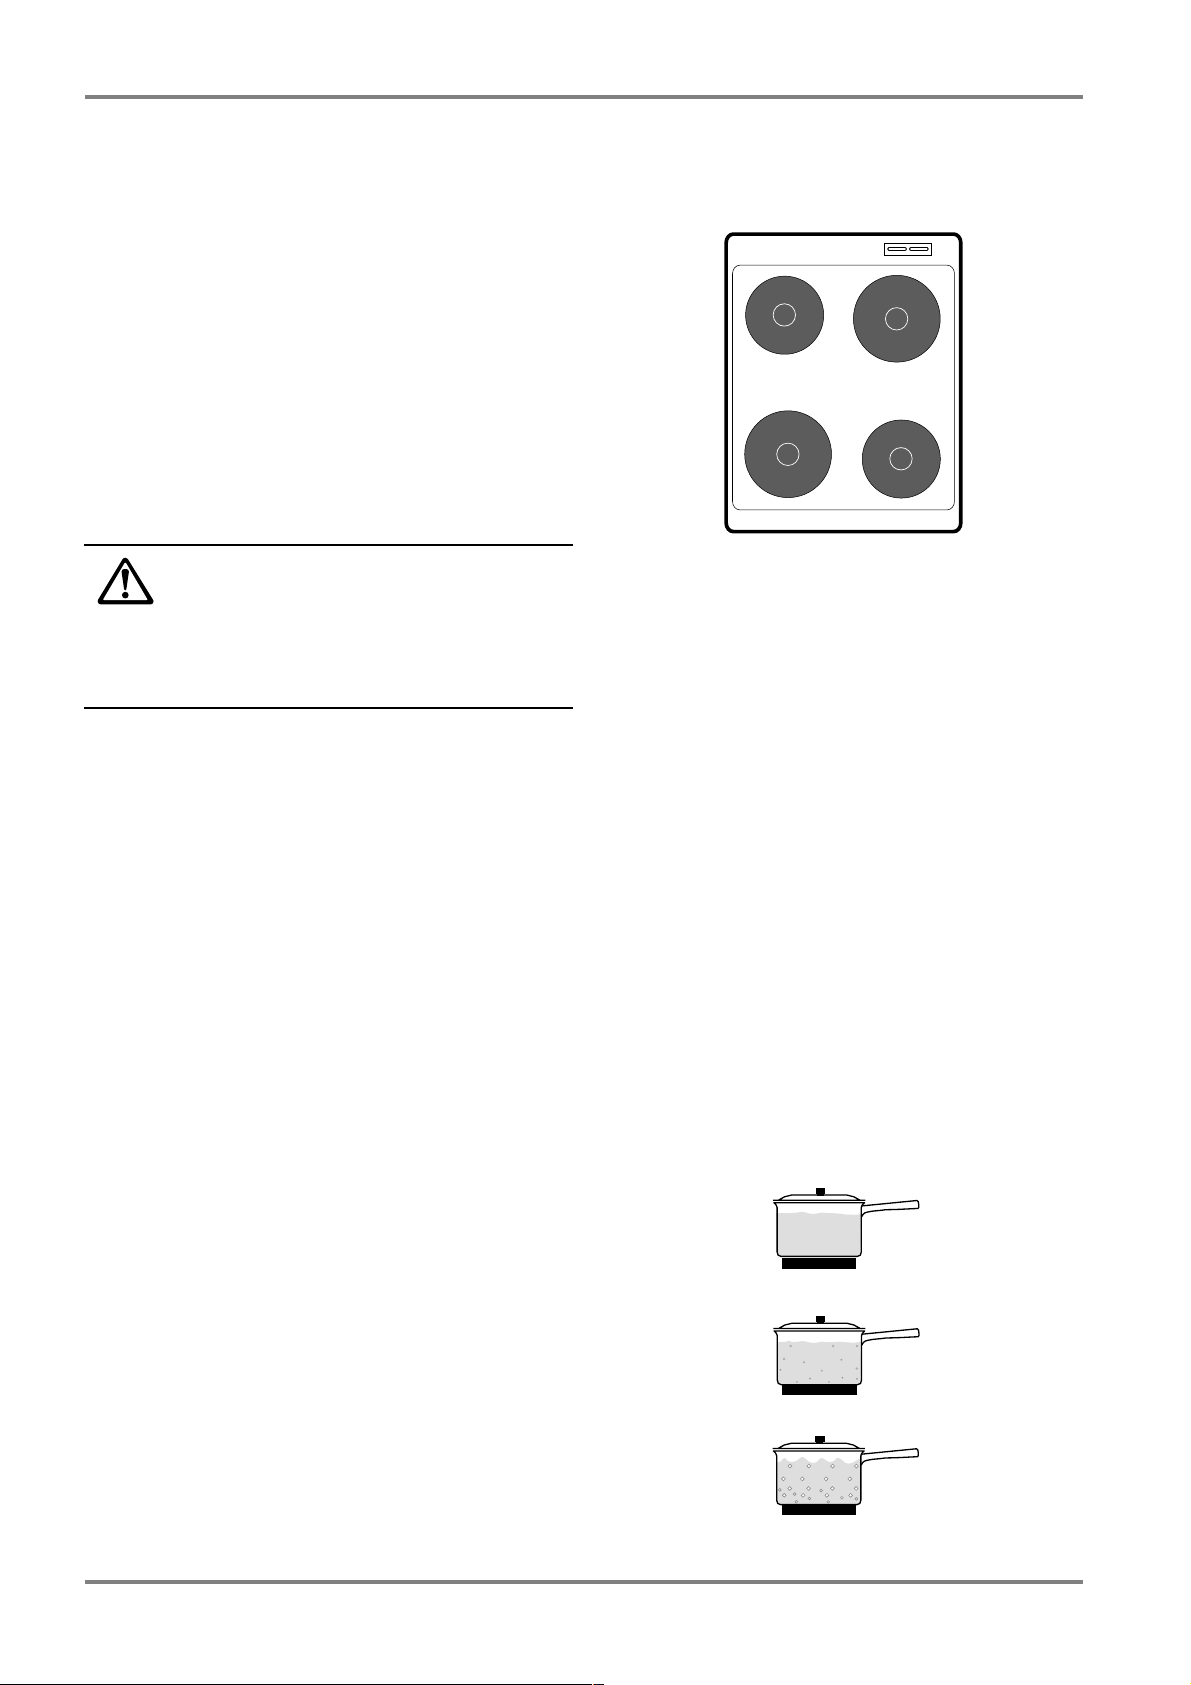
The cooker has four hotplates. Fast-heating hotplates are
marked with a red dot and have an overheating cut-out
function.
The hob
Using the hob
Never leave the cooker unattended while deep
frying, or when using it for melting fats, paraffin
wax or other flammable substances. In the event
of a fire, turn off all the controls and turn off the
cooker hood fan.
LID, never use water.
The front left hotplate and the back right hotplate are
graduated from 0 to 12. The front right and back left
hotplates have fixed settings, 0-6 (6 is the hottest).
They can all be turned both clockwise and anticlockwise.
The control setting you choose will depend on your
pans, what you are cooking and the quantity. You will
soon learn to select the correct control setting. When a
hotplate is switched on, the cooker’s red indicator light
comes on.
SMOTHER THE FIRE WITH A PAN
ø 145 mm
ø 180 mm
ø 180 mm
ø 145 mm
Boiling
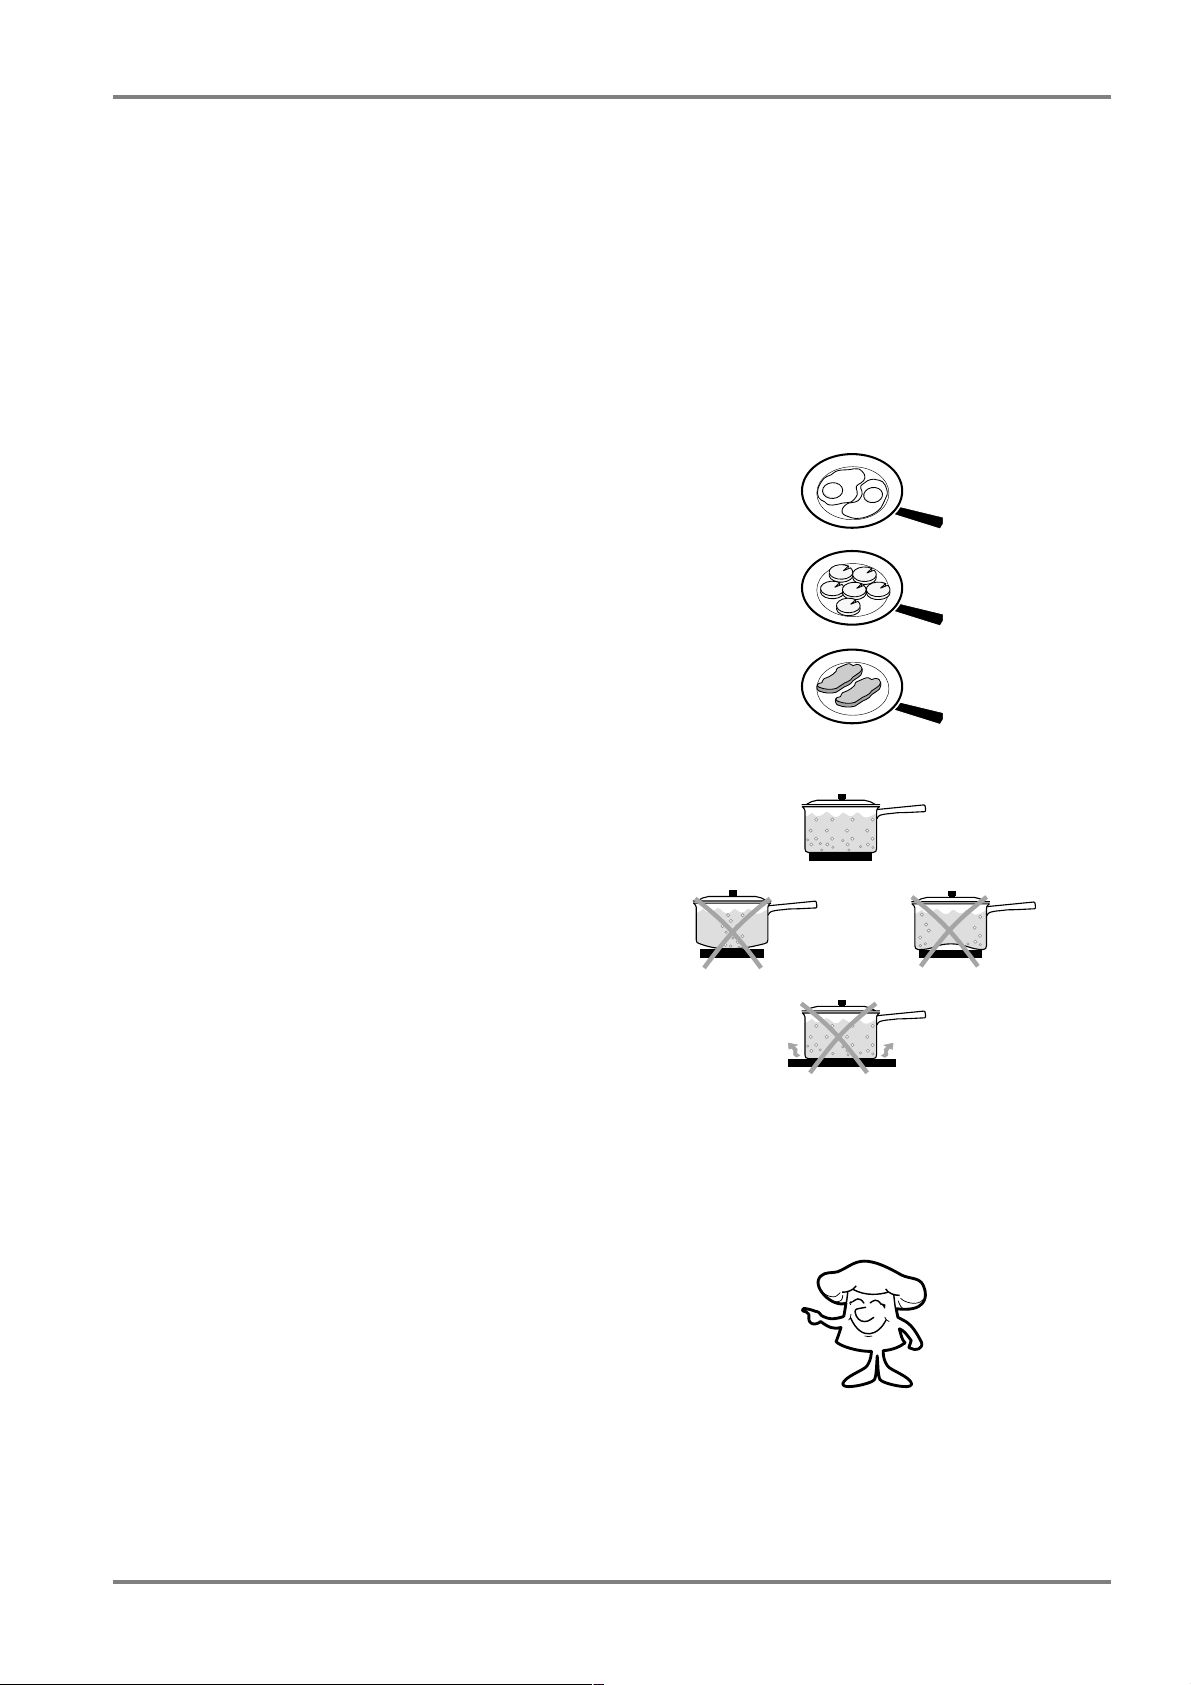
You normally start cooking with the hotplate switched
to maximum heat before turning it down to a lower
heat. The sound and size of the water bubbles can help
you to choose the correct setting:
GENTLE HEAT: Simmering with tiny bubbles as in carbonated
water. Suitable for cooking rice, fish and vegetables such as
sugar peas and broccoli.
MEDIUM HEAT: Gently boiling with larger bubbles.
Suitable for boiling most foods, such as meat,
root vegetables and potatoes.
HOT: The sound disappears before the water starts
bubbling vigorously. Suitable for boiling water for
pasta and rice. Then turn the heat down for more
gentle cooking.
9
Page 10
The hob
Frying
It is best when frying not to use food that has come
straight out of the refrigerator. Only about 2/3 of the
bottom of the pan should be covered by food.
Put the margarine or butter in the frying pan and
turn on to the recommended heat. In order to get the
best results, it is important that the fat is the right
colour (temperature) when you start frying. Hold a
light-coloured spatula to the bottom of the pan to see
the colour of the fat.
LIGHTLY BROWNED FAT: Suitable for eggs, onions, raw
potatoes, chops and steaks and whole fish, etc.
BROWNED FAT: Suitable for frying most foods such as
pancakes, minced meats, sausages, thin fish fillets and
stewing steak.
WELL BROWNED FAT: Suitable for thin steaks. Be careful
as the fat can easily become burnt.
Choosing suitable pans
To help you save both time and energy, the bases of
saucepans and frying pans should:
• be at least as large as the hotplate. If the base is
smaller than the hotplate, any spillages are quite
likely to burn onto the hob.
• be flat. It takes longer to heat a pan with a base
which curves in or outwards too much.
When you are buying new pans, it is advisable to
choose stainless steel ones with sandwich-type bases
(i.e. layers of different metals).
Save energy!
• Putting a lid on pans cuts the amount of energy
used by half (compared to cooking without lids).
• Using pans with flat bases saves 25% energy
(compared to uneven based pans).
• Make sure the hob is clean and dry. Dirt and
moisture reduce heat transfer between pans and
hotplates.
• Turn the hotplates off and finish cooking using
the remaining heat.
• Save energy by steaming and pressure-cooking.
10
Page 11
Cleaning the hotplates
Remove spillages as soon as possible, to prevent them
from burning onto the hotplate. Soilage impairs the
transfer of heat to the pan.
Cleaning and anti-corrosion treatment
1 Clean the hotplates thoroughly with soapimpreg-
nated steel-wool. Wash off all traces of soap, and
dry using paper towels.
2 When the hotplates are cold and dry, apply an even
layer of the anti-corrosion product to each. This
product is available from Electrolux dealers.
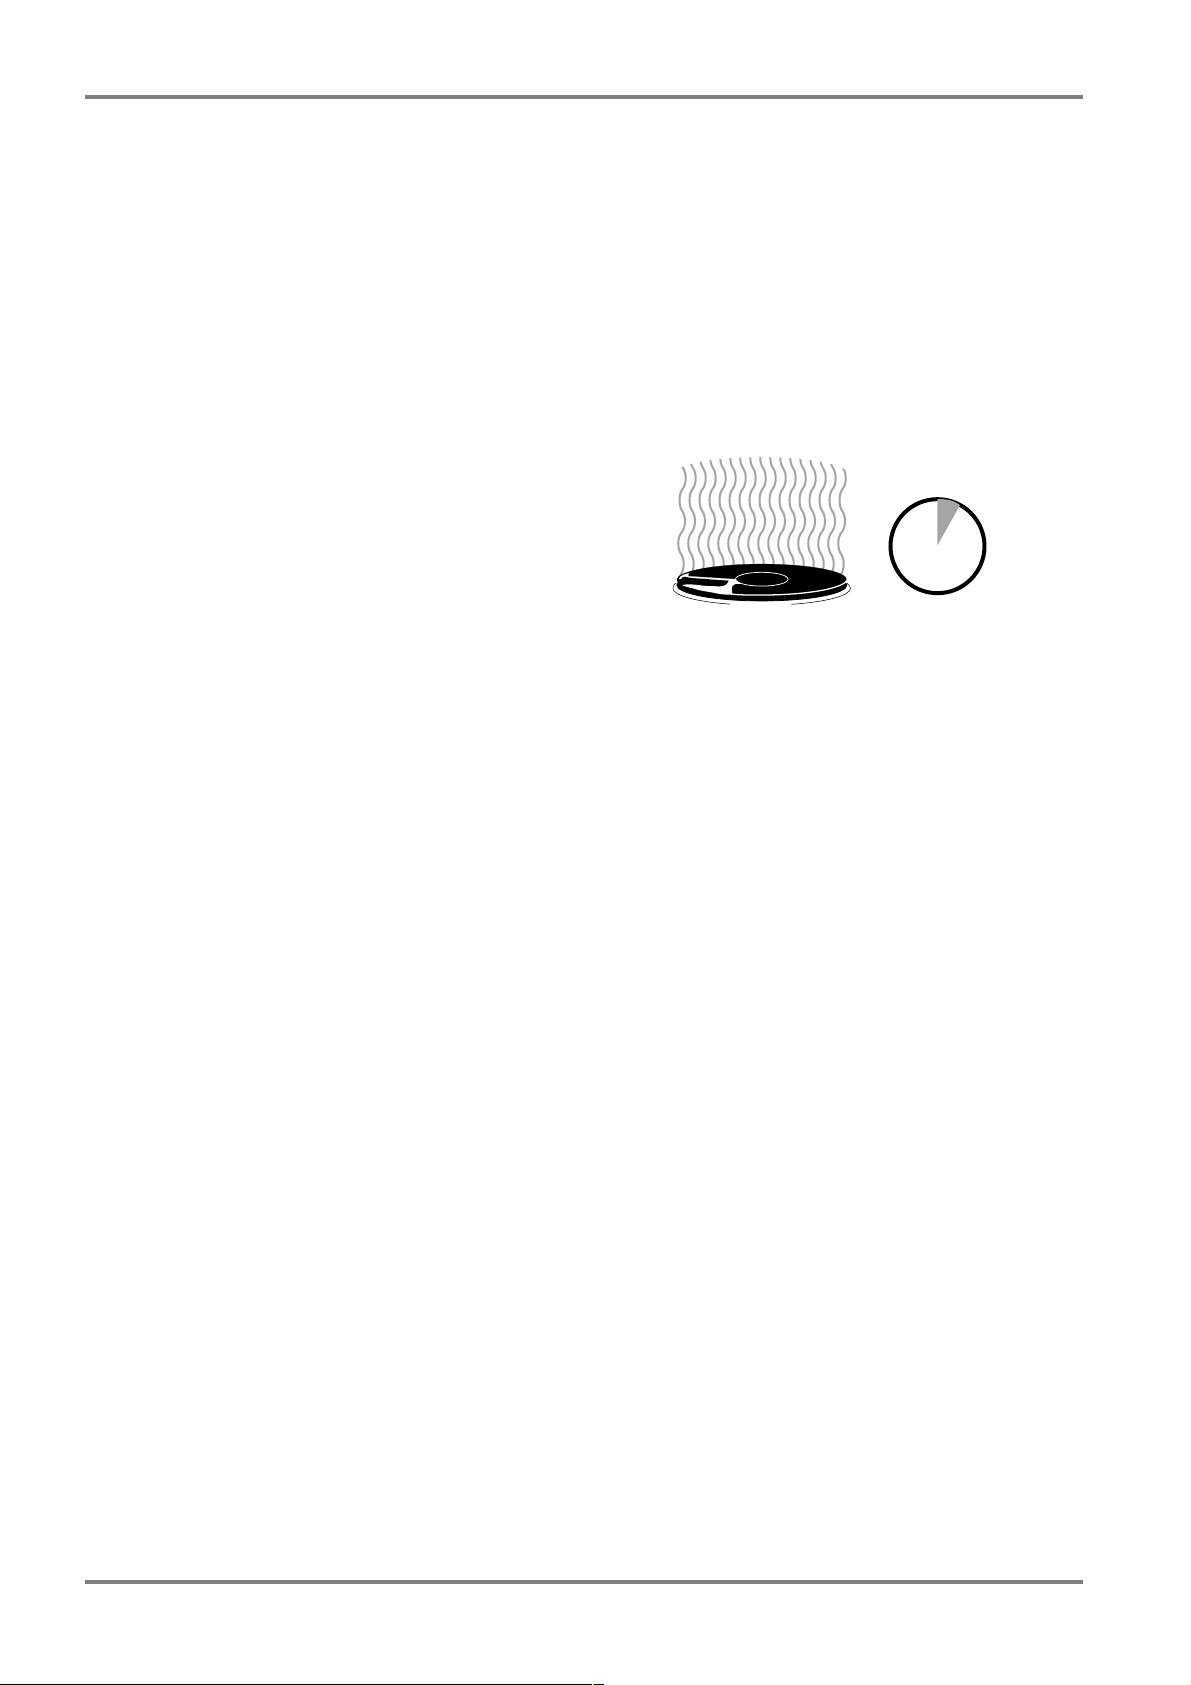
3 The product now needs to be heated on the hot-
plates. Heat one hotplate at a time on full power for
no more than five minutes. Some smoke and fumes
are to be expected as the remaining solvent evaporates.
4 Use white spirit to remove any traces of the product
on your hands or (after the cooker has cooled) on
the cooker enamel.
The hob
max. 5 min.
11
Page 12
The oven
The oven
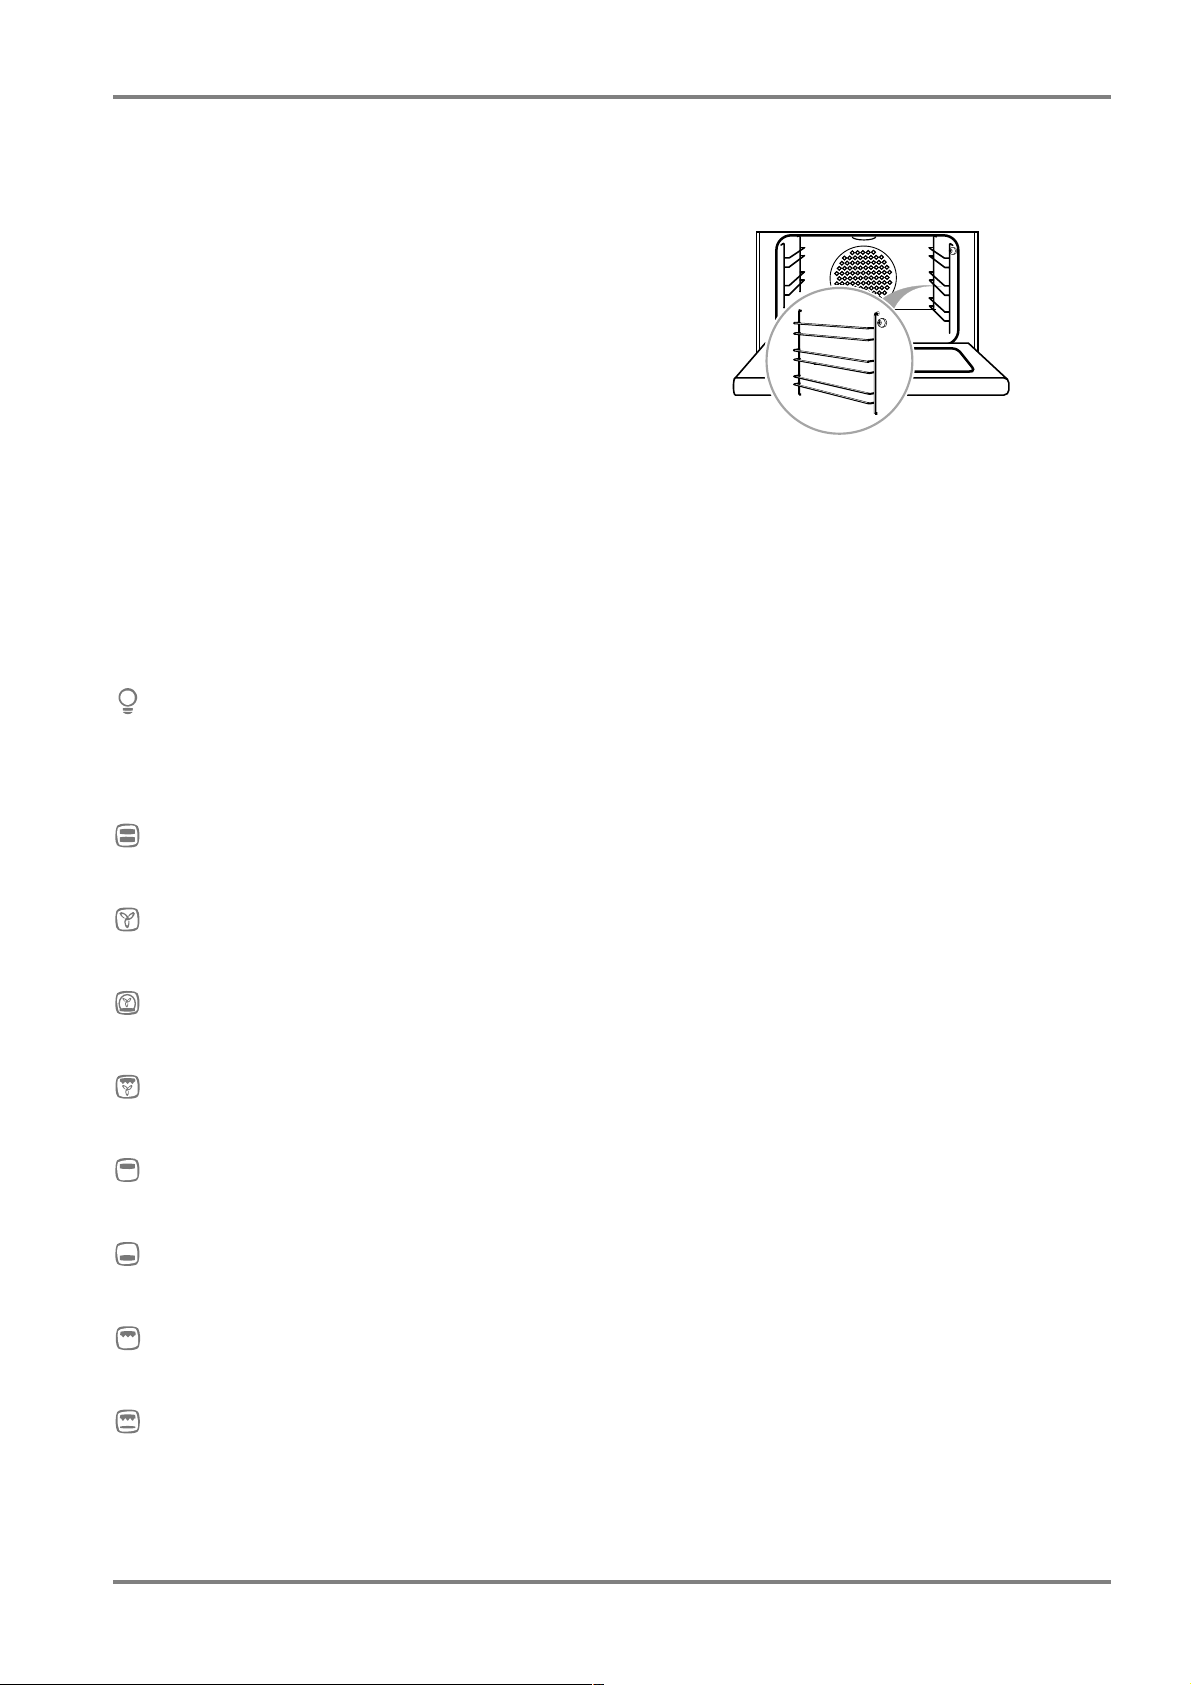
The oven has removable side racks for the shelves (1)
with three rungs on each side.
The roasting sensor socket is on the right-hand inside
of the oven (2) and the fan with ring element is on the
back wall of the oven (3).
The functions of the oven
For all oven functions, the indicator light comes on
when the oven is heating and goes out when the set
temperature is reached (goes on and off as the thermostat switches in and out). To choose an oven function,
turn the function control clockwise to the symbol for
the desired function (see below).
THE OVEN FUNCTIONS ARE:
Oven light
The oven light comes on automatically for all settings.
You can also have just the light on without any of the
other functions being turned on.
3
2
1
Top/bottom heat
Using both top and bottom elements.
Fan-assisted oven
Using fan plus an element around the fan.
Pizza/Quiche position
Using fan, ring and bottom element.
Tur bo gr i l l
Using the grill element and fan.
Top element
Using the element at the top of the oven.
Bottom element
Using the element at the bottom of the oven.
Grill
Using the grilling element.
Swift start (browning)
Using the grilling and bottom element. It takes approx.
seven minutes to heat the oven to 200ºC. Can also be
used for “au gratin” dishes.
12
Page 13
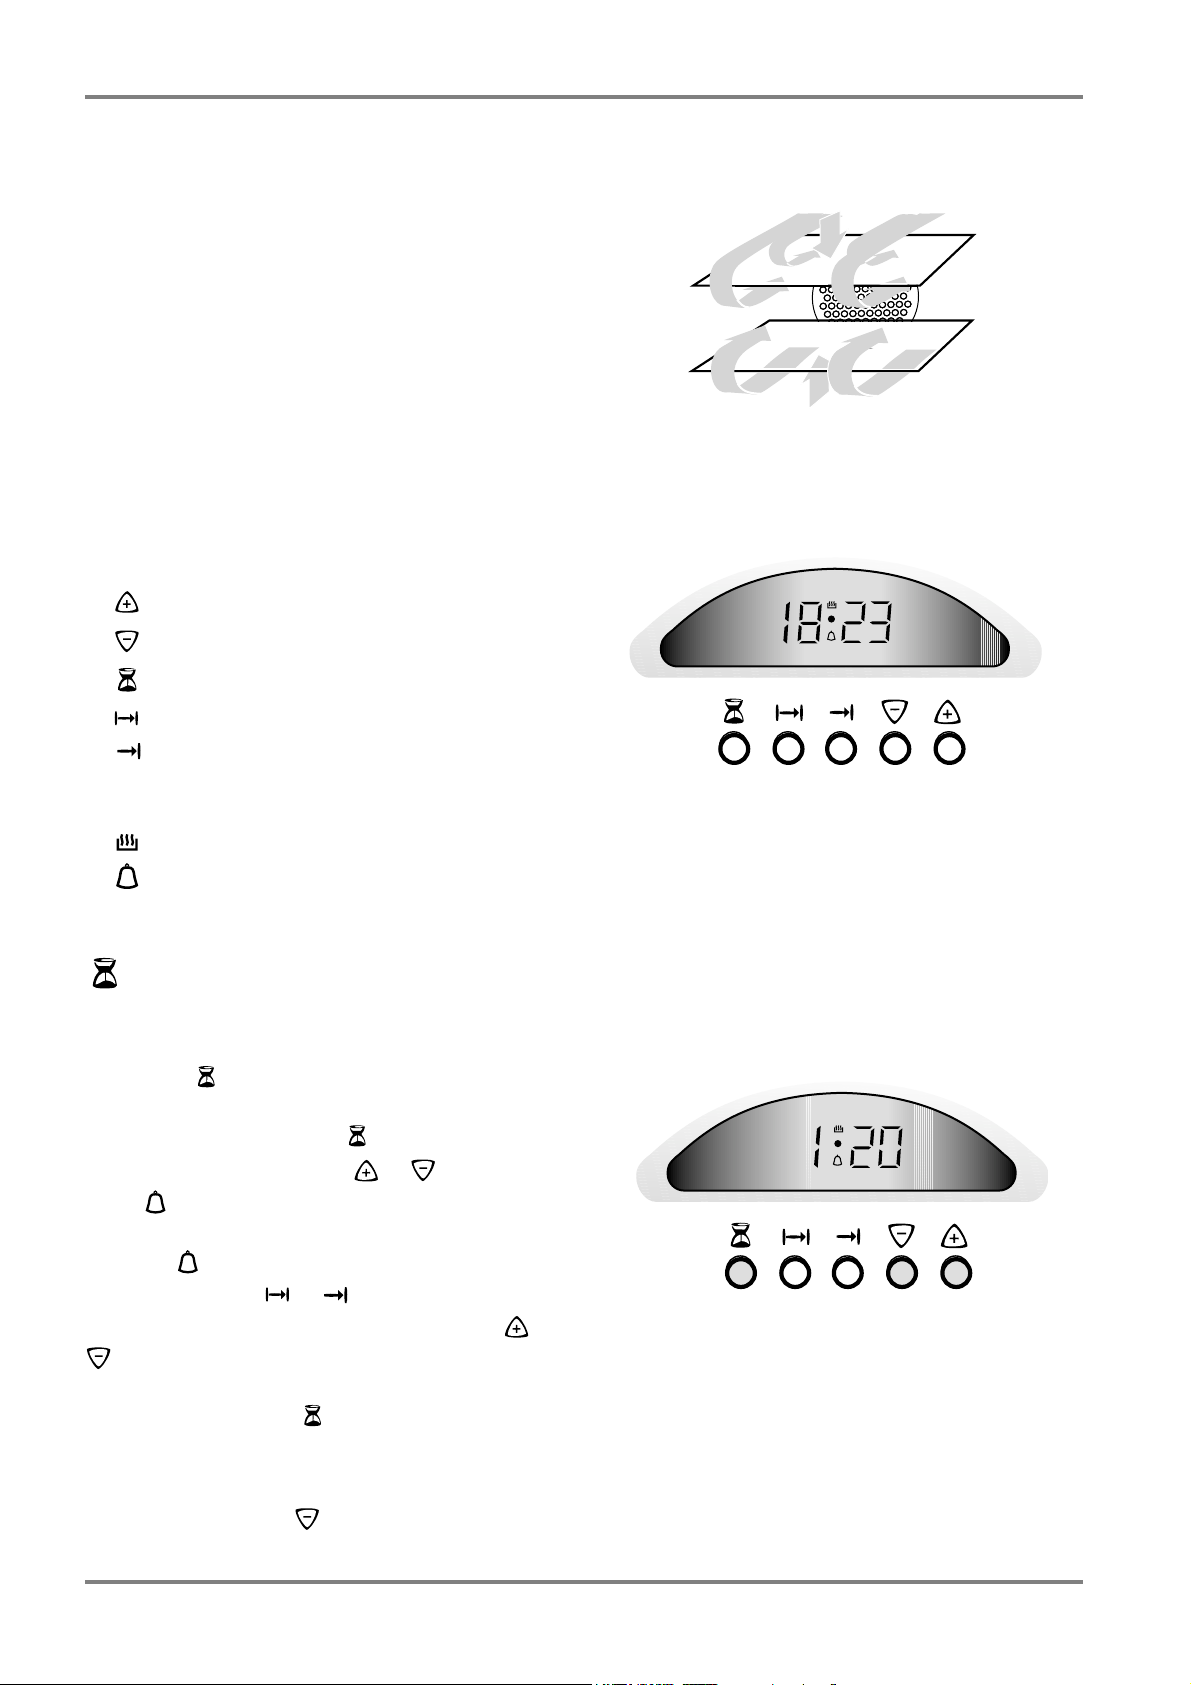
THE PRINCIPLE FOR FAN-ASSISTED OVEN
Top and bottom elements and a ring element around the
fan heat the air which then spreads through the air ducts
in the back wall of the oven. The hot air circulates in the
oven before being drawn back in through the fan grill.
The heat is transferred quickly and effectively, and
often means you can use a lower temperature than with
top/bottom heat. The temperature can be lowered by 1520% if the recipe specifies a temperature between 160ºC
and 225ºC. The higher the temperature, the more it can
be lowered. It is better to use top/bottom heat for temperatures over 225ºC.
Buttons for the clock
SYMBOLS FOR THE BUTTONS:
PLUS for time or temperature
MINUS for time and temperature
The oven
A
Timer
Oven time
End time
SYMBOLS IN THE INFORMATION WINDOW:
A Auto-symbol
Pan symbol
Timer symbol
The timer
The timer can be set for any time from 1 minute up to 23
hours and 59 minutes.
1 Press . The time 0:00 appears. If you do
not set the time within five seconds, it will go over
to ‘normal time’. Press again in that case.
2 Set the time by pressing or . The symbol
now appears in the window.
3 At the end of the set time, a buzzer is heard and
the symbol in the window disappears. Press
either button or to turn the buzzer off.
To change the set time or to reset the time, press or
. After about five seconds, the time setting for the
timer switches over to the clock. To see how much time
is left on the timer, press .
ALTERING THE TIMER SOUND
There are three different sounds/levels for the timer. To
change the sound, press until you find the one you
want to use.
13
Page 14
The oven
Oven time
Use this function to set the length of time you want the
food to be in the oven. The oven turns off after the set
time.
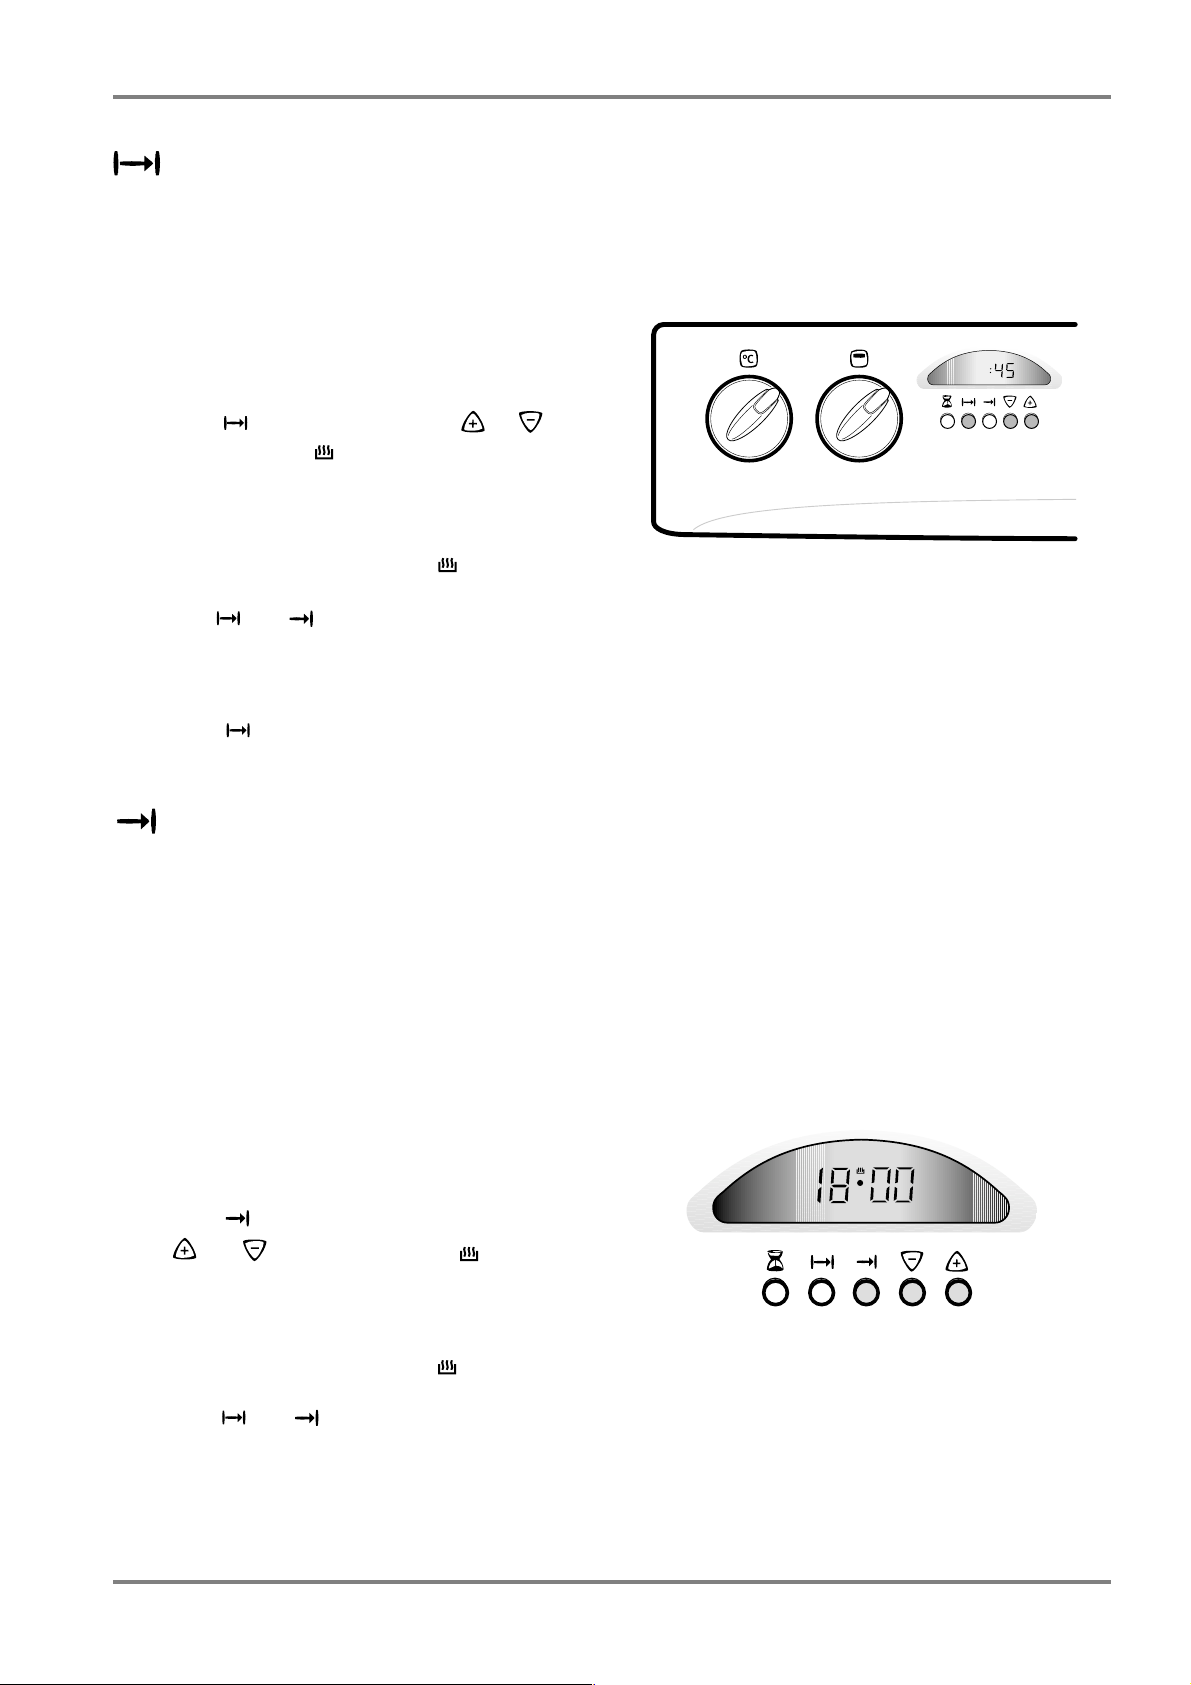
TO SET THE OVEN TIME:
1 Switch the oven on by turning the function
control and the thermostat control to the
required positions.
2 Press and set the time using or . The
symbols
tion window.
3 The oven comes on at once.
4 When the set oven time has been reached, the
symbol
sound is emitted. Press the buttons at the same
time and to turn off the sound.
5 RESET THE CONTROLS.
After about five seconds, the time setting for the oven
time switches over to the clock. To see how much time
is left, press .
A and now appear in the informa-
A flashes, the symbol goes out and a
A
End time
To set the end-time for when you want the oven to turn
off. This function is useful if you:
• have to leave the kitchen and do not wish to
spoil the cooking/baking.
• want to use the heat after turning off, thereby
saving energy.
Put the food in the oven and when you have set the end
time, switch on the oven.
TO SET THE END TIME:
1 Switch the oven on by turning the function
control and the thermostat control to the
required positions.
2 Press and set the required end time using
and . The symbols
in the information window.
3 The oven comes on at once.
4 When the set end time has been reached, the
symbol
A flashes, the symbol goes out and a
sound is emitted. Press the buttons at the same
time and to turn off the sound.
5 RESET THE CONTROLS.
E.G.: The time is 13.00. You want the food to be ready
at 13.45 (which is the set end time).
Cooking time is therefore 45 minutes.
A and now appear
A
14
Page 15
Oven time and end time
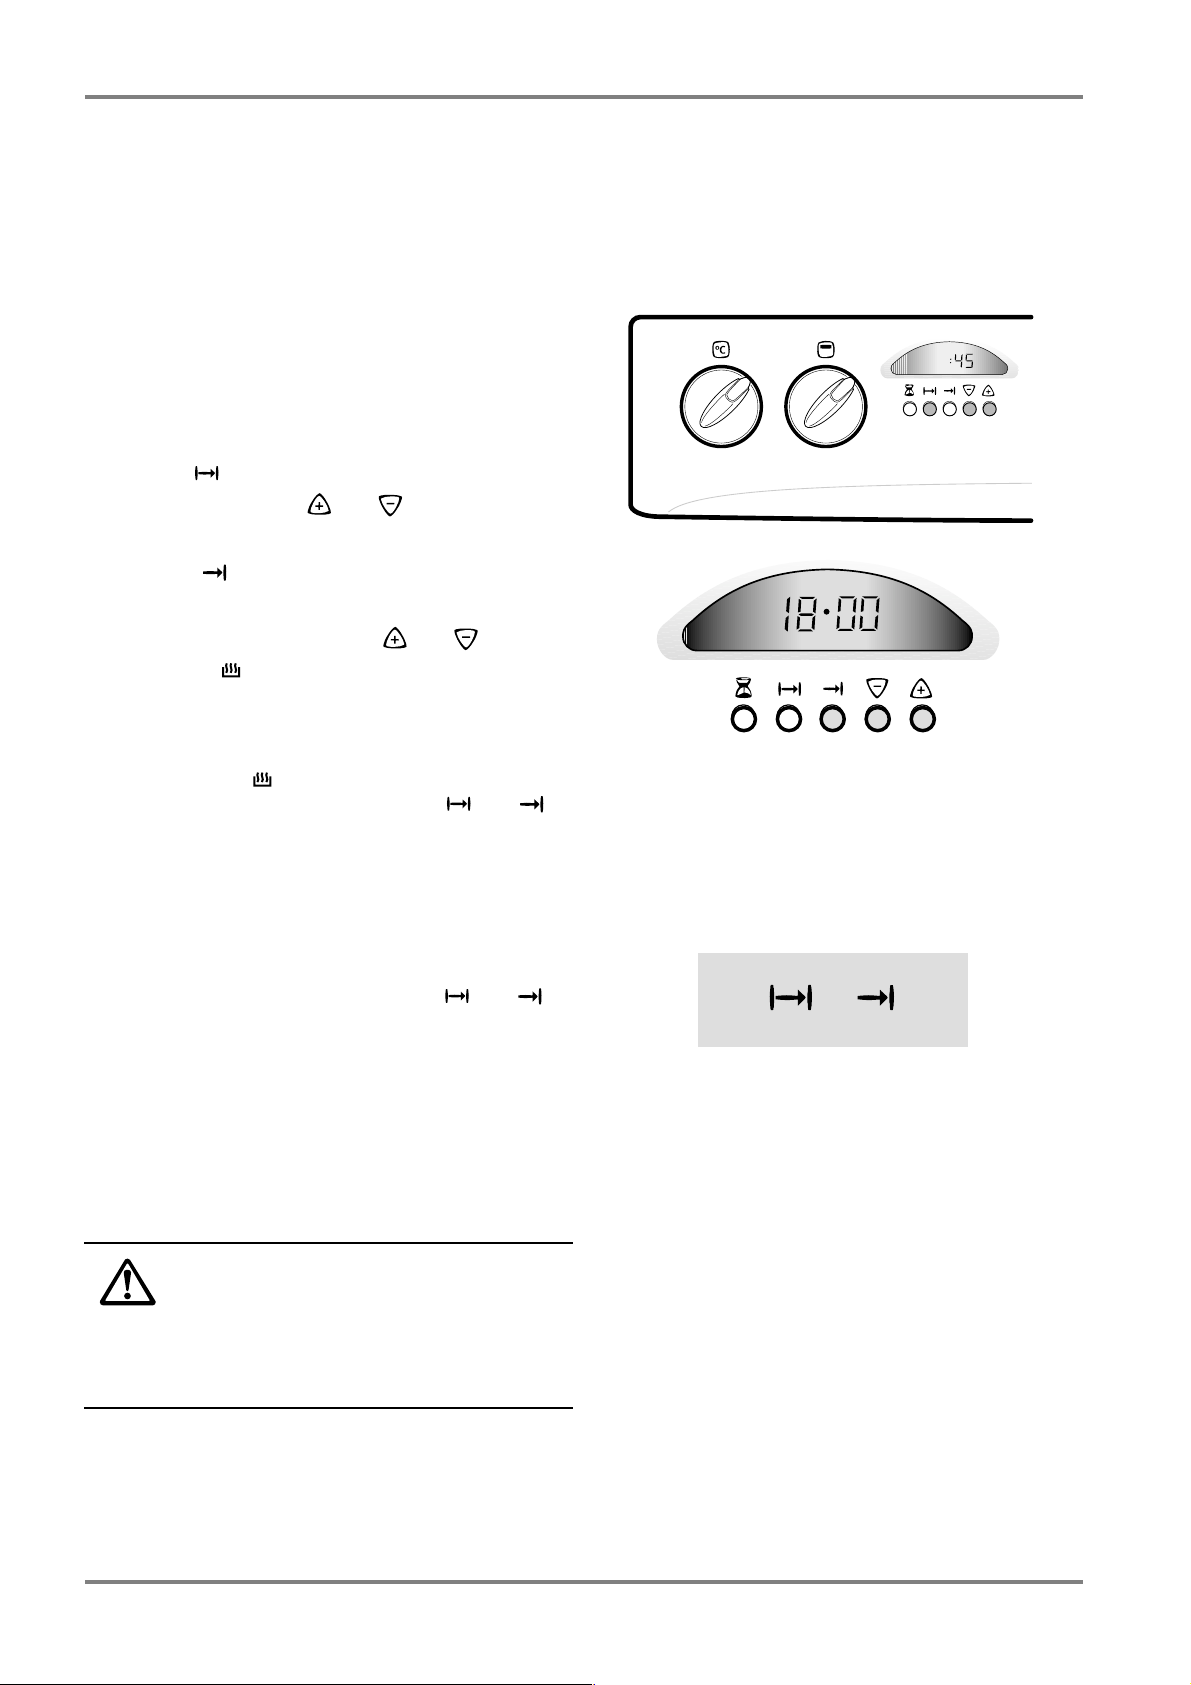
Would you like dinner to be ready when you get
home? Put the food in the oven and set the
plus the length of time the oven needs to be on, i.e. the
OVEN TIME. Maximum oven time is 10 hours.
TO DO THIS:
1 Place the food to be cooked into the oven and
switch the oven on by turning the function
control and the thermostat control to the
required positions.
2 Press and set the required cooking time (e.g.
45 minutes) using and . The symbol
appears in the information window.
3 Press to set the required end time.
The earliest end time appears in the window.
4 Choose the end time using and . The
symbol has now gone out and comes on
again when the oven starts.
5 At the end of the cooking time, the power sup-
ply to the oven cuts out. The symbol
the symbol goes out and a sound is emitted.
Press the buttons at the same time and
to turn off the sound.
6 RESET THE CONTROLS.
END TIME
A
A flashes,
The oven
A
A
To discontinue programming
If you need to stop programming for some reason,
you do this by pressing at the same time and .
REMEMBER TO switch the oven off if you discontinue
programming.
Practical use
Never place aluminium foil, baking trays or oven
dishes directly on the bottom of the oven. Blocking heat from the bottom of the oven can damage
the enamel through overheating. The oven gets
hot when in use:
SUPERVISED.
The baking tray may warp temporarily due to temperature fluctuations, or if the food, (pizza, etc.) is
unevenly distributed on its surface. The tray resumes
its shape when cool.
CHILDREN NEARBY MUST BE
15
Page 16
The oven
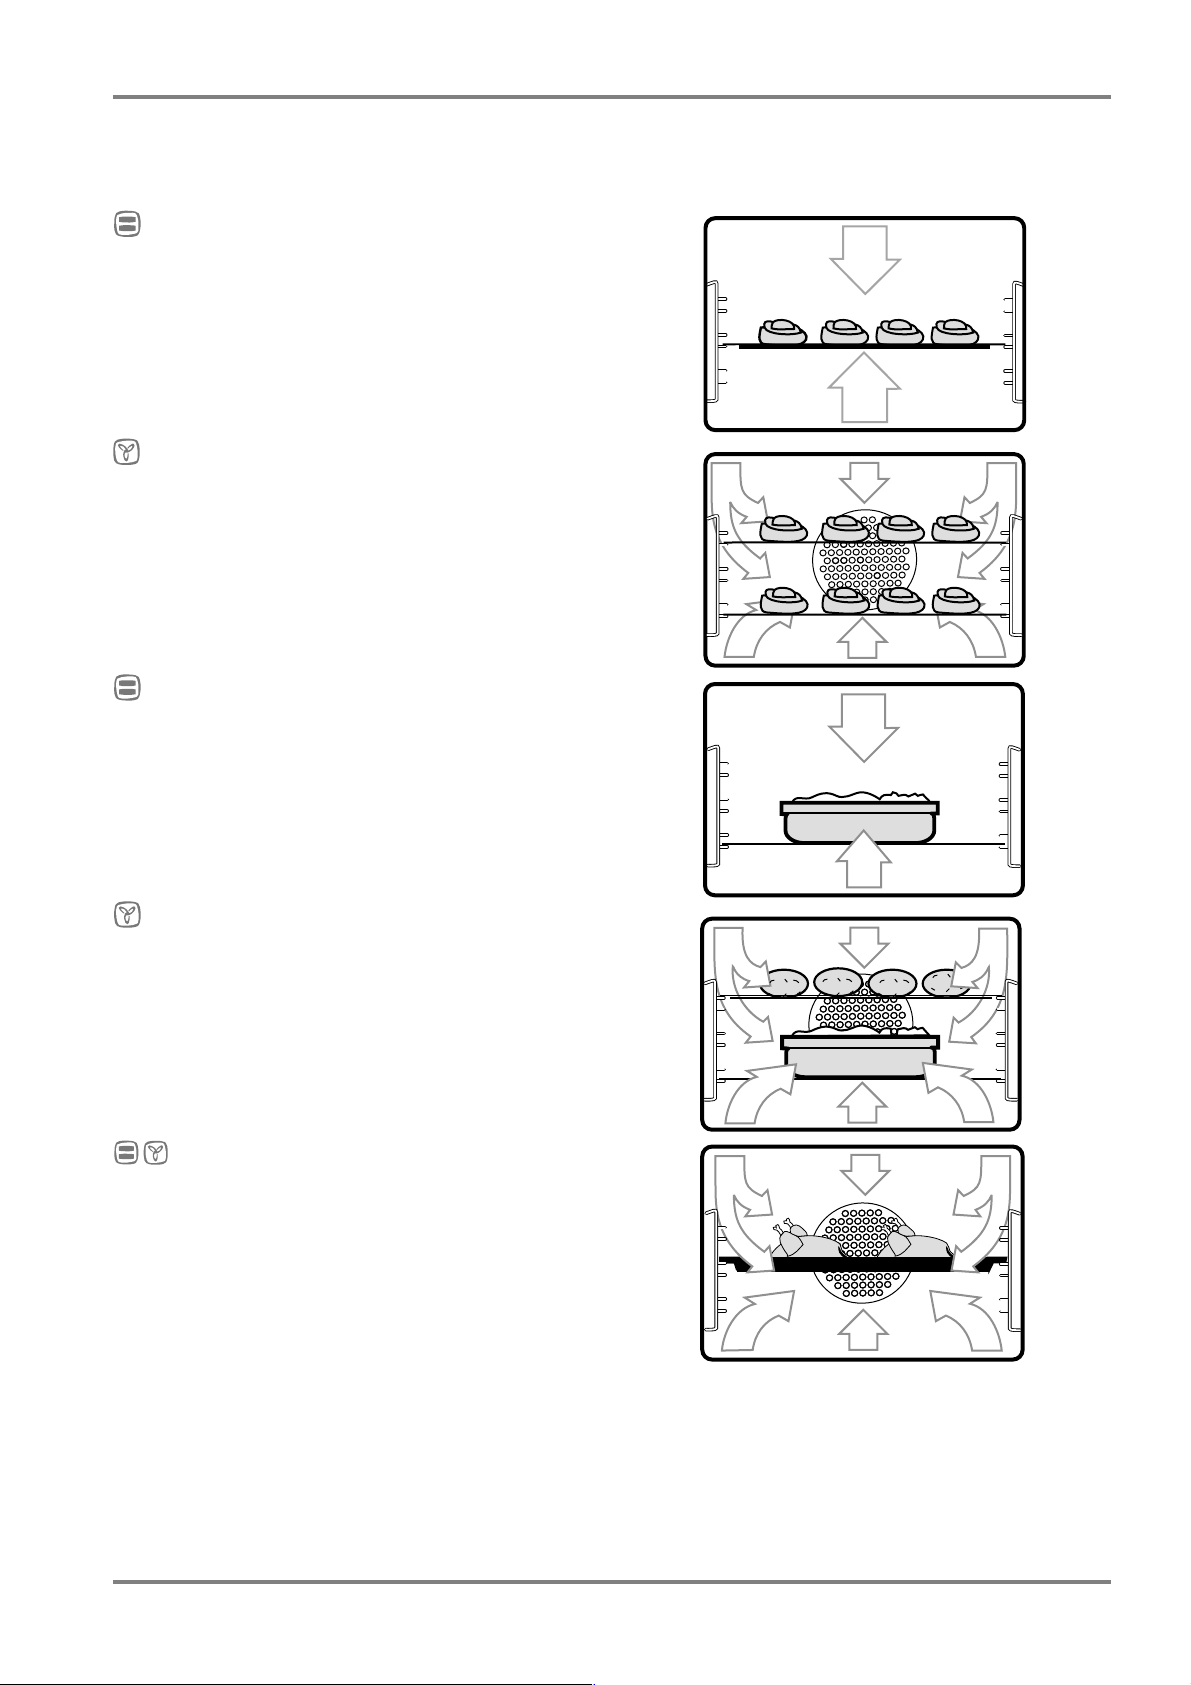
See below for practical advice on how to efficiently
use the oven functions for various ways of cooking:
Baking
Use a skewer to check whether sponge cakes are ready
when there are about 5 minutes left. You can then
shorten or lengthen the baking time. The material,
colour, shape and size of the baking tins as well as the
recipe can affect results.
even colour.
TOP/BOTTOM HEAT gives an
Fan-assisted baking
The FAN-ASSISTED OVEN reduces the total baking time as
two trays can be in the oven at the same time. However,
the bread or buns may not brown evenly particularly if
the dough had not risen well.
Didn-t you get quite the result you expected? In
“Practical tips & advice” on p. XX, we give you a few
tips on solutions to your baking problems.
Cooking
TOP/BOTTOM HEAT is normally best when using an oven
shelf.
Fan-assisted cooking
Use the FAN-ASSISTED OVEN when cooking on several
shelves at the same time, e.g. meatloaf, meatballs and
complete meals (starter, main dish and dessert).
Remember to choose dishes that need the same temperature. Dishes that need different amounts of time in
the oven will have to be put in according to when you
want them to be ready.
Roasting
Using the TOP/BOTTOM HEAT and FAN-ASSISTED OVEN
for roasting is both easy and practical. Joints of beef
such as topside and sirloin retain their natural juices
best if roasted at 125ºC. However, cooking time is
slightly longer than at a higher temperature. Use a meat
dish in which there is just sufficient room for the joint
so that the juices do not burn dry. Use a large roasting
pan or ovenproof dish when roasting a joint of ham as
there is usually a lot of meat juice. Be careful when
removing it from the oven. If you are using a roasting
bag, cut a hole in one corner before putting it in the
oven. That way you are less likely to burn yourself on
hot steam when you open the bag.
16
Page 17
Using the roasting sensor
Be careful that you do not burn yourself on the
heating element in the top of the oven or on the
oven rungs when inserting or removing the
roasting sensor plug. Use an oven glove.
The sensor works within the temperature range of 0 to
99°C. Before you switch on the oven, remove the
cover which prevents the sensor socket from becoming
dirty. Only use the sensor supplied with your oven and
make sure that no part of the sensor comes into contact
with the inside top of the oven.
In order to achieve best results, the roasting sensor
should be inserted so that its tip comes to the thickest
part of the meat, where the heat takes longest to reach.
The entire sensor should preferably be inside the meat,
because hot air in the oven can affect its reading if the
shaft is exposed. If the sensor is inserted into fat or
touches bone, it can give an unreliable reading.
Preheat the oven first, then put the joint of meat in
the lower part of the oven. Remove the joint when the
sensor shows the required temperature. Cover the meat
with aluminium foil and let it stand for about 15
minutes. This will make it easier to carve and less meat
juices will be lost when carving.
The oven
SETTING
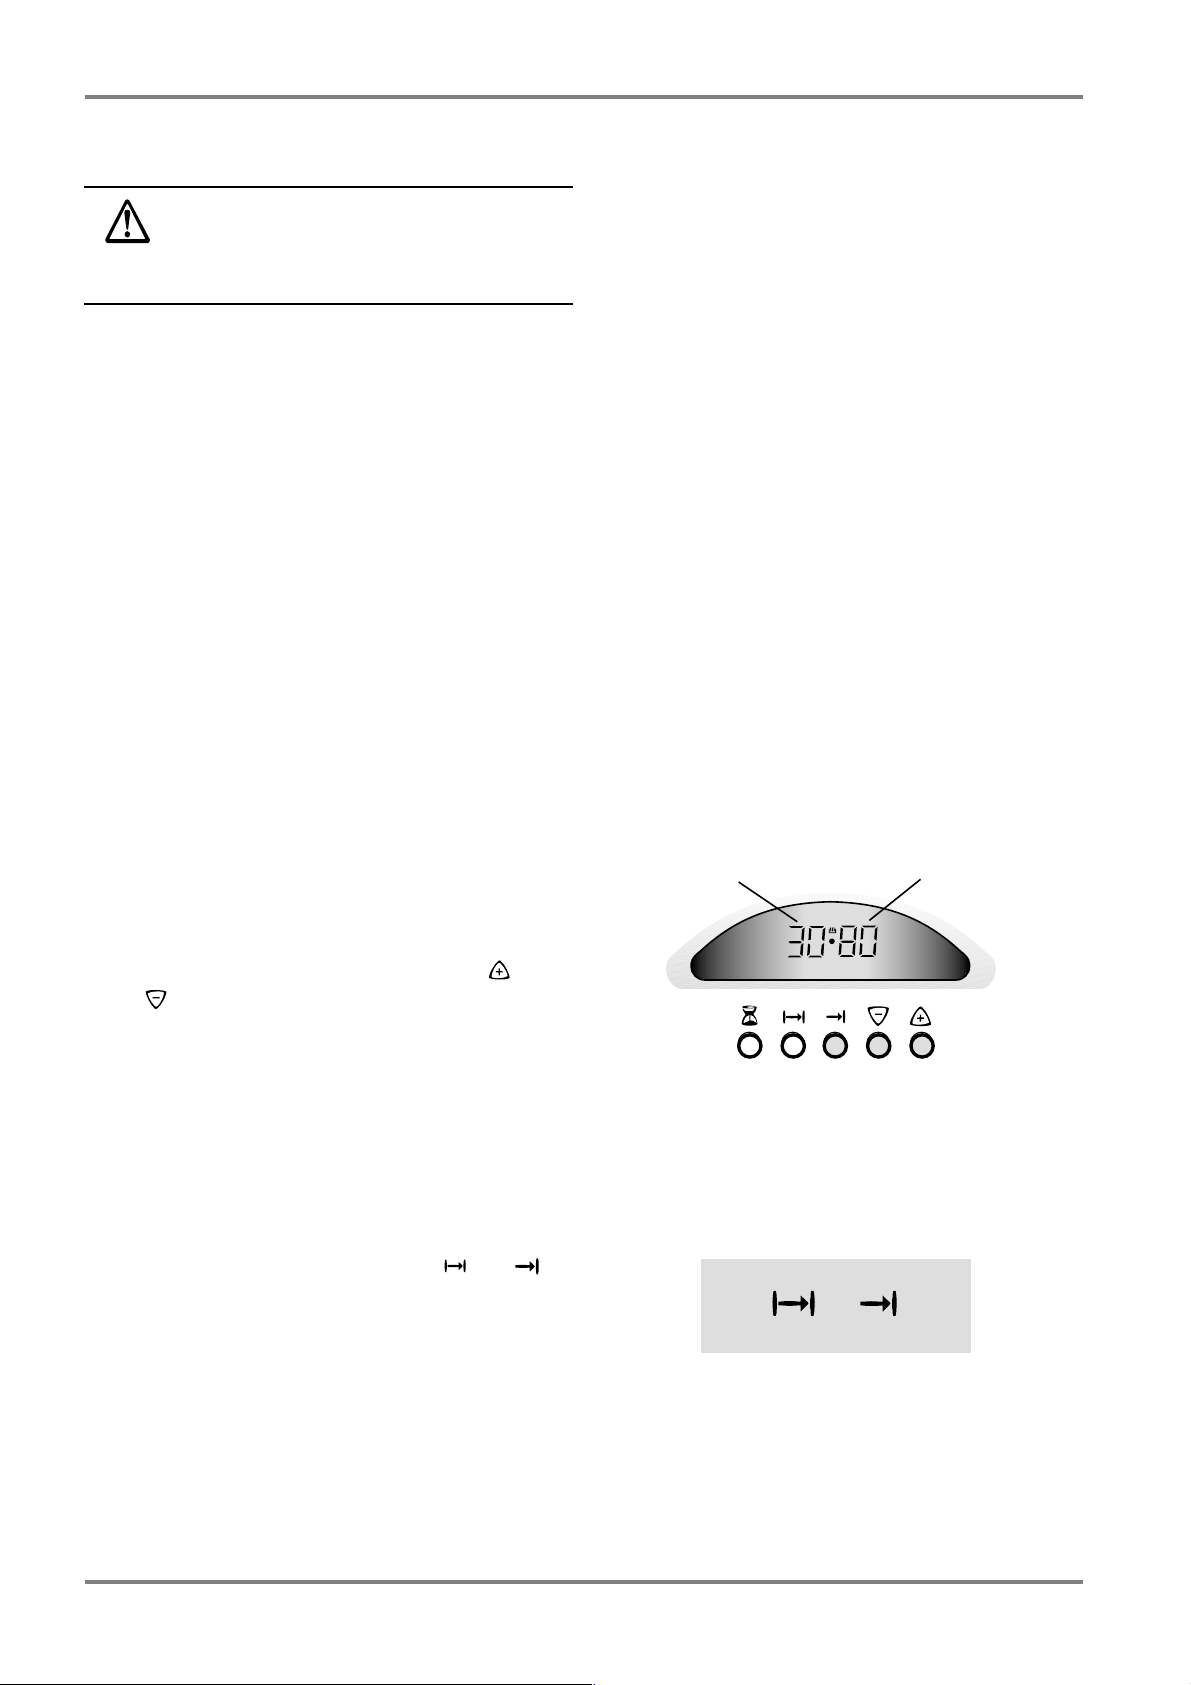
To use the roasting sensor:
1 Connect the sensor to the socket in the oven.
2 The pre-set temperature is 80ºC. You can now
alter the temperature using the buttons and
. The current temperature and the temperature you have chosen are shown in the information window (
SEE ILLUSTRATION). You can see the
rising temperature of the meat in the information
window.
TURNING OFF
When the correct meat temperature has been reached, a
sound is emitted and the oven switches off.
1 Press the buttons at the same time and to
turn off the sound.
2 Remove the sensor from the socket in the oven
and remove the meat.
NOTE! Both the oven and
the sensor are hot.
3 When the oven has cooled down, replace the
protective socket cover.
It will only be possible to use the oven again when the
sensor has been removed.
CONTROLS!
NOTE! REMEMBER TO RESET THE
Actual temperature
Desired temperature
17
Page 18
The oven
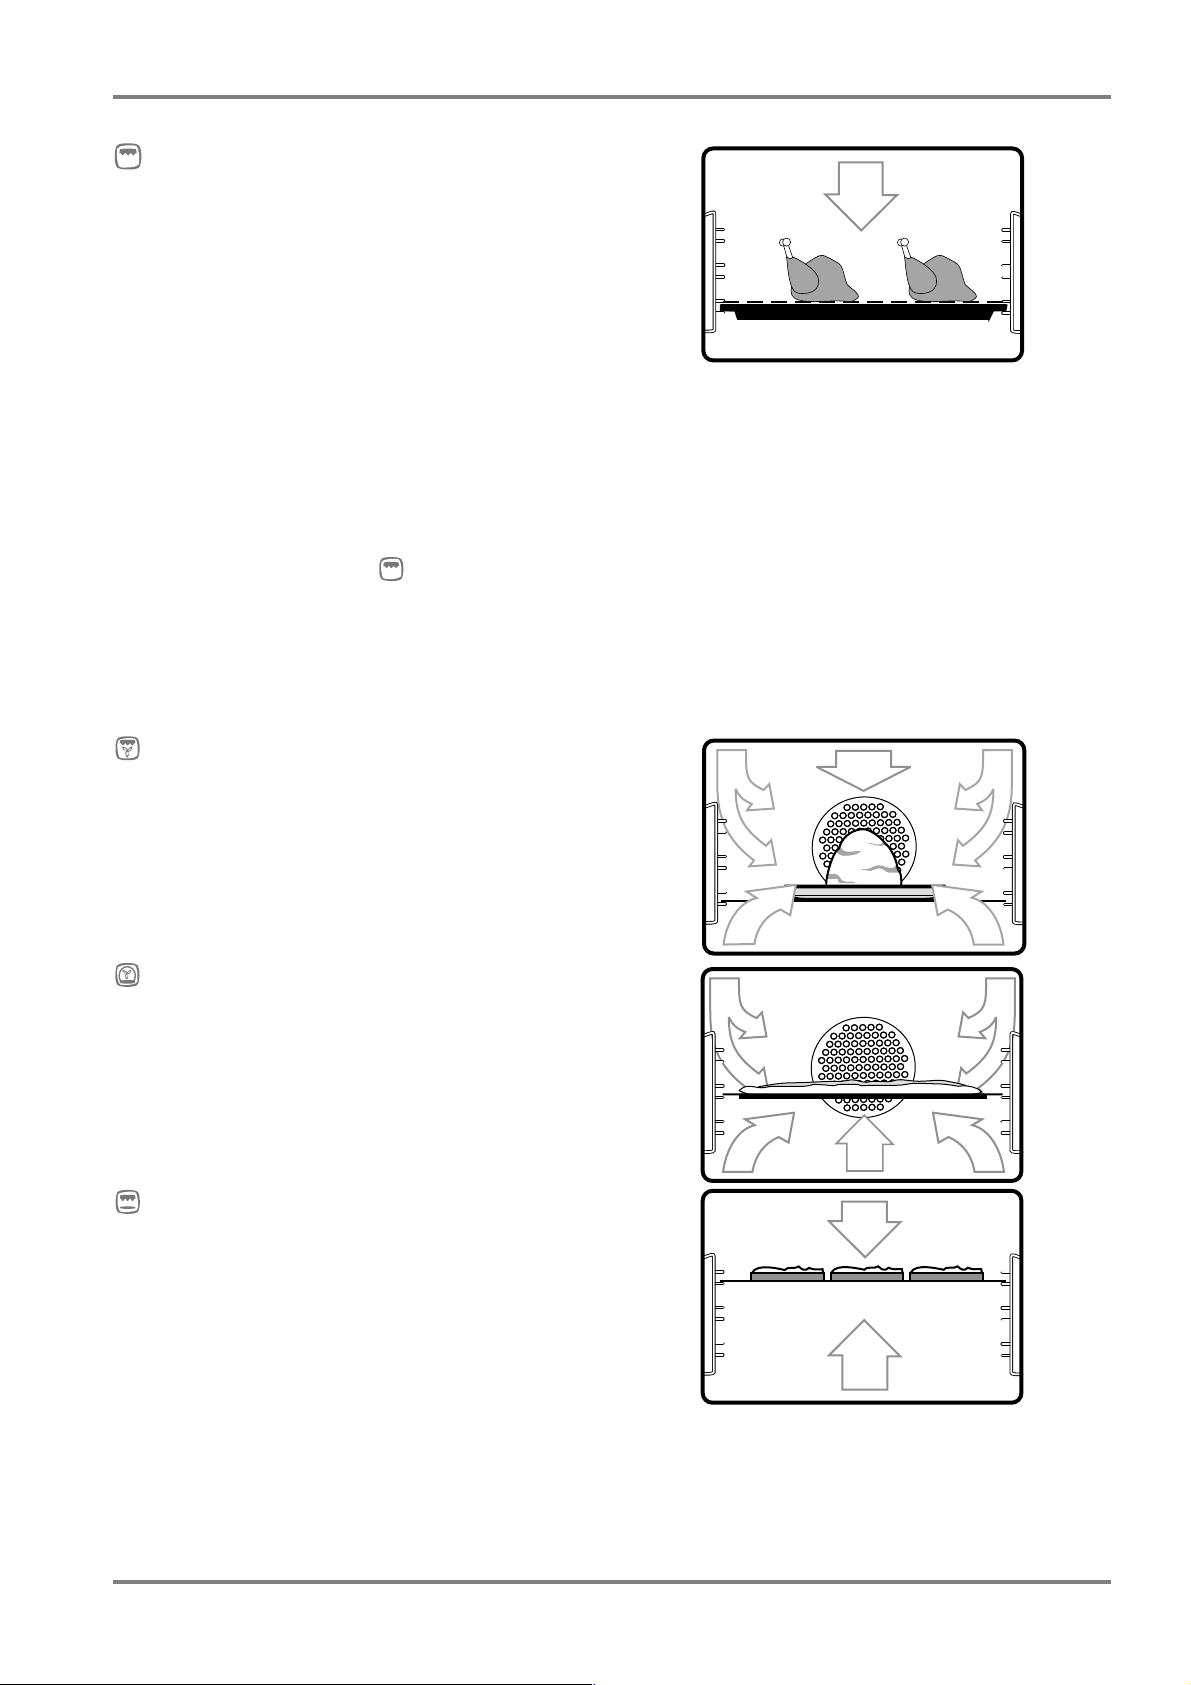
Grilling
Size, shape, quantity, the degree of fat marbling, and
even the initial temperature of the meat all affect the
outcome and time of the grilling process. Fish, poultry,
veal and pork will not brown as much as the darker
meats such as beef and game. Vegetable oil and/or seasoning will improve the colour, but it also increases the
risk of surface burning.
For best results, avoid grilling food straight from
the refrigerator. Dry the surface of the meat, place it on
the oven shelf and season to taste. Place an oven dish,
ideally lined with foil, underneath the shelf to catch the
fat etc. which runs off. Pork chops, steaks and fish
should be grilled high up in the oven, while meats such
as thick spare ribs are better lower down.
Set the function control to and the temperature
control to the temperature require (250ºC maximum).
Preheat the grill for 3 to 5 minutes. Keep an eye on the
food, and turn it at least once. Grilling for too long
makes food dry, dull, and possibly burnt as well. The
oven door should be closed when grilling.
Tur bo gr i l l
The turbo grill cooks food faster and browns it more
evenly than the grill. The grill element browns the
food and the fan circulates the hot air. Perfect for ‘tall’
dishes such as grilling ham to give it an even, all-round
colour.
Pizza/Quiche position
Perfect for cooking a pizza. Heat the oven to 225ºC
and place the pizza on the middle shelf. Use a baking
tray, not a roasting dish, to prevent the edges of the
pizza from burning.
Browning (swift start)
Excellent for browning au gratin dishes, toasted sandwiches, etc. You can also use this function to heat the
oven quickly to the set temperature. When the oven
has reached that temperature, you can then select
whichever function is required. It takes about 8 minutes to reach 200ºC. However, do not use this method
of rapid heating when baking biscuits or meringues.
18
Page 19
Defrosting
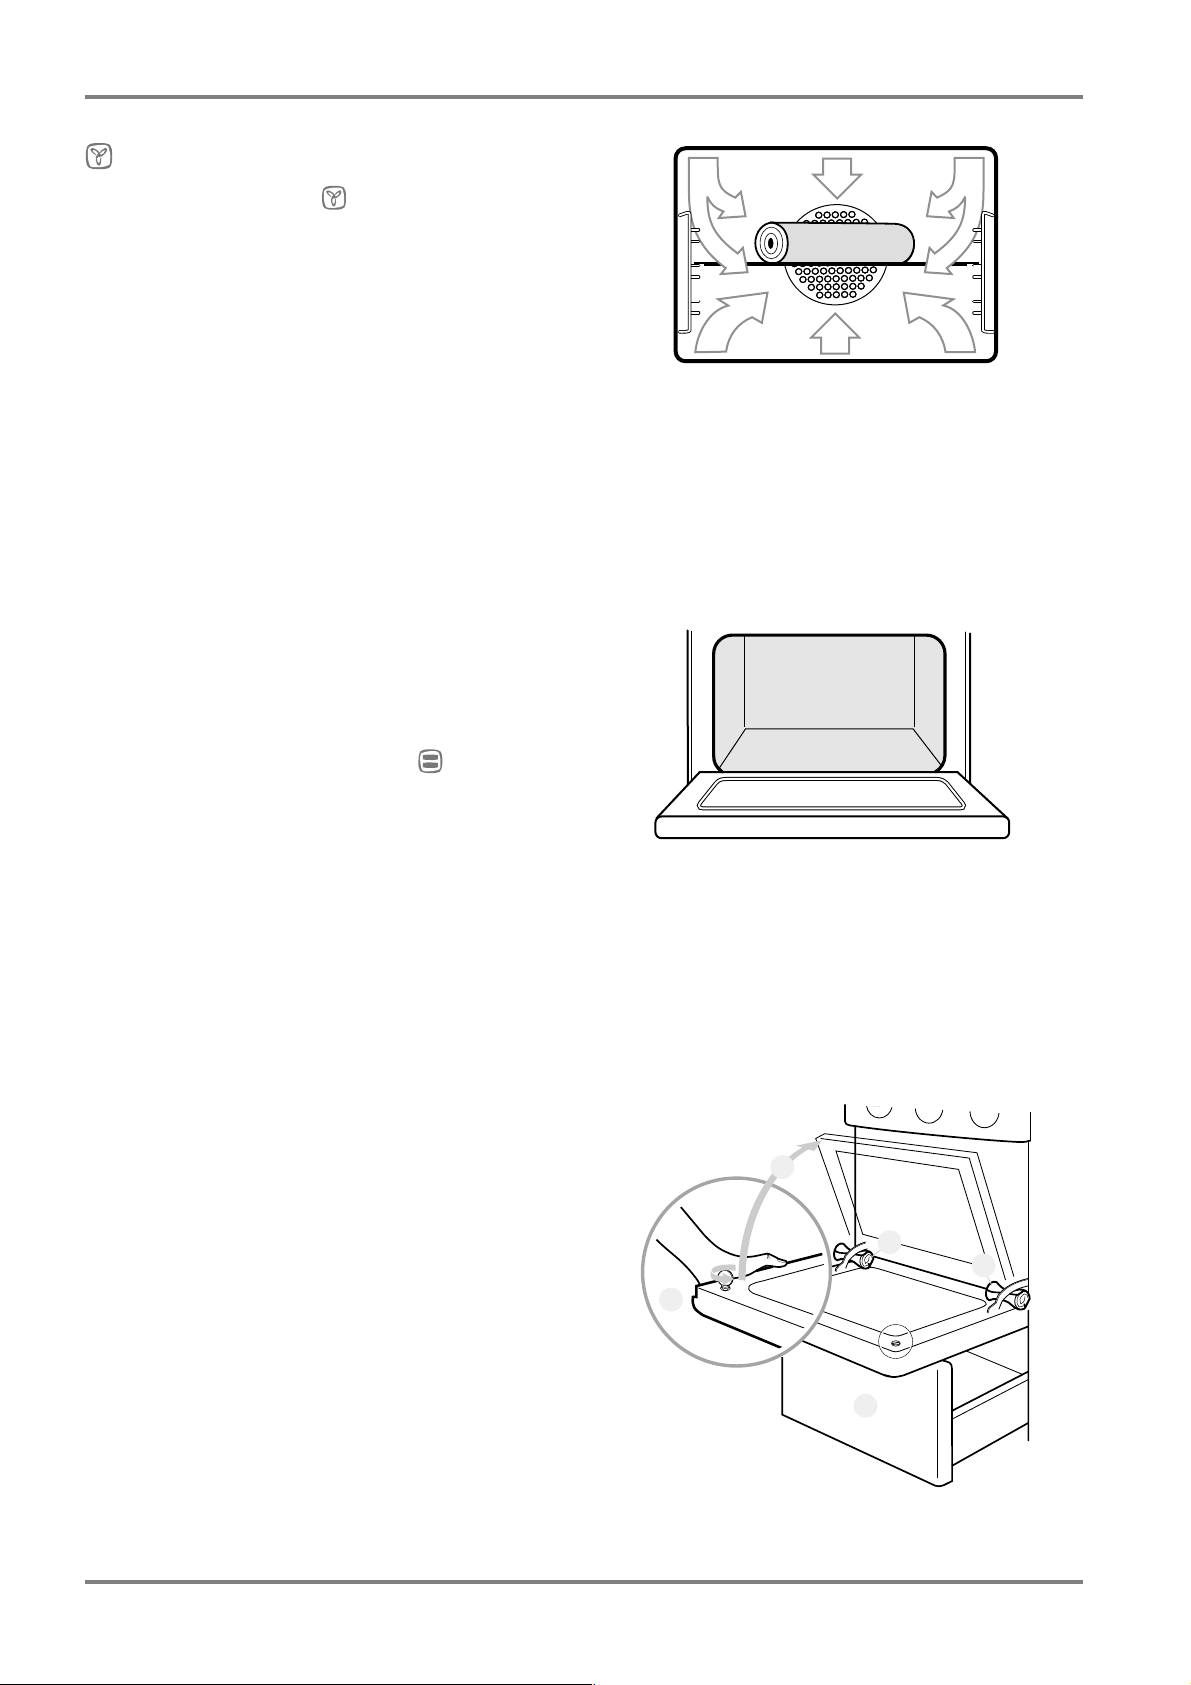
Set the function control to . When thawing frozen
meat, fish, glazed, iced or filled bakery products, the
temperature control should be off.
Oven shelves/baking trays can be placed on several
shelf positions if you have a large quantity of food to
defrost. The times required cannot be given here. Test
using a skewer.
Cleaning and maintenance
The oven
The oven surfaces are of vitreous enamel. The outer
section, the door front, can easily be removed for
cleaning (see “The oven door” below).
IF THE OVEN IS VERY SOILED:
1 Use a spatula or similar implement to remove
spillages which have hardened.
2 Use a sponge to spread soft soap inside the oven.
The oven
3 Close the door. Set the oven to (top/bottom
heat) and 100°C for about 10 minutes.
4 When the oven has cooled, wash the surfaces with
clean water. Rub gently with a soapimpregnated
steelwool pad on stubborn patches. Wipe the surfaces dry.
The oven door
The oven door consists of two sections with heatreflecting glass for a lower surface temperature. Do
not scratch the class when cleaning, it has a heatreflecting layer on the inside.
TO CLEAN BETWEEN THE TWO PANES:
1 Check that the oven is not hot, then slide the storage
drawer open.
2 Open the door and insert (for example) rolled-up
oven cloths between the hinges
are to prevent the door from closing.
3 Hold the inner section of the door down (to prevent
it from springing up when released), then use a coin
or suitable screwdriver to undo the two screws
PICTURE).
4 Carefully raise the inner section of the door and
clean the panes (use a product for window-cleaning). If the glass is very soiled, use the scraper supplied with the cooker.
5 When you have finished cleaning, hold the inner
section of the door in its original position, refit and
tighten the screws, and remove the oven cloths.
(SEE PICTURE). These
4
2
2
3
(SEE
1
19
Page 20
The oven
To change the oven light bulb
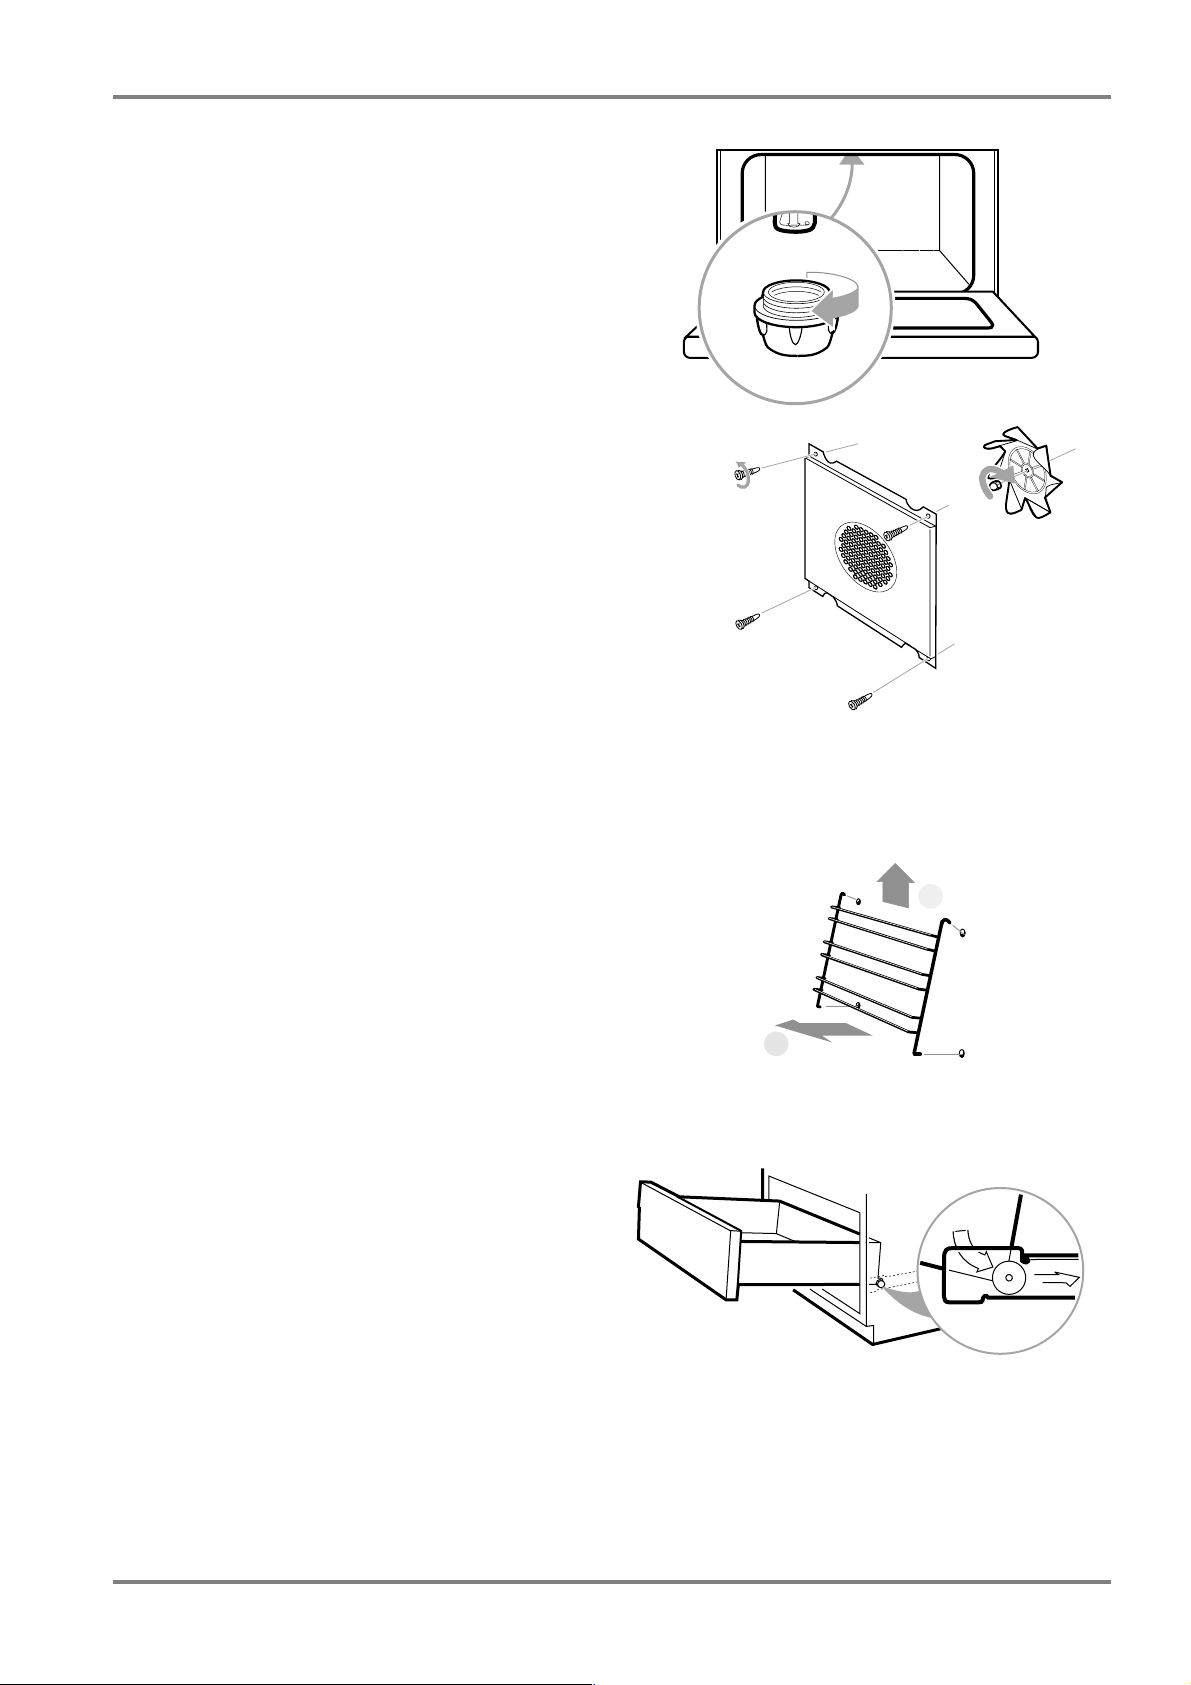
1 Turn all controls to off and check that the oven
is not hot.
2 Unscrew the glass cover (see illustration).
3 Unscrew the old bulb.
4 Fit a new bulb, marked 230–240 V, 15 W and
300°C, with an E14 screw fitting.
5 Refit the glass cover.
The fan
You can remove the fan blades for cleaning, but do so
with care, as they have sharp edges.
1 Make sure the oven is turned off and is cold.
2 Unscrew the four screws (A) and remove the
back wall of the oven.
3 Take hold of the fan impeller carefully and undo
the nut (B), by turning it clockwise with a small
adjustable spanner.
4 Clean the fan blades in hot soapy water.
5 Refit all the parts. Make sure all the screws are
securely in place.
A
BAB
The oven accessories
Release each side rack for the oven shelves at the bot-
tom corners (1), lift it sideways and upwards and
remove from the oven (2). Wash the racks and shelves
by hand or in a dishwasher. If very soiled, soak them
first, before cleaning with a steelwool pad.
The baking trays and oven dish should be wiped
clean with paper towels, or washed by hand when
necessary. Any burnt-on food can be removed using a
suitable spatula.
Storage drawer
1 Empty the drawer and pull it out as far as possible.
2 Hold the handle and lift upwards gently. This
frees the drawer from the catch at the back.
3 Pull the drawer out completely and lift it out.
After cleaning, place the drawer wheels on the brackets
(SEE PICTURE). Lift the drawer slightly as you first
push it in so as to prevent the wheels from fastening in
the front catch.
2
1
20
Page 21
Installation
85
88
90
Work on the cooker must be carried out by a qualified electrician. The cooker is heavy. Certain
edges and corners which will not normally be
exposed may be sharp.
the cooker.
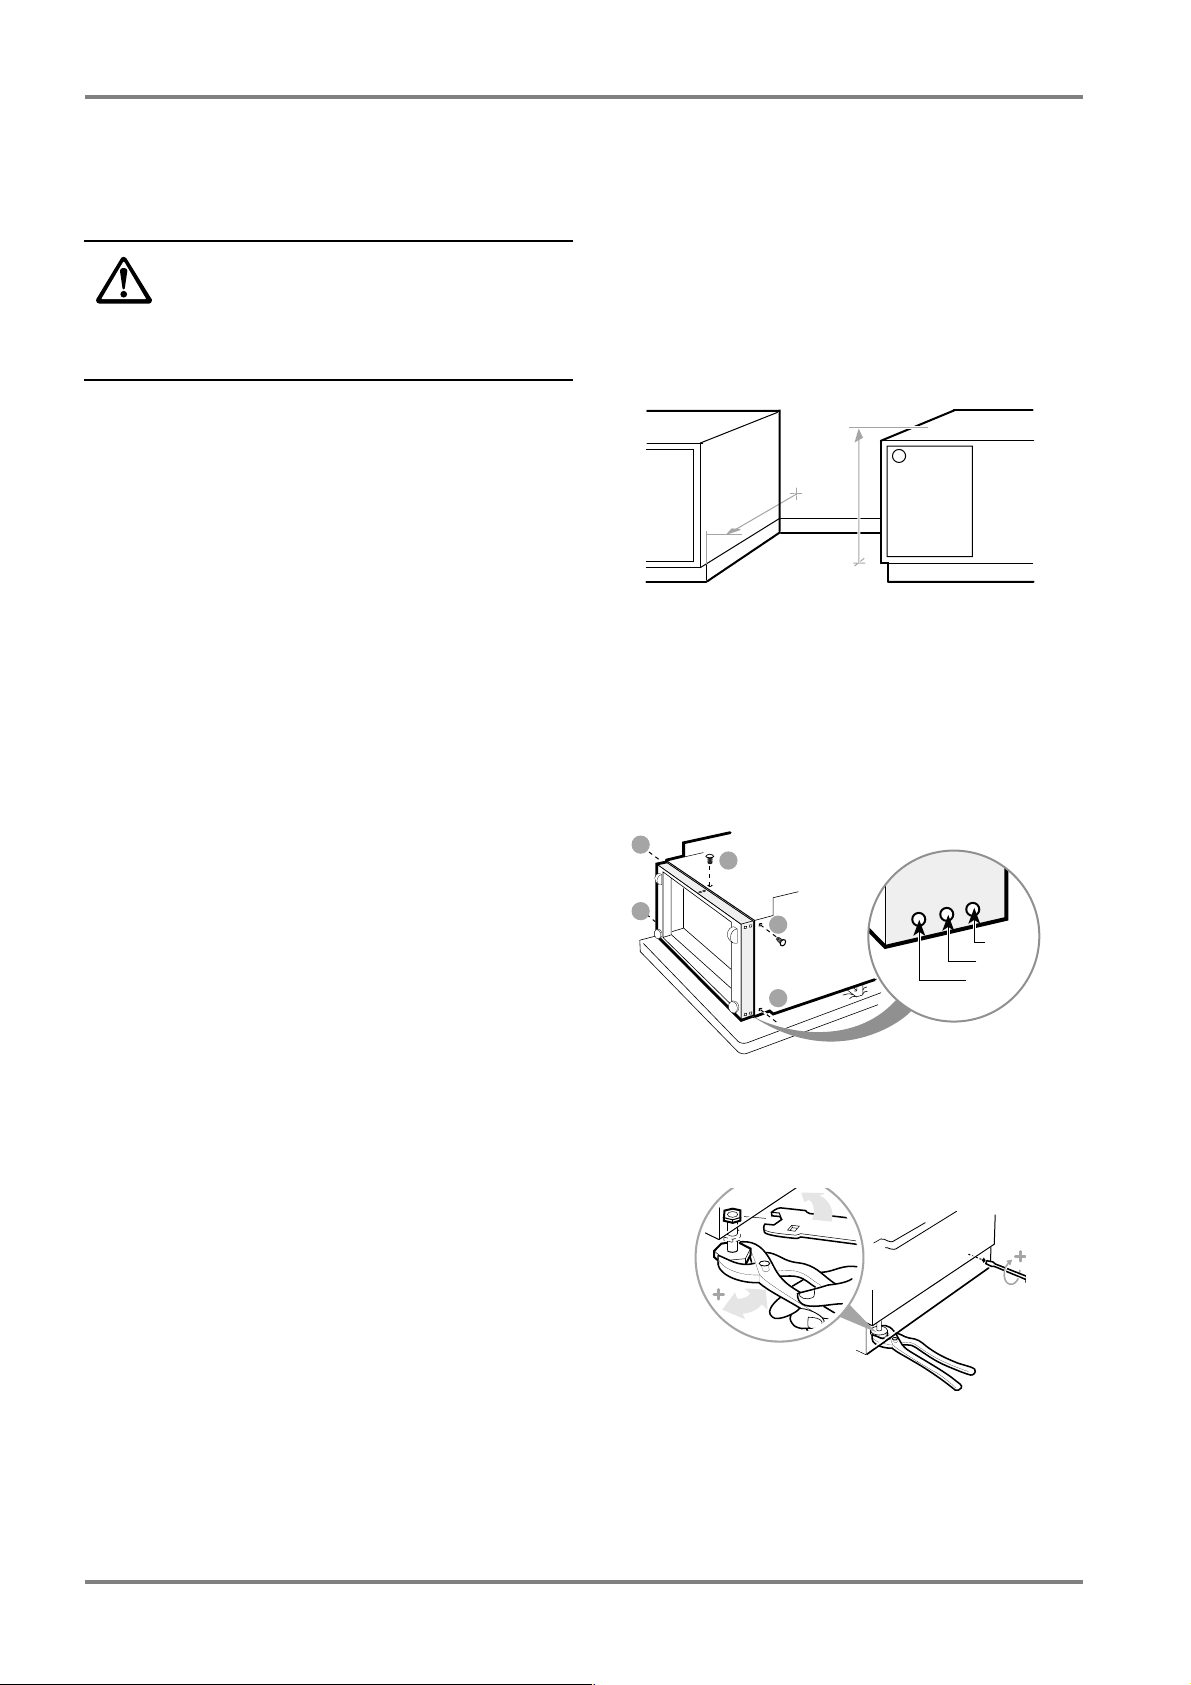
Before installing the cooker, you should check that its
dimensions correspond to the rest of your kitchen units.
Measure the height of the worktop from floor to top surface of the worktop, and the plinth depth from the wall
to the front edge of the plinth
may also be installed adjoining one wall, or one tall unit.
When delivered, the cooker plinth is adjusted to
suit a worktop height of 90 cm and a plinth depth of 55
cm. Where necessary, you can alter the height of the
plinth to make the cooker suitable for a worktop height
of 85 or 88 cm (see below). Check the cooker cable is
not trapped when moving the cooker.
USE GLOVES when moving
(SEE PICTURE). The cooker
Installation
90
88
85
55
To adjust the plinth height
1 Carefully lay the cooker on its front (SEE PICTURE).
Use some of the packaging material to cushion
the cooker on the floor surface.
2 Take care: there are sharp edges on the under-
side of the cooker. Unscrew screw A (1 screw)
in the centre rear of the plinth and the side
screws B (4 screws,
3 Push the plinth in to the required height setting,
90, 88 or 85 cm
4 Screw in screws A and B again.
SEE PICTURE).
(SEE PICTURE).
Levelling the cooker
The cooker must be level, for example to ensure that
oil in frying pans is of even depth. To check whether
the cooker is level, use a spirit level on the hob surround (but not on the hotplates themselves). Check the
level first front to back and then side to side.
If necessary, you can lower (-6 mm) or raise (+12
mm) the wheels and feet, working from the front of the
cooker. Use a screwdriver to adjust the rear wheels,
and adjustable pliers for the front feet.
B
B
A
B
B
2
1
21
Page 22

Installation
Electrical connection
Repairs and work on the cooker must be carried
out by a
by unqualified persons can damage the cooker,
and may also lead to personal injury and/or
damage to property.
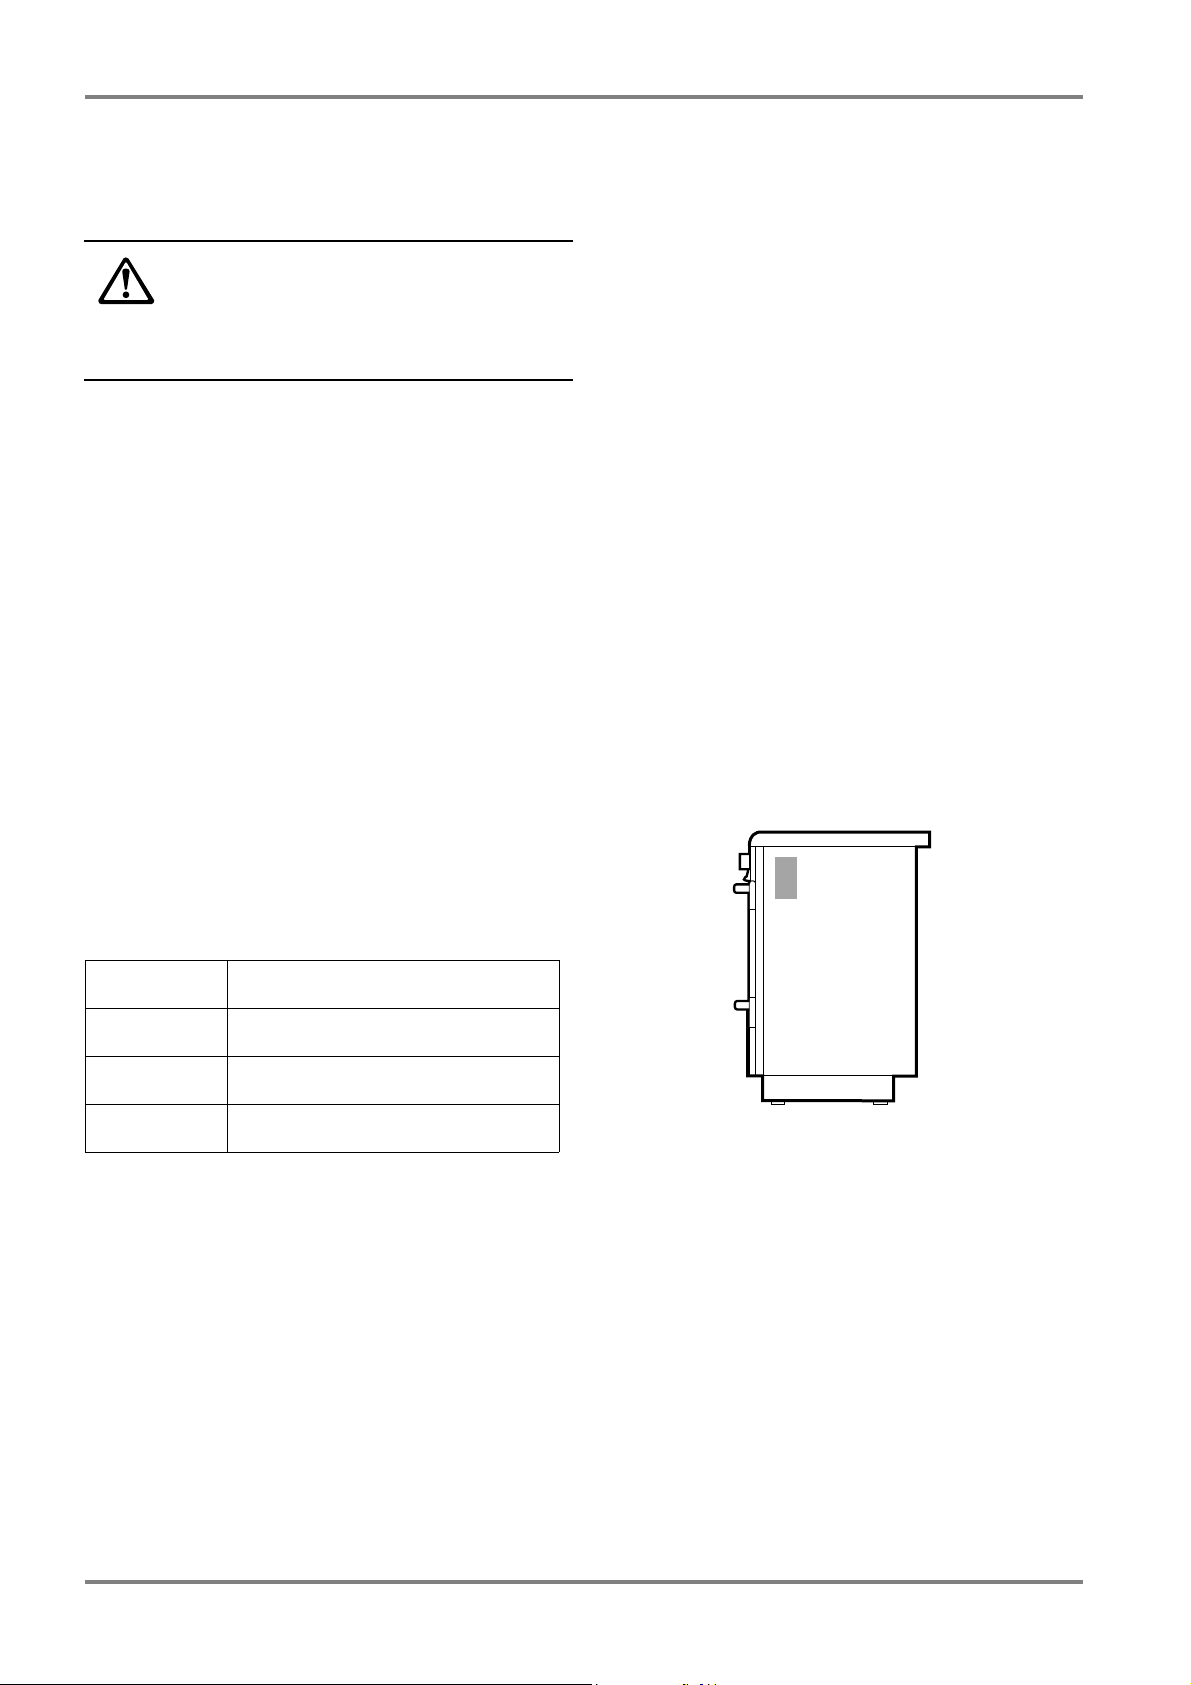
The connection options for the cooker are shown on
the plate on the rear of the cooker. Wattage and voltage
is stated on the rating plate (see the right-hand side of
the cooker).
QUALIFIED ELECTRICIAN. Work performed
22
Page 23
Service
Repairs and work on the cooker must be carried
out by a
by unqualified persons can damage the cooker,
and may also lead to personal injury and/or damage
to property.
If your cooker is not working properly, refer to pages
25 and 26 for suggestions on how to rectify the
problem.
Consumer care
Contact the retailer if you have any questions concerning the cooker or its use.
QUALIFIED ELECTRICIAN. Work performed
Service
Service and spare parts
Contact the retailer or a service company approved
by the retailer. Please note that a charge will usually
be made. Use only spare parts supplied by such
companies.
Cooker details are found on the rating plate on the righthand side of the cooker. Copy the details onto this page so
you have them handy if you should need to call a service
company.
Model:
Product. no:
Serial. no:
Purchase date:
23
Page 24

Technical data
Technical data
We reserve the right to alter these specifications. This appliance conforms
with EC-directive 89/336/EEC and 73/23/EEC.
EK 5147
Width (mm): 500
Height, when
delivered (mm):
Depth (mm): 600
Oven volume (litres): 37
Total wattage 230Vmodel (W): 9090
HOTPLATES SIZE (mm) WATTAGE (W)
Rear left 145 1000
Rear right: 180 2000
Front left: 180 1200
Front right: 145 1500
INDICATOR LIGHT BULBS: neon type
OVEN LIGHT BULB: E-14 screw fitting, marked 230-240V, 15W and 300ºC.
900
24
Page 25

Practical tips and advice
Practical tips and advice
Problem Cause Action needed
Bread and cakes are not rising properly.
Bread and cakes are too dry.
Too low an oven temperature means that
the baking is rising but then sinking flat
again.
Bread dough has not risen properly. Leaving the dough to prove too long can cause
the bread to turn out flat. Dough should
prove in a warm, draught-free place. The
dough should spring back when touched
with the
fingertips.
Not enough yeast or baking powder. Check that you used the quantity stated
Yeast destroyed by hot fat or liquid. The correct temperature for the liquid is
Not enough liquid, too much flour, or the
wrong type of flour can cause bread to be
dry.
Too low an oven temperature means that
the baking has to remain too long in the
oven to cook, which leads to drying.
Check the temperature used against that
recommended in the recipe.
Check the proving time recommended in
the recipe.
in the recipe.
37°C for fresh yeast. See instructions on
the packet for dry yeast.
Check in the recipe that you have used
the correct type of flour and the correct
proportions of flour to liquid.
Check that you have used the correct
temperature setting.
Baking/food is too dark (browned) or
unevenly cooked.
Baking/food is too pale.
Too high an oven temperature makes baking/other foods too dark on the surface
before fully cooked.
Using too high a shelf position on “top/
bottom heat” means the heat from above
is too strong. A shelf position which is
too low causes the opposite problem.
Putting the oven shelf in the wrong place
using “fan-assisted oven” prevents the air
circulating properly.
When using “fan-assisted oven”, the temperature should generally be approx. 15–
20% lower than with “top/bottom heat”.
Browning may be somewhat uneven when
using “fan-assisted oven”.
“Swift Start” has been switched on. Check that you have turned the function
Aluminium foil, baking trays or oven
dishes on the bottom of the oven hamper
the distribution of heat from below.
Light-coloured baking tins produce paler
cakes than dark tins.
Check that you have used the correct
temperature setting.
Check in the recipe that you have chosen
the right oven position.
Check that you have placed the oven shelf
in the correct position.
Check that you have used the correct
temperature setting.
control to the setting required.
Do not have anything on the bottom of
the oven.
If necessary, change to darker baking tins.
25
Page 26

Problems and actions needed
Problems and actions needed
Never attempt any repairs or work on the cooker which could cause injury or damage the product. If you cannot
solve the problem after checking the list below, contact a service company approved by the supplier.
Problem Action needed
The cooker has no electrical supply
Boiling/frying takes a long time
The oven light is not working
The door safety catch isn’t working
The roasting sensor is not working
The clock is not showing the right time/not
working
The timer is not working
Check that:
THE FUSE(S) has not gone
•
THE PLUG is pushed in correctly
•
•
THE RCD (if fitted) has not tripped
Check you have a suitable pan that conducts heat properly
(see page 10)
Replace broken bulb (see page 20)
Activate the door safety catch (see on page 6)
Check that the sensor is correctly plugged in inside the oven.
Take it out and plug it in again. Set the required temperature
(see page 17)
Set the correct time (see page 7)
Set the time required (see page 13)
26
At the end of the cooker’s life
1 Disconnect the cooker from the electrical supply.
2 Cut off the electrical lead, as close as possible to
the rear of the cooker.
3 Make sure that the oven door safety catch has been
deactivated, to remove the risk of children locking
themselves inside the oven.
Contact your local council to find out where you can
dispose of your cooker.
Page 27

Page 28

Aktiebolaget Electrolux
105 45 STOCKHOLM, SWEDEN
2B tecknare ab Printed on environmentally-sound paper © MO-STK 2001-03-26
 Loading...