

Page 1

INSTRUCTION BOOK
ELECTROGAS COOKER
Model: EK 5020
0
Page 2

CONTENTS
Instructions for the user Instructions for the installer
Technical Features
Warnings
Description of the appliance
Use of the appliance
Advice for use
Maintenance and clening
What to do if the appliance does not
work
Guarantee conditions
After Sales Service
Advice for safety
2
Installation
3
Specification nozzles
5
Oven lamp replacement
6
15
16
18
19
19
20
21
24
24
How to read the instruction book ?
The symbols bellow will guide you when reading
the instruction book
Safety instructions
Description of operations step by step
Advice and recommendation
Information environment protection
1
Page 3

TECHNICAL FEATURES
Free standing Classe 1
Hob Cover
Pan support
Front right
Back right
Front left
Back left
Oven
Accessories
Dimensions Height
Oven
Over burner power
Grill
Grill burner power
Light in the oven
Cleaning
Oven grid
Roasting tray
Protective screen
Turn spit
Breadth
Depth
Enamelled
Enamelled
Rapid
Auxiliary
Semirapid
Rapid electric plate
Lamp 15W type E14
2,6kW
1,0kW
2,0kW
1,5kW
electric
2200W
electric
1800W
catalyse
850 mm
550 mm
550 mm
This appliance complies with the
following EEC Directives :
90/683 ; 73/23 (Low Voltage
Directive) and subsequent
modifications,
89/336 (Electromagnetical
Compatibility Directive) and
subsequent modifications,
90/396 (Gas Appliance Directive)
93/68 (General Directives) and
subsequent modifications.
2
Page 4

WARNINGS
It is very important that this instruction book
should be kept safety for future consultation.
If it should be sold or given to another
person, please ensure that the booklet goes
together with it, so that the new owner can
know the functions of the machine and also
be aware of the warnings.
This warnings has been given for your and
others safety.
• This appliance has been designed for
use by adults. Take care therefore, that
children do not attempt to play with it.
• When receiving the appliance, unpack it
on the spot. Check the general aspect of
the appliance. In case you have any
comments write them on the delivery
note and keep one copy.
• Your appliance is intended only for
normal household use. Never use it for
other purposes, as commercial or
industrial.
• It is dangerous to modify, or attempt to
modify, the characteristics of this
appliance.
• On first use, heat the oven empty in
order to eliminate the unpleasant smells
of the thermal insulation of the oven and
residual grease used in manufacturing.
- Lift the cover.
- Remove the accessories in the oven.
- Remove all type of stickers and plastic
protection.
- Heat the oven for about 45 min, knob on
position “ 250”. During this operation the
appliance with smoke, air the kitchen for
eliminating the swells and the smoke. The
accessories too, should be washed before
the first use.
The use of a gas cooking appliance
produces, heat and humidity in the room in
which it is installed. Ensure good ventilation
of the room keeping natural ventilation
openings clear or installing a mechanic
ventilating device.
An intensive and prolonged use of the
cooker could necessitate a supplementary
airing by opening the window, or a more
effective ventilation by increasing the
mechanical device power, if there is.
• In case you use electric appliances near
the cooker (for instance an electric mixer)
the cables should not come into touch
with the hot parts of the cooker or
fastened by the oven door of the cooker.
• Supervise when frying in oil or greys
(chips…), hot greys ran cause fires
easily.
• Unstable or deformed pans should not be
placed on the burners in order to avoid
accidents caused by upsetting or boiling
over.
• Never pule the appliance by the oven
handle. Beside the accessories in the
oven you can use only heat-proof pans
(see instructions of the manufacturers).
• Do not put products for cleaning or
inflammable material in the drawer (if
your cooker has one) or near the cooker.
• On the open oven door never put :
- heavy things,
- ensure that children do not climb up or
sit on it.
• Always use gloves to remove dishes from
oven or when you come close to the hot
elements of the cooker.
• Do not cover the bottom of the appliance
with aluminium foil, over heating causes
damaging of the enamel,
• Never use the dripping pan as roasting
tray,
• In order to avoid damage of knobs do not
have opened the oven door when it works
or it is still hot.
The flame of the burner has to be smooth.
Avoid draught. If the flame is not regular
clean the burner and if the anomaly persists
call your after sales service.
• After use of your gas cooker ensure that a
the knobs are on “Off” position.
3
Page 5

• Do not leave anything (cloths, aluminium
foil, etc.) on the hob when using the
burners,
• Always clean the cover before closing,
• When the oven is in use the cover has to
be opened,
• Leave the oven and the hob cool before
closing otherwise the cover could
deteriorate,
• Change the gas supply pipe little before
its expire date, mentioned on it,
• Never use propane bottle (cylinder) in
your kitchen or in a closed room,
• Do not allow children near the cooker
when it is in use, for avoiding touch of
hot surfaces, overturning of pots,
• Ensure that children do not handle the
knobs of the appliance,
• Before cleaning disconnect the
appliance and allow to cool,
• Never use the ignited burners without a
pot on,
• For reasons of good culinary results,
hygiene and safety this appliance must
always be kept clean, the fat sprinklers
could give off unpleasant smells,
Environment protection
All materials marked by the symbol
recycling. Store them in places especially
foreseen for this purpose (inform yourself at
the services of your area) for recovery and
recycling.
are
• Clean your cooker after each use for
guaranteeing a right functioning,
• Never use steam or high pressure
appliances for cleaning the oven
(exactingness related to electric safety).
Installation
• The work of installation must be carried
out by a qualified installer.
• Any modifications to the domestic
electrical mains which may be necessary
for the installation of the appliance
should be carried out only by qualified
electrician.
• During installation or any intervention,
disconnect the appliance.
• The repairs have to be done only by after
sales qualified services.
• Non conforming repair could cause
serious damage.
• Before using and installing this
appliance, it is important to read carefully
all the instructions.
• Thank you for your attention.
We decline our responsibility for
possible damages resulting from bad
use and non-observing of safety rules in
force. Do observe strictly the cleaning
and maintenance instructions.
In case of functioning anomalies it is the
after sales service of your dealer the first to
intervene. In case of moving to another
place, closing of the shop, contact the
nearest Consumers Service (Authorised
Services Center) who will give you the
address of an after sales service.
In case of intervention on your appliance
ask your after sales service only the
spare parts certified by the Manufacturer.
4
Page 6

Control panel
DESCRIPTION OF THE APPLIANCE
Model : EK 5020
Hob
ELECTRIC
ZONE
OVEN
100
90
80
110
70
TIMER
KNOB
TIMER
60
GAS
FRONT
RIGHT
BURNER
CONTROL
KNOB
1
2
3
BACK
LEFT
PLATE
CONTROL
KNOB
ELECTRIC
6
5
4
3
OVEN
10
20
30
40
250
50
200 150
OVEN
KNOB
50
100
electric plate
1500W
2
GAS
FRONT
LEFT
BURNER
CONTROL
KNOB
auxiliary
1000 W
GAS
EK 5020
BACK
RIGHT
BURNER
CONTROL
KNOB
IGNITION
IGNITION
SWITCH
1. Front left burner (semi-rapid)
2. Electric plate
1
semi-rapid
2000 W
4
rapid
2600 W
3. Back left burner (auxiliary)
4. Front right burner (rapid)
5
Page 7

USE OF THE APPLIANCE
1. Electric traditional oven
Before the first use ensure that the
room is well ventilated: V.M.C.
(Mechanic ventilation) or opened
window.
How to proceed ?
1. Lift the lid
2. Remove the oven accessories
3. Detach the adhesive labels, the foil
protection if there is
4. Heat the oven the corresponding knob
on position “250” for about 45 min.
Clean the accessorie(s) with a soft
detergent. Rinse and dry carefully.
During cooking in the oven the
oven door is hot. Take care that
children do not play near it.
When using the oven the cover
has to be opened to avoid overheating.
Use
The oven can be used in traditional cooking
or for grilling, but not simultaneously.
6
Page 8

Control knob (fig.1)
It makes possible to choose the most
appropriate temperature and to select the
elements radiating heat one by one.
Explanations of symbols:
Off positions
Oven light
50-250 Temperature selection
Bottom heat
Top heat
Grill
OVEN
50
100
250
200 150
To select the temperature turn the knob
clockwise until the pointer indicating the
desires temperature between 50º-250ºC.
The temperature will be kept constant by
the thermostat.
If you want more heat coming from the
bottom or more heat coming from the top,
turn the knob so as to place the pointer on
the symbol
(bottom heat) or (top
heat).
Under these circumstances the
temperature will never exceed about
220ºC in the bottom heat
the top heat position
and 180ºC in
and it will not be
regulated by the thermostat.
Electric grill
When grilling, the accessible parts
of the appliance are hot. Take care that
children do not play near it. While the
grill is in function leave the oven door
half open and put the protective screen
“A” to the knob.
fig. 1
The grill is used for grilling all kind of meat
(pork, beef …) which remain tender, toasts
or frying dishes already cooked.
If you use the grid slide under it, on the
lowest shelf the dripping pan to collect the
juice and fat.
For turning off the heating elements.
Turn the knob clockwise to position off“
”.
fig. 2
7
Page 9
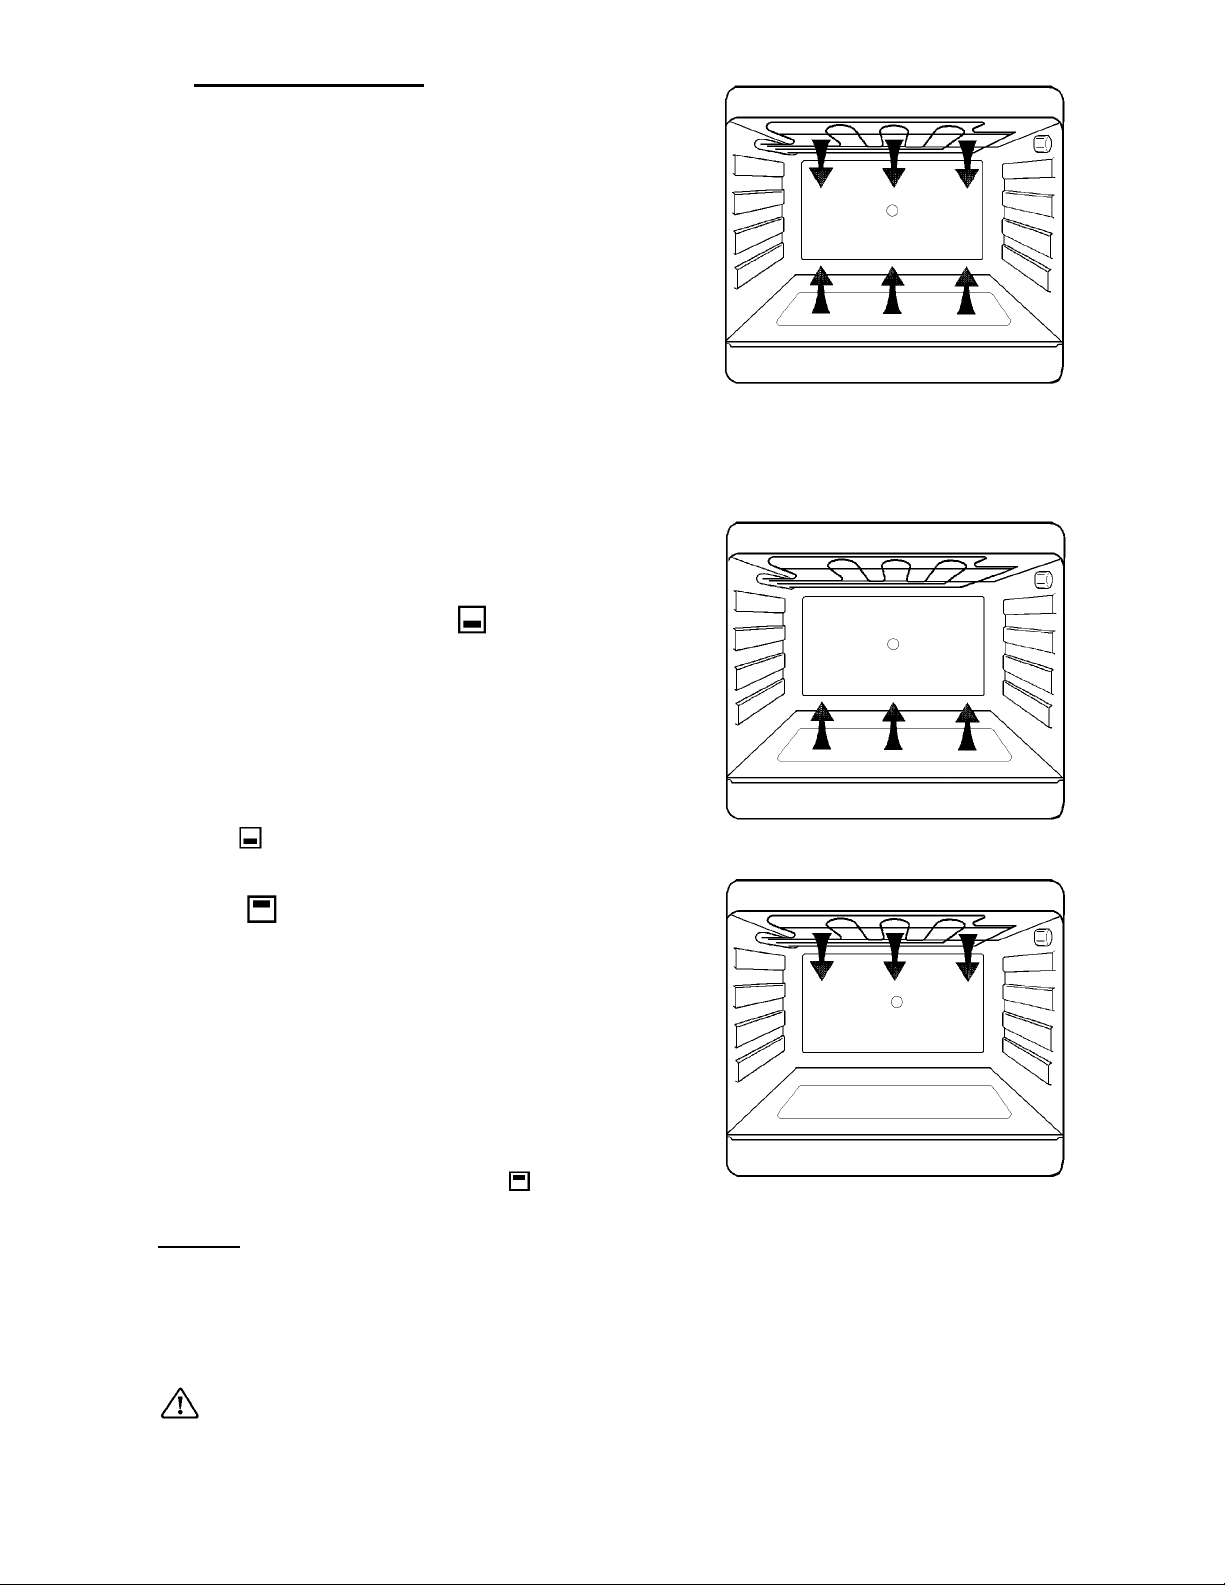
2. Cooking in the oven
Traditional cooking
Traditional cooking is made by natural
convection the heated air circulates on the
principle of ascending and descending
draughts (fig. 3).
It is necessary to pre-heat the oven
.
How to proceed ?
For small cakes, pastry, beaten mixture
cakes in moulds.
1. Preheat the oven the thermostat on
position chosen for cooking:
- about 8 min. for position 50ºC to
150ºC;
- about 15 min for position 175ºC to
250ºC;
2. Insert the meal
Cooking with lower element
This position of the thermostat is
recommended for pizza and fruit pies.
Preheating is necessary.
How to proceed ?
1. Preheat the oven the thermostat on
position
for about 10 min.
2. Insert the meal.
fig. 3
fig. 4
Grilling
It is a radiant cooking; it is only the top
element that is heating (fig. 5). This position
of the thermostat is recommended for
warning up the cooked meals.
It is not necessary to preheat the oven.
How to proceed ?
1. Insert the meal on the 3
2. Turn the thermostat on position .
rd
level.
Grilling
Heat comes from the top of the oven. It is
suitable for grilling meat (beef bacon, pork
bacon …) that remains tender, for toast or
to brown already cooked
When using the grill it has to be
supervised, the oven door opened the
protective screen in its place.
.
fig. 5
8
Page 10
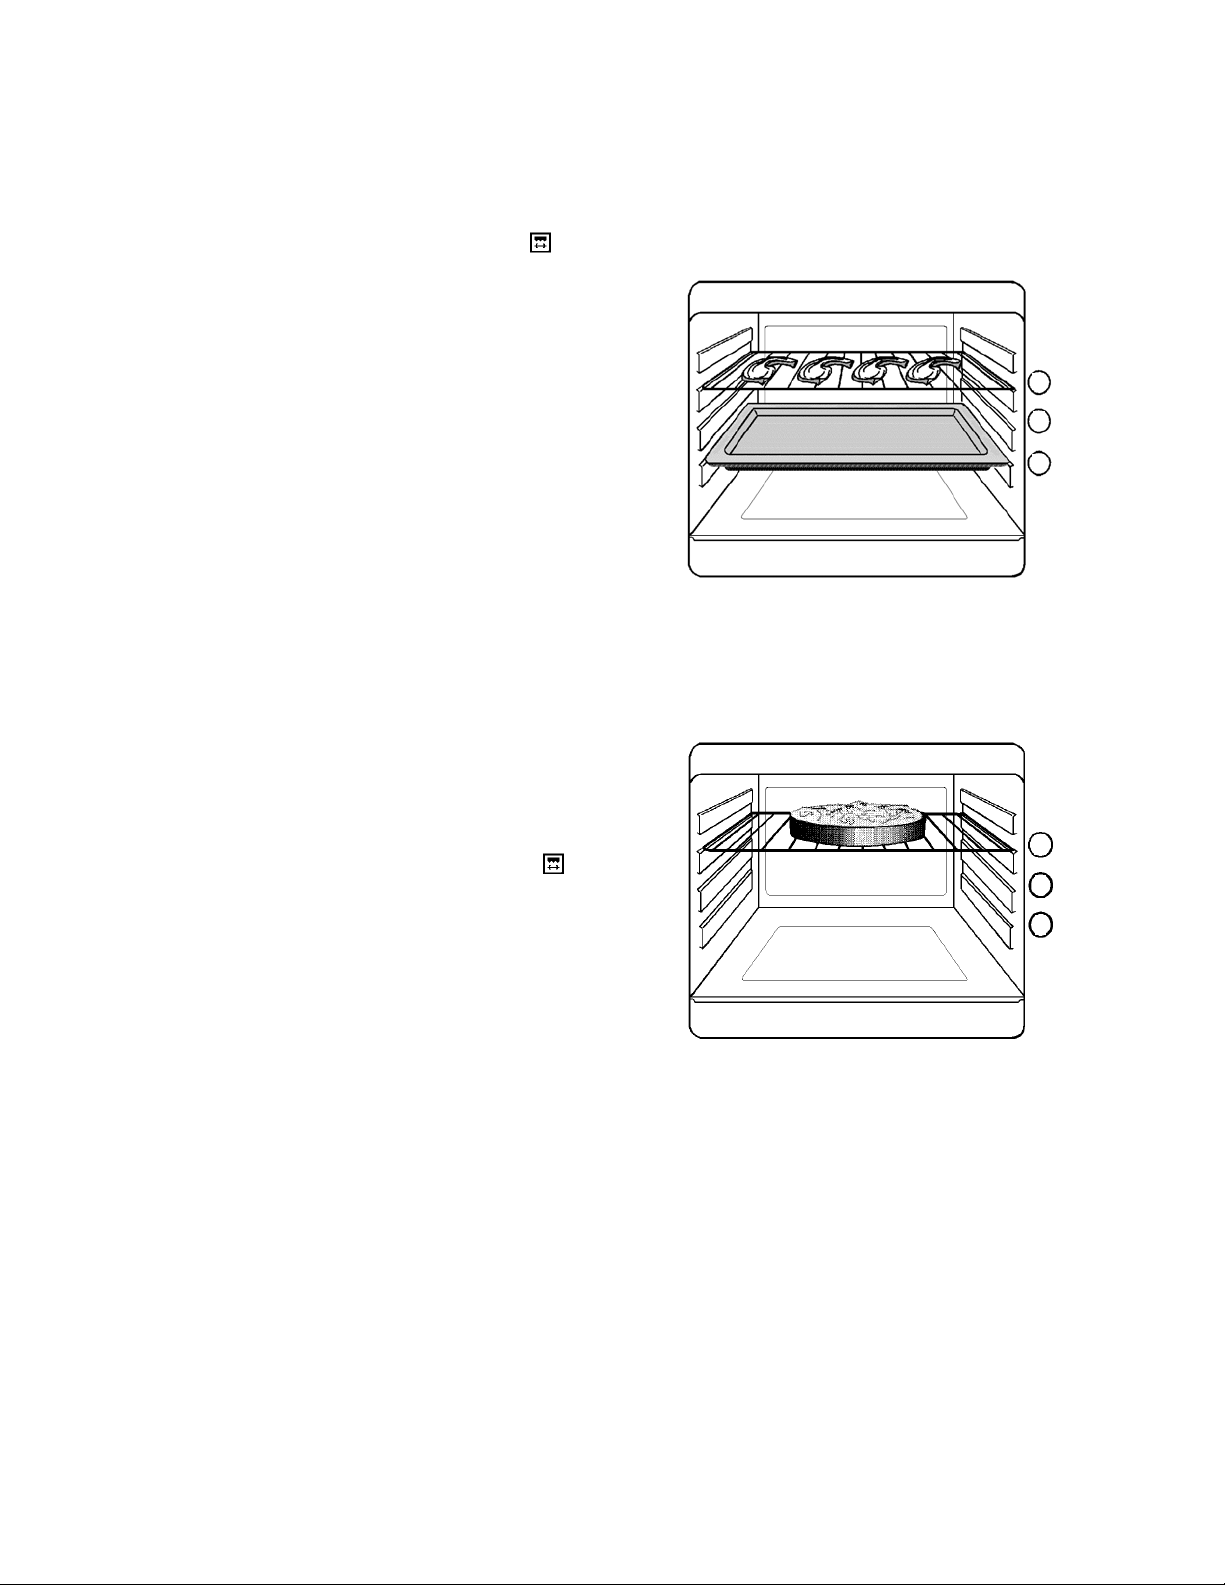
Roast meat
• Prepare the meat to be roasted, lightly
brush it with oil on both sides.
• Place it on the grill.
• Fix the protective screen.
• Fix the knob oven grill on position
.
• Slide the dripping pan in the guide 1 (fig.
6)
• Slide the pan support grid in the guide 2
or 3 depending on the thickness of the
meat to be roasted.
• Use guide 3 for the thin pieces to be
roasted (toasts, pork bacon, sausage,
small fish…)
• Use guide 2 for thick pieces to be roasted
(beef bacon, large fish, poultry).
• When the first side is brown, turn the
meat without pricking it in order that the
juices are not lost.
• Roast the second side.
• Salt when ending the cooking.
3
2
1
fig. 6
Cooking time has to determined by the
thickness of the piece to be roasted not by its
weight.
Frying
• Fix the protective screen.
• Fix the knob oven / grill on position
.
• Place the dish on the grid and slide it in
the guide 2 or 3 (fig. 7).
• Leave the dish under the radiation of the
grill for a few minutes.
3
2
1
fig. 7
9
Page 11
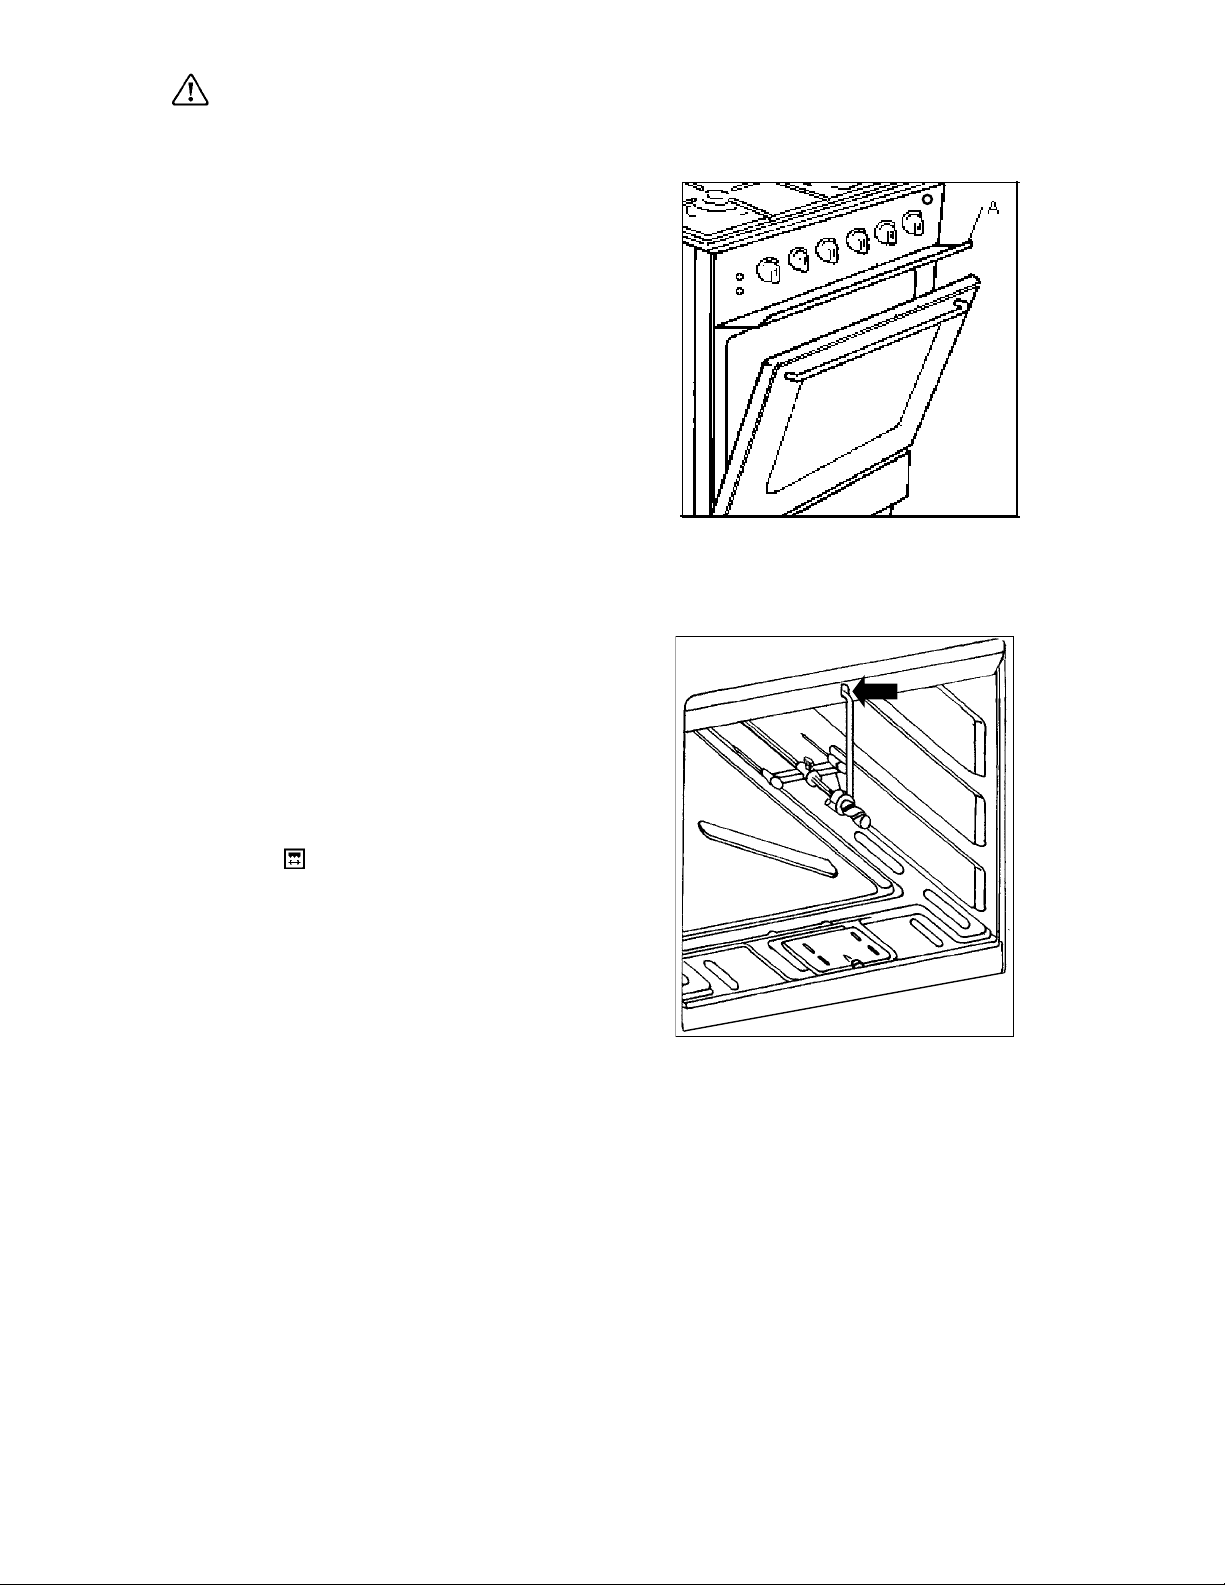
Turn-spit
The external parts of the cooker are hot
when using the turn-spit. Do not allow
children near it.
During cooking the oven will be opened and
the protective screen “A” in place the spit
and its support are hot after cooking. Use
gloves.
How to use the turn-spit ?
1. Open the oven door and fix the
protective screen “A” (fig. 8).
2. Place correctly the meat on the spit
trying to balance the weight for avoiding
useless effort for the motor.
3. Fix the second fork.
4. Block the two forks.
5. Fix the handle.
6. Fix the tip of the spit in its place in the
oven superior front frame (fig. 9).
7. Push the spit so that its end be in its
place at the bottom of the oven and put
it on the spit support.
8. Slide the dripping pan on an inferior
support.
fig. 8
1. Pull out the handle.
2. Fix the oven / grill control knob on
position
3. Check whether the spit turns.
4. For taking out the dish turn the knob to
position off
5. Fix the handle.
6. Remove slowly and simultaneously the
dripping pan and the spit.
7. Pull out the spit using a thermal glove.
Oven light
It’s lighted once the oven/grill knob is turned
on and lights the oven during its functioning.
Oven thermostat pilot light
Switches off when the oven reaches selected
temperature and re-lights every time the
thermostat intervenes to stabilize the
temperature.
fig. 9
10
Page 12
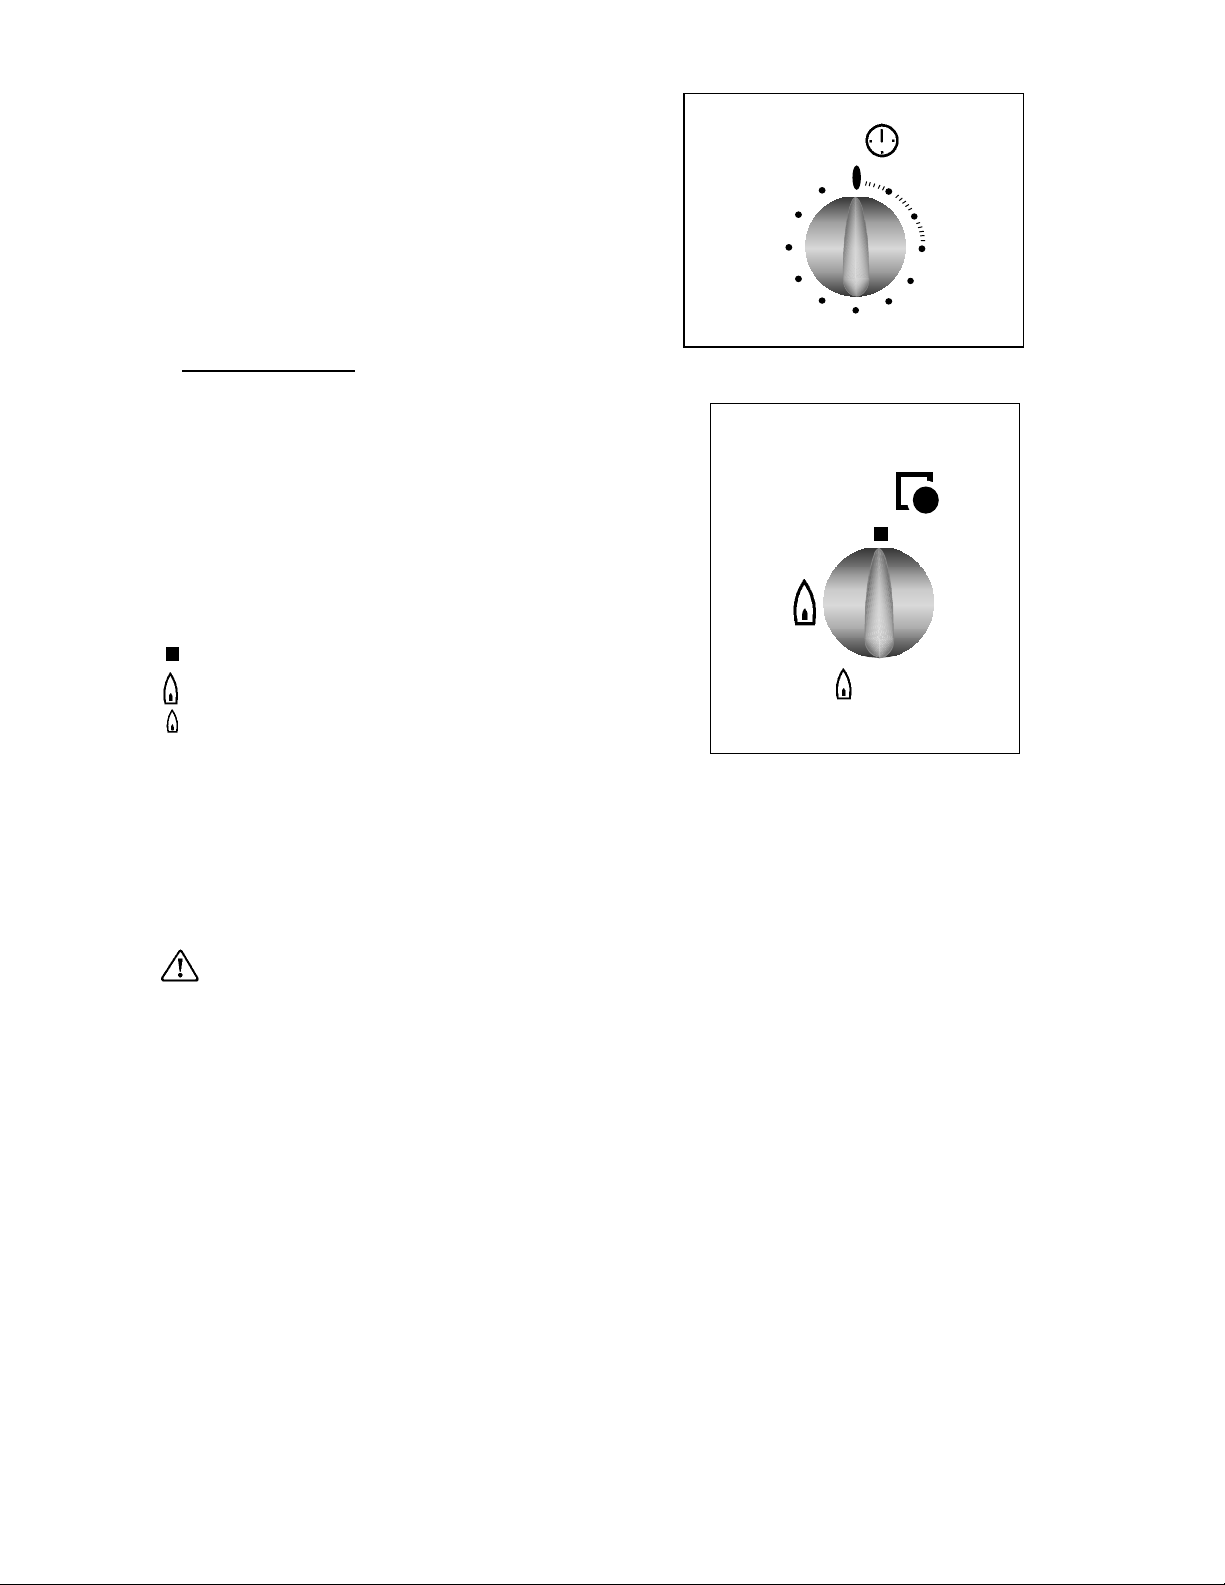
Mechanical timer
Turn the regulation knob (fig. 10) clockwise to
maximum position and than turn it back to the
position corresponding to the period of time
necessary for the cooking.
At the end of the time selected an acoustic
signal intervenes which stops automatically.
The timer does not interrupt the operation of
the oven upon action of the acoustic signal.
90
100
TIMER
110
80
70
10
20
30
40
50
60
3. The Hob Burners
The knobs for using the gas cooker are
found on the control panel (fig. 11). The
regulation knobs should be turned in
anticlockwise direction until the small flame
symbol, and vice-versa for the larger flame
symbol.
Each burner has a safety tap. In case the
flame dies out the safety tap stops the gas
supply.
Off
Maximum level
Minimum level
Use the maximum level for boiling and the
minimum for smothering and maintaining
boiling.
Choose always positions between the
minimum and maximum, never between
maximum and off.
fig. 10
GAS
fig. 11
Do not close the cover till the plate
is hot, the cover could be damaged.
11
Page 13
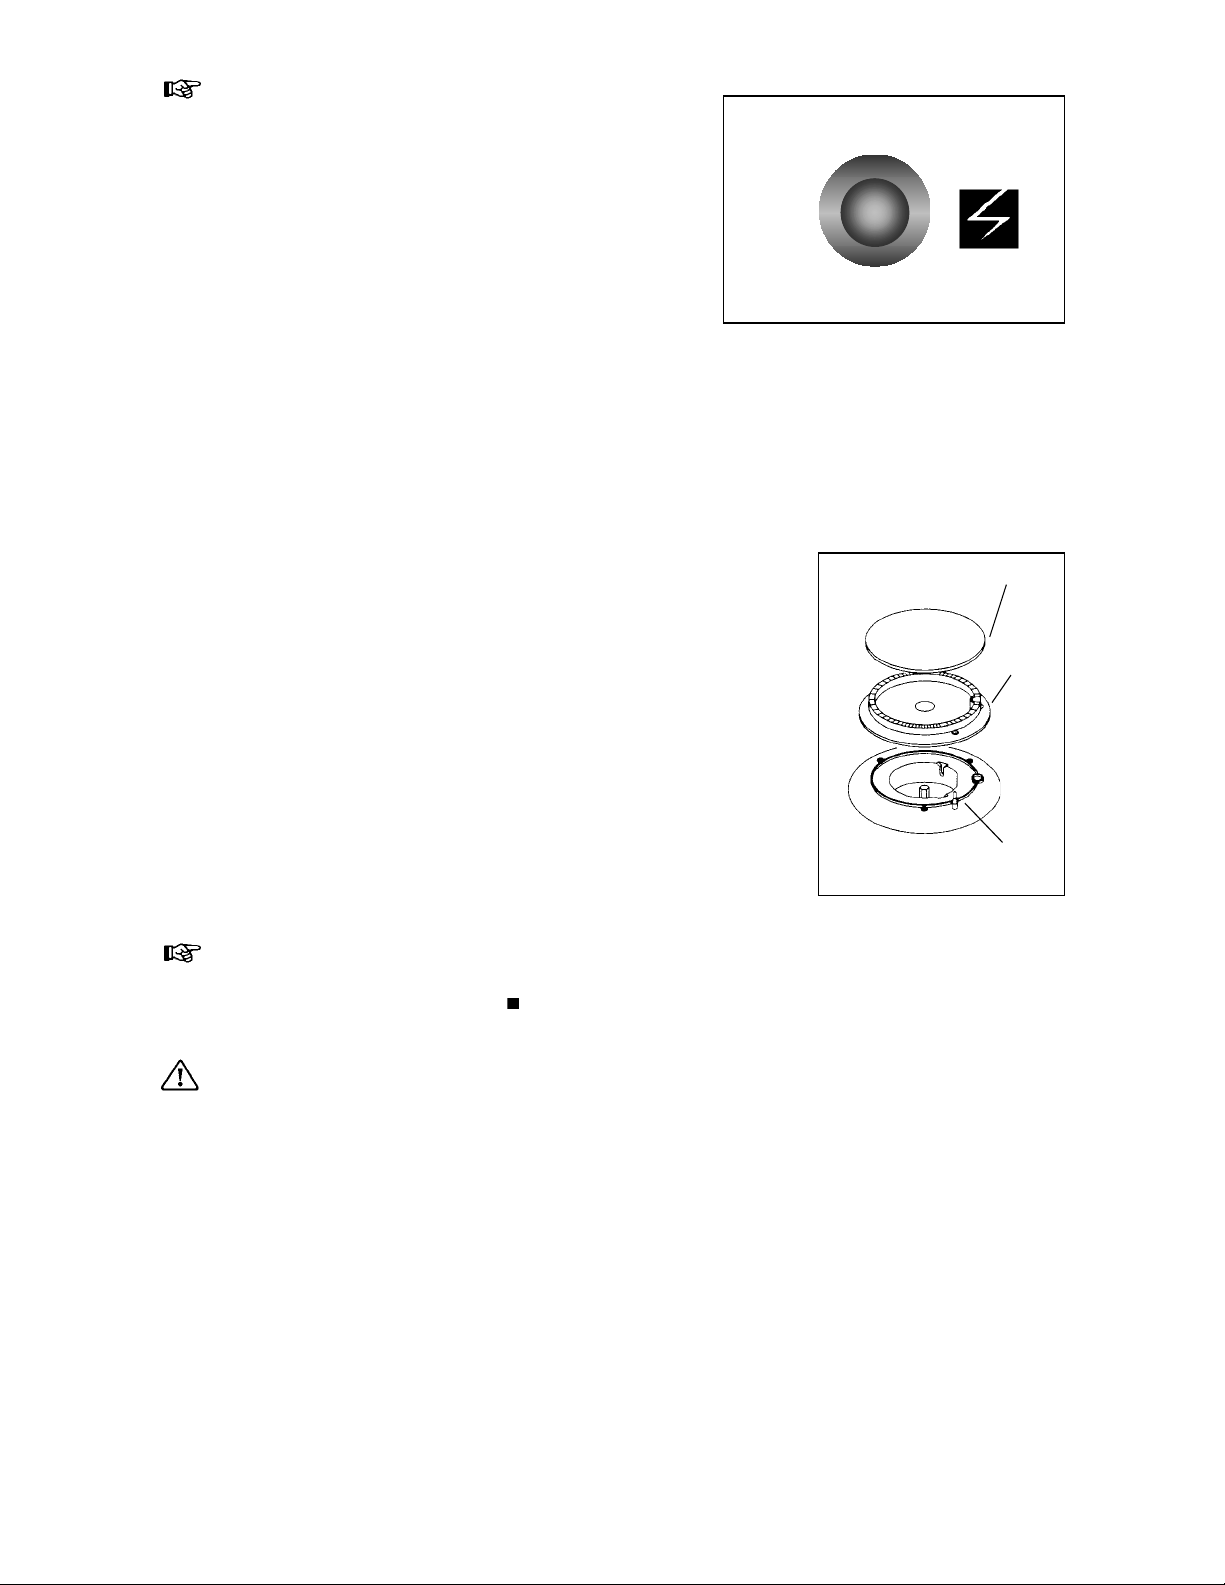
Ignition of the burners
To ignite a burner, before positioning the
saucepan, approach the burner with a
flame, or in the same time, push the
electronic ignition knob (fig. 12) for obtaining
sparkles. Keep it pushed till turning up of
the flame (1 spark/second). push the
corresponding knob in completely and turn
in an anticlockwise direction to the
maximum position.
The hob burners are provided with a safety
device. The control knob must be pressed in
for approximately 10 seconds until the
safety valve automatically keeps the flame
lit. Release the knob and watch that the
burner be ignited. Upon ignition, adjust the
flame as requred.
If for any reason the flame should extinguish
turn down the relevant knob and re-ignit it
only after 1 minute at least.
fig. 12
Burner cap
Burne r
ring
If after a few attempts the burner does not
ignite, check that the burner ring and its cap
are correctly positioned (fig. 13).
Extinguishing of burners
Turn the knob clockwise to mark «
». The
safety device is in place.
Do not put on the hob things or food
liable to melt.
Thermocoupl e
(safety device)
fig. 13
12
Page 14
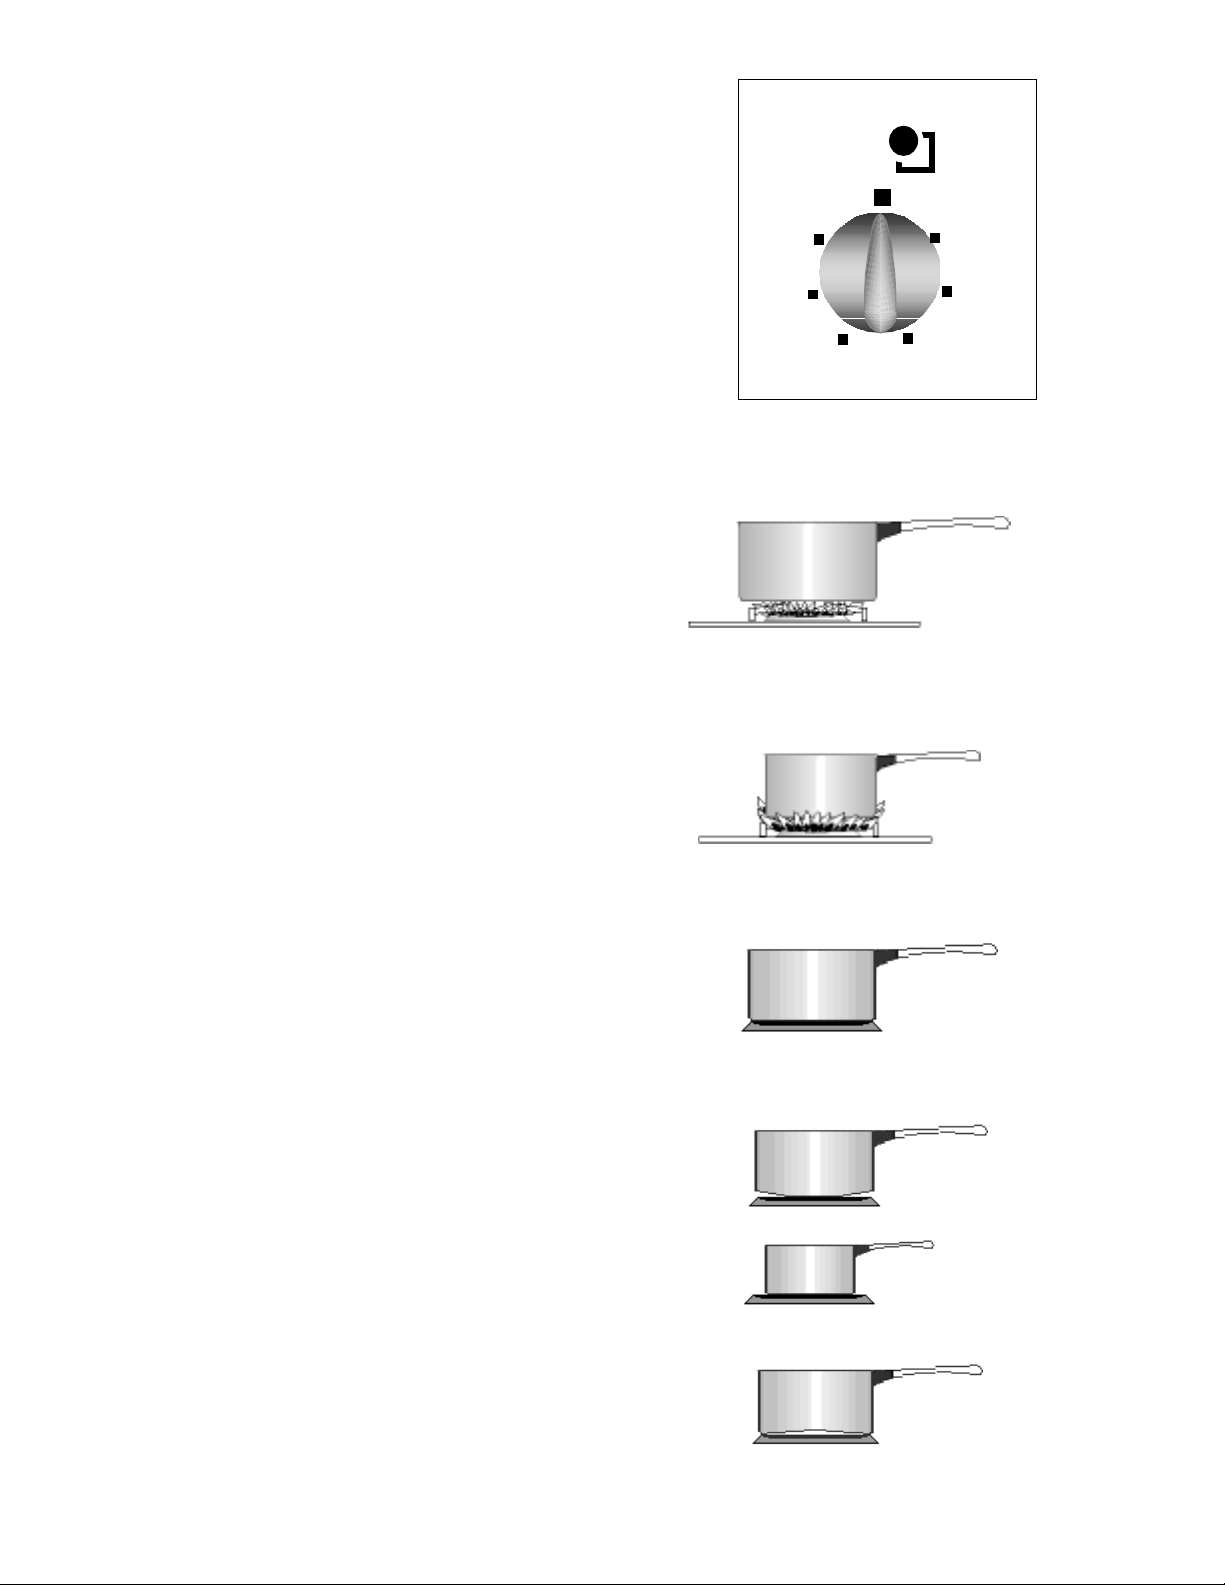
Electric plate
Depending on the cooking the knob for
electric plate can be fixed on 6 different
positions (fig. 14), from 6 (maximum heat) to
1 (minimum heat).
To spare the electric plate and for saving
power, we advise you:
1. to use flat bottom pots, with the right
diameter, never smaller.
2. avoid liquids over flowing when boiling.
3. never leave the plates on without a pot on
them or with an empty pot on them.
In models supplied with a cover, it should not
be closed when the burners are still hot.
fig. 14
ELECTRIC
1
2
3
6
5
4
How to chose the burner
Above every knob there is a symbol for the
corresponding burner.
For better cooking results, always chose pans
which properly fit to the diameter of the burner
used (fig. 15).
We advise to lower the flame as soon as the
liquid starts boiling.
For a right ignition keep the burner ring and
the sparklers always clean.
Hot plate
What pot to use
Always use pots which properly fit to the
chosen burner (14-16 cm). Chose thick, flat
bottom pots (fig. 16).
Use advice
• Never leave the plates on without a pan
on them or put a material between the
plate and the pot;
• For saving power, it is advisable to cover
the pot every time the recipe allows it;
• Turn off the knob before cooking is
finished as the accumulated heat will
finish cooking (paste, rice, smoothing);
• For avoiding overflowing (milk, oil, sauce
…) fix the knob on a weaker position
some minutes before boiling, do not fill
the pots;
• When reducing the power or the plate is
turned off, the temperature lowers
slowly
Good use
Bad use
(Power waste)
fig. 15
Bad use
(Power waste)
fig. 16
13
Page 15
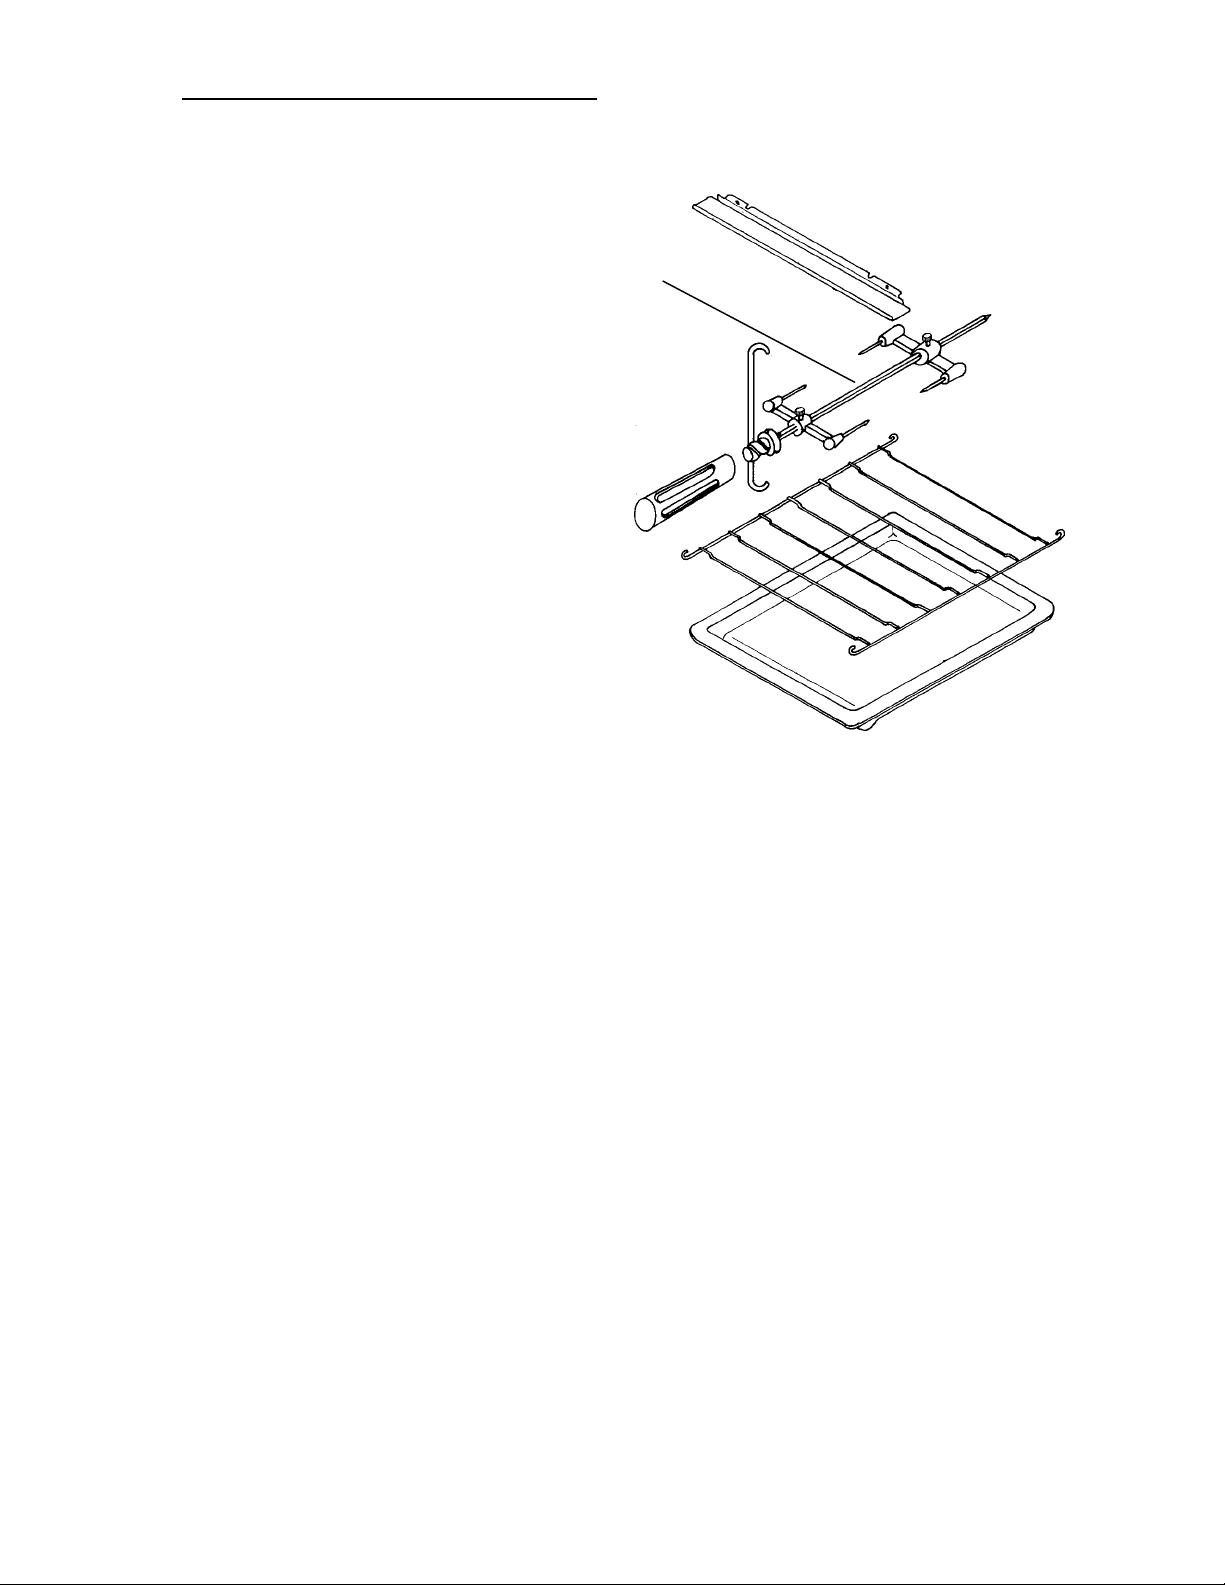
4. Accessories delivered with the appliance
Beside the accessories delivered with the
appliance we advise you to use only heat
proof pots (according to the instructions of the
manufacturer).
Your cooker is equipped with:
• a grate, pan support for putting the dishes
on (roast, pastry moulds …)
The dish has to be put in the middle of the
grate to balance the weight.
• a roasting tray.
It is used to collect juice when cooking in it,
place it on the shelf 2.
If you do not use the dripping pan, remove it
from the oven.
• a protective screen
It is used for when using the grill and the turnspit.
A turn spit (poz.1 in fig.17) made up of:
- 2 forks
- 1 spit
- 1 handle
- 1 spit support
1
fig.17
14
Page 16

ADVICE FOR USE
Oven cooking
• Turn off your oven 5 minutes before the
foreseen cooking time you will save
power, the accumulated heat will allow
to end cooking;
• The thickness, the conductibility and the
color of pot influences the culinary
results;
• When cooking, certain dishes increase
in volume, choose the pot so that above
the raw mixture remain enough place;
• For preventing fat dripping when
roasting use tall rim pans proportional to
the piece to be roasted;
• Prick the skin of poultry and the
sausage with a fork before cooking to
avoid its blowing up;
• Between the dish and the oven grid
could be put an aluminium foil but not
covering all the grid;
• Use glass heat resisting pans for crispy
and soufflés;
• Add some fat before finishing the
cooking.
Never line any part of the oven with
aluminium foil. It would result in an
accumulation of heat which might
damage the cooking results and also
damage the enamel.
The cover has to be opened when using the
oven.
Influence of the pots on oven cooking
results
You have to know that:
• The aluminium, the terracotta pots
diminish the browning bellow and
maintains the humidity of the meals. We
advice to use it for pastry, roast meat.
• The enameled cast iron, the tinned pots,
the glass and the heat-proof porcelain,
the pots with non-sticky interior and
colored exterior, increase the browning
bellow and dries the meals. We suggest
to use them for pies and all other crispy
cooking that has to be colored bellow
and above.
Cooking on the hob
Choose always the right pot, proportional to
the burner used.
In case you use a large bottom pot, put it
slight backwards on the plate, so that its
bottom should not outrun the front of the
enameled hob, thus avoiding flame
exceeding and overheating of front panel.
Before covering make sure the hob
is cooled, otherwise the cover could be
damaged.
15
Page 17

MAINTENANCE AND CLEANING
Before cleaning, check that the
knobs are on “off” position, that the
appliance has cooled completely and
that it is disconnected.
Never use abrasive powder or wire
sponge for cleaning the appliance.
Burners
Clean the covers with warm water and mild
detergent, remove all crust.
Never use vinegar.
The flame splitters have to be kept clean for
ensuring good ignition.
Before igniting make sure the flame splitter
and the caps are properly replaced.
The assembly has to be perfectly dry.
Control panel, knobs, enameled pan
support, cover, front and side panels
For cleaning them use a wet sponge with a
soft detergent, rinse and dry.
Hob
After every use wipe it with a sponge
soaked in warm detergent water, avoiding
leakage through the wholes of the hob.
Rinse and dry with a soft cloth.
In case of overflowing, wet and leave it
dissolving but do not scratch and avoid use
of abrasive or caustic products that could
damage the enamel.
Wipe immediately the stains of vinegar,
lemon, generally the acid substances.
Self-cleaning oven
Principle:
The walls of your cooker, except the soil are
protected by special porous enamel. It is
frosted and hard. It absorbs and destroys
the fat splashes when warm.
Maintenance
Sometimes when cooking causes a lot of fat
projections (poultry, roasted meat …), the
time or the temperature are not always
enough for eliminating the fat. In this case,
after cooking remove all the accessories
from the oven (grid, dripping tray), fix the
thermostat on position “250” and leave it
function empty for 45 min, then select
position
operation from cold oven count 60 minutes
for cleaning.
The soil which is not self cleaning enameled
can be pulled out, if necessary, for dripping.
Anyhow, it has to be cleaned separately,
before starting the self-cleaning, in order to
avoid burning of dirt.
Electric plate
Use a wet sponge and detergent, rinse and
dry. If necessary heat beforehand the plate
for burning the dirt.
The plates must be maintained dry.
From time to time you can wipe with an
absorbant paper lightly oiled.
The oven door is hotter the usually,
do not allow children near the appliance.
for 5 minutes. If you start this
16
Page 18
Oven
Enamelled parts: Same cleaning as other
enamelled parts.
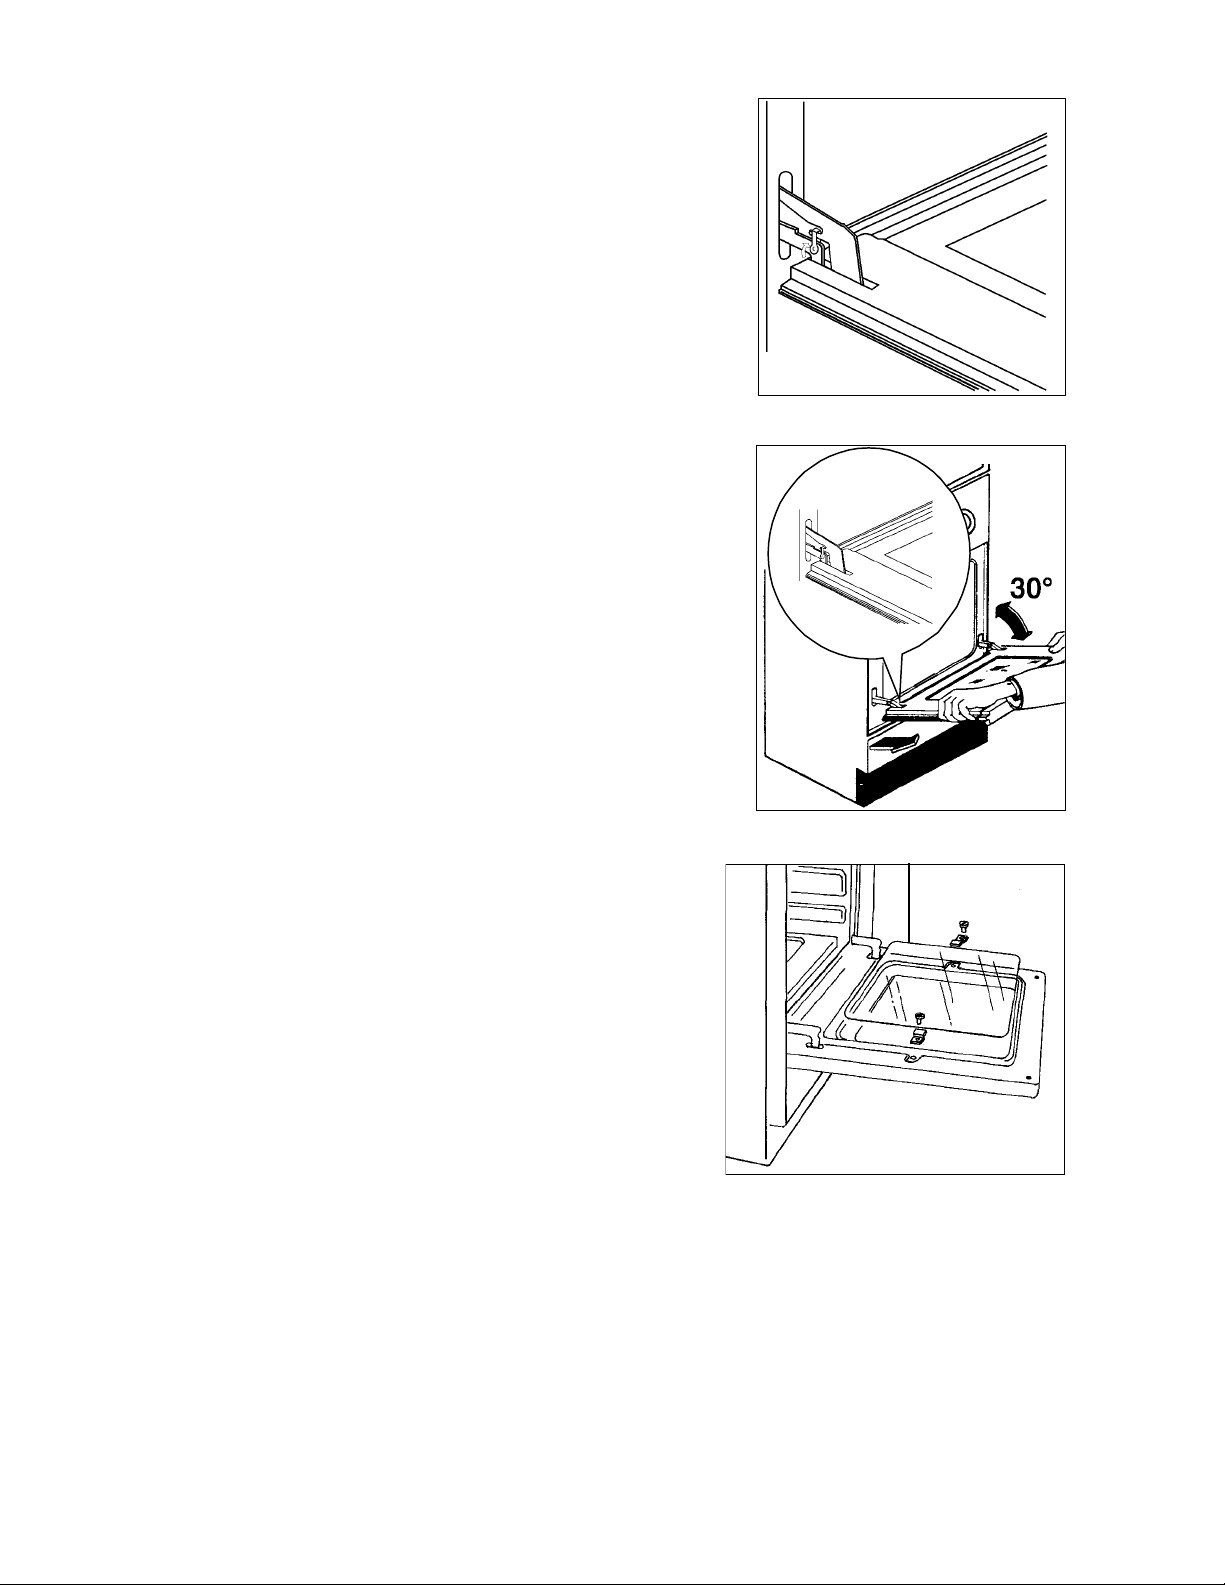
Oven door cleaning
For a complete cleaning of the oven door it
is advisable to dismantle as follows:
-open the door completely (fig.18)
-turn the two blocking parts on the hinges
arms 60º.
-close partially the door, to a 30º angle
(fig.19).
-lift the door and pull it out.
fig. 18
The internal oven door glass can be
removed for cleaning. For this purpose draw
out the 2 fixing screws (fig.20).
Important: The inner glass has to be
always in place when using the oven.
Cleaning of the accessories.
Clean them with warm water and detergent,
rinse well and dry.
fig. 19
fig. 20
17
Page 19

WHAT TO DO IF THE APPLIANCE DOES NOT WORK
If the appliance does not work properly, check the following points before asking for service;
there could be simple problems that you could remedy by yourself; if not, contact your after
sales service.
Symptoms Solutions
No burner ignites
One of the burners does not ignite
Cooking results are not satisfactory
The oven smokes
The electric plate and the oven do not
work
Check that:
• gas supply is completely open;
• the position of gas pipe is right;
• the gas cylinder or the tank is not empty.
Check that:
• the burner is in its right place;
• the burner is not wet.
Check that:
• the thermostat is placed correctly;
• the cooking time is adapted;
• the grill is placed correctly in the oven.
Check that:
• the oven does not need cleaning;
• the meal does not overflow;
• there is no excessive fat / juice projection
on the oven sides.
Check that:
• the appliance is not unplugged;
• there is no power break.
Check the fuses.
Rating Plate
The rating plate is fixed at the back of the appliance. When you call your After Sales Service,
you have to specify the model, the product number and the serial number of the appliance.
All these informations can be read on the rating plate at the back of the appliance.
18
Page 20

GUARANTEE CONDITIONS
Guarantee stipulated in the contract
1 year starting from setting into function the
manufacturer will replace the damaged
parts except the cases mentioned in chapter
“Reserves”.
Conditions for applying
For applying this guarantee you have to
direct to the distributor who sold you the
appliance and submit to him your
Guarantee Certificate. The dealer will or will
not overtake the expenses for the labor and
transport in accordance with their sales
conditions.
Reserves:
We draw your attention on the fact that the
guarantee will not be applied:
• if the damages are due to shock ,
AFTER SALES SERVICE
abnominal power variation, etc., or nonobserving of the installation and use
conditions stipulated in the Instruction
book, wrong handling, negligence or
wrong, installation non-conforming to the
rules imposed by the power, water, gas
distributor;
• if the user modified the material or took
off the marking or the serial numbers;
• if the person who made the repairing is
not certified by the manufacturer or the
dealer;
• if the appliance was used for
commercial or industrial purpose or
other household purposes than what it
was conceived for;
• if the appliance was bought or repaired
outside cantry territory
Any repair work that needs to be carried out
should be done with the utmost care and
attention. For this reason we recommend
that for any problem you contact the dealer
who sold it to you.
In case of moving to another place, closing
of the shop, contact the nearest Consumers
Service (Authorized Service Center) who
will give you the address of an After Sales
Service.
In case of intervention on your appliance
ask your after sales service only spare
parts certified by the Manufacturer.
19
Page 21

INSTRUCTIONS FOR THE INSTALLER
ADVICE FOR SAFETY
• Before installation ensure that the local
distribution conditions (gas nature and
pressure) and the pre-setting of the
appliance are consistent;
• This appliance must be installed only in
a room with good ventilation;
• The adjusting conditions of this
appliance are mentioned on the rating
plate;
• This appliance is not connected to a flue
gas exhaust device. It has to be
installed and connected in accordance
with the rules in force. Special attention
should be granted to the applicable
disposal concerning ventilation;
• This appliance is of y type, meaning that
the furniture units can exceed its height;
• The neighbouring furniture panels has to
be heat proof or protected by such
material.
Connection to gas main
• Check that the counter flow and the
diameter of piping are enough to supply
all the appliances of the installation
(take counsel with the gas distribution
company);
• Check that all connections are tight;
• Install an accessible and visible barrage
tap;
• If you use a flexible pipe it has to be
easily inspected all along and must not
pass behind the appliance;
• Change the flexible pipe little before its
expire date stamped on it.
Electric connection
Check that:
• the power of the installation is enough;
• the supplying lines are in good
conditions;
• the diameter of the cables complies with
the installation rules;
• the fix installation has a device with
contacts with omnipolar switch with a
minimum opening between contacts of
minimum3 mm.
Installation and maintenance have to be
made by a qualified person in accordance
with the regulations in force, which are:
Decision of 2
nd
August 1977
Technical and Safety Rules to be applied to
fuel gas and liquefied hydrocarburs in the
buildings.
Standard DTU 45-204
Gas Installation (former DTU no. 61-1 – Gas
Installation, April 1982 + annex no. 1 July
1984).
Departmental Sanitary Regulation.
Standard NF C 15-100 – Low Tension
Electric Installation.
We deny any responsibility in cases of
accidents or incidents caused lack of
grounding or missgrounding.
20
Page 22
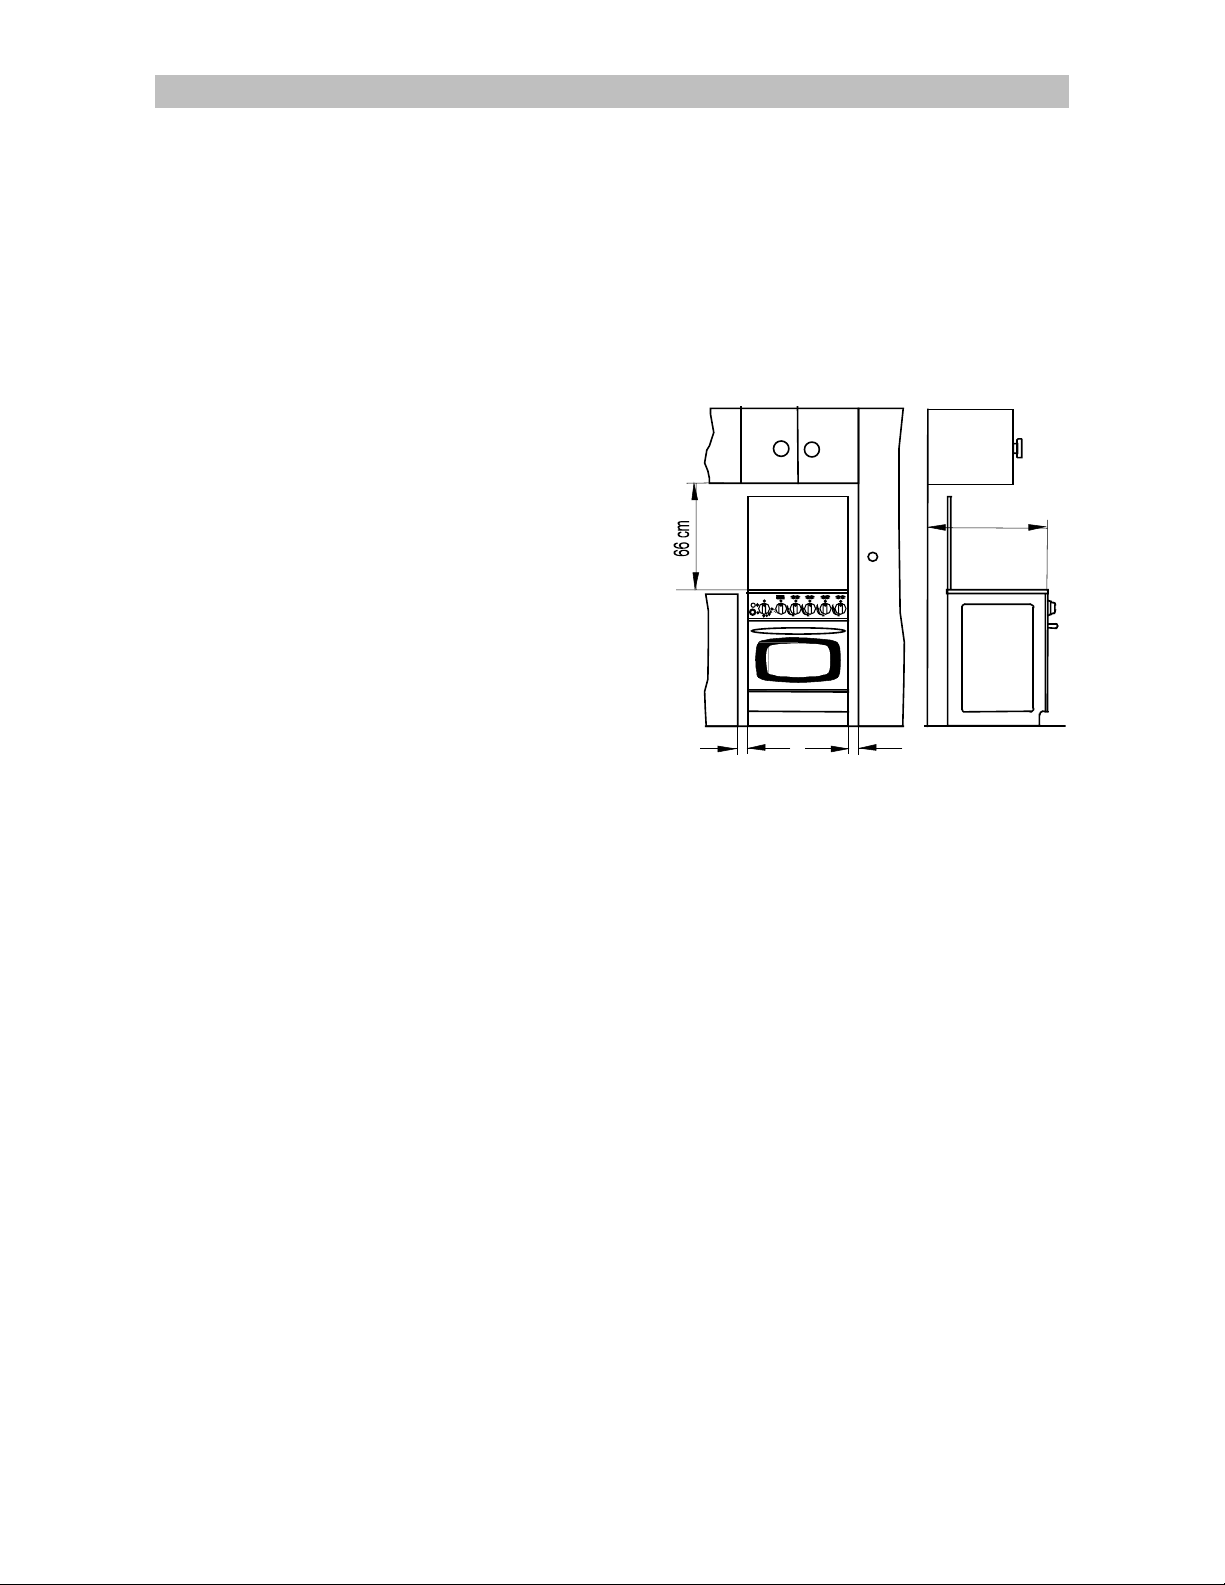
INSTALLATION
Placement
Remove the plastic packaging and install
the cooker in a dry, ventilated room (fig. 21)
not near curtains, paper, alcohol, petrol,
etc…)
The appliance has to be set on a heatproof
soil.
This appliance belongs to class “1” in
matters of protection against overheating of
surrounding surfaces.
It is mandatory to keep 2 cm distance to the
furniture walls.
The furniture cannot be taller then the
cooker hot plate.
Ventilation
59 cm
Gas combustion is possible due to the
oxygen in the air (2 m
3
air/h x kW installed
power – check the rating panel of the
cooker).
It is necessary to renew the air and that the
combustion products be discharged.
The air flow must come directly through
openings of external walls having a free
passage of at least 100 cm
2
.
These openings should be realized
preferably positioned near the floor,
opposite the combustion products
discharge. It should not be occluded both
from inside and outside.
fig. 21
2 cm
2 cm
21
Page 23
Gas connection
Your cooker is delivered adjusted for the
kind of gas stated on the rating plate.
It might be necessary to pass to another
kind of gas, different to the one it is preset
to. Under these circumstances follow the
instructions bellow.
For best efficiency, lowest
consumption and a longer length of life of
your cooker, the manifold gas pressure has
to respect the values shown in table no. 2
If the appliance is supplied with Butane or
Propane gas check that from the pressure
regulator, the pressure for Butane is 28-30
mbar and for Propane 37 mbar.
1. For cylinder butane propane gas:
• We advise you to use flexible pipe
according to the national rule in force of
minimum 1 m; this length is chosen
depending on the position of the
connection to the gas supply;
• For the old butane installations you can
use a flexible rubber pipe of max 1,5 m
and 6 mm diameter, mounted with the
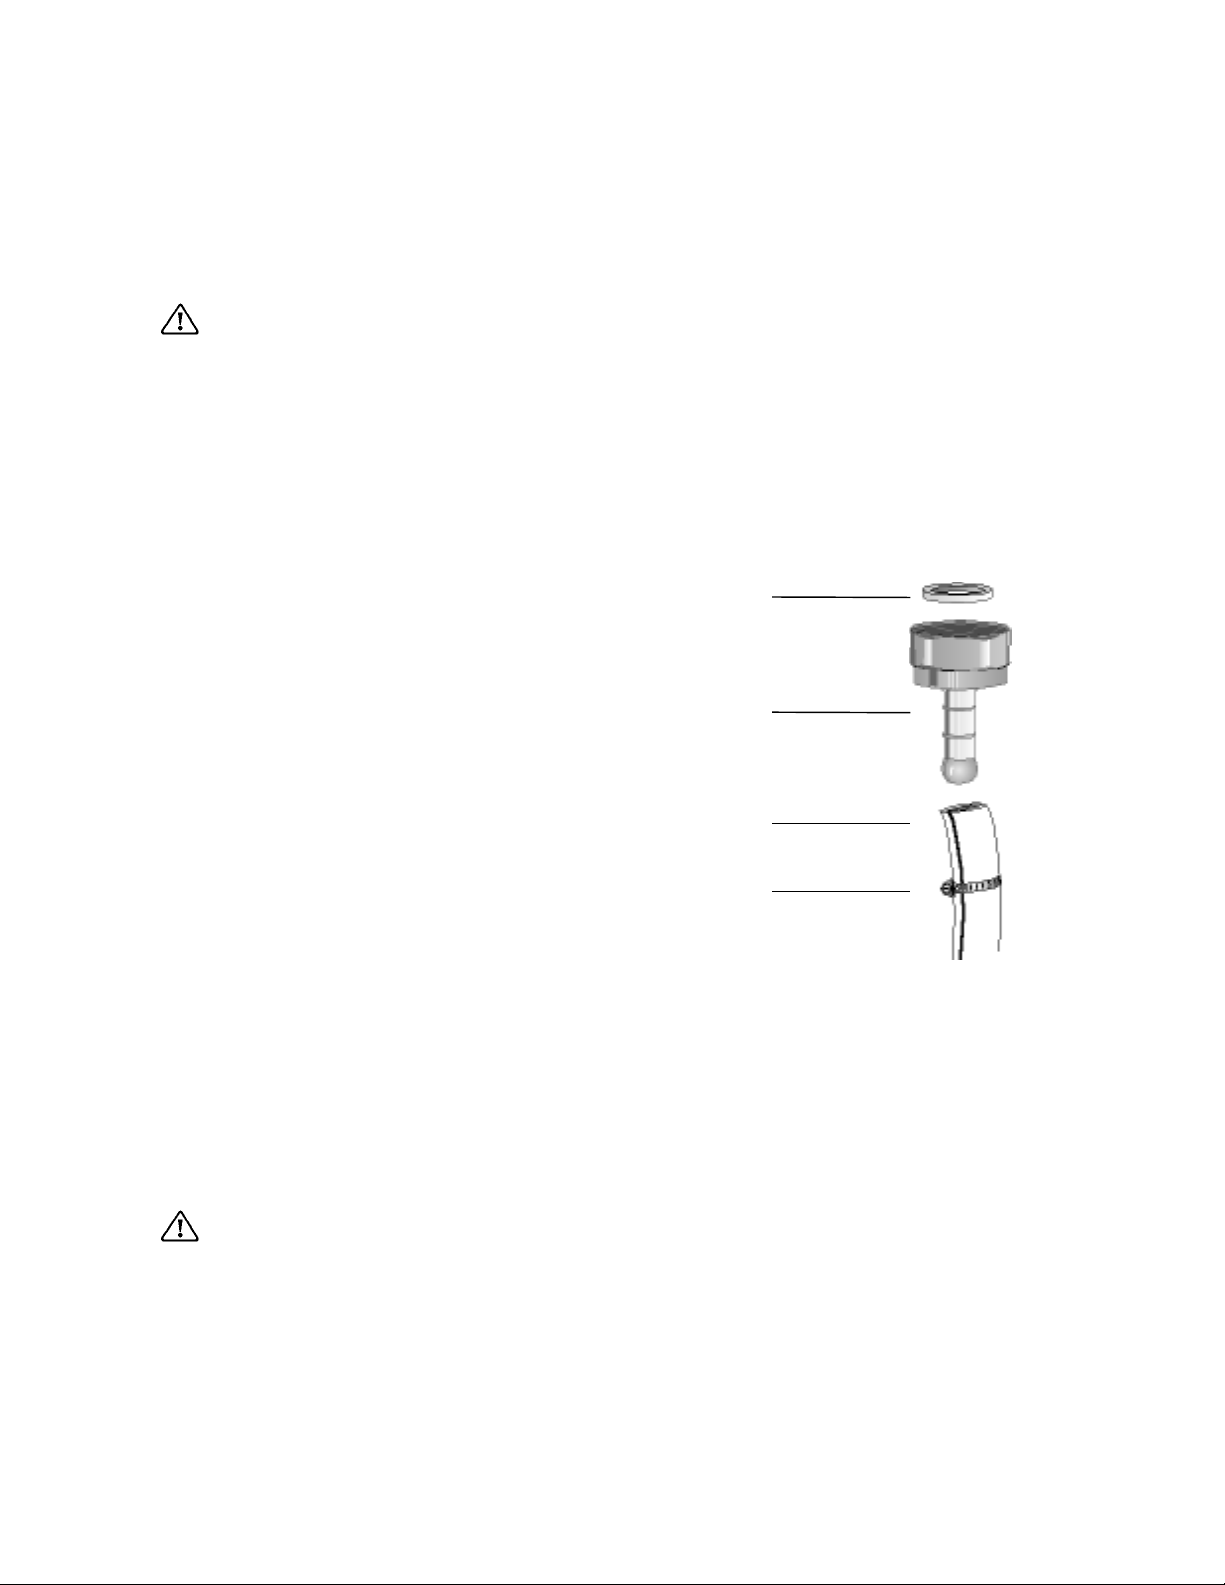
special butane holder ;
• Fix it well by means of a collar for each
end.
For buying the pipe
• Flexible rubber hose: it has to be
marked NF GAS
• Flexible pipe: according to standard NF
D 36 121, or NF D 103, or NF D 36 107
Electrical connection
Fitting
Holder
butane
Flexible
rubber
Necklace
Important
In any connection way the appliance
has to be grounded, in accordance with
the national rules in force and with
standard NFC 15 100. We decline any
responsibility in case of accidents due to
no grounding or wrong grounding.
22
Page 24

Fuse capacity: 20/16A
Note:
Check on the rating plate the value for the
total connection power for establishing the
fuse power.
In case of a direct connection to the mains
you have to interpose an omnipolar switch a
minimum opening between contacts of 3
mm.
The yellow-green grounding cable has not
to be interrupted by the switch.
The supply cord must be positioned in such
a way as it does not reach in any point a
temperature higher by 50˚C than the room
temperature.
Before connecting check that:
• fuse and household electric installation
can bear the charge of the appliance
(see rating plate);
• The socket or the omnipolar switch used
for connection is easily reachable when
the appliance is installed.
How to proceed?
• Unscrew and remove the protective
cover at the back of the appliance;
• Connect the power cord to the terminal
of the cooker according to the table
no.1;
• Fix by means of cable clamp;
• Make sure that the connection to the
terminal is matching the network power;
• Remount and screw the protective cover
at the back of the appliance.
23
Page 25
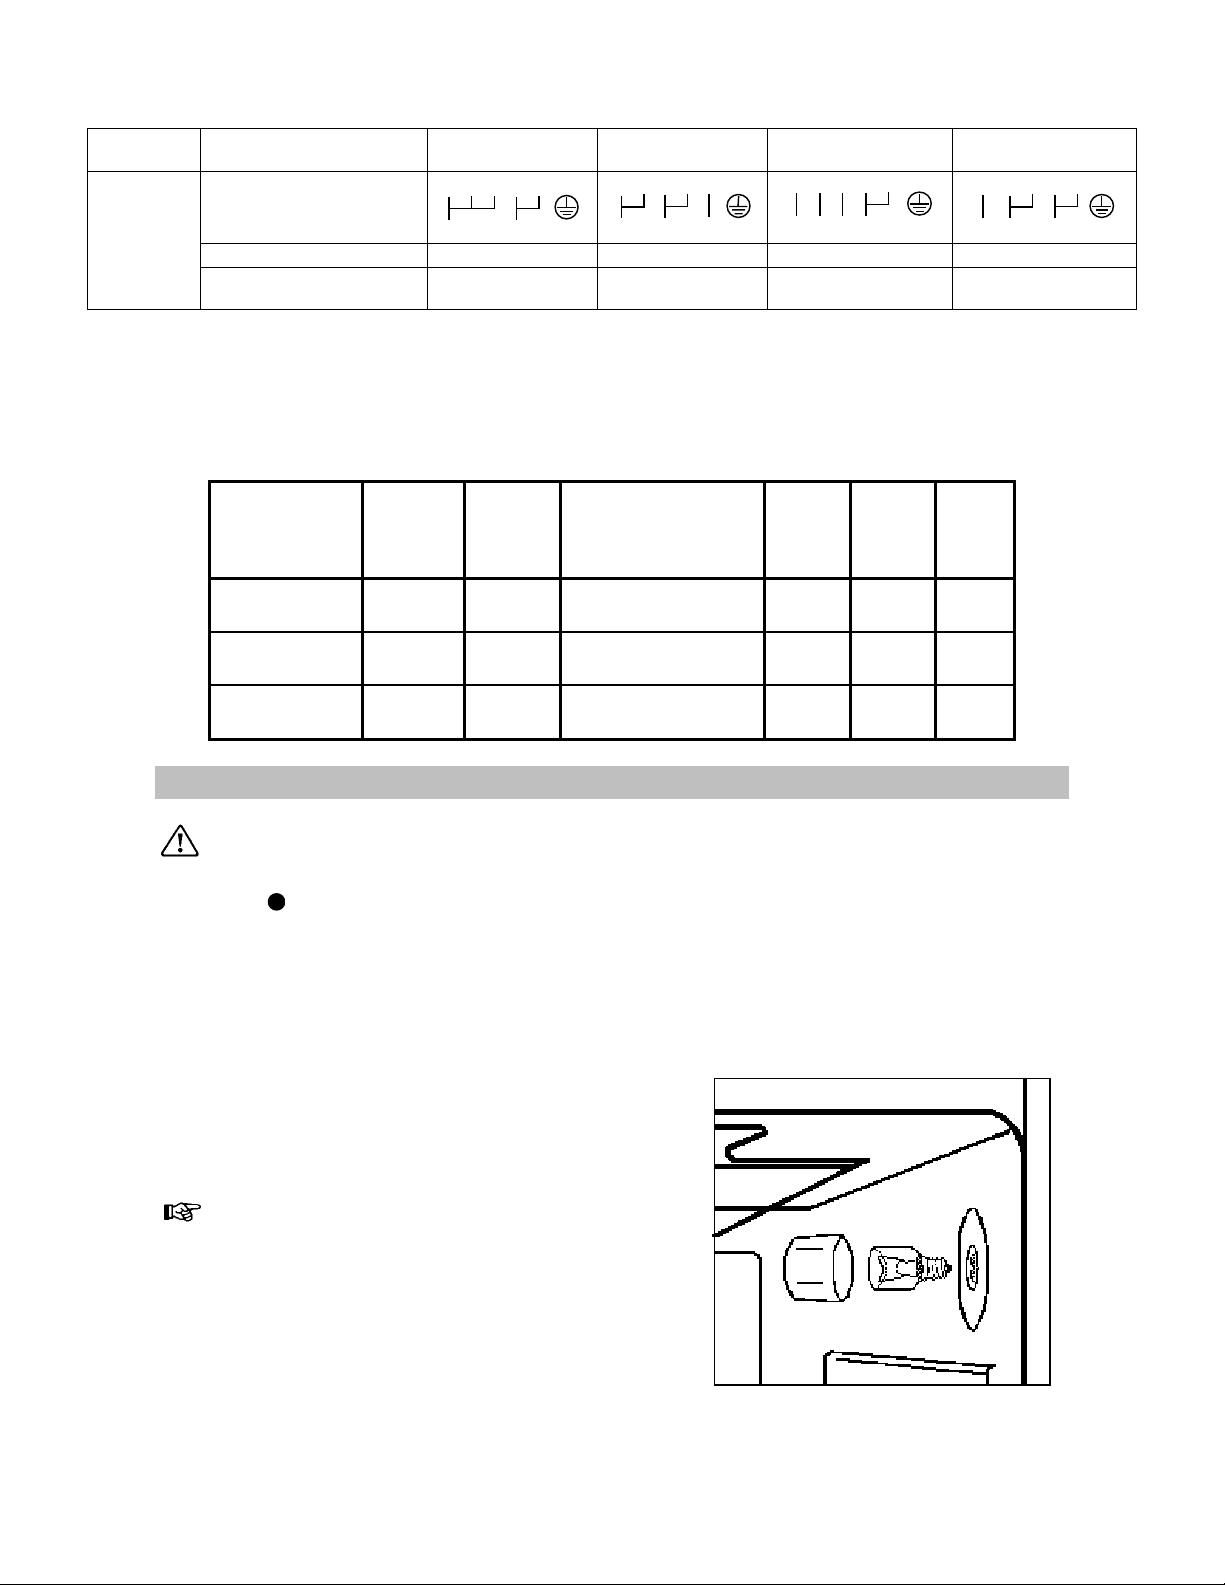
Table no.1
Connection type Single phase Tri-phase
Cable connection to the
terminal plate
A
Network power
Power of heating
elements
1 2 3 4 5
L1
N PE
230 V 230 V 230 V / 400 V 230 V / 400 V
230 V 230 V 230 V 230 V
1 2
L1 L2
3 4
5
L3
Tri-phase Y 3 ph. +
1
PE
neutral
2
L2
4 5
3
PE
N
L3L1
Tri-phase Y 3 ph. +
neutral
2 3
1
4 5
PE
N
L2L1
SPECIFICATION NOZZLES NO. 2
(Cat : I 3+)
Burner
RAPID
SEMIRAPID
AUXILIARY
Normal
power
(Kw)
2,60 0,72
2,00 0,43
1,00 0,35
Reduced
power
(Kw)
Gas type
Butane G30
Propane G31
Butane G30
Propane G31
Butane G30
Propane G31
Pressure
(mbar)
Nozzle
diameter
28-30370,86
0,86
28-30370,71
0,71
28-30370,50
0,50
Cons.
(g/h)
188,8
145,2
72,6
OVEN LAMP REPLACEMENT
Before replacing the lamp take care
that all control knobs be on “off”
position
Disconnect the appliance; watch that the
oven be cool.
This lamp of 15 W, convection E 14
(230/240V) is a special lamp for “higher”
temperature, up to 300˚C. It is supplied on
order, by your After Sales Service.
The lamp is fixed in front of the oven and is
accessible from inside.
1. Unscrew the glass lamp protection (fig.
2. Unscrew the lamp;
3. Replace the lamp;
4. Remount the lamp protection
« ».
For reaching the lamp:
22);
fig. 22
24
 Loading...