

Page 1
EJ2301AOW
................................................ .............................................
EN FRIDGE FREEZER USER MANUAL 2
HU HŰTŐ - FAGYASZTÓ HASZNÁLATI ÚTMUTATÓ 19
PL CHŁODZIARKO-
ZAMRAŻARKA
RO FRIGIDER CU CONGELATOR MANUAL DE UTILIZARE 53
INSTRUKCJA OBSŁUGI 36
Page 2

www.electrolux.com
2
CONTENTS
1. SAFETY INFORMATION . . . . . . . . . . . . . . . . . . . . . . . . . . . . . . . . . . . . . . . . . . . . . . . . . . 3
2. PRODUCT DESCRIPTION . . . . . . . . . . . . . . . . . . . . . . . . . . . . . . . . . . . . . . . . . . . . . . . . 5
3. OPERATION . . . . . . . . . . . . . . . . . . . . . . . . . . . . . . . . . . . . . . . . . . . . . . . . . . . . . . . . . . 5
4. FIRST USE . . . . . . . . . . . . . . . . . . . . . . . . . . . . . . . . . . . . . . . . . . . . . . . . . . . . . . . . . . . . 6
5. DAILY USE . . . . . . . . . . . . . . . . . . . . . . . . . . . . . . . . . . . . . . . . . . . . . . . . . . . . . . . . . . . . 6
6. HELPFUL HINTS AND TIPS . . . . . . . . . . . . . . . . . . . . . . . . . . . . . . . . . . . . . . . . . . . . . . . 8
7. CARE AND CLEANING . . . . . . . . . . . . . . . . . . . . . . . . . . . . . . . . . . . . . . . . . . . . . . . . . . 9
8.
WHAT TO DO IF… . . . . . . . . . . . . . . . . . . . . . . . . . . . . . . . . . . . . . . . . . . . . . . . . . . . . . 10
9. INSTALLATION . . . . . . . . . . . . . . . . . . . . . . . . . . . . . . . . . . . . . . . . . . . . . . . . . . . . . . . 13
10.
TECHNICAL DATA . . . . . . . . . . . . . . . . . . . . . . . . . . . . . . . . . . . . . . . . . . . . . . . . . . . . . 18
11. ENVIRONMENT CONCERNS . . . . . . . . . . . . . . . . . . . . . . . . . . . . . . . . . . . . . . . . . . . . . 18
WE’RE THINKING OF YOU
Thank you for purchasing an Electrolux appliance. You’ve chosen a product that brings with it
decades of professional experience and innovation. Ingenious and stylish, it has been designed
with you in mind. So whenever you use it, you can be safe in the knowledge that you’ll get great
results every time.
Welcome to Electrolux.
Visit our website for:
Get usage advice, brochures, trouble shooter, service information:
www.electrolux.com
Register your product for better service:
www.electrolux.com/productregistration
Buy Accessories, Consumables and Original spare parts for your appliance:
www.electrolux.com/shop
CUSTOMER CARE AND SERVICE
We recommend the use of original spare parts.
When contacting Service, ensure that you have the following data available.
The information can be found on the rating plate. Model, PNC, Serial Number.
Warning / Caution-Safety information
General information and tips
Environmental information
Subject to change without notice.
Page 3

ENGLISH 3
1.
SAFETY INFORMATION
In the interest of your safety and to ensure
the correct use, before installing and first
using the appliance, read this user manual
carefully, including its hints and warnings.
To avoid unnecessary mistakes and accidents, it is important to ensure that all
people using the appliance are thoroughly
familiar with its operation and safety features. Save these instructions and make
sure that they remain with the appliance if
it is moved or sold, so that everyone using
it through its life will be properly informed
on appliance use and safety.
For the safety of life and property keep
the precautions of these user's instructions as the manufacturer is not responsible for damages caused by omission.
1.1 Children and vulnerable
people safety
• This appliance is not intended for use
by persons (including children) with reduced physical, sensory or mental capabilities, or lack of experience and
knowledge, unless they have been given supervision or instruction concerning
use of the appliance by a person responsible for their safety.
Children should be supervised to ensure that they do not play with the appliance.
• Keep all packaging well away from children. There is risk of suffocation.
• If you are discarding the appliance pull
the plug out of the socket, cut the connection cable (as close to the appliance
as you can) and remove the door to
prevent playing children to suffer electric shock or to close themselves into it.
• If this appliance featuring magnetic
door seals is to replace an older appliance having a spring lock (latch) on the
door or lid, be sure to make that spring
lock unusable before you discard the
old appliance. This will prevent it from
becoming a death trap for a child.
1.2 General safety
WARNING!
Keep ventilation openings, in the appliance enclosure or in the built-in structure,
clear of obstruction.
• The appliance is intended for keeping
foodstuff and/or beverages in a normal
household as explained in this instruction booklet.
• Do not use a mechanical device or any
artificial means to speed up the thawing
process.
• Do not use other electrical appliances
(such as ice cream makers) inside of refrigerating appliances, unless they are
approved for this purpose by the manufacturer.
• Do not damage the refrigerant circuit.
• The refrigerant isobutane (R600a) is
contained within the refrigerant circuit of
the appliance, a natural gas with a high
level of environmental compatibility,
which is nevertheless flammable.
During transportation and installation of
the appliance, be certain that none of
the components of the refrigerant circuit become damaged.
If the refrigerant circuit should become
damaged:
– avoid open flames and sources of ig-
nition
– thoroughly ventilate the room in
which the appliance is situated
• It is dangerous to alter the specifications or modify this product in any way.
Any damage to the cord may cause a
short-circuit, fire and/or electric shock.
WARNING!
Any electrical component (power
cord, plug, compressor) must be
replaced by a certified service
agent or qualified service personnel to avoid hazard.
1.
Power cord must not be lengthened.
2.
Make sure that the power plug is
not squashed or damaged by the
back of the appliance. A squashed
or damaged power plug may overheat and cause a fire.
3.
Make sure that you can come to
the mains plug of the appliance.
Page 4
www.electrolux.com
4
• This appliance is heavy. Care should be
• Do not remove nor touch items from
• Avoid prolonged exposure of the appli-
• Bulb lamps (if foreseen) used in this ap-
1.3 Daily Use
• Do not put hot pot on the plastic parts
• Do not store flammable gas and liquid
• Do not place food products directly
• Frozen food must not be re-frozen once
• Store pre-packed frozen food in ac-
• Appliance's manufacturers storage rec-
• Do not place carbonated or fizzy drinks
• Ice lollies can cause frost burns if con-
1.4 Care and cleaning
• Before maintenance, switch off the ap-
• Do not clean the appliance with metal
4.
Do not pull the mains cable.
5.
If the power plug socket is loose,
do not insert the power plug. There
is a risk of electric shock or fire.
6.
You must not operate the appliance without the lamp cover (if
foreseen) of interior lighting.
taken when moving it.
the freezer compartment if your hands
are damp/wet, as this could cause skin
abrasions or frost/freezer burns.
ance to direct sunlight.
pliance are special purpose lamps selected for household appliances use
only. They are not suitable for household room illumination.
in the appliance.
in the appliance, because they may explode.
against the air outlet on the rear wall. (If
the appliance is Frost Free)
it has been thawed out.
cordance with the frozen food manufacturer's instructions.
ommendations should be strictly adhered to. Refer to relevant instructions.
in the freezer compartment as it creates
pressure on the container, which may
cause it to explode, resulting in damage
to the appliance.
sumed straight from the appliance.
pliance and disconnect the mains plug
from the mains socket.
objects.
• Do not use sharp objects to remove
frost from the appliance. Use a plastic
scraper.
• Regularly examine the drain in the refrigerator for defrosted water. If necessary, clean the drain. If the drain is
blocked, water will collect in the bottom
of the appliance.
1.5 Installation
For electrical connection carefully
follow the instructions given in
specific paragraphs.
• Unpack the appliance and check if
there are damages on it. Do not connect the appliance if it is damaged. Report possible damages immediately to
the place you bought it. In that case retain packing.
• It is advisable to wait at least four hours
before connecting the appliance to allow the oil to flow back in the compressor.
• Adequate air circulation should be
around the appliance, lacking this leads
to overheating. To achieve sufficient
ventilation follow the instructions relevant to installation.
• Wherever possible the back of the
product should be against a wall to
avoid touching or catching warm parts
(compressor, condenser) to prevent
possible burn.
• The appliance must not be located
close to radiators or cookers.
• Make sure that the mains plug is accessible after the installation of the appliance.
• Connect to potable water supply only (If
a water connection is foreseen).
1.6 Service
• Any electrical work required to do the
servicing of the appliance should be
carried out by a qualified electrician or
competent person.
• This product must be serviced by an
authorized Service Centre, and only
genuine spare parts must be used.
Page 5
1.7 Environment Protection
This appliance does not contain
gasses which could damage the
ozone layer, in either its refrigerant
circuit or insulation materials. The
appliance shall not be discarded
together with the urban refuse and
rubbish. The insulation foam con-
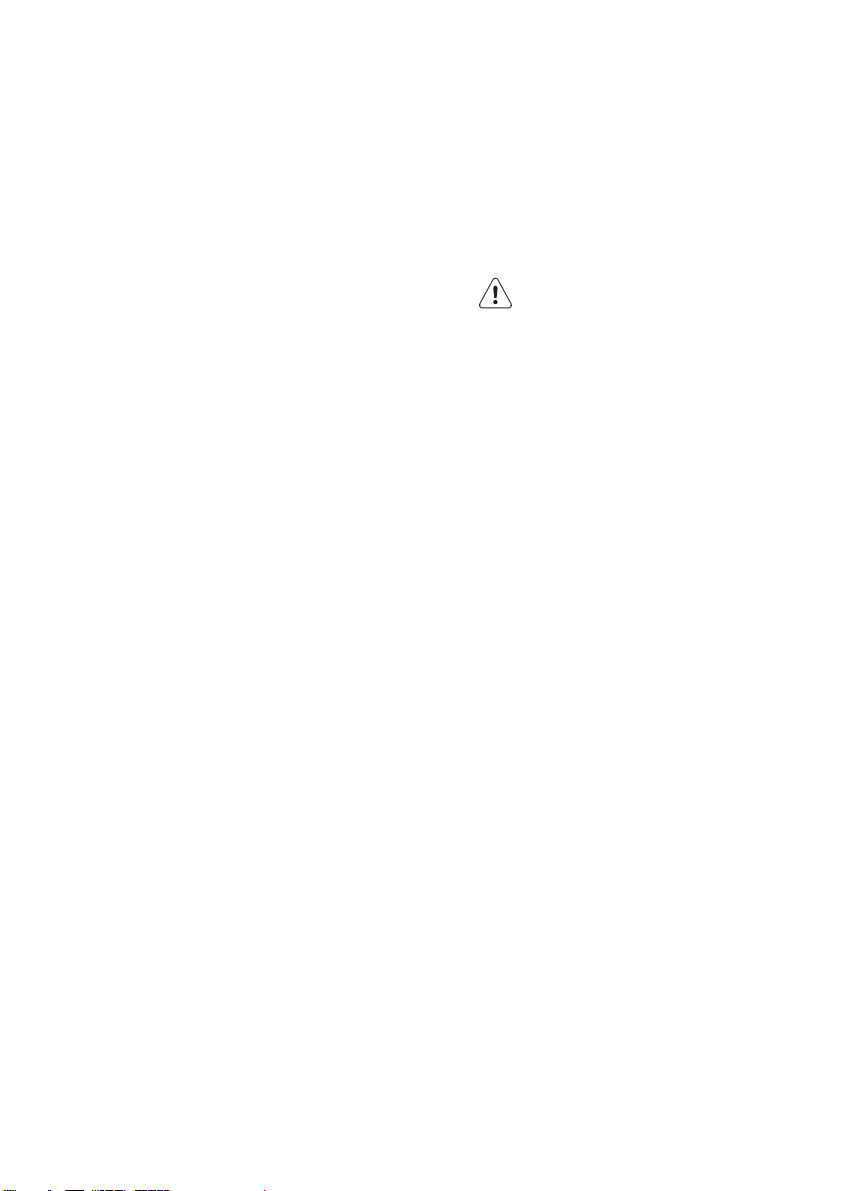
2. PRODUCT DESCRIPTION
7
6
ENGLISH 5
tains flammable gases: the appliance shall be disposed according
to the applicable regulations to
obtain from your local authorities.
Avoid damaging the cooling unit,
especially at the rear near the heat
exchanger. The materials used on
this appliance marked by the sym-
are recyclable.
bol
1
2
Wire shelf
1
Butter compartment
2
Door shelves
3
Rating plate
4
3. OPERATION
3.1 Switching on
Insert the plug into the wall socket.
Turn the Temperature regulator clockwise
to a medium setting.
3.2 Switching off
To turn off the appliance, turn the Temperature regulator to the "O" position.
5
4
Vegetable drawer
5
Glass shelves
6
Temperature regulator/ Light
7
3
3.3 Temperature regulation
The temperature is automatically regulated.
To operate the appliance, proceed as follows:
• turn the Temperature regulator toward
lower settings to obtain the minimum
coldness.
Page 6

www.electrolux.com
6
• turn the Temperature regulator toward
higher settings to obtain the maximum
coldness.
A medium setting is generally the
most suitable.
However, the exact setting should be
chosen keeping in mind that the temperature inside the appliance depends on:
• room temperature
• how often the door is opened
• the quantity of food stored
4. FIRST USE
• the location of the appliance.
If the ambient temperature is high
or the appliance is fully loaded,
and the appliance is set to the
lowest temperatures, it may run
continuously causing frost to form
on the rear wall. In this case the
dial must be set to a higher temperature to allow automatic defrosting and therefore reduced energy consumption.
4.1 Cleaning the interior
Before using the appliance for the first
time, wash the interior and all internal accessories with lukewarm water and some
neutral soap so as to remove the typical
5. DAILY USE
5.1 Freezing fresh food
The freezer compartment is suitable for
freezing fresh food and storing frozen and
deep-frozen food for a long time.
To freeze fresh foods it is not necessary
to change the medium setting.
However, for a faster freezing operation,
turn the temperature regulator toward
higher settings to obtain the maximum
coldness.
In this condition, the refrigerator
compartment temperature might
drop below 0°C. If this occurs reset the temperature regulator to a
warmer setting.
5.2 Storage of frozen food
When first starting-up or after a period out
of use, before putting the products in the
compartment let the appliance run at least
2 hours on the higher settings.
smell of a brand-new product, then dry
thoroughly.
Do not use detergents or abrasive
powders, as these will damage
the finish.
In the event of accidental defrosting, for example due to a power
failure, if the power has been off
for longer than the value shown in
the technical characteristics chart
under "rising time", the defrosted
food must be consumed quickly
or cooked immediately and then
re-frozen (after cooling).
5.3 Thawing
Deep-frozen or frozen food, prior to being
used, can be thawed in the refrigerator
compartment or at room temperature, depending on the time available for this operation.
Small pieces may even be cooked still frozen, directly from the freezer: in this case,
cooking will take longer.
Page 7
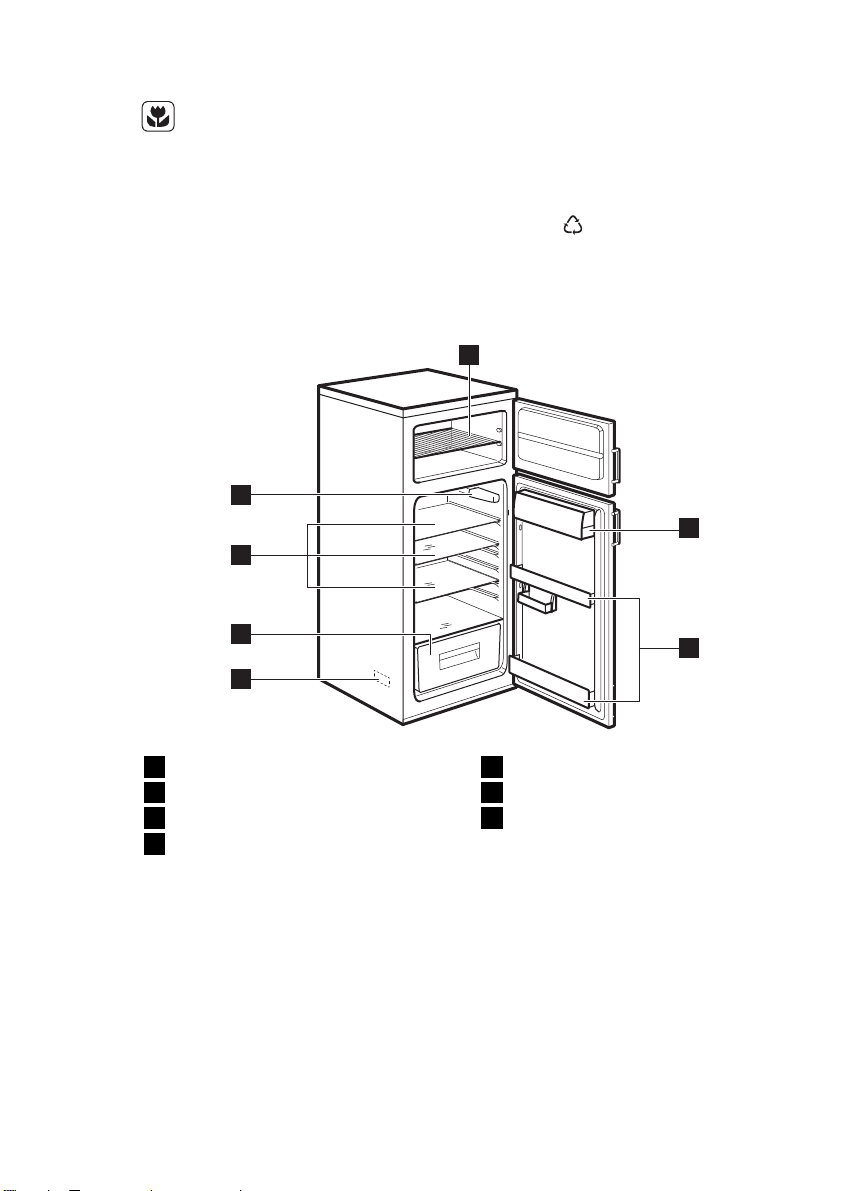
5.4 Movable shelves
5.5 Humidity control
ENGLISH 7
The walls of the refrigerator are equipped
with a series of runners so that the
shelves can be positioned as desired.
The glass shelf incorporates a device with
slits (adjustable by means of a sliding lever), which makes it possible to regulate
the temperature in the vegetable drawer(s).
When the ventilation slots are closed:
the natural moisture content of the food in
the fruit and vegetable compartments is
preserved for longer.
When the ventilation slots are opened:
more air circulation results in a lower air
moisture content in the fruit and vegetable
compartments.
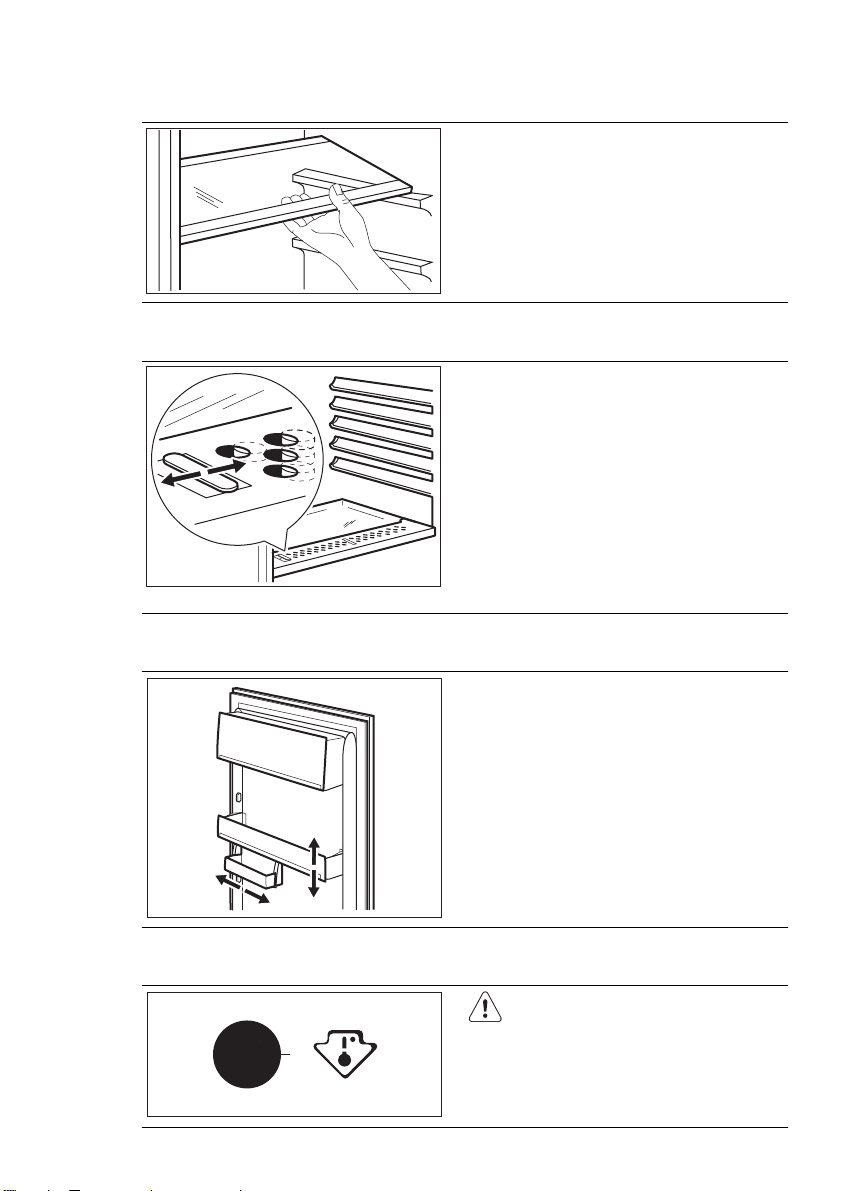
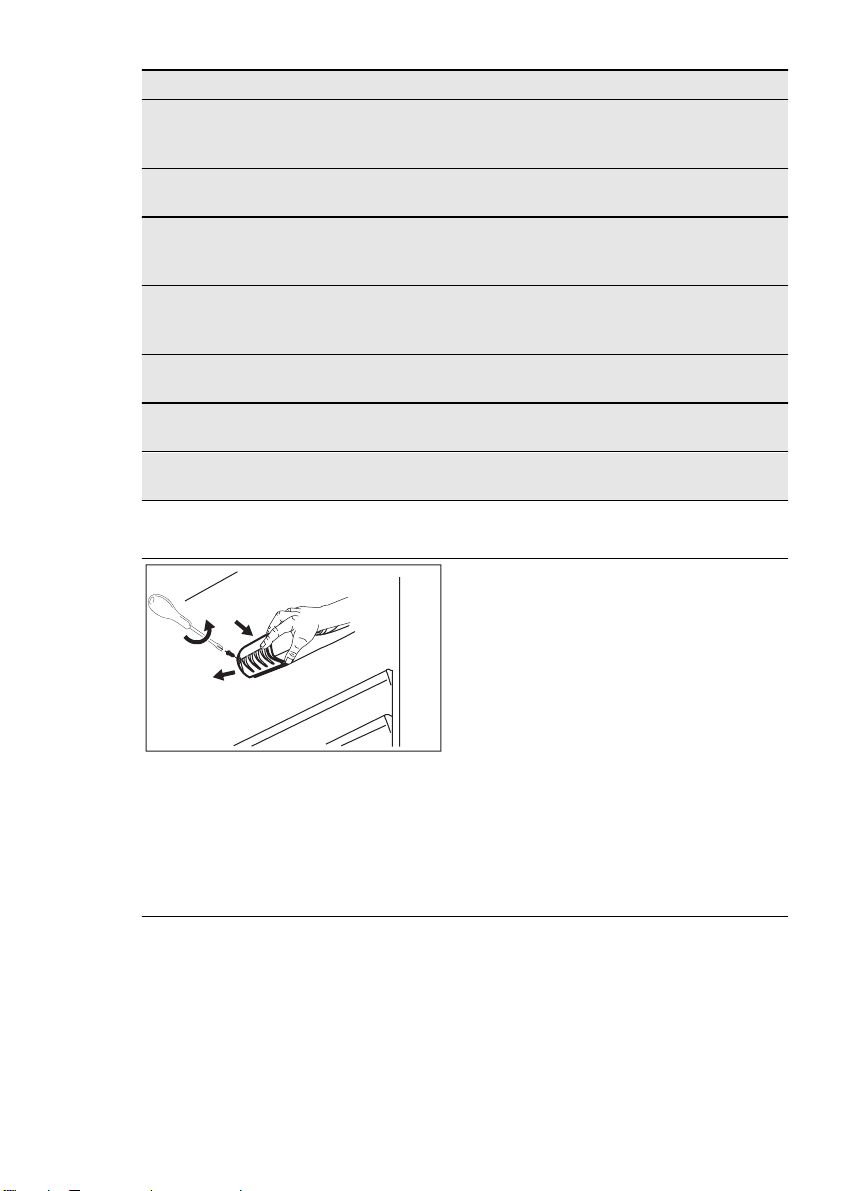
5.6 Positioning the door shelves
5.7 Temperature Indicator
To permit storage of food packages of
various sizes, the door shelves can be
placed at different heights.
To make these adjustments proceed as
follow: gradually pull the shelf in the direction of the arrows until it comes free, then
reposition as required.
This appliance is sold in France.
In accordance with regulations
valid in this country it must be
provided with a special device
(see figure) placed in the lower
compartment of the fridge to indicate the coldest zone of it.
Page 8

www.electrolux.com
8
6. HELPFUL HINTS AND TIPS
6.1 Normal Operating Sounds
• You may hear a faint gurgling and a
bubbling sound when the refrigerant is
pumped through the coils or tubing.
This is correct.
• When the compressor is on, the refrigerant is being pumped around and you
will hear a whirring sound and a pulsating noise from the compressor. This is
correct.
• The thermic dilatation might cause a
sudden cracking noise. It is natural, not
dangerous physical phenomenon. This
is correct.
• When the compressor switches on or
switches off, you will hear a faint "click"
of the temperature regulator. This is
correct.
6.2 Hints for energy saving
• Do not open the door frequently or
leave it open longer than absolutely
necessary.
• If the ambient temperature is high and
the Temperature Regulator is set to low
temperature and the appliance is fully
loaded, the compressor may run continuously, causing frost or ice on the
evaporator. If this happens, set the
Temperature Regulator toward warmer
settings to allow automatic defrosting
and so a saving in electricity consumption.
6.3 Hints for fresh food
refrigeration
To obtain the best performance:
• do not store warm food or evaporating
liquids in the refrigerator
• do cover or wrap the food, particularly if
it has a strong flavour
• position food so that air can circulate
freely around it
6.4 Hints for refrigeration
Useful hints:
Meat (all types) : wrap in polythene bags
and place on the glass shelf above the
vegetable drawer.
For safety, store in this way only one or
two days at the most.
Cooked foods, cold dishes, etc..: these
should be covered and may be placed on
any shelf.
Fruit and vegetables: these should be
thoroughly cleaned and placed in the special drawer(s) provided.
Butter and cheese: these should be
placed in special airtight containers or
wrapped in aluminium foil or polythene
bags to exclude as much air as possible.
Milk bottles: these should have a cap and
should be stored in the bottle rack on the
door.
Bananas, potatoes, onions and garlic, if
not packed, must not be kept in the refrigerator.
6.5 Hints for freezing
To help you make the most of the freezing
process, here are some important hints:
• the maximum quantity of food which
can be frozen in 24 hrs. is shown on
the rating plate;
• the freezing process takes 24 hours.
No further food to be frozen should be
added during this period;
• only freeze top quality, fresh and thoroughly cleaned, foodstuffs;
• prepare food in small portions to enable
it to be rapidly and completely frozen
and to make it possible subsequently to
thaw only the quantity required;
• wrap up the food in aluminium foil or
polythene and make sure that the
packages are airtight;
• do not allow fresh, unfrozen food to
touch food which is already frozen, thus
avoiding a rise in temperature of the latter;
• lean foods store better and longer than
fatty ones; salt reduces the storage life
of food;
• water ices, if consumed immediately after removal from the freezer compartment, can possibly cause the skin to be
freeze burnt;
• it is advisable to show the freezing in
date on each individual pack to enable
you to keep tab of the storage time.
Page 9

6.6 Hints for storage of frozen
food
To obtain the best performance from this
appliance, you should:
• make sure that the commercially frozen
foodstuffs were adequately stored by
the retailer;
• be sure that frozen foodstuffs are transferred from the foodstore to the freezer
in the shortest possible time;
7. CARE AND CLEANING
ENGLISH 9
• not open the door frequently or leave it
open longer than absolutely necessary;
• once defrosted, food deteriorates rapidly and cannot be refrozen;
• do not exceed the storage period indicated by the food manufacturer.
CAUTION!
Unplug the appliance before carrying out any maintenance operation.
This appliance contains hydrocarbons in its cooling unit; maintenance and recharging must therefore only be carried out by authorized technicians.
7.1 Periodic cleaning
The equipment has to be cleaned regularly:
• clean the inside and accessories with
lukewarm water and some neutral
soap.
• regularly check the door seals and wipe
clean to ensure they are clean and free
from debris.
• rinse and dry thoroughly.
Do not pull, move or damage any
pipes and/or cables inside the
cabinet.
Never use detergents, abrasive
powders, highly perfumed cleaning products or wax polishes to
clean the interior as this will damage the surface and leave a
strong odour.
Clean the condenser (black grill) and the
compressor at the back of the appliance
with a brush. This operation will improve
the performance of the appliance and
save electricity consumption.
Take care of not to damage the
cooling system.
Many proprietary kitchen surface cleaners
contain chemicals that can attack/damage the plastics used in this appliance.
For this reason it is recommended that
the outer casing of this appliance is only
cleaned with warm water with a little
washing-up liquid added.
After cleaning, reconnect the equipment
to the mains supply.
7.2 Defrosting of the refrigerator
Frost is automatically eliminated from the
evaporator of the refrigerator compartment every time the motor compressor
stops, during normal use. The defrost water drains out through a trough into a special container at the back of the appliance, over the motor compressor, where
it evaporates.
It is important to periodically clean the defrost water drain hole in the middle of the
refrigerator compartment channel to prevent the water overflowing and dripping
onto the food inside. Use the special
Page 10

www.electrolux.com
10
cleaner provided, which you will find already inserted into the drain hole.
7.3 Defrosting the freezer
To remove the frost, do these steps:
1.
2.
3.
4.
5.
6.
7.
A certain amount of frost will always form on the freezer shelves
and around the top compartment.
Defrost the freezer when the frost
layer reaches a thickness of about
3-5 mm.
Switch off the appliance.
Remove any stored food, wrap it in
several layers of newspaper and put it
in a cool place.
Leave the door open.
When defrosting is completed, dry
the interior thoroughly and refit the
plug.
Switch on the appliance.
Set the temperature regulator to ob-
tain the maximum coldness and run
the appliance for two or three hours
using this setting.
Reload the previously removed food
into the compartment.
Never use sharp metal tools to
scrape off frost from the evaporator as you could damage it. Do
not use a mechanical device or
any artificial means to speed up
the thawing process other than
those recommended by the manufacturer. A temperature rise of
the frozen food packs, during defrosting, may shorten their safe
storage life.
7.4 Periods of non-operation
When the appliance is not in use for long
periods, take the following precautions:
1.
disconnect the appliance from electricity supply
2.
remove all food
3.
defrost and clean the appliance and
all accessories
4.
leave the door/doors open to prevent
unpleasant smells.
If the cabinet will be kept on, ask
somebody to check it once in a
while to prevent the food inside
from spoiling in case of a power
failure.
8. WHAT TO DO IF…
WARNING!
Before troubleshooting, disconnect the mains plug from the
mains socket.
Only a qualified electrician or competent person must do the troubleshooting that is not in this manual.
Problem Possible cause Solution
The appliance is
noisy
The appliance does
not operate. The
lamp does not operate.
The appliance is not supported properly
The appliance is switched
off.
There are some sounds during
normal use (compressor, refrigerant circulation).
Check if the appliance
stands stable (all the four
feet should be on the floor)
Switch on the appliance.
Page 11

ENGLISH 11
Problem Possible cause Solution
The mains plug is not con-
nected to the mains sock-
Connect the mains plug to
the mains socket correctly.
et correctly.
The appliance has no
power. There is no voltage
in the mains socket.
Connect a different electrical appliance to the mains
socket.
Contact a qualified electrician.
The lamp does not
The lamp is in stand-by. Close and open the door.
work.
The lamp is defective. Refer to "Replacing the
lamp".
The compressor operates continually.
The door is not closed
The temperature is not set
correctly.
Set a higher temperature.
Refer to "Closing the door".
correctly.
The door has been
opened too frequently.
The product temperature
is too high.
Do not keep the door open
longer than necessary.
Let the product temperature decrease to room temperature before storage.
The room temperature is
too high.
Water flows on the
rear plate of the refrigerator.
Water flows into the
refrigerator.
During the automatic defrosting process, frost defrosts on the rear plate.
The water outlet is clogged.
Products prevent that wa-
ter flows into the water
Decrease the room temperature.
This is correct.
Clean the water outlet.
Make sure that products do
not touch the rear plate.
collector.
Water flows on the
ground.
The melting water outlet
does not flow in the evaporative tray above the
Attach the melting water
outlet to the evaporative
tray.
compressor.
The temperature in
the appliance is too
The temperature regulator
is not set correctly.
Set a higher temperature.
low.
The temperature in
the appliance is too
The temperature regulator
is not set correctly.
Set a lower temperature.
high.
The door is not closed
Refer to "Closing the door".
correctly.
Page 12
www.electrolux.com
12
Problem Possible cause Solution
The product temperature
Many products are stored
The temperature in
the refrigerator is
too high.
The temperature in
the freezer is too
high.
There is too much
frost.
The door is not closed
The temperature regulator
8.1 Replacing the lamp
8.2 Closing the door
1.
2.
is too high.
at the same time.
There is no cold air circulation in the appliance.
Products are too near to
each other.
Food is not wrapped correctly.
correctly.
is not set correctly.
Clean the door gaskets.
If necessary, adjust the door. Refer to
"Installation".
Let the product temperature decrease to room temperature before storage.
Store less products at the
same time.
Make sure that there is cold
air circulation in the appliance.
Store products so that
there is cold air circulation.
Wrap the food correctly.
Refer to "Closing the door".
Set a higher temperature.
1.
Disconnect the mains plug from the
mains socket.
2.
Remove the screw from the lamp
cover.
3.
Remove the lamp cover (refer to the
illustration).
4.
Replace the used lamp with a new
lamp of the same power and specifically designed for household appliances. (the maximum power is shown
on the lamp cover).
5.
Install the lamp cover.
6.
Tighten the screw to the lamp cover.
7.
Connect the mains plug to the mains
socket.
8.
Open the door. Make sure that the
lamp comes on.
3.
If necessary, replace the defective
door gaskets. Contact the Service
Center.
Page 13
9. INSTALLATION
ENGLISH 13
WARNING!
Read the "Safety Information"
carefully for your safety and correct operation of the appliance
before installing the appliance.
9.1 Positioning
This appliance can be installed in a dry,
well ventilated indoor (garage or cellar) also, but for optimum performance install
this appliance at a location where the ambient temperature corresponds to the cli-
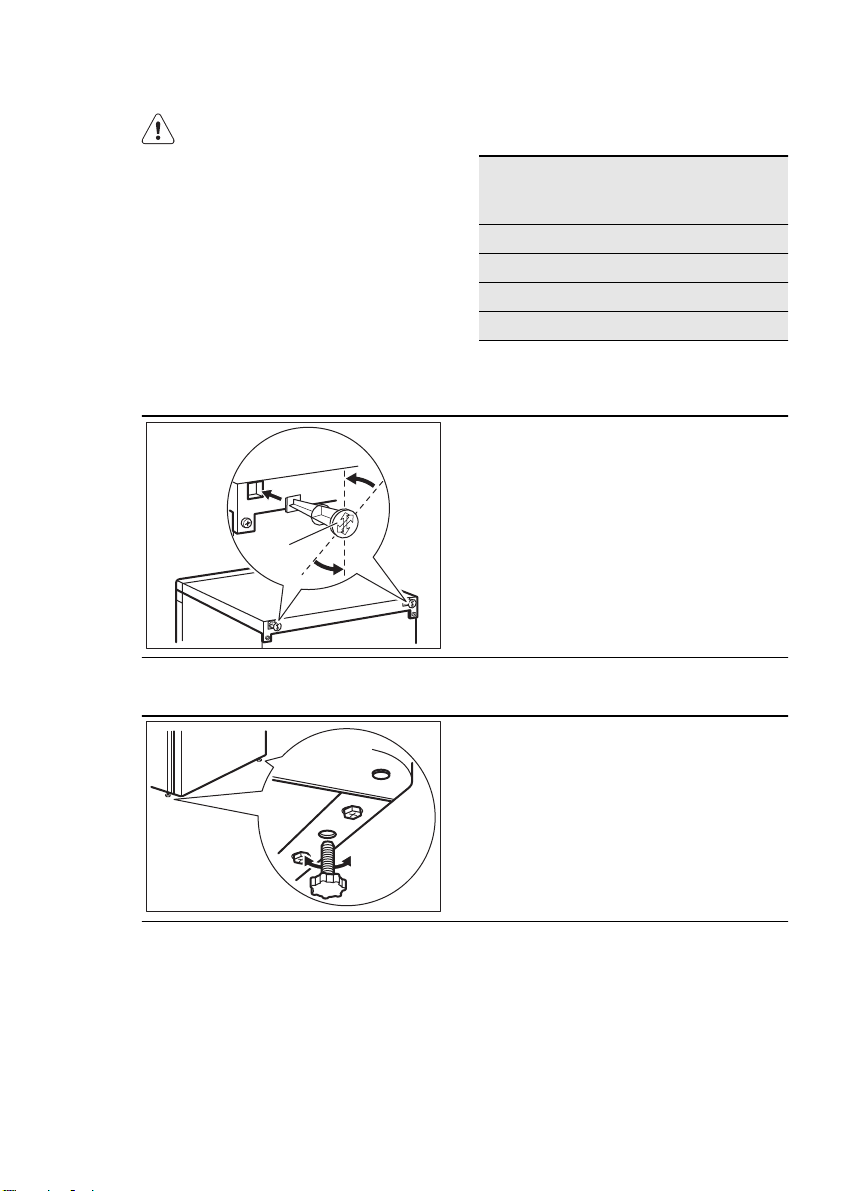
9.2 Rear spacers
1
A
2
45°
45°
2
9.3 Levelling
mate class indicated on the rating plate of
the appliance:
Cli-
Ambient temperature
mate
class
SN +10°C to + 32°C
N +16°C to + 32°C
ST +16°C to + 38°C
T +16°C to + 43°C
In the bag with the documentation, there
are two spacers which must be fitted as
shown in the figure.
1.
Fit the spacers into the holes. Make
sure that the arrow (A) is positioned
as shown in the picture
2.
Turn counter-clockwise the spacers
through 45° until they lock into place.
When placing the appliance ensure that it
stands level. This can be achieved by two
adjustable feet at the bottom in front.
Page 14

www.electrolux.com
14
9.4 Location
9.5 Door reversibility
100 mm
15 mm 15 mm
The appliance should be installed well away
from sources of heat such as radiators, boilers, direct sunlight etc. Ensure that air can
circulate freely around the back of the cabinet.To ensure best performance, if the appliance is positioned below an overhanging
wall unit, the minimum distance between
the top of the cabinet and the wall unit must
be at least 100 mm . Ideally, however, the
appliance should not be positioned below
overhanging wall units. Accurate levelling is
ensured by one or more adjustable feet at
the base of the cabinet. If the cabinet is
placed in a corner and the side with the
hinges facing the wall, the distance between
the wall and the cabinet must be at least 10
mm to allow the door to open enough so
that the shelves can be removed.
WARNING!
It must be possible to disconnect
the appliance from the mains power
supply; the plug must therefore be
easily accessible after installation.
To carry out the following operations, we suggest that this be
made with another person that will
keep a firm hold on the doors of
the appliance during the operations.
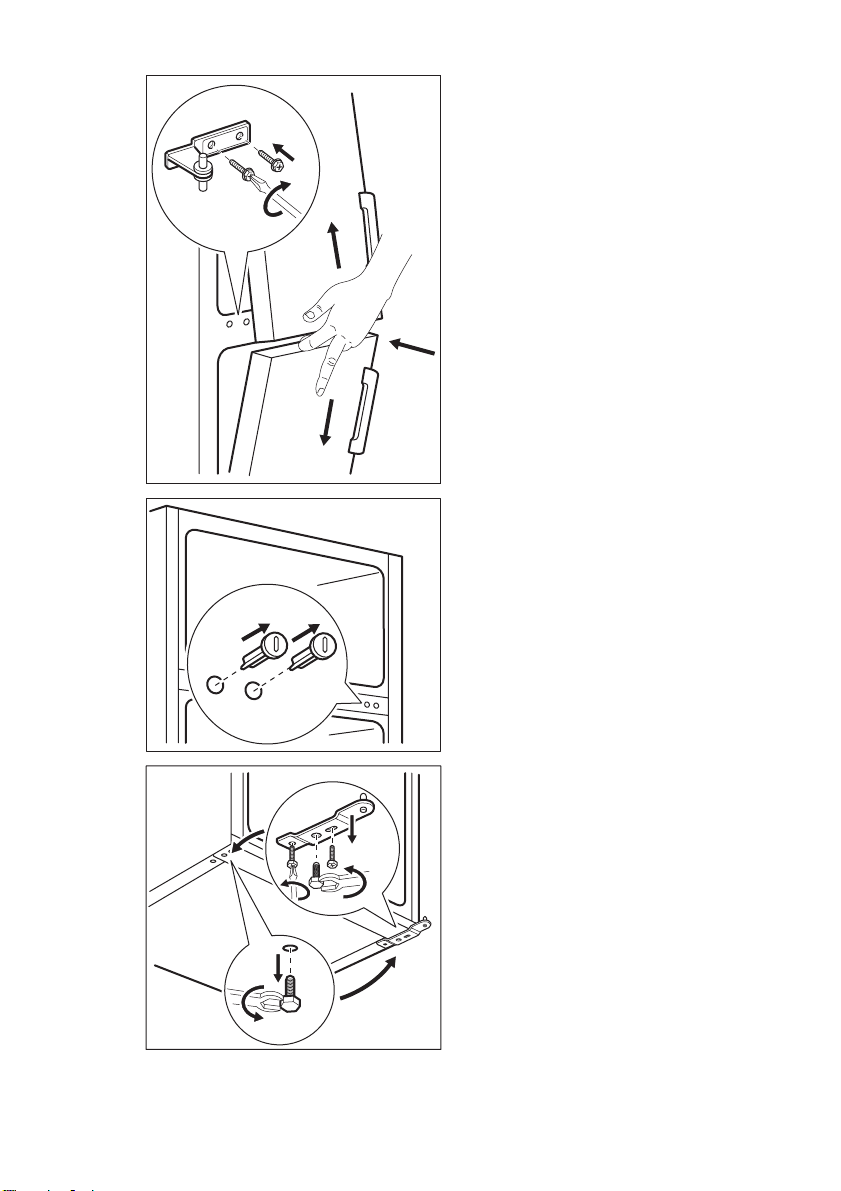
To change the opening direction of the
door, do these steps:
Remove the plug from the power socket
Open the door of the freezer. Loosen the
hinge.
Page 15
ENGLISH 15
Remove the doors by pulling them slightly
and remove the hinge.
2
3
1
On the opposite side, remove the hole
covers.
Unscrew both adjustable feet and the
screws of the bottom door hinge. Remove
the bottom door hinge and install it on the
opposite side.
1
2
Page 16

www.electrolux.com
16
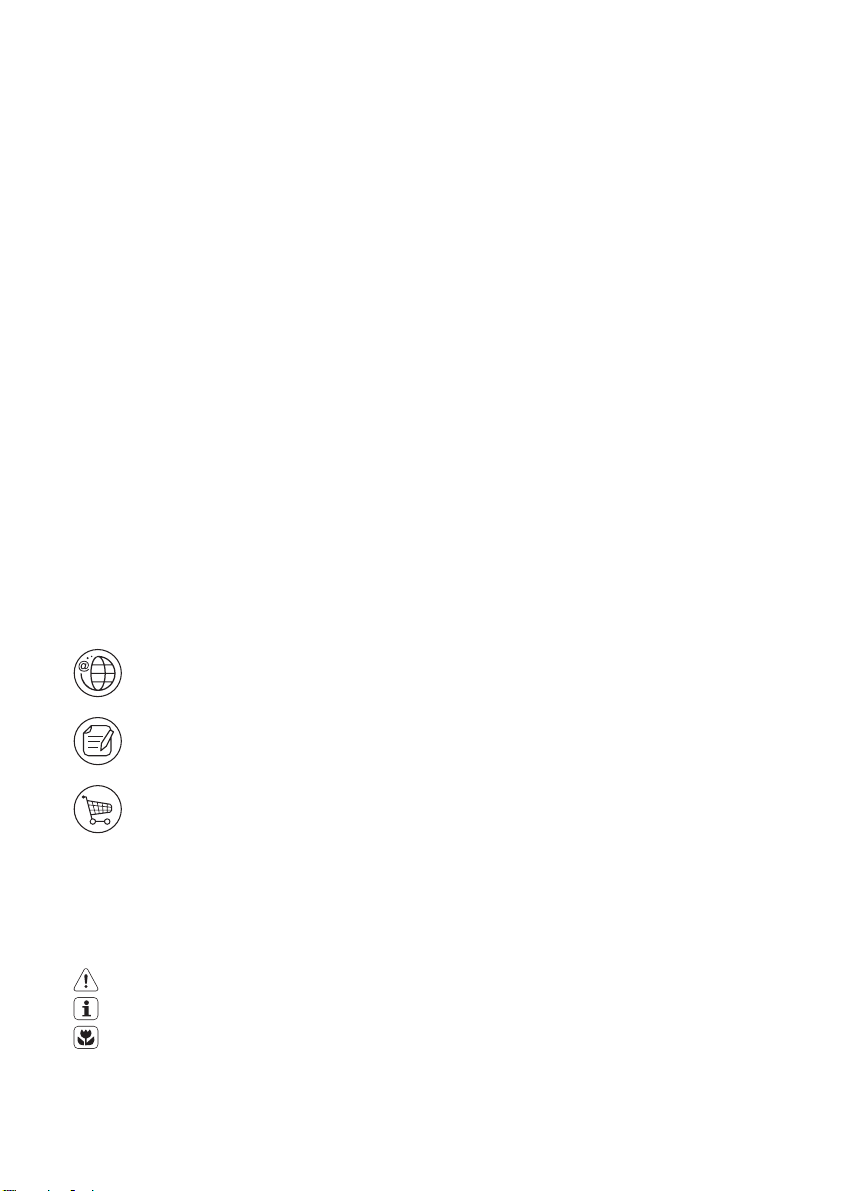
Unscrew the bottom far side screw and
install on the opposite side.
Unscrew the top door holding pin.
Screw the pin back on the other side.
2
1
Page 17

ENGLISH 17
Fit the doors into the pins and install the
doors. Install the hinge.
2
3
1
On the opposite site, install the hole covers.
Tighten the hinge. Make sure that the
doors are aligned.
Remove and install the handle (if foreseen)
on the opposite side.
Reposition, level the appliance, wait for at
least four hours and then connect it to the
power socket.
Do a final check to make sure that:
• All screws are tightened.
• The door opens and closes correctly.
If the ambient temperature is cold (i.e. in
Winter), the gasket may not fit perfectly to
the cabinet. In that case, wait for the natural fitting of the gasket.
In case you do not want to carry out the
above mentioned operations, contact the
nearest After Sales Service Force. The After Sales Service specialist will carry out
the reversibility of the doors at your cost.
9.6 Electrical connection
Before plugging in, ensure that the voltage and frequency shown on the rating
plate correspond to your domestic power
supply.
The appliance must be earthed. The power supply cable plug is provided with a
contact for this purpose. If the domestic
power supply socket is not earthed, connect the appliance to a separate earth in
compliance with current regulations, consulting a qualified electrician.
The manufacturer declines all responsibility if the above safety precautions are not
observed.
This appliance complies with the E.E.C.
Directives.
Page 18

www.electrolux.com
18
10. TECHNICAL DATA
Dimension
Height 1404 mm
Width 545 mm
Depth 604 mm
Rising Time 19 h
Voltage 230 V
Frequency 50 Hz
The technical information are situated in
the rating plate on the internal left side of
the appliance and in the energy label.
11. ENVIRONMENT CONCERNS
Recycle the materials with the symbol
. Put the packaging in applicable
containers to recycle it.
Help protect the environment and human
health and to recycle waste of electrical
and electronic appliances. Do not dispose
appliances marked with the symbol
with the household waste. Return the
product to your local recycling facility or
contact your municipal office.
Page 19
MAGYAR 19
TARTALOMJEGYZÉK
1. BIZTONSÁGI INFORMÁCIÓK . . . . . . . . . . . . . . . . . . . . . . . . . . . . . . . . . . . . . . . . . . . . . . . . . . . . . . . . . 20
2. TERMÉKLEÍRÁS . . . . . . . . . . . . . . . . . . . . . . . . . . . . . . . . . . . . . . . . . . . . . . . . . . . . . . . . . . . . . . . . . . . . 22
3. MŰKÖDÉS . . . . . . . . . . . . . . . . . . . . . . . . . . . . . . . . . . . . . . . . . . . . . . . . . . . . . . . . . . . . . . . . . . . . . . . . 22
4. ELSŐ HASZNÁLAT . . . . . . . . . . . . . . . . . . . . . . . . . . . . . . . . . . . . . . . . . . . . . . . . . . . . . . . . . . . . . . . . . . 23
5. NAPI HASZNÁLAT . . . . . . . . . . . . . . . . . . . . . . . . . . . . . . . . . . . . . . . . . . . . . . . . . . . . . . . . . . . . . . . . . . 23
6. HASZNOS JAVASLATOK ÉS TANÁCSOK . . . . . . . . . . . . . . . . . . . . . . . . . . . . . . . . . . . . . . . . . . . . . . . 25
7. ÁPOLÁS ÉS TISZTÍTÁS . . . . . . . . . . . . . . . . . . . . . . . . . . . . . . . . . . . . . . . . . . . . . . . . . . . . . . . . . . . . . . 26
8. MIT TEGYEK, HA... . . . . . . . . . . . . . . . . . . . . . . . . . . . . . . . . . . . . . . . . . . . . . . . . . . . . . . . . . . . . . . . . . . 27
9. ÜZEMBE HELYEZÉS . . . . . . . . . . . . . . . . . . . . . . . . . . . . . . . . . . . . . . . . . . . . . . . . . . . . . . . . . . . . . . . . 29
10. MŰSZAKI ADATOK . . . . . . . . . . . . . . . . . . . . . . . . . . . . . . . . . . . . . . . . . . . . . . . . . . . . . . . . . . . . . . . . . . 35
11. KÖRNYEZETVÉDELMI TUDNIVALÓK . . . . . . . . . . . . . . . . . . . . . . . . . . . . . . . . . . . . . . . . . . . . . . . . . . . 35
GONDOLUNK ÖNRE
Köszönjük, hogy Electrolux terméket vásárolt. Ön olyan készülék tulajdonosa lett, mely mögött több évtizedes
szakmai tapasztalat és innováció áll. Rendkívüli tudását és stílusos megjelenését az Ön igényei ihlették.
Valahányszor csak használja, biztos lehet abban, hogy a benne foglalt tudás a siker garanciája.
Köszöntjük az Electrolux világában.
Látogassa meg a weboldalunkat:
Kezelési tanácsok, kiadványok, hibaelhárító, szerviz információk:
www.electrolux.com
További előnyökért regisztrálja készülékét:
www.electrolux.com/productregistration
Kiegészítők, segédanyagok és eredeti alkatrészek vásárlása a készülékhez:
www.electrolux.com/shop
VÁSÁRLÓI TÁMOGATÁS ÉS SZERVIZ
Kizárólag eredeti alkatrészek használatát javasoljuk.
Ha készülékével a szervizhez fordul, legyenek kéznél az alábbi adatok.
Ezek az információk az adattáblán olvashatók. Típus, Termékszám, Sorozatszám.
Figyelmeztetés - Biztonsági információk
Általános információk és tanácsok
Környezetvédelmi információk
A változtatások jogát fenntartjuk.
Page 20

www.electrolux.com
20
1.
BIZTONSÁGI INFORMÁCIÓK
Saját biztonsága és a helyes használat biztosítá‐
sa érdekében a készülék üzembe helyezése és
első használata előtt olvassa át figyelmesen ezt
a használati útmutatót, beleértve a tippeket és fi‐
gyelmeztetéseket is. A szükségtelen hibák és
balesetek elkerülése érdekében fontos annak
biztosítása, hogy mindenki, aki a készüléket
használja, jól ismerje annak működését és biz‐
tonságos használatát. Őrizze meg ezt a haszná‐
lati útmutatót, és ha a készüléket elajándékozza
vagy eladja, az útmutatót is mellékelje hozzá,
hogy annak teljes élettartamán keresztül minden‐
ki, aki használja, megfelelő információkkal ren‐
delkezzen annak használatát és biztonságát ille‐
tően.
Az emberi élet és a vagyontárgyak biztonsága
érdekében tartsa be a jelen használati útmutató‐
ban szereplő óvintézkedéseket, mivel a gyártó
nem felelős az ezek elmulasztása miatt bekövet‐
kező károkért.
1.1 Gyermekek és fogyatékkal élő
személyek biztonsága
• A készülék kialakítása nem olyan, hogy azt
csökkent fizikai, értelmi vagy mentális képes‐
ségű, illetve megfelelő tapasztalatok és isme‐
retek híján lévő személyek (beleértve a gyer‐
mekeket is) használhassák, hacsak a bizton‐
ságukért felelős személy nem biztosít szá‐
mukra felügyeletet és útmutatást a készülék
használatára vonatkozóan.
Gondoskodni kell a gyermekek felügyeletéről
annak biztosítása érdekében, hogy ne játs‐
szanak a készülékkel.
• Minden csomagolóanyagot tartson a gyermek‐
ektől távol. Fulladásveszélyesek.
• A készülék kiselejtezésekor húzza ki a du‐
gaszt a hálózati aljzatból, vágja el a hálózati
tápkábelt (olyan közel a készülékhez, amen‐
nyire csak lehet), és távolítsa el az ajtót annak
megelőzése érdekében, hogy a játszó gyer‐
mekek áramütést szenvedjenek, vagy magu‐
kat a készülékbe zárják.
• Ha ez a mágneszáras ajtóval ellátott készülék
egy rugózáras (kilincses) ajtóval vagy fedéllel
ellátott régi készülék helyére kerül, akkor ne
felejtse el a régi készülék kidobása előtt hasz‐
nálatra alkalmatlanná tenni a rugós zárat. En‐
nek az a célja, hogy gyerekek ne tudjanak
bennrekedni a készülékben.
1.2 Általános biztonsági tudnivalók
VIGYÁZAT
A készülékházon vagy a beépített szerkezeten
lévő szellőzőnyílásokat tartsa akadálymentesen
• A készülék rendeltetése élelmiszerek és/vagy
italok tárolása a normál háztartásban, amint
azt a jelen használati útmutató ismerteti.
• Ne használjon mechanikus szerkezetet vagy
mesterséges eszközöket a leolvasztási folya‐
mat elősegítésére.
• Ne működtessen más elektromos készüléket
(például fagylaltkészítő gépet) hűtőberendezé‐
sek belsejében, hacsak ezt a gyártó kifejezet‐
ten jóvá nem hagyja.
• Ügyeljen arra, hogy ne sérüljön meg a hűtő‐
kör.
• Izobután (R600a) hűtőanyagot tartalmaz a ké‐
szülék hűtőköre, ez a környezetre csekély ha‐
tást gyakorló, természetes gáz, amely ugya‐
nakkor gyúlékony.
A készülék szállítása és üzembe helyezése
során bizonyosodjon meg arról, hogy a hűtő‐
kör semmilyen összetevője nem sérült meg.
Ha a hűtőkör megsérült:
– kerülje nyílt láng és tűzgyújtó eszközök
használatát
– alaposan szellőztesse ki azt a helyiséget,
ahol a készülék található
• Veszélyes a termék műszaki jellemzőit meg‐
változtatni vagy a terméket bármilyen módon
átalakítani. A hálózati tápkábel bármilyen sé‐
rülése rövidzárlatot, tüzet vagy áramütést
okozhat.
VIGYÁZAT
A veszélyhelyzetek megelőzése érde‐
kében mindenféle elektromos részegy‐
ség (hálózati tápkábel, dugasz, komp‐
resszor) cseréjét hivatalos szervizképvi‐
selőnek vagy szakképzett szervizmun‐
katársnak kell elvégeznie.
1.
A hálózati tápkábelt nem szabad meg‐
hosszabbítani.
2.
Ügyeljen arra, hogy a hálózati dugaszt ne
nyomja össze vagy károsítsa a készülék
hátlapja. Az összenyomott vagy sérült
hálózati dugasz túlmelegedhet és tüzet
okozhat.
Page 21

3.
Gondoskodjon arról, hogy a készülék há‐
lózati dugasza hozzáférhető legyen.
4.
Ne húzza a hálózati kábelt.
5.
Ha a hálózati aljzat ki van lazulva, ne
csatlakoztassa a hálózati dugaszt. Ára‐
mütés vagy tűz veszélye.
6.
Nem szabad működtetni a készüléket, ha
a belső világítás lámpabúrája nincs a he‐
lyén (ha van a készüléken).
• Ez a készülék nehéz. Mozgatásakor körülte‐
kintéssel járjon el.
• Ne szedjen ki semmit a fagyasztóból, és ne is
érjen hozzá ilyenekhez, ha a keze nedves
vagy vizes, mivel ez a bőrsérüléseket, illetve
fagyás miatti égési sérüléseket eredményez‐
het.
• Ne tegye ki hosszú időn keresztül közvetlen
napsütésnek a készüléket.
• Az ebben a készülékben működő izzólámpák
(ha vannak ilyenek a készülékben) kizárólag
háztartási eszközökhöz kifejlesztett, különle‐
ges fényforrások. Nem alkalmasak helyiségek
megvilágítására.
1.3 Napi használat
• Ne tegyen meleg edényt a készülék műanyag
részeire.
• Ne tároljon gyúlékony gázt vagy folyadékot a
készülékben, mert azok felrobbanhatnak.
• Ne tegyen élelmiszereket közvetlenül a hátsó
falon lévő levegőkimenet elé. (Ha a készülék
Frost Free rendszerű)
• A fagyasztott élelmiszert kiolvasztás után
többé nem szabad újra lefagyasztani.
• Az előrecsomagolt fagyasztott élelmiszereket
az élelmiszergyártó utasításaival összhang‐
ban tárolja.
• A készülék gyártójának tárolásra vonatkozó
ajánlásait szigorúan be kell tartani. Olvassa el
az idevonatkozó utasításokat.
• Ne tegyen szénsavas italokat a fagyasztóba,
mert nyomás keletkezik a palackban, ami mi‐
att felrobbanhat és kárt okozhat a készülék‐
ben.
• A jégnyalóka fagyásból eredő égéseket okoz‐
hat, ha rögtön a készülékből kivéve enni kez‐
dik.
MAGYAR 21
• Ne használjon éles tárgyakat a dérnek a ké‐
szülékről történő eltávolításához. Használjon
műanyag kaparókést.
• Rendszeresen vizsgálja meg a hűtőszekrény‐
ben a leolvadt víz számára kialakított vízelve‐
zetőt. Szükség esetén tisztítsa meg a vízelve‐
zetőt. Ha a vízelvezető el van záródva, a víz
összegyűlik a készülék aljában.
1.5 Üzembe helyezés
Az elektromos hálózatra való csatlakoz‐
tatást illetően kövesse a megfelelő feje‐
zetek útmutatását.
• Csomagolja ki a készüléket, és ellenőrizze,
vannak-e sérülések rajta. Ne csatlakoztassa a
készüléket, ha sérült. Az esetleges sérülése‐
ket azonnal jelentse ott, ahol a készüléket vá‐
sárolta. Ilyen esetben őrizze meg a csomago‐
lást.
• Ajánlatos legalább négy órát várni a készülék
bekötésével és hagyni, hogy az olaj vissza‐
folyjon a kompresszorba.
• Megfelelő levegőáramlást kell biztosítani a ké‐
szülék körül, ennek hiánya túlmelegedéshez
vezet. Az elégséges szellőzés elérése érdeké‐
ben kövesse a vonatkozó üzembe helyezési
utasításokat.
• Amikor csak lehetséges, a készülék hátlapja
fal felé nézzen, hogy el lehessen kerülni a for‐
ró alkatrészek (kompresszor, kondenzátor)
megérintését vagy megfogását az esetleges
égési sérülések megelőzése érdekében.
• A készüléket nem szabad radiátorok vagy tűz‐
helyek közelében elhelyezni.
• Ügyeljen arra, hogy a hálózati dugasz hozzá‐
férhető legyen a készülék telepítése után.
• Csak ivóvízhálózatra csatlakoztatható (Ha fel
van szerelve vízcsatlakozóval).
1.6 Szerviz
• A készülék szervizeléséhez szükséges min‐
den villanyszerelési munkát szakképzett vil‐
lanyszerelőnek vagy kompetens személynek
kell elvégeznie.
• A készüléket kizárólag arra felhatalmazott
szervizközpont javíthatja, és csak eredeti pót‐
alkatrészek használhatók.
1.4 Ápolás és tisztítás
• A karbantartás előtt kapcsolja ki a készüléket,
és a húzza ki a vezetéket a fali aljzatból.
• Ne tisztítsa a készüléket fémtárgyakkal.
1.7 Környezetvédelem
Ez a készülék sem a hűtőfolyadék-ke‐
ringető rendszerben, sem a szigetelő
Page 22

www.electrolux.com
22
anyagokban nem tartalmaz az ózonré‐
teget károsító gázokat. A készüléket
nem szabad a lakossági hulladékkal és
szeméttel együtt kidobni. A szigetelő‐
hab gyúlékony gázokat tartalmaz: a ké‐
szüléket a helyi hatóságoktól beszerez‐
hető vonatkozó rendelkezésekkel össz‐
2. TERMÉKLEÍRÁS
7
6
hangban kell hulladékba helyezni. Vi‐
gyázzon, ne sérüljön meg a hűtőegy‐
ség, különösen hátul a hőcserélő kör‐
nyéke. A készüléken használt és
szimbólummal megjelölt anyagok újra‐
hasznosíthatóak.
1
2
Huzalpolc
1
Vajtartó rekesz
2
Ajtópolcok
3
Adattábla
4
3. MŰKÖDÉS
3.1 Bekapcsolás
Illessze a csatlakozódugót a hálózati aljzatba.
Forgassa a hőmérséklet-szabályozót az óramu‐
tató járásával megegyező irányban egy közepes
beállításra.
3.2 Kikapcsolás
A készülék kikapcsolásához forgassa a hőmér‐
séklet-szabályozót "O" állásba.
5
4
Zöldségfiók
5
Üvegpolcok
6
Hőmérséklet-szabályozó/világítás
7
3
3.3 Hőmérséklet-szabályozás
A hőmérséklet szabályozása automatikusan tör‐
ténik.
A készülék üzemeltetéséhez a következők sze‐
rint járjon el:
• Forgassa a hőmérséklet-szabályozót az ala‐
csonyabb beállítások felé, hogy minimális hű‐
tést érjen el.
• Forgassa a hőmérséklet-szabályozót a maga‐
sabb beállítások felé, hogy maximális hűtést
érjen el.
Page 23

Általában egy közepes beállítás a legin‐
kább megfelelő.
A pontos beállítás kiválasztásakor azonban
szem előtt kell tartani, hogy a készülék belsejé‐
ben uralkodó hőmérséklet az alábbi tényezőktől
függ:
• szobahőmérséklet
• az ajtónyitások gyakorisága
• a tárolt élelmiszer mennyisége
• a készülék helye.
4. ELSŐ HASZNÁLAT
MAGYAR 23
Ha a környezeti hőmérséklet magas,
vagy a készülék a maximális határig
meg van terhelve, a hűtőszekrényt pe‐
dig a legalacsonyabb értékre állították
be, előfordulhat, hogy folyamatosan hűt,
s emiatt dér képződik a belső falán. Eb‐
ben az esetben a tárcsát a legmaga‐
sabb hőmérsékleti értékre kell állítani az
automatikus jégmentesítés elindításá‐
hoz, ezzel pedig csökkentett energiafo‐
gyasztást lehet elérni.
4.1 A készülék belsejének tisztítása
A készülék legelső használata előtt mossa ki a
készülék belsejét semleges szappanos langyos
vízzel, hogy eltávolítsa a tökéletesen új termékek
tipikus szagát, majd alaposan szárítsa ki.
5. NAPI HASZNÁLAT
5.1 Friss élelmiszerek lefagyasztása
A fagyasztórekesz alkalmas friss élelmiszerek le‐
fagyasztására, valamint fagyasztott és mélyhű‐
tött élelmiszerek hosszú távú tárolására.
Friss élelmiszerek lefagyasztásához nem szük‐
séges megváltoztatnia a közepes beállítást.
Azonban gyorsabb fagyasztási művelet érdeké‐
ben forgassa a hőmérséklet-szabályozót a ma‐
gasabb beállítások felé, hogy maximális hűtést
érjen el.
Ilyen feltételek mellett a hűtőrekesz hő‐
mérséklete 0°C alá eshet. Ha ez törté‐
nik, állítsa a hőmérséklet-szabályozót
melegebb beállításra.
5.2 Fagyasztott élelmiszerek tárolása
Az első indításkor, illetve hosszabb használaton
kívüli idő után, mielőtt az élelmiszereket a re‐
keszbe pakolná, üzemeltesse legalább 2 óráig a
készüléket a magasabb beállításokon.
Ne használjon mosószereket vagy súro‐
lóporokat, mert ezek megsérthetik a fe‐
lületét.
Véletlenszerűen, például áramkimara‐
dás miatt bekövetkező leolvadás ese‐
tén, amikor az áramszünet hosszabb
ideig tart, mint az az érték, amely a mű‐
szaki jellemzők között a "felolvadási
idő" alatt fel van tüntetve, a felolvadt
élelmiszert gyorsan el kell fogyasztani,
vagy azonnal meg kell főzni, majd pedig
a (kihűlés után) újra lefagyasztani.
5.3 Kiolvasztás
A mélyfagyasztott vagy fagyasztott élelmiszerek
használat előtt a hűtőrekeszben vagy szobahő‐
mérsékleten kiolvaszthatók, attól függően, hogy
mennyi idő áll rendelkezésre ehhez a művelet‐
hez.
A kisebb darabok még akár fagyasztott állapot‐
ban, közvetlenül a fagyasztóból kivéve is meg‐
főzhetők: ebben az esetben a főzés ideje meg‐
hosszabbodik.
Page 24

www.electrolux.com
24
5.4 Mozgatható polcok
5.5 Páratartalom-szabályozás
A hűtőszekrény falai több sor polctartóval vannak
ellátva, hogy a polcokat tetszés szerinti helyre le‐
hessen tenni.
Az üvegpolc fiók tartalmaz egy eszközt egy rés‐
sel (amely egy csúszkával szabályozható), ami
lehetővé teszi a zöldségfiók(ok) hőmérsékleté‐
nek szabályozását.
Amikor a szellőzőnyílások zárva vannak:
a gyümölcs- és zöldségrekeszekben lévő élelmi‐
szerek természetes nedvességtartalma hos‐
szabb ideig megőrizhető.
Amikor a szellőzőnyílások nyitva vannak:
a jobb levegőkeringés a levegő alacsonyabb
nedvességtartalmát eredményezi a gyümölcs- és
zöldségrekeszekben.
5.6 Az ajtó polcainak elhelyezése
5.7 Hőmérséklet visszajelző
Ha eltérő méretű élelmiszercsomagok számára
szeretne helyet biztosítani, az ajtópolcokat külön‐
böző magasságokba állíthatja.
A beállításnál a következők szerint járjon el: fo‐
kozatosan húzza a polcot a nyilakkal jelölt irny‐
ba, amíg ki nem szabadul, majd szükség szerint
tegye új helyre.
Ezt a készüléket Franciaországban for‐
galmazzák.
Az ebben az országban érvényben lévő
rendelkezésekkel összhangban a hűtő‐
szekrényt az alsó rekeszébe helyezett
speciális eszközzel (lásd az ábrát) kell
szállítani, hogy jelezze a készülék leghi‐
degebb zónáját.
Page 25

6. HASZNOS JAVASLATOK ÉS TANÁCSOK
MAGYAR 25
6.1 Normál működéssel járó hangok
• Esetleg egy halk csobogó vagy bugyborékoló
hangot is lehet hallani, amikor a hűtőközeget
a rendszer a hátsó tekercseken vagy vezeté‐
ken. Ez normális jelenség.
• Amikor a kompresszor be van kapcsolva, a
hűtőszekrényben körbe halad a szivattyúzott
anyag; ekkor zümmögő és pulzáló zaj hallat‐
szik a kompresszor felől. Ez normális jelen‐
ség.
• A hőtágulás hirtelen recsegő zajt okozhat. Ez
egy természetes, veszélytelen fizikai jelenség.
Ez normális jelenség.
• A kompresszor ki- vagy bekapcsolásakor hal‐
lani lehet a hőmérséklet-szabályozó halk kat‐
tanását. Ez normális jelenség.
6.2 Energiatakarékossági ötletek
• Ne nyitogassa gyakran az ajtót, illetve ne
hagyja a feltétlenül szükségesnél tovább nyit‐
va.
• Ha a környezeti hőmérséklet magas, a hőmér‐
séklet-szabályozó magas beállításon van, és
a készülék teljesen meg van töltve, be, előfor‐
dulhat, hogy a kompresszor folyamatosan
üzemel, ami miatt jég vagy dér képződik a pá‐
rologtatón. Ha ez bekövetkezik, forgassa a
hőmérséklet-szabályozót alacsonyabb beállí‐
tásokra, hogy lehetővé tegye az automatikus
leolvasztást, és így takarékoskodjon az áram‐
fogyasztással.
6.3 Ötletek friss élelmiszerek
hűtéséhez
A legjobb teljesítmény elérése érdekében:
• ne tároljon meleg ételt vagy párolgó folyadé‐
kot a hűtőszekrényben
• takarja le vagy csomagolja be az élelmiszere‐
ket, különösen ha valamelyiknek erős az aro‐
mája
• úgy helyezze be az ételeket, hogy a levegő
szabadon körbe tudja járni őket.
6.4 Ötletek a hűtőszekrény
használatához
Hasznos tanácsok:
Hús (minden fajtája): csomagolja nejlonzacskóba
és helyezze a zöldséges fiók feletti üveglapra.
Biztonsági okokból ne tárolja egy vagy két nap‐
nál hosszabb ideig ily módon a húst.
Készételek, hidegtálak stb.: ezeket le kell takarni,
majd bármelyik polcon elhelyezhetők.
Gyümölcsök és zöldségek: alaposan meg kell
őket tisztítani és számukra külön biztosított fi‐
ók(ok)ban elhelyezni.
Vaj és sajt: speciális légmentes tartóedényekbe
kell helyezni, vagy alufóliába vagy nejlonzacs‐
kókba csomagolni őket, és a lehető legtöbb leve‐
gőt kiszorítani körülöttük.
Tejesüvegek: legyen kupakjuk, és tárolja őket az
ajtó palacktartó rekeszében.
Ha a banán, krumpli, hagyma vagy fokhagyma
nincs becsomagolva, tilos őket a hűtőszekrény‐
ben tartani.
6.5 Ötletek fagyasztáshoz
Ha a legjobban szeretné hasznosítani a fagyasz‐
tási eljárást, tartson be néhány fontos ajánlást:
• az adatlapon megtekintheti azt a maximális
élelmiszer-mennyiséget, amely 24 órán belül
lefagyasztható;
• a fagyasztási folyamat 24 órát vesz igénybe.
Ez alatt az időszak alatt nem szabad további
fagyasztásra váró élelmiszert betenni;
• csak első osztályú, friss és alaposan megtisz‐
tított élelmiszereket fagyasszon le;
• készítsen kisebb adag ételeket, hogy gyorsan
és teljesen megfagyjanak, és hogy a későb‐
biekben csak a kívánt mennyiséget kelljen fel‐
olvasztani;
• csomagolja az ételt alufóliába vagy folpackba,
és ellenőrizze, hogy sikerült-e a csomagolás‐
sal kizárni a levegőt;
• ne hagyja, hogy a friss, még meg nem fagyott
élelmiszerek hozzáérjenek a már lefagyasztott
adagokhoz, mert különben az utóbbiaknak
megemelkedik a hőmérséklete;
• a zsírszegény ételeket könnyebben és hos‐
szabb ideig lehet tárolni, mint a zsírosakat; a
só csökkenti az élelmiszerek élettartamát;
• ha a vízből képződött jeget a fagyasztórekesz‐
ből történő kivétel után rögtön fogyasztani
kezdik, fagyásból eredő égési sérüléseket
okozhat a bőrön;
• ajánlatos minden egyes csomagon feltüntetni
a lefagyasztás dátumát, hogy nyomon lehes‐
sen követni a tárolási időket.
Page 26

www.electrolux.com
26
6.6 Ötletek fagyasztott élelmiszerek
tárolásához
Annak érdekében, hogy a legjobb teljesítményt
érje el a készüléknél:
• ellenőrizze, hogy a kereskedelmileg lefa‐
gyasztott élelmiszereket megfelelően tárolta-e
az eladó;
• gondoskodjon róla, hogy a fagyasztott élelmi‐
szerek a lehető legrövidebb időn belül elkerül‐
jenek az élelmiszerüzletből a fagyasztóba;
7. ÁPOLÁS ÉS TISZTÍTÁS
• ne nyitogassa gyakran az ajtót, illetve ne
hagyja a feltétlenül szükségesnél tovább nyit‐
va;
• a kiolvasztott élelmiszerek nagyon gyorsan
romlanak, és nem fagyaszthatók vissza;
• ne lépje túl az élelmiszergyártó által feltünte‐
tett tárolási időtartamot.
FIGYELEM
Bármilyen karbantartási művelet előtt
áramtalanítsa a készüléket a hálózati
csatlakozódugó kihúzásával.
Ennél a készüléknél szénhidrogén van
a hűtőegységben; ezért csak megbízott
szerelő végezhet rajta karbantartást, és
töltheti fel újra.
7.1 Időszakos tisztítás
A készüléket rendszeresen tisztítani kell:
• a készülék belsejét és a tartozékokat langyos
vízzel és egy kevés semleges mosogatószer‐
rel tisztítsa meg.
• rendszeresen ellenőrizze az ajtótömítéseket,
és törölje tisztára, hogy biztosítsa azok tiszta‐
ságát és szennyeződésmentességét.
• gondosan öblítse le és szárítsa meg.
Ne húzza meg, ne mozgassa és ne sér‐
tse meg a készülékházban lévő csöve‐
ket és/vagy kábeleket.
Soha ne használjon mosószereket, sú‐
rolóporokat, erőteljesen illatosított tisztí‐
tószereket vagy viaszos polírozószere‐
ket a beltér tisztításához, mivel ezek ká‐
rosítják a felületet, és erőteljes illatot
hagynak maguk után.
Tisztítsa meg a kondenzátort (fekete rács), majd
a készülék hátulján lévő kompresszort egy kefé‐
vel. Ezzel a művelettel javíthatja a készülék telje‐
sítményét, és csökkentheti az áramfogyasztást.
Ügyeljen arra, hogy ne sérüljön meg a
hűtőrendszer.
Számos konyhai felülettisztító olyan vegyszere‐
ket tartalmaz, amelyek megtámadhatják/károsít‐
hatják a készülékben használt műanyagokat. Eb‐
ből az okból javasoljuk, hogy a készülék külső fe‐
lületét kizárólag meleg vízzel tisztítsa, amelyhez
egy kevés mosogatószert adott.
A tisztítás után csatlakoztassa a készüléket a
táphálózathoz.
7.2 A hűtőszekrény leolvasztása
Rendeltetésszerű használat során a dér minden
alkalommal automatikusan leolvad a hűtőrekesz
elpárologtatójáról, amint a kompresszor leáll. A
jégmentesítéssel keletkezett víz a hűtőtér hátsó
falán levő, vályúszerű csatornán keresztül a ké‐
szülék hátulján, a kompresszor felett elhelyezett
tartályba jut, ahonnan elpárolog.
Fontos, hogy a hűtőszekrény-csatorna közepén
látható lefolyónyílást, amely a jégmentesítésből
származó vizet befogadja, rendszeresen meg‐
tisztítsa, nehogy a víz túlfolyjon és rácsöpögjön a
készülékben lévő élelmiszerekre. Használja a
mellékelt speciális tisztítót, amelyet gyárilag el‐
helyeztünk a lefolyócső belsejében.
7.3 A fagyasztó leolvasztása
Bizonyos mennyiségű dér mindig kép‐
ződik a fagyasztó polcain és a felső re‐
kesz körül.
Page 27

Olvassza le a fagyasztót, amikor a zúz‐
mararéteg vastagsága meghaladja a
3-5 mm-t.
A zúzmara eltávolításához a következő lépése‐
ket hajtsa végre:
1.
Kapcsolja ki a készüléket.
2.
Szedjen ki minden tárolt élelmiszert, csoma‐
golja őket több réget újságpapírba, és tegye
hideg helyre.
3.
Az ajtót hagyja nyitva.
4.
A jégmentesítés befejezése után szárítsa ki
alaposan a készülék belsejét, és dugja vis‐
sza a dugót.
5.
Kapcsolja be a készüléket.
6.
Állítsa be a hőmérséklet-szabályozót a ma‐
ximális hideg elérésére, és üzemeltesse a
készüléket két-három órán keresztül ezen a
beállításon.
7.
Pakolja vissza a korábban kiszedett élelmi‐
szereket a rekeszbe.
Soha ne próbálja meg éles fémeszkö‐
zök segítségével lekaparni a jeget a pá‐
rologtatóról, mert megsértheti. Ne hasz‐
náljon mechanikus szerkezetet vagy
mesterséges eszközöket az olvasztási
folyamat elősegítésére, ha azokat a
gyártó nem ajánlja. Ha a jégmentesítés
alatt a fagyasztott élelmiszercsomagok‐
nak megemelkedik a hőmérséklete,
emiatt lerövidülhet a biztonságos tárolá‐
si élettartamuk.
MAGYAR 27
7.4 A készülék üzemen kívül
helyezése
Amikor a készüléket hosszabb időn keresztül
nem használják, tegye meg az alábbi óvintézke‐
déseket:
1.
válassza le a készüléket a táphálózatról
2.
vegye ki az összes élelmiszert
3.
olvassza le és tisztítsa meg a készüléket és
az összes tartozékot.
4.
hagyja résnyire nyitva az ajtót/ajtókat, hogy
ne képződjenek kellemetlen szagok.
Ha a fagyasztót bekapcsolva hagyja,
kérjen meg valakit, hogy alkalmanként
ellenőrizze, nehogy egy áramkimaradás
esetén a benne lévő élelmiszer tönkre‐
menjen.
8. MIT TEGYEK, HA...
VIGYÁZAT
A hibaelhárítás megkezdése előtt húzza
ki a hálózati dugaszt a fali aljzatból.
Csak szakképzett villanyszerelő vagy
kompetens személy végezhet el bármi‐
lyen olyan hibaelhárítást, amely nem
szerepel a jelen kézikönyvben.
Probléma Lehetséges ok Megoldás
A készülék zajos A készülék alátámasztása nem
A készülék nem működik.
A lámpa nem működik.
Normál használat közben a bizonyos
hangok hallhatók (kompresszor, hűtőfo‐
lyadék áramlása).
Ellenőrizze, hogy a készülék
megfelelő
stabilan áll-e (mind a négy láb‐
nak a padlón kell állnia)
A készülék ki van kapcsolva. Kapcsolja be a készüléket.
Page 28

www.electrolux.com
28
Probléma Lehetséges ok Megoldás
A hálózati dugasz nincs he‐
A készülék nem kap áramot.
A lámpa nem működik. A lámpa készenléti üzemmód‐
A lámpa hibás. Olvassa el az "Izzó kicserélése"
A kompresszor folyamato‐
san működik.
Az ajtó nincs jól becsukva. Olvassa el "Az ajtó bezárása" c.
Túl gyakori az ajtó nyitogatása. Ne hagyja nyitva az ajtót a szük‐
A termékhőmérséklet túl ma‐
A szobahőmérséklet túl ma‐
Víz folyik le a hűtőszek‐
rény hátlapján.
Víz folyik be a hűtőszek‐
rénybe.
Az élelmiszerek megakadá‐
Víz folyik a padlóra. A leolvasztási vízkifolyó nem a
A készülékben a hőmér‐
séklet túl alacsony.
A készülékben a hőmér‐
séklet túl magas.
Az ajtó nincs jól becsukva. Olvassa el "Az ajtó bezárása" c.
A termékhőmérséklet túl ma‐
lyesen csatlakoztatva a hálóza‐
ti aljzatba.
gaszt helyesen a hálózati aljzat‐
ba.
Csatlakoztasson egy másik
Csatlakoztassa a hálózati du‐
Nincs feszültség a hálózati alj‐
zatban.
elektromos készüléket a hálózati
aljzatba.
Forduljon szakképzett villany‐
szerelőhöz.
Zárja be és nyissa ki az ajtót.
ban van.
c. szakaszt.
A hőmérséklet nincs helyesen
beállítva.
Állítson be magasabb hőmér‐
sékletet.
szakaszt.
ségesnél hosszabb időn át.
Hagyja, hogy a termékhőmér‐
gas.
séklet a szobahőmérsékletre
csökkenjen a tárolás előtt.
Csökkentse a szobahőmérsék‐
gas.
Az automatikus leolvasztási fo‐
letet.
Ez normális jelenség.
lyamat során a zúzmara leol‐
vad a hátlapon.
A vízkifolyó eltömődött. Tisztítsa ki a vízkifolyót.
Ügyeljen rá, hogy a termékek ne
lyozzák, hogy a víz a vízgyűjtő‐
érjenek a hátsó falhoz.
be folyjon.
Csatlakoztassa a leolvasztási
kompresszor fölötti párologtató
tálcához csatlakozik.
A hőmérséklet-szabályozó
nincs helyesen beállítva.
A hőmérséklet-szabályozó
nincs helyesen beállítva.
vízkifolyót a párologtató tálcá‐
hoz.
Állítson be magasabb hőmér‐
sékletet.
Állítson be alacsonyabb hőmér‐
sékletet.
szakaszt.
Hagyja, hogy a termékhőmér‐
gas.
séklet a szobahőmérsékletre
csökkenjen a tárolás előtt.
Page 29

MAGYAR 29
Probléma Lehetséges ok Megoldás
Túl sok termék van tárolva egy
időben.
A hűtőszekrényben a hő‐
mérséklet túl magas.
Nincs hideglevegő-keringetés
a készülékben.
Tároljon kevesebb terméket egy
időben.
Gondoskodjon arról, hogy le‐
gyen hideglevegő-keringetés a
készülékben.
A fagyasztóban a hőmér‐
séklet túl magas.
A termékek túl közel vannak
egymáshoz.
Tárolja a termékeket úgy, hogy
legyen hideglevegő-keringés a
készülékben.
Túl sok a zúzmara. Az élelmiszer nincs megfelelő‐
en becsomagolva.
Csomagolja be megfelelően az
élelmiszereket.
Az ajtó nincs jól becsukva. Olvassa el "Az ajtó bezárása" c.
szakaszt.
A hőmérséklet-szabályozó
nincs helyesen beállítva.
Állítson be magasabb hőmér‐
sékletet.
8.1 Izzócsere
1.
Húzza ki a hálózati csatlakozódugót a kon‐
nektorból.
2.
Távolítsa el a lámpaburkolat csavarját.
3.
Távolítsa el a lámpaburkolatot (lásd az áb‐
rát).
4.
Olyan csereizzót használjon, melynek telje‐
sítményjellemzői azonosak az eredetivel, és
kifejezetten háztartási eszközökhöz gyártot‐
ták. (A maximális teljesítmény a lámpabur‐
kolaton látható.)
5.
Helyezze vissza a lámpaburkolatot.
6.
Csavarja be a lámpaburkolat csavarját.
7.
Csatlakoztassa a dugaszt a hálózati aljzat‐
ba.
8.
Nyissa ki az ajtót. Győződjön meg arról,
hogy a világítás bekapcsol-e.
3.
8.2 Az ajtó záródása
1.
Tisztítsa meg az ajtótömítéseket.
2.
Szükség esetén állítsa be az ajtót. Olvassa
el az „Üzembe helyezés” c. szakaszt.
Szükség esetén cserélje ki a hibás ajtótömí‐
téseket. Forduljon a márkaszervizhez.
9. ÜZEMBE HELYEZÉS
VIGYÁZAT
A készülék üzembe helyezése előtt fi‐
gyelmesen olvassa el a "Biztonsági in‐
formációk" c. szakaszt saját biztonsága
és a készülék helyes üzemeltetése ér‐
dekében.
9.1 Elhelyezés
Ez a készülék száraz, jól szellőző helyiségekben
(pl. pincében vagy garázsban) használható. Az
optimális teljesítmény érdekében olyan helyen
használja a készüléket, amelynek környezeti hő‐
Page 30

www.electrolux.com
30
mérséklete megfelel annak a klímabesorolásnak,
amely a készülék adattábláján fel van tüntetve:
9.2 Hátsó távtartók
9.3 Vízszintbe állítás
Klímabe‐
Környezeti hőmérséklet
sorolás
SN +10°C és + 32°C között
N +16°C és + 32°C között
ST +16°C és + 38°C között
T +16°C és + 43°C között
A dokumentációt tartalmazó zacskóban található
két távtartó, amelyeket az ábrán látható módon
1
45°
A
2
45°
2
kell felszerelni.
1.
Illessze a távtartókat a furatokba. Győződ‐
jön meg arról, hogy a nyíl (A) a képen látha‐
tó módon van pozícionálva
2.
Forgassa el az óramutató járásával ellent‐
étes irányba a távtartókat 45°-kal, amíg a
helyükre nem zárnak.
Amikor elhelyezi a készüléket, ügyeljen arra,
hogy vízszintben álljon. Ez az elülső oldalon alul
található két szabályozható láb segítségével ér‐
hető el.
Page 31

9.4 Elhelyezés
A készüléket minden hőforrástól, például radiáto‐
100 mm
roktól, kazánoktól, közvetlen napsütéstől stb. távol
kell üzembe helyezni. Gondoskodjon arról, hogy a
levegő szabadon áramolhasson a készülék hátlap‐
ja körül. Ha a készüléket egy falra függesztett egy‐
ség alá helyezi, a legjobb teljesítmény érdekében a
készülék felső lapja és a fali egység között lega‐
lább 100 mm távolságot kell hagyni. Azonban az az
ideális, ha a készüléket nem egy falra függesztett
egység alatt helyezi el. A pontos vízszintezés a ké‐
szülék alján található egy vagy több állítható láb ré‐
15 mm 15 mm
vén biztosítható. Ha a készüléket sarokban helyezi
el, és a zsanérokkal ellátott oldala néz a fal felé, a
fal és a készülék közötti távolságnak minimum 10
mm-nek kell lennie annak érdekében, hogy az ajtót
annyira ki lehessen nyitni, hogy a polcokat ki lehes‐
sen venni.
9.5 Az ajtó nyitási irányának megfordítása
MAGYAR 31
VIGYÁZAT
Gondoskodni kell arról, hogy a készüléket
probléma esetén haladéktalanul le lehes‐
sen választani a hálózati áramkörről, ezért
a dugasznak az üzembe helyezés után
könnyen elérhető helyen kell lennie.
Azt javasoljuk, hogy a következő műve‐
leteket egy másik személy segítségével
végezze, aki a készülék ajtóit a művele‐
tek során megtartja.
Az ajtó nyitási irányának megváltoztatásához vé‐
gezze el az alábbi lépéseket:
Húzza ki a dugót a hálózati aljzatból
Nyissa ki a fagyasztó ajtaját. Lazítsa meg a zsa‐
nért.
Page 32

www.electrolux.com
32
Óvatosan felfelé húzva távolítsa el az ajtókat,
majd a zsanért.
2
3
1
Az ellenkező oldalon távolítsa el a furatborításo‐
kat.
Csavarozza ki mindkét állítható lábat és az alsó
ajtózsanér csavarjait. Távolítsa el az alsó ajtó‐
zsanért, és szerelje fel az ellenkező oldalra.
1
2
Page 33

MAGYAR 33
Csavarozza ki az alsó legszélső csavart, és csa‐
varozza be az ellenkező oldalra.
Csavarozza ki a felső ajtótartó csapot.
Csavarozza be a csapot az ellenkező oldalra.
2
1
Page 34

www.electrolux.com
34
Illessze az ajtókat a csapokhoz, és helyezze vis‐
sza az ajtókat. Szerelje fel a zsanért.
2
3
1
Az ellenkező oldalon helyezze el a furatborításo‐
kat.
Húzza meg a zsanért. Ügyeljen rá, hogy az ajtók
be legyenek igazítva.
Szerelje le a fogantyút (ha van felszerelve), és
helyezze át az ellenkező oldalra.
Állítsa vissza a készüléket az eredeti helyzetébe,
állítsa vízszintbe, és várjon legalább négy órát,
mielőtt csatlakoztatná a hálózati vezetéket a há‐
lózati aljzathoz.
Hajtson végre egy végső ellenőrzést, hogy meg‐
bizonyosodjon a következőkről:
• Minden csavar meg van-e húzva.
• Az ajtó megfelelően nyílik és csukódik.
Ha a környezeti hőmérséklet alacsony (pl. télen),
előfordulhat, hogy az ajtótömítés nem tapad hoz‐
zá tökéletesen a szekrénytesthez. Ebben az
esetben várja meg, amíg a tömítés magától hoz‐
záidomul a szekrénytesthez.
Ha nem szeretné saját maga végrehajtani a fenti
műveleteket, forduljon a legközelebbi márkaszer‐
vizhez. A márkaszerviz szakembere költségtérí‐
tés ellenében elvégzi az ajtók nyitásirányának
megfordítását.
9.6 Elektromos csatlakoztatás
Az elektromos csatlakoztatás előtt győződjön
meg arról, hogy az adattáblán feltüntetett feszült‐
ség és frekvencia megegyezik-e a háztartási há‐
lózati áram értékeivel.
A készüléket kötelező földelni. A elektromos há‐
lózatba illő vezeték dugója ilyen érintkezéssel
van ellátva. Ha a háztartási hálózati csatlako‐
zóaljzat nincs leföldelve, csatlakoztassa a készü‐
léket az érvényben lévő jogszabályok szerint kü‐
lön földpólushoz, miután konzultált egy képesített
villanyszerelővel.
A gyártó minden felelősséget elhárít magától, ha
a fenti biztonsági óvintézkedéseket nem tartják
be.
Ez a készülék megfelel az EGK irányelveknek.
Page 35

10. MŰSZAKI ADATOK
Az 1/1998. (I. 12.) IKIM sz. miniszteri rendeletnek megfelelően
Gyártó védjegye Electrolux
A készülék kategóriája Hűtőszekrény - fagyasztószekrény
Magasság mm 1404
Szélesség mm 545
Mélység mm 604
Hűtőtér nettó térfogata liter 184
Fagyasztótér nettó térfogata liter 44
Energiaosztály (A++ és G között, ahol az
A++ a leghatékonyabb, a G a legkevés‐
bé hatékony)
Villamosenergia -fogyasztás (24 órás
szabványos vizsgálati eredmények alap‐
ján. A mindenkori energiafogyasztás a
készülék használatától és elhelyezéstől
függ.)
Fagyasztótér csillagszám jele ****
Áramkimaradási biztonság óra 19
Fagyasztási teljesítmény kg/24 óra 3
Klímaosztály SN-N-ST
Feszültség Volt 230
Zajteljesítmény dB/A 40
Beépíthető Nem
A műszaki adatok megtalálhatók a készülék bel‐
sejében bal oldalon lévő adattáblán és az ener‐
giatakarékossági címkén.
MAGYAR 35
A+
kWh/év 237
11. KÖRNYEZETVÉDELMI TUDNIVALÓK
A következő jelzéssel ellátott anyagokat
hasznosítsa újra:
a megfelelő konténerekbe a csomagolást.
Járuljon hozzá környezetünk és egészségünk
védelméhez, és hasznosítsa újra az elektromos
és elektronikus hulladékot. A
. Újrahasznosításhoz tegye
tiltó
szimbólummal ellátott készüléket ne dobja a
háztartási hulladék közé. Juttassa el a
készüléket a helyi újrahasznosító telepre, vagy
lépjen kapcsolatba a hulladékkezelésért felelős
hivatallal.
Page 36

www.electrolux.com
36
SPIS TREŚCI
1. INFORMACJE DOTYCZĄCE BEZPIECZEŃSTWA . . . . . . . . . . . . . . . . . . . . . . . . . . . . . . . . . . . . . . . . . 37
2. OPIS URZĄDZENIA . . . . . . . . . . . . . . . . . . . . . . . . . . . . . . . . . . . . . . . . . . . . . . . . . . . . . . . . . . . . . . . . . 39
3. EKSPLOATACJA . . . . . . . . . . . . . . . . . . . . . . . . . . . . . . . . . . . . . . . . . . . . . . . . . . . . . . . . . . . . . . . . . . . 40
4. PIERWSZE UŻYCIE . . . . . . . . . . . . . . . . . . . . . . . . . . . . . . . . . . . . . . . . . . . . . . . . . . . . . . . . . . . . . . . . . 40
5. CODZIENNA EKSPLOATACJA . . . . . . . . . . . . . . . . . . . . . . . . . . . . . . . . . . . . . . . . . . . . . . . . . . . . . . . . 40
6. PRZYDATNE RADY I WSKAZÓWKI . . . . . . . . . . . . . . . . . . . . . . . . . . . . . . . . . . . . . . . . . . . . . . . . . . . . 42
7. KONSERWACJA I CZYSZCZENIE . . . . . . . . . . . . . . . . . . . . . . . . . . . . . . . . . . . . . . . . . . . . . . . . . . . . . . 43
8. CO ZROBIĆ, GDY… . . . . . . . . . . . . . . . . . . . . . . . . . . . . . . . . . . . . . . . . . . . . . . . . . . . . . . . . . . . . . . . . . 45
9. INSTALACJA . . . . . . . . . . . . . . . . . . . . . . . . . . . . . . . . . . . . . . . . . . . . . . . . . . . . . . . . . . . . . . . . . . . . . . . 47
10. DANE TECHNICZNE . . . . . . . . . . . . . . . . . . . . . . . . . . . . . . . . . . . . . . . . . . . . . . . . . . . . . . . . . . . . . . . . 52
11. OCHRONA ŚRODOWISKA . . . . . . . . . . . . . . . . . . . . . . . . . . . . . . . . . . . . . . . . . . . . . . . . . . . . . . . . . . . 52
Z MYŚLĄ O TOBIE
Dziękujemy za zakup urządzenia Electrolux. Jest ono owocem dziesięcioleci doświadczeń i innowacji. To
pomysłowe i stylowe urządzenie zaprojektowano z myślą o Tobie. Użytkując je masz zawsze pewność uzyskania
wspaniałych efektów.
Witamy w świecie marki Electrolux!
Odwiedź naszą witrynę internetową, aby uzyskać:
Wskazówki dotyczące użytkowania, broszury, pomoc w rozwiązywaniu problemów oraz informacje
dotyczące serwisu:
www.electrolux.com
Zarejestruj swój produkt, aby uprościć jego obsługę serwisową:
www.electrolux.com/productregistration
Kupuj akcesoria, materiały eksploatacyjne i oryginalne części zamienne do swojego urządzenia:
www.electrolux.com/shop
OBSŁUGA KLIENTA
Zalecamy stosowanie oryginalnych części zamiennych.
Kontaktując się z serwisem, należy przygotować poniższe dane.
Informacje można znaleźć na tabliczce znamionowej. Model, numer produktu, numer seryjny.
Ostrzeżenie/przestroga – informacje dotyczące bezpieczeństwa.
Informacje i wskazówki ogólne
Informacje dot. ochrony środowiska
Producent zastrzega sobie możliwość wprowadzenia zmian bez wcześniejszego powiadomienia.
Page 37

POLSKI 37
1.
INFORMACJE DOTYCZĄCE BEZPIECZEŃSTWA
W celu zapewnienia bezpieczeństwa użytkowni‐
ka i bezawaryjnej pracy urządzenia przed insta‐
lacją i pierwszym użyciem należy uważnie prze‐
czytać instrukcję obsługi, zwracając szczególną
uwagę na wskazówki oraz ostrzeżenia. Wszyscy
użytkownicy urządzenia powinni poznać zasady
jego bezpiecznej obsługi. Pozwoli to uniknąć nie‐
potrzebnych pomyłek i wypadków. Prosimy o za‐
chowanie instrukcji obsługi przez cały czas uży‐
wania urządzenia oraz przekazanie jej kolejnemu
użytkownikowi w razie odstąpienia lub sprzedaży
urządzenia.
W celu uniknięcia szkód na zdrowiu i życiu osób
oraz szkód materialnych należy przestrzegać
środków ostrożności podanych w niniejszej in‐
strukcji obsługi, gdyż producent nie jest odpowie‐
dzialny za szkody spowodowane wskutek ich
nieprzestrzegania.
1.1 Bezpieczeństwo dzieci i osób
upośledzonych
• Niniejsze urządzenie nie jest przeznaczone do
użytku przez osoby (w tym dzieci) o ograni‐
czonych zdolnościach fizycznych, sensorycz‐
nych czy umysłowych, a także nieposiadające
wiedzy lub doświadczenia w użytkowaniu tego
typu urządzeń, chyba, że będą one nadzoro‐
wane lub zostaną poinstruowane na temat ko‐
rzystania z tego urządzenia przez osobę od‐
powiedzialną za ich bezpieczeństwo.
Dzieci należy pilnować, aby mieć pewność, że
nie bawią się urządzeniem.
• Opakowanie należy przechowywać w miejscu
niedostępnym dla dzieci. Istnieje ryzyko udu‐
szenia.
• W przypadku utylizacji urządzenia należy wy‐
jąć wtyczkę z gniazdka, odciąć przewód zasi‐
lający (jak najbliżej urządzenia) i odkręcić
drzwi, aby uchronić bawiące się dzieci przed
porażeniem prądem lub przed zamknięciem
się w środku urządzenia.
• Jeśli to urządzenie zawierające magnetyczne
uszczelnienie drzwi ma zastąpić urządzenie z
blokadą sprężynową (ryglem) w drzwiach lub
w pokrywie, przed oddaniem starego urządze‐
nia do utylizacji należy usunąć blokadę. Zapo‐
biegnie to przypadkowemu uwięzieniu dziec‐
ka.
1.2 Ogólne zasady bezpieczeństwa
OSTRZEŻENIE!
Otwory wentylacyjne w obudowie urządzenia lub
w zabudowie nie mogą być zakryte ani zanieczy‐
szczone.
• Urządzenie jest przeznaczone do przechowy‐
wania żywności i/lub napojów w zwykłych wa‐
runkach domowych, tak jak to opisano w ni‐
niejszej instrukcji obsługi.
• Do przyśpieszenia procesu rozmrażania nie
wolno używać urządzeń mechanicznych ani
żadnych innych sztucznych metod.
• Nie należy stosować innych urządzeń elek‐
trycznych (np. maszynek do lodów) wewnątrz
urządzeń chłodniczych, o ile nie zostały one
dopuszczone do tego celu przez producenta.
• Należy zachować ostrożność, aby nie uszko‐
dzić układu chłodniczego.
• W układzie chłodniczym urządzenia znajduje
się czynnik chłodniczy izobutan (R600a), który
jest ekologicznym gazem naturalnym (jednak
jest łatwopalny).
Należy upewnić się, że podczas transportu i
instalacji urządzenia nie zostały uszkodzone
żadne elementy układu chłodniczego.
Jeśli układ chłodniczy został uszkodzony, na‐
leży:
– unikać otwartego płomienia oraz innych
źródeł zapłonu;
– dokładnie przewietrzyć pomieszczenie, w
którym znajduje się urządzenie.
• Ze względów bezpieczeństwa zabrania się
dokonywania jakichkolwiek modyfikacji lub
zmian konstrukcyjnych w urządzeniu. Jakie‐
kolwiek uszkodzenia przewodu zasilającego
mogą spowodować zwarcie, pożar i/lub pora‐
żenie prądem.
OSTRZEŻENIE!
Aby można było uniknąć niebezpie‐
czeństwa, wymiany elementów elek‐
trycznych (przewód zasilający, wtyczka,
sprężarka) może dokonać wyłącznie
technik autoryzowanego serwisu lub
osoba o odpowiednich kwalifikacjach.
1.
Nie wolno przedłużać przewodu zasilają‐
cego.
Page 38

www.electrolux.com
38
• Urządzenie jest ciężkie. Należy zachować os‐
• Nie wolno wyjmować ani dotykać przedmiotów
• Nie należy wystawiać urządzenia na bezpo‐
• Do oświetlenia urządzenia zastosowano spe‐
1.3 Codzienna eksploatacja
• Nie wolno stawiać gorących naczyń na plasti‐
• Nie wolno przechowywać łatwopalnych gazów
• Nie wolno umieszczać żywności bezpośrednio
• Mrożonek nie wolno ponownie zamrażać po
• Zapakowaną zamrożoną żywność należy
• Należy ściśle stosować się do wskazówek do‐
• W zamrażarce nie należy przechowywać na‐
2.
Należy upewnić się, że tylna ścianka
urządzenia nie przygniotła ani nie uszko‐
dziła wtyczki przewodu zasilającego.
Przygnieciona lub uszkodzona wtyczka
może się przegrzewać i spowodować po‐
żar.
3.
Należy zapewnić dostęp do wtyczki prze‐
wodu zasilającego urządzenia.
4.
Nie ciągnąć za przewód zasilający.
5.
Jeżeli gniazdo elektryczne jest obluzowa‐
ne, nie wolno wkładać do niego wtyczki
przewodu zasilającego. Występuje za‐
grożenie pożarem lub porażeniem prą‐
dem.
6.
Nie wolno używać urządzenia bez klosza
żarówki (jeśli występuje) oświetlenia
wnętrza.
trożność podczas jego przenoszenia.
w komorze zamrażarki wilgotnymi/mokrymi rę‐
koma, ponieważ może to spowodować uszko‐
dzenie skóry lub odmrożenie.
średnie działanie promieni słonecznych.
cjalne żarówki (jeśli występują) przeznaczone
wyłącznie do urządzeń domowych. Nie nadają
się one do oświetlania pomieszczeń domo‐
wych.
kowych elementach urządzenia.
ani płynów w urządzeniu, ponieważ mogą
spowodować wybuch.
przy otworze wentylacyjnym na tylnej ściance.
(Jeśli urządzenie jest odszraniane automa‐
tycznie)
rozmrożeniu.
przechowywać zgodnie z instrukcjami jej pro‐
ducenta.
tyczących przechowywania podanych przez
producenta urządzenia. Patrz odpowiednie in‐
strukcje.
pojów gazowanych, ponieważ duże ciśnienie
w pojemniku może spowodować ich eksplozję
i w rezultacie uszkodzenie urządzenia.
• Lody na patyku mogą być przyczyną odmro‐
żeń w przypadku konsumpcji bezpośrednio po
ich wyjęciu z zamrażarki.
1.4 Konserwacja i czyszczenie
• Przed przeprowadzeniem konserwacji należy
wyłączyć urządzenie i wyjąć wtyczkę przewo‐
du zasilającego z gniazdka.
• Nie wolno czyścić urządzenia metalowymi
przedmiotami.
• Nie wolno używać ostrych przedmiotów do
usuwania szronu z urządzenia. Należy stoso‐
wać plastikową skrobaczkę.
• Należy regularnie sprawdzać otwór odpływo‐
wy skroplin w chłodziarce. W razie koniecz‐
ności należy go wyczyścić. Jeżeli otwór odpły‐
wowy jest zablokowany, woda zacznie się
zbierać na dnie chłodziarki.
1.5 Instalacja
Podłączenie elektryczne urządzenia na‐
leży wykonać zgodnie z wskazówkami
podanymi w odpowiednich rozdziałach.
• Rozpakować urządzenie i sprawdzić, czy nie
jest w żaden sposób uszkodzone. Nie wolno
podłączać urządzenia, jeśli jest uszkodzone.
Ewentualne uszkodzenia należy natychmiast
zgłosić sprzedawcy. W tym przypadku należy
zachować opakowanie.
• Zaleca się odczekanie co najmniej czterech
godzin przed podłączeniem urządzenia, aby
olej mógł spłynąć z powrotem do sprężarki.
• Należy zapewnić odpowiednią wentylację ze
wszystkich stron urządzenia. Nieodpowiednia
wentylacja prowadzi do jego przegrzewania.
Aby uzyskać wystarczającą wentylację, należy
postępować zgodnie z wskazówkami dotyczą‐
cymi instalacji.
• W razie możliwości tylną ściankę urządzenia
należy ustawić od ściany, aby uniknąć dotyka‐
nia lub chwytania za ciepłe elementy (sprężar‐
ka, skraplacz) i zapobiec ewentualnym opa‐
rzeniom.
• Urządzenia nie wolno umieszczać w pobliżu
kaloryferów lub kuchenek.
• Należy zadbać o to, aby po instalacji urządze‐
nia możliwy był dostęp do wtyczki sieciowej.
• Urządzenie można podłączyć wyłącznie do in‐
stalacji doprowadzającej wodę pitną (jeśli
Page 39

przewidziane jest podłączenie do sieci wodo‐
ciągowej).
1.6 Serwis
• Wszelkie prace elektryczne związane z serwi‐
sowaniem urządzenia powinny być przepro‐
wadzone przez wykwalifikowanego elektryka
lub inną kompetentną osobę.
• Naprawy tego produktu muszą być wykony‐
wane w autoryzowanym punkcie serwisowym.
Należy stosować wyłącznie oryginalne części
zamienne.
1.7 Ochrona środowiska
W obiegu czynnika chłodniczego ani w
materiałach izolacyjnych urządzenia nie
2. OPIS URZĄDZENIA
POLSKI 39
ma gazów szkodliwych dla warstwy
ozonowej. Urządzenia nie należy wy‐
rzucać wraz z odpadami komunalnymi i
śmieciami. Pianka izolacyjna zawiera
łatwopalne gazy: urządzenie należy uty‐
lizować zgodnie z obowiązującymi prze‐
pisami, które można uzyskać od władz
lokalnych. Należy unikać uszkodzenia
układu chłodniczego, szczególnie z tyłu
przy wymienniku ciepła. Materiały za‐
stosowane w urządzeniu, które są oz‐
naczone symbolem
ponownego przetworzenia.
1
, nadają się do
7
6
5
4
Druciana półka
1
Przegródka na masło
2
Półki drzwiowe
3
Tabliczka znamionowa
4
Szuflada na warzywa
5
Szklane półki
6
Regulator temperatury/oświetlenie
7
2
3
Page 40
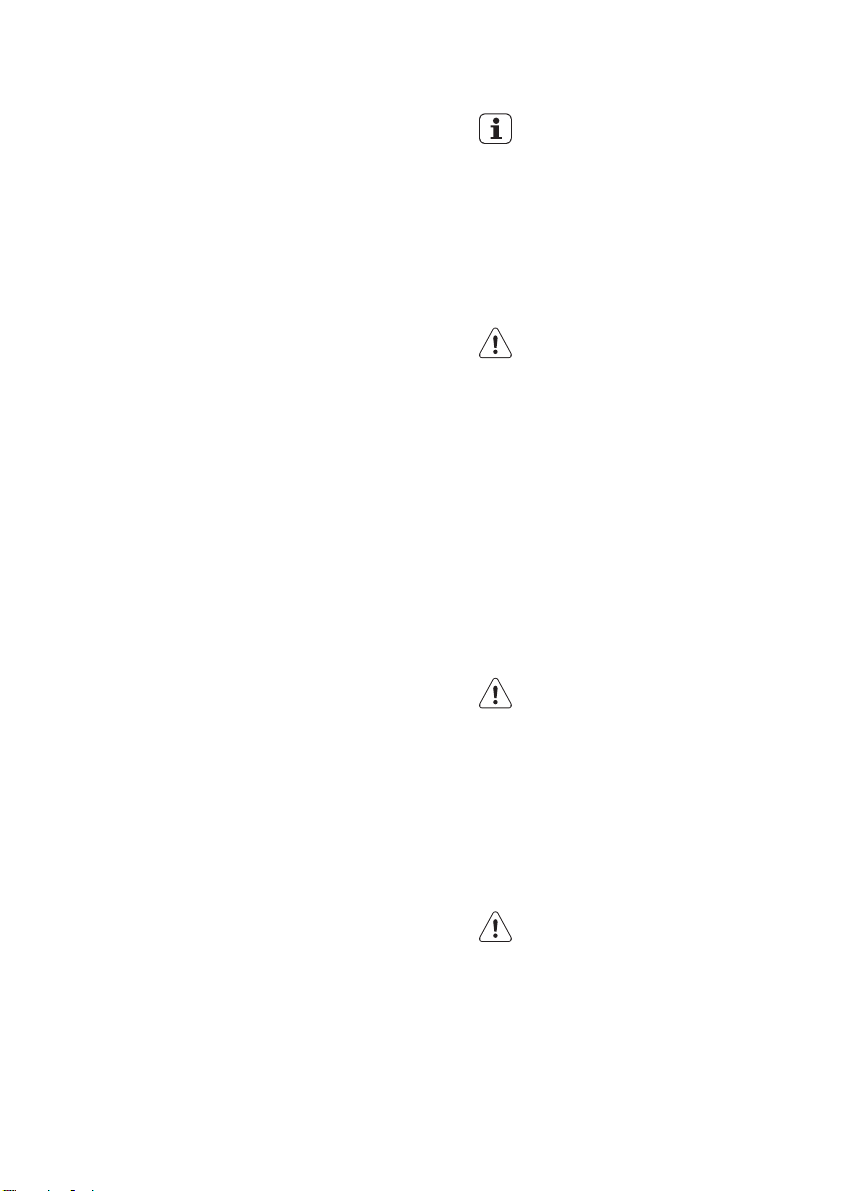
www.electrolux.com
40
3. EKSPLOATACJA
3.1 Włączanie
Umieścić wtyczkę przewodu zasilającego w
gniazdku.
Obrócić pokrętło regulacji temperatury zgodnie z
ruchem wskazówek zegara w położenie środko‐
we.
3.2 Wyłączanie
Aby wyłączyć urządzenie, należy obrócić pokręt‐
ło regulacji temperatury w położenie "O".
3.3 Regulacja temperatury
Temperatura jest regulowana automatycznie.
W celu uregulowania urządzenia należy wykonać
następujące czynności:
• obrócić pokrętło regulacji temperatury w stro‐
nę niższego ustawienia, aby uzyskać minimal‐
ne chłodzenie.
• obrócić pokrętło regulacji temperatury w stro‐
nę wyższego ustawienia, aby uzyskać maksy‐
malne chłodzenie.
4. PIERWSZE UŻYCIE
4.1 Czyszczenie wnętrza
W celu usunięcia zapachu nowego produktu
przed pierwszym uruchomieniem urządzenia na‐
leży wymyć jego wnętrze i znajdujące się w nim
elementy letnią wodą z łagodnym mydłem, a na‐
stępnie dokładnie je wysuszyć.
Ustawienie środkowe jest zazwyczaj
najbardziej odpowiednie.
Tym niemniej należy wybrać dokładne ustawie‐
nie temperatury, biorąc pod uwagę fakt, że tem‐
peratura wewnątrz urządzenia zależy od:
• temperatury w pomieszczeniu
• częstości otwierania drzwi
• ilości przechowywanej żywności
• ustawienia urządzenia.
Jeśli temperatura otoczenia jest wysoka
lub urządzenie jest w pełni załadowane,
a wybrano ustawienie najniższej tempe‐
ratury, urządzenie może pracować bez
przerwy, co powoduje tworzenie się
szronu na tylnej ściance. W takim przy‐
padku należy ustawić pokrętło na wy‐
ższą temperaturę, aby umożliwić auto‐
matyczne usuwanie szronu, a w rezulta‐
cie zmniejszyć zużycie energii.
Nie należy stosować detergentów ani
proszków do szorowania, ponieważ mo‐
gą one uszkodzić powierzchni urządze‐
nia.
5. CODZIENNA EKSPLOATACJA
5.1 Mrożenie świeżej żywności
Komora zamrażarki jest przeznaczona do dłu‐
gotrwałego przechowywania mrożonek, żywnoś‐
ci głęboko zamrożonej oraz do mrożenia świeżej
żywności.
W celu zamrożenia świeżej żywności nie potrze‐
ba zmieniać średniego ustawienia.
Jednakże w celu szybszego zamrożenia należy
obrócić regulator temperatury na wyższe usta‐
wienie w celu uzyskania maksymalnego ochło‐
dzenia.
W takiej sytuacji temperatura w chło‐
dziarce może spaść poniżej 0°C. Jeśli
to nastąpi, należy ponownie ustawić
temperaturę na wyższą.
5.2 Przechowywanie zamrożonej
żywności
W przypadku pierwszego uruchomienia urządze‐
nia lub po okresie jego nieużywania, przed wło‐
żeniem żywności do komory zamrażarki należy
odczekać co najmniej 2 godziny od włączenia
Page 41

urządzenia przy ustawieniu wyższej mocy chło‐
dzenia.
Jeżeli dojdzie do przypadkowego roz‐
mrożenia żywności, spowodowanego
na przykład brakiem zasilania przez ok‐
res czasu dłuższy niż podany w para‐
metrach technicznych w punkcie "Czas
utrzymywania temperatury bez zasila‐
nia", należy szybko skonsumować roz‐
mrożoną żywność lub niezwłocznie
poddać ją obróbce termicznej, po czym
ponownie zamrozić (po ostudzeniu).
5.4 Zmiana położenia półek
5.5 Kontrola wilgotności
POLSKI 41
5.3 Rozmrażanie
Głęboko zamrożoną żywność lub mrożonki nale‐
ży przed użyciem rozmrozić w komorze chło‐
dziarki lub w temperaturze pokojowej, zależnie
od czasu przeznaczonego na tę operację.
Małe kawałki można gotować w stanie zamrożo‐
nym, od razu po wyjęciu z zamrażarki. W takim
przypadku gotowanie potrwa jednak dłużej.
Ściany komory chłodziarki wyposażono w kilka
prowadnic umożliwiających umieszczenie półek
zgodnie z aktualnymi potrzebami.
Szklana półka posiada mechanizm ze szczelina‐
mi (regulowanymi dźwigienką), dzięki któremu
można regulować temperaturę w szufladzie na
warzywa.
Gdy szczeliny wentylacyjne są zamknięte:
artykuły w szufladzie na warzywa i owoce dłużej
zachowują naturalną wilgotność.
Gdy szczeliny wentylacyjne są otwarte:
większa cyrkulacja powietrza powoduje obniże‐
nie wilgotności powietrza w komorze na warzywa
i owoce.
Page 42

www.electrolux.com
42
5.6 Rozmieszczanie półek na drzwiach
5.7 Wskaźnik temperatury
Aby umożliwić przechowywanie artykułów spoży‐
wczych w opakowaniach o różnej wielkości, półki
w drzwiach można umieszczać na różnych wyso‐
kościach.
Aby zmienić ustawienie, należy: stopniowo wy‐
ciągać półkę w kierunku strzałek, a następnie
umieścić ją w wymaganym miejscu.
To urządzenie jest w sprzedaży we
Francji.
Zgodnie z prawem obowiązującym w
tym kraju, urządzenie musi być wyposa‐
żone w specjalny przyrząd (patrz rysu‐
nek) umieszczony w najniżej położonej
komorze chłodziarki, którego zadaniem
jest wskazywanie miejsca o najniższej
temperaturze.
6. PRZYDATNE RADY I WSKAZÓWKI
6.1 Zwykłe odgłosy pracy urządzenia
• Podczas przetłaczania czynnika chłodniczego
przez rurki i inne elementy układu chłodzące‐
go może być słyszalny odgłos cichego bulgo‐
tania lub odgłos przypominający wrzenie wo‐
dy. Jest to właściwe.
• Gdy sprężarka jest włączona, a czynnik chło‐
dzący jest pompowany, słychać warkot i od‐
głos pulsowania pochodzący ze sprężarki.
Jest to właściwe.
• Rozszerzalność cieplna może powodować na‐
głe odgłosy pękania. Jest to naturalne, nie‐
groźne zjawisko. Jest to właściwe.
• Gdy sprężarka się włącza lub wyłącza, sły‐
chać ciche kliknięcie regulatora temperatury.
Jest to właściwe.
6.2 Wskazówki dotyczące
oszczędzania energii
• Nie otwierać zbyt często drzwi zamrażarki i
• Jeśli temperatura otoczenia jest wysoka, po‐
6.3 Wskazówki dotyczące
przechowywania świeżej żywności
Aby uzyskać najlepsze wyniki:
nie zostawiać ich otwartych dłużej niż jest to
absolutnie konieczne.
krętło regulacji temperatury jest ustawione w
najwyższej pozycji, urządzenie jest w pełni za‐
ładowane sprężarka będzie pracowała bezus‐
tannie, powodując zbieranie się szronu lub lo‐
du na parowniku. W takim przypadku należy
obrócić pokrętło regulacji temperatury w kie‐
runku niższego ustawienia, aby umożliwić au‐
tomatyczne usuwanie szronu i jednocześnie
zmniejszyć zużycie energii.
Page 43

• Nie przechowywać w chłodziarce przechowy‐
wać ciepłej żywności ani parujących płynów.
• Artykuły spożywcze należy przykryć lub owi‐
nąć, szczególnie te, które mają silny zapach.
• Zapewnić swobodny przepływ powietrza wo‐
kół artykułów spożywczych.
6.4 Wskazówki dotyczące
przechowywania żywności
Przydatne wskazówki:
Mięso (każdy rodzaj): zapakować do polietyleno‐
wych worków i umieścić na szklanej półce nad
szufladą na warzywa.
Ze względów bezpieczeństwa można je przecho‐
wywać w ten sposób najwyżej przez jeden lub
dwa dni.
Żywność gotowana, potrawy na zimno itp.: nale‐
ży je przykryć i umieścić na dowolnej półce.
Owoce i warzywa: należy je dokładnie oczyścić i
umieścić w przeznaczonych dla nich szufladach.
Masło i ser: należy je umieszczać w specjalnych
hermetycznych pojemnikach lub zapakować w
folię aluminiową lub woreczki polietylenowe, aby
maksymalnie ograniczyć dostęp powietrza.
Butelki z mlekiem: należy założyć na nie nakrętki
i przechowywać na półce na butelki na drzwiach.
Bananów, ziemniaków, cebuli i czosnku, jeśli nie
są zapakowane, nie należy przechowywać w
chłodziarce.
6.5 Wskazówki dotyczące
zamrażania
Aby uzyskać najlepsze wyniki zamrażania, nale‐
ży skorzystać z poniższych ważnych wskazó‐
wek:
• Maksymalną ilość żywności, którą można za‐
mrozić w ciągu 24 godzin, podano na tablicz‐
ce znamionowej.
• Proces zamrażania trwa 24 godziny. W tym
czasie nie należy wkładać do zamrażarki wię‐
cej żywności przeznaczonej do zamrożenia.
• Należy zamrażać tylko artykuły spożywcze
najwyższej jakości, świeże i dokładnie oczy‐
szczone.
POLSKI 43
• Żywność należy dzielić na małe porcje, aby
móc ją szybko zupełnie zamrozić, a później
rozmrażać tylko potrzebną ilość.
• Żywność należy pakować w folię aluminiową
lub polietylenową zapewniającą hermetyczne
zamknięcie.
• Nie dopuszczać do stykania się świeżej, nie‐
zamrożonej żywności z zamrożonymi produk‐
tami, aby uniknąć wzrostu temperatury pro‐
duktów zamrożonych.
• Produkty niskotłuszczowe przechowują się le‐
piej i dłużej niż o wysokiej zawartości tłuszczu.
Sól powoduje skrócenie okresu przechowywa‐
nia żywności.
• Spożywanie sorbetu bezpośrednio po wyjęciu
z komory zamrażarki może spowodować od‐
mrożenia skóry.
• Zaleca się umieszczanie daty zamrożenia na
każdym opakowaniu w celu kontrolowania dłu‐
gości okresu przechowywania.
6.6 Wskazówki dotyczące
przechowywania zamrożonej
żywności
Aby urządzenie pracowało z najlepszą wydajnoś‐
cią, należy:
• Upewnić się, że mrożonki były odpowiednio
przechowywane w sklepie.
• Starać się, aby zamrożona żywność była
transportowana ze sklepu do zamrażarki w jak
najkrótszym czasie.
• Nie otwierać zbyt często drzwi zamrażarki i
nie zostawiać ich otwartych dłużej niż jest to
absolutnie konieczne.
• Po rozmrożeniu żywność szybko traci świe‐
żość i nie może być ponownie zamrażana.
• nie przekraczać okresu przechowywania pod‐
anego przez producenta żywności.
7. KONSERWACJA I CZYSZCZENIE
UWAGA!
Przed przeprowadzeniem jakichkolwiek
prac konserwacyjnych, należy odłączyć
urządzenie od zasilania.
Układ chłodniczy urządzenia zawiera
węglowodory. Prace konserwacyjne i
uzupełnianie mogą wykonywać wyłącz‐
nie technicy autoryzowanego serwisu.
Page 44

www.electrolux.com
44
7.1 Okresowe czyszczenie
Urządzenie należy czyścić regularnie:
• Wnętrze i akcesoria należy czyścić za pomo‐
• Należy regularnie sprawdzać i czyścić usz‐
• Dokładnie opłukać i wysuszyć.
Oczyścić skraplacz (czarna kratka) i sprężarkę z
tyłu urządzenia za pomocą szczotki. Poprawi to
wydajność urządzenia i zmniejszy zużycie ener‐
gii elektrycznej.
Niektóre kuchenne środki czyszczące zawierają
substancje chemiczne, które mogą uszkodzić
tworzywo zastosowane w urządzeniu. Z tego
względu zaleca się mycie zewnętrznych części
urządzenia ciepłą wodą z niewielką ilością płynu
do mycia naczyń.
Po czyszczeniu ponownie podłączyć urządzenie
do zasilania.
7.2 Rozmrażanie chłodziarki
cą ciepłej wody z dodatkiem łagodnego myd‐
ła.
czelki drzwi.
Nie ciągnąć, nie przesuwać ani nie ni‐
szczyć rurek i/lub przewodów umie‐
szczonych w urządzeniu.
Do czyszczenia wnętrza urządzenia nie
stosować środków czyszczących,
proszków do szorowania, pachnących
środków czyszczących lub wosku do
polerowania, gdyż mogą one uszkodzić
powierzchnię i pozostawić silny zapach.
Należy uważać, aby nie uszkodzić ukła‐
du chłodniczego.
Ważne jest okresowe czyszczenie otworu odpły‐
wowego znajdującego się na środku rynienki w
komorze chłodziarki, aby zapobiec przelewaniu
się wody i kapaniu jej na żywność. Należy uży‐
wać specjalnej przetyczki dostarczonej wraz z
urządzeniem i umieszczonej w otworze odpływo‐
wym.
7.3 Rozmrażanie zamrażarki
Na półkach i wokół górnej komory za‐
mrażarki będzie tworzyła się pewna
ilość szronu.
Zamrażarkę należy rozmrażać, gdy
warstwa szronu ma grubość ok. 3-5
mm.
Aby usunąć szron, należy:
1.
Wyłączyć urządzenie.
2.
Wyjąć wszelką przechowywaną żywność,
zawinąć ją w kilka warstw gazet i umieścić
w chłodnym miejscu.
3.
Zostawić otwarte drzwi.
4.
Po zakończeniu rozmrażania, dokładnie wy‐
suszyć wnętrze i ponownie umieścić wtycz‐
kę w gniazdku.
5.
Włączyć urządzenie.
6.
Ustawić regulator temperatury w celu uzys‐
kania maksymalnego chłodzenia i pozosta‐
wić takie ustawienie przez dwie - trzy godzi‐
ny.
7.
Umieścić w zamrażarce wcześniej wyjętą
żywność.
Do usuwania szronu ze skraplacza nie
używać ostrych metalowych przedmio‐
tów, ponieważ mogłoby to spowodować
jego uszkodzenie. Do przyspieszania
procesu rozmrażania nie używać urzą‐
dzeń mechanicznych ani żadnych in‐
nych "nienaturalnych" metod oprócz
tych, które są zalecane przez producen‐
ta. Wzrost temperatury zamrożonych
artykułów żywnościowych może spowo‐
dować skrócenie czasu ich przechowy‐
wania.
Podczas normalnego użytkowania, za każdym
razem po wyłączeniu się silnika sprężarki, nastę‐
puje automatyczne usunięcie szronu z parownika
komory chłodziarki. Woda z rozpuszczonego
szronu spływa rynienką do specjalnego pojemni‐
ka znajdującego się z tyłu urządzenia nad sprę‐
żarką, skąd następnie odparowuje.
7.4 Okresy przerw w eksploatacji
urządzenia
Jeśli urządzenie nie jest używane przez długi
czas, należy wykonać następujące czynności:
1.
odłączyć urządzenie od zasilania
2.
wyjąć wszystkie artykuły spożywcze
Page 45

3.
rozmrozić i wyczyścić urządzenie oraz
wszystkie akcesoria
4.
pozostawić uchylone drzwi, aby uniknąć po‐
wstawania nieprzyjemnych zapachów.
8. CO ZROBIĆ, GDY…
POLSKI 45
Jeśli urządzenie pozostanie włączone,
należy poprosić kogoś o regularne
sprawdzanie, aby uniknąć zepsucia się
żywności w przypadku przerwy w zasi‐
laniu.
OSTRZEŻENIE!
Przed przystąpieniem do usunięcia
problemu należy wyjąć wtyczkę z
gniazdka.
Usuwanie problemów nieuwzględnio‐
nych w niniejszej instrukcji można po‐
wierzyć wyłącznie wykwalifikowanemu
elektrykowi lub innej kompetentnej oso‐
bie.
Podczas normalnej pracy urządzenia
słyszalne są pewne dźwięki (sprężarka,
obieg czynnika chłodniczego).
Problem Możliwa przyczyna Rozwiązanie
Urządzenie pracuje głośno Urządzenie nie jest prawidłowo
ustawione
Należy sprawdzić, czy urządze‐
nie stoi stabilnie (wszystkie czte‐
ry nóżki powinny stać na podło‐
dze)
Urządzenie nie działa. Nie
Urządzenie jest wyłączone. Włączyć urządzenie.
działa oświetlenie.
Wtyczka przewodu zasilające‐
go nie została właściwie podłą‐
Włożyć wtyczkę prawidłowo do
gniazdka.
czona do gniazdka.
Brak zasilania urządzenia.
Brak napięcia w gniazdku.
Podłączyć inne urządzenie elek‐
tryczne do tego gniazdka.
Skontaktować się z wykwalifiko‐
wanym elektrykiem.
Nie działa oświetlenie. Oświetlenie działa w trybie
Zamknąć i otworzyć drzwi.
oszczędzania energii.
Żarówka jest uszkodzona. Patrz „Wymiana żarówki”.
Sprężarka pracuje bezus‐
tannie.
Drzwi nie są prawidłowo za‐
Temperatura nie jest prawidło‐
wo ustawiona.
Ustawić wyższą temperaturę.
Patrz „Zamykanie drzwi”.
mknięte.
Drzwi są otwierane zbyt częs‐
to.
Temperatura produktów jest
zbyt wysoka.
Nie pozostawiać drzwi otwartych
dłużej, niż jest to konieczne.
Pozostawić produkty, aby ostyg‐
ły do temperatury pokojowej i
dopiero wtedy włożyć je do
urządzenia.
Temperatura w pomieszczeniu
jest zbyt wysoka.
Obniżyć temperaturę w pomie‐
szczeniu.
Page 46

www.electrolux.com
46
Problem Możliwa przyczyna Rozwiązanie
Po tylnej ściance chło‐
dziarki spływa woda.
Woda spływa do komory
chłodziarki.
Produkty uniemożliwiają spły‐
Woda wypływa na podło‐
gę.
Temperatura w urządzeniu
jest zbyt niska.
Temperatura w urządzeniu
jest zbyt wysoka.
Drzwi nie są prawidłowo za‐
Temperatura produktów jest
Włożono jednocześnie zbyt
Temperatura w chłodziar‐
ce jest zbyt wysoka.
Temperatura w zamrażar‐
ce jest zbyt wysoka.
Zbyt dużo szronu. Produkty spożywcze nie są
Drzwi nie są prawidłowo za‐
Temperatura nie jest prawidło‐
Podczas procesu automatycz‐
Jest to normalne zjawisko.
nego rozmrażania szron roz‐
mraża się na tylnej ściance.
Odpływ skroplin jest zatkany. Wyczyścić odpływ skroplin.
Upewnić się, że produkty nie
wanie skroplin do rynienki na
stykają się z tylną ścianką.
tylnej ściance.
Końcówka wężyka odprowa‐
dzającego skropliny nie jest
skierowana do pojemnika
umieszczonego nad sprężarką.
Temperatura nie jest prawidło‐
Zamocować końcówkę wężyka
odprowadzającego skropliny w
pojemniku umieszczonym nad
sprężarką.
Ustawić wyższą temperaturę.
wo ustawiona.
Temperatura nie jest prawidło‐
Ustawić niższą temperaturę.
wo ustawiona.
Patrz „Zamykanie drzwi”.
mknięte.
Pozostawić produkty, aby ostyg‐
zbyt wysoka.
ły do temperatury pokojowej i
dopiero wtedy włożyć je do
urządzenia.
Ograniczyć liczbę jednocześnie
wiele produktów.
Brak cyrkulacji zimnego powie‐
trza w urządzeniu.
Produkty są umieszczone zbyt
blisko siebie.
przechowywanych produktów.
Zapewnić cyrkulację zimnego
powietrza w urządzeniu.
Produkty należy przechowywać
w sposób umożliwiający cyrkula‐
cję zimnego powietrza.
Zapakować prawidłowo produk‐
właściwie zapakowane.
ty spożywcze.
Patrz „Zamykanie drzwi”.
mknięte.
Ustawić wyższą temperaturę.
wo ustawiona.
Page 47

8.1 Wymiana żarówki
8.2 Zamykanie drzwi
1.
Wyczyścić uszczelki drzwi.
2.
W razie potrzeby wyregulować drzwi. Patrz
punkt „Instalacja”.
9. INSTALACJA
POLSKI 47
1.
Wyjąć wtyczkę przewodu zasilającego z
gniazda elektrycznego.
2.
Odkręcić śrubkę klosza żarówki.
3.
Zdjąć klosz (patrz ilustracja).
4.
Wymienić przepaloną żarówkę na nową ża‐
rówkę o takiej samej mocy i przeznaczoną
specjalnie do urządzeń domowych. (moc
maksymalną podano na kloszu żarówki).
5.
Zamontować klosz żarówki.
6.
Dokręcić śrubkę klosza.
7.
Włożyć wtyczkę przewodu zasilającego do
gniazda elektrycznego.
8.
Otworzyć drzwi. Sprawdzić, czy oświetlenie
włącza się.
3.
W razie potrzeby wymienić uszkodzone
uszczelki drzwi. Skontaktować się z punk‐
tem serwisowym.
OSTRZEŻENIE!
Przed instalacją urządzenia należy do‐
kładnie przeczytać "Informacje dotyczą‐
ce bezpieczeństwa" w celu zapewnienia
własnego bezpieczeństwa i prawidłowe‐
go działania urządzenia.
9.1 Ustawianie
To urządzenie należy zainstalować w suchym,
dobrze wentylowanym pomieszczeniu (w garażu
lub piwnicy), aby jednak uzyskać optymalną wy‐
dajność urządzenia należy je zainstalować w
miejscu, w którym temperatura otoczenia odpo‐
wiada klasie klimatycznej podanej na tabliczce
znamionowej urządzenia:
Klasa kli‐
Temperatura otoczenia
matycz‐
na
SN od +10°C do +32°C
N od +16°C do +32°C
ST od +16°C do +38°C
T od +16°C do +43°C
Page 48

www.electrolux.com
48
9.2 Tylne elementy dystansowe
9.3 Poziomowanie
W torebce z dokumentacją znajdują się dwa ele‐
menty dystansowe, które należy zamontować
1
45°
A
2
45°
2
tak, jak pokazano na rysunku.
1.
Włożyć elementy dystansowe w otwory.
Upewnić się, że strzałka (A) jest ustawiona
tak, jak pokazano na rysunku.
2.
Obrócić elementy dystansowe o 45° w kie‐
runku przeciwnym do ruchu wskazówek ze‐
gara, aż zostaną zablokowane.
W trakcie ustawiania urządzenia należy zwrócić
uwagę, aby było ono prawidłowo wypoziomowa‐
ne. Służą do tego dwie regulowane przednie
nóżki.
9.4 Miejsce instalacji
100 mm
15 mm 15 mm
Urządzenie należy zainstalować z dala od źródeł
ciepła, takich jak grzejniki, bojlery i nie wystawiać
na bezpośrednie działanie promieni słonecznych
itp. Należy zapewnić swobodny przepływ powietrza
z tyłu obudowy. Jeśli urządzenie jest ustawione
pod szafką wiszącą, odległość pomiędzy górną kra‐
wędzią obudowy a szafką powinna wynosić co naj‐
mniej 100 mm, co zapewni najlepszą wydajność
urządzenia. Najlepiej jednak nie ustawiać urządze‐
nia pod wiszącymi szafkami. Urządzenie można
dokładnie wypoziomować dzięki regulowanym nóż‐
kom. Jeśli urządzenie zostanie ustawione w kącie
pomieszczenia w taki sposób, że zawiasy skiero‐
wane są do ściany, wówczas odległość między
ścianą i urządzeniem musi wynosić co najmniej 10
mm, w celu umożliwienia otwarcia drzwi na tyle
szeroko, aby dało się wyjąć półki.
OSTRZEŻENIE!
Należy zapewnić możliwość odłączenia
urządzenia od źródła zasilania. Dlatego po
zainstalowaniu urządzenia wtyczka musi
być łatwo dostępna.
Page 49

9.5 Zmiana kierunku otwierania drzwi
Aby zmienić kierunek otwierania drzwi, należy
wykonać następujące czynności:
Wyjąć wtyczkę przewodu zasilającego z gniazd‐
ka.
Otworzyć drzwi zamrażarki. Poluzować zawias.
Zdjąć drzwi delikatnie je pociągając oraz wyjąć
zawias.
2
POLSKI 49
Aby wykonać poniższe czynności, zale‐
ca się skorzystanie z pomocy drugiej
osoby, która przytrzyma drzwi urządze‐
nia.
3
1
Usunąć zatyczki otworów znajdujące się po dru‐
giej stronie.
Page 50

www.electrolux.com
50
Odkręcić obie regulowane nóżki oraz śruby do‐
lnego zawiasu drzwi. Zdjąć dolny zawias drzwi i
zamocować go po przeciwnej stronie.
1
2
Odkręcić dolną śrubę znajdującą się po drugiej
stronie oraz przykręcić ją po przeciwnej stronie.
Odkręcić sworzeń górnego zawiasu.
Przykręcić go po drugiej stronie.
2
1
Page 51

POLSKI 51
Założyć drzwi nasuwając je na sworznie zawia‐
sów. Zamocować zawias.
2
3
1
Umieścić zaślepki w otworach po przeciwnej
stronie.
Dokręcić zawias. Sprawdzić, czy drzwi są pra‐
widłowo ustawione i wyrównane.
Zdemontować uchwyt (jeśli przewidziano) i za‐
montować go po przeciwnej stronie.
Ustawić i wypoziomować urządzenie, odczekać
co najmniej cztery godziny, a następnie podłą‐
czyć je do źródła zasilania.
Na końcu upewnić się, czy:
• Wszystkie śruby są dokręcone.
• Drzwi otwierają i zamykają się prawidłowo.
Jeśli temperatura otoczenia jest niska (np. zimą),
uszczelka może nie przylegać dokładnie do obu‐
dowy. Należy odczekać, aż uszczelka dopasuje
się naturalnie.
Jeżeli użytkownik nie chce samodzielnie wykony‐
wać opisanych czynności, powinien zwrócić się o
pomoc do najbliższego autoryzowanego serwisu.
Specjalista z serwisu odpłatnie zmieni kierunek
otwierania drzwi.
9.6 Przyłącze elektryczne
Przed podłączeniem urządzenia do sieci elek‐
trycznej należy sprawdzić, czy napięcie oraz
częstotliwość podane na tabliczce znamionowej
odpowiadają parametrom domowej instalacji za‐
silającej.
Urządzenie musi być uziemione. Wtyczka prze‐
wodu zasilającego dołączonego do urządzenia
posiada styk uziemiający . Jeśli gniazdko zasila‐
nia nie jest uziemione, urządzenie należy odręb‐
nie uziemić zgodnie z aktualnymi przepisami, uz‐
gadniając to z wykwalifikowanym elektrykiem.
Producent nie ponosi żadnej odpowiedzialności
w przypadku nieprzestrzegania powyższych
wskazówek dotyczących bezpieczeństwa.
Niniejsze urządzenie spełnia wymogi dyrektyw
Unii Europejskiej.
Page 52

www.electrolux.com
52
10. DANE TECHNICZNE
Wymiary
Wysokość 1404 mm
Szerokość 545 mm
Głębokość 604 mm
Czas utrzymywania tempera‐
19 h
tury bez zasilania
Napięcie 230 V
Częstotliwość 50 Hz
Dane techniczne są widoczne na tabliczce zna‐
mionowej znajdującej się z lewej strony wew‐
11. OCHRONA ŚRODOWISKA
nątrz urządzenia oraz na etykiecie informującej o
zużyciu energii.
Materiały oznaczone symbolem
poddać utylizacji. Opakowanie urządzenia
włożyć do odpowiedniego pojemnika w celu
przeprowadzenia recyklingu.
Należy zadbać o ponowne przetwarzanie
odpadów urządzeń elektrycznych i
elektronicznych, aby chronić środowisko
należy
naturalne oraz ludzkie zdrowie. Nie wolno
wyrzucać urządzeń oznaczonych symbolem
razem z odpadami domowymi. Należy zwrócić
produkt do miejscowego punktu ponownego
przetwarzania lub skontaktować się z
odpowiednimi władzami miejskimi.
Page 53

ROMÂNA 53
CUPRINS
1. INFORMAŢII PRIVIND SIGURANŢA . . . . . . . . . . . . . . . . . . . . . . . . . . . . . . . . . . . . . . . . . . . . . . . . . . . . 54
2. DESCRIEREA PRODUSULUI . . . . . . . . . . . . . . . . . . . . . . . . . . . . . . . . . . . . . . . . . . . . . . . . . . . . . . . . . 56
3. FUNCŢIONAREA . . . . . . . . . . . . . . . . . . . . . . . . . . . . . . . . . . . . . . . . . . . . . . . . . . . . . . . . . . . . . . . . . . . 56
4. PRIMA UTILIZARE . . . . . . . . . . . . . . . . . . . . . . . . . . . . . . . . . . . . . . . . . . . . . . . . . . . . . . . . . . . . . . . . . . 57
5. UTILIZAREA ZILNICĂ . . . . . . . . . . . . . . . . . . . . . . . . . . . . . . . . . . . . . . . . . . . . . . . . . . . . . . . . . . . . . . . . 57
6. SFATURI UTILE . . . . . . . . . . . . . . . . . . . . . . . . . . . . . . . . . . . . . . . . . . . . . . . . . . . . . . . . . . . . . . . . . . . . 59
7. ÎNGRIJIREA ŞI CURĂŢAREA . . . . . . . . . . . . . . . . . . . . . . . . . . . . . . . . . . . . . . . . . . . . . . . . . . . . . . . . . . 60
8. CE TREBUIE FĂCUT DACĂ... . . . . . . . . . . . . . . . . . . . . . . . . . . . . . . . . . . . . . . . . . . . . . . . . . . . . . . . . . 61
9. INSTALAREA . . . . . . . . . . . . . . . . . . . . . . . . . . . . . . . . . . . . . . . . . . . . . . . . . . . . . . . . . . . . . . . . . . . . . . 63
10. DATE TEHNICE . . . . . . . . . . . . . . . . . . . . . . . . . . . . . . . . . . . . . . . . . . . . . . . . . . . . . . . . . . . . . . . . . . . . 68
11. PROTEJAREA MEDIULUI ÎNCONJURĂTOR . . . . . . . . . . . . . . . . . . . . . . . . . . . . . . . . . . . . . . . . . . . . . . 68
NE GÂNDIM LA DUMNEAVOASTRĂ
Vă mulţumim că aţi achiziţionat un aparat Electrolux. Aţi ales un produs care include decenii de experienţă
profesională şi de inovaţie. Ingenios şi stilat, a fost conceput special pentru dumneavoastră. Pentru ca oricând îl
utilizați puteţi fi sigur de aceleaşi rezultate extraordinare.
Bine aţi venit la Electrolux.
Vizitaţi website-ul la:
Aici găsiţi sfaturi privind utilizarea, broşuri, informaţii care vă ajută la rezolvarea unor probleme apărute
şi informaţii despre service:
www.electrolux.com
Înregistraţi-vă produsul pentru a beneficia de servicii mai bune:
www.electrolux.com/productregistration
Cumpăraţi accesorii, consumabile şi piese de schimb originale pentru aparatul dvs.:
www.electrolux.com/shop
SERVICIUL DE RELAŢII CU CLIENŢII ŞI SERVICE
Vă recomandăm utilizarea pieselor de schimb originale.
Atunci când contactaţi unitatea de Service, asiguraţi-vă că aveţi disponibile următoarele informaţii.
Informaţiile pot fi găsite pe plăcuţa cu datele tehnice. Model, PNC, Număr de serie.
Avertisment / Atenţie-Informaţii privind siguranţa.
Informaţii şi recomandări generale
Informaţii cu privire la mediul înconjurător
Ne rezervãm dreptul asupra efectuãrii de modificãri.
Page 54

www.electrolux.com
54
1.
INFORMAŢII PRIVIND SIGURANŢA
Pentru siguranţa dv. şi pentru a asigura utilizarea
corectă a aparatului, înainte de instalare şi de
prima utilizare, citiţi cu atenţie acest manual de
utilizare, inclusiv recomandările şi avertismentele
cuprinse în el. Pentru a evita erorile inutile şi ac‐
cidentele, este important să vă asiguraţi că toate
persoanele care vor folosi aparatul cunosc foarte
bine modul său de funcţionare şi caracteristicile
de siguranţă. Păstraţi aceste instrucţiuni şi asigu‐
raţi-vă că ele vor însoţi aparatul în cazul în care
este mutat sau vândut, astfel încât toţi utilizatorii,
pe întreaga durată de viaţă a aparatului, să fie
corect informaţi cu privire la utilizarea şi siguran‐
ţa sa.
Pentru siguranţa persoanelor şi a bunurilor, res‐
pectaţi măsurile de precauţie din aceste instruc‐
ţiuni de utilizare, deoarece producătorul nu este
responsabil de daunele cauzate prin nerespecta‐
rea acestor cerinţe.
1.1 Siguranţa copiilor şi a persoanelor
vulnerabile
• Acest aparat nu trebuie folosit de persoane
(inclusiv copii) cu capacităţi fizice, senzoriale
şi mentale reduse, sau lipsiţi de experienţă şi
cunoştinţe, cu excepţia cazului în care sunt
supravegheaţi sau li s-au dat instrucţiuni în
legătură cu folosirea aparatului, de către o
persoană răspunzătoare pentru siguranţa lor.
Copiii trebuie supravegheaţi ca să nu se joace
cu aparatul.
• Nu lăsaţi ambalajele la îndemâna copiilor.
Există riscul de sufocare.
• Când aruncaţi aparatul, scoateţi ştecherul din
priză, tăiati cablul de alimentare (cât mai
aproape de aparat) şi înlăturaţi uşa, astfel în‐
cât copiii care se joacă să nu se poată electro‐
cuta şi să nu se poată închide înăuntru.
• Dacă acest aparat, care are garnituri magneti‐
ce la uşă, înlocuieşte un aparat mai vechi care
are un sistem de închidere cu arc (zăvor cu
resort), faceţi inutilizabil sistemul de închidere
înainte de a arunca aparatul vechi. În acest
mod nu va putea deveni o capcană mortală
pentru un copil.
1.2 Aspecte generale referitoare la
siguranţă
AVERTIZARE
Menţineţi libere deschiderile de ventilare din car‐
casa aparatului sau din structura în care este în‐
corporat.
• Acest aparat este destinat pentru conservarea
alimentelor şi/sau a băuturilor în locuinţele
normale, aşa cum se arată în acest manual de
instrucţiuni.
• Nu utilizaţi dispozitive mecanice sau alte mij‐
loace artificiale pentru a accelera procesul de
dezgheţare.
• Nu utilizaţi alte aparate electrice (de ex. apa‐
rate de îngheţată) în interiorul aparatelor de
răcire, decât dacă sunt aprobate în mod spe‐
cial de producător în acest scop.
• Nu deterioraţi circuitul de răcire.
• Circuitul de răcire al aparatului conţine izobu‐
tan ca agent de răcire (R600a), un gaz natural
cu un nivel ridicat de compatibilitate cu mediul
înconjurător, dar care este inflamabil.
În timpul transportului şi instalării aparatului,
procedaţi cu atenţie pentru a nu deteriora ni‐
ciuna dintre componentele circuitului de răci‐
re.
Dacă circuitul de răcire este deteriorat:
– evitaţi flăcările deschise şi sursele de foc
– aerisiţi foarte bine camera în care este am‐
plasat aparatul
• Este periculos să modificaţi specificaţiile sau
să modificaţi acest produs, în orice fel. Dete‐
riorarea cablului de alimentare poate produce
un scurt-circuit, un incendiu şi/sau electrocuta‐
rea.
AVERTIZARE
Pentru evitarea oricărui pericol, compo‐
nentele electrice (cablu de alimentare,
ştecher, compresor, etc.) trebuie înlo‐
cuite numai de către un tehnician de
service autorizat şi calificat, cu respec‐
tarea normelor de siguranţă în vigoare.
1.
Cablul de alimentare nu trebuie prelungit.
2.
Cablul de alimentare din spatele aparatu‐
lui nu trebuie strivit sau deteriorat de par‐
tea din spate a aparatului. Un cablu de
alimentare strivit sau deteriorat se poate
supraîncălzi şi poate produce un incen‐
diu.
3.
Trebuie asigurat un acces uşor la şteche‐
rul aparatului.
4.
Nu trageţi de cablul de alimentare.
Page 55

5.
Dacă priza nu este fixă, nu introduceţi
ştecherul în priză. Există riscul de elec‐
trocutare sau incendiu.
6.
Aparatul nu trebuie utilizat fără a fi mon‐
tat capacul becului din interior (dacă este
prevăzut).
• Acest aparat este greu. Procedaţi cu atenţie
când îl deplasaţi.
• Nu scoateţi şi nu atingeţi alimentele din com‐
partimentul congelator dacă aveţi mâinile
umede sau ude, deoarece în acest mod pielea
se poate zgâria sau poate suferi degerături.
• Evitaţi expunerea îndelungată a aparatului la
lumină solară directă.
• Becurile (dacă sunt prevăzute) din acest apa‐
rat sunt special destinate aparatelor electro‐
casnice. Acestea nu sunt compatibile cu ilumi‐
natul locuinţei.
1.3 Utilizarea zilnică
• Nu puneţi oale fierbinţi pe piesele din plastic
ale aparatului.
• Nu păstraţi gaze şi lichide inflamabile în inte‐
riorul aparatului, deoarece ar putea exploda.
• Nu puneţi alimentele în contact cu fantele de
aerisire de pe peretele din spate. (Dacă apa‐
ratul este Frost Free -fără gheaţă)
• Alimentele congelate nu trebuie să mai fie
congelate din nou după ce s-au dezgheţat.
• Păstraţi alimentele congelate ambalate în con‐
formitate cu instrucţiunile producătorului ali‐
mentelor congelate.
• Recomandările producătorului aparatului pri‐
vind conservarea trebuie respectate cu stricte‐
ţe. Consultaţi instrucţiunile respective.
• Nu puneţi băuturi gazoase sau carbonatate în
compartimentul congelator, deoarece se
creează presiune asupra recipientului, iar
acesta ar putea exploda, deteriorând aparatul.
• Îngheţata pe băţ poate cauza degerături dacă
e consumată imediat după scoaterea din apa‐
rat.
1.4 Întreţinerea şi curăţarea
• Înainte de a efectua operaţiile de întreţinere,
opriţi aparatul şi scoateţi ştecărul din priză.
• Nu curăţaţi aparatul cu obiecte din metal.
• Nu folosiţi obiecte ascuţite pentru a îndepărta
gheaţa din aparat. Folosiţi o răzuitoare din
plastic.
• Examinaţi periodic scurgerea din frigider pen‐
tru a vedea dacă există apă rezultată din dez‐
ROMÂNA 55
gheţare. Dacă este necesar, curăţaţi scurge‐
rea. Dacă scurgerea este blocată, apa se va
acumula în partea de jos a aparatului.
1.5 Instalarea
Pentru racordarea la electricitate res‐
pectaţi cu atenţie instrucţiunile din para‐
grafele specifice.
• Despachetaţi aparatul şi verificaţi să nu fie de‐
teriorat. Nu conectaţi aparatul dacă este dete‐
riorat. Comunicaţi imediat eventualele defecte
magazinului de unde l-aţi cumpărat. În acest
caz, păstraţi ambalajul.
• Se recomandă să aşteptaţi cel puţin două ore
înainte de a conecta aparatul, pentru a permi‐
te uleiului să curgă înapoi în compresor.
• Trebuie să se asigure o circulaţie adecvată a
aerului în jurul aparatului, în lipsa acesteia se
poate supraîncălzi. Pentru a obţine o ventilare
suficientă, urmaţi instrucţiunile referitoare la
instalare.
• Pe cât posibil, spatele aparatului trebuie să se
afle lângă un perete, pentru a evita atingerea
părţilor calde şi a evita riscul de arsuri.
• Aparatul nu trebuie amplasat în apropierea
caloriferului sau a aragazului.
• Asiguraţi-vă că după instalarea aparatului pri‐
za rămâne accesibilă.
• Conectaţi numai la o sursă de apă potabilă
(dacă se prevede racordarea la o sursă de
apă).
1.6 Serviciul de Asistenţă Tehnică
• Toate lucrările electrice necesare pentru insta‐
larea acestui aparat trebuie efectuate de către
un electrician calificat sau de o persoană com‐
petentă.
• Acest produs trebuie reparat numai centru de
service autorizat şi trebuie să se folosească
numai piese de schimb originale.
1.7 Protecţia mediului înconjurător
Acest aparat nu conţine gaze care pot
deteriora stratul de ozon, nici în circuitul
de răcire şi nici în materialele de izola‐
re. Aparatul nu poate fi aruncat îm‐
preună cu deşeurile urbane şi cu gu‐
noiul. Spuma izolatoare conţine gaze in‐
flamabile: aparatul trebuie eliminat con‐
form reglementărilor aplicabile ale auto‐
rităţilor locale. Evitaţi deteriorarea
unităţii de răcire, mai ales în spate,
Page 56

www.electrolux.com
56
lângă schimbătorul de căldură. Materia‐
lele folosite pentru acest aparat marcate
cu simbolul
sunt reciclabile.
2. DESCRIEREA PRODUSULUI
7
6
1
2
5
4
Raft de sârmă
1
Compartiment pentru unt
2
Rafturi pe uşă
3
Plăcuţă cu date tehnice
4
3. FUNCŢIONAREA
3.1 Pornirea
Introduceţi ştecherul în priză.
Rotiţi butonul de reglare a temperaturii în sens
orar, pe o setare medie.
3.2 Oprirea
Pentru a opri aparatul, rotiţi butonul de reglare a
temperaturii pe poziţia "O".
3.3 Reglarea temperaturii
Temperatura este reglată automat.
Pentru a pune în funcţiune aparatul, procedaţi
după cum urmează:
3
Sertar pentru legume
5
Rafturi de sticlă
6
Regulator temperatură / Lumină
7
• rotiţi butonul de reglare a temperaturii spre o
setare mai joasă, pentru a obţine o răcire mi‐
nimă.
• rotiţi butonul de reglare a temperaturii spre o
setare mai mare, pentru a obţine o răcire ma‐
ximă.
În general, cea mai adecvată este seta‐
rea medie.
Cu toate acestea, setarea exactă trebuie aleasă
ţinând cont de faptul că temperatura din interiorul
aparatului depinde de:
• temperatura din încăpere
• cât de des se deschide uşa
Page 57

• cantitatea de alimente conservate
• amplasarea aparatului.
4. PRIMA UTILIZARE
ROMÂNA 57
Dacă temperatura din încăpere este
prea mare sau dacă aparatul este com‐
plet încărcat şi e setat pe temperaturile
cele mai joase, poate funcţiona în mod
continuu, iar pe peretele din spate se
formează brumă. În acest caz, discul
trebuie setat pe o temperatură mai ridi‐
cată, pentru a permite dezgheţarea au‐
tomată, economisindu-se astfel energia.
4.1 Curăţarea interiorului
Înainte de a folosi aparatul pentru prima oară,
spălaţi interiorul şi toate acesoriile interne cu apă
călduţă şi cu detergent neutru, pentru a înlătura
5. UTILIZAREA ZILNICĂ
5.1 Congelarea alimentelor proaspete
Compartimentul congelator este adecvat pentru
congelarea alimentelor proaspete şi pentru con‐
servarea pe termen lung a alimentelor congelate.
Pentru a congela alimente proaspete nu e nece‐
sar să modificaţi setarea medie.
Cu toate acestea, pentru o congelare mai rapidă,
rotiţi butonul de reglare a temperaturii spre o se‐
tare mai mare, pentru a obţine o răcire maximă.
Cu această setare, temperatura din
compartimentul frigider poate scădea
sub 0°C. Dacă se întâmplă acest lucru,
rotiţi butonul de reglare a temperaturii
pe o setare mai caldă.
5.2 Conservarea alimentelor
congelate
La prima pornire sau după o perioadă de neutili‐
zare, înainte de a introduce alimentele în com‐
partiment, lăsaţi aparatul să funcţioneze timp de
cel puţin 2 ore la setările cele mai mari.
mirosul specific de produs nou, apoi uscaţi-le bi‐
ne.
Nu folosiţi detergenţi sau prafuri abrazi‐
ve, deoarece vor deteriora suprafaţa.
În cazul dezgheţării accidentale, de
exemplu din cauza unei întreruperi a
curentului, dacă curentul a fost întrerupt
mai mult timp decât valoarea indicată în
tabelul cu caracteristicile tehnice din pa‐
ragraful "Timpul de atingere a condiţiilor
normale de funcţionare", alimentele de‐
congelate trebuie consumate rapid sau
trebuie gătite imediat şi apoi recongela‐
te (după ce s-au răcit).
5.3 Dezgheţarea
Alimentele congelate, înainte de a fi utilizate, pot
fi dezgheţate în compartimentul frigider sau la
temperatura camerei, în funcţie de timpul de care
dispuneţi pentru această operaţiune.
Bucăţile mici pot fi gătite congelate, direct din
congelator: în acest caz, durata de coacere va fi
mai mare.
Page 58

www.electrolux.com
58
5.4 Rafturile detaşabile
5.5 Controlul umidităţii
Pe pereţii frigiderului se află o serie de ghidaje,
astfel încât rafturile pot fi poziţionate după do‐
rinţă.
Raftul din sticlă are încorporat un dispozitiv cu
fante (reglabile prin intermediul unei manete gli‐
sante), care permite reglarea temperaturii în ser‐
tarul (sertarele) de legume.
Când fantele de ventilaţie sunt închise:
conţinutul natural de umezeală al alimentelor din
compartimentele pentru fructe şi legume este
păstrat un timp mai îndelungat.
Când locaşurile de ventilare sunt deschise:
o circulaţie mai mare de aer are ca rezultat un
conţinut mai redus de umiditate a aerului în com‐
partimentele pentru fructe şi legume.
5.6 Poziţionarea rafturilor pe uşă
5.7 Indicator de temperatură
Pentru a permite conservarea pachetelor cu ali‐
mente de diferite dimensiuni, rafturile de pe uşă
pot fi poziţionate la înălţimi diferite.
Pentru a efectua aceste reglări, procedaţi după
cum urmează: trageţi treptat raftul în direcţia
săgeţilor până când se eliberează, apoi repoziţio‐
naţi-l conform necesităţilor.
Acest aparat este vândut în Franţa.
În conformitate cu reglementările în vi‐
goare din această ţară, acesta trebuie
să fie prevăzut cu un dispozitiv special
(vezi figura), plasat în compartimentul
inferior al frigiderului, pentru a indica zo‐
na cea mai rece.
Page 59

6. SFATURI UTILE
ROMÂNA 59
6.1 Sunete normale în timpul
funcţionării
• Puteţi auzi sunete slabe, ca nişte gâlgâituri
sau ca nişte bule, când agentul de răcire este
pompat prin tuburile din spate. Acest lucru es‐
te normal.
• Când compresorul funcţionează, agentul de
răcire este pompat prin circuit, iar de la com‐
presor se aude un sunet ca un sfârâit sau un
zgomot ca de pulsaţie. Acest lucru este nor‐
mal.
• Dilatarea termică poate cauza un sunet brusc
asemănător cu nişte crăpături. Este natural,
nu un fenomen fizic periculos. Acest lucru es‐
te normal.
• Când compresorul porneşte sau se opreşte,
veţi auzi un sunet slab (un "clic") datorat regu‐
latorului de temperatură. Acest lucru este nor‐
mal.
6.2 Recomandări pentru
economisirea energiei
• Nu deschideţi uşa prea des şi nu o lăsaţi des‐
chisă mai mult decât e absolut necesar.
• Dacă temperatura camerei este ridicată şi Bu‐
tonul de reglare a temperaturii este setat pe
temperatură redusă, iar aparatul este complet
încărcat, compresorul poate funcţiona în mod
continuu, iar pe evaporator se poate produce
brumă sau gheaţă. Dacă se întâmplă acest lu‐
cru, setaţi butonul de reglare a temperaturii pe
o setare mai caldă pentru a permite dezgheţa‐
rea automată, economisindu-se astfel energia.
Carne (toate tipurile) : ambalaţi-o în pungi de po‐
lietilenă şi puneţi-o pe raftul de sticlă, deasupra
sertarului pentru legume.
Carnea poate fi conservată în siguranţă în acest
mod pentru una sau două zile maximum.
Alimente gătite, gustări reci etc.: acestea trebuie
acoperite şi pot fi păstrate pe orice raft.
Legume şi fructe: acestea trebuie să fie bine
curăţate şi puse în sertarul special (sertarele
speciale) din dotare.
Unt şi brânză: acestea trebuie puse în recipiente
ermetice sau învelite în folie de aluminiu sau în
pungi de polietilenă pentru a exclude aerul cât
mai bine posibil.
Sticle de lapte: acestea trebuie să aibă dop şi să
fie păstrate în raftul pentru sticle de pe uşă.
Bananele, cartofii, ceapa şi usturoiul, dacă nu
sunt ambalate, nu trebuie păstrate în frigider.
6.5 Recomandări privind păstrarea în
congelator
Pentru a obţine o congelare eficientă, iată câteva
recomandări importante:
• cantitatea maximă de alimente care poate fi
• procesul de congelare durează 24 ore. În
• congelaţi numai alimente de calitate supe‐
• faceţi porţii mici de alimente, care să se poată
• înfăşuraţi alimentele în folie de aluminiu sau
6.3 Recomandări pentru conservarea
alimentelor proaspete
Pentru a obţine cele mai bune rezultate:
• nu puneţi alimente calde şi nu păstraţi lichide
care se evaporă în frigider
• acoperiţi sau înveliţi alimentele, mai ales dacă
au un miros puternic
• poziţionaţi alimentele astfel încât aerul să
poată circula liber în jurul lor
• aveţi grijă ca alimentele proaspete, neconge‐
• alimentele fără grăsime se păstrează mai bine
• îngheţatele pe bază de sucuri, dacă sunt con‐
6.4 Recomandări privind păstrarea în
frigider
Recomandări utile:
• se recomandă să notaţi data congelării pe fie‐
congelată într-o perioadă de 24 de ore este in‐
dicată pe plăcuţa cu datele tehnice;
acest interval de timp nu mai pot fi adăugate
alte alimente de congelat;
rioară, proaspete şi bine curăţate;
congela rapid şi complet, iar apoi să puteţi
dezgheţa numai cantitatea necesară;
de polietilenă şi verificaţi ca pachetele să fie
etanşe;
late, să nu vină în contact cu cele deja conge‐
late, evitând astfel creşterea temperaturii celor
din urmă;
şi pe o perioadă mai îndelungată decât cele
grase; sarea reduce perioada de păstrare a
alimentelor;
sumate imediat după scoaterea din congela‐
tor, pot produce degerături ale pielii;
care pachet, pentru a putea ţine evidenţa pe‐
rioadei de conservare.
Page 60

www.electrolux.com
60
6.6 Recomandări pentru conservarea
alimentelor congelate
Pentru a obţine cele mai bune rezultate cu acest
aparat, procedaţi astfel:
• verificaţi dacă alimentele congelate au fost
păstrate în mod corespunzător în magazin;
• alimentele congelate trebuie transferate din
magazin în congelator cât mai repede posibil;
7. ÎNGRIJIREA ŞI CURĂŢAREA
• nu deschideţi uşa prea des şi nu o lăsaţi des‐
chisă mai mult decât este necesar;
• după dezgheţare, alimentele se deteriorează
rapid şi nu mai pot fi recongelate;
• nu depăşiţi perioada de păstrare indicată de
producătorul alimentelor.
ATENŢIE
Scoateţi ştecherul din priză înainte de a
efectua orice operaţie de întreţinere.
Acest aparat conţine hidrocarburi în uni‐
tatea de răcire; prin urmare, întreţinerea
şi reîncărcarea trebuie efectuate numai
de tehnicieni autorizaţi.
7.1 Curăţarea periodică
Aparatul trebuie să fie curăţat regulat:
• curăţaţi interiorul şi accesoriile cu apă caldă şi
cu detergent neutru.
• verificaţi regulat garniturile uşii şi ştergeţi-le,
pentru a vă asigura că sunt curate.
• clătiţi şi uscaţi bine.
Nu trageţi, nu deplasaţi şi nu deterioraţi
tuburile şi/sau cablurile din interiorul
carcasei.
Nu folosiţi niciodată detergenţi, prafuri
abrazive, produse de curăţare foarte
parfumate sau ceară de lustruit pentru a
curăţa interiorul, deoarece acestea vor
deteriora suprafaţa şi vor lăsa un miros
puternic.
Curăţaţi condensatorul (grila neagră) şi compre‐
sorul din spatele frigiderului cu o perie. Această
operaţiune va îmbunătăţi performanţele aparatu‐
lui şi va duce la economia de energie.
Aveţi grijă să nu deterioraţi sistemul de
răcire.
Multe substanţe speciale de curăţat suprafeţele
din bucătărie conţin substanţe chimice care pot
ataca/deteriora materialul plastic utilizat în acest
aparat. Din acest motiv, se recomandă să
curăţaţi carcasa exterioară a aparatului numai cu
apă caldă în care s-a adăugat puţin detergent.
După curăţare, conectaţi din nou aparatul la re‐
ţea.
7.2 Dezgheţarea frigiderului
Gheaţa este eliminată automat din evaporatorul
compartimentului frigider de fiecare dată când se
opreşte motorul compresorului, în timpul utilizării
normale. Apa rezultată din dezgheţare se scurge
printr-un canal într-un recipient special situat în
spatele aparatului, deasupra compresorului mo‐
torului, de unde se evaporă.
Este necesar să curăţaţi periodic orificiul de eva‐
cuare a apei rezultate din dezgheţare, situat in
mijlocul canalului de colectare din compartimen‐
tul frigider, pentru ca apa să nu dea pe dinafară
şi să nu se scurgă peste alimente. Folosiţi dispo‐
zitivul special de curăţare din dotare, pe care-l
veţi găsi deja introdus în orificiul de drenare.
7.3 Dezgheţarea congelatorului
Întotdeauna se va forma gheaţă pe raf‐
turile congelatorului şi în jurul comparti‐
mentului superior.
Dezgheţaţi congelatorul când grosimea
stratului de gheaţă atinge aprox. 3-5
mm.
Pentru a înlătura gheaţa, procedaţi astfel:
Page 61

1.
Stingeţi aparatul.
2.
Scoateţi alimentele conservate, înfăşuraţi-le
în mai multe straturi de ziar şi puneţi-le întrun loc răcoros.
3.
Lăsaţi uşa deschisă.
4.
După terminarea dezgheţării, uscaţi bine in‐
teriorul şi puneţi iar ştecherul în priză.
5.
Porniţi aparatul.
6.
Setaţi butonul de reglare a temperaturii pen‐
tru a obţine o răcire maximă şi lăsaţi apara‐
tul să funcţioneze două sau trei ore la
această setare.
7.
Puneţi alimentele din nou în compartiment.
Nu folosiţi niciodată instrumente de me‐
tal ascuţite pentru a îndepărta gheaţa
de pe evaporator, deoarece îl puteţi de‐
teriora. Nu utilizaţi dispozitive mecanice
sau alte mijloace artificiale diferite de
cele recomandate de producător, pentru
a accelera procesul de dezgheţare.
Creşterea temperaturii pachetelor cu
alimente congelate, în timpul dez‐
gheţării, le poate scurta durata de con‐
servare în siguranţă.
ROMÂNA 61
7.4 Perioadele de nefuncţionare
Când aparatul nu este utilizat pe perioade lungi,
luaţi următoarele măsuri de precauţie:
1.
deconectaţi aparatul de la sursa de alimen‐
tare cu electricitate
2.
scoateţi toate alimentele
3.
dezgheţaţi şi curăţaţi aparatul şi toate acce‐
soriile
4.
lăsaţi uşa/uşile deschise pentru a preveni
formarea mirosurilor neplăcute.
Dacă aparatul rămâne în stare de func‐
ţionare, rugaţi pe cineva să-l verifice din
când în când, pentru ca alimentele din
interior să nu se strice în cazul întreru‐
perii curentului electric.
8. CE TREBUIE FĂCUT DACĂ...
AVERTIZARE
Înainte de a remedia defecţiunile scoa‐
teţi ştecherul din priză.
Numai un electrician calificat sau o per‐
soană competentă trebuie să remedie‐
ze defecţiunile care nu apar în acest
manual.
Problemă Cauză posibilă Soluţie
Aparatul face zgomot Aparatul nu este sprijinit corect Verificaţi dacă aparatul este sta‐
Aparatul nu funcţionează.
Becul nu funcţionează.
Ştecherul nu este introdus co‐
Aparatul nu este alimentat cu
Becul nu funcţionează. Becul se află în modul de aş‐
Aparatul este stins. Porniţi aparatul.
rect în priză.
electricitate. La priză nu există
tensiune.
teptare.
În timpul utilizării normale se aud unele
sunete (compresorul, circulaţia agentu‐
lui de răcire).
bil (toate cele patru picioruşe
trebuie să fie pe podea)
Introduceţi ştecherul corect în
priză.
Conectaţi alt aparat electric la
priză.
Contactaţi un electrician califi‐
cat.
Închideţi şi deschideţi uşa.
Page 62

www.electrolux.com
62
Problemă Cauză posibilă Soluţie
Becul este defect. Consultaţi paragraful „Înlocuirea
Compresorul funcţionează
în continuu.
Uşa nu este închisă corect. Consultaţi secţiunea „Închiderea
Uşa a fost deschisă prea des. Nu lăsaţi uşa deschisă mai mult
Temperatura alimentelor este
Temperatura camerei este
Pe peretele din spate al
frigiderului curge apă.
În frigider curge apă. Orificiul pentru drenarea apei
Alimentele pot împiedica scur‐
Se scurge apă pe podea. Apa rezultată din dezgheţare
Temperatura din aparat
este prea mică.
Temperatura din aparat
este prea mare.
Uşa nu este închisă corect. Consultaţi secţiunea „Închiderea
Temperatura alimentelor este
Sunt depozitate prea multe ali‐
Temperatura din frigider
este prea mare.
Temperatura din congela‐
tor este prea mare.
Există prea multă gheaţă. Alimentele nu sunt ambalate
Temperatura nu este reglată
corect.
prea mare.
prea mare.
În timpul procesului de dezghe‐
ţare automată, gheaţa de pe
peretele din spate se topeşte.
este înfundat.
gerea apei în colector.
nu se scurge în tăviţa de eva‐
porare situată deasupra com‐
presorului.
Butonul de reglare a tempera‐
turii nu este setat corect.
Temperatura nu este setată
corect.
prea mare.
mente în acelaşi timp.
Aerul rece nu circulă prin apa‐
rat.
Produsele sunt depozitate prea
aproape unele de altele.
corect.
becului”.
Selectaţi o temperatură mai ridi‐
cată.
uşii”.
decât este necesar.
Înainte de depozitare, lăsaţi
temperatura alimentelor să
scadă până la temperatura ca‐
merei.
Reduceţi temperatura camerei.
Acest lucru este normal.
Curăţaţi orificiul de scurgere a
apei.
Asiguraţi-vă că alimentele nu
ating peretele din spate.
Puneţi tubul de drenare a apei
rezultate din dezgheţare în tăvi‐
ţa de evaporare.
Selectaţi o temperatură mai ridi‐
cată.
Selectaţi o temperatură mai
mică.
uşii”.
Înainte de depozitare, lăsaţi
temperatura alimentelor să
scadă până la temperatura ca‐
merei.
Introduceţi mai puţine alimente
în acelaşi timp.
Asiguraţi circulaţia aerului rece
prin aparat.
Depozitaţi produsele astfel încât
să fie asigurată circulaţia aerului
rece.
Ambalaţi alimentele corect.
Page 63

ROMÂNA 63
Problemă Cauză posibilă Soluţie
Uşa nu este închisă corect. Consultaţi secţiunea „Închiderea
uşii”.
Temperatura nu este setată
corect.
Selectaţi o temperatură mai ridi‐
cată.
8.1 Înlocuirea becului
1.
Scoateţi ştecherul din priză.
2.
Scoateţi şurubul de la capacul becului.
3.
Scoateţi capacul becului (consultaţi dese‐
nul).
4.
Înlocuiţi becul uzat cu un bec de aceeaşi
putere şi care a fost conceput special pentru
utilizarea în aparatele electrocasnice. (pute‐
rea maximă este indicată pe capacul becu‐
lui).
5.
Puneţi la loc capacul becului.
6.
Strângeţi şurubul de la capacul becului.
7.
Introduceţi ştecherul în priză.
8.
Deschideţi uşa. Verificaţi dacă becul se
aprinde.
3.
8.2 Închiderea uşii
1.
Curăţaţi garniturile uşii.
2.
Dacă este nevoie, reglaţi uşa. Consultaţi ca‐
pitolul "Instalarea".
Dacă este nevoie, înlocuiţi garniturile defec‐
te ale uşii. Contactaţi centrul de service.
9. INSTALAREA
AVERTIZARE
Citiţi cu atenţie "Informaţiile privind sigu‐
ranţa", pentru siguranţa dv. şi pentru a
asigura utilizarea corectă a aparatului,
înainte de instalarea acestuia.
9.1 Amplasarea
Acest aparat poate fi instalat într-un spaţiu inte‐
rior uscat şi bine aerisit (garaj sau pivniţă), dar
pentru a obţine performanţe optime, instalaţi
aparatul într-un loc în care temperatura ambiantă
corespunde clasei climatice indicate pe plăcuţa
cu datele tehnice ale aparatului:
Clasa cli‐
Temperatura camerei
matică
SN +10 °C la + 32 °C
N +16 °C la + 32 °C
ST +16 °C la + 38 °C
T +16 °C la + 43 °C
Page 64

www.electrolux.com
64
9.2 Distanţierele posterioare
9.3 Aducerea la nivel
În punga cu documentaţia există două distanţie‐
re, care trebuie montate ca în figură.
1
45°
A
45°
2
1.
Montaţi distanţierele în găuri. Asiguraţi-vă
că săgeata (A) este poziţionată ca în figură
2.
Rotiţi distanţierele spre stânga la 45°, astfel
încât să se fixeze.
2
Când aparatul este instalat, asiguraţi-vă că este
perfect orizontal. Aceasta se poate face prin in‐
termediul celor două picioare reglabile de la
bază, din partea din faţă.
9.4 Amplasarea
100 mm
15 mm 15 mm
Aparatul trebuie instalat la o distanţă mare de sur‐
sele de căldură precum radiatoare, boilere, zonele
aflate sub acţiunea directă a razelor solare, etc.
Asiguraţi-vă că aerul poate circula liber prin partea
din spate a aparatului. Pentru a asigura performan‐
ţe optime când aparatul este amplasat sub un corp
de mobilier suspendat, distanţa minimă dintre par‐
tea de sus a aparatului şi corpul suspendat trebuie
să fie de cel puţin 100 mm. În mod ideal, aparatul
nu ar trebui amplasat sub corpuri de mobilier sus‐
pendate. Pentru a amplasa aparatul cu precizie în
poziţie orizontală utilizaţi picioarele reglabile de la
bază. Dacă aparatul este amplasat pe colţ, cu par‐
tea cu balamalele spre perete, distanţa dintre pere‐
te şi aparat trebuie să fie de cel puţin 10 mm, pen‐
tru a permite o deschidere suficientă a uşii nece‐
sară scoaterii rafturilor.
AVERTIZARE
Trebuie să existe posibilitatea de a decu‐
pla aparatul de la priza de alimentare; prin
urmare, ştecherul trebuie să fie accesibil
după montare.
Page 65

9.5 Reversibilitatea uşii
2
ROMÂNA 65
Pentru efectuarea operaţiilor următoare
vă recomandăm să lucraţi împreună cu
încă o persoană, care să ţină bine uşile
aparatului în timpul procedurilor.
Pentru a schimba direcţia de deschidere a uşii,
urmaţi paşii de mai jos:
Scoateţi aparatul din priză
Deschideţi uşa congelatorului. Slăbiţi prinderea
balamalei.
Îndepărtaţi uşile trăgând uşor şi apoi îndepărtaţi
balamaua.
3
1
Scoateţi dopurile găurilor de pe partea opusă.
Page 66

www.electrolux.com
66
Deşurubaţi cele două picioare reglabile şi şuru‐
burile balamalei de jos. Scoateţi balamaua de jos
şi montaţi-o pe partea opusă.
1
2
Scoateţi şurubul de jos, din exterior şi montaţi-l
pe partea opusă.
Deşurubaţi bolţul de susţinere a uşii din partea
de sus.
Înşurubaţi bolţul pe partea cealaltă.
2
1
Page 67
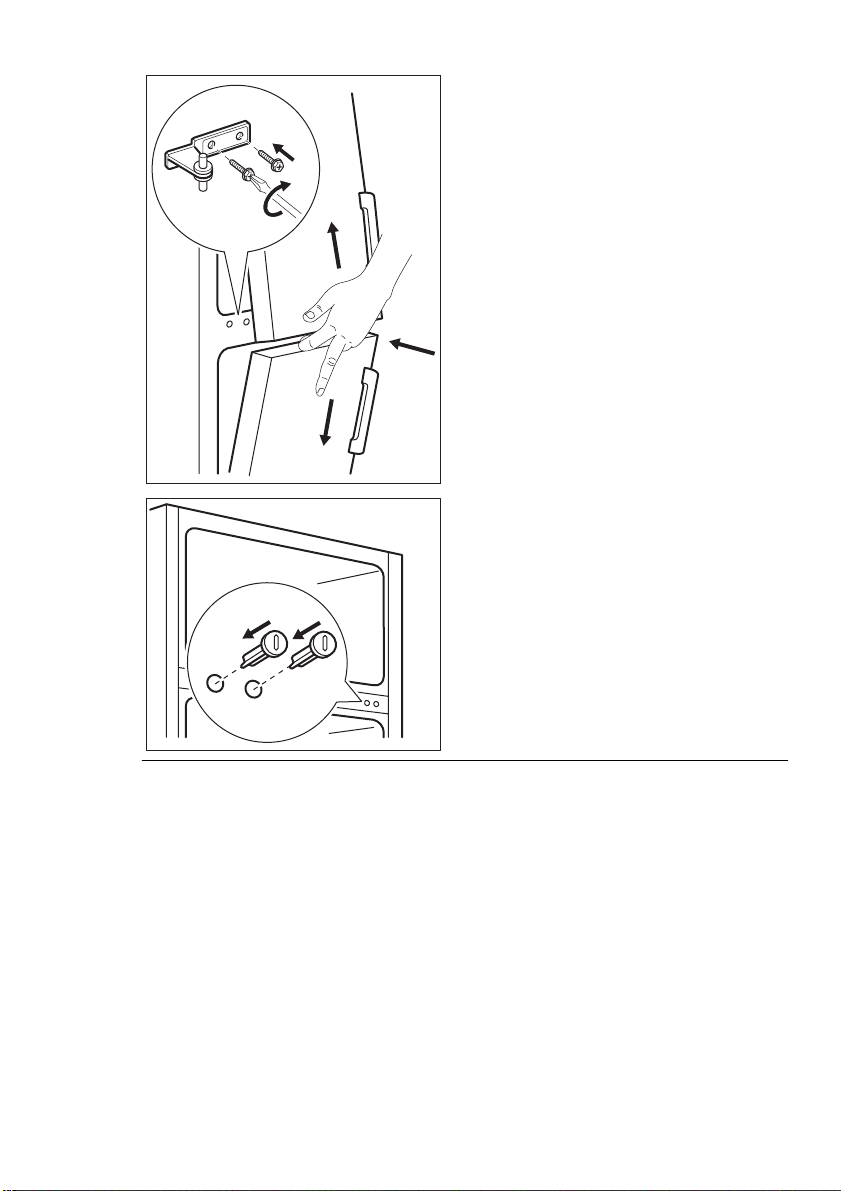
ROMÂNA 67
Poziţionaţi uşile pe bolţuri şi montaţi-le. Montaţi
balamaua.
2
3
1
Puneţi dopurile găurilor pe partea opusă.
Strângeţi balamaua. Asiguraţi-vă că uşile sunt
aliniate.
Demontaţi şi instalaţi mânerul (dacă este
prevăzut) în partea opusă.
Puneţi la loc aparatul, reglaţi-i poziţia orizontală,
aşteptaţi cel puţin patru ore, apoi conectaţi-l la
priză.
Efectuaţi o verificare finală pentru a vă asigura
că:
• Toate şuruburile sunt bine strânse.
• Uşa se deschide şi se închide corect.
Dacă temperatura ambiantă este scăzută (de
exemplu iarna), este posibil ca garnitura să nu se
potrivească bine pe aparat. În acest caz, aştep‐
taţi până când garnitura se potriveşte în mod na‐
tural.
Dacă nu doriţi să realizaţi singur operaţiile de
mai sus, adresaţi-vă celui mai apropiat centru de
service. Centrul de service va efectua operaţia
de schimbare a sensului de deschidere a uşilor
contra cost.
9.6 Conexiunea electrică
Înainte de a conecta aparatul, asiguraţi-vă că
tensiunea şi frecvenţa indicate pe plăcuţa cu da‐
tele tehnice corespund cu sursa de alimentare a
locuinţei dv.
Aparatul trebuie să fie legat la pământ. Ştecherul
cablului electric este prevăzut cu un contact în
acest scop. Dacă priza din locuinţă nu este le‐
gată la pământ, conectaţi aparatul la o împămân‐
tare separată, în conformitate cu reglementările
în vigoare, după ce aţi consultat un electrician
calificat.
Producătorul nu-şi asumă nicio responsabilitate
dacă aceste măsuri de siguranţă nu sunt respec‐
tate.
Acest aparat este conform cu Directivele C.E.E.
Page 68

www.electrolux.com
68
10. DATE TEHNICE
Dimensiuni
Înălţime 1404 mm
Lăţime 545 mm
Adancime 604 mm
Perioadă de stabilizare 19 h
Tensiune 230 V
Frecvenţă 50 Hz
Informaţiile tehnice sunt specificate pe plăcuţa cu
datele tehnice de pe partea internă din stânga a
aparatului şi pe eticheta referitoare la energie.
11. PROTEJAREA MEDIULUI ÎNCONJURĂTOR
şi electrocasnice. Nu aruncaţi aparatele marcate
Reciclaţi materialele marcate cu simbolul
Pentru a recicla ambalajele, acestea trebuie
puse în containerele corespunzătoare.
Ajutaţi la protejarea mediului şi a sănătăţii umane
şi la reciclarea deşeurilor din aparatele electrice
.
cu acest simbol
menajere. Returnaţi produsul la centrul local de
reciclare sau contactaţi administraţia oraşului
dvs.
împreună cu deşeurile
Page 69

ROMÂNA 69
Page 70

www.electrolux.com
70
Page 71

ROMÂNA 71
Page 72

www.electrolux.com/shop
200384479-A-122012
 Loading...