

Page 1

Errata corrige
REFRESHMENT CENTER
Built-In appliance
Page 2

Page 3
Package content
The package contains the mentioned material with
the addition of:
- 10 screws 3.5x16 and 3 screws M4x8
- user instruction manual
Installation
Cabinet dimensions
1.The required dimensions of the cabinet space for
the positioning of the unit are:
1. Height (1): 380mm
2. Depth (2): 560mm
3. Width (3): 560mm
errata corrige electrolux 3
50
5
0
0
4
5
3
2
1
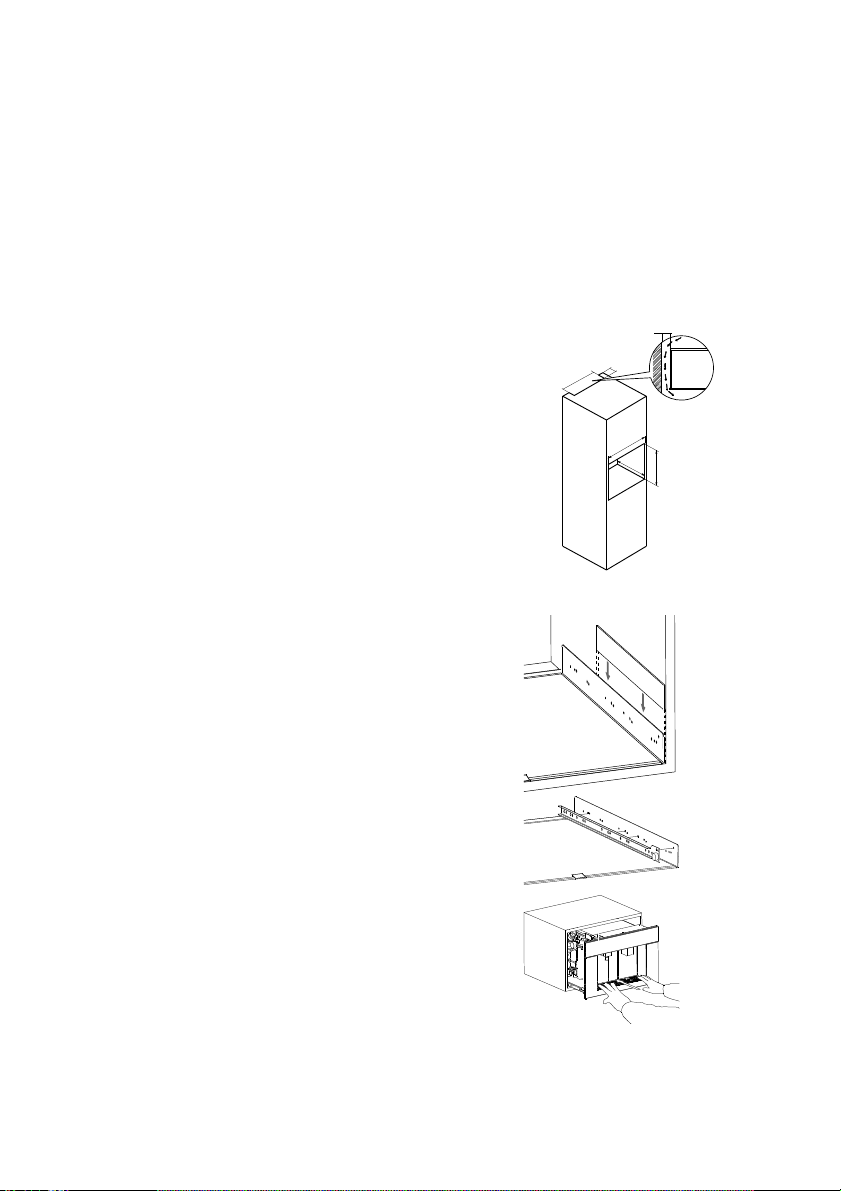
Unit position inside the cabinet
- After making sure that the overall size of the
unit fits the cabinet space, install the base
plate (Fig.3). If necessary, please use the
spacers to adapt and fix the base plate to the
cabinet space (Fig.4)
− Mount the sliding rails onto the base plate
using the included 10 self-tapping screws
3.5x16 (Fig. 5)
− Place the Refreshment Center on the
telescopic runners and push it slowly until the
confirming "click" sound.
Fig. 4
Fig. 5
Fig. 6
Page 4
4 electrolux errata corrige
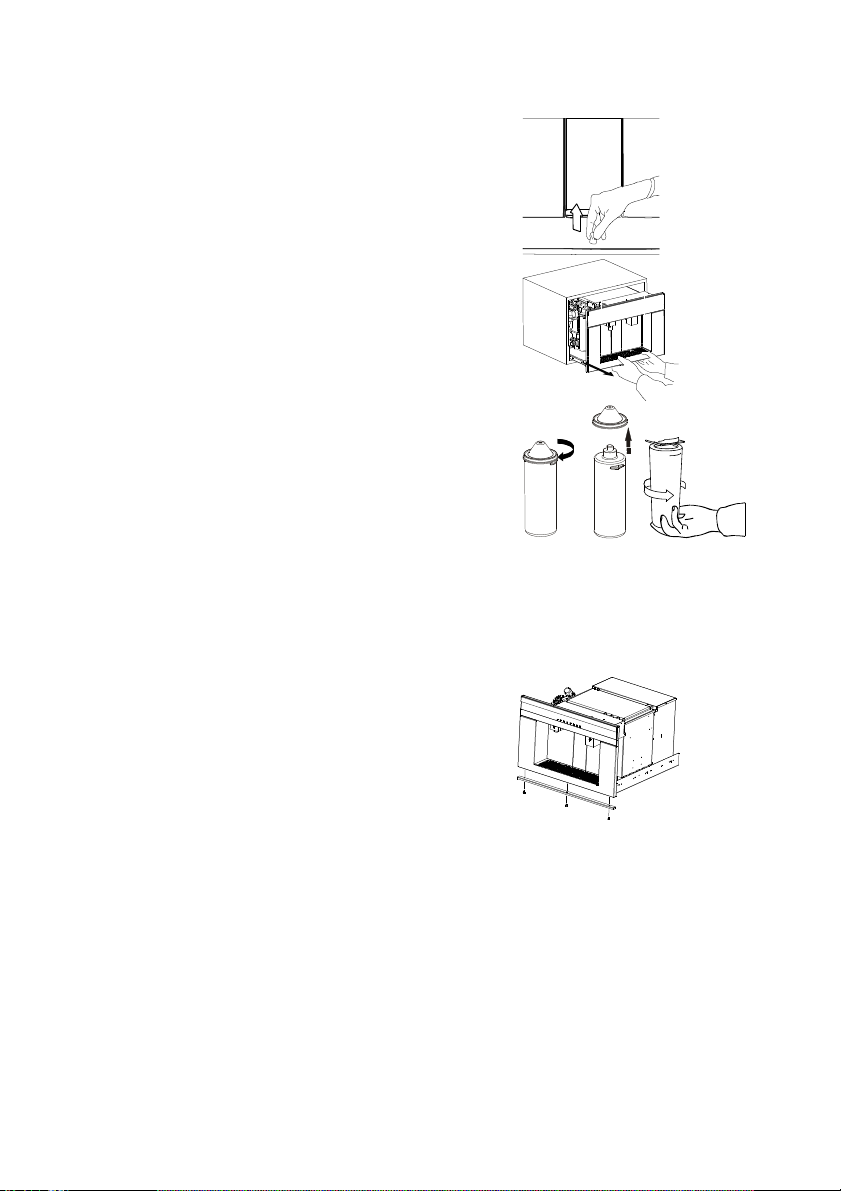
Filter cartridge first installation
Lift the drip tray and pull upward the locking
spring of the Refreshment center util it unblocks
(Fig.8)
Pull the bottom edge of the unit and extract the
Refreshment Center (Fig.9).
After pulling out the unit it is easier to access the
left side, that contains the filter cartridge.
Fig. 8
Fig. 9
Remove the capsule. Connect the filter cartridge
to the filter head turning it counter-clockwise
(Fig.10)
Check for water leaks. Dry the area before
installing the unit in the opening.
Aligner installation
- After making sure that the overall size of the
unit fits the cabinet space, install the base
plate (Fig.3). If necessary, please use the
spacers to fix the base plate to the cabinet
space (Fig.4). Its function is to line up the
Refreshment Centre to the other possible builtin appliances in the kitchen.
Fig. 4
Fig. 10
Page 5

Warning
CO2 bottle first installation
Disposable Bottle
The CO2 bottle can be found on the left side of the
unit. Remove the green cap and screw the
pressure reducer onto the bottle until fully
tightened (Fig.11).
Open the valve on the reducer until it reaches a
pressure of about 3 bar (Fig.12).
In order to obtain a higher level of CO2
concentration, it is possible to increase the
pressure up to a maximum of about 4 bar.
errata corrige electrolux 5
Fig. 11
Rechargeable bottle
The CO2 bottle can be found on the left side of
the unit. Together with the pressure reducer is a
fitting adaptor with seal ring included. The
adaptor is to be screwed onto the bottle head.
For a complete assembly, screw the pressure
reducer onto the adaptor.
Open the valve on the reducer until it reaches a
pressure of about 3 bar (Fig.12).
In order to obtain a higher level of CO2
concentration, it is possible to increase the
pressure up to a maximum of about 4 bar.
Using the Refreshment Center
Use the general switch on the right side of
the unit to switch it on. The on/off switch
of the front panel does not have a standby function; the unit is still on, but all
functions are disabled. To switch on and off
the unit always use the internal general
switch, even when resetting.
Fig. 12
Page 6

6 electrolux errata corrige
Alarms
Led indications Meaning
Filter red led
blinks slowly
Filter red led is
on
Filter red led
stays lit
Carbonated
water led blinks
slowly
CO2 bottle led
stays lit
- Ambient water
- ice cubes
leds blink
simultaneously
Ice forming bin blocked.
To reset the unit switch it off and then back on pushing the
on/off button on the front panel.
Filter is about to exhaust. 2,700 liters of
water have been dispensed.
Please replace the filter cartridge as
described in the paragraph "Filter
replacement"
Filter exhausted. 2,800 liters of water have
been dispensed.
Please replace the filter cartridge as
described in the paragraph "Filter
replacement"
All dispense buttons disabled.
The limit has been reached of 2,840 liters.
To reset all dispense functions, please
replace the filter cartridge as described in
the paragraph "Filter reaplacement"
Carbonated water is disabled.
A protection device on the pump activated.
To reset the unit, please turn it off and after
few seconds switch it back on using the
on/off button on the control panel.
Carbonated water is disabled.
CO2 bottle is empty.
To restore carbonated water dispensing,
please replace the bottle as described in the
paragraph "CO2 bottle replacement".
Page 7

Led indications Meaning
- Ambient water
- cold water
- carbonated
water
leds blink
simultaneously
and fast
- carbonated
water
- ambient water
- cold water
- ice cubes
leds blink
simultaneously
All leds blink
simultaneously
errata corrige electrolux 7
Volumetric turbine malfunctioning. The two possible causes
are:
1. Lack of water supply from the water main;
2. Low pressure in the water inlet.
Please check the presence of water supply to the unit.
Turn unit off and then back on using the on/off switch on
the front panel.
This alarm comes on only when the unit is turned on
through the main on/off switch. It means that the main
tank is empty due to a lack of water supply from the main.
To reset the unit, turn off the main switch on the side of
the Refreshment Center. Check and make sure there is
water supply to the unit, then turn the unit back on.
All dispense buttons disabled. The two possible causes are:
1. Presence of water on the base of
the unit;
2. The water level inside the tank is
too high.
In the first case, switch off the unit and dry the base.
In the second case, reset the unit by turning it off and then
back on through the main switch on the side of the
Refreshment Center.
Maintenance and cleaning
Please do not touch the front control panel with wet or oily hands, in order to
avoid the malfunctioning of the touch control.
Page 8

8 electrolux errata corrige
Ice melting
Do not block ice exit with any object,
since it may damage the unit or prevent
the correct closing of the exit. This would
cause a rise in the internal temperature
with subsequent rapid ice melting
CO2 bottle replacement (for food)
When CO2 led turns on, please replace the old bottle with a new one as
described below:
1. unblock the locking spring from under the
drip tray (Fig. 8). Pull out with both hands
the bottom of the unit, letting the
Refreshment center slide on the
telescopic runners (Fig.15). After pulling
out the unit it is easier to access the left
side, where the CO2 bottle is installed;
2. grab the bottle and extract it;
Fig. 15
3. hold the pressure reducer and turn the
bottle clockwise (fig.16) to separate the
bottle from the pressure reducer;
4. screw the new bottle to the reducer
counter-clockwise till fully tightened (Fig.
11);
5. lock the new bottle on the side of the
unit.
Fig. 16
Page 9

errata corrige electrolux 9
if few days after the
Sanification + filter cartridge replacement
installation the filter
replacement led turns on,
please activate the sanitation
procedure to restore all
functions. In such case, filter
replacement is not necessary
When the “filter” led turns on, it is necessary to replace the cartridge filter as
described below:
1. unblock the locking spring (Fig.8) and pull
out the Refreshment Center unit (Fig.15);
2. turn off the unit through the main on/off
switch;
3. see filter cartridge on the left (Fig. 1a);
4. rotate the exhausted cartridge clockwise
about a quarter of a turn to remove it
from the head (fig.17) and extract it
avoiding water spillage;
5. fill the sanification cartridge with
“Neutral Detergent”. Insert the sanitizing
cartridge on the filter head by rotating it
counter-clockwise about a quarter turn
(Fig.18);
6. in case of water spillage, dry the base and
make sure there are no leaks;
7. place a big cup under the water dispense
nozzle (the appliance will deliver round
250ml of water);
8. turn on the main switch pushing at the
same time the light-switching button for
approximately 5". Press the "light" button
two more times, each time for 5". This
will activate the sanitizing mode,
displayed as a red led moving through all
the buttons of the front panel; during this
operation, the inner tank will be
sanitized. After this initial cleaning cycle,
the unit will automatically dispense some
cold and ambient water mixed with the
sanitizing solution;
Fig. 17
Fig. 18
Fig. 19
Page 10

10 electrolux errata corrige
9. turn off the unit through the main switch;
10. remove the sanification cartridge (Fig.19)
and connect the new filter cartridge to
the head as shown on filter cartridge
instructions (Fig.20);
11. turn on the main switch and push the
Refreshment Center into the cabinet until
the locking spring clicks (Fig.21);
12. wait 4 minutes before activating the unit
pushing the on/off button on the control
panel;
13. dispense 1 liter of cold, carbonated and
ambient water to fully rinse the lines and
eliminate any residual of sanitizing
solution.
Warning
During the sanitizing
procedure please do not
dispense carbonated water.
Fig. 20
Fig. 21
Page 11

errata corrige electrolux 11
Page 12

12 electrolux errata corrige
Subject to change without notice
 Loading...