

Page 1

Ceramic glass hob
Glaskeramisk-kogezone
Glaskeramikhäll
Installation and Operating
Instructions
Monterings- og brugsanvisning
Installations- och bruksanvisning
EHS8671P
822 924 614-A-181203-01
g
k
s
Page 2

Dear customer,
Please read these operating instructions carefully.
Pay particular attention to the section “Safety information” on the first few pages. Please retain these
operating instructions for later reference. Pass them
on to possible new owners of the appliance.
The following symbols are used in the
text:
1 Safety instructions
Warning: Information concerning your personal safety.
Important: Information on how to avoid damaging the appliance.
3 Information and practical tips
2 Environmental information
1. These numbers indicate step by step how to use
the appliance.
2. …
3. …
These operating instructions contain information on
steps you can take yourself to rectify a possible malfunction. Refer to the section “What to do if...”.
2
Page 3

Contents
Operating Instructions . . . . . . . . . . . . . . . . . . . . . . . . . . . . . . . . . . . . . . . . . . . . . . . . . . . . . . . . . . . . . 4
Safety instructions . . . . . . . . . . . . . . . . . . . . . . . . . . . . . . . . . . . . . . . . . . . . . . . . . . . . . . . . . . . . . . . . . . . . 4
Description of the Appliance . . . . . . . . . . . . . . . . . . . . . . . . . . . . . . . . . . . . . . . . . . . . . . . . . . . . . . . . . . . . 5
Cooking zones and control panel . . . . . . . . . . . . . . . . . . . . . . . . . . . . . . . . . . . . . . . . . . . . . . . . . . . . . . . . . . 5
Digital displays . . . . . . . . . . . . . . . . . . . . . . . . . . . . . . . . . . . . . . . . . . . . . . . . . . . . . . . . . . . . . . . . . . . . . . . . 6
Safety cut-out function for the cooking zones . . . . . . . . . . . . . . . . . . . . . . . . . . . . . . . . . . . . . . . . . . . . . . . . 6
Before Using for the first time . . . . . . . . . . . . . . . . . . . . . . . . . . . . . . . . . . . . . . . . . . . . . . . . . . . . . . . . . . . 7
Initial Cleaning. . . . . . . . . . . . . . . . . . . . . . . . . . . . . . . . . . . . . . . . . . . . . . . . . . . . . . . . . . . . . . . . . . . . . . . . . 7
Operating the hob . . . . . . . . . . . . . . . . . . . . . . . . . . . . . . . . . . . . . . . . . . . . . . . . . . . . . . . . . . . . . . . . . . . . . 7
Touch Control Sensor Field. . . . . . . . . . . . . . . . . . . . . . . . . . . . . . . . . . . . . . . . . . . . . . . . . . . . . . . . . . . . . . . 7
Switching on the appliance. . . . . . . . . . . . . . . . . . . . . . . . . . . . . . . . . . . . . . . . . . . . . . . . . . . . . . . . . . . . . . . 7
Switching off the appliance. . . . . . . . . . . . . . . . . . . . . . . . . . . . . . . . . . . . . . . . . . . . . . . . . . . . . . . . . . . . . . . 7
Heat settings selecting . . . . . . . . . . . . . . . . . . . . . . . . . . . . . . . . . . . . . . . . . . . . . . . . . . . . . . . . . . . . . . . . . . 8
Keep warm setting . . . . . . . . . . . . . . . . . . . . . . . . . . . . . . . . . . . . . . . . . . . . . . . . . . . . . . . . . . . . . . . . . . . . . 8
Switching the casserole zone on and off . . . . . . . . . . . . . . . . . . . . . . . . . . . . . . . . . . . . . . . . . . . . . . . . . . . . 8
Switching the triple ring zone on and off . . . . . . . . . . . . . . . . . . . . . . . . . . . . . . . . . . . . . . . . . . . . . . . . . . . . 9
Switching off a cooking zone . . . . . . . . . . . . . . . . . . . . . . . . . . . . . . . . . . . . . . . . . . . . . . . . . . . . . . . . . . . . . 9
Residual Heat Indicator. . . . . . . . . . . . . . . . . . . . . . . . . . . . . . . . . . . . . . . . . . . . . . . . . . . . . . . . . . . . . . . . . . 10
Cooking using the automatic warm up function . . . . . . . . . . . . . . . . . . . . . . . . . . . . . . . . . . . . . . . . . . . . . . . 11
Cooking without the automatic warm up function . . . . . . . . . . . . . . . . . . . . . . . . . . . . . . . . . . . . . . . . . . . . . 11
Child safety lock . . . . . . . . . . . . . . . . . . . . . . . . . . . . . . . . . . . . . . . . . . . . . . . . . . . . . . . . . . . . . . . . . . . . . . . 12
Timer . . . . . . . . . . . . . . . . . . . . . . . . . . . . . . . . . . . . . . . . . . . . . . . . . . . . . . . . . . . . . . . . . . . . . . . . . . . . . . . . 14
Blocking/unblocking the control panel . . . . . . . . . . . . . . . . . . . . . . . . . . . . . . . . . . . . . . . . . . . . . . . . . . . . . . 16
Tips on Cooking and Frying . . . . . . . . . . . . . . . . . . . . . . . . . . . . . . . . . . . . . . . . . . . . . . . . . . . . . . . . . . . . . 17
Cookware . . . . . . . . . . . . . . . . . . . . . . . . . . . . . . . . . . . . . . . . . . . . . . . . . . . . . . . . . . . . . . . . . . . . . . . . . . . . 17
Energy saving . . . . . . . . . . . . . . . . . . . . . . . . . . . . . . . . . . . . . . . . . . . . . . . . . . . . . . . . . . . . . . . . . . . . . . . . . 17
Examples of cooking applications . . . . . . . . . . . . . . . . . . . . . . . . . . . . . . . . . . . . . . . . . . . . . . . . . . . . . . . . . 18
Cleaning and Care . . . . . . . . . . . . . . . . . . . . . . . . . . . . . . . . . . . . . . . . . . . . . . . . . . . . . . . . . . . . . . . . . . . . 19
Hob . . . . . . . . . . . . . . . . . . . . . . . . . . . . . . . . . . . . . . . . . . . . . . . . . . . . . . . . . . . . . . . . . . . . . . . . . . . . . . . . . 19
What to do if … . . . . . . . . . . . . . . . . . . . . . . . . . . . . . . . . . . . . . . . . . . . . . . . . . . . . . . . . . . . . . . . . . . . . . . . 21
Rectifying faults . . . . . . . . . . . . . . . . . . . . . . . . . . . . . . . . . . . . . . . . . . . . . . . . . . . . . . . . . . . . . . . . . . . . . 21
Installation Instructions . . . . . . . . . . . . . . . . . . . . . . . . . . . . . . . . . . . . . . . . . . . . . . . . . . . . . . . . . . . . 22
Technical Data. . . . . . . . . . . . . . . . . . . . . . . . . . . . . . . . . . . . . . . . . . . . . . . . . . . . . . . . . . . . . . . . . . . . . . . . . 22
Safety Instructions for the Installer . . . . . . . . . . . . . . . . . . . . . . . . . . . . . . . . . . . . . . . . . . . . . . . . . . . . . . . . . 23
Electrical Connection . . . . . . . . . . . . . . . . . . . . . . . . . . . . . . . . . . . . . . . . . . . . . . . . . . . . . . . . . . . . . . . . . . . 24
Service. . . . . . . . . . . . . . . . . . . . . . . . . . . . . . . . . . . . . . . . . . . . . . . . . . . . . . . . . . . . . . . . . . . . . . . . . . . . . 25
Rating Plate. . . . . . . . . . . . . . . . . . . . . . . . . . . . . . . . . . . . . . . . . . . . . . . . . . . . . . . . . . . . . . . . . . . . . . . . . . . 25
Assembly . . . . . . . . . . . . . . . . . . . . . . . . . . . . . . . . . . . . . . . . . . . . . . . . . . . . . . . . . . . . . . . . . . . . . . . . . . 71
3
Page 4

Operating Instructions
Safety instructions
3
Please comply with these instructions. If you
do not, any damage resulting is not covered
by the warranty.
5 This appliance conforms with the following EU
Directives:
– 73/23/EEC dated 19.02.1973 Low Voltage Direc-
tive
– 89/336/EEC dated 03.05.1989 EMC Directive in-
clusive of Amending Directive 92/31/EEC
– 93/68/EEC dated 22.07.1993 CE Marking Directive
Correct use
• This appliance should be used only for normal domestic cooking and frying of food.
• The appliance must not be used as a work surface
or as a storage surface.
• Additions or modifications to the appliance are not
permitted.
Children’s safety
• Small children must be kept away from the appliance.
• Only let bigger children work on the appliance under supervision.
General safety
• Overheated fats and oils can ignite quickly. When
cooking with fat or oil (e.g. chips) do not leave the
appliance unattended.
• Switch the cooking zones off after each use.
Safety when cleaning
• For cleaning, the appliance must be switched off
and cooled down.
• For safety reasons, the cleaning of the appliance
with steam jet or high-pressure cleaning equipment is not permitted.
How to avoid damage to the appliance
• The glass ceramic can be damaged by objects falling onto it.
• The edge of the glass ceramic can be damaged by
being knocked by the cookware.
• Cookware made of cast iron, cast aluminium or
with damaged bottoms can scratch the glass ceramic if pushed across the surface.
• Objects that melt and things that boil over can
burn onto the glass ceramic and should be removed straightaway.
• Do not use the cooking zones with empty cookware or without cookware.
• The appliance may only be installed and connected by trained, registered service engineers.
• Built-in appliances may only be used after they
have built in to suitable built-in units and work surfaces that meet standards.
• In the event of faults with the appliance or damage
to the glass ceramic (cracks, scratches or splits),
the appliance must be switched off and disconnected from the electrical supply.
• Repairs to the appliance must only be carried out
by trained registered service engineers.
Safety during use
• Remove stickers and film from the glass ceramic.
• There is the risk of burns from the appliance if used
carelessly.
• Cables from electrical appliances must not touch
the hot surface of the appliance or hot cookware.
4
Page 5

Description of the Appliance
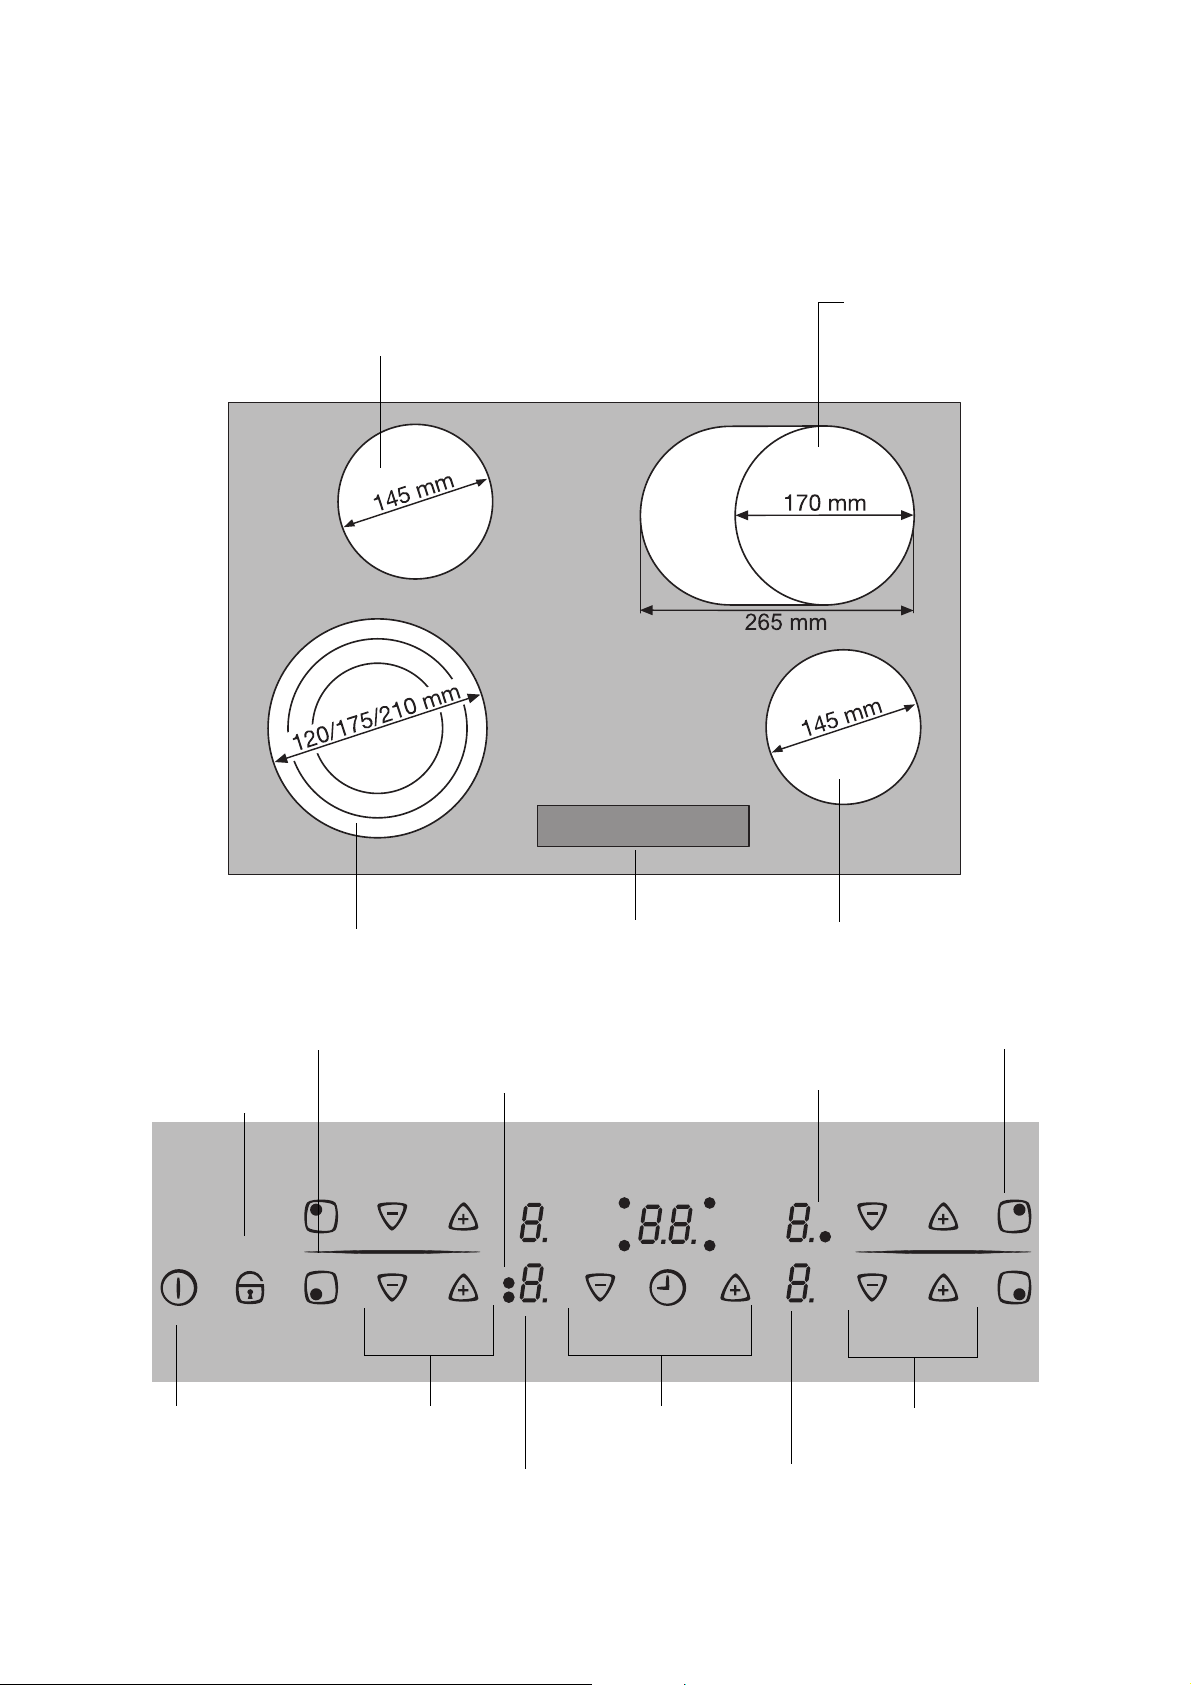
Cooking zones and control panel
Single ring cooking zone
1200W
Casserole zone
2400W
Triple ring cooking zone
Three-ring sensor panel
„Block“
sensor panel
Sensor panel
”On/Off”
2300W
Three-ring control lamps
Cooking setting
selector
Control panel
Browning zone control lamp
“Timer” with
control indicators
Indicator for cooking setting/ residual warmth
Single ring cooking zone
1200W
Browning zone sensor panel
Cooking setting
selector
5
Page 6

Digital displays
The four display fields, which are assigned to the
four cooking zones, display:
– ¾ after being switched on,
– u when the keep warm setting has been selected,
– ¿ to Ç, depending on the heat setting selected,
– a when using automatic cooking,
– h for residual heat,
– l when the child lock is activated,
– e with a fault
1 Safety cut-out function
for the cooking zones
If one of the cooking zones is not switched off after a
certain period of time or the cooking setting is not altered, that particular cooking zone will automatically
switch itself off.
Any residual warmth will be indicated with h (as for
“hot”) in the digital displays corresponding to the
particular cooking zones.
The cooking zones switch themselves off when:
• Heat setting u, 1 - 2 after 6 hours
• Heat setting 3 - 4 after 5 hours
• Heat setting 5 after 4 hours
• Heat setting 6 - 9 after 1.5 hours
3 Should one or more cooking zones switch
themselves off before the periods of time indicated have elapsed, see the chapter “What to
do if …”.
Other causes for a cooking zone
switching itself off
All cooking zones will immediately switch themselves off if liquid boils over and lands on the control
panel.
The same thing will happen if you place a damp cloth
on the control panel. In both instances, after the liquid or cloth has been removed, the appliance will
need to be switched on again using the main switch
.
6
Page 7
Before Using for the first time
Initial Cleaning
Wipe the ceramic glass surface with a damp cloth.
1 Important: Do not use any caustic, abrasive
cleaners! The surface could be damaged.
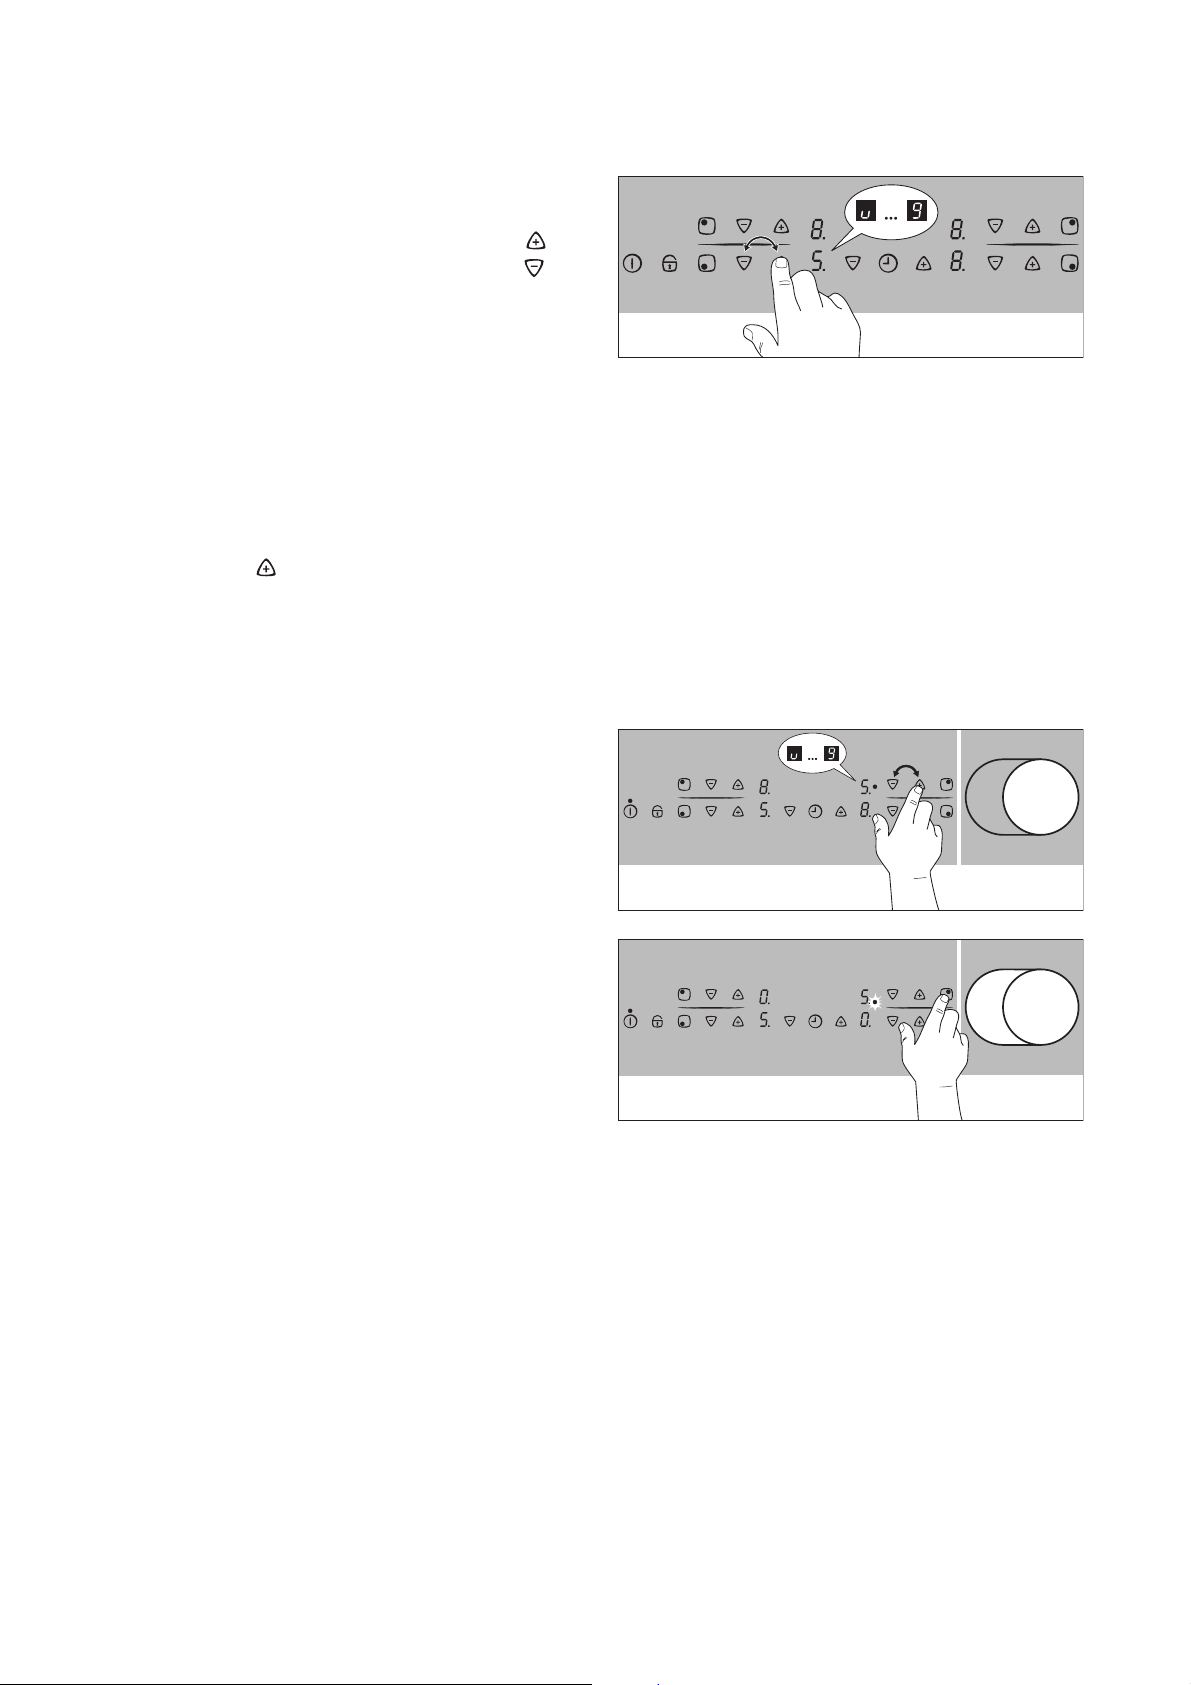
Operating the hob
Touch Control Sensor Field
To operate the Touch Control sensor field place your
finger from above flat onto the required field until the
appropriate displays come on or go out or the required function is carried out.
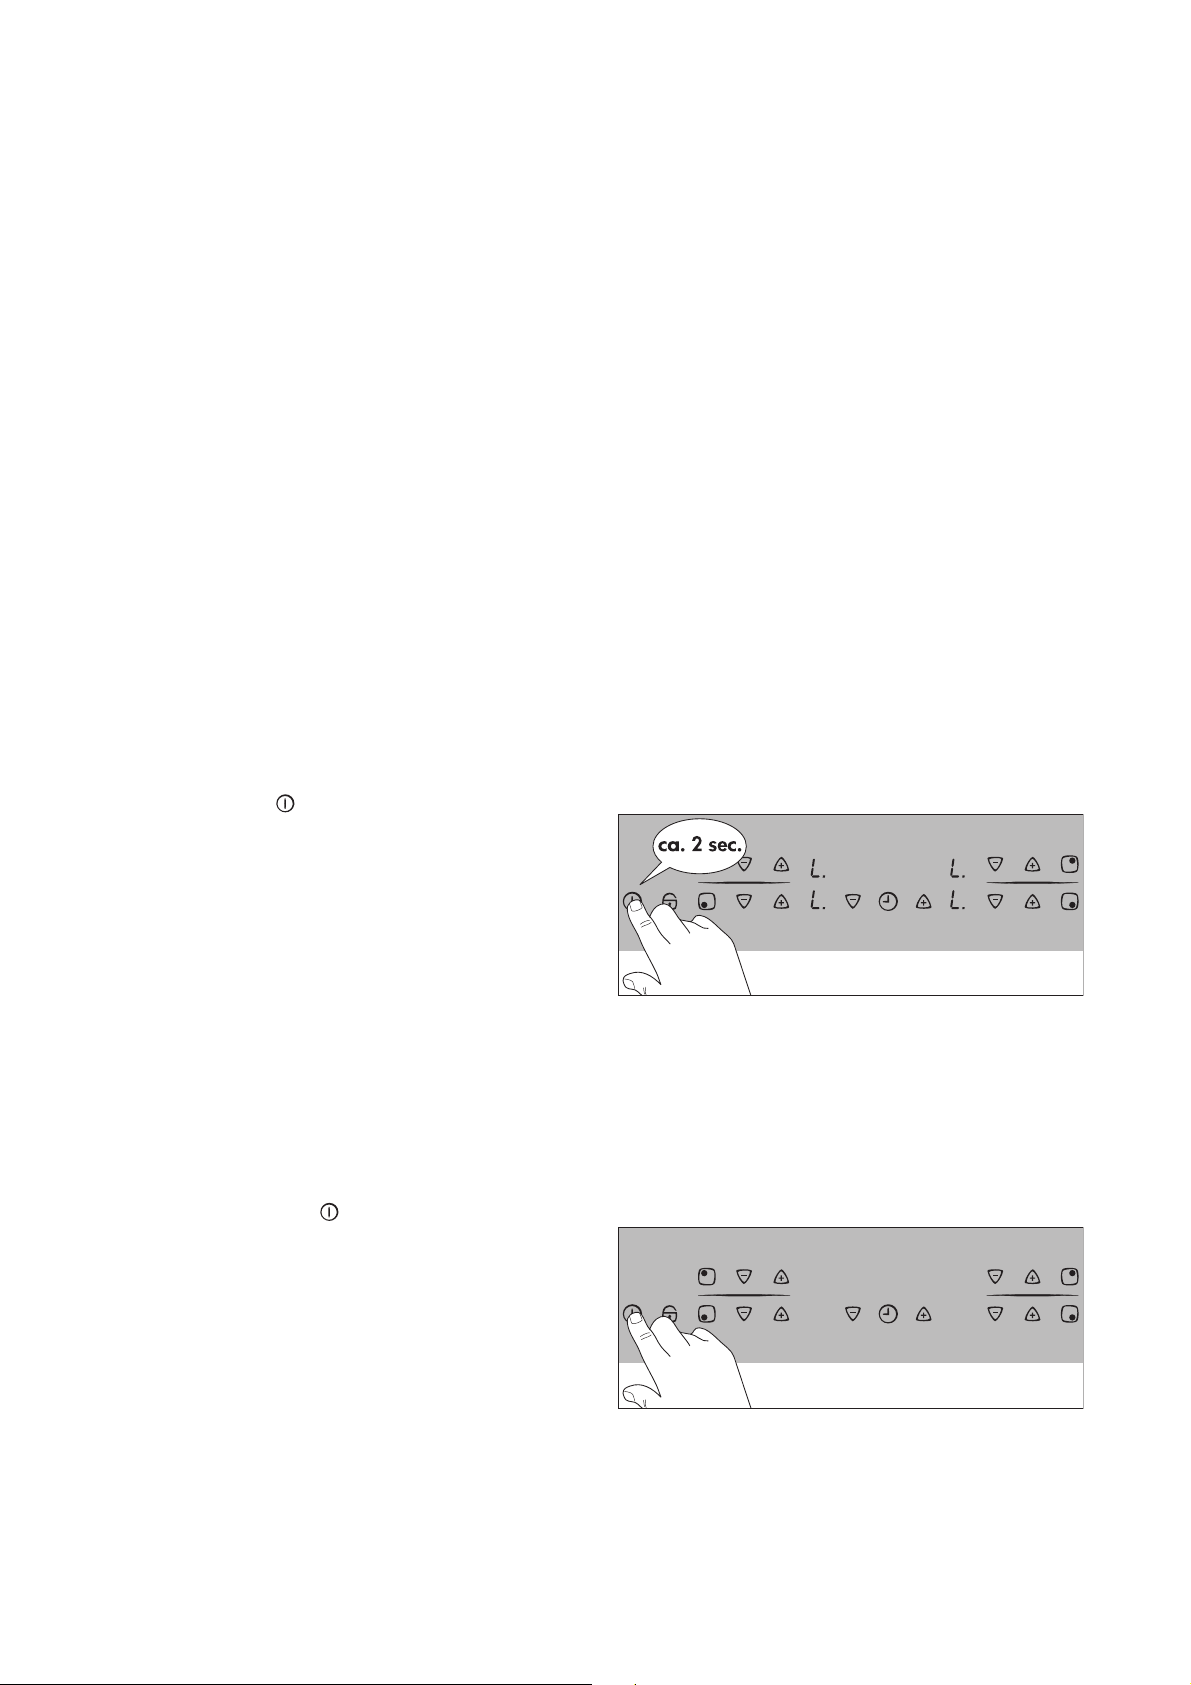
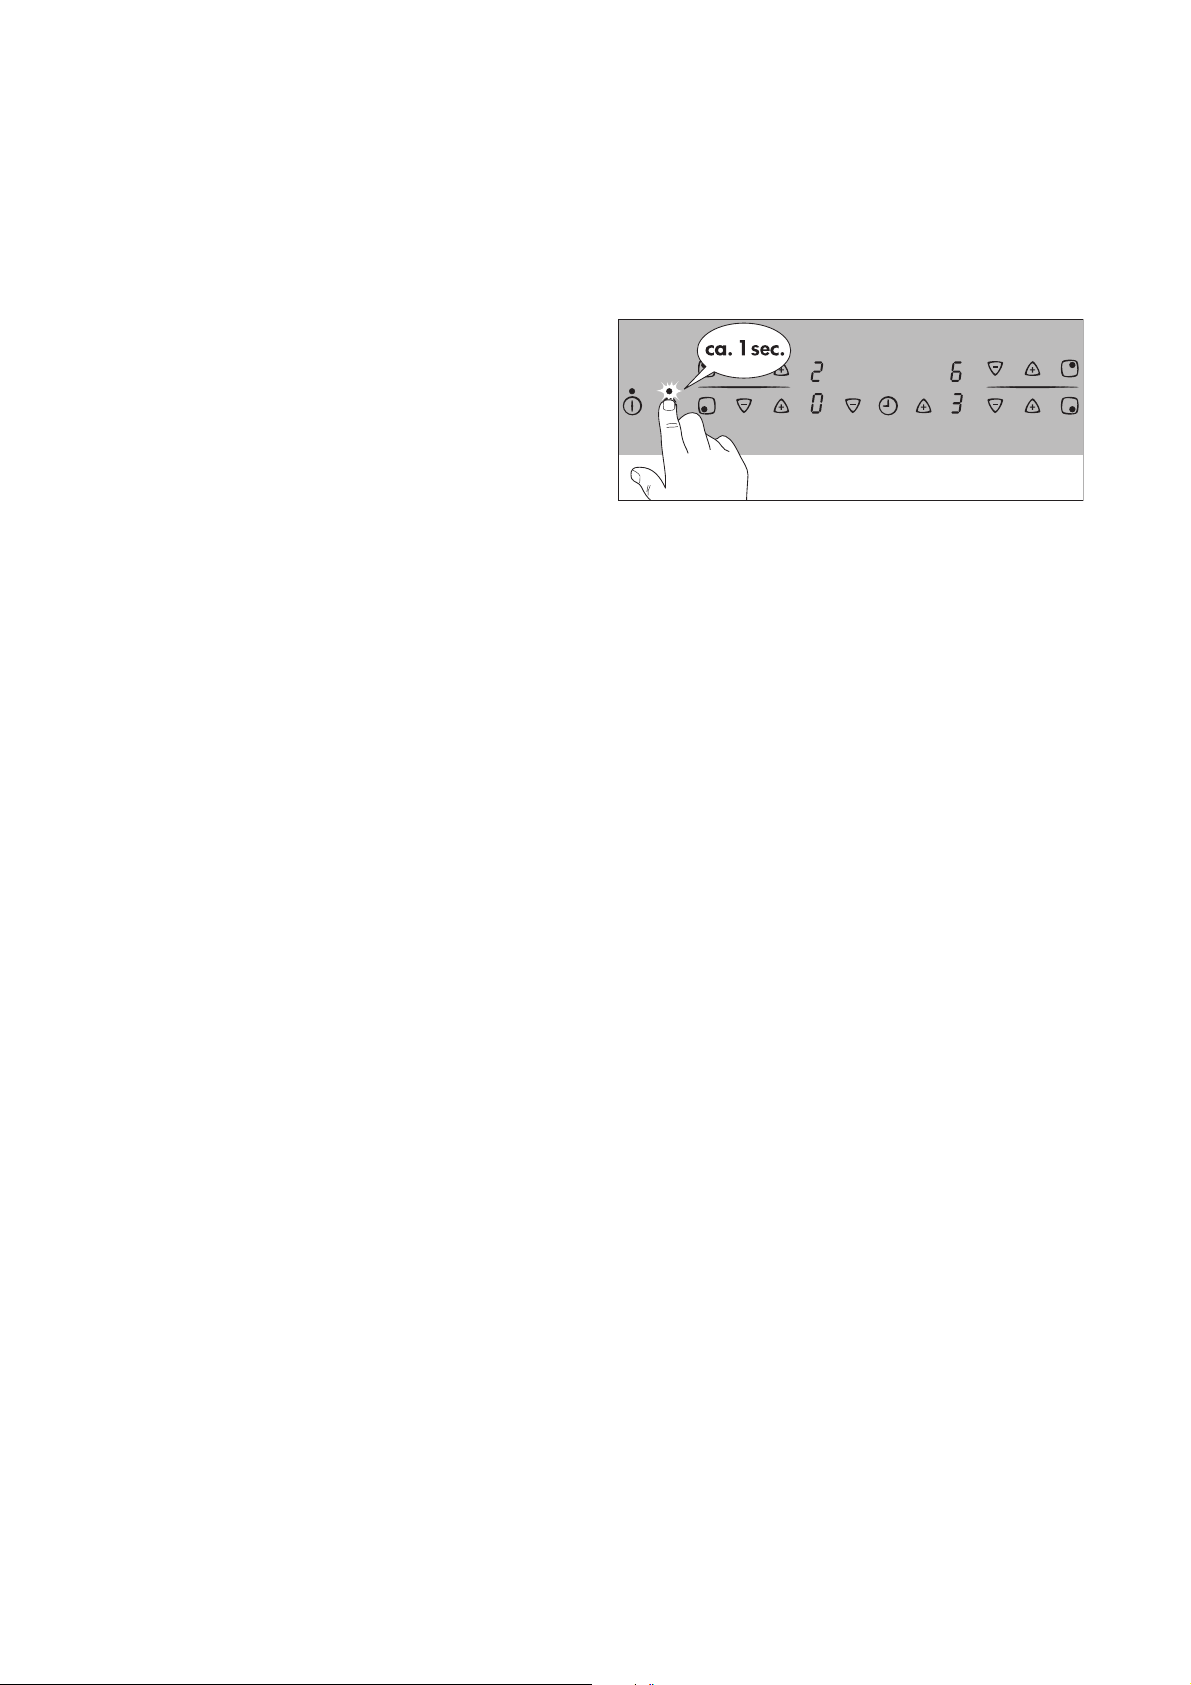
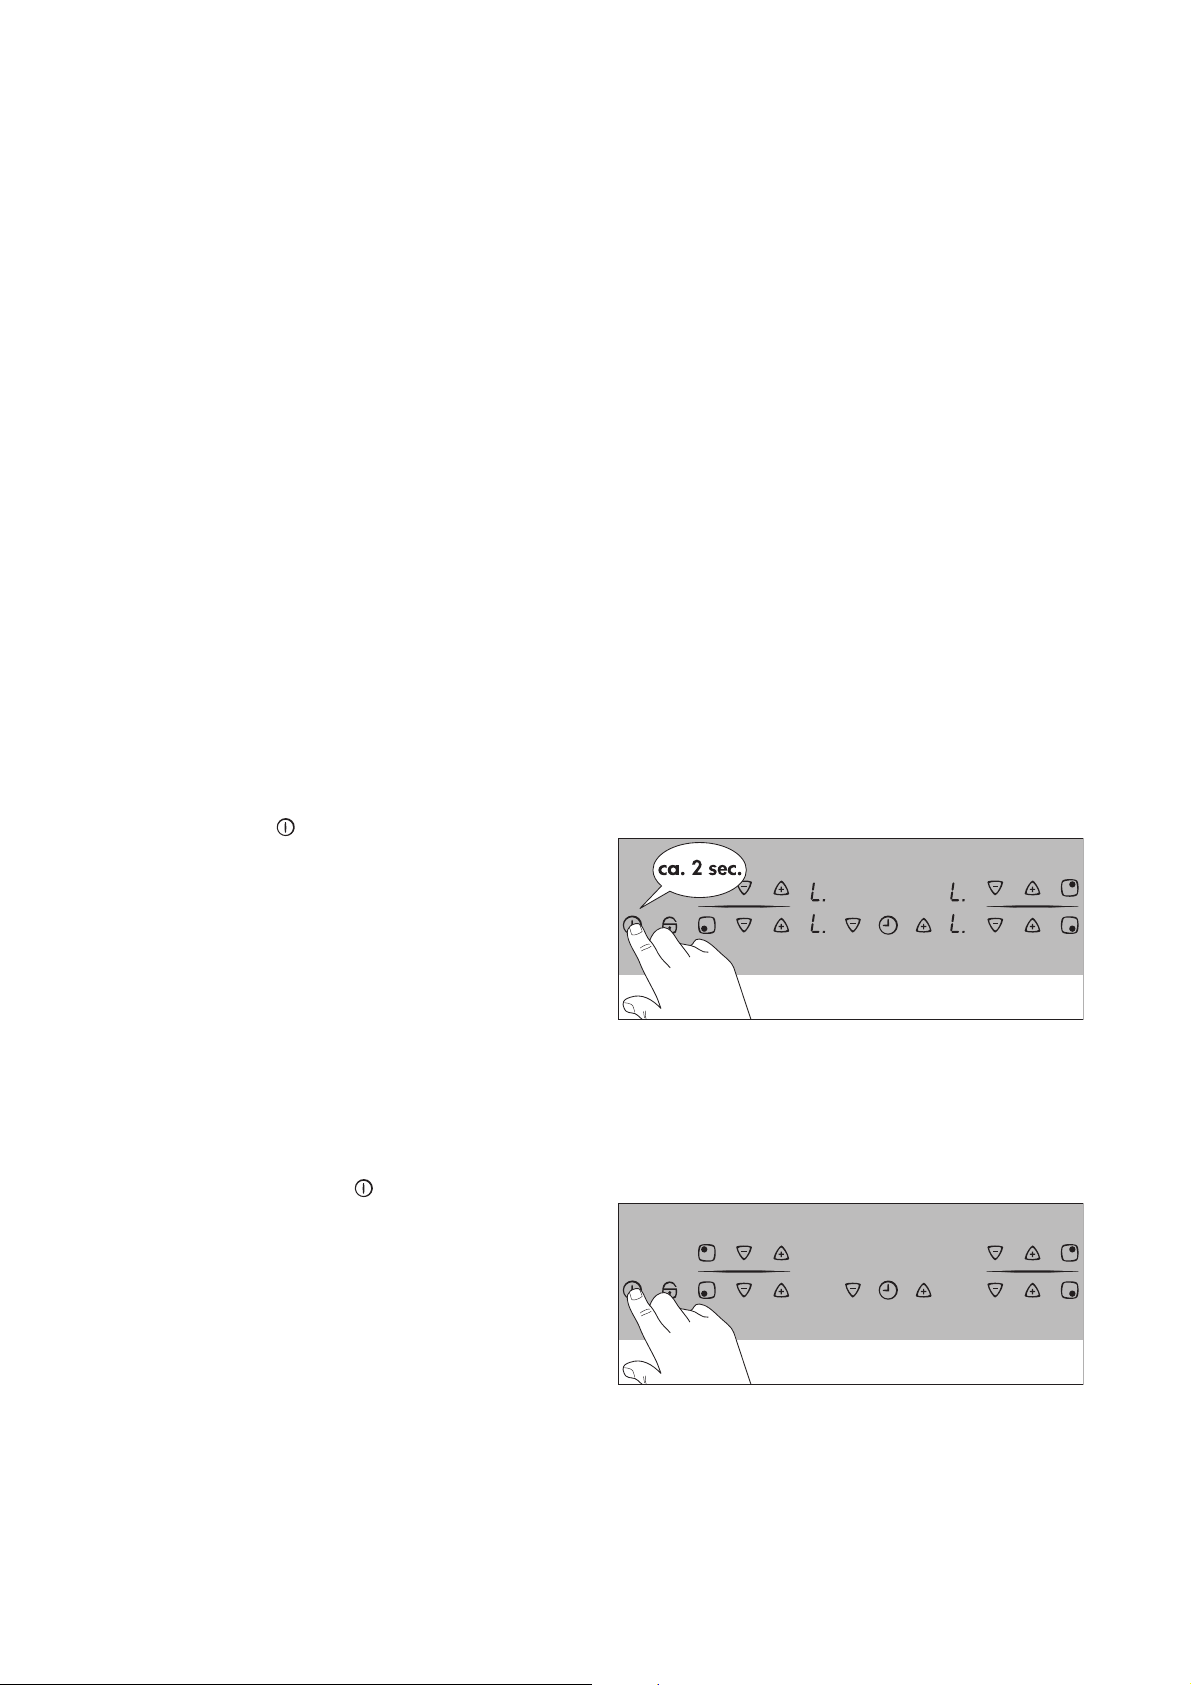
Switching on the appliance
The entire appliance is switched on using the ”On/
Off” sensor panel .
Touch the “On/Off” sensor panel for approx. two
seconds.
The digital displays will show ¾.
3 After the “On/Off” sensor panel has been ac-
tuated to switch on your appliance, a cooking
setting must be selected for a cooking zone
within approx. 10 seconds, or a time must be
set using the timer (egg timer function). If not,
the appliance will switch itself off again for reasons related to safety.
Switching off the appliance
To completely switch off the appliance, actuate the
“On/Off” sensor panel .
Touch the “On/Off” sensor panel for approx. one
second.
3 After switching off a single cooking zone or the
entire cooking surface, the existing residual
warmth will be displayed in the digital displays
of the corresponding cooking zones in the
form of h (for “hot”).
7
Page 8

Heat settings selecting
For setting and changing the heat setting (u to Ç) for
the selected cooking zone.
Raise the heat setting using the heat setting selector
sensor panel .
Lower the heat setting using the heat setting selector
sensor panel .
Keep warm setting
Each of the 4 cooking zones has a keep warm setting u.
Use the heat setting selector sensor panel to set
the keep warm setting u.
Switching the casserole
zone on and off
1. Set the desired heat setting.
2. To switch the casserole zone on or off, place your
finger flat on the “casserole zone” sensor field until
the indicator light illuminates or goes off.
8
Page 9
Switching the triple ring
zone on and off
According to the size of the saucepan or frying pan,
when using the triple ring cooking zone you can
switch from a smaller cooking zone to a larger cooking zone using the “triple ring zone” sensor panel.
3 You can only switch to the next size if a heat
setting has already been set for the smaller
heating ring.
1. Set the desired heat setting.
2. Touch the “triple ring” sensor panel.
This will switch the setting to the centre heating ring.
The lower control lamp will illuminate.
3. Touch the “triple ring” sensor panel to activate the
outer heating ring. The upper control lamp will illuminate.
4. To switch off the outer heating ring, touch the “triple ring” sensor panel, and the heating ring that is
outermost at the time will switch off.
Switching off a cooking
zone
1. To switch off a cooking zone touch the heat setting
selector sensor panel and simultaneously, or
return the setting to zero using the heat setting selector sensor panel .
9
Page 10

Residual Heat Indicator
When an individual cooking zone or
the entire hob is switched off, any residual heat is shown with an h (for
“Hot”) in the digital display for the appropriate cooking zones.
Even after the cooking zone has been switched off,
the residual heat indicator only goes out when the
cooking zone is cold.
2 You can use the residual heat for melting and
keeping food warm.
1 Important! As long as the residual heat indi-
cator is illuminated, there is a risk of burns.
1 Important! If the power supply is interrupted
the h symbol will also go out and information
about residual heat will no longer be available.
However, it is still possible to burn yourself.
This can be avoided by taking care around the
hob.
10
Page 11

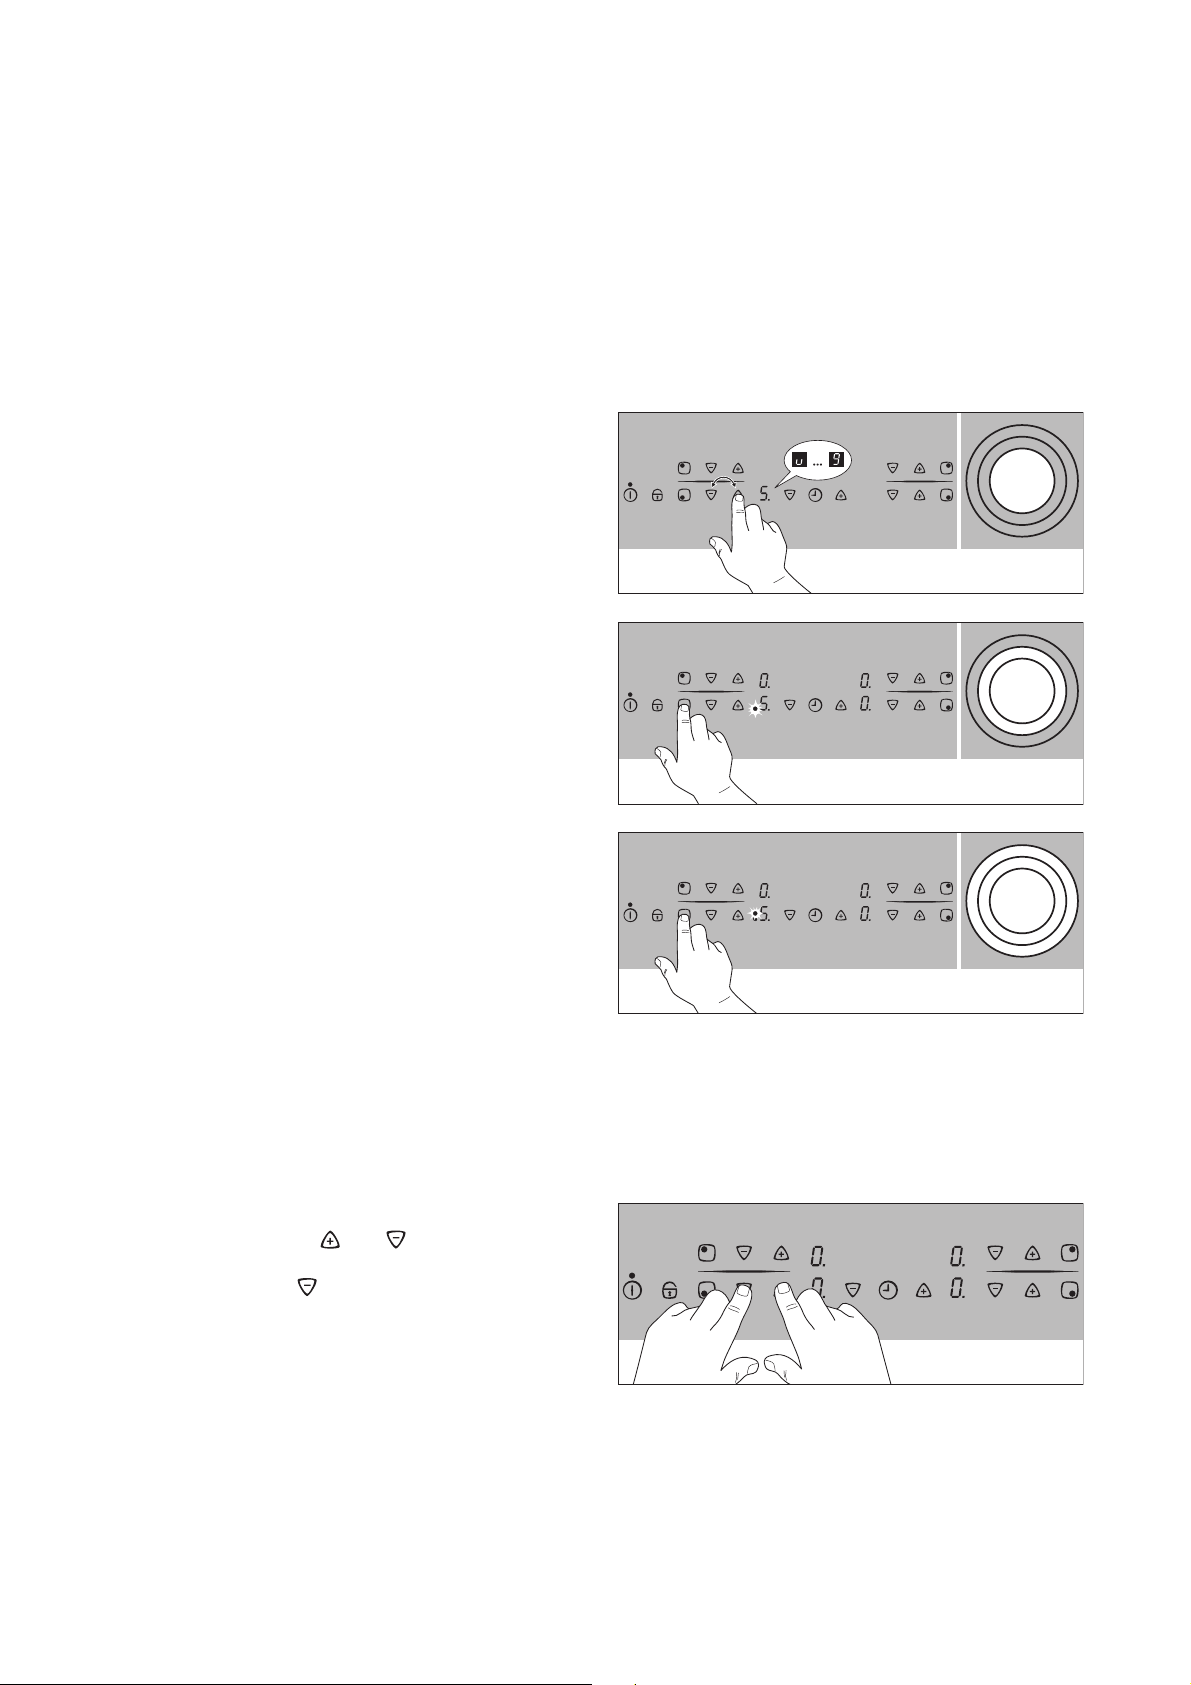
Cooking using the automatic warm up function
All of the cooking surface’s four cooking zones can
be adjusted to any of nine settings, and are
equipped with an automatic warm up function:
– ¿, lowest heat setting
– Ç, highest heat setting
– a, automatic warm up function.
When you select the desired heat setting using the
heat setting selector sensor panel, the cooking
zone will operate at maximum power for a certain
period of time and will then automatically switch
back to the follow-on heat setting that has been set.
The length of time that the automatic warm up function operates depends on the follow-on heat setting
selected.
1. Touch the heat setting selector sensor panel to
set the desired heat setting from ¿ to Æ. The heat
setting that has been set will then be displayed. After a period of 5 seconds, the a (=automatic warm
up function) will appear in the display in place of
the heat setting. After the warm up period has finished, the heat setting will once more be displayed.
3 If you should choose a higher heat setting
while the automatic function is in operation,
e.g. from Á to Ã, the period of time that the
warm up function is in operation will be adjusted accordingly. If you select a lower setting,
the warm up period will end immediately.
You can cook using the automatic warm up
function only if the cooking zone is cold or
moderately warm. If a cooking zone is already
hot when you switch it on (h indicator), the
automatic warm up function cannot be used.
Cooking without the automatic warm up function
If you wish to use the cooking zones without the automatic warm up function, select the desired heat
setting using the heat setting selector sensor panel
.
1. Touch the heat setting selector sensor panel in
order to set the desired heat setting from Ç to ¿.
3 You can change the setting at any time using
the heat setting selector sensor panels and
.
11
Page 12
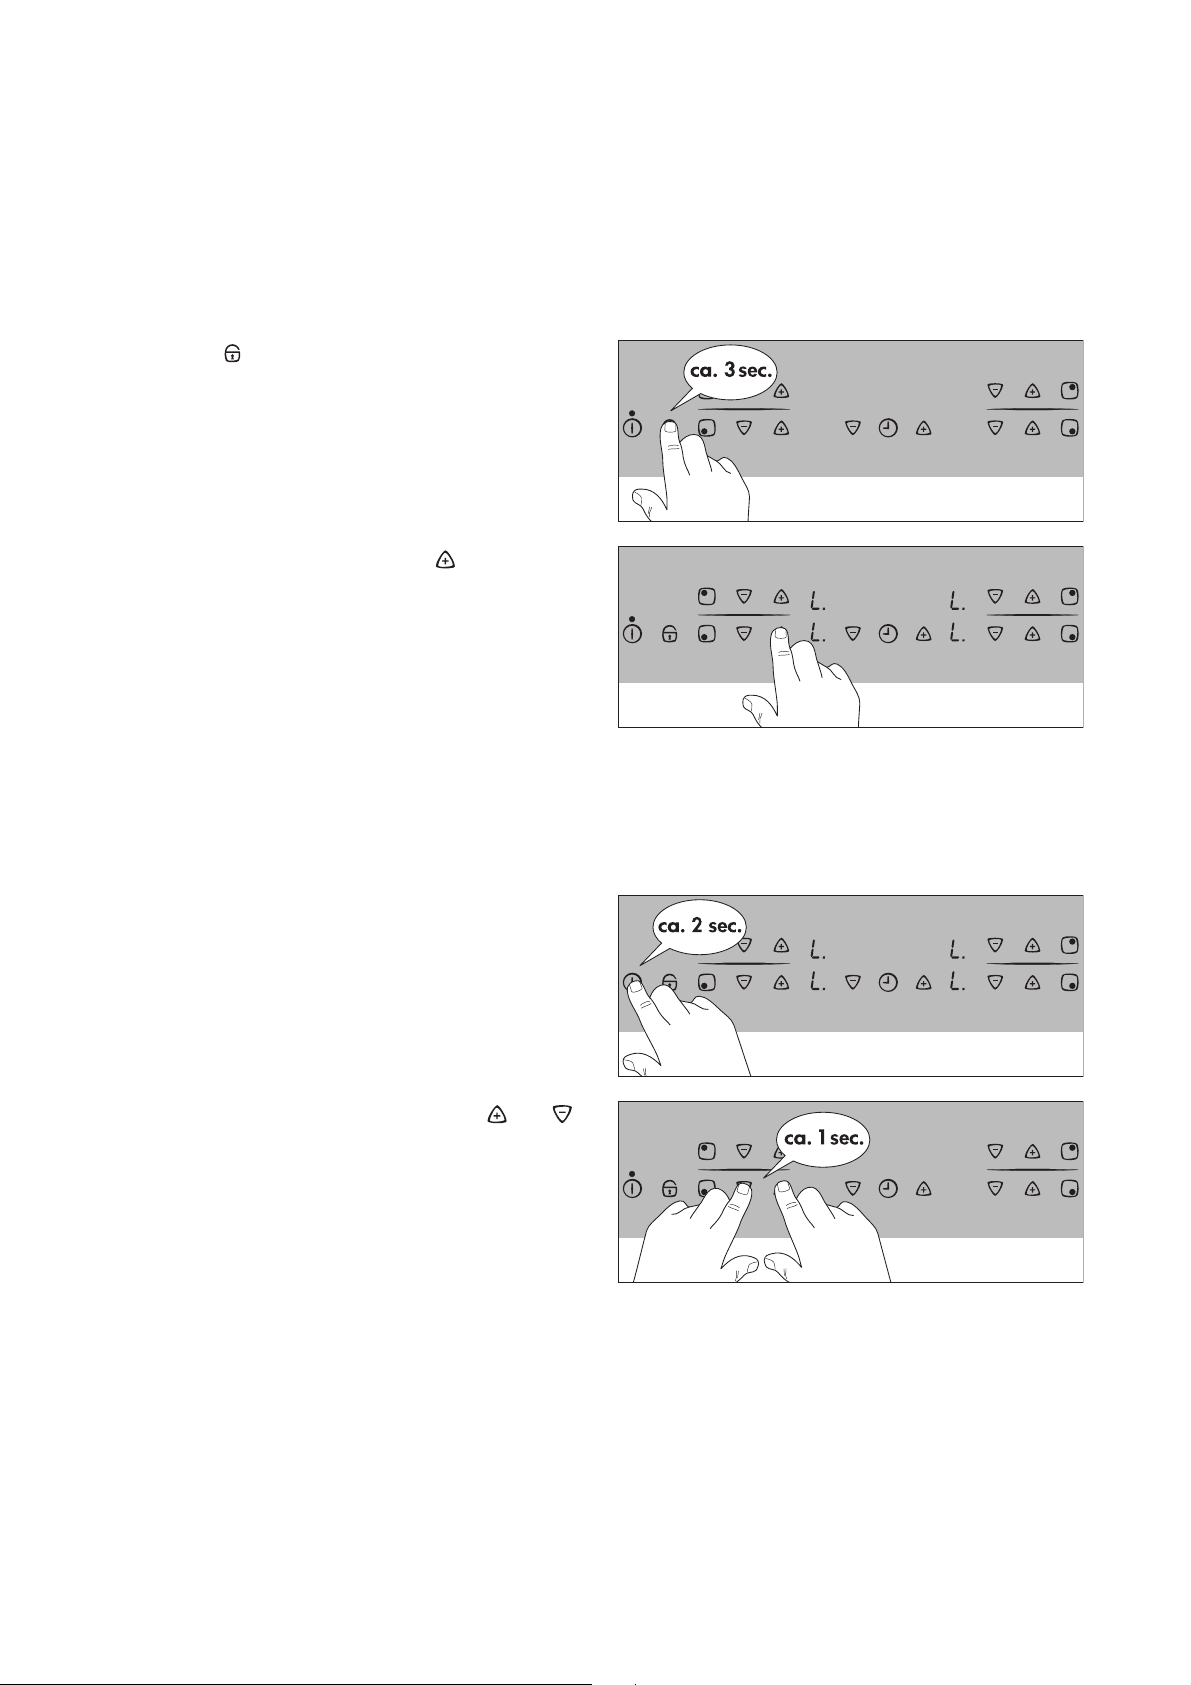
Child safety lock
You can use the child safety lock to safeguard
against unwanted use of the cooking surface.
Switching on the child safety lock
To be able to switch on the child safety lock the appliance must be switched on, but all the cooking
zones must be switched off.
1. Touch the sensor field for approx. three sec-
onds.
An acoustic signal will sound as confirmation.
2. Touch any heat setting sensor field .
l will appear in the displays, and the child safety
lock is activated. The appliance will switch itself off
automatically after a few seconds.
Overriding the child safety lock
The child safety lock can be overridden in order to
use the appliance (until the appliance is switched off
again). When the appliance is switched on again the
child safety device is activated once again.
1. Switch on the appliance.
When the child safety device has been activated, l
will be displayed.
2. Touch any two heat setting sensor fields and
simultaneously.
An acoustic signal will sound as confirmation. The
child safety device has been overridden until the appliance is switched off, and the cooking surface can
be used as normal.
12
Page 13
Switching off the child safety lock
1. Switch on the appliance.
When the child safety device has been activated, l
will be displayed.
2. Touch the sensor field for approx. three sec-
onds.
An acoustic signal will sound as confirmation.
3. Touch any heat setting sensor field .
The displays will become dark, and the child safety
device is switched off. The appliance will switch itself
off automatically after a few seconds.
13
Page 14

Timer
There are two ways to use the timer:
– as a safety cut-out function. Set a cooking period
for a cooking zone, and after this time has elapsed
the cooking zone will automatically switch itself off.
This function can be used for more than one cooking zone simultaneously.
– as a countdown timer without a cut-out function
(“egg timer”), whereby an acoustic signal can be
heard after the set period of time has elapsed.
3 The countdown timer cannot be used if a
cooking zone is switched on.
Safety cut-out
The cooking zone(s) for which you want to use the
safety cut-out function must be switched on.
1. Using the timer sensor panel T, select the cooking
zone for which the safety cut-out is to be set.
By touching the timer sensor panel T once the first
active cooking zone is selected in a clockwise direction, and the corresponding control lamp will flash
rapidly. Hereby the (e.g.) left rear control lamp corresponds to the left rear cooking zone. 00 will appear
in the timer display.
The next active cooking zone is selected by touching
the timer sensor panel again T.
2. While the control lamp is flashing rapidly, use the +
or - timersetting sensor panels to set the desired
period of time for this cooking zone up until the
point where it automatically switches itself off (e.g.
15 minutes).
The safety cut-out function will be activated after
several minutes
The control lamp will now flash more slowly and the
remaining cooking time will be shown in the display
as it elapses. If the safety cut-out function has been
set for more than one cooking zone, the time displayed will be that for the cooking zone with the
shortest period of cooking time remaining. The control lamps for the other cooking zones for which the
safety cut-out function has been set will illuminate.
To display the remaining cooking time for any of
these cooking zones, it must be selected using the
timer sensor panel T, and the corresponding control
lamp will then flash rapidly.
To reset the remaining cooking time the desired
cooking zone must be selected using the timer sensor panel T. The corresponding control lamp will
then flash more rapidly. The settings are reset using
the + or - timer setting sensor panels.
After the set period of cooking time has elapsed the
cooking zone automatically switches itself off, an
acoustic signal sounds for two minutes and the timer
display flashes 00.
3. To switch off the signal, touch the timer sensor
panel T.
14
Page 15

3 To make the setting more quickly, touch any of
the + or - timer setting sensor panels until
the desired value is reached.
If the - timer setting sensor panel is actuated
first, the time setting will begin at 99 minutes,
and if the + timer setting sensor panel is actuated first, the time setting will begin at
1 minute.
Switching off the safety cut-out
function before it has come to an
end
There are two ways to switch off the safety cut-out
function before it has come to an end.
Switch off the cooking zone and timer simultaneously
1. Using the heat setting selector sensor panel, re-
set the desired cooking zone to zero: the cooking
zone and timer will switch themselves off.
Switch off the timer – the cooking zone
remains active
1. Select the desired cooking zone using the T timer
sensor panel. The corresponding control lamp will
then flash more rapidly.
2. Using the - timer setting sensor panel, set the tim-
er to 00:
– only the timer will switch itself off.
– the cooking zone will remain in operation.
Countdown timer
To be able to use the countdown timer the appliance
must be switched on, but all the cooking zones must
be switched off.
1. Touch the timer sensor panel T.
00 will be shown in the timer display.
2. Set the desired period of time using the + or -
timer setting sensor panels.
The countdown timer function will be activated after
several minutes and the remaining time will be displayed.
To reset the remaining time, touch the timer sensor
panel and change the setting using the + or - sen-
sor panels for setting the timer.
After the set period of time has elapsed an acoustic
signal sounds and the timer display flashes 00.
3. To switch off the signal, touch the T timer sensor
panel.
15
Page 16
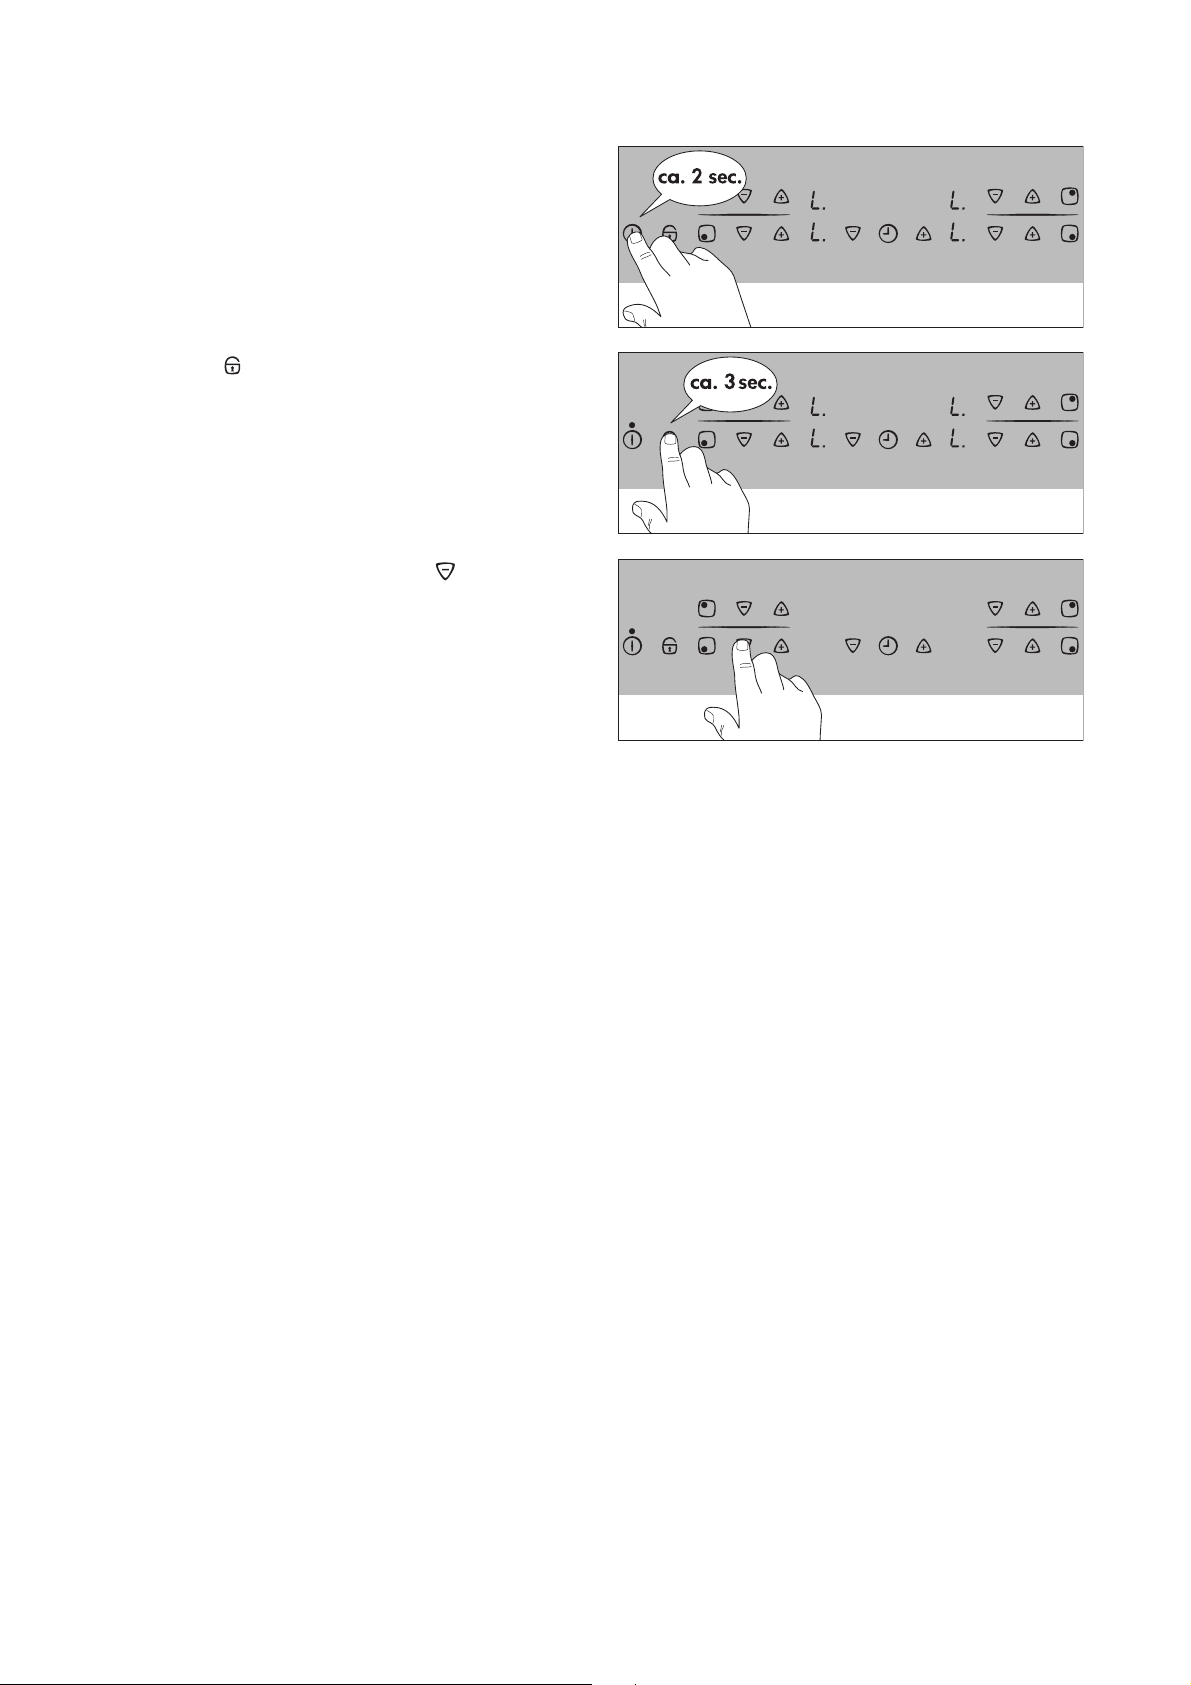
Blocking/unblocking the
control panel
At any stage of the cooking process the control panel, with the exception of the “On/Off” sensor panel,
can be blocked in order to prevent the settings being
changed e.g. by wiping over the panel with a cloth.
1. Touch the “block” sensor panel for approx. one
second.
The control light for the “block” sensor panel will illuminate. The sensor panels are blocked.
2. To unblock the panel, touch the “block” sensor
panel again for approx. one second.
The control light in the “block” sensor panel will go
out.
3 When you switch the appliance off the block-
ing function is automatically switched off.
16
Page 17

Tips on Cooking and Frying
3
Information on acrylamides
According to the latest scientific knowledge,
intensive browning of food, especially in products containing starch, can constitute a health
risk due to acrylamides. Therefore we recommend cooking at the lowest possible temperatures and not browning foods too much.
Cookware
• You can recognise good cookware from the bot-
toms of the pans. The bottom should be as thick
and flat as possible.
• Cookware made of enamelled steel or with alumin-
ium or copper bottoms can leave discolorations on
the glass ceramic surface which are difficult or impossible to remove.
Energy saving
2 Always place cookware on the cooking zone
before it is switched on.
2 If possible, always place lids on the pans.
2 Switch cooking zones off before the end of the
cooking time, to take advantage of residual
heat.
2 Bottom of pans and cooking zones should be
the same size.
17
Page 18

Examples of cooking applications
The information given in the following table is for
guidance only.
Heat
setting
0 Residual heat, Off position
u
1-2
2-3
3-4
4-5 Boiling
6-7
7-8
9
Cooking-
process
Keeping
food warm
Melting
Solidifying Fluffy omelettes, baked eggs 10-40 mins. Cook with lid on
Simmering
on low heat
Steaming
Braising
Gentle
Frying
Heavy
Frying
Boiling
Searing
Deep frying
Keeping cooked foods warm as required Cover
melting butter, chocolate, gelatine
Simmering rice and milk-based
Heating up ready-cooked meals
Cooking larger quantities of food,
Frying escalopes, veal cordon
bleu, cutlets, rissoles, sausages,
liver, roux, eggs, pancakes,
Hash browns, loin steaks, steaks,
Flädle (pancakes for garnishing
Boiling large quantities of water, cooking pasta, searing meat (goulash, pot roast),
suitable for Cooking time Tips/Hints
Hollandaise sauce,
dishes
Steaming vegetables, fish
braising meat
Steaming potatoes 20-60 mins.
stews and soups
doughnuts
soup)
5-25 mins. Stir occasionally
Add at least twice as much
25-50 mins.
20-45 mins.
60-150 mins.
Steady frying Turn halfway through cooking
5-15 mins.
per pan
deep frying chips
liquid as rice, stir milk dishes
part way through cooking
With vegetables add only a lit-
tle liquid (a few tablespoons)
Use only a little liquid, e. g.:
¼ l water for
max.
750 g potatoes
Up to 3 l liquid plus ingredi-
ents
Turn halfway through cooking
18
Page 19

Cleaning and Care
Hob
1 Important: Cleaning agents must not come
into contact with the hot ceramic glass surface! All cleaning agents must be removed
with plenty of clean water after cleaning because they can have a caustic effect when the
rings are next heated!
Do not use any aggressive cleaners such as
grill or oven sprays, coarse scourers or abrasive pan cleaners.
3 Clean the ceramic glass surface after each use
when it is warm to the touch or cold. This will
avoid spillages becoming burnt on.
Remove scale and water marks, fat spots and
discolouration with a metallic shimmer using a
commercially available ceramic glass or stainless steel cleaner.
Light Soiling
1. Wipe the ceramic glass surface with a damp cloth
and a little washing up liquid.
2. Then rub dry with a clean cloth. Remnants of
cleaner must not be left on the surface.
3. Thoroughly clean the entire ceramic glass cooking
surface once a week with a commercially available
ceramic glass or stainless steel cleaner.
4. Then wipe the ceramic glass surface using plenty
of clean water and rub dry with a clean fluff-free
cloth.
Stubborn Soiling
1. To remove food that has boiled over or stubborn
splashes, use a glass scraper.
2. Place the glass scraper at an angle to the ceramic
glass surface.
3. Remove soiling by sliding the blade.
3 You can obtain glass scrapers and ceramic
glass cleaners from specialist retailers.
19
Page 20
1 Problem Dirt
1. Remove burnt-on sugar, melted plastic, aluminium
foil or other meltable materials with a glass scraper
immediately and while still hot.
1 Important: There is a risk of burning yourself
when the glass scraper is used on a hot cooking zone!
2. Then clean the hob normally when it has cooled
down.
3 If the cooking zone on which something has
melted has already cooled down, warm it up
again for cleaning.
Scratches or dark marks on the ceramic glass
surface, caused for example by a pan base
with sharp edges, cannot be removed. However, they do not impair the function of the
hob.
20
Page 21

What to do if …
Rectifying faults
It is possible that faults have been caused by a minor
error, which you can correct yourself with the help of
the following instructions. Do not attempt any further
repairs if the following instructions do not help in
each specific case.
1 Warning! Repairs to the appliance are only to
be carried out by approved service engineers.
Improperly effected repairs may result in considerable risk to the user. If your appliance
needs repairing, please contact your specialist
dealer or customer service.
If the ceramic glass hob is broken, please quote the
3-digit number on the glass hob when contacting
customer service.
What to do if …
… the cooking zones are not functioning.
Check whether
– the fuse in the house wiring (fuse box) is intact. If
the fuses trip a number of times, please call an authorised electrician.
– the appliance is properly switched on,
– the control lamps in the control panel are illuminat-
ed,
– the relevant cooking zone is switched on,
– the cooking zones are set at the desired settings,
– the cooking zones’ safety switchoff function has
been activated (see “Safety” chapter).
… after having switched off the cooking
zones, no h for residual warmth is indicated in the display.
Check whether
– the cooking zone was only briefly used and there-
fore did not become hot enough.
If the cooking zone is hot, please call customer service.
… a cooking zone will not switch off.
Check whether
– the sensor switches are partially covered by a
damp cloth or liquid.
– the blocking function is switched on.
…a cooking zone will not switch on.
Check whether
– the child safety device is swiched on.
– the blocking function is switched on.
…the e display is illuminated?
Check whether the cooking zone has been overheated.
This display illuminates in the event of overheating,
errors in the electronic equipment or for reasons related to safety.
… the appliance is not responding when
a sensor panel is actuated.
The appliance will not respond to a sensor panel being actuated if you are simultaneously touching another sensor panel that is not part of a combination.
… you cannot switch on the cooking
zones.
Check whether
– the control panel has been blocked.
– a period of more than 10 seconds has elapsed be-
tween when the On/Off button was actuated and
the desired cooking zone switches on (see chapter
“Switching on the appliance”).
– the sensor panels are partially covered by a damp
cloth or liquid.
… the display suddenly disappears except for h for residual warmth.
Check whether
– the On/Off button was accidentally actuated.
– the sensor panels are partially covered by a damp
cloth, liquid or similar.
– the safety switchoff function has been activated.
If you request a visit from customer service because
of an error made in operating the appliance, a visit
from a customer service engineer may not be free of
charge even during the warranty period.
21
Page 22

Installation Instructions
1
Important! The new appliance may only be installed and connected by qualified person-
nel.
Please observe this instruction, otherwise the
warranty will not cover any damage that may
occur.
Technical Data
Appliance dimensions
Width 780 mm
Depth 520mm
Height 48mm
Worktop cut-out dimensions
Width 750mm
Depth 490mm
Corner radius R5
Cooking rings
Position Diameter Power
Front left 120/175/210mm 800/1600/2300W
Rear left 145mm 1200W
Rear right 170/265mm 1500/2400W
Front right 145mm 1200W
Connection voltage 230 V~ 50Hz
Maximum connected load power 7,1kW
22
Page 23

1 Safety Instructions for
the Installer
• A device must be provided in the electrical installa-
tion which allows the appliance to be disconnected
from the mains at all poles with a contact opening
width of at least 3 mm.
Suitable isolation devices include line protecting
cut-outs, fuses (screw type fuses are to be removed from the holder), earth leakage trips and
contactors.
• In respect of fire protection, this appliance corre-
sponds to EN 60 335-2-6. This type of appliance
may be installed with a high cupboard or wall on
one side.
• Drawers may not be fitted underneath the hob.
• The installation must guarantee shock protection.
• The kitchen unit in which the appliance is fitted
must satisfy the stability requirements of
DIN 68930.
• For protection against moisture, all cut surfaces
are to be sealed with a suitable sealant.
• On tiled work surfaces, the joints in the area where
the hob sits must be completely filled with grout.
• On natural, artificial stone, or ceramic tops, the
snap action springs must be bonded in place with
a suitable artificial resin or mixed adhesive.
• Ensure that the seal is correctly seated against the
work surface without any gaps. Additional silicon
sealant must not be applied; this would make removal more difficult when servicing.
• Avoid installing the appliance next to doors and
under windows. Otherwise hot cookware may be
knocked off the rings when doors and windows are
opened.
• The hob must be pressed out from below when re-
moved.
• Clean the worktop around the cut-out area.
• Stick the single-sided adhesive sealing tape pro-
vided on the underside of the hob around the outside edge ensuring that it is not stretched. The two
ends of the tape should join in the middle of one
side. After trimming the tape (allow it to overlap by
2-3 mm), press the two ends together.
23
Page 24

Electrical Connection
Before connecting, check that the nominal voltage of
the appliance, that is the voltage stated on the rating
plate, corresponds to the available supply voltage.
The rating plate is located on the lower casing of the
hob.
The heating element voltage is AC230V~. The appliance also works perfectly on older networks with
AC220V~.
The hob is to be connected to the mains using a device that allows the appliance to be disconnected
from the mains at all poles with a contact opening
width of at least 3 mm, eg. automatic line protecting
cut-out,earth leakage tripsorfuse.
A type H05VV-F cable or one with a higher grade
must be used as the mains connecting cable.
The connection must be carried out as shown in the
diagram. The connecting links should be fitted according to the appropriate connection diagram. The
earth lead is connected to terminal E. The earth lead
must be longer than leads carrying electric current.
The cable connections must be made in accordance with regulations and the terminal screws
tightened securely.
Finally, the connecting cable is to be secured with
the mains cable cleat and the covering closed by
pressing firmly (lock into place).
Before switching on for the first time, any protective
foil or stickers must be removed from the ceramic
glass surface.
1 Once connected to the mains supply check
that all cooking zones are ready for use by
briefly switching each on in turn at the maximum setting.
24
Page 25

Service
In the “What to do if …” section a number of malfunctions are listed that you can rectify yourself Look
there first if a fault occurs.
Is it a technical fault?
If so, please contact your customer service centre.
(You will find addresses and telephone numbers in
the section “Customer Service Centres”.)
Always prepare in advance for the discussion. This
will make diagnosis of the problem easier and also
make it easier to decide if a customer service visit is
necessary:
Please make a note of the following information as
accurately as possible:
• What form does the fault take?
• Under what circumstances does the fault occur?
Prior to the telephone call it is important that you
make a note of the following appliance code numbers that are given on the rating plate:
• model description,
• PNC code (9 digits),
• S No code (8 digits).
We recommend that you record the code numbers
here so that you always have them to hand:
Model: . . . . . . . . . . .
PNC: . . . . . . . . . . .
S-No: . . . . . . . . . . .
When do you incur costs even during the
warranty period?
• if you could have remedied the fault yourself using
the fault table (see section “What to do if …”),
• if the customer service technician has to make
several journeys because he was not provided with
all the relevant information before his visit and
therefore, forexample, has to fetch spare parts.
These multiple trips can be avoided if you prepare
your phone call as described above.
Rating Plate
25
Page 26

Kære kunde
Læs denne brugsanvisning grundigt igennem.
Vær særlig opmærksom på afsnittet “Sikkerhedsanvisninger” på de første sider. Opbevar denne brugsanvisning til evt. senere brug. Sørg for, at den følger
med apparatet, hvis det overdrages til andre.
Følgende symboler anvendes i teksten:
1 Sikkerhedshenvisninger
Advarsel: Anvisninger vedrørende din personlige sikkerhed.
Vigtigt: Anvisninger vedrørende undgåelse af
skader på apparatet.
3 Anvisninger og nyttige tips
2 Miljøoplysninger
1. Disse tal fører dig trin for trin gennem betjeningen
af apparatet.
2. …
3. …
Ved eventuelle fejl indeholder denne brugsanvisning
henvisninger, så du kan rette fejlen selv, se afsnittet
“Hvad man skal gøre, hvis...”.
26
Page 27

Indhold
Brugsanvisning . . . . . . . . . . . . . . . . . . . . . . . . . . . . . . . . . . . . . . . . . . . . . . . . . . . . . . . . . . . . . . . . . . . . 28
Sikkerhed. . . . . . . . . . . . . . . . . . . . . . . . . . . . . . . . . . . . . . . . . . . . . . . . . . . . . . . . . . . . . . . . . . . . . . . . . . . . 28
Beskrivelse af apparatet. . . . . . . . . . . . . . . . . . . . . . . . . . . . . . . . . . . . . . . . . . . . . . . . . . . . . . . . . . . . . . . . 29
Koge- og betjeningsfeltets opbygning . . . . . . . . . . . . . . . . . . . . . . . . . . . . . . . . . . . . . . . . . . . . . . . . . . . . . . 29
Digitale display . . . . . . . . . . . . . . . . . . . . . . . . . . . . . . . . . . . . . . . . . . . . . . . . . . . . . . . . . . . . . . . . . . . . . . . . 30
Sikkerhedsafbryder for kogezoner . . . . . . . . . . . . . . . . . . . . . . . . . . . . . . . . . . . . . . . . . . . . . . . . . . . . . . . . . 30
Inden første brug. . . . . . . . . . . . . . . . . . . . . . . . . . . . . . . . . . . . . . . . . . . . . . . . . . . . . . . . . . . . . . . . . . . . . . 31
Rengøring første gang . . . . . . . . . . . . . . . . . . . . . . . . . . . . . . . . . . . . . . . . . . . . . . . . . . . . . . . . . . . . . . . . . . 31
Betjening af kogefeltet . . . . . . . . . . . . . . . . . . . . . . . . . . . . . . . . . . . . . . . . . . . . . . . . . . . . . . . . . . . . . . . . .31
Touch-Control-sensortaster . . . . . . . . . . . . . . . . . . . . . . . . . . . . . . . . . . . . . . . . . . . . . . . . . . . . . . . . . . . . . . 31
Tænde for komfuret . . . . . . . . . . . . . . . . . . . . . . . . . . . . . . . . . . . . . . . . . . . . . . . . . . . . . . . . . . . . . . . . . . . . 31
Slukke for komfuret. . . . . . . . . . . . . . . . . . . . . . . . . . . . . . . . . . . . . . . . . . . . . . . . . . . . . . . . . . . . . . . . . . . . . 31
Valg af kogetrin . . . . . . . . . . . . . . . . . . . . . . . . . . . . . . . . . . . . . . . . . . . . . . . . . . . . . . . . . . . . . . . . . . . . . . . . 32
Trin til varmholdning . . . . . . . . . . . . . . . . . . . . . . . . . . . . . . . . . . . . . . . . . . . . . . . . . . . . . . . . . . . . . . . . . . . . 32
Tænde og slukke for stegezone . . . . . . . . . . . . . . . . . . . . . . . . . . . . . . . . . . . . . . . . . . . . . . . . . . . . . . . . . . . 32
Tænde og slukke for trekreds-kogezone . . . . . . . . . . . . . . . . . . . . . . . . . . . . . . . . . . . . . . . . . . . . . . . . . . . . 33
Slukke for kogezone . . . . . . . . . . . . . . . . . . . . . . . . . . . . . . . . . . . . . . . . . . . . . . . . . . . . . . . . . . . . . . . . . . . . 33
Restvarmevisning . . . . . . . . . . . . . . . . . . . . . . . . . . . . . . . . . . . . . . . . . . . . . . . . . . . . . . . . . . . . . . . . . . . . . . 34
Madlavning med opkogningsautomatik . . . . . . . . . . . . . . . . . . . . . . . . . . . . . . . . . . . . . . . . . . . . . . . . . . . . . 34
Madlavning uden opkogningsautomatik. . . . . . . . . . . . . . . . . . . . . . . . . . . . . . . . . . . . . . . . . . . . . . . . . . . . . 35
Børnesikring . . . . . . . . . . . . . . . . . . . . . . . . . . . . . . . . . . . . . . . . . . . . . . . . . . . . . . . . . . . . . . . . . . . . . . . . . . 35
Ur . . . . . . . . . . . . . . . . . . . . . . . . . . . . . . . . . . . . . . . . . . . . . . . . . . . . . . . . . . . . . . . . . . . . . . . . . . . . . . . . . . 37
Låse betjeningsfelt/ophæve låsning . . . . . . . . . . . . . . . . . . . . . . . . . . . . . . . . . . . . . . . . . . . . . . . . . . . . . . . . 39
Koge- og stegetips . . . . . . . . . . . . . . . . . . . . . . . . . . . . . . . . . . . . . . . . . . . . . . . . . . . . . . . . . . . . . . . . . . . . 40
Kogegrej . . . . . . . . . . . . . . . . . . . . . . . . . . . . . . . . . . . . . . . . . . . . . . . . . . . . . . . . . . . . . . . . . . . . . . . . . . . . . 40
Spar på energien. . . . . . . . . . . . . . . . . . . . . . . . . . . . . . . . . . . . . . . . . . . . . . . . . . . . . . . . . . . . . . . . . . . . . . . 40
Praktiske eksempler på madlavning. . . . . . . . . . . . . . . . . . . . . . . . . . . . . . . . . . . . . . . . . . . . . . . . . . . . . . . . 41
Rengøring og vedligeholdelse . . . . . . . . . . . . . . . . . . . . . . . . . . . . . . . . . . . . . . . . . . . . . . . . . . . . . . . . . . . 42
Kogezone . . . . . . . . . . . . . . . . . . . . . . . . . . . . . . . . . . . . . . . . . . . . . . . . . . . . . . . . . . . . . . . . . . . . . . . . . . . . 42
Hvad skal man gøre, hvis …. . . . . . . . . . . . . . . . . . . . . . . . . . . . . . . . . . . . . . . . . . . . . . . . . . . . . . . . . . . . . 44
Afhjælpning ved fejl . . . . . . . . . . . . . . . . . . . . . . . . . . . . . . . . . . . . . . . . . . . . . . . . . . . . . . . . . . . . . . . . . 44
Monteringsvejledning . . . . . . . . . . . . . . . . . . . . . . . . . . . . . . . . . . . . . . . . . . . . . . . . . . . . . . . . . . . . . . 45
Tekniske data . . . . . . . . . . . . . . . . . . . . . . . . . . . . . . . . . . . . . . . . . . . . . . . . . . . . . . . . . . . . . . . . . . . . . . . . . 45
Sikkerhedshenvisninger til installatøren . . . . . . . . . . . . . . . . . . . . . . . . . . . . . . . . . . . . . . . . . . . . . . . . . . . . . 46
Elektrisk tilslutning . . . . . . . . . . . . . . . . . . . . . . . . . . . . . . . . . . . . . . . . . . . . . . . . . . . . . . . . . . . . . . . . . . . . . 46
Service. . . . . . . . . . . . . . . . . . . . . . . . . . . . . . . . . . . . . . . . . . . . . . . . . . . . . . . . . . . . . . . . . . . . . . . . . . . . . 47
Typeskilt . . . . . . . . . . . . . . . . . . . . . . . . . . . . . . . . . . . . . . . . . . . . . . . . . . . . . . . . . . . . . . . . . . . . . . . . . . . . . 47
Montering. . . . . . . . . . . . . . . . . . . . . . . . . . . . . . . . . . . . . . . . . . . . . . . . . . . . . . . . . . . . . . . . . . . . . . . . . . 71
27
Page 28

Brugsanvisning
Sikkerhed
3
Disse anvisninger bør overholdes, da eventuelle skader i garantiperioden ellers ikke dækkes.
5 Dette apparat overholder følgende EU-direkti-
ver:
– 73/23/EØF af 19.02.1973 Lavspændingsdirektivet
– 89/336/EØF af 03.05.1989 Direktiv om elektromag-
netisk kompatibilitet, som ændret ved direktiv 92/
31/EØF
– 73/23/EØF af 19.02.1973 Direktiv om CE-mærk-
ning
Anvendelsesformål
• Apparatet må kun bruges til normal husholdnings-
mæssig tilberedning af mad (kogning og stegning).
• Apparatet må ikke bruges som arbejds- eller fra-
sætningsplads.
• Det er ikke tilladt at ombygge eller ændre appara-
tet.
Børns sikkerhed
• Hold altid småbørn væk fra apparatet.
• Større børn må kun arbejde ved apparatet under
en voksens vejledning og opsyn.
• Overophedet fedt og olie selvantændes meget let.
Madlavning med fedt eller olie (f.eks. pommes
frites) må ikke foregå uden opsyn.
• Sluk altid for kogezonerne, når de ikke er i brug.
Sikkerhed ved rengøring
• Inden rengøring skal der slukkes for apparatet, og
det skal være kølet af.
• Af sikkerhedsgrunde er det ikke tilladt at rengøre
apparatet med damp- eller højtryksrenser.
Undgå at beskadige apparatet
• Glaskeramikken kan tage skade, hvis der falder
noget ned på den.
• Knubs fra kogegrej kan beskadige kanten af glaskeramikken.
• Hvis et kogekar med defekt bund køres hen over
glaskeramikken, kan den blive ridset; det gælder
også kogekar af støbejern eller støbt aluminium.
• Ting der kan smelte og koge over kan brænde sig
fast i glaskeramikken og bør fjernes omgående.
• Tænd aldrig for en kogezone, hvis den er tom, eller
der står en tom gryde eller pande på den.
Generelt om sikkerhed
• Montering og tilslutning af apparatet må kun foretages af en faguddannet og autoriseret montør.
• Indbygningsapparater må kun indbygges og anvendes i passende standardindbygningsskabe og
bordplader.
• Ved driftsforstyrrelser eller skader i glaskeramikken
(brud, ujævnheder eller revner) skal der slukkes for
apparatet, og stikket skal tages ud af kontakten.
• Reparationer må kun udføres af en faguddannet og
autoriseret installatør.
Sikkerhed under brug
• Fjern mærkater og beskyttelsesfolie fra glaskeramikken.
• Der er risiko for forbrændinger, hvis der ikke udvises forsigtighed under arbejde ved komfuret.
• Kabler fra el-komfurer må ikke kunne komme i
nærheden af varme overflader, f.eks. på komfur eller kogegrej.
28
Page 29
Beskrivelse af apparatet
Koge- og betjeningsfeltets opbygning
Kogezone, 1 kreds
1200W
Stegezone
2400 W
Trekre ds -k og ez on e
Finger-touch taste, trekreds
Fingertouch-knap
(sensorfelt) “Lås“
Finger-touch taste
(sensorfelt)
“Tænd/sluk”
2300W
Kontrollamper, trekreds
Valg af kogetrin
Betjeningspanel
Kontrollampe, stegezone
Ur med
indikatorer
Indikator for kogetrin/restvarme
Kogezone, 1 kreds
1200W
Finger-touch taste, stegezone
Valg af kogetrin
29
Page 30

Digitale display
De fire displayfelter, der er tilordnet de fire kogezoner, viser:
– ¾ når der er tændt,
– u ved valg af varmholdningstrin,
– ¿ indtil Ç, alt efter det valgte kogetrin,
– a ved opkogningsautomatik,
– h ved restvarme,
– l ved valg af børnesikring,
– e ved fejlfunktion
1 Sikkerhedsafbryder for
kogezoner
Når der efter nogen tid ikke bliver slukket for en kogezone eller ændret kogetrin, slukkes der automatisk
for denne kogezone.
Den aktuelle restvarme vises med h (som “hed”) i digitaldisplayet for de pågældende kogezoner.
Kogezonerne afbrydes automatisk ved:
• Kogetrin u, 1 - 2 efter 6 timer
• Kogetrin 3 - 4 efter 5 timer
• Kogetrin 5 efter 4 timer
• Kogetrin 6 - 9 efter 1,5 timer
3 Hvis en eller flere kogezoner slukkes inden de
angivne tider: Se kapitlet “Hvad gør man,
hvis …”.
Afbrydelse af andre grunde
Hvis væske koger over og kommer på betjeningspanelet, afbrydes alle kogezoner straks.
Det samme sker, hvis der lægges en våd klud på betjeningspanelet. I begge tilfælde skal man atter tænde for komfuret på hovedafbryderen , når væsken
eller kluden er fjernet.
30
Page 31
Inden første brug
Rengøring første gang
Tør glaskeramikpladen af med en fugtig klud.
1 Obs: Anvend ikke aggressive, slibende rengø-
ringsmidler! Overfladen risikerer at blive beskadiget.
Betjening af kogefeltet
Touch-Control-sensortaster
For at betjene Touch-Control-sensortasterne skal du
lægge fingeren fladt på det ønskede felt, indtil den
tilhørende indikator lyser eller går ud eller den ønskede funktion udføres.
Tænde for komfuret
Der tændes for hele komfuret på finger-touch tasten “Tænd/sluk” .
Berør “Tænd/sluk” tasten i cirka to sekunder.
Digitaldisplayet viser ¾.
3 Når De har tændt for komfuret ved at berøre
“Tænd/sluk” tasten, skal De i løbet af cirka
10 sekunder indstille et varmetrin for en kogezone eller indstille en tid på uret (funktionen
minutur). Ellers slukker komfuret igen, af hensyn til sikkerheden.
Slukke for komfuret
Når der helt skal slukkes for komfuret: Berør fingertouch tasten “Tænd/sluk” .
Berør “Tænd/sluk” tasten i cirka et sekund.
3 Når der er slukket for en enkelt kogezone eller
for hele kogesektionen, vises den eftervarme,
der er til rådighed, med h (som “hed”) på digitaldisplayet for de pågældende kogezoner.
31
Page 32
Valg af kogetrin
Til indstilling eller ændring af kogetrin (u til Ç) for
den valgte kogezone.
Skift til højere kogetrin med finger-touch tasten .
Skift til lavere kogetrin med finger-touch tasten .
Trin til varmholdning
Alle fire kogezoner har et trin til varmholdning u.
Indstil trin til varmholdning u med finger-touch ta-
sten for kogetrin .
Tænde og slukke for stegezone
1. Indstil det ønskede kogetrin.
2. Stegezonen slås til eller fra ved at lægge en finger
fladt på finger-touch tasten “Stegezone”, indtil
kontrollampen lyser eller slukker.
32
Page 33

Tænde og slukke for trekreds-kogezone
På trekreds-kogezonen kan man – alt efter grydens
eller pandens størrelse – udvide de to mindste kogezoner med en større zone ved at berøre finger-touch
tasten “Trekreds”.
3 Den kan kun kobles til, når der allerede er ind-
stillet et kogetrin for den mindste af varmekredsene.
1. Indstil det ønskede kogetrin.
2. Berør finger-touch tasten “Trekreds”.
Den midterste varmekreds bliver slået til. Nederste
kontrollampe lyser.
3. Hvis man igen berører tasten “Trekreds”, tænder
man den yderste varmekreds. Øverste kontrollampe lyser.
4. Man slår den yderste af de tilkoblede varmekredse
fra ved at berøre tasten "Trekreds”.
Slukke for kogezone
1. Der slukkes for kogezonerne ved samtidig at berøre finger-touch tasterne for valg af kogetrin og
, eller de nulstilles med finger-touch tasten for
valg af kogetrin.
33
Page 34
Restvarmevisning
Efter frakobling af en enkelt kogezone
eller af hele kogefeltet vises den eksisterende overskydende varme med h
(som “hed”) på det digitale display for
de enkelte kogezoner.
Når kogezonen er frakoblet, slukkes restvarmeindikatoren også først, når kogezonen er afkølet.
2 De kan benytte restvarmen til at smelte med
og holde retterne varme.
1 Obs:! Sålænge restvarmeindikatoren lyser, er
der fare for forbrænding.
1 Obs:! Ved strømsvigt går symbolet h ud og
dermed angives den eksisterende restvarme
ikke. Det er dog fortsat mulighed for at forbrænde sig. Dette kan undgås, hvis man er
opmærksom på dette.
Madlavning med opkogningsautomatik
Alle fire kogezoner kan sættes til ni forskellige kogetrin og er forsynet med opkogningsautomatik:
– ¿, laveste kogetrin
– Ç, højeste kogetrin
– a, opkogningsfunktion.
Når De vælger det ønskede kogetrin på finger-touch
tasten , arbejder kogezonen et vist stykke tid med
fuld effekt og slår så automatisk over til det trin, der
er valgt for resten af tilberedningstiden.
Varigheden af det automatiske opkog afhænger af,
hvilket trin der er valgt for resten af tilberedningstiden.
1. Berør finger-touch tasten for at indstille det øn-
skede kogetrin ¿ til Æ. Straks efter bliver det indstillede kogetrin vist. Efter 5 sekunder viser
displayet a (= opkogningsautomatik) i stedet for
kogetrin. Når opkogningstiden er gået, vises kogetrinnet igen.
3 Hvis De under den automatiske funktion væl-
ger et højere trin, f.eks. fra Á til Ã, bliver opkogningstiden afpasset til det. Hvis De vælger
et lavere trin, afsluttes opkogningstiden straks.
Madlavning med opkogningsautomatik er kun
muligt, når kogezonen er kold eller moderat
varm. Hvis kogezonen allerede er varm, når
automatikken slås til (indikatoren h), kan man
ikke bruge opkogningsautomatik.
34
Page 35

Madlavning uden opkogningsautomatik
Hvis De vil bruge en kogezone uden opkogningsautomatik, vælger De det ønskede kogetrin med finger-touch tasten .
1. Berør finger-touch tasten for at indstille det øn-
skede kogetrin Ç til ¿.
3 Med finger-touch tasterne og kan De til
enhver tid ændre varmetrin.
Børnesikring
Med børnesikringen kan man sikre kogesektionen
mod uønsket brug.
Tilkobling af børnesikring
Når børnesikringen skal kobles til, skal der være
tændt for komfuret, men der må ikke være tændt for
en kogezone.
1. Berør finger-touch tasten i cirka tre sekunder.
Låsningen bekræftes med et tonesignal.
2. Berør en vilkårlig finger-touch taste for valg af kogetrin .
Displayet viser l, og nu er børnesikringen slået til.
Efter nogle sekunder slukkes der automatisk for
komfuret.
35
Page 36

Ignorere børnesikring
Børnesikringen kan ignoreres, så man kan bruge
komfuret én gang (til næste gang der slukkes for
det). Næste gang der tændes for komfuret, er børnesikringen automatisk slået til igen.
1. Tænd for komfuret.
Når børnesikringen er slået til, viser displayet l.
2. Berør samtidig to vilkårlige finger-touch taster for
valg af kogetrin og .
Låsningen bekræftes med et tonesignal. Børnesikringen ignoreres, til der slukkes for komfuret, og kogesektionen kan benyttes normalt.
Frakobling af børnesikring
1. Tænd for komfuret.
Når børnesikringen er slået til, viser displayet l.
2. Berør finger-touch tasten i cirka tre sekunder.
Låsningen bekræftes med et tonesignal.
3. Berør en vilkårlig finger-touch taste for valg af kogetrin .
Indikatorerne bliver mørke, og børnesikringen er slået fra. Efter nogle sekunder slukkes der automatisk
for komfuret.
36
Page 37

Ur
Uret kan bruges på to måder:
– som automatisk slukkefunktion. Der indstilles en
tilberedningstid for en kogezone, hvorefter kogezonen automatisk skal afbrydes. Denne funktion kan
bruges for flere kogezoner ad gangen.
– som minutur uden afbryderfunktion (“Æggeur”);
når den indstillede tid er gået, kommer der et lydsignal.
3 Generelt gælder, at man ikke kan bruge minut-
uret, når der er tændt for en kogezone.
Automatisk slukkefunktion
Der skal være tændt for den/de kogezone(r), som
skal afbrydes automatisk.
1. Vælg med finger-touch tasten for uret T, hvilken
kogezone der skal indstilles automatisk slukning
for.
Når De berører finger-touch tasten T én gang, vælges – med uret – den første aktive kogezone, og den
tilhørende kontrollampe blinker hurtigt. Her svarer
f.eks. bageste venstre kontrollampe til bageste venstre kogezone. Urets display viser 00.
Når finger-touch tasten for uret T berøres igen, vælges den næste aktive kogezone.
2. Mens kontrollampen blinker hurtigt, indstiller man
med finger-touch tasterne til indstilling af ur +
eller -, hvor lang tid der skal gå, før der automatisk slukkes for denne kogezone (f.eks.
15 minutter).
Den automatiske slukkefunktion går i gang efter nogle sekunder.
Nu blinker kontrollampen langsommere, og den resterende tilberedningstid vises løbende i displayet.
Hvis der er indstillet automatisk slukning for flere kogezoner, vises resttiden for den kogezone, der først
bliver slukket for. Kontrollamperne lyser for de andre
kogezoner, som der er valgt automatisk slukning for.
Hvis man vil have vist den resterende tilberedningstid for en af disse kogezoner, vælger man den med
finger-touch tasten T, og så blinker den tilhørende
kontrollampe hurtigt.
Hvis man vil ændre den resterende tilberedningstid,
vælger man den ønskede kogezone på finger-touch
tasten T. Den tilhørende kontrollampe blinker hurtigere. Indstillingen ændres med finger-touch
tasterne + eller -.
Når den indstillede tilberedningstid er gået, afbrydes
kogezonen automatisk; der høres et lydsignal i to minutter, og 00 blinker i urets display.
3. Berør finger-touch tasten T for at slå signalet fra.
37
Page 38

3 Man kan indstille det hurtigere ved at berøre
finger-touch tasten + eller -, til det ønskede
tal kommer frem.
Hvis man først berører finger-touch tasten -,
starter tidsindstillingen med 99 minutter, og
hvis man først berører +, starter tidsindstillingen med 1 minut.
Afbryde automatisk slukkefunktion før tid
Man kan afbryde den automatiske slukkefunktion før
tiden på to måder:
Afbryde kogezone og ur samtidig
1. Nulstil den ønskede kogezone med finger-touch
tasten for kogetrin : Kogezone og ur bliver afbrudt.
Slukke for ur – kogezonen forbliver aktiv
1. Vælg den ønskede kogezone med finger-touch
tasten T. Den tilhørende kontrollampe blinker hurtigere.
2. Sæt uret på 00 med finger-touch tasten -:
– kun uret bliver afbrudt.
– Der er stadig tændt for kogezonen.
Minutur
Når minuturet skal bruges, skal der være tændt for
komfuret, men der må ikke være tændt for en kogezone.
1. Berør finger-touch tasten T.
Urets display viser nu 00.
2. Indstil den ønskede tilberedningstid med fingertouch tasterne + eller -.
Efter nogle sekunder starter minuturet, og den resterende tilberedningstid bliver vist.
Hvis den resterende tilberedningstid skal ændres,
berører man finger-touch tasten for uret og ændrer
tidsindstillingen med finger-touch tasterne + eller -.
Når den indstillede periode er gået, kommer der et
lydsignal, og 00 blinker i urets display.
3. Berør finger-touch tasten T for at afbryde signalet.
38
Page 39

Låse betjeningsfelt/ophæve låsning
Når som helst under madlavningen kan man låse betjeningsfeltet (undtagen sensortasten ”Tænd/sluk”).
Derved undgår man, at indstillingerne ændres, f.eks.
når man tørrer betjeningsfeltet af med en karklud.
1. Berør sensortasten “Lås“ i ca. et sekund.
Kontrollampen i sensortasten “Lås” lyser. Sensortasterne er låst.
2. Låsningen ophæves ved atter at berøre sensortasten “Lås“ i ca. et sekund.
Kontrollampen i sensortasten “Lås” slukkes.
3 Når der slukkes for komfuret, kobles låseta-
sten automatisk fra.
39
Page 40

Koge- og stegetips
3
Oplysning om akrylamid
Ifølge de nyeste videnskabelige undersøgelser
kan kraftig bruning/ristning af – specielt stivelsesholdige – madvarer medføre en sundhedsrisiko på grund af stoffet akrylamid. Derfor
anbefaler vi at tilberede maden ved lavest mulig temperatur og undgå kraftig bruning.
Kogegrej
• Godt kogegrej kan man kende på bunden. Bunden
skal være så tyk og plan som muligt.
• Kogegrej af emaljeret stål eller med alu- eller kobberbund kan give misfarvninger på glaskeramikken, der kan være svære eller umulige at få af.
Spar på energien
2 Sæt altid kogekarret på
kogezonen, inden der tændes for den.
2 Læg så vidt muligt altid låg på gryder.
2 Sluk for kogezonen, inden tilberedningen er
slut, så restvarmen udnyttes.
2 Grydens bund og kogezonen bør være lige
store.
40
Page 41

Praktiske eksempler på madlavning
Angivelserne i de følgende tabeller er omtrentlige.
Varme-
trin
0 Eftervarme, Indstilling: 'Slukket'
u Varmetrin Holde færdige retter varme efter behov Med låg
1-2
2-3
3-4
4-5 Kogning
6-7
7-8
9
Tilberedning egnet til Tilb.tid Råd / Tips
Smeltning
Stivne Soufflé, æggekage 10-40 min. Tilberedes med låg
Madvarer, der
opsuger væde
Dampning
Grydestegning
Skånsom
stegning
Stegning
ved kraftig
varme
Opkogning
Bruning
Friture-kog-
ning
smelte smør, chokolade, husblas
Mørkogning af ris- og mælkeret-
Tilberedning af større mængder
Schnitzler, cordon bleu, kotelet-
ter, frikadeller, middagspølser, le-
Kartoffelkroketter, mørbradbøffer,
Opvarmning af store mængder vand, kogning af pasta, bruning af kød (gullasch,
Hollandaisesovs,
ter
Opvarmning af færdigretter
Dampning af grøntsager, fisk
Grydestegning af kød
Dampning af kartofler 20-60 min.
mad, sammenkogte retter og
supper
ver, opbagt sovs, æg,
æggekage, æbleskiver
steaks
grydesteg), friturekogning af pommes frites
5-25 min. Rør jævnligt i maden
25-50 min.
20-45 min.
60-150 min.
efterhånden
5-15 min.
pr. pandefuld
bages
Tilsæt mindst dobbelt så me-
get væske som ris; mælke-
retter omrøres jævnlig under
tilberedningen
Grøntsager tilsættes lidt
væde (nogle spiseskefulde)
Brug så lidt væde som mu-
ligt, f.eks.: højst
750 g kartofler
Op til 3 l væske plus ingredi-
Vendes undervejs
Vendes undervejs
¼ l vand til
enser
41
Page 42

Rengøring og vedligeholdelse
Kogezone
1 Obs: Der må ikke komme rengøringsmiddel på
den varme glaskeramikplade! Alle rengøringsmidler skal fjernes efter rengøringen med rigeligt rent vand, da de kan ætse, når de tændes
igen!
Anvend ikke aggressive rengøringmidler, som
f.eks. grill- eller ovnrens, grove skuremidler eller grydesvampe eller lign., der kradser.
3 Rengør glaskeramikpladen efter hver brug, når
den er håndvarm eller lunken. Derved undgås
fastbrænding af snavs.
Kalk- og vandrande, fedtstænk og metalliske
mærker fjernes med almindelig glaskeramikeller stålrens.
Let snavs
1. Tør glaskeramikpladen af med en fugtig klud og
lidt sulfosæbe.
2. Tør den derefter af med en ren klud. Der må ikke
efterlades rester fra rengøringsmidler på overfladen.
3. Rengør hele glaskeramikpladen grundigt en gang
om ugen med et almindeligt rengøringsmiddel til
glaskeramik eller rustfrit stål.
4. Derpå vaskes glaskeramikpladen med rigeligt rent
vand og tørres af med en ren fnugfri klud.
Fastklæbende snavs
1. Benyt en glasskraber til at fjerne rester fra retter,
der er kogt over, eller stænkrester.
2. Glasskraberen sættes skråt mod glaskeramikpladen.
3. Fjern snavs ved at skrabe over med klingen.
3 Glasskraber og rengøringsmiddel til glaskera-
mikplader fås i faghandlen.
42
Page 43

1 Specielle tilsmudsninger
1. Fastbrændt sukker, smeltet kunststof, aluminiumsfolie eller andre smeltede materialer skal straks
fjernes, mens de stadig er varme, med en glasskraber.
1 Obs: Fare for forbrænding ved brug af glas-
skraberen på den varme kogezone!
2. Derefter rengøres den afkølede kogezone som normalt.
3 Hvis kogezonen allerede er afkølet med de
smeltede materialer, opvarmes de igen inden
rengøring.
Kradsmærker eller mørke pletter på glaskeramikpladen, som f.eks. er opstået pga. grydebunde med skarpe kanter, kan ikke fjernes. De
har dog ingen indflydelse på kogezonens
funktionsdygtighed.
43
Page 44

Hvad skal man gøre, hvis …
Afhjælpning ved fejl
Ved fejl drejer det sig muligvis om en mindre fejl, som
du selv kan afhjælpe vha. følgende henvisninger. Udfør ikke selv andet arbejde, hvis efterfølgende oplysninger ikke hjælper i det konkrete tilfælde.
1 Advarsel! Reparationer på apparatet må kun
udføres af faguddannede personer. Ved uautoriserede reparationer kan der opstå alvorlige
farer for brugeren. Ved reparation bør man
henvende sig til faghandlen eller kundeservice.
Hvis du kontakter kundeservice vedrørende en revne
i den glaskeramiske kogeplade, bedes du referere til
det trecifrede tal der findes på glaspladen.
Hvad gør man, hvis …
… kogezonerne ikke virker?
Undersøg, om
– sikringen i husets eltavle (sikringsboks) er intakt.
Hvis sikringer brænder over (eller relæer slår fra)
flere gange: Tilkald en autoriseret el-installatør.
– der er tændt rigtigt for apparatet,
– kontrollamperne i betjeningspanelet lyser,
– der er tændt for den pågældende kogezone,
– kogezonerne er indstillet til det ønskede kogetrin,
– kogezonernes sikkerhedsafbryder er blevet ud-
løst. (Se kapitlet “Sikkerhed”).
… der ikke kan slukkes for en kogezone?
Undersøg, om
– finger-touch afbryderen er delvis dækket af en klud
eller af væske.
– betjeningspanelet er låst.
… der ikke kan tændes for en kogezone?
Undersøg, om
– børnesikringen er slået til.
– betjeningspanelet er låst.
…displayet viser e?
Undersøg, om kogezonen er blevet overophedet.
Denne meddelelse lyser ved overophedning, fejl i
elektronikken eller af sikkerhedsgrunde.
… komfuret ikke reagerer, når man berører en finger-touch taste?
Komfuret reagerer ikke, hvis man samtidig berører to
finger-touch taster, der ikke er beregnet på at kunne
kombineres.
Hvis De gør brug af kundeservice på grund af fejlbetjening, er serviceteknikerbesøg ikke gratis, heller
ikke i garantiperioden.
… der ikke kan tændes for kogezonerne?
Undersøg, om
– betjeningspanelet er låst.
– der er gået mere end 10 sekunder, fra der blev
trykket på tænd/sluk-tasten, og til der blev tændt
for den ønskede kogezone (se kapitlet “Tænde for
komfuret”).
– sensorfelterne er delvis dækket af en fugtig klud el-
ler væske.
… displayet pludselig falder ud, bortset
fra restvarmeindikatoren h?
Undersøg, om
– De af vanvare har trykket på tænd/sluk tasten.
– sensorfelterne er delvis dækket af en fugtig klud,
væske eller lignende.
– sikkerhedsafbryderen er blevet aktiveret.
… restvarmeindikatoren h ikke kommer
frem på displayet, når der slukkes for kogezonerne?
Undersøg om
– der kun har været tændt for kogezonen i kort tid,
så den endnu ikke er varm nok.
Hvis kogezonen er varm: Ring til kundeservice.
44
Page 45

Monteringsvejledning
1
Obs Montering og tilslutning af det nye appa-
rat kan kun foretages af en autoriseret fag-
mand.
Iagttag venligst denne henvisning, da krav på
garanti ellers bortfalder ved forekommende
skader.
Tekniske data
Komfurets mål
Bredde 780 mm
Dybde 520mm
Højde 48mm
Udskæringsmål
Bredde 750mm
Dybde 490mm
Radius, hjørne R5
Kogezoner
Placering Diameter Effekt
forrest til venstre 120/175/
210mm
bagest til venstre 145mm 1200W
bagest til højre 170/265mm 1500/2400W
forrest til højre 145mm 1200W
Spænding 230V ~ 50Hz
Samlet effekt maks. 7,1kW
800/1600/
2300W
45
Page 46

1 Sikkerhedshenvisnin-
Elektrisk tilslutning
ger til installatøren
• I den elektriske installation er der en anordning, der
gør det muligt at separere apparatet med en kontaktåbningsvidde på min. 3 mm flerpolet fra nettet.
Egnet til dette formål er f.eks. LS-kontakt, sikringer
(skruesikringer skal tages ud af fatningen), FI-kontakt og kontaktor.
• Dette apparat lever op til de gældende sikkerheds-
regler for brand type Y (EN 60 335-2-6). Kun apparater af denne type kan monteres ved den ene side
af højskabe eller vægge.
• Der må ikke monteres skuffer under komfuret.
• Beskyttelsen mod berøring skal sikres ved indbyg-
ningen.
• Indbygningsskabets stabilitet skal leve op til
DIN 68930.
• For at beskytte mod fugt er alle udskårne flader
forseglet med egnet tætningsmateriale.
• Ved arbejdsflader med fliser skal fugerne i indbyg-
ningshullet være fyldt fuldstændigt med fugemateriale.
• Ved plader af natur-, kunststen- eller keramik skal
snapfjedrene hæftes fast med syntetisk harpiks eller tokomponentlim.
• Kontroller, at tætningen sidder korrekt og underla-
get ligger rigtigt. Der må ikke anvendes yderligere
silikone-tætningsmasse, da dette vanskeliggør demontering ved service.
• Undgå montering af apparatet umiddelbart ved si-
den af døre og under vinduer. Døre og vinduer, der
springer op, kan ellers rive varme gryder og pander
ned fra kogezonen.
• Ved demontering tages forsænkningen ud nedefra.
• Rengør bordpladen omkring udskæringen.
• Den medfølgende tætningsliste er selvklæbende
på den ene side; den klæbes rundt langs undersiden af kogesektionen, langs yderkanten af den glaskeramiske plade. Tætningslisten må ikke
strækkes. Samlingen skal være midt på en side.
Efter afkortning (læg nogle mm til) trykkes de to ender mod hinanden i en stump vinkel.
Det skal kontrolleres inden tilslutning, om mærkespændingen for apparatet, altså spændingen, der er
angivet på typeskiltet, stemmer overens med den eksisterende netspænding. Typeskiltet befinder sig på
komfurets nederste beklædning.
Varmelegmespændingen udgør AC230V~. Også ved
ældre net med AC220V~ fungerer apparatet fejlfrit.
Komfurets nettilslutning skal udføres, således at der
eksisterer en flerpolet separationsmulighed med en
kontaktåbningsvidde på mindst 3mm, f.eks. LSautomat,FI-relæ eller sikring.
Som nettilslutning skal der anvendes en ledning af
typen H05VV-F eller højere.
Tilslutningen skal ske iht. diagrammet. Tilslutningsbroerne skal isættes i overensstemmelse med tilslutningsdiagrammet. Beskyttelseslederen forbindes
med klemme E. Beskyttelsesledertrådene skal være
længere end de strømførende tråde.
Kabeltilslutningerne skal være udført forskriftsmæssigt og klemskruerne spændt.
Til sidst skal tilslutningsledningen sikres med aflastningsklemme og afdækningen lukkes ved at trykke
hårdt fast (gå i hak).
Inden første ibrugtagning skal eventuelt beskyttelsesfolie eller klistermærker fjernes fra glaskeramikpladen eller rammen.
1 Efter tilslutning til strømforsyningen skal alle
kogezoner tændes kortvarigt en efter en i
maksimalstilling for at kontrollere funktionsevnen.
46
Page 47

Service
I kapitlet “Hvad skal man gøre, hvis …” er der opført
nogle fejl, som man selv kan udbedre. Ved fejl skal
du først se efter her.
Drejer det sig om en teknisk fejl?
Så kontakt venligst vores kundeservice eller en af
vore servicepartnere (adresser og telefonnumre finder du i fortegnelsen “Kundeservice”).
Forbered dig godt på samtalen. Derved bliver det lettere at afgøre, hvad fejlen skyldes, og om det er nødvendigt med et kundebesøg:
Notér så vidt muligt:
• Hvordan ytrer fejlen sig?
• Under hvilke omstændigheder forekommer fejlen?
Det er meget vigtigt, at du inden samtalen finder
frem til apparatets kodenummer, som fremgår af typeskiltet:
• PNC-ciffer (9 cifre),
• S-nr-ciffer (8 cifre).
Vi anbefaler, at du noterer kodenumrene her, så du
altid har dem ved hånden:
PNC . . . . . . . . . . .
S-No . . . . . . . . . . .
Hvornår koster det, selv om det er indenfor garantiperioden?
• Hvis du selv kunne have afhjulpet fejlen ved hjælp
af fejltabellen (se afsnittet “Hvad skal man gøre,
hvis …”),
• hvis det er nødvendigt med flere besøg fra en ser-
vicetekniker, fordi han ikke har fået alle vigtige informationer inden besøget og derfor må tilbage for
at hente f.eks. reservedele. Disse ekstrature kan
undgås, hvis du forbereder dig godt, inden du ringer til kundeservice.
Typeskilt
47
Page 48

Till våra kunder
läs igenom den här bruksanvisningen noggrant.
Läs avsnittet “Säkerhetsanvisningar“ på de första si-
dorna särskilt noga. Spara den här bruksanvisningen
för att kunna slå upp i den senare. Överlämna den till
eventuellt efterkommande ägare.
Följande symboler används i texten:
1 Säkerhetsanvisningar
Varning: Anvisningar som är avsedda för din
egen säkerhet.
Observera: Anvisningar som är avsedda för
att undvika skador på produkten.
3 Anvisningar och praktiska tips
2 Miljöinformationer
1. De här siffrorna leder dig steg för steg vid betjä-
ningen av produkten.
2. …
3. …
I avsnittet "Vad gör man när..." finns anvisningar om
hur du själv kan åtgärda eventuella fel som uppstår.
48
Page 49

Innehåll
Bruksanvisning . . . . . . . . . . . . . . . . . . . . . . . . . . . . . . . . . . . . . . . . . . . . . . . . . . . . . . . . . . . . . . . . . . . . 50
Säkerhetsanvisningar . . . . . . . . . . . . . . . . . . . . . . . . . . . . . . . . . . . . . . . . . . . . . . . . . . . . . . . . . . . . . . . . . . 50
Beskrivning av produkten . . . . . . . . . . . . . . . . . . . . . . . . . . . . . . . . . . . . . . . . . . . . . . . . . . . . . . . . . . . . . . 51
Kokzonernas och kontrollpanelens funktioner . . . . . . . . . . . . . . . . . . . . . . . . . . . . . . . . . . . . . . . . . . . . . . . . 51
Digitala displayer. . . . . . . . . . . . . . . . . . . . . . . . . . . . . . . . . . . . . . . . . . . . . . . . . . . . . . . . . . . . . . . . . . . . . . . 52
Kokzonernas säkerhetsavstängning . . . . . . . . . . . . . . . . . . . . . . . . . . . . . . . . . . . . . . . . . . . . . . . . . . . . . . . . 52
Innan produkten används första gången . . . . . . . . . . . . . . . . . . . . . . . . . . . . . . . . . . . . . . . . . . . . . . . . . . 53
En första rengöring . . . . . . . . . . . . . . . . . . . . . . . . . . . . . . . . . . . . . . . . . . . . . . . . . . . . . . . . . . . . . . . . . . . . . 53
Användning av kokhällen . . . . . . . . . . . . . . . . . . . . . . . . . . . . . . . . . . . . . . . . . . . . . . . . . . . . . . . . . . . . . . . 53
Touchkontroll-fält . . . . . . . . . . . . . . . . . . . . . . . . . . . . . . . . . . . . . . . . . . . . . . . . . . . . . . . . . . . . . . . . . . . . . . 53
Slå på hällen . . . . . . . . . . . . . . . . . . . . . . . . . . . . . . . . . . . . . . . . . . . . . . . . . . . . . . . . . . . . . . . . . . . . . . . . . . 53
Stänga av hällen . . . . . . . . . . . . . . . . . . . . . . . . . . . . . . . . . . . . . . . . . . . . . . . . . . . . . . . . . . . . . . . . . . . . . . . 53
Val av effektläge . . . . . . . . . . . . . . . . . . . . . . . . . . . . . . . . . . . . . . . . . . . . . . . . . . . . . . . . . . . . . . . . . . . . . . . 54
Varmhållningsläge. . . . . . . . . . . . . . . . . . . . . . . . . . . . . . . . . . . . . . . . . . . . . . . . . . . . . . . . . . . . . . . . . . . . . . 54
Till- och frånkoppling av stekzon (dubbelzon) . . . . . . . . . . . . . . . . . . . . . . . . . . . . . . . . . . . . . . . . . . . . . . . . 54
Till- och frånkoppling av trippelzon. . . . . . . . . . . . . . . . . . . . . . . . . . . . . . . . . . . . . . . . . . . . . . . . . . . . . . . . . 55
Stänga av kokzonen . . . . . . . . . . . . . . . . . . . . . . . . . . . . . . . . . . . . . . . . . . . . . . . . . . . . . . . . . . . . . . . . . . . . 55
Restvärmevarnare. . . . . . . . . . . . . . . . . . . . . . . . . . . . . . . . . . . . . . . . . . . . . . . . . . . . . . . . . . . . . . . . . . . . . . 56
Kokning med uppkokningsautomatik . . . . . . . . . . . . . . . . . . . . . . . . . . . . . . . . . . . . . . . . . . . . . . . . . . . . . . . 56
Kokning utan uppkokningsautomatik . . . . . . . . . . . . . . . . . . . . . . . . . . . . . . . . . . . . . . . . . . . . . . . . . . . . . . . 57
Barnsäkring (funktionslås). . . . . . . . . . . . . . . . . . . . . . . . . . . . . . . . . . . . . . . . . . . . . . . . . . . . . . . . . . . . . . . . 57
Timer . . . . . . . . . . . . . . . . . . . . . . . . . . . . . . . . . . . . . . . . . . . . . . . . . . . . . . . . . . . . . . . . . . . . . . . . . . . . . . . . 59
Låsning/upplåsning av kontrollpanel . . . . . . . . . . . . . . . . . . . . . . . . . . . . . . . . . . . . . . . . . . . . . . . . . . . . . . . 61
Tips för kokning och stekning . . . . . . . . . . . . . . . . . . . . . . . . . . . . . . . . . . . . . . . . . . . . . . . . . . . . . . . . . . . 62
Kokkärl . . . . . . . . . . . . . . . . . . . . . . . . . . . . . . . . . . . . . . . . . . . . . . . . . . . . . . . . . . . . . . . . . . . . . . . . . . . . . . 62
Spara energi . . . . . . . . . . . . . . . . . . . . . . . . . . . . . . . . . . . . . . . . . . . . . . . . . . . . . . . . . . . . . . . . . . . . . . . . . . 62
Exempel på användning vid tillagning . . . . . . . . . . . . . . . . . . . . . . . . . . . . . . . . . . . . . . . . . . . . . . . . . . . . . . 63
Rengöring och skötsel . . . . . . . . . . . . . . . . . . . . . . . . . . . . . . . . . . . . . . . . . . . . . . . . . . . . . . . . . . . . . . . . . 64
Kokhäll . . . . . . . . . . . . . . . . . . . . . . . . . . . . . . . . . . . . . . . . . . . . . . . . . . . . . . . . . . . . . . . . . . . . . . . . . . . . . . 64
Vad gör man när … . . . . . . . . . . . . . . . . . . . . . . . . . . . . . . . . . . . . . . . . . . . . . . . . . . . . . . . . . . . . . . . . . . . . 66
Åtgärd vid störningar . . . . . . . . . . . . . . . . . . . . . . . . . . . . . . . . . . . . . . . . . . . . . . . . . . . . . . . . . . . . . . . . . 66
Installationsanvisning . . . . . . . . . . . . . . . . . . . . . . . . . . . . . . . . . . . . . . . . . . . . . . . . . . . . . . . . . . . . . . 67
Tekniska data . . . . . . . . . . . . . . . . . . . . . . . . . . . . . . . . . . . . . . . . . . . . . . . . . . . . . . . . . . . . . . . . . . . . . . . . . 67
Säkerhetsanvisningar för installatören . . . . . . . . . . . . . . . . . . . . . . . . . . . . . . . . . . . . . . . . . . . . . . . . . . . . . . 68
Nätanslutning . . . . . . . . . . . . . . . . . . . . . . . . . . . . . . . . . . . . . . . . . . . . . . . . . . . . . . . . . . . . . . . . . . . . . . . . . 69
Service och reservdelar . . . . . . . . . . . . . . . . . . . . . . . . . . . . . . . . . . . . . . . . . . . . . . . . . . . . . . . . . . . . 70
Typskylt . . . . . . . . . . . . . . . . . . . . . . . . . . . . . . . . . . . . . . . . . . . . . . . . . . . . . . . . . . . . . . . . . . . . . . . . . . . . . . 70
Montering. . . . . . . . . . . . . . . . . . . . . . . . . . . . . . . . . . . . . . . . . . . . . . . . . . . . . . . . . . . . . . . . . . . . . . . . . . 71
49
Page 50

Bruksanvisning
Säkerhetsanvisningar
3
Var vänlig beakta dessa anvisningar, eftersom
annars uppkommna skador inte täcks av garantin.
5 Denna häll motsvarar följande EU-direktiv:
– 73/23/EWG från 19.02.1973 lågspännings-direktiv
– 89/336/EWG från 03.05.1989 EMV-direktiv inklusi-
ve ändrings-direktiv 92/31/EWG
– 93/68/EWG från 22.07.1993 CE-märknings-direktiv
Bestämmelser för användning
• Denna häll får endast användas i hushållet till nor-
mal kokning, och stekning, av maträtter.
• Hällen får inte användas som arbets- eller avställ-
ningsyta.
• Ombyggnad eller förändringar av hällen är inte tillå-
ten.
Säkerhet för barn
• Håll i regel småbarn borta från hällen.
• Låt bara större barn arbeta vid hällen under upp-
sikt.
Säkerhet vid rengöring
• Vid rengöring skall hällen vara frånkopplad och
kall.
• Rengöring av hällen med ångstråle- eller högtryckstvätt är av säkerhetsskäl inte tillåten.
Undvikande av skador på hällen
• Glaskeramiken kan skadas av nerfallande föremål.
• Stötar med kokkärl kan skada kanten på glaskera-
miken.
• Kokkärl av gjutjärn, aluminium eller med skadade
bottnar kan då de dras över glaskeramiken skada
denna.
• Smältbara föremål och överkokning kan bränna
fast på glaskeramiken och bör genast avlägsnas.
• Använd inte kokzonerna utan kokkärl eller med
tomma kokkärl.
Allmän säkerhet
• Montering och anslutning av hällen får endast utföras av utbildad och auktoriserad fackpersonal.
• Inbyggnadsapparater får efter montering endast
användas i standardiserade, passande inbyggnadsskåp och bänkskivor.
• Vid funktionsstörningar i hällen eller skador på
glaskeramiken (sprickor, respektive repor) måste
hällen slås av och skiljas från el-nätet.
• Reparationer av hällen får endast utföras av utbildad och auktoriserad fackpersonal.
Säkerhet under användning
• Avlägsna klistermärken och folier från glaskeramiken.
• Vid oaktsamhet under arbete vid hällen finns risk
för brännskador.
• Sladdar till elektriska apparater får inte komma i
beröring med hällens yta respektive varma kokkärl.
• Överhettat fett och olja kan snabbt ta eld. Tillagning med fett eller olja (till exempel pommes frites)
skall inte lämnas oövervakat.
• Stäng av kokzonerna efter varje användning.
50
Page 51

Beskrivning av produkten
Kokzonernas och kontrollpanelens funktioner
Kokzon med en värmezon
1200W
Stekzon/dubbelzon
2400W
Trippelzon/tre värmezoner
“Spärr”
Sensorfält
“Till/Från“
Trippelzon
2300W
Kontrollampor för trippelzon
Effektlägesval
Display för effektläge/restvärme
Kontrollpanel
Kontrollampa för stekzon
“Timer“ display med
kontrollampor
Kokzon med en värmezon
1200W
Stekzon
Effektlägesval
51
Page 52

Digitala displayer
De fyra displayfälten, som hör till de fyra kokzonerna,
visar:
– ¾ efter påslag,
– u vid val av varmhållningsläget,
– ¿ till Ç beroende av valt effektläge,
– a vid uppkokningsautomatik,
– h vid restvärme,
– l vid inkopplad barnspärr (funktionslås),
– e vid felfunktion
1 Kokzonernas säker-
hetsavstängning
Om en av kokzonerna efter en bestämd tid inte blir
avstängd eller effektläget inte ändras, kopplas motsvarande kokzon automatiskt från.
Den existerande restvärmen visas med h (som i
“Het”) i på de digitala displayerna för de motsvarande kokzonerna.
Kokzonerna kopplas från vid:
• Effektläge u, 1 - 2 efter 6 timmar
• Effektläge 3 - 4 efter 5 timmar
• Effektläge 5 efter 4 timmar
• Effektläge 6 - 9 efter 1,5 timma
3 Om en eller flera kokzoner skulle kopplas från
innan den angivna tiden förflutit, se kapitel
“Vad göra, när …”.
Frånkoppling på grund av andra orsaker
Vätskor som kokar över och som kommer på spishällen, förorsakar att alla kokzoner stängs av omgående.
Samma verkan inträder då du lägger en blöt trasa på
manöverpanelen. I båda fallen måste hällen kopplas
in på nytt med med tryck på „Till/Från„ , efter det
att vätskan eller trasan har tagits bort.
52
Page 53

Innan produkten används första gången
En första rengöring
Torka av glaskeramikhällen med en fuktig trasa.
1 Observera! Använd inga skarpa och slipande
rengöringsmedel! Ytan kan skadas.
Användning av kokhällen
Touchkontroll-fält
Du använder Touchkontroll-fälten genom att du lägger ett finger på önskat fält och trycker lätt tills motsvarande display tänds eller släcks eller önskad
funktion utförs.
Slå på hällen
Hela hällen kopplas på med fältet “Till/Från” .
Tryck lätt på fältet “Till/Från” i cirka två sekunder.
De digitala displayerna visar på ¾
3 Efter det att fältet “Till/Från” blivit aktiverad,
måste du inom cirka 10 sekunder ställa in ett
effektläge för en kokzon eller ställa in en tid på
timern (äggklocksfunktion). Hällen stängs annars av säkerhetsskäl av på nytt.
Stänga av hällen
För att stäng av hällen helt. Tryck lätt på fältet “Till/
Från” i cirka en sekund.
3 Efter frånkopplingen av en enstaka kokzon el-
ler hela kokhällen visas den existerande restvärmen med h (som i “Het”) i den digitala
displayen för den motsvarande kokzonen.
53
Page 54

Val av effektläge
För inställning och reglering av effektlägena (u till Ç)
för den valda kokzonen.
Höj effektläget med hjälp av fältet .
Sänk effektläget med hjälp av fältet .
Varmhållningsläge
Alla 4 kokzonerna är utrustade med ett varmhållningsläge u.
Tryck på effektväljarfältet ställ in u varmhållningsläget.
Till- och frånkoppling av
stekzon (dubbelzon)
1. Ställ in det önskade effektläget.
2. För till- eller frånkoppling av stekzon tryck lätt med
fingret platt på fältet “Stekzon”, tills att kontrollampan tänds eller släcks.
54
Page 55

Till- och frånkoppling av
trippelzon
Allt efter kastrullens eller stekpannans storlek kan två
eller tre zoner kopplas.
3 Den kan enbart kopplas in, när ett effektläge
redan är inställt för den mindre värmezonen. .
1. Ställ in det önskade effektläget. .
2. Tryck lätt på fältet “Val av trippelzon”.
Den mittersta värmezonen kopplas in. Den undre
kontrollampan tänds.
3. Vid förnyat tryck på fältet “Val av trippelzon” aktiveras den yttre värmezonen. Den övre kontrollampan tänds.
4. För att koppla från den yttre värmezonen .Tryck lätt
på fältet “Val av trippelzon”, som kopplar från den
yttre värmezonen.
Stänga av kokzonen
1. För att stänga av, tryck på båda fälten samtidigt eller återställ till noll med effektlägesfältet .
55
Page 56

Restvärmevarnare
När en enstaka kokzon eller hela hällen stängts av visas ett h (som i "het")
i den digitala displayen för motsvarande kokzon, för att visa att det finns
restvärme kvar.
Även sedan kokzonen stängts av, slocknar
restvärmevarnaren först när kokzonen svalnat.
2 Du kan använda restvärmen för att smälta eller
hålla maträtter varma.
1 Observera! Så länge som restvärmevarnaren
lyser finns det risk för att bränna sig.
1 Obs! Vid ett strömavbrott slocknar även sym-
bolen h och därmed går det inte att se om det
föreligger eventuell restvärme. Man kan dock
fortfarande bränna sig. Detta går emellertid
undvika genom att vara försiktig.
Kokning med uppkokningsautomatik
Kokhällens alla fyra kokzoner är reglerbara i nio effektläge och är utrustade med en uppkokningsautomatik
– ¿, lägsta effektläge
– Ç, högsta effektläge
– a, Uppkokningsfunktion
När du väljer det önskade effektläget med fältet effektlägesval , arbetar kokzonen en bestämd tid
med full effekt och kopplar därefter automatiskt tillbaks till inställt vidarkokningsläge (sjudläge).
Tiden för den automatiska uppkokningen med full effekt beror på vilket effektläge som valdes för vidarkokning.
1. Tryck lätt på fältet effektlägesval för att ställa in
det önskade effekten ¿ till Æ. Det inställda effektläget visas först. Efter 5 sekunder visas a (uppkok-
ningsautomatik) istället för inställd effektläge i
displayen. Efter uppkokningstidens slut visas valt
effektläge på nytt.
3 Om du väljer ett högre effektläge under auto-
matikfunktionen t.ex. från Á till Ã, anpassas
uppkokningstiden. Om du väljer ett lägre effektläge avslutas uppkokningstiden omgående.
Kokning med uppkokningsautomatik är enbart
möjlig med en kall eller medelvarm kokzon. Är
en kokzon redan varm vid påkopplingen fungera (displayen visar h), inte uppkokningsutomatik.
56
Page 57

Kokning utan uppkokningsautomatik
När du vill använda kokzonen utan uppkokningsautomatik, väljer du det önskade effektläget med fältet
.
1. Tryck på effektlägesfältet för att ställa in det
önskade läget Ç till ¿.
3 Med effektlägesfältet och kan du när
som helst reglera effektläget.
Barnsäkring (funktionslås)
Med barnsäkring kan kokhällen spärras mot oönskad användning.
Inkoppling av barnsäkring
För inkoppling av barnsäkringen måste hällen vara
påslagen, men ingen kokzon får vara inkopplad.
1. Tryck lätt på fältet i cirka 3 sekunder.
Som bekräftelse hörs en signalton.
2. Tryck lätt på ett valfritt effektlägesfält .
I displayen visas l, barnsäkring aktiverad. Hällen
stängs automatiskt av efter några sekunder.
57
Page 58
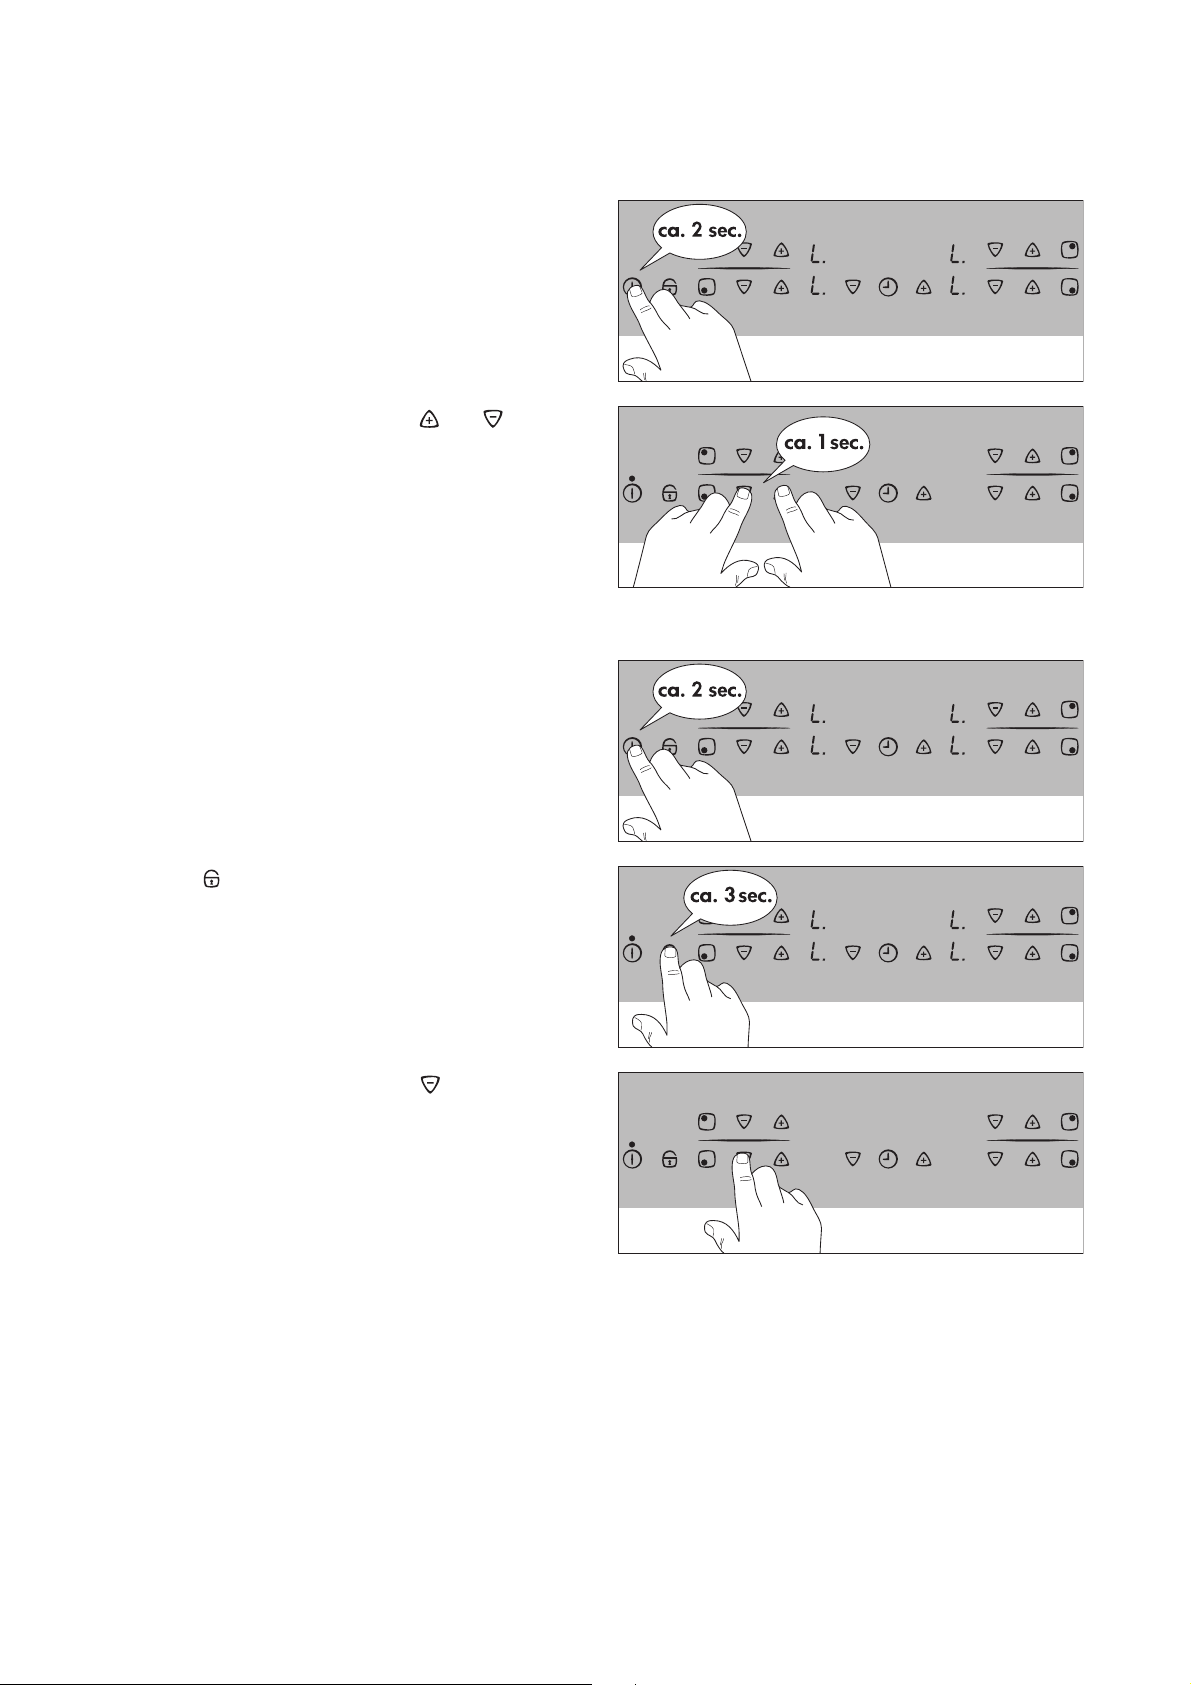
Inkoppling av kokzon med akiverad barnsäkring
1. Slå på hällen.
Vid aktiverad barnsäkring visas l.
2. Tryck samtidigt på effektlägesfält och .
Som bekräftelse hörs en signalton. Barnsäkringen är
avaktiverad tills hällen kopplas ifrån, kokhällen kan
användas normalt.
Urkoppling av barnsäkring
1. Slå på hällen.
Vid aktiverad barnsäkring visas l.
2. Tryck på fältet i cirka tre sekunder.
Som bekräftelse hörs en signalton.
3. Tryck på ett valfritt effektlägesfält .
Displayerna blir mörka, barnsäkringen är urkopplad.
Hällen stängs automatiskt av efter några sekunder.
58
Page 59

Timer
Du kan använda timern på två olika sätt:
– som Urkopplingsautomatik. Du ställer in en kok-
tid, och efter att den förflutit stängs kokzonen automatiskt av. Den här funktionen kan användas
samtidigt för flera kokzoner.
– som korttidstimer utan automatisk avstängning
(“äggklocka“). Efter att den inställda tiden förflutit
hörs endast en akustisk signal.
3 Korttidstimern kan principiellt inte användas,
när en kokzon är inkopplad.
Urkopplingsautomatik
Kokzonen/erna för vilken/vilka du vill använda urkopplingsautomatiken, måste vara inkopplad/e.
1. Med timerfältet väljer du vilken kokzon urkopplingsautomatiken ska ställas på.
När du trycker på timerfältet första gången markeras först i displayen, den aktiva kokzonen och den
tillhörande kontrollampan blinkar snabbt. Den vänstra bakre kontrollampan motsvarar t.ex. den bakre
vänstra kokzonen. I timerdisplayen visas 00.
Genom upprepade tryck på timerfältet väljs nästa
aktiva kokzon.
2. Medan kontrollampan blinkar snabbt, kan inställning av tiden ske med hjälp av fälten + eller -,
t.ex. 15 minuter.
Efter några sekunder aktiveras urkopplingsautomatiken
Kontrollampan blinkar nu långsammare och koktiden
visas i displayen och nedräkningen av tiden börjar. Är
urkopplingsautomatiken inställd för flera kokzoner,
så gäller detta för kokzonen med den kortast inställda tiden. Kontrollamporna för de övriga kokzonerna
med inställd urkopplingsautomatik tänds. För att visa
den kvarstående koktiden för en av dessa kokzoner,
måste den väljas med timerfältet , den motsvarande kontrollampan blinkar sedan snabbt.
För att ändra en kvarstående tiden måste den önskade kokzonen först väljas med fältet . Den tillhörande kontrollampan blinkar snabbare. Ändringen av
tiden sker med + eller - .
När den inställda koktiden är slut kopplas kokzonen
automatiskt från och en akustisk signal hörs i två minuter, i displayen blinkar 00.
3. Tryck lätt på timerfältet för att stänga av signa-
len.
59
Page 60

3 För en snabbare inställning, tryck på en av ti-
merinställningarna + eller - så länge, tills
den önskade tiden visas. .
Om timerinställningen - aktiveras först, börjar tidsinställningen på 99 minuter, om timerinställningen + aktiveras först, börjar
tidsinställningen på 1 minut.
Avbrytning av inställd koktid
Du har två möjligheter att avbryta inställd koktid (urkopplingsautomatiken).
Stänga av kokzon och koktid samtidigt..
1. Tryck på och ställ tillbaka den önskade kokzo-
nen på noll: Kokzon och tid stängs av.
Stänga av tiden – kokzonen förblir aktiv
1. Välj den önskade kokzonen med timerfältet .
Den motsvarande kontrollampan blinkar snabbare.
2. Tryck på timerinställningen - ställ timern på 00:
– bara tiden kopplas från.
– Kokzonen förblir i drift.
Korttidstimer (äggklocka)
För att använda timern som äggklocka måste hällen
vara påkopplad, men ingen kokzon får vara inkopplad.
1. Tryck på timerfältet .
I timerdisplayen visas 00.
2. Ställ in den önskade tiden med timerinställningen
+ eller -.
Efter några sekunder aktiveras timern och tiden börja
räknas ned.
För ändring av den kvarstående tiden tryck på timerfältet och ändra inställningen med + eller -.
Efter det att den inställda tiden är slut hörs en akustisk signal och timerdisplayen blinkar 00.
3. Tryck på för att stänga av signalen.
60
Page 61

Låsning/upplåsning av
kontrollpanel
Kontrollpanelen, med undantag för sensorfältet ”Till/
Från”, kan när som helst vid användning av spishällen spärras för att förhindra att gjorda inställningar
ändras av misstag, t ex vid avtorkning med trasa.
1. Håll fingret i ca en sekund på fältet “spärr”.
Kontrollampan för sensorfältet “Spärr” lyser. Sensorfälten är spärrade.
2. För att låsa upp sensorfälten på nytt, håll åter fingret på sensorfältet ”spärr” i ca en sekund.
Kontrollampan för sensorfältet “Spärr” slocknar.
3 Vid avstängning av spishällen kopplas spärren
automatiskt ur.
61
Page 62

Tips för kokning och stekning
3
Anvisning angående akrylamid
Enligt de senaste vetenskapliga rönen kan en
kraftig stekning av livsmedel, speciellt med
produkter som innehåller stärkelse, innebära
en hälsorisk genom att akrylamid bildas. Därför rekommenderar vi att tilllaga vid lägsta
möjliga temperatur och att inte steka maträtter
för hårt.
Kokkärl
• Kokkärlets botten avgör om det är ett bra kärl. Botten bör vara så tjock och plan som möjligt.
• Kokkärl av stålemalj eller med aluminium- eller
kopparbotten kan lämna missfärgningar på glaskeramikytan, vilka är svåra att avlägsna eller de går
inte alls att ta bort.
Spara energi
2 Placera helst kokkärlet på
kokzonen innan zonen slås på.
2 Sätt om möjligt lock på grytor.
2 Stäng av kokzoner innan tillagningstidens slut,
för att utnyttja eftervärmen.
2 Kokkärlsbotten och kokzon bör vara lika stora.
62
Page 63

Exempel på användning vid
tillagning
Angivelserna i följande tabell är riktvärden.
Värmelä-geTillagnings-
sätt
0 Eftervärme, Från-läge
u Varmhållning Varmhållning av tillagade rätter efter behov Täck över
1-2
2-3 Svällning
3-4 Ångkokning
4-5 Kokning
6-7
7-8
9
Smältning
Lätt
stekning
Hård
stekning
Kokning
Stekning
Fritering
smältning av smör, choklad, ge-
Svällning av ris och mjölkrätter.
Uppvärmning av färdiglagade
Ångkokning av grönsaker, fisk
Kokning av större mängder,
Schnitzel, cordon bleu, kotlett,
köttbullar, korv, lever, redning,
ägg, ugnspannkaka, fritering av
Kokning av större mängd vatten, kokning av pasta, bryning av kött (gulasch, gryt-
Lämpligt för Tid Råd/Tips
Hollandaisesås,
5-25 min Rör om då och då
lantin
Omelett, äggstanning 10-40 min Tillaga med lock
Tillsätt minst dubbla mäng-
25-50 min
rätter
stekning av kött i gryta
Ångkokning av potatis 20-60 min
gryträtter och soppor
munkar
Raggmunk/rårakor,
biffar, pannkakor
stek), fritering av pommes frites
20-45 min
60-150 min
tillaga fortlö-
pande
5-15 min Vänd då och då
den vätska till ris, rör om då
och då i mjölkrätter
Tillsätt lite vätska (några mat-
skedar) till grönsaker
Använd lite vätska, till exem-
pel: max
750 g potatis
Upp till 3 l vätska samt ingre-
Vänd då och då
¼ l vatten till
dienser
63
Page 64

Rengöring och skötsel
Kokhäll
1 Observera! Rengöringsmedel får inte komma
på den heta glaskeramikytan! Allt rengöringsmedel måste tas bort med tillräckligt med klart
vatten efter rengöringen, eftersom det kan verka etsande vid en återuppvärmning.
Använd inte aggressiva rengöringsmedel, som
t ex grill- eller ugnssprayer, grovkorniga skurmedel eller repande kastrullrengörare.
3 Rengör glaskeramikhällen efter varje använd-
ning när den är ljummen eller kall. På så sätt
undviker du att smuts bränns fast.
Ta bort kalk- och vattenränder, fettstänk och
metalliskt glänsande missfärgningar med ett i
handeln vanligt rengöringsmedel för glaskeramik eller rostfritt stål.
Lätt nedsmutsning
1. Torka av glaskeramikytan med en fuktig trasa och
en aning handdiskmedel.
2. Torka den därefter torr med en ren trasa. Det får
inte finns några rester från rengöringsmedel kvar
på ytan.
3. Rengör hela glaskeramikytan noggrant en gång i
veckan med ett i handeln vanligt rengöringsmedel
för glaskeramik eller rostfritt stål.
4. Torka därefter av glaskeramikytan med tillräckligt
med klart vatten och torka den torr med en ren och
luddfri trasa.
Fastsittande smuts
1. Använd en rakbladsskrapa för att ta bort mat som
kokat över eller fastsittande stänk.
2. Sätt rakbladsskrapan snett mot glaskeramikytan.
3. Ta bort nedsmutsningar med glidande blad.
3 Rakbladsskrapa och rengöringsmedel för
glaskeramik kan du köpa i fackhandeln.
64
Page 65

1 Speciell nedsmutsning
1. Inbränt socker, smält plast, aluminiumfolie och andra material som kan smälta ska omedelbart, tas
bort genast medan det fortfarande är varmt med
en rakbladsskrapa.
1 Observera! Det finns risk att bränna sig när
man använder rakbladsskrapan på den heta
kokzonen!
2. Rengör därefter den svalnade kokhällen som vanligt.
3 Värm upp kokzonen igen om den redan sval-
nat med smält material kvar.
Repor eller mörka fläckar i glaskeramikytan
som uppstått från t ex kärl med vassa kanter
går inte att ta bort. De inverkar dock inte negativt på kokhällens funktion.
65
Page 66

Vad gör man när …
Åtgärd vid störningar
Kanske handlar det vid en störning bara om litet fel,
som du själv kan åtgärda med hjälp av följande anvisningar. Fortsätt inte att försöka åtgärda felet på
egen hand, om anvisningarna vi ger dig inte hjälper.
1 Varning! Reparationer får endast utföras av
fackkunnig person. Felaktiga reparationer kan
innebära allvarliga risker för användaren. Vänd
dig vid reparation till din fackhandlare eller till
kundservice.
Om glaskeramikhällen uppvisar en sprick kontakta
Service och ange det tresiffriga nummer som står
på glasskivan.
Vad göra, när …
… kokzonerna inte fungerar?
Kontrollera om
– säkringen i husets installation (säkringslådan) är
hel. Om säkringen utlöser flera gånger, kalla då
vänligen på en auktoriserad elinstallatör.
– apparaten är riktigt påslagen.
– kontrollampor på manöverpanelen lyser,
– respektive kokzon är påslagen,
– kokzonerna är inställda på det önskade värmeste-
get,
– säkerhetsavstängningen för kokzonerna har utlösts
(se kapitel “Säkerhet”
… en kokzon går inte att stänga av?
Kontrollera om
– panelen är delvis täckt av en blöt trasa eller med
vätska.
– spärren är inkopplad.
en kokzon går inte att sätta på?
Kontrollera om
– barnsäkringen är inkopplad.
– spärren är inkopplad.
…displayen e tänds?
Kontrollera om kokzonen blivit överhettad.
Denna display lyser vid överhettning, fel i elektroniken eller av säkerhetsskäl.
… apparaten inte reagerar på en aktivering av ett sensorfält?
Apparaten reagerar inte på aktiveringen av ett sensorfält, när du samtidigt vidrör ett annat sensorfält
som inte är förutsett för en kombination.
Om du p.g.a. handhavandefel tillkallar kundtjänst är
kundtjänst-teknikerns besök inte kostnadsfritt, inte
heller under garantitiden.
… kokzonerna inte går att slå på?
Kontrollera om
– manöverpanelen är spärrad.
– mer än 10 sekunder förflutit emellan aktiveringen
av Till/Från-knappen och påkopplingen av den
önskade kokzonen (se kapitlet “Påkoppling av apparat”).
– sensorfälten är delvis täckta av en blöt trasa eller
med vätska
… symbolen h för restvärme plötsligt
uteblir?
Kontrollera om
– Till/Från-knappen av misstag har aktiverats.
– sensor
– säkerhetsavstängningen blivit aktiverad.
… efter frånkopplingen av kokzonen inget h visas i displayen för restvärme?
Kontrollera om
– kokzonen varit inkopplad bara en kort stund och
därför ännu inte är tillräckligt het.
Om kokzonen är het, ring vänligen kundtjänst.
66
Page 67

Installationsanvisning
1
Obs! Den nya hällen får endast installeras och
anslutas av en auktoriserad fackman.
Följ den anvisningen annars gäller inte garantin i händelse av skador.
Tekniska data
Spishällens mått
Bredd 780 mm
Djup 520mm
Höjd 48mm
Inbyggnadsmått
Bredd 750mm
Djup 490mm
Hörnradie R5
Kokzoner
Placering Diameter Effekt
Vänster fram 120/175/
210mm
Vänster bak 145mm 1200W
Höger bak 170/265mm 1500/2400W
Höger fram 145mm 1200W
Anslutningsspänning 230 V ~ 50Hz
Max sammanlagd anslutningseffekt
800/1600/
2300W
7,1kW
67
Page 68

1 Säkerhetsanvisningar
för installatören
• I den elektriska installationen ska det finnas en an-
ordning som gör det möjligt att skilja alla polerna
för hällen från nätet. Anordningens kontaktavstånd
ska vara minst 3 mm.
Lämpliga frånskiljare är t.ex. automatsäkringar,
smältsäkringar (säkringar ska skruvas ur sockeln),
jordfelsbrytare och kontaktorer.
• Denna häll motsvarar typ Y (EN 60 335-2-6) beträf-
fande skydd mot brandfara. Endast hällar av denna
typ får byggas med en sida mot angränsande högskåp eller väggar.
• Man får inte montera lådor under hällen utan att ett
beröringskydd är säkerställt.
• Beröringsskyddet måste vara säkerställt vid in-
byggnaden.
• Köksskåpets stabilitet måste uppfylla DIN 68930.
• Alla ursågade snittytor måste förseglas med lämp-
ligt tätningsmaterial för att skydda mot fukt.
• På kaklade arbetsytor måste fogarna i kokdelens
underlag fyllas ut helt med fogmaterial.
• För natur- , konststens- eller keramikplattor måste
låsfjädrarna limmas med lämpligt konstharts- eller
tvåkomponentlim.
• Kontrollera att tätningen sitter ordentligt fast och
att underlaget är helt. Ingen extra silikontätningsmassa får användas eftersom detta försvårar demontering vid service.
• Undvik placering av kokhällen direkt intill dörrar
och under fönster. Dörrar och fönster som slås upp
kan slå ner heta kokkärl från kokzonen.
• Vid demontering måste hällen tryckas ut underi-
från.
• Rengör kanterna i urtaget på bänkskivan.
• Klistra fast det medlevererade, på ena sidan själv-
häftande tätningsbandet, på undersidan av kokhällen, längs yttre kanten av glaskeramikskivan. Töj
inte bandet. Skarven skall vara i mitten på ena sidan. Kapa av (lägg till några mm), och tryck de
båda ändarna ordentligt mot varandra.
68
Page 69

Nätanslutning
Kontrollera alltid före nätanslutning att hällens nominella spänning, d.v.s. den som anges på typskylten,
överensstämmer med den aktuella nätspänningen.
Typskylten sitter på kokdelens undre panel.
Elementspänningen uppgår till 230V~. Spishällen
fungerar även bra vid anslutning till äldre nät med
220V~.
För nätanslutning av kokdelen krävs en frånskiljare
som bryter alla poler med ett kontaktavstånd på
minst 3 mm, t.ex. automatsäkringar,
jordfelsbrytareellersmältsäkringar.
Som anslutningskabel till nätet måste en ledning av
typ H05VV-F eller högre användas.
Nätanslutningen måste följa schemat. Anslutningsbryggorna ska installeras i enlighet med anslutningsschemat. Jordningskabeln fästs med klämman E.
Jordningskabeln måste vara längre än strömförande
kablar.
Kabelanslutningarna måste vara utförda enligt
föreskrifterna och klämskruvarna hårt åtdragna.
Avslutningsvis ska anslutningskabeln säkras med
dragavlastningsklämman och kåpan tryckas fast ordentligt.
Innan du slår på hällen för första gången, måste
eventuell skyddsfolie och eventuella klisteretiketter
avlägsnats från glaskeramikytan och ramen.
1 Efter anslutningen till strömförsörjningen ska
du slå på alla kokzoner, en efter en, i maxläge
en kort stund för att kontrollera att de är startklara.
69
Page 70

Service och reservdelar
• Achtung: für Schwedisch gibt es markenspezi-
fische Bausteine!!! Diese markenspezifischen
Bausteine sind jeweils als eigene Textobjekte in
DMS abgelegt! Die Objektnamen sind nach folgendem Muster aufgebaut:
„T02_Service_[Name der Marke]_sv“
Typskylt
70
Page 71

Assembly / Montering
71
Page 72

72
Page 73

73
Page 74
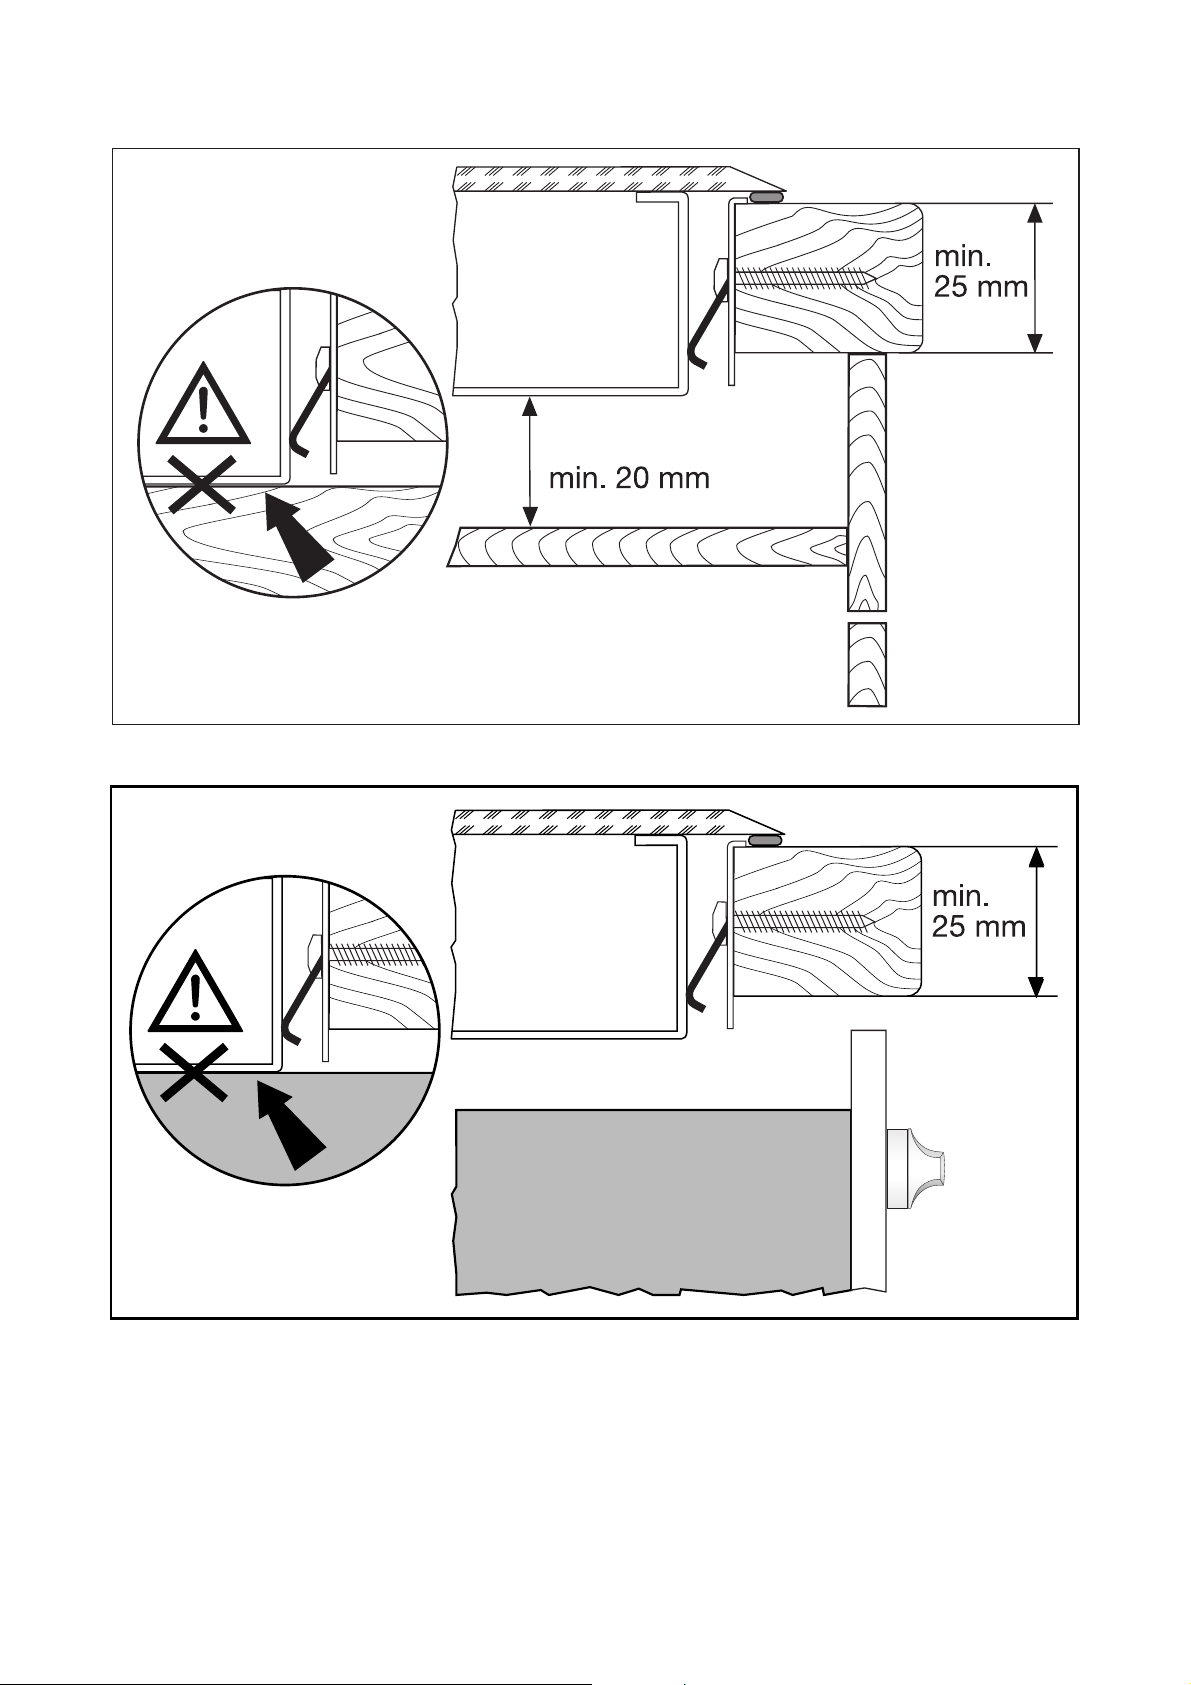
74
Page 75

75
Page 76

Subject to change without notice
Ret til ændringer uden varsel forbeholdes
822 924 614-A-181203-01 Med reservation för ändringar
The Electrolux Group. The world´s No.1 choice.
The Electrolux Group is the world´s largest producer of powered appliances for kitchen, cleaning and outdoor use. More than 55 million Electrolux Group products
(such as refrigerators, cookers, washing machines, vacuum cleaners, chain saws and lawn mowers) are sold each year to a value of approx. USD 14 billion in more
than 150 countries around the world.
 Loading...