

Page 1
user manual
notice d’utilisation
gebruiksaanwijzing
Ceramic glass hob
Table de cuisson vitro-
céramique
Glaskeramische kook-
plaat
EHS80220P
Page 2

We were thinking of you
when we made this product
Page 3

electrolux 3
Welcome to the world of Electrolux
Thank you for choosing a first class
product from Electrolux, which hopefully
will provide you with lots of pleasure in
the future. The Electrolux ambition is to
offer a wide variety of quality products
that make your life more comfortable.
You will find some examples on the cover in this manual. Please take a few minutes to study this manual so that you
can take advantage of the benefits of
your new machine. We promise that it
will provide a superior User Experience
delivering Ease-of-Mind. Good luck!
Page 4

T
1
4 electrolux
Contents
Safety instructions 5
Description of the Appliance 7
Operating the appliance 10
Tips on Cooking and Frying 19
Cleaning and Care 22
What to do if … 24
Disposal 26
Installation Instructions 27
Guarantee/Customer Service 28
Service 30
Assembly 91
Rating Plate 94
he following symbols are used in this user manual:
Important information concerning your personal safety and information on
how to avoid damaging the appliance.
3 General information and tips
2 Environmental information
Page 5

electrolux 5
Safety instructions
Please comply with these instructions. If you do not, any damage resulting is not covered by the
warranty.
5
This appliance conforms with the
following EU Directives:
– 73/23/EEC dated 19.02.1973 Low
Voltage Directive
– 89/336/EEC dated 03.05.1989 EMC
Directive inclusive of Amending Directive 92/31/EEC
– 93/68/EEC dated 22.07.1993 CE
Marking Directive
Correct use
• This appliance should be used only
for normal domestic cooking and frying of food.
• The appliance must not be used as a
work surface or as a storage surface.
• Additions or modifications to the appliance are not permitted.
• Do not place or store flammable liquids, highly inflammable materials or
fusible objects (e.g. plastic film, plastic, aluminium) on or near the appliance.
Children’s safety
• Small children must be kept away
from the appliance.
• Only let bigger children work on the
appliance under supervision.
• To avoid small children and pets unintentionally switching the appliance
on, we recommend activation of the
child safety device.
General safety
• The appliance may only be installed
and connected by trained, registered
service engineers.
• Built-in appliances may only be used
after they have built in to suitable
built-in units and work surfaces that
meet standards.
• In the event of faults with the appliance or damage to the glass ceramic
(cracks, scratches or splits), the appliance must be switched off and
disconnected from the electrical
supply, to prevent the possibility of
an electric shock.
• Repairs to the appliance must only
be carried out by trained registered
service engineers.
Safety during use
• Overheated fats and oils can ignite
very quickly. When cooking with fat
or oil (e.g. chips) do not leave the appliance unattended.
• There is the risk of burns from the
appliance if used carelessly.
• Remove stickers and film from the
glass ceramic.
• Cables from electrical appliances
must not touch the hot surface of the
appliance or hot cookware.
• Switch the cooking zones off after
each use.
Safety when cleaning
• For cleaning, the appliance must be
switched off and cooled down.
• For safety reasons, the cleaning of
the appliance with steam jet or highpressure cleaning equipment is not
permitted.
How to avoid damage to the appliance
• The glass ceramic can be damaged
by objects falling onto it.
Page 6

6 electrolux
• The edge of the glass ceramic can
be damaged by being knocked by
the cookware.
• Cookware made of cast iron, cast
aluminium or with damaged bottoms
can scratch the glass ceramic if
pushed across the surface.
• Objects that melt and things that boil
over can burn onto the glass ceramic
and should be removed straightaway.
• To avoid damaging cookware and
glass ceramics, do not allow saucepans or frying pans to boil dry.
• Do not use the cooking zones with
empty cookware or without cookware.
Page 7
description of the appliance electrolux 7
Description of the Appliance
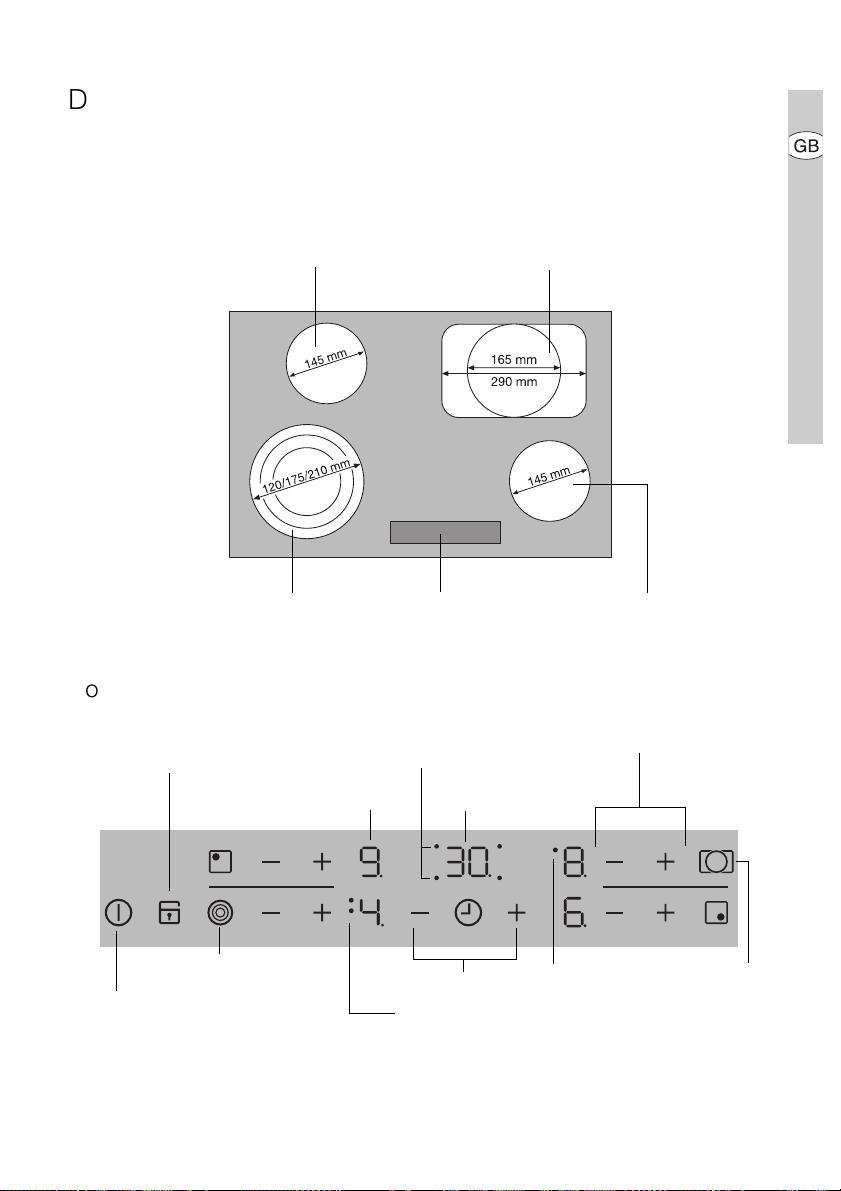
Cooking surface layout
Single cooking zone 1200 W
Triple cooking zone
800/1600/2300 W
Multi-purpose zone
1500 / 2600
Control panel Single cooking zone 1200 W
W
Control panel layout
Lock
with pilot light
Outside/middle ring
On/Off
with power indicator
On/Off
Cooking zone indicators
Timer function
Display
Timer display
Triple ring pilot light
Timer
Heat setting selection
Double ring pilot light
Outside ring
On/Off
Page 8
8 electrolux description of the appliance
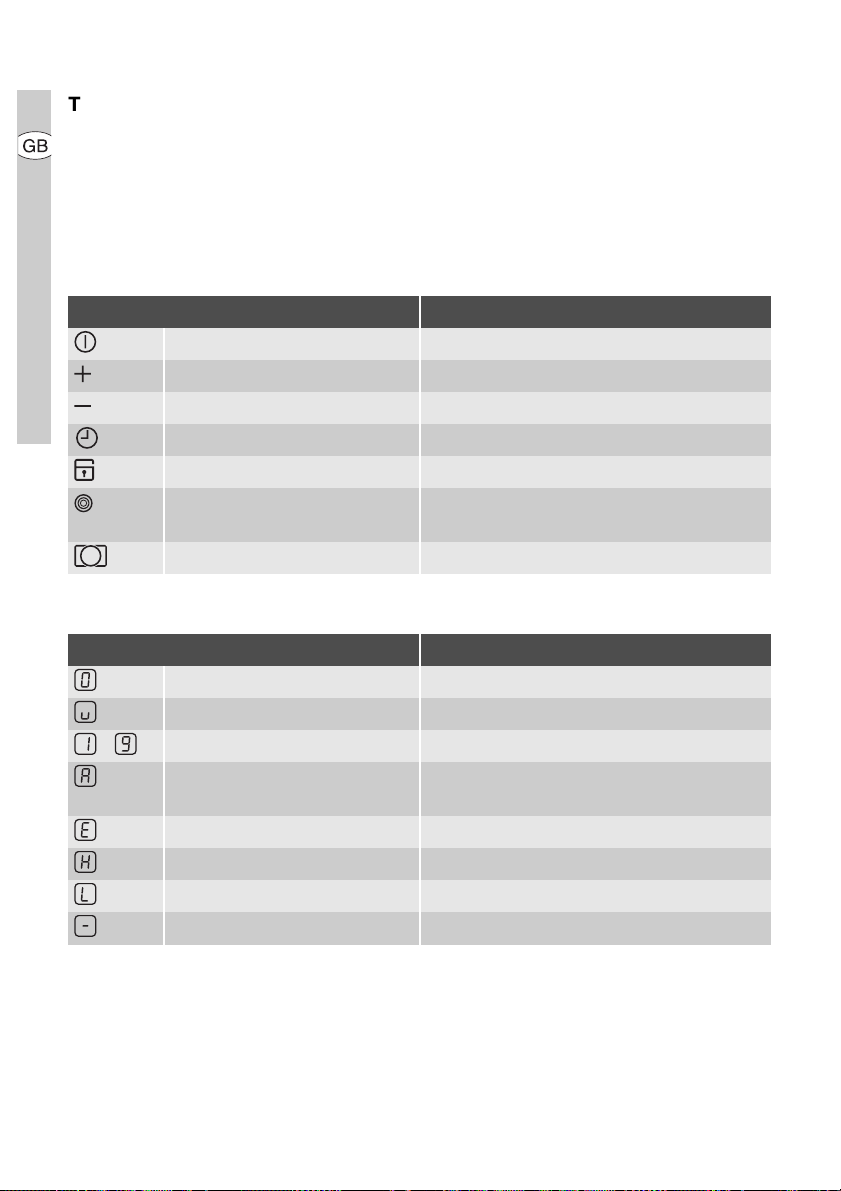
Touch Control sensor fields
The appliance is operated using Touch
Control sensor fields. Functions are
controlled by touching sensor fields and
confirmed by displays and acoustic signals.
Touch the sensor fields from above,
without covering other sensor fields.
Sensor field Function
On / Off To switch the appliance on and off
Increase settings Increasing heat setting/time
Decrease settings Decreasing heat setting/time
Timer Timer selection
Lock Locking/unlocking the control panel
Triple ring switch To switch outer rings
Multi-purpose zone switch To switch the outside ring on and off
Displays
on and off
Display Description
Cooking zone is switched off
Keep warm setting Keep warm setting is set
- Heat settings Heat setting is set
Automatic warm up function Automatic warm-up function is activat-
ed
Fault Malfunction has occurred
Residual heat Cooking zone is still hot
Child safety device Lock/child safety device is engaged
Safety cut-out Safety cut-out has been activated
Page 9
description of the appliance electrolux 9
Residual heat indicator
Warning! Risk of burns from residual heat. After being switched off, the
cooking zones need some time to
cool down. Look at the residual heat
indicator
.
Residual heat can be used for melting and keeping food warm.
Page 10
10 electrolux operating the appliance
Operating the appliance
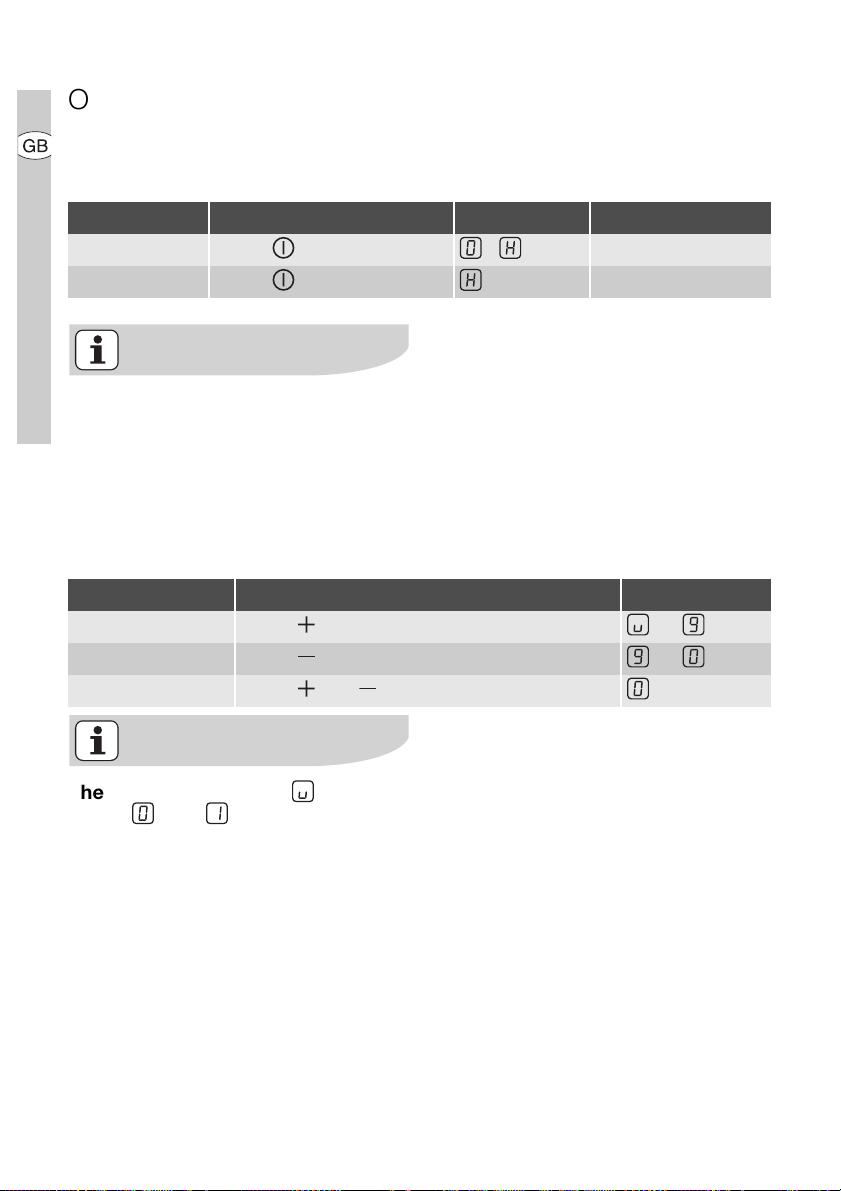
Switching the appliance on and off
Control panel Display Pilot light
Switch on Touch for 2 seconds / lights up
Switch off Touch for 1 second / none goes out
After switching on, within approx.
10 seconds a heat setting or a function must be set, otherwise the appliance automatically switches
itself off.
Setting the heat setting
Control panel Indicator
To increase Touch to
To decrease Touch to
To switch off Touch and at the same time
The keep warm setting lies between and . It is used to keep
food warm.
Page 11
operating the appliance electrolux 11
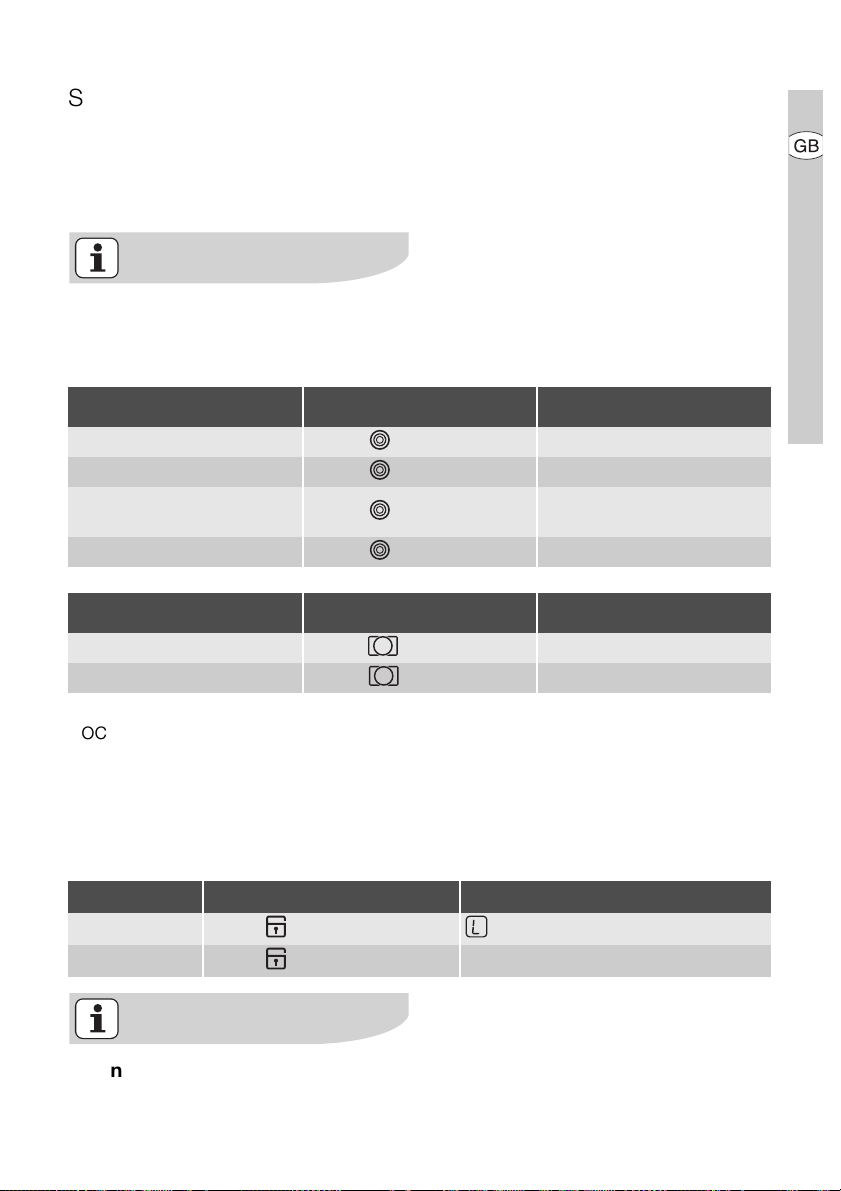
Switching the outside ring on and
off
By switching the outside rings on or off,
the effective heating surface can be
matched to the size of the cookware.
Before an outside ring can be
switched on, the inside ring must be
switched on.
Triple cooking zone
To switch on middle ring Touch for 1-2 seconds
To switch on outside ring Touch for 1-2 seconds.Two power indicators are lit.
To switch off outside ring Touch for 1-2 seconds
To switch off middle ring Touch for 1-2 seconds.First power indicator goes out.
Roasting zone
To switch on outside ring Touch for 1-2 seconds is lit
To switch off outside ring Touch for 1-2 seconds goes out
Sensor panel Power indicator
.
One power indicator is lit.
Second power indicator goes
.
out.
Sensor panel Power indicator
Locking/unlocking the control panel
The control panel, with the exception of
the “On/Off” sensor field, can be locked
at any time in order to prevent the settings being changed e.g. by wiping over
the panel with a cloth.
Control panel Display
Switch on Touch (for 5 seconds)
Switch off Touch previously set heat setting
When you switch the appliance off,
the locking function is automatically
switched off.
Page 12
12 electrolux operating the appliance
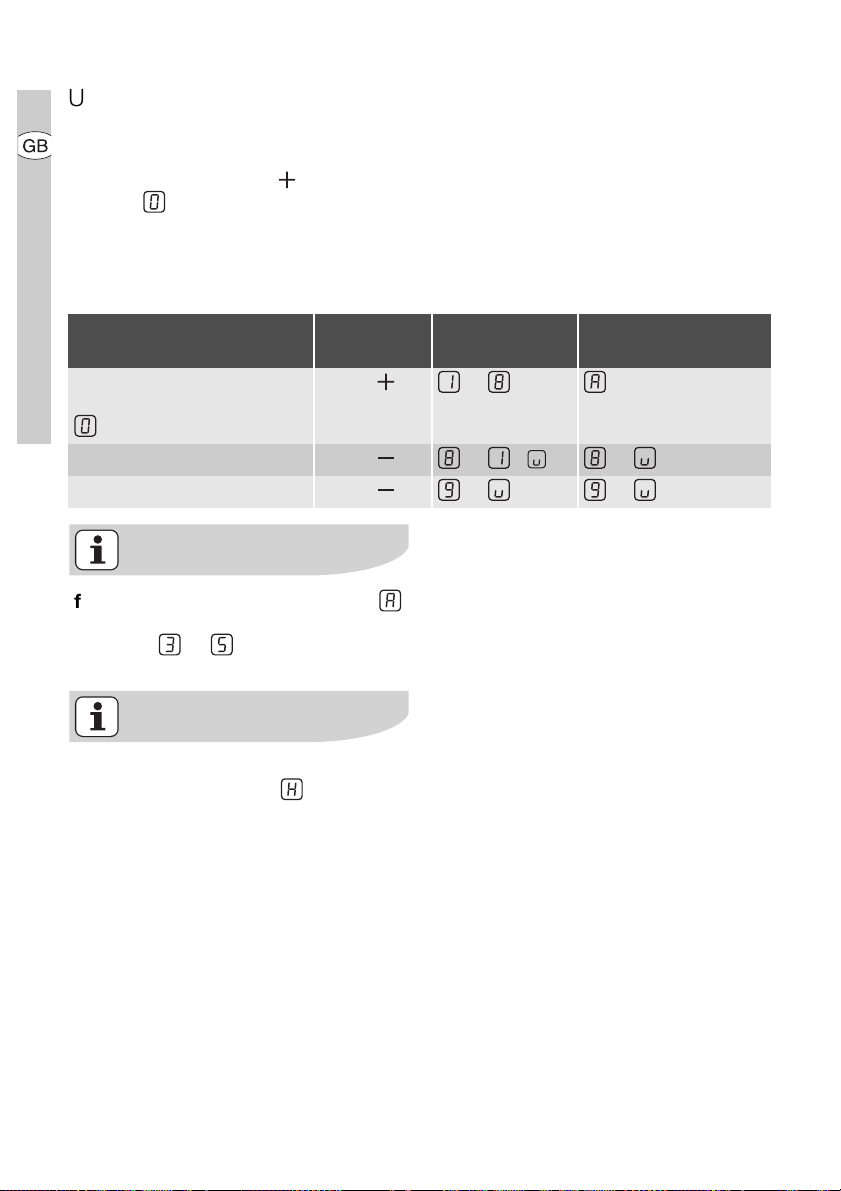
Using the automatic warm-up function
All cooking zones are equpped with an
automatic warm up function When setting a heat setting using , when starting from , the cooking zone switches
to full power for a certain amount of time
and then automatically switches back to
the heat setting set.
Switch on
Control
panel
Touch to (after 5 seconds)
possible heat
settings
Display
(only when starting at
)
Switch off Touch to / to
Not used Touch to to
If during the automatic warm up
a higher heat setting is selected,
e.g. from to , the automatic
warm up is adjusted.
If there is still residual heat on the
cooking zone (display ), the automatic warm up is not performed.
Page 13
operating the appliance electrolux 13
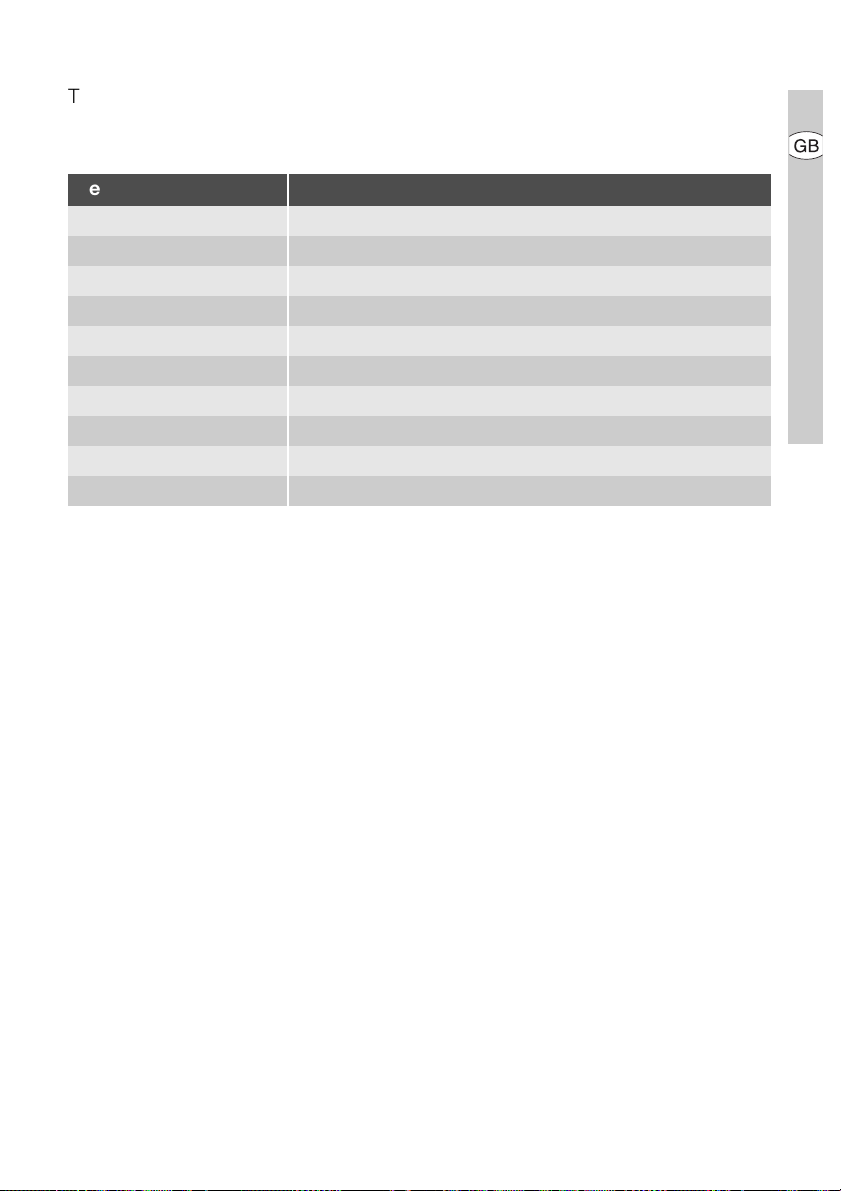
The length of time that the automatic
warm up function operates depends on
the heat setting selected.
Heat setting Length of the automatic warm up [min : sec]
v
1
2
3
4
5
6
7
8
9
0:30
1:00
1:40
4:50
6:30
10:10
2:00
3:30
4:30
---
Page 14
14 electrolux operating the appliance
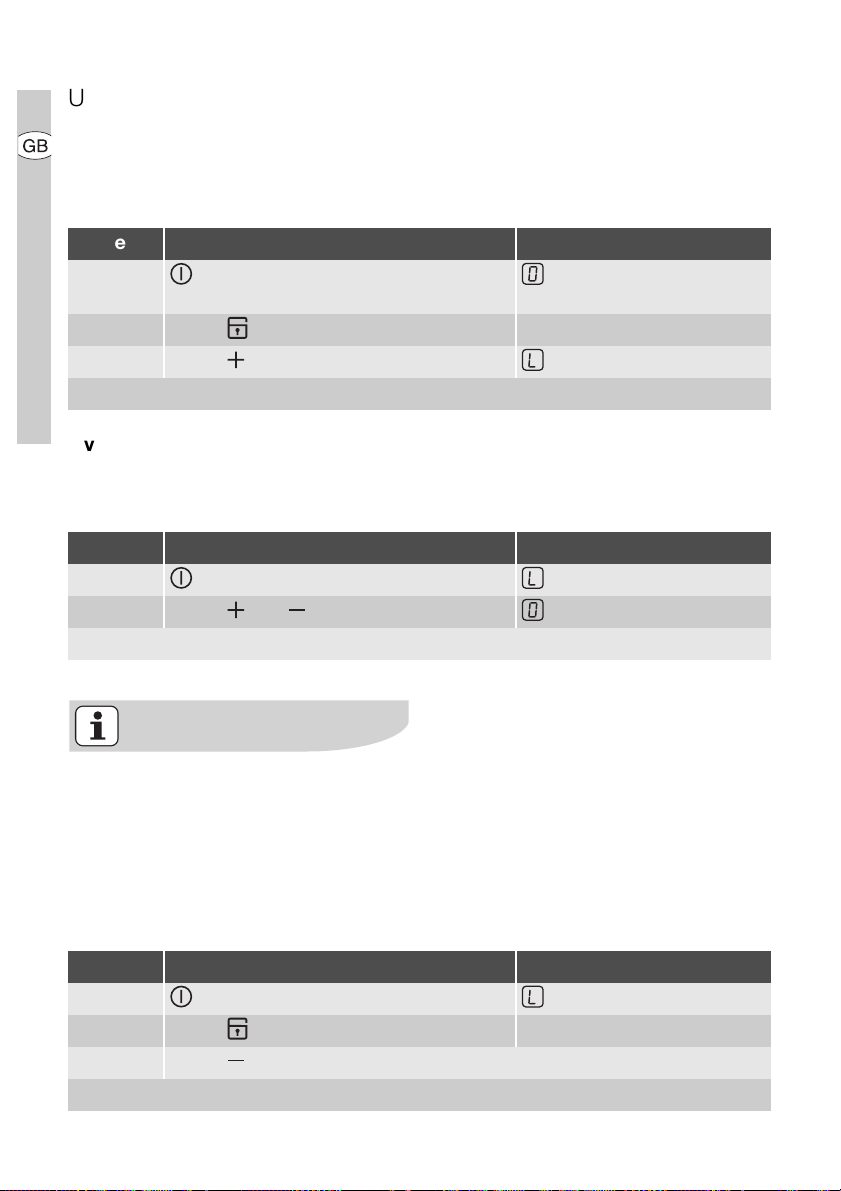
Using the child safety device
The child safety device prevents unintentional use of the appliance.
Setting the child safety device
Step Control panel Display/Signal
1. Switch on the appliance
(Do not set a heat setting)
2. Touch until the signal sounds Acoustic signal
3. To uc h
Appliance switches off. The child safety device is engaged.
Overriding the child safety device
The child safety device can be released
in this way for a single cooking session;
it remains activated afterwards.
Step Control panel Display/Signal
1. Switch on the appliance
2. Touch and at the same time / acoustic signal
Until the appliance is next switched off, it can used as normal.
After overriding the child safety device, a heat setting or a function
must be set within
approx. 10 seconds, otherwise the
appliance automatically switches itself off.
Releasing the child safety device
Step Control panel Display/Signal
1. Switch on the appliance
2. Touch until the signal sounds Acoustic signal
3. To uc h
Appliance switches off. The child safety device is released.
Page 15
operating the appliance electrolux 15
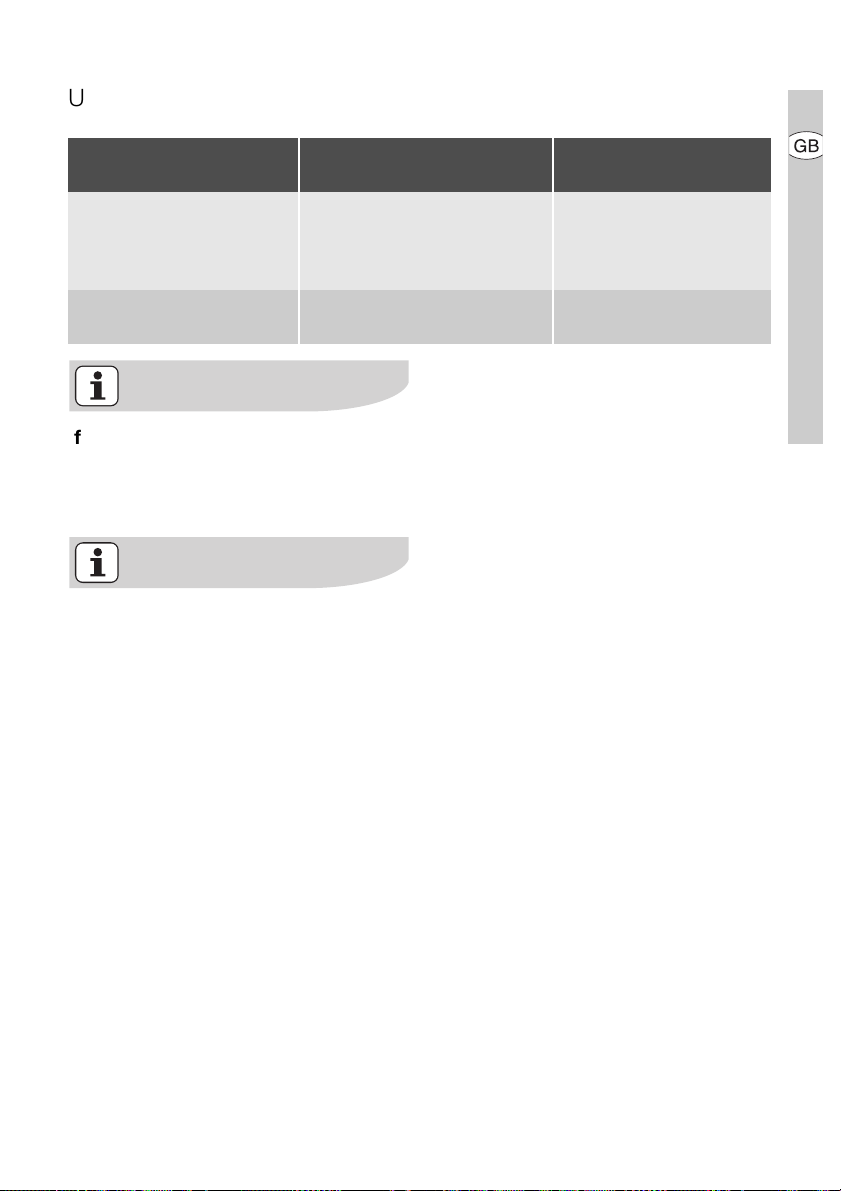
Using the timer
Function Condition Outcome after the
time has elapsed
Automatic cut-out a heat setting is set acoustic signal
00 flashes
Cooking zone switches
off
Countdown timer cooking zones not in use acoustic signal
00 flashes
If a heat setting is set on this cooking zone in addition to a countdown
timer, the cooking zone is switched
off after the time set has elapsed.
If a cooking zone is switched off, the
timer function set is also switched
off.
Page 16
16 electrolux operating the appliance
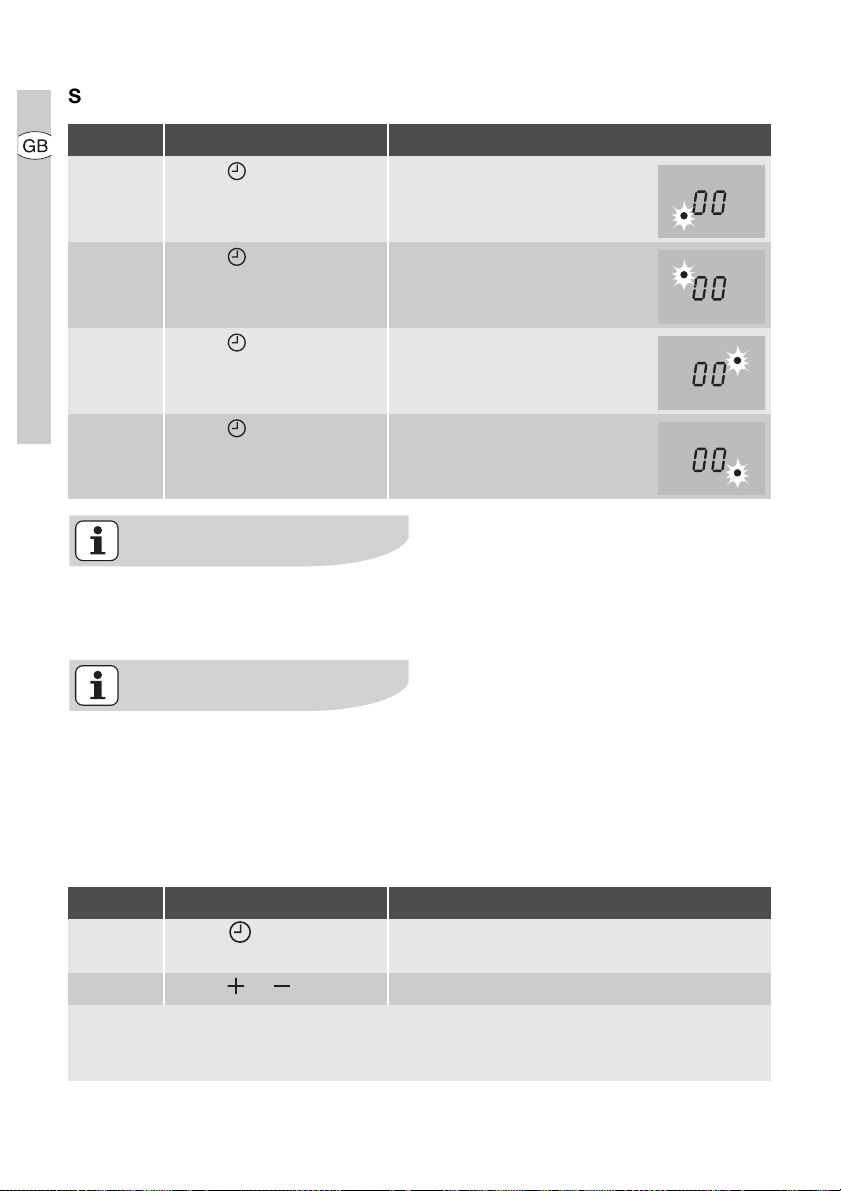
Selecting a cooking zone
Step Control panel Display
1. Touch once Pilot light of the first cooking
zone flashes
2. Touch once Pilot light of the second cook-
ing zone flashes
3. Touch once Pilot light of the third cooking
zone flashes
4. Touch once Pilot light of the fourth cooking
zone flashes
If the pilot light is flashing more
slowly, the heat setting can be set or
modified.
If other timer functions are set, after
a few seconds the shortest remaining time of all the timer functions is
displayed and the corresponding pilot light flashes.
Setting the time
Step Control panel Indicator
1. Select cooking zone Pilot light for the cooking zone selected
flashes
2. Touch or 00 to 99 minutes
After a few seconds the pilot light flashes more slowly.
The time is set.
The time counts down.
Page 17
operating the appliance electrolux 17
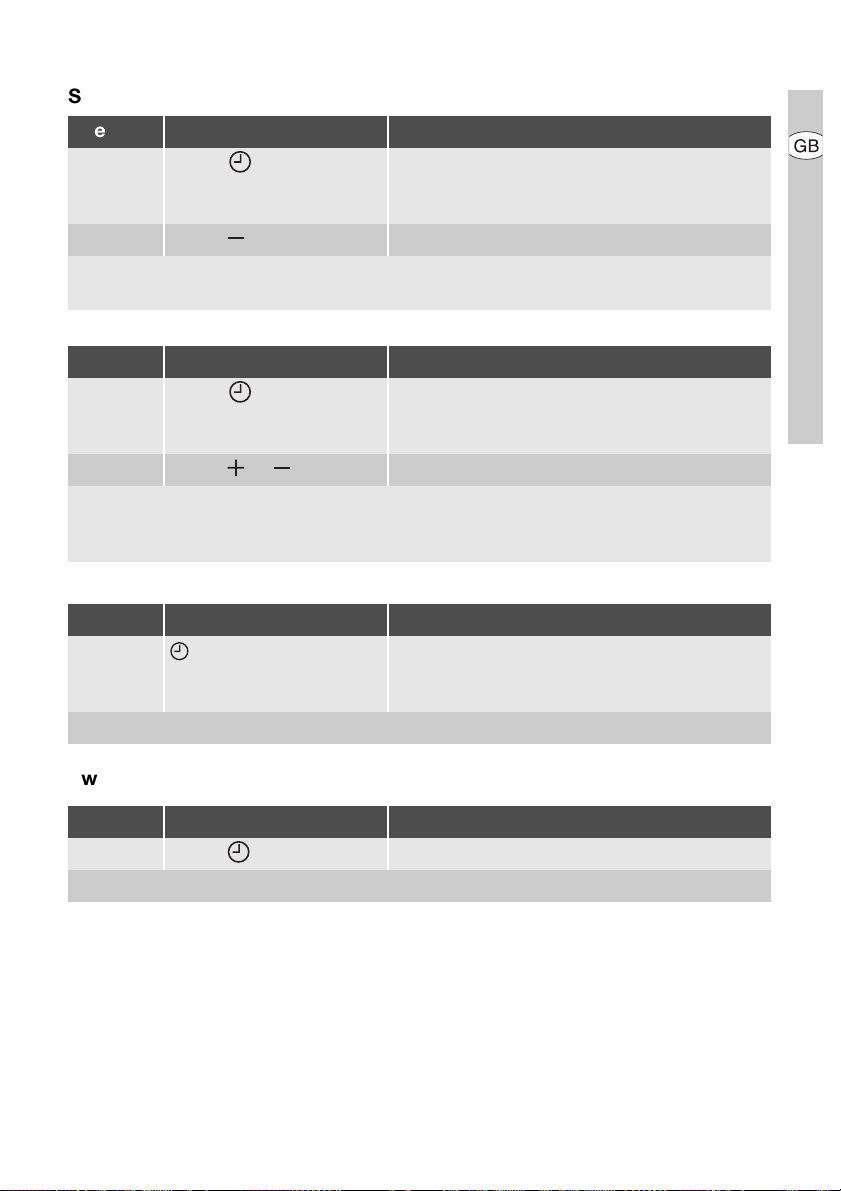
Switching off the timer function
Step Control panel Indicator
1. Select cooking zone Pilot light of cooking zone selected flashes
faster
Time remaining is displayed
2. To uc h The time remaining counts backwards to 00.
The pilot light goes out.
The Timer function for the selected cooking zone is switched off.
Changing the time
Step Control panel Indicator
1. Select cooking zone Pilot light of the selected cooking zone
flashes faster
Time remaining is displayed
2. Touch or 01 to 99 minutes
After a few seconds, the pilot light flashes more slowly.
The time is set.
The time counts down.
Displaying the time remaining for a cooking zone
Step Control panel field Display
1. Select cooking zone Pilot light of the cooking zone selected
flashes faster
The time remaining is displayed
After a few seconds the pilot light flashes more slowly.
Switching off the acoustic signal
Step Control panel field Acoustic signal
1. To uc h Acoustic signal to acknowledge.
Acoustic signal stops.
Page 18
18 electrolux operating the appliance
Safety cut-out
Cooking surface
• If after switching on the cooking surface, a heat setting is not set for a
cooking zone within approx. 10 seconds, the cooking surface automatically switches itself off.
• If one or more sensor fields are covered by objects (a pan, cloths, etc.)
for longer than approx. 10 seconds,
a signal sounds and the cooking surface switches off automatically.
• If all cooking zones are switched off,
the cooking surface automatically
switches itself off after approx. 10
seconds.
Control panel
• When the appliance is switched off, if
one or more of the sensor fields on
the control panel are covered for
more that 10 seconds, an acoustic
signal sounds. The acoustic signal
switches itself off automatically when
the sensor fields are no longer covered.
Cooking zones
• If one of the cooking zones is not
switched off after a certain time, or if
the heat setting is not modified, the
relevant cooking zone switches off
automatically. is displayed. Before
being used again, the cooking zone
must be set to 0.
Heat setting Switches off after
v, 1 - 2 6 hours
3 - 4 5 hours
5 4 hours
6 - 9 1.5 hours
Page 19

tips on cooking and frying electrolux 19
Tips on Cooking and Frying
Information on acrylamides
According to the latest scientific
knowledge, intensive browning of
food, especially in products containing starch, can constitute a
health risk due to acrylamides.
Therefore we recommend cooking
at the lowest possible temperatures
and not browning foods too much.
Cookware
• You can recognise good cookware
from the bottoms of the pans. The
bottom should be as thick and flat as
possible.
• Cookware made of enamelled steel
or with aluminium or copper bottoms
can leave discolorations on the glass
ceramic surface which are difficult or
impossible to remove.
Page 20
20 electrolux tips on cooking and frying
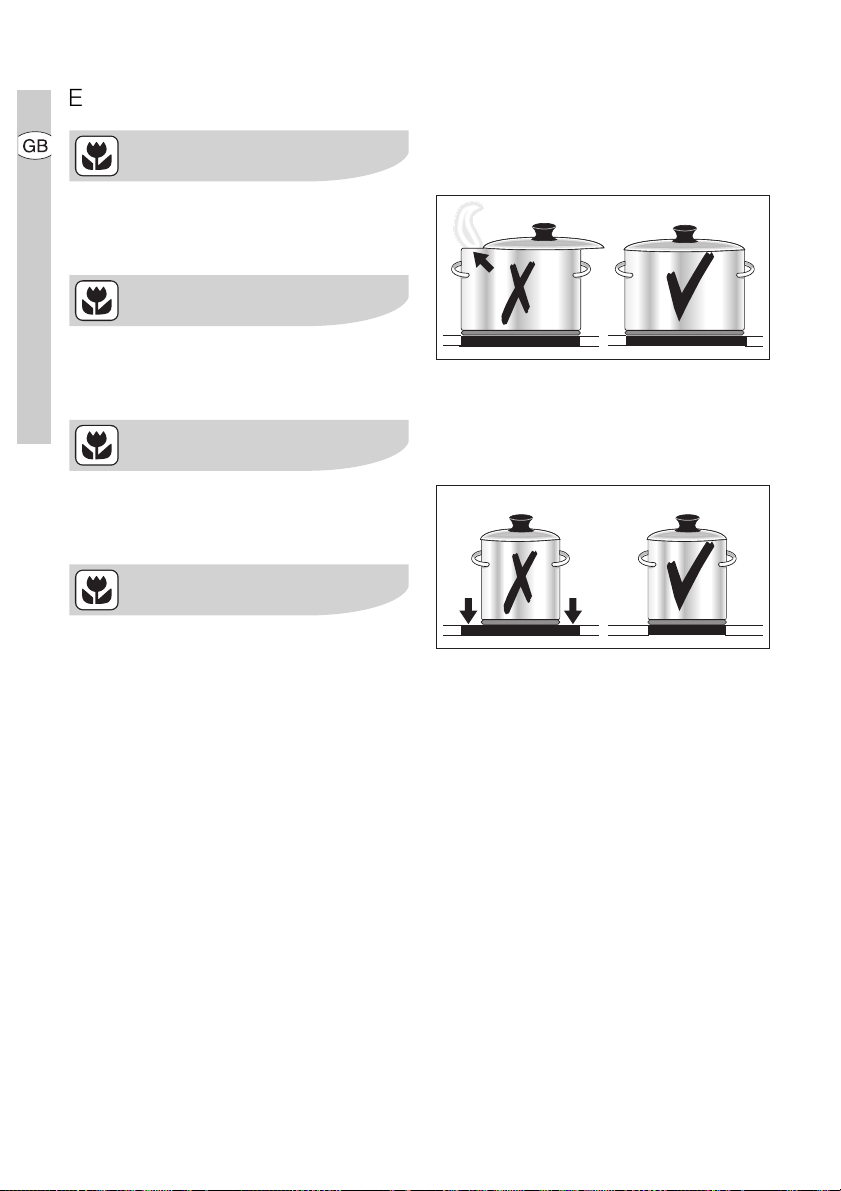
Energy saving
Always place cookware on the
cooking zone before it is switched
on.
If possible, always place lids on the
pans.
Switch cooking zones off before the
end of the cooking time, to take advantage of residual heat.
Bottom of pans and cooking zones
should be the same size.
Page 21
tips on cooking and frying electrolux 21
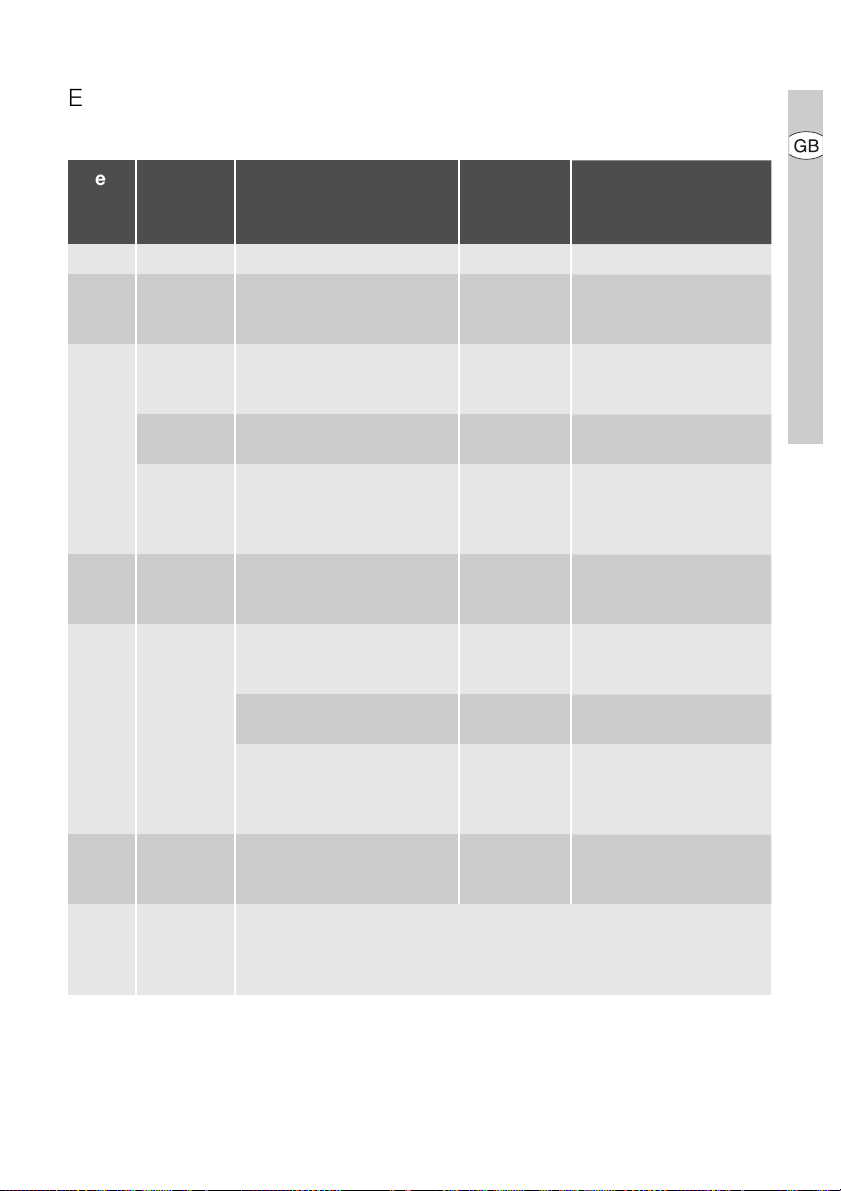
Examples of cooking applications
The information given in the following table is for guidance only.
Heat
Cooking-
setting
process
0 Residual heat, Off position
Keeping
V
1-2
2-3
3-4
4-5
6-7
7-8
9
food
warm
Melting
Solidi-
fying
Simmer-
ing on low
heat
Steaming
Braising
Boiling
Gentle
Frying
Heavy
Frying
Boiling
Searing
Deep
frying
suitable for
Keeping cooked foods warm as required Cover
Hollandaise sauce,
melting butter, chocolate,
gelatine
Fluffy omelettes, baked eggs 10-40 mins. Cook with lid on
Simmering rice and milk-
based dishes
Heating up ready-cooked
meals
Steaming vegetables, fish
braising meat
Steaming potatoes 20-60 mins.
Cooking larger quantities of
food, stews and soups
Frying escalopes, veal cor-
don bleu, cutlets, rissoles,
sausages, liver, roux, eggs,
pancakes, doughnuts
Hash browns, loin steaks,
steaks, Flädle (pancakes for
garnishing soup)
Boiling large quantities of water, cooking pasta, searing meat (goulash,
pot roast), deep frying chips
Cooking
time
5-25 mins. Stir occasionally
25-50 mins.
20-45 mins.
60-150 mins.
Steady frying
5-15 mins.
per pan
much liquid as rice, stir
With vegetables add only
a little liquid (a few table-
Use only a little liquid, e.
g.: max.
Up to 3 l liquid plus ingre-
Tips/Hints
Add at least twice as
milk dishes part way
through cooking
spoons)
¼
750 g potatoes
Turn halfway through
Turn halfway through
l water for
dients
cooking
cooking
Page 22
22 electrolux cleaning and care
Cleaning and Care
Take care! Risk of burns from residual heat.
Warning! Sharp objects and abrasive cleaning materials will damage
the appliance. Clean with water and
washing up liquid.
Warning! Residues from cleaning
agents will damage the appliance.
Remove residues with water and
washing up liquid.
Cleaning the appliance after each use
1. Wipe the appliance with a damp
cloth and a little washing up liquid.
2. Rub the appliance dry using a clean
cloth.
Page 23
cleaning and care electrolux 23
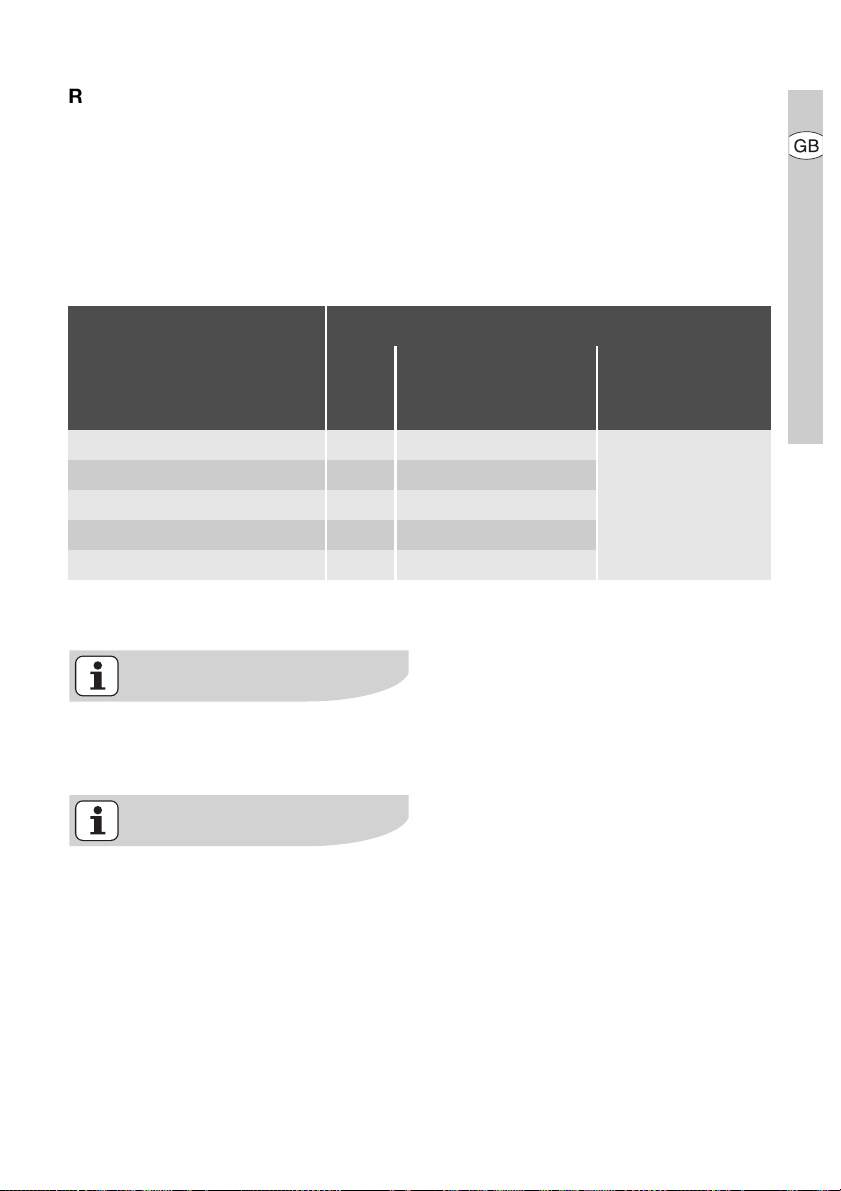
Removing deposits
1. Place a scraper on the glass ceramic
surface at an angle.
2. Remove residues by sliding the
blade over the surface.
3. Wipe the appliance with a damp
cloth and a little washing up liquid.
4. Rub the appliance dry using a clean
cloth.
im-
Type of dirt
medi-
ately
sugar, food containing sugar yes ---
plastics, tin foil yes ---
limescale and water rings --- yes
fat splashes --- yes
shiny metallic discolouration --- yes
*Scrapers and cleaners for glass ceramic and
stainless steel can be purchased in specialist
shops
when the appliance
has cooled down
Remove
using
a scraper*
cleaner for glass ce-
ramic or stainless
steel*
Remove stubborn residues with a
cleaner for glass ceramic or stainless steel.
Scratches or dark stains on the
glass ceramic that cannot be removed do not however affect the
functioning of the appliance.
Page 24
24 electrolux what to do if …
What to do if …
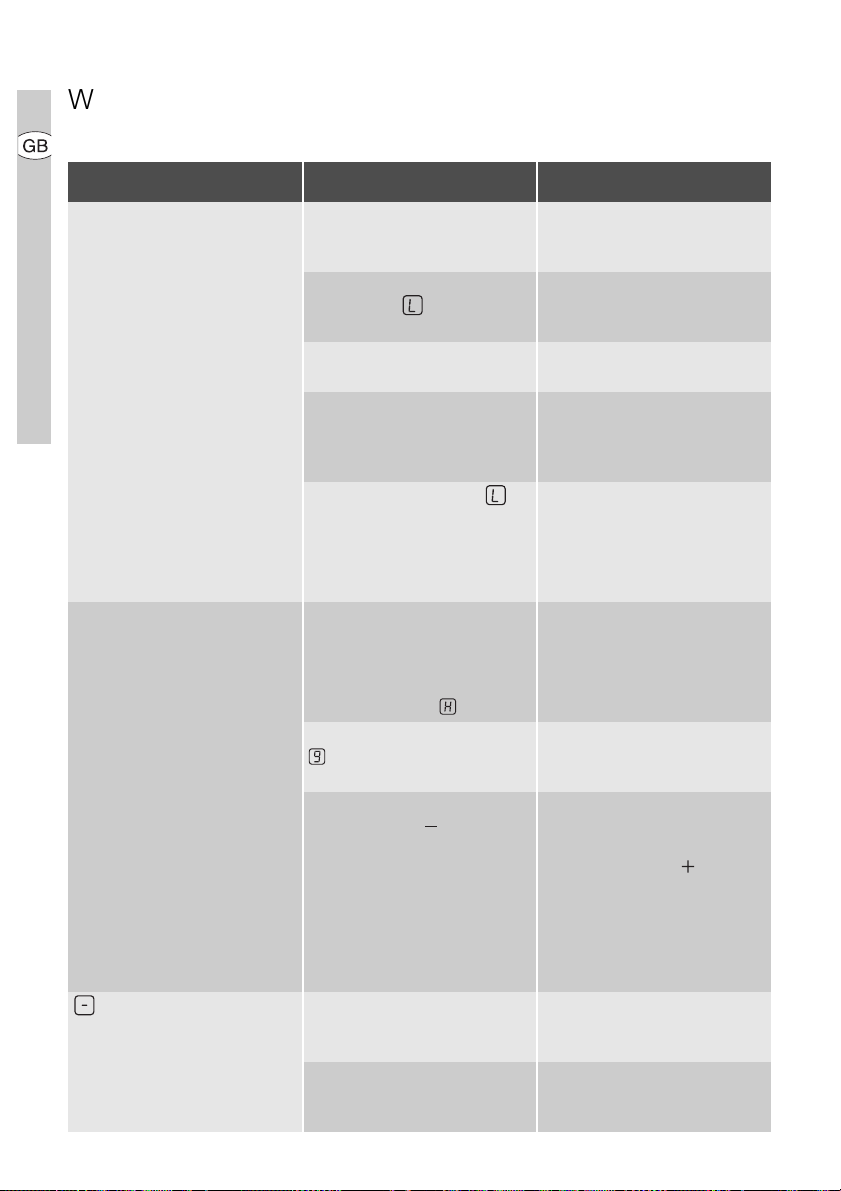
Problem Possible cause Remedy
The cooking zones will not
switch on or are not functioning
Acoustic signal sounds when
appliance is switched off
The residual heat indicator is
not displaying anything
The automatic warm up function is not switching itself on
Acoustic signal sounds and
appliance switches itself on
and then off again; after 5 seconds another acoustic signal
sounds
is lit Overheating protection for the
More than 10 seconds have
passed since the appliance
was switched on
The child safety device is
switched on
Several sensor fields were
touched at the same time
Safety cut-out has been triggered
The lock is switched on Switch off the lock (See the
The control panel is wholly or
partly covered by objects.
The cooking zone was only on
for a short time and is therefore
not hot
There is still residual heat on
the cooking zone
The highest heat setting is set The highest heat setting has
The heat setting was set using
the sensor field
The On/Off sensor field has
been covered up, e.g. by a
cloth
cooking zone has been triggered
Safety cut-out has been triggered
Switch the appliance on again.
Deactivate the child safety device (See the section “Child
safety device”)
Only touch one sensor field
Remove any objects (pan,
cloths, etc.) that are lying on
the control panel. Switch the
appliance on again
section “Locking/unlocking
the control panel”)
Remove objects.
If the cooking zone is supposed to be hot, call the Customer Service Department.
Let the cooking zone cool
down
the same power as the automatic warm up function
1.
Switching off the cooking
zone
1.
Set the cooking zone using
the sensor field
Do not place any objects on
the control panel
Switch off the cooking zone.
Switch the cooking zone on
again
Switch off the cooking zone.
Switch the cooking zone on
again
Page 25
what to do if … electrolux 25
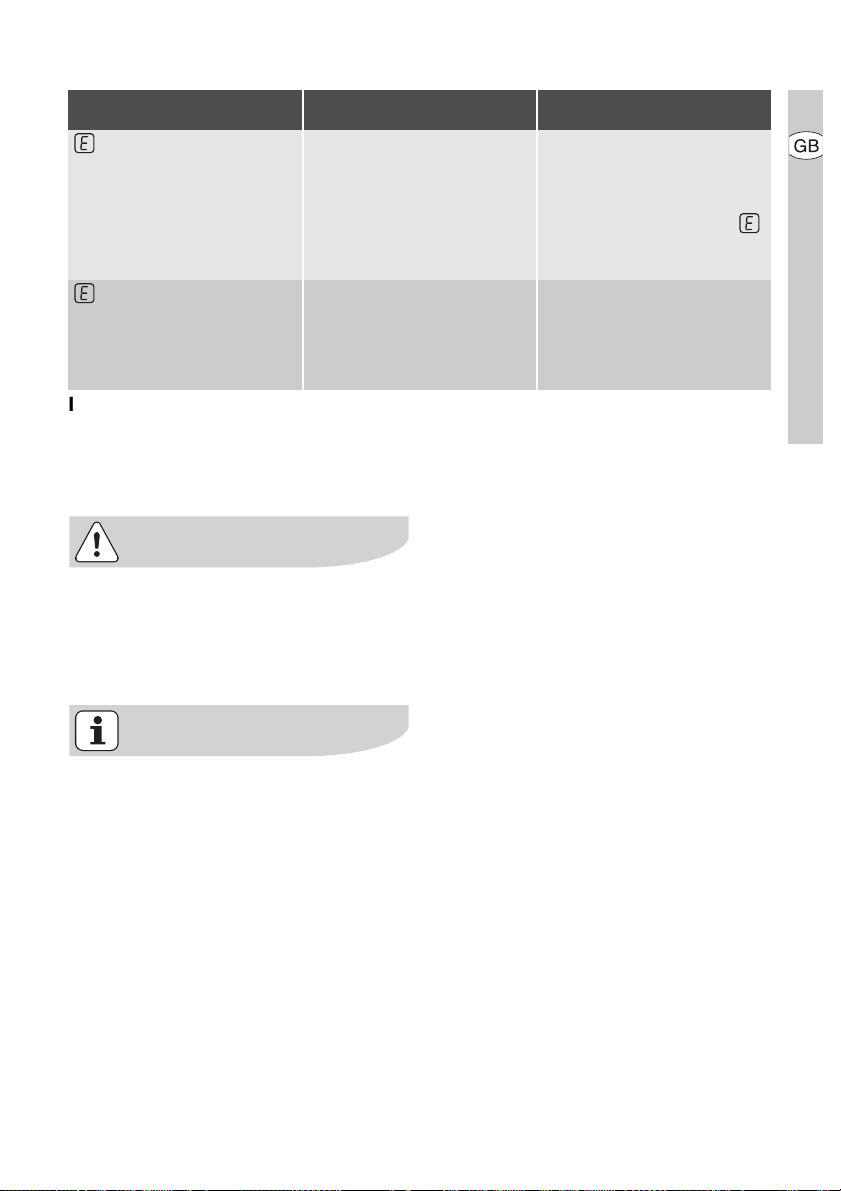
Problem Possible cause Remedy
and number are displayed Electronics fault Disconnect the appliance from
the electrical supply for a few
minutes (Take the fuse out of
the house’s wiring system)
If after switching on again,
is displayed again, call the
customer service department
and minus are displayed Light rays that are too strong
on the control panel, for example bright sunlight
Briefly shade the control panel,
for example with the hand
Acoustic signal sounds, appliance switches itself off Switch
appliance on (again)
If you are unable to remedy the
problem by following the above
suggestions, please contact your
dealer or the Customer Care Department.
Warning! Repairs to the appliance
are only to be carried out by qualified service engineers. Considerable danger to the user may result
from improper repairs.
If the appliance has been wrongly
operated, the visit from the customer service technician or dealer may
not take place free of charge, even
during the warranty period.
Page 26

26 electrolux disposal
Disposal
Packaging material
The packaging materials are environmentally friendly and can be recycled. The plastic components are
identified by markings, e.g. >PE<,
>PS<, etc. Please dispose of the
packaging materials in the appropriate container at the community
waste disposal facilities.
Old appliance
The symbol
its packaging indicates that this
product may not be treated as
household waste. Instead it shall be
handed over to the applicable collection point for the recycling of
electrical and electronic equipment.
By ensuring this product is disposed of correctly, you will help prevent potential negative
consequences for the environment
and human health, which could otherwise be caused by inappropriate
waste handling of this product. For
more detailed information about recycling of this product, please contact your local city office, your
household waste disposal service
or the shop where you purchased
the product.
W on the product or on
Page 27

installation instructions electrolux 27
Installation Instructions
Safety instructions
The laws, ordinances, directives and
standards in force in the country of use
are to be followed (safety regulations,
proper recycling in accordance with the
regulations, etc.)
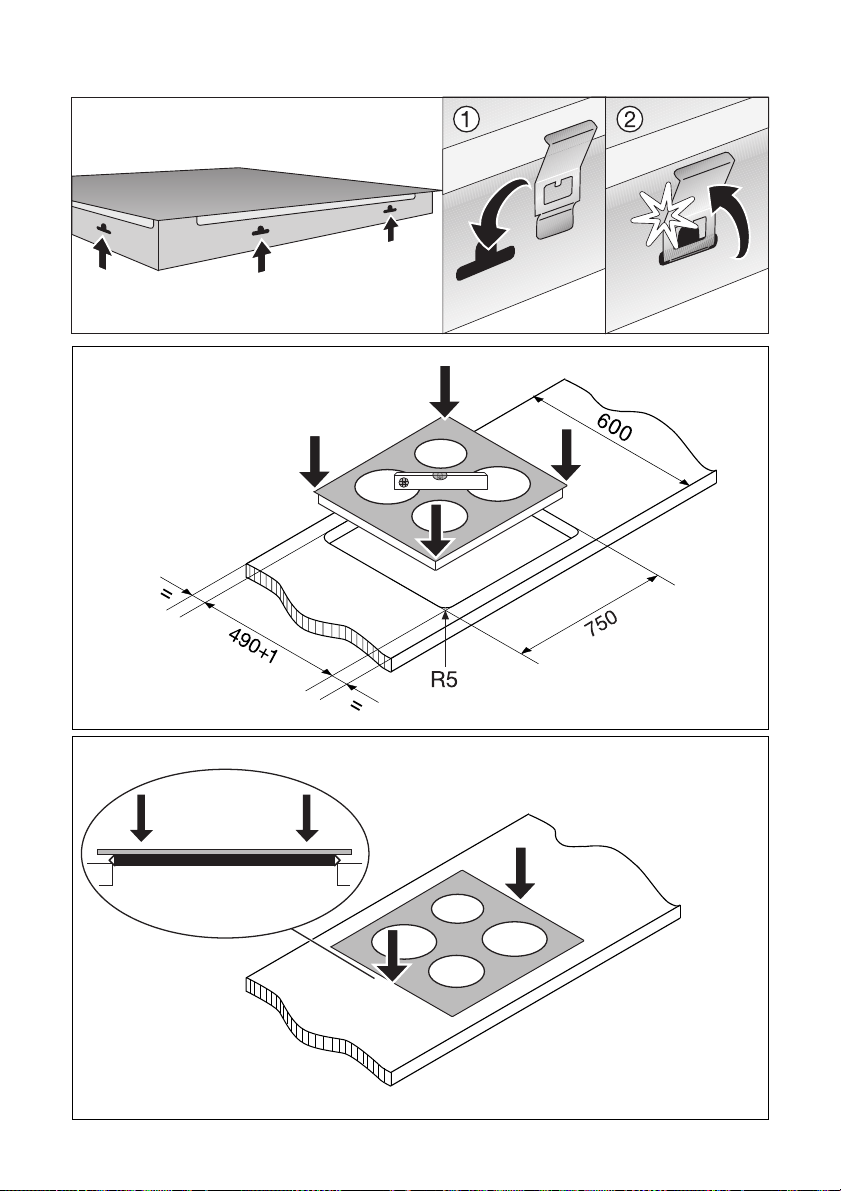
Installation may only be carried out by a
qualified electrician.
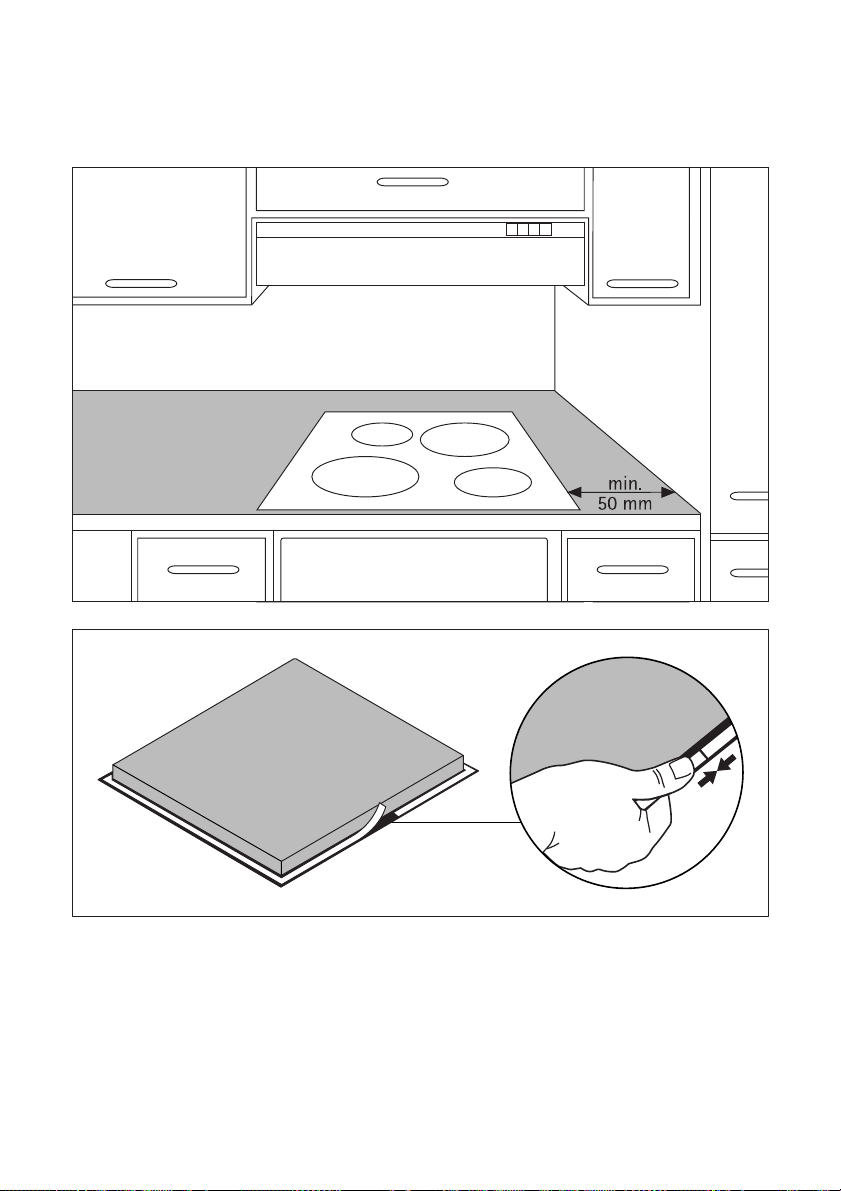
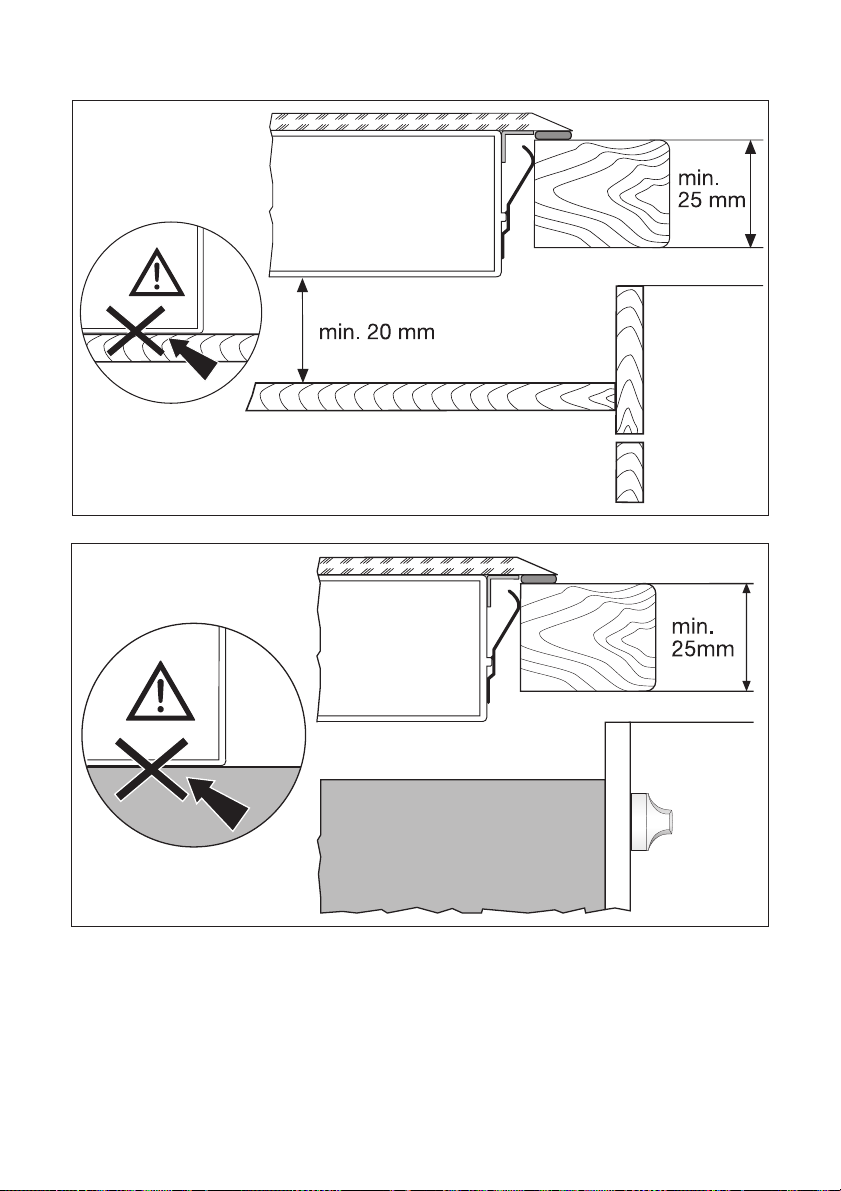
The minimum distances to other appliances and units are to be observed.
Anti-shock protection must be provided
by the installation, for example drawers
may only be installed with a protective
floor directly underneath the appliance.
The cut surfaces of the worktop are to
be protected against moisture using a
suitable sealant.
The sealant seals the appliance to the
work top with no gap.
Avoid installing the appliance next to
doors and under windows. Otherwise
hot cookware may be knocked off the
rings when doors and windows are
opened.
WARNING!
Risk of injury from electrical current.
• The electrical mains terminal is live.
• Make electrical mains terminal free of
voltage.
• Observe connection schematic.
• Observe electrical safety rules.
• Ensure anti-shock protection
through correct installation by a
qualified electrician.
• The appliance must be connected to
the electrical supply by a qualified
electrician.
IMPORTANT!
Risk of injury from electrical current.
Loose and inappropriate plug and socket connections can make the terminal
overheat.
• Have the clamping joints correctly installed by a qualified electrician.
• Use strain relief clamp on cable.
• In the event of single-phase or two-
phase connection, the appropriate
mains cable of type H05BB-F Tmax
90°C(or higher) must be used.
• If this appliance’s mains cable is
damaged, it must be replaced by a
special cable (type H05BB-F Tmax
90°C; or higher). The latter is available from the Customer Care Department.
A device must be provided in the electrical installation which allows the appliance to be disconnected from the mains
at all poles with a contact opening width
of at least 3 mm.
Suitable isolation devices include line
protecting cut-outs, fuses (screw type
fuses are to be removed from the holder), earth leakage trips and contactors.
Sticking on the seal
• Clean the worktop around the cutout area.
• Stick the single-sided adhesive sealing tape provided on the underside
of the hob around the outside edge
ensuring that it is not stretched. The
two ends of the tape should join in
the middle of one side. After trimming the tape (allow it to overlap by
2-3 mm), press the two ends together.
Page 28

28 electrolux guarantee/customer service
Guarantee/Customer Service
Belgium
DECLARATION OF GUARANTEE TERMS.
Our appliances are produced with the greatest of care. However, a defect may still occur.
Our consumer services department will repair
this upon request, either during or after the
guarantee period. The service life of the appliance will not, however, be reduced as a result.
This declaration of guarantee terms is based
on European Union Directive 99/44/EC and
the provisions of the Civil Code. The statutory
rights that the consumer has under this legislation are not affected by this declaration of
guarantee terms.
This declaration does not affect the vendor's
statutory warranty to the end user. The appliance is guaranteed within the context of and
in adherence with the following terms:
1.
In accordance with provisions laid down in
paragraphs 2 to 15, we will remedy free of
charge any defect that occurs within 24
months from the date the appliance is delivered to the first end user.
These guarantee terms do not apply in the
event of use for professional or equivalent
purposes.
2.
Performing the guarantee means that the
appliance is returned to the condition it
was in before the defect occurred. Defective parts are replaced or repaired. Parts
replaced free of charge become our property.
3.
So as to avoid more severe damage, the
defect must be brought to our attention
immediately.
4.
Applying the guarantee is subject to the
consumer providing proof of purchase
showing the purchase and/or delivery
date.
5.
The guarantee will not apply if damage
caused to delicate parts, such as glass
(vitreous ceramic), synthetic materials and
rubber, is the result of inappropriate use.
6.
The guarantee cannot be called on for minor faults that do not affect the value or the
overall reliability of the appliance.
7.
The statutory warranty does not apply
when defects are caused by:
–
a chemical or electrochemical reaction
caused by water,
–
abnormal environmental conditions in
general,
–
unsuitable operating conditions,
–
contact with harsh substances.
8.
The guarantee does not apply to defects
due to transport which have occurred outside of our responsibility. Nor will the guarantee cover those caused by inadequate
installation or assembly, lack of maintenance or failure to respect the assembly
instructions or directions for use.
9.
Defects that result from repairs or measures carried out by people who are not
qualified or expert or defects that result
from the addition of non-original accessories or spare parts are not covered by the
guarantee.
10.
Appliances that are easy to transport may
be delivered or sent to the consumer services department. Home repairs are only
anticipated for bulky appliances or built-in
appliances.
11.
If the appliances are built-in, built-under,
fixed or suspended in such a way that removing and replacing them in the place
where they are fitted takes more than half
an hour, the costs that result therefrom will
be charged for. Connected damage
caused by these removal and replacement
operations will be the responsibility of the
user.
12.
If, during the guarantee period, repairing
the same defect repeatedly is not conclusive, or if the repair costs are considered
disproportionate, in agreement with the
consumer, the defective appliance may be
replaced with another appliance of the
same value.
In this event, we reserve the right to ask for
a financial contribution calculated according to the length of time it has been used.
13.
A repair under guarantee does not mean
that the normal guarantee period will be
extended nor that a new guarantee period
begins.
14.
We give a twelve month guarantee for repairs, limited to the same defect.
Page 29

electrolux 29
15.
Except in the event where liability is legally
imposed, this declaration of guarantee
terms excludes any compensation for
damage outside the appliance for which
the consumer wishes to assert his rights.
In the event of legally admitted liability,
compensation will not exceed the pur-
chase price paid for the appliance.
These guarantee terms are only valid for appliances purchased and used in Belgium. For
exported appliances, the user must first make
sure that they satisfy the technical conditions
(e.g.: voltage, frequency, installation instructions, type of gas, etc.) for the country concerned and that they can withstand the local
climatic and environmental conditions. For
appliances purchased abroad, the user must
first ensure that they meet the qualifications
required in Belgium. Non-essential or requested adjustments are not covered by the
guarantee and are not possible in all cases.
Our consumer services department is always
at your disposal, even after the guarantee period has expired.
Address for our consumer services
department:
Belgium
Electrolux Home
Products Belgium
ELECTROLUX
SERVICE
Bergensesteenweg 719
1502 Lembeek
E-mail: [email protected]
Consumer
services
Te l. : F ax .:
02/
363.04.
44
02/
363.04.0
0
02/
363.04.6
0
Luxembourg
Grand-Duché de
Luxembourg
ELECTROLUX
HOME PRODUCTS
Rue de Bitbourg. 7
L-1273 Luxembourg-Hamm
E-mail: consumer-service.luxembourg@electrolux.lu
Consumer
services
Te l. : F ax . :
00 352
42 4311
00 352
42 431360
European Guarantee
This appliance is guaranteed by Electrolux in
each of the countries listed at the back of this
user manual, for the period specified in the appliance guarantee or otherwise by law. If you move
from one of these countries to another of the
countries listed below the appliance guarantee
will move with you subject to the following qualifications:
• The appliance guarantee starts from the date
• The appliance guarantee is for the same pe-
• The appliance guarantee is personal to the
• The appliance is installed and used in ac-
• The appliance is installed in accordance with
The provisions of this European Guarantee do
not affect any of the rights granted to you by law.
you first purchased the appliance which will
be evidenced by production of a valid purchase document issued by the seller of the
appliance.
riod and to the same extent for labour and
parts as exists in your new country of residence for this particular model or range of
appliances.
original purchaser of the appliance and cannot be transferred to another user.
cordance with instructions issued by Electrolux and is only used within the home, i.e. is
not used for commercial purposes.
all relevant regulations in force within your
new country of residence.
Page 30
30 electrolux service
Service
In the event of technical faults, please
first check whether you can remedy the
problem yourself with the help of the operating instructions (section “What to do
if…”).
If you were not able to remedy the problem yourself, please contact the Customer Care Department or one of our
service partners.
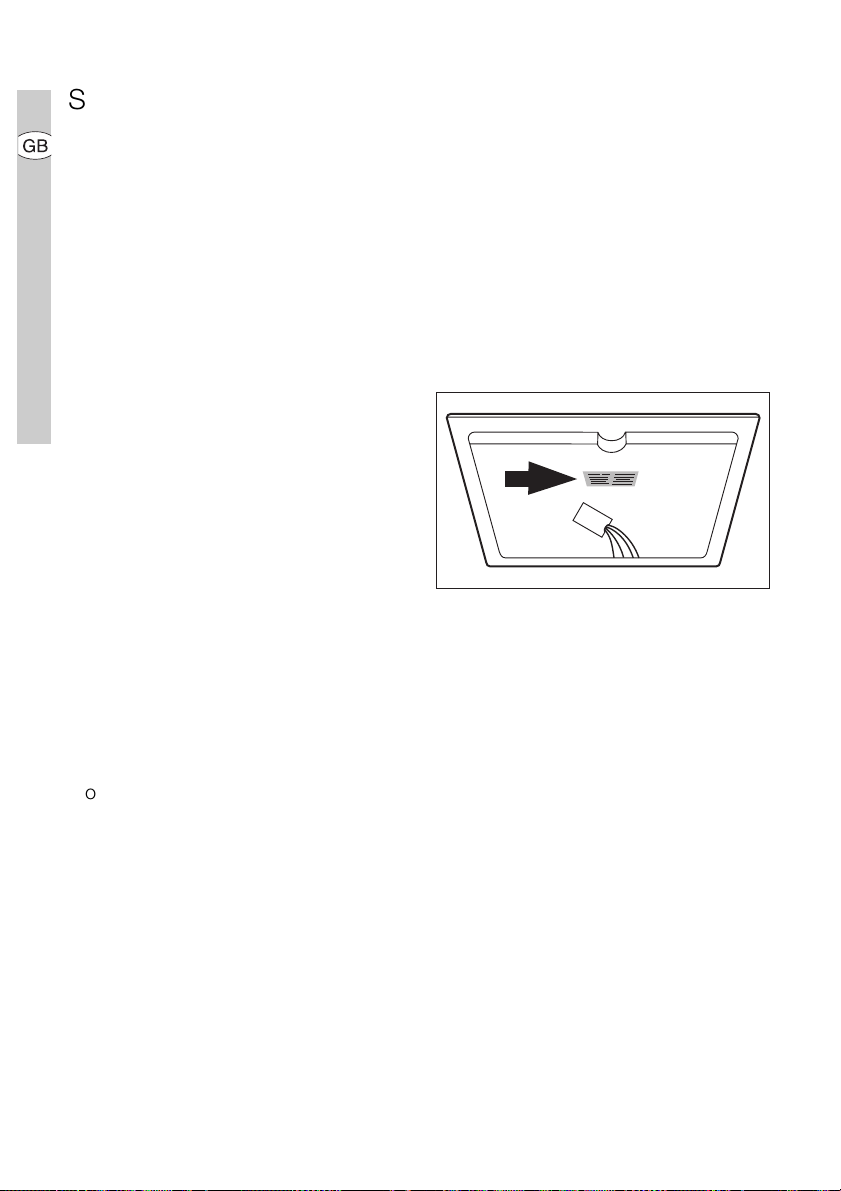
In order to be able to assist you quickly,
we require the following information:
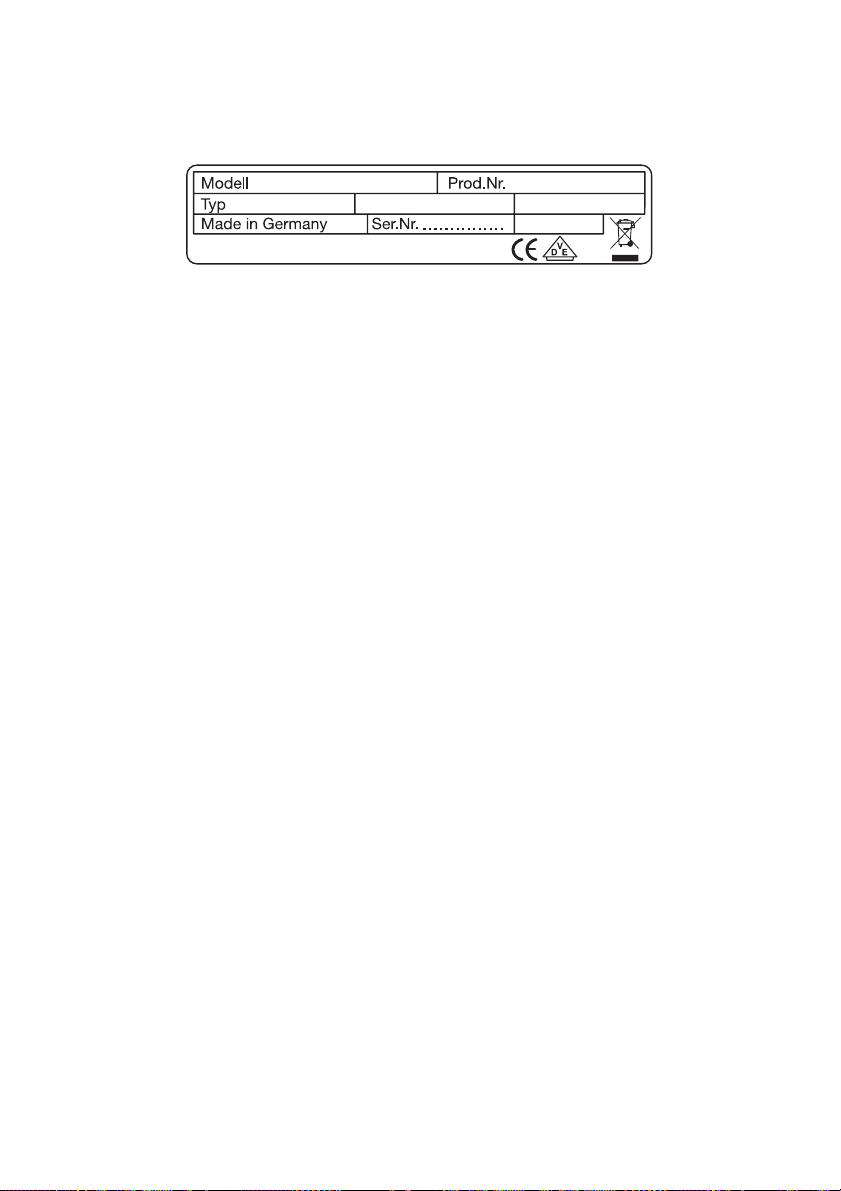
– Model description
– Product number (PNC)
– Serial number (S No.)
(for numbers see rating plate)
– Type of fault
– Any error messages displayed by the
appliance
– three digit letter-number combina-
tion for glass ceramic
So that you have the necessary reference numbers from your appliance at
hand, we recommend that you write
them in here:
Model description: ..........................
...........
PNC: ..........................
...........
S No: ..........................
...........
Page 31
Assembly / Montage
assembly / montage electrolux 91
Page 32
92 electrolux assembly / montage
Page 33
assembly / montage electrolux 93
Page 34
94 electrolux
Rating Plate / Plaque signalétique
/ Typeplaatje
EHS80220P
55HBD56AO
ELECTROLUX
230 V 50 Hz
949 592 656
7,3 kW
Page 35

Page 36

www.electrolux.com
www.electrolux.be
822 930 705-A-150906-01
 Loading...