

Page 1
Ceramic glass hob
Κεραµική επιφάνεια µαγειρέµατος
Glaskeramisk kogesektion
Installation and
Operating instructions
Οδηγίες συναρµολόγησης και
χρήσης
Monterings- og
brugsanvisning
822 924 473-A-271003
EHS 6631 P
GB
GR
DK
Page 2
Dear customer
Please read these operating instructions carefully.
Pay particular attention to the section „Safety
Information” on the first pages. Please retain these
operating instructions for later reference. Pass
them on to any possible new owners of the
appliance.
The following symbols are used in
the text:
Safety information
Warning! Information which serves your
personal safety.
Important! Information on how to avoid
damaging the appliance.
Information and practical hints
Environmental information
1. These numbers indicate step by step how to
use the appliance as required.
2. ...
3. ...
In the event of any disturbances, these operating
instructions contain information on how to
eliminate the fault yourself; refer to the section
“What to do if…”
Printed on environmentally compatible paper.
Thinking ecologically means acting ecologically…
2
Page 3

Contents
Operating instructions .................................. 4
Safety ............................................................ 4
Electrical safety .............................................. 4
Safety for children .......................................... 4
Safety during use ........................................... 4
Safety when cleaning ..................................... 4
How to prevent damage to the appliance ...... 5
Disposal ........................................................ 5
Disposing of the packaging material .............. 5
Disposing of old appliances ........................... 5
The key features of your appliance ............ 6
Appliance description ................................. 7
Control panel ................................................. 7
Digital displays ............................................... 8
Safety cut-out of the cooking zones ............... 8
Before using for the first time .................... 9
First cleaning ................................................. 9
Operating the cooking area ........................ 9
Touch Control-Sensor fields .......................... 9
Switching on the appliance ............................ 9
Switching off the appliance .......................... 10
Heat setting ................................................. 10
Setting the keep warm function .................. 10
Switching off the cooking zone .................... 11
Residual heat indicator ................................ 11
Cooking with
the automatic warm-up function .................. 12
Cooking without
the automatic warm-up function .................. 13
Child safety feature ...................................... 14
Timer ............................................................ 16
Locking/unlocking the control panel ............. 18
Uses, Tables and Tips ................................ 19
Pots and pans .............................................. 19
Tips on saving energy .................................. 20
Advice on cooking with
and without automatic warm-up ................... 21
Cleaning and care ...................................... 23
Cooking area ................................................ 23
What to do if … ........................................... 25
Rectifying faults ............................................ 25
What to do if … ............................................. 25
Installation instructions...............................27
Technical data ............................................ 27
Appliance dimensions .................................. 27
Cut-out dimensions ...................................... 27
Cooking zones .............................................. 27
Connection values ........................................ 27
Regulations, standards, directives ........... 28
Safety instructions for
the installation technician ......................... 29
Electrical connection ................................. 30
Service and Spare Parts ............................ 31
Guarantee Conditions ................................ 32
Standard guarantee conditions .................... 32
Exclusions .................................................... 32
European Guarantee .................................... 32
Installation .................................................. 95
3
Page 4
Operating instructions
Safety
The safety aspects of this appliance comply with
the accepted technical standards and the
German Appliance Safety Law. However, as the
manufacturer we also believe it is our
responsibility to familiarise you with the following
safety instructions.
Electrical safety
• Installation and connection of this new
appliance must only be carried out by a
qualified personnel.
• Repairs to the appliance are only to be
carried out by qualified personnel. Repairs
carried out by inexperienced persons may
cause an injury or serious malfunction. If your
appliances needs repairing, please contact
your local Service Force Centre.
Please follow these instructions
carefully, otherwise the guarantee will
not cover any damage that may occur.
• Flush-mounted appliances shall only be
operated following installation in suitable
installation cabinets and workplaces
complying with applicable standards. This
ensures adequate protection against contact
for electrical units as required by the VDE
(Association of German Electrical Engineers)
• If your appliance malfunctions or if fractures,
cracks or splits appear:
- Switch off all cooking zones.
- Disconnect the hob from the electricity
supply.
Safety for children
• When you are cooking or frying, the cooking
zones get hot. Keep small children away from
the appliance at all times. Keep older children
under supervision when they are using the
appliance.
• This appliance incorporates a locking device
which can be switched on so that playing
children cannot inadvertently switch the
appliance on.
Safety during use
• This appliance may only be used for cooking
and frying of foods in the home. It is not
designed for commercial or industrial
purposes.
• Never use the hob to heat the room.
• Be careful when plugging in electrical
appliances into main sockets near the
appliance. Connecting leads must not come
into contact with any hot parts of the
appliance.
• Overheated fats and oils catch fire quickly.
You should supervise cooking when
preparing foods in fat or oil (e.g., chips).
• Switch off the cooking zones after use.
• The sensor technology offers you the
maximum possible safety when using the
appliance. However, it also requires care
when setting the cooking zones, power and
times.
Safety when cleaning
• Switch off the appliance always before
cleaning.
• For reasons of safety, never use a steam jet
or a high pressure cleaner to clean the hob.
4
Page 5
How to prevent damage to the
appliance
• Never use the hob as a work surface or for
storage.
• The frameless edge of the ceramic glass
surface is susceptible to knocks. Be careful
when moving pots and pans around.
• Do not operate the cooking zones with empty
pots or pans, or with no pots and pans on
them. The cooking utensils as well as the hob
surface could suffer damage as a result.
• Ceramic glass is insensitive to temperature
shocks and is very robust, however it is not
unbreakable. Especially sharp and hard
objects that fall on the cooking surface could
damage it.
• Do not use cast iron pots or pans with
damaged bases with rough edges or burrs.
Sliding these across the hob could cause
scratches.
• Do not place any pots or pans on the frame of
the cooking area. Scratches and damage to
the varnished surface could occur.
• Always make sure that no acid-containing
liquids such as vinegar, lemon or limedissolving agents are split on the hob frame
as these can cause dull spots to appear.
• If sugar or a mixture containing sugarfalls
onto the cooking zone and melts, remove
immediately while still hot, using a suitable
kitchen scraper. If left to cool down, it may
damage the surface when removed.
• Keep objects, liable to melt, away from the
ceramic glass surface, for example, synthetic
materials, aluminium foils or cooking wraps. If
any other materials or foodstuffs melt on the
ceramic glass surface, these should be
cleaned away immediately using a suitable
kitchen scraper.
Disposal
Disposing of the packaging
material
All packing materials used can be recycled.
The plastic materials are identified as follows:
• >PE< for polyethylene, e.g. for the outer
wrapping and the bags inside.
• >PS< for foamed polystyrene, e.g., for
cushioning parts, in principle CFC-free.
The materials must be disposed of properly.
Please observe the national and regional
regulations for the disposal of packaging material
and the material designation (material
separation, recycling, waste collection).
Disposing of old appliances
Warning! Before disposing of old
appliances, make them inoperable so
that they are not a danger to others.
Separate the appliance from the
mains supply. Remove the mains
lead.
For ecological reasons, all old appliances must
be disposed of in compliance with applicable
regulations.
• The appliance must not be disposed of with
the normal domestic waste.
• Contact your local council or Environmental
Health Office for information regarding the
safe disposal of the appliance.
5
Page 6

The key features of your appliance
• Ceramic glass cooking surface: The
appliance has a ceramic glass cooking
surface and 4 rapid response cooking zones.
The particularly powerful radiant heater
elements substantially shorten the amount of
time taken for the zones to heat up.
• Sensor fields: Your appliance is operated
using Touch-Control-sensor fields.
• Cleaning: The advantage of the ceramic
glass cooking surface and the sensor fields is
their accessibility for cleaning. It is easy to
clean the flat smooth surface.
• „ON/OFF“ Sensor field: With the „ON/OFF“
sensor field the appliance has a separate
mains switch with which the power supply to
the appliance can be completely switched on
and off with one touch.
• Displays: Digital displays and/or control
lamps inform the user about heat settings,
selected functions as well as any possible
residual heat of the corresponding cooking
zone.
• Safety cut-out: A safety cut-out ensures that
all cooking zones shut off automatically after
a period of time if the settings have not been
changed.
• Child safety: With this function the
cooking area can be locked to prevent any
unintentional switching on of the appliance.
• Keep warm stage: is the cooking stage
where foods can be kept warm.
• Residual heat display: will illuminate if
the cooking zone becomes hot enough for
there to be a risk of burning.
• Single ring cook zone: The hob features
four single ring cooking zones. As such your
hob offers cooking zones of different sizes
e.g. for smaller pots. This saves energy.
• Timer: With the integrated timer, all zones
can be switched off automatically. When the
end of the cooking time has been reached,
the cooking zone switches off.
6
Page 7
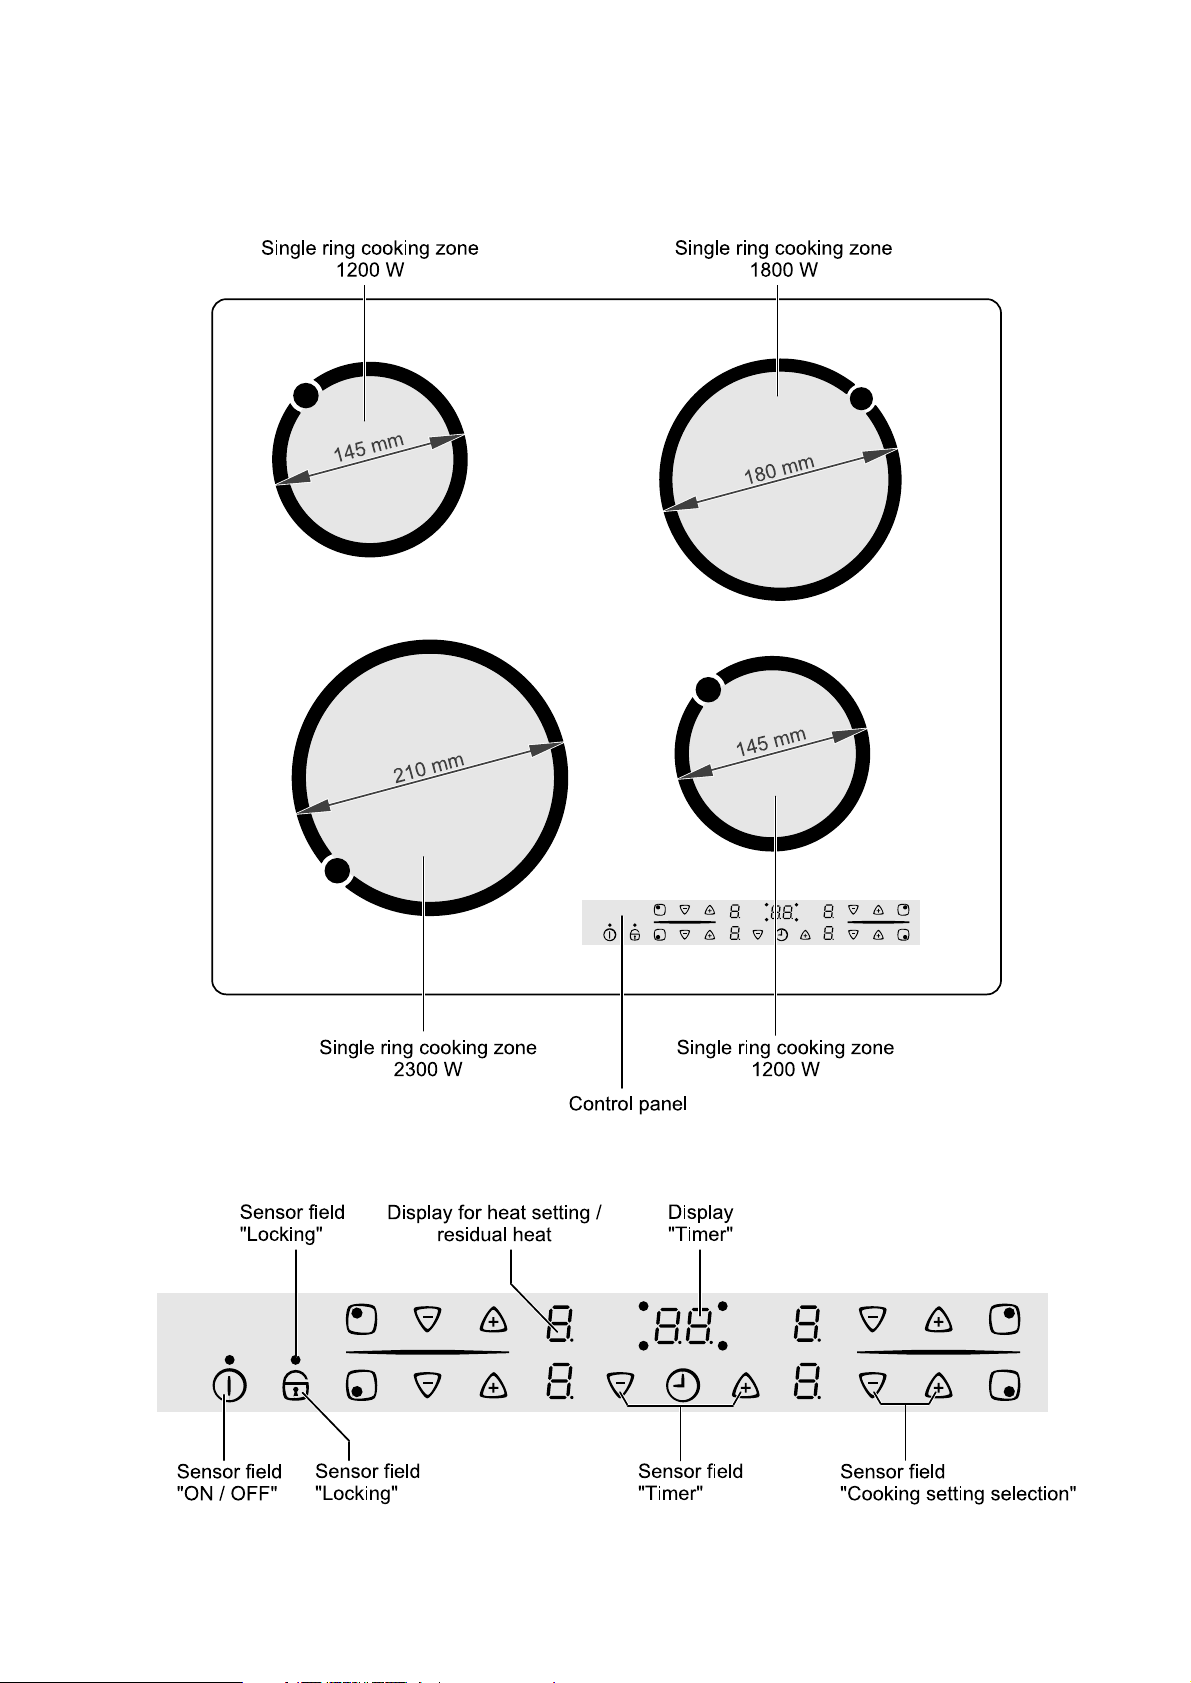
Appliance description
Control panel
7
Page 8
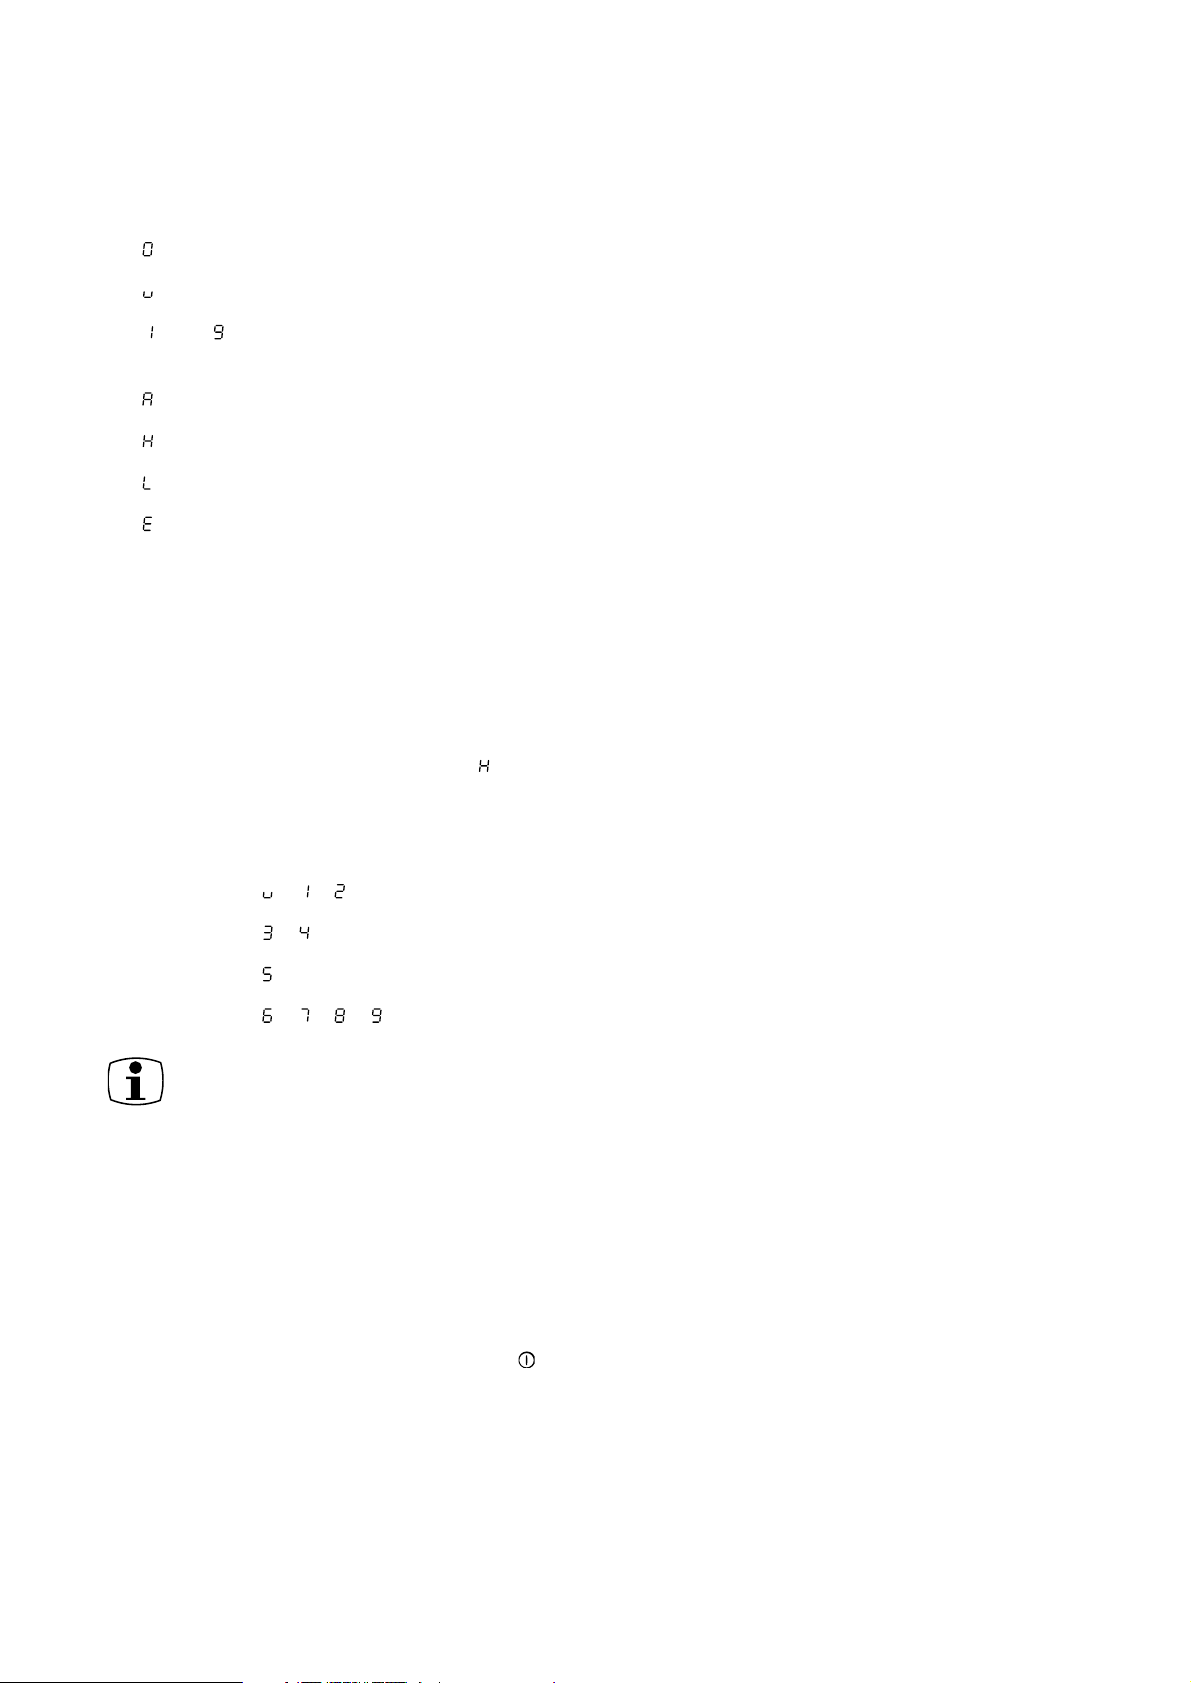
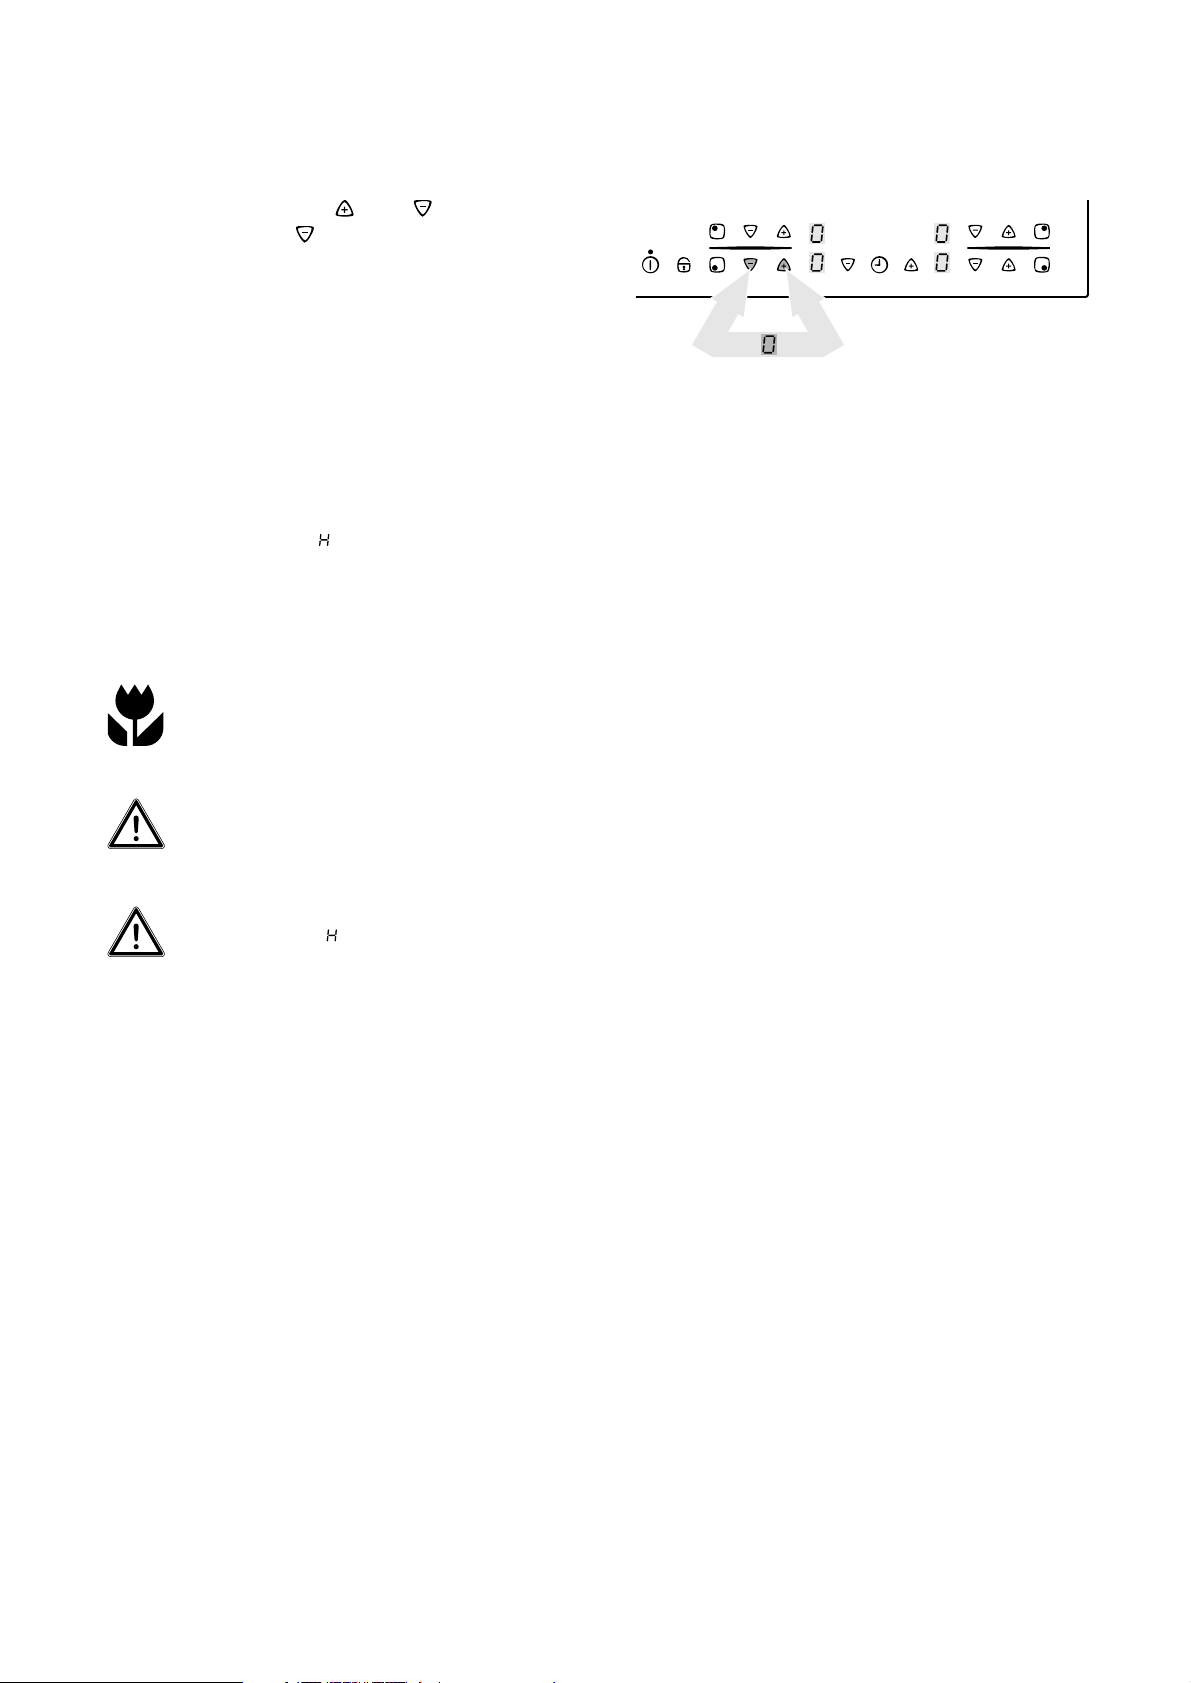
Digital displays
The four display fields allocated to the four cooking
zones show:
• after switching on
• on selection of the keep warm setting
• to , depending on the selected heat
setting
• for cooking automatic
• for residual heat
• when child safety is switched on
• upon malfunction /overheating
Safety cut-out of the cooking zones
If one of the cooking zones is not switched off after
a certain time, or if the heat setting is not changed,
the corresponding cooking zone switches itself off
automatically.
Existing residual heat is indicated with (as „hot“)
in the digital displays of the corresponding cooking
zones.
The cooking zones switch off at:
• heat setting , , after 6 hours
• heat setting , after 5 hours
• heat setting after 4 hours
• heat setting , , , after 1.5 hours
Should one or several cooking zones
switch off before expiration of the times
indicated, refer to the Chapter “What to
do, if…”
Switching off for other causes
Liquid boiling over onto the control panel causes
all cooking zones to switch off immediately.
The same effect occurs if you place a wet cloth
onto the control panel. In both cases, the appliance
must be switched on with the main switch after
the liquid or the wet cloth have been removed.
8
Page 9
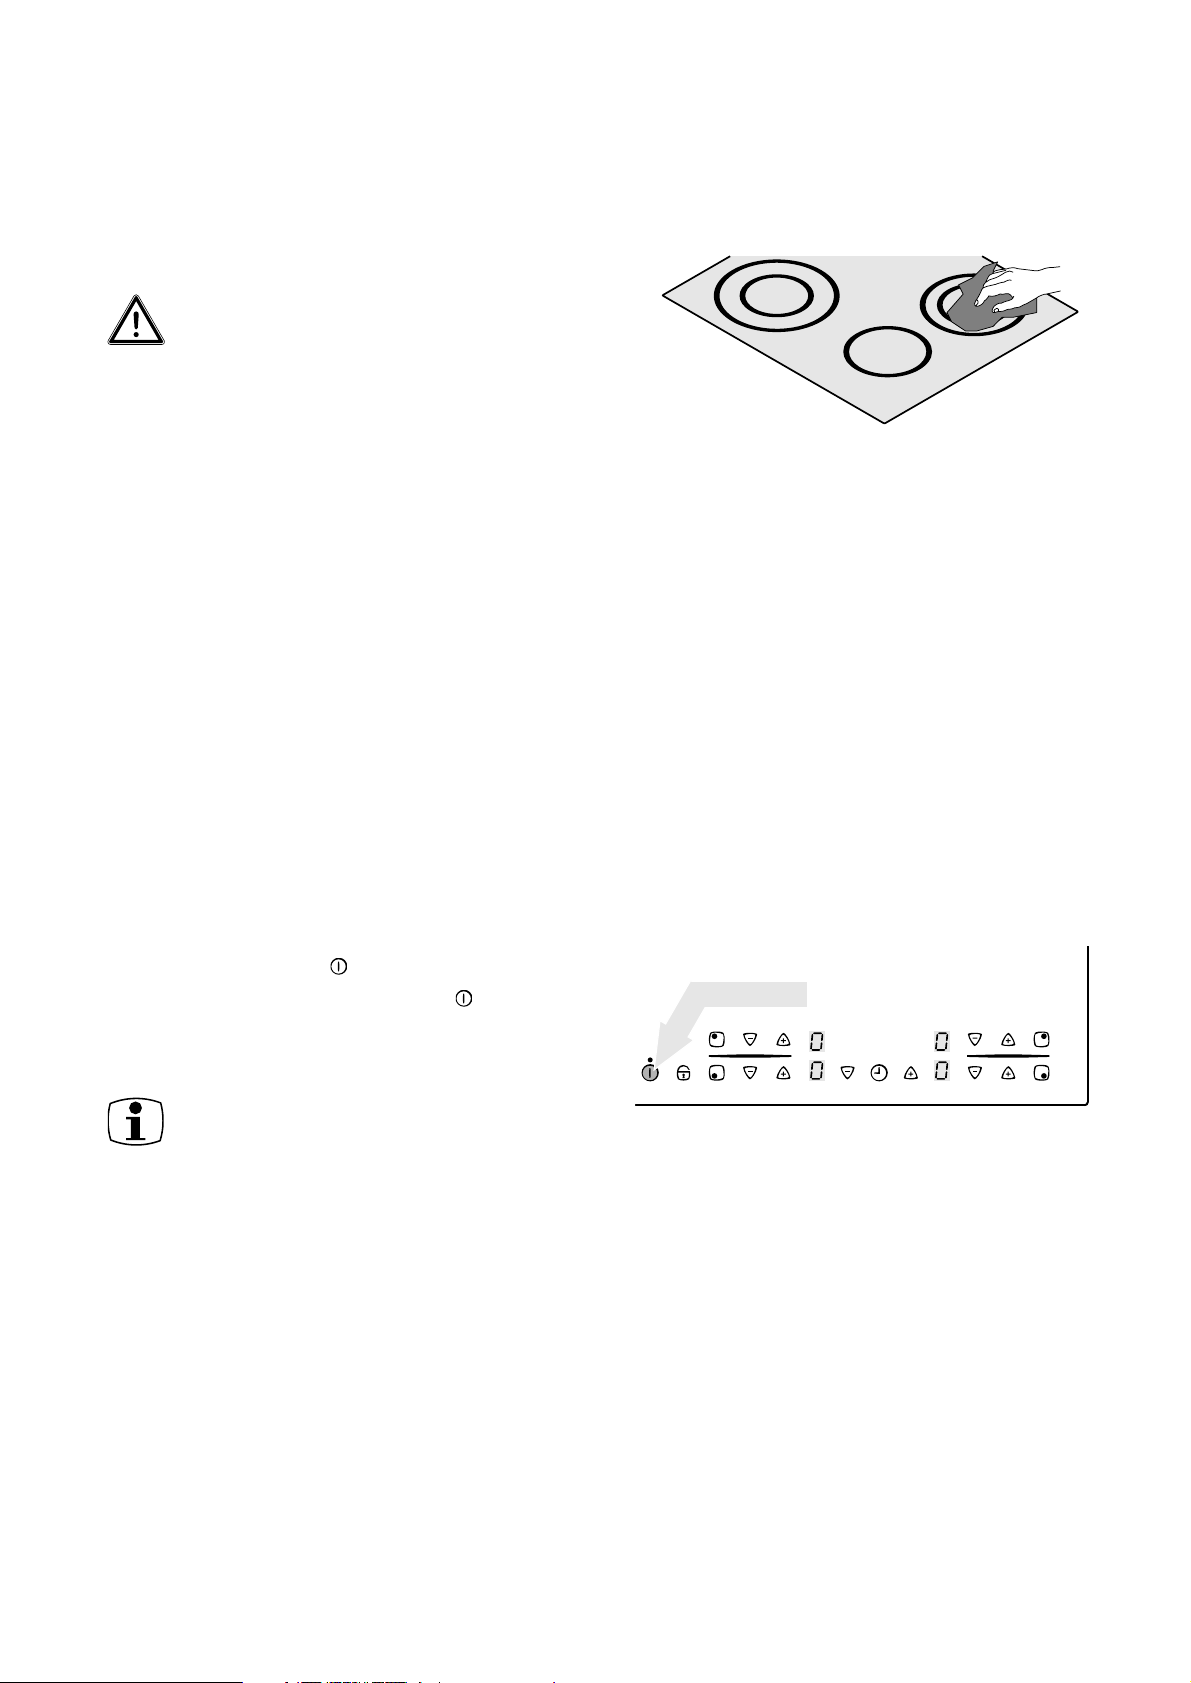
Before using for the first time
First cleaning
Wipe the ceramic glass surface with a damp cloth.
Important! Do not use any caustic or
abrasive cleaners!
The surface could get damaged as a
result.
Operating the cooking area
Touch Control-Sensor fields
In order to operate the Touch Control sensor fields
place your finger from above flat onto the required
field until the corresponding display lights up or
extinguishes, and/or the desired function is carried
out.
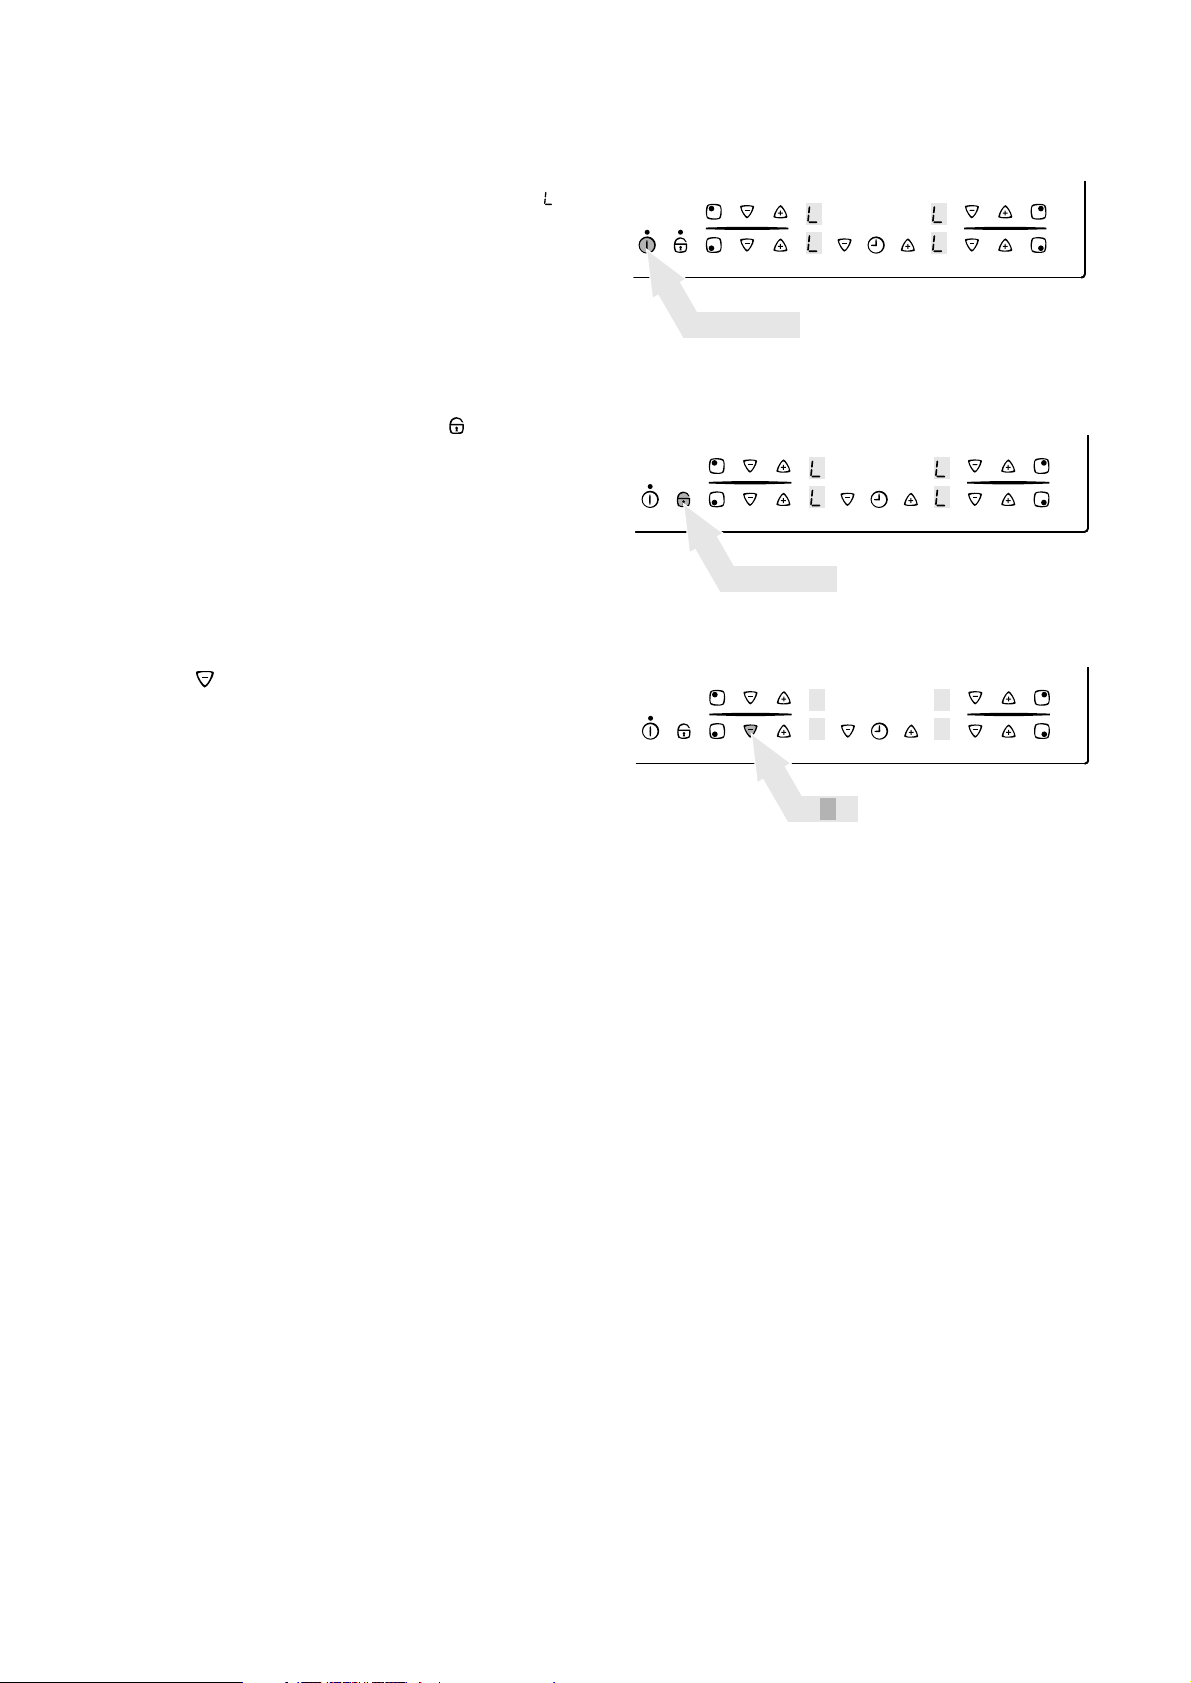
Switching on the appliance
To switch on the appliance completely, touch the
„ON/OFF“ sensor field .
Touch the „ON/OFF“ sensor field for approx.
2 seconds.
The digital displays show:
After the sensor field „ON/OFF“ has
been activated to switch on the
appliance, one of the cooking zones
must be selected within approx. 10
seconds or a time period must be set
with the timer (egg timer function).
Otherwise the appliance switches off
again for safety reasons.
~ 2 sec.
9
Page 10
Switching off the appliance
To switch off the appliance completely, touch the
„ON/OFF“ sensor field .
Touch the „ON/OFF“ sensor field for approx.
one second.
The digital displays extinguish.
After switching off an individual cooking
zone or the entire hob, the existing
residual heat is displayed with (as
„hot“) in the digital displays of the
corresponding cooking zones.
Heat setting
For setting and adjusting the heat setting ( to )
for the selected cooking zone.
With the heat setting sensor field increase the
setting.
With the heat setting sensor field reduce the
setting.
~ 1 sec.
Setting the keep warm function
All 4 cooking zones are equipped with the keep
warm function .
With the heat setting sensor field select setting
the keep warm function
10
Page 11
Switching off the cooking zone
In order to switch off, touch the heat setting
selection sensor fields and simultaneously
or with sensor field set the heat setting back to
zero.
Residual heat indicator
When an individual cooking zone or the entire
cooking area has been switched off, any residual
heat is shown with (as „Hot“) in the digital
displays of the corresponding cooking zones.
Even after the cooking zone has been switched off,
the residual heat indicator only goes out when the
cooking zone has cooled down.
You can use the residual heat for melting
foods or keeping them warm.
Important! As long as the residual heat
indicator is illuminated, there is a risk of
burns.
Important! In the event of a power failure,
the symbol also extinguishes and
there is no longer any indication of
residual heat. However, it is still possible
to burn yourself. You can avoid this by
being particularly careful when near the
hob.
11
Page 12
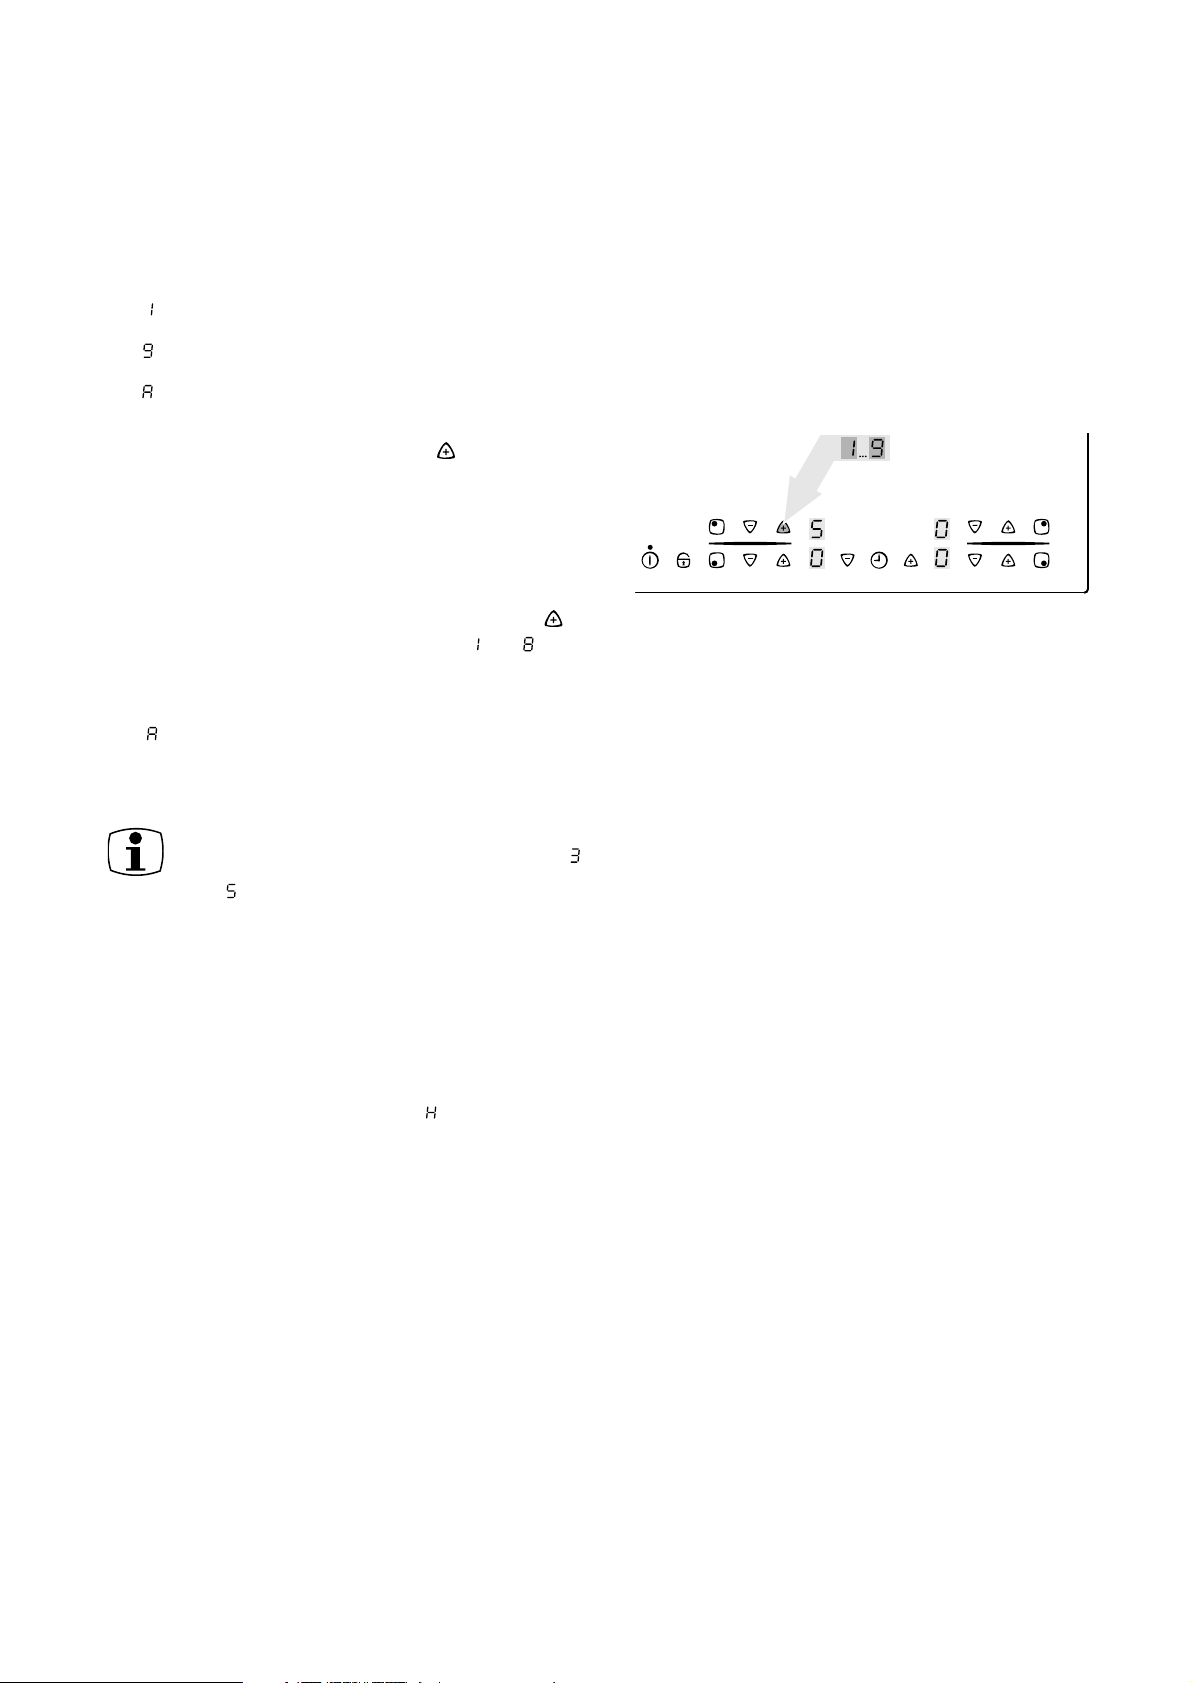
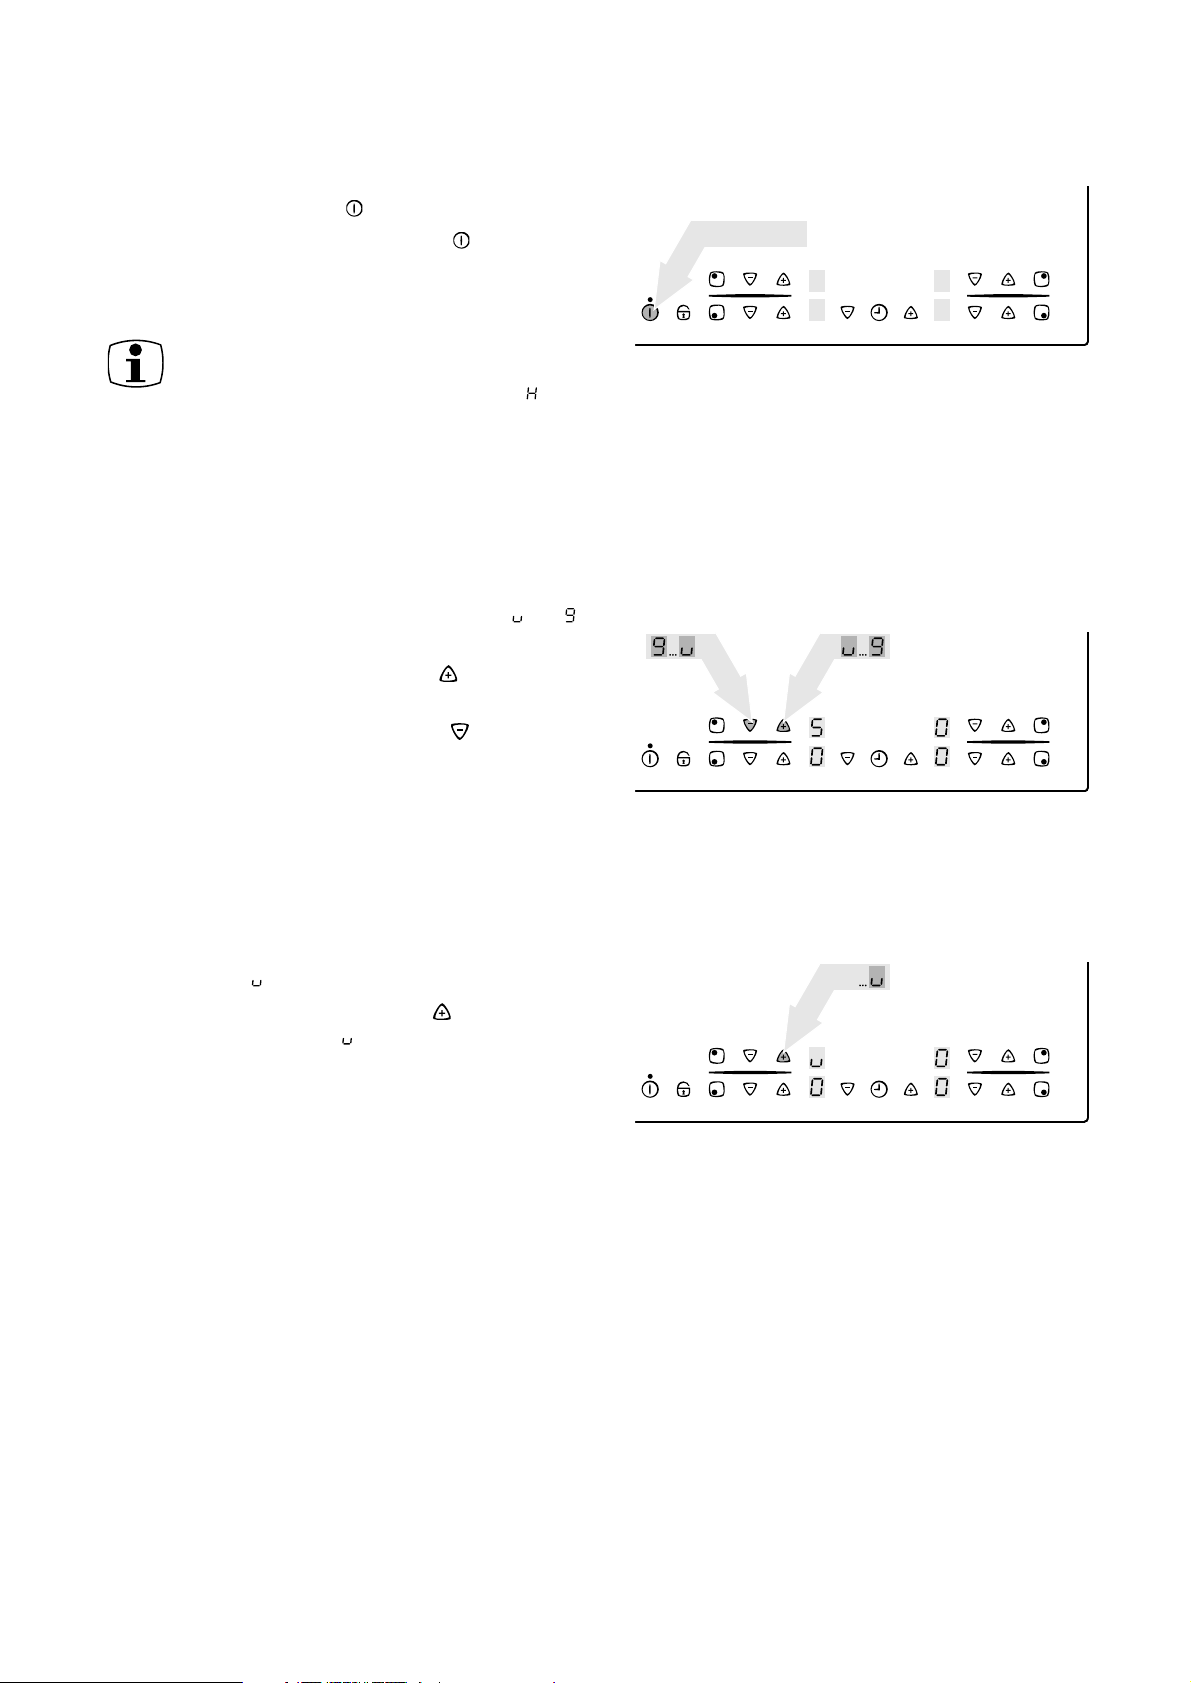
Cooking with the automatic warm-up
function
All four cooking zones of the hob can be controlled
in nine stages and have an automatic warm-up
function:
• , lowest heat setting
• , highest heat setting
• , warm-up function
When you select the required heat setting with the
heat setting selection sensor field , the cooking
zone will work for a specific time on full power and
will then switch automatically to the heat setting
selected.
The duration of the automatic warm-up function
depends on the heat setting selected.
Touch the sensor field heat setting selection in
order to set the required heat setting to .
The heat setting selected is shown first.
After 5 seconds, the heat setting will be replaced
by (= automatic warm-up function) in the
display. After the end of the warm-up time, the heat
setting will be shown again.
If during the automatic warm-up function
you select a higher setting, e.g., from
to , the warm-up time is adjusted to
match.
If you select a lower setting, the warm-up
time ends immediately.
Cooking with the automatic warm-up
function is only possible with a cold or
moderately warm cooking zone. If a
cooking zone is already hot when
switched on (display ), you cannot
work with the automatic warm-up
function.
12
Page 13
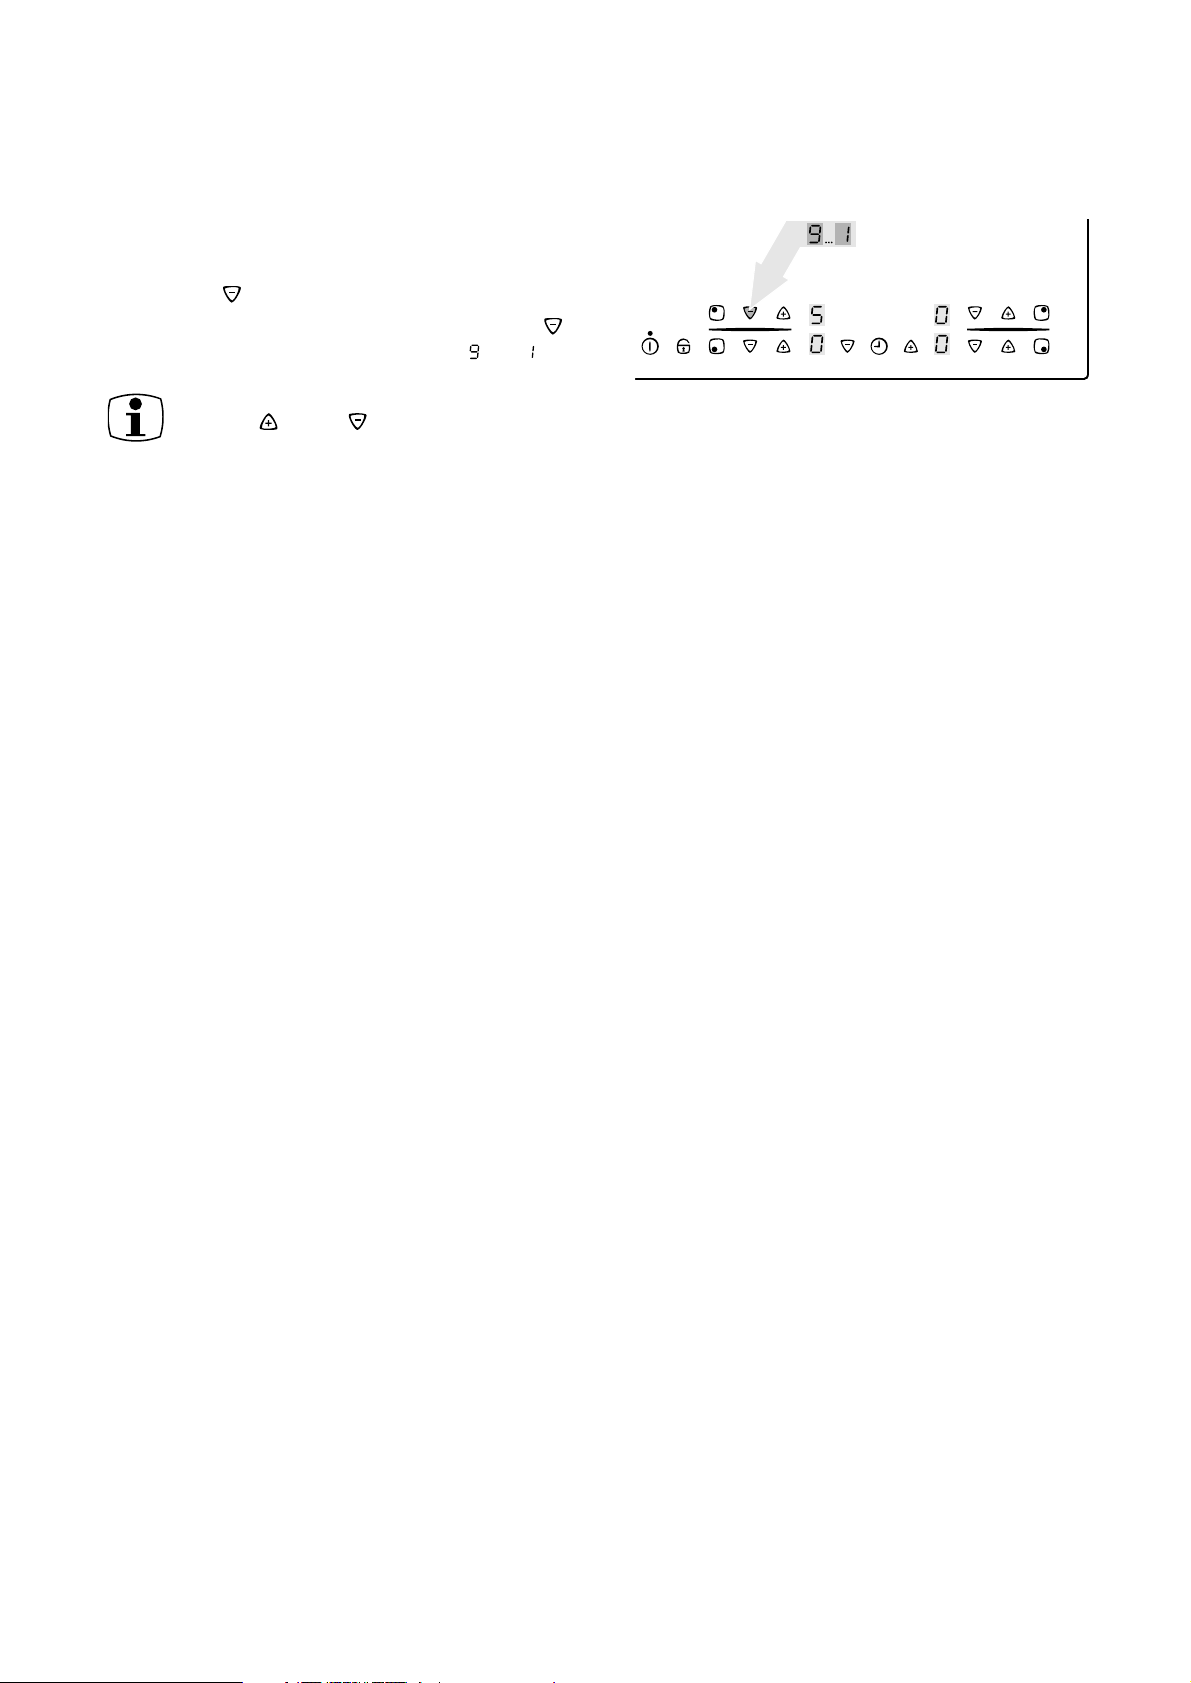
Cooking without the automatic
warm-up function
If you want to use the cooking zone without the
automatic warm-up function, then select the
required heat setting with the heat setting selection
sensor field .
Touch the sensor field heat setting selection in
order to set the required heat setting to .
With the heat setting selection sensor
fields and you can adjust the
setting at all times.
13
Page 14
Child safety feature
With the child safety feature, the hob can be
protected against undesirable use.
Switching on the child safety feature
The appliance must be switched on in order to
switch on the child safety feature. However, no
cooking zone must be switched on.
1. Touch the „locking“ sensor field for approx.
3 seconds.
As acknowledgement, you hear a signal tone.
2. Touch any of the heat setting selection sensor
fields .
In the displays, will appear, the child safety
feature is activated. The appliance switches off
automatically after a few seconds.
~ 3 sec.
Bypassing the child safety feature
The child safety feature can be bypassed for the
one-time use of the appliance (up to the next
switch-off of the appliance). At the next switch-on,
the child safety feature is automatically activated
again.
1. Switch on the appliance.
If the child safety feature is active, then is
indicated.
2. At the same time, touch any of the two heat
setting selection sensor fields and for
approx. 1 second.
As acknowledgement, you hear a signal tone. The
child safety feature is bypassed up to the point
when you switch off the appliance. The cooking
area can be used normally.
~ 2 sec.
~ 1 sec.
14
Page 15
Switching off the child safety feature
1. Switch on the appliance.
If the child safety feature is active, then is
indicated.
2. Touch the „locking“ sensor field for approx.
3 seconds.
As acknowledgement, you hear a signal tone.
3. Touch any of the heat setting selection sensor
fields .
The displays turn dark, the child safety feature is
switched off. The appliance switches off
automatically after a few seconds.
~ 2 sec.
~ 3 sec.
15
Page 16

Timer
You can use the timer in two ways:
•as
Switch-off automatic function. You set a
slow cooking time for a cooking zone, and the
cooking zone switches off automatically when
the time expires. This function can be used for
several cooking zones at the same time.
•as a
Using the automatic switch-off function
The cooking zone(s) for which you want to use the
automatic switch-off function must be switched on.
minute minder that does not control the
hob („egg timer”), you hear an acoustic signal
after the set time expires.
The minute minder cannot be used when
a cooking zone is switched on.
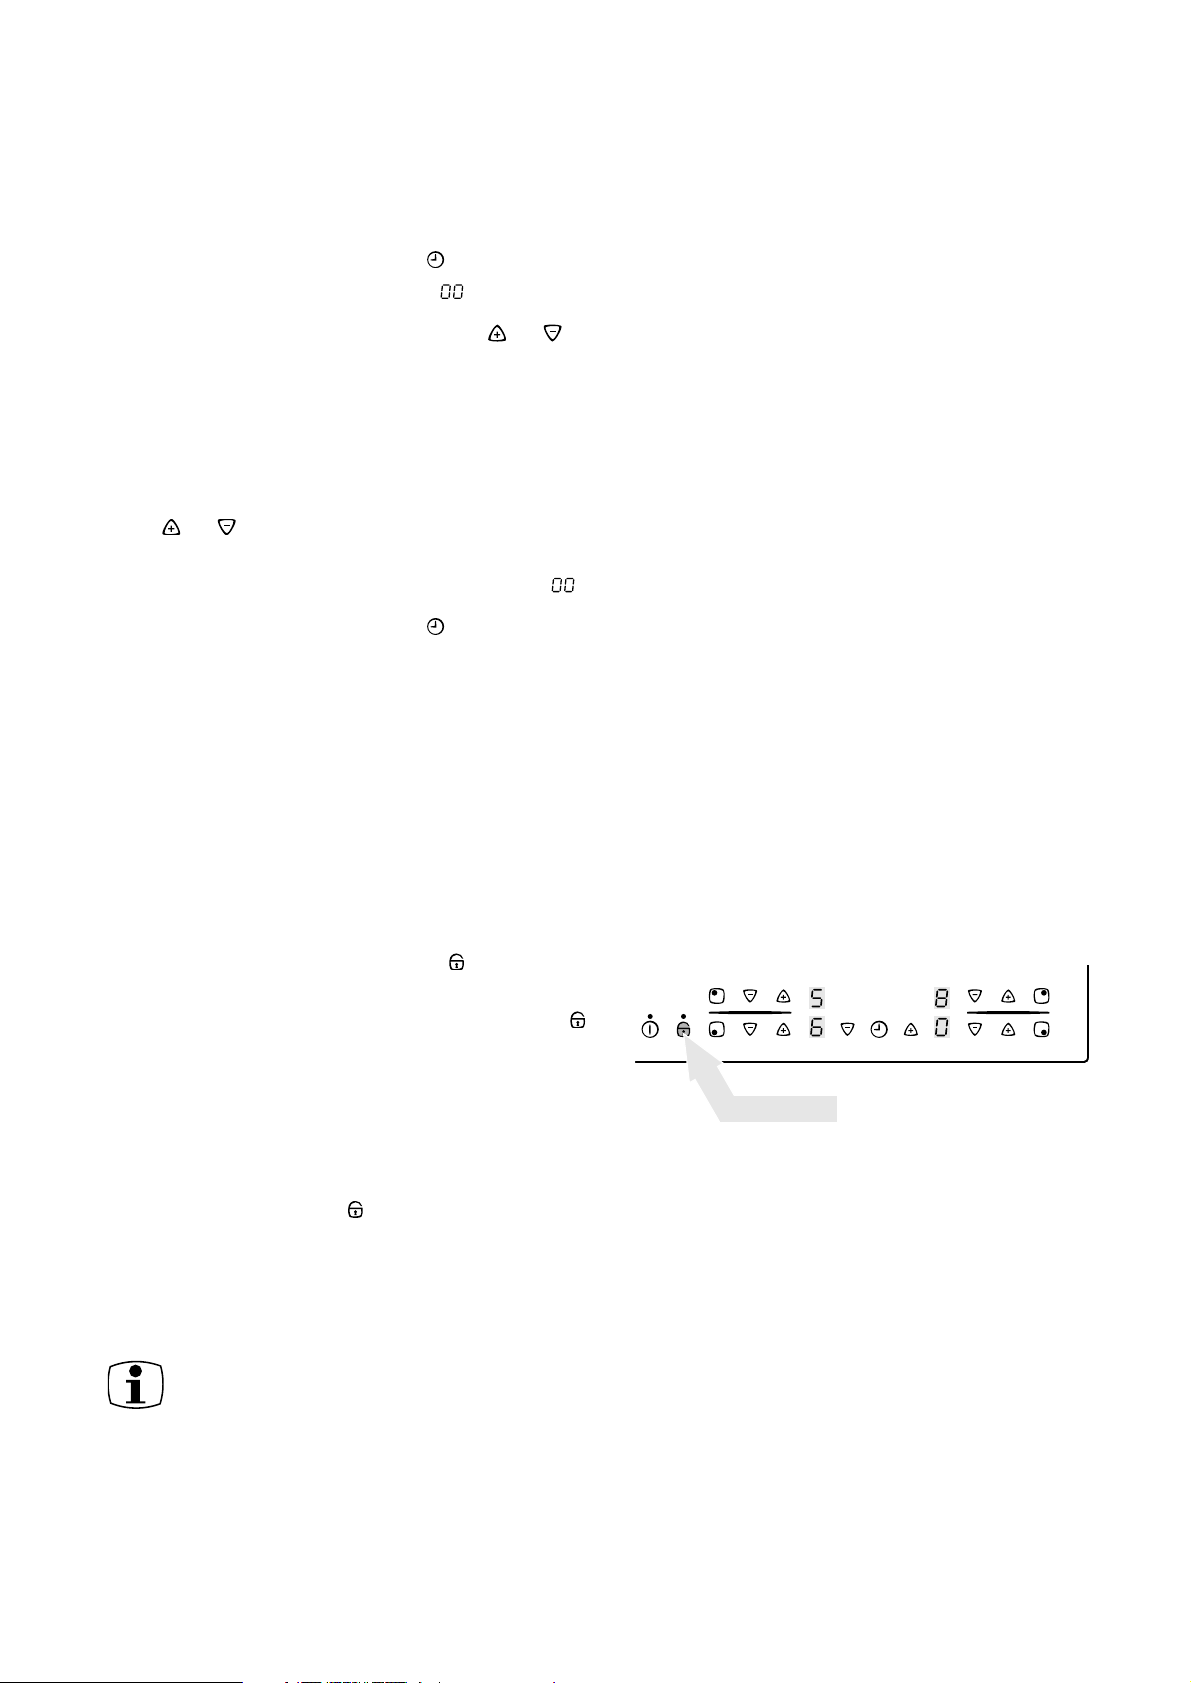
1. With the Timer sensor field select which
heating zone is to be controlled by the
automatic switch-off function is to be set.
By touching once the Timer sensor field the
first active cooking zone is selected clockwise, the
relevant lamp flashes quickly. Here, for example,
the left rear control lamp corresponds to the left
rear cooking zone. In the timer display, there
appears .
By a repeated touching of the Timer sensor field
the next active cooking zone is selected.
2. While the control lamp is flashing quickly, and
using the Timer setting sensor fields or
for this cooking zone, set the required time
period up to the automatic shut-off (e.g., 15
minutes).
After a few seconds, the automatic switch-off
function is activated.
The control lamp now flashes slower and the
remaining slow cooking time is shown in the
display. If the automatic switch-off function is set
for several cooking zones, then this applies for the
cooking zone with the shortest remaining slow
cooking time. The control lamps of the other
cooking zones with set shut-off automatic function
light up. To indicate the remaining slow cooking
time of one of these cooking zones, this must be
selected with the Timer sensor field , the
corresponding control lamp then flashes quickly.
~ 1 sec.
16
Page 17
For adjusting the remaining slow cooking time, the
required cooking zone must be selected with the
Timer sensor field . The relevant control lamp
then flashes quicker. The adjustment is made with
the Timer setting senor fields or .
After expiry of the set slow cooking time, the
cooking zone switches off automatically and for
two minutes you hear an acoustic signal, the Timer
display flashes .
3. Touch the sensor field timer in order to shut off
the signal.
For a faster adjustment, touch one of the
Timer setting sensor fields or for
such time until the required value is
obtained.
If the Timer setting sensor field is
activated first, the time setting begins
with 99 minutes. If the Timer setting
sensor field is activated first, the time
setting begins with 1 minute.
~ 1 sec.
Ending the automatic switch-off function
prematurely
You have two ways for ending the automatic
switch-off function prematurely:
Switching off the cooking zone and timer at the
same time.
With the heat setting selection sensor field , set
the required cooking zone back to zero.
Cooking zone and timer switch off.
Switch off the timer - the cooking zone remains
active
1. With the Timer sensor field select the
required cooking zone.
The corresponding control lamp then flashes
quicker.
2. With the Timer setting sensor field set the
timer to :
Only the timer switches off, while the cooking zone
remains in operation.
17
Page 18
Using the minute minder
To use the minute minder, the appliance must be
switched on but no cooking zone shall be switched
on.
1. Touch the Timer sensor field .
In the timer display, there appears .
2. With the Timer setting sensor fields or
set the required time period.
After a few seconds the minute minder is activated
and the remaining time duration is shown on the
display.
To adjust the remaining time duration, touch the
sensor field timer and with the Timer setting sensor
fields or change the setting.
After expiry of the set time duration, you hear an
acoustic signal and the timer indicator flashes .
3. Touch the Timer sensor field in order to
switch off the signal.
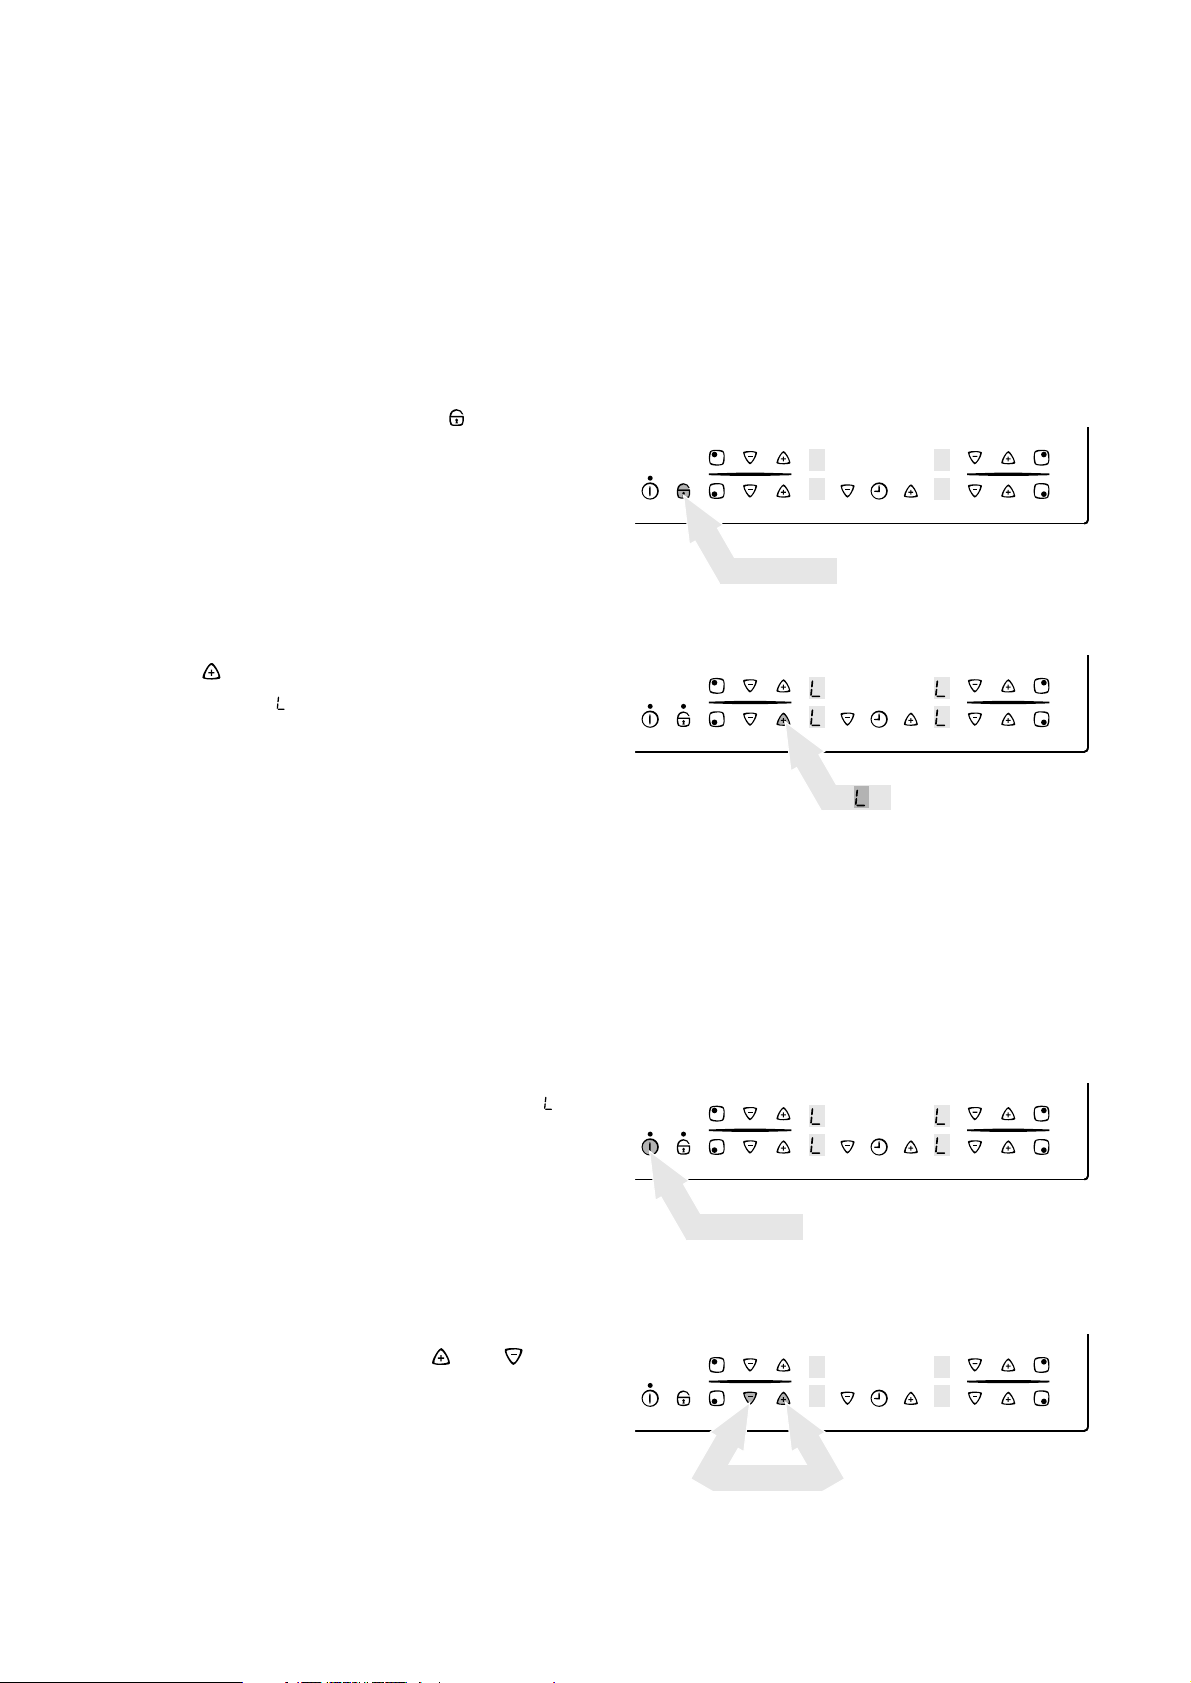
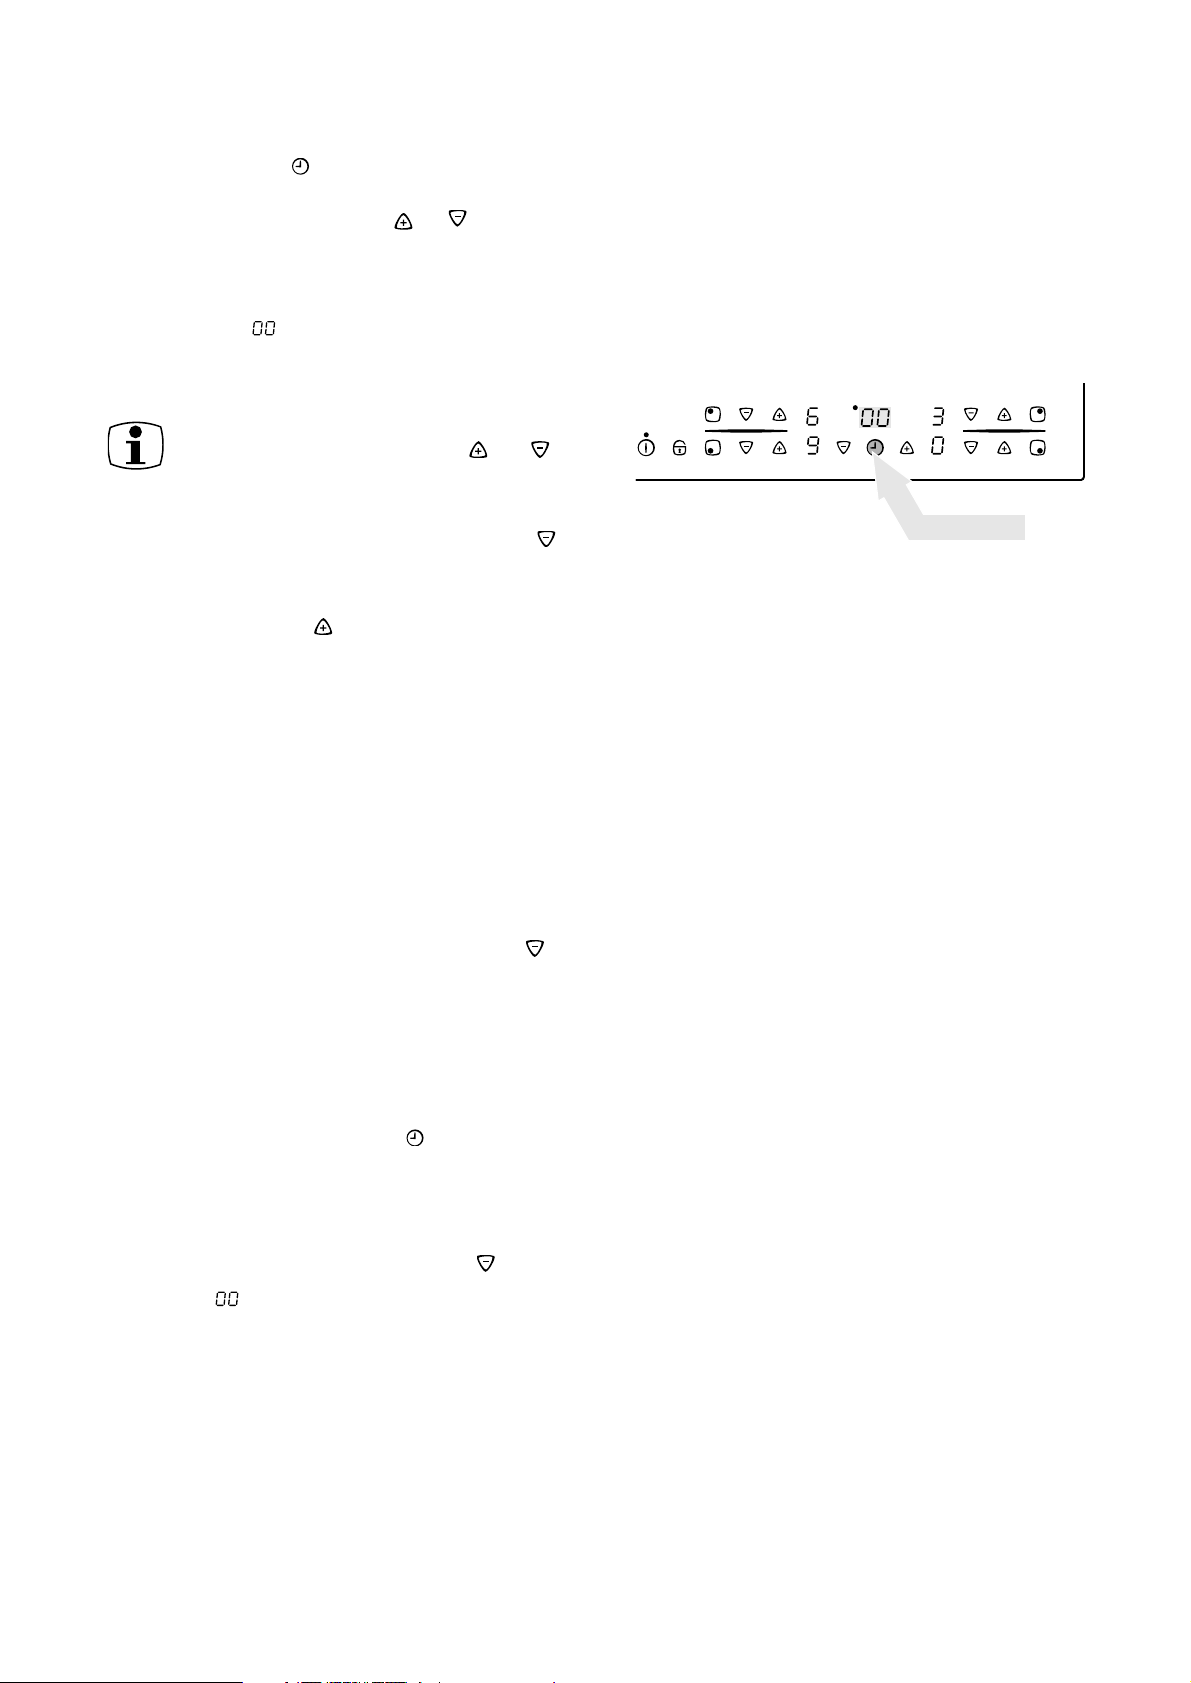
Locking/unlocking the control panel
At any random time during cooking, the control
panel can be locked with the exception of the
sensor field „ON/OFF“ in order to prevent a
changing of the settings caused by, for example,
the wiping with a cloth.
1. Touch the sensor field „locking“ for approx.
1 second.
The control lamp of the sensor field „locking“
lights up.
2. In order to cancel the locking again, touch the
sensor field „locking“ again for approx. 1
second.
The control lamp of the sensor field „locking“
extinguishes, and the previously set heat settings
are displayed again.
When switching off the appliance, the
locking function is automatically
switched off.
~ 1 sec.
18
Page 19
Uses, Tables and Tips
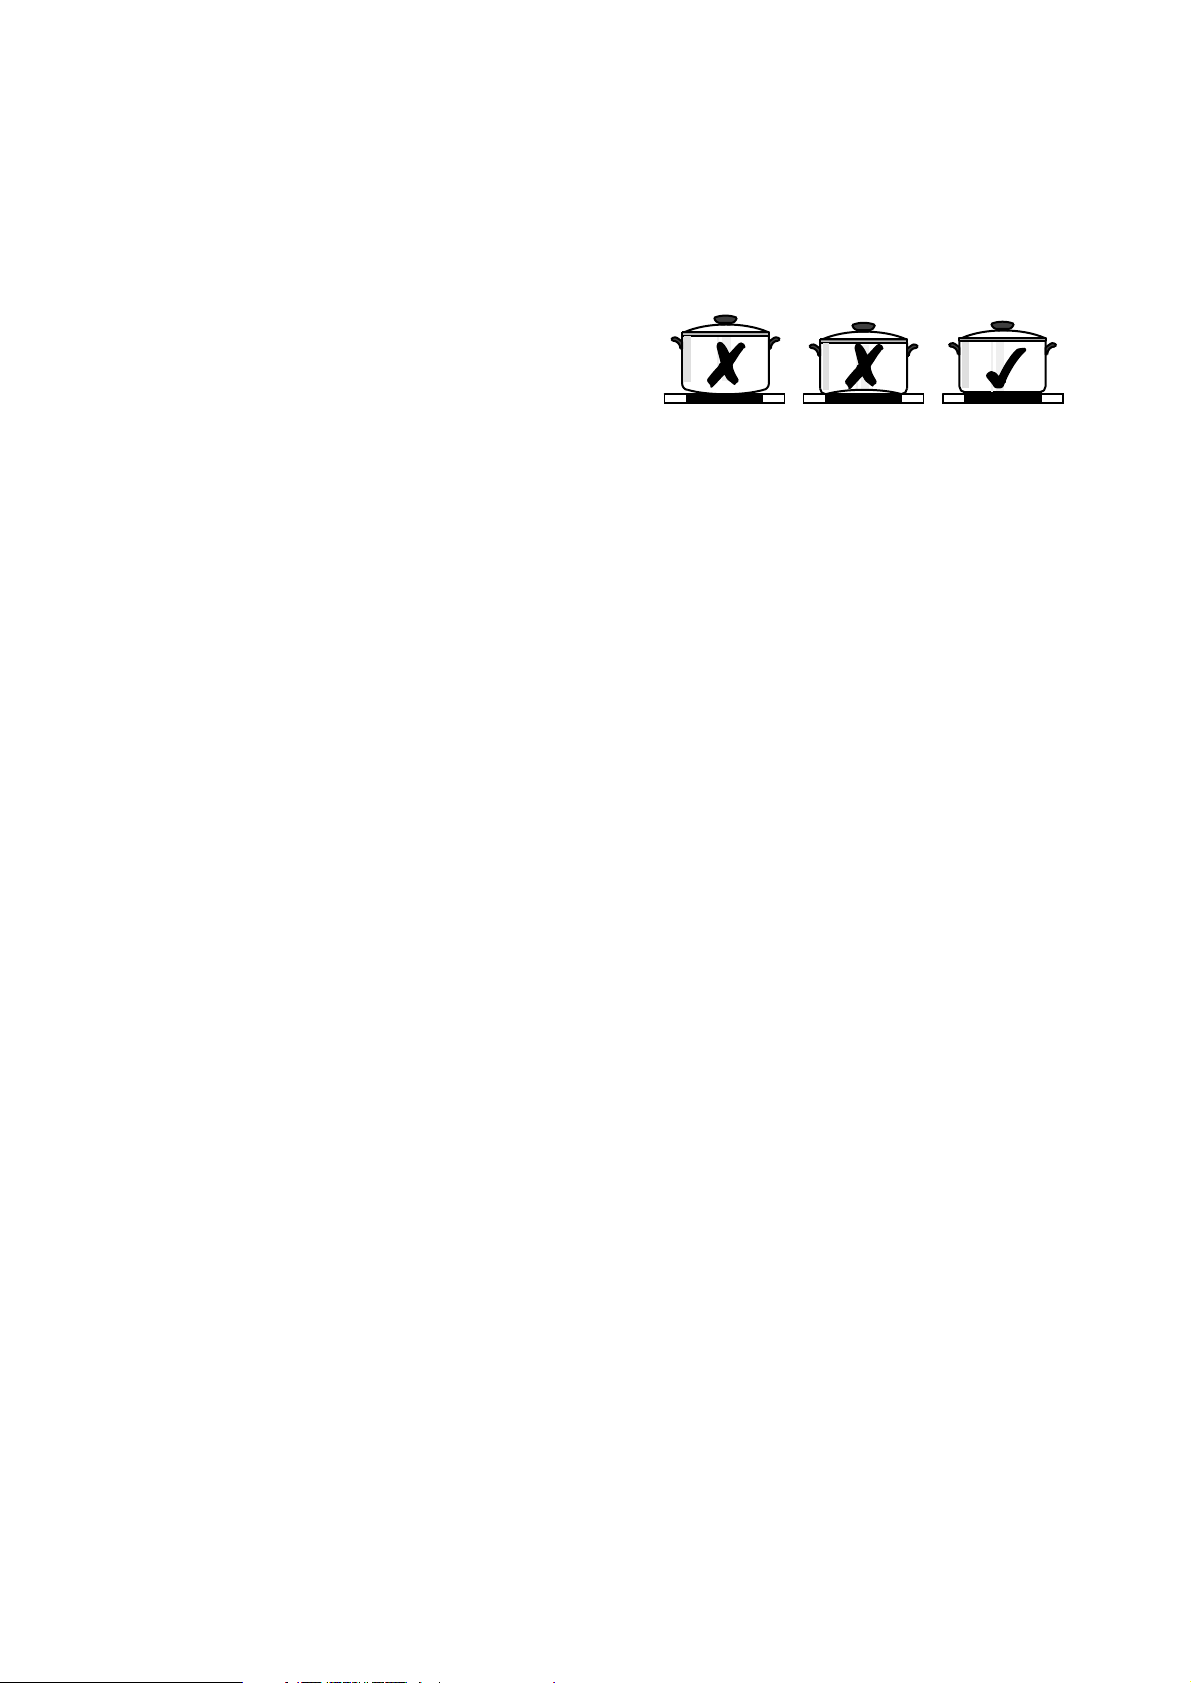
Pots and pans
The better the pot, the better the cooking results.
• You can recognise good pots and pans by their
bases. The base should be as thick and flat as
possible.
• When buying new pots and pans, pay
particular attention to the diameter of the base.
Manufacturers often only state the diameter of
the rim.
• Pots with aluminium or copper bases can
cause metallic discolouring on the ceramic
glass surface which is very difficult or
impossible to remove.
• Do not use cast iron pots or pots with damaged
bases which are rough and or burrs on them.
Scratches can occur if they are slid across the
surface.
• When cold, pot bases are normally bowed
slightly inwards (concave). They should never
be bowed outwards (convex).
• If you use special pots and pans (e.g., a
pressure cooker, simmering pan, wok etc.)
please observe the manufacturer´s
instructions.
General information
• The base should always be clean and dry.
• In order to avoid ugly scratches on the ceramic
glass cooking surface, do not slide pots and
pans around but lift them up instead when
changing positions.
• Scratches can result from grains of sand (e.g.,
after washing out vegetables) which are
dragged with the pot across the cooking
surface.
• Always use large pots for dishes with lots of
liquid so that nothing can boil over.
19
Page 20
Tips on saving energy
You will save valuable energy by
observing the following points:
• Always position pots and pans before you
switch on the cooking zone.
• Dirty cooking zones and pot bases increase the
power consumption.
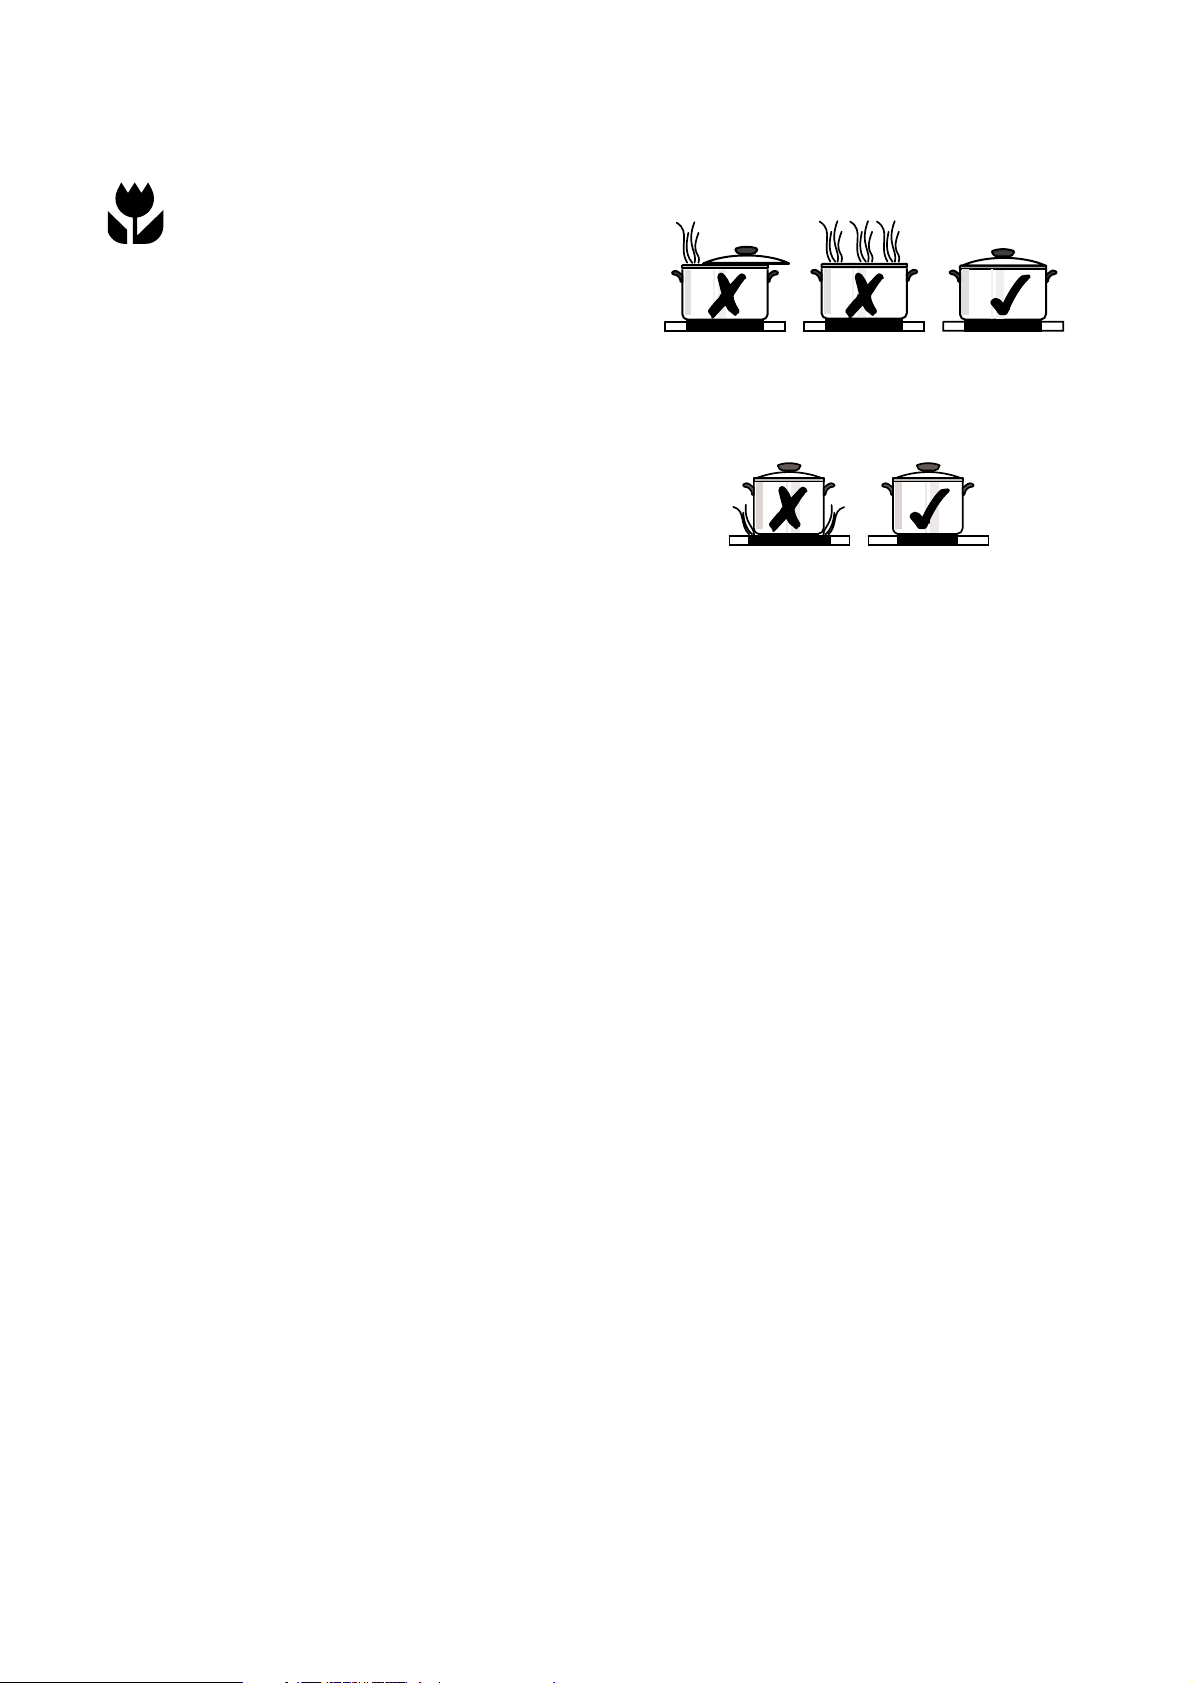
• Whenever possible, always have the lid firmly
placed on the pots and pans so that they are
completely covered.
• Switch off the cooking zones before the end of
the cooking time to use the residual heat for
keeping foods warm or for melting purposes.
• The base of the pot should have the same size
as the cooking zone.
• Using a pressure cooker shortens the cooking
times by up to 50%.
20
Page 21

Advice on cooking with and without
automatic warm-up
The automatic warm-up function is suitable
for:
• Dishes that start off cold, are heated up at high
power and do not need to be continually
watched when cooking on the lower heat
setting.
• Dishes that are put into a hot frying pan.
The automatic warm-up function is not suitable
for:
• Goulash, beef olives and similar braised dishes
that need continual turning until browned
correctly, have liquid added and are then
braised until cooked,
• Dumplings, pasta dishes with lots of liquid,
• Cooking with pressure cookers,
• Very large quantities of soups/stews with more
than 2 litres of liquid.
General information
• When cooking without the automatic warm-up
function, we recommend the use of a high heat
setting to warm up the food (with the -button)
and then leave the dish to finish cooking at a
suitable lower heat setting.
• Pay special attention to the results of your first
use of the appliance. You can then decide
which heat setting is the best for „your dishes”
in the “quantities you are accustomed to
preparing” with your own „pots and pans”. You
will then quickly appreciate the advantages of
the automatic function and will feel secure and
relaxed with your new appliance.
21
Page 22
Typical heat settings for cooking
The details shown in the following table are
guidelines. The heat setting required for cooking
depends on the quality of the pans and on the type
and quantity of food.
Heat
setting
Warm-up
time of the
automatic
function
1)
[Min.]
4,5
3,5
2,0
10,2
6,5
Slow cooking
procedure
Warming up
Frying
Deep-fat frying
Fast frying Steaks, pieces of loin,
Frying Schnitzel/cutlets,
Boiling
Examples for use
Warming up large amounts of liquid
boiling pasta,
browning of meat,
(browning goulash, pot-roast)
potato fritters,
fried sausages,
pancakes /flat cakes
liver, fish,
rissoles, fried eggs
Boiling up to 1.5 l liquid,
potatoes, vegetables
4,8
Steaming
Sautéing
1,7
Poaching
Melting Melting butter,
1,0
0,5
1)
When cooking without the automatic warmup
Keeping warm
function, the warmup time can be individually
selected.
When heating up or frying, we
recommend using the warm-up setting
„ “ and then continue cooking foods
that require longer cooking times at a
suitable lower heat setting.
Steaming and sautéing of
small quantities of vegetables,
cooking rice and
milk-based dishes
dissolving gelatine,
melting chocolate
Keeping food warm
22
Page 23

Cleaning and care
Cooking area
Important! Cleaning agents must not
come into contact with the hot ceramic
glass surface! All cleaning agents must
be removed with plenty of clean water
after cleaning because they have a
caustic effect when the zones are heated
up again.
Never use any aggressive cleaners such
as grill or oven sprays, coarse scourers
or abrasive pot cleaners.
Clean the ceramic glass surface after
every use when it is hand-warm or in a
cold condition. In this way you avoid
spillage burning solidly to the surface.
Remove scale and water marks, fat
spots and metallic shimmer discolouring
with commercially available ceramic
glass or stainless steel cleaner.
Minor soiling
1. Wipe the ceramic glass surface with a damp
cloth and a little washing up liquid.
2. Then, rub dry with a clean cloth. Remnants of
cleaner must not remain on the surface.
3. Once a week, you must thoroughly clean the
entire ceramic glass cooking surface with a
commercially available ceramic glass or
stainless steel cleaner.
4. Then wipe the ceramic glass surface using
plenty of clean water and rub dry with a clean
fluff-free cloth.
23
Page 24
Stubborn soiling
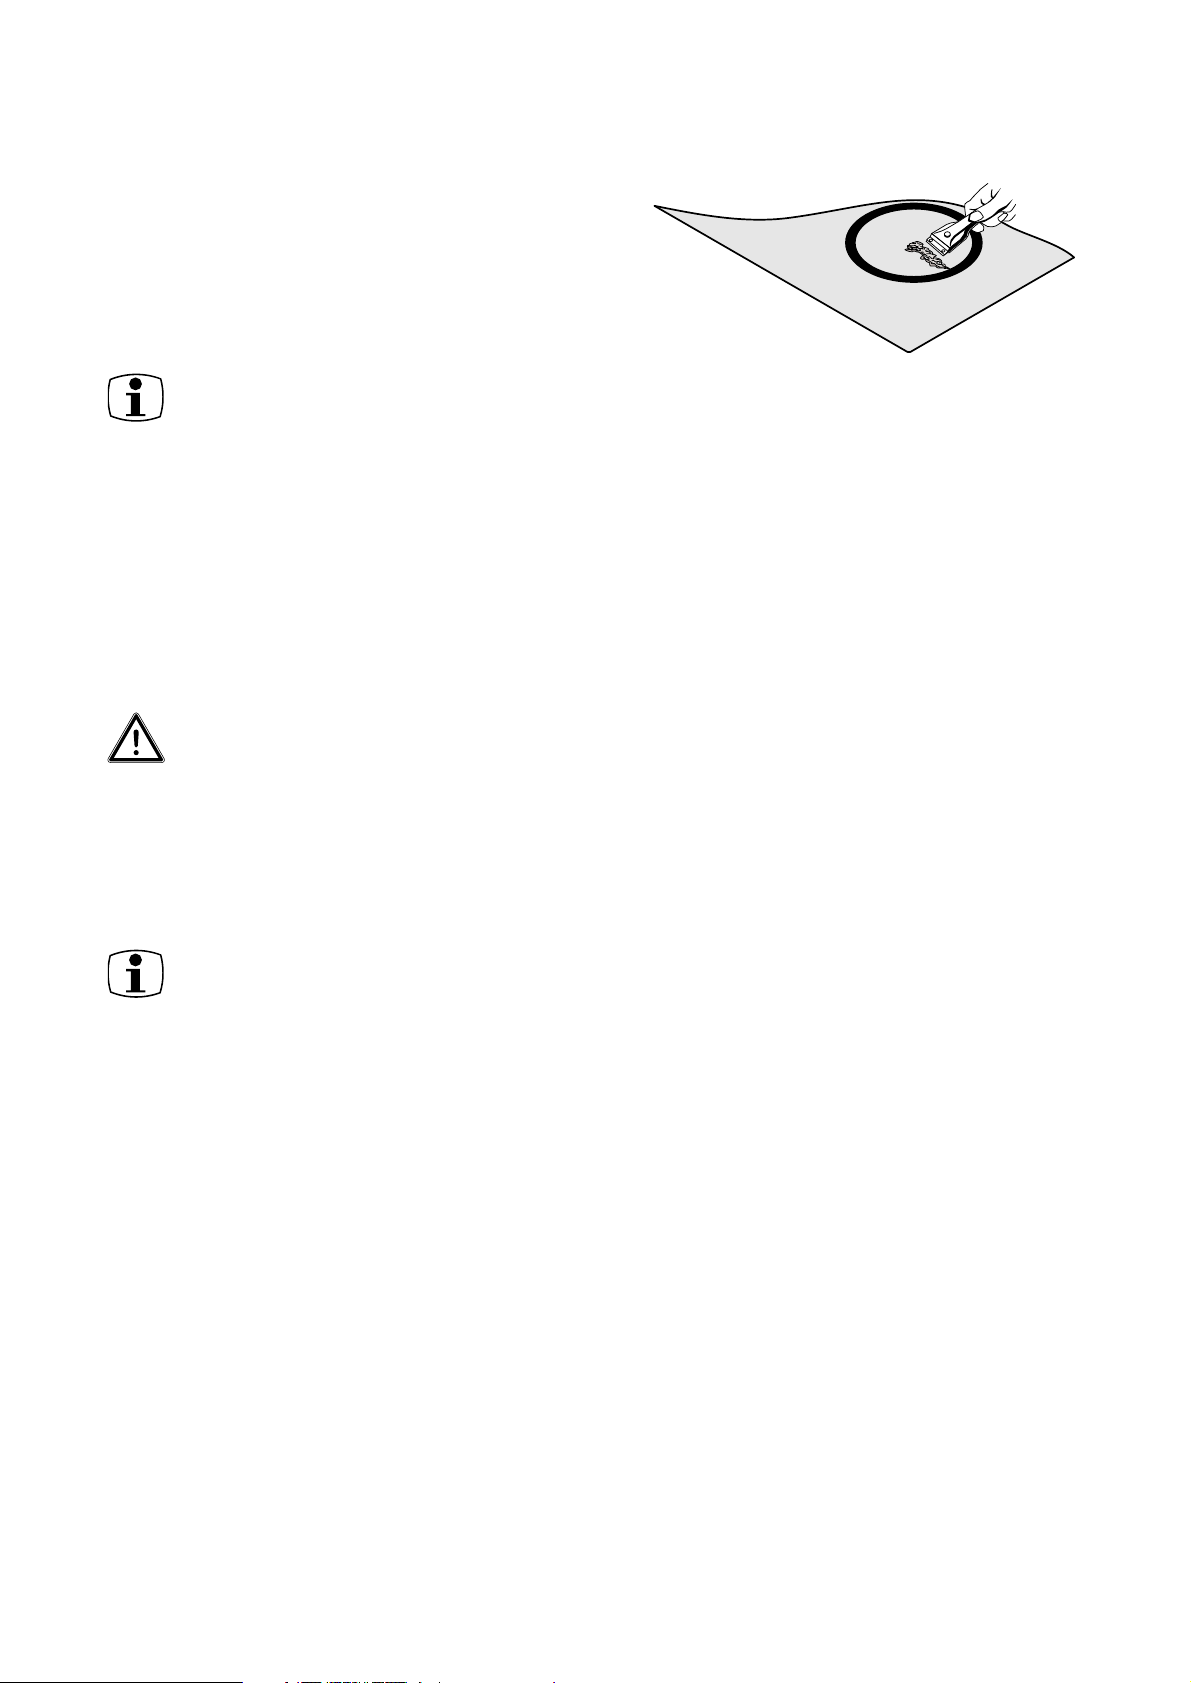
1. To remove food that has boiled over, or to
remove stubborn spatters, use a ceramic hob
scraper.
2. Place the scraper at an angle to the ceramic
glass surface.
3. Remove the soiling by sliding the blade.
Scrapers and ceramic glass cleaners are
available from Service Force.
Problem soiling
1. Remove burnt-on sugar, melted plastic,
aluminium foil or other meltable materials
immediately while there are in a hot condition,
using a suitable cleaning scraper.
Important! There is a risk of burning
yourself when you use the cleaning
scraper on the hot cooking zone!
2. Then clean the hob normally when it has
cooled down.
If the cooking zone on which something
has melted has already cooled down,
warm it up again before cleaning.
Scratches or dark marks on the ceramic
glass surface, caused for example by a
pot or pan base with sharp edges,
cannot be removed. However, they do
not impair the functioning of the hob.
24
Page 25
What to do if …
… the cooking zones cannot be switched
on?
Rectifying faults
It is possible that faults have been caused by a
minor error which you can rectify yourself with
the help of the following instructions. Do not
attempt any further repairs if the following
instructions do not help in each specific case.
Warning! Repairs to the appliance
shall only be carried out by approved
service engineers. Improper repairs
can result in considerable danger for
the user.
Contact your specialist dealer or
Service Force if repairs are required.
If the ceramic glass cooking area has a glass
fracture, please notify to the customer service
the
three-digit number, which is printed on the
glass plate.
Check whether
• the control panel is locked.
• more than 10 seconds have elapsed between
operating the ON/OFF button and switching
of the required cooking zone (refer to the
Chapter “Switching on the appliance”).
• the sensor fields are partially covered with a
damp cloth or with liquid.
… the display suddenly fails except for
for residual heat?
Check whether
• the ON/OFF button has been activated
accidentally.
• the sensor fields are partially covered with a
damp cloth, liquid or similar.
• the safety switch has been activated.
… after switching off the cooking zones,
What to do if …
… the cooking zones do not work?
Check whether
• the mains fuse (fuse box) is intact. If the fuses
trip repeatedly, call an approved electrician.
• the appliance has been switched on properly.
• the control lamps in the control panel light up.
• the corresponding cooking zone is switched
on,
• the cooking zones are set to the required
heat setting,
• the cooking zones have been switched off by
the safety switch (refer to Chapter on
“Safety”)
for residual heat does not appear in
the display?
Check whether
• the cooking zone was only used for a short
period and is therefore not hot enough.
If the cooking zone is hot, please contact the
Service Force.
… a cooking zone cannot be switched
off?
Check whether
• the control panel is covered partially by a
damp cloth or a liquid.
• the control panel is locked.
… a cooking zone cannot be switched
on?
Check whether
• the child safety feature is switched on.
• the control panel is locked.
25
Page 26

… the indication lights up?
Check whether the cooking zone is overheated.
This indicator lights up to show overheating,
electronic faults or for safety reasons.
… the appliance does not react to
activation of a sensor field?
The appliance does not react to activation of a
sensor field if you touch at the same time another
sensor field not designed for a combination.
If you request a service visit to resolve a fault listed
above or because of improper operation, the visit
of the customer service technician is not free of
charge even during the guarantee period.
26
Page 27
Installation
instructions
Important! The new appliance should
only be installed and connected up by
qualified and approved personnel.
Please observe these instructions,
otherwise the guarantee will not cover
any damage that may occur.
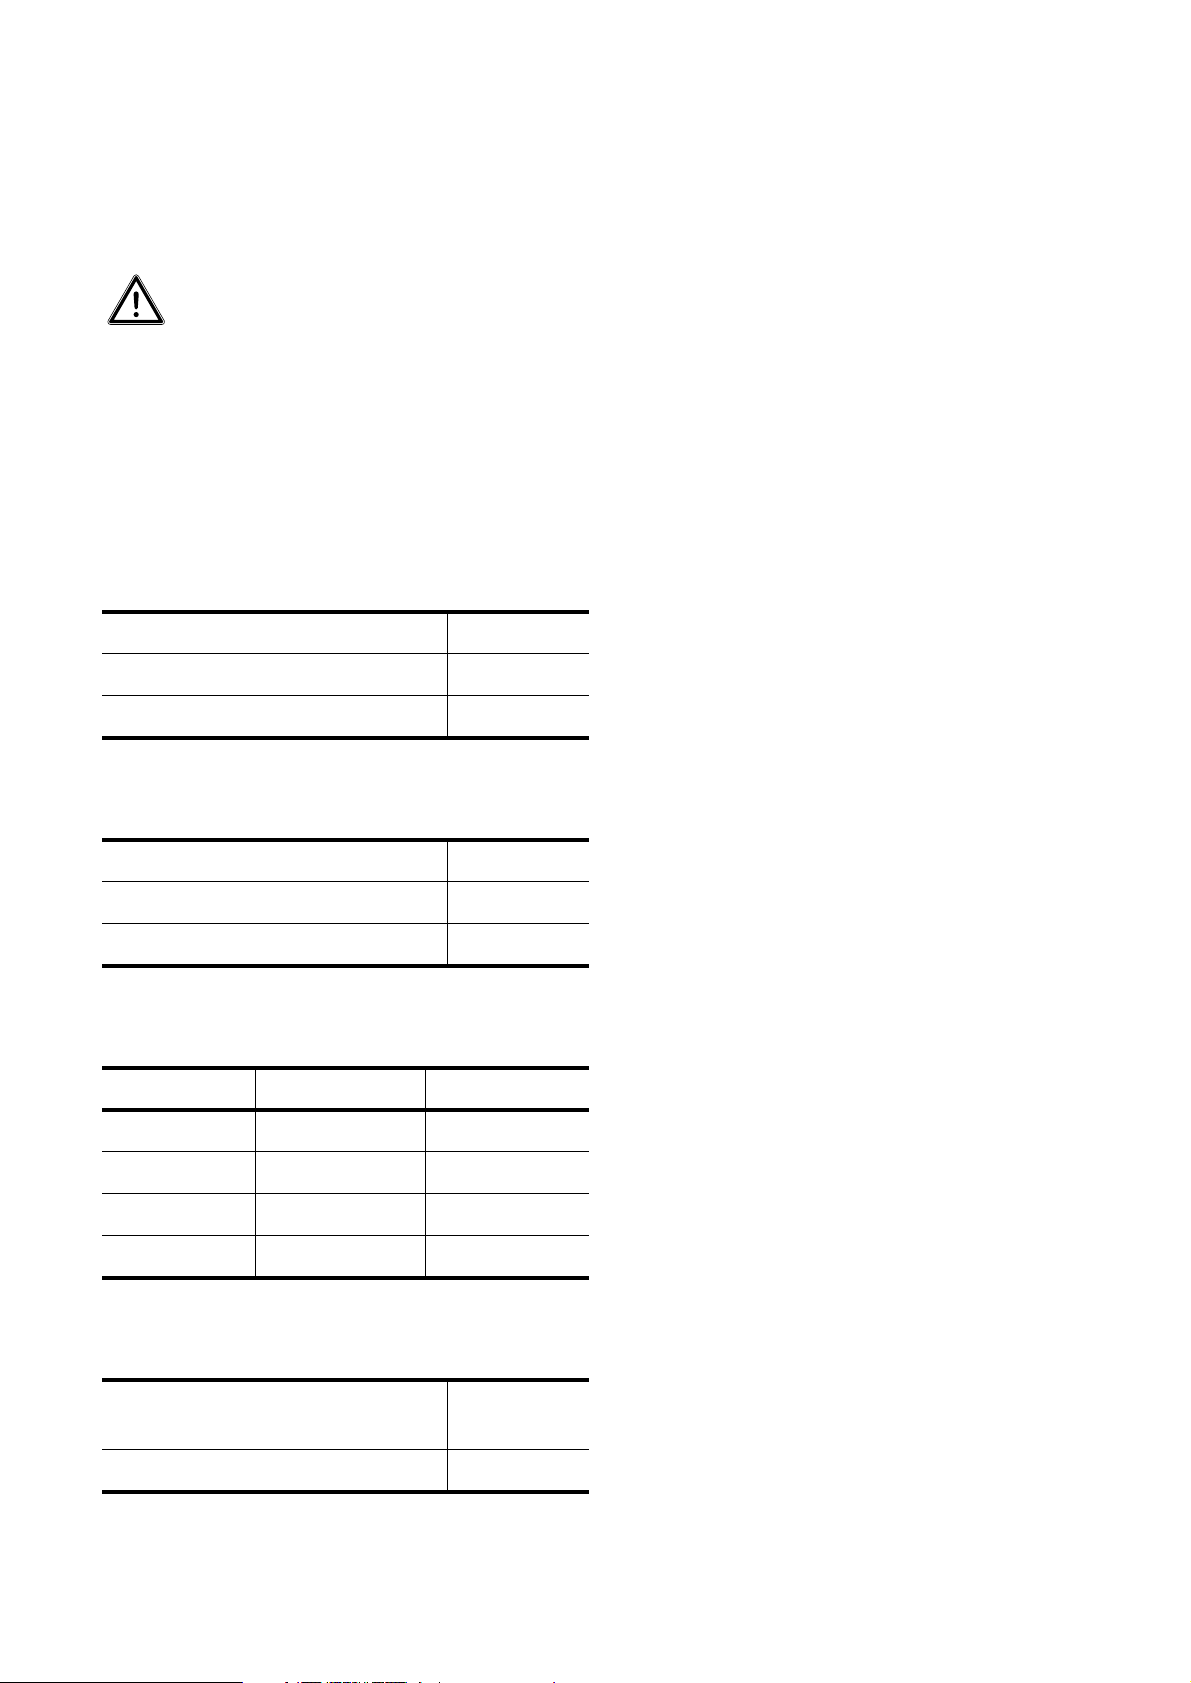
Technical data
Appliance dimensions
Width 590 mm
Depth 520 mm
Height 47 mm
Cut-out dimensions
Width 560 mm
Depth 490 mm
Corner radius R5
Cooking zones
Position Diameter Power
front left 210 mm 2300 W
back left 145 mm 1200 W
back right 180 mm 1800 W
front right 145 mm 1200 W
Connection values
Connection voltage 230 V
~ 50 Hz
Total connected load max. 6.5 kW
27
Page 28

Regulations, standards, directives
This appliance complies with the following
standards
• EN 60335-1 and EN 60335-2-6
relating to the safety of electrical appliances
for household use and similar purposes
• EN 60350 or DIN 44546 / 44547 / 44548
relating to the operating features of electric
cookers, hobs, ovens and grills for household
use.
• EN 55014-2 / VDE 0875 Part 14-2
• EN 55014 / VDE 0875 Part 14 / 1999-10
• EN 61000-3-2 / VDE 0838 Part 2
• EN 61000-3-3 / VDE 0838 Part 3
relating to basic requirements for protection
requirements with reference to electromagnetic compatibility (EMC).
This appliance complies with the
following EU directives
• 73/23/EWG dated 19.02.1973 Low voltage
directive
• 89/336/EWG dated 03.05.1989 (EMC-directive
including Amending Directive 92/31/EWG).
28
Page 29

Safety instructions for the
installation technician
• In the electrical installation a device must be
provided which allows the appliance to be
disconnected from the mains at all poles with a
contact opening width of at least 3 mm.
Suitable isolation devices include protecting
cut-outs, fuses (screw type fuses are to be
removed from the holder), earth leakage trips
and contactors.
• With regard to fire protection this appliance
complies with EN 60 335-2-6. Only this type of
appliance may be installed with a high
cupboard or wall on one side.
• The required minimum distances to other
appliances (refer to their technical
specification) of your kitchen must be
maintained.
• Drawers shall not be fitted underneath the hob.
• The installation must ensure protection against
shock.
• The kitchen unit in which the appliance is fitted
must satisfy the stability requirements of DIN
68930.
• For protection against moisture, all cut
surfaces must be sealed with a suitable sealing
material.
• On tiled work surfaces, the joints in the area
where the hob sits must be completely filled
with grout.
• On natural, artificial stone or ceramic tops, the
snap action springs must be bonded in place
with a suitable artificial resin or two-component
adhesive.
• Attach the four supplied one-sided adhesive
liner tapes to the lower side of the hob along
the outer rim of the glass ceramic pane. Do not
expand. The ends of the liner tapes must
overlap.
• For dismantling, the hob must be pressed out
from below.
• Clean the worktop around the cutout area.
29
Page 30

Electrical connection
Before connecting, check that the nominal voltage
of the appliance, that is the voltage stated on the
rating plate, corresponds to the available supply
voltage. The rating plate is located on the lower
casing of the hob.
The heating element voltage is AC230V~. The
appliance also works perfectly on older networks
with AC220V~ .
The hob is to be connected to the mains using a
device that allows the appliance to be
disconnected from the mains at all poles with a
contact opening width of at least 3 mm, e.g.,
automatic line protecting cut-out, earth leakage
trips or fuse.
A type H05VV-F cable or one with a higher grade
must be used as the mains connecting cable.
The connection must be carried out as shown in
the diagram. The connecting links should be fitted
according to the appropriate connecting diagram.
The earth lead is connected to terminal . The
earth lead must be longer than leads carrying
electric current.
The cable connections must be made in
accordance with the regulations and the
terminal screws tightened securely as
required.
Finally, the connecting cable is to be secured with
the mains cable cleat and the covering closed by
pressing firmly (lock into place).
Before switching on the the first time, any
protective foils or stickers must be removed from
the glass ceramic surface.
After connecting to the mains supply,
check and make sure that all cooking
zones are ready for use by briefly
switching each on in turn at the
maximum setting.
1
2
30
3
4
Page 31

Service and Spare Parts
If you wish to purchase spare parts or require an
engineer, contact your local Electrolux Service
Force Centre by telephoning:
08705 929 929
Your telephone call will be automatically routed to
the Service Force Centre covering your post code
area.
For the address of your local Service Force Centre
and further information about Service Force,
please visit the website at
www.serviceforce.co.uk
When you contact the Service Centre they will
need the following information:
1. Your name & address, including post code.
2. Your telephone number.
3. Clear and concise details of the fault.
4. The model and serial number of the appliance
(found on the rating plate).
5. The purchase date:
Please note that a valid purchase receipt or
guarantee documentation is required for inguarantee service calls.
Customer Care
For general enquiries concerning your Electrolux
appliance or for further information on Electrolux
products please contact our Customer Care
Department by letter or telephone at the address
below or visit our website at
www.electrolux.co.uk.
Customer Care Department
Electrolux
55-77 High Street
Slough
Berkshire, SL1 1DZ
Tel. 08705 950950 (*)
(*) Calls may be recorded for training purposes.
31
Page 32

Guarantee Conditions
Standard guarantee conditions
We, Electrolux, undertake that if within 12
months of the date of the purchase this
Electrolux appliance or any part thereof is proved
to be defective by reason only of faulty
workmanship or materials, we will, at our option
repair or replace the same FREE OF CHARGE
for labour, materials or carriage on condition that:
• The appliance has been correctly installed
and used only on the electricity supply stated
on the rating plate.
• The appliance has been used for normal
domestic purposes only, and in accordance
with the manufacturer’s instructions.
• The appliance has not been serviced,
maintained, repaired, taken apart or
tampered with by any person not authorised
by us.
• All service work under this guarantee must be
undertaken by a Service Force Centre.
• Any appliance or defective part replaced shall
become the Company’s property.
• This guarantee is in addition to your statutory
and other legal rights.
Home visits are made between 8.30am and
5.30pm Monday to Friday. Visits may be
available outside these hours in which case a
premium will be charged.
European Guarantee
If you should move to another country within
Europe then your guarantee moves with you to
your new home subject to the following
qualifications:
• The guarantee starts from the date you first
purchased your product.
• The guarantee is for the same period and to
the same extent for labour and parts as exists
in the new country of use for this brand or
range of
• products.
• This guarantee relates to you and cannot be
transferred to another user.
• Your new home is within the European
Community (EC) or European Free Trade
Area.
• The product is installed and used in
accordance with our instructions and is only
used domestically, i.e. a normal household.
• The product is installed taking into account
regulations in your new country.
Before you move please contact your nearest
Customer Care centre, listed below, to give them
details of your new home. They will then ensure
that the local Service Organisation is aware of
your move and able to look after you and your
appliances.
Exclusions
This guarantee does not cover:
• Damage or calls resulting from
transportation, improper use or neglect, the
replacement of any light bulbs or removable
parts of glass or plastic.
• Costs incurred for calls to put right an
appliance which is improperly installed or
calls to appliances outside the United
Kingdom.
• Appliances found to be in use within a
commercial environment, plus those which
are subject to rental agreements.
• Products of Electrolux manufacture which are
not marketed by Electrolux.
France Senlis +33 (0) 3 44 62 20 13
Germany Nürnberg +49 (0) 800 234 7378
Italy Pordernone +39 (0) 800 11 7511
Sweden Stockholm +46 (0) 20 78 77 50
UK Slough +44 (0) 1753 219898
32
Page 33

Αξιότιµη πελάτισσα,
αξιότιµε πελάτη
διαβάστε παρακαλώ αυτές τις οδηγίες χρήσης
προσεκτικά.
Προσέξτε κυρίως το κεφάλαιο „Υποδείξεις
ασφαλείας“ στις πρώτες σελίδες. Φυλάξτε
παρακαλώ αυτές τις οδηγίες χρήσης για µία
αργότερη ενηµέρωση. Παραδώστε τις στους τυχόν
επόµενους ιδιοκτήτες της συσκευής.
Τα ακόλουθα σύµβολα
χρησιµοποιούνται στο κείµενο:
Υποδείξεις ασφαλείας
Προειδοποίηση! Υποδείξεις που
εξυπηρετούν την προσωπική σας
ασφάλεια.
Προσοχή! Υποδείξεις που εξυπηρετούν
την αποφυγή ζηµιών στην συσκευή.
Υποδείξεις και πρακτικές συµβουλές
Πληροφορίες για το περιβάλλον
1. Αυτοί οι αριθµοί σας οδηγούν βήµα προς βήµα
στον χειρισµό της συσκευής.
2. ...
3. ...
Οι παρούσες οδηγίες χρήσης περιέχουν
υποδείξεις για αυτόνοµη άρση των βλαβών που
ίσως παρουσιαστούν, βλέπε κεφάλαιο ¨Τι κάνετε,
όταν...¨.
Εκτύπωση σε χαρτί κατασκευασµένο φιλικά προς
το περιβάλλον.
Όποιος σκέφτεται οικολογικά, ενεργεί επίσης και
έτσι...
33
Page 34

Περιεχόµενα
Οδηγίες χρήσης .......................................... 35
Ασφάλεια .................................................... 35
Ηλεκτρική ασφάλεια ..................................... 35
Ασφάλεια για τα παιδιά ................................ 35
Ασφάλεια κατά την χρήση ............................ 35
Ασφάλεια κατά τον καθαρισµό ..................... 36
Έτσι θα αποφύγετε ζηµιές στην συσκευή .... 36
Απόρριψη ................................................... 37
Απόρριψη υλικού συσκευασίας ................... 37
Απόρριψη παλαιάς συσκευής ...................... 37
Τα σηµαντικότερα χαρακτηριστικά
της συσκευής σας ...................................... 38
Περιγραφή συσκευής ................................ 39
Εξοπλισµός επιφανειών µαγειρέµατος
και χειριστηρίων ........................................... 39
Ψηφιακές ενδείξεις ....................................... 40
Απενεργοποίηση ασφάλειας των εστιών ..... 40
Πριν την πρώτη χρήση ............................. 41
Πρώτος καθαρισµός .................................... 41
Χειρισµός των µαγειρικών εστιών ........... 41
Πεδία αφής Touch Control ........................... 41
Ενεργοποίηση συσκευής ............................. 41
Απενεργοποίηση συσκευής ......................... 42
Επιλογή εστίας µαγειρέµατος ..................... 42
Ρύθµιση σκάλας διατήρησης θερµότητας ... 42
Απενεργοποίηση επιφάνειας µαγειρέµατος . 43
Ένδειξη υπόλοιπου θερµότητας .................. 43
Μαγείρεµα µε την αυτόµατη
λειτουργία προθέρµ
Μαγείρεµα χωρίς αυτόµατη
λειτουργία προθέρµανσης .......................... 45
Ασφάλεια για τα παιδιά ................................ 46
Ρολόι ............................................................ 48
Ασφάλιση/ απασφάλιση χειριστηρίων .......... 51
ανσης .......................... 44
Χρήση, πίνακες, συµβουλές ...................... 52
Μαγειρικά σκεύη ........................................... 52
Συµβουλές για εξοικονόµηση
ενέργειας ...................................................... 53
Συµβουλές για το µαγείρεµα µε
ή χωρίς αυτόµατη λειτουργία
προθέρµανσης ............................................. 54
Καθαρισµός και φροντίδα ......................... 56
Μαγειρική εστία ............................................ 56
Τι κάνετε, όταν … ....................................... 58
Αντιµετώπιση σε περίπτωση βλάβης ........... 58
Τι κάνετε, όταν … ......................................... 58
Οδηγίες συναρµολόγησης ......................... 60
Τεχνικά στοιχεία ......................................... 60
∆ιαστάσεις συσκευής ................................... 60
∆ιαστάσεις υποδοχής συναρµολόγησης ...... 60
Εστίες µαγειρέµατος ..................................... 60
Τιµές σύνδεσης ............................................ 60
Κανονισµοί, προδιαγραφές,
κατευθυντήριες γραµµές ............................ 61
Υποδείξεις ασφαλείας για
τον τεχνικό εγκατάστασης ........................ 62
Ηλεκτρική σύνδεση .................................... 63
Σέρβις .......................................................... 64
Συναρµολόγηση ...........................................95
34
Page 35

Οδηγίες χρήσης
Ασφάλεια
Η ασφάλεια αυτής της συσκευής ανταποκρίνεται
στους αναγνωρισµένους κανόνες της τεχνικής
και στην νοµοθεσία περί ασφάλειας των
συσκευών. Επιπλέον ως κατασκευαστές
αισθανόµαστε την υποχρέωση να σας
εξοικειώσουµε µε τις ακόλουθες υποδείξεις
ασφαλείας.
Ηλεκτρική ασφάλεια
• Η συναρµολόγηση και η σύνδεση της νέας
συσκευής θα πρέπει να γίνονται µόνο από
εξουσιοδοτηµένο ειδικό.
• Οι επισκευές της συσκευής θα πρέπει να
γίνονται µόνο από εξουσιοδοτηµένους
τεχνικούς σέρβις. Οι επισκευές από άτοµα µη
ειδικευµένα µπορούν να προκαλέσουν
σηµαντικούς κινδύνους. Σε περίπτωση που
χρειαστεί επισκευή,
απευθυνθείτε στο τµήµα εξυπηρέτησης
πελατών µας ή στον προµηθευτή σας.
Παρακαλούµε προσέξτε αυτές τις
υποδείξεις, διότι διαφορετικά δεν ισχύει
η εγγύηση σε περίπτωση πρόκλησης
ζηµιών.
• Οι εντοιχισµένες συσκευές θα πρέπει να
λειτουργούν µόνο µετά τον εντοιχισµό σε
τυποποιηµένα και κατάλληλα εντοιχισµένα
ντουλάπια και επιφάνειες εργασίας. Έτσι
διασφαλίζεται η προστασία αφής για τις
ηλεκτρικές συσκευές που απαιτείται από την
VDE.
• Όταν δηµιουργούνται φθορές στην συσκευή
όπως θραύσεις, ρωγµές, σπασίµατα κ.τ.λ.:
- Απενεργοποιήστε όλες τις µαγειρικές
εστίες.
- Κλείστε την ασφάλεια για την κεραµική
εστία και τραβήξτε την προς τα έξω.
παρακαλούµε
Ασφάλεια για τα παιδιά
• Όταν βράζετε και ψήνετε, οι εστίες καίνε. Για
αυτό τα µικρά παιδιά θα πρέπει κατά κανόνα
να βρίσκονται µακριά και επιτρέψτε στα
µεγαλύτερα παιδιά να εργαστούν στην
συσκευή µόνο υπό την επίβλεψή σας.
• Αυτή η συσκευή είναι εξοπλισµένη µε µ ία
διάταξη ασφαλείας, η οποία µπορεί να
ενεργοποιηθεί, για
τρόπο αυτό πιθανή ενεργοποίηση της
συσκευής από παιδiα που παίζουν γύρω από
αυτή.
να αποφευχθεί µε τον
Ασφάλεια κατά την χρήση
• Αυτή η συσκευή θα πρέπει να
χρησιµοποιείται µόνο για βράσιµο και ψήσιµο
φαγητών που συνηθίζεται στο σπίτι.
• Μην χρησιµοποιείται τις επιφάνειες
µαγειρέµατος για την θέρµανση του χώρου.
• Ιδιαίτερη προσοχή απαιτείται κατά την
σύνδεση των ηλεκτρικών συσκευών σε
πρίζες που βρίσκονται κοντά στην συσκευή.
Τα καλώδια
έρχονται σε επαφή µε τις εστίες, όταν αυτές
είναι καυτές.
• Τα λίπη και τα έλαια αναφλέγονται εύκολα.
Όταν µαγειρεύετε φαγητά σε λίπος ή λάδι
(π.χ. τηγανητές πατάτες), θα πρέπει να έχετε
τον νού σας στο µαγείρεµα.
• Μετά από κάθε χρήση απενεργοποιήστε τις
εστίες
.
• Η τεχνική αφής παρέχει µεν µεγάλη ασφάλεια
κατά τον χειρισµό της συσκευής, απαιτεί δε
µεγάλη προσοχή κατά την επιλογή
επιφανειών µαγειρέµατος, απόδοσης και
χρόνων.
σύνδεσης δεν θα πρέπει να
35
Page 36

Ασφάλεια κατά τον καθαρισµό
• Για τον καθαρισµό πρέπει η συσκευή να
απενεργοποιηθεί.
• Ο καθαρισµός της συσκευής µε µία συσκευή
εκτόξευσης ατµού ή µε µία συσκευή
καθαρισµού υψηλής πίεσης δεν επιτρέπεται
για λόγους ασφαλείας.
Έτσι θα αποφύγετε ζηµιές στην
συσκευή
• Μην χρησιµοποιείται την εστία µαγειρέµατος
ως επιφάνεια εργασίας ή απόθεσης
αντικειµένων.
• Η περιφέρεια της κεραµικής πλάκας δεν
διαθέτει κάποιο προστατευτικό πλαίσιο και
εποµένως είναι εκτεθειµένη στα χτυπήµατα.
Χρησιµοποιήστε µε µεγάλη προσοχή τις
κατσαρόλες και τα τηγάνια.
• Μην χρησιµοποιείτε τις εστίες µαγειρέ
µε άδειο µαγειρικό σκεύος ή χωρίς
κατσαρόλα ή τηγάνι. Υπάρχει περίπτωση να
φθαρούν τόσο τα µαγειρικά σκεύη όσο και οι
εστίες µαγειρέµατος.
• Το κεραµικό υλικό είναι εξαιρετικά ανθεκτικό
στις απότοµες µεταβολές της θερµοκρασίας,
δεν είναι όµως άθραυστο. Τα αιχµηρά και τα
σκληρά αντικείµ
στις εστίες µαγειρέµατος, µπορούν να
προκαλέσουν σε αυτές σηµαντικές ζηµιές.
• Μην χρησιµοποιείτε κατσαρόλες από
χυτοσίδηρο ή µε φθαρµένη βάση, οι οποίες
είναι άγριες και παρουσιάζουν προεξοχές.
Κατά την µετατόπισή τους µπορούν να
προκληθούν γρατσουνιές.
• Μην αποθέτετε τηγάνια ή κατσαρόλες στο
πλαίσιο των επιφανειών µαγειρέµατος.
Ενδέχεται να προκληθούν γρατσουνιές και
φθορές στην βαφή.
• Προσέξτε, ώστε να µην πέφτουν στις εστίες
µαγειρέµατος όξινα υγρά, όπως π.χ. ξύδι,
λεµόνι ή διαλυτικά µέσα, διότι διαφορετικά
δηµιουργούνται σηµεία µατ.
• Εάν πέσει ζάχαρη ή κάποιο µίγµα που
περιέχει
µαγειρέµατος και λιώσει, θα πρέπει να
αφαιρεθεί αµέσως µε την ξύστρα καθαρισµού
όσο ακόµη η εστία είναι ζεστή. Εάν η µάζα
κρυώσει ενδέχεται να προκληθούν φθορές
στην επιφάνεια κατά τον καθαρισµό της.
• Κρατήστε όλα τα υλικά και αντικείµενα, που
µπορεί
εστίες, όπως π.χ. πλαστικά, αλουµινόχαρτο ή
νάιλον. Σε περίπτωση που πέσει επάνω στην
κεραµική εστία και λυώσει ένα τέτοιο υλικό,
θα πρέπει αυτό να καθαριστεί αµέσως µε την
ειδική ξύστρα καθαρισµού.
ζάχαρη επάνω στην ζεστή εστία
να λιώσουν, µακριά από τις κεραµικές
ενα που θα πέσουν επάνω
µατος
36
Page 37

Απόρριψη
Απόρριψη υλικού συσκευασίας
Όλα τα υλικά µπορούν να επαναχρησιµοποιηθούν
χωρίς κανένα περιορισµό.
Τα συνθετικά υλικά έχουν σηµανθεί ως εξής:
• >PE< για το πολυαιθυλένιο, π.χ. στην
εξωτερική συσκευασία και τις σακούλες στο
εσωτερικό της συσκευής.
• >PS< για το αφρώδες πολυστυρόλιο, π.χ. στα
σφουγγάρια συσκευασίας, ουσιαστικά δεν
περιέχονται χλωροφθοράνθρακες.
Τα υλικά πρέπει να αποσύρονται
τους κανονισµούς.
Προσέξτε παρακαλώ τους εθνικούς και τοπικούς
κανονισµούς για την απόρριψη των υλικών
συσκευασίας όπως και τον χαρακτηρισµό του
υλικού (διαχωρισµός υλικών, συλλογή
απορριµµάτων, κέντρα συγκέντρωσης χρήσιµων
υλικών).
σύµφωνα µε
Απόρριψη παλαιάς συσκευής
Προειδοποίηση! Για να µην αποτελεί
πλέον κανένα κίνδυνο η παλιά
συσκευή, αχρηστέψτε την πριν την
απορρίψετε.
Αποσυνδέστε την συσκευή από το
ρεύµα και αφαιρέστε το καλώδιο
ρεύµατος από την συσκευή.
Για την προστασία του περιβάλλοντος θα πρέπει
όλες οι παλαιές συσκευές, χρησιµοποιηµένες
συσκευές να απορρίπτονται µε τον προβλεπόµενο
τρόπο.
• Η συσκευή δεν πρέπει σε καµία περίπτωση να
απορρίπτεται µαζί µε τα οικιακά απορρίµµατα.
• Περισσότερες πληροφορίες για ηµεροµηνίες
παραλαβής ή σηµεία συγκέντρωσης θα λάβετε
από την τοπική υπηρεσία καθαρισµού πόλεων
ή την τοπική αυτοδιοίκηση.
37
Page 38

Τα σηµαντικότερα χαρακτηριστικά της συσκευής σας
• Κεραµική µαγειρική εστία: Η συσκευή σας
διαθέτει µία κεραµική επιφάνεια και
4 µαγειρικές εστίες ταχείας θέρµανσης. Με τις
ιδιαίτερα αποδοτικές αντιστάσεις θέρµανσης,
ο χρόνος που χρειάζεται για να ζεσταθούν οι
εστίες µειώνεται αισθητά.
• Πεδίο αφής: Ο χειρισµός της συσκευής σας
επιτυγχάνεται µέσω πεδίων αφής Touch-
Control.
• Καθαρισµός: Το πλεονέκτηµ
κεραµικών εστιών και των πεδίων αφής είναι
η ευκολία καθαρισµού. Η λεία επιφάνεια
καθαρίζεται εύκολα.
• Πεδίο αφής ¨Ενεργοποίηση/
απενεργοποίηση¨: Η συσκευή διαθέτει
εκτός του πεδίου αφής ¨Ενεργοποίηση/
απενεργοποίηση¨, και έναν χωριστό κεντρικό
διακόπτη, από τον οποίο µπορείτε να
ενεργοποιήσετε ή να απενεργοποιήσετε την
τροφοδοσία ηλεκτρικού ρεύµατος στην
συσκευή.
• Ενδείξεις: Οι ψηφιακές ενδείξεις ή αντίστοιχα
οι λυχνίες ελέγχου σας ενηµερώνουν για τις
επιλεγµένες σκάλες µαγειρέµατος, τις
ενεργοποιηµένες λειτουργίες, καθώς και για
το υπόλοιπο θερµότητας που ενδεχοµένως
υπάρχει σε κάποια εστία.
• Απενεργοποίηση ασφάλειας: Η
απενεργοποίηση ασφάλειας φροντίζει ώστε
όλες οι εστίες µαγειρέµατος να τίθενται
αυτό
µατα εκτός λειτουργίας µετά από ένα
ορισµένο χρονικό διάστηµα, εφ’ όσον δεν
πραγµατοποιηθεί καµία µ εταβολή των
ρυθµίσεων.
• Ασφάλεια για τα παιδιά: Με αυτή την
λειτουργία ασφαλίζεται η επιφάνεια
µαγειρέµατος έναντι αθέµιτης ενεργοποίησής
της.
α των
• Επιφάνεια µαγειρέµατος µονής εστίας: Το
πεδίο µαγειρέµατος διαθέτει τέσσερις
επιφάνειες µαγειρέµατος µ
η συσκευή σας προσφέρει περισσότερες
επιφάνειες µαγειρέµατος διαφορετικού
µεγέθους, π.χ. για µικρότερες κατσαρόλες.
Με αυτό τον τρόπο εξοικονοµείτε ενέργεια.
• Ρολόι: Με το ενσωµατωµένο ρολόι µπορείτε
να θέσετε αυτόµατα εκτός λειτουργίας όλες
τις εστίες µαγειρέµατος. Μόλις περάσει ο
χρόνος µαγειρέµατος
αυτόµατα εκτός λειτουργίας.
ονής εστίας. Έτσι
, η εστία τίθεται
• Σκάλα διατήρησης θερµότητας: είναι η
σκάλα µε την οποία
ζεστά τα φαγητά.
• Ένδειξη υπόλοιπου θερµότητας:
Εµφανίζεται µία ένδειξη υπόλοιπου
θερµότητας υποδηλώνοντας την ύπαρξη
υπόλοιπου θερµότητας, η οποία αποτελεί
κίνδυνο για τυχόν εγκαύµατα, σε κάποια
εστία.
µπορείτε να διατηρήσετε
38
Page 39

Περιγραφή συσκευής
Εξοπλισµός επιφανειών µαγειρέµατος και χειριστηρίων
39
Page 40

Ψηφιακές ενδείξεις
Τα τέσσερα πεδία ενδείξεων, στα οποία έχουν
καταχωρηθεί οι τέσσερις εστίες µαγειρέµατος
εµφανίζουν:
• µετά την ενεργοποίηση,
• κατά την επιλογή µίας εστίας
µαγειρέµατος,
• έως , ανάλογα µε την εστία
µαγειρέµατος,
• στην αυτόµατη λειτουργία προθέρµανσης,
• εάν υπάρχει κάποιο υπόλοιπο
θερµότητας,
Απενεργοποίηση ασφάλειας των
εστιών
Εάν µία από τις εστίες δεν τεθεί σε λειτουργία
µετά από ένα ορισµένο χρονικό διάστηµα ή δεν
αλλάξει η σκάλα µαγειρέµατος, τότε η
συγκεκριµένη εστία απενεργοποιείται αυτόµατα.
Η υπάρχουσα υπόλοιπη θερµοκρασία
εµφανίζεται µε (όπως ¨ζεστό¨) στις ψηφιακές
ενδείξεις των ανάλογων επιφανειών
µαγειρέµατος.
Οι
επιφάνειες µαγειρέµατος απενεργοποιούνται:
• Σκάλα , , µετά από 6 ώρες
• Σκάλα , µετά από 5 ώρες
• όταν είναι ενεργοποιηµ
τα παιδιά
• σε περίπτωση εσφαλµένης λειτουργίας /
υπερθέρµανσης
ένη η ασφάλεια για
• Σκάλα µετά από 4 ώρες
• Σκάλα , , , µετά από 1,5 ώρα
Σε περίπτωση που µία ή περισσότερες
εστίες τεθούν αυτόµατα εκτός
λειτουργίας πριν από τους
προκαθορισµένους χρόνους βλέπε
κεφάλαιο ¨Τι κάνετε, όταν …¨.
Περίπτωση απενεργοποίησης που
οφείλεται σε άλλα αίτια
Τα υγρά που χύνονται κατά το βράσιµο και
έρχονται σε επαφή µε το πεδίο χειριστηρίων,
επιφέρουν την άµεση απενεργοποίηση όλων
των εστιών.
Το ίδιο θα συµβεί και εάν περάσετε ένα βρεγµένο
πανί επάνω από το πεδίο των χειριστηρίων. Και
στις δύο περιπτώσεις θα πρέπει η συσκευή να
τεθεί σε
αφού πρώτα αποµακρύνετε τα υγρά ή το
βρεγµένο πανί.
λειτουργία από τον κύριο διακόπτη
40
Page 41

Πριν την πρώτη χρήση
Πρώτος καθαρισµός
Σκουπίστε την κεραµική µαγειρική εστία µε ένα
υγρό πανί.
Προσοχή! Μην χρησιµοποιείτε πολύ
δραστικά καθαριστικά ή καθαριστικά που
χαράσσουν!
Η επιφάνεια µπορεί να υποστεί ζηµιά.
Χειρισµός των µαγειρικών
εστιών
Πεδία αφής Touch Control
Για την χρήση των πεδίων αφής Touch Control
τοποθετήστε το δάχτυλο επάνω από το εκάστοτε
πεδίο, µέχρι να ανάψουν ή να σβήσουν οι
αντίστοιχες ενδείξεις ή µέχρι να πραγµατοποιηθεί
η λειτουργία που επιθυµείτε.
Ενεργοποίηση συσκευής
Η συσκευή ενεργοποιείται από το πεδίο αφής
¨Ενεργοποίηση/ απενεργοποίηση¨ .
Πιέστε το πεδίο αφής ¨Ενεργοποίηση/
απενεργοποίηση περ. για 2 δευτερόλεπτα.
Ανάβουν οι ψηφιακές ενδείξεις.
Αφού πατήσατε το πεδίο αφής
¨Ενεργοποίηση/ απενεργοποίηση για να
θέσετε σε λειτουργία την συσκευή θα
πρέπει εντός 10
περίπου δευτερολέπτων να επιλέξετε
µία εστία µαγειρέµ ατος ή να ρυθµίσετε
κάποια ώρα µε το ρολόι (ρολόι για το
βράσιµο αυγών). Σε διαφορετική
περίπτωση η συσκευή θα τεθεί για
λόγους ασφαλείας και πάλι εκτός
λειτουργίας.
~ 2 sec.
41
Page 42

Απενεργοποίηση συσκευής
Για την πλήρη απενεργοποίηση της συσκευής
πατήστε το πεδίο αφής ¨Ενεργοποίηση/
απενεργοποίηση¨ .
Πιέστε το πεδίο αφής ¨Ενεργοποίηση/
απενεργοποίηση¨ για ένα περίπου
δευτερόλεπτο.
Σβήνουν οι ψηφιακές ενδείξεις.
Μετά από την θέση µίας εστίας ή
ολόκληρης της συσκευής εκτός
λειτουργίας, θα εµφανιστεί στις ψηφιακές
ενδείξεις των αντίστοιχων εστιών το
~ 1 sec.
υπάρχον υπόλοιπο θερ
(όπως ¨ζεστό¨).
µότητας µε
Επιλογή εστίας µαγειρέµατος
Για την επιλογή ή ρύθµιση της σκάλας ( έως )
για την επιλεγµένη επιφάνεια µαγειρέµατος.
Αυξήστε την σκάλα από το πεδίο αφής .
Μειώστε την σκάλα από το πεδίο αφής .
Ρύθµιση σκάλας διατήρησης
θερµότητας
Και οι 4επιφάνειες µαγειρέµατος είναι
εξοπλισµένες µε µία σκάλα διατήρησης
θερµότητας .
Με το πεδίο αφής διατήρησης θερµότητας
επιλέγετε την σκάλα διατήρησης θερµότητας .
42
Page 43

Απενεργοποίηση επιφάνειας
µαγειρέµατος
Για την απενεργοποίηση πιέστε ταυτόχρονα τα
πεδία αφής επιλογής σκάλας µαγειρέµατος και
ή µηδενίστε µε το πεδίο αφής επιλογής σκάλας
µαγειρέµατος .
Ένδειξη υπόλοιπου θερµότητας
Μετά από την θέση µίας εστίας ή ολόκληρης της
συσκευής εκτός λειτουργίας, θα εµφανιστεί στις
ψηφιακές ενδείξεις των αντίστοιχων εστιών το
υπάρχον υπόλοιπο θερµότητας µε (όπως
¨ζεστό¨).
Ακόµη και µετά την θέση της εστίας εκτός
λειτουργίας, η ένδειξη του υπόλοιπου θερµότητας
θα σβήσει µόνο αφού πρώτα κρυώσει
η εστία.
Μπορείτε να εκµεταλλευτείτε το
υπόλοιπο θερµότητας για το λιώσιµο ή
την διατήρηση της θερµότητας των
φαγητών.
Προσοχή! Όσο η ένδειξη του υπόλοιπου
θερµότητας είναι αναµµένη υπάρχει
κίνδυνος εγκαυµάτων.
Προσοχή! Σε περίπτωση διακοπής
ρεύµατος σβήνει και το σύµβολο και
κατά συνέπεια παύει η επισήµανση
ύπαρξης υπόλοιπου θερµότητας. Παρ’
όλα αυτά, ο κίνδυνος να καείτε συνεχίζει
να είναι υπαρκτός. Μπορείτε να
αποφύγετε αυτό τον κίνδυνο δίνοντας
ιδιαίτερη προσοχή.
43
Page 44

Μαγείρεµα µε την αυτόµατη
λειτουργία προθέρµανσης
Και οι τέσσερις επιφάνειες µαγειρέµατος διαθέτουν
αυτόµατη λειτουργία προθέρµανσης και µπορούν
να ρυθµιστούν σε εννέα σκάλες:
•, µικρότερη σκάλα µαγειρέµατος
•, µεγαλύτερη σκάλα µαγειρέµατος
•, λειτουργία προθέρµανσης.
Εάν επιλέξετε την σκάλα µαγειρέµατος που
επιθυµείτε από το πεδίο αφής , τότε η επιφάνεια
µαγειρέµ
συγκεκριµένο χρονικό διάστηµα µε πλήρη ισχύ και
στην συνέχεια θα επιστρέψει αυτόµατα στην
σκάλα που έχετε επιλέξει.
Η διάρκεια της αυτόµατης λειτουργίας εξαρτάται
άµεσα από την σκάλα µαγειρέµατος που έχετε
διαλέξει.
Πιέστε το πεδίο αφής επιλογής σκάλας
µαγειρέµατος , για να
σκάλα µαγειρέµατος από το έως το .
Στην συνέχεια εµφανίζεται η ρυθµισµένη σκάλα
µαγειρέµατος.
Μετά από 5 δευτερόλεπτα εµφανίζεται στην θέση
της ένδειξης της σκάλας (= αυτόµατη
λειτουργία) στις ενδείξεις. Μετά το πέρας του
χρόνου προθέρµανσης εµφανίζεται πάλι η ένδειξη
σκάλας µ
ατος θα λειτουργήσει για ένα
ρυθµίστε την επιθυµητή
αγειρέµατος.
Εάν κατά την διάρκεια της αυτόµατης
λειτουργίας επιλέξετε µία µεγαλύτερη
σκάλα, π.χ. από σε , τότε
αναπροσαρµόζεται ο χρόνος
προθέρµανσης.
Εάν επιλέξετε µία µικρότερη σκάλα, τότε
ο χρόνος προθέρµανσης τερµατίζεται
αµέσως.
Η αυτόµατη λειτουργία προθέρµανσης
είναι δυνατή µόνο σε κρύα ή
ζεστή εστία µαγειρέµατος. Σε περίπτωση
που µία εστία µαγειρέµατος είναι ζεστή
κατά την ενεργοποίησή της (ένδειξη ),
δεν µπορείτε να εργαστείτε µε αυτόµατη
λειτουργία προθέρµανσης.
σχετικά
44
Page 45

Μαγείρεµα χωρίς αυτόµατη
λειτουργία προθέρµανσης
Εάν θέλετε να χρησιµοποιήσετε την εστία
µαγειρέµατος χωρίς την αυτόµατη λειτουργία
προθέρµανσης, επιλέξτε την σκάλα που θέλετε µε
το πεδίο αφής επιλογής σκάλας µαγειρέµατος .
Πιέστε το πεδίο αφής επιλογής σκάλας
µαγειρέµατος , για να ρυθµίστε την επιθυµητή
σκάλα µαγειρέµατος από το έως
Με τα πεδία αφής επιλογής σκάλας
µαγειρέµατος και µπορείτε
οποιαδήποτε στιγµή να αλλάξετε την
σκάλα.
το .
45
Page 46

Ασφάλεια για τα παιδιά
Με την βοήθεια της ασφάλειας για τα παιδιά
µπορείτε να ασφαλίσετε την εστία µαγειρέµατος
έναντι ανεπιθύµητης χρήσης.
Ενεργοποιήστε την ασφάλεια για τα
παιδιά
Για την ενεργοποίηση της ασφάλειας για τα παιδιά
πρέπει να είναι ενεργοποιηµένη η συσκευή, δεν
πρέπει όµως να είναι ενεργοποιηµένη κάποια από
τις εστίες µαγειρέµατος.
1. Πιέστε το πεδίο αφής ¨Ασφάλιση¨ για περ.
τρία δευτερόλεπτα.
Για επιβεβαίωση ακούγεται ένας ηχητικός τόνος.
~ 3 sec.
2. Πιέστε ένα τυχαίο πεδίο αφής επιλογής σκάλας
µαγειρέµατος .
Στις ενδείξεις εµφανίζεται , η ασφάλεια για τα
παιδιά είναι ενεργοποιηµένη. Η συσκευή
απενεργοποιείται αυτόµατα µετά από µερικά
δευτερόλεπτα.
Προσπέλαση ασφάλειας για τα παιδιά
Η ασφάλεια για τα παιδιά µπορεί να προσπελαστεί
για µία χρήση της συσκευής (έως την επόµενη
απενεργοποίηση της συσκευής). Κατά την
επόµενη ενεργοποίηση είναι η ασφάλεια για τα
παιδιά και πάλι ενεργοποιηµένη.
1. Ενεργοποιήστε την συσκευή.
Όταν είναι ενεργοποιηµένη η ασφάλεια για τα
παιδιά εµφανίζεται .
2. Ταυτόχρονα πιέστε
επιλογής σκάλας µαγειρέµατος και για 1
περ. δευτερόλεπτο.
Για επιβεβαίωση ακούγεται ένας ηχητικός τόνος. Η
ασφάλεια για τα παιδιά έχει προσπελαστεί µέχρι
την απενεργοποίηση της συσκευής, η µαγειρική
εστία µπορεί να χρησιµοποιηθεί κανονικά.
δύο τυχαία πεδία αφής
~ 2 sec.
~ 1 sec.
46
Page 47

Απενεργοποίηση ασφάλειας για τα παιδιά
1. Ενεργοποιήστε την συσκευή.
Όταν είναι ενεργοποιηµένη η ασφάλεια για τα
παιδιά εµφανίζεται .
2. Πιέστε το πεδίο αφής ¨Ασφάλιση¨ για περ.
τρία δευτερόλεπτα.
Για επιβεβαίωση ακούγεται ένας ηχητικός τόνος.
3. Πιέστε ένα τυχαίο πεδίο αφής επιλογής σκάλας
µαγειρέµατος .
Οι ενδείξεις σκουραίνουν, η ασφάλεια για παιδιά
είναι απενεργοποιηµένη. Η συσκευή
απενεργοποιείται αυτόµατα µετά από µερικά
δευτερόλεπτα.
~ 2 sec.
~ 3 sec.
47
Page 48

Ρολόι
Μπορείτε να χρησιµοποιήσετε το ρολόι µε δύο
τρόπους:
• ως
• ως
Αυτόµατη απενεργοποίηση. Ρυθµίζετε για
µία εστία µαγειρέµατος ένα χρόνο
µαγειρέµατος, µετά το πέρας του οποίου θα
απενεργοποιηθεί αυτόµατα η εστία
µαγειρέµατος. Αυτή η λειτουργία µπορεί να
χρησιµοποιηθεί ταυτόχρονα για διάφορες
εστίες µαγειρέµατος.
Χρονόµετρο µικρής διάρκειας χωρίς
λειτουργία ενεργοποίησης (¨ρολόι για το
βράσιµο αυγών¨), µετά το πέρας του
ρυθµισµένου χρόνου ηχεί ένα ακουστικό σήµα.
Κατά κανόνα
διάρκειας δεν µπορεί να χρησιµοποιηθεί
όταν είναι ενεργοποιηµένη κάποια εστία
µαγειρέµατος.
το χρονόµετρο µικρής
Χρήση αυτόµατης απενεργοποίησης
Η επιφάνεια (-ες) µαγειρέµατος, για τις οποίες
επιθυµείτε να χρησιµοποιήσετε την αυτόµατη
απενεργοποποίηση πρέπει να είναι
ενεργοποιηµένες.
1. Επιλέξτε µε το πεδίο αφής ρολόι ποια από
τις επιφάνειες µαγειρέµατος θα
χρησιµοποιηθεί η αυτόµατη απενεργοποίηση.
Εάν αγγίξετε µία φορά το πεδίο αφής ρολόι θα
επιλεχθεί κατά την φορά των δεικτών του ρολογιού
η πρώτη ενεργή επιφάνεια µαγειρέµατος, η λυχνία
ελέγχου που αντιστοιχεί σε αυτή θα αναβοσβήσει
γρήγορα. Π.χ. η κάτω αριστερή λυχνία ελέγχου
αντιστοιχεί στην κάτω αριστερή επιφάνεια
µαγειρέµατος. Στην ένδειξη του οθόνη ρολογιού
εµφανίζεται .
Με επαναλαµβανόµενο άγγιγµα του πεδίου
ρολόι επιλέγεται η επόµενη ενεργή επιφάνεια
µαγειρέµατος.
2. Όση ώρα αναβοσβήνει η λυχνία ελέγχου,
ρυθµίστε µε τα πεδία αφής ρύθµιση ρολογιού
αφής
~ 1 sec.
ή την επιθυµητή διάρκεια µέχρι την
αυτόµατη απενεργοποίηση (π.χ. 15 λεπτά).
Μετά από µερικά δευτερόλεπτα ενεργοποιείται η
αυτόµατη απενεργοποίηση.
48
Page 49

Η λυχνία ελέγχου αναβοσβήνει πιο αργά και στην
οθόνη εµφανίζεται ο υπόλοιπος χρόνος. Εάν η
αυτόµατη απενεργοποίηση ρυθµιστεί για
περισσότερες επιφάνειες µαγειρέµατος, το
παραπάνω ισχύει για την επιφάνεια εκείνη µε τον
µικρότερο υπόλοιπο χρόνο µ αγειρέµατος. Οι
λυχνίες ελέγχου της επιφάνειας µαγειρέµατος µε
ρυθµισµένη
αυτόµατη απενεργοποίηση ανάβουν.
Για την ένδειξη του υπόλοιπου χρόνου
µαγειρέµατος άλλης επιφάνειας µαγειρέµατος,
πρέπει να επιλεχθεί µε την βοήθεια του πεδίου
αφής ρολόι , η αντίστοιχη λυχνία ελέγχου
αναβοσβήνει τότε γρήγορα.
Για αλλαγή του υπόλοιπου χρόνου µαγειρέµατος
πρέπει να επιλεχθεί πρώτα η επιθυµητή επιφάνεια
µαγειρέµατος µ
ε το πεδίο αφής ρολόι . Η λυχνία
ελέγχου που αντιστοιχεί σε αυτή αναβοσβήνει τότε
πιο γρήγορα. Η αλλαγή επιτυγχάνεται µε τα πεδία
επαφής ρύθµιση ρολογιού ή .
Μετά το πέρας του ρυθµισµένου χρόνου
απενεργοποιείται αυτόµατα η επιφάνεια
µαγειρέµατος και για δύο λεπτά ηχεί ένα ακουστικό
σήµα, η ένδειξη
ρολογιού αναβοσβήνει .
3. Πιέστε το πεδίο αφής ρολόιο για να
απενεργοποιήσετε το σήµα.
Για πιο γρήγορη ρύθµιση, πιέστε ένα
από τα πεδία αφής ρύθµισης ρολογιού
ή για τόση ώρα ώστε να επιτύχετε
την επιθυµητή τιµή.
Εάν ενεργοποιηθεί πρώτα το πεδίο αφής
ρύθµισης ρολογιού , ξεκινάει η
ρύθµιση
χρόνου από τα 99 λεπτά, εάν
ενεργοποιηθεί πρώτα το πεδίο αφής
ρύθµισης ρολογιού , ξεκινάει η
ρύθµιση χρόνου από το 1 λεπτό.
~ 1 sec.
49
Page 50

Πρόωρος τερµατισµός της λειτουργίας του
ρολογιού
Έχετε δύο δυνατότητες να τερµατίσετε πρόωρα
την λειτουργία του ρολογιού:
Απενεργοποιήστε ταυτόχρονα την επιφάνεια
µαγειρέµατος και το ρολόι
Με το πεδίο αφής επιλογή σκάλας µ αγειρέµατος
µηδενίστε την επιθυµητή επιφάνεια
µαγειρέµατος.
Η επιφάνεια µαγειρέµατος και το ρολόι
απενεργοποιούνται.
Απενεργοποίηση ρολογιού – η εστία
παραµένει σε
1. Με το πεδίο αφής ρολόι επιλέξτε την
επιθυµητή επιφάνεια µαγειρέµατος.
Τότε αναβοσβήνει πιο γρήγορα η αντίστοιχη
λυχνία ελέγχου.
2. Ρυθµίστε µε το πεδίο αφής ρύθµιση ρολογιού
λειτουργία
στο ρολόι εκτός :
Απενεργοποιείται µόνο το ρολόι, ενώ η επιφάνεια
µαγειρέµατος παραµένει σε λειτουργία.
Χρήση του χρονοµέτρου µικρής διάρκειας
Για την χρησιµοποίηση του χρονοµέτρου µικρής
διάρκειας πρέπει η συσκευή να είναι
ενεργοποιηµένη, δεν πρέπει όµως να είναι
ενεργοποιηµένη καµία επιφάνεια µαγειρέµατος.
1. Πιέστε το πεδίο αφής ρολόι .
Στην ένδειξη του οθόνη ρολογιού εµφανίζεται .
2. Με το πεδίο αφής ρύθµιση ρολογιού ή
ρυθµ
ίστε την επιθυµητή διάρκεια.
Μετά από µερικά δευτερόλεπτα ενεργοποιείται το
χρονόµετρο µικρής διάρκειας και εµφανίζεται ο
υπόλοιπος χρόνος.
Για την αλλαγή του υπόλοιπου χρόνου πιέστε το
πεδίο αφής ρολόι και µε τα πεδία αφής για την
ρύθµιση ρολογιού ή προβείτε σε αλλαγή της
ρύθµισης.
Μετά το πέρας
ακουστικό σήµα και αναβοσβήνει η ένδειξη
ρολογιού .
του ρυθµισµένου χρόνου ηχεί ένα
3. Πιέστε το πεδίο αφής ρολόι για να
απενεργοποιήσετε το σήµα.
50
Page 51

Ασφάλιση/ απασφάλιση
χειριστηρίων
Σε κάθε τυχαία χρονική στιγµή της διαδικασίας
µαγειρέµατος µπορεί να ασφαλιστεί το χειριστήριο,
εκτός από το πεδίο αφής ¨Ενεργοποίηση/
απενεργοποίηση¨, για να αποφευχθεί τυχόν
αλλαγή στις ρυθµίσεις, π.χ. καθώς σκουπίζετε την
επιφάνεια µε πανί.
1. Κρατήστε πατηµένο το πεδίο αφής ¨Ασφάλιση¨
για ένα περ. δευτερόλεπτο.
Ανάβει
¨Ασφάλιση¨ .
2. Για να απασφαλίσετε τα χειριστήρια κρατήστε
Σβήνει η λυχνία ελέγχου του πεδίου αφής
¨Ασφάλιση¨, εµφανίζονται ξανά οι σκάλες
µαγειρέµατος που είχαν ρυθµιστεί.
η λυχνία ελέγχου του πεδίου ελέγχου
εκ νέου το πεδίο αφής ¨Ασφάλιση¨ για ένα
περ. δευτερόλεπτο.
Κατά την απενεργοποίηση της
συσκευής, απενεργοποιείται αυτόµατα
και
η ασφάλιση.
~ 1 sec.
~ 1 sec.
51
Page 52

Χρήση, πίνακες, συµβουλές
Μαγειρικά σκεύη
Όσο καλύτερη είναι η κατσαρόλα, τόσο πιο
νόστιµο είναι το αποτέλεσµα.
• Τα καλά µαγειρικά σκεύη τα αναγνωρίζετε από
την βάση τους. Η βάση θα πρέπει να είναι όσο
το δυνατόν πιο παχιά και επίπεδη.
• Όταν αγοράζετε κατσαρόλες και τηγάνια
προσέξτε την διάµετρο της βάσης τους. Οι
κατασκευαστές συχνά αναφέρουν
διάµετρο της περιφέρειας του µαγειρικού
σκεύους.
• Τα µαγειρικά σκεύη µε βάση από αλουµίνιο ή
χαλκό µπορούν να αφήσουν επάνω στην
κεραµική επιφάνεια ίχνη µετάλλου τα οποία δεν
αφαιρούνται πλέον ή αφαιρούνται πολύ
δύσκολα.
• Μην χρησιµοποιείτε κατσαρόλες από
χυτοσίδηρο ή µε βάση που φέρει φθορές
οποία είναι άγρια και εµφανίζει γρατσουνιές.
Αυτά τα σκεύη µπορούν να χαράξουν
ανεπανόρθωτα την επιφάνεια κατά την
µετακίνησή τους.
• Όταν είναι κρύες, οι βάσεις από τα µαγειρικά
σκεύη συνήθως έχουν µία µικρή κλίση προς τα
µέσα (κοίλες). Σε καµία περίπτωση δεν θα
πρέπει να είναι κοίλες προς
• Εάν χρησιµοποιείτε ειδικά µαγειρικά σκεύη,
(π.χ. χύτρα ατµού, βραστήρα, WOK κ.τ.λ.), θα
πρέπει να δώσετε προσοχή στις υποδείξεις του
κατασκευαστή.
τα έξω (κυρτές).
την επάνω
, η
Γενικές υποδείξεις
• Η βάση πρέπει να είναι πάντα καθαρή και
στεγνή.
• Για να αποφύγετε τις αντιαισθητικές
γρατσουνιές πάνω στην επιφάνεια της
κεραµικής επιφάνειας
οι κατσαρόλες και τα τηγάνια να µην
σπρώχνονται κατά την µεταφορά τους αλλά να
ανασηκώνονται.
• Γρατσουνιές µπορεί να προκύψουν ακόµα και
από κόκκους άµµου (π.χ. από προηγούµενο
καθάρισµα λαχανικών) που σπρώχνονται µε
την κατσαρόλα πάνω από την επιφάνεια.
• Χρησιµοποιήστε ψηλές
µε πολλά υγρά, για να µην µπορεί να ξεχυλίσει
το νερό.
µαγειρέµατος, θα πρέπει
κατσαρόλες για φαγητά
52
Page 53

Συµβουλές για εξοικονόµηση
ενέργειας
Εξοικονοµείτε πολύτιµη ενέργεια, όταν
ακολουθείτε τις ακόλουθες οδηγίες:
• Οι κατσαρόλες και τα τηγάνια θα πρέπει
βασικά να τοποθετούνται πάνω στις εστίες
πριν αυτές ανάψουν.
• Οι λερωµένες µαγειρικές εστίες και οι βάσεις
των µαγειρικών σκευών αυξάνουν την
κατανάλωση ρεύµατος.
• Οι κατσαρόλες και τα τηγάνια θα πρέπει εάν
είναι δυνατόν, να κλείνουν πάντα µε το καπάκι
τους.
• Οι
µαγειρικές εστίες πριν από το τέλος του
χρόνου ψησίµατος θα πρέπει να κλείνουν, έτσι
ώστε να αξιοποιείται το υπόλοιπο
θερµοκρασίας, π.χ. για να κρατήσετε ζεστά τα
φαγητά σας ή για να λιώσετε κάτι.
• Η βάση της κατσαρόλας και η µαγειρική εστία
θα πρέπει να έχουν το ίδιο µέγεθος.
• Χρησιµοποιώντας µία χύτρα ταχύτητας ο
χρόνος ψησίµατος µειώνεται έως και κατά το
50%.
53
Page 54

Συµβουλές για το µαγείρεµα µε ή
χωρίς αυτόµατη λειτουργία
προθέρµανσης
Η αυτόµατη λειτουργία προθέρµανσης είναι
κατάλληλη για:
• φαγητά, τα οποία προετοιµάζονται και
τοποθετούνται κρύα στην εστία, στην συνέχει
θερµαίνονται σε µεγάλη θερµοκρασία και δεν
χρειάζονται να παρακολουθούνται κατά την
διάρκεια του µαγειρέµατος,
• φαγητά, τα οποία µαγειρεύονται σε καυτό
τηγάνι.
Η αυτόµατη λειτουργία προθέρµανσης
ακατάλληλη για:
• γκουλάς, ρολό και παρόµοια φαγητά, τα οποία
απαιτούν συχνό γύρισµα κατά το µαγείρεµα ή
σβήνονται µε υγρά,
• ζυµαρικά µε µεγάλες ποσότητες υγρών,
• το µαγείρεµα µε χύτρες ταχύτητας,
• πολύ µεγάλες ποσότητες σούπας/ φαγητών
κατσαρόλας άνω των 2 λίτρων.
Γενικές υποδείξεις:
• Προτείνουµε, στο µαγείρεµα χωρίς αυτόµατη
λειτουργία προθέρµανσης να επιλέξετε µία
µεγάλη σκάλα θερµοκρασίας (µε το πλήκτρο
) για το βράσιµο/ τηγάνισµα των φαγητών
και στην συνέχεια να ολοκληρώσετε το
µαγείρεµα επιλέγοντας την κατάλληλη σκάλα
για το συγκεκριµένο φαγητό.
• Παρατηρήστε τα πρώτα βή
Έτσι θα µπορέσετε να διαπιστώσετε, ποια
θερµοκρασία είναι ιδανική για την ¨δική σας
συνταγή¨, ¨στην ποσότητα που ετοιµάζετε
συνήθως¨ και για τα ¨µαγειρικά σκεύη που
χρησιµοποιείτε¨. Σύντοµα θα είστε σε θέση να
εκτιµήσετε τα πλεονεκτήµατα της αυτόµατης
λειτουργίας προθέρµανσης και θα
αίσθηση ασφάλειας στην χρήση των εστιών
µαγειρέµατος.
µατα µαγειρέµατος!
είναι
έχετε µία
54
Page 55

Ενδεικτικές τιµές για το µαγείρεµα στην εστία
Οι αναφερόµενες τιµές στον πίνακα που ακολουθεί
είναι ενδεικτικές. Η θέση του διακόπτη για τις
διάφορες διαδικασίες µαγειρέµατος εξαρτάται από
την ποιότητα των µαγειρικών σκευών και από την
ποσότητα και το είδος των τροφίµων.
Θέση
διακόπτη
Χρόνος
προθέρ-
µανσης
αυτόµατης
λειτουργίας
[λεπτά.]
4,5
3,5
2,0
10,2
6,5
Τρόπος
Παραδείγµατα χρήσης
µαγειρέµατος
1)
Βράσιµο
Τηγάνισµα
Φριτούρες
Βράσιµο µεγάλων ποσοτήτων υγρών,
βράσιµο ζυµαρικών,
Τηγάνισµα κρεατικών,
(γκούλας, τηγανιά)
∆υνατό
τηγάνισµα
Φιλέτα, µπριζόλες,
τηγανίτες από πατάτα,
λουκάνικα,
τηγανίτες/ τηγανόψωµα
Τηγάνισµα Σνίτσελ/ κοτολέτες,
συκώτι, ψάρι,
κεφτέδες, αυγά µάτια
Βράσιµο
Βράσιµο υγρών έως 1,5 l,
πατάτες, λαχανικά
4,8
Μαγείρεµα στον
ατµό
1,7
Τσιγά ρι σµα
Βράσιµο
Λιώσιµο Λιώσιµο βούτυρου,
1,0
0,5
1)
στο µαγείρεµα χωρίς την αυτόµατη λειτουργία ο
∆ιατήρηση
θερµοκρασίας
χρόνος προθέρµανσης µπορεί να επιλεγεί κατά
βούληση.
Προτείνουµε, κατά το βράσιµο ή το
τηγάνισµά, να θέσετε αρχικά το διακόπτη
στην θέση „“ και στην συνέχεια να
ολοκληρώσετε την παρασκευή των
τροφίµων µε µεγαλύτερο χρόνο
ψησίµατος θέτοντας τον διακόπτη στην
κατάλληλη θέση.
Μαγείρεµα στον ατµό και τσιγάρισµα
µικρότερων ποσοτήτων λαχανικών,
Βράσιµο φαγητών µε ρύζι και
γάλα
λιώσιµο ζελατίνης,
λιώσιµο σοκολάτας
∆ιατήρηση θερµοκρασίας
φαγητών
55
Page 56

Καθαρισµός και φροντίδα
Μαγειρική εστία
Προσοχή! Τα καθαριστικά µέσα δεν θα
πρέπει να έρχονται σε επαφή µε
ζεστή κεραµική επιφάνεια! Όλα τα
καθαριστικά µέσα θα πρέπει να
αφαιρούνται µετά τον καθαρισµό µε
άφθονο νερό, αφού σε αναθέρµανση της
επιφάνειας µπορεί αυτά να
παρουσιάσουν καυστική δράση!
Μην χρησιµοποιείτε ισχυρά καθαριστικά
µέσα, όπως π.χ. σπρέυ για γκρίλ και
φούρνους ψησίµατος, καθώς και
καθαριστικά µαγειρικών
µπορεί να χαράξουν την επιφάνεια.
Μετά από κάθε χρήση καθαρίστε τις
κεραµικές εστίες όταν είναι κρύες ή
χλιαρές. Έτσι αποφεύγετε το κάψιµο των
υπολειµµάτων.
Λεκέδες από άλατα και λεκέδες από
νερό, τα κατάλοιπα από λίπη και οι
ακαθαρσίες µ ε µεταλλική απόχρωση θα
πρέπει να καθαρίζονται µε ειδικό
καθαρισµού κεραµικών εστιών ή µε
καθαριστικό µέσο ανοξείδωτων
µαγειρικών σκευών.
σκευών που
την
υγρό
Ελαφρές βρωµιές
1. Περάστε τις κεραµικές εστίες µε ένα υγρό πανί
και λίγο υγρό καθαρισµού χεριών.
2. Στην συνέχεια σκουπίστε την επιφάνεια µε ένα
καθαρό πανί ∆εν θα πρέπει να παραµείνουν
υπολείµµατατου καθαριστικού µέσου επάνω
στην επιφάνει.
3. Καθαρίζετε καλά όλη την κεραµική επιφάνεια
µία φορά την
συνηθισµένα υγρά καθαρισµού κεραµικών
εστιών ή ανοξείδωτων µαγειρικών σκευών.
4. Στην συνέχεια ξεπλύνετε την κεραµική
επιφάνεια µε άφθονο νερό και σκουπίστε µε
ένα καθαρό πανί που δεν αφήνει χνούδι.
εβδοµάδα χρησιµοποιώντας
56
Page 57

Βρωµιές που έχουν κολλήσει επάνω στην
επιφάνεια
1. Για την αποµάκρυνση υπολειµµάτων φαγητού
που έχουν κολλήσει επάνω στην επιφάνεια
χρησιµοποιήστε την ειδική ξύστρα
καθαρισµού.
2. Τοποθετήστε την ξύστρα επάνω στην κεραµική
επιφάνεια µε ελαφριά κλίση.
3. Αφαιρέστε τις βρωµιές σέρνοντας την λεπίδα
επάνω στην επιφάνεια.
Την ειδική ξύστρα
υγρό καθαρισµού κεραµικών εστιών θα
τα βρείτε στο ειδικό εµπόριο.
καθαρισµού και το
Ειδικές περιπτώσεις βρωµιών
1. Η καµένη ζά χαρη , τα λιωµένα πλαστικά υλικά,
το αλουµινόχαρτο και άλλα υλικά που λιώνουν
εύκολα θα πρέπει να αφαιρεθούν αµέσως, όσο
οι εστίες είναι ζεστές, χρησιµοποιώντας την
ειδική ξύστρα.
Προσοχή! Κατά την χρήση της ξύστρας
καθαρισµού επάνω στην ζεστή κεραµική
επιφάνεια υφίσταται κίνδυνος
εγκαυµάτων!
2. Στην συνέχεια καθαρίζετε την κρύα µαγειρική
εστία µε τον συνηθισµένο τρόπο.
Εάν η µαγειρική εστία έχει ήδη κρυώσει
µε το λιωµένο υλικό, θα πρέπει να την
ζεστάνετε
Οι γρατσουνιές ή οι σκούροι λεκέδες
στην κεραµική επιφάνεια, όπως π.χ.
γρατσουνιές από αιχµηρά µαγειρικά
σκεύη δεν µπορούν να αφαιρεθούν.
Παρ’ όλα αυτά όµως δεν µειώνουν την
απόδοση της µαγειρικής εστίας.
πριν τον καθαρισµό.
57
Page 58

Τι κάνετε, όταν …
… οι εστίες µαγειρέµατος δεν µπορούν
να τεθούν σε λειτουργία;
Αντιµετώπιση σε περίπτωση
βλάβης
Ενδεχοµένως σε περίπτωση µίας βλάβης να
πρόκειται µόνο για ένα µικρό σφάλµα, που
µπορείτε να το διορθώσετε οι ίδιοι µε την βοήθεια
των ακόλουθων υποδείξεων. Μην εκτελέσετε οι
ίδιοι καµία επιπλέον εργασία, όταν οι πιο κάτω
πληροφορίες δεν σας βοηθούν περισσότερο
στην συγκεκριµένη περίπτωση.
Προειδοποίηση! Οι επισκευές στην
συσκευή επιτρέπεται να εκτελεστούν
µόνο από ειδικευµένους τεχνίτες. Οι µη
ενδεδειγµένες επισκευές µπορούν να
προκαλέσουν σοβαρούς κινδύνους για
τον χρήστη.
Σε περίπτωση
στο ειδικό κατάστηµα πώλησης ή στην
υπηρεσία εξυπηρέτησης πελατών.
Εάν η κεραµική εστία µαγειρέµατος εµφανίσει
ρωγµή, ενηµερώστε την υπηρεσία
εξυπηρέτησης πελατών για τον
ο οποίος βρίσκεται στην πλάκα µαγειρέµατος.
επισκευής απευθυνθείτε
τριψήφιο αριθµό,
Ελέγξτε εάν
• έχει ασφαλιστεί το πεδίο χειριστηρίων.
• µεταξύ της αφής του πλήκτρου Εντός/ εκτός
και την ενεργοποίηση της επιθυµητής εστίας
έχουν περάσει περισσότερα από 10
δευτερόλεπτα (βλέπε κεφάλαιο
¨Ενεργοποίηση συσκευής¨).
• τα πεδία αφής έχουν καλυφθεί από ένα
βρεγµένο πανί ή εν µέρει από υγρά που
έχουν χυθεί.
… ξαφνικά η ένδειξη για το υπόλοιπο
θερµότητας εξαφανίζεται;
Ελέγξτε εάν
• έχει πατηθεί κατά λάθος το πλήκτρο Εντός/
εκτός.
• τα πεδία αφής έχουν καλυφθεί από ένα
βρεγµένο πανί ή από υγρά που έχουν χυθεί.
• έχει ενεργοποιηθεί η λειτουργία
απενεργοποίησης ασφαλείας.
… µετά την απενεργοποίηση των εστιών
δεν εµφανίζεται στο πεδίο ενδείξεων το
για το υπόλοιπο θερµότητας;
Τι κάνετε, όταν …
… δεν λειτουργούν οι εστίες
µαγειρέµατος;
Ελέγξτε εάν
• η ασφάλεια της οικιακής εγκατάστασης
(ηλεκτρικός πίνακας) είναι εντάξει. Εάν οι
ασφάλειες πέφτουν συχνά, θα πρέπει να
καλέσετε έναν ηλεκτρολόγο.
• η συσκευή έχει τεθεί σε λειτουργία µε τον
σωστό τρόπο,
• ανάβουν οι λυχνίες ελέγχου στο πεδίο
χειριστηρίων,
• εάν έχει ενεργοποιηθεί η αντίστοιχη εστία,
• οι εστίες µαγειρέµατος έχουν
επιθυµητή σκάλα,
• εάν πραγµατοποιήθηκε απενεργοποίηση
ασφαλείας των εστιών µαγειρέµατος (βλέπε
κεφάλαιο ¨Ασφάλεια¨).
ρυθµιστεί στην
Ελέγξτε εάν
• οι εστίες µαγειρέµατος τέθηκαν µόνο για
σύντοµο χρονικό διάστηµα σε λειτουργία και
εποµένως δεν είναι αρκετά θερµές.
Εάν η εστία µαγειρέµατος είναι ζεστή
παρακαλούµε καλέστε το τµήµα εξυπηρέτησης
πελατών.
… µία εστία µαγειρέµατος δεν τίθεται
εκτός λειτουργίας;
Ελέγξτε εάν
• τα πεδία αφής έχουν καλυφθεί από ένα
βρεγµένο πανί ή από υγρά που έχουν χυθεί.
• έχει ασφαλιστεί το πεδίο χειριστηρίων.
58
Page 59

… µία εστία µαγειρέµατος δεν τίθεται εντός
λειτουργίας;
Ελέγξτε εάν
• έχει ενεργοποιηθεί η ασφάλεια για τα παιδιά.
• έχει ασφαλιστεί το πεδίο χειριστηρίων.
… ανάβει η ένδειξη ;
Ελέγξτε εάν η εστία µαγειρέµατος έχει
υπερθερµανθεί.
Αυτή η ένδειξη εµφανίζεται στην περίπτωση
υπερθέρµανσης, σε περίπτωση σφάλµατος της
ηλεκτρονικής µονάδας ή για λόγους ασφαλείας.
… η συσκευή δεν ανταποκρίνεται στην
ενεργοποίηση ενός πεδίου αφής;
Η συσκευή δεν ανταποκρίνεται στην ενεργοποίηση
ενός πεδίου αφής όταν ταυτόχρονα πατάτε και
κάποιο άλλο πεδίο αφής, το οποίο δεν έχει
προβλεφθεί για συνδυασµό µε το άλλο.
Εάν καλέσετε το τµήµα εξυπηρέτησης πελατών για
κάποιο πρόβληµα που οφείλεται σε λανθασµένο
χειρισµό, τότε η επίσκεψη του τεχνικού δεν
πραγµατοποιείται δωρεάν, ακόµη και εντός της
προθεσµίας της εγγύησης.
59
Page 60

Οδηγίες συναρµολόγησης
Προσοχή! Η συναρµολόγηση και η
σύνδεση της νέας συσκευής
επιτρέπεται να πραγµατοποιηθεί µόνο
από έναν εξουσιοδοτηµένο
ηλεκτρολόγο.
Προσέξτε παρακαλώ αυτή την
υπόδειξη, διαφορετικά σε περίπτωση
που παρουσιαστούν ζηµιές εκπίπτει η
αξίωση εγγύησης.
Τεχνικά στοιχεία
∆ιαστάσεις συσκευής
Πλάτος 590 mm
Βάθος 520 mm
Ύψος 47 mm
∆ιαστάσεις υποδοχής
συναρµολόγησης
Πλάτος 560 mm
Βάθος 490 mm
Ακτίνα γωνίας R5
Εστίες µαγειρέµατος
Θέση ∆ιάµετρος Απόδοση
Τιµές σύνδεσης
Τάσ η σύνδεσης 230 V
~ 50 Hz
Συνολική τιµή σύνδεσης, µέγιστη 6,5 kW
µπροστά
αριστερά
πίσω
αριστερά
πίσω δεξιά 180 mm 1800 W
µπροστά
δεξιά
210 mm 2300 W
145 mm 1200 W
145 mm 1200 W
60
Page 61

Κανονισµοί, προδιαγραφές,
κατευθυντήριες γραµµές
Αυτή η συσκευή ανταποκρίνεται στις ακόλουθες
προδιαγραφές:
• EN 60335-1 και EN 60335-2-6
σχετικά µε την ασφάλεια ηλεκτρικών
συσκευών οικιακής χρήσης και παρόµοιων
σκοπών και
• EN 60350 ή DIN 44546 / 44547 / 44548
σχετικά µε τις ιδιότητες χρήσης ηλεκτρικών
κουζινών για το νοικοκυριό.
• EN 55014-2 / VDE 0875 µέρος 14-2
• EN 55014 / VDE 0875 µέρος 14 / 1999-10
• EN 61000-3-2 / VDE 0838 µέρος 2
• EN 61000-3-3 / VDE 0838 µέρος 3
περί βασικών απαιτήσεων ασφαλείας στην
ηλεκτροµαγνητική συµβατότητα (ΗΜΣ
).
Αυτή η συσκευή ανταποκρίνεται στις
οδηγίες της ΕΕ:
• 73/23/EΟΚ από τις 19.02.1973 οδηγία περί
χαµηλής τάσης
• 89/336/EΟΚ από τις 03.05.1989 (ΗΜΣ-οδηγία
συµπεριλαµβανοµένης και της οδηγίας
αλλαγής 92/31/EΟΚ).
61
Page 62

Υποδείξεις ασφαλείας για τον τεχνικό εγκατάστασης
• Στην ηλεκτρική εγκατάσταση θα πρέπει να
προβλεφθεί µία συσκευή, η οποία θα
επιτρέπει τον διαχωρισµό της συσκευής από
το δίκτυο µε ένα εύρος ανοίγµατος επαφής
της τάξης τουλάχιστον των 3 mm.
Σαν κατάλληλοι διαχωριστές θεωρούνται
π.χ. ο διακόπτης LS, οι ασφάλειες (οι
βιδωτές ασφάλειες θα πρέπει να βγουν από
την υποδοχή),
διακόπτες.
• Η παρούσα συσκευή αναφορικά µε την
πυροπροστασία που παρέχει ανήκει στον
τύπο EN 60 335-2-6. Μόνο συσκευές αυτού
του τύπου µπορούν να εντοιχιστούν
µονόπλευρα σε παρακείµενες ψηλές
ντουλάπες ή τοίχους.
• Πρέπει να διατηρούνται οι ελάχιστες
απαιτούµενες αποστάσεις της κουζίνας σας
από άλλες συσκευές (βλέπε τεχνική
τεκµηρίωση).
• Συρτάρια
από την εστία µαγειρέµατος.
• Ο εντοιχισµός θα πρέπει να εγγυάται την
προστασία επαφής.
• Η ευστάθεια της εντοιχισµένης ντουλάπας θα
πρέπει να ανταποκρίνεται στο πρότυπο DIN
68930.
• Για την προστασία από την υγρασία, όλες οι
πριονισµένες επιφάνειες θα πρέπει να
σφραγίζονται µε κατάλληλο υλικό
στεγανοποίησης
• Στις επιφάνειες εργασίας µε πλακάκια, οι
αρµοί στην περιοχή στήριξης του τµήµατος
µαγειρέµατος θα πρέπει να πληρώνονται µε
υλικό αρµών.
• Σε πλάκες από φυσική ή τεχνητή πέτρα και
στις κεραµικές πλάκες θα πρέπει οι
συναρµογές να κολληθούν µε κατάλληλες
κόλλες δύο συστατικών στοιχείων
κόλλες που περιέχουν συνθετική ρητίνη.
• Οι τέσσερις αυτοκόλλητες µονωτικές ταινίες
που σας παρέχονται πρέπει να κολλιούνται
στην κάτω πλευρά της εστίας µαγειρέµατος
κατά µήκος του εξωτερικού πλαισίου του
κεραµικού µαγειρικού δίσκου. Μην τις
τεντώνετε. Τα άκρα των µονωτικών ταινιών
πρέπει να καλύπτουν το ένα το άλλο.
διακόπτες FI και µαγνητικοί
δεν πρέπει να τοποθετούνται κάτω
.
ή µε
•
Για την αποσυναρµολόγηση το κοίλο πλαίσιο
των εστιών θα πρέπει να τραβηχτεί προς τα
κάτω.
• Καθαρίστε τον πάγκο εργασίας στο σηµείο
συναρµολόγησης.
62
Page 63

Ηλεκτρική σύνδεση
Πριν από την σύνδεση θα πρέπει να ελέγξετε εάν
η ονοµαστική τάση της συσκευής, η οποία
αναγράφεται στην πινακίδα τύπου, συµφωνεί µε
την υπάρχουσα τάση δικτύου. Η πινακίδα τύπου
βρίσκεται στην κάτω επένδυση των κεραµικών
εστιών.
Η τάση των αντιστάσεων θέρµανσης ανέρχεται σε
AC230V~. Η συσκευή λειτουργεί άψογα ακόµη
σε παλαιότερα δίκτυα µε τάση AC220V~.
Η σύνδεση της συσκευής µε το ηλεκτρικό δίκτυο
θα πρέπει να γίνει µε τέτοιο τρόπο, ώστε να
εξασφαλίζεται η δυνατότητα διαχωρισµού όλων
των πόλων µε άνοιγµα επαφών τουλάχιστον
3mm, π.χ. αυτόµατος µηχανισµός LS, διακόπτης
διαφυγής ρεύµατος FI ή ασφάλεια.
Ως αγωγός
σύνδεσης στο δίκτυο πρέπει να
χρησιµοποιηθεί αγωγός του τύπου H05VV-F ή
αγωγός ανώτερης ποιότητας.
Η σύνδεση θα πρέπει να γίνει σύµφωνα µε το
σχεδιάγραµµα. Ανάλογα µε το σχεδιάγραµµα
σύνδεσης θα πρέπει να χρησιµοποιηθούν
κατάλληλα και οι γέφυρες σύνδεσης. Ο αγωγός
προστασίας συνδέεται µε κλέµα . Ο κλάδος του
αγωγού
προστασίας θα πρέπει να έχει µήκος από
τους ρευµατοφόρους κλάδους.
Οι συνδέσεις των καλωδίων θα πρέπει να
πραγµατοποιηθούν σύµφωνα µε τους
κανονισµούς και οι βίδες των κλεµών να
βιδωθούν σφιχτά.
Στην συνέχεια ο αγωγός σύνδεσης θα πρέπει να
ασφαλιστεί µε την κλέµα εκτόνωσης κα
σφραγιστεί το κάλυµµα πιέζοντάς το µε δύναµη
(κούµπωµα).
Πριν από την πρώτη φορά θέσης της συσκευής σε
λειτουργία θα πρέπει να αφαιρεθούν τυχόν
προστατευτικές ζελατίνες ή αυτοκόλλητα από την
κεραµική επιφάνεια ή το πλαίσιο.
Μετά την σύνδεση µε το δίκτυο ρεύµατος
θα πρέπει να ελεγχθεί
η λειτουργία όλων
των εστιών θέτοντας αυτές διαδοχικά
στην µέγιστη σκάλα λειτουργίας τους για
σύντοµο χρονικό διάστηµα.
και
να
1
2
3
4
63
Page 64

Σέρβις
Στο κεφάλαιο ¨Τι κάνετε, όταν …¨ αναφέρονται
ορισµένες βλάβες, τις οποίες µπορείτε να τις
επιδιορθώσετε οι ίδιοι.
Σε περίπτωση βλάβης ψάξτε στην αρχή εκεί.
Πρόκειται για µία τεχνική βλάβη;
Τότε απευθεινθείτε παρακάτω στο δικό µας σέρβις
πελατών ή σε ένα από τα συµβεβληµένα µαζί µας
σέρβις.
Σε κάθε
συνοµιλία. ∆ιευκολύνετε έτσι την διάγνωση και την
απόφαση, εάν είναι απαραίτητη µία επίσκεψη του
σέρβις.
Σηµειώστε επίσης, εάν είναι δυνατό, µε ακρίβεια:
• Πως εµφανίστηκε η βλάβη;
• Κάτω από ποιες καταστάσεις παρουσιάστηκε η
βλάβη;
περίπτωση προετοιµαστε καλά την
Σηµειώστε για την συνοµιλία οπωσδήποτε τους
ακόλουθους κωδικούς
που βρίσκονται στην πινακίδα τύπου:
• Χαρακτηρισµός µοντέλου,
• αρ. παραγωγής (9 ψηφία),
• αρ. σειράς (8 ψηφία).
Εµείς προτείνουµε, να καταχωρήσετε εδώ τους
κωδικούς αριθµούς, για να τους έχετε πάντοτε
πρόχειρους:
Μοντέλο: . . . . . . . . . . . . . . . . . . . . . . . . . . . . . . .
Αρ. παραγωγής: . . . . . . . . . . . . . . . . . . . . . . . .
Αρ. σειράς: . . . . . . . . . . . . . . . . . . . . . . . . . . . . .
αριθµούς της συσκευής σας
64
Page 65

Πότε επιβαρύνεστε µε έξοδα ακόµα και κατά
την διάρκεια του χρόνου εγγύησης;
• όταν θα µπορούσατε οι ίδιοι, µε την βοήθεια
του πίνακα βλαβών (βλέπε κεφάλαιο ¨Τι
κάνετε, όταν…¨) να είχατε επιδιορθώσει την
βλάβη,
• όταν είναι απαραίτητες περισσότερες
διαδροµές του τεχνικού του σέρβις, επειδή
πριν από την επίσκεψή του δεν
είχε πάρει όλες
τις σηµαντικές πληροφορίες και για αυτό π.χ.
πρέπει να επιστρέψει για να πάρει
ανταλλακτικά. Αυτές οι πολλαπλές διαδροµές
µπορείτε να τις αποφύγετε, εάν
προετοιµαστείτε καλά την τηλεφωνική σας
επικοινωνία µε τον τρόπο που περιγράψαµε
παραπάνω.
65
Page 66

Kære kunde!
Vi beder dig læse denne brugsanvisning grundigt
igennem.
Vi henviser specielt til afsnittet
„Sikkerhedsanvisninger“ på de første sider. Gem
brugsanvisningen for eventuel senere brug. Lad
brugsanvisningen følge med, hvis produktet
overgives til andre.
Brugsanvisningen benytter sig af
følgende symboler:
Sikkerhedsanvisninger
Advarsel! Anvisninger, som vedrører din
personlige sikkerhed.
Vigtigt! Anvisninger, som tjener til at
forebygge skader på produktet.
Anvisninger og praktiske tip.
Miljøinformation.
1. Disse punkter vil trin for trin vejlede dig i,
hvordan du betjener kogesektionen.
2. ...
3. ...
Skulle der opstå funktionsforstyrrelser, indeholder
denne brugsanvisning oplysninger om, hvordan
disse kan afhjælpes, se afsnittet „Hvad gør jeg,
hvis...“.
Trykt på miljøvenligt papir.
Den, som tænker økologisk, handler økologisk...
66
Page 67

Indholdsfortegnelse
Brugsanvisning............................................ 68
Sikkerhed .................................................... 68
Elektrisk sikkerhed ....................................... 68
Børns sikkerhed ........................................... 68
Sikkerhed under brugen .............................. 68
Sikkerhed ved rengøring .............................. 68
Således undgår du
at beskadige kogesektionen ........................ 69
Bortskaffelse .............................................. 69
Bortskaffelse af emballage .......................... 69
Bortskaffelse af kogesektion ........................ 69
Kogesektionens
væsentligste egenskaber .......................... 70
Beskrivelse af produktet ........................... 71
Udstyr kogesektion og betjeningspanel ....... 71
Digitalvisninger ............................................ 72
Sikkerhedsfrakobling af kogezoner .............. 72
Før ibrugtagning første gang ................... 73
Den første rengøring .................................... 73
Betjening af kogesektionen ...................... 73
Fingertouch-sensorfelter .............................. 73
Tænde kogesektionen ................................. 73
Slukke kogesektionen .................................. 74
Indstilling af varmetrin ................................. 74
Indstilling af trin for vedligeholdelsesvarme 74
Slukke kogezone ......................................... 75
Restvarmeindikator ...................................... 75
Tilberedning med opkogningsautomatik ..... 76
Tilberedning uden opkogningsautomatik .... 76
Børnesikring ................................................. 77
Timer ............................................................ 79
Låsning/Oplåsning af betjeningspanel ......... 81
Anvendelse, tabeller, tip ............................ 82
Kogegrej ....................................................... 82
Energispareråd ............................................. 83
Tip til tilberedning med og uden
opkogningsautomatik ................................... 84
Rengøring og pleje ..................................... 86
Kogesektion .................................................. 86
Hvad gør jeg, hvis… ................................... 88
Afhjælpning ved funktionsforstyrrelse .......... 88
Hvad gør jeg, hvis… ..................................... 88
Monterings-vejledning.................................90
Tekniske data .............................................. 90
Produktets mål ............................................. 90
Udsnitsmål .................................................... 90
Kogezoner .................................................... 90
Tilsluttet effekt .............................................. 90
Bestemmelser, standarder,
retningslinjer ............................................... 91
Sikkerhedsanvisninger til installatøren ... 92
El-tilslutning ................................................ 93
Service ......................................................... 94
Montering ......................................................95
67
Page 68

Brugsanvisning
Sikkerhed
Produktets sikkerhedsforanstaltninger er i
overensstemmelse med anerkendte tekniske
normer og gældende sikkerhedsregler for
tekniske apparater. Som produktets producent
føler vi os dog foranlediget til at gøre dig fortrolig
med nedenstående sikkerhedsanvisninger.
Elektrisk sikkerhed
• Montering og tilslutning må kun udføres af
autoriseret fagmand.
• Reparationer må kun udføres af autoriseret
fagmand. Usagkyndig reparation kan
medføre alvorlig risiko for personskade. Hvis
reparation bliver nødvendig: Kontakt vores
kunderservice eller din forhandler.
Følg anvisningerne, da garantien ellers
vil miste sin gyldighed i tilfælde af
skader.
• Indbyggede husholdningsredskaber må kun
virke i indbygningsskabe og arbejdsborde,
som er i overensstemmelse med gældende
standard. Ibrugtagning må først ske efter
indbygning. Herved sikres det, at
beskyttelsesjording er etableret i henhold til
VDE-kravene.
• Hvis der opstår funktionsforstyrrelse, brud,
sprængning eller ridser:
- Sluk for alle kogezonerne.
- Sikringen til kogesektionen kobles ud /
fjernes.
Børns sikkerhed
• Kogezonerne bliver varme under
tilberedningen. Det gælder derfor
grundlæggende, at småbørn skal holdes på
afstand - større børn må kun arbejde med
kogesektionen under opsyn.
• Kogesektionen er forsynet med en
låsefunktion, som kan kobles til for at
forhindre, at legende børn kan aktivere
knapperne.
Sikkerhed under brugen
• Dette produkt må kun anvendes i
husholdningen til kogning og stegning af
mad.
• Kogesektionen må ikke anvendes til
opvarmning af rum.
• Vær forsigtig ved tilslutning af el-apparater til
stikkontakter i nærheden af kogesektionen.
Tilslutningsledninger må ikke kunne komme i
berøring med varme dele af kogesektionen.
• Ophedet fedt og olie er let antændeligt. Når
du laver mad i fedt eller olie (f.eks. pommes
frites), bør du overvåge tilberedningen.
• Kogezonerne skal slukkes hver gang efter
brug.
• Sensorteknikken giver den størst mulige
sikkerhed ved betjening af kogesektionen, til
gengæld kræver den en høj grad af omhu
ved indstilling af kogezoner, effekt og tider.
Sikkerhed ved rengøring
• Kogesektionen skal være slukket, når den
gøres ren.
• Af sikkerhedsgrunde er det ikke tilladt at
rengøre kogesektionen med dampstråle eller
højtryksrenser.
68
Page 69

Således undgår du at beskadige
kogesektionen
• Brug ikke kogesektionen som arbejds- eller
afstillingsflade.
• Den rammeløse kant på glaskeramikpladen
er udsat for stød. Vær forsigtig i omgang med
gryder og pander.
• Kogezonerne må ikke benyttes uden
kogegrej eller med tomt kogegrej. Undgå
tørkogning af gryder og pander. Grej og
kogesektion kan blive beskadiget.
• Glaskeramik er ufølsom over for
temperaturchok og særdeles
modstandsdygtig, men kan dog briste.
Særligt spidse og hårde genstande, som
falder ned på kogesektionens overflade, kan
beskadige den.
• Undlad brug af gryder af støbejern eller
gryder, hvor bunden er beskadiget. Ujævne
gryder og gryder med støbegrat må heller
ikke anvendes. Der vil kunne opstå ridser,
som ikke kan fjernes igen, når gryden flyttes.
• Stil ikke pander og gryder på kogesektionens
ramme. Det vil eventuelt medføre ridser og
lakskader.
• Pas på, at der ikke kommer syreholdig
væske, f.eks. eddike, citronsaft og
kalkopløsende midler på kogesektionens
ramme; dette vil danne matte pletter.
• Hvis der kommer sukker eller sukkerholdig
mad på en varm kogezone, og dette smelter,
skal det straks fjernes med en renseskraber,
endnu mens det er varmt. Hvis massen når at
køle ned, kan det medføre beskadigelse af
overfladen, når det skal fjernes.
• Alle genstande og materialer, som kan
smelte, skal holdes væk fra
glaskeramikpladen, f.eks. plastik, alu- og
ovnfolie. Skulle der alligevel smelte noget på
glaskeramikpladen, skal også dette fjernes
omgående med en renseskraber.
Bortskaffelse
Bortskaffelse af emballage
Alle anvendte materialer kan genanvendes
ubegrænset.
Kunststoffer er mærket på følgende måde:
• >PE< for polyethylen, f.eks. den yderste
beklædning og poserne indvendigt.
• >PS< for opskummet polystyren, f.eks. ved
mellemlægsstykkerne, grundlæggende CFCfri.
Materialerne skal bortskaffes på miljømæssig
forsvarlig vis.
Vi henviser til nationalt og lokalt gældende
forskrifter vedrørende bortskaffelse af
emballeringsmaterialer samt mærkningen på
materialet (materialeopdeling, affaldsopsamling,
genbrugsstationer).
Bortskaffelse af kogesektion
Advarsel! Når kogesektionen skal
kasseres, skal den gøres ubrugbar,
således at den ikke udgør nogen fare.
Kogesektionen kobles fra
strømforsyningen. Tag netledningen
ud af kogesektionen.
Af miljømæssige årsager skal alle brugte
køkkenapparater bortskaffes ifølge forskrifterne.
• Kogesektionen må ikke smides ud som
almindeligt husholdningsaffald.
• Oplysninger om afhentning af storskrald og
affaldsstationer kan fås hos din kommune.
69
Page 70

Kogesektionens væsentligste egenskaber
• Glaskeramisk overflade: Produktet har en
glaskeramisk kogeoverflade og
4 hurtigopvarmende kogezoner. Herved
afkortes varmeaggregatets opvarmningstid
betydeligt gennem særligt effektstærke
strålevarmelegemer.
• Sensorfelter: Betjening af produktet sker via
fingertouch-sensorfelter.
• Rengøring: Fordelen ved den glaskeramiske
overflade og sensorfelterne er, at de er
meget rengøringsvenlige. Den glatte
overflade er nem at rengøre.
• Sensorfelt „Tænd/Sluk“: Sensorfeltet
„Tænd/Sluk“ er en separat hovedafbryder,
som kan slå strømforsyningen til
kogesektionen til og fra.
• Visninger: Digitalvisninger og
indikatorlamper giver information om
indstillede varmetrin, aktiverede funktioner
samt eventuel restvarme i den pågældende
kogezone.
• Sikkerhedsfrakobling: En
sikkerhedsfrakobling sørger for, at alle
kogezoner automatisk slår fra efter nogen tid,
hvis der ikke foretages ændringer af
indstillingerne.
• Børnesikring: Med denne funktion kan
kogefeltet låses for at undgå, at en kogezone
tændes ved en fejltagelse.
• Trin for vedligeholdelsesvarme: er det
varmetrin, du kan bruge til at holde maden
varm.
• Restvarmeindikator: En glødelampe
lyser, når restvarmen stadig er så kraftig, at
man kan brænde sig på kogezonen.
• Etkreds-kogezone: Kogefeltet har fire
etkreds-kogezoner. Det vil sige, at der findes
flere kogezoner af forskellig størrelse, f.eks.
til mindre gryder. Herved kan der spares
energi.
• Timer: Med den integrerede timer kan alle
kogezoner automatisk kobles fra. Når
kogetiden er udløbet, slukker kogezonen.
70
Page 71

Beskrivelse af produktet
Udstyr kogesektion og betjeningspanel
71
Page 72

Digitalvisninger
De fire digitalvisninger, som er tilordnet de fire
kogezoner, viser:
• når kogezonen er tændt,
• ved valg af vedligeholdelsesvarme,
• til , alt efter det valgte varmetrin,
• ved opkogningsautomatik,
• ved restvarme,
• når børnesikringen er slået til
• ved fejlfunktion / ved overophedning
Sikkerhedsfrakobling af kogezoner
Hvis en kogezone ikke slukkes efter et bestemt
tidsrum eller varmetrinnet forbliver uændret,
slukker kogezonen automatisk.
Resterende varme vises med (som „varm“) i
digitalvisningerne til de pågældende kogezoner.
Kogezonerne slukker af sig selv i følgende tilfælde:
• Varmetrin , , efter 6 timer
• Varmetrin , efter 5 timer
• Varmetrin efter 4 timer
• Varmetrin , , , efter 1,5 timer
Hvis en eller flere af kogezonerne
slukker før den angivne tid: Se kapitlet
„Hvad gør jeg, hvis …“.
Frakobling af andre årsager
Væske, som koger over og sætter sig på
betjeningspanelet, bevirker, at alle kogezoner
slukker øjeblikkeligt.
Det samme sker, hvis man lægger en våd klud på
betjeningspanelet. I begge tilfælde skal produktet
kobles til igen med hovedafbryderen , efter at
væsken eller kluden er blevet fjernet.
72
Page 73

Før ibrugtagning første gang
Den første rengøring
Tør glaskeramikpladen af med en let fugtig klud.
Vigtigt! Undlad brug af skrappe,
skurende rengøringsmidler!
Overfladen kan blive beskadiget.
Betjening af kogesektionen
Fingertouch-sensorfelter
For at aktivere fingertouch-sensorfelterne skal du
lægge fingeren fladt på det ønskede felt, indtil
visningen begynder at lyse eller går ud resp. den
ønskede funktion er sat i gang.
Tænde kogesektionen
Kogesektionen som helhed tændes med
sensorfeltet „Tænd/Sluk“ .
Berør sensorfeltet „Tænd/Sluk“ i ca.
2 sekunder.
Digitalvisningerne begynder at lyse.
Når sensorfeltet „Tænd/Sluk“ er blevet
aktiveret for at tænde kogesektionen,
skal der indstilles et varmetrin ved en
kogezone inden for ca. 10 sekunder eller
indstilles et tidsforløb med timeren
(minutur). Ellers træder
sikkerhedsfunktionen „automatisk
frakobling“ i funktion.
~ 2 sec.
73
Page 74

Slukke kogesektionen
For at slukke kogesektionen helt trykkes på
sensorfeltet „Tænd/Sluk“ .
Berør sensorfeltet „Tænd/Sluk“ i ca. et
sekund.
Digitalvisningerne går ud.
Når en enkelt kogezone eller hele
kogesektionen er blevet slukket,
markeres kogezonens restvarme med
(som „varm“) på digitalvisningerne.
Indstilling af varmetrin
Til hhv. indstilling og justering af varmetrin ( op
til ) for den valgte kogezone.
Med sensorfeltet „valg af varmetrin“ øges
varmeeffekten.
Med sensorfeltet „valg af varmetrin“ nedsættes
varmeeffekten.
~ 1 sec.
Indstilling af trin for
vedligeholdelsesvarme
Alle 4 kogezoner er forsynet med et trin for
vedligeholdelsesvarme (holde-varm funktion).
Trin for vedligeholdelsesvarme indstilles med
sensorfeltet „valg af varmetrin“.
74
Page 75

Slukke kogezone
For at slukke skal sensorfelterne „valg af
varmetrin“ og berøres samtidigt eller
tilbagestilles til nul med sensorfelt „valg af
varmetrin“ .
Restvarmeindikator
Når en enkelt kogezone eller hele kogesektionen
er blevet slukket, vises resterende varme med
(som „varm“) på digitalvisningerne til de
pågældende kogezoner.
Selv om kogezonen er blevet slukket, går
restvarmeindikatoren først ud, når kogezonen er
kølet af.
Du kan bruge restvarmen til smeltning
eller til at holde maden varm med.
Vigtigt! Så længe restvarmeindikatoren
lyser, er der fare for at brænde sig.
Vigtigt! I tilfælde af strømsvigt går også
symbolet ud og dermed signalet om
resterende varme. Risikoen for at
brænde sig er stadigvæk til stede. Vær
her ekstra påpasselig.
75
Page 76

Tilberedning med
opkogningsautomatik
Alle fire kogezoner på kogesektionen kan
reguleres i ni trin og er udstyret med
opkogningsautomatik:
• , laveste varmetrin
• , højeste varmetrin
• , opkogningsfunktion.
Når du vælger det ønskede varmetrin med
sensorfeltet „valg af varmetrin“ , arbejder
kogezonen med fuld effekt i en bestemt tid,
hvorefter den automatisk skifter tilbage til den
oprindelige indstilling for vedvarende effekt.
Varigheden af den automatiske opstartseffekt
afhænger af, hvilken indstilling der er valgt som
vedvarende effekt.
Berør sensorfeltet „valg af varmetrin“ for at
indstille det ønskede varmetrin op til .
Først vises det indstillede varmetrin.
Efter 5 sekunder fremkommer (=
opkogningsautomatik) på visningen i stedet for
varmetrin. Når opkogningstiden er udløbet,
fremkommer igen varmetrin på visningen.
Vælger du et højere trin under
automatik-funktionen, f.eks. fra til ,
tilpasses opkogningstiden tilsvarende.
Vælger du et lavere trin, ophører
opkogningsprocessen med det samme.
Tilberedning med opkogningsautomatik
er kun mulig på en kogezone, som er
kold eller moderat varm. Hvis en
kogezone allerede er varm, når den
tændes (visning ), kan
opkogningsautomatik ikke anvendes.
Tilberedning uden
opkogningsautomatik
Hvis du vil bruge kogezonen uden
opkogningsautomatik, skal du vælge det ønskede
varmetrin med sensorfeltet „valg af varmetrin“ .
Berør sensorfeltet „valg af varmetrin“ for at
indstille det ønskede varmetrin op til .
Du kan altid justere trinnet med
sensorfelterne „valg af varmetrin“ og
.
76
Page 77

Børnesikring
Med børnesikringen kan du undgå utilsigtet brug af
kogesektionen.
Tilkobling af børnesikring
For at tilkoble børnesikringen skal kogesektionen
være tændt, der må dog ikke være nogen
kogezone tændt.
1. Berør sensorfeltet „Låsning“ i ca. tre
sekunder.
Som bekræftelse lyder en signaltone.
2. Berør et vilkårlig sensorfelt for valg af varmetrin
.
I visningerne fremkommer , børnesikringen er
slået til. Efter nogle sekunder slukker
kogesektionen igen af sig selv.
~ 3 sec.
Deaktivering af børnesikring
Børnesikringen kan deaktiveres for brug af
kogesektionen en gang (indtil næste gang
kogesektionen tændes). Næste gang
kogesektionen tændes, er børnesikringen
automatisk aktiv igen.
1. Tænd kogesektionen.
Når børnesikringen er slået til, vises .
2. Berør samtidigt to vilkårlige sensorfelter for
valg af varmetrin og i ca. 1 sekund.
Som bekræftelse lyder en signaltone.
Børnesikringen er deaktiveret, indtil næste gang
kogesektionen slukkes; kogesektionen kan
benyttes på normal vis.
~ 2 sec.
~ 1 sec.
77
Page 78

Frakobling af børnesikring
1. Tænd kogesektionen.
Når børnesikringen er slået til, vises .
2. Berør sensorfeltet „Låsning“ i ca. tre
sekunder.
Som bekræftelse lyder en signaltone.
3. Berør et vilkårlig sensorfelt for valg af varmetrin
.
Visningerne går ud, børnesikringen er slået fra.
Efter nogle sekunder slukker kogesektionen igen
af sig selv.
~ 2 sec.
~ 3 sec.
78
Page 79

Timer
Timeren kan bruges på to måder:
•som
•som
Brug af frakoblingsautomatik
De kogezoner, som du vil anvende
frakoblingsautomatik til, skal være tændt.
frakoblingsautomatik. Du indstiller en
tilberedningstid for en kogezone; når den er
udløbet, slukker kogezonen automatisk. Denne
funktion kan benyttes for flere kogezoner
samtidigt.
korttidsur uden koblingsfunktion
(„æggeur“). Når den indstillede tid er udløbet,
lyder et akustisk signal.
Korttidsuret kan ikke benyttes, når en
kogezone er tændt.
1. Med sensorfeltet timer vælges, til hvilken
kogezone frakoblingsautomatikken skal
indstilles.
Ved at berøre sensorfeltet timer en gang,
vælges den første aktive kogezone i retning med
uret - den tilhørende indikatorlampe blinker
hurtigt. Her svarer f.eks. indikatorlampen bagest til
venstre til kogezonen bagest til venstre. På timerdisplayet vises .
Ved at berøre sensorfeltet timer igen, vælges
den næste aktive kogezone.
2. Mens indikatorlampen blinker hurtigt, indstilles
med sensorfelterne timer-indstilling eller
til denne kogezone det ønskede tidsforløb før
automatisk frakobling (f.eks. 15 minutter).
Frakoblingsautomatikken aktiveres efter nogle få
sekunder.
Indikatorlampen blinker langsommere, og
resterende tilberedningstid vises på displayet
under forløbet. Hvis der er indstillet
frakoblingsautomatik til flere kogezoner, gælder
dette for kogezonen med den korteste resterende
tilberedningstid. Indikatorlamperne for de andre
kogezoner med indstillet frakoblingsautomatik
lyser. Til visning af resterende tilberedningstid for
en af disse kogezoner skal denne vælges med
sensorfeltet timer , den tilhørende
indikatorlampe blinker hurtigt.
~ 1 sec.
79
Page 80

For at justere resterende tilberedningstid skal den
ønskede kogezone vælges med sensorfeltet timer
. Den tilhørende indikatorlampe blinker
hurtigere. Justering foretages med sensorfelterne
timer-indstilling eller .
Når den indstillede tilberedningstid er udløbet,
slukker kogezonen automatisk, og der lyder et
akustisk signal i to minutter, timer-displayet blinker
.
3. Berør sensorfeltet timer for at slukke for
signalet.
For hurtigere indstilling skal du berøre en
af sensorfelterne timer-indstilling eller
, indtil den ønskede værdi er nået.
Hvis sensorfeltet timer-indstilling
aktiveres først, begynder tidsindstillingen
ved 99 minutter, aktiveres sensorfeltet
timer-indstilling først, begynder
tidsindstillngen ved 1 minut.
Deaktivering af frakoblingsautomatik før
tiden
Du har to muligheder for at deaktivere
frakoblingsautomatikken før tiden:
Sluk kogezonen og timeren samtidig
Med sensorfeltet valg af varmetrin stilles den
ønskede kogezone tilbage til nul.
Kogezone og timer slukker.
Sluk timeren - kogezonen forbliver aktiv
1. Vælg den ønskede kogezone med sensorfeltet
timer .
Den tilhørende indikatorlampe blinker hurtigere.
~ 1 sec.
2. Med sensorfeltet timer-indstilling sættes
timeren på :
Kun timeren slukker, kogezonen forbliver tændt.
80
Page 81

Brug af korttidsur
For at bruge korttidsuret skal kogesektionen være
tændt, der må dog ikke være nogen kogezone
tændt.
1. Berør sensorfeltet timer .
På timer-displayet vises .
2. Med sensorfelterne timer-indstilling eller
indstilles den ønskede tid.
Efter nogle få sekunder aktiveres korttidsuret, og
resttiden vises.
For at justere resttiden berøres sensorfeltet timer,
og indstillingen ændres med sensorfelterne for
timer-indstilling eller .
Når den indstillede tid er udløbet, lyder et akustisk
signal, og timer-displayet blinker .
3. Berør sensorfeltet timer for at slukke for
signalet.
Låsning/Oplåsning af
betjeningspanel
På et hvilket som helst tidspunkt under
tilberedningen kan betjeningspanelet - undtagen
sensorfeltet „Tænd/Sluk“ – låses for at forhindre, at
indstillingerne ændres, f.eks. af en klud i
forbindelse med aftørring.
1. Berør sensorfeltet „Låsning“ i ca. et sekund.
Indikatorlampen til sensorfeltet „Låsning“ lyser.
2. For at ophæve låsefunktionen skal du berøre
sensorfeltet „Låsning“ igen i ca. et sekund.
Indikatorlamperne til sensorfeltet „Låsning“ går ud,
og de tidligere indstillede varmetrin vises igen.
Når kogesektionen slukkes, slås
låsefunktionen automatisk fra.
~ 1 sec.
~ 1 sec.
81
Page 82

Anvendelse, tabeller, tip
Kogegrej
Jo bedre gryden er, desto bedre bliver resultatet.
• Kogegrejets kvalitet afhænger af grydens
bund. Bunden skal være så tyk og plan som
mulig.
• Vær opmærksom på bundens diameter, når du
køber nye gryder og pander. Ofte angiver
producenten diameteren på grejets øverste
del.
• Grej med aluminium- eller kobberbund kan
efterlade metalliske misfarvninger på den
glaskeramiske overflade, som kun vanskeligt –
om overhovedet – lader sig fjerne.
• Undlad brug af gryder af støbejern eller gryder,
hvor bunden er beskadiget. Ujævne gryder
eller gryder med støbegrat må heller ikke
anvendes. Der vil kunne opstå ridser, som ikke
kan fjernes, når gryden flyttes.
• I kold tilstand buer bunden af gryderne normalt
lidt indad (konkav form). En bund må under
ingen omstændigheder bue udad (konveks
form).
• Hvis du bruger specialgrej (f.eks. trykkoger,
simregryde, wok osv.), skal du være
opmærksom på producentens anvisninger.
Generelle anvisninger
• Bunden skal altid være ren og tør.
• For at undgå skæmmende ridser på den
glaskeramiske kogeflade bør gryder og pander
ikke skubbes, men løftes op, når de skal flyttes.
• Ridser kan også opstå fra sandkorn (f.eks. fra
rensning af grøntsager), som trækkes med
gryden hen over kogefladen.
• Brug høje gryder til retter med megen væske,
så det ikke kan koge over.
82
Page 83

Energispareråd
Følg nedenstående råd for at spare
energi – til gavn for både dig selv og
miljøet:
• Gryder og pander skal stilles på kogezonen, før
du tænder den.
• Snavsede kogezoner og gryder øger
strømforbruget.
• Gryder og pander skal så vidt muligt altid
bruges med låg.
• Sluk kogezonen, før maden er færdigtilberedt
for at udnytte restvarmen, f.eks. til at holde
mad varm eller smelte smør.
• Grydebund og kogezone skal være lige store.
• Ved brug af lyngryde forkortes
tilberedningstiden med op til 50%.
83
Page 84

Tip til tilberedning med og uden
opkogningsautomatik
Den automatiske opkogningsautomatik er
velegnet til:
• Retter, som sættes over i kold tilstand, varmes
op ved høj effekt, og som ikke behøver
konstant overvågning under den videre
gennemvarmning,
• retter, som kommes på en varm pande.
Opkogningsautomatikken egner sig ikke til:
• Gullasch, rullestege og lignende
stegegryderetter, hvor mad hyppigt skal
vendes i forbindelse med svitsning,
opspædning og færdigstegning, inden den helt
rigtigte mørhed/bruning nås,
• boller, pastaretter med megen væske,
• tilberedning i lyngryde,
• meget store mængder supper/sammenkogte
retter med mere end 2 liter væske.
Generelle anvisninger:
• Ved tilberedning uden opkogningsautomatik
anbefaler vi, at opkogning/forsvitsning foregår
på højt trin (vælges med -knappen),
hvorefter den videre tilberedning sker på det
pågældende konstantvarmetrin.
• Vær opmærksom de første gange, du laver
mad! Så vil du få indblik i, hvilke varmetrin der
er optimale for "dine retter" i den mængde, du
normalt anvender med det forskellige kogegrej.
Du vil hurtigt se fordelen ved den automatiske
funktion, samtidig med at du vil blive fortrolig i
brugen af din nye kogesektion.
84
Page 85

Vejledende værdier for tilberedning på
kogezonerne
Angivelserne i de følgende tabeller er vejledende.
Hvilke varmetrin, der skal vælges til de forskellige
tilberedningsprocesser, afhænger af grydernes
kvalitet samt madens art og mængde.
Kontakt-
stilling
Opkogningstid
for auto-
1)
matik
[min.]
4,5
3,5
2,0
10,2
6,5
Tilberednings-
Eksempler på anvendelse
proces
Opkogning
Svitsning
Friturestegning
Opkogning af store væskemængder,
kogning af nudelstrimler,
svitsning af kød,
(svitsning af gullasch, grydestegt steg)
Kraftig stegning Steaks, mørbradstykker,
kartoffelkage,
medisterpølse,
pandekager
Stegning Schnitzler/Koteletter,
lever, fisk,
frikadeller, spejlæg
Kogning
Kogning af op til 1,5 l væske,
kartofler, grøntsager
4,8
Dampning
Kogning i
1,7
vandbad
Udblødning
Smeltning Smeltning af smør,
1,0
0,5
1)
Ved opkogning uden automatik vælges
Vedligehold-
elsesvarme
opkogningstiden individuelt.
Vi anbefaler at indstille på
opkogningstrin „ “ ved opkogning eller
svitsning og herefter lade retter med en
længere tilberedningstid færdigtilberede
på det pågældende konstantvarmetrin.
Dampning og kogning i vandbad af
mindre mængder grøntsager,
udblødning af ris og
mælkeholdige retter
opløsning af husblas,
smeltning af chokolade
Holde retter varme
85
Page 86

Rengøring og pleje
Kogesektion
Vigtigt! Der må ikke komme
rengøringsmiddel på den glaskeramiske
overflade, når den er varm! Efter
rengøringen skal der vaskes efter med
almindeligt vand, da rengøringsmidlerne
kan virke ætsende ved genopvarmning!
Der må ikke anvendes skrappe
rengøringsmidler, såsom grill- eller
ovnspray, grove skuremidler resp.
ætsende gryderens.
De glaskeramiske kogeflader skal
rengøres hver gang efter brug, når de er
håndvarme eller kolde. Således undgår
du, at madrester brænder fast.
Kalk- og vandaflejringer, fedtstænk og
metalskinnende misfarvninger fjernes
med et almindeligt rengøringsmiddel
beregnet til hhv. glaskeramik og
ædelstål.
Lettere snavs
1. Glaskeramiske overflader tørres af med en
fugtig klud og lidt opvaskemiddel.
2. Til sidst tørres efter med en ren klud. Der må
ikke efterlades rester fra rengøringsmiddel på
overfladen.
3. Den samlede glaskeramiske overflade skal
rengøres grundigt en gang om ugen med et
rengøringsmiddel beregnet til hhv.
glaskeramiske overflader og ædelstål.
4. Herefter tørres den glaskeramiske overflade af
i klart vand og tørres efter med en ren, fnugfri
klud.
86
Page 87

Fastklæbende snavs
1. Stænksprøjt og rester fra overkogning fjernes
med en renseskraber.
2. Renseskraberen holdes skråt ind mod
glaskeramikpladen.
3. Snavs fjernes ved at køre skraberen forsigtigt
hen over pladen.
Renseskraber og rengøringsmiddel til
glaskeramik fås i handelen.
Særligt snavs
1. Fastbrændt sukker, smeltet plastik, alufolie
eller andre materialer, som kan smelte, skal
fjernes omgående, med en renseskraber,
mens de endnu er varme.
Vigtigt! Brug af renseskraber på den
varme kogezone medfører fare for
forbrænding!
2. Til sidst rengøres den afkølede kogesektion på
normal vis.
Hvis kogezonen allerede er kølet af med
indsmeltet materiale, skal den varmes
op igen, inden snavset fjernes.
Ridser eller mørke pletter på
glaskeramikfladen, som f.eks. stammer
fra skarpkantede grydebunde, kan ikke
fjernes. De har dog ingen negativ
indvirkning på kogesektionens
funktionsevne.
87
Page 88

Hvad gør jeg, hvis…
Afhjælpning ved
funktionsforstyrrelse
En funktionsforstyrrelse kan skyldes en lille fejl,
som du selv kan afhjælpe med udgangspunkt i
nedenstående vejledning. Hvis problemet ikke
løses, skal du afholde dig fra at foretage dig
noget yderligere.
… kogezonerne ikke vil tænde?
Kontroller, om
• betjeningspanelet er låst.
• der er gået 10 sek. mellem, at tænd-/
slukknappen er blevet aktiveret, og den
ønskede kogezone er blevet tændt (se
kapitlet „Tænde kogesektionen“).
• sensorfelterne er tildækket af en fugtig klud
eller væske.
Advarsel! Reparationer må kun
udføres af autoriseret fagmand.
Usagkyndig reparation kan indebære
en alvorlig ulykkesrisiko for brugeren.
Hvis reparation bliver nødvendig:
Kontakt din forhandler eller
kundeservice.
Hvis glasset i glaskeramikpladen skulle briste,
beder vi dig opgive det 3-cifrede tal til
kundeservice,
som står på glaspladen.
Hvad gør jeg, hvis…
… kogezonerne ikke fungerer?
Kontroller, om
• sikringen i husets el-installation
(sikringskasse) er intakt. Hvis sikringerne
udløser flere gange efter hinanden, skal du
tilkalde el-installatør.
• kogesektionen er sluttet rigtigt til,
• indikatorlamperne på betjeningspanelet
lyser,
• der er tændt for den rigtige kogezone,
• kogezonerne er indstillet til det ønskede
varmetrin,
• kogezonernes sikkerhedsfrakobling er
aktiveret (se kapitlet „Sikkerhed“).
… visning op til for restvarme
pludselig går ud?
Kontroller, om
• tænd-/slukknappen er blevet aktiveret ved en
fejltagelse,
• sensorfelterne er tildækket af en fugtig klud,
væske eller lignende,
• sikkerhedsfrakoblingen er blevet aktiveret.
… der ikke fremkommer nogen for
restvarme i visningen, efter at
kogezonerne er blevet slukket?
Kontroller, om
• kogezonen kun har været tændt kort tid og
derfor endnu ikke er varm nok.
Hvis kogezonen er varm: Kontakt kundeservice.
… en kogezone ikke kan slukkes?
Kontroller, om
• følerkontakterne er tildækket af en fugtig klud
eller væske,
• betjeningspanelet er låst.
… en kogezone ikke kan tændes?
Kontroller, om
• børnesikringen er slået til,
• betjeningspanelet er låst.
… visningen lyser?
Kontroller, om kogezonen er blevet overophedet.
Visningen lyser ved overophedning, ved fejl i
elektronikken eller af sikkerhedsgrunde.
88
Page 89

… produktet ikke reagerer på aktivering af
sensorfelt?
Produktet reagerer ikke, når et sensorfelt
aktiveres, når du samtidig berører et andet
sensorfelt, som ikke er bestemt for en
kombination.
Hvis du som følge af forkert betjening tilkalder
kundeservice, skal der betales for
serviceteknikerens arbejde, også under
garantiperioden. Vi beder om forståelse herfor.
89
Page 90

Monterings-
vejledning
Vigtigt! Montering og tilslutning af
produktet må kun udføres af autoriseret
fagmand.
Dette er vigtigt, da garantien ellers
bortfalder i tilfælde af skader.
Tekniske data
Produktets mål
Bredde 590 mm
Dybde 520 mm
Højde 47 mm
Udsnitsmål
Bredde 560 mm
Dybde 490 mm
Hjørneradius R5
Kogezoner
Position Diameter Effekt
foran til
venstre
bagved til
venstre
bagved til
højre
foran til højre 145 mm 1200 W
210 mm 2300 W
145 mm 1200 W
180 mm 1800 W
Tilsluttet effekt
Indgangsspænding 230 V
~ 50 Hz
Samlet tilsluttet effekt maks. 6,5 kW
90
Page 91

Bestemmelser, standarder,
retningslinjer
Dette produkt er i overensstemmelse med
følgende standarder:
• EN 60335-1 og EN 60335-2-6
vedrørende sikkerhed for elektriske apparater
til brug i husholdningen og lignende formål og
• EN 60350 resp. DIN 44546 / 44547 / 44548
vedrørende brugsegenskaber for el-komfurer,
kogeborde, bageovne og grillelementer i
husholdningen.
• EN 55014-2 / VDE 0875 del 14-2
• EN 55014 / VDE 0875 del 14 / 1999-10
• EN 61000-3-2 / VDE 0838 del 2
• EN 61000-3-3 / VDE 0838 del 3
vedrørende grundlæggende beskyttelseskrav
for elektromagnetisk kompatibilitet (EMC).
Dette produkt er i overensstemmelse
med følgende EU-direktiver:
• 73/23/EØF af 19.02.1973
lavspændingsdirektiv
• 89/336/EØF af 03.05.1989 (EMC-direktiv
inklusiv ændring ved direktiv 92/31/EØF).
91
Page 92

Sikkerhedsanvisninger til
installatøren
• I den elektriske installation findes en
anordning, som muliggør multipolet udkobling
af produktet fra nettet med en kontaktafstand
på mindst 3 mm.
Egnede udkoblere er f.eks.
effektsikkerhedsafbrydere, sikringer
(skruesikringer skal tages ud af fatningen),
fejlstrømsrelæer og kontaktorer.
• Dette produkt imødekommer kravene i EN 60
335-2-6 vedrørende beskyttelse mod
brandfare. Produkter af denne type må
placeres direkte op mod et højt køkkenskab
eller op ad en væg.
• Minimumsafstande til andre apparater (se
disses tekniske specifikationer) i køkkenet skal
overholdes.
• Der må ikke monteres skuffer neden under
kogesektionen.
• Berøringsværn skal være sikret ved
indbygningen.
• Det indbyggede skab skal have en stabilitet,
som er i overensstemmelse med DIN 68930.
• Til beskyttelse mod fugt skal alle udsavede
snitflader forsegles med egnet
tætningsmateriale.
• Ved flisebelagte arbejdsflader skal fugerne i
kogedelens afstillingsområde være fyldt helt ud
med fugemateriale.
• Ved plader af naturmateriale, kunststen eller
keramik skal smækfjedrene klæbes ind i egnet
kunstharpiks eller tokomponentlim.
• De fire medleverede tætningsbånd, som er
selvklæbende på den ene side, klæbes på
undersiden af kogesektionen langs den
yderste kant på glaskeramikpladen. Båndet må
ikke strækkes. Enderne på tætningsbåndene
skal overlappe hinanden.
• Til demontage skal smækfjedrene presses ud
nedefra.
• Rens arbejdspladen i udsnitsområdet.
92
Page 93

El-tilslutning
Før tilslutning etableres, skal det kontrolleres, at
produktets mærkespænding, som er angivet på
mærkepladen, svarer til den forhåndenværende
netspænding. Mærkepladen sidder på
beklædningen nederst på kogedelen.
Varmeaggregatets spænding er AC230V~.
Produktet fungerer også med ældre forsyningsnet
med AC220V~.
Kogedelens nettilslutning skal etableres således,
at der er en mulipolet udkoblingsmulighed med en
kontaktafstand på mindst 3 mm, f.eks.
effektsikkerhedsafbryder, fejlstrømsrelæ eller
sikring.
Ledning til nettilslutning skal være af typen
H05VV-F eller bedre.
Tilslutning skal etableres i henhold til diagrammet.
Tilslutningsbroer skal indsættes i henhold til
forbindelsesdiagram. Jordledningen forbindes
med klemme . Jordledningens åre skal være
længere end strømførende årer.
Kabelforbindelserne skal udføres
forskriftsmæssigt og klemskruerne strammes
til.
Til sidst skal tilslutningsledningen fikseres med
kabelbøjle, og afdækningen lukkes til med et fast
tryk (i indgreb).
Inden produket tændes første gang, skal
beskyttelsesfolier eller mærkater fjernes fra
glaskeramikfladen og rammen.
Når ovnen er blevet tilsluttet
strømforsyningen, skal kogezonerne
kortvarigt tændes efter hinanden på
maksimal effekt for at se, om de virker.
93
1
2
3
4
Page 94

Service
I kapitlet „Hvad gør jeg, hvis …“ er sammenfattet
nogle funktionsforstyrrelser, som du selv kan
afhjælpe.
I tilfælde af funktionsforstyrrelse bedes du i første
omgang benytte dig af fejloversigten.
Er der tale om en teknisk fejl?
Så kontakt venligst vores kundeservice eller en af
vore servicepartnere (tlf.: 70 11 74 00).
Det er en god ide at forberede dig på, hvad du vil
reklamere over. Det vil gøre det lettere at finde
årsagen til fejlen og afgøre, om vi skal sende en
tekniker ud.
Du bør så vidt muligt gøre dig følgende klart:
• Hvordan viser fejlen sig?
• Under hvilke omstændigheder optræder
fejlen?
Det er vigtigt, at du noterer produktets
identifikationsnummer ned, som står på
mærkepladen:
• Modelbetegnelse,
• Prod.-nr. (9 cifre),
• Ser.nr. (8 cifre).
Vi anbefaler, at du noterer identifikationsnummeret
ned her, så du altid har det ved hånden:
Model: . . . . . . . . . . . . . . . . . . . . . . . . . . . . . . . . .
Prod. nr.: . . . . . . . . . . . . . . . . . . . . . . . . . . . . . . .
Ser. nr.: . . . . . . . . . . . . . . . . . . . . . . . . . . . . . . . .
I hvilke tilfælde skal du betale, selv om
garantiperioden ikke er udløbet?
• Hvis du selv havde kunnet afhjælpe fejlen på
grundlag af fejloversigten (se afsnittet „Hvad
gør jeg, hvis ...“),
• hvis det er nødvendigt med flere
kundeservicebesøg, fordi teknikeren ikke har
fået alle væsentlige oplysninger før sit besøg
og f.eks. skal hente reservedele. Dette ekstra
besvær kan du undgå, hvis du forbereder dig,
inden du kontakter vores kundeservice, som
beskrevet ovenfor.
94
Page 95

Installation / Συναρµολόγηση / Montering
> 50 mm
22 m
155 mm
m
155 mm
22 mm
155 mm
155 m
m
95
Page 96

Subject to modification without notice
Yπόκειται σε αλλαγές χωρίς προειδοποίηση
822 924 473-A-271003
Forbehold for ændringer
 Loading...