

Page 1
Kullanma ve montaj kýlavuzu
Operating instructions
ENTR
Ankastre ocak
Cooking Hob
EHM 6315
EHM 6335
Page 2

2 electrolux
Page 3

electrolux 3
Electrolux dünyasýna hoþgeldiniz
Size kullanýmý boyunca memnuniyet vereceðini umduðumuz birinci sýnýf bir Electrolux
ürünü seçtiðiniz için teþekkür ederiz.
Electrolux, hayatýnýzý daha da konforlu hale getirecek kaliteli ürünlerden oluþan geniþ
bir ürün yelpazesi sunmayý hedefler.
Kýlavuzunuzun kapaðýnda bu ürünlerden bazý örnekler bulabilirsiniz. Yeni makinenizin
özelliklerinden tümüyle yararlanabilmeniz için birkaç dakikanýzý ayýrýp, kýlavuzunuzu
okumanýzý öneririz.
Bunun size hayatýnýzý kolaylaþtýracak mükemmel bir kullaným rahatlýðý saðlayacaðýna
söz veriyoruz.
Ýyi þanslar!
Page 4
4 electrolux
Ýçindekiler
Kullanýcý için
Güvenliðiniz için 5
Kullaným talimatlarý 8
Elektrikli ýsýtýcýyý ilk kez kullanmadan
önce 11
Elektrikli ýsýtýcýnýn kullanýmý 12
Temizlik ve bakým 15
Periyodik bakým 17
Teknik özellikler 17
Teknik servis ve yedek parçalar 30
Avrupa garantisi 32
Montaj personeli için
Montaj talimatlari 19
Gaz baðlantýsý 20
Elektrik baðlantýsý 22
Çeþitli gaz tiplerine göre adaptasyon 24
Modüler mobilyalara ankastre montaj 26
Yerleþtirme seçenekleri 28
Talimat sembolleri kýlavuzu
Bu semboller, sizin için önemli olan bilgilere daha hýzlý ulaþmanýzý saðlayacaktýr.
Güvenlikle ilgili bilgiler
“Adým - adým” talimatlar
)
Faydalý tavsiyeler ve öneriler
Çevrenin korunmasýyla ilgili bilgiler
Bu cihaz, aþaðýdaki CEE direktifleri ile uyumludur:
- 2006/95 (Alçak gerilimle ilgili);
- 2004/108 (Elektromanyetik Uyumlulukla ilgili);
- 90/396 (Gazlý Cihazlarla ilgili)
ve müteakip modifikasyonlar.
ÜRETÝCÝ ÞÝRKET:
ELECTROLUX ITALIA S.p.A.
33080 PORCIA - PN (Italy)
Bu talimatlar sadece, bu kullanma
kýlavuzunun ön kapaðýnda basýlý
bulunan sembolle belirtilmiþ ülkeler
için geçerlidir.
Page 5
electrolux 5
Türkçe
Güvenliðiniz için
Bu yeni ürünün kullanýmý kolaydýr. Bununla birlikte, cihazý ilk kez kullanmadan önce bu
kitapçýðýn tamamýný okumanýz çok önemlidir. Bu þekilde, cihazdan en iyi performansý elde
edebilecek, hatalý kullanýmý önleyebilecek, cihazý güvenle kullanabilecek ve çevreye saygýlý
davranmýþ olacaksýnýz.
Bu talimat kitapçýðýnýn, ileride kullanmak üzere cihazla birlikte muhafaza edilmesi çok
önemlidir. Bu cihazý baþka bir kiþiye satacaðýnýz veya vereceðiniz zaman, bu kitapçýðý da
yeni sahibine birlikte veriniz, böylece yeni sahibi de cihazýn iþletimi/kullanýmý ve ilgili uyarýlar
hakkýnda bilgi sahibi olabilir.
Montaj
z Cihazýn montajý ve elektrik tesisatýna
baðlantýsý sadece KALÝFÝYE
PERSONEL tarafýndan yapýlmalýdýr.
Cihaz üzerinde herhangi bir müdahale
yapmadan önce elektrik baðlantýsýnýn
KESÝLDÝÐÝNDEN emin olunuz.
z Cihazýn etrafýnda serbest bir hava devir-
daimi olmasýný saðlayýnýz. Yetersiz
havalandýrma oksijen yetersizliðine
neden olur.
z Cihazýn, gaz þebekesi baðlantý
borusunun hemen yanýna yerleþtirilmiþ
yapýþkan etiket üzerinde belirtilen tipte
gaz ile beslendiðinden emin olunuz.
z Bu cihaz, yanma sonucu ortaya çýkan
ürünlerin tahliyesini saðlayan bir aygýta
baðlanmamalýdýr. Cihazýn montajý ve
baðlantýsý, montaj talimatlarýna tam
uygun bir þekilde yapýlmalýdýr.
Havalandýrma konusu ile ilgili uyarýlara
özel bir dikkat gösterilmelidir.
z Gazlý bir piþirme cihazýnýn
kullanýlmasý, bulunduðu ortamda ýsý
ve nem oluþumuna neden olur. Hava
giriþ yerlerini açýk ve etkin tutarak
veya bir havalandýrma bacasý
kurarak, cihazýn kurulduðu yerin iyi
þekilde havalandýrýlmasýný
saðlayýnýz.
z Eðer cihaz yoðun bir þekilde veya
uzunca bir süre boyunca
kullanýlacaksa, daha etkin bir
havalandýrma saðlamanýz
gerekmektedir, örneðin bir pencere
açarak veya eðer varsa elektrikli
tahliye fanýnýn gücünü arttýrarak.
z Cihazý ambalajýndan çýkarttýktan sonra,
ürünün hasar görmemiþ olduðundan ve
elektrik besleme kablosunun iyi
durumda olduðundan emin olunuz. Aksi
halde, cihazý kullanmaya baþlamadan
önce aldýðýnýz satýcý ile temasa geçiniz.
z Üretici firma, kaza önleme
kurallarýna uyulmamasýndan
kaynaklanan sorunlardan dolayý
hiçbir sorumluluk kabul etmez.
Page 6

6 electrolux
Güvenlik
z Bu cihaz sadece yetiþkinler tarafýndan
kullanýlmalýdýr. Çocuklarýn kontrol
düðmelerine dokunmalarýna veya
cihazla oynamalarýna izin
verilmemelidir.
z Cihaz, doðru kullanýmý garanti eden
sorumlu bir kiþinin denetimi veya
bilgilendirmesi olmaksýzýn çocuklar veya
hissi, akli ya da fiziksel kapasiteleri ya da
tecrübeleri veya bilgileri cihazý güvenli
þekilde kullanmaya elveriþli olmayan
kiþiler tarafýndan kullanýlamaz.
z Bu cihazýn ýsýya maruz kalan kýsýmlarý
piþirme iþlemi esnasýnda ýsýnýr ve
söndürüldükten sonra bile belirli bir süre
sýcak kalýr. Cihaz soðuyuncaya kadar
çocuklarý uzak tutunuz.
Kullaným esnasýnda
z Bu ürün, genel yerleþim yerlerinde
profesyonel amaçlý olmayan yemek
piþirimleri için tasarlanmýþtýr. Herhangi
baþka bir amaç için kullanmayýnýz.
z Bu ürünün özelliklerini deðiþtirmeyiniz
veya deðiþtirmeye çalýþmayýnýz.
z Cihazý çok temiz tutunuz. Artýk yemek
kalýntýlarý yangýn tehlikesine neden
olabilir.
z Bu ürünü temizlemek buhar veya buharlý
cihazlar kullanmayýnýz.
z Cihazý kullandýktan sonra, tüm kontrol
düðmelerinin “KAPALI” veya “SÖNÜK”
konumuna getirildiklerinden emin
olunuz.
z Cihaz yakýnýnda bir elektrik prizi
kullanýyorsanýz, kullandýðýnýz elektrikli ev
eþyalarýnýn kablolarýnýn cihaza
dokunmadýðýndan ve cihazýn sýcak
kýsýmlarýndan yeterince uzakta
olduklarýndan emin olunuz.
Teknik servis
z Arýza durumlarýnda, cihazý kendiniz
tamir etmeye çalýþmayýnýz. Yetkili
olmayan kiþilerce yapýlacak tamir
iþlemleri cihazýn hasar görmesine ve
kazalara neden olabilir. Ýlk olarak, bu
kitapçýðýn içeriðini dikkate alýnýz. Bu
kitapçýkta yer almayan bir bilgi için, size
en yakýn Servis Merkezine
baþvurunuz. Cihaza yapýlacak
müdahaleler sadece Yetkili Teknik
Servis tarafýndan gerçekleþtirilmelidir.
Daima orijinal yedek parça
kullanýlmasýný talep ediniz.
Page 7
Çevrenin korunmasýyla ilgili
bilgiler
z Kullanýlan tüm malzemeler çevreyle dost
ve geri-dönüþümlüdür. Bütün
malzemeleri çöp toplama
hizmetlerinden faydalanarak uygun bir
þekilde elden çýkarmanýzý ve böylece
çevrenin korunmasýna katkýda
bulunmanýzý rica ederiz.
z Cihazý atmadan önce, besleme
kablosunu kesiniz ve kullanýlmaz
duruma getiriniz.
z Ürünün veya ürün belgelerinin
üzerindeki sembolü, ürünün nor-
mal bir ev çöpü gibi muamele
görmemesi gerektiðini, bunun yerine
elektrikli ve elektronik cihazlarýn geri-
dönüþümü için kurulmuþ uygun toplama
merkezlerine götürülmesi
gerekmektedir. Ürünün uygun bir
þekilde elden çýkarýlmasýný saðlayarak,
ürünün uygunsuz elden çýkarýlmasýndan
kaynaklanan potansiyel olumsuz
sonuçlarýn ortadan kaldýrýlmasýna
yardýmcý olmuþ olursunuz. Bu ürünün
geri dönüþümü ile ilgili daha fazla bilgi
için, ilgili yerel bürolarla, yerel çöp
toplama merkezleri ile veya ürünü satýn
almýþ olduðunuz satýcý ile temasa
geçiniz.
electrolux 7
Page 8
8 electrolux
Kullaným talimatlarý
Cihazý kullanmadan önce tüm
ambalaj malzemelerini, tanýtým
etiketlerini, varsa plastik koruma
þeritlerini/filmleri çýkarýnýz.
Ocak kontrol düðmeleri
Ocaýýn ön kýsmýnda yer alan gaz ile
çalýþan gözlerin kontrol düýmelerinin
üzerinde bulunan semboller ve iýaret ettikleri
durumlar:
gaz beslemesi yok
maksimum gaz beslemesi
minimum gaz beslemesi
gaz düðmesine entegre ateþleme
Ocaýýn çalýþtýrýlmasý
Ocaýýn daha çabuk çalýþmasýný
saýlamak için, ocak gözünü
üzerine bir kap koymadan önce
yakýnýz.
Yakacaðýnýz ocaðýn ilgili düðmesine
basýp, “maksimum besleme” sembolüne
getirinceye kadar saatin tersi yönde
döndürünüz.
Bu konumun karþýsýnda ayrýca bir
ateþleme sembolü bulunmaktadýr ( ).
Ocak otomatik olarak yanacaktýr.
Ocak yandýktan sonra, düðmeyi yaklaþýk
5 saniye daha basýlý tutunuz. Bu süre, "gaz
kesme emniyetinin" ýsýnmasý için (Þek. 1, D
harfi) ve emniyet valfýnýn devre dýþý
býrakýlmasý için gereklidir, aksi takdirde gaz
çýkýþý durdurulabilir.
Alevi yaktýktan sonra, düzgün olup
olmadýðýný kontrol ediniz ve istenen
yoðunluða ulaþana kadar düðmeyi çeviriniz.
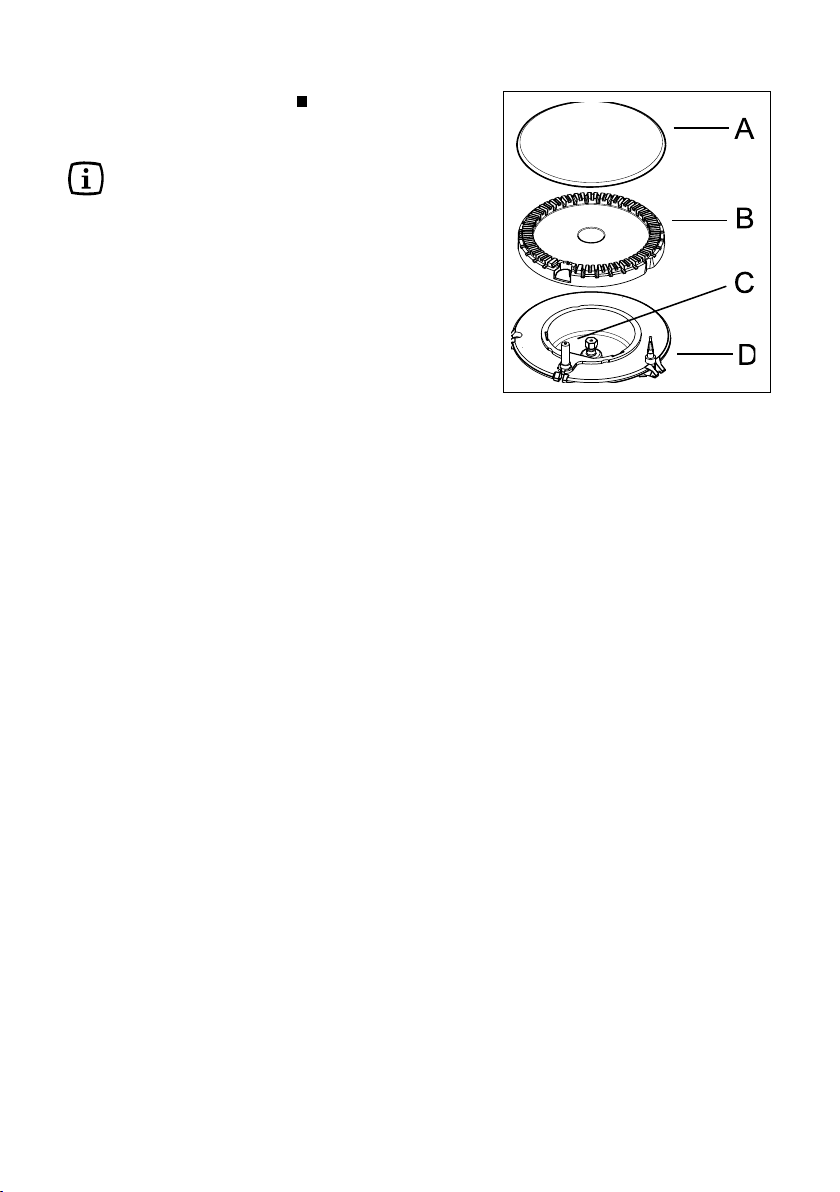
Birkaç denemeden sonra alev
yanmýyorsa, “baþlýðýn” (Þek. 1, A harfi) ve
“alev daðýtýcýsýnýn” (Þek. 1, B harfi) doðru
pozisyonda olduklarýndan emin olunuz.
Page 9
Ocaðý söndürmek için, sembolüne
gelinceye kadar düðmeyi saat yönünde
döndürünüz.
Manuel ateþleme (elektriklerin
kesik olmasý halinde): Ocaða bir
ateþ yaklaþtýrarak, düðmeye basýp
“maksimum besleme” sembolüne
getirinceye kadar saatin tersi yönde
döndürünüz.
z Tencereyi ocaktan almadan önce,
her zaman alevi azaltýnýz veya
söndürünüz.
electrolux 9
A - Baþlýk
B - Alev daðýtýcý
C - Ateþleme ucu
D - Gaz kesme emniyeti
Þek. 1
Page 10
10 electrolux
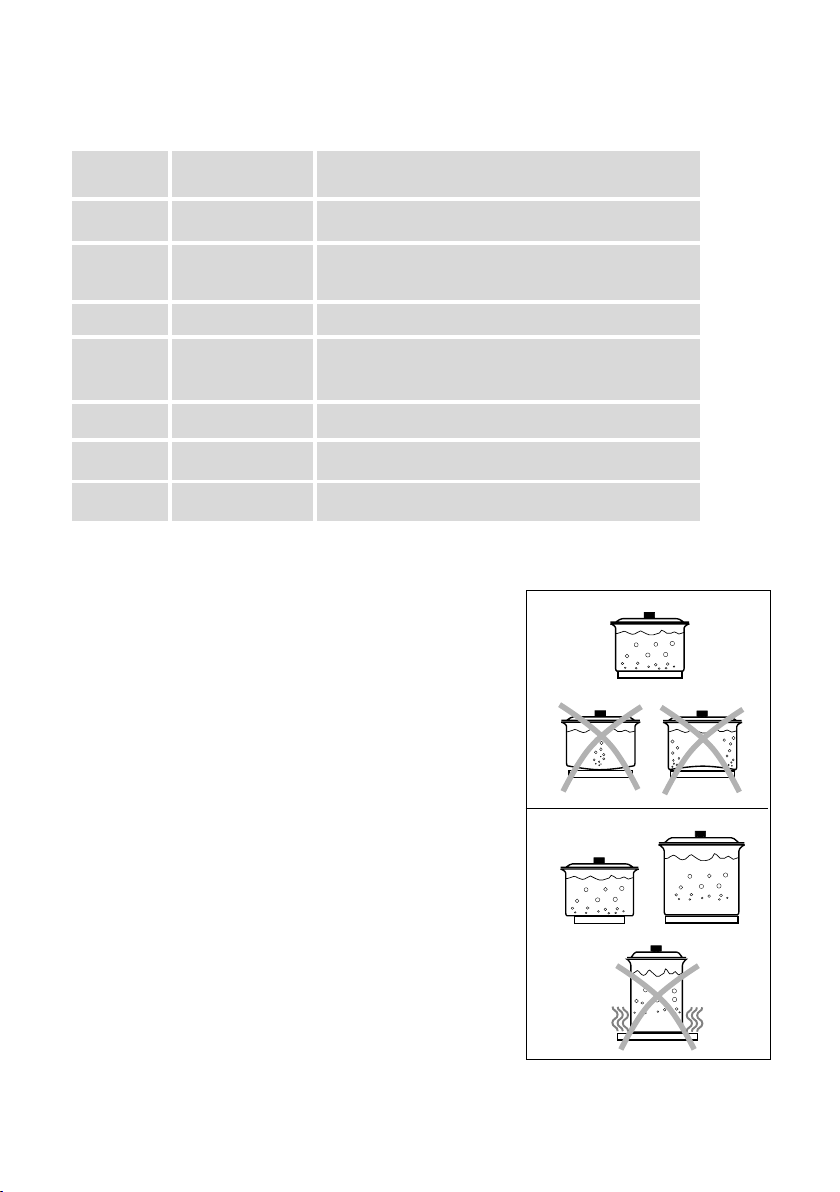
Ocaðýn doðru kullanmak için
Minimum gaz tüketimi ve daha iyi bir
performans için, sayfanýn alt kýsmýndaki
tabloda belirtildiði gibi ocakta uygun ebatta
sadece düz tabanlý tencereler kullanýnýz.
Bununla birlikte, sývý kaynamaya baþladýktan
hemen sonra alevi kaynamayý sürdürmeye
yetecek derecede azaltmaya özen
gösteriniz.
Yaðlarýn veya sývý yaðlarýn kullanýldýðý
piþirmelerde, yemeðinizi dikkatle
kontrol ediniz çünkü bu maddeler
yüksek sýcaklýkta alev alabilirler.
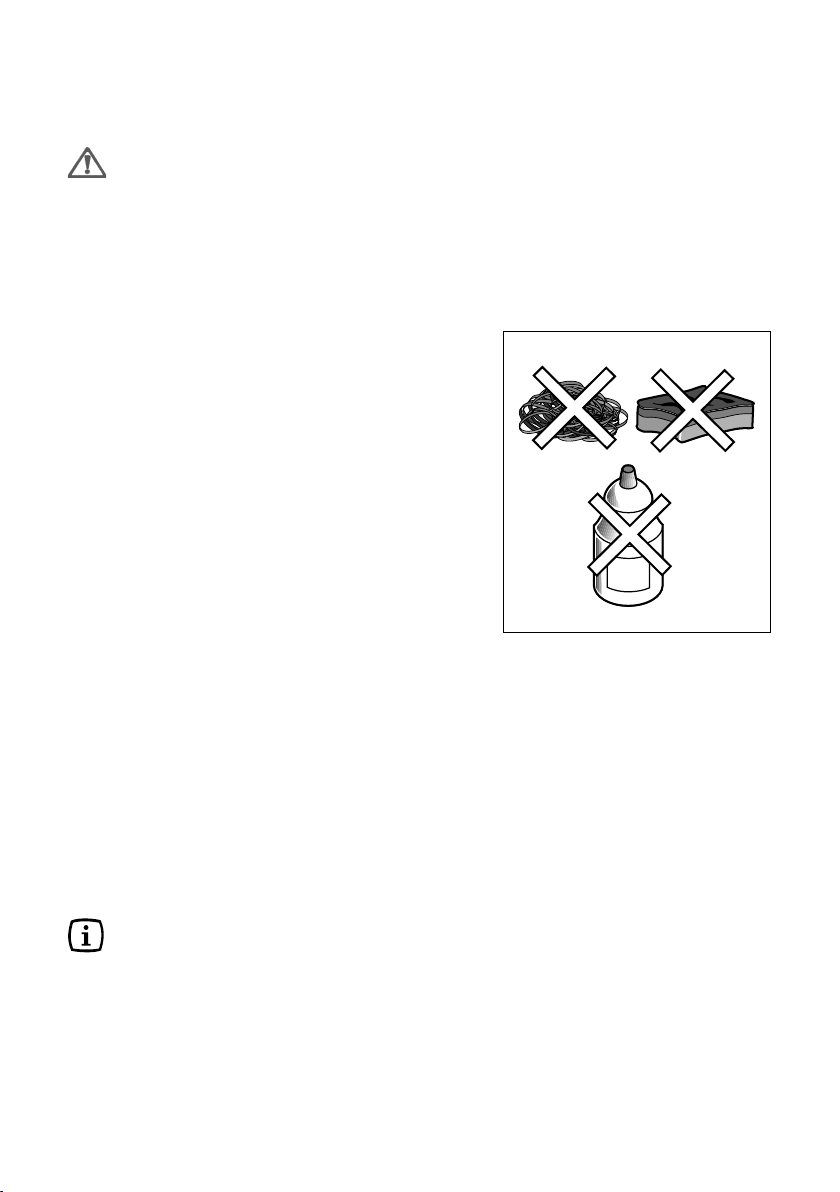
Paslanmaz çelik, aþýrý ýsýnmaya
maruz kaldýðýnda kararabilir. Bu
nedenle, taþ kaplar, piþmiþ toprak
tavalar veya dökme demir
saclarýn kullanýlmasý tavsiye edilir.
Ocak çalýþýr halde iken, düzenin
korunmasý için alüminyum
folyolarýn kullanýlmasýndan
kaçýnýlmalýdýr.
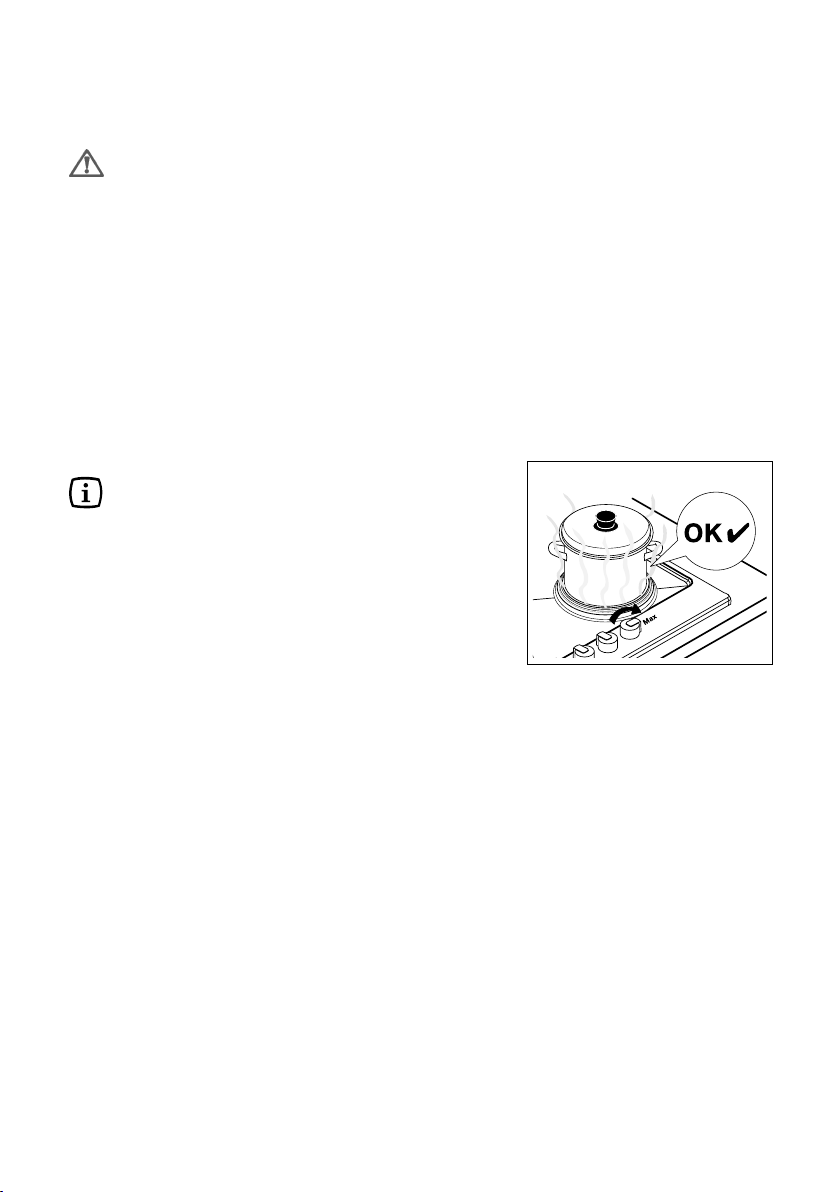
Düþük gaz tüketimi için, kaplarýn ocak
kenarlarýndan dýþarý taþmadýðýndan
ve ocaklara merkezi olarak
konumlandýrýldýklarýndan emin
olunuz.
Ocak üzerine sabit olmayan veya
deforme kaplar yerleþtirmekten
kaçýnýnýz: bunlar devrilebilir veya
içindekiler taþarak yangýna
sebebiyet verebilir.
Tencereler kumanda bölgesini
kapatmamalýdýr.
Brülör çap çap
minimum maksimum
Geniþ (hýzlý) 180 mm 260 mm
Orta (yarý-hýzlý) 120 mm 180 mm
Küçük (yardýmcý) 80 mm 180 mm
Page 11
Elektrikli ýsýtýcýyý ilk kez kullanmadan önce
Cihazý kullanmaya baþlamadan önce,
reklam etiketleri ve varsa koruyucu
filmler de dahil tüm ambalaj
malzemelerini çýkartýnýz.
Elektrikli ýsýtýcýyý ilk kez kullanýrken:
)
1) ýsýtýcý üzerine içi biraz su ile dolu bir tava
koyunuz;
2) ýsýtýcýyý, tavanýn içindeki su kaynayýncaya
kadar yaklaþýk 10 dakikalýðýna
“maksimum” ayarda çalýþtýrýnýz;
3) daha sonra, kontrol düðmesini “mini-
mum” ayara getiriniz ve ýsýtýcýyý yaklaþýk
20 dakika daha çalýþýr halde býrakýnýz;
4) havalandýrma için bir pencere açýnýz.
Bu süre zarfýnda, ýsýtýcý çok az duman
çýkarabilir ve hoþ olmayan bir koku
gelebilir. Bu gayet normal ve üretim
kalýntýlarýnýn neden olduðu bir
durumdur.
Bu iþlemi yaptýktan sonra, ýsýtýcý
plakanýn soðumasýný bekleyiniz, sonra ýlýk su
ile ýslatýlmýþ yumuþak bir bezle temizleyiniz.
electrolux 11
Þek. 2
Page 12

12 electrolux
Elektrikli ýsýtýcýnýn kullanýmý
Düðmenin, “1”den (minimum) “6”ya
(maksimum) kadar 6 ana ýsý ayarý vardýr,
fakat kiþisel ihtiyaçlarýnýza göre her ara
pozisyona da ayarlanabilir.
Piþirme bölgesini çalýþtýrmak için, kontrol
düðmesini istenilen ýsý ayarýna gelinceye
kadar saatin tersi yönde çeviriniz.
Piþirme bölgesini aktive etmeden önce
üzerine bir tencere koyunuz. Isýtýcýyý asla
üzerinde bir tencere yokken veya üzerindeki
tencere boþken açýk býrakmayýnýz. Sýcak bir
tencereyi soðuk haldeki bir ýsýtýcýnýn üzerine
koymayýnýz veya sýcak bir tencereyi
kapatýlmýþ bir ýsýtýcý üzerinde soðumaya
býrakmayýnýz. Aksi halde yoðunlaþmaya
neden olabilir ve ýsýtýcýya zarar verebilir.
Hýzlý ýsýtýcý
Hýzlý ýsýtýcý kýrmýzý bir nokta ile belirtilir ve
normal bir ýsýtýcýya göre daha hýzlý ýsýnýr.
Kýrmýzý nokta ýsýtýcý üzerinde boyanýrsa,
kullaným esnasýnda görünümü bozulabilir
ve belirli bir süre sonra tamamen görünmez
hale gelebilir. Bu durum ýsýtýcýnýn
performansýný etkilemez.
“Elektrik Aзэk” gцsterge эюэрэ
“Elektrik Aзэk” gцsterge эюэрэ, elektrikli
эsэtэcэ her зalэюtэrэldэрэnda yanacaktэr.
Page 13
electrolux 13
Isýtýcý plakanýn doðru ayarlanmasý için gerekli öneriler aþaðýdaki tabloda verilmektedir.
Ayar Seviye En iyi kullaným amacý
0 KAPALI
1 DÜÞÜK Sebzelerin yavaþ yavaþ kaynatýlmasý
Balýðýn kendi suyuyla piþirilmesi
2 Patateslerin veya çorbalarýn kaynatýlmasý
3 ORTA Büyük miktarda yiyeceklerin
güveçlerin ve çorbalarýn piþirilmesi
4 Yavaþça kýzartma, kavurma yapma
5 Et ve balýðý hýzlý bir þekilde kýzartma
6 YÜKSEK Yað veya suyun hýzlý ýsýtýlmasý
Elektrikli ýsýtýcýnýn doðru kullanýmý
için
Elektrikli ýsýtýcýnýn daha verimli kullanýmý
ve elektrik tüketiminin azaltýlmasý için:
z ýsýtýcýyý sadece üzerine tencereyi
yerleþtirdikten sonra çalýþtýrýnýz.
z Elektrikli ýsýtýcý üzerinde piþirme yapmak
için, geniþliði piþirme bölgesi ile ayný
veya hafif daha geniþ olan, alt kýsmý üç
noktadan temas eden tencerelerin
kullanýlmasý tavsiye edilir (Þek. 3).
z Elektrikli ýsýtýcý üzerine ýslak tencere
koymayýnýz ve ýslak kapaklarý kapatýlmýþ
ýsýtýcý üzerine koymayýnýz, çünkü nem ve
yoðunlaþma ýsýtýcýya zarar verebilir.
z Mümkünse, kapaklarý tencerelerin
üzerine koyunuz. Bakýr veya alüminyum
tencereler veya tavalar, elektrikli ýsýtýcý
üzerinde kullaným için uygun deðildir,
çünkü bunlar ýsýtýcý üzerinde kalýntý, leke
ve iz býrakabilir. Ayný þekilde, dökme
demir veya baþka bir alaþýmdan et
ýzgaralarý elektrikli ýsýtýcý üzerinde
Þek. 3
Page 14

14 electrolux
kullaným için uygun deðildir, çünkü
bunlar tehlikeli derecede ýsý birikimine
neden olurlar.
Ayrýca, altý pürüzlü olan kaplar ocaðýn
üstünü çizebilir ve iz býrakabilir. Tercihen,
alt kýsmý üç noktadan oturan paslanmaz
çelik bir et ýzgarasý kullanýnýz.
Cam kaplarýn kullanýlmasý da tavsiye
edilmez, çünkü bunlarýn altý genellikle
düz deðildir. Asla plastik kaplarý
kullanmayýnýz.
z Isýtýcýlarýn üzerine sabit olmayan veya
deforme kaplar yerleþtirmeyiniz, çünkü
bunlar devrilebilir veya içindekiler
taþarak yangýna neden olabilir.
z Tencereler kumanda bölgesini
kapatmamalýdýr.
z Kaynayan sývýlarýn ýsýtýcýnýn üzerine
dökülmemesine dikkat ediniz.
z Isýtýcýyý üzerinde tencere yokken veya
üzerindeki tencere boþken açýk
býrakmayýnýz.
z Sýcak bir kabý soðuk durumdaki bir
ýsýtýcýnýn üzerine koymayýnýz veya bunu
kapatýlmýþ bir ýsýtýcý üzerinde soðumaya
terk etmeyiniz. Aksi halde
yoðunlaþmaya neden olarak ýsýtýcýya
zarar verebilir.
z Daha hýzlý piþirme yapmak ve ýsýnýn
yayýlmasýný önlemek için, kaplarýn alt
kýsmýnýn maksimum temas
saðladýðýndan emin olmak amacýyla altý
düz olan kaplarýn kullanýlmasý tavsiye
edilir.
z Elektrikli ýsýtýcýnýn asla üstüne
dayanmayýnýz veya üzerinden
uzanmayýnýz. Yanýndan geçerken
tencereye takýlýp kazara düþmesine
neden olmamak için tencere kulpunu
daima ocaðýn iç kýsmýna doðru veya
ocaðýn yanýndaki tezgaha doðru
döndürünüz.
z Elektrikli ýsýtýcýyý bir odayý ýsýtmak için
kullanmayýnýz.
Page 15
Temizlik ve bakým
Her iþlemden önce, cihazýn
elektrik baðlantýsýný kesiniz ve
soðumasýný bekleyiniz.
Ocaðýn temizliði
Cilalý kýsýmlarý aþýndýrýcý olmayan ürünler
kullanmaya özen göstererek, ýlýk su ve
deterjan ile yýkayýnýz.
Baþlýklarý ve alev daðýtýcýlarýný sýcak su ve
deterjan ile kabuklaþmýþ kirleri çýkarmaya
özen göstererek sýkça yýkayýnýz. Paslanmaz
çelik kýsýmlarý kullandýktan sonra su ile iyice
durulayýnýz ve yumuþak bir bezle kurulayýnýz.
Ýnatçý lekeler için genellikle piyasada
bulunabilen özel, aþýndýrýcý olmayan normal
deterjanlarý kullanýnýz. Temizlik için hasýr,
çelik yünü ve asitlerin kullanýlmamasýna
özen gösteriniz.
z Ocak üzerinde asit veya alkalin
maddeler bulundurmaktan kaçýnýnýz
(örn. sirke, tuz, limon suyu, vs.).
Elektrikli ýsýtýcý
Plaka üzerine herhangi bir þey
döküldüðü zaman ýlýk su ve yumuþak bir
fýrçayla, naylon veya plastik kazýyýcý ile
çýkarýlmalýdýr. Plakanýn yeni gibi görünmesini
saðlamak için birçok maðazada
bulunabilen elektrikli ýsýtýcý temizleyicisi satýn
alýnabilir.
Alternatif olarak, toz oluþumunu
önlemek için bir mutfak havlusuna bir damla
zeytinyaðý döküp, plakayý siliniz. Bir sonraki
kullanýmýnýzda, plakanýn çok az duman
çýkarabileceðini ve hoþ olmayan hafif bir
koku verebileceðini unutmayýnýz.
Elektrikli ýsýtýcýnýn temizlenmemesi ve
bakýmýnýn yapýlmamasý, yüzeyde pas
ve korozyon oluþumuna neden
olabilir.
A
C
O
I
D
electrolux 15
Þek. 4
Page 16
16 electrolux
Ocak ýzgarasý
Ocaklar, hafif ve ince emaye demir veya
daha büyük ve aðýr dökme demir ýzgaralar
ile donatýlmýþtýr.
Daha iyi bir þekilde temizlemek için,
ýzgara ocak üzerinden çýkartýlabilir.
Ocaðýn çizilmesini veya hasar
görmesini önlemek için, dökme demir
ýzgaralarý kendi yerleri dýþýna
dayamayýnýz.
Emaye demirden ýzgara ayrýca, bulaþýk
makinesinde de yýkanabilir.
Yýkadýktan sonra, doðru pozisyonda
olmasýna dikkat ederek tekrar yerine
yerleþtiriniz.
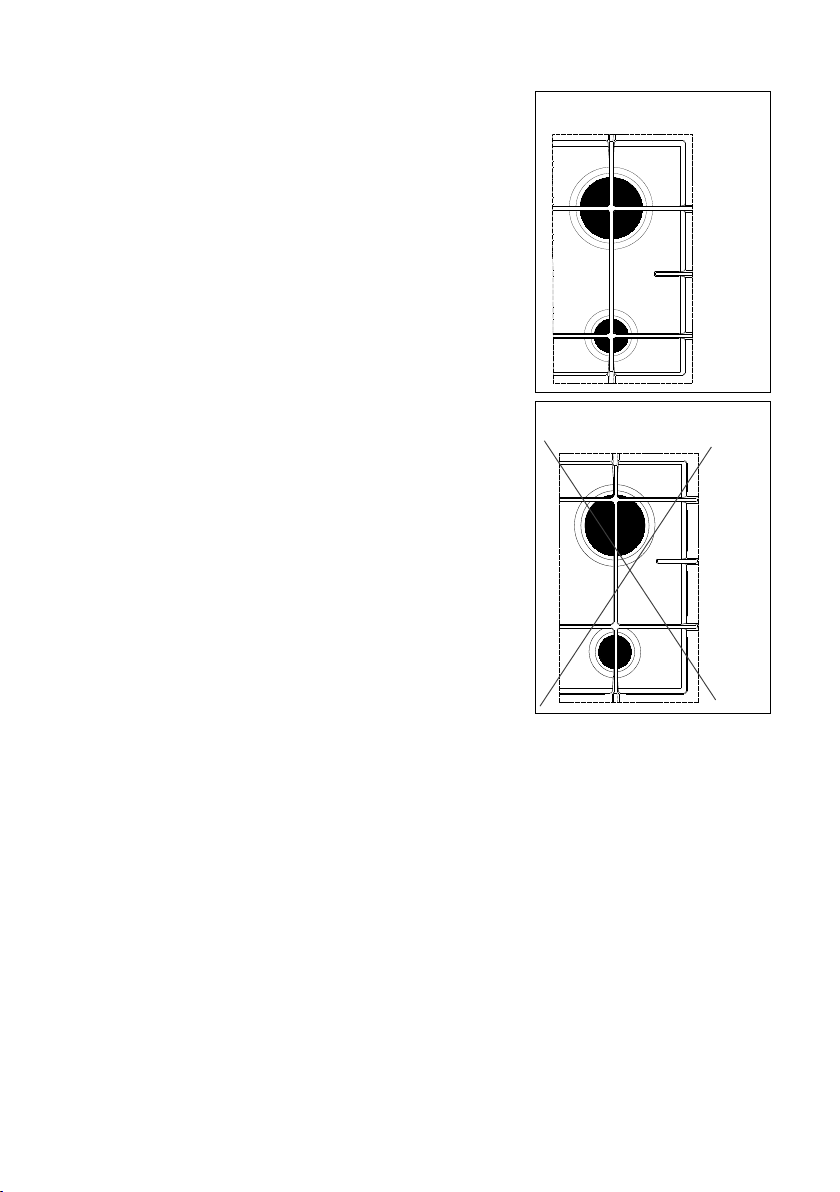
Brülörlerin düzgün çalýþmasý için,
ýzgaralarýn ocak üzerine þekil 5’te
gösterildiði gibi ortalandýklarýndan emin
olunuz.
Elektrikli ateþleyici
Ocaðýn otomatik yakma iþlemi,
seramikten yapýlmýþ bir “ateþleme ucu” ve
metalden bir elektrot ile gerçekleþtirilir (Þekil
1’de C ile gösterilmektedir). Ocak
üstlüðünün bu kýsýmlarýný periyodik olarak
özenle temizleyiniz. Ayrýca, ateþlemede
zorluk yaþanmasýný önlemek için alev ayýrýcý
üstlüðün deliklerinin (Þek. 1’de B ile
gösterilmektedir) týkanmamýþ olduðundan
emin olunuz.
EVET
Þek. 5
HAYIR
Þek. 6
Page 17
Periyodik bakým
Periyodik olarak, gaz borusunun iyi
durumda olduðunu ve borunun etkinliðini ve
varsa basýnç ayarlayýcýsýný kontrol ettiriniz.
Bunlarda herhangi bir anormallik/arýza
durumunda, tamir edilmelerini deðil arýzalý
kýsmýn deðiþtirilmesini isteyiniz.
Teknik özellikler
Gaz brülörlerinin gücü (metan gazý 20 mbar)
Hýzlý brülör 3,0 kW
Yarý-hýzlý brülör 2,0 kW
Yardýmcý brülör 1,0 kW
Kategori II2H3B/P
Cihazýn kalibrasyonu metan gazý G20 (2H) 20 mbar
Gaz giriþ baðlantýsý/rakoru G 1/2"
Elektrikli ocak gücü Ø 145 mm 1500 W
Besleme gerilimi 230 V ~ 50 Hz
electrolux 17
Cihaz sýnýfý 3
Ocaðýn boyutlarý
Geniþlik 594 mm
Derinlik 510 mm
Ankastre montaj için boyutlar
Geniþlik 560 mm
Derinlik 480 mm
Bay-pas çaplarý
Brülör Ø Santimetre
olarak
bay-pas çapý
Yardýmcý 28
Yarý-hýzlý 32
Hýzlý 42
Page 18

18 electrolux
Brülör özellikleri
NOMÝNAL
TERMÝK KAPASÝTE
(Bütan/Propan) 30 mbar
BRÜLÖR
TÝPÝ
NOMÝNAL ÝNDÝRGENMÝÞ
TERMÝK TERMÝK
KAPASÝTE KAPASÝTE DOÐAL GAZ SIVI GAZ
(Metan) - 20 mbar
kW kW Uç Uç g/s
iþareti m3/s iþareti
100/mm 100/mm
G30 G31
Brülör
(yardýmcý) 1,0 0,33 70 0,095 50 73 71
Brülör
(yarý hýzlý) 2,0 0,45 96 0,190 71 145 143
Brülör 3,0
(hýzlý) (metan gazý) 0,75 119 0,285 86 204 200
2,8
(
likit gaz
)
Page 19

Montaj talimatlari
z Montaj ve bakým ile ilgili aþaðýdaki
talimatlar, yürürlükteki tüzüklere
göre kalifiye bir personel tarafýndan
gerçekleþtirilmelidir.
z Cihaza bir müdahalede bulunmadan
önce elektrik baðlantýsý kesilmelidir.
Eðer bu tür bir iþlem için cihazýn
elektrik beslemesinin açýk kalmasý
gerekiyorsa, gerekli tüm önlemlerin
alýndýðýndan emin olunuz.
zz
z Ocaðýn monte edileceði ünitenin yan
zz
duvarlarý tezgah-üstü ocaðýn
yüksekliðini geçmemelidir.
zz
z Cihazý yanýcý materyallerin (örneðin,
zz
perdeleri çay havlularý, vs.) yakýnýna
monte etmekten kaçýnýnýz.
BU KÝTAPÇIKTA VERÝLEN DÝÐER
GÜVENLÝK TALÝMATLARDAN
HERHANGÝ BÝRÝSÝNE RÝAYET
EDÝLMEMESÝ VEYA YÜRÜRLÜKTEKÝ
KANUNLARIN GÖZ ARDI EDÝLMESÝ
HALÝNDE ÜRETÝCÝ FÝRMA
SORUMLULUK KABUL ETMEYECEKTÝR.
electrolux 19
Page 20

20 electrolux
Gaz baðlantýsý
Yürürlükteki kanunlara uygun olarak,
sabit baðlantýlar kullanýnýz veya paslanmaz
çelikten yapýlma esnek bir boru kullanýnýz.
Eðer esnek metal borular kullanýyorsanýz,
bunlarýn hareketli kýsýmlara temas
etmemesine veya sýkýþmamasýna dikkat
ediniz. Ocak bir fýrýn ile kombine halde
monte edildiðinde de ayný dikkati gösteriniz.
ÖNEMLÝ - Cihazýn doðru bir þekilde
çalýþmasýný saðlamak, enerjiden tasarruf
etmek ve cihazýn uzun ömürlü olmasý için,
cihazýn gerilim basýncý önerilen deðerlerde
olmalýdýr. Ayarlanabilir baðlantý, diþli bir G 1/
2" somunu ile çýkýþ kýsmýna baðlanýr.
Baðlantýnýn arasýna Þekil 5’te gösterildiði
gibi bir pul yerleþtiriniz. Parçalarý
zorlamadan kývýrarak birbirine takýnýz,
baðlantýyý gereken yönde ayarlayýnýz ve her
þeyi sýkýlayýnýz.
Metal olmayan esnek borular
kullanarak baðlantý yapma
Eðer baðlantý tüm kýsýmlarýndan kolayca
kontrol edilebiliyorsa, yürürlükteki kanunlara
riayet ederek esnek bir boru kullanma þansý
vardýr. Esnek boru, yürürlükteki kanunlar
uyarýnca kelepçeler kullanýlarak sýkýca
sabitlenmelidir.
Sývý gaz: kauçuk boru tutucusu «D»
(Þek. 7) kullanýnýz. Daima conta «B» takýnýz.
Daha sonra, gaz baðlantýsýný yapmaya
baþlayýnýz. Esnek boru aþaðýdaki koþullara
uygun olarak kullanýma hazýr hale
getirilmelidir:
- hiçbir kýsmý, oda sýcaklýðý dýþýnda,
30°C’nin üstünde aþýrý bir ýsýnma
yapmamalýdýr; eðer musluða
baðlanacak olan esnek borunun
baðlantý noktasýndan önce kýsa
kesilmesi gerekiyorsa, þekil 7’de
gösterildiði gibi monte edilmelidir;
- 1500 mm daha uzun olmamalýdýr;
- herhangi bir boðum yapmamalýdýr;
Doðal gaz
Sývý gaz
D
A) Ucu somunlu çýkýþ
B) Conta
C) Ayarlanabilir baðlantý
D) Sývý gaz için kauçuk boru
tutucusu
Þek. 5
Page 21

- çekilme veya bükülme olmamalýdýr;
- keskin kenarlara veya köþelere temas
etmemelidir;
- durumunu kontrol için kolayca
gözlenebilir olmalýdýr.
Esnek borunun koruma kontrolü,
aþaðýdaki kontrol aþamalarýný
içermektedir:
- çatlak, kesik ve her iki ucunda ve
tamamýnda yanýk izleri olmamalýdýr;
- malzeme sertleþtirilmemiþ halde, normal
elastikiyetinde olmalýdýr;
- sýkma kelepçeleri paslanmamýþ
olmalýdýr;
- son kullanma tarihi geçmemiþ olmalýdýr.
Eðer bir veya daha fazla anormallik
görülürse, boruyu tamir etmeyiniz,
deðiþtiriniz.
ÖNEMLÝ
Montaj iþlemi tamamlandýðýnda, tüm
boru tesisatýnýn mükemmel sýzdýrmaz
durumda olduðunu, bir sabunlu
solüsyon kullanarak (asla bir alev
kullanmayýnýz) kontrol ediniz.
electrolux 21
Page 22

22 electrolux
Elektrik baðlantýsý
Cihaz, 230 V monofaz elektrik
beslemesiyle çalýþacak þekilde
tasarlanmýþtýr. Baðlantý, standartlara/
normlara ve yerel kanunlara uygun olarak
gerçekleþtirilmelidir.
Baðlantýyý yapmadan önce aþaðýdaki
hususlarý kontrol ediniz:
z sýnýrlayýcý valf ve elektrik ünitesi, cihaz
yükünü kaldýrabilir olmalýdýr (veri
plakasýna bakýnýz);
z elektrik besleme tesisatý yürürlükteki
standartlara göre etkin bir toprak
baðlantýsýna sahip olmalýdýr;
z kurulan cihaz için kullanýlan priz veya
çok-kutuplu siviç kolaylýkla ulaþýlabilir
olmalýdýrlar.
Elektrik besleme kablosu cihazla birlikte
verilir.
Kabloya yüke uygun bir fiþ takýnýz ve
uygun bir emniyet prizine takýnýz.
Direk tesisata baðlantý yapmak
istiyorsanýz, cihaz ile elektrik tesisatý/
þebekesi arasýna kontaklar arasýndaki minimum açýklýðý 3 mm olan, yüke göre
boyutlandýrýlmýþ ve yürürlükteki kanunlara
uygun çok-kutuplu bir siviç yerleþtirmek
gereklidir.
Sarý/yeþil toprak kablosu siviçten
ayrýlmamalýdýr.
Kahverengi faz kablosu (terminalin “L”
klipsinden gelen) besleme þebekesinin
fazýna devamlý takýlý durumda kalmalýdýr.
Her durumda, besleme kablosu hiç bir
noktasýnda 90°C’den yüksek bir deðere
ulaþmayacak þekilde konumlandýrýlmalýdýr.
En uygun bir güzergah örneði Þek. 8’de
gösterilmiþtir. Kablo, mobilyaya yan
yüzeyine sabitlenmiþ bantlarýn kullanýlmasý
suretiyle, ocak üstlüðü altýndaki cihaza hiçbir
þekilde temas etmeyecek þekilde çekilir.
Page 23

electrolux 23
Elektrik besleme kablosunun
deðiþtirilmesi
Eðer kablonun deðiþtirilmesi gerekirse,
uygulamanýn yoðunluðuna ve sýcaklýða
uygun, sadece H05V2V2-F T90 tip kablolar
kullanýnýz. Bununla birlikte, sarý/yeþil toprak
kablosunun faz ve nötr kablolardan yaklaþýk
2 cm daha uzun olmasý gerekir (Þek. 9).
Baðlantý yapýldýktan sonra ýsýtýcý
elemanlarýný yaklaþýk 3 dakika çalýþtýrarak
test ediniz.
Baðlantý terminal kapaðýný açmak ve
baðlantý klipslerine ulaþmak için aþaðýdaki
iþlemleri uygulayýnýz:
z bir tornavidanýn keskin ucunu, terminalin
yan tarafýnda bulunan çýkýntýya geçiriniz;
z hafifçe bastýrarak yukarýya doðru
kaldýrýnýz (Þek. 10).
Besleme/elektrik kablosunu
deðiþtirme iþlemi, sadece teknik
servis veya benzer vasýflý bir
personel tarafýndan yapýlmalýdýr.
EVET
KABLO
KILAVUZU
Ankastre
montaj için
servis
boþluðu
Þek. 8
SERT BAKIR BORU
VEYA ESNEK
PASLANMAZ ÇELÝK
BORU
ARKADAN GÖRÜNÜM
HAYIR
ARKADAN GÖRÜNÜM
Þek. 9
Þek. 10
Nötr
Toprak (Sarý/Yeþil)
Page 24

24 electrolux
Çeþitli gaz tiplerine göre adaptasyon
Uçlarýn deðiþtirilmesi
1. Izgarayý çýkartýnýz.
2. Baþlýklarý ve alev daðýtýcýlarýný ocaktan
çýkarýnýz.
3. 7 numaralý bir boru anahtarý ile uçlarý
sökünüz ve çýkarýnýz (Þek. 11),
çalýþýlan gaz tipine uygun olanlarla
deðiþtiriniz (Bkz. “Brülör özellikleri”
tablosu - syf. 18).
4. Yukarýda belirtilen iþlemleri ters sýrada
uygulayarak parçalarý geri takýnýz.
5. Kalibrasyon plakasýný (gaz þebekesi
baðlantý kýsmýnýn yanýna
konumlandýrýlmýþtýr) yeni gaz tipine
uygun olanla deðiþtiriniz. Bu plaka,
cihazla birlikte verilen enjektör torbasý
içerisinde bulunur.
Kullanýlan gaz basýncý öngörülenden
farklý (veya deðiþken) ise giriþ borusu
baðlantýsý üzerine, cihazýn kullanýldýðý
ülkedeki yürürlükte bulunan normlara uygun
olarak, kanalize edilen gazlar için uygun bir
basýnç ayarlayýcýsý takýnýz.
Þek. 11
Page 25

Minimum ayar
Minimum ayar için, aþaðýdakileri
uygulayýnýz.
1. Daha önceden açýklandýðý gibi ocaðý
yakýnýz.
2. Musluðu minimum alev konumuna
getiriniz.
3. Düðmeleri çýkartýnýz.
4. Þekil 12’de gösterilen bay-pas pinini
ayarlayýnýz.
zz
z 20 mbar metan gazýndan likit gaza
zz
dönüþtürme yapýyorsanýz, bay-pas pinini
sonuna kadar saatin tersi yönde
döndürünüz.
zz
z Eðer likit gazdan 20 mbar’lýk metan
zz
gazýna dönüþtürme yapýyorsanýz, baypas pinini yaklaþýk 1/4 tur döndürünüz.
zz
z Eðer 20 mbar’lýk metan gazýndan 13
zz
mbar’lýk metan gazýna dönüþtürme
yapýyorsanýz, bay-pas pinini yaklaþýk 1/
4 tur döndürünüz.
zz
z Eðer likit gazdan 13 mbar’lýk metan
zz
gazýna dönüþtürme yapýyorsanýz, baypas pinini yaklaþýk 3/4 tur döndürünüz.
zz
z Her durumda, ocak tacýnýn tümünde
zz
küçük, homojen ve düzgün bir alev
olmalýdýr.
5. Musluðu hýzlý bir þekilde maksimum
konumdan minimum konuma çevirerek
iþlem sonunda ocaðýn sönmediðinden
emin olunuz.
Yukarýda açýklanan adaptasyon
iþlemleri, tezgah üstü ocaðýn mutfak
mobilyasýna montajýndan ve kurulum
þeklinden etkilenmeden kolayca yapýlabilir.
electrolux 25
Þek. 12
Minimum ayarý için
bay-pas pini
Page 26

26 electrolux
Modüler mobilyalara ankastre montaj
Boyutlar milimetre cinsinden belirtilmektedir
PE
SR
R
A
594
A = Yardýmcý brülör
SR = Yarý-hýzlý brülör
R = Hýzlý brülör
PE = Elektrikli ocak
510
Þek. 13
Bu tezgah/fýrýn-üstü ocak, derinliði 550
mm ile 600 mm arasýndaki mutfak
mobilyalarýna yerleþtirilmek üzere
tasarlanmýþtýr.
Ocaðýn boyutlarý þekil 13’de
belirtilmektedir.
Page 27

Mobilya içine yerleþtirme ve
montaj
Tezgah üstü ocak, þek. 14’de gösterilen
boyutlarda bir ankastre boþluðu olan bir
mobilyanýn içerisine gömme þekilde monte
edilebilir. Ankastre açýklýðý arka duvarýndan
en az 55 mm mesafede olmalýdýr.
Yüksekliði tezgah üstü ocaktan daha fazla
olan olasý bir sað veya sol yan duvar/panel,
üstteki boþluktan en az 100 mm uzakta
olmalýdýr.
Ocaðýn mobilya içine ankastre
)
montajý aþaðýda belirtildiði gibi
gerçekleþtirilmelidir:
zz
z özel izolasyon contasýný, uçlarýn üst üste
zz
gelmeden birleþmesine özen
göstererek boþluðun ön tarafýndaki
kenarýndan 11 milimetre, yan
kenarýndan ve arka kenarýndan 10
milimetre mesafede olacak þekilde
yerleþtiriniz (bkz. þek. 15);
zz
z ortalamaya dikkat ederek ocak
zz
üstlüðünü mobilya boþluðuna
yerleþtiriniz;
zz
z ocak üstlüðünü mobilyaya, cihazla
zz
birlikte verilen özel plakalar yardýmýyla
sabitleyiniz (bkz. Þek. 16).
Vidalarýn çekiþ gücü, izolantý çizmeye
yeterlidir, böylelikle izolantýn fazlalýk
kýsmý kolaylýkla alýnabilir.
Ocak üstlüðünün kenarý, sývýlarýn
sýzmasýna karþý kesin bir koruma saðlayan
su geçirmez bir çift labirent formasyon
oluþturur.
electrolux 27
Þek. 14
Þek. 15
izolant
Þek. 16
Page 28

28 electrolux
Yerleþtirme seçenekleri
Kapaklý, referans mobilya üzerine
Mobilyanýn yapýmýnda/hazýrlanmasýnda,
ocaðýn çalýþmasý sýrasýnda ýsýnan ocak
kasasý ile olabilecek temaslarý göz önünde
bulundurarak uygun önlemlerin alýnmasý
gereklidir. Bu sorunu önlemek için tavsiye
edilen çözüm, þekil 17’te gösterilmektedir.
Teknik servis müdahalesi sýrasýnda
ocaðýn kilitlenmesine ve açýlmasýna olanak
vermek için ocak altýndaki panel kolayca
çýkarýlabilir tipte olmalýdýr.
Þek. 17
a) sökülebilir mobilya paneli
b) baðlantýlar için kullanýlabilir alan
Page 29

Altýnda fýrýn olan tezgah üstüne
Boþluk þekil 12’de belirtilen boyutlara
sahip olmalý ve etkin bir havalandýrmaya
olanak tanýyan desteklerle donatýlmýþ
olmalýdýr.
Aþýrý ýsýnmadan kaçýnmak için,
kurulumun þekil 18 ve 19’de tanýmlandýðý
gibi yapýlmasý gereklidir.
Elektriksel sebeplerden ötürü ve fýrýnýn
ön kýsmýnýn kolaylýkla çýkarýlabilmesi için
ocak ve fýrýnýn elektrik baðlantýlarý
birbirlerinden baðýmsýz olarak yapýlmalýdýr.
Raflar veya havalandýrma bacasý, tezgah
üstü ocaktan en az 650 mm mesafede
bulunmalýdýr (Þekil 14).
electrolux 29
Þek. 18
Þek. 19
Page 30

30 electrolux
Teknik servis ve yedek parçalar
Bu cihaz, fabrikadan sevk edilmeden
önce uzman personel tarafýndan en iyi
çalýþma performansý sunacak þekilde
geliþtirilmiþ ve test edilmiþtir. Gereksinim
duyulan her onarým ve geliþtirme iþlemi,
maksimum dikkat ve özen gösterilerek
yapýlmalýdýr.
Bu nedenle, ilgili durumlarda her zaman
için ya Yetkili Satýcýya ya da en yakýn Teknik
Servis Merkezine baþvurmanýzý; problemi,
cihaz modelini (Mod.), ürün numarasýný
(Prod. No.) ve imalat numarasýný (Ser. No.)
belirtmenizi önemle tavsiye ederiz. Bu
veriler, cihazla birlikte verilen enjektör
torbasý içerisindeki veri etiketinde
belirtilmektedir.
Ürünün üreticisi tarafýndan sertifikalý, bu
marka ile iþaretli
orijinal yedek parçalar
sadece Electrolux
Yetkili Servislerde
bulunur.
Cihazýnýzýn kullanma ömrü 10 yýldýr.
Kullanma ömrü,üretici ve/veya ithalatçý
firmanýn cihazýnýzla ilgili yedek parça temini
ve bakým süresini ifade eder.
ÜCRETSÝZ TÜKETÝCÝ DANIÞMA
HATTI
0 800 211 60 32
www.electrolux.com.tr
ÜRETÝM YERÝ:
Electrolux Forli Factory
Viale Bologna, 298
47100 Forli
Italy
Page 31

electrolux 31
Garanti/Müþteri hizmetleri
GARANTÝ ÞARTLARI
1. Garanti süresi, malýn teslim tarihinden itibaren baþlar ve
zz
z Fýrýn-Çamaþýr-Bulaþýk Makineleri-Soðutucu & Dondurucular-Split klimalar ve
zz
Mikrodalgalar 3 (ÜÇ) yýl.
zz
z Süpürge-Ocak-Asprirator-Davlumbaz-Su ýsýtýcýlarý-Küçük ev aletleri 2 (ÝKÝ) yýldýr.
zz
2. Malýn bütün parçalarý dahil olmak üzere tamamý Firmamýzýn garantisi kapsamýndadýr.
3. Malýn garanti süresi içerisinde arýzalanmasý durumunda, tamirde geçen süre garanti
süresine eklenir. Malýn tamir süresi en fazla 30 iþ günüdür. Bu süre, mala iliþkin arýzanýn
servis istasyonuna, servis istasyonunun olmamasý durumunda, malýn satýcýsý, bayii,
acentasý, temsilciliði, ithalatçýsý veya imalatçýsýndan birisine bildirim tarihinden itibaren
baþlar. Sanayi malýnýn arýzasýnýn 15 iþ günü içerisinde giderilmemesi halinde, imalatçý
veya ithalatçý; malýn tamiri tamamlanýncaya kadar, benzer özelliklere sahip baþka bir
sanayi malýný tüketicinin kullanýmýna tahsis etmek zorundadýr.
4. Malýn garanti süresi içerisinde, gerek malzeme ve iþçilik, gerekse montaj hatalarýndan
dolayý arýzalanmasý halinde, iþçilik masrafý, deðiþtirilen parça bedeli yada baþka
herhangi bir ad altýnda hiçbir ücret talep etmeksizin tamiri yapýlacaktýr.
5. Malýn ;
– Teslim tarihinden itibaren garanti süresi içinde kalmak kaydýyla bir yýl içerisinde, ayný
arýzayý ikiden fazla tekrarlamasý veya farklý arýzalarýn dörtten fazla ortaya çýkmasý sonucu
maldan yararlanamamanýn süreklilik kazanmasý,
– Tamiri için gereken azami sürenin aþýlmasý,
– Servis istasyonunun mevcut olmamasý halinde sýrasýyla satýcýsý, bayii, acentasý,
temsilciliði, ithalatçýsý veya imalatçýsýndan birisinin düzenleyeceði raporla arýzanýn
tamirinin mümkün bulunmadýðýnýn belirlenmesi, durumlarýnda ücretsiz olarak deðiþtirme
iþlemi yapýlacaktýr.
6. Malýn kullanma kýlavuzunda yer alan hususlara aykýrý kullanýlmasýndan kaynaklanan
arýzalar garanti kapsamý dýþýndadýr.
7. Garanti Belgesi ile ilgili olarak çýkabilecek sorunlar için Sanayi ve Ticaret Bakanlýðý
Tüketicinin ve Rekabetinin Korunmasý Genel Müdürlüðü'ne baþvurulabilir.
Buna göre
Electrolux'ün Electrolux, AEG-Electrolux, Progress markalý mamulleri için verdiði
garanti, aþaðýdaki durumlarda geçerli olmaz.
– Kullanma Kýlavuzunda belirtilen talimatlarýn dýþýndaki kullanýmlar,
– Tüketiciye teslimden sonra oluþabilecek kýrýk, çizik ve hasarlar (taþýma, çarpma,
düþürme, vs)
– Mamulü; uygun olmayan elektrik tesisatýnda veya kullanýlmasý öngörülen voltaj dýþýnda
kullanma,
– Gereken onarým için Yetkili Servise baþvurmadan önce Electrolux Yetkili Servis
Personeli dýþýnda bir kimsenin cihazýn onarýmýna, bakýmýna veya tadiline kalkýþmýþ
olmasý durumlarýnda,
– Yukarýda belirtilen maddeler kapsamýnda olan arýzalar ücret karþýlýðý yapýlýr.
– Arýzalarýn giderilmesi konusunda uygulanacak teknik yöntemlerin tesbiti ve
deðiþtirilecek parçalarýn saptanmasý tamamen firmamýza aittir.
Page 32

32 electrolux
– Garanti Belgesi üzerinde tahrifat yapýldýðý mamul üzerindeki orijinal seri numarasý
kaldýrýldýðý veya tahrip edildiði taktirde bu belge hükümden düþer.
Garanti Belgesi'nin geçerlilik süresi 3 yýldýr ve onay tarihi esas alýnarak her yýl vize edilir.
Geçerlilik süresinin dolmasýna müteakip 3 ay içerisinde vizesi yaptýrýlmayan belgeler
geçersiz sayýlýr. Belgesi iptal edilen veya geçersiz sayýlan imalatçý ve / veya ithalatçýlara ayný
ürün için 6 ay süre ile yeni belge tanzim edilemez.
ÝMALATÇI / ÝTHALATÇI FÝRMANIN
ÜNVANI: ELECTROLUX Dayanýklý Tüketim Mamulleri Sanayi ve Ticaret A.Þ.
MERKEZ ADRESÝ: Tarlabaþý Cad.No : 35 34437 Taksim / ÝSTANBUL
TELEFONU: 0 212 293 10 20 (Pbx)
FAX: 0 212 251 60 94
www.electrolux.com.tr
Ürününüz ile ilgili teknik sorunlarýn oluþmasý halinde bölgenizde size en yakýn
Yetkili servisimiz ile irtibat kurabilmeniz için Tüketici Danýþma Merkezimizi arayýnýz
ELECTROLUX TÜKETÝCÝ DANIÞMA MERKEZÝ: 0 800 211 60 32
AEG-ELECTROLUX TÜKETÝCÝ DANIÞMA MERKEZÝ: 0 800 211 61 69
Lütfen Yetkili servisimizi aramadan önce aþaðýdaki bilgileri hazýrlayalým.
1. Ýsim ve adres bilgisi
2. Telefon numaranýz
3. Arýzanýn tam olarak tanýmlanmasý
4. Model-üretim numarasý ve seri numara bilgisi (Ürün üzerindeki etikette mevcut)
5. Satýn alma tarihi.
* Unutmayýnýzki hizmetinizi garantili olarak yaptýrabilmeniz için faturanýzý ve diðer
tüm servis hizmetlerine ait dokümanlarý Yetkili Servis'e ibra etmek zorundasýnýz.
Avrupa Garantisi
Bu cihaz, cihaz garanti belgesinde yazýlý veya kanunlarca belirlenen süre boyunca,
kýlavuzun arkasýnda liste halinde verilen ülkelerin her birinde Elektrolux tarafýndan
garantilidir. Eðer aþaðýda liste halinde belirtilen bu ülkelerin birinden diðerine taþýnýrsanýz,
cihazýn garantisi de aþaðýdaki þartlar dahilinde sizinle birlikte yer deðiþtirmiþ olacaktýr:
zz
z Cihazýn garantisi, ürünün satýcýsý tarafýndan verilen geçerli bir satýn alma belgesinin ibrazý
zz
ile kanýtlayacaðýnýz tarih olan cihazý ilk satýn aldýðýnýz tarihte baþlar.
zz
z Cihazýn garantisi ayný süre için geçerli ve cihazýn bu özel modeli ve tipi için yeni ikamet
zz
edeceðiniz ülkede geçerli iþçilik ve parçalarla ilgili olarak ayný içeriðe sahip olacaktýr.
zz
z Cihazýn garantisi, cihazý satýn alan ilk kiþiye mahsustur ve baþka bir kullanýcýya
zz
devredilemez.
zz
z Cihaz, Electrolux tarafýndan verilen talimatlar uyarýnca monte edilir ve kullanýlýr ve sadece
zz
ev içi kullaným amaçlýdýr, yani ticari kullaným amaçlý deðildir.
zz
z Cihaz, yeni ikamet edeceðiniz ülkede yürürlükte bulunan ilgili tüm kanunlar uyarýnca
zz
monte edilmelidir.
Bu Avrupa Garantisinin hükümleri, kanunlarca size tanýnan herhangi bir haktan
etkilenmez.
Page 33

electrolux 33
Welcome to the world of Electrolux
Thank you for choosing a first class product from Electrolux, which hopefully
will provide you with lots of pleasure in the future.
The Electrolux ambition is to offer a wide variety of quality products that make
your life more comfortable.
You find some examples on the cover in this manual. Please take a few minutes
to study this manual so that you can take advantage of the benefits of your new
machine.
We promise that it will provide a superior User Experience delivering Ease-of-
Mind.
Good luck!
Page 34

34 electrolux
Contents
For the User
Important Safety Information ........................................................................... 35
Operation ........................................................................................................ 37
Using the hob correctly ................................................................................... 39
Cleaning and Maintenance .............................................................................. 42
European Guarantee ....................................................................................... 53
For the Installer
Technical data ................................................................................................. 44
Installation ....................................................................................................... 46
Adaptation to different types of gas ................................................................. 48
Electrical Connection ....................................................................................... 49
Building In ....................................................................................................... 50
Possibilities for insertion .................................................................................. 52
Guide to Use the instructions
The following symbols will be found in the text to guide you throughout the
Instructions:
Safety Instructions
)
MANUFACTURER:
ELECTROLUX ITALIA S.p.A.
33080 PORCIA - PN (Italy)
It is very important that this instruction book should be kept safely for future
consultation. If the appliance should be sold or given to another person, please ensure
that the booklet goes together with it, so that the new owner can know of the functions
of the machine and also be aware of the warnings.
These instructions are only for the countries stated by the symbol printed on the front
cover of this instruction book.
Step by step instructions for an operation
Hints and Tips
Environmental information
This appliance complies with the following E.E.C. Directives:
• 2006/95 (Low Voltage Directive);
• 2004/108 (Electromagnetical Compatibility Directive);
• 90/396 (Gas Appliances) and subsequent modifications.
Page 35

electrolux 35
English
Important safety information
This warnings has been given for the safety of you and others. We therefore
ask you to carefully read the procedures of installing and using this cooker.
Installation
z The work of installation must be
carried out by competent and qualified
installers according to the regulations
in force.
• Any modifications to the domestic
electrical mains which may be
necessary for the installation of the
appliance should be carried out only
by competent personnel.
During Operation
• This appliance has been designed for
non professional purpose in private
houses only. It is meant to cook edible
foodstuff only and must not be used
for any other purposes.
• It is dangerous to alter the specification
in any way.
• For hygiene and safety reasons, this
appliance should be kept clean at all
times. A build-up of fats or other
foodstuff could result in a fire.
• Under no circumstances should you
attempt to repair the appliance
yourself. Repairs carried out by
unexperienced persons may cause
injury or serious malfunctioning. Refer
to your local Service Centre. Always
insist on genuine spare parts.
• Ensure that all control knobs are in the
OFF position when not in use.
• Should you connect any electrical tool
to a plug near this cooking appliance,
ensure that electric cables are not in
contact with it and keep them far
enough from the heated parts of this
appliance.
• If the appliance is out of order,
disconnect it from the electric supply.
People Safety
• This appliance has been designed to
be operated by adults and children
under supervision. Young children
must not be allowed to tamper with the
controls or play near or with the oven.
• This appliance is not intended for use
by children or other persons whose
physical, sensory or mental capabilities
or lack of experience and knowledge
prevents them from using the
appliance safely without supervision or
instruction by a responsible person to
ensure that they can use the appliance
safely.
• Accessible parts of this appliance may
become hot when it is in use. Children
should be kept away until it has
cooled.
About Installation, Cleaning and
Manteinance
z It is mandatory that all operations
required for the installation are carried
out by a qualified or competent
person, in accordance with existing
rules and regulations.
• Disconnect the appliance from the
electrical supply, before carrying out
any cleaning or manteinance work.
• Ensure a good ventilation around the
Page 36

36 electrolux
appliance. A poor air supply could
cause lack of oxygen.
• Ensure that the gas supply complies
with the gas type stated on the
identification label, placed near the gas
supply pipe.
• This appliance is not connected to a
combustion products evacuation
device. It must be installed and
connected in accordance with current
installation regulations. Particular
attention shall be given to the relevant
requirements regarding ventilation.
• The use of a gas cooking
appliance results in the production
of heat and moisture in the room in
which it is installed. Ensure that
the kitchen is well ventilated: keep
natural ventilation holes open or
install a mechanical ventilation
device (mechanical extractor
hood).
• Prolonged intensive use of the
appliance may call for additional
ventilation, for example opening of
a window, or more effective
ventilation, for example increasing
the level of mechanical ventilation
where present.
• Once you removed all packaging from
the appliance, ensure that it is not
damaged and the electric cable is in
perfect conditions. Otherwise, contact
your dealer before proceeding with the
installation.
• The manufacturer disclaims any
responsability should all the safety
measures not be carried out.
Environmental Information
z After installation, please dispose of
the packaging with due regard to
safety and the environment.
• When disposing of an old appliance,
make it unusable, by cutting off the
cable.
The symbol on the product or
on its packaging indicates that this
product may not be treated as household
waste. Instead it shall be handed over to
the applicable collection point for the
recycling of electrical and electronic
equipment. By ensuring this product is
disposed of correctly, you will help
prevent potential negative consequences
for the environment and human health,
which could otherwise be caused by
inappropriate waste handling of this
product. For more detailed information
about recycling of this product, please
contact your local city office, your
household waste disposal service or the
shop where you purchased the product.
Service
• Under no circumstances should you
attempt to repair the appliance
yourself. Repairs carried out by
unexperienced persons may cause
injury or serious malfunctioning. Refer
to your local Service Centre. Always
insist on genuine spare parts.
Page 37

electrolux 37
Operation
Hob burner control knobs
The symbols on the knobs mean:
= no gas supply
= maximum gas supply
= minimum gas supply
For easier lighting, proceed before
putting a pan on the pan support.
Lighting the burners
)
To light a burner, turn the relevant
knob anticlockwise to maximum
position ( ) and push down the knob
to ignite.
After lighting the flame, keep the
knob pushed down for about 5
seconds. This will allow the
"thermocouple" to be heated and the
safety device to be switched off,
otherwise the gas supply would be
interrupted. Then, check the flame is
regular and adjust it as required.
If you cannot light the flame even
after several attempts, check the "cap"
and “crown” are in the correct position.
In the absence of electricity, ignition
can occur without the electrical device;
in this case approach the burner with a
flame, push the relevant knob down and
turn it anti-clockwise until it reaches the
"maximum" position.
When switching on the mains, after
installation or a power cut, it is quite
normal for the spark generator to be
activated automatically.
Do not keep the control knob
pressed for more than 15
seconds.
If the burner does not light
even after 15 seconds, release
the control knob, turn it the
"off" position and wait for at
least one minute before trying
to light the burner again.
If the burner accidentally goes
out, turn the control knob to
the "off" position and wait for
at least 1 minute before trying
to light the burner again.
Make sure pots do not protrude
over the edges of the cooktop and
that they are centrally positioned on
the rings in order to obtain lower gas
consumption.
To switch off burners
)
To put the flame out, turn the knob to
the symbol ( ).
Take care when frying food in
hot oil or fat, as the overheated
splashes could easily ignite.
A - Burner cap
B - Burner crown
C - Ignition electrode
D - Thermocouple
Page 38

38 electrolux
Electric hotplate control knob
The knob has 6 main heat settings, from
11
"
1" (minimum) to "
11
can also be set in every intermediate
position, to adjust to personal needs.
To switch on the cooking zone, turn the
control knob anticlockwise to the desired
heat setting.
Place a saucepans on the cooking zone
before switching it on. Never leave the
plate on without a pan on it or with an
empty pan on it. Avoid leaving a hot
saucepan on a cold plate, or leaving a hot
saucepan to cool down on a switched off
plate. This could cause condensation and
damage the plate.
66
6" (maximum), but it
66
Rapid hotplate
The rapid hotplate is indicated by a red
dot, and will heat up more quickly than
a normal plate. As the red dot is painted
Suggestions for the correct setting of the
plate are given in the following table.
on the plate, it may deteriorate during
use and even disappear completely
after a period of time. This will not affect
the performance of the plate.
Mains On indicator light
The Mains On indicator light will come on
each time the electric hotplate is switched
on.
Setting Level Best for
0 OFF
1 LOW Simmering vegetables
Fish in its own juice
2 Simmering potatoes or soups
3 MEDIUM Boiling large quantities
of food, stews and soups
4 Slow frying, making a roux
5 Fast frying of meat or fish
6 HIGH Rapid heating up of fat or water
Page 39

Using the hob correctly
Practical hints
Before using the appliance remove
all packaging, including the
advertising labels and any
protective film.
The burners
To ensure maximum burner
efficiency, you should only use pots and
pans with a flat bottom fitting the size of
the burner used.
Rapid Burner
diameter 18-26 cm
Semi-rapid Burner
diameter 12-18 cm
Auxiliary Burner
diameter 8-18 cm
• For easier lighting, proceed before
putting a pan on the pan support.
• Use only pans or pots with flat bottom.
• Take care when frying food in hot
oil or fat, as the overheated
splashes could easily ignite.
• If you use a saucepan which is smaller
than the recommended size, the flame
will spread beyond the bottom of the
vessel, causing the handle to overheat.
• Prolonged cooking with
potstones, earthenware pans or
cast-iron plates is inadvisable.
Also, do not use aluminium foil to
protect the top during use.
• Make sure pots do not protrude over
the edges of the cooktop and that they
are centrally positioned on the rings in
order to obtain lower gas
consumption.
electrolux 39
• Do not place unstable or deformed
pots on the rings: they could tip over or
spill their contents, causing accidents.
• Pots must not enter the control zone.
• If the control knobs become difficult to
turn, please contact your local Service
Force Centre.
• As soon as a liquid starts boiling, turn
down the flame so that it will barely
keep the liquid simmering.
Page 40

40 electrolux
The electric hotplate
For better efficiency of the electric hotplate
and lower electricity consumption:
• switch on the hotplate only after placing
the pots on it.
• For cooking on the electric hotplate it is
advisable to use triple-bottom pots of
the same width as the cooking zone, or
slightly larger (see Figure).
• Do not use wet pots on the electric
hotplate, and do not place wet lids on
the switched off hotplate, because the
moisture and condensate could
damage it.
• If possible, place lids on the pots.
Copper or aluminium pots and pans
are not very suitable for cooking on the
electric hotplate, because they can
leave residues, stains and marks.
Likewise, meat grills in cast iron or other
alloys are not suitable for cooking on
the electric hotplate, because they
cause dangerous accumulation of
heat.
Also, the rough bottom can scratch the
cooktop and the material can stain it.
Possibly choose a meat grill in stainless
steel with triple bottom.
The use of glass containers is also
inadvisable, because they usually have
very uneven bottoms. Never use plastic
containers.
• Do not place unstable or deformed
pots on the hotplates because they
could tip over or spill their contents and
thus cause accidents.
• Pots must not enter the control zone.
• Make sure boiling liquids do not spill
onto the hotplate.
• Do not leave a hotplate switched on
without a pot or with an empty pot.
• Do not place a pot on a cold hotplate or
leave it to cool on a switched-off
hotplate. This could cause damaging
condensation to form.
• For faster cooking and to avoid heat
dispersion, it is advisable to use flatbottomed pots, to ensure maximum
contact of the bottoms with the
cooking zone.
• Take care never to lean or reach over a
hot electric plate. Always point pan
handles inward or over the work
surface next to the hob to avoid
accidentally knocking over a pan as
you pass by.
• Do not use the hotplate to warm the
room.
Page 41

Before the first use of the electric hotplate
Before using the appliance remove
all packaging, including the
advertising labels and any
protective film.
When using the electric hotplate
)
for the first time:
1) place on all the plate a pan filled with
some water;
2) switch the plate on for about 10
minutes at “maximum” position until
water inside the pans boils;
3) then, turn the control knob to
“minumum” and allow the plate to run
for approximately 20 minutes;
4) open a window for ventilation.
During this time, the plate may
smoke a little and an unpleasant
odour may be emitted. This is
absolutely normal and it is caused
by residues of manufacturing.
Once this operation is carried out,
let the plate to cool down, then it
them with a soft cloth soaked in
warm water.
electrolux 41
Page 42

42 electrolux
Cleaning and Mainteinance
Disconnect the appliance from
the electrical supply, before
carrying out any cleaning or
manteinance work.
The hob is best cleaned whilst
it is still warm, as spillage can
be removed more easily than if
it is left to cool.
This appliance cannot be
cleaned with steam or with a
steam cleaning machine.
The burners
z The burner caps and crowns can be
removed for cleaning.
z Wash the burners taps and crowns
using hot soapy water, and remove
marks with a mild paste cleaner. A
well moistened soap impregnated
steel wool pad can be used with
caution, if the marks are particularly
difficult to remove.
z After cleaning, be sure to wipe dry
with a soft cloth.
z Frequently wash the "caps" and the
"crowns" with hot soapy water,
carefully taking away any built-up of
food.
YES
The pan supports
z After cleaning, make sure that the
pan supports are correctly
positioned.
z To make burners work properly,
ensure that pan supports are placed
in a way that the arms are centred
upon the burner as shown in the
picture.
z Pay attention when replacing the
pan supports in order to avoid
damaging the hob top.
NO
Page 43

electrolux 43
The Hob Top
z Regularly wipe over the hob top
using a soft cloth well wrung out in
warm water to which a little wasing
up liquid has been added. Avoid the
use of the following:
- household detergent and bleaches;
- impregnated pads unsuitable for
non-stick saucepans;
- steel wool pads;
- bath/sink stain removers.
z Should the hob top become heavily
soiled, the following products are
recommended:
- For stainless steel hobs use a
proprietary stainless steel cleaner.
- For other hobs use Hob Brite or Bar
Keepers Friend.
z Do not leave acid or alkaline
substances (e.g. vinegar, salt, lemon
juice, etc.) on the cooktop.
The electric hotplate
Spills onto the actual plate should be
removed using warm water and a soft
brush, nylon or plastic scourer. To keep
the plate looking as new, hotplate
conditioner can be purchased from most
hardware stores.
Alternatively, wipe the plate with a drop
of olive oil on a kitchen towel to avoid
rust. It is important to note that the plate
will smoke a little and produce a slightly
unpleasant odour when next used.
Failure to clean and condition the
hotplate may lead to rust and
corrosion forming on the surface.
The Ignition electrode
The electric ignition is obtained
through a ceramic electrode with a
metal electrode (Fig - C). Keep these
components very clean, to avoid difficult
lighting, and check that the burner
crown holes (Fig - B) are not obstructed.
Page 44

44 electrolux
Technical data
Burner gas power
Rapid burner 3,0 kW
Semi-rapid burner 2,0 kW
Auxiliary burner 1,0 kW
Category II2H3B/P
Gas supply natural gas G20 (2H) 20 mbar
Gas connection G 1/2"
Electric hotplate power Ø 145 mm 1,5 kW
Electric supply 230 V ~ 50 Hz
Appliance class 3
Hob dimensions
Width 594 mm
Depth 510 mm
Cut out dimensions
Width 560 mm
Depth 480 mm
By-pass diameters
Burner Ø By-pass in 1/100 mm.
Auxiliary 28
Semi-rapid 32
Rapid 42
Page 45

Gas burners
electrolux 45
NORMAL REDUCED
POWER POWER
BURNER NATURAL GAS LPG
G20 (2H) - 20 mbar
kW kW g/h
inj. m3/h inj.
100/mm 100/mm
Auxiliary
burner 1,0 0,33 70 0,095 50 73 71
Semi-rapid
burner 2,0 0,45 96 0,190 71 145 143
Rapid 3,0
burner (natural gas) 0,75 119 0,286 86 204 200
2,8
(
LPG
)
NORMAL
POWER
(Butane/Propane) 30 mbar
G30 G31
Page 46

46 electrolux
Installation
z The following instructions about
installation and maintenance must
be carried out by qualified
personnel in compliance with the
regulation in force.
z The appliance must be electrically
disconnected before all
interventions. If any electric supply
to the appliance is required to
carry out the work, ensure all the
necessary precautions are
followed.
z The side walls of the unit in which
the hob is going to be installed,
must not exceed the height of the
working top.
z Avoid installing the appliance in
the proximity of inflammable
materials (e.g. curtains, tea towels
etc.).
THE MANUFACTURER WILL NOT
ACCEPT LIABILITY, SHOULD ANY
OF THE OTHER SAFETY
INSTRUCTIONS INCORPORATED IN
THIS BOOKLET OR THE
REGULATION IN FORCE BE
IGNORED.
Gas connection
Choose fixed connections or use a
flexible pipe instainless steel in
compliance with the regulation in force.
If using flexible metallic pipes, be careful
they do not come in contact with mobile parts or they are not squeezed. Use
the same attention when the hob is
combinated with an oven.
Page 47

electrolux 47
IMPORIMPOR
IMPOR
IMPORIMPOR
operation, a saving of energy and the
long life of the appliance, the voltage
pressure of the appliance must
correspond to the recommended values.
The adjustable connection is fixed to the
comprehensive ramp by means of a
threaded nut G 1/2". Interpose the
sealing between the components as
shown in Fig. 7. Screw the parts without
forcing, adjust the connection in the
required direction and tighten everything.
TT
ANT ANT
T
ANT - To ensure a correct
TT
ANT ANT
Connection using flexible
nonmetal pipes
When the connection can be easily
inspected in its full extent, there is the
chance to use a flexible pipe according
to the rules in force. The flexible pipe
must be tightly fixed using clamps
according to the rules in force.
Liquid gas: use the rubber pipe holder
«D». Always insert the gasket «B». Then
proceed with the gas connection. The
flexible pipe should be made ready for
use in such a way that:
- nowhere it can reach overtemperature,
other than room temperature, higher
than 30°C; if the flexible pipe, to reach
the cock, must run behind the range,
it must be installed as shown in picture;
- it is no longer than 1500 mm;
- it shows no throttles;
- it is not subject to traction or torsion;
- it doesn't get in touch with cutting
edges or corners;
-it can be easily inspected in order to
check its condition.
Natural gas
Liquid gas
D
A) Ramp with ending nut
B) Seal
C) Adjustable connection
D) Rubber pipe holder for liquid gas
The control of preservation of the flexible
pipe consistsin checking that:
- it doesn't show cracks, cuts, marks
of burnings bothon the end parts and
on its full extent;
- the material is not hardened, but
shows its normal elasticity;
- the fastening clamps are not rusted;
- expiry term is not due.
If one or more abnormalities are seen,
do not repair the pipe, but replace it.
IMPORTANT
Once installation is complete,
check the perfectseal of every
pipe fitting, using a soapy
solution, never a flame.
Page 48

48 electrolux
Adaptation to different types of gas
A. Injectors replacement
)
• Remove the pan supports.
• Remove the burner's caps and
crowns.
• With a socket spanner 7 unscrew
and remove the injectors (Fig. 1), and
replace them with the ones required
for the type of gas in use (see table
«Gas burners»).
• Reassemble the parts, following the
same procedure backwards.
• Replace the rating label (placed near
the gas supply pipe) with the relevant
one for the new type of gas supply.
You can find this label in the package
of the injectors supplied with the
appliance.
Should the feeding gas pressure be
different or variable compared with the
required pressure, an appropriate
pressure adjuster must be fitted on the
gas supply pipe, in compliance with the
rules in force.
Fig. 1
B. Adjustment of minimum
)
level
To adjust the minimum level of the
burners, proceed as follows:
• Light the burner.
• Turn the knob on the minimum
position.
• Remove the knob.
• With a thin screwdriver, adjust the
by-pass screw positioned in the
centre of the gas tap control shaft
(see Fig. 2).
If changing from natural gas 20 mbar
to liquid gas, completely tighten the
adjustment screwin.
If changing from liquid gas to natural
gas 20 mbar, undo the by-pass
screw about 1/4 of a turn.
• Finally check the flame does not go
out when quickly turning the knob
from the maximum position to the
minimum position.
This procedure can easily be carried
out, anyhow the hob has been
positioned or built in the working top.
Fig. 2
Minimum adjustment screw
Page 49

Electrical Connection
electrolux 49
The appliance is designed to be
connected to 230 V monophase
electricity supply.
The connection must be carried out
in compliance with the laws and
regulations in force.
Before the appliance is connected:
1) check that the main fuse and the
domestic installation can support the
load (see the rating label);
2) check that the power supply is
properly earthed in compliance with the
current rules;
3) check the socket or the double
pole switch used for the electrical
connection can be easily reached with
the appliance built in the forniture unit.
The appliance is supplied with a
connection cable. This has to be
provided with a proper plug, able to
support the load marked on the
identification plate. To connect the plug
to the cable, follow the recommendation
given in Fig. 3a. The plug has to be fitted
in a proper socket.
If connecting the appliance directly
to the electric system, it is necessary
that you install a double pole switch
between the appliance and the
electricity supply, with a minimum gap
of 3 mm. between the switch contacts
and of a type suitable for the required
load in compliance with the current
rules.
The connection cable has to be
placed in order that, in each part, it
cannot reach a temperature 50°C
higher than room temperature.
The brown coloured phase cable
(fitted in the terminal block contact
marked with "L") must always be
connected to the network phase.
Remplacement of the voltage
cable
The connection of the voltage cable
to the appliance's terminal block is of
type "Y". This means that its
replacement requires the specific
equipment of a technician. In this case,
only cable type H05V2V2-F T90 must
be used. The cable section must be
suitable to the voltage and the working
temperature. The yellow/green earth
wire must be approximately 2 cm.
longer than the phase wires (Fig. 3-a).
To open the terminal block and reach
the terminals, proceed as follows:
z insert the point of a screwdriver into
the visible protrunding part of the
terminal block;
z exert a light pressure and lift (Fig. 3-b)
Neutral
Earth
Fig. 3-a
Fig. 3-b
(yellow/green))
Page 50

50 electrolux
Building In
PE
SR
Fig. 4
A = Auxiliary burner
SR= Semi-rapid burner
R = Rapid burner
PE= Electric Hotplate
These hobs can be inserted in a
built-in kitchen unit whose depth is
between 550 and 600 mm. The hobs
dimensions are shown in Fig. 4.
The edge of the cut out must have a
minimum distance from the rear wall of
55 mm.
If there are side walls, or sides of the
furniture unit near the hob, the cut out
edges must have a minimum distance of
150 mm.
Hanging forniture units or hoods
must be placed at 650 mm. minimum
from the hob.
Fitting the hob to the worktop
594
R
A
510
Dimensions are given in
millimeters
Carry out the building in of the hob
as follows:
1. Place the seals supplied with the hob
on the front edge of the cut out.
Then, place them at 11 mm from the
side edges and at 10 mm from the
rear edge, as shown in the diagram,
Fig. 5
Page 51

taking care that the seals meet
without overlapping.
2. Place the hob in the cut out, taking
care that it is centred.
3. Fix the hob with the relevant fixing
clamps, supplied with the injectors
kit (see diagram). When the screws
have been tightened, the excess seal
can be removed.
The edge of the hob forms a double
seal which prevents the ingress of
liquids.
electrolux 51
Fig. 6
a
a) seal
Fig.7
Page 52

52 electrolux
Possibilities for insertion
Kitchen unit with door
Proper arrangements must be taken
in designing the forniture unit, in order to
avoid any contact with the bottom of the
hob which can be heated when it is
operated. The recommended solution is
shown in Fig. 8. The panel fitted under
the hob should be easily removable to
allow an easy access if a technical assistance intervention is needed.
Kitchen unit with oven
The hob recess dimensions must
comply the indication given in Figs. 9
and 10 and must be provided with
brackets to allow a continuous supply of
air. The hob's electric connection and
the oven's one must be carried out
separately, both for safety reasons and
to allow the oven to be easily taken off
the unit.
Fig. 8
a) Removable panel
b) Space for connections
Fig. 9
Fig. 10
Page 53

electrolux 53
European guarantee
This appliance is guaranteed by Electrolux in each of the countries listed at the back
of this user manual, for the period specified in the appliance guarantee or otherwise by
law. If you move from one of these countries to another of the countries listed below the
appliance guarantee will move with you subject to the following qualifications:
• The appliance guarantee starts from the date you first purchased the appliance
which will be evidenced by production of a valid purchase document issued by the
seller of the appliance.
• The appliance guarantee is for the same period and to the same extent for labour
and parts as exists in your new country of residence for this particular model or
range of appliances.
• The appliance guarantee is personal to the original purchaser of the appliance and
cannot be transferred to another user.
• The appliance is installed and used in accordance with instructions issued by
Electrolux and is only used within the home, i.e. is not used for commercial
purposes.
• The appliance is installed in accordance with all relevant regulations in force within
your new country of residence.
The provisions of this European Guarantee do not affect any of the rights granted to you
by law.
Page 54

54 electrolux
Page 55

electrolux 55
Page 56

www.electrolux.com.tr
35693-8804 10/08 R.A
 Loading...