

Page 1

user manual
Cooker
EH K2-2 / K2-3 / K2-4
Page 2

2 electrolux
T
1
Contents
Electrolux. Thinking of you.
Share more of our thinking at www.electrolux.com
Safety instructions.................................. 3
Description of the Appliance .................. 4
Before Using for the first time................. 6
Using the Rings...................................... 7
Using the Oven ...................................... 8
Uses, Tables and Tips............................ 10
5
Cleaning and Care................................. 16
What to do if …..................................... 22
Installation Instructions .......................... 23
Disposal ................................................ 25
Service.................................................. 27
Subject to change without notice
he following symbols are used in this user manual:
Important information concerning your personal safety and information on how to avoid
damaging the appliance.
3 General information and tips
2 Environmental information
Page 3

1 Safety instructions
electrolux 3
Electrical safety
• This appliance must be only connected
by a registered electrician.
• In the event of a fault or damage to the
appliance: Take the fuses out or switch
off.
• Repairs to the appliance must only be
carried out by qualified service engi-
neers. Considerable danger may result
from improper repairs. If repairs become
necessary, please contact our Customer Services or your dealer.
Child Safety
• Never leave children unsupervised when
the appliance is in use.
Safety whilst using
• People (including children) who, because of their physical, sensory or mental capabilities or their inexperience or
ignorance are not able to use the device
safely, should not use this device without supervision or instruction by a responsible person.
• This appliance is intended to be used for
co oking, roas ti ng and bakin g f oo d in the
home.
• Take care when connecting electric appliances to sockets nearby. Do not allow connecting leads to come into
contact with or to catch beneath the hot
oven door.
• Warning: Risk of burns! The interior of
the oven becomes hot during use.
• Using ingredients containing alcohol in
the oven may create an alcohol-air mixture that is easily ignited. In this case,
open the door carefully. Do not have
embers, sparks or naked flames in the
vicinity when opening the door.
3 Information on acrylamides
According to the latest scientific knowledge, intensive browning of food, especially in products containing starch, can
constitute a health risk due to acrylamides. Therefore we recommend cooking at the lowest possible temperatures
and not browning foods too much.
How to avoid damage to the appliance
• Do not line the oven with aluminium foil
and do not place baking trays, pots, etc.
on the oven floor, as the heat that builds
up will damage the oven enamel.
• Fruit juices dripping from the baking tray
will leave stains, which you will not be
able to remove. For very moist cakes,
use a deep tray.
• Do not put any strain on the oven door
when open.
• Never pour water directly into the oven
when it is hot. This could cause damage
to or discolouration of the enamel.
• Rough handling, especially around the
edges of the front panel, can cause the
glass to break.
• Do not store any flammable materials inside the oven. These could ignite when
the oven is switched on.
• Do not store any moist foods inside the
oven. This could damage the oven
enamel.
• After switching off the cooling fan, do
not keep uncovered dishes in the oven.
Moisture may condense in the oven interior or on the glass doors and may get
into the units.
3 Note on enamel coating
Changes in the colour of the oven’s enamel
coating as a result of use do not affect the
appliance’s suitability for normal and correct
use. They therefore do not constitute a defect in the sense of the warranty law.
Page 4
4 electrolux
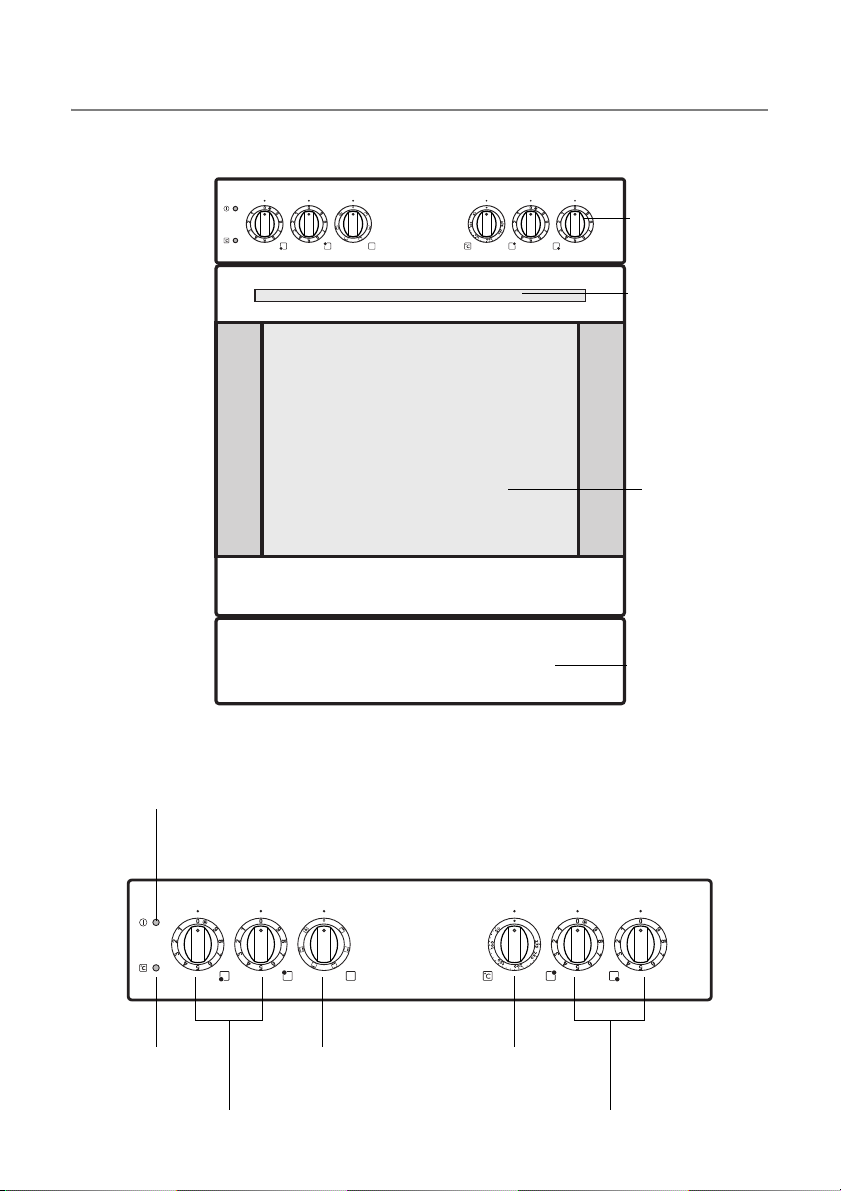
Description of the Appliance
General Overview
Control panel
Door handle
Oven door
Control Panel EH K2-4
Oven Power Indicator
Temperature Pilot
Light
Hob Cooking Zone Control Knobs
Oven Functions Temperature selector
Appliance drawer
Hob Cooking Zone Control Knobs
Page 5
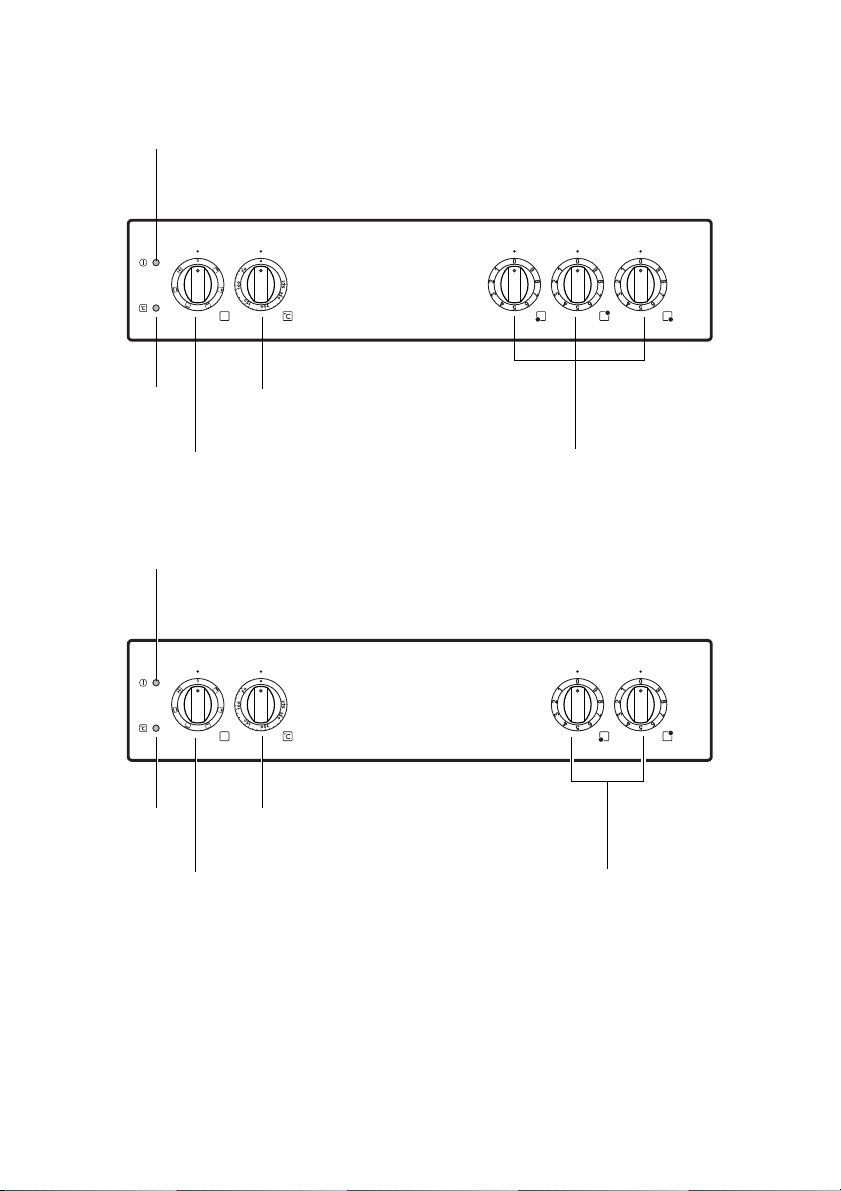
Control Panel EH K2-3
Oven Power Indicator
electrolux 5
Temperature Pilot
Temperature selector
Light
Oven Functions
Control Panel EH K2-2
Oven Power Indicator
Temperature Pilot
Light
Oven Functions
Temperature selector
Hob Cooking Zone Control Knobs
Hob Cooking Zone Control Knobs
Page 6

6 electrolux
Oven Features
Fat trap
Shelf positions
Aluminium base plate
Oven accessories
Oven shelf
Top heat and heating elements
Oven lighting
Bottom Heat
Oven shelf runners,
removable
Baking tray
For cookware, cake tins, roasts and grilled
foods.
Before Using for the first time
Initial Cleaning
Before using the oven for the first time you
should clean it thoroughly.
1 Caution: Do not use any caustic, abra-
sive cleaners! The surface could be
damaged.
3 To clean metal fronts use commercially
available cleaning agents.
For cakes and biscuits.
1. Turn the oven function switch to oven
lighting .
2. Remove all accessories and the shelf
support rails and wash them with warm
water and washing up liquid.
3. Then wash out the oven with warm water and washing-up liquid, and dry.
4. Wipe the front of the appliance with a
damp cloth.
Page 7
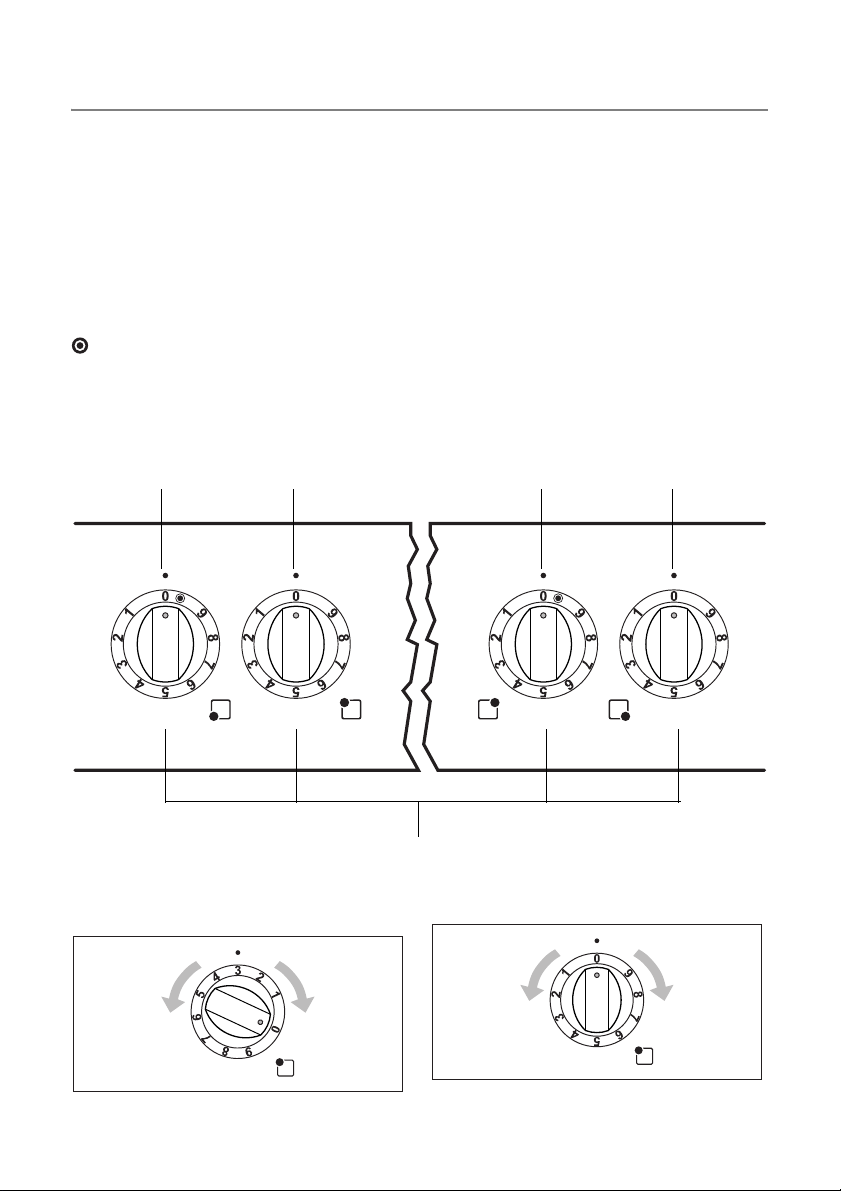
Using the Rings
3 Also refer to the operating instructions
for your built-in hob. It contains important information on ovenware, operation, cleaning and care.
Heat settings
• Heat settings can be set in the range 1 - 9.
• Half-way settings are available between
1 and 9.
1 = lowest power
9 = highest power
= double ring switch
2 Switch the cooking zone off approx. 5-
10 minutes before cooking is finished to
make use of the residual heat. This
saves electricity.
front left rear left rear right front right
electrolux 7
Setting the heat setting
1. Select the heat setting.
Hob Cooking Zone Control Knobs
2. To end the cooking process, turn back
to the Off position.
3 The power indicator light is lit as long as
a ring is on.
Page 8
8 electrolux
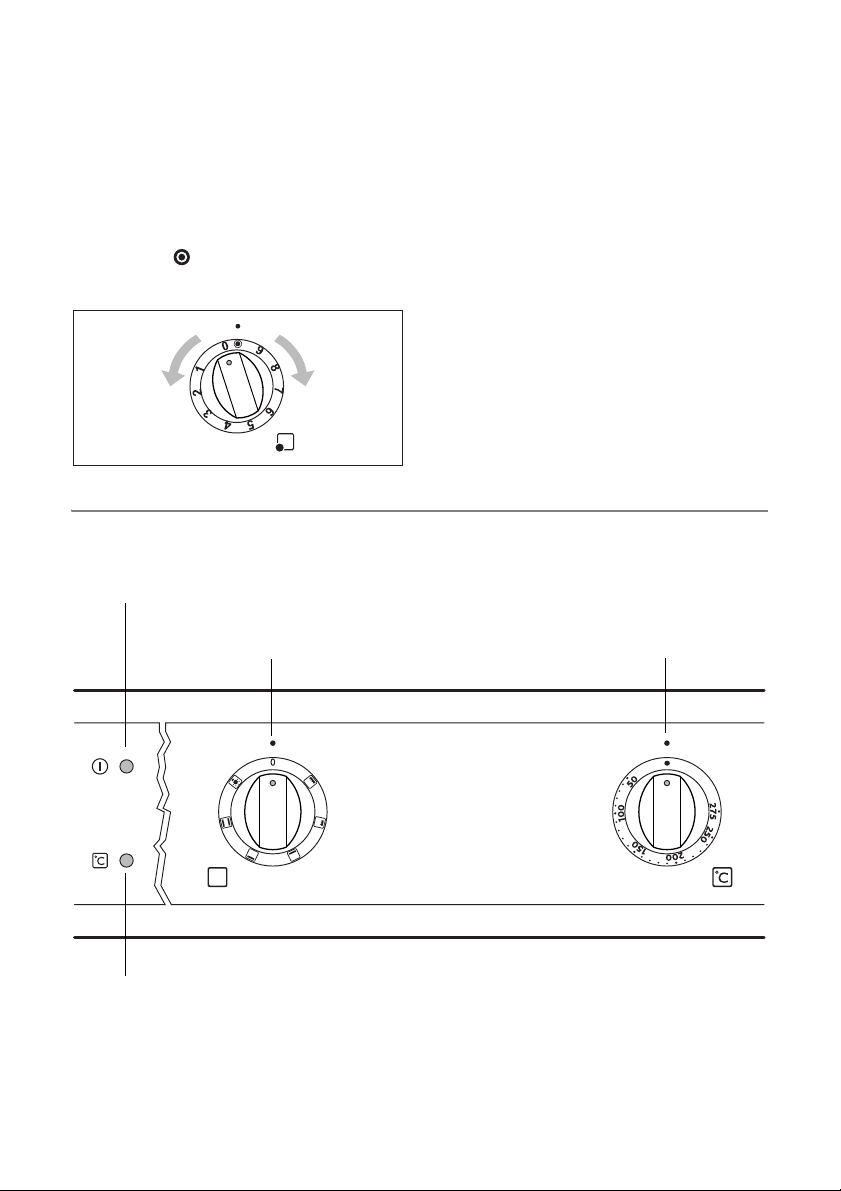
Switching on the dual fry/cook
area
1 The control for the dual fry/cook area is
switched on by turning to the right, and
cannot be turned past the stop!
1. Turn the dual fry/cook control to the
right. Continue turning to Position 9, and
onto the symbol (you will feel a slight
resistance). The stop position will then
be clearly detectable.
Using the Oven
Switching the Oven On and Off
Oven Power Indicator
Oven Functions
2. Finally, turn back to the desired setting.
3. After cooking, turn back to the OFF po-
sition.
3 To use the dual fry/cook area again af-
terwards, the larger ring must be
switched back on.
Temperature selector
Temperature Pilot Light
1. Turn the oven functions dial to the desired function.
2. Turn the temperature selector to the desired temperature.
The power indicator is lit as long as the oven
is in operation.
The temperature pilot light is lit as long as the
oven is heating up.
3. To turn the oven off, turn the oven functions dial and the temperature selector
to the Off position.
Page 9
3 Cooling fan
The fan switches on automatically in order to keep the appliance’s surfaces
cool. When the oven is switched off, the
fan continues to run to cool the appliance down, then switches itself off automatically.
Oven Functions
The oven has the following functions:
Oven function Application
Light
Using this function you can
Conventional
Top heat
Bottom heat
Grill
Dual grill
For
For
For
baking
browning
For
baking
For
grilling
toasting
grilling
and
roasting
bread, cakes and pastries and for bakes.
cakes with
flat food items placed in the
.
flat food items in
light up
the oven interior, e.g. for cleaning.
on
one oven level
crispy or crusty bases
large quantities
.
middle of the grill
.
and for
electrolux 9
and for
toasting
.
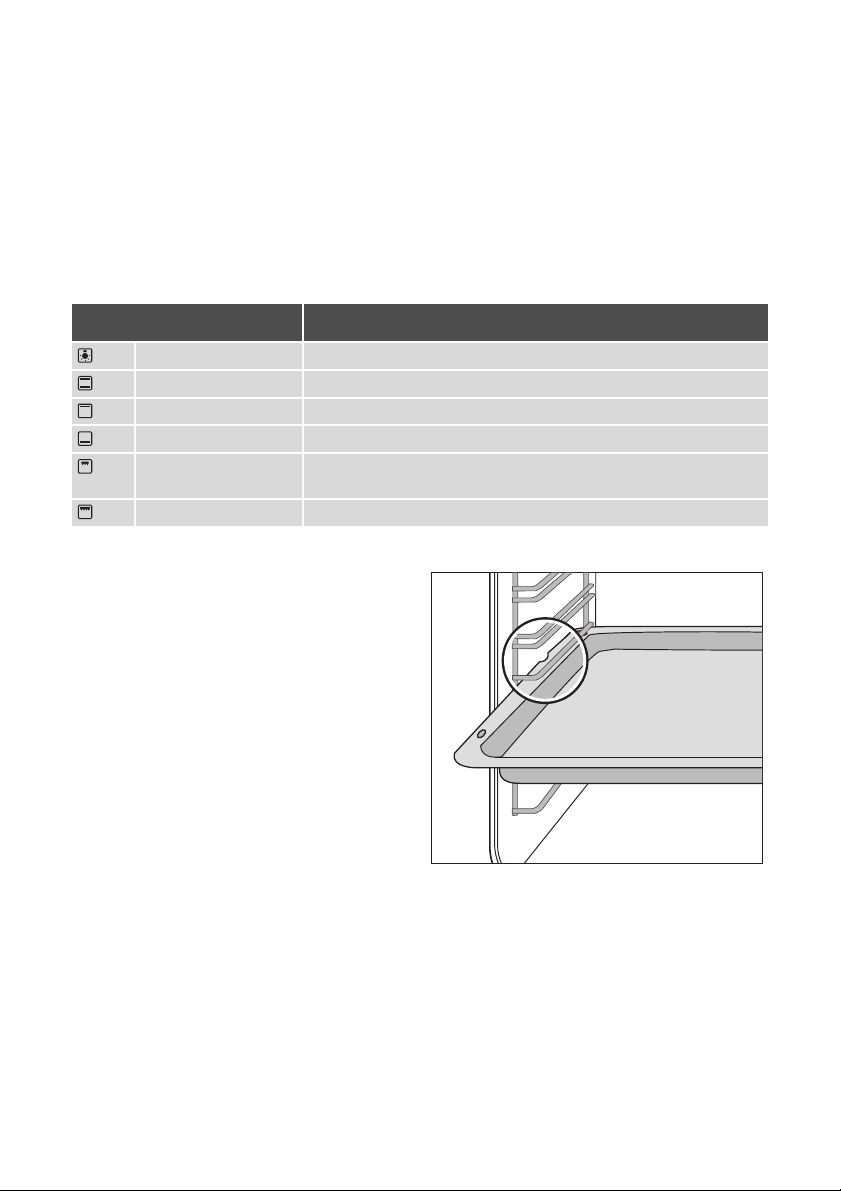
Inserting the Oven Shelf and the
Baking Tray
3 Shelf runner safety and anti-tip
device
As a shelf runner safety device, all insertable components have a small curved
indentation at the bottom on the right
and left-hand edge.
Always insert insertable components so
that this indentation is at the back of the
oven interior. This indentation is also important for preventing the insertable
components from tipping.
Inserting the baking tray
Push the baking tray between the guide bars
of the selected oven level.
Page 10

10 electrolux
Inserting the oven shelf:
Inserting the oven shelf and the baking
tray together:
Insert the oven shelf so that the feet point
downwards.
Push the oven shelf between the guide bars
of the selected oven level.
Lay the oven shelf on the baking tray.
Push the baking tray between the guide
bars of the selected oven level.
3 The high rim around the oven shelf is an
additional device to prevent cookware
from slipping.
Uses, Tables and Tips
Cooking table
The information given in the following table is for guidance only.
Heat
setting
Cooking-
process
0 Residual heat, Off position
Keeping
1
food warm
1-2
2-3
3-4
Melting
Solidifying
Simmering
on low heat
Steaming
Braising
suitable for
Keeping cooked foods warm as required Cover
Hollandaise sauce,
melting butter, chocolate,
gelatine
Fluffy omelettes, baked eggs 10-40 mins. Cook with lid on
Simmering rice and milk-based
dishes
Heating up ready-cooked meals
Steaming vegetables, fish
braising meat
Cooking
time
5-25 mins. Stir occasionally
25-50 mins.
20-45 mins.
Tips/Hints
Add at least twice as much
liquid as rice, stir milk dishes
part way through cooking
With vegetables add only a
little liquid (a few table-
spoons)
Page 11

electrolux 11
Heat
setting
4-5
6-7
7-8
9
Cooking-
process
Boiling
Gentle
Frying
Heavy
Frying
Boiling
Searing
Deep frying
suitable for
Steaming potatoes 20-60 mins.
Cooking larger quantities of
food, stews and soups
Frying escalopes, veal cordon
bleu, cutlets, rissoles, sausages,
liver, roux, eggs, pancakes,
doughnuts
Hash browns, loin steaks,
steaks, Flädle (pancakes for
garnishing soup)
Boiling large quantities of water, cooking pasta, searing meat (goulash, pot roast),
3 We recommend when boiling or searing
foods using the highest heat setting at
first and then letting foods requiring a
longer cooking time finish cooking on
the desired heat setting.
1 Overheated fats and oils can ignite very
quickly. Warning! Fire hazard!
Baking
Oven function: Conventional
Baking tins
For Conventional dark metal and nonstick tins are suitable.
Oven levels
Baking with Conventional is only possible
on one level.
1 baking tray:
Cooking
time
60-150 mins.
Steady frying
5-15 mins.
per pan
deep frying chips
Tips/Hints
Use only a little liquid, e. g.:
Up to 3 l liquid plus ingredi-
¼
max.
Turn hal fw ay thr ou gh
Turn hal fw ay thr ou gh
l water for
750 g potatoes
ents
cooking
cooking
1 cake tin:
e.g. oven level 1
General Instructions
• Insert the tray with the bevel at the front.
• With Conventional you can also bake
with two tins next to one another on the
oven shelf at the same time. This does
not significantly increase the baking
time.
3 When frozen foods are used the trays in-
serted may distort during cooking. This
is due to the large difference in temperature between the freezing temperature
and the temperature in the oven. Once
the trays have cooled the distortion will
disappear again.
e.g. oven level 3
Page 12

12 electrolux
How to use the Baking Tables
The tables give the required temperature settings, baking times and oven shelf levels for
a selection of typical dishes.
• Temperatures and baking times are for
guidance only, as these will depend on
the consistency of the pastry, mixture or
dough and the number and the type of
baking tin.
• We recommend using the lower temperature the first time and then if necessary,
for example, if a deeper browning is required, or baking time is too long, se-
• Your new oven may bake or roast differently to your previous appliance. So
adapt your normal settings (temperature, cooking times) and oven shelf levels to the recommendations in the
following tables.
2 With longer baking times, the oven can
be switched off about 10 minutes before
the end of baking time, to make use of
the residual heat.
Unless otherwise stated, the values given in
the tables assume that cooking is started
with the oven cold.
lecting a higher temperature.
• If you cannot find the settings for a particular recipe, look for the one that is
most similar.
Baking table
Type of baking
Baking in tins
Ring cake or brioche 1 160-180 50-70
Madeira cake, fruit cakes 1 150-170 70-90
Sponge flan 1 160-180 25-40
Flan base - short pastry 3 190-210
Flan base - sponge mixture 3 170-190 20-25
Apple tart (covered) 1 170-190 50-60
Apple pie
(2tins Ø20cm, placed diagonally to one another)
Savoury flan (e. g., quiche lorraine) 1 180-200 30-70
Cheesecake 1 160-180 60-90
Cakes/pastries/breads on baking trays
Plaited bread/bread crown 3 170-190 30-40
Christmas stollen 3 160-180
Bread (rye bread) first of all
.......................................then
Cream puffs, eclairs 3 190-210 25-40
Swiss roll 3 180-200
Dry streusel cake 3 160-180 20-40
Buttered almond cake, sugar cakes, Bienenstich (custard-filled cake, coated with sugar and
almonds)
Fruit flans (made with yeast dough/sponge mixture)
Oven
level
1 180-200 20-30
1
3 190-210
3 170-190 25-50
Te mp e r at u re
ºC
1)
1)
1)
250
160-180
1)
1)
Time
Mins.
10-25
40-60
20
30-60
10-20
15-30
Page 13

electrolux 13
Type of baking
Oven
level
Te mp e r at u re
ºC
Time
Mins.
Fruit flans made with short pastry 3 170-190 40-80
Yeast cakes with delicate
fillings (e. g., cream cheese, cream, etc.)
3 160-180 50-80
(cooked on baking sheet)
Pizza (with a lot of topping) 1 190-210
Pizza (thin crust) 1 230-250
Unleavened bread 1 230-250
Tarts (Swiss-style) 1 210-230
Biscuits
Short pastry biscuits 3 170-190
1)
1)
1)
1)
1)
30-60
10-25
8-15
35-50
6-20
Viennese whirls 3 160-180 10-40
Biscuits made with sponge mixture 3 170-190 15-20
Pastries made with egg white, meringues 3 100-120 120-150
Macaroons 3 120-140 30-60
Danish pastries 3 170-190 20-40
Puff pastries 3 190-210
Rolls 3 180-220
Small cakes (20 per tray) 3 170-190
1)
1)
1)
20-30
20-35
20-30
1) Pre-heat the oven
Tips on baking
Baking results Possible cause Remedy
The cake is not browned
enough at the bottom
The cake sinks (becomes
soggy, lumpy, streaky)
Cake is too dry Oven temperature too low Set oven temperature higher
Cake browns unevenly Oven temperature too high and baking
Cake is not done within the
baking time given
Wrong oven level Place cake lower in the oven
Oven temperature too high Use a slightly lower setting
Baking time too short Set a longer baking time
Baking times cannot be reduced by setting higher temperatures
Too much liquid in the mixture Use less liquid
Pay attention to mixing times, especially if using mixing machines
Baking time too long Set a shorter baking time
Set a lower oven temperature and a
time too short
longer baking time
Mixture is unevenly distributed Spread the mixture evenly on the
baking tray
Temperature too low Use a slightly higher oven setting
Page 14

14 electrolux
Roasting
Oven function: Conventional
Ovenware for roasting
• Any heat-resistant ovenware is suitable
to use for roasting. (Please read the
manufacturer's instructions.)
• For all lean meats, we recommend
roasting these in a roasting tin or
dish with a lid. The meat will be more
succulent.
• All types of meat, that can be browned
or have crackling, can be roasted in a
roasting tin or dish without a lid.
3 Tips on using the Roasting Table
The information given in the following table is for guidance only.
Roasting table
• We recommend cooking meat and fish
weighing 1kg or more in the oven.
• To prevent meat juices or fat from burning onto the ovenware, we recommend
adding some liquid.
• If required, turn the roast (after 1/2 - 2/3
of the cooking time).
• Baste large roasts and poultry with their
juices several times during roasting. This
will give better roasting results.
• You can switch the oven off
about 10 minutes before the end of the
roasting time, in order to utilise the residual heat.
Type o f me at
Beef
Pot roast 1-1.5 kg 1 200-250 120-150
Roast beef or fillet 1
- rare
- medium
- well done
Pork
Shoulder, neck, ham joint, 1-1.5 kg 1 210-220 90-120
Chop, spare rib 1-1.5 kg 1 180-190 60-90
Meat loaf 750 g-1 kg 1 170-180 45-60
Knuckles of pork (pre-cooked) 750 g-1 kg 1 210-220 90-120
Veal
Roast veal 1 kg 1 210-220 90-120
Knuckle of veal 1.5-2 kg 1 210-225 120-150
Lamb
Leg of lamb, roast lamb 1-1.5 kg 1 210-220 75-120
Saddle of lamb 1-1.5 kg 1 210-220 60-150
Amount
Weight
per cm. of
thickness
per cm. of
thickness
per cm. of
thickness
Oven
level
1 230-250
1 230-250
1 210-230
Te mp e ra -
ture
ºC
1)
1)
1)
Time
Mins.
per cm. of
thickness
6-8
8-10
10-12
Page 15

electrolux 15
Type o f me at
Game
Saddle of hare, leg of hare up to 1 kg 3 220-250
Saddle of venison 1.5-2 kg 1 210-220 60-150
Haunch of venison 1.5-2 kg 1 180-200 75-110
Poultry
Poultry portions (4 to 6 pieces)
Chicken halves (2 to 4 pieces)
Chicken, poulard 1-1.5 kg 1 220-250 45-75
Duck 1.5-2 kg 1 210-220 60-150
Goose 3.5-5 kg 1 200-210 150-180
Turk ey
Fish (steamed)
Whole fish 1-1.5 kg 1 210-220 45-75
1) Pre-heat the oven
Amount
Weight
each
200-250g
each
400-500 g
2.5-3.5 kg
4-6 kg
Oven
level
1 220-250 35-50
1 220-250 35-50
1
Te mp e ra -
ture
ºC
1)
200-210
180-200
Time
Mins.
25-40
150-120
150-240
Grill sizes
Oven function: Grill or Dual grill
with maximum temperature setting
1 Important: Always grill with the oven
door closed.
3 The empty oven should always be pre-
heated with the grill functions for 5
minutes.
Grilling table
• For grilling, place the shelf in the rec-
ommended shelf position.
• Always insert the tray into the first
shelf position from the bottom.
• The grilling times are guidelines.
• Grilling is particularly suitable for flat
pieces of meat or fish.
Food to be grilled Oven level Grilling time
1st side 2nd side
Burgers 4 8-10 mins. 6-8 mins.
Pork fillet 4 10-12 mins. 6-10 mins.
Sausages 4 8-10 mins. 6-8 mins.
Fillet steaks, veal steaks 4 6-7 mins. 5-6 mins.
Fillet of beef, roast beef (approx. 1 kg) 3 10-12 mins. 10-12 mins.
1)
To as t
Toast with topping 3 6-8 mins. ---
1) Do not pre-heat
3 4-6 mins. 3-5 mins.
Page 16

16 electrolux
Making preserves
Oven function: Bottom heat
• For preserving, use only commercially
available preserve jars of the same size.
• Jars with twist-off or bayonet type
lids and metal tins are not suitable.
• When making preserves, the first shelf
position from the bottom is the one
most used.
• Use the shelf for making preserves.
There is enough room on this for up to
six 1-litre preserving jars.
• The jars should all be filled to the same
level and clamped shut.
• Place the jars on the baking tray in such
a way that they are not touching each
other.
• Pour approx. 1/2 litre of water into the
baking tray so that sufficient moisture is
produced in the oven.
• As soon as the liquid starts to pearl in
the first jars (after about 35-60 minutes
with 1 litre jars), switch the oven off or
reduce the temperature to 100 °C (see
table).
Preserves table
The times and temperatures for making preserves are for guidance only.
Preserve
Soft fruit
Strawberries, blueberries,
raspberries, ripe gooseberries
Unripe gooseberries 160-170 35-45 10-15
Stone fruit
Pears, quinces, plums 160-170 35-45 10-15
Vegetables
Carrots
Cucumbers 160-170 50-60 ---
Mixed pickles 160-170 50-60 15
Kohlrabi, peas, asparagus 160-170 50-60 15-20
1) Leave standing in oven when switched off
1)
Temp er a tu re
in°C
160-170 35-45 ---
160-170 50-60 5-10
Cooking time until
simmering
in mins.
Continue to cook
at 100°C
in mins.
Cleaning and Care
1 Warning: First switch off the appliance
and let it cool down before carrying out
any cleaning.
Warning: For safety reasons, do not clean
the appliance with steam blasters or highpressure cleaners.
Attention: Do not use any corrosive
cleaning fluids, sharp objects or stain
removers.
Do not clean the glass oven door with abrasive fluids or metal scrapers, which could
scratch the surface. The glass could crack
and shatter.
Outside of the appliance
• Wipe the front of the appliance with a
soft cloth and a solution of hot water
and washing up liquid.
• For metal fronts, use normal commercially available cleaning agents.
• Please do not use scouring agents and
abrasive sponges.
Page 17

electrolux 17
Oven interior
Clean the appliance after each use. In this
way, dirt is easier to clean off and is not allowed to burn on.
1. For cleaning, turn the oven light on.
2. After every use, wipe the oven with a so-
lution of washing-up liquid and allow to dry.
3 Clean stubborn dirt with a special oven
cleaner.
1 Important: If using an oven spray,
please follow the manufacturer's instructions exactly.
Accessories
Wash all slide-in units (shelf unit, baking tray,
shelf support rails etc.) after each use and dry
well. Soak briefly to make them easier to clean.
Aluminium base plate
1 Never use cleaning materials, cleaning
agents or steel wool that scratch or
scour.
Do not clean in the dishwasher.
After each use, wash the aluminium base
plate using a soft brush in hot water with
washing-up liquid.
With stubborn dirt, soak for a while in hot
water with soap suds.
1 When cleaning, use a flat surface to pre-
vent the aluminium bas plate from deforming.
First pull the front of the rail away from the
oven wall (1) and then unhitch at the back (2).
Fitting the shelf support rails
3 Important! The rounded ends of the
guide rails must be pointing forwards!
To re-insert, first hook the rail into place at
the back (1) and then insert the front and
press into place (2).
Shelf Support Rails
The shelf support rails on the left and right
hand sides of the oven can be removed for
cleaning the side walls.
Removing the shelf support rails
Page 18

18 electrolux
Fat trap
The fat trap is almost maintenance free.
However, certain residues may occur due to
the frequent preparation of very fatty foods.
In this case proceed as follows for possible
cleaning actions:
1 Important: On the heating elements of
the oven roof, there is a risk of burns!
Ensure that the oven has cooled down
sufficiently so that you can touch heating elements safely
1. Pull the top heating elements out of the
plug connection to the front (see illustration).
2. Rotate the fat trap to the left from the
oven roof (see illustration).
4. Reassembly in reverse order. Make sure
the heating element has a good fit in the
connecting socket when inserting.
Oven Lighting
1 Warning: Risk of electric shock! Prior to
changing the oven light bulb:
– Switch off the oven!
– Disconnect from the electricity supply.
3 Place a cloth on the oven floor to protect
the oven light and glass cover.
Changing the oven light bulb/cleaning
the glass cover
1. Remove the glass cover by turning it
anti-clockwise and then clean it.
2. If necessary: replace with
25 watt, 230 V, 300 °C heat-resistant
oven lighting.
3. Refit the glass cover.
3. Wash the fat trap in hot water with
washing-up liquid and a soft brush or
simply wash in the dishwasher. With
stubborn dirt, soak for a while in hot water with soap suds.
Page 19

electrolux 19
Oven Ceiling
The upper heating element can be folded
down to make it easier to clean the oven
ceiling.
Folding down the heating element
1 Warning: Only fold down the heating el-
ement when the oven is switched off
and there is no risk of being burnt!
1. Remove the side shelf support rails.
2. Grip the heating element at the front and
pull it forwards and out over the support
lug on the inner wall of the oven.
3. The heating element will now fold down.
1 Caution: Do not use force to press the
heating element down! The heating element might break.
Repositioning the heating element
1. Move the heating element back up towards the oven ceiling.
2. Pull the heating element forwards
against the spring pressure and guide it
over the oven support lug.
3. Settle it onto the support.
4. Insert shelf support rail.
1 Important: The heating element must
be positioned correctly and securely on
both sides above the support lug on the
inner wall of the oven.
Oven door
For easier cleaning of the oven interior the
oven door of your appliance can be taken off
its hinges.
Cleaning the oven ceiling
Page 20

20 electrolux
Removing the oven door from its hinges
1. Open the oven door as far as it will go.
2. Undo the clamping levers (A) on both
door hinges fully.
3. Close the oven door as far as the first
position (approx. 45°).
3 Lay the oven door with the outer side
facing downwards on something soft
and level, for example, a blanket in order
to prevent scratches.
Hanging the oven door back on its hinges
1. From the handle side take hold of the
oven door with a hand on each side and
hold at an angle of approx. 45°.
Position the recesses on the bottom of
the oven door on the hinges on the oven.
Let the door slide down as far as it will
go.
2. Open the oven door as far as it will go.
4. Take hold of the oven door with a hand
on each side and pull it away from the
oven at an upwards angle (Take care: It
is heavy).
Page 21

3. Fold up the clamping levers (A) on both
door hinges back into their original
positions.
4. Close the oven door.
electrolux 21
Page 22

22 electrolux
What to do if …
Problem Possible cause Remedy
The cooking zones are not functioning
The oven does not heat up The oven is not switched on Switch the oven on
The oven lighting is not operating The oven light bulb is faulty Replace oven light bulb
If you are unable to remedy the problem
Consult the operating instructions for the built-in cooking surface
The required settings have not
been set
The house wiring fuse (in the fuse
box) has tripped
Check the settings
Check the fuse.
If the fuses trip repeatedly, please
call an authorised electrician.
by following the above suggestions,
please contact your local Service Force
Centre.
1 Warning! Repairs to the appliance are
only to be carried out by qualified service engineers. Considerable danger to
the user may result from improper repairs.
3 If the appliance has been operated in-
correctly, the engineer's visit will be
chargeable, even during the warranty
period.
3 Advice on cookers with metal
fronts:
Because of the cold surface at the front
of the cooker, opening the oven door
during (or just after) baking or roasting
may cause the glass to steam up.
Page 23

Installation Instructions
Built-in cooker SMS width 55 cm
1 Installation into flammable material must
comply with NIN 2005, Chapter 4.2.2 of
the VKF (Association of Cantonal Fire Insurers) fire protection guidelines and
regulations.
1. a) Install the hotplates according to the
installation insruction no.374307900/
374307901 so that the hotplate socket
connections can be carried out before
the cooker is inserted. Make sure the
correct socket connections are
used.
A seperate earthing is not required
b) Install the glass ceramic cooking surface and hobs according to the separate installation instructions.
electrolux 23
2. Pull the appliance drawer out as far as it
will go, take hold of it and remove it.
3. Hold the oven by the carrying using the
side grips and slide it flush into the
space.
4. Fix the oven on both sides using at least
2 screws (Detail A).
1 For safety reasons, when installing next
to a wood-fuelled boiler, a heatproof and
heat-insulating plate must be mounted
at the height of the appliance and must
be installed with a depth of at least 30 cm.
3 To secure it, you can bore 2 x 2.8mm
holes at the top where the indents are
provided (detail C).
Page 24

24 electrolux
Electrical connection/power supply
The oven must be connected to the electricity supply by a designated electrician.
Use a H05VV-F type power cable or higher.
The appliance must be installed with a sock-
et supply line, otherwise the fixed home electrical system must include an isolating device
with at least a 3mm-contact separation to
enable a simultaneous and all-pole cut off
from the mains, according to NIN 2000.
The customer must have a socket for the
electrical connection that is accessible and
outside the co-ordination room. A cable
length of approx. 120 cm must be provided
with lines connected direct to the mains.
1. Opening the terminal box (detail D).
Installation diagram 400V
Phase definitions:
L1, L2, L3 (or R, S,T)
2. Open the catch on the cord grip (detail E).
3. See the connection diagram for the ter-
minal connection.
4. Secure the cord grip by pressing firmly
on the catch (detail F).
5. Closing the terminal box.
6. Fix the connection cable into the holes
provided to prevent it rubbing against
the drawer (detail G).
1 In case of repair the appliance must
be switched off from the mains.
Page 25

Disposal
2 Packaging material
The packaging materials are environmentally friendly and can be recycled.
The plastic components are identified by
markings, e.g. >PE<, >PS<, etc. Please
dispose of the packaging materials in
the appropriate container at the community waste disposal facilities.
2 Old appliance
electrolux 25
The symbol
packaging indicates that this product
may not be treated as household waste.
Instead it shall be handed over to the
applicable collection point for the recycling of electrical and electronic equipment. By ensuring this product is
disposed of correctly, you will help prevent potential negative consequences
for the environment and human health,
which could otherwise be caused by inappropriate waste handling of this product. For more detailed information about
recycling of this product, please contact
your local city office, your household
waste disposal service or the shop
where you purchased the product.
W on the product or on its
3 Where should you take your old ma-
chines?
You can return these to any shop selling
new machines or dispose of them at official S.EN.S collection points or official
S.EN.S recycling facilities.
The official S.EN.S collection points are
listed at www.sens.ch.
1 Warning: So that the old appliance can
no longer cause any danger, make it unusable before disposing of it.
To do this, disconnect the appliance
from the mains supply and remove
the mains cable from the appliance.
Page 26

26 electrolux
Garantie/Kundendienst, Garantie/service-clientèle, Garanzia/Servizio
clienti, Guarantee/Customer Service Centres
Servicestellen
5506 Mägenwil/Zürich
Industriestrasse 10
9000 St. Gallen
Zürcherstrasse 204 e
4127 Birsfelden
Hauptstrasse 52
6020 Emmenbrücke
Seetalstrasse 11
7000 Chur
Comercialstrasse 19
Ersatzteilverkauf/Points de vente de rechange
5506 Mägenwil, Industriestrasse 10, Tel. 0848 848 023
Fachberatung/Verkauf/Demonstration/Vente/Consulente (cucina)/Vendita
8048 Zürich, Badenerstrasse 587, Tel. 044 405 81 11
Garantie
Für jedes Produkt gewähren wir ab Verkauf bzw. Lieferdatum an den Endverbraucher eine Garantie
von 2 Jahren. (Ausweis durch Garantieschein, Faktura oder Verkaufsbeleg).
Die Garantieleistung umfasst die Kosten für Material, Arbeits- und Reisezeit. Die Garantieleistung entfällt bei Nichtbeachtung der Gebrauchsanweisung und Betriebs-vorschriften, unsachgerechter Installation, sowie bei Beschädigung durch äussere Einflüsse, höhere Gewalt, Eingriffe Dritter und
Verwendung von Nicht-Original Teilen.
Garantie
Nous octroyons sur chaque produit 2 ans de garantie à partir de la date de livraison ou de la mise en
service au consommateur (documenté au moyen d’une facture, d’un bon de garantie ou d’un justificatif d’achat). Notre garantie couvre les frais de mains d’œuvres et de déplacement, ainsi que les pièces de rechange. Les conditions de garantie ne sont pas valables en cas d’intervention d’un tiers non
autorisé, de l’emploi de pièces de rechange non originales, d’erreurs de maniement ou d’installation
dues à l’inobser-vation du mode d’emploi, et pour des dommages causés par des influences extérieures ou de force majeure.
Garanzia
Per ogni prodotto concediamo una garanzia di 2 anni a partire dalla data di consegna o dalla sua messa in funzione. (fa stato la data della fattura, del certificato di garanzia o dello scontrino d’acquisto) Nella
garanzia sono comprese le spese di manodopera, di viaggio e del materiale.
Dalla copertura sono esclusi il logoramento ed i danni causati da agenti esterni, intervento di terzi, utilizzo di ricambi non originali o dalla inosservanza delle prescrizioni d’istallazione ed istruzioni per l’uso.
Warranty
For each product we provide a two-year guarantee from the date of purchase or delivery to the consumer (with a guarantee certificate, invoice or sales receipt serving as proof). The guarantee covers the
costs of materials, labour and travel. The guarantee will lapse if the operating instructions and conditions of use are not adhered to, if the product is incorrectly installed, or in the event of damage caused
by external influences, force majeure, intervention by third parties or the use of non-genuine components.
Points de Service
3018 Bern
Morgenstrasse 131
Servizio dopo vendita
1028 Préverenges
Le Trési 6
/
Vendita pezzi di ricambio/spare parts service
Point of Service
6916 Grancia
Zona Industriale E
Page 27

Service
In the event of technical faults, please first
check whether you can remedy the problem
yourself with the help of the operating instructions (section “What to do if…”).
If you were not able to remedy the problem
yourself, please contact the Customer Care
Department or one of our service partners.
In order to be able to assist you quickly, we
require the following information:
– Model description
– Product number (PNC)
– Serial number (S No.)
(for numbers see rating plate)
– Type o f fau l t
– Any error messages displayed by the
appliance
So that you have the necessary reference
numbers from your appliance at hand, we
recommend that you write them in here:
electrolux 27
Model description: .....................................
PNC: .....................................
S No: .....................................
Page 28

www.electrolux.com
www.electrolux.ch
315 9028 03-N-130109-01
 Loading...