

Page 1

EHF3320FOK
................................................ .............................................
EN HOB USER MANUAL
Page 2
www.electrolux.com
2
CONTENTS
1. SAFETY INFORMATION . . . . . . . . . . . . . . . . . . . . . . . . . . . . . . . . . . . . . . . . . . . . . . . . . . . 3
2. SAFETY INSTRUCTIONS . . . . . . . . . . . . . . . . . . . . . . . . . . . . . . . . . . . . . . . . . . . . . . . . . . 4
3. PRODUCT DESCRIPTION . . . . . . . . . . . . . . . . . . . . . . . . . . . . . . . . . . . . . . . . . . . . . . . . . 6
4. DAILY USE . . . . . . . . . . . . . . . . . . . . . . . . . . . . . . . . . . . . . . . . . . . . . . . . . . . . . . . . . . . . . 7
5. HELPFUL HINTS AND TIPS . . . . . . . . . . . . . . . . . . . . . . . . . . . . . . . . . . . . . . . . . . . . . . . . 9
6. CARE AND CLEANING . . . . . . . . . . . . . . . . . . . . . . . . . . . . . . . . . . . . . . . . . . . . . . . . . . . 10
7. TROUBLESHOOTING . . . . . . . . . . . . . . . . . . . . . . . . . . . . . . . . . . . . . . . . . . . . . . . . . . . . 10
8.
INSTALLATION INSTRUCTIONS . . . . . . . . . . . . . . . . . . . . . . . . . . . . . . . . . . . . . . . . . . . . 12
9. TECHNICAL INFORMATION . . . . . . . . . . . . . . . . . . . . . . . . . . . . . . . . . . . . . . . . . . . . . . . 13
10.
SERVICE AND GUARANTEE IN TAIWAN . . . . . . . . . . . . . . . . . . . . . . . . . . . . . . . . . . . . . 13
WE’RE THINKING OF YOU
Thank you for purchasing an Electrolux appliance. You’ve chosen a product that brings with it
decades of professional experience and innovation. Ingenious and stylish, it has been designed
with you in mind. So whenever you use it, you can be safe in the knowledge that you’ll get great
results every time.
Welcome to Electrolux.
Visit our website for:
Get usage advice, brochures, trouble shooter, service information:
www.electrolux.com
Register your product for better service:
www.electrolux.com/productregistration
Buy Accessories, Consumables and Original spare parts for your appliance:
www.electrolux.com/shop
CUSTOMER CARE AND SERVICE
We recommend the use of original spare parts.
When contacting Service, ensure that you have the following data available.
The information can be found on the rating plate. Model, PNC, Serial Number.
Warning / Caution-Safety information
General information and tips
Environmental information
Subject to change without notice.
Page 3

1. SAFETY INFORMATION
Before the installation and use of the appliance, carefully
read the supplied instructions. The manufacturer is not
responsible if an incorrect installation and use causes injuries and damages. Always keep the instructions with
the appliance for future reference.
1.1 Children and vulnerable people safety
WARNING!
Risk of suffocation, injury or permanent disability.
• This appliance can be used by children aged from 8
years and above and persons with reduced physical,
sensory or mental capabilities or lack of experience and
knowledge if they are supervised by an adult or a person who is responsible for their safety.
• Do not let children play with the appliance.
• Keep all packaging away from children.
• Keep children and pets away from the appliance when
it operates or when it cools down. Accessible parts are
hot.
• If the appliance has a child safety device, we recommend that you activate it.
• Cleaning and user maintenance shall not be made by
children without supervision.
ENGLISH 3
1.2 General Safety
• The appliance and its accessible parts become hot
during use. Do not touch the heating elements.
• Do not operate the appliance by means of an external
timer or separate remote-control system.
• Unattended cooking on a hob with fat or oil can be
dangerous and may result in fire.
Page 4
www.electrolux.com
4
• Never try to extinguish a fire with water, but switch off
• Do not store items on the cooking surfaces.
• Do not use a steam cleaner to clean the appliance.
• Metallic objects such as knives, forks, spoons and lids
• If the glass ceramic surface is cracked, switch off the
the appliance and then cover flame e.g. with a lid or a
fire blanket.
should not be placed on the hob surface since they
can get hot.
appliance to avoid the possibility of electric shock.
2.
SAFETY INSTRUCTIONS
2.1 Installation
WARNING!
Only a qualified person must install this appliance.
• Remove all the packaging.
• Do not install or use a damaged appli-
ance.
• Obey the installation instruction sup-
plied with the appliance.
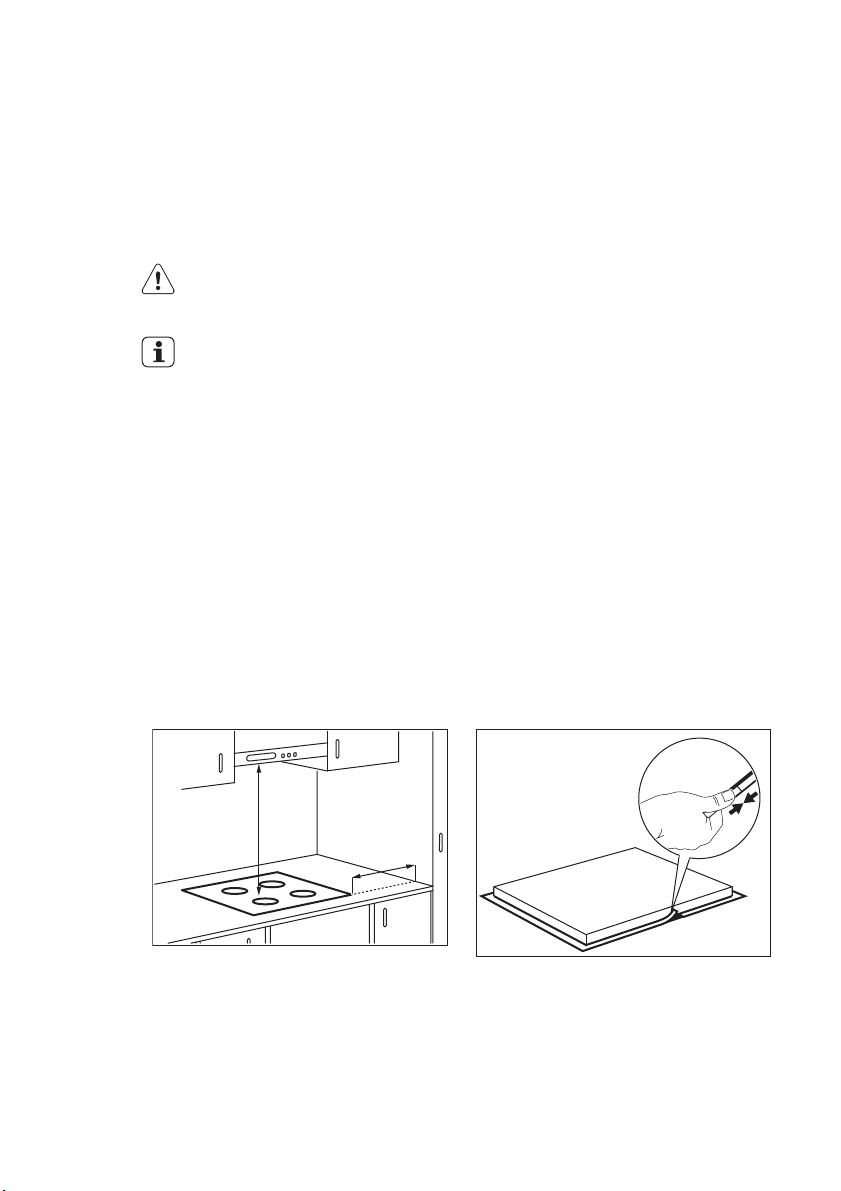
• Keep the minimum distance from the
other appliances and units.
• Always be careful when you move the
appliance because it is heavy. Always
wear safety gloves.
• Seal the cut surfaces with a sealant to
prevent moisture to cause swelling.
• Protect the bottom of the appliance
from steam and moisture.
• Do not install the appliance adjacent to
a door or under a window. This prevents hot cookware to fall from the appliance when the door or the window is
opened.
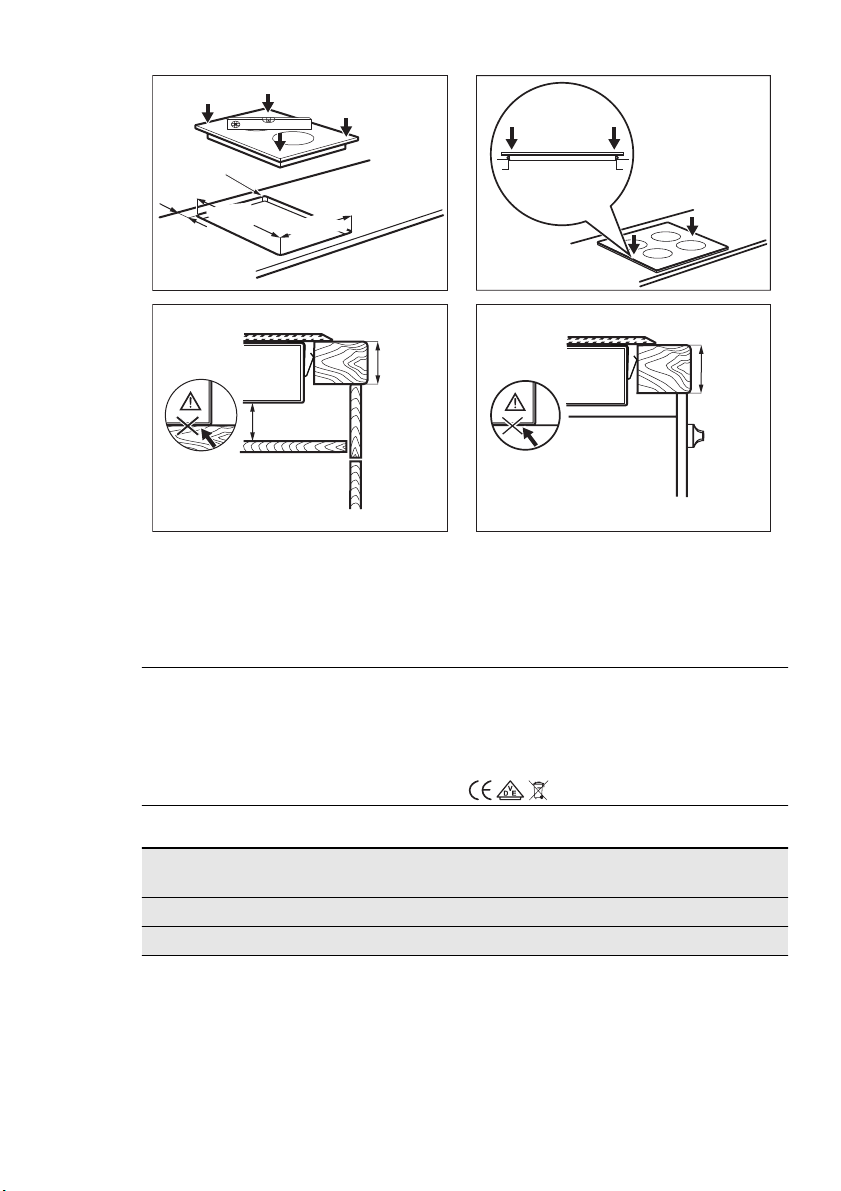
• If the appliance is installed above draw-
ers make sure that the space, between
the bottom of the appliance and the upper drawer, is sufficient for air circulation.
• The bottom of the appliance can get
hot. We recommend to install a non-
combustile separation panel under the
appliance to prevent access to the bottom.
Electrical connection
WARNING!
Risk of fire and electrical shock.
• All electrical connections must be made
by a qualified electrician.
• The appliance must be earthed.
• Before carrying out any operation make
sure that the appliance is disconnected
from the power supply.
• Use the correct electricity mains cable.
• Do not let the electricity mains cable
tangle.
• Make sure the mains cable or plug (if
applicable) does not touch the hot appliance or hot cookware, when you
connect the appliance to the near sockets
• Make sure the appliance is installed
correctly. Loose and incorrect electricity
mains cable or plug (if applicable) can
make the terminal become too hot.
• Make sure that a shock protection is installed.
• Use the strain relief clamp on cable.
• Make sure not to cause damage to the
mains plug (if applicable) or to the
mains cable. Contact the Service or an
Page 5

electrician to change a damaged mains
cable.
• The electrical installation must have an
isolation device which lets you disconnect the appliance from the mains at all
poles. The isolation device must have a
contact opening width of minimum 3
mm.
• Use only correct isolation devices: line
protecting cut-outs, fuses (screw type
fuses removed from the holder), earth
leakage trips and contactors.
2.2 Use
WARNING!
Risk of injury, burns or electric
shock.
• Use this appliance in a household environment.
• Do not change the specification of this
appliance.
• Do not let the appliance stay unattended during operation.
• Do not operate the appliance with wet
hands or when it has contact with water.
• Do not put cutlery or saucepan lids on
the cooking zones. They become hot.
• Set the cooking zone to “off” after use.
• Do not use the appliance as a work
surface or as a storage surface.
• If the surface of the appliance is
cracked, disconnect immediately the
appliance from the power supply. This
to prevent an electrical shock.
WARNING!
Risk of fire or explosion.
• Fats and oil when heated can release
flammable vapours. Keep flames or
heated objects away from fats and oils
when you cook with them.
• The vapours that very hot oil releases
can cause spontaneous combustion.
• Used oil, that can contain food remnants, can cause fire at a lower temperature than oil used for the first time.
ENGLISH 5
• Do not put flammable products or items
that are wet with flammable products
in, near or on the appliance.
WARNING!
Risk of damage to the appliance.
• Do not keep hot cookware on the control panel.
• Do not let cookware to boil dry.
• Be careful not to let objects or cookware fall on the appliance. The surface
can be damaged.
• Do not activate the cooking zones with
empty cookware or without cookware.
• Do not put aluminium foil on the appliance.
• Cookware made of cast iron, aluminium
or with a damaged bottom can cause
scratches on the glass ceramic. Always
lift these objects up when you have to
move them on the cooking surface.
2.3 Care and Cleaning
WARNING!
Risk of damage to the appliance.
• Clean regularly the appliance to prevent
the deterioration of the surface material.
• Do not use water spray and steam to
clean the appliance.
• Clean the appliance with a moist soft
cloth. Only use neutral detergents. Do
not use abrasive products, abrasive
cleaning pads, solvents or metal objects.
2.4 Disposal
WARNING!
Risk of injury or suffocation.
• Contact your municipal authority for information on how to discard the appliance correctly.
• Disconnect the appliance from the
mains supply.
• Cut off the mains cable and discard it.
Page 6
www.electrolux.com
6
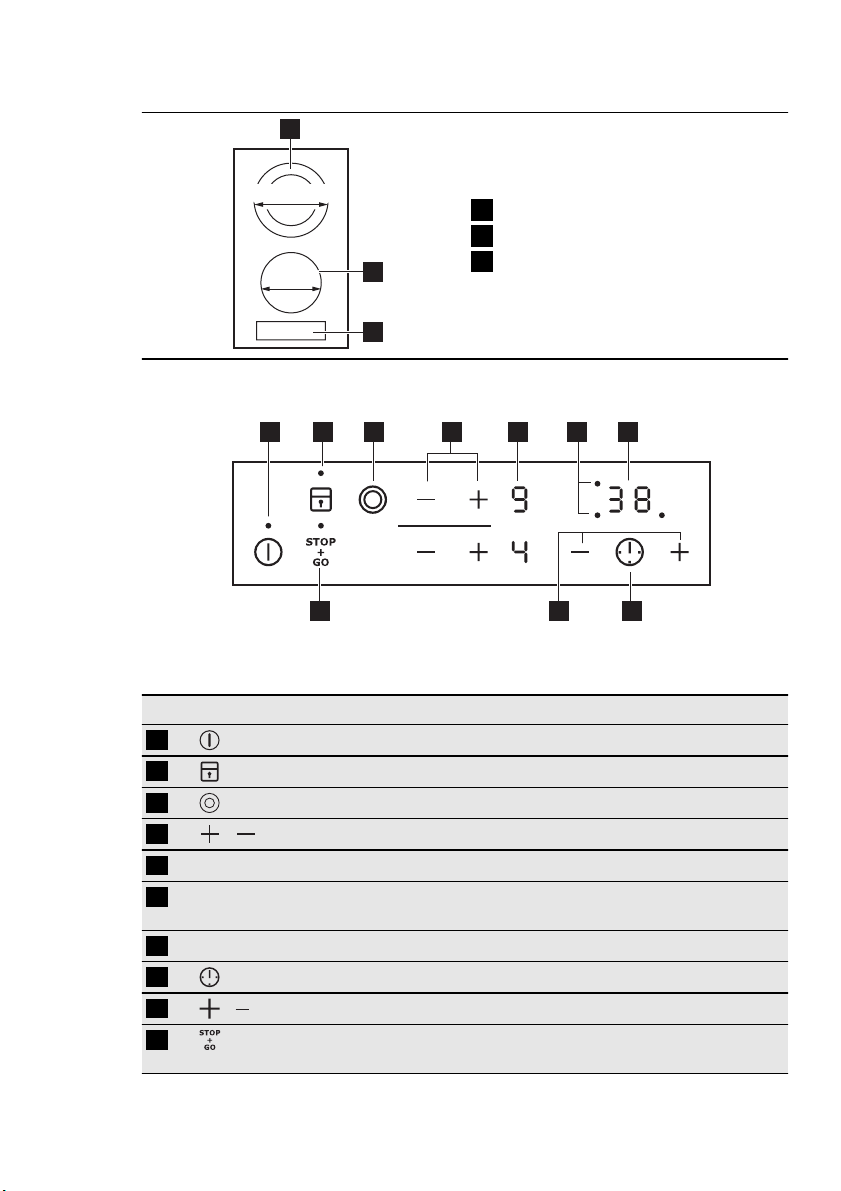
3. PRODUCT DESCRIPTION
1
120/180 mm
145 mm
2
3
Cooking zone
1
Cooking zone
2
Control panel
3
3.1 Control panel layout
1 2 3 5 6 74
8910
Use the sensor fields to operate the appliance. The displays, indicators and
sounds tell which functions operate.
Sensor field Function
1
2
3
4
5
6
/
Heat setting display To show the heat setting.
Timer indicators of cooking
zones
Timer display To show the time in minutes.
7
8
9
10
/
To activate and deactivate the appliance.
To lock / unlock the control panel.
To activate and deactivate the outer ring.
To increase or decrease the heat setting.
To show for which zone you set the time.
To select the cooking zone.
To increase or decrease the time.
To activate and deactivate the STOP+GO
function.
Page 7
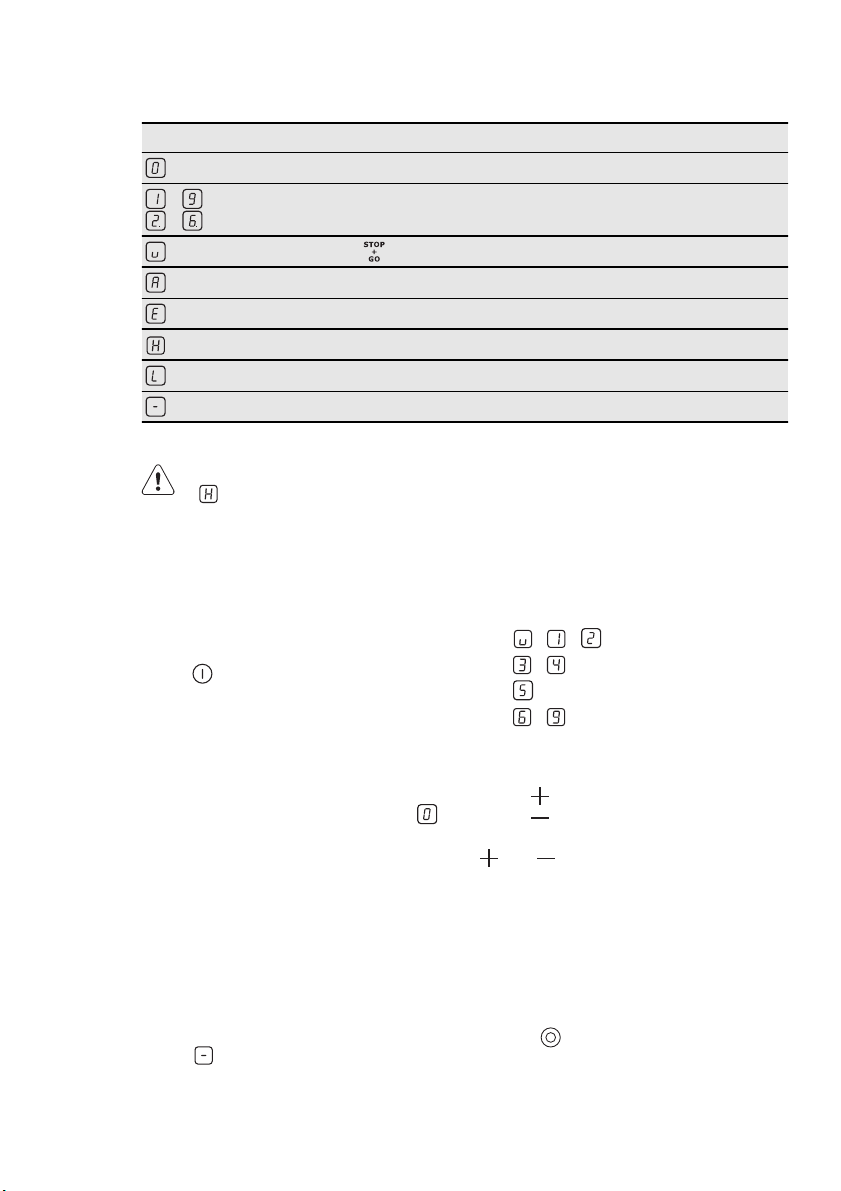
3.2 Heat setting displays
Display Description
-
-
3.3 Residual heat indicator
WARNING!
heat!
4. DAILY USE
ENGLISH 7
The cooking zone is deactivated.
The cooking zone operates.
The function operates.
The Automatic Heat Up function operates.
There is a malfunction.
A cooking zone is still hot (residual heat).
Lock / The Child Safety Device operates.
The Automatic Switch Off operates.
The risk of burns from residual
4.1 Activation and deactivation
Touch for 1 second to activate or deactivate the appliance.
4.2 Automatic Switch Off
The function deactivates the
appliance automatically if:
•
All cooking zones are deactivated (
).
• You do not set the heat setting after
you activate the appliance.
• You spill something or put something
on the control panel for more than 10
seconds, (a pan, a cloth, etc.). An
acoustic signal sound some time and
the appliance deactivates. Remove the
object or clean the control panel.
• You do not deactivate a cooking zone
or change the heat setting. After some
comes on and the appliance
time
deactivates. See below.
• The relation between heat setting and
times of the Automatic Switch Off function:
•
, - — 6 hours
•
- — 5 hours
•
— 4 hours
•
- — 1.5 hours
4.3 The heat setting
Touch to increase the heat setting.
Touch
The display shows the heat setting. Touch
the cooking zone.
to decrease the heat setting.
and at the same time to deactivate
4.4 Activation and deactivation
of the outer ring
You can adjust the surface you cook to
the dimension of the cookware.
To activate the outer ring touch the sen-
sor field
Do the procedure again to deactivate the
outer ring. The indicator goes out.
. The indicator comes on.
Page 8
www.electrolux.com
8
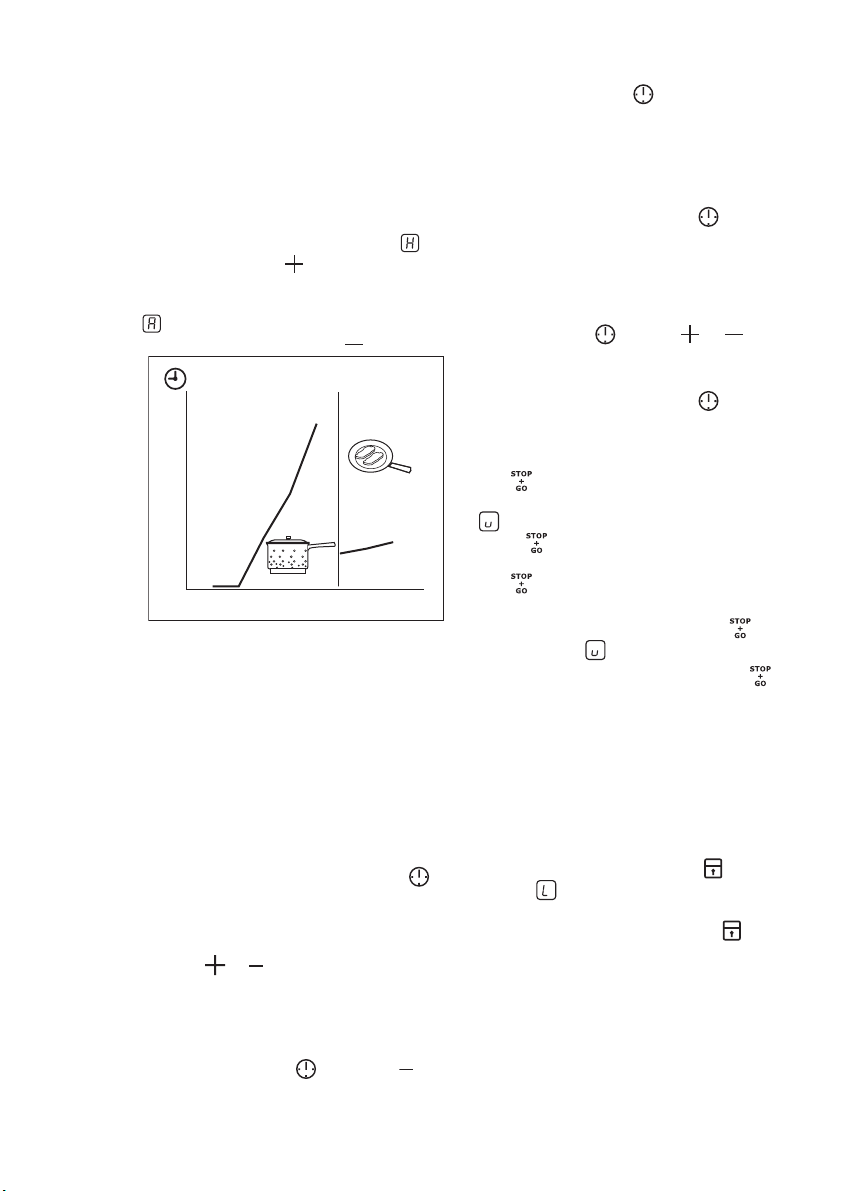
4.5 Automatic Heat Up
You can get a necessary heat setting in a
shorter time if you activate the Automatic
Heat Up function. This function sets the
highest heat setting for some time (see
the diagram), and then decreases to the
necessary heat setting.
To start the Automatic Heat Up function
the cooking zone must be cold (no
the display). Touch
zone again and again until the necessary
heat setting comes on. After 3 seconds
To stop the function, touch
4.6 Timer
Count Down Timer
Use the Count Down Timer to set how
long the cooking zone operates for only
this one time.
Set the Timer after the selection of
the cooking zone.
You can set the heat setting before or after you set the timer.
•
•
• To deactivate the Timer: set the
in
of the cooking
comes on in the display.
.
11
10
9
8
7
6
5
4
3
2
1
0
123456789
To set the cooking zone: touch
again and again until the indicator of a
necessary cooking zone comes on.
To activate or change the Timer:
touch
time (
dicator of the cooking zone starts to
flash slow, the time counts down.
cooking zone with
deactivate the Timer. The remaining
time counts back to
of the cooking zone goes out.
or of the timer to set the
- 99 minutes). When the in-
00
and touch to
. The indicator
00
• To see the remaining time: set the
cooking zone with
the cooking zone starts to flash quickly.
The display shows the remaining time.
When the time comes to an end, the
sound operates and
cooking zone deactivates.
•
To stop the sound: touch
. The indicator of
flashes. The
00
Minute Minder
You can use the Timer as a Minute
Minder while the cooking zones do not
operate. Touch
set the time. When the time comes to an
end, the sound operates and
•
To stop the sound: touch
. Touch or to
flashes
00
4.7 STOP+GO
The function sets all cooking zones
that operate to the lowest heat setting (
).
When
the heat setting.
The
function.
•
•
operates, you cannot change
function does not stop the timer
To activate this function touch
The symbol
To deactivate this function touch .
The heat setting that you set before
comes on.
comes on.
.
4.8 Lock
When the cooking zones operate, you
can lock the control panel. It prevents an
accidental change of the heat setting.
Set the heat setting first.
To activate this function touch
symbol
The Timer stays on.
To deactivate this function touch
heat setting that you set before comes
on.
When you deactivate the appliance, you
also deactivate this function.
comes on for 4 seconds.
. The
. The
4.9 The Child Safety Device
This function prevents an accidental operation of the appliance.
Page 9
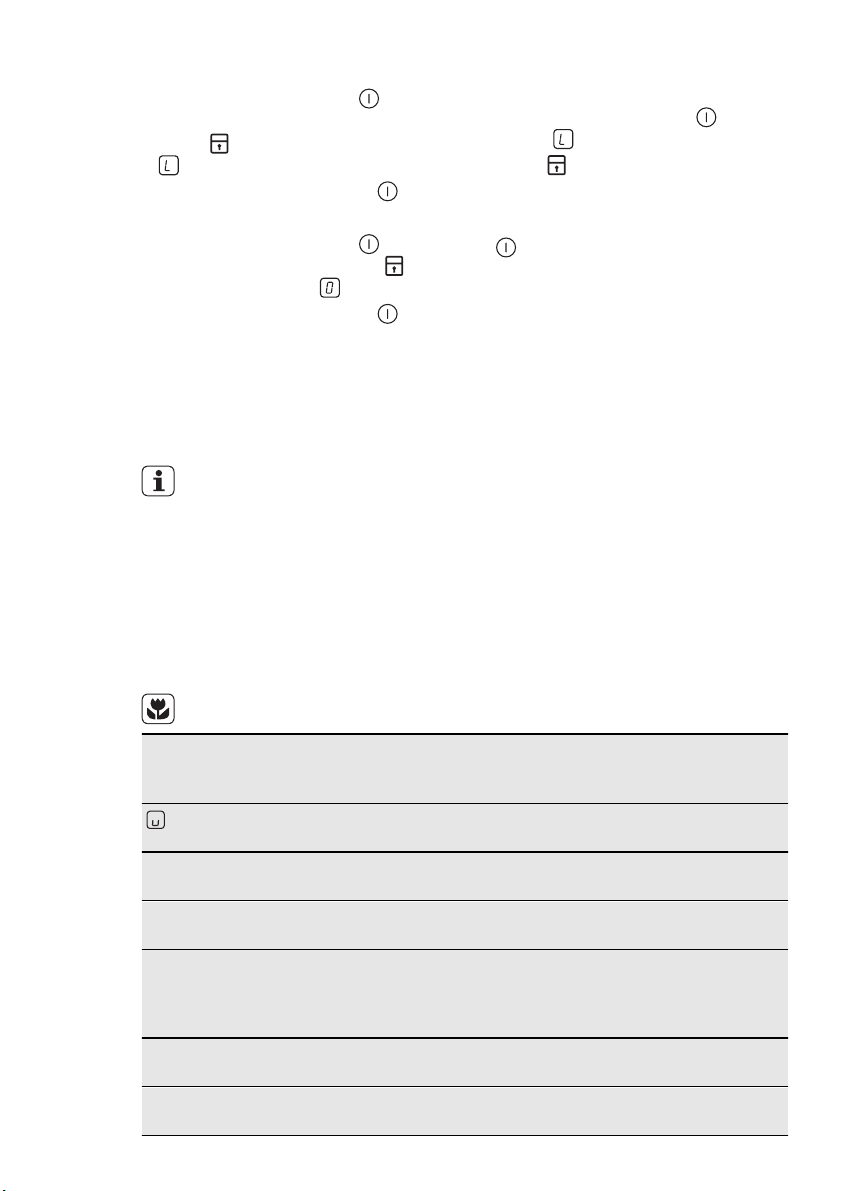
To activate The Child Safety Device
•
Activate the appliance with . Do not
set the heat settings.
•
Touch
•
Deactivate the appliance with
To deactivate The Child Safety Device
•
Activate the appliance with
set the heat settings. Touch
seconds. The symbol
•
Deactivate the appliance with
for 4 seconds. The symbol
comes on.
.
. Do not
for 4
comes on.
.
5. HELPFUL HINTS AND TIPS
ENGLISH 9
To override The Child Safety Device
for only one cooking time
•
Activate the appliance with
symbol
•
Touch for 4 seconds. Set the heat
setting in 10 seconds. You can operate the appliance.
• When you deactivate the appliance with
again.
comes on.
, The Child Safety Device operates
. The
5.1 Cookware
Information about the cookware
• The bottom of the cookware must be
as thick and flat as possible.
• Cookware made of enamelled steel and
with aluminium or copper bottoms can
cause the colour change on the glassceramic surface.
• If it is possible, always put the lids on
the cookware.
• Put cookware on a cooking zone before you start it.
• Stop the cooking zones before the end
of the cooking time to use residual
heat.
• The bottom of pans and cooking zones
must have the same dimension.
5.3 The Examples of cooking
5.2 Energy saving
How to save energy
Heat
setting
1-2 Hollandaise sauce, melt: butter,
1-2 Solidify: fluffy omelettes, baked
2-3 Simmer rice and milkbased
3-4 Steam vegetables, fish, meat 20-45
4-5 Steam potatoes 20-60
Use to: Time Hints
Keep warm the food you cooked as re-
1
chocolate, gelatine
eggs
dishes, heating up ready-cooked
meals
applications
The data in the table is for guidance only.
quired
5-25
min
10-40
min
25-50
min
min
min
Put a lid on a cookware
Mix from time to time
Cook with a lid on
Add the minimum twice as
much liquid as rice, mix milk
dishes part procedure
through
Add some tablespoons of liquid
Use max. ¼ l water for 750 g
of potatoes
Page 10
www.electrolux.com
10
Heat
Use to: Time Hints
setting
4-5 Cook larger quantities of food,
stews and soups
6-7 Gentle fry: escalope, veal cordon
bleu, cutlets, rissoles, sausages,
liver, roux, eggs, pancakes,
doughnuts
7-8 Heavy fry, hash browns, loin
steaks, steaks
9 Boil large quantities of water, cook pasta, sear meat (goulash, pot roast),
deep-fry chips
6. CARE AND CLEANING
Clean the appliance after each use.
Always use cookware with clean bottom.
Scratches or dark stains on the
glass-ceramic cause no effect on
how the appliance operates.
To remove the dirt:
1.
– Remove immediately: melted
plastic, plastic foil, and food with
sugar. If not, the dirt can cause
damage to the appliance. Use a
special scraper for the glass . Put
the scraper on the glass surface at
60-150
min
as
Up to 3 l liquid plus ingredients
Turn halfway through
necessary
5-15
Turn halfway through
min
an acute angle and move the blade
on the surface .
– Remove after the appliance is
sufficiently cool: limescale rings ,
water rings, fat stains, shiny metallic discolorations. Use a special
cleaning agent for glass ceramic or
stainless steel.
2.
Clean the appliance with a moist cloth
and some detergent.
3.
At the end rub the appliance dry
with a clean cloth.
7. TROUBLESHOOTING
Problem Possible cause Remedy
You cannot activate the
appliance or operate it.
Activate the appliance
You touched 2 or more
The appliance is not connected to an electrical
supply or it is connected
incorrectly.
sensor fields at the same
time.
Check if the appliance is
correctly connected to the
electrical supply (refer to
connection diagram).
again and set the heat
setting in less than 10
seconds.
Touch only one sensor
field.
Page 11
Problem Possible cause Remedy
The STOP+GO function
operates.
There is water or fat
stains on the control panel.
An acoustic signal
sounds and the appliance deactivates.
You put something on
one or more sensor
fields.
An acoustic signal
sounds when the appliance is deactivated.
The appliance deactivates.
The residual heat indicator does not come on.
You put something on
the sensor field
.
The cooking zone is not
hot because it operated
only for a short time.
The Automatic Heat Up
The cooking zone is hot. Let the cooking zone befunction does not operate.
The highest heat setting
is set.
You decreased the heat
You cannot activate the
setting from
Activate the inner ring first.
.
outer ring.
The sensor fields become hot.
The cookware is too
large or you put it too
near to the controls.
comes on.
The Automatic Switch Off
operates.
comes on.
The Child Safety Device
or the Lock function op-
erates.
and a number come
on.
If you tried the above solutions and cannot repair the problem, speak to your
There is an error in the
appliance.
dealer or the customer service. Give the
data from the rating plate, three digit letter
ENGLISH 11
Refer to the chapter “Daily
Use”.
Clean the control panel.
Remove the object from
the sensor fields.
Remove the object from
the sensor field.
If the cooking zone operated sufficiently long to be
hot, speak to the service
centre.
come sufficiently cool.
The highest heat setting
has the same power as
the Automatic Heat Up
function.
Start from and only increase the heat setting.
Put large cookware on the
rear cooking zones if necessary.
Deactivate the appliance
and activate it again.
Refer to the chapter “Daily
Use”.
Disconnect the appliance
from the electrical supply
for some time. Disconnect
the fuse from the electrical
system of the house. Con-
nect it again. If
comes
on again, speak to the
service centre.
Page 12
www.electrolux.com
12
code for the glass ceramic (it is in the corner of the glass surface) and an error
message that comes on.
Make sure, you operated the appliance
correctly. If not the servicing by a custom-
8. INSTALLATION INSTRUCTIONS
er service technician or dealer will not be
free of charge, also during the warranty
period. The instructions about the customer service and conditions of guarantee
are in the guarantee booklet.
WARNING!
Refer to "Safety information"
chapter.
Before the installation
Before the installation of the appliance, record the information below from the rating
plate. The rating plate is on the bottom of
the appliance casing.
• Model ...........................
• PNC .............................
• Serial number ....................
8.1 Built-in appliances
• Only use the built-in appliances after
you assemble the appliance into correct
built-in units and work surfaces that
align to the standards.
8.4 Assembly
min.
500mm
min.
50mm
8.2 Connection cable
• The appliance is supplied with the connection cable.
• Replace the damaged mains cable with
a special cable (type H05BB-F Tmax
90°C; or higher). Speak to your local
Service Centre.
8.3 To attach the seal.
• Clean the worktop in the area of the cut
out section.
• Bond the seal stripe supplied on the
lower edge of the appliance along the
outer edge of the glass ceramic. Do not
extend it. Let stay the cut ends in the
middle of one side. When, you cut it to
length (add some mm), push the two
ends together.
Page 13
R 5mm
ENGLISH 13
min.
55mm
490+1mm
270+1mm
min.
20 mm
min.
12 mm
9. TECHNICAL INFORMATION
Modell EHF3320FOK Prod.Nr. 949 596 000 01
Typ 58 HED D1 KO 220-240 V 50-60 Hz
Made in Germany
Ser.Nr. .......... 2.9 kW
ELECTROLUX
min.
28 mm
Cooking zones power
Cooking zone Nominal Power (Max heat setting)
[W]
Middle rear —120/180 mm 700/1700 W
Middle front — 145 mm 1200 W
10. SERVICE AND GUARANTEE IN TAIWAN
This appliance is guaranteed by Taiwan
Sakura, the authorized agent of Electrolux
major kitchen appliance in Taiwan. Taiwan
Sakura guarantees to the end user 1-year
free warranty services, subject to the
terms and conditions listed below:
Page 14

www.electrolux.com
14
1.
2.
3.
4.
Service and warranty are only applied
to Electrolux major kitchen appliances
sold by Taiwan Sakura in Taiwan.
The warranty card is offered with every Electrolux appliance sold by Taiwan Sakura in Taiwan.
Taiwan Sakura provides free maintenance service for 1 year commencing
from the date of appliance installation
or the date out of warehouse shown
on the warranty card. The free service
including free repairing and parts replacement should only provide to the
product under normal use. Any defective parts which have been replaced shall become the company’s
property.
This warranty is invalid in the following
cases:
– The product has been modified, al-
tered and/or repaired by persons
other than qualified installers.
– The product has been damaged
through misuse, negligence, accident or natural calamities.
– The product has been malfunction
as caused by power interruption or
abnormal voltage input.
– The product is not a fixed installa-
tion on land.
– The product is used for industrial or
commercial purposes.
– Fail to follow the installation instruc-
tions provided.
– The serial number has been al-
tered, effaced and/or removed.
5.
The service will only be provided under safe condition and circumstances.
6.
This warranty does not cover any
case cover, cosmetic items and accessories.
7.
The company will not be liable for any
losses directly or indirectly caused
from the breakdown of the appliance.
8.
Service shall be rendered within regular working hours of the customary
working week.
9.
Please keep and present the warranty
card to the technician for inspection
during each service.
10.
In case of any disputes, the company
reserves the right for the final decision.
11.
When requiring service to the appliance, you can dial the Toll Free service number (only in Taiwan area):
0800-021-818. Before calling out an
engineer, please ensure you have
read the details under the heading
“What to do if...” When contacting the
service center, you will be asked to
offer the product information on the
warranty card and customer name,
telephone, address, etc.
11. ENVIRONMENT CONCERNS
Recycle the materials with the symbol
. Put the packaging in applicable
containers to recycle it.
Help protect the environment and human
health and to recycle waste of electrical
and electronic appliances. Do not dispose
appliances marked with the symbol
with the household waste. Return the
product to your local recycling facility or
contact your municipal office.
Page 15

ENGLISH 15
Page 16
www.electrolux.com/shop
892958177-A-502012
 Loading...