

Page 1

user manual
Induction hob
EHD36020U
Page 2

We were thinking of you
when we made this product
Page 3

Welcome to the world of Electrolux
Thank you for choosing a first class
product from Electrolux, which hopefully
will provide you with lots of pleasure in
the future. The Electrolux ambition is to
offer a wide variety of quality products
that make your life more comfortable.
You will find some examples on the cover in this manual. Please take a few minutes to study this manual so that you
can take advantage of the benefits of
your new machine. We promise that it
will provide a superior User Experience
delivering Ease-of-Mind. Good luck!
electrolux 3
Page 4

4 electrolux contents
T
1
Contents
Operating Instructions 5
Safety instructions 5
Description of the Appliance 7
Operating the appliance 10
Tips on Cooking and Frying 20
Cleaning and Care 24
What to do if … 26
Disposal 28
Installation Instructions 29
Assembly 30
Installing more than one
Frontline hob 34
Guarantee/Customer Service 40
Service 42
he following symbols are used in this user information:
Warning! This must be read! Important advice for the safety of persons and
information on avoiding damage to the appliance
3 General information and advice
2 Information on environmental protection
z Dangerous voltage
Page 5

operating instructions electrolux 5
Operating Instructions
Safety instructions
Please comply with these instructions. If
you do not, any damage resulting is not
covered by the warranty.
Correct use
• This appliance is not intended for
use by children or other persons
whose physical, sensory or mental
capabilities or lack of experience and
knowledge prevents them from using the appliance safely without supervision or instruction by a
responsible person to ensure that
they can use the appliance safely.
• Do not leave the appliance unattended during operation.
• This appliance should be used only
for normal domestic cooking and frying of food.
• The appliance must not be used as a
work surface or as a storage surface.
• Additions or modifications to the appliance are not permitted.
• Do not place or store flammable liquids, highly inflammable materials or
fusible objects (e.g. plastic film, plastic, aluminium) on or near the appliance.
Children’s safety
• Small children must be kept away
from the appliance.
• Only let bigger children work on the
appliance under supervision.
• To avoid small children and pets unintentionally switching the appliance
on, we recommend activation of the
child safety device.
General safety
• The appliance may only be installed
and connected by trained, registered
service engineers.
• Built-in appliances may only be used
after they have built in to suitable
built-in units and work surfaces that
meet standards.
• In the event of faults with the appliance or damage to the glass ceramic
(cracks, scratches or splits), the appliance must be switched off and
disconnected from the electrical
supply, to prevent the possibility of
an electric shock.
• Repairs to the appliance must only
be carried out by trained registered
service engineers.
Safety during use
• Overheated fats and oils can ignite
very quickly. Warning! Fire hazard!
• There is the risk of burns from the
appliance if used carelessly.
• Remove stickers and film from the
glass ceramic.
• Cables from electrical appliances
must not touch the hot surface of the
appliance or hot cookware.
• Switch the cooking zones off after
each use.
Page 6

6 electrolux safety instructions
Safety when cleaning
• For cleaning, the appliance must be
switched off and cooled down.
• For safety reasons, the cleaning of
the appliance with steam jet or highpressure cleaning equipment is not
permitted.
How to avoid damage to the appliance
• The glass ceramic can be damaged
by objects falling onto it.
• The edge of the glass ceramic can
be damaged by being knocked by
the cookware.
• Cookware made of cast iron, cast
aluminium or with damaged bottoms
can scratch the glass ceramic if
pushed across the surface.
• Objects that melt and things that boil
over can burn onto the glass ceramic
and should be removed straightaway.
• To avoid damaging cookware and
glass ceramics, do not allow saucepans or frying pans to boil dry.
• Do not use the cooking zones with
empty cookware or without cookware.
Page 7
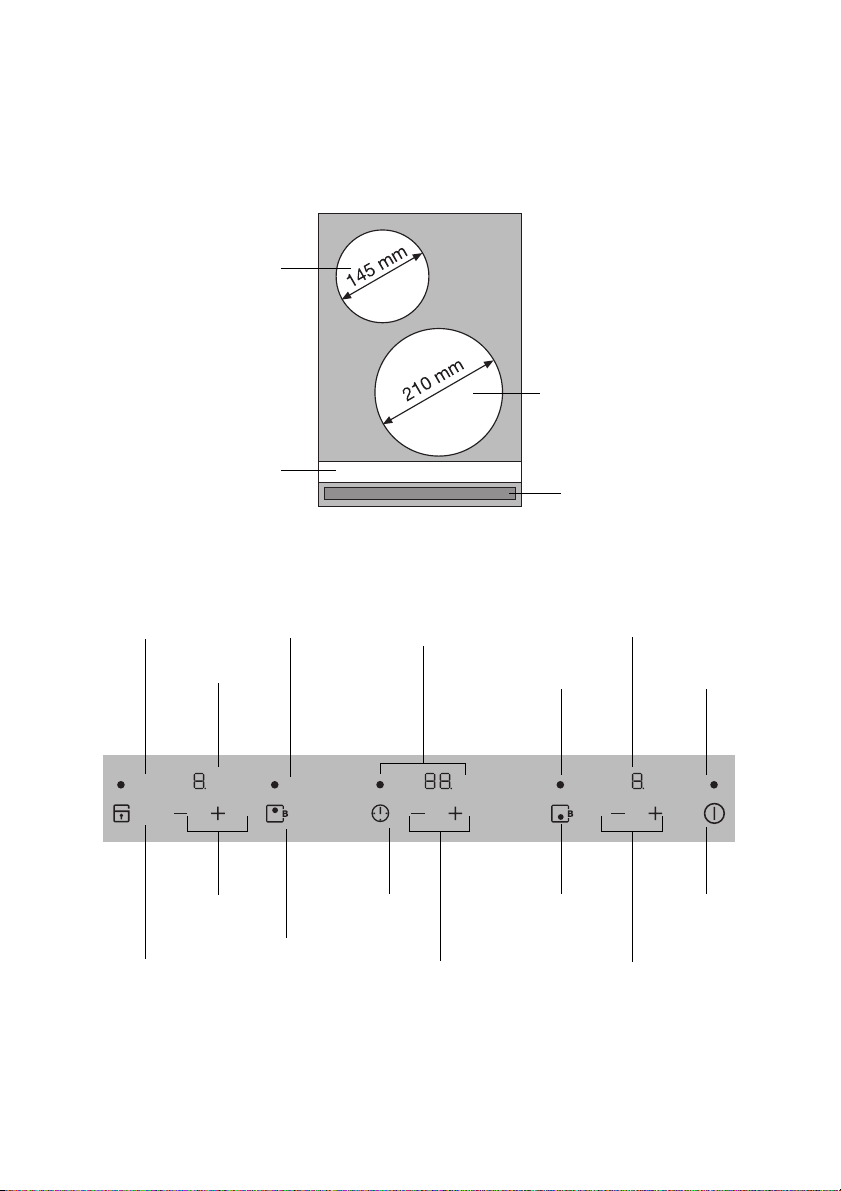
Description of the Appliance
Cooking surface layout
Induction cooking
zone 1400 W
with power function 1800 W
Frontline strip
Control panel layout
description of the appliance electrolux 7
Induction cooking
zone 2300 W
with power function 3700 W
Control panel
Child lock pilot
light
Heat setting
indicator
Heat setting
selection
Child lock
Warm up pilot
light
Automatic warm-up
function/
Power function
Timer indicator
Timer
Timer selection
Heat setting
indicator
Warm up pilot
light
Automatic warm-up
function/Power
function
Heat setting selection
On/Off pilot
light
On/Off
Page 8
8 electrolux description of the appliance
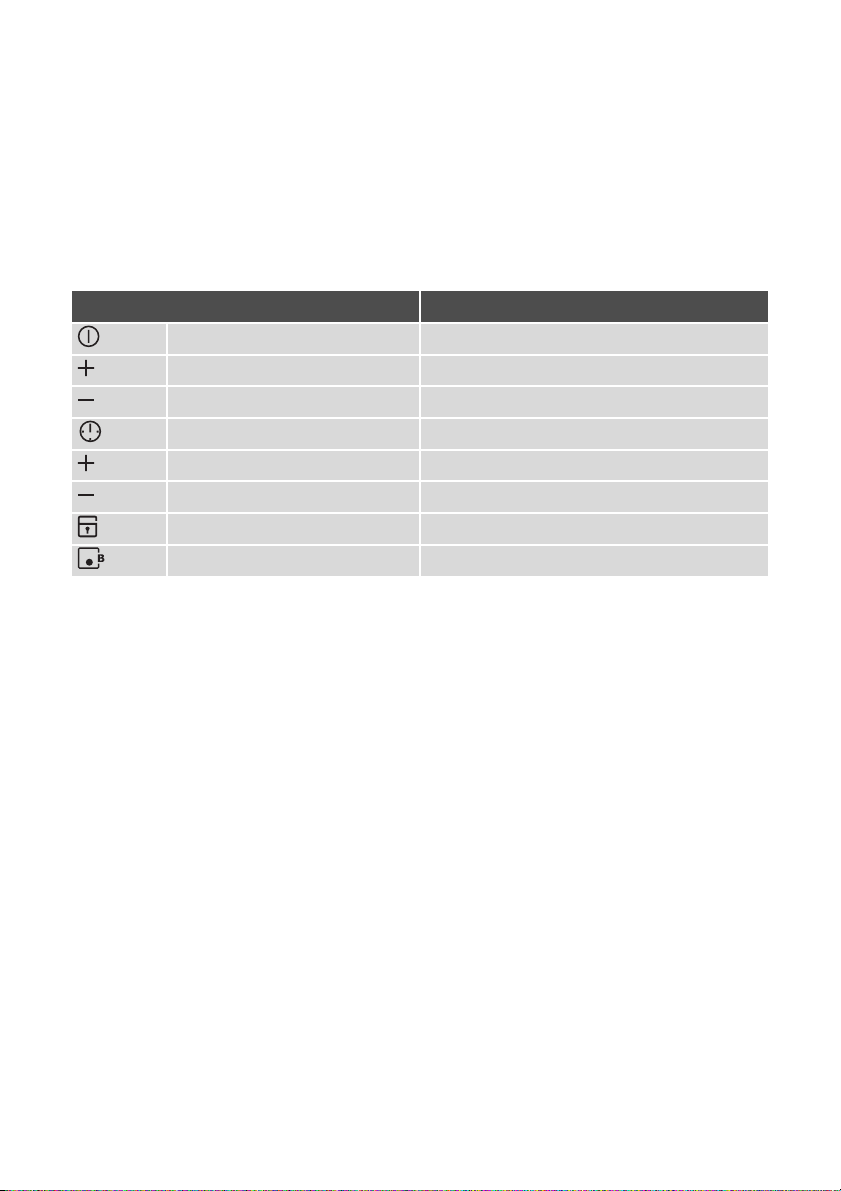
Touch Control sensor fields
The appliance is operated using Touch
Control sensor fields. Functions are
controlled by touching sensor fields and
confirmed by displays and acoustic signals.
Touch the sensor fields from above,
without covering other sensor fields.
Sensor field Function
On / Off To switch the appliance on and off
Increase settings To increase heat settings
Reduce settings To reduce heat settings
Timer Timer selection
Increase settings To increase Timer time
Reduce settings To reduce Timer time
Child lock Locking control panel for children
Power Switching the power function on and off
Page 9
description of the appliance electrolux 9
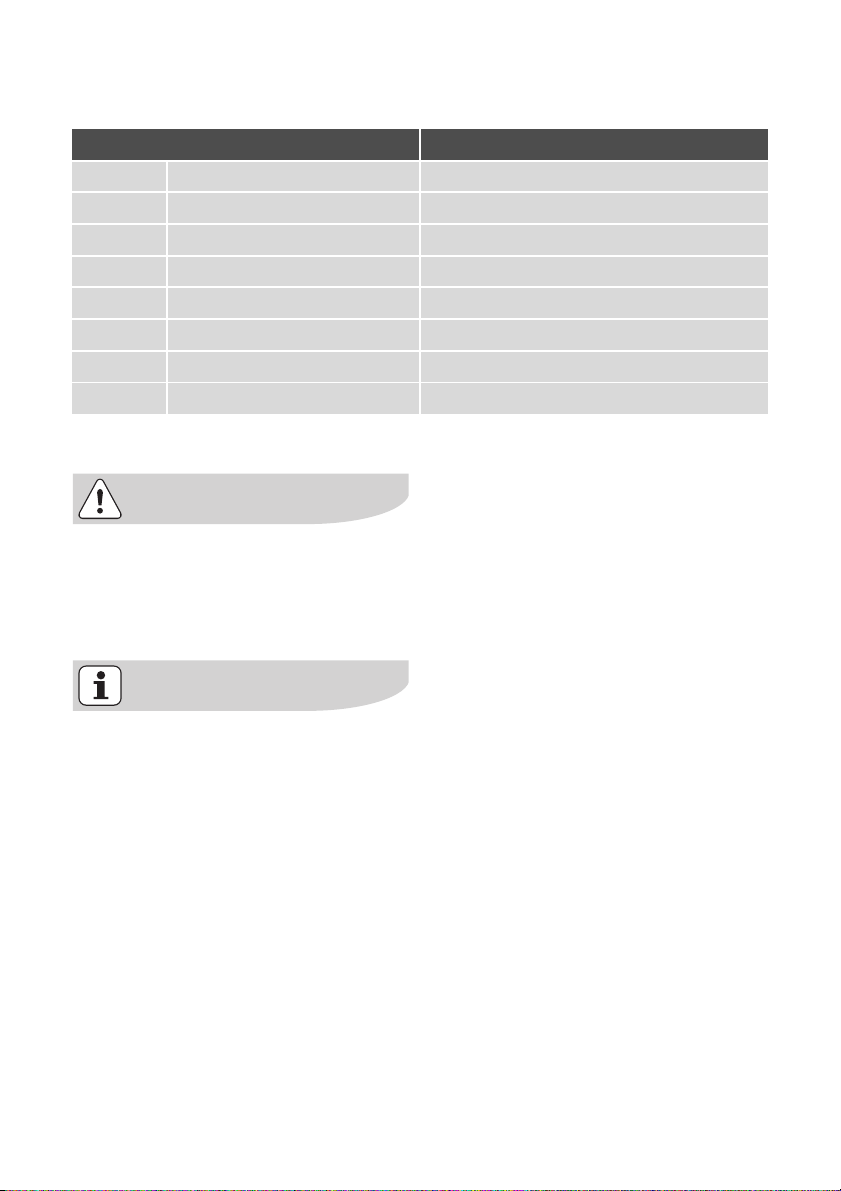
Displays
Display Description
¾ Cooking zone is switched off
u Keep warm setting Keep warm setting is set
¿ - Ç Heat settings Heat setting is set
e Fault Malfunction has occurred
h Residual heat Cooking zone is still hot
l Child safety device Child safety device is engaged
p Power Power function is switched on
_ Automatic switch off Switch off is active.
Residual heat indicator
Warning! Risk of burns from residual heat. After being switched off, the
cooking zones need some time to
cool down. Look at the residual heat
indicator
h .
Residual heat can be used for melting and keeping food warm.
The induction cooking zones create
the heat required for cooking directly in
the base of the cookware. The glass ceramic is merely heated by the residual
heat of the cookware.
The cooling fan switches itself on and
off depending upon the temperature of
the electronics.
Page 10
10 electrolux operating the appliance
Operating the appliance
Use the induction cooking zones
with suitable cookware.
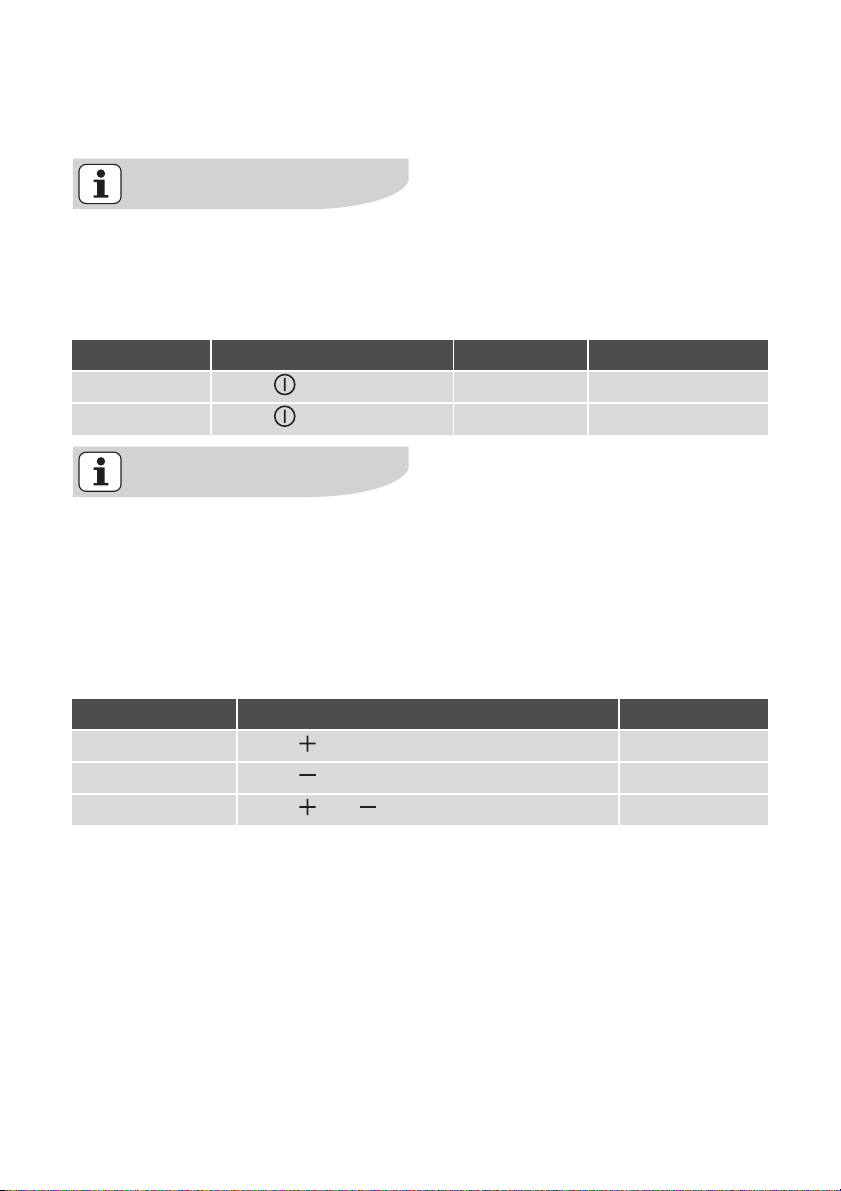
Switching the appliance on and off
Control panel Display Pilot light
Switch on Touch for 2 seconds ¾ / h lights up
Switch off Touch for 1 second h / none goes out
After switching on, within approx.
10 seconds a heat setting or a function must be set, otherwise the appliance automatically switches
itself off.
Setting the heat setting
Control panel Indicator
To increase Touch u to Ç
To decrease Touch Ç to ¾
To s wit ch o ff Touch and at the same time ¾
Page 11
operating the appliance electrolux 11
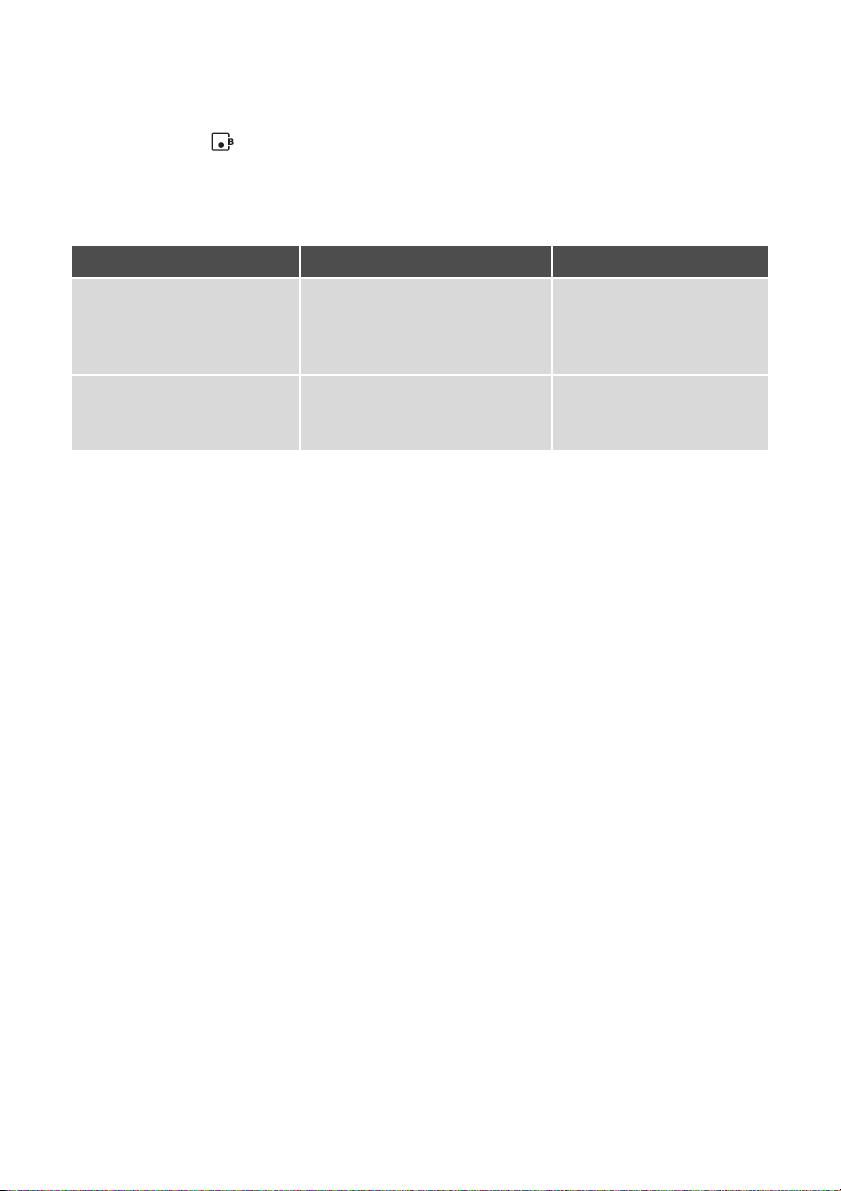
Automatic warm-up function and Power function
The sensor field controls the Power
function and the automatic warm-up
function. Both functions make more
power available to the cooking zone for
a short time.
Function Pre-condition Result
Automatic warm-up
function
Power function Heat setting ¾ or Ç is set Appliance heats up for a
A heat setting from ¿ to Æ is
set
Appliance heats up on
heat setting Ç until the
heat setting set is
reached
maximum of 10 minutes
on heat setting p.
Page 12
12 electrolux operating the appliance
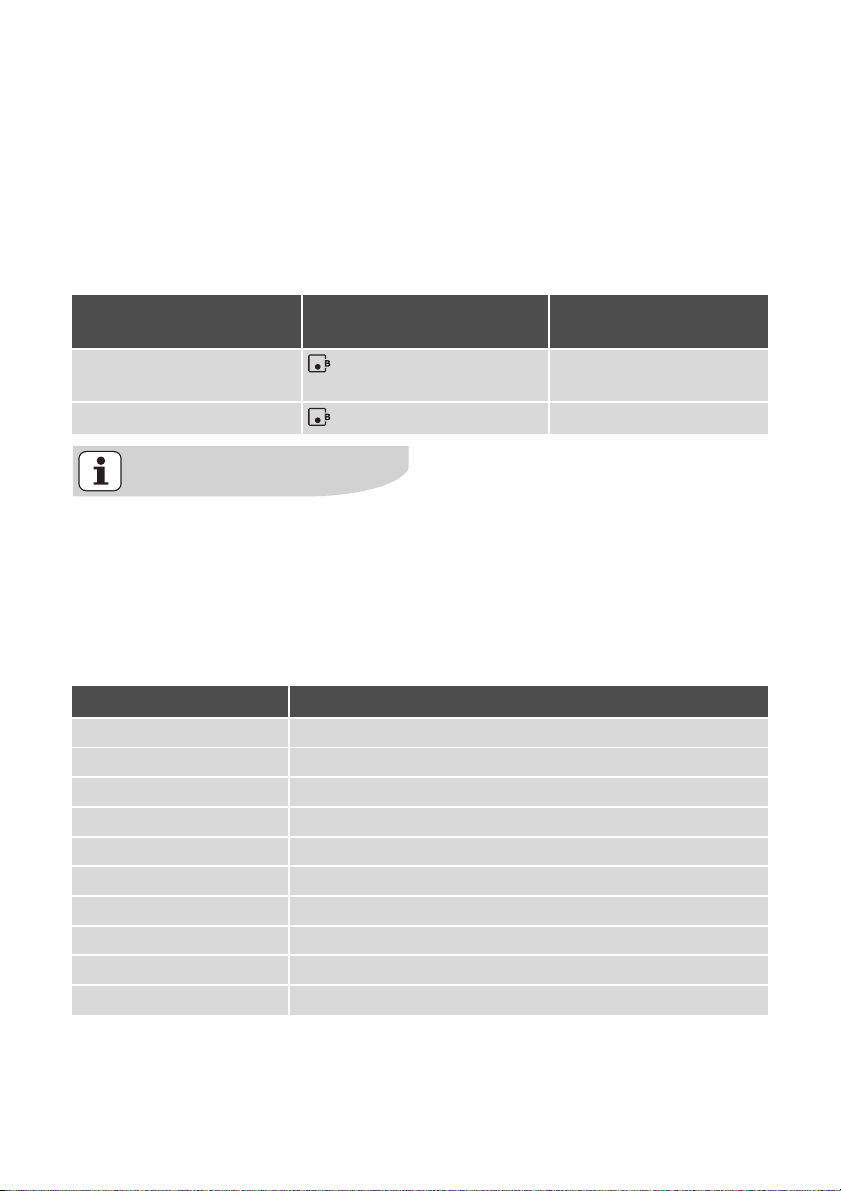
Using the automatic warm-up function
All cooking zones are equipped with an
automatic warm-up function. The automatic warm-up function sets the cooking zone to the highest setting for a
certain period of time and then automatically switches back to the cooking setting that was originally set.
Automatic warm-up
Sensor field Pilot light
function
To s wit ch o n Touch for 1 second at
heat setting ¿ to Æ
is lit throughout the automatic warm up period
To s wit ch o ff To uc h for 1 second goes out
If during the automatic warm up a
higher heat setting is selected, e.g.
Á to Ã, the automatic warm
from
up is adjusted.
The length of time that the automatic
warm up function operates depends on
the heat setting selected.
Heat setting Length of the automatic warm up [min: sec]
v
1
2
3
4
5
6
7
8
9
0:10
0:10
0:10
3:10
5:50
10:10
2:00
2:30
2:50
---
Page 13
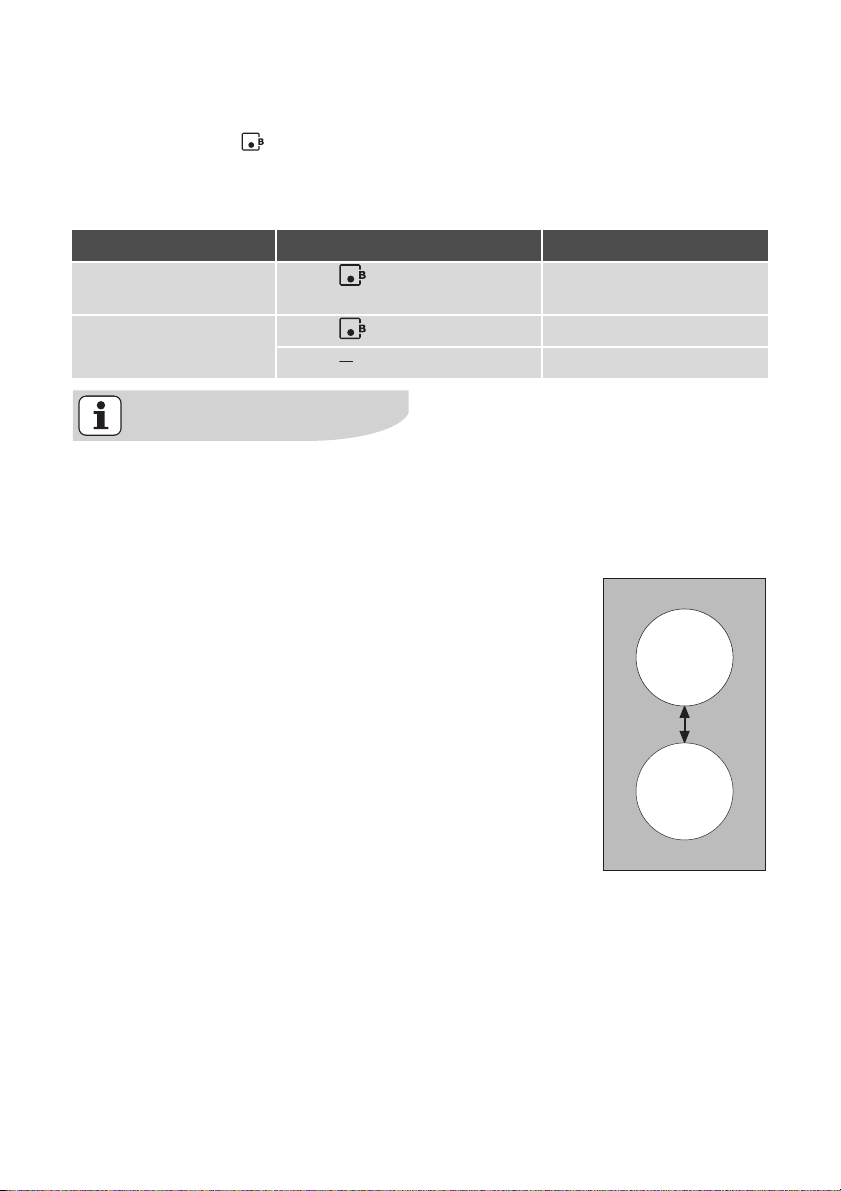
Switching the power function on and off
operating the appliance electrolux 13
The power function makes more
power available to the induction cooking
zones, e.g. to bring a large quantity of
water to the boil quickly.
The power function is activated for
10 minutes. After that the induction
cooking zone automatically switches
back to heat setting 9.
Control panel Pilot light/Indicator
To s wit ch o n Touch with heat setting
lights up, p
set to 0 or 9
To s wit ch o ff Touch goes out, 9
Touch goes out, 9
If the power function has ended, the
cooking zones automatically switch
back to the heat setting set previously.
Power Management
The cooking zones of the cooking surface have a maximum power available
to them.
So that the Power function can always
be carried out, Power Management may
reduce the power of the other cooking
zone.
Example: heat setting 9 is selected on a
cooking zone. The Power function is
switched on for the other cooking zone.
The Power function is performed, but
heat setting 9 on one cooking zone and
Power function on the other cooking
zone exceeds the maximum output for
both. Therefore Power Management reduces the first cooking zone that was
switched on from 9 to 7, for example,
and the display for this cooking zone alternates between 9 and 7 and then remains on the current maximum of 7.
(Whether the display alternates between
9 and 7 or 9 and 6 or other values, depends on the appliance type and the
size of the cooking zone.)
Page 14
14 electrolux operating the appliance
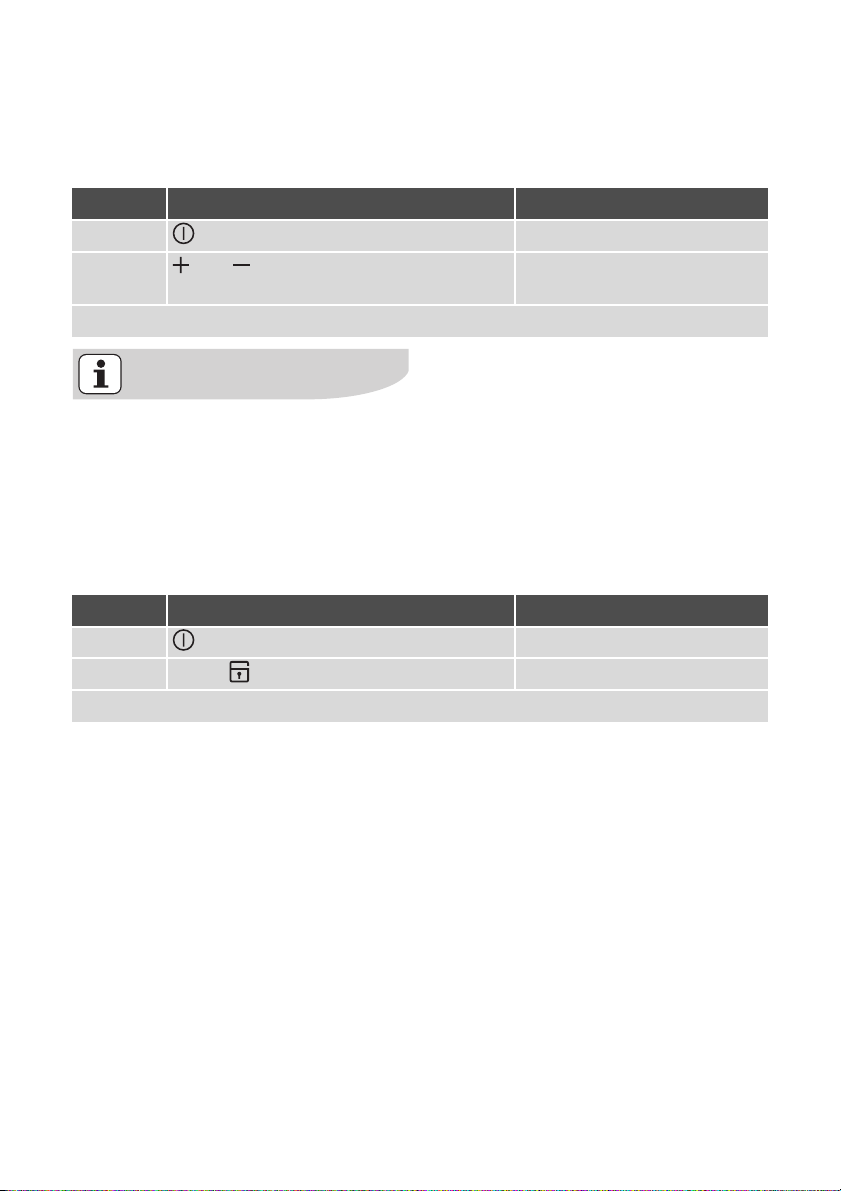
Using the child safety device
The child safety device prevents unintentional use of the appliance.
The child safety device can only be
switched on and off, if the appliance
is switched on, but no cooking zone
has a heat setting set.
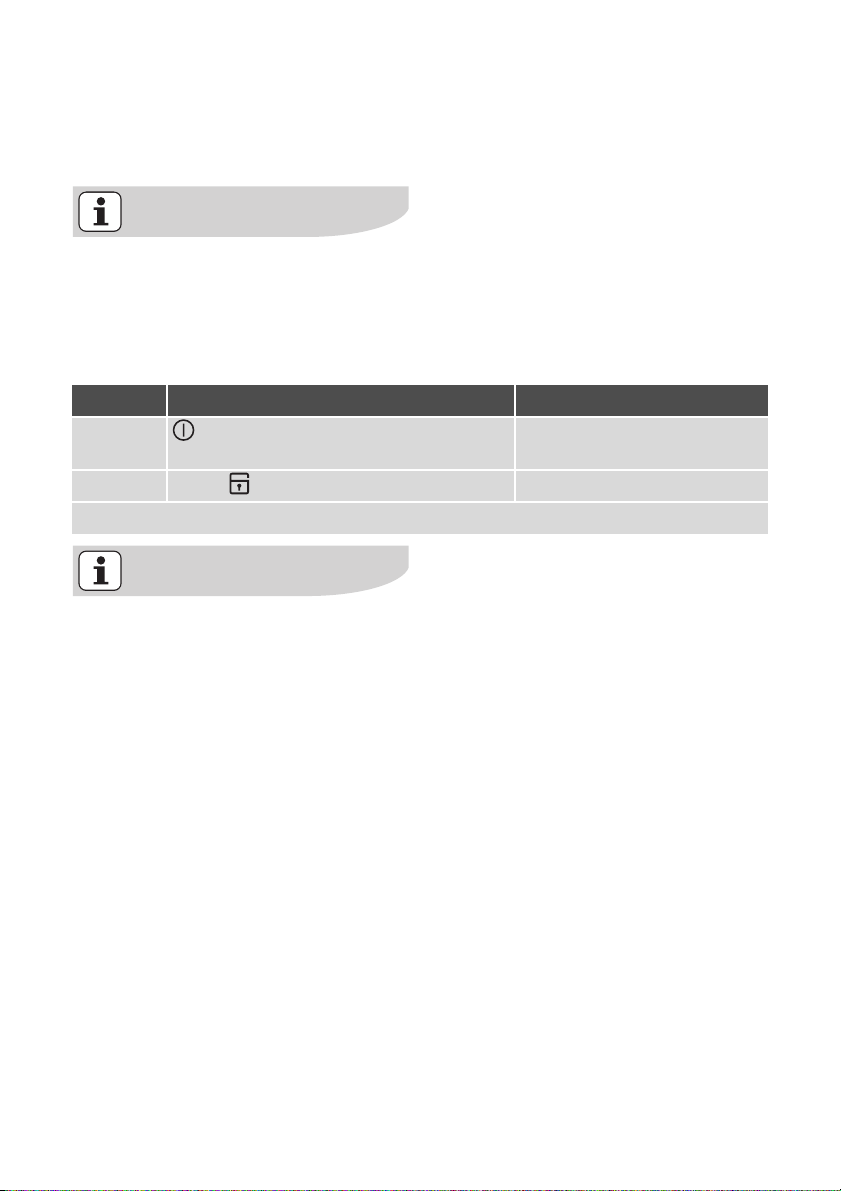
Activating the child safety device
Step Control panel Indicator/Signal
1. Switch on the appliance
(Do not set a heat setting)
2. To uc h l
Appliance switches off. The child safety device is activated.
If you want to use a locked cooking
zone (indicator
nal sounds.
l), an acoustic sig-
¾
Page 15
operating the appliance electrolux 15
Overriding the child safety device
The child safety device can be released
in this way for a single cooking session;
it remains activated afterwards.
Step control panel Indicator/Signal
1. Switch on the appliance l
2. and touch any one of the
cooking zones
Until the appliance is next switched off, it can be used as normal.
After overriding the child safety device, a heat setting or a function
must be set within
approx. 10 seconds, otherwise the
appliance automatically switches itself off.
Deactivating the child safety device
Step Control panel Indicator/Signal
1. Switch on the appliance l
2. To uc h 0 lights up
Appliance switches off. The child safety device is deactivated.
acoustic signal
Page 16
16 electrolux operating the appliance
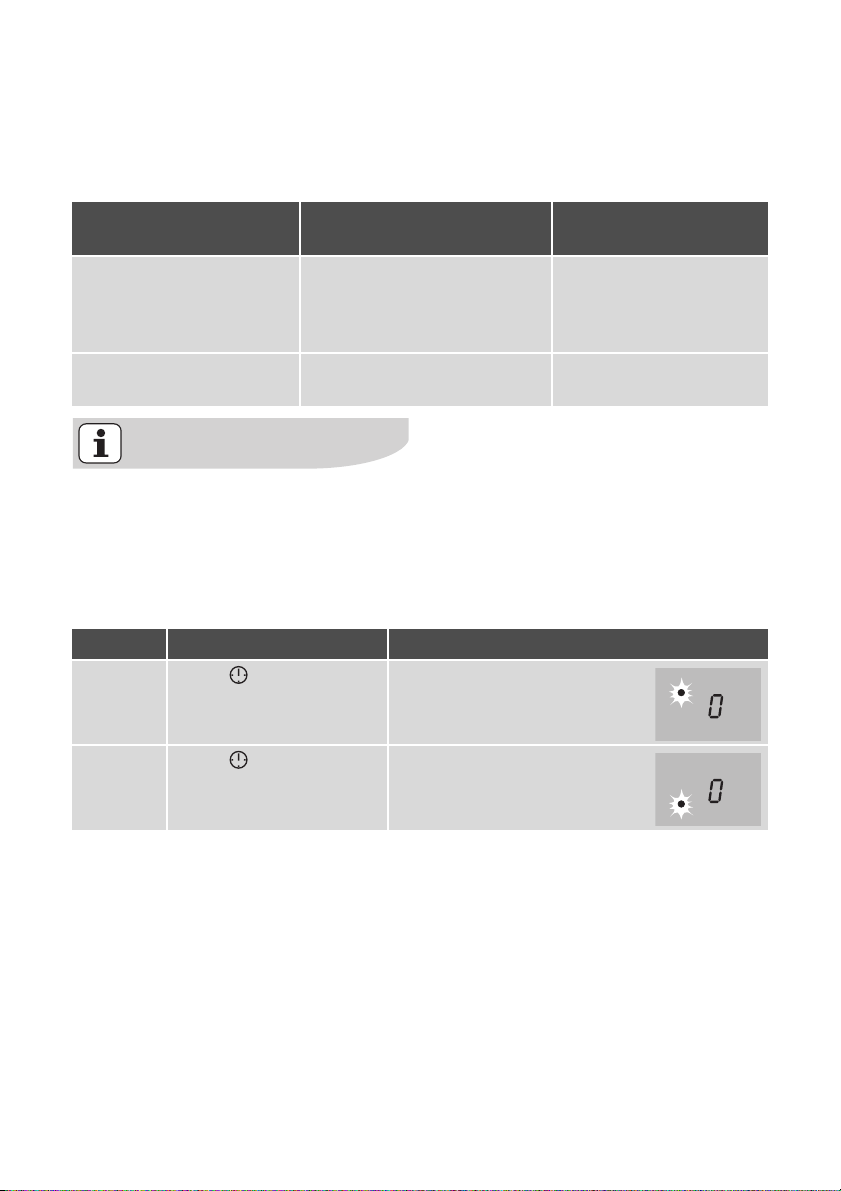
Using the timer
All cooking zones can use each use one
of the two timer functions at the same
time.
Function Condition Outcome after time
has elapsed
Safety cut-out When a heat setting is set acoustic signal
Cooking zone switches
Countdown timer When cooking zones are not
used
If a heat setting is set on this cooking zone in addition to a countdown
timer, the cooking zone is switched
off after the time set has elapsed.
Selecting the cooking zone
acoustic signal
0 lights up
off
0 lights up
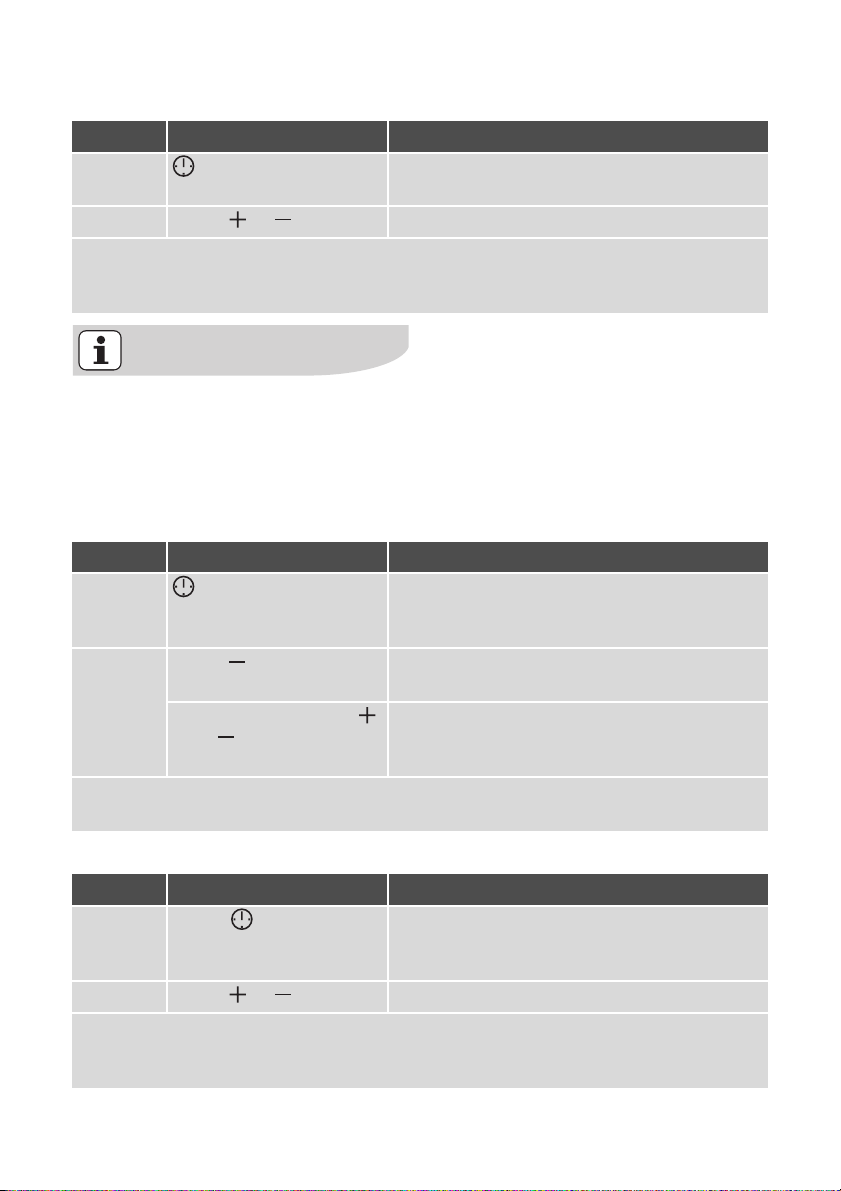
Step Control panel Display
1. Tou ch on ce Pilot light for the back cooking
zone flashes
2. Tou ch on ce Pilot light for the front cooking
zone flashes
Page 17
operating the appliance electrolux 17
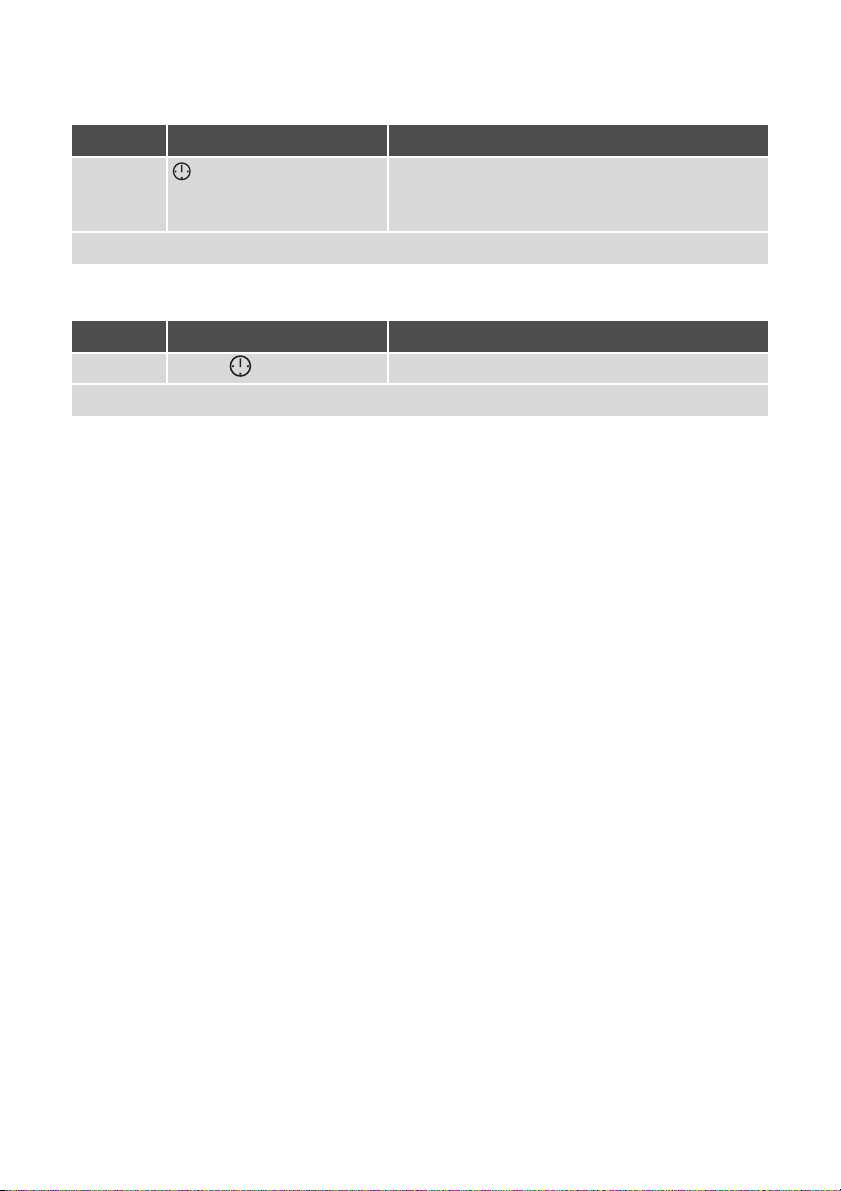
Setting the time
Step Control panel Indicator
1. Select cooking zone Pilot light for the selected cooking zone
flashes
2. Tou ch o r 0 to 99 minutes
After a few seconds the pilot light flashes more slowly.
The time is set.
The time counts down.
If other timer functions are set, after
a few seconds the shortest remaining time of all the timer functions is
displayed and the corresponding pilot light flashes.
Switching off the Timer function
Step Control panel Display
1. Select a cooking
zone
2. Touch for the cooking
zone selected
Simultaneoulsy touch
and
zone selected
The pilot light goes out.
The Timer function for the selected cooking zone is switched off.
for the cooking
Pilot light of the selected cooking zone
flashes more quickly.
Remaining time is displayed
The remaining time counts down to 00.
00 is displayed.
Changing the time
Step Control panel Indicator
1. Select cooking zone Pilot light of the selected cooking zone
flashes faster
Time remaining is displayed
2. Tou ch o r 01 to 99 minutes
After a few seconds, the pilot light flashes more slowly.
The time is set.
The time counts down.
Page 18
18 electrolux operating the appliance
Displaying the time remaining for a cooking zone
Step Control panel field Display
1. Select cooking zone Pilot light of the cooking zone selected
flashes faster
The time remaining is displayed
After a few seconds the pilot light flashes more slowly.
Switching off the acoustic signal
Step Control panel field Acoustic signal
1. To uc h Acoustic signal to acknowledge.
Acoustic signal stops.
Page 19
operating the appliance electrolux 19
Automatic switch off
Cooking surface
• If after switching on the cooking surface, a heat setting is not set for a
cooking zone within approx. 10 seconds, the cooking surface automatically switches itself off.
• If one or more sensor fields are covered for longer than approx. 10 seconds, e.g. by a pan placed upon it, a
signal sounds and the cooking surface switches off automatically.
• If all cooking zones are switched off,
the cooking surface automatically
switches itself off after approx. 10
seconds.
Control panel
Moisture (e.g. a wet cloth) or liquid
boiling over onto the control panel
immediately switches all cooking
zones off.
Induction cooking zones
• In the case of overheating (e.g. when
a saucepan boils dry) the cooking
zone automatically switches itself off.
_ is displayed. Before being used
again, the cooking zone must be set
0 and cooled down.
to
• If cookware that is not suitable is
f lights up in the display and
used,
after 2 minutes the indicator for the
cooking zone switches itself off.
• If one of the cooking zones is not
switched off after a certain time, or if
the heat setting is not modified, the
relevant cooking zone switches off
automatically. _ is displayed. Before
being used again, the cooking zone
must be set to 0.
Heat setting Switches off after
v, 1 - 2 6 hours
3 - 4 5 hours
5 4 hours
6 - 9 1.5 hours
Page 20
20 electrolux tips on cooking and frying
Tips on Cooking and Frying
Information on acrylamides
According to the latest scientific
knowledge, intensive browning of
food, especially in products containing starch, can constitute a
health risk due to acrylamides.
Therefore we recommend cooking
at the lowest possible temperatures
and not browning foods too much.
Cookware for induction cooking zones
Cookware material
Cookware material Suitable
Steel, enamelled steel yes
Cast iron yes
Stainless steel if appropriately labelled by the manufacturer
Aluminium, copper, brass --Glass, ceramic, porcelain ---
Cookware for induction cooking
zones is labelled as suitable by the
manufacturer.
Suitability test
Cookware is suitable for induction cooking, if …
• ... a little water on an induction cooking zone set to heat setting 9 is heated within a short time.
• ... a magnet sticks to the bottom of
the cookware.
Certain cookware can make noises
when being used on induction cooking zones. These noises are not a
fault in the appliance and do not affect operation in any way.
Bottom of the cookware
The bottom of the cookware should be
as thick and flat as possible.
Page 21
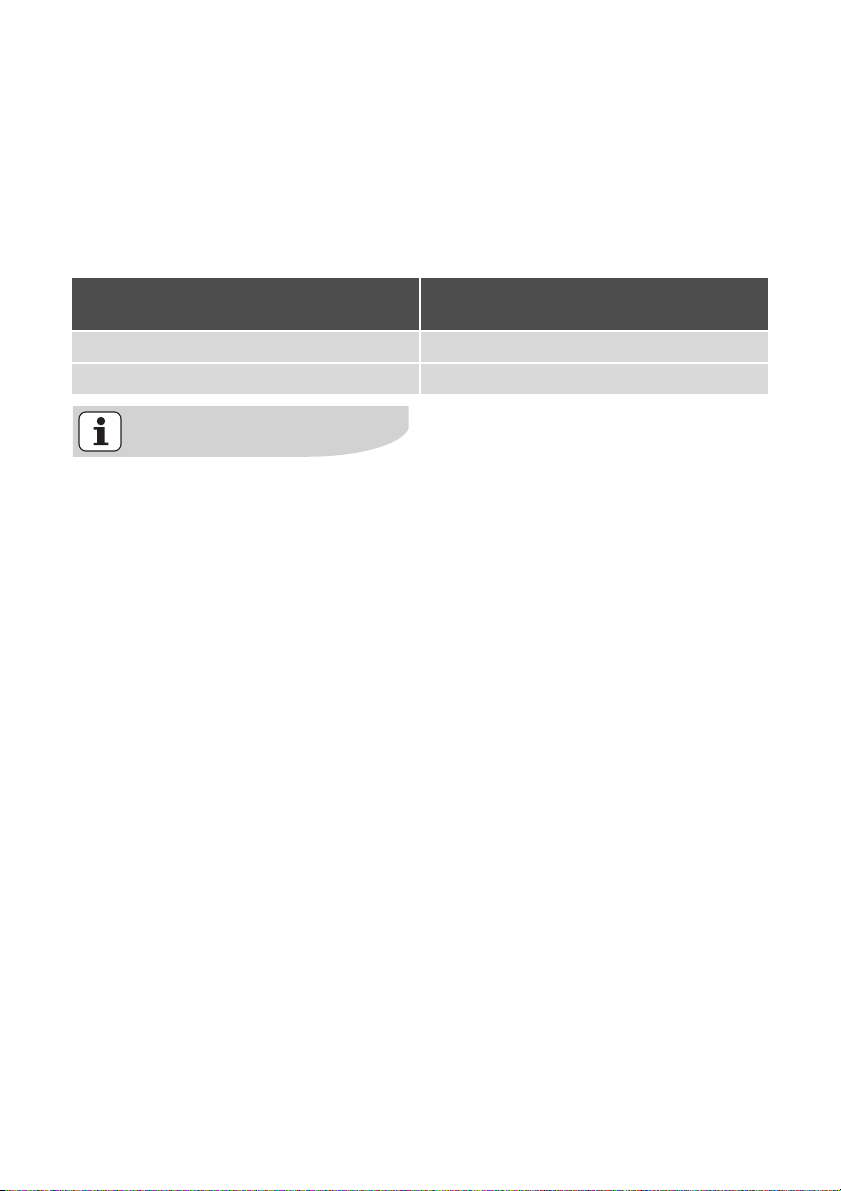
Pan size
Induction cooking zones adapt automatically to the size of the bottom of the
cookware up to a certain limit. However
the magnetic part of the bottom of the
cookware must have a minimum diameter depending upon the size of the
cooking zone.
Diameter of cooking zone
[mm]
210 180
145 120
The cookware must be placed centrally on the cooking zone.
tips on cooking and frying electrolux 21
Minimum diameter of dish base
[mm]
Page 22

22 electrolux tips on cooking and frying
Tips on energy saving
Place cookware on the cooking
zone before it is switched on.
If possible, always place a lid on the
cookware.
Page 23
tips on cooking and frying electrolux 23
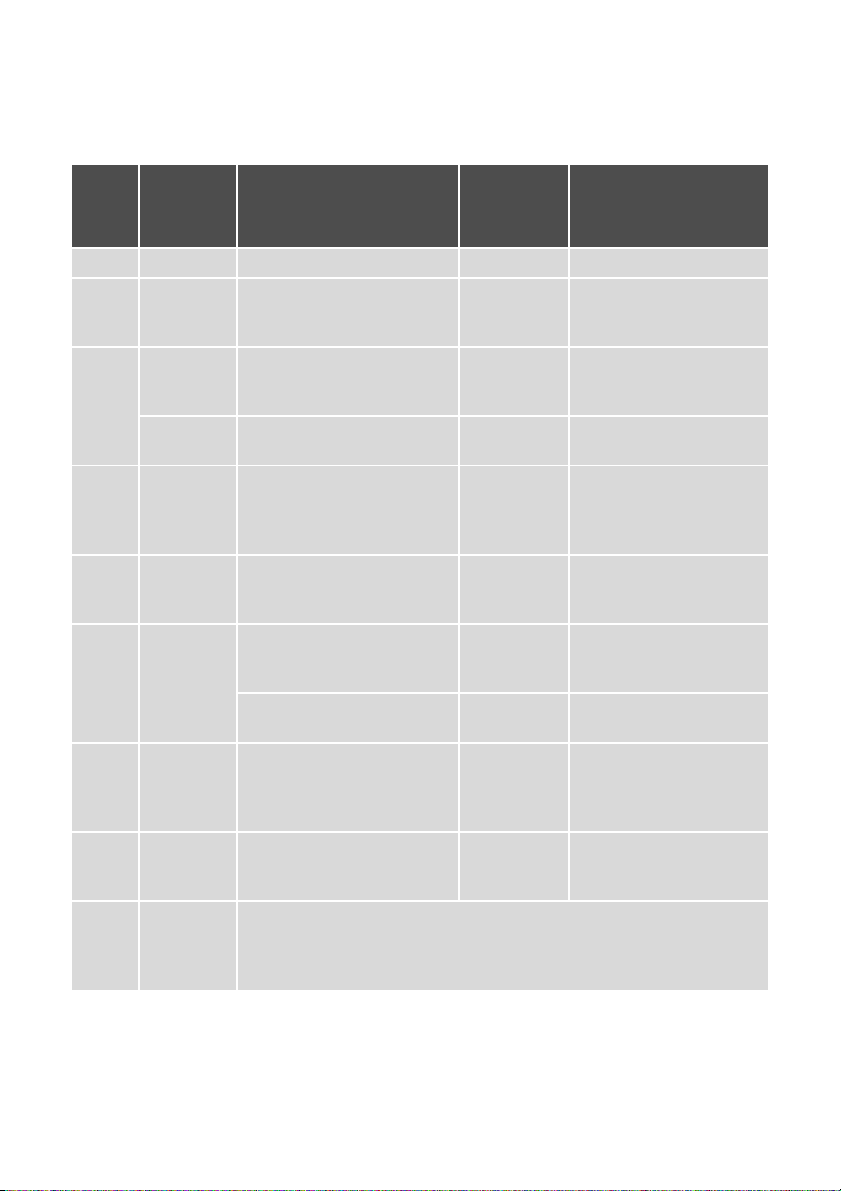
Examples of cooking applications
The information given in the following table is for guidance only.
Heat
The power function is suitable for heating large quantities of liquid.
Cooking-
setting
process
0 Off position
Keeping
1
1-2
2-3
3-4
4-5
6-7
7-8
9
food
warm
Melting
Solidi-
fying
Simmer-
ing on low
heat
Steaming
Braising
Boiling
Gentle
Frying
Heavy
Frying
Boiling
Searing
Deep
frying
suitable for
Keeping cooked foods warm as required Cover
Hollandaise sauce,
melting butter, chocolate,
gelatine
Fluffy omelettes, baked eggs 10-40 mins. Cook with lid on
Simmering rice and milk-
based dishes
Heating up ready-cooked
meals
Steaming vegetables, fish
braising meat
Steaming potatoes 20-60 mins.
Cooking larger quantities of
food, stews and soups
Frying escalopes, veal cor-
don bleu, cutlets, rissoles,
sausages, liver, roux, eggs,
pancakes, doughnuts
Hash browns, loin steaks,
steaks, Flädle (pancakes for
garnishing soup)
Boiling large quantities of water, cooking pasta, searing meat (goulash,
Cooking
time
5-25 mins. Stir occasionally
25-50 mins.
20-45 mins.
60-150 mins.
Steady frying
5-15 mins.
per pan
pot roast), deep frying chips
much liquid as rice, stir
With vegetables add only
a little liquid (a few table-
Use only a little liquid, e.
Up to 3 l liquid plus ingre-
Add at least twice as
milk dishes part way
through cooking
g.: max.
750 g potatoes
Turn halfway through
Turn halfway through
Tips/Hints
spoons)
¼
l water for
dients
cooking
cooking
Page 24

24 electrolux cleaning and care
Cleaning and Care
Take care! Risk of burns from residual heat.
Warning! Sharp objects and abrasive cleaning materials will damage
the appliance. Clean with water and
washing up liquid.
Warning! Residues from cleaning
agents will damage the appliance.
Remove residues with water and
washing up liquid.
Cleaning the appliance after each use
1. Wipe the appliance with a damp
cloth and a little washing up liquid.
2. Rub the appliance dry using a clean
cloth.
Page 25
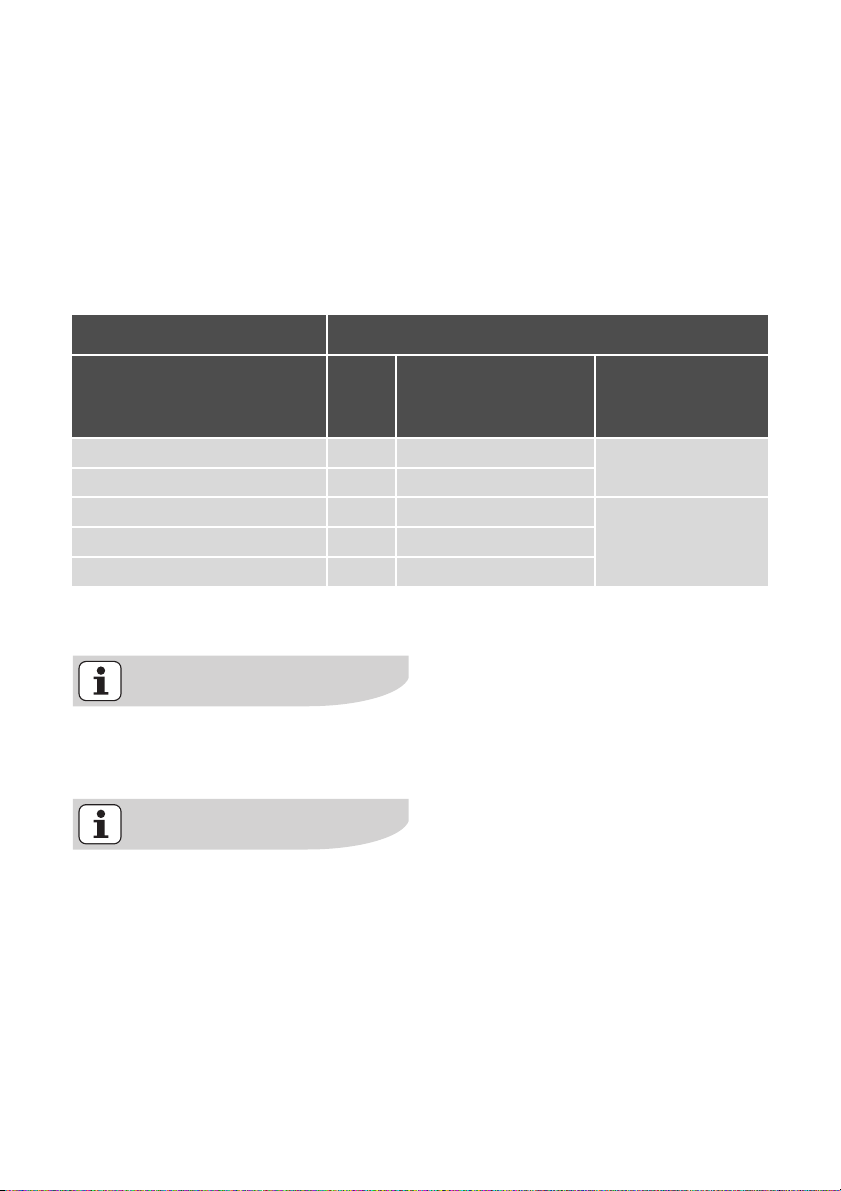
Removing deposits
1. Place a scraper on the glass ceramic
surface at an angle.
2. Remove residues by sliding the
blade over the surface.
3. Wipe the appliance with a damp
cloth and a little washing up liquid.
4. Rub the appliance dry using a clean
cloth.
cleaning and care electrolux 25
Remove
im-
Type of dirt
medi-
ately
sugar, food containing sugar yes --plastics, tin foil yes --limescale and water rings --- yes
fat splashes --- yes
shiny metallic discolouration --- yes
*Scrapers and cleaners for glass ceramic and
stainless steel can be purchased in specialist
shops
when the appliance
has cooled down
Remove stubborn residues with a
cleaner for glass ceramic or stainless steel.
Scratches or dark stains on the
glass ceramic that cannot be removed do not however affect the
functioning of the appliance.
Removable Frontline strip
The aluminium Frontline strip fastens on
by means of magnets. It is easy to remove by hand and can be cleaned with
detergent. Please do not use any scouring agents or sponges that scratch. Do
not clean the strip in the dishwasher.
using
a scraper*
cleaner for glass ce-
ramic or stainless
steel*
Page 26
26 electrolux what to do if …
What to do if …
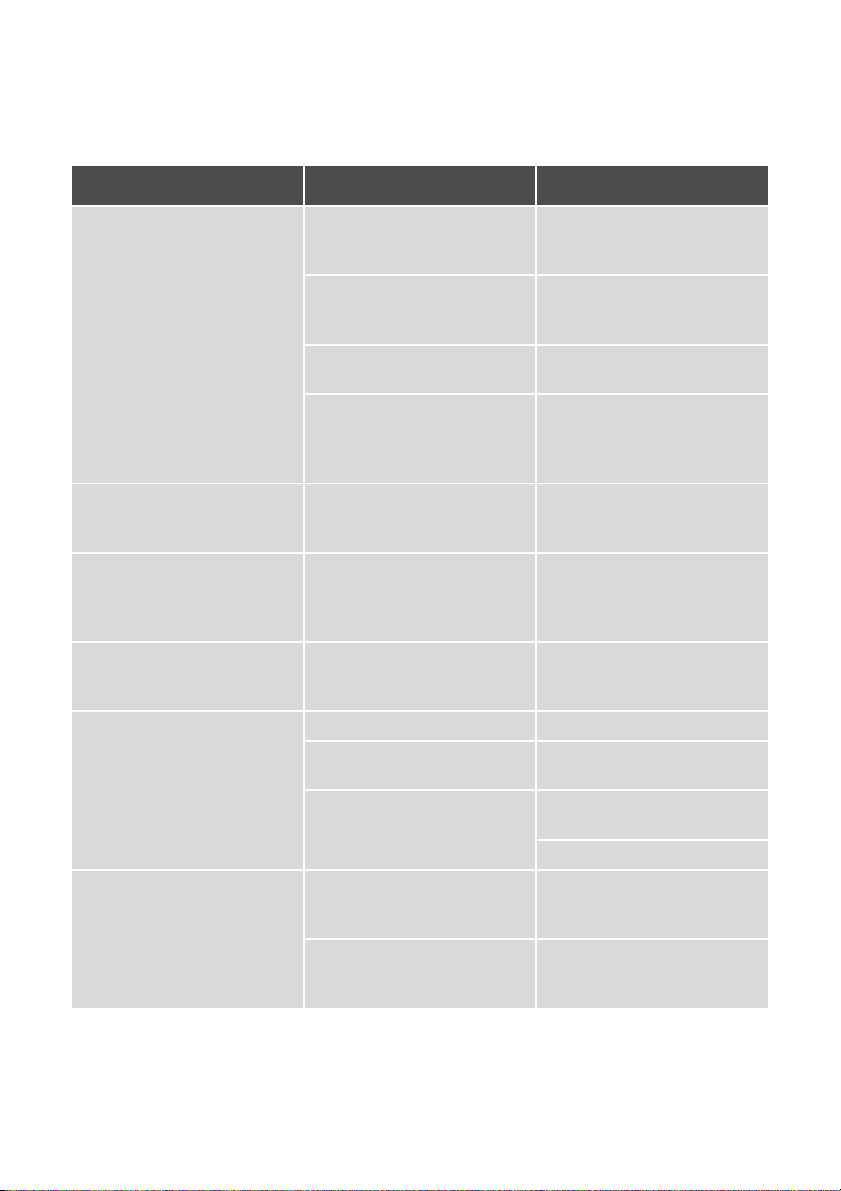
Problem Possible cause Remedy
The cooking zones will not
switch on or are not functioning
The residual heat indicator is
not displaying anything
Power function cannot be
switched on
Display changes between two
heat settings
f
lights up Unsuitable cookware Use suitable cookware
_
is lit Overheating protection for the
More than 10 seconds have
passed since the appliance
was switched on
The child safety device is
switched on
Several sensor fields were
touched at the same time
Automatic switch off has been
triggered
The cooking zone was only on
for a short time and is therefore
not hot
The Power function function
has already been activated
several times quickly one after
the other
Power Management is reducing the power of this cooking
zone
No cookware on the cooking
zone
The diameter of the bottom of
the cookware is too small for
the cooking zone
cooking zone has been triggered
Automatic switch off has been
triggered
l
Switch the appliance on again.
Deactivate the child safety device (See the section “Child
safety device”)
Only touch one sensor field
Remove any objects (pan,
cloths, etc.) that are lying on
the control panel. Switch the
appliance on again
If the cooking zone is supposed to be hot, call the Customer Service Department.
Let cooking surface cool
down.
See section “Power Management“ in the Operating the Appliance chapter
Place cookware on the cooking zone
Move onto a smaller cooking
zone
Use suitable cookware
Switch off the cooking zone.
Switch the cooking zone on
again
Switch off the cooking zone.
Switch the cooking zone on
again
Page 27
what to do if … electrolux 27
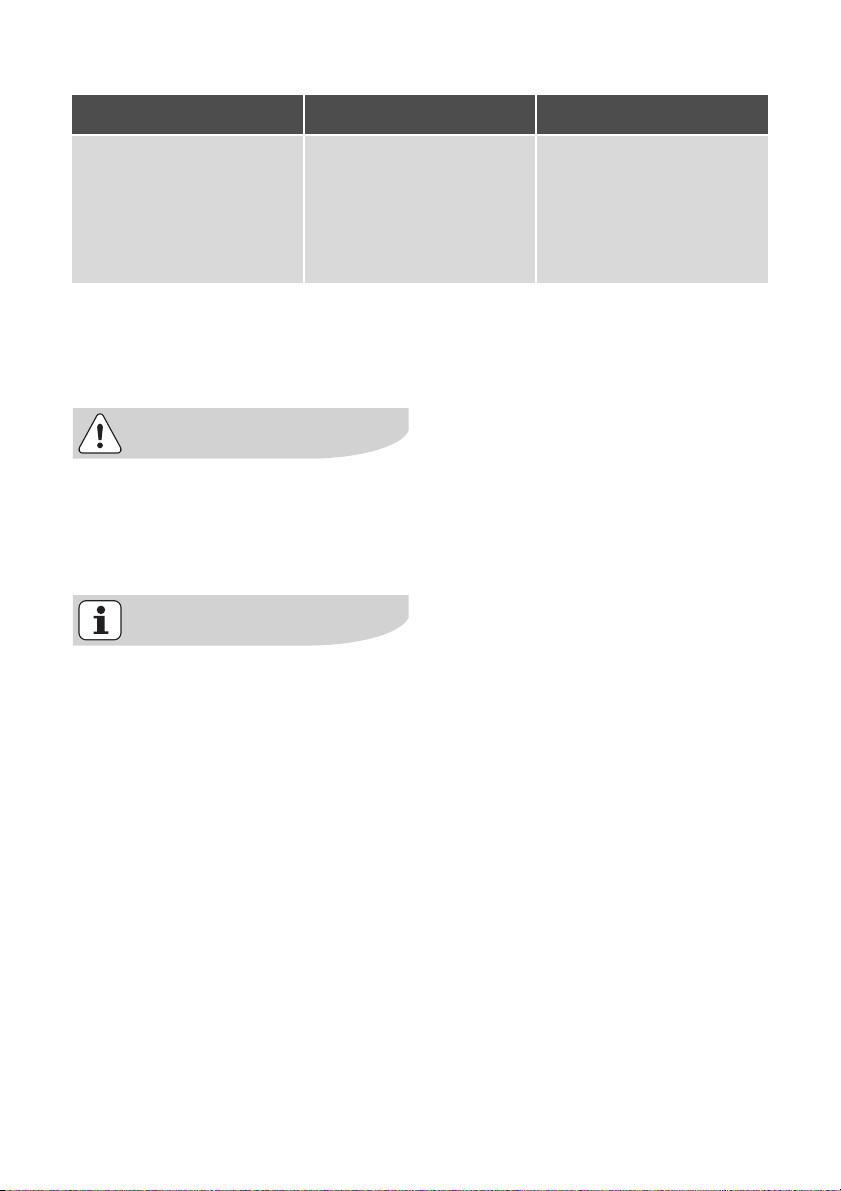
Problem Possible cause Remedy
e
and number are displayed Electronics fault Disconnect the appliance from
the electrical supply for a few
minutes (Take the fuse out of
the house’s wiring system)
If after switching on again,
is displayed again, call the
customer service department
If you are unable to remedy the
problem by following the above
suggestions, please contact your
dealer or the Customer Care Department.
Warning! Repairs to the appliance
are only to be carried out by qualified service engineers. Considerable danger to the user may result
from improper repairs.
e
If the appliance has been wrongly
operated, the visit from the customer service technician or dealer may
not take place free of charge, even
during the warranty period.
Page 28

28 electrolux disposal
Disposal
Packaging material
The packaging materials are envi-
ronmentally friendly and can be recycled. The plastic components are
identified by markings, e.g. >PE<,
>PS<, etc. Please dispose of the
packaging materials in the appropriate container at the community
waste disposal facilities.
Old appliance
The symbol
its packaging indicates that this
product may not be treated as
household waste. Instead it shall be
handed over to the applicable collection point for the recycling of
electrical and electronic equipment.
By ensuring this product is disposed of correctly, you will help prevent potential negative
consequences for the environment
and human health, which could otherwise be caused by inappropriate
waste handling of this product. For
more detailed information about recycling of this product, please contact your local city office, your
household waste disposal service
or the shop where you purchased
the product.
W on the product or on
Page 29

installation instructions electrolux 29
Installation Instructions
Safety instructions
Warning! This must be read!
The laws, ordinances, directives and
standards in force in the country of use
are to be followed (safety regulations,
proper recycling in accordance with the
regulations, etc.)
Installation may only be carried out by a
qualified electrician.
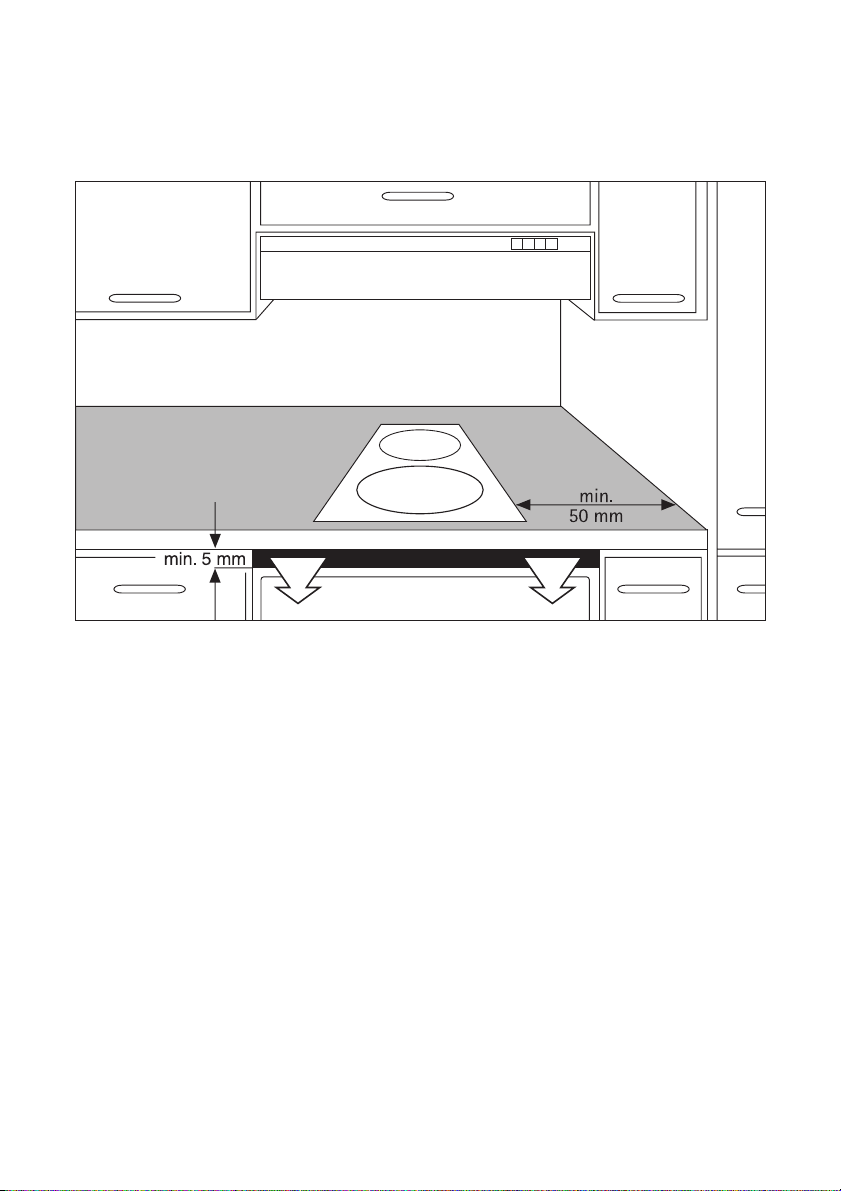
The minimum distances to other appliances and units are to be observed.
Anti-shock protection must be provided
by the installation, for example drawers
may only be installed with a protective
floor directly underneath the appliance.
The cut surfaces of the worktop are to
be protected against moisture using a
suitable sealant.
The sealant seals the appliance to the
work top with no gap.
When building in, protect the underside
of the appliance from steam and moisture, e.g. from a dishwasher or oven.
Avoid installing the appliance next to
doors and under windows. Otherwise
hot cookware may be knocked off the
rings when doors and windows are
opened.
zRisk of injury from electrical
current.
• The electrical mains terminal is live.
• Make electrical mains terminal free of
voltage.
• Follow connection schematic.
• Observe electrical safety rules.
• Ensure anti-shock protection by in-
stalling correctly.
• The appliance must be connected to
the electrical supply by a qualified
electrician.
zRisk of injury from electrical
current.
• Loose and inappropriate plug and
socket connections can make the
terminal overheat.
• Have the clamping connections correctly installed by a qualified electrician.
• Use strain relief clamp on cable.
• In the event of single-phase or two-
phase connection, the appropriate
mains cable of type H05BB-F Tmax
90°C(or higher) must be used.
• If this appliance’s mains cable is
damaged, it must be replaced by a
special cable (type H05BB-F Tmax
90°C; or higher). The latter is available from the Customer Care Department.
• This appliance’s mains cable is fixed
directly to the board. If the mains cable is damaged, it must only be replaced by a qualified ecletrician or
our Customer Care Department.
A device must be provided in the electrical installation which allows the appliance to be disconnected from the mains
at all poles with a contact opening width
of at least 3 mm.
Suitable isolation devices include line
protecting cut-outs, fuses (screw type
fuses are to be removed from the holder), earth leakage trips and contactors.
Page 30
30 electrolux assembly
Assembly
Page 31
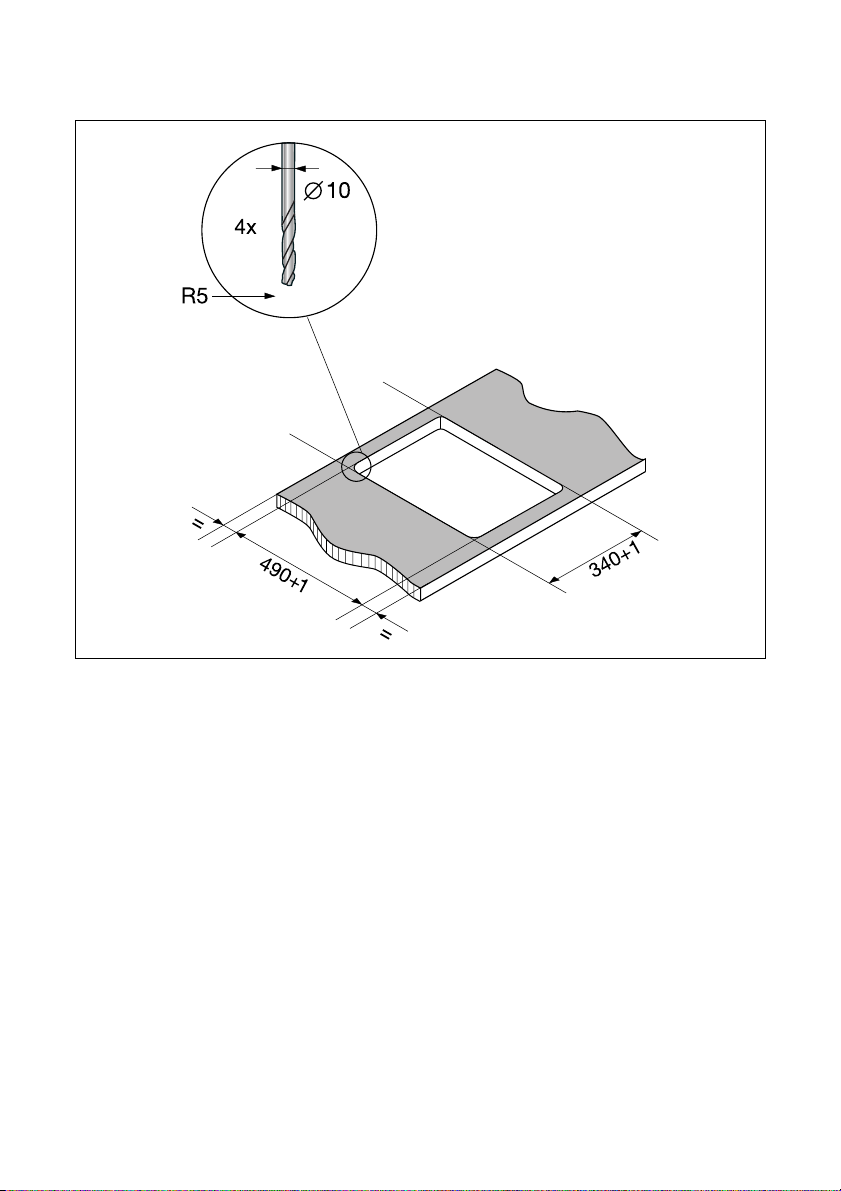
assembly electrolux 31
Page 32
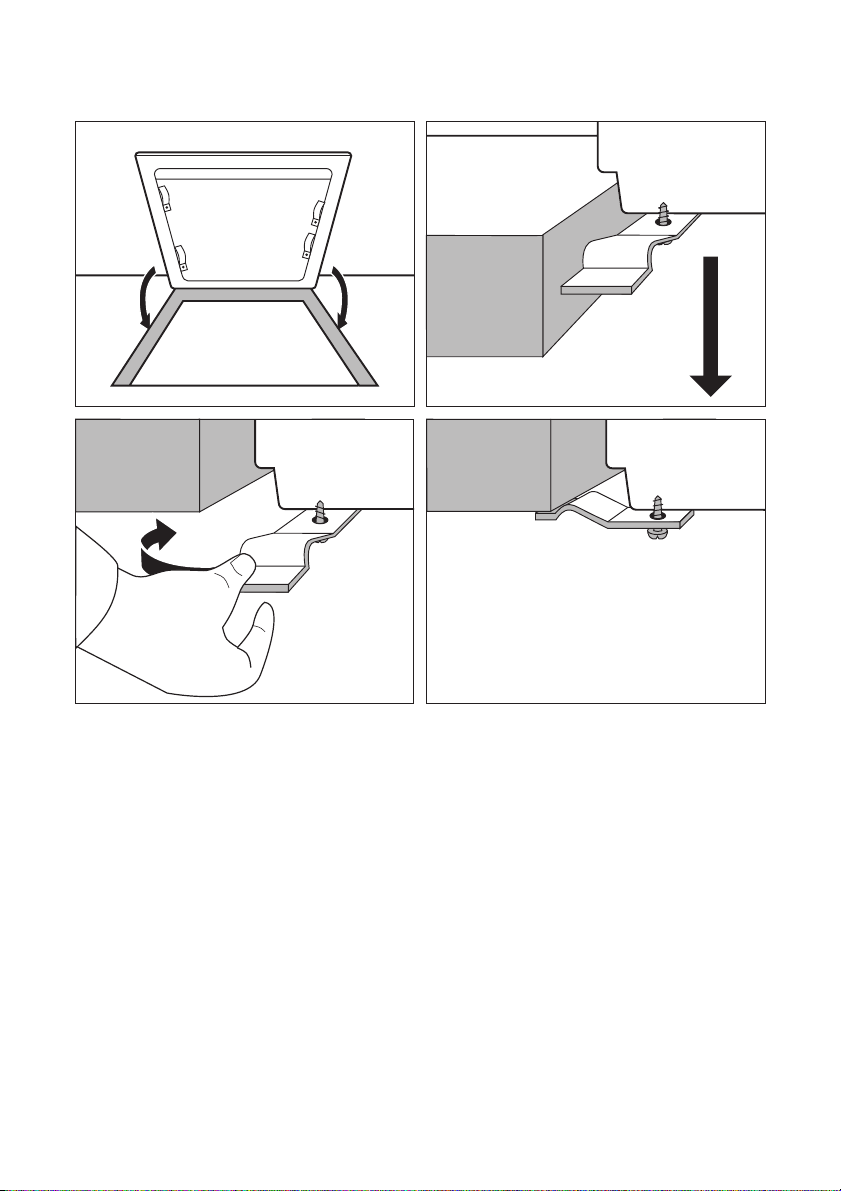
32 electrolux assembly
Page 33
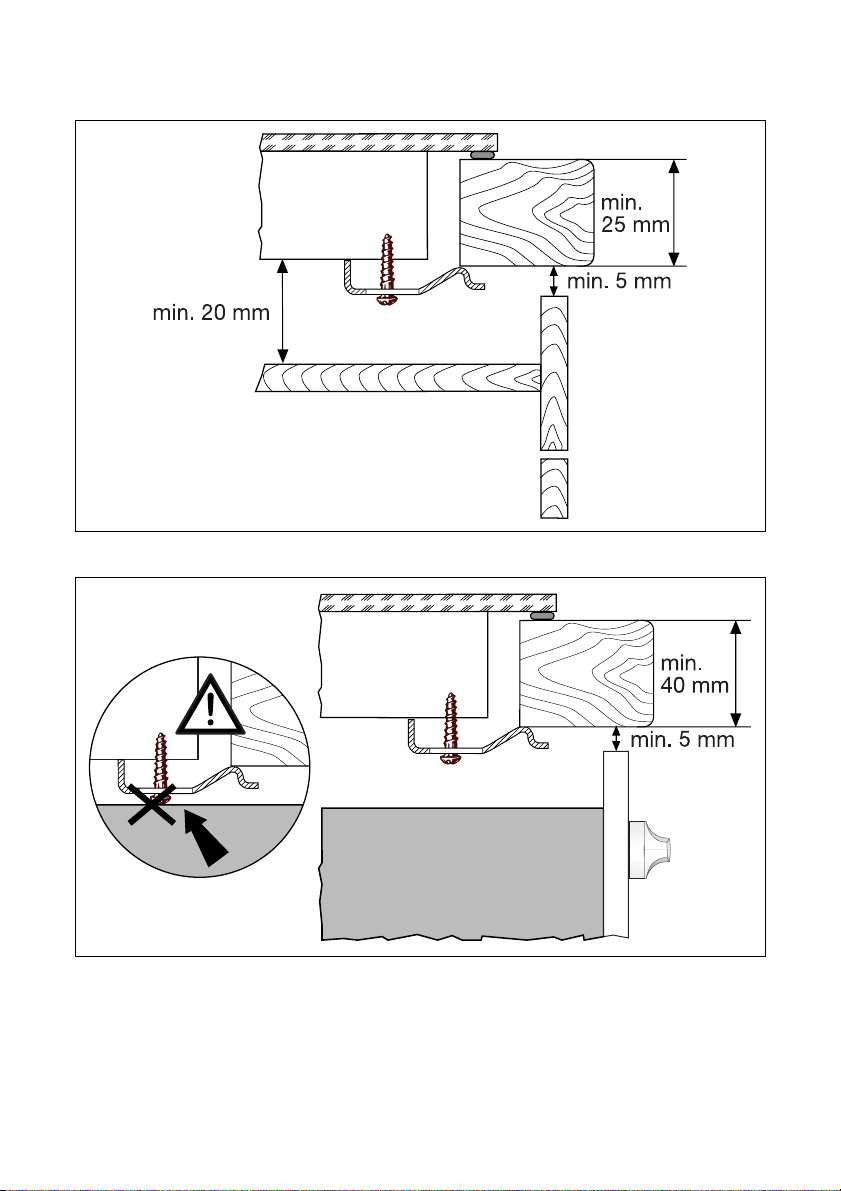
assembly electrolux 33
Page 34
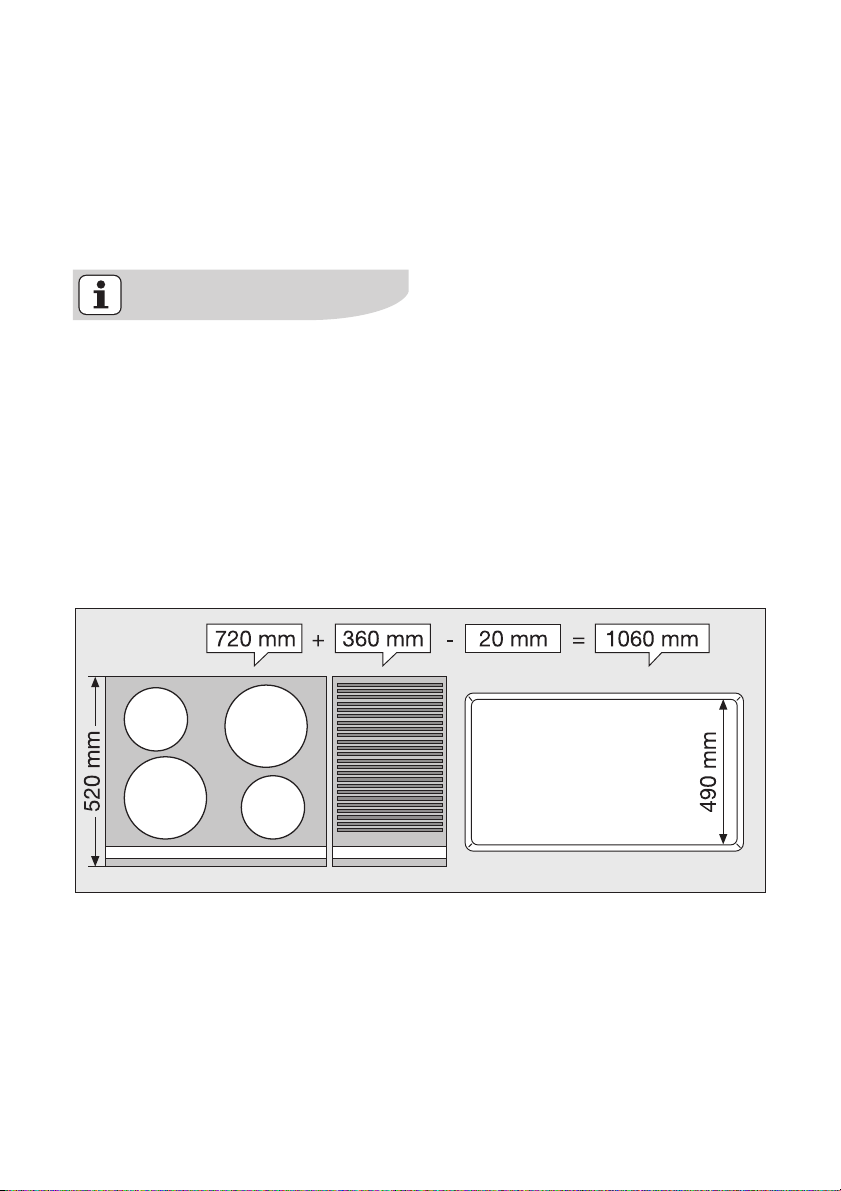
34 electrolux installing more than one frontline hob
Installing more than one
Frontline hob
Additional parts: cross bar(s), heat resistant silicon, rubber block, shaving
blade.
Only use special heat-resistant silicon.
Cut-out section
Distance from the wall: at least 50
mm
Depth:490 mm
Width: The widths of all appliances to
be built-in are added together, minus 20
mm (see also “Overview of all appliance
widths”)
Example:
Page 35
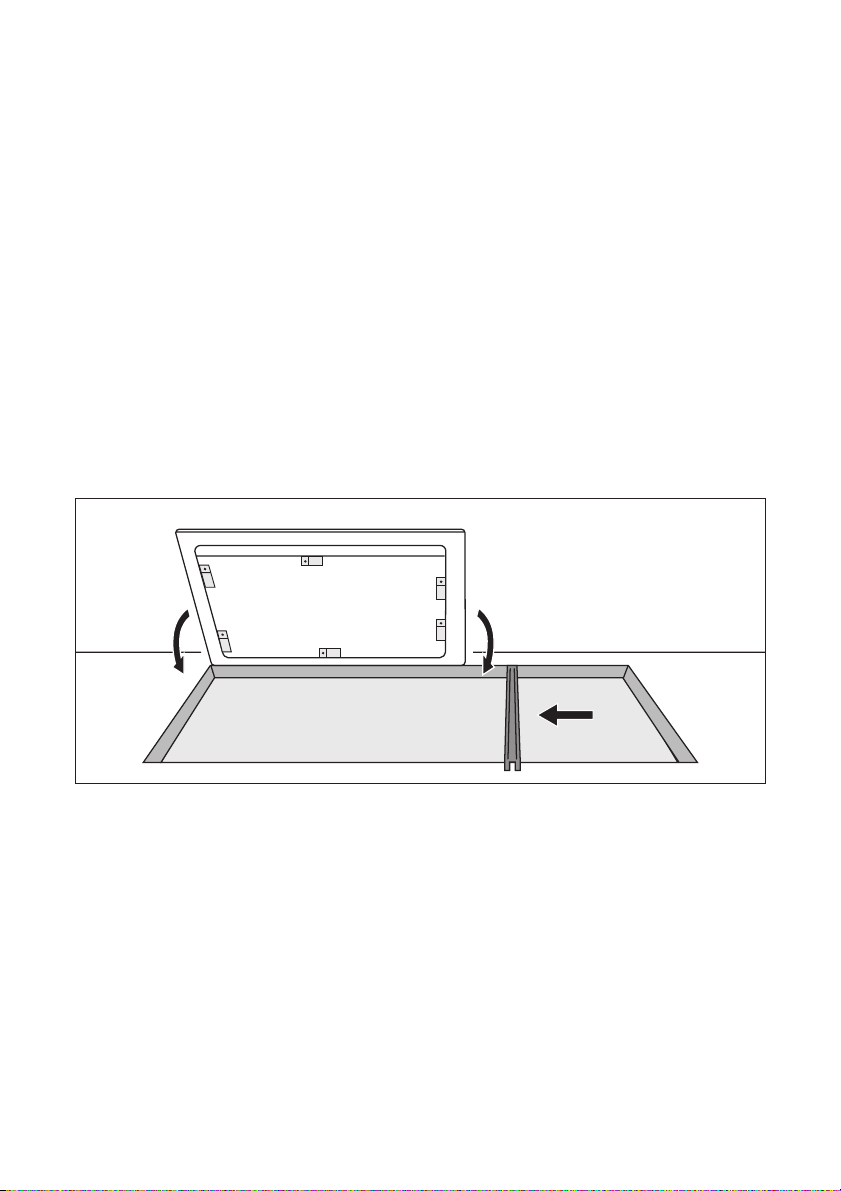
Installing more than one appliance
1. Work out the size of the cut-out section and saw it out.
2. Remove Frontline strip from the appliances by hand (magnetic fastening).
3. Lay the appliances one at a time on
something soft (for example a blanket) with the underside facing upwards.
4. Screw / clip fixing plates / retaining
grips into the appropriate holes in the
protective boxes.
5. Place first appliance in the cut-out.
Lay connecting cross bar in the cutout and push up halfway against the
appliance.
installing more than one frontline hob electrolux 35
Page 36
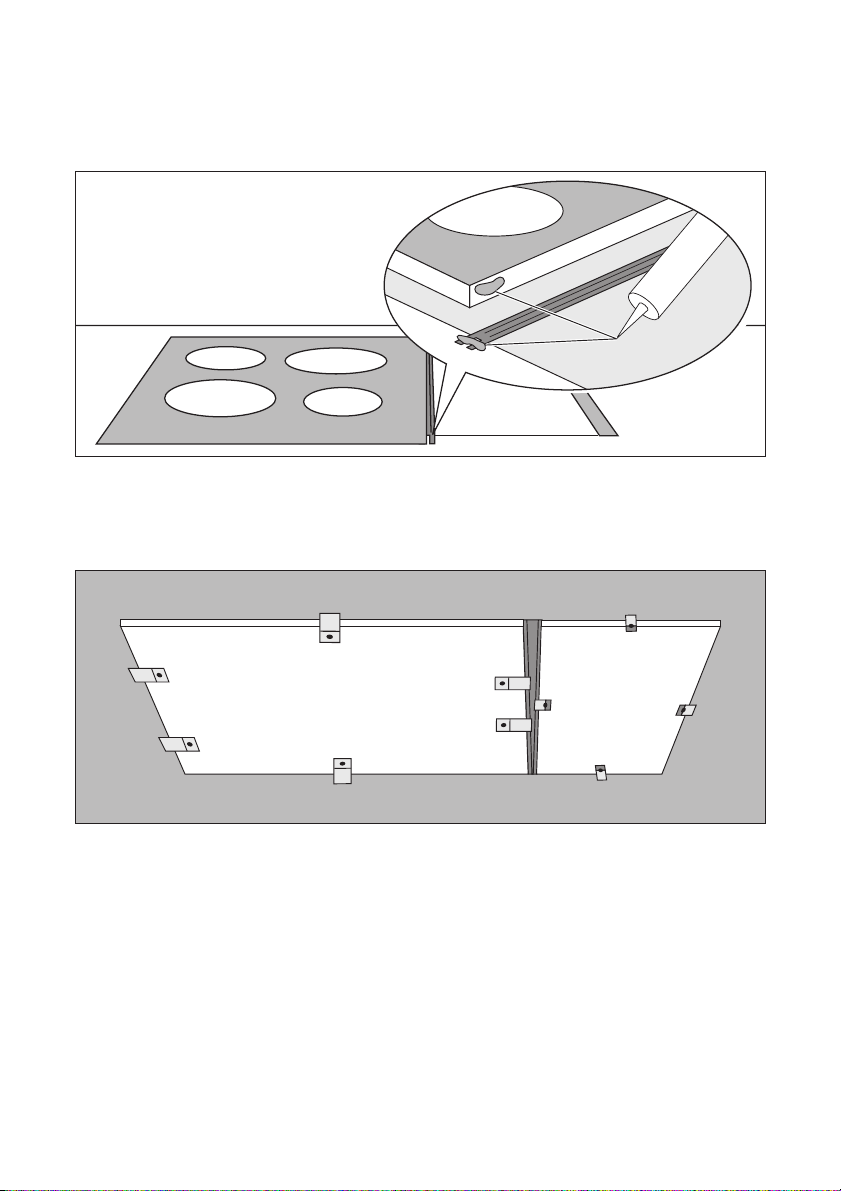
36 electrolux installing more than one frontline hob
6. Put silicon on the appliance corners
that will touch one another. Put silicon on the end of the cross bar.
7. Loosely screw in fixing plates / retaining grips from below on the
worktop and on the connecting
cross bar.
Page 37
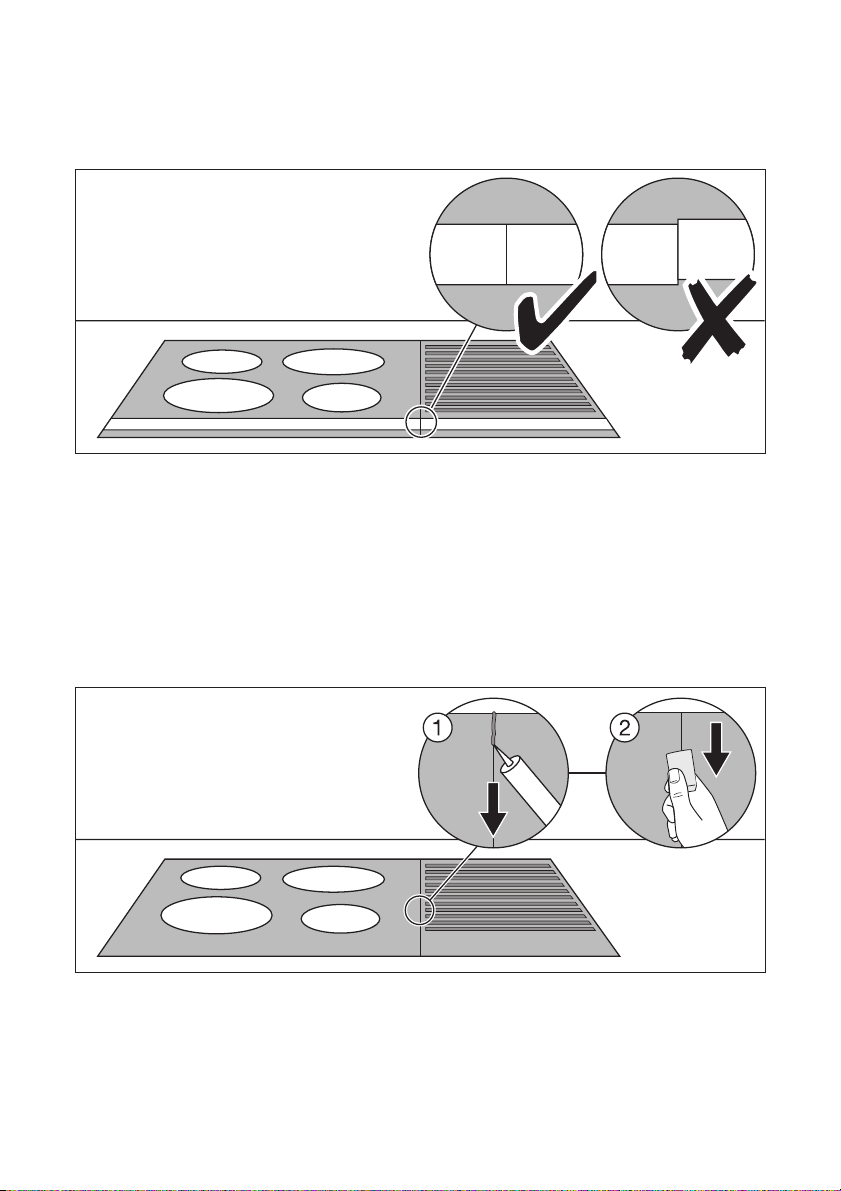
8. Place Frontline strips on the appliances. Check that the Frontline
strips are in line with one another.
9. Tighten the fixing plate / retaining
grip screws.
10.Inject a line of silicon into the gap between the appliances.
11.Dampen silicon line with a little soapy
water.
12.Press rubber block hard against the
glass ceramic and draw it slowly
along the gap.
installing more than one frontline hob electrolux 37
13.Leave silicon until the next day to
harden.
14.Carefully remove projecting silicon
with a shaving blade.
15.Clean glass ceramic thoroughly.
16.Replace Frontline strips.
Page 38

38 electrolux installing more than one frontline hob
Overview of all appliance widths
180 mm
Worktop-mounted cooker hood
360 mm
Glass ceramic cooking surface with
2 radiation cooking zones
Glass ceramic cooking surface with
2 induction cooking zones
Gas hob with 2 burners
Grill
Grill/Deep fat fryer
Wok
580 mm
Glass ceramic cooking surface with
4 radiation cooking zones
Gas hob with 4 burners
720 mm
Glass ceramic cooking surface with
4 radiation cooking zones
Glass ceramic cooking surface with
4 induction cooking zones
Gas hob with 4 burners
Page 39
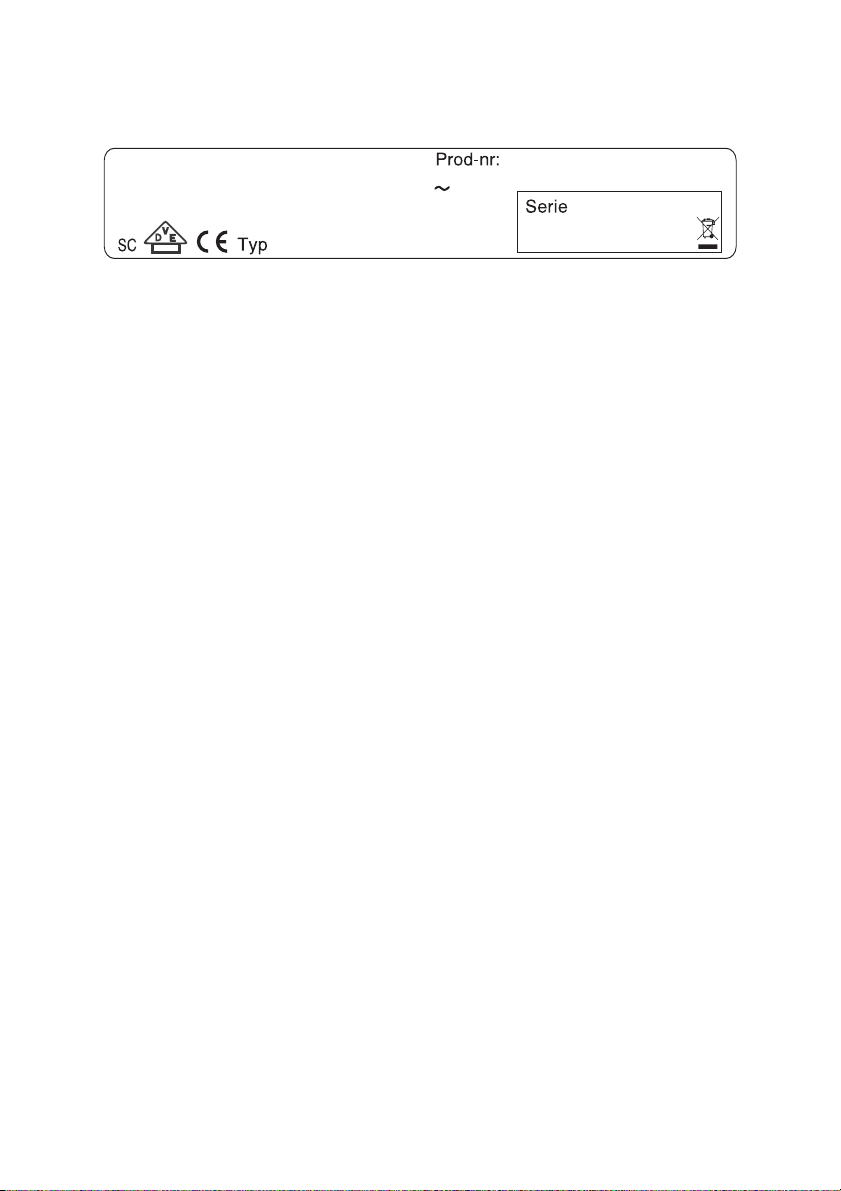
Rating Plate
ELECTROLUX
220 V3,7 kW
Induction 3,7 kW
55GED88AG
electrolux 39
941 177 725
60 Hz
EHD36020U
Page 40

40 electrolux guarantee/customer service
Guarantee/Customer Service
European Guarantee
This appliance is guaranteed by Electrolux in
each of the countries listed at the back of this
user manual, for the period specified in the appliance guarantee or otherwise by law. If you move
from one of these countries to another of the
countries listed below the appliance guarantee
will move with you subject to the following qualifications:
• The appliance guarantee starts from the date
• The appliance guarantee is for the same pe-
• The appliance guarantee is personal to the
• The appliance is installed and used in ac-
• The appliance is installed in accordance with
The provisions of this European Guarantee do
not affect any of the rights granted to you by law.
you first purchased the appliance which will
be evidenced by production of a valid purchase document issued by the seller of the
appliance.
riod and to the same extent for labour and
parts as exists in your new country of residence for this particular model or range of
appliances.
original purchaser of the appliance and cannot be transferred to another user.
cordance with instructions issued by Electrolux and is only used within the home, i.e. is
not used for commercial purposes.
all relevant regulations in force within your
new country of residence.
Page 41
www.electrolux.com
p t b
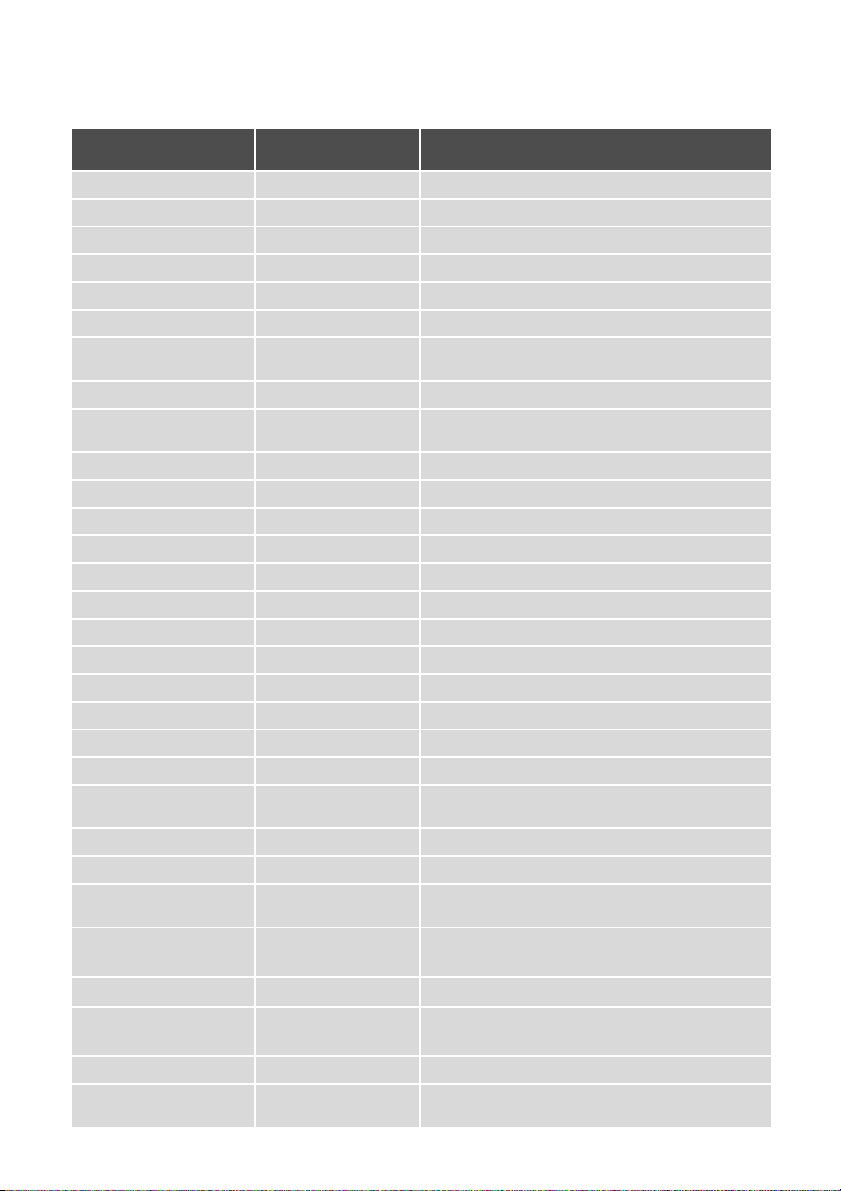
Albania
Belgique/België/Belgien +32 2 363 04 44
Èeská republika
Danmark
Deutschland
Eesti
España
France
Great Britain
Hellas
Hrvatska
Ireland
Italia
Latvija
Lithuania +3702780607
Luxembourg
Magyarország
Nederland
Norge
Österreich
Polska
Portugal
Romania
Schweiz/Suisse/Svizzera +41 62 88 99 111
Slovenija
Slovensko
Suomi
Sverige
Türkiye
Россия
+35 5 4 261 450
+420 2 61 12 61 12 Budìjovická 3, Praha 4, 140 21
+45 70 11 74 00
+49 180 32 26 622 Muggenhofer Str. 135, 90429 Nürnberg
+37 2 66 50 030
+34 902 11 63 88
www.electrolux.fr
+44 8705 929 929
+30 23 10 56 19 70 4 Limnou Str., 54627 Thessaloniki
+385 1 63 23 338
+353 1 40 90 753
+39 (0) 434 558500 C.so Lino Zanussi, 26 - 33080 Porcia (PN)
+37 17 84 59 34
+352 42 431 301
+36 1 252 1773
+31 17 24 68 300
+47 81 5 30 222
+43 18 66 400
+48 22 43 47 300
+35 12 14 40 39 39
+40 21 451 20 30
+38 61 24 25 731
+421 2 43 33 43 22
www.electrolux.fi
+46 (0)771 76 76 76
+90 21 22 93 10 25 Tarlabaþý caddesi no : 35 Taksim, Istanbul
+7 495 937 7837
guarantee/customer service electrolux 41
Rr. Pjeter Bogdani Nr. 7 Tirane
Bergensesteenweg 719, 1502 Lembeek
Sjællandsgade 2, 7000 Fredericia
Mustamäe tee 24, 10621 Tallinn
Carretera M-300, Km. 29,900
Alcalá de Henares Madrid
Addington Way, Luton, Bedfordshire
LU4 9QQ
Slavonska avenija 3, 10000 Zagreb
Long Mile Road Dublin 12
Kr. Barona iela 130/2, LV-1012, Riga
Žirmūnų 67, LT-09001 Vilnius
Rue de Bitbourg, 7, L-1273 Hamm
H-1142 Budapest XIV, Erzsébet királyné útja 87
Vennootsweg 1, 2404 CG - Alphen aan den Rijn
Risløkkvn. 2 , 0508 Oslo
Herziggasse 9, 1230 Wien
ul. Kolejowa 5/7, Warszawa
Quinta da Fonte - Edificio Gonçalves Zarco - Q 35
2774 - 518 Paço de Arcos
Str. Garii Progresului 2, S4, 040671 RO
Industriestrasse 10, CH-5506 Mägenwil
Electrolux Ljubljana d.o.o.
Gerbièeva 98, 1000 Ljubljana
Electrolux Slovakia s.r.o., Electrolux Domáce spotrebièe SK, Seberíniho 1, 821 03 Bratislava
Electrolux Service, S:t Göransgatan 143,
S-105 45 Stockholm
129090 Москва, Олимпийский проспект, 16, БЦ
„Олимпик“
Page 42
42 electrolux service
Service
In the event of technical faults, please
first check whether you can remedy the
problem yourself with the help of the operating instructions (section “What to do
if…”).
If you were not able to remedy the problem yourself, please contact the Customer Care Department or one of our
service partners.
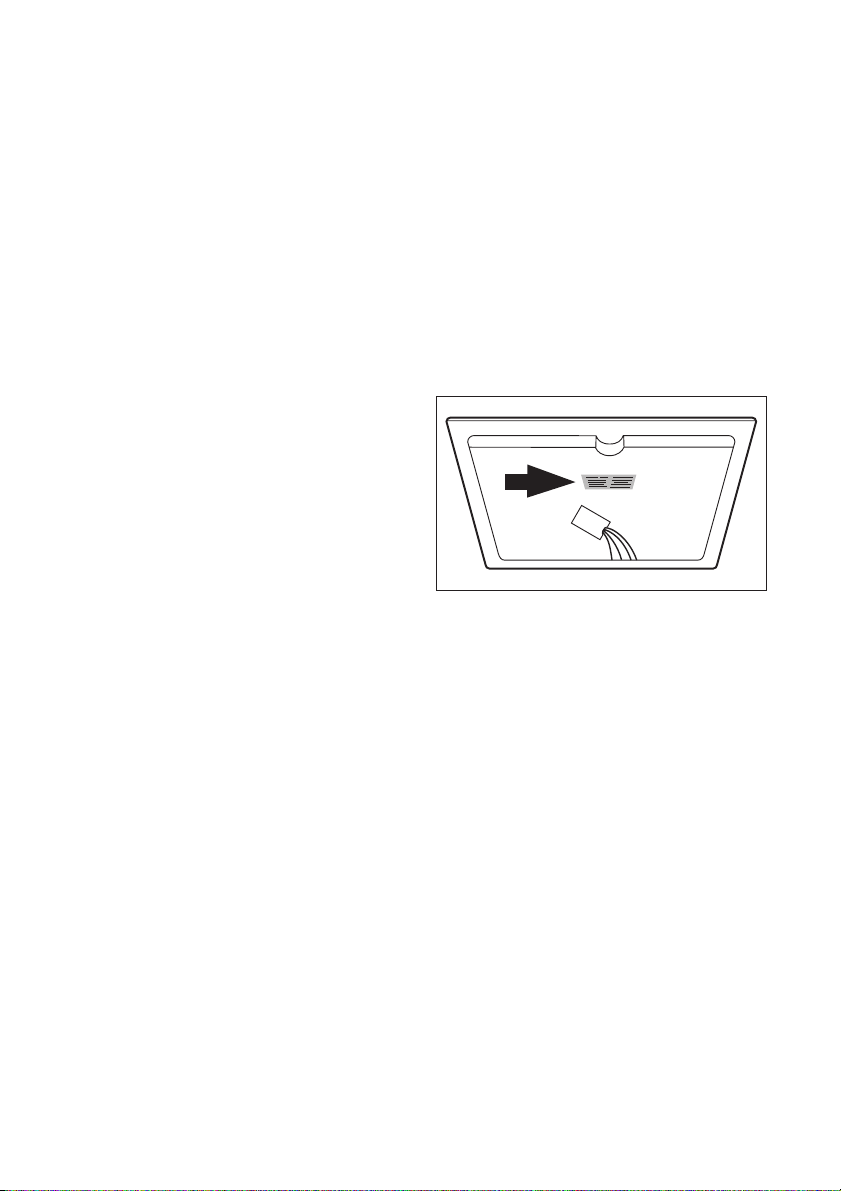
In order to be able to assist you quickly,
we require the following information:
– Model description
– Product number (PNC)
– Serial number (S No.)
(for numbers see rating plate)
– Typ e of fa ult
– Any error messages displayed by the
appliance
– three digit letter-number combina-
tion for glass ceramic
So that you have the necessary reference numbers from your appliance at
hand, we recommend that you write
them in here:
Model description: .....................................
PNC: .....................................
S No: .....................................
Page 43

Page 44

www.electrolux.com
374 477 403-M-040707-01
 Loading...