

Page 1

Builtin Hob Encimera Placa de encastrar Встраиваемая варочная панель - Häll för inbyggnad - Keittotaso - Piano di cottura
INSTRUCTION BOOKLET РУКОВОДСТВО ПО ЭКСПЛУАТАЦИИ
MANUAL DE INSTRUCCIONES - INSTRUÇÕES DE UTILIZAÇÃO
BRUKSANVISNING - KÄYTTÖOHJE - MANUALE DI ISTRUZIONI
35689-5504
Mod./Mод. EHC 30200
CZ-ES-HU-HR-PL
PT-IT-SK-SL
Page 2
ENGLISH
For Your Safety
These warnings are provided in the interest of safety. You MUST read them carefully before installing or
using the appliance.
It is most important that this instruction book should be retained with the appliance for future reference.
Should the appliance be sold or transferred, always ensure that the book is left with the appliance in
order that the new owner can get to know the functions of the appliance and the relevant warnings
During Operation
.
• This appliance has been designed to be operated by
adults and children under supervision. Young children
MUST NOT be allowed to tamper with the controls or play
near or with the oven.
• This appliance is not intended for use by children or
other persons whose physical, sensory or mental
capabilities or lack of experience and knowledge
prevents them from using the appliance safely without
supervision or instruction by a responsible person to
ensure that they can use the appliance safely.
• This appliance has been designed for cooking edible
foodstuff and to be used for domestic non-professional
purposes only. It must not be used for any other
purpose.
• It is dangerous to alter the specification in any way.
• For hygiene and safety reasons, this appliance should
be kept clean at all times. A build-up of fats or other
foodstuff could result in a fire.
• Accessible parts of this appliance may become hot
when it is in use. Children should be
has cooled.
• Under no circumstances should you attempt to repair
the appliance yourself. Repairs carried out by
unexperienced persons may cause injury or serious
malfunctioning. Refer to your local Zanussi Service
Centre. Always insist on genuine Zanussi spare
parts.
• Ensure that all control knobs are in the OFF position
when not in use.
• Should you connect any electrical tool to a plug near
this cooking appliance, ensure that electric cables
are not in contact with it and keep them far enough
from the heated parts of this appliance.
• If the appliance is out of order, disconnect it from the
electric supply.
KEPT AWAY until it
About Installation, Cleaning
and Manteinance
• It is mandatory that all operations required for the
installation are carried out by a qualified or competent
person, in accordance with existing rules and
regulations.
• Disconnect the appliance from the electrical supply,
before carrying out any cleaning or manteinance
work.
• Once you removed all packaging from the appliance,
ensure that it is not damaged and the electric cable
is in perfect conditions. Otherwise, contact your
dealer before proceeding with the installation.
• The manufacturer disclaims any responsability
should all the safety measures not be carried
out.
The symbol
indicates that this product may not be treated as household
waste. Instead it shall be handed over to the applicable
collection point for the recycling of electrical and electronic
equipment. By ensuring this product is disposed of
correctly, you will help prevent potential negative
consequences for the environment and human health,
which could otherwise be caused by inappropriate waste
handling of this product. For more detailed information
about recycling of this product, please contact your local
city office, your household waste disposal service or the
shop where you purchased the product.
on the product or on its packaging
Guide to Use the instructions
The following symbols will be found in the text to guide
you throughout the Instructions:
Safety Instructions
Step by step instructions for an operation
)
Hints and Tips
Environmental information
These instructions are only for the countries stated by the symbol
printed on the front cover of this instruction book.
2
Page 3
Content s
For the User
For Your Safety 2
Description of the appliance 3
How to use 3
Hints and tips for using the cooking zones 4
Guarantee - After Sales Service 5
European guarantee 5
Cleaning and maintenance 6
For the Installer
Technical Data 6
Instruction for the Installer 7
Electrical connection 7
Building In 8
Possibilities for insertion 9
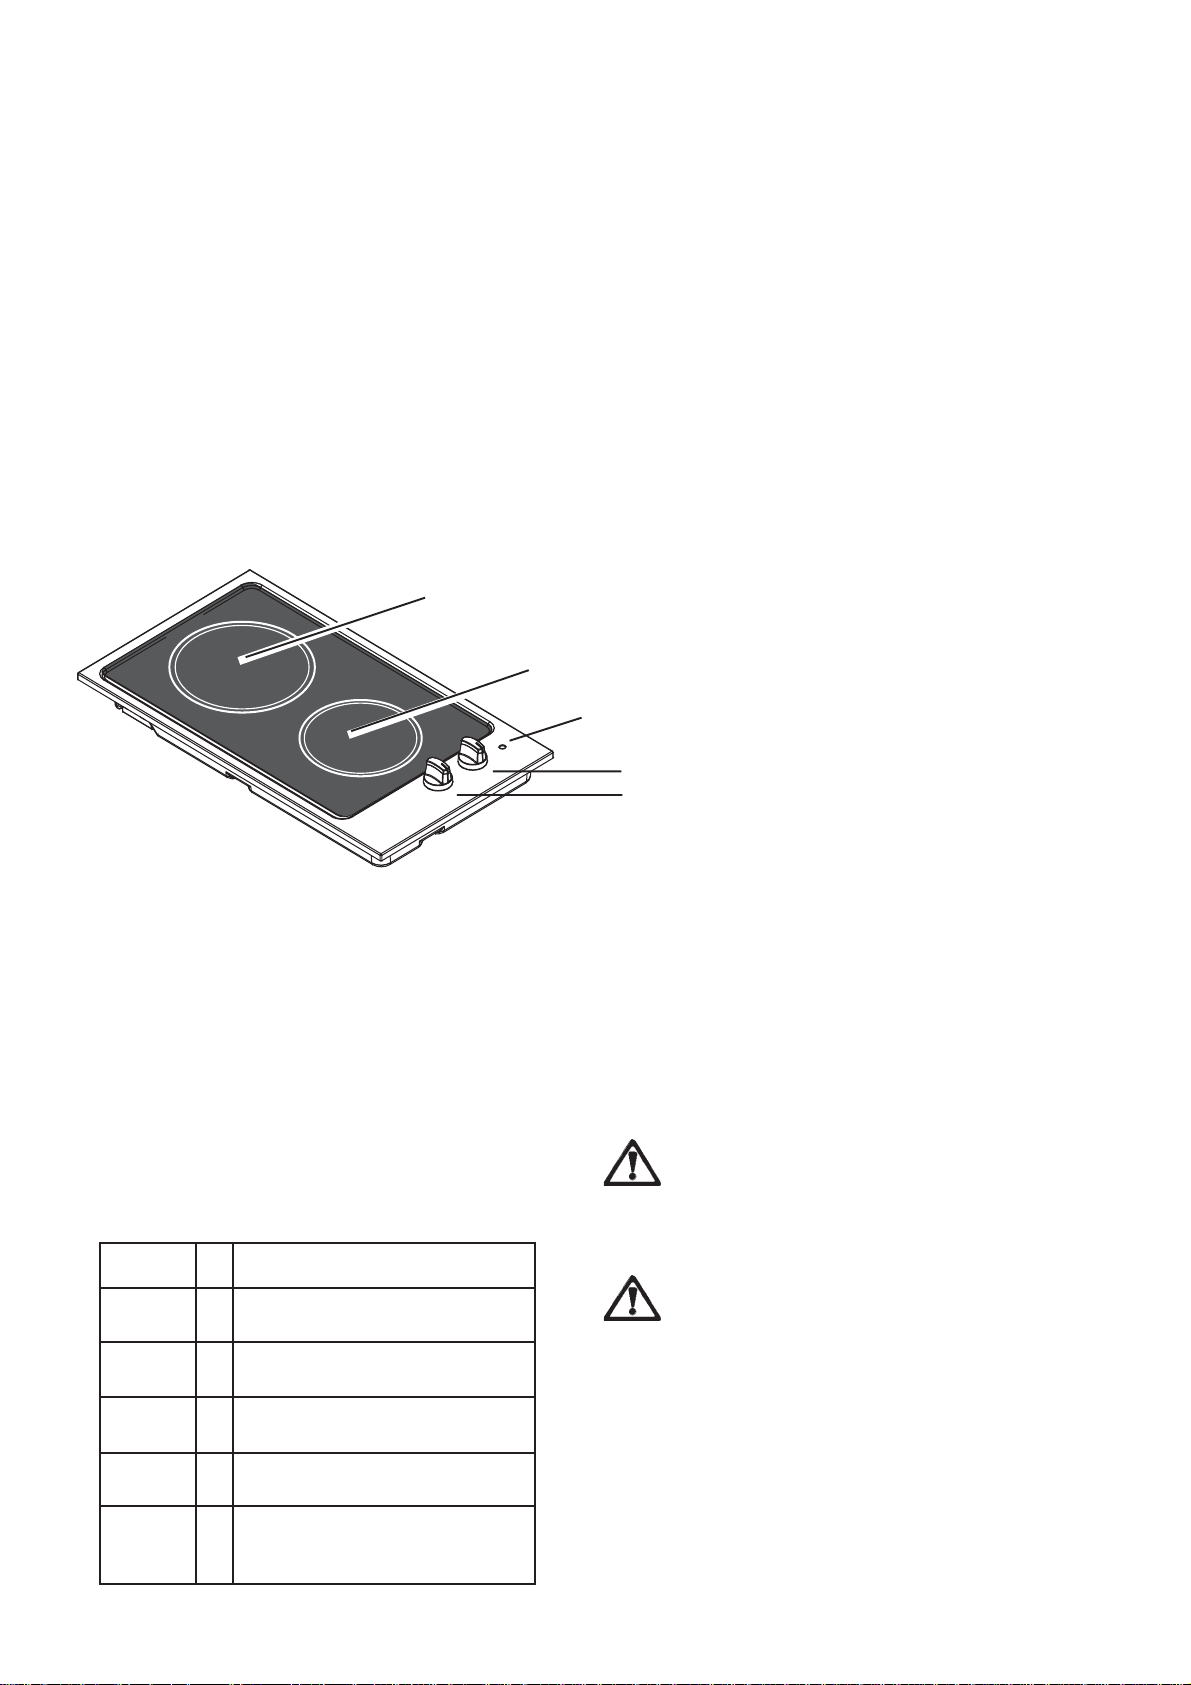
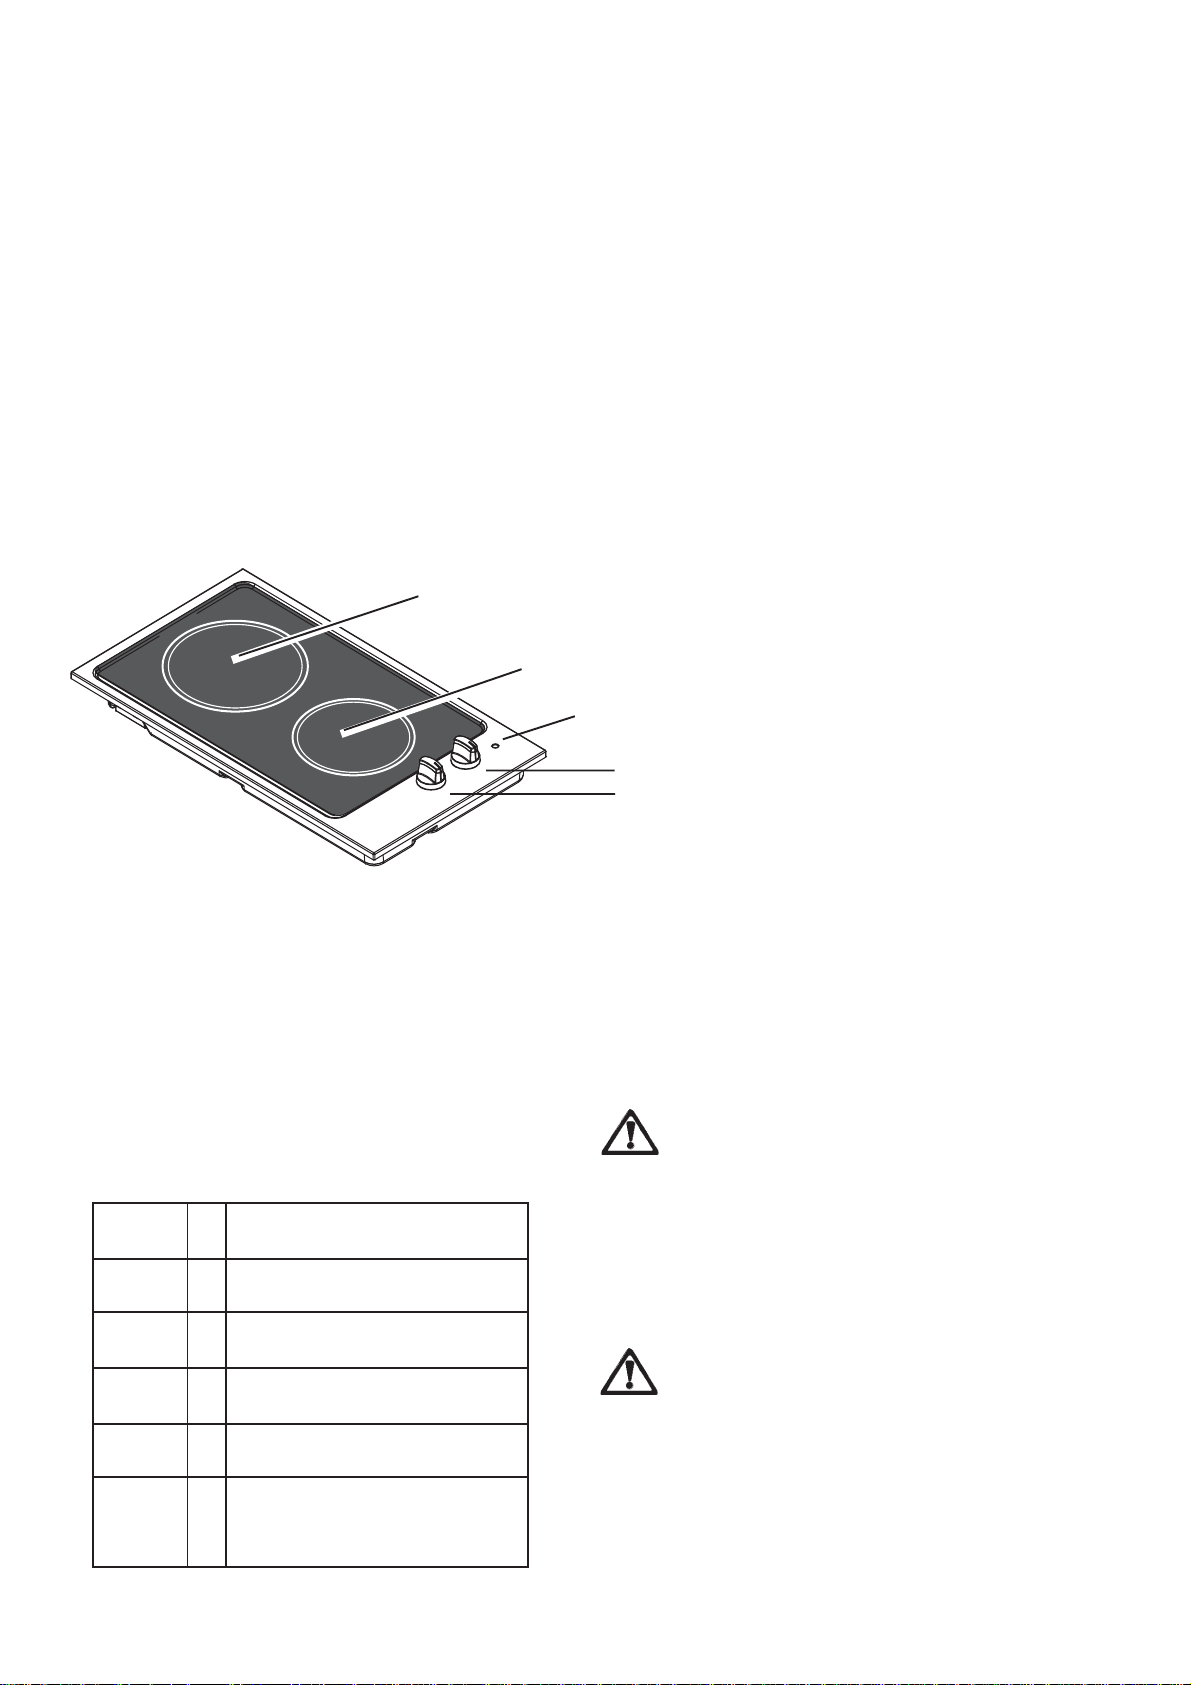
Description of the appliance
1
2
3
1 Rear cooking zone, 180 mm, 1700 W
2 Front cooking zone, 145 mm, 1200 W
3 Pilot lamp
4 Control knob for the rear cooking zone
5 Control knob for the front cooking zone
How To Use
Control knobs
The regulating of heat is graduation-free for both plates on
a scale from 1 to 6.
“1” Represents lowest heat
“6” Represents maximum heat.
“0” Represents “OFF”.
Setting 1
Setting 2
Setting 3
Setting 4
Setting 5
Keeping warm
Gentle simmering
Simmering
Frying / browning
Bringing to the boil
4
5
Pilot light
Pilot light is activated when either of the zones are turned
on, and will remain on until the cooking zones are
switched off.
Do not use the ceramic hob if the glass is
damaged.
If a fault or crack appears during cooking disconnect
the hob immediately to avoid the possibility of
electric shock and contact Electrolux Service.
Warning:
Aluminum foil and plastic utensils are not to
be placed on hot surfaces.
The surface may not be used for storage.
Do not stare at the heating units when in
operation.
Setting 6
Bringing to the boil / quick
frying / deep-frying
3
Page 4

Hint s and tip s for using the cooking
zones
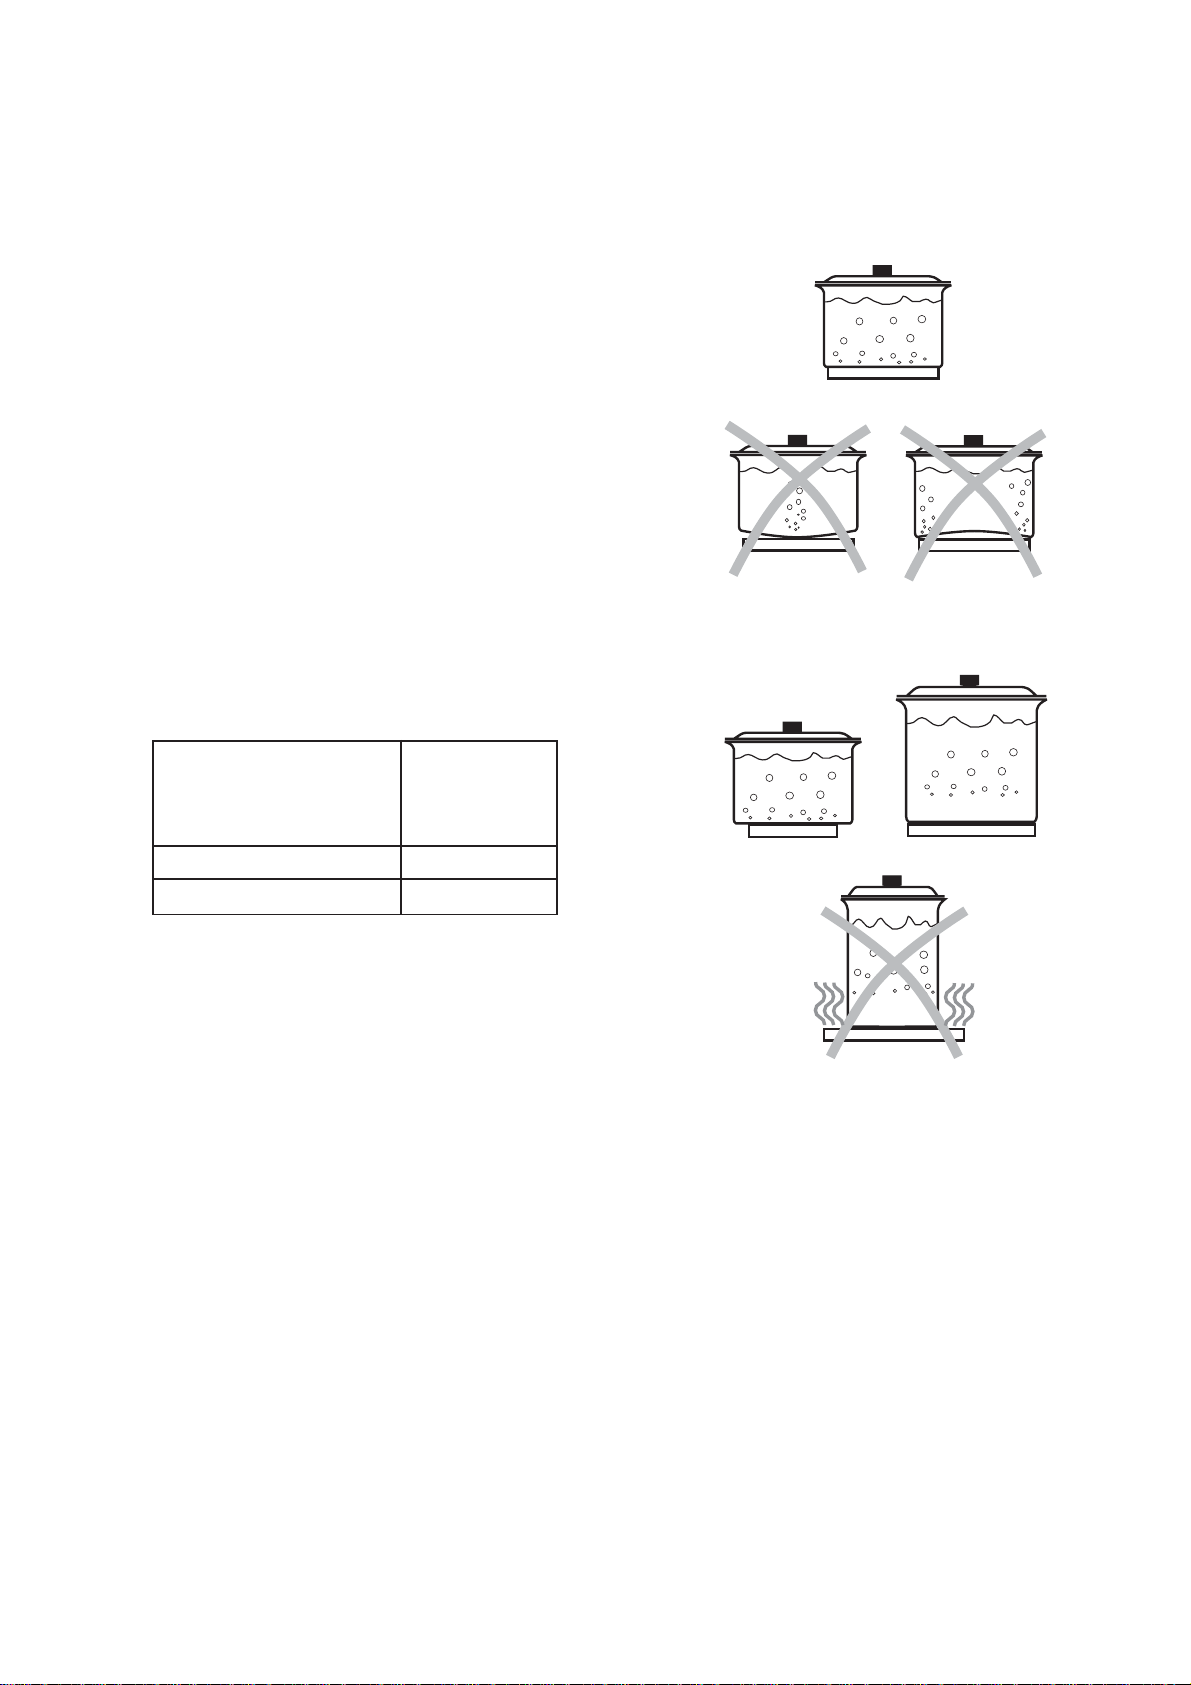
Adjust the cooking zones correctly.
z Select the highest setting for the cooking zones until
the food is brought to the boil. Then reduce the setting
as far as possible, without the food going off the boil.
z Use level saucepans. An uneven saucepan may
increase the electricity consumption by up to 50 per
cent. Check whether your saucepans have level bases
by placing the item in question upside down on a work
top and positioning a ruler on the base.
z A curved base, both inwards and outwards, will prolong
the cooking time and increase the energy consumption.
z The saucepan should match the cooking zone – or be
slightly larger.
Cooking Zone Diameter of
pans to use
Rear cooking zone 180 mm
Front cooking zone 145 mm
z Remember that a large saucepan can also hold small
quantities. If the diameter of the base is too small, the
energy consumption will increase, and any food boiling
over will burn onto the hot cooking zone.
z Saucepans with very shiny/bright bases will prolong
the cooking time slightly compared with cooking
utensils with matt/dark bases.
z Use a tightly fitting lid on the saucepan. Without a lid
you use more than three times as much electricity.
z Do not slide saucepans across the surface of the hob
- always lift the pan when placing it on, or removing it
from the ceramic surface.
z Wipe the bottom surface of the pots and pans with a
clean dry cloth before placing them on the ceramic
surface. This helps to reduce cleaning and prevents
scratching the hob glass.
z Wipe off spills whilst the hob is warm.
4
Page 5
Guarantee - Af ter Sales Service
Original spare p arts
This appliance, before leaving the factory, has been
tested and studied by many experts and specialists, in
order to give you the best results.
Any repair work which needs to be carried out should be
done with the utmost care and attention.
For this reason we reccomend that for any problem you
contact the dealer who sold it to you, or our nearest
authorized Service Centre, specifying the nature of the
problem and the particular model which you own.
Original spare parts,
certified by the
manufacturer of the
product and marked with
the following sign can only
be found at our approved Technical Assistance Centres
and in authorised Spare Parts Shops.
European guarantee
This appliance is guaranteed by Electrolux in each of the countries listed below for the period specified in the appliance
guarantee or otherwise by law. If you move from one of these countries to another of the countries listed below the
appliance guarantee will move with you subject to the following qualifications:
· The appliance guarantee starts from the date you first purchased the appliance which will be evidenced by
production of a valid purchase document issued by the seller of the appliance.
· The appliance guarantee is for the same period and to the same extent for labour and parts as exists in your new
country of residence for this particular model or range of appliances.
· The appliance guarantee is personal to the original purchaser of the appliance and cannot be transferred to another
user.
· The appliance is installed and used in accordance with instructions issued by Electrolux and is only used within
the home, i.e. is not used for commercial purposes.
· The appliance is installed in accordance with all relevant regulations in force within your new country of residence.
The provisions of this European Guarantee do not affect any of the rights granted to you by law.
5
Page 6

Cleaning and maintenance
Before any maintenance or cleaning can be carried
out, you must DISCONNECT the hob from the
electricity supply.
For reasons of hygiene and safety, the cooking
zones must be kept clean. Grease stains and
spilled food generate smoke when heated, and
can even cause fire.
Never use metal wool, metal sponges or other abrasive cleaning agents.
Never use steam or a steam cleaning machine
to clean the appliance.
The ceramic glass hob
z The decorative pattern on the ceramic surface can
become scratched and marred with use, depending
upon maintenance, but does not adversely affect
performance.
Such blemishes are not covered by the warranty
and do not affect the operation of the hob.
z Immediately scrape off stains caused by food which
has boiled over using a proper ceramic hob scraper,
spilled sugar, dishes containing sugar (jam, juice,
etc.), melted plastic and aluminium foil while the
ceramic hob is still hot. If the ceramic hob is allowed
to cool it may become damaged.
z Utensils which have been in contact with the above-
mentioned melted materials must be cleaned throughly
before used again on the ceramic-top hob unit.
z After use the cooking zones should be wiped with a
damp cloth with washing up liquid.
z For severe soiling you can follow these steps:
1. Remove stains etc., with a proper ceramic hob
scraper.
2. Make sure that the ceramic hob has cooled down.
Use a proper ceramic cleaning agent.
3. Wipe the ceramic hob clean with a damp cloth or
kitchen roll. Tough stains can be removed by
rubbing the stain hard with kitchen roll.
4. Wipe off remaining cleaning agent with a damp
cloth.
5. Wipe with a dry cloth, if required.
z Make sure that the ceramic hob is dry when you heat
it up again. Ceramic hobs can develop rainbow-like
stripes if heated while damp.
Stainless steel surfaces
z Clean the appliance after use with a soft cloth well
wrung out in warm water, use a small amount of liquid
detergent for stubborn soiling.
z Stainless steel parts may become straw coloured
with use, use a proprietary stainless steel cleaner to
remove this straw discolouration
.
Defects in the ceramic surface which can be
related to the above are not covered by the
warranty.
z A dirty ceramic hob decreases the heat transfer
between cooking zones and cookware.
Technical Data
Hotplate Rating
Rear Cooking Zone Ø 180mm 1,7 kW
Front Cooking Zone Ø 145mm 1,2 kW
Total Rating 2,9 kW
Electric Supply 230 V 50 Hz
Hob recess dimensions
Length 270 mm.
Width 490 mm.
This appliance complies with the following
E.E.C. Directives:
- 2006/95 (Low Voltage Directive);
- 89/336
- 93/68 (General Directives)
and subsequent modifications.
(Electromagnetical Compatibility Directive);
6
Page 7
Instruction for the Installer
The following instructions about installation
and maintenance must be carried out by
qualified personnel in compliance with the
regulation in force.
The appliance must be electrically
disconnected before all interventions. If any
electric supply to the appliance is required to
carry out the work, ensure all the necessary
precautions are followed.
The side walls of the unit in which the hob is
going to be installed, must not exceed the
height of the working top.
Avoid installing the appliance in the proximity
of inflammable materials (e.g. curtains, tea
towels etc.).
Electrical Connection
The appliance is designed to be connected to 230 V
monophase electricity supply.
The connection must be carried out in compliance with
the laws and regulations in force.
Before the appliance is connected:
1. check that the main fuse and the domestic installation
can support the load (see the rating label);
2. check that the power supply is properly earthed in
compliance with the current rules;
3. check the socket or the double pole switch used for
the electrical connection can be easily reached with
the appliance built in the forniture unit.
The appliance is supplied with a connection cable. This
has to be provided with a proper plug, able to support the
load marked on the identification plate. To connect the
plug to the cable, follow the recommendation given in
Fig.1. The plug has to be fitted in a proper socket.
If connecting the appliance directly to the electric system,
it is necessary that you install a double pole switch
between the appliance and the electricity supply, with a
minimum gap of 3 mm. between the switch contacts and
of a type suitable for the required load in compliance with
the current rules.
The connection cable has to be placed in order that, in
each part, it cannot reach a temperature 90 °C higher than
the room temperature.
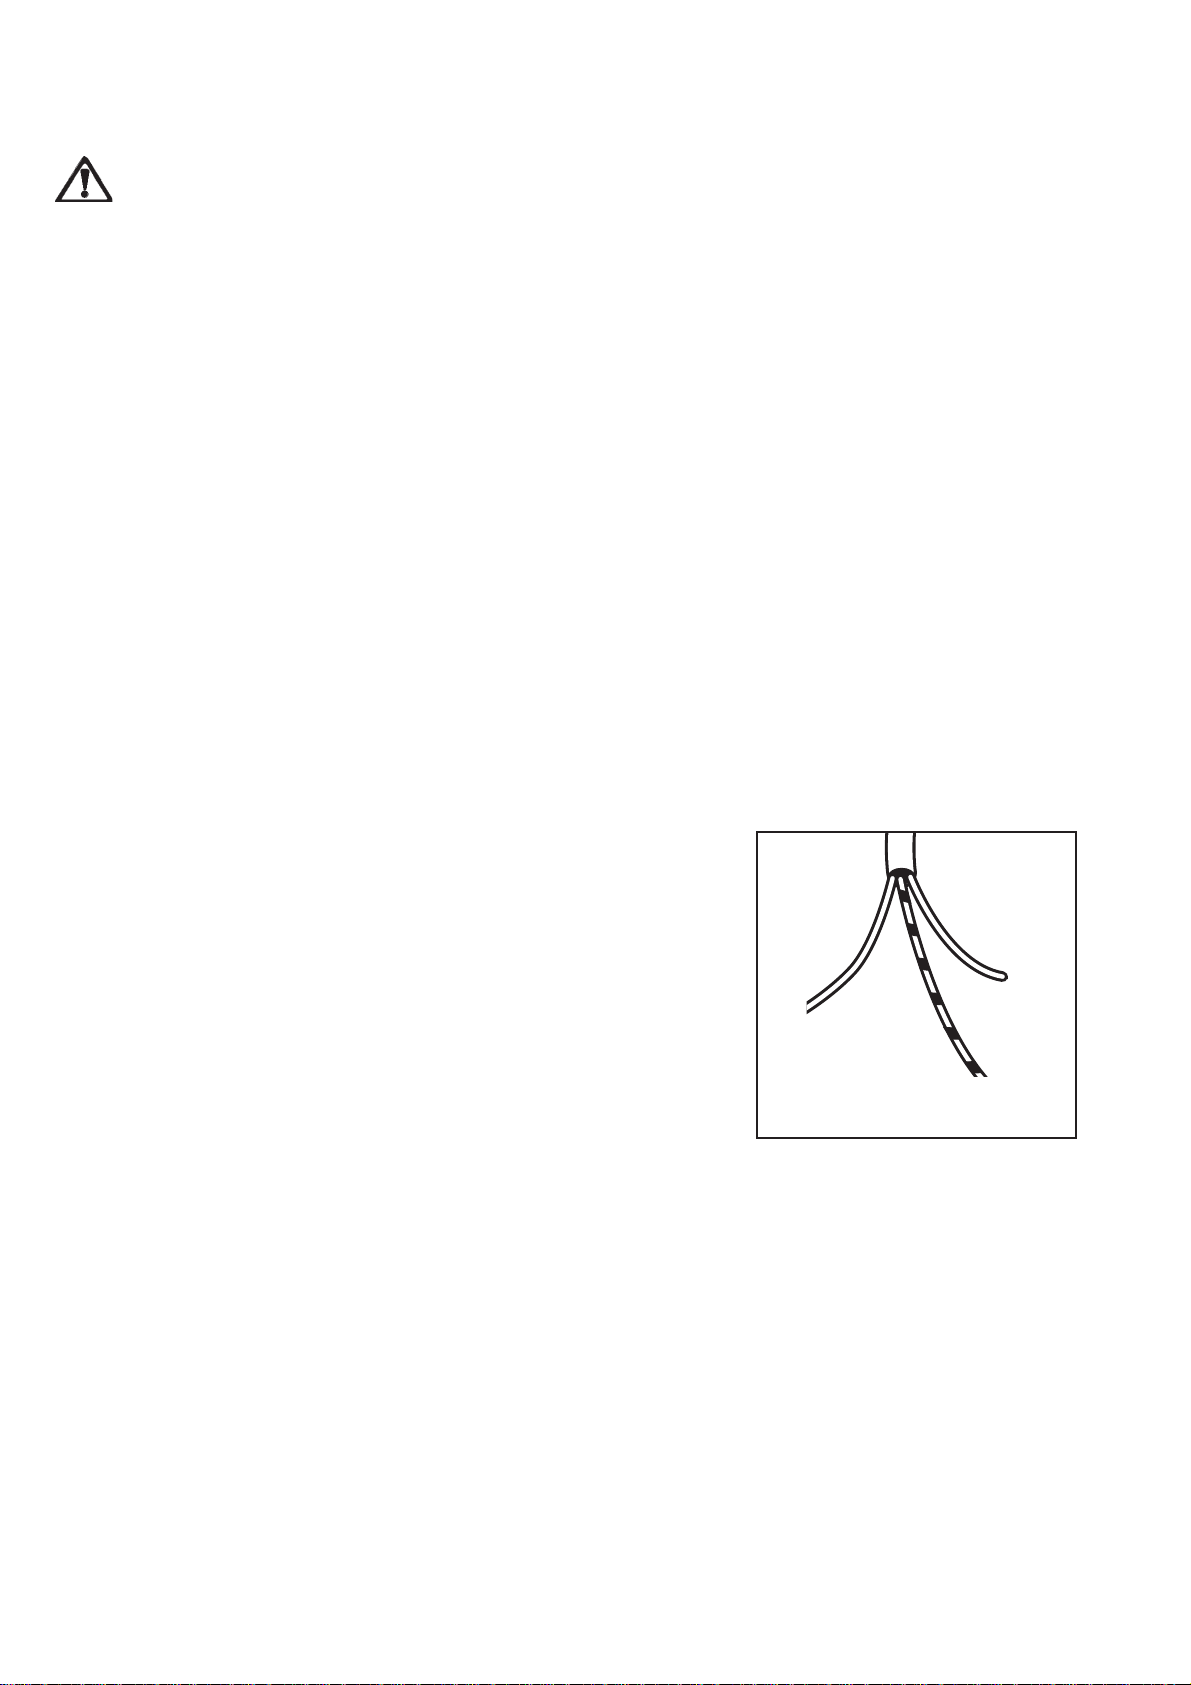
The brown coloured phase cable (fitted in the terminal
block contact marked with "L") must always be connected
to the network phase.
Neutral
Earth (yellow/green)
Fig. 1
Replacement of the connection cable
The replacement of the connection cable requires the
specific equipment of a technician.
In this case, only cable type H05V2V2-F T90 must be
used. The cable section must be suitable to the voltage
and the working temperature.
The yellow/green earth wire must be approximately 2
cm longer than the phase wires (Fig. 1).
7
Page 8
Building In
Fig. 2
Dimensions are given in millimetres
510
290
650 MIN.
490
55
270
40÷50
These hobs can be inserted in a built-in kitchen unit whose
depth is between 550 and 600 mm. The hobs dimensions
are shown in Fig. 2.
Installation and assembly
These hobs can be installed in a kitchen unit with an
opening for insertion whose dimensions are shown in
Fig. 3.
The edge of the cut out must have a minimum distance
from the rear wall of 55 mm.
If there are side walls, or sides of the furniture unit near
the hob, the cut out edges must have a minimum distance
of 100 mm.
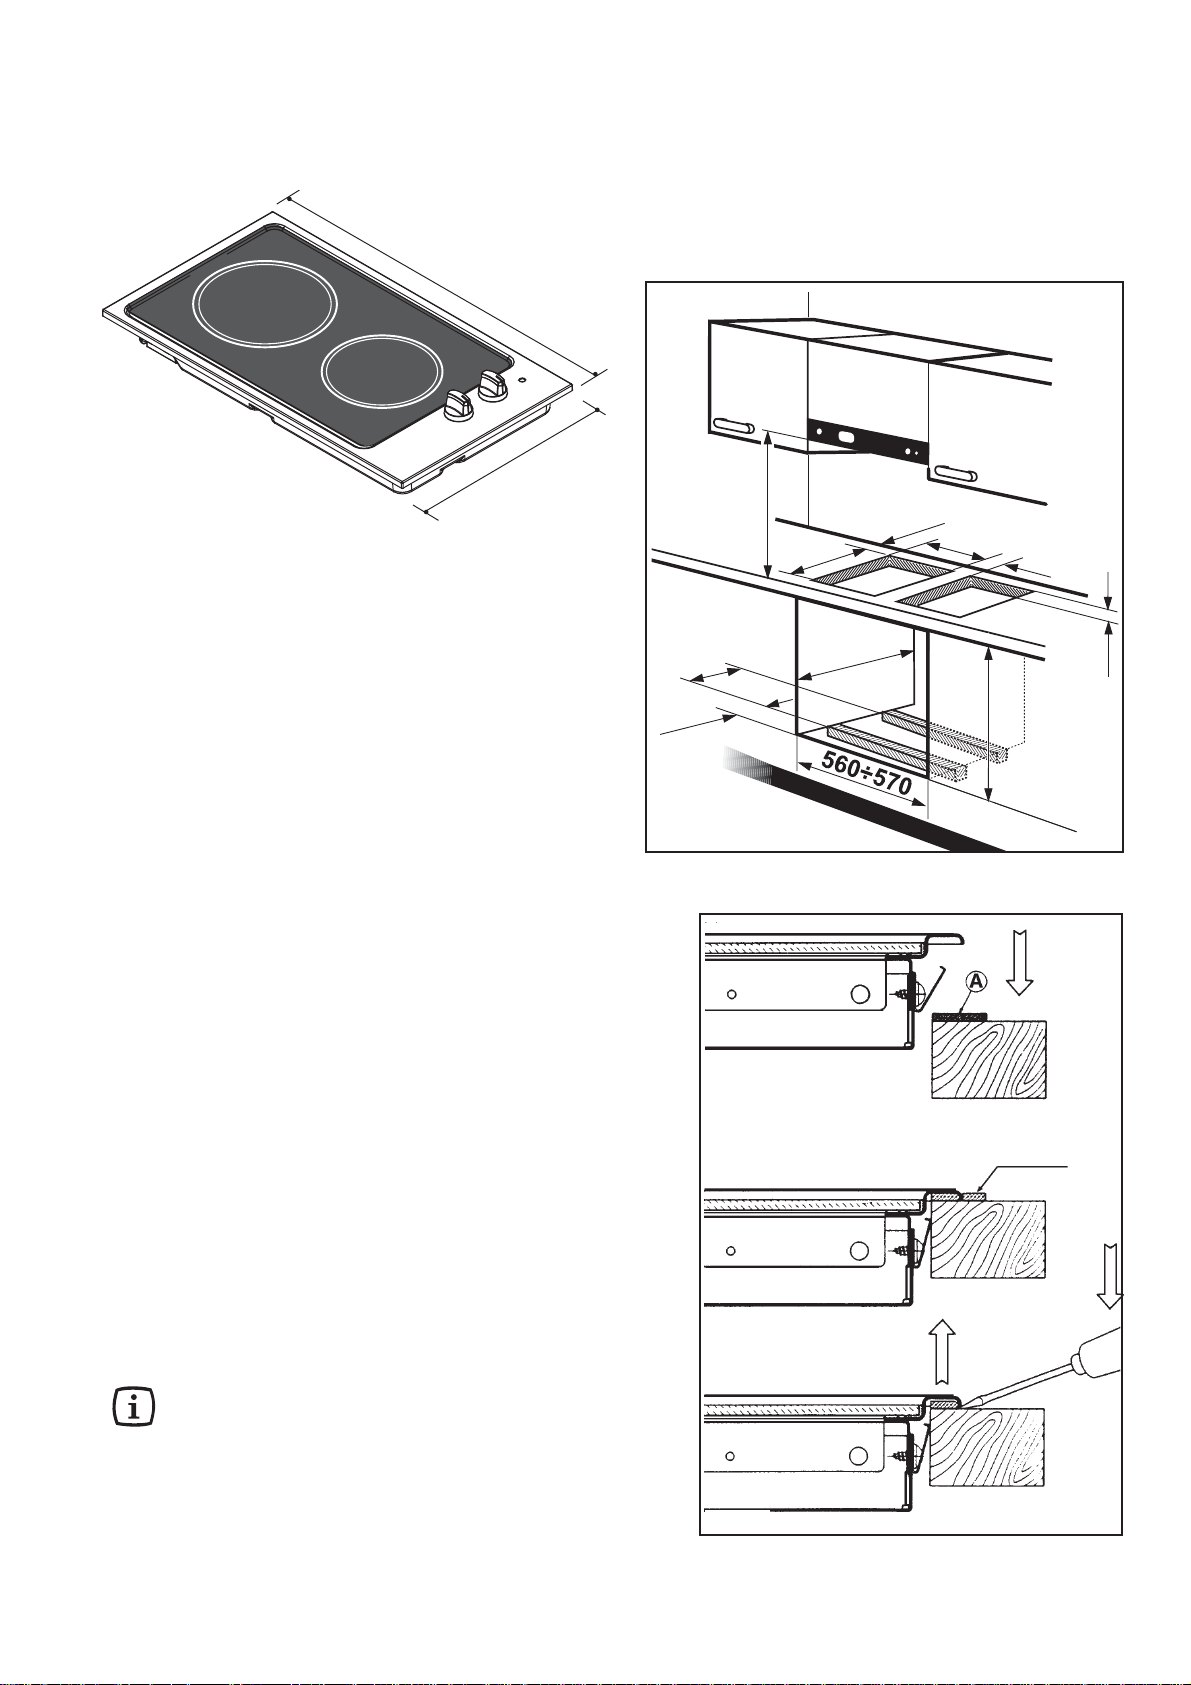
Hanging forniture units or hoods must be placed at 650
mm minimum from the hob.
Carry out the building in of the hob as follows:
)
1. Place the sealing gasket (Fig.4 - “A”) all around the
edge of the cut out.
2. Fit the hob in the cut out and push it down until it
comes in contact with the kitchen top surface. Then
remove the excess sealing.
240
140
550 MIN
30
591
Fig. 3
REMOVE
3. To remove the hob from the cut-out, lift the edge of the
hob by means of the edge of a screw-driver.
If several 30cm hob are to be installed side by
side into the same cut out, an assembly kit
including a support side bracket and
supplementary sealings is available at our After
Sales Centres. The relevant installation instructions
are supplied within the kit package.
8
FO 0548
Fig. 4
Page 9
Possibilities for insertion
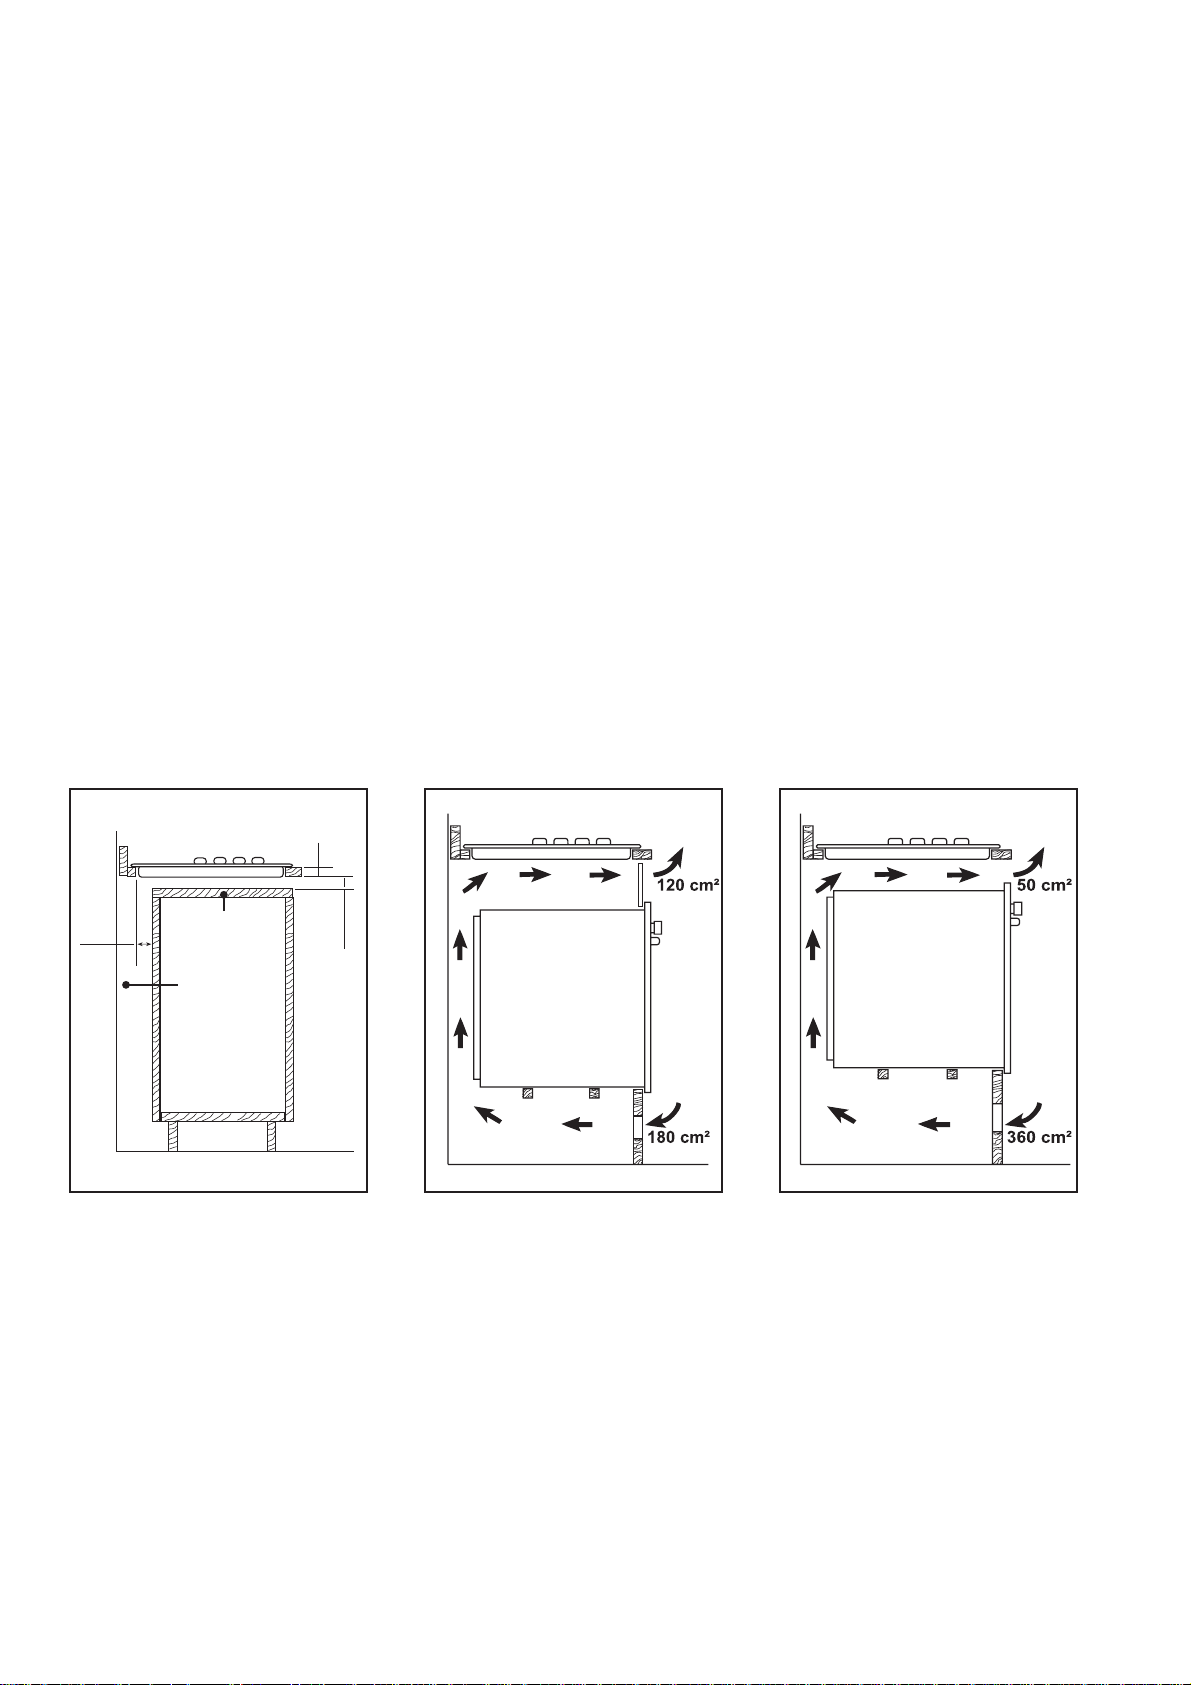
Building over a kitchen unit with
door
Proper arrangements must be taken in designing the
furniture unit, in order to avoid any contact with the bottom
of the hob which can be hot when in operation. The
recommended solution is shown in diagram 5.
The panel fitted under the hob ("a") should be easily
removable to allow easy access if technical assistance
is needed. The space behind the kitchen unit ("b") can
be used for connections.
Kitchen unit with oven
The hob recess dimensions must comply the indication
given in Fig. 3 and the kitchen unit must be provided with
proper openings to allow a continuous supply of air.
Suggestions to ensure a proper ventilation are shown in
Figs. 6 e 7.
The electrical connection for the hob must be separate
from the electrical connection for the oven, to ensure
safety and to allow an easy removal of the oven from the
unit, if necessary.
Fig. 5 Fig. 6 Fig. 7
30
80
FO 2166
a) Removable panel
b) Space for connections
a
b
20 min
FO 0939
FO 0938
9
Page 10
РУССКИЙ
Для Вашей безопасности
Правила техники безопасности приводятся в интересах Вашей безопасности и безопасности окружающих. Вам
внимательно прочитать их перед тем, как приступить к установке или эксплуатации данного изделия.
Необходимо хранить настоящее руководство в течение всего срока службы прибора. В случае продажи или передачи
данного изделия другому владельцу позаботьтесь о том, чтобы новый владелец получил вместе с прибором настоящее
руководство по эксплуатации для ознакомления с работой прибора и правилами техники безопасности.
СЛЕДУЕТ
Правила эксплуатации
• Данный прибор предназначен для эксплуатации
взрослыми и детьми, находящимися под
присмотром. Не
регуляторы на панели управления или играть с
прибором или вблизи него.
• Прибор запрещено использовать детям и лицам,
чьи сенсорные, умственные или физические
способности, а также недостаточный опыт или
незнание прибора не позволяют использовать его в
условиях безопасности без присмотра или без
указаний ответственного лица, которое
обеспечивает правильное использование прибора.
• Данная варочная панель предназначена для
приготовления пищи только в быту, а не в
профессиональных целях. Она не должна
использоваться в какихлибо других целях.
• Изменение характеристик варочной панели или
внесение какихлибо изменений в ее конструкцию
сопряжено с опасностью.
• В целях обеспечения гигиены и безопасности
содержите прибор в чистоте. Накопление остатков
жира или пищи может привести к возгоранию.
• При эксплуатации варочной панели ее доступные
части могут сильно нагреваться. Детей следует
держать
• Ни при каких обстоятельствах не следует пытаться
отремонтировать прибор самостоятельно. Ремонт,
выполненный некомпетентными лицами, может
явиться причиной травм или серьезных повреждений
прибора. Обращайтесь в ближайший
авторизованный сервисный центр Zanussi. Всегда
настаивайте на использовании оригинальных
запасных частей Zanussi.
• Когда прибор не используется, все ручки управления
должны находиться в положении “Выкл.”.
• Если Вам нужно включить какойлибо электроприбор
в розетку, расположенную рядом с варочной
панелью, убедитесь, что ее не касаются
электрические провода; держите их на достаточно
большом расстоянии от нагревающихся частей
данного прибора.
• Если прибор неисправен, отключите его от сети
электропитания.
В УДАЛЕНИИ от прибора, пока он не остынет.
ПОЗВОЛяЙТЕ маленьким детям трогать
Установка, чистка и уход
• Обязательным требованием является выполнение
всех операций по установке прибора
квалифицированным электриком или компетентным
специалистом в соответствии с действующими
нормами и правилами.
• Перед выполнением какихлибо операций по чистке
прибора или по уходу за ним отсоедините его от
сети электропитания.
• После того, как Вы полностью сняли упаковку с
прибора, убедитесь, что он не поврежден и что его
сетевой шнур находится в идеальном состоянии. В
противном случае перед тем, как приступать к его
установке, обратитесь к своему дилеру.
• Изготовитель не несет никакой ответственности
в случае несоблюдения какихлибо правил
техники безопасности.
Символ
указывает, что при утилизации данного изделия с ним
нельзя обращаться как с обычными бытовыми
отходами. Вместо этого, его следует сдавать в
соответствующий пункт приемки электрического и
электронного оборудования для последующей
утилизации. Обеспечив правильную утилизацию данного
изделия, Вы поможете предотвратить потенциальные
негативные последствия для окружающей среды и
здоровья человека, которые могли бы иметь место в
противном случае. За более подробной информацией
о правилах обращения с такими изделиями, их
утилизации и переработки обращайтесь в местные
органы власти, в службу по утилизации отходов или в
магазин, в котором Вы приобрели данное изделие.
на самом изделии или его упаковке
Указания по использованию
настоящего руководства
Вы встретите в тексте настоящего руководства
следующие символы, которые помогут Вам
ориентироваться в нем:
Указания по безопасности
Пошаговые указания по эксплуатации
)
Советы и рекомендации
Информация по охране окружающей среды
10
Данная инструкция действительна только для стран, обозначенных символом
напечатанным на передней обложке настоящего буклета.
Page 11
Содержание
Информация для
пользователя
Для Вашей безопасности 10
Описание прибора 11
Правила эксплуатации 11
Советы и рекомендации по
использованию зон нагрева 12
Чистка и уход 13
Гарантия Послепродажное обслуживание 13
Эвpoрейскaя гарантия 14
Указания для установщика
Технические характеристики 15
Указания для установщика 16
Электрическое подключение 16
Встраивание 17
Варианты установки 18
Описание прибора
1
2
1 Задняя зона нагрева, 180 мм, 1700 Вт
2 Передняя зона нагрева, 145 мм, 1200 Вт
3 Индикаторная лампочка
4 Ручка управления задней зоной нагрева
5 Ручка управления передней зоной нагрева
3
4
5
Правила эксплуатации
Ручки управления
Регулировка теплоотдачи обеих зон нагрева
выполняется плавно в диапазоне от 1 до 6.
“1” Cоответствует минимальной теплоотдаче.
“6” Соответствует максимальной теплоотдаче.
“0” Соответствует выключенной зоне нагрева
Положение 1 Поддерживание в теплом состоянии
Положение 2 Поддержание на очень малом
медленном огне
Положение 3 Поддержание на медленном огне
Положение 4 Жарка / подрумянивание
Положение 5 Доведение до кипения
.
Индикаторная лампочка
Индикаторная лампочка загорается при включении
хотя бы одной из зон нагрева и продолжает гореть
до выключения обеих зон.
Не используйте стеклокерамическую
панель, если стекло повреждено.
В случае возникновения какойлибо
неисправности или образования трещины на
поверхности варочной панели во время
приготовления пищи необходимо отсоединить
панель от сети электропитания чтобы избежать
возможности электрического шока и обратиться
в авторизованный сервисный центр Electrolux.
Внимание:
На горячую поверхность нельзя класть
алюминиевую фольгу или ставить
пластиковую посуду.
Положение 6 Доведение до кипения / быстрое
прожаривание / жарка в большом
количестве масла
Не используйте стеклокерамическую
панель в качестве подставки для каких
либо предметов.
Не смотрите пристально на
нагревательные элементы во время
работы варочной панели.
11
Page 12
Советы и рекомендации по
использованию зон нагрева
Правильно регулируйте температуру зон
нагрева.
z Выбирайте максимальное значение температуры
и сохраняйте его до тех пор, пока жидкость в
кастрюле не закипит. Затем выставьте как можно
более низкое значение температуры,
достаточное для поддерживания кипения.
z Используйте кастрюли с ровным дном.
Использование кастрюль с неровным дном
может привести к 50 % увеличению потребления
электроэнергии. Проверьте, насколько ровное
дно в Вашей посуде, установив соответствующую
кастрюлю или сковороду в перевернутом
положении на стол и приложив к ее дну линейку.
z Неровное, как выпуклое, так и вогнутое дно
посуды способствует увеличению времени
приготовления и потребления энергии.
z Диаметр посуды должен быть равен диаметру
зоны нагрева или несколько превышать его.
Зона нагрева Диаметр
используемых
кастрюль
Задняя зона нагрева 180 мм
Передняя зона нагрева 145 мм
z Помните, что в больших кастрюлях может
находиться небольшое количество
приготавливаемых продуктов. Если диаметр
посуды слишком мал, потребление энергии
увеличится, в пролившиеся на панель продукты
будут пригорать к поверхности зон нагрева.
z Посуда с очень ярким/блестящим дном
способствует некоторому увеличению времени
приготовления по сравнению с посудой с
матовым/темным дном.
z Используйте посуду с плотно закрывающимися
крышками. При приготовлении без крышки
потребление электроэнергии увеличивается
более, чем в три раза.
z Не сдвигайте кастрюли или сковороды по
поверхности варочной панели всегда
приподнимайте их при установке на панель или
снятии с нее.
z Перед тем, как ставить кастрюли и сковороды
на стеклокерамическую поверхность, протирайте
их дно чистой сухой тряпкой. Это помогает
предотвратить образование царапин на панели
и уменьшает объем работы по ее последующей
чистке.
z Удаляйте брызги, попавшие на варочную панель,
пока она еще не остыла.
12
Page 13

Чистка и уход
Перед выполнением какихлибо операций
по чистке или техническому обслуживанию
варочной панели Вы должны ОТСОЕДИНИТЬ
ее от электропитания.
В целях гигиены и безопасности
необходимо всегда содержать зоны нагрева
в чистоте. Накопление остатков жира или
пищи может привести к образованию дыма
при нагреве и даже к возгоранию.
Никогда не используйте металлические
губки или другие абразивные чистящие
средства.
Для чистки плиты нельзя использовать пар
или паровое чистящее устройство.
Стеклокерамическая варочная панель
z Декоративный узор на стеклокерамической
поверхности со временем может оказаться
поцарапанным и нарушенным, в особенности
при неподобающем уходе, но это не оказывает
никакого отрицательного воздействия на работу
варочной панели.
Такие дефекты на сказываются на работе
варочной панели и не покрываются
гарантией.
z С помощью специального скребка для чистки
стеклокерамических панелей немедленно, пока
панель еще не остыла, удаляйте с нее попавший
на нее сахар или содержащие сахар продукты
(варенье, сок и т.д.), расплавленные частицы
пластика или алюминиевой фольги. Если Вы
дадите им остыть и затвердеть на варочной
панели, возможно повреждение ее поверхности.
z Посуду, контактировавшую с вышеуказанными
расплавленными продуктами, следует тщательно
очистить перед тем, как снова использовать для
приготовления пищи на стеклокерамической
варочной панели.
На дефекты стеклокерамической
поверхности, вызванные вышеуказанными
причинами, гарантия не
распространяется.
z При загрязненной стеклокерамической варочной
панели уменьшается эффективность передачи
тепла от зон нагрева к посуде.
z После приготовления пищи зоны нагрева следует
протирать тряпкой, смоченной в жидком
моющем средстве.
z При наличии сильных загрязнений Вы можете
последовательно выполнить следующие
операции:
1. Удалите пятна и другие загрязнения с помощью
специального скребка для чистки
стеклокерамических панелей.
2. Убедитесь, что стеклокерамическая панель
остыла. Используйте специальное чистящее
средство для стеклокерамических панелей.
3. Протрите варочную панель влажной тряпкой
или кухонной салфеткой. Трудноудалимые
пятна можно устранить, с силой протирая их
кухонной салфеткой.
4. Удалите влажной тряпкой остатки моющего
средства.
5. При необходимости вытрите варочную панель
сухой тряпкой.
z Перед тем, как снова включать варочную панель,
убедитесь, что на ней не осталось влаги. При
нагреве влажных стеклокерамических панелей
на них могут образоваться радужные полосы.
Поверхности из нержавеющей стали
z После приготовления пищи протирайте
поверхность варочной панели мягкой тряпкой,
смоченной в теплой воде, в которую для
устранения трудноудалимых пятен добавлено
немного жидкого моющего средства.
z Детали из нержавеющей стали со временем
могут пожелтеть и приобрести соломенный
оттенок; для устранения этой желтизны
используйте специальное чистящее средство
для нержавеющей стали.
Гарантия Послепродажное обслуживание
Оригинальные запчасти
Перед отгрузкой с завода этот прибор был
проверен и обследован многочисленными
специалистами для того, чтобы обеспечить Вам
наилучшие результаты.
Любые операции по ремонту, которые могут
явиться необходимыми, следует выполнять с
максимальным вниманием и осторожностью.
По этой причине мы рекомендуем Вам в случае
любых неисправностей обращаться в ближайший
авторизованный сервисный центр, указав характер
неисправности, модель прибора (Mod.),
продуктовый номер (Prod. No.) и серийный номер
(Ser. No.), указанные на паспортной табличке.
Оригинальные запчасти, сертифицированные
изготовителем прибора и помеченные этим
символом,
имеются в наличии только
в наших сервисных
центрах и авторизованных
магазинах по продаже
запчастей.
13
Page 14

Гарантия/сервисная служба
Сервисное обслуживание и запасные части
В случае необходимости ремонта прибора, или если Вы хотите приобрести запасные части, обращайтесь в
наш ближайший авторизованный сервисный центр (список сервисных центров прилагается). Если у вас возникли
вопросы по использованию прибора или Вы хотите узнать о других приборах концерна ELECTROLUX, звоните на
нашу информационную линию по телефону (495) 937 78 37 или (495) 956 29 17.
Эвpoрейскaя гарантия
Данное устройство поддерживается гарантией Electrolux в каждой из нижеперечисленных стран в течение срока,
указанного в гарантии на устройство или в ином определенном законом порядке.
из одной из этих стран в любую другую из нижеперечисленных стран, гарантия на устройство переместится
вместе с вами при условии соблюдения следующих требований:
· Гарантия на устройство начинает действовать с даты, в которую вы впервые приобрели это устройство,
подтверждением которой будет служить предъявление действительного удостоверяющего покупку документа,
выданного продавцом устройства.
· Гарантия на устройство действует в течение того же срока и в пределах того же объема работ и
конструктивных частей, какие действуют в новой стране вашего проживания применительно к данной
конкретной модели или серии устройств.
· Гарантия на устройство является персональной для первоначального покупателя этого устройства и не
может быть передана другому пользователю.
· Устройство установлено и используется в соответствии с инструкциями, изданными Electrolux, только в
пределах домашнего хозяйства, т.е. не используется в коммерческих целях.
· Устройство установлено в соответствии со всеми применимыми нормативными документами, действующими
в новой стране вашего проживания.
Положения настоящей Европейской Гарантии не нарушают никаких предоставленых вам по закону
прав.
В случае вашего перемещения
14
Page 15

Технические характеристики
Мощность зон нагрева
Задняя зона нагрева диам. 180 мм 1,7 кВт
Передняя зона нагрева диам. 145 мм 1,2 кВт
Полная мощность 2,9 кВт
Электропитание 230 В 50 Гц
Размеры выемки под варочную панель
Длина 270 мм.
Ширина 490 мм.
Данное изделие соответствует следующим
Директивам Европейского Союза:
2006/95 (Директива по низкому
напряжению);
89/336
совместимости);
93/68 (Директивы общего характера)
с последующими изменениями.
(Директива по электромагнитной
15
Page 16

Указания для установщика
Следующие указания по установке и
техобслуживанию относятся к операциям,
которые должны выполняться только
квалифицированными специалистами в
соответствии с действующими нормами.
Перед выполнением любых работ с
прибором его следует отсоединить от
сети электропитания. Если для
выполнения той или иной операции
необходимо наличие электропитания,
удостоверьтесь в том, что приняты все
необходимые на этот случай меры
предосторожности.
Высота боковых стенок кухонной мебели,
на которой устанавливается варочная
панель, не должна превышать высоту
рабочего стола.
Не устанавливайте варочную панель
вблизи от легковоспламеняющихся
материалов (например, занавесок,
полотенец и т.д.).
Электрическое подключение
Прибор рассчитан на подключение к однофазной
сети электропитания напряжением 230 В.
Подключение должно выполняться в соответствии
с действующими нормами и правилами.
Перед подключением прибора:
1. удостоверьтесь, что предохранитель сети и
электрическая сеть в Вашей квартире
выдерживают соответствующую нагрузку (см.
паспортную табличку);
2. удостоверьтесь, что электрическая сеть имеет
должное заземление, соответствующее
действующим нормам;
3. удостоверьтесь, что при установленной на место
варочной панели обеспечивается легкий доступ
к розетке сети и вилке сетевого шнура.
Прибор поставляется с сетевым шнуром. Его
следует оборудовать вилкой, соответствующей
нагрузке, указанной на паспортной табличке. При
установке вилки на сетевой шнур придерживайтесь
рекомендаций, приведенных на Рис. 1. Вилку следует
вставлять в соответствующую розетку.
При неразъемном подключении прибора к сети
необходимо установить между ними двухполюсный
размыкатель с расстоянием между разомкнутыми
контактами не менее 3 мм. тип которого
соответствует требуемой нагрузке в соответствии
с действующими нормами и правилами.
Сетевой провод должен быть размещен таким
образом, чтобы никакая его часть не могла нагреться
до температуры, на 90 °C превышающей комнатную
температуру.
Коричневый провод (подключенный к контакту
клеммной колодки, помеченному буквой “L”) всегда
должен соединяться с фазой сети.
Рис. 1
Земля (желтозеленый)
Замена сетевого шнура
Замена сетевого шнура требует специального
инструмента, имеющегося только у
уполномоченных специалистов.
В этом случае должен использоваться только
специальный сетевой шнур. Сечение проводов
должно соответствовать напряжению и рабочей
температуре.
Желтозеленый провод заземления должен быть
примерно на 2 см длиннее фазовых проводов
(Рис. 1).
Нейтраль
(ноль)
16
Page 17

Встраивание
Рис. 2
510
290
Размеры указаны в мм
650 MIN.
490
55
270
40÷50
Данные варочные панели могут быть встроены в
кухонную мебель с глубиной от 550 до 600 мм.
Размеры варочных панелей показаны на Рис. 2.
Установка и сборка
Данные варочные панели могут быть встроены в
кухонную мебель с выемкой, размеры которой
приведены на Рис. 3.
Край выемки должен располагаться от задней
стены на расстояние не менее 55 мм.
В случае, если варочная панель устанавливается
рядом со стенами кухни или боковыми стенками
кухонной мебели, края выемки должны
располагаться от них на расстояние не менее 100
мм.
Расстояние от подвесных шкафов или вытяжки до
варочной панели должно составлять не менее 650
мм.
Выполните встраивание варочной панели
)
следующим образом:
1. Проложите уплотняющую прокладку (Рис.4
“A”) вдоль всего края выемки.
2. Установите варочную панель в выемку и надавите
на нее сверху вниз так, чтобы она дошла до
столешницы. Затем удалите выступившие наружу
избытки уплотнительной прокладки.
3. Чтобы снять варочную панель из выемки,
приподнимите ее, поддев за край отверткой.
240
140
550 MIN
30
591
Рис. 3
УДАЛИТЬ
В случае, если несколько 30см варочных
панелей устанавливаются в одну и ту же
выемку одна к другой, Вы можете
приобрести специальный комплект для
сборки, включая боковой кронштейн и
дополнительные уплотнения, в наших
сервисных центрах. Соответствующие
инструкции поставляются вместе с
комплектом для сборки.
FO 0548
Рис. 4
17
Page 18

Варианты установки
Установка на кухонный шкаф
с дверцей
Шкаф должен иметь специальную конструкцию,
обеспечивающую отсутствие какоголибо контакта
с дном варочной панели, которое может
нагреваться при ее использовании.
Рекомендуемое решение показано на рисунке 5.
Панель, устанавливаемая под варочной панелью
(“а”), должна быть съемной для обеспечения
легкого доступа на случай выполнения ремонтных
работ. Пространство сзади кухонной мебели (“b”)
может использоваться для выполнения
подключений.
Кухонная мебель с духовым
шкафом
Размеры выемки под варочную панель должны
соответствовать приведенным на Рис. 3; в шкафу
должны иметься отверстия для обеспечения
непрерывного притока воздуха. Рекомендованные
варианты обеспечения необходимой вентиляции
показаны на Рис. 6 и 7.
Электрические подключения духового шкафа и
варочной панели должны быть выполнены по
отдельности для обеспечения безопасности и
простоты вынимания духового шкафа в случае
необходимости.
Рис. 5 Рис. 6 Рис. 7
30
80
FO 2166
a) Съемная панель
b) Пространство для выполнения подключений
a
20 min
b
FO 0938FO 0939
18
Page 19

Español
Para su seguridad
Estas advertencias están hechas en el interés de su seguridad. Debe leerlas atentamente antes de instalar
o usar el aparato.
Es muy importante que guarde este libro de instrucciones con el aparato para consultas posteriores. Si el
aparato es vendido o transferido, asegurese de que este manual esté en el aparato para que el nuevo usuario
pueda conocer el correcto manejo y funcionamiento del aparato.
Instalación
• Los trabajos requeridos para la instalación de este
aparato deben ser realizados por un instalador competente o autorizado y de acuerdo con las normas y
regulaciones vigentes.
• Es peligroso alterar las características o modificar el
producto en cualquier forma.
• Una vez retirados todos los embalajes compruebe
que el aparato no esté dañado y el cable eléctrico en
perfectas condiciones. En caso contrario contacte
con su proveedor antes de proceder con la instalacion.
• El fabricante declina toda responsabilidad en el caso
de no seguir las normas en vigor.
Seguridad para los niños
• Este aparato ha sido diseñado para ser manejado
por personas adultas o jovencitas bajo supervisión.
No debe permitir que los niños pequeños manejen
los controles o jueguen con él.
• Algunas partes del aparato se calientan durante el
funcionamento. Vigilar a los niños para que no toquen
las partes calientes o se acerquen mientras está la
encimera encendida o aún caliente.
Durante el funcionamiento
• Este aparato ha sido diseñado para cocinar
alimentos. No lo utilice jamás para otros fines.
• Compruebe siempre que todos los mandos estén en
posición "
• En caso de avería del aparato, desconéctelo de la
red.
• Vigilar atentamente la cocción con aceites o grasas.
• Se recomienda tener apartados de la encimera los
objetos susceptibles de fundirse con el calor: objetos
de plástico, papel de aluminio, azúcar o productos
muy dulces.
z" aunque el aparato no este funcionando.
Limpieza y mantenimiento
• Antes de proceder a la limpieza o mantenimiento
desenchufe el aparado de la red.
• Por razones de higiene y seguridad mantenga el
aparato siempre limpio. La formación de grasas
resecas u otros restos de alimentos pueden provocar fuego.
Información medio ambienta l
• Después de la instalación del aparato, deshágase de
los materiales del embalaje respetando el medio
ambiente.
• Al deshacerse de un aparato antiguo hágalo inutilizable
por medio de cortar su cable de alimentación desmonte
cualquier cierre que tenga para evitar que algún niño
quede atrapado en su interior.
• El símbolo en el producto o en su embalaje
indica que este producto no se puede tratar como
desperdicios normales del hogar. Este producto se
debe entregar al punto de recolección de equipos
eléctricos y electrónicos para reciclaje. Al asegurarse
de que este producto se deseche correctamente,
usted ayudará a evitar posibles consecuencias
negativas para el ambiente y la salud pública, lo cual
podría ocurrir si este producto no se manipula de
forma adecuada. Para obtener información más
detallada sobre el reciclaje de este producto, póngase
en contacto con la administración de su ciudad, con
su servicio de desechos del hogar o con la tienda
donde compró el producto.
Guía para leer las instrucciónes
Instrucciónes de seguridad
))
)
))
- 89/336 (directiva de compatibilitad electro-magnetica);
- 93/68 (directivas generales)
y subsecuentes modificaciones.
Instrucciónes paso a paso
Consejos y indicaciónes
Información medio ambiental
Este aparato está de acuerdo con las
siguientes directiva E.E.C.:
- 2006/95 (directiva de baja tensión);
Service
• Bajo ninguna circunstancia debe intentar de reparar
el aparato Vd. mismo. Reparaciones efectuadas por
personas inexpertas pueden causar daños o graves
disfunciones. Llame al Servicio Técnico. Insista
siempre en el empleo de recambios originales.
Estas instrucciones son válidas sólo en los países a
que va destinado el aparato y cuyos símbolos de
identificación figuran en la portada del libro de
instrucciones y sobre el propio aparato.
19
Page 20

Indice
Para el Usuario
Para su seguridad 19
Descripción del aparato 20
Instrucciónes para el usuario 20
Consejos utiles 21
Limpieza y mantenimiento 22
Garantía/Servicio postventa 23
Garantía europea 24
Asistencia Tecnica - Piezas de recambio
originales 25
Para el Instalador
Caracteristicas Tecnicas 25
Instrucciónes para el instalador 25
Conexión eléctrica 26
Empotrado en los muebles de cocina 27
Posibilidades de colocación 28
Descripción del aparato
1
2
3
1 Zona de cocción 180 mm 1700 W
2 Zona de cocción 145 mm 1200 W
3 Luz testigo de funcionamiento
4 Pomo para la zona de cocción trasera
5 Pomo para la zona de cocción delantera
4
5
Instrucciónes para el usuario
Utilización de las placas
eléctricas
La zona de cocción puede emitir un breve zumbido
al encenderse. Se trata de una característica de
todas las zonas de cocción vitrocerámicas que
no perjudica ni la funcionalidad ni la vida útil del
aparato.
La zona de cocción se regula mediante un mando con 7
posisciones que van desde “0” a “6”:
Posición 0 = apagado
Posición 1 = mínima aportación de calor
Posición 6 = máxima aportación de calor
En las posiciones intermedias (2-3-4-5) se obtienen
mayores potencias.
Posición
1
2
3
4
Para mantener los
alimentos calientes. Para
derretir mantequilla o
chocolate.
Para preparar salsas,
guisos, pudín, y huevos
fritos.
Para sopas de verdura.
Descongelar alimentos,
calentar agua o leche.
Para patatas, verduras
frescas, pasta, sopa de
legumbres, concentrados,
rosquillas, pescado.
Luz testigo de funcionamiento
Hay una luz testigo roja señalando el estado de
funcionamiento del aparato. Al estar encendida, el aparato
está funcionando y puede estar muy caliente.
20
5
6
Fritos, crépes, bistecs.
Bistecs, escalopes, fritos.
Page 21

Consejos utiles
Para obtener los mejores resultados le
aconsejamos que al principio sitúe el mando en
la posición 6 para acelerar el calentamiento de la
placa y posteriormente, seleccione la posición
más adecuada para los alimentos que va a cocinar.
Cuando cocine con aceites o grasas debe
tener el máximo cuidado ya que pueden arder cuando sobrecalientan.
Para la cocción sobre planos de vitrocerámica se
aconseja utilizar ollas con triple fondo con diámetro igual
o un poco más grande que el de la zona de cocción.
Diámetro olla
zona de cocción trasera
zona de cocción delantera
A fin de evitar una pérdida de calor y por tanto para cocinar
más rápidamente, consejamos utilizar ollas de fondo
plano, así que el fondo descanse de la manera mejor
sobre la placa y, siempre que es posible, utilice una
tapa.
Sartenes o cazuelas en cobre o aluminio no son adaptas
para utilizar sobre un plano de cocción en vitrocerámica,
puesto que pueden dejar manchas y halos sobre la
vitrocerámica. Parrillas para bistecs en hierro fundido u
otras aleaciones tampoco son aconsejables para utilizar
sobre un plano de cocción en vitrocerámica puesto que
el gran espesor del fondo puede provocar peligrosas
concentraciones de calor en la zona de cocción; el fondo
áspero puede rasgar la superficie y la aleación puede
manchar la vitrocerámica de manera indeleble. Si fuera
posible, elija sartenes para bistecs en acero inoxidable
con triple fondo plano para que se apoye bien sobre el
plano de cocción, haciéndo de esa forma que la cocción
sea homogénea. El fondo de las ollas debe estar bien
limpio y secado antes de apoyarlas sobre el plano de
cocción.
Los fondo ásperos de sartenes u ollas pueden dejar
huellas o provocar rasgaduras si se mueven sobre el
plano de cocción.
180 mm
145 mm
El plano de cocción
El plano de cocción en vitroceramica aguanta cambios
de temperatura, es insensible ya sea al frío que al calor
y brinda buena resistencia contra choques mecánicos;
sin embargo, un choque con un objeto puntiagudo
aunque pequeño (la punta de un cuchillo, por ejemplo, o
una cajita de especias) puede ser peligroso puesto que
puede dañar de manera irreparable la superficie de la
placa de cocción, lo que puede comprometer su
funcionalidad.
Indicación importante:
1. Caso de que se rompiera el plano de
vitrocerámica a pesar de su utilización
cuidadosa, apague inmediatamente el aparato
para evitar el riesgo de calambre y pida la
intervención del Servicio de Asistencia.
2. Sobre el plano de cocción en vitrocerámica no
hay que cocinar guisos en hoja de aluminio o
vajillas de plástico.
21
Page 22

Limpieza y mantenimiento
Ante de cualquier operación de
mantenimiento o limpieza, desconecte al
aparto de la red eléctrica.
No usar nunca para la limpieza maquinas a
vapor.
El plano de cocción en vitrocerámica se limpia de una
manera más sencilla que cualquier otro plano de cocción,
al no tener las tradicionales parrillas de apoyo ni los
“rompellamas” de los hornos de gas o de los planos
eléctricos, que se deben limpiar. Sin embargo, el plano
en vitrocerámica tiene que ser cuidado con esmero.
Limpie con cuidado su plano de cocción antes de utilizarlo
por vez primera, luego le aconsejamos limpiarlo una vez
al día.
Utilice un paño mojado y un poco de detergente para
vajillas. Es importante secar el plano de cocción en
vitrocerámica cuidadosamente, puesto que residuos de
productos para la limpieza podrían tener efectos
corrosivos durante las utilizaciones sucesivas.
Los productos específicos para la limpieza del acero
como Sidol inox, Stahlfix, Simac brillaacero, Jif u otros
parecidos están particularmente indicados para la
suciedad más obstinata, como manchas de azúcar,
mermelada u otros pruductos con un elevado contenido
de azúcares.
En vez de estos productos para la limpieza se puede
utilizar un especial raspador de vidrio con hoja de afeitar
para quitar incrustaciones de comida y chorros de grasa
cuando el plano esté caliente, o sustancias quemadas,
como azúcar y sustancias azucaradas, o plástico.
En este caso, la limpieza del plano será completa al
frotarlo enérgicamente con un paño suave remojado en
un producto de limpieza específico para el acero.
Una solución para derrotar incluso las incrustaciones
más resistentes es la de cubrir el plano de cocción durante toda la noche con un paño remojado en agua y
detergente para la limpieza, y luego repetir la operación
de limpiado la mañana siguiente.
Los halos de caliza, debidos al rebosamiento del agua
durante la cocción, se quitan simplemente frotando la
superficie con un paño mojado y un producto para
limpieza.
No utilice nunca lana de acero, productos o esponjas
que rasguen, sustancias químicas agresivas como
sprays para el horno o quitamanchas, ni productos
quitaherrumbre para limpiar el plano de cocción en
vitrocerámica.
Ponga cuidado con los granos de arena caídos de las
hortalizas y pegados al fondo de las ollas, pues pueden
rasgar el plano de cocción en vitrocerámica.
Zona de cocción
Atención: ¡Los productos de limpieza no deben
tocar la placa vitrocerámica caliente!
¡Terminada la limpieza, enjuague con suficiente
agua clara todos esos productos porque si no
pueden ocasionar irritaciones al calentarse la
zona de cocción! No utilice productos agresivos
como sprays para limpiar parrillas u hornos,
productos de grano grueso para fregar o
limpiaollas abrasivos.
22
Page 23

Garantía/Servicio postventa
Condiciones de Garantía: ELECTROLUX HOME PRODUCTS ESP AÑA, S.A. garantiza al usuario del aparato
cuyos datos de identificación figuran en el presente documento, durante el plazo de dos (2) años desde la fecha
de su entrega, la reparación totalmente gratuita de las averías que experimente el aparato, incluyendo la
presente garantía tanto el coste de las piezas de recambio como el de la mano de obra y, en su caso, el del
desplazamiento del personal técnico del Servicio Oficial de la Marca al domicilio del usuario.
En el supuesto de que el producto, por su tamaño y movilidad, fuera susceptible de ser trasportado por el
usuario al Taller Oficial de la Marca, éste quedará liberado de la obligación de trasladar su personal técnico al
domicilio del usuario.
Para hacer uso del derecho de garantía aquí reconocido, será requisito necesario que el aparato se destine al
uso privado. También será necesario presentar al personal técnico de la marca, antes de su intervención, la
factura o tique de compra del aparato o el albarán de entrega correspondiente si éste fuera posterior, en unión
del presente documento.
Exclusiones: La presente garantía no cubre la instalación, nivelación, instrucciones de uso del aparato ni
sustitución de lámparas. No quedan cubiertas por esta garantía y por tanto la misma quedará sin efecto en
los casos de averías producidas como consecuencia de:
· Fuerza mayor (fenómenos atmosféricos, geológicos, etc.)
· Uso inadecuado o no acorde con las instrucciones del fabricante.
· Falta de mantenimiento y limpieza: filtros con objetos tales como botones, monedas, etc; condensadores con
polvo, pelusa u otros elementos que impidan la libre circulación del aire; cubetas de detergente con residuos,
etc.
· Uso de productos de limpieza abrasivos que causen daños en chapa, pintura y plásticos.
· La rotura accidental de componentes de plástico y vidrio.
· La instalación y/o conexión incorrectas o no reglamentarias (voltaje, presión de gas o agua, conexión eléctrica
o hidráulica no adecuadas).
· Los daños estéticos no denunciados en el momento de la entrega.
La garantía no tendrá efecto en caso de manipulación de la placa de características del aparato o de los datos
que figuren en la factura, tique de compra o albarán de entrega de aquél o de los consignados en este documento.
Tampoco producirá efecto si se produjesen intervenciones de personal técnico no autorizado o no perteneciente
al Servicio Oficial de la marca.
Se informa al usuario que, además de la garantía reconocida en este documento, tiene la protección que le
concede la Ley 23/2003, de 10 de julio, respecto de la exigencia de que el bien adquirido sea conforme con el
contrato de compraventa, pudiendo reclamar al vendedor, en caso de disconformidad, por las faltas que se
pongan de manifiesto en el plazo de dos (2) años desde la entrega. En ese supuesto, tendrá derecho a solicitar
la reparación gratuita del bien o a la sustitución de éste, salvo que una de esas opciones resulte imposible o
desproporcionada.
ELECTROLUX HOME PRODUCTS ESP AÑA, S.A.-Sociedad Unipersonal
Albacete, n 3C - 28027 MADRID - CIF A08145872
Central Servicio Técnico
Ctra. M-300 km, 29,900
Apdo. 119
28802 Alcalá de Henares (Madrid)
Recepción de Llamadas
Averías 902 116 388
Atención Usuarios:
e-mail: usuarios.postventa@electrolux.es
Para España:
Puede comprar recambios y accesorios on-line entre en
http://www.service.electrolux.com y seleccione Tienda Virtual
23
Page 24

Garantía europea
Este aparato está garantizado por Electrolux en cada uno de los países abajo indicados durante el periodo especificado
en la garantía del aparato o el periodo que prevea la ley. Si usted se traslada de uno de estos países a otro de los
países abajo indicados, la garantía del aparato se desplazará con usted siempre que se cumplan los siguientes
requisitos:
· La garantía entra en vigor el día en que usted compre el aparato, que se demostrará mediante un justificante de
compra válido emitido por el vendedor del aparato.
· La garantía del aparato tendrá el mismo periodo de validez y cubrirá las mismas piezas y mano de obra que las
garantías emitidas en su nuevo país de residencia para ese modelo o gama de aparatos en concreto.
· La garantía del aparato es personal del comprador original e intransferible.
· El aparato deberá ser instalado y utilizado según las instrucciones de Electrolux y es únicamente de uso
doméstico, lo que significa que no podrá ser utilizado con fines comerciales.
· El aparato deberá ser instalado observando todas las normativas relevantes que estén en vigor en su nuevo país
de residencia.
Las disposiciones de esta Garantía Europea no afectan a los derechos que le correspondan por ley.
24
Page 25

Asistencia Tecnica - Piezas de recambio originales
El aparato que Vd. acaba de adquirir ha sido
esmeradamente controlado a lo largo de todo el
proceso de fabricación. No obstante, en el caso de
presentársele algún inconveniente durante el uso, tanto
si es en el periódo de Garantía como si has rebasado
dicho periodo, rogamos de directamente en contacto con
el Centro de Servicio Técnico mas próximo a su domicilio.
La dirección y teléfono de dicho Centro, los encontrará
fácilmente en el Listin que le inviamos adjunto a este libro, o bien consultando en la guida teléfonica la voz
Electrolux.
Nuestro Servicio Técnico solamente está esperando una llamada o
indicación suya para ponerse a su
disposición con la máxima rapidez
y eficacia.
Garantía
El aparato que Vd. acaba de adquirir contiene, además
del presente libro de instrucciónes, un Tarjeta-Certificado
de Garantía, al dorso de la cual quedan especificadas
las condiciones de la misma.
Le rogamos que en dicha tarjeta-certificado, rellene todos
los datos solicitados y la remita a Electrolux
Electrodomésticos España.
Caracteristicas T ecnicas
Potencia de las zonas de cocción
Zona de cocción normal Ø 145 mm - 1,2 kW
Zona de cocción rápida Ø 180 mm - 1,7 kW
Potencia max. absorbida 2,9 kW
Tensión de alimentación 230 V 50 Hz
Dimensiones del hueco de
incastre
Ancho 270 mm
Fondo 490 mm
Instrucciónes para el inst alador
Advertencia: Este aparato debe conectarse a
una toma de tierra eficaz.
El fabricante declina toda responsabilidad en
el caso de que esta norma de seguridad no
haya sido cumplida.
El aparato debe conectarse a una tensión de 230 V. Los
trabajos de instalación deberán ser realizados por
instaladores competentes y conforme a la normativa vigente.
La encimera debe conectarse a una toma de corriente
adecuada con un interruptor bipolar que sea fácilmente
accesible después de finalizada la instalación.
Para conectarlo a la instalación eléctrica, será necesario
colocar entre el aparato y la instalación eléctrica un
interruptor pluripolar, que tenga una distancia de abertura
de los contactos de 3 mm como mínímo, dimensionado
a la carga correspondiente según la normativa en vigor.
El cable de tierra amarillo/verde no debe ser cortado por
el interruptor.
El cable utilizado para hacer la conexión de la encimera
a la corriente eléctrica debe ser del tipo H05 RR-F o
H05V2V2-F (T90).
25
Page 26

Conexión eléctrica
La conexión debe realizarse conforme con las normas y
disposiciones legales vigentes.
Antes de efectuar la conexión, cerciorarse de que:
- eI automatico de la instalación eléctrica puede
soportar la carga del aparato (ver tarjeta matricula;
- que el enchufe esté dotado de una eficaz torna de
tierra, segun las normas vigentes;
- la clavija o el interruptor empleado sea facilmente
accesible con el aparato instalado
El aparato debe conectarse a una tensión de 230 V. Los
trabajos de instalación deberán ser realizados por
instaladores competentes y conforme a la normativa vigente.
El aparato está provisto de cable de alimentación. Montar en el cable una clavija adecuada a la carga. La
encimera debe conectarse a una toma de corriente
adecuada con un interruptor bipolar que sea fácilmente
accesible después de finalizada la instalación.
Si se efectua una conexión directa a la red, es necesario
interponer entre el aparato y la red un interruptor, con
apertura minima de 3 mm entre los contactos,
dimensionado a la carga y correspondiente a la normativa en vigor. EI cable de fase de color marrón (que viene
de la toma “L” de la caja de conexiones), debe estar
siempre conectado a la red de alimentación.
En todo caso el cable de alimentación debe estar
colocado de forma que ningun punto del mismo alcance
una temperatura superior en 90°C.
Despues de la conexión, probar los elementos
calefactores, haciendolos funcionar unos 3 minutos.
Sustitución del cable de
alimentación
La conexión del cable de alimentación a la caja de
conexiones es del tipo “Y”: el cable flexible solo se puede
sustituir con la ayuda de un util especial, del que dispone el Servicio Tecnico. En el caso de sustituir el cable,
es preciso usar cables tipo HOSV2V2-T90° adaptos a
la carga y a la temperatura de trabajo. El cable de tierra
amarillo/verde ha de ser mas largo que los otros dos en
unos 2 cm (Fig. 1).
neutro
fáse
tierra (amarillo-verde)
Fig. 1
26
Page 27

Empotrado en los muebles de cocina
Fig. 2
510
290
Estas encimeras están diseñadas para empotrar en
muebles de cocina con una profundidad comprendida
entro 550 y 600 mm. y adecuadas caracteristicas. Por
las dimensiones de las encimeras, véase Fig. 2.
Estas encimeras están diseñadas para empotrar entre
unidades cuyas superficies laterales no deben superar
la altura del plano de cocción.
La existencia de una pared lateral derecha o izquierda,
cuya altura supera la altura de la encimera, debe estar
a 100 mm. mínimo de la abertura para empotrar.
Muebles colgantes o campanas de aspiración deberan
ser instaladas a 650 mm. mímino de la encimera
Las dimensiones estan indicadas en milimetros
55
270
40÷50
591
240
140
650 MIN.
490
550 MIN
30
Fig. 3
Colocación y montaje
Las encimeras se pueden montar en un mueble con la
abertura para ompotrar según la Fig. 3.
La fijaciòn de la encimera al meuble debe ser
efectuada de la siguiente forma:
1. Apoye sobre el borde de la abertura, hecha para el
empotramiento, la especial guarnición proveída
(Fig. 4, "A"), cuidando que las partes finales
coincidan sin sobreponerse.
2. Inserte el plano en la abertura del mueble y empuje
hacia abajo hasta que se apoye, poniéndose
automáticamente en la posición correcta; quite la
guarnición en sobrante (Fig. 4).
3. Para quitar el plano del mueble, ponga la punta de
un destornillador debajo del borde y empuje el plano hacia arriba(Fig. 4).
Para combinar varias encimeras de 30 cm en
lo mismo hueco, un kit con una esquadra de
suporto y guarnición está a disposición en
nostros Centros Autorizados de Servicio
Técnico. Las instrucciones de montaje se
suministran con el kit.
QUITAR
FO 0548
Fig. 4
27
Page 28

Posibilidades de colocación
Sobre mueble bajo con puerta
En la construcción del mueble es necesario que se
hayan tomado las suficientes precauciones para evitar
el contacto con la parte inferior de la encimera que se
calienta durante el funcionamiento. La solucíon se
aconseja en la ilustrada en la Fig. 5.
El panel situado bajo la encimera deberá ser fácilmente
extraíble para permitir eventuales intervenciones de la
Asistencia Técnica.
Sobre mueble bajo con horno
El hueco tendrà que tener las dimensiones existentes
en la figura 3, y tendrà que ser sujeta por soportes para
conseguir una eficaz aireación.
Para evitar excesìvos sobre-calentamientos, ès oportuno
realizar la instalación como se indica en las Fig. 6 y 7.
El enlace elèctrico de la encimera y el del horno debera
ser realizados separadamente, sea por razones
elèctricas, que para facilitar la extracción frontal del
horno.
Las dimensiones estan indicadas en milimetros
Fig. 5 Fig. 6 Fig. 7
FO 2044 FO 2041 FO 2042
a)Panel
b) Espacio disponible para la conexion
28
Page 29

Português
Para a sua segurança
Estas advertências são feitas por razões de segurança. Devem ser lidas atentamente antes da instalação e/ou
utilização do aparelho. É bastante importante a conservação deste manual de instruções junto do aparelho, para
qualquer consulta posterior. Se o aparelho fôr vendido ou transferido para outra pessoa, assegure-se que este
manual acompanha o aparelho, por forma a que o novo utilizador possa usufruir das instrucções de funcionamento
e ter conhecimento das advertências.
Instalação
z Todos os trabalhos eléctricos durante a instalação do
aparelho deverão apenas ser efectuados por pessoal
qualificado, em conformidade com as normas em
vigor.
z É perigoso alterar as características do aparelho.
z Logo após ter removido da placa todo o material que
acompanha a mesma, certifique-se que o cabo eléctrico
se encontra em boas condições. Se este não fôr o
caso, indique-o à loja onde comprou o aparelho antes
de prosseguir com a instalação.
z O fabricante declina toda a responsabilidade em caso
de incumprimento das normas de prevenção contra
acidentes.
Crianças
z Este aparelho foi concebido para ser utilizado por
adultos. Assegure-se que as crianças não se
aproximam com o objectivo de brincar com o mesmo.
z Durante a cozedura, algumas partes acessíveis do
aparelho podem ficar quentes. Assegure-se que as
crianças não se aproximam até este ter arrefecido
suficientemente.
Durante a Utilização
z Este aparelho foi concebido para apenas cozinhar
alimentos. Não o utilize para propósitos diferentes.
z Verifique sempre que todos os comandos estão na
posição de desligado, quando o aparelho não estiver
a ser utilizado.
z Se usar uma tomada de corrente próxima do forno,
certifique-se que os cabos de outros electrodomésticos
que está a utilizar, não toquem algumas das zonas
mais quentes do forno.
z Caso se verifique um mau funcionamento do aparelho,
desligue-o da tomada de corrente.
z Antes das operações de manutenção ou limpeza,
desligar o aparelho da tomada de corrente.
Ambiente
z Todo o material utilizado para o transporte e embalagem
do aparelho deve ser deitado fora cuidadosamente.
z Os aparelhos danificados não devem ser utilizados.
Em caso de problema ou qualquer avaria, a corrente
deve ser desligada no disjuntor.
z O símbolo no produto ou na embalagem indica
que este produto não pode ser tratado como lixo
doméstico. Em vez disso, deve ser entregue ao centro
de recolha selectiva para a reciclagem de equipamento
eléctrico e electrónico. Ao garantir uma eliminação
adequada deste produto, irá ajudar a evitar eventuais
consequências negativas para o meio ambiente e
para a saúde pública, que, de outra forma, poderiam
ser provocadas por um tratamento incorrecto do
produto. Para obter informações mais pormenorizadas
sobre a reciclagem deste produto, contacte os serviços
municipalizados locais, o centro de recolha selectiva
da sua área de residência ou o estabelecimento onde
adquiriu o produto.
Estas instruções são apenas válidas para os países
de destino cujos símbolos figuram na capa do livro
de instruções e sobre o aparelho.
Esta máquina com o símbolo CE cumpre com
as seguintes Directivas da CEE:
· 2006/95 (Directiva sobre baixas
voltagens)
· 89/336 (Dir. sobre a Compatibilidade Electromagnética)
· 93/68 (Directivas Gerais) e alterações seguintes.
Guia para uso do Manual
de Instruções
Os símbolos a seguir serão encontrados no texto para
guiá-lo através das instruções
Service
z Em caso de avaria, nunca tente reparar o aparelho. As
reparações efectuadas por pessoas não qualificadas
podem causar danos ou mau funcionamento. Contacte
com o concessionário mais próximo da sua residência
e aceite apenas peças originais.
Instruções de Segurança
Instruções de Operação Passo a Passo
))
)
))
Dicas e Conselhos
Informações Ambientais
29
Page 30

Índice
Para o utilizador
Para a sua segurança 29
Desçricão do aparelho 30
nstruções para o utilizador 29
Conselhos prácticos 31
Limpeza e manutenção 32
Assistência Técnica e Peças Originais 32
Garantia/Assistência Técnica 33
Garantia europeia 34
Para o técnico instalador
Características técnicas 35
Instruções para o técnico instalador 35
Ligação eléctrica 35
Encastre nos móveis de cozinha 36
Possibilidade de encastrar 37
Desçricão do ap arelho
1
1 Zona de cozedura posterior, Ø180 mm, 1700 W
2
2 Zona de cozedura anterior, Ø145 mm, 1200 W
3 Luz piloto da zona da cozedura
4 Manípulo de comando da zona de cozedura posterior
3
5 Manípulo de comando da zona de cozedura anterior
4
5
Instruções para o utilizador
Manípulos de comando
De acordo com as necessidades, a zona da cozedura
pode ser regulada em sete posições diferentes, que se
obtêm tanto com a rotação no sentido dos ponteiros do
rélogio, como no sentido inverso.
Na posição "6" há o máximo fornecimento de calor, na
posição "0" a zona de cozedura está desligada.
Setting 1
Setting 2
Setting 3
Setting 4
Setting 5
Para derreter manteiga,
chocolate
Para aquecer líquidos
Para nata e molhos
Para cozer com temperatura
de fervura
Para assar
Luz piloto da zona da cozedura
A luz acende-se sempre que o manípulo da zona
de cozedura é rodado para lá da posição "0".
Se o plano em vidroceramica estiver
rompido ou fendido, desligue
imediatamente o aparelho da electricidade para
evitar a possibilidade de choques eléctricos e
contacte o Centro de Assistência mais próximo.
Atenção:
Mantenha afastados da superfície de
cerâmica de vidro todos os materiais que
possam derreter, como, por exemplo,
material plástico, folhas de alumínio, etc.
Não utilize a placa do fogão como
superfície de trabalho ou para depositar
objectos.
Setting 6
30
Para grandes cozidos, para
fritar
Page 31

Conselhos prácticos
Utensílios para cozinhar
Ao cozinhar, quanto melhor a panela, melhor os
resultados.(Fig. 2)
• Você reconhece uma boa panela pelo seu fundo. O
fundo deve ser o mais espesso e plano possível.
• Utensílios com fundo de alumínio ou cobre podem
causar manchas metálicas na cerâmica de vidro.
Estas manchas são difíceis de ser removidas.
• O fundo da panela deveria ter o mesmo tamanho da
zona de cozedura. Ao comprar novas panelas e
frigideiras, observe o diâmetro do fundo. Os fabricantes
indicam normalmente o diâmetro superior da panela/
frigideira.
• A utilização de uma panela de cozimento rápido reduz
o tempo de cozimento em até 50%.
Zona de cozedura diâmetros
dos recipientes
Posterior 180 mm
Anterior 145 mm
• As panelas e frigideiras devem ser colocadas sobre
as zonas de cozedura antes das mesmas serem
ligadas.
• Zonas de cozedura ou fundos de panela sujos
aumentam o consumo de energia.
• Sempre que possível, tampe as panelas e frigideiras.
• Desligar as zonas de cozedura no fim do tempo de
cozimento e aproveitar o calor residual para manter
alimentos quentes ou derretê-los.
• Não utilize as zonas de cozedura sem panelas ou
com panelas vazias.
• Cerâmica de vidro não é sensível a choques térmicos
e é muito resi-stente, porém não inquebrável. Objectos
especialmente pontiagudos e duros podem danificar
a placa de cerâmica, ao caírem sobre ela.
• Não utilize panelas de ferro fundido ou com fundo
danificado, de superfície áspera e que apresente
arestas. Elas podem arranhar a cerâmica ao serem
movimentadas.
• Não coloque frigideiras ou panelas sobre a moldura da
placa do fogão. Pode haver arranhões e danos à
pintura.
• Evite aquecer panelas vazias. O fundo das mesmas
poderia ser destruído, danificando a superfície de
cerâmica.
31
Page 32

Limpeza e manutenção
Antes de qualquer operação desligar o
aparelho da electricidade.
Este equipamento não pode ser limpo com
vapor ou com uma máquina de limpeza a
vapor.
Para uma maior duração no tempo deste aparelho é
necessário realizar frequentemente uma limpeza geral,
tomando atenção aos seguintes aspectos:
• Limpe a superfície de cerâmica após cada utilização,
quando ela estiver morna ou fria. Assim, você evita que
sujidades colem na superfície. Remover manchas de cal
e manchas de água, Gotas de gorduras e manchas
metálicas brilhantes com produtos comuns de limpeza
de cerâmica de vidro ou de aço inoxidável
Atenção: Produtos de limpeza não devem ser
aplicados com a superfície de cerâmica de vidro
quente! Após a limpeza, todos os produtos de
limpeza tem de ser retirados com bastante água,
pois, uma vez aquecidos, eles podem ter um efeito
cáustico! Não utilize produtos de limpeza agressivos,
como, por exemplo, sprays para assadoras ou para
forno, produtos grosseiros para esfregar e lim-padores
de panelas ásperos.
• Limpar a superfície de cerâmica com um pano húmido
e um pouco de detergente para lavagem da loiça a mão.
Em seguida, secar com um pano limpo. Não pode ficar
nenhum resíduo de sujidade sobre a superfície.
• Limpar acuradamente toda a superfície de cerâmica,
uma vez por semana, utilizando um produto comum de
limpeza de cerâmica de vidro ou de aço inoxidável. Em
seguida, limpar a superfície de cerâmica com bastante
águay e secar, em seguida, com um pano limpo e que
não desfie.
• Para remover restos de comidas derramados e gotas
de gordura coladas na superfície, utilizar um raspador
para vidro. Utilizar o raspador para vidro de forma
inclinada sobre a superfície de cerâmica.
• Cuide para que líquidos ácidos, como, por exemplo,
vinagre, limão ou produtos descalcificadores não
atinjam a moldura da placa, pois, do contrário,
aparecerão manchas opacas sobre o mesma.
• Caso seja derramado açúcar ou algum preparo que
contenha o mesmo sobre o foco de aquecimento
quente, limpe-o de imediato, enquanto ainda estiver
quente, utilizando para isto o raspador de limpeza. Se
a massa esfriar, pode ser que, quando ela for retirada,
a superfície venha ser danificada.
• Mantenha afastados da superfície de cerâmica de
vidro todos os materiais que possam derreter, como,
por exemplo, material plástico, folhas de alumínio,
etc. Caso algo venha a derreter sobre a superfície de
cerâmica de vidro, deve-se limpar de imediato, com
auxílio do raspador.
Assistência Técnica e Peças Originais
Este aparelho, ao salir da fábrica, foi ensaiado e afinado
pelos especialistas por forma a dar os melhores
resultados em funcionamento. Qualquer reparação ou
afinação que pareça necessária, deve ser feita com o
máxima cuidado e atenção.
Por este motivo, recomendamos que se dirija ao
Concessionário que efectuou a venda, ou a nosso Centro de Assistância mais próximo, especificando quais as
anomalias e qual o modelo que adquiriu.
As Peças Originais aprovadas
pelo fabricante do aparelho e
possuidoras deste simbolo,
encontram-se apenas
disponíveis nos Centros de
Assistência ou em lojas de
peças autorizadas.
32
Page 33

Garantia/Assistência Técnica
Estimado Cliente:
Queremos felicitá-lo pela sua compra e agradecer a confiança depositada na nossa empresa.
O seu electrodoméstico dispõe de uma garantia de 24 meses para mão-de-obra e peças.
Se durante o período de garantia o seu electrodoméstico tiver uma avaria, contacte o Serviço Técnico Oficial.
ASSISTÊNCIA TÉCNICA OFICIAL
21 440 39 39
SERVIÇO DE APOIO AO CLIENTE
21 440 39 00 (de 2a a 6a feira. das 10H-13H e das 14H-17H)
CONDIÇÕES DE GARANTIA
1. O aparelho que acaba de adquirir possui uma garantia de dois anos a partir da data de aquisição. Os
pedidos de assistência na garantia são gratuitos, mediante apresentação do respectivo certificado
juntamente com a factura de compra.
2. A presente garantia do fabricante (2 anos) cobre a substituição de peças, mão de obra e deslocação.
3. Em caso de imobilização do seu aparelho por período superior a 15 dias, a garantia será prolongada
adicionando o tempo de imobilização à data de entrega nos nossos serviços.
4. Nos pedidos de assistência na garantia de Pequenos Electrodomésticos, os aparelhos a reparar deverão
ser entregues directamente no ponto de assistência.
EXCLUSÕES DE GARANTIA
Substituições de peças danificadas por mau manuseamento, instalação incorrecta, danos de transporte e
danos provocados por condições atmosféricas adversas; Intervenções por pessoal técnico não autorizado pelo
ELECTROLUX SERVICE ; substituições de lâmpadas, filtros, juntas de borracha, vidros, botões, puxadores e
acessórios de aspiradores; Todos os serviços de manutenção provocados pelo desgaste ou pela utilização do
aparelho; Pedidos de demonstração de montagem e explicações de funcionamento; Danos no esmalte e/ou na
pintura provocados por cortes ou pancadas; Uso intensivo em locais públicos ou profissionais, a menos que se
trate de um produto adequado para o efeito; Desobstrução de bombas de limpeza e filtros.
• MANIPULAÇÃO nos dados da placa de Matrícula do presente aparelho ou deste certificado.
• INSTALAÇÃO INCORRECTA E NÃO REGULAMENTAR (tensão, pressão de gás ou de água,
ligações eléctricas ou hidráulicas não adequadas).
Assistência Técnica - ELECTROLUX SERVICE - Quinta da Fonte, Edifício Gonçalves Zarco - Q 35, 2774-518
Paço de Arcos.
NOTA 1: Deve conservar a factura de compra junto deste Certificado de Garantia
NOTA 2: Para a validade desta garantia, no momento da intervenção técnica é absolutamente imprescindível
apresentar ao pessoal autorizado o presente certificado junto da factura legal de compra do aparelho devidamente
preenchida.
33
Page 34

Garantia europeia
Este aparelho possui garantia da Electrolux em cada um dos países listados em baixo, para o período especificado
na garantia do seu aparelho ou, caso contrário, pela lei. Se mudar de um destes países para outro dos países listados
em baixo, a garantia do aparelho mudará também, estando sujeita aos seguintes requisitos:
· A garantia do seu aparelho tem inicio na data em que adquiriu o aparelho, a qual terá como prova o documento
válido de compra emitido pelo vendedor do aparelho.
· A garantia do aparelho é válida para o mesmo período de tempo e para o mesmo tipo de trabalho e peças existente
no seu novo país de residência para este modelo em particular ou gama de aparelhos.
· A garantia do aparelho é pessoal, para o comprador original, e não pode ser transferida para outro utilizador.
· O aparelho é instalado e usado de acordo com as instruções emitidas pela Electrolux e destina-se apenas ao
uso doméstico, ou seja, não é usado para fins comerciais.
· O aparelho é instalado de acordo com todas as normas relevantes em vigor no seu novo país de residência.
As condições desta Garantia Europeia não afecta nenhum dos seus direitos concedidos por lei.
34
Page 35

Características técnicas
Potência das zonas de cozedura
Zona da cozedura posterior - Ø 180 mm 1,7 kW
Zona da cozedura anterior - Ø 145 mm 1,2 kW
Potência Total Máxim 2,9 kW
Tensão de alimentação 230 V 50 Hz
Dimensões do corte
Largura 270 mm.
Profundidade 490 mm.
Instruções para o técnico instalador
As instruções que se seguem dizem respeito à
instalação e à regulação, devendo ser seguidas e
utilizadas apenas por pessoal qualificado. O aparelho
deve ser instalado correctamente em conformidade com
as normas vigentes.
Qualquer intervenção deve ser efectuada com o
aparelho desligado da corrente.
A SOCIEDADE CONSTRUTORA DECLINA TODA
A RESPONSABILIDADE POR EVENTUAIS
DANOS DERIVADOS DE UMA INSTALAÇÃO
QUE NÃO ESTEJA EM CONFORMIDADE COM
AS NORMAS VIGENTES.
Ligação eléctrica
A ligação eléctrica deve ser efectuada conforme as
normas e leis em vigor.
Antes de efectuar a ligação, confirme se:
- A tensão da rede coincide com a do aparelho.
- O dijuntor suporta a carga eléctrica do aparelho (ver
etiqueta de características)
- A alimentação eléctrica efectua-se através de uma
tomada de terra, seguindo as normas vigentes.
- A tomada e o dijuntor respectivo, são de fácil acesso
após a placa instalada.
Ligar o cabo de alimentação a uma ficha adequada para
a potência máxima da placa e para a tomada da instalação.
Assegure-se que possui uma tomada com terra em
condições.
Se deseja a ligação directa à rede, é necessário interpôr
entre o aparelho e a rede, um interruptor automático com
uma abertura mínima, entre contactos de 3 mm,
dimensionada à carga e conforme as normas em vigor.
O cabo de terra amarelo/verde, não deverá ser interrompido
pelo interruptor.
O cabo de fase de côr castanha (que vém do do terminal
‘L’, da caixa de ligações), deve ser ligado à fase da rede
de alimentação.
O cabo de alimentação deve posicionar-se, por forma a
que nenhum ponto do mesmo atinja uma temperatura a
50º acima da temperatura ambiente.
Neutro
Fase
Terra (amarelo/verde)
Fig. 1
Substituição do cabo de
alimentação
Em caso de ser necessária a substituição do cabo de
alimentação, dever-se-á utilizar cabo do tipo H05 RR-F
ou H05V2V2-F T90, adaptado à carga e à temperatura do
local de funcionamento, sendo igualmente necessário
que o fio de terra amarelo/verde seja 2 cm mais largo que
os fios de fase e neutro (Fig. 1).
A ligação do cabo de alimentação aos bornes é do tipo
"Y", isto é, o cabo flexível só pode ser substituido através
dum instrumento especial que só o técnico assistente
tem.
Uma vez concluida a ligação, testar os elementos do
aquecimento fazendo-os funcionar durante 3 minutos.
35
Page 36

Encastre nos móveis de cozinha
Fig. 2
510
As dimensões estão indicadas en millimetros
290
Estas placas estão previstas para encastrar em móveis
de cozinha por módulos, tendo uma profundidade entre
550 e 600 mm e características apropriadas.
Estas placas estão projectadas de modo a ser
encastradas em um móvel cujas paredes não superior,
em altura, à la superficie de trabalho.
Uma eventual pared lateral, direita ou esquerda, superior
em altura à la superficie de trabalho, deve estar à 100
mm mínimo do corte para encastrar.
Armários ou chaminés de aspiração estar a 650 mm no
mínimo da placa de cozedura
Dimensões (Fig. 2)
Fixação
As placas de encastrar podem ser montadas num móvel
que tenha uma abertura para encastrar das dimensões
que estão illustradas na Fig. 3.
1. Antes de montar a placa no corte respectivo na
))
)
))
parte superior do móvel, posicionar a guarnição
de vedação (Fig.4-"A") que é fornecida sobre
os rebordos do corte, tendo cuidado para que
os extremos se unam sem se encaixarem.
2. Colocar a placa no corte, pressionando para
baixo até assentar no móvel; a placa centra-se
sozinha. Retirar a guarnição, e caso se exceda.
240
140
650 MIN.
490
550 MIN
55
270
40÷50
30
591
Fig. 3
RETIRAR
3 . Para retirar a placa do corte, usar uma chave de
fendas e levantar a borda da placa (Fig.4).
Para um óptimo posicionamento de uma série de
placas "dominó" de 30 cm, lado a lado, num único
corte na bancada, encontra-se à disposição um
kit de instalação. O kit pode ser comprado non
nossos Centros de Assistência. As instruções para
a sua montagem encontra-se dentro da
embalagem do kit.
36
FO 0548
Fig. 4
Page 37

Possibilidade de encastrar
Sobre o móvel base com porta
É necessário que na construção do móvel, tenham sido
tomadas as devidas precauções de modo a evitar
possíveis contactos com a caixa da placa depois de
aquecida. A solução que se aconselha, a fim de evitar
este inconveniente, está ilustrada na Fig. 5.
O painel, que está debaixo da placa, deve ser facilmente removível, a fim de permitir que se bloqueie e
desbloqueie a placa de acordo com as exigências da
assistência técnica.
Sobre o móvel base com forno
O espaço vazio deve ter as dimensões descritas na
Fig.3, e deve estar munido de suportes para permitir uma
ventilação eficaz. A fim de evitar aquecimentos
excessivos deve fazer-se a instalação como está nas
Fig. 6 e 7.
Devido a motivos eléctricos, as ligações eléctricas da
placa e do forno devem ser feitas separadamente. Assim,
facilitar-se-á também a extracção do forno.
As dimensões estão indicadas en millimetros
Fig. 5 Fig. 6 Fig. 7
FO 2044 FO 2041 FO 2042
a) Painel do móvel desmontável
b) Espaço útil para eventuais ligações
37
 Loading...