

Page 1
user manual
Down draught extractor
EFD18000U
Page 2

We were thinking of you
when we made this product
Page 3

Welcome to the world of Electrolux
Thank you for choosing a first class
product from Electrolux, which hopefully
will provide you with lots of pleasure in
the future. The Electrolux ambition is to
offer a wide variety of quality products
that make your life more comfortable.
You will find some examples on the cover in this manual. Please take a few minutes to study this manual so that you
can take advantage of the benefits of
your new machine. We promise that it
will provide a superior User Experience
delivering Ease-of-Mind. Good luck!
electrolux 3
Page 4

4 electrolux contents
T
1
Contents
Operating Instructions 5
Safety instructions 5
Description of the Appliance 6
Operating the appliance 8
Cleaning and Care 11
What to do if … 13
Disposal 15
Installation Instructions 16
Assembly 19
Installing more than one
Frontline hob 21
Guarantee/Customer Service 26
he following symbols are used in this user information:
Warning! This must be read! Important advice for the safety of persons and
information on avoiding damage to the appliance
3 General information and advice
2 Information on environmental protection
z Dangerous voltage
Page 5

operating instructions electrolux 5
Operating Instructions
Safety instructions
Please comply with these instructions. If
you do not, any damage resulting is not
covered by the warranty.
Correct use
• This appliance is not intended for
use by children or other persons
whose physical, sensory or mental
capabilities or lack of experience and
knowledge prevents them from using the appliance safely without supervision or instruction by a
responsible person to ensure that
they can use the appliance safely.
• Do not leave the appliance unattended during operation.
• The appliance must not be used as a
work surface or as a storage surface.
• Additions or modifications to the appliance are not permitted.
Children’s safety
• Small children must be kept away
from the appliance.
• Only let bigger children work on the
appliance under supervision.
General safety
• The appliance may only be installed
and connected by trained, registered
service engineers.
• Built-in appliances may only be used
after they have built in to suitable
built-in units and work surfaces that
meet standards.
• In the event of faults with the appliance or damage to the glass ceramic
(cracks, scratches or splits), the appliance must be switched off and
disconnected from the electrical
supply, to prevent the possibility of
an electric shock.
• Repairs to the appliance must only
be carried out by trained registered
service engineers.
Safety during use
• Remove stickers and film from the
glass ceramic.
• When the appliance is switched on,
do not flambé directly next it.
• In the event of fire, switch off appliance.
• Smother fire using a cover, never use
water to put out.
• Switch off the appliance after each
use.
Safety when cleaning
• For cleaning, the appliance must be
switched off.
• For safety reasons, the cleaning of
the appliance with steam jet or highpressure cleaning equipment is not
permitted.
How to avoid damage to the appliance
• The glass ceramic can be damaged
by objects falling onto it.
Page 6
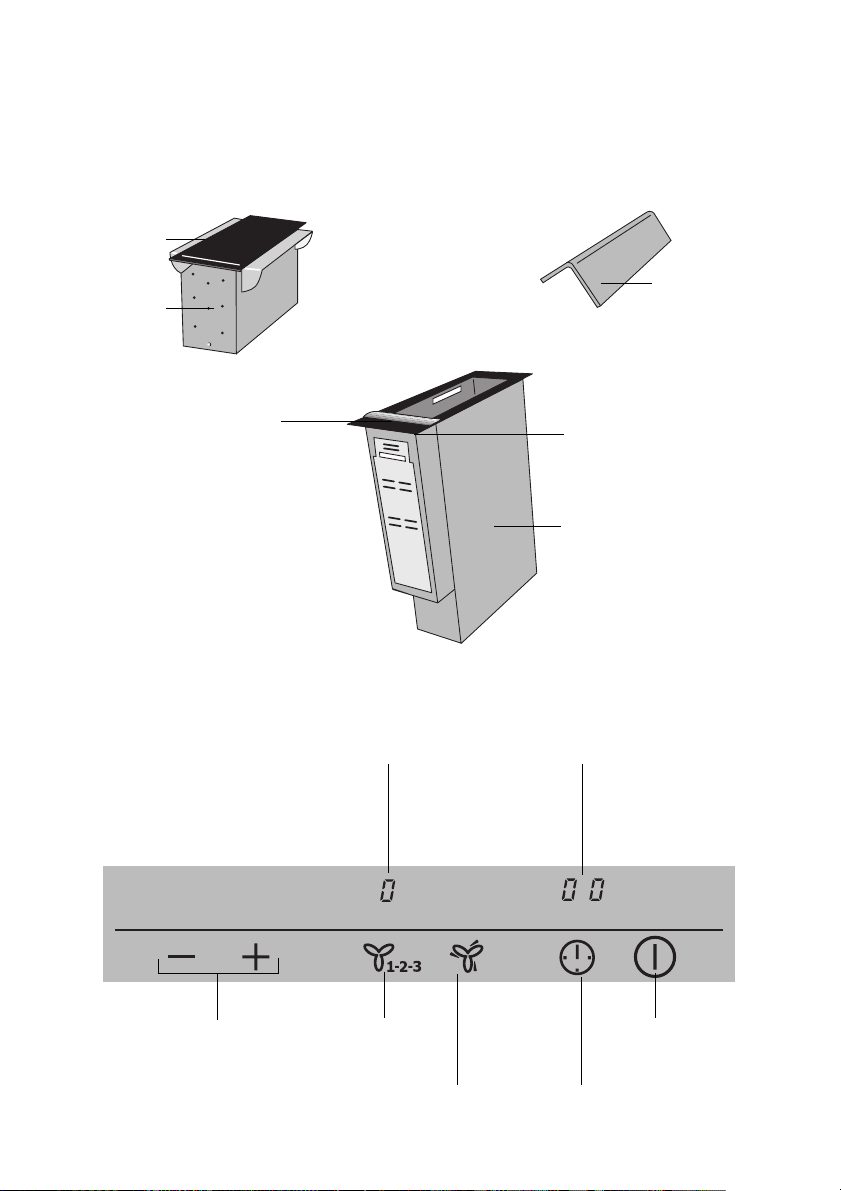
6 electrolux description of the appliance
Description of the Appliance
Cooking surface layout
Fin
Upper
casing
Filter
Frontline strip
Control panel layout
Fan level
display
Control panel
Shaft of down draught
extractor
Timer indicator
Position selection
Fan level selection
Intensive fan
On/Off
Timer
Page 7

description of the appliance electrolux 7
Touch Control sensor fields
The appliance is operated using Touch
Control sensor fields. Functions are
controlled by touching sensor fields and
confirmed by displays and acoustic signals.
Touch the sensor fields from above,
without covering other sensor fields.
Sensor field Function
On / Off To switch the appliance on and off
Increase settings To i nc re a s e p os i t io n
Reduce settings To reduce position
Fan To s et fa n l ev el
Intensive fan To switch intensive fan on/off
Timer Timer selection
Displays
Display Description
¾ no power setting set
¿ - Á Fan levels Fan level is set
e Clean filter Filter must be cleaned
Safety cut-out Safety cut-out has been activated
Page 8
8 electrolux operating the appliance
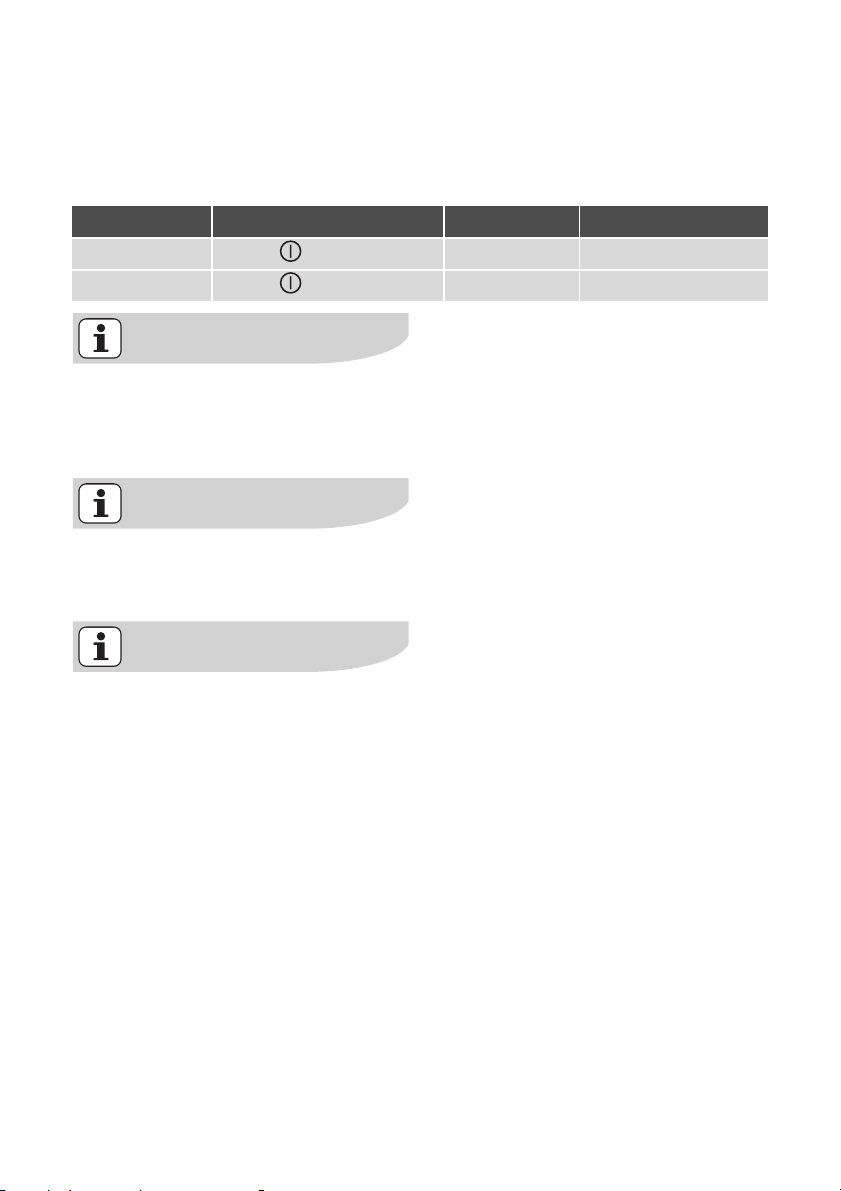
Operating the appliance
Switching the appliance on and off
Control panel Display Pilot light
To s wi tc h o n Touch for 2 seconds ¾ lights up
To s wi tc h o ff Touch for 1 second none goes out
After switching on, within approx.
10 seconds a function must be set,
otherwise the appliance automatically switches itself off.
Let the down draught extractor run
for a few minutes before and after
preparing a meal.
While the down draught extractor is
working, windows in the room
should be closed. A window in a
neighbouring room can be open.
Page 9
operating the appliance electrolux 9
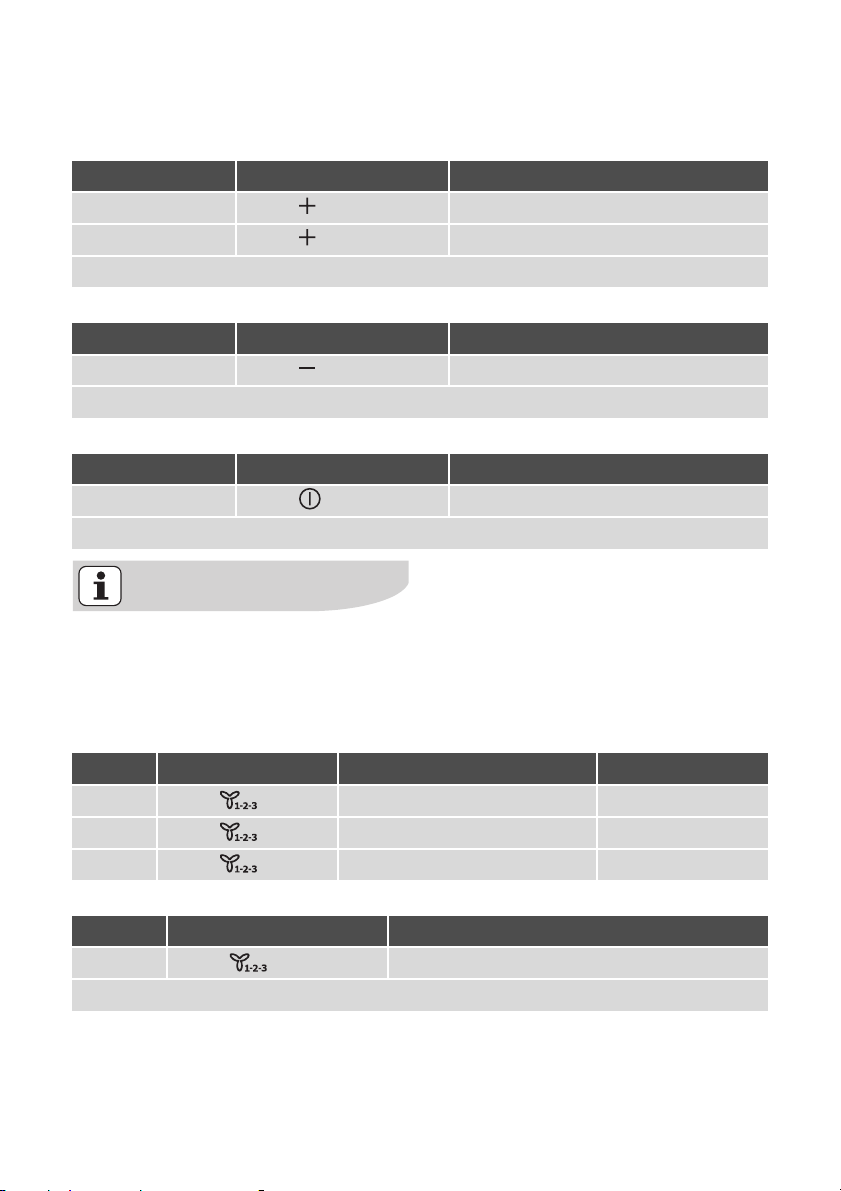
Setting position of down draught extractor
Increasing extractor position
Step Control panel Position of extractor
1. Touch once Middle
2. Touch To p
Fan level 1 is switched on.
Reducing extractor position
Step Control panel Position of extractor
1. Touch Middle/bottom
The appliance switches off in the lowest position.
Retaining extractor position
Step Control panel Position of extractor
1. Touch Current position is retained
The appliance switches off.
If the appliance becomes blocked
when changing the position, it
switches off automatically.
Setting fan level
Step Control panel Fan level display Fan power
1. Touch once ¿ 150 m³/h
2. Touch once À 220 m³/h
3. Touch once Á 345 m³/h
Switching off fan level
Step Control panel Display
1. To uc h ¾
The fan level is switched off.
Page 10
10 electrolux operating the appliance
Switching intensive fan on and off
The intensive fan function makes extra power available for 5 minutes. After
that the appliance switches off automatically or switches back to the previously
set fan level.
Control panel Fan power
To s wi tc h o n Touch 480 m³/h
To s wi tc h o ff Touch previously set fan power
Using the timer
After the time set has elapsed, the suction switches off. The down draught extractor remains in the top position.
Setting the time
Step Control panel Display
1. To uc h once 60 seconds
2. Touch for longer ... 05...10...15... 20 (5 minute increments
for easier setting)
The time is set.
The time counts down.
Switching timer function off
Step Control panel Display
1. To uc h The remaining time counts up to 00.
The timer function is switched off.
Automatic switch off
• If one or more sensor fields are covered for longer than approx.
10 seconds, e.g. by a pan cloth lying
on them, the appliance switches off
automatically.
• If the appliance is not switched off after 6 hours or the fan level is not altered, the appliance automatically
switches itself off.
• Before the appliance is used again,
must be touched.
Page 11

cleaning and care electrolux 11
Cleaning and Care
Important: A blocked grease filter
can ignite. Keep appliance clean.
Important: Sharp objects and abrasive cleaning materials will damage
the appliance. Clean with a damp
cloth and washing up liquid.
Important: Residues from cleaning
agents will damage the appliance.
Remove residues with a damp cloth
and washing up liquid.
Important: Risk of fire! Cleaning
must be performed according to the
instructions in these operating instructions.
Glass ceramic, shaft of down
draught extractor
1. Wipe the appliance with a damp
cloth and a little washing up liquid.
2. Dry the appliance using a clean
cloth.
Scratches or dark stains on the
glass ceramic cannot be removed
but do not affect the functioning of
the appliance.
Upper housing
1. Switch on down draught extractor
and move to the top position.
2. Remove upper housing.
3. Wipe the appliance with a damp
cloth and a little washing up liquid.
4. Dry the appliance using a clean
cloth.
Filter
After 30 hours of operation the filter
must be cleaned, 0 appears.
Important: Fingers can get caught.
Only remove filter or upper casing
when appliance is dismantled.
1. Switch on down draught extractor
and move to the top position.
2. Switch off fan level.
3. Remove upper casing and place on
something soft.
4. Press in and remove the springs of
the filter.
5. Take filter out.
6. Clean filter with hot water and wash-
ing up liquid or clean in the dishwasher.
If cleaned in the dishwasher, the filter can become discoloured, but
this does not affect the functioning
of the filter.
7. Install filter, springs and upper casing
in reverse order.
Page 12

12 electrolux cleaning and care
The filter must be completely dry
before being installed.
8. Reset filter sensor by pressing
and at the same time for
3seconds.
9. 0 goes out.
If the filter is cleaned before the 30
hours of operation have elapsed, it
can be reset in the same way.
If the electricity supply is interrupted, the filter sensor automatically
resets itself.
Removable Frontline strip
The aluminium Frontline strip fastens on
by means of magnets. It is easy to remove by hand and can be cleaned with
detergent. Please do not use any scouring agents or sponges that scratch. Do
not clean the strip in the dishwasher.
Page 13

What to do if …
Problem Possible cause Remedy
what to do if … electrolux 13
The appliance cannot be
switched on or is not operating
Fuses keep blowing Too many electrical appliances
The fan is switched off, but the
down draught extractor is
raised
e
is displayed Filter sensor has responded. Clean filter and reset filter sen-
Down draught extractor has
switched off automatically and
cannot be switched on again
More than 10 seconds have
passed since the appliance
was switched on
Several sensor fields were
touched at the same time
The sensor fields are partly
covered by a damp cloth or
with liquid
Electronics fault Disconnect appliance from the
are connected
There was a power cut during
operation
Vertical adjustment of the
down draught extractor has
become jammed
Switch appliance on again
Only touch one sensor field
Remove the cloth or the liquid.
Switch appliance on again
electrical supply for a few minutes. (Take the fuse out of the
house’s wiring system.)
If the appliance still does not
operate after switching on
again, call the Customer Care
Department
Switch off electrical appliances
Switch on down draught extractor and touch
sor (see section “Cleaning and
Care”)
Disconnect appliance from the
electrical supply for a few minutes. (Take the fuse out of the
house’s wiring system.)
If the appliance still does not
operate after switching on
again, call the Customer Care
Department
Page 14

14 electrolux what to do if …
If you are unable to remedy the
problem by following the above
suggestions, please contact your
local Service Force Centre.
Warning! Repairs to the appliance
are only to be carried out by qualified service engineers. Considerable danger to the user may result
from improper repairs.
If the appliance has been operated
incorrectly, the engineer's visit will
be chargeable, even during the warranty period.
Page 15

Disposal
Packaging material
The packaging materials are envi-
ronmentally friendly and can be recycled. The plastic components are
identified by markings, e.g. >PE<,
>PS<, etc. Please dispose of the
packaging materials in the appropriate container at the community
waste disposal facilities.
Old appliance
disposal electrolux 15
The symbol
its packaging indicates that this
product may not be treated as
household waste. Instead it shall be
handed over to the applicable collection point for the recycling of
electrical and electronic equipment.
By ensuring this product is disposed of correctly, you will help prevent potential negative
consequences for the environment
and human health, which could otherwise be caused by inappropriate
waste handling of this product. For
more detailed information about recycling of this product, please contact your local city office, your
household waste disposal service
or the shop where you purchased
the product.
W on the product or on
Page 16

16 electrolux installation instructions
Installation Instructions
Safety instructions
Warning! This must be read!
The laws, ordinances, directives and
standards in force in the country of use
are to be followed (safety regulations,
proper recycling in accordance with the
regulations, etc.)
Installation may only be carried out by a
qualified electrician.
The minimum distances to other appliances and units are to be observed.
Anti-shock protection must be provided
by the installation, for example drawers
may only be installed with a protective
floor directly underneath the appliance.
The cut surfaces of the worktop are to
be protected against moisture using a
suitable sealant.
The sealant seals the appliance to the
work top with no gap.
Important: If the down draught extractor
is operated at the same time as a gas
appliance, there must be sufficient
draught in the room.
Important: If the down draught extractor is operated at the same time
as a fireplace, the pressure in the
room must be below 4 Pa (4 x 10
bar).
-5
Important: If the mains cable is defective, it must only be replaced by a
qualified electrician or our Customer Care Department in order to prevent hazards.
z Risk of injury from electrical
current.
• The electrical mains terminal is live.
• Make electrical mains terminal free of
voltage.
• Follow connection schematic.
• Observe electrical safety rules.
• Ensure anti-shock protection by in-
stalling correctly.
• The appliance must be connected to
the electrical supply by a qualified
electrician.
z Risk of injury from electrical
current.
• Loose and inappropriate plug and
socket connections can make the
terminal overheat.
• Have the clamping connections correctly installed by a qualified electrician.
• Use strain relief clamp on cable.
A device must be provided in the electrical installation which allows the appliance to be disconnected from the mains
at all poles with a contact opening width
of at least 3 mm.
Suitable isolation devices include line
protecting cut-outs, fuses (screw type
fuses are to be removed from the holder), earth leakage trips and contactors.
Connect down draught extractor to an
air-tight vent hose or vent pipe with a
120 mm diameter and at least 1 m long.
Page 17

Important: Do not connect down
draught extractor to the voltage
supply until an adequate air outlet
has been provided.
Do not connect vent hose or vent
pipe to an air shaft, flue or similar
which is already in use.
If several Frontline appliances are installed, install down draught extractor
between the appliances.
Distance from flammable materials: at
least 150 mm
Important: Official regulations must
be followed when drawing off exhaust air.
installation instructions electrolux 17
Important: Do not conduct exhaust
air to a chimney which is used by
appliances operated with gas or
other combustible fuels.
Installing next to a gas appliance
Important: The appliance must not be
built in between two gas appliances.
Important: If a gas appliance is installed next to the down draught extractor, the down draught extractor
may only extract air on the opposite
side. Therefore the fin nearest the
gas appliance must be removed and
the supplied cover must be fitted.
Page 18

18 electrolux installation instructions
To r e mo ve t h e fi n
1. Switch on down draught extractor
and move to the top position.
2. Switch off fan level.
3. Press in and remove the springs of
the filter.
4. Tak e f il te r o ut .
5. Remove upper casing and place on
something soft.
6. Remove the two screws which hold
the fin.
7. Remove single screw that holds the
lever that closes the fin.
8. Remove the fin.
To f i t c ov er
1. Lay cover on the glass ceramic.
2. Position cover on the upper housing.
3. Mark four holes on the upper casing.
Use cover as a template.
4. Remove cover and drill the four holes
in the upper casing.
5. Remove adhesive film.
6. Press cover in position on the upper
casing.
7. Affix cover with the blind rivets supplied.
8. Install filter, springs and upper casing
in reverse order.
Page 19

Assembly
assembly electrolux 19
min. 500 mm
Page 20

20 electrolux assembly
Page 21

Installing more than one
Frontline hob
Additional parts: cross bar(s), heat resistant silicon, rubber block, shaving
blade.
Only use special heat-resistant
silicon.
Cut-out section
Distance from the wall: at least
50 mm
Depth:490 mm
Width: The widths of all appliances to
be built-in are added together, minus
20 mm (see also “Overview of all appliance widths”)
Example:
installing more than one frontline hob electrolux 21
Installing more than one appliance
1. Work out the size of the cut-out section and saw it out.
2. Remove Frontline strip from the appliances by hand (magnetic fastening).
3. Lay the appliances one at a time on
something soft (for example a blanket) with the underside facing upwards.
4. Screw / clip fixing plates / retaining
grips into the appropriate holes in the
protective boxes.
Page 22

22 electrolux installing more than one frontline hob
5. Place first appliance in the cut-out.
Lay connecting cross bar in the cutout and push up halfway against the
appliance.
6. Put silicon on the appliance corners
that will touch one another. Put silicon on the end of the cross bar.
7. Loosely screw in fixing plates /
retaining grips from below on the
worktop and on the connecting
cross bar.
Page 23

8. Place Frontline strips on the appliances. Check that the Frontline
strips are in line with one another.
installing more than one frontline hob electrolux 23
9. Tighten the fixing plate / retaining
grip screws.
10.Inject a line of silicon into the gap between the appliances.
11.Dampen silicon line with a little soapy
water.
12.Press rubber block hard against the
glass ceramic and draw it slowly
along the gap.
Page 24

24 electrolux installing more than one frontline hob
13.Leave silicon until the next day to
harden.
14.Carefully remove projecting silicon
with a shaving blade.
15.Clean glass ceramic thoroughly.
16.Replace Frontline strips.
Overview of all appliance widths
180 mm
Worktop-mounted cooker hood
360 mm
Glass ceramic cooking surface with
2 radiation cooking zones
Glass ceramic cooking surface with
2 induction cooking zones
Gas hob with 2 burners
Grill
Grill/Deep fat fryer
Wok
Induction Teppanyaki
580 mm
Glass ceramic cooking surface with
4 radiation cooking zones
Gas hob with 4 burners
Induction Teppanyaki
720 mm
Glass ceramic cooking surface with
4 radiation cooking zones
Glass ceramic cooking surface with
4 induction cooking zones
Gas hob with 4 burners
Page 25

Rating Plate
ELECTROLUX
electrolux 25
941 177 669
230 - 240 V0,31 kW
FDD 180
50 Hz
EFD18000U
Page 26

26 electrolux guarantee/customer service
Guarantee/Customer Service
European Guarantee
This appliance is guaranteed by Electrolux in
each of the countries listed at the back of this
user manual, for the period specified in the appliance guarantee or otherwise by law. If you move
from one of these countries to another of the
countries listed below the appliance guarantee
will move with you subject to the following qualifications:
• The appliance guarantee starts from the date
• The appliance guarantee is for the same pe-
• The appliance guarantee is personal to the
• The appliance is installed and used in ac-
• The appliance is installed in accordance with
The provisions of this European Guarantee do
not affect any of the rights granted to you by law.
www.electrolux.com
you first purchased the appliance which will
be evidenced by production of a valid purchase document issued by the seller of the
appliance.
riod and to the same extent for labour and
parts as exists in your new country of residence for this particular model or range of
appliances.
original purchaser of the appliance and cannot be transferred to another user.
cordance with instructions issued by Electrolux and is only used within the home, i.e. is
not used for commercial purposes.
all relevant regulations in force within your
new country of residence.
p t b
Albania +35 5 4 261 450 Rr. Pjeter Bogdani Nr. 7 Tirane
Belgique/België/
Belgien
Èeská republika +420 2 61 12 61 12 Budìjovická 3, Praha 4, 140 21
Danmark +45 70 11 74 00 Sjællandsgade 2, 7000 Fredericia
Deutschland +49 180 32 26 622 Muggenhofer Str. 135, 90429 Nürnberg
Eesti +37 2 66 50 030 Mustamäe tee 24, 10621 Tallinn
España +34 902 11 63 88
France www.electrolux.fr
+32 2 363 04 44 Bergensesteenweg 719, 1502 Lembeek
Carretera M-300, Km. 29,900
Alcalá de Henares Madrid
Page 27

p t b
guarantee/customer service electrolux 27
Great Britain +44 8705 929 929
Hellas +30 23 10 56 19 70 4 Limnou Str., 54627 Thessaloniki
Hrvatska +385 1 63 23 338 Slavonska avenija 3, 10000 Zagreb
Ireland +353 1 40 90 753 Long Mile Road Dublin 12
Italia +39 (0) 434 558500 C.so Lino Zanussi, 26 - 33080 Porcia (PN)
Latvija +37 17 84 59 34 Kr. Barona iela 130/2, LV-1012, Riga
Lithuania +3702780607 Žirmūnų 67, LT-09001 Vilnius
Luxembourg +352 42 431 301 Rue de Bitbourg, 7, L-1273 Hamm
Magyarország +36 1 252 1773
Nederland +31 17 24 68 300
Norge +47 81 5 30 222 Risløkkvn. 2 , 0508 Oslo
Österreich +43 18 66 400 Herziggasse 9, 1230 Wien
Polska +48 22 43 47 300 ul. Kolejowa 5/7, Warszawa
Portugal +35 12 14 40 39 39
Romania +40 21 451 20 30 Str. Garii Progresului 2, S4, 040671 RO
Schweiz/Suisse/
Svizzera
Slovenija +38 61 24 25 731
Slovensko +421 2 43 33 43 22
Suomi www.electrolux.fi
Sverige +46 (0)771 76 76 76
Türkiye +90 21 22 93 10 25
Россия +7 495 937 7837
Óêðà¿íà +380 44 586 20 60
+41 62 88 99 111 Industriestrasse 10, CH-5506 Mägenwil
Addington Way, Luton, Bedfordshire
LU4 9QQ
H-1142 Budapest XIV,
Erzsébet királyné útja 87
Vennootsweg 1, 2404 CG Alphen aan den Rijn
Quinta da Fonte - Edificio Gonçalves Zarco Q 35
2774 - 518 Paço de Arcos
Electrolux Ljubljana d.o.o.
Gerbièeva 98, 1000 Ljubljana
Electrolux Slovakia s.r.o., Electrolux Domáce
spotrebièe SK, Seberíniho 1, 821 03 Bratislava
Electrolux Service, S:t Göransgatan 143,
S-105 45 Stockholm
Tarlabaþý caddesi no : 35 Taksim
Istanbul
129090 Москва, Олимпийский проспект, 16,
БЦ „Олимпик“
04074 Ки¿в, вул.Автозаводська,
2a, БЦ „Алкон“
Page 28

28 electrolux
GUARANTEE CONDITIONS
Weitere Kundendienststellen im Ausland
In diesen Ländern gelten die Garantiebedingungen der örtlichen Partner.
Diese können dort eingesehen werden.
Further after-sales service agencies
overseas
In these countries our AEG-Electrolux
agents’ own guarantee conditions are
applicable. Please obtain further details
direct.
Autres agences étrangères assurant
le service après-vente
Dans ces pays, les conditions de garantie des concessionnaires de la région
sont valables. Vous pouvez les consulter
sur place.
Otros puntos de Postventa en el
extranjero
En estos países rigen las condiciones de
nuestros representantes locales. las
cuales pueden ser consultadas allí
mismo.
Ulteriori uffici del servizio tecnico
assistenza clienti all’estero
In questi paesi sono valide le condizioni
di garanzia dei partner locali. Queste
condizioni possono essere esaminante
sul luogo.
Serviços de assistência técnica no
estrangeiro
Nestes países são válidas as condições
de garantia dos concessionários locais,
podendo aí ser consultadas.
További vevöszolgálati irodák külföldön
Ezekben az országokban a mi AEG-Electrolux vevöszolgálatainknál saját
jótállási feltételek alkalmazhatók. A
további adatokat kérjük közvetlenül
szerezzék be.
Servisne službe
Na garancijskem listu boste našli seznam pooblašèenih servisnih služb AEGElectrolux.
CUSTOMER SERVICE CENTRES
U.A.E. Abu Dhabi
Universal Trading Company
P.O. Box 43 99
Tel.: 6335331
Service Center 6733974
Egypt
Middle East Commercial
Center
4 Salah El Dein St. - 2nd floor
Heliopolis, Kairo
Egypt
Tel.: 2024181719
Jordan
Jordan Household
Supply Co. Ltd.
P.O. Box 3/68
Amman/Tel.: 69 70 50
Canada
EURO-LINE Appliances
2150 Winston PARK Drive 20
Oakville, Ontario L6H 5V1
Tel.: 905 829 3980
Fax: 905 829 3985
Malta
ITC
International Trading
Company
White House Building
Mountbatte Street
Blata L-Bajda/Tel.:
220644
Mauritius
Happy World Centre Ltd.
P.O. 7 54
1 Chausee Street
Port Louis
Tel.: 25355
Page 29

electrolux 29
Australia
The Andi-Co Group
1 Stamford Road
Oakleigh VIC 3166
Tel.: (03) 9569 1255
Fax: (03) 9569 1450
www.andico.com.au
Bahrain/Arabian Gulf
A.A. Zayani & Sons
P.O. Box 9 32
Bahrain
Tel.: 17311124
Bulgaria
Electrolux Bulgaria E.O.O.D.
91 Levski Blvd.
1000 Sofia
Tel.: 2 806676
Fax. 2 980 5276
Cyprus
Hadjikyrlakos & Sons Ltd.
Prodromou 121
P.O. Box 21587
Nicosia 1511
Service Telephones:
Nicosia 02 481226
Limassol 05 562182
Larnaca 04 633929
Paphos 06 932 699
Korea (South)
Core Incorp.
3/F Chewoo Bldg.
200 Nonhyun-Dong
Kangnam-Ku 135-010
Seoul
Telefon 82 2 549 89 61
Croatia
Electrolux D.O.O.
Suplova 7
10000 Zagreb
Tel.: 1 61 19512
Fax: 1 61 19513
Kuwait/Arabian Gulf
Ali Al-Ghanim Est.
P.O. Box 21540 - Safat
Tel.: 4822190
Fax: 4820116
Lebanon
Adib & Assaferi
P.O. Box 539
Tripoli
Namibia
AEG NAMIBIA (PTY)
LIMITED-Jeppe Street
Northern Industrial Area
Windhoek
Tel.: (061) 21-6082/4
Fax: (061) 217838
New Zealand
Monaco Corporation Ltd.
10 Rothwell Avenue
Albany - Auckland
4399 Auckland 1
New Zealand
Tel.: 00 64-92 59 11 11
Fax: 00 64-92 59 11 12
Syria
WATTAR CO.
P.O. Box 3610 9
Mazzeh - Damascus
Direct Phone:
00963116132649
Fax: 00963116119537
Iran
ARIAN International
Development Co.
AEG Showroom
Shariati, Balatar as Safar
Teheran / Iran
Phone No. Showroom:
021 / 285 513 / 4
Phone No. Service:
021 / 312 27 67 / 8
Estonia
Electrolux Estonia Ltd.
Mustamäe tee 24
EE0006 Tallinn
Tel.: (372) 6 650 090
Fax: (372) 6 650 092
Latvia
Electrolux Latvija Ltd.
Kr.Barona iela 130/2
Riga, LV-1012
Tel.: 371 7313626
Fax: 371 7845954
Poland
Electrolux Poland Sp.
zo.o.
ul. Domaniewska 41
02-034 Warszawa
tel.: 022 874 33 33
fax: 022 874 33 00
Page 30

30 electrolux
Hong Kong
Dah Chong Hong Ltd.
20 Kai Cheung Road
Kowloon Bay
Kowloon - Hong Kong
Tel.: 0085222621620
Fax: 0085227550333
Israel
Evis Ltd.
Tadiran-Ampa Service
10 Gibonay Israel Street
New Industrial Zone
Netanya, 42504
Israel
Japan
Electrolux Japan Ltd.
Domestic Appliances Department
Maruzen Showa Warehouse
Building
Tookai 4-5-12, Ota-ku
143-006 Tokyo
Tel.: 0120-13-7117
Fax: 03-3790-5257
Lithuania
Electrolux Lithuania
Verkui 29
2600 Vilnus
Tel.: 372 272 3326
Fax: 372 272 3366
Malaysia
Arzbergh Engineering
No. 49A/B,
Jalan Petaling Utama 7
4600 Petaling Jaya
Tel.: 3 795 1084
Fax: 3 795 1082
Singapore
Group Pte Ltd.
833 Bukit Timah Road
Unit no. 01-11 Royalville
279887 Singapore
Tel.: 0065 64638484
Fax: 0065 64638488
Russia
Electrolux Russia Ltd.
16 Olympiysky prospekt
129090 Moscow
Tel.: (095) 937 7837
Fax: (095) 926 5513
Saudi Arabia
Awad Badi Nahas Est
Shara Siteen
Jeddah 21463
Phone: 6646583
Alia Trading Co
Mecca Road
Riyadh 11491
Phone 4645977
Slovenia
Electrolux Slovenia D.O.O.
Traska Ul. 132
1000 Ljubljana
Tel.: 61 1234 137
Fax: 61 1234 238
Thailand
Olympia Thai Tower, 444
Rachadapiser Road
Samsennok- Huaykwang
10320 Bangkok
Thailand
Tel.: 006625136111
Fax: 006625136334
Hungary
Electrolux Lehel KFT
(AEG Div)
Erzsébet Királyné útja 87.
1142 Budapest
Tel.: 00361/467-3200
Slovakia Rep.
Electrolux Slovakia S.R.O.
Seberiniho 1
821 03 Bratislava
Tel.: 02 4333 4322, 4355
Fax: 02 4333 6976
South Africa
AEG (Pty) Ltd.
55, 12th Road
P.O. Box 1 02 64
Kew/Johannesburg 2000
Tel.: 8069111
Page 31

Page 32

www.electrolux.com
374 464 416-A-201108-01
 Loading...